


CA-EXP1
Table of contents
 Loading...
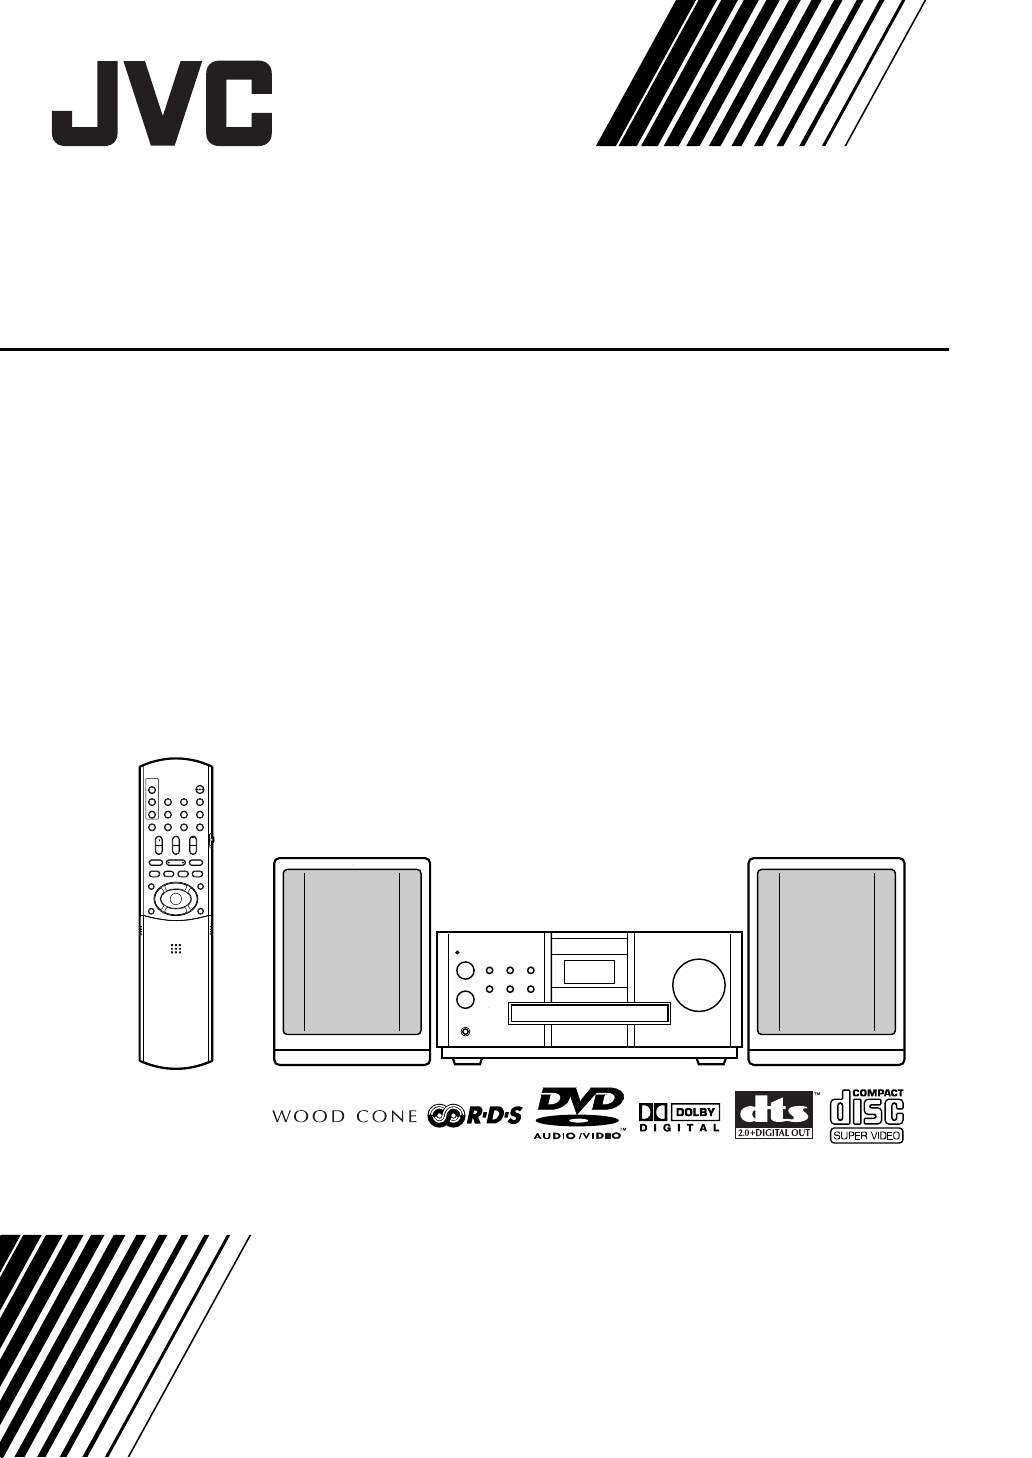
COMPACT COMPONENT SYSTEM
EX-A1
Consists of CA-EXA1 and SP-EXA1
EX-P1
Consists of CA-EXP1 and SP-EXP1
INSTRUCTIONS
LVT1284-004B
[B]
Warnings, cautions and others
CAUTION
To reduce the risk of electrical shocks, fire, etc.:
1. Do not remove screws, covers or cabinet.
2. Do not expose this appliance to rain or moisture.
CAUTION — F button!
Disconnect the mains plug to shut the power off completely (the
STANDBY lamp goes off).
The F button in any position does not disconnect the mains
line.
• When the system is on standby, the STANDBY lamp lights
red.
• When the system is turned on, the STANDBY lamp goes off.
The power can be remote controlled.
CAUTION
• Do not block the ventilation openings or holes.
(If the ventilation openings or holes are blocked by a
newspaper or cloth, etc., the heat may not be able to get out.)
• Do not place any naked flame sources, such as lighted
candles, on the apparatus.
• When discarding batteries, environmental problems must be
considered and local rules or laws governing the disposal of
these batteries must be followed strictly.
• Do not expose this apparatus to rain, moisture, dripping or
splashing and that no objects filled with liquids, such as vases,
shall be placed on the apparatus.
IMPORTANT FOR LASER PRODUCTS
1. CLASS 1 LASER PRODUCT
2. CAUTION: Do not open the top cover. There are no user
serviceable parts inside the unit; leave all servicing to
qualified service personnel.
3. CAUTION: Visible and invisible laser radiation when open
and interlock failed or defeated. Avoid direct exposure to
beam.
4. REPRODUCTION OF LABEL: CAUTION LABEL, PLACED
INSIDE THE UNIT.
G-1
Introduction
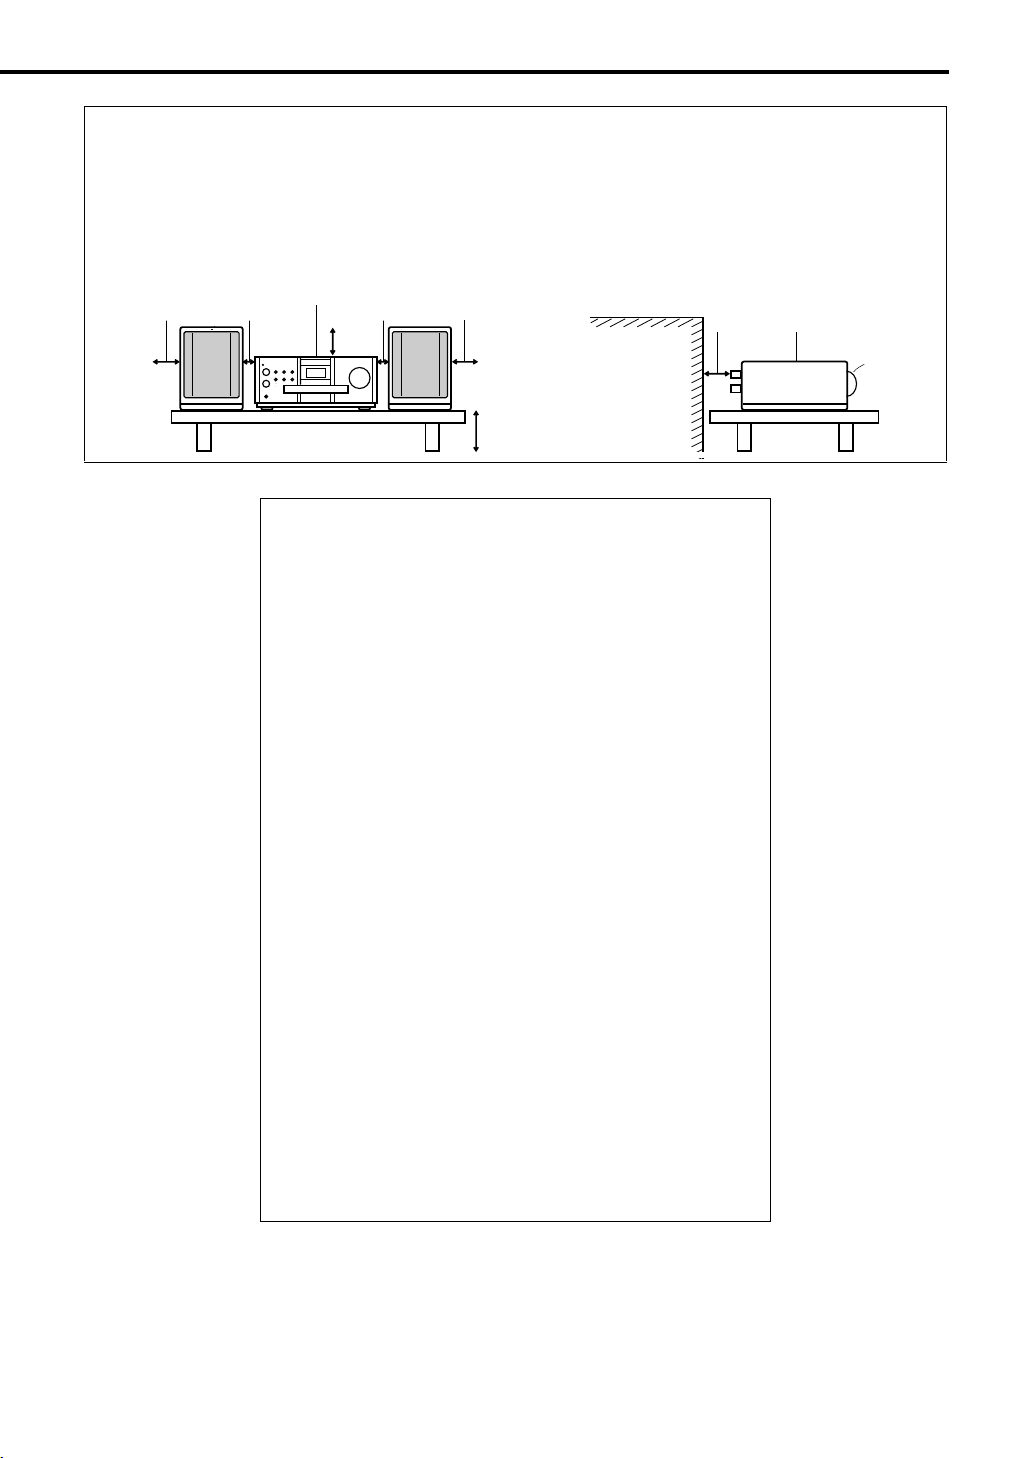
CAUTION — Proper Ventilation
To avoid risk of electric shock and fire and to protect from damage, locate the apparatus as follows:
Top/Front/Back/Sides: No obstructions should be placed in the areas shown by the dimensions below.
Bottom: Place on the level surface. Maintain adequate air path for ventilation by placing on
a stand with a height of 10 cm more.
In addition, maintain the best possible air circulation.
Front view Side view
15cm
Main unit
1cm 1cm
15cm
IMPORTANT for the U.K.
DO NOT cut off the mains plug from this equipment. If the
plug fitted is not suitable for the power points in your home or
the cable is too short to reach a power point, then obtain an
appropriate safety approved extension lead or consult your
dealer.
BE SURE to replace the fuse only with an identical approved
type, as originally fitted.
If nonetheless the mains plug is cut off ensure to remove the
fuse and dispose of the plug immediately, to avoid a possible
shock hazard by inadvertent connection to the mains supply.
If this product is not supplied fitted with a mains plug then
follow the instructions given below:
IMPORTANT:
DO NOT make any connection to the terminal which is
marked with the letter E or by the safety earth symbol or
coloured green or green-and-yellow.
The wires in the mains lead on this product are coloured in
accordance with the following code:
Blue : Neutral
Brown : Live
As these colours may not correspond with the coloured
markings identifying the terminals in your plug proceed as
follows:
The wire which is coloured blue must be connected to the
terminal which is marked with the letter N or coloured black.
The wire which is coloured brown must be connected to the
terminal which is marked with the letter L or coloured red.
IF IN DOUBT - CONSULT A COMPETENT ELECTRICIAN.
15cm
10cm
Wall or
obstructions
15cm
Main unit
Fron t
G-2

Warnings, cautions and others (continued)
SAFETY INSTRUCTIONS
“SOME DOS AND DON'TS ON THE SAFE USE OF EQUIPMENT”
This equipment has been designed and manufactured to meet international safety standards but, like any
electrical equipment, care must be taken if you are to obtain the best results and safety is to be assured.
✮✮✮✮✮✮✮✮✮✮✮✮✮✮✮✮✮✮✮✮✮✮✮✮✮✮✮✮✮✮✮✮✮✮✮✮✮✮✮✮✮✮✮✮✮✮✮
Do read the operating instructions before you attempt to use the equipment.
Do ensure that all electrical connections (including the mains plug, extension leads and interconnections
between pieces of equipment) are properly made and in accordance with the manufacturer's instructions.
Switch off and withdraw the mains plug when making or changing connections.
Do consult your dealer if you are ever in doubt about the installation, operation or safety of your
equipment.
Do be careful with glass panels or doors on equipment.
✮✮✮✮✮✮✮✮✮✮✮✮✮✮✮✮✮✮✮✮✮✮✮✮✮✮✮✮✮✮✮✮✮✮✮✮✮✮✮✮✮✮✮✮✮✮✮
DON'T continue to operate the equipment if you are in any doubt about it working normally, or if it is
damaged in any way
DON'T remove any fixed cover as this may expose dangerous voltages.
DON'T leave equipment switched on when it is unattended unless it is specifically stated that it is
designed for unattended operation or has a standby mode.
Switch off using the switch on the equipment and make sure that your family know how to do this.
Special arrangements may need to be made for infirm or handicapped people.
DON'T use equipment such as personal stereos or radios so that you are distracted from the
requirements of traffic safety. It is illegal to watch television whilst driving.
DON'T listen to headphones at high volume as such use can permanently damage your hearing.
DON'T obstruct the ventilation of the equipment, for example with curtains or soft furnishings.
Overheating will cause damage and shorten the life of the equipment.
DON'T use makeshift stands and NEVER fix legs with wood screws
fit the manufacturer's approved stand or legs with the fixings provided according to the instructions.
DON'T allow electrical equipment to be exposed to rain or moisture.
ABOVE ALL
—
NEVER let anyone, especially children, push anything into holes, slots or any other opening in the case.
— this could result in a fatal electrical shock.
—
NEVER guess or take chances with electrical equipment of any kind — it is better to be safe than sorry!
—
switch off, withdraw the mains plug and consult your dealer.
—
to ensure complete safety always
G-3
E43486
–
340B
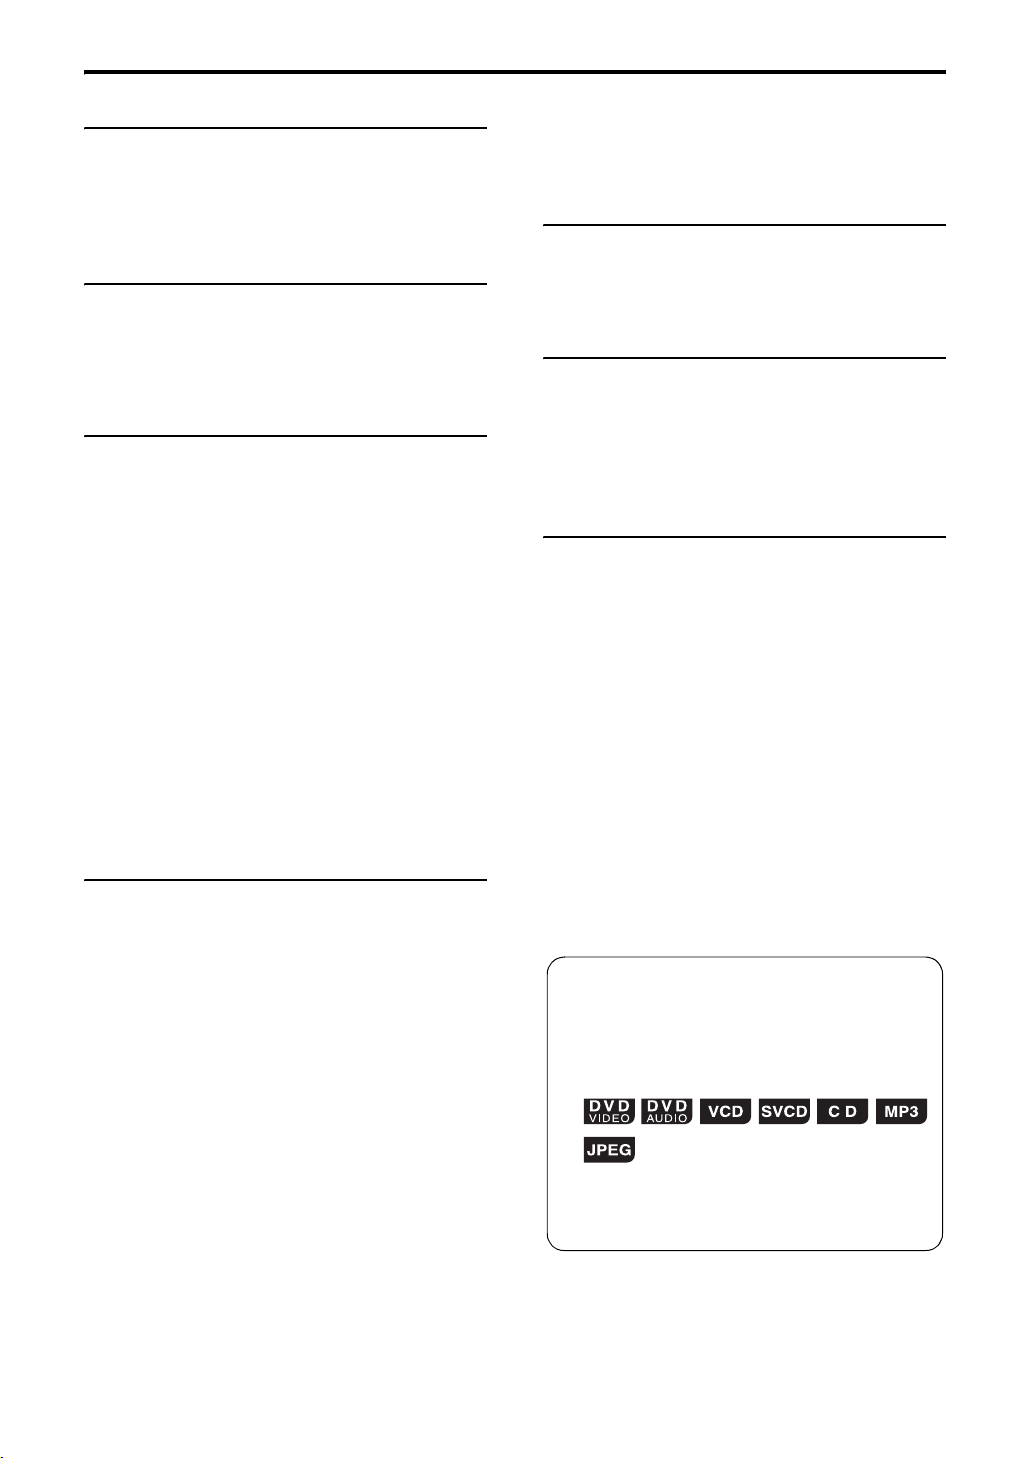
Table of contents
Introduction
Warnings, cautions and others....................G-1
Special cautions ..............................................2
About discs......................................................3
Description of parts .........................................5
Getting started
Using the remote control ................................. 6
Putting the batteries in the remote control.......... 6
Operating the TV using the remote control......... 7
Connecting up .................................................8
Basic operations
Playing discs .................................................12
Playback ........................................................... 12
To switch the display ........................................ 13
Select what you want to play by using
the number buttons....................................... 14
To stop playback............................................... 14
To pause playback............................................ 14
To advance picture frame-by-frame.................. 14
Fast reverse/Fast forward search..................... 14
Playing back from a position 10 seconds
before (One Touch Replay).......................... 15
Slow Motion Playback....................................... 15
Skip to the beginning of the selection ............... 15
To change the brightness of the
display window (DIMMER)............................ 16
Adjusting the volume ........................................ 16
Adjusting sound quality..................................... 16
Turning off the sound temporarily (MUTING) ... 16
Using the menu bar ....................................... 28
Preferences ................................................... 29
Country/Area codes....................................... 31
Listening to radio
Listening to a radio broadcast ....................... 32
Tuning in to a preset station .......................... 33
Radio Data System (RDS) ............................34
Convenient functions
Listening to the sound of
other audio device ..................................... 38
Auto Standby.................................................38
Sleep Timer ................................................... 39
Tray Lock.......................................................39
Reference
Troubleshooting.............................................40
Language codes............................................41
Specifications ................................................ 42
Advanced operations
Playing MP3 and JPEG discs........................16
Resume Playback .........................................18
Select the scene to be played .......................19
Program Playback/Random Playback........... 20
Repeat Playback ...........................................22
Other convenient functions............................24
Selecting the subtitles....................................... 24
Selecting the audio language ........................... 24
Selecting a view angle...................................... 24
Enlarging the picture (ZOOM)........................... 25
Adjusting the picture quality (VFP) ................... 25
Creating realistic sound
(VIRTUAL SURROUND) .............................. 26
Adjusting playback level (DVD LEVEL) ............ 26
Functions specific to DVD AUDIO.................27
Playing the Bonus Group.................................. 27
Browsable Still Pictures (B.S.P.)....................... 27
How to read this manual
• Operations are described by mainly using the
remote control buttons. If there are the same
marks on the main unit, the buttons on the main
unit can also be used.
• The following marks tell you for which type of the
discs the operation can be made.
• The illustrations and TV screens may be different
between the actual case and the description.
• “VCD” is an abbreviation of “Video CD”.
• “SVCD” is an abbreviation of “Super Video CD”.
1

Special cautions
Notes on handling
7 Important cautions
Installation of the system
• Select a place which is level, dry and neither too hot
nor too cold; between 5°C and 35°C.
• Leave sufficient distance between the system and the
TV.
• Do not use the system in a place subject to vibration.
Power cord
• Do not handle the power cord with wet hands!
• A small amount of power is always consumed while
the power cord is connected to the wall outlet.
• When unplugging the power cord from the wall outlet,
always pull on the plug, not the power cord.
To prevent malfunctions of the system
• There are no user-serviceable parts inside. If anything
goes wrong, unplug the power cord and consult your
dealer.
• Do not insert any metallic object into the system.
• Do not use any non-standard shape disc (like a heart,
flower or credit card, etc.) available on the market,
because it may damage the system.
• Do not use a disc with tape, stickers, or paste on it,
because it may damage the system.
Label sticker
Sticker
Note about copyright laws
Check the copyright laws in your country before
recording from DVDs, Super Video CDs (SVCDs), VCDs
and CDs. Recording of copyrighted material may infringe
copyright laws.
Note about copy guard system
DVDs are protected by copy guard system. When you
connect the system to your VCR directly, the copy guard
system activates and the picture may not be played back
correctly.
7 Safety precautions
Avoid moisture, water and dust
Do not place the system in moist or dusty places.
Avoid high temperatures
Do not expose the system to direct sunlight and do not
place it near a heating device.
When you are away
When away on travel or for other reasons for an extended
period of time, disconnect the power cord plug from the
wall outlet.
Paste
Care of the cabinet
When cleaning the system, use a soft cloth and follow the
relevant instructions on the use of chemically-coated
cloths. Do not use benzene, thinner or other organic
solvents including disinfectants. These may cause
deformation or discoloring.
If water gets inside the system
Turn the system off and disconnect the power cord plug
from the wall outlet, then call the store where you made
your purchase. Using the system in this condition may
cause fire or electrical shock.
7
When condensation or water drops adhere to the lens
In any of the following cases, condensation or water
drops may adhere to the lens to prevent the system from
working properly:
• Immediately after roomheating starts
• When the system is installed in a steamy or damp
space
• When the system is suddenly moved from a cold place
to a warm space
In any of these cases, leave the system turned on for 1 or
2 hours before use.
Supplied accessories
Check to be sure you have all of the supplied
accessories.
The number in parentheses is the quantity of the pieces
supplied. If anything is missing, contact your dealer
immediately.
• Remote control (1)
• Batteries (2)
• FM antenna (1)
• AM loop antenna (1)
• Power cord (1)
• Speaker cords (2)
• Cloth (for wiping and cleaning the speaker cabinet) (1)
(only for EX-P1)
• Manufactured under license from Dolby Laboratories. “Dolby”, “MLP Lossless”, and the double-D symbol are
trademarks of Dolby Laboratories.
• “DTS” and “DTS 2.0+DIGITAL OUT” are registered trademarks of Digital Theater Systems, Inc.
• This product incorporates copyright protection technology that is protected by method claims of certain U.S. patents
and other intellectual property rights owned by Macrovision Corporation and other rights owners. Use of this
copyright protection technology must be authorized by Macrovision Corporation, and is intended for home and other
limited viewing uses only unless otherwise authorized by Macrovision Corporation. Reverse engineering or
disassembly is prohibited.
2
About discs
Playable disc types
This system has been designed to play back the following
discs:
DVD V IDEO, DVD AU D IO, VCD, S VCD, C D
This system can also play back the following discs:
• Finalized DVD-R/RW discs recorded in the DVD
VIDEO format.
• CD-R/RW discs recorded in the following formats
- Music CDs (finalized discs)
- VCDs
- SVCDs
- MP3/JPEG discs recorded in ISO 9660 (for details, refer
to “About MP3/JPEG discs ”)
However, some discs may not be played back because of
their disc characteristics, recording conditions, or
damage or stain on them.
Only sounds can be played back from the following discs:
MIX-MODE CD CD-G
CD-EXTRA CD TEXT
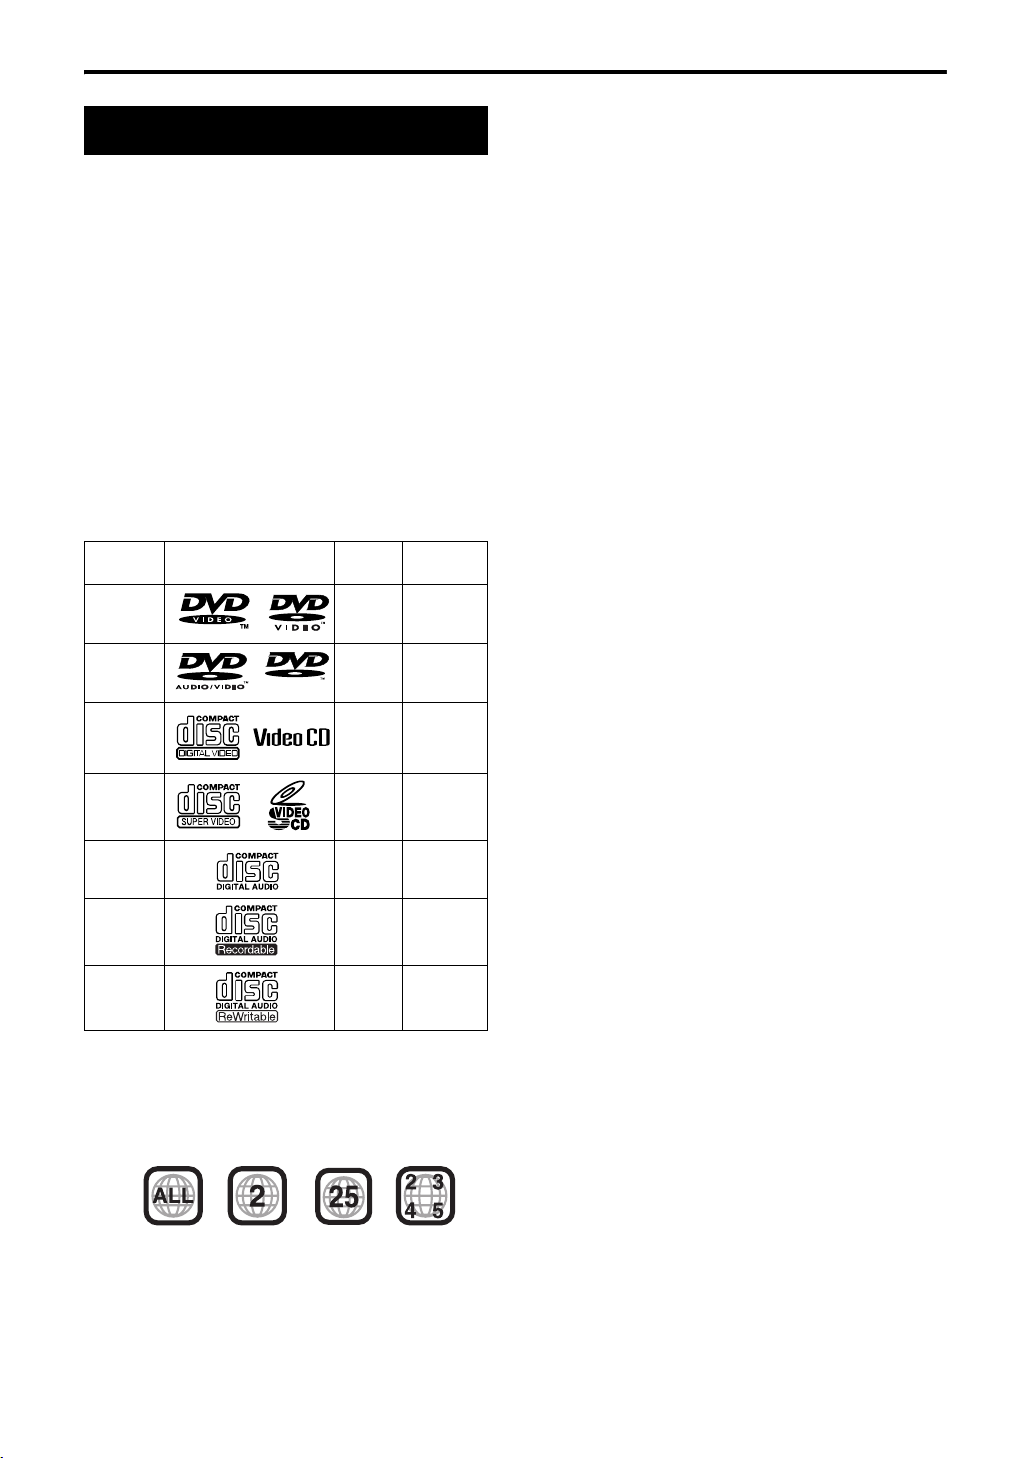
Discs you can play:
Disc
Type
Mark (Logo)
DVD
VIDEO
DVD
AUDIO
AUDIO
VCD PAL —
SVCD PAL —
CD — —
CD-R — —
CD-RW — —
* Note on Region Code
DVD players and DVD VIDEOs have their own Region
Code numbers. This system can only play back a DVD
VIDEO recorded with the Region Code number and
video format mentioned above.
Examples:
If a DVD VIDEO with an improper Region Code
number is loaded, “REGION CODE ERROR!” appears
on the TV screen and playback cannot start.
• On some DVD VIDEOs, DVD AUDIOs, VCDs or SVCDs,
their actual operation may be different from what is
explained in this manual. This is due to the disc
programming and disc structure, not a malfunction of
this system.
Video
Format
Region Code
Number
PA L 2 /A L L
——
*
Introduction
Discs that cannot be played back
• The following discs cannot be played back:
DVD-ROM, DVD-RAM, DVD-R/RW (recorded in VR
format), CD-ROM, CD-I (CD-I Ready), Photo CD,
SACD, etc.
Playing back these discs will generate noise and
damage the speakers.
Damaged discs and discs in an extraordinary shape
(other than a disc of 12 cm or 8 cm in diameter) cannot
be played back.
About MP3/JPEG discs
Playable MP3/JPEG discs and files
• Discs recorded in the ISO 9660 format are playable
(except discs recorded in the “packet write” format
(UDF format)).
• Discs recorded in the multi-session format are also
playable.
• Files with an extension of “.mp3,” “.jpg” or “.jpeg”
(extensions with uppercase and lowercase letters
mixed are also acceptable) are playable.
Notes on MP3/JPEG discs and files
• A disc may not be played, or reading it may take a long
time depending on its recording conditions or
properties.
• The time needed for reading varies with the number of
groups or tracks (files) recorded on the disc.
• If a character other than single byte English characters
is used in the file name of an MP3/JPEG file, the track/
file name will not be displayed correctly.
• The order of tracks/groups displayed on the MP3
Control screen, and the order of files/groups displayed
on the JPEG Control screen may be different from that
of files/folders displayed on PC’s monitor screen.
• An off-the-shelf MP3 disc may be played in an order
different from that indicated on the label attached to
the disc.
• Playing an MP3 file including a still image may take a
long time. The elapsed time is not displayed until
playing starts. If playing starts, the elapsed time may
not be displayed correctly.
• This system does not handle the ID3 tag of the MP3
file.
• For an MP3 file, a disc with a sampling frequency of
44.1 kHz and transmission rate of 128 kbps is
recommended.
• This system can play a baseline JPEG file, excluding
monochromatic JPEG files.
• This system can play JPEG data taken with a digital
camera conforming to the DCF (Design Rule for
Camera File System) standard (when a function is
applied such as the automatic rotation function of a
digital camera, data goes beyond the DCF standard,
so the image may not be displayed).
• If data has been processed, edited and restored with
PC image editing software, the data may not be
displayed.
• This system cannot play animations such as MOTION
JPEG, or still images (TIFF etc.) other than JPEG, and
image data with sound.
• The resolution of 640 x 480 pixels is recommended for
JPEG files. If a file has been recorded at a resolution
of more than 640 x 480 pixels, display may take a long
time. An image with a resolution of more than 8192 x
7680 pixels cannot be displayed.
• Files recorded on DVD-R/RW discs cannot be played
back.
Caution for DualDisc playback:
The Non-DVD side of a “DualDisc” does not comply with
the “Compact Disc Digital Audio” standard. Therefore,
the use of Non-DVD side of a DualDisc on this product
may not be recommended.
3
About discs (continued)
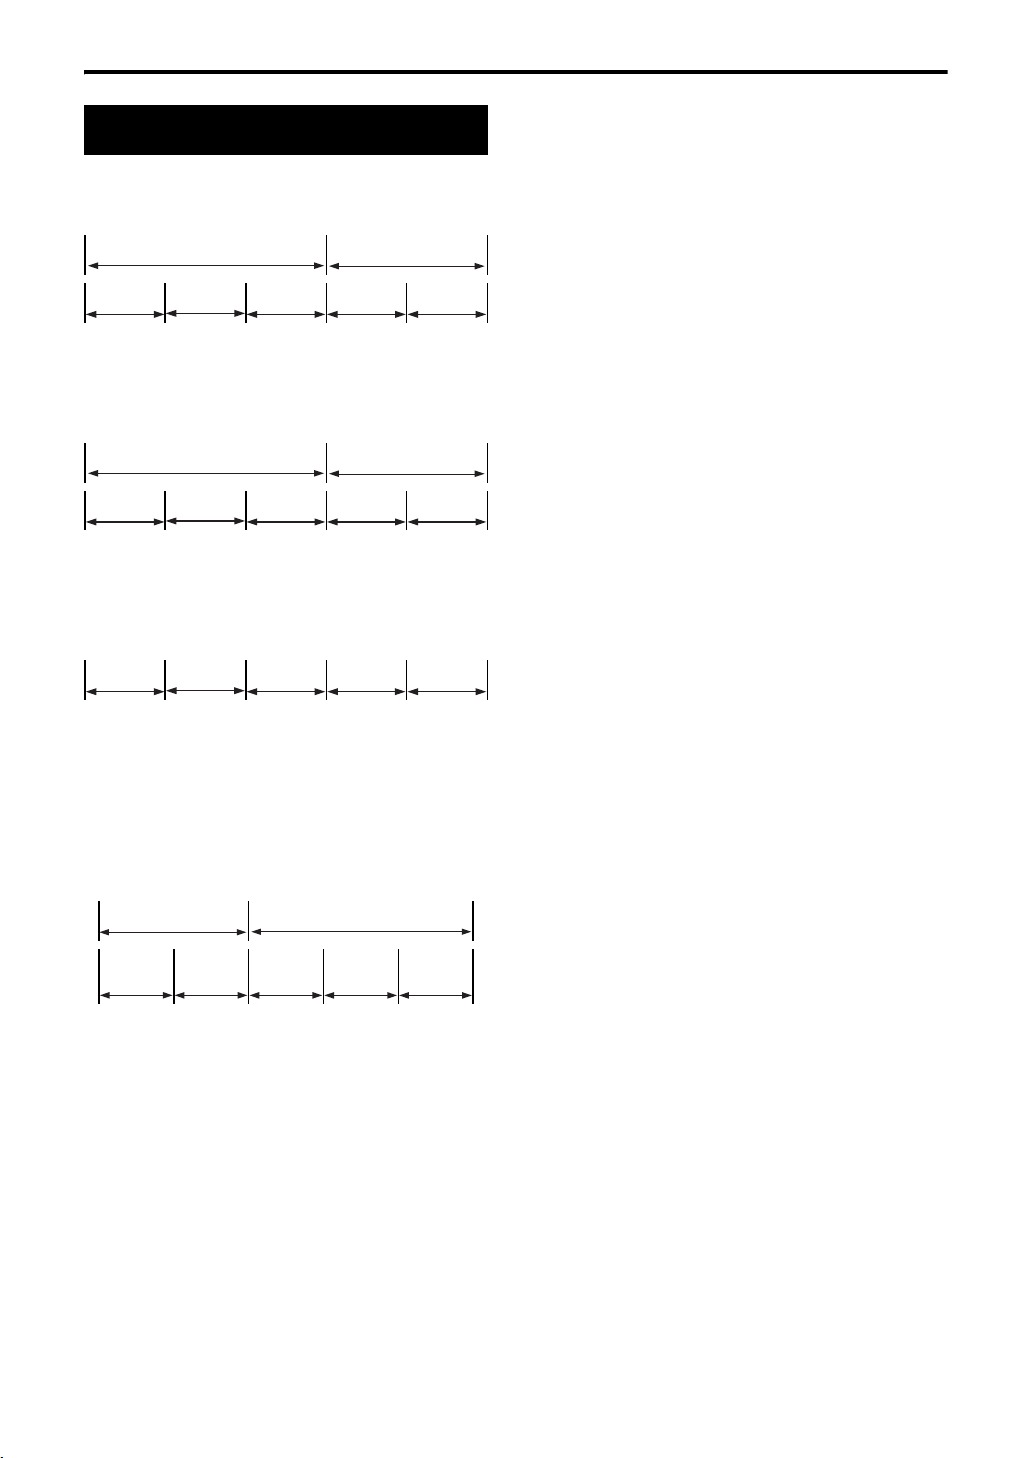
Disc structure
DVD VIDEO
A DVD VIDEO consists of “titles” and each title
may be divided into “chapters”.
Title 1 Title 2
Chapter 1 Chapter 2 Chapter 3 Chapter 1 Chapter 2
DVD AUDIO
A DVD AUDIO consists of “groups” and each group
may be divided into “tracks”.
Some discs include a “bonus group” that requires a
password for playing (A page 27).
Group 1 Group 2
Track 1 Track 2 Track 3 Track 1 Track 2
VCD/SVCD/CD
VCD, SVCD and CD consist of “tracks”.
In general, each track has its own track number.
(On some discs, each track may also be further
divided by indexes.)
Track 1 Track 2 Track 3 Track 4 Track 5
MP3 [JPEG] discs
On an MP3 [JPEG] disc, each still picture
(material) is recorded as a track [file]. Tracks [Files]
are usually grouped into a folder. Folders can also
include other folders, creating hierarchical folder
layers.
This unit simplifies the hierarchical construction of
a disc and manages folders by “groups”.
Group 1 Group 2
Track 1
[File 1]
This product can recognize up to 1000 tracks [files]
in a disc. Also, the product can recognize up to 150
tracks [files] per group and up to 99 groups in a
disc. Since the unit ignores the tracks [files] whose
numbers are exceeding 150 and the groups whose
numbers are exceeding 99, they cannot be played
back.
• If there is any type of files other than MP3 [JPEG]
files in a folder, those files are also counted in the
total file number.
Track 2
[File 2]
Group 3 Group 4 Group 5
4
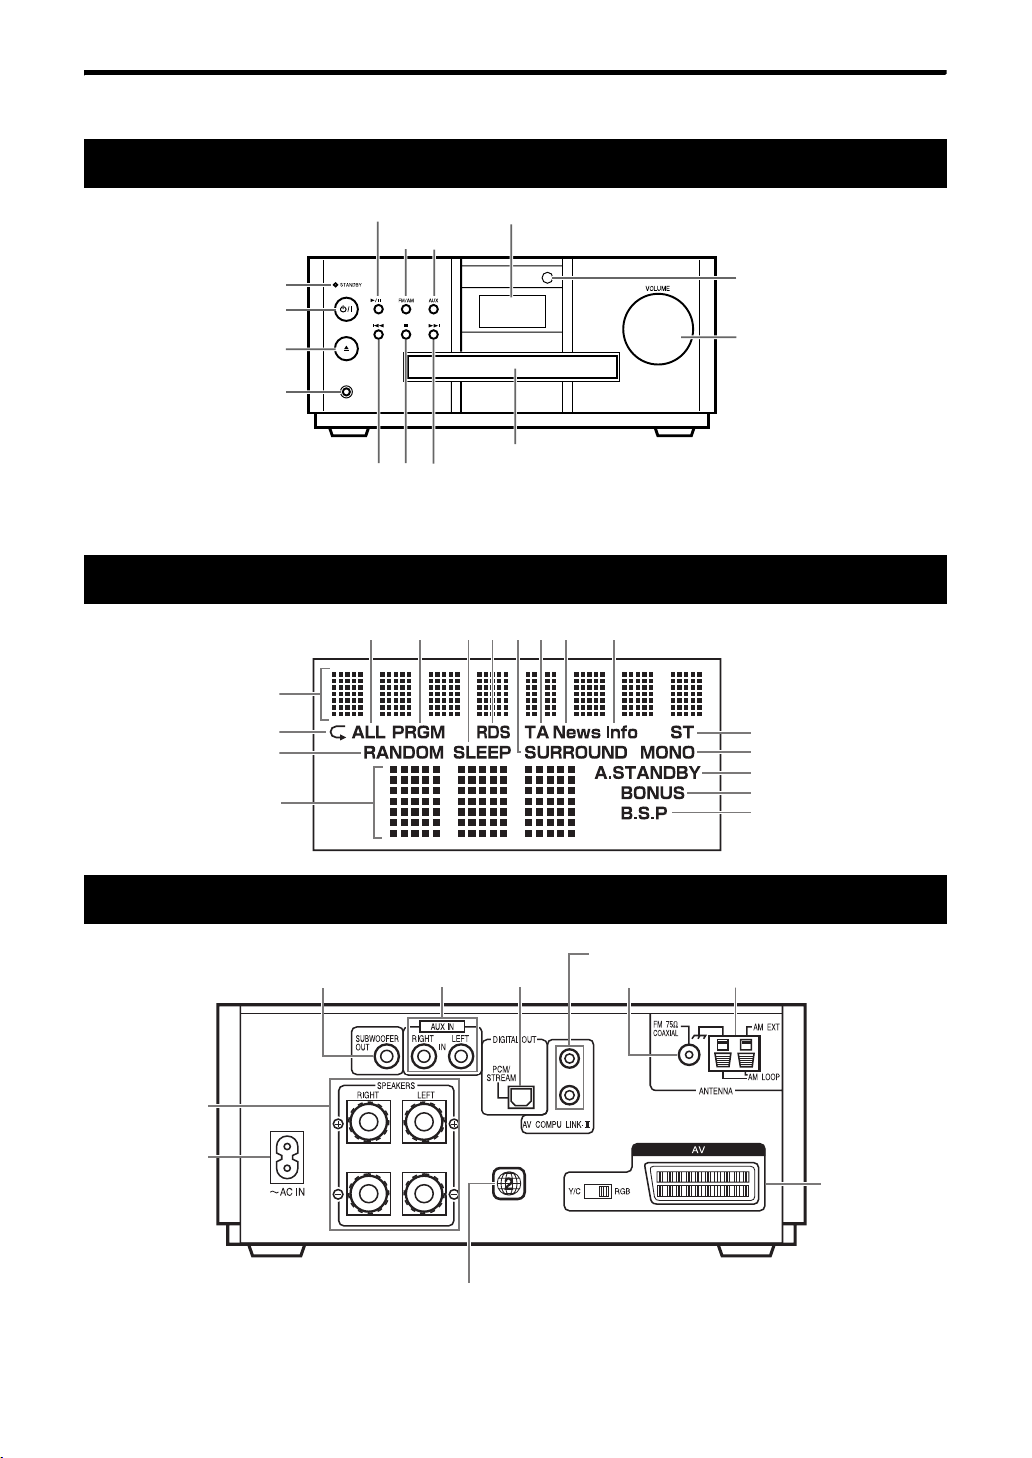
Description of parts
The numbers represent the page numbers.
Front panel
Introduction
Play/Pause:12, 14
32 38
11,12
STANDBY/ON
Open/Close
Headphones
* Connect a pair of headphones (commercially available) with a stereo mini plug. If the headphones are
connected, the speakers and subwoofer will not produce any sound.
: 12
: 12
jack*
PHONES
14 14 14
Look at “Display window” below.
Remote control
sensor: 6
VOLUME
control: 16
Disc tray: 12
Display window
17, 22 20 39 34 26 37 37
Upper display
section: 13
17, 22
21
Lower display
section: 13
37
32
32
38
27
27
Rear panel
9
11
10
Region Code Number: 3
10 10
For future use
8
8
11
5
Using the remote control
The numbers represent the page numbers.
12
16
13
15, 17
7
7
14, 32
15
14
19
19, 28
28
24
29
13
25
27
25
20
32
26
38
35
35
35
32
39
12
7
38
7
One touch
replay: 15
16
Remote control
mode selector: 7
16
14, 32
12
15
14
19
19, 28
21
24
24
Number
buttons: 7, 15
22
33, 38
26
16
16
36
10
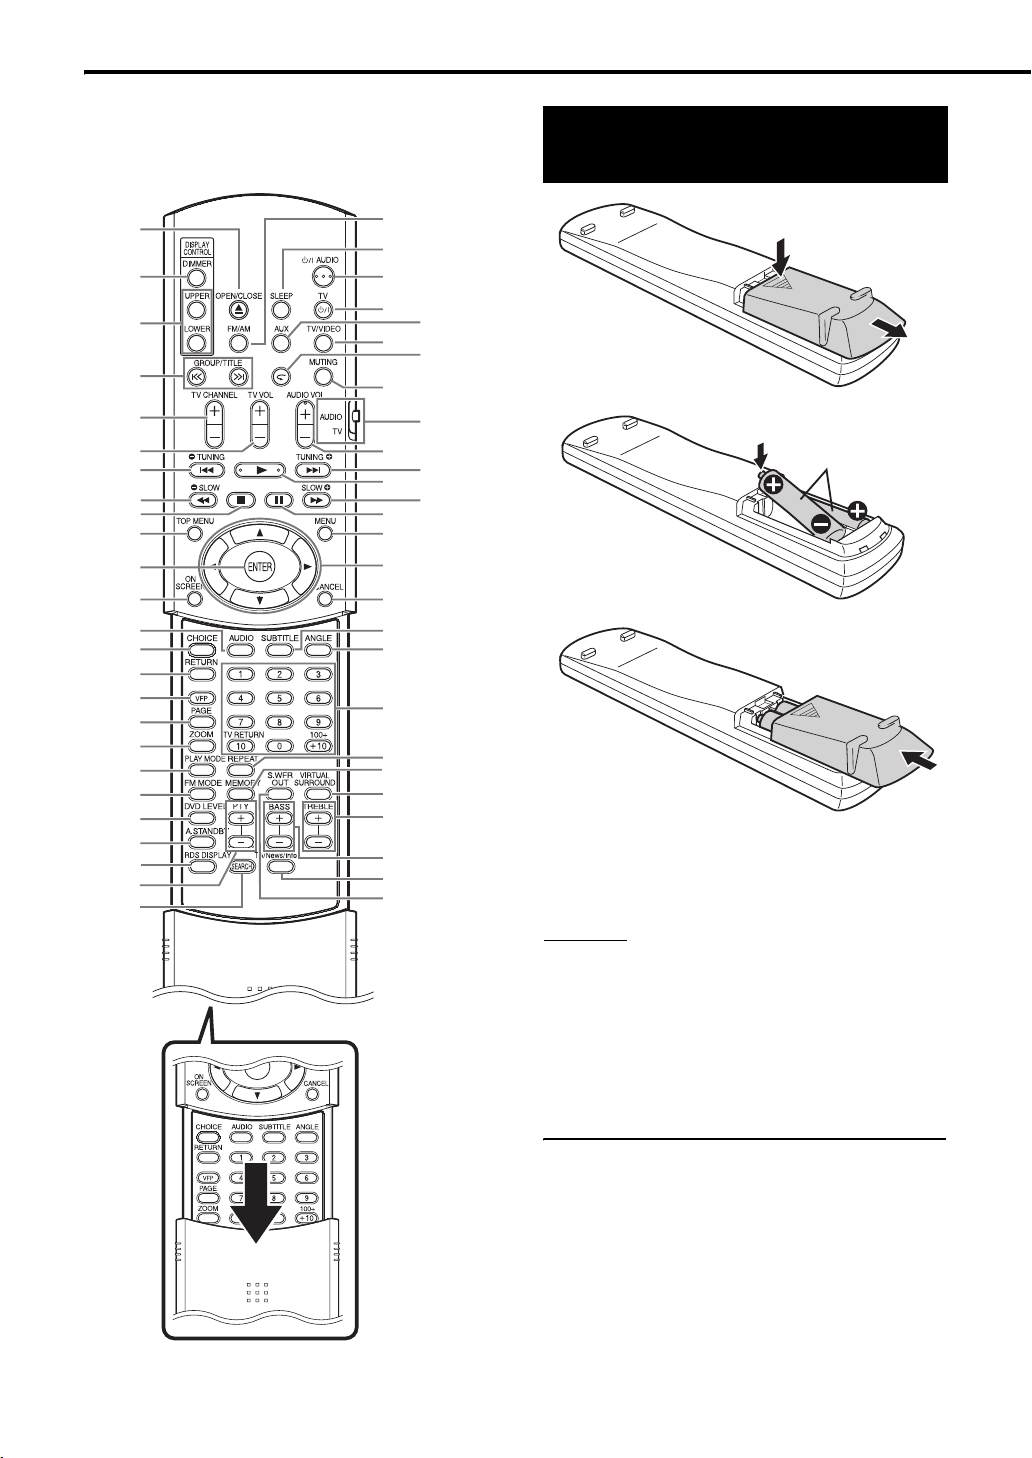
Putting the batteries in the remote control
Batteries (2)
If the range or effectiveness of the remote control
decreases, replace the batteries. Use two R6P
(SUM-3)/AA(15F) type dry-cell batteries.
CAUTION
•Do
not use a used battery and a new battery
together.
• Do not use different types of batteries at the
same time.
• Take out the batteries if the remote control is not
to be used for a long time. Otherwise it may
cause a leakage.
6
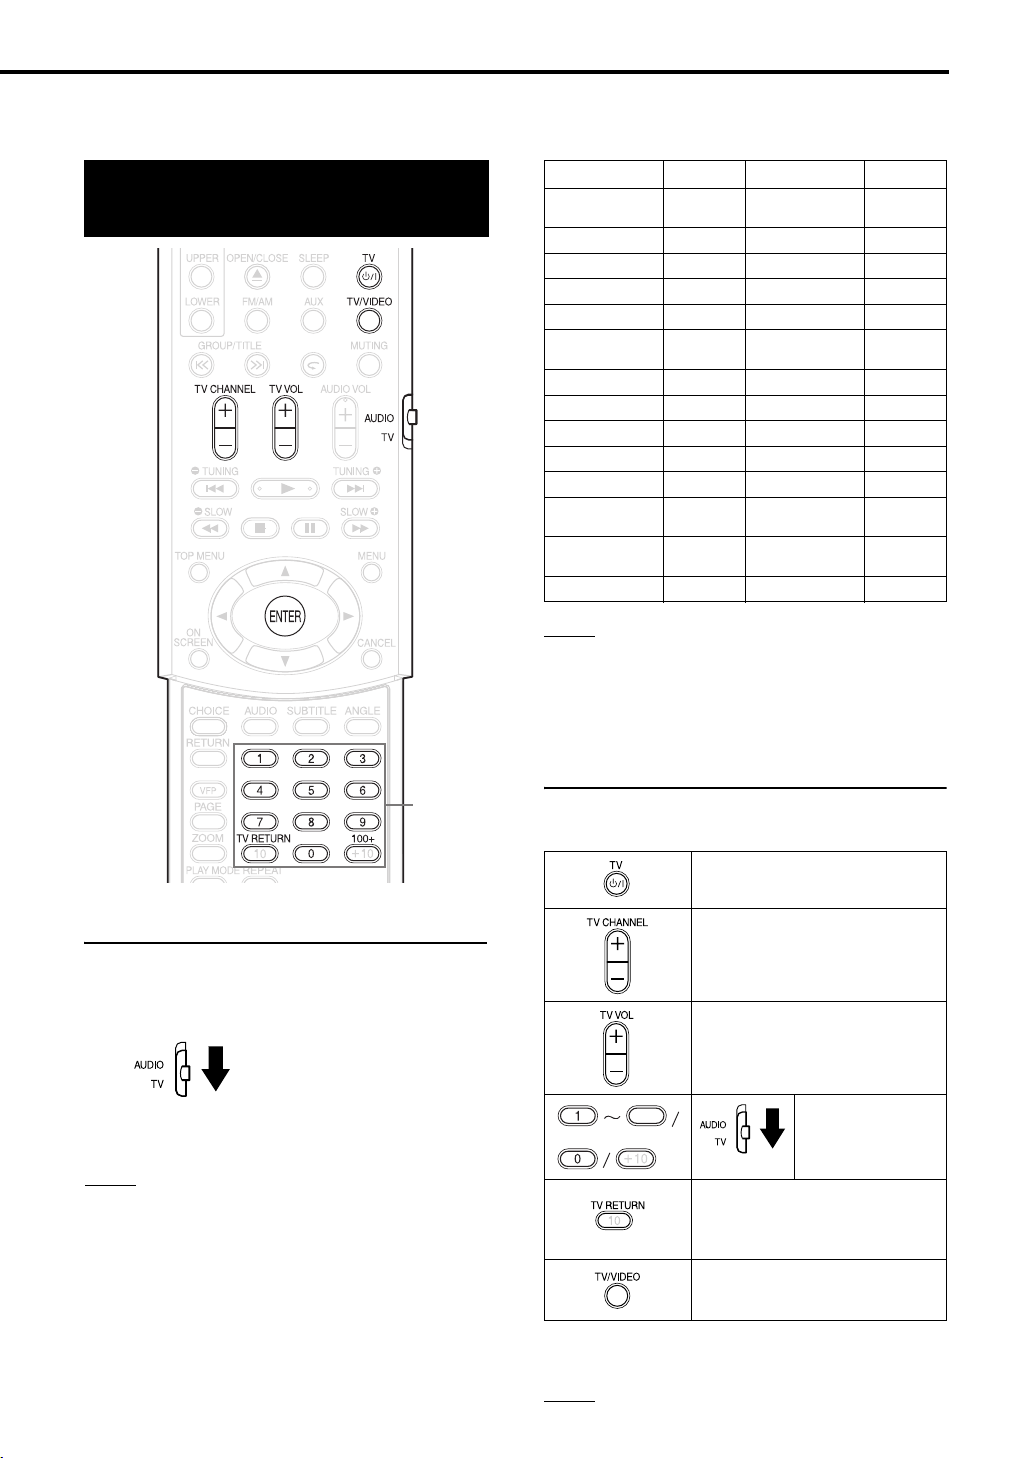
Remote control operation
When operating the remote control, point it
towards the front panel of the main unit. If the
remote control is operated from a direction that is
extremely oblique or when there is an obstacle in
the way, signals may not be transmitted.
If the remote control sensor is exposed to a strong
light such as direct sunlight, correct operation may
not be carried out.
Introduction
Getting started
This page is for when operating your TV using the
remote control of this product.
Operating the TV using the remote control
If there are more than one manufacturer’s codes,
try them in turn and select the one that causes the
product to work properly.
Manufacturer Code Manufacturer Code
JVC 01 Nordmende
Akai 02,05 Okano 09
Blaupunkt 03 Orion 15
Daewoo 10, 31, 32 Panasonic 16, 17
Fenner 04, 31, 32 Philips 10
Fisher 05 Saba
Grundig 06 Samsung 10,19, 32
Hitachi 07,08 Sanyo 05
Inno-Hit 09 Schneider 02, 05
Irradio 02, 05 Sharp 20
Magnavox 10 Sony 21-25
Mitsubishi 11, 33 Telefunken
Miver 03 Thomson
Nokia 12, 34 Toshiba 29
NOTE
Manufacturer’s codes may be changed without notice.
You may not be able to operate a TV produced by the
manufacturer shown above.
13, 14, 18,
26-28
13, 14, 18,
26-28
13, 14, 18,
26-28
13, 14, 18,
26-28, 30
Number
buttons
Setting the manufacturer's code
1 Slide the remote control mode
selector to the TV side.
2 Keep pressing down F TV.
NOTE
Keep pressing down F TV until Step 4 is complete.
3 Press ENTER and release.
5 Release F TV.
For TV operation
Operate the remote control by pointing it towards
the TV.
Turn ON/OFF the power.
Change channels.
Adjust volume.
9
100+
Alternates between the
previously selected channel
and the current channel.
Switch TV and video input.
Select channels.
*1
4 Press number buttons (1-9, 0).
Examples:
For a Hitachi TV: Press 0, then 7.
For a Toshiba TV: Press 2, then 9.
*1 Make sure to slide the remote control mode
selector to the TV side in advance.
NOTE
When the batteries are replaced, perform the
manufacturer's code setting again.
7

Connecting up
–
Do not turn on the power until the connection is complete
Connecting antennas
–
Connection
Connecting AM loop antenna (supplied)
1 Set up the AM loop antenna.
2 Connect antenna cords.
Main unit
(rear panel)
Black White
How to insert antenna cords
Connect two antenna cords
as described above.
If the antenna cord is
covered with vinyl on the
tip, twist and pull the vinyl
off and remove.
Connecting FM antenna (supplied)
FM antenna
Main unit
(rear panel)
Put the antenna up straight in the direction where
the best radio reception can be obtained, and fix
by using tape.
7 When good radio reception cannot be
obtained with the supplied antenna or when
using a communal antenna
3 Turn the AM loop antenna to the direction of the
best radio reception.
Locate the AM loop antenna as far away from
the main unit as possible.
• Do not locate the AM loop antenna on a metallic
table or close to a TV, personal computer, etc.
Otherwise it may result in bad radio reception.
7 When good radio reception cannot be
obtained with the supplied AM loop antenna
Electric wire: 3 - 5m (commercially available)
Electric wire
Twist
AM loop
antenna
Main unit
(rear panel)
Put up an electric
wire extending
horizontally,
preferably at a high
place such as
above a window or
outdoors.
Connect the AM loop
antenna cords together.
Communal
antenna terminal
Outdoor FM antenna
(commercially
available)
Coaxial cable
(commercially
available)
Main unit
(rear panel)
Antenna cord (sold
separately)
or
Converter
(sold separately:
compatible with 300C/
75C)
Depending on the radio reception
conditions, an FM feeder antenna (sold
separately: compatible with 300C) can
be used. In the case, a converter (sold
separately) is required.
For details of connecting a separately sold
antenna, refer to the user guide for the antenna
or converter.
When positioning the antenna, listen to an actual radio program (refer to “Listening to a radio broadcast” on page 32).
8
Connecting up Connection
Getting started
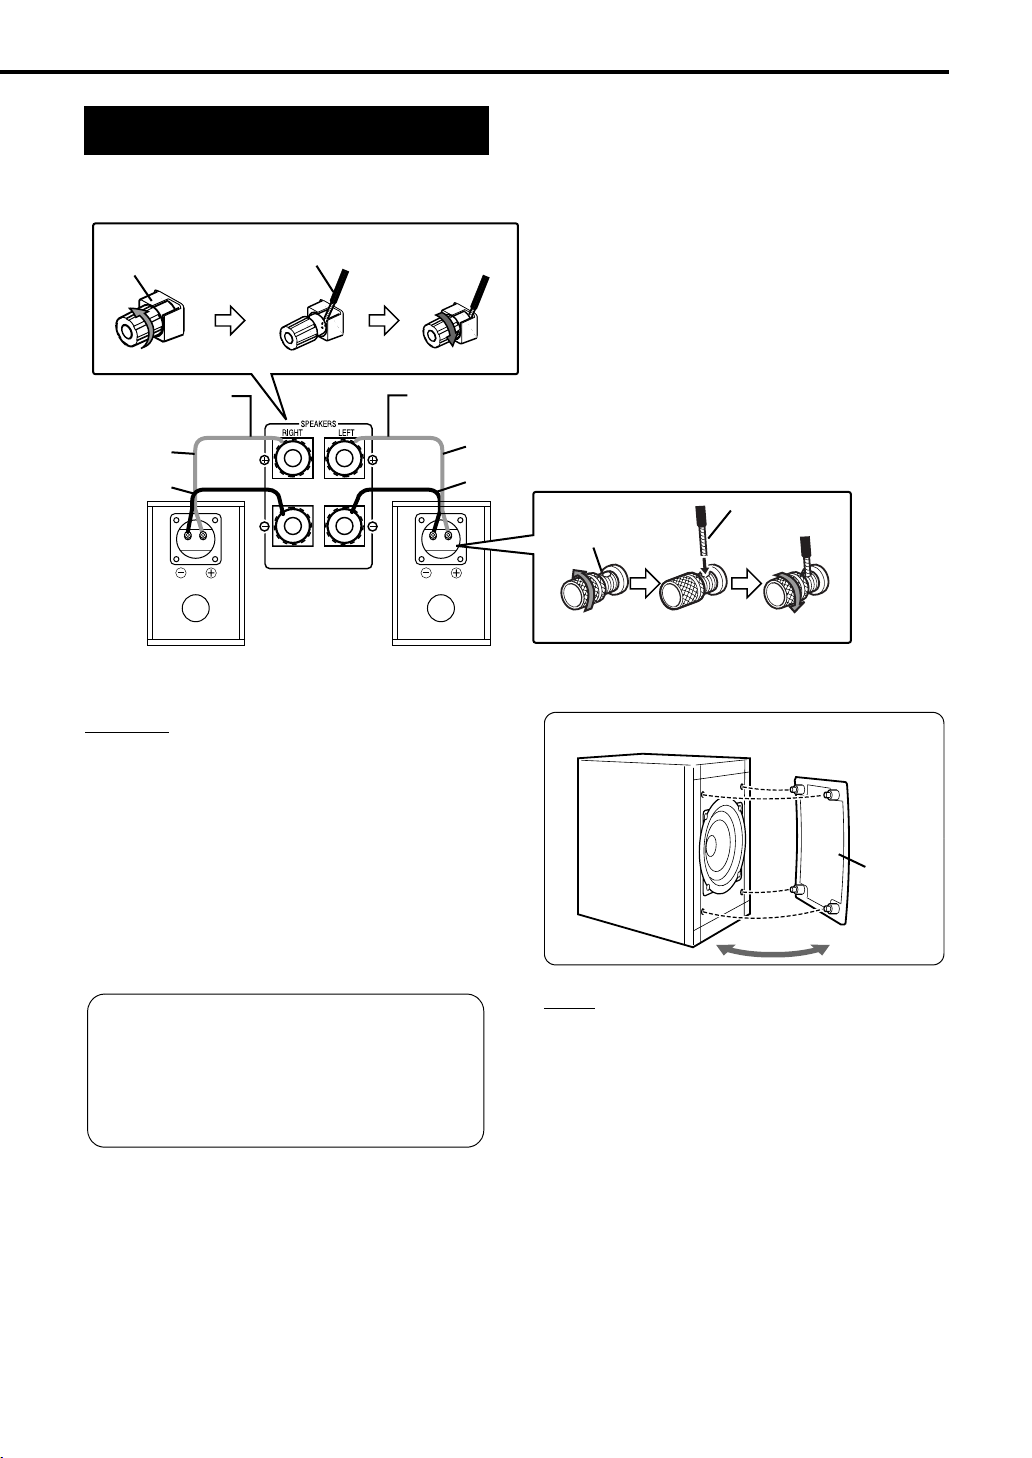
Connecting speakers
There is no difference between the left and right
speakers.
Speaker
Speaker terminal
cord
Speaker cord
Without
black line
With black
line
Right speaker
(supplied)
(rear panel)
Main unit
(rear panel)
Speaker cord
(supplied)
Without black line
Left speaker
(rear panel)
CAUTION
• DO NOT connect more than one speaker to one
speaker terminal.
• The speakers of this product are magnetically
shielded, but color irregularities may occur on
the TV depending on how the speakers are
installed. Keep in mind the following.
1. Turn off the main power of your TV before
installing the speakers. Wait for about 30
minutes before turning on the TV again.
2. If color irregularity occurs in pictures , keep a
distance of more than 10 cm between the TV
and the speakers.
The EX-A1 and EX-P1 speakers employ
natural wood for the diaphragm in order to
reproduce the original sound faithfully (the
EX-A1 speakers also employ natural wood for
the cabinet).
The appearance will therefore be different for
each unit.
With black line
Speaker terminal
NOTE
• Impedance of speaker that can be connected to the
main unit is within a range of 4
• In order to have a sufficient cooling effect, leave a
space of more than 1cm between the main unit and
the speakers or other objects.
• If the speaker cabinet gets dirty, wipe it with the
supplied cloth (EX-P1 only).
Speaker
cord
Speaker cover can be detached.
C
Speaker
cover
to 16C.
9

Connecting up Connection
(continued) – Do not turn on the power until the connection is complete –
Connecting other devices
This page is for when connecting the main unit with
other devices.
Connecting subwoofer
With an amplifier-built in subwoofer (sold separately), you can enjoy a more dynamic bass sound.
Refer to the manual of the subwoofer for details.
Amplifier-built-in subwoofer
(sold separately)
Audio cord (sold separately)
(If an audio cord comes with the amplifier-built-in subwoofer,
you can use the cord.)
Main unit
When you want to hear sound from the subwoofer,
S.WFR OUT
press
“SUB WFR ON” (Sub Woofer ON) on the display
window on the main unit. Each time you press the
button, the display toggles between “ON” and “OFF”.
NOTE
When "SUB WFR ON" is selected, bass sound from
the left and right speakers will be automatically
lowered and the bass sound will be emitted mainly
from the subwoofer.
on the remote control to display
Connecting with other audio device
Output
Audio cord (sold
separately)
Input
Main unit
10
Other audio
device
Connecting with a digital device
Input
Output
Main unit
CAUTION
• For details of signals to be output, refer to page
30.
• If connecting the main unit with equipment with the
function of a Dolby Digital decoder, the setting in
“D. RANGE COMPRESSION” of “AUDIO”
A
page 30) will be invalid regarding sound from
(
the digital audio output of the main unit.
Digital device
(MD recorder etc.)
To digital input terminal
Optical digital cord
(sold separately)
Connecting up Connection
Getting started
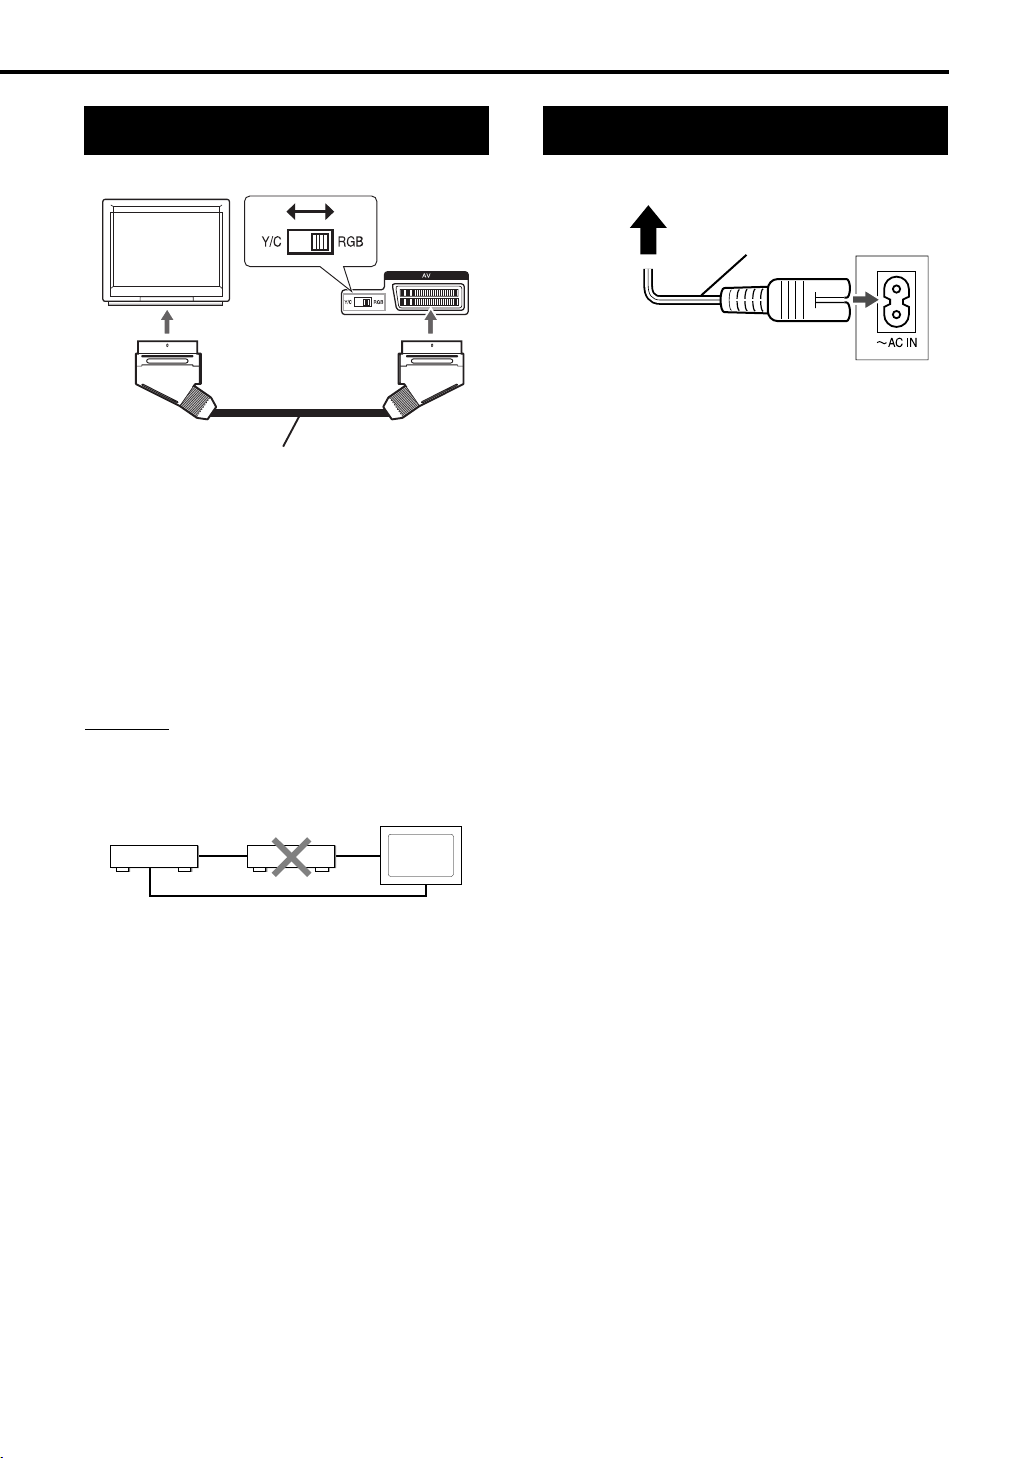
Connecting with TV
TV
Main unit
To SCART connector
SCART cable (sold separately)
• In standby mode, set the RGB-Y/C selector
correctly according to your TV.
• When the TV accommodates the RGB video
signal, set the RGB-Y/C selector to RGB so
that you can enjoy better-quality pictures.
• When the TV accommodates the S-video
signal, set the RGB-Y/C selector to Y/C.
• When the TV accommodates the composite
video signal only, set the RGB-Y/C selector to
RGB.
Connecting the power cord
AC outlet
Supplied power cord
• Connect the power cord after all other
connections are complete.
• The STANDBY lamp (on the front panel) will be
lit.
Main unit
CAUTION
Connect the main unit directly with a TV (or a
monitor) without routing through a VCR.
Otherwise it may cause picture distortion while
playing.
Main unit
Connecting directly
Also, when connecting the main unit to a TV with
a VCR built in, there may be picture distortion
while playing.
TV (or
monitor)
11
Loading...