

Page 1

COLOUR TELEVISION EQUALIZER • CINEMA SURROUND • COMPONENT INPUT
Contents
AV-29BS26
AV-29BX16
AV-29BX16B
AV-29BX26
AV-29MS26
AV-29MX16
AV-29MX56
AV-29MX76
AV-29SS26
AV-29SS29
AV-29SX56
AV-29SX76
AV-25MS26
AV-25MX16
AV-25MX56
AV-25MX76
AV-21BS26
AV-21BX16
AV-21BX26
AV-21BX16B
AV-21BX16S
AV-21MS26
AV-21MX16
AV-21MX56
Knowing your TV’s features .......................................................3
Remote control buttons and basic functions ..............................4
TV buttons and functions ............................................................6
Setting up your TV ......................................................................7
Basic setting for picture ..............................................................9
Advanced setting for picture ..................................................... 11
Original features for picture ......................................................12
Basic setting for sound .............................................................14
Advanced setting for sound ......................................................15
DVD Menu ................................................................................16
Customized setting ...................................................................17
TV channel presetting ..............................................................19
Additional preparation ..............................................................22
Troubleshooting ........................................................................23
Specifications ............................................................. Back cover
AV-21MX76
INSTRUCTIONS
GGT0116-002A-H
Page 2
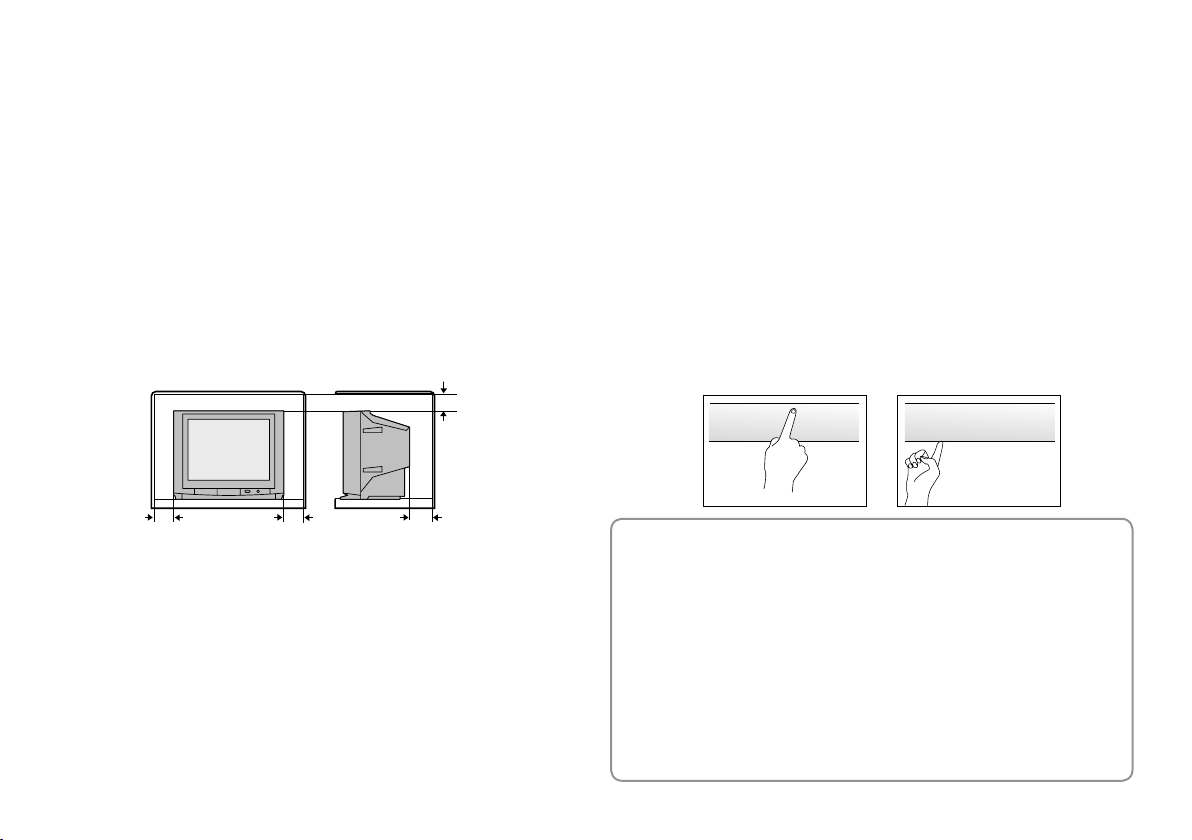
15 cm
10 cm 10 cm
15 cm
Thank you for buying this JVC colour television.
To make sure you understand how to use your new TV, please read this manual thoroughly before you begin.
WARNING: TO PREVENT FIRE OR SHOCK HAZARD, DO NOT EXPOSE
CAUTION: TO EN SURE PE RSO N AL SAF ETY, OB SER VE THE
1 Operate only from the power source indicated on the rear of the TV.
2 Avoid damaging the power cord and mains plug. When unplugging the
TV, grasp the mains plug. Do not pull on the power cord.
3 Never block or cover the ventilation openings.
Never install the TV where good ventilation is unattainable.
When installing this TV, leave spaces for ventilation around the TV of
more than the minimum distances as shown.
4 Do not allow objects or liquid into the cabinet openings.
5 In the event of a fault, unplug the unit and call a service technician.
Do not attempt to repair it yourself or remove the rear cover.
6 The surface of the TV screen is easily damaged. Be very careful with
it when handling the TV. Should the TV screen become soiled, wipe it
with a soft dry cloth. Never rub it forcefully. Never use any cleaner or
detergent on it.
7 This TV can be turned on/off power by connecting/disconnecting the
AC plug into AC outlet. While this TV is being installed, enough space
should be reserved for connection/disconnecting the AC plug into AC
outlet by hand.
THIS APPLIANCE TO RAIN OR MOISTURE.
FOLLOWING RULES REGARDING THE USE OF THIS TV.
2
8 The apparatus shall not be exposed to dripping or splashing and that
no objects filled with liquids, such as vases, shall be placed on the
apparatus.
9 Never listen to headphones at high volume!
- it may damage your hearing.
WARNING: <AV-21M, AV-25M, AV-29M, AV-21B, AV-29B Series>
YOU CAN DETACH THE PROTECT SHEET ON THE TOP
THE FRONT BUTTON DOOR OF THE TV SHOULD BE
If a television is not positioned in a sufficiently stable location, it can
be potentially hazardous due to falling. Many injuries, particularly to
children, can be avoided by taking simple precautions such as:
• Using cabinets or stands recommended by the manufacturer of the
television.
• Only using furniture that can safely support the television.
• Ensuring the television is not overhanging the edge of the supporting
furniture.
• Not placing the television on tall furniture (for example, cupboards or
bookcases) without anchoring both the furniture and the television to a
suitable support.
• Not standing the televisions on cloth or other materials placed between
the television and supporting furniture.
• Educating children about the dangers of climbing on furniture to reach the
television or its controls.
AND BOTTOM OF FRONT FRAME IF YOU NEEDED.
PULLED OUT FROM ITS BOTTOM. DO NOT PRESS THE
UPPER PART, OR YOUR FINGER MAY BE PINCHED.
✘
PULL PULL
✓
Page 3
Knowing your TV’s features
4
1
2
3
EXIT
5
Main features
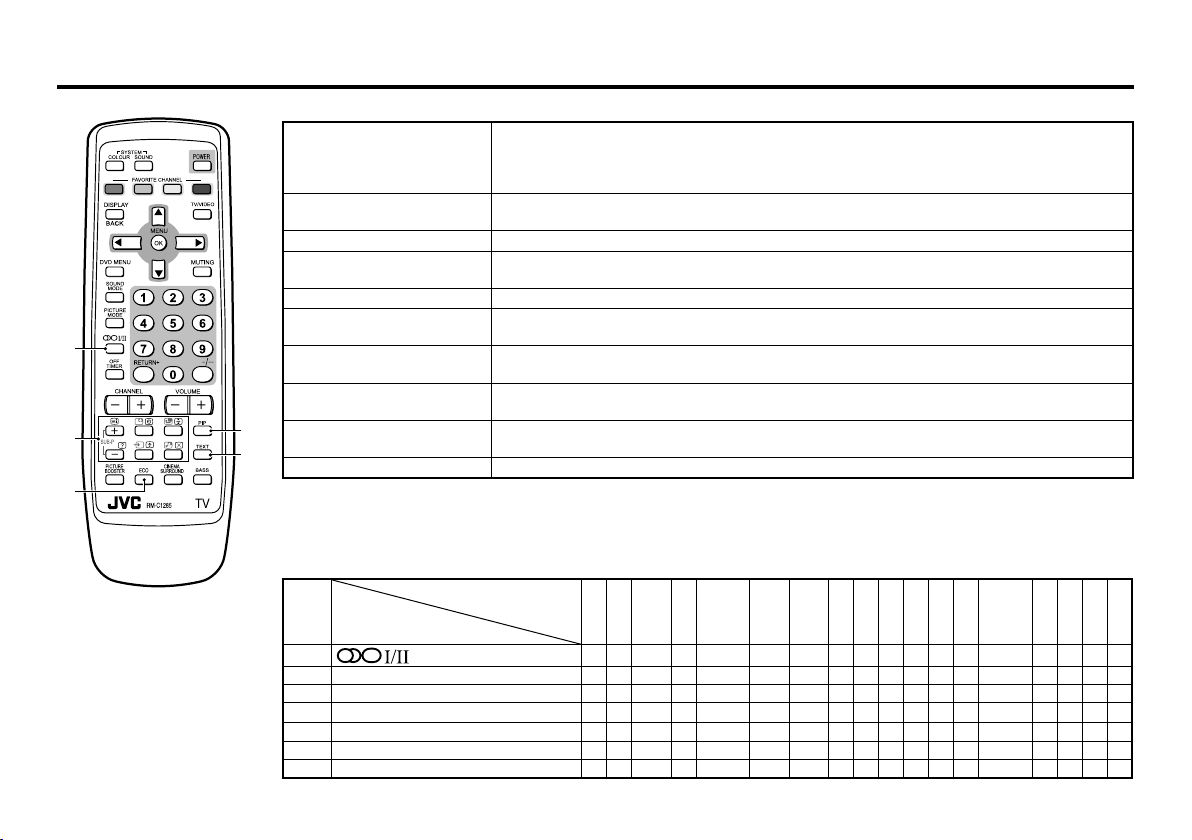
DVD MENU Just connect DVD player to the television. The television will detect DVD signal and display
MaxxBass MaxxBass enhances bass sound that cannot be reproduced by normal speakers to be
PIP (Picture In Picture) You can view two screens ( Main picture and Sub picture ) at the same time.
TELETEXT You can view teletext programmes which are broadcasted by some TV channels. Teletext
FAVORITE CH (Channel) You can register up to four favorite channels for quick recall with one press.
A2/NICAM
(STEREO / I.II)
AI ECO SENSOR TV detects the brightness of your room and automatically adjust the picture brightness to
ECO MODE You can adjust TV screen contrast according to the brightness of your room to suitable
AI VOLUME TV adjusts the volume automatically to the same level for all TV channels to avoid sudden
TINT You can adjust TINT setting for all colour systems, including PAL.
Confirm your TV’s functions
Some functions written in this instruction manual may not be available for your TV.
Please see the chart below and check the functions that are equipped for your TV’s model number.
The model number is indicated at the rear of your TV. When you press a button concerned to a function that is not available
for your TV, it does not work and the logo “Ø” appears on the screen.
NO.
Function
1
2,3
PIP control buttons (Green label)
4,3
TELETEXT control buttons (Black label)
PICTURE TILT
—
MaxxBass
—
5
AI ECO SENSOR
5
ECO MODE
(STEREO/I■II)
picture on the screen automatically and you can adjust pictures and sound while you are
watching DVD as your desire. When disconnect DVD player, the television will display the
previous channel.
heard by our ears.
programme is an information in text form.
You can listen the stereo sound or bilingual sound from TV programme broadcasting by A2
or NICAM Sound-multiplex system.
a suitable level for a better eyecare.
level for a better eyecare.
change of the volume when selecting different TV channels or selecting Video Mode.
Model No.
AV-29BS26
AV-29BX26
AV-29BX16
AV-29BX16B
AV-29MX16
AV-29MS26
AV-29SS26
AV-29SS29
AV-29MX56
AV-29SX56
AV-29MX76
AV-29SX76
AV-25MS26
AV-25MX16
AV-25MX56
AV-25MX76
AV-21BS26
AV-21BX26
AV-21BX16
AV-21BX16B
AV-21BX16S
AV-21MS26
AV-21MX16
AV-21MX56
O — — — O — — O — — — O — — O — — —
— — — — — O O — — O O — — — — — O O
O O — — O — O O — — O O O — O — — O
O O O O O O O — — — — — — — — — — —
— — — O O O O O O O O — — — O O O O
— — — O O O O O O O O — — — O O O O
O O O — — — — — — — — O O O — — — —
AV-21MX76
3
Page 4
Remote control buttons and basic functions
1
6
3
7
9
5
8
2
!
4
EXIT
"
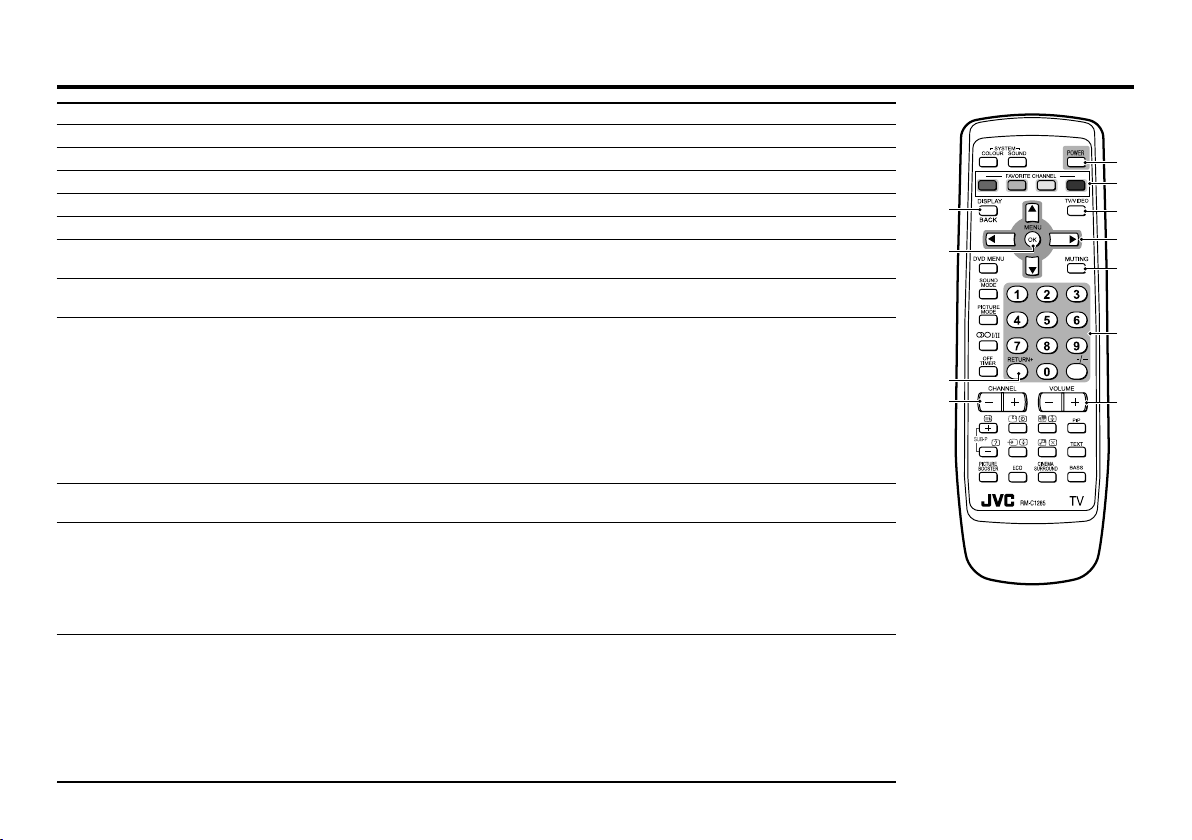
No. Press To
POWER Turn on or off the TV from standby mode.
1
MENU/OK Display menu and confirm selected function.
2
5 / ∞ / 2 / 3 Select and adjust menu function.
3
CHANNEL -/+ Select the desired channel number.
4
VOLUME -/+ Adjust the volume level.
5
TV/VIDEO
6
EXIT
MUTING Turn off the volume.
7
DISPLAY
8
/BACK
9
!
"
0~9, -/-- Select the programme number. For two digits programme number, press -/--, then press the
RETURN+ a) Return to the frequently view channel with one touch.
FAVORITE
CHANNEL
(colour buttons: red,
green, yellow, blue)
4
Select TV or video terminal input.
On the other hand, you can use this button to EXIT from the menu.
Press this button again to resume the volume.
Display the programme number or video terminal number, stereo/bilingual broadcast system and
PR list (channel list) on the screen.
You can select the channel using the PR list.
1 Press the DISPLAY button once to display the PR list.
2 Press 5 / ∞ / 2 / 3 buttons to choose a channel, then press the MENU/OK button.
You can confirm the favorite channels in the PR list. The channels set to favorite channels are
indicated with coloured mark.
On the other hand, you can use this button to return to the previous menu.
number button.
1 Choose the channel you want to register.
2 Press and hold RETURN+ button until “RETURN PLUS PROGRAMMED!” appears.
To cancel, press and hold RETURN+ button until “RETURN PLUS CANCELED!” appears.
b) Return to the previously viewed channel, if you have not set or have cancelled the Return
channel as above.
Register and recall 4 favorite channels.
1. Choose the TV channel you want to register then press and hold a colour button until
“PROGRAMMED! ■" appears.
2. To register other favorite channels, repeat step 1.
To recall the favorite channel, press the corresponding colour button.
When the TV is in Text function or MENU mode, the favorite channel function is not available.
When the TV is in PIP function, the favorite channel function cannot register but can recall the
favorite channel.
Page 5
Remote control buttons and basic functions (continued)
How to operate menus and menus locations
To Operation Note
Display the MENU
Choose a Top
menu
Choose a 2nd
menu
Display the 3rd
menu
Return to the
previous menu
Choose the setting
of a function
Adjust the effect
level of a function
Display the sub
menu of a function.
Press the MENU/OK button 2.
PICTURE MENU is displayed on
first press.
Press 2/3 buttons 3 to choose
a menu title when the cursor is
pointing at MENU.
Press 5/∞ buttons 3 to choose a
2nd menu title.
Press 5/∞ buttons 3 to choose a
2nd menu title. Then press MENU/
OK button 2.
Press the DISPLAY/BACK button
8.
Press 5/∞ buttons 3 to choose
a function. Then press the 2/3
buttons 3 to change the setting.
Press 5/∞ buttons 3 to choose
a function. Then press the 2/3
buttons 3 to adjust the effec t
level.
Pr es s t he 5/∞ but tons 3 to
choose a function. Then press
MENU/OK button 2 to display
the sub menu.
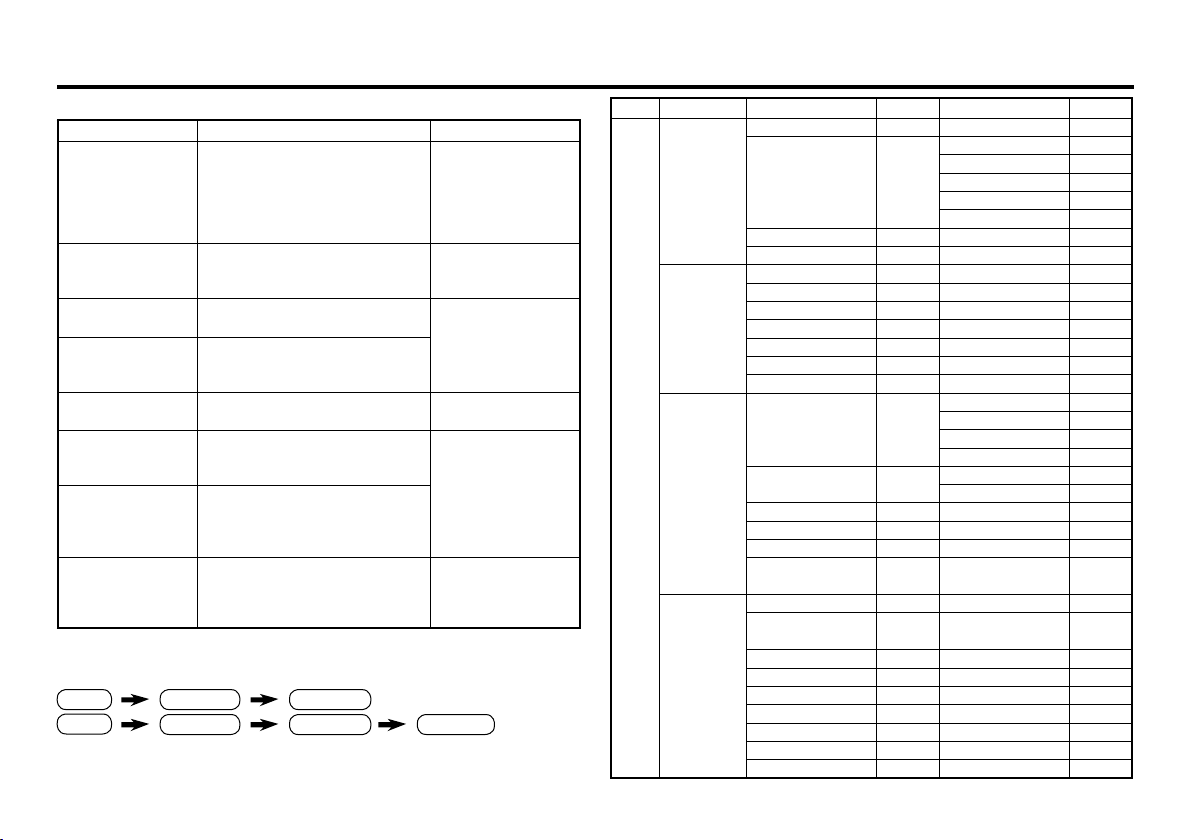
The following chart shows locations of functions in menus. In this manual,
location of a function is described as follows:
MENU
Top menu
2nd menu
Top menu 3rd menuMENU 2nd menu
Note: Some functions have the 4th menus as the sub-menus.
To exit the MENU,
press the DISPLAY/
BACK button 8 or
choose EXIT menu
or TV/V ID EO/EXIT
button 6.
—
Press ∞ button 3
to display the next
functions.
—
Press the TV/ VIDEO/
EXIT button 6 to exit
from the menu.
—
Top menu 2nd menu Location 3nd menu Location
PICTURE PICTURE MODE P.9 – –
MENU
SOUND
FEATURES DVD MENU P.16
INSTALL AUTO PROGRAM P.19 – –
PICTURE SETTING P.10 CONTRAST P.10
WHITE BALANCE P.10 – –
VNR P.17 – –
STEREO/
I■II
AI VOLUME P.15 – –
SOUND MODE P.14 – –
EQUALIZER P.15 – –
BALANCE P.14 – –
CINEMA SURROUND
MaxxBass P.15 – –
ON TIMER P.17 PR P.17
OFF TIMER P.17 – –
CHILD LOCK P.17 – –
COMPRESS (16:9)
AI ECO SENSOR/
ECO MODE
EDIT/MANUAL P.19 DELETE, MOVE,
COLOUR SYSTEM P.9 – –
LANGUAGE P.17 LANGUAGE P.17
TEXT LANGUAGE P.13 TEXT LANGUAGE P.13
VIDEO-2 SETTING P.18 – –
BLUE BACK P.11 – –
PICTURE TILT P.11 – –
BEEP P.18 – –
P.15 – –
P.15 – –
P.11 – –
P.11 – –
BRIGHT P.10
SHARP P.10
COLOUR P.10
TINT P.10
AUTO SIGNAL DETECT
DVD PICTURE MODE
DVD THEATER STATUS
DVD SOUND MODE
ON TIMER P.17
MANUAL, INSERT
P.16
P.16
P.16
P.16
P.19P.20
5
Page 6
TV buttons and functions
POWER
TV/VIDEO
MENU/OK
CHANNEL
VOLUM
E
R VL/MONO
IN(VIDEO-3)
POWER
VOLUME
CHANNEL
MENU
OK
V R
L / MONO
IN (VIDEO-3)
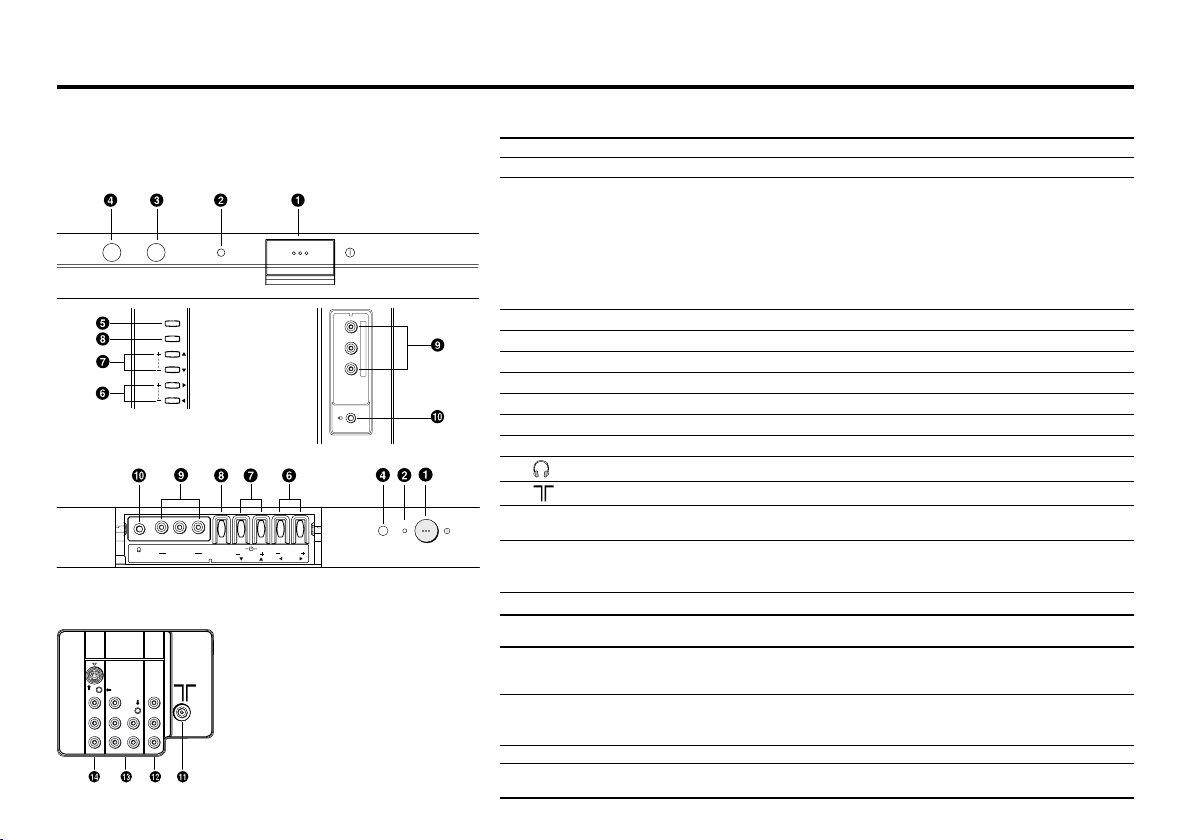
The illustrations shown below is for AV-21BS26 and AV-29SS26 only, which are used for explanation purpose.
Your TV may not look exactly the same as illustrated.
Front of the TV
AV-29SS26
AV-21BS26
Rear of the TV
AV-29SS26
6
No. Button/terminal Description Page
L (main power)
1
POWER lamp Indicate the TV’s status. –
2
Press to turn on or turn off the TV’s main power. –
No colour : TV’s main power is being turned off.
Red : TV’s main power is being turned on.
Blink :
While the TV is in standby mode, ON TIMER function is in used.
While the TV is in turn on mode , OFF TIMER function is in used.
Note: When you turn off the power switch while TV is in standby mode,
the power lamp will go off in 10 -15 seconds.
When you operate the TV, POWER Lamp will be blink.
ECO sensor –
3
Remote control sensor –
4
TV/VIDEO
5
VOLUME -/+ Press to adjust the volume level. –
6
CHANNEL -/+
7
MENU/OK Press to display the menu. –
8
IN (VIDEO-3) Video and audio input jacks for VIDEO-3 mode. 22
9
!
"
OUTPUT Video and audio output jacks. (The component video
#
COMPONENT
$
(VIDEO-2) INPUT
Press to select TV or Video terminal input or exit from menu.
Press to select the desired channel (Both of RF and Video input.)
Headphone jack. 22
Aerial socket. 7
signal cannot be output.)
Video or component video, and audio input jacks for VIDEO-2
mode. You can select the input signal by setting the “VIDEO-2
SETTING” function (see page 18).
VIDEO-1 INPUT
%
Video or S-VIDEO, and audio input jacks for VIDEO-1 mode. 7
How to operate the menus with the TV button
TV button
Work as same as the button on
the remote control unit
Note
MENU MENU/OK button To display main menu and exit menu by
press and hold within 3 seconds after finish
setting.
CHANNEL -/+ ∞/5 button To select menu function.
VOLUME -/+ 2/3 button To choose a Top menu and adjust the desired
menu function.
–
–
22
22
Page 7
Setting up your TV
V
LRRL
/
MONO
Y
C
B
C
R
/
V
V
S
OVER
L
R
/
MONO
OUTPUT
VIDEO-1
COMPONEN
T
(VIDEO-2
)
INPUT
INPU
T
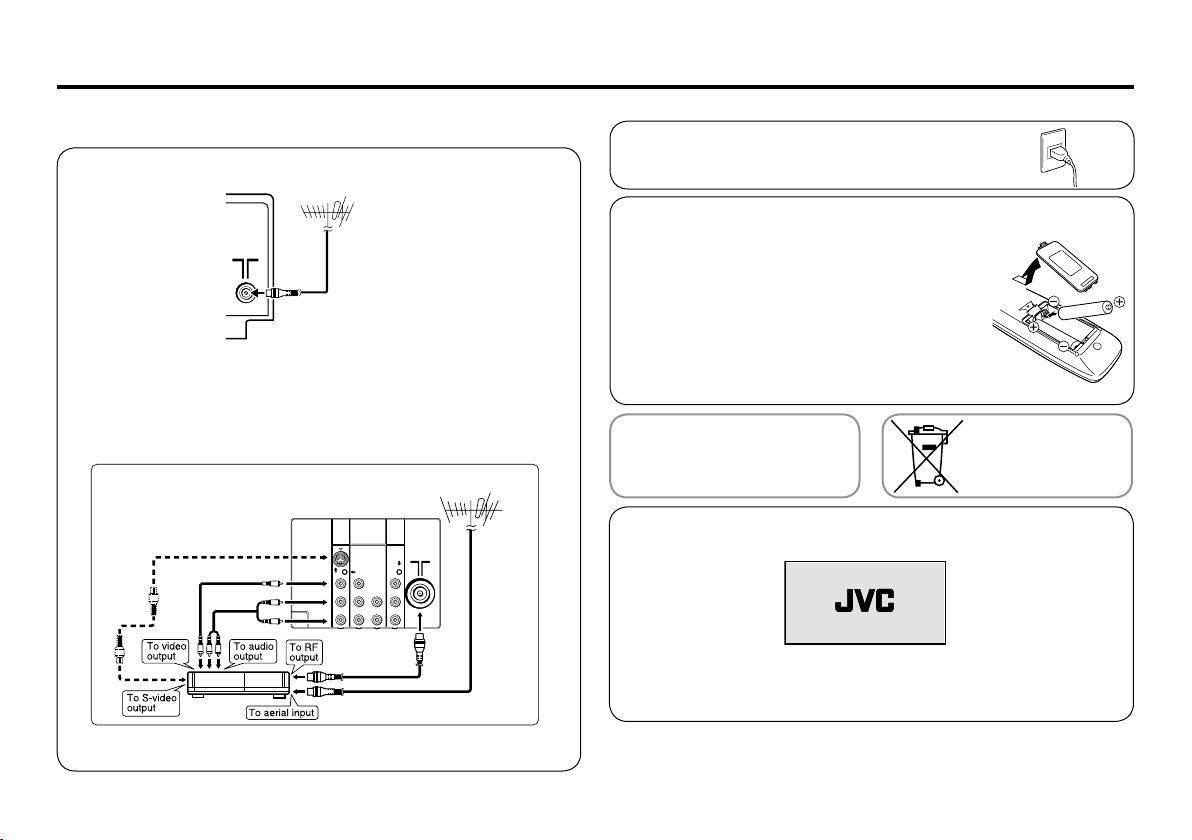
CAUTION
• Turn off the equipment including the TV before connecting.
1 Connecting the aerial cable.
2 Connecting the main plug to the AC outlet.
VHF/UHF outdoor aerial
75-ohm coaxial cable (not supplied)
If you connect a VCR, connect the aerial output jack of your VCR and
the aerial jack on the TV with aerial cable. Then connect the output
jacks of your VCR and the VIDEO-1 input jacks of the TV with the
video cable (or S-VIDEO cable if available) and audio cables. For
details, see the manual of your VCR.
Rear of TV
AV-21BS26
VCR
The illustration shown is just a sample. It may not be same as your TV.
VHF/UHF outdoor aerial
3 Inserting batteries into the remote control.
Insert two batteries by following the + and - polarities
and inserting the - end first.
CAUTION:
Follow the cautions printed on the batteries.
Notes:
• Use AA/R6/UM-3 dry cell batteries.
• If the remote control does not work properly, fit
new batteries. The supplied batteries are for testing,
not regular use.
WARNING:
Batteries shall not be exposed
to excessive heat such as direct
sunshine, fire or the like.
If this symbol is
shown, it is only valid
in the European
Union.
4 Turn on the TV by pressing the main power button.
JVC logo appears on the screen.
JVC logo will appear on the screen again at the phase of “SETUP
TOUR RESTART?” function. Then the initial setting can be performed
according to page 8.
Note:
While in the INSTALL menu with the cursor pointing at INSTALL, pressing
the blue button will also display the JVC logo.
7
Page 8
Setting up your TV (continued)
LANGUAGE TEXT LANGUAGE
MENU : OK
DISPLAY : BACK
TV/VIDEO : EXIT
TEXT LANGUAGE
MENU : OK
DISPLAY : BACK
TV/VIDEO : EXIT
AUTO PROGRAM
MENU : OK
22%
EDIT
MENU : OK
MOVE
�
INSERT
�
DELETE
�
MANUAL
�
�
�
�
PR CH/CC
AV
1 CH 04
2 CH 76
3 CH 78
4 CH 05
5 CH 28
3
6 CH 10
AUTO PROGRAM
MENU : NO
SETUP TOUR RESTART?
�
: YES
GROUP–1
GROUP–2
GROUP–3
GROUP–4
ENGLISH
êìë ëäàâ
FRANÇAIS
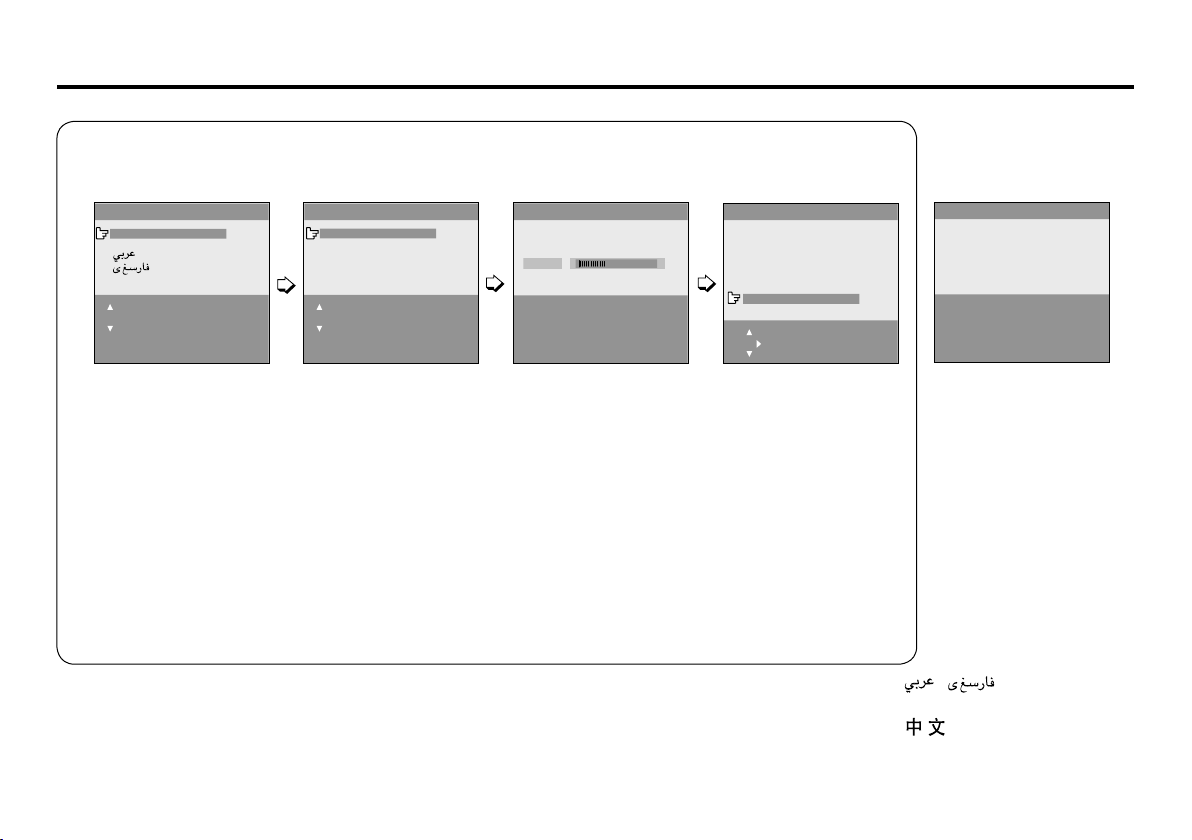
5 Making the initial settings
Set up your TV by pressing MENU/OK button or waiting for 15 seconds, then operate the TV by following the steps
When turn on the TV at
the next time
below:
• Press 5/∞ button to
select your desired
language*.
• Press 5/∞ button to
select your desired
Teletext language
group*. For details,
see page 13.
(For BS26/MS26/
SS26/SS29/MX76/
SX76 series only)
• TV will start searching
for the channels.
To stop AUTO
PROGRAM, press
MENU/OK button.
• To complete the initial
setting, press the
MENU/OK button. To
edit the channel list,
see page 19.
• “SETUP TOUR
RESTART?” will be
displayed.
Press the MENU/OK
button to cancel
the SETUP TOUR
RESTART function.
If you want to make
initial settings again
when the next time
you turn on the TV,
press the Red button
to activate the SETUP
TOUR RESTART
function.
* If the TEXT function is available for your TV and the LANGUAGE shown follow as ENGLISH/PУCCKИЙ/ / /FRANÇAIS, you
can select the TEXT LANGUAGE group from GROUP-1 to GROUP-4.
If the TEXT function is available for your TV and the LANGUAGE shown follow as ENGLISH/PУCCKИЙ/ /MELAYU/INDONESIA,
you can select the TEXT LANGUAGE group from GROUP-1 to GROUP-3.
8
Page 9

Basic setting for picture
AUTO PAL SECAM NTSC3.58
NTSC4.43
COLOUR SYSTEM
You can select the appropriate colour system when the picture is
not clear or no colour appears.
Press the COLOUR SYSTEM button to select a setting.
To operate this function with a menu:
❇
MENU INSTALL menu COLOUR SYSTEM
For the colour system in each country or region, see the table below:
Area Country or Region System
Bahrain, Kuwait, Oman, Qatar, United Arab Emirates,
Yemen, etc.
Asia, Middle
East
Europe
Oceania Australia, New Zealand, etc. PAL
Africa
Indonesia, Malaysia, Singapore, Thailand, India, etc.
China, Vietnam, etc. PAL
Hong Kong, etc. PAL
Islamic Republic of Iran, Lebanon, Saudi Arabia, etc. SECAM
Philippines, Taiwan, Myanmar, etc. NTSC
Russia, etc. SECAM
Czech Republic, Poland, etc. PAL
Germany, Holland, Belgium, etc. PAL
UK, etc. PAL
Republic of South Africa, etc. PAL
Nigeria, etc. PAL
Egypt, Morocco, etc. SECAM
PAL
PICTURE MODE
You can choose the desired picture setting with one-touch.
Press the PICTURE MODE button to select a setting.
SOFT Softens contrast and sharpness.
BRIGHT Heightens contrast and sharpness.
STANDARD Standard picture setting.
USER You can change this picture setting as you like.
Select USER and adjust following items in the
PICTURE SETTING menu. (CONTRAST, BRIGHT,
SHARP, COLOUR, TINT)
When you select VIDEO-2 Mode, you cannot adjust SHARP.
When you set DVD THEATER STATUS in DVD MENU to ON, you
cannot adjust PICTURE MODE.
To operate this function with a menu:
❇
MENU
PICTURE menu
PICTURE MODE
To return the USER setting to default, press the blue button when
the PICTURE SETTING menu is displayed.
❇ About the basic operations of the menu, please see the “How to
operate menus and menus locations” on page 5.
9
Page 10

Basic setting for picture (continued)
PICTURE SETTING
You can adjust the desired picture setting when selecting USER in
PICTURE MODE.
1 Select USER in PICTURE MODE under PICTURE menu.
❇
MENU
USER
PICTURE menu PICTURE MODE
2 Select PICTURE SETTING in PICTURE menu, then adjust the
setting.
❇
MENU
CONTRAST 2 : Lower contrast 3 : Higher contrast
BRIGHT 2 : Darker 3 : Brighter
SHARP 2 : Softer 3 : Higher
COLOUR 2 : Lighter 3 : Deeper
TINT 2 : Reddish 3 : Greenish
PICTURE menu
When you select VIDEO-2 Mode, you cannot adjust SHARP.
PICTURE SETTING
WHITE BALANCE
You can change the white balance of the picture to better match
the type of video being viewed.
Select WHITE BALANCE in the PICTURE menu, then choose the
desired setting.
❇
MENU PICTURE menu WHITE BALANCE
NORMAL Normal white balance.
COOL Bluish white.
WARM Reddish white.
When you set DVD THEATER STATUS in DVD MENU to ON, you
cannot adjust WHITE BALANCE.
10
❇ About the basic operations of the menu, please see the “How to
operate menus and menus locations” on page 5.
Page 11

Advanced setting for picture
PICTURE TILT
MENU : OK
DISPLAY : BACK
TV/VIDEO : EXIT
AI ECO SENSOR (ECO)/ECO MODE
You can adjust TV screen contrast according to the brightness of
your room.
Press the ECO button to select the desired mode.
OFF Cancel the function.
MODE-1/ECO-1 Mild contrast (recommended.)
MODE-2/ECO-2 Even contrast.
DISPLAY (for AI ECO SENSOR only)
Display the graphic of the function.
To operate this function with a menu:
❇
MENU
FEATURES menu
AI ECO SENSOR / ECO MODE
When you set DVD THEATER STATUS in DVD MENU to ON, you
cannot adjust AI ECO SENSOR / ECO MODE.
Note : AI ECO SENSOR for M and S series.
ECO MODE for B series.
Correcting the Slanting Picture (PICTURE TILT)
You can correct the picture tilt caused by the earth’s magnetic force.
1 Select PICTURE TILT in the INSTALL menu, then press MENU/
OK button.
❇
MENU INSTALL menu
The following display appears.
PICTURE TILT
2 Press the 5/∞ buttons until the picture becomes level. Then
press the MENU/OK button.
COMPRESS (16:9)
You can convert a normal picture (4:3 aspect ratio) into a wide
picture (16:9 aspect ratio).
Select COMPRESS (16:9) in the FEATURES menu, then choose
ON or OFF.
❇
MENU
BLUE BACK
You can set the TV to automatically change to a blue screen and
mute the sound if the signal is weak or absent, or when there is no
input from an antenna.
Select BLUE BACK in the INSTALL menu, then choose ON or OFF.
❇
MENU INSTALL menu BLUE BACK
If you wish to continue viewing the poor picture, off the BLUE BACK
function.
FEATURES menu
COMPRESS (16:9)
❇ About the basic operations of the menu, please see the “How to
operate menus and menus locations” on page 5.
11
Page 12

lower right lower left upper left
upper right
Original features for picture
TV mode TEXT twin mode TEXT mode
PIP
You can display a sub picture within the main picture on the screen.
Press the PIP operation buttons to display and change the sub
picture setting.
PIP Display the sub picture.
To cancel, press the PIP button again.
Notes:
• You can hear the sound from the main picture only.
•
When main picture and sub picture are the same TV channel.
Press SUB-P -/+
Press ( Input )
Press CHANNEL -/+
Press CHANNEL -/+
SUB-P -/+ Select the desired TV channel for sub picture.
(Input)
(Swap)
(Position)
(Freeze)
Select the input source for the sub picture.
Swap between the main picture and sub picture.
Change the sub picture position.
Each time you press the (Position) button, the sub picture
position will change as follows:
Freeze the sub picture.
When VIDEO-2 is set to component, you cannot select VIDEO-2
for sub picture. If the main picture input source is VIDEO-2 with
component, the PIP function is disabled.
Main picture will be changed TV channel
follow as sub picture.
To change sub picture to video mode.
Sub picture will be changed TV channel follow
as Main picture.
Until main picture change to video mode.
TELETEXT
You can watch the Teletext broadcast channel with TEXT function.
1 Press the TEXT button to select the desired mode as follows:
2 Press the CHANNEL -/+ buttons, number buttons or colour
buttons to select other Teletext pages.
3 Press TEXT or TV/VIDEO button to return to TV mode.
You can also operate the teletext using the following buttons:
(Hold)
(Reveal)
(Size)
(Index)
(Cancel)
(Sub-page)
Hold a teletext page.
The (Hold) icon is displayed at the top left of the screen.
To cancel, press (Hold) button again.
Display the hidden text (e.g. answers to a quiz).
To cancel, press (Reveal) button again.
Enlarge the teletext display.
Return to the index page instantly.
Watch TV programme while waiting for a teletext page.
When the teletext page is found, a page number appears
at the upper left of the screen.
Press (Cancel)
Operate the (Sub-page) function.
Sub-page numbers are displayed at the left of the screen.
To cancel sub-page function, press (Sub-page) button
again.
button
to view the teletext page.
12
Page 13

Original features for picture (continued)
TEXT LANGUAGE
You can set the Teletext language group that corresponds to the
programmes.
Select TEXT LANGUAGE in the INSTALL menu, then choose the
desired language group.
❇
MENU INSTALL menu TEXT LANGUAGE
GROUP-1 English, German, Swedish, Finnish, Danish, Hungarian,
Italian, French, Spanish, Portuguese, Turkish
GROUP-2 Polish, German, Estonian, Slovenian, Czech, Slovakian,
Rumanian
GROUP-3 Polish, German, Estonian, Lettish, Russian, Ukrainian
GROUP-4 English, Polish, French, Turkish, Arabic, Farsi
Depending on the broadcast, the language set may not display
properly. For details, refer to page 8.
❇ About the basic operations of the menu, please see the “How to
operate menus and menus locations” on page 5.
13
Page 14

Basic setting for sound
B/G I D/K M
SOUND SYSTEM
You can select an appropriate sound system when abnormal sound
occurs even when the picture appears normally.
Press the SOUND SYSTEM button to select a setting.
This function is not available in video mode.
For the sound system in each country or region, see the table below:
Area Country or Region System
Bahrain, Kuwait, Oman, Qatar, United Arab Emirates,
Yemen, etc.
Indonesia, Malaysia, Singapore, Thailand, India, etc.
Asia, Middle
East
Europe
Oceania Australia, New Zealand, etc. B/G
Africa
China, Vietnam, etc. D/K
Hong Kong, etc. I
Islamic Republic of Iran, Lebanon, Saudi Arabia, etc. B/G
Philippines, Taiwan, Myanmar, etc. M
Russia, etc. D/K
Czech Republic, Poland, etc. D/K
Germany, Holland, Belgium, etc. B/G
UK, etc. I
Republic of South Africa, etc. I
Nigeria, etc. B/G
Egypt, Morocco, etc. B/G
B/G
SOUND MODE
You can choose the desired sound setting.
Select the SOUND MODE in SOUND menu, then choose the setting.
❇
MENU SOUND menu SOUND MODE
USER You can change this sound setting as you like.
SOUND TURBO
THEATER
MUSIC Emphasize on music effect.
NEWS Emphasize on vocal sound.
Select USER and adjust the frequencies in EQUALIZER
(100, 300, 1K, 3K, 8K Hz).
For details, see “EQUALIZER” on page 15.
Emphasize on low and high frequency levels.
Emphasize on movie sound.
When you select VIDEO-2, you cannot adjust SOUND MODE
function. You can adjust it in DVD Menu.
When SOUND MODE is set to SOUND TURBO, EQUALIZER,
CINEMA SURROUND and MaxxBass functions are not available.
BALANCE
You can adjust the volume balance between the left and right
speakers.
Select BALANCE in SOUND menu, then adjust the setting.
❇
MENU SOUND menu BALANCE
14
❇ About the basic operations of the menu, please see the “How to
operate menus and menus locations” on page 5.
Page 15

Advanced setting for sound
IIIIIII
IIIIIIIIIIIIIIII
IIIIIIII
100 300 1K 3K 8K Hz
EQUALIZER
MENU : OK
DISPLAY : BACK
TV/VIDEO : EXIT
IIIIIIIIIIIIIIII
CINEMA SURROUND
You can enjoy an enhanced sound for wider audience.
Press the CINEMA SURROUND button to select a setting.
OFF Cancel the function.
ON Listen to sound with wider audience effect.
This function is not available when SOUND MODE is set to SOUND
TURBO.
To operate this function with a menu:
❇
MENU SOUND menu CINEMA SURROUND
STEREO / I■II ( )
You can enjoy the stereo and bilingual broadcasted programmes.
Press the button to select the desired mode.
Select stereo sound.
Select monaural sound.
I
II
Select bilingual I (sub I).
Select bilingual II (sub II).
This function is not available in video mode.
To operate this function with a menu:
❇
MENU SOUND menu STEREO / I■II
MaxxBass
You can enjoy an enhanced bass sound which cannot be reproduced
by normal speakers.
Select MaxxBass in SOUND menu, then choose the desired setting.
❇
MENU SOUND menu MaxxBass
OFF MaxxBass is turned off.
HIGH MaxxBass effect is high.
LOW MaxxBass effect is low.
This function is not available when SOUND MODE is set to SOUND
TURBO.
“MaxxBass” is a registered trademark of Waves Audio Ltd. in the
USA, Japan and other countries.
EQUALIZER
You can adjust the sound level of each frequencies when selecting
USER mode in SOUND MODE.
1 Select USER in SOUND MODE under SOUND menu.
❇
MENU
SOUND menu
SOUND MODE
USER
2 Select EQUALIZER in SOUND menu.
❇
MENU
SOUND menu
EQUALIZER
The following display appears.
3 Select and adjust the desired frequencies.
4 Press the MENU/OK button to exit the menu.
Adjust high frequency will affect higher pitch sound and vice versa.
When you select VIDEO-2, you cannot adjust EQUALIZER.
When you set DVD SOUND MODE in DVD MENU to USER,
you can adjust EQUALIZER under SOUND menu.
AI VOLUME
You can adjust the volume of all the channels and video inputs to
the same level automatically depends on the strength of signal of
the sources.
Select AI VOLUME in SOUND menu, then choose ON or OFF.
❇
MENU SOUND menu AI VOLUME
❇ About the basic operations of the menu, please see the “How to
operate menus and menus locations” on page 5.
15
Page 16

DVD Menu
AUTO SIGNAL DETECT
When the DVD input signal is detected, the input mode will be changed
to VIDEO-2 automatically. And when the DVD input signal is not
detected, the input mode will be changed to RF previous input mode.
Select AUTO SIGNAL DETECT in DVD MENU under FEATURES
menu then choose ON or OFF (Factory setting is ON).
❇
MENU
AUTO SIGNAL DETECT
FEATURES menu
DVD MENU
Press the “POWER ON” button on the DVD players or VCRs (follow
by the “PLAY” button for VCRs) so that the signal can be detected.
DVD PICTURE MODE
You can enhance the picture quality of the DVD or VIDEO-2.
Select DVD PICTURE MODE in DVD MENU under FEATURES
menu, then choose the desired setting.
❇
MENU FEATURES menu
DVD PICTURE MODE
OFF Cancel the function.
CLEAR-1
CLEAR-2
Select when the disc is with lots of noise (To soften the picture).
Select when the disc is with less noise (To sharpen the picture).
DVD MENU
DVD THEATER STATUS
You can enjoy an enhanced picture quality for movie playback in a
dark room, like watching a movie in the theater.
Select DVD THEATER STATUS in DVD MENU under FEATURES
menu, then choose ON or OFF.
ON Enjoy movie playback with suitable colour temperature, sharp
subtitles and improved gradation for black, like in a theater.
OFF
Cancel the function.
When you set DVD THEATER STATUS to ON, PICTURE MODE,
WHITE BALANCE and AI ECO SENSOR / ECO MODE functions
are not available.
DVD SOUND MODE
You can choose different sound setting for viewing different types
of DVD content.
Select DVD SOUND MODE in DVD MENU under FEATURES menu,
then choose the desired setting.
❇
MENU
MUSIC Select when watching a music concert.
USER
DRAMA
THEATER
When you set DVD SOUND MODE in DVD MENU to USER,
you can adjust EQUALIZER under SOUND menu.
FEATURES menu
DVD SOUND MODE
Select if you want to adjust the sound setting to your preference.
Select when watching a drama movie.
Select when watching an action movie.
DVD MENU
❇
16
MENU
FEATURES menu
DVD THEATER STATUS
DVD MENU
❇ About the basic operations of the menu, please see the “How to
operate menus and menus locations” on page 5.
Page 17

Customized setting
PR 01
00:15
ON TIMER
ON TIMER
DISPLAY : BACK
TV/VIDEO : EXIT
VNR
You can reduce the picture noise.
Select VNR in PICTURE menu, then choose a setting of VNR function.
❇
MENU PICTURE menu
OFF VNR is turned off.
AUTO Effect of VNR is automatically controlled.
MIN Effect of VNR becomes minimum level.
MAX Effect of VNR becomes maximum level.
VNR
If you select MAX, the picture becomes softer even if the original
picture is sharp.
When you select VIDEO-2, you cannot adjust VNR function.
LANGUAGE
You can choose your desired on screen display language.
Select LANGUAGE in the INSTALL menu, then choose a language.
❇
MENU INSTALL menu LANGUAGE
CHILD LOCK
You can disable the front control buttons of the TV.
Select CHILD LOCK in the FEATURES menu, then choose ON or
OFF.
❇
MENU
FEATURES menu
CHILD LOCK
ON TIMER
You can set the TV to turn on automatically from standby mode at
a set channel and time.
1
Select ON TIMER in the FEATURE menu.
❇
MENU FEATURES menu
The following display appears.
ON TIMER
2 Choose the PR (channel) by pressing the 2/3 button.
External input, AV position and any un-preset channel cannot be
chosen for PR.
3 Set the ON TIMER to your desired period of time by pressing the
2/3 button. ON TIMER starts. You can set the period of time to
a maximum of 12 hours in 15-minute intervals.
To off the ON TIMER, set the ON TIMER to OFF.
Note : If TV is not in standby mode when ON TIMER is reach the
setting time, this case is not available.
OFF TIMER
You can set the TV to turn off automatically to standby mode after
a set time.
Press the OFF TIMER button to select a desired period of time.
You can set the period of time to a maximum of 120 minutes in 10
minute intervals.
To operate this function with a menu:
❇
MENU FEATURES menu OFF TIMER
When the remaining elapse time is one minute, “GOOD NIGHT!”
appears on the screen.
You can display the OFF TIMER menu again to confirm or change
the remaining time.
❇ About the basic operations of the menu, please see the “How to
operate menus and menus locations” on page 5.
17
Page 18

Customized setting (continued)
ON OFF PR LIST
PR CH/CC
V1
V2
V3
AV
1
2
3
CH 09
CC 76
CC 78
PR LIST
MENU : OK
-7 +7
�
�
�
VIDEO-2 SETTING
You can set the VIDEO-2 SETTING according to the video signal
output from external devices connected to the VIDEO-2 terminal.
Select VIDEO-2 SETTING in INSTALL menu, then choose a setting
(Factory setting is COMPONENT).
❇
MENU INSTALL menu VIDEO-2 SETTING
VIDEO
If a normal video signal (composite video signal) is input.
COMPONENT If a component video signal (Y/CB/CR) is input.
You must choose a setting according to the signal that you input to
VIDEO-2. (If you input the VIDEO Signal or VCR Signal to VIDEO-2,
you must set VIDEO-2 SETTING to VIDEO.)
For connecting methods, see “Additional Preparation” on page 22.
BEEP
You can use the BEEP function to alert you during DVD AUTO
SIGNAL DETECT, AI ECO SENSOR Detect, Stereo Detect, ON
TIMER/OFF TIMER operations and when some buttons on the
remote control are pressed.
Select BEEP in the INSTALL menu, then choose ON or OFF.
❇
MENU
When the volume is level 0, then BEEP function is not available.
18
INSTALL menu
BEEP
DISPLAY
You can display the programme number, video terminal number
and PR list on the screen.
Press the DISPLAY button to select the desired mode:
Choose a TV channel or a VIDEO terminal.
1 Press the DISPLAY button to display the PR LIST.
2 Select a programme number or video terminal by pressing the
5/∞ button to move up/down on the programme number or press
the 2/3 button to skip for each 7 programme numbers, then press
MENU/OK button.
❇ About the basic operations of the menu, please see the “How to
operate menus and menus locations” on page 5.
Page 19

TV channel presetting
EDIT
MENU : OK
MOVE
�
INSERT
�
DELETE
�
MANUAL
�
�
�
�
PR CH/CC
AV
1 CH 04
2 CH 76
3 CH 78
4 CH 05
5 CH 28 3
6 CH 10
To register the TV channels automatically
(AUTO PROGRAM)
You can register the TV channels into the TV’s channel list
automatically.
1 Display the INSTALL menu.
❇
MENU INSTALL menu
2 Choose AUTO PROGRAM, then press the MENU/OK button.
AUTO PROGRAM function starts, and the channels received are
registered in the channel list (PR LIST) automatically.
3 The EDIT menu appears.
To edit the channel list Proceed to Step 3 of “To edit the channel list
If a channel is not
registered
To exit the menu Press the MENU/OK button.
To register the TV channels manually
(MANUAL in the EDIT menu)
You can register the TV channels into the TV’s channel list
manually.
(PR LIST)” on page 20.
Proceed to Step 3 of “To register the TV
channels manually” on this page.
1 Display the INSTALL menu.
❇
MENU INSTALL menu
2 Choose EDIT/MANUAL, then press the MENU/OK button.
EDIT menu appears.
3 Choose the channel which you want to register.
4 Press the blue button to activate the MANUAL function.
The sound system of the channel appears at the right of the
CH/CC number.
5 Press the 3 button to choose an appropriate sound system.
For details, see “SOUND SYSTEM” on page 14.
6 Press the green or red button to search for the TV channel.
Searching stops when a channel is found and displayed.
7 Repeat step 5 until your desired TV channel appears.
If the reception is poor Press the blue or yellow button to fine tune
the TV channel.
If noisy sound is heard Press the 3 button to choose an appropriate
sound system.
8 Press the MENU/OK button to exit the menu.
❇ About the basic operations of the menu, please see the “How to
operate menus and menus locations” on page 5.
19
Page 20

TV channel presetting (continued)
EDIT
MENU : OK
MOVE
�
INSERT
�
DELETE
�
MANUAL
�
�
�
�
PR CH/CC
AV
1 CH 04
2 CH 76
3 CH 78
4 CH 05
5 CH 28 3
6 CH 10
To edit the channel list (PR LIST)
(MOVE and DELETE in the EDIT menu)
You can edit the TV channel list as you like.
Note: After this operation, other channel’s PR numbers will be
changed.
1 Display the INSTALL menu.
❇
MENU INSTALL menu
2 Choose EDIT/MANUAL, then press the MENU/OK button.
EDIT menu appears.
3 Choose the channel which you want to change its PR number,
or delete.
4 Do the following action:
To change the PR number
(MOVE)
To d el et e the channel
(DELETE)
5 Press the MENU/OK button to exit the menu.
20
Press the 3 button. Then move it to the new
PR number you want to use for the channel
by pressing the 5/∞ button. Finally press
the 2 button.
Press the yellow button.
To add in the new channel
(INSERT in the EDIT menu)
You can add in new channels in the TV channel list as you like.
You need to find the “CH/CC” number for the TV channel. Find the
“CH/CC” number corresponding to the channel number of the TV
channel from “CH/CC number list” on page 21.
1 Display the INSTALL menu.
❇
MENU INSTALL menu
2 Choose EDIT/MANUAL, then press the MENU/OK button.
EDIT menu appears.
3 Choose the PR number for which you will register a new TV
channel. When you add a new TV channel of NTSC-M system,
press the SOUND SYSTEM button to change the sound system
to M. Then proceed to the next step.
4 Press the green button, then press 3 button to choose “CC” or
“CH”.
5 Press the number button to enter the CH/CC number for the TV
channel you wish to add.
The TV starts to search the TV channel, and the picture of the TV
channel appears. If the TV finds no TV channel, a noisy picture
appears.
When a TV channel has already been registered in PR99, using the
INSERT function deletes that TV channel.
❇ About the basic operations of the menu, please see the “How to
operate menus and menus locations” on page 5.
Page 21

TV channel presetting (continued)
CH/CC number
When you want to use the INSERT function
on page 20, fi nd th e CH/ CC nu mbe r
corresponding to the channel number of the
TV channel from this table.
Channel No. Country
US United States, Philippines, etc..
CCIR
OIRT Eastern Europe, Russia, Vietnam,
AUSTRALIA Australia, etc..
Channel
CH US CCIR OIRT AUSTRALIA
CH 02 US-2 E2 R1 AU-0
CH 03 US-3 E3 AU-1
CH 04 US-4 E4 R2 AU-2
CH 05 US-5 E5 R6 AU-6
CH 06 US-6 E6 R7 AU-7
CH 07 US-7 E7 R8 AU-8
CH 08 US-8 E8 R9 AU-9
CH 09 US-9 E9
CH 10 US-10 E10 R10 AU-10
CH 11 US-11 E11 R11 AU-11
CH 12 US-12 E12 R12
CH 13 US-13
CH 14 US-14, W+29
CH 15 US-15, W+30
CH 16 US-16, W+31
CH 17 US-17, W+32
CH 18 US-18, W+33
CH 19 US-19, W+34
CH 20 US-20, W+35
CH 21 US-21, W+36 E21
CH 22 US-22, W+37 E22
CH 23 US-23, W+38 E23
CH 24 US-24, W+39 E24
CH 25 US-25, W+40 E25
CH 26 US-26, W+41 E26
CH 27 US-27, W+42 E27
CH 28 US-28, W+43 E28 AU-28
CH 29 US-29, W+44 E29 AU-29
CH 30 US-30, W+45 E30 AU-30
CH 31 US-31, W+46 E31 AU-31/AU-32
CH 32 US-32, W+47 E32 AU-33
Middle East, Southeast Asia, etc..
etc..
CH US CCIR OIRT AUSTRALIA
CH 33 US-33, W+48 E33 AU-34
CH 34 US-34, W+49 E34 AU-35
CH 35 US-35, W+50 E35 AU-36
CH 36 US-36, W+51 E36 AU-37
CH 37 US-37, W+52 E37 AU-38
CH 38 US-38, W+53 E38 AU-39/AU-40
CH 39 US-39, W+54 E39 AU-41
CH 40 US-40, W+55 E40 AU-42
CH 41 US-41, W+56 E41 AU-43
CH 42 US-42, W+57 E42 AU-44
CH 43 US-43, W+58 E43 AU-45
CH 44 US-44, W+59 E44 AU-46
CH 45 US-45, W+60 E45 AU-47/AU-48
CH 46 US-46, W+61 E46 AU-49
CH 47 US-47, W+62 E47 AU-50
CH 48 US-48, W+63 E48 AU-51
CH 49 US-49, W+64 E49 AU-52
CH 50 US-50, W+65 E50 AU-53
CH 51 US-51, W+66 E51 AU-54
CH 52 US-52, W+67 E52 AU-55/AU-56
CH 53 US-53, W+68 E53 AU-57
CH 54 US-54, W+69 E54 AU-58
CH 55 US-55, W+70 E55 AU-59
CH 56 US-56, W+71 E56 AU-60
CH 57 US-57, W+72 E57 AU-61
CH 58 US-58, W+73 E58 AU-62
CH 59 US-59, W+74 E59 AU-63/AU-64
CH 60 US-60, W+75 E60 AU-65
CH 61 US-61, W+76 E61 AU-66
CH 62 US-62, W+77 E62 AU-67
CH 63 US-63, W+78 E63 AU-68
CH 64 US-64, W+79 E64 AU-69
CH 65 US-65, W+80 E65
CH 66 US-66, W+81 E66
CH 67 US-67, W+82 E67
CH 68 US-68, W+83 E68
CH 69 US-69, W+84 E69
CC US CCIR OIRT AUSTRALIA
CC 01 S-1 AU-5
CC 02 S-2
CC 03 S-3
CC 04 S-4
CC 05 S-5
CC 06 S-6 AU-5A
CC 07 S-7
CC 08 S-8
CC 09 S-9
CC 10 S-10
CC 11 S-11
CC 12 S-12
CC 13 S-13
CC 14 A S-14
CC 15 B S-15
CC 16 C S-16
CC 17 D S-17
CC US CCIR OIRT AUSTRALIA
CC 18 E S-18
CC 19 F S-19
CC 20 G S-20
CC 21 H S-21
CC 22 I S-22
CC 23 J S-23
CC 24 K S-24
CC 25 L S-25
CC 26 M S-26
CC 27 N S-27
CC 28 O S-28
CC 29 P S-29
CC 30 Q S-30
CC 31 R S-31
CC 32 S S-32
CC 33 T S-33
CC 34 U S-34
CC 35 V S-35
CC 36 W S-36
CC 37 W+1 S-37
CC 38 W+2 S-38
CC 39 W+3 S-39
CC 40 W+4 S-40
CC 41 W+5 S-41
CC 42 W+6
CC 43 W+7
CC 44 W+8
CC 45 W+9
CC 46 W+10
CC 47 W+11
CC 48 W+12
CC 49 W+13
CC 50 W+14
CC 51 W+15
CC 52 W+16
CC 53 W+17
CC 54 W+18
CC 55 W+19
CC 56 W+20
CC 57 W+21
CC 58 W+22
CC 59 W+23
CC 60 W+24
CC 61 W+25
CC 62 W+26
CC 63 W+27
CC 64 W+28
CC 75 X
CC 76 Y R3
CC 77 Z R4 AU-3
CC 78 Z+1 R5
CC 79 Z+2 AU-4
CC 95 A-5
CC 96 A-4
CC 97 A-3
CC 98 A-2
CC 99 A-1
21
Page 22

V
L
RR
L
/
MON
O
Y
CB
CR
/
V
V
S
OVER
L
R
/
MON
O
OUTPU
T
VIDEO-
1
COMPONENT
(VIDEO-2
)
INPUT
INPUT
Additional preparation
C
MENU
OK
V R
L / MONO
IN (VIDEO-3
)
R VL/MONO
IN(VIDEO-3)
The illustrations shown in this section are for AV-21BS26 and AV29SS26 only, which are used for explanation purpose. Your TV may
not look exactly the same as illustrated.
Before connecting
• Read the manuals provided with the devices for the proper
connection.
• Turn off all the devices including the TV.
• Note that connecting cables are not supplied.
Connecting to front video input terminals
AV-29SS26
Camcorder or TV game
AV-21BS26
Front of TV
Headphones
Connecting to rear component/video input
terminals and output terminals
Rear of TV
AV-29SS26
VCR (for playing)
DVD player
(composite signals)
VCR (for recording)
DVD player
(component video
signals)
When connecting to COMPONENT (VIDEO-2) input, depending on
the connection, choose the appropriate video input using the menu
(see “VIDEO-2 SETTING” on page 18)
22
Page 23

Troubleshooting
If a problem occurs when you are using the TV, check the below
troubleshooting guide before calling for repair.
• No picture, no sound •
• Snowy picture
• Stripes appear on the
picture
• Double-pictures
(ghosting) occur
• Poor picture • Choose the appropriate colour system. Refer to
• White and bright still
image look as if it
were coloured
• Top of the image from
software products or
video tape is distorted
• Poor sound • Choose the appropriate sound system. Refer to
• Stereo or bilingual
sound is unclear
• Cannot operate the
remote control
• Cannot operate the
menus
• Cannot operate the
front control buttons
Deactivate the BLUE BACK function if it is turned on.
• Choose the appropriate sound system. Refer to
“SOUND SYSTEM” on page 14.
•
Check the aerial cable and its connection with the TV.
• Interference occurs caused by other devices such as
an amplifier, personal computer, or a hair drier. Move
such devices away from your TV.
• Int erference occurs cause d by signal reflecting
from mountains or building. Try to adjust the aerial’s
direction or use a better directionality antenna.
“COLOUR SYSTEM” on page 9.
• Adjust the COLOUR or BRIGHT setting. Refer to
“PICTURE SETTING” on page 10.
• Inevitable phenomenon due to the nature of the picture
tube. This is not a malfunction.
• This is due to the condition of the video signal whereby
the image was not recorded properly. This is not a
malfunction.
“SOUND SYSTEM” on page 14..
• TV channel reception is poor. Change the stereo/
bilingual mode to mono sound (see page 15).
• The batteries may be exhausted. Replace with new
batteries (see page 7).
• Ensure that you are operating the remote control at
less than seven meters from the front of your TV.
• Press TV/VIDEO button to return to TV mode and try
operating the menus.
• Deactivate the CHILD LOCK function if it is turned on
(see page 17).
• Colour patches appear
at the corner of the
screen
• Picture is tilted
• Image takes a short
period to be displayed
• TV may emit crackling
sound
• Feel a slight electric
shock when touching
the TV screen
• The Auto Signal
Detect function does
not work
• Suddenly, a channel
or input was
changed to VIDEO-2
inputs.
• “PLEASE
DISCONNECT
VIDEO-1 CABLE!”
appears on the
screen.
• This may due to the magnetized device such as a
speaker near to your TV. Keep the device apart from
your TV. Alternately, you can also use the magneticshielded speaker.
• This may due to the earth magnet ism. Refer to
“PICTURE TILT” on page 11 to correct the tilt.
• Image required time to stabilize before display. This
is not a malfunction.
• This is due to a sudden change in temperature
and it is not a malfunction. If the crackling sound
is too frequent, request your service technician for
inspection.
• This is due to the static electricity of the picture tube
and it will not harm the human body. This is not a
malfunction.
• Please check that the AUTO SIGNAL DETECT
function is on or off.
• Turn the VCR or DVD player off, wait a while, then
turn it on again.
• Inspect the video cable connection on VIDEO-2 that
they are connected properly.
• Some VCRs and DVD players can trigger Auto Signal
Detect even after you choose a different input.
• Ple ase tu rn o ff th e AUT O SIGN AL DET ECT
function.
• Please disconnect either S-VIDEO cable or video input
cable from Video-1 input.
23
Page 24

Specifications
TV RF systems
B, G, I, D, K, M
Colour systems
PAL, SECAM, NTSC 3.58 MHz, NTSC 4.43 MHz
Receiving channels
VHF low channel (VL), VHF high channel (VH), UHF channel (U)
Receives cable channels in mid band, super band and hyper band.
Power requirements
For Australia
AV-29BS26 : AC220 to 240 V, 50Hz / 60 Hz
AV-21BS26 : AC110 to 240 V, 50Hz / 60 Hz
For Others country : AC110 to 240 V, 50Hz / 60 Hz
External input / output
VIDEO-1: S-video input, VIDEO input, AUDIO L/R input
VIDEO-2/COMPONENT: VIDEO input, AUDIO L/R input, COMPONENT VIDEO (Y/CB/CR) input
VIDEO-3: VIDEO input, AUDIO L/R input
OUTPUT: VIDEO output, AUDIO L/R output
Headphone jack: Stereo mini jack (3.5 mm diameter)
**Sound-multiplex systems
A2 (B/G) or NICAM (B/G, I, D/K)
**Teletext system
FLOF (Fastext), WST (World Standard Text)
**Language displayed by teletext
Please see the table in the description “TEXT LANGUAGE” on page 13.
**Depends on the models, STEREO/I■II function for the Sound-multiplex systems or Teletext function may not be available.
Please confirm with the chart on page 3.
Design and specifications subject to change without notice.
© 2009 Victor Company of Japan, Limited
0209SCT-NF-MT
 Loading...