

Page 1

DVD PLAYER
Hi-Fi VIDEO
CASSETTE
RECORDER
USER’S GUIDE
For model:
HR-XV1EU
DIGITAL VIDEO
LPT0715-001A
Page 2

Safety Precautions
SAFETY FIRST
The rating plate and the safety caution are on the rear of the unit.
WARNING: DANGEROUS VOLTAGE INSIDE
WARNING: TO PREVENT FIRE OR SHOCK HAZARD, DO NOT EXPOSE THIS UNIT
TO RAIN OR MOISTURE.
CAUTION
When you are not using the recorder for a long period of time, it is recommended that you disconnect the
power cord from the mains outlet.
Dangerous voltage inside. Refer internal servicing to qualified service personnel. To prevent electric shock
or fire hazard, remove the power cord from the mains outlet prior to connecting or disconnecting any signal
lead or aerial.
CAUTION:
A DVD/VCR IS A CLASS 1 LASER PRODUCT. HOWEVER THIS DVD/VCR USES A VISIBLE LASER BEAM
WHICH COULD CAUSE HAZARDOUS RADIATION EXPOSURE IF DIRECTED. BE SURE TO OPERATE
THE PLAYER CORRECTLY AS INSTRUCTED.
THE FOLLOWING CAUTION LABEL IS LOCATED ON THE REAR PANEL OF THE DVD/VCR.
CLASS 1
LASER PRODUCT
WHEN THIS DVD/VCR IS PLUGGED INTO THE WALL OUTLET, DO NOT PLACE YOUR EYES CLOSE TO
THE OPENING OF THE DISC TRAY AND OTHER OPENINGS TO LOOK INTO THE INSIDE OF THIS DVD/
VCR.
USE OF CONTROLS OR ADJUSTMENTS OR PERFORMANCE OF PROCEDURES OTHER THAN THOSE
SPECIFIED HEREIN MAY RESULT IN HAZARDOUS RADIATION EXPOSURE.
DO NOT OPEN COVERS AND DO NOT REPAIR YOURSELF. REFER SERVICING TO QUALIFIED
PERSONNEL.
IMPORTANT
Please read the various precautions on page 2 and 3 before installing or operating the recorder.
It should be noted that it may be unlawful to re-record pre-recorded tapes, records, or discs without the
consent of the owner of copyright in the sound or video recording, broadcast or cable programme and in
any literary, dramatic, musical, or artistic work embodied therein.
• Use only discs marked with the following.
DVD
[8 cm disc/12 cm disc]
Video CDs/Audio CDs
[8 cm disc/12 cm disc]
PAL
• Cassettes marked “VHS” (or “S-VHS”) can be used with this video cassette recorder. However, S-VHS recording
is not possible with this model.
• This model is equipped with SQPB (S-VHS QUASI PLAYBACK) that makes it possible to play back S-VHS
recordings with regular VHS resolution.
• HQ VHS is compatible with existing VHS equipment.
•SHOWVIEW is a registered trademark of Gemstar Development Corporation. The SHOWVIEW system is manufac-
tured under licence from Gemstar Development Corporation.
DIGITAL VIDEO
2
Page 3

Safety Precautions
For ItaIy:
“It is declared that this product, brand JVC, conforms to the Ministry Decree n. 548 of 28 Aug.’95 published in
the Official Gazette of the Italian Republic n. 301 of 28 Dec.’95”
The STANDBY/ON button does not completely shut off mains power from the unit, but switches operating
current on and off. “
Video tapes recorded with this video recorder in the LP (Long Play) mode cannot be played back on a singlespeed video recorder.
When the equipment is installed in a cabinet or a shelf, make sure that it has sufficient space on all sides to allow
for ventilation (10 cm or more on both sides, on top and at the rear.)
When discarding batteries, environmental problems must be considered and the local rules or laws governing
the disposal of these batteries must be followed strictly.
Failure to heed the following precautions may result in damage to the recorder, remote control or video
cassette.
1.
DO NOT place the recorder ...
... in an environment prone to extreme temperatures or humidity.
... in direct sunlight.
... in a dusty environment.
... in an environment where strong magnetic fields are generated.
... on a surface that is unstable or subject to vibration.
DO NOT block the recorder’s ventilation openings or holes.
2.
(If the ventilation openings or holes are blocked by a newspaper or cloth, etc., the heat may not be able to get
out.)
DO NOT place heavy objects on the recorder or remote control.
3.
DO NOT place anything which might spill on top of the recorder or remote control.
4.
(If water or liquid is allowed to enter this equipment, fire or electric shock may be caused.)
DO NOT expose the apparatus to dripping or splashing.
5.
DO NOT use this equipment in a bathroom or places with water. Also DO NOT place any containers filled
6.
with water or liquids (such as cosmetics or medicines, flower vases, potted plants, cups, etc.) on top of this
unit.
DO NOT place any naked flame sources, such as lighted candles, on the apparatus.
7.
AVOID violent shocks to the recorder during transport.
8.
” shows electrical power standby and “ I ” shows ON.
MOISTURE CONDENSATION
Moisture in the air will condense on the recorder when you move it from a cold place to a warm place, or under
extremely humid conditions-just as water droplets form in the surface of a glass filled with cold liquid. Moisture
condensation on the head drum will cause damage to the tape. In conditions where condensation may occur,
keep the recorder turned on for a few hours to let the moisture dry.
3
Page 4

Features
Video Cassette Recorder
• High Quality (HQ) Images
• On-Screen Displays (OSD)
• Nicam Hi-Fi Stereo Audio
Recording and Playback
• ATS- Automatic Tuning System
• CATV Tuner with Hyperband
• 80 Memories for presets
• Auto Time Setting
• 30 Minutes Back-Up in case of
Power failure
• 6 rotary Heads (4 Video Heads
2 HiFi Audio Heads)
• Long play
• VPS/PDC system
• Timer Recording of up to 8
Programs per Month
HOWVIEW
• S
®
-rapid timer
programing
• Instant Timer Recording (ITR)
• Video index Search System
• Slow Motion
• NTSC Video Cassette Tape
Playback on PAL TV
• Real-Time Tape Counter with
ZERO RETURN-Function
• Digital AUTO Tracking (ATR
• Repeat/Scene Repeat
• On-Screen Display in 3
Languages
• AV-Front input jacks
• 2 Scart sockets for Premiere
• CE Symbol guaranteeing
Compliance to Currently
Effective European Standards
DVD Player
• Digital Audio Jack (Coaxial)
• Multi-Language
• Multi-Angle
• Surround audio
• Repeat Playback
• Memory/Random Playback
• Zoom
• Video Aspect Ratio
• Parental Control
• 3 Scenes memory
• Digital (Optical or Coaxial) output
for Dolby Digital (AC-3) and DTS
• Playback of DVD, Video-CD and
Audio-CD
• PAL & NTSC DVDs playback
• A-B Repeat playback
• MP3 CD playback
Function)
* This product incorporates copyright protection technology that is protected by method claims of certain U.S.
patents and other intellectual property rights owned by Macrovision Corporation and other rights owners. Use
of this copyright protection technology must be authorized by Macrovision Corporation or other rights owners
and is intended for home and other limited viewing uses only unless otherwise authorized by Macrovision
Corporation or other rights owners. Reverse engineering or disassembly is prohibited.
* Manufactured under license from Dolby Laboratories. “Dolby” and the double-D symbol are trademarks of
Dolby Laboratories. Confidential unpublished works. © 1992-1997 Dolby Laboratories, Inc. All rights reserved.
* “DTS” and “DTS Digital Out” are trademarks of Digital Theater Systems, Inc.
* Certain audio features of this product manufactured under license from Desper Products,Inc. Spatializer and
the circle - in - square device are trademarks owned by Desper Products,Inc.
* Unauthorized recording of copyrighted television programs, films, video cassettes and other materials may
infringe the rights of copyright owners and be contrary to copyright laws.
4
Page 5

Contents
Before using your unit
Safety Precautions ...........................................2
Features ...........................................................4
Contents ........................................................... 5
Parts and functions .......................................... 6
Display ............................................................. 7
Remote control ................................................. 8
Connections and Installation ..........................10
Playback connection ...................................... 11
Setting up the VCR section
Setting the TV to the AV-Channel................... 13
Setting the On-screen language .................... 14
ATS Automatic Tuning System and
Auto Time /Date Setting ................................. 15
ATS .................................................................16
Setting the Time and Date.............................. 19
Manual TV station presetting.......................... 20
Tape playback operation
Loading and Unloading a Cassette Tape ....... 22
Cassette tape playback .................................. 23
Special playback/Playback sharpness ........... 24
Repeat Playback ............................................25
Counter Display.............................................. 26
Video Index Search System ........................... 27
Recording
Recording a TV Program ................................28
Instant Timer Recording (ITR) ........................ 30
ShowView®-Recording ................................... 31
Timer-Recording ............................................33
Advanced function of VCR section
Detailed Description of the VPS/
PDC Function ................................................. 35
NICAM/German A2 Stereo Recording
and Playback.................................................. 36
Audio Mixing................................................... 38
Duplicating a Video Tape ................................39
Disc playback operation
DISC............................................................... 40
Setting setup language .................................. 41
Playback procedure........................................ 42
Special playback ............................................ 43
DVD Picture Signal Selection/Zooming .......... 44
Repeat playback............................................. 45
Memory playback/Random playback ............. 46
MP3 Playback ................................................ 47
Changing soundtrack language /
Changing Subtitles language ......................... 48
Changing angles / Title selection /
DVD menu ...................................................... 49
Advanced function of DVD section
Parental control ..............................................50
Setting menu language .................................. 52
Setting audio soundtrack language ................ 53
Setting subtitle language ................................ 54
Setting the aspect ratio of TV screen /
Setting on Screen display .............................. 55
Setting Audio .................................................. 56
Setting Operation ........................................... 57
Selecting the sound enhancement (E.A.M.)/
Setting Background/Setting Screen Saver .....58
Setting initial setup/output sound
conversion table ............................................. 59
Status display of Disc ..................................... 60
Table of languages .........................................61
Additional information
Problems and troubleshooting ....................... 62
Video head cleaning....................................... 63
Specifications ................................................. 64
5
Page 6

Parts and functions
Front
VCR/DVD mode selector button
Cassette Loading Slot
POWER
button
AUDIO (L/R)/
VIDEO IN jacks
VCR indicator
EJECT button
PR +/– buttons
OPEN/CLOSE button
Display window
Remote sensor
PLAY button
STOP button
REW (Rewind) button
Disc tray
DVD indicator
REC button
FF (Fast Forward) button
Rear
AC power cord
DVD OPTICAL
DIGITAL AUDIO
OUT jack
DVD COAXIAL DIGITAL
AUDIO OUT jack
DVD AUDIO (L/R) OUT jacks
DVD S-VIDEO OUT jack
SCART PRISE PERITEL
RF IN jack
RF OUT jack
SCART-socket
(for VCR/DECODER)
SCART-socket
(for TV-RGB/Composite)
6
Page 7

Display window
Display
1 2
10
9
No. Display Description
6
1
2
3
4
5
VCR
DVD
CD
10 : 00
01 : 00
2
VCR mode
Playback (lights) / Auto resume (flashes)
Still picture
DVD disc is inserted.
CD is inserted.
Clock display (colon[ : ] flashes)
Counter display by hour/minute at VCR/DVD / by minute/second at CD
Track number display for CD
3
78
6
4
5
CH 2
A1/A2/A3
7
8
9
TRK
10
REC
Note:
Some discs may be displayed wrong or e.g. chapter number, playback time, etc. may not be displayed.
TV channel position display
External input display
Timer recording display
Video tape is in the unit
Track display for CD
Normal recording display (flashes during
Instant Timer Recording - ITR
)
7
Page 8

Remote control
JVC TV Remote Control
This Remote can control some functions
(
, NUMBER (0-9), TV ∏, TV @ +/–,
TV PR +/– and OK) of a remote controllable
JVC TV by slide TV/VCR/DVD switch to TV.
NOTE:
• It’s not possible to operate a unit not
equipped with a remote sensor.
• This Remote can control a JVC TV only.
• When you operate the VCR or DVD, the
TV/VCR/DVD switch must be slided to
VCR/DVD again. Otherwise the DVD/
VCR may not operate properly.
• Since this unit is combined type of DVD
and VCR, the remote code of DVD is
individual. So please note that the DVDkeys on the RCU of the other JVC
RECEIVER/TV is not effective for this unit.
Page
TV/VCR/DVD switch
DVD MENU Display menu of DVD software 49
MEMORY Index for DVD 46
RETURN Remove DVD set up menu 50
OPEN/CLOSE Open or Close the tray 42
DISPLAY Change the front Display mode 26
A.TRK Digital AUTO TRACKING 24
SUB TITLE Set Subtitle of a DVD disc 48
C. RESET Reset the counter to 00:00 26
ANGLE Change playback angle of a DVD disc 49
ZERO RETURN
(SP/LP) Sets the tape speed for recording 28,30,39
PLAY MODE Select playback mode 45,46
ZOOM Zoom (for DVD playback) 44
TITLE Select title of a DVD disc 49
REPEAT A-B Repeat playback between A and B (DVD/CD) 45
0-9 Direct channel selection of TV 28,30
AUX Scart input or AV-Front input 34,39
PROG. S
•
TV ∏ (INPUT) Switch the connected TV to external mode 8
TV/VCR Switches between TV and VCR 29
TV @ +/– Adjust the connected TV’s volume 10
8 Rewind/Review playback 23,24,43
1 Playback 23,42,47
9 Fast Forward/Forward search playback 23,24,43
2 Recording 28,30,39
3 Stop 23,42,47
4 Still picture/Recording pause on/off 24,28,39,43
SKIP 6/7 Skip chapter to forward or reverse direction 43
INDEX 6/7 Search for the INDEX mark of a tape 27
TV/VCR PR +/– Select channel of the connected TV or VCR
C/D Cursor buttons
SET –/+ Setting buttons 32~34
B/A Cursor buttons - To move Up in the VCR menu
OK
SET UP MENU Display menu of setup 14~21,41,50~59
CANCEL Delete Timer program 34
OSD Display VCR or DVD operation status 28~30,60
A.MONITOR Switches sound 37,38
SLOW Slowmotion playback 24,43
SKIP SEARCH Skip the unwanted short material of a tape 24
Switch to operate TV or VCR or DVD 14,41
Power on/off 14
Turn the connected TV on or off 8
Stop the tape when the counter reaches 00:00
Input setting 15~18,31,33,46,47
Enter a password 50
HOWVIEW-Recording 31
Confirmation of Timer-Recording 34
Set the unit to start recording at a preset time.
8,28,30,39
Manual tracking buttons in playback mode 24
you press the A. To move Down in the VCR
menu you press the B.
Enter information in the menu/Select option in the menu
Cancel input data in the setting mode
Change sound track language of DVD 48
18,21,46~50
26
32,34
8
Page 9

How to install the batteries
Use micro batteries type R6.
Remote control
Open the battery compart-
12 3
ment cover in the direction of
the arrow.
Install two "AA" batteries (not
supplied),
polarity diagram in the battery
compartment.
paying attention to the
Replace the compartment
cover.
Battery precautions
The precautions below should be followed when using batteries in this device:
1.Use only the size and type of batteries specified.
2.Be sure to follow the correct polarity when installing the batteries as indicated in the battery compartment.
Reversed batteries may cause damage to the device. To avoid a potential short circuit, insert the “–” end first.
3. Do not mix different types of batteries together (e.g. Alkaline and Carbon-zinc) or old batteries with fresh ones.
4.If the device is not to be used for a long period of time, remove the batteries to prevent damage or injury from
possible battery leakage.
5.Do not try to recharge batteries not intended to be recharged; they can overheat and rupture.
Distance of Remote
Control Operation
Effective angle:
approx.
5m
approx. 60°
Point the remote
control directly at the
remote sensor.
Change the custom code for remote control
If you operate this DVD/VCR with another JVC’s VCR simultaneously arranging them side by side, the both
recorders will react to this remote control. In this case, you can change the remote control and DVD/VCR to
other frequency (“ ”). Then you can operate only this DVD/VCR with this changed remote control.
When you purchased, the DVD/VCR and remote control have been set to the frequency-“ ”.
Example: Change frequency to
Remote control:
While holding VCR, press 2 (code: b) of Number keys.
(in case of code: A, press 1). Then press OK.
NOTE:
• If the remote control has been set to b, the DVD/VCR also must be set to b. Otherwise, the DVD/VCR can not
be operated with this remote control.
• To reset to “A”, repeat above procedure. However press 1 instead of 2.
DVD/VCR:
In the POWER off mode, press and hold PLAY for
more than 5 seconds. The current code (“A” or “b”) will
appear on the display. Then press 3 on the remote
control. The current code of the remote control will be
transmitted to the unit and the unit will be adjusted to
the transmitted code. Then the code will disappear
after approx. 4 seconds.
9
Page 10

Connections and Installation
Connect your DVD/VCR to your home's antenna and to your TV-set as shown in the illustration.
When you have finished these connections you connect your DVD/VCR to the 230 V / 50 Hz mains.
Antenna-Input
DVD/VCR
AC power cord 230V/50 Hz
TV
To Scart socket
Scart cable (not supplied)
Antenna
TV Scart Socket (A1)
VCR/DECODER
Scart Socket (A2)
RF-Input (from
house antenna)
RF-Output (to TV)
Supplied Coaxial cable
Connect a TV with the Scart socket
In addition to the coaxial cable connection, connect also with scart cable. The picture and sound will be transmitted
best through the scart cable. In this case, the TV need not be tuned to the video recorder. The AV-channel also need
not be tuned. The video recorder switch the television to video operation through the scart cable automatically.
stereo-playback is possible in only case through a scart cable!
If your TV-set does not switch to video-playback operation automatically, please
turn your TV's video switch to VIDEO position manually.
The
10
Page 11

Playback connection
The exact arrangement you use to interconnect various video and audio components to the DVD/VCR is
dependent on the model and features of each component. Check the Owner's Manual provided with each
component for the location of SCART socket.
Connection to a Satellite Receiver
If a Satellite Receiver is used, we recommend the following configuration:
Satellite
Antenna
Satellite
Receiver
To record from Satellite Receiver press "AUX " on the remote control of DVD/VCR twice. "A2" will appear
on the front display. Select the desired TV-program at Satellite Receiver.
SCART-cable (not supplied)
TV
DVD/VCR
SCART-cable (not supplied)
Connect to a TV with S-Video Output
TV
S-Video Cord (not supplied)
DVD/VCR
Audio (L) Output
Audio (R) Output
S-Video Output
To S-Video Input
To Audio (R) Input
To Audio (L) Input
AUDIO Cord (not supplied)
Note:
• The S-VIDEO jack is useful only for DVD section.
• If you use the connection with S-Video Cord, set the "Video Out Select" (P.44) to "Video".
Connection to a Decoder (for Premiere Programs)
SCART-cable (not supplied)
DVD/VCR
Cable TVconnection
TV-unit
Decoder
Note: Make sure that AV - mode in SYSTEM SETUP - menu has been set
to DEC .
RF-Output
SCART-cable (not supplied)
SYSTEM SETUP
CLOCK SET
LANGUAGE/SPRACHE/LANGUE
AV2 [DEC]
SELECT :
ENTER
:OK
MENU
EXIT
:
11
Page 12

Playback connection
Connect to a Stereo Amplifier with Audio Output
If your DVD/VCR is connected to a stereo amplifier, the video soundtrack can output through the loudspeakers of
the stereo system.
SCART-cable (not supplied)
SCART-Socket
(for TV-RGB/Composite)
DVD/VCR
Stereo Amplifier
To SCART
input
Audio (L) Output
Audio (R) Output
AUDIO Cord (not supplied)
To Audio (L) Input
To Audio (R) Input
TV
Connect to an AV Amplifier with built-in digital surround
If you are using an Amplifier with a built-in digital surround as follows, you can enjoy the various audio systems
such as Dolby Digital and DTS by using the Coaxial Digital Output.
Use this connection to connect an:
• AV amplifier with built-in *Dolby Digital decoder
• AV amplifier with built-in *DTS decoder
DVD/VCR
Coaxial digital
Audio Output
SCART-cable (not supplied)
SCART-Socket
(for TV-RGB/Composite)
Coaxial digital cable
(not supplied)
AV Amplifier with
built-in various
decoder as above
To SCART
input
TV
Connecting the optical digital cable
You may connect to an AV Amplifier with an Optical digital cable (not supplied) instead of a Coaxial digital
cable.
When you connect the optical digital cable (not supplied), remove the dust protection cap from the rear panel.
When not using the optical digital cable, attach the dust protection cap to protect against dust.
NOTES:
• The OPTICAL, COAXIAL jacks are useful only for DVD section.
VHS signal is output only from the SCART-sockets, AUDIO L/R jacks and RF OUT jack.
• When you make the connections above, do not set DOLBY DIGITAL to DOLBY DIGITAL or DTS to ON on the AV
Amplifier. If you do, a loud noise will suddenly come out from the speakers, affecting your ears or causing the
speakers to be damaged.
• DTS audio will be output only from the COAXIAL output. To hear DTS audio, DTS-Decoder is necessary.
When playing DTS-encoded CDs, only noise will be heard from the speakers or analogue stereo outputs.
• Some DTS decoders which do not support DVD-DTS interface may not work properly with the unit.
12
Page 13
Setting the TV to the AV-Channel
We recommend that television and DVD/VCR are being connected with a scart cable.
In this case, the setting of AV-channel is not necessary. Picture and sound of video cassette will be transmitted to television through the scart cable automatically. Please read the next page.
In case of no scart cable connection,
you must set the television to the AVchannel. Pay attention to the following
notice:
A built-in TV-broadcast in DVD/VCR can
do the video playback through the supplied antenna cable. This broadcast is
sent on UHF, channel 36. To receive this
broadcast, you must tune your television to channel 36 in UHF-band.(see
step 2)
In case a broadcast has already sent
to channel 36 in your area or you connect a additional equipment (e.g. Satellite receiver) with a coaxial cable
(without a scart cable), you must tune
the sending channel in DVD/VCR (see
step 3). In your television store the both
equipment (the DVD/VCR and the satellite receiver) to 2 different program
positions.
Example: Your satellite receiver is sent
to channel 36. You tune the DVD/VCR
to channel 40 (see step 3).
(If your DVD/VCR is also sent to channel 36, the interference will occur.)
In your television store the channel 36
to e.g. program position 3 and store the
channel 40 to e.g. program position 4.
Note that the program position 4 must
be suitable for video-playback especially. Please see the owner's manual
for your television. If the playback picture is often distored, you must select
the other program position for DVD/
VCR.
Preparation
•
Turn on the TV.
•
Make sure the power of DVD/VCR has been
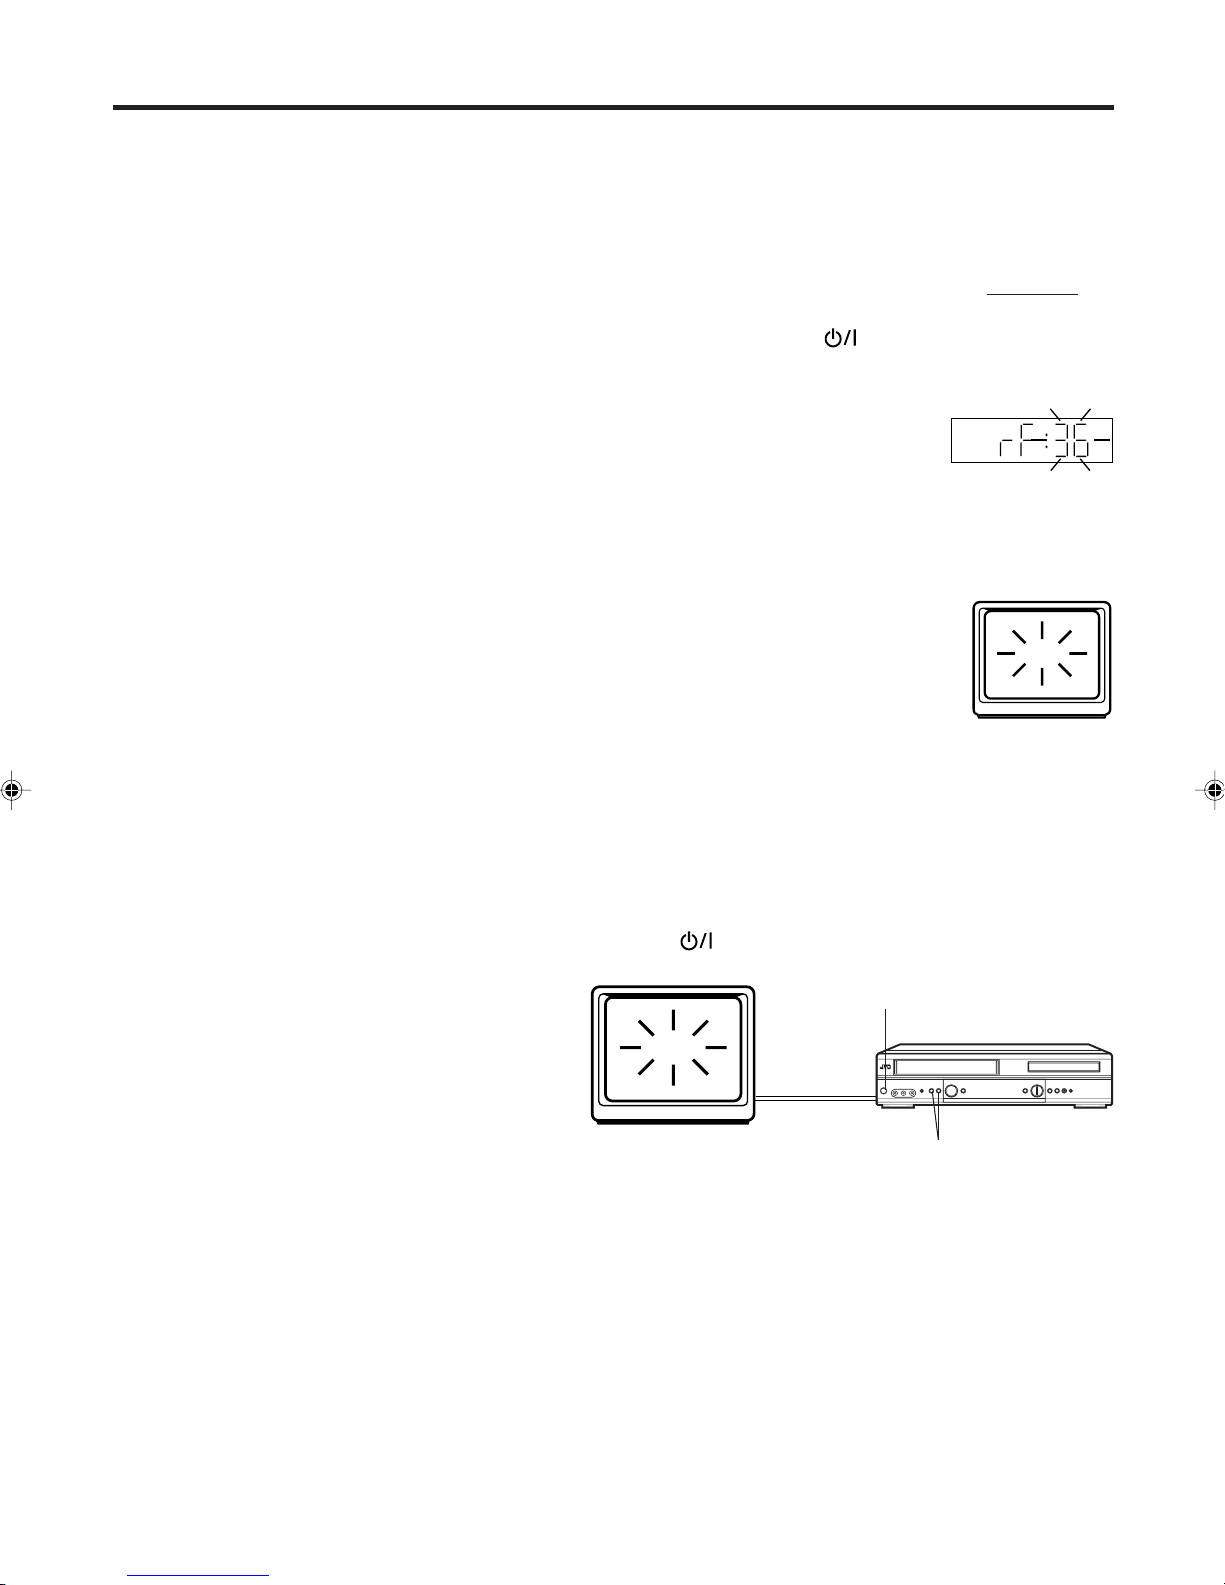
Press the DVD/VCR’s
1
control) and keep pressing it until the display shows rF:.
The number next to rF: is the channel in UHF-band to
which you must tune your TV-set.
Switch your television to the program position on which
2
the video playback is seen. Start the channel search of
your television until “TEST” appears. Store this tuning in
television like also the case of the reception for normal
television-channels you would store.
If you want to use your DVD/VCR, switch
your television to this program position.
If there is interference in the picture (you see 2 programs
3
simultaneously or what is called Ghosts), change the
sending channel in DVD/VCR. To do this, go back to the
step 1. Use PR button on the DVD/VCR to change the
number next to the rF:. Then return to step 2 and tune the
television newly.
Press button to turn off the DVD/VCR.
4
(not the one on your remote
turned off.
VCR
1,4
TEST
TEST
Note:
If you receive one TV-program on channel 35, 36 or 37, the interference can be occurred to the built-in TV
channel in DVD/VCR. If you use a scart cable for the transmission of picture and sound, you can cut off the
built-in TV-program. Then the video playback through the supplied antenna cable is not possible any more.
Press PR repeatedly (at step 1) until OFF will appear.(OFF appears after 69 or before 23)
3
13
Page 14

TIMER REC SET
ATS (AUTO TUNING SYSTEM)
VCR EXTENSION
CHANNEL SETUP
SYSTEM SETUP
SELECT :
ENTER : OK
MENU
EXIT
:
VCR SETUP
Setting the On-screen language
CLOCK SET
SYSTEM SETUP
LANGUAGE/SPRACHE/LANGUE
AV2 [DEC]
SELECT :
ENTER : OK
MENU
EXIT
:
SELECT :
LANGUAGE/SPRACHE/LANGUE
ENGLISH
DEUTSCH
OK:
OK
FRANCAIS
Turn on your TV and select the AVProgram position, on which you have
already set your DVD/VCR. (it will
happen automatically by Scart-cable
connection). So you can follow up the
all setting on TV screen.
Preparation:
• Press the
• Make sure TV/VCR/DVD switch has been slided to VCR/DVD. Then
press VCR to select the VCR mode. (The VCR indicator will light)
You can choose from three different languages (English,
French and German) for the on-screen displays.
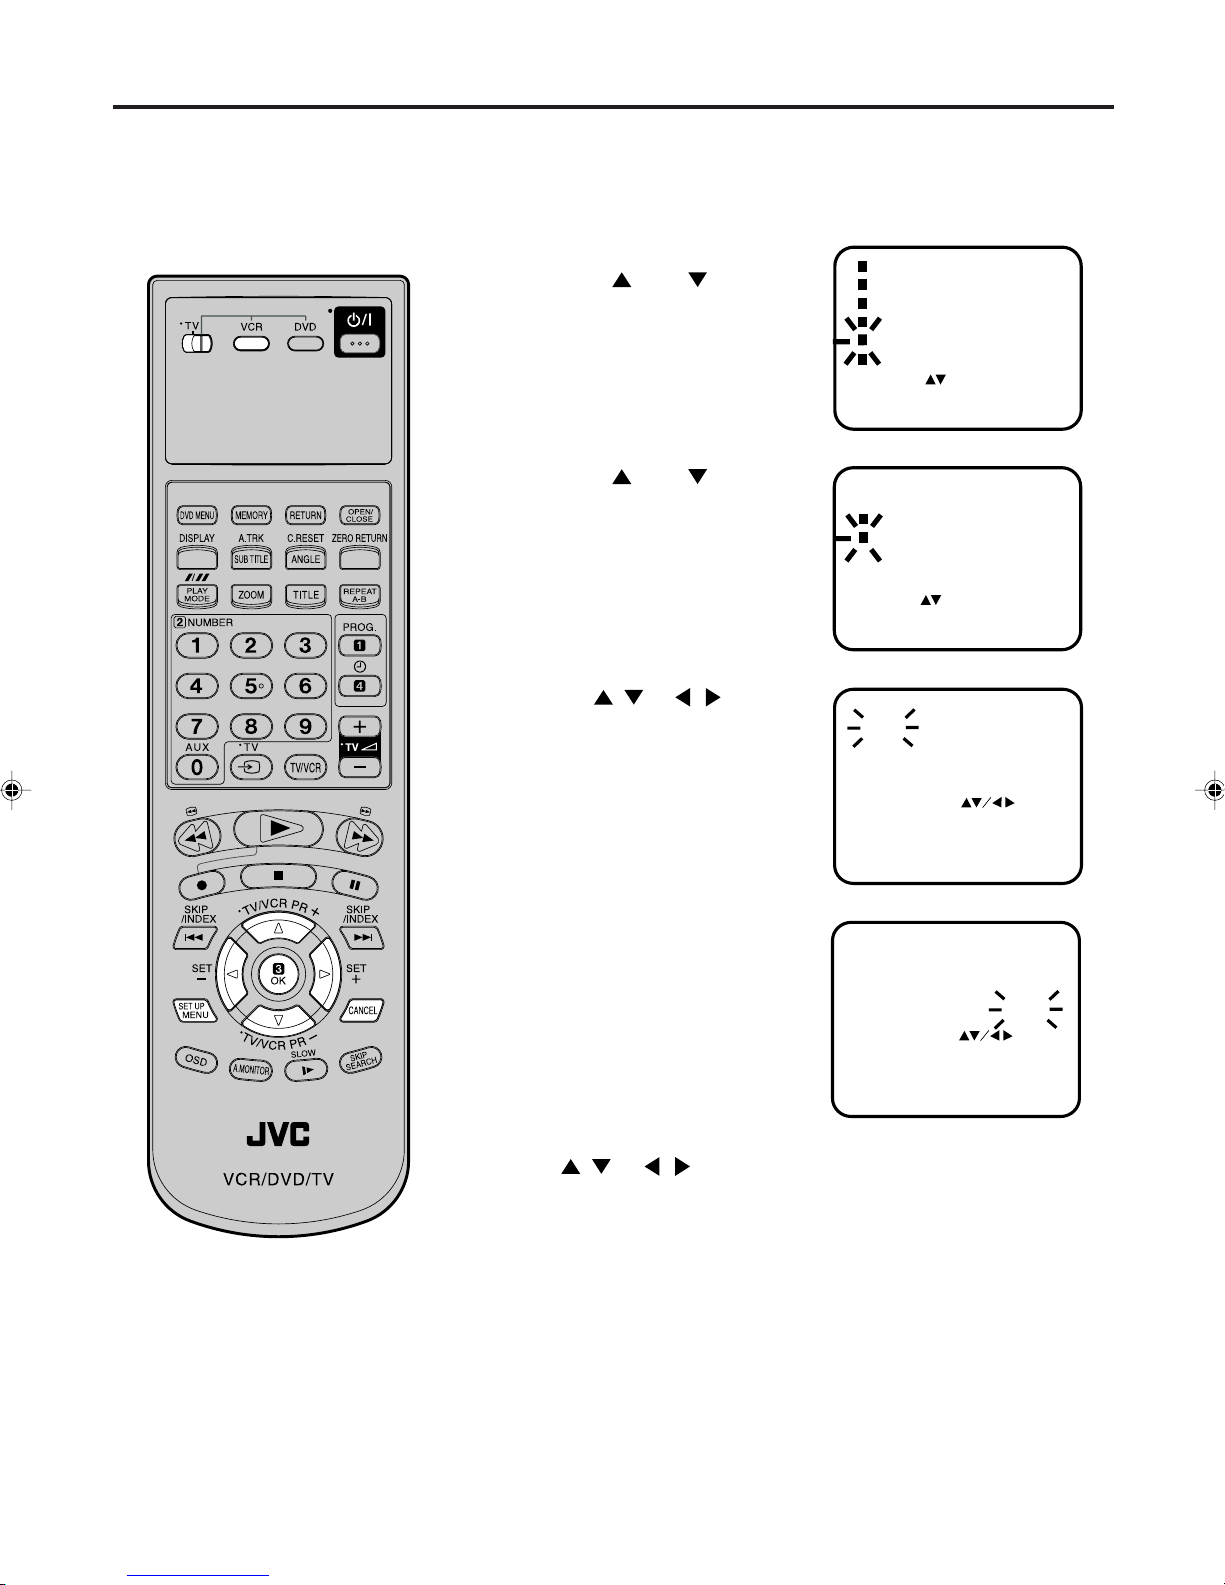
Press SET UP MENU.
1
Press or to select the
SYSTEM SETUP option, then
press OK.
If you use the unit for the first time
and press SET UP MENU,
instead of the main menu screen
on the right the “LANGUAGE” set
up menu screen in step 2 may
appear.
Press or to select the
2
“LANGUAGE” option, then
press OK.
button to turn on the DVD/VCR.
NOTES:
• If the unit does not operate properly, or No key operation (by the unit
and/or the remote control): Static
electricity, etc., may affect the player's
operation. Disconnect the AC power
cord once, then connect it again.
• Both the VCR and the DVD have their
own menu option (See page 41).
• If no buttons are pressed for more than
60 seconds, the MENU screen will
return to normal TV-operation automatically.
14
Press
3
sired language: English (ENGLISH), German (DEUTSCH) or
French (FRANCAIS), then press
OK.
Press SET UP MENU repeatedly until the TV picture appears
4
on the screen.
or to select the de-
Page 15

ATS Automatic Tuning System and Auto Time/Date Setting
This VCR has a built-in TV receiver
module. Before you can record a TV
program, all the available TV stations
must be tuned in and preset in the
memory. The ATS function (Automatic
Tuning System) allows all the locally
available TV stations to be automatically stored and sorted according to
the currently effective national station
list. To accomplish this, ATS will need
about 12 minutes. During this period
of time the VCR cannot be used. If you
wish to change the station sequence,
you can later perform a removing
procedure (see page 17).
Preparation:
• Press the
button to turn on the DVD/VCR.
• Make sure TV/VCR/DVD switch has been slided to VCR/DVD. Then
press VCR to select the VCR mode. (The VCR indicator will light)
Press SET UP MENU. Press
1
or repeatedly until the dot
before ATS (AUTO TUNING
SYSTEM) blinks. Then press OK.
ATS (AUTO TUNING SYSTEM)
TIMER REC SET
VCR EXTENSION
VCR SETUP
CHANNEL SETUP
SYSTEM SETUP
SELECT :
ENTER
:OK
MENU
:
EXIT
If no channel setting is done:
Press 1 of number keys at first, and then press SET UP MENU.
Press / or / to select
2
the desired country. Then press
the OK.
ATS (AUTO TUNING SYSTEM)
AREA
GERMANY
HOLLAND
AUSTRIA
SELECT :
OK : OK
DENMARK
ITALY
SWISS
EXIT :
MENU
The ATS setting is completed when “CHANNEL MAPPING”
3
indication and the current time display appears.
Press SET UP MENU repeatedly until the TV program will be
displayed.
CHANNEL MAPPING
1
ATS ACTIVE
ARD
2 6
ZDF
3
RTL
4
SAT1
SELECT
SKIP
CHANGE NAME
MOVE : 2
EXIT
VCR
PRO 7
5
BR3
SW3
7
8
N3
:
: CANCEL
:1
: MENU
9
10
11
12
HR3
WDR3
MDR3
TM3
If the CLOCK SET-menu appears and 00:00 appears in the display,
please set the clock manually. In this case, no station transmitting
time data can be received (see page 19).
Note: If ATS is done under the bad receiving condition, one or more
stations may not be found. In this case, set these stations
manually.(see page 20)
15
Page 16
CH TUNING
CHANNEL SETUP
CHANNEL MAPPING
SELECT :
ENTER
:
EXIT
:
OK
MENU
ATS
Skipping unwanted TV stations
(Skip those TV stations that are not
wanted to be selected by pressing the
PR button.)
Preparation:
• Turn ON the TV and set to the video input mode.
• Make sure TV/VCR/DVD switch has been slided to VCR/DVD. Then
press VCR to select the VCR mode. (The VCR indicator will light)
Press SET UP MENU.
1
Press or to select
CHANNEL SETUP. Then press
OK.
Press or to select
2
ATS (AUTO TUNING SYSTEM)
TIMER REC SET
VCR EXTENSION
VCR SETUP
CHANNEL SETUP
SYSTEM SETUP
SELECT :
ENTER : OK
EXIT
MENU
:
CHANNEL MAPPING. Then
press OK.
Press / or / repeatedly
3
until the TV station to be skipped
blinks.
CHANNEL MAPPING
1 ARD
2 ZDF 6 BR3
3 RTL
4 SAT1
SELECT
SKIP
CHANGE NAME
MOVE
EXIT
5 PRO 7
7 SW3
8 N3
:
CANCEL
:
1
:
2
:
MENU
:
9 HR3
10 WDR3
11 MDR3
12 TM3
Then press CANCEL.
4
The number before the canceled
channel (e.g. 12) will be
bracketed.
CHANNEL MAPPING
1 ARD
2 ZDF 6 BR3
3 RTL
4 SAT1
SELECT
SKIP
CHANGE NAME
MOVE
EXIT
5 PRO 7
7 SW3
8 N3
:
CANCEL
:
1
:
2
:
MENU
:
9 HR3
10 WDR3
11 MDR3
12 TM3
Canceling the skip function:
Press / or / repeatedly until the skipped TV station blinks,
then press CANCEL.
The brackets will disappear.
Press SET UP MENU repeatedly until the TV picture appears
5
on the screen.
16
Page 17

AT S
Reassigning TV station positions
Preparation:
• Turn ON the TV and set to the video input mode.
• Make sure TV/VCR/DVD switch has been slided to VCR/DVD. Then press VCR to select the VCR mode. (The
VCR indicator will light)
Example: Reassign the TV station under No. 6 to position No. 2.
Select the "CHANNEL MAPPING" in Menu-screen
1
in the same way as the step 1~2 on page 16. Then
press OK.
Press / or /
2
repeatedly until the TV
station to be reassigned
blinks.
Press "2" of number
3
keys. Then, the TV
station will be moved to
the first display line.
Press / or / repeatedly until the position
4
CHANNEL MAPPING
1 ARD
2 ZDF 6 BR3
3 RTL
4 SAT1
SELECT
SKIP
CHANGE NAME
MOVE
EXIT
MOVE CHANNEL
1 ARD
2 ZDF 6
3 RTL
4 SAT1
POSITTION
MOVE
EXIT
5 PRO 7
7 SW3
8 N3
:
:
CANCEL
:
1
2
:
MENU
:
5 PRO 7
7 SW3
8 N3
:
:OK
:
MENU
number blinks to which the selected TV station is to
be moved, then press OK.
9 HR3
10 WDR3
11 MDR3
12 TM3
6 BR3
9 HR3
10 WDR3
11 MDR3
12 TM3
After approx. 12
5
seconds the station
BR3 is set in new
position 2. The ZDF will
MOVE CHANNEL
1 ARD
5 PRO 7
2 ZDF 6
3 RTL
7 SW3
8 N3
4 SAT1
be extracted to the first
line.
Now to finish this procedure and at the same
time set the protruded
station (ZDF) to the
POSITTION
MOVE
EXIT
MOVE CHANNEL
1 ARD
2 BR3 6 ZDF
3 RTL
4 SAT1
:
:OK
:
MENU
5 PRO 7
7 SW3
8 N3
blank position 6, press
SET UP MENU
repeatedly until TV-
POSITTION
MOVE
EXIT
:
:OK
:
MENU
station appears.
Or you can of course select another station to set in
the protruded station(ZDF) in step 4.
Press SET UP MENU repeatedly until the TV picture
6
appears on the screen.
6 ZDF
9 HR3
10 WDR3
11 MDR3
12 TM3
9 HR3
10 WDR3
11 MDR3
12 TM3
WAIT blinks.
The data will be
ordered in the table
newly.
MOVE CHANNEL
1 ARD
2 ZDF 6
3 RTL
4 SAT1
POSITTION
MOVE
EXIT
MOVE CHANNEL
1
2 6
3
4
POSITION :
MOVE
EXIT
ARD
ZDF
RTL
SAT1
5 PRO 7
7 SW3
8 N3
:
:OK
:
PRO 7
5
SW3
7
8
N3
:OK
: MENU
MENU
6 BR3
9 HR3
10 WDR3
11 MDR3
12 TM3
WAIT
9
HR3
10
WDR3
MDR3
11
12
TM3
• A position number(6) will indicated near the protruded
station(ZDF) at the first line.
If any button is not pressed for more than 60 seconds,
this station(ZDF) will be set to this position number(6)
automatically.
17
Page 18

AT S
Changing TV station names
For a number of TV stations (such as
MTV) no name code will be displayed
because these TV stations do not
provide the necessary information.
You can enter the respective names
yourself. Moreover, unwanted station
codes can be changed by the user.
Preparation:
• Turn ON the TV and set to the video input mode.
• Make sure TV/VCR/DVD switch has been slided to VCR/DVD. Then
press VCR to select the VCR mode. (The VCR indicator will light)
Example: MTV is assigned to station No. 10, but the code “MTV” will
not be displayed and will also not appear in the table.
Select the "CHANNEL MAPPING" in Menu-screen in the same
1
way as the step 1 ~ 2 on page 16. Then press OK.
Press / or / repeatedly
2
until the station number position
now to be named will blink.
• If you want to turn over the page
when the blinking spot is in the
left or right edge of on-screen,
press
the next page's 12 stations ap-
or repeatedly until
CHANNEL MAPPING
1
ARD
5
26
ZDF BR3
3
RTL
4
SAT1
SELECT
SKIP
CHANGE NAME
MOVE
EXIT
PRO 7
7
SW3N311
8
:
CANCEL
:
1
:
2
:
MENU
:
10
12
9
HR3
pears.
Press "1" of number keys. The
3
first display line will change to
"CHANGE BROADCAST
NAME".
CHANGE BROADCAST NAME
1 ARD
2 ZDF 6 BR3
3 RTL
4 SAT1
SELECT :
NAME
OK
CLEAR :
EXIT : MENU
5 PRO 7
7 SW3
8 N3
:
:OK
CANCEL
9 HR3
10
11
12
Note:
When a wrong character is entered,
press CANCEL and enter the correct
character.
Press or repeatedly until
4
the desired character appears.
Then press . Use or to
select the next character. Then
press . Up to four characters
can be used to create a station
name. The character “ ” stands
for a space.
CHANGE BROADCAST NAME
1 ARD
2 ZDF 6 BR3
3 RTL
4 SAT1
SELECT :
NAME
OK
CLEAR :
EXIT : MENU
5 PRO 7
7 SW3
8 N3
:
:OK
CANCEL
Then press OK.
Each press of will change the screen display as follows.
A, B, C, ... X, Y, Z 0, 1, 2, ... 7, 8, 9
– + / •
Press SET UP MENU repeatedly until the TV picture appears
5
on the screen.
9 HR3
10 M
11
12
18
Page 19

Setting the Time and Date
If the time and date is not be displayed
for some reasons after the ATS
function has been completed, a manual
clock adjustment will be required.
Note:
• In case of a power failure the clock will
continue to operate for another 30 minutes with quartz-controlled precision. To
indicate that the power failure has lasted
for an excessive period of time “0:00” will
blink on the display. In this case readjust time and date.
If the clock does not have been adjusted
yet, the step 1 will appear automatically.
• The clock will only be automatically set
when the VCR is connected to the
Telecom CATV network. All the provided
CATV stations should be stored in the
VCR. This is the case when the ATS
function has been completed. The antenna system must be free of any defects, e.g. there should be no picture
noise. The clock will be re-adjusted every
30 minutes except the period between
23:00 and 1:00 o’clock. In case the total
difference between the indicated time
and the current time is more than 5 minutes, the clock will not be corrected. The
switching from winter time to summer
time will be considered.
The clock will not be adjust automatically when:
• timer activated.
• antenna not connected.
• only an outdoor antenna or a satellite
receiver connected.
Preparation:
• Turn ON the TV and set to the video input mode.
• Make sure TV/VCR/DVD switch has been slided to VCR/DVD. Then
press VCR to select the VCR mode. (The VCR indicator will light)
Example: Setting the clock to 11:30, 23rd October 2002.
Press SET UP MENU. Press
1
or repeatedly until the dot
before SYSTEM SETUP blinks.
Then press OK. Then press
or repeatedly until the dot
before CLOCK SET blinks. Then
press OK.
Press / repeatedly or
2
number keys until “23” appears.
Then press .
Set the month, year, hour and
3
minute in the same way as the
step 2. Then press .
Press or to select “ON” or “OFF”, then press OK. If “ON” is
4
SYSTEM SETUP
CLOCK SET
LANGUAGE/SPRACHE/LANGUE
AV2 [DEC]
SELECT :
ENTER : OK
EXIT
CLOCK SET
SELECT
SET
OK
CLOCK SET
SELECT
SET
OK
MENU
:
:
:
: OK
:
:
: OK
23
1
2002
0:00
ON
/ 0–9
EXIT : MENU
23
10
2002
11:30
ON
/ 0–9
EXIT : MENU
DAY WED
MONTH
YEAR
TIME
AUTO TIME
DAY WED
MONTH
YEAR
TIME
AUTO TIME
selected, any required time corrections will be performed
automatically (see left). In this case the personnel of the
appropriate TV station or of Telecom will be responsible for
correcting the time setting. If any
error occurs during such an
adjustment (e.g. switching from
summer time to winter time), your
clock will show the incorrect time.
To set the correct time select
“OFF” and follow the procedure
described above.
• In case of an erroneous input press
CLOCK SET
DAY WED
MONTH
YEAR
TIME
AUTO TIME
SELECT
SET
OK
23
10
2002
11:30
:
:
: OK
to go back to before
ON
EXIT : MENU
step and enter again.
Press SET UP MENU repeatedly until the TV picture appears
5
on the screen.
The clock will begin operation and the colon will blink on the
6
VCR display.
VCR
19
Page 20

TIMER REC SET
ATS (AUTO TUNING SYSTEM)
VCR EXTENSION
CHANNEL SETUP
SYSTEM SETUP
SELECT :
ENTER : OK
MENU
EXIT
:
VCR SETUP
Manual TV station presetting
DEC OFF
ATS stores the broadcast automatically.
However if you do the ATS under
unfavorable receiving conditions,
some broadcasts happen to be not
finded by ATS. For these broadcasts,
you can store also by manual.
Preparation:
• Turn ON the TV and set to the video input mode.
• Make sure TV/VCR/DVD switch has been slided to VCR/DVD. Then
press VCR to select the VCR mode. (The VCR indicator will light)
Example: Preset the SAT1 on program position 5.
Press SET UP MENU.
1
Press or to select
CHANNEL SETUP. Then press
OK.
Press or to select CH
2
TUNING. Then press OK.
CHANNEL SETUP
CH TUNING
CHANNEL MAPPING
SELECT :
ENTER
:OK
EXIT
MENU
:
Note:
Occasionally, the auto search might catch
a weak signal and stop. If the TV station
signal is weak, you shouldn't store this
station.
In that case restart the auto search using
20
or .
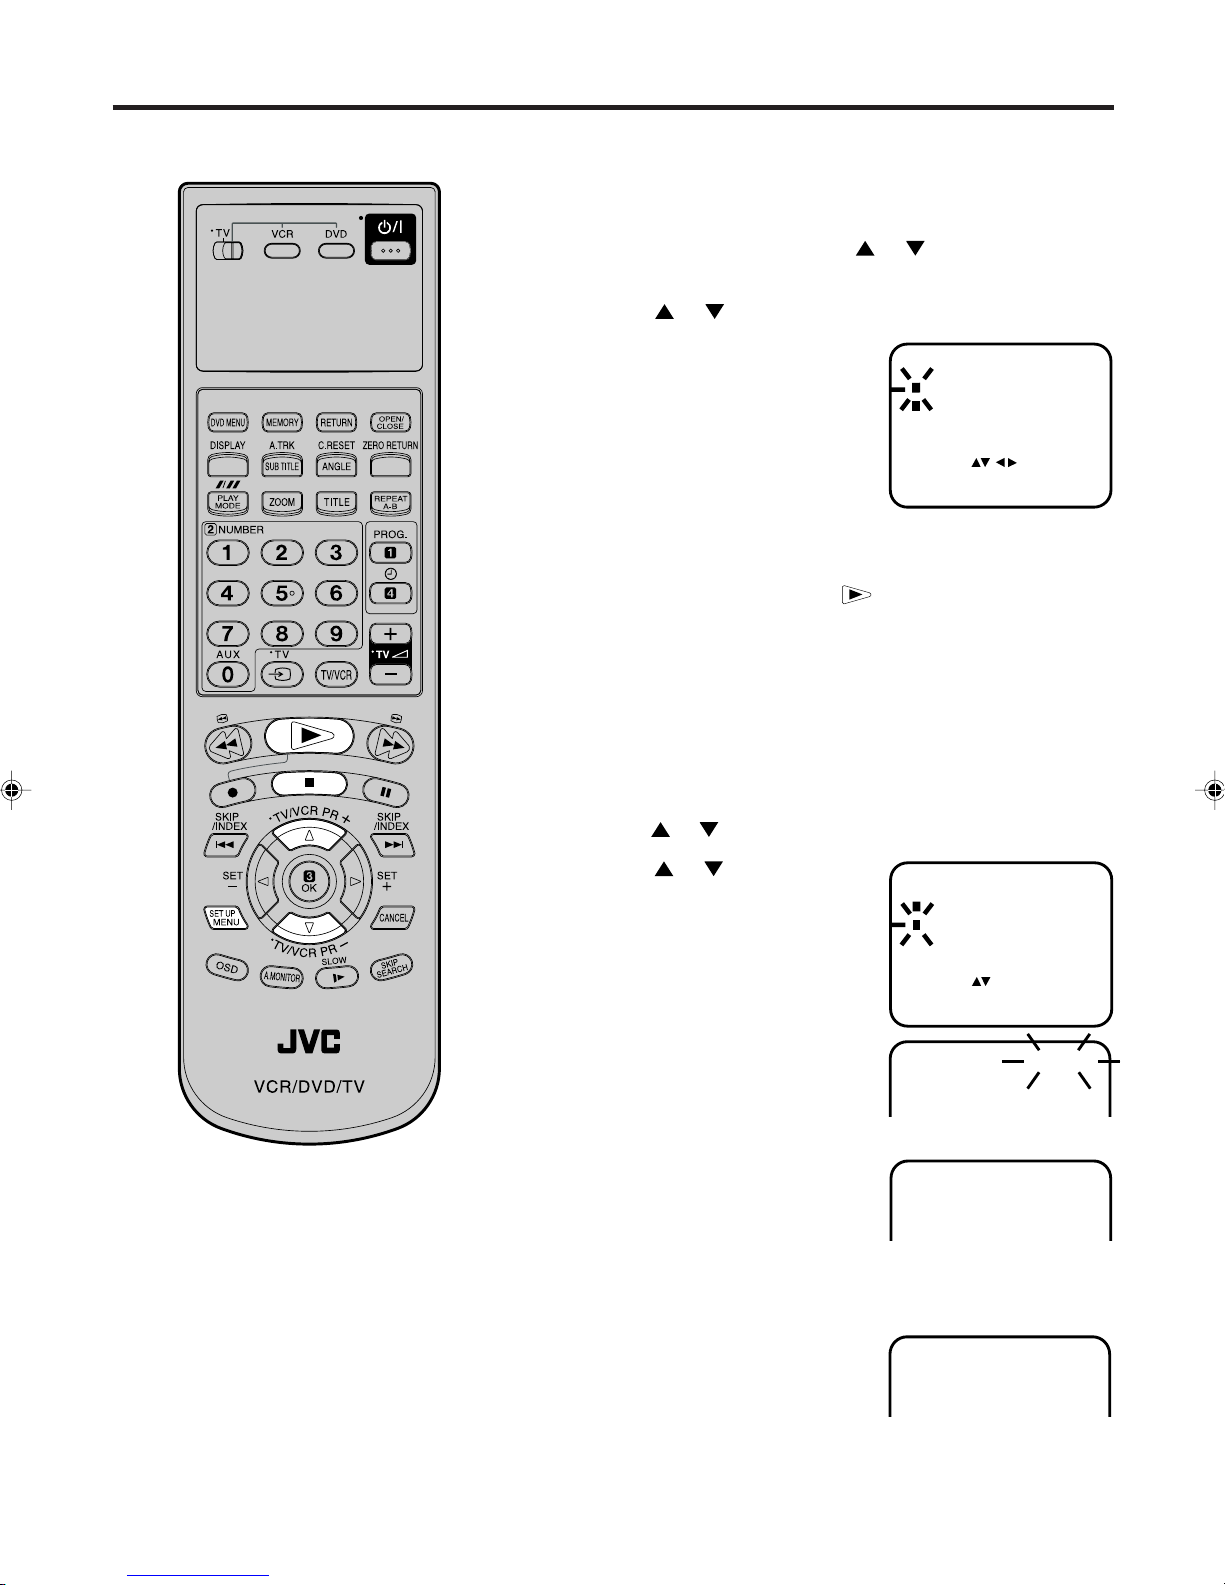
DEC OFF will blink. Press OK.
3
DEC OFF does not blink any
more. SEARCH will appear.
Note:
If you wish to store the
PREMIERE manually, the
decoder must have been
connected as on the lower of p.11.
During DEC OFF is blinking, press
DEC ON will blink now.
Press OK.
Press (rising frequency) or
4
(falling frequency) once. The
search starts. It stops at each
broadcast automatically (" "
change to " 4 "). Press or
repeatedly until the SAT1
appears. Only in case of receiving
of the weak broadcast (drifting
picture), search dose not stop. If
you want to stop, press / or
/ .
DEC OFF
SELECT :
OK
.
SEARCH :
EXIT
:
:
OK
MENU
CH 1VPS
EXIT :
CH 1
/ F. TUNE :
ARD
MENU
Page 21

Manual TV station presetting
VPS CH 5
SAT1
OK
OK :
MENU
DEC OFF
CH
/ 0–9
:
EXIT :
The Fine Tuning adjustment
Under a normal receiving condition, the
station-search will stops automatically at the
best receiving position. That picture will
appear without disturbance.
This receiving position will be memorized
automatically. The Fine Tuning can not be
memorized additionally.
In rare case of bad receiving condition, the
station-search might not stop at the best
receiving position. That picture will appear
with disturbance, e.g. waving lines.
Only in this rare case, use the Fine Tuning to
tune the concerned station manually and
exactly.
In step 5, press or until the station is
adjusted to best position. Then press OK.
Please wait until OK: ENTER
5
appears. It may take a few
seconds.
Then press OK.
In the next step, the program
position on which this station
should be stored will be set.
Press or repeatedly until
6
"5" displayed.
Or enter 5 with number keys.
Then press OK.
Repeat the steps 3 and 6 to preset other TV stations.
7
Press SET UP MENU repeatedly until the TV picture appears
8
on the screen.
DEC OFF
SELECT :
OK
:
OK
VPS CH 1
/ F. TUNE :
EXIT :
SAT1
MENU
Note:
Even the skipped program position can be
called up with number keys.
To skip a channel position
Unwanted channels can be skipped so that they cannot be called
up by pressing PR. Select the channel to be skipped...
CH 29
VPS
SWF
VCR
....e.g. channel 29.
Select channel 29, then press CANCEL.
This channel’s number will be flashing. That way you can cancel
further channels one after the other.
To cancel the channel skipping
Select the skipped channel using number keys, then press
CANCEL. The channel No. does not blink any longer, and the
channel No. now may be selected again using PR.
21
Page 22
Loading and Unloading a Cassette Tape
VCR
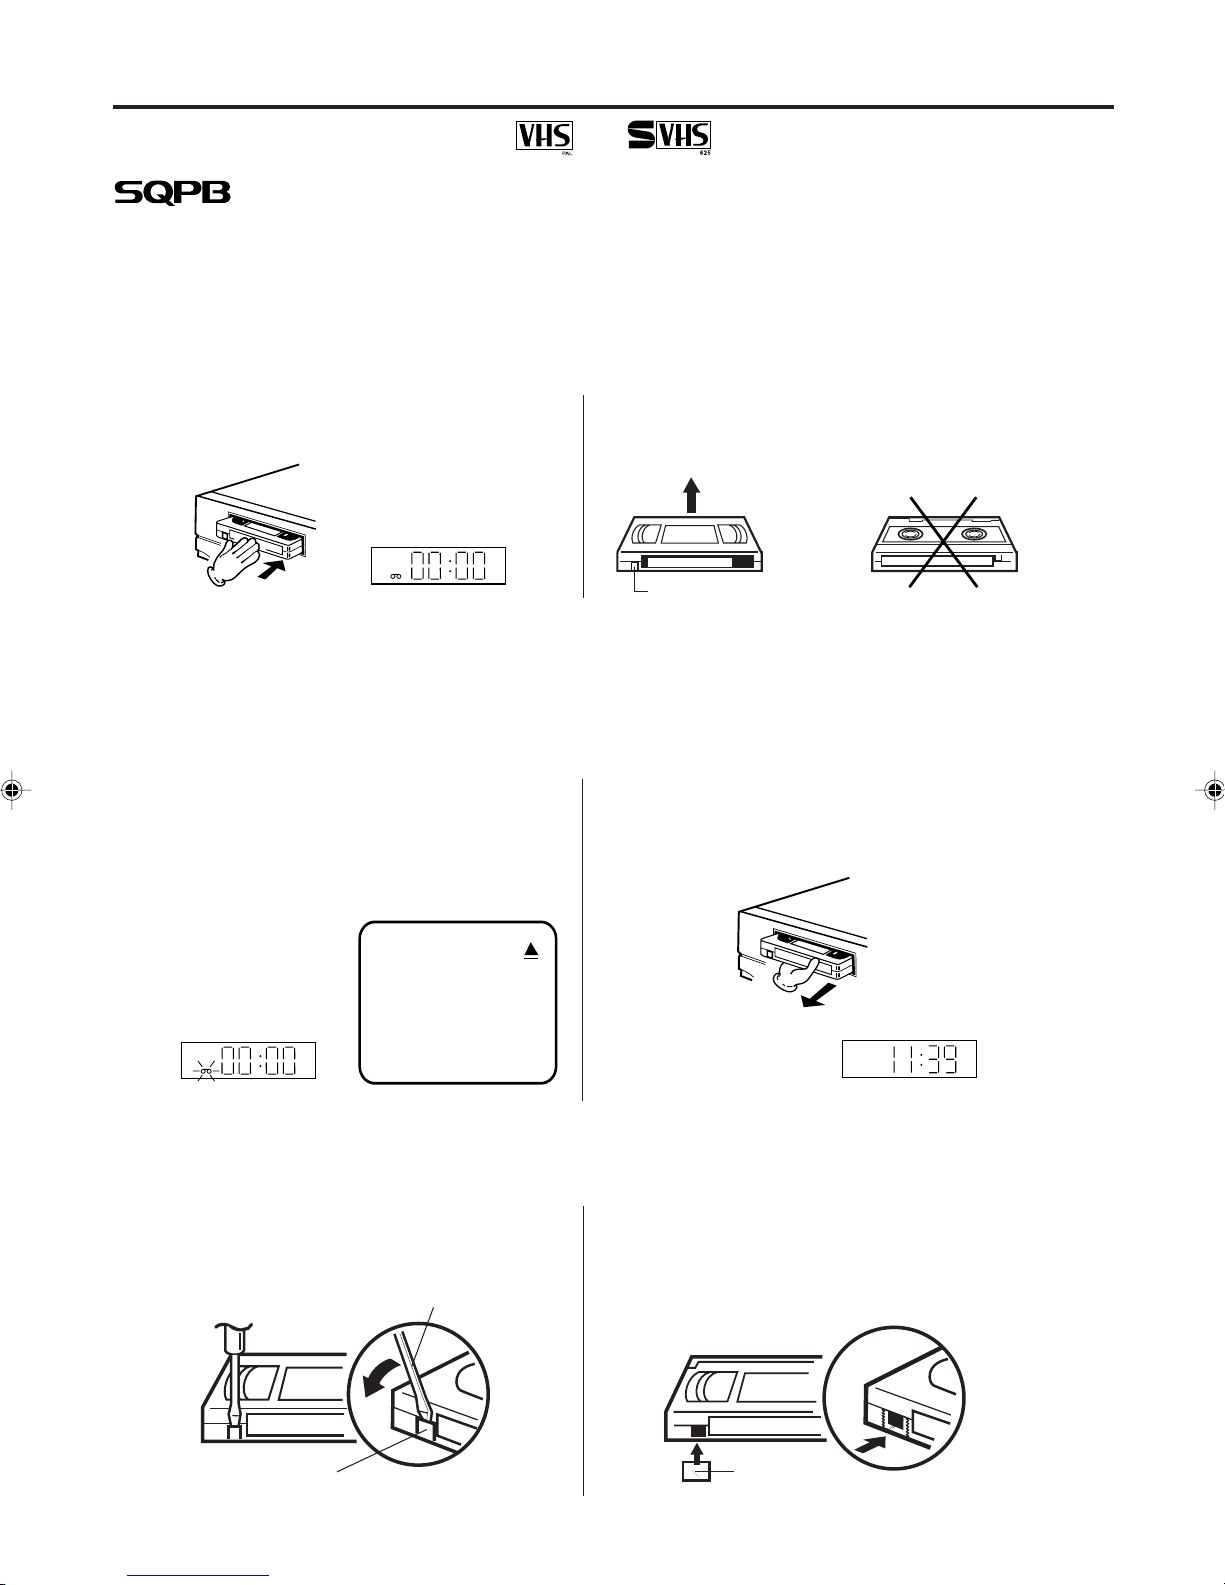
Use only video cassette tapes marked and .
• Cassettes marked “VHS” (or “S-VHS”) can be used with this video cassette recorder. However, S-VHS recording
is not possible with this model.
• This model is equipped with SQPB (S-VHS QUASI PLAYBACK) that makes it possible to play back S-VHS
recordings with regular VHS resolution.
• HQ VHS is compatible with existing VHS equipment.
• SQPB playback can be seen only at PAL SP mode.
Loading
Push the center of the tape until it is automatically
inserted.
VCR
Automatic power ON
When you insert a cassette tape the DVD/VCR power will turn ON automatically.
Automatic playback
When loading a cassette tape without an erase prevention tab, playback will start automatically.
Insert the cassette tape with its labeled side facing up
and the erase prevention tab positioned at your left.
An inverted cassette tape cannot be inserted.
Erase prevention tab
Unloading
Press EJECT on the unit. Even if a tape is being
12
played, press this button only once.
Remove the cassette tape.
VCR
Automatic tape eject
This VCR will automatically rewind the tape when the tape has ended. And when the tape is rewinded to its
beginning, the cassette tape will be ejected automatically.
To prevent accidental erasure
Remove the erase prevention tab with a screwdriver.
Erase prevention tab
22
To record again
Cover the hole with a piece of adhesive tape.
Screwdriver
Adhesive tape
Page 23

Cassette tape playback
Preparation:
Turn ON the TV and set to the video input mode.
•
•
Make sure TV/VCR/DVD switch has been slided to VCR/DVD. Then
press VCR to select the VCR mode. (The VCR indicator will light)
Load a prerecorded tape
1
(When loading a cassette tape
without the erase prevention
tab, playback will start automatically).
To start playback
2
Press .
Playback will start.
If the cassette has not loaded
yet,
To stop playback
Press 3.
will blink for 4 seconds.
VCR
NOTES:
• This VCR selects the playback tape
speed SP or LP automatically.
• The Cassette tape and DVD disc can
be played back simultaneously. If you
press VCR or DVD, the tape playback
and DVD playback alternate with each
other on the screen.
VCR
To rewind the tape or forward it rapidly
Stop the playback or recording with 3.
To rewind the tape:
Press
To stop the tape-winding, press 3. To switch to playback directly
(without 3), press
.
.
To forward the tape:
Press
.
Forward/Reverse picture search mode
When the tape is being winded, you can switch to picture search
mode (see next page). To do this, press or and hold it down.
The unit will resume the tape winding as soon as the button is
released.
NTSC video cassette playback
When using a pre-recorded NTSC video cassette tape, the
connected TV set must operate with a 60 Hz vertical frequency.
Otherwise the on-screen picture will be affected by vertical
rolling. Even if your VCR set is capable of processing NTSC video
signals, the picture may be shortened vertically (appearance of
black bars at the top and at the bottom of the TV screen). The
dubbing of a NTSC video cassette tape to a standard PAL VCR
is not possible.
23
Page 24

Special playback/Playback sharpness/Skip Search
Special playback
Picture Search
Reverse picture search function
Press x 1 or x 2 during the playback.
Forward picture search function
Press
To return to playback: Press .
Still Picture
Press 4 during playback. To resume normal
playback: Press .
Slow Motion
During playback press SLOW.
You can change the slow speed by the additional
pressing of SLOW.
To return to playback: Press .
Slow tracking and vertical lock adjustment
If noise bars appear in the picture during slow motion,
press the SET + or – to reduce the noise bars.
If the still picture jitters excessively, press SET + or –
to stabilize the still picture.
Frame by Frame picture
During playback, press 4 one by one: The picture
advances frame by frame.
To return to playback: Press
Adjusting tracking condition
Automatic tracking adjustment
Whenever you insert a tape and start playback,
automatic tracking starts working and continuously
analyzes the signal to enable optimum picture quality
during playback.
Manual tracking adjustment
If automatic tracking cannot eliminate noises well during
playback, press SET + or SET – to eliminate the noises.
“MANUAL TR.” will appear. Press it briefly for a fine
adjustment, or press and hold for a coarse adjustment.
To return to automatic tracking, press A. TRK.
Notes:
•
• During picture search mode there will be noise bars
• The Special Playback will automatically change to
x 1 or x 2 during the playback.
VCR
VCR
VCR
.
The audio output is muted during SPEED SEARCH,
STILL, FRAME ADVANCE and SLOW MOTION.
which are caused by the system.
playback after approx. 5 minutes to protect the video
tape against excessive wear.
Playback sharpness
Adjust the sharpness of playback picture during playback.
During slow motion, still picture and picture search,
sharpness-adjusting is impossible.
Start the playback of video tape.
1
Press SET UP MENU.
2
Press
VCR SETUP. Then press
OK.
Press or to select
3
SHARPNESS. Then
press OK.
"SHARPNESS" will appear
4
and then disappear after
60 seconds of the last
button-press. Adjust with
Press SET UP MENU repeatedly until the TV picture
5
appears on the screen.
Note:
To return to the initial sharpness setting, press CANCEL
while the sharpness setting screen is appearing.
Skip Search
Each time you press SKIP SEARCH while a tape is playing,
the unit will fast-forward ahead approx. 30 seconds on the
tape. You may press the button up to six times in a row to
move approx. 180 seconds (three minutes) ahead.
For example: 1 press: approx. 30 seconds of tape
or to select
sharper or lesser.
2 presses: approx. 60 seconds of tape
3 presses: approx. 90 seconds of tape
ATS (AUTO TUNING SYSTEM)
TIMER REC SET
VCR EXTENSION
VCR SETUP
CHANNEL SETUP
SYSTEM SETUP
SELECT :
ENTER : OK
EXIT
VCR SETUP
SELECT
ENTER
EXIT
SHARPNESS
SET :
CENTRE :
MENU
:
NICAM
AUDIO MIX
SHARPNESS
:
:OK
MENU
:
+ÐÐ+ÐÐ+ÐÐ+ÐÐ
CANCEL
softer sharper
EXIT :
[AUTO]
[OFF]
2
MENU
24
Page 25
Repeat Playback
Normal repeat playback
The entire video tape will be played until its end. The tape will
then automatically rewind to the beginning and the playback will
be repeated.
Press SET UP MENU. Press or to select VCR
1
EXTENSION. Then press OK.
Press
2
Then press OK
3
[OFF].
If [ON] is selected, the playback
will be repeated endlessly.
Press SET UP MENU until the menu screen is cleared.
4
To start the playback, press .
5
The playback will be repeated endlessly.
To cancel normal repeat mode:
Follow the above step 3, then press OK to select the OFF
position. Press SET UP MENU to return to the TV.
or to select AUTO REPEAT.
to select [ON] or
VCR EXTENSION
AUTO REPEAT [ON]
SCENE REPEAT
SELECT : /
ENTER
EXIT :
:OK
MENU
Scene repeat playback
Press SET UP MENU.
1
Press or to select VCR EXTENSION. Then press OK.
Press or to select SCENE
2
REPEAT. Then press OK.
The playback starts automatically.
VCR EXTENSION
AUTO REPEAT [OFF]
SCENE REPEAT
NOTE:
If the unit is turned off or starts recording, the repeat mode is canceled.
Press OK at the point you want to
3
start scene repeat play-back.
S–REPEAT will blink on the
screen.
Press OK once again at the point
4
you want to end scene repeat
playback.
SR–R will appear on the screen
and the tape will be rewinded
automatically to go back to the
starting point.
When the starting point was
5
found, the Scene repeat-playback will start automatically.
SR-PLAY will appear only once.
To stop Scene repeat playback:
Press 3.
SELECT :
ENTER
EXIT :
:OK
MENU
S – REPEAT
SR – R
SR – PLAY
25
Page 26

Counter Display
ZERO RETURN function
This function makes tape-rewinding
stop at the counter 00:00:00 position
automatically.
Preparation:
• Turn ON the TV and set to the video input mode.
• Make sure TV/VCR/DVD switch has been slided to VCR/DVD. Then
press VCR to select the VCR mode. (The VCR indicator will light)
Press OSD.
1
The counter display shows the
tape running time during
playback or recording.
The Recorder will indicate REC
during recording for itself.
VCR
Press C.RESET at the desired
2
tape position.
The counter display will be reset
to the "00:00:00" position (e.g.
the beginning of recording).
VCR
Press 3 when playback or recording is finished.
3
Press ZERO RETURN.
The tape will be rewinded or fast forwarded and automatically
stop at the ”00:00:00” position.
12:00 SUN
00:04:38 SP
12:00 SUN
00:00:00 SP
CH 2
ZDFSTEREO
CH 2
ZDFSTEREO
Note:
• When you load a video cassette, the display indication changes to "00:00".
• The counter display does not function
on non-recorded (blank) sections of the
tape. When you rewind, fast forward or
play tapes through blank sections, the
counter display stops.
Press OSD once again to make the all indicator disappear.
4
The DISPLAY-button
Press DISPLAY during the playback. The clock and tape counter
alternate with each other in the display.
VCR
VCR
Note:
You can set the tape counter to 00:00:00 with C.RESET anytime.
Therefore, the counter display can also indicate 00:00:00, even when
the tape counter does not reach its beginning yet. Even if the tape
counter indicates 00:00:00, it can be rewinded moreover. If the tape
was rewinded over the point of 00:00:00, the minus mark (–) appears
in the counter display. Although the tape counter seems to forward
when you press , in fact the tape is being rewinded. When the
tape reaches the beginning, the tape-rewinding stops automatically.
26
Page 27

Video Index Search System
REC
VCR
REC
VCR
Whenever a recording is begun an
invisible index mark is recorded on the
tape. These index marks are all identical,
and each mark means: "Here starts a
new recording". Every DVD/VCR
equipped with the Video Index Search
System (VISS) can locate these marks
at the beginning of any recording.
Example: Indexing of TV commercials.
Start playback and wait until the
1
end of the TV commercial is
reached, then press 3.
While holding 2, press
2
indication goes off, 3 may be pressed. This short recording
process will be sufficient to set an index mark.
This will result in about 10 seconds of the TV commercials to be
overwritten by another recording. Due to the system the end of
this recording will be followed by a recording gap (noise signal)
of approx. 5 seconds.
Recording several Index Marks
Due to the system only one index mark will be recorded at the
beginning of a recording. If you intend to set several index marks
during a single recording, follow the procedure below:
At the point of the recording where
1
an index mark is to be set press 4.
The unit will switch to the recording
pause mode.
once. When the "INDEX" on-screen
Notes:
•
When you record an INDEX mark at
the very beginning of the tape, the
mark may not be found.
•
During INDEX search, the tape may
stop and begin to play at a slightly
different location.
•
INDEX may not function properly with
old or worn out video tapes.
•
INDEX marks may not be found if it is
extremely close to the point where the
search began.
•
In recording, if you stop recording temporarily, the INDEX mark is not recorded on the tape.
Press PR +/– repeatedly
2
back to the original TV program.
Press 4 to resume recording.
to switch
Index Search
Press INDEX + or – during stop or play
mode.
For Succeeding programs:
Press INDEX +.
For Preceding programs:
Press INDEX –.
(Additional press increases the INDEX
NO. up to 9.)
When the INDEX + or – is pressed, the
unit starts searching the INDEX NO.
selected and finds the portion, then
playback starts automatically.
To stop the Index Search, press 3.
CH 2
ZDF
INDEX
+3
7 or 6 is displayed
INDEX NO. (up to 9)
27
Page 28

VCR
Recording a TV Program
Preparation:
• Turn ON the TV and set to the video input mode.
• Make sure TV/VCR/DVD switch has been slided to VCR/DVD. Then
press VCR to select the VCR mode. (The VCR indicator will light)
Load a blank cassette tape with the
1
erase prevention tab intact. (The
DVD/VCR will automatically turn
on.)
Select the program(e.g.29) you want to record with PR +/– or
2
number keys.
1~9 : e.g. 5 = press “5”
10~80 : e.g. 29 = press “2” and “9”.
If a recording in Long Play mode is intended, press (TAPE
3
SPEED) to display "LP". (see Note below)
On the VCR, press 2.
4
Or on the Remote, while holding 2,
press .
" " will appear on the screen for
about 4 seconds and “REC” will
appear on the display.
VCR
VCR
REC
CH 29
SWF
INDEX
Notes:
• Since the DVD/VCR has a built-in TV
tuner the TV set may be turned off when
recording. The TV set may only be used
to check for accurate program adjustments or to monitor recordings.
• You can confirm on the TV-screen whether
you selected SP or LP. Press OSD to see the
status display. (see page 29)
• If you wish to watch the DVD playback
during the normal recording on VCR,
press DVD to change to DVD mode and
perform the DVD playback (see page
42).
If the erase prevention tab is removed, the tape will eject when
both the 2 and
are pressed for recording. (see p.22)
To Stop Recording
Press 3.
VCR
To Stop Recording Temporarily
To stop a recording for a short
period of time press 4. Press this
button again if you want to resume
the recording.
VCR
REC
Attention:
A safety circuit turns the pause mode off automatically after 5
minutes, and the DVD/VCR will stop the recording mode.
28
Page 29

Recording a TV Program
Recording with a SCART Cable:
You can record a program using the
TV receiver of the DVD/VCR and at the
same time watch another program on
the TV set using its receiver. As the
DVD/VCR automatically switches the
TV set the following points should be
observed:
Press TV/VCR until "VCR" appears on the display. Select
1
the program on the DVD/VCR you
program
DVD/VCR.
While the VCR is recording press TV/VCR until the "VCR"
2
indicator on the display goes off. The TV set now displays
the program of its built-in receiving module. Select the TV
channel you want to watch on the TV set. Although the TV
set now shows another program the DVD/VCR will continue recording the previously selected program.
Using TV/VCR you can switch the TV screen between the
3
DVD/VCR picture and the TV picture. If the "VCR" indicator
is lit on the display, you will watch
has no
can be watched on the screen and recorded by the
trouble on the recording.
want to record. This
VCR
“VCR” indicator goes on.
REC
“VCR” indicator goes off.
the DVD/VCR picture. This
VCR
REC
“VCR” indicator goes on.
To Display VCR operation Status
Press OSD. The clock, day of the week and more informa-
tions will be indicated.
To cancel the indicating: Press OSD until all indicator
disappear.
Day of the week
Time
Indication for
Hi-Fi-playback
or stereoreception
Indication for
the selected
playback sound
(e.g.: L CH = Left Channel)
23:59 MON
HI-FI
L CH
Deck-status
here: Playback
Program
number or
CH 80VPS
****
01:36:58 SP
Tape speed
Stand of Tape counter
Scart input
(AV1,AV2 or
AV3)
*
(e.g. ZDF)
Cassette in
Unit
Station's name
Auto Rewind Feature
The DVD/VCR will automatically rewind
when the tape has ended (except during
ITR and TIMER REC). It will also eject
the cassette tape.
29
Page 30

Instant Timer Recording (ITR)
VCR
The instant timer recording feature
provides a simple and convenient way
to make a timed recording.
Preparation:
• Turn ON the TV and set to the video input mode.
• Make sure TV/VCR/DVD switch has been slided to VCR/DVD. Then
press VCR to select the VCR mode. (The VCR indicator will light)
Load a blank cassette tape with the
1
erase prevention tab intact. (The
DVD/VCR will automatically turn
on.)
Select the program (e.g.29) you want to record with PR +/– or
2
number keys.
1~9 : e.g. 5 = press “5”
10~80 : e.g. 29 = press “2” and “9”.
If a recording in Long Play mode is intended, press (TAPE
3
SPEED) to display "LP". (see note on page 28)
Press 2 on the VCR or while holding 2, press on
4
the Remote to begin recording. Press 2 on the VCR again to
stop recording after 30 minutes. Each additional press of 2 will
increase recording time as shown in the chart below, up to a
maximum of 5 hours. The ITR and
recording time will appear on the
screen for about 4 seconds. And,
REC will keep blinking in the display.
“REC” will keep blinking
VCR
VCR
REC
in the display.
Tape speed: SP
Recording 0:30
INDEX
1:00
ITR 0:30
CH 29
SWFSTEREO
1:30
Note:
• If you wish to watch the DVD playback
during the ITR, press DVD to change to
DVD mode and perform the DVD playback (see page 42).
• If the tape supply has not sufficed for
ITR recording, the clock symbol ( ) will
blink at the tape-end and then VCR
mode will change to DVD mode.
In this case, press • to cancel the
blink or press EJECT to remove the cassette tape.
30
5:00
Tape speed: LP
Recording 0:30
10:00
4:00
.......
To Extend the Recording Time
While holding 2, press .
repeatedly until the desired time
appears on the display.
To stop the ITR
Press 3.
3:00
1:00
5:00
2:00
1:30
4:00
ITR 1 : 30
2:00
3:00
CH 29
SWF
Page 31

SHOWVIEW®-Recording
Look up the SHOWVIEW number codes in
an appropriate TV program magazine.
Select the desired TV program for
recording and refer to the number code
next to it.
Preparation:
• Turn ON the TV and set to the video input mode.
• Make sure TV/VCR/DVD switch has been slided to VCR/DVD. Then
press VCR to select the VCR mode. (The VCR indicator will light)
Press PROG.
1
If the clock is not set, CLOCK SET
menu will appear automatically.
Enter the SHOWVIEW code with
2
number keys.
• In case of an erroneous input,
press CANCEL and enter the cor-
rect number again.
Select with or DAILY or WEEKLY. ONCE is already set.
3
ONCE = To record a program only
once.
DAILY = To record TV programs
aired daily.
WEEKLY = To record TV programs
aired once a week.
SHOWVIEW NO.----------
ONCE
DAILY
WEEKLY
SHOWVIEW NO.
SELECT
CLEAR
OK
EXIT
SHOWVIEW NO.3277--------
ONCE
DAILY
WEEKLY
SHOWVIEW NO.
SELECT
CLEAR
OK
EXIT
SHOWVIEW NO.327741029
ONCE
DAILY
WEEKLY
SHOWVIEW NO.
SELECT
CLEAR
OK
EXIT
0:9
:
: CANCEL
: OK
: PROG.
0:9
:
: CANCEL
: OK
: PROG.
0:9
:
: CANCEL
: OK
: PROG.
Note:
• The built-in timer stores 8 memories. If the
“PROGRAM FULL” indicationappears,
you must delete one memory (see page
34).
• If you wish to receive the suitable program with a satelite receiver, the AV-position must be given near “CH”.
Press AUX repeatedly until AV2 appears.
• After a power failure or disconnection of
the power plug, all programmed recording settings and time display will be lost
upon resumption of power. In this case,
reset the clock (see pages 19) and reprogram any timer recordings.
Press OK. By the SHOWVIEW Code the entered data appear on
4
the screen.
SHOWVIEW NO . 327741029
• If the entered Number is not correct, the indicator “SHOWVIEW
NO. ERROR” appears. Enter the
Number correctly again.
DATE
START
END
CH
SPEED SP
VPS/PDC OFF
SELECT :
SET :
EXIT : MENU
15
WED
17:30
18:00
— —
/ 0—9
• Only in case of the TV station that you decode for the first time,
the – – will blink at the CH line. That is to say, you must enter
the corresponding channel position with the decoded TV station manually. See next page.
....to be continued to next page
31
Page 32

SHOWVIEW®-Recording
--:--
--:-------- --
17:30 18:00 7V
15 TUE
--:--
--:-------- --
--:--
--:-------- --
--:--
--:-------- --
--:--
--:-------- --
SELECT :
EXIT
: MENU
/ OK
--:--
--:-------- --
--:--
--:-------- --
-
-
-
-
-
-
-
SP
Example: You receive NBC on program position 12.
In case of the first S
HOWVIEW-recording for NBC, 2 bars
will blink at the CH-line. Enter 12 with number keys.
Press 1 and then 2 within 2 seconds (if the 2-press was
too late, the display 1 will be replaced with 2). The
S
HOWVIEW-system memorizes that the storing position
12 is for NBC. From the next all times of the SHOWVIEW-
recording from NBC, the 12 will be entered in the “CH”-
line automatically. In case of an erroneous input for the
channel number, press to go in the “CH”-line and
enter the correct number again.
Press
keys to enter the program
position number.
Then press .
/ or number
SHOWVIEW NO . 327741029
DATE
15
START
END
CH
SPEED SP
VPS/PDC OFF
SELECT :
SET :
EXIT : MENU
TUE
17:30
18:00
12 NBC
/ 0–9
OK : OK
Setting a day of the week:
You have selected DAILY or WEEKLY in step 3, then
you can select recording date again. The date must blink
as 2 bars.
If it does not blink, then press or repeatedly until
the DATE blinks. Then press or repeatedly until
the desired date appears.
The following date are stand for your selection: SUNSAT: all dates from Sunday to Saturday, or MON-SAT:
only dates from Monday to Saturday, or MON-FRI: only
dates from Monday to Fryday. WKL-MON: each Monday,
WKL-TUE: each Tuesday, ..., WKL-SUN: each Sunday.
Change the recording start-time:
The recording start-time will be set by SHOWVIEW
automatically. However you can change the recording
start-time manually. The time near START must blink.
If it does not blink, press or repeatedly until the
time blinks. Then press to change.
Recording period extension:
The recording end-time will be set by SHOWVIEW
automatically. However you can extend the recording
end-time manually. The time near END must blink.
If it does not blink, press or repeatedly until the
time blinks. Then press to extend.
VPS/PDC:
Switch the VPS/PDC on or off. Be sure to pay attention
to the VPS/PDC-important note on page 35.
Press or repeatedly until you reach VPS/PDCline.
Then press or to select “ON” or “OFF”.
Press OK after the
5
confirmation. Then
press SET UP MENU
repeatedly until the TVpicture appears.
To enter the other
program repeat the
steps 1 - 5.
Press •. The clock symbol ( ) will appear on the
6
display and the VCR stands by for recording. At the
same time, VCR mode will change to DVD mode
automatically. You can use DVD even if the VCR is
in the Timer recording mode.
If you do not use the DVD, turn the power off.
The timer recording will start at 5 seconds before
the time you predetermined.
Note:
• If the clock symbol ( ) does not appear on the
display in spite of the pressing of •, the cassette
may not have been loaded yet.(see page 22)
• If the cassette is ejected in spite of the pressing
of •, the erase prevention tab of the cassette may
have been removed. (see page 22)
• If the clock symbol ( ) blinks when the timer recording ended, the TV program has not been completely recorded because of an insufficient tape supply. In this case, press • to cancel the timer program or press EJECT to remove the cassette tape.
• During timer recording standby mode, the VCR
mode cannot be selected. To use the VCR, press
• at first, then press VCR to change to VCR mode.
After you use the VCR, press • again to put the
VCR into timer recording standby mode.
• If you press • during timer recording, the record-
ing operation will be interrupted. If you press •
again within the programmed time, the recording
operation will start again.
Select Tape speed:
Select the recording tape speed Standard Play (SP) or
Long Play (LP).
Press or repeatedly until you are in SPEED-line.
Then press or to select “SP” or “LP”.
32
Page 33

Timer-Recording
TIMER REC SET
ATS (AUTO TUNING SYSTEM)
VCR EXTENSION
CHANNEL SETUP
SYSTEM SETUP
SELECT :
ENTER : OK
MENU
EXIT
:
VCR SETUP
TIMER REC SET
DATE 2 3 MO N
11:30
--:--
3 TV3
START
END
CH
SELECT :
SET :
EXIT
: MENU
SP
SPEED
/ 0–9
OFF
VPS/PDC
23 MO
13:00
1 ARD
LP
OK : OK
14:30
TIMER REC SET
DATE
START
END
CH
SELECT :
SET :
EXIT : MENU
SPEED
ON
VPS/PDC
Timer recording can be programmed
on the TV-screen with the remote
control. The built-in timer allows
automatic unattended recording of up
to 8 programs within 1 month.
Preparation:
• Turn ON the TV and set to the video input mode.
• Make sure TV/VCR/DVD switch has been slided to VCR/DVD. Then
press VCR to select the VCR mode. (The VCR indicator will light)
• Load a video cassette with the erase prevention tab intact. Make
sure with OSD that the time and date are correct. (see page 29).
Example: Timer recording for channel 1, 13:00 to 14:30 with Tape
speed LP on timer program number 1.
Press SET UP MENU. Press
1
or to select TIMER REC SET.
Then press OK.
Each line stand for one program
2
of the 8 memories. Select one
line with or . Then press
OK.
------
--:-- --
------
--:-- --
------
--:-- --
--:-------- --
--:-------- --
--:-------- --
--:-------- --
--:-------- --
SELECT :
EXIT : MENU
/ OK
--:--
--:--
--:--
--:--
--:--
--:--
--:--
--:--
-
-
-
-
-
-
-
-
Note:
In the event of a power failure the data of
the automatic recording will be maintained
in the built-in memory for about 30
minutes. Also, the clock will continue to
run for this period of time. Thereafter the
data will be deleted. When the power
resumes, the time display will change to
“--:--” that the timer setting will have to be
set.
Set the desired date with or
3
or number keys. Then press
to accept it.
Set the Starting time (13:00),
4
ending time (14:30), channel (1
ARD), Tape speed (LP) and
VPS/PDC (P.35) in the same way
as the step 3.
• In case of an erroneous input
press to go back to before
step and enter again.
....to be continued to next page
33
Page 34

Timer-Recording
Press OK to accept them.
5
To enter other programs,
repeat steps 2 through 4.
• To return to the normal
screen, press SET UP
13:00 14:30
23 MON
--:-------- --
--:-------- --
--:-------- --
--:-------- --
--:-------- --
--:-------- --
--:-------- --
SELECT :
EXIT : MENU
/ OK
--:--
--:--
--:--
--:--
--:--
--:--
--:--
LP
1V
-
-
-
-
-
-
-
MENU twice.
Press •. The clock symbol ( ) will appear on the
6
display and the DVD/VCR stands by for recording.
At the same time, VCR mode will change to DVD
mode automatically. You can use DVD even if the
VCR is in the Timer recording mode.
If you do not use the DVD, turn the power off.
• If the clock symbol (
) blinks in the display in
spite of the pressing of •, the cassette may not
have been loaded yet. (see page 22)
• If the cassette is ejected in spite of the pressing
of •, the erase prevention tab of the cassette may
have been removed. (see page 22)
Note:
• In case of the timer recording from the scart socket,
proceed as follows: In step 4 press or repeatedly until the "CH" line blinks. Then press AUX repeatedly until "AV1" or "AV2" or "AV3" appears.
• If the clock symbol ( ) blinks when the timer recording ended, the TV program has not been completely
recorded because of an insufficient tape supply. Press
• to cancel the timer program or press EJECT to
remove the cassette tape.
• During timer recording standby mode, the VCR mode
cannot be selected. To use the VCR, press • at first,
then press VCR to change to VCR mode. After you
use the VCR, press • again to put the VCR into timer
recording standby mode.
Timer Recording Special case
Weekly (e.g. WKL-TU: each Tuesday) or daily (e.g.
MON-SAT: Monday to Saturday) Timer recording
Follow the procedure for timer recording on both pages
before. At picture 3 press or repeatedly until the
desired setting appears. Then press . When you press
or repeatedly, the indicator at DATE will change
as follows, in case today is Friday.
SUN-SAT 25 FRI ..... 24 SUN WKL-FRI
MON-SAT MON-FRI WKL-THU.....WKL-SAT
One month later
minus one day
In case of Timer progarms-overlapping
• Do not overlap timer programs as portions of the conflicting programs will be lost. The first recording time
has priority over the next recording time as shown in
the diagram below.
Program 1
8 : 00
Program 2
Program 3
Recording
Control Settings
Prog.1
9 : 00
Deleted Parts
Non Recorded Portion Parts
Prog.2 Prog.3
10 : 00
11 : 00
Note:
• The daily/weekly recording can be made continuously
until the recording is canceled or the tape reaches
the end.
• During timer recording the automatic rewinding
mechanism does not function.
Confirmation/Cancellation of the Timer
Recording
If the Timer has been activated, now press • to
1
deactivate the Timer. The clock symbol ( ) will
disappear. Then press VCR to change to VCR mode.
Press PROG. twice. All the
2
8 Timer memories will
appear.
To correct the
3
programmed setting:
Press or to select the
program you wish to correct,
then press OK to enter the
program input mode. Then
press or to select the
item you wish to correct.
Then correct the data with
or .
To cancel Timer program:
Press or to select the
written line. Then press
CANCEL. This line is now
canceled.
Press SET UP MENU (or PROG.) repeatedly until
4
the TV-picture appears.
17:30 18:00 7V
15
TUE
23 MON
13:00 14:30 1V
25 WED
12:15 13:00 4
--:-------- --
--:-------- --
--:-------- --
--:-------- --
--:-------- --
SELECT :
CLEAR
TIMER REC SET
SELECT :
SET : / 0–9
EXIT : MENU
23 MON
25 WED
SELECT :
EXIT : MENU
/ OK
: CANCEL EXIT : MENU
DATE
23 MO
START
13:00
END
14:30
CH
1 ARD
SPEED
LP
VPS/PDC
ON
--:-------- --
13:00 14:30 1V
12:15 13:00 4
--:-------- --
--:-------- --
--:-------- --
--:-------- --
--:-------- --
/ OK
--:--
--:--
--:--
--:--
--:--
OK : OK
--:--
--:--
--:--
--:--
--:--
--:--
SP
LP
SP
LP
SP
-
-
-
-
-
-
-
-
-
-
-
MON-SAT = everyday from
Monday fo Saturday.
WKL-SAT = each Saturday
34
TIMER REC SET
DATE
WKL-WED
START
11:30
--:--
END
2 ZDF
CH
SPEED
SP
VPS/PDC
ON
/ 0–9
: MENU
SELECT :
SET :
EXIT
Page 35

Detailed Description of the VPS/PDC Function
VPS/PDC is a service provided by the public TV station. When you select a VPS/PDC-compatible TV station and
activate the VPS/PDC function, the beginning and the end of the timer recording will be controlled by the TV
station. Any program air time delays will be taken care of. The private TV companies have not provided this service
yet. Thus, please turn OFF the VPS/PDC function when performing timer recordings of programs aired by private
TV stations.
Example: Assume you want to record a sports event that is scheduled to be aired from 21:00 to 23:00 and perform
your timer programming accordingly. However, the beginning of the sports event is postponed to 21:30 so that the
program will now end at 24:00. Using the VPS/PDC function, you can still make sure that the entire TV program is
recorded.
21
The user’s timer programming setting:
Actually, however, the sports event is aired from 21:30 to
24:00.
Recording without VPS/PDC function:
Recording with VPS/PDC function:
When you perform the timer programming be sure to observe the following points:
22
23 24
1.) Date and time should be correctly set.
The following points from 2 to 5 will be automatically taken care of by the ShowView feature.
Therefore, be sure to keep them in mind when doing recordings without the ShowView feature.
2.) Set the starting time precisely to the minute according to the data in the TV program magazine (not a
single minute earlier or later); otherwise an automatic recording will not be possible.
3.) If an additional 2nd time is specified in parentheses, which in most cases is explicitly stated as “VPS/PDC
time”, make sure to enter only this time data.
4.) The starting time of the subsequent TV program is considered to be the end time of the recording.
5.) If you program the recording of several subsequent TV programs, enter the start and end times sepa-
rately for each TV program. It is not sufficient to solely enter the start time of the first and the end time of the
last program (in this case only the first program will be recorded unless the VPS/PDC function is turned off).
Please look up in your TV program magazine which TV stations transmit the VPS/PDC signal. A VPS/PDC
on-screen indication (during auto search) does not mean that the respective TV station is actually VPS/PDCcompatible. Therefore, make sure to turn OFF the VPS/PDC function if you want to make timer recordings of
programs aired by a station that is not VPS/PDC-compatible. Otherwise the TV program will not be recorded
in its entirety.
It is preferable to deactivate the VPS/PDC function even for VPS/PDC-compatible TV stations — at least it
simplifies the programming procedure — if you want to record several programs of the same TV station in
direct sequence.
For instance: at 20:00, recording of the “Tagesschau” news program,
subsequently, at 20:15, recording of a movie,
and subsequently, from 21:45 to 22:45, recording of a sports program.
Using the VPS/PDC function, enter the start and end times of each program
separately; however, if the VPS/PDC function is turned OFF, it will be sufficient
to enter the start time of 20:00 and the end time of 22:45.
35
Page 36

TIMER REC SET
ATS (AUTO TUNING SYSTEM)
VCR EXTENSION
CHANNEL SETUP
SYSTEM SETUP
SELECT :
ENTER : OK
MENU
EXIT
:
VCR SETUP
NICAM/German A2 Stereo Recording and Playback
AUDIO MIX
NICAM
VCR SETUP
SELECT
:
ENTER
:OK
MENU
/
EXIT
:
SHARPNESS
[OFF]
[AUTO]
This DVD/VCR is capable of recording
sound in Hi-Fi system. The recording
will be performed automatically.
NICAM STEREO broadcasts are
recorded in its original sound system
regardless of the setting. If you wish
to record NICAM programmes, select
NICAM "AUTO" as follows.
And, this DVD/VCR can also receive
and record German A2 stereo
program. The tape recording is always
both in HiFi and in MONO on the
standard longitudinal track. In case of
bilingual TV programs always the two
audio channels will be recorded.
Preparation:
• Turn ON the TV and set to the video input mode.
• Make sure TV/VCR/DVD switch has been slided to VCR/DVD. Then
press VCR to select the VCR mode. (The VCR indicator will light)
NICAM stereo sound reception:
Press SET UP MENU. Press
1
▲ or ▼ to select VCR SETUP.
Then press OK.
Press ▲ or ▼ to select NICAM.
2
Then press
select [AUTO].
Press the SET UP MENU repeatedly until the TV picture
3
appears.
/ or OK to
Note:
When listening to a stereo broadcast or
playing back a tape Hi-Fi recorded in
stereo, you have to connect the DVD/
VCR with the stereo audio system or the
stereo TV. The sound which is output
from the RF OUT jack is monaural.
36
NICAM programmes are divided into 4 types as
shown below.
NICAM STEREO broadcast
"NICAM ST" illuminates when a
NICAM STEREO broadcast signal is
received.
NICAM MONO A broadcast
"NICAM M1" illuminates when a
NICAM MONO A broadcast signal is
received.
NICAM MONO A B broadcast
"NICAM M1/2" illuminates when a
NICAM MONO A and MONO B
broadcast signal is received.
NICAM OFF
It will be displayed for the NICAM
signal when the "NICAM [OFF]" is
selected in menu screen.
NICAM ST
NICAM M1
NICAM M1/2
NICAM OFF
Page 37

NICAM/German A2 Stereo Recording and Playback
German A2 stereo sound reception:
Stereo program indication
It will be displayed for approx. 4
seconds when stereo programs
are being received.
Bilingual program indication
It will be displayed for approx.
4 seconds when bilingual programs are being received.
Playback
Use A.MONITOR to select under stereo/mono or bilingual
playback. See the table below for more information.
STEREO
BILINGUAL
Note:
When playing HiFi cassette tapes recorded
on another VCR, the sound output may be
distorted. This is normal and no indication
of a unit malfunction. Try to minimize sound
distortions by using SET +/– or change to
MONO by pressing of A.MONITOR.
On-screen indications
(for 4 sec.)
Stereo playback
performed in:
Stereo
STEREO
Left channel signal
output from both
L CH
loudspeakers
Right channel
signal output from
R CH
both loudspeakers
Mono
MONO
HiFi signal indication
It will be displayed for approx. 4
seconds when playing HiFi video
cassette tapes.
Bilingual playback
performed as follows:
Simultaneously
both languages
from HiFi track
(Mixed sounds)
One's mother
tongue dubbing
(Main sound)
Original sound
track (Sub sound)
One's mother
tongue dubbing
(Main sound)
HI-FI
37
Page 38

TIMER REC SET
ATS (AUTO TUNING SYSTEM)
VCR EXTENSION
CHANNEL SETUP
SYSTEM SETUP
SELECT :
ENTER : OK
MENU
EXIT
:
VCR SETUP
Audio Mixing
AUDIO MIX
NICAM
VCR SETUP
SELECT
:/
ENTER
:OK
MENU
EXIT
:
SHARPNESS
[OFF]
[AUTO]
AUDIO MIX
NICAM
VCR SETUP
SELECT
:
ENTER
:OK
MENU
EXIT
:
SHARPNESS
[ON]
[AUTO]
/
When playing audio dubbed video
tapes, press A.MONITOR to select the
sound you want to listen to. Press
A.MONITOR repeatedly until "MONO"
is displayed on the screen to listen only
to the dubbed sound. In case of the
other on-screen indications only the
original sound will be output. It is also
possible to listen to the dubbed and the
original sounds simultaneously. To
accomplish this, set "AUDIO MIX" to
"[ON]" (see right). During playback,
press A.MONITOR repeatedly until
"STEREO" is displayed on the screen.
Preparation:
• Turn ON the TV and set to the video input mode.
• Make sure TV/VCR/DVD switch has been slided to VCR/DVD.
Then press VCR to select the VCR mode. (The VCR indicator
will light)
Press SET UP MENU.
1
Press
VCR SETUP
or to select
. Then press
OK.
Press or to select
2
AUDIO MIX.
Press / or OK to select
3
[ON].
If you select "[ON]", you can
listen to the dubbed and the
original sounds at the same
time.
Press SET UP MENU repeatedly until the TV picture
4
appears.
Note:
To deactivate the AUDIO MIX function
follow the above procedure from step 1 to
3, select "[OFF]", and confirm the setting
by pressing SET UP MENU.
38
Page 39

Duplicating a Video Tape
When you try to connect with a cable, make sure the power of both units have been turned off.
Connect the recording unit with the TV. Therefore you can just watch what the recording unit is recording.
Load a blank cassette tape with the erase prevention tab
1
intact into the recording DVD/VCR. Load the previously
recorded cassette tape into the playback VCR or a video
camera.
VCR
Use AUX or PR of the recording DVD/VCR to select the
2
"A1", "A2" or "A3" instead of the preset channel.
A1 = TV-RGB/Composite Scart Socket
A2 = VCR/DECODER Scart Socket
A3 = Front AV jacks
While holding 2, press and then 4 of Recording unit.
3
Press PLAY-button and then PAUSE/STILL-button of
4
Playback unit. Now you can see the still picture of the
scene that you wish to duplicate.
Press 4 of both units simultaneously to start the Duplicat-
5
ing.
Note:
Before starting the duplicating process, select the proper
tape speed using . For a pre-recorded tape the
correct tape speed will be set automatically during
playback.
Connection with second Video recorder or Video camera
VCR/DECODER
SCART socket
OR
Playback unit
Recording unit
(not supply)
Press AUX on the
recording unit repeatedly
until A3 appears.
Playback on
camera
(not
supply)
Playback unit
HR-XV1EU
SYSTEM SETUP
CLOCK SET
LANGUAGE/SPRACHE/LANGUE
AV2 [AV]
SELECT : /
ENTER
:OK
MENU
EXIT
:
TV
(not supply)
Recording unit
TV-Scart socket
(not supply)
• Select the “AV2” in menu
screen in the same way as the
step 1~2 on page 14.
Then press OK to select AV
mode.
Duplicating a disc material onto a video tape
You can record disc material in DVD, Video CD, Audio CD, etc. onto a video tape with this DVD/VCR only.
If the DVD disc has a Copy-guard feature, the duplicating is not possible. A symbol mark “
on the screen for approx. 4 seconds. See page 42 for more information about the DVD playback.
Preparation:
Load a cassette tape with the erase prevention tab
•
intact.
Select the tape speed in the VCR mode. (see P.28)
•
Load a disc you wish to duplicate.
•
Press DVD to select the DVD mode. (The DVD indi-
1
cator will light)
Press to start the disc playback.
2
” will appear
During disc playback, while holding 2, press .
3
Note:
You can set the duplicating time using the ITR-function.
At step 3 above press 2 repeatedly until the desired
duplicating time appears on the screen.(P.30)
39
Page 40

Disc
This unit applies to DVD discs from Region 2 only.
The loaded Disc (DVD, Video-CD, Audio-CD and MP3-CD) will be recognized automatically.
The suitable Disc-formats are: DVD, CD-R and CD-RW.
Some CD-R/RW discs may be incompatible.
This DVD/VCR uses the PAL color system. The NTSC-DVDs can be playback on PAL 60Hz.
Do not play DVD-ROM, DVD-Audio, CDV, CD-G or Photo CD to prevent accidental erasure of prerecorded material.
Some DVDs is played back with a Copy guard system. In case of a dubbing on video tape, strong disturbance may
occur. This is not a defect of this DVD/VCR.
Title
When two or more movies are recorded on a disc,
the disc is divided into two or more sections. Each
section is called a “TITLE”.
CHAPTER 1
Chapter
The titles can be subdivided into many sections.
Each section is called a “CHAPTER”.
Track
An Audio CD can contain several items.
These are assigned to the tracks.
TRACK 1 TRACK 2 TRACK 3 TRACK 4 TRACK 5
Removing Disc from Case
Be sure to hold the edge of disc. Do not touch the surface of the disc.
Pick up the disc gently from the case.
DVD DISC
TITLE1 TITLE2
CHAPTER 2 CHAPTER 2 CHAPTER 3CHAPTER 1
Audio-CD
CD
• Do not scratch the disc.
• Do not get dirt on the surface of the disc.
• Do not stick a label or adhesive tape on the disc.
• Do not drop or bend the disc.
Storing Disc
• Store the disc in the case to avoid risk of scratches, dirt or damage.
• Do not leave disc exposed to direct sunlight or in hot or humid places.
Cleaning Disc
Wipe the disc with a clean, dry cloth from center to edge.
• Do not wipe the disc round.
• Do not use liquid or aerosol cleaners.
40
Page 41

Setting setup language
The setup language can be selected.
Preparation:
• Turn ON the TV and set to the video input mode.
• Make sure TV/VCR/DVD switch has been slided to VCR/DVD.
• When using an amplifier, switch on the amplifier.
Press DVD to select the DVD
1
mode. (The DVD indicator will
light.)
“No Disc” will appear on the
screen. (If a DVD disc has already loaded, the playback will
start automatically.)
Press SET UP MENU in the stop
2
mode. The SETUP MENU of
DVD will appear on the screen.
Then press
or to select
No Disc
B
A
Picture
TV Shape 4:3LB
Video Out Select Video
C
“Language”.
: Select : Enter
Press / to select On-Screen
3
Language, then press OK (En-
ter).
Language
On-Screen Language ENG
Disc Menu Language ENG
Audio Language ENG
Subtitle Language ENG
C
B
A
If the DVD/VCR does not operate
properly: Static electricity, etc., may
affect the player's operation. Disconnect
the AC power cord once, then connect
it again.
: Select : Enter
Press / to select desired
4
language: English (English),
German (Deutsch) or French
(Français).
To make the SETUP screen disappear, press SET UP MENU
5
(or RETURN).
Language
On-Screen Language ENG
Disc Menu Language ENG
Audio Language ENG
Subtitle Language ENG
C
B
A
English
Fran ais
Espa ol
: Select : Enter
41
Page 42

Playback procedure
Preparation:
• Turn ON the TV and set to the video input mode.
• Make sure TV/VCR/DVD switch has been slided to VCR/DVD. Then
press DVD to select the DVD mode. (The DVD indicator will light)
Press OPEN/CLOSE.
1
The disc tray will open.
Place a disc onto the tray.
2
Hold the disc, position it with the
printed label side up, align it with
the guides, and place it in its
proper position.
Press or OPEN/CLOSE.
3
The disc tray closes automati-
cally.
On the screen, changes to
“ ” and then playback will
commence.
• A menu screen may appear on
the TV screen, if the disc has
a menu feature. In this case,
press
operate a menu feature.
Press 3 to end playback.
4
• The DVD/VCR memorizes the stopped point, depending on
the disc. “To Return To The Last Scene Viewed, Press Play. To
Disable This Operation, Press STOP Again.” appears on the
screen for approx. 4 seconds. “ ” will continue blinking in the
display until the playback is stopped completely. Press to
resume playback (from the scene point).
• If you press 3 again (“ 3 ” appears on the screen) or unload
the disc, the DVD/VCR will clear the stopped point.
Then press OPEN/CLOSE.
5
The disc tray opens.
Remove the disc and press , (POWER).
The disc tray closes automatically and DVD/VCR turns off.
NOTES:
• If a non-compatible disc is loaded, "Please Check Disc", "Disc playback unauthorized Consult owners manual
for further information" or "Parental Lock" will appear on the TV screen according to the type of loaded disc. In
this case, check your disc again (See pages 40 and 50, 51).
• Some discs may take a minute or so to start playback.
• A “Prohibition” symbol
tried is not available on the disc, or the DVD/VCR can not access the feature at this time. This does not indicate
a problem with the DVD/VCR.
When you set a single-faced disc label downwards (ie. the wrong way up) and press or OPEN/CLOSE, " "
•
will appear and remain on the screen for approx. 30 seconds and then it will change to "Please Check Disc".
• Some playback operations of DVDs may be intentionally fixed by software producers. Since this DVD/VCR plays
DVDs according to the disc contents the software producers designed, some playback features may not be
available. Also refer to the instructions supplied with the DVDs.
• When playing DTS-encoded Audio CDs, excessive noise will be heard from the analog stereo outputs. To avoid
possible damage to the audio system, the consumer should take proper precautions when the analog stereo
outputs of the DVD/VCR are connected to an amplification system.
may appear at the upper right of the screen. This symbol means either the feature you
, , , or OK to
42
Page 43

Special playback
Note: There may be a slight delay between pressing the button and the
function activation.
Fast Forward Playback
Press during normal playback.
Each press of will increase the speed of the search x2 ( ), x8
), x30 ( ), x100 ( ). (in case of Audio-CD: x4 ( ) and x8
(
(
) are available)
• To resume normal playback, press
.
Review Playback
Press during normal playback.
Each press of will increase the speed of the search x2 ( ), x8
( ), x30 ( ), x100 ( ). (in case of Audio-CD: x4 ( ) and x8
( ) are available)
• To resume normal playback, press .
Still Playback
Press 4 during normal playback.
To resume normal playback, press
.
NOTES:
• The unit is capable of holding a still
video image or On screen display image
on your television screen indefinitely. If
you leave the still video image or On
screen display image displayed on your
TV for an extended period of time, you
risk permanent damage to your
television screen. Projection televisions
are very susceptible.
• Some titles may not display chapter
numbers.
• When you set “Title Stop” to “Off” (See
page 57), you can access chapter in
another title. If you go back to the
preceding title by pressing the SKIP, the
DVD/VCR locates the first chapter of the
title. When “Title Stop” is set to “On”.
you can access chapters only within the
current title.
Frame Advance
Press 4 during still playback.
One frame is advanced each time
you press 4.
To resume normal playback, press
.
Slow-motion Playback
Press SLOW during
Each press of SLOW will change the speed of the slow x1/2, x1/4,
x1/8.
• To resume normal playback, press .
• To resume the still playback, press 4.
normal playback or still playback.
Locating a chapter or track
T C
Press SKIP (
( ) Reverse during playback to
locate a chapter or track that you
want to watch.
Each time you press the button, a
“C (chapter)” number or “T (track)”
number is skipped.
When you press SKIP ( ), playback starts from the beginning
of the current chapter or track.
When you press SKIP ( ) twice, playback starts from the
beginning of the preceding chapter or track.
) Forward or SKIP
11
43
Page 44

DVD Picture Signal Selection/Zooming
You can select the output signal of
DVD playback picture to the TV
screen as an VIDEO signal or a RGB
signal.
Preparation:
• Turn ON the TV and set to the video input mode.
• Make sure TV/VCR/DVD switch has been slided to VCR/DVD.
Then press DVD to select the DVD mode. (The DVD indicator
will light)
Press SET UP MENU in the
1
stop mode.
Press
or to select “Pic-
TV Shape 4:3LB
Video Out Select Video
Picture
C
B
A
ture”, then press or to
select “Video Out Select”.
: Select : Enter
Press OK (Enter).
2
Press or to select the
desired picture signal, “Video”
or “RGB”.
To make SETUP screen disappear, press SET UP MENU.
3
TV Shape 4:3LB
Video Out Select Video
C
B
A
Picture
Video
RGB
: Select : Enter
Note:
• If you use the connection with S-Video cord, be sure to set the
“Video Out Select” at step 2 above to “Video”. If you select
“RGB”, the TV screen will be disturbed.
• If you selected “RGB” at step 2 above, press TV/VCR to select
VCR. (VCR indicator will appear on the display) Otherwise,
the TV screen will be disturbed when you select the channel
with TV’s CHANNEL UP/DOWN buttons.
Note:
• Picture Signal Selection is only available for connecting with a 21 pin Scart
Cable.
• Depending on your TV, NTSC disc may
not playback correctly in colour. In this
case, it is recommended to select the
Picture Signal RGB on step 2.
• Only use RGB setting if your TV is RGB
compatible.
Zooming
This unit will allow you to zoom in on the frame image. You
can then make selections by switching the position of the
frame.
Press ZOOM during playback.
1
The center part of the image
will be zoomed in.
As you repeatedly press the
OK or ZOOM while “ZOOM” is
selected, the magnification
level changes. Variation of the
levels includes image reduction.
Press / or / to view a different part of the frame.
2
You may move the frame from the center position to UP,
DOWN, LEFT or RIGHT direction.
• If you select “EXIT” and press the OK, you can turn off the
symbol mark, keeping the current magnification level.
• Press CANCEL to restore the zoom point to the center
of the picture.
While “ZOOM” is selected, press ZOOM repeatedly to re-
3
turn to a 1:1 view.
ZOOM
EXIT
Zoom Off
: Select : Change
44
Page 45
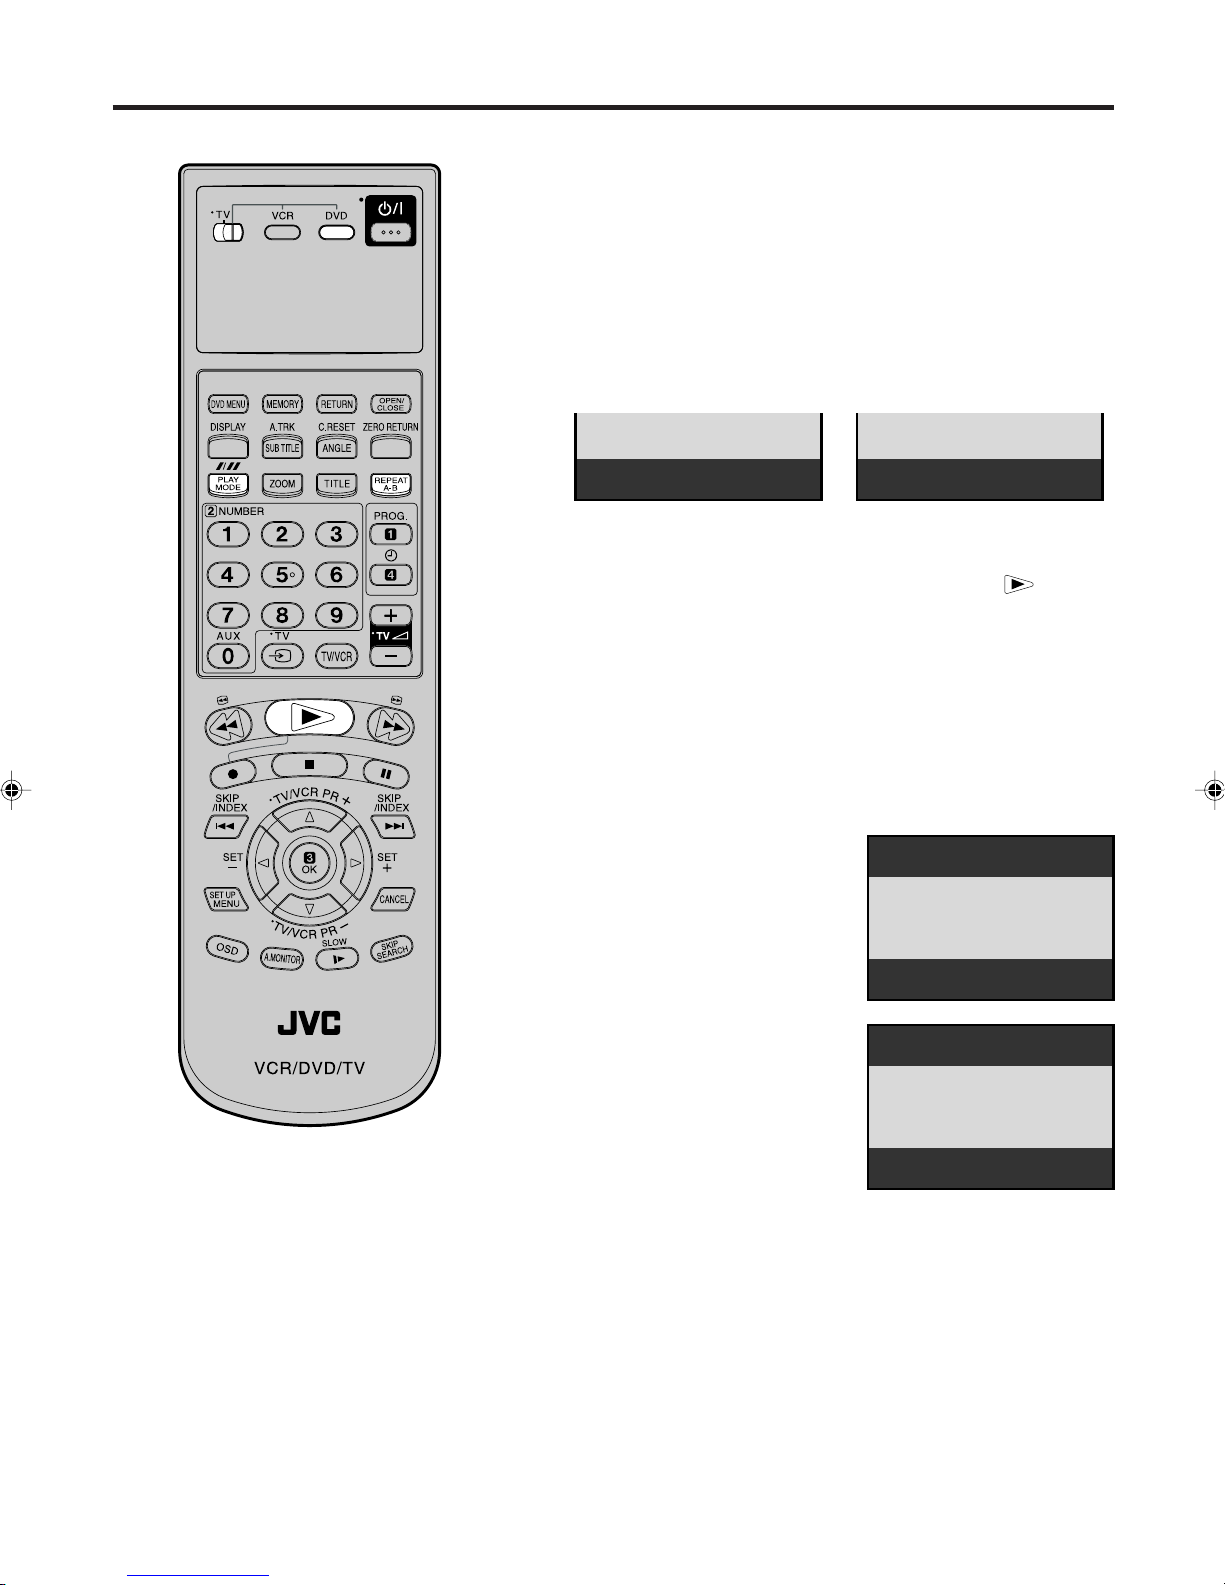
Repeat playback
Preparation:
• Turn ON the TV and set to the video input mode.
• Make sure TV/VCR/DVD switch has been slided to VCR/DVD.
Then press DVD to select the DVD mode. (The DVD indicator
will light)
REPEAT PLAYBACK
Press PLAY MODE repeatedly to select “Chapter Repeat”,
1
“Title Repeat” or “All Repeat”. (In case of CD, select “Track
Repeat” or “ ALL Repeat” )
DVD
Chapter Repeat
During playback repeat playback will start automatically.
2
To start repeat playback during stop mode, press within
about 5 seconds after you press PLAY MODE.
• To resume normal playback, press PLAY MODE repeatedly
until “Off” appears on the TV-screen.
Track Repeat
CD
A-B Repeat Playback
A-B repeat playback allows you to repeat material between two
selected points.
Press REPEAT A-B during
1
playback.
The start point is selected.
A
-
NOTES:
•
Some discs may not work with the
repeat operation.
•
In A-B repeat mode, subtitles near
point A or B may not appear.
•
During the A-B Repeat Playback the
ANGLE feature will not operate.
•
You may not be able to set A-B Repeat, depending on the scenes of the
DVD.
•
A-B repeat does not work with an interactive DVD and MP3-CD.
•
Random playback can not be combined with Repeat playback.
Press REPEAT A-B again.
2
The end point is selected.
Playback starts at the point that
you selected. Playback stops at
the end point, returns to Point A
automatically, then starts again.
To resume normal playback,
press REPEAT A-B again.
“Repeat Off” appears on the screen.
A-B
45
Page 46

1 T:- -CT:- -
-
2 T:- -CT:- -
-
3 T:- -CT:- -
-
4 T:- -CT:- -
-
5 T:- -CT:- -
-
6 T:- -CT:- -
-
7 T:- -CT:- -
-
: Select 0-9 : Input : Play
Memory
Memory playback/Random playback
: Select 0-9 : Input : Play
Memory
1 T:01 CT:002
2 T:
- -
CT:- -
-
3 T:- -CT:- -
-
4 T:- -CT:- -
-
5 T:- -CT:- -
-
6 T:- -CT:- -
-
7 T:- -CT:- -
-
Preparation:
• Turn ON the TV and set to the video input mode.
• Make sure TV/VCR/DVD switch has been slided to VCR/DVD. Then
press DVD to select the DVD mode. (The DVD indicator will light)
Memory playback
You can arrange the order of titles, chapter or tracks on the disc.
Press MEMORY.
1
Press / to
2
In stop mode
In stop mode
In playback
1 T:- -CT:- -
-
Memory
: Select 0-9 : Input : Play
In playback
select “T” Title
number or “CT”
Chapter or Track
number. Use
number keys to
1 T:01 CT:002
Memory
: Select 0-9 : Input : Play
Input the favorite
number.
• If you input a large number than the number that is recorded
on the disc, the bar will be skipped.
• The input number into "T" for CD or MP3 is not effective.
Press or OK.
3
In stop mode
In playback
Set the “T” and
“CT” in the next
bar as In step 2.
1 T:01 CT:002
2 T:02 CT:004
3 T:
- -
CT:- -
-
4 T:- -CT:- -
-
5 T:- -CT:- -
-
6 T:- -CT:- -
-
7 T:- -CT:- -
-
Memory
: Select 0-9 : Input : Play
2 T:02 CT:004
Memory
: Select 0-9 : Input : Play
NOTES:
•
The memory
when press
playback
3
during memory
is cancelled
playback.
• Random playback can not be
combined with Repeat playback.
• You can program up to 30 selections
into the memory.
• Depending on the DVD, Chapter
Random operation may not work
during playback.
• You cannot use the random playback
with memory playback.
46
• When you select another chapter In the same title, you do
not need to select the title number.
• To cancel the programmed selection, press CANCEL.
Press to start MEMORY playback.
4
• To resume normal playback, press CANCEL.
Random playback
Press PLAY MODE repeatedly to select “ Chapter Random”
1
or “Title Random”.(In case of CD, select Track Random)
DVD
Chapter Random
During playback random playback will start automatically.
2
Track Random
To start random playback during stop mode, press within
about 5 seconds after you press the PLAY MODE.
• To resume normal playback, press PLAY MODE repeatedly
until “Off” appears on the TV-screen.
CD
Page 47

MP3 Playback
This player can play back the MP3-data
which has been recorded on CD-R or CDRW. To produce the MP3-data, you need a
Windows-PC with CD-ROM drive and a MP3encoding Software (not supplied).
The Apple-HFS-System can not be played.
MP3 CD Information
Limitations on MP3 CD playback
• MP3 CD is the disc that is standardized by
ISO9660, its file name must include 3-digits
extension letters, “mp3”.
• The directory and file names of the MP3
CD must correspond to the ISO
standardized files.
• This unit can read 200 files per disc. If
one directory has more than 200 files, it
reads up to 200 files, the remaining files will
be omitted.
• As for multi-session disc, only the first
session can be played.
• If the CD has both audio tracks and MP3
files, only audio tracks are played.
• It may take more than one minute for this
unit to read MP3 files depending on its
structure.
• Music recorded by “Joliet Recording
Specification” can be played back, the file
name is displayed (within 8 letters) on the
screen. Long file names will be condensed.
• The music files recorded by “Hierarchical
File System” (HFS) cannot be played.
Limitations on display
The maximum number for display is 8
letters. Available letters for display are the
following: capital or small alphabets of A
through Z, numbers of 0 through 9, and _
(under score).
Notes on MP3 files
To play back MP3 CD in the recorded order,
1. Use MP3 software that records data
alphabetically or numerically.
2. Name each file including a two-digit or three-
digit number (e.g. “01” “02” or “001” “002”).
3. Refrain from making too many sub-folders.
CAUTION:
• Some MP3 CDs can not be played back
depending on the recording conditions.
• The CD-R/RW that has no music data or
non-MP3 files can not be played back.
Preparation:
• Turn ON the TV and set to the video input mode.
• Make sure TV/VCR/DVD switch has been slided to VCR/DVD.
Then press DVD to select the DVD mode. (The DVD indicator
will light)
Press OPEN/CLOSE.
1
The disc tray will open.
Place a disc onto the tray.
Press or OPEN/CLOSE. The
2
disc tray closes automatically. On
the TV-screen, “
” and then
11
T
reading file number will appear.
Then playback will commence.
• Reading will take as much time
as the number of file.
• Press 3 to end playback.
Press OSD.
3
Then press
MP3
and press OK (Enter).
Press / or
4
OK (Enter). Track is selected and play commences.
•
In case the folder includes more than 9 tracks, press
/ to select
/
to select the desired track, then press
T
1 000:23
: Select : Enter
MP3
EAM
PCM
to display next track list.
• To remove track list, press CANCEL.
• Press
/
to select “T” and press number keys to
input your desired track.
1 000:23
: Select : Search
MP3
EAM
PCM
Press 3 to end playback.
5
T
1. \ CRYINI~1
2. \ DANGER~1
3. \ GITARREN
4. \ LILYWA~1
5. \ MERCYS~1
6. \ OBSESS~1
7. \ PINKPA~1
8. \ RUNNIN~1
• The unit records the stopped track.
Press to resume playback (from the beginning of
track).
• If you press 3 again or unload the disc, the unit will clear
the stopped track.
Press OPEN/CLOSE.
6
The disc tray opens.
Remove the disc and press .
The disc tray closes automatically and DVD/VCR turns off.
/
NOTES:
•
During MP3-Playback, you can not use SEARCH, A-B
Repeat functions.
•
You can use Repeat(Track or All) and Random functions for
MP3 CD Playback.(See page 45 and 46)
47
Page 48

Changing soundtrack language / Changing Subtitles language
L.R
L
R
Preparation:
• Turn ON the TV and set to the video input mode.
• Make sure TV/VCR/DVD switch has been slided to VCR/DVD. Then
press DVD to select the DVD mode. (The DVD indicator will light)
Changing soundtrack language
You can select the language when you play a multilingual disc.
Press A.MONITOR during play-
1
back.
The current soundtrack language
is displayed.
ENG1 2CH
ENG2 5.1CH
FRE1 2CH
NOTES:
• If the desired language is not heard after
pressing A.MONITOR several times, the
language is not recorded on the disc.
• Changing soundtrack or subtitle
language is cancelled when you open the
disc tray or turn the power off. The initial
default language or available language
will be heard and seen if the disc is
played back again.
Depending on the DVD you may be
•
unable to turn on, turn off, or change the
subtitles, even if they are recorded on the
disc. While playing the DVD, the subtitle
may change while opening or closing the
disc tray, or while changing the title.
•
During some scenes, the subtitles may not
appear immediately after you select “On”.
• The abbreviation of the language
appears instead of the language name.
Refer to the list of languages and their
abbreviations. (See on page 61.)
48
Press A.MONITOR repeatedly
2
until the desired language is selected.
The on-screen display will disap-
Audio:FRE1 2CH
: Select : Return
ENG1 2CH
ENG2 5.1CH
FRE1 2CH
2CH
pear after a few seconds.
• To turn off the soundtrack
setting display, press the
Audio:ENG1 2CH
: Select : Return
2CH
CANCEL or OK button.
In case of VIDEO CD playback
Audio type changes as follows each time you press A.MONITOR.
L.R
L
R
L.R
L
R
Changing Subtitles language
You can select the language when playing back a disc recorded
with multi-lingual subtitles.
Press SUB TITLE during
1
playback.
Then press / to select the
desired language.
• To turn off the subtitle setting
display, press the CANCEL
or OK button.
• To turn the subtitles off, select
“Off”.
Press SUB TITLE repeatedly to
2
turn Subtitles on or off.
Off
GER 1
DUT 1
SV 1
NO 1
- - -
Subtitle:
ENG 1
SPA 1
FRE 1
Subtitle:ENG1 On
Off
: Select : Return
Off
: Select : Return
: On/Off
Page 49

Changing angles / Title selection / DVD menu
Preparation:
• Turn ON the TV and set to the video input mode.
• Make sure TV/VCR/DVD switch has been slided to VCR/DVD. Then
press DVD to select the DVD mode. (The DVD indicator will light)
Changing Angles
When playing back a disc recorded with multi-angle facility,
can change the angle that you are viewing the scene from.
Press ANGLE during playback.
1
The current angle will appear.
1
2
3
Angle :1
: Select : Return
Press ANGLE or / repeatedly until the desired angle is
2
selected.
• To turn off the angle number display, press the CANCEL.
• You can change the camera angle directly by pressing the
number keys corresponding to its angle number instead of
using the
/ buttons.
you
NOTE:
Depending on the DVD, you may not
be able to change the angles even if
multi-angles are recorded on the disc,
or you may be unable to select the title,
and a “title menu” may simply be called
a “menu” or “title” in the instructions
supplied with the disc.
Title Selection
Two or more titles are recorded on some discs. If the title menu
is recorded on the disc, you can select the desired title.
Press TITLE during playback.
1
Title menu appears on the screen.
• Press TITLE again to resume playback at the scene
when you pressed TITLE.
Press / or / to select the desired title.
2
Press OK or
3
The playback of the selected title will start.
.
DVD Menu
Some DVDs allow you to select the disc contents using the
menu.
When you play back these DVDs, you can select the subtitle
language and sound-track language,etc. using the DVD menu.
Press DVD MENU during playback.
1
The DVD menu appears on the screen.
• Press DVD MENU again to resume playback at
the scene when you pressed DVD MENU.
Press / or / to select the desired item.
2
Press OK.
3
The menu continues to another screen. Repeat steps 2 and 3 to
set the item completely.
49
Page 50

Parental control
Some discs are specified not suitable
for children. Such discs can be
prevented from play back with the
unit.
Preparation:
• Turn ON the TV and set to the video input mode.
• Make sure TV/VCR/DVD switch has been slided to VCR/DVD. Then
press DVD to select the DVD mode. (The DVD indicator will light)
Parental control setting
Press SET UP MENU in the stop
1
mode.
Press or to select “Operation”.
Press or to select
2
“Parental Lock”, then press OK.
Press or to select Off or On.
3
Off: The parental lock feature
does not function.
After pressing OK (Enter),
follow step 4 and 6 below.
On: To activate the parental lock
feature or change the
setting, press
OK (Enter)
and follow steps 4-6 below.
TV Shape 4:3LB
Video Out Select
Operation
Pause/Still AutoOnOff
Parental Lock Off
Title Stop Off
PBC On
Operation
Pause/Still AutoOnOff
Parental Lock Off
Title Stop Off
PBC On
C
B
A
Picture
: Select : Enter
C
B
A
: Select : Enter
C
B
A
: Select : Enter
NOTES:
If each setup (page 50~59) has been
•
completed, the unit can always be
worked under the same conditions
(especially with DVD discs).
Each setup will be retained in the
memory if you turn the power off.
Depending on the discs, the unit can-
•
not limit playback.
Some discs may not be encoded with
•
specific rating level information though
its disc jacket says "adult". For those
discs, the age restriction will not work.
Do not forget the security code. If you
•
forget the security code, delete it. (See
step 7 on next page)
Press
4
4-digits
number keys
security code then
to input a
press OK.
• If you input a wrong number,
press CANCEL.
• To return to the before step,
press RETURN.
Enter the code of a country/area
5
whose standards were used to
rate the DVD disc. (See the list
on the page 51)
Example: Set to DE (GERMANY).
Press or to select “D” then
press
to move to the right
character. Then select “E” same
as above. Then press OK (En-
ter).
C
B
A
Operation
Pause/Still Auto
Parental Lock Off
Title Stop Off
PBC On
: Select : Enter
C
B
A
Operation
Pause/Still AutoOnOff
Parental Lock Off
Title Stop Off
PBC On
: Select : Enter
Off
On
Security Code
----
Area Code D E
50
Page 51

Parental control
Country/Area Code
AUSTRALIA AU
BELGIUM BE
CANADA CA
CHINA CN
CHINA HONG KONG HK
DENMARK DK
FINLAND FI
FRANCE FR
GERMANY DE
INDONESIA ID
ITALY IT
JAPAN JP
Country/Area Code
NETHERLANDS NL
NORWAY NO
PHILIPPINES PH
RUSSIAN FEDERATION RU
SINGAPORE SG
SPAIN ES
SWEDEN SE
SWITZERLAND CH
TAIWAN TW
THAILAND TH
UNITED KINGDOM GB
UNITED STATES US
MALAYSIA MY
Press / to select the paren-
6
tal lock level, then press OK (En-
ter).
Operation
Pause/Still Auto
Parental Lock Off
Title Stop Off
PBC On
C
B
A
Off
On
Area Code D E
Level 7
: Select : Enter
You cannot play DVD discs rated higher than the level you selected
unless you cancel the parental lock function.
For example, when you select level 7, discs rated higher than level
7 are locked out and cannot be played.
• Level 1: DVD software for adults cannot be played back.
• Level 8: All DVD software can be played back.
• Select from the level 1 to level 8. The limitation will be more severe
as the level number is lower.
To make the SETUP screen disappear, press SET UP MENU.
7
To change the parental lock level
Follow steps 1- 6.
To change your 4-digit security code
1) After selecting “On” or “Off” at step 3 press 3 four times, then
press OK (Enter).
The 4-digit security code is deleted.
2)
Press
number keys
to create a new 4-digit security code at step 4.
51
Page 52

Setting menu language
You can select the language of the
disc menu messages of DVDs.
Preparation:
• Turn ON the TV and set to the video input mode.
• Make sure TV/VCR/DVD switch has been slided to VCR/DVD. Then
press DVD to select the DVD mode. (The DVD indicator will light)
Press SET UP MENU in the stop
1
mode.
Press
or to select “Lan-
guage”.
Press
2
Menu Language”.
Press OK (ENTER).
3
Press
or to select “Disc
or to select your
desired language, then press OK
(ENTER).
TV Shape 4:3LB
Video Out Select Video
Language
On-Screen Language ENG
Disc Menu Language ENG
Audio Language ENG
Subtitle Language ENG
Language
On-Screen Language ENG
Disc Menu Language ENG
Audio Language ENG
Subtitle Language ENG
C
B
A
Picture
: Select : Enter
C
B
A
: Select : Enter
C
B
A
English
French
German
Others
Code D E
: Select : Enter
English, French, German
The selected language is the first-priority Menu language.
Others: Other languages can be selected (See the Table of
languages on page 61).
Example:
Set to DE (GERMANY).
Press or to select “D” then press to move to
the right character. Then select “E” same as above.
Then press OK (ENTER).
To make the SETUP screen disappear, press SET UP MENU.
4
52
Page 53

Setting audio soundtrack language
The same audio soundtrack language
can always be selected by your unit
even if you replace the disc or turn
the power off.
Preparation:
• Turn ON the TV and set to the video input mode.
• Make sure TV/VCR/DVD switch has been slided to VCR/DVD. Then
press DVD to select the DVD mode. (The DVD indicator will light)
Press SET UP MENU in the stop
1
mode.
Press or to select
“Language”.
Press or to select “Audio
2
Language”.
Press OK (Enter).
3
Press
or to select your
desired Audio Language, then
press OK (Enter).
TV Shape 4:3LB
Video Out Select Video
Language
On-Screen Language ENG
Disc Menu Language ENG
Audio Language ENG
Subtitle Language ENG
Language
On-Screen Language ENG
Disc Menu Language ENG
Audio Language ENG
Subtitle Language ENG
C
B
A
Picture
: Select : Enter
C
B
A
: Select : Enter
C
B
A
English
French
German
Others
Code D E
: Select : Enter
NOTES:
• If the selected language is not recorded on the disc, the original language will be heard.
• Some DVD discs may be played in a
different language than you selected.
A prior language may be programmed
on the disc.
English, French, German
The language you have selected will play if it is recorded on
the disc.
Others: If you want to select another language, enter the lan-
guage code (See the Table of languages on page 61).
Example:
Set to DE (GERMANY).
Press or to select “D” then press to move to
the right character. Then select “E” same as above.
Then press OK (Enter).
To make the SETUP screen disappear, press SET UP MENU.
4
53
Page 54

Setting subtitle language
The same subtitle language can
always be selected even if you replace
the disc or turn the power off.
Preparation:
• Turn ON the TV and set to the video input mode.
• Make sure TV/VCR/DVD switch has been slided to VCR/DVD. Then
press DVD to select the DVD mode. (The DVD indicator will light)
Press SET UP MENU in the stop
1
mode.
Press
or to select
“Language”.
2
Press
or to select “Subtitle
Language”.
Press OK (Enter).
3
Press or to select your
desired language, then press OK
(Enter).
TV Shape 4:3LB
Video Out Select Video
Language
On-Screen Language ENG
Disc Menu Language ENG
Audio Language ENG
Subtitle Language ENG
Language
On-Screen Language ENG
Disc Menu Language ENG
Audio Language ENG
Subtitle Language ENG
C
B
A
Picture
: Select : Enter
C
B
A
: Select : Enter
C
B
A
English
French
German
No Subtitle
Others
Code D E
: Select : Enter
NOTES:
• If the selected language is not recorded
on the disc, the first-priority language is
selected.
• Some DVD discs may be set to display
Subtitles in a different language than
you selected. A prior subtitle language
may be programmed on the disc.
English, French, German
The subtitle is displayed with the selected language if it is
recorded on the disc.
No Subtitle:
Subtitles do not appear.
Others: If you want to select another language, enter the
language code (See the Table of languages on
page 61).
Example: Set to DE (GERMANY).
Press or to select “D” then press to move to
the right character. Then select “E” same as above.
Then press OK (Enter).
To make the SETUP screen disappear, press SET UP MENU.
4
54
Page 55

Setting the aspect ratio of TV screen / Setting on Screen display
You can select the aspect ratio for
your TV.
Preparation:
• Turn ON the TV and set to the video input mode.
• Make sure TV/VCR/DVD switch has been slided to VCR/DVD. Then
press DVD to select the DVD mode. (The DVD indicator will light)
Setting the aspect ratio of TV screen
Press SET UP MENU in the stop
1
mode.
Press
“Picture”, then press or
or to select
TV Shape 4:3LB
Video Out Select Video
to select “TV shape”.
Press OK (Enter).
2
Press
desired screen type.
or to select your
TV Shape 4:3LB
Video Out Select Video
You have the following screen sizes to choose from:
4:3 Letterbox:
Select when a standard 4:3 TV is connected.
Displays theatrical images with masking bars above and below
the picture.
C
B
A
Picture
: Select : Enter
C
B
A
Picture
4:3 Letterbox
4:3 Normal
16:9 Widescreen
: Select : Enter
NOTES:
• The displayable picture size is preset on
the DVD video disc. Therefore, the
playback picture of some DVD video
discs may not conform to the picture size
you select.
• When you play DVD video discs recorded in the 4:3 picture size only, the
playback picture always appears in the
4:3 picture size regardless of the TV
shape setting.
• If you select “16:9 widescreen” and you
own a 4:3 TV set, the DVD playback
picture will be horizontally distorted during playback. Images will appear to be
horizontally compressed. Always be
sure that your TV shape conforms to the
actual TV in use.
4:3 Normal:
Select when a standard 4:3 TV is connected.
Displays pictures cropped to fill your TV screen. Either or both
sides of the picture are cut off.
16:9 Widescreen:
Select this mode when connecting to a wide-screen TV.
A wide screen picture is displayed full size.
To make the SETUP screen disappear, press SET UP MENU.
3
Setting on Screen display
Press SET UP MENU in the stop
1
mode.
Press or to select “Display”
Press
2
Screen Displays”.
Press OK (Enter).
3
Press
or to select “On-
or to select “On” or
“Off”.
On: Operational modes (e.g.
On-Screen Displays On
Background Picture
Screen Saver On
On-Screen Displays Off
Background Picture
Screen Saver On
“ ”, “ ”) appear when you
press the buttons (factory
setting).
Off: Operational modes (e.g. “ ”, “ ”) do not appear when
you press any buttons.
To make the SETUP screen disappear, press SET UP MENU.
4
C
B
A
Display
: Select : Enter
C
B
A
Display
Off
On
: Select : Enter
55
Page 56

A
B
C
Audio
Karaoke Vocal On
Dynamic Range Control
On
Audio Out Select Bitstream
Analog 2ch
PCM
Bitstream
: Select : Enter
Setting Audio
A
B
C
Audio
Karaoke Vocal Off
Dynamic Range Control
On
Audio Out Select Bitstream
: Select : Enter
On
Off
Preparation:
• Turn ON the TV and set to the video input mode.
• Make sure TV/VCR/DVD switch has been slided to VCR/DVD. Then
press DVD to select the DVD mode. (The DVD indicator will light)
Audio Out Select
Select the output sound format corresponding to your system connection.
For details of sound recording systems, see on page 59.
Press SET UP MENU in the stop mode.
1
Press
Press or to select “Audio Out
2
Select”, then press OK (Enter). Press
or to select “Audio”.
or to select your desired output
sound.
Bitstream: Select when connected to an amplifier equipped with a Dolby
Digital, DTS, MPEG1 or MPEG2 decoder. The DVD/VCR outputs
digital audio information in the bitstream format when you play a
DVD video disc recorded on the Dolby Digital, DTS, MPEG1 or
MPEG2 recording system.
Analog 2ch: Select when connected to a TV, Dolby Pro Logic or stereo
system
via the analog audio jacks.
PCM: Select when connected to a 2 channel digital stereo amplifier.
The DVD/VCR outputs sounds in the PCM 2ch format when you
play a DVD video disc recorded on the Dolby Digital.
MPEG1 or
MPEG2 recording system.
NOTES:
• The Dynamic Range Control function
works only during playback of Dolby
Digital recorded discs.
• The level of Dynamic Range Control
may differ depending on the DVD video
disc.
• The vocal output feature is used during
playback of Dolby Digital (multi-channel)
recorded DVD KARAOKE discs. This
feature allows you to turn off vocal audio
tracks, or restore them for background
accompaniment.
• When playing KARAOKE, connect the
appropriate audio equipment such as an
amplifier to the DVD player.
56
3
To make the SETUP screen disappear, press SET UP MENU.
Dynamic Range Control
Turn on or off a function that makes faint sounds easier to hear
even if you lower the volume during late hours playback.
Press SET UP MENU in the stop
1
mode.
Press
Press or to select “Dynamic
2
Range Control”, then press OK (Enter).
Press
or to select “Audio”.
or to select “On” or “Off”.
Off: Full dynamic range is maintained.
On: Dynamic range is reduced.
To make the SETUP screen disappear,
3
press SET UP MENU.
Karaoke Vocal
Turn on or off the vocal output during DVD KARAOKE disc
playback.
Press SET UP MENU in the stop mode.
1
Press
Press or to select “Karaoke
2
Vocal”, then press OK (Enter).
Press
or to select “Audio”.
or to select “On” or “Off”.
Audio Out Select BitstreamOnOff
Dynamic Range Control
Karaoke Vocal Off
A
Audio
On
: Select : Enter
C
B
Off: The primary vocal is not output.
On: The primary vocal is output when
it is recorded on the disc.
To make the SETUP screen disappear, press SET UP MENU.
3
Page 57

Setting Operation
Preparation:
• Turn ON the TV and set to the video input mode.
• Make sure TV/VCR/DVD switch has been slided to
VCR/DVD. Then press DVD to select the DVD mode.
(The DVD indicator will light)
Pause/Still
Select the resolution of still pictures.
Press SET UP MENU
1
in the stop mode.
Press
or to
select “Operation”.
Press or to
2
select “Pause/Still”,
then press OK
(Enter). Press
to select “Auto”
or “Frame”, then
press OK (Enter).
or
TV Shape 4:3LB
Video Out Select Video
Operation
Pause/Still Auto
Parental Lock Off
Title Stop Off
PBC On
C
B
A
Picture
: Select : Enter
C
B
A
Auto
Frame
: Select : Enter
Auto: For normal use. Still and fast motion images
can be paused.
Frame: The resolution of still pictures is improved,
so that you can make a motionless picture
clearer when you pause it.
To make the SETUP screen disappear, press SET UP
3
MENU.
PBC
Press SET UP
1
MENU in the stop
mode.
Press
or to
TV Shape 4:3LB
Video Out Select Video
select “Operation”.
Press or to select “PBC”, then press OK
2
(Enter).
Press
or to select “On” or “Off”, then press
OK (Enter).
Operation
Pause/Still Auto
Parental Lock Off
Title Stop Off
PBC On
Off: When playing a VIDEO CD without using
the menu.
On: To use the menu when playing a PBC-
featured VIDEO CD.
To make the SET UP screen disappear, press SET
3
UP MENU.
C
B
A
Picture
: Select : Enter
C
B
A
Off
On
: Select : Enter
Title Stop
Turn on or off a feature that automatically stops
playback after a title has been viewed.
Press SET UP MENU
1
in the stop mode.
Press or to select “Operation”.
Press or to
2
select “Title Stop”,
then press OK
(Enter).
Press
or to
TV Shape 4:3LB
Video Out Select Video
Operation
Pause/Still Auto
Parental Lock Off
Title Stop Off
PBC On
C
B
A
Picture
: Select : Enter
C
B
A
Off
On
select “On” or “Off”,
then press OK
: Select : Enter
(Enter).
Off: The DVD/VCR continues after playback of
a title is completed.
On: The DVD/VCR stops after playback of a title
is completed.
To make the SETUP screen disappear,
3
press SET UP MENU.
57
Page 58

Selecting the sound enhancement (E.A.M.)/Setting Background/
Setting Screen Saver
Preparation:
• Turn ON the TV and set to the video input mode.
• Make sure TV/VCR/DVD switch has been slided to
VCR/DVD. Then press DVD to select the DVD mode.
(The DVD indicator will light)
Selecting the sound enhancement (E.A.M.*)
You can easily switch a preferred audio enhancement.
*E.A.M.: Enhanced Audio Mode
Press OSD twice.
1
BB
Then press
B/
BB
AA
A to
AA
select the E.A.M.
icon, then press OK
(Enter).
The sound enhancement menu appears.
Select the sound enhancement by pressing / .
2
Each time you press the button, the sound enhancement changes.
Normal:
Normal sound.
-0:21:28
3
2
Setting Background
Select the background color or background picture.
Press SET UP MENU
1
in the stop mode.
Press
or to se-
lect “Display”.
Press or to
2
select “Background”, then press
OK (Enter). Press
or to select
TV Shape 4:3LB
Video Out Select Video
Display
On-Screen Display
Background Picture
Screen Saver On
C
B
A
Picture
: Select : Enter
C
B
A
On
Blue
Gray
Picture
Jacket
your desired
background, then
: Select : Enter
press OK (Enter).
Blue: Blue background.
Gray: Gray background.
Picture: Use the picture which appears when you
turn on the DVD/VCR as a background.
Jacket: Use the jacket picture included on some
discs as a background. If it is not included,
a gray background will be substituted.
To make the SETUP screen disappear, press SET
3
UP MENU.
3D:
To obtain expansive virtual surround sound
effects from just two speakers.
Dialogue:
To control critical center channel information
to make dialogue more intelligible (only
when playing a DVD video disc recorded on
the Dolby Digital recording system).
To use this enhancement on sounds output
•
from the BITSTREAM/PCM jack, be sure to
set “Audio Out Select” to “PCM.” (see page 56).
To exit the audio enhancement selection Press
CANCEL.
Notes:
• Actual effects to sounds may vary depending on the speaker
system. Make selection according to your preference.
• Actual effects to sounds may vary depending on the disc.
• When the DVD/VCR is connected to an amplifier equipped
with Dolby Pro Logic Surround, select “Normal”.
Otherwise, Dolby Pro Logic Surround may function
differently than usual.
• Selecting “Dialogue” disables “Dynamic Range Control”
function (see page 56).
• During MP3 playback, the sound enhancement is not
effective.
Setting Screen Saver (DVD only)
To turn the screen saver on or off.
Press SET UP MENU
1
in the stop mode.
Press or to
select “Display”.
Press or to
2
select “Screen
Saver”, then press
OK (Enter).
Press
or to
TV Shape 4:3LB
Video Out Select Video
Display
On-Screen Display
Background Picture
Screen Saver On
C
B
A
Picture
: Select : Enter
C
B
A
On
Off
On
select “On” or “Off”,
then press OK
: Select : Enter
(Enter).
Off: The screen saver is disengaged.
On: The screen saver operates in 10
minutes after you press 4 .
To make the SETUP screen disappear, press SET
3
UP MENU.
58
Page 59

Setting initial setup/output sound conversion table
You can install the initial system
setting.
Preparation:
• Turn ON the TV and set to the video input mode.
• Make sure TV/VCR/DVD switch has been slided to VCR/DVD. Then
press DVD to select the DVD mode. (The DVD indicator will light)
Setting initial setup
Press SET UP MENU in the stop
1
mode.
Press or to select “Initial
Setup”.
Press OK, then press or
2
to select “On-Screen Language”,
“TV Shape” or “Audio Out
Select”.
TV Shape 4:3LB
Video Out Select Video
On-Screen Language ENG
TV Shape 4:3LB
Audio Out Select Bitstream
C
B
A
Picture
: Select : Enter
C
B
A
Initial Setup
: Select : Enter
English
Français
Deutsch
Español
On-Screen Language: See on page 41.
TV Shape: See on page 55.
Audio Out Select: See on page 56.
To make the SETUP screen disappear, press SET UP MENU.
3
Output sound conversion table (sampling frequency/quantization bit)
You can select the output sound format corresponding to your system connection (see page 56).
Bitstream Analog 2ch PCM
Discs
DVD video
discs
CDs
Recording system
Dolby Digital
48 kHz/16 bit
48 kHz/20 bit
Linear PCM
MPEG1, MPEG2
Linear PCM 44.1 kHz/16 bit
48 kHz/24 bit
96 kHz/16 bit
96 kHz/20 bit
96 kHz/24 bit
DTS
DTS
DIGITAL AUDIO
OUT jack
Bitstream
48 kHz/16 bit
48 kHz/16 bit
48 kHz/16 bit
48 kHz/16 bit
48 kHz/16 bit
48 kHz/16 bit
Bitstream
Bitstream
44.1 kHz/16 bit
Bitstream
ANALOG AUDIO
OUT jack
48 kHz/20 bit
48 kHz/16 bit
48 kHz/20 bit
48 kHz/24 bit
48 kHz/16 bit
48 kHz/20 bit
48 kHz/24 bit
—
48 kHz/16 bit
44.1 kHz/16 bit
(Noise)
DIGITAL AUDIO
OUT jack
Bitstream
48 kHz/16 bit
48 kHz/16 bit
48 kHz/16 bit
—
—
—
Bitstream
Bitstream
44.1 kHz/16 bit 44.1 kHz/16 bit 44.1 kHz/16 bit
Bitstream
ANALOG AUDIO
OUT jack
48 kHz/20 bit
48 kHz/16 bit
48 kHz/20 bit
48 kHz/24 bit
96 kHz/16 bit
96 kHz/20 bit
96 kHz/24 bit
——
48 kHz/16 bit
(Noise)
DIGITAL AUDIO
48 kHz/16 bit
48 kHz/16 bit
48 kHz/16 bit
48 kHz/16 bit
48 kHz/16 bit
48 kHz/16 bit
48 kHz/16 bit
48 kHz/16 bit—48 kHz/16 bit
44.1 kHz/16 bit
OUT jack
Bitstream
ANALOG AUDIO
OUT jack
48 kHz/20 bit
48 kHz/16 bit
48 kHz/20 bit
48 kHz/24 bit
48 kHz/16 bit
48 kHz/20 bit
48 kHz/24 bit
(Noise)
59
Page 60

Status display of Disc
EPM
EAM
EAM
T
1 -03:38
PCM
EAM
T
1
PCM
EAM
You can view information on the operation status and access and settings.
With each press of OSD, the status of the disc will appear on the screen and change as follows.
1
DVD
T C
2 3 0:08:16
Symbol mark of the feature
you selected is displayed.
T C
EAM
2CH
ZOOM
X
1
C
2 3 -0:21:28
ZOOM
EAM
EAM
2CH
ZOOM
X
1
C
Audio/
Video CD
T
1 00:30
mark is only for
Video CD.
EAM
EAM
PCM
OFF
BIT
T C
2 3 0:08:16
RATE
9.2Mbps
EAM
2CH
ZOOM
X
1
C
T C
2 3
T
EAM
2CH
ZOOM
X
1
C
1 01:14
-----
CD TEXT
Disc Title:
No Text
Track Title:
No Text
-----
(Audio CD only)
Press or to select the desired symbol mark, then press OK (Enter).
2
: Title number (Track number)
T
Press
/ or number keys to locate a title or
track, then press OK (Enter).
: Elapsed (remaining) time of the current title
Press number keys to locate a desired Location,
: Chapter number
C
Press
then press OK (Enter).
Audio setting
See page 48.
then press OK (Enter).
: Angle setting
: Subtitle setting
See page 49.
See page 48.
ZOOM
: To zoom a picture
See page 44.
: E.A.M. (Enhanced Audio Mode)
See page 58.
: Audio Out Select setting
: To stop playback
See page 42.
BST: Bitstream 2CH:Analog 2ch PCM:PCM
See page 56.
: Playback starts from the beginning of the
: Fast reverse playback
See Page 43.
current chapter or track.
See page 43.
: To start playback
: Fast forward playback
See page 42.
See page 43.
: To locate succeeding chapters or tracks.
: To begin slow motion playback
See page 43.
See page 43.
: To pause playback
: To turn off the display
See page 43.
OFF
EAM
PCM
/ or number keys to locate a Chapter,
CD TEXT
Displays CD text data if included on the audio
CDs. (Some letters may not be displayed
properly depending on the disc.)
60
Data transfer rate (Mbit/s)
Amount of picture, sound and subtitle data in the DVD
video disc transferred per second.
The larger the value is, the more data processed, but
this does not necessarily insure better picture quality.
Page 61

Table of languages
Enter the appropriate code for the initial settings"Menu", "Audio" and/or "Subtitle" (see pages 52~54).
Abbreviation
–––
CHI (ZH)
DUT (NL)
ENG (EN)
FRE (FR)
GER (DE)
ITA (IT)
JPN (JA)
KOR (KO)
MAY (MS)
SPA (ES)
AA
AB
AF
AM
AR
AS
AY
AZ
BA
BE
BG
BH
BI
BN
BO
BR
CA
CO
CS
CY
DA
DZ
EL
EO
ET
EU
FA
FI
FJ
FO
FY
GA
GD
GL
Language
No alternate
language
Chinese
Dutch
English
French
German
ltalian
Japanese
Korean
Malay
Spanish
Afar
Abkhazian
Afrikaans
Amharic
Arabic
Assamese
Aymara
Azerbaijani
Bashkir
Belorussian
Bulgarian
Bihari
Bislama
Bengali, Bangla
Tibetan
Breton
Catalan
Corsican
Czech
Welsh
Danish
Bhutani
Greek
Esperanto
Estonian
Basque
Persian
Finnish
Fiji
Faroese
Frisian
Irish
Scottish Gaelic
Galician
Abbreviation
GN
GU
HA
HI
HR
HU
HY
IA
IE
IK
IN
IS
IW
JI
JW
KA
KK
KL
KM
KN
KS
KU
KY
LA
LN
LO
LT
LV
MG
MI
MK
ML
MN
MO
MR
MT
MY
NA
NE
NO
OC
OM
OR
PA
PL
PS
Language
Guarani
Gujarati
Hausa
Hindi
Croatian
Hungarian
Armenian
Interlingua
Interlingue
Inupiak
Indonesian
Icelandic
Hebrew
Yiddish
Javanese
Georgian
Kazakh
Greenlandic
Cambodian
Kannada
Kashmiri
Kurdish
Kirghiz
Latin
Lingala
Laotian
Lithuanian
Latvian, Lettish
Malagasy
Maori
Macedonian
Malayalam
Mongolian
Moldavian
Marathi
Maltese
Burmese
Nauru
Nepali
Norwegian
Occitan
(Afan) Oromo
Oriya
Panjabi
Polish
Pashto, Pushto
Abbreviation
PT
QU
RM
RN
RO
RU
RW
SA
SD
SG
SH
SI
SK
SL
SM
SN
SO
SQ
SR
SS
ST
SU
SV
SW
TA
TE
TG
TH
TI
TK
TL
TN
TO
TR
TS
TT
TW
UK
UR
UZ
VI
VO
WO
XH
YO
ZU
Language
Portuguese
Quechua
Rhaeto-Romance
Kirundi
Rumanian
Russian
Kinyarwanda
Sanskrit
Sindhi
Sango
Serbo-Croatian
Singhalese
Slovak
Slovenian
Samoan
Shona
Somali
Albanian
Serbian
Siswati
Sesotho
Sundanese
Swedish
Swahili
Tamil
Telugu
Tajik
Thai
Tigrinya
Turkmen
Tagalog
Setswana
Tongan
Turkish
Tsonga
Tatar
Tw i
Ukrainian
Urdu
Uzbek
Vietnamese
Volapük
Wolof
Xhosa
Yoruba
Zulu
61
Page 62

Problems and troubleshooting
Use the following check list for troubleshooting when you have problems with your unit. Consult your local
dealer or service outlet if problems persist.
Be sure all connections are properly made when using with other units.
SYMPTOMS POSSIBLE SOLUTIONS
DVD/VCR
DVD/VCR does not operate.
No picture.
No sound.
The remote control does not
function.
•Make sure the power cord is plugged in.
•Try another AC outlet.
•Power is off, check fuse or circuit breaker.
•Unplug unit, then plug it back in.
•Select the DVD or VCR mode before operating.
•
Antenna connection is not correct or antenna cable is disconnected.
• The video channel is not in the correct position or the TV is not
set to the video channel.
• Check the unit is connected correctly.
• The video input selector of the TV is not set to VIDEO. Set to
VIDEO (or equivalent).
• Channel is set to the external mode.
• Check the unit is connected correctly.
• Check the input selector of the amplifier is set properly.
• The unit is in the Special playback mode.
• Aim at the remote control at the remote sensor.
• Operate within Approx. 5 Meters or reduce the light in the room.
• Clear the path of the beam.
• The batteries are weak. Replace the batteries.
• Check the batteries are inserted correctly.
• Check the frequency code is set correctly.
PAG E
–
–
–
–
14,41
10
13
10~12
–
–
10~12
–
24,43
9
The DVD-keys on the RCU of the
other JVC RECEIVER/TV is not
effective.
VCR
TV recording does not work.
Timer recording does not work.
Noise bars on screen.
DVD
Display is not shown in your
language.
Playback doesn’t start.
Stopping playback, slow-motion
play, repeat play, or memory play,
etc. cannot be performed.
• This is not a defect. Since this unit is combined type of DVD and
VCR, the remote code of DVD is individual.
•The erase prevention tab of the video cassette is broken off.
•The unit is in the external input mode.
• The time is not set correctly.
• The recording start/end time is not set correctly.
• The • has not been pressed (
• Tracking adjustment beyond range of automatic tracking circuit.
Try Manual tracking adjustment.
• Video heads are dirty.
• The tape is worn or damaged.
• Select proper language in the menu options.
• No disc is inserted.
• The disc may be dirty. Clean up the disc.
• The unit cannot play DVD-ROMs, etc.
• Some discs may not do some of the functions.
is not lit).
8
22,28
15
33
34
24
63
–
41
42
40
40
–
62
Page 63

Problems and troubleshooting / Video head cleaning
SYMPTOMS POSSIBLE SOLUTIONS PAGE
No 4:3 (16:9) picture • The setup does not match your TV.
No on-screen display • Select Display On.
No surround sound • The setup does not match your stereo system.
The unit or remote operation key
is not functioning.
Playback does not start when the
title is selected.
Audio soundtrack and/or subtitle
language is not changed when
you play back a DVD.
No subtitle
Angle cannot be changed. • Multi-angles are not recorded on the DVD disc.
appears on the screen.
• Turn off the unit and unplug the AC power cord for several
minutes, then replug it.
• Check the Parental control setting.
• Multilingual language is not recorded on the DVD disc.
• Some discs have no subtitles.
• Subtitles are cleared. Press SUB TITLE.
• The function is prohibited with the unit or the disc.
Video head cleaning
Video head clogging
The video heads are the means by which the DVD/VCR reads
the picture from the tape during playback. In the unlikely event
that the heads become dirty enough to be clogged, no picture will be played back. This can easily be determined if,
during playback of a known good tape, there is good sound,
but no picture (picture is extremely snowy). If this is the case,
have the DVD/VCR checked by qualified service personnel.
Good Picture Snowy Picture
55
55
12
14
50
53,54
54
48
49
–
NOTES:•DO NOT ATTEMPT TO CLEAN THE VIDEO HEADS OR SERVICE THE UNIT BY REMOVING THE
REAR COVER.
Video heads may eventually wear out and should be replaced when they fail to produce clear pictures.
•
To help prevent video head clogging, use only good quality VHS tapes. Discard worn out tapes.
•
63
Page 64

Specifications
GENERAL
Power supply:
Power consumption:
Weight:
Dimensions:
Input Level:
Output Level:
Hi-Fi Frequency Response:
Hi-Fi Dynamic Range:
VCR section
Video Head:
Audio Track:
Channel covevage:
RF Channel Output:
F.FWD/REW Time at 25˚C:
AC 230V 50Hz
Operation: 22W
Stand by: 5W
4.5 kg
Width : 430 mm
Height: 99 mm
Depth : 310.5 mm
SCART-socket:
Audio IN jack: 500 mV, 50 k Ω
SCART-socket:
Audio OUT jack: 500 mV, 1 k Ω
20Hz to 20,000Hz
More than 75dB
4 Rotary Heads
Hi-Fi Sound - 2 Tracks / MONO Sound - 1 Track
2-12, X, Y, Z, S1-S41, 21-69
UHF channel 36 (23 to 69)
Approx. 1minute and 48 seconds (with E-180 Cassette Tape)
VIDEO: 1 Vp-p, 75 Ω
AUDIO: 500 mV, 50 k Ω
VIDEO: 1 Vp-p, 75 Ω
AUDIO: 500 mV, 1 k Ω
DVD section
Signal system:
Applicable disc:
Audio characteristics:
Frequency response:
S/N Ratio:
Harmonic distortion:
Wow and flutter:
Dynamic range:
Output:
Pickup:
ACCESSORIES:
PA L
DVD (12cm, 8cm), CD (12cm, 8cm)
DVD: 4Hz - 22KHz
CD: 4Hz - 20KHz
90dB
1%
Below Measurable Level
90dB
Audio : (RCA) 500 mV, 1Kohm
Digital Audio : 0.5Vp-p/75 ohm
CD : Wavelength: 775 - 805 nm
Maximum output power: 0.5 mW
DVD : Wavelength: 640 - 660 nm
Maximum output power: 1.0 mW
Remote control x 1
75 ohm Coaxial Cable x 1
Battery (UM-3) x 2
2A73501A
02/04
U
64
 Loading...