

Page 1
HD MEMORY CAMERA
GC-FM1
U
Basic User Guide
For more details on the operations, refer
to the “Detailed User Guide” in the internal
memory. (p. 4)
ENGLISH
ESPAÑOL
FRANÇAIS
PORTUGUÊS
中文
1SM321404
Page 2

Safety Precautions
IMPORTANT:
In the event that any of the
following occur, make a request for
repair to the dealer.
• Smoke or abnormal odor is emitted
• Damage from being dropped
• Water or an object enters inside
If a malfunction occurs, stop using
the camcorder immediately and
contact www.jvc.com or by phone
at 1-800-252-5722
If this symbol is shown,
it is only valid in the
European Union.
2
Caution on camcorder
The camcorder may present a
re or chemical burn hazard if
mistreated. Do not disassemble,
heat above 100 °C or incinerate.
• Dispose of used camcorder
promptly.
• Do not disassemble and do not
dispose of in re.
WARNING:
The camcorder shall not be
exposed to excessive heat such as
direct sunshine, re or the like.
Page 3

(For owners in the U.S.A.)
Changes or modi cations not approved by JVC could
void the user’s authority to operate the equipment.
This equipment has been tested and found to comply
with the limits for a Class B digital device, pursuant
to Part 15 of the FCC Rules. These limits are designed
to provide reasonable protection against harmful
interference in a residential installation. This equipment
generates, uses, and can radiate radio frequency energy
and, if not installed and used in accordance with the
instructions, may cause harmful interference to radio
communications. However, there is no guarantee that
interference will not occur in a particular installation.
If this equipment does cause harmful interference to
radio or television reception, which can be determined
by turning the equipment o and on, the user is
encouraged to try to correct the interference by one or
more of the following measures: Reorient or relocate
the receiving antenna. Increase the separation between
the equipment and receiver. Connect the equipment
into an outlet on a circuit di erent from that to which
the receiver is connected. Consult the dealer or an
experienced radio/TV technician for help.
FCC WARNING
(For owners in the U.S.A.)
This equipment may generate or use
radio frequency energy. Changes or
modi cations to this equipment may
cause harmful interference unless the
modi cations are expressly approved
in the instruction manual. The user
could lose the authority to operate this
equipment if an unauthorized change
or modi cation is made.
(For owners in the U.S.A.)
•
The supplied interface cable must be
used with the equipment in order to
comply with the limits for a digital
device pursuant to Subpart B of Part 15
of FCC Rules.
•
Use an HDMI cable with the HDMI logo.
3
Page 4
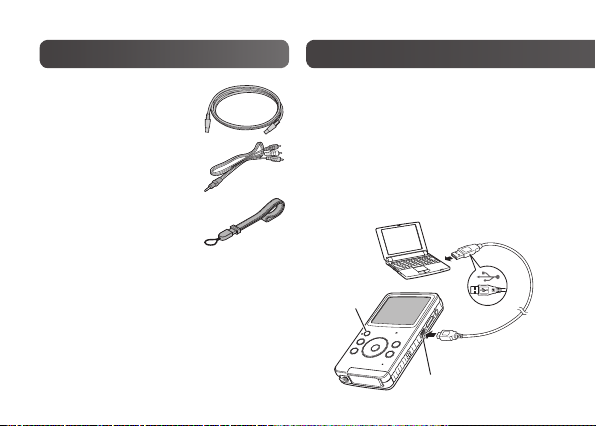
Accessories
Viewing the “Detailed
• USB Cable
(WUU102SCP001)
• AV Cable
(WPU122SCP001)
• Hand Strap
• Application software
The supplied software is preinstalled in the camcorder.
Refer to the “Detailed User Guide”
on the right column for installing
software.
4
Preparation:
• Charge the camcorder. (p. 8)
• Turn on the computer.
• Press the < button for more than
1 second to turn on the camcorder.
• Connect the camcorder to a
computer.
To Computer
<Button
USB Cable
USB Connector
Page 5

User Guide” in the internal memory
For Windows user
䡵
! The “FMCAM_FRM” window appears.
# Select [MediaBrowser LE Install and User Guide].
$ Select [Detailed User Guide].
% Click a language.
For Mac user
䡵
! Double-click [FMCAM_FRM] on the desktop.
# Double-click [FM1_guide].
$ Double-click [FM1_start.pdf].
% Click a language.
5
Page 6

Names of Components
Focus Switching Lever
Normal Recording [M]
Macro Recording [
Power Button [<]
Power Lamp
Select Button [
Recording/Playback
Delete Button [
Hand Strap
Attachment Area
¡
6
]
%
]
$
]
, ¢ , £ , ¤ Buttons
Zoom Buttons
Volume Buttons
LCD Monitor
Charge Lamp
Status (Warning) Lamp
Recording Select Button
!
]
Video [
Still Image [#]
Index Button [
Reset Hole
• If the camcorder malfunctions,
push into the reset hole with a
pointed object such as a wire to
initialize the camcorder.
Recording Start/Stop Button
Shutter Button
Set Button
7
]
Page 7

Microphone
AV Connector
HDMI Connector
USB Connector
Speaker
Lens
Inserting an SD Card
Operations are con rmed on the
following SDHC cards (class 4 or higher)
with capacity 4 GB to 32 GB. Panasonic,
TOSHIBA, SanDisk, ATP.
SD Slot Cover
Tripod Mounting
Socket
To conserve power, the camcorder turns o
automatically if there is no operation for 3 minutes.
7
Page 8

Charging
Charge the battery connecting to PC with the USB cable.
1
Press the < button to turn o
the camcorder.
The power lamp goes out.
2
Connect the camcorder to a
computer.
Charge lamp
Charging time approx. 180 minutes
NOTE
turns on: Charging
goes out: Charging finished
Charge Lamp
< Button
Power Lamp
• Charging is not possible while the camcorder is turned on.
• Make sure that the computer is turned on during charging.
8
To Computer
USB Cable
USB Connector
Page 9

Setting Date and Time
Preparation:
Turn on the power and select the recording mode.
1
While pressing the $ button,
press the 7 button.
2
Select [Time setup], and then
press the set button.
3
Set the date and time by selecting items with
¡
, ¢ and setting values with £ , ¤.
4
After completing the setting,
press the set button.
5
Select [Exit] to quit the screen.
NOTE
• When you rst turn on the power after purchasing the camcorder, the [Time
setup] screen appears.
9
Page 10

Video Recording/Playback
Preparation:
Press the ! / # button to select ! mode.
Video Recording
䡵
1
Press the set button to start recording.
Press it again to stop the recording.
Video Playback
䡵
1
Press the % button to select the playback
mode.
2
Press the ¡ , ¢ , £ , ¤ buttons to select a video.
3
Press the set button to start playback.
Press it again to stop the playback. To return to the
index screen, press the
10
7
button.
During recording, the screen
display changes to red
!
: Video mode
Page 11

Still Image Recording/Playback
Preparation:
Press the ! / # button to select # mode.
䡵
Still Image Recording
1
Press the set button to take a still image.
䡵
Still Image Playback
1
Press the % button to select the playback mode.
2
Press the ¡ , ¢ , £ , ¤ buttons to select a still image.
3
Press the set button.
To delete a video or still Image
䡵
! While a video or still image is selected, playing back or displayed, press the
$
button.
# Press the
£
, ¤ buttons to select [Yes], and then press the set button.
#
: Still image mode
11
Page 12

Viewing Files on TV
1
Connect the camcorder to a TV.
2
Select the external input mode
on the TV.
3
Play back the video or still
image. (p. 10, 11)
To T V
AV Cable
AV Connector
NOTE
• Also refer to instruction manual of the
TV.
12
Saving Files on a Computer
Preparation:
• Charge the camcorder before saving.
• Turn on the camcorder.
1
Connect the camcorder to a
computer.
Windows Double-click [FMCAM_SD]/
Macintosh Double-click [NO_NAME]
2
[FMCAM_INT] in [My
Computer].
on the desktop.
Copy the video or still image
les from the “DCIM” folder.
 Loading...