


Frischwasser-Kit X-Linie
Bedienungsanleitung
Fresh water kit X line
Instructions for use
Kit d’eau fraîche ligneX
Mode d’emploi
Kit acqua fresca linea X
Istruzioni per l’uso
de
en
fr
it
nl
es
pt
Kit voor verswateraansluiting X-serie
Gebruiksaanwijzing
Kit para toma de agua fresca línea X
Modo de empleo
Kit de água fresca da linha X
Manual de instruções
Direktvatten-set X-line
Bruksanvisning
Vanntilkoblingssett X-serie
Instruksjonsbok
Zestaw stałego podłączenia świeżej wody linia X
Instrukcja obsługi
Комплект для подачи свежей воды для серии X
Руководство по эксплуатации
Sada pro čerstvou vodusérie X
Návod kobsluze
sv
no
pl
ru
cs

Fresh water kit X line
Table of contents
Control elements ...................................................................................................................................... 10
Important information ..............................................................................................................................11
Proper use ................................................................................................................................................................ 11
For your safety ........................................................................................................................................................ 11
1 Using the fresh water kit for the first time..........................................................................................11
Requirements for installation ............................................................................................................................... 11
Installation ...............................................................................................................................................................12
2 Daily operation ...................................................................................................................................13
3 Descaling the fresh water clip ............................................................................................................14
4 LED displays ........................................................................................................................................14
5 Technical data .....................................................................................................................................15
6 JURA contact details/legal information.............................................................................................. 15
Symbol description
Symbols used
T
E
Prompt to take action. This symbol means that you are being prompted to perform
some action.
Information and tips
9
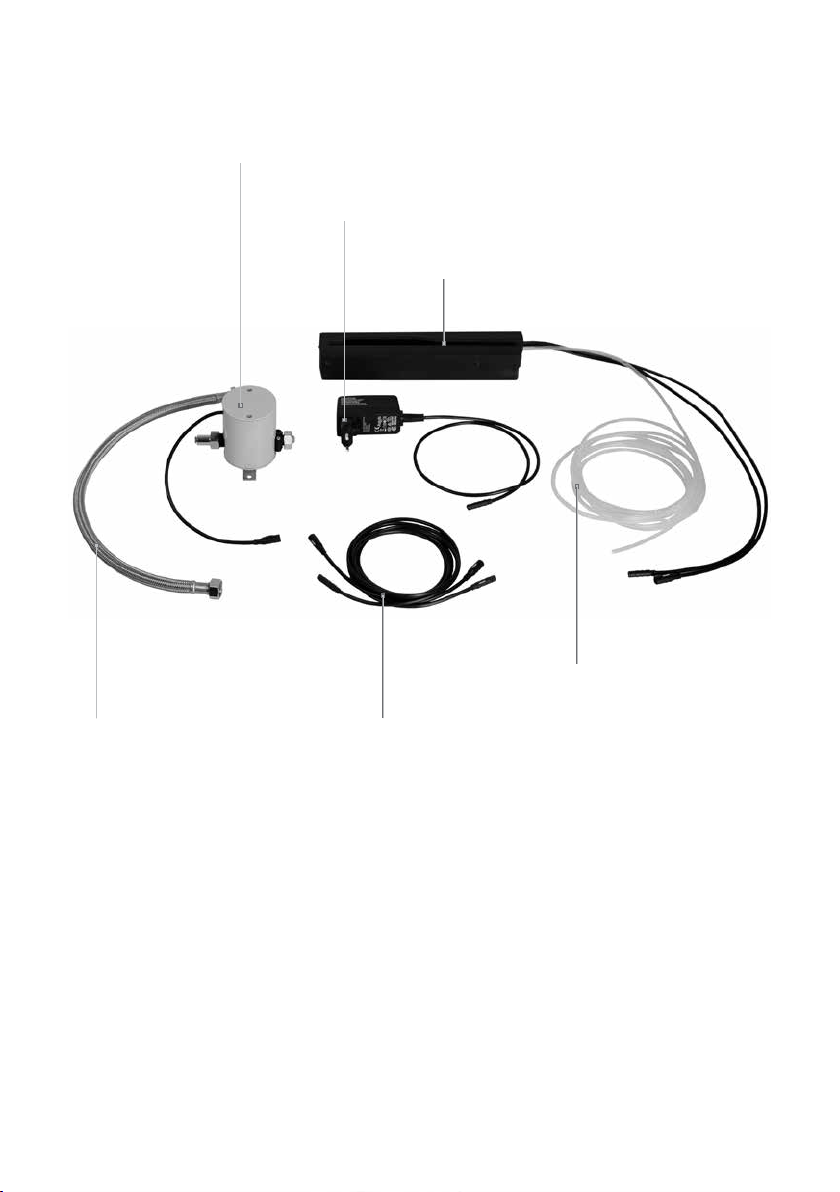
Fresh water kit X line
Control elements
Valve block
Power supply unit (country-specific version)
Fresh water clip
Water hose
10
Metal hose
Connecting cables (2x)

Fresh water kit X line
Important information
Proper use
The fresh water kit is only intended
to be used together with a JURA
coffee machine (X8/X6). Use for
any other purpose will be deemed
improper. JURA cannot accept any
responsibility for the consequences
of improper use.
Before using the machine, read
these instructions for use thoroughly and completely and comply
with the instructions they contain. A
warranty service is not applicable for
damage or defects caused by noncompliance with the instructions for
use. Keep these instructions for use
close to the machine and pass them
on to the next user.
For your safety
Children may not clean or
U
service the machine unless
supervised by a responsible
person.
Children aged 8 and over may
U
only operate the machine without supervision if they have been
instructed in how to use it safely.
Children must be able to recognise and understand the potential dangers arising from incorrect use.
People, including children, who
do not have the physical,
U
sensory or mental capabilities to
use the machine safely or
are inexperienced or lack
U
knowledge
must be supervised by a responsible person when using it, or must
be instructed in how to use it
correctly.
Ensure that the fresh water kit is
U
installed correctly to prevent
water from leaking.
Only operate the machine with
U
the mains adapter provided.
Always unplug the power supply
U
unit from the power socket once
you have closed the shut-off
valve.
Do not allow children to play
U
with the machine.
1 Using the fresh water kit for
the first time
Requirements for installation
A few preparations are necessary before you can
use the fresh water kit correctly for the first time.
The following preparations must be carried out by
a professionally qualified person:
The mains connection for the coffee machine
U
must be protected by a residual current device
(RCD).
11

Fresh water kit X line
There must be a power switch to disconnect
U
the power supply to the coffee machine.
The house end of the permanent water
U
connection (up to the supplied valve block)
must have a shut-off valve with a non-return
valve (type EA) and filter.
The permanent water connection must be
U
established in accordance with the technical
data (see chapter 4, 'Technical data').
E These preparations must be carried out by a
qualified person.
E The preparations must be carried out before
the fresh water kit can be used for the first
time.
We recommend mounting the valve block on a
wall (see diagram).
J
T Loosen the panel hooks using a tool such as
a flat screwdriver (see white circles). Remove
the panel.
T Bend the panel multiple times along the
perforated line (see the dashed line in the
diagram) and break it off.
T Insert the fresh water clip into the empty
water tank.
Installation
E Rinse the fresh water clip under running
water before using it for the first time.
T Open the water tank cover.
T Push down the cover at the rear of the
machine and remove.
12
T Guide the cable and water hose through the
tabs.

Fresh water kit X line
T Insert the panel above the fresh water clip.
T Attach the cover to the rear of the machine.
T Insert the water hose firmly into the valve
block. Check that the water hose is firmly in
place.
E You may shorten the water hose as required.
E The water connection (to the valve block)
must have been installed at the house end
by a qualified person. Have a qualified
person install the metal hose on the valve
block.
T Connect the yellow marked cable at the
fresh water clip (1) to the yellow marked
cable at the valve block (2).
1
T Connect the second cable at the fresh water
clip (1) to the power supply unit cable (3).
1
3
2
T Insert the power supply unit into a power
socket.
E Empty the water tank after it has been
filled for the first time and rinse it out.
2 Daily operation
Ensuring hygienic conditions when using water is
key to a perfect coffee result in the cup every time.
With this in mind, you should clean the fresh water
clip and the water tank every day.
E Never place the fresh water clip in the empty
water tank if the shut-off valve is closed and
the power supply unit is plugged into a
power socket.
T Close the shut-off valve.
T Unplug the power supply unit from the
power socket.
T Remove the fresh water clip and rinse
thoroughly under running water.
T Remove the water tank, then empty and
rinse it.
2
E Use one of the connecting cables supplied, if
required.
13

Fresh water kit X line
3 Descaling the fresh water clip
Calcium deposits may build up on the fresh water
clip. We recommend descaling the fresh water clip
regularly.
J CAUTION
If the descaling agent comes into contact with the
skin or eyes, this can cause irritation.
T Avoid contact with the skin or eyes.
T Rinse off the descaling agent with clean
water. Should you get any descaling agent in
your eye, see a doctor.
CAUTION
If the descaling agent comes into contact with
sensitive surfaces (e.g. marble), damage cannot be
ruled out.
T Clean up any splashes immediately.
T Close the shut-off valve.
T Unplug the power supply unit from the
power socket.
T Make a descaling solution in a tall receptacle
(3 JURA descaling tablets in 1000ml water).
T Submerge the fresh water clip in the
descaling solution up to the height shown
below for approximately 1 hour.
T Immerse and remove the clip approximately
10 times to rinse out the remains of the
descaling solution.
E Calcium deposits may build up in the water
tank. For this reason, you should remove
and clean the water tank regularly.
4 LED displays
Status LEDs at the top and side of the fresh water
clip:
Light up red: Fresh water clip is not correctly
U
attached.
Do not light up: Not an error; fresh water clip is
U
working properly.
Flash red: Error; the safety switch has been
U
activated. The water tank will no longer be
filled. Perform descaling and empty the water
tank. If the error persists, contact JURA service.
T Rinse the receptacle thoroughly and fill with
fresh water.
14

J73417/FW-Kit X-Linie/de-cs/201902
Fresh water kit X line
5 Technical data
Voltage Input: 100–240V~,
50/60Hz
Output: 12 V⎓
Ambient conditions Ambient tempera-
ture 10-35°C
Conformity symbol
Length of connecting
cables
Water hose
(Ø 4 mm)
Reinforced hose for
water supply line with
G 3/8" union nut
Permitted valve
operating pressure (in
valve block)
Filling capacity
Technical data for house end of permanent
water connection:
Permanent water
connection
Water supply line Reinforced hose with G 3/8"
Shut-off valve with non-return valve (type
A
approx. 5 m
approx. 5 m
approx. 0.5 m
1.5–10 bar
approx. 1000 ml/min
G 3/8" external thread
union nut (hose must comply
with the applicable regulations for your country)
EA) and filter (Mesh size
0.25 mm)
6 JURA contact details/legal
information
JURA Elektroapparate AG
Kaffeeweltstrasse 10
CH-4626 Niederbuchsiten
Tel. +41 (0)62 38 98 233
You will find additional contact details for your
country at www.jura.com.
Directives
The machine complies with the following
directives:
2011/65/EU (RoHS)
U
1907/2006/EC (REACH)
U
2014/35/EU (Low Voltage Directive)
U
2014/30/EU (Electromagnetic Compatibility)
U
2009/125/EC (Ecodesign Directive)
U
15
 Loading...