

The IMPRESSA XS95/XS90 One Touch Manual
Original instructions for use
E
K
Before using the machine read the instructions for use.
The ‘IMPRESSA Manual’ has been awarded the seal of approval by the
independent German Technical Inspection Agency, TÜV SÜD, due to its
easy-to-understand style, its thoroughness and coverage of safety
aspects.
JURA Type 668

Table of contents
Your IMPRESSA XS95/XS90 One Touch
Control elements 4
Proper use
For your safety
The IMPRESSA X
1 Preparing and using for the first time 9
2 Familiarising yourself with the control options 16
3 Preparation at the touch of a button 23
4 Permanent settings in programming mode 28
6
6
S95/XS90 One Touch Manual 8
Symbol description .......................................................................................................................................8
Connector System© .....................................................................................................................................9
JURA on the Internet .....................................................................................................................................9
Setting up .......................................................................................................................................................9
Filling the water tank ....................................................................................................................................9
Bean container filling ...................................................................................................................................10
First-time use ................................................................................................................................................10
Using and activating filter ...........................................................................................................................11
Determining and adjusting the degree of water hardness ..................................................................12
Adjusting grinder .........................................................................................................................................13
Switching on .................................................................................................................................................14
Switching off .................................................................................................................................................15
Preparation at the touch of a button ........................................................................................................16
One-off settings before and during preparation ....................................................................................17
Entering a permanent setting for the amount of water for a cup size...............................................18
Permanent settings in programming mode ...........................................................................................19
Viewing information and maintenance status .......................................................................................21
Counter .........................................................................................................................................................22
Espresso ........................................................................................................................................................23
Coffee ............................................................................................................................................................23
Coffee à la Carte ..........................................................................................................................................24
Latte macchiato, cappuccino ....................................................................................................................24
Pre-ground coffee .......................................................................................................................................25
Hot milk and milk foam .............................................................................................................................26
Hot water .....................................................................................................................................................27
Products ........................................................................................................................................................28
Energy-saving mode (Energy Save Mode, E.S.M.
©
) ..............................................................................30
Automatic switch-off ...................................................................................................................................31
2

Table of contents
Rinses .............................................................................................................................................................31
Restore factory settings .............................................................................................................................32
Lock ................................................................................................................................................................33
Unit amount of water .................................................................................................................................34
Language ......................................................................................................................................................34
5 Maintenance 36
Maintenance tips .........................................................................................................................................36
Cleaning the
cappuccino frother ......................................................................................................................................36
Rinsing the machine ...................................................................................................................................37
Rinsing the cappuccino frother ................................................................................................................38
Disassembling and rinsing the Professional Cappuccino Frother ......................................................39
Disassembling and rinsing the Easy Cappuccino Frother....................................................................40
Cleaning the machine ................................................................................................................................40
Descaling the machine ...............................................................................................................................42
Changing the filter ......................................................................................................................................44
Cleaning the
bean container .............................................................................................................................................46
Descaling the water tank ...........................................................................................................................47
6 Display messages 48
7 Troubleshooting
8 Transport and environmentally neutral disposal
50
52
Transport / Emptying the system .............................................................................................................52
Disposal .........................................................................................................................................................52
9 Technical data 53
Index
54
JURA contact details / Legal information
56
3
Control elements
Control elements
1
2
8
9
10
11
3
4
5
6
7
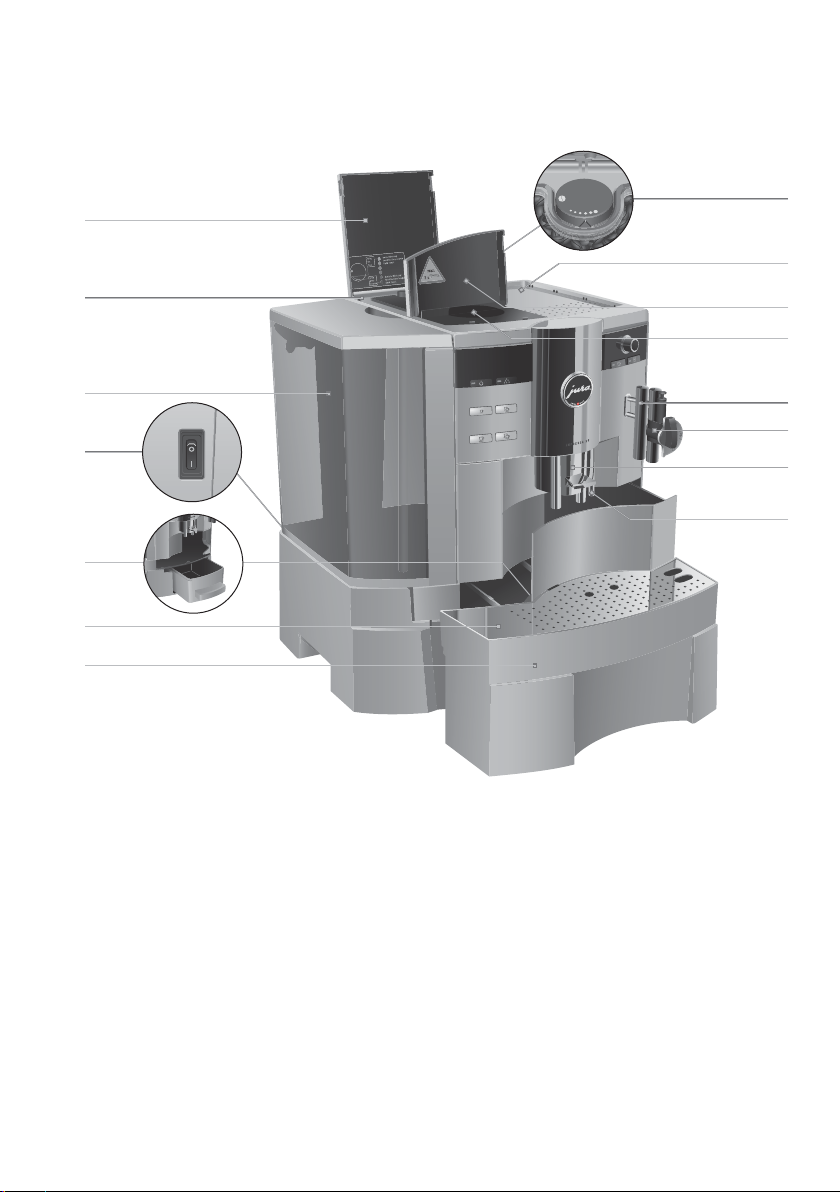
Figure: IMPRESSA XS95 One Touch
1 Bean container cover
2 Bean container with aroma preservation
cover
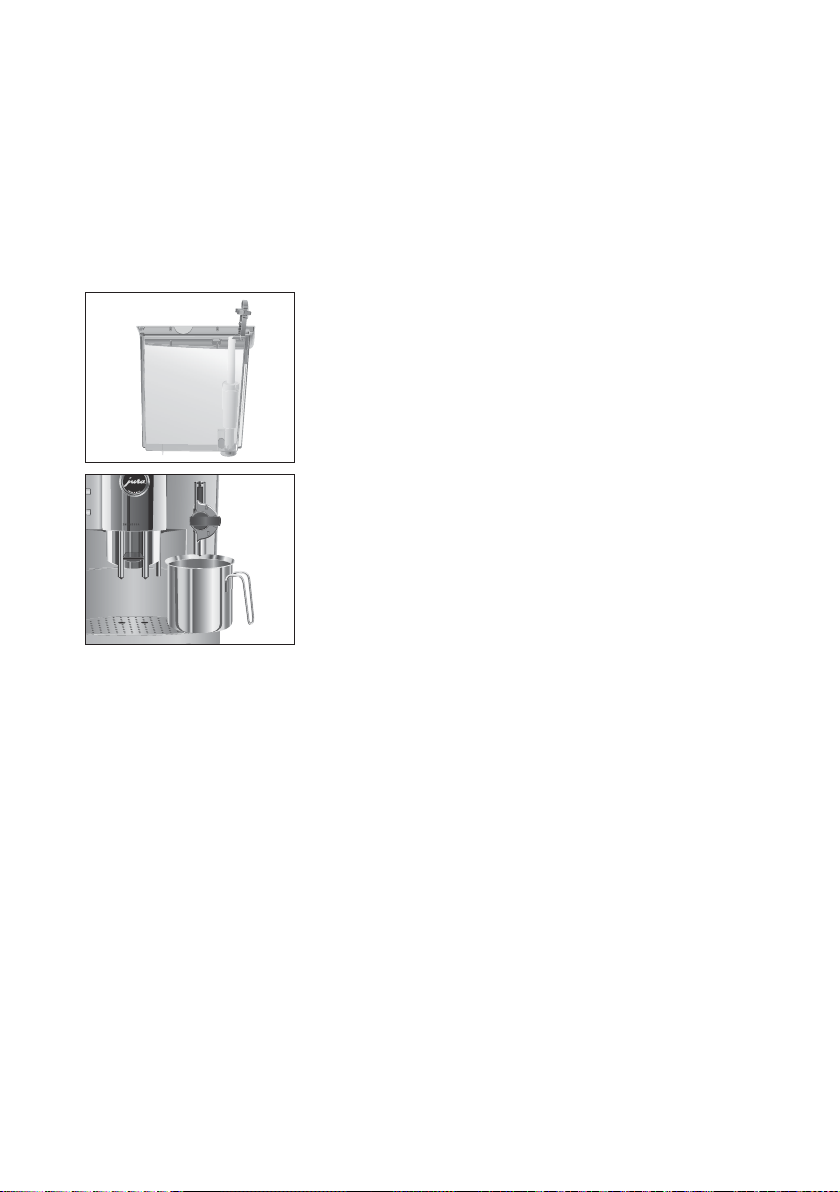
3 Water tank with handle
4 Power switch and power cable
(back of machine)
5 Coffee grounds container
6 Cup platform
7 Drip tray
8 Fineness of grind switch
9 Cup tray
10 Cover of filler funnel for pre-ground coffee
11 Filler funnel for pre-ground coffee
12 Connector System
©
for removable frothers
13 Professional Cappuccino Frother
14 Height-adjustable coffee spout
15 Hot water spout
12
13
14
15
4
Control elements
1
2
3
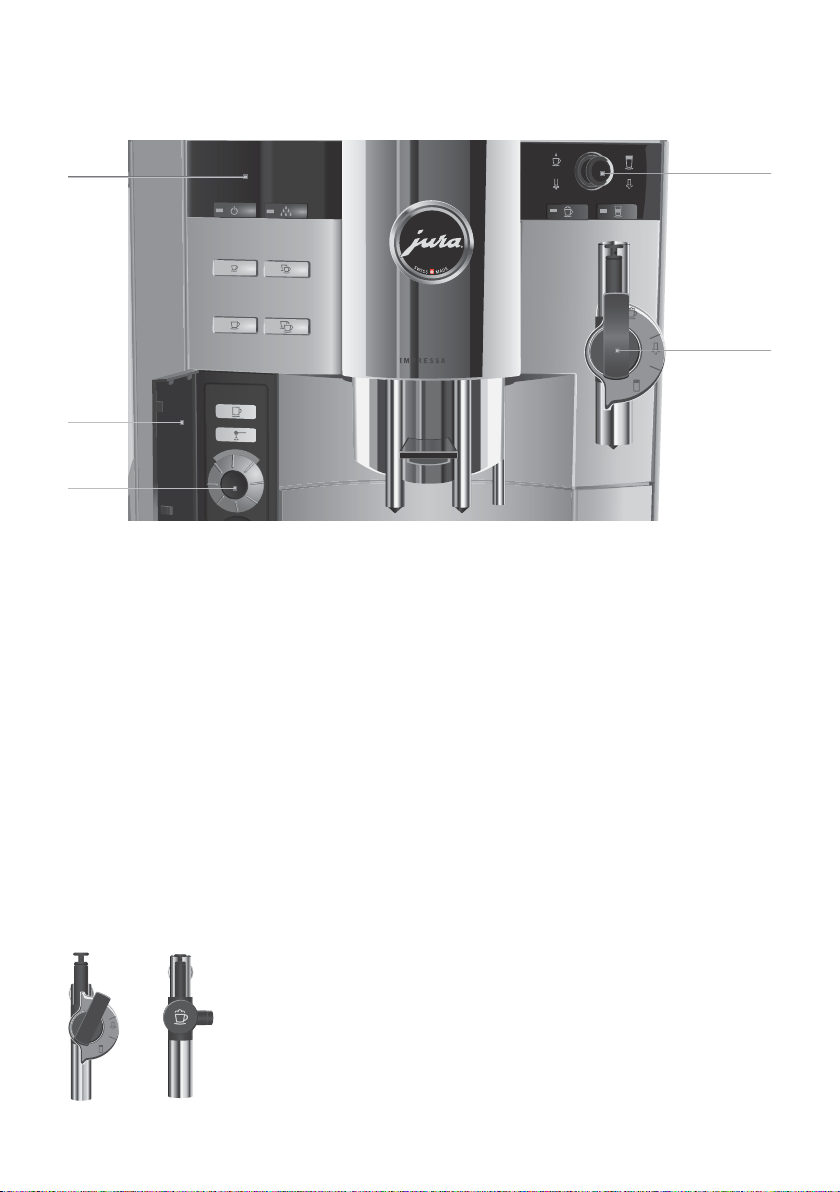
Front left
1 Display
2 Rotary Switch cover
3 f Rotary switch
Q On/off button
c Maintenance button
i 1 Espresso button
4 2 Espressi button
o 1 Coffee button
d 2 Coffees button
e Coffee à la Carte button
v Pre-ground coffee button
4
5
Front right
4 ö Selector switch
5 Professional Cappuccino Frother
6 Easy Cappuccino Frother
a Hot water portion symbol
m Hot water symbol
p Cappuccino button
z Milk portion symbol
n Milk symbol
q Latte Macchiato button
The Connector System
56
©
permits the use of different frothers. These are available from stockists.
5

Important information
Proper use
The machine is designed and intended for commercial use. It should
only be used for coffee preparation and to heat milk and wat er. Use
for any other purpose will be deemed improper. JURA Elektroapparate AG cannot accept any responsibility for the consequences of
improper use.
Before using the machine always carefully read and comply with all
these instructions. Keep this manual close to the IMPRESSA and, if
appropriate, pass it on to the next user.
For your safety
Please read and note carefully the following important safety information.
By doing this, you can avoid the life-threatening danger of electric
shock:
Z Never use a machine which has been damaged or with a
defective power cable.
Z For information on what to do in case of damage, for example
if there is a smell of burning, unplug the machine immedi ately
from the mains supply and contact the JURA service centre.
Z If the power cable for this machine is damaged, it must be
repaired either directly by JURA or by a JURA approved service
centre.
Z Make sure that the IMPRESSA and the power cable are not
located close to hot surfaces.
Z Be careful to ensure that the power cable does not get caught
and does not rub against sharp edges.
Z Never open and repair the machine yourself. Do not modify
the machine in any way that is not described in the IMPRESS A
Manual. The machine contains live parts. If opened, there is a
danger of serious injury. Repairs may only be carried out by
JURA approved service centres, using original spare parts and
accessories.
There is a risk of scalds or burns on the spouts or in the nozzle:
Z Place the machine out of the reach of children.
Z Do not touch any hot parts. Use the handles provided.
6

Important information
Z Be careful to ensure that the appropriate nozzle is installed
and clean. The nozzle or parts of the nozzle might come off if
the parts are not assembled correctly or a blockage occurs.
A defective machine is not safe and could cause injury or fire. To
avoid damage and any associated risk of injury or fire:
Z Never allow the power cable to loosely hang down. The power
cable can be tripped over or damaged.
Z Protec t your IMPRESSA from environmental influences such
as rain, frost and direct sunlight.
Z Do not put the IMPRESSA, cable or connections in water.
Z Do not put the IMPRESSA or any individual part s in the dish -
washer.
Z Turn your IMPRESSA off at the power switch before starting
any cleaning operation. Always wipe your IMPRESSA with a
damp cloth rather than a wet one, and protect it from pro-
longed water splash.
Z Do not set up the IMPRESSA anywhere where a jet of water
may be used.
Z O nly connect the machine to a power supply in accordance
with the information on the rating plate. The rating plate is
located on the underside of your IMPRESSA. Further technical
data is given in Chapter 9 ‘Technical Data’.
Z Use only original JURA care produc t s. Use of accessories that
are not explicitly recommended by JURA could damage the
IMPRESSA.
Z Do not use any coffee beans treated with additives or caramel-
ised coffee beans.
Z Always fill the water tank with cold, fresh mains water.
Z If you will be absent for an extended period, turn the machine
off and unplug.
Safe handling of the CLARIS filter cartridges:
Z CLARIS filter cartridges should be kept out of the reach of chil-
dren.
Z Store them dry in the sealed package.
Z Protect them from heat and direct sunlight.
Z Do NOT use damaged CLARIS filter cartridges.
Z Do NOT open CLARIS filter cartridges.
7

The IMPRESSA XS95/XS90 One Touch Manual
The IMPRESSA XS95/XS90 One Touch Manual
You are holding the manual for your IMPRESSA XS95/XS90 One
Touch in your hand. It will help you to familiarize yourself with y our
IMPRESSA safely and quickly and teach you the full r ange of facilities
it offers.
Chapter 1, ‘Preparing and using your IMPRESSA for the first time’,
explains step-by-step how to set up and prepare the IMPRESSA.
Chapter 2, ‘Familiarising yourself with the control options’ is important for you to read as you are familiarising yourself with your
IMPRESSA. It invites you to actively explore all the different coffee
experiences that it offers.
All the other chapters are intended to help you when you have a
specific query.
If you use the IMPRESSA X
come a master at preparing exciting coff ee specialities, y ou will be a
Barista!
You can download the short operating instructions for y our machine
from the JURA website (www.jura.com).
S95/XS90 One Touch Manual, y ou will be-
Symbol description
Warnings
Always take note of any inf ormation mark ed with the CAUTION or WARNING symbol.
The signal word WARNING points out potential risk of serious injury, and the signal
CAUTION
CAUTION
Symbols used
@
word CAUTION potential risk of slight injury.
The CAUTION symbol is used to draw attention to circumstances which could cause
the machine to become damaged.
E Information and tips to make things easier for you as you use your IMPRESSA.
References to the online JURA website, where you can find interesting further information: www.jura.com.
T Prompt to take action. This symbol means that you are being prompted to perform
some action.
8

1 Preparing and using for the first time
This chapter provides you with the information y ou need to use your
IMPRESSA without any problems. You will prepare your IMPRESSA
step-by-step for your first coffee experience.
1 Preparing and using for the first time
Connector System©
JURA on the Internet
Setting up
Filling the water tank
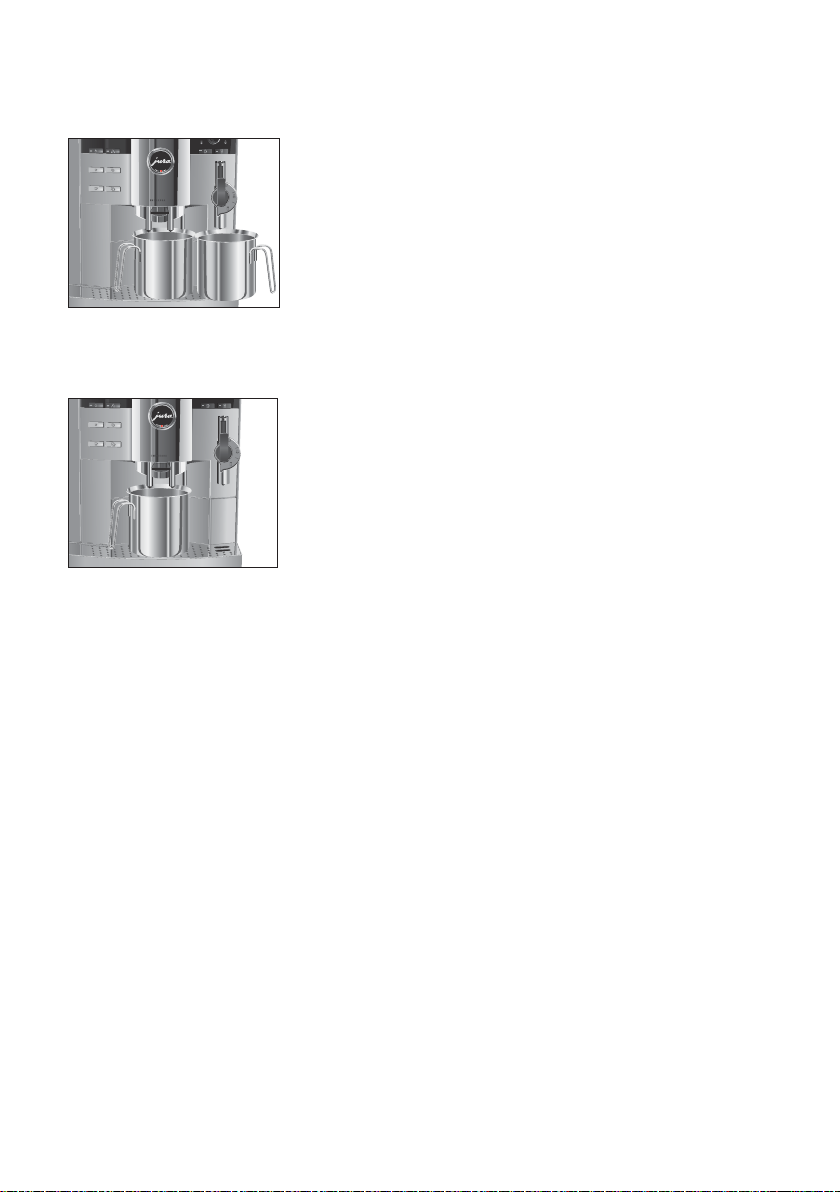
The Connector System© permits the use of different cappuccino
frothers:
Z Professional Cappuccino Frother
U Cappuccino / latte macchiato
U Hot milk
Z Easy Cappuccino Frother
U Cappuccino / latte macchiato
Visit us on the Internet.
@ At www.jura.com you will find interesting and up-to-date
information on your IMPRESS A and on ev ery aspect of coffee.
@ The Knowledge Builder awaits you at www.jura.com. The
interactive assistant, LEO, will support you and explain the
benefits of and how to use your IMPRESSA.
When setting up your IMPRESSA, please note the following:
Z Set the IMPRESSA down on a horizontal surface that is not
sensitive to water.
Z Choose a spot for your IMPRESSA which is protected against
overheating. Ensure that the ventilation slots are not covered.
To enjoy perfect coffee we recommend changing the water every
day.
CAUTION
Milk, mineral water or other liquids can damage the water tank or
the machine.
T Only fill the water tank with fresh, cold water.
T Remove the water tank and rinse it with cold water.
T Fill the water tank with fresh, cold water and reinsert.
9

1 Preparing and using for the first time
Bean container filling
CAUTION
First-time use
WARNING
The bean container has an aroma preservation cover . This will ensure
that your coffee beans retain their aroma for longer.
Coffee beans which have been treated with additives (e.g. sugar),
pre-ground or freeze-dried coffee will damage the grinder.
T Only use untreated coffee beans to refill the bean container.
T Open the cover of the bean container and remove the aroma
preservation cover.
T Remove any dirt or foreign objects inside the bean con-
tainer.
T Fill the bean container with coffee beans, then close the
aroma preservation cover and the bean container cover.
If the machine is operated with a defective power cable, there is a
danger of electric shock.
T Never use a machine which has a defective power cable.
Precondition: The water tank and bean container are full.
T Insert the mains plug into a power socket.
3 T Switch on the IMPRESS A using the power switc h on the back
of the machine.
The on/off button Q lights up (standby).
Q T Press the on/off button to switch the IMPRESSA on.
The pre-set language appears on the display.
10
T Open the cover of the Rotary Switch.
g T Turn the Rotary Switch until the desired language is dis-
played. For Example:
k T Press the Rotary Switch to confirm the language.
LANGUAGE ENGLISH
CONFIRMED √ appears briefly on the display to confirm
the setting.
FILL SYSTEM / PRESS RINSE, the maintenance
button c lights up.
1 Preparing and using for the first time
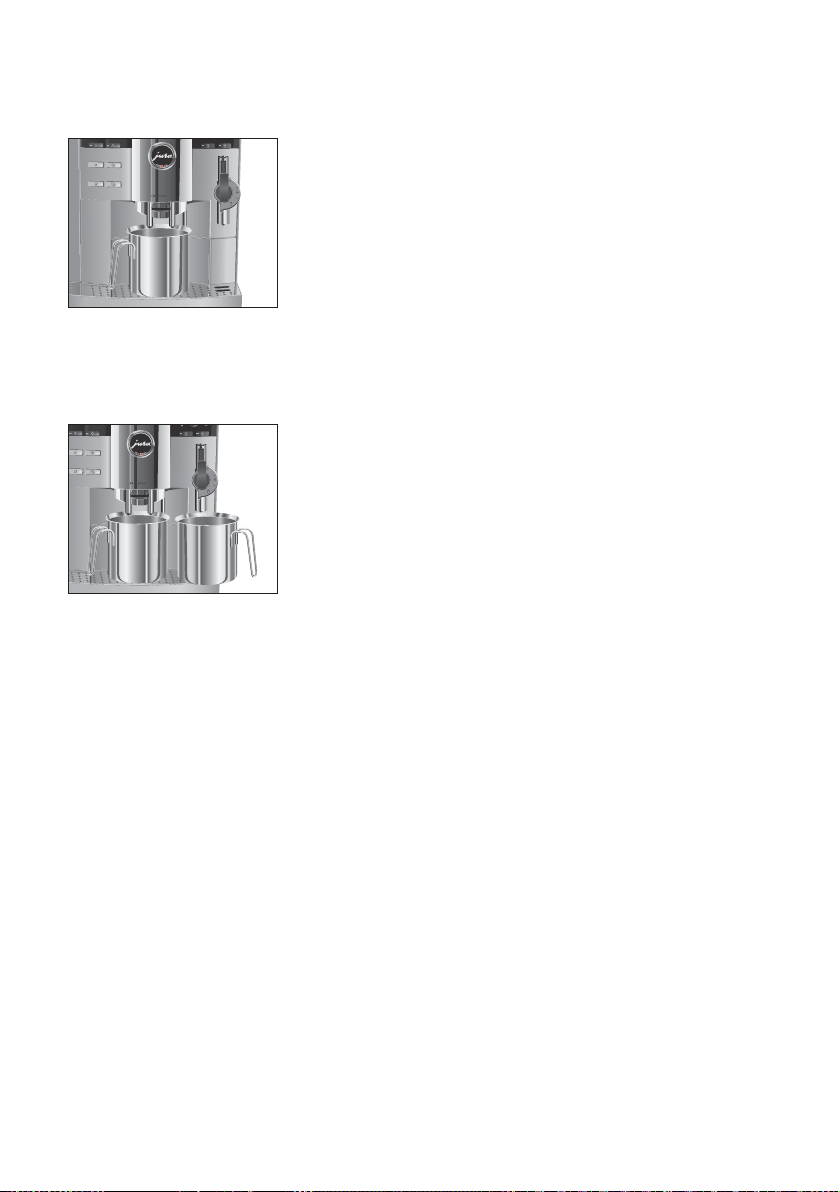
T Place a receptacle under the hot water spout and another
under the frother.
c T Press the maintenance button.
SYSTEM FILLS, the system fills up with water and the
maintenance button flashes. A small amount of water flows
from the frother and the hot water spout.
This operation stops automatically.
appears on the display.
WELCOME TO JURA
HEATING UP
PRESS RINSE, the maintenance button c lights up.
T Place a receptacle under the coffee spout.
c T Press the maintenance button.
The machine rinses itself, stopping automatically.
COFFEE READY appears on the display. Your IMPRESSA
is ready to use.
E If you have not been able to use the machine for the first time
correctly and fully, contact customer support in your country
(see ‘JURA contact details / Legal information’).
Using and activating
filter
Your IMPRES SA no longer has to be descaled if you are using CLARIS
filter cartridges.
@ You can also try out the ‘Insert filter’ operation online. Visit the
Knowledge Builder at www.jura.com.
E Perform the ‘Insert filter’ operation without interruptions. This
will ensure that your IMPRESSA always produces its best.
Precondition:
k T Keep the Rotary Switch pressed until
g T Turn the Rotary Switch until
k T Press the Rotary Switch to enter the programme item.
COFFEE READY is displayed.
T Open the cover of the Rotary Switch.
MAINTENANCE
appears on the display.
FILTER NO is displayed.
FILTER NO
g T Turn the Rotary Switch until FILTER YES is displayed.
k T Press the Rotary Switch to confirm the setting.
CONFIRMED w appears briefly on the display to confirm
the setting.
11
1 Preparing and using for the first time
INSERT FILTER / PRESS RINSE, the maintenance
button c lights up.
T Remove a CLARIS filter cartridge and the filter cartridge ex-
tension from the Welcome Pack.
T Fit the extension on top of the filter cartridge.
T Remove the water tank and empty it.
T Lift the car tridge holder and insert the filter cartridge into
the water tank, applying slight pressure.
T Close the cartridge holder. It will click into place audibly.
T Fill the water tank with fresh, cold water and reinsert.
T Place a receptacle (at least 500 ml) under the frother.
E If you are using the Professional Cappuccino Frother, set the
selection lever of the frother to the steam position n.
c T Press the maintenance button.
FILTER RINSING, water flows out of the frother.
E You can interrupt rinsing of the filter at any time by pressing
any button.
E The water may be slightly discoloured. This is not harmful to
health and does not affect the taste.
Determining and
adjusting the degree of
water hardness
12
Filter rinsing stops automatically after approx. 500 ml.
COFFEE READY appears on the display. The filter is now
activated.
The harder the water is, the more frequently the IMPRESSA needs to
be descaled. It is therefore important to adjust the water hardness.
The water hardness can be adjusted on a continuous scale between
1° dH and 30° dH. This can also be deactivated, which means that
the IMPRESSA will not let you know when it has to be descaled.
E However, if you are using the CLARIS filter cartridge and have
activated it, you will not be able to adjust the water
hardness.

1 Preparing and using for the first time
You can find out what the w at er hardness is by using the Aquadur®
test strip supplied as standard.
T Hold the test strip briefly (for one second) under flowing
water. Shake off the water.
T Wait for about one minute.
T You will then be able to read the degree of water hardness
from the discolouration of the Aquadur® test strip and the
description on the packaging.
You can now adjust the water hardness.
Adjusting grinder
CAUTION
Example: To change the water hardness from
proceed as follows:
Precondition:
k T Keep the Rotary Switch pressed until
g T Turn the rotary switch until
k T Press the Rotary Switch to enter the programme item.
COFFEE READY is displayed.
T Open the cover of the Rotary Switch.
appears.
displayed.
16°d H to 25°dH,
MAINTENANCE
HARDNESS 16°dH is
16°dH
g T Turn the Rotary Switch until 25°dH is displayed.
k T Press the Rotary Switch to confirm the setting.
CONFIRMED w appears briefly on the display.
HARDNESS 25°dH
g T Turn the Rotary Switch until EXIT is displayed.
k T Press the Rotary Switch to exit programming mode.
COFFEE READY is shown on the display.
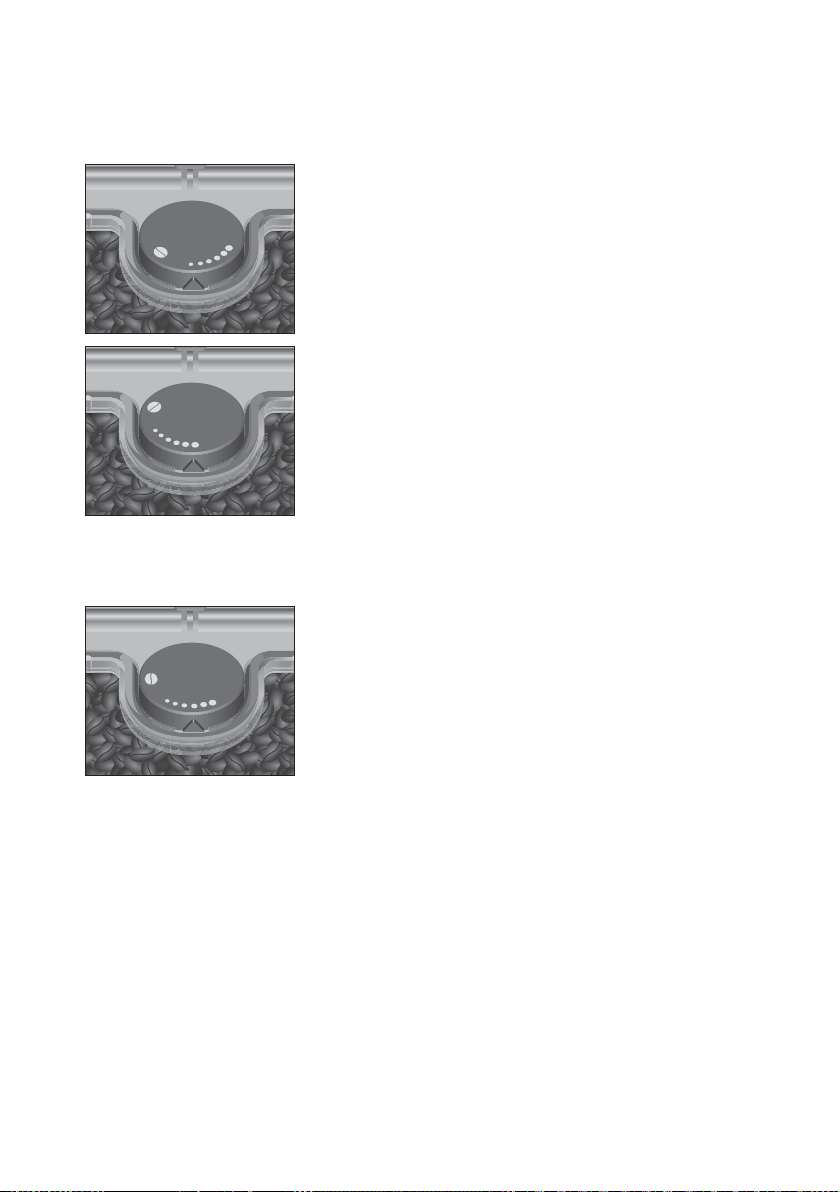
You can adjust the grinder continuously to suit the roast of your
coffee.
If you adjust the fineness of grind when the grinder is not operating,
the grinding wheel could be damaged.
T Only adjust the fineness of grind when the grinder is run-
ning.
The fineness of grind setting is correct if the coffee flows regularly
from the coffee spout. A fine, thick crema is also formed.
13
1 Preparing and using for the first time
Our recommendations:
Z Select a fine setting for a light roast.
U If the fineness of grind setting is too fine, the coffee only
drips from the coffee spout.
Z Select a coarse setting for a darker roast.
U If the fineness of grind is too coarse the coffee flows too
quickly from the coffee spout.
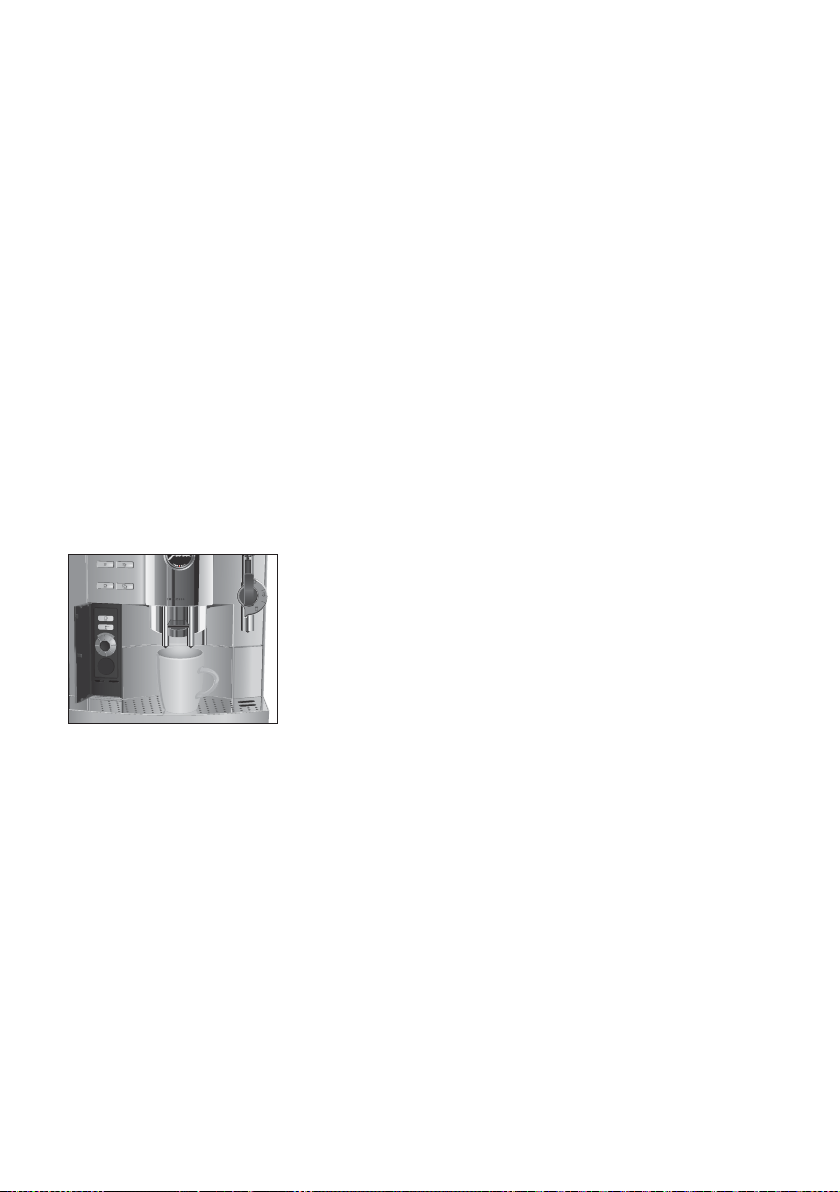
Example: T o change the fineness of grind during coffee preparation,
proceed as follows:
T Open the cover of the bean container.
T Place a cup under the coffee spout.
o T Press the 1 Coffee button.
The grinder starts and
T Turn the fineness of grind switch to the desired position
while the grinder is running.
The coffee will be prepared and the fineness of grind is
adjusted.
1 COFFEE is displayed.
Switching on
14
When the IMPRESSA is switched on, a prompt for the rinse operation
automatically appears which is initiated by pressing the maintenance button.
This setting can be changed in programming mode so that the
machine automatically activates the switch-on rinse (see Chapter 4
‘Permanent settings in programming mode – Rinses’).
Precondition: Your IMPRESSA is switched on at the power switch
and the on/off button Q is illuminated.
Q T Press the on/off button to switch the IMPRESSA on.
WELCOME TO JURA appears briefly on the display.
HEATING UP
PRESS RINSE, the maintenance button c lights up.
1 Preparing and using for the first time
T Place a receptacle under the coffee spout.
c T Press the maintenance button.
The machine rinses itself, stopping automatically.
COFFEE READY appears on the display. Your IMPRESSA
is ready to use.
Switching off
When you switch your IMPRESS A off, the spouts with which a coffee
speciality or milk have been prepared are rinsed.
T Place a receptacle under the coffee spout and the frother.
Q T Press the on/off button.
MACHINE RINSING appears on the display, and the
coffee spout is rinsed.
SPOUT RIGHT / PRESS RINSE.
c T Press the maintenance button.
MACHINE RINSING, the right coffee spout is rinsed.
The IMPRESSA is switched off, and the on/off button Q lights
up.
E When your IMPRESSA is switched off, a hissing noise may be
audible. This is normal and does not have any effect on the
machine.
15

2 Familiarising yourself with the control options
2 Familiarising yourself with the control options
With the IMPRESSA, you can prepare an excellent coffee or milk speciality at the touch of a button. You also ha ve the option of adjusting
the coffee strength and temperature, as w ell as the amount of water
to your personal taste.
This chapter will allow you to become familiar with all control
options with the aid of examples. To familiarise yourself with your
IMPRESSA, we recommend that y ou make a point of actively trying
the facilities described in this chapter . Y ou will find this is well w orthwhile.
Learn how to perform the following:
Z Preparation at the touch of a button
Z One-off settings before and while your drink is being prepared
Z Adjusting the default amount of water to suit the cup size
Z Permanent settings in programming mode
E You can stop the machine at any time while a coffee or milk
speciality or hot water is being prepared. T o do this, press any
button.
Preparation at the
touch of a button
16
@ If you prefer to familiarise yourself with your IMPRESSA in a
fun way on the computer, the interactive Knowledge Builder
tutorial programme can be found on the Internet at
www.jura.com.
Prepare your favourite coffee speciality at the touch of a button.
All coffee specialities are prepared following this model.
Example: This is how to prepare one coffee.
Precondition:
o T Press the 1 Coffee button.
COFFEE READY is displayed.
T Place a cup under the coffee spout.
1 COFFEE and the pre-set coffee strength is displayed.
The pre-set amount of water flows into the cup. Preparation
stops automatically.
COFFEE READY is then displayed.
E To prepare 2 coffees, place two cups under the coffee spout
and press the 2 Coffees button d.
ENJOY appears on the display.
2 Familiarising yourself with the control options
One-off settings before
and during preparation
Changing the coffee
strength before preparation
It is possible to make various settings before and during prepar ation.
These one-off settings are always follow the same model and are not
stored.
The coffee strength of Coffee à la Carte can be changed before
preparation. The following coffee strength options can be selected:
Z ö (xmild)
Z öö (mild)
Z ööö (normal)
Z öööö (strong)
Z ццццц (xstrong)
Example: Proceed as follows to to prepare a strong cup of Coffee à
la Carte.
Precondition:
e T Press the Coffee à la Carte button.
COFFEE READY is displayed.
T Place a cup under the coffee spout.
T Open the cover of the Rotary Switch.
A LA CARTE and the pre-set coffee strength is dis-
played.
g T Turn the Rotary Switch until
displayed.
k T Turn the Rotary Switch while
displayed.
A LA CARTE öööö is
A LA CARTE öööö is
A LA CARTE öööö, the pre-set amount of water flows
into the cup. Preparation stops automatically.
appears on the display.
played.
COFFEE READY is then dis-
ENJOY
Changing the amount of
water during preparation
The pre-set amount of water of all coffee products can be changed
during the brewing operation by turning the Rotary Switch.
Example: Proceed as follows to prepare a
Precondition:
COFFEE READY is displayed.
T Place a cup under the coffee spout.
110 ML cup of coffee.
17
 Loading...