

Page 1

www.jura.com
Art. 67653
– 12
/07
MDB-Interface
Bedienungsanleitung
User Manual
JURA Elektroapparate AG – Kaffeeweltstrasse 10 – CH-4626 Niederbuchsiten
Page 2

Bedienungsanleitung MDB- Interface
- 1 -
Page 3

Bedienungsanleitung MDB- Interface
- 2 -
Inhaltsverzeichnis:
1. LIEFERUMFANG...................................................................................................................................3
2. ALLGEMEIN..........................................................................................................................................3
3. VOR DER INBETRIEBNAHME...............................................................................................................4
4. INBETRIEBNAHME HARDWARE..........................................................................................................4
5. INSTALLATION SOFTWARE.................................................................................................................5
6. SOFTWAREBESCHREIBUNG................................................................................................................5
6.1 MENÜPUNKT „FILE“......................................................................................................................................5
6.2 SCHALTFLÄCHEN „MDB-INTERFACE“...........................................................................................................6
Schaltfläche „Read“ – Abrechnungsdaten einlesen...........................................................................6
Schaltfläche „Write“ – Abrechnungsdaten schreiben.......................................................................6
6.3 SCHALTFLÄCHEN „BILLING MODE“...............................................................................................................6
Schaltfläche „Switch On“ – Abrechnungsbetrieb einschalten.........................................................6
Schaltfläche „Switch Off“ – Abrechnungsbetrieb ausschalten........................................................6
6.4 SCROLLDOWN-MENÜ „MACHINE TYPE“.......................................................................................................6
6.5 CHECKBOX „CURRENCY REQUIRES DECIMAL PLACE“....................................................................................6
6.6 EINGABEFELDER „PRODUCT“........................................................................................................................6
6.7 EINGABEFELDER „COIN CHECKER“................................................................................................................6
6.8 EINGABEFELD „SYSTEM NUMBER“................................................................................................................7
6.9 SCHALTFLÄCHE „SET BACK TO FACTORY SETTINGS”.....................................................................................7
6.10 SCHALTFLÄCHE „DELETE CREDIT”.................................................................................................................7
6.11 EINGABEFELD „DISPLAY TEXT CREDIT“.........................................................................................................7
6.12 EINGABEFELD „DISPLAY TEXT NO CREDIT“...................................................................................................7
6.13 SCHALTFLÄCHE „UPDATE COMPUTER SOFTWARE”.......................................................................................7
7. KOMPATIBLE MDB-LESER...................................................................................................................7
Page 4
Bedienungsanleitung MDB- Interface
- 3 -
b) c) d)
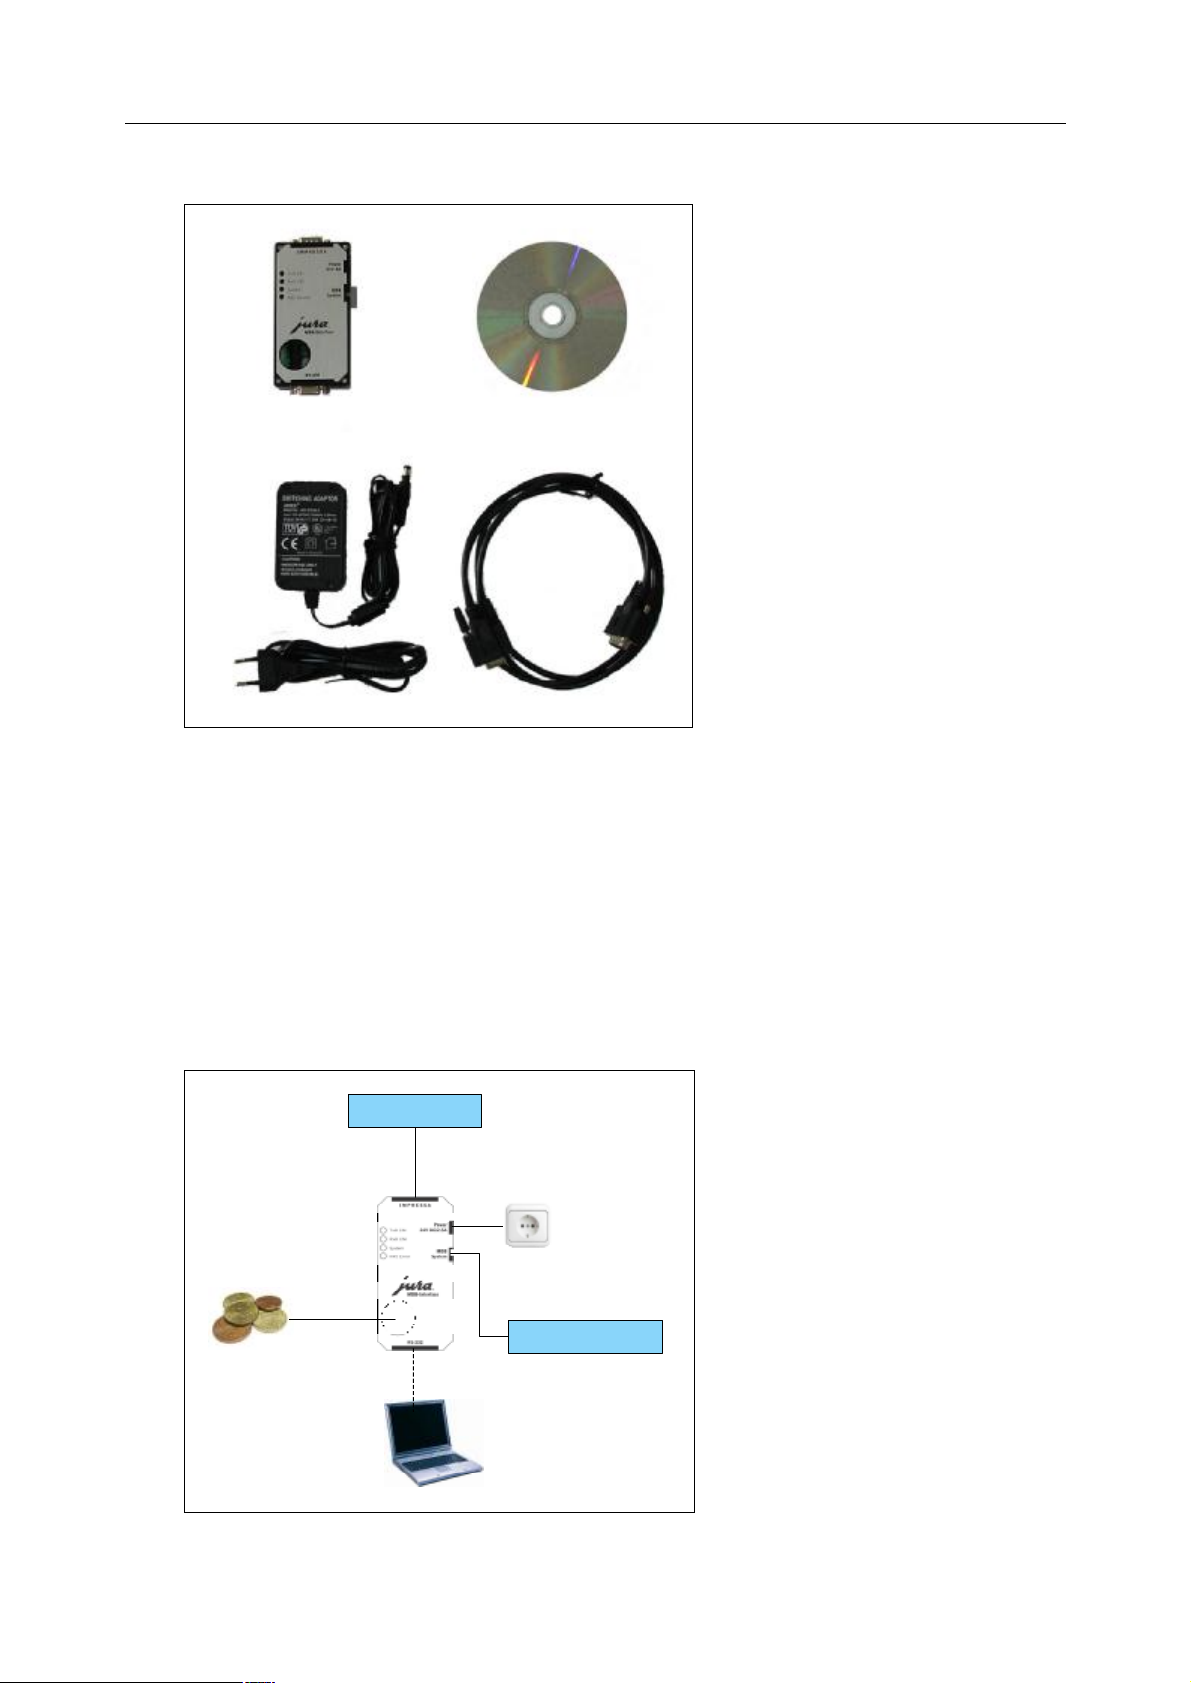
1. Lieferumfang
a)
a) MDB-Interface
b) Installations-CD
c) Netzadapter
d) RS232 Kabel
Abb. 1: Lieferumfang
2. Allgemein
Das MDB-Interface ist eine professionelle Abrechnungsschnittstelle, die Ihre IMPRESSA X-Linie mit einem Münzprüfer und/oder einem marktüblichen Abrechnungssystemen verbinden kann. Die Anzeige erfolgt jeweils direkt über das Display des Kaffeevollautomaten. Die Preis- und Produkteverwaltung erfolgt über den Computer.
Bitte beachten Sie, dass das MDB-Interface ausschliessilch eine Schnittstelle ist und mit ihr alleine
noch keine Abrechnung erfolgen kann; es wird zwingend ein Endabrechnungssystem benötigt
(vgl. Abb. 2).
Kaffeemaschine
Münzprüfer
Abrechnungssystem
Abb. 2: Aufbau Abrechnungsbetrieb
Page 5
Bedienungsanleitung MDB- Interface
- 4 -
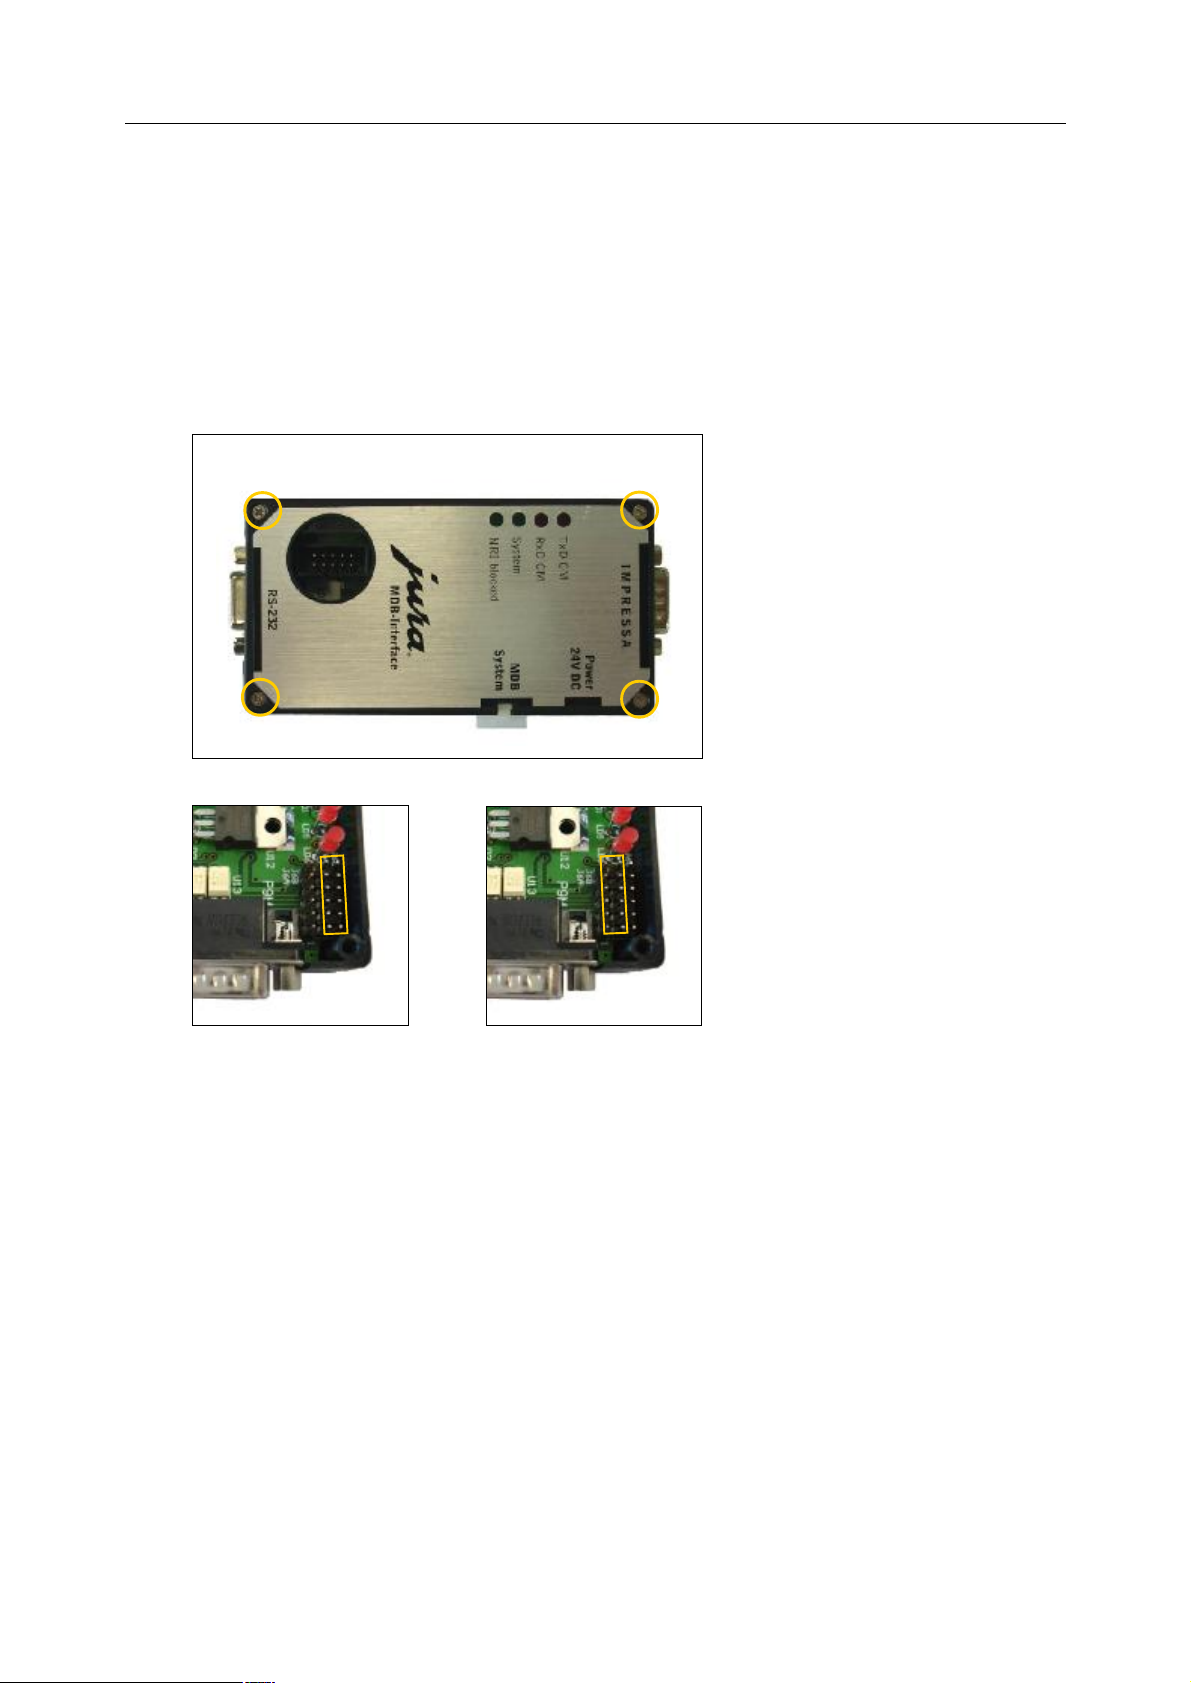
3. Vor der Inbetriebnahme
Warnung:
Passt die Stellung der Strombrücke nicht zum entsprechenden Gerät, kann dieses beschädigt werden.
Das MDB- Interface ist standardmäßig auf die neusten IMPRESSA Modelle eingestellt. Wird das MDBInterface mit einer IMPRESSA X95 oder einer IMRESSA X90 betrieben, muss im innern der MDB-Box
eine Strombrücke (Jumper) manuell umgesteckt werden (Abb. 3 bis Abb. 5).
Gehen Sie zum umstellen der Strombrücke wie folgt vor:
§ Lösen Sie die vier Schrauben.
Abb. 3: Öffnen des MDB-Interface
§ Stecken Sie die schwarze Strom-
brücke, Ihres Gerätes entsprechend, auf die entsprechenden
Metallstifte.
Abb. 4: Abb. 5:
Alle neuen Modelle IMPRESSA X95/X90
4. Inbetriebnahme Hardware
Unternehmen Sie die folgenden Schritte um das System in Betrieb zu nehmen (vgl. Abb. 2):
§ MDB-Interface mit mitgeliefertem Kabel (Abb. 1/b) an Kaffeemaschine anschließen
§ Gewünschtes Abrechnungssystem, resp. Münzprüfer an MDB-Interface anschließen
§ Kaffeemaschine ans Netz anschließen
§ MDB-Interface ans Netz anschließen
§ MDB- Interface wird automatisch initialisiert (Dauer ca. 10 Sekunden)
§ Kaffeemaschine einschalten – Ihre IMPRESSA befindet sich jetzt im Abrechnungsbetrieb
Page 6

Bedienungsanleitung MDB- Interface
- 5 -
5. Installation Software
Unternehmen Sie die folgenden Schritte um mittels PC die Preise zu ändern und angezeigten Abrechnungstexte Ihren Bedürfnissen anzupassen:
§ Die mitgelieferte Software (siehe CD) auf Ihren PC kopieren
Beispielsweise nach: C:\Programme\MDB-Interface
§ Mitgelieferte *.exe-Datei starten
Beispielsweise: „MDB- Interface Software_V3_09.exe“
§ Mit zweitem RS 232 Kabel (nicht im Lieferumfang enthalten) MDB-Interface und PC verbinden. Al-
ternativ dazu kann auch das mitgelieferte Kabel (Abb. 1/b) bei der Kaffeemaschine ausgezogen
und am PC angeschlossen werden (Abb. 6); in diesem Falle sind unter Umständen nicht alle Einstellungsmöglichkeiten voll funktionsfähig.
Kaffeemaschine
Abrechnungssystem
Münzprüfer
Abb. 6: Aufbau Softwareanpassungen
Ist das System wie beschrieben aufgebaut, können Softwareänderungen direkt am PC vorgenommen
werden. Die Beschreibung der einzelnen Menüpunkte finden Sie im Kapitel 6
„Softwarebeschreibung“.
6. Softwarebeschreibung
Um die Funktionen des MDB-Interface Ihren Bedürfnissen anzupassen, sind im Allgemeinen die folgenden Schritte notwendig:
§ Lesen der vorhandenen Daten mit der Schaltfläche „Read“.
§ Verändern der eingelesenen Daten.
§ Schreiben der veränderten Daten auf das MDB-Interface mit der Schaltfläche „Write“.
§ Falls gewünscht: Abspeichern der Daten auf dem PC.
Für eine detaillierte Beschreibung lesen Sie bitte die Punkte 6.1 bis 6.13.
6.1 Menüpunkt „File“
In diesem Menüpunkt haben Sie die Möglichkeit, die vorgenommenen Einstellungen zu speichern
(Save as...), resp. früher gespeicherte Einstellungen wieder zu öffnen (Open).
Page 7

Bedienungsanleitung MDB- Interface
- 6 -
6.2 Schaltflächen „MDB-Interface“
Schaltfläche „Read“ – Abrechnungsdaten einlesen
Damit die vorhandenen Daten verändert werden können, müssen diese erst vom MDB-Interface auf
den PC geladen werden. Drücken Sie deshalb die Schaltfläche „Read“ um die bereits vorhandenen
Daten einzulesen und anschließend nach Ihren Bedürfnissen anzupassen.
Hinweis: Der Lesevorgang dauert einige Sekunden.
Schaltfläche „Write“ – Abrechnungsdaten schreiben
Um die vorgenommenen Anpassungen wirksam zu machen, müssen die Daten durch Drücken der
Schaltfläche „Write“ auf das MDB-Interface geschrieben werden.
Hinweis: Die Schreibevorgang dauert einige Sekunden.
6.3 Schaltflächen „Billing Mode“
Schaltfläche „Switch On“ – Abrechnungsbetrieb einschalten
Mit der Schaltfläche „Switch On“ wird die Kaffeemaschine in den Abrechnungsbetrieb versetzt, sodass keine kostenlosen Bezüge mehr möglich sind.
Schaltfläche „Switch Off“ – Abrechnungsbetrieb ausschalten
Mit der Schaltfläche „Switch Off“ wird die Kaffeemaschine wieder in den Normalbetrieb (Freibezug)
versetzt. Wird das RS232 Kabel (Abb. 1/b) ohne vorgehendes drücken dieser Schaltfläche ausgezogen,
bleibt die Kaffeemaschine gesperrt und es sind keine Bezüge mehr möglich.
Hinweis:
Falls die Kreditanzeige nach Ausschalten des Abrechnungsbetriebs nicht erlischt, muss die Kaffeemaschine für kurze Zeit mittels Netzschalter vom Netz getrennt werden.
6.4 Scrolldown-Menü „Machine Type“
Nutzen Sie dieses Scrolldown-Menü um den von Ihnen verwendeten Maschinentyp auszuwählen,
falls die automatische Erkennung nicht oder nicht richtig funktioniert hat.
6.5 Checkbox „Currency Requires Decimal Place“
Markieren Sie dieses Feld, wenn die von Ihnen verwendete Währungseinheit Kommastellen benötigt.
6.6 Eingabefelder „Product“
Nutzen Sie diese Felder um für das jeweils gewünschte Produkt einen bestimmten Preis zu definieren. Die Dezimalstelle muss dabei „.“, nicht mit „,“ geschrieben werden. Welches Eingabefeld welcher
Produktetaste auf dem Gerät entspricht, entnehmen Sie bitte dem Bild auf der rechten Seite.
Verwenden Sie die Checkbox rechts des Eingabefeldes um ein bestimmtes Produkt für den Abrechnungsbetrieb so zu sperren, sodass dieses nicht mehr bezogen werden kann.
Hinweis I:
Sollte das Bild nicht demjenigen Ihres Geräts entsprechen, ändern Sie bitte die Einstellung im Scrolldown-Menü „Machine type“.
Hinweis II:
Es ist unter Umständen möglich, dass mit dem Zahlenblock Ihrer Tastatur keine Dezimalstelle eingegeben werden kann. Nutzen Sie im diesen Falle das „.“-Zeichen auf der Haupttastatur Ihres PCs.
6.7 Eingabefelder „Coin Checker“
Falls Sie einen Münzprüfer verwenden, können Sie hier den jeweiligen Münzen einen bestimmten
Wert zuordnen. Die Dezimalstelle muss dabei „.“, nicht mit „,“ geschrieben werden.
Page 8

Bedienungsanleitung MDB- Interface
- 7 -
Hinweis:
Es ist unter Umständen möglich, dass mit dem Zahlenblock Ihrer Tastatur keine Dezimalstelle eingegeben werden kann. Nutzen Sie im diesen Falle das „.“-Zeichen auf der Haupttastatur Ihres PCs.
6.8 Eingabefeld „System Number“
Von Werk aus vergebene Systemnummer. Diese ist nicht editierbar.
6.9 Schaltfläche „Set Back to Factory Settings”
Durch drücken der Schaltfläche „Set back to customer settings” wird die MDB- Software auf die
Werkeinstellung zurück.
6.10 Schaltfläche „Delete Credit”
Durch drücken der Schaltfläche „Delete Credit ” wird ein allfällig vorhandener Kreditbetrag auf dem
Maschinendisplay gelöscht, d.h. auf Null gestellt.
6.11 Eingabefeld „Display Text Credit“
Dieser Text wird im Maschinendisplays angezeigt, wenn sich das Gerät im Bereitschaftsmodus befindet. Er ist geeignet um die Diplayzeile, die den Kreditbetrag anzeigt, zu beschreiben.
Hinweis I: Es sind keine Sonderzeichen möglich.
Hinweis II: Die Anzahl verfügbarer Zeichen ist abhängig vom Maschinentyp (vgl. Kapitel 6.4)
6.12 Eingabefeld „Display Text No Credit“
Dieser Text wird im Maschinendisplays angezeigt, wenn eine Produkt gewählt wird, für das der vorhandene Kreditbetrag nicht ausreicht. Er ist geeignet um zu erklären, weshalb das gewählt Produkt
nicht bezogen werden kann.
Hinweis I: Es sind keine Sonderzeichen möglich.
Hinweis II: Die Anzahl verfügbarer Zeichen ist abhängig vom Maschinentyp (vgl. Kapitel 6.4)
6.13 Schaltfläche „Update Computer Software”
Durch drücken der Schaltfläche „Upload” kann Ihre vorhandene MDB-Interface-Software auf den
neusten Stand gebracht werden. Die aktuellste Softwareversion finden Sie außerdem auf
www.jura.com in der Rubrik „IMPRESSA X-Linie -> Zubehör“.
7. Kompatible MDB-Leser
Das MDB-Interface wurde mit folgenden MDB-Lesern erfolgreich geprüft und freigegeben.
Hersteller Produkt
CoinCo Münzprüfer SR3
Evis easy LEGIC
Fage Giotto; Oscar
MEI Cashflow 7900
Microtronic Mlight5 Leser; Msmart5 V7
NRI Münzprüfer G13
PBV Kaufmann VR1
Thales e-Transactions AVT 2800
Sollte sich das von Ihnen bevorzugte Abrechnungssystem nicht auf der obenstehenden Liste befinden, setzen Sie sich bitte mit Ihrem JURA Vertreter in Verbindung – er hilft Ihnen gerne weiter.
Page 9

User Manual MDB- Interface
- 8 -
Page 10

User Manual MDB- Interface
- 9 -
Table of contents:
1. SCOPE OF DELIVERY..........................................................................................................................10
2. GENERALLY.........................................................................................................................................10
3. BEFORE YOU START............................................................................................................................11
4. COMMISSIONING OF THE HARDWARE.............................................................................................11
5. SOFTWARE INSTALLATION................................................................................................................12
6. SOFTWARE DESCRIPTION..................................................................................................................12
6.1 MENU ITEM “FILE”.......................................................................................................................................12
6.2 “MDB-INTERFACE“ BUTTONS......................................................................................................................13
“Read“ button – import billing data....................................................................................................13
“Write“ button – export billing data....................................................................................................13
6.3 “BILLING MODE“ BUTTONS..........................................................................................................................13
“Switch On“ button.................................................................................................................................13
“Switch Off“ button................................................................................................................................13
6.4 SCROLL DOWN MENU “MACHINE TYPE“......................................................................................................13
6.5 CHECKBOX “CURRENCY REQUIRES DECIMAL PLACE“...................................................................................13
6.6 “PRODUCT“ BOXES......................................................................................................................................13
6.7 “COIN CHECKER“ BOXES..............................................................................................................................13
6.8 “SYSTEM NUMBER“ BOX .............................................................................................................................14
6.9 “SET BACK TO FACTORY SETTINGS” BUTTON ...............................................................................................14
6.10 “DELETE CREDIT” BUTTON...........................................................................................................................14
6.11 “DISPLAY TEXT CREDIT“ BOX.......................................................................................................................14
6.12 “DISPLAY TEXT NO CREDIT“ BOX.................................................................................................................14
6.13 “UPDATE COMPUTER SOFTWARE” BUTTON.................................................................................................14
7. COMPATIBLE MDB READER..............................................................................................................14
Page 11

User Manual MDB- Interface
- 10 -
b) c) d)
1. Scope of Delivery
a)
a) MDB-Interface
b) Installation CD
c) Mains adapter
d) RS232 cable
Fig. 1: Scope of delivery
2. Generally
The MDB-Interface is a professional billing interface, which connects your IMPRESSA X-Line with a
coin checker or a commercially available billing system. All advices appear directly in the display of
the coffee machine. Price and product administration can be done via computer.
Please note, that the MDB-Interface is just an interface and not a billing system. A separate billing
system is needed mandatory (cp. fig. 2)
Coffee machine
Coin checker
Billing system
Fig. 2: Composition for billing mode
Page 12

User Manual MDB- Interface
- 11 -
3. Before you start
Warning:
If the position of the jumper does not fit to your coffee machine, the coffee machine can be damaged.
The MDB-Interface is set for new IMPRESSA models as standard. If you use the MDB-Interface with an
IMPRESSA X95 or an IMPRESSA X90, the jumper inside the MDB-Box has to be plugged manually in
a different position (cp. fig. 1 to fig. 5).
Please follow the below-mentioned steps to change the position of the jumper:
§ Remove the four screws with a
screwdriver.
Abb. 3: Open the MDB-Interface
§ Plug the black jumper, according
to your coffee machine, to the
corresponding aglets.
Abb. 4: Abb. 5:
All new models IMPRESSA X95/X90
4. Commissioning of the hardware
Please follow the below-mentioned steps to put the system into operation (cp. fig. 2):
§ Connect the MDB-Interface with the provided cable (fig. 1/d).
§ Attach the desired billing system, respectively the coin checker to the MDB-Interface.
§ Connect the coffee machine to the mains supply.
§ Connect the MDB-Interface to the mains supply.
§ The MDB-Interface initialise itself automatically (duration approx. 10 seconds)
§ Start your coffee machine – your IMPRESSA is now in billing mode.
Page 13

User Manual MDB- Interface
- 12 -
5. Software installation
Please follow the below-mentioned steps to be able to change prices and/or to adapt the shown text
elements to your personal requirements:
§ Copy the provided software from the CD to your computer.
e.g.: C:\Programs\MDB-Interface
§ Start the included *.exe-Datei
e.g.: “MDB- Interface software_V3_09.exe“
§ Connect the MDB-Interface with a second RS 232 cable (not in scope of delivery) to the computer.
Alternatively the provided cable (fig. 1/d) can be removed from the coffee machine and connected
to the computer (fig. 6). If you choose this second composition, it is possible, that not all software
options are fully working.
Coffee machine
Billing system
Coin checker
Fig. 6: Composition software chanings
If your system is compositioned as described above, software changings can be done directly on the
computer. You can find a more detailed description of the software in chapter 6 “Software description“.
6. Software description
Please follow the below-mentioned steps to adapt the software settings of the MDB-Interface to your
personal requirements:
§ Use the “Read“ button to import the existing data to your computer.
§ Adapt the imported data to your requirements.
§ Use the “Write“ button to export the changed data the MDB-Interface.
§ If desired: save the data to your computer.
For a detailed description of all software functions, please read point 6.1 to 6.13.
6.1 Menu item “File”
With this menu item you have the possibility to save your settings (Save as...) or to open former settings
(Open).
Page 14

User Manual MDB- Interface
- 13 -
6.2 “MDB-Interface“ buttons
“Read“ button – import billing data
To adapt the existing software settings of your MDB-Interface to your personal requirements, you
have to import it first of all to your computer. You can do this, by pressing the “read“ button.
Note: This process may last a couple of seconds..
“Write“ button – export billing data
To make your adaptations effective, you have to press the “Write“ button, so the data can be written
to the MDB-Interface.
Note: This process may last a couple of seconds..
6.3 “Billing Mode“ buttons
“Switch On“ button
Press this button to activate the billing mode of your coffee machine. Free draw-offs won’t be possible any more.
“Switch Off“ button
Press this button to set your coffee machine back to the normal mode (free draw-offs). If you remove
the RS 232 cable (fig. 1/d) from the coffee machine before you have pressed this button, the machine
remains locked and no draw-off is possible.
Note:
If the credit remains in the display even though you have switched the billing mode off, the coffee
machine has to be disconnected from the mains supply for a short time.
6.4 Scroll down menu “Machine Type“
Use this scroll down menu to select your machine type, if the automatic recognition did not work
right or did not work at all.
6.5 Checkbox “Currency Requires Decimal Place“
Select this checkbox, if your currency requires two decimal places.
6.6 “Product“ boxes
Use this boxes to define a certain price for each product. Please note, that the decimal place has to
be a “.” and not a “,”. To learn which box belongs to which product, please consult the picture on the
right side. Use the check box right beside the text box, if you want to lock certain products for the
billing mode.
Note I:
If the picture on the right side does not belong to your machine type, please change the setting in
the scroll down menu “machine type“.
Note II:
It is possible, that you cannot enter a decimal place with the numeric keys of your computer keyboard. In this case, please use the “.”-character of the main keyboard.
6.7 “Coin Checker“ boxes
If you use a coin checker, you have the possibility to allocate a certain value for each coin. Please
note, that the decimal place has to be a “.” and not a “,”.
Note:
It is possible, that you cannot enter a decimal place with the numeric keys of your computer keyboard. In this case, please use the “.”-character of the main keyboard.
Page 15

User Manual MDB- Interface
- 14 -
6.8 “System Number“ box
Factory set system number, which cannot be edited.
6.9 “Set Back to Factory Settings” button
By pressing this button, you can set your MDB-Interface back to factory settings.
6.10 “Delete Credit” button
By pressing this button, an existing credit – shown in the display of the machine – will be deleted,
that means set back to zero.
6.11 “Display Text Credit“ box
This text appears in display, as long as the coffee machine is in stand-by mode. It is helpful to explain
the display line, which shows the credit, to a person that is not used to the coffee machine.
Note I: No special characters are allowed.
Note II: The number of possible characters depends on the machine type (cp. chapter 6.4)
6.12 “Display Text No Credit“ box
This text appears in display, if a product has been selected, for which the credit is not high enough. It
is helpful to explain, why the selected product cannot be drawn-off.
Note I: No special characters are allowed.
Note II: The number of possible characters depends on the machine type (cp. chapter 6.4)
6.13 “Update Computer Software” button
By pressing the “Update” button, your MDB-Interface software can be updated to the latest version.
You can also find the latest version of the software on www.jura.com under category “IMPRESSA XLINE -> Accessory”.
7. Compatible MDB reader
The MDB-Interface has been checked and enabled with the following MDB readers.
Producer Product
CoinCo Coin checker SR3
Evis easy LEGIC
Fage Giotto; Oscar
MEI Cashflow 7900
Microtronic Mlight5 Leser; Msmart5 V7
NRI Coin checker G13
PBV Kaufmann VR1
Thales e-Transactions AVT 2800
If you cannot find your desired billing system in the list above, please contact your JURA partner for
further help.
 Loading...