

Jura Impressa ENA5 Instructions For Use Manual
The ‘ENA 5 Instructions for Use’ has been awarded the
seal of approval by the independent German Technical
Inspection Agency, TÜV SÜD, due to its easy-to-understand
style, its thoroughness and coverage of safety aspects.
Instructions for Use
en
en
it
en
it

34
ENA 5
Your ENA 5
Control elements 36
Proper use 38
For your safety 38
Welcome to the world of JURA 39
JURA on the Internet ...........................................................................................................................................39
Knowledge Builder ..............................................................................................................................................39
Connector System
©
............................................................................................................................................39
3-colour plain text display ..................................................................................................................................40
1 Preparing and using for the first time 40
Setting up..............................................................................................................................................................40
Filling the water tank ..........................................................................................................................................40
Filling the bean container ..................................................................................................................................40
First-time use ........................................................................................................................................................40
Using and activating filter ...................................................................................................................................41
Determining and adjusting the water hardness ............................................................................................42
Adjusting grinder .................................................................................................................................................42
Switching on the machine .................................................................................................................................43
Switching off the machine .................................................................................................................................43
2 Preparation 44
1 coffee at the touch of a button ......................................................................................................................44
2 coffees at the touch of a button ....................................................................................................................44
Pre-ground coffee ................................................................................................................................................44
One-off setting before and during preparation .............................................................................................45
Entering a default setting for the amount of water for a cup size..............................................................45
Cappuccino with the Professional Cappuccino Frother ................................................................................45
Cappuccino with the Easy Cappuccino Frother .............................................................................................46
Cappuccino with the 2-stage frothing nozzle ................................................................................................47
Heating milk with the Professional Cappuccino Frother ..............................................................................47
Heating milk with the 2-stage frothing nozzle ..............................................................................................48
Hot water .............................................................................................................................................................48
3 Default settings in programming mode 48
Products ................................................................................................................................................................48
Energy-saving mode ...........................................................................................................................................49
Automatic switch-off ...........................................................................................................................................49
Units of water .......................................................................................................................................................50
Language ...............................................................................................................................................................50
4 Maintenance 50
Maintenance tips .................................................................................................................................................50
Rinsing the machine – manually .......................................................................................................................51
Changing the filter following a prompt ............................................................................................................51
Changing the filter – manually .........................................................................................................................52
Cleaning the machine following a prompt .....................................................................................................52
Cleaning the machine – manually ....................................................................................................................53
Descaling the machine following a prompt ...................................................................................................53
Descaling the machine – manually ..................................................................................................................54
Rinsing the Professional Cappuccino Frother .................................................................................................54

35
ENA 5
Cleaning the Professional Cappuccino Frother ..............................................................................................55
Dismantling and rinsing the Professional Cappuccino Frother ...................................................................55
Rinsing the Easy Cappuccino Frother ..............................................................................................................55
Cleaning the Easy Cappuccino Frother ............................................................................................................56
Dismantling and rinsing the Easy Cappuccino Frother ................................................................................57
Dismantling and rinsing the 2-stage frothing nozzle ...................................................................................57
Cleaning the bean container ............................................................................................................................57
Descaling the water tank ....................................................................................................................................57
5 Display messages 58
6 Troubleshooting 59
7 Transport and environmentally neutral disposal 60
Transport / Emptying the system .....................................................................................................................60
Disposal .................................................................................................................................................................60
8 Technical data 60
9 Contacts 60
Index 61
Symbol description
Warnings:
J
CAUTION
Always take note of any information
marked with the CAUTION or WARNING
symbol. The signal word WARNING
points out potential risk of serious
injury, and the signal word CAUTION
potential risk of slight injury.
CAUTION
The CAUTION symbol is used to draw
attention to circumstances which could
result in damage to the machine.
Symbols used:
E
Information and tips to make use of
your ENA even easier.
T
Prompt to take action . This symbol
means that you are being prompted to
perform an action.
@
References to the JURA website where
you can find interesting additional information: www.jura.com.
en
en
it
en
it
36
ENA 5
1
2
3
4
5
6
7
10
9
8
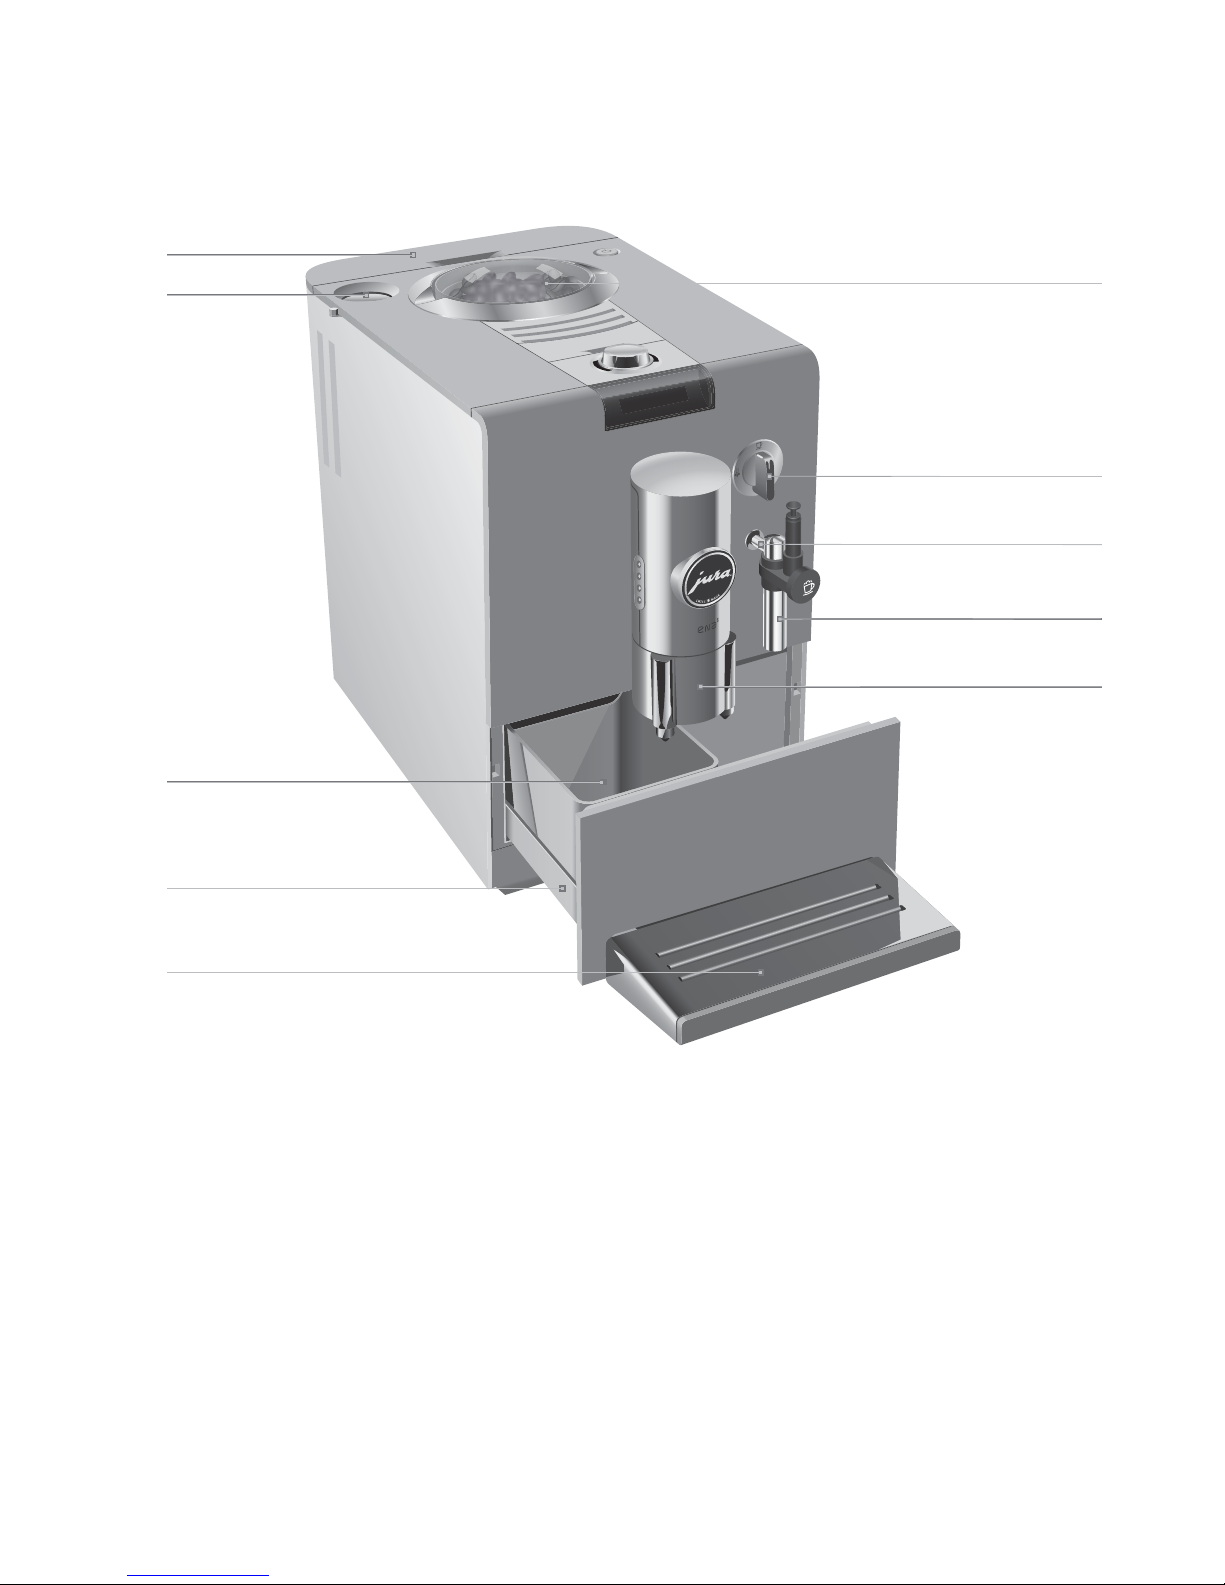
1 Water tank
2
Powder chute for pre-ground coffee
3
Coffee grounds container
4
Drip tray
5
Cup platform
6
Bean container cover
7
l Switch for hot water and steam
preparation
8
Connector System
©
for removable
nozzles
9
Easy Cappuccino Frother
10
Rotating coffee spout
Control elements
ENA
Figure: ENA 5 Blossom White
37
ENA 5
1
4
5
2
3
6
7
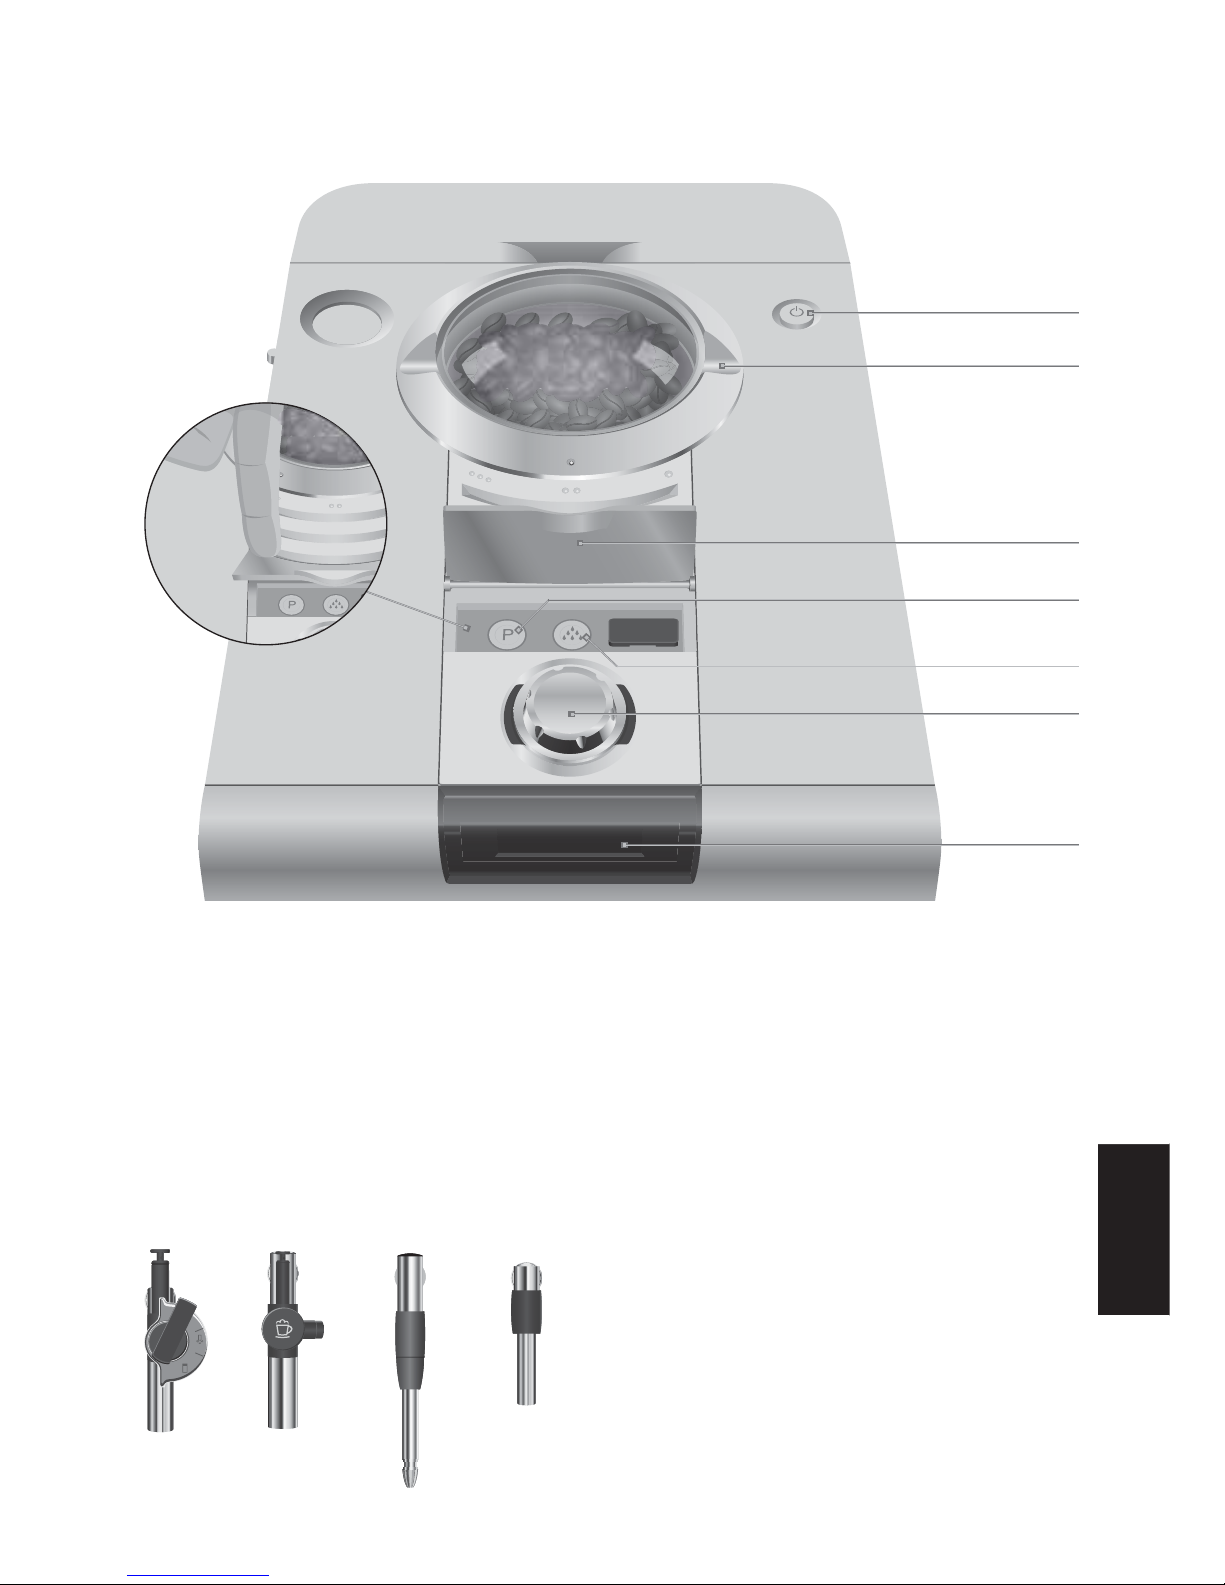
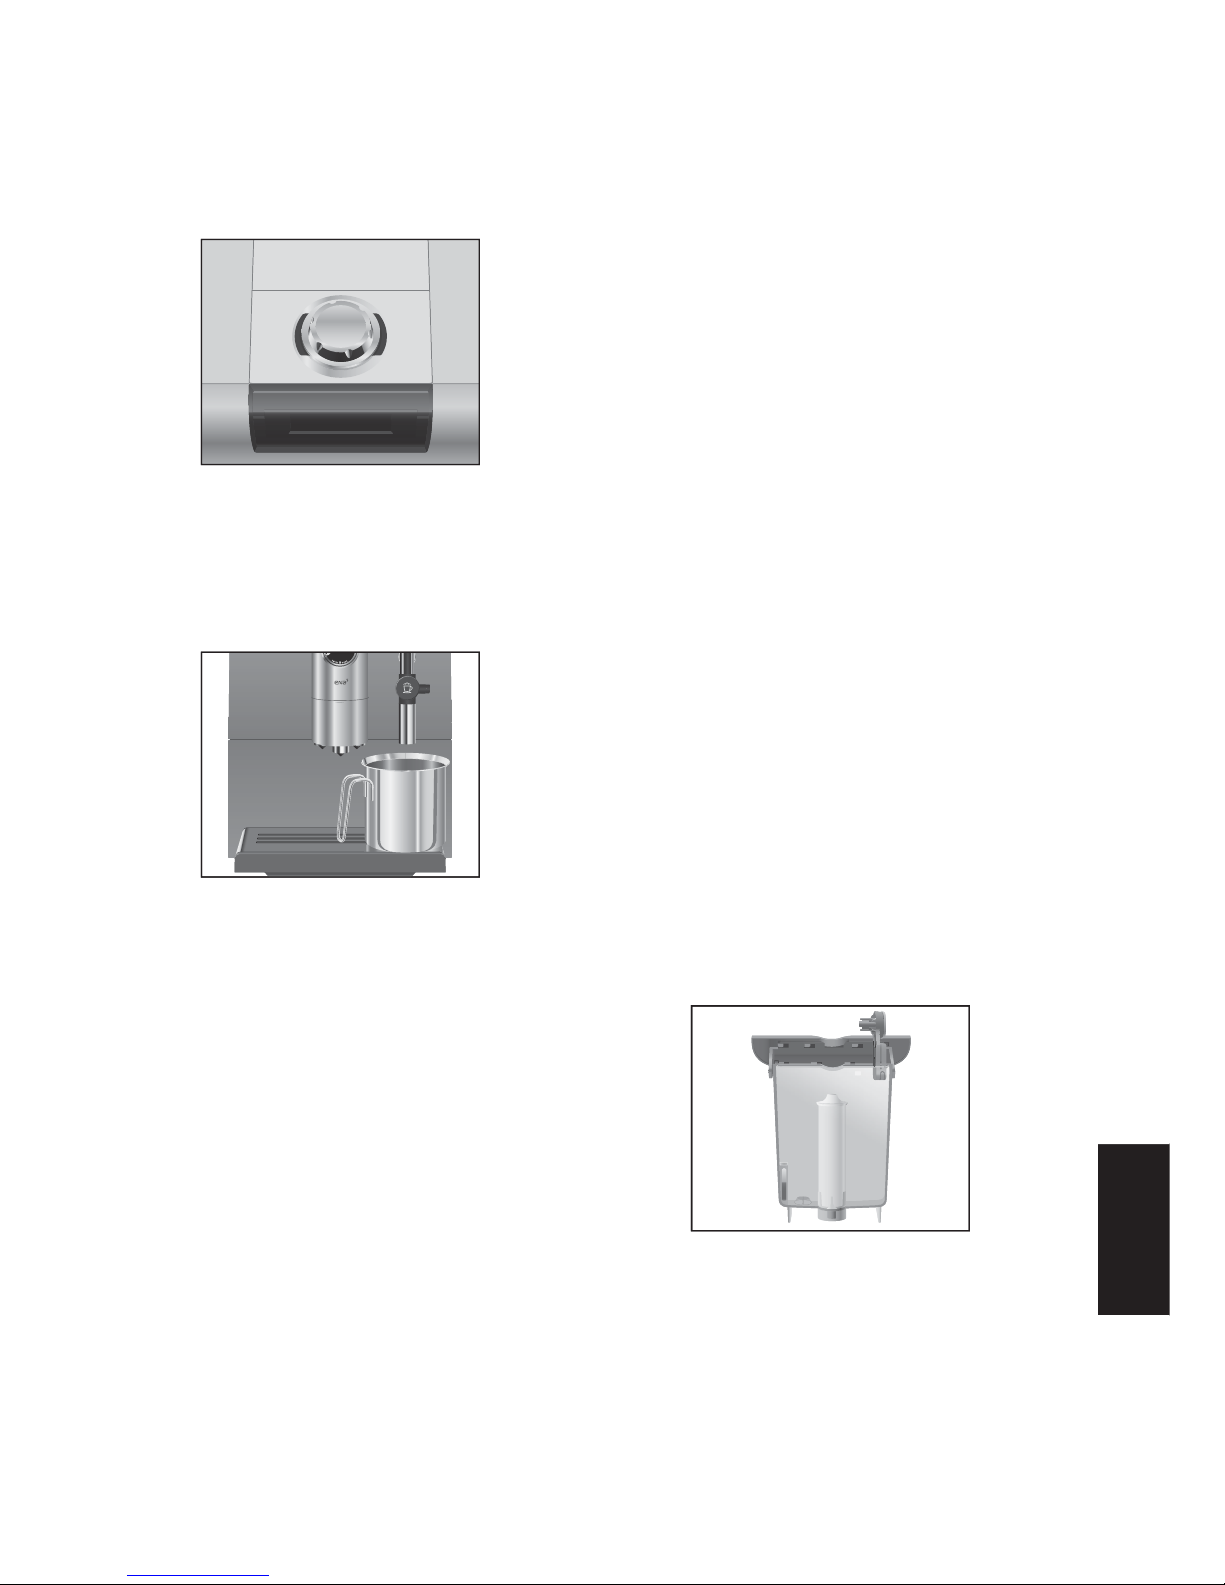
1 Q On/off button
2
Grinding wheel
3
Cover
4
P P button
5
c Maintenance button
6
g Rotary Switch
7
Display
8
Professional Cappuccino Frother
9
Easy Cappuccino Frother
10
2-stage frothing nozzle
11
Hot water nozzle
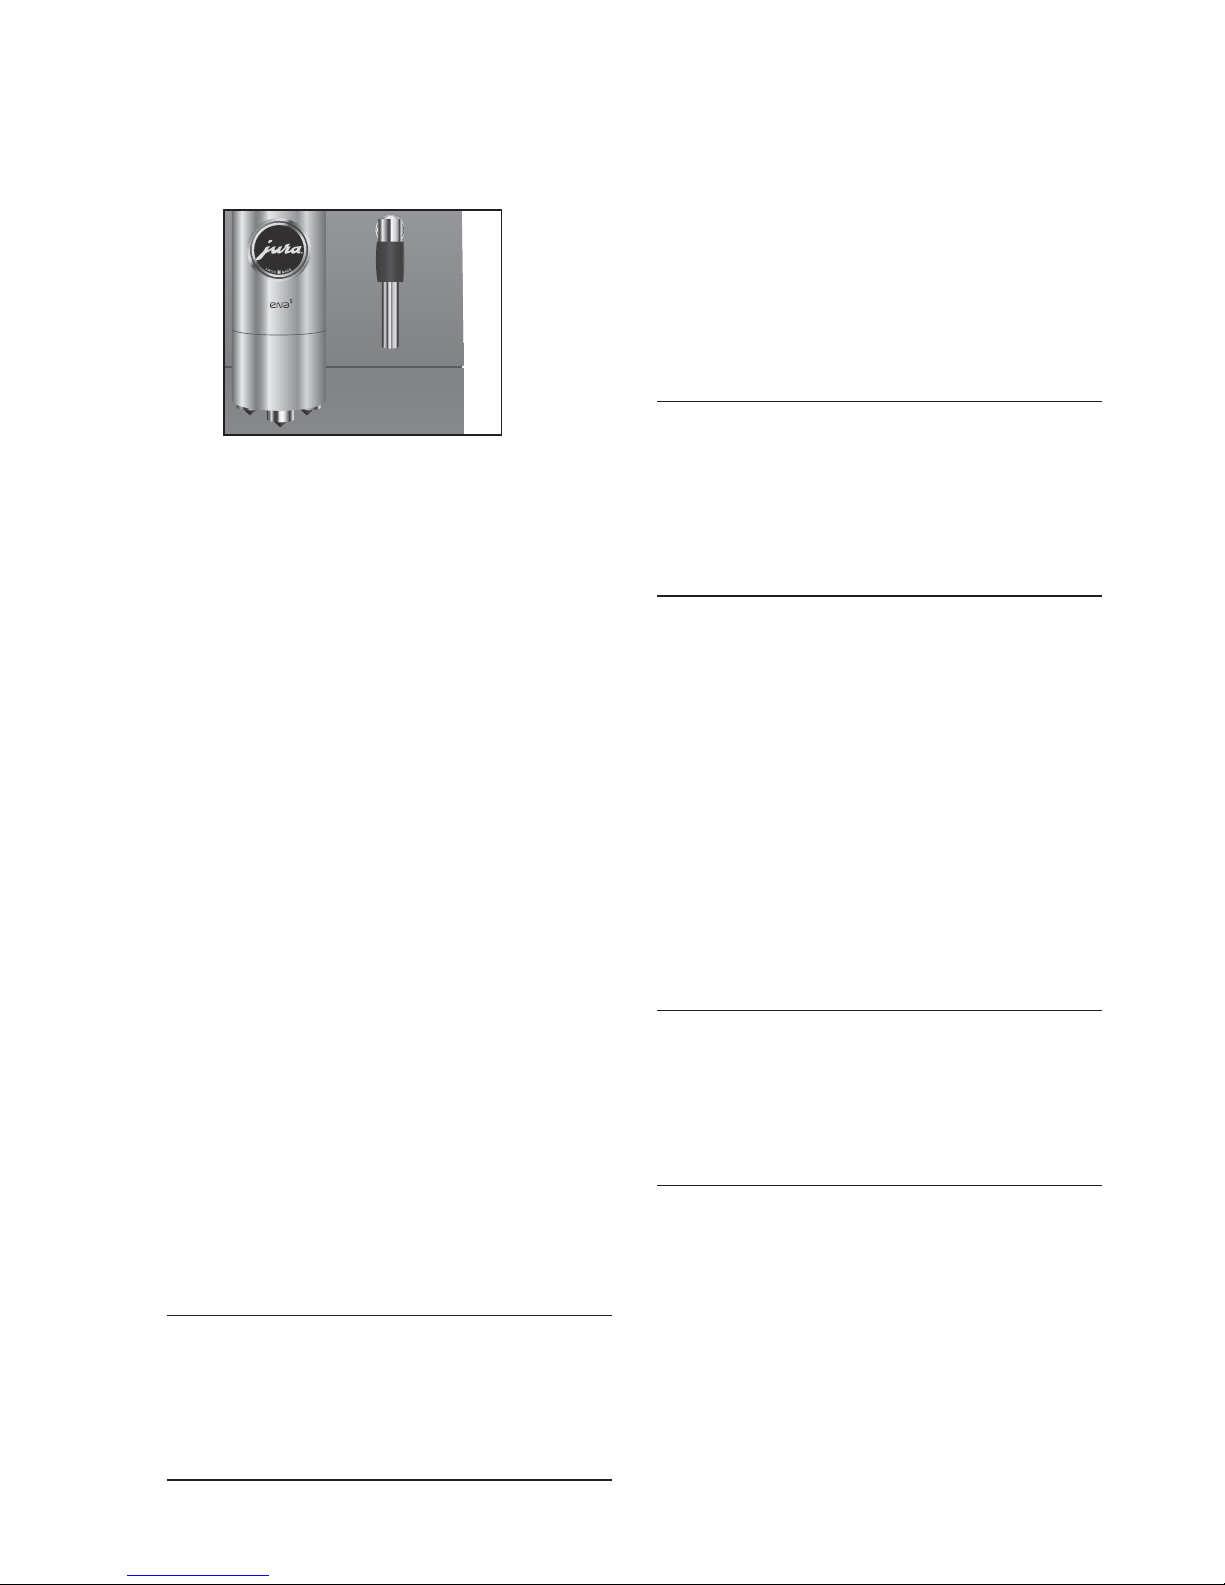
The following nozzles are available from stockists and can be fitted to the
Connector System
©
:
89 1011
Figure: Open cover
en
en
it
en
it

38
ENA 5
Proper use
The machine has been designed and built for
domestic use. It should only be used to prepare
coffee and to heat milk and water. Use for
any other purpose will be deemed improper.
JURA Elektroapparate AG cannot accept any
responsibility for the consequences of improper
use.
Before using the machine always carefully read
and comply with all these instructions. Keep this
manual close to the ENA and pass it on to the
next user if applicable.
For your safety
Please read and note the following important
safety information carefully.
This can prevent potentially fatal injury due to
electric shock:
Never use a machine which has been
damaged or which has a defective power
cable.
If there are any signs of damage, for example
if there is a smell of burning, unplug the
machine from the mains supply immediately
and contact the JURA service centre.
If the power cable for this machine is
damaged, it must be repaired either directly
by JURA or by a JURA approved service centre.
Make sure that the ENA and the power cable
are not located close to hot surfaces.
Be careful to ensure that the power cable
does not become trapped and does not rub
against sharp edges.
Never open and repair the machine yourself.
Do not modify the machine in any way that
is not described in the ENA manual.
The machine contains live parts. If opened,
there is a danger of fatal injury. Repairs may
only be carried out by JURA approved service
centres, using original spare parts and
accessories.
Z
Z
Z
Z
Z
Z
There is a risk of scalds and burns from the spouts
or the nozzle:
Place the machine out of the reach of
children.
Do not touch any hot parts. Use the handles
provided.
Be careful to ensure that the appropriate
nozzle is correctly installed and clean. The
nozzle or parts of the nozzle could become
detached if the parts are not assembled
correctly or a blockage occurs.
A defective machine is not safe and could cause
injury or fire. To avoid damage and any associated
risk of injury or fire:
Never allow the power cable to hang down
loosely. The power cable could trip someone
or be damaged.
Protect your ENA from environmental
influences such as rain, frost and direct
sunlight.
Do not put the ENA, cable or connections in
water.
Do not put the ENA or any individual parts in
the dishwasher.
Turn your ENA off and disconnect the mains
plug before starting any cleaning operation.
Always wipe your ENA with a damp cloth,
never a wet cloth, and protect it from
constant water splashes.
Only connect the machine to a power supply
in accordance with the information on the
rating plate. The rating plate is located on the
underside of your ENA. Further technical
data is given in Chapter 8 ‘Technical data’ .
Use only original JURA care products.
Use of accessories that are not explicitly
recommended by JURA could damage
the ENA.
Do not use any coffee beans treated with
additives or caramelised coffee beans.
Always fill the water tank with cold, fresh
water.
If you are absent for a prolonged period of
time, turn the machine off.
Z
Z
Z
Z
Z
Z
Z
Z
Z
Z
Z
Z
Z
39
ENA 5
Risk to children and persons with limited
capabilities in operating machines:
The machine is not designed to be operated
by children and persons with limited
capabilities.
The machine may only be used by persons
who are able to operate the machine safely.
Safe handling of the CLARIS filter cartridges:
Filter cartridges should be kept out of the
reach of children.
Store them dry in the sealed package.
Protect them from heat and direct sunlight.
Do NOT use damaged filter cartridges.
Do NOT open filter cartridges.
Welcome to the world of JURA
JURA on the Internet
Visit us on the Internet.
At www.jura.com you will find the latest
interesting information about your ENA and
all facets of the world of coffee.
Knowledge Builder
You can also get to know your ENA in a fun way
on the PC.
The Knowledge Builder awaits you at
www.jura.com. LEO, the interactive
assistant, will assist you and explain the
benefits of ENA and how it is used.
Z
Z
Z
Z
Z
Z
Z
@
@
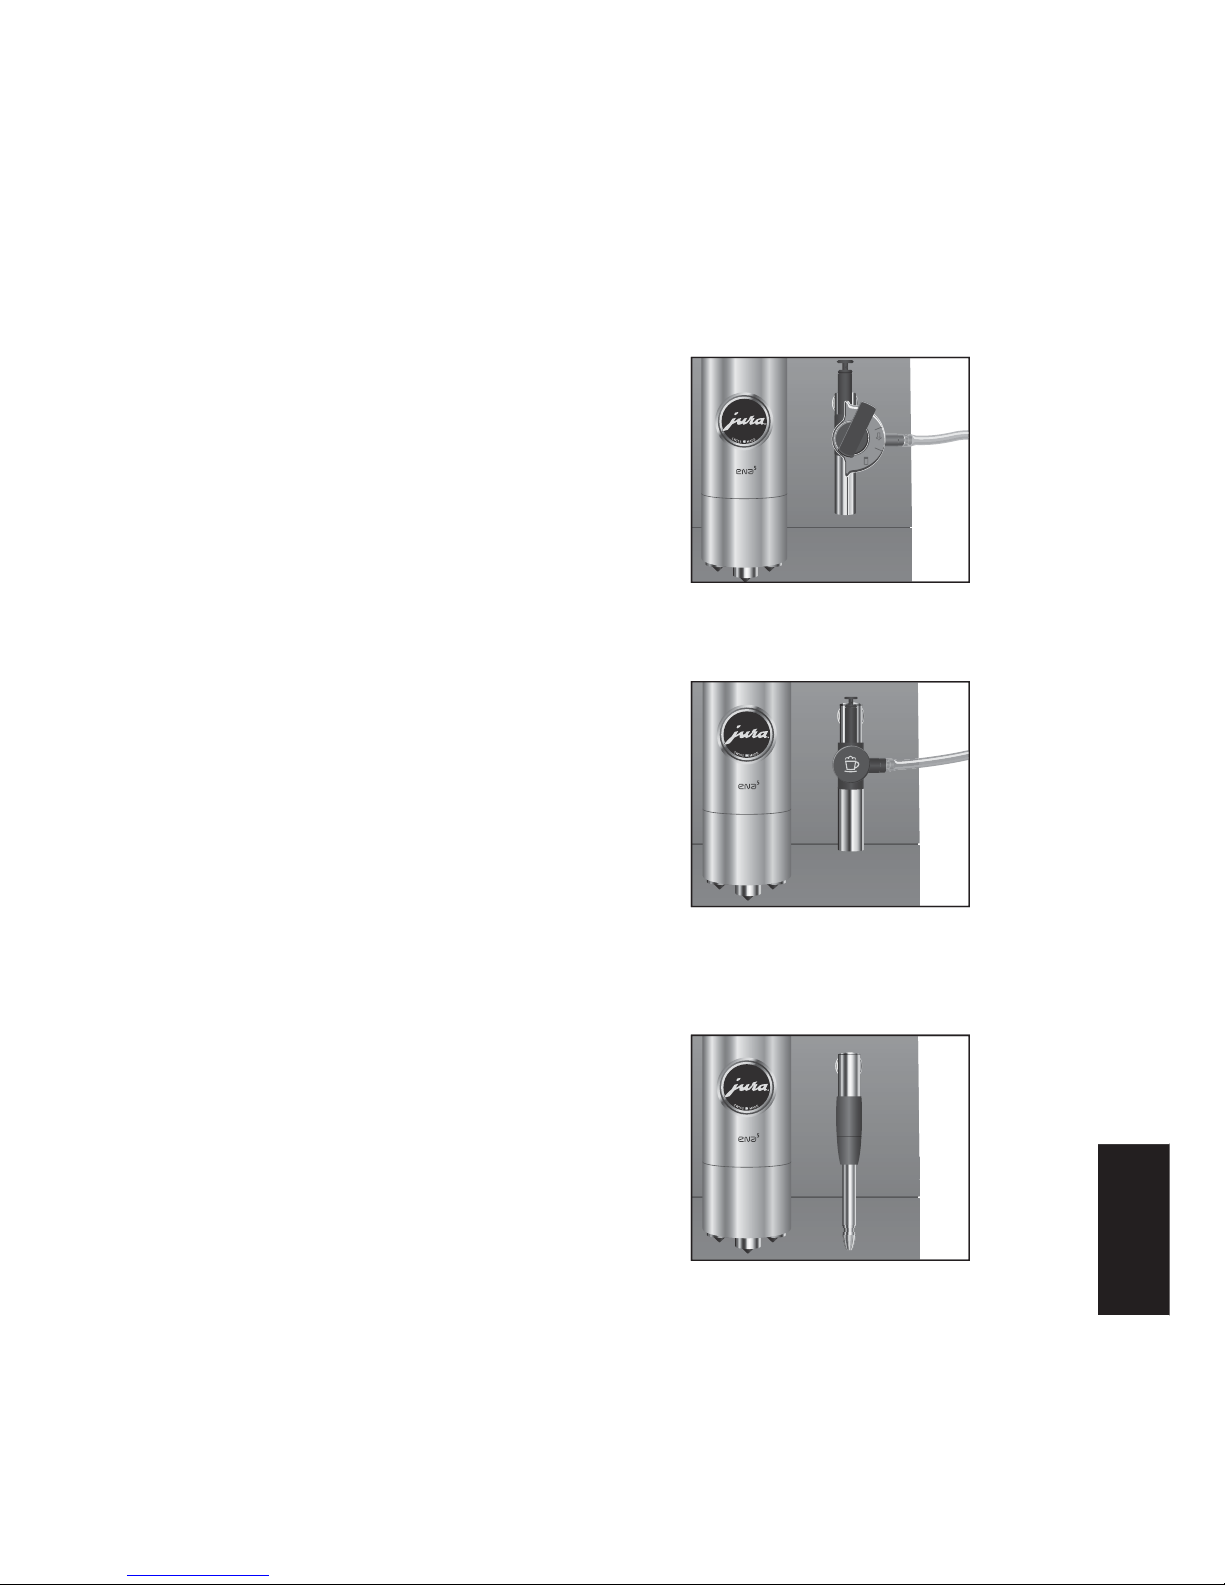
Connector System
©
The Connector System© permits the use of four
different nozzles:
Professional Cappuccino Frother
Cappuccino
Hot milk
Easy Cappuccino Frother
Cappuccino
2-stage frothing nozzle
Cappuccino
Hot milk
Z
U
U
Z
U
Z
U
U
en
en
it
en
it
40
ENA 5
Hot water nozzle
3-colour plain text display
Your ENA features a 3-colour plain text display.
The colours of the display texts have the following
meanings:
Green: Your ENA is ready for use.
Red: The ENA is prompting you to perform an
action.
Yellow: You are in programming mode.
1 Preparing and using for the first time
This chapter provides the information you need
for trouble-free use of your ENA and gives you a
step-by-step guide to preparing your ENA for your
first coffee experience.
Setting up
When setting up your ENA, please note the
following:
Place the machine on a horizontal surface
that cannot be damaged by water.
Select a position for the ENA where it is
protected against overheating.
Filling the water tank
To enjoy perfect coffee we recommend changing
the water every day.
CAUTION
Milk, mineral water or other liquids can damage
the water tank or the machine.
Only fill the water tank with fresh, cold
water.
Z
Z
Z
Z
Z
Z
T
Remove the water tank and rinse with cold
water.
Fill the water tank with cold, fresh water
and replace the tank.
Filling the bean container
CAUTION
Coffee beans which have been treated with
additives (e.g. sugar), pre-ground or freeze-dried
coffee will damage the grinder.
Only use untreated coffee beans to refill the
bean container.
Remove the bean container cover.
Remove any dirt or foreign objects from
the bean container.
Fill the bean container with coffee beans.
Close the bean container.
First-time use
The on/off button also acts as a power
switch. When the ENA is switched off, the
machine is completely disconnected from
the power supply.
WARNING
If the machine is operated with a defective power
cable, there is a danger of electric shock.
Never use a machine which has a defective
power cable.
Precondition: The water tank must be full.
Insert the mains plug into a power socket.
Q T Press the on/off button to switch the
machine on.
SPRACHE DEUTSCH
T
T
T
T
T
T
T
E
J
T
T
41
ENA 5
g T Turn the Rotary Switch until LANGUAGE
ENGLISH
is displayed.
k T Press the Rotary Switch to confirm the
language setting.
OK, the language is then adjusted.
OPEN TAP
Place a receptacle under the nozzle.
l T Turn the switch to position m.
SYSTEM FILLING
CLOSE TAP
y T Turn the switch to position o.
HEATING
PRESS ROTARY
Place a receptacle under the coffee spout.
k T Press the Rotary Switch to start rinsing.
RINSIN G
READY
When a coffee speciality has been prepared
for the first time, it is possible that
FILL
BEANS appears on the display as the
grinder has not yet been completely filled
with coffee beans. In this case prepare a
different coffee speciality.
T
T
E
Using and activating filter
Your ENA no longer requires descaling if you use
CLARIS filter cartridges.
Perform the ‘Insert filter’ operation without
interruptions. This will ensure optimum
function of your ENA.
After two months the filter capacity is
reached. The elapsed time can be checked
with the date plate on the cartridge holder.
Precondition:
READY appears on the display.
Open the cover behind the Rotary Switch.
P T Press the P button until RINSE appears.
g T Turn the Rotary Switch until FILTER - is
displayed.
k T Press the Rotary Switch to enter the
programme item.
NO -
g T Turn the Rotary Switch until YES p
appears.
k T Press the Rotary Switch to confirm the
setting.
OK
INSERT FILTER
Remove and empty the water tank.
Open the cartridge holder.
Insert the new filter cartridge into the water
tank, pressing it slightly.
Close the cartridge holder. It will click into
place audibly.
Fill the water tank with cold, fresh water
and replace the tank.
Place a receptacle (at least 500 ml) under
the nozzle.
k T Press the Rotary Switch.
OPEN TAP
E
E
T
T
T
T
T
T
T
en
en
it
en
it
 Loading...