

Page 1

EU1D
EU2D
6720805318 (2012/12)
D
Montage- und
Bedienungsanleitung
Schaltuhr
D
GB F
EI
0 6 12 18 24
MENU
OK
1
2
Page 2

Inhaltsverzeichnis
Grundlegende Sicherheitshinweise 3
Display und Tasten/Bedienprinzip 4
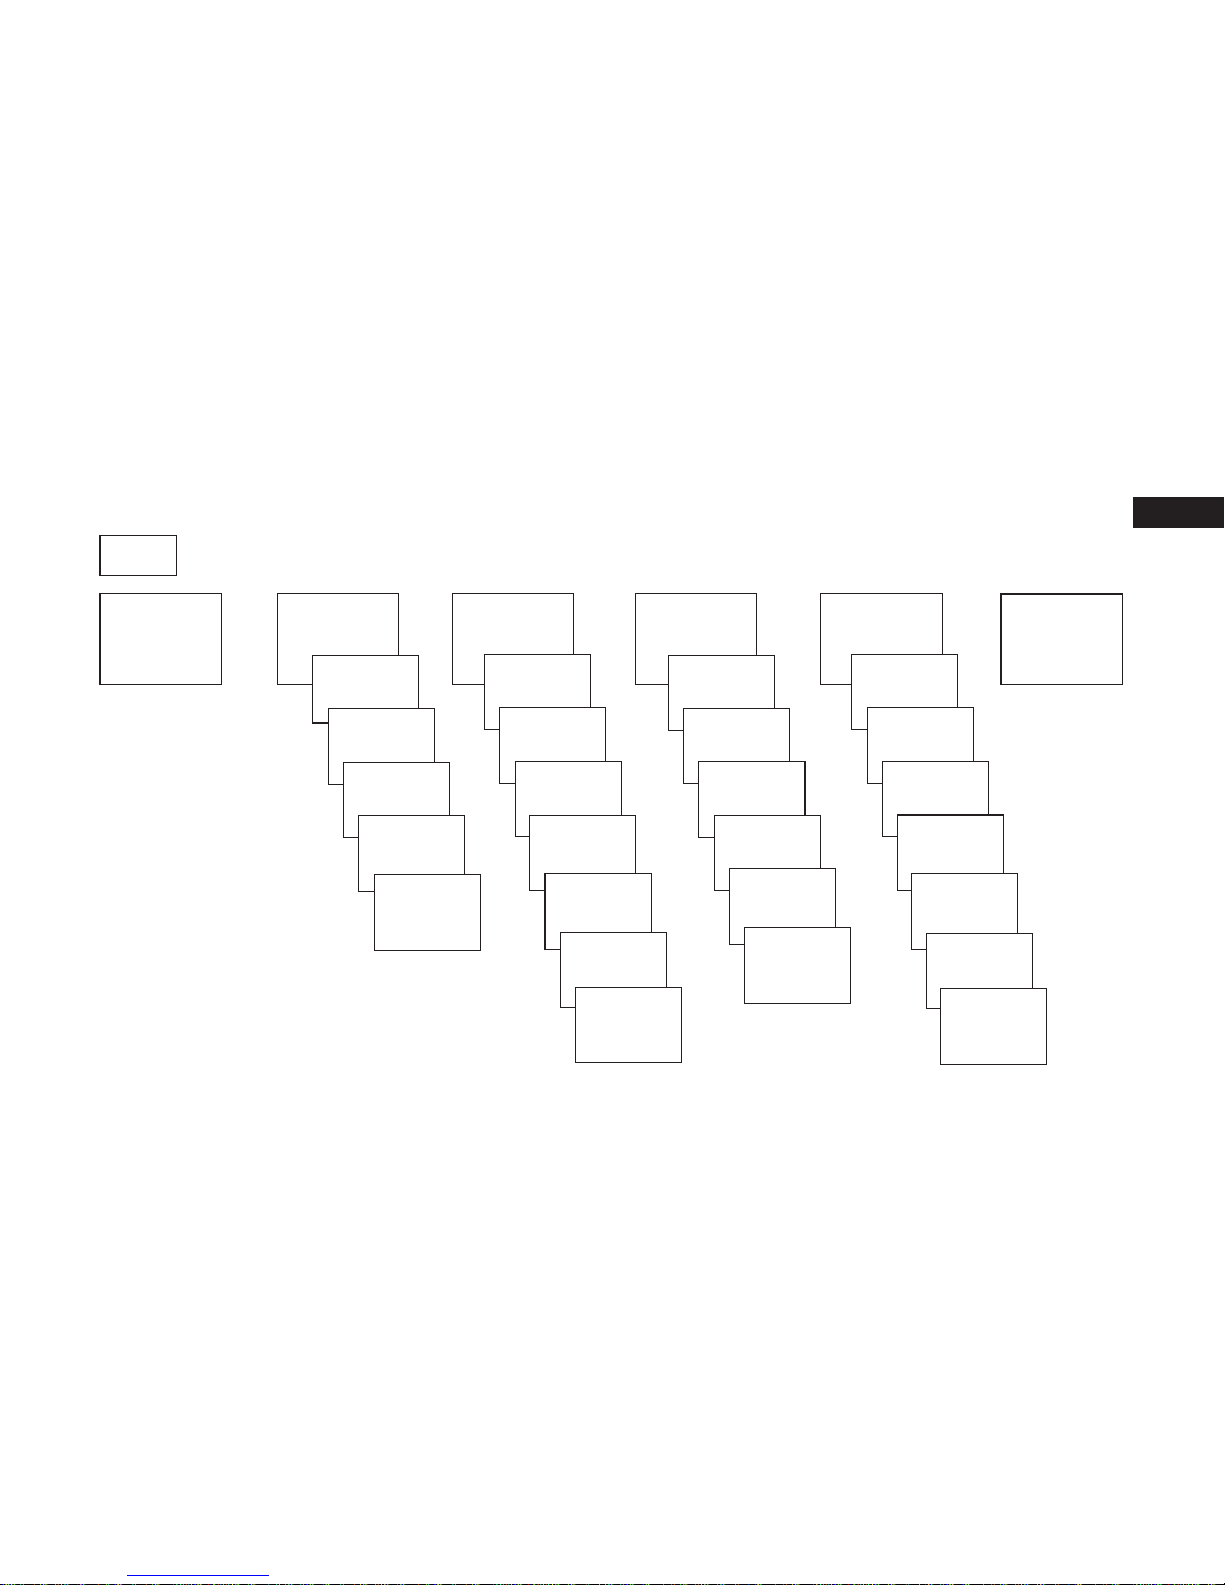
Übersicht Menüführung 5
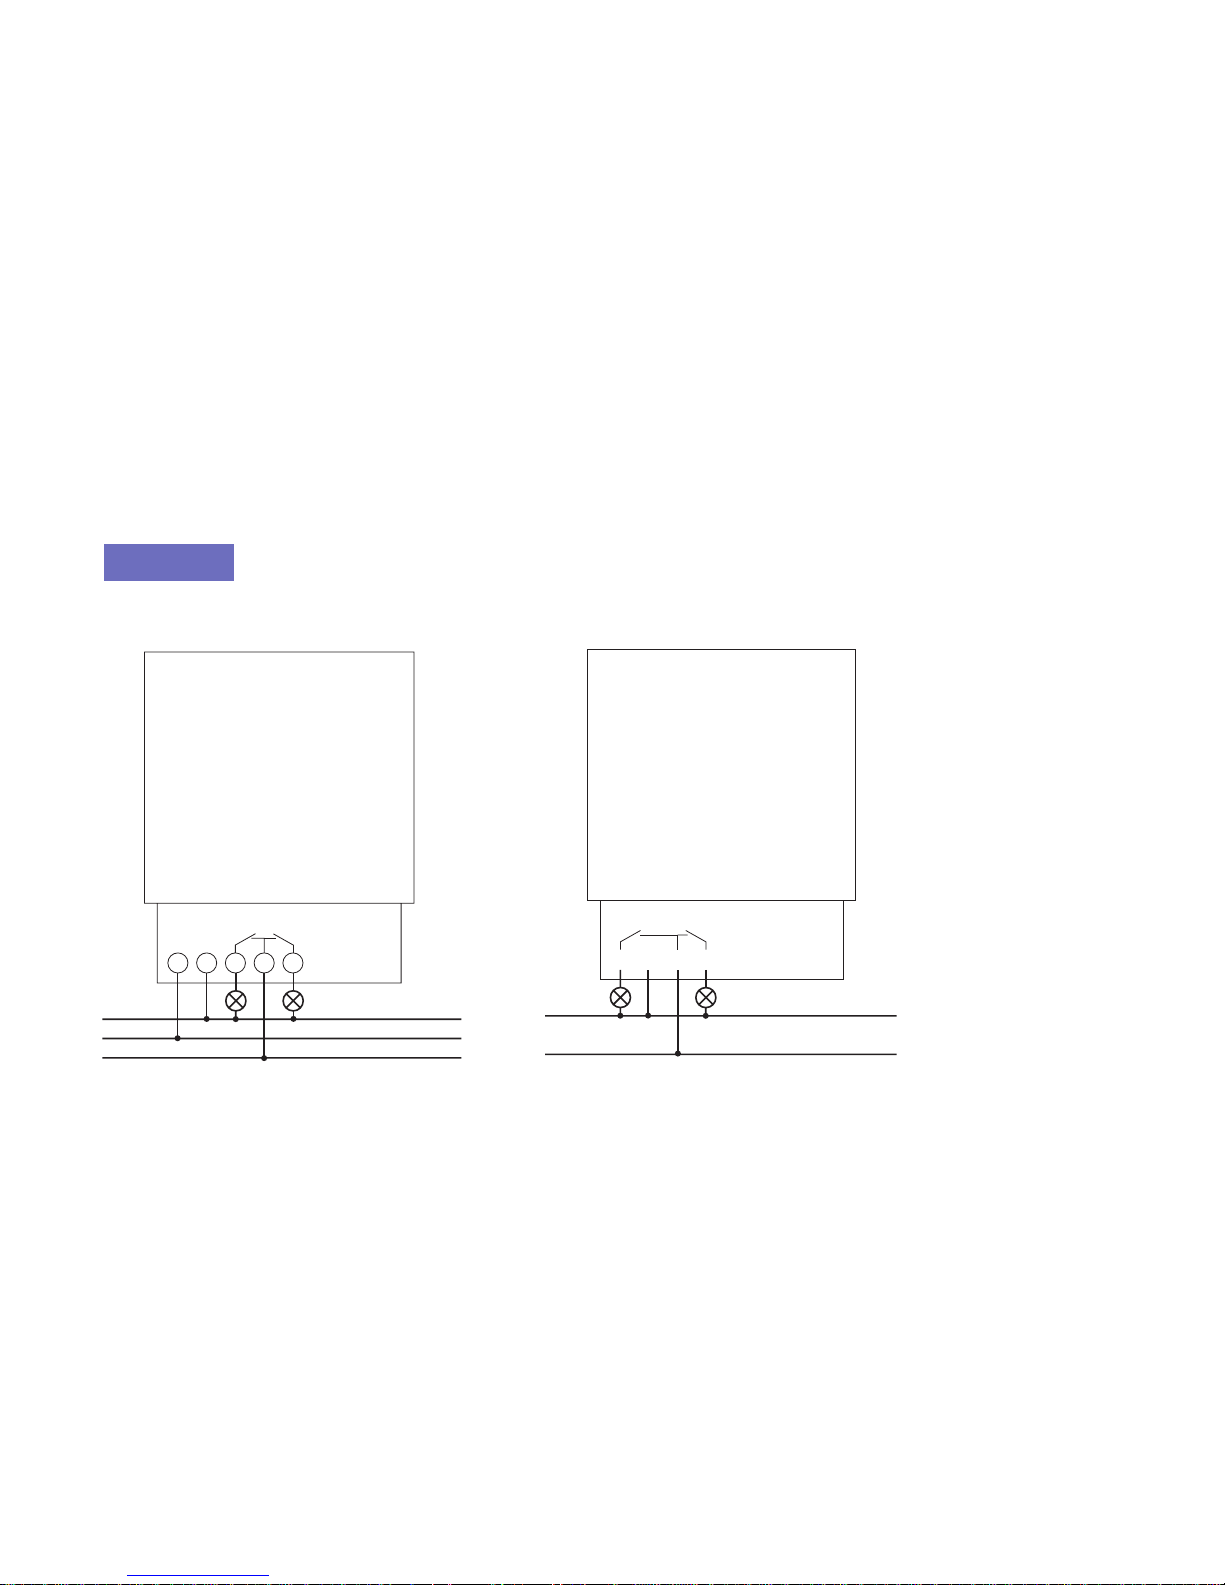
Anschluss 6
Montage 6
Erstinbetriebnahme 7
RESET 7
Menüpunkt PROGRAMM
Schaltzeit neu programmieren 8
Schaltzeit ändern 9
Menüpunkt MANUELL
Hand- und Dauerschaltung 10
Menüpunkt OPTIONEN
PIN-Code 10
Technische Daten 11
Serviceadresse/Hotline 12
2
Page 3

3
D
Grundlegende Sicherheitshinweise
• Das Gerät ist für den Fronttafeleinbau vorgesehen
• Entspricht Typ 1 BSTU nach IEC/EN 60730-2-7
Bestimmungsgemäße Verwendung
• Die Schaltuhr wird verwendet für den Einbau in Heizungssteuerungen
• Verwendung nur in geschlossenen, trockenen Räumen
Entsorgung
Gerät umweltgerecht entsorgen
Montage ausschließlich von Elektrofachkraft durchführen lassen!
HINWEIS
Page 4
4
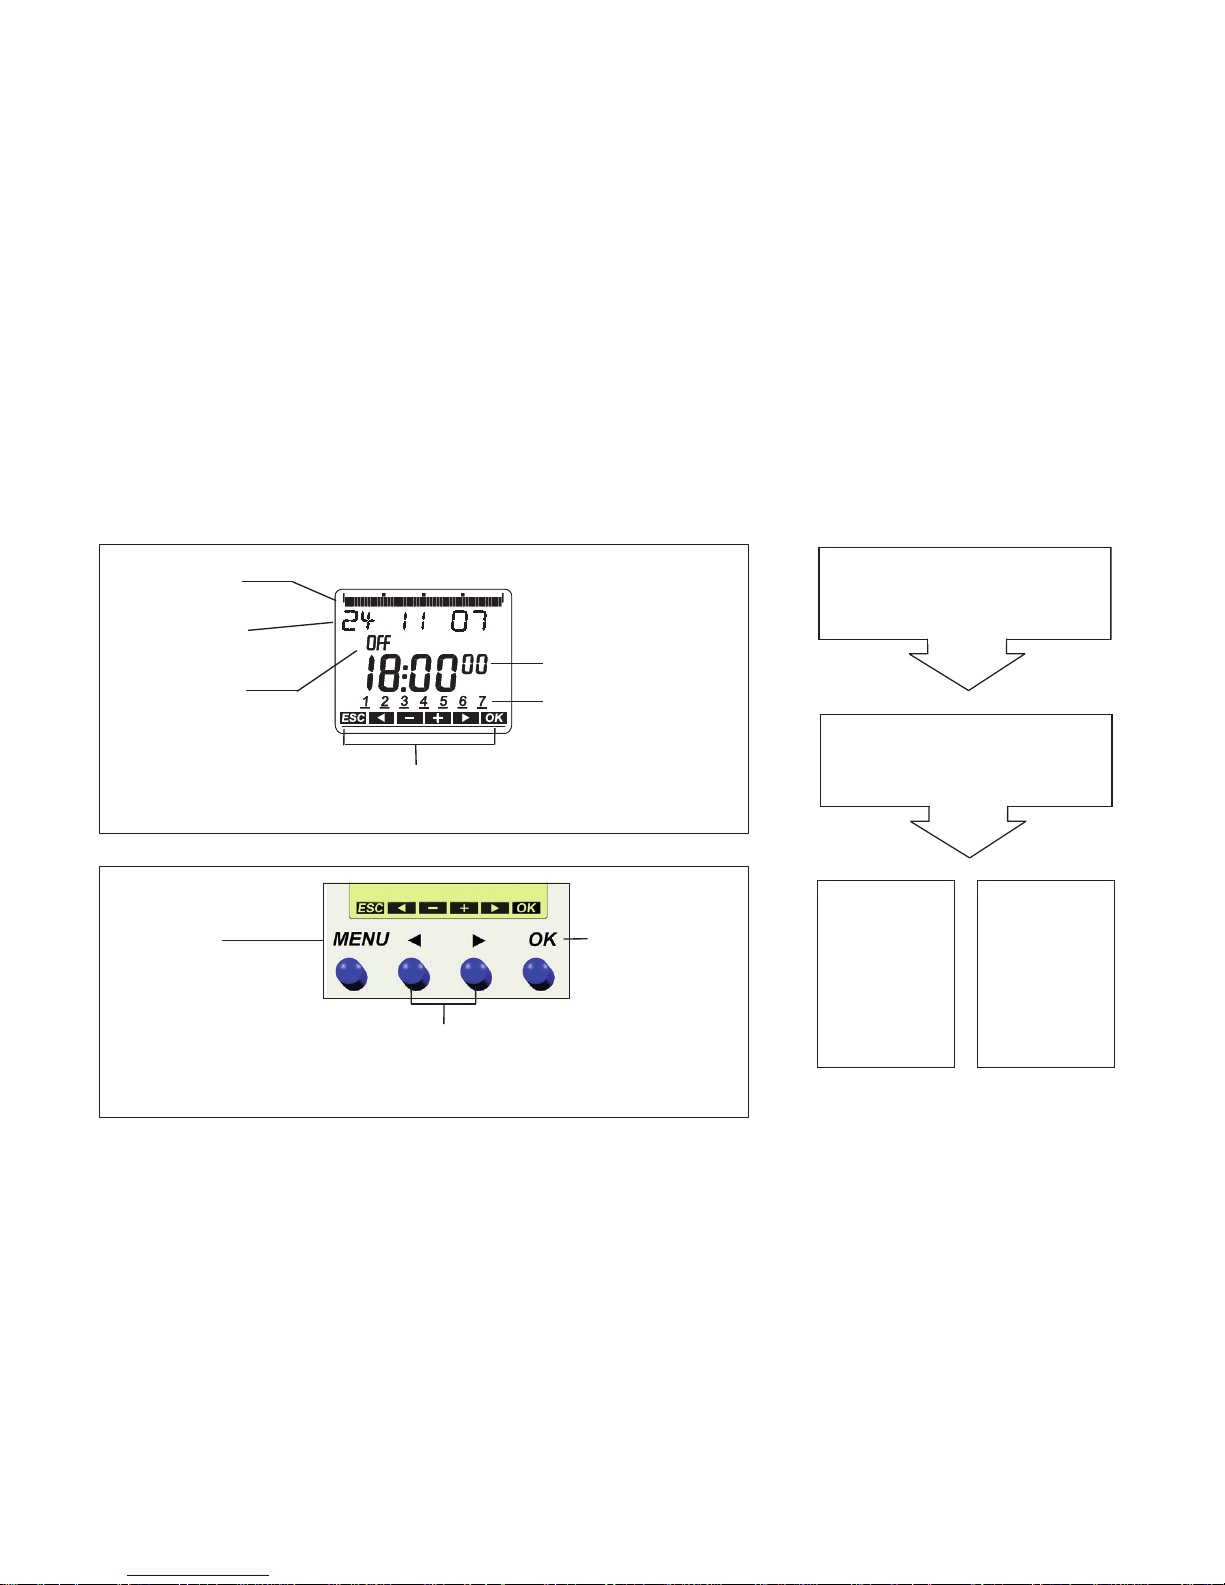
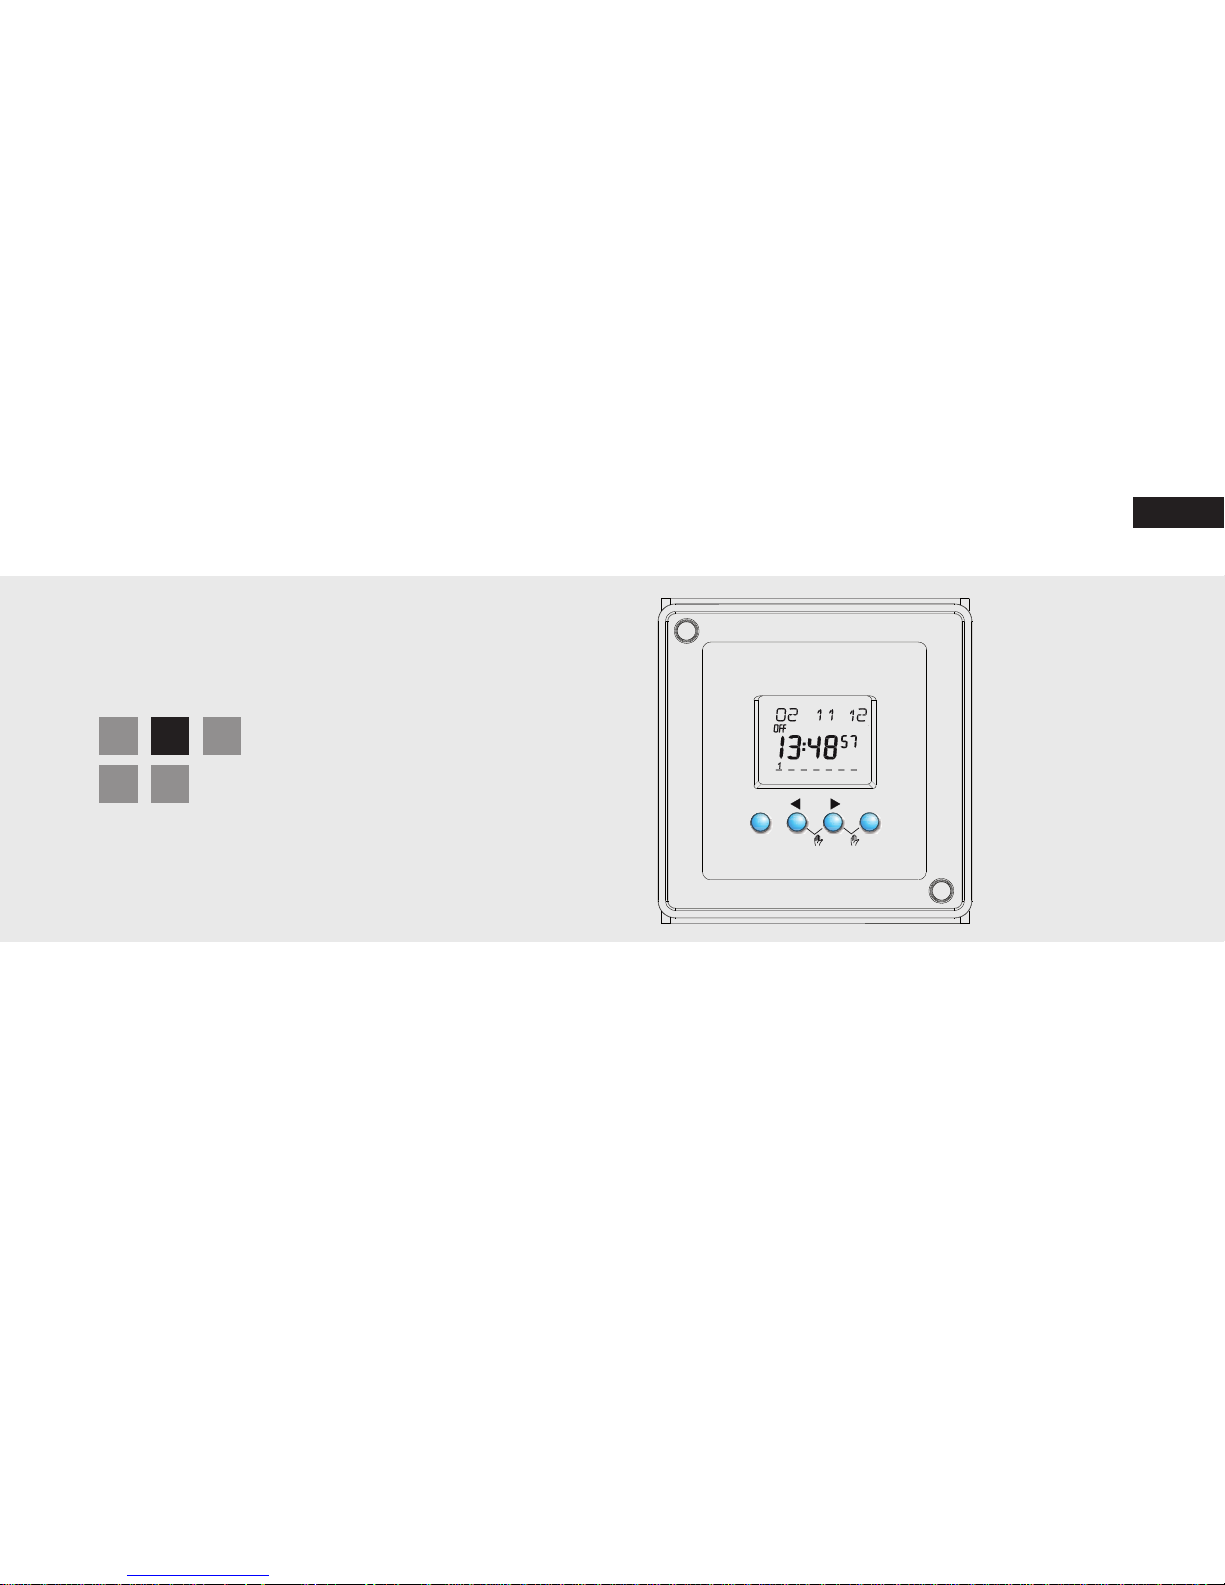
Display und Tasten Bedienprinzip
0 6
12
18
24
Zeitanzeige
Datumsanzeige
Kanalzustand
C1, C2
ON = Ein
OFF = Aus
MENU
– Display aktivieren
– Menü öffnen
– Menü abbrechen
– ESC
(Menü verlassen)
JA
Bestätigung
OK
drücken
NEIN
Ändern/
Wechseln
drücken
OK
– Auswahl
speichern
– Auswahl
bestätigen
Wahlmöglichkeiten
werden angezeigt
Wochentage von 1 – 7
Anzeige der aktiven Tasten mit
der jeweiligen Funktion
Programmierte
Schaltzeiten
1. Textzeile lesen
Blinkender Text/Symbol
stellt Frage dar
2. Entscheidung treffen
Page 5
D
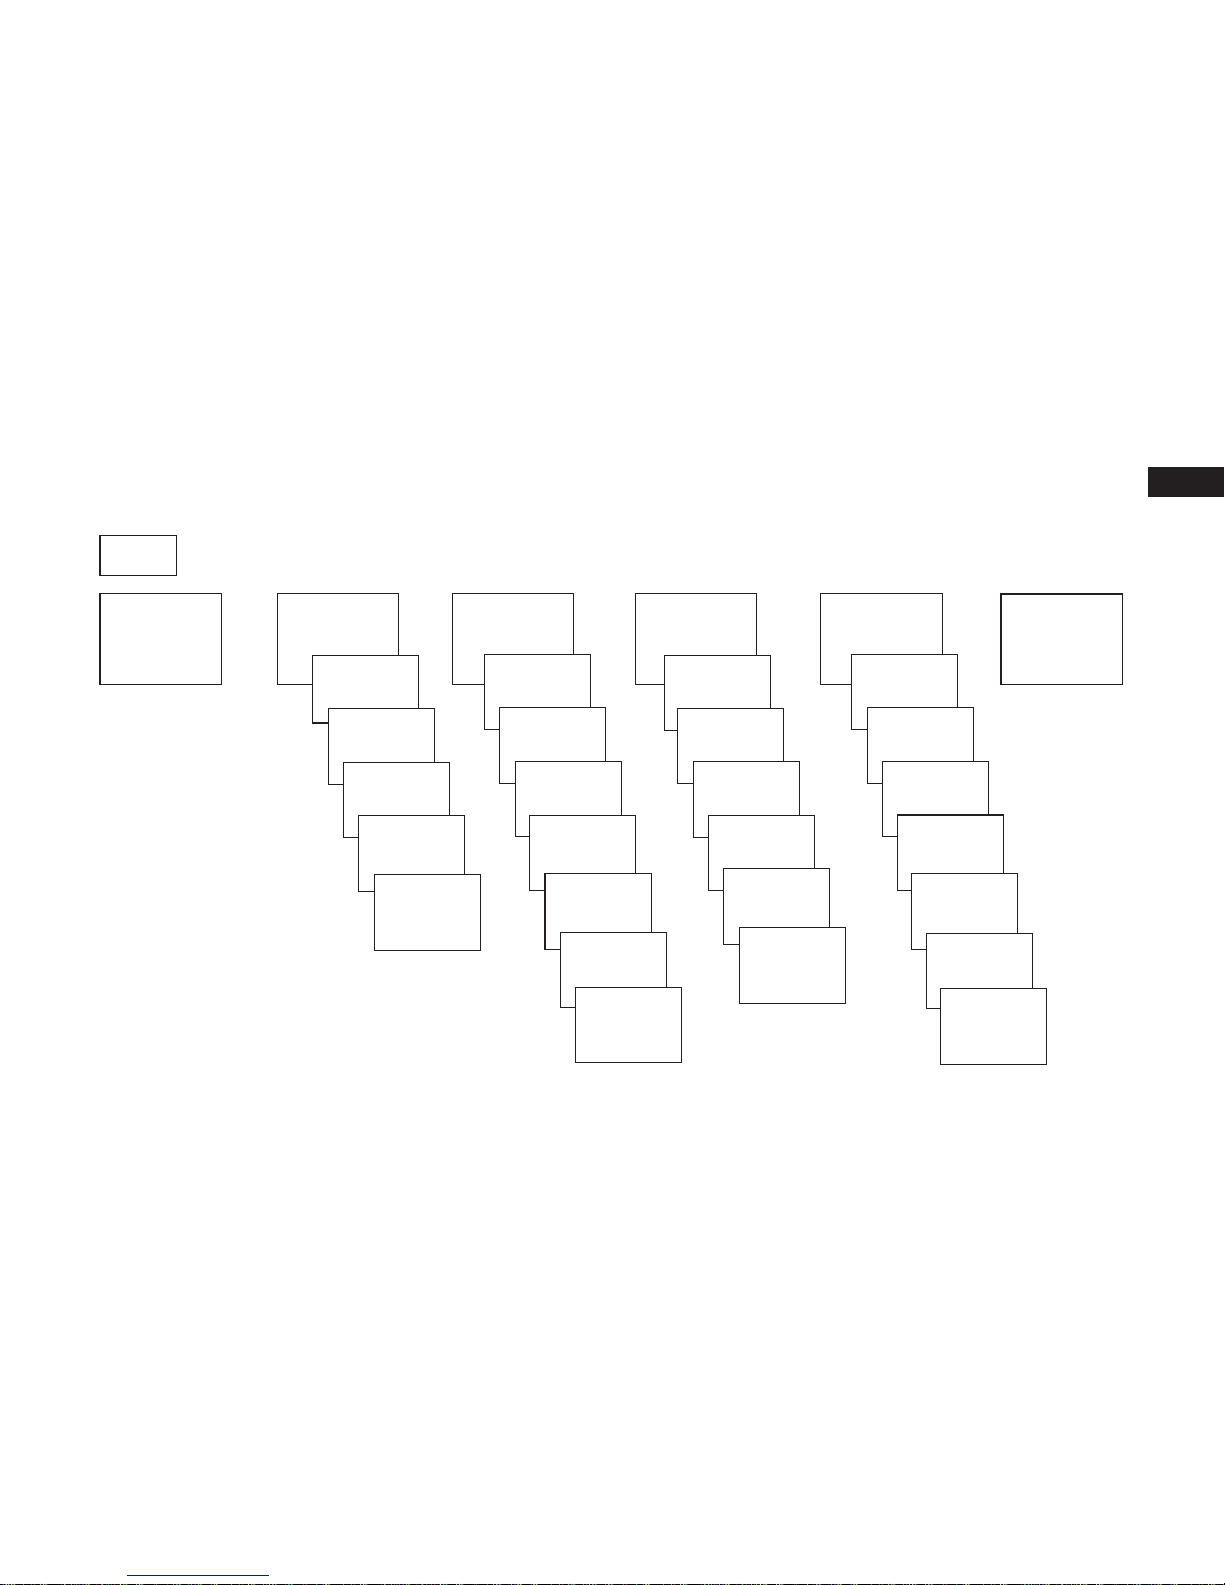
Übersicht Menüführung
19 01 12
C1 OFF C2 OFF
9:40
46
PROGRAMM
NEU
ABFRAGEN
AENDERN
LOESCHEN
ENDE
ZEIT/DAT MANUELL OPTIONEN
ENDE
UHRZEIT
DATUM
SO--WI
WOCHEN
TAG
DATUMSFORMAT
ZEIT
FORMAT
ENDE
KANAL C1
BETRIEBSSTD-ZÄHLER
LCD-BELEUCHTUNG
SPRACHE
PIN
WERKSEINSTELLUNG
INFO
ENDE
5
MENU
DAUER EIN
DAUER AUS
HAND EIN
FERIEN
ENDE
Page 6
6
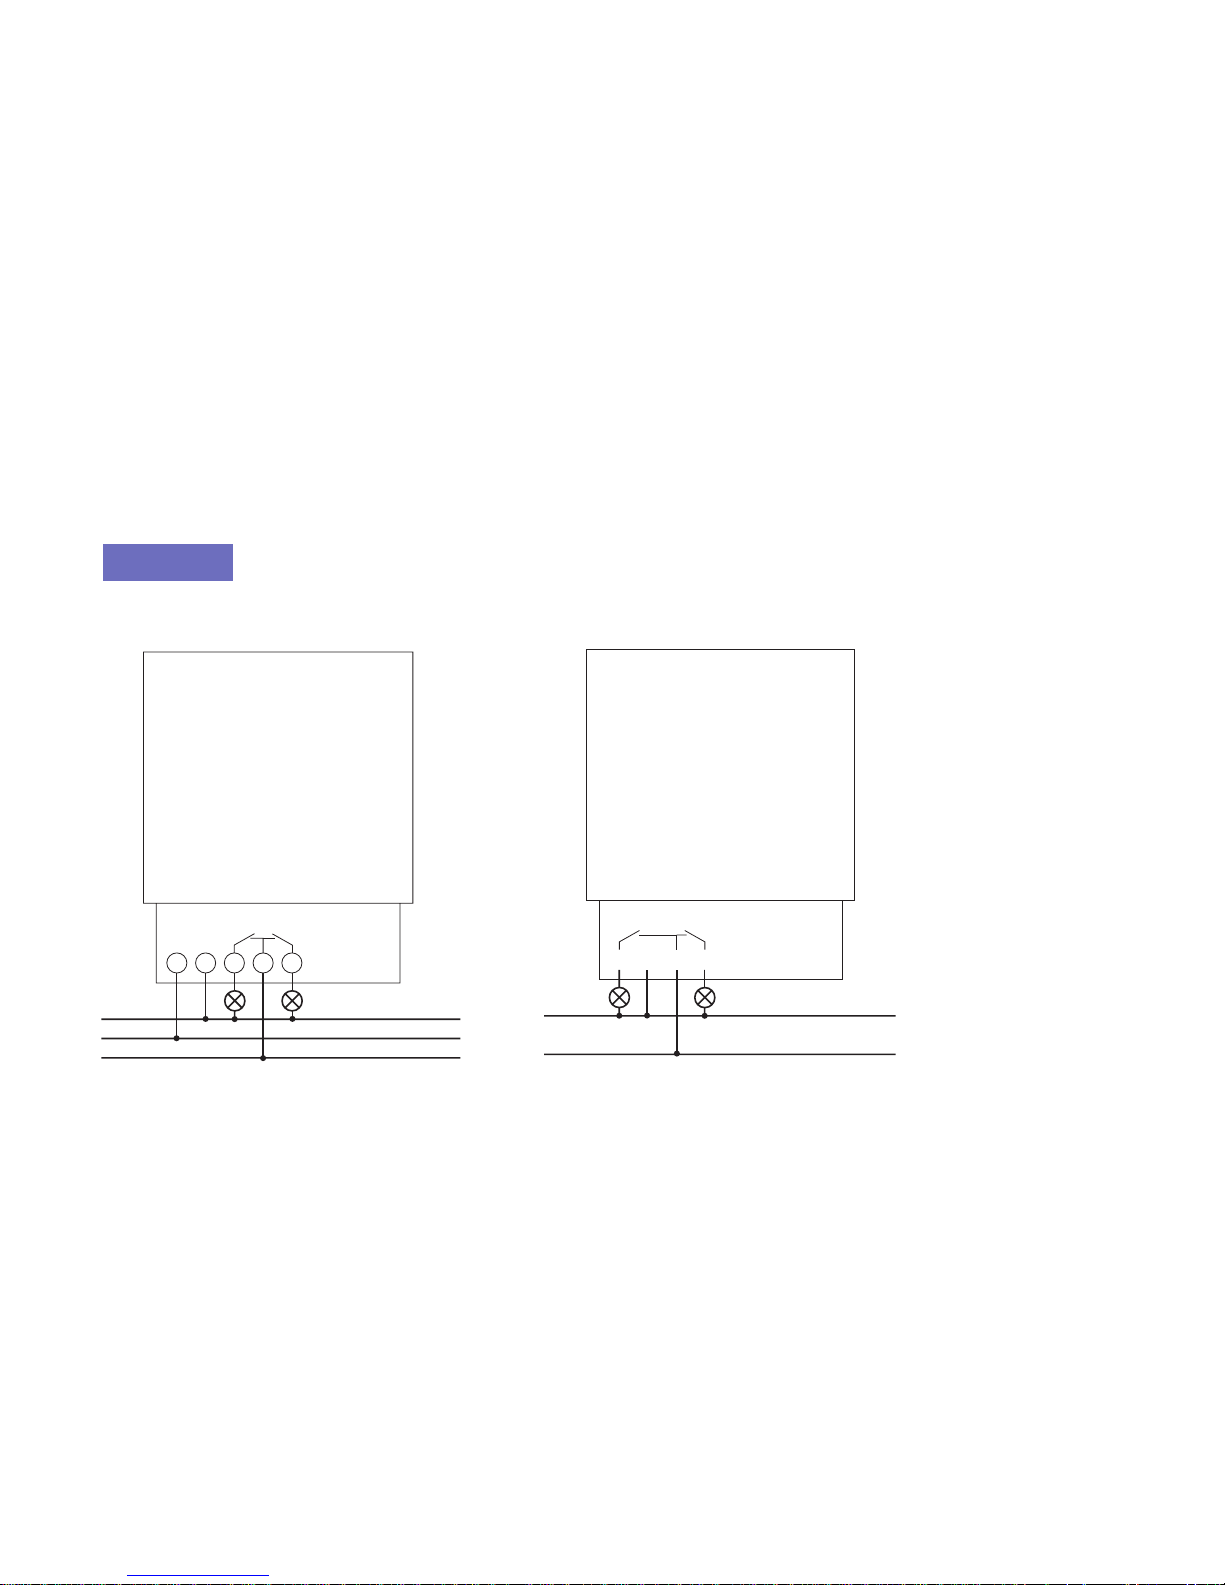
Anschluss
1 2 3 4 5
–
+24 V
+24 V
1 2 3
+24 V
–
4
Montage ausschließlich von Elektrofachkraft durchführen lassen!
Adapter (5-polig)
Stecker (verpolungssicher)
HINWEIS
8-737-704-462-0
EU1D
8-737-704-461-0
EU2D
Page 7
7
D
Erstinbetriebnahme
Datum, Uhrzeit und Sommer-/
Winterzeitregel einstellen
Beliebige Taste drücken und Anzeigen im
Display folgen (siehe Bild).
DEUTSCH
JAHR
MONAT
TAG
STUNDE
MINUTE
SO-WI
EUROPA
SO-WI GB/
IRL/P
SO-WI FIN/
GR/TR
SO-WI CDN
SO-WI USA
SO-WI IRAN
SO-WI FREIE
REGEL
SO-WI FIXES
DATUM
OHNE SO-WI
ok
19 10 06
C1 OFF C2 OFF
9:40
46
RESET
Gleichzeitig die 4 Bedientasten drücken.
Sie können nun zwischen PROGRAMM
BEHALTEN und PROGRAMM LOESCHEN
wählen.
Page 8
8
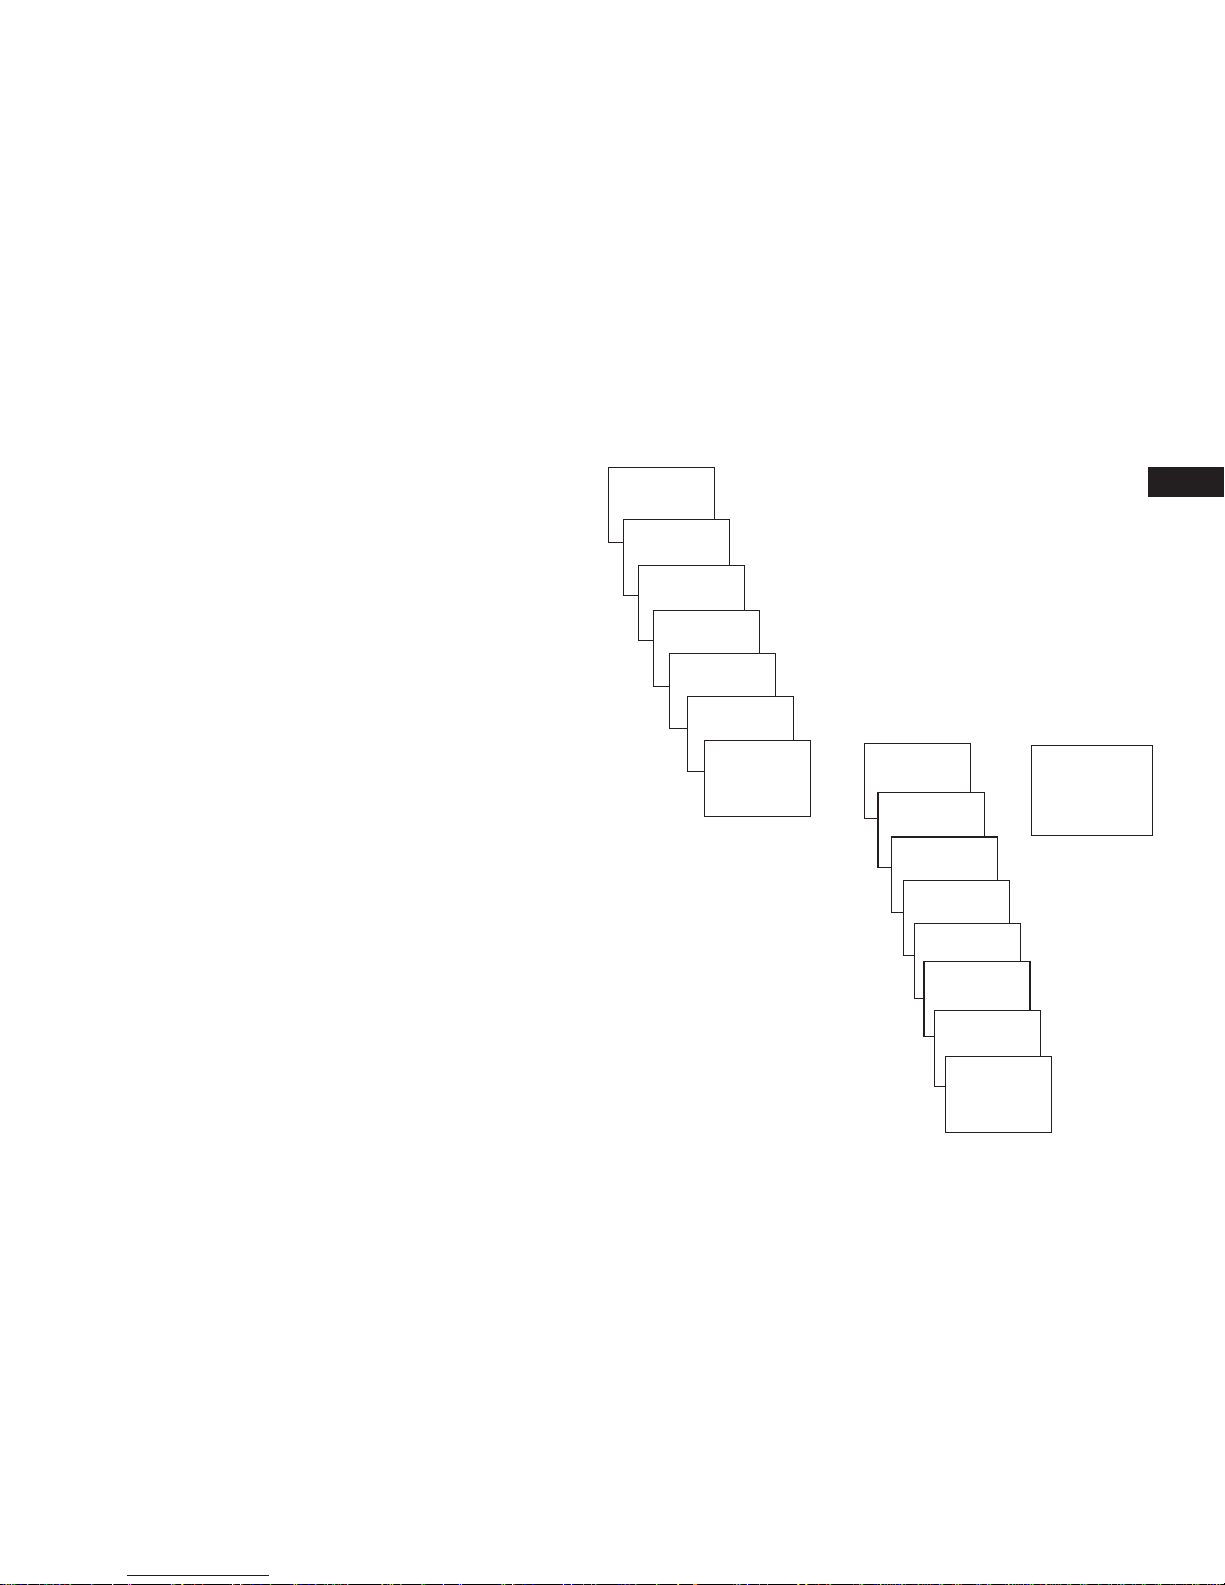
gleiche Schaltzeit für
mehrere Tage = Block
Schaltzeit für
einen Tag
NEU
KANAL C1
FREI 56
EIN C1 On
STUNDE
MINUTE
MONTAG
SPEICHERN
KOPIEREN
DAZU DIEN
SPEICHERN
ok
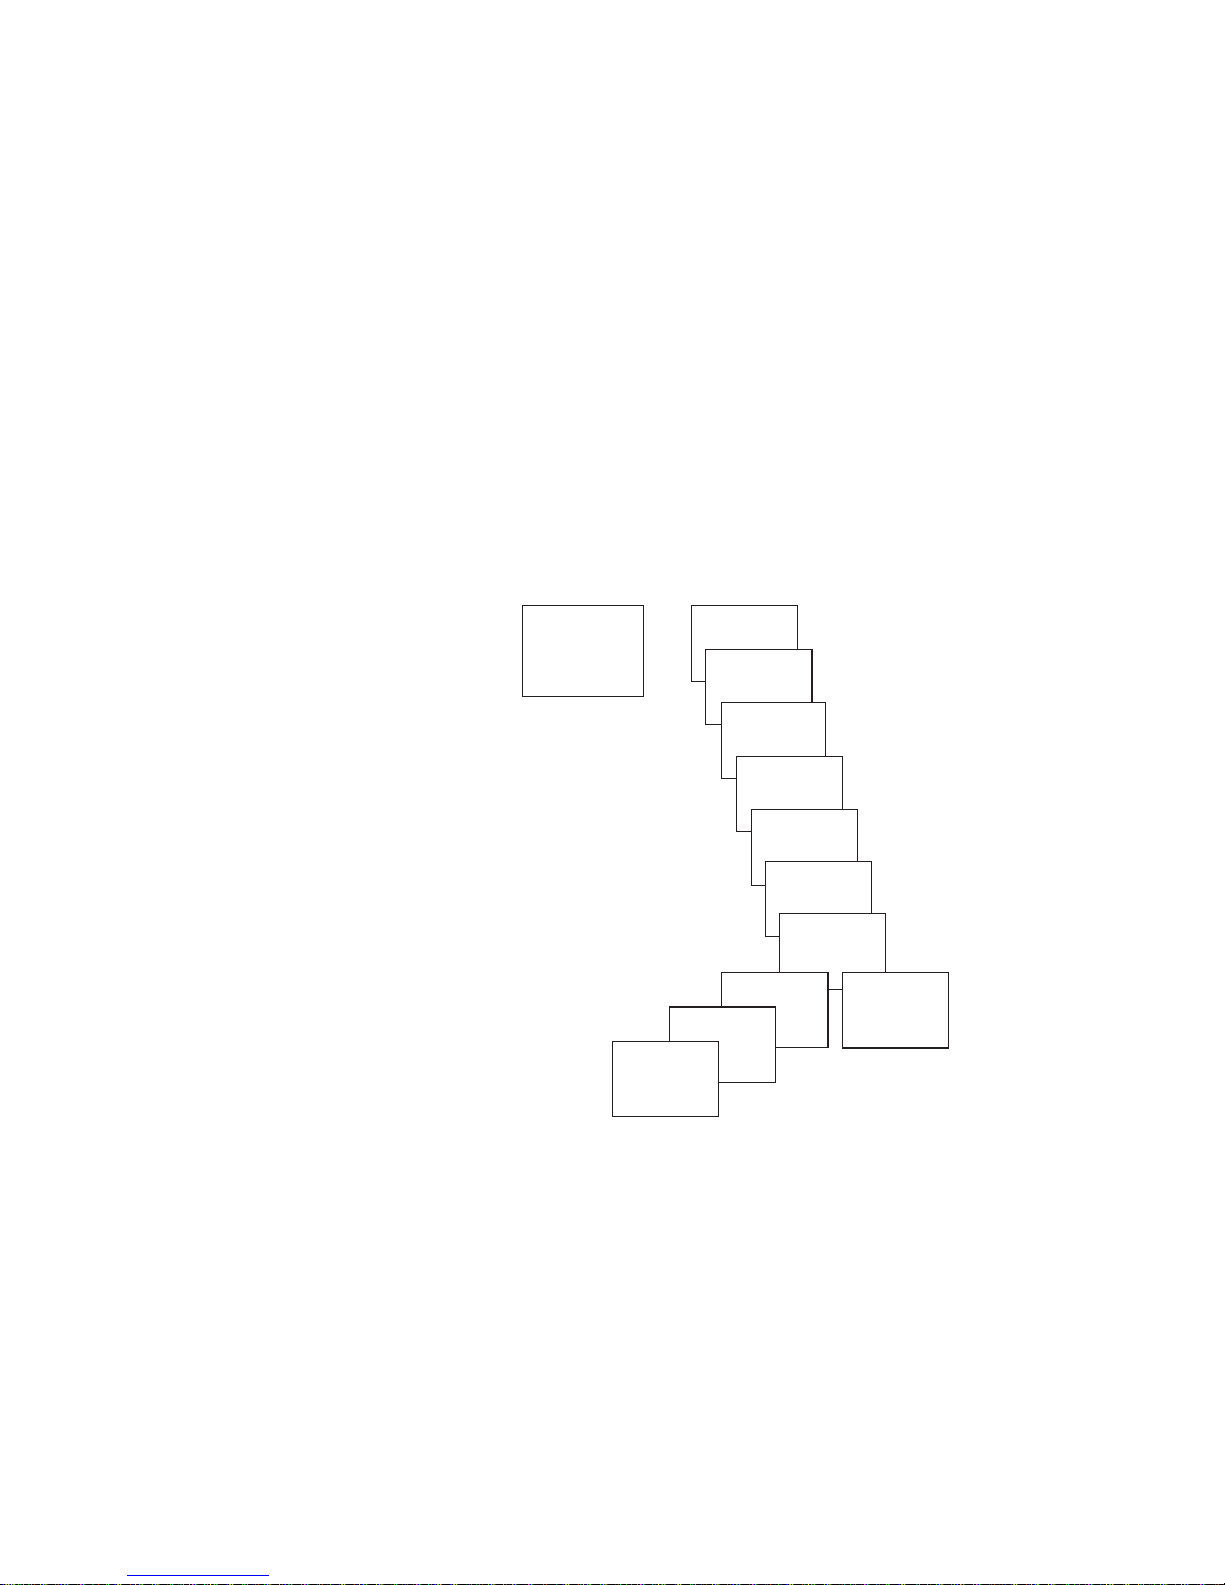
Neue Schaltzeit programmieren
MENU drücken.
(siehe Bild)
Vordefinierte Schaltzeiten für
Kanal C1: Mo–So: EIN 6:00 Uhr, AUS 22:00 Uhr
Kanal C2: Mo–So: EIN 5:00 Uhr, AUS 22:00 Uhr
Sie haben 56 freie Speicherplätze zur
Verfügung.
PROGRAMM
Page 9
9
D
KANAL C1
MONTAG
STUNDE
AENDERN
MINUTE
AENDERN
EINZELTAG
AENDERN
BLOCK
AENDERN
ok
PROGRAMM
NEU
ABFRAGEN
AENDERN
LOESCHEN
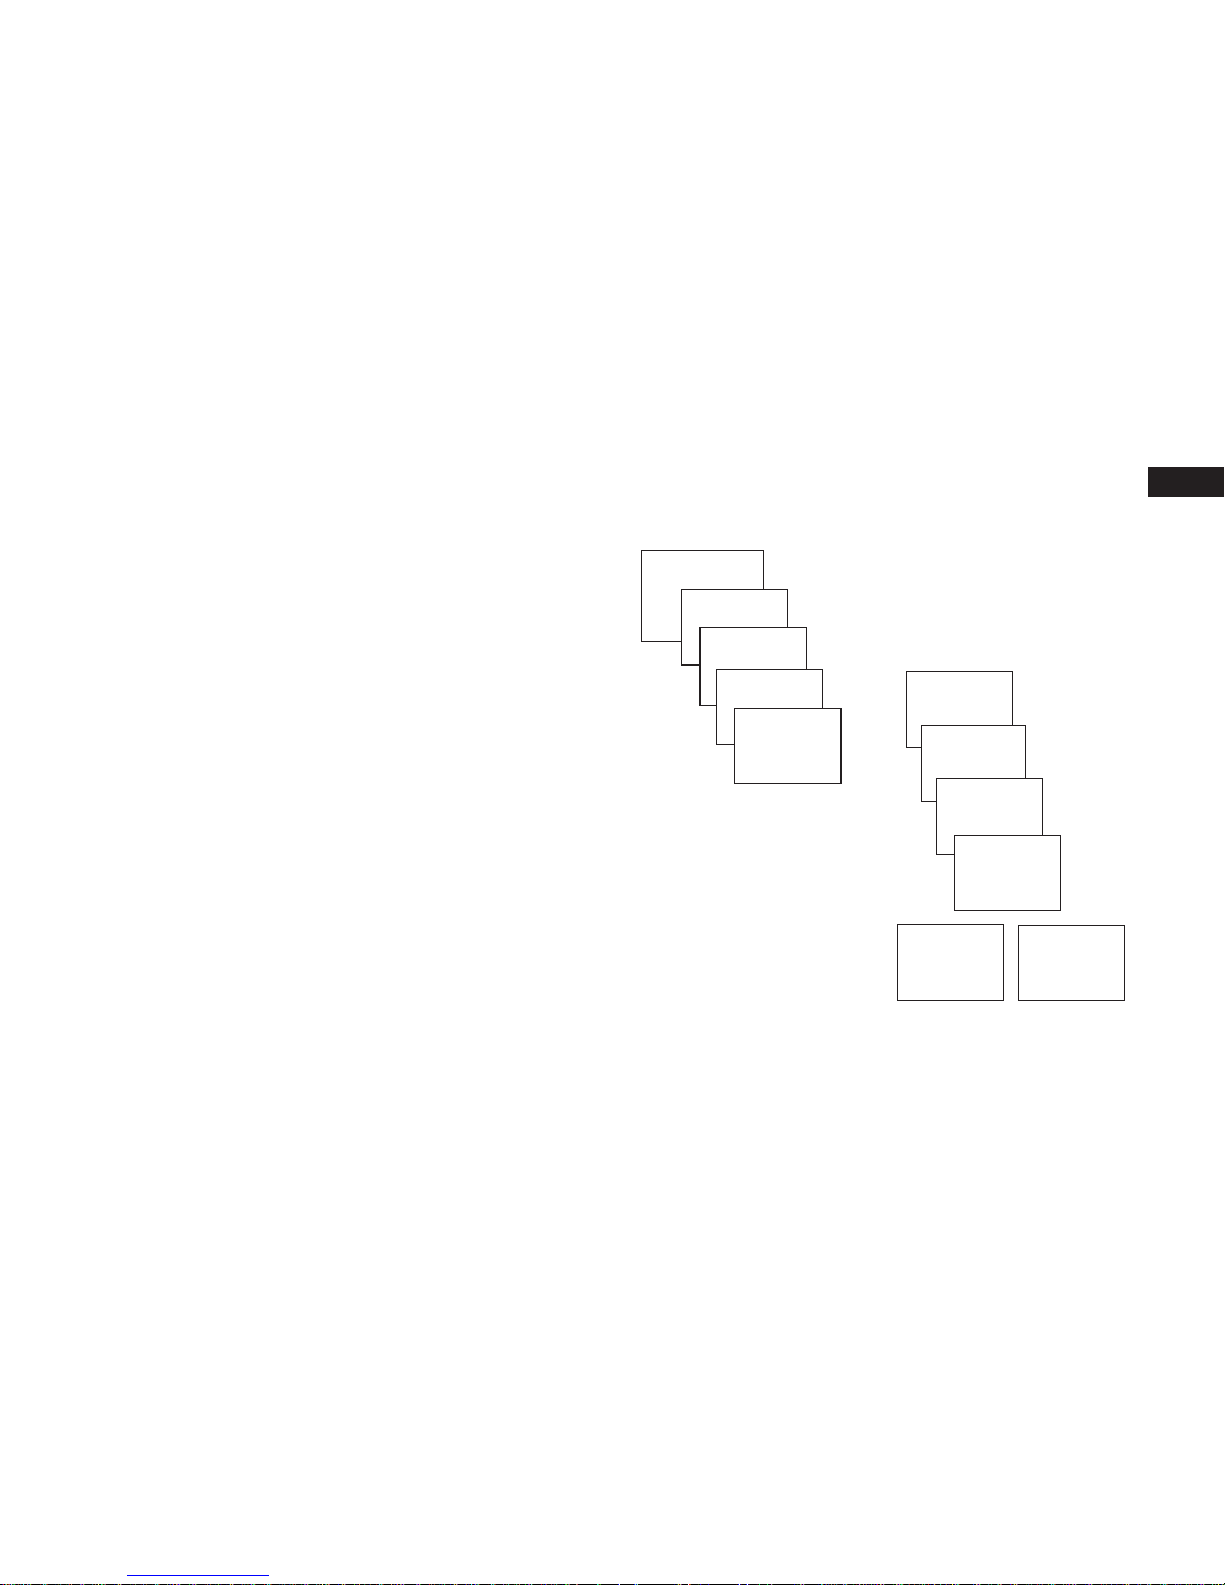
Schaltzeit ändern/löschen
MENU drücken.
(siehe Bild)
Sie können entweder einen Block ändern/löschen,
d. h. eine Schaltzeit, die auf mehrere Tage
(z. B. Mo-Fr) kopiert ist, oder eine einzelne
Schaltzeit.
Page 10
10
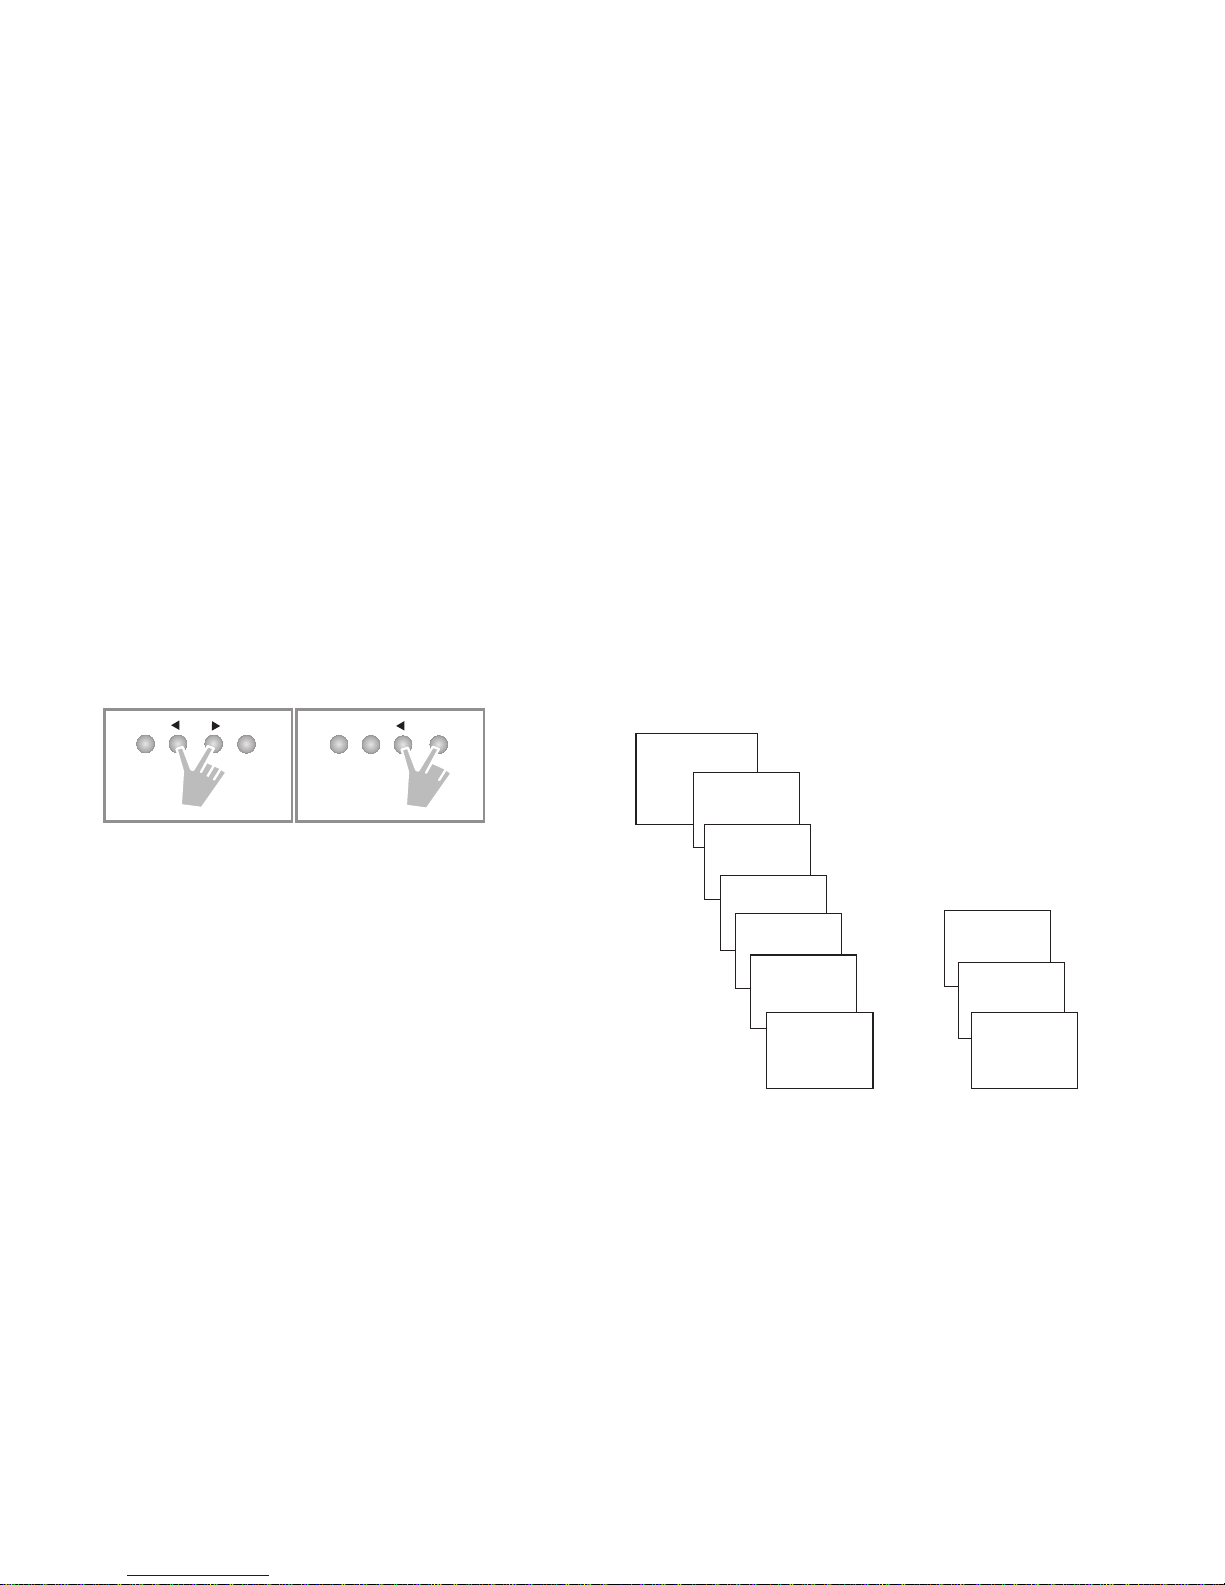
Hand- und Dauerschaltung
Die Hand- und Dauerschaltung kann menügeführt in MANUELL oder (in der Automatik-Anzeige) per Tastenkombination eingestellt wer-
den (siehe Bild).
Aktivieren Handschaltung
Kurz beide Tasten gleichzeitig drücken.
Aktivieren Dauerschaltung
2 Sekunden beide Tasten gleichzeitig drücken.
Aufheben Hand-/Dauerschaltung
Beide Tasten gleichzeitig drücken.
ok
Kanal
C1
Kanal
C2
PIN-Code eingeben
Der PIN-Code wird menügeführt in
OPTIONEN eingestellt.
Bei Verlust des PIN rufen Sie die ThebenHotline an.
OPTIONEN
MIT PIN
AKTUELLE
NEUE PIN
00 00
BETRIEBS-
STD-ZAEHLER
LCD-BELEUCHTUNG
SPRACHE
PIN
WERKSEINSTELLUNG
INFO
ok
Page 11

11
D
Technische Daten
• Nennspannung: 18–27,5 V DC
• Eigenverbrauch: 1,0 W
• Standby min. 0,1 W
• Max. Stromaufnahme: 40 mA
• Kontakt: Schließer
• Öffnungsweite: <3 mm (µ)
• Kontaktwerkstoff: AgNi (0,15 Au)
• Schaltleistung: 2 x 6 (2) A
• Zulässige Umgebungstemperatur:
–30 °C ... +55 °C
• Schutzklasse: III nach EN 60730-1 bei
bestimmungsgemäßer
Montage
• Schutzart: IP 20 nach EN 60529
• Gangreserve: 10 Jahre (Lithiumzelle)
bei +20 °C
• Ganggenauigkeit: ≤ ±0,5 s/Tag bei +25 °C
• Verschmutzungsgrad: 2
• Bemessungsstoßspannung: 4 kV
Page 12

Original Quality by
Bosch Thermotechnik GmbH
Sophienstraße 30-32
D-35576 Wetzlar/Germany
Page 13
GB
EU1D
EU2D
6720805318 (2012/12)
Assembly and operating
instructions
Time switch
0 6 12 18 24
MENU
OK
1
2
D
GB F
EI
Page 14

Contents
Basic advice 3
Screen display and keys/Operating principle 4
Menu overview 5
Connection 6
Installation 6
Initial start-up 7
RESET 7
Menu item PROGRAM
Reprogram switching time 8
Change/delete switching time 9
Menu item MANUAL
Manual and permanent switching 10
Menu item OPTIONS
PIN code 10
Technical data 11
Service address/Hotline 12
2
Page 15

3
Basic advice
• The device is intended for front panel installation
• Corresponds to type 1 BSTU actions in accordance with IEC/EN 60730-2-7
• Power reserve (10 years) is reduced with memory card inserted (in battery mode)
Designated use
• The time switch is used for integration into heating controls
• For use only in closed, dry rooms
Disposal
Dispose of equipment in an environmentally-friendly manner
GB
Installation should only be carried out by professional electrician!
ADVICE
Page 16

4
Screen display and keys Operating principle
0 6
12
18
24
Time display
Date display
Channel status
C1, C2
ON = Ein OFF = Aus
MENU
– Activate display
– Open menu
– Terminate programme
– ESC
(Leave menu)
YES
Confirmation
OK
press
NO
Change/
revice
press
OK
– Save
selection
– Confirm
selection
Alternatives
are displayed
Days of the week from
1 – 7
Display of active buttons with
relevant function
Programmed
switch times
1. Read text line
Flashing text/symbol
represents question
2. Make decision
Page 17
Menu overview
19 10 06
C1 OFF C2 OFF
9:40
46
PROGRAM
NEW
CHECK
MODIFY
DELETE
END
TIME/DATE MANUAL OPTIONS
END
TIME
DATE
SU-WI
WEEK DAY
FORM DATE
FORM TIME
END
CHANNEL
C1
OPERATING
HOUR
LCD-ILLUMINATION
LANGUAGE
PIN
FACTORY
SETTINGS
INFO
END
5
MENU
PERM ON
PERM OFF
OVERRIDE
ON
HOLIDAY
END
GB
Page 18
6
Connection
1 2 3 4 5
–
+24 V
+24 V
1 2 3
+24 V
–
4
Installation should only be carried out by professional electrician!
Adapter (5-pin)
Plug (reverse polarity protection)
ADVICE
8-737-704-462-0
EU1D
8-737-704-461-0
EU2D
Page 19

7
RESET
Press the 4 buttons simultaneously.
You can choose between RETAIN PROGRAMS
and DELETE PROGRAMS.
GB
Initial start-up
Set date, time and summer-/winter
time rule
Press desired button and follow on-screen
instructions.
ENGLISH
YEAR
MONTH
DAY
HOUR
MINUTE
SU-WI
EUROPE
SU-WI GB/
IRL/P
SU-WI FIN/
GR/TR
SU-WI CDN
SU-WI USA
SU-WI IRAN
SU-WI FREE
RULE
SU-WI FIX
DATE
NO SU-WI
ok
19 10 06
C1 OFF C2 OFF
9:40
46
Page 20

8
Switching
time for
one day
NEW
CHANNEL
C1
MEM FREE
56
C1 On
HOUR
MINUTE
MONDAY
SAVE
COPY
ADD TUESD
ok
Program switching time
Press MENU.
(see fig.)
Predefined switching times for
Channel C1: Mon–Sun: ON 6:00 am,
OFF 22:00 pm
Channel C2: Mon–Sun: ON 5:00 am,
OFF 22:00 pm
There are 56 memory locations available.
PROGRAM
same switching time for
several days = Block
SAVE
Page 21

9
GB
CHANNEL
C1
MONDAY
MODIFY
HOUR
MODIFY
MINUTE
MODIFY
SINGLE
DAY
MODIFY
BLOCK
ok
PROGRAM
NEW
CHECK
MODIFY
DELETE
Change/delete switching time
Press MENU.
(see fig.)
You can either change or delete a block, i.e.
a switching time copied for several days
(e.g. Mon-Fri) or a single switching time.
Page 22

10
Manual and permanent
switching
Manual and permanent switching can be
selected by using menu option MANUAL or
(in the automatic display) via a combination of
buttons (see fig.).
Activate manual switching
Quickly press both buttons simultaneously.
Activate permanent switching
Press both buttons simultaneously for 2 sec.
Cancelling manual/permanent switching
Press both buttons simultaneously.
ok
channel
C1
channel
C2
PIN code
The PIN code is set in the menu under
OPTIONS (see fig.).
If you lost the PIN call the
Theben Hotline.
OPTIONS
WITH PIN
NO PIN
NEW PIN
00 00
OPERATING
HOUR
LCD ILLUMINATION
LANGUAGE
PIN
FACTORY
SETTINGS
INFO
ok
Page 23

11
GB
Technical Data
• Rated voltage: 18–27,5 V DC
• Power consumption: 1,0 W
• Standby: 0,1 W
• Max. power consumption: 40 mA
• Contact: two way switch
• Gap: <3 mm (µ)
• Contact material: AgNi (0,15 Au)
• Switching capacity: 2 x 6 (2) A
• Permissible ambient temperature:
–30 °C ... +55 °C
• Protection class: III in accordance with
IEC/EN 60730-1 with
designated installation
• Protection rating: IP 20 in accordance
with IEC/EN 60529
• Power reserve: 10 years (lithium cell) at
+20 °C
• Time accuracy: ≤ ±0,5 s/day at +25 °C
• Pollution degree: 2
• Rated impulse withstand voltage: 4 kV
Page 24

Original Quality by
Bosch Thermotechnik GmbH
Sophienstraße 30-32
D-35576 Wetzlar/Germany
Page 25

F
EU1D
EU2D
6720805318 (2012/12)
Notice de montage et
d´utilisation
Horloge programmable
0 6 12 18 24
MENU
OK
1
2
D
GB F
EI
Page 26

Table des matières
Consignes fondamentales 3
Écran et touches/Principe de fonctionnement 4
Apercu du menu 5
Raccordement 6
Montage 6
Première mise en service 7
RESET 7
Entrée de menu PROGRAMME
Reprogrammer l’horaire de commutation 8
Modifier/supprimer l’horaire de commutation 9
Entrée de menu MANUEL
Commutation manuelle et permanente 10
Entrée de menu OPTIONS
Code PIN 10
Caractéristiques techniques 11
Adresse du service après-vente/Hotline 12
2
Page 27

3
Consignes fondamentales
• L’appareil est prévu pour un montage en façade
• Correspond au type 1 BSTU selon CEI/EN 60730-2-7
Utilisation conforme à l’usage prévu
• L’horloge programmable peut être utilisée pour le montage dans la commande de chauffage
• Utilisation dans des locaux fermés et secs seulement
Elimination
Procéder a` l’élimination de l’appareil selon les directives de protection de l’environnement
F
Le montage doit être effectueé exclusivement par un électricien spécialiseé !
REMARQUE
Page 28

4
Écran et touches
Principe de
fonctionnement
0 6
12
18
24
Affichage de l’heure
Affichage de la
date
Etat du canal
C1, C2
ON = Marche
OFF = ARRÊT
MENU
– Activer l’affichage
– Ouvrir le menu
– Annuler le menu
– ESC
(Quitter le menu)
OUI
Confirmation
OK
appuyer
NON
Changer/
Modifier
appuyer
OK
– Sélection
enregistrer
– Sélection
confirmer
Les options possibles
sont affichées
Jours de la semaine de
1 à 7
Affichage des touches actives
avec les différentes fonctions
Horaires de commutation programmés
1. Lire des lignes de texte
Un texte ou un symbole cligno tant indique la question
2. Prendre une décision
Page 29

Aperçu Menu
19 10 06
C1 OFF C2 OFF
9:40
46
PROGRAMME
CREER
VERIFIER
MODIFIER
EFFACER
FIN
DAT/HEURE MANUEL OPTIONS
FIN
HEURE
DATE
ETE-HIV
JOUR SEM
DAT FORME
24H/12H
FIN
CANAL C1
HEUR-ACTI
RETROECLAIRAGE
LANGUE
PIN
DEBUT
INFO
FIN
5
MENU
F
ON PERM
OFF PERM
ON TEMP
VAC PROG
FIN
Page 30

6
Raccordement
1 2 3 4 5
–
+24 V
+24 V
1 2 3
+24 V
–
4
Le montage doit être effectueé exclusivement par un électricien spécialiseé !
Adaptateur (5 pôles)
Connecteur (protégé contre les inversions de polarité
REMARQUE
8-737-704-462-0
EU1D
8-737-704-461-0
EU2D
Page 31

7
F
Première mise en service
Définir la date, l’heure et la règle
applicable pour l’heure d’été/d’hiver
Appuyer sur une touche quelconque et
suivre l’affichage à l’écran.
ALLEMAND
ANNEE
MOIS
JOUR
HEURE
MINUTE
ETE-HIV
EUROPA
ETE/HIV GB/
IRL/P
ETE/HIV FIN/
GR/TR
ETE/HIV CDN
ETE/HIV USA
ETE/HIV IRAN
ETE/HIV
LIBRE
ETE/HIV
DATE FIXE
SANS E/H
ok
19 10 06
C1 OFF C2 OFF
9:40
46
RESET
Appuyer sur les 4 touches de commande en
même temps.
Vous pouvez maintenant choisir entre PROGRAMME
GARDER et PROGRAMME EFFACER.
Page 32

8
Horaire de
commutation
pour un jour
CREER
CANAL C1
MEM LIBRE
56
C1 On
HEURE
MINUTE
LUNDI
ENREGISTRER
COPIER
SUR MARDI
ENREGISTRER
ok
Reprogrammer l’horaire de
commutation
Appuyer sur MENU.
(voir schéma)
Vous disposez de 56 emplacements de mémoire
libres.
PROGRAMME
Horaires de commutation prédéfinis pour
Canal C1 : Lu–Di : MARCHE 6h00, ARRÊT 22h00
Canal C2 : Lu–Di : MARCHE 5h00, ARRÊT 22h00
même horaire de commutation pour
plusieurs jours = bloc
Page 33

9
F
CANAL C1
LUNDI
HEURE
MODIFIER
MINUTE
MODIFIER
MODIFIER
JOUR
UNIQUE
MODIFIER
BLOC
ok
PROGRAMME
CREER
VERIFIER
MODIFIER
EFFACER
Modifier/supprimer des horaires
de commutation
Appuyer sur MENU.
(voir schéma)
Vous pouvez modifier/supprimer un bloc, c’est-àdire
un horaire de commutation copié sur plusieurs
jours (par ex. Lu-Ve), ou un seul horaire de
commutation.
Page 34

10
Commutation manuelle et
permanente
La commutation manuelle et permanente peut
être réglée dans le menu MANUEL ou (dans
l’affichage automatique) par une combinaison de
touches (voir schéma).
Activer commutation manuelle
Appuyer brièvement sur les deux touches en
même temps.
Activer commutation permanente
Appuyer 2 secondes sur les deux touches en
même temps.
Désactiver commutation manuelle/
permanente
Appuyer sur les deux touches en même temps.
ok
canal
C1
canal
C2
Code PIN
Le code PIN est réglé dans le menu
OPTIONS (voir schéma).
Si vous avez oublié le code PIN, contactez
le service après-vente de Theben.
OPTIONS
AVEC PIN
PIN ACTUEL
NOUV PIN
00 00
HEUR-ACTI
RETROECLAIRAGE
LANGUE
PIN
DEBUT
INFO
ok
Page 35

11
F
Caractéristiques techniques
• Tension nominale : 18–27,5 V DC
• Consomm. propre : 1,0 W
• Éco min. : 0,1 W
•
Consommation max. : 40 mA
• Contact : inverseur
• Ouverture : <3 mm (µ)
• Matériau des contacts : AgNi (0,15 Au)
• Puissance de commutation : 2 x 6 (2) A
• Température ambiante admise :
–30 °C ... +55 °C
• Classe de protection : III selon norme CEI/EN
60730-1 en cas de
montage conforme
• Indice de protection : IP 20 selon norme
CEI/EN 60529
• Réserve de marche : 10 ans (pile au lithium)
à 20 °C
• Précision : ≤ ±0,5 s/jour à +25 °C
• Degré de pollution : 2
• Tension assignée de tenue aux chocs : 4 kV
Page 36

Original Quality by
Bosch Thermotechnik GmbH
Sophienstraße 30-32
D-35576 Wetzlar/Germany
Page 37

EU1D
EU2D
6720805318 (2012/12)
Istruzioni per il
montaggio e per l´uso
Timer
0 6 12 18 24
MENU
OK
1
2
D
GB F
EI
I
Page 38

Indice
Indicazioni fondamentali 3
Display e tasti/Principio di comando 4
Panoramica guida menu 5
Collegamento 6
Montaggio 6
Prima messa in funzione 7
RESET 7
Voce di menu PROGRAMMA
Riprogrammazione del tempo di commutazione 8
Modifica/cancellazione del tempo di commutazione 9
Voce di menu MANUALE
Commutazione manuale e permanente 10
Voce di menu OPZIONI
Codice PIN 10
Dati tecnici 11
Indirizzo assistenza/Hotline 12
2
Page 39

3
Indicazioni fondamentali
• L’apparecchio è predisposto per il montaggio su pannello frontale
• Corrisponde al tipo 1 BSTU secondo IEC/EN 60730-2-7
Uso conforme
• Il timer viene utilizzato per il montaggio nei comandi di riscaldamento
• Utilizzo solo in ambienti chiusi e asciutti
Smaltimento
Smaltire l’apparecchio rispettando le normative in materia di tutela ambientale
I
Il montaggio deve essere eseguito esclusivamente da parte di un elettroinstallatore
specializzato!
NOTA
Page 40

4
Display e tasti
Principio di comando
0 6
12
18
24
Indicazione ora
Indicazione
data
Stato canale
C1, C2
ON = acceso
OFF = spento
MENU
– Attivare il display
– Aprire il menu
– Interrompere il
menu
– ESC (uscire dal menu)
SÌ
Conferma
OK
premere
NO
Modifica/
Cambio
premere
OK
– Memorizzare
selezione
– Confermare
selezione
Vengono visualizzate
le possibilità di scelta
Giorni della settimana
da 1 a 7
Indicazione dei tasti attivi con
la rispettiva funzione
Tempi di commutazione
programmati
1. Leggere la riga di testo
Un testo o un simbolo lampe ggiante indica una domanda
2. Prendere una decisione
Page 41

Panoramica Guida menu
19 10 06
C1 OFF C2 OFF
9:40
46
PROGRAMMA
NUOVO
VERIFICA
MODIFICA
ELIMINA
FINE
ORA/DATA MANUALE OPZIONI
FINE
IMPOSTA
ORA
IMPOSTA
DATA
ORA
LEGALE
GIORMO
SETTIMANA
FORMATO
DATA
FORMATO
ORA
FINE
CANALE C1
ORE DI
LAVORO
RETRO ILLUMINAZIOE
LINGUA
PIN
IMPOSTAZ
DI FABBRICA
INFO
FINE
5
MENU
ON PERM
MODO OFF
PERM
ON
MANUALE
PROGRAMMA
FERIE
FINE
I
Page 42

6
Collegamento
1 2 3 4 5
–
+24 V
+24 V
1 2 3
+24 V
–
4
Il montaggio deve essere eseguito esclusivamente da parte di un elettroinstallatore specializzato!
Adattatore (a 5 poli)
Connettore (protetto dall‘inversione di polarità)
HINWEIS
8-737-704-462-0
EU1D
8-737-704-461-0
EU2D
Page 43

7
I
Prima messa in funzione
Impostare data, ora e regola di
commutazione orario estivo/
invernale
Premere un tasto qualsiasi e seguire le
indicazioni sul display.
ITALIANO
ANNO
MESE
GIORNO
ORA
MINUTI
EUROPA
GB/IRL/P
SO-WI FIN/
GR/TR
CDN
USA
IRAN
LIBERA
IN DATA
FISSA
NO ORA
LEGALE
ok
19 10 06
C1 OFF C2 OFF
9:40
46
RESET
Premere contemporaneamente 4 tasti di comando.
E’ ora possibile scegliere tra MANTIENI PROGRAMMA
e CANCELLA PROGRAMMA.
Page 44

8
Tempo di
commutazione
Per un giorno
NUOVO
CANALE C1
MEM DISP
56
ON C1 On
ORA
MINUTI
LUNEDI
SALVA
COPIA
AGGIUNGI
MARTEDI
SALVA
ok
Riprogrammare il tempo di
commutazione
Premere MENU.
(vedi figura)
Sono disponibili 56 spazi di memoria liberi.
PROGRAMMA
Stesso tempo di commutazione per
pi. giorni = blocco
Tempi di commutazione predefiniti per
canale C1: Lu–Do: ON ore 6:00, OFF ore 22:00
canale C2: Lu–Do: ON ore 5:00, OFF ore 22:00
Page 45

9
I
CANALE C1
LUNEDI
MODIFICA
ORA
MODIFICA
MINUTO
MODIFICA
SINGOLO
GIORNO
MODIFICA
BLOCCO
ok
PROGRAMMA
NUOVO
VERIFICA
MODIFICA
ELIMINA
Modifica/cancellazione del
tempo di commutazione
Premere MENU.
(vedi figura)
E’ possibile modificare/cancellare un blocco, ossia
un tempo di commutazione copiato su pi. giorni
(ad es. Lun-Ven), oppure un singolo tempo di
commutazione.
Page 46

10
Commutazione manuale e
permanente
E’ possibile impostare la commutazione manuale e
permanente nel menu MANUALE facendosi guidare
dal menu o (nell’indicatore automatico) attraverso
una combinazione di tasti (vedi figura).
Attivazione della commutazione manuale
Premere brevemente entrambi i tasti contempo-
raneamente.
Attivazione della commutazione permanente
Premere contemporaneamente entrambi i tasti
per 2 secondi.
Eliminazione della commutazione manuale/
permanente
Premere contemporaneamente entrambi i tasti.
ok
Kanal
C1
Kanal
C2
Codice PIN
E’ possibile impostare il codice PIN nel
menu OPZIONI facendosi guidare dal menu.
In caso di dimenticanza del PIN,
chiamare la hotline di Theben.
OPZIONI
ATTIVA PIN
PIN
ATTUALE
NUOVO PIN
00 00
ORE DI
LAVORO
RETRO ILLUMINAZIONE
LINGUA
PIN
IMPOSTAZ
DI FABBRICA
INFO
ok
Page 47

11
I
Dati tecnici
• Tensione nominale: 18–27,5 V DC
• Autoconsumo: 1,0 W
• Standby min. 0,1 W
• Max.
assorbimento elettrico: 40 mA
• Contatti: contatto di communica zione
• Ampiezza di apertura: <3 mm (µ)
• Materiale contatto: AgNi (0,15 Au)
• Potenza di commutazione: 2 x 6 (2) A
• Temperatura ambiente ammessa:
–30 °C ... +55 °C
• Classe di protezione: III secondo la norma
IEC/EN 60730-1 in caso
di montaggio conforme
• Tipo di protezione: IP 20 secondo IEC/EN
60529
•
Riserva di carica
: 10
anni (elementi al
litio) a
+20 °C
• Precisione di riserva: ≤ ±0,5 s/giorno a
+25 °C
• Grado di inquinamento:2
• Sovratensione transitoria nominale: 4 kV
Page 48

Original Quality by
Bosch Thermotechnik GmbH
Sophienstraße 30-32
D-35576 Wetzlar/Germany
Page 49

E
EU1D
EU2D
6720805318 (2012/12)
Montage- und
Bedienungsanleitung
Schaltuhr
0 6 12 18 24
MENU
OK
1
2
D
GB F
EI
Page 50

Índice de contenidos
Indicaciones básicas 3
Pantalla y teclas/Estructura del manejo 4
Esquema de la estructura del menú 5
Conexión 6
Montaje 6
Primera puesta en marcha 7
RESET 7
Opción PROGRAMA
Programar de nuevo la conmutación 8
Modificar conmutación 9
Opción MANUAL
Anticipación manual y conmutación permanente 10
Opción OPCIONES
Código PIN 10
Datos técnicos 11
Dirección del servicio técnico/Línea de atención permanente 12
2
Page 51

3
Indicaciones básicas
• Este aparato está previsto para el montaje en paneles frontales
• Corresponde al tipo 1 BSTU según IEC/EN 60730-2-7
Uso adecuado
• El interruptor horario se utiliza para la instalación en controles de calefacción
• Utilizar exclusivamente en lugares cerrados y secos
Eliminación
Desechar el aparato de forma respetuosa con el medio ambiente
E
¡El montaje debe ser llevado a cabo exclusivamente por un electricista profesional!
NOTA
Page 52

4
Pantalla y teclas
Estructura del manejo
0 6
12
18
24
Indicación de la hora
Indicación de la
fecha
Estado del canal
C1, C2
ON = Encendido
OFF = Apagado
MENU
– Activar pantalla
– Abrir menú
– Interrumpir menú
– ESC
(Abandonar menú)
SÍ
Confirmación
OK
Pulsar
NO
Modificar/
Cambiar
Pulsar
OK
– Memorizar
selección
– Confirmar
selección
Se muestran las
opciones disponibles
Días de la semana del
1 al 7
Indicación de las teclas activas
con la función correspondiente
Conmutaciones
programadas
1. Leer línea de texto
El texto/símbolo parpadeante
es una pregunta
2. Elegir alternativa
Page 53

Esquema de la estructura del menú
19 10 06
C1 OFF C2 OFF
9:40
46
PROGRAMA
NUEVO
VERIFICAR
MODIFICAR
BORRAR
FIN
FECH/HORA MANUAL OPCIONES
FIN
HORA
FECHA
INV/VER
DIA DE LA
SEMANA
FORMATO
FECHA
FORMATO
HORA
FIN
CANAL C1
HORAS FUNCIONAMIENTO
ILLUMINACION
IDIOMA
PIN
AJUSTE DE
FABBRICA
INFO
FIN
5
MENU
E
ON PERM
OFF PERM
ANTICIP ON
VACACIONES
FIN
Page 54

6
Conexión
1 2 3 4 5
–
+24 V
+24 V
1 2 3
+24 V
–
4
¡El montaje debe ser llevado a cabo exclusivamente por un electricista profesional!
Adaptador (5 polos)
Enchufe (con protección contra inversión de la polaridad)
NOTA
8-737-704-462-0
EU1D
8-737-704-461-0
EU2D
Page 55

RESET
Pulsar al mismo tiempo las 4 teclas de
servicio.
Ahora tiene la posibilidad de elegir entre CONSERVAR PROGRAMA y
BORRAR PROGRAMA.
7
E
Primera puesta en marcha
Ajustar fecha, hora y horario de verano/
invierno
Pulsar cualquier tecla y seguir las
indicaciones de la pantalla.
ESPANOL
ANO
MES
DIA
HORA
MINUTO
INV/VER
EUROPA
INV/VER GB/
IRL/P
INV/VER FIN/
GR/TR
INV/VER CDN
INV/VER USA
INV/VER IRAN
INV/VER
LIBRE
INV/VER
FECHA FIJA
SIN INV/VER
ok
19 10 06
C1 OFF C2 OFF
9:40
46
Page 56

8
Hora de
conmutación
para un día
NUEVO
CANAL C1
LIBRES 56
C1 On
HORA
MINUTO
LUNES
GUARDAR
COPIAR
ANADIR
MART
GUARDAR
ok
Programar de nuevo la
conmutación
Pulsar MENU.
(vea la figura)
Están disponibles 56 posiciones de memoria
libres.
PROGRAMA
Hora de conmutación
igual para varios días = bloque
Tiempos de conmutación predefinidos para
canal C1: lu–do: CONECTAR 6:00 h,
DESCONECTAR 22:00 h
canal C2: lu–do: CONECTAR 5:00 h,
DESCONECTAR 22:00 h
Page 57

9
E
CANAL C1
LUNES
MODIFICAR
HORA
MODIFICAR
MINUTO
MODIFICAR
SOLO 1 DIA
MODIFICAR
BLOQUE
ok
PROGRAMA
NUEVO
VERIFICAR
MODIFICAR
BORRAR
Cambiar/borrar conmutación
Pulsar MENU.
(vea la figura)
Puede modificar/borrar un bloque, es decir, una
hora de conmutación copiada para varios días
(p. ej. lunes-viernes) o una única hora de
conmutación.
Page 58

10
Anticipación manual y
conmutación permanente
La anticipación manual y la conmutación
permanente se pueden configurar con ayuda
del menú en MANUAL o (en la indicación
automática) mediante una combinación de
teclas (ver dibujo).
Activar conexión manual
Pulsar brevemente ambas teclas al mismo
tiempo.
Activar conmutación permanente
Pulsar ambas teclas al mismo tiempo durante
2 segundos.
Suprimir anticipación manual/conexión
permanente
Pulsar ambas teclas al mismo tiempo.
ok
canal
C1
canal
C2
Código PIN
El código PIN se configura con ayuda del
menú en OPCIONES (ver la figura).
Si ha olvidado el PIN, llame a la línea de
atención permanente de Theben.
OPCIONES
CON PIN
ACTUAL PIN
NUEVO PIN
00 00
HORAS FUNCIONAMIENTO
ILUMINACION
IDIOMA
PIN
AJUSTE DE
FABRICA
INFO
ok
Page 59

11
E
Datos técnicos
• Tensión nominal: 18–27,5 V DC
• Consumo propio: 1,0 W
• Standby min. 0,1 W
•
Consumo de corriente máx.: 40 mA
• Contacto: inversor
• Amplitud de la apertura: <3 mm (µ)
• Material de contacto: AgNi (0,15 Au)
• Potencia de conexión: 2 x 6 (2) A
• Temperatura ambiental permitida:
–30 °C ... +55 °C
• Clase de protección: III según IEC/EN 60730 1 en caso de montaje
adecuado
• Tipo de protección: IP 20 según IEC/EN
60529
• Reserva de marcha: 10 años (pila de litio) a
+20 °C
• Exactitud de marcha: ≤ ±0,5 s/día con +25 °C
• Nivel de contaminación: 2
• Impulso de sobretensión admisible: 4 kV
Page 60

Original Quality by
Bosch Thermotechnik GmbH
Sophienstraße 30-32
D-35576 Wetzlar/Germany
 Loading...