

Page 1

Proj. 1716 24.01.2013
Operating Manual
PRESTO®
Highly Dynamic Temperature Control S ystem
A80, A80t, W80, W80t
1.953.3044-V1 us 12/12
See Operati ng
instructions „User
Interface“, 1953.3041,
for additional
information.
JULABO USA, Inc.
884 Marcon Boulevard Allentown, PA 18109
Phone: +1(610) 231-0250 Fax: +1(610) 231-0260 i nfo@j ulabo.com www.julabo.com
Page 2

Table of Contents
2 01.24.2013
Congratulations!
You have made an excellent choice.
JULABO would like to thank you for the trust you have placed in our company and products.
This Operating Manual will help you become acquainted with the use of our temperature control
systems. Read this manual carefully before bringing the unit into operation!
The JULABO Quality Management System
Temperature control devices for research and industry are developed,
produced, and distributed according to the requirements of
ISO 9001 . Certificate Registration No. 01 100044846
Unpacking and Inspection
After unpacking the units and accessories, carefully inspect them for any damage. If the packaging
has been damaged, you must notify the freight forwarder, railway company, or postal service so they
can file a damage report.
Printed in Germany Changes without prior notification reserved
Important: keep operating manuals for future use
Page 3

PRESTO® A80, A80t, W80, W80t Operating Manual
24.01.2013 3
Table of Contents
Table of Contents ....................................................................................................................... 3
1. Proper Use ........................................................................................................................ 6
1.1. Description .................................................................................................................... 6
2. Operator Responsibilities - General Safety Notices .......................................................... 7
2.1. Personnel ..................................................................................................................... 7
2.2. Handling guidelines ...................................................................................................... 7
2.3. Operation ...................................................................................................................... 8
2.4. Disposal ........................................................................................................................ 9
3. Safety Notices ................................................................................................................. 10
3.1. Explanation of safety notices ...................................................................................... 10
3.2. Descriptions of other notices ...................................................................................... 10
3.3. Safety instructions for operation ................................................................................. 10
3.4. Safety instructions for properly locating and installing the device ............................... 12
3.5. Transporting and properly locating the device ............................................................ 13
3.5.1. Transport ................................................................................................................ 13
3.5.2. Properly locating the device ................................................................................... 14
3.6. Connecting to power supply ....................................................................................... 15
4. Operating and functional elements ................................................................................. 16
4.1. Front side of the unit ................................................................................................... 16
4.1.1. Electrical connections on the front side of the device (upper section) ................... 17
4.1.2. Drain elements on the front side of the device (lower section) ............................... 18
4.2. Rear of unit ................................................................................................................. 19
4.2.1. A80, air-cooled ....................................................................................................... 19
4.2.2. W80, water-cooled ................................................................................................. 20
5. Preparations .................................................................................................................... 21
5.1. Cooling water connections.......................................................................................... 21
5.2. Bath fluids ................................................................................................................... 23
5.3. Temperature control tubing......................................................................................... 24
5.4. Connecting an external vessel.................................................................................... 26
5.5. Diagram: Device structure and mechanical connections ............................................ 27
Page 4

Table of Contents
4 01.24.2013
5.6. Accessories ................................................................................................................ 27
5.6.1. Connectors, Valves, Adapters, etc. ........................................................................ 27
5.7. Filling .......................................................................................................................... 28
5.7.1. Sample Calculation: D e termining whether an exte rna l expansion reserv o ir is needed
28
5.7.2. Filling a closed, external system ............................................................................ 29
5.8. “Empty the unit” menu ................................................................................................ 30
5.9. Additional thermal adjustment and electrical connection elements............................. 34
5.9.1. Adjustable high temperature cut-off ....................................................................... 34
5.9.2. Electrical connections ............................................................................................ 35
6. Electrical connection pin assignments ................................................................................. 37
6.1. Accessories ................................................................................................................ 37
6.1.1. Alarm output........................................................................................................... 37
6.1.2. Connection for the external Pt100 sensor .............................................................. 38
6.2. Options (on the rear side) ........................................................................................... 38
6.2.1. Analog module ....................................................................................................... 39
6.2.2. Module with Pt100 connector ................................................................................. 39
6.2.3. Connecting to the STAND-BY socket..................................................................... 40
6.2.4. Connecting to the REG+E-PROG socket ............................................................... 41
6.2.5. Connecting to the JULABO Pressure / Flow Sensor socket................................... 42
7. Remote operation, laboratory automation ....................................................................... 43
7.1. Preparing for remote control ....................................................................................... 43
7.2. Communication with PC or higher priority data system .............................................. 43
7.3. Status messages / Error messages ............................................................................ 44
7.3.1. Alarms .................................................................................................................... 44
7.3.2. Warnings................................................................................................................ 44
8. Technical Data ................................................................................................................ 45
8.1. Cooling water connection, cooling water quantity ....................................................... 49
8.2. Connections ............................................................................................................... 49
8.3. Safety ......................................................................................................................... 50
8.4. Ambient conditions for proper operation according to EN 61 010-1 ........................... 50
8.5. Materials of Construction of the wetted Parts ............................................................. 51
9. Pump characteristic curves (using water) ........................................................................ 52
9.1. Medium with a density of 1 kg/dm3 [8.35 lb/gal] ......................................................... 52
10. Cleaning the unit ............................................................................................................. 53
Page 5

PRESTO® A80, A80t, W80, W80t Operating Manual
24.01.2013 5
10.1. External cleaning ........................................................................................................ 53
10.2. Internal cleaning ......................................................................................................... 53
10.3. Cleaning the reservoir, tubing system and heat exchanger: ....................................... 54
10.4. Removing residual cleaning liquid: ............................................................................. 55
11. Maintenance/repair of the unit ........................................................................................ 56
11.1. Repair service ............................................................................................................. 56
11.2. Warranty ..................................................................................................................... 57
Page 6
Proper Use
6 01.24.2013
1. Proper Use
PRESTO
®
is a highly dynamic temperature control system designed for
controlling the temperature of certain liquids in a closed, external
system. The temperature-controlled external system is attached to the
protruding pump connections on the rear of the PRESTO
®
.
JULABO temperature control systems are not suitable for direct
temperature control of food or other items intended for human
consumption, pharmaceutical products, or medical products.
Direct temperature control means: The temperature-controlled object
has unprotected contact with the bath fluid.
1.1. Description
• In addition to the refrigeration unit, the main functional elements are
the heater, circulation pump, and control electronics. When used
with an external Pt100 control sensor, the auto-optimizing electronic
PID controller will automatically adjust to the requirements of the
external vessel.
• The pump’s powerful output can be reduced for use with pressure-
sensitive vessels by altering the motor speed in four stages or by
controlling via pressure.
• The refrigeration systems are cooled
- A80, A80t with air from the ambient surroundings
- W80, W80t with water.
• The unit is operated via the TFT user interface.
• Remote control through the digital RS232, USB, and ethernet
interfaces according to NAMUR enable advanced process control
without an additional interface card.
• The high temperature cut-off is a safety device that is independent
from the control circuit. The cut-off temperature is adjustable and is
displayed on the TFT user interface.
• The integrated programmer lets you store and retrieve setpoints
and times for eight different temperature profiles.
• Interfaces available on the right side of the housing:
- SD card for datalogging
- USB host interface.
• Analog interfaces:
- Alarm output for an external signal
- Ext. Pt100 connection for an external control
- Connection for JULABO pressure or flow sensor
• An analog module is optionally available, it consists of:
A STAND-BY input for remote shutoff with an external switch.
REG+E-PROG connection for specifying the setpoint with an
external analog setpoint device or programmer. Three analog
outputs for datalogging are also integrated.
Page 7

PRESTO® A80, A80t, W80, W80t Operating Manual
24.01.2013 7
2. Operator Responsibilities - G e neral Safety Notices
Products from JULABO are safe when installed, operated, and
maintained according to generally accepted rules of safety. This chapter
explains the potential hazards that can arise in conjunction with
operation of the temperature control system and describes safety
measures for eliminating these hazards when possible.
2.1. Personnel
• The owner/operator is responsible for the qualifications of the
operating personnel.
• Make sure that anyone who will operate the temperature control
system has been instructed regarding the relevant tasks.
• The operators must be trained on a regular basis on the hazards
that may occur during their activities and on measures for mitigating
these hazards.
• Make sure that anyone entrusted with operation, maintenance, and
installation has read and understood the safety information and the
operating manual.
• When using hazardous materials or materials that may become
hazardous, allow only persons with complete knowledge of the
materials and the circulator to bring the unit into operation. These
persons must have the ability to evaluate potential dangers in their
entirety.
2.2. Handling guidelines
• Avoid impacts to the housing, vibrations, damage to the keypad
(keys, display), or heavy soiling.
• Regularly check, at least once every two years, to ensure proper
condition of the safety, warning, and prohibition symbols.
• Ensure that the mains power network exhibits low impedance in
order to avoid influencing units that are operated on the same
network.
• Magnetic radiation may affect other devices that contain
components that are sensitive to magnetic fields, such as a monitor.
We advise maintaining a min. distance of 1 m from such devices.
• The ambient temperature may not exceed 40 °C [104 °F], nor fall
below 5 °C [41 °F].
• Rel. humidity should not exceed 50% at 40 °C, [104 °F].
• Do not store or use the unit in aggressive (corrosive) atmospheres.
Protect the unit from contamination.
• Do not place the device in direct sunlight.
Page 8
Operator Responsibilities - General Safety Notices
8 01.24.2013
2.3. Operation
The unit may only be configured, installed, maintained, and repaired by
qualified personnel.
Persons who operate the circulator must be trained in the particular
tasks by qualified personnel. Please call us if you have any questions
about operating the unit or the operating manual.
Contact:
JULABO USA, Inc.
884 Marcon Boulevard
Allentown, PA 18109
Phone: +1(610) 231-0250
Fax: +1(610) 231-0260
info @ julabo.com
www.julabo.com
The bath may be filled with flammable liquids. Fire hazard!
Some bath fluids may represent a chemical hazard.
Observe all warning notices on the materials used (bath fluids) and in
their associated instructions (safety data sheets).
Potentially explosive mixtures may be formed if adequate ventilation is
not provided. Use the units only in well ventilated areas. The units are
not suitable for use in potentially explosive atmospheres.
Proper use includes limitations on the types of materials (bath fluids)
used. Do not use toxic, acidic, or corrosive bath fluids.
If using hazardous materials or materials that may become hazardous,
the operator must apply the enclosed safety labels to the front side of
the unit where they are easily visible:
Warns against a dangerous condition. Important! Please observe the
documentation. (operating instructions, safety data sheet).
You must read the operating manual before switching on the unit.
Valid in: EU
You must read the operating manual before switching on the unit.
Valid in: USA, NAFTA
Page 9
PRESTO® A80, A80t, W80, W80t Operating Manual
24.01.2013 9
Special diligence and care are essential due to the wide operating
temperature range.
There are heat- and cold-related hazards: burns, scalding, superheated
steam, frostbite.
Hot and cold parts and surfaces that could cause burns or frostbite
when touched.
Warns against hot or cold surfaces.
Disconnect the unit from the power supply prior to opening.
Dangerous electrical voltage. Discharging of internal capacitors.
Observe the notices in the instructions for third-party units that you
attach to the JULABO unit, especially any safety notices.
The pin assignment of the plugs and the technical data of the products
must be observed of all times.
2.4. Disposal
This product contains oils used as bath fluids that must be disposed and
consist partially or entirely of petroleum or synthetic oil. Observe
regulations for disposal provided in the safety data sheets.
These units contains refrigerants– at this time considered not to have
any negative effects on the ozone layer. However, during the long
operating period of the unit, disposal prescriptions may change. For this
reason, disposal should be performed by qualified personnel only.
Observe all disposal regulations applicable in your country or region.
This symbol on the product or its packaging indicates that it may not be
disposed with household waste. Proper disposal avoids negative
impacts on people and the environment and enables reuse of valuable
raw materials.
Information about collection centers for old units is available from your
city or community or an authorized disposal company.
Page 10
Operator Responsibilities - General Safety Notices
10 01.24.2013
3. Safety Notices
3.1. Explanation of safety notices
The Operating Manual contains additional safety notices. They are
identified by a triangle with exclamation point.
"Caution, warning of a dangerous condition."
The significance of the danger is categorized in conjunction with a
signal word. Carefully read and observe the instructions!
Danger:
Designates a potentially threatening danger to life and health. Failure
to observe these notices can result in serious health consequences,
including life-threatening injuries.
Warning:
Designates a potentially hazardous situation. If not avoided, they may
result in slight or minor injuries. The text may also warn against
potential property damages.
Caution:
Designates the potential for property damage. If not avoided, the
product or something in its vicinity may be damaged.
3.2. Descriptions of other notices
Note!
This symbol draws attention to important information.
Important!
Refers to usage tips and other useful information.
3.3. Safety instructions for operation
It is important that you follow all safety instructions in order to avoid
personal injury and property damage. These instructions supplement
workplace safety regulations.
Safety instructions
• This device may be connected to grounded (protected earth, PE)
mains power outlets only!
• These tasks may be performed by properly trained personnel only.
• The mains plug serves as a reliable way to disconnect the unit
from its power supply for safety reasons and must be readily
accessible at all times.
• Install the unit on a level, noncombustible surface
• It is essential that you read the operating manuals before initial
operation.
• Adjust the high temperature cut-off before operating the unit.
•
Never operate the unit without bath fluid!
Page 11
PRESTO® A80, A80t, W80, W80t Operating Manual
24.01.2013 11
• Observe expansion of the bath oil as the bath temperature rises.
• Do not allow water to enter hot bath oil.
• Do not drain bath fluid while it is hot!
Check the temperature of the bath fluid before draining; this may
be done by briefly switching on the unit.
• Use tubing suitable for temperature-control purposes.
• Avoid kinking the external tubing.
• Secure tubing connections to prevent slipping.
• Regularly check tubing for material fatigue, such as cracks.
• Never operate a damaged or leaking unit.
• Do not attempt to use the unit if the power cable is damaged!
• Before performing service or repair tasks or moving the unit, switch
the unit off and remove the power plug from the socket.
• Allow only authorized technicians to perform service and repair
tasks.
• Always switch off the device and disconnect it from its power
supply before attempting to clean it.
• Completely drain the unit before moving it.
• Transport the unit carefully.
• Do not tilt or lay the unit during transport.
• Shaking or falls may damage the inside of the unit.
• Observe all safety labels!
•
Do not remove safety labels!
Warning
Hot or cold parts.
Risk of burns or frostbite.
Use gloves.
Caution
Dangerous electrical voltage
Discharging of internal capacitors takes 5 sec. Do not touch plug pins
for 5 sec. after pulling the power plug.
Page 12
Operator Responsibilities - General Safety Notices
12 01.24.2013
3.4. Safety instructions for properly locating and installing the device
Warning:
Proper use of the temperature control system includes controlling the
temperature of a liquid in a reactor or similar vessel.
We do not know which substances you will need to use.
Many substances are:
• combustible, flammable, or explosive
• hazardous to health
• hazardous to the environment
• in other words: dangerous.
The user bears sole responsibility for handling these materials!
The following questions are meant to help recognize potential
hazards and minimize risks.
• Are all tubes and electrical cables securely attached and laid?
Watch for:
sharp edges, hot surfaces during operation, moving mechanical
parts, etc.
• Will hazardous vapors or gases be produced during heat-up?
Is it necessary to work under a fume hood?
• What must be done if a hazardous substance is spilled onto or into
the unit?
Obtain information about the substance before beginning work and
define decontamination methods.
Warning: E scaping vapors/gases
• Vapors/gases may develop, especially at higher working
temperatures. The unit will vent these vapors/gases to ensure
optimum performance. Operation under a fume hood is
recommended.
Ensure good ventilation and airflow at the place of installation.
Caution:
It is advisable to continue circulation for a certain amount of time after
you are finished working with the temperature control system. You
should also set the working temperature to approximately 20 °C [68
°F] in order to uniformly drop the temperature in the closed loop. This
will avoid overheating of the bath fluid and dangerous draining
conditions.
Caution: Inspect safety devices at least twice per year:
• High temperature cut-off device.
Use a screwdriver to turn the adjustable high temperature cut-off
down to the current bath temperature (this will shut off the unit).
• Low-level safety
The float switch on this unit cannot be activated manually for the
purpose of checking functionality. Therefore, you should observe
the five-stage level indicator each time you refill the unit.
If the bath fluid becomes thick or cracks during operation, the
temperature control system must be cleaned by qualified personnel.
This can be avoided by changing the fluid regularly. Refer to
chapter 5.8. “Empty the unit” menu.
Page 13
PRESTO® A80, A80t, W80, W80t Operating Manual
24.01.2013 13
3.5. Transporting a nd properly locating the device
Danger:
The unit is not suitable for use in potentially explosive atmospheres
Warning:
Tipping hazard!
Unit may tip if pushed from the side with more than 180 N of force.
Danger:
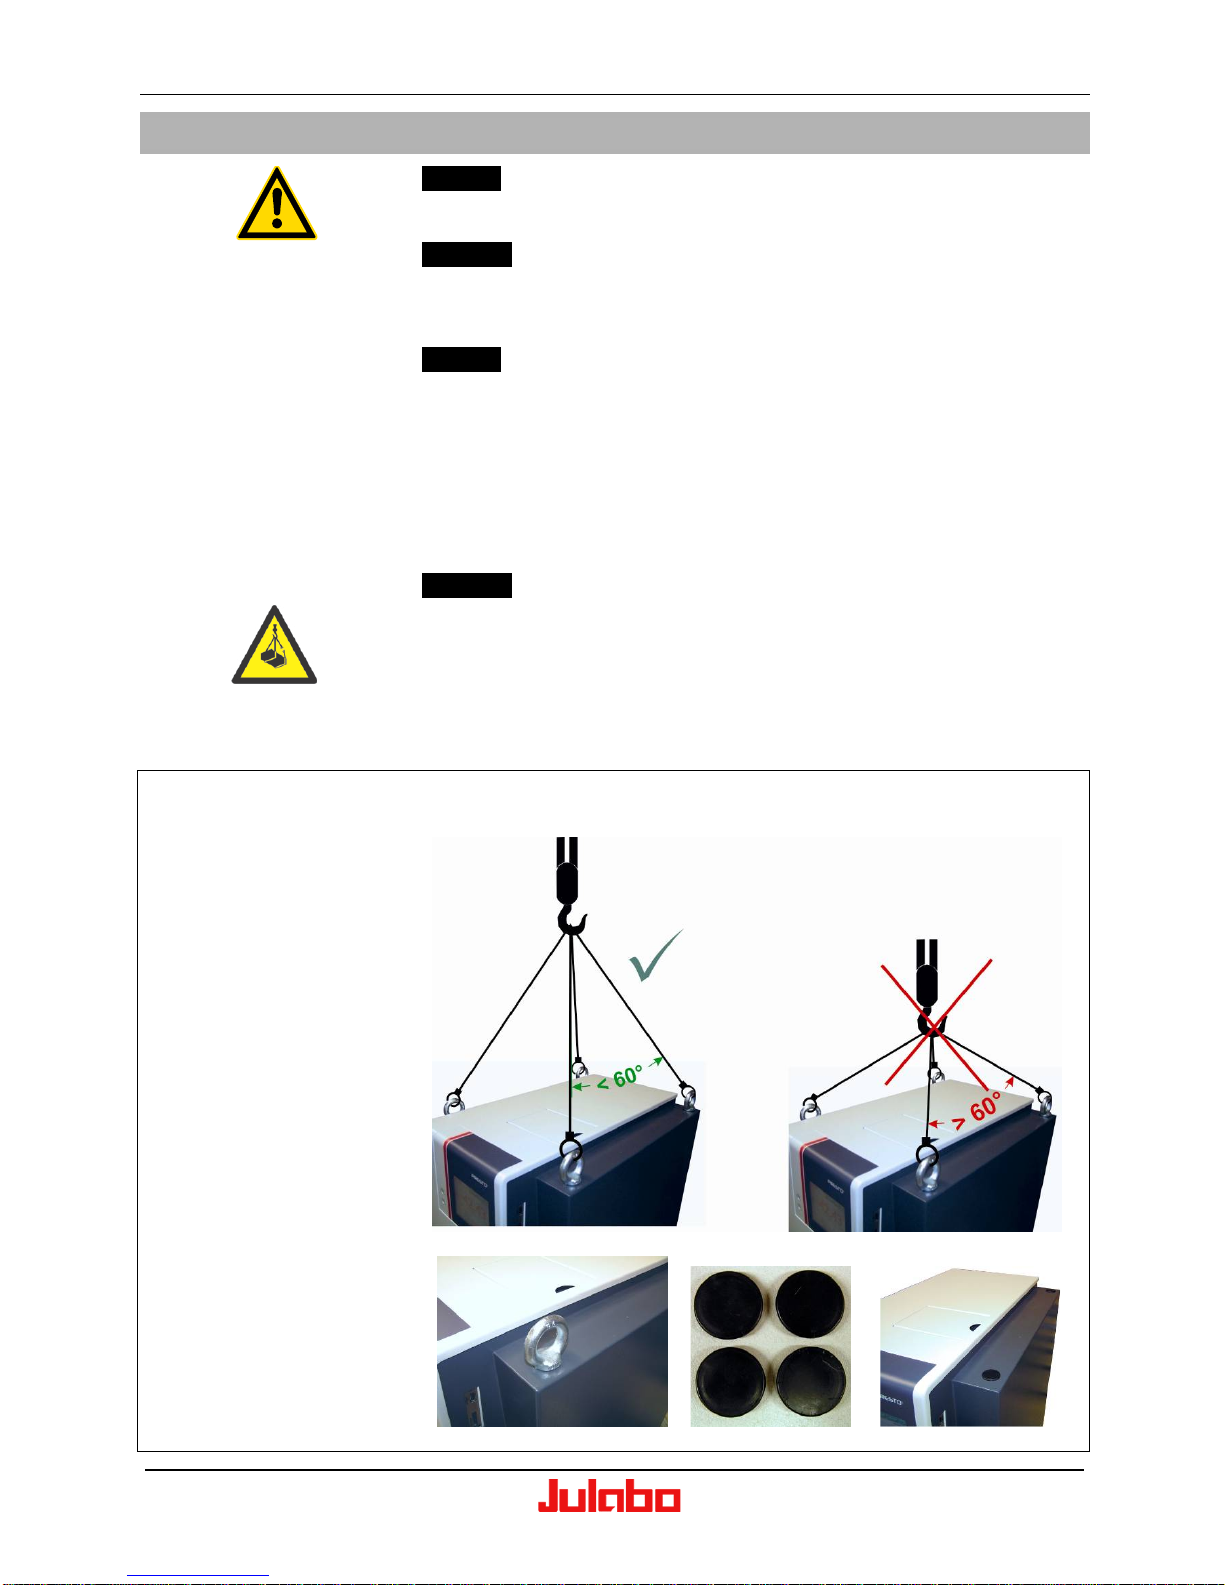
Incorrect lifting techniques and/or lifting equipment can lead to
overloading of one or more of the eye bolts (pictured below), which
could destroy it/them. As a result, all of the support points used for
lifting could become overloaded, leading to a drop that could cause
harm to bystanders and/or damage to the device.
When selecting lifting equipment, please take into account the weight
of the temperature control system.
Warning:
Danger of suspended loads
Risk of impact and crushing
- Do not step beneath the suspended unit.
- Wear personal protective equipment e.g.
safety shoes, safety helmet.
3.5.1. Transport
• Fasten lifting gear to
the four eye bolts.
• Transport unit to
installation site and
place in position.
• Remove lifting gear.
• Remove eye bolts and
retain.
• Suggestion: Close the
tapped bores with the
plastic caps included in
delivery.
To transport and position the unit with lifting gear there are four lifting
points with eye bolts.
Page 14
Operator Responsibilities - General Safety Notices
14 01.24.2013
3.5.2. Properly locating the device
• Transport the unit on a
firm, level surface.
Avoid shocks, e.g. floor
grates.
• For longer distances,
securely strap the unit
to a trolley or cart
before transport.
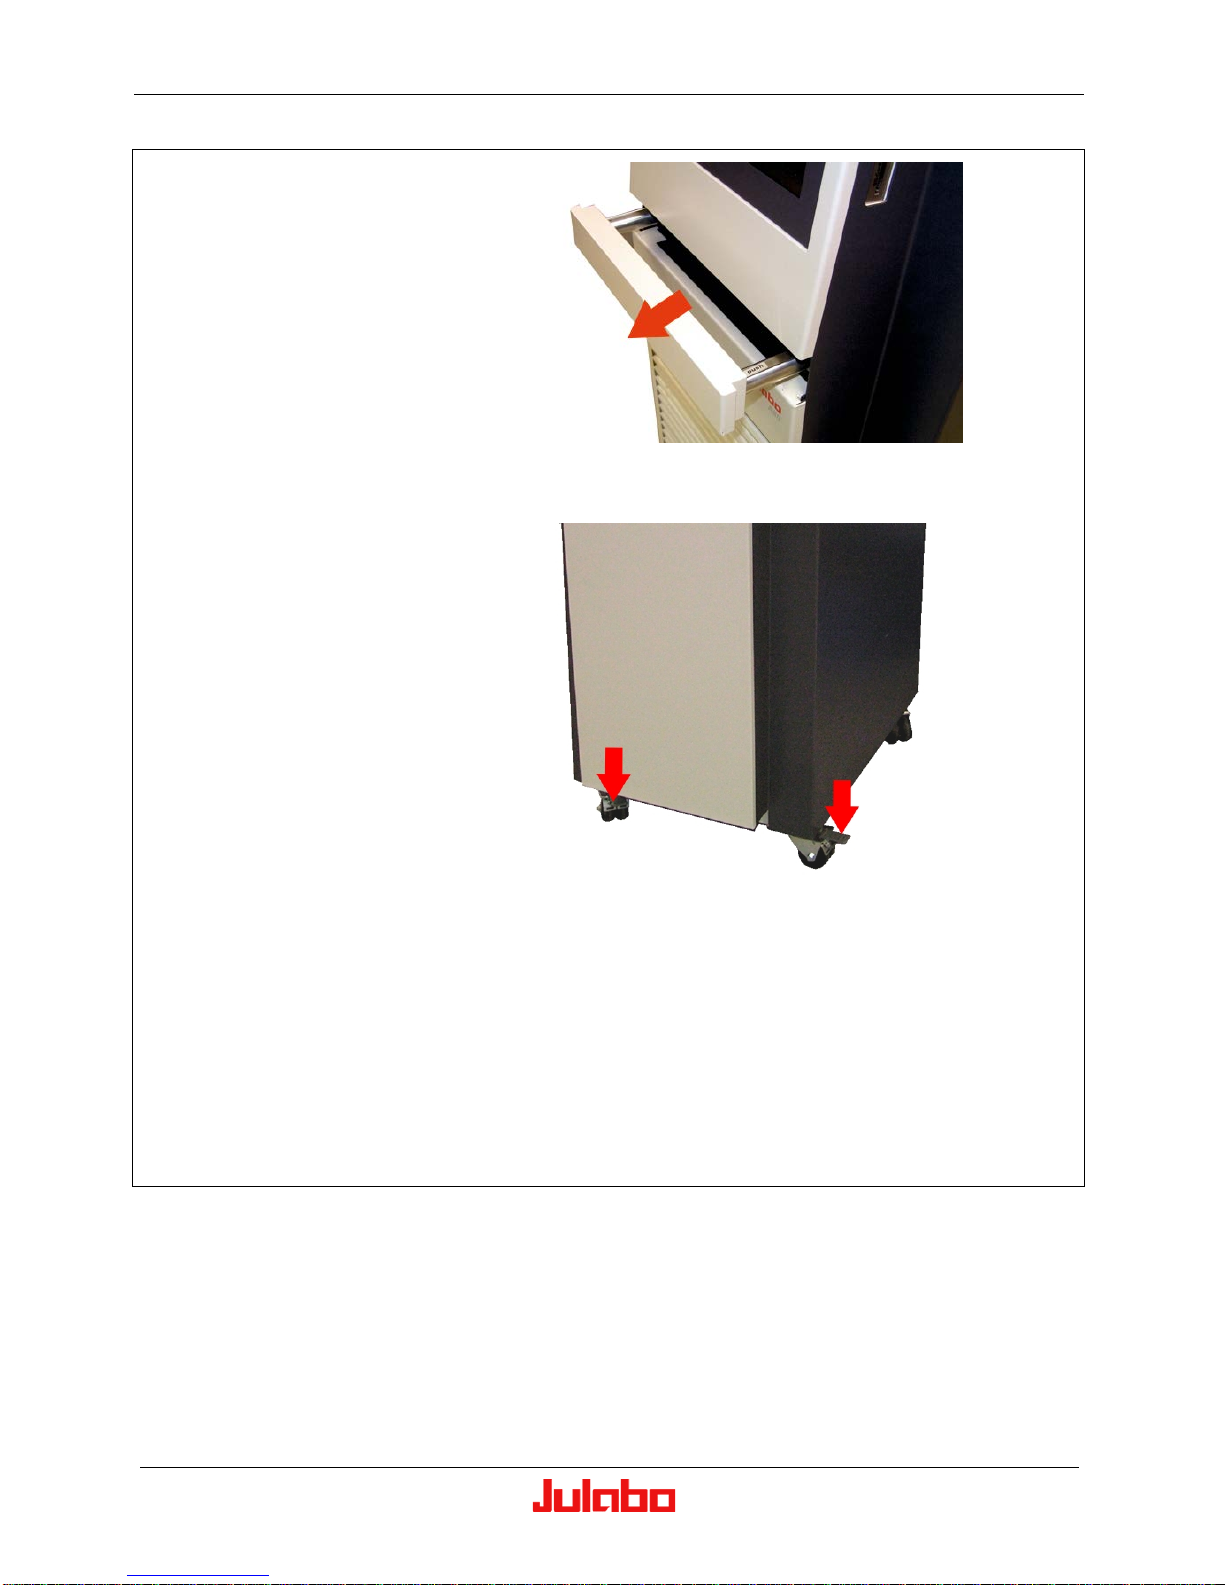
• Using the retractable
handle, position the unit
at the desired location
and lock the castors.
• Install the unit on a
level, noncombustible
surface.
• Do not install the unit in
the immediate vicinity of
a heat source and do
not place it in direct
sunlight.
• Keep the ventilation
grids clear (front and
rear)! Maintain
clearance of at least 8
inches (20 cm) from
objects, walls, etc. in
both the front and rear
of the unit.
• Clean the ventilation
grids (front and rear) at
least once every 2-3
weeks. In dirty
environments, clean the
ventilation grids more
often.
• When using an external
reservoir, additional
space is needed at the
rear.
Ensure adequate air conditioning at the installation location.
The installation location should be air conditioned to prevent the
exhaust heat of the unit from increasing the ambient temperature too
much (maximum ambient temperature 40 °C [104 °F]). Furthermore,
standard EN 378 requires a minimum room size for each kilogram of
refrigerant in the event of a leak in the refrigeration circuit. Refer to the
type label for the refrigerant volume.
0.49 kg of refrigerant R507 requires 1 m
3
of space.
0.68 kg of refrigerant R23 requires 1 m3 of space.
Page 15

PRESTO® A80, A80t, W80, W80t Operating Manual
24.01.2013 15
3.6. Connecting to power supply
Danger:
• This device may be attached to grounded (protected earth, PE)
mains power outlets only!
• The mains plug serves as a reliable way to disconnect the unit
from its power supply for safety reasons and must be readily
accessible at all times.
• Do not attempt to use the unit if the power cable is damaged!
• Regularly inspect the power cable for damage.
• JULABO assumes no liability for improper power connection!
Compare the available mains voltage and mains frequency with the
specifications on the type label.
See technical data section for information on allowable voltage
tolerances.
Connect the mains plug to a grounded (protected earth, PE) power
supply socket!
3.6.1. Unit for hard-wired installa tion
Units for hard-wiring are delivered with a mains power cable but without
a plug. These units are A80t and W80t units with the voltage
3x208 V / 60 Hz.
When installed in a building, provisions must be made for a circuit
breaker of 32-A as separator.
In addition it is recommended to fuse the unit in the building installation
with 32-A-with C-characteristic.
Page 16

Operating and functional elements
16 01.24.2013
4. Operating and f unct ional element s
4.1. Front side of the unit
1 User Interface
2 Retractable handle
3 Removable ventilation
grid
4 High temperature cut-
off adjustment
5 Power switch (at the
side of the housing)
6 USB Host (Type A)
connection and SD
Card slot.
Operation of the user
interface is described in a
separate document (see
page 1).
Fig.: A80
Page 17

PRESTO® A80, A80t, W80, W80t Operating Manual
24.01.2013 17
4.1.1. Electrical connections on the front side of the device (upper section)
Remove the ventilation
grid as follows in order to
access the electrical
connections:
• Pull out the handle.
• Grasp the bottom
edge of the ventilation
grid, lif t slightly, and tilt
it forwards.
• Remove the
ventilation grid from
the housing frame.
Included connections:
1 Ethernet connection.
2 USB device (Type B
plug).
3 RS232 interface
4 Alarm socket for ext.
alarm signal.
5 Socket for external
measurement and
control sensor
(Pt100).
6 Connection for
draining residual bath
fluid.
7 Sensor for ambient
temperature
measurement.
Using tubing and a
suitable vessel, open the
connection (6), about
every 2-3 weeks, to
release any built-up
deposits
Page 18
Operating and functional elements
18 01.24.2013
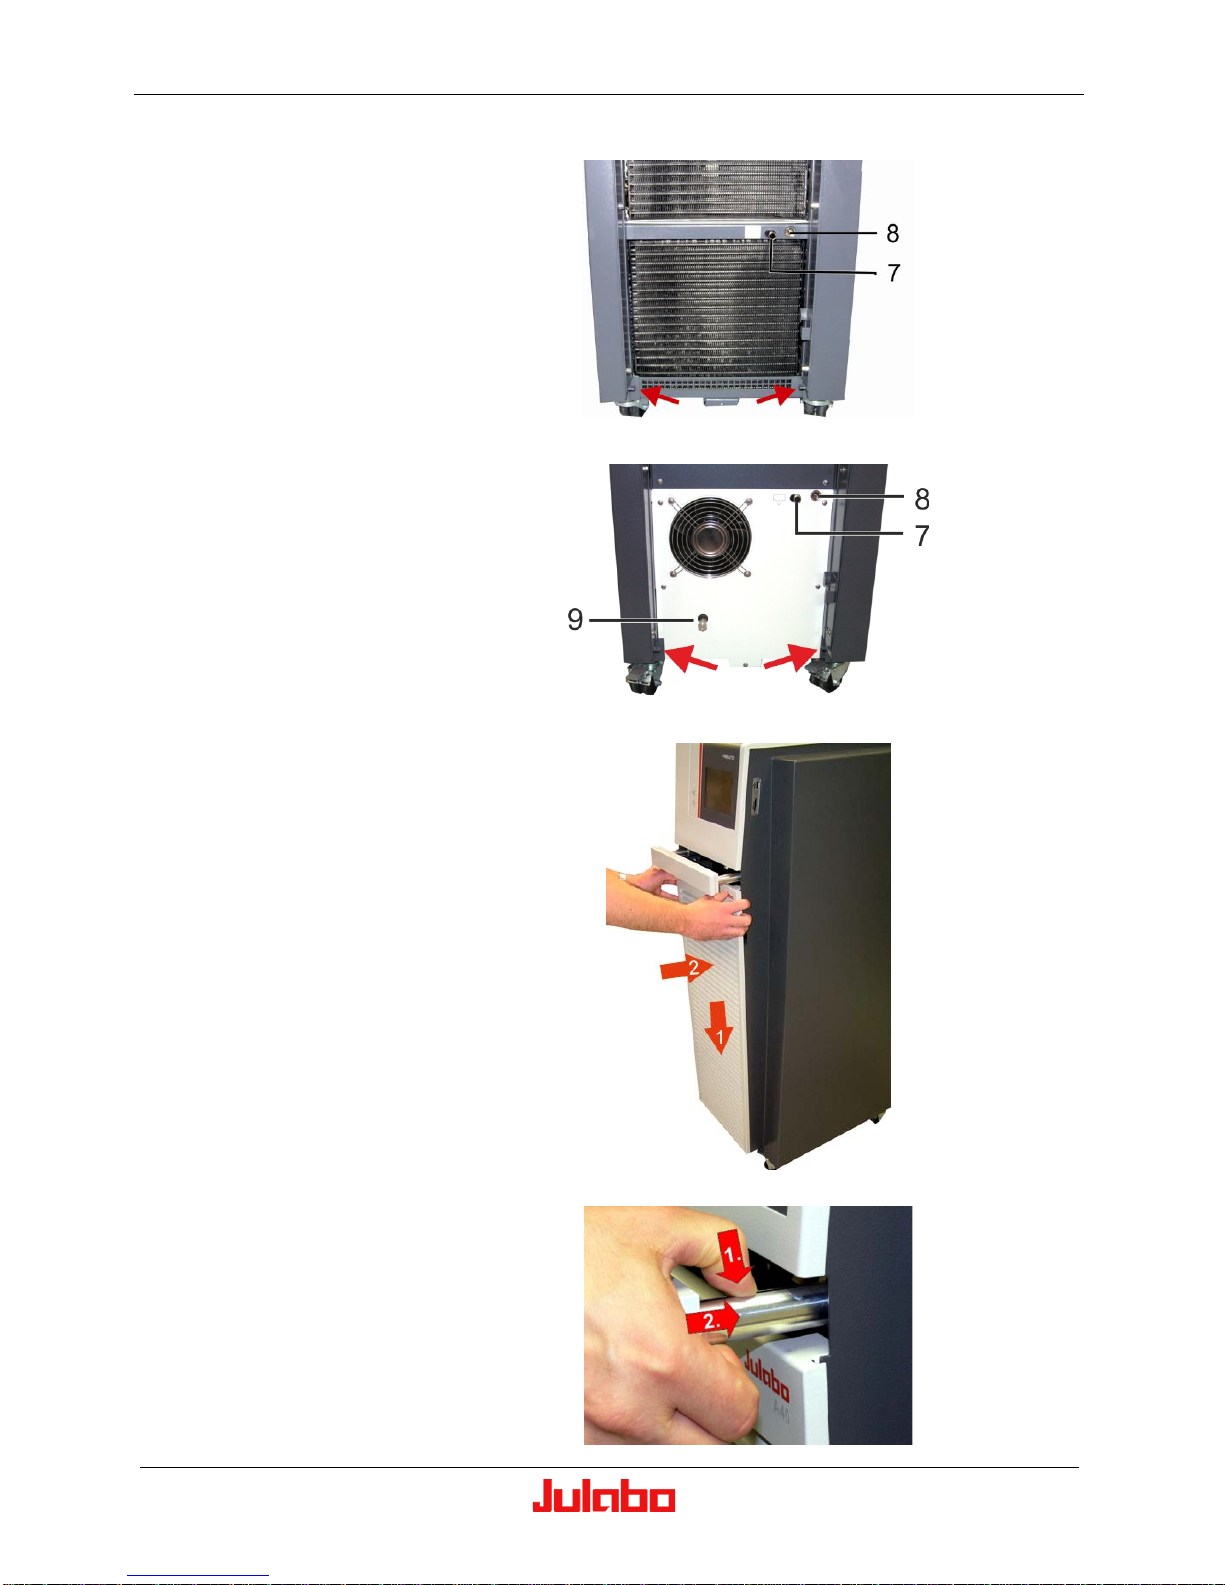
4.1.2. Drain elements on the front side of the device (lower section)
The drain nozzle (7) with
outer diameter ∅12 mm and
the drain screw (8) are
located near the bottom of
the unit behind the
ventilation grid.
On the W80 it is possible to
completely drain the cooling
water system via the sealing
plug M10x1 (9).
Details are given in chapter
5.8. “Empty the unit”
menu.
A80
W80
Replace the ventilation grid
as follows:
• Set the ventilation grid
onto the angled metal
piece at the bottom of
the unit.
• Tilt the ventilation grid
towards the unit until it
touches the mounting
pins.
• Lift the grid slightly and
onto the mounting pins.
• Slide the ventilation grid
downward.
•
To retract the handle,
press down on the
locking tab, located on
the right rail.
Page 19

PRESTO® A80, A80t, W80, W80t Operating Manual
24.01.2013 19
4.2. Rear o f unit
4.2.1. A80, A80t, air-cooled
1 Circuit breakers for
mains supply
1a at A80t
2 Mains cable with plug
2a at A80t
3 Overflow connection,
M16x1 male
4 Pump connection
(supply
),
M24x1.5 male
5 Pump connection,
(return IN
),
M24x1.5 male
6 Connection for external
expansion reservoir,
M16x1 male
Options
7 Socket for connection
of optional accessory
analog connections
(Order No. 8900105).
8 Socket for connection
of Pt100 module with
connector (Order No.
8900106).
9 JULABO Pressure /
Flow Sensor socket.
More information regarding
these connections can be
found in chapter 6.
Electrical connection pin
assignments, page 37
Safety cutouts and mains cable at A80t
Page 20

Preparations
20 01.24.2013
4.2.2. W80, W80t, water-cooled
1 Circuit breakers for main s
supply
1a at W80t
2 Mains cable with plug
2a at W80t
3 Overflow connection,
M16x1 male
4 Pump connection
(supply
),
M24x1.5 male
5 Pump connection
(return,
),
M24x1.5; male
6 Cooling water outlet,
(OUT
) G3/4“ barbed
fittings for ½” inner diameter
7 Cooling water inlet,
(IN
) G3/4“ barbed fittings
for ½” inner diameter
8 Connection for external
expansion reservoir, M16x1
male
Options
9 Socket for connection of
optional accessory analog
connections (Order No.
8900105).
10 Socket for connection of
Pt100 module with
connector (Order No.
8900106)
11 JULABO Pressure / Flow
Sensor socket
More information reg. these
connections can be found in
chapter 6. Electrical connection
pin assignments, page 37
Safety coutouts and mains cable at W80t
Page 21

PRESTO® A80, A80t, W80, W80t Operating Manual
24.01.2013 21
5. Preparations
5.1. Cooling water connections at W80 and W80t
Even high quality heat exchangers, like those installed in our equipment,
can be damaged by unsuitable cooling water.
Cooling water quality can vary based on local conditions.
The heat exchanger may become leaky due to corrosion, or it may
become clogged due to particulates building up inside.
Cooling water pressure (IN / OUT) max. 6 bar
Differential pressure (IN - OUT) 0.5 bar
Cooling water temperature < 30 °C [ < 86 °F]
Cooling water quantity see technical data.
Notice:
Danger of corrosion of heat excha nger due to unsuitable quality
of cooling water.
• Due to its high lime content, hard water is not suitable for cooling.
It will cause scale formation in the heat exchanger.
• W ater containing high amounts of iron will cause rusting even in
heat exchangers made of stainless steel.
• Chlorinated water will cause pitting corrosion in heat exchangers
made of stainless steel.
• Due to their corrosive characteristics, distilled water and deionized
water are unsuitable and will cause corrosion of the bath.
• Due to its corrosive characteristics, sea water is not suitable.
• Due to their microbial (bacterial) components which settle in the
heat exchanger, untreated and unpurified water from rivers and/or
cooling towers is unsuitable.
• Avoid particulate matter in cooling water.
• Avoid putrid water.
Page 22

Preparations
22 01.24.2013
5.1.1. Recommended quality of cooling water:
pH
7.5 to 9.0
Sulfate [SO4 2- ]
< 100 ppm
Hydrocarbonate [HCO 3-]/sulphate
[SO4 2-]
> 1 ppm
Hardness [Ca 2+, Mg 2+]/[HCO 3-]
> 0.5 °dH
Alkalinity
60 ppm < [HCO 3-] < 300 ppm
Conductivity
< 500 μs/cm
Chloride (Cl -)
< 50 ppm
Phosphate (PO4 3-)
< 2 ppm
Ammonia (NH3)
< 0.5 ppm
Free chlorine
< 0.5 ppm
Trivalent iron ions (Fe 3+)
< 0.5 ppm
Manganese ions (Mn 2+) < 0.05 ppm
Carbon dioxide (CO2)
< 10 ppm
Hydrogen sulfide (H2S)
< 50 ppm
Oxygen content
< 0.1 ppm
Algae growth
Not permitted
Suspended solids
Not permitted
Notice:
Cooling wate r circuit
There is a risk that oil could leak from the refrigeration system
(compressor) of the temperature control system into the cooling water
in case of a fault in the cooling water circuit!
Obey the laws and regulations of the water distribution company.in the
region where the unit is operated.
Connect cooling water:
• Cooling water connectors G3/4" female / Barbed fittings ½” inner
diameter.
• The used cooling water will exit via the outlet (OUT
). Plumb this
connection to the respective drain or return flo w c ircuit.
• Supply cooling water via the inlet (IN
).
5.1.2. Accessories
Order No.:
Description
8 930 312
Reinforced tubing (pressure resistant) 1/2“ inner
dia.
8 970 482
2 Tube clamps
8 920 000
Particle filter for cooling water circuit
Page 23

PRESTO® A80, A80t, W80, W80t Operating Manual
24.01.2013 23
5.2. Bath f luids
Warning:
Observe the safety data sheet of the bath fluid, especially the fire
point!
The unit must be supervised at all times if using a bath fluid with a fire
point of ≤ 65 °C [≤ 149 °F].
Recommended bath fluids for closed, external systems
• A list of recommended bath fluids is available on our website.
Find it at: www.julabo.com
Warning
Use of non-recommended bath fluids may result in a fire hazard or
other hazard:
JULABO will assume no liability for damages resulting from use of an
unsuitable bath liquid.
Unsuitable bath liquids include substances with the following
characteristics:
• highly viscous
(significantly higher than 50 cSt (50 mm
2
/s) at the relevant working
temperature)
• low viscosity, but with creep properties
• corrosive properties
• liquids that tend to crack.
JULABO assumes no liability if unsuitable liquids are used!
Page 24

Preparations
24 01.24.2013
Caution!
Maximum viscosity must not exceed 50 cSt (50 mm2/s) at working
temperature.
Caution!
Use of purified or unpurified water is not permitted.
Examples:
tap water, distilled water, deionized water, water/glycol mixtures, CaCl
2
solutions
Important notice about recommended Bath fluids:
Wh y is the operational range above the bath fluid's fire point?
This temperature control system is operated in a closed, external
temperature loop. As a result, the bath fluid only comes into contact
with oxygen in the internal filling reservoir, which is not located directly
in the temperature control loop.
A safety device monitors and controls the temperature in the internal
reservoir.
• The temperature of the bath fluid is held steady at approximately
25 °C [77 °F].
• A safety device with an adjustable temperature value
>RESERVOIR< protects against dangerous conditions, independent
of the control loop. When this safety device triggers (e.g. if
excessively hot liquid flows into the internal reservoir), the
temperature control system is completely shut down and will not
restart without manual intervention.
Set the >RESERVOIR< safety temperature at least 25 °C below the
fire point of the bath fluid.
5.3. Temperature control tubing
The following tubing is recommended:
Triple-insulated metal tubing, each with two end connections M24x1.5
female, temperature range to
-100 °C ... +350 °C [-148 °F to 662 °F].
Order No. Length
8.930.261
8.930.262
8.930.263
8.930.264
1.0 m
1.5 m
2.0 m
3.0 m
Maximum pressure 6.0 bar at +20 °C [ 68 °F]
4.6 bar at +200 °C [392 °F]
3.8 bar at +350 °C [662 °F]
Page 25

PRESTO® A80, A80t, W80, W80t Operating Manual
24.01.2013 25
Warning:
Tubing:
Temperature control tubing is a potential source of danger at high
working temperatures. If one or more temperature control tubes are
damaged, a large volume of hot bath fluid can be pumped out of the
unit in a short period of time.
Potential consequences include:
• Fire hazard
• Explosion hazard
• Severe burns to persons or property
• Difficulty breathing caused by a hot atmosphere
Safety instructions
• Use tubing suitable for temperature control purposes.
• Secure tubing connections against slipping.
• Avoid kinking the tubes.
• Regularly check tubes for material fatigue, such as cracks.
Page 26

Preparations
26 01.24.2013
5.4. Connecting an external vessel
This temperature control system is designed to control the temperature
of an external, closed-loop vessel (temperature loop).
The tubing connections between the temperature control system and
the attached external vessel should be as short as possible. This is the
only way to fully utilize one of the main advantages of this system (its
speed!).
Caution:
Secure tubing connections against slipping.
• Remove the screw
caps from the pump
connections (4, 5)
and use appropriate
tubing to connect the
unit to the external
system (M24x1.5 /
27mm wrench).
The pressure line (4,
OUT) must be
attached to the
lowest fluid
connection point of
the external vessel to
prevent air from
becoming trapped.
•
Connect one end of
an appropriate tube
to the overflow (3)
adapter and place
the other end into a
suitable container.
The container must
always be lower than
the "overflow" outlet
(M16x1 / 19mm
wrench).
The below picture shows the W80, but the A80 connects to the
external vessel in the same way.
Important notice:
If bath fluid drains out through the overflow (3) at your highest working
temperature, direct the liquid into a suitable container. If the unit also
triggers a low fluid-level alarm at the lowest working temperature, then
you should use an external expansion vessel to avoid this problem.
Page 27

PRESTO® A80, A80t, W80, W80t Operating Manual
24.01.2013 27
5.5. Diagram: Device structure and mechanical connections
5.6. Accessories
5.6.1. Connectors, Valves, Adapters, etc.
Various accessories can be found at our homepage, www.julabo.com.
Page 28

Preparations
28 01.24.2013
5.7. Filling
Caution:
Be aware of how the bath fluid changes volume within the
temperature control system's working temperature range.
Rule of thumb:
Expect about 12% volume change for every 100 °C [212 °F]
temperature change.
Attention:
Connect the external vessel first!
See chapter 5.4. Connecting an external consumer, page 26.
Note:
Always check to make sure the drain screw is closed before filling.
Recommendation:
• Use a 2-liter measuring cup or similar f or filling.
• Use a heat transfer fluid that is appropriate for your application.
5.7.1.
Sample Calc u lation: Det e rmining whet her a n ex ternal expansion reservoir is needed
Assumption:
The external vessel for this example is a reactor with capacity 5 l.
The length of the connection tube is 6 m, the inner diameter is 10 mm.
The bath fluid has a thermal expansion coefficient (γ) of 1.1 • 10-3 K-1
The temperature difference (∆ϑ) is 280 °C.
The change in volume (∆V) οf the bath fluid can be calculated as follows:
ϑγ
∆⋅⋅=∆
ges
VV
In which V
ges
= VM + VS + V
G
V
M
= Jacket volume (approx. 1/3 of external reactor volume) = 0.33 • 5 l = approx. 1.65 l
V
S
= Volume of the tubes (A • l) = 78.5 mm2 • 6 m = 0.47 l
V
G
= Volume of the active heat exchanger volume = 1.7 l
V
ges
= 1.65 + 0.47 + 1.7 = 3.82 l
∆V = 3.82 l • 1.1•10-3 K
-1
• 280 K = 1.18 • 20 % safety factor = approx. 1.4 l.
In this case, the internal usable expansion volume (please see technical data) would be sufficient.
With a reactor volume of 50 l in this example, the external expansion reservoir, offered by JULABO
(Order No. 8970833), would be necessary.
Page 29

PRESTO® A80, A80t, W80, W80t Operating Manual
24.01.2013 29
5.7.2. Filling a closed, external system
(Also refer to the "User Interface" operating manual, 1.953.3041)
Connect the unit to the
mains power supply and
switch on the unit at the
mains switch .
After the self-test is
completed, the unit will be
in the "OFF" state and will
emit an audible signal.
To mute the audible
alarm, touch the alarm
notice's red box.
The fill level indicator on
the left side of the display
shows that the unit is
empty.
To continue,
press the
button.
You will see a message
instructing how to fill the
unit. Press the button
labeled “Fill unit” and
follow t he instructions
displayed on the User
Interface.
Filling the unit:
• Open the cover on top
of the housing
• Remove the plug (not
pictured).
• Slowly pour heat
transfer liquid into the
round opening (Use a
funnel or a container
designed for pouring,
for best results).
The area around the filling
opening is sealed from
the housing, but you
should avoid spilling large
amounts of bath fluid.
Clean up any spilled fluid
with a towel or similar.
Page 30

Preparations
30 01.24.2013
Watch the level indicator.
As soon as the minimum
filling level has been
reached the fill lev el
indicator will turn green.
Switch the unit off and
switch it back on again.
You may now continue
filling up to the desired
level.
Return to standard display
by pressing
.
If there is too much bath
fluid or if the bath fluid
expands due to heating
during operation, a high
fluid level warning is
activated.
In this case, use the
residual fluid drain (6) to
remove some bath fluid.
See the next chapter for
draining instructions..
Ticker text:
The early warning system for high fluid level reports a critical fluid
level. Please drain some bath fluid.
5.8. “Empty the unit” menu
• Caution:
• Do not drain the bath fluid while it is hot!
Check the temperature of the bath fluid before draining; this may
be done by briefly switching on the unit.
• Always store and dispose of old bath fluid in an environmentally
friendly way.
Always observe the applicable disposal regulations in your
region.
Page 31

PRESTO® A80, A80t, W80, W80t Operating Manual
24.01.2013 31
After removing the
ventilation grid, the drain
nozzle (7) and the drain
screw (8) can be operated.
For draining:
• Attach a tube (outer
diameter 12 mm) to the
drain port (7).
• Place a suitable
container for holding or
storing the liquid under
the unit.
A80
W80
The draining operation is menu-driven on the user interface, but it also
requires some mechanical operations.
Call up the main menu,
then press
Page 32

Preparations
32 01.24.2013
Press
The ticker in the display
reports the start of the
automatic draining mode.
The setpoint is
automatically changed to
20.00°C. As soon as the
temperature reaches
20 °C (± 10 K), the ticker
text will change and
prompts you to drain the
unit.
• Unscrew the drain
screw (8) by a few
turns.
• To drain excess or
stagnant cooling water
from the W80 before
transportation, use the
M10x1 drain screw (9)
Ticker text:
Automatic draining mode active. Wait until the medium temperature
has reached the adjusted setpoint.
Automatic draining mode finished. You can drain the unit now.
A80
W80
Page 33

PRESTO® A80, A80t, W80, W80t Operating Manual
24.01.2013 33
As the liquid drains, the
fluid level will decrease.
The low-level warning
(warning 40) and then the
low-level alarm (alarm 1,
red) will eventually occur
when the level drops to
the two trigger points.
Warnings are displayed as
a ticker in the status line.
Mute the audible signal by
pressing the yellow
symbol.
Mute the audible signal
by touching the red box.
In order to completely drain
the bath fluid, it is
necessary to also empty
the filling reservoir.
Connect a piece of tubing
(diam. 11.5 mm), and flip
the ball valve’s handle (6)
to empty the filling
reservoir.
Page 34

Preparations
34 01.24.2013
5.9. Additional thermal adjustment and electrical connection elements
5.9.1. Adjustable high temperature cut-off
Two circular potentiometers for setting the high temperature cut-off
are located on the front of the unit. Use a screwdriver to turn these
dials.
On the TFT you will find
the continuous display of
important values and
functions.
Warning
The >TANK< high
temperature cut-off
(complies with DIN
standard 12876-1-2000)
should be set to 15 °C
above the highest
working temperature
setpoint. Make sure that
the fluid is rated for use
at this temperature, first!
The >RESERVOIR< high
temperature cut-off must
be set to at least 25 °C
below the bath fluid's fire
point.
Adjust the high
temperature cut-off by
slowly turning the dial
with a screwdriver. The
exact value will appear
on the display.
1 Date / time
2 Status: On/Standby
3 Fill level indica tor
4 External temperature sensor value
5 Current power output (X% heating, -X% cooling)
6 Selected temperature control mode (internal/external)
7 Current liquid temperature
8 Selected max. pump pressure and current pump pressure
9 Selected high temperature warning setpoint
10 Selected low temperature warning setpoint
11 High temperature cut-off setting (TANK)
12 High temperature cut-off setting (RES)
Cooling indicator icon - Blinking or continuous
Heating indicator icon - Blinking or continuous
Page 35

PRESTO® A80, A80t, W80, W80t Operating Manual
24.01.2013 35
5.9.2. Electrical connections
Electrical connections (behind the ventilation grid on the front of the unit, see Chapter 4.1.1)
Ethernet-based network
connection
1 ETHERNET
USB device interface
2
USB DEVICE
Interface RS232C
For controlling the unit via a
PC or a higher priority
process control system.
3 SERIAL
Connector: ALARM output
(for external alarm signal)
4 ALARM
Connection socket: External
measurement and control
sensor
Connect the external Pt100
sensor to the socket,
calibrate with the "ATC Ext"
function, and then use a
suitable device to secure the
sensor inside the external
vessel.
5
EXT Pt100
There are cable guides at
the side for a neat and easy
installation of the connection
cables.
Page 36

Preparations
36 01.24.2013
USB HOST and SD-Card slot are located on the right side of the housing:
USB HOST for configuring
the unit from a USB stick, or
datalogging.
SD Card for datalogging
Page 37

PRESTO® A80, A80t, W80, W80t Operating Manual
24.01.2013 37
6.Electrical connect ion pin assignments
Important:
Use shielded cables only.
The shield should be continuous, and should be electrically
connected to the plug’s housing.
When working with the SERIAL interface, use a null modem cable.
Normal operation can be ensured only if cables no longer than 3m
(9.85 ft.) are used. The use of longer cables does not itself affect
proper performance of the unit, however external interference (e.g.
cellular phones) may have a negative impact on performance in this
configuration.
SERIAL interface
Use this socket to connect
a PC via null modem cable
to PRESTO
®
in order to
remotely control the
temperature control
system.
9 6
5
1
RS232 pin assignments
Pin 2
RxD
Receive Data
Pin 3
TxD
Transmit Data
Pin 5
0 V
Signal GND
Pin 7
RTS
Request to send
Pin 8
CTS
Clear to send
Pin 1; 4; 6, 9 Reserved - do not use!
6.1. Accessories
Order No.:
Description
8 980 073 RS232 interface cable 9 pole/9 pole, 2.5 m
(8.2 ft) long.
8 900 110
USB interface adapter cable
6.1.1. Alarm output
This socket is a voltage-free change-over contact. With the options in
the menu item > AL-OUT Function< (see operating instructions for the
user interface), all possible operating conditions can be signalled as
desired, without having to change the wiring of the cable. Normally
during an alarm, pins 2 and 3 are connected.
Alarm output
This output can be used to
alert the user when the
unit enters an alarm
condition, from a distance.
Check the operating
condition of the plug
regularly (about every 2-3
days).
13
2
ALARM
Breaking capacity
max. 30 W / 40 VA
with turn-on voltage
max. 125 V∼/−
with switching current
max. 1 A
Page 38

Electrical connection pin assignments
38 01.24.2013
6.1.2. Connection for the external Pt100 sensor
The cable's shield must be electrically connected to both the sensor’s
sheath as well as the housing of the connector plug.
External sensor
connection for external
temperature measurement
and control. Only use
shielded sensors.
Check the plausibility of
the external temperature
measurement regularly
(about every 2-3 days), by
placing the Pt100 in a
state where the
temperature is already
known (e.g. in ambient air,
or a container of ice
water).
4
1
3
2
ext. Pt100
1
4
2
3
Shield Plug
Look on
soldering side.
Pt100
Pin
Signal
1
I+ 2 U+ 3 U- 4 I-
6.2. Options (on the rear side)
Caution
Danger: electricity.
During assembly conductive objects may drop into the unit and cause
a short circuit.
Disconnect the unit from the power supply prior to opening.
Installation and maintenance may be performed only by authorized,
qualified personnel.
7 Socket for connection of
optional accessory
analog connections
(Order No. 8900105).
8 Socket for connection of
Pt100 module with
connector (Order No.
8900106).
9 JULABO Pressure /
Flow Sensor socket.
Page 39

PRESTO® A80, A80t, W80, W80t Operating Manual
24.01.2013 39
6.2.1. Analog module
Order No.: 8900105
7a 7b
The analog module has two circular female connectors.
7a Female connector STAND-BY input (can be used for an
external "on/off" switch).
7b Female connector REG+E-PROG with three analog
datalogger outputs, and one input for an external programmer
or other voltage and/or current sources.
Information regarding labeling:
test For service purposes only. This button has no function during
regular operation.
reset The module can be „reset“ with this key. This may be necessary
in case of an error, for example if the red LED (error) lights up.
on
If the Green LED is blinking
Blinking indicates that the module is receiving information
(CAN-Messages) and is working correctly.
If the Green L ED is illuminated
The module is powered on, but is not receiving any information
(CAN-Messages).
If the Green LED is not illuminated
The unit is turned off, or the module is damaged, or the power
supply to the module is not working.
error
If the Red LED is not illuminated
If the unit is operating and this LED is not illuminated, the
module is working properly.
If the Red LED blinks
An unknown error has occurred while this module was
communicating on the CAN-Bus. The CAN-Bus has deactivated
itself for safety reasons. Turn the unit off via the power switch,
wait a few seconds, and turn it back on again. If the error
occurs again, please contact JULABO service
(Service@julabo.com).
If the Red LED is illu minated
A fault has occurred with the module. The TFT display will show
the type of error (Alarm code) and troubleshooting steps, if
applicable.
6.2.2. Module with Pt100 connector
Order No.: 8900106
The module with a Pt100 connector is intended for the connection of a
second Pt100 external sensor. The sensor is connected at the back of
the JULABO temperature control system. It will measure a second
temperature at any point in an application.
In connection with the VFC (Volume Flow Control) unit, it is possible to
determine the calorimetric power and performance. The value (external
2) can be displayed on the user interface. For setup use the path >
Menu Customize Home display <. For description see the operating
manual “User Interface”, 1.953.3041 of the JULABO temperature
control system.
Page 40

Electrical connection pin assignments
40 01.24.2013
6.2.3. Connecting to the STAND-BY socket
The STAND-BY-socket can be enabled or disabled via the TFT user
interface.
When the STAND-BY socket is activated, a connected switch must be
closed to start the device. If this function is activated, but an external
switch is not connected and properly closed, the TFT will display the
message "E-OFF." When you see this message, it means that the
external switch must be closed to start the device.
Stand-BY
Socket for connecting an
external on/off switch.
Warning: This
feature does not turn off
the power to the
instrument
1
2
3
AK
STAND-BY
Pin
Signal
1
Not used
2
5 VDC
3
0 V
Page 41

PRESTO® A80, A80t, W80, W80t Operating Manual
24.01.2013 41
6.2.4. Connecting to the REG+E-PROG socket
The programmer input and all of the datalogger outputs are configurable
via the TFT user-interface.
Channel 1 Voltage output, e.g. for datalogger (V)
Channel 2 Voltage output, e.g. for datalogger (V)
Channel 3 Current output, e.g. for datalogger (mA)
E-PROG Input for external programmer
With the E-PROG - input, you can use either a voltage source or a
current source to change the unit’s setpoint temperature.
REG+E-PROG
The programmer input (EPROG, pin 4) can be
configured as a voltage or
current input via the TFT
user interface.
Pin
Signal
1 Voltage output*, channel 1
0 ... 10 V
2 Voltage output*, channel 2
0 ... 10 V
3 Gnd for outputs
0 V
4 Programmer input, EPROG
0 ... 10 V or 0 ... 20 mA
5 Current ouput**, channel 3
0 ... 20 mA or 4 ... 20 mA
6 Gnd for programmer
0 V
* The resistance of any load placed on either of the voltage
outputs must be, at minimum, 10 kΩ.
** The resistance of any load placed on the current output must
be, at minimum, 400 Ω.
Page 42

Electrical connection pin assignments
42 01.24.2013
6.2.5. Connecting to the JULABO Pressure / Flow Sensor socket
Signal input for the connection of an external pressure sensor or flow-
through sensor. These two sensors are available as accessories.
Please note that only the JULABO accessory sensors will work with
this socket.
Julabo Sensor
Pressure / Flow
Pin
Signal
1
24 V
2
5 V
3
4…20 mA
4
GND (0 V)
Flow Control Units in JULABO program
Order No. Description
8980762 VFCpro Volume Flow Control unit, M24x1.5 male, (-100…300 °C) [-148…572 °F]
8980782 VFC Volume Flow Control assembly unit, (-100…300°C) [-148…572 °F]
For further i nf or mation, r efer to t he inst r uct ion manual flow control unit, 1.950.0133.
Pressu re sen sors for PRESTO® in JULABO program
Order No. Description
8980771 Pressure sensor M24x1.5 male
Caution:
Possible incorrect measurement when connecting a JULABO
pressure sensor!
• If the customer's application is positioned higher or lower than
the PRESTO
®
Temperature Control System, the height
difference will affect the measurement and cause incorrect
results.
Remedy:
Position the PRESTO
®
Temperature Control System and the
application at the same height level.
Check the plausibility of the sensor measurement regularly (about every 2-3 days).
Page 43

PRESTO® A80, A80t, W80, W80t Operating Manual
24.01.2013 43
7. Remote operation, laboratory autom at ion
7.1. Preparing for remote control
RS232, serial interface.
Refer to the "User
Interface" operating
instructions (1.953.3041).
9 6
5
1
SERIAL
BAUD RATE
4800 Baud
PARITY
Even parity
HANDSHAKE
RTS/CTS Protocol (Hardware handshake)
Data bits
7
Stop bits
1
7.2. Communication with PC or higher priority data system
When the PRESTO® temperature control system is in remote control
mode, the following symbol appears on the TFT display:
"R " = REMOTE
In most cases, commands are sent from the computer (“master
device”) to the temperature control system (“slave device”). The
temperature control system will also send error messages to the
computer, if the computer requests to know the current status of the
instrument.
If there is a power failure during remote control operation, the
computer must resend the start command and all other settings
through the RS232 or USB interface.
The instrument will not automatically restart when power is restored!
Signals are transferred in accordance with DIN standard 66022 and
DIN standard 66003, code table 1.
A transmission sequence consists of:
• Command
• Space (⇔; Hex: 20)
• Parameter (if applicable; period (“dot”) character used for
decimal point)
• Termination (↵; Hex: 0D)
Commands are divided into in and out commands.
In commands: retrieve parameters from the instrument
out commands: set parameters on the instrument
out commands can only be used while remote control mode is
active.
For more information, see the "User Interface" manual, 1.953.3041.
Page 44

Remote operation, laboratory automation
44 01.24.2013
7.3. Status messages / Error messages
7.3.1. Alarms
Alarm messages are
displayed in a flashing red
box, and are accompanied
by a loud beeping tone.
Example: Error 14
Touch the red box to mute
the alarm.
The unit switches to
“Standby“. The heater,
refrigeration unit and
circulation pump are all
switched off.
Press <
> button for
help text.
7.3.2. Warnings
Warnings are displayed in
a ticker on the status line
Example: Warning 40
Touch the icon to mute the
beeping tone.
Help is alway s accessible
through the icons
or .
Touch the icon and the
error history is displayed.
ALARMS are shown in
Red >
WARNINGS are shown in
Yellow >
The dates and times when each error occurred are also displayed.
If possible, this data will also be recorded when the error is cleared.
Examples: codes , .
For more information, including a list of alarm and warning codes with explanations, please see the
separate User Interface manual, 1.953.3041.
Page 45

PRESTO® A80, A80t, W80, W80t Operating Manual
24.01.2013 45
8. Technical Data
PRESTO
®
A80
Order No.
9420801.14
9420801.03
9420801.04
Mains connection (nom. volt.)
Nominal frequency
Tolerance of the nom.voltage
Max . current consumption
Max. heating capacity at 200 V
at 208 V
at 220 V
at 230 V
V
Hz
%
A
kW
kW
kW
kW
208
60
+ 10
15.0
1.3
1.5
1.76
-
230
50
+ 10
16.0
-
-
-
1.8
230
50
+ 10
13.0
-
-
-
1.05
Working temperature range °C [°F] -80…250 [-112…482]
Temperature stability K ± 0.01…± 0.05
Cooling capacity
Liquid: Silicon Oil//Ethanol*
°C
kW
200 100 20 0 -10 -20 -30 -40 -60 -80
1.2
1.2
1.2
1.2
1.2
1.1
1.1
1.1
0.65
0.1
Refrigeration compressor dual
stage
air-cooled
Refrigerant First stage: R507; Second Stage: R23
Pump capacity
Pressure, max.
Flow rate, max. at 0 bar
bar [psi]
l/min
[gal/min]
1.3 [18.85]
1.7 [24.66]
38
[10.04]
40
[10.57]
Viscosity not to exceed max. 50 mm2/s (50 cSt)
Noise level, 1 m distance dBA 68
Ambient temperature °C [°F] 5…40 [41…104]
Rel. Humidity %
< 80 (at <31 °C) up to < 50 (at 40 °C)
Process volume, min.
Active heat exchanger vol.
Internal usable expansion vol.
l [gal]
l [gal]
l [gal]
3.9 [1.04]
1.7 [0.45]
5.6 [1.48]
Overall dimensions (WxDxH) mm
[inch]
430 x (650 + (Stud 35)) x 1258
[16.9 x (25.6 + Stud 1.38)] x 49.5]
Weight, approx. Kg [lbs] 164 [361.6]
* at 200 °C [392 °F] and 100 °C [212 °F] : measured using Thermal HL45
All data provided in this operating manual assumes use at the rated nominal voltage and rated
nominal frequency and with ambient temperature of 20 °C [68 °F].
Information subject to technical changes without notice.
Page 46

Technical Data
46 01.24.2013
PRESTO
®
A80t
Order No.
9420801.06.T
9420801.16.T
9420801.07.T
Mains connection (nom. volt.)
Nominal frequency
Tolerance of the nom.voltage
Max. current consumption
Max. heating capacity
at 200 V
at 208 V
at 220 V
at 230 V
at 400 V
V
Hz
%
A
kW
kW
kW
kW
kW
230/3PPE
50
+ 10
16.0
-
-
-
3.4
208-220/3PPE
60
+ 10
20.0
2.6
2.8
3.1
-
-
400/3PNPE
50
+ 10
20.0
-
-
-
3.4
Working temperature range °C [°F] -80…250 [-112…482]
Temperature stability K ± 0.01…± 0.05
Cooling capacity
Liquid: Silicon Oil//Ethanol*
°C
kW
200
100
20 0 -10
-20
-30
-40
-60
-80
1.2
1.2
1.2
1.2
1.2
1.1
1.1
1.1
0.65
0.1
Refrigeration compressor dual
stage
air-cooled
Refrigerant First stage: R507; Second Stage: R23
Pump capacity
Pressure, max.
Flow rate, max. at 0 bar
bar
[psi]
l/min
[gal/min]
1.7
[24.66]
40
[10.57]
Viscosity not to exceed max. 50 mm2/s (50 cSt)
Noise level, 1 m distance dBA 69 74
Ambient temperature °C [°F] 5…40 [41…104]
Rel. Humidity %
< 80 (at <31 °C) up to < 50 (at 40 °C)
Process volume, min.
Active heat exchanger vol.
Internal usable expansion vol.
l [gal]
l [gal]
l [gal]
3.9 [1.04]
1.7 [0.45]
5.6 [1.48]
Overall dimensions (WxDxH) mm
[inch]
430 x (650 + (Stud 35)) x 1258
[16.9 x (25.6 + Stud 1.38)] x 49.5]
Weight, approx. Kg
[lbs]
165 [361.6]
* at 200 °C [392 °F] and 100 °C [212 °F] : measured using Thermal HL45
All data provided in this operating manual assumes use at the rated nominal voltage and rated
nominal frequency and with ambient temperature of 20 °C [68 °F].
Information subject to technical changes without notice.
Page 47

PRESTO® A80, A80t, W80, W80t Operating Manual
24.01.2013 47
PRESTO
®
W80
Order No.
9421801.14
9421801.03
9421801.04
Mains connection (nom. volt.)
Nominal frequency
Tolerance of the nom. voltage
Max . current consumption
Max. heating capacity at 200 V
at 208 V
at 220 V
at 230 V
V
Hz
%
A
kW
kW
kW
kW
208
60
+ 10
15.0
1.3
1.5
1.76
-
230
50
+ 10
16.0
-
-
-
1.8
230
50
+ 10
13.0
-
-
-
1.05
Working temperature range °C [°F] -80…250 [-112…482]
Temperature stability K ± 0.01…± 0.05
Cooling capacity
Liquid: Silicon Oil//Ethanol
°C
kW
200
100
20 0 -10
-20
-30
-40
-60
-80
1.2 1.2 1.2 1.2 1.2 1.1 1.1 1.1 0.65 0.1
Refrigeration compressor dual
stage
water-cooled
Refrigerant First stage: R507; Second stage: R23
Pump capacity
Pressure, max.
Flow rate, max. at 0 bar
bar [psi]
l[gal]/min
1.3 [18.85]
1.7 [24.66]
38 [10.04]
40 [10.57]
Viscosity not to exceed max. 50 mm2/s (50 cSt)
Pump connection M24x1.5
Cooling water connection G3/4 / barbed fitting ½“ inner diameter.
Noise level, 1 m distance dBA 64
Ambient temperature range °C [°F] 5…40 [41…104]
Rel. Humidity %
< 80 (at <31 °C) up to < 50 (at 40 °C)
Process volume, min.
active heat exchanger
volume
Internal usable expans. vol.
l [gal]
l [gal]
l [gal]
3.9 [1.04]
1.7 [0.45]
5.6 [1.48]
Dimensions (WxDx H) mm
[inches]
430 x (650 + (stud 35)) x 1258
[16.9 x (25.6 + Stud 1.38)] x 49.5]
Weight, approx. kg [lbs] 159 [350]
* at 200 °C [392 °F] and 100 °C [212 °F] : measured using Thermal HL45
All data provided in this operating manual assumes use at the rated nominal voltage and rated
nominal frequency and with ambient temperature of 20 °C [68 °F].
Information subject to technical changes without notice.
Page 48

Technical Data
48 01.24.2013
PRESTO
®
W80t
Order No.
9421801.06.T
9421801.16.T
9421801.07.T
Mains connection (nom. volt.)
Nominal frequency
Tolerance of the nom. voltage
Max. current consumption
Max. heating capacity at 200 V
at 208 V
at 220 V
at 230 V
at 400 V
V
Hz
%
A
kW
kW
kW
kW
kW
230/3PPE
50
+ 10
16.0
-
-
-
3.4
208-220/3PPE
60
+ 10
20.0
2.6
2.8
3.1
-
-
400/3PNPE
50
+ 10
20.0
-
-
-
-
3.4
Working temperature range °C [°F] -80…250 [-112…482]
Temperature stability K ± 0.01…± 0.05
Cooling capacity
Liquid: Silicon Oil//Ethanol
°C
kW
200
100
20 0 -10
-20
-30
-40
-60
-80
1.2
1.2
1.2
1.2
1.2
1.1
1.1
1.1
0.65
0.1
Refrigeration compressor dual
stage
water-cooled
Refrigerant First stage: R507; Second stage: R23
Pump capacity
Pressure, max.
Flow rate, max. at 0 bar
bar [psi]
l/min [gal]
1.7 [24.66]
40 [10.57]
1,3 [18.85]
38 [10.04]
1.7 [24.66]
40 [10.57]
Viscosity not to exceed max. 50 mm2/s (50 cSt)
Pump connection M24x1.5
Cooling water connection G3/4 / barbed fitting ½“ inner diameter.
Noise level, 1 m distance dBA
66
64
Ambient temperature range °C [°F] 5…40 [41…104]
Rel. Humidity %
< 80 (at <31 °C) up to < 50 (at 40 °C)
Process volume, min.
active heat exchanger
volume
Internal usable expans. vol.
l [gal]
l [gal]
l [gal]
3.9 [1.04]
1.7 [0.45]
5.6 [1.48]
Dimensions (WxDx H) mm
[inches
]
430 x (650 + (stud 35)) x 1258
[16.9 x (25.6 + Stud 1.38)] x 49.5]
Weight, approx. kg [lbs] 162 [357]
* at 200 °C [392 °F] and 100 °C [212 °F] : measured using Thermal HL45
All data provided in this operating manual assumes use at the rated nominal voltage and rated
nominal frequency and with ambient temperature of 20 °C [68 °F].
Information subject to technical changes without notice.
All pump data is based on use with liquids having a specific density of
1 kg/dm
3
[8.35 lb/gal]
Page 49

PRESTO® A80, A80t, W80, W80t Operating Manual
24.01.2013 49
Temperature setting
Digital
Local / Remote
Control type displayed on TFT User Interface
Remote Control from PC
Displayed on TFT User Interface
Temperature display
Displayed on TFT User Interface
Resolution
°C
0.01
ATC function (ATC3) internal
(ATC2) extern.
K
± 3
± 10
Temperature control
ICC – Intelligent Cascade Control
Cascade, parameters may be retrieved and modified
Working temperature sensor
Pt 100 1/3 DIN
Safety temperature sensor
Pt 100
8.1. Cooling water connection, cooling water quantity
Cooling water connections
G3/4 male / barbed fittings for ½“ I.D. tubing
Maximum water pressure bar [psi] 6 [87]
Min. water pressure at 30 °C bar [psi] 0.5 [7.25]
Necessary pressure difference bar [psi] 0.5 [7.25]
Cooling water quantity
l/min
2.0 (at 1.2 kW cooling capacity)
Max. cooling water temperature
°C [°F]
30 [86]
8.2. Connections
Computer interfaces RS232,
USB-Device V2.0 /
Ethernet
USB-Host V2.0
SD Card
USB-Stick
SD-card – up to 2 GB
Alarm output
for external alarm signal
External measurement and control sensor
Pt100
Optional Accessories: (Rear side)
Analog module
REG+E-PROG
Programmer input -100 °C - 400 °C
0 - 10 V or 0 - 20 mA or 4 - 20 mA
Temperature recorder outputs
0 - 10 V (0 V = -100 °C, 10 V = 400 °C)
0 - 20 mA (0 mA = -100 °C, 20 mA = 400 °C)
4 - 20 mA (4 mA = -100 °C, 20 mA = 400 °C)
Stand-By-input
for external switch on/off
JULABO Pressure / Flow Sensor
for pressure sensor / flow sensor
Module with Pt100 connection socket
for connection of a further Pt100
Page 50

Technical Data
50 01.24.2013
8.3. Safety
High temp. cut-off >TANK<, adj u stable setting
0 °C ... 320 °C [32 °F …608 °F]
High temp. cut-off >RESERVOIR<, adjustable
setting
0 °C ... 100 °C [32 °F …428 °F]
Low fluid protection
float s witch
Fluid level display
represented on TFT in 7 stages
Classification according to DIN 12876-1
Clas s III (FL)
Additional safety devices
visible + audible (in intervals)
Temperature limit function
See chapter “Safety adjustments“ in the
operating manual “User Interface”,
1.950.3041.
Setpoint limit function
Pressure limit function
Monitoring of the working temperature sensor
Plausibility control
Temperature differential monitoring
Working/safety temperature sensors
difference >25 K
Alarm messages
visible + audible (constant)
8.4. Ambient conditions for proper operation according to EN 61 010-1
Caution:
The unit is not suitable for use in potentially explosive atmospheres
• Designed for indoor use only. Do not use outdoors.
• Up to 2000 m (above sea level) elevation
• Ambient temperature range: +5 ... +40 °C [+41 ... +104°F]
• Relative humidity up to 80% for ambient temperatures up to 31 °C
[87.8 °F]; maximum RH% decreases linearly to 50% relative humidity
at ambient temperature of 40 °C [104 °F].
• Mains voltage cannot vary by more than +/-10% of the instrument’s
rated nominal voltage.
• High voltage classification II according to IEC60664-1.
• Contamination level 2 according to IEC60664-1.
• Protection class according to EN 60529: IP 20
• Unit complies with protection class I
EMC requirements according to EN 61326-1
This is an ISM-unit of group 1 (uses high frequency for internal
purposes), class A.
Units in class A are designed for operation in industrial environments.
Due to conducted and radiated disturbances, there might be problems
to ensure the electromagnetic compatibility of this instrument if the unit
is used in other environments (e.g. living area).
Page 51

PRESTO® A80, A80t, W80, W80t Operating Manual
24.01.2013 51
8.5. Materials of Construction of the wetted Parts
Part
Material
Turned parts and sheet metal parts (permanently wetted)
1.4301/ 304H
Heater coils (permanently wetted)
1.4401 / 316L
Corrugated tubing (permanently wetted)
1.4541 / 321
Drain tap
(Not subject to circulation, not subject to high or low
temperature loads, permanently wetted)
Nickel 99.9%
Membrane pressure sensor
(Not subject to circulation, not subject to high or low
temperature loads, permanently wetted)
1.4305 / 303
Soldered bush pressure sensor
(Not subject to circulation, not subject to high or low
temperature loads, permanently wetted)
DHP copper / C12200
O-ring for magnetic coupling (pump)
(Not subject to circulation, not subject to high or low
temperature loads, permanently wetted)
FKM
(Viton®)
O-ring for drain tap
(Not subject to circulation, not subject to high or low
temperature loads)
FPM
(Viton®)
Gasket for level detection unit <-> expansion tank
(no direct contact with medium – possibly vapors)
2.0090 SF-Cu F20
(wrought copper-base alloy)
O-ring for flange in expansion tank
(Contact with medium only in case of overflow)
NBR
(nitrile rubber)
Flat gasket in expansion tank
(Contact with medium only in case of overflow, possibly
vapors)
VMQ
(silicon rubber)
Profile gasket for filling funnel
(Possible contact with medium during filling)
FKM
(Viton®)
Pump bearings (permanently wetted)
FH42A (carbon graphite)
Plug for filling funnel
(no direct contact with medium – possibly vapors)
POM
(Polyoxymethylene)
O-ring for plug (filling funnel)
(no direct contact with medium – possibly vapors)
CR
(Chloroprene)
Page 52

Pump characteristic curves (using water)
52 01.24.2013
9. Pump characteristic curves (using water)
The pump characteristic curves of the A80/W80 devices, shown below, correspond to pump stages
1, 2, 3, and 4.
The curves are valid for the rated voltage of 230 V (50-60 Hz).
9.1. Medium with a density of 1 kg/dm3 [8.35 lb/gal]
Conversion tables
bar psi
0.2 2.900755
0.4 5.80151
0.8 11.60302
1.0 14.50377
1.2 17.40453
1.4 20.30528
1.6 23.20604
1.8 26.10679
l/min gal/min
1 0.2641721
10 2.641721
20 5.283441
30 7.925162
40 10.56688
Page 53

PRESTO® A80, A80t, W80, W80t Operating Manual
24.01.2013 53
10. Cleaning the unit
Danger:
• Always switch off the device and unplug it from its power supply
before performing any cleaning tasks.
Never allow moisture to collect inside the temperature control
system.
• Service and repair tasks may be performed only by Julabo-
authorized service providers.
10.1. External cleaning
Clean the outside of the unit with a damp cloth and a nonabrasive
cleaner (such as a mild soap).
Before trying any cleaning or decontamination method other than those
recommended by JULABO, the user must inquire with the manufacturer
to ensure that the intended method will not damage or destroy the unit.
10.2. Internal cleaning
When replenishing or changing the bath fluid, the internal wetted
surfaces must be thoroughly cleaned. The heat exchanger, internal
reservoir, connection tubes, and external vessel must be rinsed several
times with a liquid cleaner.
.
Caution:
• Choose a cleaning agent that is designed for removal of the heat
transfer fluid.
Ethanol and silicon remover are examples of suitable cleaning
agents for silicone oil.
• Always clean the unit in a well ventilated area!
• Set the working temperature setpoint near room temperature.
Recommendation: 20 °C [ 68 °F].
Page 54

Cleaning the unit
54 01.24.2013
Preparations:
1. Drain the temperature
control system.
See Chapter 5.8
.“Empty the unit”
menu.
2. If only the PRESTO®
temperature control
system will be cleaned,
you must connect the
pump connections (4,
5) together with a hose
or piece of tubing.
3. Connect one end of an
appropriate tube to the
overflow (3) adapter
and place the other
end into a suitable
container.
.
The picture below shows the W80, but cleaning of the A80 is
identical.
Cleaning is performed in two steps. First rinse the internal reservoir, the
tubing system, and the heat exchanger. The second step is to remove
residual amounts of the liquid cleaner
10.3. Cleaning the reservoir, tubing system and heat exchanger:
Caution:
Secure tubing connections against slipping.
• Fill the unit with cleaning fluid as described in chapter 5.7. Filling
• Set the working temperature setpoint.
Recommendation: 20 °C [68 °F].
• Switch on the unit.
• Start the pump.
• Let the unit run for approx. 10 – 30 minutes.
• Drain the unit as described in chapter 5.8. “Empty the unit” menu.
If the drained liquid is very dirty, repeat this procedure until the drained
liquid is relatively clean.
Page 55

PRESTO® A80, A80t, W80, W80t Operating Manual
24.01.2013 55
10.4. Removing residual cleaning liquid:
• Switch on the unit at the mains switch!
This will keep the ventilation valve open.
• Blow dry, warm air through the temperature control system.
Direct the air through the temperature control system's various
connections.
• Start with the connections (4, 5) that lead to the internal reservoir.
Then proceed to the cooling water connections that lead to the heat
exchanger, and finally the drain port on the front side.
• After the residual moisture has evaporated, reattach or seal the
connections as appropriate for the next use of the temperature
control system.
• Close the drain screw on the front side, using a screw driver.
Page 56

Maintenance/repair of the unit
56 01.24.2013
11. Maintenance/repair of the unit
Caution:
• Always switch off the device and separate it from its power supply
before attempting cleaning tasks.
Never allow moisture to penetrate inside the circulator.
• Service and repair tasks may be performed only by authorized
electrical technicians.
Clean the condenser occasionally in order to keep the unit running
with full cooling capacity.
• Switch off the unit, and unplug it from its power source.
• Remove the ventilation grid.
• Vacuum off dirt from the condenser.
• Replace the ventilation grid.
11.1. Repair service
We recommend speaking with our technical service department before
requesting a service technician or sending a JULABO device in for
repair.
JULABO Technical Service
Telephone: +49 (0) 07823 / 5166
Fax: +49 (0) 07823 / 5199
E-mail: service@julabo.de
If sending a unit back to JULABO:
• Completely drain the unit, remove the expansion tank, seal the
connections with nuts and sealing caps.
• Package the unit carefully and properly.
• Always include a brief description of the problem.
If you send your JULABO unit back to us, please include a Service
Return Note, which you can download at our website
www.julabo.com. Please fill out the form and include it with the device
or fax or e-mail it to us in
advance.
• The unit must be
standing upright during shipment.
• Label the packaging properly to avoid unintentional damage.
JULABO will not be liable for any damage caused by improper
packaging.
During the repair process, JULABO will perform any upgrades or
technical changes that are necessary to ensure the reliable operation of
the device.
Page 57

PRESTO® A80, A80t, W80, W80t Operating Manual
24.01.2013 57
11.2. Warranty
The following Warranty Provisions shall apply to products sold in North America by Julabo (“Seller”) to the entity
shown as buyer (“Buyer”) on Seller’s invoice.
1. Initial Warranty. Upon Seller’s receipt of payment in full for the products and subject to
Buyer’s compliance with the terms of sale and any other agreement with Seller relating to the products, Seller
warrants to the Buyer that the products manufactured by the Seller are free from defects in material and
workmanship for a period not to exceed two (2) years or ten thousand (10,000) hours of operation, whichever
comes first, from the date the product is shipped by Seller to Buyer (the “Initial Warranty”).
2. EXCLUSION OF ALL OTHER EXPRESS WARRANTIES; EXCLUSION OF ALL IMPLIED
WARRANTIES. OTHER THAN THE INITIAL WARRANTY, NO OTHER EXPRESS WARRANTIES ARE MADE.
ALL IMPLIED WARRANTIES OF EVERY TYPE AND KIND, INCLUDING BUT NOT LIMITED TO ANY IMPLIED
WARRANTY OF MERCHANTABILITY OR FITNESS FOR A PARTICULAR PURPOSE OR USE, ARE
EXCLUDED IN ALL RESP ECTS AND FOR ALL PURPOSES. SELL ER DISCLAI M S AND MAKES NO IMPLIE D
WARRANTIES WHATSOEVER.
3. Exclusions. The Initial Warranty does not include damage to the product resulting from
accident, misuse, improper installation or operation, unauthorized or improper repair, replacement or alteration
(including but not limited to repairs, replacements, or alterations made or performed by persons other than
Seller’s employees or authorized representatives), failure to provide or use of improper maintenance,
unreasonable use or abuse of the product, or failure to follow written installation or operating instructions. Buyer
must return the product’s record of purchase to the Seller or one of Seller’s authorized representatives within
thirty (30) days of the date the product is shipped by Seller to Buyer in order to make a claim under the Initial
Warranty. Notwithstanding anything contained herein to the contrary, all glassware, including but not limited to
reference thermometers, are expressly excluded from the Init i al Warranty.
4. Buyer’s sole remedies; Limitations on Seller’s Liability. Buyer’s sole and exclusive
remedy under the Initial Warranty is strictly limited, in Seller’s sole discretion, to either: (i) repairing defective
parts; or (ii) replacing defective parts. In either case, the warranty period for the product receiving a repaired or
replaced part pursuant to the terms of the Initial Warranty shall not be extended. All repairs or replacements
performed by Seller pursuant to these Warranty Provisions shall be performed at Seller’s facility in Allentown,
Pennsylvania, U.S.A. or Vista, California, U.S.A or at the facility of an authorized representative of Seller, which
location shall be determined by Seller in its sole discretion; provided, however, that Seller may, in its sole
discretion perform such repairs or replacements at Buyer’s facility in which case Buyer shall pay Seller’s travel,
living and related expenses incurred by Seller in performing the repairs or replacements at Buyer’s facility. As a
condition precedent to Seller’s obligation to repair or replace a product part under t he I ni tial Warranty, Buyer shall
(i) promptly notify Seller in writing of any such defect; (ii) shall have returned the product’s record of purchase to
Seller or to one of Seller’s authorized representatives within thirty (30) days of the date the product i s deli vered to
Buyer; and (iii) assist Seller in all respects in its attempts to determine the legitimacy and basis of any claims
made by or on behalf of Buyer including but not limited to providing Seller with access to the product to check
operating conditions. If Buyer does not provide such written notice to Seller within the Initial Warranty period or
fails to return the product’s record of purchase as set forth above, Seller shall have no further liabi l ity or obligation
to Buyer therefore. In no event shall Seller’s liability under the Initial Warranty exceed the original purchase price
of the product which is the subject of t he al l eged def ect .
Page 58

Maintenance/repair of the unit
58 01.24.2013
5. THE REMEDIES PROVIDED IN THE INITIAL WARRANTY ARE THE SOLE AND
EXCLUSIVE REMEDIES AVAILABLE TO THE BUYER. NOTWITHSTANDING ANYTHING TO THE
CONTRARY CONTAINED HEREIN, AND EVEN IF THE SOLE AND EXCLUSIVE REMEDIES FAIL OF THEIR
ESSENTIAL PUR PO SE F OR ANY REASON WH A T SOEVER, IN NO EVEN T SHALL SELLER B E LIAB L E FOR
BUYER’S MANUFACTURING COSTS, LOST PROFITS, GOODWILL, OR ANY OTHER SPECIAL, INDIRECT,
PUNITIVE, INCIDENTAL OR CONSEQUENTIAL DAMAGES TO BUYER OR ANY THIRD PARTY AND ALL
SUCH DAMAGES ARE HEREBY DI SCLAIMED.
6. Assignment. Buyer shall not assign any of its rights or obligations hereunder without the prior
written approval of Seller; provided, however, that if Buyer is a distributor of Seller, the rights and obligations of
Buyer under these Warranty Provisions shall inure to the benefit of and be binding upon Buyer’s customers who
provide the product’s proof of purchase to Seller pursuant to the terms set forth herein. Seller may assign any or
all of its rights or obligat i ons hereunder without Buyer’s prior consent.
7. Governing Law. The Warranty Provisions and all questions relating to their validity,
interpretation, performance, and enforcement shall be construed in accordance w ith, and shall be governed by,
the substantive laws of the Commonwealth of Pennsylvania without regard to its principles of conflicts of law.
8. Waiver. Any failure of the part of Seller to insist on strict compliance with the Warranty Provisions
shall no way constitute a waiver of such right. No claim or rights arising out of a breach of the Warranty Provisions
by Buyer may be discharged in whole or in part by a waiver of the claim or right, unless the waiver is in writing
signed by an authorized representative of Seller. Seller’s waiver or acceptance of any breach by Buyer of any
provisions of the Warranty Provisions shall not constitute a waiver of or an excuse for nonperformance as to any
other provision of the Warranty Provisions nor as to any prior or subsequent breach of the same provision.
9. Freight. Buyer will arrange and pay for shipping and handling charges for the unit to be returned to
the Seller. S el ler wil l arrange and pay for shipping and handl i ng f or t he ret urn of the unit to the B uyer.
 Loading...