

Page 1
I
Instruction
Manuel
manual
d'instructions
Brugsanvisning
Bedienungsanleitung
Page 2
Contents
1
Safety
regulations
5
Contents
7
Detailsofthe
7
-Detailsofthe
9
Preparing
9
-Accessories
9 -Accessory Box
9
-Looper
9 -Cloth plate cover
11 -Attaching the foot control
11 -Sewing
11 -Assembling
11
-Thread
11 -Power/light switch
13. Using (he machine
13.-Haadwheel
13.-Presser
13. >Changingthe ]nesser foot
15. - Inserting needles
15. - Raisingthe upperknife
17. Threading
17. -Threading/Preparation
17. -
Upper
19. -
Lower
21. - Right needle (Blue)
23. - Left needle(Yellow)
23. > After threading
25 Trial
sewing,
25 -Sewing
25 -Check your trial run
machine
machine
the
machine
cover
speed
the
cones
foot
lifter
looper
(Green)
looper(Red)
thread
test
thread
tension
stand
27
Adjusting
27 -Adjusting
29. Adjustments
29. -
the
the
Ac^'ustment
thread
and
of stitch length
29. - Cuttingwidth
29. - Stitch plate
31
Differential
31
-Differential
31 -Gathering *
33
Automatic
33
auto
35
Practical
-3
thread
-3
thread
-Unpicking
37
Maintenance
-Changing light bulb
-Cleaning
39
Trouble
43
Technical
switch
overlock
rolled
shooting
feed
feed
threadev
sewing
seams
and
lubricating
data
thread
settings
*
*
off
hem
guide
tension
tension
Page 3
Details
of
the
machine
10
11
Detailsofthe
machine
8
1
7
9
22
21
12
20
19
18
24
16
17
15
Looper
2 Looper
3 Knife
4 Cloth
5 Stitch
Presser
6
7
Lower
Upper
8
9 Right
10
Left
11
Thread
12
Thread
Accessory
13
14
Bulb
15
Power/light switch
Handwheel'
16
17
Machine
Thread
18
Anti-vibration
19
20
Spool
21
Retractable
Open
22
Presser
23
24
Stitch length dial
Differential
25
cover
cover
guard
plate
plate
foot
looper
looper
needle
needle
tension
takeupcover
guide
box
cover
socket
stand
holder
support
thread
guide
foot
lifter
feed
opening indent
tension
tension
dial
dial
tension dial
dial
plate
cone
pin
rod
dial
14
23
25
13
Page 4
Preparing
Accessories
1
Screwdriver
2
h
Tweezers
3
Oiler
4 Cleaning
5
Setofneedles
6
Net
7
Spool
8
Waste
9
Hexagon
brush
caps
collector
wrench
the
HAx1
machine
10 Upper knife
I
Accessory
All
standard
storedinthe
push
Looper
To
open
thumbinthe
you. To
cover
Waste
Fabric
you
sew.
under
in to
close.
cover
pushtothe
close
engages
collector
waste
Push
the
frontofthe
Box
accessories
box.
Pull
outtoopen,
right with your
indent
and
push
it Up
automatically.
willbecollected
the
waste
machine
are
tilt
towards
and
the
collector
as
and
slightlyto the lefttowards the cloth
plate
cover.
Cloth
plate
cover
To
open
push
the
To
close
push
right, it
snaps
automatically.
lever up.
the
cover
into position
up to
the
Page 5
Preparing
the
machine
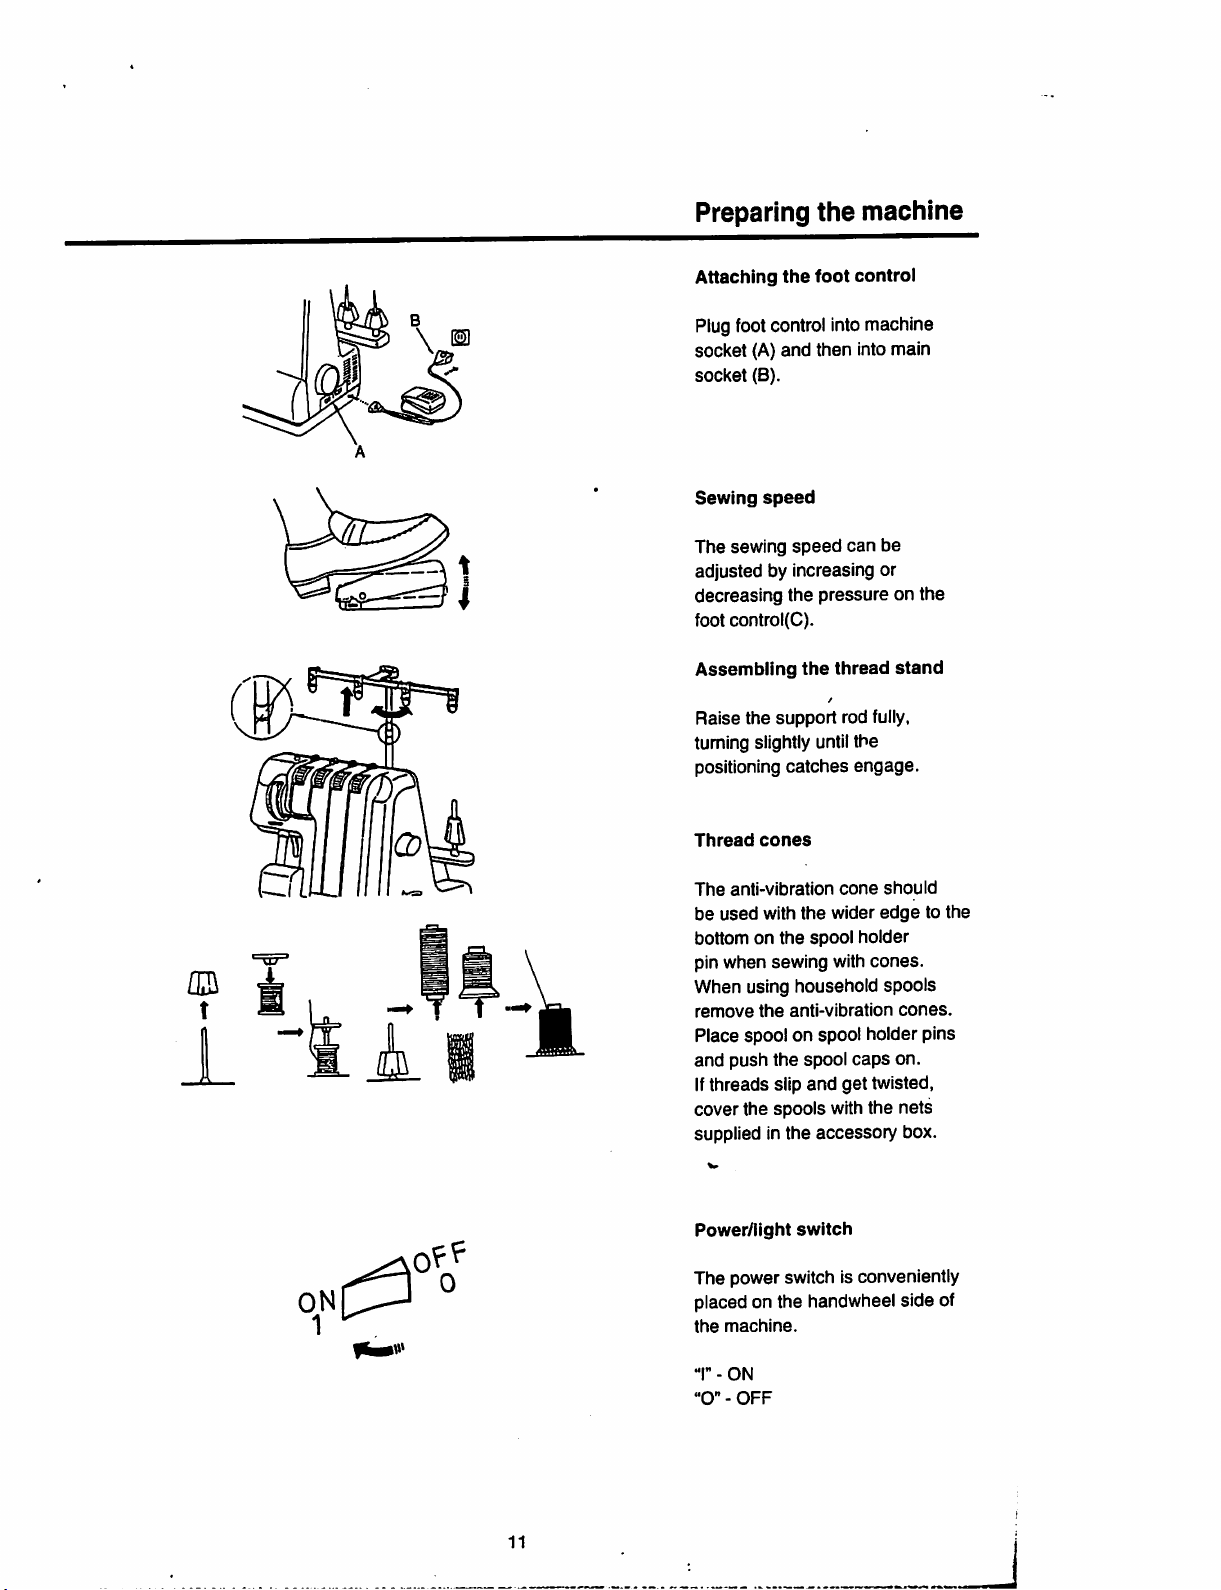
Attaching
the
foot
control
Plugfootcontrol into machine
socket (A)and then into main
socket
(B).
Sewing
The
adjusted by increasing or
speed
sewing
speed
can
be
decreasing the pressure on the
foot control(C).
Assembling
Raise
tuming slightly until the
positioning
Thread
the
the
support rod fully,
catches
cones
thread
engage.
stand
onC^
The
anti-vibration
be
used
with
bottomonthe
pin when sewing with
the
spool
cone
wider
holder
should
edgetothe
cones.
When using household spools
remove
the
anti-vibration
cones.
Place spool on spool holder pins
and
push
the
spool
caps
on.
Ifthreads slip and get twisted,
cover the
supplied in
Power/light
spools
the
switch
with the
accessory
nets
box.
The power switch is conveniently
placed on the handwheel side of
the
machine.
"I" -
ON
"0"-OFF
11
Page 6
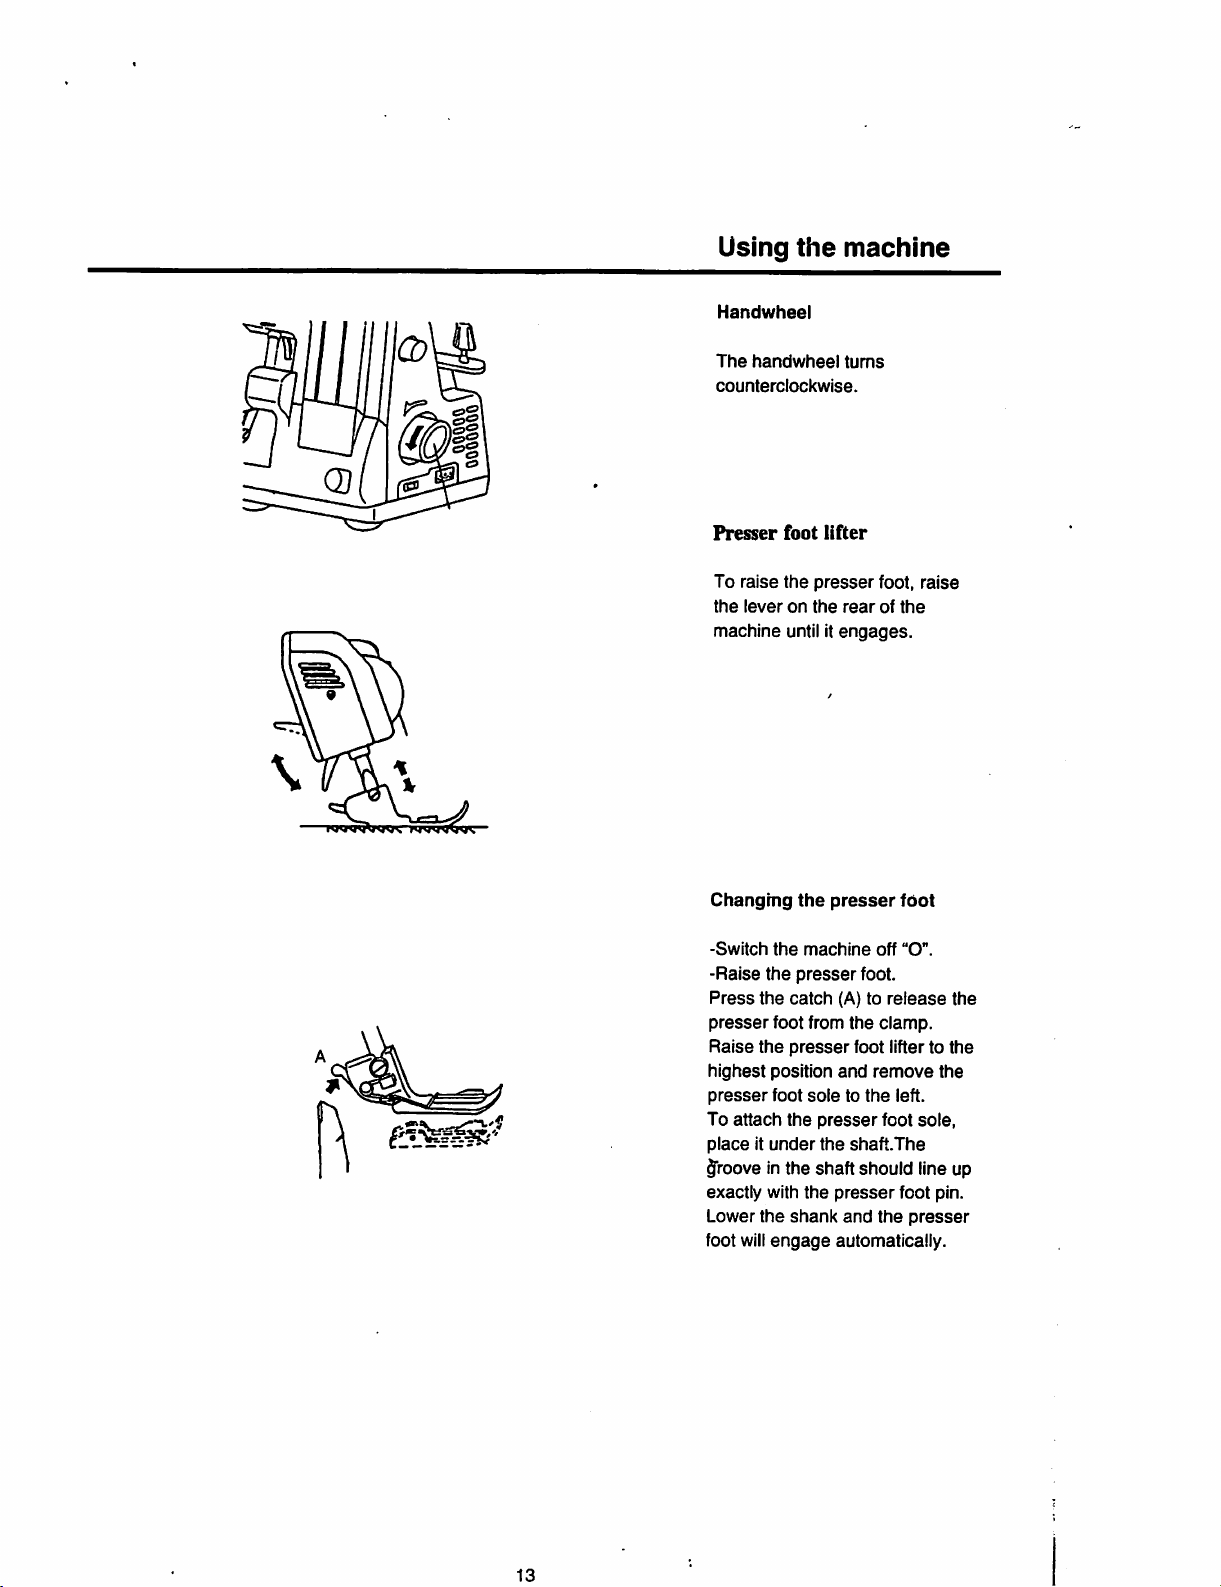
Using
Handwheel
the
machine
0)
The
handwheel
counterclockwise.
Presser
To
the
machine
Changing
foot
raise
the
leveronthe
until it
the
turns
lifter
presser
rearofthe
engages.
presser
foot,
raise
foot
-Switch
-Raise
Press
presser
Raise
highest
presser
To
placeitunder
the
the
attach
the
machine
the
presser
catch
foot from
presser
position
foot
soletothe
the
(A) to
the
foot lifter to
and
presser
the
shaft.The
off
foot.
release
clamp.
remove
foot
"O".
the
the
the
left.
sole,
groove inthe shaft should lineup
exactly with
Lower
foot will
the
engage
the
presser
shank
automatically.
and
foot pin.
the
presser
13
Page 7
Using
the
machine
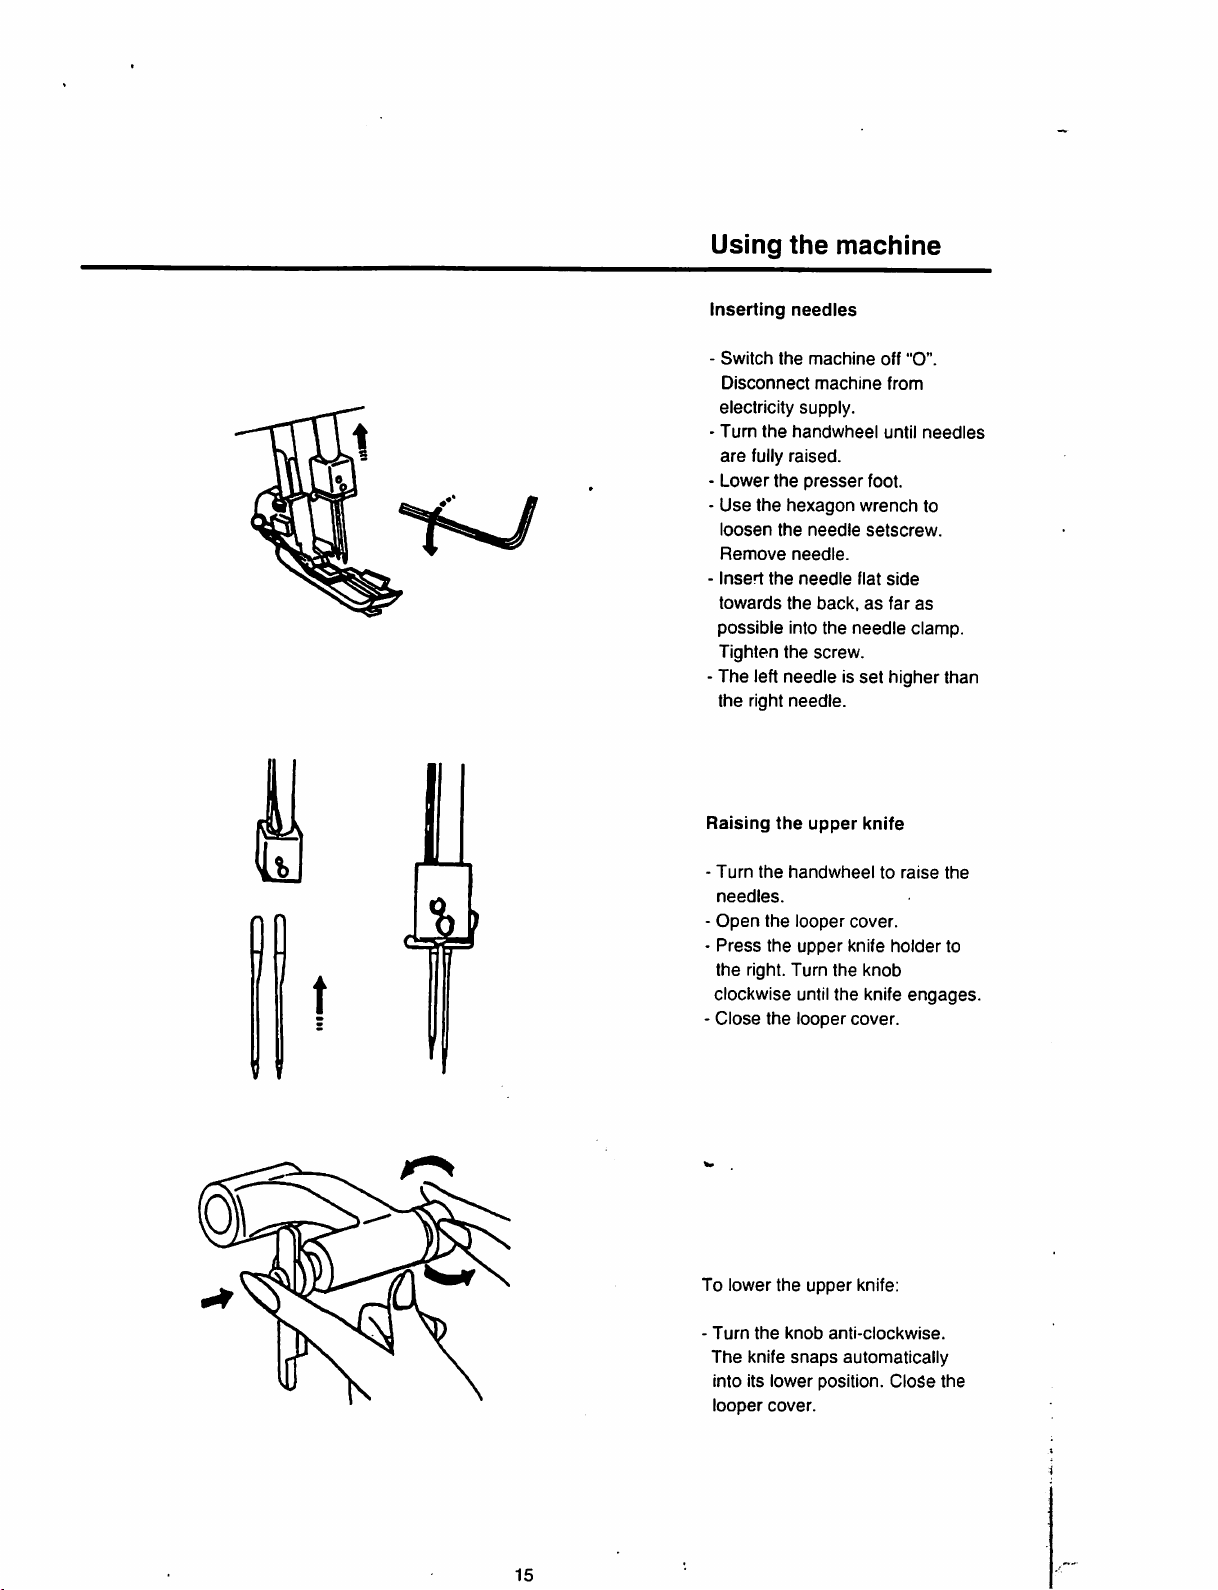
inserting
•
Switch
Disconnect
needles
the
machine
machine
off
from
"O".
electricity supply.
•
Turn
the
are
fully raised.
Lower
Use
the
loosen
Remove
Insed
towards
possible
handwheel
the
hexagon
the
needle.
the
needle
the
into
presser
needle
back,asfar
the
until
foot.
wrench
setscrew.
flat
needle
needles
to
side
as
clamp.
Tighten the screw.
The left needle is
the
right
needle.
Raising
-
Turn
needles.
-
Open
-
Press
the
t
clockwise until the knife
-
Close
the
the
handwheel
the
looper
the
upper
right. Turn
the
looper
upper
the
set
knife
cover.
knife
knob
cover.
higher than
to
raise
holder
engages.
the
to
To
lower
the
upper
-
Turn
the
knob
anti-clockwise.
The
knife
snaps
into its
lower
position.
looper
cover.
15
knife:
automatically
Close
the
Page 8

® (D ® ©
If
u =
Threading
Threading/Preparation
-
Disconnect
electricity
-
Support
mustbefully
-
Open
cloth
-
Turn
until
-
Thread
correct
Upper looper (Green)
rod with
the
plate
the
handwheel
needles
the
sequence.
machine
supply.
raised.
looper
cover.
are
machine
thread
cover
fully
from
guide
and
towards
raised.
in
the
the
you
> Place the spool on the spool holder
pin.
- Bring thread up from back to front
through guide (1).
- Make s-loop through holes in thread
guide bar (2).
- Thread guide (3,4,5)
- Thread looper eye (6)
>
- For Certain modelsonly
- Pourun certain
-
Kun
for
visse
- Nur fur gewisse
modules
modeller
Modelle
uniquement
17
Page 9

Threading
Lower
looper
(red)
-
Place
the
spoolonthe
holder
pin.
- Bring
thread
up from
through
- Make
thread
-Threadguide
FOR
♦If
guide
S-loop
guide
CERTAIN
machine
(1).
through
bar
(3,4,5)
attached
lower looper automatic
threader, then please reter to
page 33 continuously and
disregard the following
instruction.
Turn
the
handwheel
until
the
loweK
looper
left-most
tweezers
(not
left.
on the
handweel
lower
position.
thread
Insert
lower
looper
position.
to pull a
end)
the
thread
looper(6) Turnthe
towards
is in
- Thread the looper eye
that
the
thread
lies in
grooveonthe
•
Place
thread
lower
under
back
holes
(2).
MODEL
with
towards
is in
Use
the
thread
from right
into
you
until
(he
rightmost
(7)
the
looper.
presser
spool
ONLY
the
loop
the
long
to front
in
the
you
side
slit
the
so
foot..
to
- For Certain models only
- Pour un
-
Kun
for
colain
visse
- Nur fur gewisse
19
modules uniquemei
modeller
Modelle
1^-
Page 10

Threading
Right
needle
- Place the spool on the
spoolholderpin.
-
Bring
guide (1).
-
Make
in threadguidebar(2).
- Thread guide (3,4)
-
Thread
- Place thread under
foot.
(Blue)
threadupthrough
S-loop
right
through
needle
eye (5)
presser
holes
f
For Certain
Pourimcertain
Kun
for
V.
21
Nur fur gewisse
models
visse
only
modules
nndeUer
Modelle
uniquement
Page 11

iMf
Threading
Left
needle
(Yellow)
- Place the spool on the
spool holder pin.
- Bring
- MakeS-loop through holes
- Thread guide(3,4)
-
- Place thread under presser
After
When
the
looper cover
thread
through
(1).
in threadguide bar (2).
TTiread
foot.
presser
left needle eye (5)
threading
threading is
foot
and
and
complete,
close
cloth
plate.
guide
the
lower
Note:
If
the
lower
looper
threaded.
off at
surplus
the
re-thread
For Certain
the
looper
cut
needle
thread
and
the
both
eye
from
then
needles.
models
Pouruncertain
Kun
for
visse
Nur fiir gewisse
23
hastobe
needle
and
below.
only
modules
modeller
Modelle
re-
threads
remove
Thread
uniquement
J-S:.
Page 12

Trial
tension
sewing,
thread
Sewing
After threading
Always
test
make
useadouble
a trial run.
layer
of fabric
in order to be able to check tfie
stitch
formation
properly.
-
Switch
-
Set
all
tension
-
Raise
the
foot slightly with your
position
just
up to
-
Sew.
- At
the
endofthe
sewing a
chain.
-
Cut
the
remove
the
front of
the
the
8cm
thread
work.
and
machine
dialsto4.
fabric
knife.
(4") long
chain
the
under
seam
thread
on
presser
thumb
and
tension
"1".
the
continue
thread
and
foot
Check
your
trial
run
1
Upper
looper
thread
2
Lower
looper
thread
3 Right
4 Left
Perfect
both
fabric
needle
needle
stitch
looper
edge.
thread (green)
thread
(yellow)
formationiswhen
threads
The
meetatthe
needle
(grm straight stitches for a
stretchy
Thread
be
of fabric
and
tension
required
and
durable
seam.
adjustments
dependingonthe
thread
being
(blue)
(red)
threads
may
type
used.
25
Page 13

Adjusting
tension
the
thread
Adjusting
The
on
the
Tighten
tension (yeilow).
The right needle thread forms
loopsonthe
Tighten the right needle thread
tension
the
left
needle thread
underside:
the
left
underside:
(green)/
thread
needle
tension
forms
thread
loops
f
1
I
HL
^0\
The
looper loops
the
underside:
Tighten the upper looper tension
(blue), or loosen the lower looper
tension (red).
The
looper loops
the
upper
side:
Tighten the iower looper tension
(red), or loosen the upper looper
tension
(blue).
are
are
formed on
formed on
27
fi
Page 14

Adjustments
and
settings
stitch
length
- Thestitchlengthcan be adjusted
from1to4mm.
- Highernumber = longer stitch,
lower
number=shorter
- Basic stitch length = N.
stitch.
Cutting
The cutting width should be
width
adjusted accordingto the type of
fabric being sewn. Check the
seam
each
time and adjust the
cutting widthaccordingly.
Adjusting
- Open cloth plate cover
- Turn cutting width dial:
- Clockwise to
left (forheavier fabrics).
- Counter-clockwise to
knife
fabrics).
the
butting
width:
move
knife to
move
to the right(foriighter
the
the
I
How to use the needle plate
ueve?
Switch
regular or rolled hem
R-
hem sewing. "N" for regular sew
ing.
the
levertoselect
and
the
narrow
"R"
for
rolled
and
sewing.
Level
R-
29
narrow
hem
Page 15

Differential
feed'
Differential
There
and
one
move
distance
during
feed*
are
two feed
rear.
independently
each
one
complete
canbeadjusted.
Stretching effect
To
stretch
the
number
section"
This
or
prevents
closely
fromNto
[Xl
woven
puckering.
Pushing
To
selectanumber
section"
This
prevent
prevents
effect
waving or to
knitsorpuckers
fabrics.Italso
gather
single
layers
fabric.
dogs:
one
front
The
two
feed
dogs
and
the
feed
dog
travels
movement
fabric
select
a
5 in
the
fine nylon
fabrics
jerseys
from
gather
fromNto
"
8 in
waving or fluting in
in fine
woven
canbeused
of fine
to
woven
the
Note:
When
feed
sewing
the
without differential
dial
should
position N.
Gathering*
Use
the
differential
a
single
layer
of fabric.
ple
sleeve
heads,
ing or frills.
be
on
feedtogather
For
exam
yokes,
lace
edg
Page 16

Threading
AUTOMATIC LOWER LOOPER
THREADER
1.passing the thread through
the hole on lower looper
thread
2.Turn
toward
looper extending out
5-10mm
piate
S.Pull
with tweezers to pass the
lower looper
4.Draw
left hand tightly.
5.Use your finger to push the
automatic
the
thread goes through the
lower
automatically.
(FOR
CERTAIN
guide
(5).
the
balance
you
from
until
the
wheel
the
needle
edge.
the
thread
hole(A),
the therad with your
threader(B)
topmost,
looper(C)
and
then
TYPE
lower
up to
ONLY)
C€:Security "auto switch off"
T)Wien
you open
infront of the loopers
machine stops automatically
-FINGERPROTECHTION.
33
the
panel
the
Page 17

Practical
3
thread
overlock
sewing
Fora3-5
overlock,
Thread
right
Fora5-7
mm
remove
both
needle.
mm
wide3thread
the
left
loopers
and
wide3thread
needle.
then
the
overlock. remove the right needle.
Thread both loopers
left
needle.
3
thread
Switch
29.
Note:
The
adjusted
roll
the
leverto"R".
tensions
may
dependingonthe
hem
and
then
See
needtobe
the
page
type of
fabric or thread being used.
Setting:
Stitch:
Needle:
Tensions:
Needle:
Lfpper
looper
Lower
looper
Stitch length
3-5
1.5-2
Differential feed N (depending on
fabric)
Unpicking
Cut
Pull
stitches
35
the
the
seams
loops with
needle
thread
will
come
3
thread
right
3-5
7-9
sharp
undone.
overlock
scissors.
and
the
Page 18
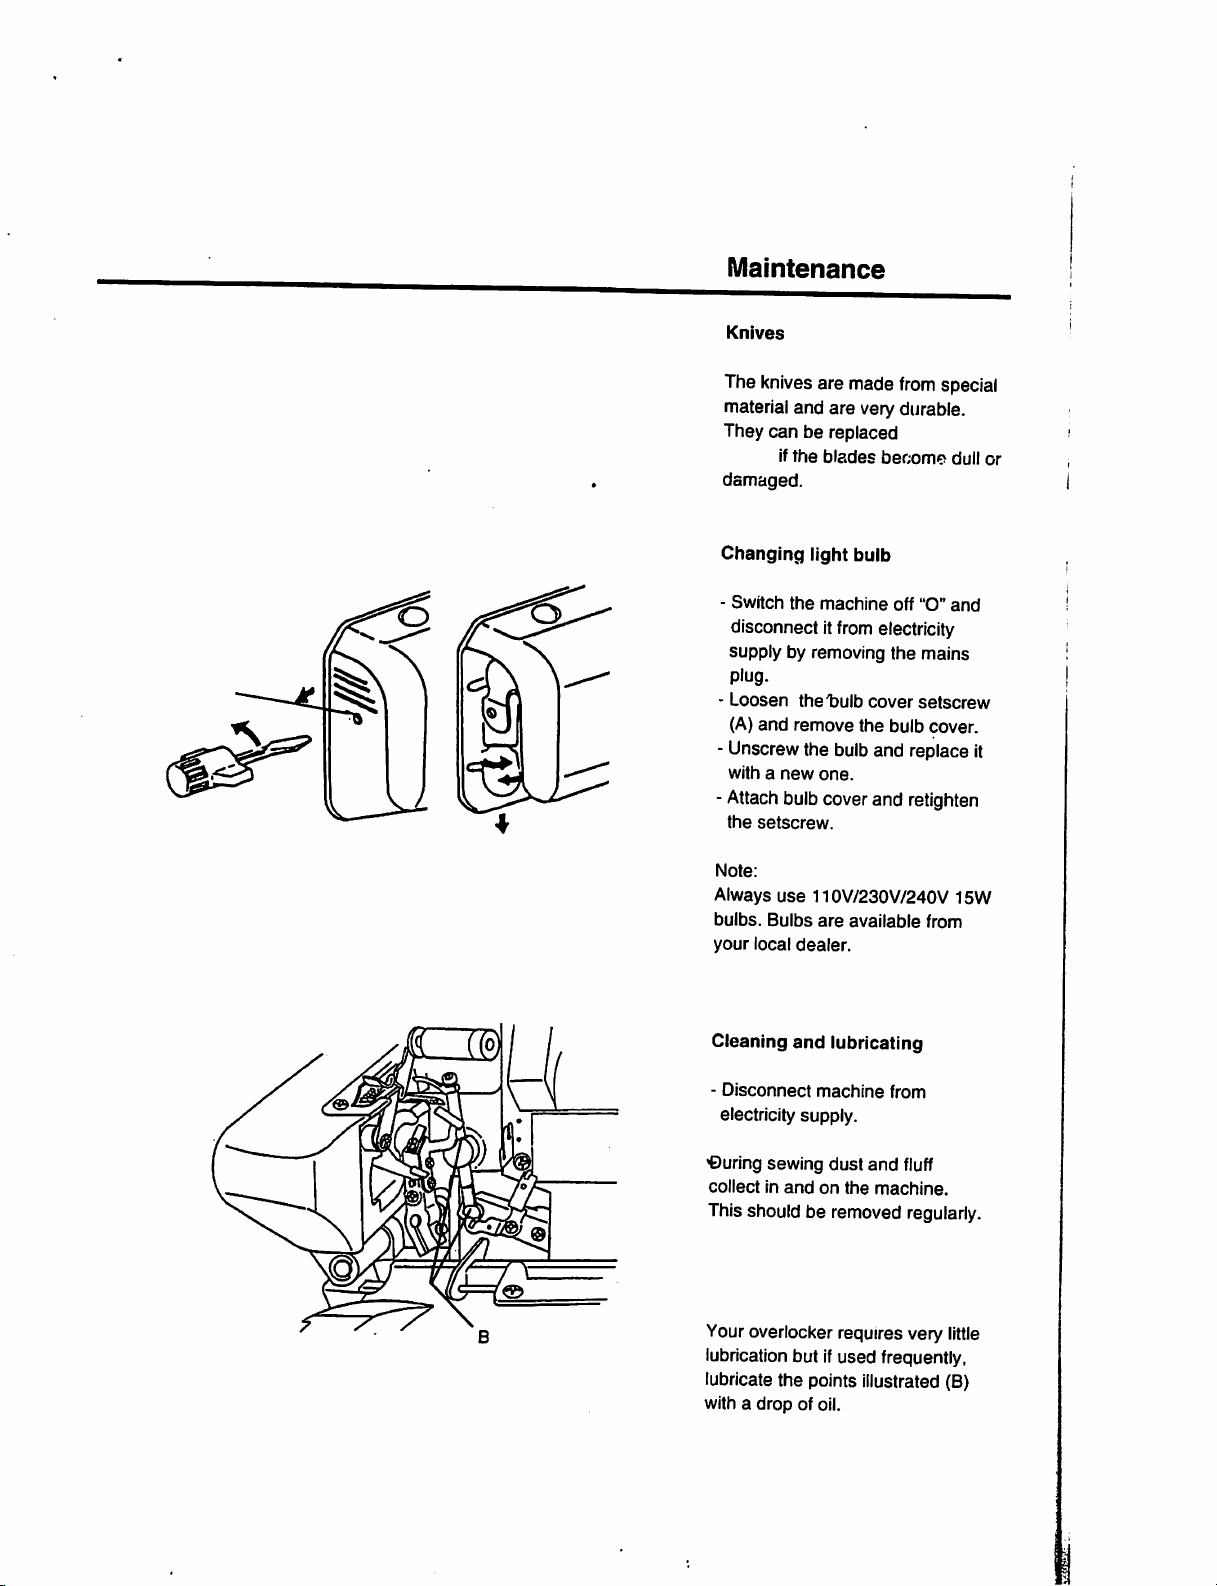
Maintenance
Knives
The
knives
are made
material
They
damaQed.
and
can
be replaced
If
the
are
blades
from
special
very durable.
become
dull
or
Changing
-
Switch
disconnect it
light buib
the
machine
from
off "O"
electricity
supply by removing the mains
plug.
-
Loosen
(A)
and
thet»ulb
remove
cover
the
bulb
setscrew
cover.
- Unscrewthe bulband replace
withanew
-
Attach
the
setscrew.
Note:
Always
bulbs.
your
local
Cleaning
-
Disconnect
electricity supply.
one.
bulbcoverand
use
110V/230V/240V
Bulbs
are
available
dealer.
and
lubricating
machine
retlghten
from
from
and
It
15W
'During sewing
collectinandonthe
dust
Thisshould be removed regularly.
Youroverlooker requires very
lubrication but ifused frequently,
lubricate the points illustrated (B)
with a drop of oil.
and
fluff
machine.
little
Page 19

Trouble
Thread
breaks
Needles
Skipped stitches
Poor
Seams
Seams
Fabric
Thread
Machine
stitch
flute or
pucker
edges
loops
break
formation
does
shooting
wave
(knits)
curl
are
loose
not
sew
guide
Thread tension is too tight forthread
used.
The machine is not threaded correctly.
Needles are incorrectly inserted.
Needles
are
Needles not inserted correctly.
Fabric
Needles
Wrong
Thread
tension
Differential feed is
Fabric
Differential
Too
formation.
Too
Cord not plugged in correctly.
Main
are
bent, blunt or
damaged.
was
pulled while sewing.
are
bentorblunt.
needles
used.
is not wound correctly round
dials.
set
incorrectly.
was
pulled while sewing.
much
little
switch
feedisset
fabricinthe
fabricinthe
not
incorrectly.
stitch
stitch
on.
the
points .
formation.
Reduce
thread
tension.
Check the threading.
Insert needles
flat
sidetothe
Replace
Insert
needles
flat
sidetothe
Guide
Replace
Use
system
Check
Adjust differential
••
Adjust
differential
fully
back.
the
needles.
fully into
back.
fabric gently with both hands.
the
needles.
HAxI (130/705H)
threading.
feed
feed
CX]
Reduce
cutting width, knife to the left.
Increase
Check
Switch
the cutting width, knife to the right.
plug.
machineon" 1
into needle clamp with
needle
clamp with
needles.
betweenNand
betweenNand
8
5
27
17/19
21/23
15
15
15
25
15
17/19
21/23
31
31
29
29
11
39
Page 20

Technical
stitch
types:
•2 needles. 4
seam
•1
needle.
Needle
system:
data
thread
3-thread
HAxI (130/705H)
Seam
width:
3-7
mm
Stitch
length;.
1-4
mm
Presser
max.
Handwheel:
rotates
Sewing
up to
foot
lift:
6mm
counter-clockwise
speed:
1300
s.p.m.
Weight:
7.3
kg
Dimensions:
340W*370DX350H
overtook with integrated safety
overlook,3thread
mm
rollhem,
Donnees
Points
rdallsables:
- 2 aiguilles, surjet d 4 fils
techniques
avec
point de
sdcuritd intdgrd
• 1 aiguille, surjet a 3 fils
Outlet
rould
k 3 fils
Syst6me
d'algullle:
HAxI (130/705 H)
Largeurdecouture:
3-7
mrn
Longueurdepoint:
1-4mm
EHvatenr de pied-de biche
6mmau
Rotation
En
Vitesse
Jusqu'd 1300 points,omite/mi
Polds:
73
Dimensions:
sens
leg.
max.
du
volant:
inverse
de
travalll
des
aiguilles
d'une
montre
- 340 (L) X370 (P) X350 (H) mm.
Standard
Dust
cover
accessory:
Special
Blind
Elasticator
Shirring
accessories
stitch
foot
foot
foot
Bead/sequin foot
Cording
foot
Accessoires
Moussedepiotection
standard
Pied
Pied
Accessoires
pour
points invisibles
pour
poser
w.
spdclaux:
des
elastiques
Taping
foot
Les
Special
from
accessories
your
dealer
are
available
accessoires
disponibles
ad
speclaux
aupr^sdeIdgent:
sont
Page 21

English
The product in this manual fulfil the demands in below norms:
Please
pay
attentiononthe
totally protection will
Greatcautionshould be
nectthe
overlook
machinebyremove
spoil
shown
needle
the
fimdemental
when
area:
working
plug
72/23
89/336
89/392
The
EEC
needle
fimction
in the
from
outlet
EEC
EEC
area
of the
needle
when
can
notbecompletely
overlook
area.
machine.
It is
recommendedtodiscon-*
changing
needle,
other work in the needlearea is required.
The light to
Dansk
Produktet i denne betjeningsvejledning opfylder kravene i nedenstSende noimer:
change
in construction and spefication
reserved.
proteced,asa
bulborwhen
72/23
89/336
89/392
Dog henledes
beskyttes fiildt ud, idet en total beskyttelse af
grundlsggende fiinktion. Der bor derfor udvises stor forsigtighed ved arbejde i n^eomrMet,
og det anbefales derfor at overlook maskinen afbrydes pS net-stikket ved udskiftning af nSl
eller ved andet arbejde i nSleomrldet.
Ret til aendringi konstruktion og specifikatioii forbeholdes.
opmaerksomheden
pS,
at nilens arbejdsomride pSoverlook maskinen ikke kan
EEC
EEC
EEC
n§leomr&det
vil
odelaegge
overlookmaskinens
45
 Loading...