

Page 1
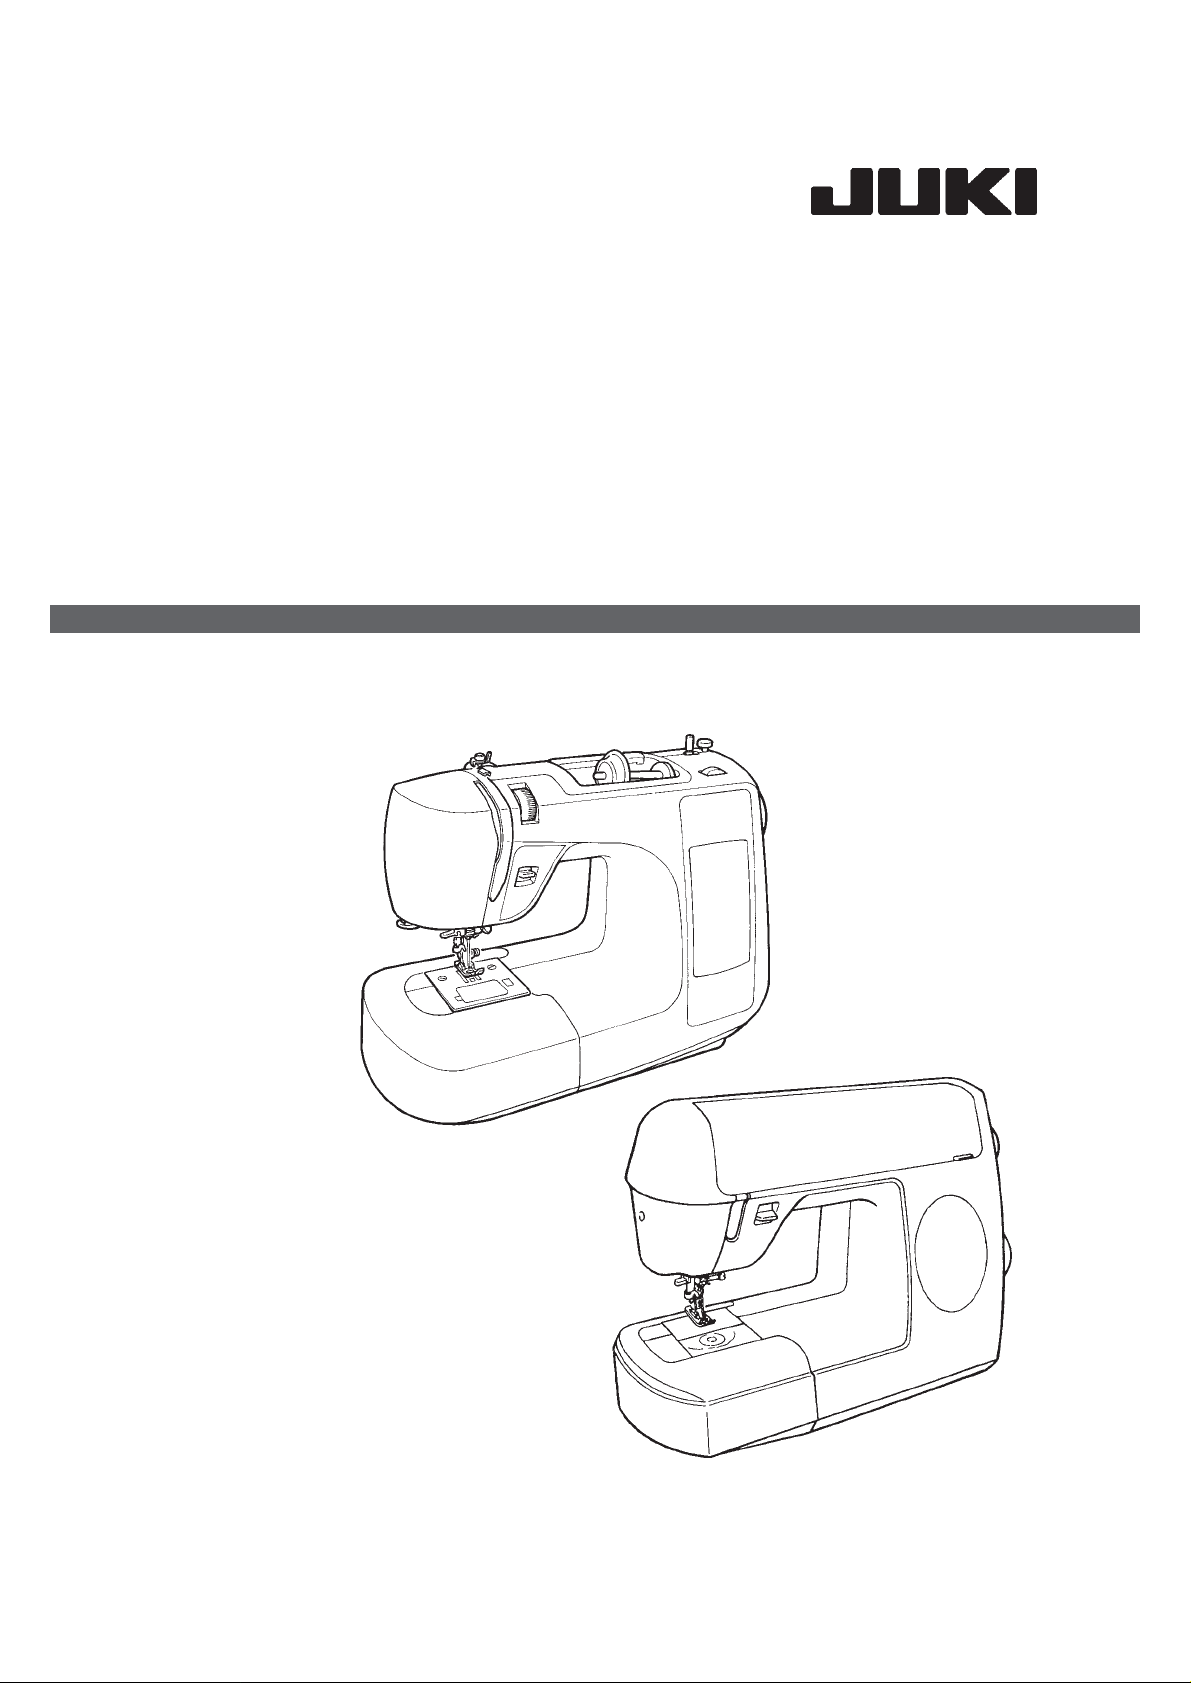
Portable Zigzag Sewing Machine
HZL-30Z / HZL-60
INSTRUCTION MANUAL
®
Page 2
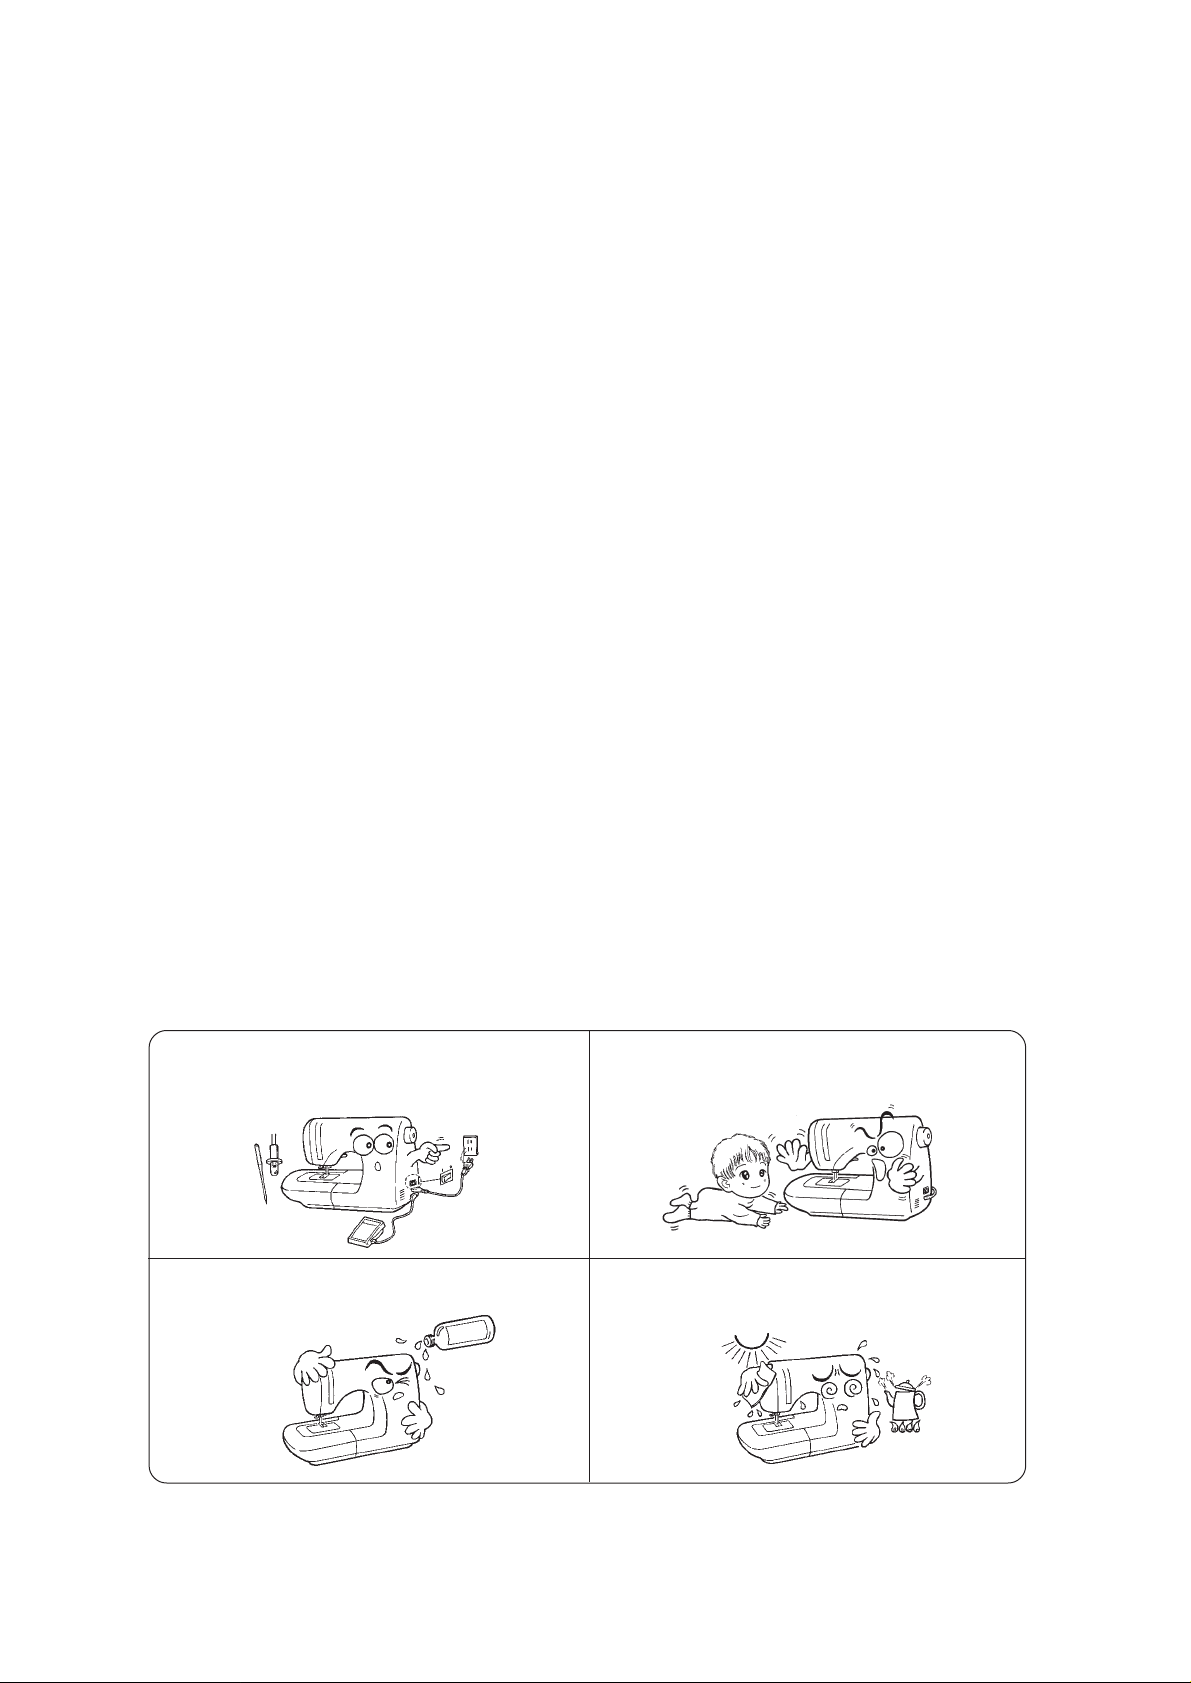
“IMPORTANT SAFETY INSTRUCTIONS”
“When using an electrical appliance, basic safety precautions should always be followed, including the following:”
“Read all instructions before using this sewing machine.”
“DANGER_____To reduce the risk of electric shock:”
1. “An appliance should never be left unattended when plugged in. Always unplug this appliance from the electric
outlet immediately after using and before cleaning.”
2. “Always unplug before relamping. Replace bulb with same type rated 15 Watts.”
“W ARNING_____To reduce the risk of burns, fire, electric shock, or injury to persons:”
1. “Do not allow to be used as a toy. Close attention is necessary when this appliance is used by or near children.”
2. “Use this appliance only for its intended use as described in this manual. Use only attachments recommended
by the manufacturer as contained in this manual.”
3. “Never operate this appliance if it has a damaged cord or plug, if it is not working properly , if it has been dropped
or damaged, or dropped into water. Return the appliance to the nearest authorized dealer or service center for
examination, repair, electrical or mechanical adjustment.”
4. “Never operate the appliance with any air openings blocked. Keep ventilation openings of the sewing machine
and foot controller free from the accumulation of lint, dust and loose cloth.”
5. “Keep fingers away from all moving parts. Special care is required around the sewing machine needle.”
6. “Always use the proper needle plate. The wrong plate can cause the needle to break.”
7. “Do not use bent needles.”
8. “Do not pull or push fabric while stitching. It may deflect the needle causing it to break.”
9. “Switch the sewing machine off ("O") when making any adjustments in the needle area, such as threading
needle, changing needle, threading bobbin, or changing presser foot and the like.”
10. “Always unplug sewing machine from the electrical outlet when removing covers, lubricating, or when making
any other user servicing adjustments mentioned in the instruction manual.”
11. “Never drop or insert any object into any opening.”
12. “Do not use outdoors.”
13. “Do not operate where aerosol (spray) products are being used or where oxygen is being administered.”
14. “To disconnect, turn all controls to the off (“O”) position, then remove plug from outlet.”
15. “Do not unplug by pulling on cord. To unplug, grasp the plug, not the cord.”
“SAVE THESE INSTRUCTIONS”
“This sewing machine is intended for household use only.”
Use only foot controller
Be sure to turn power switch OFF and disconnect
the plug from the wall outlet before replacing the
sewing machine needle or lubricating the machine.
Do not use thinner or other similar solvents to clean
the machine.
1
with your HZL-30Z/HZL-60.
When not in use, be sure to turn power switch
OFF and unplug the machine.
Do not expose the machine to direct sunlight or
humid atmosphere.
Page 3
CONTENTS
Important safeguards ··········································· 1
Accessories ·························································· 2
Principal parts ······················································ 3,4
Major functions ···················································· 5,6
Winding the bobbin ············································· 7,8
Threading the machine ······································ 9,10
Changing the presser feet ··································· 1 1
How to remove and insert the needle ················· 11
Types of feet and their application ····················· 12
How to adjust thread tension ····························· 13
Stitch length of each stitch pattern ····················· 13
Fabric, thread and needle table ·························· 13
Straight stitch ··················································· 14,15
Reverse stitch ······················································ 15
Zigzag stitch ························································· 16
Stitch width vs stitch length
Overcasting ························································· 16
Buttonholes ······················································ 17,18
Corded Buttonholes ············································· 18
Inserting zippers ··················································· 19
Blind stitch ···························································· 20
Reinforcing stretch stitch ····································· 21
Patch work ··························································· 21
Optional parts ················································ 22~24
Invisible zipper foot / Even feed foot
Rolled hemming foot / Quilting attachment
Teflon-coated presser foot
How to replace light bulb ····································· 25
Cleaning ······························································· 25
Performance checklist ········································ 26
Specification table ················································ 26
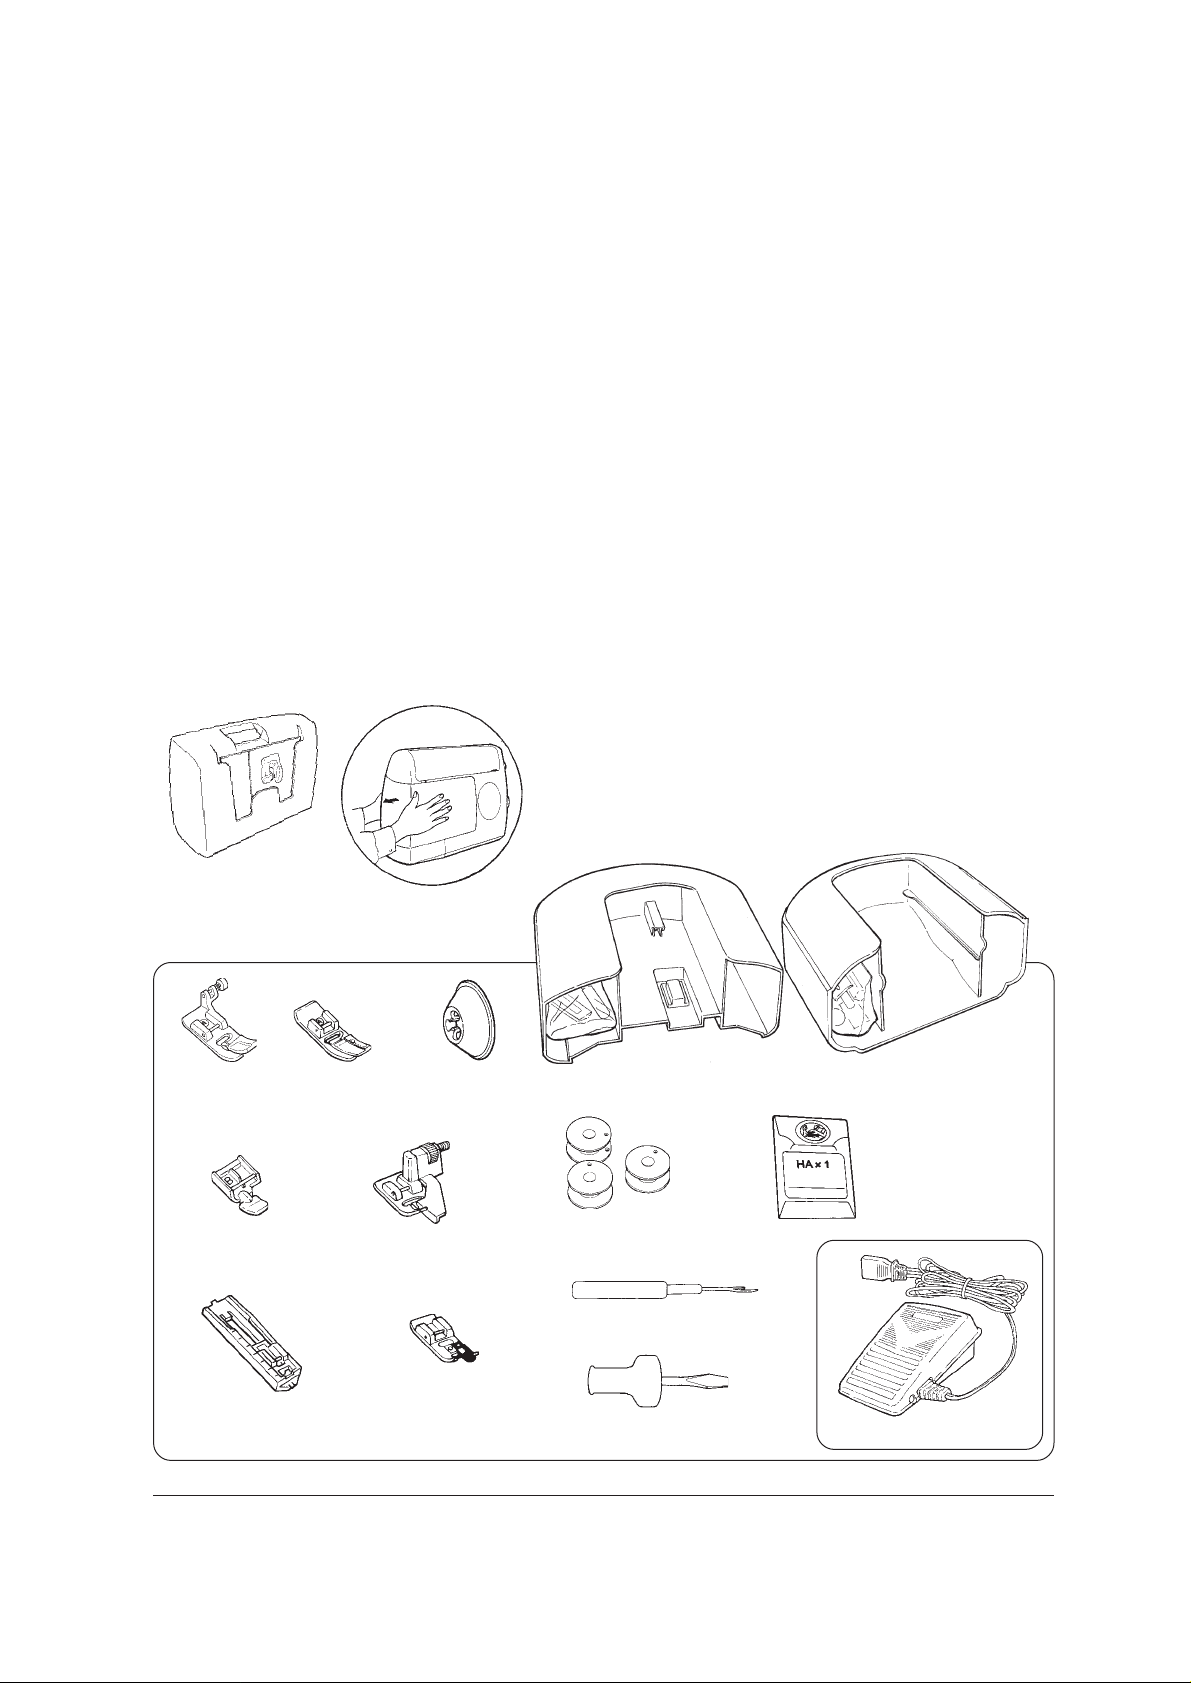
HZL-30Z
Y ou can keep instruction
manual at hard case.
Accessories
HZL-30Z
Standard presser foot (A)
Zipper foot (B)
Buttonhole foot (E)
HZL-60
HZL-60
Blindstitch presser foot (D)
HZL-30Z
Spool cap (small)
Overcasting foot (C)
HZL-30Z
Bobbins (3)
Seam ripper
Screwdriver
Auxiliary Bed
HZL-60
Needle pack
HAx1 No.11 2P
( )
No.14 1P
Speed controller
* Standard presser foot (A) is equipped with machine.
2
Page 4
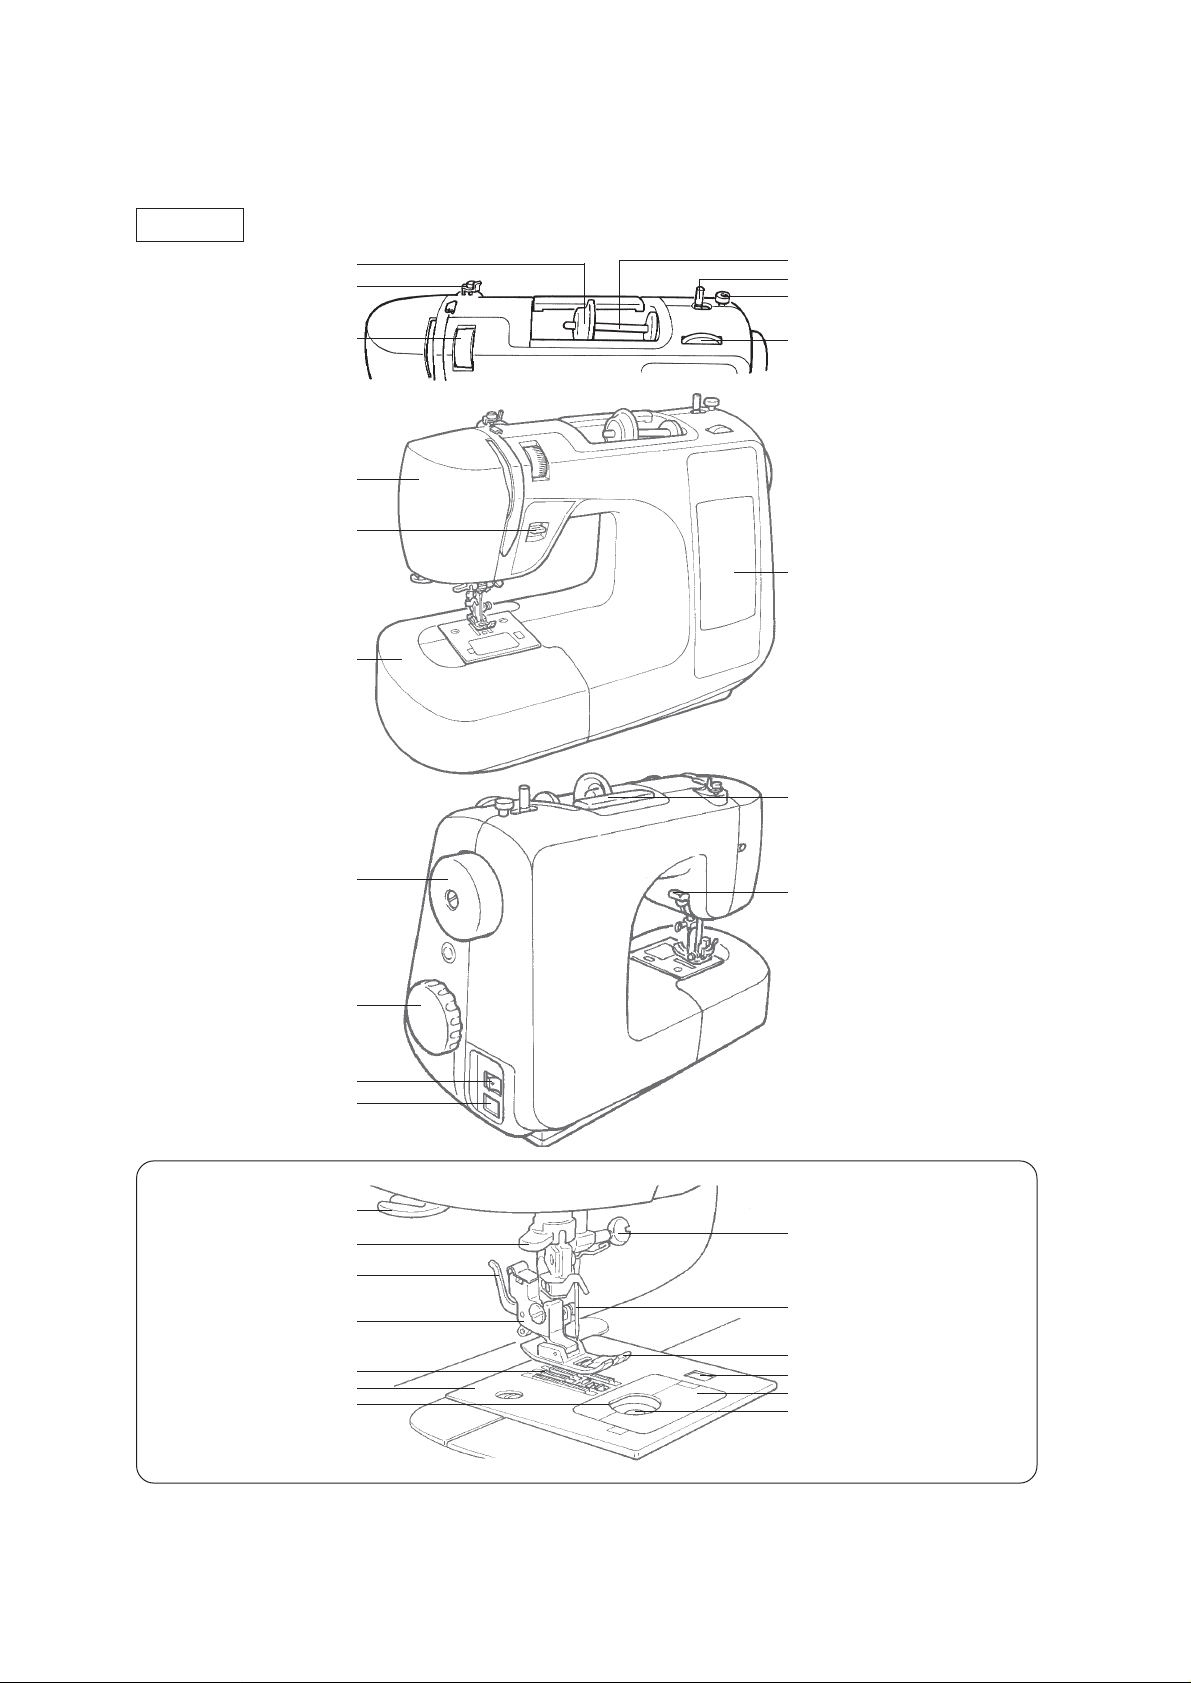
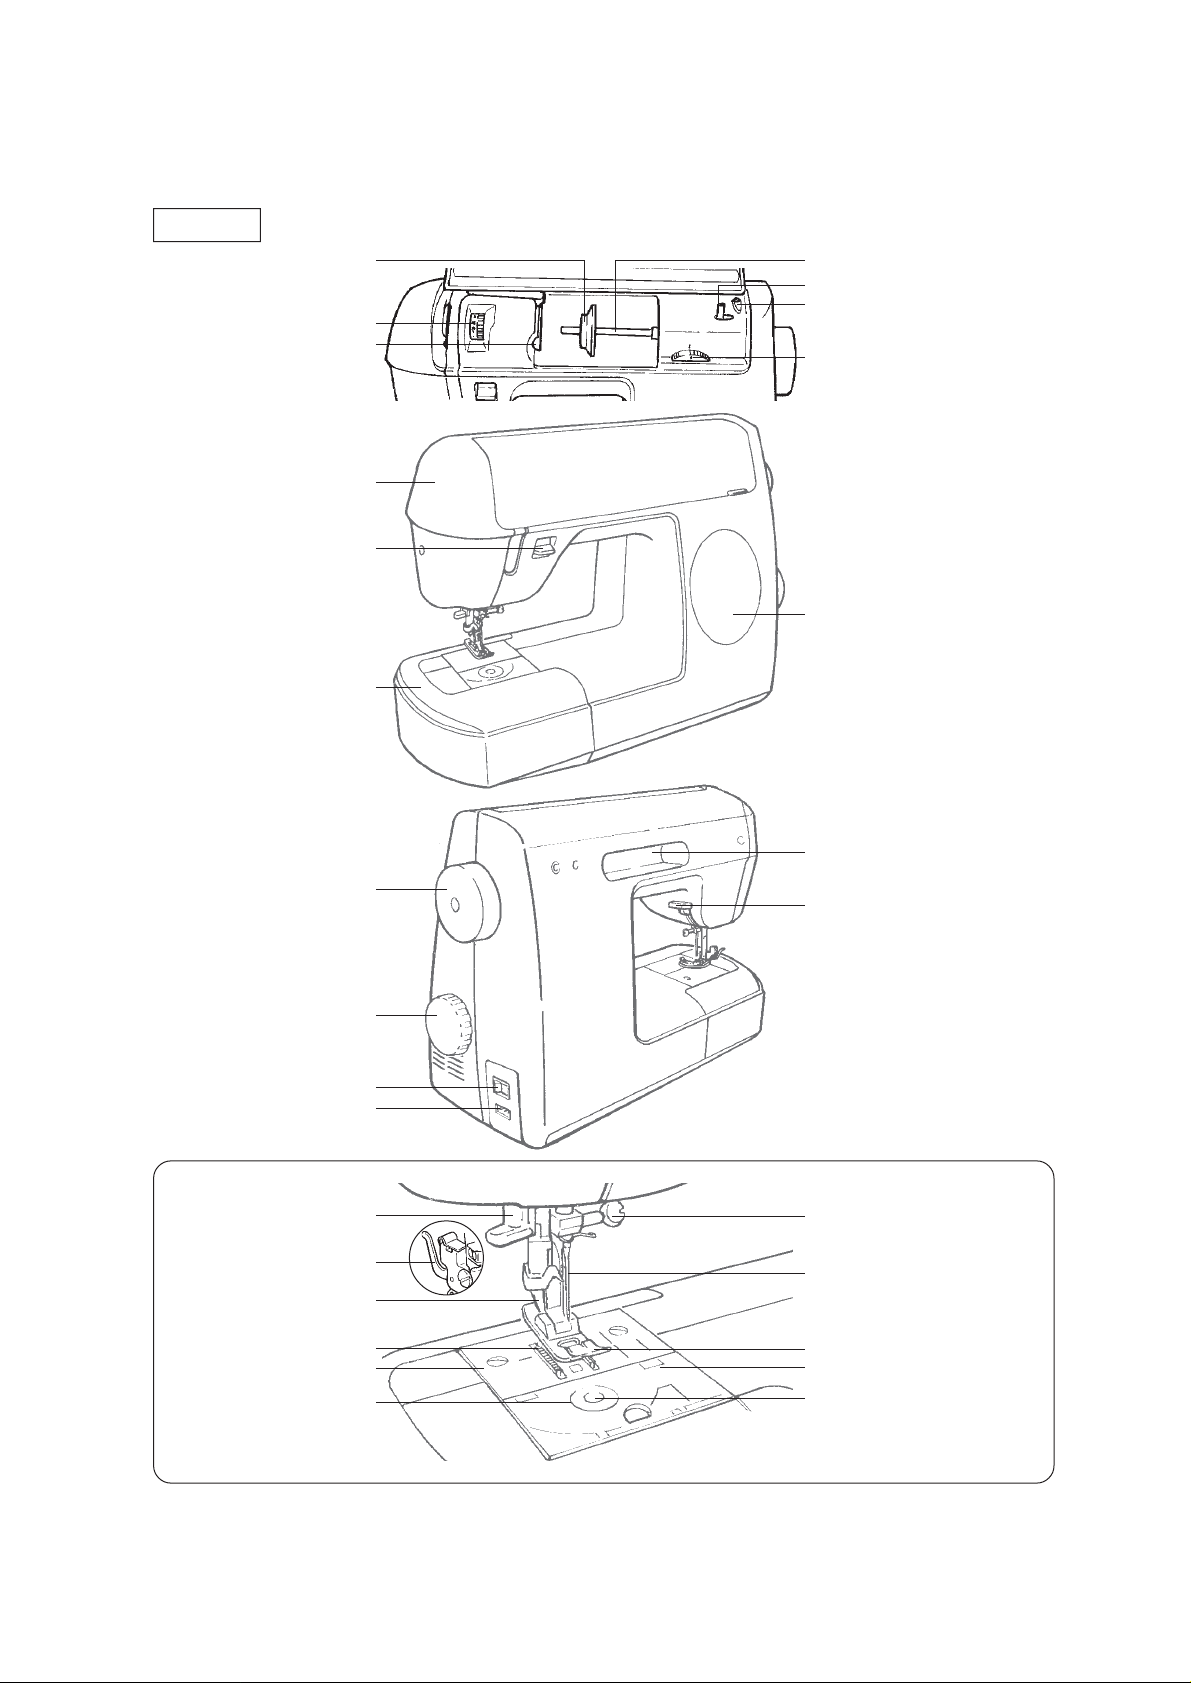
Principal Parts
HZL-30Z
Thread spool cap
Bobbin thread guide
Spool pin
Bobbin winder
Bobbin winding regulator
Thread tension dial
Face cover
Reverse stitch lever
Auxiliary bed
Handwheel
Stitch length dial
Pattern display panel
Handle
Presser foot lever
Stitch pattern dial
Light switch
Speed controller receptacle
Thread Cutter
Needle threader
Presser foot release lever
Presser foot holder
Feed dog
Needle plate
Bobbin case
3
Needle clamp
Needle
Presser foot
Hook cover release button
Hook cover
Bobbin
Page 5
HZL-60
Thread spool cap
Thread tension dial
Reverse stitch lever
Thread guide
Face cover
Auxiliary bed
Spool pin
Bobbin winder
Bobbin winding regulator
Stitch length dial
Pattern display panel
Handwheel
Stitch pattern dial
Light switch
Speed controller receptacle
Needle threader
Presser foot release lever
Presser foot holder
Feed dog
Needle plate
Bobbin case
Handle
Presser foot lever
Needle clamp
Needle
Presser foot
Hook cover
Bobbin
4
Page 6
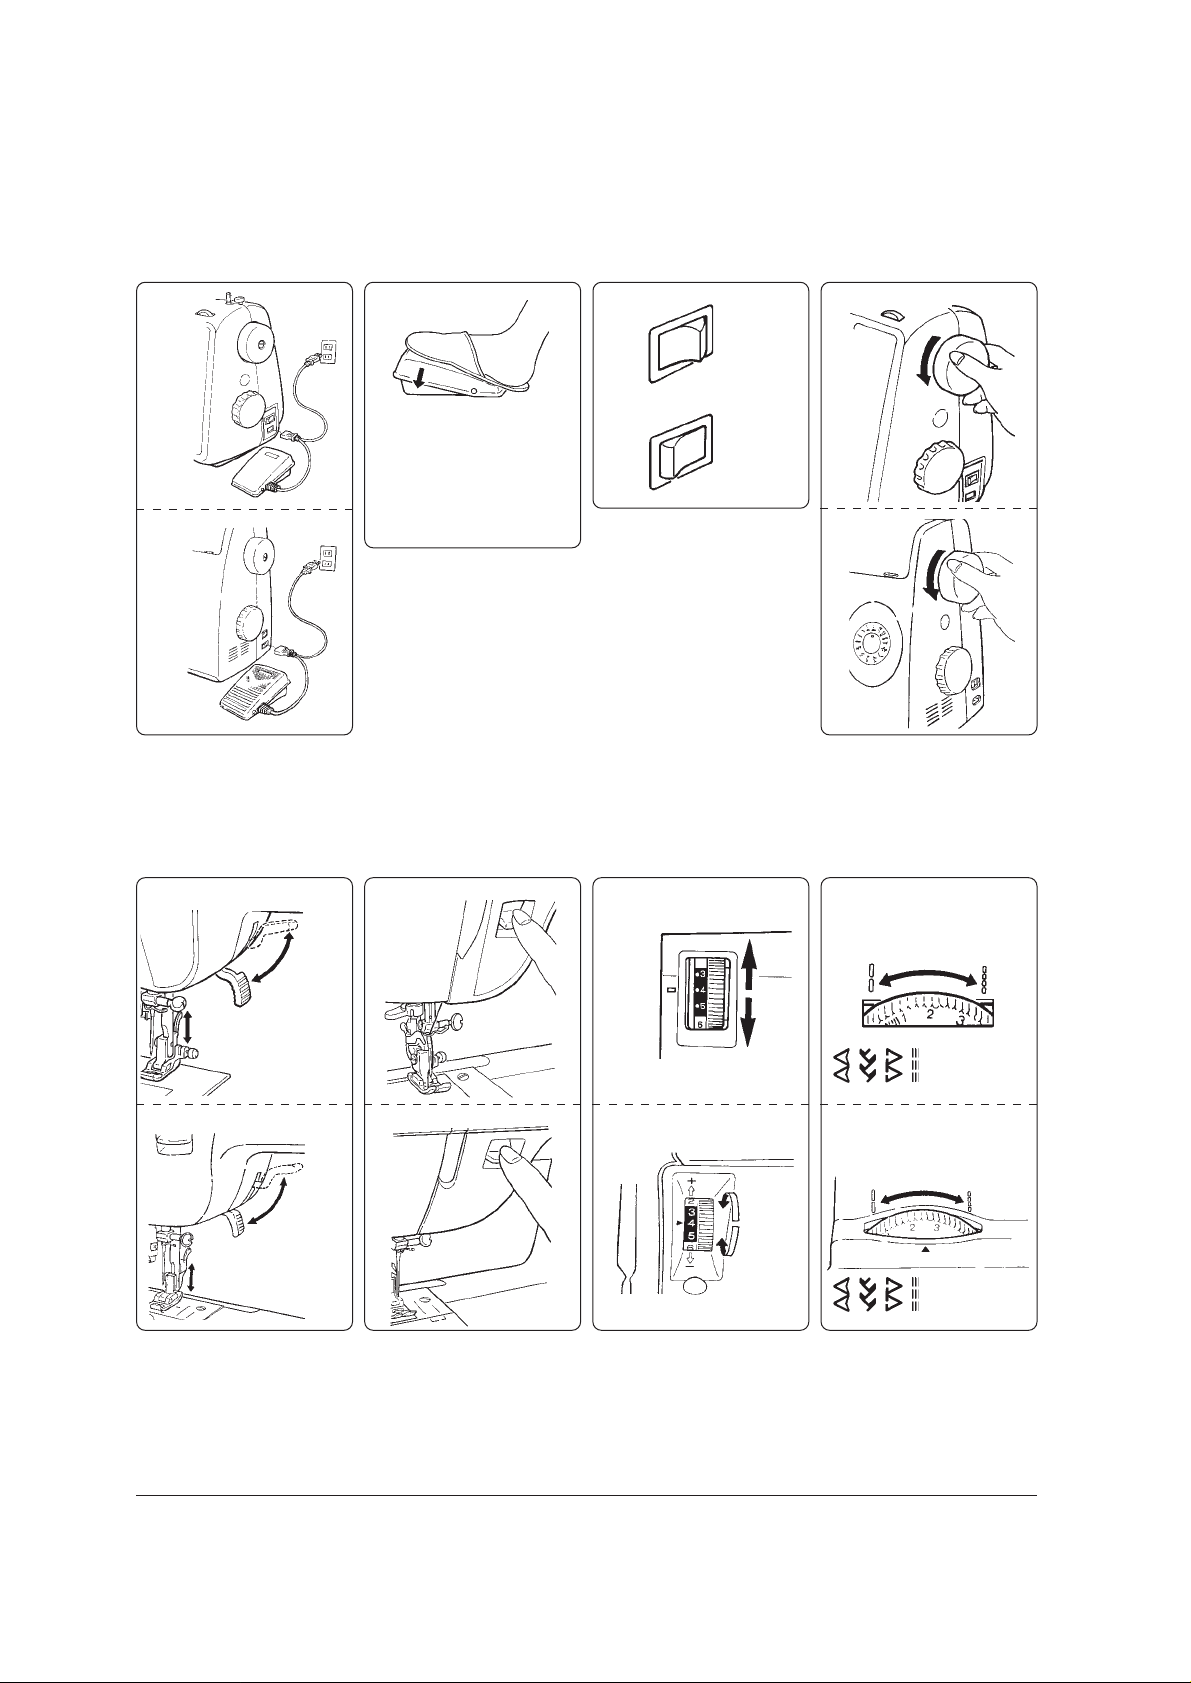
Major Functions
HZL-30Z
HZL-60
To run the machine press
foot speed controller. The
harder you press, the faster
machine will sew. To stop
machine, remove foot from
controller.
Push speed controller plug into
receptable at right end of the
machine. Plug power cord into
electric outlet.
Light switch
HandwheelSpeed controller
HZL-30Z
ON
OFF
HZL-60
Presser foot lever
HZL-30Z
Presser foot
comes down.
HZL-60
Presser foot
comes down.
Presser
foot
goes up.
Presser
foot
goes up.
Reverse stitch lever
HZL-30Z
HZL-60
The reverse stitch is used at
the beginning and end of a
seam to secure it.
Thread tension dial
HZL-30Z
To increase the needle thread
tension
To decrease the needle thread
tension
HZL-60
To increase the needle thread
tension
To decrease the needle thread
tension
Stitch length dial
HZL-30Z
T o increase the
stitch length
T o decrease the
stitch length
Automatic
stitch length
HZL-60
T o increase the
stitch length
T o decrease the
stitch length
Automatic
stitch length
5
Page 7
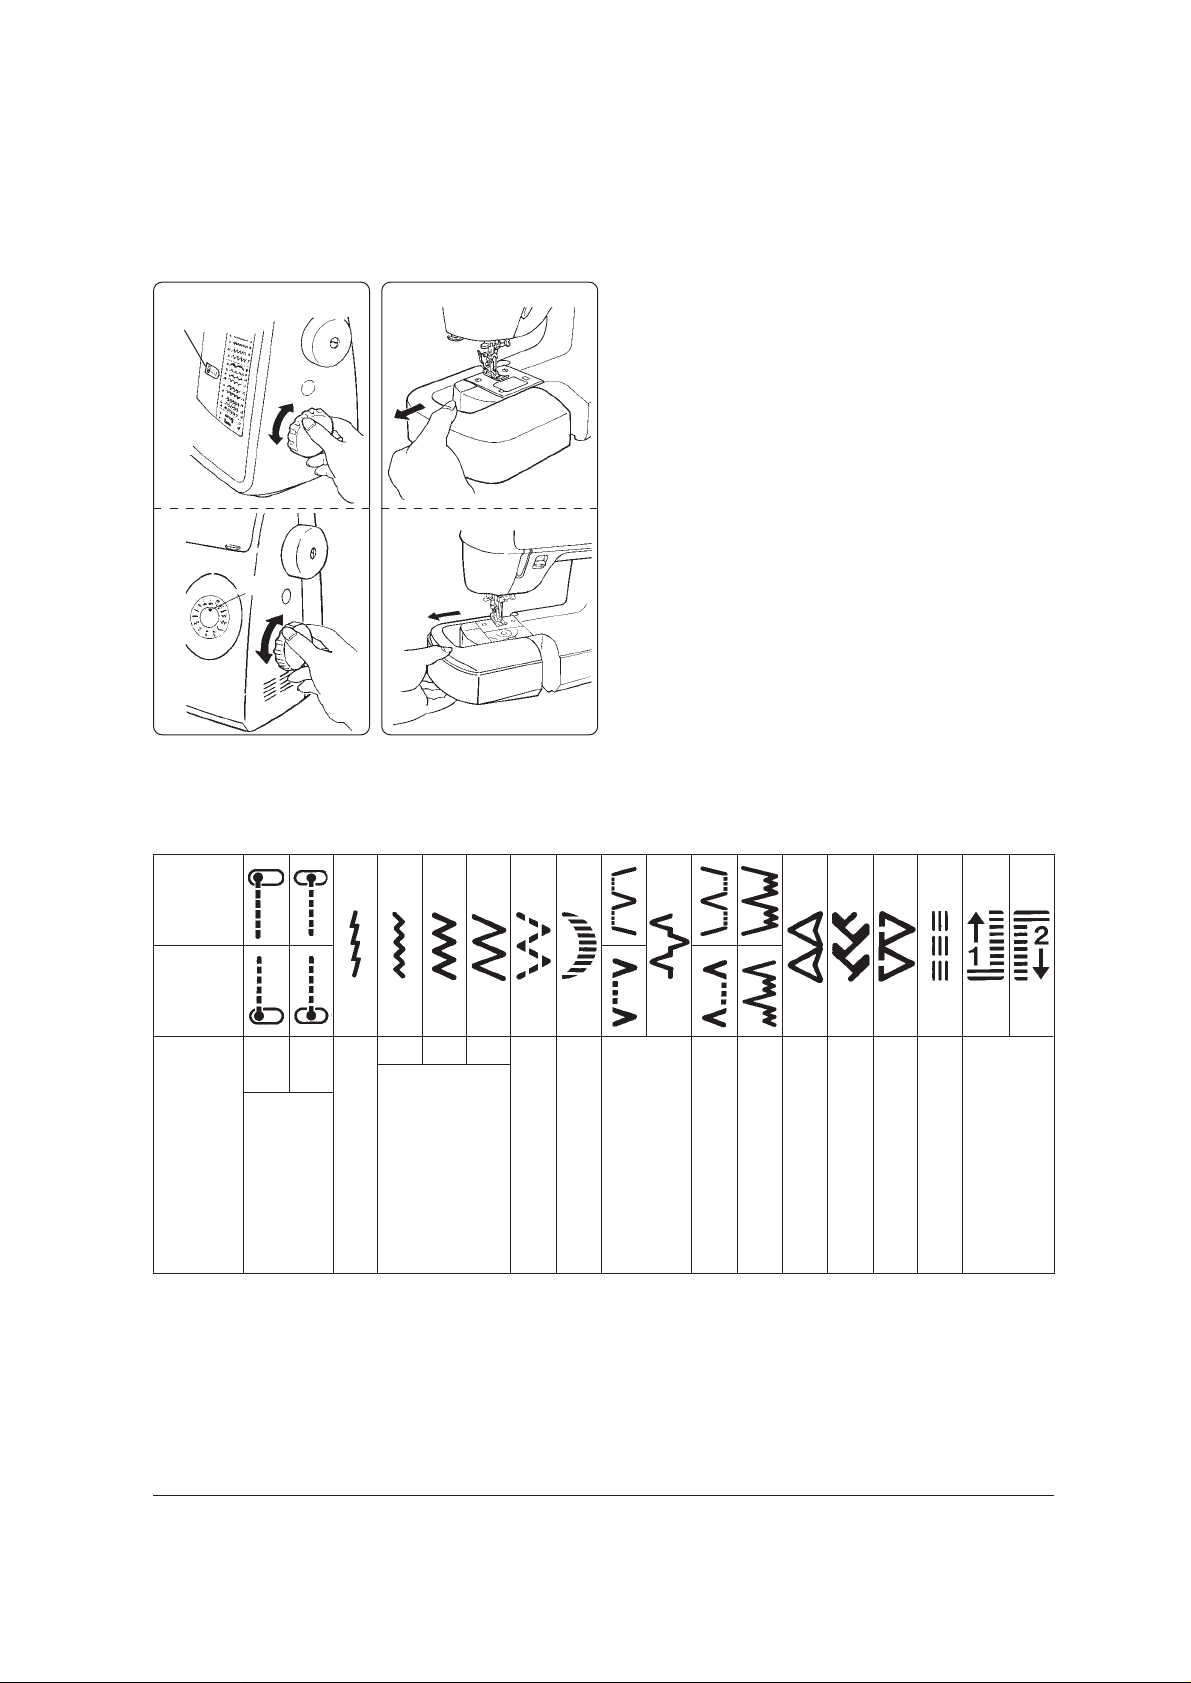
Stitch pattern dial Free arm
HZL-30Z
Pointer
HZL-30Z
HZL-60
Pointer
Stitch pattern
HZL-30Z
HZL-60
Left
side
position
Center
position
HZL-60
Draw the auxiliary bed to the
left side.
(S)
(L)(M)
Straight stitch
Straight stitch for elastic
Zigzag stitch
3-step zigzag stitch
Scallop stitch
Pattern stitch
Blindstitch
Blindstitch for elastic
Arrowhead
Overcasting
Patchwork
Stretch reinforcing stitch
Buttonholing
6
Page 8
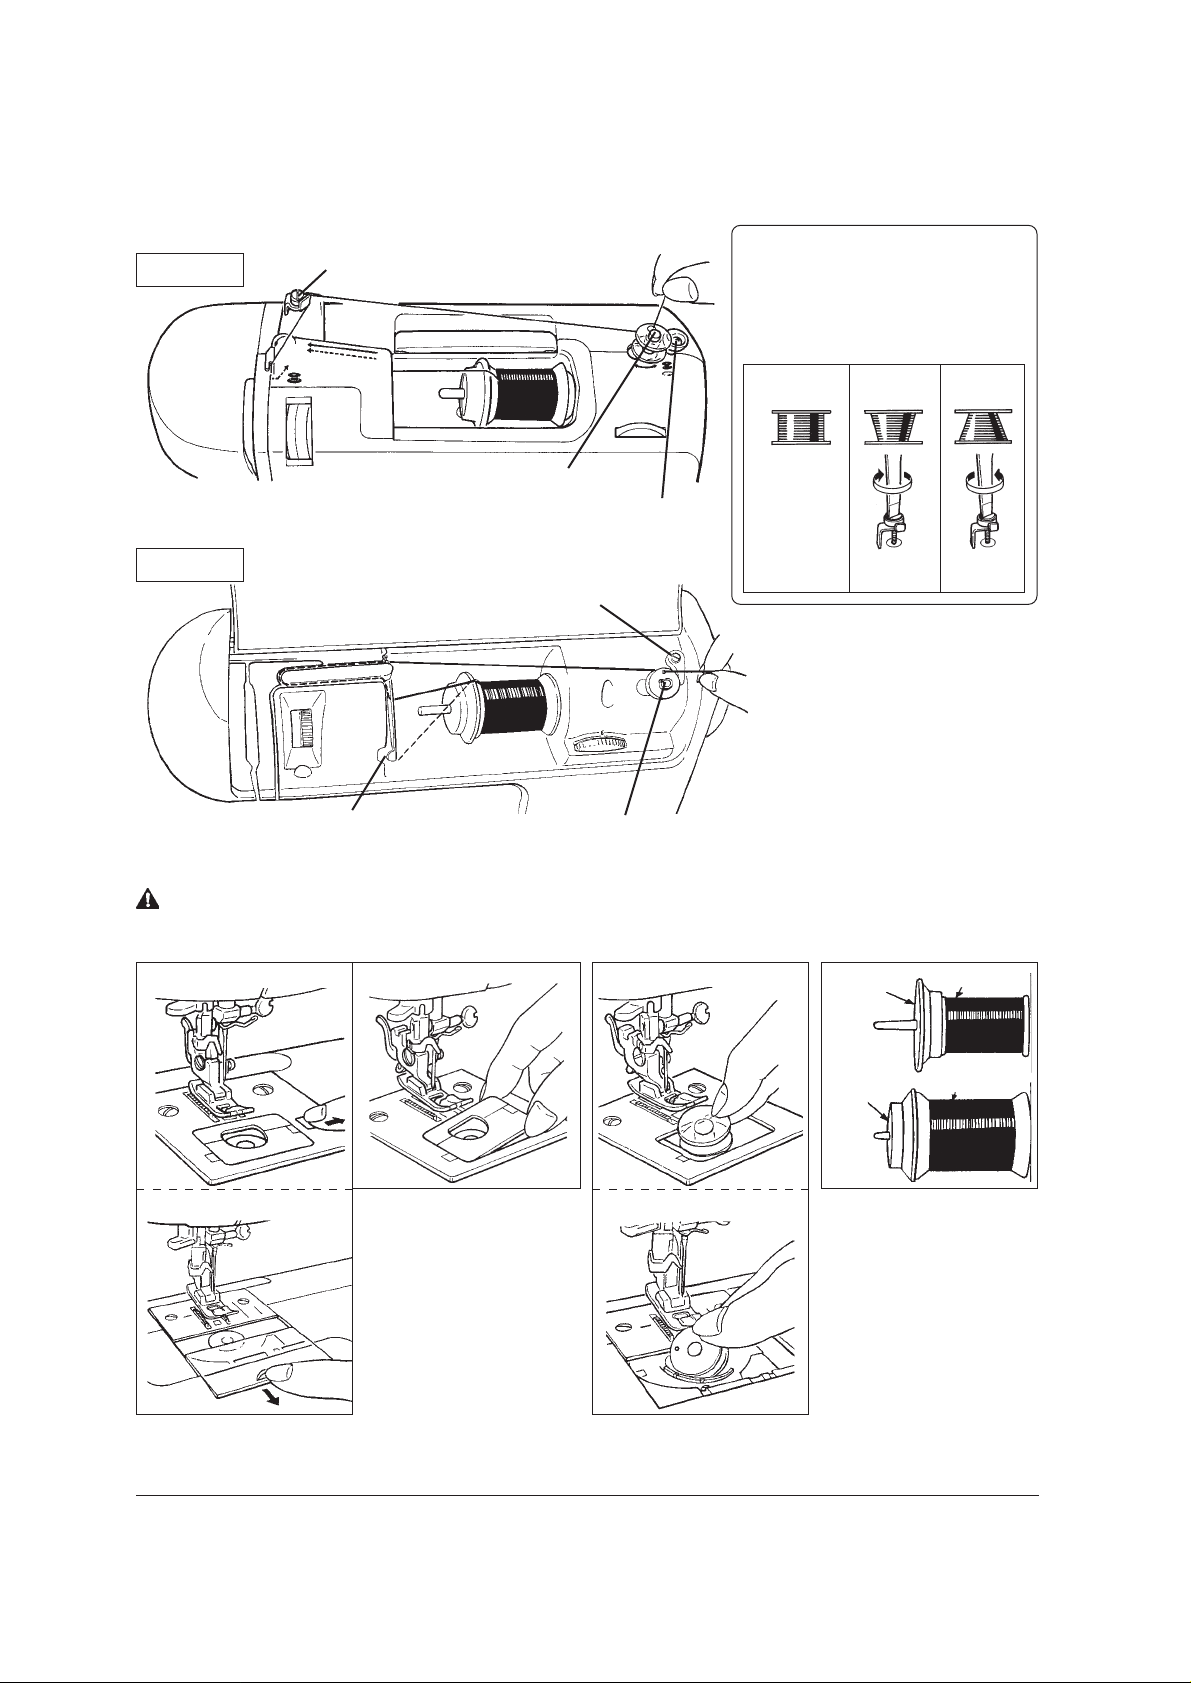
Winding The Bobbin
Threading for winding the bobbin
HZL-30Z
HZL-60
Thread guide
Bobbin winder
Bobbin winding regulator
Bobbin winding regulator
[HZL-30Z]
Adjusting the bobbin thread guide
In the case where the bobbin is unevenly
wound with thread according to the type of
thread, the bobbin thread guide has to be
adjusted.
•~•› •~
Move the bobbin thread
guide up or
down to adjust
so that the
bobbin is
evenly wound
with thread.
Thread guide
Caution:
Turn off the machine before opening the hook cover.
HZL-30Z
HZL-60
Bobbin winder
2. T ake out the bobbin.1. Open the hook cover .
HZL-30Z
HZL-60
3. Place the thread spool
and cap onto the spool
pin.
Thread
spool
cap
Thread
spool
cap
Small spool
Large spool
7
Page 9

4. Follow threading path into the bobbin winder thread
guide.
HZL-30Z
5. Place the bobbin on the
bobbin winding shaft.
HZL-30Z
6. Depress speed
controller to wind bobbin.
HZL-60
Hook the
thread into
the thread
guide.
7. Push the bobbin back
to the left.
HZL-30Z
Hook the thread into
the thread guide.
8. Place the bobbin in
case with thread pulling
off as illustrated.
HZL-30Z
Bobbin
winder
HZL-60
Bobbin winding
regulator
Press the bobbin against the
bobbin winding regulator.
Bobbin winding
regulator
Bobbin
winder
9. Pull the thread into the
groove of the bobbin
case.
HZL-30Z
10. Close the hook cover.
HZL-30Z
HZL-60
Cut the thread and take the
bobbin off the shaft.
HZL-60
[2]
[1]
HZL-60
[2]
[1]
Thread [1], place the thread on
the groove [2] and draw thread
to rear of machine.
HZL-60
8
Page 10

Threading The Machine
HZL-30Z
CAUTION:
* Be sure to raise the presser foot before threading the machine head.
Be sure to turn off the machine before threading.
[4]
Take-up
HZL-60
[4]
[7]
[8]
[2]
[7]
[3]
[8]
[5]
[2]
[3]
1. Raise the presser foot
lever.
HZL-30Z
[1]
HZL-60
[1]
2. Hook the thread into the
thread guide.
HZL-30Z
[2]
HZL-60
[2]
3. To thread the machine
follow steps.
HZL-30Z
HZL-60
[4]
[2]
[3]
9
4. 5. 6.
HZL-30Z
[3]
HZL-60
[5]
HZL-30Z
[4]
Take-up
HZL-60
[6]
Turn the handwheel to place
the take-up in the highest position.
Hook the thread in thread
guide from the right.
HZL-30Z
[5]
HZL-60
[7]
Page 11

Automatic Needle Threading
2. Push the threading lever
all the way down and a hook
1. Push the threading lever
down.
HZL-30Z
(A)
will go through the eye of the
needle.
HZL-30Z
* Check to be sure that the needle is in its highest position.
3. Slowly release the needle
threader and it will return to
its original position.
HZL-30Z
Hook
4. Pull the loop of thread
that is at the back of the
needle out about 4”.
HZL-30Z
HZL-60
HZL-60
(A)
Lower the threading lever
and place the thread onto
(A).
Pass the thread in front of the
needle and below the hook.
Pulling Up The Bobbin Thread
1. Hold the needle thread lightly with
the left hand and turn the handwheel
toward you until the needle enters the
needle plate.
HZL-30Z
HZL-60
Hook
2. Turn the handwheel
toward you.
HZL-30Z
HZL-60
3. Pull both the needle and bobbin
threads out by 10 cm.
HZL-30Z
HZL-60
Continue turning the handwheel while
holding the needle thread until the needle
rises.
HZL-60
Undo the loop with your finger.
HZL-60
10
Page 12

Changing The Presser Feet
2. Push the presser foot
1. Raise the presser foot.
HZL-30Z
release lever.
HZL-30Z
Push
CAUTION:
Make sure to disconnect the plug from the wall
outlet before changing the presser foot.
3. Align the presser foot
pin with the marker line on
needle plate.
HZL-30Z
Pin
Marker line
4. Lower the presser foot.
HZL-30Z
HZL-60
HZL-60
How T o Remove And Insert The Needle
2. Attaching the needle.
1. Removing the needle.
Needle clamp
screw
(The needle cannot be inserted unless it is correctly positioned.)
The flat
part should
face away
from you.
HZL-60
Stopper pin
CAUTION:
HZL-60
Make sure to disconnect plug from wall
outlet before inserting needle.
Screwdriver
(1) Turn the handwheel toward you to until
the needle bar reaches its highest
position.
(2) Loosen the needle clamp screw.
Needle to be purchased
When purchasing spare needles,
specify HAx1 (130/705H) for
household sewing machine or
HAx1SP (needle for knits).
11
Hold the needle with its flat part facing
away from you, and insert it fully until it
touches the stopper pin.
Checking the needle
Needle size
The larger the number,
the thicker the needle.
Parallel
Level plate
Securely tighten the needle clamp screw,
using the screwdriver furnished with the
machine.
* Check the needle for its
straightness occasionally .
Any bent needle would
cause stitch skipping,
thread breakage or damage
to materials.
Page 13

T ypes of Feet and Their Application
Feet
HZL-30Z
Stitch pattern
HZL-60
Typical applications
Straight stitch
standard presser foot (A)
HZL-30Z HZL-60
Straight stitch for elastic
Zigzag stitch
Scallop stitch
3-step zigzag stitch
Pattern stitch
Zipper foot (B)
Patchwork
Stretch reinforcing stitch
Setting zipper
Overcasting foot
(C)
Overcasting
(Overlocking)
Blindstitch
presser foot (D)
Feet
Stitch pattern
HZL-60 HZL-30Z
Typical applications
Blindstitch
Buttonhole foot (E)
Blindstitch for elastic
Buttonholing
12
Page 14

How T o Adjust Thread Tension
Correct the thread tension
Upper thread (Needle thread)
Fabric (right side)
Middle
of fabric
thickness
Fabric (wrong side)
Bobbin thread
The upper thread tension is too low.
Upper thread (Needle thread)
Bobbin thread
The upper thread tension is too high.
Normally, well-tensed seam is obtained when the
needle thread and bobbin thread interlace with
each other at the middle of the fabric thickness.
Bobbin thread
Stitch Length Of Each Stitch Pattern
Stitch
Best adjustment
Possible
adjustment scope
Adjustment
example
Straight stitch
HZL-60 HZL-30Z
2 ~ 2.5
0 ~ 4
for elastic
0 ~ 2.5
0.5 2.5
fabric
2.5
Zigzag stitch
1 1.4 2
0 ~ 4
Blindstitch
for elastic
fabric
2 1.5
0 ~ 4 0 ~ 4
Upper thread (Needle thread)
3-step
zigzag stitch
1
0 ~ 4 0 ~ 4 0 ~ 4 0 ~ 4
Pattern stitch Buttonholing
2 2.5 Automatic
HZL-30Z HZL-60
To increase upper
thread tension.
HZL-30Z
To decrease upper
thread tension.
Scallop stitch
0.5 0.4 ~ 0.6
Automatic
stitch
length
HZL-60
(0.2) (1)
Fabric, Thread And Needle Table
Light-weight
Medium-weight
Heavy-weight
Fabric
Lawn # 80~100 (No.9)
Georgette
Tricot
Wool and synthetic
fiber cloth
General cotton
and synthetic cloth
Light-weight jersey
General wool and
synthetic cloth
Jersey
Coating
Thread Needles
Silk
Synthetic thread/
Fine thread
Synthetic
Silk
Synthetic
Cotton
Synthetic
Silk
Synthetic
Cotton
Synthetic
Silk
Synthetic
Silk
# 90, 100
# 60~100
# 80
# 60~100
# 50~80
# 50~60
# 50
# 50~60
# 30~50
# 30~50
# 50
# 50~60
# 50
HA x 1
(130/705H)
No.1 1
Knitting needle
No.11
No.1 1
No.11~14
Knitting needle
No.11
No.11~14
No.14~16Denim
Knitting needle
No.11
No.11~14
Stitch length
HZL-30Z
HZL-60
Straight Zigzag
1 ~ 3 1 ~ 4
1.5 ~ 3 0.5 ~ 4
2 ~ 4 0.5 ~ 4
Thread
tension
dial
HZL-30Z HZL-60
HZL-30Z HZL-60
HZL-30Z HZL-60
* The knitting needles (HAx1sp) effectively prevent from stitch skipping, and ideal for sewing stretchy fabrics.
13
Page 15

Straight Stitch
The straight stitch is the basic stitch.
CAUTION: Turn off the machine before changing the presser foot.
1. Select a stitch pattern.
HZL-30Z
For
elastic
fabric
stitch
HZL-60
For
elastic
fabric
stitch
2. Make sure that the
presser foot is correct.
HZL-30Z
Standard presser
foot (A)
HZL-60
Standard presser
foot (A)
3. Set the fabric and lower
the presser foot.
HZL-30Z
HZL-60
Place the fabric under the
presser foot so the needle will
enter the sewing start point of the
fabric.
Pull both the needle and bobbin
threads to the rear of the machine and lower the presser foot.
4. Select the stitch length
range.
HZL-30Z
HZL-60
5. Begin sewing.
6. Lightly hold the fabric
with your hands.
HZL-30Z
HZL-60
Be careful not to apply excessive pulling force to the fabric
while sewing.
7. Adjust the sewing
speed.
8. Stop sewing.
14
Page 16

9. Remove the fabric from
the machine.
HZL-30Z
10. Cut the threads, using
the thread cutting groove.
HZL-30Z
Thread cutter
11. Knot the threads on the
wrong side of the fabric.
For elastic fabric
straight stitch
Finished seams are
elastic.
This stitch system
can be used for producing straight
stitches on elastic
fabrics such as knits
and jersey .
HZL-60
After finishing a seam, raise the
needle and the presser foot,
and slowly pull the fabric from
under the presser foot.
Reverse stitch
1. Press the reverse
[2]
[1]
Fabric
stitch button. Begin
sewing.
HZL-30Z
HZL-60
Thread
cutting
groove
Hold the upper and bobbin
threads together, pull them out
about 4” and cut them with the
thread cutting groove located
at the rear of the presser foot.
2. Detach the finger
from the reverse
stitch button, sew
the straight stitch.
HZL-30Z
Pull the upper thread to the
wrong side of the fabric, and
knot the upper and bobbin
threads. Cut the threads as
close to the knot as possible.
This technique is useful for
securing the pattern stitches.
Beginning of sewing heavy-weight fabric
[HZL-30Z]
Pressing the button (spring) that is
mounted on the presser foot into
the groove in the presser foot
holder, lower the presser foot.
To start sewing from the
multi-layer material edge,
use the button mounted on
the presser foot to make the
presser foot parallel to the
fabric, thereby ensuring
smooth sewing.
3. Press the reverse
stitch button.
HZL-30Z
4. Stop sewing.
[3]
The reverse stitch is
used at the beginning
and end of a seam to
secure it.
15
HZL-60
HZL-60
HZL-60
Page 17

Zigzag Stitch
1. Select a stitch pattern.
HZL-30Z
(S)
(M)
CAUTION: Make sure to turn off the machine before changing the presser foot.
2. Make sure that the
presser foot is correct.
HZL-30Z
Standard presser
foot (A)
Stitch width vs.stitch length
Pattern
(L)
HZL-60
(S)
(M)
(L)
HZL-60
Overcasting
Used to prevent fabric from fraying.
2. Replace the presser foot.1. Select a stitch pattern.
HZL-30Z
(L)
HZL-30Z
(S) 1.5
(M) 3.3 (L) 5
~~~
Standard presser
foot (A)
Stitch length Stitch width
0.5 4 0.5 4 0.5 4
CAUTION: Make sure to turn off the machine before changing the presser foot.
4. In case of the overcasting
3. Set the stitch length.
HZL-30Z
1 ~ 2
presser foot.
HZL-30Z
HZL-60
(L)
There are three stitch types
that can be used for overcasting.
Standard presser foot (A)
(L)
HZL-60
(L)
Overcasting foot (C)
Standard presser foot (A)
Overcasting foot (C)
Automatic
stitch length
HZL-60
1 ~ 2
Automatic
stitch length
Guide
HZL-60
Guide
Place the fabric against the foot
guide so that the needle sews
close to the edge.
16
Page 18

Buttonholes
CAUTION:
Make sure to turn off the machine before changing the presser foot.
1. Install the presser foot
for buttonholing.
HZL-30Z
HZL-60
Install it so that its scale comes
to the left-hand side.
2. Set the stitch length.
HZL-30Z
0.2 ~ 1
HZL-60
0.2 ~ 1
3. Mark the fabric.
Mark
Mark the fabric to indicate
the buttonhole placement.
4. Push the slide and set the
mark.
HZL-30Z
Mark
The slide
HZL-60
Mark
Lower the buttonhole foot so that the
mark is at the center of the needle
hole in the foot.
Push
Push
5. Select a buttonhole that matches your
purpose.
HZL-30Z
HZL-60
Step of procedure for making a choice of pattern to be
sewn.
Adjusting stitch
balance of
buttonhole stitching.
The adjusting screw is
located on the under
handwheel and can be
turned with a screwdriver
through the hole.
Incorrect Adjustment Correct
17
Page 19

6. Open the completed
buttonhole, using the
seam ripper.
Stopper pin
In the eventof buttonholing failure
In the case where a buttonholing
failure has arisen when the machine
has been sewing the right-parallel
seam of the buttonhole.
1. Lift the presser foot and undo the seam.
2. Select the “ ” using the pattern
selector dial.
3. Run the machine idle by approximately
10 stitches.
4. Select the “ ” using the pattern
selector dial.
Then, perform the buttonholing again from the
sewing start position.
In the case where a buttonholing
failure has arisen when the machine
has been sewing the left-parallel
seam of the buttonhole.
1. Lift the presser foot and undo the seam.
2. Select the “ ” using the pattern
selector dial.
Then, perform the buttonholing again from the
sewing start position.
Corded Buttonholes
Sewing a cord into the buttonholes will
prevent them from becoming loose and
they will last longer. Buttonhole twist
thread may be used for cording.
How to set the cord.
Cord
(Front)
(back)
CAUTION: Make sure to turn off the machine before
changing the presser foot.
When you sew buttonholes with cording, pass the cord through the end of the
buttonhole foot and knot the ends of the threads at the front. Then, attach the
buttonhole foot to the presser bar and sew the buttonhole. Pull the cording tight
into the sewn buttonhole and cut off the excess cord.
18
Page 20

Inserting Zippers
CAUTION: Make sure to turn off the machine before changing the presser foot.
Zippers may be inserted in several ways.
The type and location of the zipper will help you choose the right method.
1. Select a stitch pattern. 3. Change the presser foot.
HZL-30Z
Left
side
position
HZL-60
Left
side
position
2.
Seam...Stitch length [2]
Machine-baste...Stitch length [4]
Reverse stitch
(1 cm)
Fabric
(wrong side)
A zipper is lapped when one edge of the fabric opening overlaps and conceals it, allowing only one stitching line to show.
· Machine-baste the zipper opening together on the
seamline, and press open the seam allowance.
Zipper foot (B)
(Left)
(Right)
· If the zippers is left of the needle, the left
side of the zipper foot goes on the shank.
· If the zippers is right of the needle, the
right side of the zipper foot goes on the
shank.
Lapped Insertion
1. Lapped: Zippers usually are inserted
in the side seam of the garment.
3mm
Teeth
Fabric
(wrong side)
Slider
1cm
2. 3.
Attach the
right side
Fabric
(wrong side)
Zipper opening size
Stitch length [2]
Slider
Attach the
left side
Reverse
stitch
Stitch length [2]
Machine-baste
Fabric
(right side)
· The edge of the teeth following the seam line.
· Stitch the zipper to the seam allowance from
bottom to top.
Centered Insertion
1. Lapped: Zippers usually are inserted
in the side seam of the garment.
Seamline Slider
Machine-baste
Zipper
(wrong side)
Teeth
Fabric
(wrong side)
· Machine-baste the zipper opening to the
seamline, and press open the seam allowance.
Fabric
(wrong side)
19
· Smooth back the seam allowance at the edge
of the zipper.
· Stitch the zipper from bottom to top, as shown,
near the seam allowance folded edge.
· Pin or machine-baste the zipper to the garment
from the wrong side, through zipper tape, the
seam allowance, and the front of the garment.
· Turn the garment right side out.
· Stitch across the lower end of the zipper and up
to the waistline. Use the basting stitches as a
guide.
· Remove the basting and press.
2. 3.
Attach the
right side
Reverse
stitch
Fabric
(wrong side)
Stitch length [2]
· Baste through the zipper tape, seam allowance
and garment exterior .
· Turn the garment left side up and top-stitch it to
the zipper, sewing through all layers.
Machine-baste
· Right side sewing through all layers.
· Remove the basting and press.
Attach the
left side
Reverse
stitch
Fabric
(right side)
Stitch length [2]
Page 21

Blindstitch
CAUTION: Make sure to turn off the machine before changing the presser foot.
Blind stitching provides a durable way to finish a hem and is
presented as an instantly selectable pattern as a convenience.
It takes practice, however, so a test sample is suggested.
1. Overcast the fabric,
and fold the edge.
1. Fold the fabric and then baste it.
0.5~0.6 cm
Fabric
(wrong
side)
2. Fold the fabric at
the basting stitch seam.
Fabric
(wrong
side)
3.
Fabric
(wrong
side)
Refer to page 16 for overcasting.
Finished
hem
Basting
2. Select the blindhem
stitch pattern.
HZL-30Z
For
elastic
fabric
stitch
HZL-60
For
elastic
fabric
stitch
* Set the stitch length.
HZL-
30Z
HZL-
60
:2~4
:1.5~3
3. Change the presser
foot.
HZL-30Z
Blindstitch presser foot (D)
HZL-60
Blindstitch presser foot (D)
4. Position the folded
edge against the guide.
Fabric
(wrong
side)
Guide
Place the folded edge
against the presser foot
guide, and sew the fabric.
5. Turn the fabric over.
Fabric
(wrong side)
Finished hem
After sewing the seam, turn the
fabric over.
Fabric
(right side)
How to adjust stitch width
If the stitches fail to reach the folded edge:
HZL-30Z HZL-60
If the stitches reach too far beyond the folded edge:
HZL-30Z HZL-60
Turn the screw
toward you.
This will move the
guide to the right.
Place the foded
edge sungly
against the repositioned guide.
Turn the screw
away from you.
This will move the
guide to the left.
Place the foded
edge sungly
against the repositioned guide.
20
Page 22

Reinforcing stretch stitch
Stretch stitching reinforces the seam on elastic fabric
or sections that are likely to after overdged.
2. Make sure that the
1. Select the pattern.
HZL-30Z
presser foot is correct.
HZL-30Z
Standard presser
foot (A)
3.
CAUTION:
Automatic
stitch
length
Make sure to turn off the machine
before changing the presser foot.
Application examples
Sewing sleeve to armhole
Back body
HZL-60
Patch Work
1. Running stitch.
1 cm
Runstitch
Fabric
(wrong
side)
Outlet
seam
Fabric
(wrong
side)
HZL-60
Standard presser
foot (A)
CAUTION:
Make sure to turn off the machine before changing the presser foot.
2. Select the pattern.
HZL-30Z
3. Check that the
presser foot is the
correct one.
HZL-30Z
Standard
presser
foot (A)
Side
Open patch Overlapping patch
Fabric
(right
side)
Press the seam open.
Reinforcing stitch
Patch pocket
Attaching handles to bags
Fabric
(right
side)
Press the seam open.
21
HZL-60
HZL-60
Standard
presser
foot (A)
Page 23

Optional parts
Invisible zipper foot
Pattern to be used
HZL-30Z HZL-60
Since a seam does
not appear on the
right side of fabric,
opening can be finished with fabric
edges neatly butted.
CAUTION:
Make sure to turn
off the machine
before changing
the presser foot.
1. Check the zipper opening size. Install
the standard presser foot (A).
Basting
Opening end
Opening size
Fabric
(wrong side)
Runstitch
Reverse stitch (1 cm)
Place two pieces of fabric face to face. Baste the
fabric from the edge of fabric to the opening end.
At the opening end, change the stitch length to
[2.0] and sew reverse stitches by 1 cm and sew
until the predetermined position is reached.
Neatly open the seam allowance.
Zipper size
2.5 cm
3. 4.
2.
Basting
Basting
Fabric
(wrong side)
Cardboard
Put the invisible zipper on the fabric so that its
center meets the seam line. Place a cardboard
between the seam allowance and front fabric.
Manually baste both sides of seam allowances
and zipper tapes.
Upon completion of basting, remove the cardboard.
(only zipper tape and
seam allowance)
Invisible zipper
(wrong side)
Invisible
Tape
zipper foot
Undo the basting stitch seam to the bottom of opening as shown in the sketch
given in step 1. Then, open the zipper.
5.
Invisible
zipper foot
Teeth
Seam
Aligning the teeth of either zipper tape with the groove
on the zipper foot, sew the zipper at the very edge of
the teeth from the end of opening while raising the teeth
with fingers.
Teeth
Fabric
6.
Seam
Tape
Fabric
Slider
Sew the remaining zipper tape on the other side of seam
allowance in the same procedure. (The lower portion of
zipper tape located below the bottom of the opening will
remain loose without sewn on the seam allowance.)
Take out the slider and pull it out to appear on the right side of the fabric.
22
Page 24

Even feed foot
Pattern to be used
HZL-30Z
HZL-60
1. Remove presser foot holder . 2. Attach even feed foot to machine.
Actuating lever
Presser bar
Presser foot
clamp screw
Needle
clamp screw
Presser foot clamp screw
This even feed foot is generally used for fabrics (such
as knits, jersey, vinyl cloth,
artificial leather and leather)
that are difficult to be fed by
sewing machine. It ensures
smooth feed of fabric while
preventing fabric slippage
to achieve neatly finished
seams.
CAUTION:
Make sure to turn off the machine
before changing the presser foot.
Rolled hemming foot
Pattern to be used
Lift presser bar, remove presser foot clamp
screw and presser foot holder.
Put forked section of actuating lever around
needle clamp, attach to presser bar and securely tighten presser foot clamp screw.
* Sewing speed should be set at low to medium.
1. Remove presser foot holder . 2. Attach even feed foot to machine.
0.5cm
0.8cm
10cm
Groove
Fabric
HZL-30Z HZL-60
Fabric edge is hemmed
while rolling it under .
Used for finishing bottom
of shirts and blouses and
edges of frills and handkerchiefs.
CAUTION:
Make sure to turn
off the machine
before changing
the presser foot.
23
Cut away a corner of fabric in order to make
work easier.
Insert fabric into spiral groove in hemmer foot
until needle position is reached.
Drawing ends of needle and bobbin threads,
turn handwheel 3 or 4 turns by hand to guide
fabric to hemmer foot.
Page 25

Quilting attachment
Pattern to be used
HZL-30Z
HZL-60
Two piles of fabric are
stitched together with batting placed between them
to produce quilt with your
original design.
CAUTION:
Make sure to turn off the machine
before changing the presser foot.
1. Remove presser foot
holder.
Presser bar
Presser foot clamp screw
Lift presser bar, remove
presser foot clamp screw and
presser foot holder.
2. Attach throat plate
cover over throat plate.
3. Install the quilting foot.
T eflon-coated presser foot
Teflon coating provides
smooth surface.
T eflon presser foot is suitable for hard-to-feed fabrics (jersey, vinyl cloth or
leather).
CAUTION:
Make sure to turn
off the machine
before changing
the presser foot.
24
Page 26

How To Replace Light Bulb (How To Remove The Face Cover)
1. 2.
HZL-30Z
HZL-30Z
CAUTION:
Be sure to disconnect the plug from the wall outlet
before replacing light bulb.
Contact the dealer in your area for the correct light bulb
replacement.
Light bulb is hot after usage of the machine.
HZL-60
Loosen setscrew located on
rear face of machine. Slide
cover straight in a lateral direction until it comes off.
HZL-60
Increase
Decrease
The power consumption of the
light is 15 watts.
Maintenance of the sewing machine (cleaning)
3. Clean the area between
1. Remove the needle plate.
HZL-30Z
2. Take out the bobbin
case.
HZL-30Z
the feed dog teeth and in
the hook.
HZL-30Z
CAUTION:
Be sure to disconnect the plug
from wall outlet before cleaning and lubricating machine.
4. After cleaning machine,
reinstall bobbin case and
needle plate.
HZL-30Z
HZL-60
25
HZL-60
HZL-60
Fitting projection of bobbin case
holder with part marked with arrow , drop holder in place.
HZL-60
Page 27

Performance Checklist
If sewing difficulties occur, make sure the instructions are correctly followed.
If a problem still exists, the reminders below may help solve it.
Problem Cause (Reason) Action to be taken
The machine does
not feed the fabric.
The needle breaks.
The thread breaks.
The bobbin thread
breaks.
Skipped stitches.
Loud noise is head.
Fabric puckers.
The sewing
machine will not run.
The needle threading lever cannot be
done.
* The machine runs idle.
* The stitch length has been set to zero.
* The needle has been inserted wrong.
* The needle is bent or is blunt.
* The presser foot is not the correct one.
* The needle and the threads do not match.
* Threading is not correct.
* The thread has a knot in it.
* The thread tension is not correct.
* The needle is bent.
* The needle has been inserted wrong.
* The needle is bent.
* Threading is not correct.
* Dust has accumulated on the feed dog. * Clean the machine.
* The fabric, the needle and the thread do
not match.
* The bobbin winder was left in winding
position.
* Dropping the needle in the needle plate.
* The needle is not in the highest position.
* The needle has not been fully inserted into
the needle bar.
* The machine starts when the needle
threader is pushed down.
* Return bobbin winder to the left.
* Set the stitch length “ 1 - 4 ”.
* Properly insert the needle.
* Replace the needle with a new one.
* Use the correct presser foot.
* Use proper thread or needle.
* Correctly thread the machine.
* Remove the knot.
* Correct the thread tension.
* Replace the needle.
* Properly insert the needle.
* Replace the needle
* Correctly thread the machine.
* Use the correct size needle and the thread.
* Move the bobbin winder back fully to the left.
* Remove the needle.
* Turn the handwheel until the needle reaches
its highest position.
* Properly insert the needle.
* Turn the handwheel toward the back side a
little.
Page
7,8
13
11
11
12
13
9,10
-
13
11
11
11
9,10
25
13
7,8
-
9,10
11
-
The stitch pattern
dial cannot be
turned.
Specification table
Item Specification (HZL-30Z)
Dimensions 410 (W) x 300 (H) x 180 (D) mm
Dimensions when
attached with case
Weight
Rated voltage /
Power consumption
Power consumption
of lamp
440 (W) x 305 (H) x 215 (D) mm
6.6 kg (when attached with case: 7.7 kg)
120V / 1.0A 60Hz (USA and Canada only)
220-230V / 85W 50 / 60Hz
120V / 15W (USA and Canada only)
240V / 15W
* Raise the presser foot lever, turning the
handweel toward you.
Specification (HZL-60)
384 (W) x 292 (H) x 166 (D) mm
384 (W) x 292 (H) x 166 (D) mm
6.5 kg (when attached with case: 6.8 kg)
120V / 1.0A 60Hz (USA and Canada only)
220-230V / 85W 50 / 60Hz
120V / 15W (USA and Canada only)
240V / 15W
-
26
Page 28

®
8-2-1, KOKURYO-CHO,
CHOFU-SHI, TOKYO 182-8655, JAPA N
PHONE: 03(3480)5034
FAX: 03(3480)5037
E-mail: hsm@juki.co.jp
http:// www.juki.co.jp
Copyright © 2003 JUKI CORPORATION.
All rights reserved throughout the world.
000903•iJ•jA9250 30Z 000
 Loading...