

Page 1
www.joy-it.net
Pascalstr. 8 47506 Neukirchen-Vluyn
20X4 LCD MODULE
I2C serial
1. GENERAL INFORMATION
Dear customer,
Thank you for purchasing our product. In the following, we will show you
which things should be noted during the use.
Should you encounter any unexpected problems, do not hesitate to contact
us.
Page 2
www.joy-it.net
Pascalstr. 8 47506 Neukirchen-Vluyn
2. USE WITH AN ARDUINO
Connecting the display
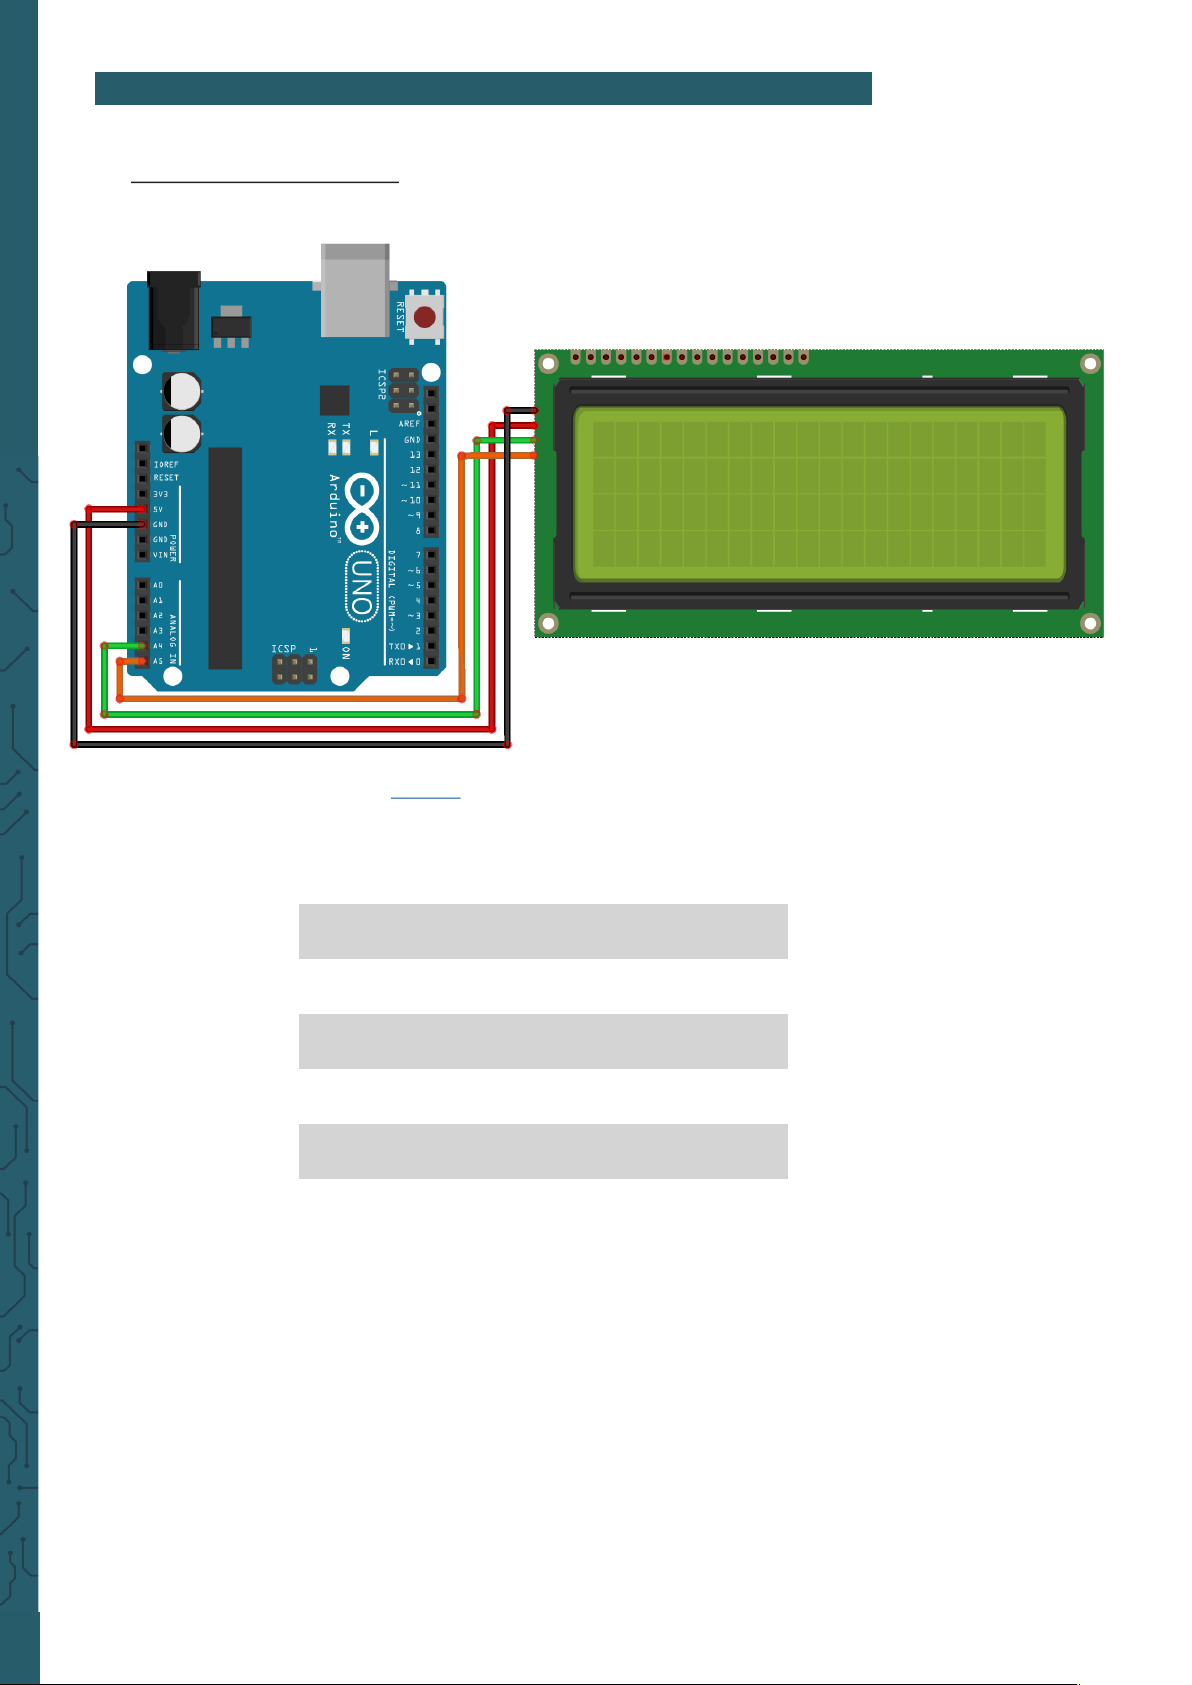
Connect the display to the pins of your Arduino like shown in the picture
or rather in the chart.
Arduino® Uno 20 x 4 LCD
GND GND
5 V VCC
SDA SDA
SCL SCL
This picture was made in Fritzing.
Page 3
www.joy-it.net
Pascalstr. 8 47506 Neukirchen-Vluyn
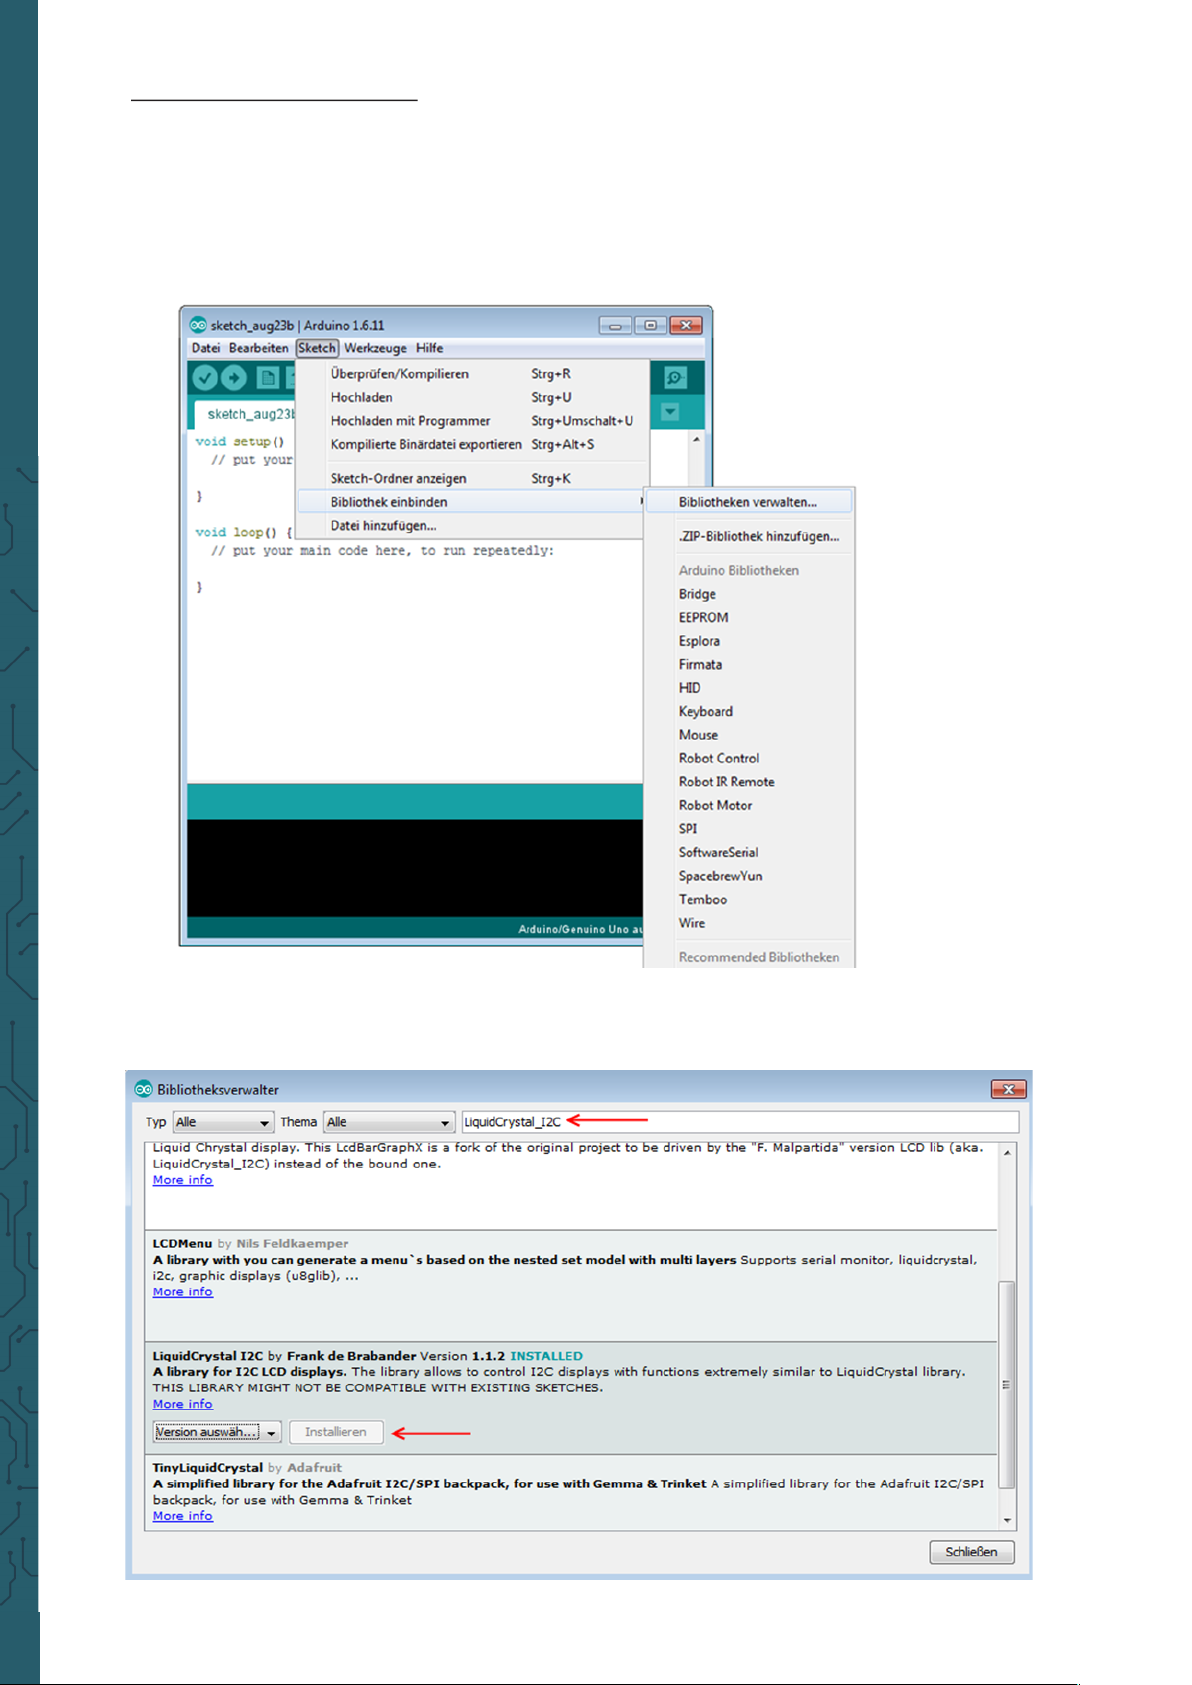
Installation of the library
Before you can transfer the code example to your Arduino, you must
install first the additional library LiquidCrystal_I2C.
This library allows you an easy and fast usage of the display.
Therefore, open the library manager on your Arduino soware.
Search now in the library manager for the LiquidCrystal_I2C library and
install it.
Page 4

www.joy-it.net
Pascalstr. 8 47506 Neukirchen-Vluyn
As soon as the library is installed, the installation of the display is finished. You can now transfer the code example which is described in the
next step and test the display.
Code example
In the following, you can use the code example to test the usage with
your display. Copy this example completely on your Arduino.
Because of the dierent hardware addresses of the display, you must use
the right address in the code.
Should your display not perform the desired action within the first try,
change the address in the provided lines.
#include <Wire.h>
#include <LiquidCrystal_I2C.h>
//-----Hardware Adressing----//In case of wrong function please comment out the up-
per line,
//and release the lower line
LiquidCrystal_I2C lcd(0x27,20,4);
//LiquidCrystal_I2C lcd(0x3F,20,4);
void setup()
{
lcd.init();
}
void loop()
{
lcd.backlight();
//output message
lcd.setCursor(0,0);
lcd.print(" joy-IT");
lcd.setCursor(0,1);
lcd.print(" ");
lcd.setCursor(0,2);
lcd.print(" I2C Serial");
lcd.setCursor(0,3);
lcd.print(" LCD");
}
Page 5

www.joy-it.net
Pascalstr. 8 47506 Neukirchen-Vluyn
3. USAGE OF THE RASPBERRY PI
Installation of the soware
Should you already have the latest Raspbian system on your Raspberry
Pi, you can skip this step and you can continue with the next step.
Install on your SD card the latest Raspbian with the help of the Win32-
Disk-Imager which you can find with the following link.
Connecting the display
Connect the display to the pins of your Raspberry Pi like shown in the
picture or rather in the chart.
This picture was made in Fritzing.
Page 6

www.joy-it.net
Pascalstr. 8 47506 Neukirchen-Vluyn
Installation of the libraries
As soon as the installation is finished and teh system is restarted, open
the terminal and perform the following commands:
Raspberry Pi 20 x 4 LCD
Pin 6 (Ground) GND
Pin 4 (5 V) VCC
Pin 3 (BCM 2 / SDA) SDA
Pin 5 (BCM 3 / SCL) SCL
sudo apt-get install python-pip python-dev build-essential
sudo pip install RPi.GPIO
sudo apt-get install python-imaging
sudo apt-get install python-smbus i2c-tools
If the I2C function is not activated on your Raspberry Pi, you must catch
this up in the settings.
Therefore, open the settings with the following command:
sudo raspi-config
In the just opened window choose the option
Interfacing Options
.
Page 7

www.joy-it.net
Pascalstr. 8 47506 Neukirchen-Vluyn
Here choose and activate
I2C
.
Aerwards, you must add the according enry into the module file.
Therefore, open the module file:
sudo nano /etc/modules
Add the following two lines at the end o the file:
i2c-bcm2708
i2c-dev
Save now the filw with the key combination CTRL + O. Aer that you can
leave the editor with CTRL+ X . Restart now your Raspberry Pi with the
following command:
sudo reboot
Now, we can download the LCD driver.
To allow you a as fast and easy beginning as possible, we use the
"I2C_LCD_driver.py" from DenisFromHR.
This is released by the GNU General Public License v3.0 and can be opened here.
As the first step, we create a new folder for the driver package and the
example script and download them aerwards (No significant changes to
the Script need to be done aer the download):
mkdir I2C-LCD && cd I2C-LCD
wget https://joy-it.net/files/files/Produkte/SBC-LCD20x4/20x4_LCD_MODUL.zip
unzip 20x4_LCD_MODUL.zip
Now you must read the I2C address.
Please note that the display must be connected first.
sudo i2cdetect -y 1
Page 8

www.joy-it.net
Pascalstr. 8 47506 Neukirchen-Vluyn
The output will show the following:
0 1 2 3 4 5 6 7 8 9 a b c d e f
00: -- -- -- -- -- -- -- -- -- -- -- -- --
10: -- -- -- -- -- -- -- -- -- -- -- -- -- -- -- --
20: -- -- -- -- -- -- -- 27 -- -- -- -- -- -- -- --
30: -- -- -- -- -- -- -- -- -- -- -- -- -- -- -- --
40: -- -- -- -- -- -- -- -- -- -- -- -- -- -- -- --
50: -- -- -- -- -- -- -- -- -- -- -- -- -- -- -- --
60: -- -- -- -- -- -- -- -- -- -- -- -- -- -- -- --
70: -- -- -- -- -- -- -- --
The just started test has recognized the I2C signal at the address 27. This
is the standard address of the display. But it also can be found at another
saving address. In such a case, you must change the saving address in the
settings of the driver to your own address.
Therefore, open the driver file with the following command:
sudo nano lcddriver.py
In the line with ADDRESS=0x27 , you must change the 27 to your own
saving address which was shown in the I2C test. Aerwards, you can
leave the editor with the frequently used key combination.
Communication with the display
The installation of the display is now finished. As the last step you can
now inspect the file, to edit it to your wishes, test the display or take it
directly into use.
sudo nano LCD.py
Page 9

www.joy-it.net
Pascalstr. 8 47506 Neukirchen-Vluyn
The text within the command
lcd.lcd_display_string
will be shown on the
display.
The number behind the text issues the line in which the text will be
shown in.
The text can be of course modified to your desires. The editor can be le
with the fundamental key combination.
Start now the code example with the following command:
sudo python LCD.py
import lcddriver
from time import *
lcd = lcddriver.lcd()
lcd.lcd_clear()
try:
while True:
lcd.lcd_display_string(" joy-IT", 1)
lcd.lcd_display_string("", 2)
lcd.lcd_display_string(" I2C Serial", 3)
lcd.lcd_display_string(" LCD", 4)
sleep(100)
except KeyboardInterrupt:
lcd.lcd_clear()
Page 10

www.joy-it.net
Pascalstr. 8 47506 Neukirchen-Vluyn
PR
4. OTHER INFORMATION
Our Information and Take-back Obligations according to the
Electrical and Electronic Equipment Act (ElektroG)
Symbol on Electrial and Electronic Products:
This crossed-out bin means that electrical and electronic products do not
belong into the household waste. You must hand over your old appliance
to a registration place. Before you can hand over the old appliance, you
must remove used batteries and replacement batteries which are not
enclosed by the device.
Return Options:
As the end user, you can hand over your old appliance (which has
essentially the same functions as the new one bought with us) free of
charge for disposal with the purchase of a new device.
Small devices, which do not have outer dimensions bigger than 25 cm
can be handed in for disposal independently of the
purchase of a new product in normal household quantities.
1. Possibility of return at our company location during our opening hours
Simac Electronics Handel GmbH, Pascalstr. 8, D-47506 Neukirchen-Vluyn
2. Possibility of return nearby
We will send you a parcel stamp with which you can send us your old
appliance free of charge. For this possibility, please contact us via e-mail
at service@joy-it.net or via telephone.
Information about Package:
Please package your old appliance safe for transport. Should you not
have suitable packaging material or you do not want to use your own
material, you can contact us and we will send you an appropriate
package.
5. SUPPORT
If any questions remained open or problems may arise aer your
purchase,we are available by e-mail, telephone and ticket
support system to answer these.
E-Mail: service@joy-it.net
Ticket-system: http://support.joy-it.net
Telephone: +49 (0)2845 98469 – 66 (10 - 17 o'clock)
For further information visit our website:
www.joy-it.net
Published: 14.07.2020
www.joy-it.net
SIMAC Electronics GmbH
Pascalstr. 8, 47506 Neukirchen-Vluyn
 Loading...