

Page 1
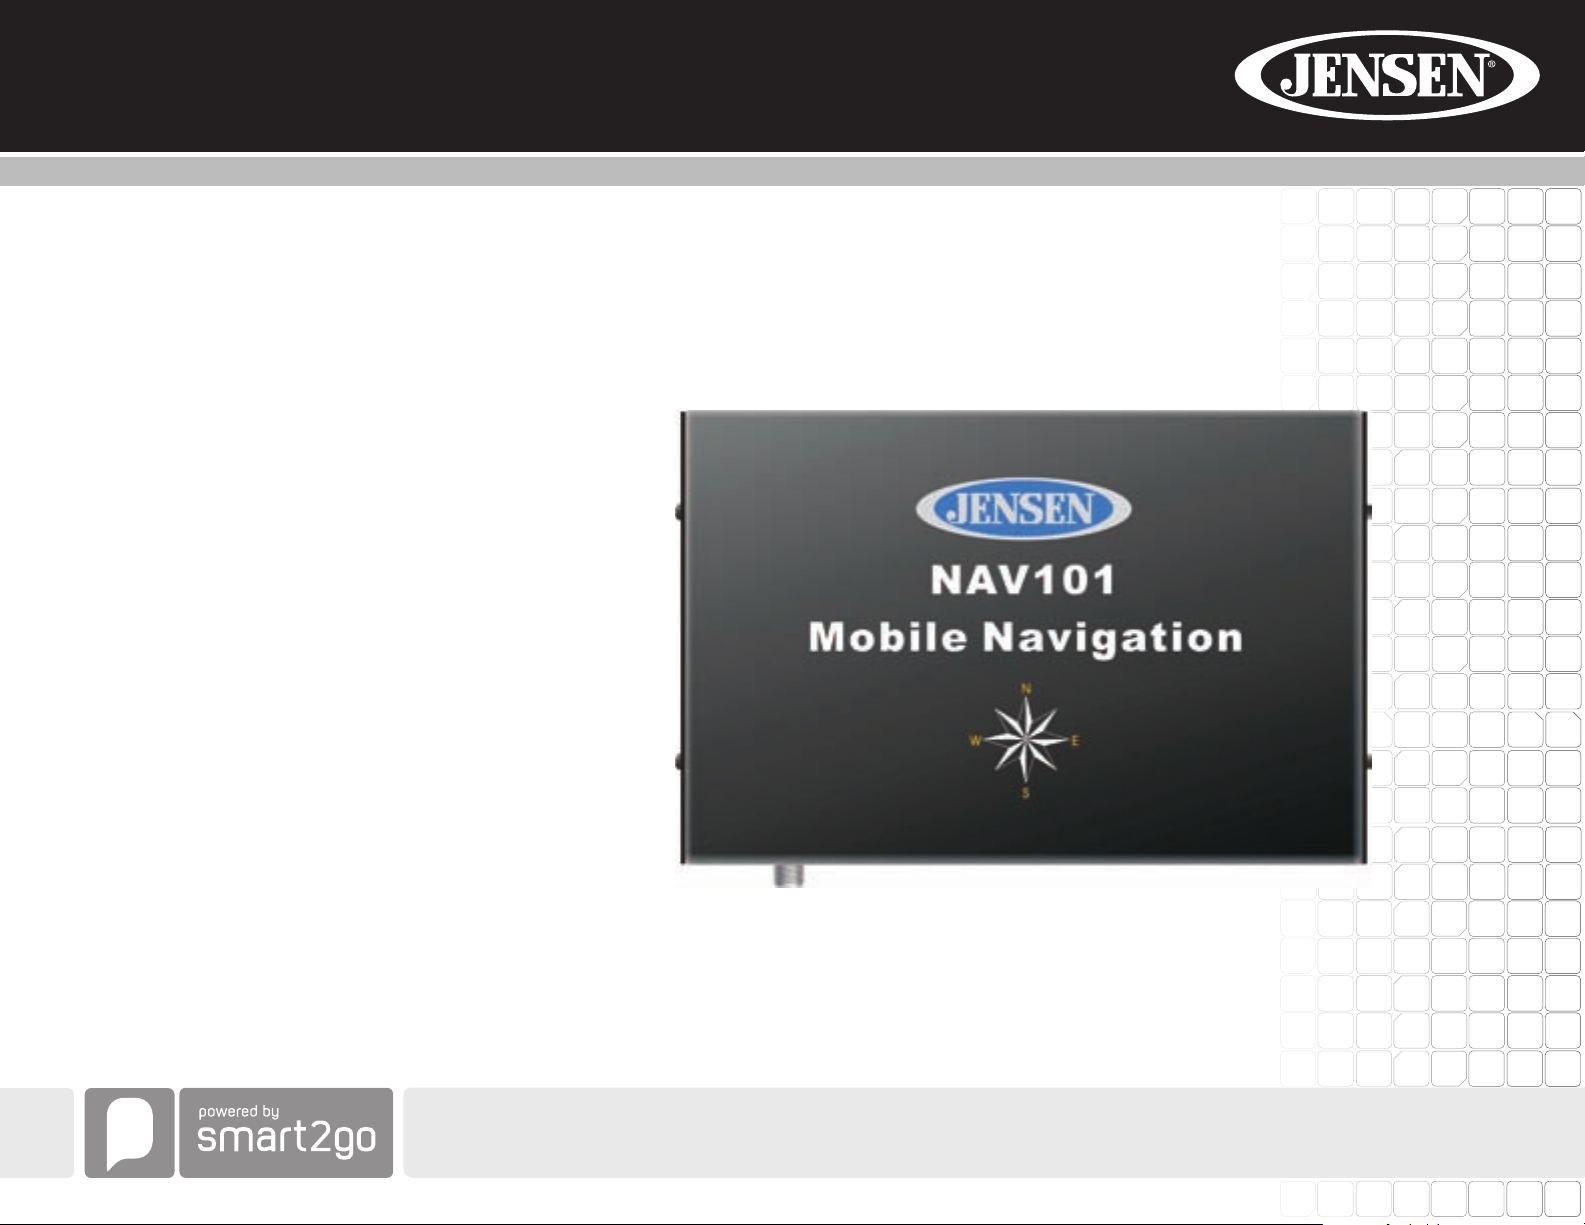
NAV101
Installation and Operation Manual
Page 2

Page 3

NAV101
CONTENTS
Thank you for choosing a Jensen product. We hope you will find the instructions in this owner’s
manual clear and easy to follow. If you take a few minutes to look through it, you’ll learn how to
use all the features of your new Jensen NAV101 navigation system for maximum enjoyment.
Introduction ........................................................................................................................... 1
Safety Information................................................................................................................. 2
Installation............................................................................................................................. 3
Getting Started...................................................................................................................... 5
Main Features....................................................................................................................... 6
Choosing and Finding Locations........................................................................................... 8
Navigating........................................................................................................................... 12
Planning a Route................................................................................................................. 13
Managing your Address Book............................................................................................. 14
Settings Menu..................................................................................................................... 16
Troubleshooting .................................................................................................................. 21
i
Page 4

NAV101
ii
Page 5

NAV101
INTRODUCTION
We hope that you enjoy using your new Jensen NAV101 navigation system. This manual is
designed to help you get the most out of your system. This navigation system leads you
straight to your destination. You can navigate and plan your route with an easy-to-use and
intuitive interface, plan your trip to suit your personal preferences and interests, and find and
save (bookmark) interesting destinations before you begin your trip.
Key Features
• S.M.A.R.T.TM - (Smart Mapping Avoids Routine Traffic) enables you to navigate around
heavy traffic areas with ease. (S.M.A.R.T. Route Guidance)
• Powered by gate5 / Nokia Smart2Go
• Teleatlas Map Data
• > 4 million POI (Point Of Interest)
• Speed Sensitive Zoom
• Enhanced Female TTS Voice Guidance Engine
• Standard Male / Female Voice Guidance Engine
• Turn by Turn Voice Guidance
• Back-Up Data DVD
Specifications
• Samsung S3C2440 (ARM9) 400MHz Processor
• 64MB SDRAM
• 32MB Nand Flash
•Win CE 4.2
• Storage - External SD Card Slot (2GB Card Included w/ Map Data)
• Sirf lll 20 Channel GPS antenna
• Operating Voltage - Received from Head Unit (11 ~ 16VDC, Negative Ground)
About GPS and GNSS
The NAV101 is a vehicle GPS (Global Positioning Satellite)-based navigation device which
utilizes digital map data to guide you from your selected location A to location B , using location
information obtained from a Global Navigation Satellite System (GNSS).
A GNSS consists of a set of satellites that transmit high-frequency radio signals containing
time, direction, and distance data that can be picked up by a receiver, allowing users to
pinpoint their precise locations anywhere around the globe. Navigation Satellite Receivers
(GPS devices) use this transmitted information to calculate an exact location on the earth.
Every point on Earth can be identified by latitude and longitude. The receiver uses the
information sent by at least three satellites and determines the coordinates of the receiving
device.
By comparing the time the signals were transmitted from the satellites and the time they were
recorded, the receiver calculates how far away each satellite is. The distance of the receiver
from three or more satellites reflects its position on the surface of the planet. Using these
distance measurements, the receiver might also be able to calculate speed, bearing, trip time,
distance to destination, altitude, etc. The GPS position may be displayed as a point on a digital
map (at least three satellites' signals must be received) and as the GPS device moves the
corresponding trace is displayed as well.
Please keep in mind that although the radio signals of navigation satellites will pass through
clouds, glass, plastic, and other lightweight materials, satellite-navigation receivers will not
work underground or in some enclosed spaces.
Smart2Go Navigation / Tele Atlas Map Data
The NAV101 2GB SD card is pre-loaded with the Smart2Go navigation engine and Tele Atlas
map data. The map data covers the continental US, Canada, Alaska, Hawaii and Puerto Rico.
Parts List
• NAV101 navigation module
• SIRF III Antenna with magnetic mount
• Left and right mounting brackets
• Four rubber feet (to affix to the bottom of the NAV101 in the recessed area near each
corner)
• SmartBus cable (used to connect the NAV101 to the Jensen navigation-ready radio)
• Four 6mm (.25in) screws (to secure the left and right mounting brackets to the NAV101
navigation module)
• One 2 Gigabyte SD Card pre loaded with map/navigation software
• Two 11mm (.4in) screws (for fastening the SmartBus cable to the radio and NAV101)
• DVD with backup software for map data and navigation
1
Page 6

SAFETY INFORMATION
When the Jensen NAV101 is first turned on, the following message appears:
You must agree to the above notice before operating the NAV101.
The following safety rules must be followed to prevent accidents that can result in injury or
death to yourself or others:
• The driver should operate the device only when the vehicle is stopped. Only a vehicle
passenger should operate the device while the vehicle is moving. When driving, the need
to view the display is minimal. Voice prompts will guide you to your destinations.
• It is your responsibility to comply with all traffic laws.
• The NAV101 is designed to assist you in the process of reaching your destination. It is not
a substitute for attentiveness and good judgement. It is your responsibility to disregard
any unsafe, hazardous, or illegal route suggestions.
• The device does not include, analyze, process, consider, or reflect any of the following:
a. Legal restrictions (such as vehicular type, weight, height, width, load and speed
restrictions);
b. Road slope or grade, bridge height, width, weight, or other limits;
c. Population density;
d. Neighborhood quality or safety;
e. Availability or proximity of law enforcement, emergency rescue, medical, or other
assistance;
f. Construction work zones or hazards;
g. Road or lane closures;
h. Road, traffic, or traffic facilities' safety or condition;
i. Weather conditions;
j. Pavement characteristics or conditions;
k. Special events;
l. Traffic congestion.
• While every attempt is made to ensure that the database is accurate, roadways, points of
interest, and business and service locations may change over time.
• Do not use the NAV101 to navigate to a police station, hospit al, etc. in an emergency. Call
911 for assistance.
NAV101
• Laws in some states prohibit wearing stereo headphones or may prohibit use or
placement of a navigation device while operating a motor vehicle. Please contact your
state's Department of Motor Vehicles for information.
2
Page 7
NAV101
INSTALLATION
The NAV101 can be used with a Jensen navigation-ready DVD unit (VM9412, VM9512,
VM9022).
Warnings
• Do not install components in areas which are susceptible to rain, moisture, direct sunlight,
extreme heat or cold, excessive dust, dirt or humidity.
• Do not install the NAV101 where it will obstruct the driver’s view or interfere with the
vehicle’s operating system or safety features (air bags, hazard light buttons, etc.).
• Use only installation parts and hardware provided with the unit. Use of other parts can
cause malfunction and possible damage to your navigation system.
• This product should only be installed in vehicles with a 12-volt battery with negative
grounding. Check the battery voltage of your vehicle before installation.
• To avoid shorts in the electrical system, be sure to disconnect the negative (–) battery
cable before beginning installation.
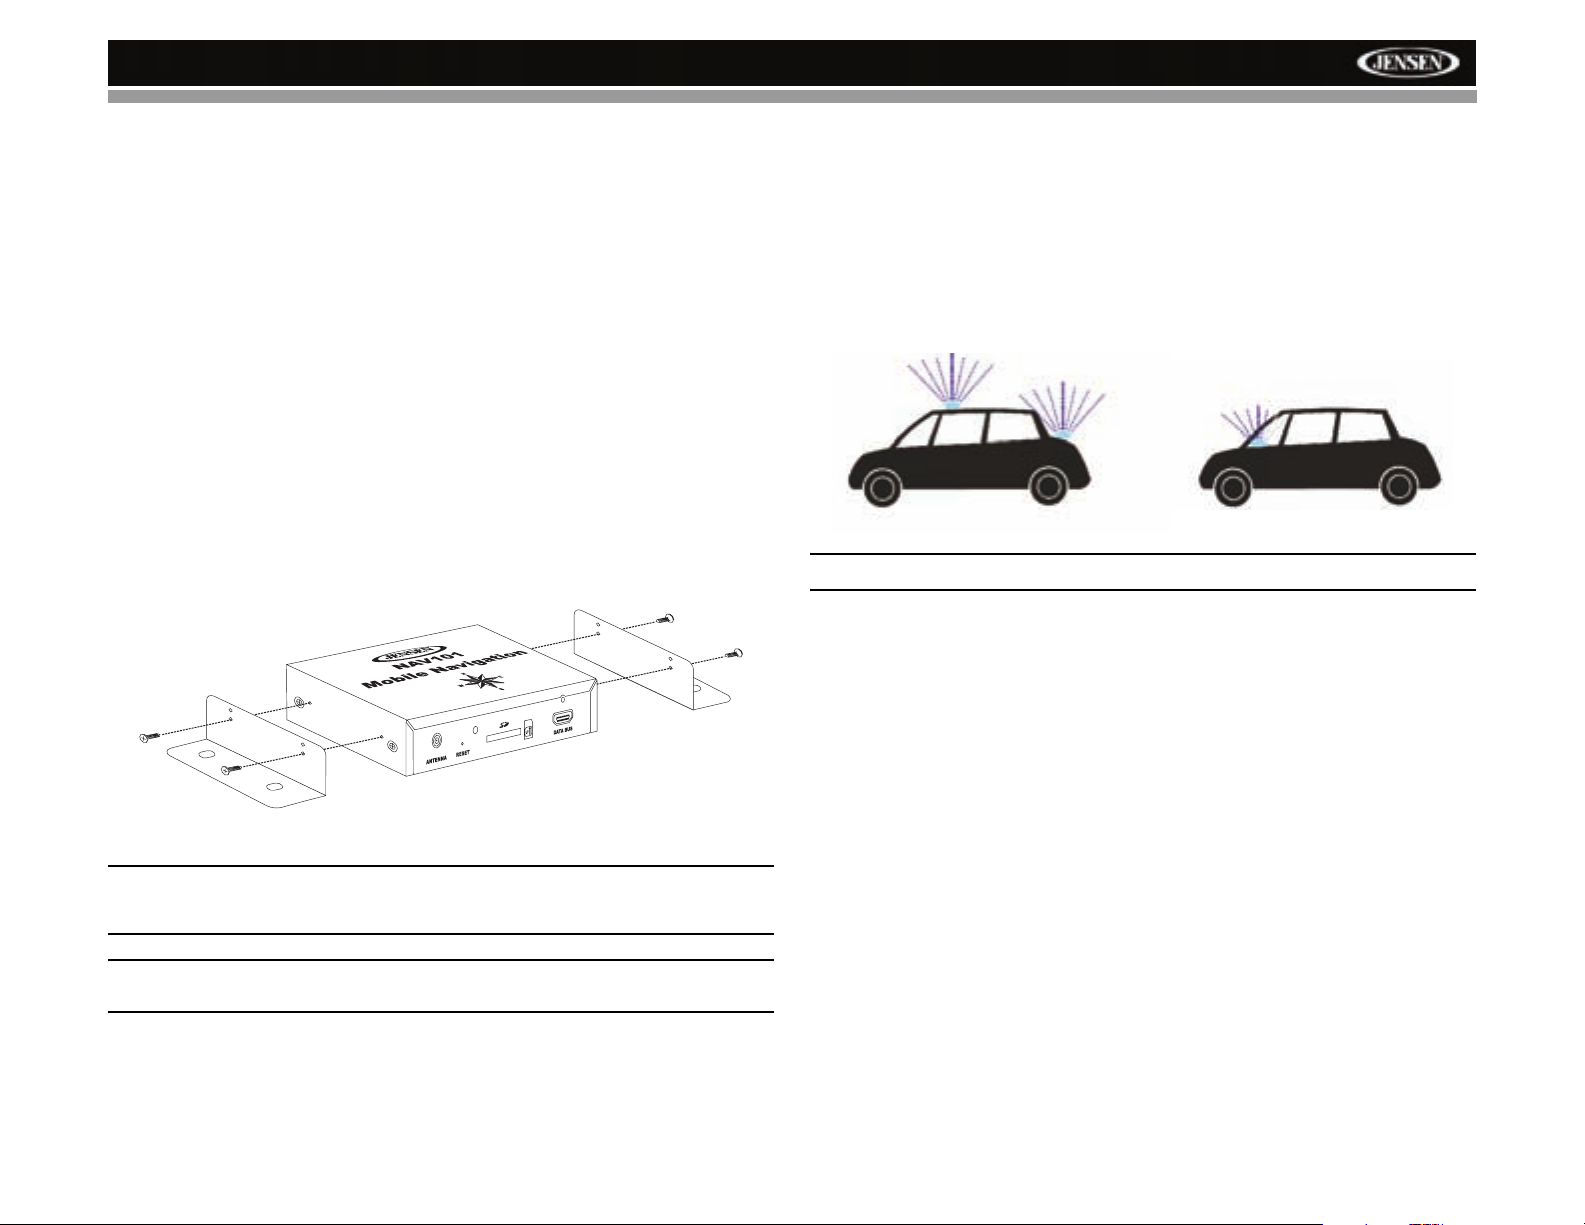
NAV101 Placement
The NAV101 should be installed under the back or front seat. It can also be installed in the
trunk, if necessary. Do not install the NAV101 where it will come in contact with water or direct
sunlight. Mount the supplied brackets to the NAV101 using the 4mm (.25in) screws provided.
Antenna Placement
Since the NAV101 uses GPS technology for navigation, proper antenna placement is crucial
for optimal performance of the GPS receiver. When using GPS antennas, the antenna plane
should be parallel to the geographic horizon. There should be nothing between the antenna
and the sky to ensure a direct line-of-sight between the antenna and available satellites.
The preferred antenna location is on the top of the car on the roof or trunk area. When placed
on the dashboard, performance may be reduced due to obstruction caused by the window or
roof.
NOTE: Do not cut the GPS antenna cable to shorten or lengthen it.
NOTE: Be sure to install the NAV101 in such a way that the SD card slot is accessible
after install, allowing for the removal/insertion of the SD card for future changes to map
data or upgrades.
WARNING! Be sure to secure all wires/cables safely away from the steering wheel, shift
lever, and gas or brake pedal.
3
Page 8
GPS Antenna
NAV101
Mobile Navigation
N
E
W
S
NAV101
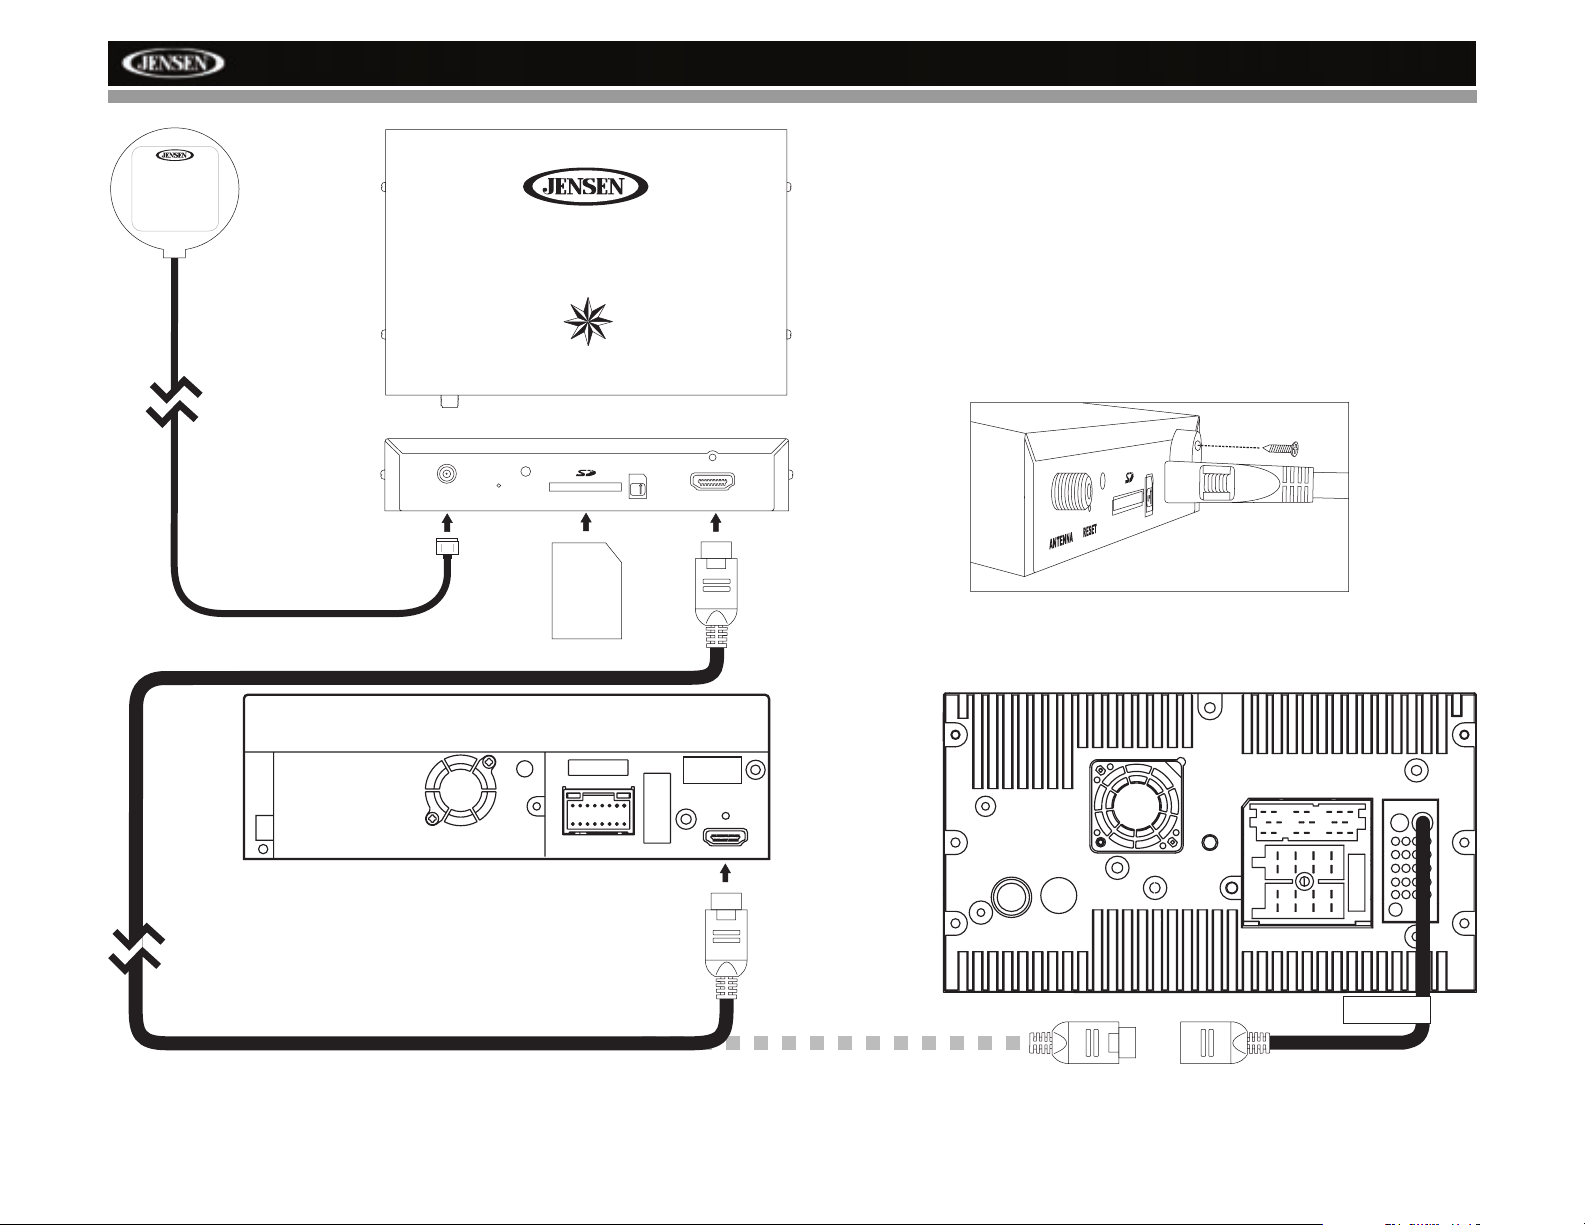
Connections
1. Insert one end of the Smartbus cable into the “DATA BUS” slot on the side of the NAV101
and secure it with a 11mm (.4in) screw (provided). Connect the other end of the cable to
the NAV101 input on the back of your Jensen navigation-ready head unit (VM9412,
VM9512, VM9022). If using a VM9412 or VM9512, secure the cable to the radio using a
11mm (.4in) screw. The VM9022 has a cable to cable connection and does not require an
anchor screw.
2. Attach the GPS Antenna to the “ANTENNA” jack on the side of the NAV101.
3. Insert SD card into the SD card slot and gently press the card in against the spring latch
until it stops, then release. The card will "lock" firmly into place inside the SD card slot.
ANTENNA
RESET
SD
CARD
Jensen VM9412/VM9512
UP
DATA BUS
Secure Smartbus Cable
with 11mm (.4in) Screw
Jensen VM9022
SMB
NAV Bus
4
Page 9

NAV101
GETTING STARTED
The initial GPS location lock is best established when your vehicle is parked. If the device is in
motion, the signal can take longer to initially connect. Once the initial coordinates are
established, the software will follow you as you move and navigate.
NOTE: It may take up to 5 minutes to establish the first connection. Subsequent
connections will be faster (30 seconds to 1 minute), but if you have not used the unit for
several days or are very far away from the last location you used it, it may take up to 5
minutes again to find a strong signal.
Set time zone
Your NAV101 automatically determines the time through the GPS signal. However, you must
set your time zone.
• Select your time zone from the list. You can change the time zone later (see “General
Settings” on page 16).
• Press the confirmation icon.
View Safety Precautions
Next, a screen with safety precautions will be shown.
1. Read the safety precautions.
2. Press “I Agree” to continue to the Main Menu.
5
Page 10

MAIN FEATURES
G
s
NAV101
Main Menu
The main menu is your central point of access to all functions of your NAV101. It allows you to
set your destination, manage your favorites and control all settings of your device.
The “Main Menu” consists of the following options:
• View Map: Press to view your current location on the Tracking Map.
• Drive to...: Choose your destination – either by searching for an address, choosing an
entry from the POI (point of interest) directory, selecting a location from the map, or by
choosing a destination from a saved list of recently visited locations or favorites (see
“Choosing and Finding Locations” on page 8).
• Settings: Configure your navigation to suit your needs. Define general settings (e.g. time,
language, or system of measurement), configure your map (e.g. 2D or 3D mode, day or
night mode, map complexity) or load a map of a different region, set the route options
(e.g. choose to avoid or allow toll roads or ferries, or change the volume (see “Settings
Menu” on page 16).
In Tracking mode, the map follows your actual position (GPS position), displaying information
about your geographic position, your speed, etc. The GPS position is indicated by a green
arrow.
GPS Signal Strength
Speed
Time
eographic
Information
Back Button
Use a stylus or your finger to browse the map and enter Browsing mode. The selected position
will be identified by a crosshair cursor. The screen is highlighted in orange when in Browsing
mode.
Business Icons
(Press for information)
Menu Button
Zoom Out
Zoom In
Map Tracking and Browsing
The map is the core component of your NAV101. It will be centered on your current location by
default, provided you have a GPS connection. You can browse the map, display information
about the different locations shown on it and choose them for routing and navigating. The map
knows two basic states, the Tracking and the Browsing mode.
Crosshair
Compass
Crosshair Location
6
POI Icon
Page 11

NAV101
NOTE: Pressing an icon on the map opens an overlay window with information about
the selected item.
• To zoom in or out, press the + or – icons. After pressing one of the icons, the zoom slider
will appear, enabling smooth zooming.
• With the compass icon (in the bottom left hand corner) you may adjust the orientation.
• If you want to return to the tracking mode, press the button.
Navigation Screen
The navigation screen displays your route (in blue) and your surroundings. A green arrow
identifies your current position. The red arrow will indicate the direction of your next turn. The
upcoming maneuver is also visualized in the upper left corner, along with the distance to that
turn. When you come up to a turn, you will hear a voice command at the appropriate time.
Next Maneuver
Distance to Next Maneuver
Speed
Current Time/
Estimated Arrival Time
Distance to Destination
On the left, additional information, including the current and estimated arrival time and the
distance to your destination, is displayed.
For one-way streets, the transit direction is indicated with a red arrow.
For more information about navigation, see “Navigating” on page 12.
Next Turn/Junction/Exit Number
Next Turn
Current Position
7
Page 12

CHOOSING AND FINDING LOCATIONS
This section describes the different ways of finding and choosing locations. You can search for
an Address, search POI (Point of Interest) directories and city guides, select a recent
destination or choose from your Address Book, or select a location on the Map.
NOTE: If a route is in progress when you exit the NAV101 system, the unit will prompt
“Do you want to resume the last route?” when you resume operation.
Finding an Address
Find addresses through the Address search. Just enter information about the desired target,
select a hit from the results list and use the address found for different purposes, like showing
it on a map, planning your route, and navigating.
1. From the main menu, press Drive to....
2. Press Address. The “Find Address” window will be displayed:
• Your NAV101 offers a convenient interactive look-ahead search function to prevent
misspelling. Only keys that lead to a search result can be pressed – all others are
greyed out.
NAV101
• After entering the second character, only letters that can be used to spell an existing
destination will be available for selection of the third character, the fourth character,
and so on.
• Continue entering characters until you have narrowed down the search to only one
result, or press the OK button to display a list of search results, from which you can
choose.
• If at any point you want to backspace and delete characters, press the backspace
button (<-) on screen.
• To add a space, press the space bar ( _ ).
• If you need to enter an apostrophe ('), use the space key instead.
3. Select a State/Prov.
a. Press the “State/Prov.” data field to access the “Select State” screen.
b. Choose a state from the list by pressing to highlight it. Use the scroll bar on the right
of the screen to view all of the choices.
c. Press the OK button to choose the highlighted State/Prov. and return to the “Find
Address” screen.
4. Select a City.
a. Press the “City” data field to access the “Enter...” screen.
b. Use the on-screen keypad to enter the City name. If the first two characters are not
part of an existing City name, “No entries found” appears on the screen.
c. Press the OK button to select the entered name or select from a list of matches
based on the letters you entered.
d. Press the OK button to choose the highlighted City and return to the “Find Address”
screen.
5. Select a Street.
a. Press the “Street” data field to access the “Enter...” screen.
b. Use the on-screen keypad to enter the Street name. If the first two characters are not
part of an existing Street name, “No entries found” appears on the screen.
c. Press the OK button to select the entered name or select from a list of matches
based on the letters you entered.
d. Press the OK button to choose the highlighted Street and return to the “Find
Address” screen.
6. Select a street No.
8
Page 13

NAV101
a. Press the “No.” data field to access the “Enter...” screen.
b. Use the on-screen keypad to enter the street Number.
c. Press the OK button to enter the street Number. If the Number you entered is not an
existing street Number, “House number not found. Street will be used for
destination.” appears on the screen. You will automatically return to the “Find
Address” screen.
7. Press the MENU button to view the following screen:
• To navigate to the location, select Navigate.
• To use the location for planning a route, select Waypoint.
• To save the location as a bookmark, select Save.
• To view the location on the map, select On Map.
Searching for and Choosing a POI (Point Of Interest)
The POI finder allows you to quickly find points of interest, like gas stations and rest aurant s , in
a database of millions of POIs. These places can be near your current position (the default) or
at any other location.
Browse POIs
1. From the main menu, press POI Search. The “POI Search” window will be displayed:
2. Select an area for the POI search. Although the text in the white “Where?” box shows
your current location, you must press the Where? button to set your current location for
the POI search or enter a new location.
NOTE: The first time the POI search is used, the default location will be New York City.
You must press the Where? button to choose your current location or specify another
location.
a. To search for a POI in another location, press the “Where?” button. A screen with
navigation options appears.
b. Press the corresponding button to search for a new address using the “Enter...”
screen (Find Address), My Address Book, or your current GPS Position. To skip this
3. On the “POI Search” screen, select one of the following POI categories: Automotive,
step and return to the “POI Search” screen press Back.
Overnight, Dining, Sights, Shopping, Leisure, Service, Transport. A menu with subcategories will be shown.
9
Page 14

NAV101
4. Select a sub-category from the POI Search list. A list of POIs will be shown.
• Use the scroll bar on the right side of the screen to see all of the choices.
• To return to the previous category, press the button.
5. Press a POI to select it and display the following navigation options:
Choosing a Location on the Map
1. From the “Main Menu”, press View Ma p . The “Map - Tracking” window will be displayed,
indicating your last location:
2. Press any part of the map area to enter browsing mode and navigate the map. During
browsing, the map screen borders will turn orange. Use the +/– buttons to zoom in/out.
Point the cursor at any location on the map to view location information in a pop-up box.
• To navigate to the location, select Navigate.
• To use the location for planning a route, select Waypoint.
• To save the location as a bookmark, select Save.
• To view the location on the map, select On Map.
•Press Description to view detailed information about the chosen POI, including
address and telephone number, when available.
Search POIs
1. To search for a POI, return to the “POI Search” screen and press the ABC button. The
“Enter...” screen will appear.
2. Enter the search keyword (at least three characters), and press the OK button. A list of
POIs beginning with the search keyword appears on the screen. (If there are no POIs
containing your search criteria, “No entries found.” appears on the screen.)
3. Press the POI to select it and view navigation options. Continue navigation as instructed
in the previous section.
3. Press the MENU button to view navigation options for the selected destination.
Navigating to a Recent Location
1. From the “Main Menu”, select Drive to....
10
Page 15

NAV101
2. From the “Drive to...” menu, select Recents. A list of recent locations will appear on the
screen:
3. Press to select a recent destination from the “Recents” list. (Use the scroll bar on the right
side of the screen to see all of the choices.) A screen with navigation options appears.
4. Continue navigation as instructed in the previous sections.
NOTE: The “Recents” list stores the last 15 addresses or destinations. After 15 entries,
the oldest destination will be deleted and the newest entry added to the top of the list.
Recent addresses cannot be deleted manually.
Choosing a Location from your Address Book
1. From the “Main Menu”, select Drive to....
2. From the “Drive to...” menu, select My Address Book. The “My Address Book” screen
will be displayed:
5. Continue navigation as instructed in the previous sections.
3. Select one of the following Address Book categories: Home and Work, Favorites, Trips.
The “Home and Work”, “Favorites” or “Trips” screen will appear, depending on your
selection.
4. Press a bookmarked location to select it and display available navigation options.
11
Page 16

NAVIGATING
The powerful navigation capabilities of your NAV101 will guide you along the shortest or
quickest route from A to B – with voice commands and in 3D (optional).
To begin navigation, select a location using the Drive to... feature (see “Choosing and Finding
Locations” on page 8).
Using the Guidance Menu
To view available menu options during navigation, press the MENU button. The “Guidance
Menu” appears on the screen:
NAV101
Browsing the Map During Navigation
You can browse the map while navigating without interrupting the current route – you will still
be guided through voice commands.
• To browse during navigation, simply touch the "map" (the screen) and the Map Browsing
feature is automatically activated. During browsing, the map screen borders will turn
orange until the Back button is pressed to return to the guide.
• Press the button to return to on-screen navigation.
Alt. route
With this option, you can choose to block the calculated route for a given distance (e.g., 0.5
mile) and force an alternate route. Simply tap on the icon which shows the desired distance to
block. Your route will be recalculated, and the previous route will be discarded for the given
distance.
Turn by Turn
Opens the list of the waypoints (turns) along your route.
Save
Save your present position as a favorite.
Volume
Alter the volume of the voice commands.
Search (POI)
Redirect your route by adding a point of interest (POI) stop, e.g., a gas station.
Settings
Change the device settings as described in “Settings Menu” on page 16.
12
Page 17

NAV101
PLANNING A ROUTE
This section describes the route planning feature. This feature allows you to plan your route in
advance, choosing multiple stopovers along your journey.
1. To begin navigation, select a location using the Drive to... feature (see “Choosing and
Finding Locations” on page 8).
2. Select Waypoint to view the “Destination List”, where you will see the location you just
entered.
3. Press the + icon to add a stopover to your route. The “Choose stopover” screen appears:
6. Once you have chosen your route, press the MENU button in the bottom right-hand
corner of the screen. The following options are available:
• To begin navigation, press Start Navi. The display will switch to the navigation map.
• To simulate the planned route, press Simulate. The device will calculate the route
based on a user entered destination, but not actually perform navigation guidance
based on GPS signals. This setting is primarily used for preview or for checking
various routes and turns.
• To calculate the route, press Routing. Once the route is calculated, the “Route
Summary” will be displayed. Select an item from the “Route Summary” to display the
“Turn by Turn” list. When you press (highlight) a turn, the system will prompt “Do you
4. Choose stopovers like your home or work addresses, a favorite, a point of interest, a
recent location, or you can search for an address or pinpoint a destination on the map.
5. After adding stopovers, you can modify your trip using the following features:
• Use the + icon to choose additional stopovers.
• To change the order of the stopovers, select a stopover and then use the up and
down arrows to move it up/down in the list.
• Use the Trash icon to delete a selected stopover.
want to delete this waypoint?”. Choose Yes or No. Press the button to
view the route beginning with the highlighted turn.
• To save the route as a favorite trip, press Save (see “Favorites” on page 15).
• To return to the previous screen, select Back.
NOTE: When planning a route, you can select the Waypoints option to add or delete
stopovers on your trip. When adding a new beginning or ending point, the system will
not automtically eliminate stopovers. The unwanted stops must be manually removed
by selecting them and pressing the Trash can icon.
13
Page 18

MANAGING YOUR ADDRESS BOOK
The Address Book allows you to save your home and work locations, as well as other frequent
destinations for easy recall. After entering an address or searching for a POI, you can choose
the Save option to bookmark your selection, eliminating the need to perform repeated
searches.
To access your Address Book, select Drive to... from the “Main Menu”, and then select My
Address Book. The “My Address Book” screen will be displayed:
Home and Work
To access the “Home and Work” screen, press the Home and Work button.
NAV101
set the initial default address for work or home, press Home or Work and then choose one of
the following options:
• To return to the previous screen, select Back.
• Select Address to open the “Find Address” screen and enter the address (see “Finding
an Address” on page 8).
• Select GPS Position to bookmark your current position as your Home or Work address.
• Select Recent to choose your Home or Work address from a list of recent locations.
If the address is already set, press Home or Work to choose from the following options:
If no home address has been set, you are prompted to set one. Y ou can choose it by searching
for an address through your current GPS position or by choosing a recently visited location.To
• To navigate to the location, select Navigate.
• To use the location for planning a route, select Waypoint.
• To change the bookmarked location, select Edit.
• To view the location on the map, select On Map.
• To return to the previous screen, select Back.
• To erase the current saved location, select Delete.
• To erase both Home and Work locations, select Delete all.
To modify or navigate to/from an address once it is saved, select the home or work address
and then press the MENU button to select from available options.
14
Page 19

NAV101
Favorites
To access your list of favorites, press the Favorites button. The “Favorites” screen appears:
NOTE: Use the scroll bar and arrows on the right side of the screen to move up and
down the list and view all entries.
Select an item and then press the MENU button to choose from the following options:
NOTE: All user information such as settings, bookmarks and recently visited locations
are stored on the SD memory card and not on the device.
Trips
To access your list of saved trips, press the Trips button. The “Trips” screen appears:
Select a trip and then press the MENU button to choose from the following options.
• To navigate to the location, select Navigate.
• To use the location for planning a route, select Waypoint.
•Press Sort to sort all entries into alphabetical order.
• To view the location on the map, select On Map.
• To return to the previous screen, select Back.
• Select Rename to go to the “Change bookmark name” screen and rename the selected
bookmark.
• To erase the current saved location, select Delete.
• To erase all saved locations, select Delete all.
• To calculate the route for the selected trip, select Navigate.
• To edit existing or add new stopovers to the selected trip, select Edit Stopovers.
• Select Rename to go to the “Change trip name” screen and rename the selected trip.
• To erase the current saved trip, select Delete.
• To return to the previous screen, select Back.
• To erase all saved trips, select Delete all.
15
Page 20

SETTINGS MENU
When using the NAV101 for the first time, it is recommended that you customize the system
parameter settings. For example, regarding navigation, you can choose to avoid or allow toll
roads or ferries or enable S.M.A.R.T . routing. You can also edit display settings, including 2D or
3D mode, day or night mode, map complexity, etc.
To get started, choose Settings from the “Main Menu”.
NAV101
• Press Set Time to select the appropriate time zone from the “Time zone” menu (use the
up/down arrows and scroll bar to view the entire list). Press the OK button to confirm and
return to the “General Settings” menu.
• Press Miles/Kilometers to change the system of measurement.
• Press About to view information about the application.
You can always press the button to return to the previous screen.
General Settings
Select General Settings to modify the following options.
•Press Language to view the “Language” screen. Press the “USA” (English) icon and then
select one of the following voice types for voice commands: English_US female (TTS),
US English Female, US English Male
Map Settings
Select Map Settings to modify the following options.
16
Page 21

NAV101
• To select which and how many icons are displayed on the map, press Display POI.
• Check the boxes of any category you want to have displayed on the map. Uncheck
those that should be hidden. Note that this will NOT affect any searches that you
perform.
• To apply your settings, press the OK button.
• Repeatedly press the Day/Night/Automatic button to toggle between day and night
modes. Choose Automatic to allow the mode to be chosen automatically based on the
time of day.
DAY MODE
Route Settings
Select Route Settings to modify the following options
Table 1: Route Settings
Calculate route
based on the fastest
time.
Use toll roads when
calculating routes.
Calculate route
based on the shortest distance.
Do not use toll roads
when calculating
routes.
NIGHT MODE
• Select Maps to select the appropriate map (USA). If you have map data for different
regions on your memory card, select the name of the current region. All available maps
on the memory card will be listed.
•Press the 2D/3D button to toggle between 2D and 3D display mode.
• Press to toggle the map display between Track Up and North Up.
• Track Up: This mode will display the map with the vehicle direction always pointing
up. The map will rotate and move accordingly during navigation while the green
arrow representing the vehicle stays up and still.
• North Up: This mode will display the map with North always pointing upward. The
map will not rotate during navigation. The green arrow representing the vehicle will
rotate and move according to the vehicle location on the map.
Use highways as
much as possible
when calculating
routes.
Use ferry travel
when calculating
routes.
Enable Smart
Routing (see
“Traffic Avoidance Technology
(Smart Routing)”
on page 18.)
Press each button to toggle between the options listed in Table 1.
17
Try not to use highways when calculating routes.
Do not include ferry
travel when calculating routes.
Disable Smart
Routing.
Page 22

NAV101
Traffic Avoidance Technology (Smart Routing)
Traffic Avoidance Technology (Smart Routing) uses a massive quantity of data that has been
compiled over many years to provide a 'rolling average' database of the speeds that traffic
actually moves on any given road within the continental USA.
When you enter the settings screen of the software, you are asked to select routing options.
The Fastest Time setting takes into account the posted speed limits of the various roads and
streets along a route in order to determine the correct route. The Shortest Distance setting
takes into account the actual distance of the route, without regard to the types of roads or
streets or their posted speed limits.
While the Shortest Distance option is an obvious calculation, the Fastest Time setting can
result in a route that is impacted by rush hour tie-ups.
Smart Routing considers the 2 year rolling average of the actual speed of traffic along each
roadway and further considers hour of day and day of week.
In short, Smart Routing does for you what anyone with perfect local knowledge would do –
selects a route that best avoids unpleasant traffic tie-ups.
Volume
From the “Settings” menu, select Volume to modify the volume of voice commands.
• Press the + button to increase the volume.
• Press the – button to decrease the volume.
• Press the Mute button to silence or resume the voice command volume.
18
Page 23

NAV101
TROUBLESHOOTING
Table 1: Troubleshooting
Problem Cause Corrective Action
I can’t find an address Address spelled incorrectly Please make sure you have correctly spelled your entry. If you do not know how an address is spelled, sim-
I cannot get a good signal Poor antenna placement If you have problems getting a satellite fix with GPS (you can see how many satellites are being received on
The NAV101 stops responding Unknown Turn the unit off and back on. If this does not help, reset the unit by using a small metal object to press the
ply enter the parts of the address about which yo u are ce rt ain - e.g. "Brook" fo r Brooklyn in New York. Then
browse the results list and look for the address. Also make sure th at the cit y in which you are looki ng fo r an
address is correct. Sometimes the official postal address dif fers fr om the address you are looking for. In that
case, search for a known address nearby and browse the map.
the main menu at the bottom left), please make sure yo u are out side and t he GPS an tenna has good 'visibility' to the open sky. Some models also support an additional external active antenna. Please consult the
hardware manual of your device to get further information on how to obtain a GPS fix.
RESET button located on the side of the NAV101 unit between the ANTENNA connection and the SD card
slot .
19
Page 24

NAV101
20
Page 25

Limited Warranty DO NOT RETURN THIS PRODUCT TO THE STORE
CD or Multimedia Radios/Headunits/Navigation
Audiovox Electronics Corporation (“the Company”) is committed to
quality and customer service, and are pleased to offer you this
Warranty. Please read it thoroughly and contact the Company at 1-800323-4815 with any questions.
Who is covered?
The Company extends this warranty to the original retail purchaser of products
purchased through an authorized Audiovox retailer in the U.S.A., Puerto Rico or
Canada. This warranty is not transferable or assignable. Proof of purchase is
required in the form of an original sales receipt.
What is covered?
The Company warrants that should this product or any part thereof, under normal
use, be proven defective in material or workmanship within 12 months from the
date of original purchase, such defect(s) will be repaired or replaced with a new or
reconditioned product (at the Company's option) without charge for parts and
repair labor.
What is not covered?
This Warranty does not cover the following:
• Damage incurred during shipping or transporting the product to the
Company or a service center
• Elimination of car static or motor noise
• Defects in cosmetic, decorative or non-operative structural parts
• Correction of antenna problems
• Costs incurred for installation, removal or reinstallation of the product
• Consequential damage to compact discs, USB devices, digital media
cards, accessories or vehicle electrical systems
• Damage caused by improper installation, mishandling, misuse, neglect,
accident, blown fuse, battery leakage, theft or improper storage
• Products whose factory serial number/bar code label(s) or markings
have been removed or defaced
• Damage resulting from moisture, humidity, excessive temperature,
extreme environmental conditions or external natural causes
Please review the “Care and Maintenance” section of your Installation
and Operation Manual for additional information regarding the proper
use of your product.
Limitations
THE EXTENT OF THE COMPANY'S LIABILITY UNDER THIS WARRANTY
IS LIMITED TO THE REPAIR OR REPLACEMENT PROVIDED ABOVE AND,
IN NO EVENT, SHALL THE COMPANY'S LIABILITY EXCEED THE
PURCHASE PRICE PAID BY PURCHASER FOR THE PRODUCT.
This Warranty is in lieu of all other express warranties or liabilities. ANY IMPLIED
WARRANTIES, INCLUDING ANY IMPLIED WARRANTY OF
MERCHANTABILITY, SHALL BE LIMITED TO THE DURATION OF THIS
WRITTEN WARRANTY. ANY ACTION FOR BREACH OF ANY WARRANTY
HEREUNDER INCLUDING ANY IMPLIED WARRANTY OF
MERCHANTABILITY MUST BE BROUGHT WITHIN A PERIOD OF 24
MONTHS FROM DATE OF ORIGINAL PURCHASE. IN NO CASE SHALL THE
COMPANY BE LIABLE FOR ANY CONSEQUENTIAL OR INCIDENTAL
DAMAGES FOR BREACH OF THIS OR ANY OTHER WARRANTY, EXPRESS
OR IMPLIED, WHATSOEVER. No person or representative is authorized to
assume for the Company any liability other than expressed herein in connection
with the sale of this product.
Some states do not allow limitations on how long an implied warranty lasts or the
exclusion or limitation of incidental or consequential damage so the above
limitations or exclusions may not apply to you. This Warranty gives you specific
legal rights and you may also have other rights which vary from state to state.
Obtaining Warranty Service
• To obtain repair or replacement within the terms of this Warranty,
call 1-800-323-4815 for the location of a warranty station serving
your area.
• You must prepay the initial shipping charges to the Company.
The Company will pay the return shipping charges for all
warranteed products returned to an address within the U.S.A.,
Puerto Rico or Canada.
• Please package the product securely to avoid shipping damage.
We recommend using a carrier that provides tracking service to
prevent lost packages. Lost or damaged packages are not
covered by this warranty.
• Provide a detailed description of the problem(s) for which you
require service.
Page 26

Audiovox Electronics Corporation
Hauppauge, NY 11788
Technical Assistance: 1-800-323-4815
www.jensen.com
© 2007 Audiovox
81307
Ver. 0
Printed in China
 Loading...