

Page 1
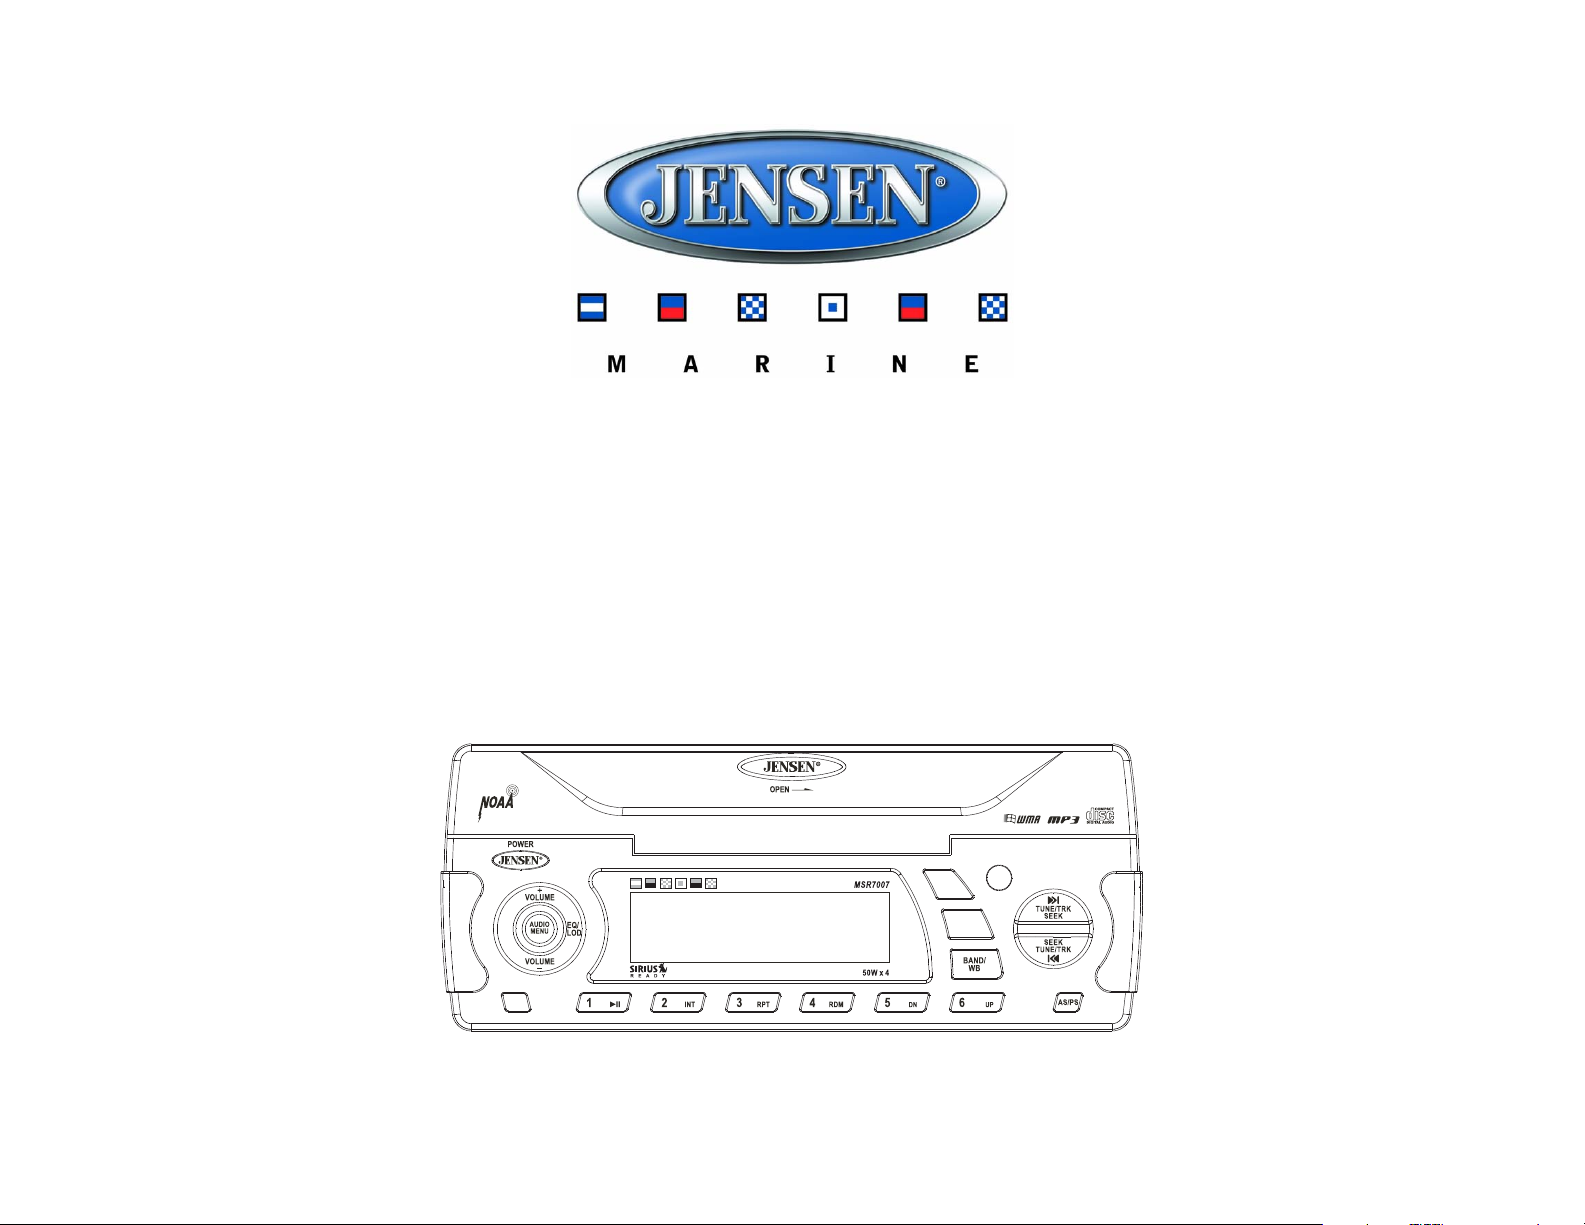
MSR7007
Waterproof AM/FM/RBDS/WB/CDP/Sirius/iPod Ready Marine Radio
Installation and Operation Manual
Manual de la Instalación y Operación / Guide d'installation et d'opération
INFO
DISP
SCROLL
MUTE
PTY
MODE
Page 2

CONTENTS
System Features................................ .. ..................................... ... ....................... 1
Safety Information .............................................................................................. 2
Installation........................................................................................................... 3
Wiring................................................................................................................... 4
Basic Operation .................................................................................................. 5
Tuner Operation.................................................................................................. 7
CD/MP3 Player Operation................................................................................... 9
Satellite Radio Operation................................................................................. 10
iPod Operation.................................................................................................. 11
Care and Maintenance................................................ .................................... .. 12
Troubleshooting................... .. ........................................................................... 12
Specifications ................................................................................................... 13
CONTENIDO
Características del Sistema................................................................ ... ... ....... 15
Información de Seguridad................... ... ... ....................................................... 16
Instalación......................................................................................................... 17
Cableado.................................................. .......................................................... 18
Operación Básica ......................................... .................................... ................ 19
Operación del Sintonizador........................................................ ..................... 21
Operación del Equipo de CD/MP3..................................... .............................. 23
Operación del Radio Satelital.......................................................................... 24
Operación del iPod........................................................................................... 25
Cuidado y Mantenimiento................................................................................ 26
Solución de Problemas...................................................... ... ........................... 26
Especificaciones................................................... ..................................... ....... 27
MSR7007
TABLE DES MATIÈRES
Fonctions du système.................................. ... .................................... ............. 29
Information de sécurité.................................................................................... 30
Installation.................................... ... ... ................................. ... ... ........................ 31
Câblage................................... ... .................................. ... .. ................................. 32
Opération de base........................ ... .................................................................. 33
Operation tuner................................................................................................. 35
Opération platine CD/MP3.......................................... ... .. ................................. 37
Opération radio satellite................................................................................... 38
Opération iPod.................................................................................................. 39
Soin et entretien................................................................................................ 40
Dépannage ......................................... .. ............................................................. 40
Specifications ................................................................................................... 41
ii
Page 3

MSR7007
SYSTEM FEATURES
Features of the Jensen MSR7007 Marine radio include:
• Waterproof Face/Control Panel (IPX5)
• AM/FM US/EURO Tuner with 30 Presets (12 AM, 18 FM)
• RBDS (Radio Broadcast Data Service)
• SIRIUS Radio Ready
• Single In-Dash CD Player
• MP3/WMA Playback Capable
• iPod Ready
• Weatherband Tuner with Weather Alert
• Pre-set Equalizer - 5 settings (Flat, Rock, Pop, Classical, Off)
• Electronic Bass, Treble, Balance and Fader Controls
• Output Power 50W x 4
•Clock
• CD Door Open Alarm
• Low Vehicle Battery Warning
• Wired Marine Remote Control Ready
• 4-Channel Pre-amp Line Level Outputs
• 2-Wire Power OR Non-Volatile Memory and Interior Power Clock/Time Support
• Auxiliary Audio Input
1
Page 4
SAFETY INFORMATION
When Boating
Keep the volume level Iow enough to be aware of your surroundings.
Protect from Water
Do not submerge the product directly in water, as this can cause electrical shorts, fire or other
damage.
Protect from High Temperatures
Exposure to direct sunlight for an extended period of time can produce very high temperatures
inside your vessel. Give the unit time to cool down before starting playback.
Do not mount radio within close proximity of engine compartment.
Use the Proper Power Supply
This product is designed to operate with a 12 volt DC negative ground battery system.
Protect the Disc Mechanism
Avoid inserting any foreign objects into the disc slot. Misuse may cause malfunction or
permanent damage due to the precise mechanism of this unit. Do not keep the CD door open
for long periods of time. EXPOSING THE UNIT TO WATER WITH THE CD DOOR OPEN
WILL CAUSE DAMAGE OR MALFUNCTION.
CAUTION:
THIS MOBILE CD PLAYER IS A CLASS I LASER PRODUCT. THIS UNIT USES A VISIBLE/
INVISIBLE LASER BEAM WHICH COULD CAUSE HAZARDOUS RADIATION IF EXPOSED
DIRECTLY. BE SURE TO OPERATE THE MOBILE CD PLAYER AS INSTRUCTED.
USE OF CONTROLS OR ADJUSTMENTS OR PERFORMANCE OR PROCEDURES OTHER
THAN THOSE SPECIFIED HEREIN MAY RESULT IN HAZARDOUS RADIATION
EXPOSURE.
DO NOT OPEN COVERS AND DO NOT REPAIR BY YOURSELF. PLEASE REFER
SERVICING TO A QUALIFIED TECHNICIAN.
WARNING:
• DO NOT OPEN, DISASSEMBLE OR ALTER THE UNIT IN ANY WAY. Doing so may
result in fire, electric shock or product damage.
• USE THE CORRECT AMPERE RATING WHEN REPLACING FUSE. Failure to do so
may result in fire, electric shock or product damage.
• DO NOT INSTALL IN LOCATIONS THAT MIGHT HINDER VESSEL OPERATION. Doing
so may obstruct vision or hamper movement which can result in a serious accident.
• INSTALL THE WIRING SO THAT IT IS NOT CRIMPED OR PINCHED BY SCREWS OR
SHARP METAL EDGES. Route the cables away from moving parts or sharp pointed
edges. This will prevent crimping and damage to the wiring. If the wiring must pass
through a metal hole, be sure to use a rubber grommet to prevent the wire's insulation
from being cut by the metal edge of the hole. It is also recommended to apply sealing
caulk to any opening that may potentially allow water to enter.
• Be sure to choose a location that is flat and has clearance above the unit to prevent any
damage, as well as allow for ventilation.
• Before drilling any holes, carefully inspect the area underneath and behind the mounting
surface where the devices will be mounted to make sure it will not interfere with existing
wires, fuel lines, the fuel tank or any other objects that could be damaged.
• Always disconnect the vessel negative battery terminal to prevent accidental shorting
during installation.
MSR7007
DISC NOTES
Depending on the recording status, conditions of the disc, and the equipment used for
recording, some CD-Rs/CD-RWs may not play on this unit. For more reliable playback, please
adhere to the following recommendations:
• Use CD-RWs with speed 1x to 4x and write with speed 1x to 2x.
• Use CD-Rs with speed 1x to 8x and write with speed 1x to 2x.
• Do not play a CD-RW which has been written more than 5 times.
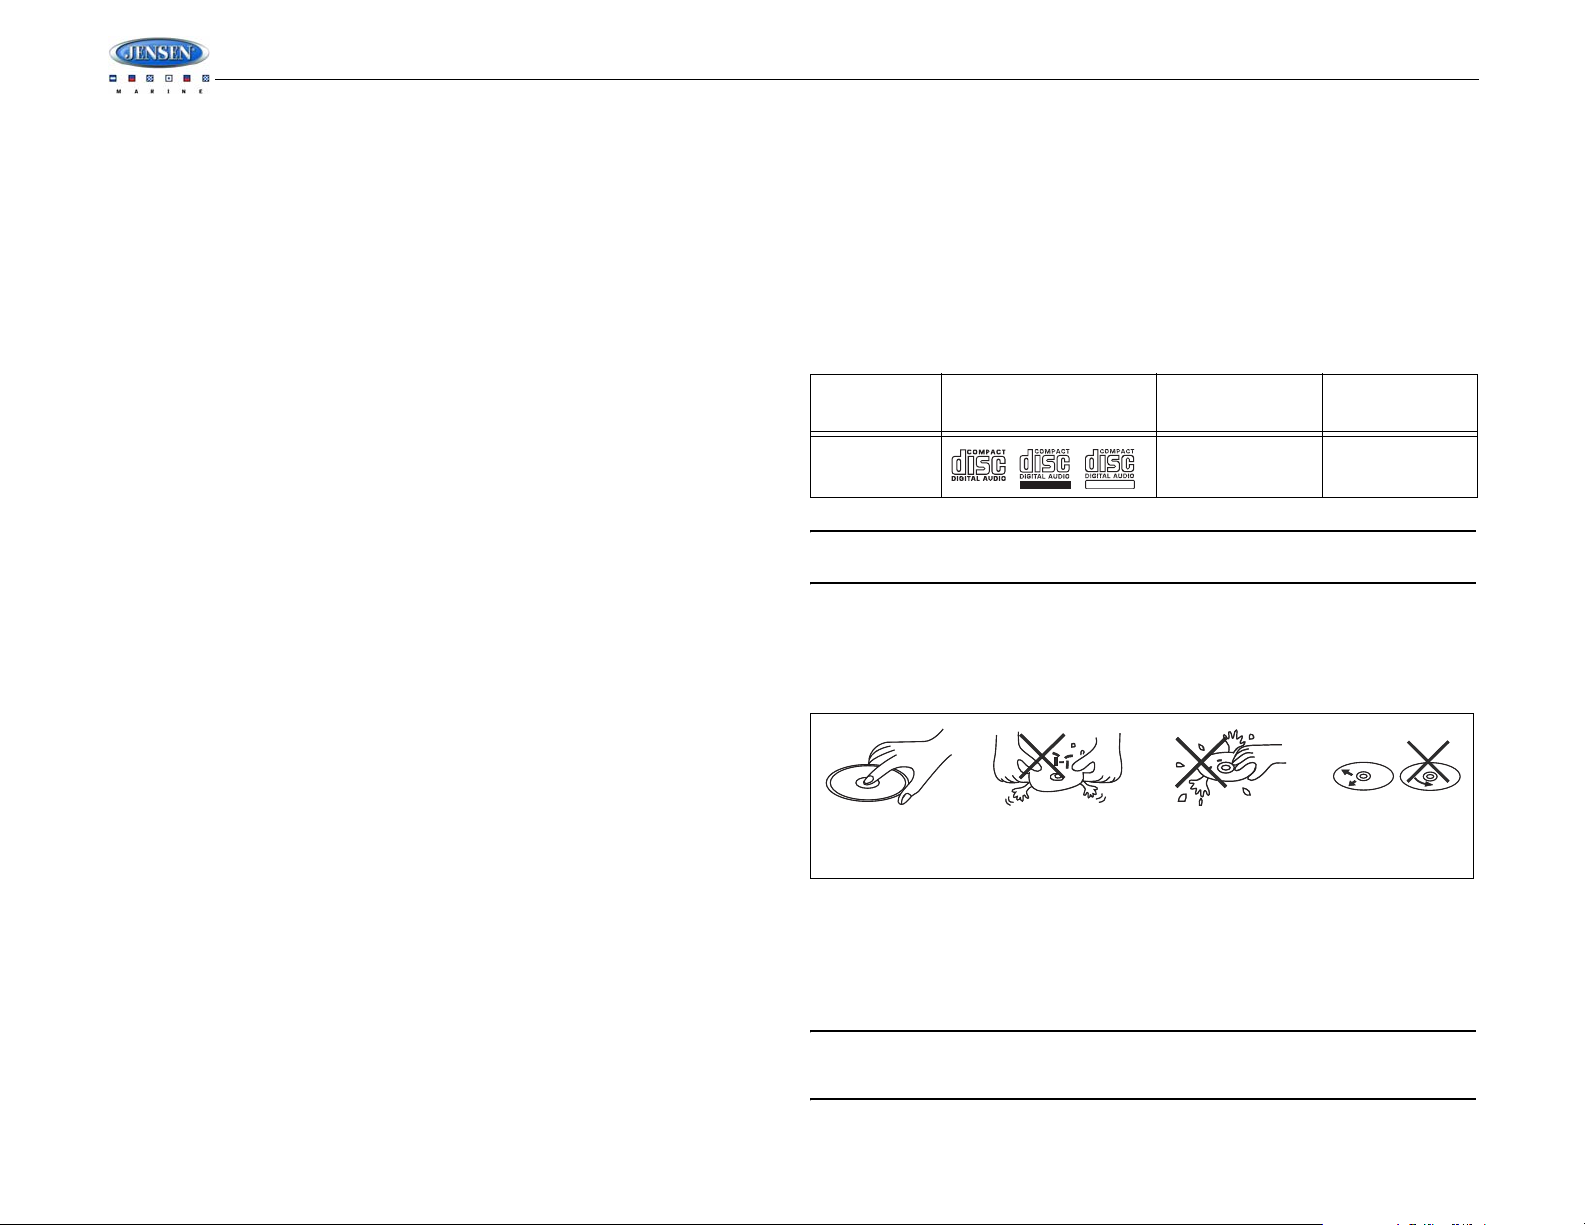
Compatible Disc Types
Table 1: General Disc Information
Disc Type Logo
Audio CD 12 cm single side 74 minutes
RECORDABLE
NOTE: CD-R and CD-RW discs will not play unless the recording session is closed and
the CD is finalized.
REWRITABLE
Disc Maintenance
• A dirty or defective disc may cause sound dropouts while playing. Before playing, wipe
the disc using a clean cloth, working from the center hole towards the outside edge.
Never use benzene, thinners, cleaning fluids, anti-static liquids or any other solvent.
Insert label Do not bend.
side up.
• Be sure to use only round CDs for this unit and do not use any special shape CDs. Use of
special shape CDs may cause the unit to malfunction.
• Do not stick paper or tape on the disc. Do not use CDs with labels or stickers attached or
that have sticky residue from removed stickers.
• Do not expose discs to direct sunlight or heat sources.
NOTE: A disc may become scratched (although not enough to make it unusable)
depending on how you handle it and other conditions in the usage environment. These
scratches are not an indication of a problem with the player.
Diameter/
Playable Sides
Never touch
the under side
of the disc.
Playback Time
Wipe clean from
the center to the
edge.
2
Page 5

MSR7007
INSTALLATION
This unit is designed for installation in vessels with an existing standard size DIN radio
opening.
Before You Begin
1. Disconnect Battery
Before you begin, always disconnect the battery negative terminal.
2. Remove Transport Screw
Please remove the shipping screw before installation. If the screw is left in place, the CD
mechanism will not operate.
Important Notes
• Before final installation, test the wiring connections to make sure the unit is connected
properly and the system works.
• Use only the parts included with the unit to ensure proper installation. The use of
unauthorized parts can cause malfunctions.
• Consult with your nearest dealer if installation requires the drilling of holes or other
modifications to your vessel.
• Install the unit where it does not interfere with driving and cannot injure passengers if
there is a sudden or emergency stop.
• Avoid installing the unit where it will be subject to high temperatures from direct sunlight,
hot air, or from a heater, or where it would be subject to excessive dust, dirt or vibration.
• Install the unit within 30° of the horizontal plane.
DIN Front Mount
1. Check the dashboard opening size by sliding the radio into it. If the opening is not large
enough, carefully cut or file as necessary until the radio easily slides into the opening.
Check that there will be sufficient space behind the dashboard for the radio chassis. Use
the included drilling template to prepare the opening on a new mounting surface.
2. Place the radio in front of the dashboard opening so the wiring can be brought through the
DIN opening.
3. Follow the wiring diagram carefully and make certain all connections are secure and
insulated with crimp connectors or electrical tape to ensure proper operation.
4. After completing the wiring connections, turn the unit on to confirm operation (vehicle
accessory switch must be on). If the unit does not operate, recheck all wiring until the
problem is corrected. Once proper operation is achieved, turn the accessory switch off
and proceed with final mounting of the chassis.
5. Carefully slide the radio into the dashboard making sure it is right-side-up.
6. Attach one end of the Perforated Support Strap (supplied) to the Rear Support Stud on
the rear of the chassis using the M5 Mounting Nut provided. Fasten the other end of the
perforated strap to a secure part of the dashboard either above or below the radio using
the screw and plain washer provided. Bend the strap, as necessary, to position it.
CAUTION: The perforated rear support strap must be used in the installation of the
radio. Installation without the strap may result in damage to the radio or the
mounting surface and void the manufacturer’s warranty.
7. Install the six #6 Stainless Steel Mounting Screws through the front of the radio into the
dashboard.
CAUTION: Radio must be secured using all 6 mounting points. Failure to do so may
result in damage to the radio or dashboard.
8. Test radio operation by referring to the operating instructions for the unit.
USED TO SECURE TO
STANDARD SIZE DIN
REAR SUPPORT STUD
#6 ROUND HEAD STAINLESS STEEL
MOUNTING SCREW (6-PLCS.)
MINIMUM SCREW LENGTH 1 1/2"
M5 MOUNTING NUT
SUB DASH STRUCTURE
PERFORATED REAR
SUPPORT STRAP
Reconnect Battery
When wiring is complete, reconnect the battery negative terminal.
3
Page 6
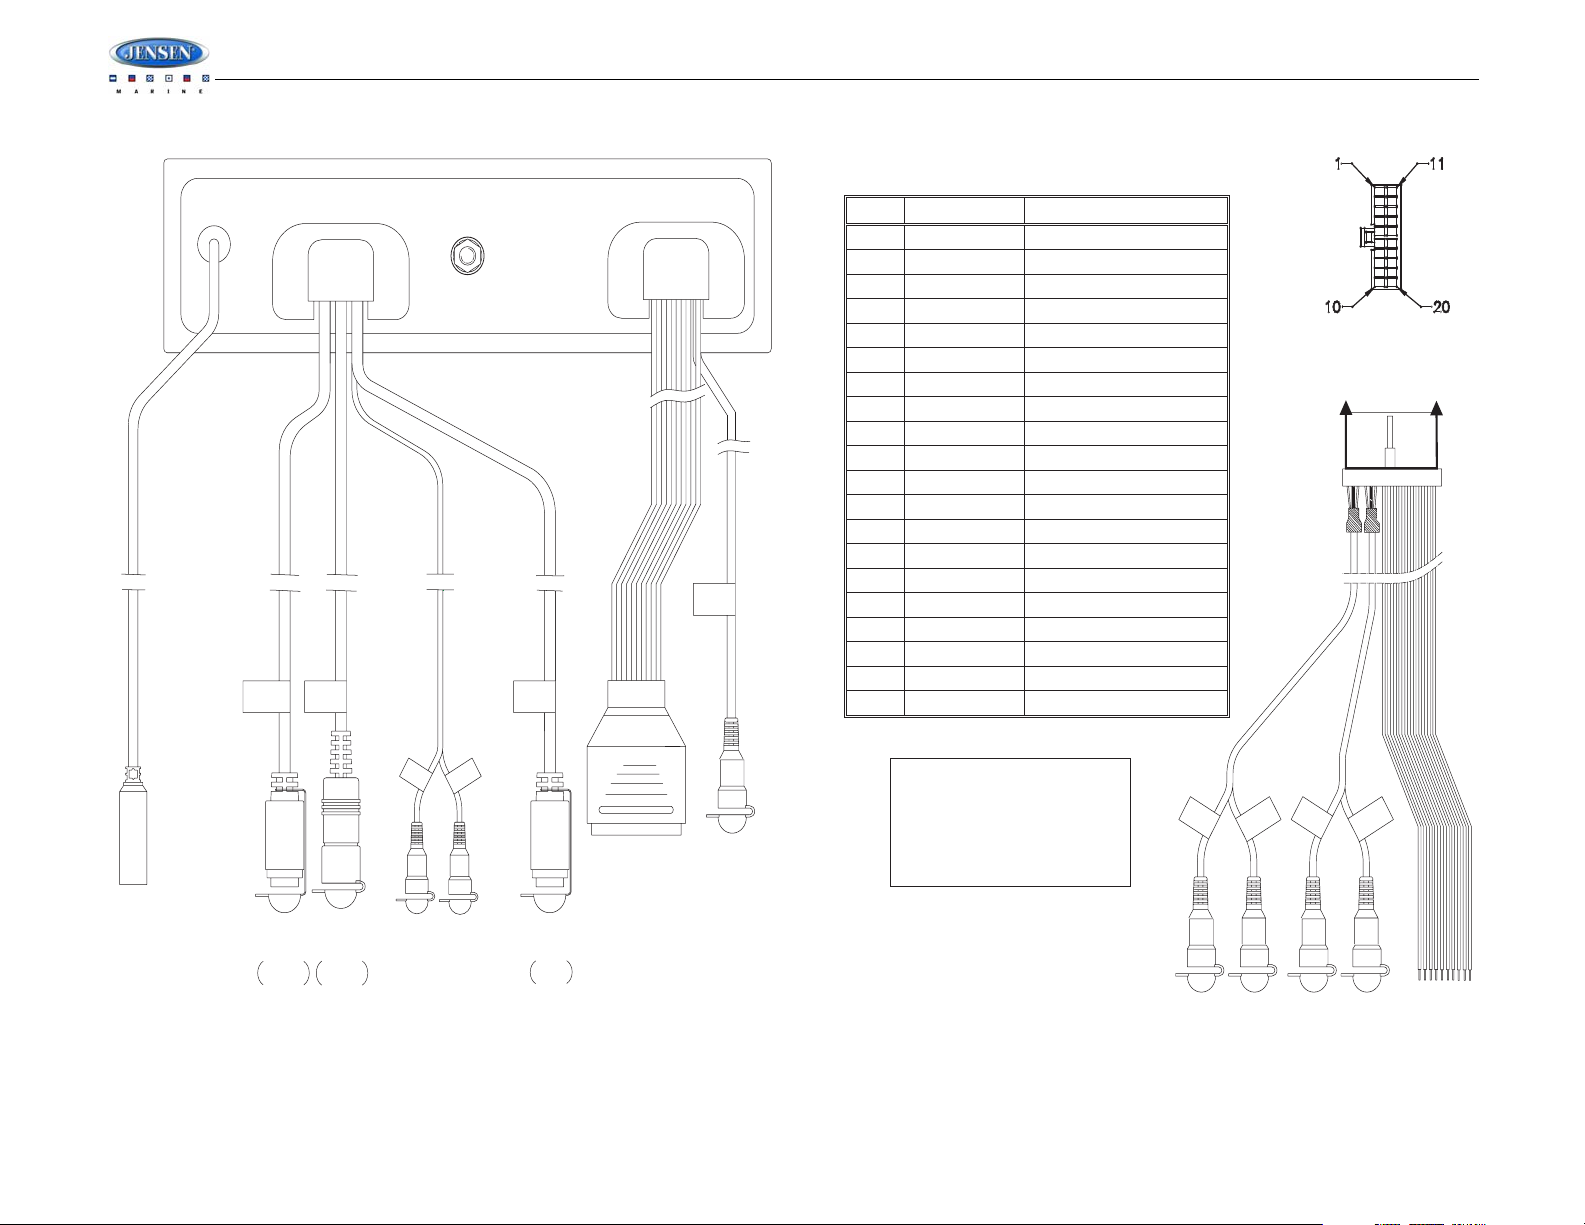
WIRING
PIN NO.
1
2
3
4
5
6
7
8
9
10
11
12
13
14
15
16
17
18
19
20
WIRE INSERTION VIEW
WIRE COLOR
GRAY/BLACK
GRAY
VIOLET
VIOLET/BLACK
EMPTY
GREEN
GREEN/BLACK
BLACK/SHIELD
RED (gray wire)
WHITE
WHITE/BLACK
EMPTY
BLUE
RED
BLACK
WHITE (brown wire)
RED (brown wire)
BLACK/SHIELD
WHITE (gray wire)
VIEW A-A
DESCRIPTION
RIGHT FRONT SPEAKER (-)
RIGHT FRONT SPEAKER (+)
RIGHT REAR SPEAKER (+)
RIGHT REAR SPEAKER (-)
NO CONNECTION
LEFT REAR SPEAKER (+)
LEFT REAR SPEAKER (-)
NO CONNECTIONEMPTY
REAR LINE AUDIO NEGATIVE
REAR RIGHT LINE LEVEL OUT
LEFT FRONT SPEAKER (+)
LEFT FRONT SPEAKER (-)
NO CONNECTION
POWER ANTENNA
ACCESSORY/IGNITION (+)
GROUND
FRONT LEFT LINE LEVEL OUT
FRONT RIGHT LINE LEVEL OUT
FRONT LINE AUDIO NEGATIVE
REAR LEFT LINE LEVEL OUT
MSR7007
20 PIN AUDIO OUTPUT WIRE
MALE
A
A
ANTENNA
(BLACK)
IPOD
(WHITE)
6 inches
8 PIN
FEMALE
SIRIUS
(GRAY)
6 inches
8 PIN
FEMALE
REDWHITE
AUX IN
(YELLOW)
6 inches
20 PIN AUDIO OUTPUT WIRE
WIRED REMOTE
(BLACK)
6 inches
8 PIN
MALE
FEMALE
7.68 Inches
SUBWOOFER OUT-RCA
(GREEN)
6 inches
4
WARNING!
Do not connect the RED +DC
wire to the battery. This wire
MUST be connected to a +12
volts switched power source.
GRAY
GRAY
REDWHITE
LINE OUT
10.22 inches
(REAR)
BROWN
WHITE
LINE OUT
10.22 inches
(FRONT)
BROWN
RED
Page 7

MSR7007
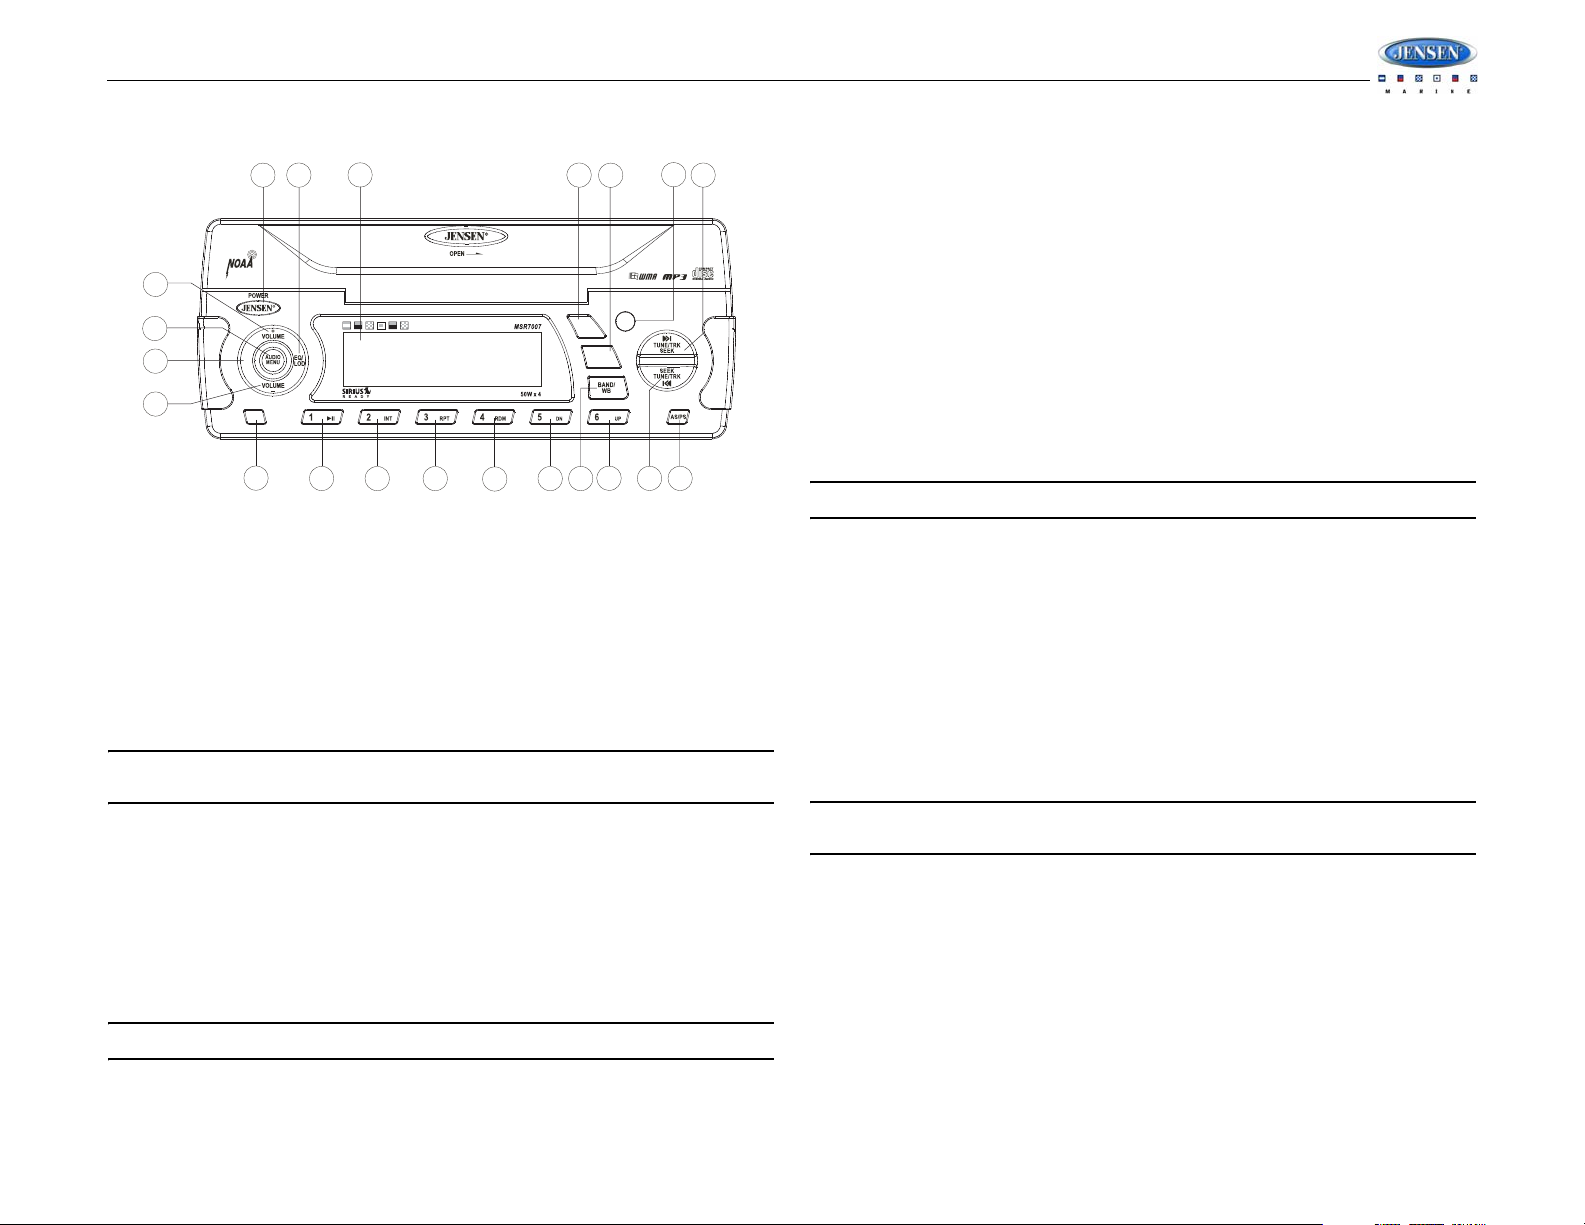
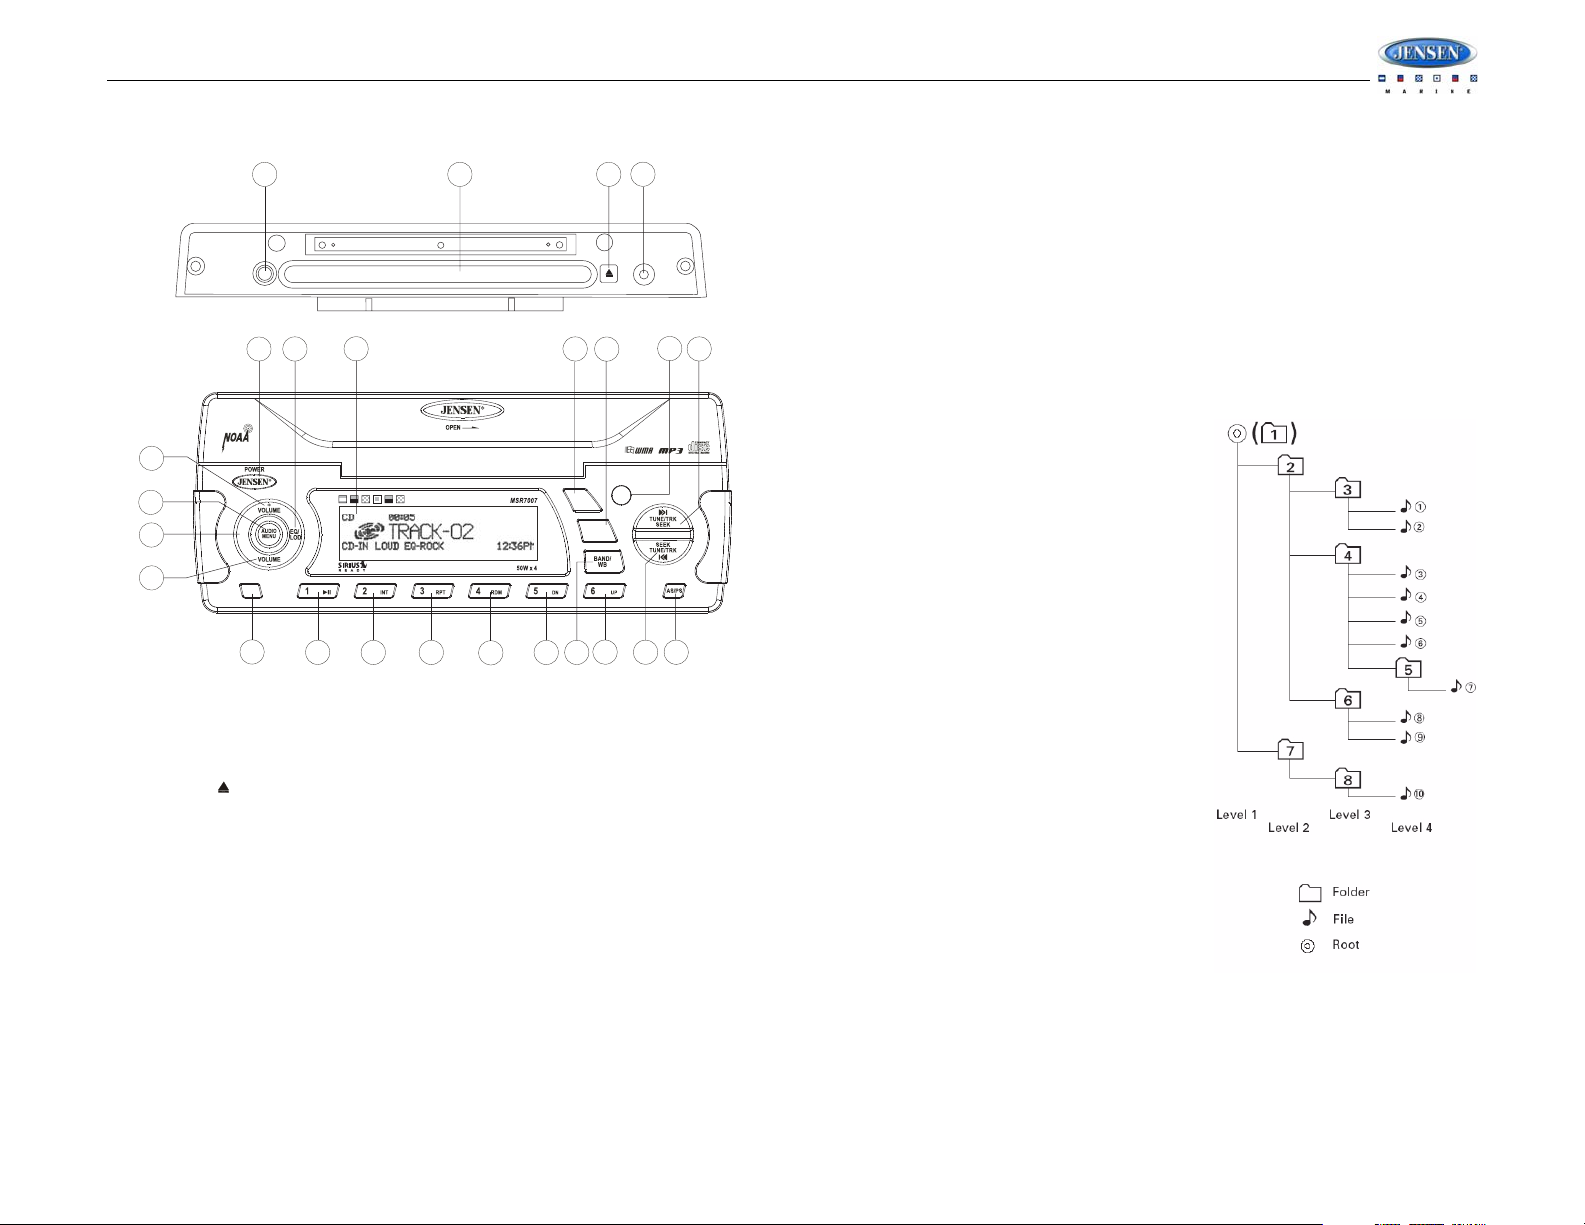
BASIC OPERATION
20
13
23
RESET
17
19
24
1
11
22
VIEW BEHIND CD DOOR
21
12
2a
INFO
DISP
SCROLL
PTY
10
9
15
18
14
16
2b
3
MUTE
MODE
4
8
5
6
7
Power On/Off
Press the POWER button (1) to turn the unit on or off. The unit will resume at the last mode
selected (Tuner, Aux, etc.).
Volume Control
To increase the volume, press the VOLUME + button (2a). To decrease the volume, press the
VOLUME - button (2b). While adjusting the volume, the LCD displays a bar graph and
numerical representation of the level. The maximum volume setting is 40.
Mute
Press the MUTE button (16) on the control panel to mute the audio output. Press MUTE again
to restore the audio output to the previous level.
Mode
Press the MODE button (4) on the control panel to select a different mode of operation, as
indicated on the display panel. Available modes include Tuner (AM/FM), SAT Radio, CD, iPod
and AUX In (optional Auxiliary Input).
NOTE: CD, iPod, or SIRIUS mode will be skipped if the module is not installed.
NOTE: SIRIUS Radio mode will be skipped when the Region menu option is set to
“EURO”.
Reset
Use a ball point pen or similar object to press the RESET button (23). The RESET button
should be activated for the following reasons:
• initial installation of the unit when all wiring is completed
• function buttons do not operate
• error symbol on the display
Audio Menu
Press the AUDIO/MENU button (3) on the control panel to access the audio menu. You can
navigate through the audio menu items by pressing the AUDIO/MENU button repeatedly. Once
the desired menu item appears on the display, adjust that option by pressing the VOLUME
buttons (2) within 5 seconds. The unit will automatically exit the audio menu after five seconds
of inactivity. The following menu items can be adjusted.
Bass Level
Use the VOLUME buttons (2) to adjust the Bass level range from “-6” to “+6”.
Treble Level
Use the VOLUME buttons to adjust the Treble level range from “-6” to “+6”.
Balance
Use the VOLUME buttons to adjust the Balance between the left and right speakers from “12L”
(full left) to “12R” (full right).
Fader
Use the VOLUME buttons to adjust the Fader between the rear and front speakers from “12R”
(full rear) to “12F” (full front).
Front Panel
Important Notes
• Always operate the unit with the front panel door closed.
• When closing the front panel door, do not apply pressure to the OPEN slide button.
• Do not force front panel door operation when opening or closing.
• Do not touch the door open detection switch (24).
Front Panel Door Alarm
To prevent damage to the unit by entry of water or debris through the CD opening, the front
panel door should only be opened for a short period of time during CD loading or ejecting. If the
front panel door is left open for longer than 30 seconds, the current playback audio will mute
and a beep tone will sound. Close the door to resume normal playback.
5
Page 8

MSR7007
System Menu
1. Press and hold the AUDIO/MENU button (3) for more than 2 seconds to enter the system
menu. The first menu item, “Beep Tone”, will appear on the display.
2. Press the AUDIO/MENU button repeatedly to navigate the system menu and select the
desired item.
3. Use the VOLUME buttons (2) to adjust the selected menu item.
The following items can be adjusted:
• Beep Tone (ON/OFF): Turn the audible beep ON/OFF (heard when functions/buttons are
selected).
• Region (USA/EURO): Set frequency spacing for various regions.
• Time Zone: Set the local time zone (used only for Sirius satellite mode).
• DST (Observed/Not Observed): Set for Daylight Savings Time.
• Clock (12Hr/24Hr): Select 12 or 24 hour display mode.
• Brightness (Low/Mid/High): Adjust LCD brightness.
• Contrast (Low/Mid/High): Adjust LCD contrast.
• Pwr On Vol (0 – 40): Select an automatic turn-on volume.
• iPod Auto (ON/OFF): Choose ”ON” to automatically detect and playback iPod when
connected or “OFF” to use the MODE button to select the iPod source.
• WB Alert (ON/OFF): Choose “ON” to switch to Weatherband mode when NOAA weather
alerts are issued. (See “NOAA Weather Alert” on page 8.)
• Alert PWR (AUTO/OFF): Select “Auto” to turn on the radio when NOAA alerts are issued.
This function only works when the +12V switched is on.
• Low Battery Alarm (ON/OFF): Monitor voltage on +12 volts switched line.
• Default Set (NO/YES): Choose “YES” to return the EEPROM to factory default set up
values.
LOW BATTERY Operation
If LOW BATT is set to “ON”, a alarm will sound (8 beeps every 30 sec) when the voltage drops
to 10.8V (+/- 0.03V). A visual warning (LOW BATT) will appear flashing (8 flashes every 30
sec) in the lower left corner of the LCD display.
Liquid Crystal Display (LCD)
The current frequency and activated functions are shown on the LCD panel (21).
NOTE: LCD panels may take longer to respond when subjected to cold temperatures for
an extended period of time. In addition, the visibility of the numbers on the LCD may
decrease slightly. The LCD display will return to normal when the temperature increases
to a normal range.
Setting the Clock
To set the clock to display the current time, turn the vehicle ignition on and turn the radio off.
Press and hold the DISP/SCROLL button (12) for more than one second, and the time will
flash in the display. Press the TUNE/TRK |<< button (19) to adjust the hours or the TUNE/TRK
>>| button (18) to adjust the minutes. “AM” or “PM” will appear on the display to indicate AM or
PM. When no adjustment is made for five seconds, the time will become set and normal
operation will resume.
Scroll
When the information is too long to be displayed on the LCD, press and hold the DISP/
SCROLL button (12) to view the entire title. The information will scroll twice and then return to
abbreviated text.
NOTE: “OFF” is the default setting for LOW BATT. If the audio is muted or the volume is
set to 0, the audible beep will not be heard.
Equalizer
Press the EQ/LOD button (11) to choose one of the following pre-defined bass and treble
curves: OFF > FLAT > ROCK > POP > CLAS(SIC).
Loudness
Press and hold the EQ/LOD button (11) toggle loudness on/of f. When listening to music at low
volumes, this feature will boost the bass and treble ranges to compensate for the
characteristics of human hearing.
Auxiliary Input
To access an auxiliary device:
1. Connect the portable audio player to the AUX IN cables on the back of the radio.
2. Press the MODE button (4) to select AUX mode.
3. Press MODE again to cancel AUX mode and go to the next available playback mode.
6
Page 9
MSR7007
TUNER OPERATION
21
8
6
2a
16
2b
1
11
3
MUTE
MODE
4
Automatically Store / Preset Scan (AS/PS)
13
12
DISP
SCROLL
PTY
5
7
10
9
15
17
19
INFO
Automatically Store
Select an AM or FM band. Press and hold the AS/PS (14) button for more than 2 seconds to
automatically select six strong stations and store them in the current band. The new stations
replace any stations already stored in that band.
Preset Scan
Select a band. Press AS/PS (14) to scan stations stored in the current band. The unit will
pause for 5 seconds at each preset station. Press AS/PS again to stop scanning when the
desired station is reached.
RBDS Operation
This unit is equipped to display RBDS (Radio Broadcast Data Service) information when
broadcast by the radio station. The following LCD indicators appear when data is received:
• RBDS: The current radio station is broadcasting RBDS data.
• PTY: Program Type data is being received. When flashing, PTY search is in progress.
14
18
NOTE: Radio stations broadcasting RBDS may not be available in your listening area.
Select a Band
Press the BAND button (15) to change between three FM bands and two AM (MW) bands.
Press and hold the BAND button to access the Weatherband (WB).
Manual Tuning
Press the TUNE/TRK >>| or |<< buttons (19, 18) to seek stations up/down step by step.
Auto Seek Tuning
Press and hold the TUNE/TRK >>| or |<< buttons (19, 18) to automatically seek the next or
previous strong station.
NOTE: Seek tuning is not available for weather band channels. Use the up or down
tuning buttons to manually select any of the seven available weather band channels.
Preset Stations
Six numbered preset buttons store and recall stations for each band.
Store a Station
Select a band (if needed), then select a station. Press and hold a preset button (5-10) for two
seconds. The preset number will appear on the LCD.
Recall a Station
Select a band (if needed). Press a preset button (5-10) to select the corresponding stored
station.
NOTE: Preset buttons will not function in weather band mode.
Program Type (PTY)
In FM radio mode, press the PTY button (13) to list the following search options: ANY / News /
Information / Sports / Talk / Rock / Classic Rock / Adult Hits / Soft Rock / Top 40 / Country /
Oldies / Soft / Nostalgia / Jazz / Classical / Rhythm and Blues / Soft R&B / Language /
Religious Music / Religious Talk / Personality / Public / College / Weather / Emergency Test /
Emergency.
To search for stations in a PTY category:
1. Press the PTY button (13) to view the current PTY category.
2. Use the VOLUME buttons (2) to move through the list of available categories and select
the program type you wish to search.
3. After selecting the desired PTY, press and hold the TUNE/TRK >>| or |<< button (19, 18)
to search the band for broadcasts of this type.
NOTE: Performing a PTY search on “ANY” will Seek Tune and stop on any station
broadcasting RBDS, regardless of the program type.
7
Page 10

Weather Band Operation
What is the NOAA Weather Radio/Weatheradio Canada?
This is a nationwide system that broadcasts local weather emergency information 24 hours a
day. The U.S. network has more than 530 stations covering the 50 states as well as the
adjacent costal waters, Puerto Rico, the U.S. Virgin Islands and the U.S. Pacific Territories.
Each local area has its own transmitting station and there are a total of seven broadcasting
frequencies used. A similar system is available in Canada under the Weatheradio Canada
service administered by Environment Canada.
Tuning to Weatherband
Press and hold the BAND/WB button (15) to access the Weatherband. The indication "WB"
will appear on the display panel, along with the current number and channel indication:
"CH01", CH02", "CH03", "CH04", "CH05", "CH06" or "CH07". Use the TUNE/TRK >>| or |<<
buttons (19, 18) to tune to each of the seven channels until you find the weatherband station
broadcasting in your area.
How many stations can I expect to receive?
Since the broadcasts are local weather and information, the transmission power is usually very
low (much less than standard AM or FM stations) so you will usually receive only one station
unless you are on the edge of two or more broadcast signals. The most you will receive will be
two or three, and that is rare.
Is it possible I won't receive any stations?
Depending on where you are located, there is a possibility you will receive only a very weak
signal or none at all. Also, similar to AM and FM signals, weatherband signals are subject to
surrounding conditions, weather, obstructions of the signal by hills or mountains, etc.
NOAA Weather Alert
The Weather Alert function adds an additional level of user safety by automatically switching
from any of the available function modes (Tuner, SAT, CD, iPod, AUX) to weather band for a
minimum of 60 seconds if a NOAA warning tone (1050 Hz) is received/detected. If no
additional warning tone is received for 60 seconds, the unit will switch back to the last known
function mode. See “System Menu” on page 6 to learn how to turn the WB Alert feature on.
MSR7007
8
Page 11
MSR7007
CD/MP3 PLAYER OPERATION
20
DISP
SCROLL
PTY
13
10
23
RESET
17
19
INFO
14
18
24
1
11
21
22
12
2a
3
16
2b
MUTE
MODE
4
8
5
6
9
7
15
Inserting and Ejecting a Disc
Insert a disc, label-side up, into the disc slot (22). The unit will automatically draw the disc in
and play the first track on the disc, whether the power was turned on or not.
Press the eject button (20) to stop disc play and eject the disc. The unit does not have to be
on to eject the disc.
Controlling Disc Playback
Selecting Tracks
Press the TUNE/TRK >>| (19) or TUNE/TRK |<< button (18) to advance to the next track on
the disc. The selected track number will appear on the display. Press and hold the TUNE/TRK
>>| or |<< button to fast forward or fast reverse through the disc. Disc play starts when the
button is released.
Play/Pause Disc Playback
Press the 1/>|| button (8) to suspend disc play. Press the 1/>|| button again to resume disc
Play.
Previewing Tracks
Press the 2/INT button (6) to play the first 10 seconds of each track sequentially. Press 2/INT
again to stop Intro Scan and resume normal play at the current track.
Repeat Play
• Press the 3/RPT button (5) during disc play to repeat play the current track.
• Press and hold the 3/RPT button to repeat the current folder.
• Press 3/RPT again to stop repeat play.
Random Play
• Press the 4/RDM button (7) during disc play to play all tracks in random, shuffled order.
• Press and hold the 4/RDM button to randomly play all files in the current folder.
• Press 4/RDM again to stop random play.
Folder Navigation (MP3 Only)
Press the 5/DN button (9) to select folder down.
Press the 6/UP button (10) to select folder up.
MP3 Playback
Notes on MP3 Playback
• Any directory that does not include an MP3 file is
skipped
• Maximum number of folders: 512 (including
skipped directories)
• Maximum number of folder levels: 12
• Maximum number of MP3 files: 999
• Maximum number of characters for MP3 file name
and folder name: 32
• Sampling frequency: 16KHz, 22.05KHz, 24KHz,
32KHz, 44.1KHz, 48KHz
• Bit rates: maximum 384 Kbps
• Maximum number of Characters of ID3 Tag:
• ID3 Tag version 1.0: 32
• ID3 Tag version 2.x: 32
File Playing Order
When selected for play, files and folders (Folder
Search, File Search or Folder Select) are accessed in
the order they were written by the CD writer. As a
result, the order in which they are expected to be
played may not match the order in which they are
actually played. You may be able to set the order in
which MP3/WMA are to be played by writing them onto
a medium such as a CD-R with their file names
beginning with play sequence numbers such as "01" to
"99".
For example, a medium with the folder/file hierarchy
illustrated on the right is subject to Folder Search, File
Search and playback order.
9
Page 12
SATELLITE RADIO OPERATION
1
11
21
12
13
2a
DISP
SCROLL
PTY
10
9
15
16
2b
3
MUTE
MODE
4
8
5
6
7
Switching to Sirius Satellite Radio
(Requires optional Sirius tuner)
Press the MODE button (4) to change the mode to Sirius radio mode.
Accessing your RADIO ID
To display your radio ID, use the TUNE/TRK |<< button (18) to tune to channel “000”. The
screen will display “Sirius ID” on the top bar with the SID displayed in the middle of the LCD
screen. The Sirius Radio ID is 12 characters long.
Selecting a Band
In Sirius mode, press the BAND button (15) to access the Sirius user-preset channel groups in
the following order: SR-1, SR-2, SR-3.
Category Tuning
1. Press the INFO button (17) to access Category mode.
2. While the category is flashing, press TUNE/TRK |<< / >>| buttons (18, 19) to choose a
category.
3. Press the INFO button to confirm category selection and tune to the first channel in the
selected category. The category icon will stop flashing.
4. Press the TUNE/TRK |<< / >>| buttons (18, 19) to choose desired channels in that
category. (The lowest channel number within the chosen category will always be the
default first channel tuned.)
5. Press and hold the INFO button to return to channel tuning mode.
Channel Up/Down Tuning
Press the TUNE/TRK |<< / >>| buttons (18, 19) to search for a channel. Press and hold the
TUNE/TRK buttons to fast search.
17
19
INFO
14
18
MSR7007
Storing Preset Channels
The preset buttons (5-10) can be used to store 6 channels, allowing convenient access to your
favorite channels.
Programming Channels
1. Select the channel you want to store in memory.
2. Press and hold a preset button (5-10) until the corresponding preset button number
appears.
3. Repeat steps 1 and 2 to program additional channels.
Quick Tuning
Press one of the six preset buttons (5-10) to select a preset channel directly.
Preset Scan
Select a band. Press AS/PS (14) to scan stations stored in the current band. The unit will
pause for 10 seconds at each preset station. Press AS/PS again to stop scanning when the
desired station is reached.
Preset Tuning
Press and hold the AS/PS button (14) to access Preset Tuning Mode. In Preset Tuning Mode,
you can use the TUNE/TRK |<< / >>| buttons (18, 19) to access all 18 preset stations in
sequential order. Press and hold the AS/PS button again to deactivate Preset Tuning Mode.
Alternate Display Mode
Press the DISP/SCROLL button (12) to change the display information between single and
dual line text display. In dual line mode, both artist and title are available for viewing.
Press and hold the DISP/SCROLL button while in single line text display to start scrolling of
Artist/Song Title information.
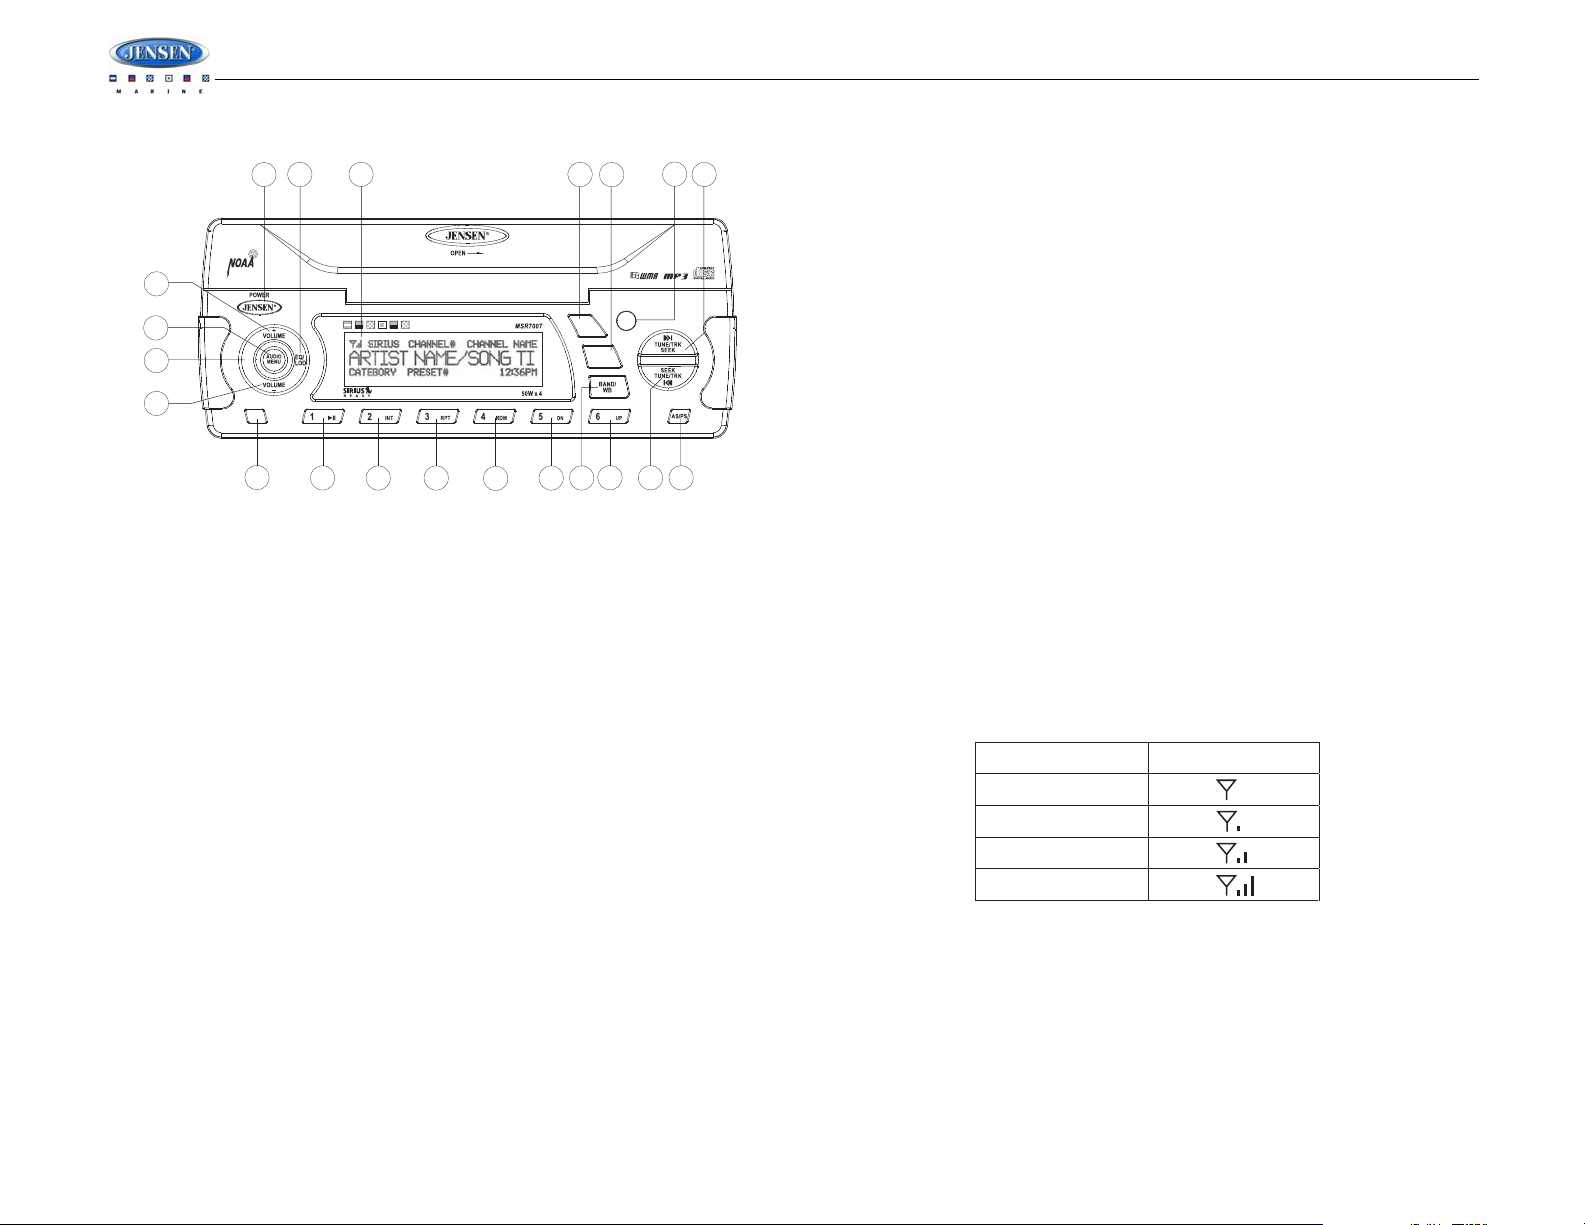
Satellite Signal Strength
The display will indicate satellite reception strength as shown below.
Signal Strength Strength Display
No Signal
Weak
Good
Excellent
Channel Lock
While tuned to the channel to be locked, press and hold the MODE button (4) to access the
Channel Lock function. “Enter Code” is displayed on the LCD. Using the 1-6 digit buttons, enter
your 4-digit code (the default code is 111 1). “Channel Locked” appears on the LCD, confirming
that the channel has been locked. The next time the channel is sequentially accessed, the
“Channel Locked” message will appear, followed by “Enter Code”. To retrieve the locked
channel, enter your 4-digit code. To change the channel lock code, press and hold the PTY
button (13). Enter Current Code > New Code > Confirm. The LCD will display “New Code
Stored”.
X
10
Page 13
MSR7007
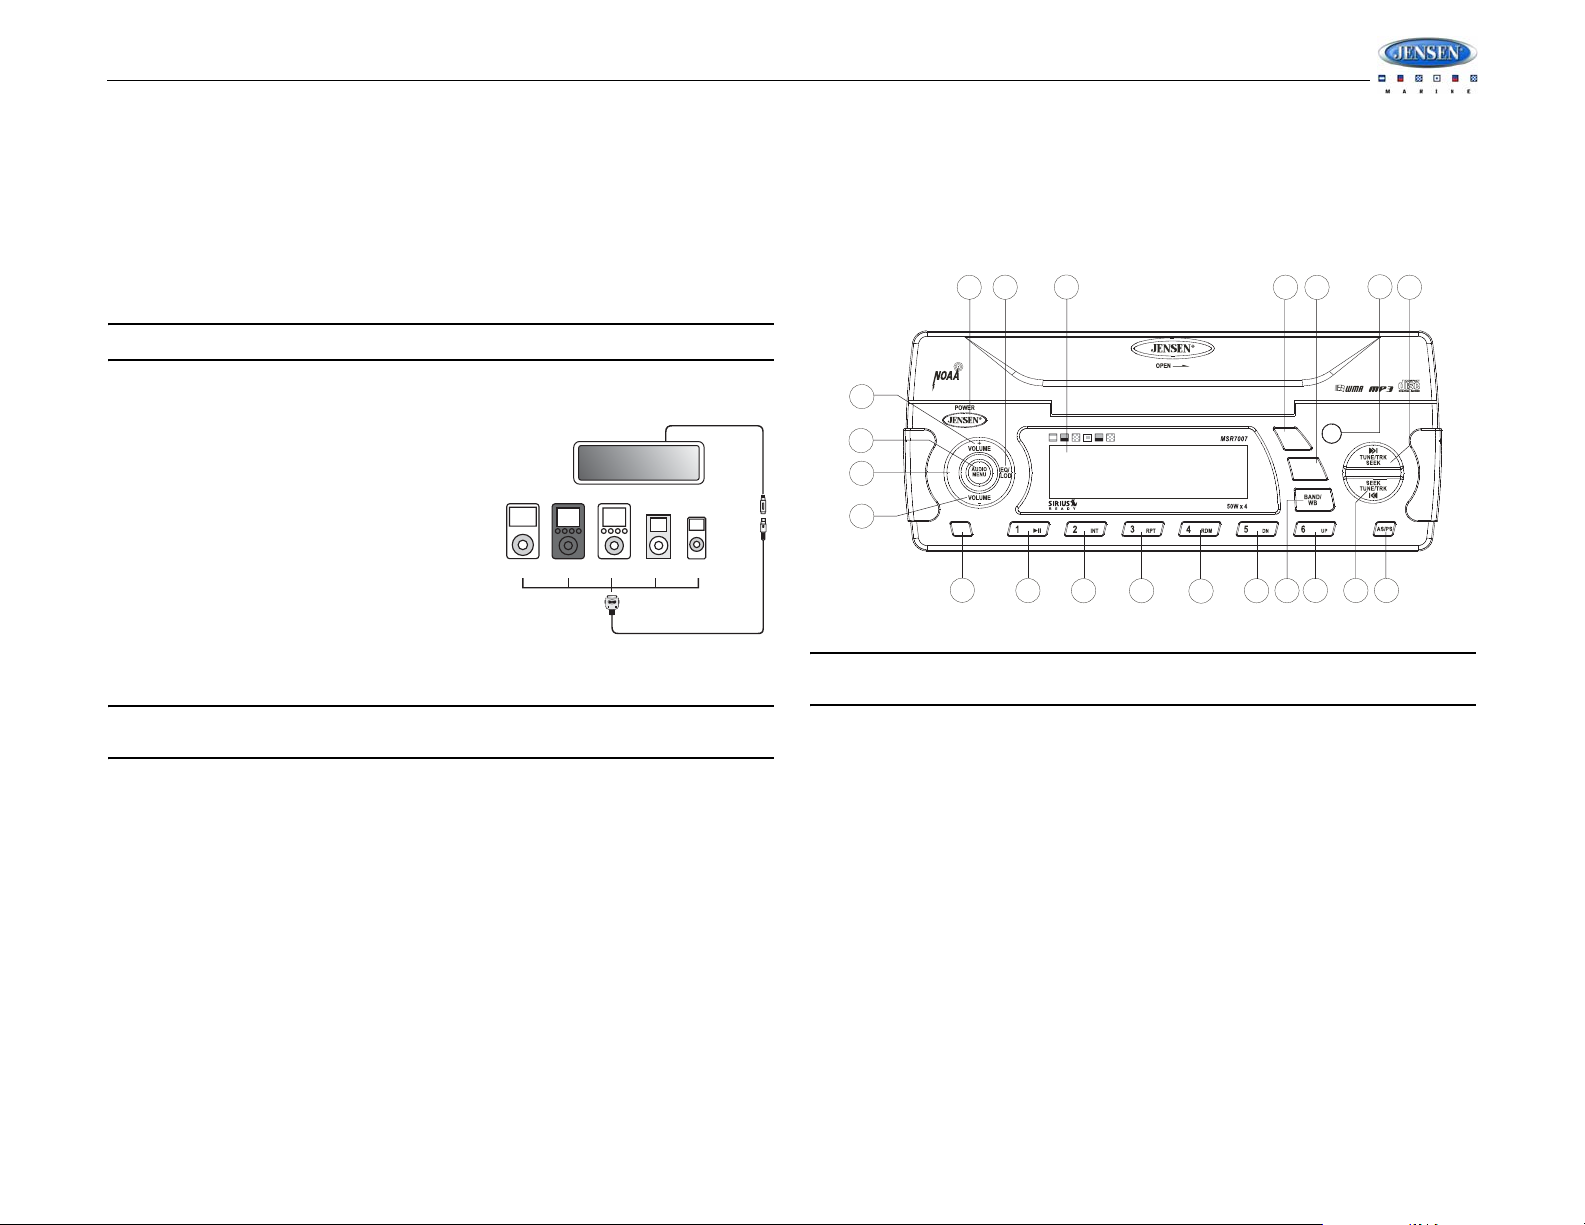
iPod OPERATION
This unit is equipped with an iPod ready function that will allow you to control your iPod (if
compatible) using the control panel control buttons. The following iPod versions are supported:
• iPod 3G (firmware version 2.2 only)
• iPod Mini
• iPod 4G
• iPod Photo
• iPod Nano
• iPod 5G (Video)
NOTE: iPod and iPod Cable sold separately.
Selecting Tracks
During playback, press the TUNE/TRK |<< / >>| button (18, 19) to play the previous or next
track in the current category. Press the TUNE/TRK |<< button (18) once to play the song from
the start position or press TUNE/TRK |<< twice to play the previous track.
Press and hold the TUNE/TRK |<< / >>| button (18, 19) to fast reverse/forward the song.
1
11
21
12
13
17
19
Accessing iPod Mode
The unit will automatically switch to iPod mode
when an iPod is plugged into the iPod cable.
To return to the iPod menu from any other source,
press the MODE button (4) on the control panel or
remote control until “iPod” appears on the display.
8 Din iPod Ready Cable
HEAD UNIT
Turning the iPod On/Off
The iPod power turns on automatically when an
iPod is connected to 30-pin iPod cable, as long as
the vessel ignition is turned on. You can turn the
iPod off by disconnecting it from the cable or by
turning the ignition off. When the +12 volts
switched power source is turned off, the iPod will pause and then enter sleep mode after 2
minutes. While the iPod is connected, the power cannot be turned on or off from the iPod itself.
NOTE: The iPod will continuously recharge when connected to the unit, as long as the
vessel +12 volts switched power source is turned on.
iPod
Video
iPod
photo
iPod iPod
mini
iPod Cable
iPod
nano
Controlling Playback
Pausing Playback
During playback, press the 1/>|| button (8) to pause the iPod player. “Pause” will appear on the
LCD. Press 1/>|| again to resume playback.
Repeat Play
During playback, press the 3/RPT button (5) to repeat the current song. “Repeat” will appear
on the LCD. Press again to select “Repeat All”. Press 3/RPT again to stop repeat playback.
Random Play
During playback, press the 4/RDM button (7) to play all songs in the current category in
random order. Random play will begin once the current song has finished playing. “Shuffle” will
appear on the LCD. Press 4/RDM again to stop random playback.
2a
INFO
DISP
SCROLL
PTY
10
9
15
18
14
16
2b
3
MUTE
MODE
4
8
5
6
7
NOTE: If you press and hold the TUNE/TRK |<< / >>| button to change the current song
to the previous/next song, you will exit fast reverse/forward mode.
Playlist Selection
Press the INFO button (17) to access Playlist selection mode.
• Press the 5/DN button (9) to select list down.
• Press the 6/UP button (10) to select list up.
• Press the 1/>|| button (8) to select and start playback.
Alternate Display Mode
Press the DISP/SCROLL button (12) to change the display information between single and
double line text display.
11
Page 14
MSR7007
CARE AND MAINTENANCE
• If liquids (coffee, soda, etc.) are spilled on the radio, wipe it dry immediately. Some liquids
contain minerals that can corrode the electronic circuits.
• Keep the product away from dust and dirt, which can cause premature wear of parts.
• Handle the product gently and carefully. Dropping it can damage circuit boards and
cases, and can cause the product to work improperly.
• Wipe the product with a dampened cloth occasionally to keep it looking new. Do not use
harsh chemicals, cleaning solvents, or strong detergents to clean the product.
• Use and store the product only in normal temperature environments. High temperature
can shorten the life of electronic devices, damage batteries, and distort or melt plastic
parts.
Ignition
The most common source of noise in reception is the ignition system. This is a result of the
radio being placed close to the ignition system (engine). This type of noise can be easily
detected because it will vary in intensity of pitch with the speed of the engine.
Usually, the ignition noise can be suppressed considerably by using a radio suppression type
high voltage ignition wire and suppressor resistor in the ignition system. (Most vessels employ
this wire and resistor but it may be necessary to check them for correct operation.) Another
method of suppression is the use of additional noise suppressors. These can be obtained from
most professional mobile electronics retailers.
Interference
Radio reception in a moving environment is very different from reception in a stationary
environment (home). It is very important to understand the difference.
AM reception will deteriorate when passing under a bridge or when passing under high voltage
lines. Although AM is subject to environmental noise, it has the ability to received at great
distance. This is because broadcasting signals follow the curvature of the earth and are
reflected back by the upper atmosphere.
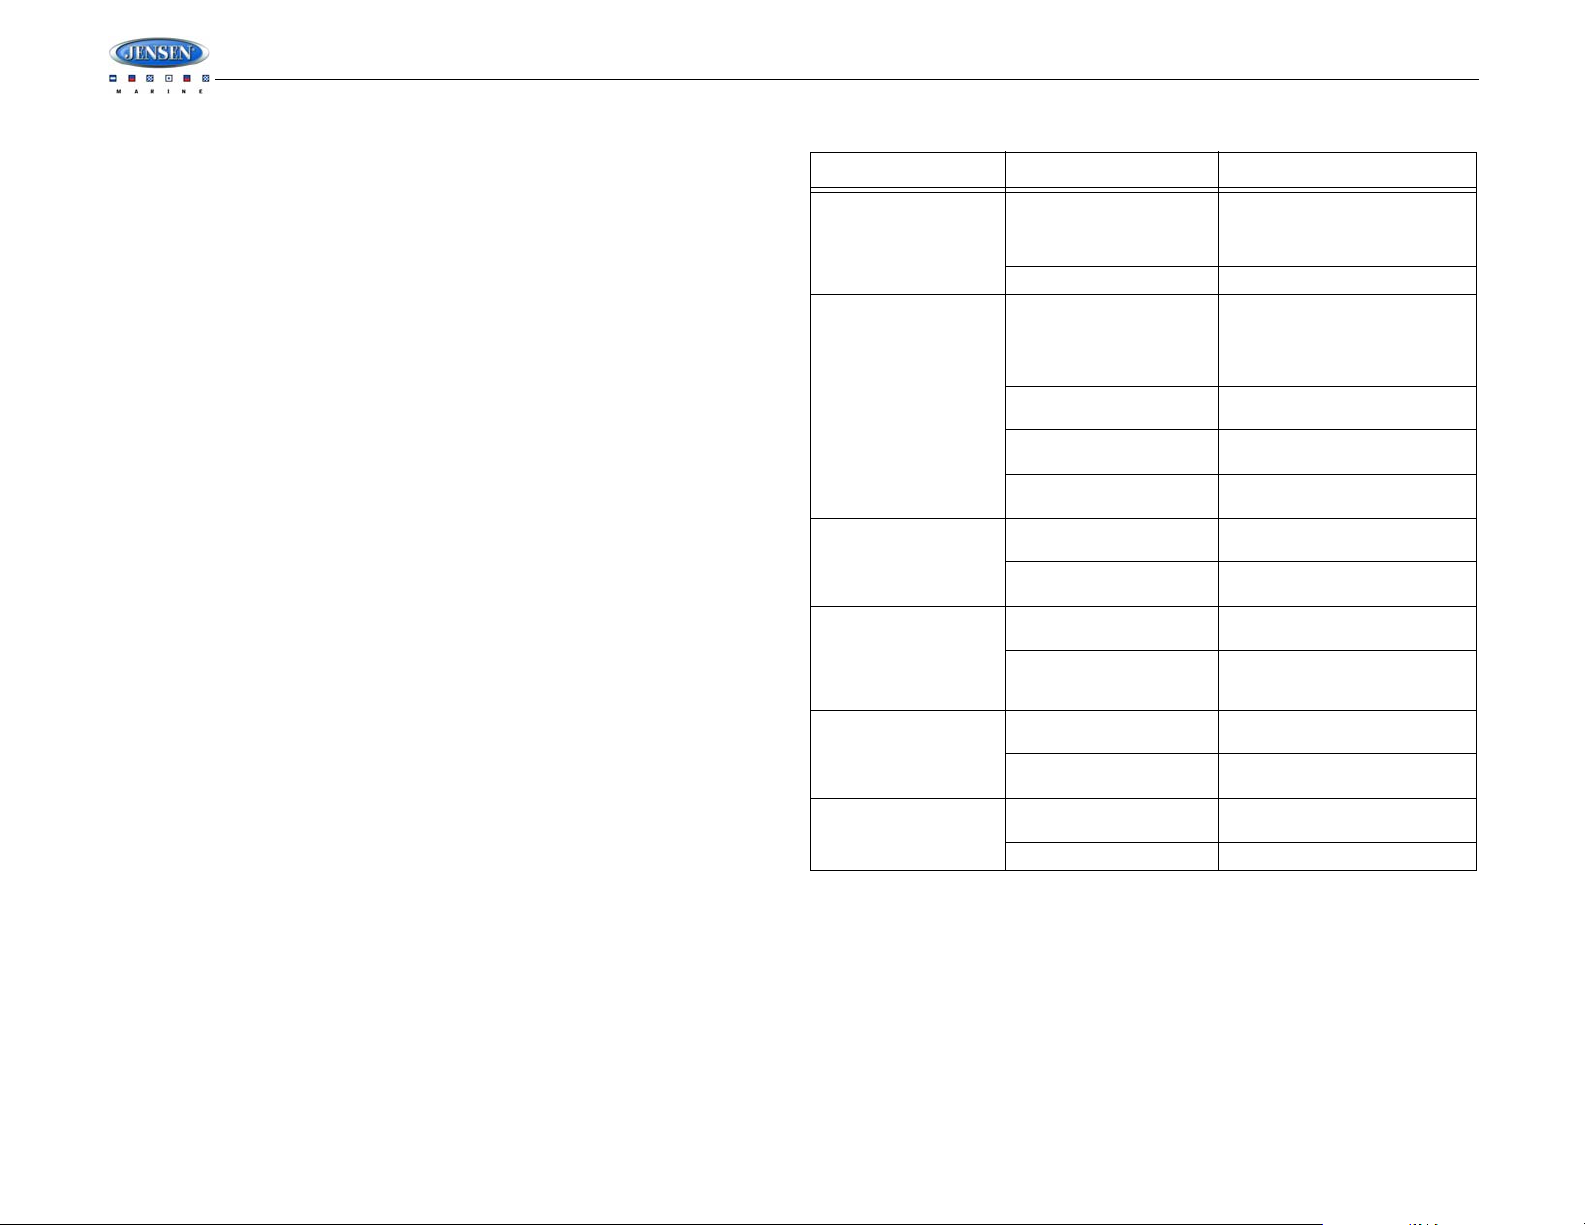
TROUBLESHOOTING
Symptom Cause Solution
No power The vessel’s +12V switched
Disc cannot be loaded or
ejected
No sound Volume is too low or system
The operation keys do
not work
Sound skips The installation angle is
Cannot tune to radio station, auto-seek does not
work
power source is not on
The fuse is blown Replace the fuse
Presence of CD disc inside
the player
Inserting the disc in rev erse
direction
Compact disc is extremely
dirty or disc is defective
Condensation Leave the player off for an hour or
is muted
Wiring is not properly con-
nected
Front panel not properly
closed
The built-in microcomputer
is not operating properly
due to noise
more than 30 degrees
The disc is dirty or defec-
tive.
The antenna cable is not
connected
The signals are too weak Select a station manually
If the radio power supply is properly connected to the vessel’s
+12V switched power source terminal, switch to “on” position
Remove the disc in the player and
insert the new one
If disc will not eject, press the
RESET button
Insert the compact disc with the
label facing upward
Clean the disc or try to play a new
one
so, then try again
Adjust volume to audible level
Check wiring connections
Close front panel
Press the RESET button
Adjust the installation angle to
less than 30 degrees
Clean the disc and try to play
again or use new disc
Check antenna cable
12
Page 15

MSR7007
SPECIFICATIONS
CD
Signal to Noise Ratio. . . . . . . . . . . . . . . . . . . . . . . . . . . . . . . . . . . . . . . . . . . . . . . . . >
Channel Separation . . . . . . . . . . . . . . . . . . . . . . . . . . . . . . . . . . . . . . . . . .: More than 50 dB
Frequency Response . . . . . . . . . . . . . . . . . . . . . . . . . . . . . . . . . . . . . . . . . . : 20 Hz - 20 kHz
FM Radio
Frequency Coverage (USA) . . . . . . . . . . . . . . . . . . . . . . . . . . . . . . . . . . . 87.5 to 107.9 MHz
Frequency Coverage (Europe) . . . . . . . . . . . . . . . . . . . . . . . . . . . . . . . . . . .87.5 to 108 MHz
Sensitivity (S/N=30dB) . . . . . . . . . . . . . . . . . . . . . . . . . . . . . . . . . . . . . . . . . . . . . . . . . . .4µV
Image Rejection . . . . . . . . . . . . . . . . . . . . . . . . . . . . . . . . . . . . . . . . . . . . . . . . . . . . . >45 dB
Stereo Separation. . . . . . . . . . . . . . . . . . . . . . . . . . . . . . . . . . . . . . . . . . . . . . . . . . . . >25 dB
AM/MW
Frequency Range (USA). . . . . . . . . . . . . . . . . . . . . . . . . . . . . . . . . . . . . . . . . 530-1710 kHz
Frequency Range (Europe). . . . . . . . . . . . . . . . . . . . . . . . . . . . . . . . . . . . . . . 522-1620 kHz
Sensitivity (S/N=20dB) . . . . . . . . . . . . . . . . . . . . . . . . . . . . . . . . . . . . . . . . . . . . . . . . . 36 dB
General
Operating Voltage . . . . . . . . . . . . . . . . . . . . . . . . . . . . . . . . . . . . . . . . . . . . . . . . .DC 12 Volts
Grounding System . . . . . . . . . . . . . . . . . . . . . . . . . . . . . . . . . . . . . . . . . . . Negative Ground
Speaker Impedance . . . . . . . . . . . . . . . . . . . . . . . . . . . . . . . . . . . . . . .4-8 ohms per channel
Tone Controls:
Bass (at 100 Hz) . . . . . . . . . . . . . . . . . . . . . . . . . . . . . . . . . . . . . . . . . . . . . . . . . : ±10 dB
Treble (at 10 kHz). . . . . . . . . . . . . . . . . . . . . . . . . . . . . . . . . . . . . . . . . . . . . . . . . : ±10 dB
Power Output . . . . . . . . . . . . . . . . . . . . . . . . . . . . . . . . . . . . . . . . . . . . . . . . . . . . . . 50W x 4
Current Drain. . . . . . . . . . . . . . . . . . . . . . . . . . . . . . . . . . . . . . . . . . . . . . . .15 Ampere (max.)
Idle/Standby Current . . . . . . . . . . . . . . . . . . . . . . . . . . . . . . . . . . . . . . . . . . . . . . . . . . . 75mA
Dimensions . . . . . . . . . . . . . . . . . . . . . . . . . . . . . . . . . . . . . . . . . . .80 (W) x 183 (D) x 58 (H)
75 dB
13
Page 16

MSR7007
14
Page 17

MSR7007
CARACTERÍSTICAS DEL SISTEMA
Las características del radio Jensen MSR7007 Marine incluyen:
• Delantera/Panel de Control a Prueba de Agua (IPX5)
• Radio AM/FM US/EURO con 30 Preselecciones (12 AM, 18 FM)
• RBDS (Servicio de Transmisión de Datos de Radio, por sus siglas en inglés)
• Compatible con Radio SIRIUS
• Reproductor de CD Único Dentro del Tablero
• Modos de Reproducción MP3/WMA
• Compatible con iPod
• Radio de Banda del Tiempo (Weatherband) con Alertas de Tiempo
• Ecualizador Preconfigurado - 5 configuraciones (Plano, Rock, Pop, Clásico, Apagado)
• Controles Electrónicos de Graves, Agudos, Balance Derecho Izquierdo y Balance
Delantero Posterior
• Salida de Potencia 50W x 4
• Reloj
• Alarma de Puerta Abierta de CD
• Advertencia de Batería Baja del Vehículo
• Compatible con Control Remoto Marino de Cable
• Salidas de Nivel de Línea Preamplificadas de 4 Canales
• Encendido de 2 Cables o Memoria No Volátil y Soporte de Reloj/Tiempo de Encendido
Interior
• Entrada de Audio Auxiliar
15
Page 18

INFORMACIÓN DE SEGURIDAD
Cuando Navegue
Mantenga el volumen lo suficientemente bajo para escuchar a su alrededor.
Protéjalo del Agua
No sumerja o exponga el producto directamente al agua, pues puede causar cortos eléctricos,
incendios o daños.
Protéjalo contra las Altas Temperaturas
Exposición a luz solar directa por un periodo extendido de tiempo puede producir muy altas
temperaturas dentro de su buque. Deje que el interior se enfríe antes de iniciar la
reproducción.
No monte un radio en las proximidades del compartimiento del motor.
Utilice la Alimentación de Energía Adecuada
Este producto está diseñado para operar con un sistema de baterías de 12 voltios de Corriente
Continua negativa conectado a tierra.
Proteja el Mecanismo del Disco
Evite insertar cualquier objeto extraño dentro de la ranura del disco. Un uso equivocado causa
mal funcionamiento o daño permanente debido al mecanismo de precisión de esta unidad.
CUIDADO:
ESTE REPRODUCTOR DE CD MÓVIL ES UN PODUCTO LÁSER DE PRIMERA CLASE. LA
UNIDAD UTILIZA UN RAYO LÁSER VISIBLE/INVISIBLE CUYA EXPOSICIÓN DIRECTA
PODRÍA CAUSAR RADIACIÓN PELIGROSA. ASEGÚRESE DE OPERAR EL
REPRODUCTOR DE CD MÓVIL COMO SE DETALLA.
EL USO DE CONTROLES O AJUSTES O DESEMPEÑOS O PROCEDIMIENTOS
DISTINTOS A AQUELLOS ESPECIFICADOS AQUÍ PUEDEN PROVOCAR EN UNA
PELIGROSA EXPOSICIÓN A LA RADIACIÓN.
NO ABRA COBERTURAS O TAPAS Y NO LO REPARE USTED MISMO. POR FAVOR,
LLÉVELO AL SERVICIO DE UN TÉCNICO CALIFICADO.
ADVERTENCIA:
• NO ABRA, DESARME O ALTERE LA UNIDAD DE NINGUNA FORMA. Hacerlo puede
provocar fuego, choque eléctrico o daños.
• USE EL AMPERAJE CORRECTO CUANDO REEMPLACE UN FUSIBLE. No hacerlo
puede provocar fuego, choque eléctrico o daños.
• NO INSTALE EN LUGARES QUE PUEDAN OBSTRUIR LA OPERACIÓN DEL
VEHÍCULO. Hacerlo puede obstaculizar la visión u o los movimientos y puede provocar
accidentes serios.
• INSTALE EL CABLEADO DE TAL FORMA QUE NO SE DOBLE O PINCHE CON
TORNILLOS O FILOS. Coloque los cables lejos de partes movibles o con bordes filosos
o con punta. Esto prevendrá doblar o dañar el cableado. Si el cableado debe pasar por
un agujero de metal, asegúrese de usar un reborde de goma para prevenir que se corte
el cable con el borde metálico del agujero. También se recomienda aplicar sellador en
cualquier apertura que potencialmente pueda permitir el ingreso de agua.
• Asegúrese de elegir una ubicación que sea plana y tenga lugar arriba de la unidad para
prevenir cualquier daño, como así también permitir la ventilación.
• Antes de realizar algún agujero, cuidadosamente inspeccione el área debajo y detrás de
la superficie de montaje donde los dispositivos se fijarán, para asegurarse que no
interferirán con cables, tubos o tanques combustibles o cualquier otro objeto que pueda
ser dañado.
• Siempre desconecte el terminal negativo de la batería del vehículo para prevenir cortos
accidentales durante la instalación.
MSR7007
Notas Sobre Discos
Algunos CD-Rs/CD-RWs pueden no funcionar en esta unidad dependiendo del estado de
grabación, las condiciones del disco y el equipo usado para grabar. Para reproducciones más
confiables, por favor siga estas recomendaciones:
• Use CD-RWs con velocidad 1x a 4x y grabe con velocidad 1x a 2x.
• Use CD-Rs con velocidad 1x a 8x y grabe con velocidad 1x a 2x.
• No reproduzca CD-RWs que hayan sido grabados más de cinco veces.
Tipos Compatibles del Disco
Table 1: Información General del Disco
Tipo de
Disco
CD de Audio Lado simple de 12
NOTA: CD-R y CD-RW no se reproducirán al menos que la sesión de grabación esté
cerrada y el CD finalizado.
Logo
RECORDABLE
REWRITABLE
Mantenimiento del Disco
• Un disco sucio o defectuoso puede causar saltos mientras se está reproduciendo. Antes
de reproducir un CD, pase una tela limpia desde el agujero central hacia los bordes
externos. Nunca utilice bencina, aguarrás, líquidos de limpieza, líquidos antiestática o
ningún otro solvente.
Inserte el lado de la
etiqueta hacia arriba.
• Asegúrese de usar sólo CDs redondos en esta unidad y no use ninguna otra forma
especial de CDs. Usar CDs de formas especiales pueden causar el mal funcionamiento
de la unidad.
• No pegue papel o cinta en el disco. No pegue etiquetas o autoadhesivos al CD y quite
todos los residuos pegajosos de etiquetas despegadas.
• No exponga discos a luz solar directa o fuentes de calor.
NOTA: Un disco puede estar rayado (tal vez no lo suficiente para quedar inutilizado)
dependiendo de cómo lo maneja y otras condiciones en el amb iente de uso. Estos
rayones no indican problemas con el reproductor.
No lo doble.
Diámetro/Lados
Reproducibles
cm.
Nunca toque el
lado de abajo
del disco.
Tiempo de
Reproducción
74 minutos
Límpielo desde el
centro hacia los
costados.
16
Page 19

MSR7007
INSTALACIÓN
Esta unidad está diseñada para ser instalada en vehículos con abertura preexistente estándar
tamaño DIN para radio.
Antes de Empezar
1. Desconecte la Batería
Antes de empezar, siempre desconecte el terminal negativo de la batería.
2. Quite Tornillos de Transporte
Quite por favor el tornillo del envío antes de la instalación. Si el tornillo se deja en lugar, el
mecanismo del CD no funcionará.
Notas Importantes
• Antes de la instalación final, pruebe las conexiones de cables para asegurarse de que la
unidad esté conectada adecuadamente y el sistema funcione.
• Utilice solamente las partes incluidas con la unidad para asegurar una instalación
adecuada. El uso de partes no autorizadas puede causar mal funcionamiento.
• Consulte su revendedor más cercano si la instalación requiere taladrar agujeros u otras
modificaciones a su buque.
• Instale la unidad donde no interfiera con el manejo y no pueda herir a ningún pasajero si
se frena repentinamente o de emergencia.
• Evite instalar la unidad donde sea sometida a altas temperaturas debido a luz directa del
sol, aire caliente o calefacción, o donde reciba polvo, suciedad o vibración en exceso.
• Instale la unidad dentro de los 30° del plano horizontal.
Montaje Delantero de DIN
1. Verifique el tamaño de apertura del tablero deslizando el radio adentro del mismo. Si la
apertura no es lo suficientemente grande, cuidadosamente corte o lime hasta que el radio
se deslice dentro de la apertura. Verifique que haya suficiente espacio detrás del tablero
para el chasis del radio. Utilice la plantilla que perfora incluida para preparar la abertura
en una nueva superficie de montaje.
2. Ubique el radio en frente de la apertura del tablero de manera tal que los cables puedan
pasar por la abertura para el DIN.
3. Siga el diagrama de cableado detalladamente y asegúrese de que todas las conexiones
estén seguras y aisladas con conectores crimpados o cinta aisladora para asegurar la
instalación adecuada.
4. Luego de completar las conexiones del cableado, encienda la unidad para confirmar la
operación (el interruptor accesorio del vehículo debe estar encendida). Si la unidad no
opera, verifique nuevamente todas las conexiones de cables hasta que se solucione el
problema. Una vez que se alcanza una operación correcta, apague el interruptor
accesorio y proceda con el montaje final del chasis.
5. Cuidadosamente deslice el radio dentro del tablero asegurándose que esté hacia arriba.
6. Adjunte un extremo de la Cinta de Soporte Perforada (provista) al Perno de Soporte
Trasero en la parte trasera del chasis utilizando la Tuerca de Montaje M5 provista.
Asegure el otro extremo de la correa perforada a una parte segura del tablero, ya sea
arriba o abajo del radio, utilizando el tornillo y las arandelas planas provistos. Doble la
correa hasta colocarla en la posición necesaria. CUIDADO: La cinta de soporte trasera
perforada debe ser usada en la instalación del radio. La instalación sin la cinta
puede causar daños al radio o a la superficie de montaje e invalida la garantía del
fabricante.
7. Instale los seis Tornillos de Montaje de Acero Inoxidable Nro.6 a través del frente del
radio hasta el tablero. CUIDADO: El radio debe asegurarse usando los 6 puntos de
montaje. No hacerlo puede causar daños al radio o al tablero.
8. Verifique la operación del radio leyendo las instrucciones de operación para la unidad.
ASEGURABAN A LA
EstándarTamaño DIN
Pernode Soporte Trasero
Tornillos de Montaje deAcero Inoxidable
Nro.6 (6.)
LONGITUD MÍNIMA DEL
TORNILLO11/2"
Tuercade Montaje M5
ESTRUCTURA SECUNDARIA
DE LA ROCIADA
SoporteTraseraPerforada
Reconecte la Batería
Cuando el cableado se complete, reconecte el terminal negativo de la batería.
17
Page 20

CABLEADO
MSR7007
ANTENA
(NEGRO)
IPOD
(BLANCO)
6 pulgadas
8 PINES
HEMBRA
SIRIUS
(GRIS)
6 pulgadas
8 PINES
HEMBRA
ROJOBLANCO
AUX ENTRADA
(AMARILLO)
6 pulgadas
CABLE DE SALIDA DE AUDIO
DE 20 PINES (15,24cm.)
REMOTO CABLEADO
(NEGRO)
6 pulgadas
8 PINES
MACHO
HEMBRA
PIN DESCRIPCIÓNCOLOR ALAMBRE
SUBWOOFER SALIDA
RCA (VERDE)
6 inches
VISTA DE INSERCIÓN DE CABLE
GRIS/NEGRO
GRIS
VIOLETA
VIOLETA/NEGRO
VAC ÍO
VERDE
VERDE/NEGRO
VAC ÍO
NEGRO/PROTECTOR
ROJO
BLANCO
BLANCO/NEGRO
VAC ÍO
AZUL
ROJO
NEGRO
BLANCO (cable MARRÓN)
RED (cable MARRÓN)
NEGRO/PROTECTOR
BLANCO (cable gris)
VISTAA-A
ALTAVOZ DELANTERO DERECHO (-)
ALTAVOZ DELANTERO DERECHO
ALTAVOZ TRASERO DERECHO (+)
ALTAVOZ TRASERO DERECHO (-)
SIN CONEXIÓN
ALTAVOZ TRASERO IZQUIERDO (+)
ALTAVOZ TRASERO IZQUIERDO (-)
SIN CONEXIÓN
LÍNEA DE AUDIO NEGATIVA TRASERA
LÍNEA DE NIVEL DE SALIDADERECHA TRASERA
ALTAVOZ DELANTERO IZQUIERDO (+)
ALTAVOZ DELANTERO IZQUIERDO (-)
SIN CONEXIÓN
ANTENA DE ENERGÍA
IGNICIÓN ACCESORIA
TIERRA
SALIDA DE NIVEL DE LÍNEAIZQUIERDA DELANTERA
SALIDA DE NIVEL DE LÍNEADERECHA DELANTERA
LÍNEA DE AUDIO NEGATIVA DELANTERA
LÍNEA DE NIVEL DE SALIDAIZQUIERDA TRASERA
¡CUIDADO!
No conecte el cable ROJO
+DC a la batería. Este cable
DEBE estar conectado al
fuente de energía cambiada
+12 voltios.
(+)
GRIS
BLANCO
LINE SALIDA
10.22 pulgadas
GRIS
ROJO
(TRASERO)
CABLE DE SALIDA DE AUDIO DE 20 PINES
MARRÓN
BLANCO
15,24cm.
MACHO
A
MARRÓN
ROJO
LINE SALIDA
10.22 pulgadas
(DELANTERO)
A
18
Page 21

MSR7007
OPERACIÓN BÁSICA
20
24
22
23
RESET
VEA DETRÁS DE LA PUERTA DE CD
1
11
21
12
13
17
19
2a
INFO
DISP
SCROLL
PTY
10
9
15
18
14
16
2b
3
MUTE
MODE
4
8
5
6
7
Encendido / Apagado
Presione el botón POWER (1) para encender o apagar la unidad. La unidad reasumirá el
último modo seleccionado (Radio, Auxiliar, etc.).
Control de Volumen
Para subir el volumen, presione el botón VOLUME + (2a). Para bajar el volumen, presione el
botón VOLUME - (2b). Mientras ajuste el volumen, la pantalla LCD muestra un gráfico de
barras y la representación numérica del nivel. El nivel máximo de volumen es 40.
Mudo (Mute)
Presione el botón MUTE (16) en el panel de control para enmudecer la salida de audio.
Presione MUTE nuevamente para restaurar la salida de audio al nivel previo.
Modo (Mode)
Presione el botón MODE (4) en el panel de control para seleccionar un modo de operación
diferente, como se indica en la pantalla. Los modos disponibles incluyen Tuner (Radio AM/
FM), SAT Radio (Radio Satelital), CD, iPod y AUX In (Entrada Auxiliar opcional).
NOTA: Los modos CD, iPod o SIRIUS serán salteados si el módulo no está instalado.
NOTA: El modo SIRIUS Radio será salteado cuando el menú Región esté en "EURO".
Reiniciar
Para reiniciar, utilice un bolígrafo u objeto similar para presionar el botón RESET (23). El botón
de reinicio (RESET) se debe activar por los siguientes motivos:
• initial installation of the unit when all wiring is completed
• function buttons do not operate
• error symbol on the display
Menú de Audio
Presione el botón AUDIO/MENÚ (3) en el panel de control para acceder al menú de audio.
Usted puede navegar a través de los ítems de menú de audio presionando repetidas veces el
botón AUDIO/MENÚ. Una vez que el menú deseado aparezca en pantalla, ajuste la opción
presionando los botones de VOLUME (2) dentro de los 5 segundos. La unidad
automáticamente saldrá del menú de audio luego de cinco segundos de inactividad. Se
pueden ajustar los siguientes ítems del menú.
Nivel de Graves (Bass Level)
Utilice los botones VOLUME (2) para ajustar el rango de nivel de Graves desde "-6" a "+6".
Nivel de Agudos (Treble Level)
Utilice los botones VOLUME para ajustar el rango de nivel de Agudos desde "-6" a "+6".
Balance izquierdo/derecho (Balance)
Gire el botón VOLUME para ajustar el Balance entre los altavoces izquierdo y derecho desde
"12L" (completamente a la izquierda) hasta "12R" (completamente a la derecha).
Balance delantero/posterior (Fader)
Gire los botones de VOLUME para ajustar el balance entre los altavoces posteriores y
delanteros desde "12R" (completamente hacia atrás) hasta "12F" (completamente hacia
adelante).
Panel Delantero
Notas Importantes
• Siempre opere la unidad con la puerta del panel delantero cerrada.
• Cuando cierre la puerta del panel delantero, no presione el botón deslizable de apertura
(OPEN).
• No fuerce la operación de la puerta del panel delantero cunado la abra o la cierre.
• No toque la llave de detección de puerta abierta (24).
Alarma de Puerta del Panel Delantero
Para prevenir el daño a la unidad por ingreso de agua o restos a través de la apertura de CD,
la puerta del panel delantero sólo debe abrirse por un periodo de tiempo corto durante la carga
o eyección del CD. Si la puerta del panel delantero se deja abierta por más de 30 segundos, el
audio en reproducción enmudecerá y sonará un tono de bip. Cierre la puerta para reasumir
una reproducción normal.
19
Page 22

MSR7007
Menú de Sistema
1. Mantenga presionado el botón AUDIO/MENÚ (3) por más de 2 segundos para acceder al
menú de sistema. El primer ítem del menú, "Beep Tone" (Tono de Bip), aparecerá en
pantalla.
2. Presione el botón AUDIO/MENÚ varias veces para navegar el menú sistema y
seleccionar el ítem deseado.
3. Presione los botones de VOLUME (2) para ajustar el ítem de menú seleccionado.
Se pueden ajustar los siguientes ítems:
• Beep Tone / Tono de Bip (ENCENDIDO/APAGADO): Encienda o apaga el bip audible
(escuchado cuando se seleccionan botones o funciones).
• Región (USA/EURO): Configura espacio en la frecuencia para varias regiones.
• Time Zone / Zona Horaria: Ingrese la zona horaria local (usado solamente para modo
satelital Sirius).
• DST / Horario de Ahorro de Luz (Observado/No Observado): Configúrelo para Horario de
Ahorro de Luz.
• Clock / Reloj (12Hr/24Hr): Seleccione el modo de 12 o 24 horas.
• Brightness / Brillo (Bajo/Medio/Alto): Ajuste el brillo de la pantalla LCD.
• Contraste (Bajo/Medio/Alto): Configurar el contraste del LCD.
• Pwr On Vol (0 - 40): Selecciona un volumen de encendido automático.
• Auto iPod (ENCENDIDO/APAGADO): Elija "ON" para detectar automáticamente y
reproducir cuando un iPod se conecte u "OFF" para usar el botón de MODE para
seleccionar la fuente de iPod.
• WB Alert / Alertas del tiempo (ENCENDIDO/APAGADO): Elija "ON" para encender el
modo Weatherband cuando se envíen las alertas de tiempo NOAA. (Vea "Alertas de
Tiempo NOAA" en página 8).
• Alert PWR / Encendido de Alertas (AUTOMATICO/APAGADO): Seleccione "Auto" para
encender el radio cuando las alertas NOAA se envíen. Esta función solamente funciona
cuando el interruptor de +12V está encendido.
• Low Battery Alarm / Alarma de Batería Baja (ENCENDIDO/APAGADO): Voltaje de
monitor en línea +12 voltios cambiados.
• Default Set / Configuración por Defecto (NO/SI): Elija "YES" para volver el EEPROM a los
valores configurados de fábrica.
Operación con Batería Baja (LOW BATTERY)
Si LOW BATT está en "ON", una alarma sonará (8 bips cada 30 segundos) cuando el voltaje
cae a 10.8V (+/- 0.03V). Una advertencia visual (LOW BATT) aparecerá (8 destellos cada 30
segundos) en la esquina inferior izquierda de la pantalla.
Entrada Auxiliar
Para acceder a un dispositivo auxiliar:
1. Conecte el reproductor de audio portátil a los cables AUX IN en la parte de atrás del
radio.
2. Presione el botón MODE (4) para seleccionar el modo AUX.
3. Presione MODE nuevamente para cancelar el modo AUX y seguir al siguiente modo de
reproducción disponible.
Pantalla de Cristal Líquido (LCD)
La frecuencia de corriente y las funciones activas se muestran en pantalla (21).
NOTA: Los paneles LCD pueden tardar más en responder cuando estén expuesto a
temperaturas bajas durante un período prolongado de tiempo. Además, la visibilidad de
los números en el LCD puede bajar levemente. La pantalla LCD volverá a su normalidad
cuando la temperatura suba a un rango normal.
Poniendo en Hora el Reloj
Para ver el reloj mostrando la hora actual, encienda la ignición del vehículo y apague el radio.
Mantenga presionado el botón DISP/SCROLL (12) por más de un segundo y la hora
destellará en pantalla. Presione el botón TUNE/TRK |<< (19) para ajustar las horas o el botón
TUNE/TRK >>| (18) para ajustar los minutos. "AM" o "PM" aparecerán en pantalla para indicar
AM o PM. Cuando no se realizan ajustes por cinco segundos, la hora se fijará y se reanudará
la operación normal.
Scroll (Avanzar)
Cuando la información es muy larga para entrar en la pantalla, mantenga presionado el botón
DISP/ SCROLL (12) para ver el título entero. La información pasará dos veces y luego volverá
al texto abreviado.
NOTA: La configuración por defecto para LOW BATT es apagado ("OFF"). Si se
enmudece el audio o el volumen está en 0, el bip audible no se escuchará.
Ecualizador
Presione el botón EQ/LOD (11) para elegir una de las siguientes curvas graves y agudas
predefinidas: OFF (Apagado) > FLAT (Plano) > ROCK > POP > CLASSIC (Clásico).
Sonoridad
Mantenga presionado el botón EQ/LOD (11) para cambiar entre sonoridad encendida o
apagada. Cuando escuche música en volumen bajo, esta función potenciará los rangos
graves y agudos para compensar las características del oído humano.
20
Page 23

MSR7007
OPERACIÓN DEL SINTONIZADOR
1
11
21
12
13
17
19
2a
INFO
DISP
SCROLL
PTY
10
9
15
18
14
16
2b
3
MUTE
MODE
4
8
5
6
7
Seleccione una Banda
Presione el botón BAND (15) para cambiar entre tres bandas FM y dos bandas AM (MW).
Mantenga presionado el botón BAND para acceder a la banda del tiempo Weatherband (WB).
Sintonía Manual
Presione los botones TUNE/TRK >>| o |<< (19, 18) para buscar estaciones una a una hacia
arriba o hacia abajo.
Sintonía de Búsqueda Automática
Presione los botones TUNE/TRK >>| o |<< (19, 18) para buscar automáticamente la estación
potente siguiente o anterior en el dial.
NOTA: La búsqueda en la sintonía no está disponible para canales en la banda del
tiempo. Utilice los botones hacia arriba o hacia abajo de la sintonía para seleccionar
manualmente cualquiera de los siete canales de la banda del tiempo di sponibles.
Estaciones Preseleccionadas
Seis botones numerados almacenan y sintonizan estaciones preseleccionadas por cada
banda.
Almacene una Estación
Seleccione una banda (si es necesario), luego seleccione una estación. Mantenga presionado
el botón de configuración previa (5-10) por dos segundos. El número preseleccionado
aparecerá en la pantalla.
Ir a una Estación
Seleccione una banda (si es necesario). Presione el botón de preselección (5-10) para
seleccionar la estación almacenada correspondiente.
NOTA: Los botones de preselección no funcionarán en modo de banda del tiempo.
Grabado Automático / Recorrido Preseleccionado de
Sintonía (AS/PS)
Grabado Automático
Selecciona una banda AM o FM. Mantenga presionado el botón AS/PS (14) por más de 2
segundos para seleccionar automáticamente seis estaciones fuertes y grabarlas en la banda
actual. Las nuevas estaciones reemplazan cualquier estación almacenada anteriormente en
esa banda.
Escaneo Preseleccionado
Seleccione una banda. Presione AS/PS (14) para recorrer estaciones grabadas en la banda
actual. La unidad se detiene por 5 segundos en cada estación potente. Presione AS/PS
nuevamente para detener el escaneo cuando se alcanza la estación deseada.
Operación del Servicio de Transmisión de Datos de Radio
(RBDS)
Esta unidad está equipada para mostrar información RBDS, Servicio de Transmisión de
Información de Radio, cuando la estación de radio lo emita. Los siguientes indicadores
aparecen en el LCD cuando se reciben datos:
• RBDS: La estación de radio actual está transmitiendo información RBDS.
• PTY: Se está recibiendo datos del Tipo de Programa. Cuando destella, la búsqueda del
tipo de programa o PTY se está realizando.
• RBDS: The current radio station is broadcasting RBDS data.
NOTA: Las estaciones que transmitan RBDS pueden no estar disponibles en su área..
Tipo de Programa (PTY)
En modo de radio FM, presione el botón PTY (13) para listar las siguientes opciones de
búsqueda: ANY (Cualquiera) / News (Noticias) / Information (Información) / Sports (Deportes) /
Talk (Charlas) / Rock / Classic Rock (Rock Clásico) / Adult Hits (Hits de Adultos) / Soft Rock
(Rock Suave) / Top 40 / Country / Oldies (Viejitos) / Soft (Lentos) / Nostalgia / Jazz / Classical
(Clásicos) / Rhythm and Blues (R&B) / Soft R&B (R&B Lentos) / Language (Lenguajes) /
Religious Music (Música Religiosa) / Religious Talk (Charlas Religiosas) / Personality
(Personalidad) / Public (Público) / College (Universitario) / Weather (Tiempo) / Emergency T est
(Verificación de Emergencia) / Emergency (Emergencia).
Para buscar estaciones en la categoría PTY:
1. Presione el botón PTY (13) para ver la categoría PTY actual.
2. Utilice los botones de VOLUME (2) para moverse por la lista de categorías disponibles y
seleccionar el tipo de programa que desea buscar.
3. Luego de seleccionar el tipo de programa deseado, mantenga presionado los botones
TUNE/TRK >>| o |<< (19, 18) para buscar en la banda transmisiones de este tipo.
NOTA: Realizar una búsqueda PTY en "ANY" (cualquiera) buscará y se detendrá en
cualquier estación transmitiendo RBDS, sin importar el tipo de programa.
21
Page 24

Operación de la Banda del Tiempo
¿Qué es la Radio del Tiempo NOAA / Weatheradio Canada?
Este es un sistema nacional que transmite información de emergencia del tiempo local las 24
horas del día. La red de Estados Unidos tiene más de 530 estaciones cubriendo 50 estados y
las costas adyacentes, Puerto Rico, las Islas Vírgenes y Territorios de Pacífico de Estados
Unidos. Cada área local tiene su propia estación transmisora y hay un total de siete
frecuencias de transmisión en uso. Un sistema similar está disponible en Canadá bajo el
servicio Weatheradio Canada, administrado por Enviroment Canada (Medioambiente
Canadá).
Sintonizando la banda del Tiempo o Weatherband
Mantenga presionado el botón BAND/WB (15) para acceder a la banda del tiempo
(Weatherband). La indicación "WB" aparecerá en pantalla, junto con el número y canal actual.
"CH01", CH02", "CH03", "CH04", "CH05", "CH06" o "CH07". Utilice los botones TUNE/TRK
>>| o |<< (19, 18) para sintonizar cada uno de los siete canales hasta que encuentre la
transmisión de banda de tiempo en su área.
¿Cuántas estaciones puede recibir?
Debido a que los transmisores son tiempo e información locales, la potencia de transmisión es
usualmente muy baja (mucho menos que las estaciones AM o FM), por ello usualmente
recibirá solo una estación a menos que esté en el borde de dos o más señales de transmisión.
Lo más que puede recibir serán dos o tres, y eso es raro.
¿Es posible no recibir ninguna estación?
Dependiendo de dónde esté usted ubicado, hay una posibilidad que reciba solamente una
señal muy débil o ninguna. También, igual que las señales AM y FM, las señales de la banda
del tiempo están sujetas a las condiciones del medioambiente, tiempo, obstrucciones de señal
por montañas, etc.
Alertas de Tiempo NOAA
La Función de Alerta del Tiempo agrega un nivel adicional de seguridad de usuario al cambiar
automáticamente desde cualquiera de los modos disponibles (Tuner, SAT, CD, iPod, AUX) a la
banda del tiempo por un mínimo de 60 segundos si un tono de advertencia NOAA (1050 Hz)
se recibe/detecta. Si no se recibe un tono de advertencia adicional por 60 segundos, la unidad
volverá al último modo en funcionamiento. Vea “Menú de Sistema” on page 20 para ver cómo
activa la función de Alerta de la Banda del Tiempo (WB Alert).
MSR7007
22
Page 25

MSR7007
OPERACIÓN DEL EQUIPO DE CD/MP3
20
DISP
SCROLL
PTY
13
10
23
RESET
17
19
INFO
14
18
24
1
11
21
22
12
2a
3
16
2b
MUTE
MODE
4
8
5
6
9
7
15
Insertando y Quitando un Disco
Inserte un disco, con el lado correcto hacia arriba, dentro de la abertura (22). La unidad
automáticamente jalará el disco hacia adentro y reproducirá la primera pista del disco, esté
encendida o apagada.
Presione el botón de eyectar (20) para detener el disco y quitarlo. La unidad no debe estar
encendida para quitar el disco.
Controlando la Reproducción del Disco
Seleccionando Pistas
Presione el botón TUNE/TRK >>| (19) o TUNE/TRK |<< (18) para avanzar a la pista siguiente
en el disco. El número de pista seleccionado aparecerá en pantalla. Mantenga presionado el
botón TUNE/TRK >>| o |<< para avanzar o retroceder rápido por el disco. La reproducción del
disco inicia cuando el botón se libera.
Reproducción/Pausa de Disco
Presione el botón 1/>|| (8) para suspender la reproducción del disco. Presione nuevamente 1/
>|| para reasumir la reproducción.
Viendo Previamente las Pistas
Presione el botón 2/INT (6) para reproducir los primeros 10 segundos de cada pista
secuencialmente. Presione 2/INT nuevamente para detener el escaneo de las introducciones
(Intro Scan) y reasumir la reproducción normal de la pista actual.
Reproducción en Repetición
• Presione el botón 3/RPT (5) durante la ejecución del disco para repetir continuamente la
misma pista.
• Mantenga presionado el botón 3/RPT para repetir la carpeta actual.
• Presione 3/RPT nuevamente para detener la repetición.
Reproducción Aleatoria
• Presione el botón 4/RDM (7) durante la reproducción para pasar todas las pistas en
orden aleatorio, entremezclado.
• Mantenga presionado el botón 4/RDM para pasar aleatoriamente todos los archivos en
la carpeta actual.
• Presione 4/RDM nuevamente para detener la ejecución aleatoria.
Navegación de Carpeta (MP3 Solamente)
Presione el botón 5/DN (9) para seleccionar una carpeta hacia abajo.
Presione el botón 6/UP (10) para seleccionar una carpeta hacia arriba.
Reproducción de MP3
Comentarios sobre la Reproducción de MP3
• Cualquier directorio que no incluya un archivo
MP3 será salteado.
• Número máximo de carpetas: 512 (incluyendo
directorios salteados)
• Número máximo de niveles de carpetas: 12
• Número máximo de archivos MP3: 999
• Número máximo de caracteres para nombre de
archivo MP3 y carpeta: 32
• Frecuencia de Muestreo: 16KHz, 22.05KHz,
24KHz, 32KHz, 44.1KHz, 48KHz
• Tasa de bits: máximo 284 Kbps
• Máximo número de Caracteres para Etiqueta ID3:
• Etiqueta ID3 versión 1.0: 32
• Etiqueta ID3 versión 2.x: 32
Orden de Reproducción de Archivo
Cuando se seleccionen para reproducción, los archivos
y carpetas (Búsqueda de Carpetas, Búsqueda de
Archivos o Selección de Carpetas) se acceden en el
orden en el cual fueron grabados en el CD. En
consecuencia, el orden en el cual se espera que sean
reproducidos puede no ser igual al orden en el cual se
reproduzcan. Usted puede seleccionar el orden en el
cual MP3/WMA se reproduzcan grabándolos en un
medio como un CD-R con sus nombres de archivos
empezando con una secuencia numérica tal como del
"01" al "99".
Por ejemplo, un medio con la jerarquía de carpeta/
archivo ilustrada en la derecha queda sujeto a
Búsqueda de Carpeta, a Búsqueda de Archivo y a un
orden de reproducción.
23
Page 26

OPERACIÓN DEL RADIO SATELITAL
1
11
21
12
13
2a
DISP
SCROLL
PTY
10
9
15
16
2b
3
MUTE
MODE
4
8
5
6
7
Cambiando al Radio Satelital Sirius
(Requiere un radio Sirius opcional)
Presione el botón MODE (4) para cambiar el modo a radio Sirius.
Accediendo al Identificador de su Radio (RADIO ID)
Para mostrar su identificador de radio, utilice los botones TUNE/TRK |<< (18) para sintonizar
al canal "000". La pantalla mostrará "Sirius ID" en la barra superior con el identificador en la
mitad de la pantalla LCD. El identificador de Radio Sirius es de 12 caracteres de largo.
Seleccionando una Banda
En modo Sirius, presione el botón BAND (15) para accederlos grupos de canales
preseleccionados por el usuario en Sirius en el siguiente orden: SR-1, SR-2, SR-3.
Sintonía de Categoría
1. Presione el botón INFO (17) para acceder al modo de Categoría.
2. Mientras la categoría está destellando, presione los botones TUNE/TRK |<< / >>| (18, 19)
para elegir la categoría.
3. Presione el botón INFO para confirmar la selección de categoría y sintonizar el primer
canal en la categoría elegida. El icono de la categoría dejará de destellar.
4. Presione los botones TUNE/TRK |<< / >>| (18, 19) para elegir los canales deseados en
esa categoría. (El número de canal más bajo dentro de la categoría elegida siempre será
el primer canal en sintonizar por defecto.)
5. Mantenga presionado el botón INFO para volver al modo de sintonía de canales.
Sintonía de Canal hacia Arriba o Hacia Abajo
Presione los botones TUNE/TRK |<< / >>| (18/19) para buscar un canal. Mantenga presionado
los botones TUNE/TRK para búsqueda rápida.
Guardando Canales Preseleccionados
Los botones de preselección (5-10) se pueden usar para guardar hasta 6 canales, permitiendo
acceso conveniente a sus canales favoritos.
17
19
INFO
14
18
MSR7007
Programando Canales
1. Seleccione el canal que usted quiere guardar en memoria.
2. Mantenga presionado el botón de configuración previa (5 - 10) hasta que el número del
botón correspondiente aparece.
3. Repita los pasos 1 y 2 para programar canales adicionales.
Sintonía Rápida
Presione uno de los seis botones de preselección (5 - 10) para seleccionar directamente un
canal.
Escaneo Preseleccionado
Seleccione una banda. Presione el botón AS/PS (14) para recorrer estaciones grabadas en la
banda actual. La unidad se detiene por 10 segundos en cada estación potente. Presione AS/
PS nuevamente para detener el escaneo cuando se alcanza la estación deseada.
Sintonía de Estaciones Preseleccionadas
Mantenga presionado el botón AS/PS (14) para acceder al Modo de Sintonía de Preselección.
En Modo de Sintonía de Estaciones Preseleccionadas, usted puede usar los botones TUNE/
TRK |<< / >>| (18, 19) para acceder a las 18 estaciones preseleccionadas en orden
secuencial. Mantenga presionado el botón AS/PS nuevamente para desactivar el Modo de
Sintonía de Estaciones Preseleccionadas.
Modo de Pantalla Alternativo
Presione el botón DISP/SCROLL (12) para cambiar la información de p antalla entre una o dos
líneas de texto en pantalla. En modo de línea dual, ambos artista y título están a la vista.
Mantenga presionado el botón DISP/SCROLL mientras esté mostrando una sola línea de
texto en pantalla, para pasar toda la información de Artista/Título de Canción.
Fuerza de la Señal Satelital
La pantalla indica la fuerza de la recepción satelital como se muestra abajo.
Fuerza de la Señal Fuerza en Pantalla
Sin Señal
Débil
Buena
Excelente
Bloqueo de Canal
Mientras esté en la sintonía del canal que desea bloquear, mantenga presionado el botón
MODE (4) para acceder a la función de Bloqueo de Canal. "Enter Code" aparece en pantalla
para ingresar el código. Usando los botones del 1 al 6, ingrese su código de 4 dígitos (el
código por defecto es 1111). "Channel Locked" aparece en pantalla, confirmando que el canal
está bloqueado. Las próximas 12 veces que al canal se acceda secuencialmente, el mensaje
"Channel Locked" aparecerá, seguido de "Enter Code": Para recuperar el canal bloqueado,
ingrese el código de 4 dígitos. Para cambiar el código de bloqueo de canal, mantenga
presionado el botón PTY (13). Ingrese Código Actual > Nuevo Código > Confirmar. La
pantalla LCD mostrará que el nuevo código ha sido guardado con la frase "New Code Stored".
24
Page 27

MSR7007
OPERACIÓN DEL IPOD
Esta unidad está equipada con una función de compatibilidad con iPod que permite controlar
su iPod (si es compatible) usando los botones del panel de control. Son compatibles las
siguientes versiones de iPod:
• iPod 3G (soportes lógico inalterable 2.2 solamente)
• iPod Mini
• iPod 4G
• iPod Photo
• iPod Nano
• iPod 5G (Video)
finalice. En pantalla aparecerá "Shuffle". Presione 4/RDM nuevamente para detener la
ejecución aleatoria.
Seleccionando Pistas
Durante la reproducción, presione los botones TUNE/TRK |<< / >>| (20/21) para reproducir la
pista anterior o siguiente en la categoría actual. Presione el botón TUNE/TRK |<< (20) una vez
para reproducir la canción desde la posición inicial o presiones TUNE/TRK |<< dos veces para
reproducir la pista previa. Mantenga presionado el botón TUNE/TRK |<< / >>| (20/21) para
retroceder o avanzar rápidamente la canción.
NOTA: iPod y Cable de iPod se venden por separado.
Accediendo al Modo iPod
La unidad automáticamente cambiará a modo de
iPod cuando un iPod se enchufa en el cable de
iPod.
To return to the iPod menu from any other source,
press the MODE button (4) on the control panel or
remote control until “iPod” appears on the display.
Para volver al menú de iPod desde cualquier otra
fuente, presione el botón MODE (4) en el panel de
control o en el control remoto hasta que "iPod"
iPod
Video
iPod
photo
aparezca en pantalla.
Encendiendo/Apagando el iPod
El iPod se enciende automáticamente cuando un iPod se conecta al cable de 30 pines de
iPod, siempre que la ignición del vehículo esté encendida. Usted puede apagar el iPod
desconectándolo del cable o apagando la +12 voltios cambiaron fuente de energía. Cuando la
ignición del vehículo se apaga, el iPod hará una pausa y luego de 2 minutos entrará en modo
dormir. Mientras está conectado, el iPod no se puede encender o apagar usando los controles
del iPod.
NOTA: El iPod se recargará continuamente cuando esté conectado a la unidad,
mientras que la +12 voltios cambiaron fuente de energía del vehículo esté encendida.
8 Din iPod Ready Cable
HEAD UNIT
iPod iPod
mini
iPod
nano
iPod Cable
Controlando la Ejecución
Deteniendo la Reproducción
Durante la reproducción, presione el botón 1/>|| (8) para pausar el reproductor del iPod. En
pantalla aparecerá "Pause". Presione nuevamente 1/>|| para reasumir la reproducción.
Reproducción en Repetición
Durante la reproducción, presione el botón 3/RPT (5) para repetir la canción actual. En
pantalla aparecerá "Repeat". Presione 3/RPT nuevamente para detener la repetición.
Reproducción Aleatoria
Durante la reproducción, presione el botón 4/RDM (7) para pasar todas las canciones de esa
categoría en orden aleatorio. La reproducción aleatoria se iniciará cuando la canción actual
1
11
21
12
13
17
19
2a
INFO
DISP
SCROLL
PTY
10
9
15
18
14
16
2b
3
MUTE
MODE
4
8
5
6
7
NOTA: Si mantiene presionado el botón TUNE/TRK |<< / >>| para cambiar la canción
actual por la siguiente o a la previa, usted saldrá del modo retroceso o avance rápido.
Selección de Lista del Juego
Presione el botón INFO (17) para acceder al modo de selección de Lista del Juego.
• Presione el botón 5/DN (9) para seleccionar una lista hacia abajo.
• Presione el botón 6/UP (10) para seleccionar una lista hacia arriba.
• Presione el botón 1/>|| (8) para seleccionar un archivo y para comenzar aparato de
lectura.
Modo de Pantalla Alternativo
Presione el botón DISP/SCROLL (12) para cambiar la información de p antalla entre una o dos
líneas de texto en pantalla.
25
Page 28

MSR7007
CUIDADO Y MANTENIMIENTO
• Mantenga el producto seco. En el caso de mojarse, séquelo inmediatamente. Los
líquidos pueden contener minerales que corroen los circuitos electrónicos.
• Mantenga el producto lejos de polvo y suciedad, lo cual puede causar un desgaste
prematuro de las partes.
• Maneje el producto suave y cuidadosamente. Dejarlo caer puede dañar circuitos y cajas,
y puede causar que el producto funcione inadecuadamente.
• Ocasionalmente limpie el producto con un trapo mojado para que mantenerlo como
nuevo. No utilice químicos fuertes, solventes de limpieza o detergentes fuertes para
limpiar el producto.
• Utilice y guarde el producto solamente en ambientes de temperatura normal. Las altas
temperaturas pueden acortar la vida de los dispositivos electrónicos, dañar baterías y
distorsionar y derretir las partes plásticas.
Ignición
La fuente más común de ruido en la recepción es el sistema de ignición. Esto es el resultado
de un radio ubicado cerca del sistema de ignición (motor). Este tipo de ruido puede ser
detectado fácilmente porque variará en intensidad de tono con la velocidad del motor.
Usualmente, el ruido de la ignición se puede suprimir considerablemente usando un cable de
ignición de la suspensión de alto voltaje y un resistor supresor en el sistema de ignición. (La
mayoría de los buques emplean este cable y resistor pero puede ser necesario verificarlos
para una operación correcta.) Otro método de supresión es el uso de supresores adicionales.
Éstos se pueden obtener en la mayoría de los comercios electrónica.
Interferencia
La recepción de radio en un ambiente en movimiento es muy diferente de la recepción en un
ambiente estacionado (casa). Es muy importante entender la diferencia.
La recepción AM se deteriorará cuando pase bajo un puente o cuando pase bajo líneas de alto
voltaje. A pesar que banda AM está sujeta a ruidos medioambientales, tiene la habilidad de
recibir a gran distancia. Esto es porque las señales de transmisión siguen la curvatura de la
tierra y se rebotan de vuelta en la atmósfera superior.
SOLUCIÓN DE PROBLEMAS
Problema Cause Solución
No hay energía La fuente de energía cam-
El disco no se puede
insertar o eyectar
No hay sonido El volumen está muy bajo Ajuste el volumen a un nivel audi-
Los botones de operación no funcionan
El sonido salta El ángulo de instalación es
No se puede sintonizar a
una estación de radio, la
búsqueda automática no
funciona
biada +12V del buque no
está encendida
El fusible está quemado Reemplace el fusible.
Hay un CD dentro del
reproductor
Insertando el disco en
dirección reversa
El disco compacto está muy
sucio o tiene un defecto
Condensación Deje el reproductor apagado por
El cableado no está
conectado adecuadamente
El panel de control no está
instalado correctamente
El microcomputador integrado no está operando
adecuadamente debido al
ruido
de más de 30 grados
El disco está sucio o tiene
un defecto
The antenna cable is not
El cable de la antena no
está conectado
Las señales son muy
débiles
Si la fuente de alimentación de
radio está conectada correctamente con el terminal cambiado
+12V de la fuente de energía del
buque, cambie a "on" la posición.
Quite el disco en el reproductor e
inserte uno nuevo.
Si el disco no sale, presione el
botón RESET.
Inserte el disco compacto con la
etiqueta hacia arriba.
Limpie el disco o intente reproducir otro.
una hora, luego intente nuevamente.
ble.
Verifique las conexiones de
cables.
Reinstale el panel de control.
Presione el botón RESET.
Ajuste el ángulo de instalación a
menos de 30 grados.
Limpie el disco e intente nuevamente o use un nuevo disco.
Verifique el cable de la antena
Seleccione una estación manualmente.
26
Page 29

MSR7007
ESPECIFICACIONES
CD
Señal a Coeficiente de Ruido . . . . . . . . . . . . . . . . . . . . . . . . . . . . . . . . . . . . . . . . . . . > 75 dB
Separación de Canal. . . . . . . . . . . . . . . . . . . . . . . . . . . . . . . . . . . . . . . . . . . . . Más de 50 dB
Frecuencia de Respuesta . . . . . . . . . . . . . . . . . . . . . . . . . . . . . . . . . . . . . . . . 20 Hz - 20 kHz
Radio FM
Cobertura de la Frecuencia (USA) . . . . . . . . . . . . . . . . . . . . . . . . . . . . . . . 87.5 a107.9 MHz
Cobertura de la Frecuencia (Europe) . . . . . . . . . . . . . . . . . . . . . . . . . . . . . . 87.5 a 108 MHz
Sensibilidad (S/N=30dB). . . . . . . . . . . . . . . . . . . . . . . . . . . . . . . . . . . . . . . . . . . . . . . . . 4µV
Rechazamiento de la Imagen . . . . . . . . . . . . . . . . . . . . . . . . . . . . . . . . . . . . . . . . . . . >45 dB
Separación Estérea. . . . . . . . . . . . . . . . . . . . . . . . . . . . . . . . . . . . . . . . . . . . . . . . . . . >25 dB
AM/MW
Cobertura de la Frecuencia (USA) . . . . . . . . . . . . . . . . . . . . . . . . . . . . . . . . . 530-1710 kHz
Cobertura de la Frecuencia (Europe) . . . . . . . . . . . . . . . . . . . . . . . . . . . . . . . 522-1620 kHz
Sensibilidad (S/N=20dB). . . . . . . . . . . . . . . . . . . . . . . . . . . . . . . . . . . . . . . . . . . . . . . 36 dB
General
Voltaje de Funcionamiento . . . . . . . . . . . . . . . . . . . . . . . . . . . . . . . . . . . . . . . . . DC 12 Volts
Poner a Tierra el Sistema . . . . . . . . . . . . . . . . . . . . . . . . . . . . . . . . . . . . . . . Tierra Negativa
Impedancia del Altavoz. . . . . . . . . . . . . . . . . . . . . . . . . . . . . . . . . . 4-8 ohmios por el canall
Controles del Tono:
Bajo (at 100 Hz). . . . . . . . . . . . . . . . . . . . . . . . . . . . . . . . . . . . . . . . . . . . . . . . . . : ±10 dB
Agudos (at 10 kHz) . . . . . . . . . . . . . . . . . . . . . . . . . . . . . . . . . . . . . . . . . . . . . . . : ±10 dB
Salida de Energía . . . . . . . . . . . . . . . . . . . . . . . . . . . . . . . . . . . . . . . . . . . . . . . . . . . 40W x 4
Dren Eléctrico . . . . . . . . . . . . . . . . . . . . . . . . . . . . . . . . . . . . . . . . . . . . . . .15 Ampere (max.)
Actual Aislado/Preparado . . . . . . . . . . . . . . . . . . . . . . . . . . . . . . . . . . . . . . . . . . . . . . . 75mA
Dimensiones de Comando . . . . . . . . . . . . . . . . . . . . . . . . . . . . . . . 80 (W) x 183 (D) x 58 (H)
27
Page 30

MSR7007
28
Page 31

MSR7007
FONCTIONS DU SYSTÈME
Fonctions de la radio marine Jensen MSR7007 comprennent :
• Face/Panneau de contrôle étanches (IPX5)
• Tuner AM/FM Etats-Unis/Euro avec 30 pré-réglées (12 AM, 18 FM)
• RBDS (Service de donnée transmission radio)
• Prêt pour radio Sirius
• Platine CD simple sur le tableau de bord
• Capable de reproduire MP3/WMA
• Prêt pour iPod
• Tuner weatherband avec alerte météo
• Egaliseur pré-réglé - 5 réglages (Plat, Rock, Pop, Classique, en arrêt)
• Contrôle électronique de basse, aigu, balance et équilibre
• Sortie puissance 50W x 4
• Horloge
• Alarme de la fente CD ouverte
• Avertissement de la pile voiture en bas
• Prêt pour télécommande marine câblée
• Des sorties 4-chaînes niveau de ligne pré-amplificateur
• Puissance à deux fil OU mémoire non-volatile et horloge puissance intérieur/soutien
heure
• Entrée audio auxiliaire
29
Page 32

INFORMATION DE SÉCURITÉ
Lorsque vous êtes en bateau
Gardez le niveau de volume assez bas pour être conscient de votre environnement.
Protéger de l'eau
Ne submergez pas et n'exposez pas le produit directement à l'eau. Cela peut produire des
court-circuits, incendies ou d'autres types de dommages.
Protéger des températures hautes
Exposition à des rayons de soleil directs peut produire des températures très hautes à
l'intérieur de votre vaisseau. Donnez à l'intérieur le temps de se rafraîchir avant de commencer
la reproduction.
Ne montez pas la radio près du compartiment du moteur.
Utiliser l'alimentation correcte
Ce produit est conçu pour opérer avec un système de pile négative terre 12 Volt DC.
Protéger le mécanisme du disque
Evitez d'insérer des objets étrangers dans la fente du disque. La mauvaise utilisation peut
provoquer un mauvais fonctionnement ou un endommagement permanent à cause du
mécanisme précis de cet appareil.
CAUTION :
CETTE PLATINE CD MOBILE EST UN PRODUIT LASER DE CLASSE 1. CET APPAREIL
UTILISE UN RAYON DE LASER VISIBLE/INVISIBLE QUI PEUT CAUSER UNE RADIATION
DANGEREUSE S'IL EST EXPOSE DIRECTEMENT. ASSUREZ-VOUS QUE VOUS OPEREZ
CETTE PLATINE CD MOBILE SELON LES INSTRUCTIONS.
UTILISATION DES CONTROLES OU DES AJUSTEMENTS OU DE LA PERFORMANCE OU
DES PROCEDURES AUTRES QUE CEUX SPECIFIES DANS CE GUIDE PEUT RESULTER
EN UNE EXPOSITION A L'EFFET HASARDEUX DE LA RADIATION.
N'OUVREZ PAS LES COUVERTURES ET NE DEPANNEZ PAS VOUS-MEME. FAITES
DEPANNER PAR UN TECHNICIEN QUALIFIE.
AVERTISSEMENT :
• N'OUVREZ, NE DEMANTELEZ, N'ALTEREZ PAS L'APPAREIL DE QUELQUE FACON QUE CE
SOIT. Cela peut produire une incendie, un choc électrique ou endommag er le prod uit.
• LORSQUE VOUS REMPLACEZ LE FUSIBLE UTILISEZ LE BON AMPERE. Cela peut produire
une incendie, un choc électrique ou endommager le produ it.
• NE PAS INSTALLEZ DANS DES EMPLACEMENT OU CELA PEUT GENER L'OPERATION DU
VAISSEAU . Cela peut faire obstacle à la vision ou empêcher le mouvement ce qui peut donner un
accident sérieux.
• INSTALLEZ LE CA BLAG E DE FACON A CE QU'IL NE SOIT PAS PLIE OU PINCEZ P AR DES
ECROUS OU DES BORDS METALLIQUES FINS. Faites dérouler le câblage loin des pièces qui
bougent ou des bords fins et pointus. Cela peut empêcher le pliage et l'endomm age m en t du
câblage. Si le câble doit traverser un trou métallique soyez sûr d'utiliser une erse en caoutchouc
pour éviter que l'isolement du câble ne soit coupé par le bord méta llique du trou. Il est aussi
recommandé d'appliquer le matage à un e ou verture quelconque qui peut admettre l'eau.
• Soyez sûr de choisir un emplacement qui est plat et qui a suffisamm e nt d'espace audessus de
l'appareil pour éviter l'endommagement et aussi perm ettre la ventilation.
• Avant de percer des trous, inspectez avec soin l'endroit en-dessous et derrière la surface de
montage ou les engins seront montés, pour être sû r que de tels perça ge n'inte rfereront pas avec
des fils existants, de la canalisation du carburant, le réservoir à carburant ou tout autre objet qui
peut être endommagé.
• Débranchez toujours la borne négative de la p ile pour éviter des co urt-circuits pen dant l'installation.
MSR7007
Notes du disque
Certains CD-Rs/CD-RWs peuvent être incompatibles avec cet appareil en fonction du statut de
reproduction, des conditions du disque, et de l'équipement utilisé pour l'enregistrement. Pour
une reproduction fiable adhérez-vous aux recommandations suivantes :
• Utilisez des CD-RWs avec vitesse 1x à 4x et écrivez avec vitesse 1x à 2x
• Utilisez les CD-Rs avec une vitesse 1x à 8x et écrivez avec une vitesse 1x à 2x
• N'utilisez pas un CD-RW qui a été écrit plus de 5 fois
Types de disques compatibles
Table 1: Information Générale du disque
Type du
disque
CD Audio 12 cm côté simple 74 minutes
A NOTER : Des disques CD-R et CD-RW ne joueront pas à moins que la séance
d'enregistrement est terminé et le CD est finalisé.
Logo
RECORDABLE
REWRITABLE
Entretien du disque
• Un disque sale ou défectueux peut donner des lacunes de son pen da nt la reprod uction. Avant de
jouer, essuyez le disque avec un tissu propre , com m en çan t p a r le centre et allant petit à petit au
bord extérieur. N'utilisez jamais de be nzène, des diluant s, des détergent s, des liquides anti-statique
ou d'autres solutions.
Insérez avec
l'étiquette en haut
• Assurez-vous que vous n'utilisez que des disques ronds pour cet appareil, et n'utilisez pas de s CDs
avec une forme spéciale. Utilisation des CDs avec une forme spéciale peut causer un mau vais
fonctionnement.
• Ne collez pas de papier ou de bande adhésive sur le disque. N'utilisez pas de CD avec des
étiquettes ou des autocollants attachés ou des CDs qui ont un résidu collant des autoco llant s
enlevés.
• N'exposez pas le disque à des rayons de soleil directs ou à des sources de cha leur.
A NOTER : Un disque peut devenir égratigné (bien que pas autant de le rendre inutilisable)
dépendant de la façon dont vous le manipulez et des autres conditions dans l'ambience de
l'utilisation. Ces égratignures ne sont pas une indication d'un problème avec la platine.
No pliez pas.
Diamètre/Côtés
jouables
Ne touchez pas
le côté inférieur
du disque
Te mps de
reproduction
Essuyez du
centre jusqu'à la
périphérie
30
Page 33

MSR7007
INSTALLATION
L'appareil est conçu pour installation dans des vaisseaux avec une taille d'ouverture radio DIN
standardisée.
Avant de commencer
1. Débranchez la pile
Avant de commencer, débranchez toujours la borne négative de la pile
2. Enlevez les écrous de transportation
Veuillez enlever la vis d'expédition avant installation. Si la vis est laissée en place, le
mécanisme de CD ne fonctionnera pas.
Notes Importantes
• Avant l'installation finale, testez les branchements câbles pour être sûr que l'appareil est
bien branché et que le système fonctionne.
• N'utilisez que des pièces fournies avec cet appareil pour assurer une bonne installation.
L'utilisation des pièces non-autorisées peut mener à des fonctionnements mauvais.
• Consultez avec votre détaillant le plus près au cas où l'installation exigerait le perçage
des trous ou d'autres modifications de votre vaisseau.
• Installez l'appareil là où il n'interfère pas avec la conduite et ne peut pas blesser des
passagers lors d'un arrêt soudain ou d'urgence.
• Evitez d'installez l'appareil là où il serait exposé aux hautes températures provenant des
rayons de soleil directs, de l'air chaud, ou un réchauffeur ou là où il serait exposé à de la
poussière excessive, des ordures ou de la vibration.
• Installez l'appareil dans 30° de l'horizontal.
Montage d'avant DIN
1. Vérifiez la taille de l'ouverture dans le tableau de bord en glissant la radio là-dedans. Si
l'ouverture n'est pas suffisamment large coupez comme nécessaire jusqu'à ce que la
radio glisse facilement dans le trou. Vérifiez qu'il y a suffisamment de place derrière le
tableau de bord pour accommoder le châssis de la radio. Employez le calibre de forage
inclus pour préparer l'ouverture sur une nouvelle surface de montage.
2. Placez la radio devant l'ouverture dans le tableau de bord pour qu'on puisse ramener le
câblage à travers l'ouverture DIN.
3. Suivez le diagramme de câblage avec soin et assurez-vous que tous les branchement
sont sûrs et isolés avec des raccords à sertir ou avec du ruban isolant pour assurer une
bonne opération.
4. Après avoir terminé les branchements de câbles, mettez l'appareil en marche pour
vérifiez l'opération (il faut que l'interrupteur d'accessoir du véhicule soit en marche). Si
l'appareil ne marche, refaites le câblage jusqu'à ce que vous trouviez le défaut. Dès que
la bonne opération est atteinte, mettez l'interrupteur accessoire en arrêt, et procédez au
montage final du châssis.
5. Glissez doucement la radio dans le tableau de bord en étant sûr qu'il n'est pas sens
dessus sens dessous.
6. Attachez un bout de la barrette de soutien perforé (fournie) au Plot de Soutien en arrière,
à l'arrière du châssis en utilisant le boulon de montage M5 fourni. Attachez l'autre bout de
la barrette perforé à une partie sûre du tableau de bord soit audessus ou endessous de la
radio en utilisant l'écrou et la rondelle fournis. Pliez la barrette comme il faut pour la
positionner. CAUTION : La barrette de soutien arrière perforée doit être utilisée dans
l'installation de la radio. Installation sans la barrette peut endommager la radio ou
la surface du montage et rendre nul la garantie du fabricant.
7. Installez les Six Ecrous de Montage en acier inoxydable à travers l'avant de la radio dans
le tableau de bord. CAUTION : La Radio doit être sécurisé en utilisant tous les six
points de montage. Sinon, vous pouvez endommager la radio et/ou le tableau de
bord.
8. Testez l'opération de radio en vous référant aux instructions d'opération de l'appareil.
Taille d'ouverture radio DIN
Pernode Soporte Trasero
Six Ecrous de Montageen acier
La longueur minimum de visest pouces
inoxydable (6.)
de 11/2
standardisée
Boulon de montage M5
Fixaient à la structure
derrière detaille
Barrette de soutien
arrièreperforée
Rebrancher la pile
Lorsque le câblage est terminé, rebranchez la borne négative de la pile.
31
Page 34

CÂBLAGE
AIGUILLE
1
2
3
4
5
6
7
8
9
10
11
12
13
14
15
16
17
18
19
20
VUE INSERTION DE FIL
COULEUR DE FIL
GRIS/NOIR
GRIS
VIOLET
VIOLET/NOIR
VIDE
VERT
VERT/NOIR
NOIR/SHIELD
ROUGE (fil gris)
BLANC
BLANC/NOIR
VIDE
BLEU
ROUGE
NOIR
BLANC (fil brun)
ROUGE (fil brun)
NOIR/SHIELD
BLANC (fil gris)
VUE A-A
DESCRIPTION
HAUT PARLEUR D'AVANT GAUCHE (+)
HAUT PARLEUR D'AVANT GAUCHE (-)
HAUT PARLEUR D'AVANT DROITE (+)
HAUT PARLEUR D'AVANT DROITE (-)
PAS DE CONNECTION
HAUT PARLEUR D'ARRIERE GAUCHE (+)
HAUT PARLEUR D'ARRIERE GAUCHE (-)
PAS DE CONNECTIONVIDE
AUDIO NEGATIF LIGNE ARRIERE
NIVEAU LIGNE ARRIERE DROITE EN MARCHE
HAUT PARLEUR D'AVANT GAUCHE (+)
HAUT PARLEUR D'AVANT GAUCHE (-)
PAS DE CONNECTION
ANTENNE DE PUISSANCE
ALLUMAGE ACCESSOIRE
TIERRE
AVANT GAUCHE SORTIE NIVEAU DE LIGNE
AVANT DROITE SORTIE NIVEAU DE LIGNE
AUDIO NEGATIF LIGNE AVANT
NIVEAU LIGNE ARRIERE GAUCHE EN MARCHE
MSR7007
FIL DE SORTIE AUDIO A 20 AIGUILLE
MALE
A
A
PRISE D'ANTENNE
(NOIR)
IPOD
(BLANC)
6 pouces
PRISE
FEMELLE A
8 AIGUILLE
SIRIUS
(GRIS)
6 pouces
PRISE
FEMELLE A
8 AIGUILLE
AUX IN
(JAUNE)
6 pouces
ROUGEBLANC
FIL DE SORTIE AUDIO A 20 AIGUILLE
CÂBLÉ À DISTANCE
(NOIR)
6 pouces
PRISE
MALE A
8 AIGUILLE
FEMELLE
7.68 pouces
SUBWOOFER OUT-RCA
(VERT)
6 pouces
32
AVERTISSEMENT !
Ne branchez pas le fil ROUGE
DC+ à la pile. Ce fil doit être
branché au source d'énergie
commutée +12 par volts.
GRIS
SORTIEDELIGNE
10.22 pouces
(ARRIERE)
GRIS
BRUN
BRUN
BLANC
ROUGEBLANC
ROUGE
SORTIEDELIGNE
10.22 pouces
(AVANT)
Page 35

MSR7007
OPÉRATION DE BASE
20
13
23
RESET
17
19
24
1
22
VUE DERRIÈRE LA PORTE DU CD
11
21
12
2a
INFO
DISP
SCROLL
PTY
10
9
15
18
14
16
2b
3
MUTE
MODE
4
8
5
6
7
Puissance en marche/en arrêt
Appuyez sur le bouton POWER (1) pour mettre l'appareil en marche et en arrêt. L'appareil
reprendra à la dernière mode sélectionnée (Tuner, Aux, etc).
Contrôle du volume
Pour augmenter le volume appuyez sur le bouton VOLUME + (2a). Pour diminuer le volume
appuyez sur le bouton VOLUME - (2b). En ajustant le volume, l'affichage aux cristaux liquides
affiche une graphe à barre et une représentation numérique du volume. Le réglage maximum
du volume est 40.
Muet
Appuyez sur le bouton MUTE (16) sur le panneau du contrôle pour assourdir la sortie audio.
Appuyez de nouveau sur MUTE pour rétablir la sortie audio au niveau précédent.
Mode
Appuyez sur le bouton MODE (4) sur le panneau de contrôle pour sélectionner une mode
d'opération différente comme indiquée sur le panneau d'affichage. Les modes disponibles
comprennent Tuner (AM/FM), SAT Radio, CD, iPod et Aux In (entrée auxiliaire facultative).
A noter : Les modes CD, iPod et Sirius seront sautées si le module n'est pas installé.
A noter : La mode de radio Sirius sera sauté si l'option menu région est réglé à EURO.
Réinitialisation
Utilisez une bille ou un objet semblable pour appuyer sur le bouton RESET (23). Le bouton
RESET doit être activé pour les raisons suivantes :
• Installation du départ de l'appareil lorsque tout le câblage est terminé
• Les boutons de fonction ne marchent pas
• Symbole d'erreur sur l'affichage
Menu Audio
Appuyez sur le bouton AUDIO/MENU (3) sur le panneau de contrôle pour accéder au menu
audio. Vous pouvez naviguer à travers les articles du menu audio en appuyant de manière
répétée sur le bouton AUDIO/MENU. Lorsque l'article du menu désiré apparaît dans
l'affichage, ajustez cette option-là en appuyant sur les boutons VOLUME (2) dans 5 secondes.
L'appareil va automatiquement quitter le menu audio au bout de 5 secondes d'inactivité. Les
articles du menu suivants peuvent être ajustés :
Niveau de basse
Utilisez les boutons de VOLUME (2) pour ajuster le niveau de basse de -6 à +6.
Niveau d'aigu
Utilisez les boutons de VOLUME (2) pour ajuster le niveau d'aigu de -6 à +6.
Balance
Utilisez les boutons de VOLUME (2) pour ajuster la balance entre les haut parleurs de gauche
et de droite de 12L (plein gauche) à 12R (plein droite).
Equilibreur
Utilisez les boutons de VOLUME pour ajuster l'équilibre entre les hauts parleurs d'avant et
ceux d'arrière de 12R (plein arrière) à 12F (plein avant).
Panneau d'avant
Notes importantes
• Opérez toujours l'appareil avec la porte du panneau d'avant fermée.
• Lorsque vous fermez la porte du panneau d'avant n'appuyez pas sur le bouton glissant
OPEN.
• Ne forcez pas l'opération de la porte du panneau d'avant en l'ouvrant ou en la fermant.
• Ne touchez pas l'interrupteur de détection de la porte ouverte (24).
Alarme de la porte du panneau d'avant
Pour éviter l'endommagement de l'appareil par l'entrée de l'eau ou du débris à travers
l'ouverture du CD, la porte du panneau d'avant ne doit être ouverte que pour une période
courte lors de l'insertion ou l'éjection d'un CD. Si la porte du panneau d'avant est laissée
ouverte pour plus de 30 secondes, l'audio de reproduction actuelle va s'assourdir et une
tonalité bip sera entendue. Fermez la porte pour reprendre la reproduction normale.
33
Page 36

MSR7007
Menu Système
1. Appuyez et maintenez l'appui sur le bouton AUDIO/MENU (3) pendant plus de 2 secondes pour entrer dans le système menu. Le premier article du menu 'Beep Tone' apparaîtra dans l'affichage.
2. Appuyez de manière répétée sur le bouton AUDIO/MENU pour naviguer à travers le
menu système et sélectionner l'article désiré.
3. Utilisez les boutons VOLUME (2) pour ajuster l'article sélectionné.
Les articles suivants peuvent être ajustés :
• Tonalité bip (En marche/En arrêt) : Mettez le bip audible en marche ou en arrêt (entendu
lorsque les boutons/fonctions sont sélectionnés.
• Région (Etats-Unis/EURO) : Réglez l'espacement de fréquence pour des régions
diverses.
• Fuseau horaire : Réglez le fuseau horaire local (utilisé seulement pour la mode satellite
Sirius)
• DST (observé ou non-observé) : Réglé pour Daylight Savings Time.
• Horloge (12H ou 24H) : Sélectionnez une mode d'affichage à 12 heures ou à 24 heures.
• Luminosité (Bas/Moyen/Haut) : Ajustez la luminosité de l'affichage aux cristaux liquides.
• Contraste (Bas/Moyen/Haut) : Ajustez le contraste de l'affichage aux cristaux liquides.
• Pwr On Vol (0 à 40) : Sélectionnez un niveau de volume mis en marche automatique.
• iPod Auto (En marche/en arrêt) : Choisissez ON pour détecter et reproduire iPod
automatiquement lorsqu'il est branché ou OFF pour utiliser le bouton MODE pour
sélectionner la source d'iPod.
• WB Alert (ON/OFF) : Choisissez ON pour changer à la mode Weatherband lorsque les
alertes météo NOAA sont émis. (voir NOAA Weather Alert à la page 8).
• ALERT/PWR (ON/OFF) : Sélectionnez auto pour mettre la radio en marche lorsque les
alertes NOAA sont émis. Cette fonction ne marche que lorsque le +12V est en marche.
• Alarme Pile Epuisé (ON/OFF) : Surveillez le voltage sur la ligne +12 volts commutés.
• Réglages par défaut (Oui/Non) : Choisissez YES pour rendre l'EEPROM aux valeurs de
configuration par défaut d'usine.
Opération pile epuisé
Si LOW BAT est réglé à ON, un alarme va sonner (8 bips toutes les 30 secondes) lorsque le
voltage tombe jusqu'à 10.8V (+- 0.03V). Un avertissement visuel (LOW BATT) va apparaître
clignotant (8éclairs toutes les 30 secondes) dans le coin gauche en bas de l'affichage aux
cristaux liquides.
Entrée auxiliaire
Pour accéder à un engin auxiliaire :
1. Branchez l'appareil audio portable aux câbles Aux In à l'arrière de la radio
2. Appuyez sur le bouton MODE (4) pour sélectionner la mode AUX.
3. Appuyez de nouveau sur le bouton MODE pour annuler la mode AUX et pour aller à la
mode de reproduction prochaine disponible.
Affichage à cristaux liquides (LCD)
La fréquence actuelle et les fonctions activées sont montrées dans le panneau d'affichage aux
cristaux liquides.
A noter : Les panneaux d'affichage aux cristaux liquides peuvent prendre du temps
pour répondre lorsqu'ils sont soumis à des températures froides pendant une longue
période. En outre, la visibilité des numéros sur l'affichage aux cristaux liquides peut
diminuer un peu. L'affichage aux cristaux liquides reviendra au normal lorsque la
température remonte jusqu'à un niveau normal.
Réglez l'horloge
Pour régler l'horloge afin qu'il affiche l'heure actuelle, mettez le commutateur d'allumage du
véhicule en marche et mettez la radio en arrêt. Appuyez et maintenez l'appui sur le bouton
DISP/SCROLL (12) pendant plus d'une seconde et l'heure va clignoter dans l'affichage.
Appuyez sur le bouton TUNE/TRK |<< (19) pour ajuster les heures ou le bouton TUNE/TRK
>>| (18) pour ajuster les minutes. AM ou PM apparaîtra dans l'affichage pour indiquer AM ou
PM. Lorsqu'aucun ajustement n'est fait pendant plus de 5 secondes, l'heure sera réglée et
l'opération normale reprendra.
Déroulement
Lorsque l'information est trop longue pour être affiché sur l'affichage aux cristaux liquides,
appuyez sur le bouton DISP/SCROLL (12) pour voir le titre tout entier. L'information va se
dérouler deux fois avant de revenir au texte abrégé.
A noter : OFF est le réglage par défaut pour LOW BATT. Si l'audio est assourdi ou le
volume est réglé à 0, le bip audible ne sera pas entendu.
Egaliseur
Appuyez sur le bouton EQ/LOD (11) pour choisir une des courbes aigu ou basses prédéfinies :
OFF, FLAT, ROCK, POP, CLASSIC.
Intensité (Loudness)
Appuyez et maintenez l'appui sur le bouton EQ/LOD pour basculer entre en marche/en arrêt.
Lorsque vous écoutez la musique à des volumes bas cette fonction va rehausser les gammes
aigues et basses pour compenser pour les caractéristiques de l'ouie humaine.
34
Page 37

MSR7007
OPERATION TUNER
1
11
21
12
13
17
19
2a
INFO
DISP
SCROLL
PTY
10
9
15
18
14
16
2b
3
MUTE
MODE
4
8
5
6
7
Sélectionner une bande
Appuyez sur le bouton BAND (15) pour changer entre les trois bandes FM et deux bandes AM
(MW). Appuyez et maintenez l'appui sur le bouton BAND pour accéder au Weatherband.
Syntonisation à la main
Appuyez sur le bouton TUNE/TRK >>| ou |<< (19, 18) pour chercher des stations un pas vers
le haut ou vers le bas.
Syntonisation à recherche automatique
Appuyez et maintenez l'appui sur le bouton TUNE/TRK |<< ou >>| (19, 18) pour chercher
automatiquement la station forte prochaine ou précédente.
A noter : La syntonisation à recherche n'est pas disponible pour les chaînes bande
météorologique. Utilisez les boutons de syntonisation vers le haut ou vers le bas pour
sélectionner n'importe laquelle des sept chaînes de bande météorologique disponibles.
Stations pré-réglées
Six boutons pré-réglés numérotés mettent en mémoire et rappellent des stations pour chaque
bande.
Mettez une station en mémoire
Sélectionner une bande (si nécessaire) et puis sélectionner une station. Appuyez et maintenez
l'appui sur un bouton pré-réglés (5 à 10) pendant deux secondes. Le numéro pré-réglé
apparaîtra sur l'affichage aux cristaux liquides.
Rappeler une station
Sélectionner une bande (si nécessaire). Appuyez sur un bouton pré-réglé (5 à 10) pour
sélectionner la station mise en mémoire correspondante.
A noter : Les boutons pré-réglés ne marcheront pas dans la mode bande
météorologique.
Mise en mémoire automatique/Balayage des pré-réglés
(AS/PS)
Mise en mémoire automatique
Sélectionnez une bande FM ou AM. Appuyez et maintenez l'appui sur le bouton AS/PS (4)
pendant plus de 2 secondes pour sélectionner automatiquement six stations fortes et les
mettre en mémoire dans la bande actuelle. Les nouvelles stations remplaceront toutes les
stations déjà mise en moire dans cette bande.
Balayage des pré-réglés
Sélectionnez une bande. Appuyez sur AS/PS pour balayer les stations mise en mémoire dans
la bande actuelle. L'appareil va faire pause pendant 5secondes à chaque station pré-réglées.
Appuyez de nouveau sur AS/PS pour arrêter le balayage lorsque la station désirée est
atteinte.
Opération RBDS
Cet appareil est équipé pour afficher de l'information RBDS (Radio Broadcast Data Service)
lorsqu'elle est transmise par une station de radio. Les indicateurs d'affichage aux cristaux
liquides suivants apparaissent lorsque les données sont reçues :
• RBDS : La station de radio actuelle est en train de transmettre des données RBDS.
• PTY : Des données du Type de Programme sont en train d'être reçues. Lorsqu'il clignote,
la recherche PTY est en cours.
A noter : Des stations de radio transmettant RBDS peuvent ne pas exister dans votre
région.
Type du programme (PTY)
En mode de radio FM, appuyez sur le bouton PTY (13) pour lister les options de recherche
suivantes : N'importe quoi/Des informations/Information/Sport/Talk/Rock/Rock classique/Hits
adultes/Soft Rock/Top 40/Country/Oldies/Soft/Nostalgie/Jazz/Classique/Rhythm and Blues/
Soft R & B/Langue/Musique religieuse/Talk religieux/Personnalité/Publique/College/Météo/
Essai d'urgence/Urgence.
Pour rechercher des stations dans une catégorie PTY :
1. Appuyez sur le bouton PTY (13) pour voir la catégorie PTY actuelle.
2. Utilisez les boutons VOLUME (2) pour vous déplacer à travers la liste des catégories
disponibles et sélectionnez le type de programme que vous désirez chercher.
3. Après avoir sélectionné une PTY, appuyez et maintenez l'appui sur le bouton TUNE/TRK
|<< ou >>| (19, 18) pour chercher la bande pour des emissions de ce type.
A noter : Pour conduire une recherche PTY sur N'importe quoi syntonisera à recherche
et s'arrêtera à une station en train de transmettre RBDS peu importe le t y pe du
programme.
35
Page 38

Operation bande météorologique
Qu'est-ce que la radio météo NOAA/Radio Météo Canada ?
C'est un système national qui transmet des informations d'urgence météorologique 24 heures
par jour. Le réseau des Etats-Unis a plus de 530 stations qui recouvre 50 états aussi bien que
des eaux costale adjacentes, Puerto Rico, les Virgin Islands des Etats-Unis et les territoires
Pacifiques des Etats-Unis. Chaque région a sa propre station transmettant et sept fréquences
de transmission sont utilisées. Un système semblable existe au Canada sous le service
Weatherradio Canada administré par Environment Canada.
Syntoniser la bande météorologique
Appuyez et maintenez l'appui sur le bouton BAND/WB (15) pour accéder à la bande météo.
L'indication WB apparaîtra sur le panneau d'affichage avec le numéro actuel et l'indication de
chaîne : CH01, CH02, CH03, CH04, CH05, CH06, CH07. Utilisez les boutons TUNE/TRK |<<
ou >>| pour syntoniser chacune des sept chaînes jusqu'à ce que vous trouviez la station de
bande météo active dans votre région.
Combien de stations puis-je recevoir ?
Puisque les transmissions comportent la météo locale et les informations, la puissance de
transmission est normalement très basse (beaucoup moins que les stations AM et FM
standardisées), de sorte que vous ne receviez qu'une station, à moins que vous ne soyez au
point d'intersection de deux signaux émis. Le maximum que vous pouvez recevoir sera deux
ou trois et cela est aussi très rare.
Est-il possible je ne recevra-t-il pas des stations ?
Selon où vous êtes localisé, il y avez une possibilité que vous uniquement récepteur un signal
très faible ou aucun. En outre, semblable aux signaux de AM et de FM, signaux de
weatherband sont sujets à des conditions d'entourage, survivent à, les obstructions du signal
par des collines ou des montagnes, etc.
Alerte Météo NOAA
La fonction Weather Alert ajoute un niveau de sécurité supplémentaire en changeant de
n'importe quelle autre fonction (Tuner, SAT, CD, iPod, AUX) à la bande météo pour un
minimum de 60 secondes si une tonalité d'avertissement NOAA (1050Hz) est reçue. S'il n'y a
plus de tonalité d'avertissement supplémentaire pour 60 secondes l'appareil va revenir à la
mode de fonctionnement dernière. Voir “Menu Système” à la page 34 pour apprendre à mettre
en marche le Weather Alert.
MSR7007
36
Page 39

MSR7007
OPÉRATION PLATINE CD/MP3
20
DISP
SCROLL
PTY
13
10
23
RESET
17
19
INFO
14
18
24
1
11
21
22
12
2a
3
16
2b
MUTE
MODE
4
8
5
6
9
7
15
Insertion et éjection d'un disque
Insérez un disque ; l'étiquette en haut, dans la fente du disque (22). L'appareil va
automatiquement tirer le disque vers l'intérieur et jouer la première piste du disque, que la
puissance soit en marche ou non.
Appuyez sur le bouton d'éjection (20) pour arrêter la reproduction du disque et éjecter le
disque. Il n'est pas nécessaire que l'appareil soit en marche pour éjecter un disque.
Contrôler la reproduction du disque
Sélectionner les pistes
Appuyez sur les boutons TUNE/TRK >>| (19) ou TUNE/TRK |<< (18) pour avancer ou reculer
jusqu'à la piste prochaine ou précédente du disque. Le numéro de la piste sélectionée
apparaîtra dans l'affichage. Appuyez et maintenez l'appui sur les boutons TUNE/TRK |<< ou
>>| pour faire avance ou recule rapide à travers le disque. La reproduction du disque
commence dès que le bouton est relâché.
Jouer/Pause reproduction du disque
Appuyez sur le bouton 1/>|| (8) pour suspendre la reproduction du disque. Appuyez de
nouveau sur le bouton 1/>|| pour reprendre la reproduction du disque.
Prévoir les pistes
Appuyez sur le bouton 2/INT (6) pour jouer les 10 premières secondes de chaque piste en
séquence. Appuyez de nouveau sur le bouton 2/INT pour arrêter le balayage intro et pour
reprendre la reproduction du disque.
Reproduction répétée
• Appuyez sur le bouton 3/RPT (5) durant la reproduction du disque pour répéter la piste
courante.
• Appuyez et maintenez l'appui sur le bouton 3/RPT pour répéter le dossier courant.
• Appuyez de nouveau sur le bouton 3/RPT pour arrêter la reproduction répétée.
Reproduction au hasard
• Appuyez sur le bouton 4/RDM (7) pour jouer toutes les pistes dans un ordre mélangé
• Appuyez et maintenez l'appui sur le bouton 4/RDM pour jouer tous les fichiers dans le
dossier courant
• Appuyez de nouveau sur le bouton 4/RDM pour arrêter la reproduction au hasard.
Navigation du dossier (MP3 uniquement)
Appuyez sur le bouton 5/DN (9) pour sélectionner un dossier vers le bas.
Appuyez sur le bouton 6/UP (10) pour sélectionner un dossier vers le haut.
Reproduction MP3
Notes sur la reproduction MP3
• Tout répertoire qui ne comprend pas un fichier
MP3 est sauté
• Nombre maximum de dossiers : 512
• Nombre maximum de niveaux de dossier : 12
• Nombre de fichiers MP3 maximum : 999
• Nombre maximum de caractères pour le nom d'un
fichier MP3 ou un nom de dossier : 32
• Fréquence d'échantillonnage : 16KHz, 22.05KHz,
24KHz, 32KHz, 44.1KHz, 48KHz
• Taux de bits : maximum 384 Kbps
• Nombre maximum de caractères pour un ID3 Tag:
• ID3 Tag version 1.0 : 32
• ID3 Tag version 2x : 32
L'ordre dans lequel les fichiers sont joués
Lorsqu'ils sont sélectionnés pour reproduction, des
fichiers et des dossiers (Recherche dossier, Recherche
fichier ou Sélectionner Fichier) sont accédés dans
l'ordre dans lequel ils ont été écrits par l'écrivain CD.
Par conséquent, l'ordre dans lequel on attend de les
jouer peut ne pas être l'ordre dans lequel ils sont, en
fait, joués. Vous pouvez régler l'ordre dans lequel des
fichiers MP3/WMA sont joués en les écrivant sur un
médium tel que CD-R avec leur nom de fichier
commençant avec les nombre de séquence de
reproduction tels que 01, 99.
Par exemple, un medium avec l'hiérarchie dossier/
fichier illustrée à droite est soumis au Recherche
dossier, Recherche fichier et l'ordre de la reproduction.
37
Page 40

OPÉRATION RADIO SATELLITE
1
11
21
12
13
2a
DISP
SCROLL
PTY
10
9
15
16
2b
3
MUTE
MODE
4
8
5
6
7
Changer à la radio satellite Sirius
(Exige un tuner Sirius facultatif)
Appuyez sur le bouton MODE (4) pour changer à la mode radio Sirius.
Accéder à votre ID radio
Pour afficher votre ID radio utilisez le bouton TUNE/TRK |<< (18) pour syntoniser à la chaîne
000. L'écran va afficher Sirius ID en haut avec SID affiché au milieu de l'écran affichage aux
cristaux liquides. L'ID Radio Sirius est composé de 12 caractères.
Sélectionnez une bande
En mode Sirius, appuyez sur le bouton BAND (15) pour accéder aux groupes de chaînes préréglées par l'utilisateur Sirius dans l'ordre suivant : SR-1, SR-2, SR-3.
Syntonisation de la catégorie
1. Appuyez sur le bouton INFO pour accéder à la mode catégorie
2. Alors que la catégorie clignote, appuyez sur les boutons TUNE/TRK |<< et >>| pour
choisir une catégorie.
3. Appuyez sur le bouton INFO pour confirmer la sélection de catégorie et syntoniser à la
première chaîne dans la catégorie sélectionnée. L'icône de la catégorie va s'arrêter de
clignoter.
4. Appuyez sur les boutons TUNE/TRK |<< et >>| (18, 19) pour choisir les chaînes désirées
dans cette catégorie. (Le nombre de la chaîne le plus bas à l'intérieur de la catégorie
choisie, sera toujours la première chaîne syntonisée par défaut).
5. Appuyez et maintenez l'appui sur le bouton INFO pour revenir à la mode de
syntonisation de chaîne.
Syntonisation de chaîne vers le haut/vers le bas
Appuyez sur le bouton TUNE/TRK >>| ou |<< pour chercher une chaîne. Appuyez et
maintenez l'appui sur le bouton TUNE/TRK pour chercher rapidement.
17
19
INFO
14
18
MSR7007
Mise en mémoire des chaînes pré-réglées
Les boutons de pré-réglage (5-10) peuvent être utilisés pour mettre en mémoire 6 chaînes
permettant un accès commode à vos chaînes favories.
Programmer des chaînes
1. Sélectionnez la chaîne que vous voulez mettre en mémoire.
2. Appuyez et maintenez l'appui sur un bouton de pré-réglage (5-10) jusqu 'à ce que le num é ro pr éréglé correspondant apparaisse.
3. Répétez les démarches 1 et 2 ci-dessus pour programmer des chaînes supplémentaires.
Syntonisation rapide
Appuyez sur l'un des boutons de pré-réglage (5-10) pour sélectionner une chaîne pré-réglée
directement.
Balayage des pré-réglés
Sélectionnez une bande. Appuyez sur le bouton
dans cette bande. L'appareil va faire pause pendant 10 secondes à cha que station pré -réglées. Appuyez
de nouveau sur le bouton
Syntonisation des pré-réglés
Appuyez et maintenez l'appui sur le bouton
réglés. Dans la mode syntonisation des pré-réglés vous pouvez utiliser les boutons
pour accéder à toutes les 18 stations pré-réglées, dans l'ordre de la séquence . Appuy ez et maintene z
l'appui de nouveau sur le bouton
AS/PS
pour arrêter le balayage lorsque la station désirée est atteinte.
AS/PS
Mode d'affichage alternatif
Appuyez sur le bouton DISP/SCROLL (12) pour changer l'information d'affichage entre
l'affichage de texte à ligne simple ou double. Dans la mode ligne double, vous pouvez voir le
titre et l'artiste.
Appuyez et maintenez l'appui sur le bouton DISP/SCROLL lorsque vous êtes en affichage de
texte à ligne simple, pour commencer à dérouler l'information Artiste/Titre de chanson.
Force du signal satellite
L'affichage va indiquer la force de réception satellite comme montré ci-dessous.
Force du signal Exhibition de force
Pas de signal
Faible
Bon
Excellent
Verrouillage de chaîne
Lorsque vous êtes syntonisé à la chaîne à verrouiller , appu yez et maintenez l'ap pui sur le bouton
(4) pour accéder à la fonction Verrouillage de Chaîne. 'Enter Code' est af fiché sur l'affichage a ux crist aux
liquides. Utilisez les bouton 1 à 6 pour entrer votre code à 4 chiffres (le code par défaut est 1111).
'Channel Locked' apparaît sur l'affichage aux cristaux liqu ides, confirm an t que la chaîne a été verr ouillé.
La prochaine fois que la chaîne est accédée en séquence, le message Cha nn el Locke d va ap paraître
suivi par Enter Code. Pour retrouver la chaîne verrouillé entre votre code. Pour changer la code de
verrouillage de chaîne, appuyez et maintenez l'appui sur le bouton
Nouvelle Code - Confirmez. L'affichage aux cristaux liquides va afficher Ne w Co de Stored.
AS/PS
(14) pour balayer les stations mise en mémoire
AS/PS
(14) pour accéder à la mode de syntonisation des pré -
pour désactiver la mode de syntonisation des pré-réglés.
PTY
(13). Entre Code Actuelle -
TUNE/TRK |<<
et
>>|
MODE
38
Page 41

MSR7007
OPÉRATION iPod
Cet appareil est équipé d'une fonction « prête pour iPod » qui vous permettra de contrôler
votre iPod (si compatible) en utilisant les boutons du panneau de contrôle. Les versions iPod
suivantes sont soutenues :
• iPod 3G (progiciels 2.2 seulement)
• iPod Mini
• iPod 4G
• iPod Photo
• iPod Nano
• iPod 5G (Video)
dès que la chanson actuelle est terminée. « Shuffle » va apparaître sur l'affichage aux cristaux
liquides. Appuyez de nouveau sur 4/RDM pour arrêter la reproduction au hasard.
Sélection des pistes
Pendant la reproduction, appuyez sur les boutons TUNE/TRK >>| ou |<< pour jouer la piste
prochaine ou précédente dans la catégories actuelle. Appuyez une fois sur le TUNE/TRK |<<
pour jouer la chanson depuis la position de départ ou appuyez deux fois sur le bouton TUNE/
TRK |<< pour jouer la piste précédente. Appuyez et maintenez l'appui sur les boutons TUNE/
TRK >>| ou |<< pour faire avance ou recul rapide.
A NOTER : iPod et le câble iPod sont vendus séparément.
Accéder la mode iPod
L'unité commutera automatiquement au mode d'iPod
quand un iPod est branché au câble d'iPod.
Pour revenir au menu iPod de n'importe quelle
source, appuyez sur le bouton MODE sur le panneau
de contrôle ou la télécommande jusqu'à ce que iPod
apparaisse sur l'affichage.
Mettre l'iPod en marche/en arrêt
La puissance iPod se met en marche
iPod
Video
iPod
photo
automatiquement lorsqu'un iPod est branché au
câble iPod à 30 aiguille, aussi longtemps que le
véhicule est allumé. Vous pouvez mettre l'iPod en
arrêt en le débranchant du câble iPod ou mettant l'allumage en arrêt. Lorsque +12 volts ont
commuté la source d'énergie est mis en arrêt, l'iPod fera une pause et puis entrera dans la
mode sommeil après 2 minutes. Pendant que l'iPod est branché, la puissance ne peut pas être
mis en marche ou en arrêt à partir d'iPod lui-même.
A NOTER : L'iPod va se charger d'une manière continue lorsqu'il est branché à
l'appareil, aussi longtemps que +12 volts ont commuté la source d'énergie du véhicule
est en marche.
8 Din iPod Ready Cable
HEAD UNIT
iPod iPod
mini
iPod
nano
iPod Cable
Contrôler la reproduction
Faire pause pendant la reproduction
Pendant la reproduction, appuyez sur le bouton 1/>// pour faire pause. « Pause » va apparaître
dans l'affichage. Appuyez de nouveau sur le bouton 1/>// pour reprendre la reproduction.
Reproduction répétée
Pendant la reproduction, appuyez sur le bouton 3/RPT (5) pour répéter la chanson actuelle. «
Repeat » va apparaître sur l'affichage aux cristaux liquides. Appuyez de nouveau sur 3/RPT
pour arrêter la répétition de la reproduction.
Reproduction au hasard
Pendant la reproduction, appuyez sur le bouton 4/RDM (7) pour jouer toutes les chansons
dans la catégorie actuelle dans un ordre mélangé. La reproduction au hasard commencera
1
11
21
12
13
17
19
2a
INFO
DISP
SCROLL
PTY
10
9
15
18
14
16
2b
3
MUTE
MODE
4
8
5
6
7
A NOTER : Si vous appuyez et maintenez l'appui sur les bouton TUNE/TRK >>| ou |<<
pour changer la chanson actuelle à la chanson prochaine ou précédente, vous allez
sortir de la mode avance et recul rapide.
Sélection de liste de reproduction
Appuyez sur le bouton INFO pour accéder à la mode de sélection de liste de reproduction.
• Appuyez sur le bouton 5/DN pour (9) pour sélectionner la liste vers le bas.
• Appuyez sur le bouton 6/UP (10) pour sélectionner la liste vers le haut.
• Appuyez sur le bouton 1/>|| (8) pour choisir un dossier et pour commencer le
reproduction.
Mode d'affichage alternatif
Appuyez sur le bouton DISP/SCROLL (12) pour changer l'information d'affichage entre
l'affichage de texte à ligne simple ou double.
39
Page 42

MSR7007
SOIN ET ENTRETIEN
• Gardez le produit sec. S'il devient moite, essuyez tout de suite. Des liquides peuvent
contenir des minéraux qui peuvent endommager les circuits électroniques.
• Gardez le produit loin de la poussière et d es ordures, qui peut prématurément usé les
parties.
• Manipuler le produit doucement et avec soin. Si vous le laissez tomber, cela peut
endommager les bords de circuits, et peut produire un mauvais fonctionnement du
produit.
• Essuyez le produit de temps en temps avec un tissu moite pour qu'il paraisse neuf.
N'utilisez par de produits chimiques corrosifs, des détergents, ou des solutions de
nettoyage pour nettoyer le produit.
• Utilisez et gardez le produit dans des températures normales. Des hautes températures
peuvent raccourcir la vie des produits électroniques, endommager les piles, et fondre les
plastiques.
Allumage
La source de bruit le plus commun dans la réception est l'allumage. Cela résulte de
l'emplacement de la radio près du système d'allumage (le moteur). Ce type de bruit peut être
facilement détecté parce que son intensité variera avec la vitesse du moteur.
Normalement, le bruit de l'allumage peut être supprimé en utilisant un fil d'allumage haut
voltage du type suppression de la radio et un résisteur supprimeur dans le système
d'allumage. (La plupart des vaisseaux utilise ce fil et résisteur, mais il peut être nécessaire de
les contrôler pour une opération bonne). Une autre méthode de suppression est d'utiliser les
supprimeurs de bruit supplémentaires. On peut les procurer des magasins de radio et
fournitures électroniques CB/A.
Interférence
La réception radio dans un environnement mobile est très différent de la réception radio dans
un environnement stationnaire. Il est très important de comprendre cette différence.
La réception AM va se détériorer lorsque vous passez sous un pont ou sous les lignes de haut
voltage. Bien que AM soit sujet à des bruits environnementaux, il a la capacité de recevoir à
une grande distance. Ceci parce que les signaux de transmission suivent la courbe de la terre
et sont réfléchis par l'atmosphère supérieur.
DÉPANNAGE
Symptôme Cause Solution
Pas de puissance L'interrupteur accessoire du
Disque ne peut pas être
chargé ou électé
Pas de son Le volume est trop bas Ajustez le volume à un niveau
Les clés d'opération ne
fonctionne pas
Le son saute L'angle d'installation est
Ne peut pas syntoniser à
une station de radio,
auto-recherche ne fonctionne pas
vaisseau n'est pas en
marche
Le fusible est sauté Remplacez le fusible.
Présence d'un disque CD à
l'intérieur de la platine
Insérez un disque dans la
direction contraire
Le disque compact est très
sale ou le disque est défectueux
Condensation Laissez la platine en arrêt pour
Le câblage n'est pas bien
branché
Le panneau du contrôle
n'est pas bien installé
L'ordinateur encastré ne
fonctionne pas à cause du
bruit
plus de 30°
Le disque est sale ou
défectueux
Le câble d'antenne n'est
pas branché
Les signaux sont trop faibles
Si l'alimentation d'énergie par
radio est correctement reliée à la
borne commutée par +12V de
source de l'énergie du vaisseau,
commutez à en marche la position
Enlevez le disque dans la platine
et en insérez un nouveau..
Si le disque n'ejecte pas, appuyez
sur le bouton RESET.
Insérez un disque compact avec
l'étiquette en haut.
Nettoyez le disque ou essayez
d'en jouer un nouveau.
une heure environ et puis essayer
de nouveau.
audible.
Vérifiez les connexions.
Réinstaller le panneau du contrôle.
Appuyez sur le bouton RESET.
Ajustez l'angle d'installation à
moins de 30°.
Nettoyez le disque et essayez de
jouer ou bien utilisez un nouveau
disque.
Vérifiez le câble antenne.
Sélectionnez u ne station à la
main.
40
Page 43

MSR7007
SPECIFICATIONS
CD
Rapport signal au bruit . . . . . . . . . . . . . . . . . . . . . . . . . . . . . . . . . . . . . . . . . . . . . . . .> 75 dB
Séparation des chaînes . . . . . . . . . . . . . . . . . . . . . . . . . . . . . . . . . . . . . . . .More than 50 dB
Réponse fréquence. . . . . . . . . . . . . . . . . . . . . . . . . . . . . . . . . . . . . . . . . . . . . 20 Hz - 20 kHz
Radio FM
Assurance de Fréquence (USA) . . . . . . . . . . . . . . . . . . . . . . . . . . . . . . . . 87.5 à 107.9 MHz
Assurance de Fréquence (Europe). . . . . . . . . . . . . . . . . . . . . . . . . . . . . . . . 87.5 à 108 MHz
Sensibilité (S/N=30dB) . . . . . . . . . . . . . . . . . . . . . . . . . . . . . . . . . . . . . . . . . . . . . . . . . . 4µV
Rejet d'Image . . . . . . . . . . . . . . . . . . . . . . . . . . . . . . . . . . . . . . . . . . . . . . . . . . . . . . . >45 dB
Séparation Stéréo . . . . . . . . . . . . . . . . . . . . . . . . . . . . . . . . . . . . . . . . . . . . . . . . . . . . >25 dB
AM/MW
Chaîne de Fréquence (USA). . . . . . . . . . . . . . . . . . . . . . . . . . . . . . . . . . . . . . 530-1710 kHz
Chaîne de Fréquence (Europe) . . . . . . . . . . . . . . . . . . . . . . . . . . . . . . . . . . . 522-1620 kHz
Sensibilité (S/N=20dB) . . . . . . . . . . . . . . . . . . . . . . . . . . . . . . . . . . . . . . . . . . . . . . . . 36 dB
Généralités
Tension d'Opération . . . . . . . . . . . . . . . . . . . . . . . . . . . . . . . . . . . . . . . . . . . . . . DC 12 Volts
Fondre le Système . . . . . . . . . . . . . . . . . . . . . . . . . . . . . . . . . . . . . . . . . . La Terre Négative
Impédance de Haut Parleurs . . . . . . . . . . . . . . . . . . . . . . . . . . . . . . . . 4-8 4 ohms par canal
Commandes de Tonalité:
Basse (at 100 Hz) . . . . . . . . . . . . . . . . . . . . . . . . . . . . . . . . . . . . . . . . . . . . . . . . : ±10 dB
Aigu (at 10 kHz) . . . . . . . . . . . . . . . . . . . . . . . . . . . . . . . . . . . . . . . . . . . . . . . . . . : ±10 dB
Rendement de Puissance. . . . . . . . . . . . . . . . . . . . . . . . . . . . . . . . . . . . . . . . . . . . . 40W x 4
Drainage Courant . . . . . . . . . . . . . . . . . . . . . . . . . . . . . . . . . . . . . . . . . . . .15 Ampere (max.)
Commandant Dimensions. . . . . . . . . . . . . . . . . . . . . . . . . . . . .5.15” (W) x 1.2” (D) x 3.7” (H)
Courant fainéant/En attente . . . . . . . . . . . . . . . . . . . . . . . . . . . . . . . . . . . . . . . . . . . . . 75mA
Tuner/Amp Dimensions. . . . . . . . . . . . . . . . . . . . . . . . . . . . . .8.35” (W) x 6.55” (D) x 2.4” (H)
41
Page 44

ASA Electronics Corporation
www.asaelectronics.com
© 2007 ASA Electronics Corporation
v.062107
 Loading...