

Page 1
Using Your Jenn-Air Connected Appliance
For future reference, please fill in the following information
as you connect your appliance:
Home Network Name (SSID) _______________________________
Account ID/E-mail Address ________________________________
Home Network Password _________________________________
Appliance SAID#_________________________________________
Account Password________________________________________
Your Jenn-Air connected appliance is pretty clever.
It can notify you when it needs attention through the app to get
your attention.
To start: Connect your appliance to the internet so it is ready
to communicate. On your smart phone, download and install
the Jenn-Air Connect application.
Jenn-Air Connect is available for the iOS™ and Android™
operating systems.
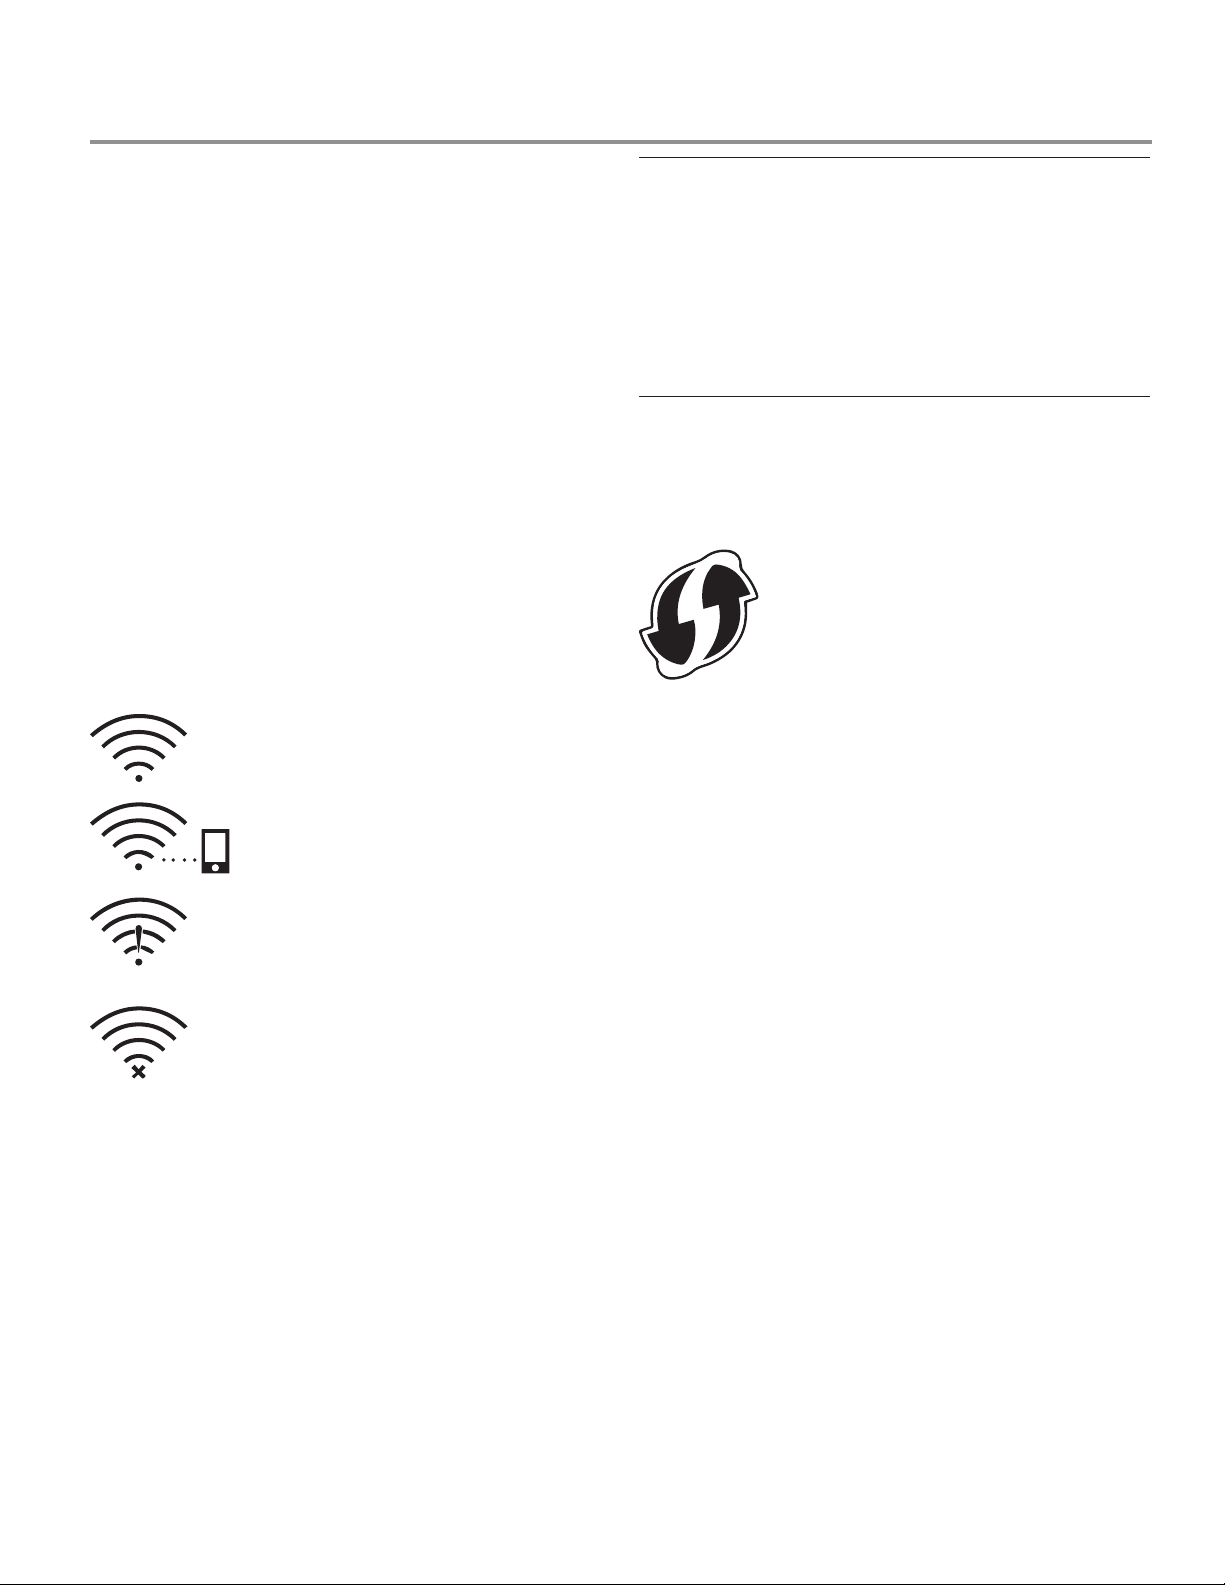
What the different appliance Wi-Fi Icons mean:
Connected to the home router and to the
Jenn-Air server (Remote Start Disabled)
Connected to the home router and to the
Jenn-Air server (Remote Start Enabled)
Connected to the home router, but not to the
Jenn-Air server (not connected to the internet,
not claimed)
Not Connected to home router (i.e. appliance has
the router info, but cannot connect to it)
NOTES:
■The signal “bars” can change to white or grey to indicate
signal strength. All white indicates the best signal.
■These icons will only show if Wi-Fi is enabled. If Wi-Fi
is disabled, no icon will show at all. The Jenn-Air Connect
application is under continuous improvement. The images
and steps within these instructions may slightly vary from
the time of publication.
iOS™ is a trademark or registered trademark of Cisco in the U.S.
and other countries.
Android™ is a trademark of Google Inc.
W10787928A
Before you begin
Make sure:
■ Your appliance is an 802.11g device. Please check that your
wireless network is compatible.
■ Your Wi-Fi-enabled appliance is properly installed and
turned on.
■ Your wireless router is turned on and you have an internet
connection.
Determine which of the two connection
setup methods to use
1. Manual Method: If your wireless router
does not support WPS, follow the Manual
Method Setup instructions below.
2.Automatic Method: Many wireless
routers support a standard for fast and
easy connection to wireless devices.
Ofcially known as Wi-Fi Protected Setup
(WPS), it features a connection button and
indicator light. If yours is like this, follow
the preferred Automatic Method Setup
instructions below.
Manual Method Setup:
You will need:
■ Your home wireless network name (or SSID number) and
your network password.
Follow These Steps:
1. On your Wi-Fi-enabled appliance, go to TOOLS >
WIRELESS FEATURES> Enable WiFi; then touch OK.
2. Review the Terms of Service contract. If you agree, proceed
to step 3; otherwise, the Wi-Fi feature may not be used
and you must touch DISAGREE or BACK to return to
the previous menu.
3. Touch SEARCH NETWORK. Your appliance will then begin
searching for available networks. To scan for a network,
go step 4; to manually enter a network, go to step 5.
To Scan for a Network:
4. Touch to highlight the network you wish to connect to;
then touch CONNECT. If your network does not appear,
touch SEARCH NETWORK again.
If you are attempting to connect to a secured network, you
will be prompted to ENTER PASSWORD. Enter your network
password and touch CONNECT. NOTE: The home network
password is case sensitive.
Otherwise, if you are connecting to an unsecured network,
the appliance will attempt to make the connection. Proceed
to “After Setup.”
To Manually Enter a Network:
5. Once the network begins to search, touch ADD A
NETWORK.
6. Using the keypad, enter your network’s SSID and
touch NEXT.
7. You will be asked to select between WEP, WPA PSK,
WPA2 PSK, or OPEN Authentication. Touch the desired
authentication type; then touch NEXT.
1
Page 2

8. If you select OPEN, your appliance will begin making
the network connection.
Otherwise, if you selected WEP, WPA PSK, or WPA2 PSK,
enter your network password and touch CONNECT. Your
appliance will begin making the network connection.
Proceed to “After Setup.”
The connection status will be displayed.
NOTE: If needed, consult your wireless router’s user manual
for more information.
Automatic Method Setup:
Follow These Steps:
1. On your Wi-Fi enabled appliance, go to TOOLS>WIRELESS
FEATURES>Enable Wi; then touch OK.
2. Review the Terms of Service contract. If you agree, proceed
to the next step; otherwise, the Wi-Fi feature may not be
used and you must touch BACK or DISAGREE to return
to the main menu.
3. Touch PUSH BUTTON. The appliance will search for the
WPS-enabled router. This can take up to 2 minutes.
NOTE: Complete the next step within 2 minutes.
4. On your wireless router, press the WPS (Wi-Fi Protected
Setup) button. An indicator light on your router will begin
blinking. (If needed, consult your wireless router’s user
manual for more information.)
NOTE: If your Wi-Fi enabled appliance times out, repeat
steps 1–4.
When the appliance and router are connected, the appliance
will sound 2 short tones. After that, the Wi-Fi indicator light
may go out briey, but will come back on and remain solidly
lit to conrm connection.
After Setup:
The connection status will be displayed.
If the connection was unsuccessful, your appliance will sound
two tones and display CONNECTION UNSUCCESSFUL. You
can choose to TRY AGAIN or touch OK to return to the main
menu.
If the connection was successful, your appliance will sound
two tones and display a message that your appliance is now
connected to the router. Follow the on-screen instructions
to complete your Wi-Fi activation.
Set up your account
You will need:
■ Your Smart Appliance’s “Smart Appliance ID” (SAID),
which can be found, once your appliance’s WIRELESS
FEATURES is enabled, by navigating to TOOLS>WIRELESS
FEATURES>SAID CODE; then touch NEXT. The SAID will
be used in the Jenn-Air Connect application to claim
your appliance.
Download the Jenn-Air Connect
application from the App StoreSM
or on Google PlayTM.
1. Create a new
account by
selecting SIGN UP
on the initial screen.
From this screen
you can LOGIN
(after your
account has been
created), SIGN UP
for a new Jenn-Air
Connect account,
EMAIL
PASSWORD
SIGN IN
Remember Me
Cancel
Forgot Password?
Sign Up
CREATE HOME
FIRST NAME
LAST NAME
EMAIL
Password: Use between 8-15 characters
with at least 1 number, 1 capital letter and 1
lowercase letter.
PASSWORD
CONFIRM PASSWORD
I agree to the Terms and
Conditions and Privacy Policy
Next
Sign Up
i
and retrieve a
forgotten password.
2. Create Home
by completing
the requested
information. The
Account Password
must meet the
complexity
requirements detailed
in the Jenn-Air
Connect application.
NOTE: Record the
account information
at the beginning of
this document for
future reference.
3. Touch NEXT to
proceed.
NOTE: In order to
proceed, you must
agree to the Terms
and Conditions and
Privacy Policy.
App StoreSM is a service mark of Apple Inc.
Google Play™ is a trademark of Google Inc.
2
Page 3

Back
CREATE HOME
ADDRESS 2 (optional)
STATE/PROVINCE
ZIP/POSTAL CODE
MOBILE PHONE NUMBER
Sign Up
LOCATION
ADDRESS 1
CITY
Finish
4. Complete
the additional
information and
touch FINISH when
completed.
Claim your appliance
My Appliances
NO APPLIANCES
Select here to add an
appliance
1. You are ready to
claim your appliance
by adding it to your
appliance list. On
your rst use of
the application,
you will see “NO
APPLIANCES”.
To claim (add) an
appliance to your
account, touch the
NO APPLIANCES
area. This starts the
claiming process.
Back
Email Conrmation sent to:
smith@mailinator.com
To verify this email address, conrm the
account by accepting the conrmation link
sent to your Email.
Verify Em...
Sign Out
Resend Email
5. Follow the on-screen
instructions to verify
your email address.
NOTE: If the email
does not appear in
your inbox, check
other folders within
your mail client
before requesting
to Resend Email.
It may take a few
minutes for the
verication email to
appear. The email
validation link will
be active for 2 weeks
(14 days). If this time
lapses, you will have
to RESEND EMAIL
for a new link.
In Order to
Proceed: You
will need your
appliance’s
SAID (found by
navigating to
TOOLS>WIRELESS
FEATURES>SAID
CODE and touching
NEXT). For future
reference, it is
recommended to
record your SAID
at the beginning
section of this
document in the
space provided.
DashboardCulinary Center More...
Back
Add Appliance
Appliance Name
Double Oven
Enter SAID
WPR
Appliance Location
Primary Home
DashboardCulinary Center More...
1111100000
Save
2. Enter the desired
Appliance Name
(you can change
the default), enter
the appliance SAID
code (10 characters),
and select the
Appliance Location;
then touch SAVE.
You will receive a
conrmation screen
upon successfully
claiming your
appliance. If the
claiming process
was not successful,
repeat steps 1 and 2.
3
Page 4

Need More Help?
ISSUE SOLUTION
I’m unable to
use Remote
App and/
or I’m not
receiving
Push
notifications.
It could be a few things. First, be sure that
your wireless router is connected to the
internet and the Wi-Fi indicator is on.
Then check these items:
■User Account: You must set
up an account and register your
appliance on your smart phone app.
■Be sure that you have the push
notifications activated on your
remote app.
Remote App Features
1. Connected Account Creation and Maintenance: The
account can have multiple locations, for example Primary
home and Secondary home, with a unique name for each
appliance.
2. Invite Additional Members to Your Account (up to 4):
These members can monitor and control your appliances.
Each member has his or her own user-id and password.
The owner of the account also has the capability to remove
members from the account.
3. Wi-Fi Home Network Connection: This is a WPS method
to simplify the provision process to homeowners’ router/
network.
4. Simplied Claiming of Appliance to Homeowners’
Network: The SAID# is easy to nd on the oven’s display.
The homeowner can assign the appliance to location
during the claiming process.
5. Remote App Appliance Information Page: Remote
App displays Appliance Model#, Serial#, In-Service Date,
and SAID#.
6. Remote Status: Provides the ability to view Cooking
Modes, Cooking Temperatures, Cooking Time, Oven Light
Status, Kitchen Timer, Meat Probe, and Remote Control.
7. Remote Control: Provides remote control over Cooking
Modes, Cooking Time, Cooking Temperature, Delay Start
Time, and Remote Start.
8. Adjust Cooking Settings: Permits you to adjust Cooking
Modes, Cooking Time, Cooking Temperature, Delay Start
Time, and Remote Start.
9. Remote Push Cooking Setting to Oven: Provides remote
control over Cooking Modes, Cooking Time, Cooking
Temperature, and Delay Start Time.
10. Remote View and Start of MyCreations: Provides remote
view of MyCreations and the ability to remote start.
11. Remote Notications: The connected oven user has the
ability to select Push Notications such as Oven Mode
change, Cook Temperature change, etc.
12. Oven Preference Settings: Brightness, Clock Themes,
Sound, Temp Units, Display On/Off, Button, Appliance
Language English and French, Clock On/Off, Control Lock
On/Off, and Number Entry.
13. Remote App Support for Both English and French
4
Page 5

Utiliser votre électroménager Jenn-Air connecté
Pour référence future, veuillez inscrire les renseignements
suivants pendant que vous connectez votre électroménager :
Nom du réseau domestique (SSID) _________________________
ID de compte/courriel _____________________________________
Mot de passe du réseau domestique _______________________
No SAID de l’électroménager ______________________________
Mot de passe du compte __________________________________
Votre électroménager Jenn-Air connecté est très intelligent.
Il peut communiquer avec vous à l’aide de l’application lorsqu’il
a besoin de votre attention.
Pour commencer : Branchez votre électroménager à Internet
pour qu’il puisse commencer à communiquer. Téléchargez
et installer sur votre téléphone intelligent l’application Connect
de Jenn-Air.
L’application Connect de Jenn-Air est compatible avec
les systèmes d’exploitation iOS™ et Android™.
Signication des différentes icônes Wi-Fi
de l’électroménager :
Avant de commencer
Vous assurez que :
■ Votre électroménager est un appareil 802.11g. Votre réseau
sans l domestique est compatible.
■ Votre électroménager compatible Wi-Fi est correctement
installé et sous tension.
■ Votre routeur sans l est sous tension et vous avez
une connexion Internet.
Évaluer lequel des deux modes
de connexion choisir
1. Méthode manuelle : Si votre routeur sans
l n’est pas compatible WPS, suivez la
méthode de connexion manuelle suivante.
2.Méthode automatique : Plusieurs
routeurs sans l sont compatibles avec
une norme qui permet de connecter
rapidement et facilement des appareils
sans l. Ofciellement connue sous le nom
de Wi-Fi Protected Setup (WPS), cette
fonction possède un bouton de connexion
et un indicateur lumineux. Si c’est le cas
pour vous, suivez la méthode de connexion
automatique ci-dessous.
Connecté au routeur domestique et au serveur
Jenn-Air (démarrage à distance désactivé)
Connecté au routeur domestique et
au serveur Jenn-Air (démarrage à distance
activé)
Connecté au routeur domestique, mais non
au serveur Jenn-Air (non connecté à Internet,
pas de demande)
Non connecté au routeur domestique (c.-à-d.
l’électroménager possède les infos du routeur,
mais ne peut y accéder)
REMARQUES :
■Les « barres » de signal peuvent passer du blanc au gris
pour indiquer la puissance du signal. Le signal est à son plus
fort lorsqu’elles sont toutes blanches.
■Ces icônes ne s’afchent que si la connexion Wi-Fi
est activée. Aucune icône ne sera afchée si la connexion
Wi-Fi est désactivée. L’application Connect de Jenn-Air
est continuellement améliorée. Les images et étapes de ce
manuel peuvent donc légèrement varier selon la date de
publication.
iOS™ est une marque de commerce ou une marque déposée de Cisco
aux États-Unis et dans d’autres pays.
Android™ est une marque de commerce de Google Inc.
Méthode de connexion manuelle :
Il vous faudra :
■ Le nom de votre réseau sans l domestique (ou son numéro
SSID) et son mot de passe.
Suivez ces étapes :
1. Sur votre électroménager compatible Wi-Fi, choisissez
TOOLS > WIRELESS FEATURES > Enable WiFi (Outils >
Fonctions sans l > Activer Wi-Fi); touchez ensuite OK.
2. Lisez le contrat des conditions générales d’utilisation.
Si vous êtes en accord, poursuivez à l’étape 3; sinon, la
fonction Wi-Fi ne pourra être utilisée et vous devez toucher
DISAGREE (désaccord) ou BACK (retour) pour revenir
au menu précédent.
3. Touchez SEARCH NETWORK (trouver un réseau).
Votre électroménager commencera à chercher les réseaux
accessibles. Pour chercher un réseau, continuez à l’étape 4;
pour entrer manuellement les données de réseau, continuez
à l’étape 5.
Pour chercher un réseau :
4. Touchez le réseau auquel vous souhaitez vous connecter
pour le surligner; touchez ensuite CONNECT (connexion).
Si votre réseau n’apparaît pas, touchez de nouveau
SEARCH NETWORK (trouver un réseau).
Si vous tentez de vous connecter à un réseau sécurisé,
le système vous demandera de saisir le MOT DE PASSE.
Inscrivez votre mot de passe de réseau et touchez
CONNECT (connexion). REMARQUE : Le mot de
passe du réseau domestique est sensible à la case.
Si ce n’est pas le cas et que vous vous connectez à un
réseau non sécurisé, l’électroménager essaiera d’effectuer
la connexion. Poursuivez à la section « Après la connexion ».
5
Page 6

Pour entrer manuellement un mot de passe :
5. Une fois la recherche de réseaux commencée, touchez ADD
A NETWORK (ajouter un réseau).
6. À l’aide du clavier, saisissez le SSID de votre réseau,
puis touchez NEXT (suivant).
7. Il vous sera demandé de choisir entre les modes
d’authentication WEP, WPA PSK, WPA2 PSK ou OPEN.
Touchez le mode d’authentication souhaité, puis touchez
NEXT (suivant).
8. Si vous avez choisi OPEN, votre électroménager
commencera à effectuer la connexion au réseau.
SI ce n’est pas le cas et que vous avez sélectionné WEP,
WPA PSK ou WPA2 PSK, saisissez le mot de passe de
votre réseau, puis touchez CONNECT (connexion). Votre
électroménager commencera à effectuer la connexion
au réseau. Poursuivez à la section « Après la connexion ».
Le statut de connexion est afché.
REMARQUE : Au besoin, consulter le guide de l’utilisateur
de votre routeur pour obtenir plus de renseignements.
Méthode de connexion automatique :
Suivez ces étapes :
1. Sur votre électroménager compatible Wi-Fi, choisissez
TOOLS > WIRELESS FEATURES > Enable WiFi (Outils >
Fonctions sans l > Activer Wi-Fi); touchez ensuite OK.
2. Lisez le contrat des conditions générales d’utilisation. Si
vous êtes en accord, poursuivez à l’étape suivante; sinon, la
fonction Wi-Fi ne pourra être utilisée et vous devez toucher
BACK (retour) ou DISAGREE (désaccord) pour revenir au
menu principal.
3. Appuyer sur le bouton PUSH (notication). L’électroménager
cherchera le routeur compatible WPS. Cette opération peut
prendre jusqu’à 2 minutes.
REMARQUE : L’étape suivante doit être effectuée dans
les 2 minutes suivantes.
4. Sur votre routeur sans l, appuyez sur le bouton
WPS (Wi-Fi Protected Setup). Un indicateur lumineux
commencera à clignoter sur votre routeur. (Au besoin,
consulter le guide de l’utilisateur de votre routeur pour
obtenir plus de renseignements.)
REMARQUE : Si votre électroménager compatible Wi-
arrive au bout de son délai, répétez les étapes 1 à 4.
Lorsque la connexion entre l’électroménager et le routeur est
établie, l’électroménager fera entendre deux courtes tonalités.
L’indicateur lumineux Wi-Fi peut ensuite s’éteindre brièvement,
il s’allumera cependant de nouveau sans clignoter pour
conrmer la connexion.
Après la connexion :
Le statut de connexion est afché.
Si la connexion a échoué, votre électroménager fera
entendre deux tonalités et afchera le message CONNECTION
UNSUCCESSFUL (échec de la connexion). Vous pouvez
sélectionner TRY AGAIN (essayer de nouveau) ou toucher
OK pour revenir au menu principal.
Si la connexion s’est effectuée avec succès, votre
électroménager fera entendre deux tonalités et afchera un
message indiquant qu’il est maintenant connecté au routeur.
Suivez les instructions à l’écran pour terminer l’activation Wi-Fi.
App Store
Google Play™ est une marque de commerce de Google Inc.
SM
est une marque de service d’Apple Inc.
Configurer votre compte
Il vous faudra :
■ L’identiant « Smart Appliance ID » (SAID) de votre
électroménager intelligent. Vous pourrez trouver ce
renseignement une fois LES FONCTIONS SANS FIL activées
en choisissant TOOLS>WIRELESS FEATURES>SAID CODE
(outils > fonctions sans l > code SAID); touchez ensuite
NEXT (suivant). Le SAID sera utilisé par l’application
Connect de Jenn-Air pour identier votre électroménager.
Téléchargez l’application Connect
de Jenn-Air à partir de l’App StoreSM
ou de Google PlayTM .
1. Créez un nouveau
compte en
sélectionnant SIGN
UP (créer un compte)
à l’écran d’accueil.
À partir de cet écran,
vous pouvez ouvrir
une session à l’aide
du bouton LOGIN
(connexion) (après
avoir créé votre
compte), créer un
nouveau compte
Connect Jenn-Air
avec le bouton SIGN
UP ou récupérer un
mot de passe oublié.
2. Créez votre
page d’accueil
en inscrivant les
renseignements
demandés. Le
mot de passe
doit respecter les
critères décrits dans
l’application Connect
de Jenn-Air.
REMARQUE :
Pour référence
future, inscrivez
les renseignements
de compte au début
de ce document.
3. Touchez NEXT
(suivant) pour
continuer.
REMARQUE :
Pour continuer,
vous devez accepter
les conditions
et le politique de
condentialité.
6
EMAIL
PASSWORD
SIGN IN
Remember Me
Cancel
CREATE HOME
Password: Use between 8-15 characters
with at least 1 number, 1 capital letter and 1
lowercase letter.
I agree to the Terms and
Conditions and Privacy Policy
Forgot Password?
Sign Up
FIRST NAME
LAST NAME
EMAIL
PASSWORD
CONFIRM PASSWORD
Next
Sign Up
i
Page 7

Back
CREATE HOME
Back
Email Conrmation sent to:
smith@mailinator.com
To verify this email address, conrm the
account by accepting the conrmation link
sent to your Email.
Sign Up
LOCATION
ADDRESS 1
ADDRESS 2 (optional)
CITY
STATE/PROVINCE
ZIP/POSTAL CODE
MOBILE PHONE NUMBER
Finish
Verify Em...
Resend Email
Sign Out
4. Inscrivez les
renseignements
supplémentaires
demandés, puis
touchez FINISH
(terminé) lorsque
vous avez terminé.
5. Suivez les instructions
à l’écran pour vérier
le courriel.
REMARQUE :
SI aucun courriel
n’apparaît dans
votre boîte de
réception, vériez
d’autres dossiers
de votre client de
messagerie avant de
demander d’envoyer le
courriel de nouveau. Le
courriel de vérication
peut prendre quelques
minutes avant
d’apparaître dans votre
boîte de réception. Le
lien de validation du
courriel sera actif
pour 2 semaines
(14 jours). Après cette
période, vous devrez
demander l’envoi d’un
nouveau courriel pour
obtenir un nouveau
lien.
Pour continuer :
Vous aurez besoin
du SAID de votre
électroménager
(vous le trouverez dans
TOOLS>WIRELESS
FEATURES>SAID
CODE (outils >
fonctions sans l >
code SAID); puis
en touchant NEXT
(suivant)). Pour
référence future, nous
vous recommandons
d’inscrire le SAID au
début de ce manuel
dans l’espace
approprié.
Inscrire votre électroménager
My Appliances
NO APPLIANCES
Select here to add an
appliance
DashboardCulinary Center More...
Back
Add Appliance
Appliance Name
Double Oven
Enter SAID
WPR
Appliance Location
Primary Home
DashboardCulinary Center More...
1111100000
7
Save
1. Vous êtes
maintenant prêt
à inscrire votre
électroménager
en l’ajoutant à votre
liste d’électroménager.
Lors de votre
première utilisation
de l’électroménager,
vous pourrez lire
le message « NO
APPLIANCES »
(aucun électroménager).
Pour inscrire (ajouter)
un électroménager
à votre compte,
touchez la zone
NO APPLIANCES
(aucun électroménager).
Ceci permet de
commencer
le processus
d’inscription.
2. Inscrivez le nom
d’électroménager
souhaité (vous pouvez
modier le nom
par défaut), le code
SAID de l’appareil
(10 caractères),
puis sélectionnez
l’emplacement de
l’électroménager;
touchez ensuite
SAVE (sauvegarder).
Un écran de
conrmation
s’afchera pour
conrmer l’inscription
réussie de votre
électroménager.
Si l’inscription
a échoué, répétez
les étapes 1 et 2.
Page 8

Besoin d’aide supplémentaire?
PROBLÈME SOLUTION
Je ne suis
pas capable
d’utiliser
l’application
à distance ou
je ne reçois
aucune
notification.
Plusieurs problèmes sont possibles.
D’abord, assurez-vous que votre routeur
sans fil est connecté à Internet et que
l’indicateur Wi-Fi est allumé. Vérifiez ensuite
les points suivants :
■Compte utilisateur : Vous devez
créer un compte et enregistrer votre
électroménager sur l’application de votre
téléphone intelligent.
■Assurez-vous que la fonction de
notification est activée sur l’application
à distance.
Fonctions de l’application à distance
1. Création d’un compte Connect et entretien : Le
compte peut comporter plusieurs localisations, par
exemple domicile principal et résidence secondaire,
avec un nom unique pour chaque électroménager.
2. Inviter des membres supplémentaires dans votre
compte (jusqu’à 4) : Ces membres peuvent contrôler
et commander vos électroménagers. Chaque membre
possède son propre identiant et mot de passe.
Le propriétaire du compte a aussi la possibilité
de supprimer les membres du compte.
3. Connexion au réseau Wi-Fi domestique : Il s’agit
d’une méthode WPS pour simplier le processus de
connexion au routeur/réseau du propriétaire.
4. Inscription simpliée de l’électroménager au réseau
domestique : Le no SAID est facile à trouver sur l’afchage
du four. Le propriétaire peut jumeler l’électroménager et
l’emplacement pendant le processus d’inscription.
5. Page d’information de l’application à distance de
l’électroménager : L’application à distance afche
le no de modèle, le no de série, la date de mise en service
et le no SAID de l’électroménager.
6. Statut à distance : Permet de consulter les modes de
cuisson, les températures de cuisson, le temps de cuisson,
l’état de la lumière du four, la minuterie de la cuisinière,
la sonde thermique, ainsi que de modier des commandes
à distance.
7. Commande à distance : Permet de modier à distance
les modes de cuisson, le temps de cuisson, la température
de cuisson, de retarder le début et de commencer la
cuisson à distance.
8. Modier les réglages de cuisson : Permet de modier
les modes de cuisson, le temps de cuisson, la température
de cuisson, de retarder le début et de commencer la
cuisson à distance.
9. Réglage à distance de la cuisson au four : Permet
de modier à distance les modes de cuisson, le temps de
cuisson, la température de cuisson et de retarder le début
de la cuisson.
10. Afchage et démarrage à distance de MyCreations :
Permet de voir et de démarrer à distance MyCreations.
11. Notications à distance : L’utilisateur du four connecté
peut recevoir des notications, par exemple, lorsque
le mode du four ou la température de cuisson change.
12. Réglages des préférences pour le four : Luminosité,
thèmes de l’horloge, sons, unités d’afchage de la
température, afchage marche/arrêt, bouton, langue de
l’électroménager français/anglais, verrouillage ouvert/fermé
et entrée de chiffre.
13. L’application à distance peut être congurée pour
utiliser le français ou l’anglais
W10787928A
®/TM © 2015 Jenn-Air. Used under license in Canada. All rights reserved.
®/TM © 2015 Jenn-Air. Utilisé sous licence au Canada. Tous droits réservés.
04/2015
Printed in U.S.A.
Imprimé aux États-Unis
 Loading...