

Jenn-Air JMW2430IL02, JMW2430IL01 Owner’s Manual

27" (68.6 CM) AND 30" (76.2 CM)
BUILT-IN ELECTRIC SINGLE AND DOUBLE OVENS
27 PO (68.6 CM) ET 30 PO (76,2 CM)
FOURS ÉLECTRIQUES SIMPLES ET DOUBLES,
ENCASTRÉS
Use & Care Guide
For questions about features, operation/performance, parts, accessories, or service in the U.S.A., call:
1-800-JENNAIR (1-800-536-6247) or visit our website at www.jennair.com.
In Canada, call: 1-800-JENNAIR (1-800-536-6247) or visit our website at www.jennair.ca.
Guide d’utilisation et d’entretien
Pour des questions à propos des caractéristiques, du fonctionnement/rendement, des pièces, accessoires ou dépannage, composer le:
Au Canada, composer le: 1800JENNAIR (1800536-6247) ou visiter notre site Web au www.jennair.ca.
W11235342A
1800JENNAIR (1800536-6247) ou visiter notre site Web au www.jennair.com.

TABLE OF CONTENTS TABLE DES MATIÈRES
BUILT-IN OVEN SAFETY ............................................................... 3
PARTS AND FEATURES ................................................................4
FEATURE GUIDE ............................................................................5
Touch Panel ..................................................................................6
Display ..........................................................................................6
Display Navigation .......................................................................6
Menu Demonstrations ..................................................................6
Kitchen Timer ...............................................................................8
Tones/Sounds ..............................................................................8
Tools .............................................................................................8
Button Lock ..................................................................................9
Oven Temperature Control ...........................................................9
Sabbath Mode..............................................................................9
OVEN USE .....................................................................................10
Aluminum Foil .............................................................................10
Position Racks and Bakeware ...................................................11
Roll-Out Extension Rack ............................................................11
Bakeware ....................................................................................12
Oven Vents .................................................................................13
Preheating and Oven Temperature ............................................13
Baking and Roasting ..................................................................13
Broiling........................................................................................13
Convection .................................................................................14
Convection Bake ........................................................................14
Convection Roast .......................................................................14
Convection Broil .........................................................................14
Proong Bread ...........................................................................14
Temperature Probe .....................................................................15
Timed Cooking ...........................................................................15
OVEN CARE ..................................................................................16
Self-Cleaning Cycle ....................................................................16
General Cleaning ........................................................................16
Oven Lights ................................................................................17
Oven Door ..................................................................................17
TROUBLESHOOTING ..................................................................18
ASSISTANCE OR SERVICE .........................................................19
In the U.S.A. ...............................................................................19
In Canada ...................................................................................19
Accessories ................................................................................19
SÉCURITÉ DU FOUR ENCASTRÉ .............................................20
PIÈCES ET CARACTÉRISTIQUES ..............................................21
GUIDE DES CARACTÉRISTIQUES .............................................22
Panneau tactile ...........................................................................23
Afchage ....................................................................................23
Afchage du menu .....................................................................23
Démonstration de menu ............................................................23
Minuterie de cuisine ...................................................................25
Tons/Sons ...................................................................................25
Outils ..........................................................................................25
Verrouillage des commandes .....................................................26
Commande de la température du four ......................................26
Mode Sabbat ..............................................................................27
UTILISATION AU FOUR ............................................................... 28
Papier d’aluminium ....................................................................28
Position des grilles et des ustensiles
de cuisson au four ......................................................................28
Grille coulissante déployante .....................................................29
Ustensiles de cuisson ................................................................29
Évents du four ............................................................................30
Préchauffage et température du four .........................................30
Cuisson au four et rôtissage ......................................................30
Cuisson au gril ............................................................................30
Convection .................................................................................30
Cuisson au four par convection .................................................31
Rôtissage par convection ..........................................................31
Cuisson au gril par convection ..................................................31
Levée du pain .............................................................................31
Sonde thermométrique ..............................................................32
Cuisson minutée ........................................................................32
ENTRETIEN DU FOUR .................................................................33
Programme d’autonettoyage .....................................................33
Nettoyage général ......................................................................33
Lampes du four ..........................................................................34
Porte du four ..............................................................................34
DÉPANNAGE .................................................................................35
ASSISTANCE OU SERVICE .........................................................37
Au Canada ..................................................................................37
Accessoires ................................................................................37
2

BUILT-IN OVEN SAFETY
Your safety and the safety of others are very important.
We have provided many important safety messages in this manual and on your appliance. Always read and obey all safety
messages.
This is the safety alert symbol.
This symbol alerts you to potential hazards that can kill or hurt you and others.
All safety messages will follow the safety alert symbol and either the word “DANGER” or “WARNING.”
These words mean:
You can be killed or seriously injured if you don't immediately
DANGER
WARNING
All safety messages will tell you what the potential hazard is, tell you how to reduce the chance of injury, and tell you what can
happen if the instructions are not followed.
IMPORTANT SAFETY INSTRUCTIONS
follow instructions.
You
can be killed or seriously injured if you don't
instructions.
follow
WARNING: To reduce the risk of fire, electrical shock,
injury to persons, or damage when using the oven, follow
basic precautions, including the following:
Proper Installation – Be sure the oven is properly installed
■
and grounded by a qualified technician.
■ Never Use the Oven for Warming or Heating the Room.
■ Do Not Leave Children Alone – Children should not be left
alone or unattended in area where oven is in use. They
should never be allowed to sit or stand on any part of the
oven.
■ Wear Proper Apparel – Loose-fitting or hanging garments
should never be worn while using the oven.
■ User Servicing – Do not repair or replace any part of the
oven unless specifically recommended in the manual. All
other servicing should be referred to a qualified technician.
■ Storage in Oven – Flammable materials should not be
stored in an oven.
■ Do Not Use Water on Grease Fires – Smother fire or flame
or use dry chemical or foam-type extinguisher.
■ Use Only Dry Potholders – Moist or damp potholders on
hot surfaces may result in burns from steam. Do not let
potholder touch hot heating elements. Do not use a towel
or other bulky cloth.
■ Use Care When Opening Door – Let hot air or steam
escape before removing or replacing food.
■ Do Not Heat Unopened Food Containers – Build-up of
pressure may cause container to burst and result in injury.
■ Keep Oven Vent Ducts Unobstructed.
■ Placement of Oven Racks – Always place oven racks in
desired location while oven is cool. If rack must be moved
while oven is hot, do not let potholder contact hot heating
element in oven.
■ DO NOT TOUCH HEATING ELEMENTS OR INTERIOR
SURFACES OF OVEN – Heating elements may be hot
even though they are dark in color. Interior surfaces of an
oven become hot enough to cause burns. During and after
use, do not touch, or let clothing or other flammable
materials contact heating elements or interior surfaces of
oven until they have had sufficient time to cool. Other
surfaces of the oven may become hot enough to cause
burns – among these surfaces are oven vent openings and
surfaces near these openings,
oven doors.
For self-cleaning ovens:
■ Do Not Clean Gasket – The gasket is essential for a good
seal. Care should be taken not to rub, damage, or move
the gasket.
■ Do Not Use Oven Cleaners – No commercial oven cleaner
or oven liner protective coating of any kind should be used
in or around any part of the oven.
■ Clean Only Parts Listed in Manual.
■ Before Self-Cleaning the Oven – Remove broiler pan and
other utensils.
For smart enabled ovens:
■ Remote Operation – This appliance is configurable to allow
remote operation at any time. Do not store any flammable
materials or temperature sensitive items inside of the
appliance.
oven doors, and windows of
SAVE THESE INSTRUCTIONS
3
PARTS AND FEATURES
B
D
C
A
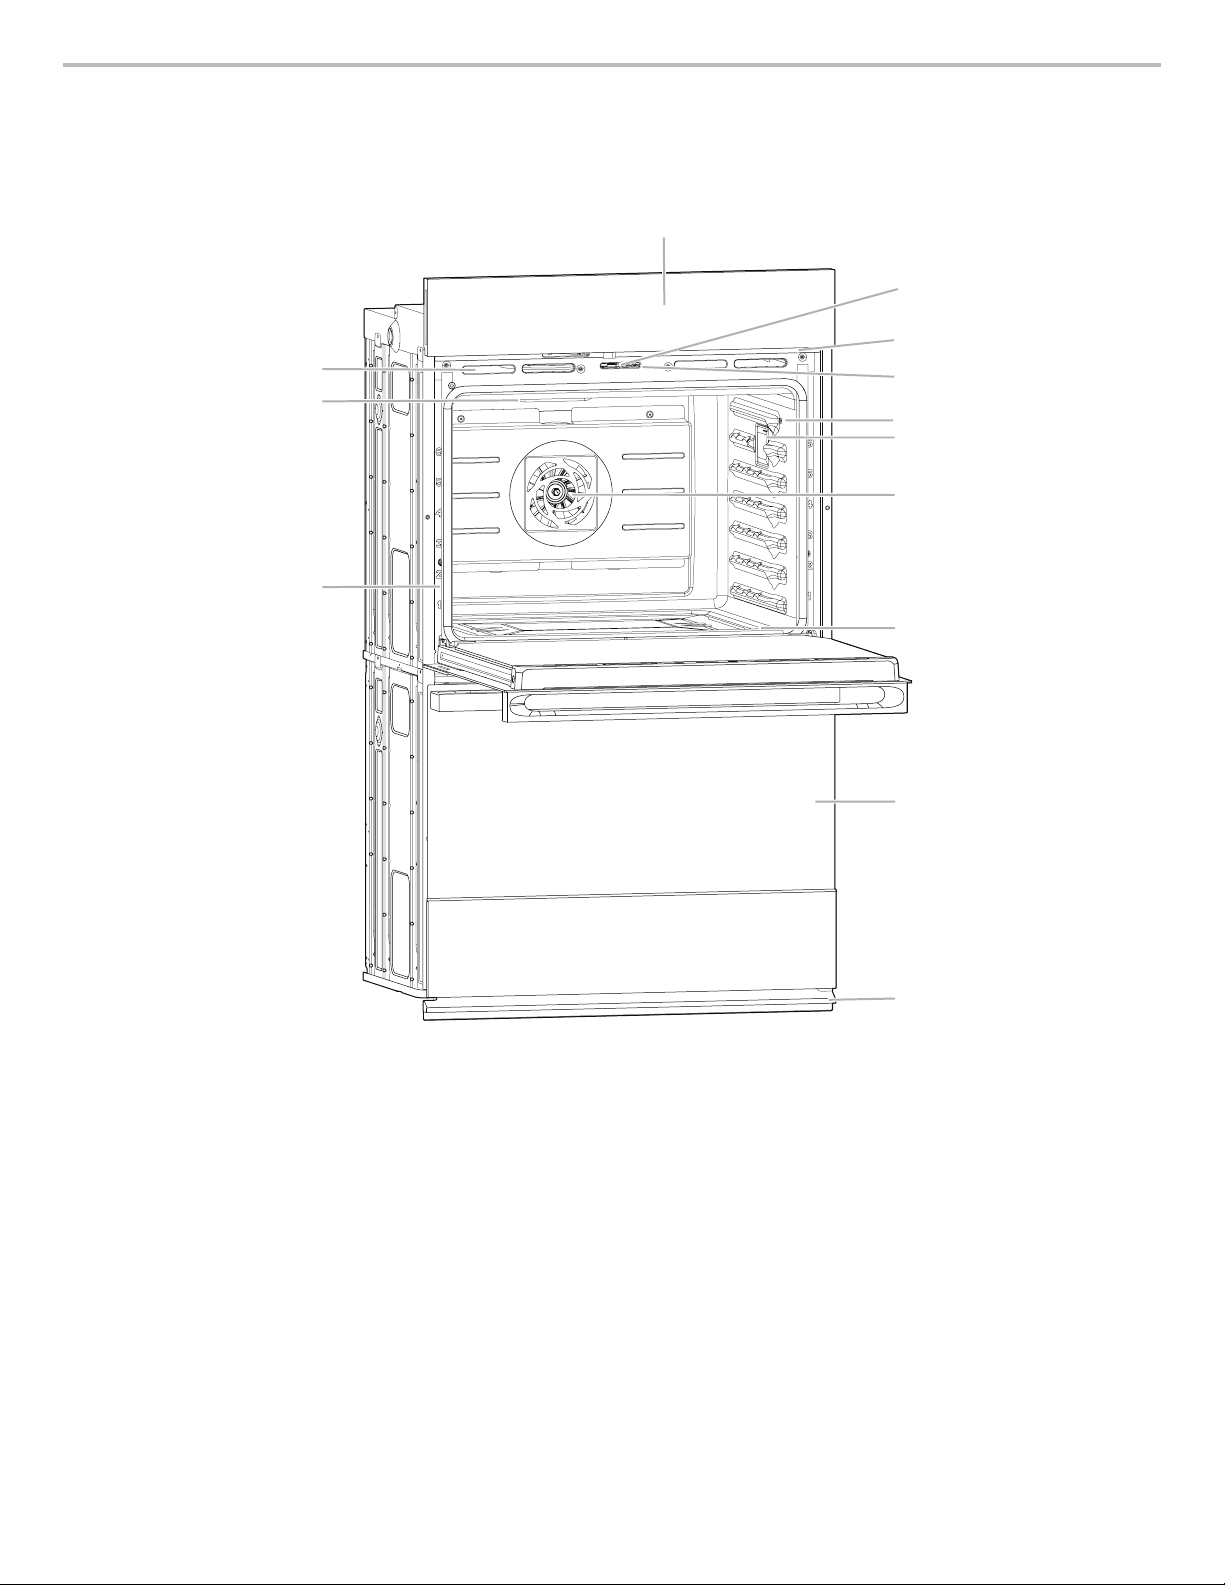
This manual covers several models. Your model may have some or all of the items listed. Refer to this manual or the Frequently Asked
Questions (FAQs) section of our website at www.jennair.com for more detailed instructions. In Canada, refer to the Customer Service
Section at www.jennair.ca.
M
L
K
J
I
H
G
F
E
A. Electronic oven control
B. Oven vent
C. Broil elements
D. Gasket
E. Bottom vent
F. Lower oven (on double oven models)
G. Hidden bake element
H. Convection element and fan
I. Oven lights (left side, not shown)
J. Temperature probe jack
K. Oven door lock latch
L. Model and serial number plate
(on right-hand side underneath
the control panel)
M. Oven light switch
Parts and Features not shown
Temperature probe
Racks
4
FEATURE GUIDE
A
G
H
FEDCB
H
I
GFEDC
AB
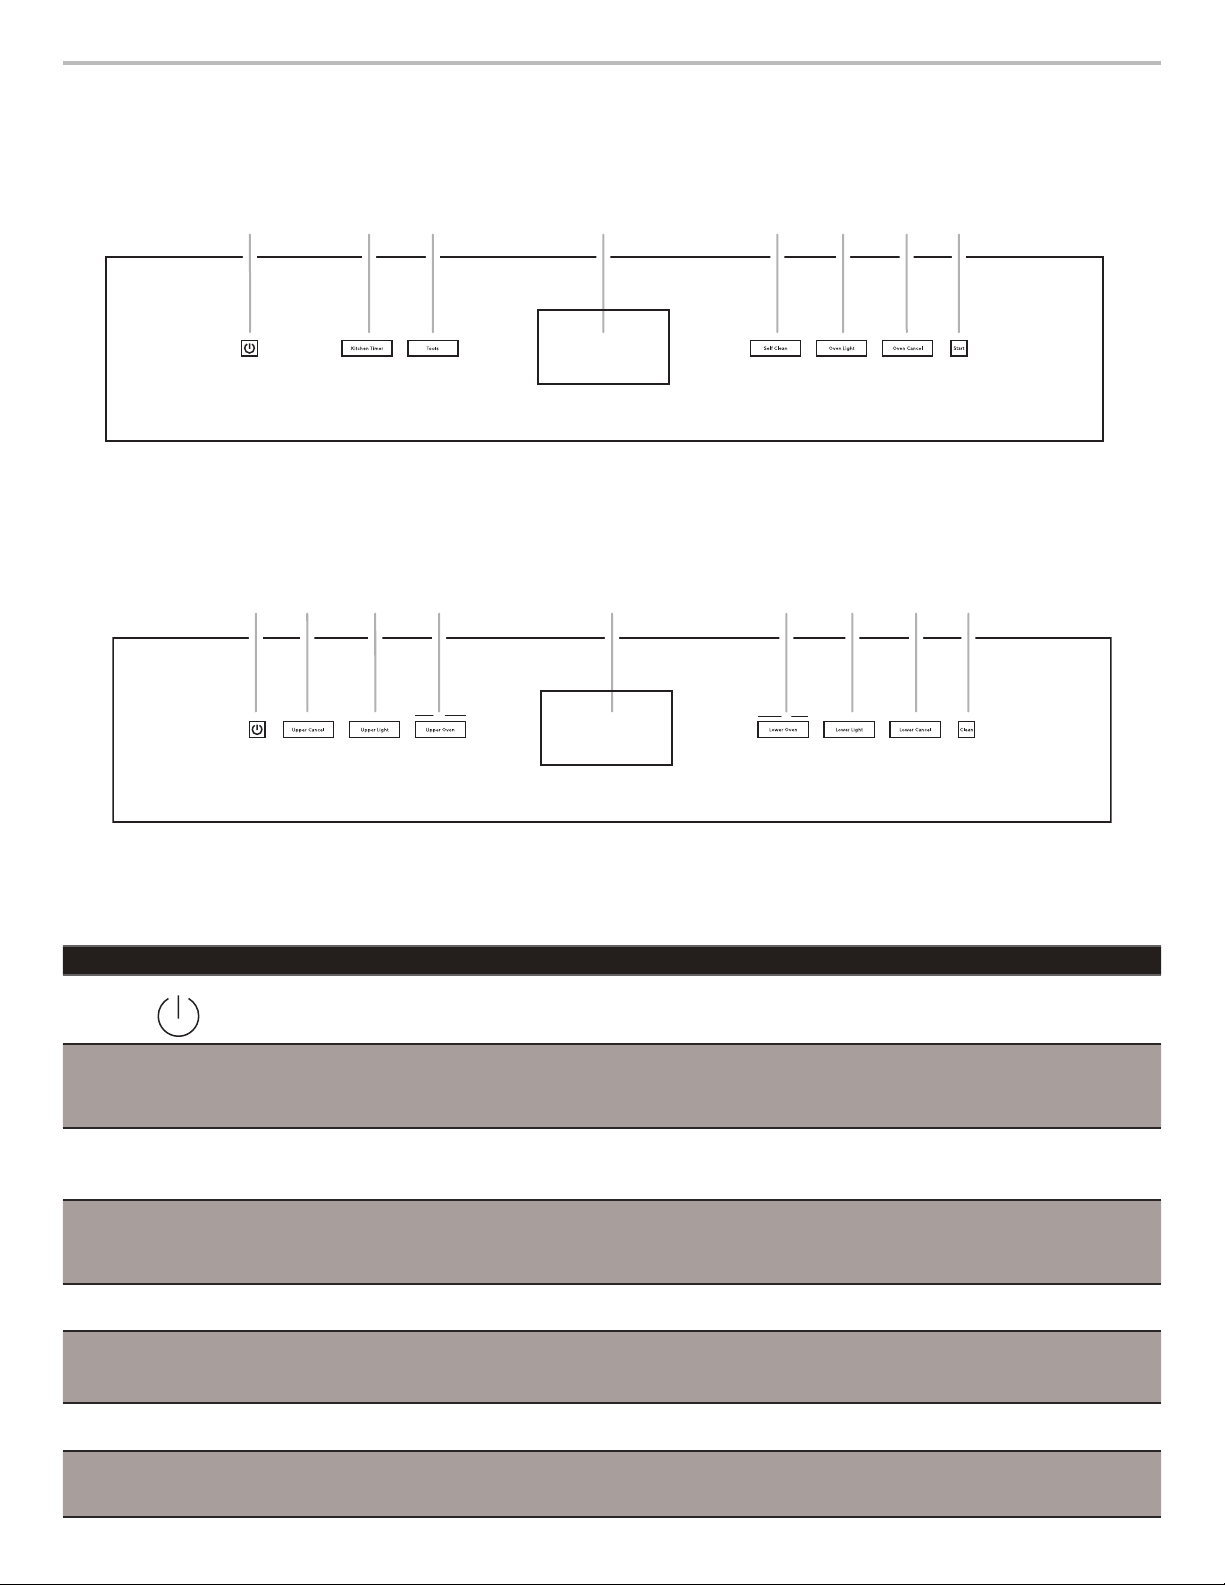
This manual covers several models. Your model may have some or all of the items listed. Refer to this manual or the Frequently Asked
Questions (FAQs) section of our website at www.jennair.com for more detailed instructions. In Canada, refer to the Customer Service
Section at www.jennair.ca.
Single Oven:
A. Power
B. Kitchen timer
C. Tools
D. Display
E. Self clean
F. Oven light
G. Oven cancel
H. Start
Double Oven:
A. Power
B. Upper cancel
C. Upper light
D. Upper oven
E. Display
F. Lower oven
G. Lower light
H. Lower cancel
I. Clean
KEYPAD FEATURE INSTRUCTIONS
POWER Power Touch the Power keypad to turn the oven display on and off.
OVEN LIGHT
UPPER LIGHT
LOWER LIGHT
KITCHEN TIMER
(on some models)
OVEN CANCEL
UPPER CANCEL
LOWER CANCEL
(on some models)
START
(on some models)
CLEAN
SELF CLEAN
(on some models)
TOOLS
(on some models)
UPPER OVEN
LOWER OVEN
(on some models)
Oven cavity light The desired oven light is controlled by a touch keypad on the oven control panel. While
the oven door is closed, touch the desired Oven Light keypad to turn the oven lights on
and off. When the oven door is opened, the oven lights will automatically come on for
the corresponding oven.
Timer The Kitchen Timer can be set in hours, minutes, or seconds up to 23 hours, 59
minutes, and 59 seconds.
The Kitchen Timer does not start or stop the oven(s).
Oven function The Lower Cancel, Upper Cancel, and Cancel keypads stop their respective oven
functions except for the Clock, Kitchen Timer, and Button Lock. The oven cooling fan(s)
may continue to operate even after an oven function has been canceled or completed,
depending on the oven temperature.
Mode Start The Start keypad begins some oven functions. If Start is not touched within 2 minutes
after touching a keypad, the function is canceled, and the time of day is displayed.
Self-Cleaning cycle See the “Self-Clean Cycle” section.
Oven use function The Tools keypad enables you to personalize the oven operation to suit your needs.
See the “Tools” section.
Oven selection The Upper and Lower Oven keypads enable you to select which oven you want to use.
5
Touch Panel
AB
The touch panel houses the control menu and function controls.
The touch pads are very sensitive and require only a light touch to
activate.
For more information about the individual controls, see their
respective sections in this manual.
Welcome Guide
This appears on your display the rst time the oven is powered
up. The Welcome Guide allows you to set up your new oven.
After every selection, a tone will sound.
1. Select your language.
2. Select the clock by scrolling to the correct time in the hours
and minutes column. You can then select AM/PM or 24-hour
clock (military time).
3. Choose to have daylight savings time AUTO SYNC (turn on),
or DO NOT ADJUST (turn off).
4. Enter current date (MM/DD/YYYY) by scrolling to the column
to set the MONTH, DAY, and YEAR. Touch SAVE.
5. Select the units of temperature. You can choose Fahrenheit
or Celsius. Touch SAVE.
6. Select the Clock Theme by scrolling to the desired setting.
Touch SAVE.
NOTE: This is the background for the center touch display.
Display
The display is for both the menu and oven function controls. The
touchscreen allows you to scroll through the oven menus. The
display is very sensitive and requires only a light touch to activate
and control.
When an oven is in use, the display will show the clock, mode,
oven temperature, kitchen timer, and oven timer, if set. If the oven
timer is not set, you can set it from this screen.
After approximately 2 minutes of inactivity, the display will go
into sleep mode and the display will dim. When the oven is in
operation, the display will remain bright.
During use, the display will show menus and the appropriate
selections for the options being chosen.
Display Navigation
If the oven is off, touch the Power keypad to activate the menu.
From the home screen, all automatic cooking programs can
be activated, all manual cooking programs can be set, options
can be adjusted, and instructions, preparation, and tips can be
accessed.
Menu Demonstrations
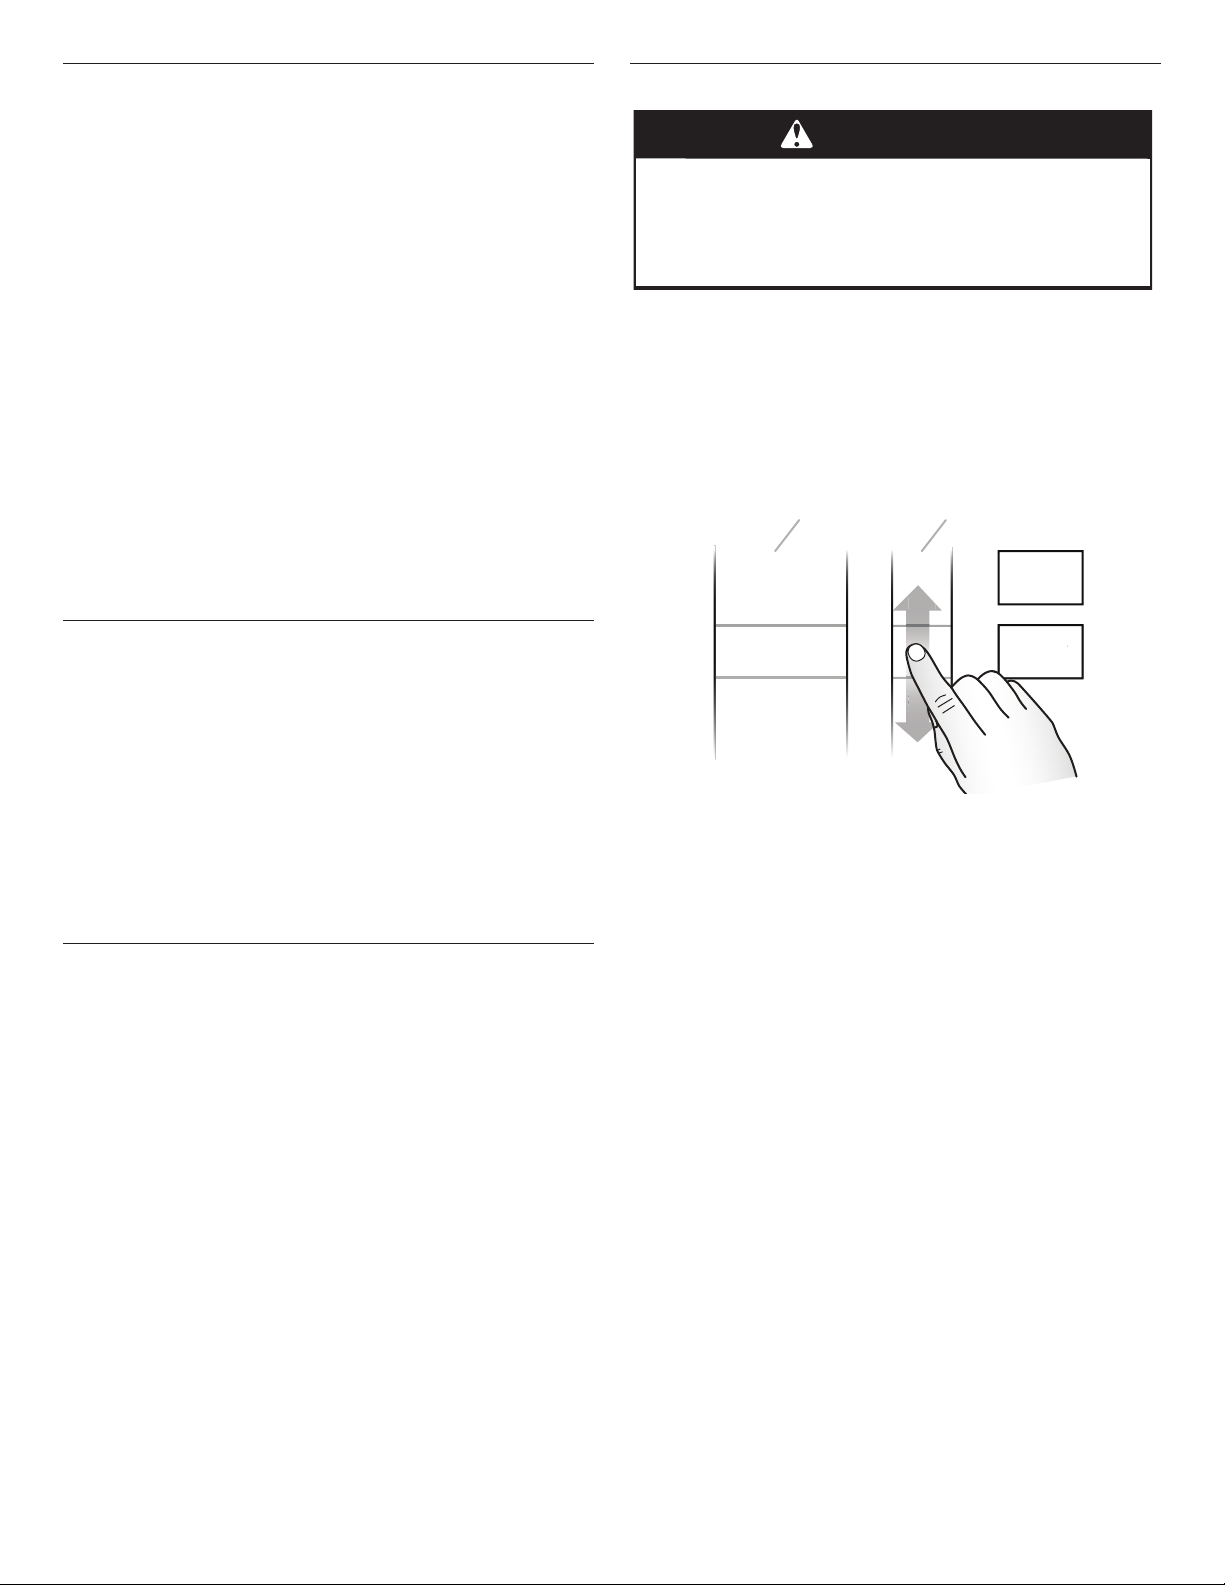
WARNING
Food Poisoning Hazard
Do not let food sit in oven more than one hour before
or after cooking.
Doing so can result in food poisoning or sickness.
In double oven models, touch the corresponding oven keypad to
show the cooking modes and temperatures for the desired oven.
NOTE: A line will appear above the corresponding oven.
In single oven models, the display will show cooking modes and
temperatures when the oven is turned on.
Bake Demonstration
CCoCoCoCoCoCoCoCoCoCoCo
nvnvnvnvnvnvnvnvnvnvPPecececececececececececConvect Bake
ttttttttttt BBaBaBaBaBaBaBaBaBaBatakkekekekekekekekekekee
RR
idid
hh
RapRapRapRapRapRapRapRappppRapid Pridididididididid PrPrPrPrPrPrPrPreeeeeeeeeheatheaheaheaheaheaheaheaheatttttttt
CCoConvnverertttConvert Recipe RReReciciipepe
For CoFor Convectionnvection
NNoNoNoNoNoNoNo PrPPPPPPPkkrererererereCChheheheheheheeheat
11
11111--rrrrackackackack CoCoCoCorack Cookingokiokiokiokingngngngg
BBrBrBrBrBrBrBroioioioioioioililllllll
1. Conrm the Bake mode is selected.
2. In the temperature column, scroll to the desired temperature.
The temperature must be between 170°F and 550°F (77°C
and 288°C)
3. Touch START to begin preheating.
atatatatatatt
kiki
A. Modes column
B. Temperature column
40404040404040404040400400000000000000
373737373755
375
3535353535000000BaBakeke
32323232323255555555555
30303030303030303000000000
DDDeDeDeDeDeDeDeDeDelay
lllalalalalalalalayyyyyyyyyyy
˚˚FF
STSTSTARARARTTT
START
6
 Loading...