

JennAir JMW2430IL, JJW2827IL, JMW2427IM Use & Care Guide

27" (68.6 CM) AND 30" (76.2 CM)
BUILT-IN ELECTRIC SINGLE AND DOUBLE OVENS
27 PO (68.6 CM) ET 30 PO (76,2 CM)
FOURS ÉLECTRIQUES SIMPLES ET DOUBLES,
ENCASTRÉS
Use & Care Guide
For questions about features, operation/performance, parts, accessories, or service in the U.S.A., call:
1-800-JENNAIR (1-800-536-6247) or visit our website at www.jennair.com.
In Canada, call: 1-800-JENNAIR (1-800-536-6247) or visit our website at www.jennair.ca.
Guide d’utilisation et d’entretien
Pour des questions à propos des caractéristiques, du fonctionnement/rendement, des pièces, accessoires ou dépannage, composer le:
Au Canada, composer le: 1800JENNAIR (1800536-6247) ou visiter notre site Web au www.jennair.ca.
W11235342A
1800JENNAIR (1800536-6247) ou visiter notre site Web au www.jennair.com.

TABLE OF CONTENTS TABLE DES MATIÈRES
BUILT-IN OVEN SAFETY ............................................................... 3
PARTS AND FEATURES ................................................................4
FEATURE GUIDE ............................................................................5
Touch Panel ..................................................................................6
Display ..........................................................................................6
Display Navigation .......................................................................6
Menu Demonstrations ..................................................................6
Kitchen Timer ...............................................................................8
Tones/Sounds ..............................................................................8
Tools .............................................................................................8
Button Lock ..................................................................................9
Oven Temperature Control ...........................................................9
Sabbath Mode..............................................................................9
OVEN USE .....................................................................................10
Aluminum Foil .............................................................................10
Position Racks and Bakeware ...................................................11
Roll-Out Extension Rack ............................................................11
Bakeware ....................................................................................12
Oven Vents .................................................................................13
Preheating and Oven Temperature ............................................13
Baking and Roasting ..................................................................13
Broiling........................................................................................13
Convection .................................................................................14
Convection Bake ........................................................................14
Convection Roast .......................................................................14
Convection Broil .........................................................................14
Proong Bread ...........................................................................14
Temperature Probe .....................................................................15
Timed Cooking ...........................................................................15
OVEN CARE ..................................................................................16
Self-Cleaning Cycle ....................................................................16
General Cleaning ........................................................................16
Oven Lights ................................................................................17
Oven Door ..................................................................................17
TROUBLESHOOTING ..................................................................18
ASSISTANCE OR SERVICE .........................................................19
In the U.S.A. ...............................................................................19
In Canada ...................................................................................19
Accessories ................................................................................19
SÉCURITÉ DU FOUR ENCASTRÉ .............................................20
PIÈCES ET CARACTÉRISTIQUES ..............................................21
GUIDE DES CARACTÉRISTIQUES .............................................22
Panneau tactile ...........................................................................23
Afchage ....................................................................................23
Afchage du menu .....................................................................23
Démonstration de menu ............................................................23
Minuterie de cuisine ...................................................................25
Tons/Sons ...................................................................................25
Outils ..........................................................................................25
Verrouillage des commandes .....................................................26
Commande de la température du four ......................................26
Mode Sabbat ..............................................................................27
UTILISATION AU FOUR ............................................................... 28
Papier d’aluminium ....................................................................28
Position des grilles et des ustensiles
de cuisson au four ......................................................................28
Grille coulissante déployante .....................................................29
Ustensiles de cuisson ................................................................29
Évents du four ............................................................................30
Préchauffage et température du four .........................................30
Cuisson au four et rôtissage ......................................................30
Cuisson au gril ............................................................................30
Convection .................................................................................30
Cuisson au four par convection .................................................31
Rôtissage par convection ..........................................................31
Cuisson au gril par convection ..................................................31
Levée du pain .............................................................................31
Sonde thermométrique ..............................................................32
Cuisson minutée ........................................................................32
ENTRETIEN DU FOUR .................................................................33
Programme d’autonettoyage .....................................................33
Nettoyage général ......................................................................33
Lampes du four ..........................................................................34
Porte du four ..............................................................................34
DÉPANNAGE .................................................................................35
ASSISTANCE OU SERVICE .........................................................37
Au Canada ..................................................................................37
Accessoires ................................................................................37
2
BUILT-IN OVEN SAFETY
Your safety and the safety of others are very important.
We have provided many important safety messages in this manual and on your appliance. Always read and obey all safety
messages.
This is the safety alert symbol.
This symbol alerts you to potential hazards that can kill or hurt you and others.
All safety messages will follow the safety alert symbol and either the word “DANGER” or “WARNING.”
These words mean:
You can be killed or seriously injured if you don't immediately
DANGER
WARNING
All safety messages will tell you what the potential hazard is, tell you how to reduce the chance of injury, and tell you what can
happen if the instructions are not followed.
IMPORTANT SAFETY INSTRUCTIONS
follow instructions.
You
can be killed or seriously injured if you don't
instructions.
follow
WARNING: To reduce the risk of fire, electrical shock,
injury to persons, or damage when using the oven, follow
basic precautions, including the following:
Proper Installation – Be sure the oven is properly installed
■
and grounded by a qualified technician.
■ Never Use the Oven for Warming or Heating the Room.
■ Do Not Leave Children Alone – Children should not be left
alone or unattended in area where oven is in use. They
should never be allowed to sit or stand on any part of the
oven.
■ Wear Proper Apparel – Loose-fitting or hanging garments
should never be worn while using the oven.
■ User Servicing – Do not repair or replace any part of the
oven unless specifically recommended in the manual. All
other servicing should be referred to a qualified technician.
■ Storage in Oven – Flammable materials should not be
stored in an oven.
■ Do Not Use Water on Grease Fires – Smother fire or flame
or use dry chemical or foam-type extinguisher.
■ Use Only Dry Potholders – Moist or damp potholders on
hot surfaces may result in burns from steam. Do not let
potholder touch hot heating elements. Do not use a towel
or other bulky cloth.
■ Use Care When Opening Door – Let hot air or steam
escape before removing or replacing food.
■ Do Not Heat Unopened Food Containers – Build-up of
pressure may cause container to burst and result in injury.
■ Keep Oven Vent Ducts Unobstructed.
■ Placement of Oven Racks – Always place oven racks in
desired location while oven is cool. If rack must be moved
while oven is hot, do not let potholder contact hot heating
element in oven.
■ DO NOT TOUCH HEATING ELEMENTS OR INTERIOR
SURFACES OF OVEN – Heating elements may be hot
even though they are dark in color. Interior surfaces of an
oven become hot enough to cause burns. During and after
use, do not touch, or let clothing or other flammable
materials contact heating elements or interior surfaces of
oven until they have had sufficient time to cool. Other
surfaces of the oven may become hot enough to cause
burns – among these surfaces are oven vent openings and
surfaces near these openings,
oven doors.
For self-cleaning ovens:
■ Do Not Clean Gasket – The gasket is essential for a good
seal. Care should be taken not to rub, damage, or move
the gasket.
■ Do Not Use Oven Cleaners – No commercial oven cleaner
or oven liner protective coating of any kind should be used
in or around any part of the oven.
■ Clean Only Parts Listed in Manual.
■ Before Self-Cleaning the Oven – Remove broiler pan and
other utensils.
For smart enabled ovens:
■ Remote Operation – This appliance is configurable to allow
remote operation at any time. Do not store any flammable
materials or temperature sensitive items inside of the
appliance.
oven doors, and windows of
SAVE THESE INSTRUCTIONS
3
PARTS AND FEATURES
B
D
C
A
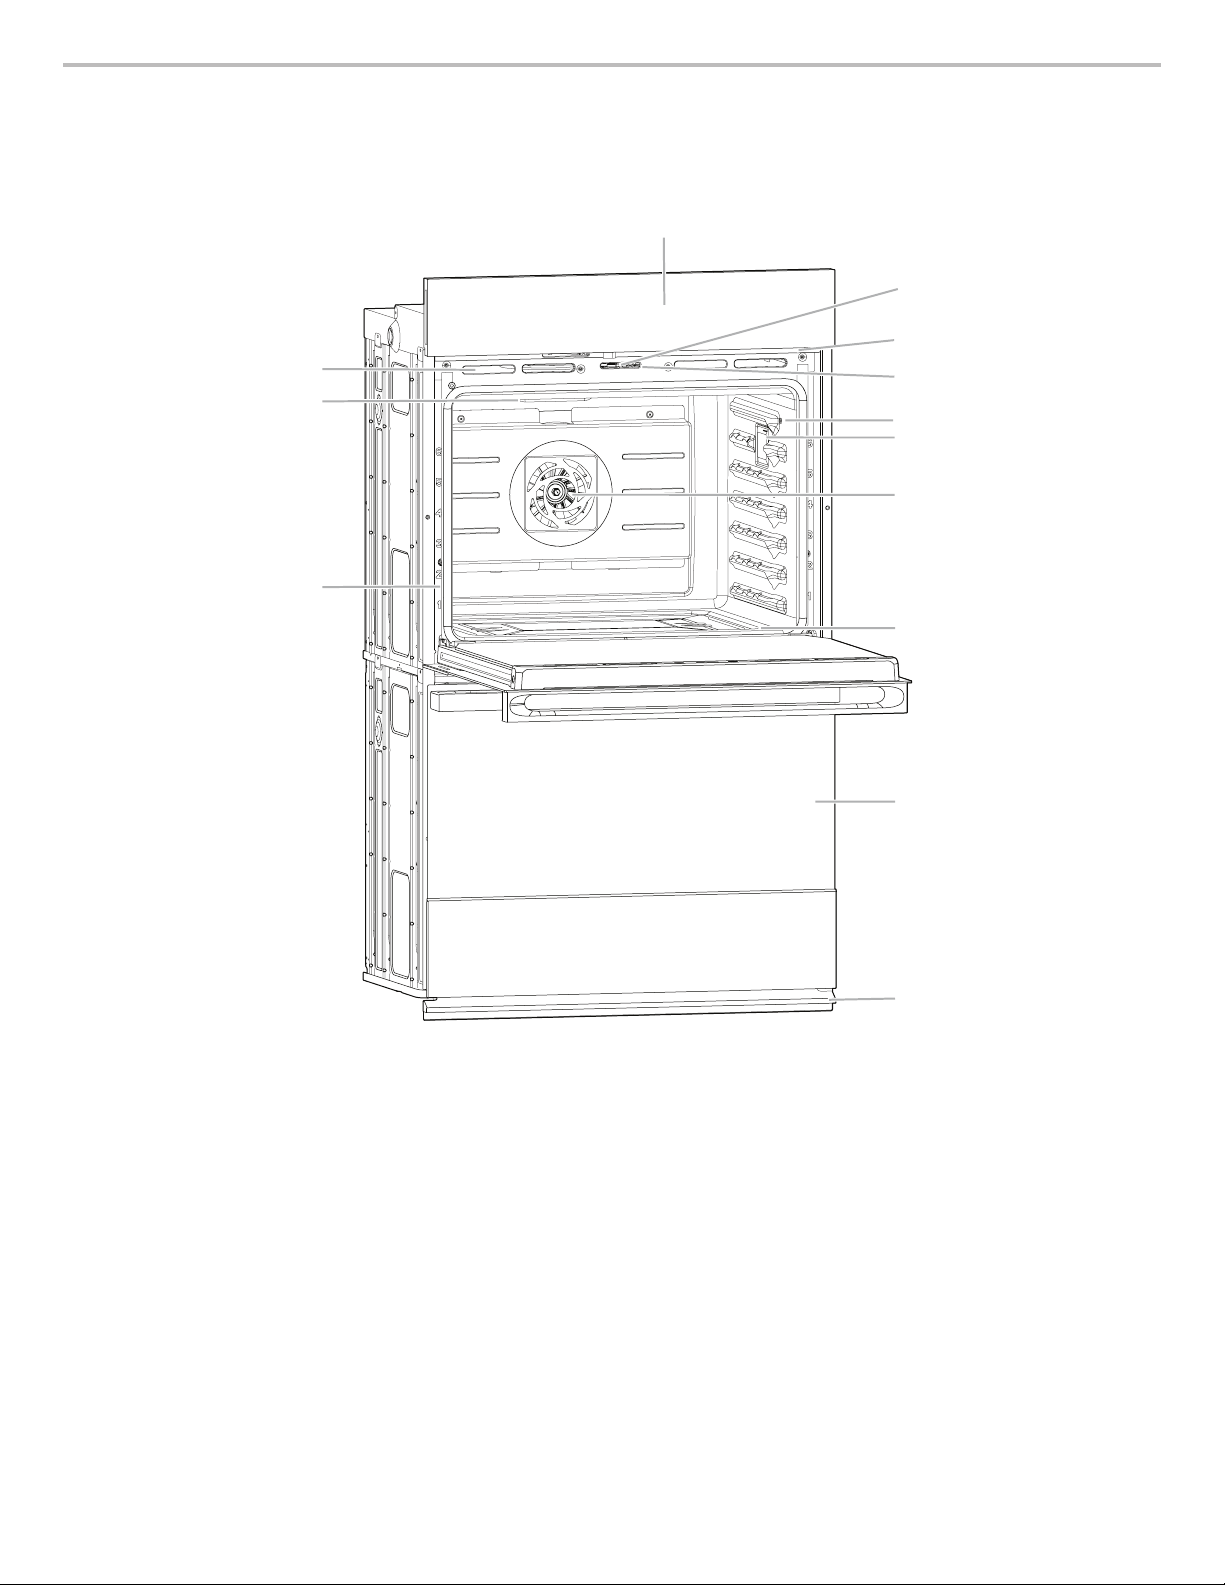
This manual covers several models. Your model may have some or all of the items listed. Refer to this manual or the Frequently Asked
Questions (FAQs) section of our website at www.jennair.com for more detailed instructions. In Canada, refer to the Customer Service
Section at www.jennair.ca.
M
L
K
J
I
H
G
F
E
A. Electronic oven control
B. Oven vent
C. Broil elements
D. Gasket
E. Bottom vent
F. Lower oven (on double oven models)
G. Hidden bake element
H. Convection element and fan
I. Oven lights (left side, not shown)
J. Temperature probe jack
K. Oven door lock latch
L. Model and serial number plate
(on right-hand side underneath
the control panel)
M. Oven light switch
Parts and Features not shown
Temperature probe
Racks
4
FEATURE GUIDE
A
G
H
FEDCB
H
I
GFEDC
AB
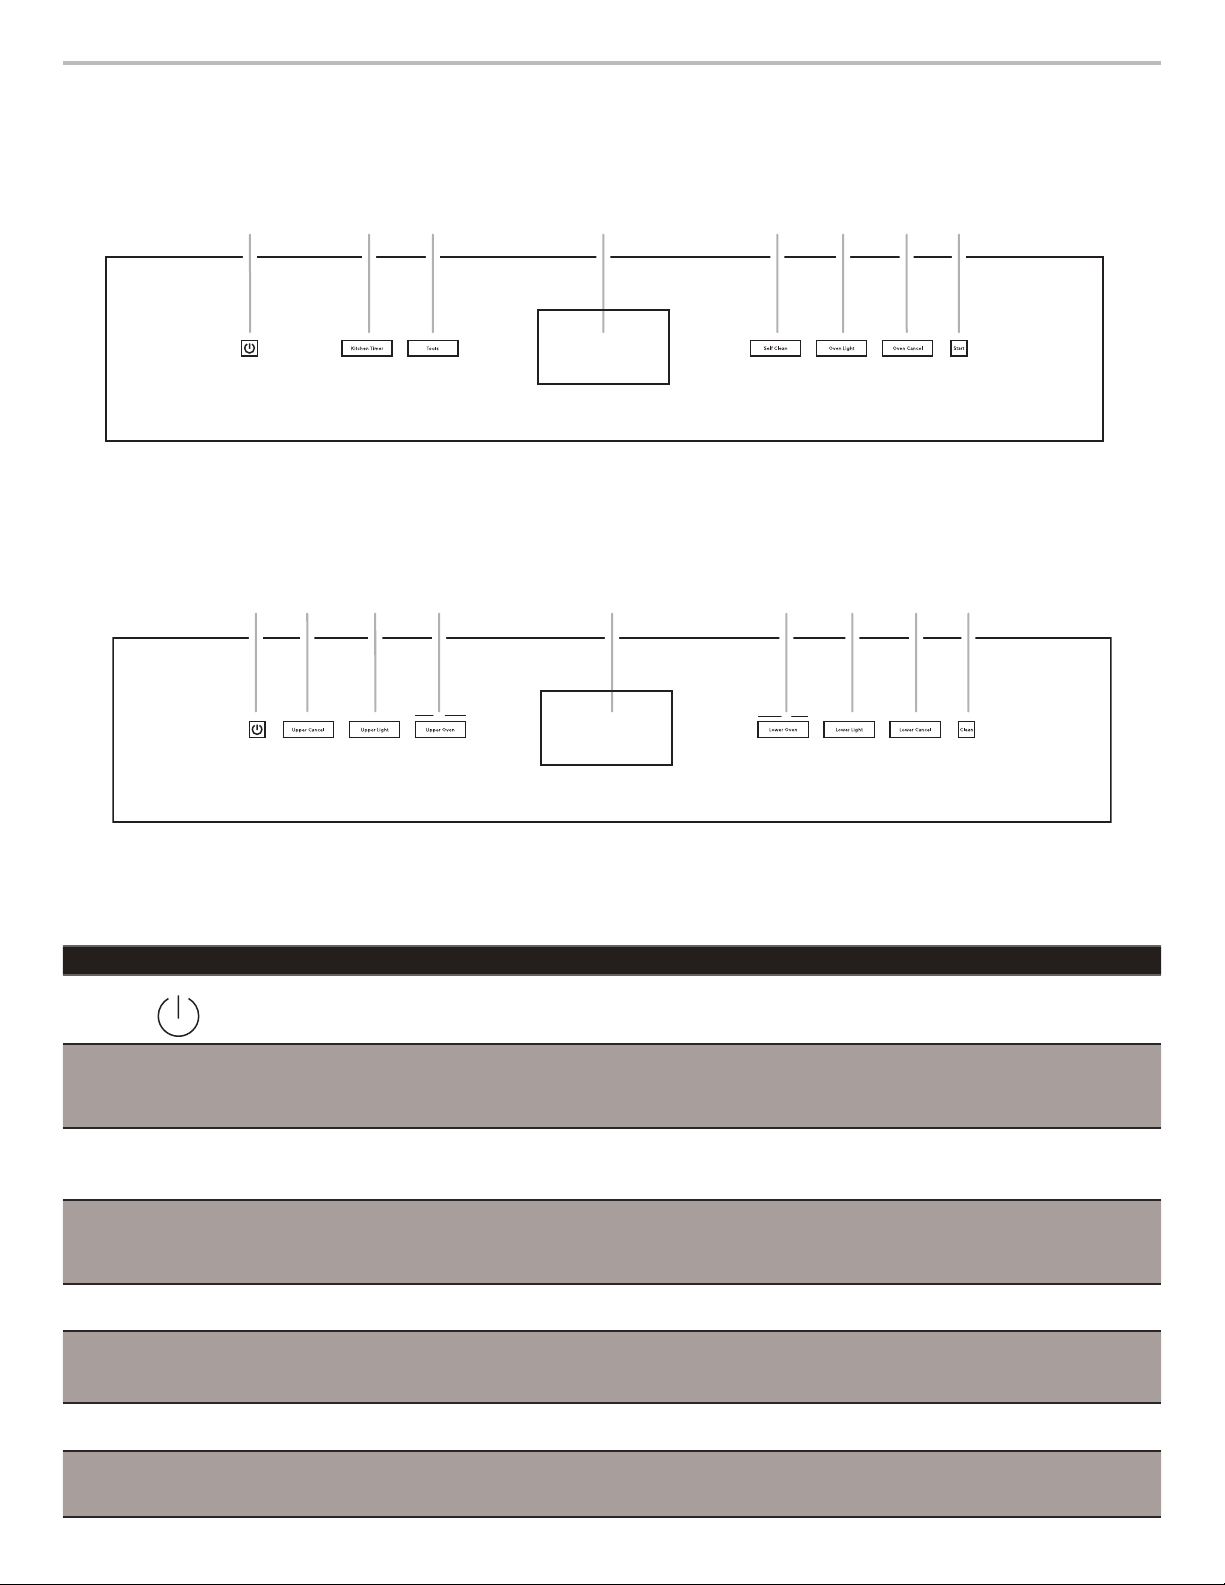
This manual covers several models. Your model may have some or all of the items listed. Refer to this manual or the Frequently Asked
Questions (FAQs) section of our website at www.jennair.com for more detailed instructions. In Canada, refer to the Customer Service
Section at www.jennair.ca.
Single Oven:
A. Power
B. Kitchen timer
C. Tools
D. Display
E. Self clean
F. Oven light
G. Oven cancel
H. Start
Double Oven:
A. Power
B. Upper cancel
C. Upper light
D. Upper oven
E. Display
F. Lower oven
G. Lower light
H. Lower cancel
I. Clean
KEYPAD FEATURE INSTRUCTIONS
POWER Power Touch the Power keypad to turn the oven display on and off.
OVEN LIGHT
UPPER LIGHT
LOWER LIGHT
KITCHEN TIMER
(on some models)
OVEN CANCEL
UPPER CANCEL
LOWER CANCEL
(on some models)
START
(on some models)
CLEAN
SELF CLEAN
(on some models)
TOOLS
(on some models)
UPPER OVEN
LOWER OVEN
(on some models)
Oven cavity light The desired oven light is controlled by a touch keypad on the oven control panel. While
the oven door is closed, touch the desired Oven Light keypad to turn the oven lights on
and off. When the oven door is opened, the oven lights will automatically come on for
the corresponding oven.
Timer The Kitchen Timer can be set in hours, minutes, or seconds up to 23 hours, 59
minutes, and 59 seconds.
The Kitchen Timer does not start or stop the oven(s).
Oven function The Lower Cancel, Upper Cancel, and Cancel keypads stop their respective oven
functions except for the Clock, Kitchen Timer, and Button Lock. The oven cooling fan(s)
may continue to operate even after an oven function has been canceled or completed,
depending on the oven temperature.
Mode Start The Start keypad begins some oven functions. If Start is not touched within 2 minutes
after touching a keypad, the function is canceled, and the time of day is displayed.
Self-Cleaning cycle See the “Self-Clean Cycle” section.
Oven use function The Tools keypad enables you to personalize the oven operation to suit your needs.
See the “Tools” section.
Oven selection The Upper and Lower Oven keypads enable you to select which oven you want to use.
5
Touch Panel
AB
The touch panel houses the control menu and function controls.
The touch pads are very sensitive and require only a light touch to
activate.
For more information about the individual controls, see their
respective sections in this manual.
Welcome Guide
This appears on your display the rst time the oven is powered
up. The Welcome Guide allows you to set up your new oven.
After every selection, a tone will sound.
1. Select your language.
2. Select the clock by scrolling to the correct time in the hours
and minutes column. You can then select AM/PM or 24-hour
clock (military time).
3. Choose to have daylight savings time AUTO SYNC (turn on),
or DO NOT ADJUST (turn off).
4. Enter current date (MM/DD/YYYY) by scrolling to the column
to set the MONTH, DAY, and YEAR. Touch SAVE.
5. Select the units of temperature. You can choose Fahrenheit
or Celsius. Touch SAVE.
6. Select the Clock Theme by scrolling to the desired setting.
Touch SAVE.
NOTE: This is the background for the center touch display.
Display
The display is for both the menu and oven function controls. The
touchscreen allows you to scroll through the oven menus. The
display is very sensitive and requires only a light touch to activate
and control.
When an oven is in use, the display will show the clock, mode,
oven temperature, kitchen timer, and oven timer, if set. If the oven
timer is not set, you can set it from this screen.
After approximately 2 minutes of inactivity, the display will go
into sleep mode and the display will dim. When the oven is in
operation, the display will remain bright.
During use, the display will show menus and the appropriate
selections for the options being chosen.
Display Navigation
If the oven is off, touch the Power keypad to activate the menu.
From the home screen, all automatic cooking programs can
be activated, all manual cooking programs can be set, options
can be adjusted, and instructions, preparation, and tips can be
accessed.
Menu Demonstrations
WARNING
Food Poisoning Hazard
Do not let food sit in oven more than one hour before
or after cooking.
Doing so can result in food poisoning or sickness.
In double oven models, touch the corresponding oven keypad to
show the cooking modes and temperatures for the desired oven.
NOTE: A line will appear above the corresponding oven.
In single oven models, the display will show cooking modes and
temperatures when the oven is turned on.
Bake Demonstration
CCoCoCoCoCoCoCoCoCoCoCo
nvnvnvnvnvnvnvnvnvnvPPecececececececececececConvect Bake
ttttttttttt BBaBaBaBaBaBaBaBaBaBatakkekekekekekekekekekee
RR
idid
hh
RapRapRapRapRapRapRapRappppRapid Pridididididididid PrPrPrPrPrPrPrPreeeeeeeeeheatheaheaheaheaheaheaheaheatttttttt
CCoConvnverertttConvert Recipe RReReciciipepe
For CoFor Convectionnvection
NNoNoNoNoNoNoNo PrPPPPPPPkkrererererereCChheheheheheheeheat
11
11111--rrrrackackackack CoCoCoCorack Cookingokiokiokiokingngngngg
BBrBrBrBrBrBrBroioioioioioioililllllll
1. Conrm the Bake mode is selected.
2. In the temperature column, scroll to the desired temperature.
The temperature must be between 170°F and 550°F (77°C
and 288°C)
3. Touch START to begin preheating.
atatatatatatt
kiki
A. Modes column
B. Temperature column
40404040404040404040400400000000000000
373737373755
375
3535353535000000BaBakeke
32323232323255555555555
30303030303030303000000000
DDDeDeDeDeDeDeDeDeDelay
lllalalalalalalalayyyyyyyyyyy
˚˚FF
STSTSTARARARTTT
START
6
Drop-down Message Demonstration
C
o
n
ver
R
t
MODE
A
B
The next steps will convert your standard recipe for use with
convection cooking.
Roast
Convert Bake
t Bake
Rapid Preheat
Convert Recipe
For Convection
Bake
oas
Meats, Veggies
Bake
Cookies, Cakes
Broil
Steaks, Fries
NEXT
Tips
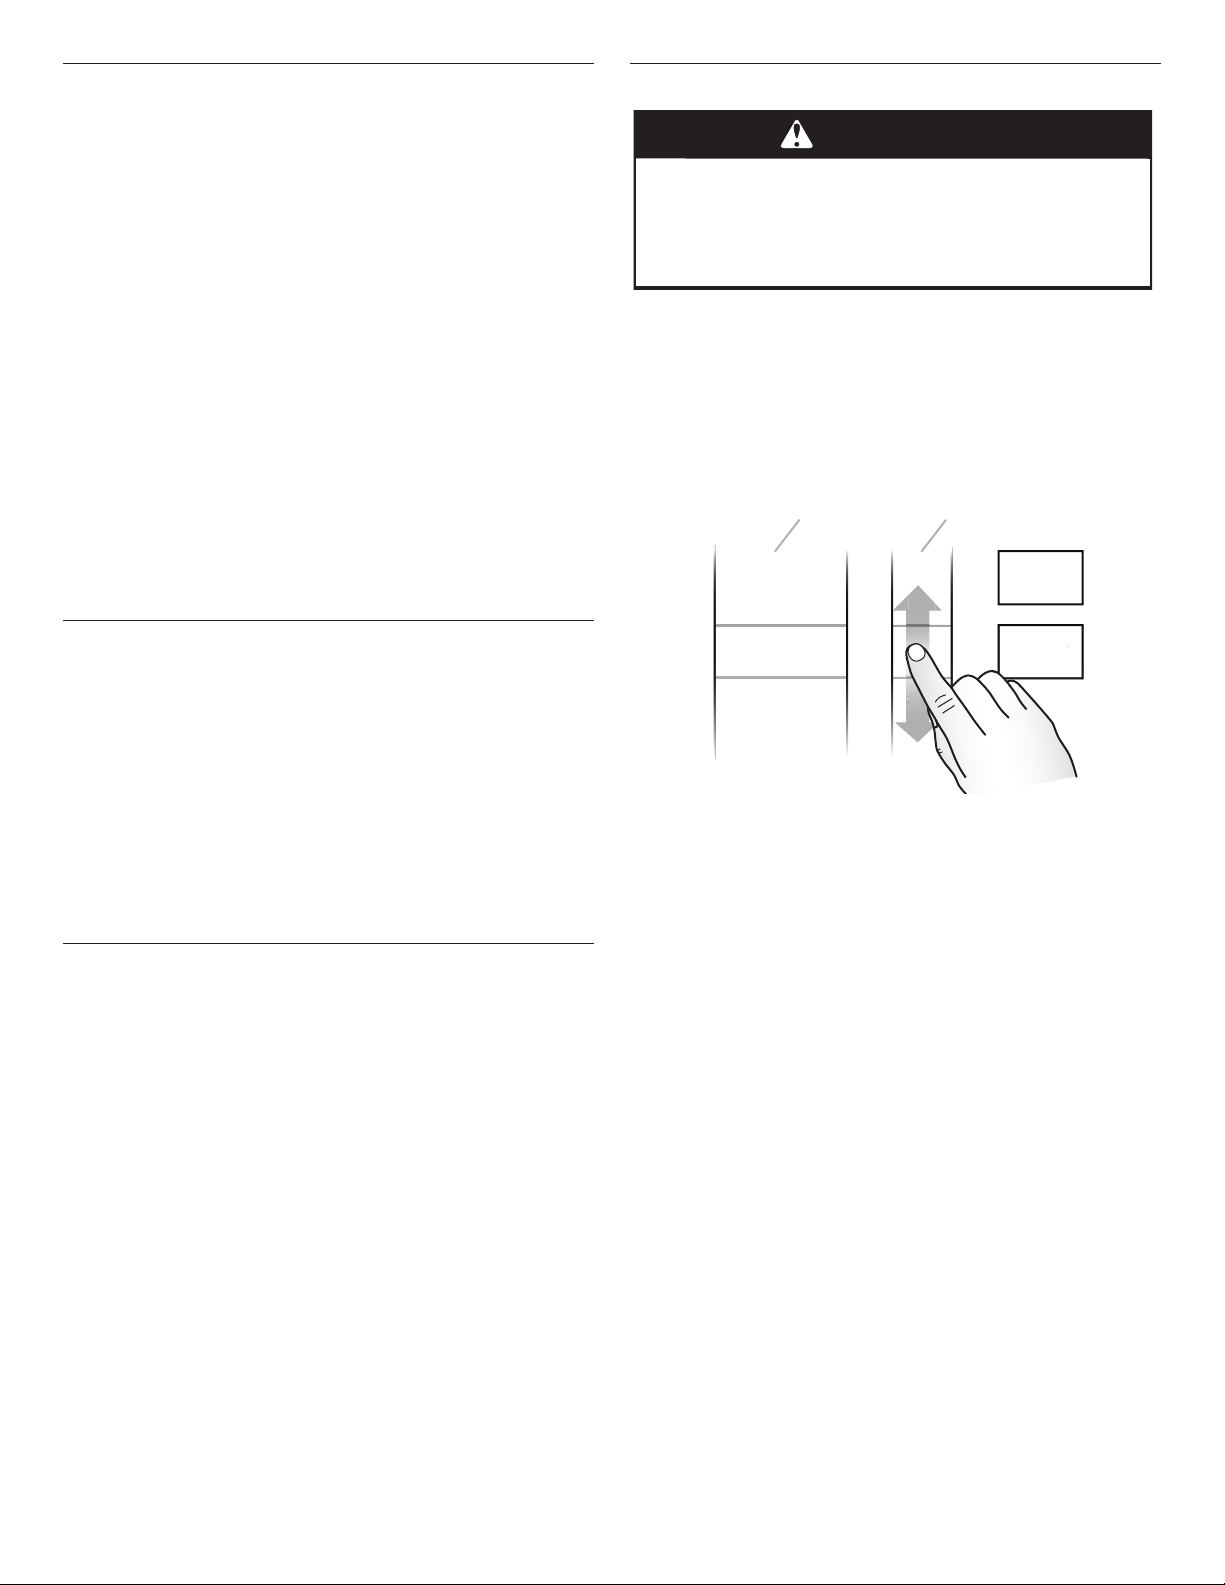
There are some menus that prompt a drop-down message to
appear. Once the message is read, you can dismiss the menu by
touching the directional arrow and swiping up.
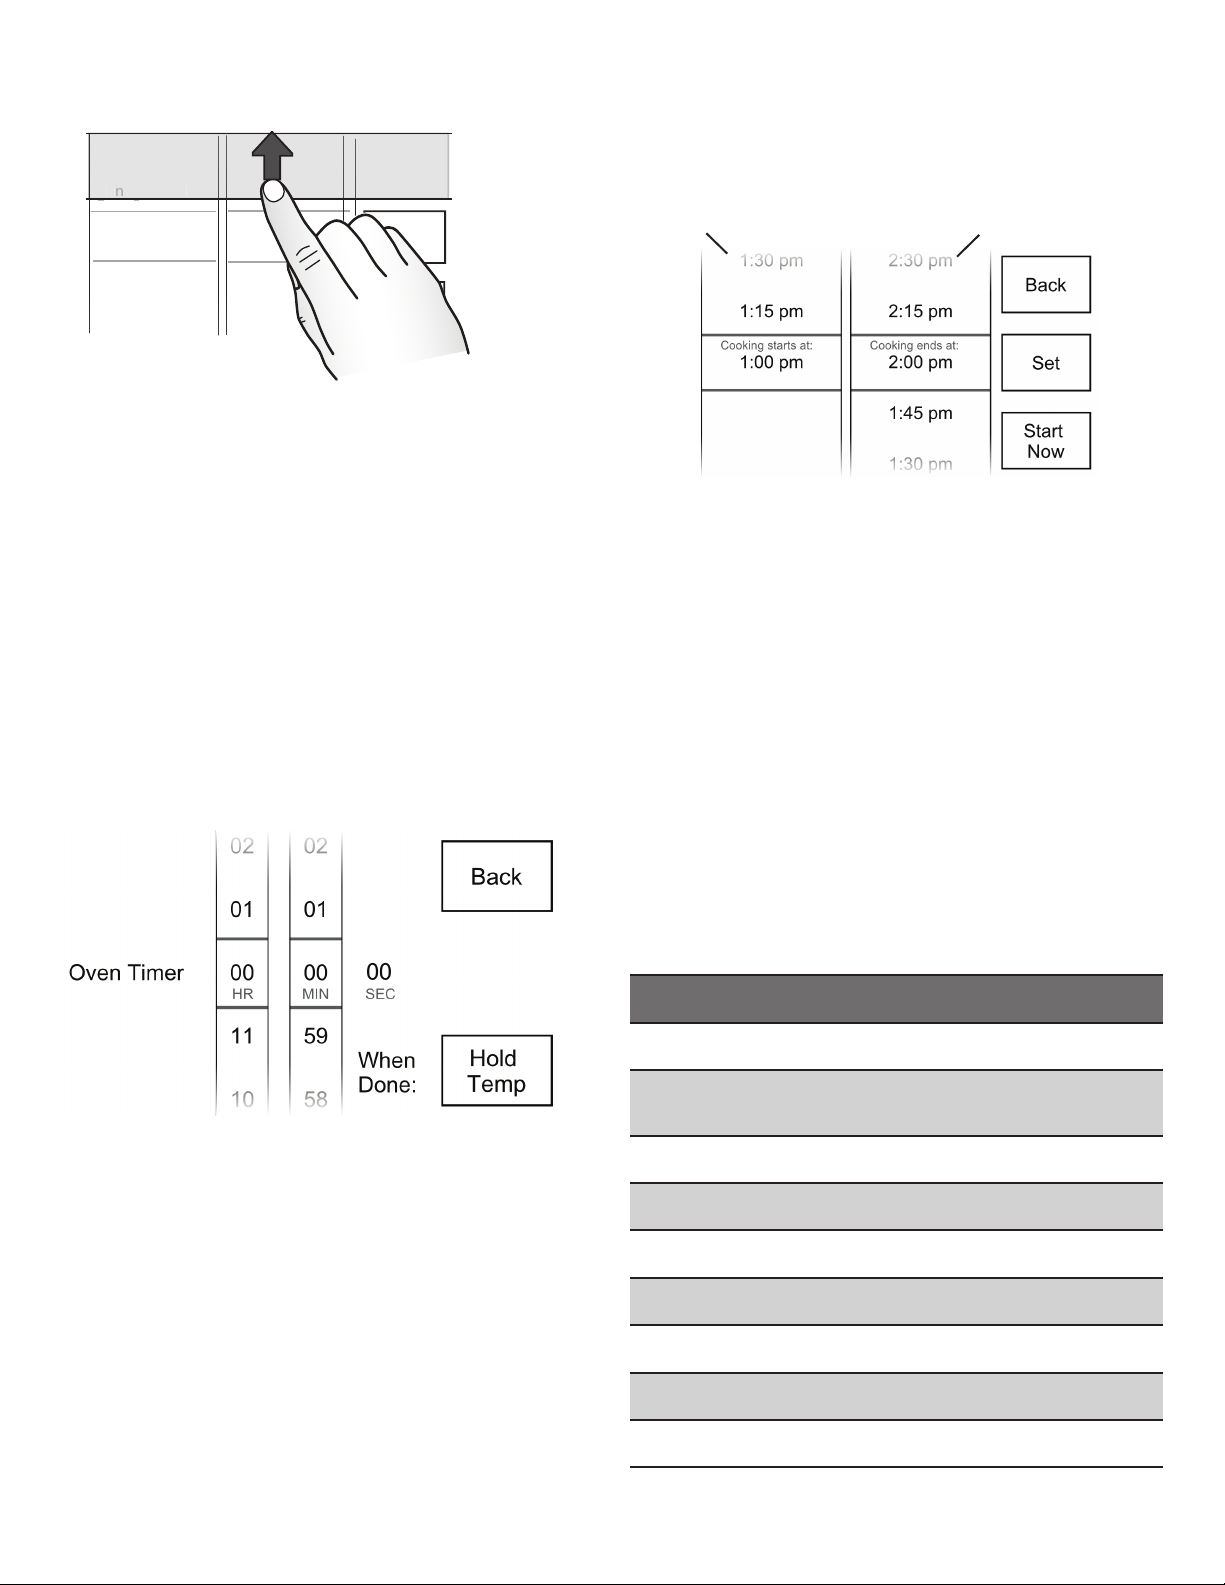
Cook Time Demonstration (Optional)
NOTE: In some cooking modes the user can set the cooking
time while other modes have xed times.
To set a cooking time, follow these instructions.
1. To set a cook time, touch OVEN TIMER once the cycle
begins. Use the time columns or number keypads to enter
the cooking length.
2. Touch START to begin the timer.
NOTE: The Oven Timer is only visible once a cooking cycle
has been activated.
OR
Select oven action when the timer expires. The default action
is Hold Temp.
To change the default oven end of cycle action, touch HOLD
TEMP, then select the desired oven action. Touch SET when
completed or touch Back to return to the oven timer screen.
Delay Start Demonstration (Optional)
1. To set a delayed start and end time, touch DELAY.
NOTE: The cooking start time always begins on the nearest
quarter hour (0:00, 0:15, 0:30 and 0:45). The cooking time
includes oven preheating time. Adjust the start and end times
accordingly.
A. Start time column
B. End time column
2. Touch or scroll to the desired cooking start time in the Start
Time column on the left-hand side. The oven cannot be
delayed more than 11 hours and 45 minutes.
3. Touch or scroll to the desired cooking end time in the End
Time column on the right-hand side. The cook time cannot
be longer than 12 hours.
4. Touch BACK to return to the Cooking Mode menu or Touch
SET when done. The oven will start preheating when the
Start Time is reached. Once the end time is reached, the
oven will go in to Keep Warm mode by default.
5. Touch START NOW to start the oven from the Delay screen.
NOTE: Do not use Delay Start for items that require a
preheated oven, such as cakes, cookies, and breads. If food
is in the oven during preheat, it may become overcooked.
6. To change a cooking mode or temperature while the oven is
preheating or in a Delay Start, touch the cooking mode key,
make the new selection, and then touch SET.
7. Touch OVEN CANCEL, UPPER CANCEL, or LOWER
CANCEL to turn off the desired oven.
Cooking Modes
The previous steps can be used for the following cooking modes:
MODE TEMP. RANGE
Convect Frozen Pizza 300°F–500°F
(149°C–260°C)
Convect Pastry 170°F–550°F
(77°C-288°C)
DEFAULT
TEMP.
375°F
(191°C)
325°F
(163°C)
Keep Warm™ setting will reduce the oven temperature to 170°F
(77°C) after the cook time ends. Hold Temp will keep the set oven
temperature after the cook time ends. Oven Off will turn the oven
off when the cook time ends.
Convect Slow Roast
12hrs
Convect Slow Roast
8hrs
Convect Slow Roast
4hrs
190°F–225°F
(88°C–107°C)
200°F–250°F
(93°C–121°C)
250°F–300°F
(121°C–149°C)
Convect Roast 170°F–550°F
(77°C–288°C)
Convect Broil 450°F–550°F
(232°C–288°C)
Convect Bake 170°F–550°F
(77°C–288°C)
Convect Bake – Rapid
Preheat
170°F–550°F
(77°C–288°C)
200°F
(93°C)
225°F
(107°C)
275°F
(135°C)
350°F
(177°C)
550°F
(288°C)
325°F
(163°C)
325°F
(163°C)
7

MODE TEMP. RANGE
Bake 170°F–550°F
(77°C–288°C)
Broil 450°F–550°F
(232°C–288°C)
Keep Warm 150°F–200°F
(66°C–93°C)
Rapid Proof 110°F
(43°C)
Proof 100°F
(38°C)
Convert Recipe
- -
DEFAULT
TEMP.
350°F
(177°C)
550°F
(288°C)
170°F
(77°C)
110°F
(43°C)
100°F
(38°C)
For Convection
Probe Cook - -
My Creations - -
Kitchen Timer
The Kitchen Timer can be set in hours, minutes, and seconds.
NOTE: The Kitchen Timer does not start or stop the oven.
Tones/Sounds
Tones are audible signals, indicating the following:
■ Valid keypad touch
■ Function has been entered
■ Preheat cycle has been completed
■ Invalid keypad touch
■ End of a cooking cycle
■ When timer reaches zero
■ Includes using the Kitchen Timer for functions other
than cooking.
■ First oven element activation in a cooking mode.
Tools
The Tools selection key allows you access to functions
and customization options within the Electronic Oven Control.
These tools allow you to set the clock, change the oven
temperature between Fahrenheit and Celsius, turn the audible
signals and prompts on and off, and adjust the oven calibration,
change the language, and more. The Sabbath Mode is also set
using the Tools selection key.
MODE AVAILABLE SELECTIONS
Sabbath ■ Sets Sabbath Mode
Demo Mode ■ On
■ Off (Default)
Temp Units ■ Celsius
■ Fahrenheit (Default)
Language ■ Français
■ English (Default)
Display On/Off ■ Display Off
■ Display Dimmed (Default)
Clock On/Off ■ Clock Off
■ Clock On (Default)
Brightness ■ Max
■ High
■ Med (Default)
■ Low
■ Dim
Sound ■ Key Press
■ Timer & Alert (Default)
■ Power On & Off
Clock Theme ■ Textures
■ Celebration
■ Culinary
■ Clock Only
■ Animation (Default)
■ Spring
■ Summer
■ Fall
■ Winter
Time & Date ■ Daylight Saving
■ Clock Style
■ Set Clock (Default)
■ Set Date
Self Clean ■ Starts the Self Clean Cycle
Button Lock ■ Press Lock to lock controls
Number Entry ■ Num. Pad
■ Scroll (Default)
Probe ■ Use for Probe Cooking Mode
Temp Calib. ■ +35°F to -35°F
■ +20°C to -20°C
Touch Calib. ■ Use to calibrate touch screen
Service Info. ■ Model Number and Serial Number
Legal Info. ■ License Information
Restore Defaults ■ Restores Factory Defaults
8

Button Lock
The Button Lock shuts down the control panel keypads
to avoid unintended use of the oven(s). The Button Lock will
remain set after a power failure if it was set before the power
failure occurs. When the control is locked, only the Power keypad
will function.
The Button Lock is preset unlocked but can be locked.
To Activate the Button Lock:
1. From the Tools menu, touch BUTTON LOCK.
2. Touch LOCK to activate the Button Lock mode.
NOTE: The touch screen will return to idle mode and a control
locked message will be displayed.
To Deactivate the Button Lock:
1. Touch the Power keypad, and then follow the on-screen
directions.
NOTE: The oven will generate a random sequence of shapes that
must be touched in the order prompted on the screen.
Oven Temperature Control
IMPORTANT: Do not use a thermometer to measure the oven
temperature. Elements will cycle on and off as needed to maintain
a consistent temperature but may run slightly hot or cool at any
point in time due to this cycling. Opening the oven door will affect
cycling of the elements and impact the temperature.
The oven provides accurate temperatures and has been
thoroughly tested at the factory. However, it may cook faster
or slower than your previous oven, causing baking or browning
differences. If necessary, the temperature calibration can be
adjusted in either Fahrenheit or Celsius.
On double ovens, the upper oven and the lower oven can each be
calibrated independently.
A minus sign means the oven will be cooler by the displayed
amount. The absence of a minus sign means the oven will be
warmer by the displayed amount. Use the following chart as
a guide.
NOTE: The oven display will continue to show the original
set temperature and will not reect the calibration offset.
For example, if set to 350° (177°C) and calibrated to -20,
the display will continue to show 350° (177°C).
ADJUSTMENT °F
(AUTOMATIC °C CHANGE) COOKS FOOD
10°F (6°C) ...a little more
20°F (12°C) ...moderately more
30°F (18°C) ...much more
0°F (0°C) default setting
-10°F (-6°C) ...a little less
-20°F (-12°C) ...moderately less
-30°F (-18°C) ...much less
Sabbath Mode
The Sabbath Mode sets the oven(s) to remain on in a bake setting
until turned off. A timed Sabbath Mode can also be set to keep
the oven on for only part of the Sabbath.
When the Sabbath Mode is set, the allowed keypads are the
Power keypad and the Cancel keypads.
When the oven door is opened or closed, the oven light
will not turn on or off, and the heating elements will not turn
on or off immediately.
If a power failure less than 1 second occurs when the Sabbath
Mode is set, the oven(s) will remain in Sabbath Mode and
continue cooking.
For a power failure that lasts greater than a few seconds,
the oven(s) will return to an idle state and Sabbath mode
will no longer be active. For double ovens, the upper and lower
oven temperatures and cook timers can be set independently. If
a cook timer is set, the countdown will not appear. The timer will
appear frozen at the set time.
To Activate:
1. Touch the Power keypad, and then touch TOOLS.
2. From the Mode menu, select “Sabbath” and touch NEXT.
3. Touch ON, and then touch SETUP.
NOTE: The programmed status of the oven(s) will be
displayed.
4. Touch CHANGE.
5. For single ovens, go to Step 6. For double ovens, select the
desired oven, and then touch NEXT.
6. Select the desired oven temperature and touch NEXT.
7. (Optional) Set Bake Time (00:00) and touch SET.
OR
Touch SKIP TIMER.
8. For single ovens, touch START. For double ovens, touch
START to begin Sabbath Mode, or touch CHANGE to edit the
current programming or to program the other oven.
To Deactivate:
Sabbath Mode can be deactivated on all cavities, once activated,
by touching the Power keypad.
For single ovens, Sabbath Mode can also be deactivated
by touching Cancel.
For double ovens, if both ovens are running, touching Cancel for
one oven will turn off Sabbath Mode for both ovens and
will turn off the selected oven. The other oven will return to
a regular Bake mode.
9

Delayed Sabbath Bake:
WARNING
Food Poisoning Hazard
Do not let food sit in oven more than one hour before
or after cooking.
Doing so can result in food poisoning or sickness.
For double ovens, the upper and lower oven temperatures
and cook timers can be set independently.
If a cook timer is set, the countdown will not appear. The timer will
appear frozen at the set time.
To Activate:
1. Touch the Power keypad, and then touch TOOLS.
2. From the Mode menu, select “Sabbath” and touch NEXT.
3. Touch ON, and then touch SETUP.
NOTE: The programmed status of the oven(s) will be
displayed.
4. Touch CHANGE.
5. For single ovens, go to Step 6. For double ovens, select
the desired oven, and then touch NEXT.
6. Select the desired oven temperature and touch NEXT.
7. (Optional) Set Bake Time (00:00) and touch SET.
OR
Touch SKIP TIMER.
8. Touch DELAY and set both the “Cooking Starts at” time.
NOTE: If a bake time is set in the previous steps,
the “Cooking ends at” will be calculated based on
the bake time. If the timer is not set, the Sabbath Mode will
continue until canceled.
9. Touch SET.
10. Review the settings and touch START to begin the baking
cycle.
NOTE: Once the timer ends; opening and closing the oven
door will deactivate the Sabbath Mode.
Change Temperature
The oven temperatures can be changed while running Sabbath
Mode by touching the -25° F (-5°C) or +25°F (+5° C). Touching
these buttons will not result in any changes to the screen
and no sound will play.
As an example, touching the +25°F (+5° C) button 3 times will
result in an oven cavity temperature increase of +75° F (+15° C);
however, the initial oven cavity set temperature will remain
on the screen.
NOTE: On double oven models, the oven cavity temperature may
be set individually.
OVEN USE
Odors and smoke are normal when the oven is used the rst few
times or when it is heavily soiled.
During oven use, the heating elements will not remain on but will
cycle on and off throughout oven operation.
IMPORTANT: The health of some birds is extremely sensitive
to the fumes given off. Exposure to the fumes may result in death
to certain birds. Always move birds to another closed and wellventilated room.
If the oven door is opened during a cooking mode and left open
for approximately 60 seconds, the cooling fan will switch to a
higher speed. You may experience higher noise during this time.
When the oven door is closed, the fan will switch back to its lower
speed after approximately 60 seconds.
Aluminum Foil
IMPORTANT: To avoid permanent damage to the oven bottom
nish, do not line the oven bottom with any type of foil or liner.
■ For best cooking results, do not cover entire rack with foil
because air must be able to move freely.
■ To catch spills, place foil on rack below dish. Make sure
foil is at least 1/2" (1.3 cm) larger than the dish and that
it is turned up at the edges.
10
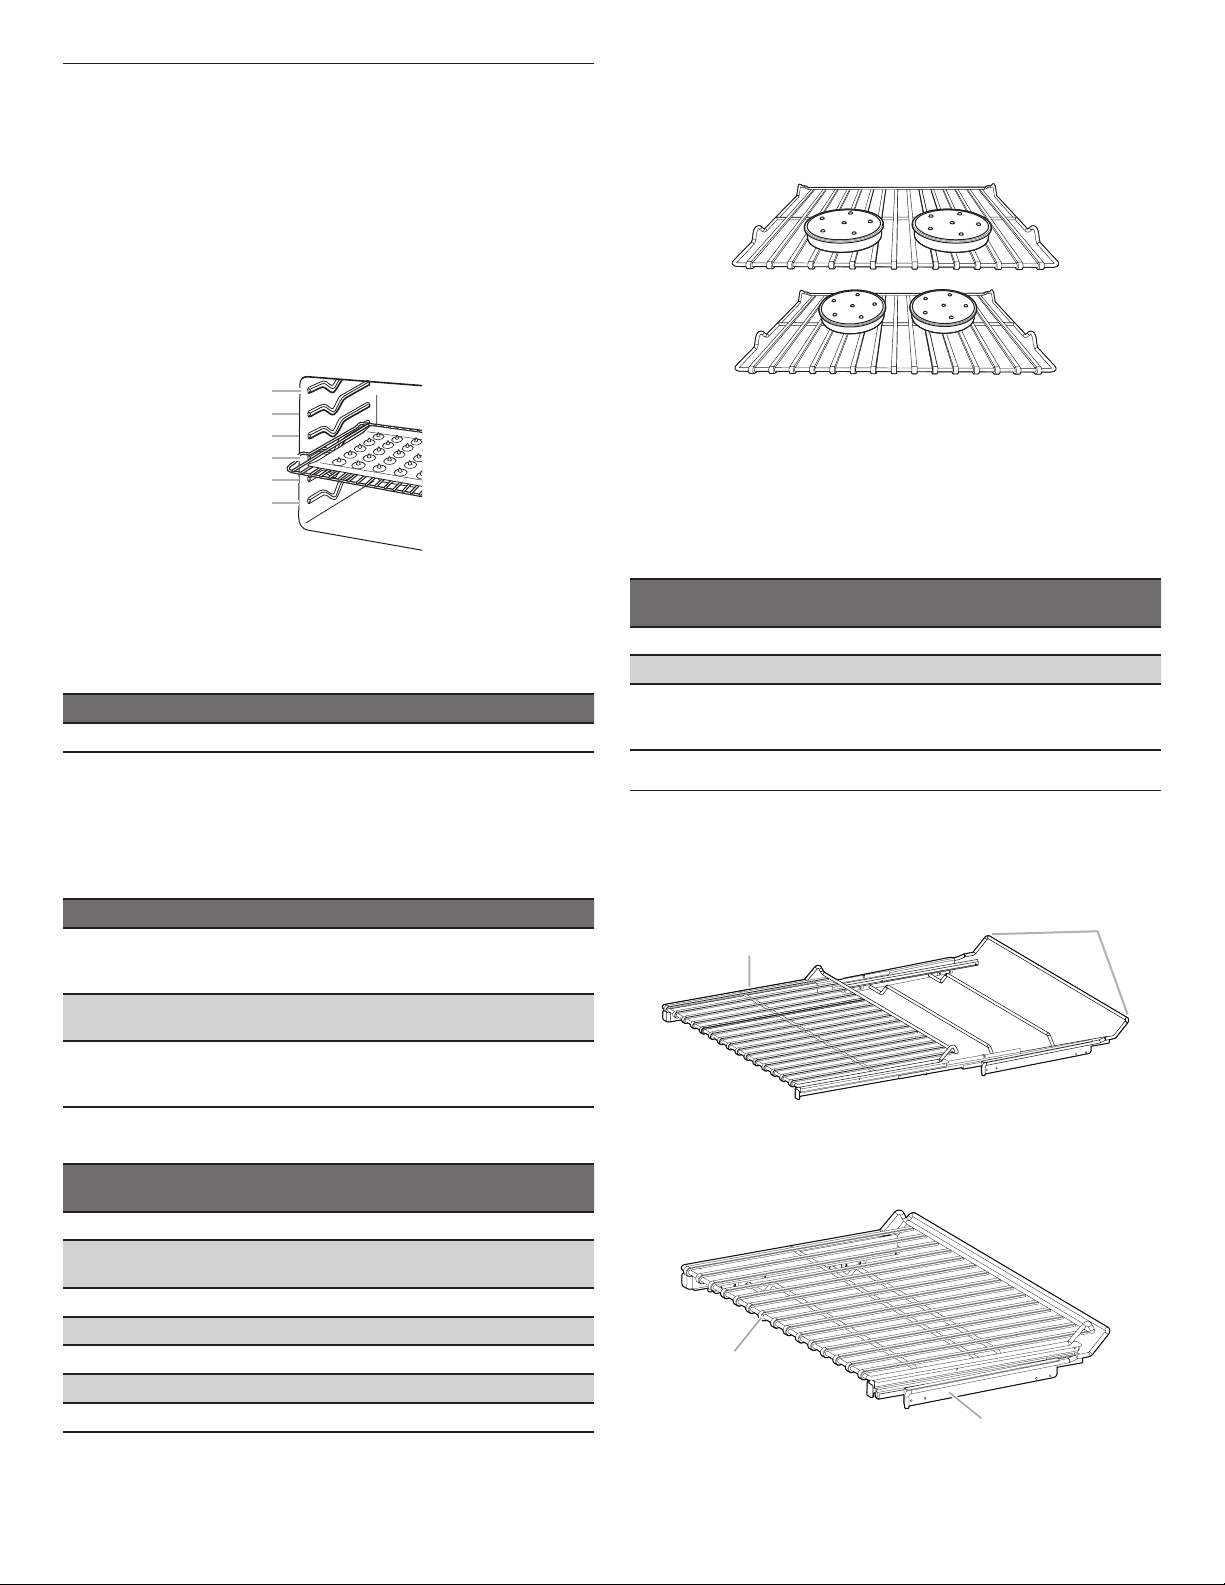
Position Racks and Bakeware
B
B
IMPORTANT: To avoid permanent damage to the porcelain
nish, do not place food or bakeware directly on the oven door or
bottom.
Racks
■ Position racks before turning on the oven.
■ Do not position racks with bakeware on them.
■ Make sure racks are level.
To move a rack, pull it out to the stop position, raise the front
edge, and lift out. Use the following illustration and charts
as guides.
Baking Cakes on 2 Racks
For best results when baking cakes on 2 racks, use the Bake
function and racks in positions 2 and 5. Place the cakes on the
racks as shown. Keep at least 2 inches of space between the
front of the racks and the front of the cakes.
6
5
4
3
2
1
Rack And Bakeware Positions
Rack Positions – Upper and Lower Oven
Broiling
FOOD RACK POSITION
Most broiling 6
For hamburger patties to have a well-seared exterior
and a rare interior, use a at rack in position 6. Side 1 should
cook for approximately 3 minutes. Side 2 should cook for
approximately 3 to 4 minutes. Expect a moderate degree
of smoke when broiling.
Traditional Cooking
FOOD RACK POSITION
Large roasts, turkeys, angel
food cakes, bundt cakes, quick
breads, pies
Yeast breads, casseroles,
meat, poultry
Cookies, biscuits, mufns, cakes 2 or 3 when single-rack
Convection Cooking
1 or 2
2
baking; 2 and 5 when
multi-rack baking
Baking Cookies on 2 Racks
For best results when baking cookies on 2 racks, use the Convect
Bake function and place racks in positions 2 and 5.
Bakeware
To cook food evenly, hot air must be able to circulate. For best
results, allow 2" (5 cm) of space around bakeware and oven walls.
Use the following chart as a guide.
NUMBER
OF PAN(S) POSITION ON RACK
1 Center of rack.
2 Side by side or slightly staggered.
3 or 4 See the rack position graphics
in this section for pan placement
recommendations.
Roll-Out Extension Rack
The roll-out extension rack allows easy access to position food in
the oven, and remove food from the oven. It can be used in rack
positions 1 through 6.
Open Position
A
A. Roll-out extension rack
B. Sliding shelf
OVEN SETTING
Rapid Preheat Bake 1 3
Rapid Preheat
Convection Bake
Convection Bake 1 1, 2 or 3
Convection Bake 2 2 and 5
Convection Bake 3 1, 3 and 5
Convection Roast 1 1 or 2
Convection Broil 1 4, 5 or 6
NUMBER OF
RACKS USED
1 3
RACK
POSITION(S)
Closed and Engaged Position
A
A. Roll-out extension rack
B. Sliding shelf
11
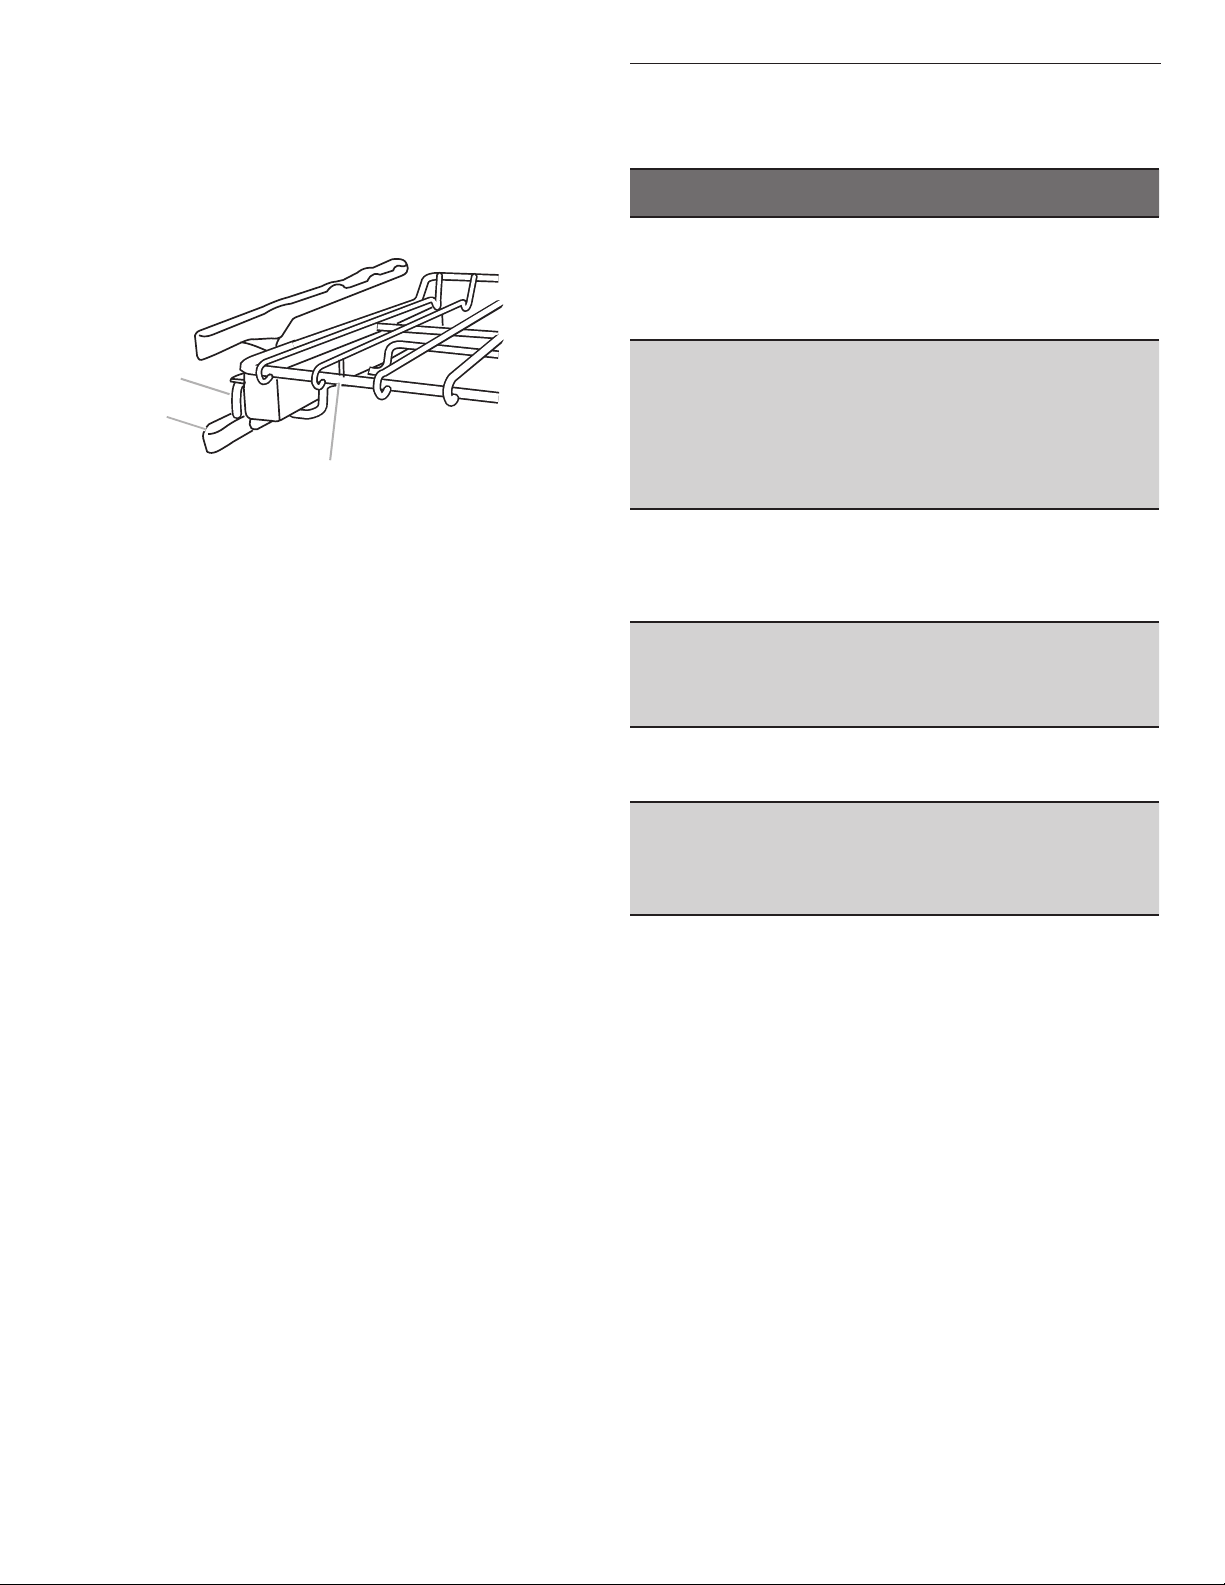
To Remove Roll-Out Extension Rack:
B
C
1. Slide the rack in completely so that it is closed and engaged
with the sliding shelf.
2. Using 2 hands, lift up on the front edge of the rack and push
the sliding shelf to the back wall of the oven so that the front
edge of the sliding shelf sits on the rack guides. The front
edge of the rack and the sliding shelf should be higher than
the back edge.
A
A. Sliding shelf
B. Rack guide
C. Roll-out extension rack
3. Pull the rack and the sliding shelf out.
To Replace Roll-Out Extension Rack:
1. Using 2 hands, grasp the front of the closed rack and the
sliding shelf. Place the closed rack and the sliding shelf on the
rack guide.
2. Using 2 hands, lift up on the front edge of the rack and the
sliding shelf together.
3. Slowly push the rack and the sliding shelf to the back of the
oven until the back edge of the rack pulls over the end of the
rack guide.
To avoid damage to the sliding shelves, do not place more than
25 lbs (11.4 kg) on the rack.
Do not clean the roll-out extension rack in a dishwasher.
It may remove the rack’s lubricant and affect its ability to slide.
See the “General Cleaning” section for more information.
Bakeware
The bakeware material affects cooking results. Follow
manufacturer’s recommendations and use the bakeware size
recommended in the recipe. Use the following chart as a guide.
BAKEWARE/
RESULTS RECOMMENDATIONS
Light-colored
aluminum
■ Light golden
crusts
■ Even browning
Dark aluminum
and other bakeware
with dark, dull and/
or nonstick nish
■ Brown, crisp
crusts
Insulated cookie
sheets or baking
pans
■ Little or no bottom
browning
Stainless steel
■ Light, golden
crusts
■ Uneven browning
Stoneware/Baking
stone
■ Crisp crusts
Ovenproof
glassware
or ceramic
■ Brown, crisp
crusts
■ Use temperature and time
recommended in recipe.
■ May need to reduce baking
temperatures slightly.
■ Use suggested baking time.
■ For pies, breads, and casseroles, use
temperature recommended
in recipe.
■ Place rack in center of oven.
■ Follow rack recommendations
in the “Position Racks and
Bakeware” section.
■ May need to increase baking time.
■ May need to increase baking time.
■ Follow manufacturer’s instructions.
■ May need to reduce baking
temperatures slightly.
12
 Loading...