

Page 1

J
E N N
- A
I R
R E N C H
F
U
D
SE
O O R
R
& C
E F R I G E R A T O R
ARE
G
T
A B L E O F
Important Safety Instructions ........................................1-2
Installation.............................................................................3-9
Temperature Controls...................................................10-12
Fresh Food Features .....................................................13-14
Freezer Features ...................................................................15
Ice and Water.........................................................................16
Water Filter .......................................................................17-19
Food Storage Tips..........................................................20-22
Care and Cleaning ........................................................23-26
Operating Sounds ................................................................27
Troubleshooting..............................................................28-30
Warranty & Service...............................................................31
Guide de l’utilisateur ...........................................................32
Guía de Uso y Cuidado......................................................64
UI DE
C
O N T E N T S
Form No. C/12/04 Part No. 12828119 Printed in U.S.A.
©2004 Maytag Appliances Sales Co.
Page 2
I
MPORTANT
S
AFETY
I
NSTRUCTIONS
I n s t a l l e r : Please leave this guide with this appliance.
Consumer: Please read and keep this Use & Care
Guide for future reference. This guide provides
proper use and maintenance information.
Keep sales receipt and/or cancelled check as proof
of purchase.
Call: 1-800-JENNAIR (1-800-536-6247)
U.S.A. and Canada
Have complete model and serial number
identification of your refrigerator. This is located on a
data plate inside the refrigerator compartment, on
the upper left side. Record these numbers below for
easy access.
Model Number _______________________________
Serial Number ________________________________
Date of Purchase ______________________________
In our continuing effort to improve the quality and
performance of our appliances, it may be necessary
to make changes to the appliance without revising
this guide.
What You Need to Know About
Safety Instructions
Warning and Important Safety Instructions appearing in
this guide are not meant to cover all possible
conditions and situations that may occur. Common
sense, caution and care must be exercised when
installing, maintaining or operating appliance.
DANGER
To reduce risk of injury or death, follow basic
precautions, including the following:
IMPORTANT: Child entrapment and suffocation
are not problems of the past. Junked or abandoned
refrigerators are still dangerous – even if they sit out
for “just a few days.” If you are getting rid of your old
refrigerator, please follow the instructions below to
help prevent accidents.
Before you throw away your old
refrigerator or freezer:
• Take off the doors.
• Leave the shelves in place so
children may not easily climb
inside.
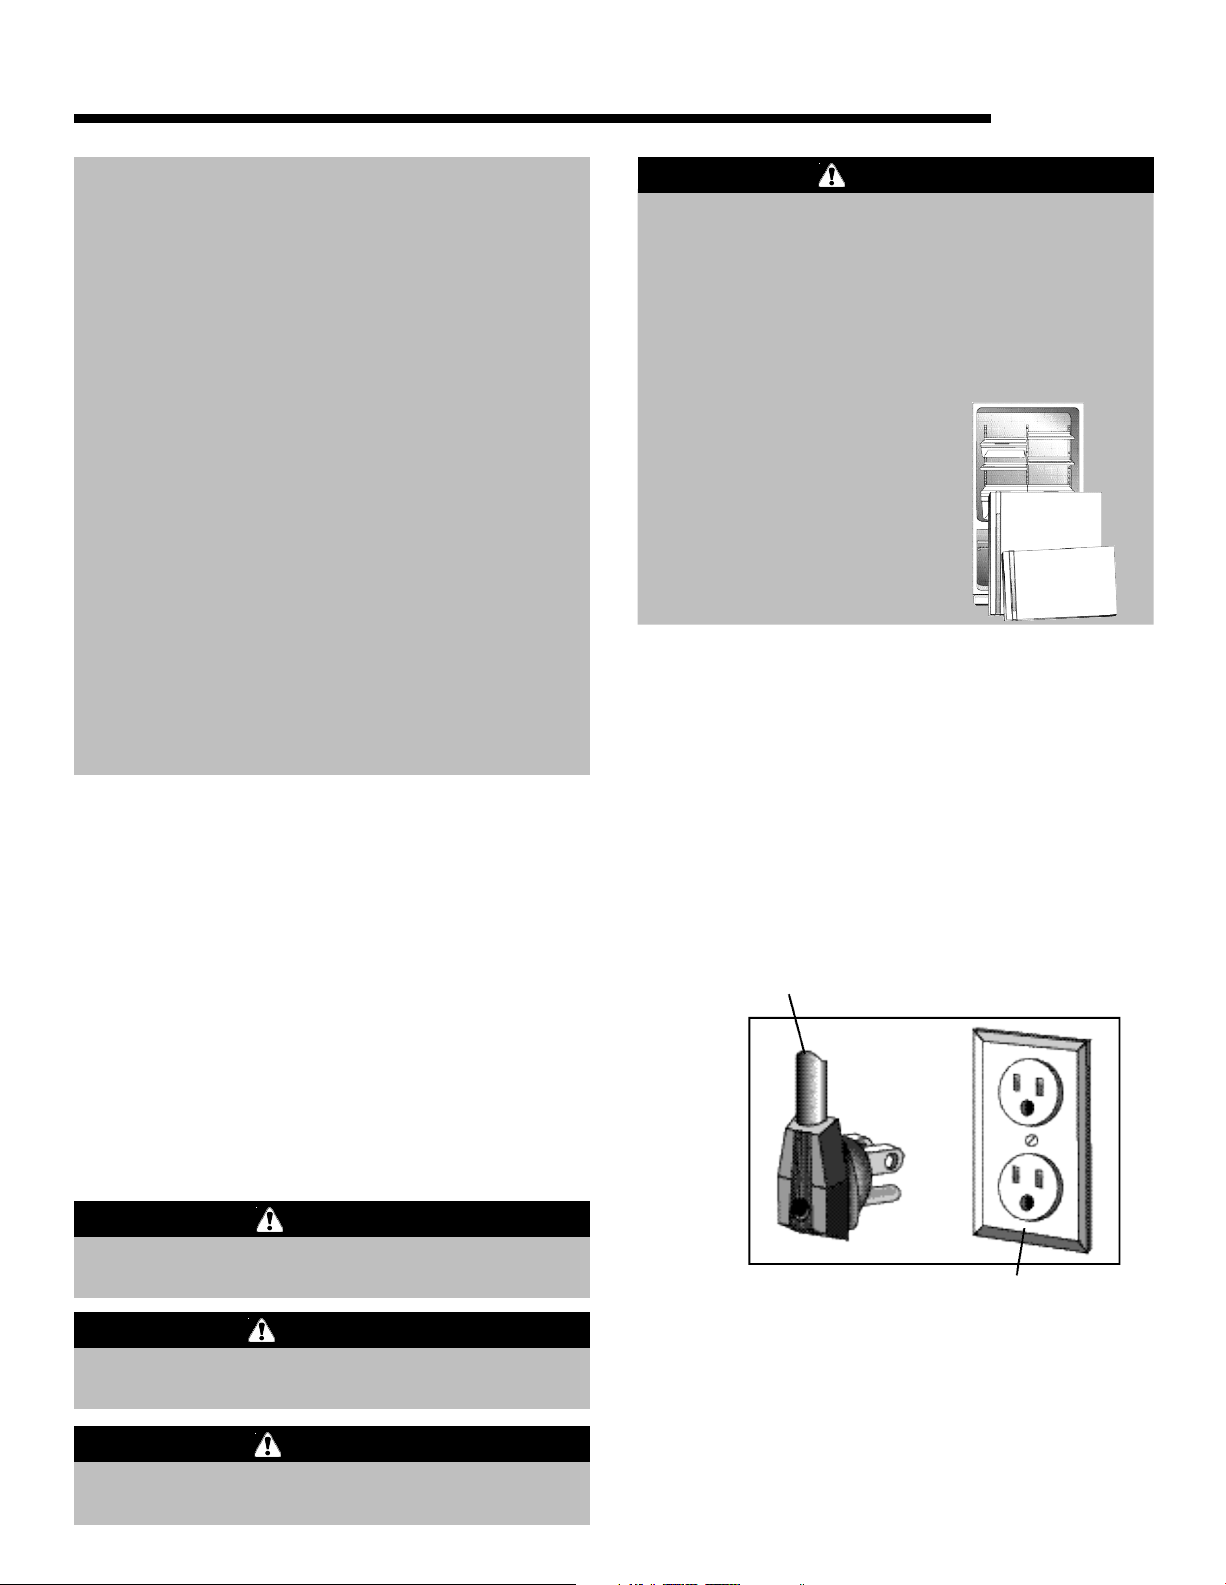
This appliance is equipped with a three-prong
grounding plug for your protection against possible
electrical shock hazards. It must be plugged into a
grounding receptacle. Where a standard two-prong
wall receptacle is encountered, it is the personal
responsibility and obligation of the customer to have it
replaced with a properly grounded three-prong wall
receptacle. Do not under any circumstances, cut or
remove the third (ground) prong from the power cord.
Do not use an adapter plug.
Power supply cord with
three-prong grounding plug
Always contact the manufacturer about problems or
conditions you do not understand.
Recognize Safety Symbols, Words,
Labels
DANGER
DANGER – Immediate hazards which WILL result
in severe personal injury or death.
WARNING
WARNING – Hazards or unsafe practices which
COULD result in severe personal injury or death.
CAUTION
CA U T I ON – Hazards or unsafe practices which COUL D
result in minor personal injury or property damage.
1
Grounding type
wall receptacle
Page 3

I
MPORTANT
To reduce risk of fire, electric shock, serious
injury or death when using your refrigerator,
follow these basic precautions, including the
following:
1. Read all instructions before using the refrigerator.
S
AFETY
I
NSTRUCTIONS
WARNING
not attempt service if instructions are not understood or if they are beyond personal skill level.
13. Always disconnect refrigerator from electrical
supply before attempting any service. Disconnect
power cord by grasping the plug, not the cord.
2. Observe all local codes and ordinances.
3. Be sure to follow grounding instructions.
4. Check with a qualified electrician if you are not
sure this appliance is properly grounded.
5. Do not ground to a gas line.
6. Do not ground to a cold-water pipe.
7. Refrigerator is designed to operate on a separate
115 volt, 15 amp., 60 cycle line.
8. Do not modify plug on power cord. If plug does
not fit electrical outlet, have proper outlet installed
by a qualified electrician.
9. Do not use a two-prong adapter, extension cord
or power strip.
10. Do not remove warning tag from power cord.
11. Do not tamper with refrigerator controls.
12. Do not service or replace any part of refrigerator
unless specifically recommended in Use & Care
Guide or published user-repair instructions. Do
14. Install refrigerator according to Installation
Instructions. All connections for water, electrical
power and grounding must comply with local
codes and be made by licensed personnel when
required.
15. Keep your refrigerator in good condition. Bumping
or dropping refrigerator can damage refrigerator
or cause refrigerator to malfunction or leak. If
damage occurs, have refrigerator checked by
qualified service technician.
16. Replace worn power cords and/or loose plugs.
17. Always read and follow manufacturer’s storage
and ideal environment instructions for items being
stored in refrigerator.
18. Your refrigerator should not be operated in the
presence of explosive fumes.
19. Children should not climb, hang or stand on any
part of the refrigerator.
20. Clean up spills or water leakage associated with
water installation.
SAVE THESE INSTRUCTIONS
2
Page 4
I
NSTALLATION
Your refrigerator was packed carefully for shipment.
Remove and discard shelf packaging and tape. Do not
remove the serial plate.
Location
• Do not install refrigerator near oven, radiator or other
heat source. If not possible, shield refrigerator with
cabinet material.
• Do not install where temperature falls below 55° F
(13° C) or rises above 110° F (43° C). Malfunction may
occur at this temperature.
• Refrigerator is designed for indoor household
application only.
Measuring the Opening
When installing your refrigerator, measure carefully.
1
2
Allow
compartment cover (located in the rear) for proper air
circulation.
⁄
” space at top and
1
2
⁄
” space behind the machine
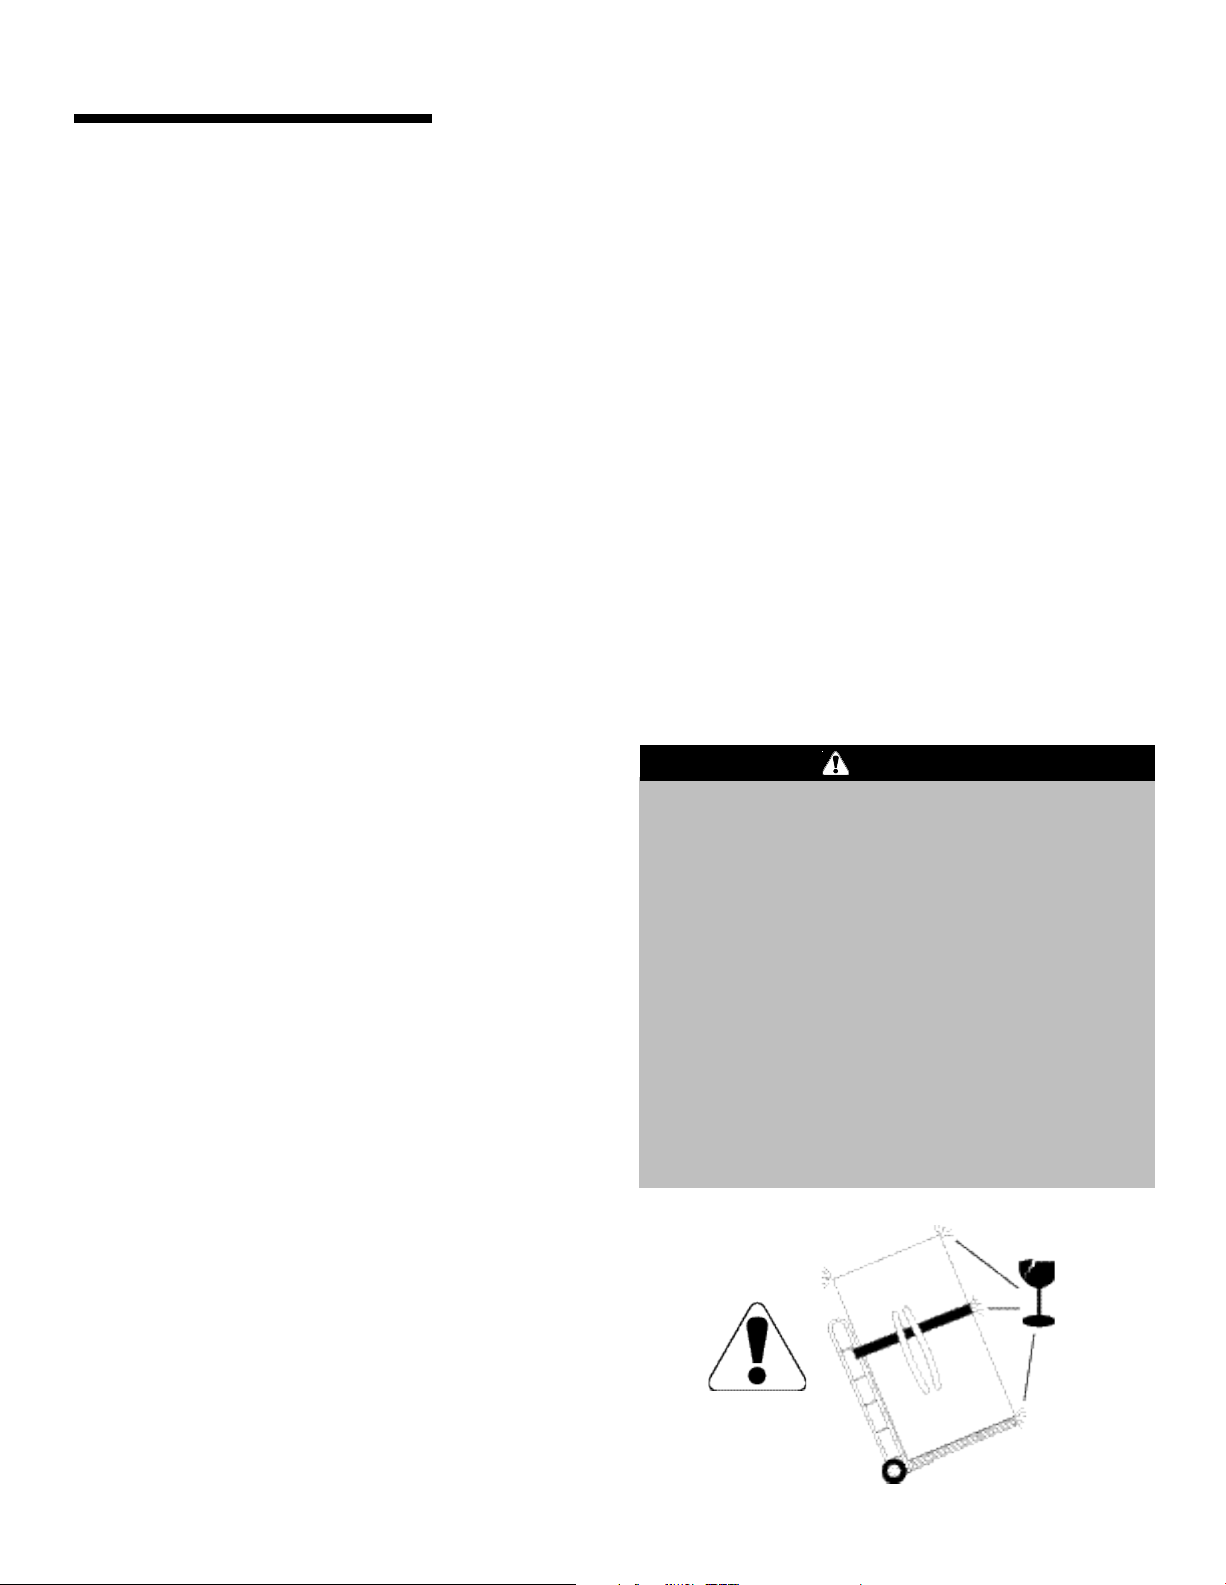
Transporting Your Refrigerator
• NEVER transport refrigerator on its side. If an
upright position is not possible, lay refrigerator on its
back. Allow refrigerator to sit upright for
approximately 30 minutes before plugging it in to
assure oil returns to the compressor. Plugging the
refrigerator in immediately may cause damage to
internal parts.
• Use an appliance dolly when moving refrigerator.
ALWAYS truck refrigerator from its side or
back–NEVER from its front.
• Protect outside finish of refrigerator during transport
by wrapping cabinet in blankets or inserting padding
between the refrigerator and dolly.
• Secure refrigerator to dolly firmly with straps or
bungee cords. Thread straps through handles when
possible. Do not overtighten. Overtightening
restraints may dent or damage outside finish.
Glass Panel Doors
(select models)
Subflooring or floor coverings (i.e. carpet, tile, wood
floors, rugs) may make your opening smaller than
anticipated.
Some clearance may be gained by using the leveling
procedure under Leveling.
IMPORTANT: If refrigerator is to be installed into a
recess where the top of the refrigerator is completely
covered, use distance from floor to top of hinge cap to
verify proper clearance.
CAUTION
To avoid possible injury, product or property damage,
observe the following:
• When working directly on the doors, protect the
door corners and sides by placing doors on a
nonabrasive surface protected by towels or rugs.
• Protect the glass panel sides when securing the
unit to a dolly. DO NOT OVERTIGHTEN! Overtightening the restraints may shatter the glass
which could cause personal injury.
• DO NOT carry or transport removed doors by the
handles.
• Fully tighten handle set screws when installing the
door handles.
3
Page 5
I
NSTALLATION
Leveling
CAUTION
To protect property and refrigerator from damage,
observe the following:
• Protect vinyl or other flooring with cardboard, rugs,
or other protective material.
• Do not use power tools when performing leveling
procedure.
To enhance the appearance and maintain performance,
the refrigerator should be level.
Note
• Complete any required door reversal, panel
installation and/or a water supply connection,
before leveling.
Materials Needed:
3
8
⁄
•
” hex head driver
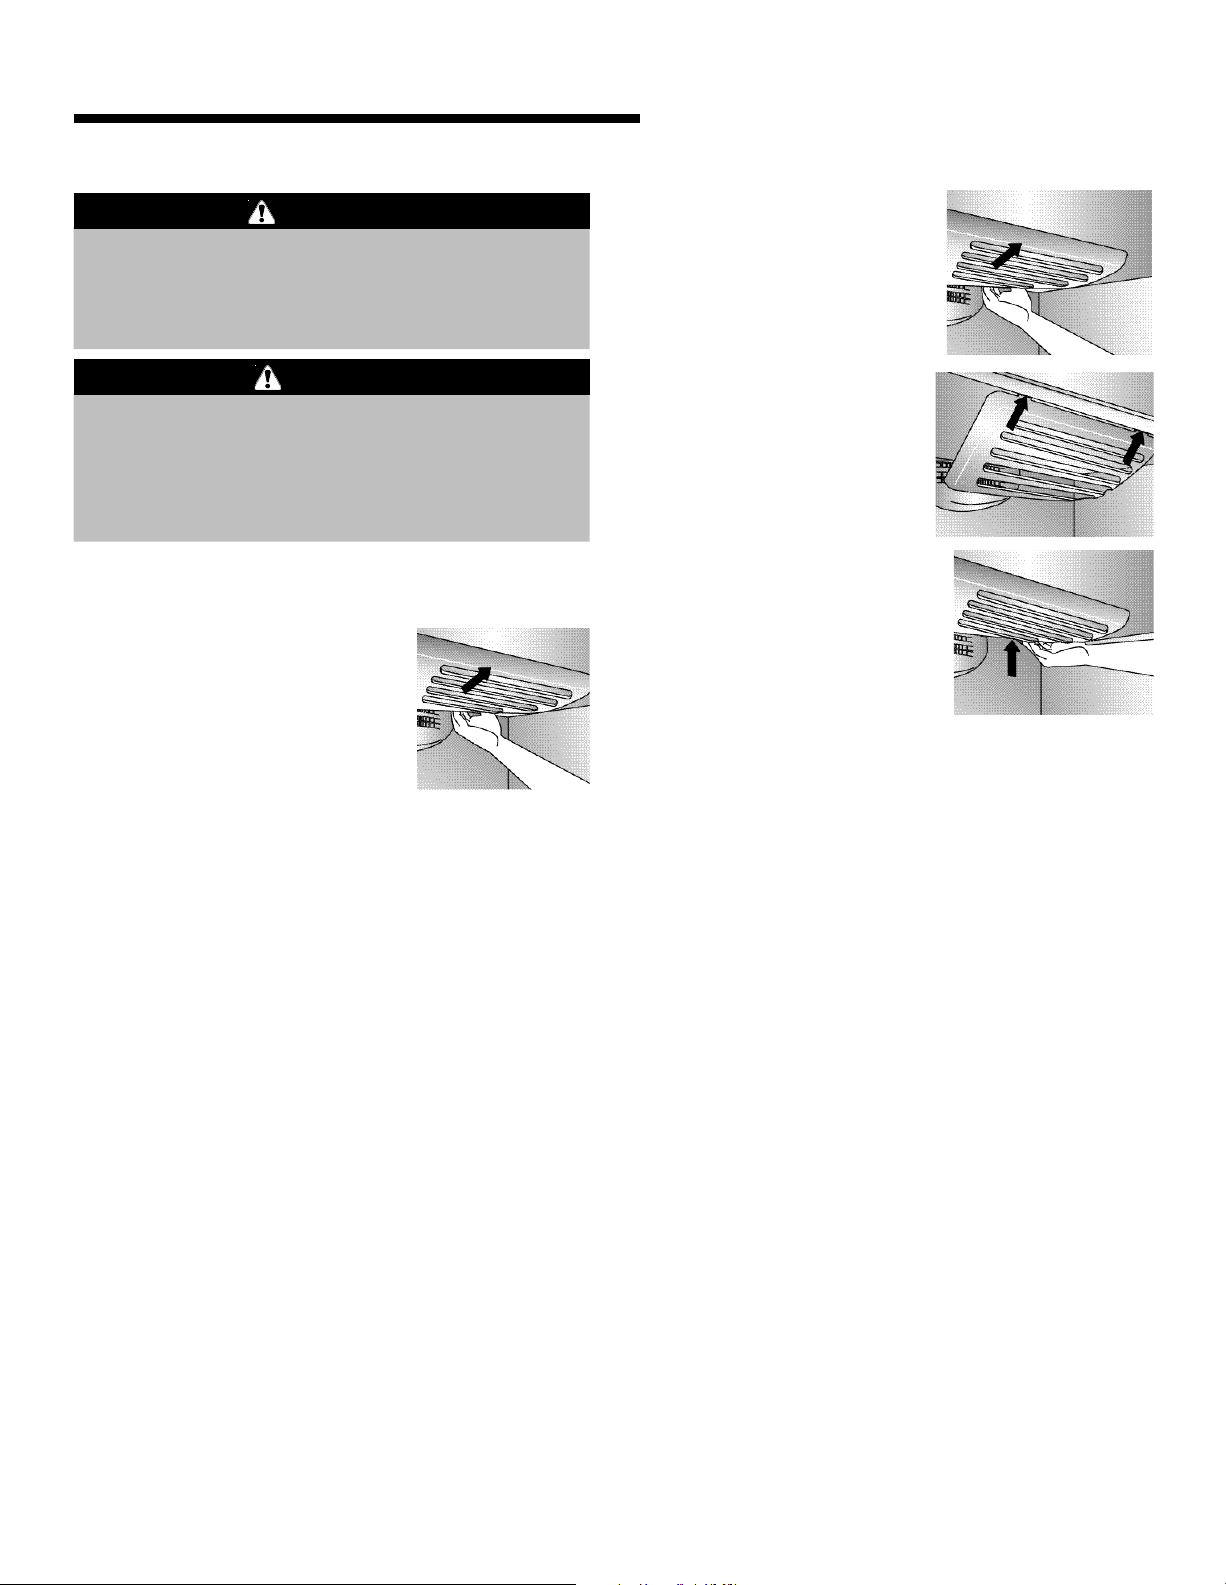
• Carpenter’s level
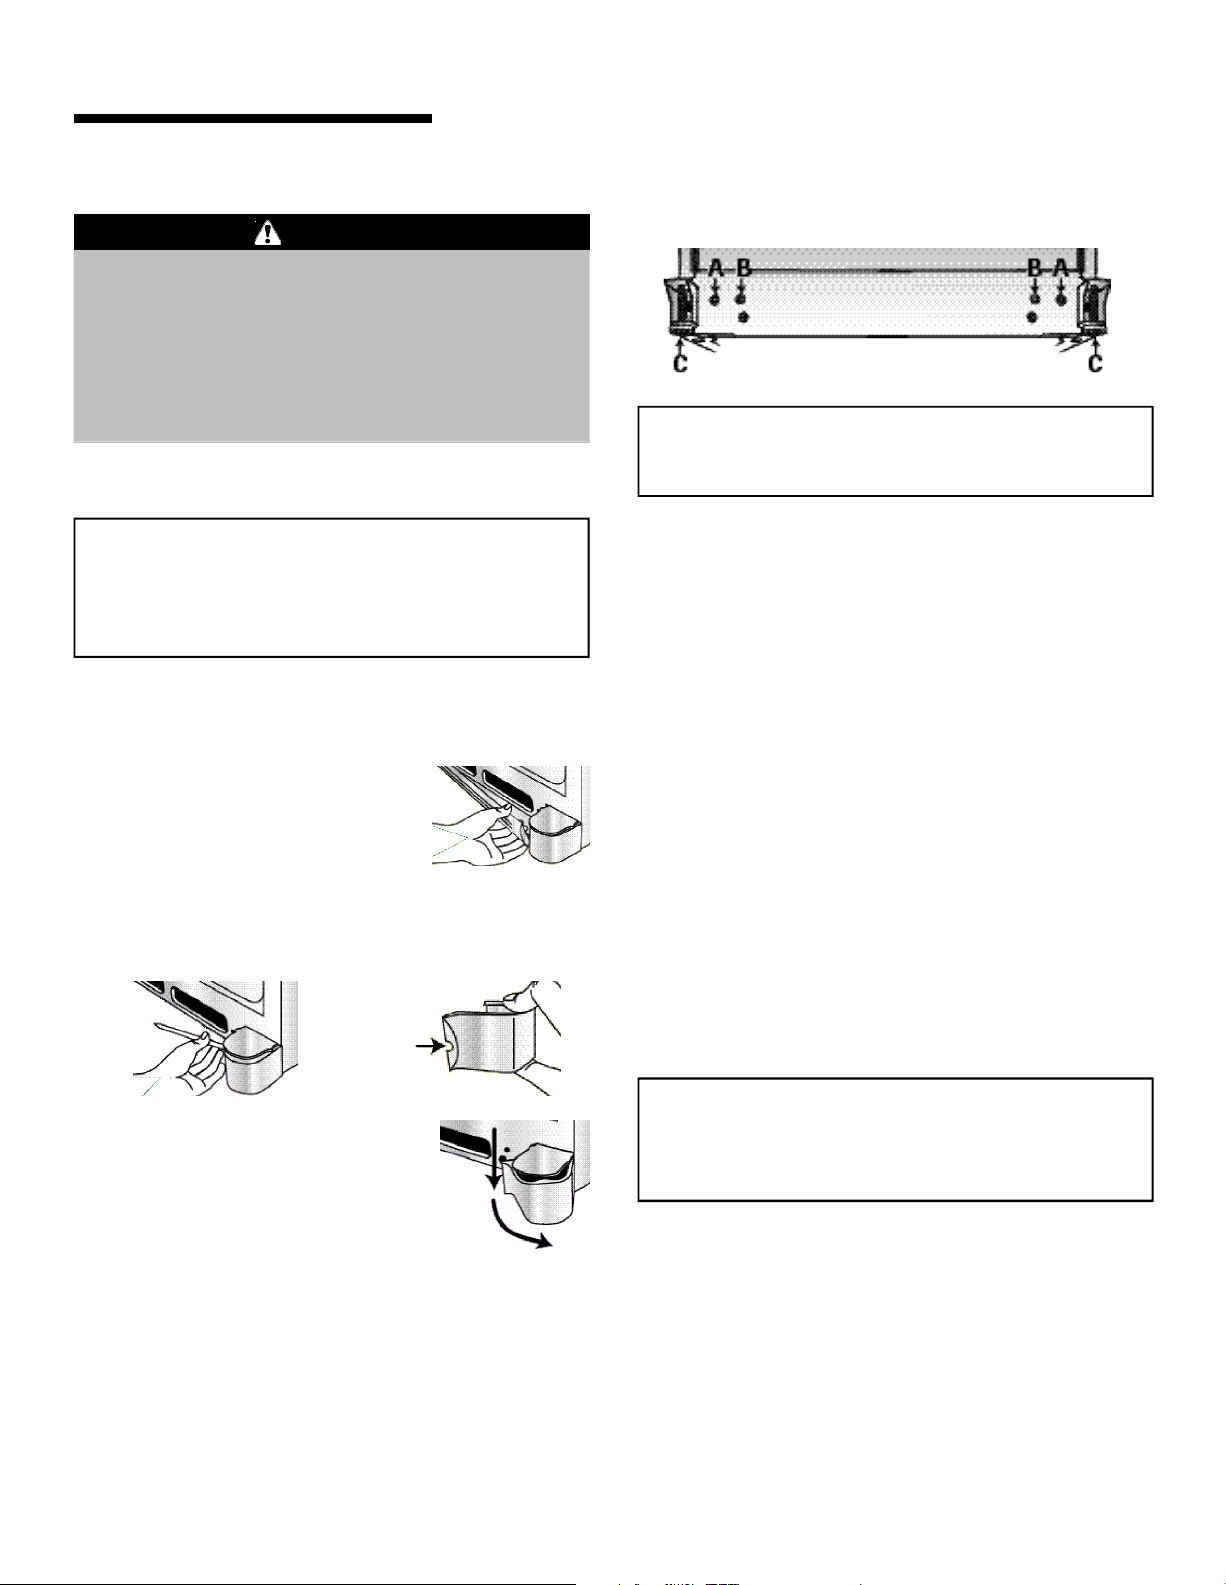
1. Remove toe grille.
• Grasp firmly and pull outward
to unclip.
2. Remove bottom hinge cover(s).
• Place the eraser end of a pencil or similar blunt
tool in the cover notch.
3. Using hex head driver, turn the front adjustment
screws (A) on each side to raise or lower the front
of the refrigerator.
Note
• Some models only have adjustment screws “A.”
4. Using the hex head driver, turn each of these
adjustment screws (B) to raise or lower the rear of
the refrigerator.
5. Using the carpenter’s level, make sure front of
refrigerator is
back of refrigerator and that the refrigerator is level
from side to side.
6. Turn stabilizing legs (C) clockwise until firmly
against floor.
7. Turn adjustment screws (A) counterclockwise to
allow the full weight of the refrigerator to rest on
the stabilizing legs.
8. Replace bracket cover(s).
• Position cover into the outer edge of the hinge.
• Swing the cover toward the cabinet and snap it
into place.
1
” (6 mm) or
⁄
4
1
bubble higher than
⁄
2
Notch
Location
• Use slight pressure to pry the
cover loose.
• Continue to maintain
downward pressure to the
notched side of the cover while
swinging it off.
9. Replace the toe grille.
Note
• For proper reinstallation, ensure the “top” marking
on the interior of the toe grille is oriented correctly.
• Align the toe grille mounting clips with the lower
cabinet slots.
• Push the toe grille firmly until it snaps into place.
4
Page 6
I
NSTALLATION
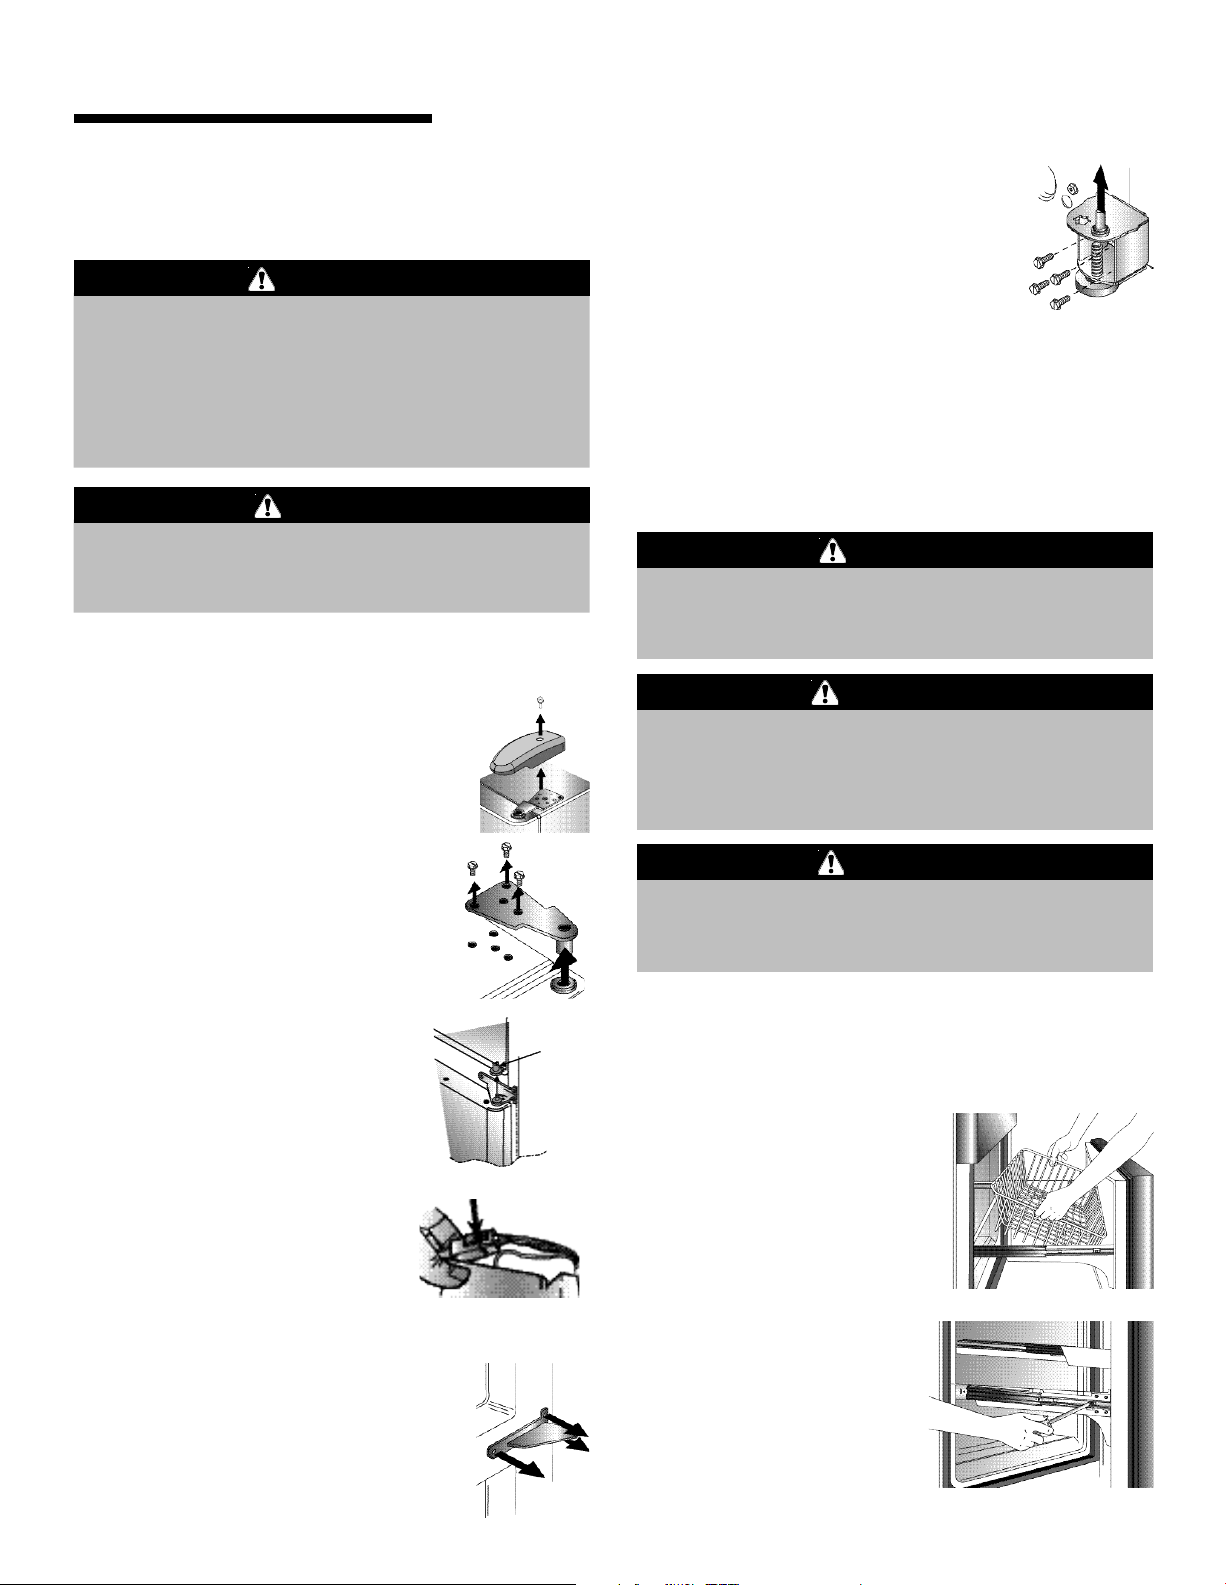
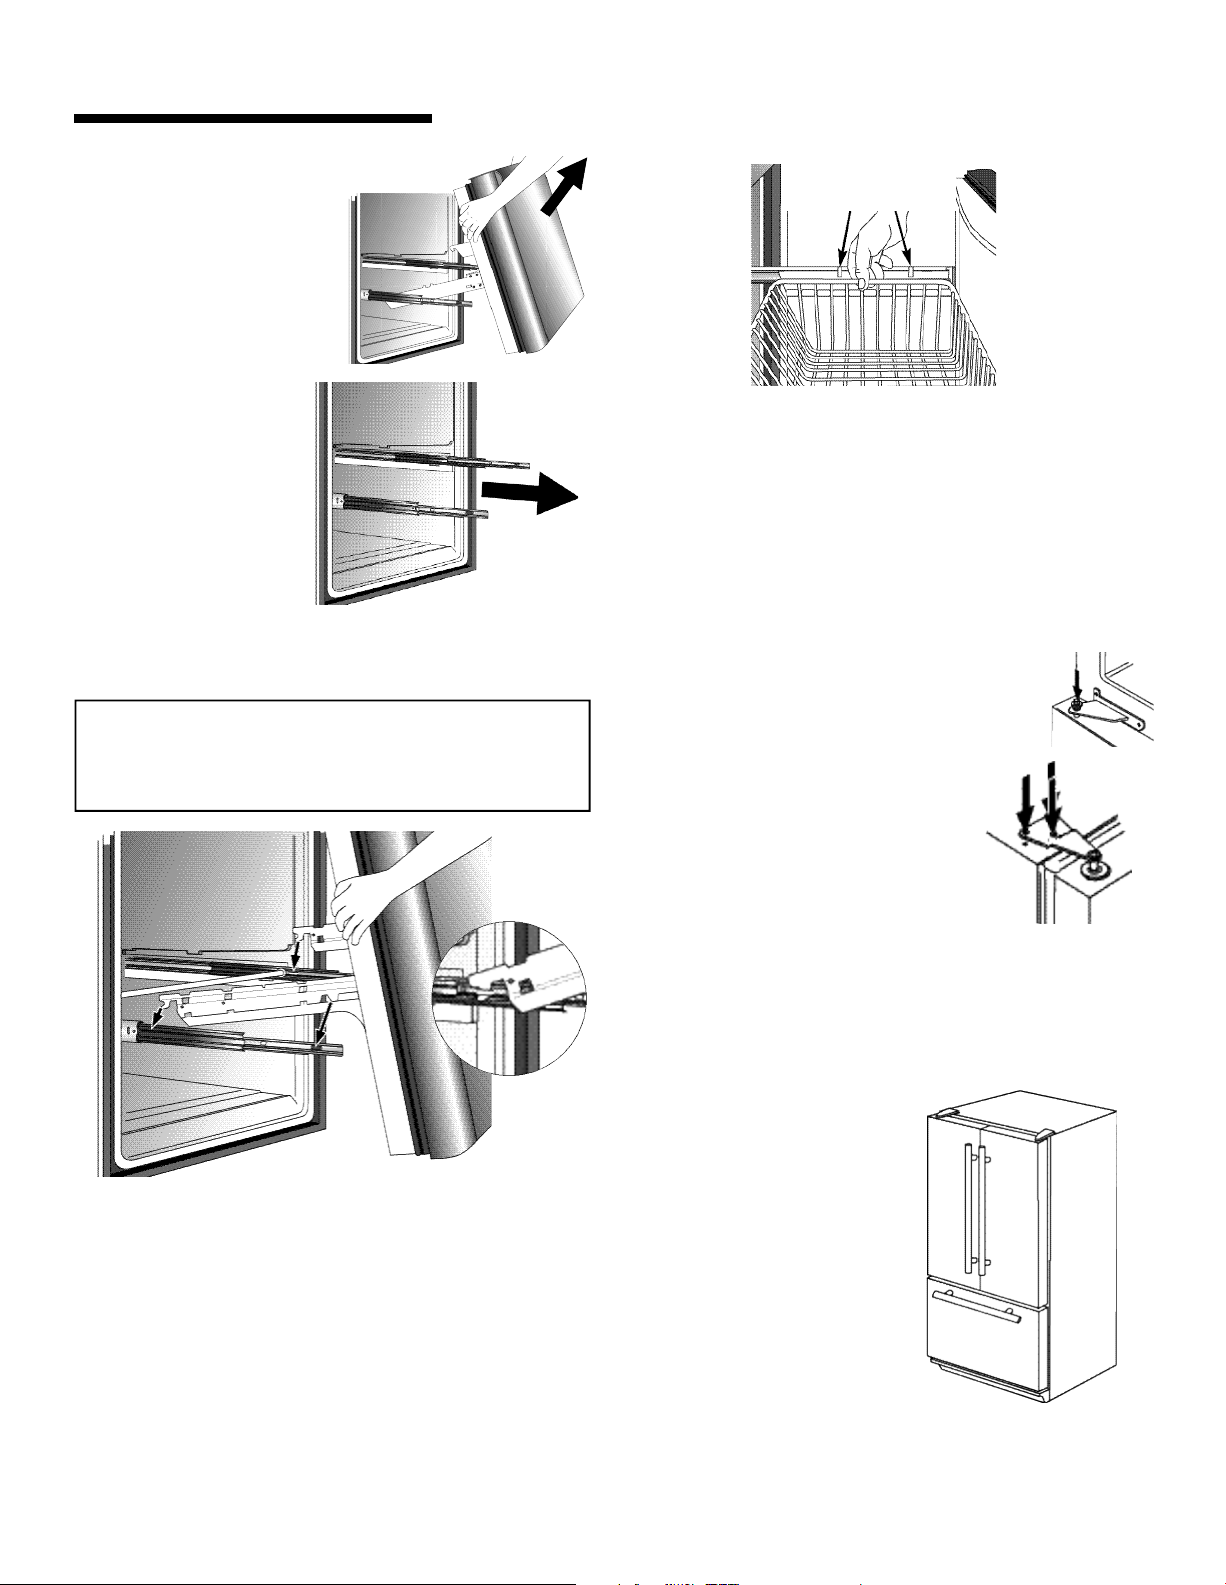
Door and Drawer Removal
Some installations require door/drawer removal to
transport the refrigerator to its final location.
WARNING
To avoid electrical shock which can cause severe
personal injury or death, observe the following:
• Disconnect power to refrigerator before removing
doors or drawer. Connect power only after
replacing doors or drawer.
5
Remove center hinge pin with a
hex head driver and retain hinge pin
for later use.
8. Remove Phillips screws to remove
right and left hinges and retain all
screws for later use.
9. Remove both stabilizing brackets with
driver and retain screws for later use.
⁄
”
16
Pullout Freezer Drawer
3
” hex head
8
⁄
CAUTION
To avoid damage to walls and flooring, protect vinyl
or other flooring with cardboard, rugs or other
protective material.
1. Unplug power cord from power source.
2. Remove toe grille and bottom hinge
cover(s) (see page 4).
3. Remove top hinge cover from
refrigerator door by removing Phillips
screw and retain screw and cover for
later use.
5
⁄
4. Unscrew
top hinge to remove hinge and retain
all screws for later use.
5. Lift right side refrigerator door from
center hinge pin. Remove door
closure from center hinge pin on
the right side and retain for later
use.
6. Disconnect wire harness on top
of left side refrigerator door top
hinge.
Release two-pin connector by
pressing junction point with a
flat blade screwdriver or
fingernail.
Green ground wire remains
attached to the hinge.
7. Unscrew
top hinge to remove hinge and retain
for later use.
16
” hex head screws from
5
” hex head screws from
16
⁄
closure
right
side
door
(select models)
DANGER
To prevent accidental child entrapment or
suffocation risk, do not remove the divider in the top
freezer basket.
WARNING
To avoid electrical shock which can cause severe
personal injury or death, disconnect power to
refrigerator before removing doors. After replacing
doors, connect power.
CAUTION
To avoid possible injury, product, or property
damage, you will need two people to perform the
following instructions.
To Remove:
1. Pull drawer open to full extension.
2. Tilt the lower basket forward and lift to remove.
3. On each white drawer
bracket is a basket cradle
with two snap attachments.
To release each cradle,
unlatch the snaps by
pushing them inward, away
from the side bracket. Lift
the cradles off of the rails.
4. Remove Phillips screw
from each of the drawer
slides (select models).
Lift left side refrigerator door, along
with top hinge, from center hinge pin.
5
Page 7
I
NSTALLATION
5. Lift top of drawer front
to unhook the drawer
from the slides. Lift
door front out to
remove.
To Install:
1. Pull both rails out to
full extension.
2. While supporting door front, hook supports into
slots located on inside of each slide.
Note
• All four drawer bracket supports must be in the
proper slots for the drawer to function properly.
Basket cradle
snap attachments
6. Tilt the lower basket front down and set it down
into the basket cradles.
Door Reinstallation
1. Install hinge assemblies:
• Install center hinge with Phillips screws.
2. Place hinge side of refrigerator door on center
hinge pin.
• Install top hinge with
screws.
3. While holding refrigerator door
upright, tighten down top hinge
5
with
” hex head driver.
⁄
16
5
” hex head
16
⁄
3. Lower door front into final position.
4. Replace and tighten Phillips screws that were
removed from the drawer slides (select models).
5. Place the basket cradles back onto the drawer
slides. Align basket cradle snaps with the slots on
the drawer brackets and press each cradle
towards the bracket until it clicks.
4. Reconnect two-pin connector.
5. Replace top hinge covers.
Handles
This handle style is installed at the factory. Style may
vary by model.
Materials Needed:
3
⁄
32
•
” allen wrench
To Remove:
• Remove set screw from
handle mounting post
using the
wrench.
• Repeat the procedure on
all posts to remove the
handle.
To replace:
(style varies by model)
3
⁄
” allen
32
• Align handle with the mounting posts.
• Fully tighten all set screws to secure handle
in place.
6
Page 8

I
NSTALLATION
Installing Front-Mounted Handles for
Stainless Steel Door
1. Loosen lower door clip on door with a
phillips screwdriver.
2. Locate predrilled hole at base of
handle, and fit hollow end of
handle over lower door clip.
3. Fit other end of handle over upper
door clip and slide up as far as
possible.
NOTE: If top of handle does not
fit over top clip, loosen lower clip
further until fit can be
accomplished.
4. Insert phillips screwdriver into
predrilled hole at base of handle
to tighten screw. Insert plastic
button plug into hole.
5. Repeat above steps to install other handle.
Installing Front-Mounted Handles for
Stainless Steel Freezer Door
1. Loosen lower door clip on door
with a phillips screwdriver.
2. Locate predrilled hole at
base of handle, and fit hollow
end of handle over left door
clip.
3. Fit other end of handle over
left door clip and slide left as
far as possible.
NOTE: If end of handle does
not fit over left clip, loosen
right clip further until fit can
be accomplished.
4. Insert phillips screwdriver
into predrilled hole at end of
handle to tighten screw.
Insert plastic button plug into
hole.
Removing Front-Mounted Handles for
Stainless Steel Door
1. Remove plastic button plug at base
of handle with a very small flat-blade
screwdriver.
• Insert phillips screwdriver into
predrilled hole to remove screw.
2. Slide handle down and remove from
door clip.
3. Repeat above steps to remove
other handle.
7
Removing Front-Mounted Handles for
Stainless Steel Freezer Door
1. Remove right side plastic button
plug at end of handle with a
very small flat-blade screwdriver.
• Insert phillips screwdriver into
predrilled hole to remove
screw.
2. Slide handle right and remove
from door clip.
Page 9
I
NSTALLATION
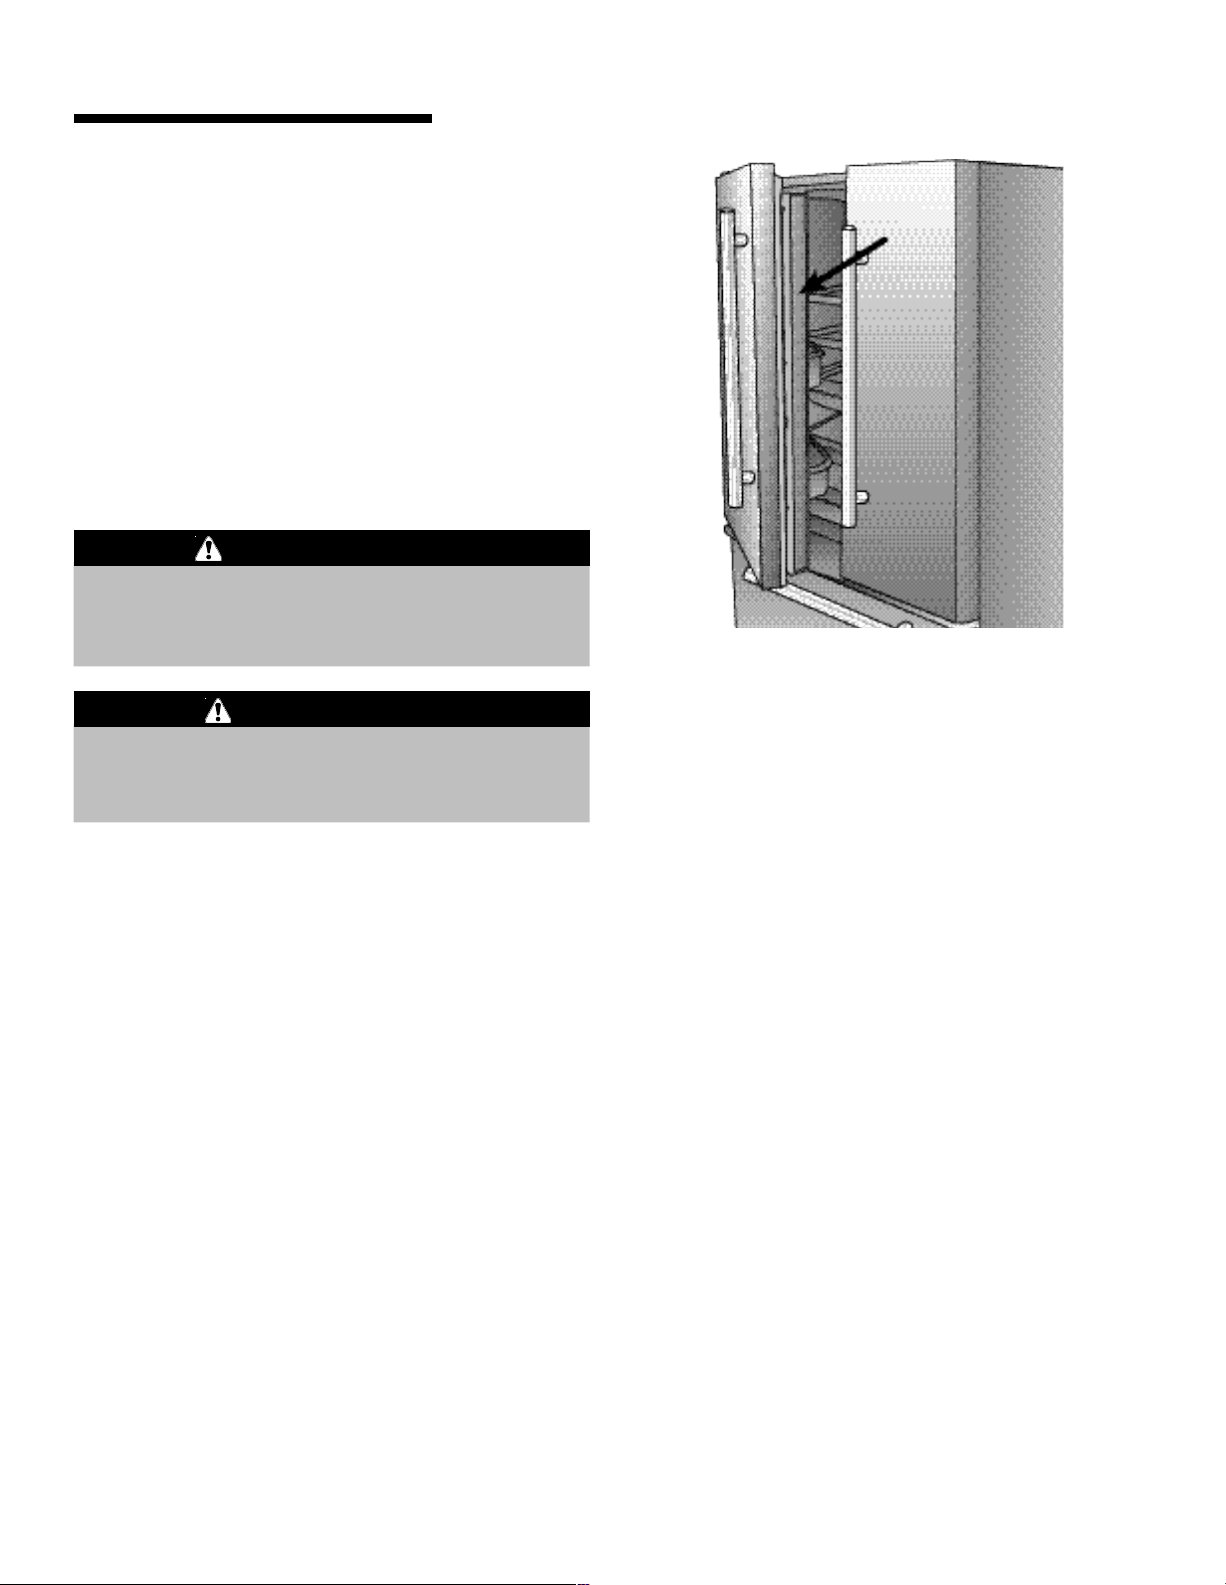
Opening and Closing Your
Fresh Food Doors
Your new refrigerator is uniquely designed with two
fresh food doors. Either door can be opened or closed
independently of one another.
There is a vertically-hinged section on the left fresh
food door. When the left door is closed, the hinged
section automatically forms a seal between the two
doors when both doors are closed.
When the left door is opened, the hinged seal
automatically folds inward so that it is out of the way.
WARNING
To avoid electrical shock which can cause severe
personal injury or death, DO NOT attempt to remove
the hinged seal from the fresh food section.
CAUTION
To avoid possible product damage, ALWAYS verify
that the hinged seal is folded against the edge of
the door prior to closing.
Hinged
Seal
8
Page 10
I
NSTALLATION
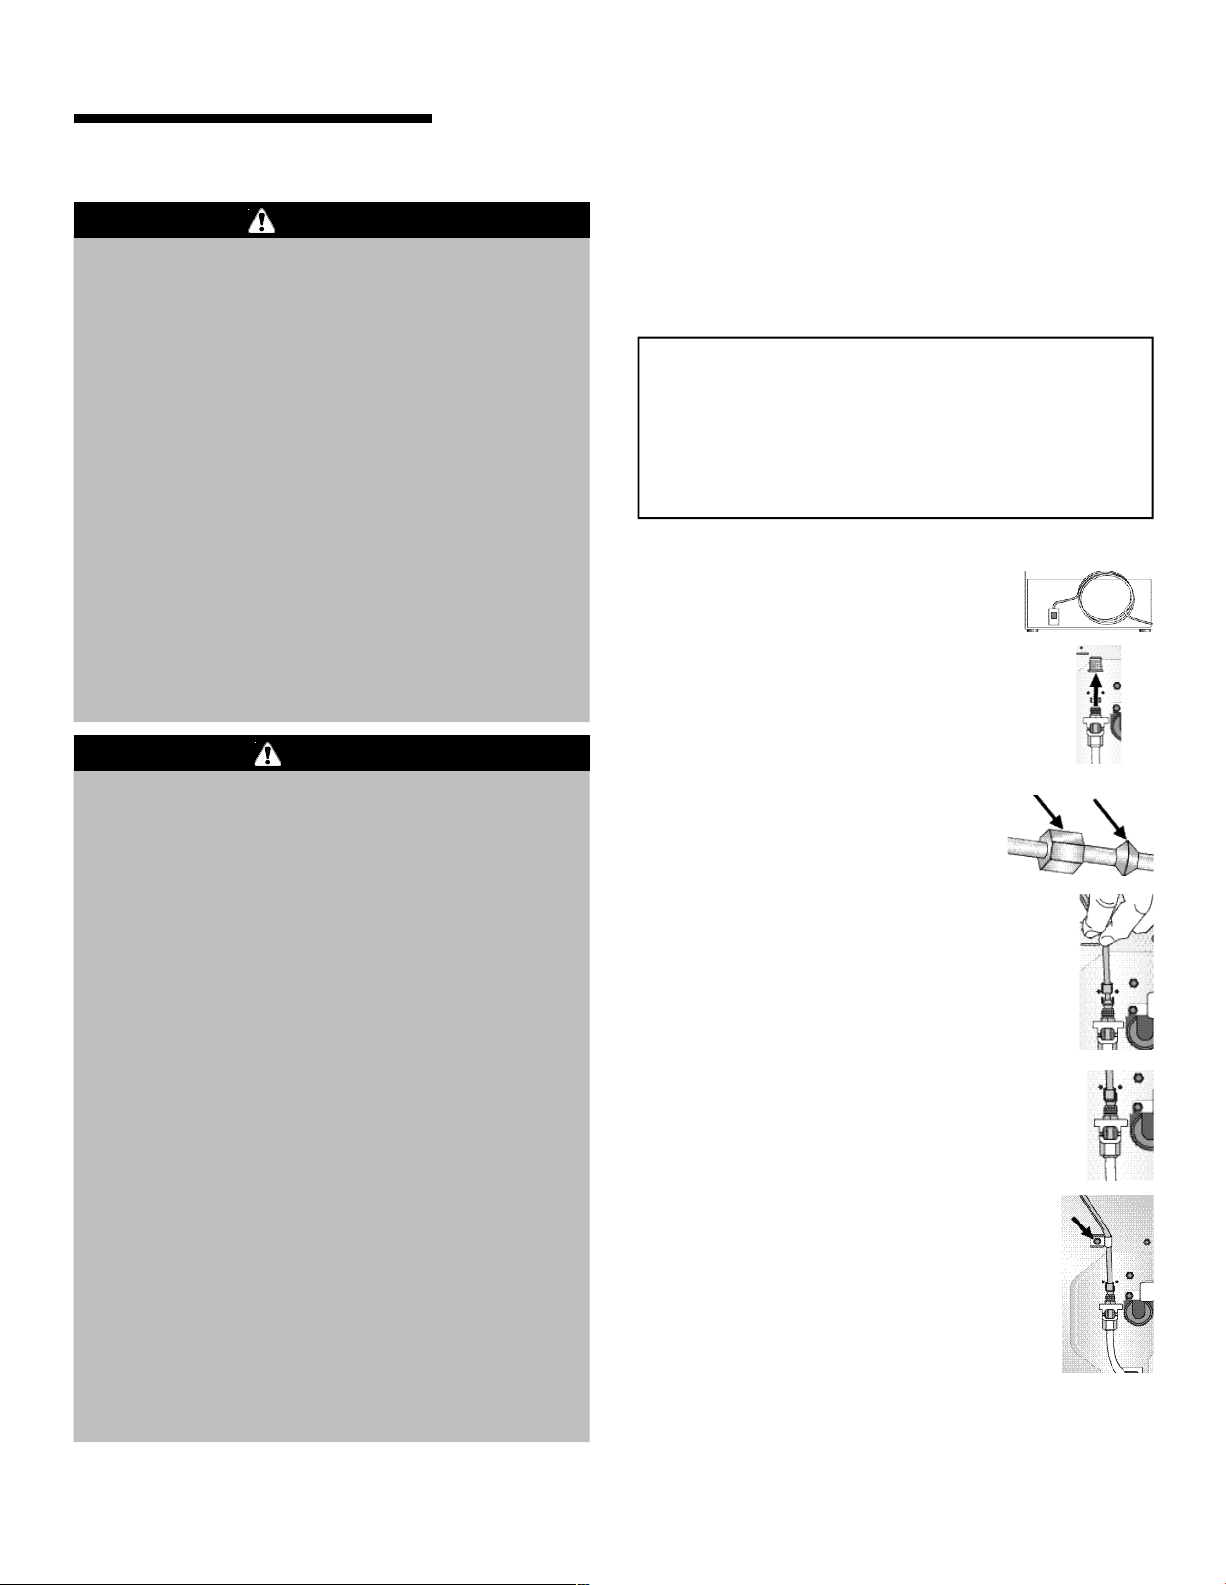
Connecting the Water Supply
WARNING
To reduce the risk of injury or death, follow
basic precautions, including the following:
• Read all instructions before installing ice maker.
• Do not attempt installation if instructions are not
understood or if they are beyond personal skill
level.
• Observe all local codes and ordinances.
• Do not service ice maker unless specifically
recommended in Use & Care Guide or published
user-repair instructions.
• Disconnect power to refrigerator before installing
ice maker.
• Water damage due to an improper water
connection may cause mold/mildew growth. Clean
up spills or leakage immediately!
CAUTION
To avoid property damage or possible injury,
follow basic precautions, including the
following:
1
4
• Consult a plumber to connect
tubing to household plumbing to assure
compliance with local codes and ordinances.
• Confirm water pressure to water valve is between
35 and 100 pounds per square inch, 20 pounds
per square inch without filter.
• Do not use a self-piercing, or
Both reduce water flow and can become clogged
over time, and may cause leaks if repair is
attempted.
• Tighten nuts by hand to prevent cross threading.
Finish tightening nuts with pliers and wrenches.
Do not overtighten.
• Wait two to three hours before placing refrigerator
into final position to check and correct any water
leaks. Recheck for leaks after 24 hours.
• Verify the copper tubing under the sleeve is
smooth and free from defects. Do not reuse an old
sleeve.
⁄
” O.D. copper
3
⁄
16
” saddle valve.
Materials Needed:
1
4
•
” outer diameter flexible copper tubing
⁄
• Shut-off valve (requires a
1
” hole to be drilled into
⁄
4
water supply line before valve attachment)
• Adjustable wrench
1
⁄
•
” hex nut driver
4
Notes
• Use copper tubing only for installation. Plastic is
less durable and can cause damage.
• Add 8’ to tubing length needed to reach water
supply for creation of service loop.
2’ diameter
1. Create service loop with copper
tubing (minimum 2’ diameter).
Avoid kinks in the copper tubing
when bending it into a service
loop. Do not use plastic tubing.
2. Remove plastic cap from water valve inlet
port.
3. Place brass nut (A) and sleeve (B)
on copper tube end as illustrated.
Reminder: Do not use an old
sleeve. The nut and sleeve are
provided in the use and care packet.
4. Place end of copper tubing into water
valve inlet port. Shape tubing slightly. Do
not kink – so that tubing feeds straight
into inlet port.
5. Slide brass nut over sleeve and screw nut
into inlet port. Tighten nut with wrench.
IMPORTANT: Do not overtighten. Cross
threading may occur.
6. Pull on tubing to confirm connection is
secure. Connect tubing to frame with
water tubing clamp (C) and turn on
water supply. Check for leaks and
correct if necessary. Continue to
observe the water supply connection
for two to three hours prior to moving
the refrigerator to its permanent
location.
7. Monitor water connection for 24 hours. Correct
leaks, if necessary.
minimum
A
C
B
9
Page 11
T
EMPERATURE
C
ONTROLS
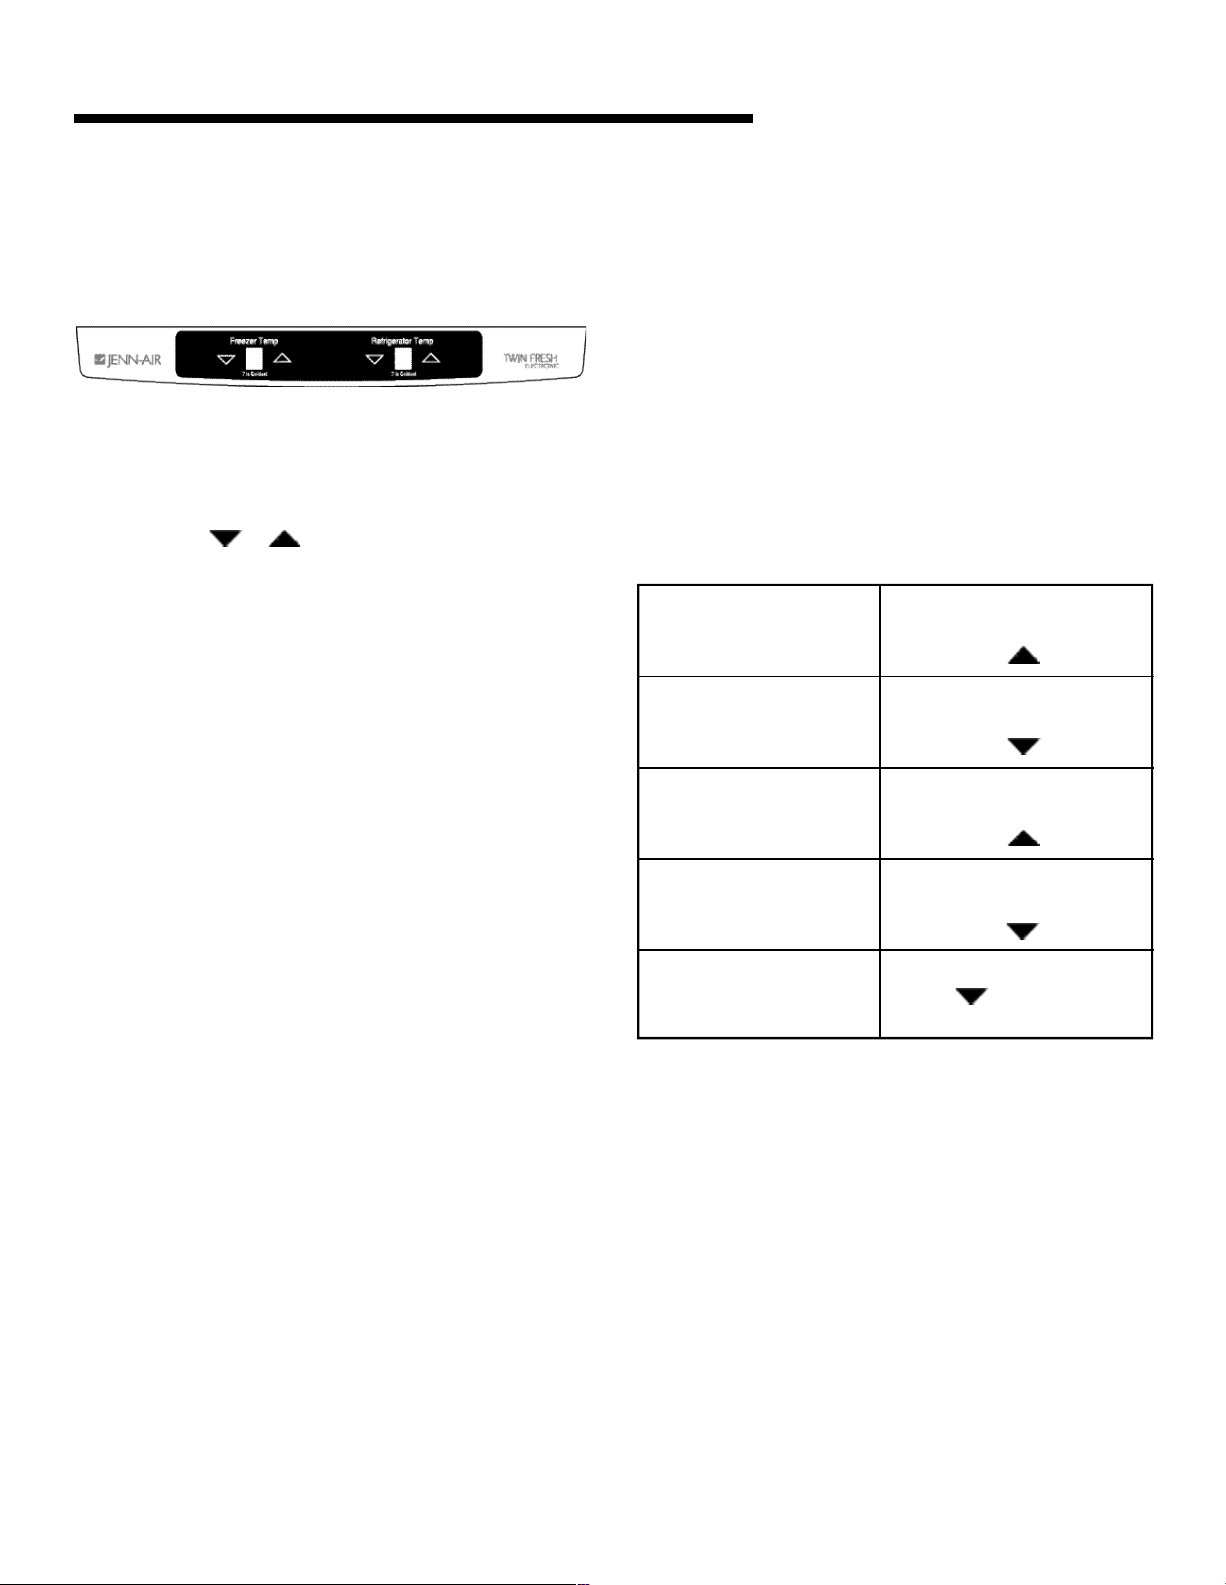
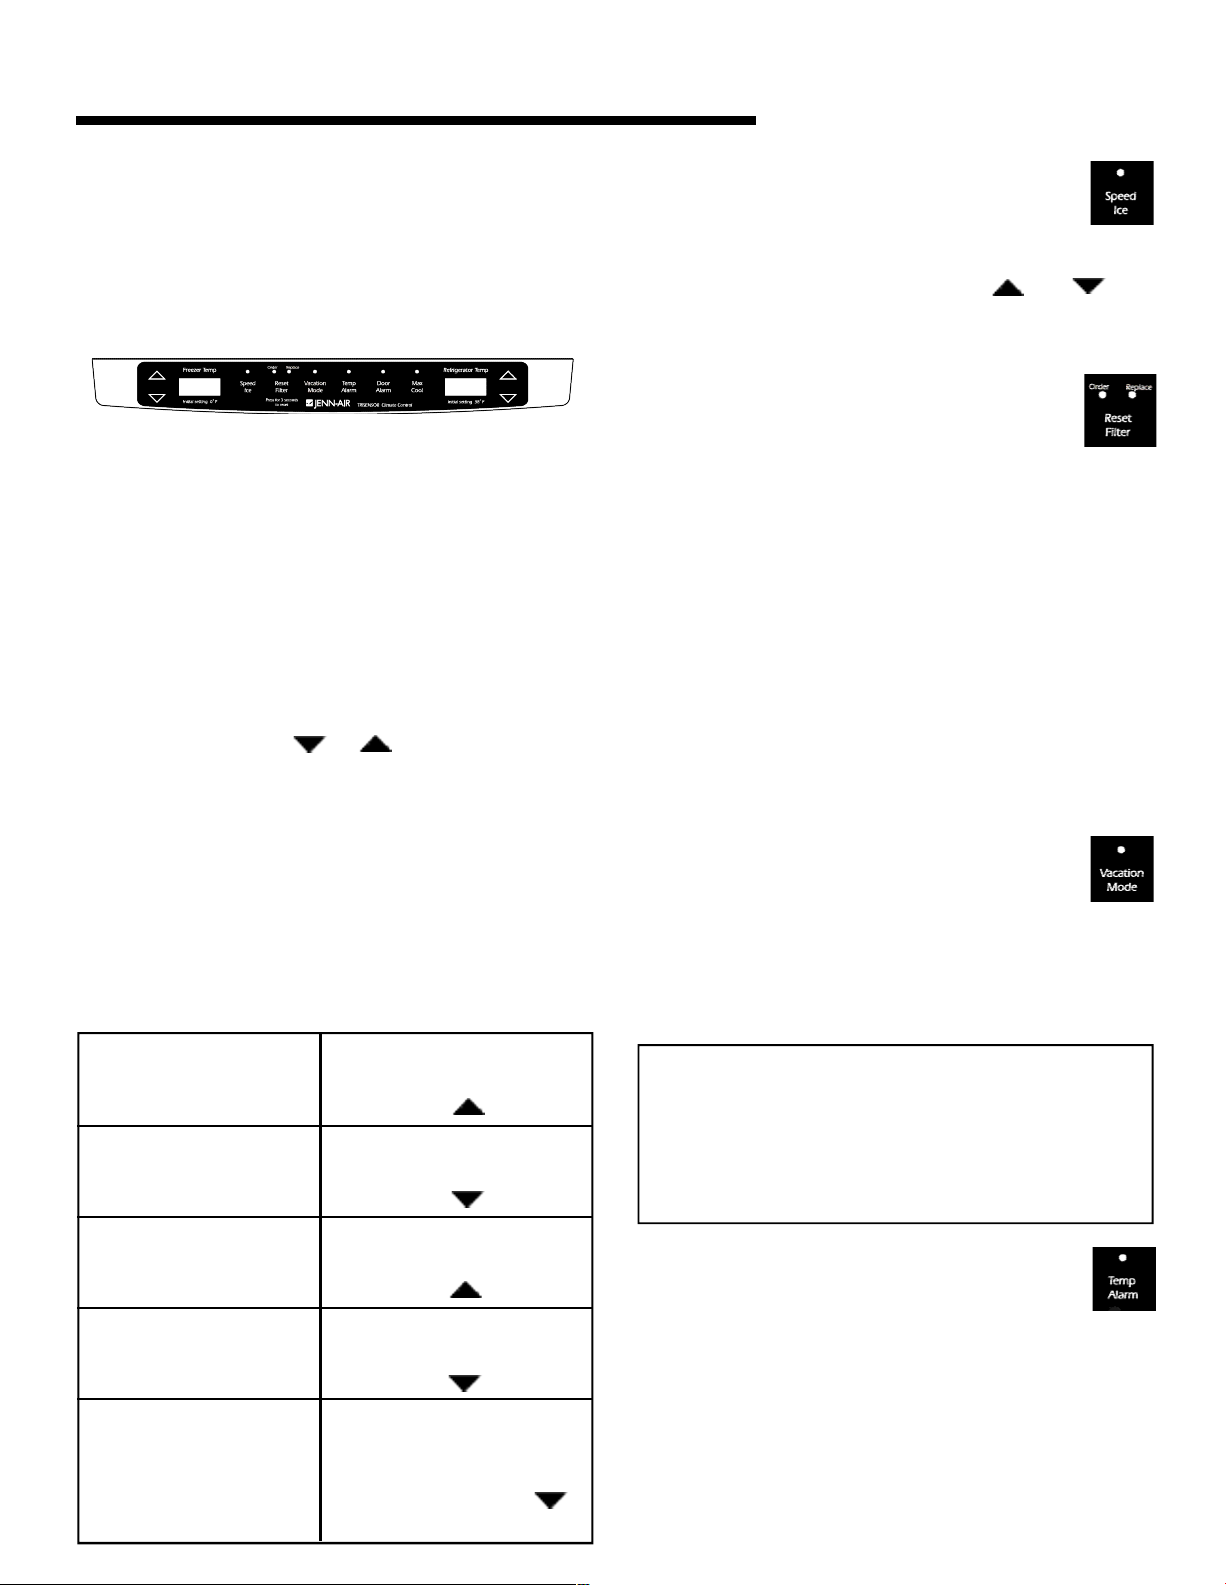
Touch Temperature Controls
The controls are located at the top front of the
refrigerator compartment.
Control
Initial Control Settings
After plugging the refrigerator in, set the controls.
• Pressing the or pads adjusts the controls to
the desired setting.
• The temperature control range for both
compartments is 1 through 7 (coldest).
• Initially set the refrigerator control on 4.
• Initially set the freezer control on 4.
• Let the refrigerator run at least 8 to 12 hours before
adding food.
Warm Cabinet Surfaces
At times, the front of the refrigerator cabinet may be
warm to the touch. This is a normal occurrence that
helps prevent moisture from condensing on the
cabinet. This condition will be more noticeable when
you first start the refrigerator, during hot weather and
after excessive or lengthy door openings.
Adjusting the Controls
• 24 hours after adding food, you may decide that one
or both compartments should be colder or warmer. If
so, adjust the control(s) as indicated in the
Temperature Control Guide table below. See page 20
for instructions on checking compartment
temperature.
• Except when starting the refrigerator, do not change
either control more than one number at a time.
• Allow 24 hours for temperatures to stabilize.
• Changing either control will have some effect on the
temperature of the other compartment.
Temperature Control Guide
Refrigerator too warm
Refrigerator too cold
Freezer too warm
Freezer too cold
Turn refrigerator OFF
Set the refrigerator control
to next higher number by
pressing the pad.
Set the refrigerator control
to next lower number by
pressing the pad.
Set the freezer control to
next higher number by
pressing the pad.
Set the freezer control to
next lower number by
pressing the pad.
Press the refrigerator or
freezer pad until a dash
(–) appears in the display.
10
Page 12
T
EMPERATURE
C
ONTROLS
Trisensor Climate Control
(select models)
The control is located at the top front of the fresh food
compartment.
Control
Initial Temperature Setting
Temperatures are preset at the factory at 38° F (3° C)
in the fresh food compartment and 0° F (-18° C) in the
freezer compartment.
Adjusting the Control
24 hours after adding food, you may decide that one
or both compartments should be colder or warmer. If
so, adjust the control as indicated in the Temperature
Control Guide below.
• The first touch of the or pads shows the
current temperature setting.
• The display will show the new setting for
approximately three seconds, and then return to the
actual temperature currently within that
compartment.
• Do not change either control more than one degree
at a time. Allow temperature to stabilize for 24 hours
before making a new temperature adjustment.
Temperature Control Guide
Refrigerator too cold
Refrigerator too warm
Set the refrigerator control
to next higher number by
pressing the pad.
Set the refrigerator control
to next lower number by
pressing the pad.
Speed Ice
When activated, Speed Ice reduces the freezer
temperature to the optimum setting for 24
hours in order to produce more ice. Note: When the
Speed Ice feature is in operation, the and pads
for the freezer control will not operate.
Reset Filter (select models)
When a water filter has been installed in the
refrigerator, the yellow Order light will
illuminate when 90 percent of the volume of water for
which the filter is rated has passed through the filter
OR 11 months have elapsed since the filter has been
installed.
The red Replace light will illuminate when the rated
volume of water has passed through the filter OR 12
months have elapsed since the filter was installed. A
new filter should be installed immediately when the
Replace light is illuminated.
After replacing the filter, press and hold the Reset
Filter pad for three seconds. The Order and Replace
lights will go off.
Vacation Mode
The Vacation Mode feature causes the freezer
to defrost less frequently, conserving energy. The
Vacation Mode indicator light will illuminate when the
feature is activated. To deactivate, press the Vacation
Mode pad again OR open either door. The indicator
light will go out.
Notes
• Door openings will not deactivate Vacation Mode
for approximately one hour after activation.
• If vacationing for more than a few days, see the
Preparing for Vacation section, page 26.
Freezer too cold
Freezer too warm
Turn refrigerator OFF
11
Set the freezer control to
next higher number by
pressing the pad.
Set the freezer control to
next lower number by
pressing the pad.
Press the freezer pad
until OFF appears in the
display. Press either the
freezer or refrigerator
pad to turn back on.
Temp Alarm
The Temp Alarm system will alert you if the
freezer or fresh food temperatures exceed
normal operating temperatures due to a power outage
or other event. When activated, the Temp Alarm light
will illuminate.
If the freezer or fresh food temperatures have
exceeded these limits, the display will alternately show
the current compartment temperatures and the highest
compartment temperatures reached when the power
was out. An audible alarm will sound repeatedly.
Page 13
T
EMPERATURE
C
ONTROLS
Press the Temp Alarm pad once to stop the audible
alarm. The Temp Alarm light will continue to flash and
the temperatures will alternate until the temperatures
have stabilized.
To turn off Temp Alarm, press and hold the Temp Alarm
pad for three seconds. The indicator light will go off.
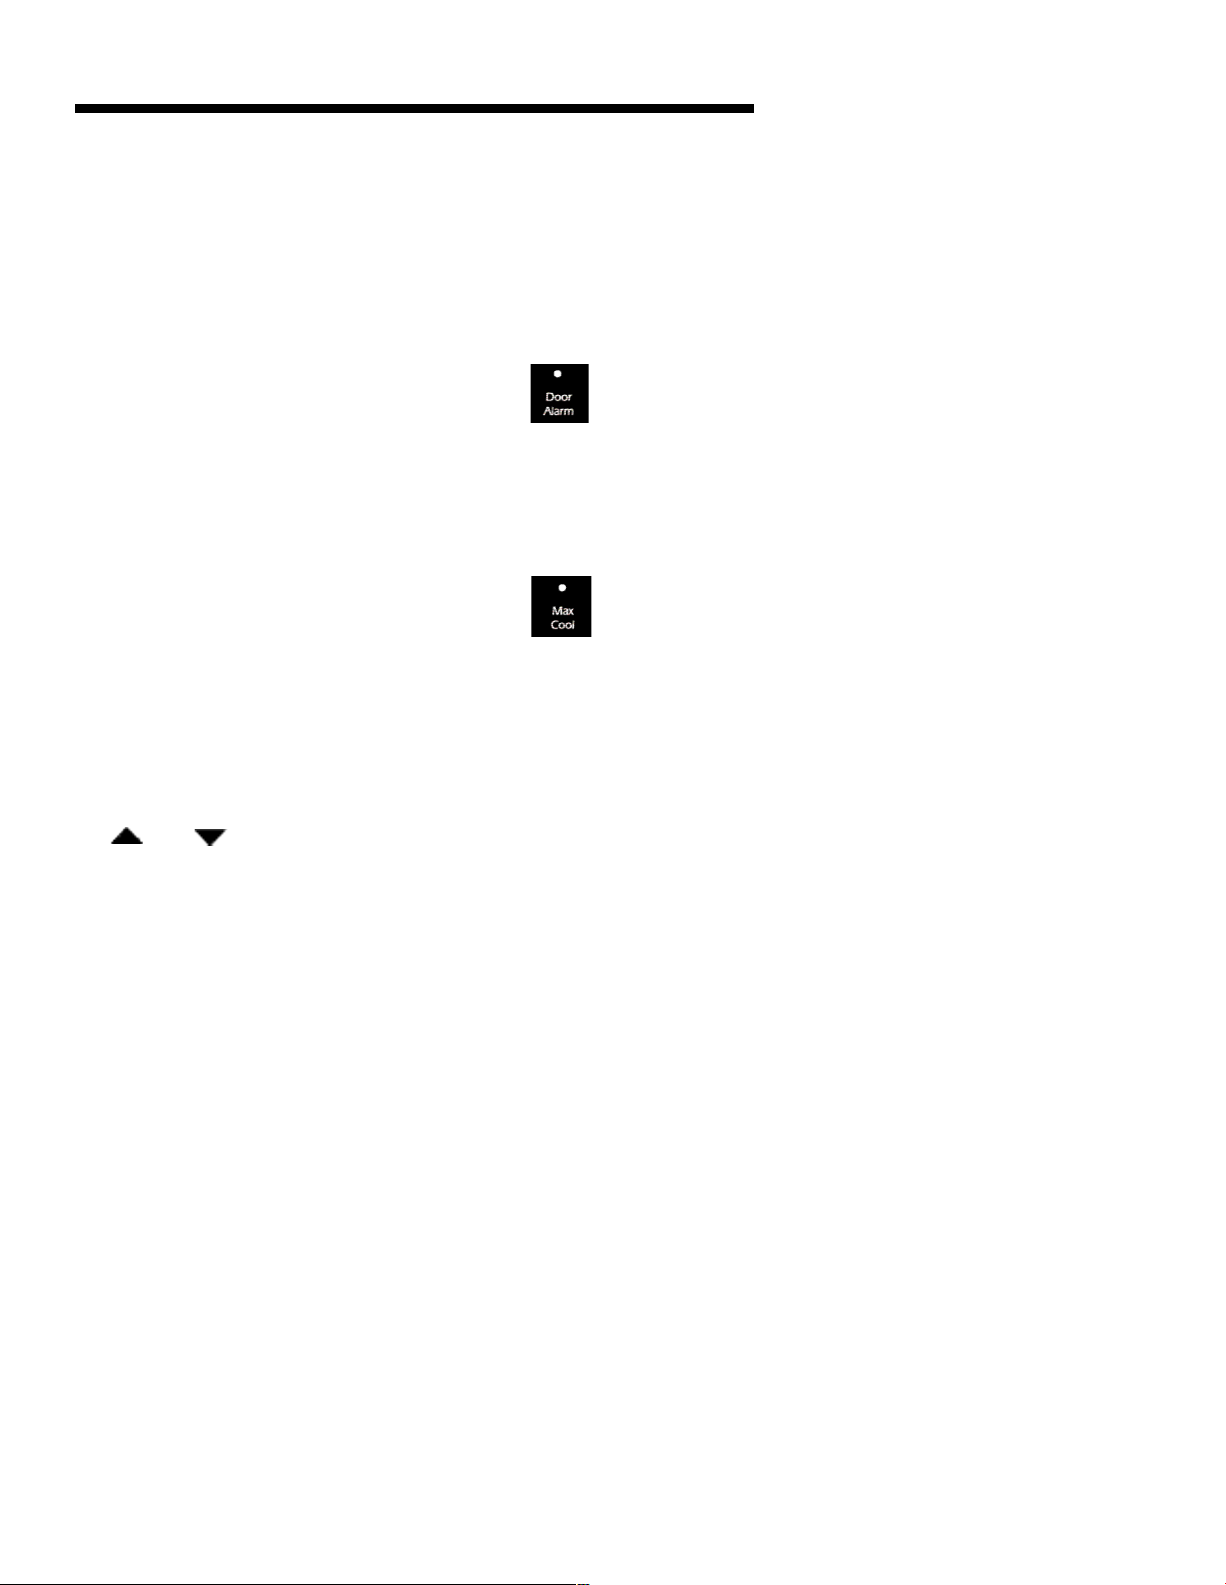
Door Alarm
The Door Alarm will alert you when one of the
doors has been left open for five continuous minutes.
When this happens, an audible alarm will sound every
few seconds until the door is closed OR press the Door
Alarm pad to deactivate the feature.
Max Cool
When activated, Max Cool causes the fresh food
and freezer temperatures to drop to the minimum
settings on the control. This cools down the
refrigerator and freezer after extended door openings
or when loading the refrigerator or freezer with warm
food.
Note: When the Max Cool feature is in operation,
the and pads for the refrigerator and freezer
controls will not operate.
To activate, press the Max Cool pad. Max Cool will
deactivate automatically after 12 hours, OR press the
Max Cool pad to deactivate the feature.
User Preferences
1. Use the Freezer up and down control to scroll
through the features.
2. When the desired feature is displayed, use the Fresh
Food up and down control to change the status.
3. When changes are complete, press the Door Alarm
pad for three seconds OR close the Fresh Food
door.
Super Cool (CC) (select models)
When Super Cool is ON, an air-mixing fan in the fresh
food compartment is activated to improve air flow and
temperature control. To save energy, this feature may
be deactivated by choosing OFF.
Temperature Display (F_C)
Change the display to show temperatures in degrees
Fahrenheit or degrees Celsius.
Alarm (AL)
When the Alarm mode is OFF, all audible alarms will
be disabled until the feature is turned on.
Auto Light Level Selection (LL) (select models)
This setting adjusts the light level at which the
dispenser light will illuminate when the sensor detects
that the light levels in the room are low. Setting 1 is
the darkest light level setting, setting 9 is the lightest
light level setting. Note: The Auto Light (select
models) must be activated on the ice and water
dispenser control to take advantage of this option.
Sabbath Mode (SAB)
When the Sabbath Mode is ON, all control lights and
the night light will be disabled until the feature is
turned OFF. This feature does not disable the interior
lights. Press any pad to restore the control lights.
Access the User Preferences menu to:
• Activate or turn off Super Cool (select models)
• Change the temperature display from °F to °C
• Enable or disable audible alarms.
• Adjust the light level at which the Dispenser Auto
Light will illuminate (when this feature is activated on
the ice and water dispenser) (select models)
• Activate the Sabbath Mode
To access the User Preferences menu, press and hold
the Door Alarm pad for three seconds. When in the
User Preferences mode, a short title for the feature will
appear in the Freezer temperature display and the
feature status will appear in the Fresh Food display.
Warm Cabinet Surfaces
At times, the front of the refrigerator cabinet may be
warm to the touch. This is a normal occurrence that
helps prevent moisture from condensing on the
cabinet. This condition will be more noticeable when
the refrigerator is first started, during hot weather and
after excessive or lengthy door openings.
12
Page 14
F
RESH
F
OOD
F
EATURES
Shelves
CAUTION
To avoid personal injury or property damage,
observe the following:
• Never attempt to adjust a shelf that is loaded with
food.
• Confirm shelf is secure before placing items on
shelf.
• Handle tempered glass shelves carefully. Shelves
may break suddenly if nicked, scratched, or
exposed to sudden temperature change.
Your refrigerator has Spill-proof Glass Shelves. The
Spill-proof shelves have a spill retainer edge which
allows for easier clean up and are equipped with a
slide out feature. To slide out, grasp the front of the
shelf and pull forward. Push in the shelf to return to
the original position.
To Remove a Shelf:
• Slightly tilt up the front and lift up
the rear of the shelf, then pull the
shelf straight out.
To Lock the Shelf Into Another
Position:
• Tilt up the front edge of the shelf.
• Insert the hook into the desired frame openings and
let the shelf settle into place.
• Be sure the shelf is securely locked at the rear.
• Place hand under the frame to push up the glass. Lift
glass out.
• Lift frame from refrigerator liner rails.
To Install:
• Replace frame in refrigerator liner rails.
• Carefully replace glass into frame.
Door Storage
Dairy Center
The Dairy Center provides
convenient door storage for
spreadable items such as butter
and margarine. This compartment can be moved to
different locations to accommodate storage needs. To
use the dairy center, raise the cover.
To Remove:
• Raise the cover, pull upward and tilt out.
To Install:
• Slide the Dairy Center in and down until firmly seated
in the door liner.
Door Buckets
Door Buckets can be moved to meet storage needs.
To Remove:
• Slide bucket up and pull straight out.
To Install:
Rear Shelf Extensions
Rear Shelf Extensions help prevent articles from
falling off the back of the shelf.
To remove and install shelf extension:
• To remove, pull extension straight up from the rear of
shelf.
• To install, insert posts of the
shelf extension into holes in the
shelf frame.
The Crisper Top serves as the lower fresh food shelf.
To Remove the Crisper Top:
• Remove crisper drawers.
13
• Slide bucket in and down until
firmly seated in the door liner.
Crisper Drawers
The Crisper Drawers provide a higher humidity
environment for fresh fruit and vegetable storage.
Controls
The Crisper Controls regulate the amount of humidity
in the crisper drawer. Slide the control toward the Fruit
setting for produce with outer skins. Slide the control
toward the Vegetables setting for leafy produce.
Page 15
F
RESH
F
OOD
F
EATURES
To Remove:
• Pull drawer out to full extension. Tilt up front of
drawer and pull straight out.
To Install:
• Insert drawer into frame rails and push back into
place.
Note
• For best results, keep the crisper drawers tightly
closed.
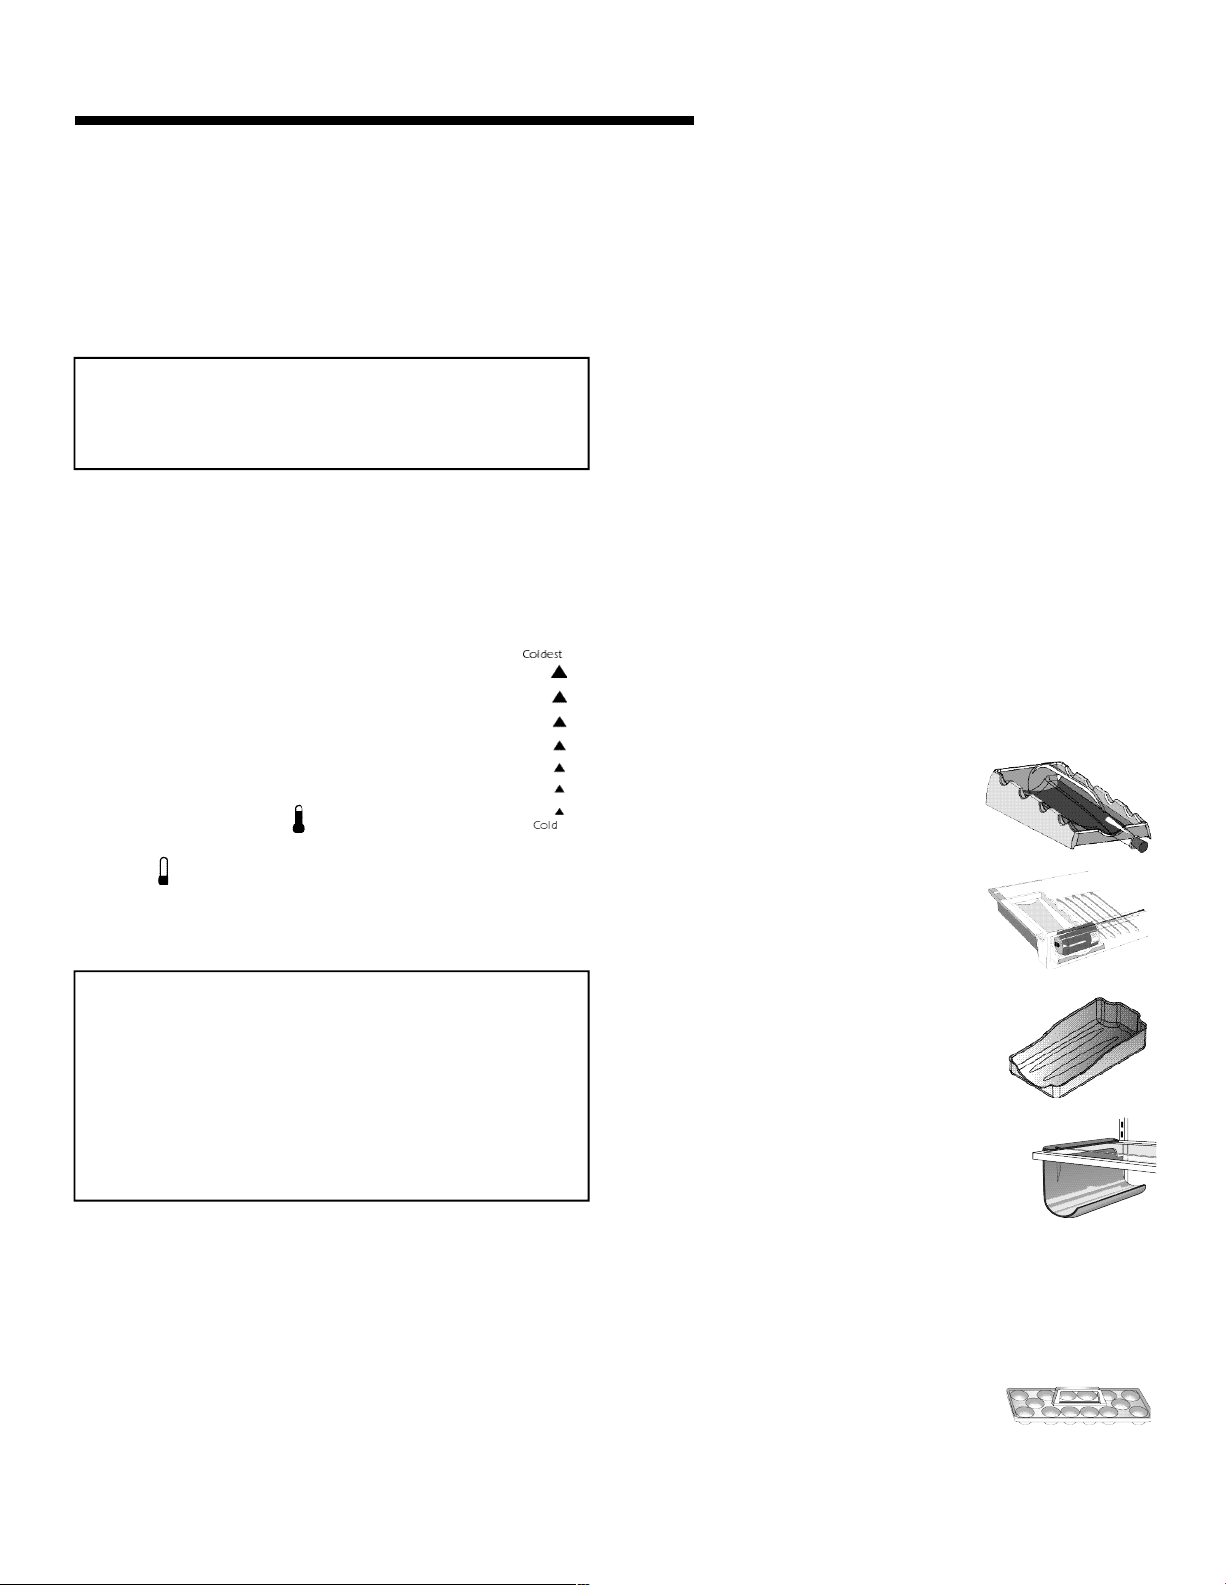
Gourmet Bay™
The Gourmet Bay™ drawer is a full-width drawer with
adjustable temperature control. This drawer can be
used for large party trays, deli items, beverages or
miscellaneous items. There is a divider to
organize the drawer into sections if desired.
There is a temperature control which adjusts
the amount of cold air allowed into the
Gourmet Bay™. The control is located on the
right of the drawer, under the lid.
Set the control to cold to provide a normal
refrigerator temperature. Set the drawer on the
coldest setting when a temperature colder than the
main refrigerator compartment is desired. Use the
coldest setting when storing meats.
To Remove:
• Lift lid. Pull drawer out to full extension. Tilt the
drawer front up and pull straight out.
To Install:
• Push metal glide rails to the back of the refrigerator.
Place drawer onto rails and slide drawer back until it
falls into place.
To Remove Divider:
• Pull drawer completely out and raise the front of the
divider to unhook it from the rear wall of the pantry
and lift it out.
To Install Divider:
• Hook back of divider over rear wall of pantry and
lower into place.
Accessories
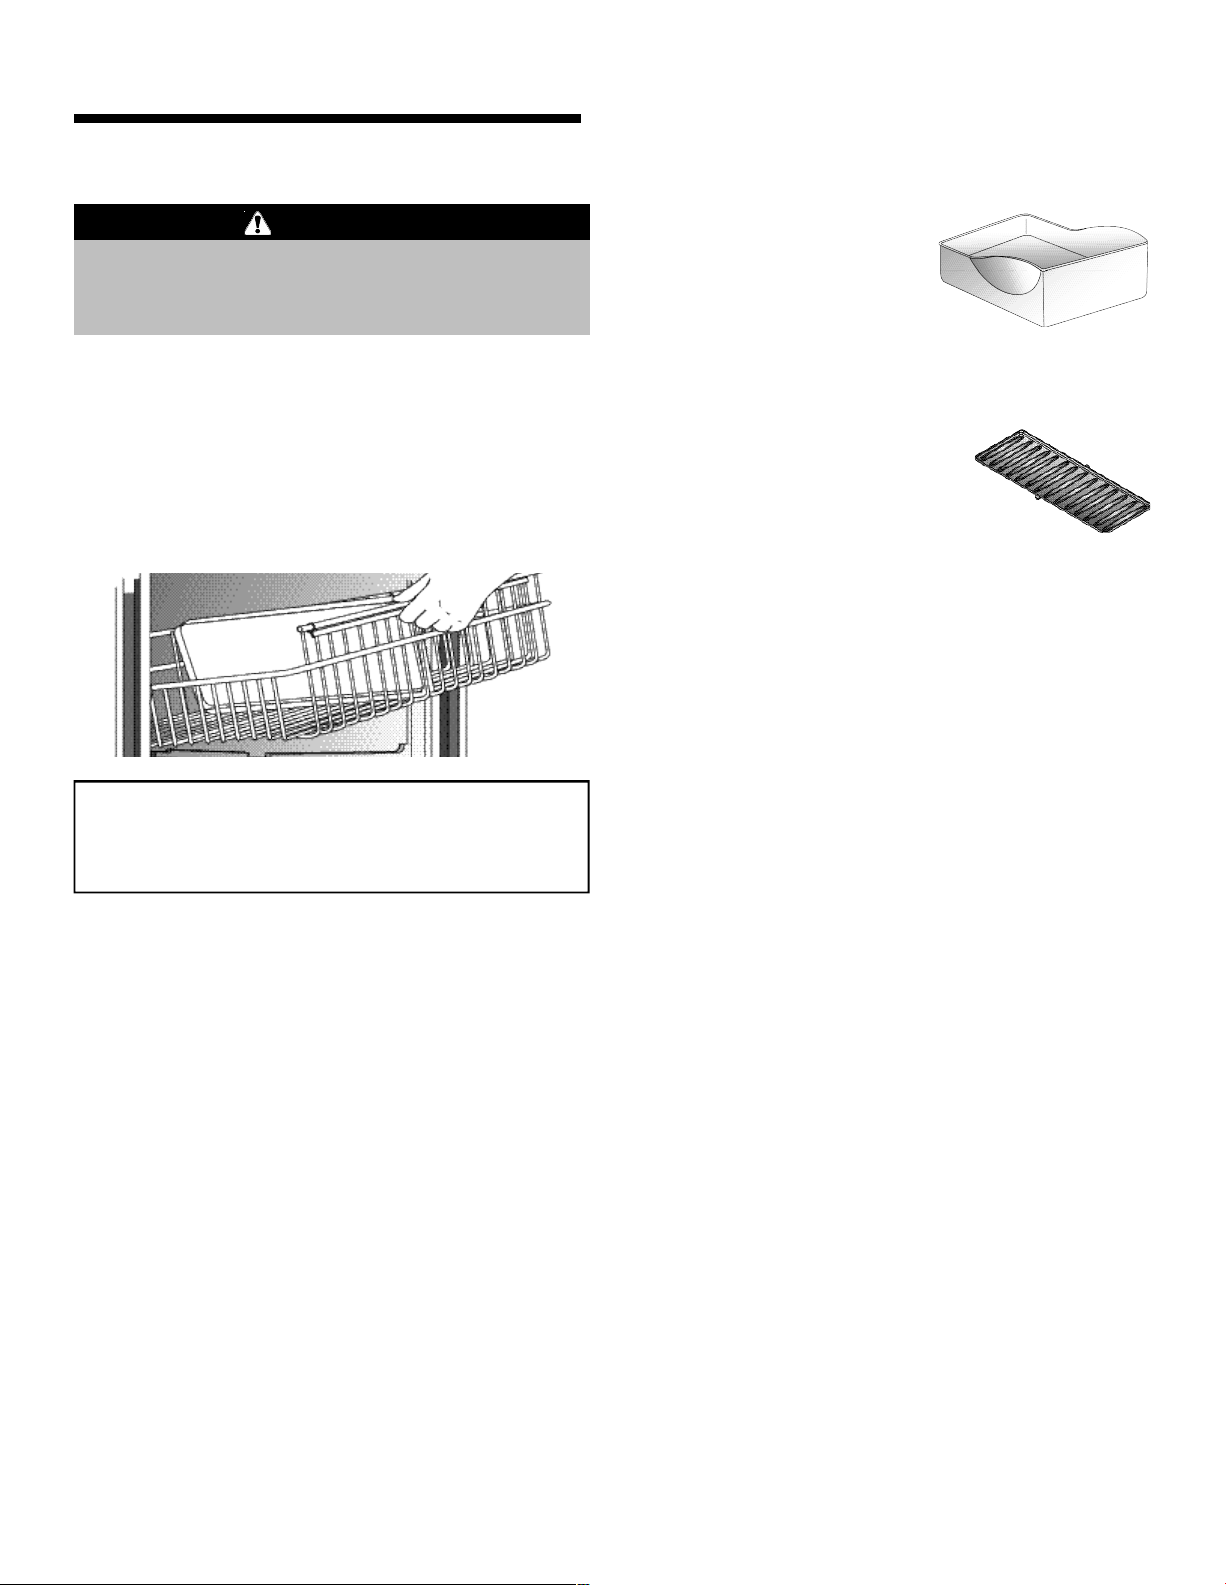
Wine Trivet/Can Rack
The Wine Trivet/Can Rack
accessory fits in the Gourmet Bay™
or on a shelf.
Bottles or cans can be laid
crosswise, or a single bottle may be
laid in the center depression.
(select models)
Notes
• Cold air directed to the Gourmet Bay™ drawer can
decrease refrigerator temperature. Refrigerator
control may need to be adjusted.
• Do not place leafy vegetables in the Gourmet
Bay™ drawer. Colder temperatures could damage
leafy produce.
Gourmet Bay™ Tray
The Gourmet Bay™ Tray allows for a
removable tray within the full-width
storage drawer.
Adjustable Storage Rack
The Adjustable Storage Rack provides
a place for horizontally storing wine. The
rack can also hold an egg carton.
Position the rack to rest on the left hand side of a
refrigerator shelf.
Egg Cradle
The Egg Cradle (style may vary)
holds a “dozen-plus” eggs. It can be
removed to carry to work area or to be
washed.
14
Page 16
F
REEZER
F
EATURES
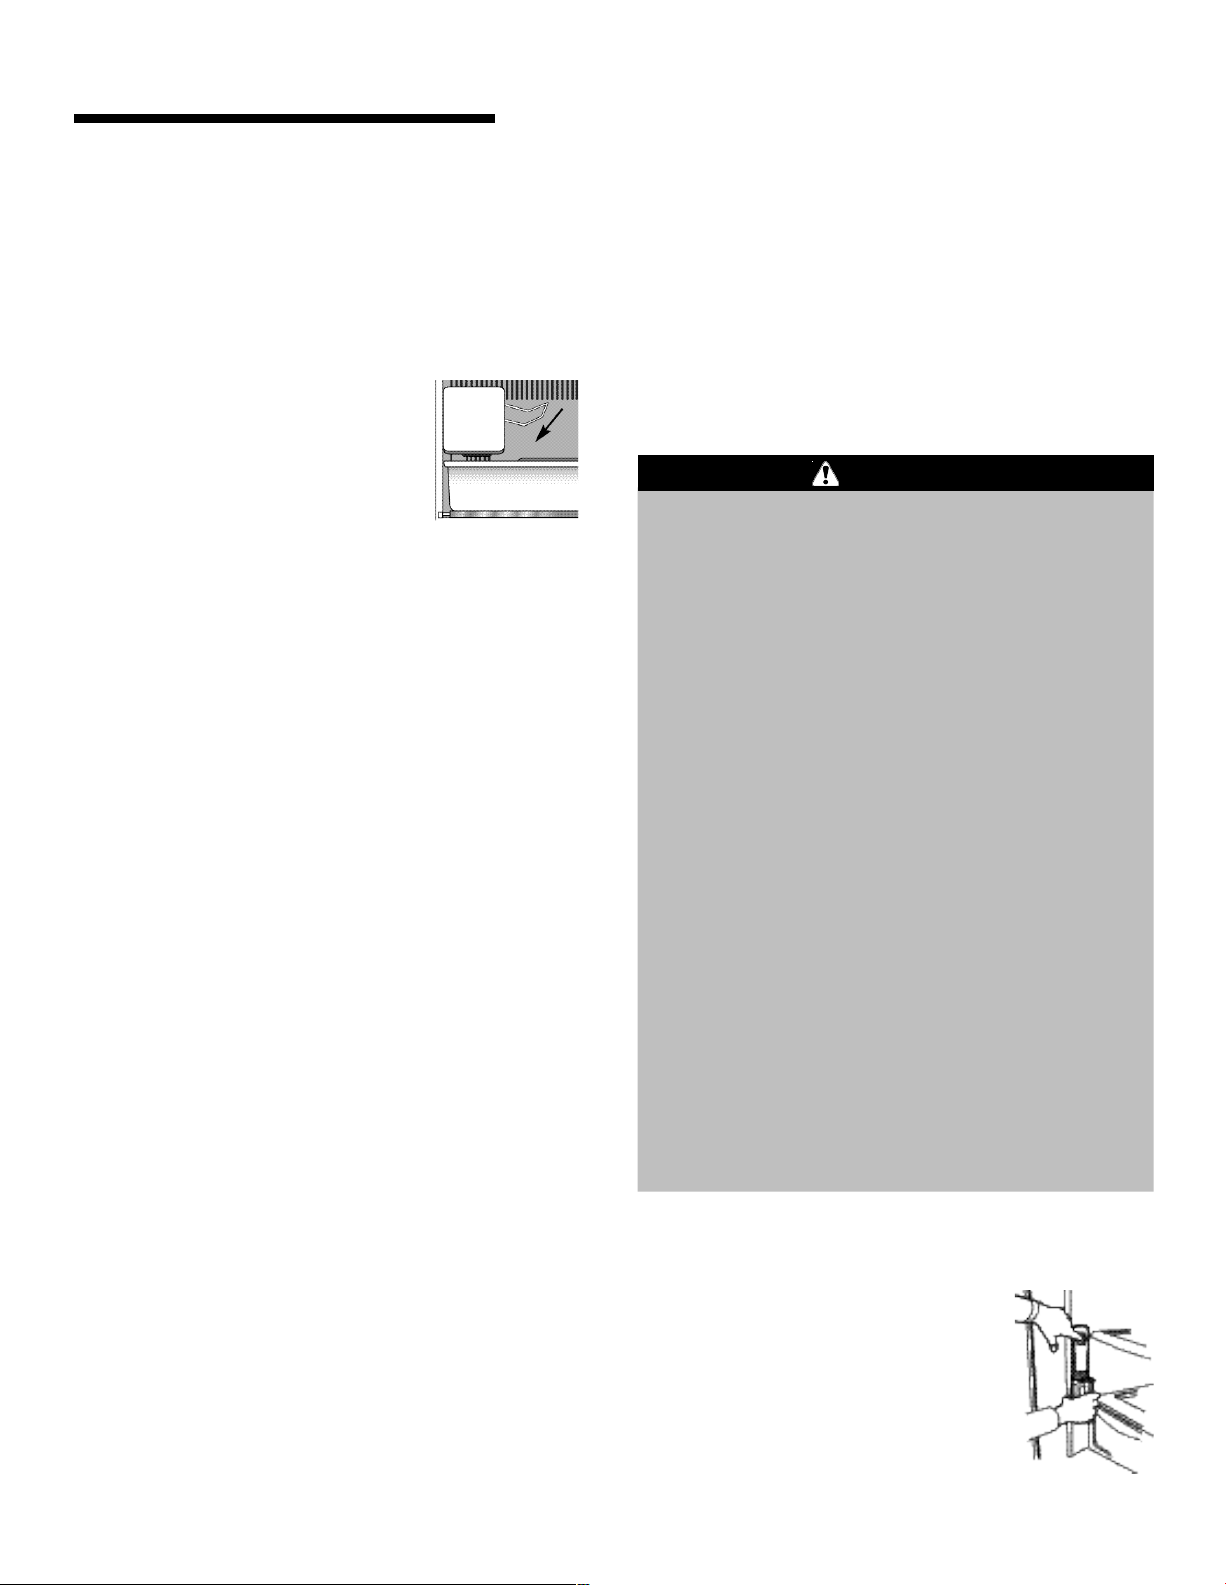
Upper Wire Basket
DANGER
To prevent accidental child entrapment or
suffocation risk, do not remove the divider in the top
freezer basket
To Remove:
• Pull upper basket out to full extension and lift out to
remove.
To Install:
• Slide upper basket into freezer. Make sure that rear
of basket hooks behind rail catch.
Accessories
Ice Bin
The Ice Bin provides storage
for ice.
Lower Basket Tray
The Basket Tray is a removable
plastic item that rests on the
bottom of the lower pullout
basket to catch spills and small
food items before they can fall
through to the freezer
compartment.
The tray can be removed for easy
cleaning by lifting the tray from the basket.
Lower Basket Divider
The Lower Basket Divider allows the option to
organize the basket area into sections.
Note
• Lower Freezer Drawer: See page 5 for lower
basket and complete pullout drawer instructions.
To remove and replace divider:
• To remove, pull divider straight up.
• To install, hook top corners of divider over top
horizontal basket rungs.
15
Page 17
I
CE AND
W
ATER
Automatic Ice Maker
Connect the ice maker to the water supply as
instructed on page 9. Proper water flow and a level
refrigerator are essential for optimal ice maker
performance.
Operating Instructions
• Confirm ice bin is in place and ice
maker arm is down.
• After freezer section reaches
between 0° to 2° F (-18° to -17° C),
ice maker fills with water and
begins operating. You will have a
complete harvest of ice approximately every three
hours.
• Allow approximately 24 hours after installation to
receive first harvest of ice.
• Discard ice created within first 12 hours of operation
to assure system is flushed of impurities.
• Turn off (arm up) the ice maker when the water
supply is to be shut off for several hours.
To Remove the Ice Bin:
• Pull it forward, away from the ice maker. To avoid the
ice maker dumping ice while the bin is removed, turn
the ice maker off by raising the icemaker arm.
To Install the Ice Bin:
• Reverse the above procedure. Turn the ice maker on
by lowering the ice maker arm.
WARNING
To avoid personal injury or property damage,
observe the following:
• Do not place fingers or hands on the automatic ice
making mechanism while the refrigerator is
plugged in. This will help protect you from possible
injury. It will also prevent interference with moving
parts of the ejector mechanism and the heating
element that releases the cubes.
• Stop ice production by raising ice maker arm until
click is heard.
• Ice maker will remain in the off position until arm is
pushed down.
• The first one or two batches will probably contain
undersized and irregular cubes because of air in the
supply line.
• When the ice cubes are ejected it is normal for
several cubes to be joined together at the ends. They
can easily be broken apart. The ice maker will
continue to make ice until the supply of ice cubes
raises the ice maker arm, shutting the ice maker off.
• Certain sounds may accompany the various cycles of
the ice maker. The motor may have a slight hum, the
cubes will rattle as they fall into an empty storage
pan and the water valve may click or “buzz”
occasionally.
• If the ice is not used frequently, the ice cubes will
become cloudy, shrink, stick together and taste stale.
Empty the ice storage bin periodically and wash it in
lukewarm water. Be sure to dry the bin thoroughly
before replacing it.
• Under certain rare circumstances, ice cubes may
be discolored, usually appearing with a greenbluish hue. The cause of this unusual discoloration
can be a combination of factors such as certain
characteristics of local waters, household
plumbing and the accumulation of copper salts in
an inactive water supply line which feeds the ice
maker. Continued consumption of such discolored
ice cubes may be injurious to health. If such
discoloration is observed, discard the ice cubes
and contact your dealer to purchase and install a
water line filter.
• Water damage due to improper water connection
may cause mold/mildew growth.
• Clean up water and ice spills to avoid personal
injury and to prevent mold/mildew growth.
Water Dispenser
The Water Dispenser is located on
the left side wall of the fresh food
section. This design is for cold water
dispensing only.
• Beverages and foods should not be placed in the ice
storage bin for quick chilling. These items can block
the ice maker arm, causing the ice maker to
malfunction.
To Dispense Water:
• Hold container under spout and
press dispenser pad.
16
Page 18
W
ATER
F
ILTER
Removal and Installation
WARNING
To avoid serious illness or death, do not use
refrigerator where water is unsafe or of unknown
quality without adequate disinfection before or after
use of filter.
CAUTION
After installing a new water filter, always
dispense water for two minutes before
removing the filter for any reason. Air trapped in
system may cause water and cartridge to eject.
Use caution when removing.
• The bypass cap does not filter water. Be sure to
have replacement cartridge available when filter
change is required.
• If water filtration system has been allowed to
freeze, replace filter cartridge.
• If system has not been used for several months, or
water has an unpleasant taste or odor, flush
system by dispensing two to three glasses of
water. If unpleasant taste or odor persists, change
filter cartridge. If system has not been use for
three months or more, replace water filter
cartridge.
Initial Installation
The water filter is located in the
upper right hand corner of the fresh
food compartment.
1. Remove blue bypass cap and
retain for later use.
3. Rotate gently clockwise until filter stops. Snap filter
cover closed.
4. Reduce water spurts by flushing air from system.
Run water continuously for two minutes through
dispenser until water runs steady. During initial
use, allow about a one- to two-minute delay in
water dispersal to allow internal water tank to fill.
• Additional flushing may be required in some
households where water is of poor quality.
Replacing Water Filter
IMPORTANT: Air trapped in system may cause
water and cartridge to eject. Always dispense
water for two minutes before removing the filter
for any reason. Use caution when removing.
1. Turn filter counterclockwise until it releases from
filter head.
2. Drain water from filter into sink, and dispose of
filter in normal household trash.
3. Wipe up excess water in filter cover and continue
with Initial Installation, steps 2 through 4.
The filter should be changed at least every 12 months.
Important: Condition of water and amount used
determines life span of water filter cartridge. If water
use is high, or if water is of poor quality, replacement
may need to take place more often.
To purchase a replacement water filter ca r tridge,
call 1-800-JENNAIR (1-800-536-6247) U.S.A. and
Canada.
The dispenser feature may be used without a water
filter cartridge. If you choose this option, replace filter
with blue bypass cap.
2. Remove sealing label from end of
filter and insert into filter head.
17
Page 19
W
ATER
F
ILTER
System Specification and Performance Data Sheet
Refrigerator Water Filter Cartridge Model UKF8001AXX
Specifications
Service Flow Rate (Maximum).............................................0.78 GPM (2.9 L/min)
Rated Service Life UKF8001AXX-750 (Maximum)......750 gallons /2838 liters
Maximum Operating Temperature .....................................100° F / 38° C
Minimum Pressure Requirement........................................35 psi / 241 kPA
Minimum Operating Temperature ......................................33° F /1° C
Maximum Operating Pressure .............................................120 psi / 827 kPA
1000 Apollo Road
Eagan, Minnesota 55121-2240
651.450.4913
EPA EST #35917-MN-1
Performance Data
Standard No. 42: Aesthetic Effects
Parameter
Chlorine
T & O
Particulate**
Parameter
Turbidity
Cysts
Asbestos
Lead at pH 6.5
Lead at pH 8.5
Mercury at pH 6.5
Mercury at pH 8.5
Atrazine
Benzene
Carbofuran
p-Dichlorobenzene
Lindane
Toxaphene
* Tested using a flow rate of 0.78 gpm; pressure of 60 psig; pH of 7.5 + 0.5; temp. of
68° + 5° F (20° + 3° C)
** Measurement in Particles /ml. Particles used were 0.5 - 1 microns
*** NTU - Nephelometric Turbidity Units
USEPA
MCL
—
—
—
USEPA
MCL
1 NTU**
99.5% Reduction
99% Reduction
0.015 mg/L
0.015 mg/L
0.002 mg/L
0.002 mg/L
0.003 mg/L
0.005 mg/L
0.04 mg/L
0.075 mg/L
0.0002 mg/L
0.003 mg/L
Standard No. 53: Health Effects
1 071 08f i b e r s /L; fibers >10 micrometers in length
Influent
Challenge Concentration
2.0 mg /L ± 10%
—
at least 10,000 particles /ml
Influent
Challenge Concentration
11 ± 1 NTU***
Minimum 50,000/L
0.15 mg/L + 10%
0.15 mg/L + 10%
.006 mg/L ± 10%
.006 mg/L ± 10%
0.009 mg/L + 10%
0.015 mg/L ± 10%
0.08 mg/L ± 10%
.225 mg/L ± 10%
0.002 mg/L + 10%
0.015 ± 10%
Influent
Average
1.88 mg /L
—
5,700,000 #/ml
Influent
Average
10.7 NTU
166,500 #/L
155 MF/L
0.153 mg/L
0.150 mg/L
0.006 mg/L
0.006 mg/L
0.009 mg/L
0.014 mg/L
0.081 mg/L
0.208 mg/L
0.002 mg/L
0.015 mg/L
100834/B
Effluent % Reduction
Average
<0.05136 364 mg/ L
—
30,583 # /ml
Average
0.31 NTU
<1 #/L
<1 MF/L
<.001 mg/L
<.001 mg/L
0.0003 mg/L
0.0008 mg/L
<0.002 mg/L
0.0006 mg/L
<0.001 mg/L
<0.0005 mg/L
0.000 mg/L
<0.001 mg/L
Tested and certified by NSF International against ANSI/NSF Standard s 42 & 53
in models UKF8001AXX-750 for the reduction of:
Standard No. 42: Aesthetic Effects
Taste and Odor Reduction
Chlorine Taste & Odor
Mechanical Filtration Unit
Particulate Reduction Class 1
Maximum
0.06 mg /L
—
69,000 # /ml
Effluent % Reduction
Maximum
.049 NTU
<1 #/L
<1 MF/L
<.001 mg/L
<.001 mg/L
0.0005 mg/L
0.0015 mg/L
0.002 mg/L
0.0011 mg/L
<0.001 mg/L
<0.0005 mg/L
< 0.0001 mg/L
<0.001 mg/L
Average
> 97.26%
—
99.52%
Average
97.09%
>99.9 9%
>99.9 9%
> 99.35%
> 99.33%
95.70%
86.22%
76.99%
95.71%
98.74%
99.76%
98.72%
92.97%
Standard No. 53: Health Effects
Chemical Reduction Unit
Lead, Atrazine, Lindane, Benzene,
Carbofuran, p-Dichlorobenzene, Mercury
& Toxaphene Reduction
Mechanical Filtration Unit
Cyst, Turbidity and Asbestos Reduction
Minimum
96.84%
98.94%
Minimum
>99.9 9%
>99.9 9%
> 99.29%
> 99.29%
95.20%
90.91%
75.93%
75.31%
92.14%
98.46%
99.74%
96.50%
91.67%
—
Min. Required
Reduction
50%
—
85%
Min. Required
Reduction
0.5 NTU
> 99.95%
99%
0.10 mg/L
0.10 mg/L
0.002 mg/L
0.002 mg/L
0.003 mg/L
0.005 mg/L
0.04 mg/L
0.075 mg/L
0.0002 mg/L
0.003 mg/L
General Use Conditions
Read this Performance Data Sheet and compare the
capabilities of this unit with your actual water treatment
needs.
DO NOT use this product where water is micro b i o l o g i c ally unsafe or of unknown quality without adequate
d i s i n f ection befo r e or after the system. System certified
for cyst reduction may be used on disinfected wa t e r
that may contain filterable cysts.
USE ONLY WITH COLD WATER SUPPLY. CHECK FOR
COMPLIANCE WITH THE STATE AND LOCAL LAWS
AND REGULATIONS.
The PuriClean®II retractable water filtration system uses a
UKF8001AXX replacement cartridge. Timely replacement of
filter cartridge is essential for performance satisfaction from
this filtration system. Please refer to the applicable section of
your Use & Care Guide for general operation, maintenance
requirements and troubleshooting. Suggested retail price of
replacement water filter is $39.99.
This system has been tested according to ANSI/NSF 42 and
53 for reduction of the substance listed above. Th e
concentration of the indicated substa n c es in water entering
the system was reduced to a concentration less than or equal
to the permissible limit for water leaving the system, as
specified in ANSI/NSF 42 and 53.
18
Page 20

W
ATER
F
ILTER
State of California
Department of Health Services
Water Treatment Device
Certificate Number
03 - 1583
Date Issued: September 16, 2003
Date Revised: April 22, 2004
Trademark /Model Designation Replacement Elements
UKF8001AXX750 UKF8001AXX
469006-750 46 9006
67003523-750 67003523
Manufacturer: PentaPure Inc.
The water treatment device(s) listed on this certificate have met the testing requirements pursuant to Section 116830 of the
Health and Safety Code for the following health related contaminants:
Microbiological Contaminants and Turbidity Inorganic/Radiological Contaminants
Cysts Asbestos
Turbidity Lead
Mercury
Organic Contaminants
Atrazine
Lindane
Benzene
Carbofuran
p-dichlorobenzene
Toxaphene
19
Rated Service Capacity: 750 gal. Rated Service Flow: 0.78 gpm
Conditions of Certification:
Do not use where water is microbiologically unsafe or with water of unknown quality, except that systems certified for cyst
reduction may be used on disinfected waters that may contain filterable cysts.
Page 21

F
OOD
S
TORAGE
T
IPS
Fresh Food Storage
• The fresh food compartment of a refrigerator should
be kept between 34°-40° F (1°- 4° C) with an
optimum temperature of 37° F (3° C). To check the
temperature, place an appliance thermometer in a
glass of water and place in the center of the
refrigerator. Check after 24 hours. If the temperature
is above 40° F (4° C) adjust the controls as explained
on pages 10-12.
• Avoid overcrowding the refrigerator shelves. This
reduces the circulation of air around the food and
results in uneven cooling.
Fruits and Vegetables
• Storage in the crisper drawers traps humidity to help
preserve the fruit and vegetable quality for longer
time periods (see page 14).
• Sort fruits and vegetables before storage and use
bruised or soft items first. Discard those showing
signs of decay.
• Always wrap odorous foods such as onions and
cabbage so the odor does not transfer to other foods.
Frozen Food Storage
• The freezer compartment of a refrigerator should be
kept at approximately 0° F (-18° C). To check the
temperature, place an appliance thermometer
between the frozen packages and check after 24
hours. If the temperature is above 0° F (-18° C),
adjust the control as described on pages 10-12.
• A freezer operates more efficiently when it is at least
two-thirds full.
Packaging Foods for Freezing
• To minimize dehydration and quality deterioration use
aluminum foil, freezer wrap, freezer bags or airtight
containers. Force as much air out of the packages as
possible and be sure they are tightly sealed. Trapped
air can cause the food to dry out, change color and
develop an off-flavor (freezer burn).
• Overwrap fresh meats and poultry with suitable
freezer wrap prior to freezing.
• Do not refreeze meat that has completely thawed.
Loading the Freezer
• While vegetables need a certain amount of humidity
to remain fresh, too much humidity can shorten
storage times (especially leafy vegetables). Drain
vegetables well before storing.
• Wait to wash fresh produce until right before use.
Meat and Cheese
• Raw meat and poultry should be wrapped securely
so leakage and contamination of other foods or
surfaces does not occur.
• Occasionally mold will develop on the surface of
hard cheeses (Swiss, Cheddar, Parmesan). Cut off at
least an inch around and below the moldy area. Keep
your knife or instrument out of the mold itself. Do not
try to save individual cheese slices, soft cheese,
cottage cheese, cream, sour cream or yogurt when
mold appears.
Dairy Food
• Most dairy foods such as milk, yogurt, sour cream
and cottage cheese have freshness dates on their
cartons for appropriate length of storage. Store these
foods in the original carton and refrigerate
immediately after purchasing and after each use.
• Avoid adding too much warm food to the freezer at
one time. This overloads the freezer, slows the rate of
freezing and can raise the temperature of frozen
foods.
• Leave space between the packages so cold air can
circulate freely, allowing food to freeze as quickly as
possible.
• Avoid storing hard-to-freeze foods such as ice cream
and orange juice on the freezer door shelves. These
foods are best stored in the freezer interior where the
temperature varies less with door openings.
Refer to the Food Storage Chart on pages 21 and 22 for
approximate storage times.
20
Page 22
F
OOD
S
TORAGE
T
IPS
Food Storage Chart
Storage times are approximate and may vary depending on type of packaging, storage temperature, and the quality
of the food when purchased.
FOODS
DAIRY PRODUCTS
Butter
Milk and cream
Cream cheese, cheese
spread and cheese food
Cottage cheese
Sour cream
Hard cheese
(Swiss, Cheddar and Parmesan)
EGGS
Eggs in the shell
REFRIGERATOR
1 month
1 week
1 to 2 weeks
3 to 5 days
10 days
1 to 2 months
3 weeks
FRE EZER
6 to 9 months
Not recommended
Not recommended
Not recommended
Not recommended
4 to 6 months
May become
crumbly
Not recommended
STORAGE TIPS
Wrap tightly or cover.
Check carton date. Close tightly.
Don’t return unused portions to
original container. Don’t freeze
cream unless whipped.
Wrap tightly.
Store in original carton.
Check carton date.
Store in original carton.
Check carton date.
Wrap tightly.
Cut off any mold.
Refrigerate small ends down.
Leftover yolks or whites
FRUITS
Apples
Bananas
Pears, plums, avocados
Berries, cherries, apricots
Grapes
Citrus fruits
Pineapples, cut
2 to 4 days
1 month
2 to 4 days
3 to 4 days
2 to 3 days
3 to 5 days
1 to 2 weeks
2 to 3 days
9 to 12 months
8 months (cooked)
6 months
(whole/peeled)
Not recommended
6 months
1 month (whole)
Not recommended
6 to 12 months
For each cup of yolks to be frozen,
add 1 tsp. sugar for use in sweet, or
1 tsp. salt for non-sweet dishes.
May also store unripe or hard apples
at 60° to 70° F (16° to 21° C).
Ripen at room temperature before
refrigerating. Bananas darken when
refrigerated.
Ripen at room temperature before
refrigerating. Avocados darken when
refrigerated.
Ripen at room temperature before
refrigerating.
Ripen at room temperature before
refrigerating.
May also store at 60° to 70° F (16° to
21° C). If refrigerated, store uncovered.
Will not ripen after purchase.
Use quickly.
21
Page 23
F
OOD
S
TORAGE
T
IPS
FOODS
VEGETABLES
Asparagus
Brussels sprouts, broccoli,
cauliflower, green peas,
lima beans, onions, peppers
Cabbage, celery
Carrots, parsnips, beets and
turnips
Lettuce
POULTRY and FISH
Chicken and Turkey, whole
Chicken and Turkey, pieces
Fish
MEATS
REFRIGERATOR
1 to 2 days
3 to 5 days
1 to 2 weeks
7 to 10 days
7 to 10 days
1 to 2 days
1 to 2 days
1 to 2 days
FRE EZER
8 to 10 months
8 to 10 months
Not recommended
8 to 10 months
Not recommended
12 months
9 months
2 to 6 months
STORAGE TIPS
Do not wash before refrigerating.
Store in crisper.
Wrap odorous foods.
Leave peas in pods.
Wrap odorous foods and refrigerate
in crisper.
Remove tops. Wrap odorous foods
and refrigerate in the crisper.
Keep in original packaging for
refrigeration. Place in the meat and
cheese drawer. When freezing longer
than two weeks, overwrap with
freezer wrap.
Bacon
Beef or lamb, ground
Beef or lamb, roast and steak
Ham, fully cooked, whole
half
slices
Luncheon meat
Pork, roast
Pork, chops
Sausage, ground
Sausage, smoked
Veal
7 days
1 to 2 days
3 to 5 days
7 days
5 days
3 days
3 to 5 days
3 to 5 days
3 to 5 days
1 to 2 days
7 days
3 to 5 days
1 month
3 to 4 months
6 to 9 months
1 to 2 months
1 to 2 months
1 to 2 months
1 to 2 months
4 to 6 months
4 months
1 to 2 months
1 to 2 months
4 to 6 months
Fresh meats can be kept in original
packaging for refrigeration.
Place in the meat and cheese drawer.
When freezing longer than two
weeks, overwrap with freezer wrap.
Unopened, vacuum-packed luncheon
meat may be kept up to two weeks
in the meat and cheese drawer.
Frankfurters
Sources: United States Department of Agriculture; Food Marketing Institute; Cooperative Extension Service, Iowa
State University
7 days
1 month
Processed meats should be tightly
wrapped and stored in the meat and
cheese drawer.
22
Page 24
C
ARE AND
C
LEANING
WARNING
To avoid electrical shock which can cause severe
personal injury or death, disconnect power to
refrigerator before cleaning. After cleaning, connect
power.
Refrigerator Cleaning Chart
PART
Cabinet Interior
Stainless Steel Doors
and Exterior
IMPORTANT:
Damage to stainless steel
finish due to improper use
of cleaning products or
non-recommended products
is not covered under this
product’s warranty.
(select models)
Abrasive or harsh cleaners
Ammonia
Chlorine bleach
Concentrated detergents or solvents
Metal or plastic-textured
scouring pads
Abrasive or harsh cleaners
Ammonia
Chlorine bleach
Concentrated detergents or solvents
Metal or plastic-textured
scouring pads
Vinegar-based products
Citrus-based cleaners
DO NOT USE
CAUTION
To avoid personal injury or property damage,
observe the following:
• Read and follow manufacturer’s directions for all
cleaning products.
• Do not place buckets, shelves or accessories in
dishwasher. Cracking or warping of accessories
may result.
DO
Use 4 tablespoons of baking soda dissolved
in 1 quart (1 liter) warm soapy water.
Rinse surfaces with clean warm water and
dry immediately to avoid water spots.
Use warm, soapy water and a soft, clean
cloth or sponge.
Rinse surfaces with clean warm water and
dry immediately to avoid water spots.
To polish and help prevent finger prints,
follow with Stainless Steel Magic Spray (part
no. 20000008*).
Glass Doors
Door Gaskets
Condenser Coil
Remove base grille to access.
Condenser Fan Outlet Grille
See back of refrigerator.
Accessories
Shelves, buckets,
drawers, etc.
(select models)
Avoid using excessive
amounts of water which may seep
under or behind glass causing staining.
Abrasive or harsh cleaners
Do not use abrasive materials such as
scouring pads, steel wool or powdered
cleaners as they will scratch glass.
Metal or plastic-textured
scouring pads
Anything other than a vaccuum cleaner
A dishwasher
Wash with soap and water. Rinse with clear
water and dry. Glass cleaner can be used if
sprayed on a cloth first.
Use warm, soapy water and a soft, clean
cloth or sponge.
Use a vacuum cleaner hose nozzle.
Use a vacuum cleaner hose nozzle with
brush attachment.
Follow removal and installation instructions
from appropriate feature section.
Allow items to adjust to room temperature.
Dilute mild detergent and use a soft clean
cloth or sponge for cleaning.
Use a plastic bristle brush to get into
crevices. Rinse surfaces with clean warm
water.
Dry glass and clear items immediately to
avoid spots.
* To order, call 1-800-JENNAIR (1-800-536-6247) U.S.A. and Canada.
23
Page 25

C
ARE AND
C
LEANING
Removing Odors From
Refrigerator
WARNING
To avoid electrical shock which can cause severe
personal injury or death, disconnect power to
refrigerator before cleaning. After cleaning,
reconnect power.
1. Remove all food and turn the refrigerator OFF.
2. Disconnect power to the refrigerator.
3. Clean the walls, floor, ceiling of cabinet interior,
drawers, shelves and gaskets according to the
instructions on page 23.
4. Dilute mild detergent and brush solution into
crevices using a plastic bristle brush. Let stand for
5 minutes. Rinse surfaces with warm water. Dry
surfaces with a soft, clean cloth.
5. Wash and dry all bottles, containers and jars.
Discard spoiled or expired items.
6. Wrap or store odor-causing foods in tightly sealed
containers to prevent recurring odors.
7. Reconnect power to refrigerator and return food to
refrigerator.
8. Allow the refrigerator to cool.
9. After 24 hours, check if odor has been eliminated.
If odor is still present:
Energy Saving Tips
• Avoid overcrowding refrigerator shelves.
Overcrowding reduces air circulation around food
and causes refrigerator to run longer.
• Avoid adding too much warm food to refrigerator at
one time. This overloads compartments and slows
rate of cooling.
• Do not use aluminum foil, wax paper, or paper
toweling as shelf liners. This decreases air flow and
causes refrigerator to run less efficiently.
• A freezer that is two-thirds full runs most efficiently.
• Locate refrigerator in coolest part of room. Avoid
areas of direct sunlight, or near heating ducts,
registers or other heat producing appliances. If this is
not possible, isolate exterior by using a section of
cabinet or an added layer of insulation.
• Clean door gaskets every three months according to
cleaning instructions. This will assure that door seals
properly and refrigerator runs efficiently.
• Take time to organize items in refrigerator to reduce
time that door is open.
• Be sure your doors are closing securely by leveling
refrigerator as instructed in your installation
instructions.
• Clean condenser coils as indicated in the cleaning
instructions every three months. This will increase
energy efficiency and cooling performance.
1. Remove drawers and place on top shelf of
refrigerator.
2. Pack refrigerator and freezer sections – including
doors – with crumpled sheets of black and white
newspaper.
3. Place charcoal briquettes randomly on crumpled
newspaper in both freezer and refrigerator
compartments.
4. Close doors and let stand 24 to 48 hours.
24
Page 26
C
ARE AND
C
LEANING
Replacing Light Bulbs
WARNING
To avoid electrical shock which can cause severe
personal injury or death, disconnect power to
refrigerator before replacing light bulb. After
replacing light bulb, reconnect power.
CAUTION
To avoid personal injury or property damage,
observe the following:
• Allow light bulb to cool.
• Wear gloves when replacing light bulb.
Fresh Food Section
(style of light shield varies)
1. Slide clear light shield toward
back of compartment to
release from light assembly.
2. Remove light bulbs.
3. Replace with appliance bulbs
no greater than 40 watts.
4. Replace light bulb cover by inserting tabs on light
shield into liner holes on each side of light
assembly. Slide shield toward front of refrigerator
until it locks into place. Do not force shield beyond
locking point. Doing so may damage light shield.
Freezer
1. Reach behind the light
cover.
2. With firm pressure, press
forward on the notches at
the back of the cover and
pull down. The cover will
open from the back.
3. Remove the cover.
4. Remove light bulb.
5. Replace bulb with
appliance bulb no
greater than 40 watts.
6. Insert front tabs of light
cover into slots in freezer
liner and snap rear portion
over light assembly until rear
tab engages.
Glass Doors
(style of light shield varies)
(select models)
To protect the glass doors:
1. Do not use abrasive cleaning agents such as steel
wool scouring pads or powdered cleaners as they
may scratch the glass.
2. Do not hit the glass with pots, pans, furniture, toys,
or other objects.
25
3. Do not close the door until the shelves and
drawers are in place.
Scratching, hitting, jarring or stressing the glass may
weaken its structure causing an increased risk of
breakage at a later date.
Page 27

C
ARE AND
C
LEANING
Preparing for Vacation
CAUTION
If your refrigerator has a dispenser and if there is
any possibility that the temperature can drop below
freezing where the refrigerator is located, the water
supply system (including the water tank and the
water valve) must be drained by a qualified servicer.
For short vacations or absences (three months or
less):
1. Remove all perishables.
2. If no one will be checking in on the refrigerator
during your absence, remove all frozen items also.
3. If your refrigerator has an automatic ice maker:
• Shut off the water supply to the ice maker at least
one day ahead of time.
• After the last load of ice drops, raise the wire shut
off arm to the OFF position.
• Empty the ice bin.
Upon your return
After a short vacation or absence:
For models with automatic ice makers or dispensers:
• Reconnect the water supply and turn on supply valve
(see page 9).
• Monitor water connection for 24 hours and correct
leaks if necessary.
• Run 10-15 glasses of water from the dispenser to
flush out the system.
• Restart the ice maker by lowering the ice maker arm.
• Discard at least the first three ice harvests.
After a long vacation or absence:
• Reconnect the water supply and turn on supply valve
(see page 9).
• Plug the refrigerator back in and reset controls (see
pages 10-12).
• Monitor water connection for 24 hours and correct
leaks, if necessary.
4. If the room temperature will drop below 55° F
(13° C), follow the instructions for longer absences.
For long vacations, absences (more than three
months) OR if the room temperature will drop below
55º F (13° C):
1. Remove food.
2. If your refrigerator has an automatic ice maker:
• Shut off the water supply to the ice maker at least
one day ahead of time.
• After the last load of ice drops, raise the wire shut
off arm to the OFF position.
• Empty the ice bin.
3. If your refrigerator has a dispenser system with water
filter, remove the water filter cartridge and install the
filter bypass. Dispose of the used cartridge.
4. Turn the freezer control to OFF.
5. Unplug the refrigerator.
6. Thoroughly clean the interior of both compartments
with a baking soda solution and a clean soft cloth
(four tablespoons of baking soda in one quart of
warm water).
7. Dry thoroughly.
8. Leave the doors open to prevent the formation of
mold and mildew.
For dispenser models, run water through the dispenser
for at least three minutes with the filter bypass in
place, then install water filter (see page 17).
• After installing the water filter, run water through the
dispenser continuously for at least two minutes, or
until water runs steady. Initially you may notice a
one to two minute delay in water dispersal as the
internal tanks fills.
• Restart the ice maker by lowering the ice maker arm.
• Discard ice produced within the first 12 hours (at
least the first three harvests).
Preparing to move
• Follow the above instructions for long
vacations/absences, through step 7.
• Secure all loose items such as shelves and drawers
by taping them securely in place to prevent damage.
• Tape the doors shut.
• Use an appliance dolly when moving the refrigerator.
Always truck the refrigerator from its side or back
- never from its front.
• Be sure the refrigerator stays in an upright position
during moving.
26
Page 28
O
PERATING
Improvements in refrigeration design may produce sounds in your new refrigerator that are different or were not
present in an older model. These improvements were made to create a refrigerator that is better at preserving food,
is more energy efficient, and is quieter overall. Because new refrigerators run quieter, sounds may be detected that
were present in older refrigerators, but were masked by higher sound levels. Many of these sounds are normal.
Please note that the surfaces adjacent to a refrigerator, such as hard walls, floors and cabinetry may make these
sounds seem even louder. The following are some of the normal sounds that may be noticed in a new refrigerator.
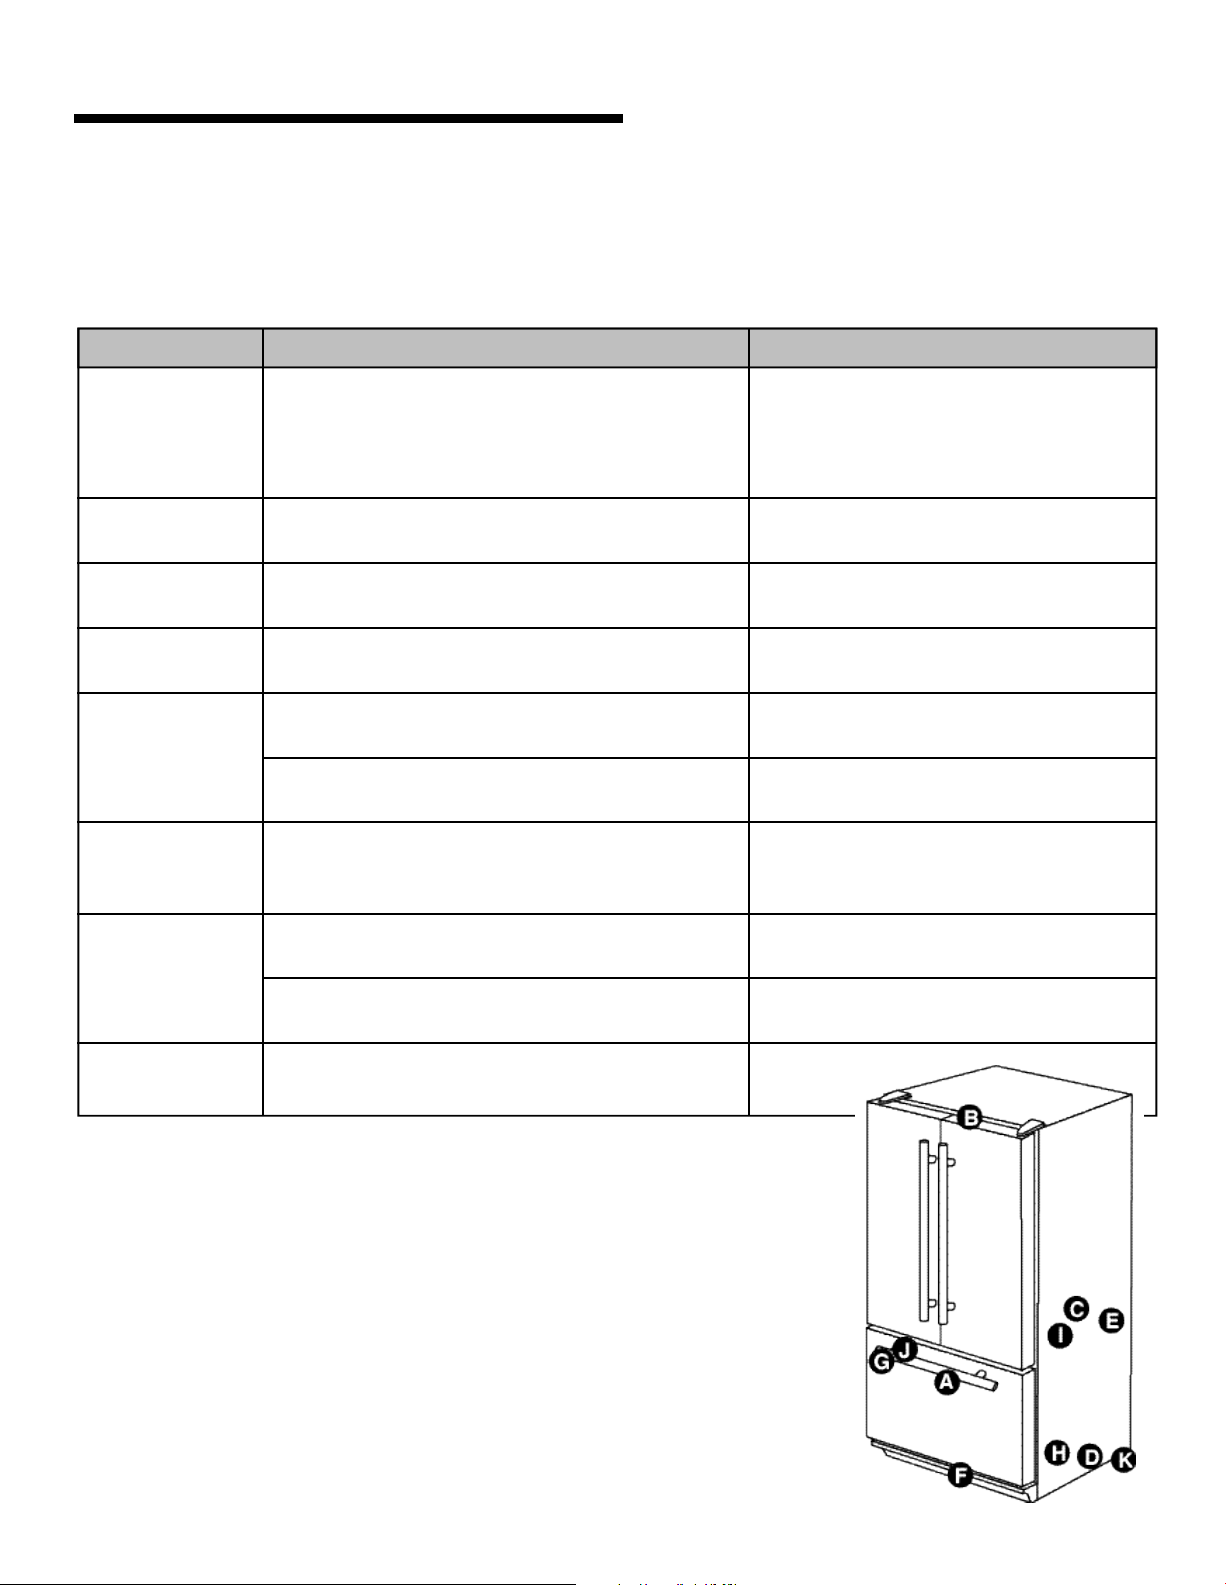
S
OUNDS
SOUND
Clicking
Air rushing or
whirring
Gurgling or
boiling sound
Thumping
Vibrating noise
Buzzing
POSSIBLE CAUSE
• Freezer control (A) clicks when starting or
stopping compressor.
• Motorized device (B) sounds like an electric
clock and snaps in and out.
• Freezer fan (C) and condenser fan (D) make
this noise while operating.
• Evaporator (E) and heat exchanger (F)
refrigerant makes this noise when flowing.
• Ice cubes from ice maker (select models) drop
into ice bucket (G).
• Compressor (H) makes a pulsating sound
while running.
• Refrigerator is not level.
• Ice maker water valve (I) hookup (select
models) buzzes when ice maker fills with
water.
SOLUTION
• Normal operation
• Normal operation
• Normal operation
• Normal operation
• Normal operation
• Normal operation
• See page 4 for details on how to level
your refrigerator.
• Normal operation
Humming
Hissing or
popping
• Ice maker (J) is in the ‘on’ position without
water connection.
• Compressor (H) can make a high-pitched hum
while operating.
• Defrost heater (K) hisses, sizzles or pops when
operational.
• Stop sound by raising ice maker arm
to OFF position (see page 16).
• Normal operation
• Normal operation
27
Page 29
T
ROUBLESHOOTING
PROBLEM
Freezer control and
lights are on, but
compressor is not
operating
Crisper drawer
temperature is too
warm
Refrigerator does
not operate
Refrigerator still
won’t operate
Food temperature
is too cold
Food temperature
is too warm
Refrigerator has
an odor
Water droplets
form on outside
of refrigerator
POSSIBLE CAUSES
Refrigerator is in defrost mode.
Control settings are too low.
Refrigerator is not plugged in.
Control is not on.
Fuse is blown, or circuit breaker needs
to be reset.
Power outage has occurred.
Refrigerator is malfunctioning.
Condenser coils are dirty.
Refrigerator or freezer controls are set
too high.
Door is not closing properly.
Controls need to be adjusted.
Condenser coils are dirty.
Rear air grille is blocked.
Door has been opened frequently, or has
been opened for long periods of time.
Food has recently been added.
Compartment is dirty or has odorcausing food.
Check gaskets for proper seal.
Humidity levels are high.
Controls require adjustment.
WHAT TO DO
Normal operation.
Wait 40 minutes to see if refrigerator restarts.
See pages 10-12 to adjust controls.
Plug in refrigerator.
See pages 10-12 to adjust your controls.
Replace any blown fuses.
Check circuit breaker and reset, if necessary.
Call local power company listing to report outage.
Unplug refrigerator and transfer food to another
refrigerator. If another refrigerator is not available,
place dry ice in freezer section to preserve food.
Warranty does not cover food loss.
Contact service for assistance.
Clean according to the chart on page 23.
See pages 10-12 to adjust your controls.
Refrigerator is not level. See page 4 for details on how
to level your refrigerator.
Check gaskets for proper seal. Clean, if necessary,
according to the chart on page 23.
Check for internal obstructions that are keeping door
from closing properly (i.e. improperly closed drawers,
ice buckets, oversized or improperly stored
containers, etc.)
See pages 10-12 to adjust your controls.
Clean according to the chart on page 23.
Check the positioning of food items in refrigerator to
make sure grille is not blocked. Rear air grilles are
located under crisper drawers.
Reduce time door is open.
Organize food items efficiently to assure door is open
for as short a time as possible.
Allow time for recently added food to reach
refrigerator or freezer temperature.
Clean according to instructions on page 23.
Clean according to the chart on page 23.
Hot, humid weather can increase condensation.
See pages 10-12 to adjust your controls.
28
Page 30

T
ROUBLESHOOTING
PROBLEM
Water droplets form
on inside of
refrigerator
Refrigerator or ice
maker makes
unfamiliar sounds
or seems too loud
Crisper drawers
do not close freely
Refrigerator runs
too frequently
POSSIBLE CAUSES
Humidity levels are high or door has
been been opened frequently.
Check gaskets for proper seal.
Normal operation.
Contents of drawer, or positioning of
items in the surrounding compartment
could be obstructing drawer.
Drawer is not in proper position.
Refrigerator is not level.
Drawer channels are dirty or need
treatment.
Doors have been opened frequently or
for long periods of time.
Humidity or heat in surrounding area is
high.
Food has recently been added.
Refrigerator is exposed to heat by
environment or by appliances nearby.
Condenser coils are dirty.
Controls need to be adjusted.
Door is not closing properly.
Normal Operation
WHAT TO DO
See pages 10-12 to adjust your controls.
Reduce time door is open.
Organize food items efficiently to assure door is open
for as short a time as possible.
Clean, if necessary, according to the chart on page 23.
See page 16.
Reposition food items and containers to avoid
interference with the drawers.
See page 14 for proper drawer placement.
See page 4 for details on how to level your
refrigerator.
Clean drawer channels with warm, soapy water.
Rinse and dry thoroughly.
Apply a thin layer of petroleum jelly to drawer
channels.
Reduce time door is open.
Organize food items efficiently to assure door is open
for as short a time as possible.
Allow interior environment to adjust for period the
door has been opened.
Normal operation.
Allow time for recently added food to reach
refrigerator or freezer temperature.
Evaluate your refrigerator’s environment. Refrigerator
may need to be moved to run more efficiently.
Clean, if necessary, according to the chart on page 23.
See pages 10-12 to adjust your controls.
Refrigerator is not level. See page 4 for details on how
to level your refrigerator.
Check gaskets for proper seal.
Clean, if necessary, according to the chart on page 23.
Check for internal obstructions that are keeping door
from closing properly (i.e. improperly closed drawers,
ice buckets, oversized or improperly stored
containers, etc.)
See Operating Sounds on page 27.
29
Page 31

T
ROUBLESHOOTING
Ice and Water
PROBLEM
Refrigerator is
leaking water
Ice forms in inlet
tube to ice maker
Water flow is
slower than normal
POSSIBLE CAUSES
Plastic tubing was used to complete
water connection.
Improper water valve was installed.
Water pressure is low.
Freezer temperature is too high.
Water pressure is low.
WHAT TO DO
The manufacturer recommends using copper tubing
for installation. Plastic is less durable and can cause
leakage. The manufacturer is not responsible for
property damage due to improper installation or
water connection.
Check water connection procedure (see page 9). Selfpiercing and 3⁄16” saddle valves cause low water
pressure and may clog the line over time. The
manufacturer is not responsible for property
damage due to improper installation or water
connection.
Water pressure must be between 35 to 100 pounds
per square inch to function properly. A minimum
pressure of 35 pounds per square inch is
recommended for refrigerators with water filters.
Adjust freezer control (see pages 10-12). Freezer is
recommended to be approximately 0° F (-18° C).
Water pressure must be between 35 to 100 pounds
per square inch to function properly. A minimum
pressure of 35 pounds per square inch is
recommended for refrigerators with water filters.
Improper water valve was installed.
Copper tubing has kinks.
Water filter is clogged or needs to be
changed.
Check water connection procedure (see page 9). Selfpiercing and3⁄16” saddle valves cause low water The
manufacturer is not responsible for property
damage due to improper installation or water
connection.
Turn off water supply and remove kinks. If kinks
cannot be removed, replace tubing.
Change water filter (see page 17).
30
Page 32

W
ARRANTY
& S
ERVICE
Jenn-Air Refrigerator Warranty
Full One Year Warranty
One (1) year - From the date of original retail purchase, any
part that fails in normal home use will be repaired or replaced free of charge.
Ice Maker - When purchased with the refrigerator and
installed by the dealer the ice maker will be considered part
of the refrigerator for warranty purposes.
Limited Warranty - Major Refrigeration
Components
Second Through Fifth Year - After the first year from the
date of original purchase, through the fifth year, Maytag
ServicesSMwill repair or replace, at its option, free of charge
for parts and labor only, any part of the sealed refrigeration
system (consisting of the compressor, evaporator, condenser,
drier and connecting tubing) and the cabinet liner (exclusive
of the door liner) which fail in normal home use. All other
costs, including mileage, transportation, trip charge and
diagnostic charge, if required, shall be the responsibility of
the owner.
Limited Warranty - Puriclean®II Water
Filter, if equipped
30 days - From the original retail purchase date, any part of
the water filter cartridge which fails due to a defect in
workmanship or materials will be replaced free of charge.
The specific warranties expressed above are the ONLY war -
ranties provided by the manufacturer. These warranties give
you specific legal rights, and you may also have other rights
which vary from state to state.
What is Not Covered By These
Warranties:
1. Conditions and damages resulting from any of the
following:
a. Improper installation, delivery, or maintenance.
b . Any repair, modification, alteration, or adjustment not
authorized by the manufacturer or an authorized servicer.
c. Misuse, abuse, accidents, or unreasonable use.
d. Incorrect electric current, voltage, or supply.
e. Improper setting of any control.
2. Warranties are void if the original serial numbers have
been removed, altered or cannot be readily determined.
3. Light bulbs.
4. Products purchased for commercial or industrial use.
5. The cost of service or service call to:
a. Correct installation errors.
b. Instruct the user on the proper use of the product.
c. Transport the appliance to the servicer.
6. Consequential or incidental damages sustained by any
person as a result of any breach of these warranties.
Some states do not allow the exclusion or limitation of
consequential or incidental damages, so the above
exclusion may not apply.
Limited Warranty - Other Parts
Second Year - Parts other than major refrigeration
components which fail in normal home use during the
second year following the date of original retail purchase will
be repaired or provided free of charge for the part itself, with
the owner paying all other costs, including labor, mileage,
transportation, trip charge and diagnostic charge, if required.
Note
The full warranty and the limited warranties apply when
the refrigerator is located in the United States or
Canada. Refrigerators located elsewhere are covered by
the limited warranties only including parts that fail
during the first year.
Canadian Residents
The above warranties only cover an appliance installed in
Canada that has been certified or listed by appropriate test
agencies for compliance to a National Standard of Canada
unless the appliance was brought into Canada due to
transfer of residence from the United States to Canada.
Limitations of Liability
The warrantor shall not be liable for any incidental or
consequential damages, including food loss. Some states do
not allow the exclusion or limitation of consequential
damages, so the above limitation or exclusion may not apply
to you.
If You Need Service
• Call the dealer from whom your appliance was purchased
or call Maytag ServicesSM, Jenn-Air Customer Assistance
at 1-800-JENNAIR (1-800-536-6247) U.S.A. and C a n a d a ,
to locate an authorized servicer.
• Be sure to retain proof of purchase to verify warranty
status. Refer to Warranty for further information on owner’s
responsibilities for warranty service.
• If the dealer or service company cannot resolve the
problem, write to Maytag ServicesSM, Attn: CAIR®Center,
P.O. Box 2370, Cleveland, TN 37320-2370 or call
1-800-JENNAIR (1-800-536-6247) U.S.A. and
Canada.
U.S. customers using TTY for deaf, hearing impaired or
speech impaired, call 1-800-688-2080.
• Use & Care Guides, service manuals and parts information
are available from Maytag ServicesSM, Jenn-Air Customer
Assistance.
Note
• When writing or calling about a service problem, please
include the following information:
a. Your name, address and telephone number;
b. Model number and serial number;
c. Name and address of your dealer or servicer;
d. A clear description of the problem you are having;
e. Proof of purchase (sales receipt).
31
Page 33

R
É F R I G É R A T E U R
D
E
O R T E
P
R A N Ç A I S E
F
G
UIDE
E N N
J
- A
I R
DE L
A B L E D E S
T
Instructions de sécurité importantes........................33-34
Installation.......................................................................... 35-41
Commandes de température...................................... 42-44
Caractéristiques – compartiment
réfrigérateur....................................................................... 45-46
Caractéristiques – compartiment congélateur ........... 47
Eau et glaçons......................................................................... 48
Filtre à eau......................................................................... 49-51
Conseils pour la conservation des aliments......... 52-54
Entretien et nettoyage ................................................... 55-58
Bruits de fonctionnement ................................................... 59
Recherche des pannes ................................................. 60-62
Garantie et service après-vente ....................................... 63
Guía Uso y Cuidado .............................................................. 64
U T I L I S AT E UR
’
A T I É R E S
M
Page 34

I
NSTRUCTIONS DE SÉCURITÉ IMPORTANTES
Installateur : Remettez ce guide au propriéta i r e .
Consommateur : Veuillez lire ce Guide d’utilisation et
d ’ entretien et le conserver pour consultation ultérieure.
Il fournit les informations appropriées sur l’utilisation et
l ’ entretien de l’a p p a r e i l .
Conservez la facture d’achat ou le chèque enca i s s é
comme preuve de l’a c h a t .
Composez le : 1 - 80 0 - J ENNAIR É.-U. et Canada
( 1 - 80 0 - 5 3 6 - 62 47 )
Préparez les numéros de modèle et de série identifiant
votre réfrigérateur. Ceux-ci se trouvent sur la plaque
signalétique située à l’intérieur du compart i m e n t
r é f r i g é r a t e u r , sur le côté supérieur gauche. Notez ces
numéros ci-dessous pour y accéder facilement :
Numéro de modèle ____________________________
Numéro de série ______________________________
Date d’achat__________________________________
Dans le cadre de nos pratiques d’a m é l i o r a t i o n
c o n s tan te de la qualité de nos appareils, des
m o d i f i cat ions peuvent être introduites sur les appareils
sans que cela donne lieu à une révision de ce guide.
DANGER
Pour réduire le risque de blessure ou même de
mort, suivez les précautions de base, y compris
les suivantes :
IMPORTANT : Les risques d’enfermement et
d’étouffement d’un enfant dans un réfrigérateur
n’ont pas disparu. Un réfrigérateur abandonné
demeure dangereux... même s’il ne reste ainsi
accessible « que pendant
quelques jours ». Lorsqu’on se
débarrasse d’un vieux
réfrigérateur, il faut appliquer
les instructions ci-dessous pour
éviter tout accident.
Avant de jeter votre vieux
réfrigérateur ou congélateur :
• Démontez les portes.
• Laissez les clayettes et étagères en place pour
qu’un enfant ne puisse pas facilement s’introduire
dans le réfrigérateur.
Ce que vous devez savoir sur
les instructions de sécurité
Les instructions de sécurité importa n t e s et les
a v e r t i s s e m e n t s paraissant dans ce guide ne sont pas
d estinés à couvrir toutes les situations et conditions
é v e n t u e l l es qui peuvent se présenter. Il faut faire preuve
de bon sens et de prudence lors de l’installation, de
l ’ entretien ou de l’utilisation de cet appareil.
Prenez toujours contact avec le fabricant, au sujet de
problèmes ou conditions que vous ne comprenez pas.
Reconnaissez les étiquettes, phrases
ou symboles sur la sécurité
DANGER
DANGER – risques immédiats qui RÉSULTERONT
en de graves blessures ou même la mort.
AVERTISSEMENT
AVERTISSEMENT – risques ou pratiques non sûres,
qui POURRAIENT résulter en de graves blessures
ou même la mort.
Cet appareil est doté d’une fiche de branchement à 3
broches (pour liaison à la terre), ce qui assure une
protection adéquate contre les risques de chocs
électriques. On doit brancher l’appareil uniquement sur
une prise de courant reliée à la terre. Si la prise de
courant disponible ne comporte que deux alvéoles,
c’est au client qu’incombent la responsabilité et
l’obligation personnelle de la faire remplacer par une
prise de courant à 3 alvéoles convenablement reliée à
la terre. On ne doit jamais, quelles que soient les
circonstances, couper ou arracher la troisième broche
(liaison à la terre) de la fiche de branchement. Il ne
faut jamais utiliser une fiche d’adaptation.
Cordon d’alimentation avec fiche de
branchement à trois broches
ATTENTION
ATTENTION – risques ou pratiques non sûres qui
POURRAIENT résulter en des blessures mineures
ou dégâts matériels.
33
Prise de courant murale
reliée à la terre
Page 35

I
NSTRUCTIONS DE SÉCURITÉ IMPORTANTES
AVERTISSEMENT
Pour réduire le risque d’incendie, choc
électrique, blessure ou même de mort lors de
l’utilisation du réfrigérateur, suivez les
précautions de base, y compris les suivantes :
1. Lisez toutes les instructions avant d’utiliser le
réfrigérateur.
2. Respectez les prescriptions de tous les codes et
règlements locaux.
3. Observez les instructions de liaison à la terre.
spécifiquement recommandé dans le Guide
d’utilisation et d’entretien ou les instructions de
réparation publiées. N’entreprenez pas une
intervention si l’intervenant ne comprend pas
parfaitement les instructions ou ne possède pas
les compétences nécessaires.
13. Veillez toujours à déconnecter le réfrigérateur du
circuit électrique avant d’entreprendre une
intervention. Pour débrancher, saisissez la fiche –
ne tirez pas sur le cordon.
4. En cas d’incertitude quant à la qualité de la
liaison à la terre de l’appareil, consultez un
électricien qualifié.
5. N’utilisez pas une canalisation de gaz pour la
liaison à la terre.
6. N’utilisez pas une tuyauterie d’eau froide pour la
liaison à la terre.
7. Le réfrigérateur est conçu pour être alimenté par
un circuit électrique indépendant 115 V, 15 A,
60 Hz.
8. Ne modifiez pas la fiche du cordon d’alimentation;
si la fiche ne correspond pas à la configuration de
la prise de courant, faites installer la prise de
courant adéquate par un électricien qualifié.
9. N’utilisez pas un adaptateur pour fiche de
branchement à deux broches, un câble de
rallonge ou une barre de prises de courant.
10. N’enlevez pas l’étiquette d’avertissement du
cordon d’alimentation.
11. N’interférez pas avec les commandes du
réfrigérateur.
12. Ne réparez pas ou ne remplacez jamais un
composant du réfrigérateur, sauf si ceci est
14. Installez le réfrigérateur conformément aux
instructions d’installation. Chaque raccordement
(eau, électricité et liaison à la terre) doit être
conforme aux prescriptions des codes locaux, et
doit éventuellement être réalisé par un personnel
professionnel.
15. Veillez à maintenir le réfrigérateur en bon état.
Les chocs ou chutes peuvent susciter des
anomalies de fonctionnement du réfrigérateur ou
des fuites. En cas de dommages, faites contrôler
le réfrigérateur par un technicien qualifié.
16. Remplacez la fiche de branchement ou le cordon
d’alimentation en cas d’usure.
17. Lisez et respectez les instructions du fabricant
concernant l’environnement idéal de conservation
des produits placés dans le réfrigérateur.
18. Ne faites pas fonctionner le réfrigérateur en
présence de fumées explosives.
19. Les enfants ne doivent grimper sur aucune partie
du réfrigérateur, s’y suspendre ou s’y tenir debout.
20. Nettoyez les fuites ou écoulements d’eau
occasionnés par le raccordement à l’eau.
CONSERVEZ CES INSTRUCTIONS
34
Page 36

I
NSTALLATION
Votre réfrigérateur a été soigneusement emballé pour
l’expédition. Retirez et jetez le matériau d’emballage et
le ruban adhésif des clayettes et étagères. N’enlevez
pas la plaque signalétique.
Emplacement d’installation
• N’installez pas le réfrigérateur près d’un four,
radiateur ou d’une autre source de chaleur. Si cela
n’est pas possible, protégez-le avec du matériau de
l’armoire.
• Ne l’installez pas dans un endroit où la température
descend en dessous de 13 °C (55 °F), ou monte audessus de 43°C (110 °F). À cette température, il
pourrait mal fonctionner.
• Le réfrigérateur est prévu seulement pour une
application domestique, à l’intérieur.
Mesure de l’ouverture
Lors de l’installation de votre appareil, mesurez bien
cet espace. Prévoyez un espace de 1,2 cm (
haut, et de 1,2 cm (
compartiment machine (situé à l’arrière) pour assurer
une bonne circulation de l’air.
Les revêtements de sol (tapis, carreaux, bois) peuvent
diminuer les dimensions de l’ouverture.
Un dégagement supplémentaire peut être obtenu en
ayant recours à la méthode présentée dans la section
Aplomb du réfrigérateur.
IMPORTANT : Si le réfrigérateur doit être installé
dans une enceinte où sa partie supérieure se trouverait
complètement recouverte, mesurez la distance entre le
plancher et le haut du couvre-charnière pour vérifier le
bon dégagement.
1
po) derrière le couvercle du
⁄
2
1
⁄
2
po) en
Transport du réfrigérateur
• NE transportez JAMAIS le réfrigérateur sur le côté.
S’il n’est pas possible de le mettre à la verticale,
posez-le sur l’arrière. Laissez le réfrigérateur à la
verticale pendant environ 30 minutes avant de le
brancher pour être sûr que l’huile revienne au
compresseur. Le branchement immédiat du
réfrigérateur pourrait endommager les pièces
internes.
• Servez-vous d’un chariot ou diable pour déplacer le
réfrigérateur. Transportez TOUJOURS le
réfrigérateur par un côté ou par l’arrière et JAMAIS
par l’avant.
• Protégez le fini extérieur du réfrigérateur lors du
transport en enveloppant la caisse de couvertures ou
en ajoutant du rembourrage entre le réfrigérateur et
le diable.
• Assujettissez fermement le réfrigérateur au diable à
l’aide de sangles ou de cordons élastiques. Faites
passer les sangles par les poignées, si possible. Ne
serrez pas trop. Un serrage excessif pourrait
endommager l’extérieur du fini.
Panneaux de porte en verre
(certains modèles)
AVERTISSEMENT
Pour éviter blessures ou dommages matériels,
observez les précautions suivantes :
• Lorsque vous travaillez directement sur les portes,
protégez les coins et les côtés en plaçant les
portes sur une surface non-abrasive recouverte de
linge ou de serviette.
• Protégez les côtés des panneaux lorsque vous
fixez l’appareil sur un diable. NE SERREZ PAS
TROP! Le fait de trop serrer les fixations pourrait
casser le verre causant ainsi des blessures.
• NE transportez PAS les portes par les poignées.
• Serrez bien les vis des poignées lorsque vous
installez les portes.
35
Page 37

I
NSTALLATION
Aplomb du réfrigérateur
ATTENTION
Pour protéger les biens matériels ou le réfrigérateur
de tout dommage, observez les règles suivantes :
• Protégez le vinyle ou autres revêtements à l’aide
de carton, tapis ou autres matériaux de protection.
• N’utilisez pas d’outils électriques pour mettre le
réfrigérateur d’aplomb.
Pour optimiser l’esthétique et la performance du
réfrigérateur, il faut le placer d’aplomb.
Remarque
• Terminez, au besoin, l’inversion des portes,
l’installation des panneaux et/ou le raccordement
à l’alimentation en eau, avant la mise d’aplomb.
Matériel nécessaire :
• Tourne-écrou hex. de
• Niveau à bulle
1. Retirez la grille inférieure.
• Saisissez-la fermement et
tirez-la pour l’enlever.
3
po
⁄
8
3. À l’aide d’un tourne-écrou hex., tournez les vis de
réglage avant (A), de chaque côté, pour relever ou
baisser l’avant du réfrigérateur.
Remarque
• C e r tains modèles n’ont que des vis de réglage « A ».
4. Certains modèles ont aussi des vis de réglage
arrière (B). À l’aide du tourne-écrou hex., tournez
chacune de ces vis de réglage (B) pour relever ou
baisser l’arrière du réfrigérateur.
5. À l’aide du niveau à bulle, assurez-vous que l’avant
du réfrigérateur est relevé de 6 mm (
bulle par rapport à l’arrière du réfrigérateur et que
le réfrigérateur est bien à niveau latéralement.
6. Tournez les pieds stabilisateurs (C) à droite jusqu’à
ce qu’ils reposent fermement sur le sol.
7. Tournez les vis de réglage (A) vers la gauche, pour
que tout le poids du réfrigérateur repose sur les
pieds stabilisateurs.
1
⁄
po) ou d’
4
1
⁄
2
2. Retirez le(s) cache(s) inférieur(s).
• Placez l’extrémité gomme d’un crayon ou outil
semblable non pointu, dans l’encoche du cache.
Emplacement
de l’encoche
• Appuyez légèrement pour
soulever le cache.
• Continuez à maintenir une
pression vers le bas, du côté de
l’encoche, tout en faisant
pivoter le cache pour l’enlever.
8. Remettez en place le(s) cache(s).
• Placez le cache dans le bord extérieur de la
charnière.
• Faites pivoter le cache vers la caisse, et
enclenchez-le en place.
9. Remettez la grille inférieure en place.
Remarque
• Pour que la réinstallation se fasse bien, suivez le
repère « top » à l’intérieur de la grille inférieure.
• Alignez les attaches de montage de la grille
inférieure avec les fentes à la partie inférieure de
la caisse.
• Poussez fermement la grille inférieure en place,
jusqu’à ce qu’elle s’enclenche.
36
Page 38

I
NSTALLATION
Dépose des portes et du tiroir
Certaines installations nécessitent que les portes / le
tiroir soient retirés pour transporter le réfrigérateur à
son emplacement définitif.
AVERTISSEMENT
Pour éviter tout risque de décharge électrique
pouvant entraîner des blessures graves ou même la
mort, observez les précautions suivantes :
• Débranchez le réfrigérateur avant de retirer les
p o r t e s ou le tiroir. Ne rebranchez le réfrigérateur
q u ’ après avoir remis en place les port e s ou le tiroir.
ATTENTION
Pour éviter d’endommager les murs et le sol,
protégez les parties en vinyle ou autre revêtement,
de carton, tapis ou autres matériaux de protection.
1. Débranchez le cordon électrique de la
prise.
2. Retirez la grille inférieure et le(s)
charnière
3. Retirez le couvre-charnière supérieur de la
p o rte du réfrigérateur en retirant la vis
Phillips. Conservez la vis et le couvrecharnière pour les réutiliser plus ta r d .
4. Dévissez les vis à tête hexagonale de
5
1 6
po de la charnière supérieure pour
⁄
retirer la charnière. Conservez toutes
l es vis pour les réutiliser plus ta r d .
5. Soulevez la porte du réfrigérateur
côté droit, de l’axe de charnière
centrale. Enlevez l’embout fermoir
de l’axe de charnière centrale, sur
le côté droit, et conservez-le pour
le réutiliser plus tard.
(s) inférieur(s) (page 36).
embout
fermoir
côté
droit
6. Débranchez le faisceau de fils sur
le dessus de la charnière
supérieure de porte du
réfrigérateur, côté gauche.
Débranchez le connecteur à deux broches en
appuyant au point de raccordement à l’aide d’un
tournevis plat ou d’un ongle.
Le fil de terre vert reste fixé à la
charnière.
7. Dévissez les vis à tête hexagonale de
5
16
po de la charnière supérieure pour
⁄
retirer la charnière, et conservez-les
pour les réutiliser plus tard.
Soulevez la porte du réfrigérateur côté
gauche, avec la charnière supérieure,
de l’axe de charnière centrale.
Retirez l’axe de charnière centrale à
l’aide d’un tourne-écrou hex. de
et conservez l’axe de charnière pour le
réutiliser plus tard.
8. Retirez les vis Phillips pour enlever les charnières
gauche et droite et conservez toutes les vis pour les
réutiliser plus tard.
9. Retirez les deux pieds stabilisateurs à l’aide d’un
tourne-écrou hex. de
les réutiliser plus tard.
3
8
po et conservez les vis pour
⁄
5
16
po
⁄
37
Page 39

I
NSTALLATION
Tiroir coulissant (congélateurtiroir)
Pour éviter qu’un enfant ne soit accidentellement
enfermé dans l’appareil ou ne risque de s’étouffer,
n’enlevez pas le diviseur se trouvant dans le panier
du congélateur.
Pour éviter tout choc électrique pouvant entraîner
des graves blessures ou même la mort, débranchez
le réfrigérateur avant de retirer le tiroir. Avant de
remettre le tiroir en place, rebranchez le
réfrigérateur.
Pour éviter toute blessure, dommage matériel ou de
l’appareil, deux personnes seront nécessaires pour
effectuer les instructions suivantes.
(certains modèles)
DANGER
AVERTISSEMENT
ATTENTION
Installation :
1. Tirez les deux
glissières au
maximum.
2. Tout en retenant le
devant de la porte,
accrochez les
supports en plaçant leurs crochets dans les fentes
à l’intérieur de chaque glissière.
Remarque
• Les quatre supports du tiroir doivent être bien
installés dans les fentes appropriées pour que le
tiroir coulisse correctement.
Dépose :
1. Tirez le tiroir au maximum.
2. Inclinez le panier inférieur vers l’avant, puis
soulevez-le pour le retirer.
3. Sur chaque glissière
latérale se trouve un
support pour le panier, avec
deux crochets. Pour libérer
chacun des supports,
ouvrez les crochets en les
poussant vers l’intérieur, à
l’écart du système de
glissières. Soulevez les
supports pour les sortir
des glissières.
4. Enlevez la vis Phillips de
chacune des glissières
du tiroir (certains
modèles).
5. Soulevez le haut de
l’avant du tiroir pour
défaire ce dernier des
glissières. Retirez la
porte en relevant sa
partie avant.
3. Baissez la façade du tiroir à son emplacement
définitif.
4. Remettez les vis Phillips qui ont été retirées de
chacune des glissières du tiroir et serrez-les
(certains modèles).
5. Remettez les supports de panier sur les glissières
du tiroir. Alignez les fermoirs des supports de
panier avec les fentes des supports du tiroir et
appuyez sur chaque fermoir et ce vers les supports
jusqu’à ce que chacun s’enclenche.
Crochets des
supports de
panier
6. Inclinez vers le bas le devant du panier inférieur et
placez-le dans les supports de panier.
38
Page 40

I
NSTALLATION
Remise en place des portes
1. Installation des ensembles de charnière :
• Installez la charnière centrale à l’aide de vis
Phillips.
2. Placer le côté charnières de la porte
du réfrigérateur sur l’axe de
charnière centrale.
• Installez la charnière supérieure à
l’aide de vis à tête hexagonale de
5
⁄
po.
16
3. Tenez la porte du congélateur à la
verticale tout en installant l’axe de
charnière centrale à l’aide d’un tourneécrou hex. de
4. Rebranche le connecteur à deux broches.
5. Remettez en place le couvre-charnière.
Poignée
Ce style de poignée est installé à l’usine.
5
⁄
16
po.
(le modèle change par le modèle)
Ouverture et Fermeture des
Portes du Réfrigérateur
Votre réfrigérateur est d’une conception unique avec 2
portes de compartiment pour aliments frais. Chacune
de ces portes s’ouvre ou se ferme indépendamment.
Il existe un volet vertical articulé sur la porte gauche
pour aliments frais. Quand la porte gauche est fermée,
le volet forme automatiquement une étanchéité entre
les deux portes quand toutes deux sont fermées.
Quand la porte gauche est ouverte, le volet articulé se
replie automatiquement vers l’intérieur afin de ne pas
gêner.
AVERTISSEMENT
Pour éviter une décharge électrique pouvant
entraîner une blessure grave ou une électrocution
mortelle, N’essayez PAS d’enlever le volet articulé
du compartiment pour aliment frais.
ATTENTION
Matériel nécessaire :
• Clé Allen de
Dépose :
• Retirez la vis de pression
du support de montage de
la poignée à l’aide de la clé
Allen de
• Répétez la méthode sur
tous les supports afin de
retirer la poignée.
Installation :
• Alignez la poignée avec les supports de montage.
• Serrez bien toutes les vis pour bien fixer la poignée
en place.
3
po.
32
⁄
3
⁄
32
po.
Pour éviter des dommages éventuels aux produits,
vérifiez TOUJOURS que le volet articulé se trouve
replié contre le bord de la porte avant la fermeture.
volet
articulé
39
Page 41

I
NSTALLATION
Pose de Poignées montées sur le
devant d’un modèle en acier
inoxydable
1. Desserrez l’attache inférieure de la
porte à l’aide d’un tournevis Phillips.
2. Repérer le trou percé à la base de
la poignée et enclencher l’extrémité
creuse de la poignée sur le clip
inférieur de la porte.
3. Insérer l’autre extrémité de la
poignée sur le clip supérieur de la
porte et la faire glisser aussi loin
que possible.
REMARQUE : Si le haut de la
poignée ne s’insère pas sur le clip
supérieur, ouvrir un peu plus le
clip inférieur jusqu’à ce que la
poignée puisse s’insérer en place.
4. Pour serrer la vis, insérez le
tournevis Phillips dans les trous de montage situés à
la base de la poignée. Insérez le bouchon de
plastique dans le trou.
5. Répéter les étapes ci-dessus pour l’autre poignée
Retrez de poignées montées
sur le devant d’un modèle
en acier inoxydable
1. Enlevez l’obturateur en plastique à la
base de la poignée à l’aide d’un très
petit tournevis plat.
• Insérer d’un tournevis Phillips.
dans le trou percé dans la
poignée pour enlever la vis.
2. Faire glisser la poignée vers le
bas et la retirer du clip de la
porte.
3. Répéter les étapes ci-dessus
pour l’autre poignée.
Pose de poignées montées sur le
devant d’un porte de congélateur en
acier inoxydable
1. Desserrez l’attache inférieure de
la porte à l’aide d’un tournevis
Phillips.
2. Repérez le trou à la base de
la poignée et emboîtez
l’extrémité creuse de la
poignée sur l’attache de
retenue gauche de la porte.
3. Mettez l’autre extrémité de la
poignée sur l’attache de
retenue gauche et faites
glisser la poignée vers la
gauche, au maximum.
REMARQUE : Si l’extrémité
de la poignée ne
s’enclenche pas sur l’attache
gauche, desserrez
davantage l’attache droite
jusqu’à obtention d’une
adaptation appropriée.
.
4. Pour serrer la vis, insérez le tournevis Phillips dans
le trou situé à l’extrémité de la poignée. Insérez le
bouchon en plastique dans le trou.
Retrez de poignées montées sur le
devant d’un porte de
congélateur en acier
inoxydable
1. Enlevez l’obturateur en
plastique à la base de la
poignée à l’aide d’un très petit
tournevis plat.
• Insérer d’un tournevis
Phillips dans le trou percé
dans la poignée pour
enlever la vis.
2. Faire glisser la poignée vers
le bas et la retirer du clip de
la porte.
40
Page 42

I
NSTALLATION
Raccordement de
l’alimentation en eau
AVERTISSEMENT
Pour réduire le risque de blessure ou même de
mort, suivez les précautions de base, y compris
les suivantes :
• Lisez toutes les instructions avant d’installer la
machine à glaçons.
• N’essayez pas d’installer la machine à glaçons si
les instructions ne sont pas comprises ou si elles
dépassent les compétences de la personne.
• Observez tous les codes et règlements locaux.
• Ne réparez pas la machine à glaçons à moins de
s p é c i f i c ations précises recommandées dans ce guide
ou dans les instructions des t i n é es à l’utilisa t e u r.
• Débranchez le réfrigérateur avant d’installer la
machine à glaçons.
• Un raccordement à l’eau inapproprié peut
entraîner la formation de moisissures/mildiou.
Nettoyez immédiatement les fuites ou
écoulements d’eau.
Matériel nécessaire :
• Tube en cuivre flexible de
• Robinet d’arrêt (nécessite un trou de 6,4 mm [
1
po de diamètre extérieur
4
⁄
1
⁄
4
po] à
percer dans le tuyau d’alimentation en eau avant de fixer le
robinet)
• Clé à molette
1
• Tourne-écrou hex. de
4
po
⁄
Remarques
• Vous devriez seulement utiliser la tuyauterie de cuivre
pour l’installation. Le plastique est moins durable et
peut endommager.
• Ajoutez 2,50 m (8 pi) à la longueur de tube néces saire pour
atteindre l’a l i m e n t ation en eau afin d’obtenir une longueur
s u f f i s ante en cas de réparation.
diamètre minimum
1. Créez une boucle (diamètre
minimum de 60 cm/2 pi) avec le
tube en cuivre. Évitez d’entortiller le
tube en cuivre en l’enroulant. Ne
pas utilisez le tube en plastique.
2. Retirez le capuchon en plastique de l’orifice
d’arrivée du robinet d’eau.
de 60 cm/2 pi
ATTENTION
Pour éviter des dommages matériels ou des
blessures, suivez les précautions de base, y
compris les suivantes :
• Consultez un plombier pour raccorder le tube en
cuivre d’
d’assurer la conformité de l’installation aux codes
et règlements locaux.
• Confirmez que la pression de l’eau au robinet
d’eau est située entre 35 et 100 livres/po2, 20 psi
sans filtre.
• N’utilisez pas de robinet à brides de
robinet autoperceur. Les deux réduisent le débit
d’eau, s’engorgent avec le temps, et peuvent
causer des fuites en cas de réparation.
• Serrez les écrous à la main pour empêcher de
fausser le filetage. Finissez le serrage des écrous à
l’aide de pinces et de clés. Ne serrez pas trop.
• Attendez 2 à 3 heures avant de mettre l’appareil à
son emplacement définitif, puis vérifiez et corrigez
toute fuite d’eau. Revérifiez l’absence de fuite
après 24 heures.
• Vérifiez que le tube en cuivre sous la virole est
lisse et sans défectuosité. Ne réutilisez pas une
ancienne virole.
41
1
⁄
4
po de D.E. au réseau de la maison afin
3
⁄
16
po ou
3. Placez la virole (A) et l’écrou en laiton (B) sur
l’extrémité du tube en cuivre, comme il est
illustré. Rappel : Ne réutilisez pas une
A
ancienne virole. La virole et l’écrou sont
fournée en la packet de utilisation et
entretien.
4. Placez l’extrémité du tube en cuivre dans
l’orifice d’arrivée du robinet d’eau. Façonnez
légèrement le tube – sans l’entortiller – pour
qu’il pénètre dans l’orifice d’arrivée.
5. Coulissez l’écrou en laiton par-dessus la virole
et vissez l’écrou dans l’orifice d’arrivée. Serrez
l’écrou à la clé.
Important : Ne serrez pas trop. Il y risque sinon de
fausser le filetage.
6. Tirez sur le tube pour confirmer que le
raccordement est bien fait. Raccordez le
tube au châssis à l’aide d’un collier (C) et
C
ouvrez l’eau. Vérifiez l’absence de fuite et
corrigez la situation, le cas échéant.
Continuez à observer le raccordement en
eau pendant deux à trois heures avant de
déplacer le réfrigérateur à son emplacement
permanent.
7. Surveillez le raccordement de l’eau pendant 24 heures.
Corrigez les fuites, le cas échéant.
B
Page 43

C
OMMANDES DE TEMPÉRATURE
Commandes à touche
Les commandes sont situées en haut, sur le devant du
compartiment de réfrigération.
Commandes
Réglage initial
Après avoir branché le réfrigérateur, réglez les
commandes.
• Appuyez sur ou pour ajuster les
commandes au réglage désiré.
• La gamme des commandes de température pour les
deux compartiments va de 1 à 7 (température la plus
basse).
• Réglez la commande du congélateur sur 4.
• Réglez la commande du réfrigérateur sur 4.
• Laissez le réfrigérateur fonctionner pendant au moins
8 à 12 heures avant d’y placer des aliments.
Guide d’ajustage des températures
Compartiment de
réfrigération trop
chaud
Compartiment de
réfrigération trop froid
Compartiment de
congélation trop
chaud
Compartiment de
congélation trop froid
ARRÊT du
réfrigérateur
Réglez la commande du
réfrigérateur vers le chiffre
supérieur, en appuyant sur
la touche .
Réglez la commande du
réfrigérateur vers le chiffre
inférieur, en appuyant sur
la touche .
Réglez la commande du
congélateur vers le chiffre
supérieur, en appuyant sur
la touche .
Réglez la commande du
congélateur vers le chiffre
inférieur, en appuyant sur
la touche .
Appuyez sur la touche du
réfrigérateur ou du
congélateur jusqu’à ce
que (–) paraisse à
l’afficheur.
Surfaces de la caisse chaudes
Occasionnellement, la face avant de la caisse du
réfrigérateur peut être chaude au toucher. Il s’agit d’un
effet normal qui empêche la condensation d’humidité
sur la caisse. Ceci se remarque particulièrement lors
de la mise en marche initiale du réfrigérateur, par
temps chaud ou après une période prolongée ou
excessive d’ouverture des portes.
Ajustage des commandes
• 24 heures après l’addition d’aliments, il est possible
de décider s’il convient d’ajuster la température dans
l’un ou l’autre ou les deux compartiments. Dans ce
cas, ajustez la ou les commandes, selon les
indications du tableau Guide d’ajustage des
températures, ci-dessous. Voyez à la page 52, les
instructions sur la vérification de la température des
compartiments.
• Sauf lors de la mise en marche initiale du
réfrigérateur, ne changez pas la commande de plus
d’une unité à la fois.
• Laissez les températures se stabiliser pendant 24
heures.
Commande climatique de la
température Trisensor
(certains modèles)
Cette commande est située en haut, à l’avant du
compartiment réfrigérateur.
Commande
Réglage initial de la température
Les températures sont préréglées à l’usine. Celle du
réfrigérateur est réglée à 38 °F (3 °C) et celle du
congélateur à 0 °F (-18 °C).
Ajustement de la commande
Il est possible que, au bout de 24 heures, vous décidiez
que la température de l’un des deux compartiments
devrait être moins basse ou plus basse. Si cela est le
cas, ajustez la commande de la façon indiquée cidessous dans le guide d’ajustement des températures.
• Changer l’une ou l’autre commande aura un certain
effet sur la température de l’autre compartiment.
42
Page 44

C
OMMANDES DE TEMPÉRATURE
• Lorsque vous appuyez la touche ou la
première fois, la température actuelle s’affiche.
• La nouvelle température enregistrée s’affichera pour
environ trois secondes puis la température actuelle
du compartiment réapparaîtra.
• Ne changez pas l’une des températures des
compartiments de plus de un degré à la fois. Laissez
la température se stabiliser pour 24 heures avant de
la réajuster.
Guide d’ajustage des températures
Compartiment
réfrigérateur trop
froid
Compartiment
réfrigérateur trop
chaud
Compartiment
congélateur trop
froid
Compartiment
congélateur trop
chaud
Arrêt du réfrigérateur
(OFF)
Dispositif « Speed Ice »
Une fois le réglage Speed Ice (Glace rapide)
activé, la température du congélateur est
baissée au réglage optimal pour 24 heures afin de
produire plus de glace. Remarque : Lorsque la
fonction Speed Ice est activée, les touches et
du congélateur ne sont pas fonctionnelles.
Réinitialisation du filtre (certains modèles)
Réglez la température du
réfrigérateur à un degré
supérieur en appuyant sur
la touche .
Réglez la température du
réfrigérateur à un degré
inférieur en appuyant sur la
touche .
Réglez la température du
congélateur à un degré
supérieur en appuyant sur
la touche .
Réglez la température du
congélateur à un degré
inférieur en appuyant sur la
touche .
Appuyez sur la touche
du congélateur jusqu’à ce
que « OFF » apparaisse.
Appuyez sur la touche
du congélateur ou du
réfrigérateur pour le
remettre en marche.
Le témoin lumineux rouge Replace s’allumera lorsque
le volume d’eau maximum aura été filtré, OU 12 mois
après l’installation du filtre. Lorsque le témoin lumineux
rouge Replace s’allume, un nouveau filtre doit être
installé immédiatement.
Après avoir remplacé le filtre, appuyez sur la touche
Reset Filter pendant trois secondes. Les témoins
lumineux Order et Replace s’éteindront.
Mode Congés
Le mode Congés fait en sorte que le
congélateur se dégivre moins souvent, réduisant
ainsi la consommation d’énergie. Le témoin du mode
Congés s’allumera lorsque la fonction est activée. Pour
la désactiver, réappuyez sur la touche Vacation Mode
OU ouvrez la porte. Le témoin s’éteindra.
Remarques
• Les ouvertures de porte ne désactivent pas le
mode Congés pendant environ 1 heure après
l’activation.
• Si vous avez l’intention d’être absent pour plus de
quelques jours, reportez-vous à la section prévue
à cet effet à la page 58.
Alarme de température
L’alarme de température vous avertira si les
températures des compartiments réfrigérateur ou
congélateur dépassent les températures normales de
fonctionnement en raison de panne de courant ou
d’une autre raison. Lorsque le dispositif Temp Alarm
est activé, son témoin lumineux s’allume.
Si les températures des compartiments congélateur et
réfrigérateur ont dépassé les normes, les températures
actuelles et les températures les plus élevées atteintes
lors de la panne de courant seront affichées en
alternance. Un signal sonore se fera entendre de façon
répétitive.
Appuyez sur la touche Temp Alarm une fois pour
arrêter le signal sonore. Le témoin de l’alarme de
température continuera à clignoter et les températures
vont varier en alternance jusqu’à ce qu’elles se
stabilisent.
Lorsqu’un réfrigérateur est doté d’un filtre à
eau, le témoin lumineux jaune Order s’allume
lorsque 90 % du volume d’eau pour lequel le filtre à
été conçu est filtré, OU 11 mois après l’installation du
filtre.
43
Appuyez sur la touche Temp Alarm pendant trois
secondes pour arrêter la fonction. Le témoin s’éteindra.
Page 45

C
OMMANDES DE TEMPÉRATURE
Alarme de porte
L’alarme de porte vous avertira si l’une des deux
portes est demeurée ouverte pendant plus de 5
minutes consécutives. Un signal sonore se fera donc
entendre jusqu’à ce que la porte soit fermée, OU si la
fonction est désactivée en appuyant sur la touche Door
Alarm.
Max Cool
Lorsque la fonction Max Cool est activée, les
températures du réfrigérateur et du congélateur
diminuent aux réglages minimaux. Ceci permet de
refroidir les deux compartiments si les portes sont
demeurées ouvertes très longtemps ou après avoir
rangé des aliments chauds. Remarque : Lorsque la
fonction Max Cool est activée, les touches et
du réfrigérateur et du congélateur ne sont pas
fonctionnelles.
Pour activer la fonction, appuyez sur la touche Max
Cool. Max Cool se désactivera automatiquement après
12 heures, OU si l’on appuie sur la touche Max Cool.
Préférences de l’utilisateur
L’on doit accéder au menu des préférences de
l’utilisateur pour :
• Activez ou arrêtez le réglage Super Cool/Très froid
(certains modèles).
• Modifier l’affichage de la température (°F en °C)
• Activez ou désactivez les alarmes sonores.
• Ajuster le degré de luminosité de la lampe du
distributeur (si cette fonction est activée sur le
distributeur d’eau et de glaçons) (certains modèles)
3. Une fois les modifications terminées, appuyez sur la
touche Door Alarm pendant trois secondes, OU
fermez la porte du réfrigérateur.
Super Cool/Très froid (CC) (certains modèles)
Lorsque le réglage Super Cool est en marche (ON), un
ventilateur est activé dans le compartiment des
aliments frais pour améliorer la circulation de l’air et la
régulation des températures. Pour économiser
l’énergie, cette caractéristique peut être désactivée en
la mettant à l’arrêt (OFF).
Affichage de la température (F_C)
Modifiez l’affichage des températures en degrés
Fahrenheit en degrés Celsius.
Alarme (AL)
Lorsque le mode Alarme est à l’arrêt (OFF), toutes les
alarmes sonores sont désactivées jusqu’à ce que ce
mode soit remis en marche.
Sélection du niveau de luminosité (LL) (certains
modèles)
Cette fonction ajuste le degré de luminosité du
distributeur lorsque le capteur détecte que la
luminosité de la pièce est faible. Le réglage 1 est le
degré le plus sombre et le réglage 9 est le degré le
plus clair. Remarque : Cette fonction (certains
modèles) doit être activée à partir du distributeur d’eau
et de glaçons.
Mode sabbat (SAB)
Lorsque le mode Sabbat est en marche (ON), tous les
voyants et la veilleuse sont désactivés jusqu’à ce que
cette caractéristique soit arrêtée (OFF). Le mode
Sabbat ne désactive pas les lampes intérieures.
Appuyez sur n’importe quelle touche pour réinitialiser
les témoins des commandes.
• Activer le mode sabbat
Pour accéder au menu des préférences de l’utilisateur,
appuyez sur la touche Door Alarm pendant trois
secondes. Le nom des fonctions du menu des
préférences de l’utilisateur apparaîtra à l’affichage du
congélateur et l’état actuel des fonctions apparaîtra à
l’affichage du réfrigérateur.
1. Servez-vous de la touche « Up » et « Down » du
congélateur pour faire défiler les fonctions.
2. Lorsque la fonction désirée apparaît, servez-vous de
la touche « Up » et « Down » du réfrigérateur pour
la modifier.
Surfaces chaudes de la caisse
Parfois, il se peut que le devant du réfrigérateur soit
chaud au toucher. Cela est normal et empêche la
condensation de l’humidité sur l’appareil. Ce
phénomène sera plus apparent lors de la mise en
marche initiale du réfrigérateur, lorsque la température
extérieure est élevée ou si la porte est demeurée
ouverte pendant longtemps.
44
Page 46

C
ARACTÉRISTIQUES
–
COMPARTIMENT RÉFRIGÉRATEUR
Étagères
ATTENTION
Pour éviter blessure ou dommage matériel, observez
les points suivants :
• Ne tentez jamais d’ajuster une étagère chargée de
nourriture.
• Assurez-vous que l’étagère est bien fixée avant d’y
placer des articles.
• Manipulez soigneusement les étagères en verre
trempé. Elles peuvent se briser soudainement si
elles sont entaillées, égratignées ou exposées à de
brusques changements de température.
Votre réfrigérateur comporte de étagère en verre
Spill-proof. Les étagères Spill-proof ont un rebord de
retenue qui facilite le nettoyage. Certaines sont aussi
équipées de la caractéristique coulisser. Pour faire
coulisser l’étagère, prenez-la par l’avant et tirez-la.
Poussez-la pour la remettre à sa position d’origine.
Pour enlever une étagère :
• Relevez légèrement l’avant et
soulevez l’arrière de l’étagère, puis
tirez l’étagère tout droit pour la sortir.
Pour verrouiller l’étagère à une autre place :
• Relevez le bord avant de l’étagère.
• Introduisez les crochets dans les ouvertures désirées
du cadre et laissez l’étagère se mettre en place.
• Assurez-vous que l’étagère est bien verrouillée à
l’arrière.
Rallonges D’étagére Arriére
• Placez la main sous le cadre pour sortir le verre.
Soulevez le verre.
• Soulevez le cadre des glissières du réfrigérateur.
Installation :
• Remplacez l’armature dans des rails de
recouvrement de réfrigérateur.
• Remplacez soigneusement le verre dans l’armature.
Rangement dans la
contre-porte
Centre laitier
Le centre laitier permet de ranger des articles à
tartiner tels que le beurre et la margarine. Il peut être
déplacé à différents endroits selon les besoins. Pour
utiliser le centre laitier, relevez le couvercle.
Dépose :
• Relevez le couvercle, tirez le centre laitier à la
verticale et penchez-le pour le sortir.
Installation :
• Glissez le centre de laiterie dedans et vers le bas
jusque fermement à assis dans le recouvrement de
porte.
Balconnets
Les balconnets peuvent être déplacés selon
les besoins particuliers de rangement.
Dépose :
• Coulissez le balconnet vers le
haut et tirez-le tout droit.
Les Rallonges D’étagère Arrière empêchent les
articles de tomber à l’arrière de l’étagère.
Dépose et installation d’une rallonge d’étagère :
• Pour la retirer, soulevez-la à la verticale à partir de
l’arrière.
• Pour l’installer, enfoncez les tenons
de l’étagère dans les trous situés
dans le cadre de l’étagère.
L’étagère au-dessus du bac sert d’étagère inférieure
pour les aliments frais.
Dépose de l’étagère au-dessus du bac :
• Retirez les étagère au-dessus du bacs.
45
Installation :
• Coulissez le balconnet vers le bas, jusqu’à ce qu’il
soit fermement installé dans la doublure de porte.
Bacs à légumes
Les bacs à légumes procurent un environnement à
humidité plus élevée pour les légumes et les fruits frais.
Commandes
Ces commandes permettent de contrôler le niveau
hygrométrique dans le bac. Coulissez la commande vers
le réglage Fruit (fruit) pour les légumes à peau.
Coulissez la commande vers le réglage Vegetables
(légumes) pour les légumes à feuilles.
Page 47

ARACTÉRISTIQUES
C
Dépose :
COMPARTIMENT RÉFRIGÉRATEUR
–
Installation :
• Poussez les glissières métalliques vers l’arrière du
réfrigérateur. Mettez le tiroir sur les glissières et
repoussez-le jusqu’à ce qu’il retombe en place.
• Tirez le bac au maximum. Relevez l’avant du bac et
tirez le bac tout droit.
Installation :
• Introduisez le bac dans les glissières du cadre et
poussez-le en place.
Remarque
• Pour de meilleurs résultats, les bacs à légumes
doivent être bien fermés.
Gourmet Bay
Le tiroir du chef Gourmet BayMCest un tiroir pleine
largeur avec commande de température réglable. Ce
tiroir peut être utilisé pour les grands plateaux, les
charcuteries, les boissons ou des articles divers et
comprend un diviseur pour séparer le tiroir en sections,
si vous le désirez.
Une commande de température ajuste la quantité d’air
froid admise dans le tiroir du chef Gourmet BayMC. La
commande est située à la droite du tiroir.
Mettez la commande sur cold (froid) ou
pour une température de réfrigérateur
normale. Mettez la commande sur coldest
(plus froid) ou lorsqu’une température
inférieure à celle du compartiment de
réfrigération principal est souhaitée. Utilisez
le réglage plus froid pour la conservation de
viandes.
MC
Dépose :
• Tirez complètement le tiroir et relevez l’avant du
diviseur pour le décrocher de la paroi arrière du
tiroir, puis sortez-le.
Installation :
• Accrochez le diviseur sur la paroi arrière du tiroir, et
baissez-le en place.
Accessoires
Porte-bouteilles/Support à canettes
(certains modèles)
Le porte-bouteilles/support à
canettes est un accessoire qui
s’installe dans le tiroir du chef Chef’s
PantryMCou sur une étagère.
Les bouteilles et les canettes peuvent être
rangées transversalement ou une seule
bouteille peut être placée dans la
dépression centrale.
Plateau du Gourmet Bay
Le plateau du Gourmet BayMCest
amovible et se range dans le tiroir de
rangement pleine largeur.
Porte-bouteille
MC
Remarques
• L’air froid dirigé vers le tiroir du chef Gourmet
BayMCpeut faire baisser la température dans le
réfrigérateur. Il peut alors être nécessaire d’ajuster
la commande du réfrigérateur.
• Ne mettez pas de légumes à feuilles dans le tiroir
du chef Gourmet BayMC. Les températures plus
basses qui y règnent pourraient endommager ces
produits.
Dépose :
• Relevez le couvercle. Tirez le tiroir au maximum.
Relevez l’avant du tiroir et tirez-le tout droit.
Le porte-bouteille permet de ranger
horizontalement une bouteille. Il peut
permettre aussi le rangement d’une
boîte d’œufs.
Placez le porte-bouteille sur le côté gauche d’une
étagère du réfrigérateur.
Oeufrier
L’œufrier (le style peut varier) permet le rangement
d’une douzaine d’œufs et plus. Il
peut être enlevé pour être
transporté sur le plan de travail,
ou pour être lavé.
46
Page 48

C
ARACTÉRISTIQUES
–
COMPARTIMENT CONGÉLATEUR
Panier métallique supérieur
DANGER
Pour éviter qu’un enfant ne soit accidentellement
enfermé dans l’appareil ou ne risque de s’étouffer,
n’enlevez pas le diviseur se trouvant dans le panier
du congélateur.
Dépose :
• Tirez le panier au maximum et soulevez-le pour
l’enlever.
Installation :
• Glissez le panier supérieur dans le congélateur.
Assurez-vous qu’arrière des crochets de panier
derrière le crochet de rail.
Accessoires
Bac à glaçon
Le bac à glaçons sert à
l’entreposage de glace.
Plateau de panier inférieur
Le plateau de panier est
un article en plastique
amovible, qui repose au
fond du panier inférieur et
qui permet de recueillir les
p r o d u i ts renversés et les
p e t i t s art i c l e s avant qu'ils ne
tombent dans le compartiment congélateur.
Le plateau peut être enlevé pour être nettoyé
facilement en le soulevant du panier.
Diviseur de panier inférieur
Le diviseur de panier inférieur permet de séparer la
zone de rangement en différentes sections.
Remarque
• Pour les modèles avec congélateur-tiroir :
Voyez, en page 38, le panier inférieur et les
instructions complètes sur le tiroir coulissant.
Dépose et remise en place du diviseur :
• Pour l'enlever, tirez le diviseur à la verticale.
• Pour l'installer, accrochez les coins supérieurs du
diviseur par-dessus les barreaux horizontaux
supérieurs du panier.
47
Page 49

E
AU ET GLAÇONS
Machine à glaçons automatique
Raccordez la machine à glaçons à la canalisation d’eau
comme il est indiqué à la page 41. Une bonne circulation
d’eau et la mise à niveau du réfrigérateur sont
essentielles à des performances optimales de la
machine à glaçons.
Instructions de fo n c t i o n n e m e n t
• Assurez-vous que le bac à glaçons est
en place et que le bras de détection est
en bas.
• Une fois que le compartiment
congélateur atteint une température
d’environ -18 °C (0 °F), la machine à
glaçons se remplit d’eau et se met en marche. Il est
possible de recueillir un lot complet de glaçons environ
toutes les trois heures.
• Attendez 24 heures environ après l’installation pour
recueillir le premier lot de glaçons.
• Jetez les glaçons obtenus les 12 premières heures de
fonctionnement pour vous assurer que le système ne
comporte pas d’impuretés.
• Arrêtez la production de glaçons en relevant le bras
jusqu’à ce qu’un déclic se fasse entendre.
• La machine à glaçons reste à l’arrêt tant que le bras n’est
pas poussé vers le bas.
• Le premier ou les deux premiers lots seront probablement
constitués de glaçons de petite taille et irréguliers, du fait
de la présence d’air dans la canalisation.
• Lors de l’éjection des glaçons, il est normal que plusieurs
glaçons soient collés ensemble aux extrémités. Il est facile
de les séparer. La machine à glaçons continuera à
produire des glaçons jusqu’à ce que l’accumulation de
glaçons relève le bras de détection, ce qui arrête la
machine à glaçons.
• Certains sons peuvent accompagner les diverses phases
de la production de glaçons : léger bourdonnement du
moteur, chute de glaçons dans le bac à glaçons vide et
déclic de l’électrovanne ou, de temps à autre,
bourdonnement.
• Si la consommation de glaçons est faible, les glaçons
accumulés vont prendre un aspect trouble, se contracter,
coller ensemble et prendre un goût. Videz périodiquement
le bac pour le laver à l’eau tiède. Veillez à bien le sécher
avant de le réinstaller.
• Ne placez dans le bac à glaçons aucun aliment ou liquide
pour un refroidissement rapide. Ces articles entraveraient
les mouvements du bras de détection, ce qui entraînerait
un mauvais fonctionnement de la machine à glaçons.
• Lorsque l’arrivée d’eau doit être interrompue pendant
plusieurs heures, arrêtez la machine à glaçons en
relevant le bras de détection.
Dépose du bac à glaçons :
• Tirez le bac à glaçons vers l’avant puis enlevez-le de la
machine à glaçons. Pour empêcher que la machine à
glaçons ne produise des glaçons alors que le bac est
enlevé, arrêtez la machine à glaçons en relevant le bras
de détection.
Installation du bac à glaçons :
• Inversez la méthode ci-dessus. Remettez en marche la
machine à glaçons en baissant le bras de détection.
AVERTISSEMENT
Pour éviter tout risque de blessure ou dommage
matériel, observez les points suivants :
• Ne placez jamais les doigts ou la main sur le
mécanisme de la machine à glaçons lorsque le
réfrigérateur est branché, afin d’éviter tout risque de
blessure. Cela évitera aussi toute interférence avec
les pièces mobiles du mécanisme d’éjection et avec
l’élément chauffant qui provoque la libération des
glaçons.
• Dans certa i n e s circonsta n c e s rares, les glaçons
peuvent présenter une coloration vert-bleu. Ceci es t
dû à une combinaison de facteurs comme
ca r a c t é r i s t i q u es de l’eau locale, circuits de plomberie
de la résidence, et accumulation de sels de cuivre
dans la ca n a l i sation inactive qui alimente la machine à
glaçons. La consommation répétitive de glaçons ainsi
colorés peut être néfaste pour la santé. Jetez tous les
glaçons manifes tant une telle coloration et conta c t e z
le détaillant pour l’achat d’un filtre qui devra être
i n s tallé sur la ca n a l i sat ion d’e a u .
• Un raccordement à l’eau inapproprié peut entraîner
la formation de moisissures/mildiou.
• Nettoyez les renversements d’eau et de glaçons pour
éviter de vous blesser, et pour empêcher la
formation de moisissures/mildiou.
Distributeur d’eau
Le distributeur d’eau se trouve sur la
paroi gauche du compartiment
réfrigérateur. Cette conception ne
permet que la distribution d’eau froide.
Pour se servir en eau :
• Tenez le contenant sous le bec verseur
et appuyez sur la touche du distributeur.
48
Page 50

F
ILTRE À EAU
Dépose et installation
AVERTISSEMENT
Pour éviter une maladie grave pouvant entraîner la
mort, n’utilisez pas, dans le réfrigérateur, une eau de
qualité biologique déficiente ou inconnue sans avoir
installé, avant ou après le filtre, un dispositif de
désinfection adéquat.
ATTENTION
Après l’installation d’un filtre à eau neuf, faites
toujours couler de l’eau pendant deux minutes
avant d’enlever le filtre, quelle qu’en soit la
raison. L’air résiduel du système peut provoquer
l’éjection d’eau et de la cartouche. Procédez
prudemment pour la dépose.
Le bouchon d’obturation de la dérivation ne filtre
•
pas l’eau. Assurez-vous toujours d’avoir une
cartouche de rechange disponible lorsqu’un
remplacement est nécessaire.
Si on a laissé se produire une congélation du circuit
•
de filtration, remplacez la ca rtouche de filtration.
Si le système n’a pas été utilisé pendant une court e
•
période de temps, et si l’eau manifeste une odeur ou
un goût, puisez 2 à 3 verres d’eau pour rincer le
circuit. Si une odeur ou un goût désagréable persiste,
changez la ca rto uche de filtration. Si le système n’a
pas été utilisé pendant trois mois ou plus, remplacez
la ca rtouche du filtre à eau.
Installation initiale
Le filtre à eau est situé au coin droit
supérieur du compartiment de
réfrigération.
1. Ôtez et conservez le bouchon
bleu d’obturation.
2. Enlevez l’étiquette de protection
à l’extrémité du filtre; insérez le
filtre dans la base de connexion.
4. Expulsez l’air du circuit pour que l’eau puisse
couler librement : laissez l’eau couler sans
interruption pendant deux minutes par le
distributeur, jusqu’à ce que le débit soit stable. Lors
de l’utilisation initiale, prévoyez une période
d’attente de une à deux minutes pour que l’eau
puisse remplir le réservoir interne de l’appareil.
• Une purge additionnelle peut être nécessaire si
la qualité de l’eau est médiocre.
Remplacement du filtre à eau
IMPORTANT : L’air résiduel du système peut
provoquer l’éjection d’eau et de la cartouche.
Faites toujours couler l’eau pendant deux minutes
avant d’enlever le filtre, quelle qu’en soit la raison.
Procédez prudemment pour la dépose.
1. Faites tourner le filtre dans le sens antihoraire,
jusqu’à ce qu’il se sépare de la base.
2. Laissez l’eau résiduelle du filtre s’écouler dans
l’évier; jetez le filtre à la poubelle.
3. Enlevez l’excès d’eau dans le corps du filtre et
procédez en suivant les étapes 2 au 4 de la section
Installation initiale
On devrait changer le filtre/la cartouche de filtration au
moins tous les 12 mois.
IMPORTANT : La longévité de la cartouche de
filtration dépend de la qualité de l’eau à filtrer et de la
quantité d’eau puisée. Si on puise une quantité d’eau
importante ou si la qualité de l’eau est médiocre, il
sera nécessaire de remplacer la cartouche de filtration
plus fréquemment.
Pour acheter une ca rto uche de filtration de rechange,
prenez contact avec votre détaillant ou composez le
1 - 80 0 - J ENNAIR (1-80 0 - 5 36 - 62 47) aux É.-U. et Canada.
Vous pouvez utiliser le distributeur d’eau sans y
installer une cartouche de filtration. Dans ce cas,
remplacez le filtre par le bouchon bleu d’obturation de
la base du filtre.
3. Faites-le tourner doucement dans le sens horaire,
jusqu’à la position de butée, et emboîtez les deux
parties du corps de filtre pour la fermeture.
49
Page 51

F
ILTRE À EAU
Spécifications du système et caractéristiques de performance
Cartouche de filtration d’eau pour réfrigérateur –
Modèle UKF8001AXX
Specifications
Débit maximal en service ....................................................................2,9 L /mn (0,78 GPM)
Longévité maximale – modèle UKF8001AXX – 750 (max.) ..2838 litres/750 gallons
Température de service maximale ..................................................38 ºC/100 ºF
Pression d’alimentation minimale ....................................................241 kPa/35 lb/po
Température de service minimale ....................................................1 ºC/33 ºF
Pression d’alimentation maximale....................................................827 kPa/120 lb/po
Spécifications
Paramètre
Chlore
Goût et odeur
Particules**
USEPA
MCL
—
—
—
Caractéristiques de performance
Norme n° 42: Effets esthétiques
Concentration à l’entrée
2,0 mg/L ±10%
—
Au moins 10 000 particules/mL
Moyenne à
l’entrée
1,88 mg/L
—
5 700 000 part./mL
Concentration à la sortie % de réduction
Moyenne
< 0,05136364 mg/L
–
30 583 part./mL
Maximale
< 0,06 mg/L
–
69 000 part./mL
1000 Apollo Road
Eagan, Minnesota 55121-2240
651.450.4913
EPA EST n° 35917-MN-1
100834/B
–
Taux de réduction
min. nécessaire
50%
–
85%
Moyen
> 97,26%
–
99,52%
Minimal
96,84%
98,94%
Paramètre
Turbidité
Spores
Amiante
Plomb à pH 6,5
Plomb à pH 8,5
Mercure à pH 6,5
Mercure à pH 8,5
Atrazine
Benzene
Carbofuran
p-Dichlorobenzène
Lindane
Toxaphène
* Mesure avec débit de 2,9 L/mn (0,78 GPM); pression de 413,1 kPa (60 lb/po_); pH
de 7,5 ± 0,5; température de 20 °C ± 3 °C (68 °F ± 5 °F)
** Mesures en particules/mL. Utilisation de particules de 0,5 – 1 micron.
*** NTU – Unités de turbidité néphélémétrique
USEPA
MCL
1 NTU**
Réduction de 99,5%
Réduction de 99%
0,015 mg/L
0,015 mg/L
0,002 mg/L
0,002 mg/L
0,003 mg/L
0,005 mg/L
0,04 mg/L
0,075 mg/L
0,0002 mg/L
0,003 mg/L
Norme n° 53: Effets sur la santé
Concentration à l’entrée
11 ± 1 NTU***
Min. 50 000/L
107108fibres/L; fibres de longueur 10 micromètres ou plus
0,15 mg/L + 10%
0,15 mg/L + 10%
0,006 mg/L ± 10%
0,006 mg/L ± 10%
0,009 mg/L + 10%
0,015 mg/L ± 10%
0,08 mg/L ± 10%
0,225 mg/L ± 10%
0,002 mg/L + 10%
0,015 ± 10%
Conditions générales d’utilisation
Lisez cette fiche technique et comparez les caractéristiques
de l’appareil avec les besoins de traitement de l’eau.
N’utilisez PAS ce produit en présence d’une eau de
qualité microbiologique déficiente ou inconnue sans
installer un dispositif de désinfection adéquat avant ou
après le système. Vous pouvez utiliser un système
certifié pour la rétention des spores en présence d’une
eau désinfectée qui peut contenir des spores filtra b l e s .
UTILISEZ CE PRODUIT UNIQUEMENT AVEC UNE
SOURCE D’EAU FROIDE. VÉRIFIEZ LE RESPECT DES
DISPOSITIONS DES LOIS ET RÈGLEMENTS LOCAUX ET
PROVINCIAUX.
Moyenne à
l’entrée
10,7 NTU
166.500 # /L
155 MF/L
0,153 mg/L
0,150 mg/L
0,006 mg/L
0,006 mg/L
0,009 mg/L
0,014 mg/L
0,081 mg/L
0,208 mg/L
0,002 mg/L
0,015 mg/L
Concentration à la sortie % de réduction Moyen
Moyenne
0,36 NTU
< 1 # /L
< 1 MF/L
< 0,001 mg/L
< 0,001 mg/L
0,00026 mg/L
0,0008 mg/L
<0,002 mg/L
0,0006 mg/L
<0,001 mg/L
<0,0005 mg/L
0,000 mg/L
<0,001 mg/L
Cartouches de filtration UKF 80 0 1 A X X - 7 50 testées et certifiées par NSF International sur
la base des normes ANSI/NSF 42 et 53, pour la rétention des contaminants suivants :
Norme nº 42 : Effets esthétiques
Réduction sur goût et odeur
Odeur et goût de chlore
Unité de filtration mécanique
Rétention des particules – Classe 1
Maximale
0,49 NTU
< 1 # /L
< 1 MF/L
< 0,001 mg/L
< 0,001 mg/L
0,0005 mg/L
0,0015 mg/L
0,002 mg/L
0,0011 mg/L
<0,001 mg/L
<0,0005 mg/L
<0,0001 mg/L
<0,001 mg/L
Moyen
97,09 %
> 99,99 %
> 99,99 %
> 99,35%
> 99,33%
95,70%
86,22%
76,99%
95,71%
98,74%
99,76%
98,72%
92,97%
Norme nº 53 : Effets sur la santé
Unité de rétention des contaminants
chimiques
Réduction de la concentration en plomb,
atrazine, lindane, benzene, carbofuran,
p-dichlorobenzène, mercure et toxaphène
Unité de filtration méca n i q u e
Réduction de spores, turbidité et amiante
Minimal
95,20 %
> 99,99 %
> 99,99 %
> 99,29%
> 99,29%
90,91%
75,93%
75,31%
92,14%
98,46%
99,74%
96,50%
91,67%
Le système de filtration d’eau rétractable PuriClean®II utilise
une cartouche de filtration remplaçable UKF8001AXX. Le
remplacement en temps opportun de la cartouche est un
facteur essentiel pour une performance satisfaisante de ce
système de filtration. Consultez la section applicable de ce
Guide d’utilisation et d’entretien au sujet des instructions
pour l’utilisation générale, l’entretien et le diagnostic. Le prix
au détail suggéré pour un filtre à eau de rechange est de
39,99 $.
Ce système a été testé sur la base des normes ANSI/NSF 42
et 53 pour la rétention des substances mentionnées cidessus. La concentration des substances indiquées dans
l’eau à l’entrée du système a été réduite à une valeur
inférieure ou égale à la limite admissible spécifiée par les
normes ANSI/NSF 42 et 53 pour l’eau quittant le système.
Taux de réduction
min. nécessaire
0,5 NTU
> 99,95 %
99 %
0,10 mg/L
0,10 mg/L
0,002 mg/L
0,002 mg/L
0,003 mg/L
0,005 mg/L
0,04 mg/L
0,075 mg/L
0,0002 mg/L
0,003 mg/L
50
Page 52

F
ILTRE À EAU
État de Californie
Services de santé
Appareil de traitement de l’eau
Certificat numéro
03 – 1583
Date d’émission : 16 septembre 2003
Date mis à jour : April 22, 2004
Marque/modèle Cartouche de rechange
UKF8001AXX750 UKF8001AXX
469006-750 46 9006
67003523-750 67003523
Fabricant : PentaPure Inc.
L’appareil de traitement d’eau mentionné dans ce certificat a satisfait aux critères des tests prévus par la section 116830 du
Health and Safety Code, à l’égard des contaminants nocifs suivants :
Contamination microbiologique et turbidité Contaminants minéraux/radiologiques
Spores Amiante
Turbidité Plomb
Mercure
Contaminants organiques
Atrazine
Lindane
Benzene
Carbofuran
p-Dichlorobenzène
Toxaphène
Capacité nominale en service : 2839 L (750 gal.) Débit nominal en service: 2,9 L/mn (0,78 GPM)
Conditions de la certification :
N’utilisez pas ce produit en présence d’une eau de qualité microbiologique déficiente ou inconnue, sans installer un système
certifié pour la rétention des spores, en présence d’une eau désinfectée qui peut contenir des spores filtrables.
51
Page 53

ONSEILS POUR LA CONSERVATION DES ALIMENTS
C
Conservation de produits frais
• On devrait maintenir la température dans le
c o m p a r timent réfrigérateur entre 1 °C et 4 °C (34 °F
et 40 °F) (la valeur optimale est 3 °C [37 °F]). Po u r
contrôler la température, placez un thermomètre pour
appareils ménagers dans un verre d’eau, au centre du
c o m p a r timent réfrigérateur. Notez l’indication du
thermomètre après 24 heures. Si la température es t
supérieure à 4 °C (40 °F), ajustez les commandes ,
selon les instructions de page 42-44 .
• Évitez de placer trop de produits sur les clayettes et
étagères du réfrigérateur. Ceci entrave la circulation
de l’air autour des aliments et entraîne un
refroidissement non uniforme.
Fruits et légumes
• L’humidité des produits conservés dans les bacs à
légumes est retenue, ce qui permet de maximiser la
qualité et la durée de conservation des fruits et
légumes (page 46).
• Effectuez un tri des fruits et légumes avant de les
placer dans le réfrigérateur; veillez à consommer
d ’ abord les art i c l e s amollis ou qui ont subi des chocs.
Jetez les art i c l e s manifes tant un début de dégradation.
• Veillez à toujours envelopper les aliments très
odorants – oignons, choux, etc. – afin que l’odeur ne
soit pas transférée à d’autres aliments.
• Tandis qu’une certaine dose d’humidité est
nécessaire à la conservation de la fraîcheur des
légumes, un excès d’humidité peut réduire la durée
de conservation (particulièrement pour les légumes
feuillus). Veillez à bien égoutter les légumes avant de
les placer dans le réfrigérateur.
• Ne lavez les produits frais que juste avant de les
utiliser.
Viandes et fromages
• On devrait parfaitement envelopper la viande ou
volaille non cuite pour qu’il ne puisse y avoir aucune
contamination d’autres aliments ou des surfaces du
réfrigérateur.
• Occasionnellement une moisissure peut se
développer à la surface de certains fromages durs
(gruyère, cheddar, parmesan). Coupez dans le
fromage, jusqu’à 2,5 cm (1 pouce) autour et audessous de la zone moisie. Veillez à ce que couteau
ou autre instrument ne touche pas la zone moisie.
Ne tentez pas, après l’apparition de moisissure, de
récupérer tranches de fromage individuelles, fromage
mou, fromage cottage, crème, crème sure ou yaourt.
Produits laitiers
• Une date de péremption indiquant la limite de
conservation apparaît généralement sur l’emballage
de la plupart des produits laitiers comme lait, yaourt,
crème sure et fromage cottage. On doit veiller à
conserver ces aliments dans leur emballage d’origine
et à les réfrigérer immédiatement après l’achat et
après chaque prélèvement.
Conservation des aliments
surgelés
• La température dans le compartiment congélateur
d’un réfrigérateur doit être maintenue à environ
-18 °C (0 °F). Pour contrôler la température, placez
un thermomètre pour appareils ménagers entre les
paquets d’aliments surgelés. Notez l’indication du
thermomètre après 24 heures. Si la température est
supérieure à -18 °C (0 °F), ajustez le bouton de
commande, selon les instructions de page 42-44.
• Le fonctionnement du congélateur est plus efficace
lorsqu’il est rempli aux deux tiers ou plus.
Préparation des aliments pour la
congélation
• Pour minimiser la déshydratation et la détérioration
qualitative, utilisez feuille d’aluminium, emballage
pour congélation, et sachets ou contenants étanches
pour congélateur. Expulsez autant d’air que possible
de l’emballage, veillez à ce que chaque paquet soit
parfaitement fermé. L’air retenu peut provoquer
l’assèchement des aliments, un changement de
couleur ou le développement d’une saveur non
naturelle (brûlures de congélation).
• Avant de les congeler, enveloppez les paquets de
viande fraîche et de volaille avec un produit adéquat
d’emballage pour congélation.
• Ne congelez pas de nouveau une pièce de viande
complètement décongelée.
Chargement du congélateur
• Évitez de placer trop d’aliments tièdes dans le
congélateur en une seule fois. Ceci soumet le
congélateur à une surcharge, ce qui ralentit le
refroidissement et peut provoquer une augmentation
de la température des aliments déjà congelés.
• Laissez un espace entre les paquets pour que l’air
froid puisse circuler librement, ce qui entraînera une
congélation plus rapide.
• Évitez de placer sur les balconnets du congélateur des
p r o d u i t s à congélation difficile comme crème glacée
ou jus d’orange; il est préférable de placer ces
p r o d u i t s à l’intérieur du congélateur où la température
varie moins lors de l’o u v e rtu re des port es .
Reportez-vous au tableau de conservation des aliments
aux pages 53 et 54 pour connaître les durées
approximatives de conservation.
52
Page 54

ONSEILS POUR LA CONSERVATION DES ALIMENTS
C
Tableau de conservation des aliments
La durée de conservation est approximative et peut varier selon le type d’emballage, la température de conservation
et la qualité du produit lors de son achat.
ALIMENTS
PRODUITS LAITIERS
Beurre
Lait et crème
Fromage à la crème, tartinade de
fromage et produits au fromage
Fromage cottage
Crème sure
Fromage dur
(gruyère, cheddar et parmesan)
ŒUFS
Oeufs en coquille
Jaunes ou blancs
R É FRIG É R AT E UR
1 mois
1 semaine
1 à 2 semaines
3 à 5 jours
10 jours
1 à 2 mois
3 semaines
2 à 4 jours
CONGÉLATEUR
6 à 9 mois
Non recommandé
Non recommandé
Non recommandé
Non recommandé
4 à 6 mois
Peut s’émietter
Non recommandé
9 à 12 mois
CONSEILS DE CONSERVATION
Empaquetez bien ou couvrez.
Vérifiez la date sur l’emballage. Fermez
bien. Ne remettez pas la partie non
utilisée dans le contenant d’origine. Ne
congelez pas la crème à moins qu’elle ne
soit fouettée.
Enveloppez bien.
Conservez dans le contenant d’origine.
Vérifiez la date sur le cartonnage.
Conservez dans le contenant d’origine.
Vérifiez la date sur le cartonnage.
Enveloppez bien.
Découpez toute partie moisie.
Réfrigérez, pointe vers le bas.
Pour chaque tasse de jaunes d’œuf,
ajoutez 1 c. à thé de sucre pour les
pâtisseries ou 1 c. à thé de sel pour les
mets non sucrés.
FRUITS
Pommes
Bananes
Poires, prunes, avocats
Baies, cerises, abricots
Raisin
Agrumes
Ananas, découpé
1 mois
2 à 4 jours
3 à 4 jours
2 à 3 jours
3 à 5 jours
1 à 2 semaines
2 à 3 jours
8 mois (cuites)
6 mois
(entières/pelées)
Non recommandé
6 mois
1 mois (entier)
Non recommandé
6 à 12 mois
Également, conservation de pommes à chair
ferme ou non mûres à 15-21 °C (60 - 70 °F).
Faites mûrir à la température ambiante
avant de mettre au réfrigérateur. Les
bananes noircissent lorsqu’elles sont
mises au réfrigérateur.
Faites mûrir à la température ambiante
avant de mettre au réfrigérateur. Les
avocats noircissent lorsqu’ils sont mis au
réfrigérateur.
Faites mûrir à la température ambiante
avant de mettre au réfrigérateur.
Faites mûrir à la température ambiante
avant de mettre au réfrigérateur.
Se conservent aussi à 16-21 °C (6070 °F). Au réfrigérateur, conservez sans
les recouvrir.
Ne mûrit pas après l’achat. Utilisez
rapidement.
53
Page 55

C
ONSEILS POUR LA CONSERVATION DES ALIMENTS
ALIMENTS R É FRI G É RAT E UR
LÉGUMES
Asperges
Choux de Bruxelles, brocoli,
chou-fleur, petits pois, haricots
de Lima, oignons, poivrons
Chou, céleri
Carottes, panais, betteraves
et navets
Laitue
VOLAILLES ET POISSONS
Poulet et dinde, entiers
Poulet et dinde, morceaux
Poisson
1 à 2 jours
3 à 5 jours
1 à 2 semaines
7 à 10 jours
7 à 10 jours
1 à 2 jours
1 à 2 jours
1 à 2 jours
CONGÉLATEUR
8 à 10 mois
8 à 10 mois
Non recommandé
8 à 10 mois
Non recommandé
12 mois
9 mois
2 à 6 mois
CONSEILS DE CONSERVATION
Ne lavez pas avant de réfrigérer. Rangez
dans le bac à légumes.
Enveloppez les aliments dégageant une
odeur. Laissez les petits pois en gousse.
Enveloppez les aliments dégageant une
odeur et réfrigérez-les dans le bac à
légumes.
Enlevez les feuilles. Enveloppez les
aliments dégageant une odeur et
réfrigérez-les dans le bac à légumes.
Conservez dans l’emballage d’origine
pour la réfrigération. Rangez dans le bac
à viande et fromage. Si la congélation
est de plus de deux semaines,
réenveloppez avec un emballage pour
congélation.
VIANDES
Bacon
Boeuf ou agneau, haché
Boeuf ou agneau, rôti et steak
Jambon, entièrement cuit, entier,
moitié,
en tranches
Viandes froides
Rôti de porc
Côtelettes de porc
S a u c i s s es à base de viande hachée
7 jours
1 à 2 jours
3 à 5 jours
7 jours
5 jours
3 jours
3 à 5 jours
3 à 5 jours
3 à 5 jours
1 à 2 jours
1 mois
3 à 4 mois
6 à 9 mois
1 à 2 mois
1 à 2 mois
1 à 2 mois
1 à 2 mois
4 à 6 mois
4 mois
1 à 2 mois
Les viandes fraîches peuvent être
conservées dans leur emballage
d’origine pour la réfrigération.
Placez dans le bac à viande et fromage.
Si la congélation est de plus de deux
s e m a i n e s, réenveloppez avec un
emballage pour congélation.
La charcuterie non ouverte, emballée
sous vide, peut être conservée jusqu’à
deux semaines dans le bac à viande et
fromage.
Saucisses fumées
Veau
Saucisses de Francfort
7 jours
3 à 5 jours
7 jours
1 à 2 mois
4 à 6 mois
1 mois
Enveloppez bien les viandes
transformées et rangez-les dans le bac à
viande et fromage.
Sources : Department of Agriculture des États-Unis; Food Marketing Institute; Cooperative Extension Service,
Université d’état de l’Iowa
54
Page 56

E
NTRETIEN ET NETTOYAGE
AVERTISSEMENT
Pour éviter tout choc électrique pouvant entraîner de
graves blessures ou même la mort, débranchez le
réfrigérateur avant de le nettoyer. Après le nettoyage,
rebranchez le réfrigérateur.
Tableau de nettoyage
du réfrigérateur
COMPOSANTS
Intérieur de la caisse
Extérieur et portes en acier
inoxydable
IMPORTANT:
Les dommages du fini en acier
inoxydable dus à une utilisation
incorrecte des produits de nettoyage
ou de produits non recommandés ne
sont pas couverts par la garantie de ce
produit.
Nettoyants abrasifs ou énergiques
Ammoniaque
Javellisant
Solvants ou détergents concentrés
Tampons de récurage en métal ou
plastique
Nettoyants abrasifs ou énergiques
Ammoniaque
Javellisant
Solvants ou détergents concentrés
Tampons de récurage en métal ou
plastique
Produits à base de vinaigre
Nettoyants à base d’agrumes
N’UTILISEZ PAS
ATTENTION
Pour éviter tout risque de blessure ou dommage matériel,
observez les points suivants :
• Lisez et suivez les instructions du fabricant de tous les
produits de nettoyage.
• Ne lavez aucun bac, tiroir, accessoire, étagère ou
clayette au lave-vaisselle. Ceux-ci risquent de se fissurer
ou de se déformer.
UTILISEZ
Utilisez 4 cuillères à soupe de bicarbonate de
sodium par litre (1 pinte) d’eau tiède savonneuse.
Rincez les surfaces à l’eau tiède et propre et séchez
immédiatement pour éviter les marques dues à
l’eau.
Utilisez une éponge ou un linge propre et souple
avec de l’eau tiède et savonneuse.
Rincez les surfaces à l’eau tiède et propre et séchez
immédiatement pour éviter les marques dues à
l’eau. Pour polir et enlever les marques de doigts,
faites suivre par une vaporisation de Magic Spray
pour acier inoxydable*.
Portes en verre
(certains modèles)
Joints de porte
Serpentins de condenseur
Retirez la grille inférieure pour
accéder aux serpentins.
Grille de sortie du ventilateur
de condenseur
Voyez arrière du réfrigérateur.
Accessoires
Clayettes, étagères, bacs,
balconnets, tiroirs, etc
55
* Pour commander directement, composez le 1-800-JENNAIR (1-800-536-6247) É.-U. au Canada.
Éviter d’utiliser de grandes quantités d’eau
qui pourraient s’infiltrer sous ou derrière le
verre, en le tachant.
Ne pas utiliser de substances abrasives
comme des tampons à récurer, des
nettoyants en laine d’acier ou en poudre
qui raieraient le verre.
Nettoyants abrasifs ou énergiques
Tampons de récurage en métal ou
plastique.
Autre chose qu’un aspirateur
Lave-vaisselle
Laver à l’eau et au savon. Rincer à l’eau claire et
sécher. On peut utiliser un nettoyant pour verre à
condition d’en pulvériser auparavant sur un linge.
Utilisez une éponge ou un linge propre et souple
avec de l’eau tiède et savonneuse.
Utilisez une buse d’aspirateur.
Utilisez une buse d’aspirateur avec brosse.
Suivez les instructions de dépose et d’installation
dans la section appropriée.
Laissez les acces s o i r es s’ajuster à la température
a m b i a n t e .
Diluez du détergent doux et utilisez une éponge ou
un linge souple et propre pour le nettoyage.
Utilisez une brosse à filaments plastiques pour aller
dans les interstices
Rincez les surfaces à l’eau tiède et propre.
Séchez immédiatement les articles transparents et
en verre pour éviter toutes marques.
Page 57

E
NTRETIEN ET NETTOYAGE
Désodorisation du
réfrigérateur
AVERTISSEMENT
Pour éviter toute décharge électrique pouvant
entraîner de graves blessures ou même la mort,
débranchez le réfrigérateur avant de le nettoyer.
Après le nettoyage, rebranchez-le.
1. Enlevez toute la nourriture et ARRÊTEZ le
réfrigérateur.
2. Débranchez le réfrigérateur.
3. Nettoyez les parois, la partie inférieure et le
plafond de l’intérieur de la caisse, et les bacs,
tiroirs, clayettes, étagères et joints, conformément
aux instructions données à la page 55.
4. Diluez du détergent doux et passez la solution
dans les interstices à l’aide d’une brosse à
filaments plastiques. Laissez agir pendant 5
minutes. Rincez les surfaces à l’eau tiède. Séchez
les surfaces à l’aide d’un linge propre et doux.
5. Lavez et séchez tous les flacons, récipients et
bocaux. Jetez les articles dont la date de
péremption est expirée ou qui se sont gâtés.
6. Enveloppez les aliments générateurs d’odeur ou
mettez-les dans des contenants bien fermés pour
éviter que les odeurs ne réapparaissent.
7. Rebranchez le réfrigérateur et remettez la
nourriture à l’intérieur.
8. Laissez le réfrigérateur refroidir.
9. Après 24 heures, vérifiez si les odeurs ont été
éliminées.
Si les odeurs sont toujours présentes :
1. Retirez les bacs et tiroirs et placez-les sur l’étagère
supérieure du réfrigérateur.
Conseils pour l’économie
d’énergie
• Évitez de surcharger les étagères du réfrigérateur.
Ceci réduit la circulation de l’air autour des aliments
et fait fonctionner le réfrigérateur plus longtemps.
• Évitez d’ajouter trop de nourriture tiède dans le
réfrigérateur en même temps. Ceci surcharge les
compartiments et diminue la vitesse de
refroidissement.
• N’utilisez pas de papier aluminium, papier ciré ou
papier essuie-tout pour recouvrir les clayettes et
étagères. Ceci diminue la circulation de l’air et
entrave le fonctionnement efficace du réfrigérateur.
• Un congélateur qui est aux deux tiers plein
fonctionne plus efficacement.
• Installez le réfrigérateur à l’endroit le plus frais de la
pièce. Évitez les zones en contact avec la lumière
directe du soleil ou près des bouches de chaleur,
conduits de chauffage ou appareils générateurs de
chaleur. Si ceci n’est pas possible, isolez l’extérieur
en utilisant une section de l’armoire.
• Nettoyez les joints de porte tous les trois mois selon
les instructions de nettoyage. Ceci assure une bonne
fermeture des portes et une efficacité de
fonctionnement du réfrigérateur.
• Prenez le temps d’organiser le rangement des
articles dans le réfrigérateur pour réduire le temps
d’ouverture des portes.
• Assurez-vous que les portes sont bien fermées en
mettant le réfrigérateur d’aplomb, selon les
instructions d’installation.
• Nettoyez, tous les trois mois, les serpentins du
condenseur, comme il est indiqué dans les
instructions de nettoyage. Ceci augmente l’efficacité
énergétique et les performances de refroidissement.
2. Remplissez les sections réfrigérateur et congélateur
y compris les contre-portes, de feuilles froissées de
journaux en noir et blanc.
3. Placez des briquettes de charbon de bois au
hasard sur le journal froissé dans les deux
compartiments.
4. Fermez les portes et laissez agir pendant 24 à 48
heures.
56
Page 58

E
NTRETIEN ET NETTOYAGE
Remplacement des ampoules
AVERTISSEMENT
Pour éviter tout choc électrique pouvant entraîner de
graves blessures ou même la mort, débranchez le
réfrigérateur avant de remplacer l’ampoule. Après le
remplacement de l’ampoule, rebranchez le
réfrigérateur.
ATTENTION
To avoid personal injury or property damage,
observe the following:
• Allow light bulb to cool.
• Wear gloves when replacing light bulb.
Compartiment réfrigérateur
(le style du cabochon peut varier)
1. Faites coulisser le cabochon
transparent vers l’arrière du
compartiment pour libérer
l’ensemble de lampe.
2. Retirez les ampoules.
3. Remplacez-les avec des
ampoules pour appareil ménager de puissance
non supérieure à 40 watts.
4. Remettez en place le cabochon en introduisant les
pattes du cabochon dans les trous de la doublure,
de chaque côté de la lampe. Coulissez le cabochon
vers l’avant jusqu’à ce qu’il se verrouille en place.
Ne forcez pas au-delà du point de verrouillage.
Sinon, le cabochon pourrait être endommagé.
Compartiment congélateur
(le style du
cabochon peut varier)
1. Passez la main derrière le
cabochon.
2. D’une pression ferme,
appuyez en avant sur les
encoches se trouvant à
l’arrière du cabochon, et
tirez le cabochon vers le
bas. Le cabochon s’ouvre
par l’arrière.
3. Retirez le cabochon.
4. Enlevez l’ampoule.
5. Remplacez-la par une
ampoule pour appareil
ménager de puissance
non supérieure à 40
watts.
6. Introduisez les taquets
avant du cabochon dans
les fentes de la doublure du congélateur et
enclenchez la partie arrière par-dessus la lampe
pour emboîter le taquet arrière.
Portes en verre
Pour protéger les portes en verre :
1. Ne pas utiliser de produits nettoyants abrasifs
comme des tampons à récurer en laine d’acier ou
des produits de nettoyage en poudre qui
risqueraient de rayer le verre.
(certains modéles)
57
2. Ne pas heurter les portes en verre avec un
ustensile, un article de mobilier, un jouet, etc.
3. Ne pas fermer les portes avant que les étagéres et
les tiroirs ne soient en place.
Toute dégradation les portes en verre - rayure, choc,
tension, etc. - peut affaiblir sa structure et augmenter
le risque de bris à une date ultérieure.
Page 59

E
NTRETIEN ET NETTOYAGE
Préparation pour des congés
ATTENTION
Si votre réfrigérateur a un distributeur, et qu’il est
possible que la température descende en dessous du
point de congélation là où le réfrigérateur est situé, le
système d’alimentation en eau (y compris le réservoir
d’eau et la soupape d’eau) doit être vidangé par un
technicien qualifié.
Pour de courts congés ou absences (trois mois ou
moins) :
1. Enlevez toutes les denrées périssables.
2. Si personne ne vient vérifier le réfrigérateur de temps
en temps, pendant votre absence, retirez aussi tous
les aliments congelés.
3. Si votre réfrigérateur a une machine à glaçons
automatique :
• Coupez l’alimentation en eau de la machine à
glaçons, au moins un jour avant votre départ.
• Après la dernière récolte de glaçons, relevez le bras
de détection à la position ARRÊT.
• Videz le bac à glaçons.
4. Si la température ambiante descend en dessous de
12 °C (55 °F), suivez les instructions ci-dessous, pour
de longues absences.
Dans le cas d’absences de longue durée (plus de
trois mois), OU si la température ambiante risque de
descendre en dessous de 12 °C (55 °F) :
1. Retirez les aliments.
2. Si votre réfrigérateur comporte une machine à
glaçons automatique :
• Coupez l’alimentation en eau de la machine à
glaçons, au moins un jour avant votre départ.
• Après la dernière récolte de glaçons, relevez le bras
de détection à la position ARRÊT.
• Videz le bac à glaçons.
3. Si votre réfrigérateur comporte un système de
distribution avec filtre à eau, retirez la cartouche de
filtration et installez la dérivation du filtre. Jetez la
cartouche usagée.
4. Tournez la commande du congélateur sur OFF (ARR Ê T )
dans le cas de commandes rota t i v es, ou appuyez sur
(–) dans le cas de touches (page 36 ) .
5. Débranchez le réfrigérateur.
6. Nettoyez parfaitement l’intérieur des deux
compartiments, à l’aide d’une solution de bicarbonate
de sodium et d’un linge propre et souple (quatre
cuillerées à soupe de bicarbonate dans 1 litre/1 pinte
d’eau tiède).
7. Séchez bien l’intérieur.
8. Laissez les portes ouvertes pour empêcher la
formation de moisissure et de mildiou.
À votre retour
Après de courts congés ou absences :
Pour les modèles équipés de distributeur ou de machine
à glaçons automatique :
• Rebranchez l’alimentation en eau et ouvrez le robinet
d’eau (page 41).
• Surveillez, pendant 24 heures, le raccordement à l’eau
et assurez-vous qu’il n’y a pas de fuites. Réparez-les au
besoin.
• Faites couler 10 à 15 verres d’eau du distributeur, pour
bien rincer le système.
• Remettez en marche la machine à glaçons en baissant
le bras de détection.
• Jetez au moins les trois premiers lots de glaçons.
Après une longue absence :
• Rebranchez l’alimentation en eau et ouvrez le robinet
d’eau (page 41).
• Rebranchez le réfrigérateur et réglez à nouveau les
commandes (pages 42-44).
• Surveillez, pendant 24 heures, le raccordement à l’eau
et assurez-vous qu’il n’y a pas de fuites. Réparez-les au
besoin.
Pour les modèles avec distributeur, faites couler l’eau par
le distributeur pendant au moins trois minutes, avec la
dérivation du filtre en place, puis installez le filtre à eau
(page 49).
• Après l’installation du filtre à eau, faites couler l’eau en
continu par le distributeur pendant au moins deux
minutes, ou jusqu’à ce que l’eau s’écoule de façon
régulière. Au début, vous pourrez remarquer un retard
d’une à deux minutes dans la distribution de l’eau, alors
que le réservoir se remplit.
• Remettez en marche la machine à glaçons en baissant
le bras de détection.
• Jetez les glaçons produits les douze premières heures
(au moins les trois premiers lots).
Préparation pour un
déménagement
• Suivez les instructions ci-dessus, données pour de
longues absences, jusqu’à l’étape 7.
• Puis, immobilisez tous les articles mobiles, comme les
clayettes, les étagères et les tiroirs, par du ruban
adhésif fixé en place pour éviter tout dommage.
• Fermez les portes par du ruban adhésif.
• Déplacez le réfrigérateur à l’aide d’un chariot ou diable.
Déplacez le réfrigérateur toujours par son côté ou sa
partie arrière, et jamais par l’avant.
• Assurez-vous que le réfrigérateur reste à la verticale
lors de son déplacement.
58
Page 60

B
RUITS DE FONCTIONNEMENT
Des améliorations dans la conception du système de réfrigération peuvent produire des bruits dans le nouveau
réfrigérateur qui sont différents ou qui n’étaient pas présents dans un ancien modèle. Ces améliorations ont été réalisées
pour produire un réfrigérateur meilleur pour la préservation des aliments, plus efficace en énergie et plus silencieux.
Parce que ces nouveaux réfrigérateurs fonctionnent de façon plus silencieuse, l’on détecte des sons qui étaient présents
dans les anciens réfrigérateurs, mais qui étaient masqués par des niveaux de bruit plus élevés. Nombre de ces bruits
sont normaux. Il faut noter que les surfaces adjacentes à un réfrigérateur, comme les murs, les sols et les armoires,
peuvent amplifier ces bruits. Voici les bruits normaux qui peuvent être remarqués dans un réfrigérateur neuf.
BRUIT
Cliquetis
G r and
m o u v ement d’air
Bruit d’ébullition
ou de gargouillis
Bruit sourd
Bruit de vibra t i o n
Bourdonnement
CAUSE POSSIBLE
• La commande du congélateur (A) émet un déclic
à l’arrêt ou au départ du compresseur.
• Le dispositif motorisé (B) fait le bruit d’une
horloge électrique et fonctionne par
intermittence.
• Le ventilateur du congélateur (C) et le ventilateur
du condenseur (D) font ce bruit en cours de
fonctionnement.
• Le réfrigérant de l’échangeur de chaleur (F) et
de l’évaporateur (E) fait ce bruit lorsqu’il circule.
• Les glaçons tombent de la machine à glaçons
(certains modèles) dans le bac à glaçons (G).
• Le compresseur (H) fait ce bruit en fonctionnant.
• Le réfrigérateur n’est pas d’aplomb.
• La soupape d’eau de la machine à glaçons (I)
(certains modèles) bourdonne lorsque la
machine à glaçons se remplit d’eau.
SOLUTION
• Fonctionnement normal
• Fonctionnement normal
• Fonctionnement normal
• Fonctionnement normal
• Fonctionnement normal
• Fonctionnement normal
• Voir les détails sur la mise d’aplomb du
réfrigérateur à la page 36.
• Fonctionnement normal
Ronronnement
Sifflement ou
claquement
• La machine à glaçons (J) est à la position de
marche sans raccordement d’eau.
• Le compresseur (H) peut émettre un
ronronnement aigu en fonctionnant.
• L’élément chauffant du système de dégivrage (K)
fait un sifflement, grésille ou claque en cours de
fonctionnement.
• Arrêtez le bruit en relevant le bras détecteur
à la position d’arrêt. Voyez page 48 .
• Fonctionnement normal
• Fonctionnement normal
59
Page 61

R
ECHERCHES DES PANNES
PROBLÈMES
Vo y ants et commande
du congélateur sont
allumés, mais le
c o m p r esseur ne
fonctionne pas
La température du
bac à légumes est
trop élevée
Le réfrigérateur ne
fonctionne pas
Le réfrigérateur ne
fonctionne toujours
pas
Température des
aliments trop basse
Température des
aliments semble
trop élevée
CAUSES POSSIBLES
Le réfrigérateur est en mode dégivrage.
Les commandes du réfrigérateur sont
réglées à un chiffre trop bas.
Cordon d’alimentation non branché.
La commande est à la position d’arrêt.
Fusible grillé ou disjoncteur déclenché.
Panne de courant.
Le réfrigérateur présente un défaut de
fonctionnement.
Les serpentins du condenseur sont
encrassés.
Les commandes du réfrigérateur ou du
congélateur sont réglées à un chiffre trop
élevé.
Les portes ne se ferment pas
correctement.
SOLUTIONS
Fonctionnement normal.
Attendez 40 minutes pour voir si le réfrigérateur se
remet en marche.
Voyez pages 42-44 comment ajuster les commandes.
Branchez le réfrigérateur.
Voyez pages 42-44 comment ajuster les commandes.
Remplacez tout fusible grillé.
Vérifiez le coupe-circuit et réenclenchez-le au besoin.
Appelez la compagnie d’électricité locale pour signaler
la panne.
Débranchez le réfrigérateur et transférez les aliments
dans un autre appareil. Si aucun réfrigérateur n’es t
disponible, placez de la glace sèche dans le
c o m p a rtime nt congélateur pour conserver la nourriture.
La garantie ne couvre pas les pert es de nourriture.
Prenez contact avec le service après-vente.
Nettoyez selon le tableau de la page 55.
Voyez pages 42-44 comment ajuster les commandes.
Le réfrigérateur n’est pas d’aplomb. Voyez en page 36,
les détails sur la mise d’aplomb du réfrigérateur.
Vérifiez les joints. Nettoyez, au besoin, selon le tableau
de la page 55.
Le réfrigérateur a
une odeur
Gouttes d’eau
formées à l’extérieur
du réfrigérateur
Les commandes ont besoin d’être ajustées.
Les serpentins du condenseur sont
encrassés.
La grille arrière est obstruée.
Les portes sont trop souvent ouvertes ou
sont restées ouvertes pendant de longues
durées.
Des aliments viennent d’être ajoutés.
Le compartiment est sale ou renferme des
aliments générateurs d’odeurs.
Vérifiez que les joints ferment bien.
Niveaux d’humidité élevés.
Les commandes ont besoin d’être ajustées.
Vérifiez qu’il n’y a pas d’obstruction interne qui empêche
la porte de se fermer correctement (par exemple tiroirs
mal repoussés, bacs à glaçons, contenants ou aliments
mal rangés ou trop encombrants, etc.).
Voyez pages 42-44 comment ajuster les commandes.
Nettoyez selon le tableau de la page 55.
Vérifiez la disposition des articles dans le réfrigérateur
pour vous assurer que la grille n’est pas obstruée. Les
grilles arrière sont situées sous les bacs à légumes.
É c o u rtez les périodes pendant les q u e l l es les port es
sont ouvert es. Organisez les aliments de manière à
laisser les port es ouvert es le moins longtemps possible.
Attendez un certain temps pour que la température
des aliments qui viennent d’être ajoutés atteigne celle
du réfrigérateur ou du congélateur.
Nettoyez selon les instructions de la page 55.
Nettoyez selon le tableau de la page 55.
Une température élevée et humide peut augmenter la
condensation.
Voyez pages 42-44 comment ajuster les commandes.
60
Page 62

ECHERCHE DES PANNES
R
PROBLÈMES
Gouttes d’eau
formées à l’intérieur
du réfrigérateur
Le réfrigérateur ou
la machine à glaçons
p r oduit des bruits
b i z a r r es ou semble
t r op bruya n t
Les bacs à légumes
ne se ferment pas
facilement
Le réfrigérateur
fonctionne trop
fréquemment
CAUSES POSSIBLES
Niveaux d’humidité élevés ou portes
ouvertes fréquemment.
Vérifiez que les joints ferment bien.
Fonctionnement normal.
Le contenu d’un bac ou les articles dans
le compartiment alentour peuvent gêner
le bac.
Le bac n’est pas à son bon emplacement.
Le réfrigérateur n’est pas d’aplomb.
Les glissières du bac sont sales ou
doivent être traitées.
Les portes sont trop souvent ouvertes ou
sont restées ouvertes pendant de
longues durées.
Humidité ou chaleur élevées dans
l’espace environnant.
De la nourriture a récemment été
ajoutée.
Le réfrigérateur est exposé à la chaleur
par l’environnement ou par les appareils
proches.
Les serpentins du condenseur sont
encrassés.
SOLUTIONS
Voyez pages 42-44 comment ajuster les commandes.
Écourtez les périodes pendant lesquelles les portes sont
ouvertes. Organisez les aliments de manière à laisser les
portes ouvertes le moins longtemps possible.
Nettoyez, au besoin, selon le tableau de la page 55.
Voyez page 48.
Replacez les aliments et les contenants pour éviter
qu’ils ne gênent les tiroirs.
Voyez page 46 comment bien installer les bacs.
Voyez page 36 les détails sur la mise d’aplomb du
réfrigérateur.
Nettoyez les glissières avec de l’eau savonneuse tiède.
Rincez et séchez bien.
Appliquez une mince couche de vaseline sur les
glissières du bac.
Écourtez les périodes pendant lesquelles les portes sont
ouvertes. Organisez les aliments de manière à laisser
les portes ouvertes le moins longtemps possible.
Laissez la température à l’intérieur du réfrigérateur
s’ajuster après une période pendant laquelle les portes
étaient ouvertes.
Fonctionnement normal.
Laissez le temps à la nourriture d’atteindre la
température du réfrigérateur ou du congélateur.
Évaluez l’environnement du réfrigérateur. Le
réfrigérateur peut avoir à être déplacé pour fonctionner
plus efficacement.
Nettoyez, au besoin, selon le tableau de la page 55.
61
Les commandes ont besoin d’être
ajustées.
Les portes ne se ferment pas
correctement.
Fonctionnement normal.
Voyez pages 42-44 comment ajuster les commandes.
Le réfrigérateur n’est pas d’aplomb. Voyez page 36 les
détails sur la mise d’aplomb du réfrigérateur.
Vérifiez les joints.
Nettoyez, au besoin, selon le tableau de la page 55.
Vérifiez qu’il n’y a pas d’obstruction interne qui empêche
les portes de se fermer correctement (par exemple
tiroirs mal repoussés, bacs à glaçons, contenants ou
aliments mal rangés ou trop encombrants, etc.).
Voyez Bruits de fonctionnement page 59.
Page 63

R
ECHERCHE DES PANNES
Glace et l’eau
PROBLÈMES
Fuites d’eau
De la glace se
forme dans le tube
d’arrivée à la
machine à glaçons
La circulation de
l’eau est plus lente
que normalement
CAUSES POSSIBLES
Tube plastique utilisé pour le
raccordement d’eau.
Un mauvais robinet a été installé.
La pression de l’eau est faible.
La température du congélateur est trop
élevée.
La pression de l’eau est faible.
SOLUTIONS
Le fabricant recommande l’utilisation d’un tube en
cuivre pour l’installation. Les tubes en plastique sont
moins durables et peuvent éventuellement fuir. Le
fabricant n’est pas responsable des dommages
matériels découlant d’une mauvaise installation
ou de mauvais raccordements de canalisation
d’eau.
Vérifiez la méthode de raccordement à l’eau (page
41). Les robinets autoperceurs ou à brides de
peuvent entraîner une faible pression d’eau et peuvent
obstruer la canalisation après un certain temps. Le
fabricant n’est pas responsable des dommages
matériels découlant d’une mauvaise installation
ou de mauvais raccordements de canalisation
d’eau.
La pression de l’eau doit être située entre 35 et 120
livres/po2. Une pression minimale de 35 lb/po2est
recommandée pour les réfrigérateurs avec filtres à
eau.
Ajustez la commande du congélateur (pages 42-44). Il
est recommandé de régler le congélateur à -18 °C (0 °F).
La pression de l’eau doit être située entre 35 et 120
livres/po2. Une pression minimale de 35 lb/po2est
recommandée pour les réfrigérateurs avec filtres à
eau.
3
16
po
⁄
Un mauvais robinet a été installé.
Le tuyau en cuivre est tordu.
Le filtre à eau est obstrué ou doit être
changé.
Vérifiez la méthode de raccordement à l’eau (page
41). Les robinets autoperceurs ou à brides de
peuvent entraîner une faible pression d’eau et peuvent
obstruer la canalisation après un certain temps. Le
fabricant n’est pas responsable des dommages
matériels découlant d’une mauvaise installation
ou de mauvais raccordements de canalisation
d’eau.
Fermer l’eau et éliminer les plis. Si les plis ne peuvent
être éliminés, remplacer le tuyau.
Changer le filtre à eau (voir page 49).
3
po
⁄
16
62
Page 64

G
ARANTIE ET SERVICE APRÈS-VENTE
Garantie de la réfrigérateur Jenn-Air
G a r antie complète d’une année
Durant une période d’un (1) an à compter de la date de l’achat initial
au détail, toute pièce qui se révélerait défectueuse dans des conditions
n o r m a l es d’usage ménager, sera réparée ou remplacée gratuitement..
Machine à glaçons – Lorsque la machine à glaçons est achetée avec le
réfrigérateur et installée par le détaillant, elle fait partie du réfrigérateur
aux fins de la garantie.
Garantie limitée – Principaux éléments du
système de réfrigération
Deuxième à cinquième année – Après la première année suivant la
date de l’achat initial, jusqu’à la cinquième année, le fabricant réparera
ou remplacera, à son choix, gratuitement pour les pièces et la maind ’ œuvre seulement, toute pièce du système de réfrigération scellé
(comprenant le compres s e u r, l’évaporateur, le condenseur, le
déshydrateur et la tubulure) et la doublure de caisse (à l’exclusion de la
doublure de porte) qui se révéleraient défectueuses dans des conditions
n o r m a l es d’usage ménager. Le propriétaire devra assumer tous les autres
frais, y compris les frais de déplacement, de transport, de kilométrage et
de diagnostic, le cas échéant.
G a r antie limitée – A u t r es pièces
Deuxième année – Les pièces autres que les principaux éléments du
système de réfrigération, qui se révéleraient défectueuses dans des
conditions normales d’usage ménager durant la deuxième année suivant
la date de l’achat initial au déta i l , seront réparées ou fournies
gratuitement pour la pièce elle-même. Le propriétaire devra assumer tous
l e s autres frais, y compris la main-d’œuvre, les frais de déplacement, de
t r a n s p o rt, de kilométrage et de diagnostic, le cas échéant.
Les garanties spécifiques formulées ci-dessus sont les SEUL E S que le
fabricant accorde. Ces garanties vous confèrent des droits juridiques
spécifiques. Vous pouvez également jouir d’autres droits, variables d’un
état à un autre ou d’une province à une autre.
Ne sont pas couverts par ces
garanties :
1. Les dommages ou dérangements dus à :
a. Mise en service, livraison ou entretien effectués incorrectement.
b. Toute réparation, modification, altération et tout réglage non
autorisés par le fabricant ou par un prestataire de service
après-vente agréé.
c. Accidents, mauvaise utilisation ou usage abusif ou
déraisonnable.
d. Alimentation électrique (tension, intensité) incorrecte.
e. Réglage incorrect d’une commande.
2. Les garanties ne peuvent être honorées si les numéros de série
d’origine ont été enlevés, modifiés ou ne sont pas facilement
lisibles.
3. Ampoules.
4. Appareils achetés aux fins d’usage commercial ou industriel.
5. Les frais de visite d’un prestataire de service ou de service
après-vente encourus pour les raisons suivantes :
a. Correction d’erreurs de mise en service.
b. Initiation de l’utilisateur à l’emploi de l’appareil.
c. Transport de l’appareil aux locaux du prestataire de service.
6. Dommages secondaires ou indirects subis par toute personne
suite au non-respect des garanties. Certains états ou provinces
ne permettent pas l’exclusion ou la limitation des dommages
secondaires ou indirects; par conséquent, les limitations ou
exclusions ci-dessus peuvent ne pas s’appliquer à votre cas.
Garantie limitée – Filtre à eau PuriClean®II, le cas
Echéant
30 jours – À compter de la date de l’achat initial au détail, toute pièce
de la cartouche du filtre à eau se révélant défectueuse en raison d’un
vice de matière ou de fabrication, sera remplacée gratuitement.
R e m a r q u e
Cette garantie complète et les garanties limitées ne s’appliquent qu’à
un réfrigérateur situé aux Éta ts-Unis ou au Canada. Les
réfrigérateurs situés ailleurs ne sont couverts que par les garanties
l i m i t é e s, y compris dans le cas de pièces qui se révéleraient
d é f e c t u e u s e s la première année.
Résidents canadiens
Les garanties ci-dessus couvrent un appareil installé au Canada,
seulement s’il a été agréé par les agences de test habilitées (vérifica t i o n
de la conformité à une norme nationale du Canada), sauf si l’appareil a
été introduit au Canada à l’o c casi on d’un changement de résidence des
É ta ts-Unis vers le Canada.
Limites de re s p o n s a b i l i t é
Le garant ne sera res p o n s able d’aucun dommage secondaire ou indirect,
y compris perte de produits alimenta i r e s. Certains éta ts ou provinces ne
permettent pas l’exclusion ou la limitation des dommages secondaires ou
i n d i r e c ts; pa r conséquent, les limitations ou exclusions ci-d essus peuvent
ne pas s’appliquer à votre ca s .
Si vous avez besoin de service
après-vente
• Contactez le détaillant où vous avez acheté l’appareil ou
contactez le service à la clientèle de Jenn-Air, Maytag ServicesSM,
au 1-800-JENNAIR (1-800-536-6247) aux É.-U. et Canada pour
connaître l’adresse d’un réparateur agréé.
• Conservez la preuve de l’achat pour vérifier le statut de la
garantie. Reportez-vous à la Garantie pour obtenir plus
d’informations sur les responsabilités du propriétaire quant au
service en vertu de la garantie.
• Si le détaillant ou l’établissement de service après-vente ne peut
résoudre le problème, écrivez à Maytag ServicesSM, Attn: CAIR
Center, P.O. Box 2370, Cleveland, TN 37320-2370, ou composez le
1-800-JENNAIR (1-800-536-6247) aux É.-U. et Canada.
• Les guides de l’utilisateur, les manuels de service et les
références sur les pièces sont disponibles auprès du service à la
clientèle de Jenn-Air, Maytag ServicesSM.
Remarque
• Lors de tout contact en raison d’un problème particulier,
veuillez fournir l’information suivante :
a. Vos nom, adresse et numéro de téléphone;
b. Numéro de modèle et numéro de série de l’appareil;
c. Nom et adresse du détaillant ou du réparateur;
d. Description claire du problème observé;
e. Preuve d’achat (facture de vente).
®
63
Page 65

E F R I G E R A D O R D E
R
U E R T A S
P
R A N C E S A
F
G
U Í A
E N N
J
- A
I R
DE
U
Instrucciones Importantes sobre Seguridad..........65-66
Instalación .......................................................................... 67-73
Controles de la Temperatura....................................... 74-76
Características del Refrigerador ................................ 77-78
Características del Congelador......................................... 79
Hielo y Agua ............................................................................ 80
Filtro del Agua .................................................................. 81-83
Sugerencias para Conservar los Alimentos .......... 84-86
Cuidado y Limpieza ........................................................ 87-90
Sonidos del Funcionamiento ............................................. 91
Localización y Solución de Averías .......................... 92-94
Garantía y Servicio...........................................Última Página
SO Y
T
A B L A D E
C
M
UIDADO
A T E R I A S
Page 66

I
NSTRUCCIONESIMPORTANTES SOBRE
S
EGURIDAD
Instalador: Por favor deje esta guía junto con este
electrodoméstico.
C o n s u m i d o r : Por favor lea y conserve esta Guía de
Uso y Cuidado para referencia futura. Este manual
contiene información sobre el uso y mantenimiento
apropiado.
Conserve el recibo de compra y/o el cheque
cancelado como comprobante de compra.
Llame al: 1-800-JENNAIR (1-800-536-6247)
en EE.UU. y Canadá
Tenga el número completo de modelo y de serie
para identificación de su refrigerador. Estos se
encuentran en una placa de datos dentro del
compartimiento del refrigerador en el lado superior
izquierdo. Anote estos números a continuación para
su fácil acceso.
Número de Modelo ____________________________
Número de Serie ______________________________
Fecha de Compra _____________________________
En nuestro continuo afán de mejorar la calidad de
nuestros electrodomésticos, puede que sea
necesario hacer modificaciones al electrodoméstico
sin actualizar esta guía.
PRECAUCIÓN
PRECA UCIÓN – Peligros o prácticas no seguras que
PODRIAN causar lesión personal menos grave o
daños materiales.
PELIGRO
A fin de reducir el riesgo de lesión o muerte,
siga las precauciones básicas incluyendo las
siguientes:
IMPORTANTE: Los problemas de atrapamiento y
asfixia de los niños no han quedado relegados al
pasado. Los refrigeradores desechados o
abandonados son peligrosos - “aunque sólo se
dejen unos días”. Si va a deshacerse de su
refrigerador antiguo, por favor siga las siguientes
instrucciones para ayudar a prevenir accidentes.
Antes de deshacerse de su
refrigerador o congelador antiguo:
• Retire las puertas.
• Deje las parrillas y bandejas en
su lugar de modo que los niños
no puedan entrar fácilmente.
Información sobre las
Instrucciones de Seguridad
Las advertencias e instrucciones importa n t e s sobre
seguridad que aparecen en este manual no es t á n
d estinadas a cubrir todas las posibles circunstancias y
s i t u a c i o n es que puedan ocurrir. Se debe ejercer sentido
común, precaución y cuidado cuando instale, efectúe
mantenimiento o cuando use este electrodoméstico.
Siempre póngase en contacto con su fabricante si
surgen problemas o situaciones que usted no
comprenda.
Reconozca los Símbolos, Advertencias
y Etiquetas de Seguridad
PELIGRO
PELIGRO – Riesgos inmediatos que CAUSARAN
lesión personal grave o mortal.
ADVERTENCIA
Este electrodoméstico está equipado con un enchufe
de tres clavijas con pues t a a tierra para su protección
contra el posible peligro de choques eléctricos. Se debe
enchufar en un tomacorriente puesto a tierra. Si sólo se
dispone de un tomacorriente estándar para enchufe de
dos clavijas, el cliente tiene la res p o n sab ilidad y
obligación de reemplazarlo por un tomacorriente de
t r e s alvéolos debidamente puesto a tierra. Por ningún
motivo corte o retire la tercera clavija (pues ta a tierra)
del cordón eléctrico. No use un tapón adapta d o r .
Cordón eléctrico con enchufe de
tres clavijas con puesta a tierra
ADVERTENCIA – Peligros o prácticas no seguras
que PODRI A N ca u s ar lesión personal grave o morta l .
65
Tomacorriente mural del
tipo con puesta a tierra
Page 67

I
NSTRUCCIONESIMPORTANTES SOBRE
ADVERTENCIA
A fin de reducir el riesgo de incendio, choque
eléctrico, lesión grave o mortal cuando use su
refrigerador, siga estas precauciones básicas,
incluyendo las siguientes:
1. Lea todas las instrucciones antes de usar el
refrigerador.
2. Observe todos los códigos y reglamentos locales.
3. Asegúrese de seguir las instrucciones de puesta
a tierra.
4. Consulte con un electricista calificado si no está
seguro de que el electrodoméstico está puesto a
tierra en forma correcta.
5. No use una tubería de gas para la puesta a tierra.
6. No use una tubería de agua fría para la puesta a
tierra.
7. El refrigerador ha sido diseñado para funcionar
con una fuente de energía eléctrica de 115
voltios, 15 amperios, 60 Hz.
8. No modifique el enchufe del cordón eléctrico. Si
el enchufe no calza en el tomacorriente, pida a un
electricista calificado que instale un
tomacorriente apropiado.
9. No use un adaptador de dos clavijas, un cordón
de extensión ni regletas protectoras de tomas
múltiples.
10 No retire la etiqueta de advertencia del cordón
eléctrico.
11. No manipule indebidamente los controles del
refrigerador.
12. No repare ni reemplace ninguna pieza del
refrigerador a menos que sea específicamente
recomendado en la Guía de Uso y Cuidado o en
las instrucciones para reparaciones que pueden
ser efectuadas por el usuario. No intente hacer
reparaciones si no comprende las instrucciones o
si son demasiado complicadas para sus
conocimientos.
13. Siempre desenchufe el refrigerador antes de
intentar cualquier reparación. Desenchufe el
cordón tomándolo del enchufe sin tirar del
cordón.
14. Instale el refrigerador de acuerdo con las
instrucciones de instalación. Todas las conexiones
para el agua, energía eléctrica y puesta a tierra
deben cumplir con los códigos locales y ser
realizadas por personal calificado cuando sea
necesario.
15. Mantenga su refrigerador en buen estado. Si se
golpea o deja caer se puede ocasionar daño,
malfuncionamiento o escapes. Si ocurre daño,
haga revisar el refrigerador por un técnico de
servicio calificado.
16. Reemplace los cordones eléctricos que estén
gastados y/o los enchufes sueltos.
17. Siempre lea y siga las instrucciones de
conservación de los alimentos y del medio
ambiente ideal recomendado por el fabricante
para los alimentos que sean guardados en el
refrigerador.
18. No haga funcionar su refrigerador en presencia
de vapores explosivos.
19. Los niños no deben treparse, colgarse ni pararse
en ninguna pieza del refrigerador.
20. Limpie los derrames o escapes de agua
relacionados con la conexión del agua.
S
EGURIDAD
CONSERVE ESTAS INSTRUCCIONES
66
Page 68

I
NSTALACIÓN
Su refrigerador fue empacado cuidadosamente para el
embarque. Retire y descarte la cinta y el material de
empaque de las bandejas. No retire la placa de serie.
Ubicación
• No instale el refrigerador cerca del horno, radiador u
otra fuente de calor. Si esto no es posible, proteja el
refrigerador con material de los armarios.
• No instale el refrigerador en un lugar donde la
temperatura pueda bajar a menos de 13° C (55° F) o
suba a más de 95° C (110° F). Con tales temperaturas
puede ocurrir mal funcionamiento.
• El refrigerador ha sido diseñado solamente para
uso doméstico en el interior.
Medición de la Cavidad
Cuando instale su refrigerador, haga todas las mediciones
con cuidado. Se debe dejar un espacio de 1,25 cm (
en la parte superior y
compartimiento mecánico para contribuir a la circulación
adecuada del aire.
Los revestimientos del subsuelo o del piso (es decir,
alfombras, baldosas, pisos de madera, tapetes) pueden
disminuir el tamaño de la cavidad.
Se puede obtener más espacio libre usando el
procedimiento de nivelación descrito en la sección N i v e l a d o.
IMPORTANTE: Si el refrigerador va a ser instalado en
una cavidad en que la parte superior del mismo quedará
completamente cubierta, use las dimensiones desde el
piso hasta la parte superior de la tapa de la bisagra para
verificar el espacio libre apropiado.
1
” detrás de la cubierta del
2
⁄
1
”)
2
⁄
Transporte del Refrigerador
• NUNCA transporte el refrigerador de costado. Si no es
posible transportarlo en posición vertical, hágalo
descansar en la parte trasera. Deje el refrigerador en
posición vertical durante aproximadamente 30 minutos
antes de enchufarlo a fin de asegurar de que el aceite
vuelva al compresor. Si el refrigerador se enchufa
inmediatamente, se puede causar daño a las piezas
internas.
• Siempre use una carretilla de mano cuando mueva el
refrigerador. SIEMPRE coloque la carretilla de mano
por el costado o por la parte trasera del refrigerador –
NUNCA por el frente.
• Proteja el acabado exterior del refrigerador durante el
transporte envolviendo el gabinete en frazadas o
colocando material acolchado entre el refrigerador y la
carretilla.
• Asegure el refrigerador firmemente en la carretilla de
mano con flejes o cuerdas elásticas. Pase los flejes a
través de las manijas cuando sea posible. No apriete
demasiado los materiales de sujeción pues pueden
hendir o dañar el acabado exterior.
Puertas de vidrio
Para evitar posibles lesiones o daños materiales, siga
las siguientes recomendaciones:
• Cuando trabaje directamente en las puertas, proteja
las esquinas y costados de las mismas colocándolas
sobre una superficie no abrasiva cubierta con toallas
o alfombra.
• Proteja los costados de vidrio cuando amarre la
unidad a una carretilla. ¡NO APRIETE DEMASIADO!
Si aprieta demasiado los amarres, se puede romper
el vidrio, lo que podría causar lesiones personales.
• NO cargue o transporte las puertas sueltas por las
manijas.
• Apriete bien los tornillos del conjunto de las manijas
cuando las instale.
(modelos selectos
PRECAUCIÓN
)
67
Page 69

I
NSTALACIÓN
Nivelado
PRECAUCIÓN
A fin de proteger sus bienes materiales o el refrigerador
contra daño, siga las siguientes instrucciones:
• Proteja el vinilo u otro revestimiento del piso con
cartón, alfombras u otros materiales protectores.
• No use herramientas eléctricas cuando esté
nivelando el electrodoméstico.
Para mejorar el aspecto y mantener el buen
rendimiento, el refrigerador debe estar nivelado.
Nota
• Lleve a cabo la inversión de la puerta, la
instalación de paneles y/o la conexión del
suministro de agua antes de nivelar el refrigerador.
Materiales Necesarios:
3
⁄
• Llave de tuercas hexagonal de
• Nivel de carpintero
1. Retire la rejilla inferior.
• Sujétela firmemente y tire de
ella hacia afuera para
desengancharla.
2. Retire la(s) cubierta(s) del soporte inferior.
8
”
3. Usando la llave de tuercas hexagonal, gire los
tornillos de ajuste delanteros (A) situados a cada lado
para levantar o bajar la parte delantera del
refrigerador.
Nota
•
Algunos modelos sólo tienen tornillos de ajuste “A”.
4. Usando la llave de tuercas hexagonal, gire cada uno
de estos tornillos de ajuste (B) para levantar o bajar
la parte trasera del refrigerador.
5. Usando el nivel de carpintero, asegúrese de que la
parte delantera del refrigerador esté 6 mm (
burbuja más alta que la parte trasera del refrigerador
y que refrigerador esté nivelado de lado a lado.
6. Gire los tornillos niveladores (C) a la derecha hasta
que queden firmemente asentado contra el piso.
7. Gire los tornillos de ajuste (A) a la izquierda para
dejar que todo el peso del refrigerador descanse en
los tornillos niveladores.
8. Vuelva a colocar la(s) cubierta(s) de los soportes.
• Coloque la cubierta en el borde exterior de la
bisagra.
1
4
⁄
”) o
1
2
⁄
• Coloque el extremo con el borrador de un lápiz o
una herramienta similar no afilada en la muesca
de la cubierta.
Ubicación
de la
muesca
• Suelte la tapa usando una leve
presión.
• Continúe ejerciendo una leve
presión hacia abajo en el lado
muescado de la cubierta a la
vez que la gira para soltarla.
• Gire la cubierta hacia el gabinete y hágala entrar a
presión en su lugar.
9. Vuelva a colocar la rejilla inferior.
Nota
• Para una correcta instalación, asegúrese la marca
“top” (hacia arriba) que se encuentra en el interior
de la rejilla inferior esta onéntado correctamente.
• Alinee los clips de montaje de la rejilla inferior con
las ranuras inferiores del gabinete.
• Empuje firmemente la rejilla inferior hasta que entre
a presión en su lugar.
68
Page 70

I
NSTALACIÓN
Desmontaje de la Puerta y del Cajón
En algunas instalaciones es necesario retirar la puerta
y el cajón antes de mover el refrigerador a su lugar
definitivo.
ADVERTENCIA
Para evitar choque eléctrico que puede causar una
lesión personal grave o mortal, observe lo siguiente:
• D ese nchufe el refrigerador antes de retirar las
p u e r tas o el cajón. Enchufe el refrigerador
solamente después de que haya reinstalado las
p u e r tas o el ca j ó n .
PRECAUCIÓN
A fin de evitar daño a las paredes y al piso, proteja el
vinilo u otro revestimiento del piso con cartón,
alfombras u otros materiales protectores.
1. Desenchufe el cordón eléctrico.
2. Retire la rejilla inferior y la(s) cubierta(s) del
soporte inferior (ver página 68).
3. Retire la cubierta de la bisagra superior
de la puerta del refrigerador sacando
el tornillo Phillips. Conserve el tornillo y
la cubierta para uso posterior.
4. Retire los tornillos de cabeza
hexagonal de
superior para retirar la bisagra y
conserve todos los tornillos para uso
posterior.
5
16
de la bisagra
⁄
”
6. Desconecte el alambrado preformado situado en la
parte superior de la bisagra superior de la puerta
izquierda del refrigerador.
Separe el conector de dos
clavijas oprimiendo el punto de
unión con un destornillador de
punta plana o con la uña.
El alambre verde de puesta a tierra permanece
instalado en la bisagra.
7. Retire los tornillos de cabeza
5
⁄
hexagonal de
16
” de la bisagra
superior para sacar la bisagra y
consérvele para uso posterior.
Levante la puerta izquierda del
refrigerador, junto con la bisagra superior, para
sacarla del pasador de la bisagra central.
Retire el pasador de la bisagra central con una llave
5
16
de tuercas hexagonal de
⁄
” y conserve el pasador
de la bisagra para uso posterior.
8. Retire los tornillos Phillips para sacar
la bisagra izquierda y la bisagra
derecha y conserve todos los tornillos
para uso posterior.
9. Retire ambos soportes estabilizadores
3
con una llave para tuercas hexagonal de
⁄
8
” y
conserve los tornillos para uso posterior.
5. Levante la puerta del lado derecho
del refrigerador sacándola del
pasador de la bisagra central.
Retire la tapa de la puerta
situada en el pasador de la
bisagra central en el lado
derecho y consérvela para uso
posterior.
69
tapa
del
lado
derech
o de la
puerta
Page 71

I
NSTALACIÓN
Cajón Deslizable del Congelador
(modelos selectos)
PELIGRO
A fin de evitar que los niños queden
accidentalmente atrapados o se asfixien, no retire el
divisor de la canasta superior del congelador.
ADVERTENCIA
Para evitar un choque eléctrico que puede causar
una lesión personal grave o mortal, desconecte la
energía eléctrica al refrigerador antes de retirar las
puertas. Después de reinstalar las puertas, conecte
la energía eléctrica.
PRECAUCIÓN
Para evitar una posible lesión, daño al refrigerador o
daños materiales, solicite ayuda a otra persona que
le ayude con las instrucciones siguientes.
Desmontaje:
Instalación:
1. Saque ambos rieles
hacia afuera en toda
su extensión.
2. Mientras sostiene la
parte delantera de la
puerta, enganche
los soportes en las
ranuras ubicadas en el interior de cada riel.
Nota
• Todos los soportes del cajón deben estar en las
ranuras adecuadas para que el cajón funcione
adecuadamente.
1. Abra totalmente el cajón.
2. Incline la cesta inferior hacia adelante y levántela
para sacarla.
3. Cada riel lateral tiene un soporte para la canasta
provisto de 2 clips a
presión. Para soltar cada
uno de los soportes,
desenganche los clips a
presión empujándolos hacia
adentro, en dirección
opuesta al sistema de rieles
laterales. Levante los
soportes fuera de los
rieles.
4. Retire el tornillo Phillips
de cada uno de los rieles
del cajón (modelos
selectos).
5. Levante la parte superior
del cajón para
desengancharlo de los
rieles. Levante la parte
delantera de la puerta
para retirarla.
3. Baje el frente de la puerta hacia su posición final.
4. Vuelva a instalar los tornillos Phillips que retiró de
los rieles (modelos selectos) y apriételos.
5. Coloque los soportes laterales de la cesta en los
rieles del cajón. Alinee los ganchos de los
soportes laterales de la cesta con las ranuras
ubicadas en los soportes del cajón y oprima cada
soporte lateral hacia el soporte de la gaveta hasta
que encaje en su lugar.
Clips a presión del
soporte de la
canasta
6. Incline la parte delantera de la cesta inferior hacia
abajo y asiéntela en los soportes laterales de la
cesta.
70
Page 72

I
NSTALACIÓN
Reinstalación de las Puertas
1. Instale los conjuntos de las bisagras:
• Instale la bisagra central con los tornillos Phillips.
2. Inserte el pasador de la bisagra
inferior.
• Instale la bisagra superior con los
tornillos de cabeza hexagonal de
5
16
⁄
”.
3. Mantenga la puerta del
congelador en posición vertical
mientras instala el pasador de
la bisagra central con una llave
de tuercas hexagonal de
4. Reconecte el connector de dos
clavijas.
5. I n s t alar la cubierta de la bisa g r a .
Manijas
Este estilo de manija es instaled en la fábrica. El esilo
varía según el modelo.
Materiales Necesarios:
3
• Llave Allen de
Desmontaje:
• Retire el tornillo de ajuste
de la patilla de montaje de
la manija usando la llave
allen de
• Para retirar la manija repita
el procedimiento en todos
los postes.
3
⁄
”
32
⁄
”
32
5
⁄
”.
16
Apertura y Cierre de las
Puertas del Refrigerador
Su nuevo refrigerador está dotado de un diseño único
con 2 puertas. Cada una de las puertas se pueden
abrir o cerrar independientemente de la otra.
Existe una sección abisagrada verticalmente en la
puerta izquierda del refrigerador denominada
‘SmartSeal’. Cuando la puerta izquierda está cerrada, la
sección abisagrada forma automáticamente un sello
entre las dos puertas cuando ambas están cerradas.
Cuando se abre la puerta izquierda, el cierre
‘SmartSeal’ se pliega automáticamente hacia adentro
para evitar interferencia.
ADVERTENCIA
Para evitar un choque eléctrico que puede causar
una lesión personal grave o mortal, NO trate de
retirar el cierre SmartSeal del compartimiento del
refrigerador.
PRECAUCIÓN
A fin de evitar posible daño al producto,
SIEMPRE verifique si el cierre SmartSeal está
plegado contra el borde de la puerta antes de
cerrarla.
Hinged
Seal
Reinstalación:
• Alinee la manija con las patillas de montaje.
• Apriete firmemente todos los tornillos de ajuste
para asegurar la manija en su lugar.
71
Page 73

I
NSTALACIÓN
Instalación de las Asas del Acero
Inoxidable Montó en el Frente e la
Puerta
1. Afloje el gancho inferior de la puerta
con un destornillador Phillips.
2. Localice el orificio previamente
hecho en la base del asa, y
coloque el extremo hueco del asa
sobre el sujetador inferior.
3. Coloque el otro extremo del asa
sobre el sujetador superior de la
puerta y deslícelo lo más arriba
posible.
NOTA: Si la parte superior del
asa no se ajusta sobre el
sujetador superior, afloje el
sujetador inferior un poco más
hasta que pueda ajustarse.
Instalación de las Asas
del Acero Inoxidable
Montó en el Frente e la
Puerta del Congelador
1. Afloje el gancho inferior de la
puerta con un destornillador
Phillips.
2. Ubique el agujero
pretaladrado en la base de
la manija y coloque el
extremo hueco de la manija
sobre el gancho izquierdo de
la puerta.
3. Coloque el otro extremo de
la manija sobre el gancho
superior de la puerta y
deslícelo lo más arriba
posible.
NOTA: Si la manija superior
no cabe sobre el gancho
superior, afloje el gancho
inferior hasta que quepa.
4. Inserte el destornillador Phillips
en el agujero previamente
taladrado en la base de la manija
para apretar el tornillo. Inserte el botón de plástico
en el agujero como se muestra.
5. Repita los pasos anteriores para instalar la otra asa.
Para quitar las asas del acero
inoxidable Montó en el
Frente e la Puerta
1.
Retire el tapón de plástico del botón
en la base de la manija con un
destornillador plano muy pequeño.
• Inserte un destornillador Phillips
dentro del orificio previamente
hecho en la base del asa para
quitar el tornillo.
2. Deslice el asa hacia abajo y
quítela del sujetador de la puerta.
3. Repita los pasos anteriores para
quitar la otra asa.
4. Inserte el destornillador
Phillips en el agujero previamente taladrado en la
base de la manija para apretar el tornillo. Inserte el
botón de plástico en el agujero.
Para quitar las asas del acero
inoxidable Montó en el Frente e la
Puerta del Congelador
Retire el tapón de plástico del
1.
botón en la base de la manija
con un destornillador plano muy
pequeño.
• Inserte un destornillador
Phillips dentro del orificio
previamente hecho en la
base del asa para quitar el
tornillo.
2. Deslice el asa hacia abajo y
quítela del sujetador de la
puerta.
72
Page 74

I
NSTALACIÓN
Conexión del Suministro de Agua
ADVERTENCIA
Para evitar el riesgo de una lesión o la muerte, siga
las precauciones básicas incluyendo las siguientes:
• Lea todas las instrucciones antes de instalar la máquina
de hacer hielo.
• No intente la instalación si no comprende las
instrucciones o si son demasiado complicadas para sus
conocimientos.
• Observe todos los códigos y reglamentos locales.
• No repare la máquina de hacer hielo a menos que se
recomiende específicamente en la Guía de Uso y
Cuidado o en las instrucciones escritas sobre
reparaciones por el usuario.
• Desconecte la energía eléctrica al refrigerador antes de
instalar la máquina de hacer hielo.
• El daño causado por agua debido a una conexión
inapropiada del agua puede causar crecimiento de
moho/mildiú. Limpie los derrames o escapes
inmediatamente.
PRECAUCIÓN
Para evitar daños materiales o posible lesión, siga
las precauciones básicas incluyendo las siguientes:
• Consulte a un plomero para conecta r la tubería de
c o b re de
hogar a fin de asegurar el cumplimiento de los códigos y
reglamentos loca l e s .
• Asegúrese de que la presión del agua hacia la válvula
del agua sea entre 35 y 100 libras por pulgada
cuadrada. Si se no instala un filtro de agua, la presión
del agua hacia la válvula del agua sea 20 libras por
pulgada cuadrada.
• No use una válvula autoperforante ni una válvula de
asiento de
pueden obstruir con el pasar del tiempo y causar
escapes si se intenta repararlas.
• Apriete las tuercas a mano para evitar dañar las roscas.
Termine de apretar las tuercas con pinzas y llaves. No
las apriete demasiado.
• Espere entre 2 y 3 horas antes de colocar el refrigerador
en su lugar definitivo a fin de verificar y corregir
cualquier escape de agua. Vuelva a verificar si hay
escapes después de 24 horas.
• Asegúrese de que la tubería de cobre debajo del
manguito esté lisa y sin defectos. No vuelva a usar un
manguito antiguo.
1
⁄
” de diám. ext. al sistema de tuberías del
4
3
⁄
16
”. Ambas reducen el flujo del agua, y se
Materiales Necesarios:
1
• Tubería de cobre flexible de
⁄
” de diámetro exterior
4
• Válvula de cierre (requiere que se taladre un agujero de
en la tubería de suministro del agua antes de instalar la
válvula)
• Llave ajustable
1
• Llave de tuercas hexagonal de
⁄
”
4
Notas
• Use solamente de tubería de cobre para la instalación.
La tubería de plástico es menos durable y puede causar
daño.
• Agregue 8’ al largo necesario de la tubería para llegar al
suministro del agua a fin de crear un bucle de servicio.
1. Haga el bucle de servicio (por lo
menos de 2 pies de diámetro) con la
tubería de cobre. Evite que la tubería
quede torcida cuando la enrolle para
formar el bucle. No use la tubería de plástico.
2. Retire la tapa de plástico del orificio de
admisión de la válvula del agua.
3. Coloque la tuerca de latón (A) y el manguito
(B) en el extremo de la tubería de cobre como
se muestra en la ilustración.
Recuerde: No use un manguito
antiguo. La tuerca y el manguito estan
proveen en la paquete del uso y
cuidado.
4. Coloque el extremo de la tubería de cobre en
el orificio de admisión de la válvula del agua.
Dele una leve forma a la tubería. Evite torcerla
- a fin de que llegue directamente al orificio
de admisión.
5. Coloque la tuerca de latón en el manguito y
atorníllela en el orificio de admisión. Apriete la
tuerca con una llave.
IMPORTANTE: No apriete demasiado. Se pueden
dañar las roscas.
6. Tire de la tubería para comprobar que la
conexión esté firme. Conecte la tubería al
marco con la abrazadera de la tubería del
agua (C) y abra el suministro del agua.
Verifique si hay escapes y repárelos, si es
necesario. Continúe observando la
conexión del suministro del agua durante
dos a tres horas antes de mover el
refrigerador a su lugar definitivo.
2 pies de diámetro
A
B
C
1
⁄
4
”
73
7. Supervise la conexión del agua durante 24 horas. Repare
los escapes, si es necesario.
Page 75

C
ONTROLES DE LA
T
EMPERATURA
Controles de la Temperatura
Sensibles al Tacto
Los controles están ubicados en la parte delantera superior
del compartimiento del refrigerador.
Control
Ajustes Iniciales de los Controles
Después de enchufar el refrigerador, ajuste los controles.
• Al oprimir la tecla o los controles se programan
en el ajuste deseado.
• El control del refrigerador para ambos compart i m i e n t o s
tiene ajustes que van desde el 1 hasta el 7 (más frío).
• Inicialmente coloque el control del congelador en el
número 4.
• Inicialmente coloque el control del refrigerador en el
número 4.
Guía de Control de la Temperatura
Refrigerador
demasiado tibio
Refrigerador
demasiado frío
Congelador
demasiado tibio
Congelador
demasiado frío
Como APAGAR el
refrigerador
Ajuste el control del refrigerador
un grado más frío oprimiendo la
tecla .
Ajuste el control del refrigerador
un grado más tibio oprimiendo la
tecla .
Ajuste el control del congelador
un grado más frío oprimiendo la
tecla .
Ajuste el control del congelador
un grado más tibio oprimiendo la
tecla .
Oprima la tecla en el
refrigerador o congelador hasta
que (-) aparezca en el indicador.
Control de temperatura ‘Trisensor’
• Deje funcionar el refrigerador por lo menos de 8 a 12
horas antes de colocar los alimentos.
Superficies Tibias del Gabinete
A veces, la parte delantera del gabinete del refrigerador
puede sentirse caliente al tacto. Esta es una situación normal
que ayuda a prevenir la condensación de la humedad en el
gabinete. Esta situación es más notoria cuando el
refrigerador se pone en marcha por primera vez, durante
tiempo caluroso y después de abrir la puerta de manera
excesiva o prolongada.
Ajuste de los Controles
• Si después de 24 horas de colocar los alimentos observa
que uno o ambos compartimientos deberían estar más
fríos o más tibios, ajuste el (los) control(es) según se
indica en la tabla Guía de Control de la Temperatura
siguiente. Vea la página 84 para las instrucciones en la
comprobación de temperatura del compartimiento.
• Exceptuando cuando el refrigerador se pone en
funcionamiento por primera vez, no cambie ninguno de los
controles más de un número a la vez.
• Espere 24 horas para que la temperatura se estabilice
antes de reajustar.
(modelos selectos)
El control se encuentra en la parte superior delantera del
refrigerador.
Control
Ajuste inicial de la temperatura
La temperatura se ajusta en la fábrica a 3ºC (38ºF) en el
refrigerador y a -18ºC (0ºF) en el congelador.
Ajuste del control
24 horas después de colocar los alimentos en el interior,
usted podrá decidir si desea cambiar la temperatura del
refrigerador o del congelador. En ese caso, ajuste el control
como lo indica la Guía de control de temperatura a
continuación.
• Cuando oprima por primera vez la tecla o , verá el
ajuste de temperatura actual.
• La pantalla mostrará el nuevo ajuste por aproximadamente
tres segundos y luego mostrará la temperatura actual del
compartimiento.
• No cambie ninguno de los controles más de un grado a la
vez. Permita que la temperatura se estabilice durante 24
horas antes de realizar un nuevo ajuste de temperatura.
74
Page 76

C
C
ONTROLES DE LA
ONTROLES DE LA
T
T
EMPERATURA
EMPERATURA
Guía de Control de la Temperatura
El refrigerador está
demasiado frío
El refrigerador está
demasiado tibio
El congelador está
demasiado frío
El congelador está
demasiado tibio
Para APAGAR el
refrigerador
Función ‘Speed Ice’ (Hielo rápido)
Cuando se activa la función ‘Speed Ice’ (Hielo
rápido), se reduce la temperatura del congelador al ajuste
óptimo durante 24 horas para producir una mayor cantidad
de hielo. Nota: Cuando esta función está activada, las
teclas y del control del congelador no podrán ser
usadas.
Función ‘Reset Filter’ (Reposición del filtro)
(modelos selectos)
Cuando se ha instalado un filtro de agua en el
refrigerador, la luz amarilla ‘Order’ (Pedir) se encenderá
cuando un 90% de la capacidad del filtro haya sido utilizado.
La luz también se encenderá cuando hayan pasado 11
meses a partir de la fecha de instalación del filtro.
La luz roja ‘Replace’ (Reemplazar) se encenderá cuando
la cantidad de agua que haya pasado por el filtro haya
sobrepasado su capacidad o después de 12 meses a partir
de la fecha de instalación del filtro. Se debe reemplazar el
filtro inmediatamente después de que se encienda la luz
‘Replace’ (Reemplazar).
Después de reemplazar el filtro, oprima y mantenga
oprimida la tecla ‘Reset Filter’ (Reposición del filtro)
75
Cambie el control del
refrigerador a un ajuste
superior oprimiendo la
tecla .
Cambie el control del
refrigerador a un ajuste
inferior oprimiendo la
tecla .
Cambie el control del
congelador a un ajuste
superior oprimiendo la
tecla .
Cambie el control del
congelador a un ajuste inferior
oprimiendo la
tecla .
Oprima la tecla del
congelador hasta que ‘OFF’
(Apagado) aparezca en la
pantalla. Oprima la
tecla en el refrigerador o
congelador para encenderlo
nuevamente.
durante tres segundos. Las luces de pedido y reemplazo del
filtro se apagarán.
‘Vacation Mode’ (Modo de vacaciones)
Esta función hace que el congelador se descongele
con menor frecuencia para conservar energía. La luz
indicadora del modo de vacaciones se encenderá cuando se
active la función. Para desactivarla, oprima la tecla ‘Vacation
Mode’ (Modo de vacaciones) nuevamente O abra cualquier
puerta. La luz indicadora se apagará.
Nota
• La apertura de la puerta no desactivará el modo de
vacaciones por aproximadamente una hora después de
su activación.
• Si sus vacaciones van a durar más de algunos días, vea
la sección de preparación para las vacaciones en la
página 90.
‘Temp Alarm’ (Alarma de temperatura)
El sistema de alarma de temperatura le avisará si la
temperatura del congelador o del refrigerador excede la
temperatura normal de funcionamiento debido a una falla
eléctrica o a otras causas. Cuando se activa esta función, la
luz ‘Temp Alarm’ (Alarma de temperatura) se encenderá.
Si la temperatura del congelador o del refrigerador ha
excedido el límite, la pantalla mostrará alternadamente la
temperatura actual de los compartimientos y la temperatura
máxima que se alcanzó durante la falla eléctrica. Escuchará
una señal sonora repetidamente.
Oprima la tecla ‘Temp Alarm’ (Alarma de temperatura) una
vez para apagar la alarma sonora. La luz de alarma de
temperatura seguirá destellando y el despliegue de
temperaturas seguirá alternándose hasta que la temperatura
se haya estabilizado.
Para apagar la alarma de temperatura, oprima y mantenga
oprimida la tecla ‘Temp Alarm’ (Alarma de temperatura)
durante tres segundos. La luz indicadora se apagará.
‘Door Alarm’ (Alarma de la puerta)
La alarma de la puerta le avisa cuando una de las
puertas se ha dejado abierta por más de cinco minutos
continuos. Cuando esto ocurre, escuchará una señal sonora
cada cinco segundos hasta que se cierre la puerta O hasta
que se oprima la tecla ‘Door Alarm’ para desactivar la
función.
Page 77

C
ONTROLES DE LA
T
EMPERATURA
‘Max Cool’ (Frío máximo)
Cuando se activa esta función, la temperatura del
refrigerador y del congelador bajan hasta el mínimo
disponible en el control. Esto enfría el refrigerador y el
congelador después de períodos extendidos de apertura de
las puertas o después de cargar el refrigerador o congelador
con alimentos tibios. Nota: Cuando esta función está
activada, las teclas y del control del refrigerador y
del congelador no podrán ser usadas.
Para activar esta función, oprima la tecla ‘Max Cool’ (Frío
máximo). Esta función se desactivará automáticamente
después de 12 horas O cuando oprima la tecla ‘Max Cool’
(Frío máximo).
Preferencias del usuario
Use el menú de preferencias del usuario para:
• Activar o apagar la función ‘Super Cool’
(Superenfriamiento) (modelos selectos)
• Cambiar el despliegue de la temperatura de ºF a ºC
• Activar o desactivar las alarmas sonoras.
• Ajustar el nivel de luz del distribuidor (cuando se activa la
función de luz automática del distribuidor de hielo y agua)
(modelos selectos)
• Activar el modo sabático
Para acceder al menú de preferencias del usuario, oprima y
mantenga oprimida la tecla ‘Door Alarm’ (Alarma de la
puerta) durante tres segundos. Cuando se encuentre en el
modo de preferencias del usuario, aparecerá un subtítulo
corto en la pantalla de despliegue de temperatura del
congelador y se mostrará el estado de la característica en la
pantalla del refrigerador.
1. Use los controles “arriba” y “abajo” del congelador para
navegar entre las opciones.
2. Cuando se muestre la función que desea modificar, use
los controles “arriba” y “abajo” del refrigerador para
cambiar el estado de la función.
3. Cuando haya realizado los cambios, oprima la tecla ‘Door
Alarm’ (Alarma de la puerta) durante tres segundos O
cierre la puerta del refrigerador.
Función ‘Super Cool’ (Superenfriamiento) (‘CC’)
(modelos selectos)
Cuando se ACTIVA esta función, se enciende un ventilador
de combinación en el refrigerador que mejora la circulación
del aire y el control de la temperatura. Para ahorrar energía,
puede desactivar esta característica seleccionando la opción
‘OFF’ (Apagado).
Despliegue de temperatura (F_C)
Esta función permite cambiar el despliegue de temperatura
en grados Fahrenheit o Celsius.
Alarma (‘AL’)
Cuando el modo de alarma está APAGADO, todas las
alarmas sonoras permanecerán desactivadas hasta que se
vuelva a encender esta función.
Selección de intensidad de luz automática (LL)
(modelos selectos)
Esta función ajusta el nivel de luz del distribuidor cuando el
sensor detecta que los niveles de luz de la habitación son
bajos. El nivel 1 es el ajuste de menor intensidad, mientras
que el nivel 9 es el nivel de luz de mayor intensidad. Nota:
La función de luz automática (modelos selectos) debe estar
activada en el control del distribuidor de hielo y agua para
poder utilizar esta característica.
Modo sabático (SAB)
Cuando el modo sabático está ENCENDIDO, todas las luces
de los controles y la luz nocturna estarán desactivadas hasta
que se APAGUE la función. Esta función no deshabilita las
luces interiores. Oprima cualquier tecla para restablecer las
luces de control.
Superficies exteriores tibias
En ciertas ocasiones, la parte delantera del gabinete del
refrigerador puede estar tibia al tacto. Esto es normal y evita
que la humedad se condense sobre la superficie exterior del
refrigerador. Esta condición será más perceptible cuando se
encienda el refrigerador por primera vez, en ambientes
calurosos y después de abrir la puerta muchas veces o
durante mucho tiempo.
76
Page 78

C
A RA CT E R Í ST I CA S DEL
R
EFRIGERA DOR
Bandejas
PRECAUCIÓN
A fin de evitar una lesión personal o daños
personales, observe lo siguiente:
• Nunca intente ajustar una bandeja que tenga
alimentos.
• Cerciórese de que la bandeja esté firme antes de
colocar artículos sobre ella.
• Manipule con cuidado las bandejas de vidrio
templado. Las bandejas se pueden quebrar
repentinamente si son melladas, rayadas o
expuestas a cambios repentinos de temperatura.
Su refrigerador está equipado con ‘Spill-proof Glass
Shelves’ (bandejas de retenedor derrames). Las
bandejas tienen un borde retenedor de derrames que
facilita la limpieza y otras están equipadas con la
característica de deslizar. Para deslizar la bandeja hacia
afuera, sujete la parte delantera de la bandeja y tire
hacia adelante. Oprima la bandeja para volverla a la
posición original.
Desmontaje de una Bandeja:
• Incline levemente hacia arriba la
parte delantera y levante la parte
trasera de la bandeja; luego tire de la
bandeja derecho hacia afuera para sacarla.
Desmontaje de la cubierta del cajón de las
verduras:
• Desmontaje las cajónes de las verduras.
• Coloque la mano debajo del marco para empujar el
vidrio hacia arriba. Levante el vidrio para sacarlo.
• Levante el marco de los rieles del revestimiento del
refrigerador.
Para instalar:
• Vuelva a colocar el marco en los rieles de la pared
del refrigerador.
• Vuelva a colocar cuidadosamente el vidrio en el
marco.
Almacenamiento en la Puerta
Centro de Productos Lácteos
El centro de productos lácteos ofrece
almacenamiento conveniente para tales
artículos como la mantequilla y la
margarina. Este compartimiento puede
moverse a lugares diferentes para acomodar las
necesidades de conservación de alimentos. Para usar el
centro de productos lácteos, levante la tapa.
Desmontaje:
• Levante la tapa, tire de él hacia arriba e inclínelo para
sacarlo.
Cambio de Lugar de una Bandeja:
• Incline hacia arriba el borde delantero de la bandeja.
• Inserte los ganchos en las aberturas deseadas del
marco y deje que la bandeja se asiente en su lugar.
• Asegúrese de que la bandeja esté bien asegurada en
la parte trasera.
Extensiones Traseras de las Bandejas
Las Extensiones Traseras de las Bandejas ayudan a
evitar que los artículos se caigan por la parte trasera de
la bandeja.
Desmontaje y reinstalación de
la extensión de la bandeja:
• Para retirar, tire de la extensión
derecho hacia arriba desde la
parte trasera de la bandeja.
• Para reinstalar, inserte los postes de la extensión de
la bandeja en los agujeros del marco de la bandeja.
La cubierta del cajón de las verduras se utiliza
como la bandeja inferior del refrigerador.
77
Instalación:
• Coloque el centro de productos lácteos en la puerta y
empújelo hacia abajo hasta que quede firmemente
asentado en el revestimiento de la puerta.
Contenedores de la Puerta
Los contenedores de la puerta pueden moverse para
adaptarse a sus necesidades de almacenamiento.
Desmontaje:
• Deslice el contenedor hacia arriba y tire de él
derecho hacia afuera.
Instalación:
• Coloque el contenedor en la puerta y
empújelo hacia abajo hasta que quede firmemente
asentado en el revestimiento de la puerta.
Cajones de las Verduras con Control de
Humedad
Los cajones de las verduras ofrecen un ambiente de
mayor humedad para la conservación de frutas y
verduras frescas.
Page 79

C
A R A C T E R Í S T I CA S DEL
R
EFRIGERA DOR
Controles
Los controles del cajón de las verduras regulan la
cantidad de humedad en el cajón. Deslice el control hacia
el ajuste ‘Fruit’ (fruta) para productos con cáscaras.
Deslice el control hacia el ajuste ‘Vegetables’
(verduras) para verduras con hojas.
Desmontaje:
• Abra el cajón en toda su extensión. Levante la parte
delantera del cajón y tire de él derecho hacia afuera.
Instalación:
• Inserte el cajón en los rieles del marco y empuje hacia
atrás a su lugar.
Nota
• Para obtener mejores resultados, mantenga los
cajones de las verduras herméticamente cerrados.
Desmontaje:
• Levante la tapa. Tire del cajón hacia afuera en toda su
extensión. Incline hacia arriba la parte delantera del
cajón y retírelo derecho hacia afuera.
Instalación:
• Empuje los rieles de metal hacia la parte trasera del
refrigerador. Coloque el cajón en los rieles y deslice el
cajón hacia atrás hasta que quede en su lugar.
Desmontaje:
• Abra completamente el cajón y levante la parte
delantera del divisor para desengancharlo de la pared
trasera del cajón y levántelo para sacarlo.
Instalación:
• Enganche la parte trasera del divisor sobre la pared
trasera del cajón y bájelo a su lugar.
Accesorios
‘Gourmet BayTM’
El cajón ‘Gourmet BayTM’ es un cajón que ocupa todo el
ancho del refrigerador y que tiene un control de
temperatura ajustable. Este cajón puede usarse para
bandejas grandes de fiestas, fiambres o bebidas o
artículos misceláneos. Hay un divisor para organizar el
cajón en secciones si está deseado.
Está equipado con un control de temperatura que ajusta la
cantidad de aire frío dirigida hacia el cajón ‘Gourmet
BayTM’. El control se encuentra en el lado derecho
del cajón. Dependiendo del modelo, puede es ta r
en la parte delantera del cajón o debajo de la
ta p a .
Ajuste el control en ‘cold’ (frío) o para
proveer temperatura normal en el refrigerador.
Use el ajuste ‘coldest’ (más frío) o cuando
desee una temperatura más fría que la
temperatura del compartimiento del refrigerador. Use el
ajuste más frío cuando guarde carnes.
Notas
Bandeja para Botellas de Vino/Latas de
Refrescos
La bandeja para botellas de vino/latas
de refrescos se puede colocar en el cajón
‘Gourmet BayTM’ o sobre una bandeja.
Las botellas o latas se pueden colocar en
forma transversal o una sola botella puede ser
colocada en la depresión central.
(modelos selectos)
Gourmet BayTMTray
La Bandeja Gourmet Bay™ consiste en
una bandeja removible situada dentro del
compartimiento de todo el ancho de la puerta.
Soporte para Botellas de Vino
El soporte para botellas de vino ofrece un
lugar para guardar vino en forma horizontal.
El soporte también puede sostener una caja
de huevos.
Coloque el soporte de modo que descanse en el lado
izquierdo de una bandeja del refrigerador.
• El aire frío dirigido al cajón ‘Gourmet BayTM’ puede
disminuir la temperatura del refrigerador. Puede ser
necesario ajustar el control del refrigerador.
• No coloque verduras con hojas en el cajón ‘Gourmet
BayTM’. Las temperaturas más frías pueden dañar tal
tipo de verduras.
Bandeja con Manija para Huevos
La bandeja con manija para
huevos tiene capacidad para más de
una docena de huevos. Puede ser
sacada para colocarla en el lugar de trabajo o para
lavarla.
78
Page 80

C
ARACTERÍSTICAS DEL
C
ONGELADOR
Canasta Superior de Alambre
PELIGRO
A fin de evitar que los niños queden
accidentalmente atrapados o se asfixien, no retire el
divisor de la canasta superior del congelador.
Desmontaje:
• Deslice la canasta superior hacia afuera en toda su
extensión y levántela para sacarla.
Instalación:
• Deslice la canasta superior hacia adentro del
congelador. Asegúrese de que la parte trasera de la
canasta quede enganchada detrás del fiador del riel.
Accessorios
Deposito del Hielo
El Depósito del Hielo es útil
para guardar hielo,
concentrados congelados, etc.
Bandeja de la Canasta Inferior
La Bandeja de la
Canasta Infe r i o r es de
plástico y removible que
d e s c a n sa en la part e
inferior de la ca n a s t a
d e s m o n table inferior para
recoger derrames y
a rtículos alimenticios pequeños antes de que puedan
caer a través del compartimiento del congelador.
La bandeja puede ser retirada para facilitar la limpieza
levantándola de la canasta.
Divisor de la Canasta Inferior
El Divisor de la Canasta Inferior ofrece la opción de
organizar el área de la canasta en secciones.
Nota
•
Modelos con Congelador de Cajón: Ver en la
página 70 las instrucciones para la ca n a s t a inferior y
las instrucciones completas sobre el ca j ó n
d es l i z a b l e .
Desmontaje y reinstalación del divisor:
• Para retirar, tire del divisor derecho hacia arriba.
• Para reinstalar, enganche las esquinas superiores del
divisor en los listones superiores horizontales de la
canasta.
79
Page 81

H
IELO Y
A
GUA
Máquina Automática de Hacer
Hielo
Otros modelos tienen una máquina de hacer hielo
i n s tal ada en la fábrica. Conecte la máquina de hacer
hielo al suministro de agua según se explica en la página
73. Pa ra un rendimiento óptimo de la máquina de
hacer hielo es necesario que haya flujo apro p i a d o
del agua y que el re f r i g e r ador esté nive l a d o .
Instrucciones de Funcionamiento
• Cerciórese de que el depósito del hielo esté en su
lugar y que la manecilla de la máquina esté dirigida
hacia abajo.
• Después de que el compartimiento del congelador
alcanza aproximadamente 0° F (-18° C), la máquina
de fabricar hielo se llena con agua
y comienza a funcionar. Usted
obtendrá un lote de hielo
aproximadamente cada tres horas.
• Espere aproximadamente 24 horas
después de la instalación para
recibir el primer lote de hielo.
• Descarte el hielo creado durante las primeras 12
horas de operación a fin de asegurarse de que el
sistema no tenga impurezas.
• Detenga la producción de hielo levantando la
manecilla de la máquina hasta que se escuche un
chasquido.
• La máquina de hacer hielo permanecerá en la
posición ‘off’ (apagada) hasta que la manecilla no
sea bajada.
• Los primeros dos lotes probablemente contendrán
cubos muy pequeños o de forma irregular debido al aire
que puede haber en la tubería de suministro de agua.
• Cuando los cubos de hielo son expulsados es normal
que varios cubos salgan unidos. Se podrán separar
fácilmente. La máquina de hacer hielo continuará
haciendo hielo hasta que la cantidad de cubos de hielo
producida levante el brazo sensor y apague la máquina.
• Se pueden oír ciertos ruidos cuando se está fabrica n d o
el hielo. El motor puede hacer un leve zumbido, los
cubos sonarán al caer en la bandeja vacía y la llave del
agua puede emitir un chasquido o ‘zumbido’ de vez en
c u a n d o .
• Si el hielo no se usa con frecuencia, los cubos se
tornaran opacos, disminuirán de tamaño, se pegarán y
adquirirán mal sa b o r. Vacíe el depósito de hielo
p e r i ó d i camente y límpielo con agua tibia. Asegúrese de
s e car bien el depósito antes de volver a colocarlo en su
l u g a r .
• No se deben colocar bebidas ni alimentos en el
depósito del hielo para enfriarlos rápidamente. Estos
artículos pueden bloquear el brazo sensor, afectando
el funcionamiento de la máquina de hacer hielo.
• Cuando el suministro de agua vaya a ser
interrumpido por varias horas, apague la máquina de
hacer hielo levantando la manecilla.
Desmontaje del Depósito del Hielo:
• Para sacar el depósito del hielo, tire de él hacia
adelante, alejándolo de la máquina de hacer hielo.
Para evitar que la máquina produzca cubos cuando
el recipiente haya sido quitado, apague la máquina
levantando el brazo sensor.
Instalación del Depósito del Hielo:
• Invierta el procedimiento anterior. Ponga en marcha
la máquina de hacer hielo bajando la manecilla de la
máquina de hacer hielo.
ADVERTENCIA
A fin de evitar una lesión personal o daños materiales,
observe lo siguiente:
• No introduzca los dedos o la mano en el mecanismo
automático de hacer hielo mientras el refrigerador
esté enchufado. Esto le protegerá contra posibles
lesiones y también evitará interferencia con las piezas
móviles del mecanismo eyector y del calentador que
expulsa los cubos.
• En raras oca s i o n e s, los cubos de hielo pueden sa l i r
d e scoloridos, mostrando generalmente un color azul
verdoso. La ca u s a de es ta rara decoloración es una
combinación de factores ta l es como cierta s
ca r a c t e r í s t i cas del agua local, la plomería de la ca sa y la
acumulación de sa l es de cobre en la tubería inactiva de
suministro de agua que abastece a la máquina de hacer
hielo. El consumo continuo de los cubos des c o l o r i d o s
puede ser nocivo para la salud. Si observa la
mencionada descoloración, des ca rte los cubos de hielo y
póngase en contacto con su Distribuidor para comprar e
i n s tal ar un filtro en la tubería del agua.
• El daño causado por agua debido a una conexión
inapropiada del agua puede causar crecimiento de
moho/mildiú.
• Limpie los derrames de agua y hielo para evitar una
lesión personal y el crecimiento de moho/mildiú.
Distribuidor de Agua
El distribuidor de agua se encuentra
en la pared izquierda del
compartimiento del refrigerador. Este
modelo solamente distribuye agua fría.
Para sacar agua:
• Sostenga el vaso debajo del
distribuidor y oprima el accionador.
80
Page 82

F
ILTRO DEL AGUA
Instalación y Desmontaje
ADVERTENCIA
A fin de evitar una enfermedad grave o mortal, no
use el refrigerador donde el agua no sea segura o
se desconozca su calidad sin desinfección adecuada
antes o después de pasar por el filtro.
PRECAUCIÓN
Después de instalar un filtro del agua nuevo,
siempre deje salir agua durante dos minutos antes
de retirar el filtro por cualquier razón. El aire que
permanece atrapado en el sistema puede causar
eyección de agua y del cartucho.
• La tapa de derivación no filtra el agua. Asegúrese
de tener cartuchos filtrantes de repuesto cuando
el filtro necesite ser cambiado.
• Si el sistema de filtración de agua estuvo
congelado, reemplace el cartucho filtrante.
• Si el sistema no ha sido usado durante un período
de tiempo corto y el agua tiene un sabor y olor
desagradable, lave el sistema haciendo salir dos o
tres vasos de agua. Si el olor o sabor
desagradable persiste, cambie el cartucho
filtrante.
Instalación Inicial
El filtro del agua está ubicado en la
esquina superior derecha del
compartimiento del refrigerador.
1. Retire la tapa de derivación azul
y consérvela para uso posterior.
2. Retire la etiqueta de sellado del
extremo del filtro e insértelo en
la cabeza del filtro.
3. Gire suavemente a la derecha
hasta que el filtro se detenga.
Cierre la cubierta del filtro.
4. Reduzca las salpicaduras de agua purgando el aire
del sistema. Deje correr el agua continuamente
durante dos minutos a través del distribuidor hasta
que el agua salga uniformemente. Durante el uso
inicial, es necesario esperar de 1 a 2 minutos para
que comience a salir agua pues el depósito del
agua interno debe tener tiempo de llenarse.
• Se puede requerir limpieza adicional en los
hogares en que el agua es de mala calidad.
Reemplazo del Filtro del Agua
IMPORTANTE: El aire que permanece atrapado
en el sistema puede causar eyección de agua y
del cartucho. Siempre deje salir agua durante dos
minutos antes de retirar el filtro por cualquier
razón. Tenga cuidado cuando retire el cartucho.
1. Gire el filtro a la izquierda hasta que se
desenganche de la cabeza.
2. Desagüe el agua del filtro en el fregadero y
descártelo en la basura normal del hogar.
3. Limpie el exceso de agua acumulada en la
cubierta del filtro y continúe con la Instalación
Inicial, pasos 2 a 4.
El filtro del agua debe cambiarse por lo menos cada 12
meses.
IMPORTANTE: La calidad del agua y la cantidad
usada determinan la duración de la vida útil del
cartucho filtrante. Si consume mucha agua o si el agua
es de mala calidad, puede que sea necesario
reemplazar el filtro más a menudo.
Para comprar un ca r tucho filtrante de repuesto, póngase
en contacto con su distribuidor o llame al
1 - 80 0 - J ENNAIR (1-80 0 - 5 36 - 62 47) en EE . UU. y Canadá.
El distribuidor puede ser usado sin el ca rtucho filtrante
del agua. Si usted decide es ta opción, reemplace el filtro
con la tapa de derivación azul.
81
Page 83

F
ILTRO DEL AGUA
Especificaciones del Sistema y Datos de Funcionamiento
Cartucho Filtrante del Agua para Refrigerador –
Modelo UKF8001AXX
Especificaciones
Medida del gasto (máximo) en servicio...........................2,9 L/min (0,78 GPM)
Vida útil (máxima) – modelo UKF8001AXX-750 ..........2838 litros/750 galones
Temperatura máxima de operación ...................................38° C /100° F
Presión mínima de operación ..............................................241 kPa/35 lbs./pulg
Temperatura mínima de operación ....................................1° C/33° F
Presión máxima de operación .............................................827 kPa/120 lbs./pulg
Datos de Funcionamiento
Parámetro
Cloro
Sabor y Olor
Partículas**
Parámetro
Turbiedad
Quistes
Asbesto
Plomo a pH 6,5
Plomo a pH 8,5
Mercurio a pH 6,5
Mercurio a pH 8,5
Atrazina
Benzene
Carbofuran
p-Dichlorobenzene
Lindano
Toxafeno
USEPA
MCL
—
—
—
USEPA
MCL
1 NTU**
Reducción de 99,5%
Reducción de 99%
0,015 mg/L
0,015 mg/L
0,002 mg/L
0,002 mg/L
0,003 mg/L
0,005 mg/L
0,04 mg/L
0,075 mg/L
0,0002 mg/L
0,003 mg/L
Norma N° 42: Efectos Estéticos
Concentración
de Influente
2.0 mg/L ± 10%
–
por lo menos 10.000 partículas/mL
Norma N° 53: Efectos sobre la Salud
Concentración
de Influente
11 ± 1 NTU***
Mínimo 50.000/L
107a 108fibras/L; fibras> de 10 micrómetros de largo
0,15 mg/L + 10%
0,15 mg/L + 10%
0,006 mg/L ± 10%
0,006 mg/L ± 10%
0,009 mg/L + 10%
0,015 mg/L ± 10%
0,08 mg/L ± 10%
0,225 mg/L ± 10%
0,002 mg/L + 10%
0,015 ± 10%
Promedio de
Influente
1,88 mg/L
–
5.700.,000 # /mL
Promedio de
Influente
10,7 NTU
166.500 # /L
155 MF/L
0,153 mg/L
0,150 mg/L
0,006 mg/L
0,006 mg/L
0,009 mg/L
0,014 mg/L
0,081 mg/L
0,208 mg/L
0,002 mg/L
0,015 mg/L
< 0,05136364 mg/L
30.583 # /mL
< 0,001 mg/L
< 0,001 mg/L
<0,002 mg/L
<0,001 mg/L
<0,0005 mg/L
<0,001 mg/L
Efluente % de Reducción
Promedio
–
Efluente % de Reducción
Promedio
0,31 NTU
< 1 # /L
< 1 MF/L
0,0003 mg/L
0,0008 mg/L
0,0006 mg/L
0,000 mg/L
Eagan, Minnesota 55121-2240
Máximo
< 0,06 mg/L
–
69.000 # /mL
Máximo
0,049 NTU
< 1 # /L
< 1 MF/L
< 0,001 mg/L
< 0,001 mg/L
0,0005 mg/L
0,0015 mg/L
0,002 mg/L
0,0011 mg/L
<0,001 mg/L
<0,0005 mg/L
<0,0001 mg/L
<0,001 mg/L
1000 Apollo Road
651.450.4913
EPA EST #35917-MN-1
100834/B
Promedio
> 97,26%
–
99,52%
Promedio
97,09 %
> 99,99 %
> 99,99 %
> 99,35%
> 99,33%
95,70%
86,22%
76,99%
95,71%
98,74%
99,76%
98,72%
92,97%
Mínimo
96,84%
98,94%
Mínimo
95,20 %
> 99,99 %
> 99,99 %
> 99,29%
> 99,29%
90,91%
75,93%
75,31%
92,14%
98,46%
99,74%
96,50%
91,67%
Reducción Mín.
–
Reducción Mín.
0,0002 mg/L
Requerida
50%
–
85%
Requerida
0,5 NTU
> 99,95 %
99 %
0,10 mg/L
0,10 mg/L
0,002 mg/L
0,002 mg/L
0,003 mg/L
0,005 mg/L
0,04 mg/L
0,075 mg/L
0,003 mg/L
* Probado con una medida de gasto de 0,78 GPM (2,9 L/min); presión de 413,5 kPa (60
lbs./pulg._); pH de 7,5 ± 0,5; temp. de 20° C ± 3° C (68° F ± 5° F)
** Medido en partículas/mL. Se usaron partículas de 0,5 – 1 micrón.
*** NTU – Unidades de Turbulencia (Nefelométricas)
Condiciones de Uso Generales
Lea esta Ficha de Datos de Funcionamiento y compare la
capacidad de este producto con sus necesidades reales de
tratamiento de agua.
NO use este producto donde el agua sea
m i c r obiológicamente peligrosa o de calidad
desconocida sin haberla desinfectado de manera
adecuada antes o después de pasar por el sistema. Los
sistemas certificados para reducción de quistes pueden
ser usados en agua desinfectada que pueda contener
quistes filtra b l e s .
USE SOLAMENTE CON EL SUMINISTRO DE AGUA
FRÍA. VERIFIQUE EL CUMPLIMIENTO DE TODOS LOS
REGLAMENTOS Y LEYES LOCALES Y ESTATALES.
Cartuchos filtrantes UKF8001AXX-750 probados y certificados por NSF
International en base a las normas ANSI/NSF 42 y 53 para la reducción de las
siguientes substancias:
Norma No. 42: Efectos Estéticos
Reducción del sabor y olor
Sabor y olor de cloro
Unidad de Filtración Mecánica
Reducción de Partículas – Clase I
Norma No. 53: Efectos sobre la Salud
Unidad de Reducción Química
Reducción de Plomo, Atrazina, Lindano,
Benzene, Carbofuran, p-Dichlorobenzene,
Mercurio y Toxafeno
Unidad de Filtración Mecánica
Reducción de Quistes, Turbiedad y Asbes t o
El sistema de filtración de agua retráctil PuriClean®II usa el
cartucho filtrante de repuesto UKF8001AXX. Es esencial el
reemplazo oportuno del cartucho para obtener un
rendimiento satisfactorio de este sistema de filtración. Por
favor consulte la sección correspondiente de esta Guía de
Uso y Cuidado para los requerimientos generales de
funcionamiento, mantenimiento y reparación de averías. El
precio sugerido de venta del filtro de agua de repuesto es
de $39,99.
Este sistema ha sido probado de acuerdo con las normas
ANSI/NSF 42 y 53 para la reducción de las substancias
indicadas anteriormente. La concentración de las
substancias indicadas en el agua que entra al sistema se
redujo a una concentración inferior o igual al límite
permisible indicado por las normas ANSI/NSF 42 y 53 para
el agua que sale a través del sistema.
82
Page 84

F
ILTRO DEL AGUA
Estado de California
Departamento de Servicios de la Salud
Dispositivo de Tratamiento de Agua
Número de Certificado
03 - 1583
Fecha de Emisión: 16 de Septiembre de 2003
Fecha Revisada: 22 de Abril de 2004
Designación de Marca Registrada/Modelo Elementos de Repuesto
UKF8001AXX750 UKF8001AXX
469006-750 46 9006
67003523-750 67003523
Fabricante: PentaPure Inc.
El (Los) dispositivo(s) de tratamiento de agua indicado(s) en este certificado cumple(n) los requisitos de prueba en
conformidad con la Sección 116830 del Código de Salud y Seguridad para los siguientes contaminantes relacionados con la
salud:
Contaminantes Microbiológicos y Turbiedad Contaminantes Inorgánicos/Radiológicos
Quistes Asbesto
Turbiedad Plomo
Mercurio
Contaminantes Orgánicos
Atrazina
Lindano
Benzene
Carbofuran
p-Dichlorobenzene
Toxafeno
Vida Util Máxima: 2839 litros (750 galones) Medida del Gasto en Servicio: 2,9 L/min (0,78 GPM)
Condiciones de la Certificación:
NO use este producto donde el agua sea microbiológicamente peligrosa o con agua de calidad desconocida, a excepción de que los
sistemas certificados para reducción de quistes pueden ser usados en agua desinfectada que pueda contener quistes filtrables.
83
Page 85

S
UGERENCIAS PARA
C
ONSERVAR LOS
A
LIMENTOS
C o n s e r v ación de Alimentos
Fre s c o s
• La temperatura del refrigerador se debe mantener entre
1° C (34° F) y 4° C (40º F). La temperatura ideal es de
3° C (37º F). Para verificar la temperatura, coloque un
termómetro para electrodomésticos en un vaso de agua
en el centro del refrigerador. Espere 24 horas antes de
verificar la temperatura. Si la temperatura es superior a
4° C (40º F) ajuste los controles según se explica en la
páginas 74-76.
• Evite sobrecargar las bandejas del refrigerador pues
esto reduce la circulación de aire alrededor de los
alimentos y ocasiona enfriamiento irregular.
Frutas y Verduras
• El cajón de las verduras retiene la humedad para ayudar
a preservar la frescura de las frutas y verduras por
períodos más prolongados (ver página 78 ) .
• Clasifique las frutas y verduras antes de guardarlas y
consuma primero las que se encuentren maduras o
magulladas. Descarte aquellas que muestren señales
de descomposición.
• Siempre envuelva los alimentos que despiden olor tal
como cebollas y repollo de modo que el olor no se
transfiera a otros alimentos.
• Aunque las verduras neces i t an cierta cantidad de
humedad para retener la frescura, demasiada humedad
puede acortar el tiempo de conservación (es p e c i a l m e n t e
las verduras con hojas). Seque bien las verduras antes
de guardarlas.
• No lave las verduras frescas hasta el momento de
usarlas.
Carnes y Quesos
• La carne cruda de res y de ave debe envolverse muy
bien para que no ocurran derrames ni contaminación
de otros alimentos o superficies.
• A veces se puede formar moho en la superficie de los
quesos duros (Suizo, Cheddar y Parmesano). Corte por
lo menos 2,5 cm (1”) alrededor y debajo del área
afectada. Mantenga el cuchillo o instrumento cortante
alejado del moho. El queso restante retendrá su sabor y
se puede comer sin preocupación. No trate de
conservar las rodajas individuales de queso, el queso
cremoso, el requesón, la crema, nata cortada o yogur
cuando tengan señales de moho.
Productos Lácteos
• La mayoría de los productos lácteos como la leche,
yogur, nata cortada y requesón muestran la fecha de
vencimiento en sus envases para asegurar su correcta
duración. Guarde estos alimentos en los envases
originales y refrigérelos inmediatamente después de
comprarlos y después de cada uso
.
Conservación de Alimentos
Congelados
• El compartimiento del congelador de un refrigerador
debe ser mantenido aproximadamente a -18° C (0° F).
Para verificar la temperatura, coloque un termómetro
para electrodomésticos entre los paquetes congelados y
espere 24 horas antes de verificarla. Si la temperatura
es superior a -18°C (0°F), ajuste el control como se
i n d i c a en la páginas 74 - 7 6 .
• El congelador funcionará más eficazmente si se ocupa
por lo menos dos tercios de su capacidad.
Envoltura de los Alimentos para su
Congelación
• Para reducir la des h i d r a t ación y el deterioro de la ca l i d a d
de los alimentos, use papel de aluminio, envoltura para
alimentos congelados, bolsas es p e c i a l e s para alimentos
congelados o envases herméticamente cerrados. Extraiga
la mayor cantidad posible de aire del paquete y
a s e g ú r ese de que esté bien sellado. El aire atrapado
puede res e ca r , cambiar de color o dar mal sa b o r
(quemadura de congelación) a los alimentos.
• Envuelva bien las carnes frescas y la carne de ave con
envoltura especial para alimentos congelados antes de
guardarlas.
• No congele nuevamente la carne que se haya
descongelado completamente.
Colocación de los Alimentos en el
Congelador
• Evite guardar demasiados alimentos tibios en el
congelador de una sola vez. Esto sobrecarga el
congelador, reduce la velocidad de congelación y
puede elevar la temperatura de los alimentos
congelados.
• Deje un espacio entre los paquetes de manera que el
aire pueda circular libremente para que los alimentos
se congelen lo más rápido posible.
• Evite guardar alimentos difíciles de congelar tal como
helados y jugo de naranja concentrado en los
compartimientos de la puerta del congelador. Es
preferible guardar estos alimentos en el interior del
congelador donde la temperatura fluctúa menos
cuando se abre la puerta.
Consulte la Tabla de Conservación de los Alimentos en las
páginas 85 y 86 para los tiempos de almacenamiento
a p r o x i m a d o s .
84
Page 86

UGERENCIAS PARA
S
ONSERVAR LOS
C
LIMENTOS
A
Tabla de Conservación de los Alimentos
Los tiempos de conservación son aproximados y pueden variar dependiendo del tipo de empaque, temperatura de
almacenamiento y la calidad del alimento cuando fue comprado.
ALIMENTOS
PRODUCTOS LACTEOS
Mantequilla
Leche y crema
Queso en crema, queso en pasta
y alimentos de queso
Requesón
Nata cortada
Queso duro
(Suizo, Cheddar y Parmesano)
HUEVOS
Huevos enteros
REFRIG ERADOR
1 mes
1 semana
1 a 2 semanas
3 a 5 días
10 días
1 a 2 meses
3 semanas
CONGELADOR
6 a 9 meses
No se recomienda
No se recomienda
No se recomienda
No se recomienda
4 a 6 meses
Puede quedar
migajoso
No se recomienda
SUGERENCIAS PA R A LA CONSER V A C ION
Envuelva bien o cubra.
Verifique la fecha del envase. Cierre
firmemente. No vuelva a colocar las
porciones no usadas en el envase
original. No congele la crema a menos
que sea batida.
Envuelva bien.
Guarde en el envase original. Verifique la
fecha del envase.
Guarde en el envase original. Verifique la
fecha del envase.
Envuelva bien. Recorte las partes
afectadas por el moho.
Refrigere colocando los extremos
pequeños hacia abajo.
Claras o yemas restantes
FRUTAS
Manzanas
Plátanos
Peras, ciruelas, aguacate
Fresas, cerezas, damascos
Uvas
Frutas ácidas
2 a 4 días
1 mes
2 a 4 días
3 a 4 días
2 a 3 días
3 a 5 días
1 a 2 semanas
9 a 12 meses
8 meses (cocinadas)
6 meses
(enteros /pelados)
No se recomienda
6 meses
1 mes (enteras)
No se recomienda
Por cada taza de yemas que se desee
congelar, agregue 1 cucharadita de
azúcar si se van a usar en dulces o una
cucharadita de sal si es para platillos no
dulces.
También se pueden guardar manzanas
verdes o duras a una temperatura de
15º C a 21º C (60º F a 70° F).
Madúrelas a temperatura ambiente antes
de ser refrigeradas. Los plátanos se
obscurecen cuando son refrigerados.
Madúrelas a temperatura ambiente antes
de ser refrigeradas. Los aguacates se
obscurecen cuando son refrigerados.
Madúrelas a temperatura ambiente antes
de ser refrigeradas.
Madúrelas a temperatura ambiente antes
de ser refrigeradas.
También se pueden refrigerar a 15º C a
21° C (60º F a 70° F). Si se refrigeran,
guárdelas sin cubrirlas.
85
Piña, en trozos
2 a 3 días
6 a 12 meses
No madurarán después de la compra.
Use rápidamente.
continuacion . . .
Page 87

UGERENCIAS PARA
S
ONSERVAR LOS
C
LIMENTOS
A
ALIMENTOS
VERDURAS
Espárragos
Repollitos de Bruselas, brócoli,
coliflor, chícharos, frijoles,
cebollas, pimientos
Repollo, apio
Zanahorias, pastinaca, betarraga
y nabos
Lechuga
AVES y PESCADO
Pollo y pavo, entero
Pollo y pavo, presas
Pescado
CARNES
REFRIGERADOR
1 a 2 días
3 a 5 días
1 a 2 semanas
7 a 10 días
7 a 10 días
1 a 2 días
1 a 2 días
1 a 2 días
CONGELADOR
8 a 10 meses
8 a 10 meses
No se recomienda
8 a 10 meses
No se recomienda
12 meses
9 meses
2 a 6 meses
SUGERENCIAS PA RA LA CONSER V A CIO N
No lave antes de refrigerar. Guarde en el
cajón de las verduras.
Envuelva los alimentos que producen
olor. Deje los chícharos en las vainas.
Envuelva los alimentos que producen olor
y refrigere en el cajón de las verduras.
Retire los tallos verdes. Envuelva los
alimentos que producen olor y refrigere
en el cajón de las verduras.
Mantenga en el envase original para
refrigeración. Coloque en el
compartimiento de la carne y queso.
Cuando congele por más de dos
semanas, envuelva nuevamente con
envoltura para congelador.
Tocino
Res o cordero, molida
Res o ternera, asada y bistec
Jamón, completamente cocido, entero
mitad
rebanadas
Fiambres
Cerdo, asado
Cerdo, chuletas
Salchichas, molidas
Salchichas, ahumadas
Ternera
Salchichas
7 días
1 a 2 días
3 a 5 días
7 días
5 días
3 días
3 a 5 días
3 a 5 días
3 a 5 días
1 a 2 días
7 días
3 a 5 días
7 días
1 mes
3 a 4 meses
6 a 9 meses
1 a 2 meses
1 a 2 meses
1 a 2 meses
1 a 2 meses
4 a 6 meses
4 meses
1 a 2 meses
1 a 2 meses
4 a 6 meses
1 mes
Las carnes frescas pueden ser
guardadas en el envase original para su
refrigeración.
Colóquelas en el compartimiento de la
carne y queso. Cuando congele por más
de dos semanas, envuelva nuevamente
con envoltura para congelador.
Los fiambres sin abrir envasados al vacío
pueden ser guardados durante dos
semanas en el compartimiento de la
carne y queso.
Las carnes procesadas deben ser bien
envueltas y guardadas en el
compartimiento de la carne y queso.
Fuentes: Ministerio de Agricultura de los Estados Unidos; Instituto de Mercadotecnia de Alimentos; Servicio de
Extensión Cooperativa, Universidad Estatal de Iowa
86
Page 88

C
UIDADO Y
L
IMPIEZA
ADVERTENCIA
Para evitar choque eléctrico que puede causar una lesión
personal grave o mortal, desenchufe el refrigerador antes
de la limpieza. Enchúfelo después de la limpieza.
Tabla de Limpieza del Refrigerador
PIEZA
Puertas Texturadas
y Exterior (modelos selectos)
Interior del Gabinete
Puertas de Acero Inoxidable
y Exterior (modelos selectos)
IMPORTANTE:
La garantía de este producto no
cubre daño al acabado de acero
inoxidable causado por uso
incorrecto de productos de
limpieza o de productos no
recomendados.
Limpiadores abrasivos o ásperos
Amoníaco
Blanqueador de cloro
Detergentes o solventes
concentrados
Esponjas de restregar de metal o
plástico texturado
Limpiadores abrasivos o ásperos
Amoníaco
Blanqueador de cloro
Solventes o detergentes
concentrados
Esponjas de restregar de metal o
plástico texturado
Productos a base de vinagre
Limpiadores a base de productos
cítricos
NO USE
PRECAUCIÓN
A fin de evitar una lesión personal o daños materiales,
observe lo siguiente:
• Lea y siga las instrucciones del fabricante para todos los
productos de limpieza.
• No coloque los compartimientos, bandejas ni accesorios en
el lavavajillas. Los accesorios se pueden agrietar o deformar.
USE
4 cucharadas de bicarbonato disuelto en 1 cuarto de
galón (1 litro) de agua tibia con jabón.
Enjuague las superficies con agua tibia limpia y seque
inmediatamente para evitar las manchas.
Agua tibia con jabón y un paño suave limpio o una
esponja.
Enjuague las superficies con agua tibia limpia y seque
inmediatamente para evitar las manchas.
Para pulir y evitar marcas de los dedos, use el producto
‘Stainless Steel Magic Spray’*
Puertas de Vidrio
(algunos modelos)
Juntas de las Puertas
Bobina del Condensador
Retire la rejilla inferior para tener acceso.
Rejilla de la Salida del
Ventilador del Condensador
Vea la parte trasera del refrigerador.
Accesorios
Bandejas, compartimientos,
cajones, etc.
Evite usar cantidades excesivas
de agua que pueda escurrirse
debajo o detrás del vidrio
causando manchas.
Limpiadores abrasivos o
ásperos
No use materiales abrasivos
como una esponja de fregar, lana
de acero o limpiadores en polvo
ya que pueden rayar el vidrio.
Esponjas de restregar de metal o
plástico texturado
Ningún otro implemento que no
sea una aspiradora
Un lavavajillas
Lave con agua y jabón. Enjuague con agua limpia y
seque. Se puede usar limpiador de vidrio si se coloca
en un paño antes de usarse.
Agua tibia con jabón y un paño suave limpio o una
esponja.
La boquilla de una manguera de aspiradora.
La boquilla de una manguera de aspiradora con
escobilla.
Siga las instrucciones de desmontaje e instalación
indicadas en la sección correspondiente a cada
accesorio. Espere hasta que los accesorios se ajusten a
la temperatura ambiente. Diluya detergente suave y use
un paño limpio y suave o una esponja para limpiarlos.
Una escobilla con cerdas de plástico para limpiar las
hendiduras. Enjuague las superficies con agua tibia
limpia. Seque inmediatamente los artículos de vidrio y
los transparentes para evitar las manchas.
* Para hacer pedidos, llame al 1-800-JENNAIR (1-800-536-6247) en EE.UU. y Canadá.
87
Page 89

C
UIDADO Y
L
IMPIEZA
Eliminación de los Olores del
Refrigerador
ADVERTENCIA
A fin de evitar un choque eléctrico que puede
causar una lesión grave o mortal, desenchufe el
refrigerador antes de la limpieza. Enchúfelo después
de la limpieza.
1. Retire todo los alimentos y apague el refrigerador.
2. Desenchufe el refrigerador.
3. Limpie las paredes, el piso, el techo del interior del
gabinete, los cajones, las bandejas y las juntas de
acuerdo con las instrucciones indicadas en la
página 87.
4. Diluya detergente suave y escobille los intersticios
con la solución usando una escobilla de cerdas de
plástico. Deje reposar durante 5 minutos. Enjuague
las superficies con agua tibia. Seque las superficies
con un paño limpio y suave.
5. Lave y seque todas las botellas, envases y frascos.
Descarte los alimentos añejos o deteriorados.
6. Envuelva o guarde los alimentos que causan olores
en envases herméticos para evitar que los olores
vuelvan a ocurrir.
7. Enchufe el refrigerador y vuelva a colocar los
alimentos en el refrigerador.
8. Espere a que el refrigerador se enfríe.
9. Después de 24 horas, verifique si se han eliminado
los olores.
Si el olor aún persiste:
1. Retire los cajones y colóquelos en la bandeja
superior del refrigerador.
2. Llene el compartimiento del refrigerador y del
congelador – incluyendo las puertas – con hojas
de periódicos en blanco y negro arrugadas.
Sugerencias para Ahorro de
Energía
• Evite colocar demasiados artículos en las bandejas
del refrigerador. Esto reduce la circulación del aire
alrededor de los alimentos y el refrigerador realizará
ciclos de funcionamiento más frecuentes.
• Evite colocar demasiados alimentos tibios en el
refrigerador de una sola vez. Esto sobrecarga los
compartimientos y disminuye la velocidad de
enfriamiento.
• No use papel de aluminio, papel encerado o toallas
de papel para forrar las bandejas. Esto disminuye la
circulación del aire y el refrigerador funcionará
menos eficientemente.
• Un congelador lleno hasta dos tercios de su
capacidad funcionará más eficientemente.
• Ubique el refrigerador en la parte más fresca de la
habitación. Evite las áreas que reciben luz directa del
sol o cerca de tuberías o rejillas de calefacción u
otros electrodomésticos que producen calor. Si esto
no es posible, aisle el exterior usando una sección de
los armarios o una capa adicional de aislamiento.
• Limpie las juntas de la puerta cada tres meses de
acuerdo con las instrucciones de limpieza. Esto
asegurará que la puerta cierre herméticamente y que
el refrigerador funcione con mayor eficiencia.
• Organice los artículos en el refrigerador de modo
que se reduzca el tiempo que la puerta está abierta.
• Asegúrese de que las puertas se cierran
herméticamente nivelando el refrigerador como se
indicó en las instrucciones de instalación.
• Limpie las bobinas del condensador cada tres meses
como se indica en las instrucciones de limpieza. Esto
contribuirá al ahorro de energía y a un mejor
enfriamiento.
3. Coloque briquetas de carbón dispersas en los
periódicos arrugados en el compartimiento del
refrigerador y del congelador.
4. Cierre las puertas y deje reposar durante 24-48
horas.
88
Page 90

C
UIDADO Y
L
IMPIEZA
Reemplazo de los Focos
ADVERTENCIA
A fin de evitar choque eléctrico que puede causar
una lesión personal grave o mortal, desenchufe el
refrigerador antes de reemplazar el foco. Después
de reemplazar el foco, enchufe nuevamente el
refrigerador.
PRECAUCIÓN
A fin de evitar una lesión personal o daños
materiales, observe lo siguiente:
• Espere hasta que el foco se enfríe.
• Use guantes cuando reemplace el foco.
Compartimiento del Refrigerador
(el estilo de la pantalla de la luz varía)
1. Deslice la pantalla
transparente de la luz hacia la
parte trasera del
compartimiento para sacarla
del conjunto de la luz.
Congelador (el estilo de la pantalla de
la luz varía)
1. Alcance con la mano
detrás de la cubierta de la
luz.
2. Ejerciendo una presión
firme, oprima hacia
adelante las muescas que
se encuentran en la parte
trasera de la cubierta y
tire hacia abajo. La
cubierta se abre desde
atrás.
3. Retire la cubierta.
4. Retire el foco.
5. Reemplácelo con focos
para electrodomésticos de
no más de 40 watts.
6. Inserte las lengüetas
delanteras de la cubierta de la luz en las ranuras
del revestimiento del congelador y coloque a
presión la parte trasera del conjunto de la luz hasta
que la lengüeta trasera se enganche.
2. Retire los focos.
3. Reemplácelos con focos para electrodomésticos de
no más de 40 watts.
4. Vuelva a colocar la pantalla de la luz insertando las
lengüetas de la pantalla en los agujeros situados a
cada lado del conjunto de la luz. Deslice la pantalla
hacia adelante hasta que entre a presión en su
lugar. No fuerce la pantalla después de quedar
bloqueada en su lugar. Si lo hace, puede dañar la
pantalla.
Puertas de Vidrio
A fin de proteger puertas de vidrio:
1. No use agentes de limpieza abrasivos tales como
esponjas de restregar de lana de acero o
limpiadores en polvo pues ellos pueden rayar el
vidrio.
2. No golpee el vidrio con ollas, sartenes, muebles,
juguetes u otros objetos.
3. No cierre las puertas de vidrio hasta que las
bandejas y cajones no estén en sus lugares.
Al golpear, rayar, hacer vibrar o esforzar el vidrio puede
debilitar su estructura causando un mayor riesgo de
rotura en una fecha posterior.
(modelos selectos)
89
Page 91

C
UIDADO Y
L
IMPIEZA
Preparación para las vacaciones
PRECAUCIÓN
Si su refrigerador tiene un distribuidor y existe la
posibilidad de que la temperatura en el lugar donde está
ubicado el refrigerador descienda bajo el punto de
congelación, el sistema de suministro del agua
(incluyendo el depósito del agua y la válvula del agua)
debe ser desaguado por un técnico de servicio calificado.
Para vacaciones o ausencias cortas (tres meses o
menos):
1. Retire todos los productos perecederos.
2. Si nadie va a controlar el refrigerador durante su
ausencia, retire también todos los productos
congelados.
3. Si su refrigerador tiene una máquina automática de
hacer hielo:
• Cierre el suministro de agua hacia la máquina de
hacer hielo por lo menos un día antes de partir.
• Después de que caiga el último lote de hielo,
levante la manecilla de alambre y colóquela en la
posición ‘OFF’.
• Vacíe el depósito del hielo.
4. Si la temperatura ambiente descenderá a menos de
13° C (55° F), siga las instrucciones para ausencias
más largas.
Para ausencias o vacaciones largas, (más de tres
meses) O si la temperatura ambiente descenderá a
menos de 13° C (55° F):
1. Retire el alimento.
2. Si su refrigerador tiene una máquina automática de
hacer hielo:
• Cierre el suministro de agua hacia la máquina de
hacer hielo por lo menos un día antes de partir.
• Después de que caiga el último lote de hielo,
levante la manecilla de alambre y colóquela en la
posición ‘OFF’.
• Vacíe el depósito del hielo.
3. Si su refrigerador tiene un sistema distribuidor con
filtro del agua, retire el cartucho filtrante e instale la
derivación del filtro. Descarte el cartucho usado.
4. Gire el control del congelador a la posición ‘OFF’.
5. Desenchufe el refrigerador.
6. Limpie completamente el interior de ambos
c o m p a r timientos con una solución de bicarbonato y
un paño suave limpio (cuatro cucharadas de
b i c arbonato en un litro/cuarto de galón de agua tibia).
7. Seque bien ambos compartimientos.
8. Deje las puertas abiertas a fin de evitar la formación
de moho y mildiú.
A su regreso
Después de una vacación o ausencia corta:
Para los modelos con máquinas automáticas de hacer
hielo o distribuidores:
• Conecte nuevamente el suministro del agua y abra la
válvula de suministro del agua (ver página 73).
• Vigile la conexión del agua durante 24 horas y corrija
los escapes si es necesario.
• Deje salir 10-15 vasos de agua del distribuidor para
lavar el sistema.
• Levantando la manecilla de la máquina para vuelva a
activar la máquina de hacer hielo.
• Descarte por lo menos los tres primeros lotes de hielo.
Después de una vacación o ausencia larga:
• Si su refrigerador tiene una máquina automática de
hacer hielo, vuelva a conectar el suministro del agua y
abra la llave del suministro del agua (ver página 73).
• Enchufe nuevamente el refrigerador y reajuste los
controles (ver páginas 74-76).
• Vigile la conexión del agua durante 24 horas y corrija
los escapes si es necesario.
Para los modelos con distribuidor, deje correr agua a
través del distribuidor por lo menos durante tres minutos
con la derivación del filtro en su lugar, después instale el
filtro del agua (ver página 81).
• Después de instalar el filtro del agua, deje correr agua
a través del distribuidor continuamente durante por lo
menos dos minutos o hasta que el agua salga de
manera continua. Inicialmente usted observará que hay
uno o dos minutos de retraso en que salga el agua
hasta que el depósito interno se llena.
• Levantando la manecilla de la máquina para active la
máquina de hacer hielo.
• Descarte el hielo producido dentro de las primeras 12
horas (por lo menos los tres primeros lotes).
Preparación para una
mudanza
• Siga las instrucciones anteriores para
vacaciones/ausencias largas, hasta el paso 7.
• Asegure todos los artículos sueltos, tal como bandejas y
cajones en sus lugares con cinta adhesiva a fin de
evitar que se dañen.
• Coloque cinta adhesiva en las puertas cerradas.
• Use una carretilla de mano cuando mueva el
refrigerador. Siempre coloque la carretilla de mano por
el costado o por la parte trasera del refrigerador, nunca
por el frente.
• Asegúrese de que el refrigerador se mantenga en
posición vertical durante la mudanza.
90
Page 92

S
ONIDOS DEL
Las mejoras en el diseño de la refrigeración pueden producir sonidos en su nuevo refrigerador que son diferentes o que no
existían en el modelo más antiguo. Estas mejoras fueron hechas para crear un refrigerador que conserve los alimentos de manera
más eficiente, que ahorre energía y que en general sea más silencioso. Debido a que los nuevos refrigeradores funcionan más
s i l e n c i o s amente, ahora es posible detectar sonidos que es tab an pres e n t e s en los refrigeradores más antiguos pero que pasa b a n
i n a d v e r tidos debido a los niveles de ruido más altos. Muchos de estos sonidos son normales. Por favor tome nota de que las
s u p e r f i c i e s adyacentes a un refrigerador, ta l e s como las paredes, los pisos y la es t antería pueden a veces aumentar el nivel de
estos sonidos. A continuación se indican algunos de los sonidos normales que pueden ser notados en un refrigerador nuevo.
F
UNCIONAMIENTO
SONIDO
Chasquido
Agolpamiento o
runruneo de aire
Gorgoteo o
hervor
Ruido sordo
Vibración
Zumbido
CAUSA POSI BLE
• El control del congelador (A) hace un
chasquido cuando se pone en marcha o se
detiene el compresor.
• El dispositivo motorizado (B) suena como un
reloj eléctrico cuando se activa y desactiva.
• El ventilador del congelador (C) y el ventilador
del condensador (D) hacen ese ruido cuando
funcionan.
• El refrigerante del evaporador (E) y del
intercambiador de calor (F) hace este ruido
cuando circula.
• Los cubos de la máquina de hacer hielo (modelos
selectos) al caer en el depósito del hielo ( G ).
• El compresor (H) hace este sonido intermitente
cuando está funcionando.
• El refrigerador no está nivelado.
• La conexión de la válvula del agua (I) de la
máquina de hacer hielo (modelos selectos)
hace este sonido cuando la máquina se está
llenando con agua.
SOLUCION
• Funcionamiento normal
• Funcionamiento normal
• Funcionamiento normal
• Funcionamiento normal
• Funcionamiento normal
• Funcionamiento normal
• Ver la página 68 para obtener detalles
sobre como nivelar el refrigerador.
• Funcionamiento normal
Murmullo
Siseo o ruido
seco
91
• La máquina de hacer hielo (J) está ‘activada’
sin tener el agua conectada.
• El compresor (H) puede producir un murmullo
alto cuando está funcionando.
• El calentador del descongelador (K) sisea o
hace un ruido seco cuando está funcionando.
• D esa ctive levantando la manecilla de la
máquina a la posición ‘
• Funcionamiento normal
• Funcionamiento normal
OFF
’. (Ver página 80 .
)
Page 93

L
OCALIZACIÓN Y
S
OLUCIÓN DE
A
VERÍAS
PROBLEMA
El control y las luces
del congelador
están encendidas
pero el compresor
no funciona
El cajón de las
verduras está
demasiado tibio
El refrigerador no
funciona
El refrigerador aún
no funciona
La temperatura de
los alimentos es
demasiado fría
La temperatura de
los alimentos es
demasiado tibia
El refrigerador tiene
un olor
Se forman gotas de
agua en el exterior
del refrigerador
CAUSAS POSIBLES
El refrigerador está en modo de
descongelación.
Los ajustes del control del refrigerador
son demasiado bajos.
El refrigerador no está enchufado.
El control no está activado.
Fusible fundido o se necesita reponer el
disyuntor.
Ha ocurrido una falla de corriente.
El refrigerador tiene algún problema de
funcionamiento.
Las bobinas del condensador están
sucias.
El control del refrigerador y del
congelador están en un ajuste muy alto.
La puerta no cierra bien.
Los controles necesitan ser ajustados.
Las bobinas del condensador están
sucias.
La rejilla del aire trasera está bloqueada.
La puerta se ha abierto con frecuencia o
se ha dejado abierta por períodos
prolongados.
Se han colocado alimentos
recientemente.
El compartimiento está sucio o tiene
alimentos que expiden olor.
Verifique si las juntas cierran
herméticamente.
Los niveles de humedad son altos.
Los controles deben ser ajustados.
SOLUCION
Funcionamiento normal.
Espere 40 minutos para ver si el refrigerador reanuda
el funcionamiento.
Ver páginas 74-76 para ajustar los controles.
Enchufe el refrigerador.
Ver páginas 74-76 para ajustar los controles.
Reemplace los fusibles fundidos.
Verifique el disyuntor y repóngalo, si es necesario.
Llame a su compañía de electricidad para informarles
de la falla de corriente.
Desenchufe el refrigerador y cambie todos los
alimentos a otro refrigerador. Si no dispone de otro,
coloque hielo seco en el congelador para preservar
los alimentos. La garantía no cubre pérdida de
alimentos. Haga una llamada de servicio.
Limpie de acuerdo con la tabla en la página 87.
Ver páginas 74-76 para ajustar los controles.
El refrigerador no está nivelado. Ver página 68 para
obtener los detalles sobre como nivelar el
refrigerador.
Revise la junta de la puerta para ver si cierra
herméticamente. Limpie si es necesario, de acuerdo
con la tabla en la página 87.
Verifique si hay obstrucciones internas que impidan
que la puerta se cierre bien (es decir, cajones mal
cerrados, depósitos del hielo, contenedores o
alimentos demasiado grandes o mal colocados, etc.)
Ver páginas 74-76 para ajustar los controles.
Limpie de acuerdo con la tabla en la página 87.
Verifique la posición de los alimentos en el
refrigerador para asegurarse de que la rejilla no esté
bloqueada. Las rejillas del aire traseras se encuentran
debajo de los cajones de las verduras.
Reduzca el tiempo que la puerta está abierta.
Organice bien los alimentos para asegurar de que la
puerta se abra por tiempos tan cortos como sea
posible.
Espere hasta que el alimento que se ha colocado
recientemente alcance la temperatura del
refrigerador o del congelador.
Limpie de acuerdo con la tabla en la página 87.
Limpie de acuerdo con la tabla en la página 87.
El tiempo caluroso y húmedo puede aumentar la
condensación.
Ver páginas 74-76 para ajustar los controles.
92
Page 94

L
OCALIZACIÓN Y
S
OLUCIÓN DE
A
VERÍAS
PROBLEMA
Se forman gotas de
agua en el interior
del refrigerador
El refrigerador o la
máquina de hacer
hielo hacen ruidos
extraños o
demasiado altos
Los cajones de las
frutas y verduras no
cierran bien
El refrigerador
funciona con
demasiada
frecuencia
CAUSAS POSIBLES
Los niveles de humedad son altos o la
puerta se ha abierto con demasiada
frecuencia.
Verifique si las juntas cierran
herméticamente.
Funcionamiento normal.
El contenido del cajón o la posición de
los artículos en el compartimiento
vecino pueden estar obstruyendo el
cajón.
El cajón está mal colocado.
El refrigerador no está nivelado.
Las canaletas de los cajones están
sucias o necesitan tratamiento.
La puerta se ha abierto con frecuencia
o se ha dejado abierta por períodos
prolongados.
La humedad o calor en el área vecina
es alta.
Se han colocado alimentos
recientemente.
El refrigerador está expuesto al calor
debido al medio ambiente o a otros
electrodomésticos a su alrededor.
Las bobinas del condensador están
sucias.
Los controles necesitan ser ajustados.
La puerta no cierra bien.
Funcionamiento normal.
SOLUCION
Ver páginas 74-76 para ajustar los controles.
Reduzca el tiempo que la puerta está abierta.
Organice bien los alimentos para asegurar de que la
puerta se abra por tiempos tan cortos como sea
posible.
Limpie de acuerdo con la tabla en la página 87, si es
necesario.
Ver página 80.
Cambie de lugar los alimentos y contenedores para
evitar interferencia con los cajones.
Ver página 78.
Ver página 68 para los detalles sobre como nivelar el
refrigerador.
Limpie las canaletas con agua tibia y jabón. Enjuague
y seque bien.
Aplique una capa delgada de vaselina en las
canaletas de los cajones.
Reduzca el tiempo que la puerta está abierta.
Organice bien los alimentos para asegurar de que la
puerta se abra por tiempos tan cortos como sea
posible.
Espere a que el ambiente interior se ajuste por el
período de tiempo que la puerta estuvo abierta.
Funcionamiento normal.
Espere hasta que el alimento que se ha colocado
recientemente alcance la temperatura del
refrigerador o del congelador.
Evalúe el medio ambiente de su refrigerador.
Posiblemente sea necesario cambiarlo de lugar para
mejorar su rendimiento.
Limpie si es necesario, de acuerdo con la tabla en la
página 87.
Ver páginas 74-76 para ajustar los controles.
El refrigerador no está nivelado. Ver página 68 para
obtener los detalles sobre como nivelar su
refrigerador.
Revise la junta de la puerta para ver si cierran
herméticamente.
Limpie si es necesario, de acuerdo con la tabla en la
página 87.
Verifique si hay obstrucciones internas que impidan
que la puerta se cierre bien (es decir, cajones mal
cerrados, depósitos del hielo, contenedores o
alimentos demasiado grandes o mal colocados, etc.)
Ver Sonidos del Funcionamiento en la página 91.
93
Page 95

L
OCALIZACIÓN Y
Hielo y agua
S
OLUCIÓN DE
A
VERÍAS
PROBLEMA
El refrigerador tiene
escape de agua
Se forma hielo en el
tubo de admisión de
la máquina de
hacer hielo
El flujo del agua es
más lento que lo
normal
CAUSAS POSIBLES
Se usó tubería plástica para completar
la conexión.
Se instaló una válvula de asiento
incorrecta.
La presión del agua es demasiada baja.
La temperatura del congelador es
demasiado alta.
La presión del agua es demasiada baja.
SOLUCION
El fabricante recomienda el uso de tubería de cobre
para la instalación. La tubería de plástico es menos
durable y puede causar escapes. El fabricante no
se responsabiliza por daños materiales debido a
la instalación o conexión del agua incorrecta.
Verifique el procedimiento de conexión del agua (ver
página 73). Las válvulas autoperf o r a n t e s y las válvulas
de asiento de
pueden obstruir la tubería con el pasar del tiempo. El
fabricante no se responsabiliza por daños
materiales debido a la instalación o conexión del
agua incorre c t a .
La presión del agua debe ser entre 35 y 100 libras
por pulgada cuadrada para que el funcionamiento
sea apropiado. Se recomienda una presión mínima
de 35 libras por pulgada cuadrada para los
refrigeradores que tienen filtros de agua.
Ajuste el control del congelador (ver páginas 74-76).
Se recomienda que la temperatura del congelador
sea aproximadamente -18° C (0° F).
La presión del agua debe ser entre 35 y 100 libras
por pulgada cuadrada para que el funcionamiento
sea apropiado. Se recomienda una presión mínima
de 35 libras por pulgada cuadrada para los
refrigeradores que tienen filtros de agua.
3
” ca u s an baja presión del agua y
1 6
⁄
Se instaló una válvula de asiento
incorrecta.
La tubería de cobre está torcida.
El filtro de agua está obstruido o
necesita cambiarse.
Verifique el procedimiento de conexión del agua (ver
página 73). Las válvulas autoperf o r a n t e s y las válvulas
de asiento de
pueden obstruir la tubería con el pasar del tiempo. El
fabricante no se responsabiliza por daños
materiales debido a la instalación o conexión del
agua incorre c t a .
Cierre el suministro de agua y enderece la tubería. Si
no se puede enderezar, reemplace la tubería.
Cambie el filtro del agua (ver página 81).
3
” ca u s an baja presión del agua y
1 6
⁄
94
Page 96

G
ARANTÍA Y
S
ERVICIO
Garantía de la Refrigerador Jenn-Air
Garantía Completa de Un Año
Durante un (1) año - Desde la fecha original de compra al por menor, se
reparará o reemplazará gratuitamente cualquier pieza que falle durante uso
normal en el hogar.
Máquina de hacer hielo – Cuando se compra con el refrigerador y es
instalada por el distribuidor, la máquina de hacer hielo se considera parte
del refrigerador para efectos de la garantía.
Garantía Limitada – Componentes Principales
de Refrigeración
Desde el Segundo hasta el Quinto año – Después del primer año a
partir de la fecha original de compra al por menor, hasta el final del quinto
año, el fabricante reparará o reemplazará, a su elección, sin costo alguno
por piezas y mano de obra solamente, cualquier pieza del sistema de
refrigeración sellado (compuesto por el compresor, evaporador,
condensador, secador y tubería de conexión) así como el revestimiento del
gabinete, (excluyendo el revestimiento de la puerta) que falle durante el
uso normal en el hogar. El propietario deberá pagar todos los otros costos
incluyendo kilometraje/millaje, transporte, costo del viaje y costo del
diagnóstico, si fuese necesario.
Garantía Limitada – Filtro del agua
PuriClean®II, si viene Equipado
30 días – Desde la fecha original de compra, se reemplazará gratuitamente
cualquier pieza del cartucho filtrante del agua que falle debido a un
defecto de material o fabricación.
Garantía Limitada – Otras Piezas
Segundo Año – Las piezas, a excepción de los componentes principales
de refrigeración, que fallen durante el uso normal en el hogar durante el
segundo año después de la fecha de compra al por menor, serán
reparadas o reemplazadas gratuitamente por la pieza misma, asumiendo el
propietario los demás costos, incluyendo mano de obra, kilometraje/millaje,
transporte, costo del viaje y costo del diagnóstico, si fuese necesario.
Nota
La garantía completa y las garantías limitadas son válidas cuando el
refrigerador se encuentra en Estados Unidos o Canadá. Los
refrigeradores que se encuentren en cualquier otro lugar están
cubiertos por garantías limitadas que incluyen solamente las piezas que
fallen durante el primer año.
Residentes Canadienses
Las garantías anteriores cubren solamente aquellos electrodomésticos
instalados en Canadá que han sido certificados o aprobados por las
agencias de prueba correspondientes para cumplimiento con la Norma
Nacional de Canadá a menos que el electrodoméstico haya sido traído a
Canadá desde EE.UU. debido a un cambio de residencia.
Limitaciones de la Responsabilidad
El garante no será responsable por ningún daño incidental o consecuente,
incluyendo la pérdida de alimentos. En algunos estados no se permite la
exclusión o limitación de daños consecuentes, por lo tanto, la limitación o
exclusión anterior puede no aplicarse en su caso.
Las garantías específicas expresadas anteriormente son las UNICAS
garantías provistas por el fabricante. Estas garantías le otorgan
derechos legales específicos y usted puede tener además otros
derechos que varían de un estado a otro.
Lo que No Cubren Estas
Garantías:
1. Situaciones y daños resultantes de cualquiera de las
siguientes eventualidades:
a. Instalación, entrega o mantenimiento inapropiados.
b. Cualquier reparación, modificación, alteración o ajuste no
autorizados por el fabricante o por un centro de servicio
autorizado.
c. Mal uso, abuso, accidentes o uso irrazonable.
d. Corriente eléctrica, voltaje o suministro incorrectos.
e. Programación incorrecta de cualquiera de los controles.
2. Las garantías quedan nulas si los números de serie originales
han sido retirados, alterados o no son fácilmente legibles .
3. Focos.
4. Productos comprados para uso comercial o industrial.
5. El costo del servicio o llamada de servicio para
a. Corregir errores de instalación.
b. Instruir al usuario sobre el uso correcto del artefacto.
c. Transporte del artefacto al establecimiento de servicio.
6. Los daños consecuentes o incidentales sufridos por
cualquier persona como resultado del incumplimiento de
estas garantías. En algunos estados no se permite la
exclusión o limitación de daños consecuentes o incidentales,
por lo tanto la limitación o exclusión anterior puede no
aplicarse en su caso.
Si Necesita Servicio
• Llame al distribuidor donde compró su electrodoméstico o
llame a Maytag ServicesSM, Jenn-Air Customer Assistance al
1-800-JENNAIR (1-800-536-6247) en EE.UU. y en Canadá
para ubicar a un técnico autorizado.
• Asegúrese de conservar el comprobante de compra para
verificar el estado de la garantía. Consulte la sección sobre la
Garantía para mayor información sobre las responsabilidades
del propietario para servicio bajo la garantía.
• Si el distribuidor o la compañía de servicio no pueden res o l v e r
el problema, escriba a Maytag ServicesSM, Attn: CAIR®C e n t e r ,
P.O. Box 2370, Cleveland, TN 37 3 2 0 - 2 370 o llame al
1- 80 0 -JENNAIR (1-800-536-6247) en EE . U U. y Canadá.
• Las Guías del usuario, manuales de servicio e información
sobre los repuestos pueden solicitarse a Maytag ServicesSM,
Jenn-Air Customer Assistance.
Nota
• Cuando llame o escriba acerca de un problema de servicio,
por favor incluya la siguiente información.
a. Su nombre, dirección y número de teléfono;
b. Número de modelo y número de serie;
c. Nombre y dirección de su distribuidor o técnico de
servicio;
d. Una descripción clara del problema que está
experimentando;
e. Comprobante de compra (recibo de venta).
Form No. C/12/04 Part No. 12828119 www.jennair.com Litho U.S.A.
 Loading...