

Jenn-Air JED8345ADB, JED8230ADS Owner’s Manual

JENN-AmR ELF_
JED8130, JED8230. JED8345
<TOP
i!!_i_l_l_il%l_:_:_i_ii_i_i_i_i_i_i_i_i_i_i_i_ii_i_l_i_i_ii!_!i_!i_!ii!_l_l_i_i_i_i_i_i_i_i_i!i_!_i!i_i_i_!_l_l_i!!_!!_!!_!!_!!_!!_!!_!i!!_!!i!!_!!_i_!!!;i_ll_iliii_iiiii_ii_ii_iii__i_i_ii_ii_iiiiiiii_iiiiiiiiiiiiiiiiiiiiiiiiiiiiiiiiiiiiiiiiiiiiiiiiiiiiiiiiiiiiiiiiiiiiiiiiiiiiiiiiiiiiiiiiiiiiiiiiiiiiiiiiiiiii_iiiiii
_ABLE OF CONTENTS
Important Safety Instructions ................................................1-2
Ducting Information ......................................................................2
Using Your Cooktop .................................................................3-8
Care & Cleaning .............................................................................9
Accessories & Cartridges .........................................................10
Before You Call for Service......................................................10
Warranty ..........................................................................................11
Guide de Futilisateur ..................................................................12
Guia del Usuario ..........................................................................24
i!!i!!i!!i!!i!!i!!i!!i!!i!!i!!i!!i!!i!!i!!i!!i!i!!ii!ii!
JENN-AiR
Form No A/06/06 Part No. 8111P487-60
®b2006 Maytag Appliances Sales Co. All rights reserved. Lkho U.S.A,
IIIRYAN"[SAFETY INSTIIRUOTIOHS
Installer: Please leave this manual
with this appliance.
Consumer: Pleaseread and keep
this manual for future reference.
Keep sales receipt and/or can-
celled check as proof of purchase.
Model Number
Serial Number
Date of Purchase
if you have questions, call:
Jenn-Air Customer Assistance
1-800-JENNAIR11-800-536-6%7}
1-800-688-2080 ( U.S.lq-Y for
hearing or speech impaired)
(Mon.-Fri., 8 am-8 pm Eastern
Time)
[nternet: http://www.jen nair.com
For service &formation, see
page t 1.
in our continuing effort to
improve the quality and
cooking products, it may
be necessaryto make
without revising this guide.
Read and follow all instructions
before using this appliance to prevent
the potential risk of fire, electric shock,
personal injury or damage to the appliance
as a result of improper usage of the
appliance. Useappliance only for its
intended purpose as described in this
guide,
To ensure proper and safe
operation: Appliance must be properly
installed and grounded by a qualified
technician.
IN CASEOFFIRE
Turn off appliance and ventilating hood to
avoid spreading the flame. Extinguish
flame then turn on hood to remove smoke
and odor.
• Smother fire or flame in a pan with a lid
or cookie sheet.
NEVER pick up or move aflaming pan.
Do not use water on grease fires. Use
baking soda, a dry chemical or foam-type
extinguisher to smother fire or flame.
If appliance is installed near awindow,
precautions should be taken to prevent
curtains from blowing over surface
elements.
NEVER use appliance to warm or heat
the room. Failure to follow this instruction
can lead to possible burns, injury, fire, or
damage to the appliance.
NEVER wear loose-fitting or hanging
garments while using the appliance.
Clothing could catch utensil handles or
ignite and cause burns if garment comes
in contact with hot heating elements.
To ensure proper operation and to avoid
damage to the appliance or possible
injury, do not adjust, service, repair or
replace any part of the appliance unless
specifically recommended in this guide.
Refer all other servicing to a qualified
technician.
NEVER store or use gasoline or other
combustible or flammable materials near
m
surface units or in the vicinity of this
appliance as fumes could create a fire
hazard or an explosion.
To prevent grease fires, do not let cooking
grease or other flammable materials
accumulate in or near the appliance.
Use only dry potholders. Moist or damp
potholders on hot surfaces may result in a
steam burn. Do not let potholders touch
hot heating elements. Do not use a towel
or other bulky cloth which could easily
touch hot heating elements and ignite.
Always turn off all controls when cooking
is completed.
This appliance has been tested for safe
performance using conventional cookware.
Do not use any devices or accessories that
are not specifically recommended in this
manual. Do not use eyelid covers or stove
top grills. The use of devices or accesso-
ries that are not expressly recommended
in this manual can create serious safety
hazards, result in performance problems,
and reduce the life of the components of
this appliance.
NEVER use aluminum foil or foil contain-
ers on the cooktop. These may become
very hot. Use foil only as directed in this
guide.
Aerosol-type cans are EXPLOSIVEwhen
exposed to heat and may be highly
flammable. Do not use or store near
appliance.
Clean only parts listed in this guide and
use procedures recommended.
NEWERleave surface units unattended
especially when using high heat. An
unattended boilover could cause smoking
and a greasy spiiiover can cause a fire.
This appliance is equipped with different
size surface elements. Select pans with flat
bottoms large enough to cover element.
Fitting pan size to element wiii improve
If pan is smaller than element, a portion of
the element will be exposed to direct
contact and could ignite clothing or
potholder.
Only certain types of glass, glass/ceramb,
ceramic, earthenware, or other glazed
utensts are suitabb for cooktop service
without breaking due to the sudden
change in temperature. Folow utenst
manufacturer's instructions when using
glass.
Turn pan handb toward center of cooktop,
not out into the room or over another
surface ebment. This reduces the risk of
burns, ignition of fiammabb materiab, or
sptlage if pan is accidenly bumped or
reached by smal chtdren.
Make sure drip bowb (sebct modeb[ are
in place. Absence of these bowb during
cooking may subject wiring or components
underneath to damage.
Protective triers - Do not use aluminum fot
to line surface unit drip bowls. Improper
installation of these liners may result in a
risk of electric shock or fire.
NEVER cook on broken cooktop. If cooktop
should break, cleaning solutions and
spilovers may penetrate the broken
cooktop and create a risk of electric shock.
Contact a qualified technician immediately.
Clean cooktop with caution. Some cleaners
can produce noxious fumes if applied to a
hot surface. If awet sponge, cloth, or paper
towel is used on a hot cooking area, be
careful to avoid steam burn.
_EEP _AT _RYERS
Use extreme caution when moving the
grease pan or disposing of hot grease.
Allow grease to cool before attempting to
move pan.
MEATING ELEMENTS
NEVER touch surface elements or
aress near e_ements°
Heating elements may be hot even though
they are dark in color. Areas near surface
elements may become hot enough to
cause burns.
During and after use,do not touch or let
clothing or other flammable materials
contact heating elements or areas near
elements until they have had sufficient
time to cool.
Do not soak removeabb heating elements.
Heating elements should never be im-
mersed in water.
Other potentially hot surfaces include:
Cooktop and areas facing the cooktop.
CHILD SAFETY
NEVER leave children alone or unsuper-
vised in area where appliance is in use or
is still hot.
NEVER allow children to sit or stand on
any part of the appliance as they could
be injured or burned.
CAUTION: NEVER store items of interest
to children in cabinets above an appli-
ance or on backguard of a cooktop.
Children climbing on appliance to reach
items could damage the appliance or be
burned or seriously injured.
Children must be taught that the appli-
ance and utensils in or on it can be hot.
Let hot utensils cool in a safe place, out
of reach of small children. Children
should be taught that an appliance is not
a toy. Children should not be allowed to
play with controls or other parts of the
unit.
IMPORTANTSAFETY
_OTIOE AID WA//I/{}
IMPORTANT NOTICE
REGARDING PET BIRDS: Never keep
pet birds in the kitchen or in rooms
where the fumes from the kitchen could
reach. Birds have a very sensitive respira-
tory system. Fumes released during an
oven self-cleaning cycle may be harmful
or fatal to birds. Fumes released due to
overheated cooking oil, fat, margarine
and overheated non-stick cookware may
be equally harmful.
THESE INSTIIIBUOTIONS OIIIR UTUIIBE REFERENCE
INFOIIIRM£HON
Jenn-Air's ventilation system is designed
to capture both cooking fumes and smoke
from the cooktop surface. If the system
does not, these are some ducting installa-
tion situations to check:
• 6" diameter round or3 1/4tT X 10 TT
rectangular ducting should be used for
duct lengths 10'-6d. Nete: 5"
diameter reund dueting may be
used if the duet lel_gth is 10' or
less.
. No more than three 90 elbows should
be used. Distance between elbows
should be at bast 18".
• Recommended Jenn-Air wail cap
MUSTbe used. Make sure damper
moves freely when ventilation system is
operating.
• There should be a minimum clearance
of 6" for cooktop installed near a side
wail.
o
2
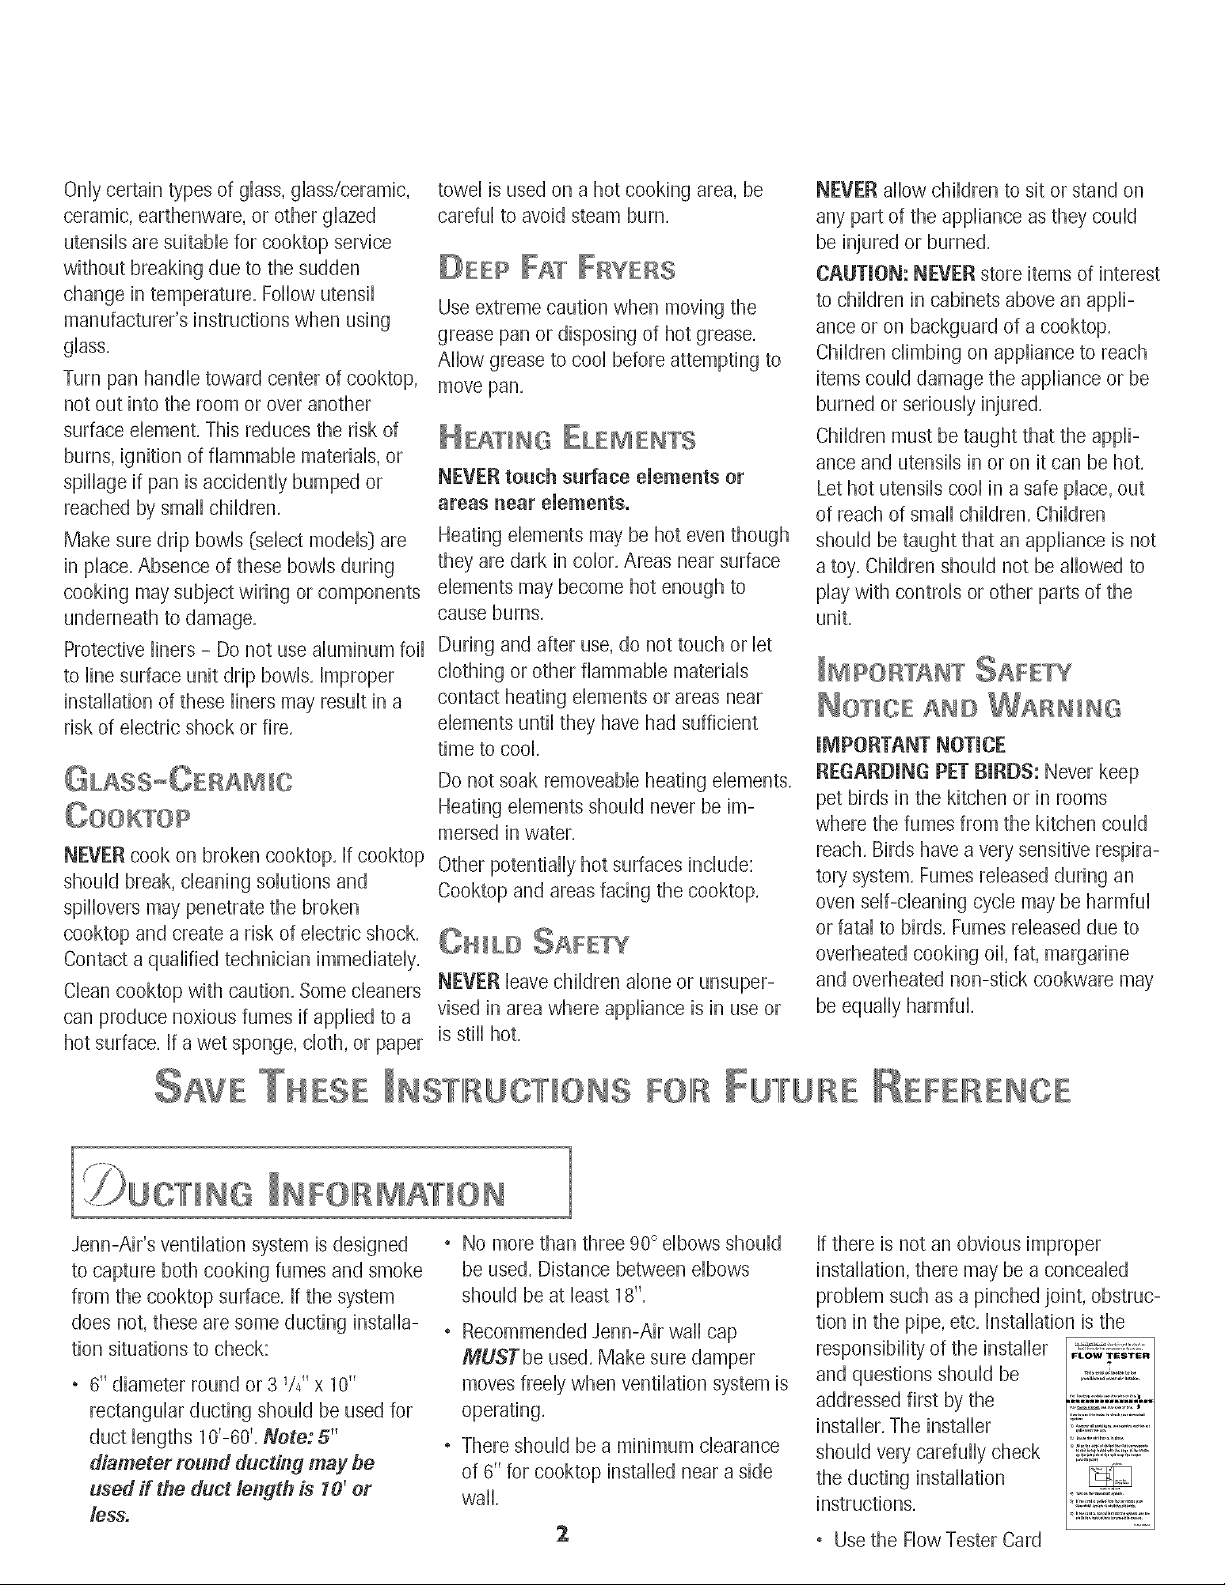
If there is not an obvious improper
installation, there may bea concealed
problem such as a pinched joint, obstruc-
tion in the pipe, etc. Installation is the
responsibility of the installer ,to_(_;'f_;,
and questions should be ,;_';,s-,';'._:,'.',_.
addressed first by the ,".;'_"_'._'_---_;-_'.:....._.........,
installer. The installer L"]£1,L,CZ...........
should very carefully check 'iii_i_=a=_:£_:_=
the ducting installation ......
instructions. ::::_,:i,S,:,,?'f,:,i:,'{.:,i:.)-T;,}.
• Use the Flow Tester Card
_'F;=':".......................
SunFACE @ONTnOLS
Use to turn on the surface elements. An
infinite choice of heat settings is
available from Le to Hi. The knobs can
be set on or between any of the set-
tings.
SITTING THE
1. Place pan on surface element.
2. Push in and turn the knob in either
direction to the desired heat setting.
3. After cooking, turn knob to OFF.
Remove pan.
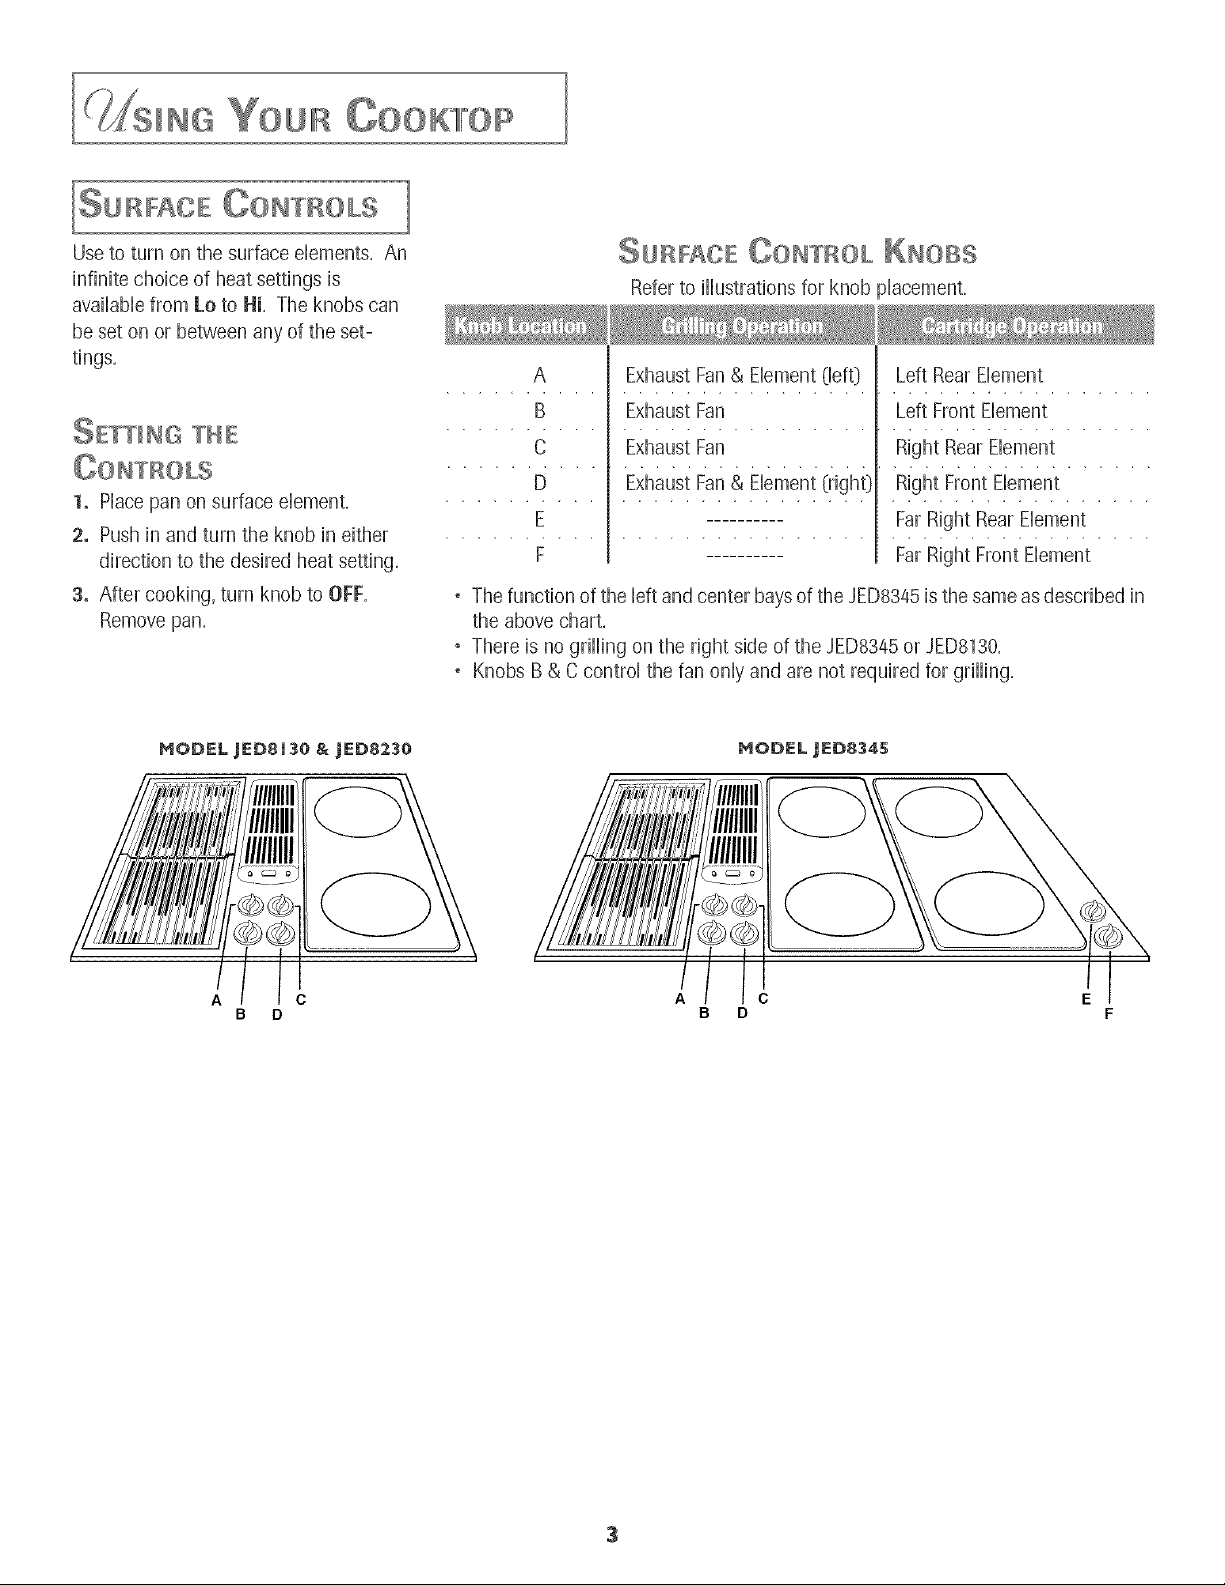
MODEL JEDSISe & JED8230 HODEL JED8345
SQIF£OE _ONTIOL _HOBS
Referto illustrationsfor knobplacement.
A Exhaust Fan & Element (lefO Left Rear Element
B Exhaust Fan Left Front Element
C Exhaust Fan Right Rear Element
D Exhaust Fan & Element (right} Right Front Element
E Far Right Rear Element
F Far Right Front Element
. The function of the left and center baysof the JED8345isthe same as described in
the above chart.
• There is no grilling on the right side of the JED8345or JED8130.
. Knobs B& C control the fan only and are not required for grilling.
A C
B D
A C
B D
E
F
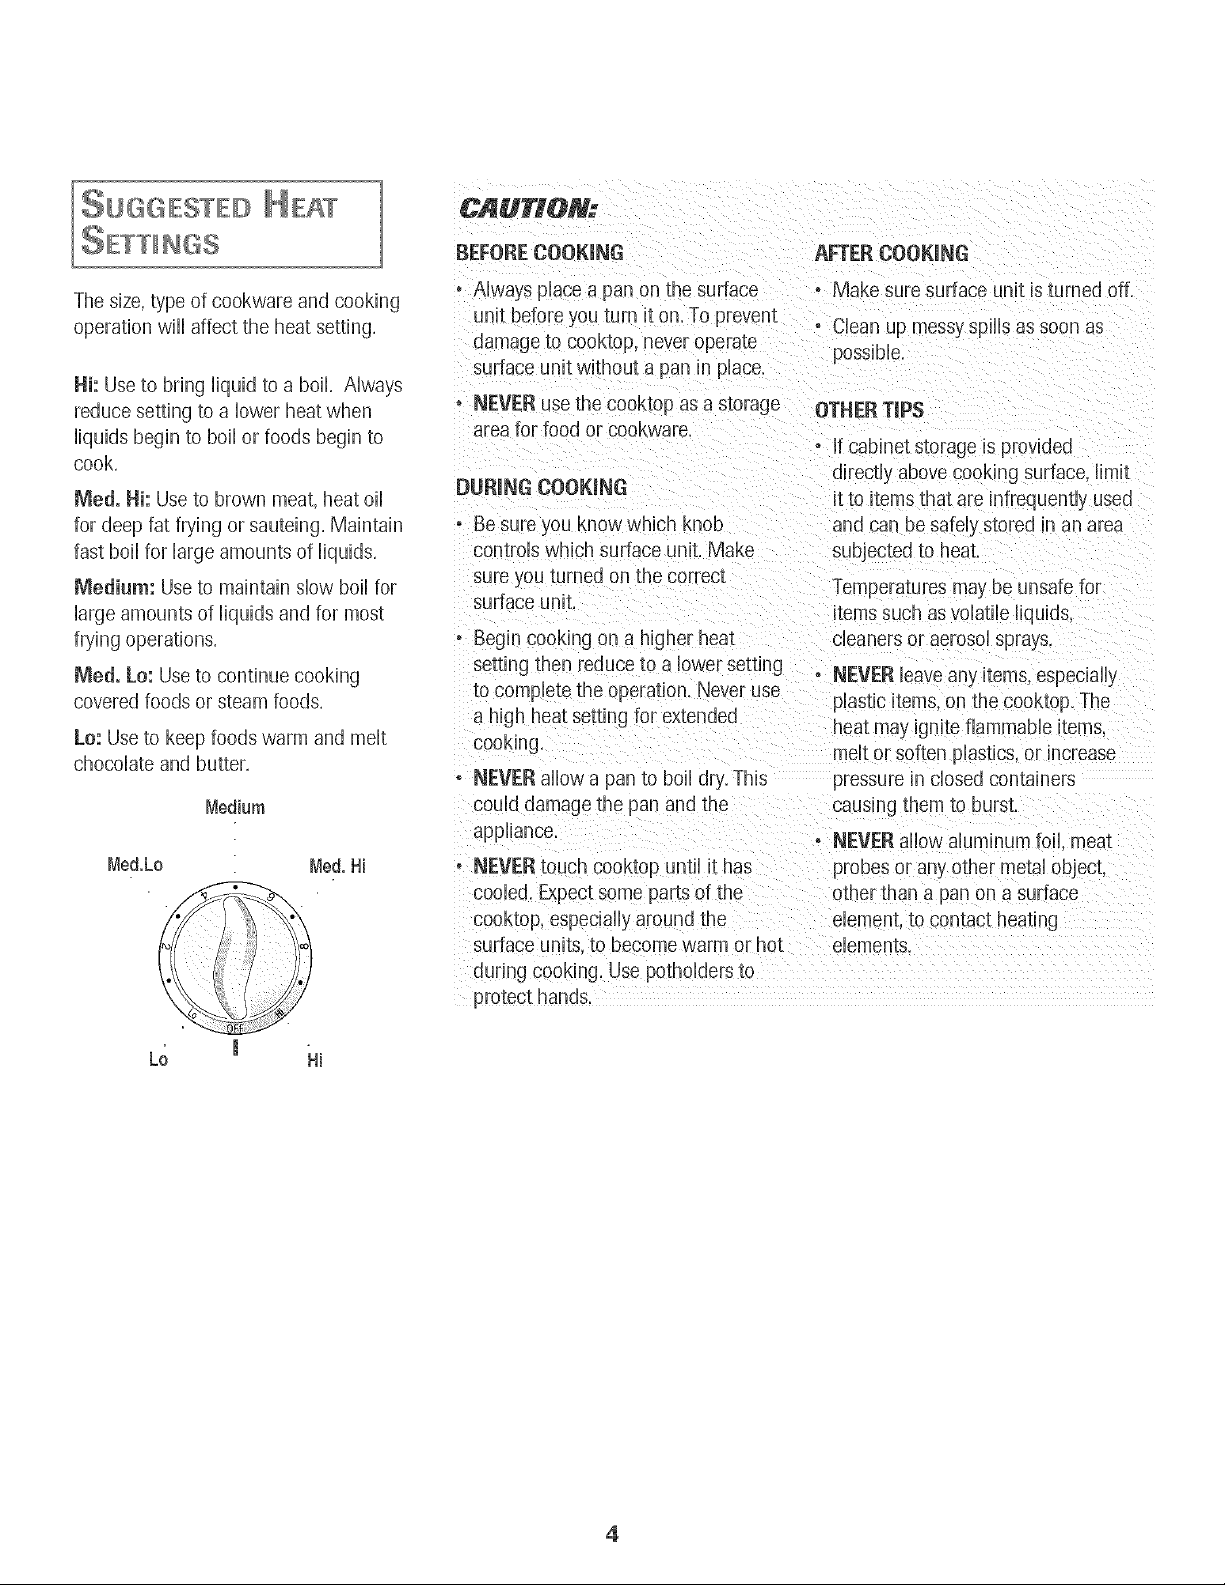
SU@@ESTED HE£[
CABS@N:
BEFORECOOKmNG AFTER COOKmNG
The size,type of cookware and cooking
operation will affect the heat setting,
Hi: Useto bring liquid to a boil, Always
reduce setting to a lower heat when
liquids begin to boil or foods begin to
cook,
Med. Hh Use to brown meat, heat oil
for deep fat frying or sauteing, Maintain
fast boil for large amounts of liquids,
Medium: Use to maintain slow boil for
large amounts of liquids and for most
frying operations,
Meal. Le: Useto continue cooking
covered foods or steam foods,
Lo: Use to keep foods warm and melt
chocolate and butter,
Medium
Med.Lo Meal.Hi
• Always place a pan on the surface - Make sure surface unit is turned off,
unit before you turn it on. To prevent
damage to cooktop, never operate
surface unit without a pan in place.
° NEVER usethe cooktop asa storage
area for food or cookware.
DURING COOKmN6
• Be sureyou know which knob
controls which surface unit, Make
sure you turned on the correct
sudace unit,
• Begin cooking on a higher heat
setting then reduce to a lower setting
to complete the operation. Never use
a high heat setting for extended
cooking.
o NEVERallow a pan to boil dry,This
could damage the pan and the
appliance,
• NEVER touch cooktop until it has
cooled, Expect some parts of the
cooktop, especially around the
surface units, to become warm or hot
during cooking. Use potholders to
protect hands,
Clean up messy spills as soon as
possible,
OTHER TraPS
If cabinet storage is provided
directly above cooki ng surface, limit
it to items that are infrequently used
and can be safely stored in an area
subjected to heat.
Temperatures may be unsafe for
items such asvolatile liquids,
cleaners or aerosol sprays
NEVER leave any items, especially
plastic items, on the cooktop, The
heat may ignite flammable terns,
melt or soften plastics, or increase
pressure m closed containers
causing them to burst.
NEVER allow aluminum foil. meat
probes or an} other metal object.
other than a pan on a surface
elements....
4
OOIIT=
lOOORTOP OAITIIIDQE INSTALLATION
Cooktop cartridges, either conventional
coil, halogen or radiant element, can be
installed on either side of the downdraft
air grille on models JED8230and
JED8345.Model JED8130 will accept an
optional cartridge on the left side only.
(See page 10 for all available cartridges
and accessories, and their model
TO INSTALL CAITIIDGES
1, If the grill grates, element, and/or
basin pan are in place, remove
before installing a cooktop cartridge.
Clean porcelain basin of any grease
accumulation. (See page 9 for
cleaning recommendations.)
2, To instal any of the optional cooktop
cartridges, be sure controls are
turned Off and the cartridge is cool.
Position the cartridge terminal plug
towards the terminal receptacle.
This receptacle is located at the front
of the left side and at the back of the
right side of the cooktop.
TO IEMOVE CAITIIDGES
1, Controls must be Off and the
cartridge should be cool.
2, Lift up the edge of the cartridge until
top of cartridge clears the opening
on the cooktop by about 2 inches.
(Lifting the cartridge too high while
still engaged in the receptacle could
damage the terminal plug.)
3, To disengage terminal, hold
cartridge by the sides and pull away
from the terminal receptacle. Lift out
4_
Do not stack cartridges where they
may fall or be damaged. Never store
other materials on top of the glass-
ceramic cartridges since this could
damage or scratch the surface.
HOME OANNIN(
Canning should be done on the
conventional cot cartridge only.
Canning element accessory, Model
A145A, makes it possible to use large
oversized canners with the conventional
cot cartridge.
For additional information, refer to the
user's guide packaged with your
cartridge.
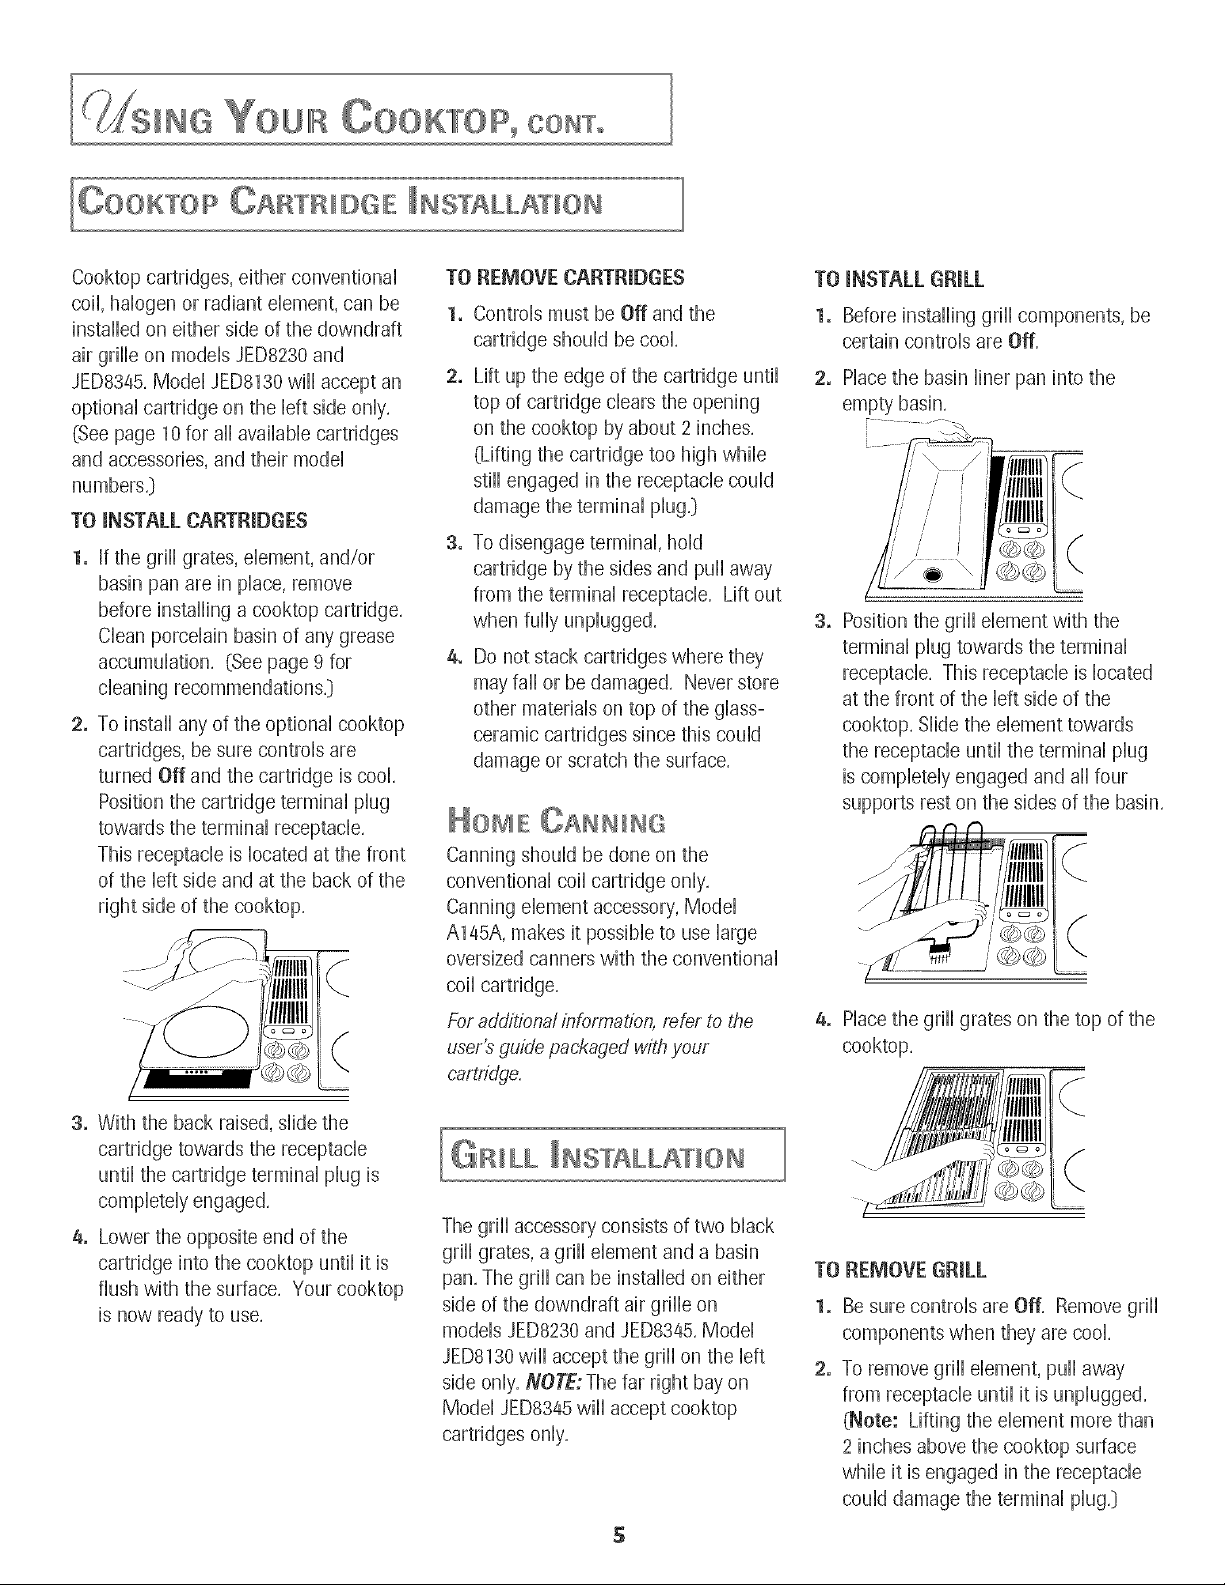
TO INSTALL GIILL
1, Before installing grill components, be
certain controls are Off.
2, Place the basin liner pan into the
empty basin.
3_
Position the grill element with the
terminal plug towards the terminal
receptacle. This receptacle is located
at the front of the left side of the
cooktop. Slide the element towards
the receptacle until the terminal plug
is completely engaged and aii four
supports rest on the sides of the basin.
-- A _.j / i:(
4, Placethe grill grates on the top of the
cooktop.
3, With the back raised, slide the
cartridge towards the receptacle
until the cartridge terminal plug is
completely engaged.
4, Lower the opposite end of the
cartridge into the cooktop until it is
flush with the surface. Your cooktop
is now ready to use.
I_RILL INSTALLATION
The grill accessory consists of two black
grill grates, a grill element and a basin
pan. The grill can be installed on either
side of the downdraft air grille on
models JED8230and JED8345.Model
JED8130will accept the grill on the left
side only. NOTE; The far right bay on
Model JED8345will accept cooktop
cartridges only.
TO IEMOVE GIILL
Be sure controls are Off. Remove grill
components when they are cool.
2,
To remove grill element, pull away
from receptacle until it is unplugged.
(Note: Lifting the element more than
2 inches above the cooktop surface
while it is engaged in the receptacle
could damage the terminal plug.)

IUSINGTHEGRILL
, Before the first use, wash your new
grill grates in hot soapy water, rinse
and dry, Then "season" the surface
by wiping on a thin coating of
cooking oik Remove excess oil by
wiping with paper towek
This procedure should be repeated
when either: a} cleaning in the
dishwasher since the detergent may
remove seasoning or b} anytime a
sugar-based marinade (for example,
barbecue sauce} is going to be used,
• Preheat the grill on Hi for 5 minutes,
Preheating improves the flavor and
appearance of meats and quickly
sears the meat to help retain the
juices,
, Usenonmeta//ic spatulas or utensi/s
to prevent damaging the nonstick gri//
grate finish.
, Excessiveamounts of fatshould be
trimmed from meats. Only a normal
amount is necessary to produce the
smoke needed for that smoked,
"outdoor" flavor, Excessivefat can
create cleaning and flare-up prob-
lems,
NEVER LEAVE GRILL
UNATTENDED DURING GRILL
OPERATION.
SHOULD EXCESS GREASE CAUSE
SUSTAINED
FLAREoUPS:
1. Turn on the fan ruanually,
2. Immediately turn grill controls to
Off,
3. Remove meat from grill,
|MP@RTANT
Do not use aluminum foil inside
the grill area,
Do not use charcoal or wood chips
in the grill area,
Do not allow grill basin pan to
become overloaded with grease,
Clean frequently,
Do not cover grates completely
with meat, Leave air space
between each steak, etc, to allow
proper ventilation aswell as
• For best results, buy top grade meat,
Meat that is at bast sAinch thick wiii
grill better than thinner cuts,
. Score fat on edges of steak, but do
not cut into meat, to prevent curling
while cooking,
• For the attractive "branded" look on
steaks, be sure grill is preheated,
Allow one side of meat to cook to
desired aloneness,or until juices
appear on the top surface, before
turning, Turn steaks and hamburgers
just once, Manipulating food causes
loss of juices,
. When basting meats or applying
sauces to foods, remember that
excessiveamounts accumulate inside
your grill and do not improve the
food flavor,
Apply sauces during the last 15 to 20
minutes of cooking tirne unless
recipe specifies otherwise, Plus,
anytime a sugar-based marinade {for
example barbecue sauce} is going to
be used,the grates should be
"seasoned" prior to preheating, (See
Using the Grill section,}
. A//owing excessiveamounts of grease
or drippings to constant/y f/are-up
voids the warranty on the gri// grates.
• Excessiveflare-ups indicate that
either the grill interior needs to be
cleaned or that excessive amounts of
fat are in the meat or the meat was
not properly trimmed,
. Greasedrippings wiii occasionally
ignite to produce harmless puffs of
flame for a second or two, This is a
normal part of the cooking process,
@RILLIHG Tips
• Besureto followdirectionsfor using
Suggested cooking times and control
settings (see page 7} are approximate
due to variations in the foods and
electrical voltage,
6
There are many meat marinades
which wiii help tenderize less
expensive cuts of meat for cooking
on the grill,
Certain foods, such as poultry and
non-oily fish, may need some extra
fat, Brush with oil or melted butter
occasionally while grilling,
Use tongs with long handles or
spatulas for turning meats, Do not
use forks as these pierce the meat,
allowing juices to be lost,
OONT=
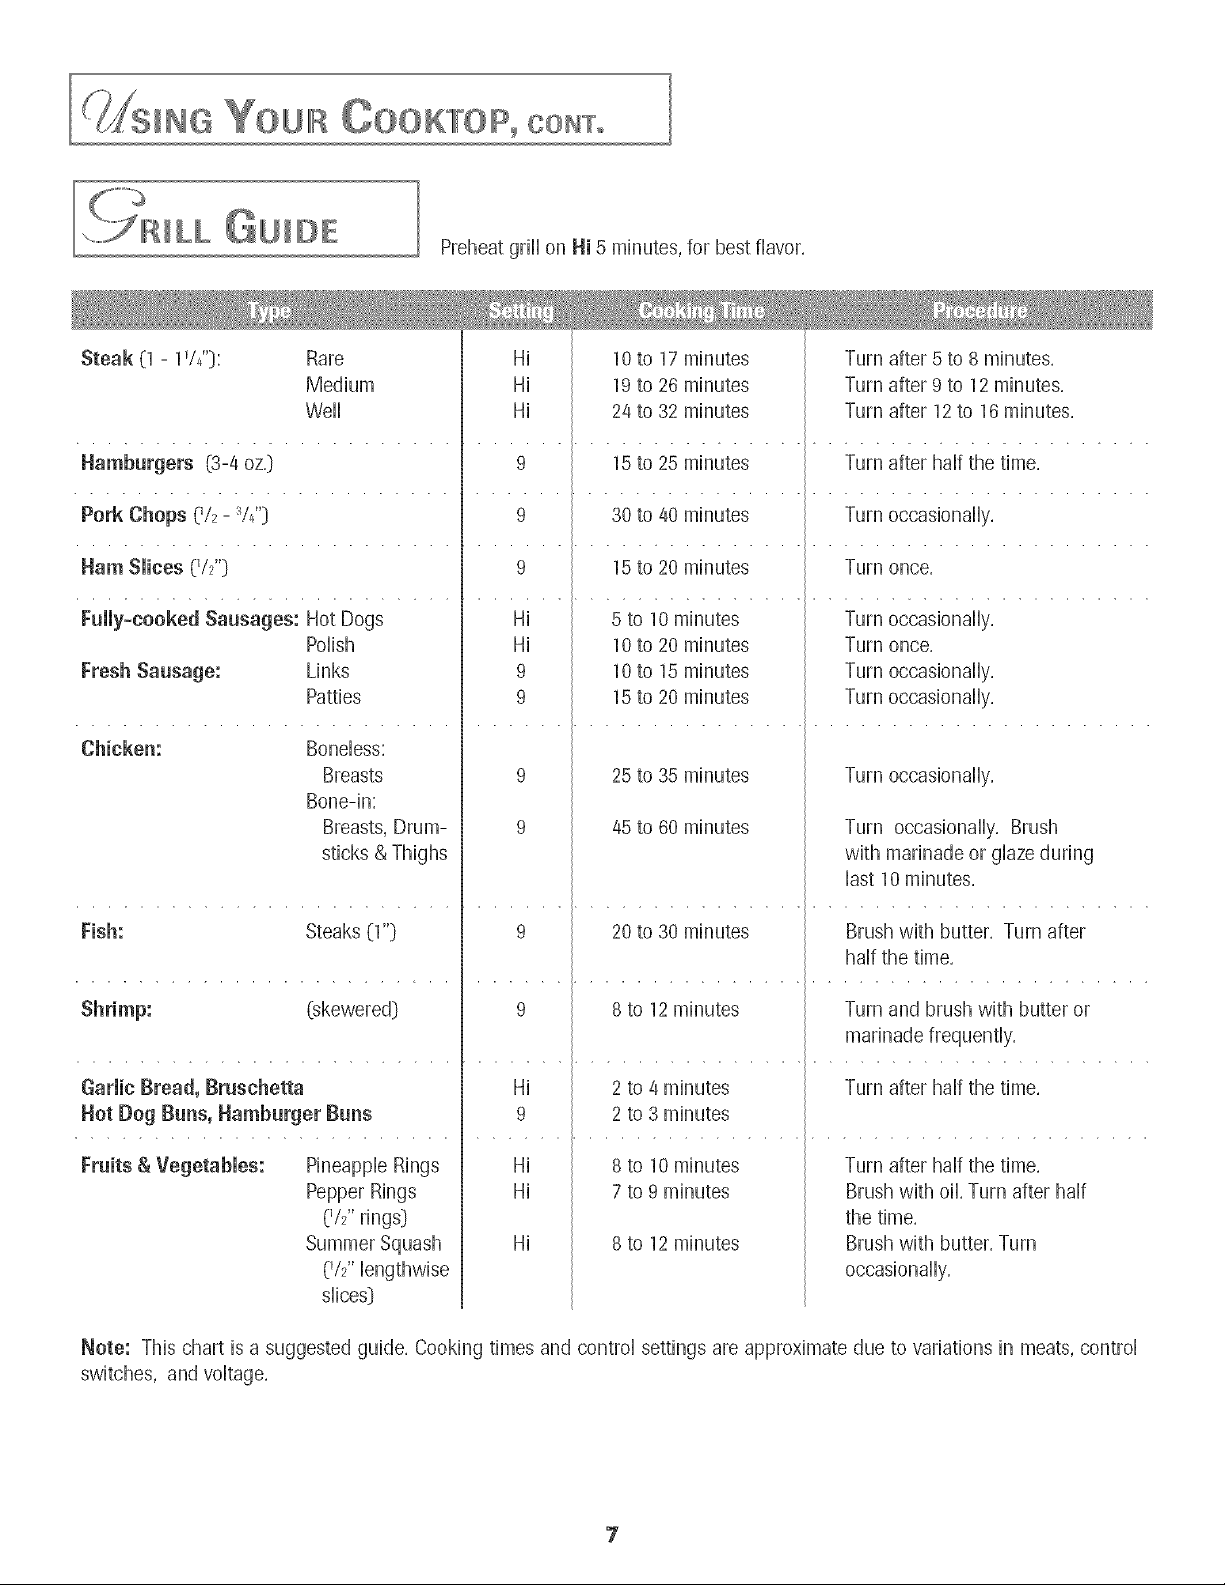
LLGuise
Preheat grill on HI 5 minutes, for best flavor.
Steak (1 - 1W'}: Rare Hi 10to 17 minutes Turn after 5 to 8 minutes.
Medium Hi 19to 26 minutes Turn after 9 to 12 minutes.
Well Hi 24 to 32 minutes Turn after 12to 16 minutes.
Hamburgers (3-4 oz.} 9 15to 25 minutes Turn after hal the time.
Pork Chops (V2- sf4"} 9 30to 40 minutes Turn occasionally.
Ham Slices (_/2"} 9 15to 20 minutes Turn once.
Fully-cooked Sausages: Hot Dogs Hi 5 to 10 minutes Turn occasionally.
Polish Hi 10to 20 minutes Turn once.
Fresh Sausage: Links 9 10to 15 minutes Turn occasionally.
Patties 9 15to 20 minutes Turn occasionally.
Chicken: Boneless:
Breasts
Bone-in:
Breasts, Drum-
sticks & Thighs
9
9
25 to 35 minutes
45 to 60 minutes
Turn occasionally,
Turn occasionally. Brush
with marinade or glaze during
last 10minutes,
Fish: Steaks (1"} 9 20 to 30 minutes Brush with butter. Turn after
hal the time.
(skewered} 9 8to 12 minutes Turn and brush with butter or
Garlic Bread, Bruschetta Hi 2 to 4 minutes Turn after hal the time.
Hot Dog Buns, Hamburger Buns 9 2 to 3 minutes
Pineapple Rings
Pepper Rings
(V2"rings}
C/2"lengthwise
slices}
Note: This chart is a suggested guide. Cooking times and control settings are approximate due to variations in meats, control
switches, and voltage.
Hi
Hi
Hi
8 to 10 minutes
7 to 9 minutes
8 to 12 minutes
Turn after hal the time.
Brush with oil. Turn after hal
the time.
Brush with butter. Turn
occasionally.
7
_ENT_LAT_ON SYSTEM
The built-in ventilation system removes
cooking vapors, odors and smoke from
foods prepared on your cooktop and
grill,
To operate the
ventilation
system
manually,
push the vent fan
switch located in front of the air grille,
Push to the right for high or push to
the left for low,
The ventilation system will operate
automatically on high when the grill
element is in use,
• The fan can be used to remove strong
odors from the kitchen aswhen
chopping onions near the fan.
_AR£ AND _LEANING OF THE
VENTILATION SYSTEM
, Air Grille: The air grille lifts off easily,
Wipe clean or wash in dishwasher or
sink with mild household detergents,
To prevent scratching the surface, do
not use abrasive cleaners or
scrubbing pads,
• Filter: Turn off ventilation system
before removing, The filter is a
permanent type and should be
cleaned when soiled, Clean in sink
with warm water and detergent or in
dishwasher,
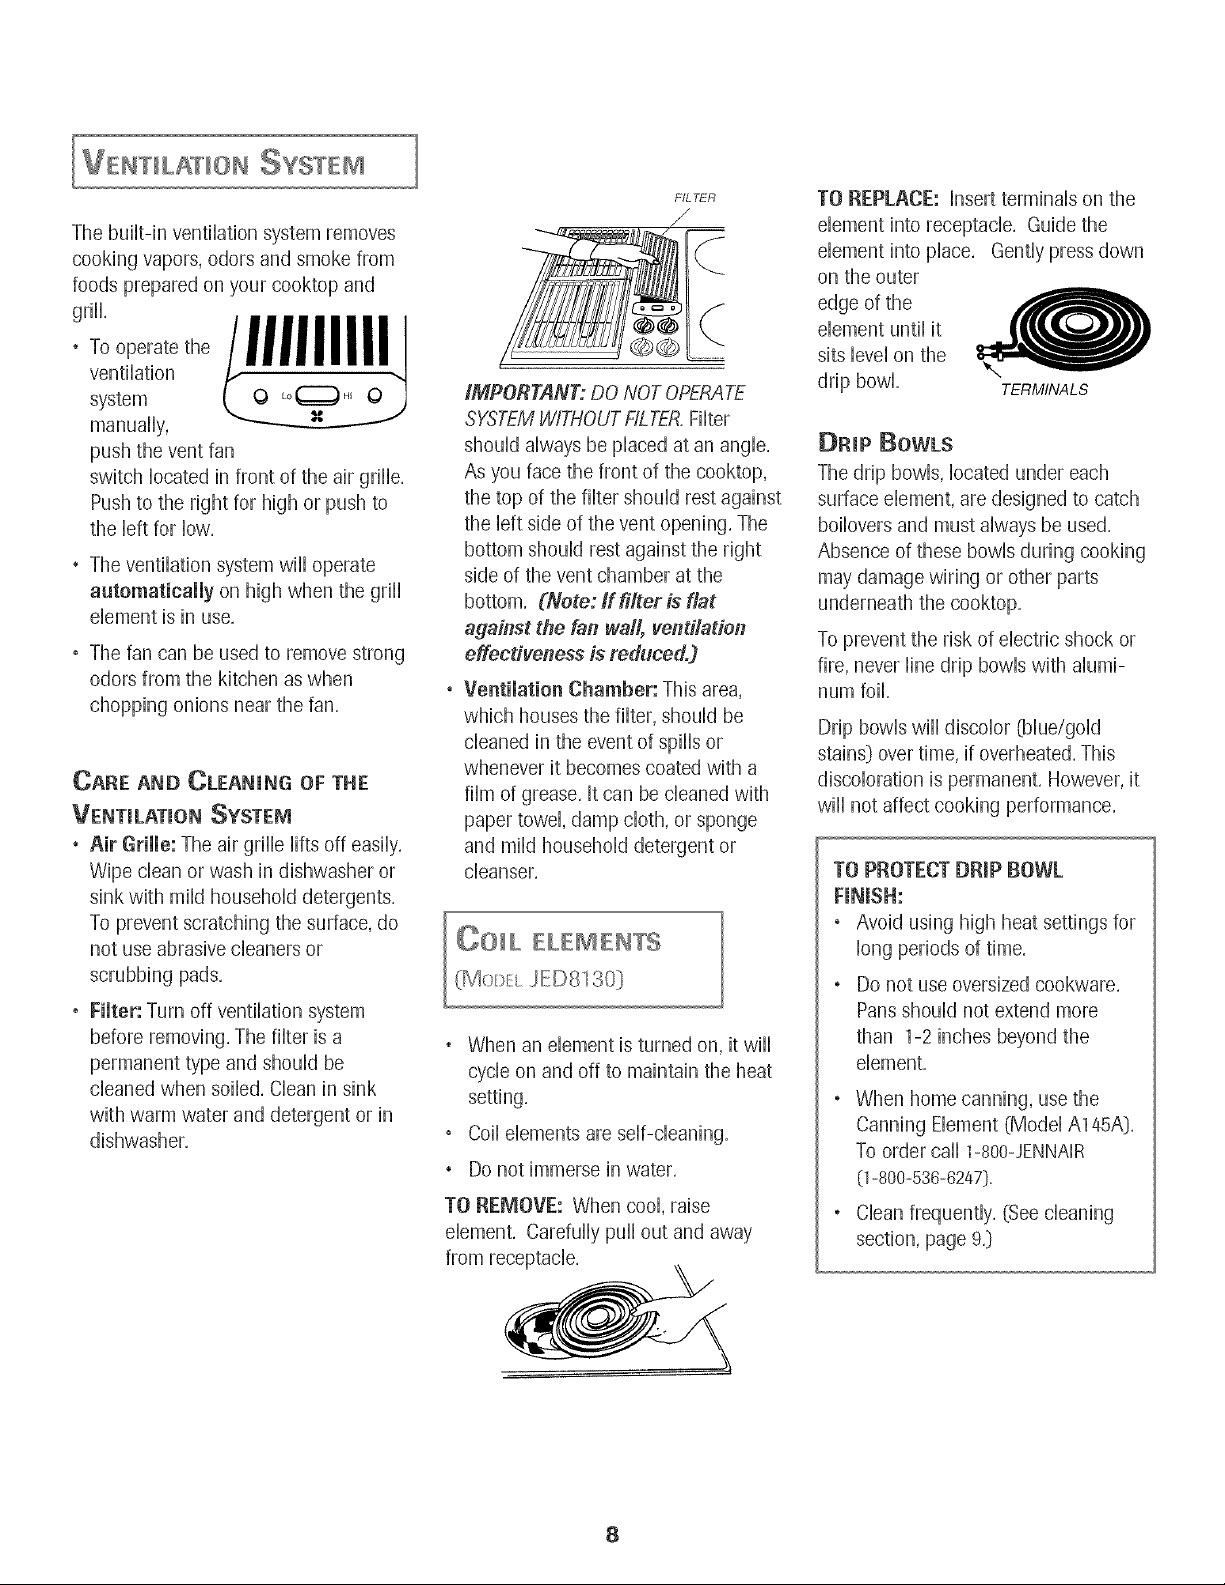
HLTER
J
IMPORTANT; DO NOT OPERAT£
SYSTEMWITHOUTFITTER.Filter
should always be placed at an angle.
As you face the front of the cooktop,
the top of the filter should rest against
the left side of the vent opening. The
bottom should rest against the right
side of the vent chamber at the
bottom, (Note: lf filter is fiat
against the fan wall, ventilatietl
effectiveness is reduced.J
Ventilation Chamber: This area,
which houses the filter, should be
cleaned in the event of spills or
whenever it becomes coated with a
film of grease. Itcan be cleaned with
paper towel, damp cloth, or sponge
and mild household detergent or
cleanser.
OO_L ELEMENTS
When an element is turned on, it will
cycle on and off to maintain the heat
setting,
° Coil elements are self-cleaning,
Do not immerse in water,
TO REMOVE: When cool, raise
element, Carefully pull out and away
from receptacle,
TO REPLACE: Insert terminals on the
element into receptacle, Guide the
element into place, Gently pressdown
on the outer
edge of the
element until it
sits level on the
drip bowl.
TERMINALS
DRiP Bowts
The drip bowls, located under each
surface element, are designed to catch
boiiovers and must always be used.
Absence of these bowls during cooking
may damage wiring or other parts
underneath the cooktop.
To prevent the risk of electric shock or
fire, never line drip bowls with alumi-
num foil.
Drip bowls wiii discolor (blue/gold
stains} over time, if overheated, This
discoloration is permanent, However, it
wiii not affect cooking performance,
TO PROTECT DR(P BOWL
FINISH:
• Avoid using high heat settings for
long periods of time.
• Do not use oversized cookware.
Pansshould not extend more
than 1-2 inches beyond the
element.
• When home canning, use the
Canning Element (Model Ala5A},
To order call 1-800-JENNAiR
(1-800-536-6247}.
• Clean frequently. (See cleaning
section, page 9.}
8
OLERIIIQ
CLEAIIIG PROOEQQRES
CAU @N. =
• Be sure appliance is off and ai
parts are cool before handling
or cieaningo This is to avoid
damage and possible burns.
- To prevent staining or discoloration
clean appliance after eachuse,
o if a part is removeo,be sure it is
correctly replaced.
CONTROL KNOBS
+ Removeknobs in the OFFposition by
pulling up.
• Wash,rinse and dry. Donot use
abrasivecleaning agents asthey may
scratch the finish.
° Turn oneach element to be sure the
knobs havebeen correctly replaced.
COOKTOP=POrCELAIN ENAMEL
Porcelainename! is glass fused on metai
and maycrack or chip with misuse. It is
acid resistant,not acid proof.A!
spilovers, especiallyacidic or sugary
spilIovers,should bewiped up
immediately with a dry cloth.
• When cool, wash with soapywater,
rinse and dr)'.
• Neverwipe off a warm or hot surface
with a damp cloth. Thismay cause
cracking or chipping.
• Never use oven cleaners,abrasiveor
caustic cleaning agentson exterior
finish of cooktop.
Drop BOWLS- CHROME
(SELECTmODELS)
• When cool, wash after each use, rinse
and dry to prevent staining and
discoloration.
• To clean heavysoil, soak in hot, sudsy
water, then use a mild abrasivecleaner
such as SoftScrub* and a plastic
scouring pad. Donot useabrasive
cleaning agents.
STAINLESS STEEL
(SELECTmODELS)
• DO NOTOSEANYCLEANING
PRODUCT CONTAINING CHLORINE
BLEACH.
• ALWAYS WIPE WITH THEGRAIN
WHEN CLEANING.
, Daily CieaninglLight Sol -- Wipe
with oneof the following - soapy water,
white vinegar/water soIution, Formula
@9 Gtassand Surface Cleaner*or a
similar glasscleaner- using a sponge or
soft cloth. Rinseand dry.To polish and
help prevent fingerprints, follow with
StainlessSteelMagic Spray (Jenn-Air
Model A912, PartNo. 20000008)**.
• ModeratelHeavy sot -- Wipewith
one of the following - BonAmi*, Smart
Cleanser*,or SoftScrub_- using a damp
sponge or soft cloth. Rinseand dry.
Stubborn soils may be removedwith a
damp Scotch-Brite* pad; rubevenlywith
the grain. Rinseand dr),.To restore luster
and removestreaks,follow with Stainless
SteeI Magic Spray.
• Discoloration -- Using a damp sponge
or soft cloth, wipe with CameoStainless
Steel CbaneP. Rinse immediatelyand
dry. To removestreaks and restore luster,
follow with Stainless Steel Magic Spray.
QRILL £SSE@ILY
BASIN AND BASIN PaN -
The basin pan and basinare located under
the grill element and/or cartridges. Clean
after each useof the grill.
• To remove light soil, dean with soapy
water orspray with cleanserssuch as
Fantastik*or Formula409". Foreasier
cleanup: a) spray with a household
cleanser; h) cover with paper towels; c)
add smallamount of hot water to keep
the paper towels moist; d) coverand
wait 15minutes; and e) wipe clean.
• To remove moderatesoil, scrub with Bon
Ansi*,a soft scrub cleanser or plastic
scrubber.
• Basinliner pan can be cleaned in the
dishwasher.
Note: Check the greasedrain after each
useof the grill. To clean: Pourabout V,s
cup of very hot tap water mixed with 1
teaspoondish detergent down the drain.
• Never immerse in water. Most soilwill
burn offduring use. Theterminal block
may be wiped with warm soapy water.
Do not useabrasive cleaners or
materials. Drythoroughly before
reinserting inthe cooktop.
GRATES - CAST ALUMINUM
COATED WITH NON-STICK FINISH
• Washcool grates (DONOT IMMERSE
HOTGRILLGP_gTESINWATER)with
detergent inhot water in the sink or
wash them in the dishwasher. Besure to
removeall food residue before cooking
on the grill grates again.
• Removestubborn soils with a plastic
mesh puff or pad. Useonly those
cleaning products which state they are
recommendedfor usewhen cleaning
nonstick surfaces.
• If grates were washed in the dishwasher,
seasonwith oil prior to grilling.
• Do not use metalbrushes or abrasive
scouring padsor other scrubbers
intended to clean outdoor charcoal grills.
Thesewill removethe finish aswell as
scratch the grates. Do not clean in self-
cleaning ovenor useoven cleaners on
the grates.
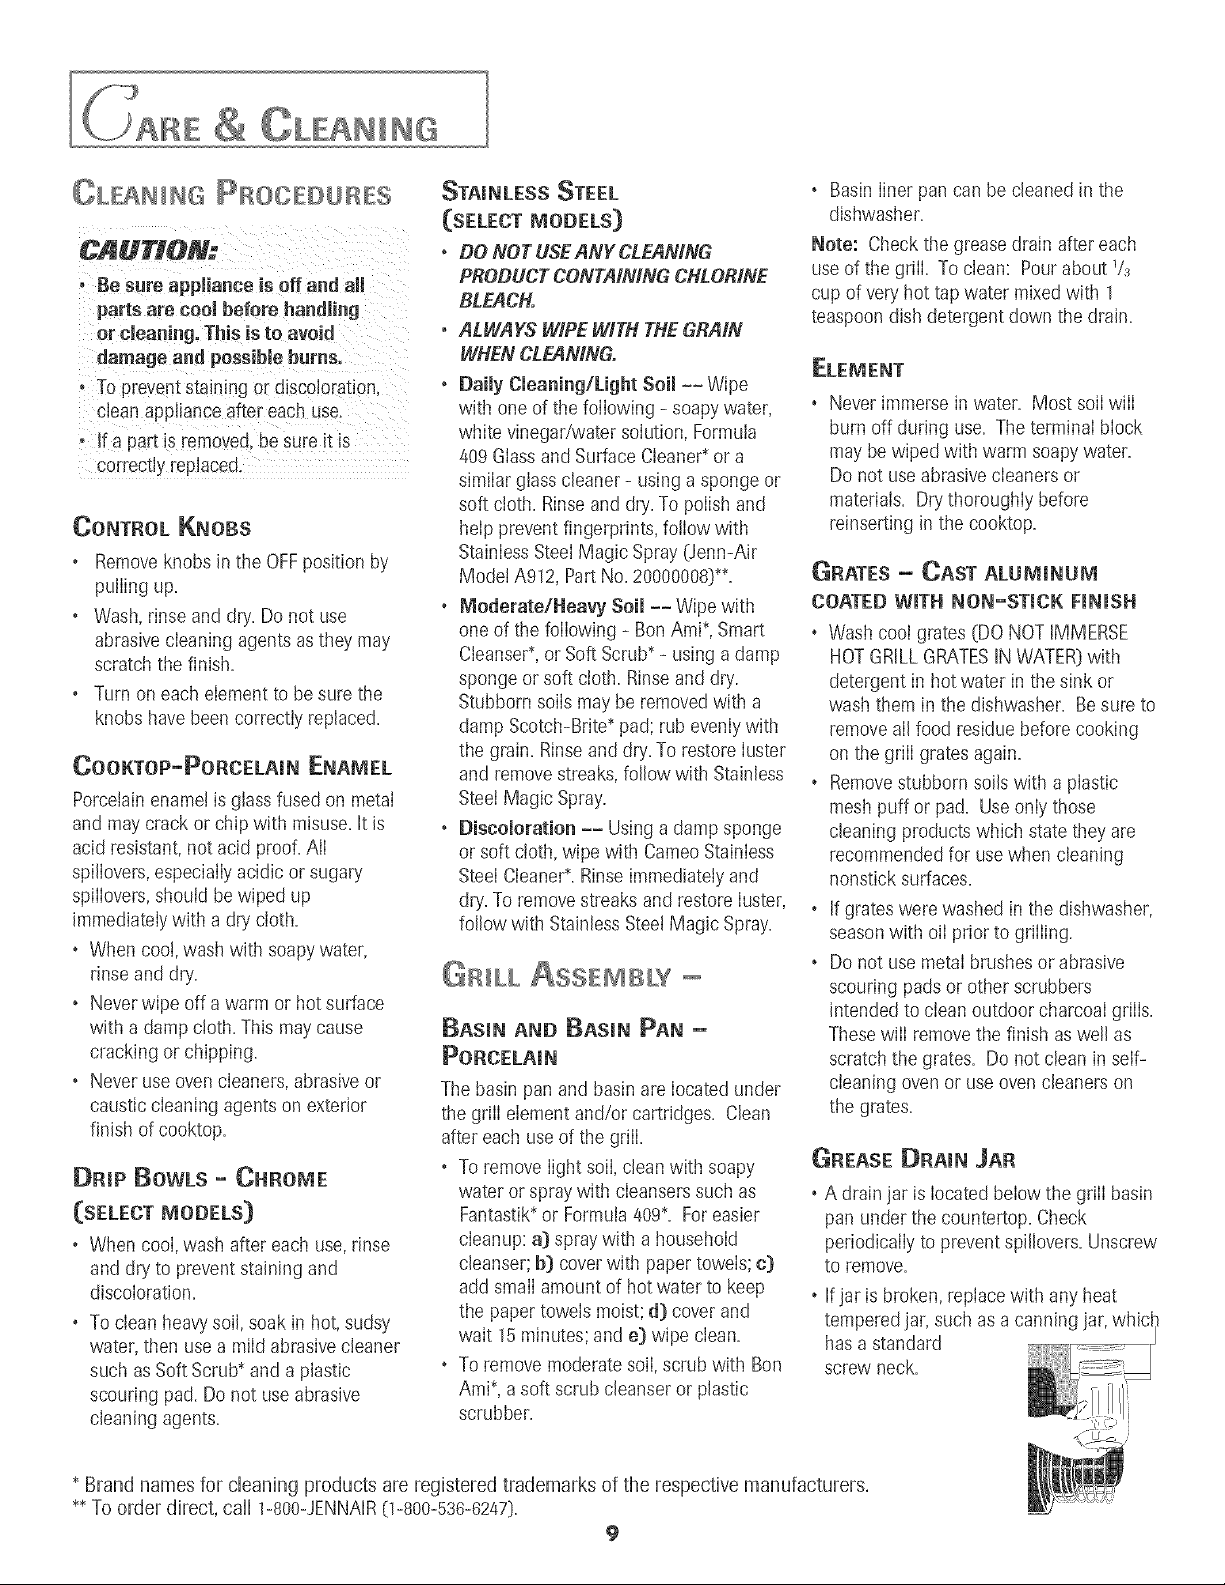
Grease Drain .JAr
• A drain jar islocated below the grill basin
pan under the countertop. Check
periodically to prevent spi/overs. Unscrew
to remove.
• Ifjar is broken, replace with any heat
tempered jar, such as a canning jar, whic
has a standard
screw Reck.
* Brand names for cleaning products are registered trademarks of the respective manufacturers.
*_To order direct, call 1-800-JENNAIR11-800-536-6247}.
9

080 %%1
Electric Grill Accessory Model
JEAS000ADB
Includes grill element,two grill grates and
basin liner pan,
OOOKTOP OABTBIOGES
Electric Griddle
Model JEA8200AD×
Self-draining griddle makes many
favorite foods easier to fix, Family-sized
surface lets you cook several pancakes,
hamburgers, or grilled sandwiches at a
time, Hasa black non-stick finish,
Canning Element
Model A145A
Special canning element plugs into
conventional col cooktop cartridge
raising the heating element above the
cooking surface, Allows use of over-
sized utensils and those with warped or
rippled bottoms,
Grill Cover
Model A341
Attractive grill cover protects grill when
not in use, Textured steel in black or
white with molded handles,
Gas or Electric Wok Accessory
Model AO142
Ideal for stir frying, steaming, braising,
and stewing, Wok has nonstick finish,
wood handles, cover, steaming rack, rice
paddies and cooking tips, Fiatbottom
wok can be used on ALL cartridges,
_j
Conventional Halogen
Coil
Conventional Coil
JEA7000ADB-Black Porcelain
JEA7000ADS- Stainless Steel
JEAT000ADW-White Porcelain
JEA8130ADB-Black
JEA8130ADW-White
Radiant
JEA8120ADB-Black
JEA8120ADW-White
EFOIIBE FOIl@BE} VIOE
IF NOTHING ON THE COOKTOP
OPERATES:
• Check for a blown circuit fuse or a
tripped main circuit breaker,
, Check if cooktop is properly con-
nected to electric circuit in house,
IF GRILL HEATING ELEMENT
OR COOKTOP DOES NOT GET
HOT ENOUGH:
• Check if heating element is plugged
in solidly,
, Surface controls may not be
properly set,
• Voltage to house may be low,
IF VENTiLATiON SYSTEM iS
NOT CAPTURING SMOKE
EFFiCI ENTLY:
• Check on cross ventilation in room or
make up air,
!@
• Excessiveamount of smoke is being
created; check instructions for grilling,
trimming meats, (See pg, 6,}
• Outside wan cap may be trapped shut,
• Cooktop may be improperly installed;
check ducting information, {See pg, 2,}
Filter may be improperly installed, {See
pg, 8,}

SEBVIOE
Fall One Year Warranty =Parts and Lahore
Forone (1} year fromthe originalretat pumhasedate
anypartwhich [als in normalhomeusewi!l berepaired
or replacedfree ofcharge.
Phase Note: Thisfu! warrantyapples only when the
applianceislocatedin the UnitedStatesor Canaua.
Applianceslocatedelsewhereare coveredo),the lmited
warranles only,includingpartswhich fail during t/e
first yea
LimitedWarranties= Parts Only
Second ThroughFifth Year = Fromthe original
purchasedate,par_sfsted below Elfapplicableto the
applance purchased}which fail in normalhome __se
wtl berepared or replacedfree of chargeforthe part
itselLwith the ownerpayingat other(osts_including
labor,mileageandtransportaton,trip cnargeanD
dlagnoslc charge,if required.
• Touch pad and microprocessor
• Maguetron tube
, Glass=ceramic Cooktop:Oae to thermal
breakage
o ElectricHeating Ememeuts:Surface, broil
aud bake elemeuts on electric cookiug
• Eleclanie Controls
• Sealed Gas Bamem
CanadiauResidents
Thiswarramycoversonlythose applances instaled in
Canadathal havebeenlistedwith CanadianStandards
Assoclalon unlesstheapplances are brought into
Canaaaduetotransfer of residencefrom the United
Statesto Canaua.
ThespecificwarrantieaexpressedabovearetheONLY
warraanesprovidedb} themanufacturer:T@swarranty
gtvesyouspecificlegalrights,andyouma) alsohave
otherrightsthat varytromstatetostate
CUSTOMER'SSOLEAND EXCLUSIVEREMEDYUNDER
THISWARRANTYSHALLBEPRODUCTREPAIRAS
PROVIDEDHEREIN.iMPLiEDWARRANTIES,iNCLUDiNG
WARRANTIESOFMERCHANTABiLiTYORFITNESSFOR
A PARTICULARPURPOSE,ARELiMiTEDTOONEYEAR
ORTHESHORTESTPERIODALLOWEDBY LAW.
MAYTAGCORPORATIONSHALLNOTBELIABLEFOR
iNCiDENTALOR CONSEQUENTIALDAMAGES.SOME
STATESAND PROVINCESDONOTALLOWTHE
EXCLUSIONORLiMiTATiONOFiNCiDENTALOR
CONSEQUENTIALDAMAGES,ORLiMiTATiONSONTHE
DURATIONOFiMPLiEDWARRANTIESOF
MERCHANTABiLiTYORFITNESS,SOTHESE
EXCLUSIONSORLiMiTATiONSMAY NOTAPPLYTO
YOU. THiSWARRANTYGIVESYOUSPECiFiCLEGAL
RIGHTSANDYOUMAYALSOHAVEOTHERRIGHTS,
WHICHVARYSTATETOSTATEORPROVINCETO
PROVINCE.
WHATISNOT COVEREDBY THESE WARRANTIES
1.Conditionsand damagesresultingfrom anyof the fo/owing:
a.Improperinstallation,delivery,or maintenance.
b.Any repair,nmdification,alteration,or adjustmentnotauthorizedby
the manufactureror anauthorizedservicer.
c.Misuse,abuse,accidents,unreasonabbuse,or actsof God.
d.Incorrectelectriccurrent,voltage,orsupply.
e.Impropersettingof anycontrol.
2.Warrantiesarevoidif the original serialnumbershavebeenremoved,altered,
or cannotbe readilydetermined.
3.Lightbulbs.
4.Productspurchasedfor commercialor industrialuse.
5.The cost of serviceor servicecallto:
a.Correctinstallationerrors.
b.Instructthe useron theproper use of the product.
c.Transportthe appliancetothe servicerand back.
6.Consequentialor incidentaldamagessustainedbyanypersonasa resultof
anybreachof thesewarranties. Somestatesdo not allowthe exclusionor
limitationofconsequentialor incidentaldamages,sothe aboveexclusionmay
notapply.
IFYou NEEDSERVICE
Firstseethe Troubleshootingsectionin yourUseand CareGuideor call
MaytagServices,LLC,Jenn-AirCustomerAssistanceat 1-800-JENNAIR
(1-800-536-62471U.S.A.and Canada.
TO OBTAIN WARRANTY SERVICE
To locatean authorizedservicecompanyin your area,contactthe dealerfrom
whom your appliancewaspurchasedor catIMaytag Services,LLC,Jenn-Air
CustomerAssistance.Shouldyou not receivesatisfactorywarrantyservice,ca/or
write:
MaytagServices,LLC
Attn:CAIR:_Center
P.O.Box2370,Cleveland,TN 37320-2370
U.S.and Canada 1-gOO-JENNAIR(1-800-536-6247}
U.S.customers using TYYfor deaf, hearingimpaired or
speech impaired, call 1-800-688-208e.
Note: WhencontactingMaytagServices,LLC,Jenn-Air Customer
Assistanceabouta serviceproblem,pleaseincludethefollowing:
a.Your name,addressandteIephonenumber:
b.Model numberandserialnumberof yourappliance;
c. NameandaddressofyourdeaIerand date appliancewas purchased:
d.A Near description of the probbm youare having;
e.Proofof purchase.
UseandCareguides,servicemanualsandparts informationareava/able from
MayCagServices,LLC,Jenn-AirCustomerAssistance.
!!
 Loading...