

Jenn-Air JDRP430 User Manual

JENN-AIR® PRO-STYLE® DUAL FUEL CONVECTION
RANGES
CUISINIÈRES À CONVECTION À DOUBLE
ALIMENTATION PRO-STYLE
®
JENN-AIR
®
Use & Care Guide
For questions about features, operation/performance, parts, accessories, or service in the U.S.A., call:
1-800-JENNAIR (1-800-536-6247) or visit our website at www.jennair.com.
In Canada, call: 1-800-807-6777, or visit our website at www.jennair.ca.
Guide d'utilisation et d'entretien
Au Canada, pour assistance, installation ou service, composez le 1-800-807-6777 ou visitez notre site web à www.jennair.ca.
Table of Contents/Table des matières ...................2
Models/Modèles JDRP430, JDRP436, JDRP536, JDRP548
W10295367B

TABLE OF CONTENTS
TABLE DES MATIÈRES
RANGE SAFETY .............................................................................3
The Anti-Tip Bracket ....................................................................4
PARTS AND FEATURES................................................................6
COOKTOP USE ..............................................................................8
Cooktop Controls.........................................................................8
Cooktop Surface..........................................................................9
Sealed Surface Burners ...............................................................9
Chrome Electric Griddle.............................................................10
Cookware ...................................................................................11
Home Canning ...........................................................................11
ELECTRONIC OVEN CONTROL.................................................12
Control Panel..............................................................................13
Display........................................................................................13
Interactive Touch Display...........................................................13
Menu Demonstration..................................................................14
Kitchen Timer .............................................................................14
Setup Menu................................................................................14
OVEN USE.....................................................................................17
Aluminum Foil.............................................................................17
Positioning Racks and Bakeware ..............................................17
Extendable Roller Rack..............................................................17
Meat Thermometer.....................................................................18
Oven Vent...................................................................................18
Cooling Fan ................................................................................18
Cooking Functions .....................................................................18
My Creations ..............................................................................18
Bake............................................................................................19
Broil ............................................................................................20
Keep Warm™ Option.................................................................21
Convect Bake.............................................................................21
Convect Broil..............................................................................22
Convect Pastry...........................................................................22
Convect Roast............................................................................23
Convect Slow Roast...................................................................23
Convect Frozen Pizza ................................................................24
Auto Convection Conversion.....................................................25
Proof...........................................................................................25
Rapid Proof ................................................................................26
Cook Timer.................................................................................26
Temperature Probe ....................................................................26
Delay Start..................................................................................27
RANGE CARE ...............................................................................28
Self-Cleaning Cycle....................................................................28
General Cleaning........................................................................29
Oven Lights ................................................................................30
Oven Door ..................................................................................30
TROUBLESHOOTING ..................................................................31
ASSISTANCE OR SERVICE.........................................................32
In the U.S.A. ...............................................................................32
Accessories................................................................................32
In Canada ...................................................................................33
WARRANTY ..................................................................................34
SÉCURITÉ DE LA CUISINIÈRE ...................................................36
La bride antibasculement...........................................................37
PIÈCES ET CARACTÉRISTIQUES ..............................................40
UTILISATION DE LA TABLE DE CUISSON................................42
Commandes de la table de cuisson ..........................................42
Surface de la table de cuisson...................................................43
Brûleurs de surface scellés ........................................................43
Plaque à frire électrique chromée ..............................................44
Ustensiles de cuisson ................................................................45
Préparation de conserves à la maison.......................................46
MODULE DE COMMANDE ÉLECTRONIQUE DU FOUR..........46
Tableau de commande ..............................................................47
Affichage.....................................................................................47
Afficheur tactile interactif............................................................47
Démonstration de menu.............................................................48
Minuterie de cuisine ...................................................................48
Menu de réglage.........................................................................48
UTILISATION DU FOUR...............................................................51
Papier d’aluminium.....................................................................51
Positionnement des grilles et des ustensiles de
cuisson au four...........................................................................51
Grille coulissante déployable .....................................................52
Thermomètre à viande ...............................................................52
Évent du four ..............................................................................52
Ventilateur de refroidissement ...................................................53
Fonctions de cuisson .................................................................53
Mes créations.............................................................................53
Cuisson au four ..........................................................................54
Cuisson au gril............................................................................55
Option Keep Warm™.................................................................56
Cuisson au four par convection.................................................57
Cuisson au gril par convection...................................................58
Cuisson de pâtisseries par convection......................................58
Rôtissage par convection ..........................................................59
Rôtissage lent par convection....................................................60
Cuisson par convection de pizza surgelée................................60
Conversion automatique pour convection.................................61
Levée ..........................................................................................61
Levée rapide...............................................................................62
Minuterie de cuisson ..................................................................62
Sonde thermométrique ..............................................................62
Mise en marche différée.............................................................63
ENTRETIEN DE LA CUISINIÈRE.................................................64
Programme d'autonettoyage .....................................................64
Nettoyage général ......................................................................65
Lampes du four ..........................................................................66
Porte du four...............................................................................67
DÉPANNAGE.................................................................................68
ASSISTANCE OU SERVICE.........................................................70
Au Canada..................................................................................70
Accessoires ................................................................................70
GARANTIE.....................................................................................71
2
RANGE SAFETY
Your safety and the safety of others are very important.
We have provided many important safety messages in this manual and on your appliance. Always read and obey all safety
messages.
This is the safety alert symbol.
This symbol alerts you to potential hazards that can kill or hurt you and others.
All safety messages will follow the safety alert symbol and either the word “DANGER” or “WARNING.”
These words mean:
You can be killed or seriously injured if you don't immediately
DANGER
WARNING
All safety messages will tell you what the potential hazard is, tell you how to reduce the chance of injury, and tell you what can
happen if the instructions are not followed.
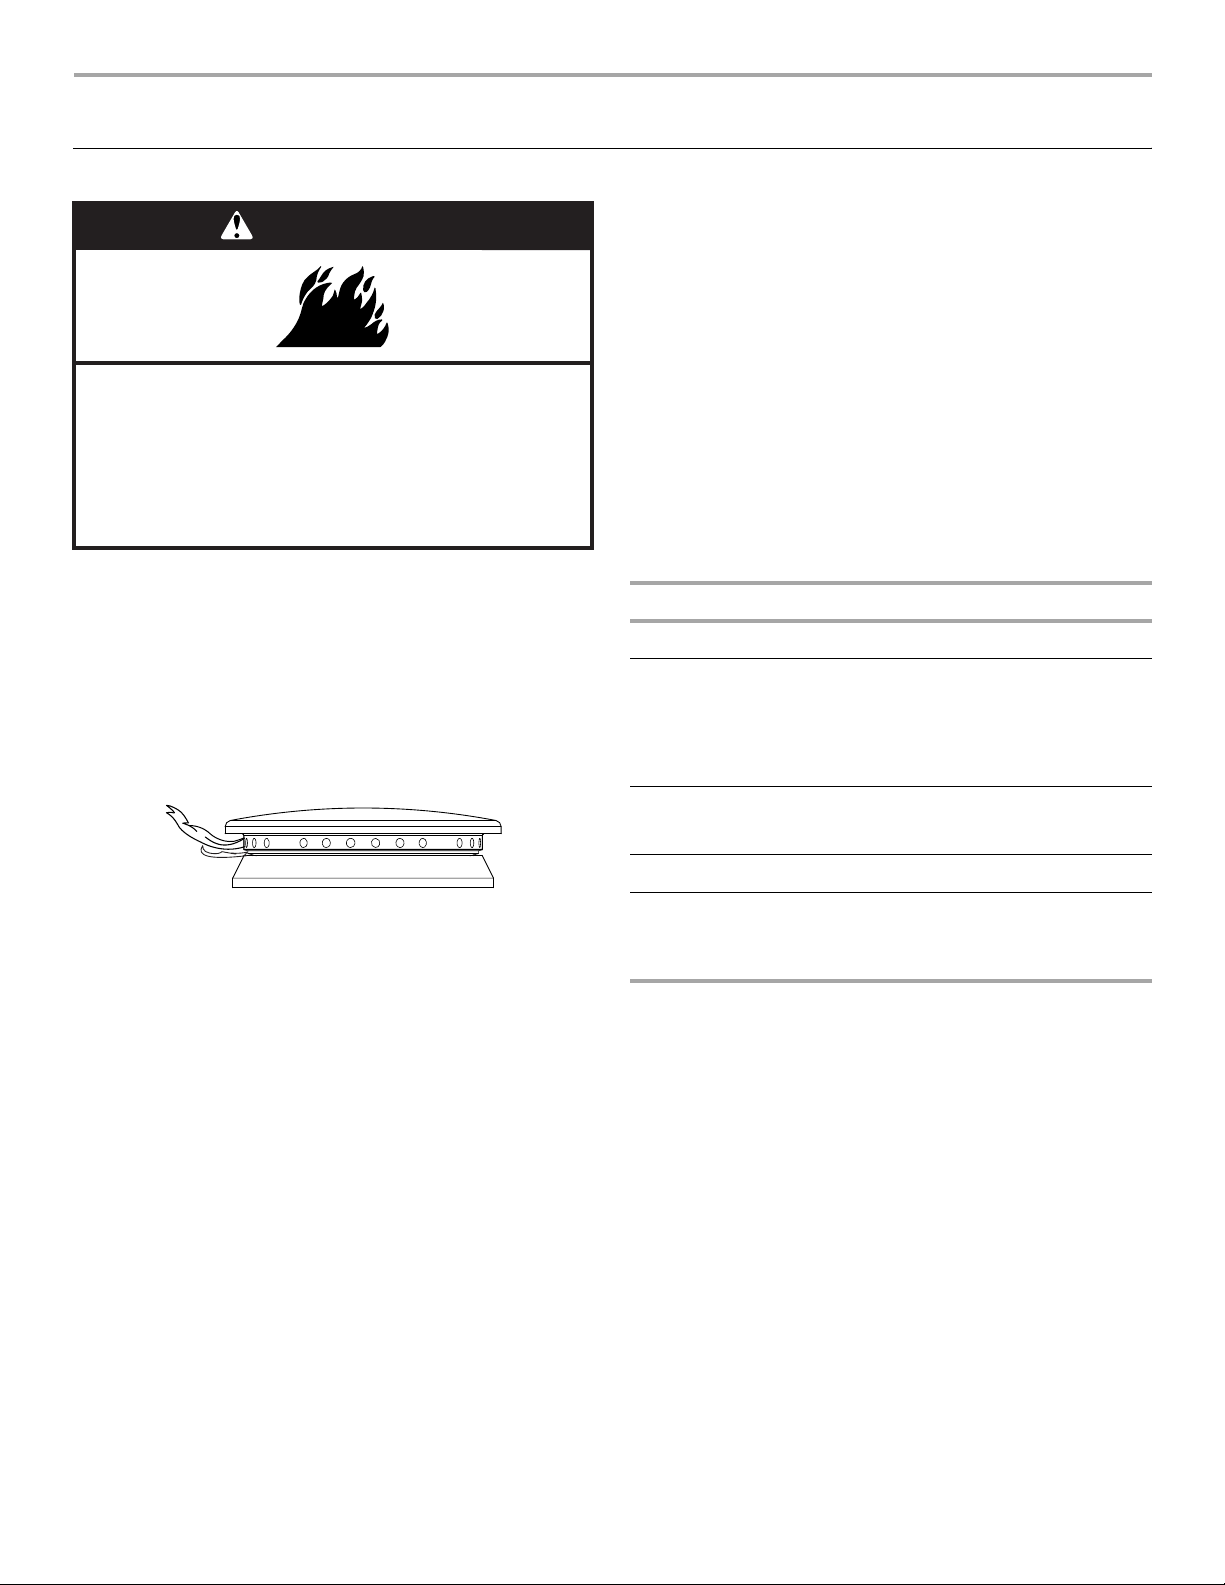
WARNING: If the information in this manual is not followed exactly, a fire or explosion
may result causing property damage, personal injury or death.
follow instructions.
can be killed or seriously injured if you don't
You
instructions.
follow
– Do not store or use gasoline or other flammable vapors and liquids in the vicinity of this
or any other appliance.
– WHAT TO DO IF YOU SMELL GAS:
Do not try to light any appliance.
•
Do not touch any electrical switch.
•
Do not use any phone in your building.
•
Immediately call your gas supplier from a neighbor's phone. Follow the gas supplier's
•
instructions.
If you cannot reach your gas supplier, call the fire department.
•
– Installation and service must be performed by a qualified installer, service agency or
the gas supplier.
WARNING: Gas leaks cannot always be detected by smell.
Gas suppliers recommend that you use a gas detector approved by UL or CSA.
For more information, contact your gas supplier.
If a gas leak is detected, follow the “What to do if you smell gas” instructions.
State of California Proposition 65 Warnings:
WARNING: This product contains a chemical known to the State of California to cause cancer.
WARNING: This product contains a chemical known to the State of California to cause birth defects or other reproductive harm.
3
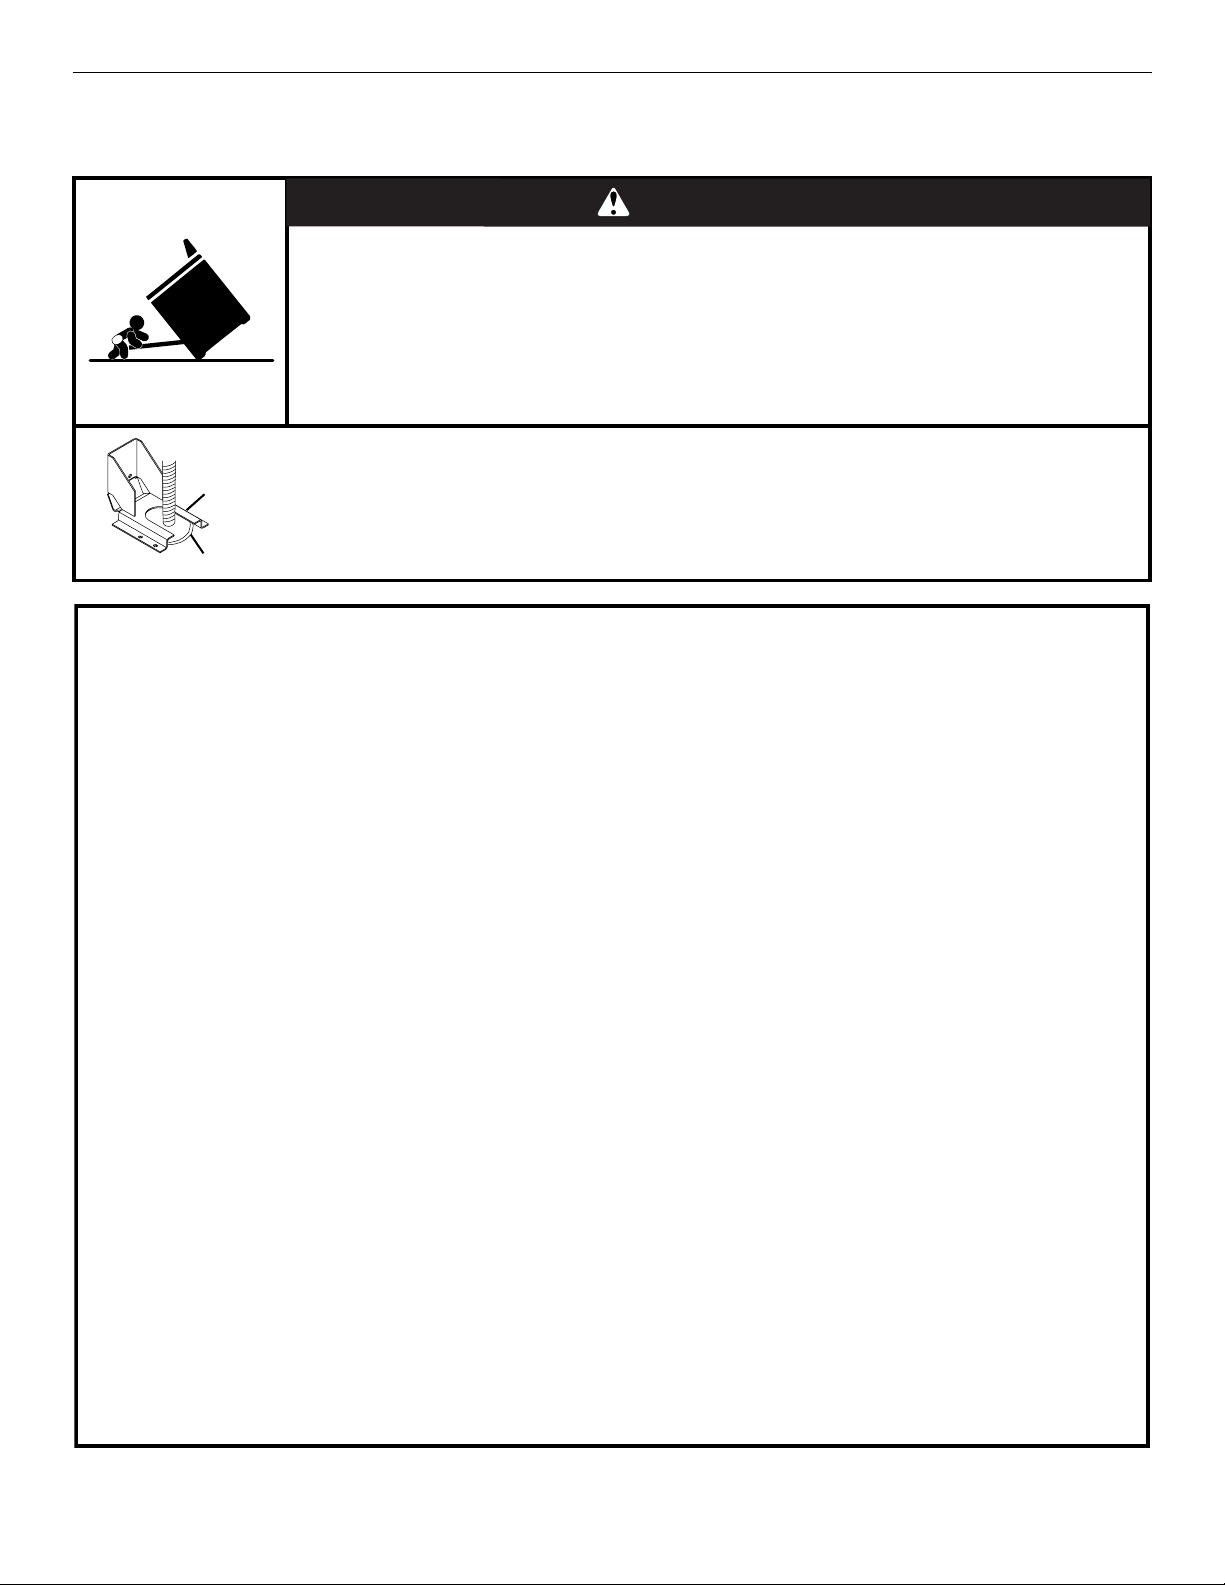
The Anti-Tip Bracket
The range will not tip during normal use. However, the range can tip if you apply too much force or weight to the open door without the
anti-tip bracket fastened down properly.
WARNING
Tip Over Hazard
A child or adult can tip the range and be killed.
Connect anti-tip bracket to rear range foot.
Reconnect the anti-tip bracket, if the range is moved.
See the installation instructions for details.
Failure to follow these instructions can result in death or serious burns to children and adults.
Making sure the anti-tip bracket is installed:
Anti-Tip
Bracket
Range Foot
• Slide range forward.
• Look for the anti-tip bracket securely attached to floor or wall.
• Slide range back so rear range foot is under anti-tip bracket.
IMPORTANT SAFETY INSTRUCTIONS
WARNING: To reduce the risk of fire, electrical shock, injury to
persons, or damage when using the range, follow basic
precautions, including the following:
■ WARNING: TO REDUCE THE RISK OF TIPPING OF THE
RANGE, THE RANGE MUST BE SECURED BY PROPERLY
INSTALLED ANTI-TIP DEVICES. TO CHECK IF THE DEVICES
ARE INSTALLED PROPERLY, SLIDE RANGE FORWARD,
LOOK FOR ANTI-TIP BRACKET SECURELY ATTACHED TO
FLOOR OR WALL, AND SLIDE RANGE BACK SO REAR
RANGE FOOT IS UNDER ANTI-TIP BRACKET.
■ WARNING: TO REDUCE THE RISK OF BURNS, DO NOT
MOVE THE RANGE WHILE HOT. THIS RANGE IS PROVIDED
WITH WHEELS TO FACILITATE MOVEMENT. TO REDUCE THE
RISK OF INJURY DUE TO TIPPING OF THE APPLIANCE,
VERIFY THE REINSTALLATION OF THE RANGE INTO THE
ANTI-TIP DEVICE PROVIDED, AND EXTEND LEVELING FEET
AFTER RETURNING THE RANGE TO THE ORIGINAL
INSTALLED POSITION.
■ WARNING: NEVER use this appliance as a space heater to
heat or warm the room. Doing so may result in carbon monoxide
poisoning and overheating of the oven.
■ WARNING: NEVER cover any slots, holes or passages in the
oven bottom or cover an entire rack with materials such as
aluminum foil. Doing so blocks air flow through the oven and
may cause carbon monoxide poisoning. Aluminum foil linings
may also trap heat, causing a fire hazard.
■ CAUTION: Do not store items of interest to children in
cabinets above a range or on the backguard of a range –
children climbing on the range to reach items could be seriously
injured.
■ Do Not Leave Children Alone – Children should not be left alone
or unattended in area where the range is in use. They should
never be allowed to sit or stand on any part of the range.
■ Wear Proper Apparel – Loose-fitting or hanging
garments should never be worn while using the range.
■ User Servicing – Do not repair or replace any part of the
range unless specifically recommended in the manual.
All other servicing should be referred to a qualified
technician.
■ Storage in or on the Range – Flammable materials
should not be stored in an oven or near surface units.
■ Do Not Use Water on Grease Fires – Smother fire or
flame or use dry chemical or foam-type extinguisher.
■ Use Only Dry Potholders – Moist or damp potholders on
hot surfaces may result in burns from steam. Do not let
potholder touch hot heating elements. Do not use a
towel or other bulky cloth.
■ DO NOT TOUCH SURFACE UNITS OR AREAS NEAR
UNITS – Surface units may be hot even though they are
dark in color. Areas near surface units may become hot
enough to cause burns. During and after use, do not
touch, or let clothing or other flammable materials
contact surface units or areas near units until they have
had sufficient time to cool. Among those areas are the
cooktop and surfaces facing the cooktop.
■ Never Leave Surface Units Unattended at High Heat
Settings – Boilover causes smoking and greasy
spillovers that may ignite.
■ Glazed Cooking Utensils – Only certain types of glass,
glass/ceramic, ceramic, earthenware, or other glazed
utensils are suitable for range-top service without
breaking due to the sudden change in temperature.
SAVE THESE INSTRUCTIONS
4

IMPORTANT SAFETY INSTRUCTIONS
■
Utensil Handles Should Be Turned Inward and Not Extend Over
Adjacent Surface Units – To reduce the risk of burns, ignition of
flammable materials, and spillage due to unintentional contact
with the utensil, the handle of a utensil should be positioned so
that it is turned inward, and does not extend over adjacent
surface units.
■
Clean Cooktop With Caution – If a wet sponge or cloth is used
to wipe spills on a hot cooking area, be careful to avoid steam
burn. Some cleaners can produce noxious fumes if applied to a
hot surface.
■
Use Care When Opening Door – Let hot air or steam escape
before removing or replacing food.
■
Do Not Heat Unopened Food Containers – Build-up of pressure
may cause container to burst and result in injury.
■
Keep Oven Vent Ducts Unobstructed.
■
Placement of Oven Racks – Always place oven racks in desired
location while oven is cool. If rack must be moved while oven is
hot, do not let potholder contact hot heating element in oven.
■
DO NOT TOUCH HEATING ELEMENTS OR INTERIOR
SURFACES OF OVEN – Heating elements may be hot even
though they are dark in color. Interior surfaces of an oven
become hot enough to cause burns. During and after use, do
not touch, or let clothing or other flammable materials contact
heating elements or interior surfaces of oven until they have had
sufficient time to cool. Other surfaces of the appliance may
become hot enough to cause burns – among these surfaces are
oven vent openings and surfaces near these openings, oven
doors, and windows of oven doors.
■
Proper Installation – The range, when installed, must be
electrically grounded in accordance with local codes or, in the
absence of local codes, with the National Electrical Code,
ANSI/NFPA 70. In Canada, the range must be electrically
grounded in accordance with Canadian Electrical Code. Be sure
the range is properly installed and grounded by a qualified
technician.
■
Disconnect the electrical supply before servicing the
appliance.
■
Injuries may result from the misuse of appliance doors
or drawers such as stepping, leaning, or sitting on the
doors or drawers.
■
Maintenance – Keep range area clear and free from
combustible materials, gasoline, and other flammable
vapors and liquids.
■
Top burner flame size should be adjusted so it does not
extend beyond the edge of the cooking utensil.
For self-cleaning ranges –
■
Do Not Clean Door Gasket – The door gasket is
essential for a good seal. Care should be taken not to
rub, damage, or move the gasket.
■
Do Not Use Oven Cleaners – No commercial oven
cleaner or oven liner protective coating of any kind
should be used in or around any part of the oven.
■
Clean Only Parts Listed in Manual.
■
Before Self-Cleaning the Oven – Remove broiler pan
and other utensils. Wipe off all excessive spillage before
initiating the cleaning cycle.
For units with ventilating hood –
■
Clean Ventilating Hoods Frequently – Grease should not
be allowed to accumulate on hood or filter.
■
When flambéing foods under the hood, turn the fan on.
SAVE THESE INSTRUCTIONS
5
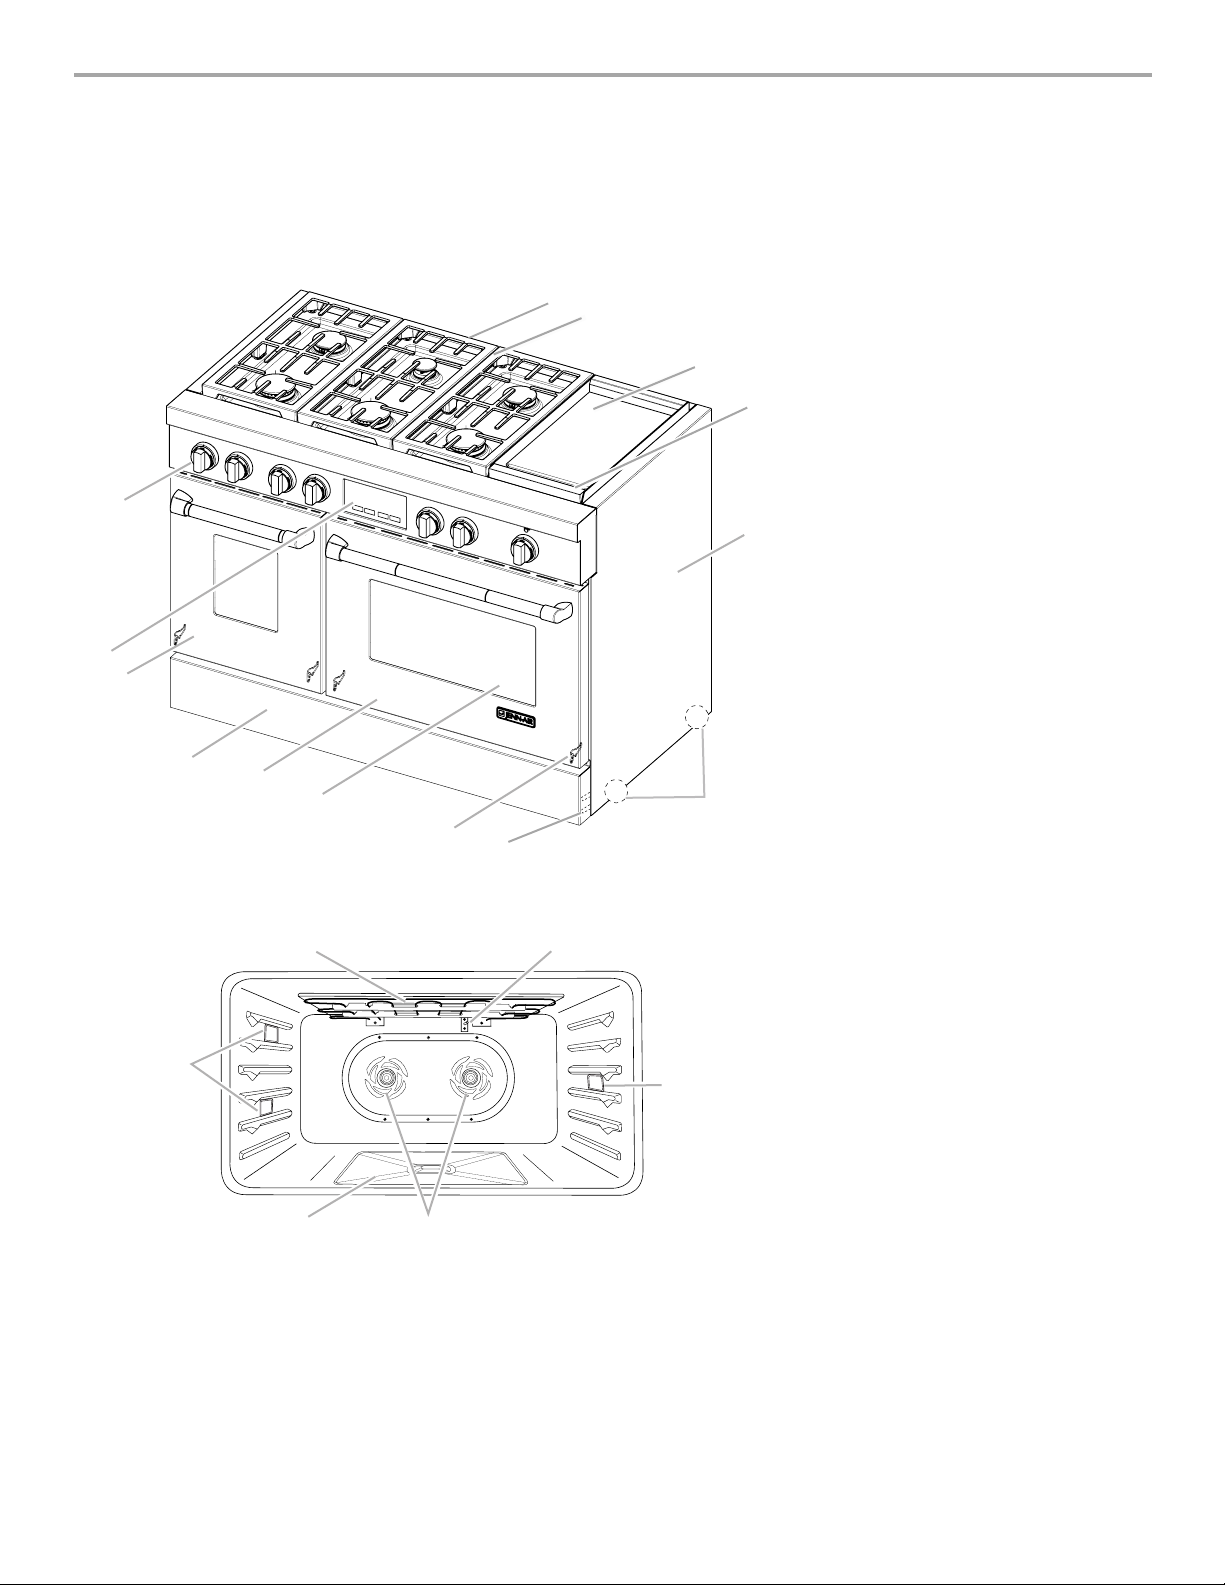
PARTS AND FEATURES
D
A
This manual covers several different models. The range you have purchased may have some or all of the items listed. The locations and
appearances of the features shown here may not match those of your model.
NOTE: Burner ratings listed are for Natural gas.
Range
A
B
C
N
M
L
K
J
I
H
G
F
A. Island trim
B. Heavy-duty single grate design
C. Electric griddle (on some models)
D. Drip tray
E. Stainless steel panels
F. Roller feet
G. Leveling rods
H. Balanced hinged doors
I. Large viewing window
J. Dual-Fan true convection oven
K. Removable lower panel
L. 18" (45.7 cm) true convection oven
M. 7" (17.8 cm) full color touch-anywhere LCD
E
N. Oversized stainless steel knobs
Not shown:
Optional 9" (22.9 cm), 22" (55.9 cm) and
adjustable backguards
Optional griddle cover
Optional wok ring
Optional broil pan and roasting rack
Hefty-duty racks with handle
Extendable roller rack with handle
Oven Interior
BC
A. Halogen lights
B. Broil elements with broil reflector
C. Oven cavity sensor
A
D. Convection fan(s)
E. Hidden bake element
E
D
6
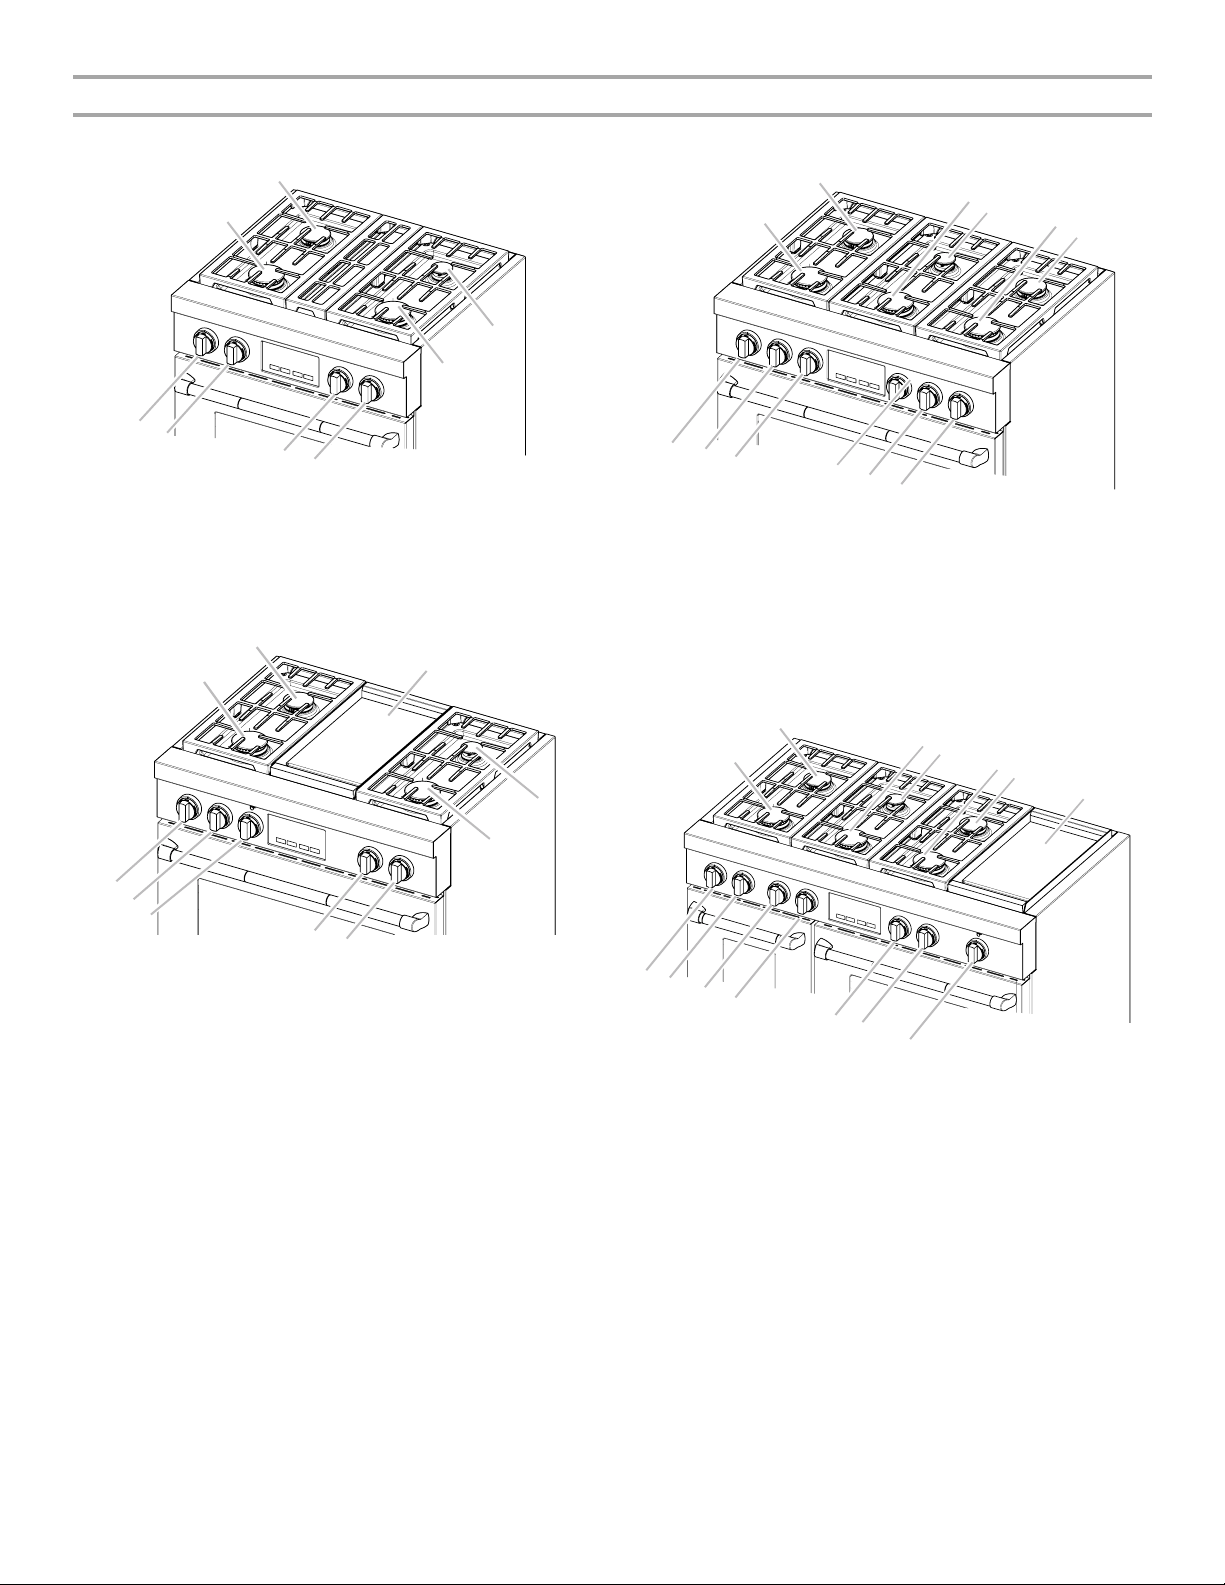
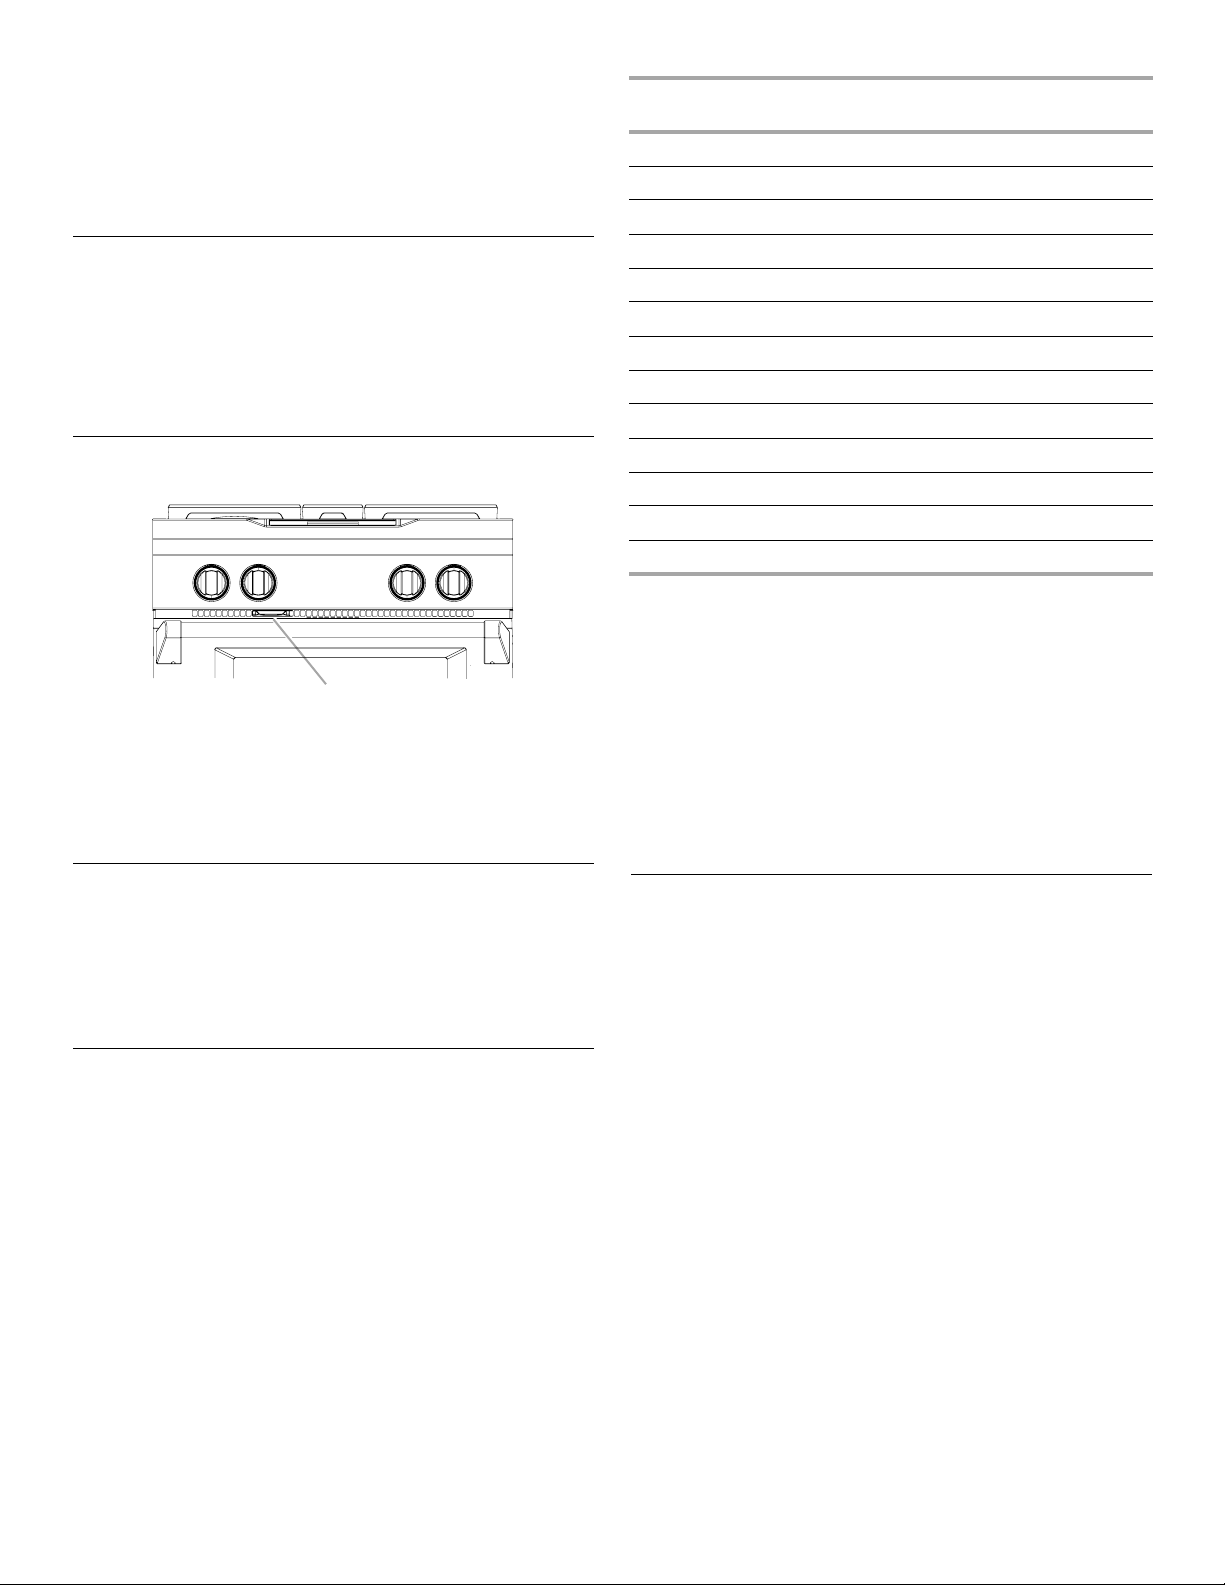
Control Panels
JDRP430
H
JDRP536
B
A
G
F
A. 20,000 Btu/h burner
B. 15,000 Btu/h burner
C. 5,000 Btu/h burner
D. 15,000 Btu/h burner
B
A
E
E. Right front control knob
F. Right rear control knob
G. Left front control knob
H. Left rear control knob
JDRP436
B
C
A
D
E
F
C
D
L
K
J
A. 20,000 Btu/h burner
B. 15,000 Btu/h burner
C. 15,000 Btu/h burner
D. 5,000 Btu/h burner
E. 20,000 Btu/h burner
F. 15,000 Btu/h burner
C
JDRP548
I
H
G
G. Right front control knob
H. Right rear control knob
I. Center front control knob
J. Center rear control knob
K. Left front control knob
L. Left rear control knob
B
C
A
D
D
E
F
G
J
I
H
A. 20,000 Btu/h burner
B. 15,000 Btu/h burner
C. Electric griddle
D. 5,000 Btu/h burner
E. 15,000 Btu/h burner
G
F
F. Right front control knob
G. Right rear control knob
H. Griddle control knob
I. Left front control knob
J. Left rear control knob
E
N
M
L
K
A. 20,000 Btu/h
B. 15,000 Btu/h
C. 15,000 Btu/h
D. 5,000 Btu/h
E. 20,000 Btu/h
F. 15,000 Btu/h
G. Electric griddle
J
I
H
H. Griddle control knob
I. Left rear control knob
J. Left front control knob
K. Center rear control knob
L. Center front control knob
M. Right rear control knob
N. Right front control knob
7
WARNING
COOKTOP USE
Cooktop Controls
Flame-Sensing™ Reignition Feature
During cooktop use, if one or more burners are extinguished due
to external causes (such as a water spill, wind or ventilation
draft), the ignition system will turn on to reignite the flame. When
the flame comes back on, the system will stop sparking. If the
draft in the room is not removed, occasional sparking may
continue. Sparking may also occasionally occur when using the
low setting on a burner.
Fire Hazard
Do not let the burner flame extend beyond the edge of
the pan.
Turn off all controls when not cooking.
Failure to follow these instructions can result in death
or fire.
IMPORTANT: Your cooktop is factory-set for use with Natural
gas. If you wish to use LP gas, an LP Gas Conversion Kit is
included with your new range. See the instructions included in
the Installation Instructions for details on making this conversion.
Electric igniters automatically light the surface burners when
control knobs are turned to LITE.
Three different sizes of burners are provided: 20,000 Btu/h
[British Thermal Units], 15,000 Btu/h, and 5,000 Btu/h.
The 20,000 Btu/h stacked power burner has an upper and lower
level of flame.
The Power Hi setting uses both flame levels at full power to
provide the highest heat and is ideal for cooking large quantities
of food or liquid, and using large pots and pans. The Simmer Hi
and Lo settings use the lower flame only and allow for accurate
simmer control and cooking of smaller quantities of food.
The 5,000 Btu/h burner reaches a low of 500 Btu/h, and is ideal
for cooking smaller quantities of food and melting chocolate or
butter.
Before setting a control knob, place filled cookware on the grate.
Do not operate a burner using empty cookware or without any
cookware on the grate.
NOTE: Visually check that the burner has lit. If the burner does
not ignite, listen for the clicking sound. If you do not hear the
igniter click, turn off the burner. Check for a tripped circuit
breaker or blown fuse.
Check that the control knob is pressed completely down on the
valve shaft. If the spark igniter still does not operate, call a trained
repair specialist.
Proper grounding and polarity are necessary for correct operation
of the electric ignition system. If the wall receptacle or junction
box does not provide correct polarity, the igniter will become
grounded and occasionally click, even after the burner has
ignited. Contact a trained repair specialist to check the wall
receptacle or junction box to see whether it is wired with the
correct polarity.
To S et :
1. Push in and turn knob counterclockwise to LITE.
All surface burners will click. Only the burner with the control
knob turned to LITE will produce a flame.
2. Turn knob counterclockwise to anywhere between HI and LO.
Push in one more time to get from LO to Simmer HI.
Use the following charts as a guide when setting heat levels.
20,000 Btu/h Stacked Power Burner
SETTING RECOMMENDED USE
LITE (Light)
HI (High)
MED (Medium)
LO (Low)
Simmer HI (High)
Simmer LO (Low)
■ Light the burner.
■ Start food cooking.
■ Bring liquid to a boil.
■ Preheat skillets/pans.
■ Quickly brown or sear food.
■ Fry or sauté foods.
■ Hold a boil.
■ Cook soups, sauces and gravies.
■ Start cooking thicker foods such
as tomato sauce, chili, etc.
■ Hold a gentle simmer.
Simmer Burner Settings
To S et :
1. Push in and turn knob counterclockwise to LITE.
All surface burners will click. Only the burner with the control
knob turned to LITE will produce a flame.
2. Turn knob counterclockwise to anywhere between Simmer HI
and LO.
Use the following charts as a guide when setting heat levels.
8
15,000 Btu/h Burner
A
C
A
C
D
B
A
C
B
SETTING RECOMMENDED USE
Sealed Surface Burners
LITE (Light)
■ Light the burner.
HI (High) ■ Start food cooking.
■ Bring liquid to a boil.
■ Preheat skillets/pans.
■ Quickly brown or sear food.
MED (Medium)
LO (Low)
■ Fry or sauté foods.
■ Hold a boil.
■ Cook soups, sauces and gravies.
■ Stew or steam foods.
5,000 Btu/h Simmer/Melt Burner
SETTING RECOMMENDED USE
LITE (Light)
HI (High)
LO (Low)
■ Light the burner.
■ Cook soups, sauces and gravies.
■ Stew or steam foods.
■ Melt chocolate or butter.
REMEMBER: When cooktop is in use, the entire cooktop
area may become hot.
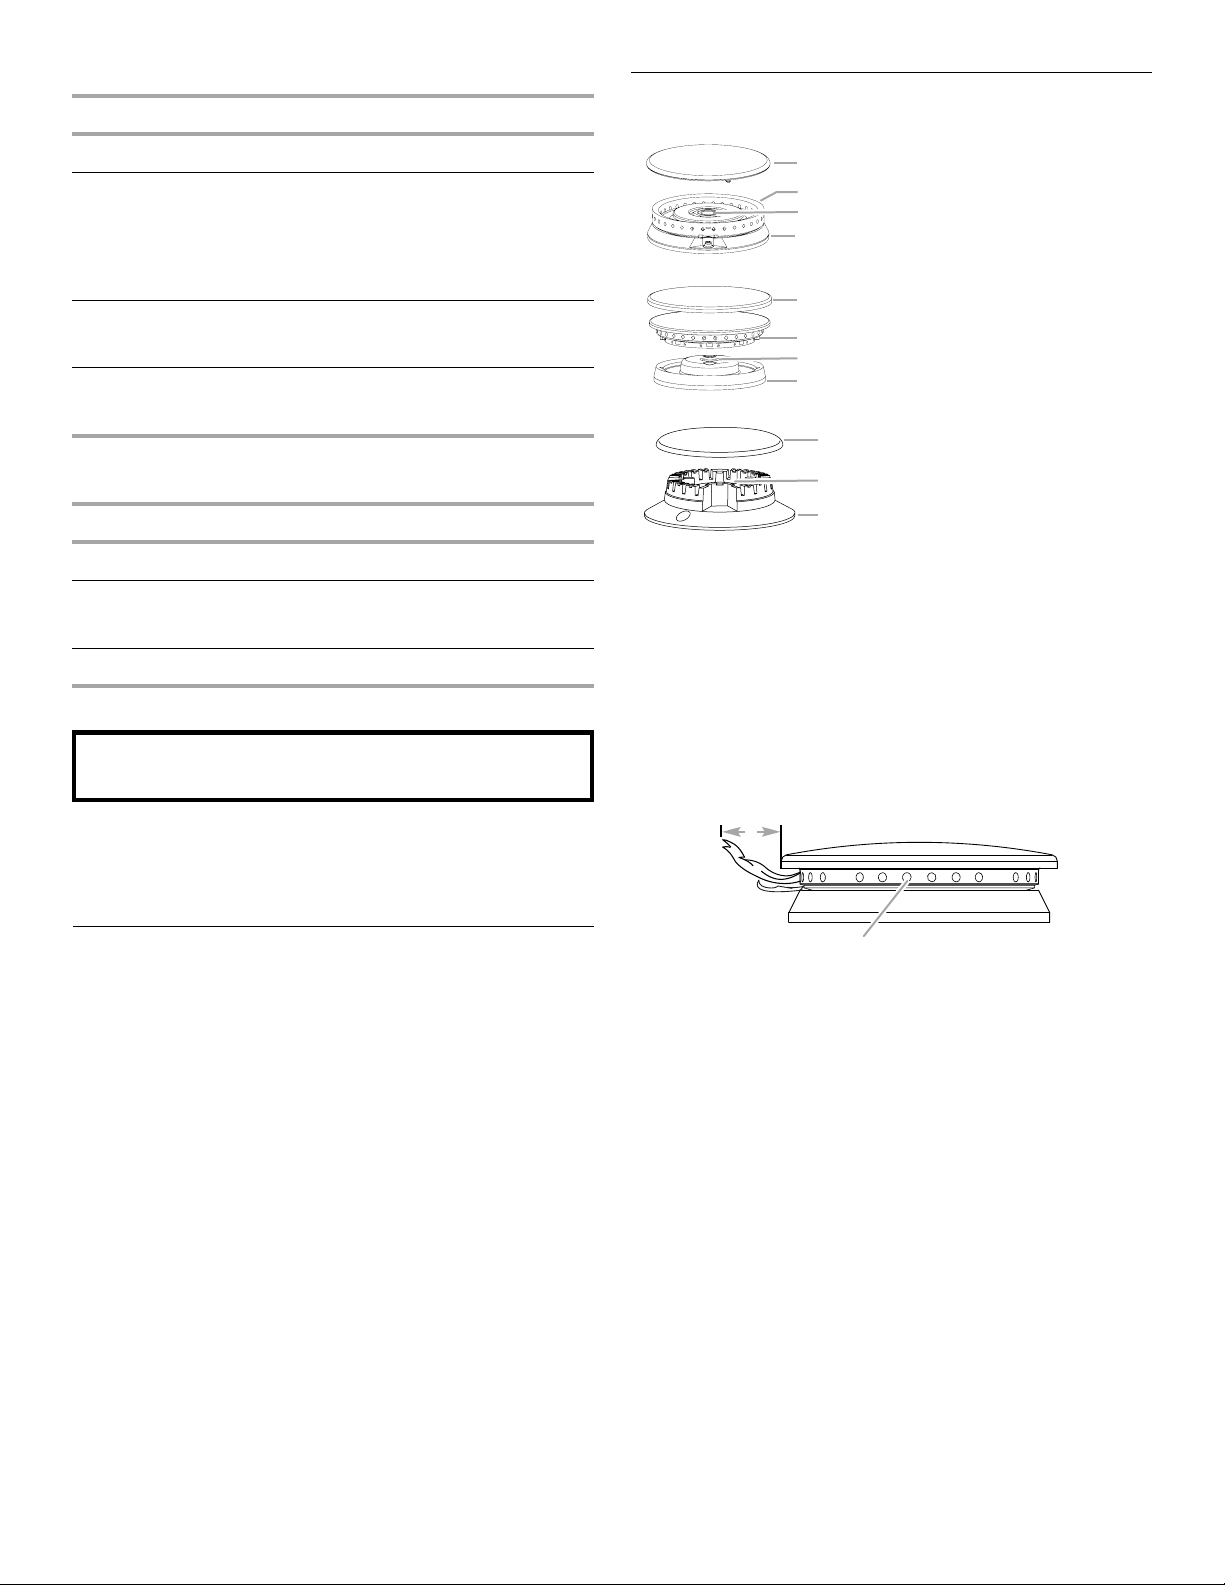
20,000 Btu/h Stacked PowerBurner
B
D
A. Burner cap
B. Burner head
C. Gas opening
D. Burner base
15,000 Btu/h Burner
A. Burner cap
B. Burner head
C. Gas opening
D. Burner base
5,000 Btu/h Simmer Burner
A. Burner cap
B. Gas opening
C. Burner base
IMPORTANT: Do not obstruct the flow of combustion and
ventilation air around the burner grate edges.
Burner cap: Always keep the burner cap in place when using a
surface burner. A clean burner cap will help avoid poor ignition
and uneven flames. Always clean the burner cap after a spillover
and routinely remove and clean the caps according to the
“General Cleaning” section.
Gas opening: Gas must flow freely throughout the gas opening
for the burner to light properly. Keep this area free of soil and do
not allow spills, food, cleaning agents or any other material to
enter the gas opening. Keep spillovers out of the gas opening by
always using a burner cap.
Power Failure
In case of prolonged power failure, the surface burners can be lit
manually. Hold a lit match near a burner and turn knob
counterclockwise to HI. After burner lights, turn knob to setting.
Cooktop Surface
Wiping off the cooktop, grates and caps after each use will help
keep it free from stains.
Food spills containing acids, such as vinegar and tomato, should
be cleaned as soon as the entire appliance is cool. These spills
may affect the finish.
For more information, see the “Sealed Surface Burners” and
“General Cleaning” sections.
A
B
A. 1-1¹⁄₂" (25-38 mm)
B. Burner ports
Burner ports: Check burner flames occasionally for proper size
and shape as shown above. A good flame is blue in color, not
yellow. Keep this area free of soil and do not allow spills, food,
cleaning agents or any other material to enter the burner ports.
To Cle an:
IMPORTANT: Before cleaning, make sure all controls are off and
the oven and cooktop are cool. Do not use oven cleaners, bleach
or rust removers.
1. Remove the burner cap and burner head (15,000 and
5,000 Btu/h burners) from the burner base and clean
according to “General Cleaning” section.
2. Clean the gas opening with a damp cloth.
9
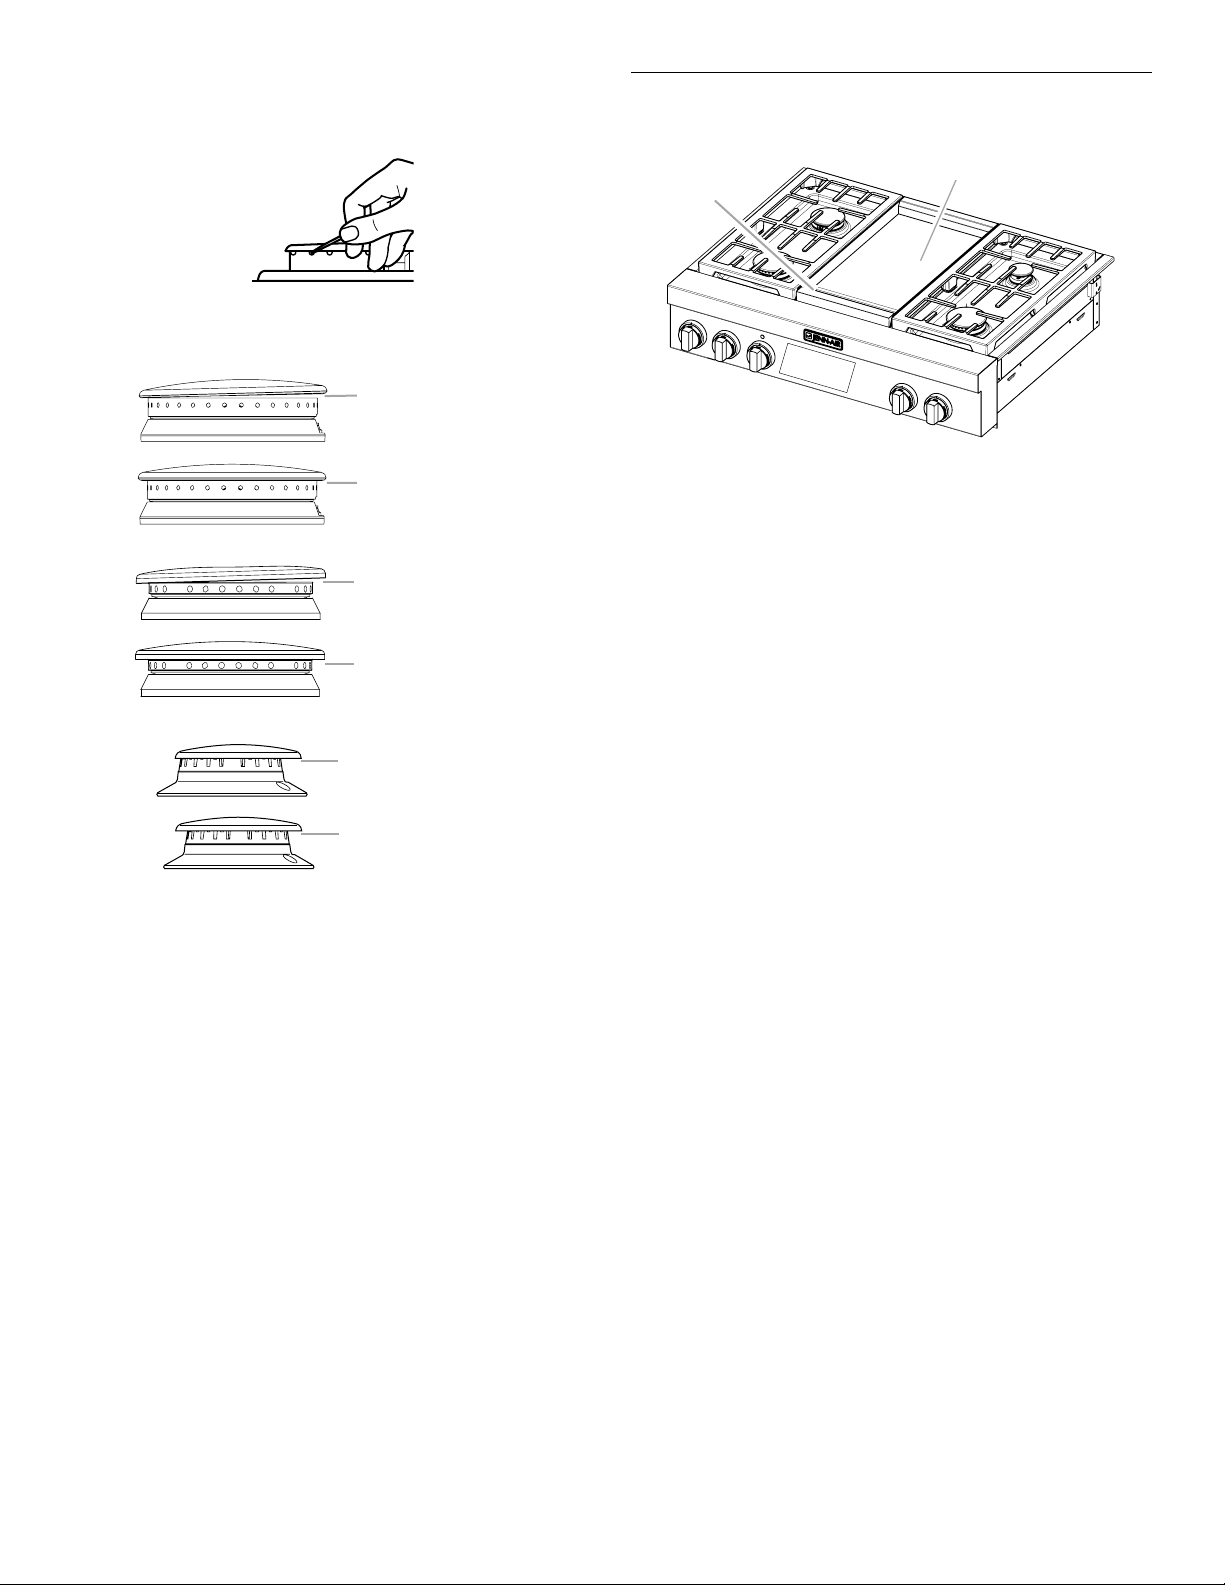
3. Clean clogged burner ports with a straight pin as shown. Do
A
B
A
B
A
B
not enlarge or distort the port. Do not use a wooden
toothpick. If the burner needs to be adjusted, contact a
trained repair specialist.
4. Replace the burner cap, making sure the alignment pins are
properly aligned with the burner cap.
20,000 Stacked PowerBurner
Chrome Electric Griddle
(on some models)
B
A
A. Incorrect
B. Correct
15,000 Btu/h Burner
A. Incorrect
B. Correct
5,000 Btu/h Simmer Burner
A. Incorrect
B. Correct
5. Turn on the burner. If the burner does not light, check cap
alignment. If the burner still does not light, do not service the
sealed burner yourself. Contact a trained repair specialist.
A. Drip tray
B. Griddle
The chrome electric griddle system provides an evenly heated
and easy to clean cooking surface.
■ Remove plastic film and clean with hot, soapy water prior to
first use.
■ To avoid scratching the griddle, do not place any pots or pans
on the griddle.
■ To avoid scratching the griddle, use only heat resistant plastic
or wooden utensils.
■ The griddle surface is ready to use, and does not need to be
seasoned.
■ Pouring cold water on a hot griddle may warp the griddle,
resulting in an uneven cooking surface.
To Use :
1. Position the drip tray under the front edge of the griddle to
catch grease and food residue.
2. Push in and turn the control knob to desired temperature.
3. Refer to the griddle Preheat Chart for preheat times.
The griddle light will turn off when the griddle has finished
preheating. The griddle light will turn on and off during use to
indicate that the griddle element is maintaining the selected
surface temperature.
4. Place food on the griddle and cook to desired doneness.
10
Griddle Charts
The settings and times are guidelines only and may need to be
adjusted for individual tastes.
Preheat Chart
TEMPERATURE TIME TO PREHEAT
250°F (121°C) 10
300°F (149°C) 14
350°F (177°C) 15
400°F (204°C) 20
450°F (232°C) 25
500°F (260°C) 27
(in minutes)
Cooking Chart
FOOD SETTING COOK TIME
Sausage patties
325°F (163°C) 12-18
and links
Bacon slices 350°F (177°C) 7-11
Ham steak
325°F (163°C) 5-7
(fully cooked)
Frankfurters and
325°F (163°C) 8-15
precooked
sausages
Ground meat
350°F (177°C) 10-15
patties
Grilled
325°F (163°C) 3-5
sandwiches
Fish steaks, fillets 325°F (163°C) 8-15
Eggs 300°F (149°C) 3-5
Hash brown
potatoes
400°F to 425°F
(204°C to 218°C)
French toast 350°F (177°C) 5-7
Pancakes 350°F (177°C) 2-4
TOTAL MINUTES
8-12
After Each Use:
1. Turn the griddle off and let cool.
2. Scrape griddle residue into drip tray using heat resistant
plastic or wooden utensils.
3. Rinse griddle with hot, soapy water.
4. Remove and clean the drip tray and the area below. Gently tip
the drip tray so that the contents are not spilled when
removing.
5. Clean using a nylon scrub pad with soapy water and rinse
with hot water.
6. Dry griddle, drip tray and area below griddle with paper
towels to remove excess grease and oil.
7. If desired, a final cleaning with diluted white vinegar will
remove stubborn residues on the griddle. Use a nylon scrub
pad dipped into a mixture of 1 tbs (15 mL) of white vinegar
and a ½ cup (118 mL) of hot water. Gently scrub stubborn
spots, rinse with hot water and dry.
Cookware
IMPORTANT: Do not leave empty cookware on a hot surface
cooking area, element or surface burner.
Ideal cookware should have a flat bottom, straight sides and a
well-fitting lid, and the material should be of medium-to-heavy
thickness.
Rough finishes may scratch the cooktop or grates. Aluminum and
copper may be used as a core or base in cookware. However,
when used as a base they can leave permanent marks on the
cooktop or grates.
Cookware material is a factor in how quickly and evenly heat is
transferred, which affects cooking results. A nonstick finish has
the same characteristics as its base material. For example,
aluminum cookware with a nonstick finish will take on the
properties of aluminum.
Cookware with nonstick surfaces should not be used under the
broiler.
Use the following chart as a guide for cookware material
characteristics.
COOKWARE CHARACTERISTICS
Aluminum
■ Heats quickly and evenly.
■ Suitable for all types of cooking.
■ Medium or heavy thickness is best for
most cooking tasks.
Cast iron
Ceramic or
Ceramic glass
■ Heats slowly and evenly.
■ Good for browning and frying.
■ Maintains heat for slow cooking.
■ Follow manufacturer’s instructions.
■ Heats slowly, but unevenly.
■ Ideal results on low to medium heat
settings.
Copper
Earthenware
Porcelain
■ Heats very quickly and evenly.
■ Follow manufacturer’s instructions.
■ Use on low heat settings.
■ See stainless steel or cast iron.
enamel-onsteel or cast
iron
Stainless steel
■ Heats quickly, but unevenly.
■ A core or base of aluminum or copper
on stainless steel provides even
heating.
Home Canning
When canning for long periods, alternate the use of surface
burners between batches. This allows time for the most recently
used areas to cool.
■ Center the canner on the grate.
■ Do not place canner on 2 surface burners at the same time.
■ For more information, contact your local agricultural
department. Companies that manufacture home canning
products can also offer assistance.
11
ELECTRONIC OVEN CONTROL
This manual covers different models. The oven you have purchased may have some or all of the items listed. The locations and
appearances of the items shown here may not match those of your model.
The oven's controls are accessed through its control panel and interactive touch display.
NOTE: Due to the sensitivity of the control panel, we have provided special instructions for cleaning the panel as well as the touch
control panel. See “General Cleaning” section for cleaning instructions.
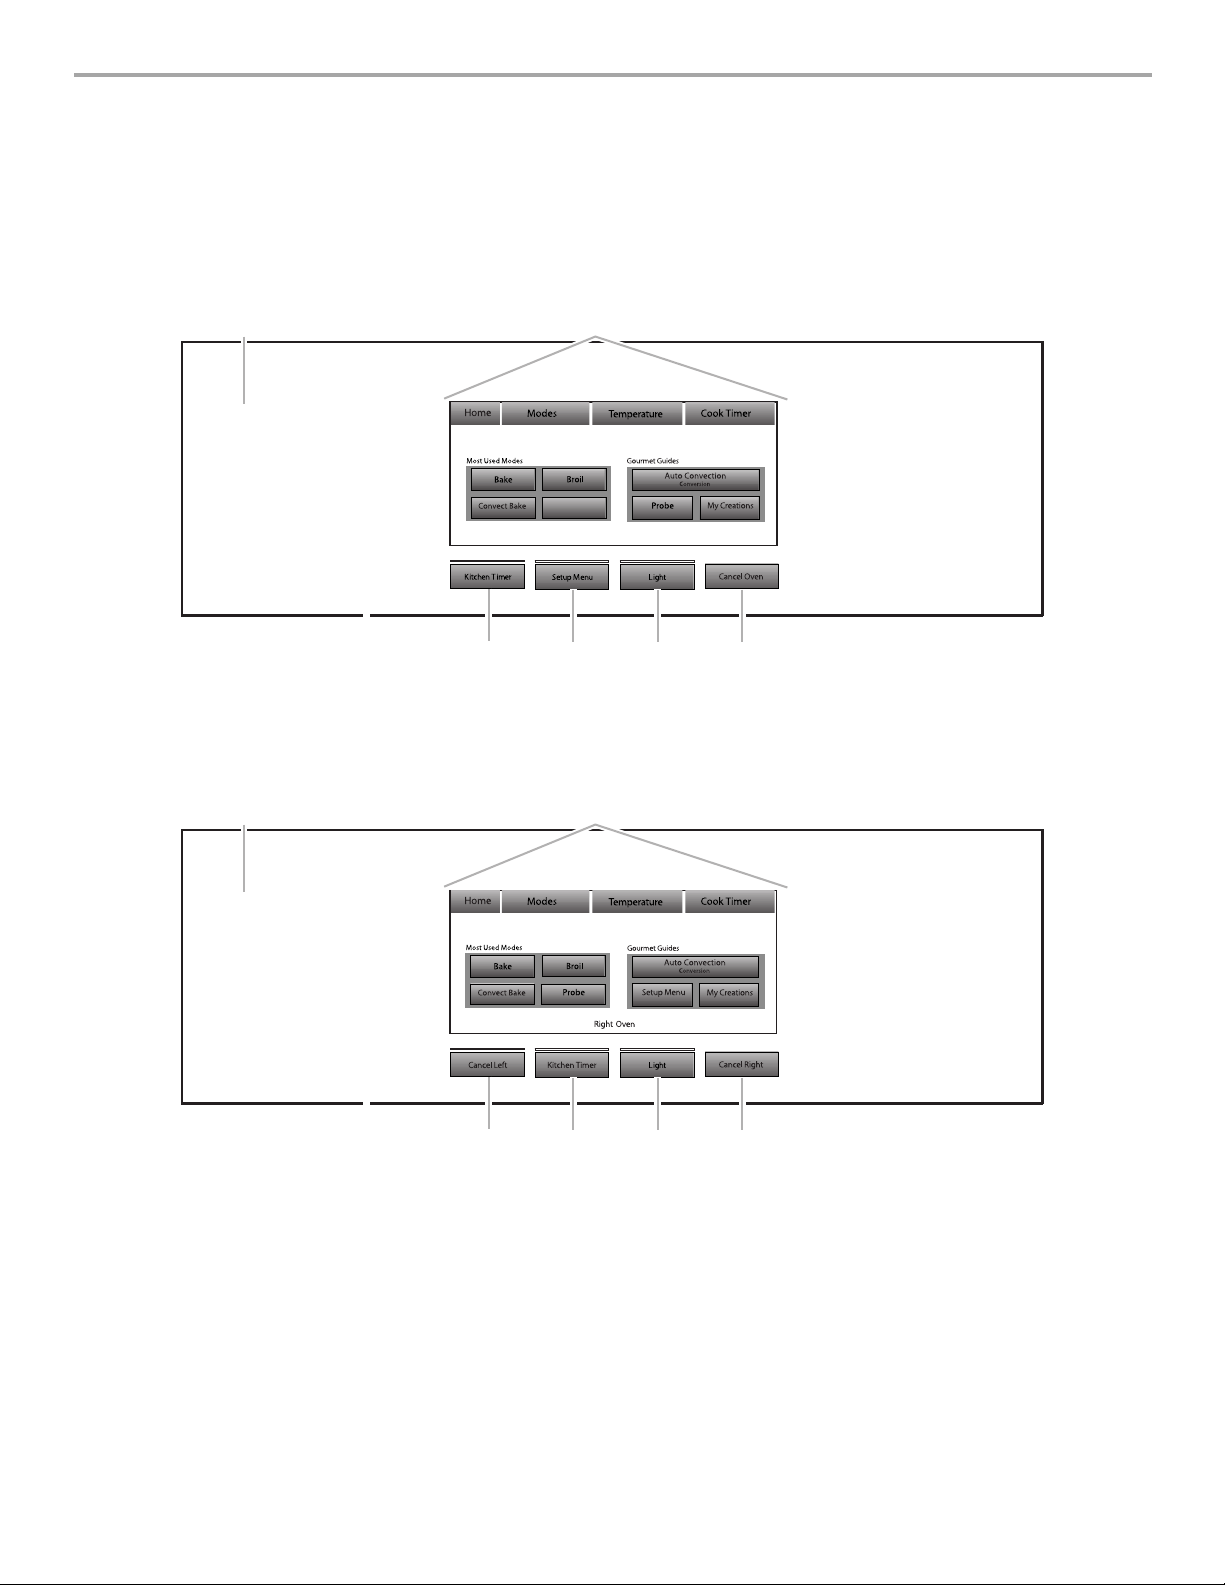
30" (76.2 cm) and 36" (91.4 cm) Oven Control Panel
A
48" (121.9 cm) Oven Control Panel
A
Keep Warm
F
A. Touch panel
B. Interactive touch display
C. Cancel oven
E
B
D. Oven light
E. Setup menu
F. Kitchen timer
B
D
C
12
F
A. Touch panel
B. Interactive touch display
C. Cancel right oven
E
D
D. Oven light
E. Kitchen timer
F. Cancel left oven
C
8. Enter current clock time using the on-screen number
Control Panel
The control panel houses the control menu and function controls.
The control pads are very sensitive, and require only a light touch
to activate.
For more information about the individual controls, see their
respective sections in this manual.
Welcome Guide
This appears on the display the first time the oven is powered up.
The Welcome Guide allows you to set up your new oven.
1. Select the language by touching English or Français.
2. Select temperature degree units by touching Fahrenheit or
Celsius.
3. Select YES or NO for Daylight Savings - Time Observed.
4. Touch NEXT.
5. Select clock units by touching AM/PM or 24-HOUR (military).
6. Touch ANALOG or DIGITAL for clock style.
7. Touch NEXT.
keyboard.
9. Touc h NEX T.
10. Select today’s date by using the on-screen number keyboard
and use the buttons “<“ and “>” to enter the month and year.
11. Select NEXT.
12. Select a screen appearance to match your oven.
13. Select DONE. This will save your adjustments.
14. See “Setup Menu” section for more detailed information.
Display
When the oven (s) are in use (active mode), the display shows the
clock, mode, oven temperature and timer, if set. If the timer is not
set, you can set it from this screen.
After approximately 2 minutes of inactivity, the display will go into
standby (sleep) mode and the backlight of the display will dim.
When the oven is in operation, the display will remain active.
During programming, the display shows menus and the
appropriate selections for the respective cooking function.
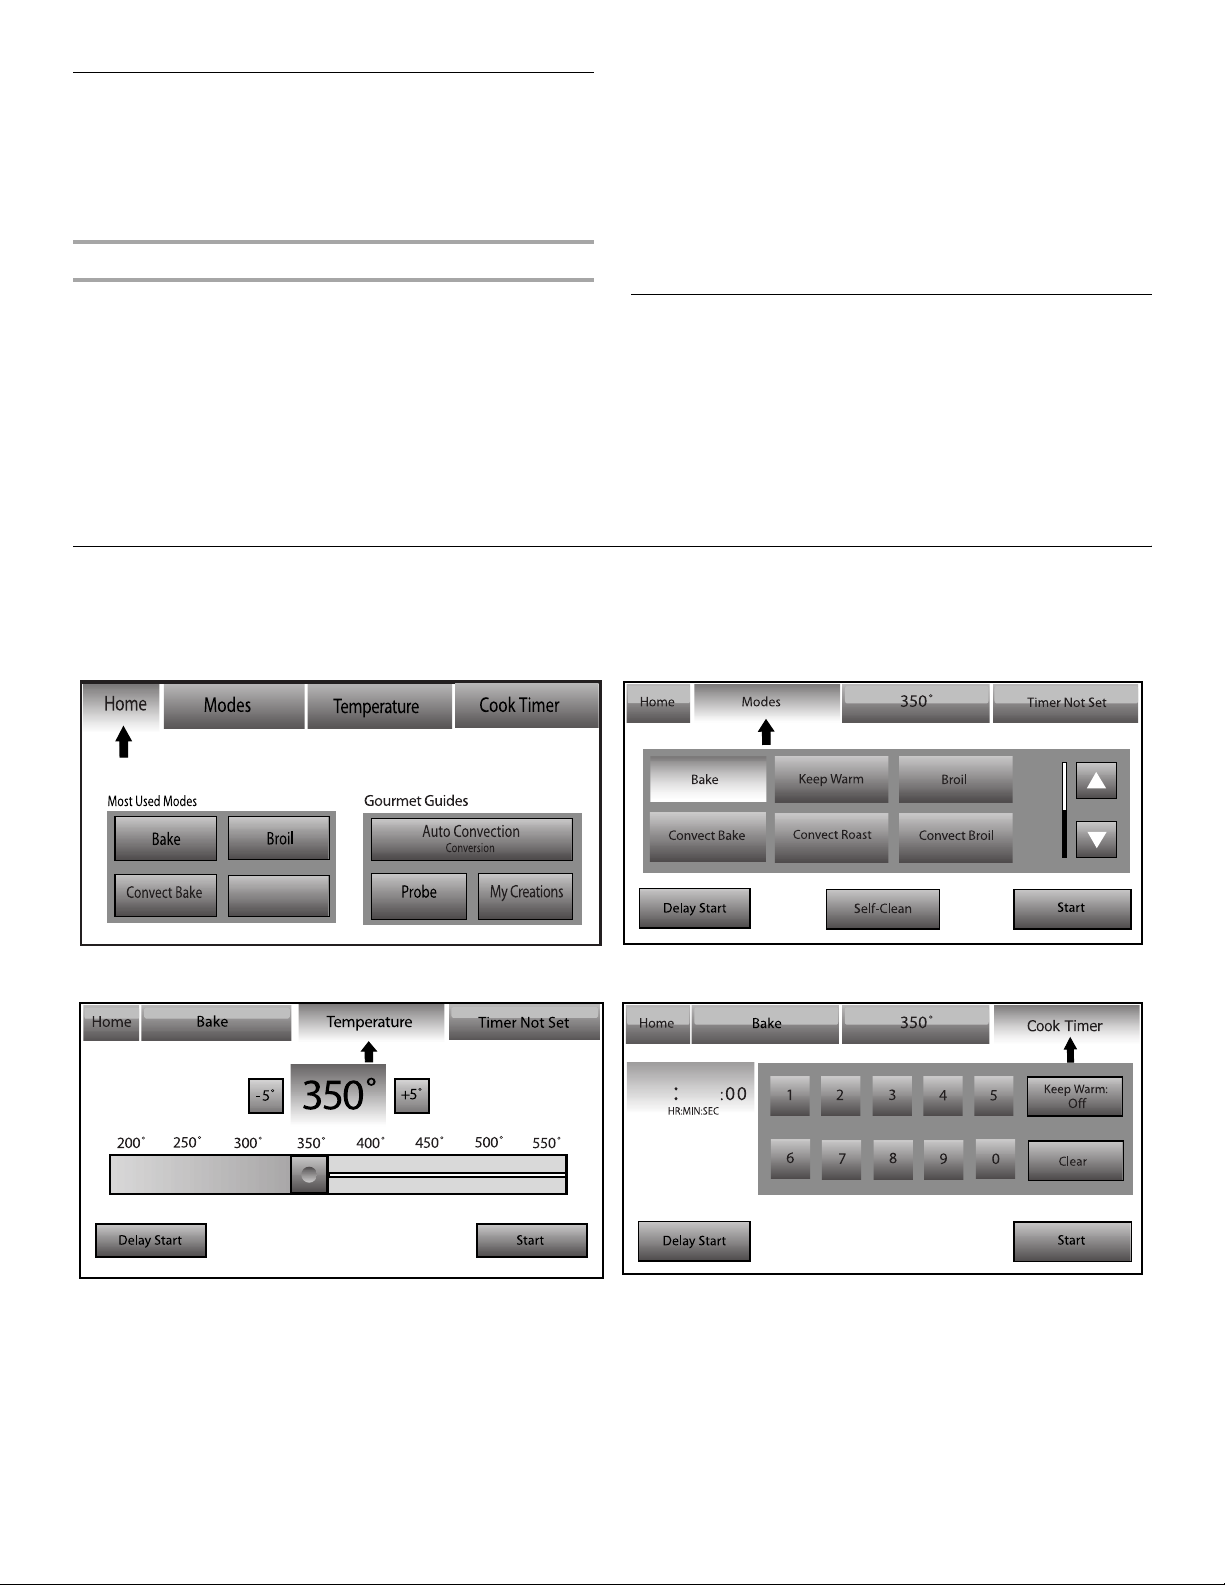
Interactive Touch Display
From the Home and Modes Menu, all automatic cooking programs can be activated; all manual cooking can be programmed; settings
can be adjusted; and instructions, preparation and tips can be accessed.
Home Menu Screen Modes Menu Screen
Keep Warm
Temperature Menu Screen Cook Time Menu Screen
-
-
-
-
13
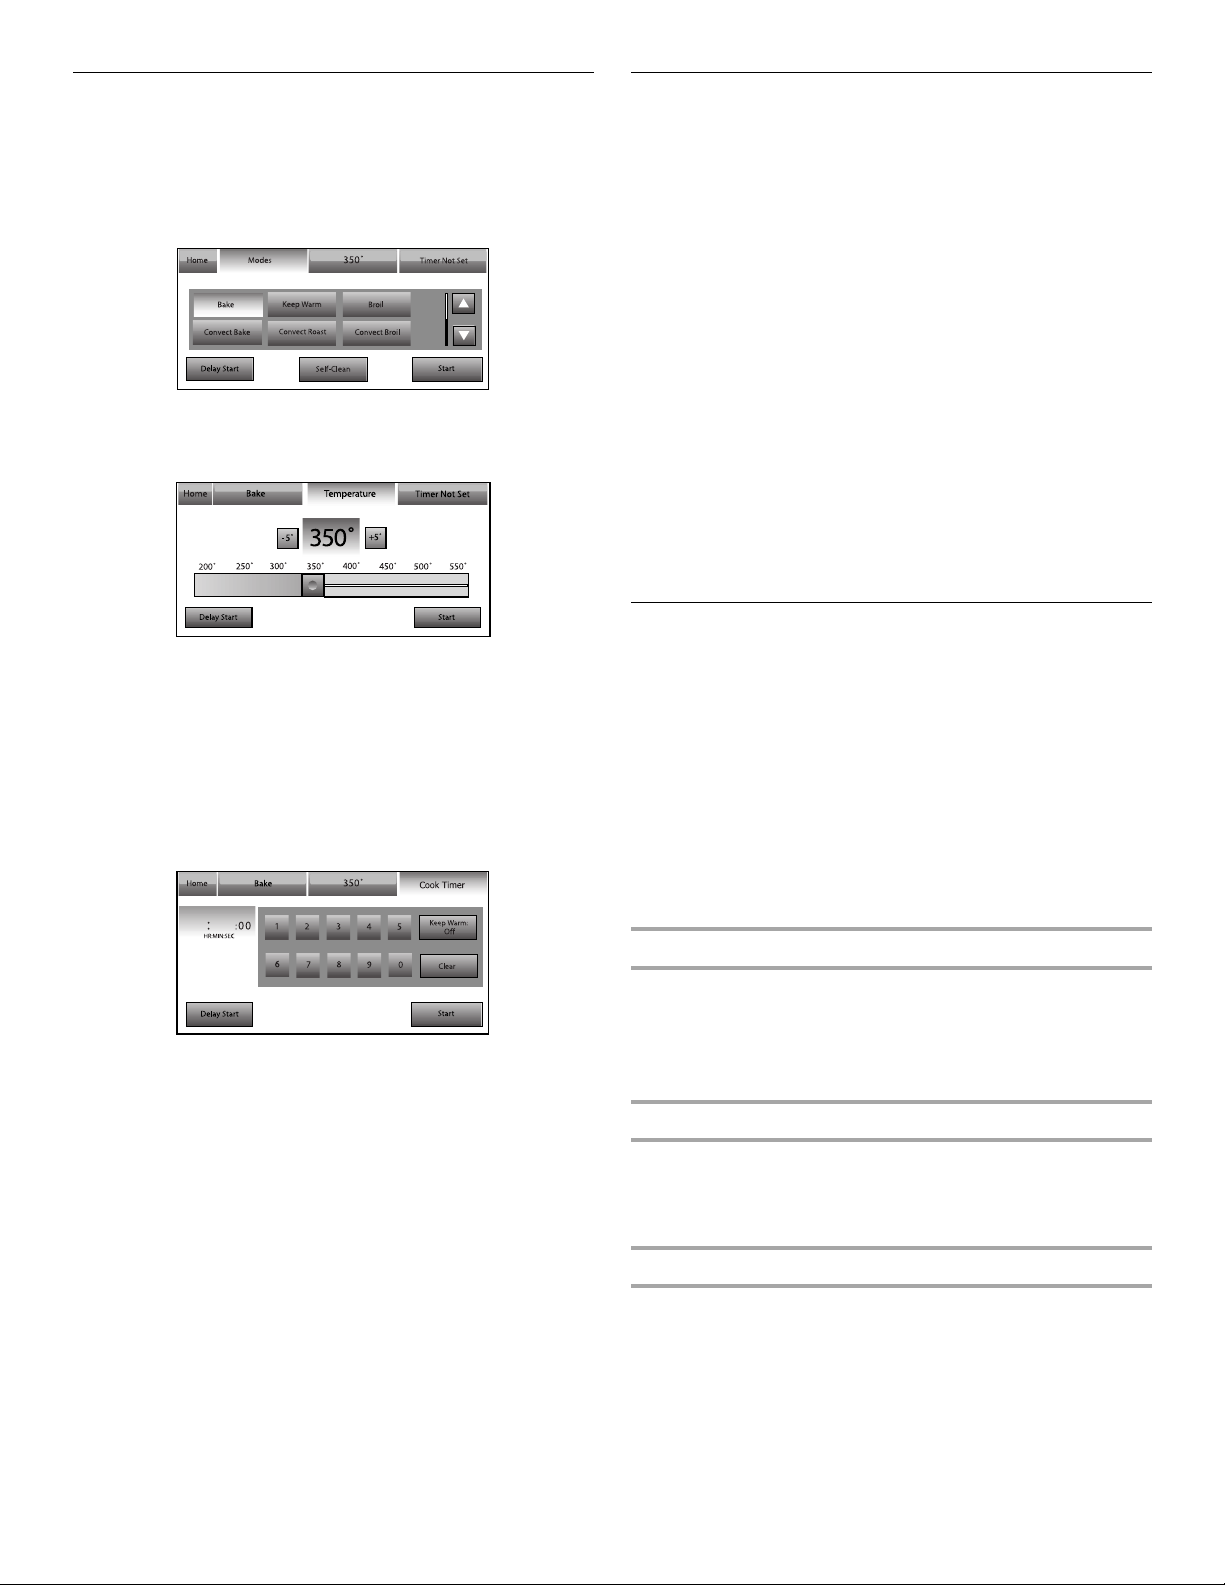
Menu Demonstration
The following demonstrates how to program a Bake cycle,
starting at the Modes menu.
1. Touch the MODES tab to move to the Modes menu.
2. From the Modes menu, touch BAKE. You will move to the
Temperature screen.
3. Use the slider to enter a desired cooking temperature or
touch the -5ºF (-1ºC) or +5ºF (+1ºC) buttons. The temperature
must be between 170ºF (77ºC) and 550ºF (288ºC).
4. Touch START to begin preheating the oven.
OR
5. If a Cook Time, Keep Warm™ or Delay Start function is
desired, touch TIMER NOT SET to enter the Cook Timer
screen.
To set a cook time, enter a cooking length using the onscreen number keyboard. A timer will alert you when cooking
ends. The time length may not exceed 12:00:00. See the
“Cook Timer” section for more information.
-
-
-
-
Kitchen Timer
The Kitchen Timer is an independent timer not associated with
the Cook Timers.
1. Touch the KITCHEN TIMER button anytime needed.
2. Enter the desired time (- - : - - : - -) using the on-screen
number keyboard.
3. Touch CLEAR to clear timer back to (- - : - - : - -).
4. Touch START TIMER to initiate the function.
5. Touch CLOSE to hide the Kitchen Timer panel.
While the Kitchen Timer is running, the timer is minimized to
the bar at the right-hand side of the screen.
6. To adjust the Kitchen Timer while running, touch ADJUST and
choose “Cancel timer” or use the on-screen number
keyboard to enter a new time.
7. If “Cancel timer” is touched, the timer is canceled and the
panel is hidden.
8. When the Kitchen Timer is complete, a beep will sound.
9. When time expires, it is possible to add extra time by
touching the Add More Time button. Use the on-screen
number keyboard to enter additional time.
10. To hide the panel, touch OK.
Setup Menu
This oven provides ability to control several of the default settings
and access information through the on-screen display. These
include: Lock Buttons Now, Automatic Lock, Self-clean, Sound
Volume, Set Time, Set Date, Clock Options, Sabbath Mode,
Screen Brightness, Screen Appearance, Language, Regional
Settings, Touchscreen Calibration, Temperature Calibration,
Learning Mode, Service Information and Reset All Settings.
To access the Setup menu:
1. Touch SETUP MENU.
2. Use the scroll bar on the right-hand of the screen to view and
access settings.
3. If the oven is in use, SETUP MENU is disabled.
Lock Buttons Now
6. (Optional) To set a delayed start, touch DELAY START and
SET DELAY. See “Delay Start” section for additional
information.
7. (Optional) To keep food warm after cooking ends, set Keep
Warm ON. See “Keep Warm™ Option” section for additional
information.
8. Press START to begin preheating the oven.
9. Place food in the oven when preheat signal sounds. The
screen will say “Insert food and Set Timer, if desired.”
10. Touch CANCEL (CANCEL LEFT or CANCEL RIGHT on
48" [121.9 cm] models) to turn off the oven.
14
The Lock Buttons Now function allows all the buttons to be
locked. This setting is automatically disabled if the Kitchen Timer
is running or the oven is in use.
Slide bar up on main screen above “Slide to unlock” to unlock
button/screen.
Automatic Lock
To activate the automatic lock function, press “Automatic Lock.”
Slide bar up on main screen to unlock buttons/screen. To
deactivate this function, press “Automatic Lock” in the Setup
Menu.
Set Time
1. From the Setup Menu, touch SET TIME.
2. Enter the time using the on-screen number keyboard. A valid
time must be entered in order to save the settings.
3. If Clear is pressed, the clock clears to 00:00
4. Choose AM or PM.
5. Touch SAVE. This will return you to the Clock Screen.
Date
Regional Settings
1. From the Setup Menu, touch SET DATE.
2. Enter the day using the on-screen number keyboard.
3. Choose the month using the “<“ or “>” buttons.
4. Choose the year using the “<“ or “>” buttons.
5. Touch SAVE. This will return you to the Clock Screen.
Clock Options
1. From the Setup Menu, touch CLOCK OPTIONS.
2. Select desired clock units: AM/PM or 24-HOUR (military).
3. Select ANALOG or DIGITAL for clock style.
4. Touch Save. This will return you to the Clock Screen.
Sound Volume
1. From the Setup Menu, touch SOUND VOLUME.
2. Adjust the timer, button press, or alert sounds; use the slider
bar to enter desired sound levels.
3. Touch ON/OFF to toggle between settings for start-up and
shut-down sounds. When “On,” the oven will make a sound
when it transitions in and out of idle mode. When “Off,” no
sounds will be made.
4. If the Cancel button is touched, the sounds settings will go to
the recommended level.
5. Touch SAVE. This will return you to the Clock Screen.
Screen Appearance
1. From the Setup Menu, touch REGIONAL SETTINGS.
2. Select a temperature unit: Fahrenheit or Celsius. Toggle
between °F/°C.
3. Select YES or NO to observe Daylight Saving Time.
4. Touch SAVE. This will return you to the Clock Screen.
Self-Clean
This setting is disabled while oven is in use. See the
“CustomClean™ Self-Cleaning with Adjustable Levels and Auto
Lock” section.
Sabbath Mode
The Sabbath Mode sets the oven to remain on in a bake setting
until turned off. A timed Sabbath Mode can also be set to keep
the oven on for only part of the Sabbath. When the Sabbath
Mode is set, only the number and start keys will function. No
tones will sound, and the display will not show messages or
temperatures changes. The heat source icons will appear lit on
the oven display throughout the Sabbath Mode.
When the oven door is opened or closed, the oven light will not
turn on or off and the heating elements will not turn on or off
immediately.
If a power failure occurs when the Sabbath Mode is set, the oven
will remain in Sabbath Mode but will no longer be actively
cooking. When power returns, the display will read “SABBATH
MODE - Power outage has occurred.” Touch CANCEL to return
to the normal operating mode (non-Sabbath Mode, not cooking).
1. From the Setup Menu, touch SCREEN APPEARANCE.
2. Select a screen appearance to match your oven.
3. Touch SAVE. This will return you to the Clock screen. The
following message will show: “You have selected a new
theme. The oven will reset momentarily. Please wait.” It will
take approximately 1 minute to restart the oven with the new
settings.
Screen Brightness
1. From the Setup Menu, touch SCREEN BRIGHTNESS.
2. Use the slider bar to adjust the screen brightness.
3. Choose “Dim The Screen” or “Turn-Off The Screen” for use
when the oven has been idle for 5 minutes.
4. If the Cancel button is touched, the screen brightness will go
to the recommended level and return you to the clock display
screen.
5. Touch SAVE. This will return you to the Clock Screen.
Language
1. From the Setup Menu, touch LANGUAGE.
2. From the Language Menu, select your language: English or
Français.
3. If Cancel button is touched, the language will go back to the
default setting.
4. Touch SAVE. This will return you to the Clock Screen.
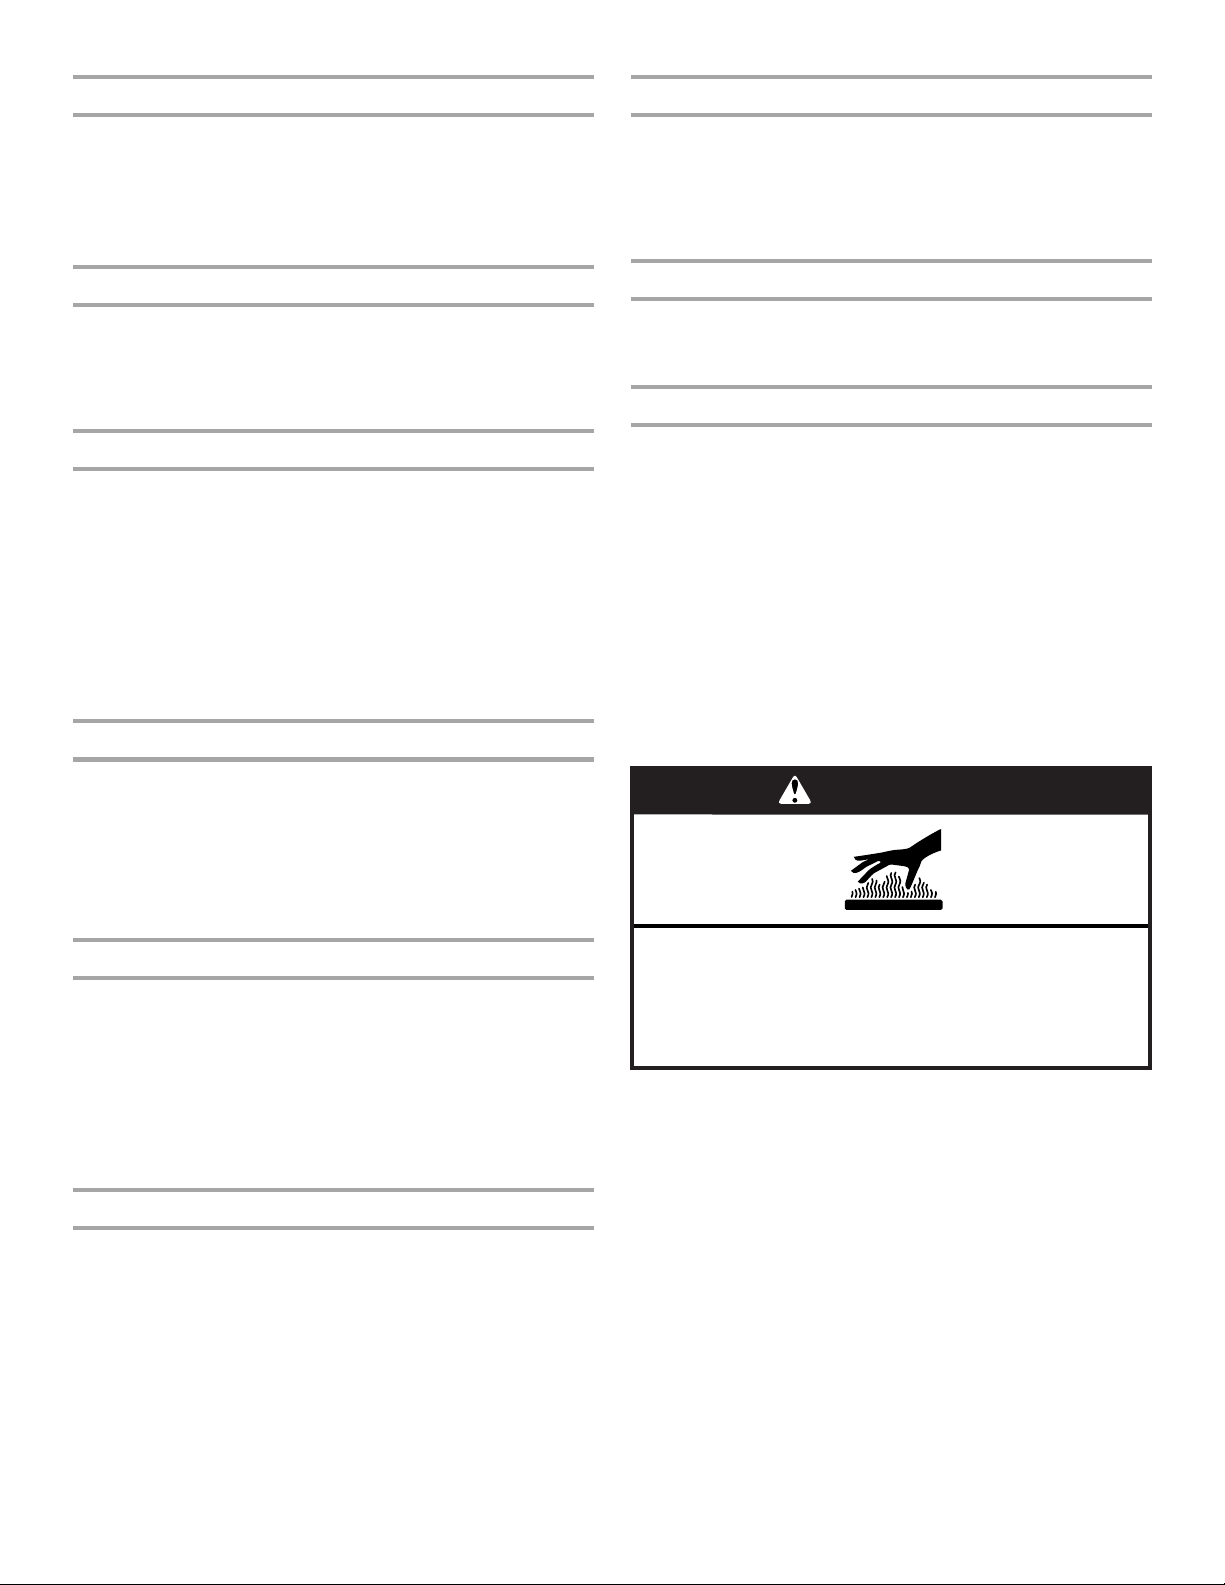
WARNING
Burn Hazard
Use an oven mitt to remove temperature probe.
Do not touch broil element.
Failure to follow these instructions can result in burns.
NOTE: If you touch Sabbath Mode while the temperature probe
is set, a message will appear saying “Probe not inserted.”
Remove the probe and touch NEXT to enter the Sabbath Mode.
Touch CANCEL to return to the Bake mode.
To Use Sabbath Mode:
The Sabbath Mode must be enabled each time it is used.
1. From the Setup Menu, scroll the bar until Sabbath Mode
appears and touch SABBATH MODE.
2. From the Sabbath Mode Menu, read the on-screen
instructions and touch OFF to turn Sabbath Mode on.
NOTE: Sabbath Mode disables the 12-hour shutoff. All lights
and displays are disabled so that no visible activity takes
place when the oven door is opened.
3. On 48" [121.9 cm] ranges, select the oven to set up by
pressing the Left Oven or Right Oven buttons.
15
4. Touch COOKING SETTING. To select the oven temperature,
use the slider to enter a desired temperature or touch the
-5°F (-1°C) or +5°F (+1°C) buttons to decrease or increase the
temperature. The temperature must be between 170°F (77°C)
and 550°F (288°C) or an invalid key alert occurs and the
default temperature appears on the screen.
5. Press NEXT.
6. If desired, set the Cook Timer by using the on-screen number
keyboard. The time length may not exceed 12:00:00. When
the timer ends, the oven cavity will stop heating.
7. Press NEXT.
8. On 48" [121.9 cm] ranges, repeat steps 1-8 to set the second
oven, if desired.
Temperature Calibration
1. From the Setup Menu, touch TEMPERATURE CALIBRATION.
2. On 48" (121.9 cm) ranges, select which oven to calibrate by
pressing LEFT OVEN or RIGHT OVEN.
3. Touc h NEX T.
4. Select the temperature offset. Press -1° button if oven seems
too hot or +1° button if oven seems too cold. The oven can
be adjusted +/- 35°F.
5. Touch SAVE and the adjustment has been made.
Touchscreen Calibration
WARNING
Food Poisoning Hazard
Do not let food sit in oven more than one hour before
or after cooking.
Doing so can result in food poisoning or sickness.
9. (Optional) To set a Delayed Start, touch DELAY START and
set the desired time. See the “Delay Start” section for more
information.
10. Press START to begin heating the oven.
11. Press CANCEL OVEN (CANCEL LEFT or CANCEL RIGHT on
48" [121.9 cm] models) to turn off the oven.
To Disable Sabbath Mode:
Sabbath Mode will automatically be disabled when a cook time
ends, or can be disabled by pressing Cancel. “Sabbath Mode:
OFF” will appear on screen. To program a new cycle, follow steps
2 - 11 in the “To Use Sabbath Mode” section.
To Change Temperature:
The oven temperature can be changed when the oven(s) are in
the Sabbath Mode. No tones will sound, and the display will not
change. Touch the -25°F (-14°C) or +25°F (+14°C) buttons once
for each 25°F (14°C) temperature change desired.
NOTE: On double ovens, if both ovens are operating in Sabbath
Mode, the temperature of each oven can be changed
independently. Touch the -25°F (-14°C) or +25°F (+14°C) buttons
for the desired oven.
IMPORTANT: If the buttons on the screen are difficult to touch
accurately, you may need to calibrate the touchscreen.
1. From the Setup Menu, touch TOUCHSCREEN
CALIBRATION.
2. Touc h NEX T.
3. You will be asked to touch, hold and release 3 different
targets to calibrate.
4. You will be asked again to touch the same targets in
10 seconds. If calibration fails, the process will restart at
Step 2.
5. Test calibration by moving the circle around the screen.
Ensure you can reach all the corners.
6. Touch TRY AGAIN to run calibration again.
7. If CANCEL is touched, the Touchscreen Calibration will be
canceled.
8. Touch SAVE. This will return you to the Clock Screen.
Reset All Settings To Factory Defaults
1. From the Setup Menu, touch RESET ALL SETTINGS.
2. Touch RESET or CANCEL.
3. If Reset is touched, the following settings will be lost: most
used modes, My Creations, Date/Time, and Language. The
Welcome Guide will appear to help you reset these settings.
Service Information
For more information, see the “Assistance or Service” section.
1. From the Setup menu, touch SERVICE INFORMATION.
2. Choose ON or OFF for Demo Mode. The default option is off
when connected to 240V and on when connected to 120V.
3. If CANCEL is touched, the Service Information will go back to
the default setting.
4. Touch SAVE. This will return you to the Clock Screen.
16
OVEN USE
A
Odors and smoke are normal when the oven is used the first few
times, or when it is heavily soiled.
During oven use, the heating elements will not remain on, but will
cycle on and off throughout oven operation.
IMPORTANT: The health of some birds is extremely sensitive to
the fumes given off. Exposure to the fumes may result in death to
certain birds. Always move birds to another closed and wellventilated room.
Closed and Engaged Position
B
Aluminum Foil
IMPORTANT: To avoid permanent damage to the oven bottom
finish, do not line the oven bottom with any type of foil or liner.
■ For best cooking results, do not cover entire rack with foil
because air must be able to move freely.
■ To catch spills, place foil on rack below dish. Make sure foil is
at least ½" (1.3 cm) larger than the dish and that it is turned
up at the edges.
Positioning Racks and Bakeware
IMPORTANT: To avoid permanent damage to the porcelain
finish, do not place food or bakeware directly on the oven door or
bottom.
RACKS
■ Position racks before turning on the oven.
■ Do not position racks with bakeware on them.
■ Make sure racks are level.
5
4
3
2
1
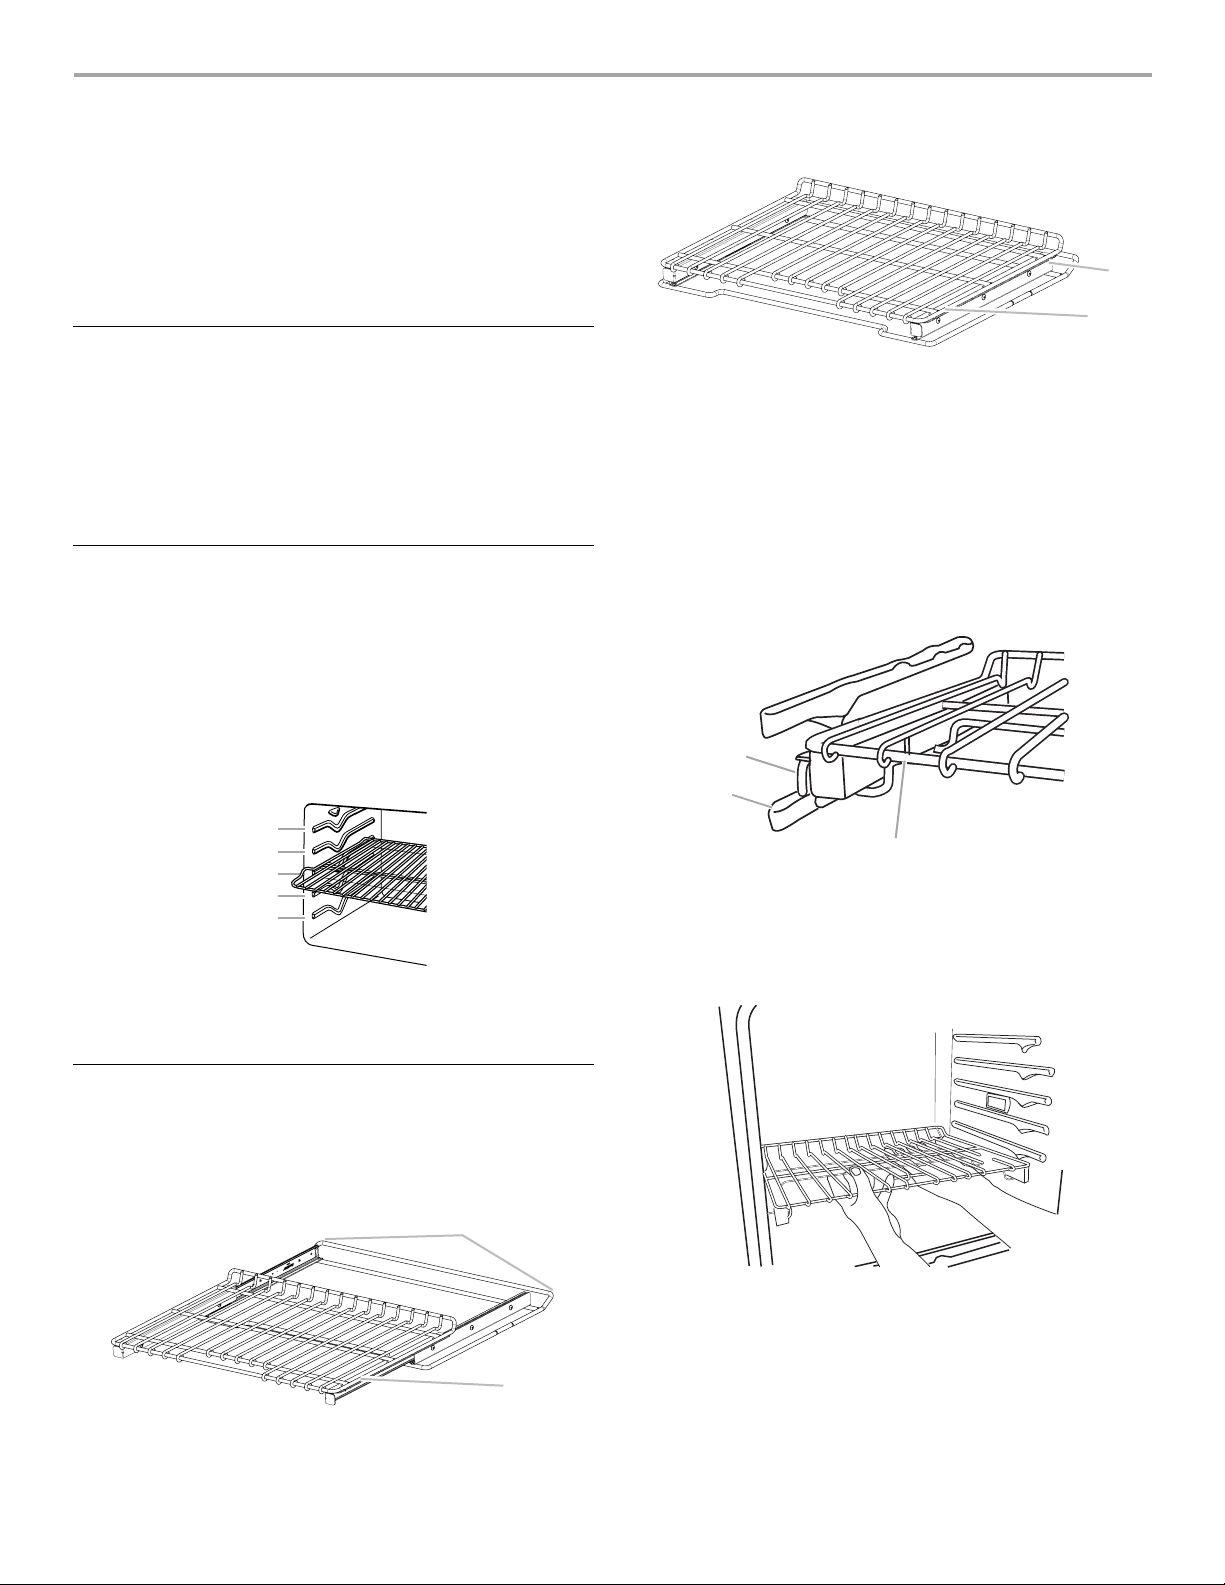
A. Extendable roller rack
B. Sliding shelf
To Remove the Extendable Roller Rack:
1. Slide the rack in completely so that it is closed and engaged
with the sliding shelf.
2. Using 2 hands, lift up on the front edge of the rack and the
sliding shelf together. Slowly push both to the back wall of the
oven so the front edge of the sliding shelf sits on the rack
guide located on the sides of the oven.
The front edge of the rack and the sliding shelf should be
higher than the back edge.
A
B
C
A. Sliding shelf
B. Rack guide
C. Extendable roller rack
BAKEWARE
To cook food evenly, hot air must be able to circulate. Allow
2" (5.0 cm) of space around bakeware and oven walls.
Extendable Roller Rack
The extendable roller rack allows easy access to position and
remove food in the oven. It can be used in rack positions 1
through 4. The extendable roller rack will not fit in position 5.
Open Position
A
B
A. Extendable roller rack
B. Sliding shelf
3. Using 2 hands, lift up the back of the rack and the sliding
shelf so that the back and front are level on the rack guide.
4. Pull the rack and the sliding shelf out.
To Replace Extendable Roller Rack
1. Using 2 hands, grasp the front of the closed rack and the
sliding shelf. Place the closed rack and the sliding shelf on
the rack guide.
2. Slowly push the rack and the sliding shelf to the back of the
oven until the back edge of the sliding shelf drops.
17
3. Pull the rack and the sliding shelf slightly forward until the
front edge drops and the sliding shelf is on the rack guide.
To avoid damage to the sliding shelves, do not place more than
25 lbs (11.4 kg) on the rack.
Do not clean the extendable roller rack in a dishwasher. It may
remove the rack’s lubricant and affect its ability to slide.
See the “General Cleaning” section for more information.
Mode Default
Temperature
Bake 350°F (177°C) 170-550°F (77-288°C)
Broil 550°F (288°C) 450-550°F (232-238°C)
K. Warm 170°F (77°C) 150-200°F (66-93°C)
Range
Meat Thermometer
On models without a temperature probe, use a meat
thermometer to determine whether meat, poultry and fish, are
cooked to the desired degree of doneness. The internal
temperature, not appearance, should be used to determine
doneness. A meat thermometer is not supplied with this
appliance. Follow manufacturer's directions for using a meat
thermometer.
Oven Vent
A
A. Oven vent
The oven vent should not be blocked or covered since it allows
the release of hot air and moisture from the oven. Blocking or
covering the vent will cause poor air circulation, affecting cooking
and cleaning results. Do not set plastics, paper or other items
that could melt or burn near the oven vent.
Cvt. Bake 325°F (163°C) 170-550°F (77-288°C)
Cvt. Roast 350°F (177°C) 170-550°F (77-288°C)
Cvt. Broil 550°F (288°C) 450-550°F (232-238°C)
Cvt. Slow Roast 4h 275°F (135°C) 250-300°F (120-150°C)
Cvt. Slow Roast 8h 225°F (107°C) 200-250°F (93-120°C)
Cvt. Slow Roast 12h 185°F (85°C) 170-225°F (77-107°C)
Cvt. Pastry 325°F (163°C) 170-550°F (77-288°C)
Cvt. Pizza 400°F (204°C) 170-550°F (77-288°C)
Proof 100°F (38°C)
Rapid Proof 200°F (93°C)
5. (Optional) For cook timer, enter a cooking length using the
on-screen number keyboard to set a timer to alert you when
cooking ends. The time length may not exceed 12 hours. See
“Cook Timer” section for additional information.
6. (Optional) To keep food warm after cooking ends, turn Keep
Warm ON. See the “Keep Warm™ Option” section for
additional information.
7. (Optional) To set a delayed start, touch DELAY START and set
the desired time. See the “Delay Start” section for additional
information.
8. Press START to begin cooking.
9. Press CANCEL OVEN (CANCEL LEFT or CANCEL RIGHT on
48" [121.9 cm] models) to turn off the oven.
Cooling Fan
The oven has a 2-speed cooling fan motor.
When the oven temperature reaches 475°F (246°C), or is in the
Self-Cleaning cycle, the fan will operate at its highest speed to
increase airflow and better exhaust the hotter air through the
oven vent(s). An increase in noise may be noticeable until the
oven cools.
Cooking Functions
The Home Tab allows for easy access to the Most Used Modes
and Culinary Assistants.
1. Touch the MODES tab to move to the Modes menu.
2. From the Modes menu, select one of the following options:
Bake, No Preheat 1-rack Cooking, Broil, Keep Warm™,
Convect Bake, Convect Bake Rapid Preheat, Convect Broil,
Convect Pastry, Convect Roast, Convect Slow Roast, True
Convect, and Proof.
3. Touch the Temperature tab to move to the Temperature
screen.
4. The default temperature and its range is shown in the
following table. To change the temperature, move the slider to
enter a desired cooking temperature or touch the -5ºF (-1ºC)
or +5ºF (+1ºC) buttons.
My Creations
My Creations allows the customization of cooking processes.
When My Creations is selected from the main menu a list of
existing creations is presented along with the ability to create
more.
1. From the Home tab, touch MY CREATIONS.
If nothing has yet been added to My Creations, a welcome
screen will appear, explaining the feature and providing the
option to create a new entry. It should read: “Save frequent
recipe settings for easy access in the future! You may also
link multiple modes together. For example, create a favorite
lasagna recipe which bakes for 40 minutes, then broils
5 minutes at the end to brown the cheese.”
2. Touch CREATE NEW.
3. Select the desired cooking mode: Bake, Keep Warm™, Broil,
Convect Bake, Convect Roast, Convect Broil, Convect
Frozen Pizza, Convect Slow Roast, Convect Pastry, Proof, or
Rapid Proof.
4. Touc h NEX T.
5. Select the desired cooking temperature. Use the slider to
enter a desired cooking temperature or touch the 5ºF (-1ºC)
or +5ºF (+1ºC) buttons, then touch NEXT.
6. Select how to monitor cooking: TIMER (alerts you when a
cook timer is complete), PROBE (alerts you when a target
probe temperature is reached), or NONE (no alerts).
18
7. If Timer is chosen, enter the cook timer length using the
B
C
D
on-screen number keyboard and touch NEXT.
WARNING
Burn Hazard
Use an oven mitt to remove temperature probe.
Do not touch broil element.
Failure to follow these instructions can result in burns.
8. The Probe can be used only with Bake, Convect Bake and
Convect Roast. If Probe is chosen, select the probe target
internal temperature. Use the -5ºF (-1ºC) or +5ºF (+1ºC)
buttons to decrease or increase the set temperature, then
touch NEXT.
9. Touch ADD STAGE to enter new stage information.
10. Review your settings. Touch EDIT to re-enter the settings or
touch DELETE to immediately delete the stage.
11. Touch SAVE or SAVE & START.
When saving, you can enter a name for the food using an
on-screen keyboard. Press a keyboard key repeatedly to
cycle through its letters. For example, press “ABC” once to
enter “a,” twice to enter “b” and three times to enter “c.” After
2 seconds, the letter is accepted, and cursor moves to the
next position. A name cannot exceed 40 characters,
including spaces. Touch DELETE to delete the last character
in the text box.
12. Touch OK.
13. NOTE: If you would like to edit after saving the settings, enter
into My Creations from the Home Tab. Select the setting
name you would like to edit and touch EDIT at the bottom of
screen. Select EDIT for the steps you want to edit then enter
new settings.
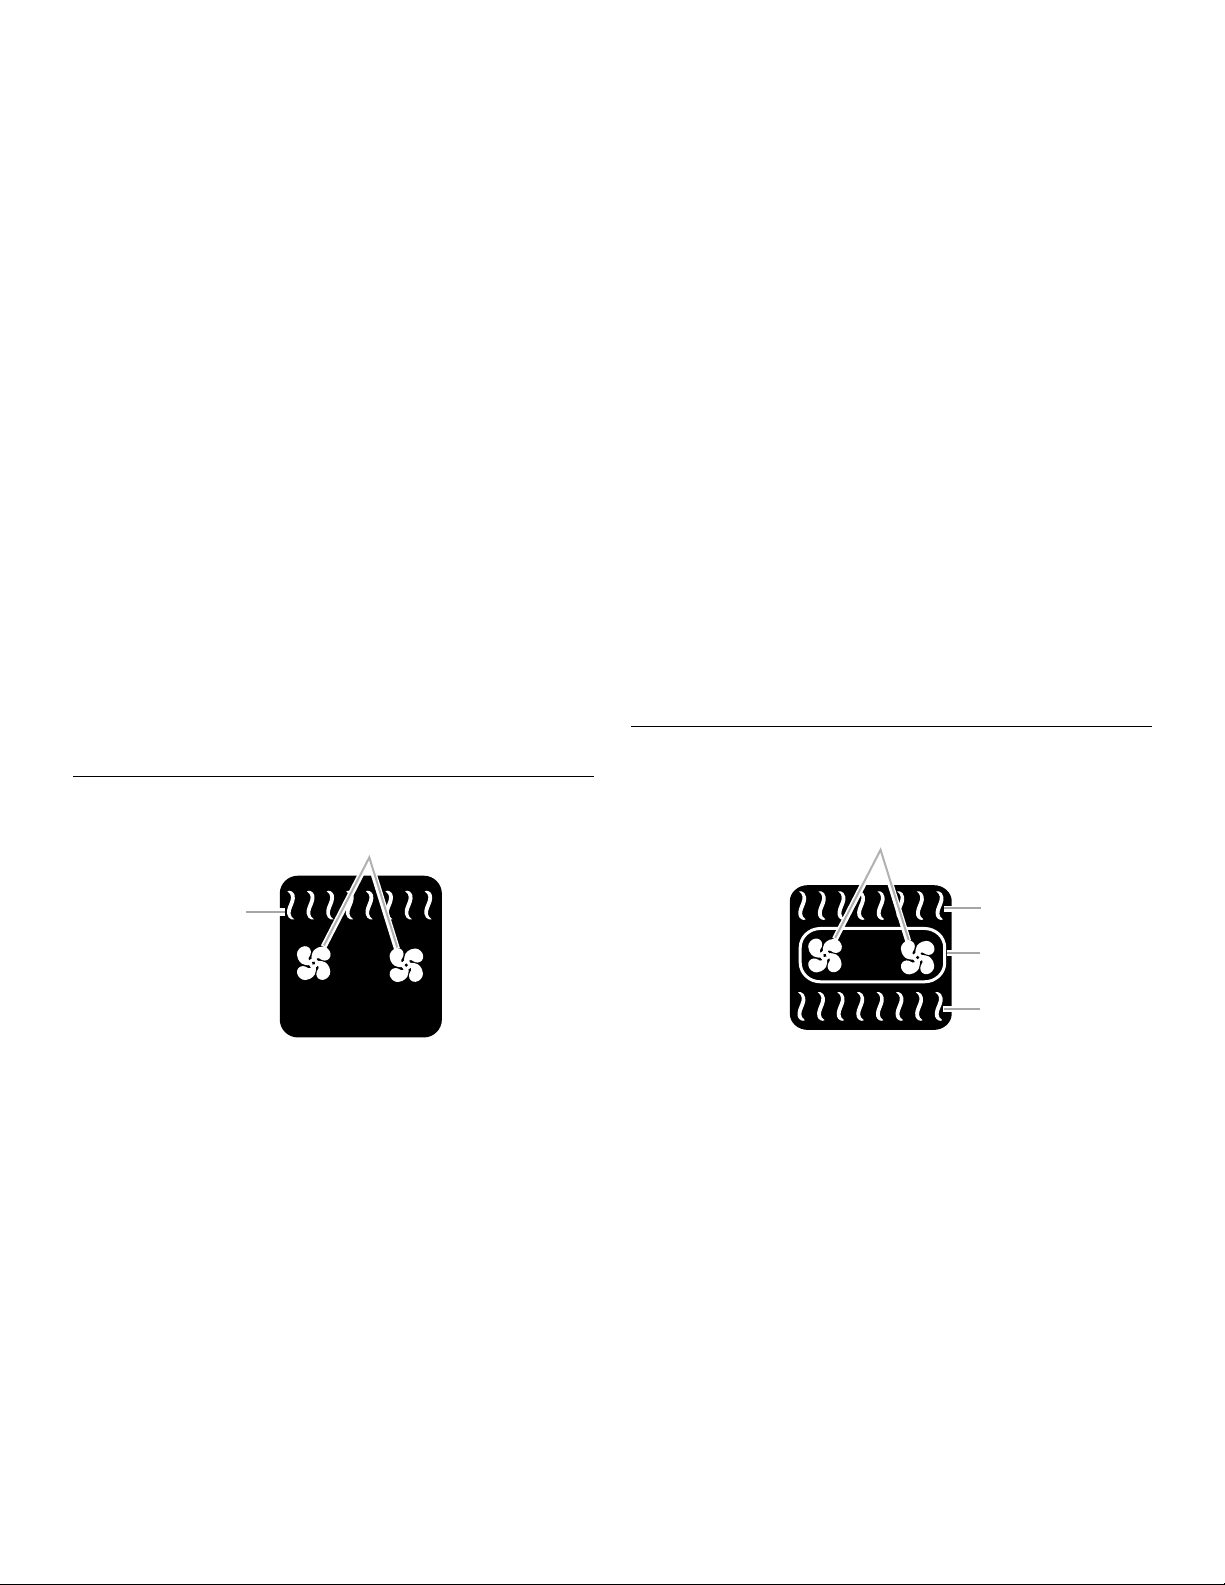
Bake
During baking, the appropriate heating elements and fan(s) will
cycle on and off in intervals to maintain the oven temperature.
Bake is used to cook up to 2 racks of food. For best results, allow
the oven to preheat prior to placing food in the oven.
A
Before Using Bake:
Before using Bake, see the “Positioning Racks and Bakeware”
section and the following tips for rack positions.
Rack positions
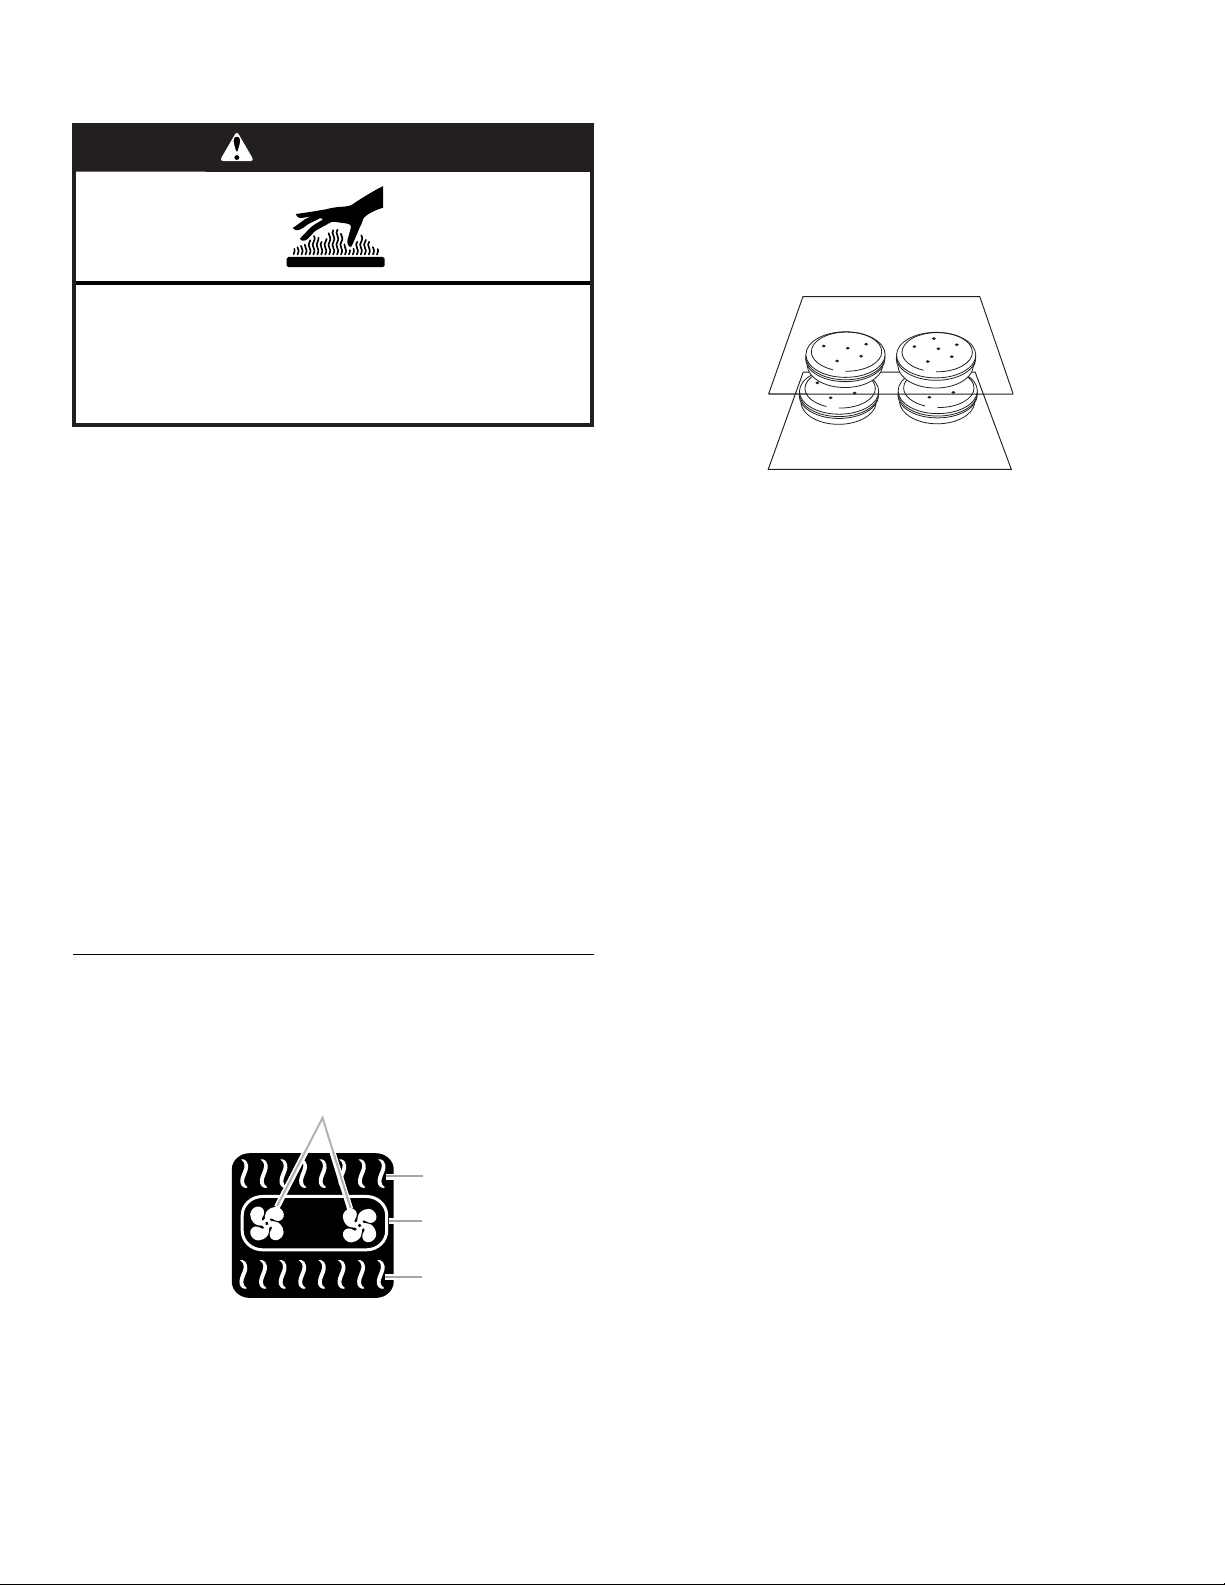
1-rack baking: 3
2-rack baking: 2 and 4
For meat and poultry: 2
For best results when baking cakes on 2 racks, use racks 4 and 2
for baking. Place the cakes on the racks as shown.
To Use Bake:
1. Touch MODES to move to the Modes menu.
2. From the Modes menu, touch BAKE.
3. After touching Bake, you will move to the Temperature
screen, or you may touch the Temperature tab to move to the
Temperature screen.
Use the slider to enter a desired cooking temperature or
touch the -5°F (-1°C) or +5°F (+1°C) buttons. The temperature
must be between 170°F (77°C) and 550°F (288°C).
4. Touch START to begin preheating oven.
OR
5. If a programmed cook time is desired, touch TIMER NOT SET
to enter the Cook Timer screen. Enter a cooking length using
the on-screen number keyboard to set a timer to alert when
cooking ends. The cook time may not exceed 12:00:00. The
oven will turn off when the cook time expires.
6. (Optional) To keep food warm after a programmed cook timer
ends, press KEEP WARM ON from the Cook Timer screen.
See the “Keep Warm™ Option” section for additional
information.
7. (Optional) To set a delayed start with a cook time, touch the
TIMER NOT SET/COOK TIMER screen and enter desired
cook time. Select DELAY START, set the desired start time
and touch SET DELAY. To set only a delay start, touch DELAY
START from the temperature tab, set the desired time and
touch SET DELAY.
8. Touch START to begin cooking or to activate Delay Start.
9. To change a mode, temperature or cook time while the oven
is active, touch the appropriate tab. Make a new selection
and touch OK.
10. Press CANCEL OVEN (CANCEL LEFT or CANCEL RIGHT on
48" [121.9 cm] models) to turn off the oven.
A. Convection fan
B. Broil element
C. Convection element
D. Bake element
If the oven door is opened during baking, the heating elements
will turn off approximately 30 seconds after the door is opened.
They will turn on again approximately 30 seconds after the door
is closed.
19
Broiling uses direct radiant heat to cook food.
A
A. Broil
The element cycles on and off in intervals to maintain the oven
temperature.
If the oven door is opened during broiling, the broil element
will turn off in approximately 30 seconds. When the oven door is
closed, the elements will come back on approximately
30 seconds after the door is closed.
■ For best results, use a broiler pan and grid. It is designed to
drain juices and help avoid spatter and smoke.
If you would like to purchase a Broiler Pan Kit, it may be
ordered. See “Assistance or Service” section to order. Ask for
Part Number W10123240.
■ For proper draining, do not cover the grid with foil. The
bottom of the broiler pan may be lined with aluminum foil for
easier cleaning.
■ Trim excess fat to reduce spattering. Slit the remaining fat on
the edges to avoid curling.
■ Pull out oven rack to stop position before turning or removing
food. Use tongs to turn food to avoid the loss of juices. Very
thin cuts of fish, poultry or meat may not need to be turned.
■ After broiling, remove the pan of food from the oven.
Drippings will bake on the pan if left in the heated oven,
making cleaning more difficult.
To Use Broil:
Before broiling, position rack according to the Broiling Chart.
When broiling, changing the temperature allows more precise
control. The lower the temperature, the slower the cooking.
Thicker cuts and unevenly shaped pieces of meat, fish and
poultry may cook better at lower broiling temperatures.
Position food on the grid on the broiler pan, then place it in the
center of the oven rack with the longest side parallel to the door.
Close the door. It is not necessary to wait for the oven to preheat
before putting food in unless recommended in the recipe.
1. Place food in oven.
2. Touch MODES tab to move to the Modes menu.
3. Touch BROIL.
4. Touch the Temperature tab to move to the Temperature
screen.
Use the slider to enter a desired cooking temperature or
touch the -5°F (-1°C) or + 5°F (+1°C) buttons. The
temperature must be between 450°F (232°C) and
550°F (288°C).
5. Touch START to begin cooking.
OR
6. If a programmed cook time is desired, touch TIMER NOT SET
to enter the Cook Timer screen. Enter a cooking length using
the on-screen number keyboard to set a timer to alert when
cooking ends. The cook time may not exceed 12:00:00. The
oven will turn off when the cook time expires.
Broil
7. (Optional) To keep food warm after a programmed cook timer
ends, press KEEP WARM ON from the Cook Timer screen.
See the “Keep Warm™ Option” section for additional
information.
8. (Optional) To set a delayed start with a cook time, touch the
TIMER NOT SET/COOK TIMER screen and enter desired
cook time. Select DELAY START, set desired start time and
touch SET DELAY. To set only a delay start, touch DELAY
START from the temperature tab, set the desired time and
touch SET DELAY.
9. Touch START to begin cooking or to activate Delay Start.
10. To change a mode, temperature or cook time while the oven
is active, touch the appropriate tab. Make a new selection
and touch OK.
11. Press CANCEL OVEN (CANCEL LEFT or CANCEL RIGHT on
48" [121.9 cm] models) to turn off the oven.
BROILING CHART
For best results, follow the chart below. For diagram, see the
“Positioning Racks and Bakeware” section.
A temperature setting of 550°F (288°C) is recommended for most
foods. Bone-in chicken pieces should be broiled at 450°F (232°C)
Times are guidelines only and may need to be adjusted for
individual foods and tastes. Preheat if required by the recipe.
FOOD COOK TIME
(in minutes)
Beef
Steak
1" to 1¹⁄₄" (2.5 cm to 3 cm) thick
medium-rare
medium
well-done
Pork
Pork chops
1" (2.5 cm) thick
medium 11-16
Lamb
Lamb chops
1" (2.5 cm) thick
medium-rare
medium
Ground Meats
Ground beef, pork or lamb patties*
³⁄₄" (2 cm) thick
well-done 10-14
Chicken
Chicken
bone-in pieces**
(2" to 2¹⁄₂" [5 cm to 6.3 cm])
boneless pieces (4 oz, [113 g])
Fish
Fish
Fillets ¹₂" to ³⁄₄" (1.25 to 2 cm) thick
Steaks 1" (2.5 cm) thick
*Place up to 12 patties, equally spaced, on broiler grid.
**A temperature setting of 450° (232°C) is recommended.
6-12
10-15
13-18
6-13
11-16
25-35
11-17
5-9
12-17
20
Keep Warm™ Option
B
C
D
WARNING
Food Poisoning Hazard
Do not let food sit in oven more than one hour before
or after cooking.
Doing so can result in food poisoning or sickness.
IMPORTANT: Food must be at serving temperature before
placing it in the warmed oven. Food may be held up to 1 hour;
however, breads and casseroles may become too dry if left in the
oven during the Keep Warm™ function.
The Keep Warm™ option allows hot cooked foods to stay at
serving temperature. It can also be used at the end of a timed
cook.
To Use Keep Warm™ Option:
1. Place food in oven.
2. Touch MODES to move to the Modes menu.
3. From the Modes menu, touch KEEP WARM.
4. Touch the Temperature tab to move to the Temperature
screen.
Use the slider to enter a desired cooking temperature or
touch the -5ºF (-1ºC) or +5ºF (+1ºC) buttons. The temperature
must be between 150ºF (66ºC) and 200ºF (93ºC).
5. Touch START to begin Keep Warm™ cycle.
6. If a Cook Time, Keep Warm™ or Delay Start function is
desired, touch TIMER NOT SET to enter the Cook Time
screen or touch the Delay Start button from the Temperature
tab.
Enter a cooking length using the on-screen number keyboard
to set a timer to be alerted when cooking ends. The time
length may not exceed 12:00:00.
7. (Optional) To set delayed start, touch DELAY START and set
desired time. See “Delay Start” section for additional
information.
8. Touch START to begin Keep Warm™ cycle.
9. Touch CANCEL (CANCEL LEFT or CANCEL RIGHT on
48" [121.9 cm] models) to turn off the oven.
To Use Keep Warm™ Option at the End of a Cooking
Cycle:
The Keep Warm™ Option can be set up to come on at the end of
a cooking cycle. Activate Keep Warm while setting up the
cooking cycle.
1. During setup of a cooking cycle, touch the TIMER NOT SET/
COOK TIME screen.
2. Touch KEEP WARM WHEN DONE and toggle to ON.
The oven will automatically go into Keep Warm™ mode when
the cook timer ends.
3. If you want to change the Keep Warm™ temperature during
the Keep Warm™ cycle, touch the programmed temperature
at the top of the screen. Adjust temperature and touch OK.
4. To change the mode, touch the programmed mode at the top
of the screen. Select the new mode and touch OK.
5. Touch CANCEL (CANCEL LEFT or CANCEL RIGHT on
48" [121.9 cm] models) to turn off the oven.
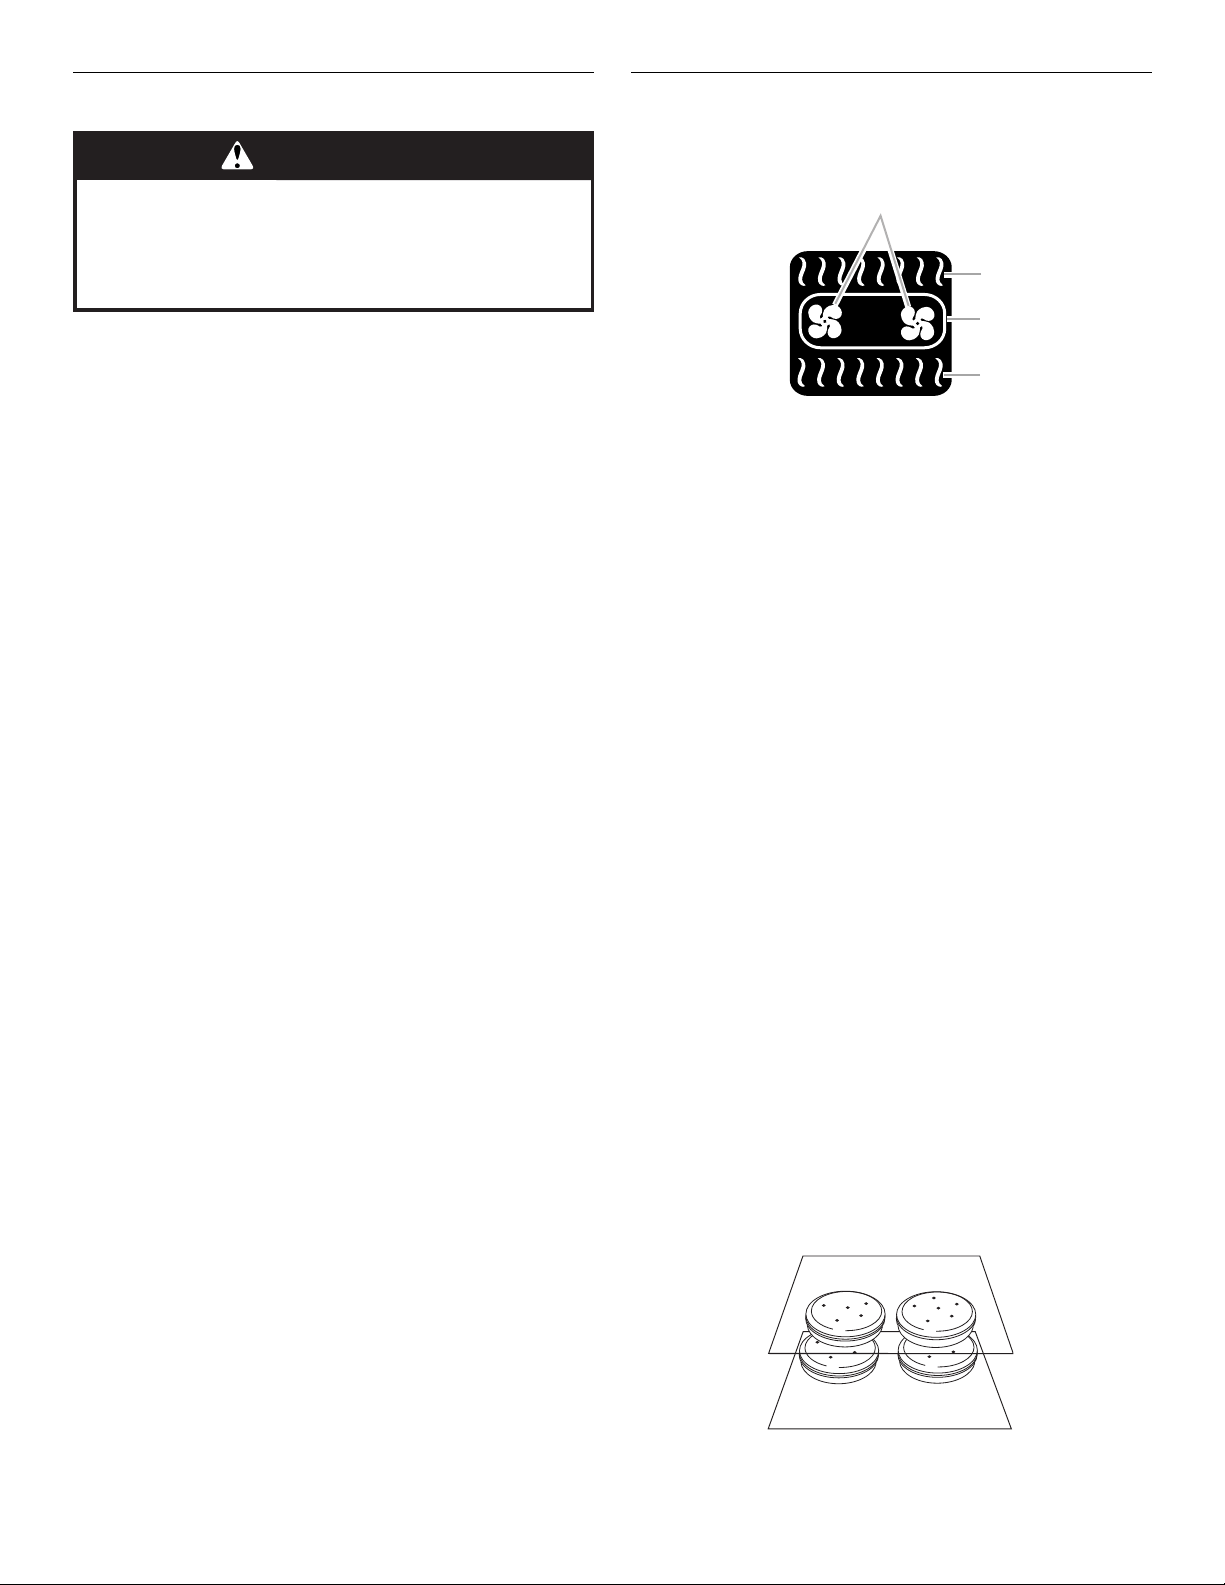
Convect Bake
The convection elements are located in the rear of the oven
cavity, and assisted by the convection fans, provide balanced,
efficient heating.
A
A. Convection fan
B. Broil element
C. Convection element
D. Bake element
Convection baking can be used for baking cakes, uncovered
casseroles, and frozen or convenience foods, as well as foods on
multiple racks. If the oven is full, extra cooking time may be
needed.
When cooking an oven meal with several different types of foods,
be sure to select recipes that require similar temperatures.
Cookware should sit in the oven with at least 1" (2.5 cm) of space
between the cookware and the sides of the oven.
During convection baking preheat, the convection, bake and broil
elements all heat the oven cavity. After preheat, the convection,
bake and broil elements and the fans will cycle on and off in
intervals to maintain oven temperature.
If the oven door is opened during convection baking, the fans
turn off immediately when the door is opened and turn on
immediately when the door is closed. Convection, Bake, and
Broil elements will turn off approximately 30 seconds after the
door is opened. They will turn on again approximately
30 seconds after the door is closed.
■ Reduce recipe temperature 25°F (14°C). Check food at
shortest recommended package or recipe time.
■ Use cookie sheets with no sides to allow air to move freely
around the food.
Before Using Convect Bake:
Before using Convect Bake, see the “Positioning Racks and
Bakeware” section and the following tips for rack positions.
Rack positions
1-rack baking: 3
2-rack baking: 2 and 4 or 1 and 4
3-rack baking: 1, 3, and 5
4-rack baking: 1, 2, 4, and 5
For best results when baking cakes on 2 racks, use racks 4 and 2
for baking. Place the cakes on the racks as shown.
21
To Use Convect Bake:
B
C
D
1. Touch MODES to move to the Modes menu.
2. From the Modes menu, touch CONVECT BAKE.
3. Touch the Temperature tab to move to the Temperature
screen.
Use the slider to enter a desired cooking temperature or
press the -5°F (-1°C) or +5°F (+1°C) buttons. The temperature
must be between 170°F (77°C) and 500°F (260°C).
4. Touch START to preheat oven.
OR
5. If a programmed cook time is desired, touch TIMER NOT SET
to enter the Cook Timer screen. Enter a cooking length using
the on-screen number keyboard to set a timer to alert when
cooking ends. The cook time may not exceed 12:00:00. The
oven will turn off when the cook time expires.
6. (Optional) To keep food warm after a programmed cook timer
ends, press KEEP WARM ON from the Cook Timer screen.
See the “Keep Warm™ Option” section for additional
information.
7. (Optional) To set a delayed start with a cook time, touch the
TIMER NOT SET/COOK TIMER screen and enter desired
cook time. Select DELAY START, set desired start time and
touch SET DELAY. To set only a delay start, touch DELAY
START from the temperature tab, set the desired time, and
touch SET DELAY.
8. Touch START to begin cooking or to activate Delay Start.
9. To change a mode, temperature, or cook time while the oven
is active, touch the appropriate tab. Make a new selection
and touch OK.
10. Press CANCEL OVEN (CANCEL LEFT or CANCEL RIGHT on
48" [121.9 cm] models) to turn off the oven.
Convect Broil
B
3. Touch CONVECT BROIL.
4. Touch the Temperature tab to move to the Temperature
screen.
Use the slider to enter a desired cooking temperature or
touch the -5°F (-1°C) or +5°F (+1°C) buttons. The temperature
must be between 450ºF (232ºC) and 550ºF (288ºC).
5. Touch START to begin cooking.
OR
6. If a programmed cook time is desired, touch TIMER NOT SET
to enter the Cook Timer screen. Enter a cooking length using
the on-screen number keyboard to set a timer to alert when
cooking ends. The cook time may not exceed 12:00:00. The
oven will turn off when the cook time expires.
7. (Optional) To keep food warm after a programmed cook timer
ends, press KEEP WARM ON from the Cook Timer screen.
See the “Keep Warm™ Option” section for additional
information.
8. (Optional) To set a delayed start with a cook time, touch the
TIMER NOT SET/COOK TIMER screen and enter desired
cook time. Select DELAY START, set desired start time and
touch SET DELAY. To set only a delay start, touch DELAY
START from the temperature tab, set the desired time and
touch SET DELAY.
9. Touch START to begin cooking or to activate Delay Start.
10. To change a mode, temperature or cook time while the oven
is active, touch the appropriate tab. Make a new selection
and touch OK.
11. Press CANCEL OVEN (CANCEL LEFT or CANCEL RIGHT on
48" [121.9 cm] models) to turn off the oven.
Convect Pastry
Convect Pastry is best for 1, 2, or 3 rack baking of items such as
cream puffs, turnovers, and croissants.
A
A
A. Broil element
B. Convection fans
During convection broiling, the broil element will cycle on and off
in intervals to maintain oven temperature, while the fan circulates
the hot air.
The temperature is preset at 550°F (288°C), but can be changed
to a different temperature. Cooking times will vary depending on
the rack position and temperature and may need to be adjusted.
It is not necessary to reduce the temperature when using
Convect Broil.
The fans turn off immediately when door is opened and turn on
again immediately when door is closed. The broil element will
turn off approximately 30 seconds after the door is opened. It will
turn on again approximately 30 seconds after the door is closed.
To Use Convection Broil:
Before convection broiling, see “Broil” section for general broiling
guidelines. Position rack.
1. Place food in oven and close the door.
2. Touch MODES tab to move to the Modes menu.
22
A. Convection fan
B. Broil element
C. Convection element
D. Bake element
Before Using Convect Pastry:
Before using Convect Pastry, see the “Positioning Racks and
Bakeware” section and the following tips for rack positions.
1-rack baking: 3
2-rack baking: 2 and 4 or 1 and 4
3-rack baking: 1, 3, and 5
To Use Convect Pastry:
1. Touch MODES tab to move to the Modes menu.
2. From the Modes menu, touch CONVECT PASTRY.
3. Touch the Temperature tab to move to the Temperature
screen.
Use the slider to enter a desired cooking temperature or
touch the -5°F (-1°C) or +5°F (+1°C) buttons. The temperature
must be between 170°F (77°C) and 500ºF (260ºC).
 Loading...