

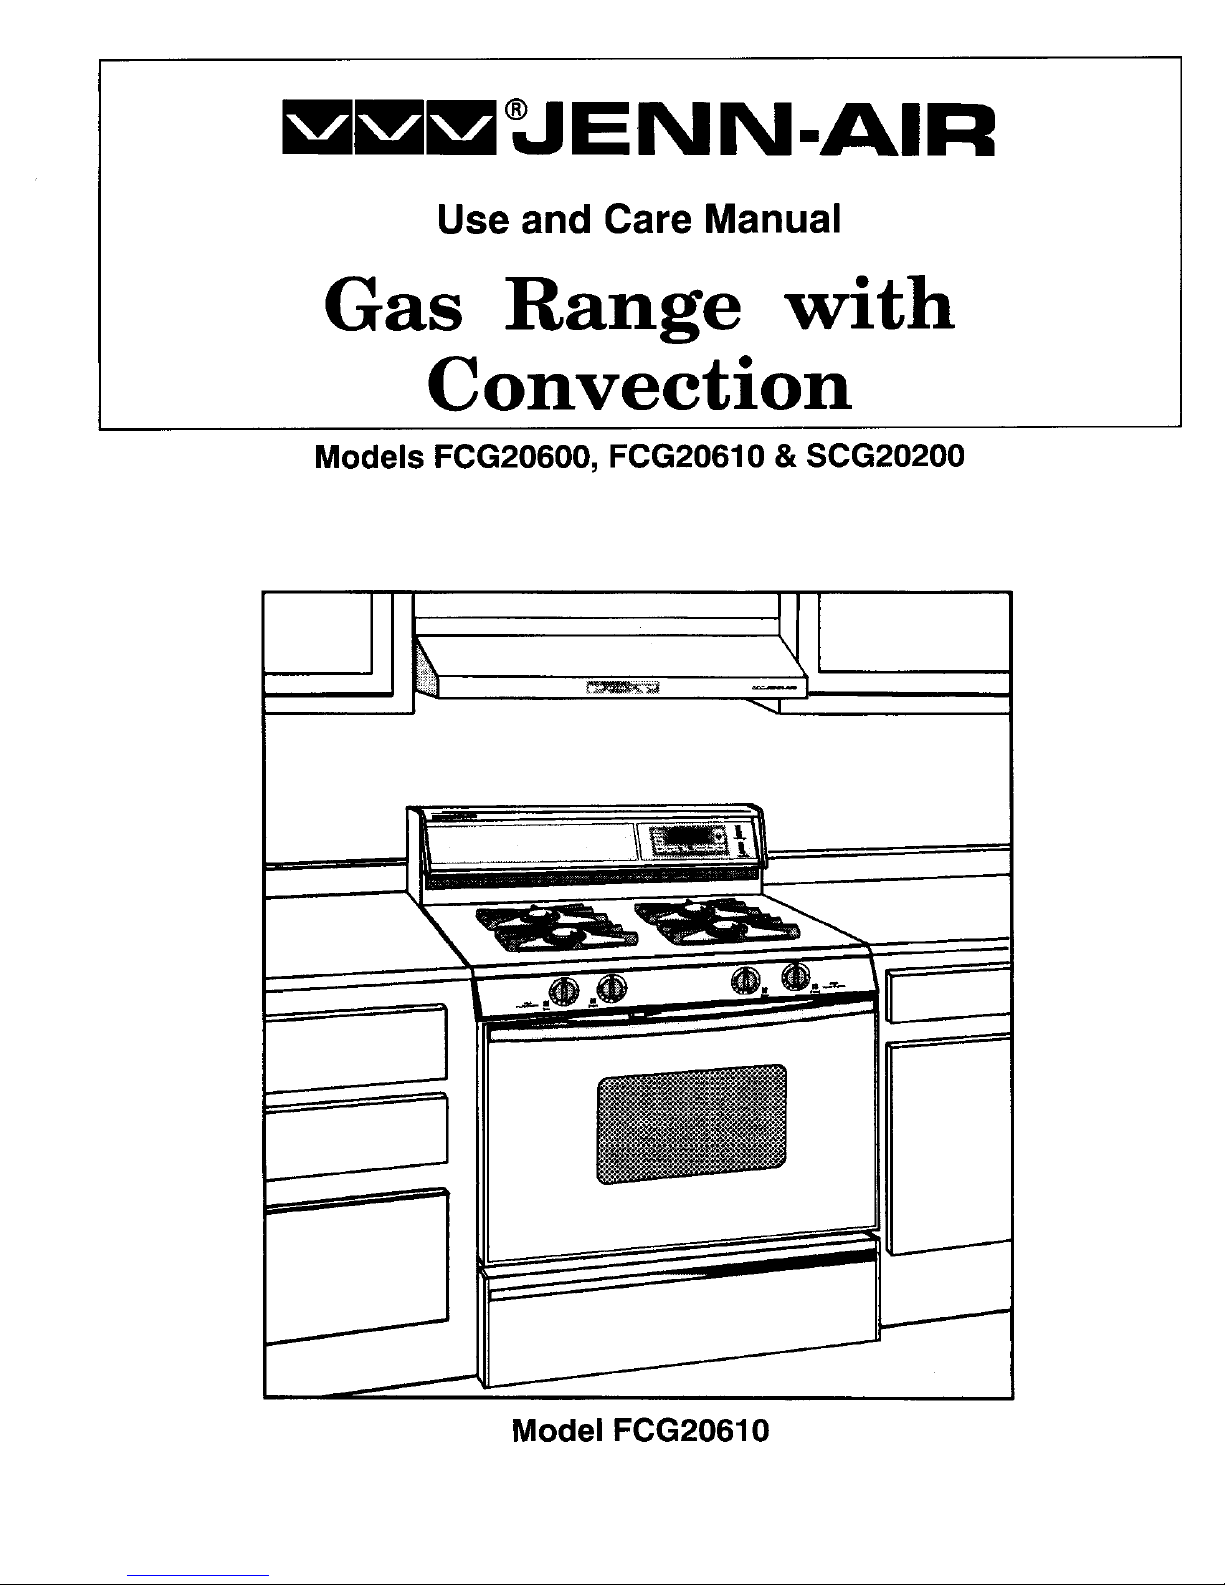
Jenn-Air FCG20600, SCG20200, FCG20610 Use And Care Manual
ENN-AIR
Use and Care Manual
Gas Range with
Convection
Models FCG20600, FCG20610 & SCG20200
r_
i
!
I
Model FCG20610
Congratulationson your choice of a Jenn-Air gas range.
WARNING: Ifthe information in this Yourrangehasfour sealedgasburnerswitha self-cleaning
manual is not followed exactly, a electroniccontrolledoven.As you useyour new range,we
know you will appreciatethe many features that provide
fire or explosion may result causing excellentperformance,easeofcleaning,convenienceand
property damage, personal injury dependability.
or death. Your Jenn-Air self-cleaning oven features flexibility in
conventional baking or roasting, convection baking or
-Do not store or use gasoline or roasting,and broiling.
otherflammable vapors and liquids Beforeyou begincookingwithyour newrange,pleasetake
in the vicinity of this or any other a few minutes to read and become familiar with the
instructionsinthisbook.Onthefollowingpages,youwillfind
appliance, a wealthof informationregardingallaspectsofusingyour
newrange.
- WHAT TO DO IF YOU SMELL GAS
Byfollowingtheinstructionscarefully,youwillbeabletofully
• Do not try to light any appliance, enjoyandproperlymaintain yourrangeandachieve
excellentresultswiththefood you prepare.
• Do not touch any electrical
Shouldyou haveany questionsaboutusingyourJenn-Air
switch; do not use any phone in gasrange,writetousorcall.Besure to providethe model
your building, number.
• Immediately call your gas Jenn-Air CustomerAssistance
c/e MaytagAppliances SalesCompany
supplier from a neighbor's eo.Box2370
phone. Follow the gas supplier's Cleveland,TN37320-2370
instructions. 1-800-688-1100
• If you cannot reach your gas
supplier, call the fire department.
-Installation and service must be
performed by a qualified installer,
service agency orthe gas supplier.
WARNING
• ALLRANGESCANTIP AND
CAUSEINJURIESTOPERSONS.
] NST*LANTT"EVCES
PACKEDWITHRANGE.
• FOLLOWALL INSTALLATION
INSTRUCTIONS.
SAVETHESEINSTRUCTIONSFORFUTUREREFERENCE
2
Appliance Usage ConvectionBaking.......................... 16
Before You Gall For Service ................ 26 FrozenConvenienceFoods.................. 17
Caring For Your Range GeneralRecommendations.................. 15
Broiling...................................... 20
AdjustingOvenTemperature................. 25 ClockControls
Cleaning............................... 23-24 ClockControlledBakingorRoasting.......... 14
OvenLightBulbReplacement................ 24 TimeOfDay ............................... 13
RangeComponents............................ 6 Timer ..................................... 13
SafetyPrecautions......................... 2,4-5
OvenCleaning
Self-Cleaning........................... 21-22
CooktopUsage OvenOperation
Cookware..................................... 8 IgnitionSystemandOvenBurner............. 12
HowA SurfaceBurnerWorks.................... 9 OvenControlPanel......................... 10
SurfaceControls............................... 7 RackPositions............................. 12
SettingControls............................ 11
Oven Usage Roasting
Baking ConvectionRoasting........................ 19
BakingChart............................... 15 GeneralRecommendations.................. 18
CausesOf CakeFailure..................... 16 RoastingChart ............................. 18
Read Before Operating Your Range
All appliances - regardless of the manufacturer - SHOULD BE TURNED INWARD AND NOT
havethepotentialthroughimproperorcarelessuseto EXTEND OVER ADJACENT SURFACE
createsafetyproblems.Thereforethe followingsafety BURNERS to minimize burns, ignition of
precautionsshould be observed: flammable materials, and spillage due to
1. Be sure your appliance is properly installed and unintentionalcontactwith the cookware.
groundedby a qualifiedtechnician. 13. CAUTION - Do not store items of interest to
2. Neveruse your appliancefor warmingor heating childrenincabinetsaboverange-childrenclimbing
the room. This warning is based on safety on the rangeto reach items could be seriously
considerations, injured.
3. Childrenshouldnot be left alone or unattendedin 14.Do not touch surface burner areas or perimeter
areawhereapplianceisin use.Theyshould never areas around cooktop or interior surfaces of
be allowed to sit or stand on any part of the ovens. Duringand after use,these areas maybe
appliance, hot enough to cause burns. Avoid contact with
these areas by clothing or other flammable
4. Wear proper apparel. Loose-fitting or hanging materials until they have had sufficient time to
garments should never be worn while using the cool. Other surfaces may become hot enoughto
appliance, causeburns-amongthese surfacesare the upper
5. Donot repairor replaceany partofthe appliance door frame and door, oven vent opening and
unlessspecificallyrecommendedin this manual, surfacesnearthe opening,andthetopedgeofthe
All other servicing should be referred to an controlpanel.
authorizedJenn-Air Servicer. 15.Do not heat unopened food containers. Build-up
6. Do not store combustiblematerials, gasoline or of pressure may cause container to burst and
other flammable vapors and liquid near range, result in injury.
This also appliesto aerosol sprays and aerosol
16.Keep all controls"OFF"when unit is not in use.
spraycans.
17.GREASE - Grease is flammable and should be
7. Donot usewater on greasefires.Smotherfire or
flame or use dry chemical or foam-type handled carefully. Never leave any cooking
operation unattended. Let fat cool before
extinguisher, attempting to handle it. Do not allow grease to
8. Useonlydrypotholders.Moistordamppotholders collectaround the rangeor inthe vents. Wipe up
onhotsurfacesmayresultinburnsfromsteam.Do spilloversimmediately.
notuse a towel or other bulkycloth.
18.If the range is installed near a window, proper
9. Selectcookwarelargeenoughto properlycontain precautionsshould be taken to prevent curtains
food and avoid boilovers or spillovers. This will from blowing over burners creating a FIRE
save on cleaning and prevent hazardous HAZARD.
accumulationsof food, since heavysplattering or
spilloversleft on a range can ignite. Pan size is 19.Do not use aluminum foil to line burner spillover
especiallyimportantin deep fat frying, bowl. Restriction of normal air flow may result in
unsafeoperation.
10. Neverleaverangeunattendedat Hi heatsettings.
Boil over causes smoking and greasy spillovers 20. Clean only parts listed in this manual and use
that may ignite, proceduresrecommended.
11.TYPE OF COOKWARE - Avoid pans that are 21.Alwaysallow hot pansto cool in a safe placeout
unstableand easilytipped. Inchoosingpans, look ofthe reachof small children.
foreasily-graspedhandlesthatwillstay cool.Pans 22. A faint gasodor may indicate a gas leak.If a gas
that aretoo heavy when filled with food can also odor is detected, shut off the gas supply to the
be a hazard. If pan handlestwist and cannot be range. Callyour installer or local gas companyto
tightened,discardthe pan. have the possible leak checked. Never use a
12. HANDLES- Alwaysturn pan handlesto the side match or other flame to locate a gas leak.
orbackofthe range- notout intothe roomwhere 23.Use care when openingoven door. Let hot air or
they are easily hit. COOKWARE HANDLES steamescapebefore removingor replacingfood.
24. Keepovenvent ductsunobstructed.Yourrangeis 36. Be sure all packing materials are removed from
ventedthroughthe baseof the backsplash.Never the range before operating it to prevent fire or
blockovenvent orair intakes.Do not obstructthe smokedamageshouldthe packingmaterialignite.
flow of combustionand ventilationair. Restriction 37. WARNING: To reduce the risk of tipping of the
of air flow to the burner prevents proper appliance, the appliance must be secured by a
performance, properly installed anti-tip device. To check if
25.Always placeoven racks in desiredlocation while device is installed properly:Use a flashlight and
oven is cool. If rangemust be moved while oven look underneaththe range to see that one of the
is hot, do not let potholder contact oven burner rear leveling legs is engagedin the bracketslot.
flame. When removing appliance for cleaning, be sure
26. Do not clean door gasket. The door gasket is anti-tip deviceisengagedwhen rangeis replaced.
Theanti-tip devicesecuresthe rear levelingleg to
essentialfor a goodseal.Careshouldbetaken not the floor,when properlyengaged.
to rub,damage,or movethe gasket.
38. Havethe installershowyou thelocationof the gas
27'.Do not use oven cleaners. No commercial oven shut off valve and how to shut it off in an
cleaneror oven linerprotectivecoatingof any kind emergency.
should beusedin or aroundany part of the oven. 39.Always place a pan of food on a surface burner
28.CAUTION; BEFORE SELF-CLEANING THE beforeturning iton,andturn itoffbeforeremoving
OVEN, REMOVE FOOD, BROILER PAN AND the pan to preventexposureto the burnerflame.
OTHER UTENSILS. 40.This appliance has been tested for safe
29. Before servicing your appliance, disconnect performance using conventional cookware. Do
power to the range at the main fuse or circuit not use any devices or accessoriesthat are not
breakerpanel and atthe electricalreceptacle, specifically recommendedin this manual. Do not
30. Glazed cookware - only certain types of glass, use eyelid covers for the surface units, stovetop
glass-ceramic, ceramic earthenware, or other grills, or add-on convection systems.The use of
glazedcookwarearesuitablefor cooktop surface devices or accessories not expressly
without breaking due to the sudden change in recommendedin this manual can create serious
temperature. Use only such cookware as you safety hazards, result in performance problems,
and reduce the life of the components of the
knowhas beenapprovedfor this purpose.
appliance.
31. Misuse of appliance doors, such as stepping,
leaningor sittingonthe doormayresultin possible IMPORTANTSAFETY NOTICE AND WARNING
tipping of the appliance, breakage of door, and The California Safe Drinking Water and Toxic
seriousinjuries. EnforcementActof 1986(Proposition65)requiresthe
Governorof Californiato publish a list of substances
32.Avoid placing the range in a main "traffic path"or known to the State of California to cause cancer or
in an isolated location with no counter space reproductiveharm, and requires businessesto warn
nearby.Visualizethe oven in usebeforeselecting customersof potentialexposuresto suchsubstances.
a location. Rememberthat open oven doors may Users ofthis applianceare herebywarnedthat when
blocka passagewayand create a hazard, the rangeisengagedintheself-cleancycle,theremay
33.Always remove soiled broiler panfrom the broiler be some low level exposure to some of the listed
compartmentaftercookingfor grease left in the substances,includingCarbonMonoxide.Additionally,
pan may becomehot enoughto ignite, usersarealso herebywarnedthat the burningof gas
canresult inlow-levelexposureto some of the listed
34. Do not use ovenfor storage space, substances, including benzene, formaldehyde and
35. PREPARED FOOD WARNING: Follow food soot, due primarilyto the incomplete combustionof
manufacturer's instructions. If a plastic frozen natural gas or liquid petroleum (LP) fuels. Properly
food containerand/or itsfilmcover distorts,warps adjusted burners will minimize incomplete
or is otherwise damaged during cooking, combustion. Exposure to these substances can be
immediatelydiscard the food and its container, minimized by properly venting the range to the
Thefood couldbe contaminated, outdoors.
SAVE THESE INSTRUCTIONS FOR FUTURE REFERENCE
5
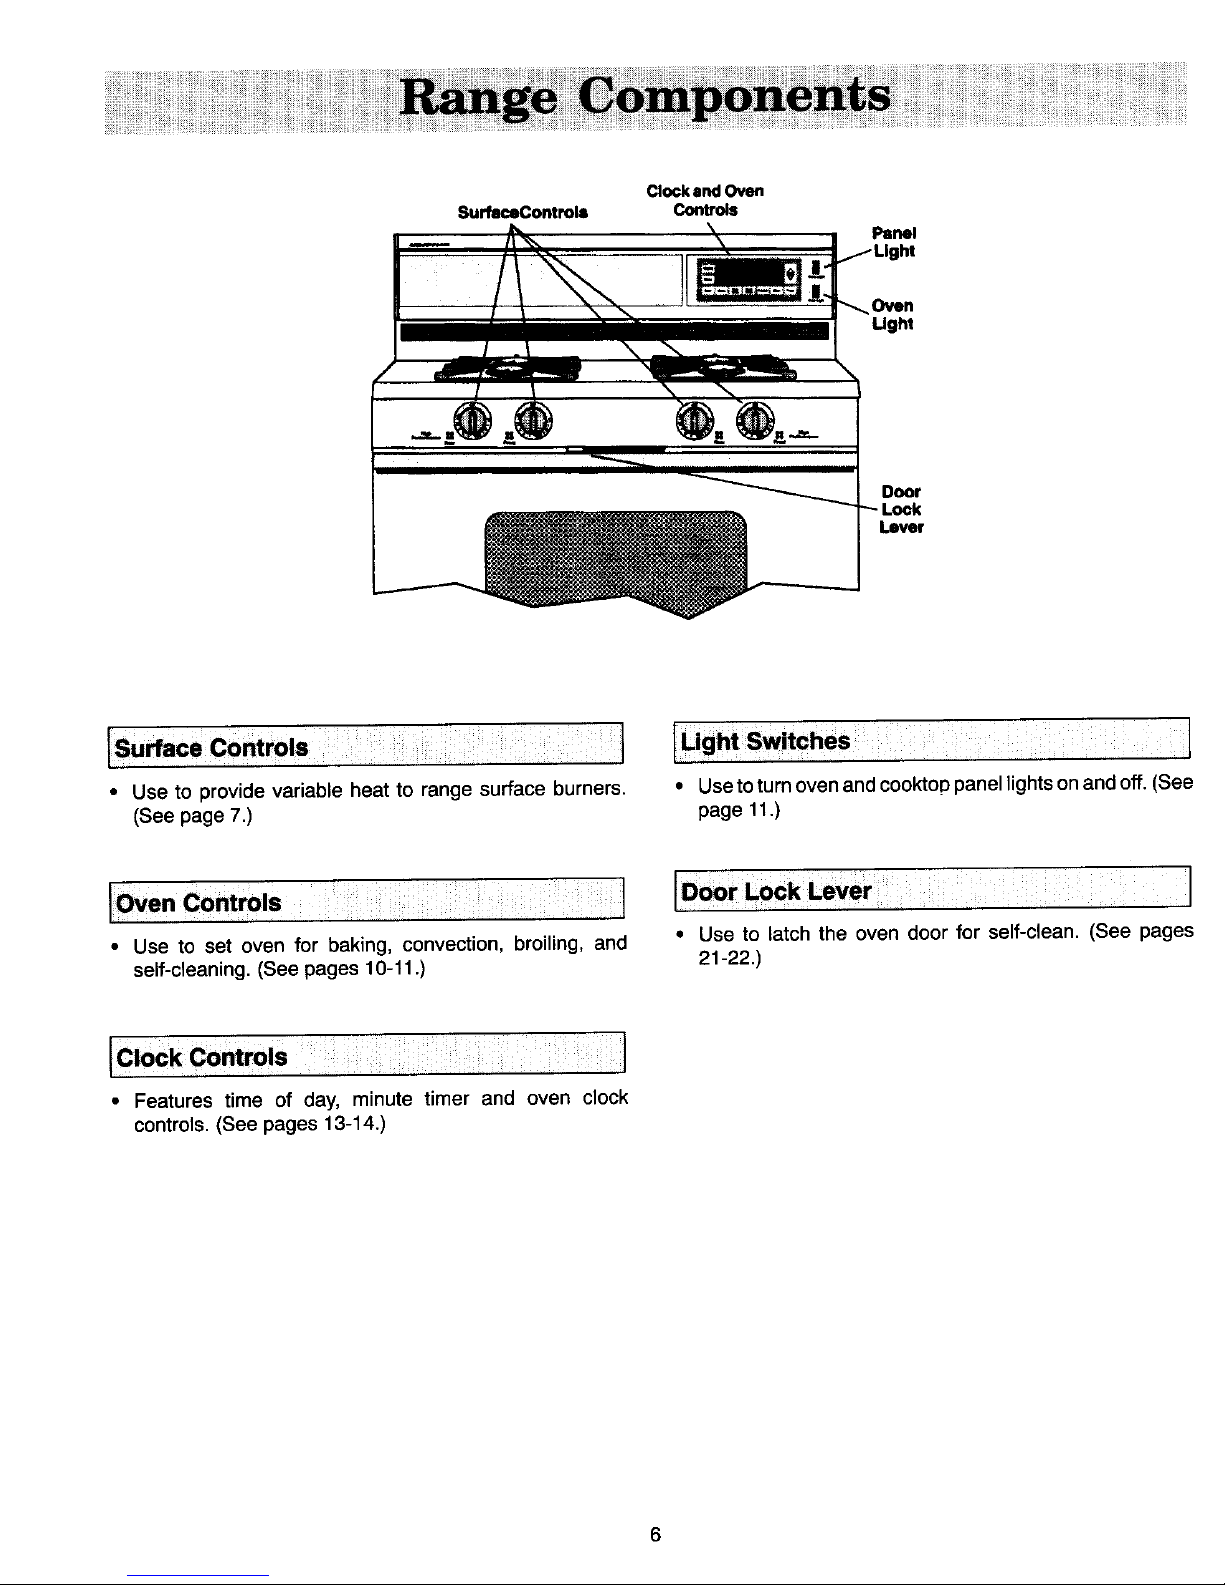
ClockandOven
SurfaceContmls Controls
Panel
Oven
Ught
Door
Lever
• Use to provide variable heat to range surface burners. • Usetoturnovenandcooktoppanellightsonandoff. (See
(See page 7.) page 11.)
Oven Controls I
• Use to set oven for baking, convection, broiling, and • Use to latch the oven door for self-clean. (See pages
self-cleaning. (See pages 10-11.) 21-22.)
• Features time of day, minute timer and oven clock
controls. (See pages 13-14.)
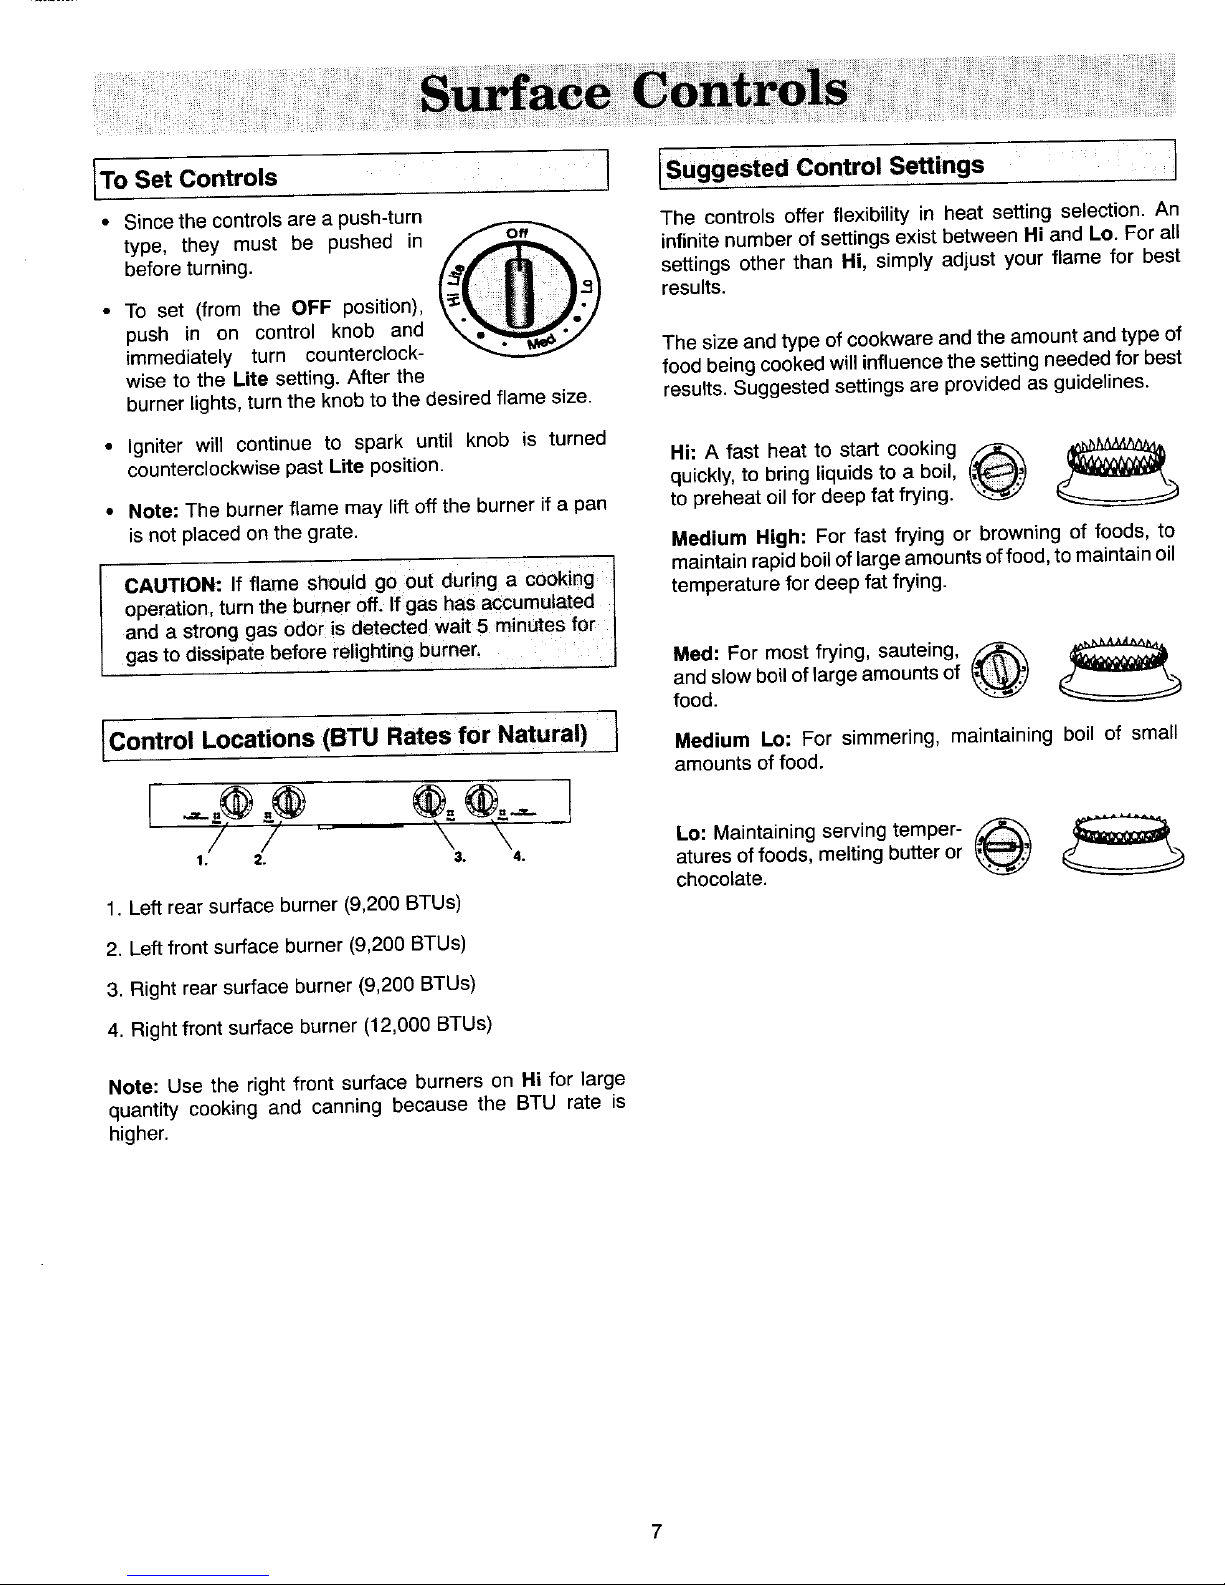
ToSet Controls : '1 Suggested Control Settings
• Sincethecontrolsarea push-turn_ The controlsofferflexibilityin heat settingselection.An
type, they must be pushed in /_,,,V.,lV,,,__ infinitenumberof settingsexistbetweenHiandLo.Forall
beforeturning. _ settingsotherthan Hi, simplyadjustyourflame for best
• To set (fromthe OFF position), results.
push in on control knob and
immediately turn counterclock- Thesize andtype of cookwareandthe amount andtype of
wise to the Ute setting. After the foodbeingcookedwill influencethesetting neededfor best
burnerlights, turnthe knobto the desiredflamesize. results.Suggestedsettingsare providedas guidelines.
• Igniter will continue to spark until knob is turned
counterclockwisepast Lite position. Hi: A fast heatto start cooking
quickly,to bring liquidsto a boil,
• Note: The burnerflame may lift off the burner if a pan to preheat oil for deep fat frying.
isnot placedon the grate. Medium High: Forfast frying or browning of foods, to
CAUTION: If flame should go out during a cooking I maintainrapidboiloflarge amountsoffood, tomaintainoil
operation,turnthe burneroff. If gashas accumulated I temperaturefor deepfat frying.
and a stronggas odor s detected:wait'5 minutesfor I
gasto dissipatebeforetelghting burner.......... : " food.andMed:For mostfrying, sauteing, __slowboilof largeamountsof
ControlLocations(BTU Ratesfor Natural) I Medium Lo: For simmering, maintaining boil of small
amountsoffood.
7 7 _ LO:Maintainingservingtemper- _ _
1. 2. _. 4. aturesof foods,melting butteror
chocolate.
1. Leftrear surfaceburner (9,200BTUs)
2. Leftfrontsurfaceburner (9,200BTUs)
3. Rightrearsurface burner(9,200BTUs)
4. Rightfrontsurface burner (12,000BTUs)
Note: Use the right front surface burnerson Hi for large
quantity cooking and canning because the BTU rate is
higher.
To achieve optimum cooking performance, use cookpots e
with flat bottoms, tight fitting covers, and sized for the COY red Cookware
surfaceburner. If the cookware is covered, less fuel will be needed;
therefore,a lower flamesize can be used.
ISize I Note: Food will not cook any faster when morethan the
t
Of Cookware
• Flame size should be adjusted so it does not extend amount of heatneededto maintaina gentleboil is used.
beyond the edge of the cookware. This instruction is
basedonsafety considerations.Adjustingthe size ofthe
flameto fit the sizeof the cookware also helps to save t"_lln;nnv.. ,,,_
fuel.
• Cookpotswhichextendmorethantwoinchesbeyondthe • Acceptablewater-bathorpressurecannersshouldnotbe
grate or touch the cooktopmay cause heatto build up, oversized and should have a flat bottom.The following
resulting in damage to the burner grate, burner or arenotrecommended:Oversizedcannersor averylarge
cooktop, cannerthat restson two surfaceburner grates.
• Specialityitems suchaswoks with a supportring,which • When canning, use the Hi setting just until the water
restrictaircirculationaroundthe burnerwill causeheatto comes to a boil or pressure is reached in the pressure
buildup and may result in damage to the burner grate, canner, then reduce to the lowest flame setting that
burner or cooktop. Use Jenn-Air flat bottom wok maintainsthe boil orpressure.
accessory,ModelAO142.
• Prolonged use of the Hi setting or the use of incorrect
canningutensils will produceexcessive heat. Excessive
heatcan causepermanentdamageto the appliance.
• Aluminumcookwareheatsevenly andquickly. A slightly
largerflamesizecanbe used.Theflamecanbeadjusted
so it comesto the edge of the cookware. However,the
flame should NEVER be adjusted so that it extends
beyondthe bottomofthe cookware.
• Stainlesssteelcookwarewith copperor aluminumcores
heatevenly andfairly quickly.The flame size should be
adjustedtoextendonlyhalfwaybetweencenterandedge
ofthe cookwarebottomfor best results.
• Castironcookware heatsslowly.
• Check manufacturer's recommendations before using
porcelain on steel, porcelain on cast iron, glass,
glass/ceramic,earthenware,or other glazedcookpots.
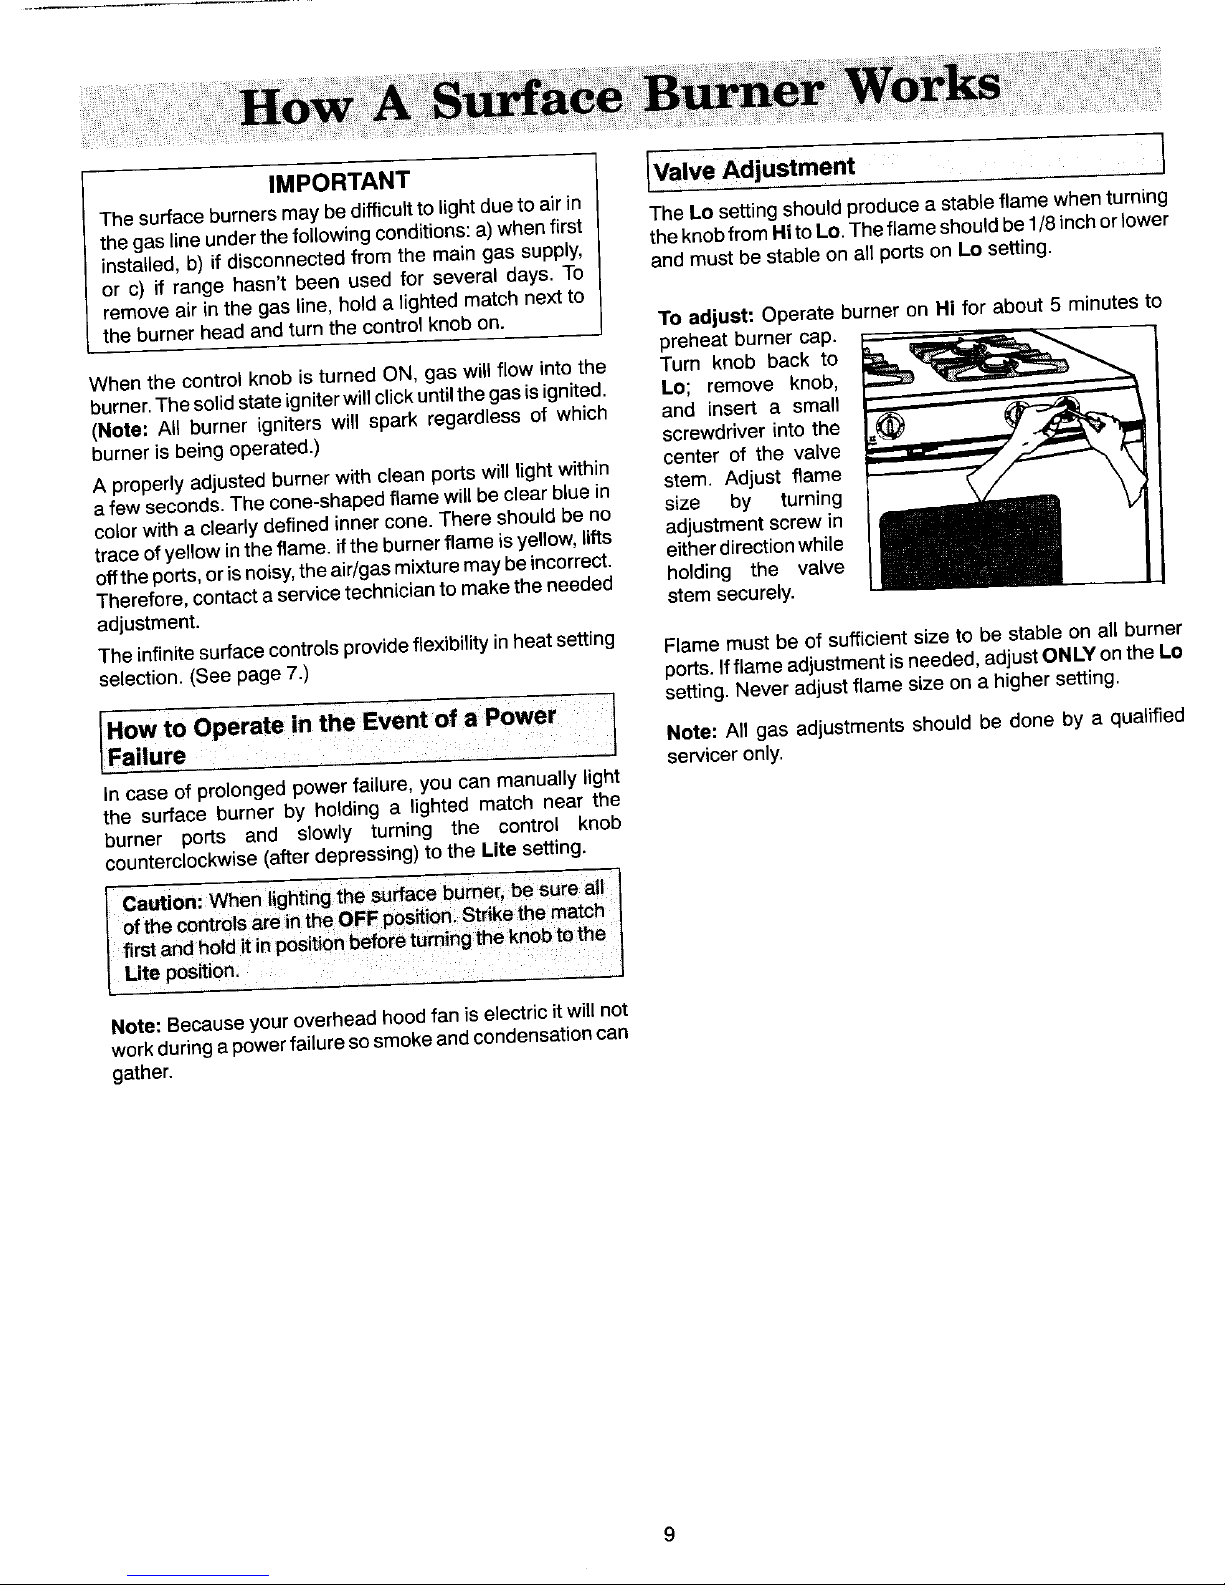
IMPORTANT ValveAdjustment ,
ThesurfaceburnersmaybedJfficu)ttolight dueto air in
thegaslineunderthe followingconditions:a)whenfirst The Lo settingshouldproducea stableflamewhenturning
installed,b) if disconnectedfrom the main gassupply, theknobfrom Hito Lo.Theflameshouldbe1/8inchor lower
or c) if range hasn't been used for several days. To and mustbe stable on all portson Lo setting.
removeair inthe gas line,hold a lightedmatchnext to
theburnerhead andturn the controlknobon. To adjust: Operateburner on Hi for about 5 minutes to
preheatburnercap. 1
Whenthe control knob isturned ON, gas will flow into the Turn knob back to
I
burner.Thesolidstateigniterwillclickuntilthe gasisignited. Lo; remove knob,
(Note" All burner igniters will spark regardless of which and insert a small
burneris beingoperated.) screwdriverinto the
A properly adjustedburnerwith cleanportswilllight within center of the valve
afew seconds.Thecone-shapedflamewillbeclear bluein stem. Adjust flame
colorwith a clearlydefined innercone.There shouldbe no size by turning
traceofyellowinthe flame, ifthe burnerflameisyellow,lifts adjustmentscrew in
offthe ports,orisnoisy,theair/gasmixturemaybeincorrect, eitherdirectionwhile
Therefore,contacta servicetechnicianto maketheneeded holding the valve
adjustment, stem securely.
Theinfinitesurfacecontrolsprovideflexibilityin heatsetting Flame must be of sufficientsize to be stable on all burner
selection.(See page7.) ports.Ifflameadjustmentisneeded,adjustONLYonthe Lo
Operatein the Event of a Power } setting.Neveradjustflame size ona higher setting.
IR..FadureOWto I servicerN°te:Allonly.gasadjustmentsshouldbe done by a qualified
In case of prolongedpowerfailure, you can manuallylight
the surface burner by holding a lighted match near the
burner ports and slowly turning the control knob
counterclockwise(afterdepressing)tothe Lite setting.
Caution:Whenlightingthe surfaceburner;be sure ai! I
ofthe controlsarein theOFF posEion;StrikethematchI
firstandholditinpositionbeforeturningtheknobtOthe
Utepostion,, ,,
Note: Becauseyour overheadhoodfanis electricit will not
workduringa powerfailuresosmokeandcondensationcan
gather.
.... Stop Cook
|
Broil Clean Time Time Convecl Bake i Timer
Oven Control Panel: : : ,: Fun_ion Pads
The control panel is designed for ease in programming. The Cancels all programming except Timer and
Display Window features Indicator Words which describe Clock.
the functions set.
To Program: Use to set time of day.
1. Touch the function pad to give command desired.
2. Touch the Up or Down Arrow Pads to enter time or
temperature. Use for top browning or oven broiling.
Note: Four seconds later, time or temperature will
automatically be entered. If more than 30 seconds elapse
between touching a pad and touching the Up or Down Use to set self-cleaning process.
Arrow Pads, the control is not set and Display will return to
previous Display.
Use for clock controlled cooking and cleaning
when a delayed start is desired.
Use for clock controlled cooking.
Use for convect baking or convect roasting.
Use for baking or roasting.
Use to signal expiration of a time period up to
9 hours and 50 minutes.
Use to set time, temperature, or to select Hi or
Lo Broil.
10
Oven LightSwitch (ControlPanel) SettingControls I
Whenthedoorisclosed,pushtheOvenLightSwitchtoturn
t
ovenlighton oroff.The ovenlightautomaticallycomeson BASICINSTRUCTIONS
whenevertheovendoorisopened. 1. Positionovenracks.
2.TouchBake Pador ConvectPad,
CooktopPanel/BacksplashLightSwitch
(ControlPanel) 3.TouchtheUporDownArrowPadsfordesired
temperature.
Pushthe Panel LightSwitchto turnthe backsplashlighton
oroff. Toset ovenon backor convect:
Display Window 1. Placeovenracksonproperrackpositions.
Showstime of day,timer,and ovenfunctions. (Seepage 12).
DisplayNumbers: 2. TouchBake Pad or Convect Pad.
IndicatorWordsBAKE or CONVECT BAKEand "000°"
• Showtimeof day. willappearintheDisplay.Note:Ifmorethan30 seconds
• Countdownoftimeremainingwhenusingtimefunctions, elapsebetweentouchingapadandtouchingtheUp or
DownArrow Pads,the ovenisnotset and Displaywill
• Show temperature of oven as it rises to reach returntopreviousDisplay.
programmedtemperatureand thesettemperatureonce
itis reached. 3.Touchthe Up or DownArrow Pads untildesiredoven
temperatureappearsin the Display.(Allowablerange is
• Recall programmed temperature or time when 170° to 550°.) Note: When baking, the first tap on an
commanded. Arrow Pad will giveyou 350°.When convectbaking,the
first tap of an Arrow Pad will give you 325°. After five
Prompts: seconds the oven will begin to preheat. The Indicator
Words ON and either BAKE or CONVECT BAKE will
• Serveasa reminderto latchovendoor for self-cleaning appearinthe Display.Thetemperatureshownwill be75°
operationwhen the word,door, is displayed.
orthe oventemperaturewhichever is higher.
Indicator Words: Example: If at 10 o'clockyou set the ovenfor 350° for
• Flashto prompt nextstep. baking,after five secondsthe Displaywillshow:
• Indicatestatus of programmedfunction. Irl •rl i-i -I '--,°
• Showprogrammedfunctionwhen recalled. I IJ °IgIJ ,,_
ON
IMPORTANT During the preheat,the Displaywill show a rise in 5°
DONOTMOVEDOORLOCK LEVERTOTHERIGHT increments until programmedtemperature is reached.
DURINGA COOKINGOPERATION.If the door lock Whenthe oven is preheated,the ovenwill beep, the ON
lever is moved to the lock position, the cooking and BAKE Indicator Words and programmed oven
operationwillautomaticallybecancelledand"door"will temperaturewill remainin the Display.
appearinthe Display. Note: Oven will preheat for approximately 7 to 10
minutes.
To recall temperature set during preheat: Touchthe
appropriateBakePad orConvectPad.Temperaturewill
be brieflydisplayed,then will automaticallyreturnto
on-goingprogram.
To change temperature set: Touchthe appropriate
Bake Pad orConvect Pad andtouchthe Up or Down
Arrow Padsfor a new desiredtemperature.
4. TouchCancel Padto turn ovenoff at end of baking.
11
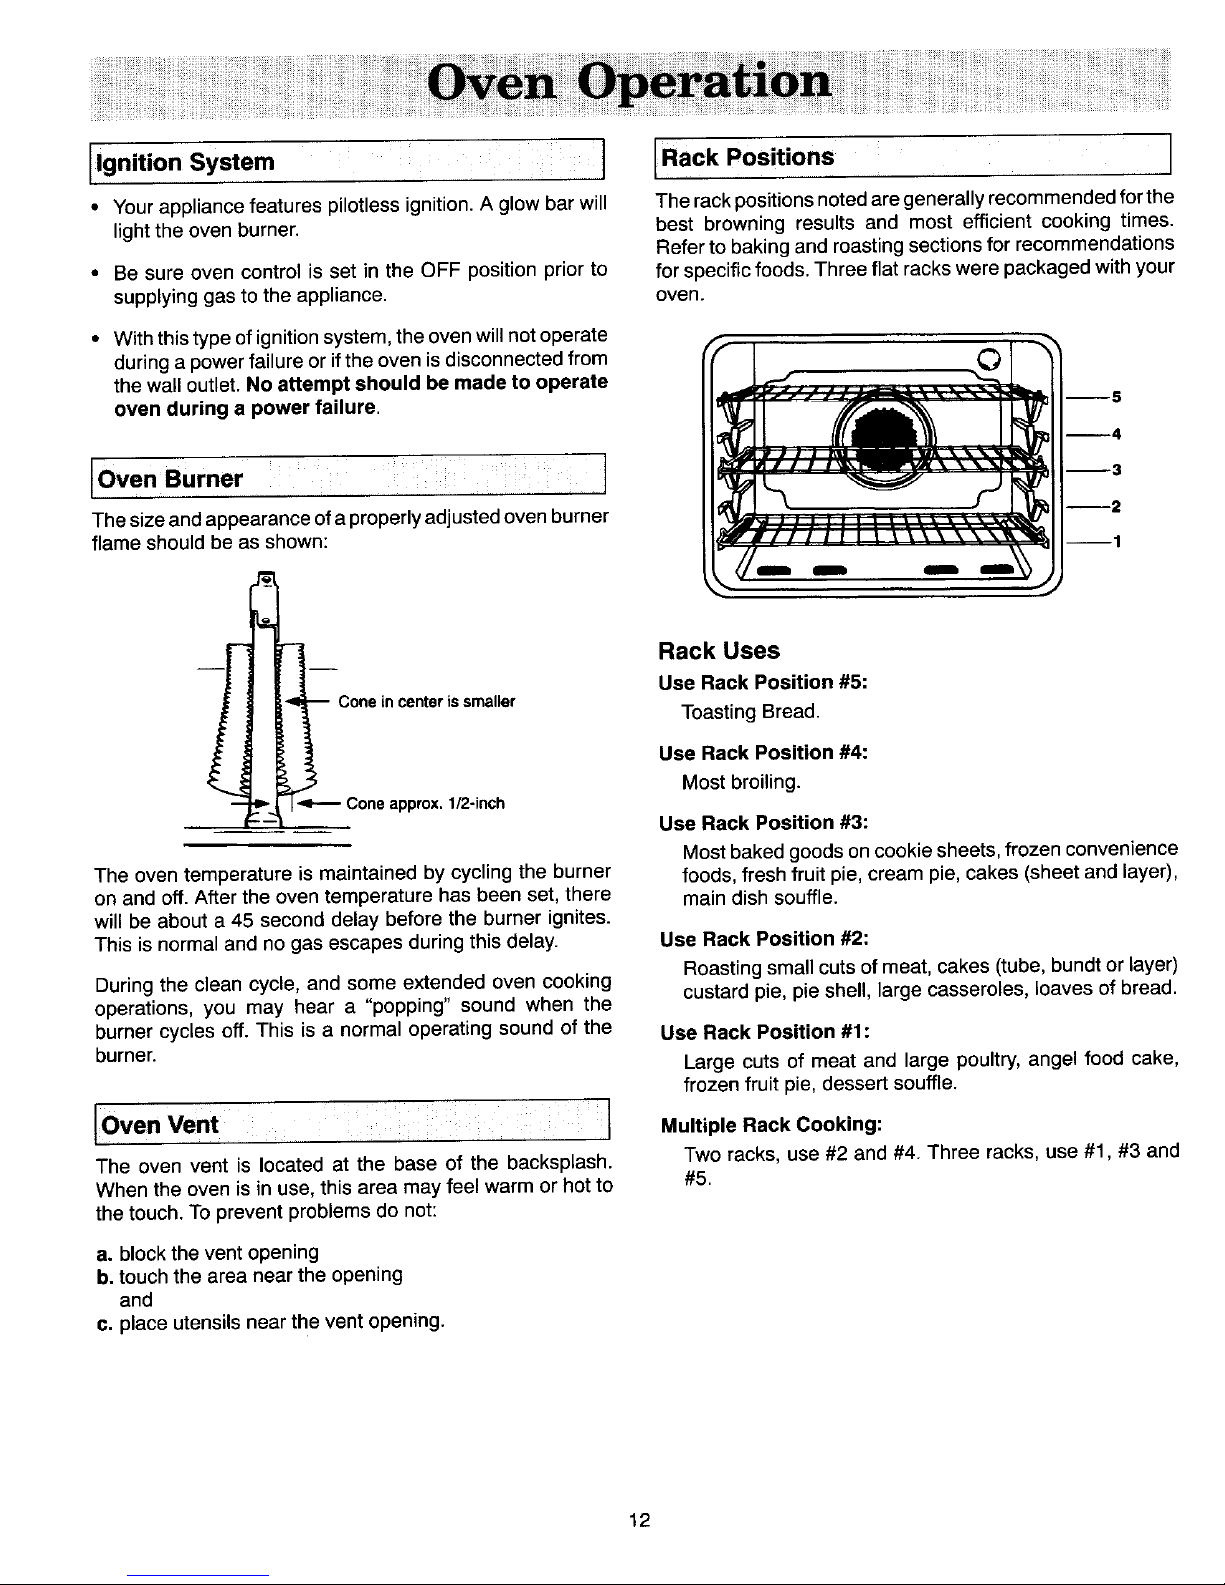
I RackPositions
Ignition System
• Yourappliancefeaturespilotlessignition.A glowbar will Therackpositionsnotedare generallyrecommendedforthe
lightthe ovenburner, best browning results and most efficient cooking times.
Referto bakingand roastingsectionsfor recommendations
• Be sureoven control is set in the OFF position prior to for specificfoods.Threeflat rackswerepackagedwith your
supplyinggasto the appliance, oven.
• Withthistype ofignitionsystem,the ovenwillnot operate r
duringapowerfailure or if the ovenisdisconnectedfrom C
thewall outlet.Noattempt shouldbe madeto operate ¢_ __-_.
ovenduringa powerfailure. _/ _ "'_
4
Iu 3
Oven Burner _
f
Thesizeandappearanceotaproperlyadjustedovenburner __:...,. _ _:._._._._.<.._
2
flameshouldbe asshown: _ r / i ! i f i i _i x _ \ \ \_ _'_ 1
UseRack Position#5:
Cone in center is smaller ToastingBread.
Use Rack Position#4:
Mostbroiling.
-- ._ Cone approx. 1/2-inch
I -- Use Rack Position#3:
Mostbakedgoodsoncookiesheets,frozenconvenience
The oventemperatureismaintainedbycyclingthe burner foods,freshfruitpie,creampie,cakes(sheetandlayer),
on and off.After the oventemperaturehasbeen set, there maindish souffle.
will be about a 45 second delay before the burner ignites.
Thisis normaland nogas escapesduring this delay. UseRack Position#2:
Roastingsmall cutsof meat,cakes (tube,bundtor layer)
Duringthe clean cycle, and some extended oven cooking custardpie, pieshell,large casseroles,loaves of bread.
operations, you may hear a "popping" sound when the
burnercycles off. This is a normaloperating sound of the Use Rack Position#1:
burner. Large cuts of meat and largepoultry, angel food cake,
frozenfruit pie, dessertsouffle.
Oven Vent Multiple RackCooking:
The oven vent is locatedat the baseof the backsplash. Tworacks,use#2 and#4. Three racks,use#1, #3 and
Whenthe ovenisinuse,thisareamayfeelwarmor hotto #5.
thetouch.Topreventproblemsdo not:
a. blocktheventopening
b.touchthe areaneartheopening
and
c. placeutensilsneartheventopening.
12
ITime of Day Clock -_ Timer
When electrical power is supplied or after power IMPORTANT
interruption,the lastclocktimedisplayedbeforepowerwas This interval Timer can be usedto remindyou when a
interruptedwillflash.Timewilladvanceandcontinuetoflash period,upto 9 hoursand 50minutes,expires.Itcan be
untilclock is reset, used independentlyof anyother oven activity and can
be set while anotheroven function is operating.The
BASICINSTRUCTIONS Timerdoes not control the oven.
1. TouchClock Pad.
2, TouchUpor DownArrowPad(s). BASICINSTRUCTIONS }
1.TouchTimerPad. t
ToSet Timeof Day: 2, TouchtheUpArrow Pad.
1.TouchClock Pad.
ToSet Timer:
Indicatorwords SETTIME willflash and time digits will
appear inthe Display.(if morethan 30 seconds elapse 1.TouchTimer Pad.
The IndicatorWordsTIMERwill flash and"0:00"appears
between touching Clock Pad and touching the Up or
Down Arrow Pads, the Clock Pad must be touched in theDisplay.
again in order to set clock.) 2.Touchthe UpArrow Pad until desired numberof hours
and minutesappear in Display.
2. Touchthe Up or Down Arrow Pads in either direction
untilcorrecttime of dayappears in Display. Note: If morethan30 secondselapsebetweentouching
Timer Pad and touchingthe Up Arrow Pad, the Timer
Note: Fivesecondslater,timeof daywill_aut0maticall_be Pad must be touchedagainto setthe numbers.
entered. Important:When enteringhoursand minutes,hoursare
to the left of the colon with the Hr Indicator word and
IMPORTANT minutesareto the rightof colon. Duringthe lastminute,
countdownwill beshownin seconds,
• Torecall time of daywhen another time function Example: Touch the Up Arrow Pad until the Display
is showing: TouchClock Pad, (Note: To return to shows:"0HR:05"for5 minutesor"5 HR:00"for 5 hours
anothertimefunctionpad,touchtheappropriatepad.) and 0 minutes.
• Tochangetime of day set on clock: Repeatabove
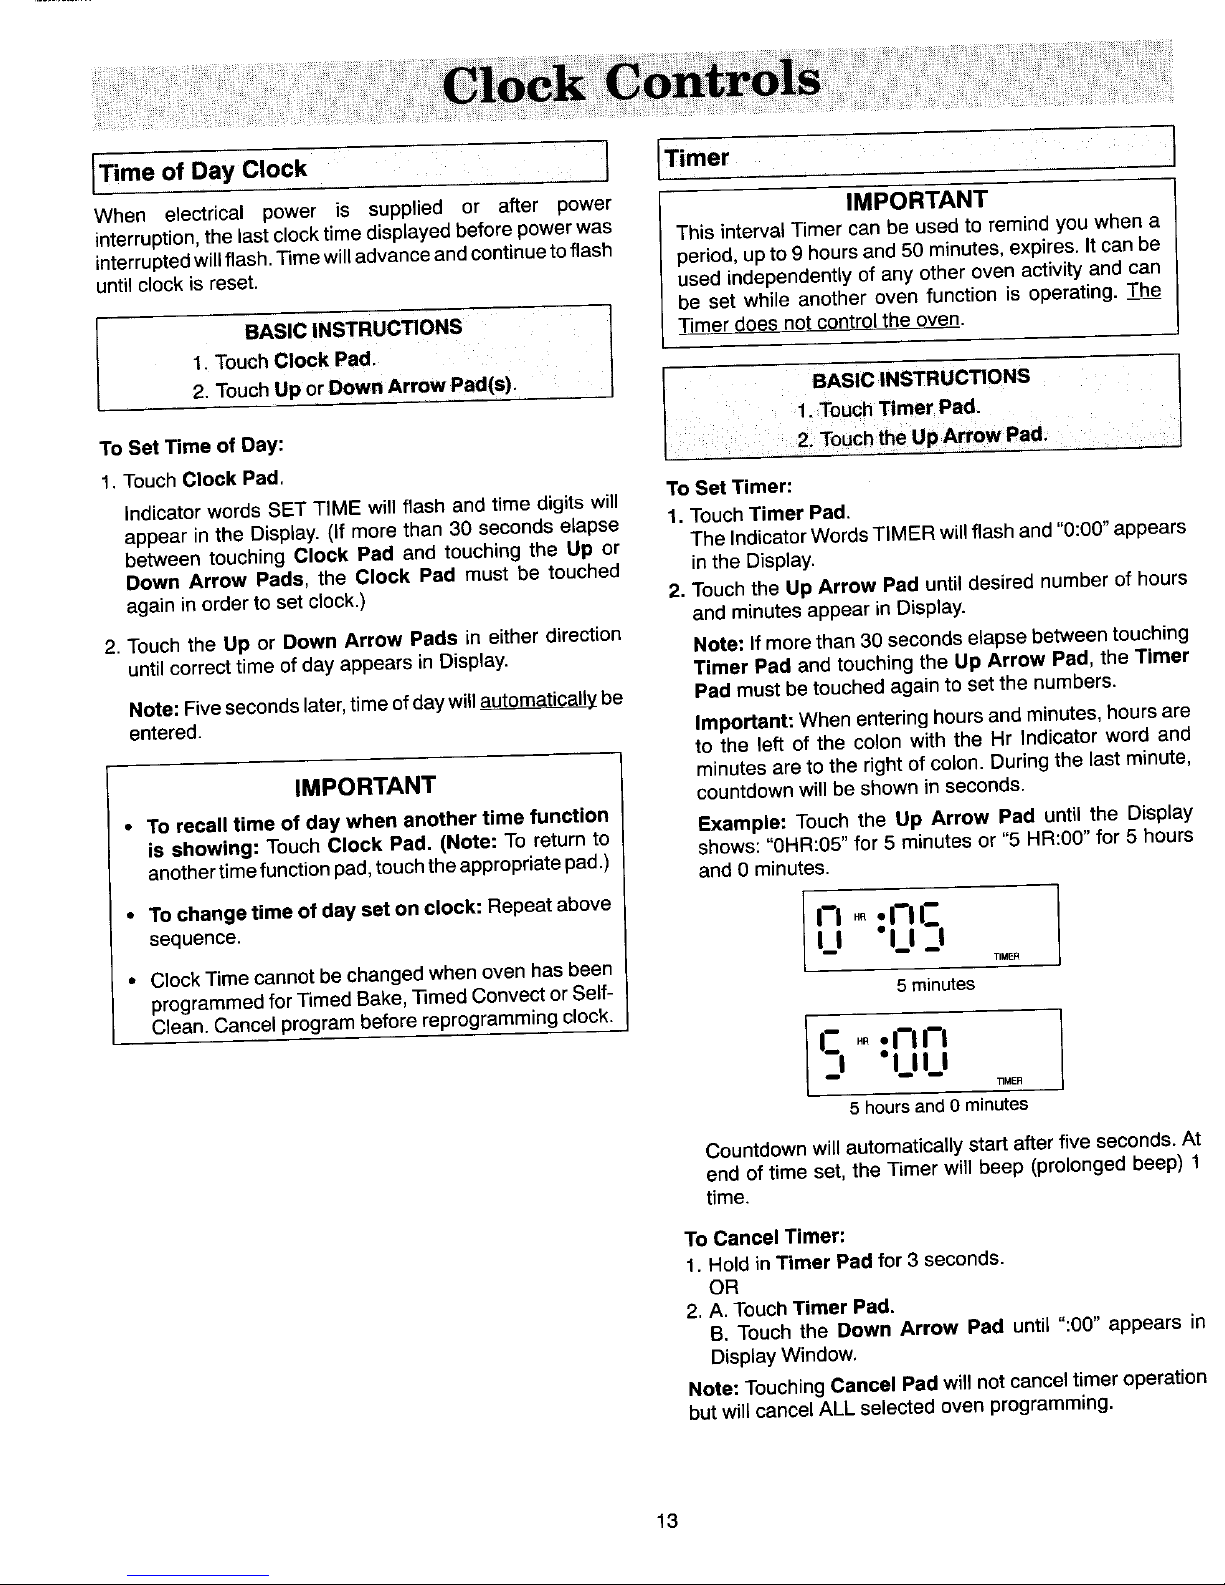
sequence. I_ H,_5
• ClockTimecannotbechangedwhenoven hasbeen T,._,
programmedforTimedBake,TimedConvector Self- 5 minutes
Clean.Cancel programbeforereprogrammingclock.
rl "r'lrs"UU
"riMER
5 hoursand0 minutes
Countdownwillautomaticallystartafterfiveseconds.At
endof timeset,the Timerwillbeep(prolongedbeep)1
time.
ToCancel Timer:
1. HoldinTimer Padfor 3 seconds.
OR
2. A. TouchTimerPad.
B. Touchthe Down Arrow Pad until":00" appearsin
DisplayWindow,
Note:TouchingCancel Padwillnotcanceltimeroperatior
butwillcancelALLselectedovenprogramming.
13
 Loading...