

Page 1
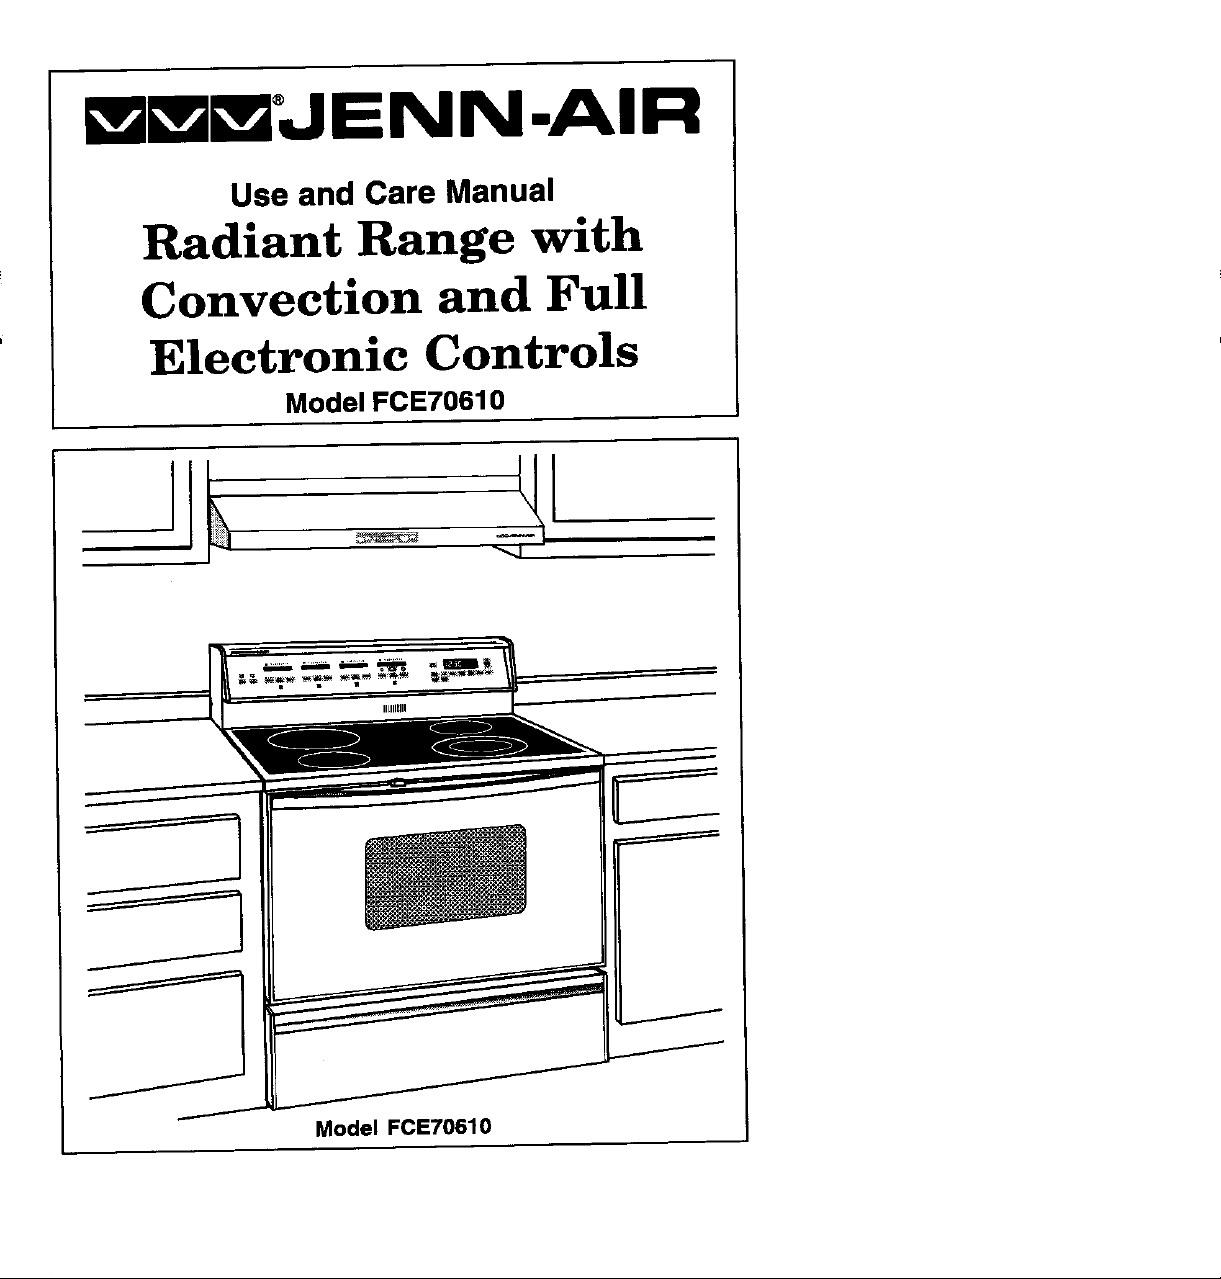
mmJENN-AIR
Use and Care Manual
Radiant Range with
Convection and Full
Electronic Controls
Model FCE70610
Model FCE70610
Page 2
Congratulationson yourchoice of aJenn-Airelectricrange. YourJenn-
Air self-cleaningrange combinesthe best of four cookingmethods,
convectionbaking,convectionroasting,conventionalbakingor roast-
ing,andbroiling.
The Jenn-Air convectionoven is actuallya conventionaloven that
circulatesheated air withinthe oven. As both bake and broil heating
elementscycleon and offwiththethermostat,a fan keepsthe heated
air circulatingaroundthefood. Theconstantlyrecirculatingheatedair
intheconvectionovenstripsawaythe layerofcoolerairthatsurrounds
the food. Consequently,many foods cook more quickly. Distributed
heat makesmultiple rack cooking possible. Convection roasted meats
retaintheirnatural flavor andjuiciness withlessshrinkagethen conven-
tional roasting.
In addition to the many exclusive benefits of convectioncooking, your
ovenisalsoa finefull featuredconventional "bakeand broil" oven. You
can cook your "old favorite" recipes as you have in the past. The
conventionalbakeovenalsogivesyoutheflexibilityofpreparingvarious
foods when convection cooking may not be as beneficial, as when
cooking foods in covered casseroles or clay pots. The broilelement is
convenient for top browning and oven broiling of foods.
Before you begin cooking with your new range, please take a few
minutesto read and become familiarwith the instructions in this book.
Onthe following pagesyou will find awealth of information regarding all
aspectsofusingyour new range. Byfollowing the instructionscarefully,
you will be able to fully enjoy and properly maintain your range and
achieve excellent resultswiththe food you prepare.
Should you have any questionsabout using your Jenn-Air range, write
to us. Be sure to provide the model number.
Jenn-Air Customer Assistance
c/o Maytag CustomerService
P.O. Box 2370
Cleveland, TN 37320-2370
2
Page 3
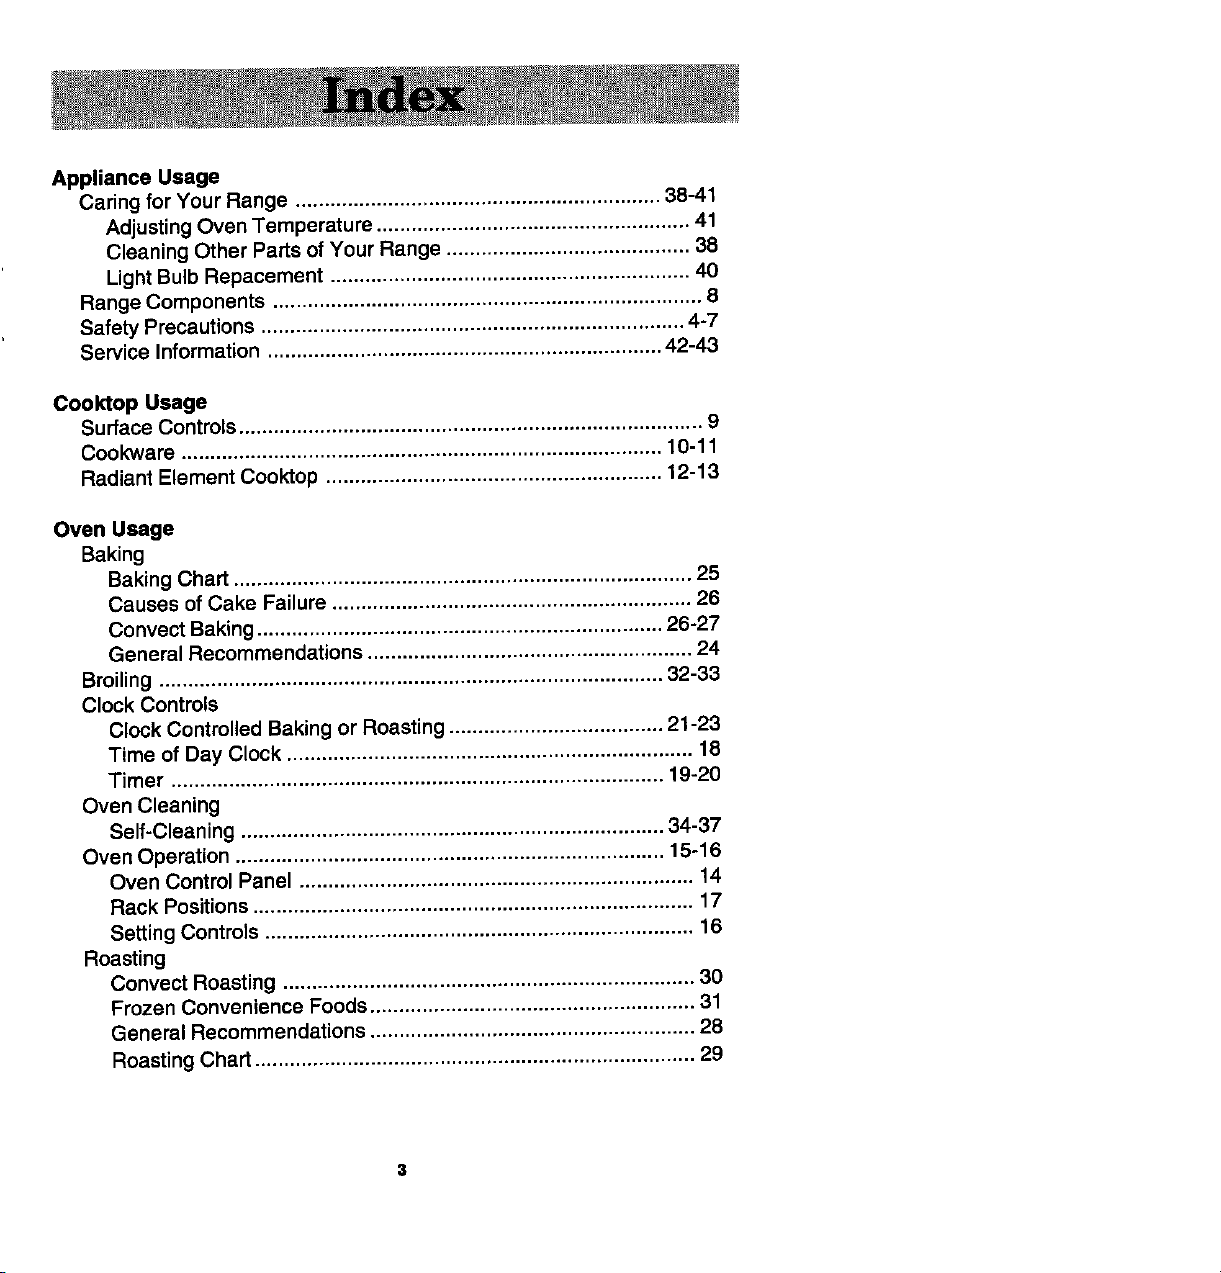
Appliance Usage
Caring for Your Range ............................................................... 38-41
Adjusting Oven Temperature ...................................................... 41
Cleaning Other Parts of Your Range .......................................... 38
Light Bulb Repacement .............................................................. 40
Range Components .......................................................................... 8
Safety Precautions ......................................................................... 4-7
Service Information .................................................................... 42-43
Cook'top Usage
Surface Controls................................................................................ 9
Cool<ware................................................................................... 10-11
Radiant ElementCooktop .......................................................... 12-13
Oven Usage
Baking
BakingChart............................................................................... 25
Causes of Cake Failure .............................................................. 26
Convect Baking ...................................................................... 26-27
General Recommendations ........................................................ 24
Broiling ....................................................................................... 32-33
Clock Controls
Clock Controlled Baking or Roasting ..................................... 21-23
Time of Day Clock ...................................................................... 18
Timer ..................................................................................... 19-20
Oven Cleaning
Self-Cleaning ......................................................................... 34-37
Oven Operation .......................................................................... 15-16
Oven Control Panel .................................................................... 14
Rack Positions ............................................................................ 17
Setting Controls ..........................................................................16
Roasting
Convect Roasting ....................................................................... 30
Frozen Convenience Foods ........................................................ 31
General Recommendations ........................................................ 28
Roasting Chart ............................................................................ 29
Page 4
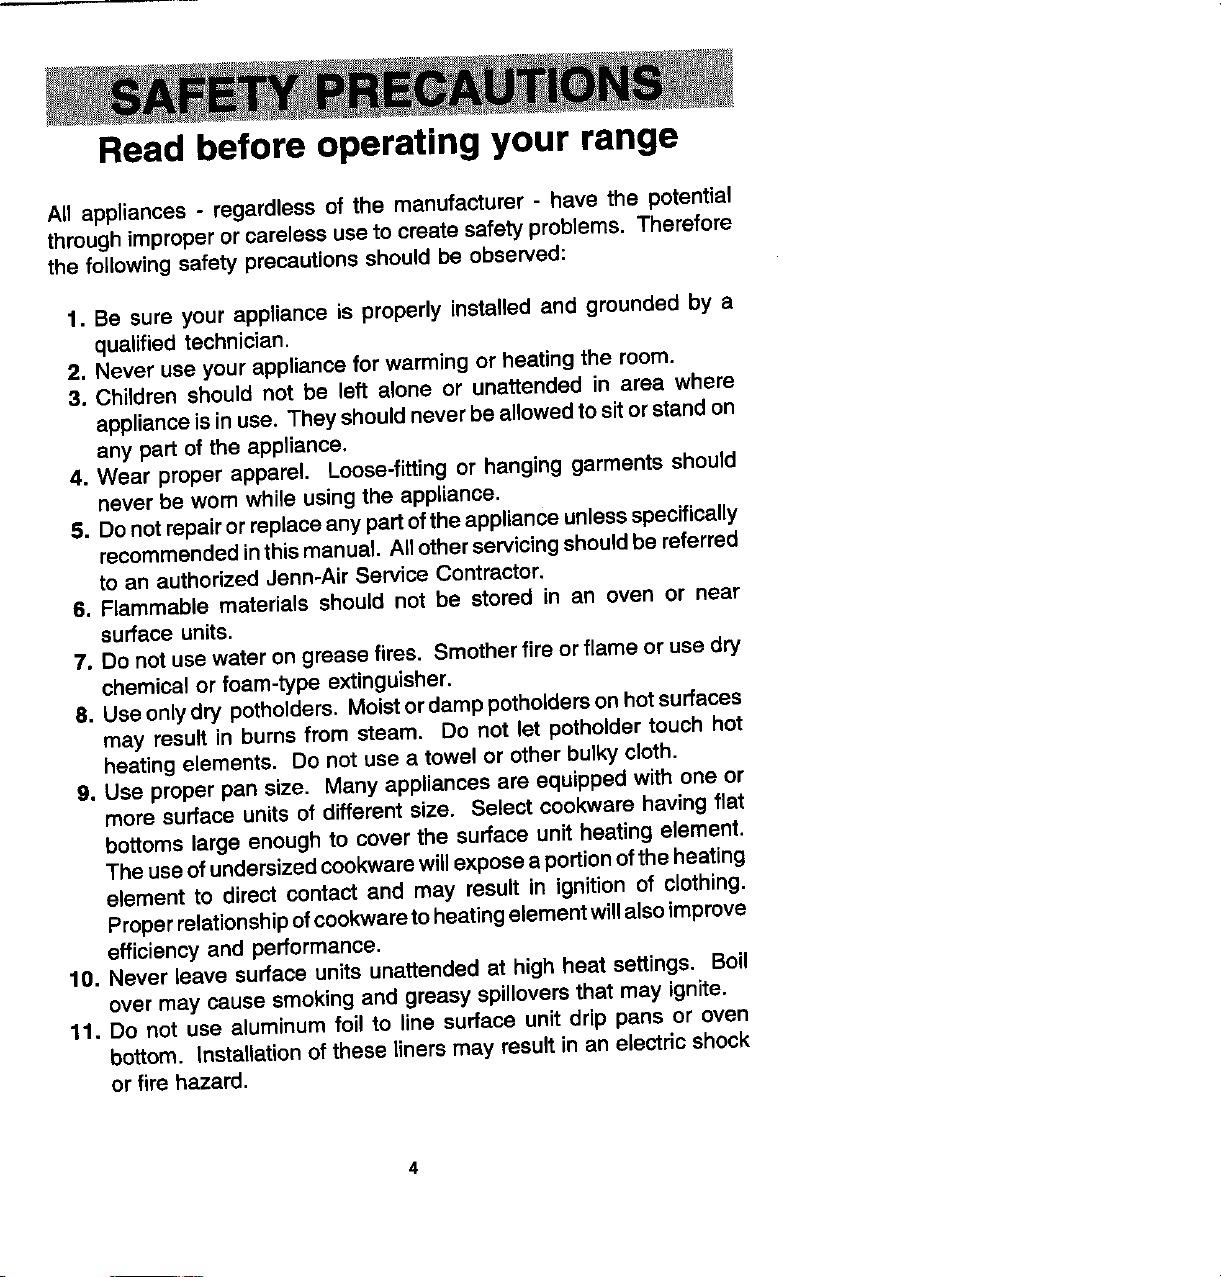
Read before operating your range
All appliances - regardlessof the manufacturer - have the potential
throughimproperorcarelessuseto createsafetyproblems.Therefore
the followingsafety precautionsshouldbe observed:
1. Be sureyourapplianceis properlyinstalledand groundedby a
qualifiedtechnician.
2. Neveruseyourapplianceforwarmingor heatingthe room.
3. Childrenshouldnot be left alone or unattendedin area where
applianceisinuse. Theyshouldneverbeallowedtositorstandon
anypart of the appliance.
4. Wear properapparel. Loose-fittingor hanginggarmentsshould
neverbe worn while usingtheappliance.
5. Donotrepairorreplaceanypartoftheapplianceunlessspecifically
recommendedinthismanual.Allotherservicingshouldbereferred
to an authorizedJenn-AirServiceContractor.
6, Flammable materialsshould not be stored in an oven or near
surface units.
7. Donot usewateron greasefires. Smotherfireorflame or usedry
chemicalor foam-typeextinguisher.
8. Useonlydry pothofders.Moistordamppotholdersonhotsurfaces
may resultin burnsfrom steam. Do not let potholdertouchhot
heatingelements. Do notusea towelor otherbulky cloth.
g. Use properpansize. Manyappliancesare equippedwith one or
more surfaceunitsof differentsize. Select cookwarehavingflat
bottomslargeenoughto cover the surface unitheatingelement.
Theuseofundersizedcookwarewillexposea portionoftheheating
element to direct contactand may resultin ignitionof clothing.
Properrelationshipofoookwaretoheatingelementwillalsoimprove
efficiencyand performance.
10. Never leave surface unitsunattendedat high heat settings. Boil
overmay causesmokingand greasyspilloversthat may ignite.
11. Do not use aluminumfoil to linesurfaceunitdrippansor oven
bottom. Installationof these linersmay resultin an electricshock
orfire hazard.
Page 5
12. Glazed cookware - only certain types of glass, glass-ceramic,
ceramic,earthenware,or other glazedcookwareare suitablefor
cooktopsurface withoutbreakingdue to the suddenchange in
temperature. Use onlysuch cookware as you know has been
approvedfor thispurpose.
13. Cookwarehandlesshouldbe turnedinwardand notextendover
adjacent surface heating elements to avoid burns, ignitionof
flammablematerialsandspillagedueto unintentionalcontactwith
the cookware.
14. Do not soakorimmerseremovableheatingelementsinwater.
15. CAUTION - Do notstore itemsof interestto childrenin cabinets
aboverange- childrenclimbingonthe rangeto reach itemscould
be seriouslyinjured.
16. Donottouchsurfaceunitsorareasnear units,heatingelementsor
interiorsurfacesofoven.Surface unitsorheatingelementsmay be
hoteventhoughtheyaredarkincolor.Areasnearsurfaceunitsand
interior surfaces of an oven may becomehot enoughto cause
burns. Duringand after use,do nottouchor let clothingorother
flammable materialscontact these areas until they have had
sufficienttimetocool. Othersurfacesmay becomehotenoughto
causebums-amongthese surfacesare the cooktop,upperdoor
frameandglass,ovenventopeningandsurfacesneartheopening,
ovendoor,and ovenwindow.
17. Do not cook on glass-ceramiccookingsurface if the cooktopis
broken. Cleaning solutionsand spilloversmay penetrate the
broken cooktopandcreatea shock hazard. Contactanauthorized
Jenn-Air Service Contractor.
18. Clean glass-ceramiccooktopswithcaution. If wetsponge or cloth
is used to wipe spills on a hot cooking area, be careful to avoid
steam bums. Some cleansers can produce noxious fumes if
applied to a hot surface.
19. Do not operate with damaged cooking element after any product
malfunction until proper repair has been made.
20. Keep all switches "OFF" when unit is not in use.
21. Use care when opening oven door. Let hot air or steam escape
before removing or replacing food.
22. Do not heat unopenedfood containers. Build-up of pressure may
cause container to burst and result in injury.
23. Keepovenvent ductsunobstructed.
Page 6
24. Alwaysplace oven racks in desired location whileoven is cool. If
rack must be moved while oven is hot, do not letpotholder contact
hot heating element in oven.
25. Do not clean door gasket. The door gasket is essential for a good
seal. Care should betaken notto rub,damage,or movethe gasket.
26. Do not use oven cleaners. No commercial oven cleaner or oven
linerprotective coating ofany kind should be used inor aroundany
part of the oven.
27. Clean only parts listed in this manual.
28. CAUTION: BEFORE SELF-CLEANING THE OVEN, REMOVE
FOOD, BROILER PAN AND OTHER UTENSILS.
29. Do not allowaluminumfoilto contact heating elements.
30. PREPARED FOOD WARNING: Follow food manufacturer's
instructions. If a plasticfrozenfoodcontainerand/oritsfilm cover
distorts,warpsorisotherwisedamagedduringcooking,immediately
discardthefoodanditscontainer.Thefoodcouldbecontaminated,
31. WARNING' To reduce the risk of tippingof the appliancefrom
unusualusage or by excessiveloadingof the oven door, the
appliancemustbe securedby a properlyinstalledanti-tipdevice,
To checkif device is installedproperly:Use a flashlightand look
underneaththe rangetosee that one of the rearlevelinglegsis
engagedinthebracketslot. Whenremovingapplianceforcleaning,
besureanti-tipdeviceisengagedwhenrangeisreplaced.The anti-
tipdevicesecuresthe rear levelingleg tothefloor,whenproperly
engaged.
32. This appliance has been tested for safe performance using
conventionalcookware.Donotuseanydevicesoraccessoriesthat
arenotspecificallyrecommendedinthismanual. Donotuseeyelid
coverforthe surface units,stovetopgrills,or add-onconvection
systems.The useofdevicesor accessoriesthat arenotexpressly
recommendedinthis manualcan create serioussafety hazards,
result in performance problems, and reduce the life of the
componentsofthe appliance.
- SAVE THESE INSTRUCTIONS -
Page 7
IMPORTANT SAFETY NOTICE AND WARNING
TheCaliforniaSafe DrinkingWaterandToxicEnforcementActof 1986
(Proposition65) requiresthe Governorof Californiato publisha listof
substancesknownto the State of Californiato cause canceror repro-
ductiveharm,andrequiresbusinessesto warn customersof potential
exposuresto suchsubstances. Users of this applianceare hereby
warnedthatwhentheovenisengagedintheself-cleancycle,theremay
besomelowlevelexposuretosomeofthe listedsubstances,including
CarbonMonoxide.Exposureto thesesubstancescan be minimizedby
properlyventingthe rangeto the outdoorsduringthe self-cleancycle.
ModelNumber
SerialNumber
DatePumhased
JENN-AIR DEALERFROM WHOM PURCHASED
Address
(Numbersappear ontheSerial Rate locatedbehindthe storagedraweronthefrontframe.)
c_ty
Phone
AUTHORIZED JENN-AIR SERVICE CONTRACTOR
Address
city
Phone
Important: Retain proofofpurchasedocumentsforwarrantyservice.
Page 8
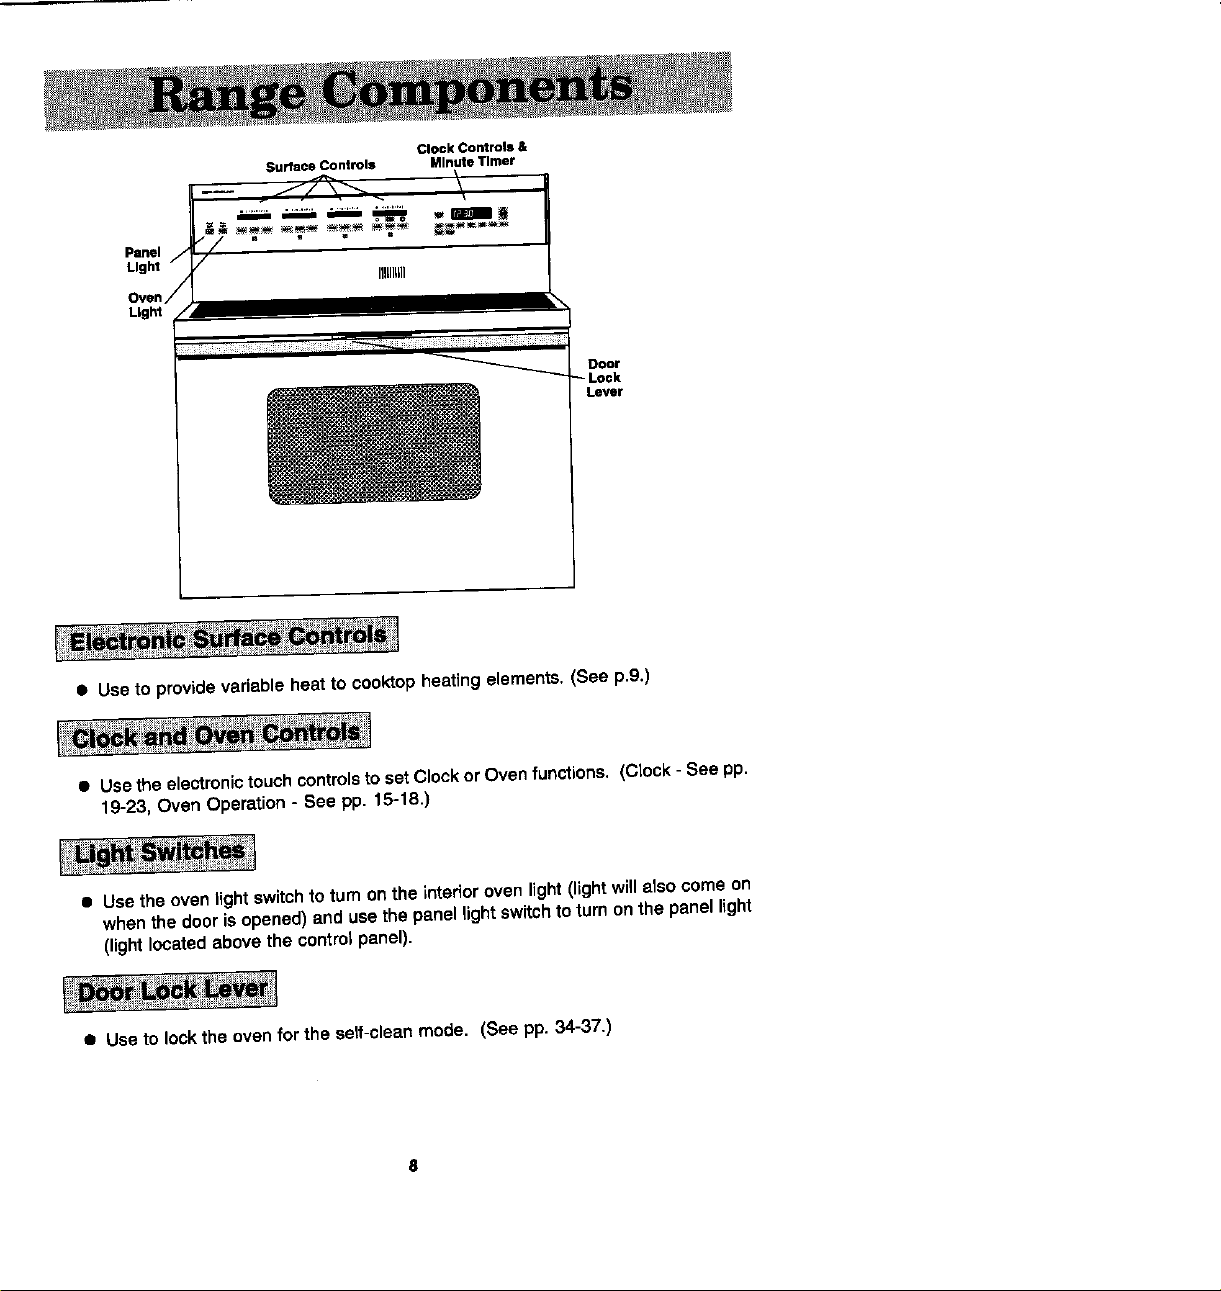
Surface Controls Minute Timer
Clock Controls &
= ............................_,_,_ _=_a=_t
Light/_ iil,liln
Ii := =
_ Door
Lock
Lever
• Use to provide variableheatto cooktopheatingelements,(See p.9.)
• Usethe electronictouchcontrolsto setClockorOven functions,(Clock- See pp.
19-23, Oven Operation- See pp. 15-18.)
• Use the oven lightswitch to turn on the interioroven light(light willalsocome on
whenthedooris opened)and usethepanel lightswitchtoturnonthe panellight
(lightlocatedabovethe controlpanel).
• Use tolockthe oven for theself-clean mode. (See pp. 34-37,)
8
Page 9
• The surfacecontrolsare electronic.Toset requirestwo steps:1) touchtheOn/Off
Pad (an orangeindicatorlightappears)and2) touchthe Lowerand/orHigher Pads
toselecta setting.ThefirsttapontheLower Padwillbethe "1" (Low)settingand
thefirsttapontheHigherPadwillbethe"9" (High)setting.Toselectothersettings,
touchand holdthe Lower and Higher Pad. The number of red indicatorlights
correspondtothe selectedsetting.
• The rightfrontdualelementis controlledbytheSmall/Large Pad. Whenthe small
indicatorlighttotheleftoftheSmall/LargePad islit,thesmallelementison. When
thelargeindicatorlightto therightoftheSmall/Large Padislit,the largeelementis
on. To switchfromoneelementsizeto the other, touchthe Small/Large Pad.
TheHotSurfaceLight(locatedontheglasscooktop)wiflglowredtoindicatethatacooking
areaishot. Thislightwillremainonuntilthearea hascooled.
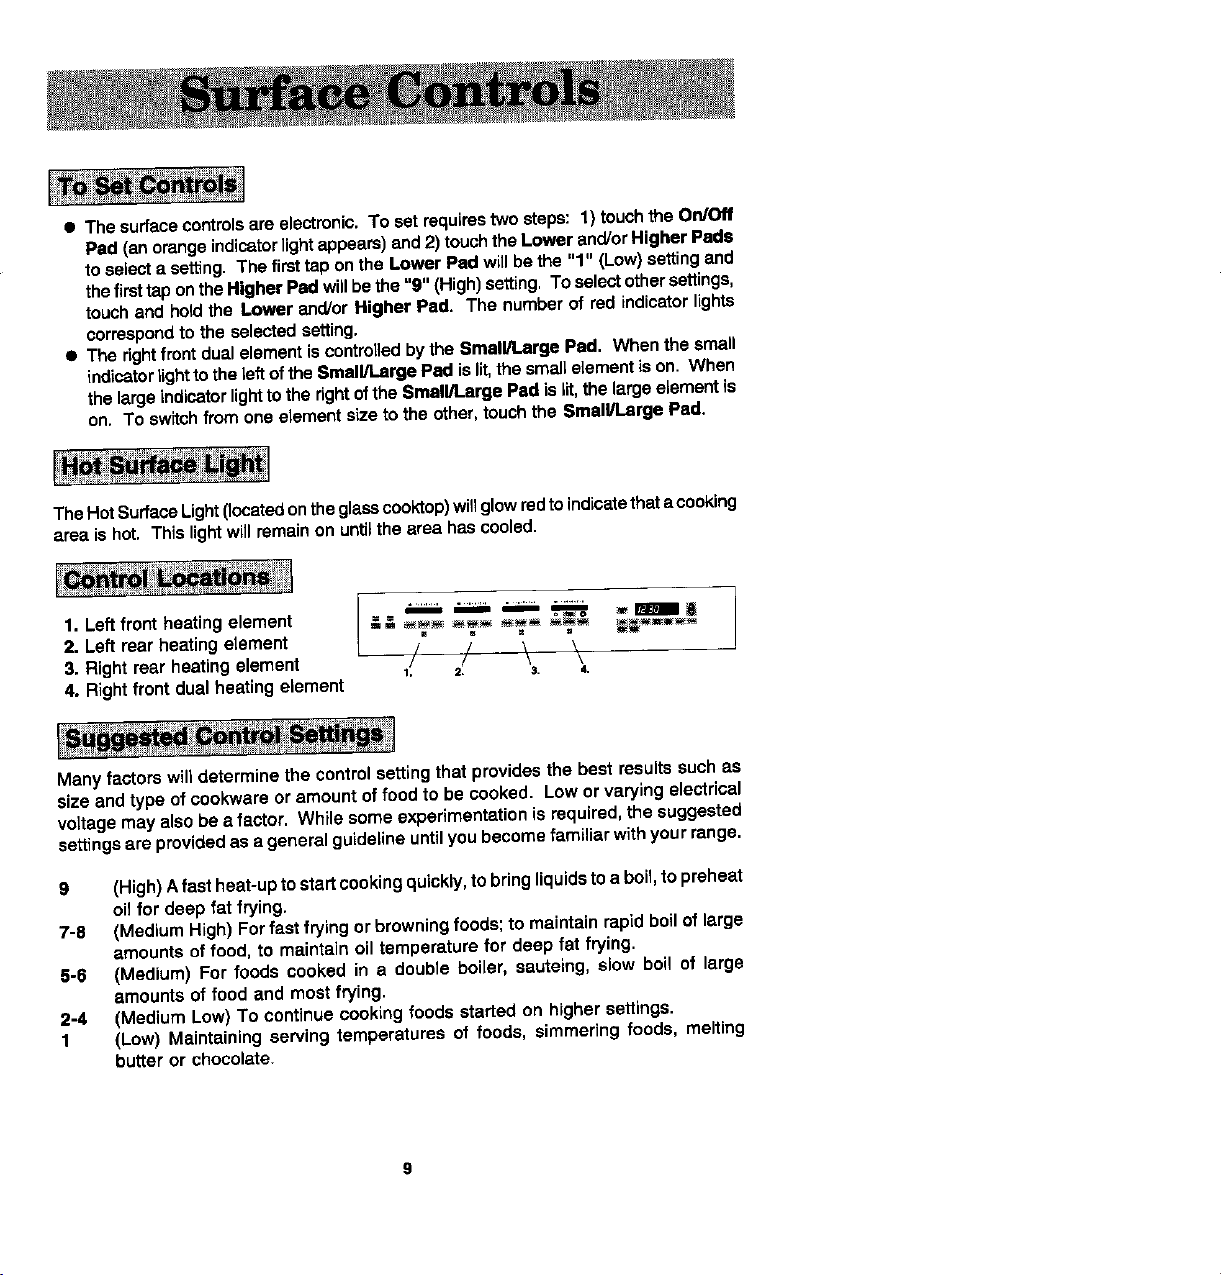
1. Left front heatingelement -===_ _ _ _ _ _
2. Left rear heatingelement __ / 7L____ \ \
3. Rightrear heatingelement 1/ =. 3. 4.
4. Rightfront dual heatingelement
Manyfactors willdeterminethe controlsettingthat providesthe best resultssuchas
size andtype of ccokwareor amountoffoodto be cooked. Low orvaryingelectrical
voltagemayalsobe a factor. While someexperimentationisrequired,thesuggested
settingsare providedas a generalguidelineuntilyoubecomefamiliar withyourrange,
9 (High)Afast heat-uptostartcookingquickly,to bringliquidsto a boil,to preheat
oil for deep fat frying.
7-8 (MediumHigh) Forfast frying orbrowningfoods;to maintainrapidboilof large
amountsoffood, to maintainoiltemperaturefor deep fat frying.
5-6 (Medium) For foods cooked in a doubleboiler,sauteing,slow boil of large
amountsof food and most frying.
2.4 (Medium Low)To continuecookingfoodsstarted on highersettings.
1 (Low) Maintainingservingtemperaturesof foods,simmeringfoods, melting
butter or chocolate.
Page 10
To achieve optimumcooking performance,use heavy gauge, flat, smooth bottom
cookpotsthat conformto thediameterofthe radiant element(no morethan one inch
overhang).Propercookpotswillminimizecookingtimes,uselesselectricity,cookfood
moreevenlyand requirelesswater oroil.
Cookpotswiththin,unevenbottomsdo notadequatelyconductheatfromthe element
tothefoodinthe cookpotswhichresultsinhotspots,burnedorunderdonefood. Using
bad oookpotsalsorequiresmorewater,time,andenergyto cookfood.
• Select heavy gauge cookpots. Usuallyheavygaugecookpotswillnot change
shapewhen heated.
• Use cookpots with flat, smooth bottoms. The twowaysto determineifcookpots
havea flat, smoothbottomare the rulertest and thecookingtest.
Ruler Test
1. Placethe edge of ruleracrossthe bottomofthe pot.
2. Hold uptothe light.
3. No lightshouldbe visibleunderthe ruler.
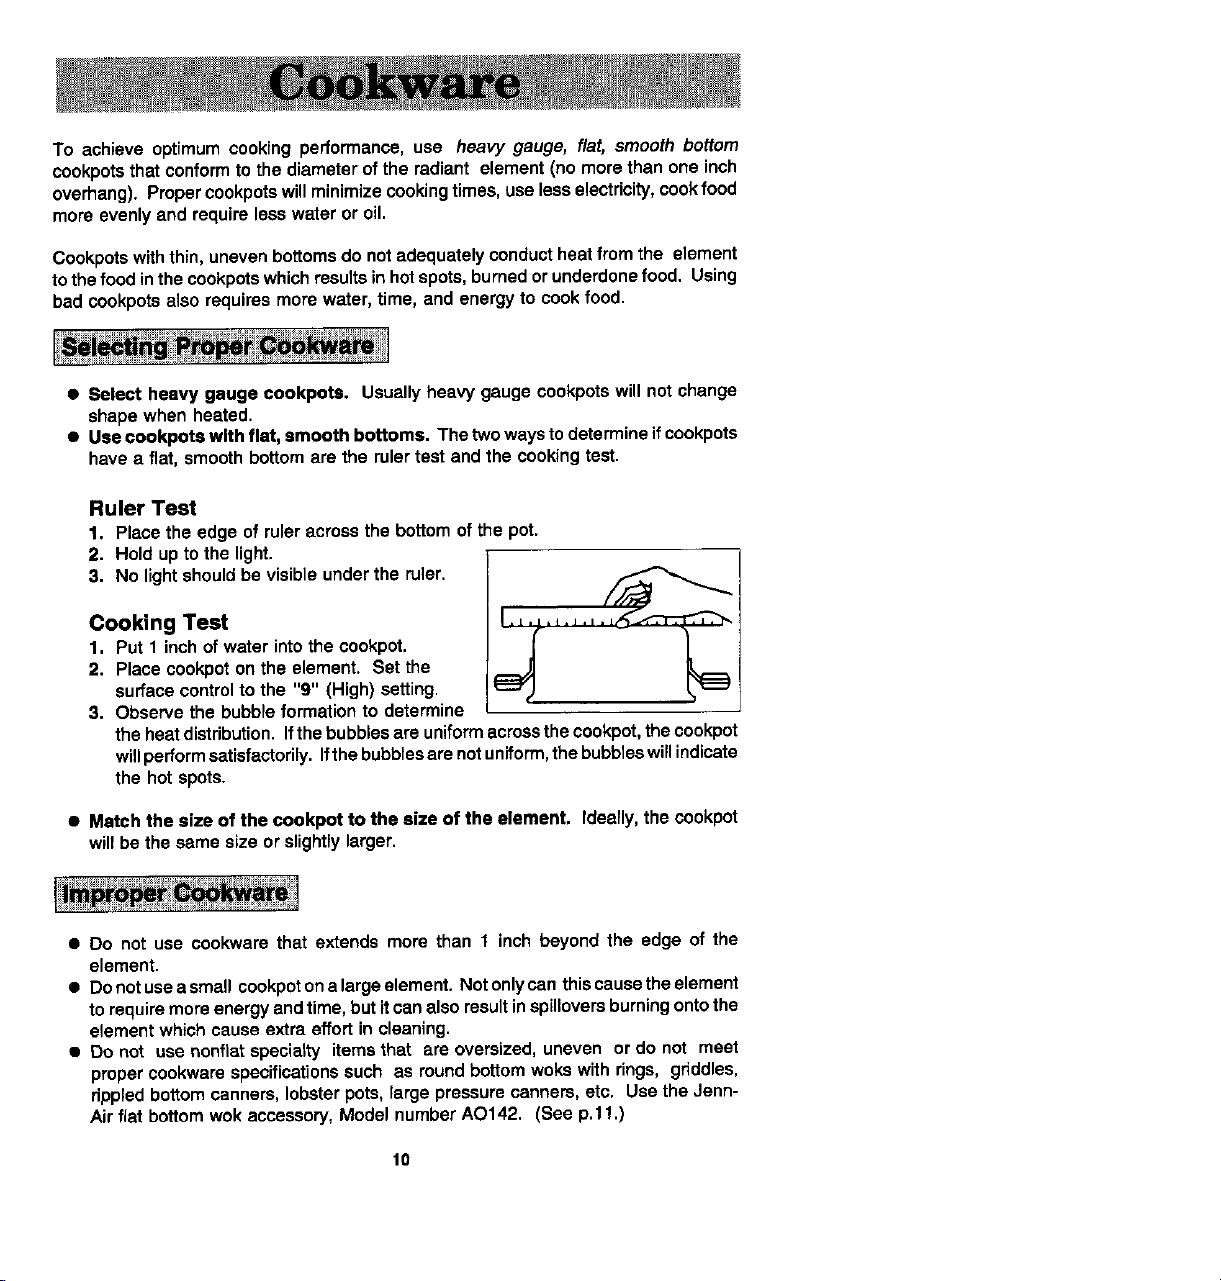
Cooking Test I., ,,_.......
1. Put1 inchofwater intothecookpot.
2. Placecookpoton the element. Set the
surfacecontrolto the "9" (High)setting.
3. Observethe bubble formationto determine
theheatdistribution.Ifthe bubblesare uniformacrossthecookpot,the cookpot
willperformsatisfactorily.Ifthebubblesarenotuniform,thebubbleswillindicate
the hot spots.
• Match the size of the cookpot to the size of the element. Ideally,the cookpot
willbethesamesize or slightlylarger.
• Do not use cookware that extends more than 1 inch beyondthe edge of the
element.
• Donotuseasmall cookpotona largeelement.Notonlycan thiscausetheelement
torequiremoreenergyandtime,butitcanalsoresultinspilloversburningontothe
elementwhichcauseextra effortin cleaning.
• Do not use nonfletspecialty itemsthat are oversized,uneven ordo not meet
propercookwarsspecificationssuch as roundbottomwokswith rings, griddles,
rippledbottomcanners,lobsterpots,large pressurecanners,etc. Use theJenn-
Airfiatbottomwokaccessory,Model numberAO142. (See p.11.)
10
Page 11
Heavy gauge cookpotswithflat, smoothbottomswill usuallywork in a similarway.
However,there aresomedifferencesinthe cookingperformanceof variousmaterials.
• Aluminum cookpotsheat quicklyand evenly. Bestsuitedfor simmering,braising,
boilingand frying.
• Stainless steel cookpotswill evenly distributeheat if constructedof tri-ply or
combinedwith other metals such as aluminumand copper. Use for cooking
functionssimilarto aluminum.
• Cast iron cookpotsare slowto heat but cook moreevenly once temperature is
reached. Useforlongtermlow heat cookingorfor browningandfrying.
• Glass ceramic, earthenware, heat-proof glass or glazed cookpotscan be usedif
recommendedby the manufacturerfor cookpotcooking. Do not use withtrivets.
Bestusedon lowto mediumcontrolsettings.
• Porcelain enamel-on-steel or porcelain enamel-on-cast iron should be used
accordingto manufacturer'sdirections. Do not allowto boildry.
Acceptablecanningpotsshouldnotbe oversizedand musthave a flatbottom. When
cannersdo notmeetthesestandards,the useof the "9" (High)heat settingbecomes
excessiveandmayresultindamagetothe cooktop. In addition,watermay notcome
toa boilandcannersmay notreach10 lb. of pressure.
Theacceptablecanningprocedureusesthe"9" (High)settingjustlongenoughtobring
the water toa boil,then lowerthe settingto maintainthe watertemperature.
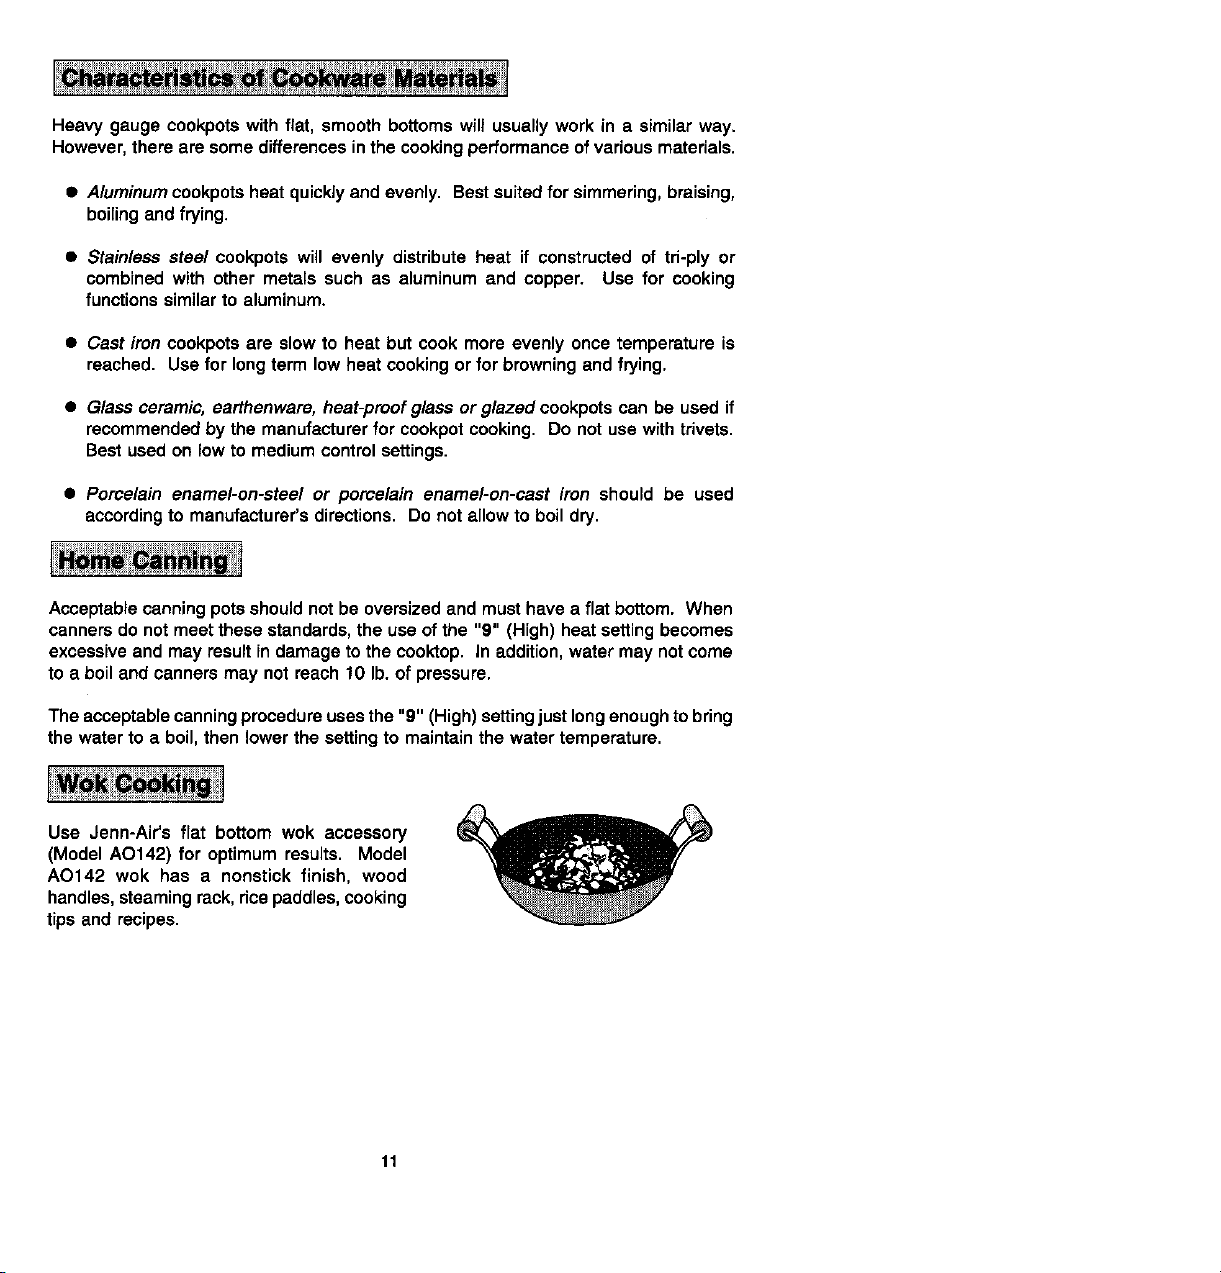
Use Jenn-Air'sflat bottom wok accessory
(ModelAO142) for optimumresults. Model
AO142 wok has a nonstick finish, wood
handles,steamingrack,ricepaddles,cooking
tipsand recipes.
11
Page 12

• BEFORE FIRST USE CLEAN COOKTOP. (See p.39.)
@ For best results,alwaysuse recommendedcookware.
• Differentcookpotsand differentamountsoffood beingpreparedwillinfluencethe
controlsett'=ngsneededfor bestresults.For fastestcooking,startwiththesurface
controlon"g" (High)foroneminute;thensetthecontroltothe lowerdesiredsetting.
Coveringpans, wheneverpossible,speedscookingand Ismore energyefficient.
• The glassceramiccookingarearetainsheatfor aperiodoftimeafterthe elements
havebeenturned off. Putthisretainedheat to gooduse. Turn theelements offa
fewminutesbeforefoodiscompletelycookedandusethe retainedheatto complete
thecooking. Becauseofthisheat retentioncharacteristic,the elementswin not
respondto changesin heat settingsas quicklyas coil elements. In theeventof a
potentialboilover, removethe cookpotfromthe cookingarea.
• Whenpreparingfoodswhichcanbeeasilyscorchedorover-cooked,startcooking
at a lowertemperaturesettingand graduallyincreasetemperatureas needed.
• A highersettingthannormalmaybe necessarywhen usingcookpotsmade with
materialthatisslowto conductheat,such_s castiron.
• A lowersettingcan beusedwhencookingsmallquantitiesoffoodsorwhenusing
a cookpotthatconductsheat quickly.
IMPORTANT
• Do notusewiretrivets,firerings,padsorany suchitem betweenthe cookware
and the e_ement.
• Do notcookfoodsdirectlyon cooktop.
• Do not allowpanto boildry as thiscoulddamage thecooktopandthe pan.
• Donotslideheavymetalorglasscookpotsacrosssurfacesincethesemay scratch
the surface.
• Do not use or placeplasticitemsanywhereon cooktop.
12
Page 13
• Do notallowplasticobjects,sugar,orfoodswithhighsugarcontenttomeltontothe
hotcooktop.Mertedmaterialscancausepermanentdamagetothe cooktop.Ifyou
accidentallymeltanythingontothecooktop,orasugarysolutionboilsover,remove
itimmediatelywhilethecooktopis stillhot. Carefully,useasingleedge razorblade
heldwitha potholderto scrapethe meltedmaterialorsugaryboiloverto a cooler
area of the cooktop. Useseverallayersof papertowlesto wipeupthe spillover,
beingcarefulnotto burnyourself.Whentheelementhascooled,usea razorblade
toscrapeofftheremainingsoilandcleanasyouwouldfor heavyspilrs.(Seep.39.)
• Donotusealuminumfoilorfoil-typecontainersunderanycircumstances.Aluminum
foilwilldamagethecooktopifitmeltsontotheglass. If metalmeltsoncooktop,do
not use. Callan authorizedJenn-AirServiceContractor.
• Do not usethe glass-ceramiccooktopas a cuttingboard.
• DoNOTuseabresivecleansingpowdersorscouringpads(includingmetalscouring
pads),whichwillscratchthe cooktop.
• Do NOT use chlorinebleach, ammonia,rust removers,oven cleaners, or other
cleansernotspecificallyrecommendedfor useon glass-ceramic.
• Testcastironwaresinceallare notflat. Alsobecautionedagainstpossible"impact
damage"shouldthe heavycookpotbe droppedon the glass-ceramicsurface.
• Make surebottomsof cookpotsare alwaysclean and dry. (Soilfromthe cookpot
bottomcanbe transferredto thecooktopsurface.) Beforeusingcookpotsonthe
glass-ceramiccooktopfor the first time, and periodicanyas needed, clean the
bottomswithscouringpads or othercleansers. Rinseand dry thoroughly.
• Make ita practicetowipecooktopsurfacewitha c/ean dampclothorpapertowel
beforeeachuse; drythoroughly.Invisiblespatters,dustspecks,cleansersorwater
cancausestainsthatappearafter unitisheated. A spongeor dishclothwhichis
notcleanwillleavefilmand soilladendetergentwaterwhichmaycausestainson
surface after area isheated.
• When frying, usea spatter shieldto reducespattering.
• Use correctcontrolsettingsandcookwarelargeenoughto holdfood andliquidto
preventboUoversand splattering.
• if abadspilloveroccurswhilecooking,spillsmaybe cleanedfromthe cooktopwhile
itis hotto preventa toughcleaningchorelater. Usingextremecare, wipewitha
cleandamptowel. Becarefultoavoidburnsfromsteamor handstouchingthe hot
cooktop.
13
Page 14

The controlpanelisdesignedfor ease in programming.The DisplayWindowfeatures
IndicatorWordswhichdescribethe functionsset.
To program
1. Touch the functionpadtogive commenddesired.
2. TouchUp or Down Arrow Pad(s) to entertime or temperature.
Note: Foursecondslater,time or temperaturewillautomaticallybe entered. Ifmore
thanthirtysecondselapsebetweentouchingepadandtouchingUp orDown Arrow
Pad(s), the controlis notsetand Displaywillreturnto previousDisplay.
[=.o.H =-lrB°S="
/:90
Function Pads
Use for conventionalbakingor roasting.
Usefortop browningoroven broiling.
Useto set self-cleaningprocess.
Usefor clockcontrolledcooking.
Usetosignalexpirationofa t/meperiodupto9 hoursand50 minutes,
Use to settime of day.
Useforclook controlledcookingandcleaningwhen a delayedstart
isdesired.
Use for convectionBaking.
Use for convectionRoasting.
CancelsagprogrammingexceptTimer and Clock.
Use to entertime or temperature.
14
Page 15

Oven Light Switch (Control Panel)
The ovenlightautomaticallycomesonwhenevertheovendooris opened.When door
isclosed,pushin ovenlightswitchto turn oven lighton or off.
Panel Light Switch (Control Panel)
Pushthepanellightswitchtoturnthepanellightonoroff(thepanellightislocatedabove
thecontrolpanel).
Display Window
Shows time of day, timer,and ovenfunctions.
• CLEANBROIL
CONVECTSETBAKEROASTCOOK STOP TIMER
[IE 3L-I-" ss
Note: To setetimefunctiontheIndicatorWordSET mustbeflashing.(Timerfunctions
includeTimer,Clock,CookTime, StopTime andClean.)
Display Numbers:
• Showtime ofday.
• Countdownof timeremainingwhen usingtime functions.
• Showtemperatureof oven as it risesto reach programmedtemperatureand the
settemperatureonce itis reached.
• Recall programmedtemperatureor time when commanded.
Prompts:
• Serveas aremindertoshutovendoor,if itisopen,forself-cleaningoperationwhen
theword,door, isdisplayed.
Indicator Words:
• Appearto promptnextstep.
• Indicatestatusof programmedfunction.
• Show programmedfunctionwhen recalled.
DELAYTIMED
IMPORTANT
DO NOT MOVE DOOR LOCK LEVER TO THE RIGHT DURING A COOKING
OPERATION. If the door lock lever is movedto the lock position,the cooking
operationwillautomaticanybe cancelledand "door"will appear inthe Display.
15
Page 16
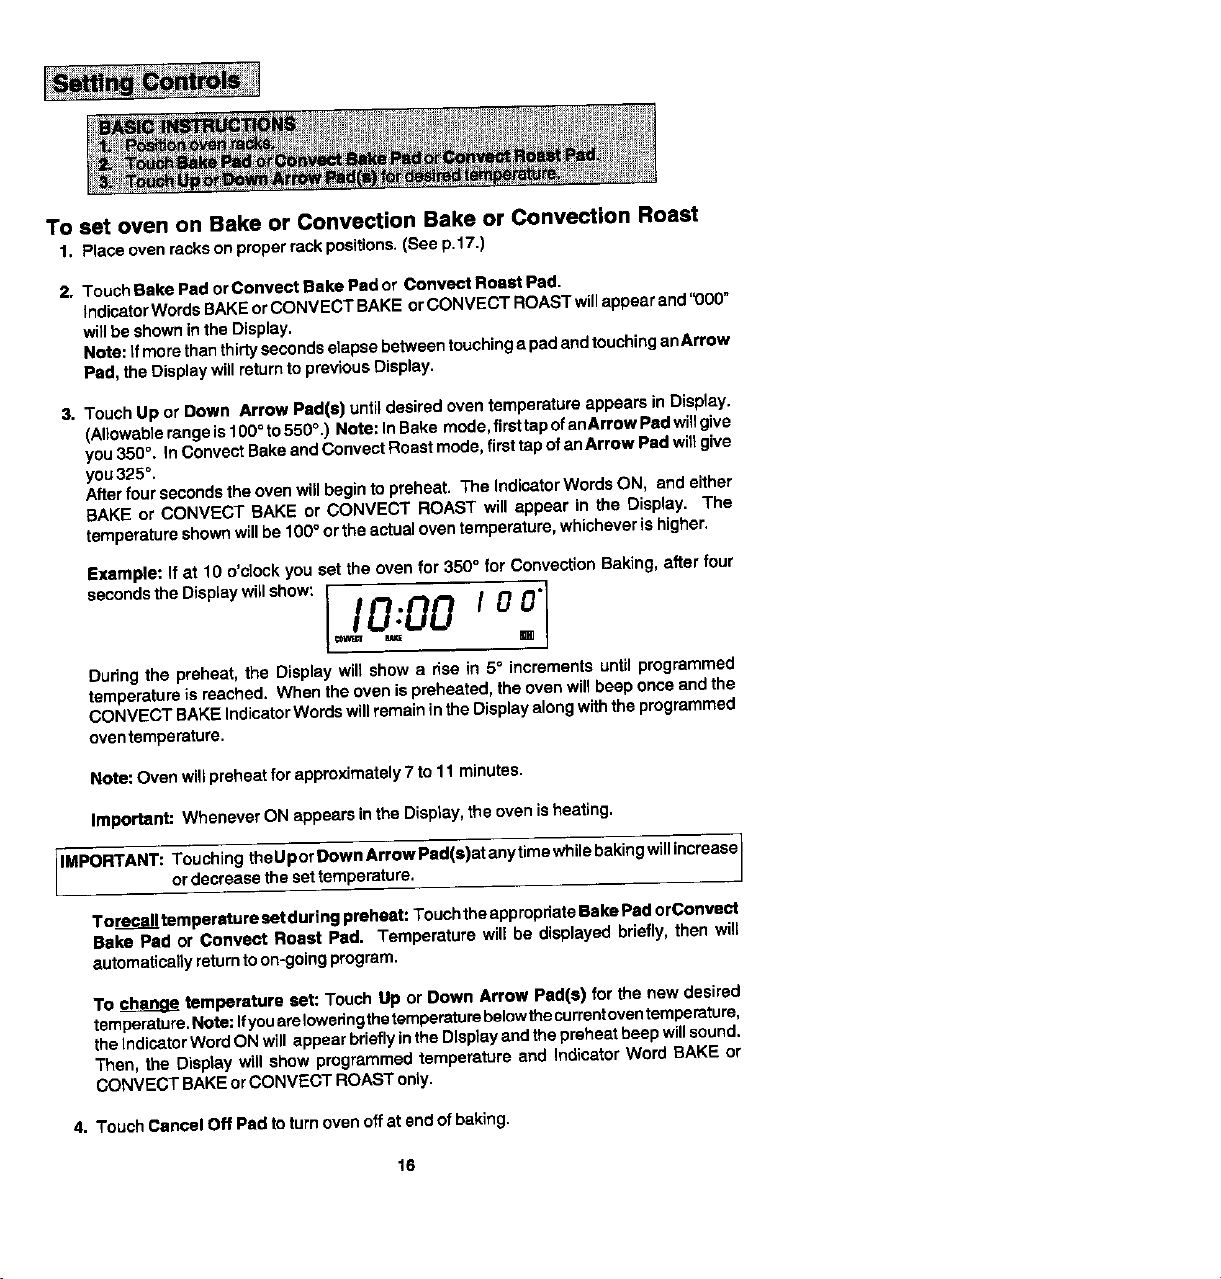
To set oven on Bake or Convection Bake or Convection Roast
1. Place oven racks on proper rack positions. (See p.17.)
2. Touch Bake Pad orConvect Bake Pad or Convect Roast Pad,
indicator Words BAKE or CONVECT BAKE orCONVECT ROAST wiJJappear end '_D00"
will be shown inthe Display.
Note: if more than thirtyseconds elapse between touchingapad and touchinganArrow
Pad, the Displaywill returnto previousDisplay.
3. Touch Up or Down Arrow Pad(s) untildesired oventemperature appears in Display.
(Allowablerangeis100°to550°.) Note: In Bake mode, firsttapof anArrow Pad willgive
you 350 °. In Convect Bake and Convect Roast mode, firsttap of anArrow Pad wil}give
you 325°.
Afterfour secondstheovenwill beginto preheat. The IndicatorWords ON, and either
BAKE or CONVECT BAKE or CONVECT ROAST will appear in the Display. The
temperature shownwill be 100° orthe actualoven temperature,whicheveris higher.
Example: If at 10 o'clock you set the oven for 350° for Convection Baking, after four
o
Dudng the preheat, the Display will show a rise in 5° increments until programmed
temperature is reached. When the oven is preheated, the oven will beep once and the
CONVECT BAKE Indicator Words will remain in the Display along with the programmed
oven temperature.
Note: Oven will preheat for approximately7 to 11 minutes.
Important: Whenever ON appears inthe Display, the oven is heating.
IMPORTANT: Touching theUpor_wnArrowPad(s)atanytimewhilebakingwillincrease 1
or decrease the set temperature, l
Torecall temperature cat during preheat: Touchthe appropriateBake Pad orConvect
Bake Pad or Convect Roast Pad. Temperature wilt be displayed briefly, then will
automaticallyreturntoon-goingprogram.
To than as temperature set: Touch Up or Down Arrow Pad(s) for the new desired
temperature.Note: IfyouareIowedngthe temperaturebslowthecurrentoventemperature,
the IndicatorWord ON will appear brieflyinthe Displayand the preheat baep willsound.
Then, the Display will show programmed temperature and Indicator Word BAKE or
CONVECT BAKEorCONVECT ROAST only.
4. Touch Cancel Off Pad toturnoven offat end of baking.
16
Page 17
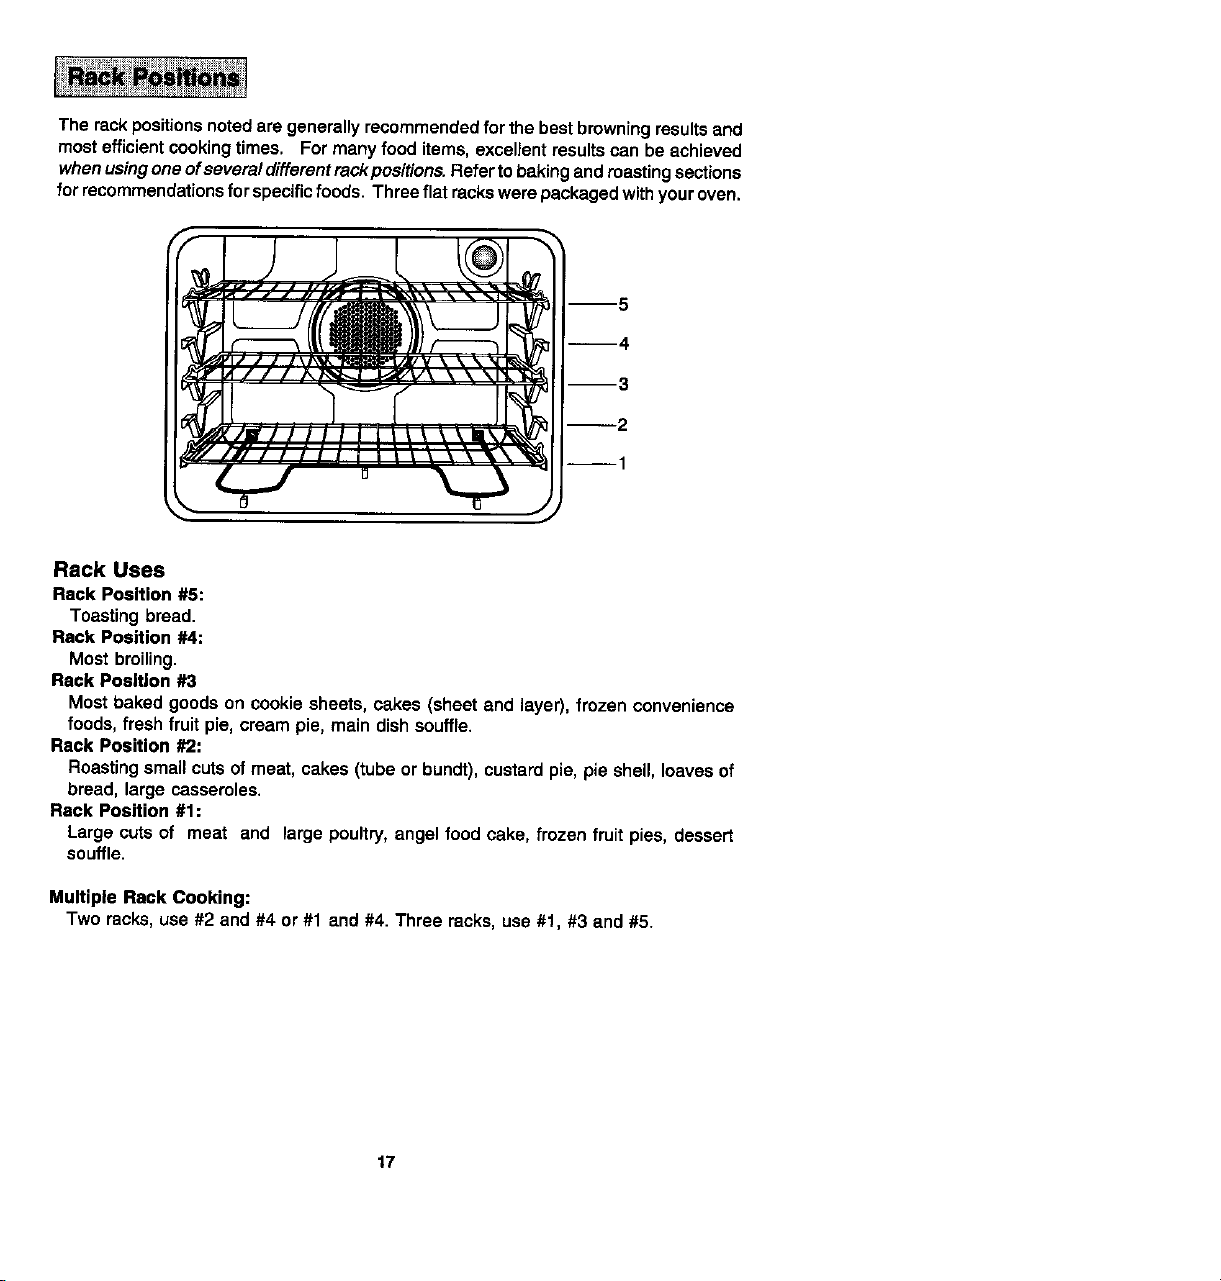
The rackpositionsnotedare generallyrecommendedfor thebestbrowningresultsand
mostefficientcookingtimes. Formanyfood items,excellentresultscan be achieved
whenusingone ofsevera/different rackpositions. Refertobakingandroastingsections
forrecommendationsforspecificfoods.Threeflatrackswerepackagedwithyouroven.
4
2
¢ ..==_ rJ _ 1
Rack Uses
Rack Position#5:
Toastingbread.
Rack Position #4:
Most broiling.
Rack Position #3
Mostbaked goodson cookiesheets,cakes (sheet and layer),frozenconvenience
foods,freshfruitpie, creampie, main dishsouffle.
Rack Position #2:
Roastingsmallcutsof meat, cakes (tubeor bundt),custardpie,pie shell,loavesof
bread, largecasseroles.
Rack Position #1:
Largecutsof meat and large poultry,angelfoodcake, frozenfruitpies,desseK
souffle.
Multiple Rack Cooking;
Two racks,use #2 and #4 or#1 and #4. Three racks,use#1, #3 and #5.
17
Page 18

When electricalpower is supplied or after power interruption,the last clock time
displayedbefore powerwas interruptedwillflash. Time wilJadvanceandcontinueto
flashuntilclockis reset.
TO set time of day
1. TouchClock Pad.
IndicatorWordsSET TIME willflash andtime digitswillappearinthe Display. (If
more than thirtysecondselapse betweentouchingClock Pad and touchingan
Arrow Pad, the Clock Pad mustbe touchedagain in ordertosetclock.)
2. TouchtheUp or Down Arrow Pad(s) untilcorrecttimeofday appearsin Display.
Note: Foursecondslater,time of daywill automaticallybe entered.
IMPORTANT
• To rec_lltimeof daywhen anothertime functionis showing:TouchClock Pad.
(Note: To returnto anothertimefunctionpad,touchthe appropriatepad.)
• To changetimeof day set on clock: Repeatabove sequence.
• CIockTimecannotbechangedwhenovenhasbeenpregrammedforTimedBake,
TimedConvectBake,TimedConvectRoastorSelf-clean.Cancelprogrambefore
reprogrammingclock.
18
Page 19
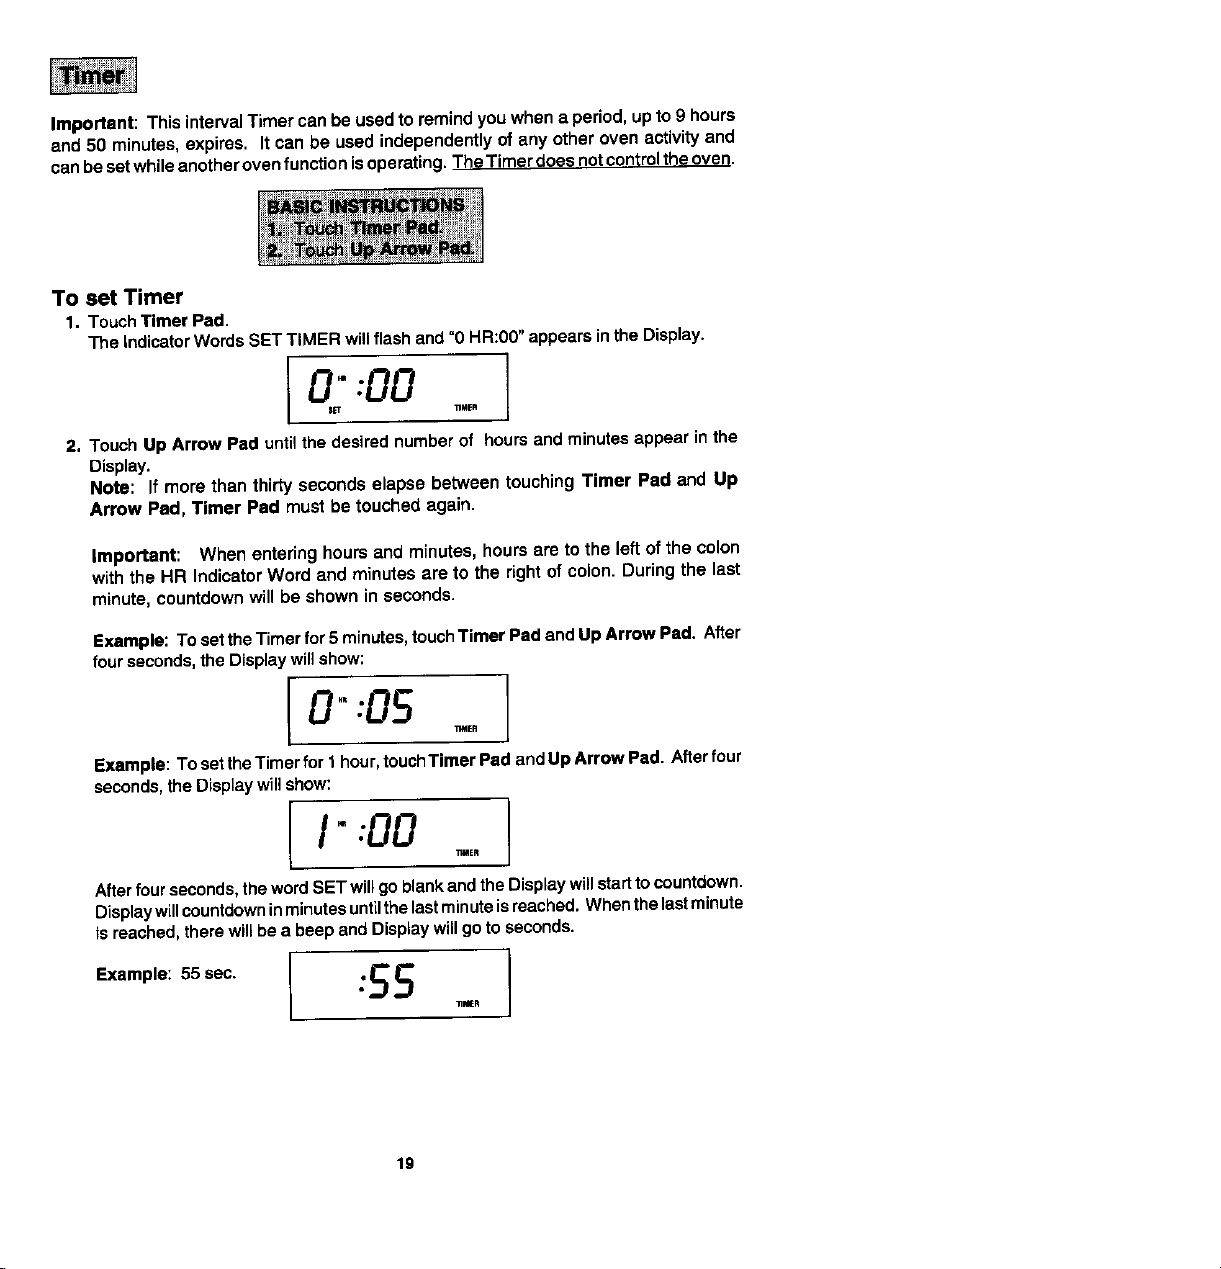
Important: ThisintervalTimercanbeusedto remindyouwhena period,upto9 hours
and 50 minutes,expires. It canbe usedindependentlyof any otheroven activityand
canbesetwhileanotherovenfunctionJsoperating.TheTimerdoesnot controltheoven.
To set Timer
1. TouchTlmerPad.
The indicatorWordsSETTIMER willflashand =0HR:00"appearsinthe Display.
O+:00
2. TouchUp ArrowPad untilthedesirednumberof hoursandminutesappearinthe
Display.
Note: If morethan thirtysecondselapsebetweentouchingTimer Pad and Up
Arrow Pad, Timer Pad must be touchedagain.
important: Whenenteringhoursand minutes,hoursare tothe left of thecolon
withthe HR IndicatorWord and minutesare to the rightof colon. Duringthe last
minute,countdownwillbe showninseconds.
Example:To settheTimerfor5 minutes,touchTimerPad andUpArrowPad. After
fourseconds,the Displaywillshow:
I O+:OS _
Example:TosettheTimerfor1hour,touchTimer PadandUp ArrowPad. Afterfour
seconds,theDisplaywillshow:
]I':00_
Afterfourseconds,thewordSETwillgoblankandtheDisplaywillstartto countdown.
Displaywillcountdowninminutesuntilthelastminuteisreached.Whenthelastminute
is reached,therewillbea beepandDisplaywillgoto seconds.
Example: 55 sec+ :SS
19
_MER
Page 20
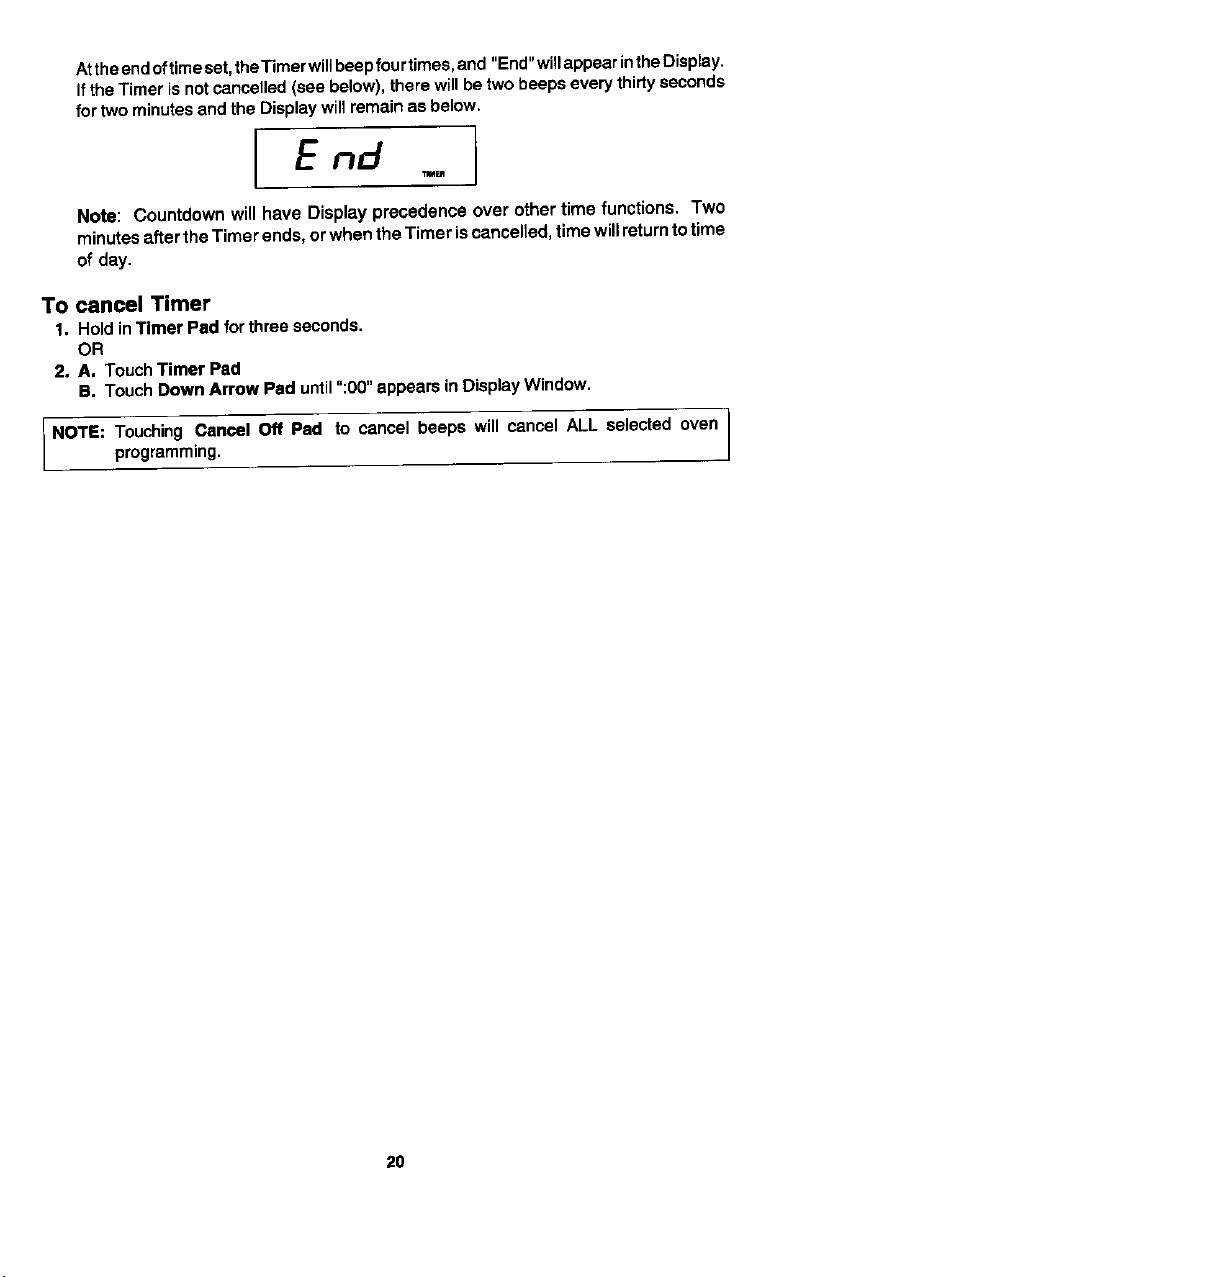
Attheendoftimeset,theTimerwillbeepfourtimes,and "End"willappearintheDisplay.
IftheTimerisnotcancelled(seebelow),therewillbetwobeepseverythirtyseconds
fortwominutesandtheDisplaywill remainasbelow.
E nd
Note: Countdownwillhave Displayprecedenceover othertime functions. Two
minutesaftertheTimerends,orwhentheTimeriscancelled,timewillreturntotime
of day.
,_¢4FIt
To cancel Timer
1. Holdin Timer Padforthreeseconds.
OR
2. A. TouchTimer Pad
a. TouchDownArrowPaduntil":00"appearsinDisplayWindow.
I NOTE: TouchingCancel Off Pad to cancelbeeps will cancel ALLselectedoven1
programming.
J
20
Page 21
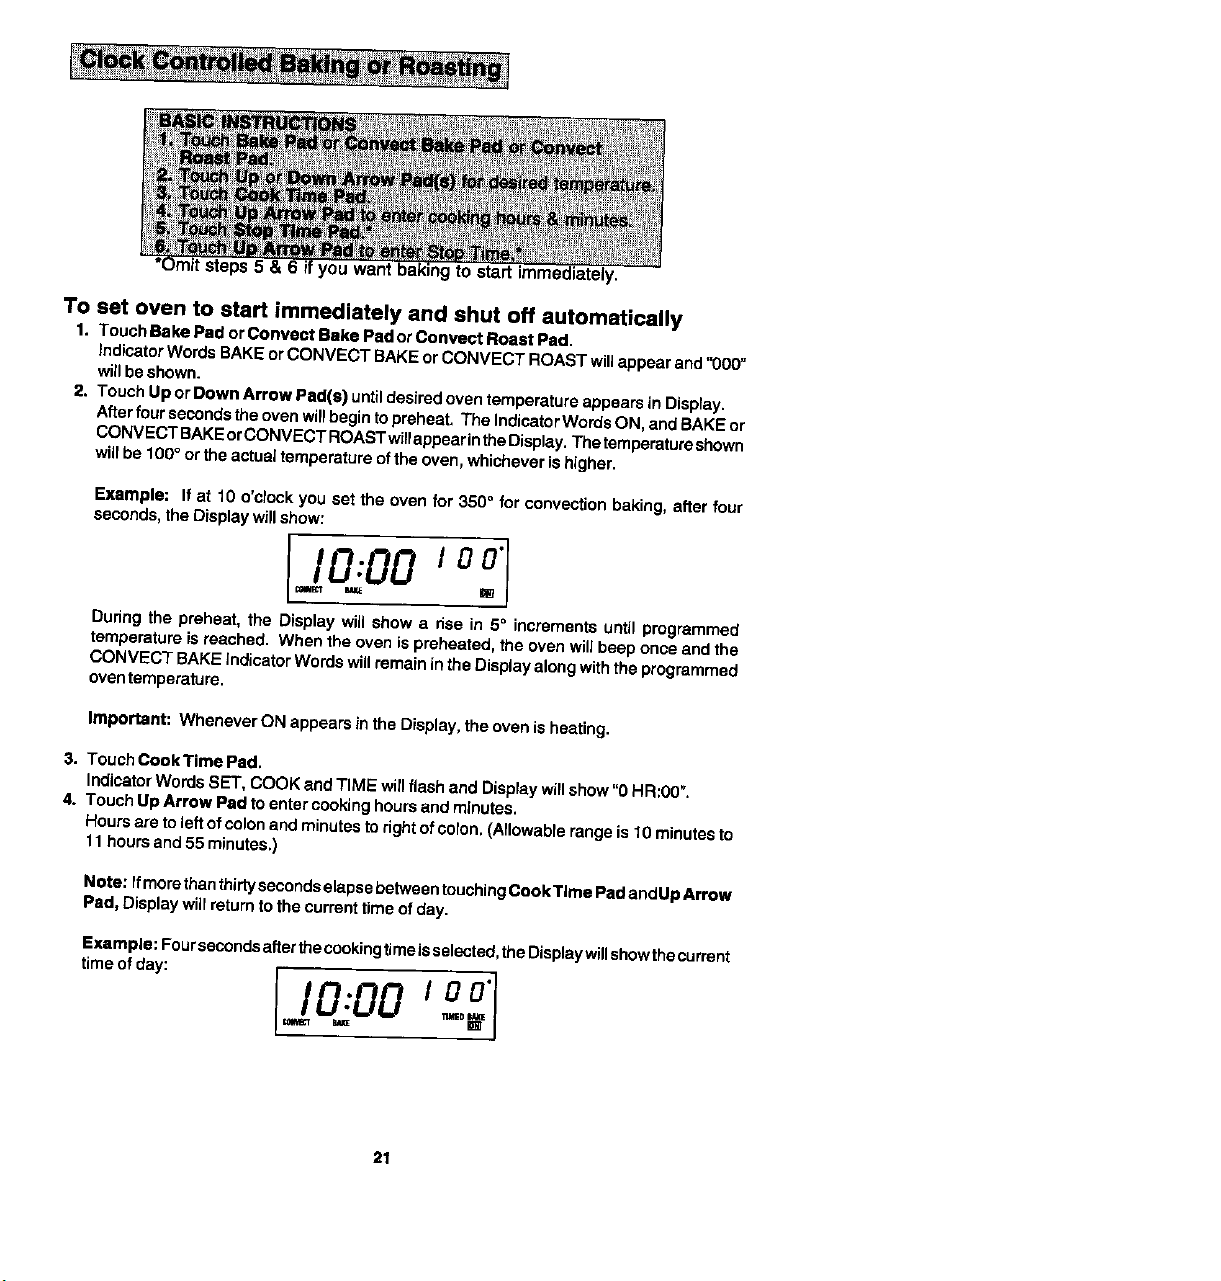
it steps 5 & 6 ) you want to start =mmealately.
To set oven to start immediately and shut off automatically
1. Touch Bake Pad or Convect Bake Pad orConvect Roast Pad.
IndicatorWords BAKEor CONVECT BAKEor CONVECT ROAST wigappear and'_300"
wiltbe shown.
2. Touch Up or Down Arrow Pad(e) untildesired oven temperature appearsin Display.
Afterfour secondsthe ovenwillbegin topreheat, The IndicatorWords ON, and BAKEor
CONVECT BAKEorCONVECT ROAST willappear intheDisplay.The temperatureshown
willbe100° or the actualtemperature ofthe even, whicheverishigher.
Example; If at 10 o'clock you set the oven for 350° for convection baking, after four
seconds,the Display willshow:
i=o.oo,oo.]
During the preheat, the Display wiiI show a rise in 5° increments until programmed
temperature is reached. When the oven ispreheated, the oven wiUbeep once and the
CONVECT BAKE indicatorWordswillremain inthe Display alongwiththe programmed
oventemperature.
Important: Whenever ON appears in the Display,theovenis heating.
3. Touch CookTIme Pad.
indicatorWords SET, COOK and TIME will flash and Display willshow_0HR:00".
4. Touch Up Arrow Pad to enter cookinghoursand minutes.
Hours are toleftof colonand minutesto rightof coron.(Aflowabrs rangeis 10 minutesto
11hoursand 55 minutes.)
Note: Ifmorethanthirtysecondselapse betweentouchingCook Time PadandUp Arrow
Pad, Displaywill return tothecurrenttimeof day.
Example: Foursecondsafter the cookingtimeisselected, theDisplaywillshowthecurrent
timeofday: =_0_00 / 00"
21
Page 22

Important: Ovenwillpreheatforapproximately7 to 11 minutes.Attheendofthe
preheat,therewillbe one beep.At endofprogrammedCookTime, ovenwillshut
offautomatically.Iffood_snotremoved,retainedheatwillcontinuetocookthe food.
Clock controlledcooking is not recommendedfor baked items that require a
preheatedoven,such ascakes,cookies,pies,breads. Forthesefoods,placefood
inpreheatedoven,then useTimerto signalend of bakingtime.
Atthe end of programmedCookTime, the oven willshutoffautomatically,four
beepswill be heardandthe word"End"will showin the Display.The beepswill
continueat onebeep perminutefor 1houroruntilthe CancelOff Pad istouched.
To recall Cook Time set: TouchCook Time Pad once.The programmedcook
timeand IndicatorWords COOK and TIME willappearbrieflyinthe Display.
To cha_ Cook Time set: TouchCook Time Pad twi_'_. The indicatorWords
SET,COOK andTIME willappearintheDisplay.TouchUI_orDownArrowPad(s)
to enternew CookTime. If morethan foursecondselapse betweentouchingthe
Cook Time Pad andan Arrow Pad, the Displaywill returntocurrenttime of day.
TO set oven to start at future time and shut off automatically
1-4. Followprecedingsteps1-4onpage21.
5. TouchStop Time Pad.
IndicatorWordsSET,STOP andTIME willflash. Displaywillshowthe calculated
stoptimebasedoncurrenttimeofdayandcooktime. Note: If SET isnotflashing,
touchStop Time Pad twiceto set stoptime.
6. TouchUp Arrow Pad to enterdesiredstoptime.
A stoptimecan only be acceptedfor later inthe day.
Note: If morethanfoursecondselapsebetweentouchingtheStop Time Padand
theUp Arrow Pad,the ovenis notset fora delayedcookand the oven willstart
to cookimmediately.
Note: Sincefoodcontinuesto cookif leftinthe oven,itissuggestedthattheclock
controlsbeusedprimarilytostarttheovenwhennooneisinthekitchen.Provisions
shou;dbemadeto havethefoodremovedas soonasthe cooktimeiscompleted.
Example: If at 10 o'clockyousettheovenfor 350°convectionbakingand2 hours
and 30 minutescookingtime, the calculatedstoptime would be "12:30". The
Displaywouldshow: _/2;30,__ =__ _,=S0"
ifyouwantthestoptimetobe1 o'clock,touchtheUpArrow Pad until1:O0appears
inthe Display.After fourseconds,the Displaywillreturntocurranttime ofday,thus
showing:
2o-oo.
22
Page 23
At the end of the delayed period, the DELAY IndicatorWord will go off, the ON
IndicatorWordwillappearandthe ovenwillbegintoheat. 100° orthecurrentoven
temperature,whicheveris higher, willbeshown. As the oven heats,the Display
will showa riseinincrementsof 5° untilprogrammedtemperatureis reached.
At the end of programmedCook Time, the oven willshutoff automatically,four
beepswill beheard and"End"will appear in theDisplay. If ovenisnotcancelled,
"End"will remainintheDisplayandtherewillbe onebeepeve_ minutefor1 hour.
IMPORTANT
• To recalltimefunctionprogrammed:Touchtheappropriatetimepad once(Cook
Time or Stop Time Pad).
• To changetimefunctionprogrammed:Touchthe appropriatetimepad twice and
touchUp or Down Arrow Pad(s) to enterthe new time.
• Tocanqeltimedfunctiononly:HoldCookTimePadforfourseconds.Thiswillonly
cancelcooktime andstoptime, notprogrammedbake mode.
23
Page 24
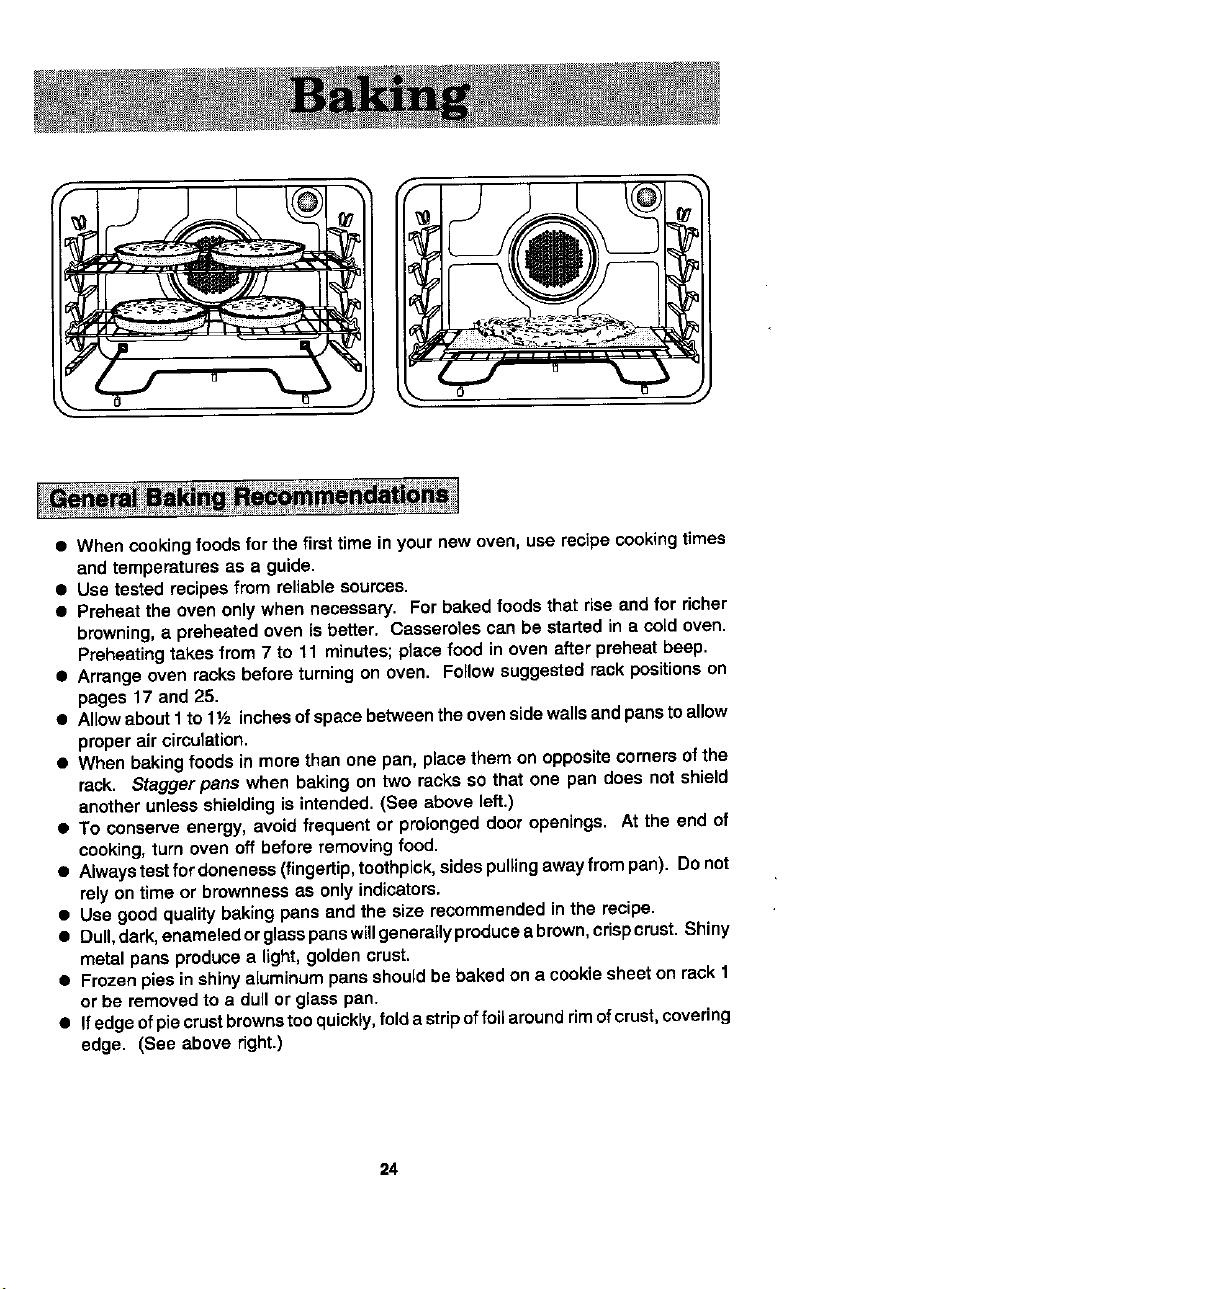
• When cookingfoods forthe first timeinyour newoven, use recipecookingtimes
and temperaturesas a guide.
• Use testedrecipesfromreliablesources.
• Preheat the oven only when necessary. For bakedfoodsthat rise and for richer
browning,a preheatedovenisbetter. Casserelescan be startedinacoldoven.
Preheatingtakes from7 to 11 minutes;placefoodinovenafterpreheat beep.
• Arrangeoven racks before turning on oven. Follow suggested rack positionson
pages 17 and 25.
• Allowabout1to 1V2inchesofspacebetweenthe ovensidewallsandpanstoallow
properair oimulation.
• When bakingfoods inmorethanonepan,placethem on oppositecornersof the
rack. Stagger pans when baking on two racksso that one pan does notshield
anotherunless shieldingisintended.(See above left.)
• To conserveenergy,avoid frequentorprolongeddooropenings. At the end of
cooking,turnoven offbeforeremovingfood.
• Alwaystestforaloneness(fingertip,toothpick,sidespullingawayfrompan). Donot
relyon timeorbrownnessasonlyindicators.
• Use goodqualitybakingpans andthe size recommendedinthe recipe.
• Dull,dark,enameledorglasspanswillgenerallyproducea brown,crispcrust.Shiny
metalpansproducea light,goldencrust.
• Frozenpiesin shinyaJumJnumpans shouldbebakedon a cookiesheet onrack1
orbe removedto a dullor glass pen.
• Ifedgeofpie crustbrownstooquickly,fold astripoffoilaroundrimofcrust,covering
edge. (See above right.)
24
Page 25
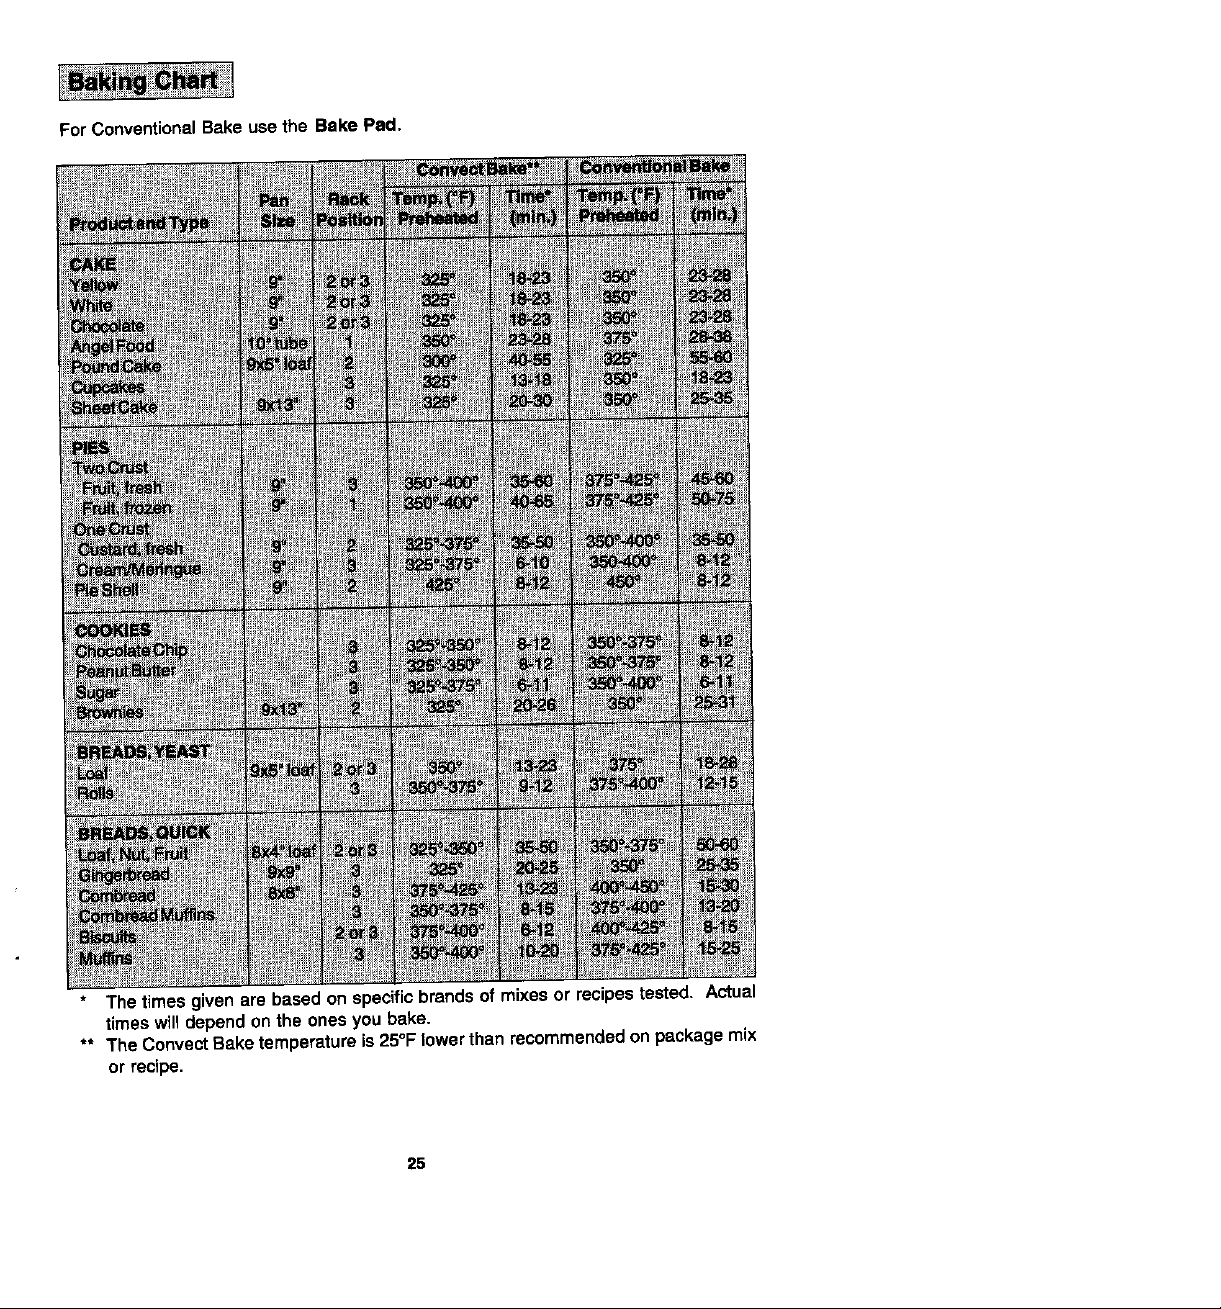
ForConventionalBakeusethe Bake Pad.
x!ilii_ li i_i
The timesgivenarebasedonspecificbrandsof mixesor recipestested. Actual
timeswill dependonthe onesyou bake.
** The Convect Baketemperatureis 25°F lowerthan recommendedonpackagemix
or recipe.
25
Page 26

• Use convectionbakingfor breads,cakes,cookiesand pies.
• As e general rule, when using recipes or prepared mixes developed for a
conventionalbake oven, set the oven temperature 25oF lowerthanthe recipe
recommendedtemperature. Times willbe similarto or a few minutes less than
reciperecommendedtimes.Thechartonpage25comparestimesandtemperatures
ofmanybakedfoods. Usethis as a reference.
• Cookiesheetsshouldbewithoutsidesandmadeofshinyaluminum.Thebestsize
to use forcookiesheetsis16"x12" or smaller
• For multiplerackbaking,suchas cookies,useracks#2 and#4 or #1, #3 and#5.
26
Page 27

Forbestresuits,bakefoodsonone rack ata timeas describedinthismanual. However,
verygoodresultscan be obtainedwhenbakingquantitiesof foodson multiple racks.
Quantitycookingprovidesbothtime and energysavings.
Theconvectionoven issuggestedformostmultiplerackcooking,especiallythreerack
cooking,becausethe circulatingheatedair resultsinmoreevenbrowningthanradiant.
Fortworackcooking,theconventionalbake oven providesvery good bakingresults
especiallywhen panscan bestaggered,suchas withlayercakesandfreshpies.
Manyfoodscanbe preparedon three racksat the same time. These arejust a few
examples:cookies,cupcakes,mils,biscuits,muffins,pies,frozen conveniencefoods,
pizzas,appetizers,and snack foods.
To obtainthebest resultsinmultiplerackcooking,followthesesuggestions:
• Usetemperatureand times inthis manualas a guidefor bestresults.
• Fortworack baking,rackposit_ons#2 and4 arebestfor mostbakedproducts,but
rackpositions#1 and 4 also provideacceptableresults.
• Forthree rackbakingusepositions#1, 3 and 5.
• Sinoefoodsonpositions#1 and5 willusuallybe donebeforefoodson position#3,
add(tionalcook(ngtime w(ffbe neededfor browningfoodsonthe middlerack. An
additionalminute is neededfor thin foods such as cookies. For foods such as
biscuits,rolls,ormuffins,allow1to 2 moreminutes. Frozenpiesandpizzas,which
shouldbe bakedona cookiesheet,need about3 to 6 more minutes.
• Staggersmallpans,suchas layer cake pans,inthe oven.
• Frozen piesinshinyaluminum pansshouldbe placedon cookie sheets andbaked
on rackpositions#1, 3 and 5.
• Ovenmealsare recommendedforenergyconservation.Use ConvectRoastmode
and rackpositions#1 and 4 or #2 and4.
27
Page 28

• Preheating is not necessary.
• Foropenpan roasting,placemeat orpoultryontheslottedportionofthetwo-piece
pan included with the oven. Do not add water to the pan. Use open pan roasting
for tender cuts of meat. Lesstender cuts of meat needto becookedby moist heat
in a covered pan.
• For best results, a meat thermometer is the most accurate guide to degree of
doneness. The tip of the thermometer should be located in the thickest part of a
roast, not touching fat, bone, or gdstle. For turkeys and large poultry products,
insert the tip of the thermometer into the thickest part of the inner thigh.
• Place roast fat side up to allow self basting of meat during roasting.
• Since meats continue to cook after being removed from the oven, remove roast
from oven when it reaches an internal temperature about 5 degrees below the
temperature desired.
• For lessloss of juices and easier carving, allow about 15 minutes "standing time"
after removing meat from oven.
• Forbest resultsin roastingpoultry,thawcompletely. Duetothestructureofpoultry,
partially thawed poultry will cook unevenly.
• If preferred,tendercuts ofmeatcan be roastedin the conventionalbake oven by
following the general recommendations given above. However, meats will roast
more quickly in the convection oven.
• Conventional bake is best for lesstender cuts of meat that require a longer, moist
heatmethodof cooking. Followyour recipefortimes and temperaturesforcovered
meats.
• Meatscookedinovencookingbags,dutchovens,orcoveredroastingpansare best
cookedinthe conventionalbake oven.
• Use meat roastingcharts in standardcookbooksfor recommendedtimes and
temperaturesfor roastingina conventionalbake oven.
28
Page 29

Charttimeis based on thawed meatsonly. ForConventionalRoastingusethe Bake
Pad.
.... _i _
* Not recommendedfor convectionmasting. Most precookedhams need to be
coveredwhile roasting,thusthere wouldbe notime savings.
29
Page 30

• Tender cuts of meat and poultry can be roasted to a dch golden brown in the
convectionoven. Followgeneralrecommendationsfor roasting.
• Refer to convection meat roastingchertfor recommendedcookingtemperature
andtime. The chartcan serveas a guideto help planmealservingtime.
• Minutes per pound will vary accordingto the size, shape, quality,and initial
temperatureofmeataswellastheelectricalvoltageinyourarea. Timesarebased
on refrigeratorcold meat.
• A largecut of meatwill usuallyrequirefewer minutesper poundto roastthan a
smaller cut of meat.
• Do not usea roastingpan withhigh sides;usepanprovidedwithoven.
• Do notcovermeat. Allowthe circulatinghotair to surroundthe meat andseal in
the juices.
• Sincethe breastmeat on a largeturkey cooksmorequicklythanthe thigharea,
placea "foilcap"overthebreastareaafterdesiredbrownnessisreachedtoprevent
overbrowning.(See above.)
• A stuffedturkeywill requireanextra30 to60 minutesdependingonsize. Stuffing
should reachan internal temperature of t65°F.
Convect Roasting: Frozen to Finish
Meats (except poultry) maybe roastedfrozentofinish. Followtheseguidelinesforthe
mostsatisfactoryresults.
• Usetemperaturesforroastingfresh meatsas recommendedbymostcookbooks.
Generally, most meats are roasted at 325°F. For best results do not use
temperaturesbelow 300°F.
• Usetimesforroastingfresh meatsgiveninyourfavoritecookbooksas approximate
guidesforroastingfrozen meats. Roastingtimes willvary dueto factorssuchas
coldnessof meat,size, quality,orcut. Ingeneral,roastingtimesforfrozentofinish
intheconvectionovenwillbe approximatelythe same ora few moreminutesper
pound,as freshto finishin a conventionalbake oven.
• The guidelinesgivenfor roastingfresh meatsinthe convectionovenalsoapplyto
roastingfrozenmeats.
• Insertmeat thermometermidwayduringthe cooking process.
3O
Page 31

• Use Convect Roast Pad for frozen convenience foods.
• Preheating the oven is not necessary.
• Foilow package recommendations for oven temperature, foil covering and use of
cookie sheets. Convect Roasting times will be similar• See chart below for some
exceptions and examples.
• Centerfoodsfntheoven. ff more than one food item is being baked or if foods are
being baked on multiple racks, stagger foods for proper air circulation.
• Most foods are baked on rack position #3.
• For multiple rack baking, use racks #2 and 4 or #1,3 and 5. Place pizzas on cookie
sheets•
Here are a few examples of times and temperatures
;!
*The times given are based on specific brands of mixes or recipes tested. Actual
times will depend on the ones you bake.
**Conventional Bake uses the Bake Pad.
31
Page 32
1. Place oven rack on the rack positionsuggested in the chart. (See p. 33.)
Distance from broilingelement depends on foods beingprepared. Rack position#4 is
usually recommended unless otherwise stated.
2. Touch Broil Pad.
IndicatorWord BROIl_and 000° will appear in the Display.
Note: If more than thirty seconds elapse between touching Broil Pad and touching
Up orDown Arrow Pad(s), the oven is notset and the Display will return to previous
Display.
3. Touch Up or Down Arrow Pad(s).
The firsttouch of an Arrow Pad will enter "HI" ('HI" is 550°) in the Display. The oven
has a variable broil feature which means that a lower temperature can be selected.
Touch Down Arrow Pad if a lower tempeature is desired. (The first touch of Down
Arrow Padwillenter 450=.) Temperature can beentered in5°increments. Range is"HI"
(550°), 500_to 300°.
Use "HI" Broil formost broiloperations. When broilinglongercookingfoods such as
pork chops, poultry or thick steaks, select lower broiling temperature. (See chart, p.33.)
Lower temperature breiling allowsfood tocooktothewell donestage withoutexcessive
browning.
Four seconds after entering a temperature, the broil element will come on and the
IndicatorWords BROIL and ON will remain inthe Display along with the selected broil
temperature. Ifvariable broilfeature was selected, the indicatorWord ON willcycle with
the element.
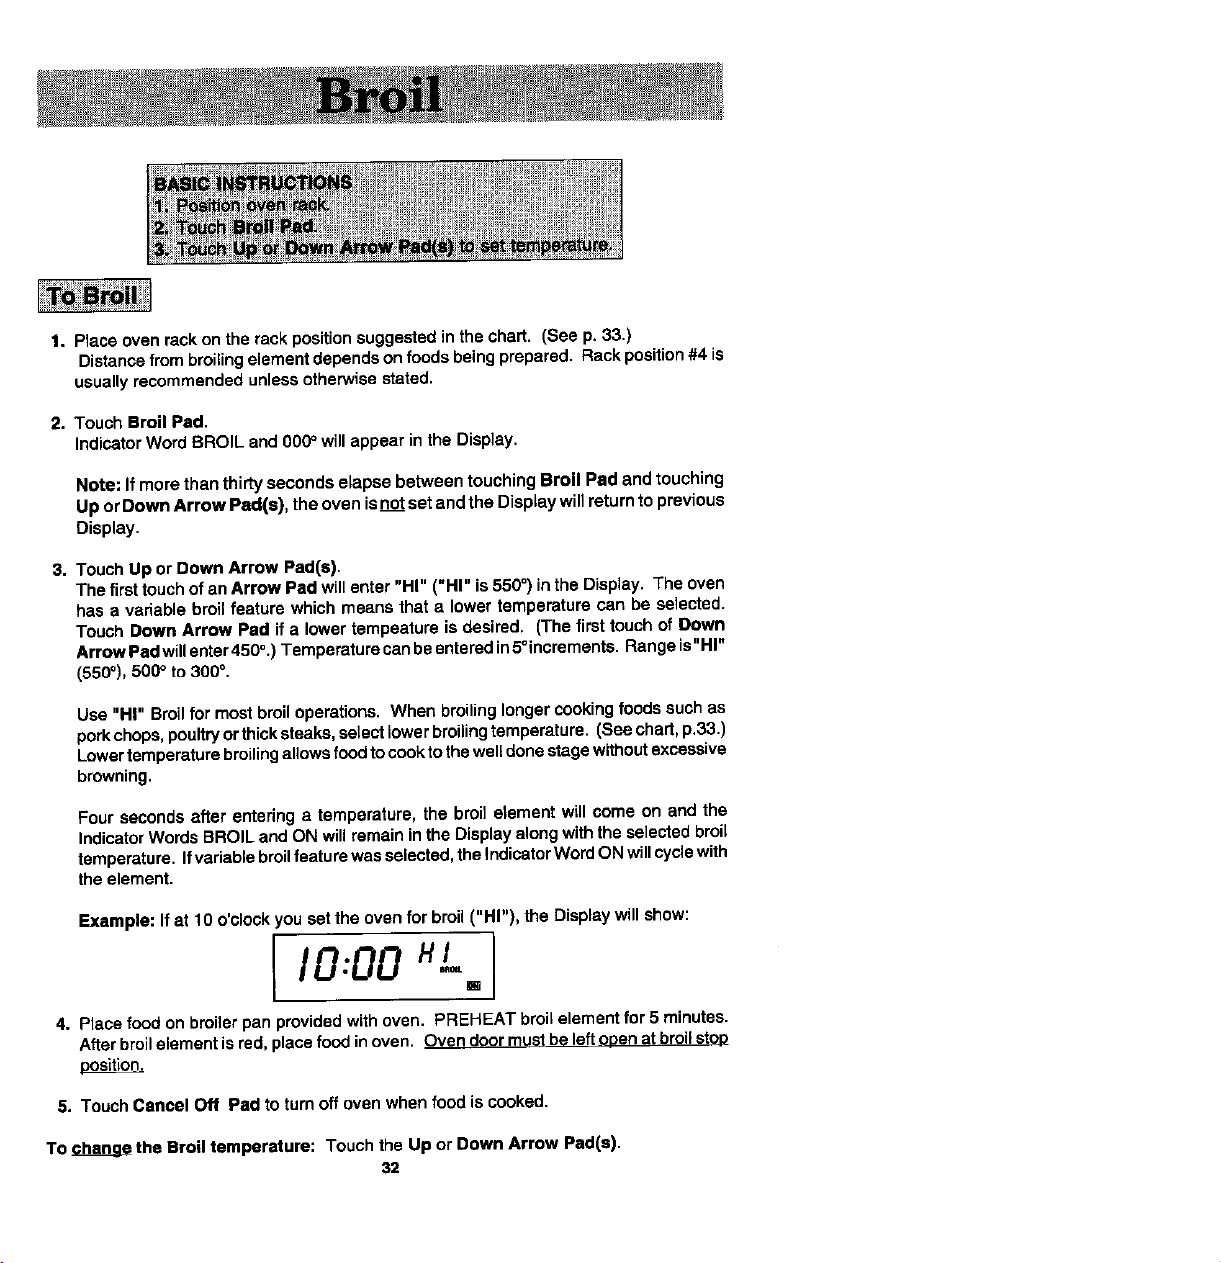
Example: If at 10 o'clock you set the oven for broil ("HI"), the Display will show:
I,ooo L.I
4. Place food on broilerpan providedwithoven. PREHEAT broil element for 5 minutes.
Afterbroilelement is red, placefood inoven. Oven doormust be left ooen atbroilstoo
po_lition.
5. Touch Cancel Off Pad to turn off oven when food is cooked.
To change the Broil temperature: Touch the Up or Down Arrow Pad(s).
32
Page 33
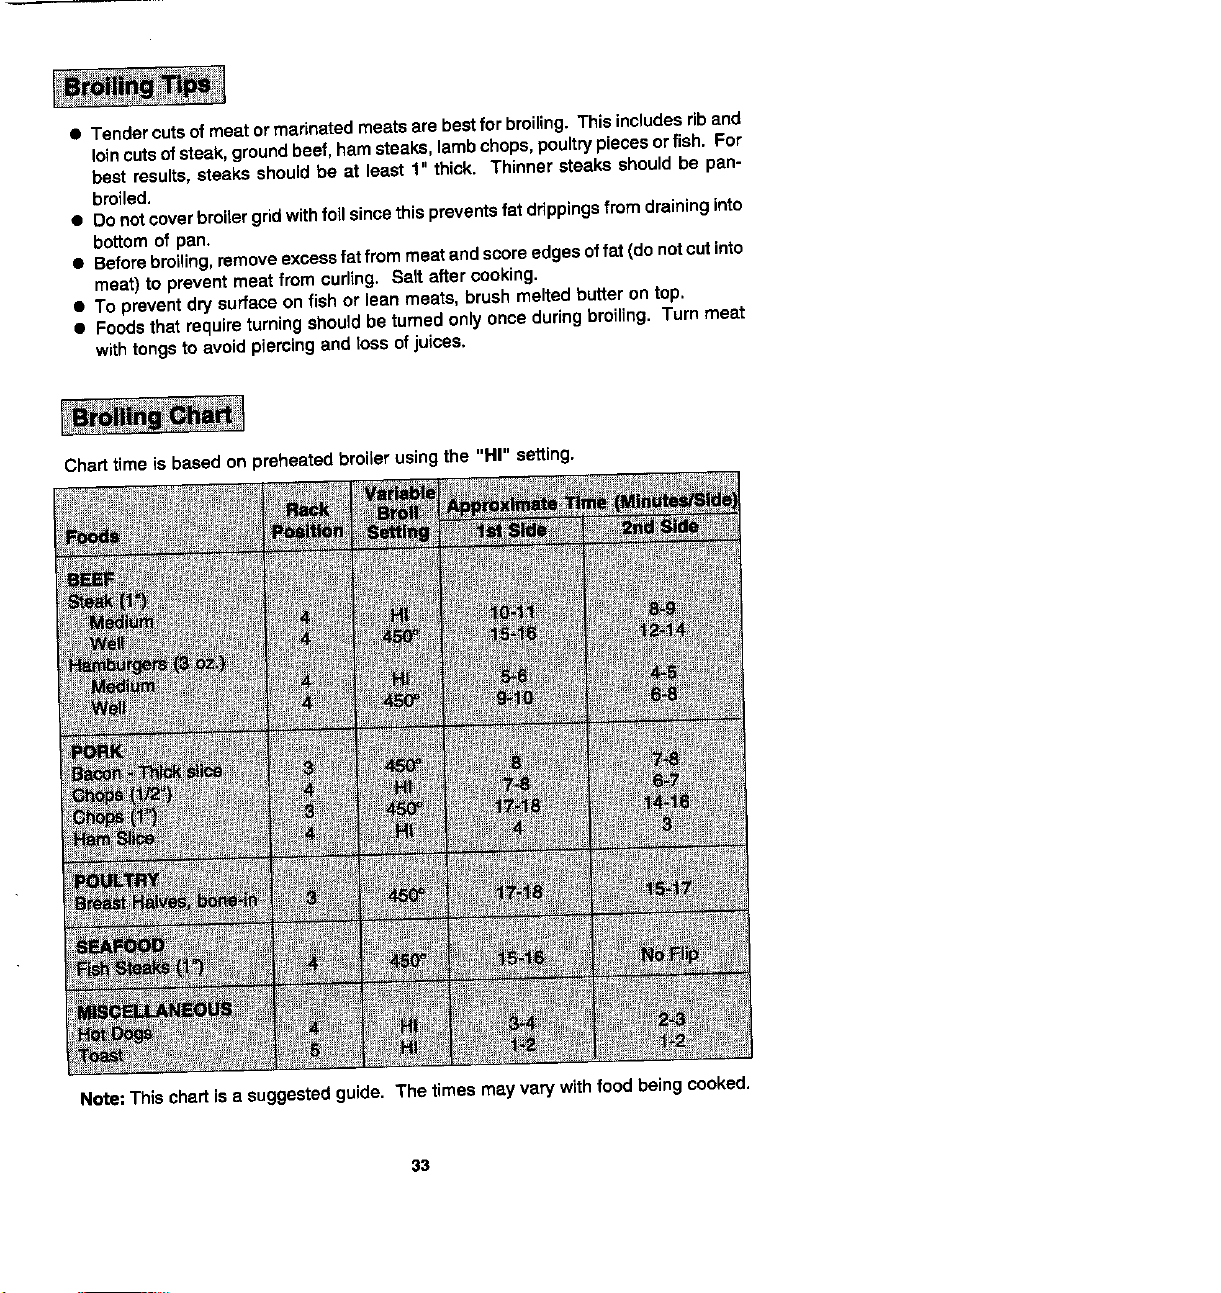
• Tendercutsofmeatormannated meatsare bestfor broiling.This includesriband
loincutsofsteak,groundbeef, hamsteaks,lambchops,poultrypiecesorfish. For
best results,steaks should be at least 1" thick. Thinner steaks should be pan-
broiled.
• Do notcoverbroilergridwithfoilsincethispreventsfat drippingsfromdraininginto
bottomof pan.
• Beforebroiling,removeexcessfat frommeatandscoreedgesoffat (do notcut into
meat)to prevent meatfromcurling. Salt aftercooking•
• To preventdrysurfaceonfish or lean meats, brushmeltedbutteron top.
• Foodsthat requireturningshouldbeturnedoniyonceduringbroiling. Turnmeat
withtongsto avoidpiercingand lossofjuices.
33
Page 34
When the ovencontrolsare set to CLEAN, the oven heats to temperaturesthatare
higherthanthose usedfor cooking. The hightemperaturescausefood soilto burnoff
and substantiallydisappear. While this occurs,a devicein the oven vent helps to
consume normal amounts of smoke. The ovenvent is located at the bottom of the
Backspiash.
• Removethe broilerpanandany otherutensilsfromthe oven. These utensilscannot
withstandthe hightemperaturesofthe cleaningprocess.
• Clean spattersandspillsfromthoseareaswhichwillnotbe cleanedduringthe self-
cleaningprocess:
- center front of oven and door near openingin door gasket.
- porcelain oven door liner (area outsidethe door gasket).
- oven front frame.
Toclean theseareas, usehot water and detergent, nonabrasive cleansersorsoap
filled steel wool pads. Rinse thoroughly, being careful not to use an excessive
amount of water that would dampen the door gasket. Soft left in these areas will
be more difficult to remove after the self-cleaning
/
process since the high heat will bake on any soil _ /_._
OVEN CLEANERS TO CLEAN THESE AREAS.
• DONOTATTEMPTTO CLEAN, RUB,ORAPPLY
WATER TO GASKET ON OVEN DOOR. The i
gasketisessentialfora gooddoorseal. Rubbingor
thatispresent. DONOTUSECOMMERC,AL ____ "_i_ _
cleaningwilldamagethegasketandmayaffectthe
seal.
• Wipe upexcessgreaseandfoodspilloverswhichhavenotbakedonthebottomof
the oven. Large accumulationsof soil can cause heavy smokeor fire inthe oven
duringthecleaning process.For easeof cleaning,the heatingelement canbelifted
slightly.
• Although smoke or fire in the oven is a normal occurrence and there is no safety
problem,there will be ventingof excessivesmokeand odor.
• The oven rackscan be cleanedin theoven. However,theovenracks willdiscolor,
loseshininess,and becomedifficulttoslideinand outifleft intheovenduringthe
cleaningprocess. REMOVE RACKS FROM OVEN IF THIS DISCOLORATION
WILLBE OBJECTIONABLE. Asa suggestion,do notleavethe racksin theoven
duringthe self-cleaningprocessif they do notneed to be cleanedsincetheywill
discolortoadullsilverafterthefirstcleaning.Moderatelysoiledrackscanbecleaned
witha soapyS.O.S. pad or Scotch-Britescourpad. Stubbornstainsneedto be
removedintheself-cleaningprocess.Besuretoreadspecialtipsonpage37 if oven
racksare cleaned duringthe self-cleaningprocess.
34
Page 35

*Omitsteps_ immediately.
TO set oven to start cleaning immediately
1. Close and latchthe ovendoor.
2. TouchClean Pad.
Indicator Words SET, CLEAN and TIME will flash and Display will show
"3HR: 00":
3":00o-,
3. TouchUp or Down Arrow Pad(e) to selectmoreorlesscleaningtime.
Thecleaningtimecanbe vadeddependingontheamountofsoil. 8et"2:00" for light
soilor "4:00" for heavysoil.
Note: If morethanfoursecondselapsebetweentouchingClean Padandtouching
anArrowPad,theovenwiltstarttocleanfor 3 hours.Tochangethe programmed
cleantime,touchClean Pad }wiceandtouchUp or Down Arrow Pad(e} to enter
desiredcleaningtime.
Foursecondsafterselectingdesiredcleaningtimethe Displaywillreturntotimeof
dayand the IndicatorWordsHR, SET, and TiME will go off. The indicatorWord
CLEANwillremain.TheIndicatorWord ON willappearandcyclewiththeelements
tomaintainthe cleantemperature.The Displaywouldshow:
lO:OOo°,
Note: Ifovendoorwasnotlatched,the word_door"will flash inthe Displayand a
signalwillbeep.After thelockleverhas been movedto the Lockposition,repeat
steps2 and3.
35
B
Page 36
After the oven temperature is above 400 °, the LOCK indicator word will appear in
the Display. When the clean funct/on has been completed, the Indicator Words
CLEAN andON will go off. The Indicator Word LOCK will remain on untilthe oven
has cooled down. Afterthe Lock light goes off,the lock levercan be moved to the
left and the door opened.
To set oven to start cleaning at a later time
1-3. Follow steps 1-3, on page 35.
4. Touch Stop Time Pad twice.
Indicator Words SET, STOP and TIME will flash in the Display. The Indicator Word
CLEAN and the calculated stop time will also appear in Display.
Example: If at 10:00, you set the Clean time for 3 hours, the calculated stop time
would be 1:00 and the Display would show:
I:00°"
SET _P _ME
6. Touch Up Arrow Pad to enter new stop time.
A stop time can only be accepted for later in the day.
Note; If more than four seconds elapse between touching Stop Time Pad and an
Arrow Pad, Stop Time Pad must be touched twice again.
Example: Ifyou want the stop time to be 4:00 instead of 1:00, touch Up Arrow Pad
until the Display shows:
4:00-
tET i10P _ME
After four seconds, the Display will return to the Time of Day, thus showing:
I0:00
When the oven begins to clean, the Indicator Word DELAY will go off. The Display
will show the Indicator words CLEAN and ON.
When the clean time has been completed, the Indicator Words CLEAN and ON will
go off. The Indicator Word LOCK will remain on unt/Ithe oven has cooled down. After
the lock lightgoes off, the lock lever can be moved to the left and the door opened.
To recall cleaning time or stop time: Touch the appropriate time pad once (Clean Pad
or Stop Time Pad).
To chance cleaning time or stop time before cleaning begins: Touch the appropriate
time pad tw(_c_eand follow the preceding steps.
To cancel self-cleaning:
• Touch Cancel Off Pad. The ovendoor will be locked while the LOCK IndicatorWord
remains in the Display. Depending on the length of time the oven had been self-
cleaning, itmay take up to45 minutesfor the oven tocooldown, end the lockIndicator
Word to go off.
36
Page 37
• A slightodormay bedetected,and if an ovenisheavilysoiled,somesmoke may
be visible. Some smoke and odor duringthe cleaning processis a normal
occurrence. Since the oven vent is at the bottom of the backsplash,vapors,
moisture,etc.may be seen comingfromthisarea.
• Duringthe cleaningprocess,do not bealarmed if an occasionalflame is visible
throughthe oven window. This is caused by excessivefood soil that was not
removedbeforethe oven was setto clean.
• SINCE THE DOOR AND WINDOW OF THE OVEN WILL GET WARM DURING
THE SELF-CLEANING PROCESS, AVOID CONTACT.
• Sometypesof soilmaydisintegratebutleave a lightfilmor heavierdepositofash.
The amountofash dependsontheamountofsoilwhichwasintheoven. Afteroven
has cooled, this ash may be removedwith a damp sponge, if other dark deposits
remain after wiping with a sponge, the time set for the length of cleaning was not
enough. Increasethe cleaning timefor future cleanings or clean more frequently.
The normal cleaning time is 3 hours. A maximum of 4 hours may be selected if
necessary.
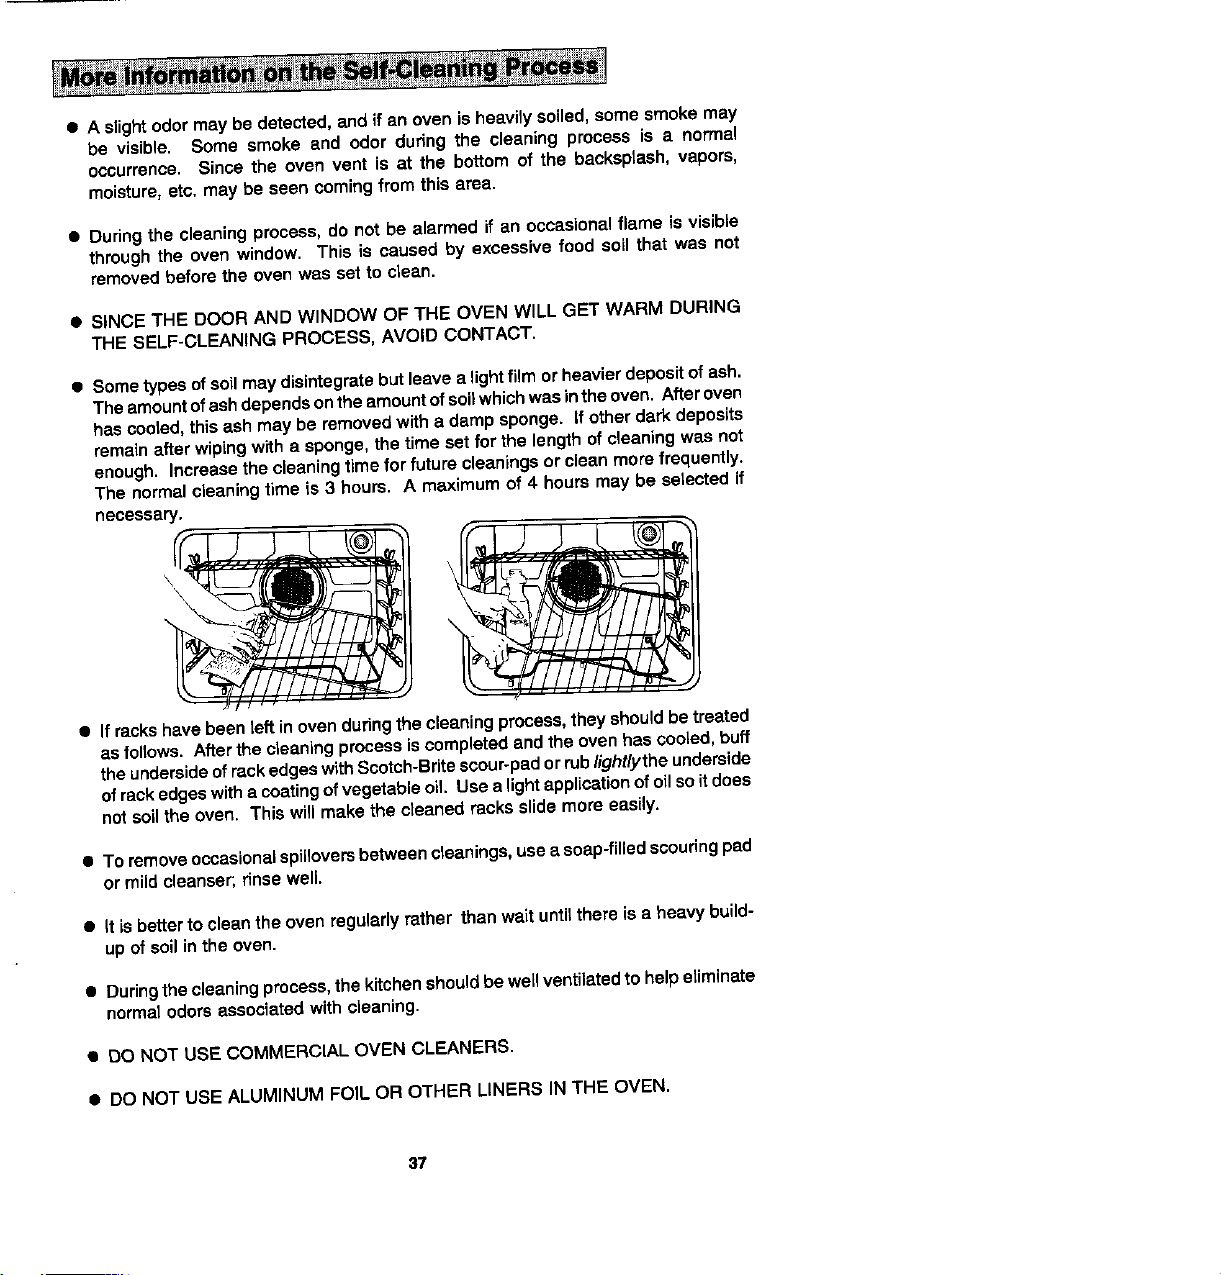
• If rackshavebeenleftinovenduringthe cleaningprocess,theyshouldbetreated
as follows. Afterthecleaningprocessiscompletedandthe ovenhascooled,buff
theundersideof rackedgeswithScotch-Britescour-padorrublightlythe underside
of rackedgeswitha coatingof vegetableoil. Use a lightapplicationofoilsoitdoes
notsoilthe oven. This willmakethe cleanedracksslidemoreeasily.
• To removeoccasionalspilfoversbetweencfeanings,usea soap-filledscouringpad
or mildcleanser;rinsewell
• It isbettertocleanthe ovenregularlyrather thanwait untilthereis a heavybuild-
up of soilintheoven.
• Duringthecleaningprocess,the kitchenshouldbewell ventilatedto helpeliminate
normalodors associatedwithcleaning.
• DO NOT USE COMMERCIAL OVEN CLEANERS.
• DO NOT USE ALUMINUM FOIL OR OTHER LINERS IN THE OVEN.
37
Page 38
Beforecleaning,be certainall elementsare turnedoffandthe topsoftheelementsare
cool.
Control Panel
To preventmoisturefromgettingbehindcontrolpanel,spraya c_othwithglasscleaner.
Then,wipethe panel. Do notusecleaningspraysorlargeamountsofsoapand water
directlyon the panel. Do not useabrasivesor sharpobjectson the panel,they can
damage it.
Glass on Oven Door Front
Use any suitable glass cleaner or soapywater.
Porcelain Areas
• Wash cool range withwarmsoapywater and rinse. Polishwith a dry cloth.
• Donotuseabrasiveorcausticcleaningagentswhichmaypermanentlydamagethe
finish.
• NEVERWIPE OFF AWARM OR HOT PORCELAIN ENAMELSURFACE WITH A
DAMPCLOTH.
Therefore,acidfoods(such as vinegar,tomato,milk,etc.) spilledonthe range
NOTE: The pomelain enamel used on your rangeis acid resistant,not acid proof.I
shouldbe wiped up minedateywitha dryc oth. J
38
Page 39
CAUTION: Do NOT use a cooktopcleaner on a hot cooktop. The fumes can be
hazardoustoyourhealth,and can chemLcallyattackthe gtaas-ceramicsurface.
Note: Plasticobjects,sugaror foodswithhighsugarcontentallowedtomelt ontothe
cooktopcancausedamage. See page 13 for cleaninginstructions.
• Forgeneralda)lycleaningandlightsurfacesoil,useac)eandishc_othorpapertowel
and washsurface withsolutionof waterandanyofthesecleansers:dishwashing
liquidsuch as IvoryorJoy, bakingsoda,fine polishing powderssuch as Son Ami,
or commercialceramiccooktopcleanserssuchas CooktopCleaningCreme(Part
No. 20000001). Wipe with dean damp cloth or paper towel. Rinse and dry
thoroughly.
• To removeresiduefromburned onspills,makea pasteof waterandbakingsoda
orSonAmi,BarKeepersFr/end,Comet,ShinySinksornonabrasivesoftscrubbing
cleansers,such as CooktopCleaningCreme (Part No. 20000O0t). Scrubwith
papertowels,nylonor plasticscrubber,suchas Tufty. Rinseanddry thoreughly.
If stainisnotremovedeasily,al(owpasteto remainon surfacefor30to 40 minutes.
Keep moistby coveringwithwet paper towelorplasticwrap.
• To removeburnedonspot, usea single edge razorblade. Place bladeedgeon
cooktopat 30° angle; scrape off spot. Clean remainder of soil with method
describedabove.
39
Page 40
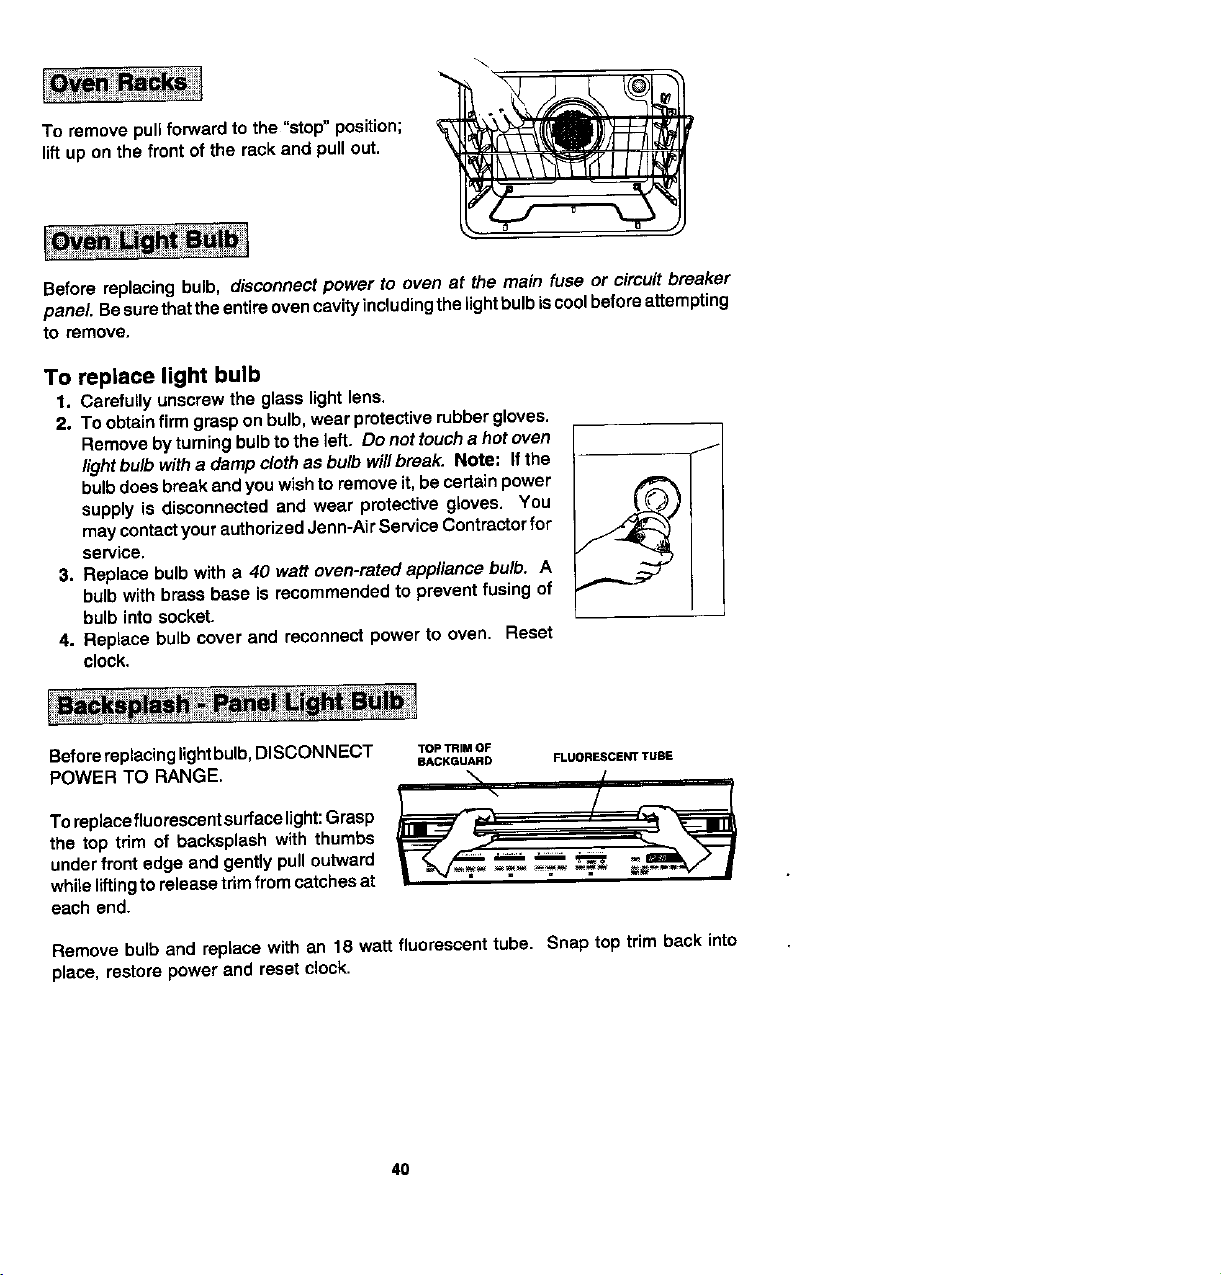
To removepullforwardto the"stop"position; _
liftup onthe frontofthe rackand pull out.
.j o
Before replacingbulb, disconnect power to oven at the main fuse or circuit breaker
panel. Besurethattheentireovencavityincludingthelightbulbiscoolbeforeattempting
to remove,
TO replace light bulb
1. Carefullyunscrewthe glasslightlens.
2. Toobtainfirmgraspon bulb,wearprotectiverubbergloves.
Removeby _ming bulb to the left. Do not touch a hot oven _l
light bulb with a damp cloth as bulb wiflbreak. Note: If the
bulb doesbreakandyou wish to removeit,be certainpower
supply is disconnected and wear protective gloves. You
may contactyour authorizedJenn-Air Service Contractorfor
service,
3. Replacebulb with a 40 watt oven-rated appliance bulb. A I
bulb with brass base is recommendedto prevent fusing of
bulb into socket.
4. Replaco bulb cover and reconnect power to oven. Reset
clock.
Beforereplacinglightbulb,DISCONNECT "roPm_MoF
POWER TO RANGE.
BACKGUARD FLUORESCENT TUBE
Toreplacefluorescentsurfacelight:Grasp
the top trim of backsplashwith thumbs
underfront edgeand gentlypulloutward
whileliftingtoreleasetrimfrom catchesat
each end.
Remove bulb and replace with an 18 watt fluorescent tube. Snap top trim back into
place, restore power and reset clock.
40
Page 41
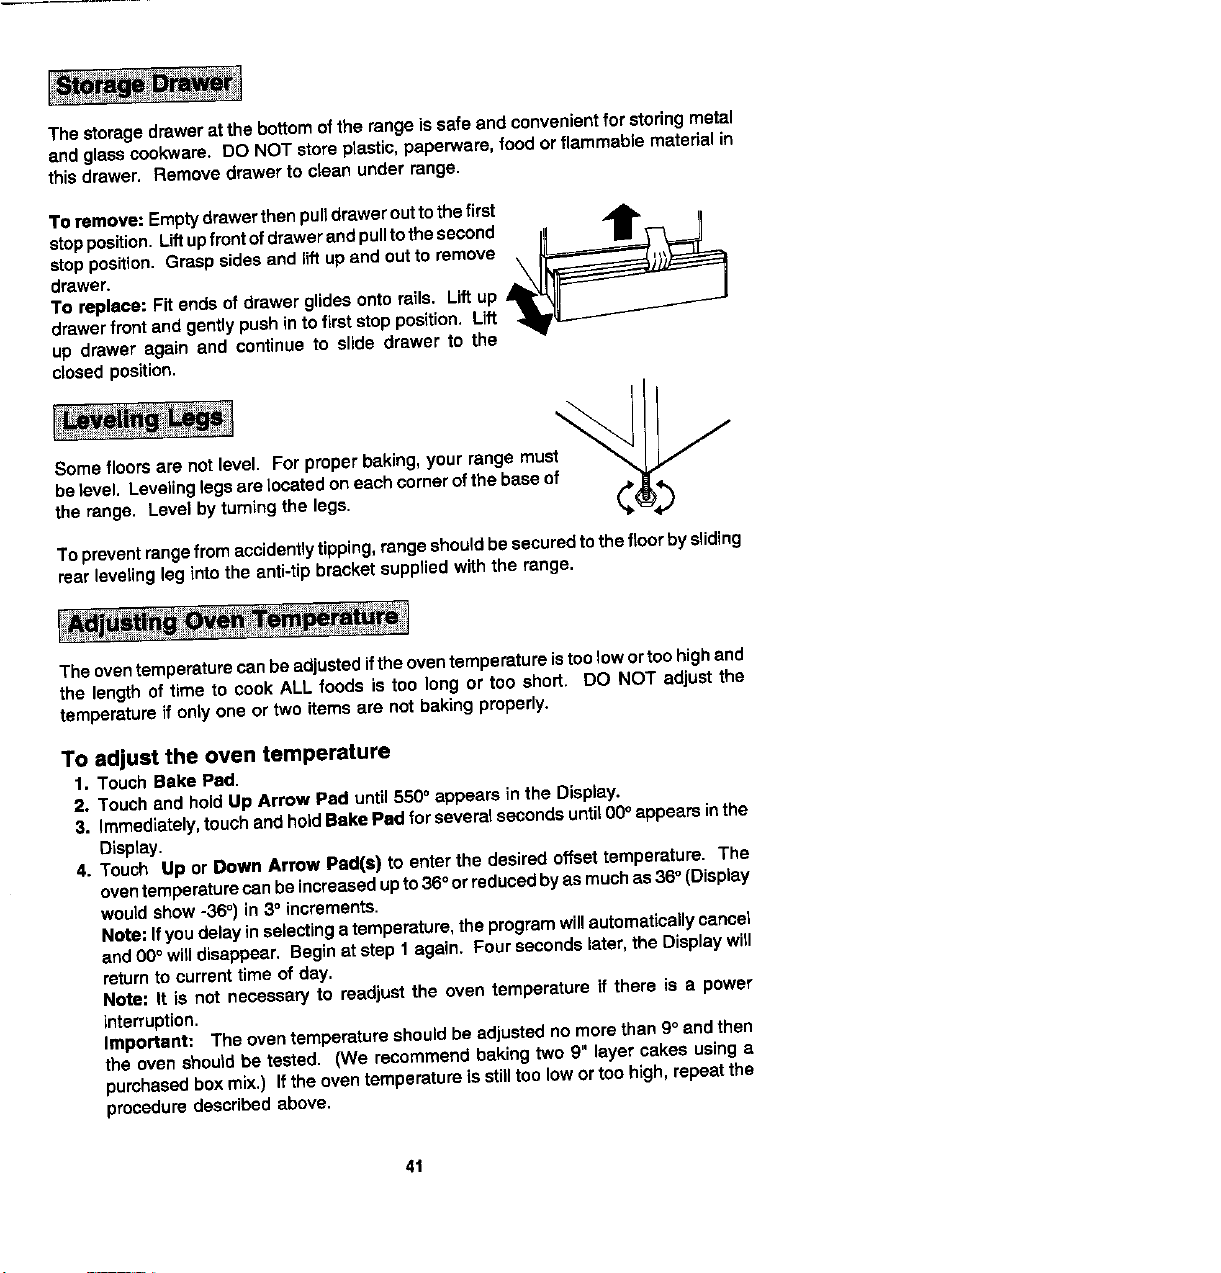
The storagedrawerat the bottomoftherange is safeend eonvenlentfor storingmetal
andglasscookware. DO NOT store plastlc,paperware,foodorflammablematerialin
thisdrawer. Removedrawerto clean underrange.
To remove: Emptydrawerthen pull drawerouttothefirst _bh. ,,
stopposition. Uffupfrentofdrawerendpulltothesecond
Hopposition.Graspsidesand liftup andoutto remove
drawer.
To replace: Fitends ofdrawerglidesontorails. Liftup
drawerfront andgentlypushin to firststopposition.Lift
up drawer again and continue to slide drawer to the
closedposition.
ff I I. F "
!h_?_!°LrSeL?r_Ivne;iigt_eien_°_ite_d!ireba:kl:g°'ryn:rurfrtheg:am::tf _
To preventrangefromacoidentlytipping,rangeshouldbesecuredtothe floorbyslidlng
rearlevelingleg intothe anti-tipbracket suppliedwiththe range.
Theoventemperaturecanbeadjustedifthe oventemperatureistoolowortoohighand
the lengthof time to cook ALLfoods is too long or too short. DO NOT adjust the
temperatureif only one ortwo itemsare not bakingproperly.
TO adjust the oven temperature
1. TouchBake Pad.
2. Touchand holdUpArrow Pad until550° appearsinthe Display.
3. immediately,touchandholdBakePad forseveralsecondsuntil00°appearsinthe
Display.
4. Touch Up or Down Arrow Pad(s) to enter the desiredoffsettemperature. The
oventemperaturecan beincreasedupto36°orreducedbyasmuchas36_(Display
wouldshow-36°) in 3° increments,
Note: Ifyoudelayinselectinga temperature,theprogramwillautomaticallycancel
and O0°willdisappear. Beginat step f again. Four seconds_ater,theDisplaywill
returnto currenttimeof day.
Note: It is not necessaryto readjustthe oven temperature ff there is a power
interruption.
Important: Theoventemperatureshouldbe adjustednomore than9° end then
the oven should be tested. (We recommend beking two 9" layer cakes using a
purchasedboxmix.) Ifthe oventemperatureis stilltoolowortoohigh,repeatthe
proceduredescribedabove.
41
Page 42

Checkthefollowinglistto be sureaservicecall isreallynecessary. A quickreference
ofthismanualmay preventan unneededservicecall.
If nothing on the range operates:
• check for a blowncimuitfuse or a trippedmaincircuitbreaker.
• check ifrangeisproperlyconnectedto electriccircuitinhouse.
If ¢ooktop elements do not get hot enough:
• surfacecontrolsmay not be set properly.
• voltagetohouse may be low.
If clock, indicator words, and/or lights operate but oven does not
heat:
• the controlsmay have been set incorrectly.
• clockcontrolsmay be setfordelayed startof oven.
If unable to set a time function:
• The IndicatorWord SET must beflashinginthe Display,
If the oven light does not work:
• the lightbulbis looseor defective.
If oven will not go through self-cleaning process:
• controlsmay be improperlyset.
• doormay notbe locked.
• check the "C_ean"and "Stop"timesettingsand thecurrenttimeof dayon theclock.
If oven did not clean properly:
• ovenmay need longercleaningtime.
• excessivespillswere not removedpriortoself-cleaningprocess.
If oven door will not unlock:
• oven may not have cooledto safe temperatureafter self-cleaningprocess.
If foods do not broil properly:
• the controlmay notbe set properly.
• check rackposition.
• voltageintohousemay be low.
If baked food is burned or too brown on top:
• food may be positionedincorrectlyin oven.
• ovennot preheatedproperly.
42
Page 43

|f foods bake unevenly:
• the rangemay be installedImproperly,
• check the oven rack witha level.
• staggerpans,do not allow pansto touch each otheror ovenwe}l,
• checkinstructionsfor suggestedplacementof pans on oven rack.
If oven baking results are less than expected:
• the pans being used may notbe of the size or material recommendedfor best
results.
• there may notbesufficientroomaroundsidesofthe pansforproperaircimulation
in the oven.
• checkinstructionsfor preheating,reck positionand oven temperature.
• ovenvent may be blockedor covered.
If baking results differ from previous oven:
• oventhermostatcalibrationmay differbetweenotdand newovens. Followrecipe
and useand caredirectionsbeforecallingfor servicesincethecalibretiononthe
previousoven may have driftedto a too high or too lowsetting. See page 41-
AdjustingOven Temperature.
If F plus a number appears in the Display:
• these are fault codes, If a fault code appearsinDisplayand a continuousbeep
sounds,pushtheCancel Off Pad. Ifthe faultcodereappears,disconnectpower
to the oven end call anauthorizedJenn-AirService Contractor.
43
 Loading...