

Page 1
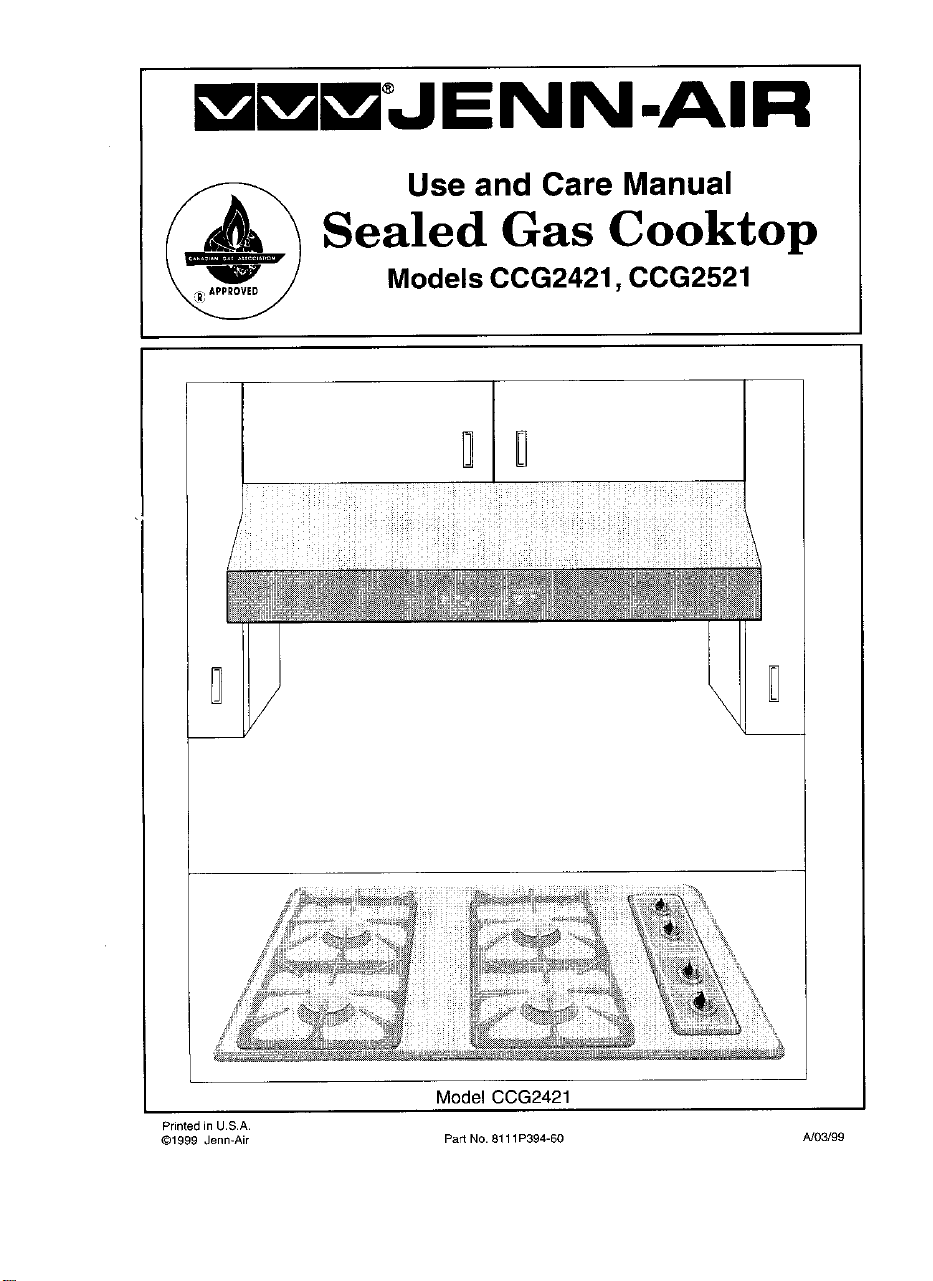
NN-AIR
Sealed Gas Cooktop
Models CCG2421, CCG2521
Use and Care Manual
Model CCG2421
Printedin U.S.A.
@1999 Jenn-Air PartNo.8111P394-60 AJ03/99
Page 2
Page 3
Readbeforeoperatingyourcooktop
All appliances - regardless ofthe manufacturer- havethe potential through improper
or careless use to create safety problems. Therefore the following safety precau-
tions should be observed:
1. Be sure your appliance is properly installed and grounded by a qualified
technician.
2. Never use your appliance for warming or heating the room. This warning is
based on safety considerations.
3. Children should not be left alone or unattended in area where appliance is in
use. They should never be allowed to sit or stand on any part of the appliance.
4. Wear proper apparel. Loose-fitting or hanging garments should never be
worn while using the appliance.
5. Do not repair or replace any part of the appliance unless specifically recom-
mendedin this manual. All other servicing should be referredto an authorized
Jenn-Air Servicer.
6. Do not store combustible materials, gasoline or other flammable vapors and
liquidnear cooktop, Thisalsoapplies to aerosol spraysand aerosol spraycans.
7. Donot usewater on grease fires. Smother fire or flame or usedry chemical or
foam-type extinguisher.
8. Useonly dry potholders. Moist or damp potholders on hot surfaces may result
in burns from steam. Do not use a towel or other bulky cloth.
9. Select ceokware large enough to properly contain food and avoid boilovers or
spillovers. This will save on cleaning and prevent hazardous accumulations of
food, since heavysplattering or spillevers left on acooktop can ignite. Pan size
is especially important in deep fat frying.
10, Never leave cooktop unattended at Hi heat settings. Boilover causes smoking
and greasy spillovers that may ignite.
11. TYPE OF COOKWARE - Avoid pans that are unstable and easily tipped. In
choosing pans, look for easily-grasped handles that will stay cool. Pans that
are too heavy when filled with food can also be a hazard. Ifpan handles twist
and cannot be tightened, discard the pan.
12. HANDLES - Always turn pan handles to the side or back of the cooktop - not
out into theroom where theyare easily hit. COOKWARE HANDLES SHOULD
BE TURNED INWARD AND NOT EXTEND OVER ADJACENT SURFACE
BURNERS tominimize burns, ignitionof flammable materials, andspillage due
to unintentional contact with the cookware.
13. CAUTION - Donot store itemsof interestto children incabinets above cooktop-
children climbing on the cooktop to reach items could be seriously injured.
Page 4

14. Donot touch surface burnerareas or anyareas near burners. During and after
use, these areas may be hot enough to cause burns. Avoid contact with these
areas by clothing or other flammable materials until they have had sufficient
time to cool.
15. Do not heat unopened food containers. Build-up of pressure may cause
container to burst and result in injury.
16. Keep all controls "OFF" when unit is not in use.
17. GREASE - Grease isflammable andshould be handled carefully. Never leave
any cooking operation unattended. Letfat cool before attempting to handle it.
Do not allow grease to collect around the cooktop. Wipe up spillovers
immediately.
18. If the cooktop is installed near a window, proper precautions should be taken
to prevent curtains from blowing over burners creating a FIRE HAZARD.
19. Donot usealuminum foil to line burner spillover bowl. Restrictionof normal air
flow may result in unsafe operation.
20. Clean only parts listed in this manual and use procedures recommended.
21. Alwaysallow hot pans tocool ina safe place out of the reachof small children.
22. A faint gas odor may indicate a gas leak. If a gas odor is detected, shut off the
gassupply to thecooktop. Call your installer or localgas company to havethe
possible leak checked. Never use a match or other flame to locate agas
leak.
23. Flame size should be adjusted so itdoes not extendbeyond the edge of the
cookware. This instructionisbased on safetyconsideration.
24. This appliance has been tested for safe performance using conventional
cookware. Do not use any devicesor accessoriesthat are not specifically
recommendedinthismanual. Donotuseeyelidcoversforthe surfaceburners
or stovetopgrills. The use of devices or accessories that are not expressly
recommended in this manual can create serious safety hazards, result in
performanceproblemsandreducethelifeof thecomponentsofthe appliance.
25. Beforeservicingandwhennecessarybeforecleaning,followtheseprocedures
to remove appliance: a. shut off gas supply to appliance; b. disconnect
electricalsupplyand gas supply tubing;c. remove screwsthat secure appli-
ance to cabinet. Reverse these proceduresto install. If gas linehas been
disconnected,check for gas leaks after reconnection. (See Installation
Instructionsfor gas leak test method.) Note: A trained serviceman should
makethe gasinstallation,disconnectionand reconnectionofgas supplytothe
appliance.
26. Never cover controlarea with dishtowel, potholders,etc., or aluminumfoil
whichcouldobstructcoolingand combustionair fromenteringthe appliance
at the controlknobarea.
27. Donotletcookinggreaseor otherflammable materialsaccumulateinornear
the appliance,hoodorventfan. Clean hoodfrequentlytopreventgreasefrom
accumulating on hoodorfilter. When flamingfoods underthe hood turnthe
fan on.
- SAVE THESE INSTRUCTIONS FOR FUTURE REFERENCE-
Page 5
IMPORTANT SAFETY NOTICE AND WARNING
, The California Safe Drinking Water and Toxic Enforcement Act of 1986
(Proposition 65) requires the Governor of California topublish a list ofsubstances
known to the State of California to cause cancer or reproductive harm, and
requires businesses to warn customers ofpotential exposures to such substances.
Users of this appliance are hereby warned that burning of gas can result in low-
levelexposure tosome of the listed substances, including benzene, formaldehyde
and soot, due primarily to the incomplete combustion of natural gas or liquid
petroleum (LP) fuels. Properly adjusted burners will minimize incomplete
combustion. Exposure to these substances can be minimized by properly
venting the burners to the outdoors.
WARNING
Electrical Grounding Instructions
The appliance is equipped witha three-prong grounding plugfor yourprotection
against shock hazard and should be plugged directly intoa properly grounded
three-prong receptacle. Do notcut or removethegrounding prong fromthis plug.
Congratulationson your choice of a Jenn-Air sealed gas cooktop. The chart below
describesthe differencebetweenmodels.
Cooktop
1 30"cooktepwith4 sealedburners
ICCG2521 36"cooktopwith5 sealedburners
Beforeyou begincookingwithyour newcooktop,pleasetake afew minutesto readand
becomefamiliarwiththe instructionsinthis book. Shouldyou haveanyquestionsabout
usingyour Jenn-Airgas cooktop,write to us. Be sure to providethe model number.
Jenn-AirCustomerAssistance
Attn: CAIRsMCenter
P.O. Box2370
Cleveland,TN 37320
1-800-688-1100
(Men.- Fri.,8 am-8pm EasternTime)
Internet:http://www.jennair.com
5
Page 6
Whenthe control knobis turnedON,gas willflow intothe burner. Thesolid stateigniter
willclick as longas theknob is in the Lite position. (Note: All burner igniterswill spark
regardlessofwhichburneris beingoperatedwhen a knobisturnedto theIite position.)
A properlyadjustedburnerwith clean ports will light within a few seconds. On natural
gas, theflame will be bluewith a deeper blue inner core. Thereshould be no trace of
yellowin theflame. A yellowflameindicatesan impropermixtureof air/gas.Thiswastes
fuel, sohavea servicemanadjustthemixtureifa yellowflameoccurs. On LPgas,some
yellowtipping is acceptable. This is normal and adjustment is not necessary.
Theinfinite surface controls provide flexibility in heat setting selection. (See page 7,)
Incaseof prolongedpowerfailure, youcanmanuallylightthe surfaceburnerby holding
alightedmatchneartheburnerportsandslowlyturningthe controlknobcounterclockwise
(after depressing)to the LJtesetting.
CAI,ITION: When lightingthesurface burner,besure all ofthe controlsare in the OFF
position. Strikethe matchfirst andhold it in positionbeforeturningthe knobto theLite
position.
Note: Becauseyour overheadhoodfan is electricitwill notwork duringa power failure
so smoke and condensationcan gather.
COUNTERCLO£;KWlSE
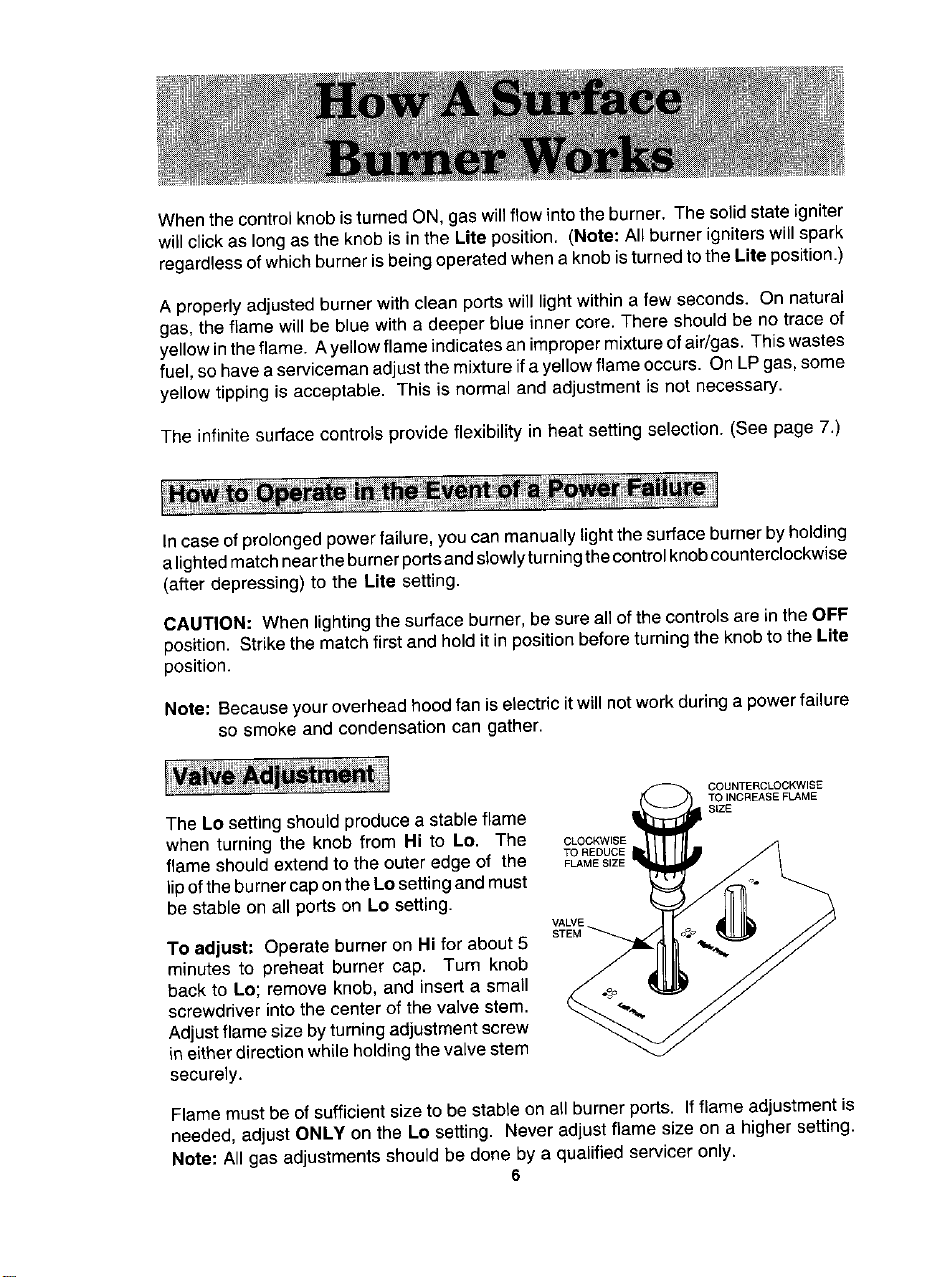
t TO,NCREASE_LAME
TheLo setting shouldproduce a stableflame _ _1SLzE
when turning the knob from Hi to Io. The CLOCKW,SE.IIIIA
flame shouldextendto the outer edge of the FLAMESIZE
TO REDUCE
lipoftheburnercaponthe Lo settingandmust
be stable on all ports on Lo setting.
To adjust" Operateburner on Hifor about 5 STEM , ,
minutes to preheat burner cap. Turn knob
back to Lo; removeknob, and insert a small
screwdriverintothe center of the valve stem.
Adjustflamesize byturningadjustmentscrew
in eitherdirectionwhile holdingthevalvestem
VALVW
securely.
Flamemustbe of sufficientsize to be stable on all burnerports. If flame adjustmentis
needed,adjust ONLY on the Lo setting. Never adjustflame size on a higher setting.
Note: All gas adjustmentsshould be done bya qualified serviceronly.
6
Page 7

• Since the controls are a push-turn type, they must be pushed
down before turning. To set (from the OFF position), push down
on control knob and immediately turn counterclockwise to the
Life setting. After the burner lights, turn the knob to the desired
flame size.
• Igniter wil_spark until knob is turned counterclockwise past the Hi position.
CAUTION: If flame should go out during a cooking operation, turn the burner off. If gas
has accumulated and a strong gas odor is detected wait 5 minutes for gas to dissipate
before relighting burner.
5 1. Left rear(11,000BTUs)
3 3.Rightrear(1t ,O00BTUs)*
4.Rightfront (9.200BTUs)*
2. Leftfront (9,200BTUs)
2 4
*l_ledel CCG2421: Rightfront burner BTU rate is 12,000and rightrear is9,200.
Note: Use the surface burnerswith the higher BTU rateon Hi for large quantity cooking and
canning.
The controls offer flexibility in heat setting selection. An infinite number of settings exist
between Hi and Lo. At the Hi setting, a detent may be felt. For all settings other than
I-li, simply adjust your flame for best results. The size and type of cookware and the
amount and type of food being cooked will influence the setting needed for best results.
Suggested settings are provided as guidelines. _ ._^^_,
Hi_ Afast heat to start cooking quickly, to
bring liquids to a boil, to preheat oil for
deepfat frying.
(Medium High) For fast frying or browning offoods, to
maintain rapidboil of large amounts of _ .^,,_,kk,k_tz_^_.
food, tO maintain oil temperature for
deep fat frying.
Meal= For mostfrying, sauteing, and slowboil
(Medium Lo) Forsimmering, maintainingboilofsmall _ _,_,.,_-___
Le: Maintaining serving temperatures of
of largeamounts of food.
amounts offood.
foods, melting butter or chocolate.
5.Centerrear(9,200BTUs)
U
O
U
7
Page 8

To achieveoptimum cooking performance,usecookpots with flat bottoms,tight fitting
covers, and sized for the surfaceburner.
• Flame size should be adjusted so it does not extend beyond the edge of the
cookware. This instructionis based on safety considerations. Adjusting the size
ofthe flame to fit the size of the cookwarealso helpsto save fuel.
• Cookpotswhichextendmorethantwoinchesbeyondthegrate ortouchthecooktop
may cause heat to build up, resulting in damage to the burner grate, burner or
cooktop.
• Specialityitems such as woks with a supportring, which restrict air circulation
aroundtheburnerwill causeheatto buildupand mayresultindamageto theburner
grate, burner or cooktop.
• Aluminumcookwareheats evenlyand quickly. A slightlylargerflamesizecanbe
used.Theflamecanbeadjustedsoit comesto theedgeof thecookware. However,
the flame should NEVER be adjustedso that it extendsbeyond the bottom of the
cookware.
• Stainlesssteel cookwarewith copper or aluminumcores heat evenly and fairly
quickly. Theflamesize shouldbe adjustedtoextendonly halfwaybetween center
and edge ofthe cookwarebottom for best results.
• Cast iron cookwareheatsslowly.
• Checkmanufacturer'srecommendationsbeforeusingporcelainon steel,porcelain
on cast iron, glass,glass/ceramic, earthenware,or other glazedcookpots.
If the cookware is covered, less fuelwill be needed;therefore, a lowerflame size can
beused.Note; Foodwillnotcookanyfaster whenmorethanthe amountofheat needed
to maintaina gentle boil is used.
• Acceptablewater-bathor pressurecannersShouldnot be oversizedand should
have a flat bottom. The following are not recommended:oversized canners or a
very large canner that rests on two surfaceburner grates.
• Whencanning, usethe Hi settingjust untilthe water comesto a boil or pressure
is reached in the pressure canner, then reduce to the lowest flame setting that
maintainsthe boil or pressure.
• Prolongeduseof theHi settingor the useof incorrectcanning utensilswill produce
excessiveheat. Excessiveheat can cause permanentdamage to the appliance.
Page 9

Checkthe following listto be sure a servicecall is really necessary.
If surface burner fails to light:
• checkto besureunit isproperlyconnectedto powersupply.
• checkfor ablowncircuitfuseoratrippedmaincircuit breaker.
• checkto besureburner iscorrectlyratedfor yourtype of gas.
• checkto besureburner portsor ignitionportsarenotclogged.
• checkto besureigniteris clicking, If igniterdoesn'tclick,turn controlknobOFF,
If the flame is uneven:
• burnerportsmaybe clogged.
• flamesettingmay need tobeadjusted.
If surface burner flame lifts off the ports:
• contactanauthorizedJenn-AirServiceContractor.
If surface burner flame is yellow in color:
• contactan authorizedJenn-AirServiceContractor.
Page 10

Be sureall controls are OFF and all cooktopparts are cool beforecleaning.
Thecooktopisdesignedwithcontouredwellswhichcontainspills untiltheycanbe wiped
up. Neverwipe awarm orhot porcelainenamelsurfacewith a dampcloth. Forgeneral
daily cleaning and lightsoil, wash with warm soapy water, rinse,and dry. To remove
greasespatters, spray with cleanerssuch as Fantastikor 409. DO NOT use abrasive
or caustic cleaningagents which may permanently damagethe finish.
The surface burner grates are made of porcelain on
castiron. Therefore,the gratescan bewashedinthe _, ,_
sink with mild detergents and a plastic scrubber or
washed in the dishwasher.
Burner grates must be properly positioned before j _.
cooking. Do notoperate the burnerswithouta pan on
the grate. The porcelainfinish on the grate may chip
withouta pan to absorbthe intense heat. I_ All
Whenreinstallingsquare grates,place indentedsides
togetherso straight sides are at front and rear. _
Althoughthe burner grate is durable, it will gradually j %.
lose its shine and/or discolor, regardless of the care
you take of it. This is dueto its exposureto the high
temperatureof gas flames.
#,
f
To preservethe porcelainenamel finish as longas possible, have a pan on the grate
before you turn on the burner, and lower the flame when food reaches the desired
cooking temperature.
lO
Page 11

• The sealed burners are secured to the cooktop and are NOT designed to be
removed.Since thefour burnersaresealed intothe cooktop, boiloverswon'tseep
underneathto theburner box area. Thus, thereare no hiddenspills in the burner
box areato clean.
• Cleanwith warm soapy water and a spongeordishcloth. Burnedon greasecan
be removedwith ahouseholdcleaner,such as Fantastikor 409, anda sponge. To
prevent scratching,do not use abrasivecleaners or scrubbingpads.
Note: Becareful notto get water or spray into burner ports.
Whencleaningaroundthesurfaceburner,use /_, _
care to prevent damage to the spark igniter
whichislocatedatthe backsideofeachburner.
If a cleaning cloth should catch the igniter, it
could damage or break it. If the igniter is Igniter
damagedorbroken,the surfaceburnerwill not
light. REARVIEWOFSEALEDBURNER
The knobs on the control panelcan be removedwith the controlsin the OFF position.
Pulleachknobstraightfromthe shaft. Washknobsinwarm soapywater ordishwasher;
do not use abrasivecleansersor materials. To replaceeach knob, matchflat part of
knobopening with the flat on the shaft, returning in OFFposition.
Important: Neveruse a metalbladeto pry knoboff. If knobcannotbeeasilyremoved,
tuckthe folds of a cloth dishtowel under the knob skirt and pull the towel upwardwith
steady, even pressure.
Important- Becareful to replacethe knobs with gentle pressure. Neverhit the knob
on the shaft with your hand or any other object.
Wipewith a damp cloth. Dry thoroughly. Donot use cleaning sprays, large amounts
of soap and water,abrasives, or sharp objectson the panel. They can damage it.
11
Page 12

Model Number
Serial Number
(Serial Plate is located on the bottom side of the cooktop.)
Date Purchased
JENN-AIR DEALER FROM WHOM PURCHASED
Address
city.
Phone
AUTHORIZED JENN-AIR SERVICE CONTRACTOR
Address
City_
Phone
Important: Retain proof of purchase documentsfor warranty service.
BBmLIENN-AIR
403 WEST FOURTH STREET NORTH • NEWTON_ IA 50208
Page 13

Page 14

Page 15

Page 16

Page 17

Page 18

Page 19

 Loading...