


Multi-Fruit Juicer
Operator & Service Manual
January 2017

Multi-Fruit Juicer
Operator & Service Manual
Copyright © John Bean Technologies Corporation 2017
JBT Corporation 400 Fairway Avenue Lakeland, FL 33801 (863) 683-5411
Manual No. FNS-0002-060-EN
2 |
FNS-0002-060-EN |
January 2017 |
Rev F |

Table of Contents
Important Safety Information ······································4 Specifications ··························································6 General Information ··················································7 Operating Instructions ············································· 10 Operator Do's and Don'ts ·········································· 13 Cleaning Instructions ··············································· 14 Maintenance ··························································· 20 Troubleshooting Table ············································ 27 Troubleshooting ····················································· 28 Rebuilding ····························································· 34 Rebuild Tooling Kit and Spare Parts Kit ····················· 48 Juicing Parts, 060-00099 ··········································· 50 Hopper Assembly Parts, 060-00043 ···························· 52 Drive Parts, 060-00103··············································· 54 Upper Drive Arm Assembly Parts, 060-00116 ··············· 56
Rod End Assembly, Upper Cup Drive Parts 060-00114, 060-00114-01 for Field Replacement···························· 57
Orifice Drive Arm Assembly Parts, 060-00115··············· 58
Rod End Assembly, Orifice Drive Parts, 060-00113, 060-00113-01 for Field Replacement···························· 59
Frame & Stand Assembly Parts, 060-00117 ················· 60 Bracng Rail Kit, 060-10126 ········································ 62 Cover Assembly Parts, ABS, 060-00118······················· 64 Cover Assembly Parts, Stainless Steel, 060-01001 ········ 66 Splash Shield Assembly Parts, 060-01054···················· 69 Decals, Warning Labels, Bumpers ······························ 70 Electrical Parts, 060-00034········································· 72 Electrical Box Assembly Parts (115 Volt), 060-00168 ····· 74 Electrical Box Assembly Parts (220 Volt), 060-00169 ····· 76
Motor Assembly Parts (110 Volt), 060-00106
and (220 Volt), 060-00196··········································· 78 Miscellaneous Parts·················································· 80
3 |
FNS-0002-060-EN |
January 2017 |
Rev F |

Important Safety Information
You can help prevent personal injury and/or property damage.
Please read this manual carefully before operating the Multi-Fruit Juicer.
DO NOT attempt any operation until you understand exactly how the machine functions.
If uncertainty remains after studying this manual, please contact John Bean Technologies
Corporation.
We're here to help. With proper handling, the JBT Multt-Fruit Juicer will provide safe, efficient and convenient service for years to come.
North America |
Europe |
South Africa |
JBT Corporation |
JBT Corporation, S.L. |
JBT (Pty) Ltd. |
400 Fairway Ave |
Julián Camarillo 26, 4º |
Koper Street |
Lakeland, FL 33801 |
28037 Madrid Spain |
Brackenfell |
USA |
Phone: +34 91 304 00 45 |
Cape Town, South Africa 7560 |
Phone: +1 863 683 5411 |
Fax: +34 91 327 50 03 |
Phone: +27 21 982 1130 |
Fax: +1 863 680 3672 |
|
Fax: +27 21 982 1136 |
Brazil |
Latin America |
Asia / Pacific |
JBT Máquinas e Equipamentos Industriais Ltda. |
JBT Corporation |
JBT (Shanghai) Co. Ltd. |
Av. Eng. Camilo Dinucci 4605 |
Carr. Mty-Saltillo Km 7—Bodega 4 |
Room 3002-3003 |
14808-900 Araraquara |
Colonia Las Mitras |
Haitong Security Building |
São Paulo Brazil |
Santa Catarina, NL |
No. 689 Guangdong Road |
Phone: +55 16 3301 2000 |
Mexico 66350 |
Shanghai 200001, |
Fax: +55 16 3332 0565 |
Phone: +52 81 81 23 70 55 |
China |
www.jbtcorporation.com |
Fax: +52 81 81 23 70 54 |
Phone: +86 21 6341 1616 |
|
Fax: +86 21 6341 0708 |
Revision History
|
Manual Code |
|
|
Rev. |
|
|
Date |
|
|
Pages |
|
|
Change History |
|
|
|
|
No. |
|
|
|
|
|
|
|
||||
|
|
|
|
|
|
|
|
|
|
|
|
|
|
|
|
|
|
|
|
|
|
|
|
|
|
|
|
|
|
060-00203 |
|
1 |
|
|
03/15/09 |
|
62, 63, 65, 66, 67 |
Updates and modifications |
||||||
|
|
|
|
|
|
|
|
|
|
|
|
|
|
|
|
|
|
|
|
|
|
|
|
6, 50, 54, 68, 69, |
|
|
Updates to specifications and part numbers for |
||
060-00203 |
|
2 |
|
|
03/15/11 |
|
|
|
assemblies 060-00099-F, 060-00103-F, 060-00034-D, |
|||||
|
|
|
|
70, 71, 72, 73, 74 |
|
|||||||||
|
|
|
|
|
|
|
|
|
|
060-00168-C, 060-00169-C, 060-00106C, 060-00196-C |
||||
|
|
|
|
|
|
|
|
|
|
|
|
|
||
|
|
|
|
|
|
|
|
|
|
|
|
|
|
|
|
FNS-0002-060-EN |
|
A |
|
09/15/14 |
|
Entire manual |
|
Updates, modifications and alignment to JBT global |
|||||
|
|
|
|
|
version control and inventory standards |
|||||||||
|
|
|
|
|
|
|
|
|
|
|
|
|
||
|
|
|
|
|
|
|
|
|
|
|||||
|
FNS-0002-060-EN |
|
B |
|
12/15/15 |
|
Entire manual |
|
Addition of new Fresh 'n Squeeze logo |
|||||
|
|
|
|
|
|
|
|
|
|
|
|
|
|
|
|
FNS-0002-060-EN |
|
C |
|
3/1/16 |
|
62 |
|
|
Updates for part number information for assembly |
||||
|
|
|
|
|
060-00118 |
|
||||||||
|
|
|
|
|
|
|
|
|
|
|
|
|
||
|
|
|
|
|
|
|
|
|
|
|
|
|
|
|
|
|
|
|
|
|
|
|
|
|
|
|
|
Update of torque values and illustration on Page 41. |
|
|
FNS-0002-060-EN |
|
D |
|
8/9/16 |
|
40, 50, 51, 60 |
|
|
Updates for part number information for assemblies |
||||
|
|
|
|
|
|
|
|
|
|
|
|
060-00117, 060-00099 |
|
|
|
|
|
|
|
|
|
|
|
|
|||||
|
FNS-0002-060-EN |
|
E |
|
12/14/16 |
|
Entire manual |
|
Edits and additions |
|||||
|
|
|
|
|
|
|
|
|
|
|
||||
|
FNS-0002-060-EN |
|
F |
|
1/19/17 |
|
50, 51 |
|
|
Update to parts list/drawing for Juicing Parts, 060-00099 |
||||
|
|
|
|
|
|
|
|
|
|
|
|
|
|
|
|
|
|
|
|
|
|
|
|
|
|
|
|
|
|
4 FNS-0002-060-EN |
January 2017 |
|
|
|
|
|
|
Rev F |
||||||
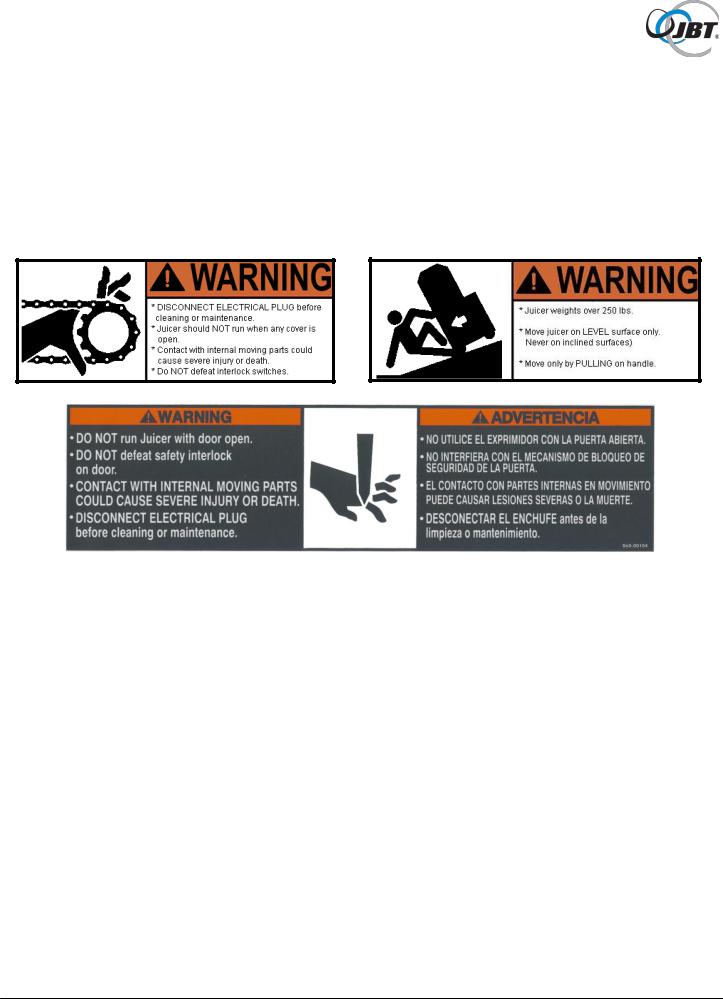
Safety Labels
The safety labels shown below appear on the Juice Extractor. Safety labels provide essential instructions on how to avoid possible hazards.
Please, for your safety: FOLLOW THOSE INSTRUCTIONS AT ALL TIMES.
Should the Juicer safety labels become damaged or unreadable, contact JBT Corporation for replacement labels.
Safety Instructions
Carefully review the following safety instructions.
Make them a habit when using the JBT Corporation Multi-Fruit Juicer.
1.If Juicer continues to run when any access cover is open, the interlock switch is defective.
Turn Juicer off immediately. Call for service.
2.Prevent unauthorized access to Juicer by locking all covers with supplied key.
3.Prevent unauthorized operation of Juicer by placing electrical plug inside cart door.
4.NEVER attempt to make any safety device inoperative.
5.NEVER operate or perform maintenance or repair work on the Juicer when taking any kind of drug or sedative, when under the influence of alcohol, or when fatigued.
6.ALWAYS check adjustment of all nuts, bolts, and screws after installation, repair, or periodic maintenance.
5 |
FNS-0002-060-EN |
January 2017 |
Rev F |

Specifications
Technical Specifications
Fruit size: 2 1/2" to 3 3/4" diameter (6.5 cm to 9.5 cm)
Oranges — FL: ·································· 125 to 50 count
Oranges — CA: ································· 138 to 48 count
Grapefruit — FL: ································ |
56 to 48 count |
Hopper capacity: ································ |
40 Ib. (1 carton) (18 kg) |
Reservoir capacity: ····························· |
3.5 gal. (1 carton) (13.2 liters) |
Waste container capacity: ···················· |
40 Ib. of peel (2 cartons) (18 kg) |
Speed: ············································· |
20 fruit/minute |
(20 to 60 gallons/hour) |
|
(75 to 225 liters/hour) |
|
Electrical Specifications
115V, 60 Hz Single Phase 20 AMP Service on a dedicated circuit 10 GA. wire — up to 200 ft. from main breaker panel
or
220 VAC, 50 Hz / 60Hz Single Phase 16 AMP Service 10 GA. wire — up to 200 ft. from main breaker panel
Shipping Specifications
Machine With Stand: |
|
|
Height: |
67" |
(170 cm) |
Width: |
27" |
(69 cm) |
Depth: |
32" |
(81 cm) |
Weight: |
535 Ibs |
(243 kg) |
Patents
U.S. Patents - #4905586 and #4922814
and Patents Pending
6 |
FNS-0002-060-EN |
January 2017 |
Rev F |

General Information
The JBT Corporation Juicer is designed to provide years of dependable service. It uses a unique patented design to extract every available amount of juice from the fruit with the least amount of peel oil. The peel is completely separated from the juice and juice sacs before being compressed and strained.
The machine will juice all types of citrus — oranges, grapefruit, lemons, limes, tangerines, etc. — without changing or adjusting parts. In fact, different varieties and sizes of fruit can be juiced to create various fruit juice blends.
Clean-up is simple, requiring disassembly of only five parts. All waste material — peel, membranes, and seeds — is collected in a disposable garbage bag for easy removal and disposal.
The Juice Extractor is solidly built using heavy duty components in all assemblies, including the drive. It is simple to operate and uses a minimal number of parts.
ALWAYS follow cleaning and maintenance schedules in this manual to prevent equipment damage.
Figure 1. JBT Multi-Fruit Juicer
7 |
FNS-0002-060-EN |
January 2017 |
Rev F |
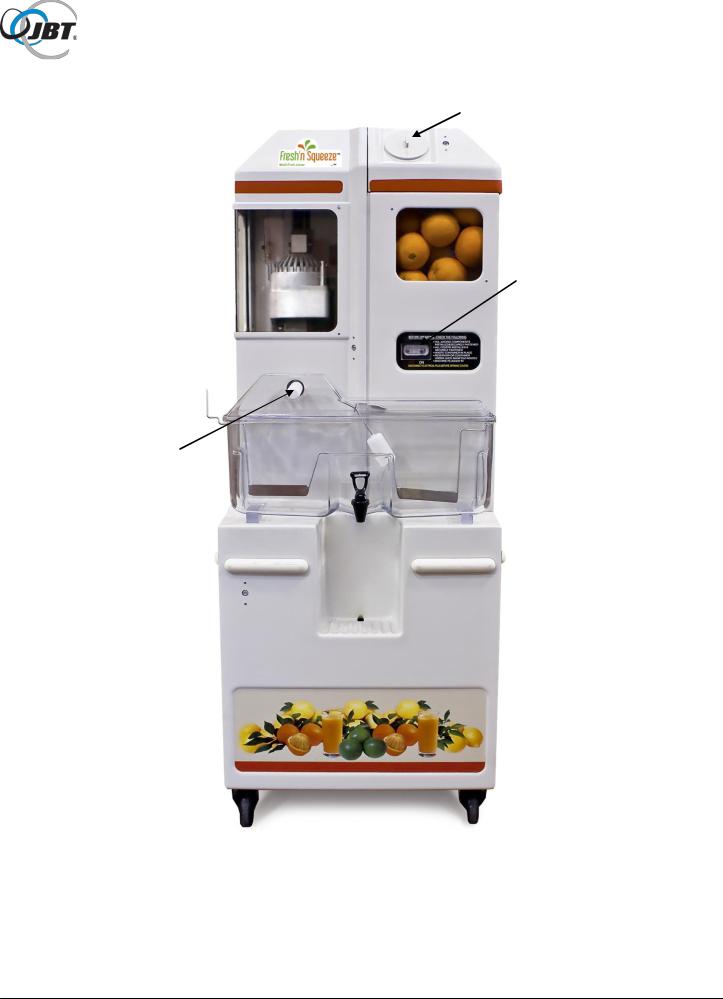
Back Cover 
Drive Cover
¼ turn lock 
Juice Components  Cover
Cover
Juice Nozzle
Cart Cover
¼ turn lock
Single Feed Hole
 ¼ turn lock
 Hopper Cover
 Hopper
On-Off Switch
 Stirrer Handle
 Juice Reservoir
 Juice Reservoir
Valve
 Cart Door
Figure 2. Multi-Fruit Juicer – Exterior Components
8 |
FNS-0002-060-EN |
January 2017 |
Rev F |
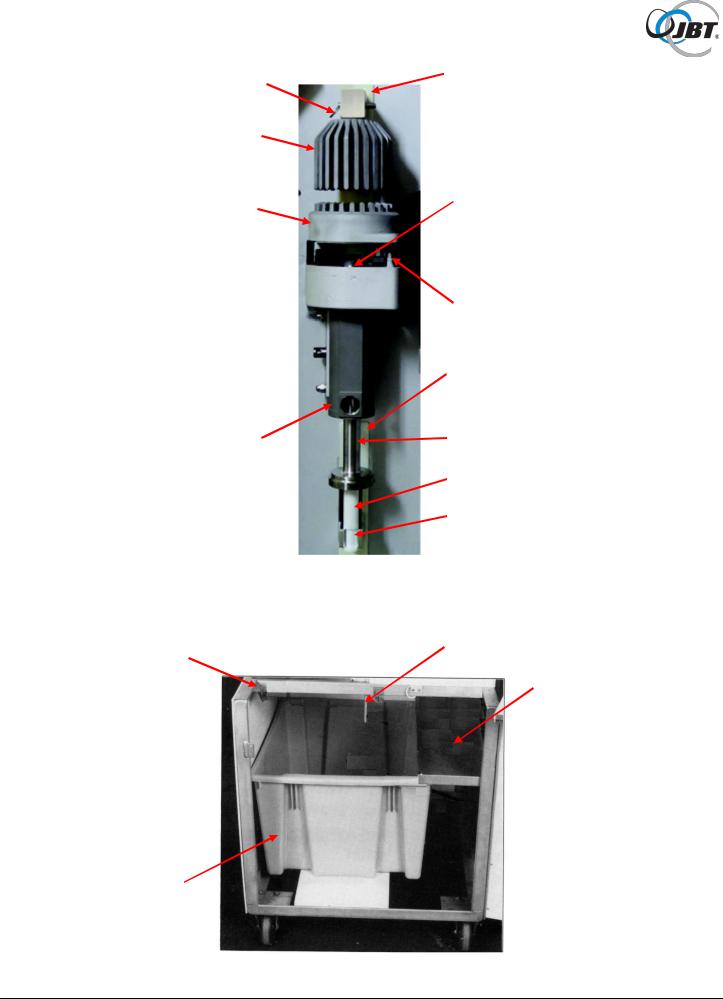
Upper Drive
|
Pull Pin |
Splash Plate |
|
|
|
||
|
|
|
|
|
Upper Cup |
|
|
|
|
Lower Cutter |
|
Lower Cup |
|||
|
|||
Spanner Nut (2)
Spanner Screw 
Lower Drive
Splash Plate
Juice Manifold |
Strainer Tube |
Orifice Tube
NOTE: Groove Portion of
Orifice Tube in Slot
Figure 3. Juicing Components Assembly
Spanner Wrench
Garbage Bag Hooks
Storage Pan
Cleaning Tools
Waste Container
Figure 4. Inside Cart Door
9 |
FNS-0002-060-EN |
January 2017 |
Rev F |
Operating Instructions
Equipment Check
Before plugging the Multi-Fruit Juicer into an electrical outlet, the following steps must be performed:
1.Locate the Multi-Fruit Juicer on a level surface.
This will prevent fruit feed problems.
CAUTION: WHEN MOVING JUICER, ALWAYS TRANSPORT ON LEVEL SURFACE. USE RAMPS IF NECESSARY. AVOID LEDGES, IRREGULAR FLOORS OR DRAIN INDENTIONS. TO AVOID TIPPING, NEW JUICER UNITS ARE SHIPPED WITH BRACING RAILS. UNITS IN THE FIELD CAN BE UPGRADED USING THE BRACING RAIL KIT.
SEE FIGURE 5 FOR INSTALLATION INFORMATION.
2.Lock both rear casters.
To lock, push down on caster with foot. To unlock, push again with foot.
3.Check waste container.
Open cart door to verify that waste container is in place. A plastic bag may be attached to the hooks above the waste container (30 gallon capacity or equivalent).
4.Check juicing components.
a. Twist and pull juice nozzle off.
b. Use key to unlock juicing components cover. Open cover and check that juicing components are installed and securely fastened. See Figure 3, Page 9.
5.Close and lock all access covers.
There are 4 separate access covers: hopper cover, juicing components cover, cart door (cover) and back cover.
NEVER operate juicer unless all covers are in place.
6.Replace juice nozzle. Wet the o-ring before installing the nozzle.
7.Make sure juice reservoir is firmly in place.
8.Make sure juice reservoir valve is in closed position.
9.Check the hopper for foreign objects.
Remove any foreign objects found in the hopper.
10.Make sure floor area around Juicer is clean and free of obstructions and water.
Wear appropriate non-slip footwear when water is necessary.
10 |
FNS-0002-060-EN |
January 2017 |
Rev F |

Figure 5. Bracing Rail Installation
11 |
FNS-0002-060-EN |
January 2017 |
Rev F |

Juicing
CAUTION: DO NOT RUN JUICER WITHOUT FRUIT FOR MORE THAN ONE MINUTE. EQUIPMENT DAMAGE MAY RESULT.
1.Turn on Juicer.
Push the "ON-OFF" button to "ON" position.
2.Fruit may be fed into Juicer one at a time (Single Feed) or in bulk.
a.Single Feed
Remove hopper single feed hole cover.
Twist and pull cover to remove.
Drop fruit individually down single-feed chute through hole in hopper cover. DO NOT overload chute or fruit will accidentally be double fed.
b.Bulk Feed
Unlock and open the hopper cover.
Dump up to one carton (40 Ibs.) of fruit into the hopper.
Fruit may be divided between the carton and carton lid for ease of lifting.
3.DO NOT use the single-feed chute when hopper is full.
Fruit will accidentally be double fed.
4.Turn-off Juicer.
Push the "ON-OFF" Switch to the "OFF" position.
5.Stir juice.
Use stirrer handle to stir juice in reservoir before filling containers.
6.Fill containers.
Place container under juice reservoir valve. Open valve by turning lever until container is full.
7.Clean Juicer.
If finished juicing, clean Juicer as soon as possible.
(See Page 14 for cleaning instructions.)
12 |
FNS-0002-060-EN |
January 2017 |
Rev F |

Operator Do's and Don'ts
Do's |
Don'ts |
|
|
|
|
Unplug juicer before opening juicing component |
DO NOT open juicing component door before |
|
door |
unplugging |
|
|
|
|
Stop juicer when cups are in most open position |
DO NOT stop juicer when cups are in closed |
|
|
position |
|
|
|
|
Use light water spray when rinsing juicer |
DO NOT use high pressure or volume water when |
|
|
rinsing juicer |
|
|
|
|
When hopper cleaning, use spray bottle and damp |
When hopper cleaning, DO NOT use chemical |
|
towel |
dosage and water system |
|
|
|
|
Use spray bottle with cleaner on main frame |
DO NOT use chemical dosage and water system |
|
casting in juicing components area |
to clean main casting (can result in mechanical |
|
|
damage) |
|
|
|
|
Rinse sanitizer off juicer five minutes after applying |
DO NOT leave sanitizer on juicer without rinsing |
|
|
(can damage aluminum) |
|
|
|
|
Use fruit within size range (2-1/2" to 3-7/8" |
DO NOT use oversized fruit |
|
diameter) |
|
|
|
|
|
Use fruit within size range (2-1/2" to 3-7/8" |
DO NOT use small fruit |
|
diameter) |
(can result in double feed and cause cups to break) |
|
|
|
|
Inspect and test safety switches and door locks |
DO NOT use juicer if safety switches are not work |
|
weekly |
properly |
|
|
|
|
Install juicing components using spanner tool; |
DO NOT hand tighten spanner nuts and screw |
|
tighten spanner nuts and screw from top to bottom |
(can result in major equipment damage) |
|
|
|
|
Install orifice tube into slot on lower arm |
DO NOT install orifice tube on top of lower arm slot |
|
(see Figure 6 on Page 19) |
(see Figure 6 on Page 19) |
|
|
|
|
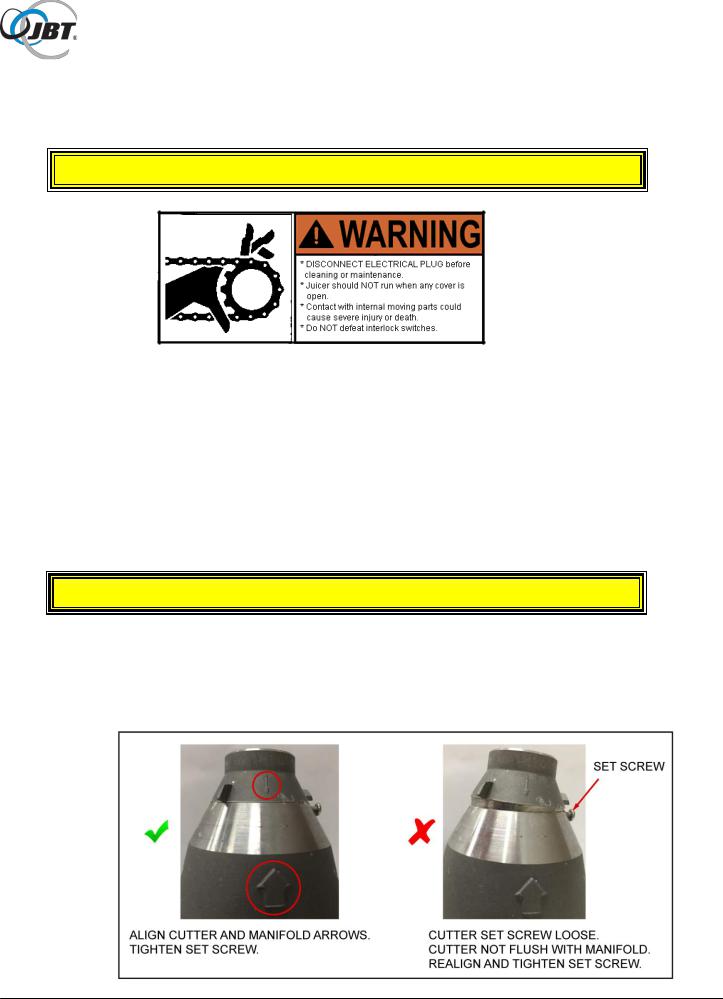
Inspect cutter daily. |
If cutter is damaged, loose or dull, juice quality and |
|
Replace if damaged; adjust and tighten screw |
yield can be impacted |
|
|
|
|
Mix juice and pulp slowly to reduce foam in |
DO NOT mix juice quickly in reservoir (can result in |
|
reservoir |
foam and off flavor) |
|
|
|
13 |
FNS-0002-060-EN |
January 2017 |
Rev F |

Cleaning Instructions
ALWAYS follow cleaning and maintenance schedules in this manual to prevent equipment damage.
Clean Juicer as soon as possible after juicing. Use a soft towel or sponge to wipe equipment parts. DO NOT use abrasive pads such as steel wool.
The recommended cleaner is JBT Corporation brand CorKlean. CorKlean is a low-foaming alkaline equipment cleaner. It is safe on aluminum, 100% water soluble and free rinsing. CorKlean has been especially formulated for cleaning food processing equipment and is USDA accepted. Follow instructions on cleaner label for dilution.
1.Turn-off Juicer with Juicing Component cups separated. Open Upper Cup to highest position.
2.DISCONNECT ELECTRICAL PLUG.
3.Pull Juicer to clean-up area, if one is available.
4.Brush all loose peel into waste container or bag.
5.Empty and rinse waste container.
14 |
FNS-0002-060-EN |
January 2017 |
Rev F |
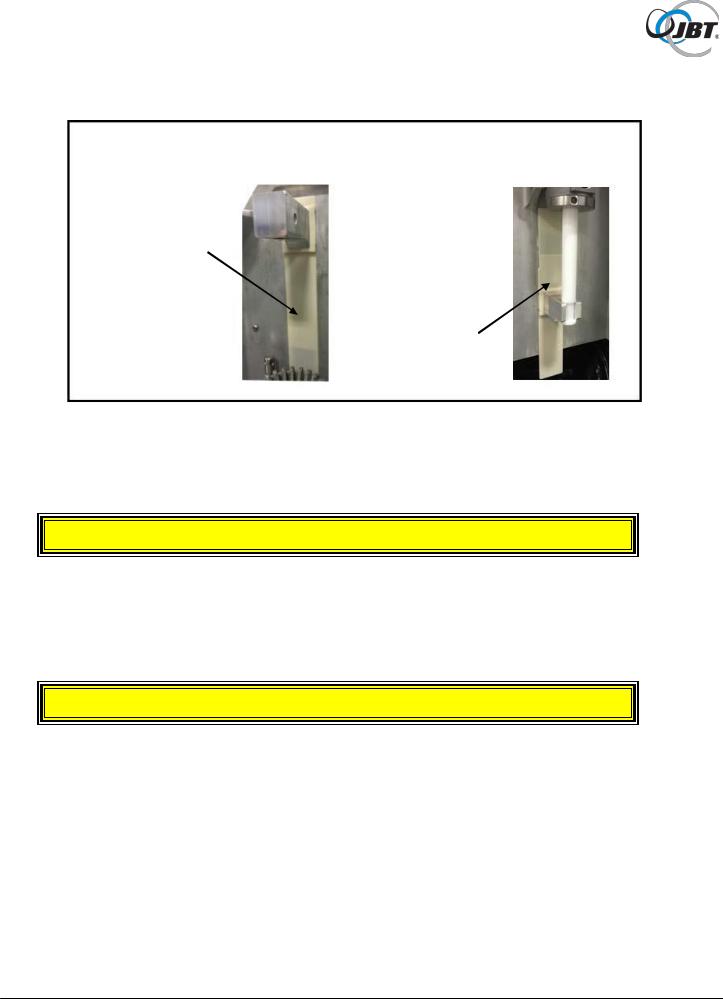
6.DO NOT move or pull out splash guards.
MOVING SPLASH GUARDS WHEN CLEANING CAN CAUSE SPLASH GUARDS
TO MISALIGN AND BREAK
DO NOT PULL OUT
OR MOVE UPPER
SPLASH GUARD
WHEN CLEANING
DO NOT PULL OUT
OR MOVE LOWER
SPLASH GUARD
WHEN CLEANING
7.Remove juicing components.
a.Cups should be separated. (Juicer should have been turned off with cups in the separated position.)
b.Remove splatter shield by sliding upwards off mounting screws.
CAUTION: DO NOT PLACE HANDS OR FINGERS BETWEEN CUPS.
c.Grasp upper cup and pull out pin just above it. Place upper cup in waste container.
d.Remove lower cup by removing spanner nuts on either side of lower cup. (Spanner wrench is provided to loosen/tighten spanner nuts).
Place lower cup in waste container.
CAUTION: CUTTER AND KNIVES ARE SHARP.
e.Install red protective cap on cutter. (Red protective cap is provided.)
f.Grasp juice manifold and orifice tube firmly. Remove entire juicing components assembly.
g.Grasp orifice tube and pull out of strainer tube.
h.Remove strainer tube from inside juice manifold by turning tube counter-clockwise and sliding out. (Spanner wrench is provided to loosen/tighten strainer tube.) Place juicing components into waste container.
15 |
FNS-0002-060-EN |
January 2017 |
Rev F |

8.Prepare cleaning solution.
JBT Corporation brand CorKlean is recommended, see Page 14.
Read the product label. Follow the manufacturer's mixing directions and safety precautions.
9.Immerse all components in cleaning solution.
Use the blunt end of plastic rod provided to displace any fruit material lodged in the bore of the orifice tube.
Use pointed end of plastic rod to displace any fruit material lodged in cup fingers.
10. Scrub components.
Use a brush, towel, or sponge. DO NOT use abrasive pads such as steel wool. Thoroughly rinse with clean water, then thoroughly rinse with sanitizer solution. Follow the manufacturer's mixing directions and safety precautions.
11. For best results, soak strainer tube overnight.
After soaking overnight, rinse the strainer tube thoroughly before using. Check that all strainer tube holes are clean. Clean strainer tube with a hard spray from a hose while moving orifice tube back and forth in strainer tube. Rinse thoroughly with sanitizer solution. Allow to air dry.
12. If possible, hose down juicing area and cover.
If location prohibits using a hose to clean juicing area and cover, ensure waste container is in place. Wash down the exposed juicing area and cover with a sponge or spray applicator using the recommended cleaning solution. Cover may be rinsed in place or removed by lifting it off the hinges. Allow to stand for two minutes before rinsing thoroughly with water.
13. Re-assemble juicing components.
Start by re-assembling strainer tube into juice manifold. Tighten with spanner wrench. Insert orifice tube into bottom of strainer tube. Mount juice manifold assembly onto locating pins with orifice tube notch engaging lower drive. Tighten spanner screw with spanner wrench. Remove red protective cap from cutter. Install lower cup and tighten spanner nuts with spanner wrench. Install upper cup by slipping pin into stem hole. Install splatter shield.
Refer to Figure 6.
14.Verify that orifice tube is properly installed (Figure 7).
15.Remove wax build-up as needed.
Cups, hopper and other parts may acquire a build-up of wax over time.
a.Soak cups for five minutes in an ammonia cleaning solution.
Rinse thoroughly with sanitizer solution.
b.Wipe hopper and other parts with a cloth soaked in ammonia cleaning solution.
16 |
FNS-0002-060-EN |
January 2017 |
Rev F |

16. Remove orange discoloration as needed.
Equipment may exhibit some build-up or orange coloration over time.
CorKlean solution should remove this. Wipe with a cloth soaked in any pine based cleaner to remove discoloration from plastic covers.
Rinse thoroughly with sanitizer solution.
17. Clean Tomlinson faucet.
Daily cleaning is crucial to the performance, maintenance and sanitation of the faucet.
Take apart handle assembly and flush with clean water, then sanitize.
17 |
FNS-0002-060-EN |
January 2017 |
Rev F |
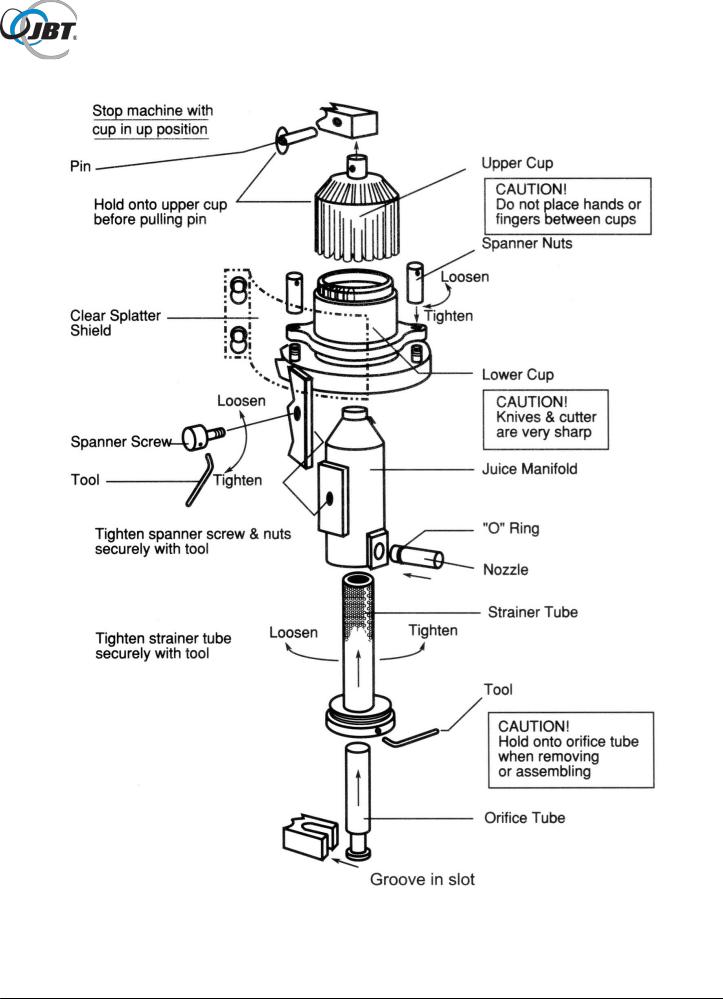
Figure 6. Juicing Components
18 |
FNS-0002-060-EN |
January 2017 |
Rev F |

Figure 7. Proper Orifice Tube Installation
19 |
FNS-0002-060-EN |
January 2017 |
Rev F |
Maintenance
Before performing any maintenance,
DISCONNECT ELECTRICAL PLUG.
After every juice run:
1.Check cutter and knives for sharpness.
Refer to Figure 8 to determine condition of cutter.
If dull, sharpen with a whetstone provided.
Refer to Figure 8 to sharpen cutter.
If cutter is severely damaged or rolled over, replace cutter.
a.Cutter removal:
Disassemble juicing components (Figure 3, Page 9). Loosen set screw under front knife (make sure screw is backed out far enough to clear cutter). Cutter should lift out, if not, tap the cutter lightly from inside the juice manifold with a 1-1/4" diameter rod (hammer handle).
CAUTION: CUTTER AND KNIVES ARE SHARP.
Install red protective cap provided onto cutter. After red protective cap is installed, remove cutter. Handle cutter with care to avoid direct contact with sharp edge.
b.Cutter installation:
Align arrows on cutter and juice manifold to seat cutter. Make sure cutter is fully seated. Tighten set screw. (DO NOT over-tighten.)
20 |
FNS-0002-060-EN |
January 2017 |
Rev F |
Figure 8 Sharpening Cutter
21 |
FNS-0002-060-EN |
January 2017 |
Rev F |
Maintenance (continued)
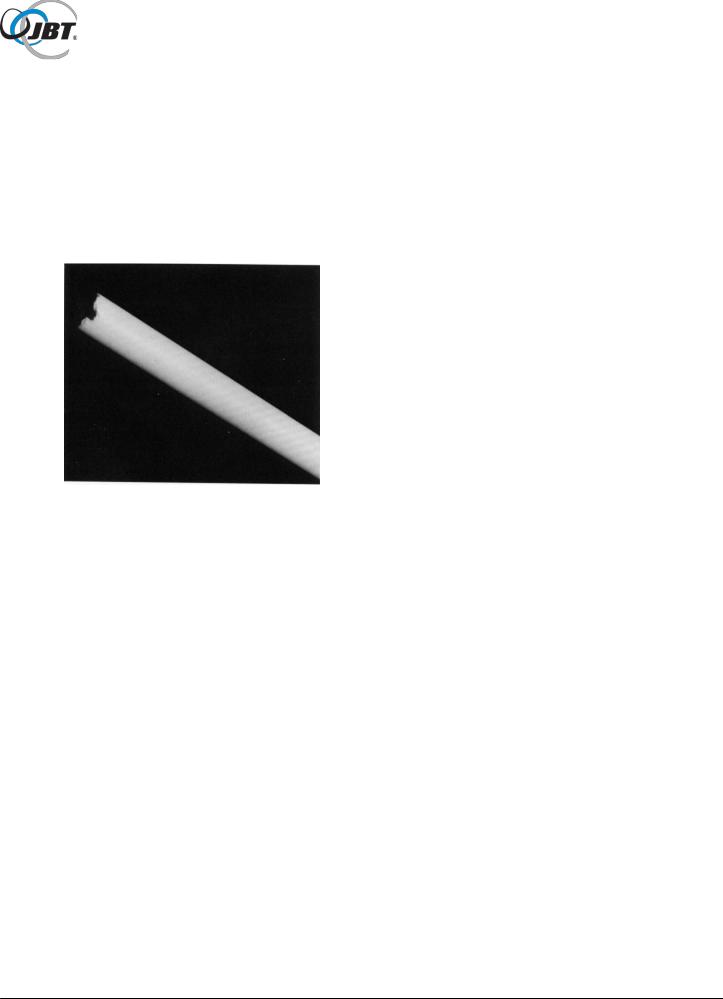
2.Check orifice tube for damage. Refer to Figure 9.
Replace tube when:
a.Chunks are missing from top end.
b.Score marks 1/32" or deeper appear along the length of the tube.
Figure 9. Severely Damaged Orifice Tube
3.Check for loose or missing nuts and bolts.
a.Tighten or replace nuts and bolts as necessary.
b.DO NOT exceed torque ranges specified in Service Manual.
c.ALWAYS use JBT Corporation recommended spare parts.
22 |
FNS-0002-060-EN |
January 2017 |
Rev F |
Periodic Inspection
Perform the following steps every week.
1.Test all access cover interlock switches.
Juicer should stop automatically when any access cover is opened. Individually open and close the four access covers (hopper, juice components, cart and back). If juicer continues to run when any access cover is opened, the interlock switch is defective.
Stop the juicer and replace the defective interlock switch immediately.
See Troubleshooting Section.
2.Check all fasteners for tightness.
Check especially on the Sprockets, Crank Arms, Fruit Lift, and Hopper.
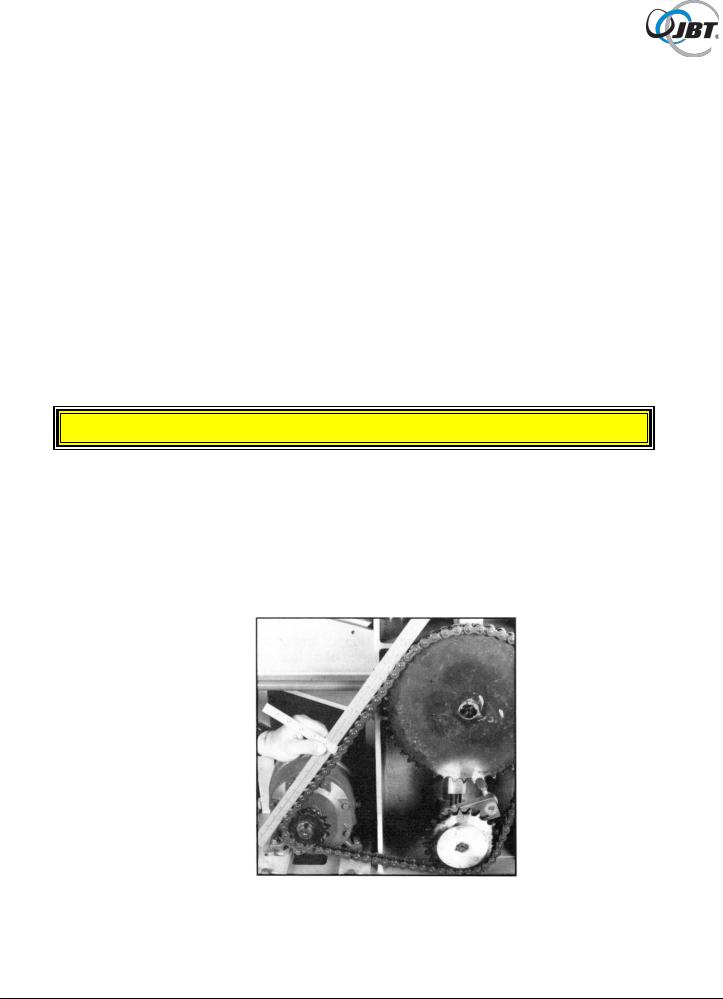
3.Check chain for tightness. Refer to Figure 10.
Chain should have 1/4 inch maximum slack on top side. To adjust, (see Figure 11) loosen the four bolts holding the gearbox base to frame, move motor/ gearbox to the correct adjustment.
(If necessary, use a small board to pry between frame and motor.)
CAUTION: DO NOT OVER TIGHTEN CHAIN.
4. Check chain and sprockets for rust.
Lubricate chain and sprockets should rust appear. JBT Select FG Spray (Non-Drip), p/n 575054, is recommended.
5. Lubricate the seven grease fittings with JBT Select 2FG grease, p/n 575066.
Figure 10. Checking Chain Slack
23 |
FNS-0002-060-EN |
January 2017 |
Rev F |
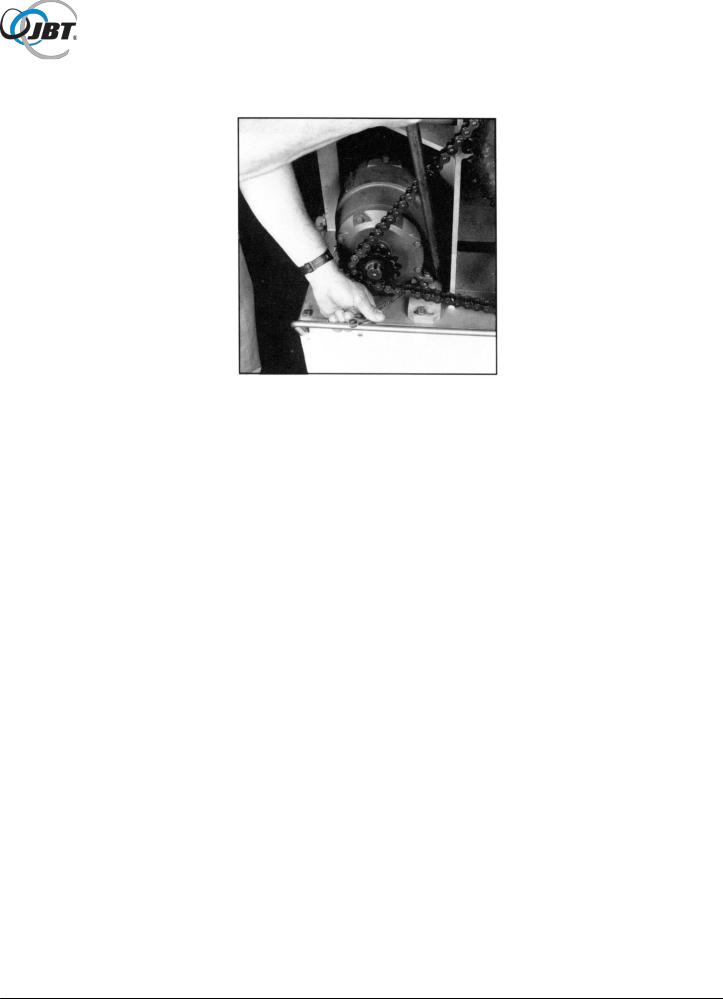
Figure 11. Loosening Bolts on Base of
Motor and Prying Motor
6.Check oil level in gearbox. Refer To Figure 12.
If Juicer has been laid on its side for any reason (i.e., during shipping), or if there is any evidence of oil leak, check gearbox for proper oil level. Remove back cover. Oil level plug is located on the left side of gearbox. Filler plug is located on the top of the gearbox.
Use S.A.E. 40W oil only.
7.Check hopper bump button. Refer to Figure 13.
Replace bump button if it has worn to less than 1/8" high. To locate hopper bump button, remove hopper. If hopper does not lift out, see Troubleshooting, Page 28, item 'a', to remove electrical switch cover.
a.Hopper removal:
Fruit lift (upper cup drive) must be in down position. Remove two spanner screws using spanner wrench. Remove hopper.
b.Hopper installation:
DO NOT over tighten spanner screws. Hopper is designed to be loose. Hopper must be free to "bump" during each cycle to prevent fruit bridging.
24 |
FNS-0002-060-EN |
January 2017 |
Rev F |
 Loading...