

Page 1
WWW.BEGLEC.COM
Copyright © 2010 by BEGLEC NV
‘t Hofveld 2C ~ B1702 Groot-Bijgaarden ~ Belgium
Reproduction or publication of the content in any manner, without express permission of the publisher, is prohibited.
Version: 1.0
Operation Manual
Mode d'emploi
Gebruiksaanwijzing
Bedienungsanleitung
Manual de instrucciones
Manual do utilizador
EN
FR
NL
DE
ES
PT
The Power Source for DJ’s
Page 2

EN - DISPOSAL OF THE DEVICE
Dispose of the unit and used batteries in an environment friendly manner
according to your country regulations.
FR - DÉCLASSER L’APPAREIL
Débarrassez-vous de l’appareil et des piles usagées de manière écologique
Conformément aux dispositions légales de votre pays.
NL - VERWIJDEREN VAN HET APPARAAT
Verwijder het toestel en de gebruikte batterijen op een milieuvriendelijke
manier conform de in uw land geldende voorschriften.
DU - ENTSORGUNG DES GERÄTS
Entsorgen Sie das Gerät und die Batterien auf umweltfreundliche Art und
Weise gemäß den Vorschriften Ihres Landes.
ES - DESHACERSE DEL APARATO
Reciclar el aparato y pilas usadas de forma ecologica conforme a las
disposiciones legales de su pais.
PT - COMO DESFAZER-SE DA UNIDADE
Tente reciclar a unidade e as pilhas usadas respeitando o ambiente e em
conformidade com as normas vigentes no seu país.
Page 3
ENGLISH USER MANUAL
OPERATION MANUAL
Thank you for buying this JB Systems®product. To take full advantage of all possibilities, please read these
operating instructions very carefully.
FEATURES
Full MP3 Playback (max. 999 MP3-files / 255 Folders on 1 CD)
o MPEG1 layer3 (32 + 44,1 + 48kHz)
o MPEG2 layer3 (16 + 22,05 + 24kHz)
o MPEG2.5 layer3 (8 + 11,025 + 12kHz)
o Supports both CBR and VBR bitrate modes.
Digital scratch effect via touch sensitive jog wheel
Electronic brake effect + 3 digital effects:
o Echo, flanger, filter
o Manual control of parameters
o Beat synchronized mode
Alphanumeric LCD display (CD-TEXT and ID3v2 tags: shows title, artist, bitrate, …)
Hot Cue buttons can hold up to 4 cue points or seamless loops per track!
Permanent memory for up to 2000 hot cue points and loops
Seamless real-time loop edit function!
Full automatic BPM counter
Real-time cue (“Cue on the fly”)
Anti-shock Memory 10seconds
1/75sec Frame search, also on MP3
Pitch Lock (Master Tempo)
Pitch ranges: +/-4% +/-8% +/-16% +/-100% (up to +/-16% on MP3)
Pitch bend on jog wheel and buttons for perfect mixes
Ultra fast memory start within 10msec
Auto cue function(-48dB)
Fader start, fader stop (back cue),
S/PDIF digital audio RCA coaxial
Reads CD-DA, CD-R, CD-RW
Selectable elapsed, remain and total remain time display
Single/continuous play
Relay play allows consecutive playback on two decks
60 seconds Transport Protection
Sleep mode (saves the life span of the laser)
BEFORE USE
Check the contents:
Check that the carton contains the following items:
TMC200 unit
User manual
1 Mains cable
1 cinch/cinch cable
1 mono mini-jack cable for fader start and relay play
ENGLISH USER MANUAL
SAFETY INSTRUCTIONS:
CAUTION
The lightning flash with arrowhead symbol within the equilateral triangle is intended to alert the
use or the presence of un-insulated “dangerous voltage” within the product’s enclosure that may
be of sufficient magnitude to constitute a risk of electric shock.
The exclamation point within the equilateral triangle is intended to alert the user to the presence of
important operation and maintenance (servicing) instructions in the literature accompanying this
appliance.
This symbol means: indoor use only
This symbol means: Read instructions
This symbol means: Safety Class II appliance
To prevent fire or shock hazard, do not expose this appliance to rain or moisture.
To avoid condensation to be formed inside, allow the unit to adapt to the surrounding temperatures when
bringing it into a warm room after transport. Condense sometimes prevents the unit from working at full
performance or may even cause damages.
This unit is for indoor use only.
Don’t place metal objects or spill liquid inside the unit. No objects filled with liquids, such as vases, shall be
placed on this appliance. Electric shock or malfunction may result. If a foreign object enters the unit,
immediately disconnect the mains power.
No naked flame sources, such as lighted candles, should be placed on the appliance.
Don’t cover any ventilation openings as this may result in overheating.
Prevent use in dusty environments and clean the unit regularly.
Keep the unit away from children.
Inexperienced persons should not operate this device.
Maximum save ambient temperature is 40°C. Don’t use this unit at higher ambient temperatures.
Always unplug the unit when it is not used for a longer time or before you start servicing.
The electrical installation should be carried out by qualified personal only, according to the regulations for
electrical and mechanical safety in your country.
Check that the available voltage is not higher than the one stated on the rear panel of the unit.
The socket inlet shall remain operable for disconnection from the mains.
The power cord should always be in perfect condition: switch the unit immediately off when the power cord
is squashed or damaged.
Never let the power-cord come into contact with other cables!
When the power switch is in OFF position, this unit is not completely disconnected from the mains!
In order to prevent electric shock, do not open the cover. Apart from the mains fuse there are no user
serviceable parts inside.
Never repair a fuse or bypass the fuse holder. Always replace a damaged fuse with a fuse of the same
type and electrical specifications!
In the event of serious operating problems, stop using the appliance and contact your dealer immediately.
Please use the original packing when the device is to be transported.
Due to safety reasons it is prohibited to make unauthorized modifications to the unit.
INSTALLATION GUIDELINES:
Install the unit in a well-ventilated location where it will not be exposed to high temperatures or humidity.
Placing and using the unit for long periods near heat-generating sources such as amplifiers, spotlights, etc.
will affect its performance and may even damage the unit.
Take care to minimize shocks and vibrations during transport.
When installed in a booth or flight case, please make sure to have good ventilation to improve heat
evacuation of the unit.
To avoid condensation to be formed inside, allow the unit to adapt to the surrounding temperatures when
bringing it into a warm room after transport. Condense sometimes prevents the unit from working at full
performance.
CAUTION: To reduce the risk of electric shock, do not
remove the top cover. No user-serviceable parts inside.
Refer servicing to qualified service personnel only.
JB SYSTEMS® 1/78 TMC200
JB SYSTEMS® 2/78 TMC200
Page 4

ENGLISH USER MANUAL
ENGLISH USER MANUAL
CLEANING THE CD-PLAYER:
Clean by wiping with a polished cloth slightly dipped with water. Avoid getting water inside the unit. Do not
use volatile liquids such as benzene or thinner which will damage the unit.
CONNECTIONS
Use the supplied cinch cable to connect the audio output of the CD player with a CD input on your mixing
unit.
Also connect the fader start cable if your audio mixer has fader start connections. (Synq® or Pioneer®
compatible)
Connect the mains cable.
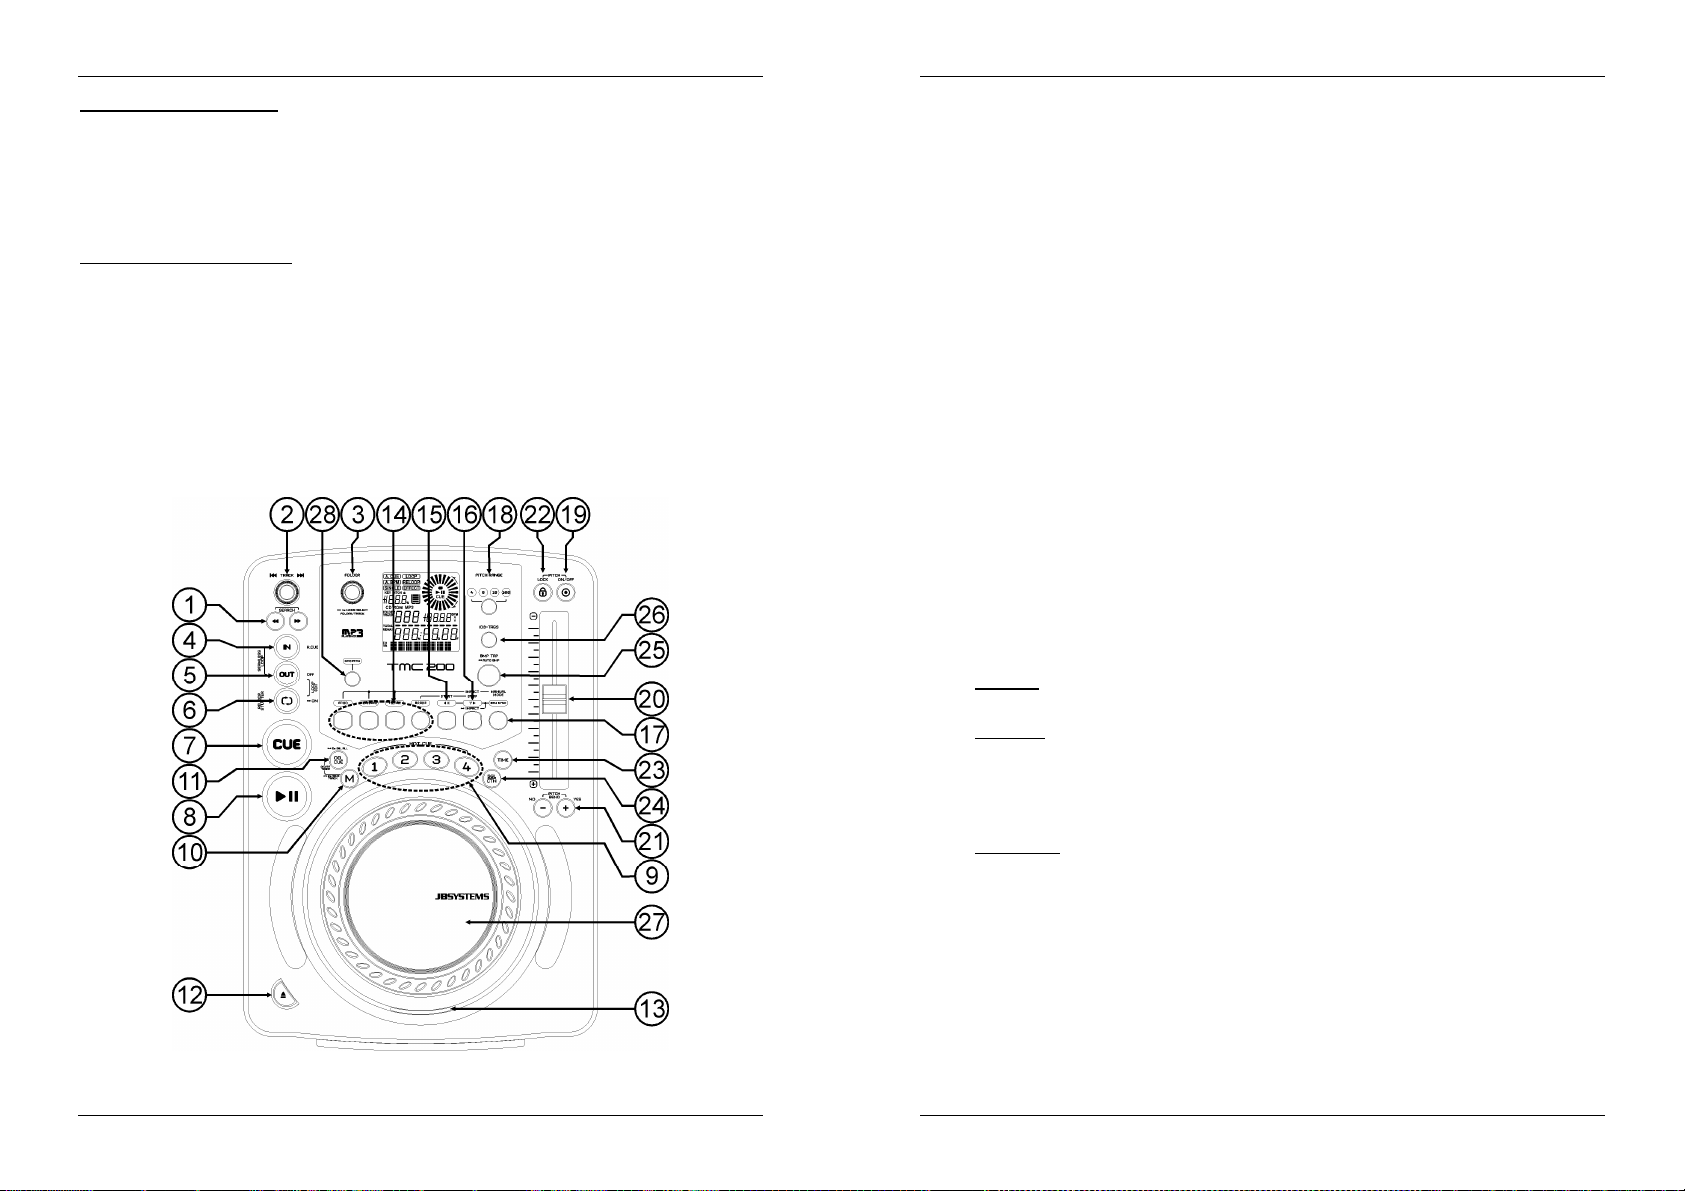
CONTROLS AND FUNCTIONS
1. SEARCH Buttons: These buttons have 4 forward and 4 backward speed positions for searching
through songs. The longer you press a button in either direction the faster you will search through the
music.
2. TRACK SEARCH Knob: several functions are available:
Normal track search: turn the knob to browse the tracks by +1/-1 steps.
Fast track search: keep the knob pressed while turning to browse the tracks by +10/-10steps.
Restart display info: pressing the knob shortly will force the display to show the information from
the beginning (restart scrolling)
3. FOLDER SELECTOR Knob: several functions are available:
Folder search: if your CD has MP3 subfolders, you can select these by simply turning this folder
selector. The display shows you the folder number + name. Check the next chapter for more
information on the use of subfolders. When the CD doesn’t contain subfolders, this selector is not
used.
Show folder name: The folder name is shown instantly when you press the folder selector
shortly.
Switch between FOLDER / TRACK mode: press the knob for about 1second, the display starts
switching between “FOLDERmd” and “TRACKmd”. Release the knob when the desired mode is
shown.
FOLDER MODE: you can only select tracks inside the selected folder. To go to another folder
just use the FOLDER selector.
TRACK MODE: you will be able to browse all the tracks on your CD as if no subfolders where
present. To move quickly (by 10tracks) through the CD, press the TRACK selector while turning
it forward/backward.
4. IN/R.CUE button: Allows you to set the cue point without stopping the playback (CUE ON THE FLY).
This button also sets the beginning of a seamless loop. When you play one of the hot cues(9), the
starting point is also copied to this button.
5. OUT button: Used to set the endpoint when looping music. The player starts to loop seamlessly until
you press this button again to exit. When a loop is programmed but not active you can also restart the
loop. The point where you press the button will be memorized as the new end point of the loop. When
the player is in “loop edit mode” pressing this button stops the loop editing and saves the current
endpoint of the loop.
6. RELOOP/STUTTER button: This button has 3 functions:
RELOOP: If a loop is programmed and you have hit the OUT button(5), press the reloop button to
enter the loop again. Just press the OUT(5) button to exit the loop. (intro and end points of the loop
are unchanged)
STUTTER: When a loop is playing you can press this button to restart the loop at once. You can
also press this button when a track is not playing in loop. Every time the RELOOP/STUTTER button
is pressed, it will restart the music from the preprogrammed cue point. This stutter effect adds extra
creativity to your performance.
LOOP EDIT: When a loop is programmed, press the RELOOP/STUTTER button for about 2
seconds to enter “loop edit” mode. Now you are able to change the endpoint of the loop. See
chapter “How to use…” for more information.
7. CUE button: Pressing the CUE button during playback provides an immediate return to the position at
which playback was started. Playback starts immediately from the programmed cue point for as long as
the CUE button is pressed. The CD player jumps back to the cue point as soon as the CUE button is
released. Also with the unit in pause mode (Play/Pause LED blinks) the jog wheel is used to set a
different start point. By pressing "PLAY/PAUSE" button then "CUE", you can confirm this new cue point.
8. PLAY/PAUSE button: every time you press the PLAY/PAUSE button the CD player changes from play
to pause or from pause to play. The button blinks as long as the player is set to pause.
9. HOT CUE buttons: 4 programmable buttons where you can store ordinary cue points and/or loops.
When a normal cue point is stored, the corresponding button is blue, when a loop is stored the
corresponding button turns white. All stored cue points and loops can be backed up to permanent
memory for future use. Check the chapter “HOW TO USE” for more information on how to program cue
points etc.
10. MEMORY Button: is used to store cue points and loops to the Hot Cue buttons and to the permanent
cue memory:
Storing to HOT CUE buttons: Press the MEMORY button shortly to prepare the TMC200 for
storing a cue point or loop to one of the 4 HOT CUE buttons.
Storing to permanent memory: Press the MEMORY button until it starts flashing and the LCD
display shows “SAVING”. The contents of the HOT CUE buttons for this track are stored to
permanent memory.
Important: Not only the HOT CUE buttons are stored to permanent memory, also a lot of other
parameters are saved so you don’t have to set these again each time you switch the player on.
Apart from the hot cue buttons, the following parameters will also be saved: pitch range,
single/cont mode, time display, jog wheel setting, auto cue, auto BPM mode, pitch on/off, pitch
lock on/off and start/stop parameter.
Look further in this manual for more information on how to use these functions.
11. DELETE CUE Button: this button has several functions:
DELETE 1 HOT CUE: press the DELETE CUE button, followed by the HOT CUE button that you
want to delete from track memory. The deleted button turns dark.
JB SYSTEMS® 3/78 TMC200
JB SYSTEMS® 4/78 TMC200
Page 5

ENGLISH USER MANUAL
ENGLISH USER MANUAL
DELETE 4 HOT CUES: press the DELETE CUE button for about 2seconds to erase all 4 hot cues
from track memory.
DELETE TRACK: press the DELETE CUE button and MEMORY button (10) together for about
2seconds to delete the hot cues for the entire track from permanent memory. Because there will be
no way back, the display first asks you if you're sure: using the PITCH BEND buttons (21) you can
choose YES or NO.
Please refer to the chapter “HOW TO USE” for more information.
12. OPEN/CLOSE button: press this button to open and close the disc tray in the front of the TMC200. This
button is disabled during playback. If the tray is not closed after 60sec. It will close automatically to
prevent damage.
13. CD TRAY INDICATOR: is lit when a CD is loaded.
14. EFFECT buttons: each of these buttons has its own settings, described below:
ECHO EFFECT button: press this button to activate the echo effect. Depending on the sync-mode
(manual or beat synchronized), different settings are possible:
Manual mode: the BPM-SYNC button (17) is dark. You can set all parameters manually, use the
following controls:
Jog-wheel (27): used to set the echo time from 1ms to 2000ms.
IMPACT button (16): as long as the IMPACT-button is lit you can use the jog-wheel (27) to
change the impact (dry/wet) of the effect.
Beat synchronized mode: the BPM-SYNC button (17) is lit. You can use the following controls:
EFFECT SYNC-buttons (15+16): choose one of the beat synchronized echo presets.
IMPACT button (16): as long as the IMPACT-button is lit you can use the jog-wheel (27) to
change the impact (dry/wet) of the effect signal.
FLANGER EFFECT button: press this button to activate the flanger effect. Depending on the syncmode (manual or beat synchronized), different settings are possible:
Manual mode: the BPM-SYNC button (17) is dark. You can set all parameters manually, use the
following controls:
Jog-wheel (27): used to manually change the effect.
IMPACT button (16): as long as the IMPACT-button is lit you can use the jog-wheel (27) to
change the impact (dry/wet) of the effect.
Beat synchronized mode: the BPM-SYNC button (17) is lit. You can use the following controls:
EFFECT SYNC-buttons (15+16): choose one of the beat synchronized sweep presets.
IMPACT button (16): as long as the IMPACT-button is lit you can use the jog-wheel (27) to
change the impact (dry/wet) of the effect signal.
FILTER EFFECT button: press this button to activate the filter effect. Depending on the sync-mode
(manual or beat synchronized), different settings are possible:
Manual mode: the BPM-SYNC button (17) is dark. You can set all parameters manually, use the
following controls:
Jog-wheel (27): used to manually change the cutoff frequency of the filter.
IMPACT button (16): as long as the IMPACT-button is lit you can use the jog-wheel (27) to
change the impact (Q-factor) of the filter.
Beat synchronized mode: the BPM-SYNC button (17) is lit. You can use the following controls:
EFFECT SYNC-buttons (15+16): choose one of the beat synchronized sweep presets.
IMPACT button (16): as long as the IMPACT-button is lit you can use the jog-wheel (27) to
change the impact (Q-factor) of the filter.
BRAKE button: press this button to activate the brake effect. Now you can determine the
acceleration/deceleration speed of the music while using the PLAY/PAUSE button (8). You can set the
parameters with buttons (15+16), see below.
15. EFFECT SYNC/START-button: this button has several functions, depending on the effect mode:
BPM-Synced effects: when an effect is used in beat synchronized mode, this button is lit. You
can now choose how you want the effect to be synchronized to the beat. Use this button to cut
the current BPM-parameter in half.
BRAKE effect: press this button to change the acceleration time (time from zero to full speed).
While the button is lit, you can use the jog-wheel (27) to change the time from 0,0s (instant start)
to almost 10s. (very slow start)
16. EFFECT SYNC/STOP/IMPACT-button: this button has several functions, depending on the effect
mode:
BPM-Synced effects: when an effect is used in beat synchronized mode, this button is lit. You
can now choose how you want the effect to be synchronized to the beat. Use this button to
double the current BPM-parameter.
BRAKE effect: press this button to change the deceleration time (time from full speed to zero).
While the button is lit, you can use the jog-wheel (27) to change the time from 0,0s (instant stop)
to almost 10s. (very slow stop)
IMPACT parameter: while one of the 3 DSP-effects is activated, press the button until it starts
17. BPM-SYNC button: press this button to toggle between manual and beat synchronized effect mode!
18. PITCH RANGE Button: Every time you press this button, you will change the scale of the speed
19. SPEED Button: This button is used to turn the speed function on and off.
20. SPEED slider: Press the SPEED button(19), so it is lit. The speed can be changed up to +/-100% by
21. PITCH BEND buttons: The speed rises while the “+ button” is pressed and returns to the original pitch
22. PITCH LOCK Button: (Master tempo) activates the Pitch Lock function. This function allows you to
23. TIME Button: The TIME button switches between elapsed playing time, remaining time in a selection
24. SGL/CTN Button: with this button you can choose between “single track mode” and “continuous play”.
25. BPM-TAP button: This player has a full automatic BPM-counter. In some rare cases the automatic beat
26. ID3-TAGS Button: to make things easier for you most MP3-tracks contain ID3-tags to give you more
27. TACTILE JOG-WHEEL: This jog wheel serves different functions depending on the working mode:
blinking. Now you can adapt the impact of the selected effect, also see EFFECT buttons (14).
Please refer to point (14) for more information.
slider(20). On normal audio CDs you can select +/-4%, +/-8%, +/-16% and +/-100%. The +/-100% option
is not available on MP3 CDs.
moving the fader. The speed will not change if the SPEED button(19) is off. You can change the pitch
range with the PITCH RANGE button(18)
when the button is released. The speed drops when the “– button” is pressed and returns to the original
pitch when the button is released. These buttons can be used to synchronize the beats of 2 tracks. They
are also used to confirm (or not) the questions that are sometimes shown on the display.
make adjustments to a tracks speed using the pitch control without altering its tonal pitch. This button
turns blue when the Pitch Lock is on.
NOTE: be informed that the pitch lock function has its limitations. From a certain speed deviation
(depends on the music style) the pitch lock won’t be able to keep the same pitch anymore. First you will
hear a small distortion that becomes more important at higher speed deviations. This is not always a
disadvantage: at very low speeds you can also use it as a special “distortion effect”!
and total remaining time of the disc. (standard = remaining /track) The “total remaining time of the disc”
is not available on MP3 CDs.
You can also switch the auto cue function (-48dB) on and off.
Continuous play: the complete CD will be played without interruption. (mostly used in pubs)
Single track: player stops at the end of each track and waits at the beginning of the next track.
The player waits at the first music note of each track. This means that badly indexed CDs will not
interfere with the instant start capabilities of this CD player. This is a very useful feature for
deejays!
Auto Cue on/off: The TMC200 automatically detects the first “music note” on each track to
ensure the music starts immediately when you press the play button. To turn this Auto Cue
function on/off just press the SGL/CTN button for about 2 seconds. The display shows “A.CUE”
when the function is active.
counter doesn’t count as it should do (beats are out of the normal range or there’s simply no beat to
detect). In these cases you can help the beat counter by manually tapping this button to the rhythm of
the beat. You can switch back to the automatic beat counter by pressing the TAP button until the
“AUTOBPM” in the left upper corner of the display turns on.
information about the selected song. The TMC200 can show some of these tags on the display:
“Song title” information: by default the display shows the “song title”.
“Artist” information: press the ID3-TAGS-button 1x to show the artist name, the display returns
automatically to default.
“Bit-rate” information: press the ID3-TAGS-button 2x to show the bit-rate (recording quality) of
the track, the display returns automatically to default.
When the track doesn’t have ID3-tags, the display shows the file name (xxxxxxxxx.mp3)
The jog wheel acts as a slow frame search (1/75sec) control when the CD is not playing but either
paused or set to a cue point. To set a new cue point, spin the wheel then press PLAY(8) or LOOP
IN(4) when you have determined the proper position. Press CUE(7) to return to the “CUE POINT”.
If the track is playing, the jog wheel temporarily bends the pitch of the music up to +/-100% by rotating
the wheel clockwise to speed it up or counterclockwise to slow it down. The amount of pitch change is
determined by the speed of rotation. This is an alternative to the PITCH BEND buttons(21).
JB SYSTEMS® 5/78 TMC200
JB SYSTEMS® 6/78 TMC200
Page 6
ENGLISH USER MANUAL
ENGLISH USER MANUAL
In scratch mode (SCRATCH button (28) activated) the jog wheel is used to manipulate playback of
the music in real time. As a result you can scratch the music on your CD the way you do this with a
normal analog vinyl record. To match the vinyl feel as close as possible and largely improve scratch
performance, the the jog-wheel uses a patented touch-sensitive technology!
You can manipulate the DSP-effects while they are used in manual mode, see EFFECT buttons (14).
28. SCRATCH button: Used to put the TMC200 in scratch mode. This option gives you the possibility to
scratch any track on the CD in real time. You can use the scratch function in both play and pause mode:
In play mode: The music plays normally until you touch the big jog wheel(27). While manipulating
the jog wheel(27), the scratch effect is audible. Once the jog wheel is stopped, the music
continues playing from the point where you stopped turning it.
In pause mode: the music is paused for as long as the jog wheel(27) isn’t moved. When you start
manipulating the jog wheel(27), the scratch effect is audible. Once the jog wheel is stopped, the
music stops playing and waits in pause mode.
NOTE: during scratch mode you can switch between play and pause mode by simply pressing the
PLAY/PAUSE button(8)
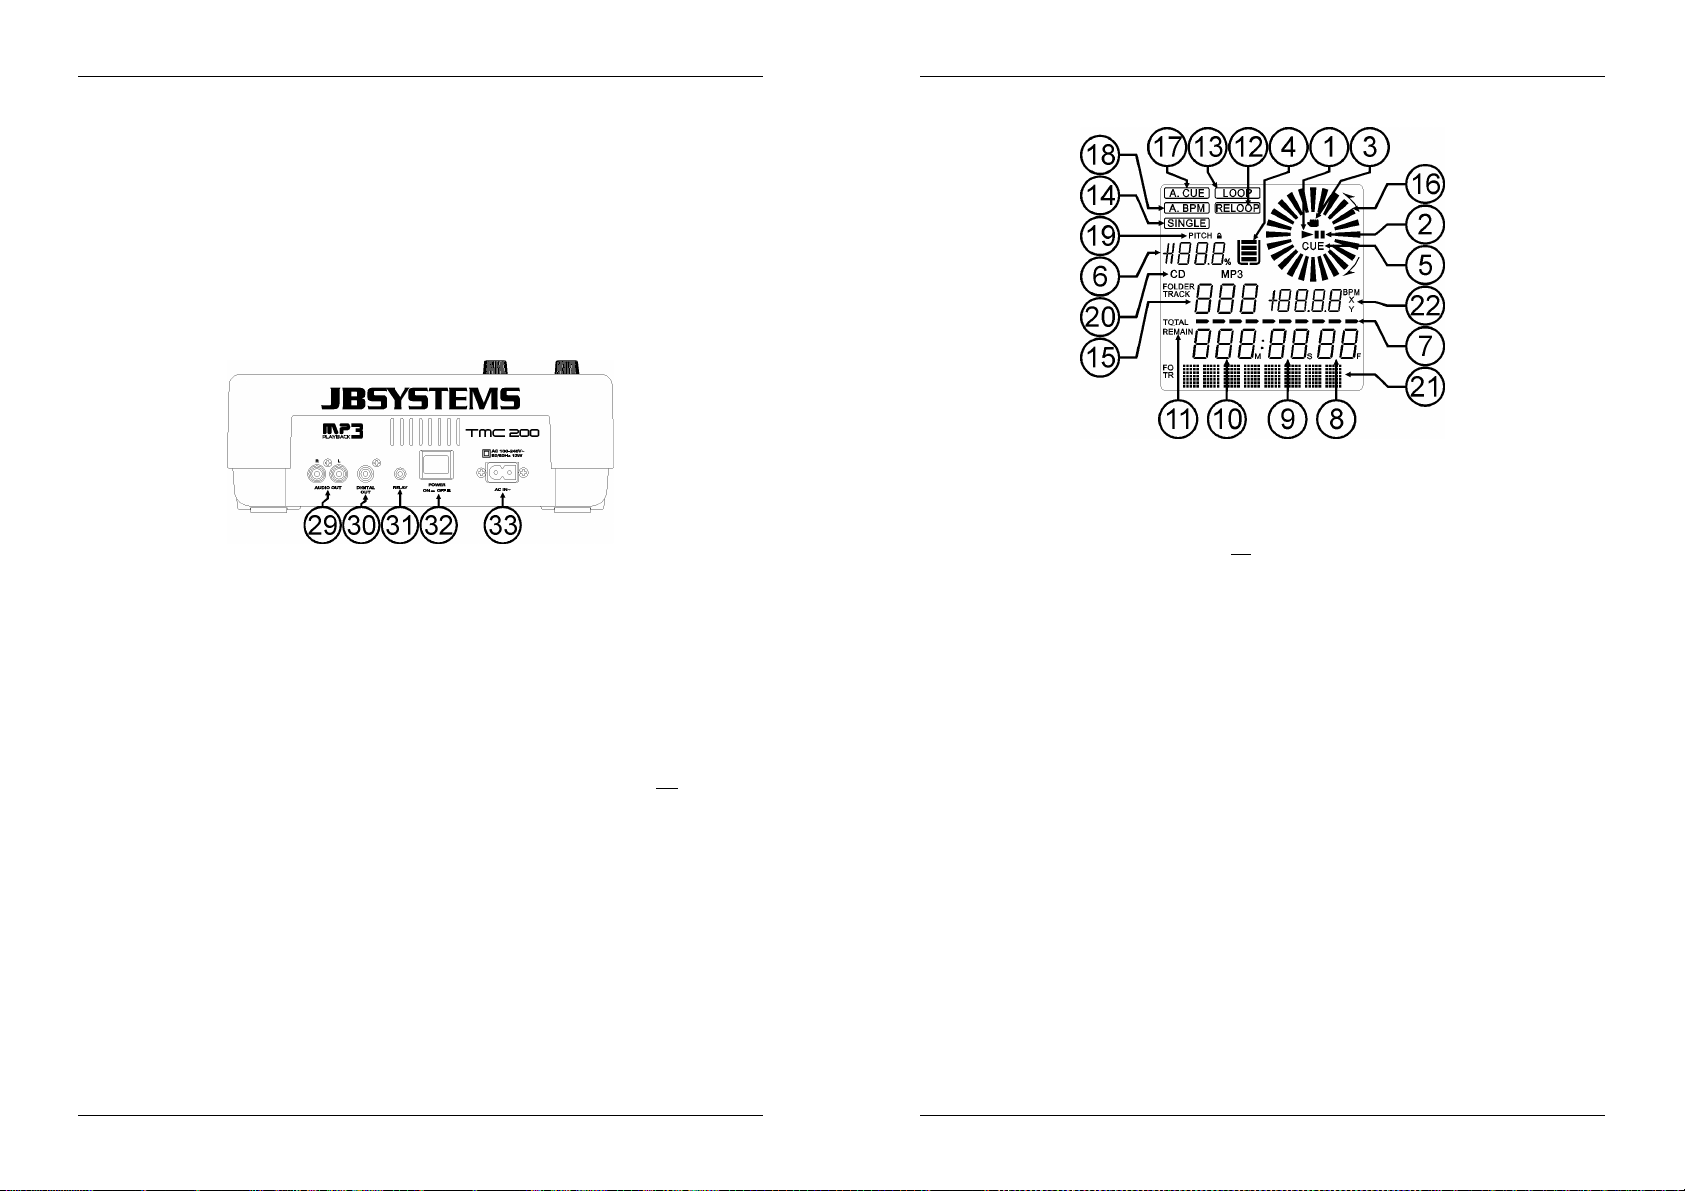
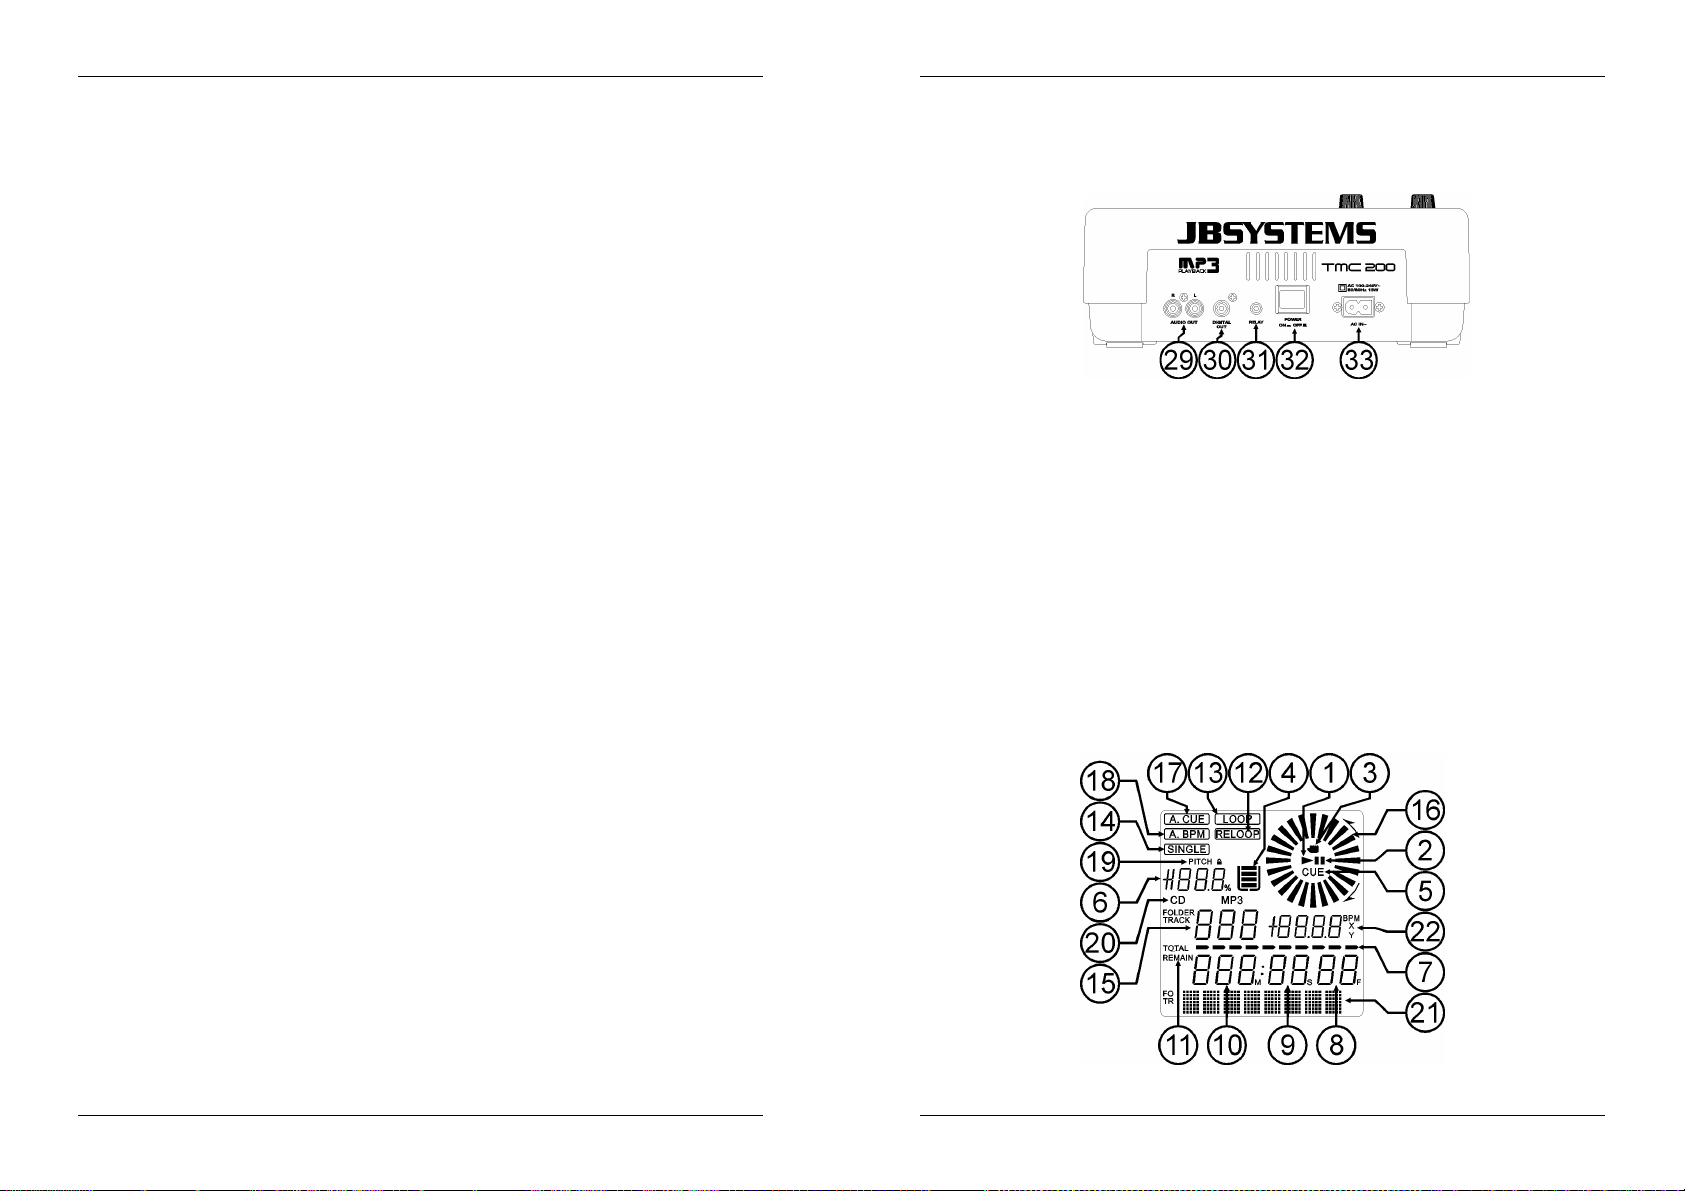
29. Audio output: Output for the audio signals from the CD-player. Use the supplied cinch/cinch cable to
connect this output to a CD/line input of your mixing unit.
30. Digital out socket: Use this connector to connect the digital signal (S/PDIF format) to the input of a
digital amplifier or digital recorder (ex. Mini disc)
31. RELAY Socket: you can use this connector in two ways: you can use it with the fader start option on
certain mixers or you can connect two TMC200 players together to obtain the relay play function.
Relay play: Use the supplied mono mini jack/jack cable to connect the RELAY sockets of two
TMC200 players together. Look further in this manual to learn how to perform the relay play
function.
Fader start: If you are using a mixer with fader start function, use the supplied mono mini
jack/jack cable to connect the player with the fader start of the mixer. Please note that this socket
must never be connected with any voltage.
Attention: This remote control is only compatible with certain (Synq® or Pioneer® compatible)
32. POWER ON/OFF switch: switches the TMC200 on and off.
33. MAINS INPUT: connect the CD player to the AC mains, using the supplied power-cord.
mixers. Mixers with remote starts functioning with a signal switched to ground will not work.
LCD DISPLAY
1. PLAY: appears while the unit is playing a CD.
2. PAUSE: appears while the player is in pause or cue mode.
3. TOUCH INDICATOR: appears when the touch sensitive part of the jog wheel is active.
4. ANTI SHOCK AND BUFFER INDICATOR: The memory status is represented on the display by a
bucket being filled up or emptied. The bucket itself represents that the instant start function is available.
If the bucket is flashing, the instant start is not available. Each segment within the bucket represents
about 2 seconds of anti shock protection.
5. CUE: appears when the master cue point is programmed.
6. PITCH DISPLAY: Shows the actual percentage of speed change, selected with the SPEED slider(20).
7. TIME BAR: shows either time remaining or elapsed depending on the setting of the TIME button(23).
Starts flashing at the end of each track to alert the user to take action.
8. FRAME: Shows “frame” time information of current track. (1 frame = 1/75thsec.)
9. SECOND: Shows “seconds” time information of current track.
10. MINUTE: Shows “minutes” time information of current track.
11. ELAPSED, TOTAL REMAIN: indicates that the time shown on the display is the track elapsed,
remaining or total remaining time.
12. RELOOP: appears when the loop is played. (repeating a particular area)
13. LOOP: shows when a loop is programmed. You can return to the loop with the reloop button(6).
14. SINGLE: appears when the unit is set to play just one track at a time. When it is not shown, the CD
plays continuously through all tracks. The function is controlled by the SGL/CTN button(24).
15. TRACK / FOLDER: Shows current track or folder number.
16. VISUAL MARKER: indicates the play position in frames: a full rotation equals 95 frames. The marker
moves clockwise in normal play mode and counter-clockwise when the track plays backwards. In pause
mode the marker stops moving.
17. AUTO CUE: The display shows “A.CUE” when the auto cue function is active.
18. AUTO BPM: This indicator is always on present to indicate that the automatic beat counter is working.
19. PITCH LOCK: when Master Tempo is active, the display shows a small “lock” to indicate that the pitch of
the music is locked.
20. CD/MP3: indicates if you have loaded a normal digital audio or MP3 CD.
21. ALPHANUMERIC DISPLAY: Shows the names of folders and MP3 tracks. For MP3 tracks recorded in
CBR also the bit rate is shown. For VBR recorded MP3 tracks the display only shows “VBR”. For Audio
CD’s CD-TEXT information will be shown when it’s available on the CD, otherwise the display shows “No
Text”.
22. BPM/PARAMETER: The automatic beat counter shows the number of Beats Per Minute on the display.
When the effects are activated, this part of the display shows the applied effect parameters.
JB SYSTEMS® 7/78 TMC200
JB SYSTEMS® 8/78 TMC200
Page 7

ENGLISH USER MANUAL
ENGLISH USER MANUAL
HOW TO USE …
Most of the common functions are explained in the previous chapter “controls and functions” In this chapter
we talk about the functions that need a little more explanation.
SOME GENERAL FUNCTIONS:
SLEEP MODE:
The CD player automatically shuts off the transport and laser after about 15 minutes (when in pause or
cue mode). This extends the life of your motor drive and laser. During sleep mode the display shows the
word “z Z ... SLEEP”. To wake up the player, just press the cue or play button, the display turns to normal
and is ready to receive instructions.
PITCH BENDING:
This function is used to synchronize the beats of two tracks. This can be done in two ways:
PITCH BEND buttons: The speed increases or decreases respectively as long as the PITCH
BEND+ or PITCH BEND- buttons are pressed.
JOG WHEEL: While the effects are not used in manual mode, the JOG WHEEL will temporarily
bend the pitch of the music by turning the JOG WHEEL clockwise to speed up or counterclockwise to
slowdown. The rotation speed the JOG WHEEL determines the percent of pitch bend.
CD-TEXT:
Not only MP3 files can show the track name on the display. Some normal audio CDs use CD-TEXT to
show the track names. Also some CDR burning software (ex. Nero) can add CD-TEXT to a normal audio
CD. When the TMC200 detects these CD-TEXT data, the display will show them automatically.
PLAYING/RECORDING CD-R and CD-RW:
Apart from normal audio CD’s the TMC200 can play both CD-R (CD recordable) and CD-RW (CD
rewriteable). Please note that you should always use the “disc at once” and “track at once” disc writing
options! Although the TMC200 is capable of reading CD-R and CD-RW recorded at higher speeds, we
suggest not using recording speeds more than x12 to increase readability. Always buy good quality brands
for CD-R and CD-RW!
If the disc is multi session, it will only play the first session:
if the first session is CD-DA you can only play CD-DA tracks.
if the first session is MP3 you can only play MP3 files.
PLAYING MP3 FILES:
The CD player automatically detects if a CD contains MP3 files. The TMC200 is able to read several
different MP3 formats. The display shows some of the ID3-tags (song title / performer / bitrate). The CD
may contain up to 999 MP3- files, spread over maximum 255 folders.
The MP3-files may have the following file extensions: .mp3 ~ .MP3 ~ .mP3 ~ .Mp3
Check the technical specifications to see which MP3-files are allowed.
FOLDER / TRACK SELECTORS:
Most of the time a CDR contains a lot of MP3 files (sometimes 150 or more). To keep things manageable
you can sort your MP3 files in different subfolders (directories). These folders can be named after the
names of the performers, after the music genres (techno, slows, salsa …), the BPM count (100BPM,
110BPM, 120BPM …) or any other idea you have to sort your music…
With the FOLDER / TRACK selectors you can easily browse through the different folders and tracks. You
can put the TMC200 in FOLDER mode and TRACK mode, also see FOLDER SELECTOR knob (3):
FOLDER MODE: use the FOLDER selector to select the desired folder. With the TRACK selector you
can select the desired MP3 tracks in this folder. Note that you can only select tracks inside the
selected folder. To go to another folder just use the FOLDER selector.
TRACK MODE: you will be able to browse all the tracks on your CD as if no subfolders were present.
To move quickly (by 10tracks) through the CD, press the TRACK selector while turning it
forward/backward.
RELAY FUNCTION:
First check if the special fader start cable connects the two TMC200 players.
Put a disc in both players.
Open the 2 channel faders of the corresponding CD inputs on your mixer.
Check if both players are in Single mode (the “single” indicator(14) on the display appears). If one of
the players is not in single mode, press its SGL/CNT button(24) of that player.
Begin playback on one of the two players.
Alternately a track will be played from both players. You can always put a new CD in the player that is
waiting in pause. In this way you can create an endless program, perfect for use in pubs etc.
Remove the relay cable if you don’t want to use the relay function anymore.
ABOUT LOOPS:
CREATE A LOOP:
While a track is playing, press IN/R.CUE button to program the starting point of the loop. Now press the
OUT button to program the endpoint of the loop. The seamless loop starts playing at once. (With some
practice you will be able to create perfect loops!) While the loop is playing, you can press the OUT button
again to exit the loop and continue the rest of the track.
It is possible to program a new loop, even when the current loop is still playing. While the loop is playing,
simply press the IN/R.CUE button to set the starting point of the new loop. Now enter the endpoint by
pressing the OUT button. Your new loop is programmed and playing.
RESTART A LOOP:
This can be done in 3 ways:
When a loop is programmed and you left it by pressing the OUT button, just press RELOOP to restart
the loop.
When a loop is programmed and you left it by pressing the OUT button, just press OUT again to restart
the loop. The point where you pressed OUT is now programmed as the new endpoint of the loop.
When the loop is still playing, press the RELOOP button to restart the loop immediately. You can
repeat this several times to create a “Stutter” effect.
EDIT A LOOP:
When a loop is programmed, press the RELOOP/STUTTER button for about 2 seconds to enter “loop edit”
mode. While the loop is seamlessly playing, the alphanumerical display shows the time information of the
loop endpoint. Use the big jog wheel to set the new loop endpoint. To make things very easy you can hear
your modifications to the loop endpoint continuously. When the loop is perfect, press the LOOP OUT
button to save the new loop endpoint and leave the loop.
NOTE: You can store loops under the HOT CUE buttons. This means that you have up to 4 loops per track
to play with. In the next paragraph you learn how to store these loops.
ABOUT EFFECTS:
In the description of the effects you can already find a lot of information, don’t forget to also check that part!
USE THE EFFECTS IN BEAT SYNCHRONIZED MODE:
While music is playing you can press any of the 3 effects and press the BPM-SYNC button (17) so it’s lit:
the effect works in beat synchronized mode. Use the EFFECT-SYNC buttons (15+16) to choose different
beat presets. Use the IMPACT-button (16) to adapt the impact of the effect.
USE THE EFFECTS IN MANUAL MODE:
While music is playing you can press any of the 3 effects and press the BPM-SYNC button (17) so it’s
dark: use the JOG WHEEL (27) to change the effect in real-time. Use the IMPACT-button (16) to adapt the
impact of the effect.
ABOUT MEMORY:
DIFFERENT MEMORIES:
Before we talk about using the memory, we have to know the difference between “track memory” and
“permanent memory”:
Track Memory: This is the memory where the TMC200 stores a set of up to four cue points and/or
loops for one track. You can set up a “track memory” for every single track on a CD.
Example: your CD contains 16 tracksfor every track you can store up to 4 cue points and/or loops.
This makes a total of 16 x 4 = 64 cue points and/or loops on one CD
Permanent Memory: This is the large memory where all the cue points and loops are permanently
stored. In fact it’s an indexed collection of “track memories”. When you recall previously stored cue
points of a certain track, you make a transfer from “permanent memory” to “track memory”.
JB SYSTEMS® 9/78 TMC200
JB SYSTEMS® 10/78 TMC200
Page 8

ENGLISH USER MANUAL
ENGLISH USER MANUAL
USING THE “TRACK MEMORY”:
STORING A MASTER CUE POINT:
There are 2 ways to set a master cue point:
Press the LOOP IN (4) button during normal playback to set the new cue point (“CUE on the fly”).
Put the player in pause and use the jog/shuttle wheel to search for the exact location for the cue point.
Once this location is found, press LOOP IN button (4) to set the new cue point. (or press PLAY/PAUSE
button)
Once the cue point is programmed, just press the CUE button (7) to recall it.
STORING A SIMPLE CUE POINT TO THE “HOT CUE” BUTTONS:
First press the MEMORY button(10) to make the unit enter hot cue memory mode (MEMORY button is lit).
Press one of the four HOT CUE buttons at the right moment during normal playback: the HOT CUE
button you just pressed turns to blue colour to indicate that the desired cue point is stored. (“Cue on
the fly”).
Put the player in pause and use the jog/shuttle wheel to search for the exact location for the cue point.
Once this location is found, press one of the four HOT CUE buttons to set the new cue point: the HOT
CUE button you just pressed turns to blue colour to indicate that the desired cue point is stored.
Once the cue point is programmed, just press the HOT CUE button to start playback from the stored cue
point.
STORING A LOOP TO THE “HOT CUE” BUTTONS:
This is very similar to storing a simple cue point. The only difference is that you have to put the TMC200 in
loop mode first. When the loop is playing, you press the MEMORY button to make the CD-player enter hot
cue memory mode (MEMORY button is lit). After this press one of the four HOT CUE buttons: the HOT
CUE button you just pressed turns to white colour to indicate that the loop, playing at that moment, is
stored. You can store up to 4 loops!
DELETE THE “HOT CUE” BUTTONS:
You can easily delete the contents of a HOT CUE button by pressing the DELETE CUE button (11),
followed by the HOT CUE button you want to delete. Or simply store a new cue point or loop to this HOT
CUE button. You can also erase all four HOT CUE buttons together by pushing the DELETE CUE button
(11) for more than 2 seconds. You will notice that all 4 HOT CUE buttons turn dark to indicate that the
HOT CUE buttons are empty.
USING THE “PERMANENT MEMORY”:
For security reasons the cue points and loops stored in the HOT CUE buttons are not automatically stored
to the permanent memory. This means that if you recall a set of cue points and loops from permanent
memory to the HOT CUE buttons (which is track memory), you can change, edit and delete them as much
as you want. The permanent memory will not be affected until you make a backup of the HOT CUE
buttons to permanent memory.
STORING TO “PERMANENT MEMORY”:
Press the MEMORY button (10) for 2seconds. The display shows “Saving” to indicate that the cue points
and loops in the HOT CUE buttons for that track are stored to permanent memory.
DELETE A TRACK IN “PERMANENT MEMORY”:
Select the track that you want to delete and load the hot cues. Press the “DELETE CUE” and “MEMORY”
buttons together until the display asks “DEL ALL?”. If you press the YES button (PITCH BEND+ button),
the track information will be deleted in the permanent memory.
RECALLING “HOT CUE POINTS/LOOPS” FROM PERMANENT MEMORY:
Because it takes some seconds to load the permanent cue points, they are not automatically restored.
Sometimes you simply don’t need them so why would you wait for them? Below we explain how
everything works:
No cue points stored: When you select a track that has no cue points or loops stored in permanent
memory, nothing happens: you can start playback right away.
Cue points stored: When you select a track where cue points or loops are stored in permanent
memory, the TMC200 shows “Load Cues?” and wants to know if you want to load the cue points. This
is what you can do:
You press the YES button: Press yes (pitch bend + button) to load the pre-stored cue points
and loops. The display shows RECALL while the Hot cue buttons are filled up.
You press the NO button: the cue points are not loaded and the display becomes normal.
You can start playback right away.
You do nothing: after some seconds the display becomes automatically normal and of
course the cue points are not loaded.
DELETE THE ENTIRE PERMANENT CUE MEMORY:
Keep both the DELETE CUE-button (11) and MEMORY-button (10) pressed while switching the TMC200
on: the permanent cue memory is cleared. During this action the display shows “clearALL”.
CAUTION: THIS ACTION IS IRREVERSIBLE; ALL CUE POINTS/LOOPS WILL BE DELETED!!!
FIRMWARE UPDATES
To increase flexibility TMC200 can be upgraded at any moment, to add new functions or repair bugs if
they would exist. We suggest you check our website (www.jbsystems.be) from time to time to see if any
firmware update is available for download.
Checking the actual firmware version(s)
Keep the SGL/CTN-button (24) pressed while you turn the player on: the currently installed firmware
versions are shown on the display. The firmware contains different parts: Control + DSP + Servo, each
with their own version number.
Upgrading instructions
Since upgrading instructions may change, please check the file “TMC200 – upgrade instructions.txt”
included with each update.
SPECIFICATIONS
Power Supply: AC 100-240V, 50/60Hz
Power Consumption: 13W
Output level: 2,0V +/0.5dB @ 1kHz, 0dB
Frequency response: 17-20.000Hz (+/-0,4dB)
THD + noise (20kHz LPF): 0,006% @ 1kHz, 0dB
S/N Ratio (IHF-A): >130dB @ 1kHz, 0dB
Short access time (next track): <2sec
Long access time (track 1 20): <4sec
Laser Pickup: Sanyo 3spot detection 780nm
Electronic tracking: Full automatic digital tracking.
DISC FORMAT:
Possible file extensions: .mp3 ~ .MP3 ~ .mP3 ~ .Mp3
ID3 tag compatibility: ID3v2 and earlier
ISO9660: Level1 (max. 8”/8.3” character style)
Level2 (max. 31/30 character style)
Joliet: max. 63/63 character style
CD-ROM sector format: mode-1 only
Max. Folders: 255
Max. Files: 999 (max. 255 per folder)
MP3 FORMATS:
MPEG1 Layer3 (ISO/IEC11172-3): mono / stereo sampled at: 32 - 44,1 - 48kHz
Bitrates: 32 – 320 Kbps
Bitrate modes: CBR (Constant Bitrate) or VBR (Variable Bitrate)
MPEG2 Layer3 (ISO/IEC13818-3): mono / stereo sampled at: 16 – 22,05 - 24kHz
Bitrates: 32 – 160 Kbps
Bitrate modes: CBR (Constant Bitrate) or VBR (Variable Bitrate)
MPEG2,5 Layer3: mono / stereo sampled at: 8 – 11,025 - 12kHz
Bitrates: 32 – 160 Kbps
Bitrate modes: CBR (Constant Bitrate) or VBR (Variable Bitrate)
Dimensions: 246(W) x 103,5(H) x 348(D) mm
Weight: 2,66 kg
Every information is subject to change without prior notice
You can download the latest version of this user manual on our website: www.beglec.com
JB SYSTEMS® 11/78 TMC200
JB SYSTEMS® 12/78 TMC200
Page 9
FRANCAIS MODE D’EMPLOI
MODE D’EMPLOI
Nous vous remercions d’avoir acheté ce produit JB Systems®. Veuillez lire ce mode d’emploi très
attentivement afin de pouvoir exploiter toutes les possibilités de cet appareil.
EN VOUS INSCRIVANT POUR LA LETTRE D’INFORMATION VOUS SEREZ TOUJOURS
TENU AU COURANT DES DERNIÈRES NOUVELLES CONCERNANT NOS PRODUITS:
NOUVEAUTÉS, ACTIONS SPÉCIALES, JOURNÉES PORTES OUVERTES, ETC.
SURFEZ SUR: WWW.BEGLEC.COM
CARACTÉRISTIQUES
Compatibilité MP3 intégrale (max. 999 fichiers MP3 / 255 dossiers par CD)
MPEG1 layer3 (32 + 44,1 + 48kHz)
MPEG2 layer3 (16 + 22,05 + 24kHz)
MPEG2.5 layer3 (8 + 11,025 + 12kHz)
Supporte les modes de taux de transfert CBR (constant) et VBR (variable).
Effet de scratch digital à l’aide de la molette sensible au toucher
Effet de frein + 3 effets digitaux:
Echo, flanger, filter
Contrôle manuel des paramètres
Mode de synchronisation au rythme de la musique
Écran LCD alphanumérique (CD-TEXT et ID3v2 tags: affiche le titre, l’artiste, bitrate, …)
Les touches Hot Cue savent contenir jusqu’à 4 points cue ou boucles par morceau!
La mémoire permanente peut contenir jusqu’à 2000 points cue et boucles
Fonction d’édition de boucle parfaite en temps réel!
Compteur BPM entièrement automatique
Verrouillage du Pitch (Master Tempo)
Portée variation Pitch: +/-4% +/-8% +/-16% +/-100% (jusqu’à +/-16% en MP3)
Pitch bend : changement temporaire de la vitesse à l’aide de touches et de la roue Jog Wheel pour des
mixages parfaits
Jusqu’à 4 boucles sans fin pour chaque plage avec reloop/stutter
Programmation des points CUE en temps réel (“Cue volant”)
Démarrage Memory Start ultrarapide en moins de 10msec
Fader start, fader stop (back cue)
Fonction Auto Cue (-48dB)
4 vitesses de recherche
Ecran Alphanumérique LCD (noms MP3 + CD-TEXT)
Choix entre l’affichage du temps écoulé, du temps restant de la plage ou du temps restant du disque
entier
Jog W heel équipé d’une surface en caoutchouc spécial
Lecture d’une seule plage où continue du CD
Fonction Relay offrant la possibilité d’une lecture alternée automatique en utilisant deux lecteurs CD
Sortie S/PDIF digital audio RCA coaxiale
Transport Protection de 60 secondes
Fonction Sleep (prolonge la durée de vie du laser)
AVANT L’UTILISATION
Vérifiez si les pièces suivantes sont incluses dans l’emballage de votre appareil :
Lecteur TMC200
Mode d’emploi
Câble d’alimentation
Un câble aux raccords cinch
Un câble de démarrage « fader start » (mono mini-jack/mini-jack)
FRANCAIS MODE D’EMPLOI
INSTRUCTIONS DE SECURITE:
ATTENTION:afin de réduire le risque d’électrocution,
CAUTION
La flèche dans un triangle met l'utilisateur en garde contre la présence de haute tension sans
isolation dans l'appareil, ce qui peut causer un risque d'électrocution.
Un point d'exclamation dans un triangle prévient de la présence d'instructions relatives au
fonctionnement et à la maintenance se trouvant dans le manuel fourni avec l'appareil.
Ce symbole signifie: uniquement pour usage à l'intérieur.
Ce symbole signifie : Lire le mode d’emploi.
Ce symbole signifie: appareil construit selon les normes de sécurité classe II
Afin d’éviter tout risque d’incendie ou de choc électrique, ne pas exposer cet appareil à la pluie ou
l’humidité.
Pour éviter la formation de condensation à l’intérieur de l’appareil, patientez quelques minutes pour laisser
l’appareil s’adapter à la température ambiante lorsqu’il arrive dans une pièce chauffée après le transport.
La condensation empêche l’unité de fonctionner en performance optimale et peut même causer des
dommages.
Cette unité est destinée à une utilisation à l’intérieur uniquement.
Ne pas insérer d’objet métallique ou verser un liquide dans l’appareil. Aucun objet rempli de liquides, tels
que des vases, ne peut être placé sur cet appareil. Risque de choc électrique ou de dysfonctionnement. Si
un corps étranger est introduit dans l’unité, déconnectez immédiatement de la source d’alimentation.
Aucune source de flamme nue, telle que les bougies allumées, ne peut être placée sur l'appareil.
Ne pas couvrir les ouvertures de ventilation, un risque de surchauffe en résulterait.
Ne pas utiliser dans un environnement poussiéreux et nettoyez l’unité régulièrement.
Ne pas laisser l’unité à portée des enfants.
Les personnes non expérimentées ne doivent pas utiliser cet appareil.
La température ambiante maximum d’utilisation de l’appareil est de 40°C. Ne pas l’utiliser au-delà de cette
température.
Débranchez toujours l’appareil si vous ne l’utilisez pas de manière prolongée ou avant d’entreprendre des
réparations.
Les installations électriques ne peuvent être faites que par du personnel qualifié et conformément aux
régulations de sécurité électrique et mécanique en vigueur dans votre pays.
Assurez-vous que la tension d’alimentation de la source d’alimentation de la zone dans laquelle vous vous
trouvez ne dépasse pas celui indiqué à l’arrière de l’appareil.
La prise sera toujours accessible pour que le cordon secteur puisse être enlevé à chaque moment.
Le cordon d’alimentation doit toujours être en condition parfaite. Mettez immédiatement l’unité hors tension
si le cordon est écrasé ou endommagé.
Ne laissez jamais le cordon d’alimentation entrer en contact avec d’autres câbles !
Quand l’interrupteur principal est dans la position OFF, cet appareil n'est pas complètement isolé du
courant 230V!
Utilisez toujours les câbles appropriés et certifiés lorsque vous installez l’unité.
Pour éviter tout choc électrique, ne pas ouvrir l’appareil. En dehors du fusible principal, il n’y a pas de
pièces pouvant être changées par l’utilisateur à l’intérieur.
Ne jamais réparer ou court-circuiter un fusible. Remplacez systématiquement un fusible endommagé par
un fusible et de mêmes type et spécifications électriques !
En cas de problèmes de fonctionnement sérieux, arrêtez toute utilisation de l’appareil et contactez votre
revendeur immédiatement.
Utilisez l’emballage d’origine si l’appareil doit être transporté.
Pour des raisons de sécurité, il est interdit d’apporter toute modification à l’unité non spécifiquement
autorisée par les parties responsables.
n’enlevez jamais le couvercle de l’appareil. Il n’y a aucune
pièce à l’intérieur de l’appareil que vous puissiez
remplacer vous-même. Confiez l’entretien uniquement à
des techniciens qualifiés.
JB SYSTEMS® 13/78 TMC200
JB SYSTEMS® 14/78 TMC200
Page 10
FRANCAIS MODE D’EMPLOI
FRANCAIS MODE D’EMPLOI
CONSEILS D'INSTALLATION:
Installer l'appareil dans un lieu bien aéré, à l'abri de l'humidité et des fortes températures.
Placer et utiliser l'appareil à proximité de sources de chaleur telles que spots, amplis,… pourrait affecter
ses performances et même endommager l'appareil.
En cas d'installation dans un 'flight case', assurer une bonne ventilation afin d'évacuer la chaleur produite
par l'appareil.
Pour éviter la condensation à l'intérieur, laisser l'appareil s'adapter à la nouvelle température ambiante
après le transport. La condensation peut altérer les performances de l'appareil.
NETTOYAGE DU LECTEUR CD:
Nettoyez l’appareil à l’aide d’un chiffon doux, légèrement humide. Evitez d’introduire de l’eau à l’intérieur de
l’appareil. N’utilisez pas de produits volatiles tels le benzène ou le thinner qui peuvent endommager
l’appareil.
CONNECTIONS
Utilisez le câble cinch pour relier la sortie audio du lecteur CD à l’entrée CD de votre table de mixage.
Connectez également le câble “fader start” si votre table de mixage possède des connecteurs « fader
start ». (compatible Synq® SMX-1 ou Pioneer®)
Connectez le câble d’alimentation.
CONTRÔLES ET FONCTIONS
1. Touches SEARCH: Ces touches possèdent 4 positions de vitesse avant et 4 positions de vitesse
arrière pour rechercher des passages sur votre CD. Au plus longtemps que vous appuyez sur la touche,
au plus vite vous parcourez les morceaux.
2. Bouton TRACK SEARCH: plusieurs fonctions sont disponibles :
Recherche normale: tournez le bouton pour parcourir les morceaux par pas de +1/-1 morceau.
Recherche rapide: tenez le bouton enfoncé pendant que vous tournez pour parcourir les
morceaux par pas de +10/-10 morceaux.
Redémarrer l’affichage: appuyez brièvement sur le bouton pour que les informations soient à
3. Bouton FOLDER SELECTOR: plusieurs fonctions sont disponibles :
4. Touche IN/R.CUE: Vous permet de définir le point CUE sans arrêter la lecture (CUE VOLANT). Cette
5. Touche OUT: est utilisée pour déterminer la fin de la boucle pendant la création de « loops ». Le lecteur
6. Touche RELOOP/STUTTER: Cette touche a 3 fonctions:
7. Touche CUE: Si vous appuyez sur la touche CUE pendant la lecture vous obtiendrez un retour
8. Touche PLAY/PAUSE: chaque fois que vous appuyez sur la touche PLAY/PAUSE le lecteur CD
nouveau affichées à partir du début. (redémarrer le déroulement)
Folder search: si votre CD contient des sous-dossiers MP3, vous pouvez les sélectionner en
tournant ce sélecteur de dossiers. Le cadran affiche le numéro + le nom du dossier. Voyez le
chapitre suivant pour plus d’informations concernant l’utilisation des sous-dossiers. Quand le CD
ne contient pas de sous-dossiers, ce sélecteur ne sera pas utilisé.
Show folder name: Le nom du dossier est affiché instantanément quand vous appuyez
brièvement sur le sélecteur de dossiers.
Sélectionner le mode FOLDER / TRACK: appuyez pendant 1 seconde sur le bouton: l’écran
commence à alterner “FOLDERmd” et “TRACKmd”. Relâchez le bouton quand le mode que vous
désirez est affiché.
FOLDER MODE: vous pouvez uniquement sélectionner des fichiers qui se trouvent à l’intérieur
du dossier sélectionné. Utilisez le sélecteur FOLDER pour aller vers un autre dossier.
TRACK MODE: vous pourrez parcourir toutes les plages (fichiers) de votre CD comme si il n’y
avait pas de sous-dossiers. Pour avancer rapidement (par 10 plages), appuyez sur le sélecteur
TRACK pendant que vous le tournez vers l’avant/vers l’arrière.
touche définit également le début d’une boucle sans fin (seamless loop) Si vous utilisez une des
touches hot CUE (19), le point de départ sera également copié vers cette touche.
CD reproduira la boucle sans fin jusqu'à-ce que vous appuyez a nouveau sur cette touche pour sortir de
la boucle et continuer la lecture normale. Quand une boucle est programmée mais pas activé vous
pouvez également redémarrer la boucle avec cette touche. L’endroit où vous appuyez sur la touche
pendant la lecture sera mémorisé comme nouveau point de sortie de la boucle. Quand le lecteur est en
“loop edit mode” (édition de boucle) et que vous appuyez sur cette touche, l’édition de la boucle s’arrête
et le point de fin de boucle actuel est mis en mémoire.
RELOOP: quand une boucle à été programmée et que vous avez appuyé sur la touche OUT (4),
appuyez sur la touche reloop pour réactiver la boucle. Pour sortir de la boucle appuyez sur la
touche OUT (4). (les points de départ et de sortie de la boucle restent inchangés)
STUTTER: Quand une boucle est activée (en lecture) vous pouvez appuyer sur cette touche pour
redémarrer instantanément la boucle à partir de son point de départ. Vous pouvez également
appuyer sur cette touche quand une plage n’est pas reproduite en boucle. Chaque fois que vous
appuyez sur la touche RELOOP/STUTTER, vous redémarrez la musique à partir de son point de
départ programmé.
L’effet “stutter” (bégaiement) vous permet d’ajouter une touche de créativité supplémentaire à votre
prestation.
LOOP EDIT: quand une boucle est programmée, appuyez sur la touche RELOOP/STUTTER
pendant environ 2 secondes pour activer la fonction “édition de boucle”. Maintenant vous pouvez
modifier le point de fin de boucle. Voir chapitre “Utilisation…” pour plus d’informations.
immédiat vers la position de départ de la lecture initiale. La lecture démarre immédiatement à partir du
point de départ programmé (CUE point) et continuera tant que vous tenez cette touche enfoncée. Le
lecteur CD retourne à nouveau au point de départ « CUE point » dès que vous relâchez la touche CUE.
Si le lecteur est en mode pause (le LED Play/Pause clignote) la roue de recherche ou la roue “jog
wheel” peuvent être utilisées pour définir un nouveau point de départ. En appuyant sur la touche
"PLAY/PAUSE" puis sur la touche "CUE", vous pouvez confirmer ce nouveau point de départ. Le LED
CUE s’allumera aussi longtemps que la touche CUE sera tenue enfoncée, jusqu’à ce que le CD soit
retourné à sa position de départ.
passera du mode lecture au mode pause ou du mode pause au mode lecture. La touche clignote aussi
longtemps que le lecteur CD est en mode pause.
JB SYSTEMS® 15/78 TMC200
JB SYSTEMS® 16/78 TMC200
Page 11

FRANCAIS MODE D’EMPLOI
FRANCAIS MODE D’EMPLOI
9. Touches HOT CUE : il s'agit de quatre touches programmables qui peuvent enregistrer des points de
cue ordinaires et/ou des boucles. Lorsqu'un point de cue ordinaire est enregistré, la touche
correspondante est bleue, et quand une boucle est enregistrée, la touche correspondante est blanche.
Tous les points de cue et les boucles enregistrés peuvent être stockés dans la mémoire permanente
pour une utilisation future. Prière de se reporter au chapitre 'UTILISATION' pour de plus amples
informations concernant la programmation des points de cue, etc
10. Touche MEMORY: est utilisée pour enregistrer des points cue et des boucles (Loops) dans les touches
Hot Cue (19) ainsi que dans la mémoire permanente:
Enregistrer dans les touches HOT CUE: Appuyez brièvement sur la touche MEMORY pour
préparer le TMC200 à l’enregistrement d’un point cue ou d’une boucle dans une des 4 touches
HOT CUE.
Enregistrement dans la mémoire permanente: Appuyez sur la touche MEMORY jusqu’à ce que
elle commence à clignoter et que l’écran LCD affiche “SAVING”. Le contenu des touches HOT
CUE pour ce morceau est enregistré dans la mémoire permanente.
Important: pas seulement les touches HOT CUE sont stockés dans la mémoire permanente,
plein d’autres paramètres sont également sauvegardés pour que vous n’ayez pas as refaire les
réglages, chaque fois que vous rallumez l’appareil. A part les touches hot cue, les paramètres
suivants seront également sauvegardés: pitch range, single/cont mode, time display, jog wheel
setting, auto cue, auto BPM mode, pitch on/off, pitch lock on/off et start/stop.
11. Touche DELETE CUE (supprimer un point de cue) : Ce bouton possède plusieurs fonctions :
DELETE 1 HOT CUE (supprimer 1 point de hot cue) : appuyez sur la touche DELETE CUE, puis
appuyez ensuite sur la touche HOT CUE que vous voulez supprimer de la mémoire de piste. Le
bouton concerné va s'éteindre.
DELETE 4 HOT CUE (supprimer 4 points de hot cue) : appuyez sur la touche DELETE CUE
pendant environ 2 secondes afin de supprimer tous les hot cues de la mémoire de piste.
DELETE TRACK (supprimer la piste) : appuyez en même temps sur la touche DELETE CUE et la
touche MEMORY (10) pendant environ 2 secondes afin de supprimer les hot cue présents sur la
piste et enregistrés dans la mémoire permanente. Etant donné qu'il n'est pas possible de revenir en
arrière, l'écran vous demande d'abord si vous êtes sûr de vous : en recourant aux touches de PITCH
BEND (21), vous pouvez choisir entre YES et NO.
Pour de plus amples informations, prière de se reporter au chapitre 'UTILISATION'.
12. Touche OPEN/CLOSE: appuyez sur cette touche pour ouvrir et fermer le chargeur CD qui se trouve à
l’avant du TMC200. Cette touche ne fonctionne pas durant la lecture d’un CD. Si le tiroir n’est pas
refermé après 60sec. il se refermera automatiquement afin d’éviter qu’il soit endommagé
accidentellement.
13. CD TRAY INDICATOR: est allumé quand un CD est chargé.
14. Touches EFFECT: chacune de ces touches possède ses propres paramètres comme décrit ci-dessous:
Touche ECHO EFFECT : appuyez sur cette touche pour activer l'effet d'écho. Suivant le statut du
mode SYNC (manuel ou synchronisé au rythme), différents réglages sont possibles:
Mode manuel : la touche BPM-SYNC (17) reste éteinte. Vous pouvez régler tous les paramètres
manuellement en utilisant les contrôles suivants:
Molette (27): à utiliser pour régler le temps d'écho entre 1 ms et 2000 ms.
Touche IMPACT (16): tant que la touche IMPACT reste allumée, on peut utiliser la molette
(27) pour changer la balance (entre son non traité et son traité) de l'effet.
Mode synchronisé au rythme: la touche BPM-SYNC (17) est allumée. Vous pouvez utiliser les
contrôles suivants:
Touches EFFECT SYNC (15+16): choisissez une des présélections d'écho synchronisé au
rythme.
Touche IMPACT (16): tant que la touche IMPACT reste allumée, on peut utiliser la molette
(27) pour changer la balance (entre son non traité et son traité) de l'effet.
Touche FLANGER EFFECT : appuyez sur cette touche pour activer l'effet de flanger. Suivant le
statut du mode SYNC (manuel ou synchronisé au rythme), différents réglages sont possibles:
Mode manuel: la touche BPM-SYNC (17) est éteinte. Vous pouvez régler tous les paramètres
manuellement en utilisant les contrôles suivants:
Molette (27): à utiliser pour modifier l'effet manuellement.
Touche IMPACT (16): tant que la touche IMPACT reste allumée, on peut utiliser la molette
(27) pour changer la balance (entre son non traité et son traité) de l'effet.
Mode synchronisé au rythme: la touche BPM-SYNC (17) est allumée. Vous pouvez utiliser les
contrôles suivants:
Touches EFFECT SYNC (15+16): choisissez une des présélections de balayage synchronisé
au rythme.
Touche IMPACT (16): tant que la touche IMPACT reste allumée, on peut utiliser la molette
(27) pour changer la balance (entre son non traité et son traité) de l'effet.
Touche FILTER EFFECT: appuyez sur cette touche pour activer l'effet de filtre. Suivant le statut du
mode SYNC (manuel ou synchronisé au rythme), différents réglages sont possibles:
Mode manuel: la touche BPM-SYNC (17) reste éteinte. Vous pouvez régler tous les paramètres
manuellement en utilisant les contrôles suivants:
Molette (27): à utiliser pour modifier manuellement la fréquence de coupure du filtre.
Touche IMPACT (16): tant que la touche IMPACT reste allumée, on peut utiliser la molette
(27) pour changer la profondeur (facteur Q) de l'effet de filtre.
Mode synchronisé au rythme : la touche BPM-SYNC (17) est allumée. Vous pouvez utiliser les
contrôles suivants:
Touches EFFECT SYNC (15+16): choisissez une des présélections de balayage synchronisé
au rythme.
Touche IMPACT (16): tant que la touche IMPACT reste allumée, on peut utiliser la molette
(27) pour changer la profondeur (facteur Q) de l'effet de filtre.
Touché BRAKE: appuyez sur cette touché pour active l’effet de frein. Vous pouvez dès à présent
déterminer la vitesse d’accélération / décélération de la musique quand vous activez la touche
PLAY/PAUSE (8). Vous pouvez régler les paramètres à l’aide des touches (15+16), voir ci-dessous.
15. Touche EFFECT SYNC/START: cette touche possède plusieurs fonctions, dépendant de l’effet choisi:
Effets synchronisés: La touche est allumée quand un effet, synchronisé au rythme de la
musique, est utilisé. Vous pouvez maintenant choisir comment vous voulez que l’effet soit
synchronisé au rythme de la musique. Utilisez cette touché pour diviser le tempo par 2.
Effet BRAKE: appuyez sur cette touché pour modifier le temps d’accélération (temps nécessaire
pour passer de l’arrêt à la vitesse maximale). Quand la touche est allumée, vous pouvez utiliser
la molette JOG (27) pour modifier la durée de 0,0s (démarrage instantané) à 10s. (démarrage
16. Touche EFFECT SYNC/STOP/IMPACT: cette touche possède plusieurs fonctions, dépendant de l’effet
17. Touche BPM-SYNC: appuyez sur cette touche pour traiter les effets soit en mode manuel, soit en mode
18. Touche PITCH RANGE: Chaque fois que vous appuyez sur cette touche, vous changerez l’échelle du
19. Touche SPEED: Cette touche est utilisée pour activer ou désactiver la fonction de réglage de vitesse.
20. Curseur SPEED: Appuyez sur la touche SPEED (19), pour l’allumer. La vitesse de lecture peut être
21. Touches PITCH BEND: La vitesse augmente si vous appuyez sur la touche “+” et retourne à sa vitesse
22. Touche PITCH LOCK: (Master tempo) active la fonction Pitch Lock. Cette fonction vous permet de faire
très lent)
choisi:
Effets synchronisés: La touche est allumée quand un effet, synchronisé au rythme de la
musique, est utilisé. Vous pouvez maintenant choisir comment vous voulez que l’effet soit
synchronisé au rythme de la musique. Utilisez cette touche pour doubler le tempo.
Effet BRAKE: appuyez sur cette touché pour modifier la durée de décélération (temps
nécessaire pour passer de la vitesse maximale à l’arrêt). Quand la touche est allumée, vous
pouvez utiliser la molette JOG (27 pour modifier la durée de 0,0s (arrêt instantané) à 10s. (temps
d’arrêt très long)
Paramètre d’IMPACT: quand un des 3 effets DSP est activé, vous pouvez appuyer sur la touché
jusqu’à ce qu’elle commence à clignoter. Vous pouvez maintenant régler l’impact de l’effet
sélectionné. Voir également la description des touches EFFECT (14).
synchronisé au rythme ! Pour de plus amples informations, prière de se reporter au point (14).
curseur de vitesse (20). Pour les CD’s audio normaux vous pouvez sélectionner +/-4%, +/-8%, +/-16%
et +/-100%. L’option +/-100% n’est pas disponible pour les CD’s en MP3.
modifiée jusqu’à +/-100% en bougeant le curseur. La vitesse ne changera pas si la touche SPEED (19)
est désactivée (éteint). Vous pouvez changer la portée du changement de vitesse avec la touche PITCH
RANGE (18).
initiale dès que vous la relâchez. La vitesse de lecture diminue si vous appuyez sur la touche “– ” et
retourne à sa vitesse initiale dès que vous la relâchez. Ces touches peuvent être utilisées pour
synchroniser le tempo des 2 lecteurs. Elles sont aussi utilisées pour confirmer (ou non) les questions qui
sont parfois affichées à l’écran.
des réglages de vitesse de lecture en utilisant Pitch Control(15) sans en altérer le ton. Cette touche
devient bleue quand la fonction Pitch Lock est activée.
REMARQUE: Sachez que la fonction pitch lock à ses limites. A partir d’un certain niveau de
changement de vitesse (dépendant du style de musique) le pitch lock ne pourra plus garder la même
JB SYSTEMS® 17/78 TMC200
JB SYSTEMS® 18/78 TMC200
Page 12
FRANCAIS MODE D’EMPLOI
FRANCAIS MODE D’EMPLOI
tonalité. Vous entendrez d’abord une petite distorsion qui deviendra plus importante selon que vous
augmentez encore le changement de vitesse. Ceci n’est pas toujours un inconvénient : à de très basses
vitesses vous pouvez également l’utiliser comme un effet spécial de distorsion !
23. Touche TIME: La touche TIME vous permet de choisir entre l’affichage du temps de lecture écoulé
(elapsed), le temps restant d’une plage (remaining/track) et le temps total restant du disque (total
remaining) (standard = remaining /track). Le “temps de lecture total restant” n’est pas disponible pour
les CD’s en MP3.
24. SGL/CTN: Vous pouvez choisir entre “single track mode” et “continuous play”. Vous pouvez également
allumer ou éteindre la fonction auto cue (-48dB).
Continuous play: Le CD complet sera reproduit sans interruption. (le plus souvent utilisé dans les
tavernes)
Single track: La lecture s’arrête à la fin de la plage et attends au début de la plage suivante. Le
lecteur attendra à la première note musicale de la plage. Ce qui veut dire que les CD’s mal indexés
ne poseront pas de problèmes aux capacités de démarrage instantané de ce lecteur CD. Ceci est
une caractéristique très utile pour les deejays!
Auto Cue allumé/éteint: Le TMC200 détecte automatiquement la première “note de musique” de
chaque plage afin d’assurer le démarrage instantané de la musique dès que vous appuyez sur la
touche play. Pour couper/allumer cette fonction Auto Cue il suffit d’appuyer sur la touche SGL/CTN
pendant environ 2 secondes. Le cadran affiche “A.CUE” quand la fonction est activée.
25. Touche BPM-TAP: Ce lecteur possède un compteur automatique de BPM. Dans quelques rares cas il
se pourrait que le compteur automatique n’arrive pas à calculer le tempo comme il devrait le faire
(tempo irrégulier ou simplement pas de battement à détecter). Dans ces cas vous pouvez aider le
compteur de tempo en tapant manuellement sur cette touche au rythme de la musique. Vous pouvez
retourner au compteur de tempo automatique en appuyant sur la touche TAP jusqu’à ce que
“AUTOBPM” s’allume dans le coin supérieur gauche de l’écran.
26. Touche ID3-TAGS: pour vous faciliter la tâche, la plupart de fichiers MP3 contiennent des informations
sous forme de tags ID3 qui vous donnent des informations du morceau sélectionné. Le TMC200 peut
afficher certaines de ces informations sur l’écran:
Information “Song title”: par défaut, l’écran affiche le titre du morceau.
Information “Artist”: appuyez 1 fois sur la touche ID3-TAGS pour afficher le nom de l’artiste,
l’écran retourne automatiquement à l’affichage par défaut.
Information “Bit-rate”: appuyez 2 fois sur la touche ID3-TAGS pour afficher le débit “bit-rate”
(qualité d’enregistrement) du morceau, l’écran retourne automatiquement à l’affichage par défaut.
Quand un morceau ne contient pas de tags ID3, l’écran affichera (xxxxxxxxx.mp3)
27. JOG WHEEL TACTIL: Cette roue contrôle différentes fonctions, selon le mode dans lequel vous
travaillez.
Le « jog wheel » vous permet de rechercher lentement un “frame” (1/75sec) quand le CD n’est pas
en mode lecture, mais en pause ou sur un point « CUE ». Pour définir un nouveau point “CUE”,
tournez la roue puis appuyez sur PLAY (8) ou sur LOOP IN (4) quand vous avez trouvé l’endroit
exact pour installer le nouveau point CUE. Appuyez sur CUE (7) pour retourner au point “CUE”.
Pendant la lecture du CD, en tournant la roue dans le sens des aiguilles d’une montre, le “jog wheel”
augmente temporairement la vitesse de lecture jusqu’à +/-100%. Tournez dans le sens inverse des
aiguilles d’une montre pour ralentir la vitesse de lecture temporairement. Le changement de vitesse
de lecture est déterminé par la vitesse de rotation de la roue. (ceci est une alternative aux touches
PITCH BEND (21)
En mode scratch (touche SCRATCH (28) activée) la roue Jog Wheel est utilisée pour manipuler la
reproduction de la musique en temps réel. De ce fait vous pouvez faire du scratch avec la musique
de votre CD en temps réel, comme si vous le faisiez avec un disque vinyle analogique normal. pour
se rapprocher du "toucher vinyle" le plus possible, mais aussi pour améliorer la performance au
niveau du scratch, la partie centrale de la molette fait appel à une technologie déposée réagissant
au toucher!
Vous pouvez manipuler les effets DSP quand ils sont utilisés en mode manuel. Voir touches
EFFECT (14).
28. Touche SCRATCH: est utilisée pour engager la fonction scratch du TMC200. Cette option vous offre la
possibilité de scratcher n’importe quelle plage du CD en temps réel. Vous pouvez utiliser la fonction
scratch pendant la lecture du CD ou en mode Pause:
En mode play: La musique joue normalement jusqu’à ce que vous touchez la roue Jog W heel
(27). Pendant que vous manipulez la roue (27), l’effet scratch est audible. Dès que vous relâchez
la roue, la musique continue sa lecture normale à partir du point ou vous avez relâché la roue.
En mode pause: la musique est en attente (pause) jusqu’à ce que vous tournez la roue Jog
Wheel (27). Pendant que vous manipulez la roue (27), l’effet scratch est audible. Dès que vous
relâchez la roue, la musique s’arrête et le lecteur se remet en mode pause.
REMARQUE: Pendant le scratch vous pouvez passer du mode pause au mode lecture ou inversement
en appuyant tout simplement sur la touche PLAY/PAUSE (8)
29. Sortie Audio: Sortie du signal audio du lecteur CD. Utilisez le câble cinch/cinch fourni avec l’appareil
pour relier cette sortie aux entrées CD/line de votre table de mixage.
30. Connecteur Digital out: Utilisez ce connecteur pour relier le signal digital (format S/PDIF) à l’entrée
d’un amplificateur digital ou d’un enregistreur digital (p.ex. Mini disc)
31. Connecteur RELAY: vous pouvez utiliser ce connecteur de 2 façons: vous pouvez l’utiliser avec l’option
fader start sur certaines tables de mixage ou vous pouvez relier deux lecteurs TMC200 ensemble pour
obtenir la fonction de lecture alternée.
Relay play: utilisez le câble mono mini jack/jack qui est fourni avec l’appareil pour relier les
connecteurs RELAY de deux lecteurs TMC200. Voyez plus loin dans ce mode d’emploi pour
apprendre comment utiliser cette fonction.
Fader start: Si vous utilisez une table de mixage qui possède la fonction fader start, utilisez le
câble mono mini jack/jack pour relier le lecteur CD avec les connecteurs fader start de la table de
mixage. Faites attention de ne jamais raccorder ce connecteur à une source de courant.
Attention: cette commande à distance est uniquement compatible avec certaines tables de
mixage (Synq® ou Pioneer® compatible). Les tables de mixage avec fader start fonctionnant par
un signal relié à la terre ne conviennent PAS.
32. Interrupteur POWER ON/OFF: allume ou éteint le TMC200.
33. Mains input: connectez le lecteur CD au réseau AC, en utilisant le câble d’alimentation fourni avec
l’appareil.
ÉCRAN LCD
JB SYSTEMS® 19/78 TMC200
JB SYSTEMS® 20/78 TMC200
Page 13

FRANCAIS MODE D’EMPLOI
FRANCAIS MODE D’EMPLOI
1. PLAY: apparaît quand la lecture du CD est activée.
2. PAUSE: apparaît pendant que le lecteur est en mode pause ou CUE.
3. INDICATEUR DE TOUCHER : est affiché quand la fonction tactile de la partie sensible au toucher de la
molette est active.
4. INDICATEUR ANTI SHOCK ET BUFFER: L’état de la mémoire est représentée sur l’écran par un seau
qui se remplit ou se vide. Le seau en lui même précise que la fonction Instant Start (démarrage
instantané) est disponible. Si le seau clignote, c’est que le démarrage instantané n’est pas disponible.
Chaque segment dans le seau représente environ 2 secondes de protection anti shock.
5. CUE: apparaît quand le lecteur est en attente au point CUE principal.
6. PITCH DISPLAY: vous montre le pourcentage de changement de vitesse.
7. TIME BAR: vous montre soit le temps restant soit le temps écoulé, selon l’option choisie avec la touche
TIME (23). Cette barre se met à clignoter à la fin de chaque plage pour prévenir l’utilisateur qu’il est
grand temps de passer à l’action.
8. FRAME: vous montre le “frame” de la plage en cours d’exécution. (1 frame = 1/75
9. SECOND: Vous montre les “secondes” de la plage en cours d’exécution.
10. MINUTE: Vous montre les “minutes” de la plage en cours d’exécution.
11. ELAPSED, TOTAL REMAIN: indique si le temps affiché à l’écran est le temps écoulé (elapsed), le
temps restant total du disque (total) ou le temps restant de la plage (remain).
12. RELOOP: vous montre quand le CD joue une boucle
13. LOOP: apparaît quand une boucle à été programmée auparavant. Vous pouvez retourner à la lecture de
cette boucle en appuyant sur la touche reloop (6).
14. SINGLE: apparaît quand l’appareil est réglé pour jouer uniquement une plage à la fois. Quand Single
n’est pas affiché, le CD sera lu entièrement sans interruption. La fonction est contrôlée par la touche
SGL/CTN (24).
15. TRACK / FOLDER: vous montre la plage ou le folder en cours d’exécution.
16. INDICATEUR VISUEL: indique la position de lecture en frames: une rotation complète représente 95
frames. L’indicateur évolue dans le sens des aiguilles d’une montre pendant la lecture normale d’un CD
et dans le sens inverse des aiguilles d’une montre quand la lecture s’effectue à l’envers. En mode pause
l’indicateur est à l’arrêt.
17. AUTO CUE: Le cadran affiche “A.CUE” quand la fonction auto cue est activée.
18. AUTO BPM: Cet indicateur est toujours allumé pour vous signaler que le compteur BPM fonctionne.
19. PITCH LOCK: Quand Master Tempo est activé, le cadran affiche un petit “verrou” pour indiquer que le
pitch (tonalité) de la musique est verrouillé.
20. CD/MP3: vous montre si un CD audio normal ou un CD MP3 est chargé.
21. CADRAN ALPHANUMERIQUE: Affiche le nom des dossiers et des fichiers MP3. Pour les fichiers MP3
enregistrés en CBR, la valeur « bit rate » est également affiché. Pour les fichiers MP3 enregistrés en
VBR, le cadran n’affichera que “VBR”. Les informations des CD audio contenant un texte CD seront
affichés, dans le cas contraire “No Text” sera affiché sur l’écran. Toutes autres informations interactives
seront également affichées.
22. BPM/PARAMETER : le compteur de rythme automatique vous montre le nombre de Beats Per Minute
(battements par minutes) sur l’écran.
Quand les effets sont activés, cette partie de l’écran affichera les paramètres d’effets appliqués.
éme
sec.)
UTILISATION …
La plupart des fonctions les plus utilisées sont expliquées dans le chapitre précédent “contrôles et fonctions”
Dans ce chapitre nous parlerons des fonctions qui nécessitent un peu plus d’explications.
QUELQUES FONCTIONS GENERALES:
SLEEP MODE:
Le lecteur CD éteint automatiquement le moteur du chargeur CD et le laser après environ 15 minutes
d’inutilisation (en mode pause ou CUE). Ceci prolonge la durée de vie du moteur et du laser. Pendant le
mode veille l’écran affiche le mot “ z Z ... SLEEP ”. Pour « réveiller » votre lecteur CD, appuyez juste sur la
touche CUE(6) ou PLAY(8), l’écran retournera à son affichage normal et l’appareil est prêt à recevoir les
instructions.
PITCH BENDING:
Cette fonction est utilisée pour synchroniser parfaitement les beats des 2 CD. Ceci peut être fait de 2
façons:
Touches PITCH BEND: La vitesse augmente ou diminue tant que vous tenez les touches PITCH
BEND+ ou PITCH BEND- enfoncées.
JOG WHEEL: quand les effets ne sont pas utilisés en mode manuel, la molette (JOG WHEEL)
changera temporairement la vitesse de la musique. En tournant la roue dans le sens des aiguilles
d’une montre la vitesse augmentera. En tournant en sens inverse, la vitesse diminuera.. La valeur du
changement de vitesse est déterminée par la vitesse de rotation de la roue.
CD-TEXT:
Il n’y à pas que les fichiers MP3 qui peuvent contenir des informations affichables à l’écran. Certains CD
audio contiennent un texte CD qui montre le titre des plages. Certains logiciels de gravure pour CDR (par
ex. Nero) permettent d’ajouter un texte CD sur un CD audio normal. Quand le TMC200 détecte ces
informations de texte CD, ils seront automatiquement affichés à l’écran.
LECTURE/ENREGISTREMENT DES CD-R et CD-RW:
A part les CD’s audio normaux, le TMC200 peut également lire les CD-R (CD enregistrable) et les CD-RW
(CD réenregistrable). Remarquez que vous devriez toujours utiliser l’option de gravure “disc at once” et
“track at once”! malgré que le TMC200 est capable de lire des CD-R et des CD-RW enregistrés à grande
vitesse, nous vous conseillons de ne pas utiliser des vitesse d’enregistrement de plus de x12 afin
d’accroître la qualité de lecture. Utilisez toujours des CD-R et CD-RW de bonne qualité!
Si le disque est gravé avec l’option multi session, il ne jouera que la première session:
Si la première session est en CD-DA vous ne pourrez lire que les pistes CD-DA.
Si la première session est en MP3 vous ne pourrez lire que les fichiers MP3.
LECTURE DES FICHIERS MP3:
Le lecteur CD détecte automatiquement si un CD contient des fichiers MP3. Le TMC200 est capable de
lire différents formats MP3. Le cadran affiche quelques-uns des ID3-tags (titre / artiste / taux de transfert).
Le CD peut contenir jusqu’à 999 fichiers MP3, répartis dans maximum 255 dossiers.
Les fichiers MP3 peuvent avoir les extensions de fichier suivants: .mp3 ~ .MP3 ~ .mP3 ~ .Mp3
Consultez les spécifications techniques pour savoir quels fichiers MP3 sont acceptés.
SELECTEURS FOLDER / TRACK:
La plus part du temps, les CDR contiennent beaucoup de fichiers MP3 (parfois 150 ou plus). Pour que tout
cela reste exploitable vous pouvez organiser vos fichiers MP3 en les plaçant dans différents sous-dossiers
(répertoires). Ces dossiers peuvent être nommés selon le nom de l’artiste, le style de musique (techno,
slows, salsa …), la valeur BPM (100BPM, 110BPM, 120BPM …) ou selon une quelconque autre façon
d’organiser votre musique…
Avec les sélecteurs FOLDER / TRACK vous pouvez aisément parcourir les différents dossiers et fichiers.
Vous pouvez mettre le TMC200 en mode FOLDER et en mode TRACK. Voir également la description du
bouton FOLDER SELECTOR (3):
FOLDER MODE: utilisez le sélecteur FOLDER pour sélectionner le dossier souhaité. Avec le sélecteur
TRACK vous pouvez sélectionner le fichier MP3 souhaité dans ce dossier. Remarquez que vous
pouvez uniquement sélectionner des fichiers qui se trouvent dans le dossier sélectionné. Utilisez le
sélecteur FOLDER pour aller vers un autre dossier.
TRACK MODE: vous pourrez parcourir tous les fichiers de votre CD, comme si il n’y avait pas de
sous-dossiers. Pour parcourir rapidement (par 10 fichiers) le CD, appuyez sur le sélecteur TRACK
pendant que vous le tournez vers l’avant/vers l’arrière.
FONCTION RELAY:
Vérifiez d’abord si le câble spécial Fader Start relie les deux lecteurs TMC200.
Mettez un CD dans les deux lecteurs.
Ouvrez les 2 curseurs des entrées CD sur votre table de mixage.
Vérifiez si les deux lecteurs sont en mode Single (l’indicateur “single” (14) apparaît sur l’écran). Si un
des lecteurs n’est pas en mode Single, appuyez sur la touche SGL/CNT (24) de l’appareil en question.
Commencez la lecture sur un des deux lecteurs CD.
Une plage de chaque CD sera reproduite alternativement. Vous pouvez toujours mettre un nouveau CD
dans l’appareil qui est en attente en mode Pause. De cette façon vous pouvez créer un programme sans
fin, l’idéal pour une utilisation dans des tavernes, etc.
Retirez le câble Relay si vous ne voulez plus utiliser la fonction Relay.
JB SYSTEMS® 21/78 TMC200
JB SYSTEMS® 22/78 TMC200
Page 14

FRANCAIS MODE D’EMPLOI
FRANCAIS MODE D’EMPLOI
LES BOUCLES (LOOPS):
CRÉATION DE BOUCLES:
Pendant qu’une plage du CD est lue, appuyez sur la touche IN/R.CUE(3) pour programmer le point de
départ de la boucle. Appuyez ensuite sur la touche OUT pour programmer le point de fin de boucle. La
boucle sans fin se met à jouer immédiatement. (Avec un peu d’entraînement vous arriverez à créer des
boucles parfaites!) Pendant qu’une boucle est en cours de lecture, vous pouvez appuyer une nouvelle
fois sur la touche OUT(4) pour sortir de la boucle et continuer la lecture normale.
Il est possible de créer une nouvelle boucle, même quand une boucle est toujours en train de jouer.
Pendant que la boucle joue, appuyez simplement sur la touche IN/R.CUE(3) pour définir le point de départ
d’une nouvelle boucle. Entrez ensuite le point de la fin de la boucle en appuyant sur la touche OUT(4).
Votre nouvelle boucle est enregistrée et reproduite.
REDÉMARRER UNE BOUCLE:
Ceci peut être fait de 3 façons:
Quand une boucle est programmée et que vous l’avez quittée en appuyant sur la touche OUT,
appuyez juste sur la touche RELOOP pour redémarrer la lecture de la boucle.
Quand une boucle est programmée et que vous l’avez quittée en appuyant sur la touche OUT,
appuyez juste à nouveau sur la touche OUT pour redémarrer la boucle. L’endroit ou vous avez appuyé
sur la touche OUT est maintenant programmé comme nouveau point de fin de boucle.
Quand une boucle est lue, appuyez sur la touche RELOOP pour redémarrer la boucle immédiatement.
Vous pouvez répéter cette action plusieurs fois de suite afin de créer un effet de « bégaiement »
ADAPTER UNE BOUCLE (LOOP EDIT):
Quand une boucle est programmée, appuyez sur la touche RELOOP/STUTTER pendant environ 2
secondes pour entrer dans le mode d’édition de boucle “loop edit”. Quand une boucle est lue, le cadran
alphanumérique affiche l’information en temps du point de fin de boucle. Utilisez la grande roue pour
définir un nouveau point de fin de boucle. Pour vous faciliter la tâche vous pouvez entendre vos
modifications sur la fin de boucle continuellement. Quand la boucle est parfaite, appuyez sur la touche
LOOP OUT pour enregistrer le nouveau point de fin de boucle et quitter la boucle.
REMARQUE: Vous pouvez enregistrer des boucles dans les touches HOT CUE. Ainsi vous pouvez avoir
jusqu’à 4 boucles par plage à votre disposition. Au chapitre suivant vous apprendrez comment enregistrer
ces boucles.
LES EFFETS :
Dans la description des effets, vous pouvez déjà trouver une grande quantité d'informations, donc,
n'oubliez pas de lire également cette partie du manuel !
UTILISATION DES EFFETS EN MODE SYNCHRONISE AU RYTHME:
Pendant que la musique se fait entendre, vous pouvez appuyer sur un des 3 touches à effets et appuyez
sur la touche BPM-SYNC (17) pour qu’elle s’allume: l'effet choisi fonctionnera en mode synchronisé au
rythme. Utilisez les touches EFFECT-SYNC (15+16) l'effet choisi fonctionnera en mode synchronisé au
rythme. Utilisez la touche IMPACT (16) afin d'adapter l'intensité de l'effet.
UTILISATION DES EFFETS EN MODE MANUEL:
Pendant que la musique se fait entendre, vous pouvez appuyer sur un des 3 touches à effets et appuyez
sur la touche BPM-SYNC (17) pour qu’elle s’éteigne: utilisez la molette (27) pour modifier l'effet en temps
réel. Utilisez la touche IMPACT (16) afin d'adapter l'intensité de l'effet.
LES MÉMOIRES:
DIFFERENTES MEMOIRES:
Avant de parler de l’utilisation de la mémoire, nous devons connaître la différence entre la mémoire de
plage “track memory” et la mémoire permanente “permanent memory”:
Track Memory: ceci est la mémoire ou le TMC200 enregistre un set allant jusqu’à 4 points de
démarrage (CUE Points) et/ou boucles par plage. Vous pouvez régler la mémoire “track memory” pour
chaque plage d’un CD.
Par Exemple: votre CD contient 16 plages (morceaux)pour chaque plage vous pouvez enregistrer
jusqu’à 4 points CUE et/ou boucles. Ceci fait un total de 16 x 4 = 64 points CUE et/ou boucles sur un
seul CD!
Permanent Memory: ceci est la grande mémoire ou tous les points CUE et les boucles sont
enregistrés de façon permanente En fait c’est une collection indexée de “track memories”. Quand vous
rappelez des points CUE d’une certaine plage qui on été installés précédemment, vous faites un
transfert de la mémoire permanente à la mémoire de plage.
UTILISATION DU “TRACK MEMORY”:
ENREGISTRER UN « MASTER CUE POINT »:
Il y a 2 façons pour programmer le point CUE principal:
Appuyez sur la touche LOOP IN (4) pendant la lecture normale pour définir un nouveau point CUE
(“CUE volant”).
Mettez le lecteur en Pause et utilisez les roues jog/shuttle pour rechercher l’endroit exact du nouveau
point CUE. Si vous avez repéré l’endroit exact, appuyez sur la touche LOOP IN (4) pour enregistrer
votre nouveau point CUE. (ou appuyez sur la touche PLAY/PAUSE)
Une fois ce point CUE enregistré, appuyez juste sur la touche CUE (7) pour le rappeler.
ENREGISTRER UN SIMPLE POINT CUE DANS LES TOUCHES “HOT CUE”:
Appuyez d’abord sur la touche MEMORY(10) pour entrer dans le mode hot CUE memory (la touche
MEMORY s’allume).
Appuyez sur une des quatre touches HOT CUE au bon moment pendant la lecture normale d’une
plage: la touche HOT CUE sur laquelle vous venez d’appuyer devient bleue pour indiquer que le point
CUE est enregistré.
Mettez le lecteur CD en mode pause et utilisez les roues jog/shuttle pour rechercher l’endroit exact du
nouveau point CUE. Si vous avez repéré l’endroit exact, appuyez sur une des quatre touches HOT
CUE pour enregistrer le nouveau point CUE: la touche HOT CUE sur laquelle vous venez d’appuyer
devient bleue pour indiquer que le point CUE est enregistré.
Dès que ce point CUE est enregistré, il suffit d’appuyer sur la touche HOT CUE pour démarrer la lecture à
partir du point CUE enregistré.
ENREGISTRER UNE BOUCLE DANS LES TOUCHES “HOT CUE”:
Ceci est pratiquement identique à l’enregistrement d’un point CUE. La seule différence est que vous
devez d’abord mettre le TMC200 en mode boucle. Quand une boucle est lue, appuyez sur la touche
MEMORY pour entrer dans le mode Hot Cue Memory (la touche MEMORY commence s’allume). Après
cela, appuyez sur une des quatre touches HOT CUE: la touche HOT CUE sur laquelle vous venez
d’appuyer devient blanche pour indiquer que la boucle qui joue est enregistrée. Vous pouvez enregistrer
jusqu’à 4 boucles!
EFFACER LES MÉMOIRES DES TOUCHES “HOT CUE”:
Vous pouvez facilement effacer le contenu d’une touche HOT CUE en appuyant sur la touche DELETE
CUE (11), puis en appuyant ensuite sur la touche HOT CUE que vous voulez effacer. Ou vous pouvez
simplement enregistrer un nouveau point de cue ou une boucle via cette touche HOT CUE. Vous pouvez
également effacer le contenu des quatre touches HOT CUE en appuyant sur la touche DELETE CUE (11)
pendant plus de deux secondes. Vous remarquerez que l’éclairage des touches s’éteint pour indiquer que
la mémoire des HOT CUE est vide.
UTILISATION DE LA MÉMOIRE PERMANENTE :
Pour des raisons de sécurité les points CUE et les boucles qui sont enregistrés dans les touches HOT
CUE ne sont pas automatiquement enregistrés dans la mémoire permanente. Cela signifie que si vous
rappelez un set de points CUE et de boucles de la mémoire permanente vers les touches HOT CUE (qui
sont la mémoire de plage), vous pouvez les changer, modifier ou effacer autant que vous voulez. La
mémoire permanente ne sera pas affectée jusqu’à ce que vous fassiez un « back up » des touches HOT
CUE vers la mémoire permanente.
ENREGISTRER DANS LA MÉMOIRE PERMANENTE:
Appuyez pendant environ 2 secondes sur la touche MEMORY (10). L’écran VFD affichera “Saving” pour
indiquer que les points CUE et les boucles des touches HOT CUE buttons sont enregistrées dans la
mémoire permanente.
JB SYSTEMS® 23/78 TMC200
JB SYSTEMS® 24/78 TMC200
Page 15

FRANCAIS MODE D’EMPLOI
EFFACER UNE PLAGE DANS LA MÉMOIRE PERMANENTE:
Choisissez le morceau que vous voulez effacer et chargez les Hot Cue. Appuyez en même temps sur les
touches “DELETE CUE” et “MEMORY” jusqu’à ce que l’écran demande “DEL ALL?”. Si vous appuyez sur
la touche YES (touche PITCH BEND+), les informations de cette plage seront effacées de la mémoire
permanente.
RAPPELER LES 'HOT CUE POINTS/LOOPS' DE LA MEMOIRE PERMANENTE :
Étant donné que cela prend quelques secondes de charger les points de cue permanents, ils ne sont pas
restaurés automatiquement. A certains moments, vous n'en aurez pas besoin, alors, pourquoi se soucier
d'eux ? Ci-dessous, nous expliquons comment cela fonctionne :
S'il n'y a pas de points de cue enregistrés : Quand vous sélectionnez une piste qui n'a pas de point
de cue ou de boucle enregistré en mémoire permanente, il ne se passe rien : vous pouvez démarrer la
lecture directement.
S'il y a des points de cue enregistrés : Quand vous sélectionnez une piste qui a des points de cue
ou des boucles enregistrés en mémoire permanente, le TMC200 affiche le message 'Load Cues ?' : il
veut savoir si vous voulez charger les points de cue. Voici les choix possibles:
Vous appuyez sur la touche YES : Appuyez sur YES (pitch bend + touche) pour charger les
points de cue et les boucles préenregistrés. L'écran affiche le message 'Loading Cue Points'
pendant que les touches HOT CUE se chargent.
Vous appuyez sur la touche NO : les points de cue ne sont pas chargés et l'écran n'affiche
aucun message spécifique : vous pouvez démarrer la lecture directement.
Vous ne faites rien : après quelques secondes, l'écran redevient automatiquement normal,
et bien entendu, les points de cue ne sont pas chargés.
EFFACER ENTIEREMENT LA MEMOIRE PERMANENTE:
Tenez les touches DELETE CUE (11) et MEMORY (10) enfoncées pendant que vous allumez le TMC200 :
la mémoire cue permanente sera effacée. Pendant cette action le cadran affiche “clearALL”.
ATTENTION: CETTE ACTION EST IRREVERSIBLE, TOUS LES POINTS CUE / BOUCLES SERONT
EFFACES!!!
MISE A JOUR DU FIRMWARE
Pour un maximum de flexibilité, le TMC200 peut recevoir des mises à jour quand nécessaire, pour ajouter
de nouvelles fonctions ou pour réparer d’éventuels bugs. Nous vous suggérons de consulter
régulièrement notre site (www.jbsystems.be) pour vérifier si il n’y à pas de nouvelles mises-à-jour à
télécharger.
Vérifiez votre version(s) du firmware
Tenez la touche SGL/CTN (24) enfoncée pendant que vous allumez l’appareil: l’écran affichera la version
qui est installé dans l’appareil. Le firmware est composé de différentes parties: Control + DSP + Servo,
chaque élément porte son propre numéro d’identification.
Instructions de mise à jour
Comme les instructions pour la mise-à-jour peuvent varier, nous vous conseillons de toujours vérifier le
fichier “TMC200 – upgrade instructions.txt” qui est inclus avec chaque téléchargement de mise-à-jour.
FRANCAIS MODE D’EMPLOI
SPECIFICATIONS TECHNIQUES
Alimentation: AC 100-240V, 50/60Hz
Consommation: 13W
Niveau de sortie: 2,0V +/-0,5dB @ 1kHz, 0dB
Réponse de fréquence: 17-20.000Hz (+/-0,4dB)
Distorsion Harmonique + bruit: 0.006% @ 1kHz, 0dB (20kHz LPF)
Rapport Signal/Bruit (IHF-A): >130dB @ 1kHz, 0dB
Temps d’accès court plage suivante: <2sec
Temps d’accès long (plage 1 20): <4sec
Laser Pickup: Sanyo, détection 3spot 780nm
Tracking électronique: Full automatic digital tracking.
FORMAT DISQUE:
Extensions possibles: .mp3 ~ .MP3 ~ .mP3 ~ .Mp3
Compatibilité ID3 tag: ID3v2 et antérieur
ISO9660: Level1 (max. 8”/8.3” character style)
Level2 (max. 31/30 character style)
Joliet: max. 63/63 character style
CD-ROM sector format: mode-1 only
Max. Directories: 255
Max. Fichiers: 999 (max. 255 par fichier)
FORMATS MP3:
MPEG1 Layer3 (ISO/IEC11172-3): mono / stereo sampled at: 32 - 44,1 - 48kHz
Bit rates: 32 – 320 Kbps
Bitrate modes: CBR (Constant Bitrate) or VBR (Variable Bitrate)
MPEG2 Layer3 (ISO/IEC13818-3): mono / stereo sampled at: 16 – 22,05 - 24kHz
Bitrates: 32 – 160 Kbps
Bitrate modes: CBR (Constant Bitrate) or VBR (Variable Bitrate)
MPEG2,5 Layer3: mono / stereo sampled at: 8 – 11,025 - 12kHz
Bitrates: 32 – 160 Kbps
Bitrate modes: CBR (Constant Bitrate) or VBR (Variable Bitrate)
Dimensions: 246 (L) x 103,5 (H) x 348 (P) mm
Poids: 2,66 kg
Chacune de ces informations peut être modifiée sans avertissement préalable. Vous pouvez
télécharger la dernière version de ce mode d’emploi de notre site Web: www.beglec.com
JB SYSTEMS® 25/78 TMC200
JB SYSTEMS® 26/78 TMC200
Page 16

NEDERLANDS HANDLEIDING
HANDLEIDING
Hartelijk dank voor de aankoop van dit JB Systems®product. Om ten volle te kunnen profiteren van alle
mogelijkheden en voor uw eigen veiligheid, gelieve de aanwijzingen zeer zorgvuldig te lezen voor U begint
het apparaat te gebruiken.
DOOR U OP ONZE MAILINGLIJST IN TE SCHRIJVEN ONTVANGT U STEEDS DE
LAATSTE INFORMATIE OVER ONZE PRODUKTEN: NIEUWIGHEDEN, SPECIALE
ACTIES, OPENDEURDAGEN, ENZ.
SURF NAAR: WWW.BEGLEC.COM
EIGENSCHAPPEN
Volledige MP3 weergave (max. 999 MP3-files / 255 Mappen per CD)
o MPEG1 layer3 (32 + 44,1 + 48kHz)
o MPEG2 layer3 (16 + 22,05 + 24kHz)
o MPEG2.5 layer3 (8 + 11,025 + 12kHz)
o Ondersteunt zowel constante CBR als variabele VBR transmissiesnelheden.
Digitaal scratch effect via het aanraakgevoelige jog wiel
Electronisch “brake” effect + 3 digitale effecten:
Echo, flanger, filter
Manuele controle van de parameters
Beat synchrone modus
Alphanumerische LCD display (CD-TEXT en ID3v2 tags: toont titel, artiest, bitrate, …)
De Hot Cue toetsen kunnen tot 4 cue punten of loops bevatten per nummer!
Permanent geheugen voor 2000 hot cue points en loops
Naadloos bewerken van de loop in “real-time”!
Volautomatische BPM counter
Pitch Lock (Master Tempo)
Anti-shock memory 10sec.
4 schalen voor de snelheidsregelaar: +/-4% +/-8% +/-16% +/-100% (tot +/-16% voor MP3 files)
Pitch bend op het jog wiel en via toetsen (synchroniseren van de beats)
Aanpasbare pitch bend parameter voor zeer precieze pitch bending (software V22 en hoger)
Tot 4 naadloze loops voor 1 track met reloop/stutter
Direct programmeerbare cue (“Cue on the fly”)
Ultra snelle memory start binnen 10msec
Fader start, fader stop (back cue),
Auto cue functie(-48dB)
Snel zoeken van een passage op 4 snelheden
Alfanumeriek LCD display voor uitlezing van CD-TEXT en MP3 ID3v2 tags.
Verschillende tijdsaanduidingen: verlopen, blijvende en totaal blijvende tijd.
Jog wiel met een speciale rubber bedekking
Single/continuous play
Relay play voor een eindeloze weergave op twee TMC200 spelers.
Digitale S/PDIF uitgang
CD-lade sluit automatisch na 60seconden
Sleep mode (verlengt de levensduur van de laser)
VÓÓR DE INGEBRUIKNAME
Controleer of de volgende onderdelen in de verpakking zitten:
TMC200 speler
Handleiding
Voedingskabel
Een cinch kabel
Een mono mini-jack kabel voor fader start en relay play
NEDERLANDS HANDLEIDING
VEILIGHEIDSVOORSCHRIFTEN:
WAARSCHUWING: Om het risico op elektrocutie zoveel
CAUTION
De bliksempijl die zich in een gelijkbenige driehoek bevindt is bedoeld om u te wijzen op het
gebruik of de aanwezigheid van niet-geïsoleerde onderdelen met een “gevaarlijke spanning” in
het toestel die voldoende kracht heeft om een risico van elektrocutie in te houden.
Het uitroepteken binnen de gelijkbenige driehoek is bedoeld om de gebruiker erop te wijzen dat
er in de meegeleverde literatuur belangrijke gebruik en onderhoudsinstructies vermeld staan
betreffende dit onderdeel.
Dit symbool betekent: het apparaat mag enkel binnenhuis worden gebruikt.
Dit symbool betekent: Lees de handleiding!
Dit symbool betekent: Klasse II apparaten
Stel dit apparaat niet bloot aan regen of vocht, dit om het risico op brand en elektrische schokken te
voorkomen.
Om de vorming van condensatie binnenin te voorkomen, laat het apparaat aan de omgevingstemperatuur
wennen wanneer het, na het transport, naar een warm vertrek is overgebracht. Condensatie kan het
toestel soms verhinderen perfect te functioneren. Het kan soms zelfs schade aan het apparaat
toebrengen.
Gebruik dit apparaat uitsluitend binnenshuis.
Plaats geen stukken metaal en mors geen vocht binnen in het toestel om elektrische schokken of storing
te vermijden. Objecten gevuld met water, zoals bvb. Vazen, mogen op dit apparaat worden geplaatst.
Indien er toch een vreemd voorwerp of water in het apparaat geraakt, moet U het direct van het lichtnet
afkoppelen.
Open vuur, zoals brandende kaarsen, mogen niet op het apparaat geplaatst worden.
Bedek geen enkele ventilatieopening om oververhitting te vermijden.
Zorg dat het toestel niet in een stoffige omgeving wordt gebruikt en maak het regelmatig schoon.
Houd het apparaat uit de buurt van kinderen.
Dit apparaat mag niet door onervaren personen bediend worden.
De maximum veilige omgevingstemperatuur is 40°C. Gebruik het apparaat dus niet bij hogere
temperaturen.
Trek altijd de stekker uit wanneer het apparaat gedurende langere tijd niet wordt gebruikt of alvorens met
de onderhoudsbeurt te beginnen.
De elektrische installatie behoort uitsluitend uitgevoerd te worden door bevoegd personeel, volgens de in
uw land geldende regels betreffende elektrische en mechanische veiligheid.
Controleer dat de beschikbare spanning niet hoger is dan die aangegeven op de achterzijde van het
toestel.
Het stopcontact zal steeds vrij toegankelijk blijven zodat de stroomkabel op elk moment kan worden
uitgetrokken.
De elektrische kabel behoort altijd in uitstekende staat te zijn. Zet het apparaat onmiddellijk af als de
elektrische kabel gekneusd of beschadigd is.
Laat de elektrische draad nooit in contact komen met andere draden.
Als de netschakelaar zich in OFF (uit) positie bevindt dan is dit apparaat niet volledig van het lichtnet
gescheiden!
Om elektrische schokken te voorkomen, moet U de behuizing niet openen. Afgezien van de zekering zitten
er geen onderdelen in die door de gebruiker moeten worden onderhouden.
Repareer nooit een zekering en overbrug de zekeringhouder nooit. Vervang een beschadigde zekering
steeds door een zekering van hetzelfde type en met dezelfde elektrische kenmerken.
Ingeval van ernstige problemen met het bedienen van het toestel, stopt U onmiddellijk het gebruik ervan.
Contacteer uw dealer voor een eventuele reparatie.
Gebruik best de originele verpakking als het toestel vervoerd moet worden.
Om veiligheidsredenen is het verboden om ongeautoriseerde modificaties aan het toestel aan te brengen.
mogelijk te vermijden mag u nooit de behuizing
verwijderen. Er bevinden zich geen onderdelen in het
toestel die u zelf kan herstellen. Laat de herstellingen
enkel uitvoeren door een bevoegde technicus.
JB SYSTEMS® 27/78 TMC200
JB SYSTEMS® 28/78 TMC200
Page 17
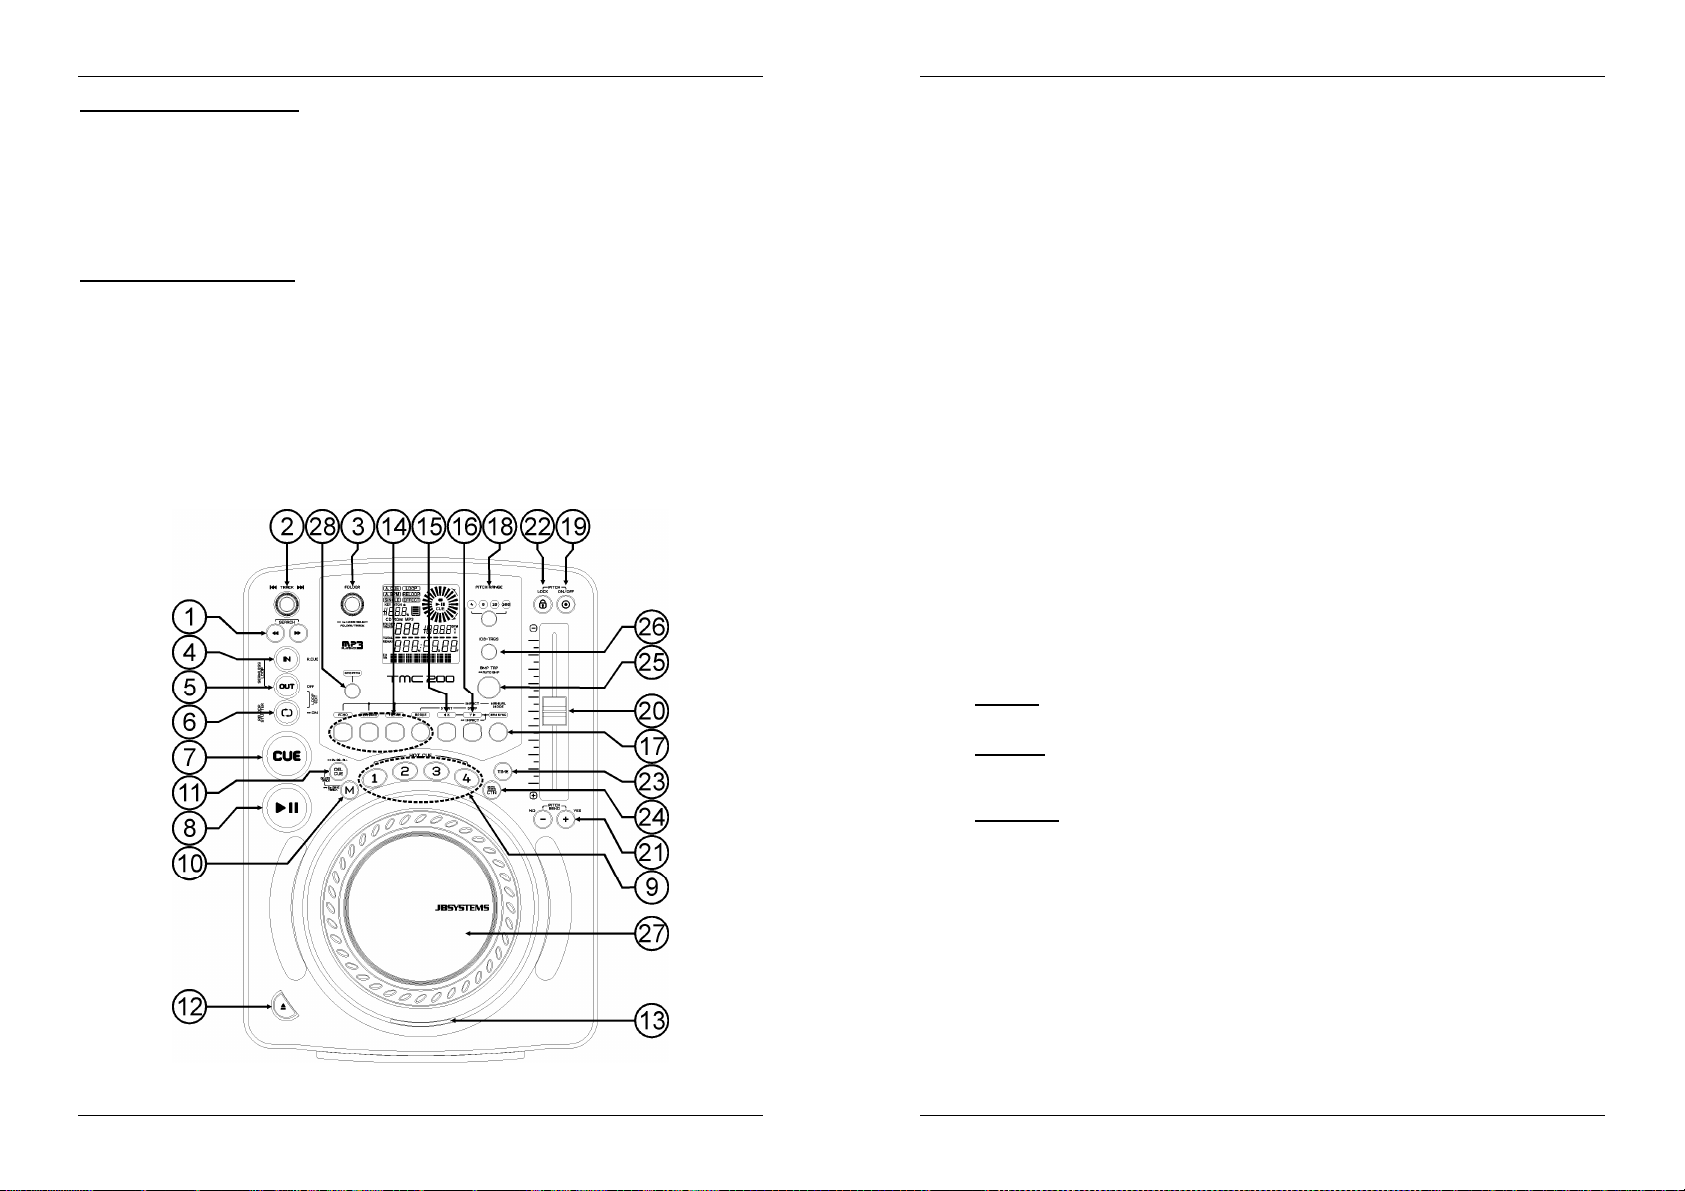
NEDERLANDS HANDLEIDING
NEDERLANDS HANDLEIDING
INSTALLATIEVOORSCHRIFTEN:
Plaats dit apparaat in een goed geventileerde ruimte waar het niet blootgesteld is aan hoge temperaturen
of vocht.
Het plaatsen en het gebruik van dit apparaat gedurende een lange periode in de nabijheid warmtebronnen
zoals versterkers, spots, enz. zal zijn werking beïnvloeden.
Zorg, bij inbouw in een vaste installatie of flightcase, voor een goede ventilatie om de warmte optimaal te
kunnen afvoeren.
Zorg ervoor, om inwendige vorming van condensatie te voorkomen, dat de mengtafel zich na transport kan
aanpassen aan de warme binnentemperatuur. Condensatie kan de goede werking soms verhinderen.
REINIGEN VAN DE CD SPELER:
Reinig het toestel met een zacht, lichtjes bevochtigd doek. Vermijd water te morsen in het toestel. Gebruik
nooit vluchtige producten zoals benzeen of thinner, dit kan het toestel beschadigen.
AANSLUITINGEN
Gebruik de meegeleverde cinch kabel om de audio uitgang van de CD speler te verbinden met de CD
ingangen van uw mengtafel.
Verbind eveneens de fader start kabel indien uw audio mixer voorzien is van fader start aansluitingen.
(Synq® SMX-1 of Pioneer® compatibel)
Verbind de voedingskabel.
BEDIENING EN FUNCTIES
1. SEARCH toetsen: Deze toetsen hebben 4 voorwaartse en 4 achterwaartse snelheidsposities voor het
snel opzoeken van muziekfragmenten. Hoe langer u op de toets drukt, hoe vlugger u door de muziek
heen gaat.
2. TRACK SEARCH Toets: er zijn verschillende functies beschikbaar:
Normale zoekfunctie: draai aan de knop om de muzieknummers te overlopen met een stap van
+1/-1 nummer.
Snelle zoekfunctie: houd de knop ingedrukt terwijl u er aan draait om de muzieknumers te
overlopen in stappen van +10/-10 nummers.
Herstart de display info: als u heel even op de knop drukt zal de display de info opnieuw van in
het begin tonen (scroll functie herstarten)
3. FOLDER KEUZEKNOP: er zijn verschillende functies beschikbaar:
Map zoeken: als uw CD MP3 mappen bevat dan kunt u deze selecteren door eenvoudigweg aan
deze FOLDER keuzeknop te draaien. Op het LCD scherm ziet u het nummer + de naam van de
map. In het volgende hoofdstuk vindt u meer informatie over het gebruik van mappen. Als de CD
geen mappen bevat, dan wordt deze keuzeknop niet gebruikt.
Naam van de map weergeven: de naam van de map wordt onmiddellijk weergegeven wanneer u
even op de FOLDER knop drukt.
Omschakelen tussen de FOLDER / TRACK modus: druk gedurende ongeveer 1 seconde op de
knop, de display schakelt om tussen “FOLDERmd” en “TRACKmd”. Laat de knop los wanneer de
gewenste modus weergegeven wordt.
FOLDER MODE: u kunt alleen nummers kiezen binnen de geselecteerde map. Gebruik de
FOLDER keuzeknop om een andere map te kiezen.
TRACK MODE: zo kunt u alle nummers van uw CD overlopen, alsof er geen mappen aanwezig
waren. Om de nummers van de CD snel te overlopen (per 10 nummers) moet u op de TRACK
keuzeknop drukken terwijl u deze vooruit/achteruit draait.
4. IN/R.CUE toets: Laat u toe het Cue punt in te stellen zonder de weergave van de CD te stoppen (CUE
ON THE FLY). Deze toets bepaalt ook het beginpunt van een naadloze Loop. Wanneer u op één van de
hot cue(19) toetsen drukt wordt het startpunt ook gekopieerd naar deze toets.
5. OUT toets: Wordt gebruikt om het eindpunt van een Loop te bepalen. De CD speler start het afspelen
van de naadloze Loop tot wanneer u terug op deze toets drukt om de Loop te verlaten. Wanneer een
Loop geprogrammeerd is maar niet afgespeeld wordt kan men zo ook het aflezen van de Loop
herstarten. De plaats in het nummer waar u op deze toets gedrukt heeft zal opgeslagen worden als
nieuw eindpunt van de Loop. Als u op deze toets drukt wanneer de speler in “loop edit mode” staat dan
stopt u het bewerken van de loop en wordt het huidige eindpunt van de loop opgeslagen als nieuw
eindpunt.
6. RELOOP/STUTTER toets: Deze toets heeft 3 functies:
RELOOP: Als een loop geprogrammeerd was en u hebt op de OUT toets (4) gedrukt, druk dan op
de Reloop toets om de loop opnieuw te starten. Druk op de OUT(4) toets om de Loop terug te
verlaten. (start en eindpunt van de Loop blijven onveranderd)
STUTTER: Wanneer een loop afgespeeld wordt kunt u op deze toets drukken om de loop
onmiddellijk te herstarten. U kunt ook op deze toets drukken wanneer een nummer geen loop
afspeelt. Telkens u op de RELOOP/STUTTER toets drukt herstart de muziek vanaf het
geprogrammeerd Cue punt. Het stotter effect (stutter) laat u toe extra creatief te zijn.
LOOP EDIT: wanneer een loop geprogrammeerd is, druk dan op de RELOOP/STUTTER toets
gedurende ongeveer 2 seconden om de “loop edit” modus in te schakelen. U kunt nu het eindpunt
van de loop veranderen. Raadpleeg hoofdstuk “Hoe gebruiken…” voor meer informatie.
7. CUE toets: Als u op de CUE toets drukt tijdens de weergave, dan veroorzaakt dit een onmiddellijke
terugkeer naar de positie waar de weergave gestart werd. De weergave start onmiddellijk vanaf het
geprogrammeerde Cue punt, en duurt verder zolang de CUE toets ingedrukt blijft. De CD speler springt
terug naar het Cue punt zodra de CUE toets losgelaten wordt. W anneer het toestel in pauze modus
staat (Play/Pause LED knippert) kan het Search en/of het Jog wiel gebruikt worden om een ander
startpunt te kiezen. Door op de "PLAY/PAUSE" toets en nadien op de "CUE" toets te drukken kunt u dit
nieuwe Cue punt bevestigen.
8. PLAY/PAUSE toets: Telkens u op de PLAY/PAUSE toets drukt zal de CD speler overgaan van
afspelen naar pauze of van pauze naar afspelen. De toets knippert zolang de CD speler in pauze staat.
9. HOT CUE buttons: 4 programmeerbare toetsen waarin u gewone Cue punten en/of Loops kunt
opslaan. Deze toetsen kleuren blauw als er een gewoon cue punt werd opgeslagen en kleuren wit, als
er een loop werd opgeslagen. Alle opgeslagen Cue punten en Loops kunnen opgeslagen worden in het
permanente geheugen om later opnieuw gebruikt te worden. Zie hoofdstuk “HOE GEBRUIKEN” voor
verdere informatie over het programmeren van Cue punten, enz.
JB SYSTEMS® 29/78 TMC200
JB SYSTEMS® 30/78 TMC200
Page 18

NEDERLANDS HANDLEIDING
NEDERLANDS HANDLEIDING
10. MEMORY toets: wordt gebruikt om Cue punten en Loops op te slaan in de Hot Cue toetsen(19) en het
permanente cue geheugen:
Opslagen in de HOT CUE toetsen: Druk heel even op de MEMORY toets om de TMC200 voor
te bereiden voor het opslaan van een cue punt of een Loop in één van de 4 HOT CUE toetsen.
Opslagen in het permanente geheugen: Druk op de MEMORY toets tot deze begint te
knipperen en “SAVING” op het LCD scherm verschijnt. De inhoud van de HOT CUE toetsen voor
dit nummer worden opgeslagen in het permanente geheugen.
Belangrijk: niet alleen de HOT CUE worden opgeslagen in het permanente geheugen, ook heel
wat andere parameters worden opgeslagen zodat u deze niet telkens opnieuw moet instellen
wanneer u het toestel aanzet. Naast de Hot Cues worden ook volgende parameters opgeslagen:
pitchbereik, single/cont mode, tijdweergave, jog wiel instellingen, auto cue, auto BPM mode, pitch
on/off, pitch lock on/off en start/stop parameters
Kijk verder in deze handleiding om te leren hoe U dit juist doet.
11. DELETE CUE toets: deze toets heeft verschillende functies:
1 HOT CUE WISSEN: druk op de DELETE CUE toets, en daarna op de HOT CUE toets die u wilt
wissen in de “track memory”. De gewiste toets zal uit gaan.
4 HOT CUES WISSEN: druk gedurende ongeveer 2 seconden op de DELETE CUE toets om de 4
hot cues te wissen uit de track memory.
TRACK WISSEN: druk gedurende ongeveer 2 seconden tegelijkertijd op de DELETE CUE toets
en de MEMORY toets (10) om de hot cues voor het gehele nummer uit het permanente geheugen
te wissen. Aangezien er geen weg meer terug is om de handeling ongedaan te maken zal de
display u eerst vragen of u zeker bent om door te gaan: gebruik de PITCH BEND toetsen (21) om
YES of NO te antwoorden.
Zie hoofdstuk “HOE GEBRUIKEN” voor meer info.
12. OPEN/CLOSE toets: gebruik deze toets om de CD lade vooraan de TMC200 te openen of te sluiten.
Deze toets kan niet gebruikt worden tijdens het afspelen van een CD. Indien de lade niet gesloten wordt,
zal deze na 60sec. automatisch sluiten om schade te voorkomen.
13. CD LADE INDICATOR: licht op als een CD geladen wordt
14. EFFECT toetsen: elk van deze toetsen heeft haar eigen instellingen, zoals hieronder beschreven:
ECHO EFFECT toets: druk op deze toets om het echo effect in te schakelen. Afhakelijk van de sync-
mode (manueel of synchroon met de beat), zijn verschillende instellingen mogelijk:
Manuele modus: de BPM-SYNC toets (17) is uit. U kan alle parameters manueel instellen,
gebruik de volgende controles:
Jog-wiel (27): wordt gebruikt om een echo tijd te kiezen van 1ms tot 2000ms.
IMPACT toets (16): zo lang de IMPACT toets aan is kan u het jog-wiel (27) gebruiken om het
impact (dry/wet) van het effect in te stellen.
Beat synchrone modus: de BPM-SYNC toets (17) is aan. U kunt de volgende controles
gebruiken:
EFFECT SYNC- toetsen (15+16): gebruik een van de beat gesynchroniseerde echo presets.
IMPACT toets (16): zo lang de IMPACT toets aan is kan u het jog-wiel (27) gebruiken om het
impact (dry/wet) van het effect signaal in te stellen.
FLANGER EFFECT toets: druk op deze toets om het flanger effect in te schakelen. Afhankelijk van
de sync-mode (manueel of synchroon met de beat), zijn verschillende instellingen mogelijk:
Manuele modus: de BPM-SYNC toets (17) is uit. U kan alle parameters manueel instellen,
gebruik de volgende controles:
Jog-wiel (27): wordt gebruikt om het effect manueel in te stellen.
IMPACT toets (16): zo lang de IMPACT toets aan is kan u het jog-wiel (27) gebruiken om het
impact (dry/wet) van het effect in te stellen t.
Beat synchrone modus: dhe BPM-SYNC toets (17) is aan. U kunt de volgende controles
gebruiken:
EFFECT SYNC toetsen (15+16): gebruik een van de beat gesynchroniseerde sweep presets.
IMPACT toets (16): zo lang de IMPACT toets aan is kan u het jog-wiel (27) gebruiken om het
impact (dry/wet) van het effect signaal in te stellen.
FILTER EFFECT toets: druk op deze toets om het filter effect in te schakelen. Afhankelijk van de
sync-mode (manueel of synchroon met de beat), zijn verschillende instellingen mogelijk:
Manuele modus: de BPM-SYNC toets (17) is uit. U kan alle parameters manueel instellen,
gebruik de volgende controles:
Jog-wiel (27): wordt gebruikt om manueel de afsnijfrequentie van de filter in te stellen.
IMPACT toets (16): zo lang de IMPACT toets aan is kan u het jog-wiel (27) gebruiken om om
het impact (Q-factor) van de filter te wijzigen.
Beat synchrone modus: de BPM-SYNC toets (17) is aan. U kan de volgende controles
gebruiken:
EFFECT SYNC toetsen (15+16): kies een van de beat gesynchroniseerde sweep presets.
IMPACT toets (16): zo lang de IMPACT toets aan is kan u het jog-wiel (27) gebruiken om om
het impact (Q-factor) van de filter te wijzigen.
BRAKE toets: druk op deze toets om het remeffect in te schakelen. U kunt nu de de snelheid van het
opstarten/stilvallen van de muziek bij gebruik van de PLAY/PAUSE toets (8) instellen. U kunt de
parameters instellen met de toetsen 15+16 (zie hieronder).
15. EFFECT SYNC/START toets: deze toets heeft verschillende functies, afhankelijk van de effect modus:
BPM-synchrone effecten: wanneer een effect gebruikt wordt in beat synchrone modus, dan is
deze toets aan. U kunt nu kiezen hoe het effect synchroon moet werken met de beat. Gebruik
deze toets om de huidige BPM parameter in 2 te delen.
BRAKE effect: druk op deze toets om de opstarttijd te veranderen (tijd van stilstand naar volle
snelheid). W anneer de toets aan is kunt u het jog wiel (27) gebruiken om de tijd in te stellen van
16. EFFECT SYNC/STOP/IMPACT toets: deze toets heeft verschillende functies, afhankelijk van de effect
17. BPM-SYNC toets: druk op deze toets om te navigeren tussen de manuele en beat synchrone effect
18. PITCH RANGE toets: Telkens als U deze toest indrukt wordt de schaal van de snelheidfader(20)
19. SPEED toets: Deze toets wordt gebruikt om de snelheidsregeling aan te zetten of uit te schakelen.
20. SPEED schuifregelaar: Druk op de SPEED toets(19), zodat deze aan is. De snelheid kan bijgeregeld
21. PITCH BEND toetsen: De snelheid verhoogt wanneer men op de “+ toets” drukt en keert weer naar zijn
22. PITCH LOCK toets: (Master tempo) activeert de Pitch Lock functie. Deze functie laat u toe de snelheid
23. TIME toets: De TIME toets laat u toe over te schakelen naar het weergeven van de reeds verstreken
24. SGL/CTN: U kunt kiezen tussen “single track mode” en “continuous play”. Tevens is het ook mogelijk
0,0s (snelle start) tot bijna 10s. (zeer trage start)
modus:
BPM- synchrone effecten: wanneer een effect gebruikt wordt in beat synchrone modus, dan is
deze toets aan. U kunt nu kiezen hoe het effect synchroon moet werken met de beat. Gebruik
deze toets om de huidige BPM parameter te verdubbelen.
BRAKE effect: druk op deze toets om de tijd voor het stilvallen te veranderen (tijd van volle
snelheid naar stilstand). Wanneer de toets aan is kunt u het jog wiel (27) gebruiken om de tijd in
te stellen van 0,0s (snelle stop) tot bijna 10s. (zeer trage stop)
IMPACT parameter: terwijl één van de 3 DSP effecten actief is kunt u op de toets drukken tot
deze begint te knipperen. Nu kunt u het impact van het gekozen effect instellen, zie ook EFFECT
toetsen (14).
modus ! Zie punt (14) voor meer informatie.
aangepast. Voor gewone audio CD’s kunt u +/-4%, +/-8%, +/-16% en +/-100% kiezen. De +/-100% optie
kan niet gebruikt worden met MP3 CD’s.
worden tot +/-100% door de schuifregelaar te verzetten. De snelheid zal niet veranderen als de SPEED
toets(19) uit staat. U kunt het bereik van de snelheidsverandering instellen met de toets PITCH RANGE
(18)
oorspronkelijke snelheid wanneer de toets losgelaten wordt. De snelheid daalt wanneer men op de “–
toets” drukt en keert weer naar zijn oorspronkelijke snelheid wanneer de toets losgelaten wordt. Deze
toetsen kunnen gebruikt worden om de beats van 2 nummers op elkaar af te stellen. Zij worden ook
gebruikt voor het bevestigen (of annuleren) van vragen die soms getoond worden op het scherm.
van een nummer te regelen door middel van de Pitch Control schuifregelaar, zonder de toonhoogte te
wijzigen. Deze toets wordt blauw wanneer de Pitch Lock ingeschakeld is.
TIP: U moet weten dat de pitch lock functie zijn technische grenzen heeft. Vanaf een bepaalde
snelheidsafwijking (afhankelijk van de muziekstijl) zal de pitch lock niet meer correct werken. Eerst hoort
U een kleine vervorming die steeds groter naarmate de snelheidsafwijking toeneemt. Dit is daarom
echter niet direct een: bij erg lage snelheden kan U deze vervorming perfect als een soort
“vervormingseffect” gebruiken!
tijd, de resterende tijd van het nummer of de totaal resterende tijd van de CD. (standaard = resterende
tijd van het nummer)
De total resterende tijd van de CD is niet beschikbaar bij MP3 CD’s.
om de “auto cue” functie (-48dB) aan/uit te schakelen.
Continuous play: de volledige CD zal afgespeeld worden zonder onderbreking. (meestal gebruikt
in taverne’s)
JB SYSTEMS® 31/78 TMC200
JB SYSTEMS® 32/78 TMC200
Page 19

NEDERLANDS HANDLEIDING
NEDERLANDS HANDLEIDING
Single track: de CD speler stopt aan het einde van elk nummer en wacht op de eerste
muzieknoot van het volgende nummer. Dit betekent dat slecht geïndexeerde CD’s geen hindernis
vormen voor de onmiddellijke start mogelijkheden van deze CD speler. Dit is een zeer nuttige
eigenschap voor deejays!
Auto Cue on/off: De TMC200 detecteert automatisch de eerste “muzieknoot” van elk nummer
zodat de muziek onmiddellijk start wanneer u op de Play toets drukt. Om deze Auto Cue functie
aan/uit te zetten moet u gedurende ongeveer 2 seconden op de SGL/CTN toets drukken. Er staat
“A.CUE” op het scherm wanneer deze functie ingeschakeld is.
25. BPM-TAP toets: deze speler heeft een volledig automatische BPM counter. In sommige uitzonderlijke
gevallen kan de automatische beat counter niet werken zoals het hoort (onregelmatige beats of
eenvoudigweg geen beats te bespeuren). In dit geval kunt u de beat counter helpen door manueel op
deze toets te tokkelen op het ritme van de muziek. Na het gebruik van de TAP functie kan U de BPMcounter terug in automatische mode zetten door de TAP toets in te drukken tot er in de linker bovenhoek
van het scherm terug “AUTOBPM” verschijnt.
26. ID3-TAGS toets: om het u gemakkelijk te maken bevatten MP3 nummers ID3-tags welke u meer
informatie geven over het gekozen nummer. De TMC200 kan enkele van deze tags weergeven op de
display:
“Song title” informatie: standaard geeft de display de titel van het nummer weer.
“Artist” informatie: druk 1x op de ID3-TAGS toets om de artiestennaam weer te geven, de
display keert automatisch weer naar de standaard weergave.
“Bit-rate” informatie: druk 2x op de ID3-TAGS toets om de bit-rate (opnamekwaliteit) van het
nummer weer te geven, de display keert automatisch weer naar de standaard weergave.
27. TACTIEL JOG WIEL: Dit grote wiel heeft verschillende functies, afhankelijk van de werkmodus:
Met het jog wiel kunt u traag de frames (1/75sec) opzoeken wanneer de CD niet afgespeeld wordt
maar in pauze of op een Cue punt staat. Om een nieuw Cue punt in te stellen draait u aan het wiel
tot u op de juiste plaats bent, daarna drukt u op de PLAY(8) of LOOP IN(4) toets. Druk vervolgens
op CUE(7) om naar het ingegeven “CUE PUNT” terug te keren .
Tijdens de weergave van een nummer kan men met het jog wiel de snelheid van de weergave
tijdelijk verhogen door het wiel in wijzerzin te draaien of verlagen door het wiel in tegen wijzerzin te
draaien tot +/-100%. De waarde van de snelheidsverandering wordt bepaald door de snelheid van
de rotatie van het wiel. (dit is een alternatief voor de PITCH BEND toetsen (21)
In scratch mode (SCRATCH toets (28) is geactiveerd) gebruikt U dit wiel om het afspelen van de
track te beïnvloeden. Op deze manier kan U de muziek op de CD scratchen alsof het een gewone
vinyl plaat is. Om u een zo realistisch mogelijk vinyl gevoel te geven zodat u de best mogelijke
scratch performance kan neerzette, gebruikt dit Jog wiel een gepatenteerde aanraakgevoelige
technologie!
U kan de DSP effecten manipuleren terwijl ze gebruikt worden in manuele modus: zie EFFECT
toetsen (14).
28. SCRATCH toets: hiermee zet U de TMC200 in scratch mode. U kan nu eender welk nummer op de CD
digitaal scratchen alsof het een vinyl plaat is. U kan de scratch functie zowel in play als in pause
gebruiken:
In play mode: De muziek speelt normaal tot U het grote jog wiel(27) aanraakt. Het scratch effect
is hoorbaar zolang U het jog wiel(27) snel vooruit en achteruit beweegt. Zodra U het wiel niet meer
beweegt speelt de muziek verder vanaf het punt waar de laser zich op dat ogenblik bevindt.
In pause mode: zolang het jog wiel(27) niet beweegt, hoort U niets. Zodra U het jog wiel(27) snel
voorwaarts en achterwaarts beweegt is het scratch effect hoorbaar. Zodra U het jog wiel stopt zal
de muziek stoppen en wacht de speler in pauze.
TIP: tijdens de scratch mode kan U de PLAY/PAUSE toets(8) indrukken om tussen play en pause om te
schakelen.
29. Audio output: audio uitgang van de CD speler. Gebruik de meegeleverde cinch/cinch kabel om deze
uitgang te verbinden met de CD/line ingang van uw mengtafel.
30. Digitale uitgang: sluit dit digitale uitgangssignaal (S/PDIF formaat) eventueel aan op een digitale
versterker of een digitale recorder (vb. Mini disc)
31. RELAY Socket: U kan gebruikmaken van de compatible faderstart functie op sommige mixers of U kan
ook 2 TMC200 spelers met elkaar verbinden om zo de relay functie te activeren.
Relay play: Verbind de relay aansluitingen van beide TMC200 spelers met elkaar door middle van
het bijgeleverde mono mini jack/jack kabeltje. Verder in deze handleiding wordt beschreven hoe U
deze functie gebrukt.
FADER START aansluitingen: wanneer u een mengtafel hebt die uitgerust is met een fader start
functie, verbind de CD speler dan met de fader start aansluitingen van de mixer door middel van
het bijgeleverde mono mini jack/jack kabeltje. Let er wel op dat deze aansluitingen nooit
verbonden worden met één of andere spanning.
Opgelet: Deze afstandbediening is enkel verenigbaar met een bepaald type mixers (Synq® of
Pioneer® compatibel.) Mixers die beschikken over een start functie die werken met een signaal
dat verbonden wordt met de massa zullen niet werken.
32. POWER ON/OFF switch: schakelt de TMC200 aan en uit.
33. Mains input: Verbind de CD speler met het AC net door middel van de meegeleverde voedingskabel.
LCD DISPLAY
1. PLAY: verschijnt tijdens het afspelen van een CD.
2. PAUSE: verschijnt wanneer de CD speler in pause of in cue modus staat.
3. TOUCH INDICATOR: verschijnt wanneer het tactiele gedeelte van het Jog wiel actief is.
4. ANTI SHOCK EN BUFFER INDICATOR: De staat van het geheugen wordt op het scherm weergegeven
door middel van een emmer die gevuld of leeggemaakt wordt. De emmer zelf geeft aan dat de Instant
Start functie beschikbaar is. Als de emmer flitst is de Instant Start functie niet beschikbaar. Elk segment
in de emmer vertegenwoordigt ongeveer 2 seconden anti shock bescherming.
5. CUE: verschijnt wanneer de CD speler Stand-by staat aan het master cue punt.
6. PITCH DISPLAY: toont de actuele snelheidsafwijking zoals deze ingesteld werd met de
snelheidsfader(20).
7. TIME BAR: toont u ofwel de verstreken tijd, ofwel de resterende tijd, afhankelijk van de keuze die
gemaakt werd door middel van de TIME toets(23). De Time Bar begint te knipperen aan het eind van elk
nummer om de gebruiker te verwittigen dat het hoog tijd is om tot de actie over te gaan.
8. FRAME: Geeft de tijdsinformatie van het lopende nummer weer in “frames”.
(1 frame = 1/75thsec.)
9. SECOND: Geeft de tijdsinformatie van het lopende nummer weer in “seconden”.
10. MINUTE: Geeft de tijdsinformatie van het lopende nummer weer in “minuten”.
11. ELAPSED, TOTAL REMAIN: toont aan dat de tijd die weergegeven is op het scherm de verstreken tijd
(elapsed), de totaal resterende tijd van de CD (total) of de resterende tijd van het nummer (remain) is.
JB SYSTEMS® 33/78 TMC200
JB SYSTEMS® 34/78 TMC200
Page 20

NEDERLANDS HANDLEIDING
NEDERLANDS HANDLEIDING
12. RELOOP: wijst u erop dat een loop wordt uitgelezen.
13. LOOP:.verschijnt wanneer er voordien al een Loop werd geprogrammeerd voor de CD. U kunt
terugkeren naar deze Loop door op de Reloop toets(6) te drukken
14. SINGLE: verschijnt wanneer men gekozen heeft om slechts één nummer te lezen. Wanneer Single niet
verschijnt, zal de CD speler de volledige CD lezen zonder onderbreking. Deze functie wordt ingesteld
door middel van de SGL/CTN toets(17).
15. TRACK / FOLDER: Toont het track of folder nummer.
16. POSITIE MARKERING: geeft de afspeelpositie in frames aan: een volledige omwenteling op de display
komt overeen met 95 frames. De markering beweegt in wijzerzin bij het voorwaarts afspelen en in tegen
wijzerzin bij het achterwaarts afspelen van de muziek. In pauze stopt de markering.
17. AUTO CUE: Op het LCD scherm staat “A.CUE” wanneer de auto cue functie ingeschakeld is.
18. AUTO BPM: Deze indicator duidt aan dat de automatische beat counter werkt.
19. PITCH LOCK: wanneer Master Tempo ingeschakeld is dan verschijnt er op de display een klein “slot”
wat betekent dat de pitch van de muziek vergrendeld is.
20. CD/MP3: duidt aan of u een gewone audio CD of een MP3 CD opgeladen hebt.
21. ALFANUMERISCHE DISPLAY: Toont de namen van de mappen en de MP3 files. Als de MP3 files in
CBR opgenomen zijn, dan wordt ook de transmissiesnelheid weergegeven. Voor in VBR opgenomen
MP3 files wordt alleen “VBR” weergegeven. Als normale audio CD’s CD-TEXT informatie bevatten dan
wordt deze ook getoond. Als er geen CD-TEXT informatie gevonden wordt dan toont het scherm “No
Text”. Ook allerlei interactieve informatie en vragen worden hier weergegeven.
22. BPM/PARAMETER: hier leest U het aantal Beats Per Minuut af, afkomstig van de automatische
beatcounter. Wanneer de effecten geactiveerd zijn toont dit deel van de display de toegepaste effect
parameters.
HOE GEBRUIKEN …
De meeste algemene functies worden uitgelegd in het voorgaande hoofdstuk “controle en functies” In dit
hoofdstuk spreken we over de functies die wat meer uitleg nodig hebben.
ENKELE ALGEMENE FUNCTIES:
SLEEP MODE:
De CD speler zet na 15 minuten inactiviteit automatisch de motor en de laser uit (wanneer in pauze of in
cue modus). Dit verlengt de levensduur van de motor en de laser. Tijdens de Sleep Mode wordt het woord
“z Z ... SLEEP” weergegeven op het scherm. Om de CD speler te doen “ontwaken” moet u enkel op de
Cue of Play toets drukken, het scherm keert terug naar zijn normale weergave en is klaar om de
instructies te ontvangen.
PITCH BEND:
Deze functie wordt gebruikt om de beats van 2 nummers te synchroniseren. Dit kunt u op 2 manieren
doen:
PITCH BEND toetsen: De snelheid neemt toe of neemt af naargelang u op de PITCH BEND+ of op
de PITCH BEND- toets drukt.
JOG WHEEL: wanneer de effecten niet in manuele modus gebruikt worden, zal het JOG Wiel de
weergavesnelheid van de muziek ombuigen naargelang u het JOG wiel in wijzerzin draait om te
versnellen, of in tegenwijzerzin draait om te vertragen. De rotatiesnelheid van het wiel zal bepalen in
welke mate (%) de snelheid moet veranderen.
CD-TEXT:
Niet enkel bij MP3 nummers is het mogelijk om de namen weer te geven. Bepaalde in de handel
verkrijgbare audio CD’s bevatten CD-TEXT informatie. Ook heel wat software om CDR te branden (bvb.
Nero) maken het mogelijk om CD-TEXT aan een audio CD toe te voegen. Als er CD-TEXT gevonden
wordt dan wordt deze automatisch op het scherm weergegeven.
WEERGAVE/OPNEMEN VAN CD-R EN CD-RW:
Naast gewone audio CD’s kan de TMC200 eveneens CD-R’s (CD recordable) en CD-RW’s (CD
rewriteable) lezen. Let er bij het branden van uw CD’s wel op steeds de opties “disc at once” en “track at
once” te gebruiken! Hoewel dit apparaat CD-R en CD-RW kan aflezen die bij hoge snelheid geschreven
werden, raden wij U toch aan om de snelheid bij het branden te beperken tot x12 om een optimale
afleesbaarheid te garanderen. Eveneens raden wij U aan om enkel goede kwaliteit CDROMs van bekende
merken te gebruiken!
Als u een multi sessie CD maakt, dan zal enkel de eerste sessie gespeeld worden:
Als de eerste sessie in CD-DA is, dan kunt u alleen CD-DA nummers spelen.
Als de eerste sessie in MP3 is, dan kunt u alleen MP3 files spelen.
WEERGAVE VAN MP3 FILES:
De CD speler detecteert automatisch of de CD MP3 files bevat. De TMC200 kan verschillende MP3
formaten lezen. Het scherm toont enkele van de ID3-tags (titel van het nummer / artiest / bitrate). De CD
mag tot 999 MP3- files bevatten, verspreid over maximum 255 mappen. De MP3-files mogen de volgende
file extensies bevatten: .mp3 ~ .MP3 ~ .mP3 ~ .Mp3
Controleer in de technische eigenschappen welke MP3-files worden toegestaan.
FOLDER / TRACK SELECTORS:
Meestal bevat een CDR heel wat MP3 files (soms 150 of meer). Om alles wat overzichtelijk te houden kunt
u uw MP3 files in verschillende mappen (directories) onderverdelen. Deze mappen kunnen genoemd
worden naar de namen van de artiesten, het muziekgenre (techno, slows, salsa …), het aantal BPM
(100BPM, 110BPM, 120BPM …) enz…
Met de FOLDER / TRACK keuzeknoppen kunt u gemakkelijk uw verschillende mappen en nummers
overlopen. U kunt de TMC200 in FOLDER mode en TRACK mode zetten, zie ook FOLDER KEUZEKNOP
toets (3)::
FOLDER MODE: gebruik de FOLDER keuzeknop om de gewenste map te kiezen. Met de TRACK
keuzeknop kunt u het gewenste MP3 nummer in deze map kiezen. U kunt echter alleen nummers
kiezen die zich in de geselecteerde map bevinden. Gebruik de FOLDER keuzeknop om naar een
andere map te gaan.
TRACK MODE: u kunt nu alle nummers van uw CD overlopen, alsof er geen mappen aanwezig
waren. Om de nummers van de CD snel te overlopen (per 10 nummers) moet u op de TRACK
keuzeknop drukken terwijl u deze vooruit/achteruit draait.
RELAY FUNCTIE:
Verbind beide TMC200 spelers met door middel van het bijgeleverde faderstart kabeltje.
Laad een CD in beide TMC200 spelers.
Open de 2 schuiven van de ingangskanalen waar de TMC200 spelers op de mixer aangesloten zijn.
Kijk of beide spelers in “single” mode staan. (de “single” indicator(14) op de display is aan). Als de
spelers niet in single mode staan, druk dan op de SGL/CNT toets(24) tot het woord “single” op het
scherm verschijnt.
Start de weergave op één van de twee spelers.
Afwisselend zal er van elke speler een track gespeeld worden. Bij de speler die in pauze wacht kan U
steeds de aanwezige CD door een andere vervangen. Zo kan U een oneindige weergave creëren,
perfect voor gebruik in pubs enz.
Verwijder de kabel als U de relay functie niet meer wenst te gebruiken.
LOOPS:
MAAK EEN LUS (LOOP):
Druk op de IN/R.CUE toets om het startpunt van de Loop te programmeren terwijl de muziek afgespeeld
wordt. Druk daarna op de OUT toets om het eindpunt van de Loop te programmeren. De weergave van de
naadloze lus (seamless loop) start onmiddellijk. (Met wat ervaring zult u perfecte Loops kunnen
programmeren!) Tijdens het afspelen van de Loop kunt u terug op de OUT toets drukken om de loop te
verlaten en terug over te gaan naar de normale weergave van de rest van het nummer
Het is mogelijk om een nieuwe Loop te programmeren, zelfs wanneer een Loop weergegeven wordt. Druk
terwijl de Loop speelt gewoon op de IN/R.CUE toets om het startpunt van de nieuwe Loop te bepalen.
Breng nu het eindpunt in door op de OUT toets te drukken. Uw nieuwe Loop is nu geprogrammeerd en
wordt afgespeeld.
HERSTART EEN LOOP:
Dit kan gedaan worden op 3 manieren:
Wanneer een Loop geprogrammeerd is en u deze verlaten hebt door op de OUT toets te drukken, druk
dan gewoon op de RELOOP toets om de Loop opnieuw te starten.
Wanneer een Loop geprogrammeerd is en u deze verlaten hebt door op de OUT toets te drukken, druk
dan gewoon terug op de OUT toets om de Loop opnieuw te starten. De plaats waar u op de OUT toets
gedrukt hebt is nu geprogrammeerd als nieuw eindpunt van de Loop.
Wanneer de Loop wordt afgespeeld, druk dan op de RELOOP toets om de Loop onmiddellijk terug te
starten. U kunt dit verschillende keren na elkaar doen om een «stotter» effect te creëren.
JB SYSTEMS® 35/78 TMC200
JB SYSTEMS® 36/78 TMC200
Page 21

NEDERLANDS HANDLEIDING
NEDERLANDS HANDLEIDING
EEN LOOP BEWERKEN:
Wanneer er al een Loop geprogrammeerd is, druk dan gedurende ongeveer 2 seconden op de
RELOOP/STUTTER toets om de loop te kunnen bewerken. Terwijl de loop naadloos wordt weergegeven
kunt u op het LCD scherm de tijdinformatie van het eindpunt van de lus aflezen. Gebruik het grote jog wiel
om een nieuw eindpunt voor de lus in te stellen. Om dit te vergemakkelijken hoort u continu wat u precies
aan het eindpunt veranderde. Wanneer de loop perfect is, druk dan op de LOOP OUT toets om het nieuwe
eindpunt van de loop op te slagen en de loop te verlaten.
Opmerking: U kunt loops opslagen in de HOT CUE toetsen. Dit betekent dat u over 4 loops per nummer
kunt beschikken. Hieronder leert u hoe u deze lussen kunt opslagen.
OVER EFFECTEN:
In de beschrijving van de effecten vindt u al heel wat informatie, vergeet dat gedeelte ook niet te lezen!
GEBRUK DE EFFECTEN IN DE BEAT GESYNCHRONIZEERDE MODUS:
Terwijl de muziek speelt kunt u op een van de 3 effecten en op de BPM-SYNC toets (17) drukken zodat
deze aan gaat: het effect op de beat van de muziek. Gebruik de EFFECT-SYNC toetsen (15+16) om
verschillende beat presets te kiezen. Gebruik de IMPACT toets (16) om het impact van het effect in te
stellen.
GEBRUIK DE EFFECTEN IN MANUELE MODUS:
Terwijl de muziek speelt kunt u op een van de 3 effecten en op de BPM-SYNC toets (17) drukken zodat
deze uit gaat: gebruik het JOG WIEL (27) om het effect in real-time te veranderen. Gebruik de IMPACTtoets (16) om het impact van het effect aan te passen.
HET GEHEUGEN:
VERSCHILLENDE GEHEUGENS:
Voor wij over het gebruik van het geheugen spreken moeten u het onderscheid kunnen maken tussen
“track memory” (geheugen van het nummer) en “permanent memory” (het permanente geheugen):
Track Memory: Dit is het geheugen waarin de TMC200 een set van maximum 4 Cue punten en /of
Loops van een nummer opslaagt. U kunt een “track memory” instellen voor elk nummer van een CD.
Voorbeeld: uw CD bevat 16 nummersvoor elk nummer kunt u tot 4 Cue punten en/of Loops
opslagen. Dit maakt een totaal van 16 x 4 = 64 Cue punten en/of Loops op één enkele CD!
Permanent Memory: Dit is het grote geheugen waarin alle Cue punten en Loops permanent worden
opgeslagen. Het is in feite een geïndexeerde verzameling van “track memories”. Wanneer u vooraf
opgeslagen Cue punten oproept van een bepaald nummer, dan maakt u een overdracht van
permanent geheugen “permanent memory” naar de “track memory”.
GEBRUIK VAN DE “TRACK MEMORY”:
OPSLAAN VAN EEN MASTER CUE PUNT:
Er zijn 2 manieren om een Master Cue punt te bepalen:
Druk op de LOOP IN (4) toets tijdens de normale weergave van een CD om het nieuwe Cue punt te
bepalen (“CUE on the fly”).
Zet de CD speler in pause stand en gebruik het jog/shuttle wiel om de exacte plaats van het Cue punt
te bepalen. Eenmaal u dit gevonden hebt, druk dan op de LOOP IN toets (4) om het nieuwe Cue punt
te programmeren. (of druk op de PLAY/PAUSE toets)
Als het Cue punt geprogrammeerd is, druk dan op de CUE toets (7) om dit Cue punt terug op te roepen.
OPSLAAN VAN EEN GEWOON CUE PUNT IN DE “HOT CUE” TOETSEN:
Druk eerst op de MEMORY(10) toets om de hot cue memory modus in te schakelen (MEMORY toets licht
op).
Druk op één van de vier HOT CUE toetsen op het juiste moment tijdens de normale weergave van het
nummer: de HOT CUE toets die u net gebruikte veranderd in een blauwe kleur om aan te wijzen dat
het Cue punt is opgeslagen. (“Cue on the fly”).
Zet de CD speler in pauze stand om het jog/shuttle wiel te gebruiken voor het exact opzoeken van het
Cue punt. Eenmaal u dit gevonden hebt, druk dan op één van de vier HOT CUE toetsen om het
nieuwe Cue punt op te slagen: de HOT CUE toets die u net gebruikte veranderd in een blauwe kleur
om aan te wijzen dat het Cue punt is opgeslagen.
Als het Cue punt geprogrammeerd is, druk dan op de HOT CUE toets om de weergave opnieuw te starten
vanuit het opgeslagen Cue punt.
OPSLAGEN VAN EEN LOOP IN DE “HOT CUE” TOETSEN:
Dit is sterk vergelijkbaar met het opslaan van een gewoon Cue punt. Het enige verschil is dat u de
TMC200 eerst in Loop modus moet zetten. Wanneer de Loop wordt afgespeeld, druk dan op de MEMORY
toets om de CD speler in de HOT CUE modus te zetten.(MEMORY toets licht op). Druk daarna op één
van de vier HOT CUE toetsen: de HOT CUE toets die u net gebruikte verandert in een witte kleur om aan
te tonen dat de Loop die op dit moment speelt is opgeslagen. U kunt tot 4 Loops per nummer opslaan!
DE “HOT CUE” TOETSEN WISSEN:
U kunt gemakkelijk de inhoud van een HOT CUE toets wissen door eerst op de DELETE CUE toets (11),
te drukken en daarna op de HOT CUE toets die u wilt wissen. Of sla eenvoudigweg een nieuw Cue punt of
loop op in deze this HOT CUE toets. U kunt eveneens de inhoud van de vier HOT CUE toetsen
tegelijkertijd wissen door gedurende meer dan 2 seconden op de DELETE CUE toets (11) te drukken. U
zult merken dat de lichten uitgaan om u erop te wijzen dat de HOT CUE toetsen leeg zijn.
GEBRUIK VAN HET PERMANENTE GEHEUGEN:
Om veiligheidsredenen worden de Cue punten en de Loops die opgeslagen zijn in de HOT CUE toetsen
niet automatisch opgeslagen in het permanente geheugen. Dit betekent dat wanneer u een set Cue
punten en Loops oproept van het permanente geheugen naar de HOT CUE toetsen (welke betrekking
hebben tot de track memory), u deze kunt bewerken, wijzigen en wissen, zoveel u maar wilt. Het
permanente geheugen zal niet gewijzigd worden zolang u geen back-up maakt van de HOT CUE toetsen
naar het permanente geheugen.
OPSLAGEN IN HET PERMANENTE GEHEUGEN:
Druk gedurende 2 seconden op de MEMORY toets (10). Het scherm toont “Saving” om aan te duiden dat
de Cue punten en de Loops van de HOT CUE toetsen van dit nummer opgeslagen zijn in het permanente
geheugen.
EEN NUMMER WISSEN IN HET PERMANENTE GEHEUGEN:
Kies het nummer dat u wilt wissen en laad de hot cues. Druk tegelijkertijd op de “DELETE CUE” en de
“MEMORY” toetsen tot de display “DEL ALL?” vraagt. Als U de YES toets (PITCH BEND+ toets) indrukt
dan wordt alle cue informatie voor dit nummer in het permanente geheugen gewist.
“HOT CUE POINTS/LOOPS” OPROEPEN UIT HET PERMANENTE GEHEUGEN:
Omdat het oproepen van de permanente cue punten enkele seconden duurt wordt dit niet automatisch
uitgevoerd. Soms hebt U de cue punten gewoon even niet nodig en dan zou het zonde zijn om nutteloos
te moeten wachten. Hieronder vindt U hoe het oproepen werkt:
Geen opgeslagen Cue punten: Als U een track kiest waarvoor er geen cue punten in permanent
geheugen bestaan dan gebeurt er niets: u kan direct de play/pauze toets indrukken om de weergave te
starten.
Er bestaan cue punten in permanent geheugen: Als U een track kiest waarvoor er cue punten in
permanent geheugen bestaan dan zal er “Load Cues?” op het scherm verschijnen. De TMC200 vraagt
wat U wil doen. Dit zijn de mogelijkheden:
U drukt op de YES toets: Druk YES (“pitch bend+” toets) om de cue punten uit het
permanente geheugen naar de hot cue toetsen te laden. Tijdens dit proces toont het scherm
RECALL. Zodra de Hot Cues geladen zijn kunt U de weergave starten.
U drukt op de NO toets: De cue punten worden niet geladen en het scherm toont de normale
track en tijd informatie van het nummer. U kan de weergave onmiddellijk starten.
U doet niets: na enkele seconden zal het scherm automatisch terug overgaan naar zijn
gewone aanduidingen waarbij de cue punten niet werden geladen.
HET VOLLEDIGE PERMANENTE CUE GEHEUGEN WISSEN:
Houd tegelijkertijd de DELETE CUE toets (11) en MEMORY toets (10) ingedrukt terwijl u de TMC200 aan
zet: het permanente Cue geheugen is gewist. Tijdens deze actie toont het scherm “clearALL”.
WAARSCHUWING: DEZE ACTIE KAN NIET ONGEDAAN GEMAAKT WORDEN, ALLE CUE
PUNTEN/LOOPS ZIJN VOOR GOED GEWIST !!!
JB SYSTEMS® 37/78 TMC200
JB SYSTEMS® 38/78 TMC200
Page 22

NEDERLANDS HANDLEIDING
FIRMWARE UPDATES
Voor een betere flexibiliteit kan de TMC200 op om het even welk ogenblik opgewaardeerd worden, om
nieuwe functies bij te voegen of eventuele bugs te herstellen. Het is aanbevolen om af en toe een kijkje te
nemen op onze website (www.jbsystems.be) om te zien of er geen nieuwe firmware beschikbaar is als
download.
Controleer de firmware versie(s)
Houd de SGL/CTN toets (24) ingedrukt terwijl u het toestel aanzet: de versie van de geïnstalleerde
firmware wordt weergegeven op de display. De firmware bestaat uit verschillende delen: Control + DSP +
Servo, elk met hun eigen versienummer.
Upgrade instructies
Aangezien de instructies voor een opwaardering kunnen verschillen controleert u best de “TMC200 –
upgrade instructions.txt” file welke bij elke update download bijgevoegd wordt.
TECHNISCHE KENMERKEN
Netvoeding: AC 100-240V, 50/60Hz
Verbruik: 13W
Uitgangsspanning: 2,0V +/-0,5dB @ 1kHz, 0dB
Frequentiebereik: 17-20.000Hz (+/-0.4dB)
THD + ruis: 0.006% @ 1kHz, 0dB
S/R verhouding (IHF-A): >130dB @ 1kHz, 0dB
Tijd tussen opeenvolgende tracks: <2sec
Tijd bij schakelen van track 1 20: <4sec
Laser Pickup: Sanyo 3spot detectie 780nm
Elektronische tracking: volautomatische digitale tracking.
DISC FORMAT:
Possible file extensions: .mp3 ~ .MP3 ~ .mP3 ~ .Mp3
ID3-tag compatibiliteit: ID3v2 en vroeger
ISO9660: Level1 (max. 8”/8.3” character style)
Level2 (max. 31/30 character style)
Joliet: max. 63/63 character style
CD-ROM sector format: mode-1 only
Max. Folders: 255
Max. Files: 999 (max. 255 per folder)
MP3 FORMATS:
MPEG1 Layer3 (ISO/IEC11172-3): mono / stereo sampled at: 32 - 44,1 - 48kHz
Bitrates: 32 – 320 Kbps
Bitrate modes: CBR (Constant Bitrate) or VBR (Variable Bitrate)
MPEG2 Layer3 (ISO/IEC13818-3): mono / stereo sampled at: 16 – 22,05 - 24kHz
Bitrates: 32 – 160 Kbps
Bitrate modes: CBR (Constant Bitrate) or VBR (Variable Bitrate)
MPEG2,5 Layer3: mono / stereo sampled at: 8 – 11,025 - 12kHz
Bitrates: 32 – 160 Kbps
Bitrate modes: CBR (Constant Bitrate) or VBR (Variable Bitrate)
Afmetingen: 246(B) x 103,5(H) x 348(D) mm
Gewicht: 2,66 kg
Elke inlichting kan veranderen zonder waarschuwing vooraf
U kan de laatste versie van deze handleiding downloaden via
Onze website: www.beglec.com
DEUTSCH BEDIENUNGSANLEITUNG
BEDIENUNGSANLEITUNG
Vielen Dank, dass Sie sich für den Erwerb dieses JBSystems®-Produkt entschieden haben. Bitte lesen sie
diese Bedienungsanleitung sorgfältig vor der Inbetriebnahme durch, zur vollen Ausschöpfung der
Möglichkeiten, die dieses Gerät bietet sowie, zu Ihrer eigenen Sicherheit.
BESONDERHEITEN
Vollständige MP3 Wiedergabe (max. 999 MP3-dateien / 255 Ablagen auf 1 CD)
o MPEG1 layer3 (32 + 44,1 + 48kHz)
o MPEG2 layer3 (16 + 22,05 + 24kHz)
o MPEG2.5 layer3 (8 + 11,025 + 12kHz)
o Unterstützt beide Bitraten Verfahren (CBR und VBR).
Digitaler Scratch-Effekt über berührungsempfindliches Datenrad (Jog-Wheel)
Elektronischer Brake[Bremse]-Effekt + 3 digitale Effekte:
Echo, Flanger, Filter
Manuelle Steuerung der Parameter
Taktsynchronisierter Modus
Alphanumerisches LCD-Display (CD-TEXT und ID3v2 Tags: zeigt Titel, Künstler, Bitrate, … an)
Hot Cue Tasten können bis zu 4 Cue-Punkte oder nahtlose Loops pro Track speichern!
Festspeicher für bis zu 2000 Cue-Punkte und Loops
Nahtlose real-time Loop edit Funktion!
Vollautomatischer BPM counter
PitchLock (Mastertempo): Keine Beeinflussung der Tonhöhe bei Änderung der Geschwindigkeit.
Instant Memory Start mit Auto CUE (Wiedergabe ohne Zeitverzögerung)
Pitch wählbar: +/-4% *+/-8% *+/-16% *+/-100% (bis zu +/-16% mit MP3)
Pitch-Bend Funktion für optimales mixen
Einstellbarer Pitch Bend Parameter für ultra präzises Pitch Bending (Software V22 und höher)
Bis zu 4 Loops für jeden Track mit reloop/stutter
Echtzeit Cue (“Cue on the fly”)
Ultra schneller Memory-Start innerhalb von 10msec
Fader-Start, Fader-Stop (Back Cue)
Auto Cue Funktion(-48dB)
4 verschiedene Geschwindigkeitsscannungen
Alphanumerisches LCD Display (für CD-TEXT und MP3 ID3v2 Tracks)
Wählbare Zeitanzeige ( Laufzeit, Ablaufzeit, Restzeit )
Drehrad mit spezieller Gummioberfläche
Single/continuous play
Relay Play (Abwechselnde Wiedergabe zwischen zwei TMC200)
Soft Touch Tasten mit mehrfarbiger Hintergrundbeleuchtung
Transport Schutz ( nach 60 sec. schließt das CD Fach automatisch )
Automatische Sleepfunktion zur Verlängerung der Laserlebensdauer
S/PDIF digitaler Audioausgang
VOR DEM GEBRAUCH
Überprüfen Sie, ob die folgenden Teile im Paket enthalten sind:
TMC200
Bedienungsanleitung
Netzanschlusskabel
Chinch-Kabel
Fader-Start Kabel (mono Miniklinke/Miniklinke)
JB SYSTEMS® 39/78 TMC200
JB SYSTEMS® 40/78 TMC200
Page 23

DEUTSCH BEDIENUNGSANLEITUNG
DEUTSCH BEDIENUNGSANLEITUNG
SICHERHEITSHINWEISE
ACHTUNG: Um sich nicht der Gefahr eines elektrischen
CAUTION
Das Blitzsymbol im Dreieck weist den Benutzer darauf hin, dass eine Berührungsgefahr mit
nicht isolierten Teilen im Geräteinneren, die eine gefährliche Spannung führen, besteht. Die
Spannung ist so hoch, das hier die Gefahr eines elektrischen Schlages besteht.
Das Ausrufezeichen im Dreieck weist den Benutzer auf wichtige Bedienungs- und
Wartungshinweise in den Dokumenten hin, die dem Gerät beiliegen.
Dieses Symbol bedeutet: Nur innerhalb von Räumen verwenden.
Dieses Symbol bedeutet: Achtung! Bedienungsanleitung lesen!
Dieses Symbol bedeutet: Klasse II Klassifizierung
Zur Vermeidung von Stromschlag oder Feuer, Gerät bitte nicht Regen oder Feuchtigkeit aussetzen.
Zur Vermeidung von Kondensation im Inneren des Geräts, bitte nach Transport in eine warme Umgebung
einige Zeit zum Temperaturausgleich bringen. Kondensation kann zu Leistungsverlust des Gerätes oder
gar Beschädigung führen.
Gerät nicht im Freien und in feuchten Räumen und Umgebungen verwenden.
Keine Metallgegenstände oder Flüssigkeiten ins Innere des Geräts gelangen lassen. Keine mit Flüssigkeit
gefüllte Gegenstände z.B. Vasen, auf das Gerät stellen. Kurzschluß oder Fehlfunktion können die Folge
sein. Falls es doch einmal vorkommen sollte, bitte sofort Netzstecker ziehen und vom Stromkreis
trennen.
Offene Brandquellen, wie z.B. brennende Kerzen, sollten nicht auf das Gerät gestellt werden.
Ventilationsöffnungen nicht abdecken, da Überhitzungsgefahr!
Nicht in staubiger Umgebung verwenden und regelmäßig reinigen.
Für Kinder unerreichbar aufbewahren.
Unerfahrene Personen sollen das Gerät nicht bedienen.
Umgebungstemperatur darf 40ºC nicht überschreiten.
Stets Netzstecker ziehen, wenn Gerät für längeren Zeitraum nicht genutzt, oder es gewartet wird.
Elektrische Anschlüsse nur durch qualifiziertes Fachpersonal überprüfen lassen.
Sicherstellen, daß Netzspannung mit Geräteaufkleber übereinstimmt.
Die Netzsteckdose sollte immer gut erreichbar sein um das Gerät vom Netz zu trennen.
Gerät nicht mit beschädigtem Netzkabel betreiben.
Netzkabel nicht mit anderen Kabeln in Berührung kommen lassen!
Das Gerät ist nicht vollständig vom Netz getrennt wenn der Netzschalter sich in der AUS-Stellung
befinded.
Gerät nicht öffnen. Abgesehen vom tausch der Sicherung sind keine zu wartenden Bauteile im Gerät
enthalten.
Sicherung niemals reparieren oder überbrücken, sondern immer mit gleichartiger Sicherung ersetzen!
Bei Fehlfunktion, Gerät nicht benutzen und mit Händler in Verbindung setzen.
Bei Transport bitte Originalverpackung verwenden, um Schäden am Gerät zu vermeiden.
Aus Sicherheitsgründen dürfen an dem Gerät keine unbefugten Veränderungen vorgenommen werden.
INSTALLATIONSANLEITUNG:
Stellen Sie das Gerät in einem gut belüfteten Raum auf, wo es nicht Feuchtigkeit und hohen Temperaturen
ausgesetzt wird.
Plazieren und benutzen Sie das Gerät für eine längere Zeit neben sehr warmen Geräten wie Verstärker,
Lampen, etc., könnte es die Funktion des Gerätes beeinträchtigen.
Sollte das Gerät in ein Flightcase eingebaut werden, achten Sie auf eine gute Luftzirkulation.
Wenn das Gerät aus einer kalten Umgebung an einem warmen Ort aufgestellt wird, kann sich
Kondenswasser bilden. Um Fehlfunktionen zu vermeiden, sollten Sie das Gerät für ca. 1 Stunde vom
Stromnetz trennen.
Schlags auszusetzen, entfernen Sie keines der
Gehäuseteile. Im Geräteinneren befinden sich keine vom
Benutzer reparierbaren Teile. Überlassen Sie
Reparaturen dem qualifizierten Kundendienst.
REINIGUNG DES CD-PLAYERS:
Entfernen Sie Staub und Schmutz mit einem weichen, trockenen Tuch. Achten Sie darauf, dass keine
Flüssigkeit in das Geräteinnere gelangen kann. Benutzen Sie keinen Verdünner, Benzin oder andere
chemische Mittel. Die Oberfläche des Gerätes könnte zerstört werden.
VERBINDUNGEN
Benutzen Sie das mitgelieferte Chinch-Kabel, um den Audio-Output des CD-Spielers mit einem CD-Input
Ihrer Mischer-Einheit zu verbinden.
Schließen Sie auch das Fader-Start-Kabel an, falls Ihr Audio-Mixer Fader-Start-Verbinder hat. (Synq®
oder Pioneer® kompatibel)
Stecken Sie das Stromkabel ein.
TASTEN UND FUNKTIONEN
1. SEARCH Taste: Diese Tasten haben 4 Vorlauf- und 4 Rücklaufgeschwindigkeitseinstellungen zum
Durchsuchen der Songs. Umso länger Sie eine Taste drücken, umso schneller durchlaufen Sie die
Musik.
2. TRACK SEARCH Knopf: Verschiedene Funktionen sind verfügbar:
Normale Tracksuche: Drehen Sie den Knopf, um die Tracks mit +1/-1 Schritten zu durchlaufen.
Schnelle Tracksuche: Halten Sie den Knopf gedrückt und drehen Sie ihn gleichzeitig, um die
Tracks mit +10/-10 Schritten zu durchlaufen.
Restart Display-Info: Durch ein kurzes Drücken wird auf dem Display die Information vom
Anfang angezeigt (Restart Scrollen)
JB SYSTEMS® 41/78 TMC200
JB SYSTEMS® 42/78 TMC200
Page 24

DEUTSCH BEDIENUNGSANLEITUNG
DEUTSCH BEDIENUNGSANLEITUNG
3. FOLDER SELECTOR Knopf: Verschiedene Funktionen sind verfügbar:
Folder search: Wenn Ihre CD MP3 Unterordner besitzt, können diese durch einfaches drehen
des folder selector angezeigt werden. Das Display zeigt nun die Verzeichnis Nummer und Name
an. Schauen Sie im nächsten Kapitel für mehr Informationen. Wenn die CD keine Unterordner
enthält hat der selector keine Bedeutung.
Show folder name: Verzeichnis Name wird dauerhaft angezeigt, wenn man den folder selector
kurz drückt.
Wechseln zwischen FOLDER / TRACK Modus: Halten Sie den Knopf ungefähr 1 Sekunde lang
gedrückt. Das Display beginnt zwischen “FOLDERmd” und “TRACKmd” hin- und herzuwechseln.
Lassen Sie den Knopf los, sobald der gewünschte Modus angezeigt wird.
FOLDER MODE: man kann nur Tracks in dem ausgewählen Verzeichnis auswählen. Um in ein
anderes Verzeichnis zu gelangen muß man den FOLDER selector nutzen.
TRACK MODE: nun ist es möglich alle Tracks der CD auszuwählen, alsob keine Unterordner
vorhanden sind. Um mehrere TRACKS (10er Schritte) schnell auszuwählen, drücke den
TRACK Wählknopf währen man vorwärts/rückwärts dreht.
4. IN/R.CUE Taste: Erlaubt Ihnen, ohne die W iedergabe zu beenden, den CUE Punkt zu setzen (CUE ON
THE FLY). Diese Taste setzt auch den Anfang eines nahtlosen Loop’s. Wenn Sie einen der HOT CUE’s
(9) abspielen, wird die Ausgangsposition auch zu dieser Taste kopiert.
5. OUT Taste: Mit dieser Taste setzen Sie den Endpunkt in einem Loop. Der Player gibt nun diesen Loop
solange wieder, bis Sie die Taste noch einmal drücken. Ist ein Loop programmiert, aber nicht aktiv
können Sie ihn neu starten. Der Punkt, wo Sie die Taste drücken, wird als der Endpunkt gespeichert.
Wenn der Player sich im „Loop edit mode” befindet, drücken Sie den LOOP OUT Knopf um die Stellung
zu speichern und die Funktion zu verlassen.
6. RELOOP/STUTTER Taste: Diese Taste hat 3 Funktionen:
RELOOP: Wenn ein Loop programmiert worden ist und Sie die OUT Taste (5) gedrückt haben,
drücken Sie diese Taste um den Loop wieder zu beginnen. Um den Loop zu verlassen drücken
Sie die OUT Taste (5) (Start- und Endpunkt werden nicht verändert)
STUTTER: Während der Loop Wiedergabe, drücken Sie diese Taste um direkt zum Startpunkt
des Loop’s zu gelangen. Dieser „Stotter“ Effekt gibt Ihnen die Möglichkeit ihre Darbietung kreativ
zu erweitern.
LOOP EDIT: Sobald ein Loop programmiert wurde, drücke den RELOOP/STUTTER Schalter für
ca. 2 sec. um in den „Loop edit” Modus zu gelangen. Nun ist es möglich die Endpunkte der Loops
zu wechseln. Siehe Kapitel „Wie nutze ich…” für mehr Informationen.
7. CUE Taste: Drücken Sie die CUE-Taste während der Wiedergabe, beginnt die Wiedergabe sofort ab
dem programmierten CUE Punkt, solange die CUE Taste gedrückt ist. Sobald der CUE-Taste
losgelassen wird, springt der Tonabnehmer an den markierten CUE Punkt. Auch das Jog/Wheel kann
im Pausenmodus (PLAY-/PAUSE LED blinkt) dazu verwendet werden, um einen anderen CUE Punkt zu
suchen. Durch Drücken der PLAY/PAUSE Taste und CUE können Sie den neuen CUE Punkt
übernehmen.
8. PLAY/PAUSE Taste: Jedes Mal, wenn Sie die PLAY/PAUSE Taste drücken, wechselt der Player
zwischen Wiedergabe und Pause oder Pause und Wiedergabe
9. HOT CUE Taste: Mit diesen 4 programmierbaren Tasten können Sie CUE-Punkte und/oder Loop’s
speichern. W enn ein normaler CUE gespeichert wird, ist die entsprechende CUE Taste blau, wenn eine
Loop gespeichert wird ist die entsprechende CUE Taste weiß. Alle abgespeicherten Cue-Punkte und
Loops können für den späteren Gebrauch im Festspeicher gesichert werden. Lesen Sie das Kapitel
„WIE NUTZE ICH ...“ für weitere Informationen über das Programmieren von Cue-Punkten usw.
10. MEMORY KNOPF: Wird verwendet, um Cue-Punkte und Loops in den Hot Cue Knöpfen (19) und in
den permanenten Cue Speicher zu speichern.
Speichern der HOT CUE Schalter: Drücke den MEMORY Schalter kurz um die Cue Punkte und
Loops auf einem der 4 HOT CUE Schalter zu speichern.
Speichern in den permanenten Speicher: Drücke den MEMORY Knopf solange bis im LCD
Display “SAVING“ blinkend erscheint. Der Inhalt der HOT CUE Knöpfe für diese Audio-Track
wurde somit permanent gespeichert.
Wichtig: Nicht nur die HOT CUE-Tasten werden im Festspeicher abgespeichert, sondern auch viele
andere Parameter, sodass Sie diese nicht jedes Mal wieder neu einstellen müssen, wenn Sie den
Player einschalten. Neben den Hot-Cue-Tasten werden folgende Parameter ebenfalls
abgespeichert: Pitch Range (Tonhöhenbereich), Single/Cont Modus, Zeitanzeige, Jog-WheelEinstellung, Auto Cue, Auto BPM-Modus, Pitch an/aus, Pitch Lock an/aus und Start-/StoppParameter
Beachten Sie weitere Hinweise in dieser Bedienungsanleitung, in der Sie Informationen über den
Gebrauch dieses Knopfes erhalten.
11. DELETE [Löschen] CUE Taste: Diese Taste hat verschiedene Funktionen:
LÖSCHEN 1 HOT CUES: Drücken Sie die DELETE CUE Taste gefolgt von der HOT-CUE-Taste, die
Sie aus dem Track-Memory entfernen möchten. Die Entferntaste wird schwarz.
LÖSCHEN VON 4 HOT CUES: Halten Sie die DELETE CUE Taste ungefähr 2 Sekunden lang
gedrückt, um alle 4 Hot-Cues aus dem Track Memory zu entfernen.
LÖSCHEN DES TRACKs: Drücken Sie ca. 2 Sekunden gleichzeitig die DELETE CUE Taste und die
MEMORY Taste (10) um die Hot-Cues für den gesamten Track aus dem Festspeicher zu entfernen.
Da dieser Schritt nicht rückgängig gemacht werden kann, fragt das Display Sie zunächst, ob Sie
sicher sind: mit Hilfe der PITCH BEND Tasten (21) können Sie YES (Ja) oder NO (Nein) wählen.
Siehe Kapitel „WIE NUTZE ICH ...“ für weitere Informationen.
12. OPEN/CLOSE Knopf: Drücken Sie diesen Knopf, um das CD-Fach auf der Vorderseite des TMC200 zu
öffnen und zu schließen. Während des Abspielens der CD, ist die Schublade nicht zu öffnen. Falls das
Fach nach 60 Sekunden nicht geschlossen wird, schließt es automatisch, um Schäden vorzubeugen.
13. CD TRAY INDIKATOR: Erleuchtet, wenn eine CD wird geladen.
14. EFFECT Taste: Jede dieser Tasten hat seine eigenen Einstellungen:
ECHO EFFECT-Taste: Drücken Sie diese Taste, um den Echo-Effekt zu aktivieren. Abhängig vom
Sync-Modus (manuell oder taktsynchronisiert) sind verschiedene Einstellungen möglich:
Manueller Modus: die BPM-SYNC Taste (17) ist nicht erleuchtet. Sie können alle Parameter
manuell einstellen, benutzen Sie dabei die folgenden Steuerknöpfe:
Jog-wheel (27): um die Echozeit von 1ms bis 2000ms einzustellen.
IMPACT Taste (16): Solange die IMPACT- Taste erleuchtet ist, können Sie das Datenrad (27)
benutzen, um die Wirkung (trocken/nass) des Effekts zu ändern.
Taktsynchronisierter Modus: Die BPM-SYNC Taste (17) ist erleuchtet. Sie können die
folgenden Steuerknöpfe benutzen:
EFFECT SYNC-Taste (15+16): Wählen Sie eine der taktsynchronisierten Echo-
Voreinstellungen.
IMPACT Taste (16): Solange die IMPACT- Taste erleuchtet ist, können Sie das Datenrad (27)
benutzen, um die Wirkung (trocken/nass) des Effektsignals zu ändern.
FLANGER EFFECT Taste: Drücken Sie diese Taste, um den Flanger-Effekt zu aktivieren. Abhängig
vom Sync-Modus (manuell oder taktsynchronisiert) sind verschiedene Einstellungen möglich:
Manueller Modus: die BPM-SYNC Taste (17) ist nicht erleuchtet. Sie können alle Parameter
manuell einstellen, benutzen Sie dabei die folgenden Steuerknöpfe:
Jog-wheel (27): zum manuellen Ändern des Effekts.
IMPACT Taste (16): Solange die IMPACT- Taste erleuchtet ist, können Sie das Datenrad (27)
benutzen, um die Wirkung (trocken/nass) des Effekts zu ändern.
Taktsynchronisierter Modus: Die BPM-SYNC Taste (17) ist erleuchtet. Sie können die
folgenden Steuerknöpfe benutzen:
EFFECT SYNC- Taste (15+16): Wählen Sie eine der taktsynchronisierten Sweep-
Voreinstellungen.
IMPACT Taste (16): Solange die IMPACT- Taste erleuchtet ist, können Sie das Datenrad (27)
benutzen, um die Wirkung (trocken/nass) des Effektsignals zu ändern.
FILTER EFFECT Taste: Drücken Sie diese Taste, um den Filter-Effekt zu aktivieren. Abhängig vom
Sync-Modus (manuell oder taktsynchronisiert) sind verschiedene Einstellungen möglich:
Manueller Modus: die BPM-SYNC Taste (17) ist nicht erleuchtet. Sie können alle Parameter
manuell einstellen, benutzen Sie dabei die folgenden Steuerknöpfe:
Jog-wheel (27): zum manuellen Ändern der Grenzfrequenz des Filters.
IMPACT Taste (16): Solange die IMPACT- Taste erleuchtet ist, können Sie das Datenrad (27)
benutzen, um die Wirkung (Q-Faktor) des Filters zu ändern.
Taktsynchronisierter Modus: Die BPM-SYNC Taste (17) ist erleuchtet. Sie können die
folgenden Steuerknöpfe benutzen:
EFFECT SYNC- Taste (15+16): Wählen Sie eine der taktsynchronisierten Sweep-
Voreinstellungen.
IMPACT Taste (16): Solange die IMPACT- Taste erleuchtet ist, können Sie das Datenrad (24)
benutzen, um die Wirkung (Q-Faktor) des Filters zu ändern.
BRAKE Taste: Drücken Sie diese Taste, um den Brake-Effekt zu aktivieren. Jetzt können Sie die
Beschleunigung/Abbremsung der Musik festlegen, indem Sie die PLAY/PAUSE-Taste benutzen (8).
Sie können die Parameter mit den Tasten (15+16) einstellen, siehe nachstehend.
JB SYSTEMS® 43/78 TMC200
JB SYSTEMS® 44/78 TMC200
Page 25
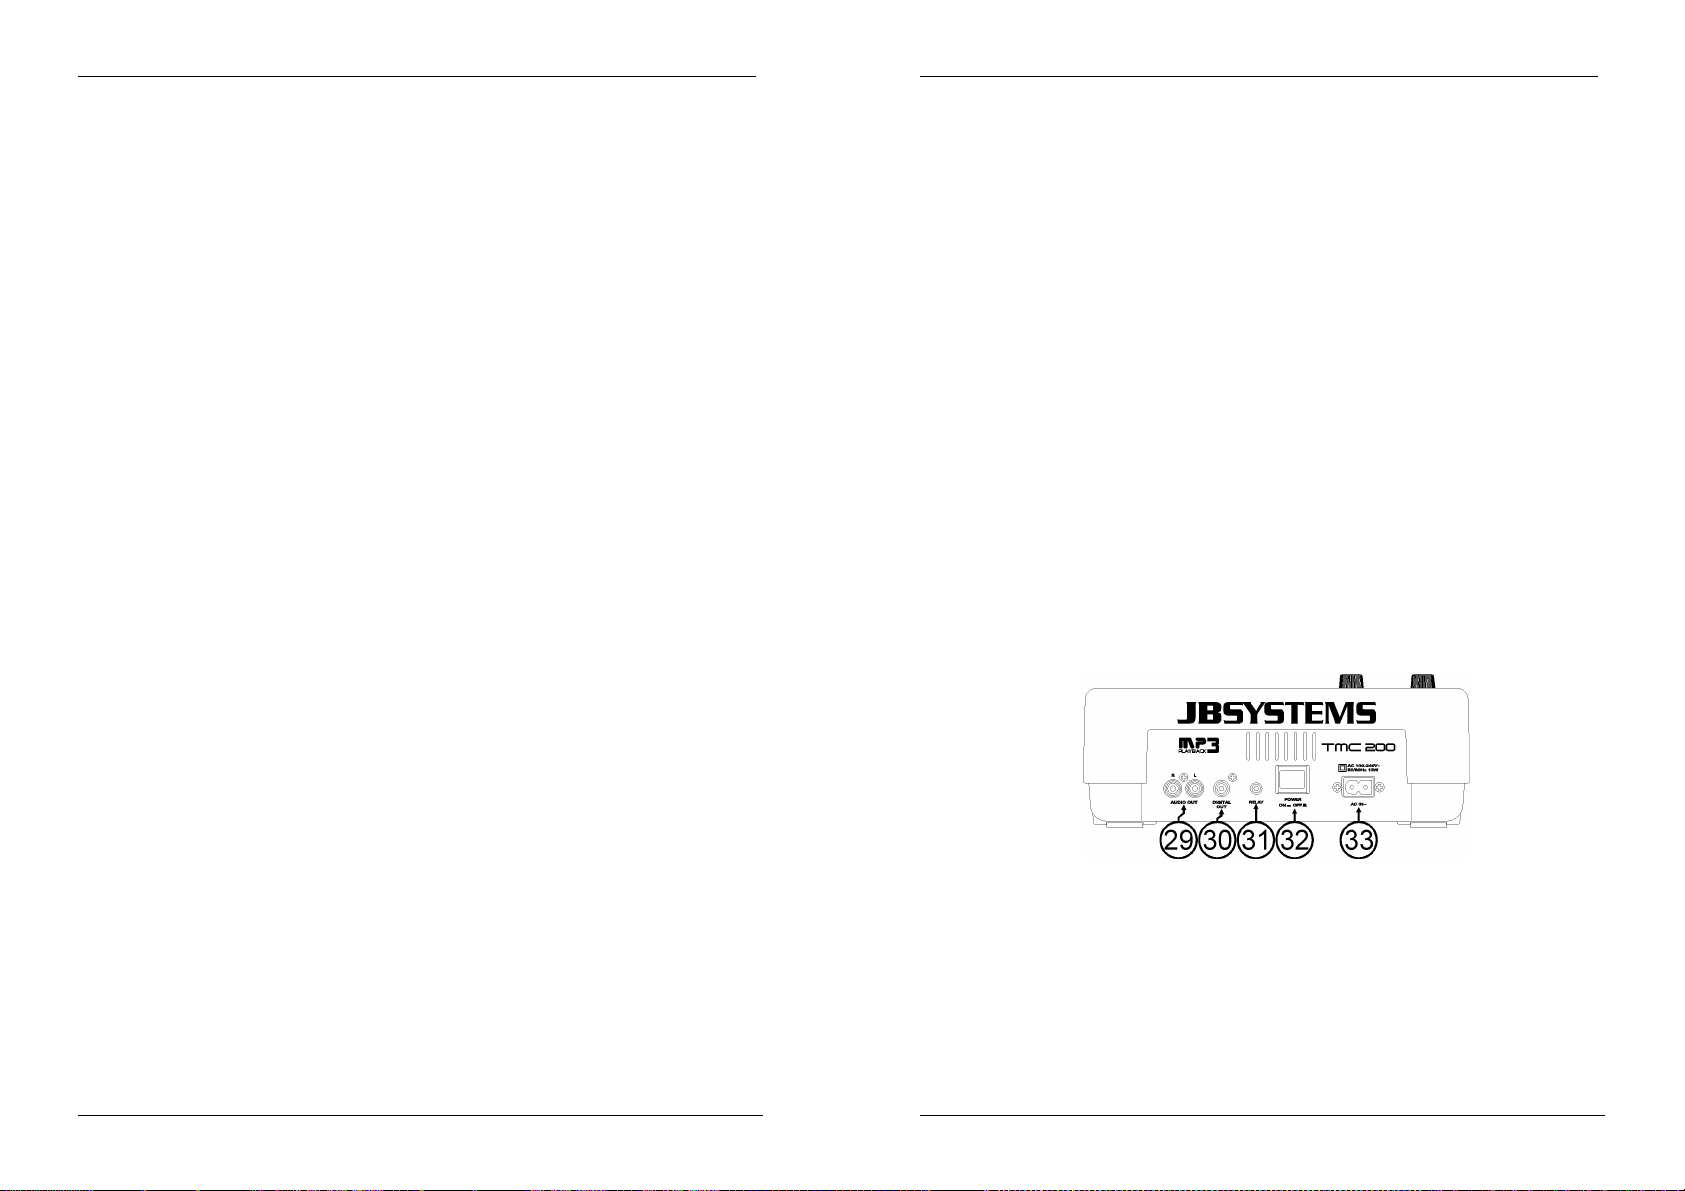
DEUTSCH BEDIENUNGSANLEITUNG
DEUTSCH BEDIENUNGSANLEITUNG
15. EFFECT SYNC/START- Taste: Diese Taste hat verschiedene Funktionen je nach Effekt-Modus:
BPM-Sync. Effekte: Wenn ein Effekt im taktsynchronisierten Modus eingesetzt wird, leuchtet
diese Taste. Sie können jetzt wählen, wie der Effekt mit dem Takt synchronisiert werden soll.
Benutzen Sie diese Taste, um den aktuellen BPM-Parameter zu halbieren.
BRAKE-Effekt: Drücken Sie diese Taste, um die Beschleunigungszeit zu ändern (Zeiteinstellung
von Null bis volle Geschwindigkeit). Wenn die Taste leuchtet, können Sie mit dem Jog-Wheel
(27) die Zeit zwischen 0,0s (Sofortstart) bis fast 10s anpassen. (sehr langsamer Start)
16. EFFECT SYNC/STOP/IMPACT-Taste: diese Taste hat verschiedene Funktionen je nach Effekt-Modus:
BPM-Sync. Effekte: Wenn ein Effekt im taktsynchronisierten Modus eingesetzt wird, leuchtet
diese Taste. Sie können jetzt wählen, wie der Effekt mit dem Takt synchronisiert werden soll.
Benutzen Sie diese Taste, um den aktuellen BPM-Parameter zu verdoppeln.
BRAKE-Effekt: Drücken Sie diese Taste, um die Abbremszeit zu ändern (Zeiteinstellung von
voller Geschwindigkeit bis Null). Wenn die Taste leuchtet, können Sie mit dem Jog-Wheel (27)
die Zeit zwischen 0,0s (Sofortstopp) bis fast 10s anpassen. (sehr langsamer Stopp)
IMPACT-Parameter: Wenn einer der 3 DSP-Effekte aktiviert ist, drücken Sie diese Taste, bis sie
zu blinken beginnt. Jetzt können Sie die Wirkung (Impact) des gewählten Effekts anpassen.
Beachten Sie auch die EFFECT-Tasten (14).
17. BPM-SYNC Taste: Drücken Sie diese Taste, um zwischen manuellem und taktsynchronisiertem
Effektmodus hin- und herzuwechseln! Weitere Erläuterungen finden Sie unter Punkt (14).
18. PITCH RANGE Knopf: Jedesmal, wenn Sie diesen Knopf drücken, werden Sie die Einteilung des
Speed-Sliders (20) verändern. Es sind folgende Pitchbereiche einstellbar: +/-4%, +/-8%, +/-16% and +/100%. Die +/-100% ist nicht bei MP3 CDs verfügbar
19. SPEED TASTE: Dieser Knopf wird verwendet, um die Geschwindigkeitsfunktion ein- und
auszuschalten.
20. GESCHWINIGKEITSFADER: Drücken Sie die SPEED Taste(19), so dass sie leuchtet. Die
Geschwindigkeit kann nun bis zu +/-100% durch Bewegen des Faders geändert werden. Die
Geschwindigkeit ändert sich nicht, wenn die SPEED Taste (19) ausgeschaltet ist. Sie können den PitchUmfang mit dem PITCH RANGE Knopf(18) verändern.
21. PITCH BEND Tasten: Die Geschwindigkeit nimmt zu, während die "+ Taste" gedrückt wird und kehrt
zurück wenn der Knopf losgelassen wird. Die Geschwindigkeit fällt wenn die "- Taste" gedrückt wird und
kehrt zurück, wenn der Knopf losgelassen wird. Diese Tasten können zum Synchronisieren von 2
Tracks genutzt werden. Sie dienen ebenfalls zum Bestätigen (oder nicht) der Fragen, die manchmal auf
dem Display erscheinen.
22. PITCH LOCK Taste: (MAIN TEMPO) Aktiviert die Pitch Lock Funktion. Diese Funktion erlaubt Ihnen,
die Geschwindigkeit zu ändern ohne die Tonhöhe zu verändern. Diese Taste wird blau, wenn die Pitch
Lock Funktion eingeschaltet ist.
BEACHTEN SIE: Die Pitch-Lock-Funktion hat ihre Grenzen. Ab einer bestimmten
Geschwindigkeitsabweichung (abhänig vom Musikstil) wird der Pitch-Lock nicht mehr in der Lage sein,
den gleichen Pitch zu halten. Zunächst werden Sie eine kleine Verzerrung hören, die bei größeren
Geschwindigkeitsabweichungen immer stärker wird. Dies muss nicht immer ein Nachteil sein: bei sehr
langsamer Geschwindigkeit können Sie es als speziellen „Verzerrungseffekt“ verwenden!
23. TIME Taste: Mit der TIME Taste schalten Sie zwischen „noch zu spielende Zeit“ , “abgelaufener Zeit“
und „Totaler Zeit“ um. Die „Totale Zeit der CD“ is bei MP3 CDs nicht verfügbar.
24. SGL/CTN: Sie können zwischen "Einzelwiedergabe" und "kontinuierlicher Wiedergabe" wählen. Zudem
kann man die auto Cue Funktion (-48db) An- und Ausschalten.
Kontinuierliche Wiedergabe: Die komplette CD wird ohne Unterbrechung abgespielt (Funktion
wird meistens von Gaststätten benutzt)
Einzelwiedergabe: Die Wiedergabe endet nach jedem Track und wartet am Anfang des nächsten
Tracks. Dies ist ein sehr nützliches Merkmal für DJ’s!
Auto Cue An/Aus: Der MCD 200 findet automatisch die erste „Musik Note” jedes Tracks um
sicher zu gehen das, daß Gerät sofort nach drücken des Start Knopfes startet. Um die Auto Cue
Funktion An bzw Aus zu Schalten drücken Sie den Schalter SGL/CTN Knopf für ca. 2sec. Das
Display zeigt „A.CUE“ wenn die Funktion aktiv ist.
25. BPM-TAP Taste: Der vorliegende Player hat einen vollautomatischen BPM-Zähler. In einigen seltenen
Fällen zählt der automatische Taktzähler nicht ordnungsgemäß (Takte liegen außerhalb der normalen
Bereiche oder es kann einfach kein Takt gefunden werden). In diesen Fällen können Sie dem
Taktzähler helfen, indem Sie den Taktrhythmus manuell auf diesen Knopf tippen. Sie können zurück
zum automatischen Taktzähler wechseln, indem Sie den TAB-Knopf solange gedrückt halten, bis das
„AUTOBPM” in der oberen linken Ecke auf dem Display erscheint.
26. ID3-TAGS-Taste: Im Sinne der Benutzerfreundlichkeit enthalten die meisten MP3-Tracks ID3-Tags, die
Ihnen mehr Informationen über den gewählten Song geben. Der TMC200 kann einige dieser Tags auf
dem Display anzeigen:
„Songtitel“-Information: In der Standardeinstellung zeigt das Display den „Songtitel”.
„Künstler-Information: Drücken Sie die ID3-TAGS-Taste 1x, um den Künstlernamen
anzuzeigen, das Display kehrt automatisch zur Standardeinstellung zurück.
„Bit-rate”-Information: Drücken Sie die ID3-TAGS-Taste 2x, um die Bitrate (Aufnahmequalität)
des Tracks anzuzeigen, das Display kehrt automatisch in die Standardeinstellung zurück.
Wenn der Track keine ID3-Tags hat, zeigt das Display den Dateinamen (xxxxxxxxx.mp3)
27. TAKTILEN JOG WHEEL: Dieses Rad besitzt verschiedene Funktionen:
Im Pausenmodus können Sie mit dem Jog/Wheel framegenau suchen (1/75 Sek.) Um einen CUE
Punkt zu setzen, drücken Sie PLAY (8) oder LOOP IN (4), wenn Sie die korrekte Position eingestellt
haben. Drücken Sie CUE (7), um zum "CUE PUNKT" zurückzukehren.
Im Wiedergabe Modus können Sie die Geschwindigkeit bis zu +/-100% beeinflussen. Durch Drehen
im Uhrzeigersinn beschleunigen oder entgegen den Uhrzeigersinn verlangsamen Sie die
Geschwindigkeit. Das Maß der Änderung wird von der Geschwindigkeit der Rotation bestimmt. (dies
ist eine Alternative zu den PITCH BEND Tasten (21)
Im Scratch-Modus (SCRATCH Taste (28) ist aktiviert) wird das Jog-Wheel dazu verwendet, den
Playback der Musik in Echtzeit zu justieren. Deshab können Sie die Musik auf Ihrer CD genause
scratchen, wie das mit den normalen analogen Vinyl-Platten der Fall ist. Um ein möglichst
authentisches Plattenfeeling (vinylecht) herzustellen und die Scratch-Leistung erheblich zu steigern,
wurde das Mittelstück des Datenrads mit einer patentierten berührungsempfindlichen Technology
ausgestattet!
28. SCRATCH Knopf: W ird verwendet, um in den Scatch-Modus zu gelangen. Diese Option gibt Ihnen die
Möglichkeit, jeden Track auf der CD in Echtzeit zu scratchen. Sie können die Scratch-Funktion sowohl
im Play- als auch im Pause-Modus verwenden:
Im Play-Modus: Die Musik spielt normal bis Sie das große Jog-Wheel(27) touchieren. W ährend
der Justierung des Jog-Wheel(27) sind Scratch-Effekte hörbar. Wenn das Rad nicht mehr bewegt
wird, setzt die Musik an der Stelle fort, an der Sie sie angehalten haben.
Im Pause-Modus: Die Musik hält solange an, wie das Jog-Wheel(27) nicht bewegt wird. Sobald
Sie das Jog-Wheel(27) bewegen, sind Scratch-Effekte hörbar. Wenn Sie das Rad anhalten, stoppt
die Musik und verharrt im Pause-Modus.
BEACHTEN SIE: Während dem Scratch-Modus können Sie zwischen dem Play- und dem PauseModus wählen, indem Sie einfach den Play/Pause- Knopf(8) drücken.
29. AUDIO Output: Output für die Audio-Signale des CD-Players. Verwenden Sie das beigefügte
Cinch/Cinch-Kabel, um diesen Output mit einem CD/line-Input Ihrer Mixer-Einheit zu verbinden.
30. Digitalausgang: Verwenden Sie diesen Anschluss, um das Digital ausgangssignal (S/PDIF Format)
mit einem digitalem Mischpult oder Recorder zu verbinden, (z.B. MiniDisc, DAT o.ä.)
31. RELAY Eingang: Diesen Verbinder können Sie auf zwei Arten verwenden: Sie könne ihn mit der Fader-
Start-Option an bestimmten Mixern verwenden oder zwei TMC200-Player miteinander Verbinden, um
die Relay-Play-Funktion zu erhalten.
Relay Play: Verwenden Sie das beigefügte mono mini Klinke/Klinke-Kabel, um die Relay-
Eingänge zweier TMC200-Player zu verbinden. Beachten Sie des Weitern die Hinweise in dieser
Bedienungsanleitung, um die Relay-Play-Funktion kennenzulernen.
Fader Start: Falls Sie einen Mixer mit Fader-Start-Funktion gebrauchen, verwenden Sie das
beigefügte mono mini Klinke/Klinke-Kabel, um den Player mit dem Fader-Start des Mixers zu
JB SYSTEMS® 45/78 TMC200
JB SYSTEMS® 46/78 TMC200
Page 26

DEUTSCH BEDIENUNGSANLEITUNG
DEUTSCH BEDIENUNGSANLEITUNG
verbinden. Bitte beachten Sie, dass dieser Eingang niemals mit Spannung verbunden werden
darf.
Achtung: Diese Remote-Konrolle ist nur mit bestimmten Mixern (Synq® oder Pioneer®
kompatibel) vereinbar.
32. POWER ON/OFF SCHALTER: Schaltet den TMC200 ein und aus.
33. NETZBUCHSE: Verbinden Sie diese Buchse mit einer AC Steckdose. Benutzen Sie das mitgelieferte
Netzkabel.
LCD DISPLAY
1. PLAY: Leuchtet während der Wiedergabe einer CD.
2. PAUSE: Leuchtet während sich der Player im Pausen oder CUE Modus befindet.
3. BERÜHRUNGSANZEIGE: erscheint, wenn der berührungsempfindliche Teil des Datenrads aktiv ist
4. ANTI SHOCK und Speicher Anzeige: Der Speicherstatus wird auf der Anzeige von einem vollen oder
leeren Eimer dargestellt. Wenn der Eimer blinkt, ist der Sofort-Start nicht verfügbar. Jedes Segment
innerhalb des Eimers stellt etwa 2 Sekunden des Anti-Shock Speichers dar.
5. CUE: Leuchtet während der Player am CUE Punkt wartet.
6. PITCH DISPLAY: Zeigt die aktuelle Prozentzahl der Geschwindigkeitsverän-derung an, ausgelöst durch
den SPEED-Slider(20).
7. TIME BAR: Zeigt die vergangene oder aktuelle Zeit je nach Einstellung der TIME Taste (23). Wenn der
Balken warnend blinken, ist der Track fast am Ende angelangt!
8. FRAME: Zeigt den aktuellen Frame vom gegenwärtigen Track (1 Frame = 1/75 Sek.)
9. SECOND: zeigt "Sekunden" Information vom gegenwärtigen Track.
10. MINUTE: zeigt "Minuten" Information vom gegenwärtigen Track.
11. ELAPSED, TOTAL REMAIN: Angezeigte Zeit ist die laufende, abgelaufene oder Gesamtzeit.
12. RELOOP:. Leuchtet, während der Wiedergabe eines Loop’s (das Wiederholen eines besonderen
Bereichs)
13. LOOP: Leuchtet, wenn ein Loop programmiert ist. Sie können zum Loop zurückkehren indem Sie die
RELOOP Taste (6) drücken
14. SINGLE: Leuchtet wenn der Player nur ein Track abspielt. Leuchtet diese Anzeige nicht, befindet sich
das Gerät im kontinuierlichen Wiedergabemodus. Diese Funktion wird über die SGL/CTN Taste (24)
eingestellt.
15. TRACK / FOLDER: zeigt gegenwärtige Track/Folder nummer.
16. VISUAL ANZEIGER: Zeigt die Play-Position in Kästchen an: eine volle Rotation entspricht 95 Kästchen.
Der Anzeiger läuft im normalen Play-Modus im Uhrzeigersinn und gegen den Uhrzeigersinn, wenn der
Track rückwärts läuft. Im Pause-Modus stoppt der Anzeiger.
17. AUTO CUE: Das Display zeigt “ A.CUE” wenn die Funktion aktiv ist.
18. AUTO BPM: Der Indikator leuchtet wenn der automatische Beatcounter aktiviert ist. (ist ständig aktiviert)
19. PITCH LOCK: Wenn die Master Tempo Funktion aktiviert wurde zeigt das Display “lock”.
20. CD/MP3: Zeigt an, ob eine normale oder MP3 CD eingelegt ist.
21. ALPHANUMERIC DISPLAY: Zeigt die Namen der Folder und MP3 Tracks. Für MP3 Tracks
aufgenommen im CBR Fomat wird auch die Bitrate angezeigt. Bei Aufnahmen im VBR Modus zeigt das
Display nur „VBR”. Bei Audio-CDs mit CD-Text wird dieser gezeigt, andernfalls zeigt das Display “No
Text”. Sämtliche interaktiven Informationen werden ebenfalls gezeigt.
22. BPM / PARAMETER: Der automatische Beat Counter zeigt die Beats Per Minute an. Wenn die Effekte
aktiviert sind, zeigt dieser Teil des Displays die angewandten Effektparameter an.
WIE NUTZE ICH…
Die meisten gemeinsamen Funktionen sind im vorherigen Kapitel "Tasten und Funktionen" beschrieben. In
diesem Kapitel werden speziellere Funktionen erklärt.
EINIGE ALLGEMEINE FUNKTIONEN:
SLEEP MODUS:
Befindet sich der CD-Player länger als 15 Minuten im Pausen- oder CUE Modus schaltet der Player
automatisch in den „Schlafmodus“. Dies verlängert die Lebensdauer des Lasers sowie des Spindelmotors.
Während des Schlafmodus zeigt die Anzeige das Wort " z Z ... SLEEP ". Um den Player „aufzuwecken“,
drücken Sie die PLAY oder CUE Taste.
PITCH BENDING:
Verwenden Sie diese Funktion, um den Takt zweier Titel so perfekt wie möglich anzugleichen. Hierfür gibt
es 2 Möglichkeiten:
PITCH BEND Tasten: W ird die „PITCH BEND+” oder „PITCH BEND-“ Taste betätigt, so erhöht bzw.
verringert sich die Geschwindigkeit des wiedergegebenen Titels.
JOG WHEEL: W enn die Effekte nicht im manuellen Modus eingesetzt werden, kann mit dem JOG-
WHEEL zeitweise ein Pitchbending vorgenommen werden, dabei wird das Datenrad zur
Beschleunigung im Uhrzeigersinn und zur Verlangsamung entgegen dem Uhrzeigersinn gedreht. Die
Geschwindigkeit, mit der das JOG-WHEEL gedreht wird, bestimmt den Prozentsatz des
Pitchbendings.
CD-TEXT:
Nicht nur MP3 Files können Tracknamen auf dem Display anzeigen. Einige normale Audio CDs
verwenden CD-TEXT, um Tracknamen anzuzeigen. Auch CDR-Brennsoftware (z.B. Nero) kann einen CDTEXT zu einer normalen Audio CD hinzufügen. Wenn der TMC200 diese CD-TEXT Daten ermittelt, wird
das Display sie automatisch anzeigen.
ABSPIELEN/AUFNEHMEN VON CD-R UND CD-RW:
Ausser normalen Audio CD’s kann der TMC200 auch CD-R und CD-RW abspielen.
Bitte verwenden Sie beim brennen einer CD ausschliesslich den “disc at once” und “track at once” Modus!
Obwohl der TMC200 in der Lage ist, CD-R und CD-RW zu lesen, die mit höheren Geschwindigkeiten
aufgenommen sind, empfehlen wir, keine Aufnahmen, die mit mehr als 12facher Geschwindigkeit
gebrannt wurden, zu verwenden, um die Lesbarkeit zu verbessern. Kaufen Sie stets qualitativ hochwertige
CD-R und CD-RW!
Wenn die Disc eine Multi Session ist, wird nur die erste Session gespielt:
Wenn die erste Session eine CD-DA ist, können Sie nur CD-DA Tracks abspielen.
Wenn die erste Session eine MP3 Datei ist, können Sie nur eine MP3 Datei abspielen.
MP3 FILES ABSPIELEN:
Der CD Player erkennt eine MP3 Datei automatisch
Der TMC200 ist in der Lage verschiedene MP3 Formate zu lesen. Das Display zeigt einige der ID3-tags
(Liedtitel / Interpret / Bitrate). Die CD nimmt bis zu 999 MP9 Dateien auf, umfassend auf max. 255 Folders.
Wenn die MP3 Dateien in seperate Folder sortiert sind, listet der MCD570 alle Dateien auf. Die MP3
Dateien müssen folgendem Format entsprechen mp3 ~ .MP3 ~ .mP3 ~ .Mp3
Sehen Sie sich die technischen Daten an um zu sehen welche MP3 Dateien erlaubt sind.
FOLDER / TRACK SELECTORS:
Die meisten CDs beinhalten eine Menge an MP3 Files (150 oder mehr). Um diese anzahlen zu managen
kann man die Files in verschieden Unterordner (Verzeichnisse) stellen. Diese Verzeichnisse können nach
dem Interpreten, den Musikrichtungen (Techno, langsam, Salsa...), den Beats per Minute (100BPM,
110BPM, 120BPM), usw. gespeichert werden.
JB SYSTEMS® 47/78 TMC200
JB SYSTEMS® 48/78 TMC200
Page 27

DEUTSCH BEDIENUNGSANLEITUNG
DEUTSCH BEDIENUNGSANLEITUNG
Mit dem FOLDER / TRACK Wähler kann man einfach zwischen den verschiedenen Verzeichnisse und
Tracks wählen.
Man kann den TMC200 im FOLDER und TRACK Mode betreiben, siehe auch FOLDER SELECTOR Knopf
(3):
FOLDER MODE: Nutze den FOLDER Wähler um in die gewünschten Verzeichnisse zu wechseln.
Beachte, das man nur Tracks in den gewählten Verzeichnis wählen kann. Um in ein anderes
Verzeichnis zu wechseln muß man den Folder W ähler betätigen.
TRACK MODE: Es ist möglich alle Tracks so auszuwählen, als wären keine Unterordner vorhanden.
Um mehrere TRACKS (10er Schritte) schnell auszuwählen, drücke den TRACK Wählknopf währen
man vorwärts/rückwärts dreht.
RELAY FUNCTION:
Überprüfen Sie zunächst, ob das spezielle Fader-Start-Kabel die beiden TMC200-Player verbindet.
Legen Sie in beide Player eine CD ein.
Öffnen Sie die zwei Kanal-Fader der korrespondierenden CD Inputs Ihres Mixers.
Überprüfen Sie, ob beide Player im Single-Modus sind (der “single” Anzeiger(14) erscheint auf dem
Display). Falls einer der Player nicht im Single-Modus ist, drücken Sie den SGL/CNT Knopf(24) dieses
Players.
Beginnen Sie mit dem Playback auf einem der beiden Player.
Ein Track wird abwechselnd von beiden Playern gespielt. Sie können jederzeit eine neue CD in den
Player einlegen, der gerade im Pause-Modus ist. Dadurch ist es möglich, ein endloses Programm zu
gestalten, wie es ideal für Pubs usw. ist.
Entfernen Sie das Relay-Kabel, wenn Sie die Relay-Funktion nicht mehr brauchen.
ÜBER LOOPS:
ERSTELLEN EINES LOOPS:
Während der Wiedergabe drücken Sie die IN/R.CUE Taste. Dies ist der Startpunkt des Loops. Nun
drücken Sie die OUT Taste um den Endpunkt zu markieren. Der nahtlose Loop startet direkt und wird
wiederholt (Mit ein wenig Übung erhalten Sie perfekte Loops). W ährend der Wiedergabe des Loop’s
können Sie die OUT Taste drücken, um den Loop zu verlassen und den Rest des Tracks wiederzugeben.
Es ist möglich während der Wiedergabe des Loop’s einen neuen Loop zu erstellen. Dazu drücken Sie
einfach die Taste IN/R.CUE um den neuen Startpunkt zu markieren. Nun markieren Sie den Endpunkt mit
der OUT Taste. Ihr neuer Loop ist programmiert und wird wiedergegeben.
RESTART DES LOOPS :
Dies kann auf 3 Arten geschehen:
Wenn ein Loop programmiert ist und Sie ihn durch Drücken der OUT Taste verlassen haben, drücken
Sie die Taste RELOOP um den Loop neu zu starten.
Wenn ein Loop programmiert ist und Sie ihn durch Drücken der OUT Taste verlassen haben, drücken
Sie die Taste OUT noch einmal um den Loop neu zu starten. Der nun markierte Punkt ist der neue
Endpunkt des laufenden Loop’s.
Während der Wiedergabe des Loop’s drücken Sie die Taste RELOOP um den Loop direkt wieder neu
zu starten. Ideal um einen „Stotter“ Effekt zu kreieren.
EDITIEREN EINES LOOPS:
Wenn ein Loop programmiert wurde, drücken Sie den RELOOP/STUTTER Knopf über 2sec, um in den
„Loop edit“ Mode zu gelangen. Während der Loop nahtlos abgespielt wird zeigt das Display den Loop
Endpunkt an. Nutzen Sie das große Drehrad um einen neuen Loop Endpunkt zu setzen. Um das Setzen
zu vereinfachen kann man den neu gewählten Endpunkt dauerhaft hören. Wenn der Endpunkt gesetzt ist
drücken Sie den LOOP OUT Knopf um die Stellung zu speichern und die Funktion zu verlassen.
BEACHTE: Man kann Loops auf die HOT CUE Knöpfe speichern. D.h. Sie können pro Track bis zu 4
Loops speichern. Das nächste Kapitel beschreibt wie man die Loops speichert.
ÜBER DIE EFFEKTE:
In der Beschreibung der Effekte finden Sie bereits eine Menge Informationen, vergessen Sie nicht dort
nachzusehen!
BENUTZUNG DER EFFEKTE IM TAKTSYNCHRONISIERTEM MODUS:
Während des Abspielens der Musik können Sie jeden der 3 Effekte und die BPM-SYNC-Taste (17)
drücken, so das letztere erleuchtet ist: Der Effekt arbeitet im taktsynchronisierten Modus. Benutzen Sie die
EFFECT-SYNC-Tasten (15+16), um verschiedene Takteinstellungen auszuwählen. Benutzen Sie den
IMPACT-Knopf (16), um die Wirkung des Effekts anzupassen.
BENUTZUNG DER EFFEKTE IM MANUELLEN MODUS:
Während des Abspielens der Musik können Sie jeden der 3 Effekte und die BPM-SYNC-Taste (17)
drücken, so das letztere aufhört zu leuchten: Benutzen Sie das JOG WHEEL (27) um den Effekt in
Echtzeit zu verändern. Benutzen Sie die IMPACT-Taste (16) um die Wirkung des Effekts anzupassen.
ÜBER DEN SPEICHER:
VERSCHIEDENE SPEICHER:
Bevor wir darüber reden, wie der Speicher verwendet wird, müssen wir den Unterschied zwischen
"TRACK MEMORY" und "PERMANENT MEMORY" kennen:
Track Memory: Dies ist der interne Speicher, wo der TMC200 bis zu vier CUE-Punkte und/oder
Loop’s für einen Track speichern kann. Sie können ein "Track Memory" für jeden einzelnen Track auf
einer CD erstellen.
Beispiel: Ihre CD enthält 16 Tracks (für jeden Track können Sie bis zu 4 CUE-Punkte und/oder Loop’s
speichern. Das macht eine Gesamtsumme von 16 x 4 = 64 CUE-Punkte und/oder Loop’s auf einer
CD!
PERMANENT MEMORY: Dies ist der große Speicher, wo alle CUE-Punkte und Loop’s dauerhaft
gespeichert werden. In der Tat ist es eine indizierte Sammlung von "TRACK MEMORYs". Wenn Sie
sich an zuvor gespeicherte CUE-Punkte eines gewissen Tracks erinnern, übertragen Sie diese vom
"PERMANENT MEMORY" in das "TRACK MEMORY".
VERWENDUNG DES TRACK MEMORY:
Einen MASTER CUE-Punkt speichern:
Es gibt 2 Arten, einen CUE-Punkt zu setzen:
Drücken Sie den LOOP IN (4) Knopf während des normalen Abspielens, um den Cue-Punkt zu setzen
(“CUE on the fly”).
Setzen Sie den Player auf Pause und benutzen Sie das Jog/Shuttle Wheel, um den genauen Standort
für den Cue-Punkt zu suchen. Sobald der Standort gefunden ist, drücken Sie den LOOP IN Knopf (4)
um den neuen Cue-Punkt zu setzen. (oder drücken Sie die PLAY/PAUSE-Taste)
Sobald der Cue-Punkt programmiert ist, drücken Sie einfach den CUE-Knopf (7), um ihn wieder
abzurufen.
Einen einfachen CUE-Punkt auf die "HOT CUE" Tasten speichern:
Drücken Sie die MEMORY Taste (10), um in den HOT CUE Memory Modus zu gelangen (MEMORY
Taste leuchtet).
Drücken Sie während der Wiedergabe einen der vier HOT CUE Tasten: Die CUE-Taste, die Sie
gerade drücken, leuchtet nun blau. Der CUE Punkt ist nun gespeichert. ("CUE on the fly").
Befinden Sie sich im PAUSE-Modus können Sie mit Hilfe des JOG/Wheels einen neuen CUE-Punkt
suchen. Haben Sie die Stelle gefunden, drücken Sie einen der vier HOT CUE Tasten um den neuen
CUE-Punkt zu setzen. Die CUE-Taste, die Sie gerade drücken, leuchtet nun blau. Der CUE Punkt ist
nun gespeichert.
Sobald der HOT CUE-Punkt gesetzt ist, können Sie in über die HOT CUE-Taste abrufen.
SPEICHERN EINES LOOPS auf den HOT CUE Tasten:
Bringen Sie den TMC200 in den Loop Modus. Während der W iedergabe des Loop’s, drücken Sie die
MEMORY Taste, um in den Speichermodus zu gelangen (Die MEMORY Taste leuchtet). Nachdem Sie
eine der vier HOT CUE Tasten gedrückt haben, wechselt die Farbe der betreffenden Taste auf weiß. Der
nun ablaufende Loop ist gespeichert. Sie können bis zu 4 Loops pro Track speichern!
LÖSCHEN DER „HOT CUE”-KNÖPFE:
Sie können die Inhalte eines HOT CUE-Knopfes leicht löschen, indem Sie den DELETE CUE-Knopf (11)
und anschließend den HOT CUE-Knopf, den Sie löschen möchten, drücken. Oder speichern Sie einfach
einen neuen Cue-Punkt oder Loop auf diesem HOT CUE-Knopf. Sie können auch alle vier HOT CUEKnöpfe auf einmal löschen, indem Sie den DELETE CUE-Knopf (11) länger als 2 Sekunden gedrückt
halten. Sie werden bemerken, dass das Licht aller 4 HOT CUE-Knöpfe ausgeht, um anzuzeigen, dass die
HOT CUE-Knöpfe leer sind.
JB SYSTEMS® 49/78 TMC200
JB SYSTEMS® 50/78 TMC200
Page 28

DEUTSCH BEDIENUNGSANLEITUNG
VERWENDUNG DES PERMANENT MEMORY:
Aus Sicherheitsgründen, werden die CUE-Punkte und Loop’s, die auf den HOT CUE Tasten gespeichert
sind, nicht automatisch im PERMANENT MEMORY abgelegt. Dies bedeutet das Sie jederzeit CUE’s und
Loop’s aus dem PERMANENT MEMORY auf die HOT CUE Tasten legen können. Diese CUE Punkte und
Loop’s können Sie ändern, editieren und löschen. Der PERMANENT MEMORY wird davon nicht
beeinflusst werden, bis Sie ein BACKUP der HOT CUE Tasten für PERMANENT MEMORY machen.
SPEICHERN ZUM PERMANENT MEMORY:
Drücken Sie 2 Sekunden lang die MEMORY Taste (10). Das Display zeigt “Saving” “, die CUE Punkte
und Loop’s auf den HOT CUE Tasten in den PERMANENT MEMORY wurden gespeichert.
LÖSCHEN EINES TRACKS IM PERMANENT MEMORY:
Wählen Sie den Track, den Sie löschen möchten und laden Sie die Hot-Cues. Drücken Sie gleichzeitig die
„DELETE CUE” und “MEMORY” Tasten, bis auf dem Display die Frage erscheint “DEL ALL?” [alle
Löschen?]. W enn Sie den YES Knopf drücken (PITCH BEND+ Taste); die Track Information wird vom
permanenten Speicher gelöscht.
AUFRUFEN VON „HOT CUE-PUNKTEN/LOOPS” AUS DEM FESTSPEICHER:
Da es einige Sekunden dauert, um die permanenten Cue-Punkte zu laden, werden Sie nicht automatisch
aufgerufen. Manchmal brauchen Sie diese einfach nicht, warum also auf sie warten? Im Nachfolgenden
erläutern wir, wie alles funktioniert:
Keine Cue-Punkte gespeichert: Wenn Sie einen Track auswählen, für den keine Cue-Punkte oder
Loops im Festspeicher gespeichert sind, geschieht nichts: Sie können das Abspielen sofort beginnen.
Cue-Punkte gespeichert: Wenn Sie einen Track auswählen, für den Cue-Punkte oder Loops im
Festspeicher gespeichert sind, zeigt der TMC200 Load Cues?” [Cues laden?] an, um zu fragen, ob Sie
die Cue-Punkte laden möchten. Dies sind Ihre Auswahlmöglichkeiten:
Sie drücken den YES-Knopf: Drücken Sie Yes (Ja) (Pitch Bend + Knopf), um die
vorgespeicherten Cue-Punkte und Loops zu laden. Das Display zeigt RECALL an, während
die Hot-Cue-Knöpfe gefüllt werden.
Sie drücken den NO-Knopf: Die Cue-Punkte werden nicht geladen und das Display kehrt zur
normalen Anzeige zurück. Die können das Abspielen sofort starten.
Sie tun gar nichts: Nach einigen Sekunden kehrt das Display automatisch zur normalen
Anzeige zurück und die Cue-Punkte wurden natürlich nicht geladen.
LÖSCHEN DES PERMANENTEN CUE SPEICHERS
Halten Sie gleichzeitig die DELETE CUE-Taste (11) und die MEMORY-Taste (10) gedrückt und schalten
Sie den TMC200 an: Der permanente Speicher ist somit gelöscht. Es erscheint im Display „clearALL“
VORSICHT: DIESE FUNKTION IST NICHT RÜCKGÄNGIG ZU M ACHEN !!!
FIRMWARE UPDATES
Zur Steigerung der Flexibilität kann der TMC200 jederzeit upgegraded (aufgerüstet) werden, um neue
Funktionen hinzuzufügen oder eventuelle Fehler zu beheben. Wir empfehlen Ihnen, unsere Website
(www.jbsystems.be) von Zeit zu Zeit zu besuchen und zu überprüfen, ob irgendein Firmware Update zum
Downloaden bereit steht.
Überprüfen der effektiven Firmware-Version(en)
Halten Sie die SGL/CTN-Taste (24) gedrückt und schalten Sie den Player an: Die derzeit installierten
Firmware-Versionen erscheinen auf dem Display. Die Firmware umfasst verschiedene Teile: Control +
DSP + Servo, jedes mit seiner eigenen Version-Nummer.
Upgrading-Anleitungen
Da die Upgrading-Anleitungen ändern können, sollten Sie die Datei “TMC200 – upgrade instructions.txt”,
die jedem Update beigefügt ist, überprüfen.
DEUTSCH BEDIENUNGSANLEITUNG
TECHNISCHE DATEN
Stromzufuhr: AC 100-240V, 50/60 Hz
Leistungsaufnahme: 13W
Output level: 2,0Vrms +/0,5dB @ 1kHz, 0dB
Frequenzbereich: 17-20.000Hz (+/-0,4dB)
THD + noise (20kHz LPF): 0,006% @ 1kHz, 0dB
S/N Ratio (IHF-A): >130dB @ 1kHz, 0dB
Kürzeste Zugriffszeit (next track): <2sec
Längste Zugriffszeit (track 1 20): <4sec
Laser Pickup: Sanyo 3spot detection 780nm
Electronic tracking: Vollautomatisches digital tracking.
DISC FORMAT:
Mögliche Datei Erweiterung: .mp3 ~ .MP3 ~ .mP3 ~ .Mp3
ID3 tag Kompatibilität: ID3v2 und früher
ISO9660: Level1 (max. 8”/8.3” character style)
Joliet: max. 63/63 character style
CD-ROM Sektor Format: nur mode-1
Max. Folders: 255
Max. Files: 999 (bis zu 255 pro Ordner)
MP3 FORMATE:
MPEG1 Layer3 (ISO/IEC11172-3): mono / stereo gesampelt bei: 32 - 44,1 - 48kHz
Bitrates: 32 – 320 Kbps
Bitrate modes: CBR (Constant Bitrate) or VBR (Variable Bitrate)
MPEG2 Layer3 (ISO/IEC13818-3): mono / stereo gesampelt bei: 16 – 22,05 - 24kHz
Bitrates: 32 – 160 Kbps
Bitrate modes: CBR (Constant Bitrate) or VBR (Variable Bitrate)
MPEG2,5 Layer3: mono / stereo gesampelt bei: 8 – 11,025 - 12kHz
Bitrates: 32 – 160 Kbps
Abmessungen: 246(W) x 103,5(H) x 348(D)mm
Gewicht: 2,66 kg
Bitrate modes: CBR (Constant Bitrate) or VBR (Variable Bitrate)
Technische Änderungen können auch ohne Vorankündigung vorgenommen werden!
Sie können sich die neueste Version dieses Benutzerhandbuches von unserer Website herunterladen:
Level2 (max. 31/30 character style)
www.beglec.com
JB SYSTEMS® 51/78 TMC200
JB SYSTEMS® 52/78 TMC200
Page 29

ESPAÑOL MANUAL DE INSTRUCCIONES
MANUAL DE FUNCIONAMIENTO
Gracias por la compra de este producto JB Systems®. Para sacar todo el rendimiento de las posibilidades de
este aparato y por su propia seguridad, por favor lea este manual de instrucciones con mucho cuidado antes
de utilizar esta unidad.
CARACTERÍSTICAS
Reproducción de MP3 total (máx. 999 archivos MP3 / 255 carpetas en 1 CD)
o MPEG1 layer3 (32 + 44,1 + 48kHz)
o MPEG2 layer3 (16 + 22,05 + 24kHz)
o MPEG2.5 layer3 (8 + 11,025 + 12kHz)
o Soporta los modos de velocidad CBR y VBR.
Efecto de scratch digital por medio de la jog wheel sensible al tacto
Efecto de freno electrónico + 3 efectos digitales:
Eco, flanger, filtro
Control manual de parámetros
Modo de sincronización de beats
Pantalla LCD alfanumérica (etiquetas CD-TEXT e ID3v2: muestran el título, el artista y la velocidad de
bits, etc.)
¡Los botones Hot Cue pueden contener hasta 4 puntos cue o loops ininterrumpidos por cada pista!
Memoria permanente de hasta 2000 puntos hot cue y loops
¡Función de edición de seamless loop en tiempo real!
Contador BPM totalmente automático
Pitch Lock (Master Tempo)
Rangos de pitch: +/-4% +/-8% +/-16% +/-100% (hasta +/-16% en MP3)
Pitch bend en rueda Jog y botones para mezclas perfectas
Parámetro ajustable ultra exacto de la velocidad (el software V22 y superior)
Hasta 4 seamless loops para cada pista con reloop/stutter
Cue en tiempo real (“Cue al vuelo”)
Inicio de memoria ultra rápido en 10 mseg
Inicio fader, parada fader (back cue),
Función Auto cue (-48dB)
Exploración a 4 velocidades diferentes
Pantalla LCD azul con visualización de pitch y marcador de posición
Visualización de tiempo transcurrido, restante y total seleccionable
Rueda jog con superficie especial de goma
Reproducción continua/sencilla
Relay play (reproducción alternada) permite la reproducción consecutiva en dos mesas
Salida coaxial RCA de audio digital S/PDIF
Protección de transporte de 60 segundos
Modo "Sleep" (para alargar la vida del láser)
ANTES DE UTILIZAR EL APARATO
Compruebe el contenido:
Compruebe que la caja contiene los siguientes elementos:
Unidad TMC200
Manual de usuario
1 cable Mains
1 cable cinch/cinch
1 cable mono mini-jack para inicio de fader y reproducción relay
ESPAÑOL MANUAL DE INSTRUCCIONES
PRECAUCIONES DE USO
CAUTION
El simbolo de un rayo en el interior de un triangulo alerta sobre la presencia o el uso de
elementos no isolados donde un voltaje peligroso constituye un riesgo grande para causar una
eventual electrocución.
El punto de exclamación en el interior de un triangulo alerta al usuario sobre la presencia de
importantes instrucciones de operación y de mantenimiento tenidas en cuenta en el manual de
uso.
Este símbolo significa : uso para el interior solamente.
Este símbolo significa : Lea las instrucciones.
Este símbolo significa: Aplicaciones de la clase II
Afín de evitar todo riesgo de incendio o electrocución, no exponer el aparato a la lluvia o ambiente
humedo.
Para evitar que se forme condensación en el interior, permita que la unidad se adapte a las temperaturas
circundantes cuando la lleve a una habitación cálida después de transporte. La condensación algunas
veces impide que la unidad funcione a rendimiento pleno o puede incluso causar daños.
Esta unidad es sólo para uso interior.
No coloque objetos metálicos o derrame líquidos dentro de la unidad. No colocar recipients llenos de
liquidos, como floreros, encima del aparato. Podría resultar descarga eléctrica o mal funcionamiento. Si
un objeto extraño entrara en la unidad, desconecte inmediatamente la fuente de alimentación.
No colocar fuentes de llamas, como velas, encima de la unidad.
No cubra ninguna apertura de ventilación ya que esto podría resultar en sobrecalentamiento.
Evite su uso en ambientes polvorientos y limpie la unidad regularmente.
Mantenga la unidad alejada de los niños.
Personas sin experiencia no deberían manejar este aparato.
La temperatura máxima de ambiente es 40°C. No use esta unidad a temperaturas más elevadas.
Siempre desenchufe la unidad cuando no la use por un periodo de tiempo largo o antes de cambiar la
bombilla o comenzar una reparación.
La instalación eléctrica debería ser llevada a cabo sólo por personal cualificado, acorde a las regulaciones
para seguridad eléctrica y mecánica de su país.
Compruebe que el voltaje disponible no es superior al que aparece en el panel trasero de la unidad.
Enchufe siempre accessible para desconectar la alimentación.
El cable de alimentación debería estar siempre en perfectas condiciones: apague la unidad
inmediatamente cuando el cable de alimentación esté roto o dañado.
¡Nunca deje el cable de alimentación entrar en contacto con otros cables!
¡Cuando el interruptor está en la posición de reposo, esta unidad no se desconecta totalmente de la
alimentación!
Para prevenir descargas eléctricas, no abra la tapa. Aparte de fusibles principales no hay partes que
puedan ser reparadas por el usuario en su interior.
Nunca repare un fusible o haga un bypass al fusible. ¡Siempre sustituya el fusible dañado por un fusible
del mismo tipo y especificaciones eléctricas!
En el caso de problemas serios de manejo, deje de usar la instalación y contacte con su vendedor
inmediatamente.
Por favor, use el empaquetado original cuando el aparato deba ser transportado.
Debido a motivos de seguridad está prohibido hacer modificaciones sin autorizar a la unidad.
CONSEJOS DE INSTALACION:
Instalar el aparato en un sitio con buena ventilación para no exponerla a altas temperaturas o humedad.
No colocar y utilizar el aparato mucho tiempo en sitios calientes (al lado de amplificadores, focos,…)
puede afectar sus prestaciones.
Para evitar la condensación en el aparato, dejarlo adaptarse a la nueva temperatura despues del
transporte. La condensación puede alterar las prestaciones de este aparato.
PRECAUCIÓN: Para reducir el riesgo de electrocución,
no quite la cubierta superior . Ninguna pieza usable
adentro para el utilizador. Dirijase unicamente a personal
cualificado.
JB SYSTEMS® 53/78 TMC200
JB SYSTEMS® 54/78 TMC200
Page 30

ESPAÑOL MANUAL DE INSTRUCCIONES
ESPAÑOL MANUAL DE INSTRUCCIONES
LIMPIEZA DEL REPRODUCTOR DE CD:
Limpie con un paño pulido ligeramente empapado en agua. No deje entrar agua en la unidad. No utilice
líquidos volátiles como bencina o diluyente, puesto que dañarán la unidad.
CONEXIONES
Utilice el cable cinch suministrado para conectar la salida de audio del reproductor de CD con una entrada
de CD en su unidad de mezclas.
Conecte también el cable de inicio del fader si su mesa de mezclas de audio incluye conexiones de inicio
de fader. (compatible Synq® o Pioneer®)
Conecte el cable de red.
CONTROLES Y FUNCIONES
1. Botones SEARCH: Estos botones cuentan con 4 posiciones de velocidad de avance y 4 posiciones de
velocidad de retroceso para buscar a través de las canciones. Cuanto más tiempo presione un botón
más rápido buscará a través de la música.
2. Perilla TRACK SEARCH: se encuentran disponibles varias funciones:
Búsqueda normal de pista: gire la perilla para explorar las pistas en incrementos de +1/-1.
Búsqueda rápida de pista: mantenga presionada la perilla mientras la gira para explorar las
pistas en incrementos de +10/-10.
Reinicio de información en la pantalla: al presionar la perilla por un breve tiempo se forzará a la
pantalla a mostrar la información desde el inicio (reinicio de desplazamiento)
3. Perilla de SELECCIÓN DE CARPETA: se encuentran disponibles varias funciones:
Búsqueda de carpeta: Si su CD dispone de subcarpetas MP3, puede seleccionarlas girando
simplemente el selector de carpetas. Consulte el capítulo siguiente para obtener más información
sobre cómo utilizar las subcarpetas. Cuando el CD no contiene subcarpetas, este selector no se
utiliza.
Mostrar el nombre de la carpeta: El nombre de carpeta se muestra instantáneamente cuando
pulsa brevemente el selector de carpeta.
Alternar entre el modo FOLDER / TRACK: presione la perilla aproximadamente 1 segundo, la
pantalla empieza a alternar entre “FOLDERmd” y “TRACKmd”. Suelte la perilla cuando se
muestre el modo deseado.
MODALIDAD FOLDER: sólo puede seleccionar las pistas dentro de la carpeta seleccionada.
Para ir a otra carpeta utilice el selector FOLDER.
MODALIDAD TRACK: podrá explorar todas las pistas de su CD como si no hubiera
subcarpetas. Para desplazarse rápidamente (10 pistas) por el CD, pulse el selector TRACK
mientras lo gira hacia delante o hacia atrás.
4. Botón IN/R.CUE: Le permite ajustar el punto cue sin detener la reproducción (CUE AL VUELO). Este
botón también ajusta el comienzo de un seamless loop. Cuando reproduce uno de los hot cues (9), el
punto de inicio también se copia en este botón.
5. Botón OUT: Se utiliza para ajustar el punto final al ejecutar loops en la música. El reproductor
comienza a ejecutar un seamless loop hasta que se vuelve a pulsar el botón para salir. Cuando hay un
loop programado pero no está activo, también puede r einiciar el loop. El punto donde pulse el botón se
memorizará como nuevo punto final del loop. Cuando el reproductor está en “loop edit mode”
(modalidad de edición de loop) al pulsar este botón se detiene la edición de loop y se guarda el punto
final actual del loop.
6. Botón RELOOP/STUTTER: Este botón consta de 3 funciones:
RELOOP: Cuando hay un loop programado y ha pulsado el botón OUT (5), pulse el botón reloop
para volver a introducir el loop. Pulse el botón OUT (5) para salir del loop. (Los puntos de intro y
final permaneces sin cambios).
STUTTER: Cuando se está reproduciendo un loop puede pulsar este botón para reiniciar el loop
inmediatamente. También puede pulsar este botón cuando una pista no se está reproduciendo en
loop. Cada vez que se pulsa el botón RELOOP/STUTTER, se reiniciará la música desde el punto
cue programado. El efecto stutter añade creatividad extra a su trabajo.
EDICIÓN DE UN LOOP: Cuando programe un loop, pulse el botón RELOOP/STUTTER durante 2
segundos para entrar en la modalidad “loop edit”. Ahora puede cambiar el punto final del loop.
Consulte el capítulo “Utilización” para obtener más información.
7. Botón CUE: Al pulsar el botón CUE durante la reproducción se consigue un regreso inmediato a la
posición en la que comenzó la reproducción. La reproducción comienza inmediatamente desde el punto
cue programado mientras se mantenga pulsado el botón CUE. El reproductor de CD salta hacia atrás
hasta el punto tan pronto como se suelte el botón CUE. Además con la unidad en la modalidad de
pausa (el LED Play/Pause parpadea) la rueda Jog y/o la rueda de búsqueda se utiliza para ajustar un
punto de inicio diferente. Pulsando el botón "PLAY/PAUSE" y a continuación, "CUE", se puede
confirmar el nuevo punto cue.
8. Botón PLAY/PAUSE: Cada vez que se pulsa el botón PLAY/PAUSE, el reproductor de CD pasa de
reproducción a pausa o de pausa a reproducción. El botón parpadea siempre que el reproductor esté
establecido en pausa.
9. Botones HOT CUE: 4 botones programables donde puede guardar puntos cue y/o loops ordinarios. Al
guardar un punto cue normal, el botón correspondiente es azul, cuando un loop está guardado el botón
correspondiente cambia a color blanco. Todos los puntos cue y loops guardados se pueden respaldar
en la memoria permanente para uso futuro. Verifique el capítulo “FUNCIONAMIENTO” para obtener
más información sobre cómo programar los puntos cue, etc
10. Botón MEMORY: Se utiliza para almacenar puntos cue y loops en los botones Hot Cue (19) y en la
memoria cue permanente:
Almacenamiento en los botones HOT CUE: Pulse brevemente el botón MEMORY para
preparar la unidad TMC200 para que almacene un punto cue o loop en uno de los 4 botones HOT
CUE.
Almacenamiento en memoria permanente: Pulse el botón MEMORY hasta que comience a
parpadear y la pantalla LCD muestre “SAVING” (GUARDANDO). Los contenidos de los botones
HOT CUE para este canción se almacenarán en la memoria permanente.
Importante: No solo se almacenan los botones HOT CUE en la memoria permanente, sino que
también se guardan muchos parámetros de tal modo que no tenga que ajustarlos nuevamente
JB SYSTEMS® 55/78 TMC200
JB SYSTEMS® 56/78 TMC200
Page 31

ESPAÑOL MANUAL DE INSTRUCCIONES
ESPAÑOL MANUAL DE INSTRUCCIONES
cada vez que encienda el reproductor. Además de los botones hot cue, también se guardarán los
siguientes parámetros: rango de pitch, modo sencillo/cont, visualización de tiempo, ajuste de jog
wheel, cue automático, modo BPM automático, activación/desactivación de pitch,
activación/desactivación de bloqueo de pitch y parámetro para iniciar/detener.
Consulte este manual para obtener más información sobre cómo utilizar esta funciones.
11. Botón DELETE CUE: este botón tiene diferentes funciones:
ELIMINAR 1 HOT CUE: pulse el botón DELETE CUE, seguido del botón HOT CUE que desea
eliminar de la memoria de pista. El botón eliminado cambiará a color negro.
ELIMINAR 4 HOT CUES: pulse el botón DELETE CUE durante 2 segundos para borrar todos los 4
hot cues de la memoria de pista.
ELIMINAR PISTA: pulse durante 2 segundos simultáneamente el botón DELETE CUE y el botón
MEMORY (10) para eliminar los hot cues para toda la pista de la memoria de pista. Debido a que no
podrá revertir esta operación, la pantalla primero le pregunta si está seguro: al usar los botones
PITCH BEND (21) puede seleccionar YES o NO.
Consulte el capítulo “FUNCIONAMIENTO” para obtener más información.
12. Botón OPEN/CLOSE: Pulse este botón para abrir y cerrar la bandeja del disco en la parte frontal de la
unidad TMC200. Este botón se desactiva durante la reproducción. Si la bandeja no se cierra después
de 60 segundos. Se cerrará automáticamente para evitar daños.
13. INDICADOR CD TRAY: se enciende cuando se carga un cd.
14. Botones EFFECT: cada uno de estos botones tiene su propia configuración:
Botón ECHO EFFECT: pulse este botón para activar el efecto de eco. Dependiendo del modo de
sincronización (manual o sincronización de beats), es posible realizar diferentes ajustes:
Modo Manual: el botón BPM-SYNC (17) es oscuro. Puede ajustar todos los parámetros
manualmente, use los siguientes controles:
Jog-wheel (27): se usa para establecer el tiempo de eco entre 1 ms a 2000 ms.
Botón IMPACT (16): cuando el botón IMPACT esté encendido puede usar la jog-wheel (27)
para cambiar el impacto (seco/húmedo) del efecto.
Modo beat sincronizado: el botón BPM-SYNC button (17) está encendido. Puede usar los
siguientes controles:
Botones EFFECT SYNC (15+16): seleccione uno de los ecos sincronizados con el beat ya
preestablecido.
Botón IMPACT (16): cuando el botón IMPACT esté encendido puede usar la jog-wheel (27)
para cambiar el impacto (seco/húmedo) de la señal del efecto.
Botón EFECTO FLANGER: pulse este botón para activar el efecto de flanger. Dependiendo del
modo de sincronización (manual o sincronización de beats), es posible realizar diferentes ajustes:
Modo Manual: el botón BPM-SYNC (17) es oscuro. Puede ajustar todos los parámetros
manualmente, use los siguientes controles:
Jog-wheel (27): usado para cambiar manualmente el efecto.
Botón IMPACT (16): cuando el botón IMPACT esté encendido puede usar la jog-wheel (27)
para cambiar el impacto (seco/húmedo) del efecto.
Modo beat sincronizado: el botón BPM-SYNC (17) está encendido. Puede usar los siguientes
controles:
Botones EFFECT SYNC (15+16): seleccione uno de los ecos sincronizados con el beat ya
preestablecido.
Botón IMPACT (16): cuando el botón IMPACT esté encendido puede usar la jog-wheel (27)
para cambiar el impacto (seco/húmedo) de la señal del efecto.
Botón FILTER EFFECT: pulse este botón para activar el efecto de filtro. Dependiendo del modo de
sincronización (manual o sincronización de beats), es posible realizar diferentes ajustes:
Modo Manual: el botón BPM-SYNC (17) es oscuro. Puede ajustar todos los parámetros
manualmente, use los siguientes controles:
Jog-wheel (27): se usa para cambiar manualmente la frecuencia de corte del filtro.
Botón IMPACT (16): cuando el botón IMPACT esté encendido puede usar la jog-wheel (27)
para cambiar el impacto (factor-Q) del filtro.
Modo beat sincronizado: el botón BPM-SYNC (17) está encendido. Puede usar los siguientes
controles:
Botones EFFECT SYNC (15+16): seleccione uno de los barridos sincronizados con el beat
ya preestablecido.
Botón IMPACT (16): cuando el botón IMPACT esté encendido puede usar la jog-wheel (27)
para cambiar el impacto (factor-Q) del filtro.
Botón BRAKE: presione este botón para activar el efecto de freno. Ahora puede determinar la
velocidad de aceleración/desaceleración de la música al usar el botón REPRODUCIR/PAUSA (8).
Puede establecer los parámetros con los botones (15+16), consulte la información descrita a
continuación.
15. Botón EFFECT SYNC/START: este botón tiene varias funciones, dependiendo del modo de efecto:
Efectos sincronizados con BPM: al usar un efecto en el modo de sincronización de beats, este
botón permanece encendido. Puede elegir el modo en el cual desea sincronizar el efecto con el
beat. Use este botón para cortar el parámetro BPM actual a la mitad.
Efecto de FRENO: presione este botón para cambiar el tiempo de aceleración (de cero a la
máxima velocidad). Cuando el botón esté encendido, puede usar la jog-wheel (27) para cambiar
16. Botón EFFECT SYNC/STOP/IMPACT: este botón tiene varias funciones, dependiendo del modo de
17. Botón BPM-SYNC: ¡pulse este botón para alternar entre el modo de efecto manual y sincronización de
18. Botón PITCH RANGE: Cada vez que pulse este botón, cambiará la escala del deslizador de velocidad
19. Botón SPEED: Este botón se utiliza para encender o apagar la función de velocidad.
20. Deslizador SPEED: Pulse el botón SPEED(19), de forma que esté encendido. La velocidad puede
21. Botones de PITCH BEND: la velocidad incrementa mientras se mantenga pulsado el “botón +” y
22. Botón PITCH LOCK: (Master tempo) activa la función Pitch Lock. Esta función le permite realizar
23. Botón TIME: El botón TIME cambia entre el tiempo de reproducción transcurrido, el tiempo restante en
24. Botón SGL/CTN: Puede seleccionar entre “single track mode” (modalidad de pista sencilla) y
25. Botón BPM-TAP: este reproductor cuenta con un contador BPM totalmente automático. En casos no
el tiempo de 0,0 seg. (inicio instantáneo) a casi 10 seg. (inicio muy lento)
efecto:
Efectos sincronizados con BPM: al usar un efecto en el modo de sincronización de beats, este
botón permanece encendido. Puede elegir el modo en el cual desea sincronizar el efecto con el
beat. Use este botón para duplicar el parámetro BPM actual.
Efecto de FRENO: presione este botón para cambiar el tiempo de desaceleración (tiempo de
velocidad máxima a cero). Cuando el botón esté encendido, puede usar la jog-wheel (27) para
cambiar el tiempo de 0,0 seg. (inicio instantáneo) a casi 10 seg. (inicio muy lento)
Parámetro de IMPACTO: cuando esté activado uno de los 3 efectos DSP, presione el botón
hasta que empiece a parpadear. Ahora puede adaptar el impacto del efecto seleccionado,
también vea los botones de EFECTO (14).
beats! Consulte (14) para obtener más información
(20). En CDs de audio normales puede seleccionar +/-4%, +/-8%, +/-16% y +/-100%. La opción +/100% no está disponible en CDs MP3.
cambiarse hasta un +/-100% moviendo el fader. La velocidad no cambiará si el botón SPEED(19) está
desactivado. Puede cambiar el rango de pitch con el botón PITCH RANGE (18)
regresa al pitch original al soltar el botón. La velocidad disminuye mientras se mantenga pulsado el
“botón -” y regresa al pitch original al soltar el botón. Estos botones se pueden usar para sincronizar los
beats de 2 pistas. También se usan para confirmar (o no) las preguntas que algunas veces se muestran
en la pantalla.
ajustes en la velocidad de las pistas mediante el control de pitch sin alterar el pitch tonal. Este botón se
vuelve azul cuando Pitch Lock está activado.
NOTA: tenga en cuenta que la función pitch lock tiene sus limitaciones. A partir de cierto desvío de
velocidad (dependiendo del estilo de música) el pitch lock no podrá mantener el pitch más. Primero oirá
una pequeña distorsión que se hará más grande en desvíos de velocidad mayores. Esto no es siempre
una desventaja: a velocidades muy bajas también puede utilizar “distortion effect” (efecto distorsión).
una selección y el tiempo restante del disco. (Estándar = restante / pista) El “tiempo total restante del
disco no está disponible en CDs de MP3.
“continuous play” (reproducción continua). También puede activar y desactivar la función auto cue (48dB).
Continuous play: Todo el CD se reproducirá sin interrupción. (Se utiliza mayormente en pubs).
Single track: El reproductor se detiene al final de cada pista y espera al comienzo de la siguiente
pista. El reproductor espera a la primera nota musical de cada pista. Esto significa que los CDs
indexados incorrectamente no interferirán con la capacidad de inicio instantáneo de este
reproductor de CD. ¡Esta es una característica muy útil para los DJs!
Auto Cue activado/desactivado: La unidad TMC200 detecta automáticamente la primera “nota
musical” de cada pista para garantizar que la música comience inmediatamente cuando pulse el
botón de reproducción. Para activar o desactivar la función Auto Cue, pulse el botón SGL/CTN
durante unos 2 segundos. La pantalla muestra “A.CUE” cuando la función está activada.
comunes el contador automático de beats no cuenta como debería ser (los beats están fuera del rango
JB SYSTEMS® 57/78 TMC200
JB SYSTEMS® 58/78 TMC200
Page 32
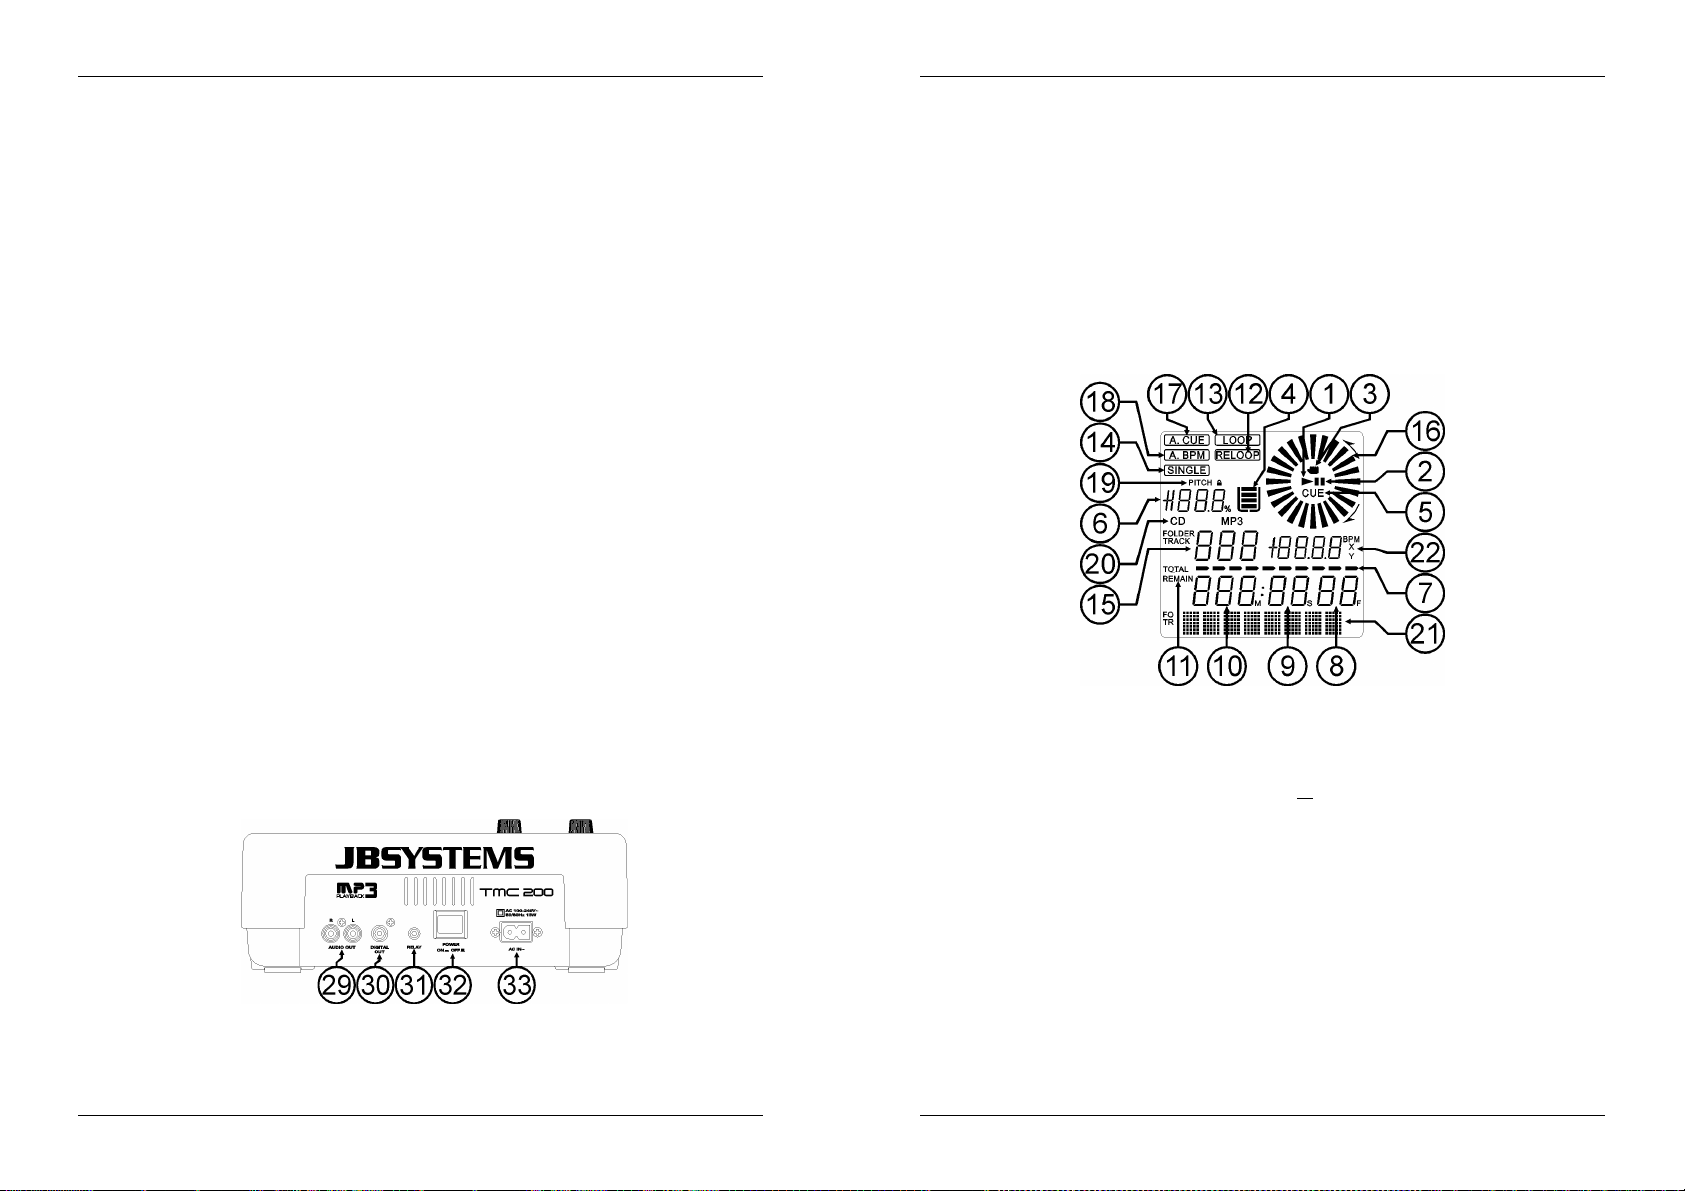
ESPAÑOL MANUAL DE INSTRUCCIONES
ESPAÑOL MANUAL DE INSTRUCCIONES
normal o simplemente no existen beats que se puedan detectar). En estos casos puede ayudar al
contador de beats tocando manualmente este botón al ritmo del beat. Puede volver al contador
automático de beats pulsando el botón TAP hasta que se encienda el mensaje “AUTOBPM” en la
esquina superior izquierda de la pantalla..
26. Botón ID3-TAGS: para facilitarle todo, la mayoría de las pistas MP3 contienen ID3-tags para
proporcionarle más información sobre la canción seleccionada. El TMC200 puede mostrar algunas de
estas etiquetas en la pantalla:
Información de “Título de canción”: de forma predeterminada la pantalla muestra el
“título de la canción”.
Información de “Artista”: presione el botón ID3-TAGS 1x para mostrar el nombre del
artista, la pantalla regresa automáticamente al ajuste predeterminado.
Información de “Velocidad de bits”: presione el botón ID3-TAGS 2x para mostrar la
velocidad de bits (calidad de grabación) de la pista, la pantalla regresa automáticamente al ajuste
predeterminado.
Cuando la pista no cuente con ID3-tags, la pantalla muestra el nombre del archivo (xxxxxxxxx.mp3)
27. JOG WHEEL TÁCTIL: Esta rueda jog dispone de diferentes funciones dependiendo de la modalidad en
la que esté trabajando.
La rueda jog actúa como un control de búsqueda de frames lentos (1/75 seg) cuando el CD no se
está reproduciendo pero se encuentra en pausa o con un punto cue establecido. Para establecer un
nuevo punto cue, gire la rueda y a continuación, pulse PLAY(8) o LOOP IN(4) cuando haya
determinado la posición correcta. Pulse CUE(7) para volver al “PUNTO CUE”.
Si la pista se está reproduciendo, la rueda Jog curvará temporalmente el pitch de la música hasta un
+/-100% girando la rueda a la derecha para acelerarla o hacia la izquierda para aminorarla. La
magnitud de cambio de pitch se determina por la velocidad de giro. Esta es una alternativa a los
botones PITCH BEND(21).
En la modalidad scratch (botón SCRATCH (28) está activado) la rueda jog se utiliza para manejar la
reproducción de la música en tiempo real. Como resultado, puede realizar scratch en la música de su
CD de la misma forma que con un disco de vinilo normal. para tener la máxima sensación de vinilo y
mejora en gran medida el desarrollo del scratch, la parte central de la jog-wheel usa una tecnología
patentada sensible al tacto!
Puede manipular los efectos DSP mientras se usen en el modo manual, vea los botones de EFECTO
(14).
28. Botón SCRATCH: Se utiliza para establecer la unidad TMC200 en modalidad scratch. Esta opción le
permite realizar scratch en cualquier pista del CD en tiempo real. Puede utilizar la función scratch tanto
en la modalidad de reproducción como en la modalidad de pausa:
En la modalidad de reproducción: La música se reproduce normalmente hasta que al tocar la
rueda jog grande (27). Mientras maneja la rueda jog (27), el efecto scratch es audible. Cuando
detiene la rueda jog, la música continúa reproduciéndose desde el punto donde la dejó de girar.
En la modalidad de pausa: La música entra en pausa mientras no se mueva la rueda jog (27).
Cuando empiece a manejar la rueda jog (27), el efecto scratch será audible. Una vez que se
detenga la rueda jog, la música dejará de reproducirse y permanecerá en modalidad de pausa.
NOTA: durante la modalidad scratch puede alternar entre las modalidades de reproducción y pausa
pulsando simplemente el botón PLAY/PAUSE (8)
29. Salida de audio: Salida para las señales de audio del reproductor de CD. Utilice el cable cinch/cinch
suministrado para conectar esta salida a las entradas de CD/línea de la unidad de mezclas.
30. Toma de salida digital: Utilice este conector para conectar la señal digital (formato S/PDIF) a la
entrada de un amplificador digital o grabador digital (p. ej. Mini disc)
31. Toma RELAY: Puede utilizar este conector de dos maneras: puede utilizarlo con la opción de inicio de
fader en algunas unidades de mezcla o puede conectar dos reproductores TMC200 para obtener la
función RELAY PLAY (reproducción alternada).
Relay play (reproducción alternada): Utilice el mini cable jack/jack mono para conectar las
tomas RELAY de dos reproductores TMC200. Consulte este manual para obtener información
sobre cómo ejecutar la función relay play.
Fader start: Si está utilizando una unidad de mezclas con la función inicio de fader, utilice el mini
cable jack/jack para conectar el reproductor con el inicio de fader de la unidad de mezclas. Tenga
en cuenta que esta toma nunca deberá conectarse con ningún voltaje.
Atención: Este mando a distancia sólo es compatible con algunas unidades de mezcla Synq® o
Pioneer®.
32. Interruptor POWER ON/OFF: Enciende y apaga la unidad TMC200.
33. Entrada de red: Conecte el reproductor de CD a una red eléctrica CA, mediante el cable de
alimentación suministrado.
PANTALLA LCD:
1. PLAY: Aparece mientras la unidad está reproduciendo un CD.
2. PAUSE: Aparece mientras la unidad está en modalidad de pausa o cue.
3. INDICADOR TÁCTIL: aparece cuando la parte táctil sensible de la jog-wheel está activa.
4. INDICADOR ANTI SHOCK Y BUFFER: El estado de memoria se representa en pantalla mediante un
balde lleno o vacío. El balde representa en sí mismo que la función de inicio instantáneo está disponible.
Si el balde está parpadeando, el inicio instantáneo no está disponible. Cada segmento del balde
representa representa unos 2,5 de protección anti shock.
5. CUE: Aparece cuando el punto cue maestro es programado.
6. PITCH DISPLAY: Muestra el porcentaje real de cambio de velocidad, seleccionado con el deslizador
SPEED(20).
7. TIME BAR: Muestra el tiempo restante o transcurrido dependiendo del ajuste del botón TIME(23).
Comienza a parpadear al final de cada pista para avisar al usuario para que emprenda una acción.
8. FRAME: Muestra la información de tiempo de la pista actual en “frames”. (1 frame = 1/75thseg.)
9. SECOND: Muestra la información de tiempo de la pista actual en “segundos”.
10. MINUTE: Muestra la información de tiempo de la pista actual en “minutos”.
11. ELAPSED, TOTAL REMAIN: Indica que el tiempo que se muestra en la pantalla es el transcurrido, el
restante o el total restante.
12. RELOOP: Aparece cuando se está reproduciendo un ciclo (Repitiendo un área particular)
13. LOOP: Muestra cuando hay un loop programado. Puede volver al loop con el botón reloop (6)
14. SINGLE: Aparece cuando la unidad está establecida para reproducir sólo una pista a la vez. Cuando no
se muestra, el CD se reproduce continuamente a través de todas las pistas. La función es controlada
por el botón SGL/CTN (24).
15. TRACK / FOLDER: Muestra la pista actual o número de carpeta.
JB SYSTEMS® 59/78 TMC200
JB SYSTEMS® 60/78 TMC200
Page 33

ESPAÑOL MANUAL DE INSTRUCCIONES
ESPAÑOL MANUAL DE INSTRUCCIONES
16. MARCADOR VISUAL: Indica la posición de reproducción en frames: un giro completo equivale a 95
frames. El marcador se mueve hacia la derecha en modalidad de reproducción normal y hacia la
izquierda cuando la pista se reproduce hacia atrás in normal. En la modalidad de pausa el marcador
deja de moverse.
17. AUTO CUE: La pantalla muestra “A.CUE” cuando la función auto cue está activada.
18. AUTO BPM: Este marcador siempre está presente para indicar que el contador de beats automático
está funcionando.
19. PITCH LOCK: Cuando Master Tempo está activado, la pantalla muestra un pequeño “candado” para
indicar que el pitch de la música está activado.
20. CD/MP3: Indica si ha cargado un CD de audio digital o CD de MP3.
21. PANTALLA ALFANUMÉRICA: Muestra los nombres de las carpetas y las pistas MP3. Para las pistas
MP3 grabadas en CBR también se muestra la velocidad. Para pistas MP3 grabadas en VBR la pantalla
sólo muestra “VBR”. Para el CD de audio la información CD-TEXT se mostrará cuando esté disponible
en el CD, en caso contrario la pantalla muestra “No Text”. También se muestran los demás tipos de
información interactiva.
22. BPM/PARAMETER: El contador de beats automático muestra el número de Beats Por Minuto en la
pantalla.
Cuando estén activados los efectos, esta parte de la pantalla muestra los parámetros de efecto
aplicados.
UTILIZACIÓN…
La mayoría de las funciones comunes se explican en el capítulo anterior “controles y funciones”. En este
capítulo se describen las funciones que necesitan información ampliada.
ALGUNAS FUNCIONES GENERALES:
MODALIDAD SLEEP:
El reproductor de CD apaga automáticamente el transporte y el láser después de unos 15 minutos
(cuando está en modalidad de pausa o cue). Esto prolonga la vida del motor y del láser. Durante la
modalidad sleep la pantalla muestra la palabra “z Z ... SLEEP”. Para reanudar el reproductor, pulse el
botón cue o play, la pantalla se encenderá en modalidad normal y estará preparada para recibir
instrucciones.
PITCH BENDING:
Esta función se usa para sincronizar los beats de dos pistas. Esto se puede realizar de dos modos:
Botones PITCH BEND: la velocidad incrementa o disminuye respectivamente siempre y cuando se
mantengan pulsados los botones PITCH BEND+ o PITCH BEND -.
JOG WHEEL: Si bien los efectos no se utilizan en modo manual, la JOG-WHEEL flexionará
temporalmente el pitch de la música girando la JOG-WHEEL en el sentido de las manecillas del reloj
para acelerar o en el sentido contrario al de las manecillas del reloj para alentar. La velocidad de
rotación de la JOG-WHEEL determina el porcentaje del pitch bend.
TEXTO DE CD:
No sólo los archivos MP3 pueden mostrar el nombre de la pista en la pantalla. Algunos CDs de audio
comunes usan el TEXTO de CD para mostrar los nombres de la pista. También algunos programas para
quemar CD-R (por ejemplo, Nero) pueden agregar TEXTO de CD a un CD de audio normal. Cuando el
TMC200 detecta estos datos de TEXTO de CD, la pantalla los mostrará automáticamente.
REPRODUCCIÓN/GRABACIÓN DE CD-R y CD-RW:
Además de los CD de audio comunes, el TMC200 puede reproducir tanto CD-R (CD grabable) como CDRW (CD regrabable). ¡Tenga en cuenta que siempre debe usar las opciones de escritura de disco “todo el
disco a la vez” y “una pista a la vez”! Aunque el TMC200 es capaz de leer CD-R y CD-RW grabados a alta
velocidad, le sugerimos que no use velocidades de grabación mayores a 12x para incrementar la
legibilidad.
¡Siempre compre CD-R y CD-RW de marcas de buena calidad!
Si el disco es de sesión múltiple, solamente se reproducirá la primera sesión:
Si la primera sesión es CD-DA puede reproducir solamente pistas CD-DA.
Si la primera sesión es MP3 puede reproducir solamente archivos MP3.
REPRODUCCIÓN DE ARCHIVOS MP3:
El reproductor de CD detecta automáticamente si un CD contiene archivos MP3. El TMC200 es capaz de
leer varios formatos diferentes de MP3. La pantalla muestra algunas de las etiquetas ID3 (título de la
canción / artista / nombre de la carpeta / velocidad). El CD puede contener hasta 999 archivos MP3,
repartidos en un máximo de 255 carpetas.
Los archivos MP3 pueden tener las siguientes extensiones: .mp3 ~ .MP3 ~ .mP3 ~ .Mp3
Compruebe las especificaciones técnicas para comprobar que archivos MP3 están permitidos.
SELECTORES TRACK/FOLDER:
La mayoría de las veces un CDR contiene muchos archivos MP3 (a veces 150 o más). Para facilitar las
cosas puede clasificar sus archivos MP3 en diferentes subcarpetas (directorios). Estas carpetas pueden
recibir el nombre los artistas, del género musical (tecno, lentas, salsa …), el conteo BPM (100 BPM, 110
BPM, 120 BPM …) o cualquier otra idea que le ayude a clasificar su música…
Mediante los selectores FOLDER / TRACK puede explorar fácilmente a través de las diferentes carpetas y
pistas. Puede establecer la unidad TMC200 en modalidad FOLDER y en modalidad TRACK , vea también
botòn FOLDER SELECTOR (3):
MODALIDAD FOLDER: Mediante el selector TRACK puede seleccionar la pista MP3 deseada en
esta carpeta. Tenga en cuenta que sólo puede seleccionar pistas dentro de la carpeta seleccionada.
Para ir a otra carpeta utilice el selector FOLDER.
MODALIDAD TRACK: Para seleccionar la modalidad de pista, pulse brevemente el selector TRACK:
podrá explorar todas las pistas de su CD como si no hubiera subcarpetas. Para desplazarse
rápidamente ( 10 pistas) por el CD, pulse el selector TRACK mientras lo gira hacia delante o hacia
atrás.
FUNCIÓN RELAY:
Compruebe primero si el cable especial de inicio de fader está conectado a los dos reproductores
TMC200.
Coloque un disco en los dos reproductores.
Abra primero los 2 canales fader de las entradas de CD en la unidad de mezclas.
Compruebe si los dos reproductores están en la modalidad Single (el indicador “single” (14) aparece
en la pantalla). Si uno de los reproductores no está en modo single, pulse el botón SGL/CNT (24) de
dicho reproductor.
Comience la reproducción en uno de los dos reproductores.
Se reproducirá una pista de forma alternativa desde los dos reproductores. Siempre puede colocar un
nuevo CD en el reproductor que esté esperando en pausa. De esta forma puede crear un programa
sin fin, ideal para pubs etc.
Retire el cable si no desea utilizar más la función relay.
ACERCA DE LOOPS:
CREACIÓN DE UN LOOP:
Mientras se está reproduciendo una canción, pulse el botón IN/R.CUE para programar el punto de inicio
del loop. A continuación, pulse el botón OUT para programar el punto final del loop. El seamless loop
comienza a reproducirse inmediatamente. (Con algo de práctica será capaz de crear loops perfectos).
Mientras se está reproduciendo el loop, puede pulsar el botón OUT otra vez para salir del loop y continuar
con el resto de la pista.
Es posible programar un nuevo loop, incluso cuando el loop actual se está todavía reproduciendo.
Mientras se está reproduciendo un loop, pulse el botón IN/R.CUE para programar el punto de inicio del
nuevo loop. A continuación, introduzca el punto final pulsando el botón OUT. El nuevo loop se ha
programado y se reproduce.
REINICIO DE UN LOOP:
Esto puede realizarse de 3 formas:
Cuando se programa un loop y lo deja pulsando el botón OUT, pulse RELOOP para reiniciar el loop.
Cuando se programa un loop y lo deja pulsando el botón OUT, pulse OUT de nuevo para reiniciar el
loop. El punto donde ha pulsado OUT se ha programado como el nuevo punto de loop.
Cuando el loop todavía se está reproduciendo, pulse el botón RELOOP para reiniciar el loop
inmediatamente. Puede repetir esto varias veces para crear un efecto “Stutter”.
JB SYSTEMS® 61/78 TMC200
JB SYSTEMS® 62/78 TMC200
Page 34

ESPAÑOL MANUAL DE INSTRUCCIONES
ESPAÑOL MANUAL DE INSTRUCCIONES
EDICIÓN DE UN LOOP:
Cuando programe un loop, pulse el botón RELOOP/STUTTER durante 2 segundos para entrar en la
modalidad “loop edit”. Mientras se está reproduciendo el seamless loop, la pantalla alfanumérica muestra
la información de tiempo del punto final de loop. Utilice la rueda jog grande para establecer un nuevo
punto final de loop. Para simplificar, puede escuchar sus modificaciones de punto final del loop
continuamente. Cuando el loop sea perfecto, pulse el botón LOOP OUT para guardar el nuevo punto final
del loop y dejar el loop.
NOTA:Puede almacenar loops en los botones HOT CUE. Esto significa que dispone de hasta 4 loops por
pista para reproducir. En el siguiente párrafo obtendrá información sobre cómo almacenar dichos loops.
ACERCA DE LOS EFECTOS:
¡En la descripción de los efectos puede encontrar mucha información, no olvide también verificar esa
sección!
CÓMO USAR LOS EFECTOS EN EL MODO DE SINCRONIZACIÓN DE BEATS:
Cuando se esté reproduciendo la música puede pulsar cualquiera de los 3 efectos y pulse el botón SYNCBPM (17) por lo que es encendido: el efecto funciona en el modo sincronizado por beats. Use los botones
EFFECT-SYNC (15+16) para seleccionar diferentes beats preestablecidos. Use el botón IMPACT (16)
para adaptar el impacto del efecto.
CÓMO USAR LOS EFECTOS EN EL MODO MANUAL:
Cuando se esté reproduciendo la música puede pulsar cualquiera de los 3 efectos y pulse el botón SYNCBPM (17) por lo que es oscuro: use la JOG-WHEEL (27) para cambiar el efecto en tiempo real. Use el
botón IMPACT (16) para adaptar el impacto del efecto.
ACERCA DE LA MEMORIA:
DIFERENTES MEMORIAS:
Antes de entrar a detalle sobre el uso de la memoria, se debe saber la diferencia entre “memoria de pista”
y “memoria permanente”:
Track Memory: esta es la memoria donde el TMC200 guarda un conjunto de hasta cuatro puntos cue
y/o loops para una pista. Puede configurar una “memoria de pista” para cada pista en un CD.
Ejemplo: su CD contiene 16 pistaspara cada pista puede guardar hasta 4 puntos cue y/o loops.
¡Esto produce un total de 16 x 4 = 64 puntos cue y/o loops en un CD!
Memoria permanente: esta es la memoria grande donde se guardan permanentemente todos los
puntos cue y loops. De hecho es una recopilación indexada de “memorias de pista” Cuando recupere
los puntos cue previamente guardados de una cierta pista, puede realizar la transferencia de la
“memoria permanente” a la “memoria de pista”.
USO DE LA “TRACK MEMORY”:
ALMACENAMIENTO DE UN PUNTO CUE MAESTRO:
Existen 2 formas de establecer un punto cue maestro:
Pulse el botón LOOP IN (4) durante la reproducción normal para establecer el nuevo punto cue (“CUE
al vuelo”).
Coloque el reproductor en pausa y use la rueda para jog/shuttle para buscar la ubicación exacta para
el punto cue. Cuando se haya encontrado la ubicación, pulse el botón LOOP IN (4) para establecer el
nuevo punto cue (o pulse el botón PLAY/PAUSE)
Cuando haya programado el punto cue, sólo pulse el botón CUE (7) para recuperarlo.
ALMACENAMIENTO DE UN PUNTO CUE SIMPLE EN LOS BOTONES “HOT CUE”:
Primero pulse el botón MEMORY (10) para hacer que la unidad entre en la modalidad de memoria hot
cue (el botón MEMORY está encendido).
Pulse uno de los cuatro botones HOT CUE en el momento oportuno durante la reproducción normal:
el botón HOT CUE que ha pulsado se enciende en azul para indicar que se ha almacenado el punto
cue deseado. (“Cue on the fly”).
Ponga el reproductor en pausa y utilice la rueda jog/shuttle para buscar la ubicación exacta del punto
cue. Una vez que se haya encontrado esta ubicación, pulse uno de los cuatro botones HOT CUE para
establecer el nuevo punto cue: el botón HOT CUE que ha pulsado se enciende en azul para indicar
que se ha almacenado el punto cue deseado.
Una vez que se ha programado el punto cue, pulse el botón HOT CUE para comenzar la reproducción
desde el punto cue almacenado.
ALMACENAMIENTO DE UN LOOP EN LOS BOTONES “HOT CUE”:
Es muy parecido a almacenar un punto cue simple. La única diferencia es que hay que establecer primero
el TMC200 en modalidad loop. Cuando el loop se está reproduciendo, pulse el botón MEMORY para que
el reproductor de CD entre en la modalidad de memoria hot cue (el botón MEMORY está encendido).
Después de esto pulse uno de los cuatro botones HOT CUE: el botón HOT CUE que ha pulsado se pone
en blanco para indicar que el loop, que se está reproduciendo en ese momento, se ha almacenado.
¡Puede almacenar hasta 4 loops!
ELIMINAR LOS BOTONES “HOT CUE”:
Puede eliminar fácilmente el contenido del botón HOT CUE pulsando el botón DELETE CUE (11),
seguido del botón HOT CUE que desea eliminar. O simplemente guarde un nuevo punto cue o loop en
este botón HOT CUE. También puede borrar los cuatro botones HOT CUE conjuntamente presionando el
botón DELETE CUE (11) durante más de 2 segundos. Notará que los 4 botones HOT CUE en su totalidad
cambiarán a color oscuro para indicar que los botones HOT CUE están vacíos.
USO DE LA “MEMORIA PERMANENTE”:
Por razones de seguridad los puntos cue y los loops almacenados en los botones HOT CUE no se
guardan automáticamente en la memoria permanente. Esto significa que si recupera un conjunto de
puntos cue y loops de la memoria permanente en la memoria HOT CUE (la cual es la memoria de pista),
puede cambiar, editar y eliminar estos puntos cuantas veces lo desee. La memoria permanente no se
verá afectada hasta que respalde los botones HOT CUE en la memoria permanente.
GUARDAR EN LA “MEMORIA PERMANENTE”:
Pulse el botón MEMORY (10) durante 2 segundos. La pantalla muestra “Saving” para indicar que los
puntos cue y los loops en los botones HOT CUE para esa pista se guardan en la memoria permanente.
ELIMINAR UNA PISTA EN LA “MEMORIA PERMANENTE”:
Seleccione la pista que desea eliminar y carga las Hot Cue. Pulse simultáneamente los botones “DELETE
CUE” y “MEMORY” hasta que la pantalla pregunta “DEL ALL?”. Si pulsa el botón YES (botón PITCH
BEND+), se eliminará la información de la pista en la memoria permanente.
RECUPERACIÓN DE LOS “PUNTOS HOT CUE/LOOPS” DE LA MEMORIA PERMANENTE:
Debido a que tarda unos segundos en cargar los puntos cue permanentes, no se restauran
automáticamente. Algunas veces simplemente no los necesita así que ¿para qué conservarlos? A
continuación se explica cómo funciona:
No se guardan puntos cue: cuando seleccione una pista que no tenga puntos cue o loops
guardados en la memoria permanente, nada sucede: puede iniciar la reproducción de inmediato.
Puntos cue almacenados: cuando seleccione una pista donde están guardados los puntos cue o
loops en la memoria permanente, el TMC200 muestra “¿Load cues?” y debe confirmar si desea cargar
los puntos cue. Esto es lo que puede hacer:
Pulsar el botón YES: pulse sí (botón pitch bend+) para cargar los puntos cue y loops guardados
previamente. La pantalla muestra RECALL mientras se llenan los botones Hot Cue.
Pulsar el botón NO: los puntos cue no se cargan y la pantalla cambia a su estado normal.
Puede iniciar la reproducción de inmediato.
No hacer nada: después de unos segundos la pantalla cambia automáticamente a su estado
normal y por supuesto no se cargan los puntos cue.
BORRADO DE TODA LA MEMORIA CUE PERMANENTE:
Mantenga el botón DELETE CUE (11) y un botón MEMORIA (10) pulsada mientras enciende la unidad
TMC200: la memoria cue permanente se borrará. Durante esta acción la pantalla muestra “clearALL”
(Borrar todo).
PRECAUCIÓN: ¡¡¡ESTA ACCIÓN ES IRREVERSIBLE, TODOS LOS PUNTOS CUE/LOOPS SERÁN
ELIMINADOS!!!
ACTUALIZACIONES DE FIRMWARE
Para incrementar la flexibilidad, el TMC200 se puede actualizar en cualquier momento para agregar
nuevas funciones o reparar bugs si es que estuvieran presentes. Le sugerimos que visite nuestro sitio
web (www.jbsystems.be) de vez en cuando para ver si existen actualizaciones de firmware para
descargarlas.
JB SYSTEMS® 63/78 TMC200
JB SYSTEMS® 64/78 TMC200
Page 35

ESPAÑOL MANUAL DE INSTRUCCIONES
Verificación de la(s) versión(es) del firmware
Mantenga presionado el botón SGL/CTN (24) al encender el reproductor: las versiones de firmware
instaladas actualmente se muestran en la pantalla. El firmware contiene diferentes partes: Control + DSP
+ Servo, cada una con su propio número de versión.
Instrucciones de actualización
Debido a que las instrucciones de actualización podrían cambiar, verifique que se incluya el archivo
“TMC200 – upgrade instructions.txt” incluido en cada actualización.
PORTUGUÊS MANUAL DO UTILIZADOR
MANUAL DO UTILIZADOR
Parabéns e obrigado por ter adquirido este produto JB SYSTEMS®. Por favor leia atentamente este manual
do utilizador de forma a saber como utilizar esta unidade correctamente. Após ler este manual, guarde-o
num lugar seguro de forma a poder consultá-lo no futuro.
ESPECIFICACIONES
Suministro de alimentación: CA 100-240V, 50/60Hz
Consumo de energía: 13W
Nivel de salida: 2,0V +/0.5dB @ 1kHz, 0dB
Respuesta de frecuencia: 17-20.000Hz (+/-0,4dB)
THD + ruido (20kHz LPF): 0,006% @ 1kHz, 0dB
Relación S/N (IHF-A): >130dB @ 1kHz, 0dB
Tiempo de acceso corto (siguiente pista): <2 seg
Tiempo de acceso largo (pista 1 20): <4 seg
Recepción láser: Sanyo detección de 3 puntos 780nm
Tracking electrónico: Tracking digital completamente automático.
FORMATO DE DISCO:
Extensiones de archivo posibles: .mp3 ~ .MP3 ~ .mP3 ~ .Mp3
Compatibilidad con etiqueta ID3: ID3v2 y anterior
ISO9660: Nivel 1 (máx. 8”/8.3” estilo de caracter)
Nivel 2 (máx. 31/30/ estilo de caracter)
Joliet: máx. 63/63 estilo de caracter
Formato de sector CD-ROM: Sólo modo 1
Carpetas máx.: 255
Archivos máx.: 999 (hasta 255 por carpeta)
FORMATOS MP3:
MPEG1 Layer3 (ISO/IEC11172-3): mono / estéreo muestreado a: 32 - 44,1 - 48kHz
Bitrates: 32 – 320 Kbps
Modos de bitrate: CBR (Bitrate Constante) o VBR (Bitrate Variable)
MPEG2 Layer3 (ISO/IEC13818-3): mono / estéreo muestreado a: 16 – 22,05 - 24kHz
Bitrates: 32 – 160 Kbps
Modos de bitrate: CBR (Bitrate Constante) o VBR (Bitrate Variable)
MPEG2,5 Layer3: mono / estéreo muestreado a: 8 – 11,025 -12kHz
Bitrates: 32 – 160 Kbps
Modos de bitrate: CBR (Bitrate Constante) o VBR (Bitrate Variable)
Dimensiones: 246 (W) x 103,5 (H) x 348 (D) mm
Peso: 2,66kg
Toda la información está sujeta a cambios sin previo aviso
Puede descargar la última versión de este manual de usuario en nuestro sitio web: www.beglec.com
CARACTERÍSTICAS
Reprodução completa de MP3 (máx. 999 ficheiros MP3 / 255 pastas num CD)
o MPEG1 layer3 (32 + 44,1 + 48kHz)
o MPEG2 layer3 (16 + 22,05 + 24kHz)
o MPEG2.5 layer3 (8 + 11,025 + 12kHz)
o Suporta os modos bitrate CBR e VBR.
Efeito scratch digital através da jog wheel táctil
Efeito electrónico de “travão” + 3 efeitos digitais:
Echo, flanger, filter
Controlo manual dos parâmetros
Modo sincronizado á batida
Visor LCD alfanumérico (CD-TEXT e etiquetas ID3V2: mostram o titulo, artista, taxa de bits, …)
Botões Hot Cue podem guardar até 4 pontos cue ou loops contínuos por faixa!
Memória permanente para até 2000 pontos cue e loops
Função de edição de loops perfeitos em tempo real!
Contador BPM totalmente automático
Pitch Lock (Master Tempo)
Escalas de Pitch: +/-4% +/-8% +/-16% +/-100% (até +/-16% em MP3)
Pitch bend através de jog wheel e botões para misturas perfeitas
Parâmetro de alcance do valor do pitch ajustável para um ajuste ultra preciso do pitch (software V22 e
superior)
Até 4 loops perfeitos para cada faixa com reloop/stutter
Cue em tempo real (“Cue on the fly”)
Início de memória ultra rápido em 10 mseg.
Fader start/stop (back cue)
Função Auto cue (-48DB)
Busca em 4 velocidades diferentes
Display LCD azul com indicador de pitch e marcador de posição
Indicador seleccionável de tempo decorrido, restante e total
Jog wheel com superfície especial de borracha
Reprodução faixa-a-faixa ou CD completo
Função Relay play permite reprodução consecutiva em dois leitores
Saída Coaxial digital S/PDIF áudio RCA
Protecção de transporte de 60 segundos
Modo Sleep (prolonga a duração do laser)
JB SYSTEMS® 65/78 TMC200
ANTES DE UTILIZAR
Verifique o conteúdo:
Certifique-se que a caixa contém os seguintes artigos:
Unidade TMC200
Manual do utilizador
1 Cabo de alimentação.
1 cabo rca/rca
1 cabo mono mini-jack para fader start e relay play
JB SYSTEMS® 66/78 TMC200
Page 36
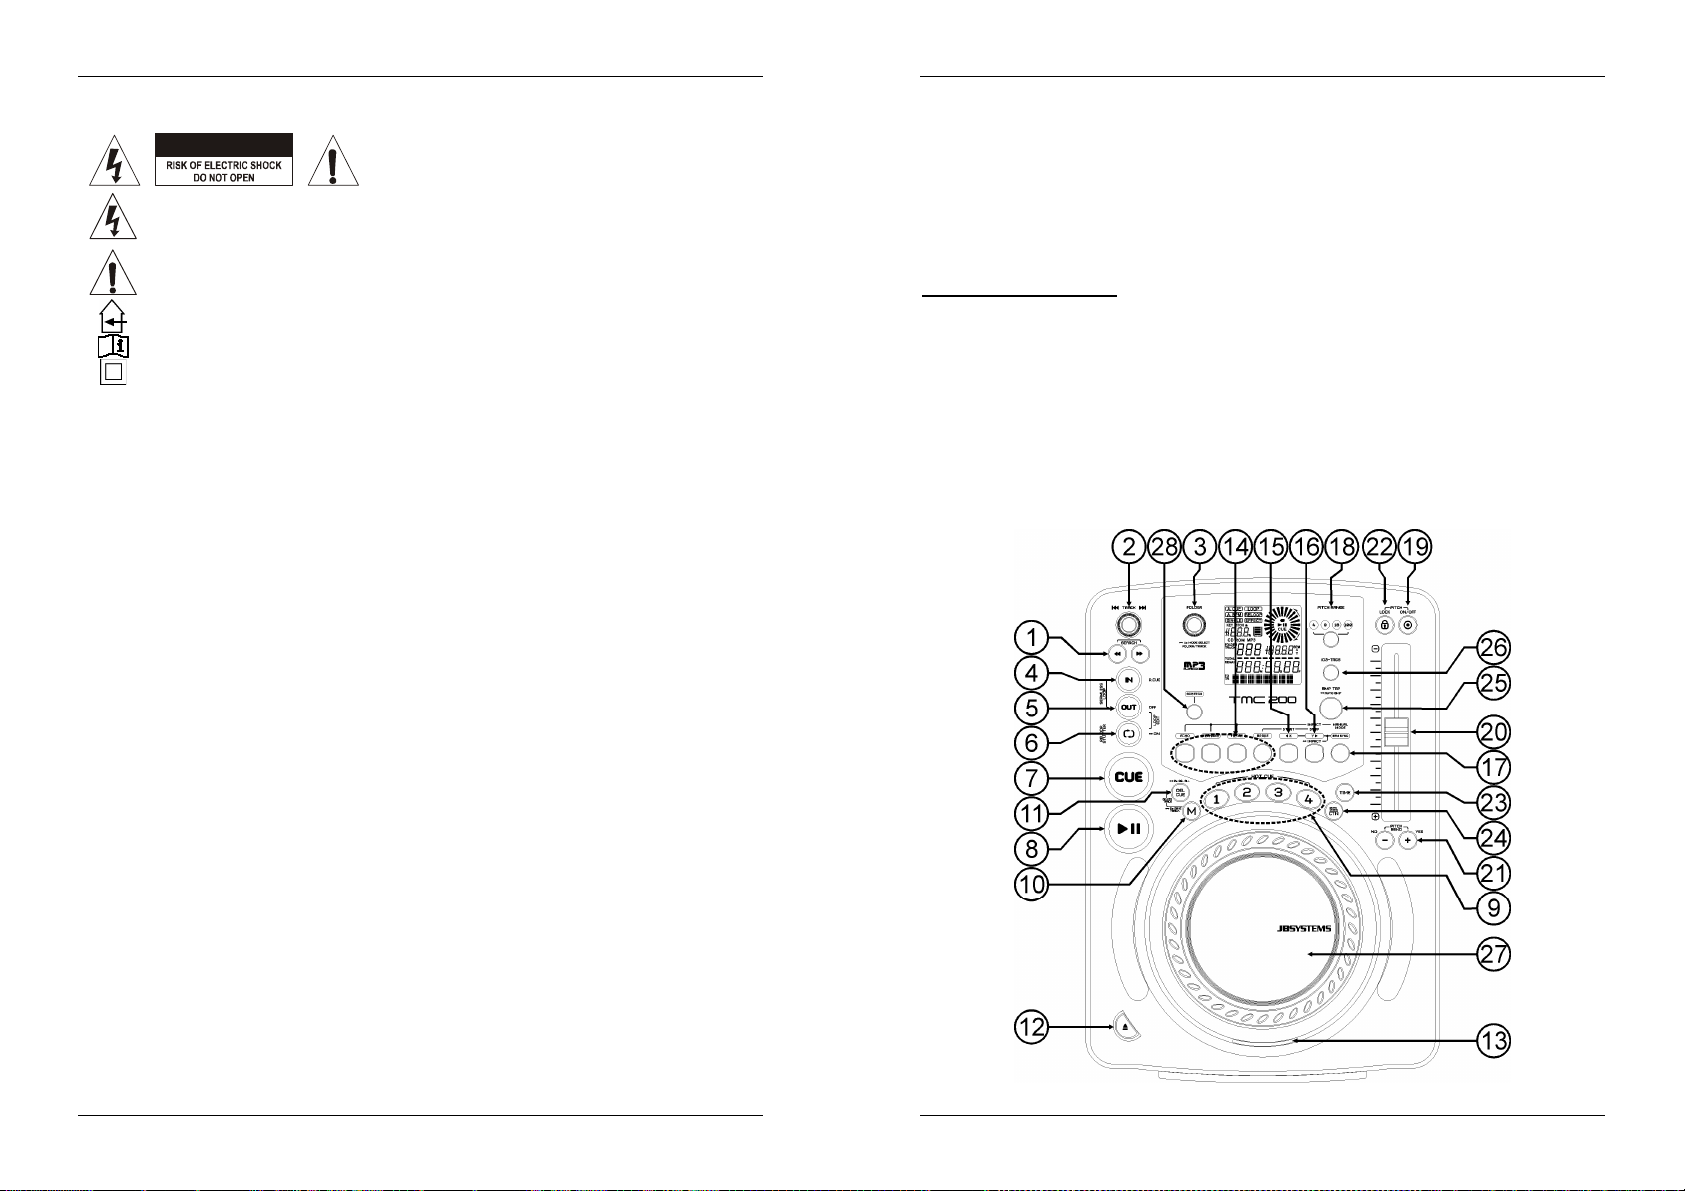
PORTUGUÊS MANUAL DO UTILIZADOR
PORTUGUÊS MANUAL DO UTILIZADOR
INSTRUÇÕES DE SEGURANÇA:
CAUTION
O símbolo composto por um triângulo equilátero com um relâmpago no interior alerta para a
presença de voltagem perigosa não isolada no interior do produto que poderá constituir risco
de choque eléctrico.
O símbolo composto por um triângulo equilátero com um ponto de exclamação alerta o
utilizador para a presença de instruções importantes de utilização e manutenção do produto.
Este símbolo significa: utilização unicamente em espaços fechados
Este símbolo significa: Leia instruções
Este símbolo significa: Aparelho Classe II
De modo a evitar risco de fogo ou choque eléctrico, não exponha este produto a chuva ou humidade.
De forma a evitar a formação de condensação no interior da unidade, ao transportá-la para ambiente
quente aguarde algum tempo de modo a que haja uma ambientação à temperatura. A condensação
poderá afectar o desempenho da unidade ou até danificá-la.
Esta unidade destina-se unicamente a utilização em espaços fechados.
Não introduza objectos de metal nem verta líquidos no interior do produto, correrá risco de choque
eléctrico ou poderá danificar o produto. Caso algum objecto estranho entre em contacto com o interior da
unidade, desligue-a de imediato da corrente.
Não coloque chamas descobertas (tais como velas acesas) sobre a unidade.
Não cubra os orifícios de ventilação ou a unidade poderá sobreaquecer.
Evite locais com poeiras. Limpe a unidade regularmente.
Mantenha esta unidade fora do alcance das crianças.
Esta unidade deverá ser operada unicamente por pessoas experientes.
Temperatura ambiente de funcionamento máxima é de 40ºC. Não utilize esta unidade a temperaturas
ambientes mais elevadas.
Desligue sempre a unidade da corrente quando não a utilizar durante longos períodos de tempo ou antes
de efectuar manutenção.
A instalação eléctrica deve ser efectuada unicamente por pessoal qualificado, cumprindo os regulamentos
de segurança em instalações eléctricas e mecânicas do seu pais.
Certifique-se que a voltagem a utilizar não é superior à voltagem indicada no painel traseiro da unidade.
A tomada de corrente deverá permanecer acessível para que a unidade possa ser desligada da corrente.
O cabo de alimentação deverá estar sempre em perfeitas condições: desligue a unidade e substitua
imediatamente o cabo caso este apresente algum dano.
Nunca permita que este cabo entre em contacto com outros cabos!
Quando o interruptor de poder está no posição de repouso, esta unidade não está desconectada
completamente dos canos principais!
De forma a não correr risco de choque eléctrico não abra a cobertura da unidade. À excepção do fusível,
não existem peças que possam ser substituídas pelo utilizador.
Nunca repare um fusível nem tente operar a unidade sem fusível. Substitua sempre um fusível danificado
por outro com as mesmas características!
Em caso de problemas sérios de funcionamento, interrompa a utilização da unidade e contacte
imediatamente o seu revendedor.
Caso seja necessário transportar a unidade utilize a embalagem original.
Por motivos de segurança, são proibidas quaisquer alterações não autorizadas à unidade.
ATENÇÃO: De forma a evitar o risco de choque eléctrico,
não remova peças da unidade. Não tente fazer
reparações. Contacte pessoal qualificado
GUIA DE INSTALAÇÃO:
Instale a unidade num local bem ventilado onde não exista exposição a altas temperaturas ou humidade.
Colocar ou utilizar a unidade durante longos períodos de tempo perto de fontes de calor, tais como
amplificadores, holofotes, etc., irá afectar o desempenho da unidade e poderá até danificá-la.
Quando colocar a unidade numa cabine ou numa mala, certifique-se que há ventilação de modo a permitir
a evacuação do calor produzido pela unidade.
De forma a evitar a formação de condensação no interior da unidade, ao transportá-la para ambiente
quente aguarde algum tempo de modo a que haja uma ambientação à temperatura. A condensação
poderá afectar o desempenho da unidade.
LIMPEZA DO LEITOR DE CD:
Utilize um pano limpo ligeiramente humedecido em água. Evite introduzir água dentro da unidade. Não
utilize líquidos voláteis como benzeno ou diluente, irá danificar a unidade.
LIGAÇÕES
Utilize o cabo rca fornecido para ligar a saída áudio do leitor de CD à entrada CD da sua unidade de
mistura.
Ligue também o cabo fader start se a sua unidade de mistura áudio tiver ligações para fader start.
(Compatível com Synq® ou Pioneer®)
Ligue o cabo da alimentação.
CONTROLOS E FUNÇÕES
JB SYSTEMS® 67/78 TMC200
JB SYSTEMS® 68/78 TMC200
Page 37

PORTUGUÊS MANUAL DO UTILIZADOR
1. Botões SEARCH: Esses botões tem 4 posições (para a frente e para trás) de velocidade de busca nas
músicas. Quanto mais tempo pressionar o botão, mais depressa irá pesquisar através da música.
2. Botão TRACK SEARCH: várias funções estão disponíveis
Procura normal de faixa: rode o botão para procurar as faixas em passos de +1/-1.
Procura rápida de faixa: mantenha o botão pressionado enquanto roda o mesmo para pesquisar
as faixas em passos de +10/-10.
Reiniciar informação do visor: Pressionando o botão irá forçar o visor a mostrar a informação
3. Botão FOLDER SELECTOR: várias funções estão disponíveis
4. Botão IN/R.CUE: Permite definir ponto CUE sem interromper a reprodução (CUE ON THE FLY). Este
5. OUT button: Utilizado para estabelecer o final dos loops. O leitor dá início ao loop perfeito até que este
6. Botão RELOOP/STUTTER: Este botão tem 3 funções:
7. Botão CUE: Ao pressionar o botão CUE durante a reprodução irá voltar imediatamente à posição em
8. Botão PLAY/PAUSE: Sempre que pressiona o botão PLAY/PAUSE, o leitor de CD muda de play
9. Botões HOT CUE: quatro botões programáveis onde pode armazenar os usais pontos cue e/ou loops.
10. Botão MEMORY: É utilizado para guardar pontos cue e loops nos os botões Hot Cue (19) e na
desde o inicio
Procura de pasta: Se o seu CD contém subpastas MP3, poderá seleccionar através deste
selector de pastas. O display mostra o número da pasta + nome. Consulte o próximo capítulo
para obter mais informações sobre a utilização das subpastas. Quando o CD não contém
subpastas, este selector não é utilizado.
Mostrar nome de pasta: O nome da pasta é mostrado instantaneamente quando este selector é
pressionado por breves momentos.
Alternar entre modo FOLDER / TRACK: pressione este botão em cerca de 1 segundo, o visor
começa a alternar entre “FOLDERmd” e “TRACKmd”. Liberte o botão quando o modo mostrado é
o desejado.
MODO FOLDER: poderá seleccionar apenas faixas no interior da pasta selecionada. Para
passar a outra pasta, tem apenas que utilizar o selector FOLDER.
MODO TRACK: poderá percorrer todas as faixas do CD como se não existissem subpastas.
Para percorrer o CD mais rapidamente (saltos de 10 faixas), pressione o selector TRACK e
gire-o para a frente ou para trás.
botão também define o inicio de um loop contínuo. Ao reproduzir um dos hot cues (9), o ponto de
partida é também copiado para este botão.
botão seja pressionado novamente para sair. Quando um loop é programado mas não está activo,
poderá também reiniciar o loop. O ponto em que o botão é pressionado será memorizado como o novo
final do loop. Quando o leitor está em modo “loop edit”, pressione este botão para parar a edição do
loop e guardar o ponto final do loop.
RELOOP: Se um loop tiver sido programado e tiver pressionado o botão OUT (5), pressione o
botão reloop para voltar a aceder ao loop. Para sair do loop pressione o botão OUT (5). (Os pontos
iniciais e finais permanecerão inalterados)
STUTTER: Quando um loop está a ser reproduzido pode pressionar este botão para reiniciar
imediatamente o loop. Este botão pode também ser pressionado quando uma faixa não está a ser
reproduzida em loop. Sempre que o botão RELOOP/STUTTER é pressionado, a música será
reiniciada a partir do ponto cue pré-programado. Este efeito adiciona criatividade extra ao seu
desempenho.
LOOP EDIT: Quando um loop está programado, pressione o botão RELOOP/STUTTER durante
cerca de 2 segundos para entrar no modo “loop edit”. Agora poderá alterar o ponto final do loop.
Consulte o capítulo “Como utilizar…” para mais informações.
que a reprodução foi iniciada. A reprodução começa imediatamente a partir do ponto cue programado
enquanto o botão CUE for pressionado. O leitor de CD regressa ao ponto cue assim que o botão CUE é
solto. Colocando a unidade em modo pausa (o LED PLAY/PAUSE pisca), o botão search e/ou o jog
wheel é utilizado para estabelecer um ponto inicial diferente. Ao pressionar o botão PLAY/PAUSE
seguido do botão CUE, pode confirmar este novo ponto cue.
(reprodução) para pause (pausa) e vice-versa. O botão pisca enquanto estiver em pause.
Quando um ponto cue normal é guardado, o botão correspondente fica azul, quando um loop é
guardado o botão correspondente fica branco. Todos os pontos cue e loops guardados podem ser
transferidos para a memória permanente para uso futuro. Consulte o capítulo “COMO UTILIZAR” para
mais informação como programas pontos cue etc.
memória cue permanente:
PORTUGUÊS MANUAL DO UTILIZADOR
Guardar nos botões HOT CUE: Pressione o botão MEMORY durante alguns momentos de
forma a que o TMC200 se prepare para guardar um ponto cue ou loop num dos 4 botões HOT
CUE.
Guardar na memória permanente: Pressione o botão MEMORY até que este comece a piscar e
o display LCD mostre “SAVING”. Os conteúdos dos botões HOT CUE para esta faixa serão
guardados na memória permanente.
Importante: Não são apenas os botões HOT CUE que são armazenados na memória
permanente, também são guardados inúmeros parâmetros para que não tenha de os definir outra
vez cada vez que liga o aparelho. Para além dos botões hot cue, também são guardados os
seguintes parâmetros: alcance do pitch, modo single/continue, indicação do tempo, configuração
da jog Wheel, auto cue, modo auto BPM, pitch on/off, pitch lock on/off e parâmetro do start/stop.
Mais adiante neste manual irá encontrar mais informação sobre como utilizar estas funções.
11. Botão DELETE CUE: este botão tem várias funções:
Eliminar 1 HOT CUE: pressione o botão DELETE CUE, seguido do botão HOT CUE que quer
eliminar da track memory. O botão eliminado apaga-se.
Eliminar 4 HOT CUES: pressione o botão DELETE CUE durante 2 segundos para apagar todas as
4 hot cues da track memory.
Eliminar faixa: pressione o botão DELETE CUE e o botão MEMORY (10) ao mesmo tempo em
cerca de 2 segundos para eliminar as hot cues de toda a faixa da memória permanente. Porque não
haverá maneira de retroceder, o ecrã pergunta primeiro se tem a certeza: usando os botões PITCH
BEND (21) pode escolher YES (sim) ou NO (não).
Por favor ver o capítulo “COMO UTILIZAR” para mais informação.
12. Botão OPEN/CLOSE: Pressione para abrir e fechar a gaveta do CD na frente do TMC200. Este Botão
é desactivado durante a reprodução. A gaveta fecha automaticamente após 60 seg. por razões de
segurança.
13. CD TRAY INDICATOR: Este indicador acende-se quando um disco é carregado.
14. BOTÕES EFFECT: Cada um destes botões tem as suas próprias configurações, descritas em baixo:
Botão ECHO EFFECT: pressione este botão para activar o efeito de eco. Dependendo do modo de
sincronização (manual ou sincronizado à batida), diferentes configurações são possíveis:
Modo manual: o botão BPM-SYNC (17) está apagado. Pode configurar todos os parâmetros
manualmente, use os controlos seguintes:
Jog-wheel (27): usado para configurar o tempo de eco de 1ms a 2000ms.
Botão IMPACT (16): enquanto o botão IMPACT estiver aceso pode usar a jog-wheel (27)
para mudar o impacto (dry/wet) do efeito.
Modo Sincronizado à Batida: o botão BPM-SYNC (17) está aceso. Pode usar os seguintes
controlos:
Botões EFFECT SYNC (15+16): escolha uma das predefinições de eco sincronizadas à
batida.
Botão IMPACT (16): enquanto o botão IMPACT estiver aceso pode usar a jog-wheel (27)
para mudar o impacto (dry/wet) do efeito.
Botão FLANGER EFFECT: pressione este botão para activar o efeito flanger. Dependendo do modo
de sincronização (manual ou sincronizado à batida), diferentes definições são possíveis:
Modo manual: o botão BPM-SYNC (17) está apagado. Pode configurar todos os parâmetros
manualmente, use os controlos seguintes:
Jog-wheel (27): usado para mudar o efeito manualmente.
IMPACT button (16): enquanto o botão IMPACT estiver aceso pode usar a jog-wheel (27)
para mudar o impacto (dry/wet) do efeito.
Modo Sincronizado à Batida: o botão BPM-SYNC (17) está aceso. Pode usar os seguintes
controlos:
Botões EFFECT SYNC (15+16): escolha um dos modos sincronizados à batida predefinidos.
IMPACT button (16): enquanto o botão IMPACT estiver aceso pode usar a jog-wheel (27)
para mudar o impacto (dry/wet) do efeito.
Botão FILTER EFFECT: pressione este botão para activar o efeito de filtro. Dependendo do modo de
sincronização (manual ou sincronizado à batida), diferentes definições são possíveis:
Modo Manual: o botão BPM-SYNC (17) está apagado. Pode configurar todos os parâmetros
manualmente, use os controlos seguintes:
Jog-wheel (27): usado para alterar manualmente a frequência de corte do filtro.
Botão IMPACT (16): enquanto o botão IMPACT está iluminado pode usar a jog-wheel (27)
para mudar o impacto (factor Q) do filtro.
JB SYSTEMS® 69/78 TMC200
JB SYSTEMS® 70/78 TMC200
Page 38

PORTUGUÊS MANUAL DO UTILIZADOR
PORTUGUÊS MANUAL DO UTILIZADOR
Modo Sincronizado à Batida: o botão BPM-SYNC (17) está aceso. Pode usar os seguintes
controlos:
Botões EFFECT SYNC (15+16): escolha um dos modos sincronizados à batida predefinidos.
Botão IMPACT (16): quanto o botão IMPACT está iluminado pode usar a jog-wheel (27) para
mudar o impacto (factor Q) do filtro.
Botão BRAKE: pressione este botão para activar o efeito travão. Agora pode determinar a
velocidade de aceleração/desaceleração da música enquanto usa o botão PLAY/PAUSE (8). Pode
definir os parâmetros com os botões (15+16), veja em baixo.
15. Botão EFFECT SYNC/START: Este botão tem várias funções, dependendo do modo de efeito:
Efeitos BPM-Synced: Quando um efeito é usado em modo sincronizado á batida, este botão
está aceso. Agora pode escolher como quer que o efeito seja sincronizado á batida. Use este
botão para cortar o parâmetro BPM actual para metade.
Efeito BRAKE: Pressione este botão para mudar o tempo de aceleração (desde zero até
velocidade máxima). Enquanto este botão está aceso, pode usar a jog Wheel (27) para mudar o
16. Botão EFFECT SYNC/STOP/IMPACT: Este botão tem várias funções, dependendo do modo de efeito:
17. Botão BPM-SYNC: pressione este botão para alternar entre manual e modo de efeito sincronizado à
18. Botão PITCH RANGE: Sempre que pressionar este botão, irá mudar a escala do cursor speed (20).
19. Botão SPEED: Este botão é utilizado para ligar/desligar a função speed.
20. Cursor SPEED: Pressione o botão SPEED (19), para que se acenda. A velocidade pode ser alterada
21. Botões PITCH BEND: A velocidade aumenta enquanto o botão “+” é pressionado e volta à velocidade
22. Botão PITCH LOCK: (Master tempo) Activa a função Pitch Lock. Esta função permite ajustar a
23. Botão TIME: o botão TIME alterna entre tempo decorrido, tempo restante numa selecção, e tempo total
24. Botão SGL/CTN: Com este botão pode seleccionar entre “single track mode” e “continuous play”.
tempo desde 0,0s (arranque imediato) para até quase 10s (arranque muito lento)
Efeitos BPM-Synced: Quando um efeito é usado em modo sincronizado á batida, este botão
está aceso. Agora pode escolher como quer que o efeito seja sincronizado á batida. Use este
botão para duplicar o parâmetro BPM actual.
Efeito BRAKE: Pressione este botão para mudar o tempo de desaceleração (desde a
velocidade máxima até zero). Enquanto este botão está aceso, pode usar a jog Wheel (27) para
mudar o tempo desde 0,0s (paragem imediata) para até quase 10s (paragem muito lenta)
Parâmetro IMPACT: enquanto um dos 3 efeitos DSP é activado, pressione o botão até que este
comece a piscar. Agora pode adaptar o impacto dos efeitos seleccionados, ver também os
botões EFFECT (14).
batida! Por favor referem-se ao ponto (14) para mais informação.
Em CDs áudio normais poderá seleccionar entre +/-4%, +/-8%, +/-16%, e +/-100%. A opção +/-100%
não está disponível em CDs de MP3.
até +/-100% movendo o cursor. A velocidade não se alterará se o botão SPEED (19) estiver desligado.
Pode alterar o escala do pitch com o botão PITCH RANGE (18)
normal quando o botão é solto. A velocidade decresce quando o botão “-”é pressionado e volta ao pitch
original quando o botão é solto. Estes botões podem ser utilizados para sincronizar as batidas de 2
faixas e também para confirmar (ou não) as perguntas que por vezes são mostradas no display.
velocidade de uma faixa, utilizando o pitch control sem alterar o pitch tonal. Este botão fica azul quando
o Pitch Lock está ligado.
NOTA: tenha em atenção que a função pitch lock tem limitações. A partir de certo ponto na alteração da
velocidade (depende do estilo de musica), o pitch lock não conseguirá manter o mesmo pitch.
Inicialmente irá ouvir uma pequena distorção que se irá tornar mais notória a alterações de velocidade
mais altas. Este facto nem sempre é uma desvantagem: a velocidades muito baixas poderá utilizá-lo
como um “efeito de distorção” especial!
restante num CD. (standard = restante/faixa) O tempo total restante num CD não está disponível em
CDs MP3.
Também poderá ligar\desligar a função auto cue (-48dB).
Continuous play: O CD será reproduzido na sua totalidade sem interrupção. (Geralmente
utilizado em bares)
Single track: O leitor pára no fim de cada faixa e aguarda no início da faixa seguinte. O leitor irá
aguardar na primeira nota musical de cada faixa. Isto significa que os CDs mal indexados não irão
interferir com as capacidades de arranque rápido deste leitor de CD. Esta é uma característica
muito útil para deejays!
Auto Cue on/off: O TMC200 detecta automaticamente a primeira nota musical de cada faixa de
forma a garantir que a música é reproduzida assim que o button play é pressionado. Para
ligar\desligar esta função Auto Cue pressione simplesmente o botão SGL/CTN durante 2
segundos. O display mostra “A.CUE” quando esta função está activada.
25. Botão BPM-TAP: Botão TAP: Este leitor contém um contador de batidas (BPM) totalmente
automático. Em alguns casos raros o contador de batidas não consegue efectuar a contagem
correctamente (as batidas estão fora da escala normal ou simplesmente não existem batidas). Nestas
situações poderá auxiliar o contador de batidas manualmente pressionando este botão ao ritmo da
música. Para voltar ao contador de batidas automático pressione o botão TAP até que a mensagem
“AUTOBPM” surja no canto superior esquerdo do display
26. Botão ID3-TAGS: para tornar as coisas mais fácies para si, a maioria das faixas MP3 contém etiquetas
ID3 para lhe dar mais informação acerca da canção seleccionada. O TMC200 pode mostrar algumas
das informações no visor:
Informação “Song title”: por definição o visor mostra o título da música.
Informação “Artist”: pressione o botão ID3-TAGS 1 vez para mostrar o nome do artista, o visor
regressa automaticamente ao predefinido.
Informação “Bit-rate”: pressione o botão ID3-TAGS 2 vezes para mostrar a taxa de bits
(qualidade de gravação) da faixa, o visor regressa automaticamente ao predefinido.
Quando a faixa não tem etiquetas ID3, o visor mostra o nome do ficheiro (xxxxxxxxx.mp3)
27. JOG WHEEL TÁCTIL: O jog wheel tem diferentes funções, dependendo do modo que estiver a utilizar.
O jog wheel funciona como um controlo de busca de frame (1/75 seg) quando o CD não esta a
reproduzir mas também não está em pausa ou com ponto cue estabelecido. Para estabelecer novo
ponto cue, gire o jog wheel e de seguida pressione PLAY (8) ou LOOP IN (4) quando tiver definido a
posição certa. Pressione CUE (7) para regressar ao “PONTO CUE”.
Se a faixa está a ser reproduzida, jog wheel altera temporariamente o pitch da música até +/-100%,
ao girar o jog na direcção dos ponteiros do relógio irá aumentar a velocidade, ao girar sentido
contrário a velocidade irá diminuir. A variação de pitch será determinada pela velocidade da rotação.
Esta função é uma alternativa aos botões PITCH BEND (21).
Em modo scratch (botão SCRATCH (28) ativado) o jog wheel é utilizado para manipular a reprodução
da música em tempo real. Desta forma, poderá fazer scratch com a música do CD do mesmo modo
que faria com um disco de vinil normal. Para igualar ao toque do vinyl o mais possível e uma
performance scratch largamente melhorada, a jog wheel usa uma tecnologia patenteada sensível ao
toque!
Pode manipular os efeitos DSP enquanto eles são usados em modo manual, ver botões EFFECT
(14).
28. Botão SCRATCH: É utilizado para colocar o TMC200 em modo scratch. Esta opção permite fazer
scratch com qualquer faixa no CD em tempo real. Pode utilizar a função scratch tanto em modo play
como e modo pausa:
No modo play: A música é reproduzida normalmente até ao momento em que o jog wheel (27) é
tocado. Enquanto o jog wheel (27) é girado, o efeito scratch é audível. Quando o jog wheel pára,
a música retoma a partir do ponto onde o jog wheel parou.
No modo pause: A música entra em pausa enquanto o jog wheel (27) não for accionado.
Quando o jog wheel (27) é girado, o efeito scratch é audível. Quando o jog wheel pára, a música
pára e aguarda em modo pause.
NOTA: durante o modo scratch, poderá alternar entre modo play e modo pause, carregando
simplesmente no botão PLAY/PAUSE (8)
29. Saída ÁUDIO : Saída para os sinais áudio provenientes do leitor de CD. Utilize o cabo rca/rca para ligar
esta saída a uma entrada CD/line da sua unidade de mistura.
JB SYSTEMS® 71/78 TMC200
JB SYSTEMS® 72/78 TMC200
Page 39

PORTUGUÊS MANUAL DO UTILIZADOR
PORTUGUÊS MANUAL DO UTILIZADOR
30. Conector SAÍDA DIGITAL: Utilize este conector para ligar o sinal digital (formato S/PDIF) à entrada de
um amplificador digital ou gravador digital (ex: Mini disc)
31. Conector RELAY: Pode utilizar este conector de duas formas: com a opção fader start em algumas
mesas de mistura ou pode ligar dois TMC200 em conjunto de modo a obter a função relay play.
Relay play: Utilize o cabo mono mini tipo jack/jack fornecido para ligar os conectores RELAY de
dois TMC200 em conjunto. Mais adiante neste manual poderá ver como executar a função relay
play.
Fader start: Se utilizar uma mesa de mistura com a função fader start, use o cabo mono mini tipo
jack/jack fornecido para ligar o leitor ao fader start da mesa de mistura. Tenha em atenção que
este conector nunca deve ser ligado a qualquer tipo de voltagem.
Atenção: este controlo remoto é apenas compatível com algumas mesas de mistura (compatíveis
com Synq® ou Pioneer®). Mesas de mistura com remote starts que operem com o sinal ligado à
terra não irão funcionar.
32. INTERRUPTOR ON/OFF: Liga e desliga o TMC200.
33. FONTE ALIMENTAÇÃO: Use o cabo de alimentação fornecido para ligar o leitor de CD a uma tomada
AC.
DISPLAY LCD
1. PLAY: Surge quando a unidade está a reproduzir um CD.
2. PAUSE: Surge quando o leitor está em modo pausa ou cue.
3. TOUCH INDICATOR: Surge quando a parte sensível ao toque da jog wheel está activa.
4. INDICADOR ANTI-CHOQUE E BUFFER: O estado da memória é representado no mostrador por um
“recipiente” que se enche e esvazia. Quando este ícone surge significa que a opção instant start está
disponível. Se o “recipiente” piscar, o instant start não está disponível. Cada segmento no interior do
“recipiente” representa cerca de 2 segundos de protecção anti-choque.
5. CUE: Surge quando o ponto cue master está programado.
6. INDICADOR DE PITCH: Indica a percentagem de mudança de velocidade, seleccionada no cursor
SPEED (20).
7. BARRA DO TEMPO: Demonstra o tempo restante ou o tempo decorrido dependendo da opção
seleccionada no botão TIME (23). Começa a piscar no fim de cada faixa de forma a alertar o utilizador
para que aja antecipadamente.
8. FRAMES: Mostra informação sobre os frames da faixa a ser reproduzida. (1 frame = 1/75° seg.)
9. SEGUNDOS: Mostra informação sobre os segundos da faixa a ser reproduzida.
10. MINUTOS: Mostra informação sobre os minutos da faixa a ser reproduzida.
11. ELAPSED, TOTAL REMAIN: Mostra que o tempo indicado no mostrador é o tempo elapsed
(decorrido), remaining (restante), ou tempo total restante.
12. RELOOP: Surge quando o loop está jogando. (Repetindo uma certa parte)
13. LOOP: Surge quando um loop é programado. Pode voltar ao loop com o botão reloop (6)
14. SINGLE: Surge quando a unidade está definida para reproduzir apenas uma faixa de cada vez. Quando
esta mensagem não é mostrada, o CD será reproduzido continuamente na sua totalidade. Esta função é
controlada pelo botão SGL/CTN (24).
15. TRACK / FOLDER: Indica o número da faixa ou pasta.
16. MOSTRADOR: Representa a reprodução em frames: uma rotação total equivale a 95 frames. O
marcador desloca-se no sentido dos ponteiros do relógio no modo normal e desloca-se no sentido
contrário quando a faixa é reproduzida de trás para a frente. No modo pausa o marcador não se
desloca.
17. AUTO CUE: O display mostra “A.CUE” quando a função auto cue está activada.
18. AUTO BPM: Este indicador está sempre presente indicando que o contador de batidas automático está
a funcionar.
19. PITCH LOCK: Quando a função Master Tempo está activada, o display mostra um pequeno “cadeado”
indicando que o pitch da música está fixo.
20. CD/MP3: Indica que introduziu um CD digital áudio normal ou um CD MP3.
21. DISPLAY ALFANUMÉRICO: Mostra os nomes das pastas e das faixas MP3. Nas faixas MP3 gravadas
em CBR também será mostrada a bit rate. Nas faixas MP3 gravadas em VBR o display mostra apenas
“VBR”. Para CD´s Áudio, a informação CD-TEXT irá ser mostrada quando estiver disponível no CD, de
outra forma o visor mostra “No Text”.
22. BPM/PARAMETER: O contador de batidas automático indica o número de Batidas Por Minuto no
display. Quando os efeitos são activados, esta parte do visor mostra os parâmetros de efeitos aplicados.
COMO UTILIZAR…
A maioria das funções normais foram explicadas no capítulo anterior “controlos e funções”. Neste capitulo
vamos abordar as funções que requerem mais algumas explicações.
ALGUMAS FUNÇÕES GERAIS:
MODO SLEEP:
O leitor de CD desliga automaticamente o transporte e o laser após 15 minutos (quando no modo pausa
ou cue). Esta característica prolonga a vida do motor e do laser. Durante o modo sleep o mostrador indica
a palavra “z Z ... SLEEP”. Para voltar a activar o leitor, basta pressionar o botão cue ou play, o mostrador
volta ao normal e fica pronto a receber instruções.
ALTERAÇÃO DE PITCH:
Esta função é utilizada para sincronizar na perfeição as batidas de duas faixas. Pode ser feito de duas
formas:
Botões PITCH BEND: A velocidade aumenta ou diminui respectivamente, enquanto mantiver
pressionados os botões PITCH BEND+ ou PITCH BEND-.
JOG WHEEL: : Enquanto os efeitos não estão a ser usados em modo manual, o JOG WHEEL irá
temporariamente alterar o pitch da música, ao girar o jog no sentido dos ponteiros do relógio aumenta
a velocidade, ao girar no sentido contrário a velocidade diminui. A velocidade a que girar o jog irá
determinar a percentagem de alteração de pitch.
CD-TEXT:
Os ficheiros MP3 não são os únicos a mostrar o nome da faixa no display. Alguns CDs áudio normais
utilizam CD-TEXT par amostrar os nomes das faixas. Além disso alguns softwares de gravaçao de CDs
(ex: Nero) podem adicionar informação CD-TEXT a CDs áudio normais. Quando a informação CD-TEXT
é detectada pelo TMC200 é automaticamente mostrada no display.
REPRODUZIR/GRAVAR CD-R e CD-RW:
Além de reproduzir CDs normais de áudio, o TMC200 também reproduz CD-R (CD gravável) e CR-RW
(CD regravável). Lembre-se que deve utilizar sempre as opções de gravação “disc at once” e “track at
once” no seu gravador! Embora o TMC200 tenha capacidade para ler CD-Rs e CD-RWs gravados a alta
velocidade, sugerimos que não utilize velocidades de gravaçao superiores a 12x de forma a optimizar a
capacidade de leitura. Utilize sempre CD-Rs e CD-RWs de qualidade!
Se o CD for multi-sessão, o CDX-2 só irá reproduzir a primeira sessão:
Se a primeira sessão é CD-DA, só poderá reproduzir as faixas CD-DA.
Se a primeira sessão é MP3 só poderá reproduzir ficheiros MP3.
JB SYSTEMS® 73/78 TMC200
JB SYSTEMS® 74/78 TMC200
Page 40

PORTUGUÊS MANUAL DO UTILIZADOR
PORTUGUÊS MANUAL DO UTILIZADOR
REPRODUZIR FICHEIROS MP3:
O leitor de CD detecta automaticamente se um CD contém ficheiros MP3. O TMC200 tem a capacidade
de ler diferentes formatos de MP3. O display mostra alguns dos tags ID3 (título da faixa / intérprete /
nome da pasta / bitrate). O CD pode conter até 999 ficheiros MP3 divididos por um máximo de 255
pastas.
Os ficheiros MP3 poderão ter as seguintes extensões: .mp3~ .MP3~ .mP3~ .Mp3. Consulte as
especificações para verificar que ficheiros MP3 são permitidos..
SELECTORES FOLDER / TRACK:
Geralmente um CDR contém muitos ficheiros MP3 (por vezes 150 ou mais). De modo a facilitar a gestão
dos ficheiros poderá organizar os seus ficheiros MP3 em diferentes subpastas (directorias). Estas pastas
podem receber o mesmo nome dos intérpretes, dos tipos de música (techno, slows, salsa …), do valor
BPM (100BPM, 110BPM, 120BPM …) ou qualquer outra ideia que tenha para organizar a sua música…
Utilizando os selectores FOLDER / TRACK poderá facilmente percorrer as diferentes pastas e faixas. É
possível definir o TMC200 para modo FOLDER e modo TRACK , ver também o controlo FOLDER
SELECTOR (3):
MODO FOLDER: Utilize o selector FOLDER para seleccionar a pasta pretendida. Utilize o selector
TRACK para seleccionar a faixa MP3 pretendida nesta pasta. Tenha em atenção que só poderá
escolher faixas no interior da pasta seleccionada. Para passar a outra pasta terá apenas que utilizar o
selector FOLDER.
MODO TRACK: poderá percorrer todas as faixas no CD como se não existissem subpastas. Para
percorrer as faixas mais rapidamente (saltos de 10 faixas), pressione o selector TRACK e gire-o para
a frente ou para trás.
FUNÇÃO RELAY:
Comece por verificar se o cabo fader start especial está a ligar os dois leitores.
Coloque um CD em cada um dos leitores.
Ligue os dois faders do canal das entradas correspondentes de CD na mesa de mistura.
Verifique se ambos os leitores se encontram em modo Single (O indicador “single” (14) é apresentado
no mostrador). Se um dos leitores não se encontrar em modo single, pressione o botão SGL/CTN (24)
do leitor correspondente.
Inicie a reprodução num dos dois leitores.
Alternadamente será reproduzida uma faixa de cada leitor. Pode em qualquer momento colocar um
novo CD no leitor que aguarda em modo pausa. Desta forma pode criar um programa infinito, perfeito
para usar em bares, etc.
Retire o cabo relay caso não pretenda continuar a utilizar a função relay.
ACERCA DOS LOOPS:
CRIAR UM LOOP:
Enquanto uma faixa está a ser reproduzida, pressione no botão IN/R.CUE para programar o ponto de
partida do loop. Em seguida pressione o botão OUT para programar o fim do loop. O loop começa a ser
reproduzido de imediato (com algum treino será capaz de criar loops perfeitos!). Enquanto o loop estiver a
ser reproduzido, pode pressionar o botão OUT novamente para sair do loop e continuar a reproduzir o
resto da faixa.
É possível programar um novo loop, mesmo durante a reprodução de outro loop. Enquanto o loop está a
ser reproduzido, basta pressionar o botão IN/R.CUE para definir o ponto de partida do novo loop. Em
seguida defina o final, pressionando o botão OUT. O novo loop está agora programado e a ser
reproduzido.
REINICIAR UM LOOP:
Esta função pode ser efectuada de 3 maneiras:
Se programou um loop e em seguida pressionou botão OUT para sair, basta apenas pressionar botão
RELOOP para reiniciar o loop.
Se programou um loop e em seguida pressionou botão OUT para sair, basta apenas voltar a
pressionar botão OUT para reiniciar o loop. O ponto onde pressionou botão OUT é agora programado
como o novo fim do loop.
Enquanto o loop está a ser reproduzido, pressione o botão RELOOP para reiniciar o loop de imediato.
Pode repetir este processo várias vezes para criar um efeito “Stutter” (Repetição).
EDITAR UM LOOP:
Quando um loop está programado, pressione o botão RELOOP/STUTTER durante cerca de 2 segundos
para entrar no modo “loop edit”. Enquanto o loop esta a ser reproduzido, o display alfanumérico indica a
informação sobre o tempo relativamente ao final do loop. Utilize a big jog wheel para definir o novo ponto
final do loop. De modo a facilitar a operação é possível ouvir continuamente as modificações ao final do
loop. Quando o loop está perfeito, pressione o botão LOOP OUT para salvar o novo final do loop e sair do
loop.
NOTA: É possível guardar loops nos botões HOT CUE. Isto significa que poderá contar com até 4 loops
por faixa. No parágrafo que se segue irá aprender como guardar estes loops.
SOBRE OS EFEITOS:
Na descrição dos efeitos já pode encontrar muita informação, não se esqueça de ver também essa parte!
USE OS EFEITOS EM MODO DE BATIDA SINCRONIZADA:
Enquanto a música está a tocar pode pressionar um dos 3 efeitos e pressionar o botão BPM-SYNC (17),
portanto está aceso: o efeito funciona em modo sincronizado. Use os botões EFFECT-SYNQ (15+16)
para escolher diferentes predefinições da batida. Use o botão IMPACT (16) para adaptar o impacto do
efeito.
USE OS EFEITOS EM MODO M ANUAL:
Enquanto a música está a tocar pode pressionar um dos 3 efeitos e pressionar o botão BPM-SYNC (17),
portanto está apagado: use a jog Wheel (27) para mudar o efeito em tempo real. Use O botão IMPACT
(16) para adaptar o impacto do efeito.
ACERCA DA MEMÓRIA:
MEMÓRIAS DIFERENTES:
Antes de abordarmos a utilização da memória, é necessário conhecer a diferença entre “track memory” e
“permanent memory”:
Track Memory (memória de faixa): Esta é a memória onde o TMC200 guarda um conjunto de até
quatro pontos cue e/ou loops para uma faixa. É possível preparar uma “track memory” para cada faixa
num CD.
Exemplo: o CD contém 16 faixaspara cada faixa poderá guardar até 4 pontos cue e/ou loops. Isto
significa um total de 16 x 4 = 64 pontos e/ou loops num CD!
Permanent Memory (memória permanente): Esta é a memória mais extensa onde todos os pontos
cue e loops são permanentemente guardados. Na verdade é uma colecção indexada de “track
memories”. Ao reutilizar pontos cue e loops anteriormente guardados de determinada faixa, estará a
fazer uma transferência da “permanent memory” para a “track memory”.
COMO UTILIZAR A “TRACK MEMORY” (Memória de Faixa):
GUARDAR UM PONTO CUE MASTER:
Existem 2 formas de definir um ponto cue master:
Pressione o botão LOOP IN (4) durante a reprodução normal para definir o novo ponto cue (“CUE on
the fly”).
Coloque o leitor em pausa e utilize o jog wheel para procurar o sítio exacto para o ponto cue. Após
encontrar o sítio exacto, pressione o botão LOOP IN (4) para definir o novo ponto cue (ou pressione o
botão PLAY/PAUSE)
Quando o ponto cue estiver programado, pressione o botão CUE (7) para o utilizar.
GUARDAR UM PONTO CUE SIMPLES NOS BOTÕES “HOT CUE”:
Comece por pressionar o botão MEMORY (10) para que a unidade active o modo de memória hot cue (o
botão MEMORY acende-se).
Pressione um dos 4 botões HOT CUE no momento certo durante a reprodução normal: o botão HOT
CUE que tiver sido pressionado fica azul indicando que o cue point desejado foi guardado (“Cue on
the fly”).
Ponha o leitor em modo pausa e utilize o jog/shuttle wheel para procurar o sítio exacto para o ponto
cue. Após encontrar o sítio desejado, pressione um dos quatro botões HOT CUE para definir o novo
ponto cue: o botão HOT CUE que tiver sido pressionado fica azul indicando que o cue point desejado
foi guardado.
Após a programação do ponto cue, basta pressionar o botão HOT CUE para iniciar a reprodução a partir
do ponto cue guardado.
JB SYSTEMS® 75/78 TMC200
JB SYSTEMS® 76/78 TMC200
Page 41

PORTUGUÊS MANUAL DO UTILIZADOR
PORTUGUÊS MANUAL DO UTILIZADOR
GUARDAR UM LOOP NOS BOTÕES “HOT CUE”:
Este processo é muito semelhante ao de guardar pontos cue simples.
A diferença é que inicialmente tem que colocar o TMC200 em modo loop. Quando o loop estiver a ser
reproduzido, pressione o botão MEMORY para que o leitor de CD entre em modo de memória hot cue (o
botão MEMORY acende-se). Seguidamente pressione um dos quatro botões HOT CUE: o botão HOT
CUE que tiver sido pressionado fica branco indicando que o loop, no momento a ser reproduzido, está
guardado. Pode guardar até quatro loops!
ELIMINAR OS BOTÕES “HOT CUE”:
Pode facilmente eliminar o conteúdo de um botão HOT CUE pressionando o botão DELETE CUE (11),
seguido do botão HOT CUE que deseja eliminar. Ou simplesmente guardar um novo ponto cue ou loop
neste botão HOT CUE. Também é possível apagar o conteúdo dos quatro botões HOT CUE em
pressionando o botão DELETE CUE (11) durante mais de 2 segundos. Todos os botões HOT CUE se irão
apagar indicando que estão vazios.
COMO UTILIZAR A “PERMANENT MEMORY” (Memória Permanente):
Por razoes de segurança os pontos cue e loops guardados nos botões HOT CUE não são
automaticamente guardados na memória permanente. Isto significa que caso transfira um conjunto de
pontos cue e loops guardados na memória permanente para os botões HOT CUE (ou seja “track
memory”), poderá alterá-los e apagá-los sem preocupações. A memória permanente não será afectada
até que guarde o conteúdo os botões HOT CUE na memória permanente.
GUARDAR DADOS NA MEMÓRIA PERMANENTE:
Pressione o botão MEMORY (10) por 2 segundos. O display mostra “Saving” de forma a indicar que os
pontos cue e loops da faixa guardados nos botões HOT CUE foram guardados na memória permanente.
APAGAR UMA FAIXA NA MEMÓRIA PERMANENTE:
Seleccione a faixa que deseja apagar e carregar as “hot cues”. Pressione os botões “DELETE CUE” e
“MEMORY” em simultâneo até que no visor surja “DEL ALL?”. Caso pressione o botão YES (botão PITCH
BEND +) a informação da faixa será apagada da memória permanente.
REUTILIZAR PONTOS CUE/LOOPS “HOT CUE” A PARTIR DA MEMÓRIA PERMANENTE:
Uma vez que a operação de carregar os pontos cue permanentes demora alguns segundos, estes não
são completamente carregados. Visto que por vezes nem são necessários, não há motivo para esperar
que a operação seja efectuada. Seguidamente explicamos como tudo funciona:
Não existem pontos cue guardados: Quando é seleccionada uma faixa onde não existem pontos
cue nem loops guardados na memória permanente, nada acontece: poderá iniciar de imediato a
reprodução.
Pontos cue guardados: Ao seleccionar uma faixa onde existem pontos cue ou loops guardados na
memória permanente, o TMC200 mostra “Load Cues?” e aguarda a confirmação para carregar os
pontos cue. Poderá fazer o seguinte:
Se pressionar o botão YES: Pressione YES (botão pitch bend +) para carregar os pontos
cue e loops guardados anteriormente. O display mostra “RECALL” enquanto a informação é
transferida para os botões HOT CUE.
Se pressionar o botão NO: Caso pressione NO (botão pitch bend -) os pontos cue não
serão carregados e o display volta ao normal. Poderá iniciar a reprodução imediatamente.
Se não fizer nada: Após alguns segundos o display volta automaticamente ao normal e
naturalmente os pontos cue não serão carregados.
APAGAR TODA A MEMÓRIA CUE PERMANENTE:
Mantenha ambos os botões DELETE CUE (11) e MEMORY (10) pressionados enquanto liga o TMC200: a
memória permanente será apagada. Ao efectuar esta operação o display mostra “clearALL”.
ATENÇÃO: ESTA OPERAÇÃO É IRREVERSÍVEL, TODOS OS PONTOS CUE/LOOPS SERÃO
APAGADOS!!!
ACTUALIZAÇÃO DO FIRMWARE
Para aumentar a flexibilidade o TMC200 pode ser actualizado a qualquer momento, para adicionar novas
funções ou corrigir erros caso eles existam. Nós sugerimos que visite o site (www.jbsystems.be) de
tempos a tempos para verificar se existe alguma actualização disponível para descarregar.
Verificar a versão actual do firmware
Mantenha o botão SGL/CTN pressionado (24) enquanto liga o aparelho: a versão do firmware
actualmente instalada é mostrada no visor. O firmware contém diferentes partes: Controlo + DSP + Servo,
cada um com os seus números de versão.
Instruções de actualização
Tendo em conta que as instruções de actualização podem mudar, por favor consulte o ficheiro “TMC200 –
upgrade instructions.txt” incluído em cada actualização.
ESPECIFICAÇÕES
Fonte de Alimentação: AC 100-240V, 50/60 Hz
Consumo de energia: 13W
Nível de saída: 2,0V +/0.5dB @ 1kHz, 0dB
Resposta em Frequência: 17-20.000Hz (+/-0,4dB)
THD + noise (20kHz LPF): 0,006% @ 1kHz, 0dB
S/N Ratio (IHF-A): >130dB @ 1kHz, 0dB
Tempo acesso min. (faixa seguinte): <2seg
Tempo acesso máx. (faixa 1→20): <4seg
Sistema de laser: Captação 3pontos 780nm Sanyo
Busca Electrónica: Busca automática digital.
FORMATO CD:
Extensões ficheiro possíveis: .mp3 ~ .MP3 ~ .mP3 ~ .Mp3
Compatibilidade tag ID3: ID3v2 e anteriores
ISO9660: Nível 1 (máx. 8”/8.3” tipo de fonte)
Nível 2 (máx. 31/30 tipo de fonte)
Joliet: máx. 63/63 tipo de fonte
Formato sector CD-ROM: Apenas modo-1
Máx. Pastas: 255
Máx. Ficheiros: 999 (max. 255 por pasta)
FORMATOS MP3:
MPEG1 Layer3 (ISO/IEC11172-3): Amostragem mono/estéreo: 32 - 44,1 - 48kHz
Bitrates: 32 – 320 Kbps
Modos Bitrate: CBR (Bitrate constante) ou VBR (Bitrate variável)
MPEG2 Layer3 (ISO/IEC13818-3): Amostragem mono/estéreo:16– 22,05 - 24kHz
Bitrates: 32 – 160 Kbps
Modos Bitrate: CBR (Bitrate constante) ou VBR (Bitrate variável)
MPEG2,5 Layer3: Amostragem mono/estéreo:8– 11,025 - 12kHz
Bitrates: 32 – 160 Kbps
Modos Bitrate: CBR (Bitrate constante) ou VBR (Bitrate variável)
Dimensões: 246 (L) x 103,5 (A) x 348 (D) mm
Peso: 2,66 kg
Estas informações estão sujeitas a alterações sem aviso prévio
Pode fazer download da versão mais recente deste manual no nosso site: www.beglec.com
JB SYSTEMS® 77/78 TMC200
JB SYSTEMS® 78/78 TMC200
 Loading...