

Page 1

CALYPSO
WWW.BEGLEC.COM
Copyright © 2007 by BEGLEC cva.
Reproduction or publication of the content in any manner, without express permission of the publisher, is prohibited.
Version: 1.0
Operation Manual
Mode d'emploi
Gebruiksaanwijzing
Bedienungsanleitung
Manual de instrucciones
EN
FR
NL
DU
ES
Page 2

EN - DISPOSAL OF THE DEVICE
Dispose of the unit and used batteries in an environment friendly manner
according to your country regulations.
FR - DÉCLASSER L’APPAREIL
Débarrassez-vous de l’appareil et des piles usagées de manière écologique
Conformément aux dispositions légales de votre pays.
NL - VERWIJDEREN VAN HET APPARAAT
Verwijder het toestel en de gebruikte batterijen op een milieuvriendelijke
manier conform de in uw land geldende voorschriften.
DU - ENTSORGUNG DES GERÄTS
Entsorgen Sie das Gerät und die Batterien auf umweltfreundliche Art und
Weise gemäß den Vorschriften Ihres Landes.
ES - DESHACERSE DEL APARATO
Reciclar el aparato y pilas usadas de forma ecologica conforme a las
disposiciones legales de su pais.
PT - COMO DESFAZER-SE DA UNIDADE
Tente reciclar a unidade e as pilhas usadas respeitando o ambiente e em
conformidade com as normas vigentes no seu país.
Page 3

ENGLISH OPERATION MANUAL
Thank you for buying this JB Systems®product. To take full advantage of all possibilities and for your own
safety, pleaseread these operating instructions very carefully beforeyou start using this unit.
FEATURES
This unit is radio-interference suppressed.This product meetsthe requirementsofthe current European and
nationalguidelines.Conformityhas been established and the relevantstatements and documents have been
depositedby the manufacturer.
This devicehas beendesigned to produce decorative effect lighting and is used inlight show systems.
Innovative, multicolor LED moonflower.
Based on 156 power LEDs(R=48+ G=36 + B=36 + W=36):
Extremely brilliantcolors compared to effectswith halogen lamps
More dynamic effects compared toeffects based on halogen lamps
Very sharpwhite, blue, red and green laser-likebeams
No lamp replacements!
Uses LEDs with extremelylong lifespan!
Virtuallyno heat production
Verylow power consumption
Lightweight (no lamptransformers needed)
0-100% dimming and ultra fast strobe function
Excellent built-in programsfor wonderful,ever changing, light shows:
DMX-control:4 channels
Standalone:sound activated with internalmic
Master/slave:wonderfulsynchronized shows
Optional CA-8 remote controlleravailable
4-digitmenu drivendisplay
Equipped with bigoptical lens for maximumlight output and wide 41° beamangle
BEFORE USE
Before you start using this unit, pleasecheck if there’s no transportation damage. Should there be any, do
not usethe device and consult your dealerfirst.
Important: This device left our factory in perfect condition and well packaged. It is absolutely necessary
for the user to strictly follow the safety instructions and warnings in this user manual. Any damage caused
by mishandling is not subject to warranty. The dealerwill not accept responsibility for any resulting defects
orproblems caused bydisregarding this user manual.
Keep this booklet in a safe place for future consultation. If you sell the fixture, be sure to add this user
manual.
Check the contents:
Check that the carton contains the following items:
Operatinginstructions
Calypso
Hangingbracket with knobs
Mains cable
ENGLISH OPERATION MANUAL
SAFETY INSTRUCTIONS:
CAUTION
The lightning flash with arrowhead symbol within the equilateral triangle is intended to alert the
use or thepresence of un-insulated“dangerous voltage”within the product’s enclosurethat may
be of sufficientmagnitude to constitute a risk of electric shock.
The exclamation point within the equilateral triangle is intended to alert the userto the presence
of important operation and maintenance (servicing) instructions in the literature accompanying
this appliance.
This symbol means:indoor useonly
This symbol means:Read instructions
To protectthe environment,pleasetry to recycle thepacking material as much as possible.
A new light effect sometimes causes some unwanted smoke and/or smell. This is normaland disappears
aftersome minutes.
To preventfire or shockhazard, do not exposethis appliance to rain or moisture.
To avoid condensation to be formed inside, allow the unit to adapt to the surrounding temperatures when
bringing it into a warm room after transport. Condense sometimes prevents the unit from working at full
performance or may even causedamages.
Thisunit is for indoor use only.
Don’t place metalobjects or spill liquid inside the unit. Electric shock or malfunction may result. If a foreign
object enters the unit, immediately disconnect themains power.
Locate the fixture in a well ventilated spot, away from any flammable materials and/or liquids. The fixture
must be fixed at least 50cmfromsurroundingwalls.
Don’tcover any ventilation openings asthis may result in overheating.
Prevent use in dusty environmentsand clean the unit regularly.
Keep the unit away from children.
Inexperienced personsshould not operate thisdevice.
Maximum save ambienttemperature is 40°C. Don’t use this unit at higher ambient temperatures.
Make sure the area below the installation place is free from unwanted persons during rigging, de-rigging
andservicing.
Always unplug the unit when it is not used for a longertime or start servicing.
The electricalinstallation should be carried out by qualified personal only, according to the regulations for
electrical and mechanical safetyin your country.
Check that the available voltageis not higher than the one statedon the rear panel of the unit.
The power cord should always be in perfect condition. Switch the unit immediately off when the power cord
issquashed or damaged. It must be replaced by the manufacturer, its service agent or similarly qualified
persons in order to avoid a hazard.
Neverlet the power-cord come into contact with other cables!
This fixturemust be earthed to in order comply with safety regulations.
Don’t connect the unit to any dimmerpack.
Always use an appropriateand certified safetycable when installing the unit.
In order to prevent electric shock, do not open the cover. Apart from the lamp and mains fuse there are no
user serviceablepartsinside.
Never
repair a fuse or bypass the fuse holder.
type and electricalspecifications!
In the event of serious operating problems, stop using the fixture and contactyour dealer immediately.
Thehousing and the lensesmust be replaced if theyarevisibly damaged.
Pleaseuse the originalpacking when the device is tobe transported.
Due to safety reasonsit is prohibitedto make unauthorized modificationsto the unit.
Important:
Don’t use theeffectin the presence of persons suffering from epilepsy.
CAUTION: To reduce the risk of electric shock, do not
remove the top cover. No user-serviceable parts inside.
Referservicing to qualifiedservice personnel only.
Always
replace a damaged fuse with a fuse of the same
JB SYSTEMS
®
1/42 CALYPSO
JB SYSTEMS
®
2/42 CALYPSO
Page 4

ENGLISH OPERATION MANUAL
ENGLISH OPERATION MANUAL
OVERHEAD RIGGING
Important: The installation must be carried out by qualified service personal only. Improper
installation can result in serious injuries and/or damage to property. Overhead rigging requires
extensive experience! Working load limits should be respected, certified installation materials
shouldbe used, theinstalled device should be inspected regularly for safety.
Make sure the area below the installation place is free from unwanted persons during rigging, de-rigging
andservicing.
Locate the fixture in a well ventilated spot, far away from any flammable materials and/or liquids. The
fixturemust be fixed
The deviceshould be installedout of reach of people and outside areas where personsmay walk by or be
seated.
Before rigging make sure that the installation area can hold a minimum point load of 10times the device’s
weight.
Always use a certified safety cable that can hold 12times the weight of the device when installing the unit.
This secondary safety attachment should be installed in a way that no part of the installation can drop
more than 20cm if the main attachment fails.
The deviceshould bewell fixed;a free-swinging mounting isdangerous and may not be considered!
Don’tcover any ventilation openings asthis may result in overheating.
The operator has to make sure that the safety-relating and machine-technical installationsare approvedby
an expert before using them for the first time. The installations should be inspected every yearby a skilled
person to be sure that safetyis still optimal.
at least 50cm
fromsurrounding walls.
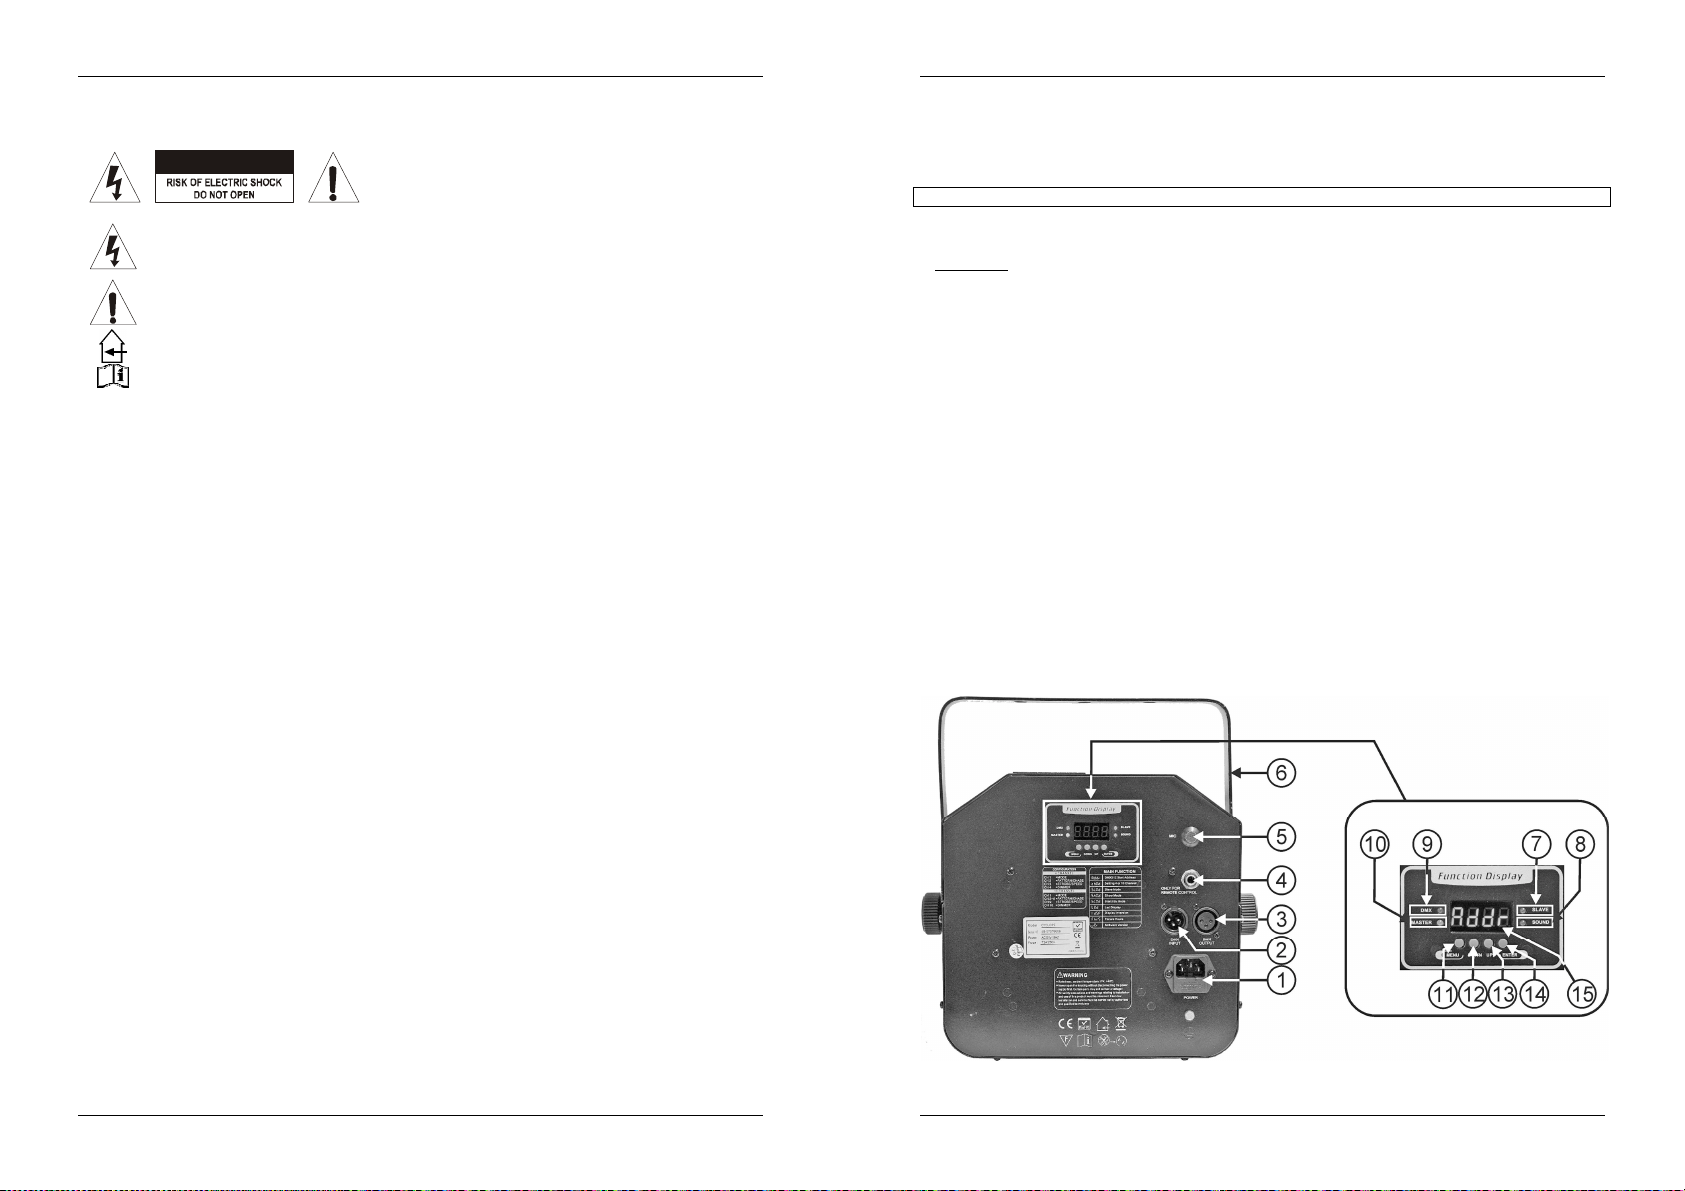
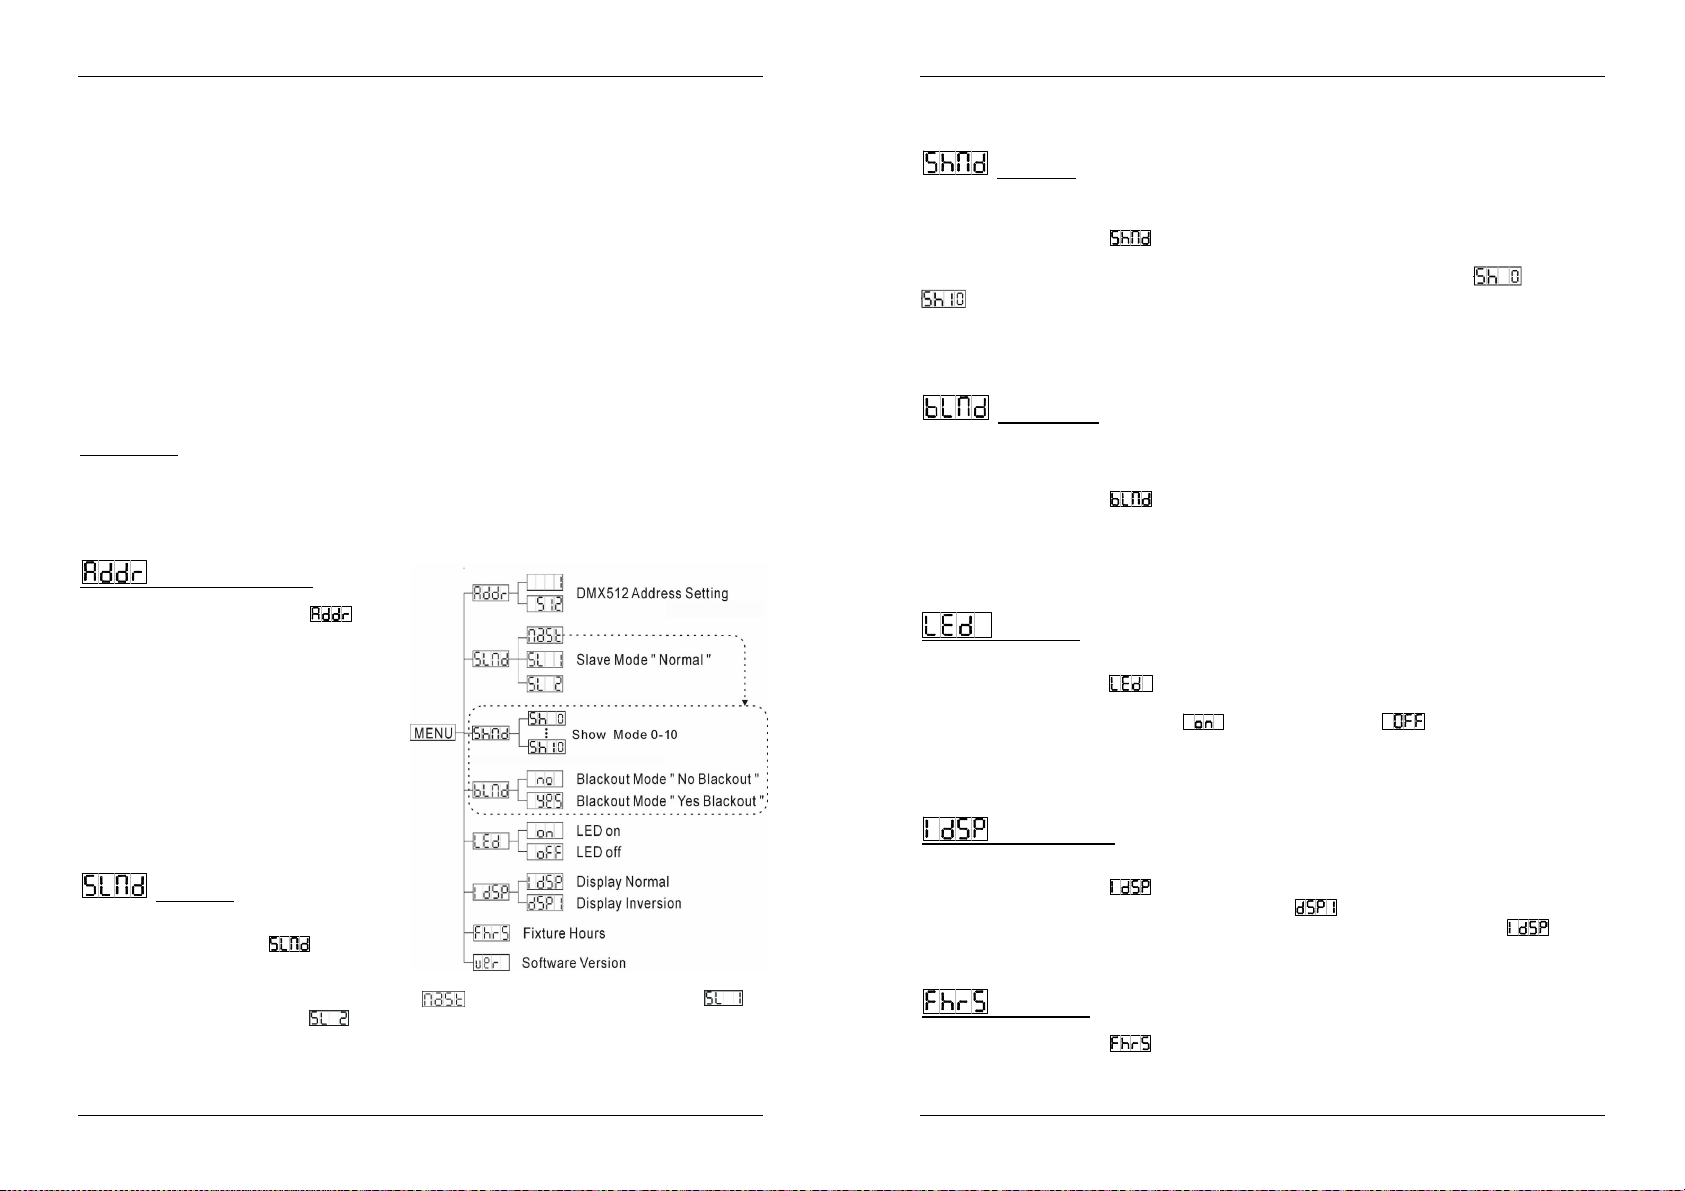
DESCRIPTION:
11. MENU button:used to select the different menu items
12. DOWNbutton: to go back in the menu and to lowerthe values shown onthe display.
13. UP button:to go up in the menu and toincrease thevalues shown on the display.
14. ENTER button:used to confirmyour choice.
15. DISPLAY showsthe various menus and the selected functions.
HOW TO SETUP:
MAINMENU:
To select any of the menu options, press the MENU button up to when the required one is shown on the
display.
Select the function with the ENTER button. Thedisplay willblink.
UseDOWN and UP button to choosethe desired menu option.
Once the requiredmenu option is selected, press the ENTER button to select. To go back to the functions
withoutany change press the MENU button or justwait 8 seconds. The menu structure is shownbelow.
Used to set the starting address in a DMXsetup.
Press the MENU button until is shown on
Press the ENTER button, the display starts
Use DOWN and UP buttons to change the
Once the correct address shows on the display,
To go back to the functions without any change
press the MENU button again.
Used to set the unitin master or slave mode.
Press the MENU button until is shown on
Press the ENTER button, the current working
Use the DOWN and UP buttons to select
Once the mode is selected, press the ENTER button save it. (or automaticallyreturn to the main functions
To go backto the functions without any change press the MENU button again.
Remarks: when “SL 1” or “SL 2” is selected, some menu options are not available. When only one unit is
used, you should alwaysselectmastermode.
DMX512Address Setting
thedisplay.
blinking.
DMX512address.
press the ENTERbuttonto saveit.
(or automatically return to the main functions
withoutany change after 8 seconds)
Working Mode
thedisplay.
modestarts blinking in the display
(master), (slave in sync with the master) or
(2 lightshow – slave in anti-sync with the master).
withoutany change after 8 seconds)
1. Mains input with IECsocketand integrated fuse holder, connect the supplied mains cable here.
2. DMXinput
3. DMX output
4. ¼” Jack input for the optional CA-8 hand controller
5. Internalmicrophone
6. Hanging bracket with 2 knobs on both sides to fasten the unit and a mounting hole to fix a mounting
hook.
7. Slave LED:is lit when the unit is in slave mode
8. Sound LED: blinks to the rhythm of the music whilethe unit is in audio mode
9. DMX LED: is lit when the unit receives a DMX-signal
10. Master LED: is lit when the unitis switched as master
JB SYSTEMS
®
3/42 CALYPSO
Used to choose to selectone of the preprogrammed shows when used in standalone or master/slave
mode. This menu option is not available when the unitis set to slave mode (“S L 1 ” or “S L 2 ”)!
Press the MENU buttonuntil isshowing on the display.
Press the ENTER button, the current show startsblinking in the display.
Use DOWN and UP buttons to select one of the 11 preprogrammed shows ( (show 0) to
(show10)
Once the right show blinks on the display,press the ENTER buttonto saveit.
(or automaticallyreturn to the main functions withoutany change after 8 seconds)
To go back tothe functions without any change press the MENUbutton again.
JB SYSTEMS
Show Mode
®
4/42 CALYPSO
Page 5

ENGLISH OPERATION MANUAL
ENGLISH OPERATION MANUAL
Blackout mode:when no DMX-signalis detected, the unit goes in blackout.
No blackout mode: when no DMX-signal is detected, the unit automaticallyswitches to master mode.
This menu option is not available when the unit is set to slave mode (“S L 1 ” or “S L 2 ”)!
Press the MENU buttonuntil isshown on the display.
Press the ENTER button, the current selection startsblinking in the display.
UseDOWN and UP button to select Y E S (blackout) orn o (no blackout) mode.
Once the mode is selected,press the ENTER buttonto save it.
(or automaticallyreturn to the main functions withoutany change after 8 seconds)
To go backto the functions without any change press the MENU button again.
Display on:display is always on.
Display off:display is off when not used.
Press the MENU button untilthe display shows .
Press the ENTER button, thedisplay startsblinking.
UseDOWN and UP buttons to select (display always on)or (display off whennot used).
Once the mode is selected,press the ENTER buttonto save it.
(or automaticallyreturn to the main functions withoutany change after 8 seconds)
To go backto the functions without any change press the MENU button again.
Display normal:display is readable when the unit is on the floor.
Display inversion: display is readable whenthe unitis mounted upside down.
Press the MENU buttonuntil isblinking on the display. (normaldisplay)
Use the ENTER button to change to the mode (display inversion), the option will be automatically
stored after 8 seconds.Or press the ENTER button again return to the mode (normaldisplay).
To go backto the functions press the MENU button.
Used to show the number of working hours of the unit.
Press the MENU buttonuntil is blinking on the display.
Press the ENTER button to showthe number of workinghours in the display.
Togo back tothe functions press the MENU button.
BlackoutMode
Led Display
Display Inversion
Fixture Hours
ELECTRICAL INSTALLATION + ADDRESSING
Important: The electrical installation should be carried out by qualified personal only,
according to the regulations for electrical and mechanical safetyin your country.
Electrical installationfor 1 standalone unit:
Just insert themains cable. The unit startsworking immediatelyin stand-alone mode.
Remark1:You can connecta CA-8 remote controller to the unit if youwantto have more control. Refer to
“how to operate the unit”to learn howto do this.
Remark2:if there’s no output,please make sure to set the unit in mastermode (seepreviouschapter)
Electrical installationfor two or more unitsin master/slave:
Connect 2 to maximum 16 units together using good quality balanced microphone cables. Put the first
unit of the chain in master mode, the rest must be set to slave mode (SL1 or SL2). See the previous
chapter for more information.
Make sure that all units are connected to the mains.
Done!
Remark: You can connect a CA-8 remote controller to the master unit if you want to have more control
over the master/slave operation.
Electrical installationin DMX-mode:
The DMX-protocol is a widely used high speed signal to control intelligent light equipment. You need to
“daisy chain” your DMXcontrollerand all the connected units with a good qualitybalanced cable.
Both XLR-3pin and XLR-5pin connectors are used, however XLR-3pin is more popular because these
cables arecompatible withbalanced audio cables.
Pin layoutXLR-3pin: Pin1 =GND ~ Pin2 = Negative signal (-) ~ Pin3 = Positivesignal (+)
Pin layout XLR-5pin: Pin1 = GND ~ Pin2 = Negative signal (-) ~ Pin3 = Positive signal
(+) ~ Pins4+5 not used.
To prevent strange behavior of the light effects, due to interferences, you must use
a 90Ω to 120Ω terminator at the end of the chain. Never use Y-splitter cables, this
simply won’t work!
Make sure that all units are connected to the mains.
Each light effect in the chain needs to have its proper starting address so it knows which commands
from the controller it has to decode. In the next section you will learn how to set the DMXaddresses.
Used to showthe software versionof the unit.
Press the MENU buttonuntil blinks onthe display.
Press the ENTER button to show the software version of the unit.
Togo back tothe functions press the MENU button.
JB SYSTEMS
Softwareversion:
®
5/42 CALYPSO
HOW TO SET THE THE RIGHT STARTING ADDRESS:
Refer to the previous chapter (DMX-512 address setting) to learn how to set the starting address on this unit.
The starting address of each unit is very important. Unfortunately it is impossible to tell you in this user
manual which starting addresses you have to set because this completely depends on the controller you will
use… So please refer to the user manual of your DMX-controller to find out which starting addresses you
must set.
JB SYSTEMS
®
6/42 CALYPSO
Page 6

ENGLISH OPERATION MANUAL
ENGLISH OPERATION MANUAL
DMX-CONFIGURATIONOF CALYPSO:
What arepatterns?
Patternsare different static (non moving) combinations of LEDs on a LED-cluster.
When thevalueof CH1 is set between 000and 119,you can use CH2 to select 25 differentpatterns.
Use CH3 to changethe strobe frequency of the selected patterns.
Whatare chases?
Chases are a seriesof patterns put in a loop to createdynamic (moving) effects.
When thevalueof CH1 is set between120 and 239,you can use CH2 to select 25 different chases.
Use CH3 to change thespeed of the selected chases.
BY EASY CONTROLLER:
When used in Master/slave mode we strongly advice you to use the CA-8 “Easy
controller” Just connect this small controller to the 1/4” jack of the master unit, and
you will be able to controlthe following FUNCTIONS:
Standby Blackout the unit
Function Sound strobe Select one of the chases
Mode Strobe/Sound (LED off) Chase(LED ON)
MAINTENANCE
Make sure the areabelow the installationplace is free from unwanted persons during servicing.
Switch off the unit, unplug the mains cable and wait until the unit has been cooled down.
During inspection the following points shouldbe checked:
All screws used for installing the device and any of its parts should be tightly fastened and may not be
corroded.
Housings, fixations and installations spots (ceiling, truss, suspensions) should be totally free from any
deformation.
Whenan opticallens is visibly damaged due to cracks or deep scratches, it must be replaced.
The mains cables must be in impeccable condition and should be replaced immediately when even a
small problemis detected.
In order to protect the device from overheat the cooling fans (if any) and ventilation openings should be
cleanedmonthly.
The interiorof the device should be cleaned annuallyusing a vacuum cleaneror air-jet.
The cleaning of internal and external optical lenses and/or mirrors must be carried out periodically to
optimizelight output. Cleaning frequency depends on the environment in which the fixtureoperates:damp,
smokyor particularlydirty surroundings can causegreater accumulation of dirton the unit’s optics.
Clean witha soft clothusingnormal glass cleaningproducts.
Always dry the parts carefully.
Clean the external optics at least once every 30 days.
Clean the internal optics at least every 90 days.
Attention: We strongly recommend internal cleaningto be carried out by qualified personnel!
HOW TO OPERATE THE UNIT
Everytime you turn the unit on, it will show L373 on thedisplay.
YOU CAN OPERATE THE UNITIN 3 WAYS:
BY MASTER/SLAVE BUILT-INPREPROGRAM FUNCTION:
Select this function when you want an instant show. By linking the units in master/slave connection, the
first unit willcontrol the other unitsto give an automatic, sound activated,synchronized light show. Its DMX
input will have nothingplugged intoit, and itsmaster-LED will be constantly onand sound-LED will flash to
themusic.
Important! This function only works when the blackout mode in the menu of the master is set to
OFF, otherwisenothing will happen!Read more about this option in the “How to setup”paragraph.
JB SYSTEMS
o By master/slavebuilt-in preprogramfunction
o By CA-8 easycontroller
o By universalDMX controller
MASTER has 11 built-in shows: You can select (show 0) to (show 10) directly in the
menu of the master.
SLAVES have 2 working options: These units are set to slave mode (slave-LED is constantly on). In
order to create a great light show you can introduce contrast movements In the menu of the slave
units you can go to option and select:
o Normalslave: slave works in sync with the master.
o 2 lightshow: slaveworks in opposite with the master.
®
7/42 CALYPSO
SPECIFICATIONS
Mains Input: AC 230V,50Hz
Power consumption: 18 Watt
Fuse: 250V 2A slow blow (20mmglass)
SoundControl: Internalmicrophone
DMXconnections: 3pin XLR male/ female
DMX channelsused: 4 channels
Lamp: 156 LEDs(R=48+ G=36 + B=36 +W=36):
Size: 250mm x 250mm x 280mm
Weight: 4.2kg
You can download the latest versionof thisuser manual on our website:www.beglec.com
JB SYSTEMS
Every information is subject to change without prior notice
®
8/42 CALYPSO
Page 7
FRANÇAIS MODE D’EMPLOI
ATTENTION
:
afin
de réduire le risque d’électrocution,
FRANÇAIS MODE D’EMPLOI
INSTRUCTIONS DE SECURITE:
Merci d’avoirchoisi ce produit JB Systems®. Pour votre sécurité et pour une utilisation optimalede toutes les
possibilités de l’appareil, lisez attentivement cette notice avant utilisation.
EN VOUS INSCRIVANT POUR LA LETTRE D’INFORMATION VOUS SEREZ TOUJOURS
TENU AU COURANT DES DERNIERES NOUVELLES CONCERNANT NOS PRODUITS:
NOUVEAUTES,ACTIONS SPECIALES,JOURNEES PORTES OUVERTES, ETC.
SURFEZ SUR: WWW.BEGLEC.COM
CARACTERISTIQUES
Cet appareil ne produit pas d’interférences radio. Il répond aux exigences nationales et européennes. La
conformité a été établieet lesdéclarations et documentscorrespondants ont été déposés par le fabricant.
Cet appareil a été conçu pour la production de jeux de lumières décoratifs et est utilisé dans des
spectacleslumineux.
Moonflower à LED, innovanteet multicolore.
Equipéede 156 LED de puissance (48 rouges, 36vertes, 36bleues et 36blanches) :
Couleurs extrêmementbrillantes comparéesaux effetsfonctionnant avecdes lampes halogènes ;
Effets nettement plus dynamiquescomparés aux effetsfonctionnant avec des lampes halogènes ;
Faisceaux blancs, bleus, rouges et verts, extrêmement denses,un peu comme des rayons lasers ;
Pas de lampes à remplacer !
Utilise desLED ayantune durée de vie très longue !
Pratiquement aucune productionde chaleur ;
Consommation de couranttrès faible ;
Poids plume (aucun transfopour lampes n'estnécessaire).
Fonction gradateur allantde 0 à 100% et fonction stroboscope ultrarapide.
Excellents programmesintégrés donnant lieu à de splendides light shows qui changent sans arrêt :
ContrôleviaDMX : 4 canaux ;
Mode autonome : activation sonore via microinterne ;
Mode maître/esclave:magnifiques showssynchronisés.
En option, une télécommandeCA-8 est disponible.
Ecran à 4 chiffresfonctionnantsur base de menus.
Equipé de lentilles de grandes dimensions en vue d'obtenirune puissance lumineuse maximale, angle de
dispersionde 41°.
AVANT UTILISATION
Avant d’utiliser cet appareil, assurez-vous de l’absence de dommages liés au transport. En cas de
dommages,n’utilisez pas l’appareil et contactez levendeur.
Important:
l’utilisateur suive les instructions de sécurité et avertissements inclus dans ce manuel. La garantie ne
s’applique pas en cas de dommage lié à une utilisation incorrecte. Le vendeur ne prend pas la
responsabilité des défauts ou de tout problème résultant du fait de n’avoir pas tenu compte des misesen
garde dece manuel.
Conservez ce manuel dans un endroit sûr pour toute consultation future. Si vous vendez l’appareil,
assurez-vous d’y joindre ce manuel également.
Afin de protéger l’environnement,merci de recycler les emballagesautant que possible.
Vérifiez le contenu:
Vérifiezsi l’emballage contient bien lesarticles suivants:
Appareil Calypso
Mode d'emploi
Support de fixation etboutons à visser
Câbled’alimentation
Cet appareil a quitté notre usine en parfaite condition et bien emballé. Il est primordial que
CAUTION
n’enlevez jamais le couvercle de l’appareil. Il n’y a aucune
pièce à l’intérieur de l’appareil que vous puissiez
remplacer vous-même. Confiez l’entretien uniquement à
destechniciens qualifiés.
La flèche dans un triangle met l'utilisateur en garde contre la présence de haute tension sans
isolationdans l'appareil,ce qui peut causerun risque d'électrocution.
Un point d'exclamation dans un triangle prévient de la présence d'instructions relatives au
fonctionnement et à la maintenancese trouvantdans le manuel fourni avec l'appareil.
Ce symbolesignifie:uniquementpour usage à l'intérieur.
Ce symbole signifie: Lire le mode d’emploi.
Afin de protéger l’environnement, merci de recycler les emballages autant que possible.
Un effet lumière neuf peut provoquer de la fumée et/ou une odeur non souhaitée, qui devrait disparaître après
quelquesminutes.
Afin d’éviter tout risque d’incendie ou de décharge électrique,ne pas exposercet appareil à la pluie ouà l’humidité.
Pour éviter la formation de condensation à l’intérieur de l’appareil, patientez quelques minutes pour laisser l’appareil
s’adapter à la température ambiante lorsqu’il arrive dans une pièce chauffée après le transport. La condensation
empêche l'appareil de fonctionner manière optimale, et elle peut mêmecauser des dommages.
Cet appareil est destinéà une utilisationà l’intérieuruniquement.
Ne pas insérer d’objet métallique ou renverser de liquide dans l’appareil. Aucun objet contenant un liquide, tels que
des vases, ne peut être placé sur cet appareil. Cela risquerait de provoquer une décharge électrique ou un
dysfonctionnement. Si un corps étranger est introduit dans l’appareil, déconnectez immédiatement de la source
d’alimentation.
Aucune source de flammenue, telle que des bougies allumées, ne peut être placée sur l'appareil.
Placez l’appareil dans un endroit bien ventilé, éloigné de tout matériau ou liquide inflammable. L’appareil doit être fixé
à 50cm minimum desmurs.
Ne pas couvrirles orifices de ventilation, un risque de surchauffe en résulterait.
Ne pas utiliserl'appareil dans un environnement poussiéreux et le nettoyer régulièrement.
Ne pas laisserl'appareil à portée des enfants.
Les personnes non expérimentées ne doiventpas utilisercet appareil.
La température ambiante maximale d’utilisation de l’appareil est de 45°C. Ne pas l’utiliser au-delà de cette
température.
Assurez-vousque la zone au-dessousdu lieud’installationne comportepas de personnes non concernéespendant le
montage,le démontageet les opérations de maintenance.
Débranchez toujours l’appareil si vous ne l’utilisez pas de manière prolongée avant de changer une ampoule ou
d’entreprendredesréparations.
Les installations électriques ne peuvent être faites que par du personnel qualifiéet conformément aux règlements de
sécurité électriqueet mécanique envigueur dansvotre pays.
Assurez-vousque la tension d’alimentation de la source d’alimentation de la zone dans laquelle vous vous trouvez ne
dépasse pas celle indiquée à l’arrièrede l’appareil.
Le cordon d’alimentation doit toujours être en parfait état. Mettez immédiatement l’unité hors tension si le cordon
devait être écrasé ou endommagé. Pour éviter tout risque de choc électrique, le cordon doit être remplacé par le
constructeur, sonagent ou untechnicien qualifié.
Ne laissez jamaisle cordon d’alimentation entrer en contact avec d’autres câbles !
L’appareil doit être à la masse selon les règles de sécurité.
Ne pas connecter l’unité à un variateurde lumière.
Utilisez toujoursdes câbles appropriéset certifiés lorsque vousinstallez l'appareil.
Pour éviter toute décharge électrique,ne pas ouvrir l’appareil. En dehors des ampouleset du fusible principal, il n’y a
pas de pièces pouvantêtre changées parl’utilisateur àl’intérieur.
Ne jamais réparer ou court-circuiter un fusible. Remplacez systématiquement un fusible endommagé par un fusible
de même type et ayant les mêmesspécificationsélectriques!
JB SYSTEMS
®
9/42 CALYPSO
JB SYSTEMS
®
10/42 CALYPSO
Page 8

FRANÇAIS MODE D’EMPLOI
FRANÇAIS MODE D’EMPLOI
En cas de problèmes de fonctionnement sérieux, arrêtez toute utilisation de l’appareil et contactez votre revendeur
immédiatement.
La carrosserie et les lentilles doivent être remplacées si elles sont visiblementendommagées.
Utilisez l’emballage d’origine si l’appareil doit être transporté.
Pour des raisons de sécurité, il est interdit d’apporter une quelconque modification à l’unité non spécifiquement
autoriséepar les partiesresponsables.
Important: Ne pas utiliser d’effets en présence de personnes souffrant d’épilepsie.
INSTALLATION EN HAUTEUR
Important: L’installation doit être faite par du personnel qualifié uniquement. Une installation
incorrecte peut causer des blessures sévères et/ou endommager l’appareil. L’installation en
hauteurexige de l’expérience ! Les limitesde charge doivent être scrupuleusement respectées, du
matériel d’installation certifié doit être utilisé, et l’appareil installé doit subir des inspections de
sécuritérégulièrement.
Assurez-vous que la zone au-dessous du lieu d’installation ne comporte pas de personnes non
concernéeslors de l’installation, la désinstallationou la maintenance.
Placez l’appareil dans un endroit bien ventilé, éloigné de tout matériau ou liquide inflammable. L’appareil
doit être fixé à
L’appareil doit être hors de portée du public et en dehors des zones de passage de personnes ou des
zones où le publicest installé.
Avant l’installation, assurez-vous que la zone d’installation pourra supporter, en son point de fixation, un
minimumde 10 fois le poids de l’appareil.
Utilisez systématiquement un câble de sécurité qui peut supporter 12 fois le poids de l’appareil lors de
l’installation. Ce câble de sécurité secondaire doit être installé de manière à ce qu’aucune partie de
l’appareilne puisse descendre de plus de 20cm si le support principal tombe.
L’appareil doit être bien fixé, un montage à balancement est dangereux et ne devrait pas être pris en
considération !
Nepas couvrir les orifices de ventilation pour éviter toutrisque de surchauffe.
L’utilisateur doit s’assurer que les installations techniques et de sécurité sont bien approuvées par un
expert avant la première utilisation. Les installations doivent être inspectées chaque année par du
personnelqualifié pour assurerune sécurité optimale.
50cm minimum
des murssitués à proximité.
DESCRIPTION
2. Connecteur d’entréeDMX
3. Connecteur de sortieDMX
4. Prise ¼” utilisée pour connecterle contrôleur CA-8 optionnel
5. Microphone interne
6. Supportde fixation,pourvu de 2 leviers de serrage (un de chaque côté de l’appareil) et d’un trou pouvant
recevoirun crochet defixation.
7. LED 'SLAVE': elle est alluméequand l'appareil est en mode esclave
8. LED 'SOUND' : elle clignote suivantle rythmede la musique quand l'appareil est en mode audio
9. LED 'DMX' : elle est allumée quand l'appareil reçoitun signalDMX
10. LED 'MASTER' : elle estalluméequand l'appareilest utilisé en tant qu'appareil maître
11. Touche 'MENU' : utiliséepour sélectionnerles différentschapitres du menu
12. Touche 'DOWN' : utilisée pour reculer dans le menu et pour diminuerles valeurs affichéespar l'écran.
13. Touche 'UP' : utiliséepour avancer dans lemenu et pour augmenterles valeurs affichéespar l'écran.
14. Touche 'ENTER' : utiliséepour confirmervotre sélection.
15. L'écran montreles différents menus et les fonctions sélectionnées.
COMMENT REGLER L'APPAREIL
MENU PRINCIPAL:
Pour sélectionner une option du menu, appuyez sur la touche MENU jusqu’à ce que la fonction désirée
apparaisseà l’écran.
Sélectionnezla fonction à l’aide de la touche ENTER. L’écran clignotera.
Utilisez les touches DOWN et UP pour choisir dans lemenu l'option désirée.
Dès que vous avez sélectionné l'option désirée dans le menu, appuyez sur la touche ENTER pour
confirmer. Après 8 secondes l’écran retournera automatiquement aux fonctions principales sans avoir
modifié quoi que ce soit. Pour retourner aux
fonctions sans effectuer de changements,appuyez
sur la touche MENU. La structure du menu est
affichéeci-contre.
Est utilisépour régler l’adresse de départdans
une configuration DMX.
Appuyez sur la toucheMENU jusqu’à ce que
soit affichéà l’écran.
Appuyez sur la touche ENTER, l’écran commence
à clignoter.
Utilisez les touches DOWN et UP pour changer
l’adresseDMX512.
Quand l’adresse désirée est affiché à l’écran,
appuyez sur la touche ENTER pour confirmer votre
choix.
principales sans aucune modification après 8
secondes)
Pour retourner aux fonctions sans effectuer de
changements, appuyez à nouveau sur la touche
MENU.
Reglagede l’adresse DMX512
(Où il retournera automatiquement aux fonctions
1. Entrée de l'alimentationsecteur, avec prise IEC et fusibleincorporé. Connectez les câbles d’alimentation
fournis à cetteprise.
JB SYSTEMS
®
11/42 CALYPSO
Utilisé pourmettre l'appareil en mode 'master'(maître) ou 'slave'(esclave).
Appuyez sur la toucheMENU jusqu’à ce que est affichéà l’écran.
Appuyez sur la touche ENTER, le modede fonctionnementen cours commenceà clignoter à l'écran.
Utilisez les touches DOWN et UP pour sélectionner (master), (esclave synchronisé au
master)ou (esclavesynchronisé en opposition parrapportau master).
Dès que le mode de fonctionnement est affiché à l’écran, appuyez sur la touche ENTER pour confirmer
votre choix.
JB SYSTEMS
Modede fonctionnement
®
12/42 CALYPSO
Page 9

FRANÇAIS MODE D’EMPLOI
FRANÇAIS MODE D’EMPLOI
(Où il retourneraautomatiquement aux fonctionsprincipales sansaucune modificationaprès 8 secondes)
Pour retourneraux fonctions sans effectuerde changements, appuyez à nouveau sur la touche MENU.
Remarques : quand 'SL 1' ou 'SL 2' sont sélectionnés, certaines des options du menu ne sont pas
disponibles.Quandon n'utilisequ'unseulappareil,le mode'master' devrait toujoursêtresélectionné.
Modeutilisé pour sélectionner l'undes shows préprogrammés quand on est en mode 'standalone'
(autonome)ou en mode 'master/slave' (maître/esclave). Cette optiondu menun'est pas disponible
quand l'appareilest régléen modeesclave (“SL1” ou “SL 2”) !
Appuyez sur la toucheMENU jusqu’à ce que est affichéà l’écran.
Show Mode
Appuyez sur la touche ENTER, le show en mémoire commence à clignoter à l'écran.
Utilisez les touches DOWN et UP pour sélectionnerun des 11 shows préprogrammés, de (show
0) à (show10).
Unfois que le numéro du show désiré clignote à l'écran,appuyez sur latouche ENTERpour l'enregistrer.
(Où il retourneraautomatiquement auxfonctions principales sans aucune modificationaprès 8 secondes)
Pour retourneraux fonctions sans effectuerde changements, appuyez à nouveau sur la touche MENU.
Black out mode: quand aucunsignal DMX est détecté, l’appareil se meten black out.
Mode « pas de black-out »: quand aucun signal DMX n'est détecté, l’appareil se met
automatiquementà fonctionneren modemaster.
Cette option du menu n'est pas disponible quand l'appareil est réglé en mode esclave (“SL1” ou
“SL2”) !
ModeBlack out
Appuyez surla toucheMENU jusqu’à ce que soitaffiché à l’écran.
Appuyez sur la touche ENTER, lasélectionen mémoirecommence à clignoterà l'écran.
Utilisez lestouches DOWN et UP pour sélectionner 'YES'(mode black out) ou 'NO' (mode sans black out).
Dès que le mode de fonctionnement est affiché à l’écran, appuyez sur la touche ENTER pour confirmer
votre choix.
(Où ilretournera automatiquement aux fonctions principalessans aucune modificationaprès 8 secondes)
Pour retourner aux fonctions sans effectuerde changements, appuyezà nouveau sur la touche MENU.
Display on: l’écran est toujours allumé.
Display off: l’écranest éteint quand il n’est pas utilisé.
Appuyez sur la toucheMENU jusqu’à ce que l’écran affiche .
Appuyez sur la touche ENTER, l’écran commence à clignoter.
Utilisez les touches DOWN et UPpour sélectionner (écran toujours allumé) ou (écran éteint
si pasutilisé).
Dès que le mode de fonctionnement est affiché à l’écran, appuyez sur la touche ENTER pour confirmer
votre choix.
(Où ilretournera automatiquement aux fonctions principalessans aucune modificationaprès 8 secondes)
Pour retourneraux fonctions sans effectuerde changements, appuyez à nouveau sur la touche MENU.
Display normal: possibilité de lire ce qui est affichéà l’écran quandl’appareil est posé par terre.
Displayinversion: possibilité de lire ce qui est affiché à l’écran quandl’appareil est suspendu.
Appuyez sur la toucheMENU jusqu’à ce que clignotesur l’écran. (affichage normal)
Utilisez la touche ENTER pour changer l’affichage (affichage inversé), l’option sera
automatiquement enregistrée après 8 secondes. Ou appuyez à nouveau sur la touche ENTER pour
retournerà l’affichagenormal
Pour retournervers les fonctions,appuyez sur la toucheMENU.
Led Display
InversionDisplay
Vouscommuniquele nombre d’heures de service de l’appareil.
Appuyez sur la toucheMENU jusqu’à ce que clignote à l’écran.
Appuyez sur la touche ENTER pourque l’appareil affiche le nombre d’heuresde service à l’écran.
Pour retourner auxfonctions, appuyez sur la touche MENU.
Fonctionutilisée pour montrer sous quelle versiondu software fonctionne l'appareil.
Fixture Hours
Versiondusoftware
Appuyez surla touche MENU jusqu'àce que les lettres semettent à clignoter à l'écran.
Appuyez sur la touche ENTER pourafficher sous quelle version du softwarefonctionne l'appareil
Pour retourner vers les fonctions, appuyez sur la touche MENU.
INSTALLATION ELECTRIQUE + ADRESSAGE
Important : L'installationélectrique devrait être effectuée uniquementpar du personnel qualifié,
suivant les normes de sécurité relatives à l'électricité et à la mécanique dans votre pays.
Installationélectrique pour 1 appareil en fonctionnement seul:
Installez simplement le câble secteur. L’appareil commencera à fonctionner immédiatement en mode
autonome.
Remarque1: vous pouvezbrancher unecommande àdistanceCA-8 sur l’appareil sivous souhaitez avoir
plus de possibilités de contrôle. Référez-vous à la section 'Comment utiliser l'appareil' pour apprendre à
effectuercetteprocédure correctement.
Remarque 2: s'il n'y a pas de sortie, veuillez vous assurer que l'appareil soit bien réglé en mode 'master'
(sereporter auchapitreprécédent).
Installationélectrique pourdeux ouplusieursappareils en maître/esclave:
Branchez de 2 à 16 appareils au maximum ensembleen utilisant des câbles symétriques pour micro de
bonne qualité. Mettez le premier appareil de la chaîne en mode 'master', les autres doivent êtremis en
mode esclave (SL 1 ou SL 2). Sereporter auchapitre précédent pour deplus amples informations.
Assurez-vous que les appareils sont tous branchés sur le secteur.
Et c’est terminé!
Remarque: vous pouvez brancher une commande à distance CA-8 sur l’appareil maître (master) si vous
souhaitez avoirplus decontrôle surle fonctionnement maître/esclave.
Installationélectriqueen mode DMX:
Le protocole DMX est un signal à haute vitesse très utilisé pour contrôler des équipements lumineux
intelligents. Vous devez connecter en guirlande (daisy chaining) votre contrôleur DMX et tous les
appareilsavec un câble symétriquede bonne qualité.
Les deuxtypes de connecteurs XLR, ceux à 3 broches comme ceux à 5 broches, peuvent être utilisés ;
cependant,les connecteurs à 3 broches se rencontrent plus fréquemment car ils sont compatibles avec
les câblesaudio symétriques.
Plan de câblage desXLR à 3 broches : Broche 1 = prise de terre ~ broche 2 = signal négatif(-) ~ broche 3 =
signal positif(+)
Plan de câblage des XLR à 5 broches : Broche 1 = prise de terre ~ broche 2 = signal
négatif (-) ~ broche 3 = signal positif (+) ~ broches 4 et 5 : non utilisées.
Pour éviter des comportements étranges des effets lumineux dus aux interférences,
vous devez utiliser une résistance de bouclage de 90 ohms à 120 ohms en fin de
chaîne. Ne jamais utiliser de séparateur de câbles en forme de "Y", cela ne
fonctionnera pas !
Assurez-vous que tous les appareils soient bien connectés ausecteur.
Chaque effet lumineux de la chaîne doit avoir sa propre adresse de départ afin de savoir à quelle
commande du contrôleur il doit obéir. Dans le chapitre qui suit, vous apprendrez à régler les adresses
DMX.
JB SYSTEMS
®
13/42 CALYPSO
JB SYSTEMS
®
14/42 CALYPSO
Page 10

FRANÇAIS MODE D’EMPLOI
COMMENT REGLERL’ADRESSE DEDEMARRAGE EXACTE:
Référez-vous au chapitre précédent (réglage de l’adresse DMX-512) pour apprendre à régler l’adresse de
départ sur cet appareil. L’adresse de départ de chaque appareil est très importante. Malheureusement il est
impossible de vous expliquer dans ce mode d’emploi quel adresse de démarrage vous devez introduire car
cela dépends entièrement du contrôleur que vous utiliserez … veuillez donc vous référer au mode d’emploi
de votrecontrôleur DMX pour savoirquelle adresse vous devez utiliser.
CONFIGURATIONDMXDU CALYPSO:
FRANÇAIS MODE D’EMPLOI
COMMENT UTILISER L’APPAREIL
Chaque fois que vous allumerezl’appareil, l’écran afficheraL373
Vous pouvez utiliser l’appareil selon 3 façons:
EN UTILISANT LES PROGRAMMES INTÉGRÉS MAÎTRE/ESCLAVE:
Sélectionnez cette fonction si vous voulez un show instantané. En reliant tous les appareils selon le
principe maître/esclave, le premier appareil contrôlera tous les autres appareils en effectuant un show
automatiqueet synchronisé au rythme de lamusique. Rien ne sera branché à son entrée DMX et sa LED
« master » seraconstamment allumée,tandis que la LED « sound » clignotera au rythmede la musique.
Important ! Cette fonction n'est opérationnelle que quand le mode black out du menu de l'appareil
maître est OFF (désactivé), sans quoi, rien ne se passe ! Pour en savoir plus à propos de cette
option,se reporter au chapitre 'Comment régler l'appareil'.
EN UTILISANT LE CONTRÔLEURCA-8:
Si vous utilisez l’appareil en mode maître/esclave nous vous recommandons d’utiliserle contrôleur CA-8.
Connectez ce petit contrôleur à l’entrée jack 1/4” de l’appareil maître. Ceci vous
permettrade contrôler lesfonctions suivantes:
o En utilisantles programmes intégrés maître/esclave
o En utilisant le petitcontrôleur
o En utilisantun contrôleur DMX universel
Le MASTER dispose de 11 shows préprogrammés : on peut sélectionner du (show 0) au
(show 10) directementdans le menu de l'appareil maître.
Les appareils esclaves possèdent 2 options: les autres appareils sont réglés en mode esclave (la
LED « slave » est constamment allumée). Afin de créer un magnifique show vous pouvez introduire
des mouvements contrastés dans le menu des appareils esclaves vous pouvez aller à l’option
etsélectionner:
o Normal slave: l’appareil esclave fonctionne de façon synchronisée par rapport à
l’appareil maître.
o 2 light show: l’appareil esclave fonctionne de façon synchronisée, mais en
opposition parrapport à l’appareil maître.
Qu'appelle-t-on les motifs (patterns) ?
Les motifs, ce sont des combinaisons deLED qui sont statiques (donc,qui ne changent pas) dansun
ensemblede LED.
s la valeurde CH1 est réglée entre 000 et 119, on peut utiliserCH2 pour sélectionner25 motifs différents
On utiliseCH3 pour modifierla fréquence du stroboscopedes motifssélectionnés.
Qu'appelle-t-on les effetschenillards(chases = séquences de poursuite) ?
Les effetschenillards, ce sont des séries de motifsqui se succèdent en boucle pour créer des effets
dynamiques(donc, qui changent sansarrêt).
Quand lavaleur de CH1 estréglée entre 120et 239, on peut utiliser CH2 pour sélectionner 25 effets
chenillardsdifférents.
On utilise CH3pour modifier lavitesse des effets chenillards sélectionnés.
JB SYSTEMS
®
15/42 CALYPSO
Standby L'appareil esttotalement éteint.
Fonction
Mode Strobe/ Sound (LED éteinte) Effetchenillard (LED allumée)
Stroboscoperéagissantau
son.
Sélection d'un des effets
chenillards
MAINTENANCE
Assurez-vous que la zone au-dessous du lieu d’installation ne comporte pas de personnes non
concernées lorsde la maintenance
Mettez l'appareil hors tension, débranchez le cordon d’alimentationet attendezque l’appareil ait refroidi.
Pendantl’inspection,les points suivants doivent êtrevérifiés :
Toutes les vis utilisées pour l’installation de l’appareil ou de chacune de ses pièces doivent être bien
fixéeset non corrodées.
Les niches, fixations et structures de support (plafond, poutres, suspensions) doivent être totalement
intactes,sans aucune déformation.
Lorsqu’une lentille optique est visiblement endommagée (fissure ou éraflures profondes), elle doit être
remplacée.
Les câbles doivent être en parfait état et doivent être remplacés immédiatement en cas de détection d’un
problème,mêmebénin.
Pour protéger l’appareil de toute surchauffe, les ventilateurs (le cas échéant) et les orifices de ventilation
doiventêtre nettoyés tous les mois.
L’intérieur del’appareil doit êtrenettoyéchaque année à l’aide d’un aspirateurou d'un pistolet à air.
JB SYSTEMS
®
16/42 CALYPSO
Page 11

FRANÇAIS MODE D’EMPLOI
Lenettoyage des lentilles optiques internes et externeset/ou des miroirs doit être effectuépériodiquement
pour optimiser la production de lumière. La fréquence de nettoyage dépend de l’environnement dans
lequel l’appareil fonctionne: des environnements humides, enfumés ou particulièrement sales peuvent
entraînerune accumulation de saletés plus importante surles parties optiques de l’appareil.
Nettoyezà l’aide d’unchiffon doux avecdes produits denettoyage pour verresnormaux.
Séchez toujoursles partiessoigneusement.
Nettoyezles optiques externes au moins une fois tous les30 jours.
Nettoyezles optiques internes au moins une fois tousles 90 jours.
Attention: Nous vous recommandons fortement de faire exécuter le nettoyage interne par du
personnel qualifié !
SPECIFICATIONS
Alimentation: CA230V, 50Hz
Consommation : 18 watts
Fusible: 250V 2A lente (20mmverre)
Contrôle du son: microphoneinterne
ConnexionsDMX: connecteurs XLR mâle / femelleà 3 broches
Canaux DMX utilisés : 4 canaux
Ampoules: 156 LEDs (Rouge=48+ Vert=36 + Bleu=36 + Blanc=36)
Dimensions: 250 x 250 x 280 mm
Poids: 4,2kg
Chacune deces informationspeut êtremodifiéesans avertissement préalable. Vous pouvez
télécharger la dernière version dece mode d’emploi de notre site Web: www.beglec.com
NEDERLANDS HANDLEIDING
Hartelijk dank voor de aankoop van dit JB Systems®product. Om ten volle te kunnen profiteren van alle
mogelijkheden en voor uw eigen veiligheid, gelieve de aanwijzingen zeer zorgvuldig te lezen voor U begint
het apparaatte gebruiken.
DOOR U OP ONZE MAILINGLIJST IN TE SCHRIJVEN ONTVANGT U STEEDS DE
LAATSTE INFORMATIE OVER ONZE PRODUKTEN: NIEUWIGHEDEN,SPECIALE
ACTIES, OPENDEURDAGEN, ENZ.
SURF NAAR: WWW.BEGLEC.COM
KARAKTERISTIEKEN
In dit apparaat is radio-interferentie onderdrukt. Dit product voldoet aan de gangbare Europese en nationale
voorschriften. Het is vastgesteld dat het apparaat er zich aan houdt en de desbetreffende verklaringen en
documenten zijn door de fabrikant afgegeven.
Het toestel is ontworpen om decoratieve lichteffecten te produceren en kan eventueel worden gebruikt in
lichtshows.
Innoverende veelkleurigeLED Moonflower effect.
Gebaseerd op156 powerLEDs (R=48 + G=36+ B=36 + W=36):
Extreem heldere kleurenin vergelijking met traditionelehalogeenlamp effecten
Meer dynamisch dan traditionelehalogeenlampeffecten
Scherpe witte, blauwe, rode en groene laserachtige lichtstralen
Geen lampen te vervangen!
Gebruikt LEDs met eenextreem lange levensduur!
Bijna geen warmteontwikkeling
Zeer laag verbruik
Lichtgewicht(geen zwarelamptransformatoren)
0-100% dimmeren uiterstsnelle strobe functie
Uitstekende ingebouwdeprogramma’s voor prachtigegevarieerdelicht shows:
DMX-sturing: 4 kanalen
Standalone: werkt op het ritmevan de muziek dank zij de ingebouwde microfoon
Master/slave:prachtige gesynchroniseerdeshows
CA-8 controller verkrijgbaarin optie
Menu displaymet 4 digits
Uitgerustmet een grote optische lens vooreen maximale lichtopbrengsten een 41° brede openingshoek
JB SYSTEMS
VOOR DE IN GEBRUIKNAME
Controleer voor het eerste gebruik van het apparaat of het tijdens het transport beschadigd werd. Mocht er
schade zijn, gebruik het dan niet,maarraadpleeg eerstuw dealer.
Belangrijk: Dit apparaat verliet de fabriek in uitstekende staat en goed verpakt. Het is erg belangrijk dat de
gebruiker de veiligheidsaanwijzingen en raadgevingen in deze gebruiksaanwijzing uiterst nauwkeurig volgt.
Elke schade veroorzaakt door verkeerd gebruik van het apparaat valt niet onder de garantie. De dealer
aanvaardt geen verantwoordelijkheid voor mankementen en problemen die komen door het veronachtzamen
van deze gebruiksaanwijzing.
Bewaardeze brochure op een veilige plaats om hem inde toekomst nogmaals te kunnen raadplegen. Indien
U het apparaatverkoopt, denkt Uer wel aan om de gebruiksaanwijzing bij te voegen.
Controleer deinhoud:
Controleerof de doos volgende onderdelen bevat:
Handleiding
Calypso
Ophangbeugelmetvijsknoppen
Voedingskabel
®
17/42 CALYPSO
JB SYSTEMS
®
18/42 CALYPSO
Page 12
NEDERLANDS HANDLEIDING
WAARSCHUWING:
Om het risico op elektrocutie zoveel
NEDERLANDS HANDLEIDING
VEILIGHEIDSVOORSCHRIFTEN:
CAUTION
De bliksempijl die zich in een gelijkbenige driehoek bevindt is bedoeld om u te wijzen op het
gebruik of de aanwezigheid van niet-geïsoleerde onderdelen met een “gevaarlijke spanning” in
het toestel die voldoende kracht heeft om een risico van elektrocutie in te houden.
Het uitroepteken binnen de gelijkbenige driehoekis bedoeld om de gebruikererop te wijzen dat
er in de meegeleverde literatuur belangrijke gebruik en onderhoudsinstructies vermeld staan
betreffendedit onderdeel.
Dit symboolbetekent: hetapparaat magenkel binnenhuiswordengebruikt.
Dit symboolbetekent: Leesde handleiding!
Om hetmilieu te beschermen, probeerzoveel mogelijk het verpakkingsmateriaal te recycleren.
Een nieuw lichteffect kan soms ongewenste rook en/of reuk veroorzaken. Dit is normaal en verdwijnt na
een paarminuten.
Stel dit apparaat niet bloot aan regen of vocht, dit om het risico op brand en elektrische schokken te
voorkomen.
Om de vorming van condensatie binnenin te voorkomen, laat het apparaat aan de omgevingstemperatuur
wennen wanneer het, na het transport, naar een warm vertrek is overgebracht. Condensatie kan het
toestel soms verhinderen perfect te functioneren. Het kan soms zelfs schade aan het apparaat
toebrengen.
Gebruik ditapparaat uitsluitend binnenshuis.
Plaats geen stukken metaal en mors geen vocht binnen in het toestel om elektrische schokken of storing
te vermijden. Indien een vreemd voorwerp in het apparaat geraakt, moet U het direct van het lichtnet
afkoppelen.
Plaats de installatie op een plaats met goede ventilatie, ver van brandbare materialen en/of vloeistoffen.
De installatie moetop minstens 50 cm van de muren rondom geplaatst worden.
Bedek geen enkeleventilatieopening om oververhittingte vermijden.
Zorg dat het toestelniet in een stoffige omgevingwordt gebruikt en maak het regelmatigschoon.
Houdhet apparaatuit de buurt van kinderen.
Ditapparaat magniet door onervaren personen bediend worden.
De maximum veilige omgevingstemperatuur is 40°C. Gebruik het apparaat dus niet bij hogere
temperaturen.
Verzeker er U van dat er zich onder de plaats waar het toestel wordt geïnstalleerd geen ongewenste
personenbevinden tijdens het bevestigen en losmakenalsook bij hetonderhoud.
Trek altijd de stekker uit wanneer het apparaat gedurende langere tijd niet wordt gebruikt of alvorens te
beginnen met deonderhoudsbeurt.
De elektrische installatie behoort uitsluitend uitgevoerd te worden door bevoegd personeel,volgens de in
uw landgeldende regels betreffendeelektrische en mechanischeveiligheid.
Controleer dat de beschikbare spanning niet hoger is dan die aangegeven op de achterzijde van het
toestel.
Deelektrische kabel behoortaltijd in uitstekende staat te zijn. Zet hetapparaat onmiddellijk af als de
elektrischekabel gekneusd ofbeschadigd is. De kabelmoet vervangen worden door de fabrikant zelf,zijn
dealer of vergelijkbare bekwamepersonen om een brand te voorkomen.
Laatde elektrische draad nooit in contact komen met andere draden.
Volgens de veiligheidsvoorschriften moet deze installatie geaard worden.
Sluithet apparaat niet aan op een elektronische dimmer.
Gebruik altijd een geschikte en gekeurde veiligheidskabel bijhet installeren van het toestel.
Om elektrische schokken te voorkomen, moet U de behuizing niet openen. Afgezien van de lamp en de
zekering zittener geen onderdelenin die door de gebruikermoeten wordenonderhouden.
Repareer
steeds
nooit
een zekering en overbrug de zekeringhouder nooit. Vervang een beschadigde zekering
door een zekeringvan hetzelfde type en met dezelfde elektrischekenmerken.
mogelijk te vermijden mag u nooit de behuizing
verwijderen. Er bevinden zich geen onderdelen in het
toestel die u zelf kan herstellen. Laat de herstellingen
enkeluitvoeren door eenbevoegde technicus.
Ingeval van ernstige problemen met het bedienen van het toestel, stopt U onmiddellijk het gebruik ervan.
Contacteeruw dealer voor een eventuele reparatie.
Debehuizing en de lenzen moeten vervangen worden als ze zichtbaarbeschadigd zijn.
Gebruik best de originele verpakking als hettoestelvervoerd moetworden.
Om veiligheidsredenen is het verboden om ongeautoriseerdemodificatiesaan het toestelaan te brengen.
Belangrijk:Gebruik het lichteffect nietin de tegenwoordigheid van personen die lijdenaan epilepsie.
OPHANGEN VAN HET APPARAAT
Belangrijk: De installatie van het toestel mag uitsluitend door bekwaam onderhoudspersoneel
uitgevoerd worden. Onjuiste plaatsing kan ernstige letsels en/of schade aan eigendommen tot
gevolg hebben. Het ophangen vergt veel ervaring. U behoort de grenzen te respecteren aan de
werklast; erkende installeringmaterialen moeten worden gebruikt; de veiligheid van het
geïnstalleerde toestel moetregelmatigworden gecontroleerd.
Overtuig U ervan dat het gebied onder installatieplaats vrij is van ongewenste personen tijdens het
plaatsen,het weghalenen het onderhoud.
Installeer het toestel op een goed geventileerde plaats, ver van brandbare stoffen en/of vloeistoffen. Het
toestelmoet worden bevestigd op
Het toestel moet worden geïnstalleerd buiten het bereikvan iedereen en weg van plaatsen waarmen mag
lopen en zitten.
Alvorens tot plaatsen over te gaan, moet men controleren dat de minimum puntbelasting van de
installatieplaats 10 keer het gewicht van het toestel bedraagt.
Gebruik bij het installerenvan het toestel altijd een gewaarmerkte veiligheidskabel die 12 keer het gewicht
van het toestel kan dragen. Deze bijkomende veiligheidsbevestiging moet zo worden aangebracht dat
geen deel van het toestel meerdan 20 cm vallen kan als dehoofdbeveiliging faalt.
Het apparaat moet goed worden vastgezet; aan een vrij zwaaiende montage mag zelfs niet gedacht
worden.
Bedek geen ventilatieopeningen, anderszou dit oververhitting tot gevolg kunnen hebben.
De gebruiker moet er zich van verzekeren dat de installaties met betrekking tot de veiligheid en de
technische mechaniek door een expert zijn goedgekeurd alvorens ze voor de eerstekeer te gebruiken. Elk
jaar moeten de installatiesworden gekeurd door een vakman om te controlerenof de veiligheid nog steeds
perfectis.
minstens 50 cm
van de omringendemuren.
BESCHRIJVING:
JB SYSTEMS
®
19/42 CALYPSO
JB SYSTEMS
®
20/42 CALYPSO
Page 13
NEDERLANDS HANDLEIDING
NEDERLANDS HANDLEIDING
1. Voedingsconnector met IEC stekker en geïntegreerde zekeringhouder. Sluit hier de meegeleverde
stroomkabelaan.
2. DMXingang
3. DMXuitgang
4. ¼” Jackingang voorde optionele CA-8 hand controller
5. Ingebouwdemicrofoon
6. ophangbeugel met 2 schroefknoppenom het toestelvastte zetten.
7. Slave LED:is aan wanneer het toestelin slavemodus staat
8. Sound LED: knippert op het ritmevan de muziekwanneer het toestel in audio modus staat
9. DMX LED: is aan wanneer het toestel een DMX-signaalontvangt
10. Master LED: is aan wanneer hettoestel ingesteld is als master
11. MENUtoets: wordtgebruikt om de verschillende menu’s te selecteren
12. DOWN toets: om terug te gaan in het menu en om waarden die in het display worden weergegeven te
verlagen.
13. UP toets: om verder te gaan in het menu en om waarden die in het display worden weergegeven te
verhogen.
14. ENTER toets: wordtgebruikt omuw keuze tebevestigen.
15. DISPLAY geeftde verschillende menu’s en de geselecteerde functies weer.
HOE INSTELLEN:
HOOFDMENU:
Drukop de MENU toets tothet gewenste menu op hetscherm verschijnt.
Selecteer de functie door op de ENTER toets te drukken.De display zal beginnen knipperen.
Gebruik de DOWN en UP toetsenom de gewenstemenu optie te kiezen.
Druk daarna op de ENTER toets om de selectie te bevestigen. Om terug te keren naar de hoofdfuncties
zonder ietste veranderen kunt u terug op de MENU toets drukken of gewoon 8 seconden wachten.
Bepaalt het startadres in de DMXopstelling.
Druk op de MENU toets tot wordt
Druk op de ENTER toets, de display beging te
Gebruik de DOWN en UP toetsen om het
Wanneer het gewenste adres op de display
U kunt ook terugkerennaar het hoofdmenu zonder
iets te wijzigen door terug op de MENU toets te
drukken.
Om het toestel als master of als slave te laten
werken.
Druk op deMENU toetstot op dedisplay
Drukop de ENTER toets,de gebruikte modus begint te knipperen op de display
Gebruik de DOWN en UP toetsen om de ‘master’ of ‘slave synchroon met de master’ of
Bevestig uw keuze door op de ENTER toets te drukken. (indien u dit niet doet wordt er na 8 seconden
U kunt ook terugkerennaar het hoofdmenu zonder iets te wijzigen door terug op de MENU toetste drukken
DMX512adres instellen
weergegeven op de display.
knipperen.
DMX512 adres te veranderen.
verschijnt moet u dit bevestigen door op de
ENTER toets te drukken. (indien u dit niet doet
wordt er na 8 seconden terug overgegaan naar
het hoofdmenu zonder de veranderingen op te
slagen)
werkmodus
wordt weergegeven.
‘slave asynchroonmet de master’ werkmodus te kiezen.
terug overgegaannaar hethoofdmenu zonder de veranderingen op te slagen)
Opmerkingen: indien u “SL 1” of “SL 2” heeft gekozen zijn sommige menuopties niet meer beschikbaar.
Indienu één enkel toestel gebruiktmoet usteeds de ‘master’ werkmodus kiezen.
Wordt gebruikt om één van de voorgeprogrammeerdeshows teselecteren wanneer het toestel
autonoomof in master/slave wordt gebruikt. Deze optie is niet beschikbaar wanneer het toestel in
slave mode staat(“S L 1 ” or “S L 2 ”)!
Druk op deMENU toetstot wordtweergegevenop de display.
Druk opde ENTER toets, deshow welkein gebruik is begint te knipperen op de display.
Gebruik de DOWN en UP toetsen om één van de 11 voorgeprogrammeerde shows (show 0) tot
Wanneerde gewenste show knippert op de display moet u enkel nog op de ENTER toetsdrukken om uw
keuze te bevestigen.(indien u ditniet doet wordt er na 8 seconden terug overgegaan naar het hoofdmenu
zonderde veranderingen op teslagen)
U kunt ook terugkerennaar het hoofdmenu zonder iets te wijzigen door terug op de MENU toetste drukken.
Blackout mode: wanneer er geen DMX-signal gedetecteerdwordtgaat het toestelin blackout.
No blackoutmode: wanneerer geen DMX-signal gedetecteerd wordtschakelt het toestelautomatisch
over naar master mode.
Deze optie is niet beschikbaar indienhet toestel in slave mode staat(“S L 1 ” of “S L 2 ”)!
Druk op deMENU toetstot wordt weergegeven op dedisplay.
Drukop de ENTER toets,de gebruikte functie begintte knipperenop de display.
Gebruik de DOWN en UP toetsen om Y E S (blackout) ofn o (no blackout) te kiezen.
Druk daarna op de ENTER toets om uw keuze te bevestigen. (indien u dit niet doet wordt er na 8
seconden terug overgegaan naarhet hoofdmenuzonder de veranderingen op te slagen)
U kunt ook terugkerennaar het hoofdmenu zonder iets te wijzigen door terug op de MENU toets tedrukken
Display on: display is steedsaan.
Display off: display is uit wanneer deze niet wordt gebruikt.
Druk op deMENU toetstot op de display wordt weergegeven.
Drukop de ENTER toets,de display begint te knipperen.
Gebruik de DOWN en UP toetsen om (display steeds aan) of (display uit wanneer niet in
gebruik) te selecteren.
Druk daarna op de ENTER toets om uw keuze te bevestigen. (indien u dit niet doet wordt er na 8
seconden terug overgegaan naarhet hoofdmenuzonder de veranderingen op te slagen)
U kunt ook terugkerennaar het hoofdmenu zonder iets te wijzigen door terug op de MENU toetste drukken.
Display normal: displayis leesbaar wanneer het toestel op de grond staat.
Displayinversion: displayis leesbaar wanneer het toestel ondersteboven hangt.
Druk op deMENU toetstot knippert op de dislpay. (normaldisplay)
Druk op de ENTER toets om over te schakelen op (display inversion), de handeling wordt
automatisch na 8 seconden opgeslagen. Of druk nogmaals op de ENTER toets om naar (normal
display) terug te schakelen.
Druk op de MENU toets om naarde functies terug te keren.
Geefthetaantal gepresteerdewerkurenweer.
Druk op deMENU toetstot knippert op de display.
Druk opde ENTER toets om het aantalwerkuren telaten verschijnen op dedisplay.
Druk op deMENU toetsom naar de functies terug te keren.
Show Mode
(show10) te kiezen
BlackoutMode
Led Display
DisplayInversion
Fixture Hours
JB SYSTEMS
®
21/42 CALYPSO
JB SYSTEMS
®
22/42 CALYPSO
Page 14

NEDERLANDS HANDLEIDING
Geeft de softwareversie vanhet toestel weer.
Druk op deMENU toetstot knippertop de display.
Druk op deENTER toets om de softwareversie te laten verschijnen.
Druk op deMENU toetsom naar de functies terug te keren.
Softwareversion:
ELEKTRISCHE INSTALLATIE + ADRESSERING
Belangrijk: De elektrische installatie zou alleen uitgevoerd moeten worden door een bekwaam
persoon volgens de voorschriftenvoor elektrische en mechanische veiligheidin uw land.
Electrishe installatievan 1 standalone toestel:
Verbind gewoon de stroomkabel met het net.Het toestelstart onmiddellijkop in stand-alonemode.
Opmerking1: u kunt een CA-8 remote controller aansluiten indien u een betere controle over het toestel
wilthebben. Zie “how to operatethe unit”.
Opmerking2: indien er niets gebeurt moet u controleren ofhet toestel wel degelijk in master mode staat,
(zievorig hoofdstuk)
Electrische installatievan 2 of meer toestellenin master/slave:
Verbind 2 tot maximum 16 toestellen met mekaar door middel van symmetrische microfoonkabels van
goede kwaliteit.Zet het eerste toestel in Master Mode, alle andere toestellen moeten in slave mode (SL1
of SL2) staan . Zie vorig hoofdstuk voor meerinformatie.
Controleer of alle toestellen op hetstroomnet zijn aangesloten.
Klaar!
Opmerking: u kunt een CA-8 remote controller op het ‘Master’ toestel aansluiten indien u een betere
controleoverhet toestel wenst te hebben.
DMX AANSLUITINGEN
Het DMX-protocol is een breed gebruikt hogesnelheidssignaal om lichtuitrustingen te bedienen. U
moetuw DMX bediening en alle units met een gebalanceerdekabel van goede kwaliteit doorverbinden.
Zowel de XLR-3pin als XLR-5pin connector worden gebruikt, echter de XLR-3pin is populaider want
dezekabels zijn compatible met gebalanceerde audio kabels.
Pin layoutXLR-3pin: Pin1 = GND ~ Pin2 = Negatief signaal (-) ~ Pin3 = Positiefsignaal (+)
Pin layout XLR-5pin: Pin1 = GND ~ Pin2 = Negatief signaal (-) ~ Pin3 = Positief signaal (+) ~
Pins4+5 niet ingebruik.
Om vreemd gedrag van de lichteffecten, veroorzaakt door storing, te voorkomen, moet u een
afsluitweerstand van 90Ω tot 120Ω aan het eind van de keten gebruiken. Gebruik nooit een Y-splitkabel,
dit zal eenvoudig nietwerken!
Weet zekerdat alle units op het lichtnet zijn aangesloten.
Elk lichteffect in de keten heeft een eigen DMX startadres nodig zodat het weet
welke commando’s van de bediening het moet ontcijferen. In de volgende sectie
zal u leren hoe hetDMX adres in te stellen.
NEDERLANDS HANDLEIDING
HOE HET CORRECTE STARTADRES INSTELLEN:
In vorighoofdstuk wordt beschreven hoe u het adres op dit toestel moet instellen (DMX-512 adres instellen).
Het startadres van elk toestel is zeer belangrijk. Het is echter onmogelijk u mede te delen welk start adres u
zou moeten gebruiken aangezien dit volledig afhangt van de controller die u gaat gebruiken… Gelieve
hiervoorde handleiding van uwDMX-controller te raadplegen.
DMX-CONFIGURATIEVAN DE CALYPSO:
Wat zijnpatterns?
Patterns (patronen) zijnverschillende statische(niet bewegende)combinaties van LEDs in eenLED-cluster.
Wanneerde waardevan CH1 ingesteld istussen 000 en 119, dan kunt u CH2 gebruiken om25
verschillende patterns te kiezen.
Gebruik CH3 om de strobo frekwentievan de geselecteerdepatterns te wijzigen.
Wat zijnchases?
Chases zijn series vanpatterns welkein een lus weergegeven worden om alzo dynamische (bewegende)
effecten te creëren.
Wanneerde waardevan CH1 ingesteld istussen 120 en 239,dan kunt u CH2 gebruiken om uit 25
verschillendechases te kiezen.
Gebruik CH3 om desnelheid van de geselecteerdechases in te stellen.
BEDIENING VAN HET TOESTEL
Elke keer dat het toestel wordt aangezetverschijnt erL373op het display
U KUNT HET TOESTEL OP 3 MANIEREN GEBRUIKEN:
VIA DE MASTER/SLAVE FUNCTIEEN INGEBOUWDE PROGRAMMA’S:
selecteer deze functie indien u onmiddellijk wil van start gaan met een kant en klare show. Door de
toestellen als master/slave met mekaar te verbinden zal het eerste toestel alle andere toestellen
controlerenen bekomt u alzo een automatische, gesynchroniseerde lichtshow op hetritme van de muziek.
Op de DMX ingang van het ‘master’ toestel mag niets aangesloten worden, de master led is continu aan
en de Sound led knippert op het ritme van de muziek.
o Viade master/slavefunctie en ingebouwdeprogramma’s
o Met de CA-8 easy controller
o Met eenuniversele DMXcontroller
JB SYSTEMS
®
23/42 CALYPSO
JB SYSTEMS
®
24/42 CALYPSO
Page 15

NEDERLANDS HANDLEIDING
NEDERLANDS HANDLEIDING
Belangrijk! Deze functie werkt alleen wanneer de blackout mode in the menu van de ‘master’ uit
staat (OFF), anders zal er niets gebeuren! Lees meer over deze optie in de paragraaf “hoe
instellen”.
De MASTER heeft 11 ingebouwde shows: U kunt van (show 0) tot (show 10)
kiezenin het menu van het master toestel.
SLAVES hebben 2 werkopties: Deze toestellen staan in slave mode (slave-LED is continu aan). Om
een mooiere lichtshow te creëren kunt u gecontrasteerde bewegingen invoegen In hetmenu van de
slave units kunt u naar de optie gaan. Kieshier:
o Normalslave: slavewerkt synchroon met de master.
o 2 lightshow: slavewerkt in contrast met de master.
MET DE EASY CONTROLLER:
Voor de Master/slavewerkmodus raden wij u ten sterkste aan de CA-8 “Easy controller”
te gebruiken. Verbind deze kleine controller met de 1/4” jackaansluiting van het ‘master’
toestel. Zo heeft u de volledige controleover volgende FUNCTIES:
Standby Toestel in Blackout
Function
Mode
Soundstrobe Selecteeréén van de chases
Strobe/Sound (LED uit) Chase (LED AAN)
ONDERHOUD
Overtuig U ervan dat het gebied onder de installatieplaats vrij is van ongewenste personen tijdens het
onderhoud.
Zet het toestel uit, trek de netstekker uit het stopcontact en wacht tot het toestel is afgekoeld.
Bij inspectie moeten de volgende punten worden gecontroleerd.
Alle schroeven gebruikt om het te toestel te installeren en al zijn onderdelen moeten goed vastgedraaid
zijn en mogen niet verroest zijn.
Behuizingen, vastzetstukken, installeringplaatsen (plafond, spanten, schokbrekers) mogen absoluut niet
verwrongenzijn.
Wanneer een optische lens klaarblijkelijk beschadigd is door barsten of diepe krassen, dan moet deze
vervangenworden.
De stroomkabels moeten in perfecte staat zijn en behoren vervangen te worden, wanneer er zelfs maar
een kleinprobleem ontdekt werd.
Om het toestel tegen oververhitting te beschermen, behoren de ventilatoren (als die er zijn) en de
ventilatieopeningenelke maandgereinigd te worden.
Debinnenkant van het toestelbehoort elkjaar gereinigd te worden met een stofzuiger of eenluchtspuit.
Het schoonmaken van inwendige en uitwendige optische lenzen en/of spiegels moet regelmatig worden
uitgevoerd om een zo goed mogelijke lichtuitstraling te verkrijgen. Hoe vaak ze schoon moeten worden
gemaakt hangt af van de omgeving waar het toestel wordt gebruikt: een klamme, rokerige of bijzonder
vuile omgeving kan een grotereopeenhoping van vuil veroorzaken opde optische uitrusting.
Reinig met eenzachte doeken gebruik normaleglasreinigendeproducten.
Droog de onderdelenaltijdzorgvuldig af,
Reinig de uitwendigeoptische uitrusting minstens éénkeer permaand.
Reinig de inwendige optische uitrusting minstens omde 3 maanden.
Let op: We bevelen sterk aan dat het schoonmaken van de binnenkant wordt uitgevoerd door
vakbekwaampersoneel!!
TECHNISCHE KENMERKEN
Netvoeding: wisselstroom230 V, 50 Hz
Stroomverbruik: 18 Watt
Zekering: 250 V/ 2Atrage zekering(20 mm glas)
Geluidscontrole: Ingebouwdemicrofoon
DMX verbinding: 3 pins XLR mannelijk/ vrouwelijk
Aantal DMX kanalen: 4 kanalen
Lamp: 156 LEDs (R=48 + G=36+ B=36 +W=36):
Afmetingen: 250 x 250 x280 mm
Gewicht: 4,2kg
U kan de laatste versie van deze handleiding downloadenvia Onze website:www.beglec.com
Elkeinlichtingkanveranderenzonderwaarschuwingvooraf
JB SYSTEMS
®
25/42 CALYPSO
JB SYSTEMS
®
26/42 CALYPSO
Page 16

DEUTSCH BEDIENUNGSANLEITUNG
ACHTUNG:
Um sich nicht der Gefahr eines elektrischen
DEUTSCH BEDIENUNGSANLEITUNG
SICHERHEITSHINWEISE
Vielen Dank, dass Sie sich für den Erwerb dieses JBSystems®-Produkt entschieden haben. Bitte lesen Sie
diese Bedienungsanleitung sorgfältig vor der Inbetriebnahme durch, zur vollen Ausschöpfung der
Möglichkeiten,die dieses Gerät bietet, sowiezu Ihrer eigenen Sicherheit.
EIGENSCHAFTEN
Das Gerät ist funkentstört und erfüllt die Anforderungen der europäischen und nationalen Bestimmungen.
EntsprechendeDokumentationliegt beimHersteller vor.
DasGerät istzur Erzeugung von dekorativemLicht sowiezur Verwendungin Lightshows bestimmt.
Innovativer, farbenfroher LED Moonflower.
Mit156 leistungsstarken LEDs(R=48 + G=36 +B=36 + W=36):
Extrem leuchtende Farbenverglichenmit Halogenlampen-Effekten
DynamischereEffekte verglichenmit Halogenlampen-Effekten
Sehr konturscharfe weiße,blaue, rote undgrünelaserartige Strahlen
Kein Lampenaustausch erforderlich!
VerwendetLEDs mit extremlanger Lebensdauer!
Praktisch keineWärmeentwicklung
Sehr geringeLeistungsaufnahme
Geringes Gewicht (keine Lampen-Trafos erforderlich)
0-100%Dimmer und ultraschnelle Strobe-Funktion
AusgezeichnetevoreingestellteProgrammefürwunderschöne abwechslungsreicheLightshows:
DMX-Steuerung: 4 Kanäle
Standalone: musikgesteuertmit eingebautemMikrofon
Master/Slave:wunderbar synchronisierteShows
Wahlweise CA-8-Fernsteuerungerhältlich
4-stelliges menügesteuertesDisplay
Ausgestattet mit großen optischen Linsen für eine maximaleLichtausbeute und weitem41° Abstrahlwinkel
VOR DER ERSTBENUTZUNG
Vor der Erstbenutzung bitte das Gerät zuerst auf Transportschäden überprüfen. Sollte das Gerät einen
Schaden aufweisen, Gerätbittenicht benutzen, sondernsetzen Sie sich unverzüglich mit Ihrem Händler in
Verbindung.
Wichtiger Hinweis:
dass der Benutzer sich streng an die Sicherheitshinweise und Warnungen in der Bedienungsanleitung
hält. Schäden durch unsachgemäße Handhabung sind von der Garantie ausgeschlossen. Der Händler
übernimmt keine Verantwortung für Schäden, die durch Nichtbeachtung der Bedienungsanleitung
hervorgerufen wurden.
Die Bedienungsanleitung zum zukünftigen Nachschlagen bitte aufbewahren. Bei Verkauf oder sonstiger
WeitergabedesGeräts bitteBedienungsanleitung beifügen.
Packungsinhaltprüfen:
Bitte überprüfenSie, dass die Packung folgende Einzelteileenthält:
Bedienungsanleitung
Calypso
Befestigungsunterlage
Netzkabel
Das Gerät hat das Werk unbeschädigt und gut verpackt verlassen. Es ist wichtig,
CAUTION
Das Blitzsymbol im Dreieck weist den Benutzer darauf hin, dass eine Berührungsgefahr mit
nicht isolierten Teilen im Geräteinneren, die eine gefährliche Spannung führen, besteht. Die
Spannung ist sohoch,das hier die Gefahreines elektrischen Schlages besteht.
Das Ausrufezeichen im Dreieck weist den Benutzer auf wichtige Bedienungs- und
Wartungshinweise inden Dokumenten hin,die dem Gerätbeiliegen.
DiesesSymbol bedeutet: Nurinnerhalb vonRäumen verwenden.
DiesesSymbol bedeutet:Achtung!Bedienungsanleitung lesen!
Aus Umweltschutzgründen Verpackung bittewiederverwendenoder richtigtrennen.
Ein neues Gerät kann Geruch oder Rauch entwickeln. Das ist völlig normal und legt sich nach einigen
Minuten.
Zur Vermeidung von Stromschlag oder Feuer, Gerät bitte nicht Regen oder Feuchtigkeit aussetzen.
Zur Vermeidung von Kondensation im Inneren des Geräts bitte nach dem Transport in eine warme
Umgebung einige Zeit zum Temperaturausgleich ausgeschaltet stehen lassen. Kondensation kann zu
Leistungsverlustdes Gerätsodergar Beschädigung führen.
Gerät nicht imFreien und in feuchten Räumenund Umgebungen verwenden.
Keine Metallgegenstände oder Flüssigkeiten ins Innere des Geräts gelangen lassen, Kurzschluss oder
Fehlfunktion können die Folge sein. Falls es doch einmal vorkommen sollte, bitte sofort Netzstecker
ziehen undvom Stromkreis trennen.
Gerät nur in gut belüfteter Position und entfernt von entflammbaren Materialien oder Flüssigkeiten
betreiben.Mindestabstand an allen Seiten sollmindestens 50 cm betragen.
Ventilationsöffnungen nichtabdecken,da Überhitzungsgefahr!
Nichtin staubigerUmgebung verwendenund regelmäßig reinigen.
Für Kinder unerreichbar aufbewahren.
Unerfahrene Personensollen das Gerät nichtbedienen.
Umgebungstemperaturdarf40ºC nichtüberschreiten.
Sicherstellen, dass sich während des Auf- und Abbaus keine unbefugten Personen unterhalbdes Geräts
befinden.
Stets Netzsteckerziehen, wenn Gerätfür längeren Zeitraum nicht genutzt oderes gewartetwird.
ElektrischeAnschlüssenur durchqualifiziertesFachpersonal überprüfen lassen.
Sicherstellen, dassNetzspannung mit Geräteaufkleberübereinstimmt.
Gerät nicht mit beschädigtem Netzkabel betreiben. Ist die Zugangsleitung beschädigt, muss diese durch
den Hersteller,seinen Vertrieb oder durch eine qualifizierte Person ersetzt werden.
Netzkabel nicht mitanderen Kabelnin Berührung kommenlassen!
Zur Einhaltung der Sicherheitsbestimmungen muss dasGerät geerdetsein.
Gerät nicht an einen Dimmeranschließen.
Ausschließlich vorschriftsmäßige Kabel zurInstallationverwenden.
Gerät nicht öffnen. Abgesehenvom Tausch des Leuchtmittels und der Sicherungsind keine zu wartenden
Bauteileim Gerät enthalten.
Sicherungniemalsreparierenoderüberbrücken, sondern immerdurch gleichartigeSicherung ersetzen!
Bei FehlfunktionGerät nicht benutzenund sich mitHändler in Verbindung setzen.
Bei sichtbarenBeschädigungenmüssen Gehäuseund Optik ersetztwerden.
Bei Transport bitte Originalverpackung verwenden,um Schäden am Gerät zu vermeiden.
Aus Sicherheitsgründen dürfenan dem Gerätkeine unbefugten Veränderungenvorgenommenwerden.
Wichtiger Hinweis:
leiden.
Gerät nicht verwenden, wenn sich Personen im Raum befinden, die unter Epilepsie
Schlags auszusetzen, entfernen Sie keines der
Gehäuseteile. Im Geräteinneren befinden sich keine vom
Benutzer reparierbaren Teile. Überlassen Sie
Reparaturendem qualifiziertenKundendienst.
JB SYSTEMS
®
27/42 CALYPSO
JB SYSTEMS
®
28/42 CALYPSO
Page 17

DEUTSCH BEDIENUNGSANLEITUNG
DEUTSCH BEDIENUNGSANLEITUNG
ÜBERKOPF-MONTAGE
Wichtig: Montage ausschließlich durch qualifiziertes Fachpersonal durchführen lassen.
Unvorschriftsmäßiger Einbau kann erhebliche Verletzungen und/oder Schäden verursachen.
Überkopf-Montage verlangt entsprechende Erfahrung! Belastungsgrenzen müssen beachtet
werden, geeignetes Installationsmaterial muss verwendet werden und das installierte Gerät muss
in regelmäßigen Abständen überprüft werden.
Sicherstellen, dass sich keine unbefugtenPersonen unterhalb des Geräts befinden, während es installiert
oder gewartet wird.
Gerät in gut belüfteter Position installieren, weit entfernt von entflammbaren Materialien und/oder
Flüssigkeiten. Einen Seitenabstand von mindestens 50cm einhalten.
Gerät außerhalb der Reichweite von Personen und nichtin niedrigen Durchgängen oder in der Nähe von
Sitzgelegenheiteninstallieren.
Vor Montage sicherstellen, dass die gewählte Position wenigstens das 10-fache Gerätegewicht
aufnehmenkann.
Zur Aufhängung stets geeignetes Befestigungsmaterial verwenden, das das 12-fache Gerätegewicht
aushalten kann. Eine zweite Sicherungsaufhängung muss angebracht werden, die ein Absacken des
Geräts vonmehr als 20 cm verhindert,sollte die Befestigung brechen.
Gerät gut befestigen. Eine freischwingende Aufhängung ist gefährlich und sollte auf gar keinen Fall in
Betrachtgezogen werden!
Ventilationsöffnungennicht abdecken,da Überhitzungsgefahr!
Betreiber muss sicherstellen, dassdie sicherheitsrelevanten und technischen Installationenvor Erstbetrieb
fachmännischvorgenommenworden sind.
Installationen sollten jährlich durch qualifiziertes Fachpersonal inspiziert werden, um jederzeit einen
sicherenBetrieb zugewährleisten.
BESCHREIBUNG
9. DMX LED: leuchtet auf, wenndas Gerät ein DMX-Signal erhält
10. Master LED: leuchtet auf,wenn das Gerät als Master geschaltet ist
11. MENU-Knopf:zumWählen derverschiedenenMenüpunkte
12. DOWN-Knopf:zum Zurückgehen im Menü und zum Mindern der auf demDisplay angezeigtenWerte.
13. UP-Knopf: zum Vorwärtsgehenim Menü und zum Erhöhen der auf demDisplay angezeigtenWerte.
14. ENTER-Knopf:zum Bestätigen IhrerWahl.
15. DISPLAYzeigt dieverschiedenen Menüsund diegewähltenFunktionen an.
EINSTELLUNGSANLEITUNG:
HAUPTMENÜ:
Umeine derMenüoptionenauszuwählen, drücken Sieden MENU-Knopf sooft bis die gewünschte Option
auf demDisplay erscheint.
Auswahl der Funktion mit EINGABE (ENTER),das Display blinkt.
Mit ABWÄRTS und AUFWÄRTSwählen Sie die gewünschte Menüoption.
Wenn die gewünschte Menüoption ausgewählt ist, mit EINGABE (ENTER) bestätigen. Nach 8 Sekunden
kehrt das Display automatisch ohne Veränderung zu den Hauptfunktionen zurück. Zurück zu den
Funktionenohne Veränderungmit MENÜ-Taste. Im Nachfolgenden ist die Menüstruktur dargestellt.
ZumEinstellen der Startadresse in DMX
Einstellung.
MENU-Taste drücken bis im Display
angezeigtwird.
EINGABE (ENTER) drücken und das Display
beginnt zublinken.
Mit ABWÄRTS und AUFWÄRTS die DMX512
Adresseverändern.
Sobald die richtige Adresse im Display angezeigt
wird, mit EINGABE (ENTER) speichern
(anderenfalls nach 8 Sekunden Rückkehr zu den
HauptfunktionenohneÄnderung).
Zur Rückkehr zu den Funktionen ohne
VeränderungMENÜ-Tasteerneut drücken.
DMX512 EinstellungAdresse
1. Netanschluss Mit Hilfe des IEC Steckers und eingebauter Sicherung, verbinden sie hier den
Netzstecker.
2. DMX-Eingangsstecker
3. DMX-Ausgangsstecker
4. ¼ " Buchsezum Anschluss eines optionalen CA-8-Controllers
5. EingebautesMikrofon
6. Halter mit zwei Schrauben auf jeder Seite und einem Montierloch um das Gerät in eine
Montagevorrichtung zubringen.
7. Slave LED: leuchtet auf,wenn das Gerät im Slave-Modusist
8. Sound LED: blinkt im Takt der Musikwenn das Gerät im Audio-Modus ist
JB SYSTEMS
®
29/42 CALYPSO
ZumEinstellen des Geräts im Master- oder
Slave-Modus.
MENÜ-Taste drücken bis im Display
angezeigtwird.
Drücken Sie den ENTER-Knopf, der aktuelle
Betriebsmodusbeginnt auf dem Displayzu blinken
Benutzen Sie die DOWN- oder UP-Knöpfe um (Master), (Slave synchron mit dem Master)
oder (2 light show – Slave führt das Gegenteildes Masters aus).
Sobald die richtige Adresse im Display angezeigt wird, mit EINGABE (ENTER) speichern (anderenfalls
nach8 Sekunden Rückkehr zuden Hauptfunktionen ohneÄnderung).
Zur Rückkehrzu den FunktionenohneVeränderung MENÜ-Taste erneutdrücken.
Anmerkungen: wenn “SL 1” oder “SL 2” gewählt wurde, sind bestimmte Menüoptionen nicht verfügbar.Ist
nur ein Gerätim Einsatz, wählenSie immer den Master Modus.
ZumAuswählen eines der vorprogrammierten Shows bei Benutzung imStandaloneoder
Master/Slave-Modus. Diese Menüoption ist nicht verfügbar,wenn dasGerät im Slave-Modus
eingestellt ist (“S L 1 ” oder “S L 2 ”)!
MENU-Taste drückenbis im Display erscheint.
Dann EINGABE(ENTER) drücken, die aktuelleShow beginntauf dem Display zu blinken.
JB SYSTEMS
Betriebsmodus:
Showbetrieb
®
30/42 CALYPSO
Page 18
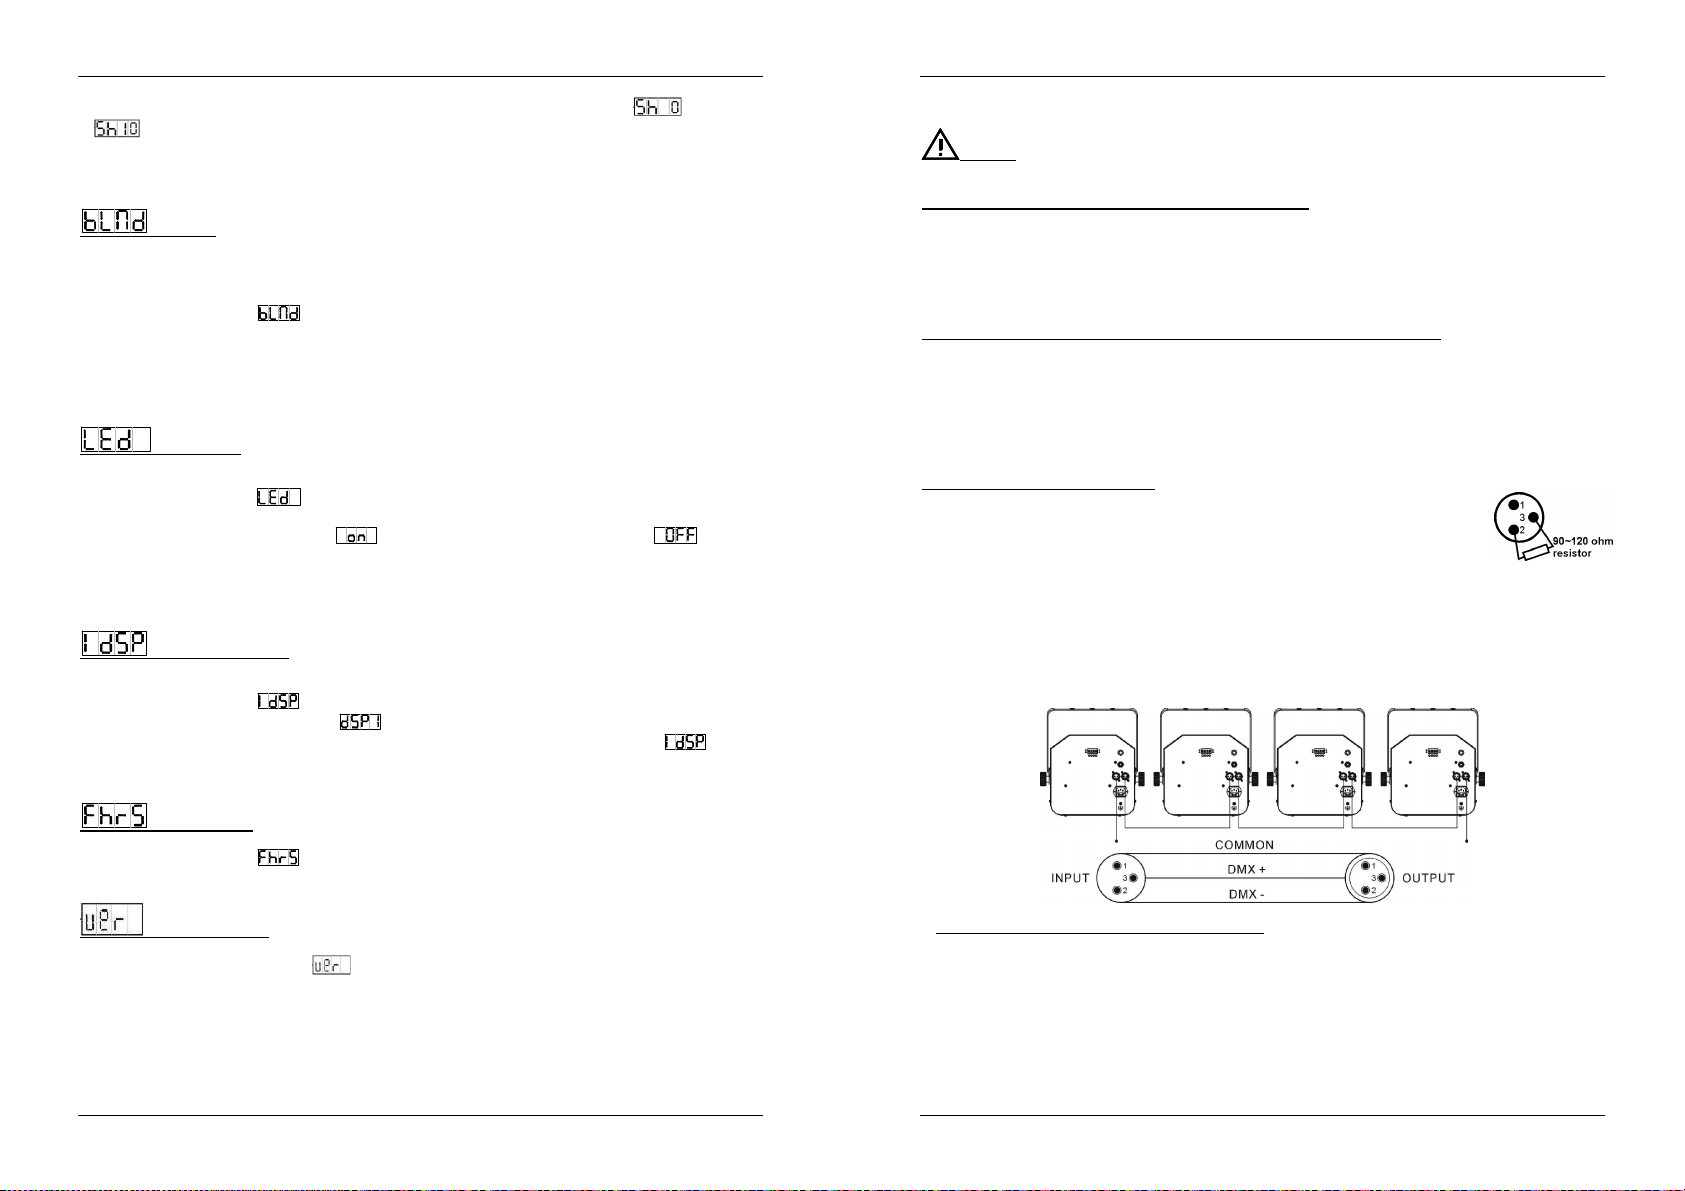
DEUTSCH BEDIENUNGSANLEITUNG
DEUTSCH BEDIENUNGSANLEITUNG
Benutzen Sie die DOWN- und UP-Knöpfe umeine der 11 vorprogrammiertenShows ( (show0)bis
Wenndie richtige Show auf demDisplayblinkt, drücken Sie den ENTER-Knopfum sieabzuspeichern.
Blackout:Wird kein DMX-Signalerkannt, geht das Gerät in Blackout.
Kein Blackout:Wird keinDMX-Signal erkannt,schaltet das Gerät automatischauf Master um.
Diese Menüoption ist nicht verfügbar, wenn das Gerät im Slave-Modus eingestellt ist (“S L 1 ” oder “S L
2 ”)!
MENÜ-Taste drückenbis im Display erscheint.
DannEINGABE(ENTER) drücken, die aktuelle Auswahl beginnt auf dem Display zu blinken.
Benutzen Sie denDOWN- und UP-Knopf umY E S (Blackout) oder n o (kein Blackout)Modus zu wählen.
Sobald die richtige Adresse im Display angezeigt wird, mit EINGABE (ENTER) speichern (anderenfalls
Display an: Displayist ständigeingeschaltet.
Display aus: Display ist ausgeschaltet,wennnicht in Benutzung.
MENÜ-Taste drückenbis im Displayerscheint.
DannEINGABE(ENTER)drücken und Display beginnt zu blinken.
Mit ABWÄRTS und AUFWÄRTS (Display ständig eingeschaltet) oder (Display
Sobald die richtige Adresse im Display angezeigt wird, mit EINGABE (ENTER) speichern (anderenfalls
Display Normal: Displayist lesbar, wenn Gerät auf demBoden installiert ist.
DisplayUmkehrung: Display ist lesbar, wennGerät auf dem Kopf stehendinstalliert ist.
MENÜ-Taste drückenbis im Display blinkt (NormalDisplay).
Mit EINGABE (ENTER) zu Betriebsart (Display Umkehrung) umschalten, die Einstellung wird nach
(show10)auszuwählen
(anderenfallsnach 8 Sekunden Rückkehr zu den HauptfunktionenohneÄnderung).
ZurRückkehr zu den Funktionenohne Veränderung MENÜ-Taste erneutdrücken.
Blackout
nach8 Sekunden Rückkehr zuden Hauptfunktionen ohneÄnderung).
Zur Rückkehr zu den Funktionen ohne VeränderungMENÜ-Taste erneutdrücken.
LED Display
ausgeschaltet,wennnicht in Benutzung)auswählen.
nach8 Sekunden Rückkehrzu denHauptfunktionen ohneÄnderung).
Zur Rückkehrzu den FunktionenohneVeränderung MENÜ-Taste erneutdrücken.
DisplayUmkehrung
8 Sekunden automatisch gespeichert oder EINGABE (ENTER) erneut drücken und so zu (Normal
Display)zurückkehren.
Zur Rückkehr zu den FunktionenMENÜ-Taste drücken.
ELEKTRISCHE INSTALLATION + ADRESSIERUNG
Wichtig: Die Elektroinstallation sollte nur von Fachleuten in Übereinstimmungmit den in Ihrem
Land geltendenBestimmungenfürelektrische und mechanische Sicherheit ausgeführt werden.
Elektrische Installationvon einemallein stehenden Gerät:
Stecken Sieeinfach das Netzkabelein. Die Gerät fängt sofort an im allein stehenden Modus zu arbeiten
Anmerkung 1: Sie können einen Fernsteuerungscontroller CA-8 an das Gerät anschließen, wenn Sie
zusätzliche Steuerungsfunktionen haben möchten. In Abschnitt „Bedienen des Geräts“ erfahren Sie mehr
darüber.
Anmerkung 2: Sollte kein Ausgang vorhanden sein, stellen Sie sicher, dass das Gerät im Master-Modus
eingestelltist(siehe vorangehendesKapitel)
Elektrische Installation fürzwei oder mehrere Geräte imMaster/Slave-Modus:
Schließen Sie 2 bis max. 16 Geräte mit hochwertig abgeschirmten Mikrofonkabeln an. Setzen Sie das
erste Gerät der Kette in den Master-Modus, die übrigen müssen in den Slave-Modus gesetzt werden
(SL1 oder SL2). Siehevorangehendes Kapitel für weitereInformationen.
VergewissernSie sich, dassalle Geräte an die Netzleitung angeschlossen wurden.
Fertig!
Anmerkung: Sie können einen Fernsteuerungscontroller CA-8 an das Gerät anschließen, wenn Sie
zusätzlicheSteuerungsfunktionenhabenmöchten.
Elektroinstallationim DMX-Modus:
Das DMX-Protokoll ist ein gängiges Hochgeschwindigkeitssignal, um intelligente
Lichtsysteme zu steuern. Sie müssen Ihren DMX-Controller und alle
angeschlossenen Geräte mit einem hochwertigen symmetrischen Kabel
hintereinanderschalten (daisychain).
Es werden sowohl XLR-3pin als auch XLR-5pin-Stecker benutzt, allerdings ist der
XLR-3pingängiger,da diese Kabel mit symmetrischen Audiokabelkompatibel sind.
StiftanordnungXLR-3pin: Pin1 = GND ~ Pin2 = Negatives Signal (-) ~ Pin3 = Positives Signal(+)
StiftanordnungXLR-5pin: Pin1 = GND ~ Pin2 = Negatives Signal (-) ~ Pin3 = Positives Signal (+) ~ Pins4+5
nichtbenutzt.
Um durch Interferenzen verursachte Fehlfunktionen der Lichteffekte zu vermeiden, müssen Sie einen
90Ω bis 120Ω Abschlusswiderstand am Ende der Kette einsetzen. Verwenden Sie niemals Y-Splitter
Kabel, das funktioniert nicht!
StellenSie sicher,dass alle Geräte an dasNetz angeschlossen sind.
ZurAnzeige der Arbeitsstunden des Geräts.
MENÜ-Taste drückenbis im Display blinkt.
Mit EINGABE (ENTER) die Arbeitsstunden im Display anzeigen.
Zur Rückkehr zu den Funktionen MENÜ-Taste drücken.
ZumAnzeigen der Software-VersiondesGeräts.
DrückenSie denMENU-Knopfbis aufdem Display blinkt.
DrückenSie denENTER-Knopf,um die Software-Versiondes Geräts anzuzeigen.
Umzu denFunktionen zurückzugehen,drückenSie denMENU-Knopf.
JB SYSTEMS
Stundenzähler
Software-Version:
®
31/42 CALYPSO
EINSTELLEN DER RICHTIGENSTARTADRESSE:
Bitte im vorherigen Kapitel (DMX-512 Adresse einstellen) nachlesen, wie die Startadresse eingestellt wird.
Die Startadresse jedes einzelnen Geräts ist ausgesprochen wichtig. Unglücklicherweise ist es unmöglich,
Ihnen in dieser Bedienungsanleitung zu erklären, welche Startadresse Sie einzustellen haben. Das hängt
vollständig von dem verwandten Controller ab… Also, bitte lesen Sie in der Bedienungsanleitung Ihres DMX
Controllersnach, wie die Startadresse einzustellen ist.
JB SYSTEMS
®
32/42 CALYPSO
Page 19

DEUTSCH BEDIENUNGSANLEITUNG
DEUTSCH BEDIENUNGSANLEITUNG
DMX-KONFIGURATIONDES CALYPSO:
Was sindPattern?
Patternsind verschiedene statische(unbewegliche) KombinationenvonLEDs auf einemLED-Cluster.
Wenn der Wert vonCH1 zwischen 000 und 119 eingestellt ist,könnenSie CH2 zum Auswählen von 25
verschiedenenPatternbenutzen.
BenutzenSie CH3, um die Strobe-Frequenzder gewähltenPatternzu wählen.
Was sindChase?
Chase sind eine ReihevonPattern, die in Schleifegesetzt werden,um dynamische (Bewegungs-) Effekte zu
schaffen.
Wenn der Wert vonCH1 zwischen 120 und 239 eingestellt ist,könnenSie CH2 zum Auswählen von 25
verschiedenenChasebenutzen.
BenutzenSie CH3, um dieGeschwindigkeit der gewähltenChaseauszuwählen.
BEDIENUNG DES GERÄTS
Bei jedemEinschalten wird auf dem Display L373 angezeigt.
Sie könnendas Gerät auf 3 verschiedeneWeisenbedienen:
ALS HAUPT-/UNTERGERÄTMIT EINGEBAUTEN,VORPROGRAMMIERTENFUNKTIONEN:
Auswahldieser Funktion, falls Sie eine unverzüglicheShowablaufen lassen wollen. DurchVerbindung der
Geräte in Haupt-/Untergeräte steuert das erste Gerät die nachfolgenden Geräte und erzeugt eine
automatische, musikgesteuerte, synchronisierte Lightshow. Am DMX Eingang ist nichts angeschlossen,
die Master-LED ist ständig an und dieSound-LED blinkt synchron mitder Musik.
Wichtiger Hinweis! Diese Funktion arbeitet nur, wenn Betriebsart Blackout im Menü des
Hauptgeräts AUSgeschaltet ist, anderenfalls passiert gar nichts! Mehr dazu bitte im Kapitel
„Einstellanleitung”nachlesen.
o AlsHaupt-/Untergerät miteingebauten,vorprogrammiertenFunktionen
o Mit Easy Controller
o Mit Universal DMX Controller
MASTER hat 11 vorprogrammierte Shows: Sie können (Show 0) bis (Show 10)
direkt im Menü des Mastergerätswählen.
UNTERGERÄTE haben 2 Betriebsoptionen: Die weiteren Geräte sind auf Betriebsart Untergerät
eingestellt (Untergerät-LED ist ständig an). Um eine großartige Lightshow zu kreieren, können Sie
Kontrastbewegungeneinführen im Menü derUntergeräte zu Option gehenund auswählen:
o NormalUntergerät: Untergerät arbeitetsynchron mit Hauptgerät.
o 2 Lightshow: Untergerät arbeitetumgekehrt vomHauptgerät.
MIT EASY CONTROLLER:
Bei Verwendung in Betriebsart Haupt-/Untergerät empfehlen wir dringend die Verwendung unseres CA-8
„Easy Controller”. Diesen kleinen Controller einfach an der 1/4” Buchse des Hauptgeräts
anschließenund dann folgende Funktionen steuern:
Stand-by
Funktion
Modus Strobe/ Musik (LED off) Chase(LEDON)
Musik-Strobe Wählen Sieeinen der Chase
Blackoutdes Geräts
WARTUNG UND INSTANDHALTUNG
Sicherstellen, dass sich keine unbefugten Personen unterhalb des Geräts befinden,während es gewartet
wird.
Gerät ausschalten, Netzsteckerziehenund warten,bis es sich abgekühlt hat.
Während der Wartungsind folgende Punkte ganz besonderszu beachten:
Sämtliche Schrauben zur Installation und Befestigung jeglicher Teile müssen fest angezogen und rostfrei
sein.
Gehäuse, Befestigungsmaterialien und Aufhängungen (Decke, Balken, abgehängte Decken) dürfen keine
Anzeichen vonVerformungaufweisen.
Ist die Optik sichtbar beschädigt (Sprünge oder tiefe Kratzer), dann müssen die entsprechenden Teile
ausgewechseltwerden.
Netzkabel muss stets in einwandfreiem Zustand sein und selbst bei kleinsten Beschädigungen erneuert
werden.
Zur Vermeidung von Überhitzung müssen die Ventilatoren (sofern vorhanden) und Lüftungsschlitze
monatlichgereinigt werden.
Gerät innen mindestenseinmal pro Jahr mit Staubsauger oder Airjetreinigen.
Reinigung der inneren und äußeren optischen Linsen und/oder Spiegel müssen in regelmäßigen
Abständen zur Beibehaltung einer optimalen Lichtausbeute vorgenommen werden. Reinigungsintervalle
hängen stark von der Umgebung ab: feuchte, verrauchte und besonders verschmutzte Umgebung führen
zu größererVerschmutzung aufden Linsen.
Mit weichem Tuch undgewöhnlichem Glasreinigersäubern.
Alle Teilestets gut abtrocknen.
ÄußereOptik mindestens alle 30 Tage säubern.
InnereOptik mindestens alle90 Tage säubern.
Achtung: Wir empfehlen dringend, Reinigung im Innern des Geräts nur von qualifiziertem Personal
durchführen zulassen!
TECHNISCHE EINZELHEITEN
Netzspannung: ≈ 230V, 50Hz
Leistungsaufnahme: 18Watt
Sicherung: 250V/ 2A langsame Sicherung (20mm Glas)
Klangregler: EingebautesMikrofon
DMXAnschlüsse: 3-pinXLR Stecker/Buchse
BenutzteDMX-Kanäle: 4 Kanäle
Leuchtmittel 156 LEDs (Rot=48 +Grün=36 +Blau=36 +Weiss=36)
Abmessungen: 250x 250 x 280mm
Gewicht: 4,2kg
TechnischeÄnderungen könnenauch ohne Vorankündigungvorgenommenwerden!
Sie können sichdie neuesteVersion dieses Benutzerhandbuches von unserer Website
herunterladen:www.beglec.com
JB SYSTEMS
®
33/42 CALYPSO
JB SYSTEMS
®
34/42 CALYPSO
Page 20

ESPAÑOL MANUAL DE INSTRUCCIONES
PRECAUCI
Ó
N:
Par
a reducir el riesgo de electrocución
,
Gracias por comprar este producto JB Systems®. Para sacar el máximo rendimiento a sus posibilidades y
por su propia seguridad, lea estas instrucciones de funcionamiento detenidamente antes de comenzar a
utilizaresta unidad.
CARACTERÍSTICAS
Esta unidad está a prueba de interferencias de radio. Este producto cumple los requisitos de las directrices
nacionales y europeas actuales. Se ha establecido la conformidad y las instrucciones y documentos
correspondienteshan sido depositadospor el fabricante.
Este dispositivo ha sido diseñado para producir efectos luminosos decorativos y se utiliza en sistemas de
espectáculosde luces.
moonflower Innovador,basado en leds de colores.
Basado en156 LEDs de potencia (R=48+ V=36 + A=36+ B=36):
Colores sumamentebrillantes comparadosa efectos con lámparas de halógeno
Efectosmuy dinamicos que se comparana efectos con lámparas de halógeno
Haces lasermuy brillantes blancos , azules y rojos
Nunco mas reemplazosde lámpara!
Esperanzade vida larga para los leds!
Virtualmente sin producción de calor
Consumo deenergia muy bajo
Ligero (sin transformador para lámpara)
Dimerizable de o-100% y funciónestrobo muy rapida
Escelentes programasincorporadospara espectaculareslight shows
Control DMX:4 canales
Independiente:activaciónmusical
Master/Slave:maravillosasdemostracionessincronizadas
ControladorCA-8 disponibleenopción
Visualizador de menu con 4 digitos
Equipado deuna lente ópticapara maxima potencia con angulo de haz de41°
:
ANTES DE UTILIZAR EL APARATO
Antes de comenzar a utilizar esta unidad, compruebe que no haya habido daños durante el transporte.Si
observaalgún daño, no utilice el dispositivo y consulte primero a su distribuidor.
Importante:
absolutamente necesario que el usuario siga estrictamente estas instrucciones y advertencias de
seguridad que aparecen en este manual de usuario. Cualquier daño producido por un manejo innecesario
queda excluido de la garantía. El distribuidor no asumirá ninguna responsabilidad por cualquier defecto o
problemaque surja por no haber seguidoel manual de usuario.
Guarde este folleto en un lugar seguro paraconsultarloen el futuro. Si vende este aparato más adelante,
asegúresede incluir estemanual de usuario.
Compruebeel contenido:
Compruebeque la caja contiene los siguienteselementos:
Instrucciones de funcionamiento
Calypso
Soporte colgante con perillas
Cablede red
Este dispositivo ha salido de nuestrasinstalaciones en perfecto estado y bien embalado. Es
INSTRUCCIONES DE SEGURIDAD:
CAUTION
no quite la cubierta superior . Ninguna pieza usable
adentro para el utilizador. Dirijase unicamente a personal
cualificado.
ESPAÑOL MANUAL DE INSTRUCCIONES
El simbolo de un rayo en el interior de un triangulo alerta sobre la presencia o el uso de
elementos no isolados donde un voltaje peligroso constituye un riesgo grande para causar una
eventual electrocución.
El punto de exclamación en el interior de un triangulo alerta al usuario sobre la presencia de
importantesinstrucciones de operación y de mantenimiento tenidas en cuenta en el manual de
uso.
Este símbolosignifica: uso para el interiorsolamente.
Estesímbolo significa : Lealas instrucciones.
Para proteger el medio ambiente, recicle el material de embalaje en la medida de lo posible.
Un nuevo efecto luminoso provoca a veces humo y/u olor no deseados. Esto es normal y desaparece
después de algunos minutos.
Para evitar incendios o riesgos de descarga,no expongala unidada la lluvia o a la humedad.
Para evitar que se forme condensación en el interior, deje que la unidad se adapte a la temperatura
exterior cuando la lleve a una habitación cálida después del transporte. A veces la condensación impide
que launidadfuncione apleno rendimientoy puedeincluso provocardaños.
Esta unidadsólo se puede usar en el interior.
Nocoloque objetos metálicos ni derrame líquidos dentro del reproductor de la unidad. Se pueden producir
descargas eléctricas o fallos de funcionamiento. Si algún objeto extraño entra en la unidad, desconecte
inmediatamenteel suministro eléctrico.
Coloque el aparato en un lugar bien ventilado, lejos de materiales y/o líquidos inflamables. El aparato
debe colocarsea al menos50 cm de las paredes.
No cubra ninguna abertura de ventilación puesto que podría producirse un sobrecalentamiento de la
unidad.
Evite el uso en ambientescon polvo y limpie la unidad regularmente.
Mantenga la unidad lejosde los niños.
Laspersonas sin experiencia nodeben utilizar este aparato.
La máxima temperatura ambiente para un funcionamiento seguro es de 40°C. No utilice la unidad a
temperaturasambientesuperiores.
Asegúrese de que debajo del área del lugar de instalación no hay personas durante el montaje,
desmontajeo mantenimiento.
Desenchufesiempre la unidad cuando no vaya a ser utilizada durante un largo periodo de tiempo o antes
de reemplazar la bombilla o comenzar el mantenimiento.
La instalación eléctrica sólo debe ser llevada a cabo por personal cualificado, de acuerdo con la
regulacionessobre seguridad eléctricay mecánica desu país.
Compruebeque el voltajedisponible no supera el que se indica en el paneltrasero dela unidad.
El cable de alimentación siempre debe estar en perfecto estado. Apague la unidad inmediatamente
cuando observe daños o desperfectos en el cable de alimentación. Debe ser reemplazado por el
fabricante,su agente de servicioo personas cualificadas para evitar cualquier peligro.
¡Nunca deje que el cable de alimentación entre en contacto con otros cables!
Este aparato debeconectarse a tierra para cumplircon las regulaciones sobre seguridad.
Noconecte launidad a ningún regulador de voltaje.
Utilice siempre un cablede seguridad apropiadoy homologadocuando instale la unidad.
Para evitar descargas eléctricas, no abra la cubierta. Además de la lámpara y el fusible de red no hay
piezas en el interiorde este aparatoque pueda mantener el usuario.
Nunca repare un fusible ni derive el soporte del fusible. ¡Reemplace siempre el fusible dañado por un
fusible delmismo tipo y especificación eléctrica!
En caso de que ocurran problemas de funcionamiento serios, deje de utilizar el aparato y póngase en
contactocon su distribuidor inmediatamente.
Lacarcasa y la lentedeben reemplazarsesi presentan daños visibles.
Utilice el embalajeoriginal cuando tenga que transportarel dispositivo.
Por razones de seguridad se prohibe realizar modificaciones no autorizadas en la unidad.
Importante: No utilice el efecto en presencia depersonas epilépticas.
JB SYSTEMS
®
35/42 CALYPSO
JB SYSTEMS
®
36/42 CALYPSO
Page 21

ESPAÑOL MANUAL DE INSTRUCCIONES
ESPAÑOL MANUAL DE INSTRUCCIONES
MONTAJE SUPERIOR
Importante: La instalación sólo debe llevarse a cabo por personal técnico cualificado. Una
instalación incorrecta puede provocar lesiones graves y/o daños en la propiedad. ¡El montaje
superior requiere mucha experiencia! Deben respetarse los límites de carga de funcionamiento,
deben utilizarse materiales de instalación homologados, el dispositivo instalado debe
inspeccionarse regularmenteporsu seguridad.
Asegúrese de que debajo del área del lugar de instalación no hay personas durante el montaje,
desmontajeo mantenimiento.
Coloque el aparato en un lugar bien ventilado, lejos de materiales y/o líquidos inflamables. El aparato
debecolocarse
El dispositivo debe instalarse lejos del alcance de las personas y de las áreas exteriores donde éstas
puedan andar o sentarse.
Antes del montaje asegúrese de que el área de la instalación puede soportar una carga mínima de 10
veces el pesode la unidad.
Utilice siempre un cable de seguridad homologado que pueda soportar 12 veces el peso del dispositivo
cuando instale la unidad. Este accesorio de seguridad secundario debe instalarse deforma que ninguna
pieza dela instalaciónpueda caerse más 20 cm si falla el accesorio principal.
El dispositivo debe fijarsecorrectamente;¡un montaje congiro libre es peligroso y no debeconsiderarse!
No cubra ninguna abertura de ventilación puesto que podría producirse un sobrecalentamiento de la
unidad.
El operario debeasegurarse de que las instalacionesrelacionadascon la seguridad son aprobadas porun
experto antes de utilizarlas por primera vez. Las instalaciones deberán inspeccionarse anualmente por
una personacualificadapara asegurar que la seguridades óptima.
a al menos 50 cm
de lasparedes.
DESCRIPCIÓN:
9. LED DE DMX: seenciende cuando la unidad recibe una señal DMX
10. LEDmaestro: seenciende cuando la unidad está en modo maestro.
11. Botón MENU: se utiliza para seleccionar los diferenteselementosdel menú.
12. BOTÓN DOWN: para bajar en el menú y reducir los valores que semuestran en la pantalla.
13. BOTÓN UP: para subir en elmenú y aumentarlos valores quese muestran en la pantalla.
14. Botón ENTER:se utiliza para confirmar su selección.
15. DISPLAY muestra los varios menús y lasopciones seleccionadas.
CONFIGURACIÓN:
MENÚ PRINCIPAL:
Para seleccionar cualquiera de las opciones del menú, pulse el botón MENU hasta que se muestre en
pantalla laque desea.
Seleccione lafuncióncon el botón ENTER. La pantallaparpadeará.
Utilice los botones DOWN y UP para seleccionar laopción de menú deseada.
Una vez que haya seleccionado la opción deseada, pulse el botón ENTER para seleccionar.Después de
8 segundos la pantalla volverá automáticamente
a las funciones principales sin ningún cambio.
Para volver a las funciones sin hacer cambios
pulse el botón MENU. La estructura del menú
se muestraa continuación.
Se utilizapara ajustar la dirección de inicio en
una configuración DMX.
Pulse el botón MENU hasta que se
Pulse el botón ENTER, la pantalla comienza a
Utilice los botones DOWN y UP para cambiar la
Una vez que se muestre la direccióncorrecta en
principales sin hacer ningún cambio tras 8
segundos)
Para volver a las funciones sin hacer cambios
pulse el botón MENU otravez.
Ajuste de la direcciónDMX512
muestre en la pantalla.
parpadear.
direcciónDMX512.
pantalla,pulse el botón ENTER paraguardarla.
(o volver automáticamente a las funciones
1. Entrada de red eléctrica con la toma IEC y el soporte de fusible integrado, conecte el cable de red
suministradoaquí.
2. EntradaDMX.
3. Salida DMX.
4. Entrada de jackde ¼” parael controladormanual CA-8 opcional.
5. Micrófono interno.
6. Soportecolgante dos perillasa ambos lados para sujetar launidad y unagujero de montaje para instalar
el gancho de montaje.
7. LED esclavo: se enciende cuando la unidad está en modo esclavo.
8. LED de sonido: parpadeaal ritmo de la música mientras la unidad está en modo audio.
JB SYSTEMS
®
37/42 CALYPSO
Se utilizapara establecer la unidad enmodo
maestro o esclavo.
Pulseel botónMENU hasta que se muestre en lapantalla.
Pulse el botón ENTER, el modode funcionamiento actualcomenzará a parpadear en la pantalla.
Use los botones DOWN y UP para seleccionar (maestro), (esclavo in sinc. con maestro) o
Unavez que hayaseleccionado el modo,pulse el botón ENTER para guardarlo.
(ovolver automáticamente a lasfunciones principalessin hacer ningún cambiotras 8 segundos)
Para volver a lasfunciones sin hacer cambios pulse elbotón MENU otra vez.
Observaciones: cuando se selecciona “SL 1” o “SL 2”, algunas opciones de menú no están disponibles.
Sólocuandoseutiliceunaunidad,deberá seleccionar siempre elmodo maestro.
Se utilizapara seleccionar unode losespectáculos preprogramados cuando se utiliza en modo
independienteo maestro/esclavo. Esta opciónde menú noestá disponible cuandola unidadse
establece en modoesclavo (“S L 1 ” o “S L 2 ”).
Pulseel botónMENU hasta que se muestre en lapantalla.
JB SYSTEMS
Modo de funcionamiento
(2 espectáculosde luces – esclavo enantisinc.con maestro).
Modalidad Espectáculo
®
38/42 CALYPSO
Page 22

ESPAÑOL MANUAL DE INSTRUCCIONES
ESPAÑOL MANUAL DE INSTRUCCIONES
Pulseel botón ENTER, el espectáculo actual comenzará aparpadear en lapantalla.
Use los botones DOWN y UP para seleccionar uno de los 11 espectáculos preprogramados (
(espectáculo0) a (espectáculo10)
Una vez que se muestre el espectáculo correcto en pantalla, pulse el botón ENTER paraguardarlo.
(ovolver automáticamente a lasfunciones principalessin hacer ningún cambiotras 8 segundos)
Para volver a lasfunciones sin hacer cambios pulse elbotón MENU otra vez.
Modalidad Oscurecimiento: cuando no se detecta ninguna señal DMX, la unidad entra en
oscurecimiento.
Sin modalidad Oscurecimiento: cuando no se detecta ninguna señal DMX, la unidad pasa
automáticamente a modomaestro.
Esta opciónde menú no está disponible cuando la unidad se establece en modoesclavo (“S L 1 ” o “S L
2 ”).
Pulseel botónMENU hastaque se muestre en la pantalla.
Pulse el botón ENTER, la selección actual comenzará a parpadearen la pantalla.
Uselos botones DOWN y UP paraseleccionar S Í (oscurecimiento) o N O (sin oscurecimiento).
Una vez que haya seleccionadoel modo,pulse el botón ENTER para guardarlo.
(ovolver automáticamente a lasfunciones principalessin hacer ningún cambiotras 8 segundos)
Para volver a lasfunciones sin hacer cambios pulse elbotón MENU otra vez.
Pantallaencendida: la pantalla siempre estáencendida.
Pantallaapagada: la pantalla está apagada cuandono se utiliza.
Pulse el botón MENU hasta que la pantalla muestre .
Pulse el botón ENTER, la pantallacomienza a parpadear.
Utilicelos botones DOWN y UP para seleccionar (pantalla siempre encendida) o (pantalla
apagadacuando no se utiliza).
Una vez que haya seleccionadoel modo,pulse el botón ENTER para guardarlo.
(o volverautomáticamentea las funciones principales sin hacerningún cambio tras 8 segundos)
Para volver a lasfunciones sin hacer cambios pulse elbotón MENU otra vez.
Pantallanormal: la pantalla se puede leer cuandola unidad está en el suelo.
Inversión de pantalla lapantalla se puede leer cuando la unidad está montada al revés.
Pulseel botónMENU hasta que parpadee en la pantalla.(pantalla normal)
Utilice el botón ENTER para cambiar a la modalidad (inversión de pantalla), la opción se
almacenará automáticamentedespués de 8 segundos. O pulse el botón ENTER denuevo para volver a la
modalidad (pantalla normal).
Para volver a lasfunciones pulseel botón MENU.
Modalidad Oscurecimiento
Pantallade LED
Inversiónde pantalla
INSTALACIÓN ELÉCTRICA + DIRECCIONAMIENTO
Importante: La instalación eléctrica sólo debe ser llevada a cabo por personal cualificado, de
acuerdo conla regulaciones sobre seguridad eléctrica ymecánica de su país.
Blauwe tekst komt uit manual LED SPOT/LED WASH
Instalacióneléctrica para 1 unidadindependiente:
Inserte el cable de red eléctrica. La unidad comienza a funcionar instantáneamente en modalidad
independiente.
Observación 1: Puede conectar un controlador CA-8 remoto a la unidad si desea disponer de más
control.Consulte“Manejo dela unidad” parasaber cómohacerlo.
Observación 2: Si no hay emisión, asegúrese de establecer la unidad en modo maestro (consulte el
capítuloanterior)
Instalacióneléctrica de una o más unidades enmodalidadmaestra/eslava:
Conecte de 2 a un máximo de 16 unidades juntas mediante cables de micrófono equilibrados de buena
calidad. Establezca la primera unidad de la cadena en modo maestro, el resto debe establecerse en
modoesclavo (SL1 o SL2). Consulte el capítulo anterior para obtener más información.
Asegúresede que todas las unidades están conectadas a la red eléctrica.
¡Ya está!
Observación: Puedeconectar uncontroladorCA-8 remoto a la unidad maestrasi desea disponer de más
controlsobreelfuncionamientomaestro/esclavo.
Instalación eléctrica en modoDMX:
El protocolo DMX es una señal de alta velocidad muy utilizada para controlar equipo de iluminación
inteligente. Necesita conectar en cadena tipo margarita su controlador DMX y todas las unidades
conectadascon un cable equilibradode buena calidad.
Se utilizan conectores XLR de 3 pines y conectores XLR de 5 pines, no obstante, el conectorXLR de 3
pines es más popularporque estoscables son compatibles con los cables deaudio equilibrados.
Disposición de pines en elconector XLR de3 pines: Pin1 = GND ~ Pin2 = Señal negativa (-) ~ Pin3 = Señal
positiva (+)
Disposición de pines en elconector XLR de5 pines: Pin1 = GND ~ Pin2 = Señal negativa (-) ~ Pin3 = Señal
positiva (+) ~ Pines4+5 nose utilizan.
Para evitar un comportamiento anómalo de los efectos luminosos, debido a
interferencias, debe utilizar un terminador de 90Ω a 120Ω al final de la cadena.
Nunca utilicecables divisores en Y, ¡Nofuncionarán!
Asegúresede que todas las unidades están conectadas a la red eléctrica.
Cada efecto luminoso en la cadena necesita disponer de su propia dirección de inicio de forma que
sepa qué comando del controlador debe descodificar. En la siguiente sección obtendrá información
sobrecómo establecer las direccionesDMX.
Se utilizapara mostrar el número de horas de funcionamiento de la unidad.
Pulseel botónMENU hasta que parpadee en lapantalla.
Pulse el botón ENTERpara mostrarel número de horas defuncionamiento en la pantalla.
Para volver a las funciones pulse el botón MENU.
Se utilizapara mostrar la versión de software de la unidad.
PulseMENU hastaque parpadee en la pantalla.
Pulse el botón ENTER para mostrarla versiónde softwarede la unidad.
Para volver a las funciones pulse el botón MENU.
JB SYSTEMS
Horas delaparato
Versión de software:
®
39/42 CALYPSO
AJUSTE DE LA DIRECCIÓN DE INICIO CORRECTA:
Consulte el capítulo anterior(ajuste de dirección DMX-512) parasaber cómo ajustar la dirección deinicio en
esta unidad. La dirección de inicio de cada unidad es muy importante. Lamentablemente es imposible
decirle en este manual de usuario qué dirección de inicio debe ajustar porque esto dependerá
completamente del controlador que utilice… Consulte el manual de usuario de su controlador DMX para
saberque direcciones de inicio debeajustar.
JB SYSTEMS
®
40/42 CALYPSO
Page 23

ESPAÑOL MANUAL DE INSTRUCCIONES
ESPAÑOL MANUAL DE INSTRUCCIONES
CONFIGURACIÓNDMXDE CALYPSO:
¿Qué son los patrones?
Los patrones son distintascombinaciones estáticas (no móviles) deLEDs en un grupo de LEDs.
Cuando el valor de CH1 se estableceentre 000 y 119, puedeutilizar CH2 para seleccionar 25 patrones
diferentes.
Use CH3 paracambiar la frecuencia estroboscópicade los patronesseleccionados.
¿Qué son orugas?
Las orugas son una serie depatrones enbucleque crean efectos dinámicos.
Cuando el valor de CH1 se establece entre120 y 239, puede utilizarCH2 para seleccionar 25orugas
diferentes.Use CH3 para cambiarla velocidad de lasorugas seleccionadas.
MANEJO DE LA UNIDAD
Cada vezque encienda la unidadse mostrará L373 en la pantalla.
PUEDE MANEJAR LAUNIDAD DE TRES FORMAS:
MEDIANTELAFUNCIÓN PREPROGRAMADAINCORPORADAMAESTRA/ESCLAVA:
Seleccione esta unidad cuando desee un espectáculo luminoso instantáneo. Uniendo las unidades en
conexión maestra/esclava, la primera unidad controlará el resto de unidades para proporcionar un
espectáculo luminosoautomático,sonoro y sincronizado.Su entrada DMXno tendrá nada conectado y su
LED de maestraestará encendido constantemente y el LED de sonido parpadearácon la música.
¡Importante! ¡Esta función sólo funciona cuando la modalidad de oscurecimiento en el menú de la
unidad maestra esté desactivada, en caso contrario, no ocurrirá nada! Lea más sobre esta opción
en elpárrafo “Configuración”.
o Mediantela función preprogramadaincorporada maestra/esclava
o Mediante el controlador fácil CA-8
o Mediantecontroladoruniversal DMX
MAESTRA dispone de 11 espectáculosincorporados: Puede seleccionar (espectáculo 0)
a (espectáculo10) directamenteen el menú de la unidad maestra.
ESCLAVA dispone de 2 opciones de funcionamiento: Lasotras unidades se ajustan en modalidad
esclava (el LED de esclava está constantemente encendido). Para crear un gran espectáculo
luminoso, puede introducir movimientosde contraste En el menú de las unidades esclavas,puede
ir a laopción y seleccionar:
o Esclavanormal: la unidad esclava funciona en sincronización con la maestra.
o Espectáculo de 2 luces: la unidad esclavafunciona en oposición a lamaestra.
MEDIANTECONTROLADOR FÁCIL:
Cuando se utiliza en modalidad maestra/esclava,le recomendamos encarecidamente
que utilice el "controlador fácil" CA-8. Conecte este pequeño controlador al jack de
1/4” de launidadmaestra ypodrá controlar las siguientes FUNCIONES:
Standby Oscurece la unidad
Función
Modalidad
Estroboscópicade sonido Seleccioneuna de las 12 orugas
Estroboscópica/ Sonido (LEDapagado) Oruga (LEDencendido)
MANTENIMIENTO
Asegúrese de que debajo de lazona del lugar de instalación no haya personas durante el mantenimiento.
Apague la unidad,desenchufe el cable de red y espere hastaque la unidad se haya enfriado.
Durante la inspección deberá comprobar los siguientes puntos:
Todos los tornillos utilizados para instalar el dispositivo y cualquiera de sus piezas deberán apretarse
firmementey no corroerse.
Las carcasas, las fijaciones y los puntos de instalación (techo, suspensiones) no deberán presentar
ningunadeformidad.
Cuando una lente óptica esté visiblemente dañada por grietas o rasguños profundos, deberá ser
reemplazada.
Los cables de red deberán estar en perfectoestado y deberán reemplazarse inmediatamente incluso si el
problema detectadoes pequeño.
Para proteger al aparatodel sobrecalentamiento, las aletas de refrigeración (si lashubiera)y las aberturas
de ventilacióndeberán limpiarsemensualmente.
El interior del dispositivodeberá limpiarse anualmentemediante una aspiradora o chorro de aire.
La limpieza de las lentes internas y externas y/o espejos deberá llevarse a cabo periódicamente para
optimizar la emisión luminosa. La frecuencia de limpieza depende del entorno en el que funcione el
aparato: los ambientes húmedos, con humo o especialmente sucios pueden provocar una mayor
acumulación de suciedad en los elementosópticos del aparato.
Limpie con un paño suave utilizandoproductos de limpiezade cristalesnormales.
Seque siemprelas piezas con cuidado.
Limpie los elementos ópticos externosal menos una vez cada30 días.
Limpie los elementos ópticos internos al menos una vez cada 90 días.
Atención: ¡Le recomendamos encarecidamente que la limpieza interna sea llevada a cabo por
personal cualificado!
ESPECIFICACIONES
Entrada dered: CA230V, 50Hz
Consumode energía: 18 W
Fusible: 250V 2A lento (20 mm cristal)
Control de sonido: Micrófonointerno
Conexiones DMX: 3 clavijas XLR macho /hembra
Canales DMXutilizados: Canales4
Lámpara: 156 LEDs(R=48 + G=36 + B=36 + W=36):
Tamaño: 250 x 250 x 280 mm
Peso: 4,2kg
Puede descargar la última versión de estemanual de usuario en nuestra página Web:
Toda la informaciónestá sujeta a cambios sinprevio aviso
www.beglec.com
JB SYSTEMS
®
41/42 CALYPSO
JB SYSTEMS
®
42/42 CALYPSO
 Loading...