

Page 1
BT-250S
WWW.BEGLEC.COM
Copyright © 2007 by BEGLEC cva.
Reproduction or publication of the content in any manner, without express permission of the publisher, is prohibited.
Version: 1.0
Operation Manual
Mode d'emploi
Gebruiksaanwijzing
Bedienungsanleitung
Manual de instrucciones
EN
FR
NL
DU
ES
Page 2
EN - DISPOSAL OF THE DEVICE
Dispose of the unit and used batteries in an environment friendly manner
according to your country regulations.
FR - DÉCLASSER L’APPAREIL
Débarrassez-vous de l’appareil et des piles usagées de manière écologique
Conformément aux dispositions légales de votre pays.
NL - VERWIJDEREN VAN HET APPARAAT
Verwijder het toestel en de gebruikte batterijen op een milieuvriendelijke
manier conform de in uw land geldende voorschriften.
DU - ENTSORGUNG DES GERÄTS
Entsorgen Sie das Gerät und die Batterien auf umweltfreundliche Art und
Weise gemäß den Vorschriften Ihres Landes.
ES - DESHACERSE DEL APARATO
Reciclar el aparato y pilas usadas de forma ecologica conforme a las
disposiciones legales de su pais.
PT - COMO DESFAZER-SE DA UNIDADE
Tente reciclar a unidade e as pilhas usadas respeitando o ambiente e em
conformidade com as normas vigentes no seu país.
Page 3
ENGLISH OPERATION MANUAL
OPERATION MANUAL
Thank you for buying this Briteq®product. To take full advantage of all possibilities and for your own safety,
pleasereadtheseoperating instructions very carefully beforeyoustartusing this unit.
FEATURES
This unitis radio-interferencesuppressed.This product meets the requirements of the current European and
nationalguidelines. Conformityhas been established and therelevantstatements and documents have been
depositedby the manufacturer.
Powerfulintelligent moving head for use in discothequesand hiring companies
16 DMX channels (pan - tilt – pan/tilt speed - dimmer - shutter/Shaking - color – gobo – gobo rotation –
prism - prismrotation- focus – pan16bit – tilt 16bit – reset + lamp on/off)
Can be switched to 8 or16 DMX channels
RemoteDMX addressing
Smooth540° panning and 270° tiltmovements with automaticpositioncorrection
7 rotating,interchangeablegobos (D=26,8mm)+open
9 trapezoid dichroic colors + white and variable speed rainbow effect
3-facetprism, rotating in both directions at variablespeed
Menu driven blue LED display can be switched on/off
13° beam angle with focus adjustmentby DMX control.
Blackout and fast strobeeffectup to 10 flashes/second
Smoothdimming0-100%
Can be used in Master/slave mode with built-inmicrophonetriggered programs.
Optional CA-8 controller available for different operating modes, including: blackout, different strobe
programs, manualcolor/gobo and X/Yposition selection, program selectionand slow/fastmode.
Fan cooling and electronicoverheatprotection.
BEFORE USE
Beforeyou start using this unit, please check if there’s no transportation damage. Should there be any, do
not use the device and consult your dealer first.
Important: This device left our factory in perfect condition and well packaged. It is absolutely necessary
for the user to strictly follow the safety instructions and warnings in this user manual. Any damage caused
by mishandling is not subject to warranty. The dealerwill not accept responsibility for any resulting defects
orproblemscausedbydisregarding this user manual.
Keep this booklet in a safe place for future consultation. If you sell the fixture, be sure to add this user
manual.
Check the contents:
Check that the carton contains the following items:
BriteQBT250S unit
Operatinginstructions
2Hanging brackets
SAFETY INSTRUCTIONS:
CAUT ION
The lightning flash with arrowhead symbol within the equilateral triangle is intended to alert the use
or the presence of un-insulated “dangerous voltage” within the product’s enclosure that may be of
sufficient magnitude to constitute a risk of electricshock.
The exclamation point within the equilateral triangle is intended to alert the user to the presence of
important operation and maintenance (servicing) instructions in the literature accompanying this
appliance.
This symbol means:indoor use only.
CAUTION: To reduce the risk of electric shock, do not remove the top cover.
No user-serviceable parts inside. Refer servicing to qualified service
personnel only.
ENGLISH OPERATION MANUAL
This symbol means:Readinstructions.
This symbol determines:the minimum distance from lightedobjects.The minimum distance between
light-output and the illuminated surfacemust be more than 1 meters.
To protect the environment, please try to recycle the packing material as much as possible.
A new light effect sometimes causes some unwanted smoke and/or smell. This is normal and disappears after
someminutes.
To prevent fire or shock hazard, do not expose this appliance to rain or moisture.
To avoid condensation to be formed inside, allow the unit to adapt to the surrounding temperatures when
bringing it into a warm room after transport. Condense sometimes prevents the unit from working at full
performance or may even cause damages.
This unit is for indoor use only.
Don’t place metal objects or spill liquid inside the unit. Electric shock or malfunction may result. If a foreign
object enters the unit, immediatelydisconnect the mains power.
Locate the fixture in a well ventilated spot, away from any flammable materials and/or liquids. The fixture must
be fixed at least 50cm fromsurrounding walls.
Don’t cover any ventilation openings as this may result in overheating.
Prevent use in dusty environments and clean the unit regularly.
Keep the unit away from children.
Inexperienced persons should not operate this device.
Maximum saveambient temperature is 40°C. Don’t use this unit at higher ambient temperatures.
The units’ surface temperature may reach up to 85°C. Don’t touch the housing with bare hands during its
operation.
Make sure the area below the installation place is free from unwanted persons during rigging, de-rigging and
servicing.
Allow the device about 10 minutes to cool down before replacing the bulb or start servicing.
Always unplug the unit when it is not used for a longer time or before replacing the bulb or start servicing.
The electrical installation should be carried out by qualified personal only, according to the regulations for
electrical and mechanical safety in your country.
Check that the available voltage is not higher than the one stated on the rear panel of the unit.
The power cord should always be in perfect condition: switch the unit immediately off when the power cord is
squashed ordamaged.
Never let the power-cord come into contact with other cables!
This fixture must be earthed to in order comply with safety regulations.
Don’t connect the unit to any dimmer pack.
Always use an appropriateand certified safetycable when installing the unit.
In order to prevent electric shock, do not open the cover. Apart from the lamp and mains fuse there are no user
serviceable parts inside.
Never repair a fuse or bypass the fuse holder. Always replace a damaged fuse with a fuse of the same type
and electrical specifications!
In the event of serious operating problems, stop using the fixture and contact your dealer immediately.
The housing and the lenses must be replaced if they are visibly damaged.
Please use the original packing when the device is to be transported.
Due to safety reasons it is prohibited to make unauthorized modifications to the unit.
Important: Never look directly into the light source! Don’t use the effect in the presence of persons suffering from
epilepsy.
Briteq
®
1/69 BT250S
Briteq
®
2/69 BT250S
Page 4
ENGLISH OPERATION MANUAL
ENGLISH OPERATION MANUAL
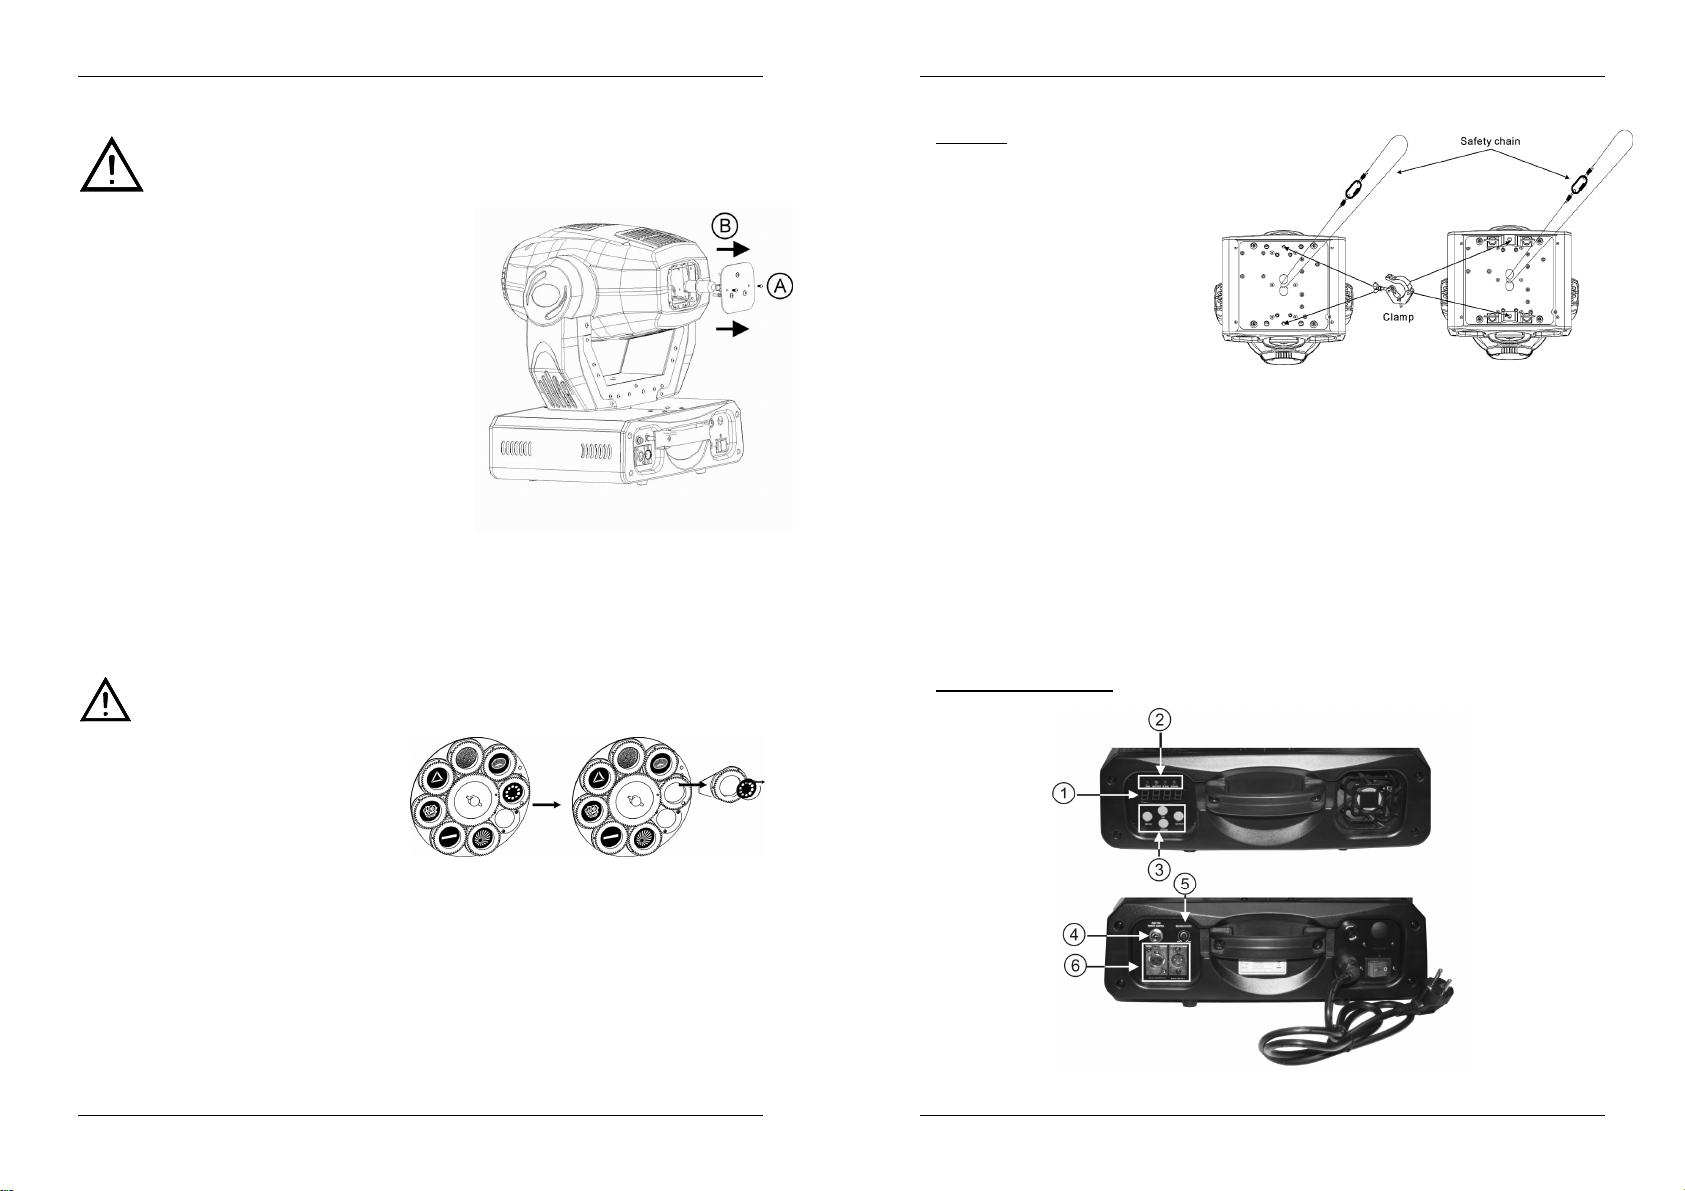
LAMP (RE)PLACEMENT
In case of replacement of the lamp or maintenance, do not open the fixture within 10
minutes until the unit cools down after switching off. Always unplug the unit before
servicing! Always use the same type of spare parts (bulbs, fuses, etc.) When replacing
Switchoffthemainsupply and unplug the unit.
Wait for about 15 minutes until the unit has been cooled
down.
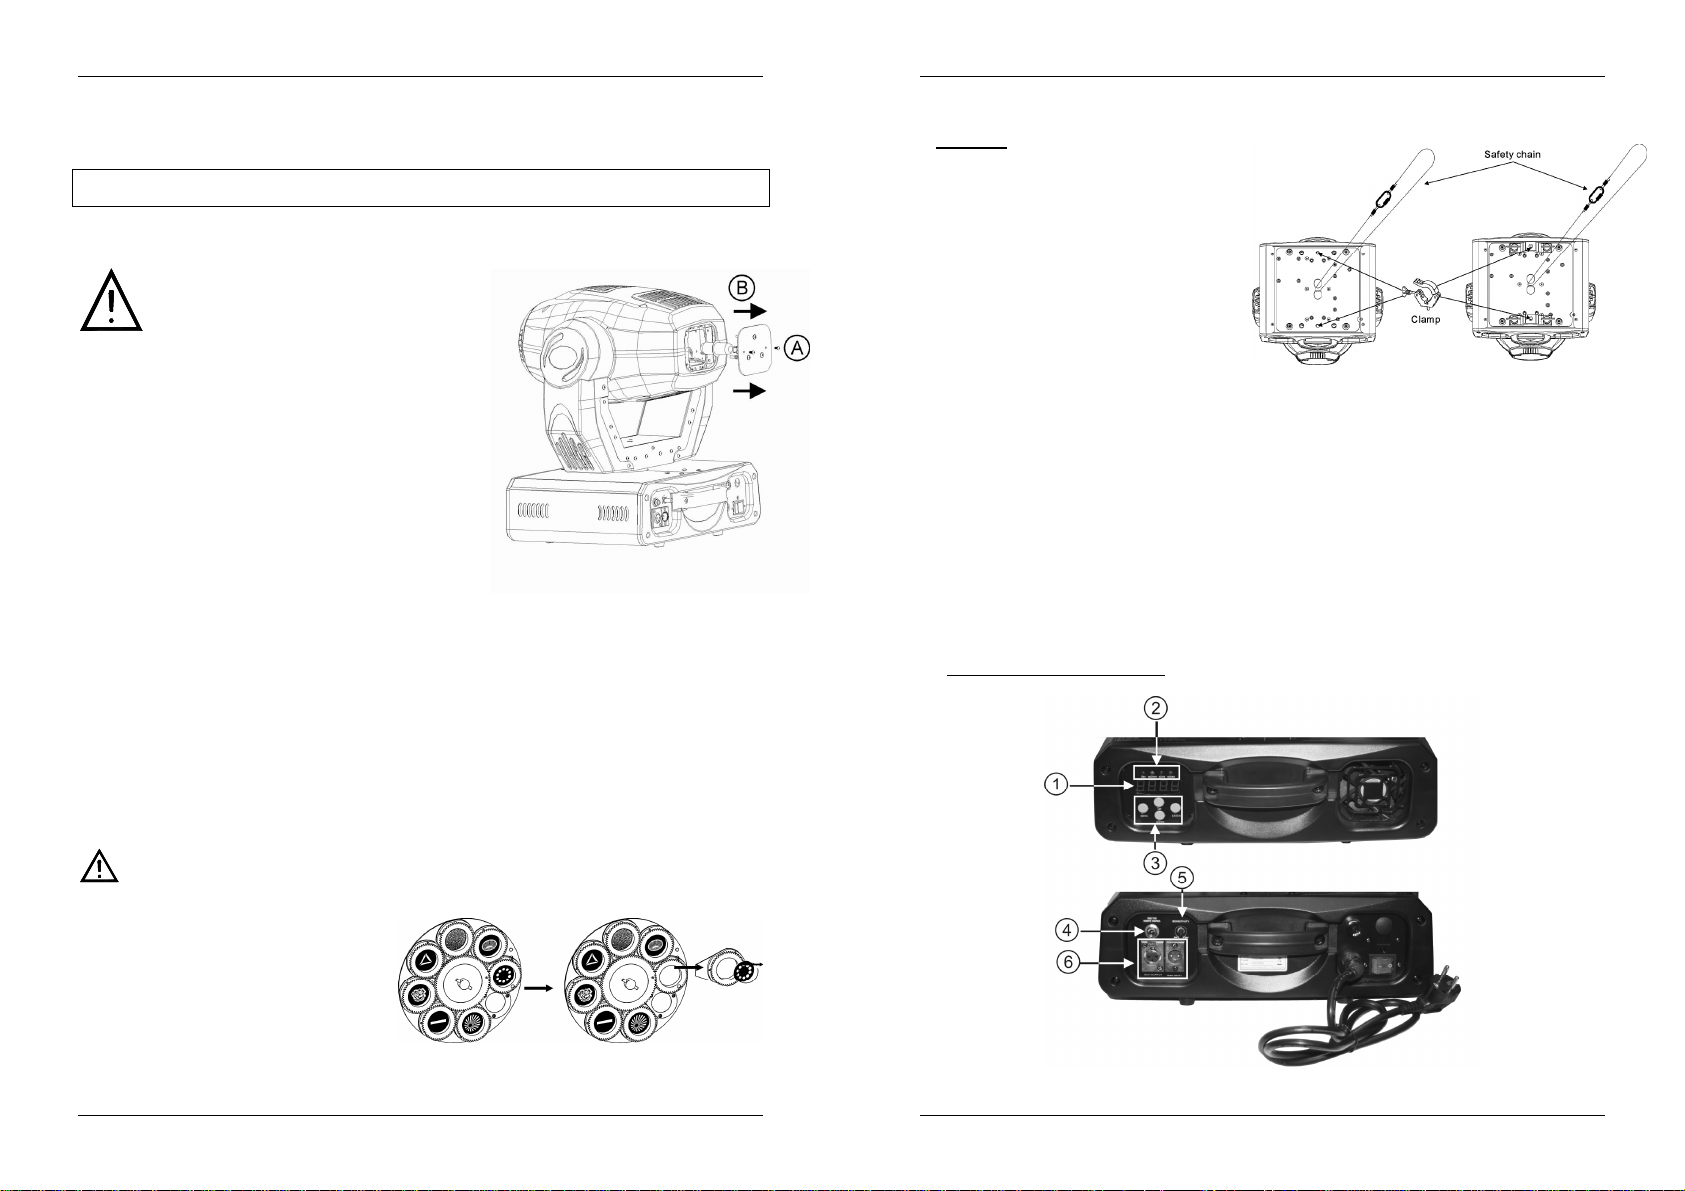
Unscrew the 2 screws on the back of the fixture to open
the lamp compartment(See A on the picture)
On the inside you will see the lamp socket. Tear the lamp
socketgently out of the lamp compartment.
Unplug the old lamp. Hold the lamp socket while
unpluggingthe lamp !
Hold the lamp socket while pressing the new lamp gently
in the socket.
Attention! Check the label on the backside of the device
or see the technical specifications in this manual to know
which lamp should be used. Never install lamps with a
higher wattage!
Don’t touch the bulb with bare hands! This drastically
shortens the lifespan of the lamp. If you touched the lamp,
clean it with a cloth and a little denatured alcohol. Wipe
the lamp off before installing.
Put the new lamp back inside the unit. Be sure that the
wires don’t touch the lamp.
Close the lamp compartmentwith the screws
Make sure the lamp is located in the center of the reflectorforthe best spot. Switch the unit on and adjust
lamp position by screws A, B and C, located on the back of the head. ( A on the picture )
Done!
parts, please only genuine spare parts.
EXCHANGING/ROTATING GOBOS
ATTENTION: Install the gobos only when the unit is switched off!
Never unscrew the screws of the rotating goboas the ballbearing will be opened.Repairing
Switchoffthemainsupply and unplug the unit.
Opentheplastictopcover(4screws)
Locate the gobo wheel and remove the fixation
Removethe goboand insert the newgobo.
Press the fixation-ring together and insert it in
Done!
this is very difficult!
ring of the gobo you want to change with an
appropriate tool.
the front of the gobo.
OVERHEAD RIGGING
Important: The installation must be
carried out by qualified service
personal only. Improper installation
can result in serious injuries and/or
damage to property. Overhead rigging
requires extensive experience!
Working load limits should be
respected, certified installation
materials should be used, the installed
device should be inspected regularly
for safety.
Make sure the area below the installation
place is free from unwanted persons
during rigging, de-riggingandservicing.
Locate the fixture in a well ventilated spot, far away from any flammable materials and/or liquids. The
fixturemust be fixed
The device should be installed out of reach of people and outside areas where persons may walk by or be
seated.
Before rigging make sure that the installation area can hold a minimum point load of 10times the device’s
weight.
Alwaysuse a certified safety cable that can hold 12times the weight of the device when installing the unit.
This secondary safety attachment should be installed in a way that no part of the installation can drop
more than 20cm if the main attachmentfails.
The device should be well fixed; a free-swinging mounting is dangerous and may not be considered!
Don’t coverany ventilation openingsasthis may result in overheating.
The operator has to make sure that the safety-relating and machine-technical installations are approved by
an expert before using them for the first time. The installations should be inspected every year by a skilled
person to be sure that safety is still optimal.
at least 50cm
fromsurrounding walls.
HOW TO SET UP THE UNIT
CONTROL PANEL:
Briteq
®
3/69 BT250S
Briteq
®
4/69 BT250S
Page 5

ENGLISH OPERATION MANUAL
ENGLISH OPERATION MANUAL
1. DISPLAY shows the various menus and the selected functions.
2. LEDS
3. BUTTONS
4. REMOTE CONTROL INPUT: Used to connect a simple CA-8 hand controller while the unit is used in
standaloneormaster/slavemode.
5. SENSITIVITY: Used to adjust the sensitivity of the micro when the unit is used in standalone or
master/slavemode.
6. DMX INPUT/OUTPUT: used for DMX512 linking. Use good quality 3pin XLR M/F balanced cable to link
the units together.
MAINMENU:
To select any of the pre-set functions,
press the MENU button up to when the
required one is shown on the display.
Select the function with the ENTER
button.The display will blink.
Use DOWN and UP button to change
the mode.
Once the required mode has been
selected, press the ENTER button to
select. After 8 seconds the display will
automatically return to the main
functions without any change. To go
back to the functions without any
change press the MENU button. The
main functionsare shown on the right.
Used to set the starting address in a
DMX setup.
Press the MENU button until is
shown onthe display.
Press the ENTER button, the display
startsblinking.
Use DOWN and UP buttons to change
theDMX512 address.
Once the correct address shows on the
display, press the ENTER button to
save it.
(or automatically return to the main
functions without any change after 8
seconds)
To go back to the functions without any
change press the MENU button again.
DMX
MASTER On Mastermode
SLAVE
SOUND
MENU Toselect theprogramming functions
DOWN
UP
ENTER
DMX512AddressSetting
On DMXinput present
On Slavemode
Flashing Soundactivation
To go backward in the selected functions
To go forward in the selectedfunctions
To confirm the selectedfunctions
ChannelMode
PresstheMENU button until is shown on the display.
PresstheENTER button so the display starts blinking.
UseDOWN and UP button to select the (16Channel ) or (8Channel) mode.
Once the mode is selected,press the ENTER button to setup
( or automatically return to the main functions without any change after 8 seconds. )
To go back to the functions without any change press the MENU button again.
Used to choose the Show mode when used instandaloneor master/slave mode.
PresstheMENU button until is showing on thedisplay.
PresstheENTER button, the display startsblinking.
Use DOWN and UP buttons to select (show 1), (show 2), (show 3) or (show
4) mode.
Once the right mode shows on the display, press the ENTER button to save it.
(or automaticallyreturn to the main functions withoutany change after 8 seconds)
To go back to the functions without any change press the MENU button again.
Used to make the slave unit work in opposite to the master or towork in complete sync.
PresstheMENUbuttonuntil is shown on the display.
PresstheENTER button, the display startsblinking.
UseDOWN and UP button to select (normal)or (2lightshow) mode.
Once the mode has been selected, press the ENTERbuttonsaveit.
(or automaticallyreturn to the main functions withoutany change after 8 seconds)
To go back to the functions without any change press the MENU button again.
Blackout mode: when no DMX-signal is detected, the unit goes in blackout and waits for the DMXsignal.
No blackout mode: when no DMX-signal is detected, the unit automatically switches to standalone
mode.
PresstheMENUbuttonuntil is shown on the display.
PresstheENTER button, the display startsblinking.
UseDOWN and UP button to select (yes blackout) or (no blackout) mode.
Once the mode has been selected,press the ENTER button to save it.
(or automaticallyreturn to the mainfunctions without any change after 8 seconds)
To go back to the functions without any change press the MENU button again.
Show Mode
Show 1 mode - Fixtureis placed on the floor. Tilt movementangle 210°.
Show 2 mode - Fixtureis fixed under ceiling. Tilt movement angle 90°.
Show 3 mode - Fixtureis placed on a podium, in front of the audience
The spot is alwaysprojecting to the audience’s direction;i.e in front of the stage. Pan movement
angle (left to right to left): 160°. Tilt movementangle: 90° (60° above horizon; 30° below horizon)
Show 4 mode - Fixtureis fixed under ceiling.
The spot is mainly projecting in front of the stage. Pan movement angle (left to right to left):160°.
Tilt movementangle: 90° (vertically, front 75°; back 15°)
SlaveMode
BlackoutMode
Briteq
®
5/69 BT250S
Briteq
®
6/69 BT250S
Page 6
ENGLISH OPERATION MANUAL
ENGLISH OPERATION MANUAL
Normal: Panningmovement is not inversed.
Pan inversion: Panning movementis inversed
PresstheMENUbuttonuntil is shown on the display.
Pressthe ENTER button, the display starts blinking.
UseDOWN and UP button to select (normal) or (pan inversion)mode.
Once the mode has been selected,press the ENTER button to save it.
(or automaticallyreturn to the main functions without any change after 8 seconds)
To go back to the functions without any change press the MENU button again.
Normal: Tilt movement isnot inversed.
Tilt inversion: tiltmovement is inversed
PresstheMENUbuttonuntil is shown on the display.
Press theENTER button, the display starts blinking.
UseDOWN and UP buttons to select (normal)or (tilt inversion) mode.
Once the mode has been selected,press the ENTER button to save it.
(or automaticallyreturn to the main functions withoutany change after 8 seconds)
To go back to the functions without any change press the MENU button again.
Display on: display is always on.
Display off: display is off when not used.
PresstheMENU button until the display shows .
PresstheENTER button, the display starts blinking.
UseDOWN and UP buttons to select (displayalways on) or (display offwhen not used).
Once the mode has been selected,press the ENTER button to save it.
(or automaticallyreturn to the main functions without any changeafter8 seconds)
To go back to the functions without any change press the MENU button again.
Display normal: displayis readable when the unit is on the floor.
Display inversion: display is readable when the unit is mounted upsidedown.
PresstheMENU button until is blinking on the display. (normaldisplay)
Use the ENTER button to change to the mode (display inversion), the option will be automatically
stored after8 seconds. Or press the ENTER button again return tothe mode (normal display).
To go back to the functions press the MENU button.
Used to help you adjusting the focus of the light beam and gobos.
PresstheMENU button untill is blinking on thedisplay.
Pressthe ENTER button so the unit goes to the “tilt 90°” position.
Press the ENTER buttonso the unit goes to the “pan 0°” position.
Press the ENTER buttonso the unit goes to the “pan 90°” position.
Press the ENTER buttonso the unit goes to the “pan 180°” position.
PresstheENTER button so the unit goes to the “pan 270°” position.
In the Previous 5 steps you are able to adjust the focus with the UP/DOWN buttons on the unit (the display
shows the current focus status).
Attention: please note that you can only set an “average focus” for all 5 positions, so it is not possible to set
the focus perfectly sharp for all directions.
To go back to the functions press the MENU button.
PanInversion
Tilt Inversion
Led Display
DisplayInversion
FocusAdjust
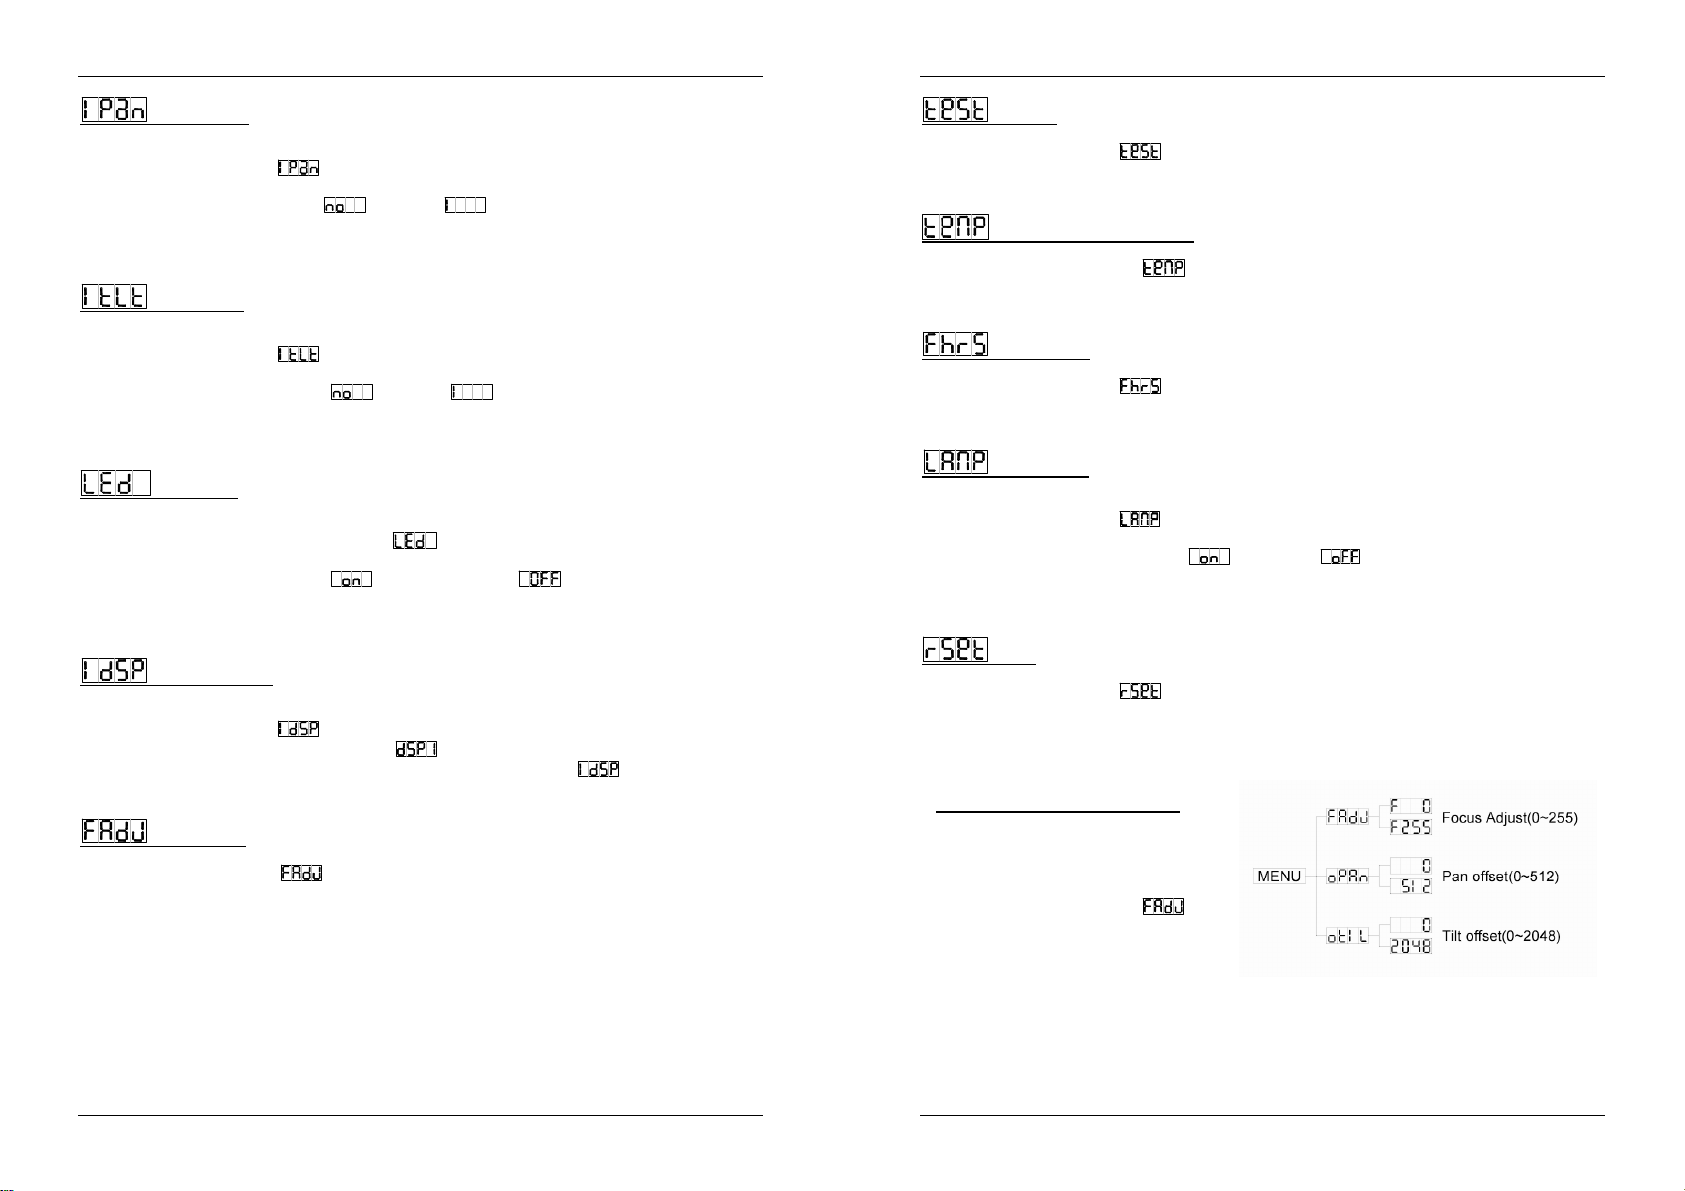
Used to activate the internal “self-test” program which shows all possibilities of the unit.
Pressthe MENUbutton until is blinking on the display.
Press the ENTER button to start the internal self-test program.
To go back to the functions press the MENU button.
Used toshow the temperature inside the lamp compartment
PresstheMENU button until the sign is blinking on the display.
Pressthe ENTER button and the ambient temperatureof lamp will show on the display.
To go back to the functions press the MENU button again.
Used to show the n° ofworking hours of the unit.
PresstheMENU button until is blinking on the display.
Pressthe ENTER button to show the n° of working hours in the display.
To go back to the functions press the MENU button.
Used to switch the lamp ON/OFFso you can cool the lamp with the internal fans before
transportation
PresstheMENU button until is blinking on the display.
Press ENTER button so the displaystarts blinking.
UseDOWN and UP button to select the (Lampon) or (Lamp off)mode.
Once the mode is selected,press the ENTER button to setup
(or automaticallyreturn to the main functions withoutanychange after8 seconds)
To go back to the functions without any change press the MENU button again.
Used to force a reset of the unit.
PresstheMENU button until is blinking on the display.
Press the ENTER to reset all channels to their standard position.
To go back to the functions press the MENU button.
Pleasealso check the chapter about the DMX-channel configuration of the unit to find out how you can force
a reset by DMX.
Self-Test
Ambienttemperature of lamp
Fixture Hours
Lamp Display
Reset
HOME POSITION ADJUST
Press MENU button for at least 5 seconds to
go into offsetmode
Now you can adjust the home position ( this is
the zero position )
When you want to adjust gobo and color
home position, you should run mode
first
The functions are shownbelow:
Briteq
®
7/69 BT250S
Briteq
®
8/69 BT250S
Page 7
ENGLISH OPERATION MANUAL
ENGLISH OPERATION MANUAL
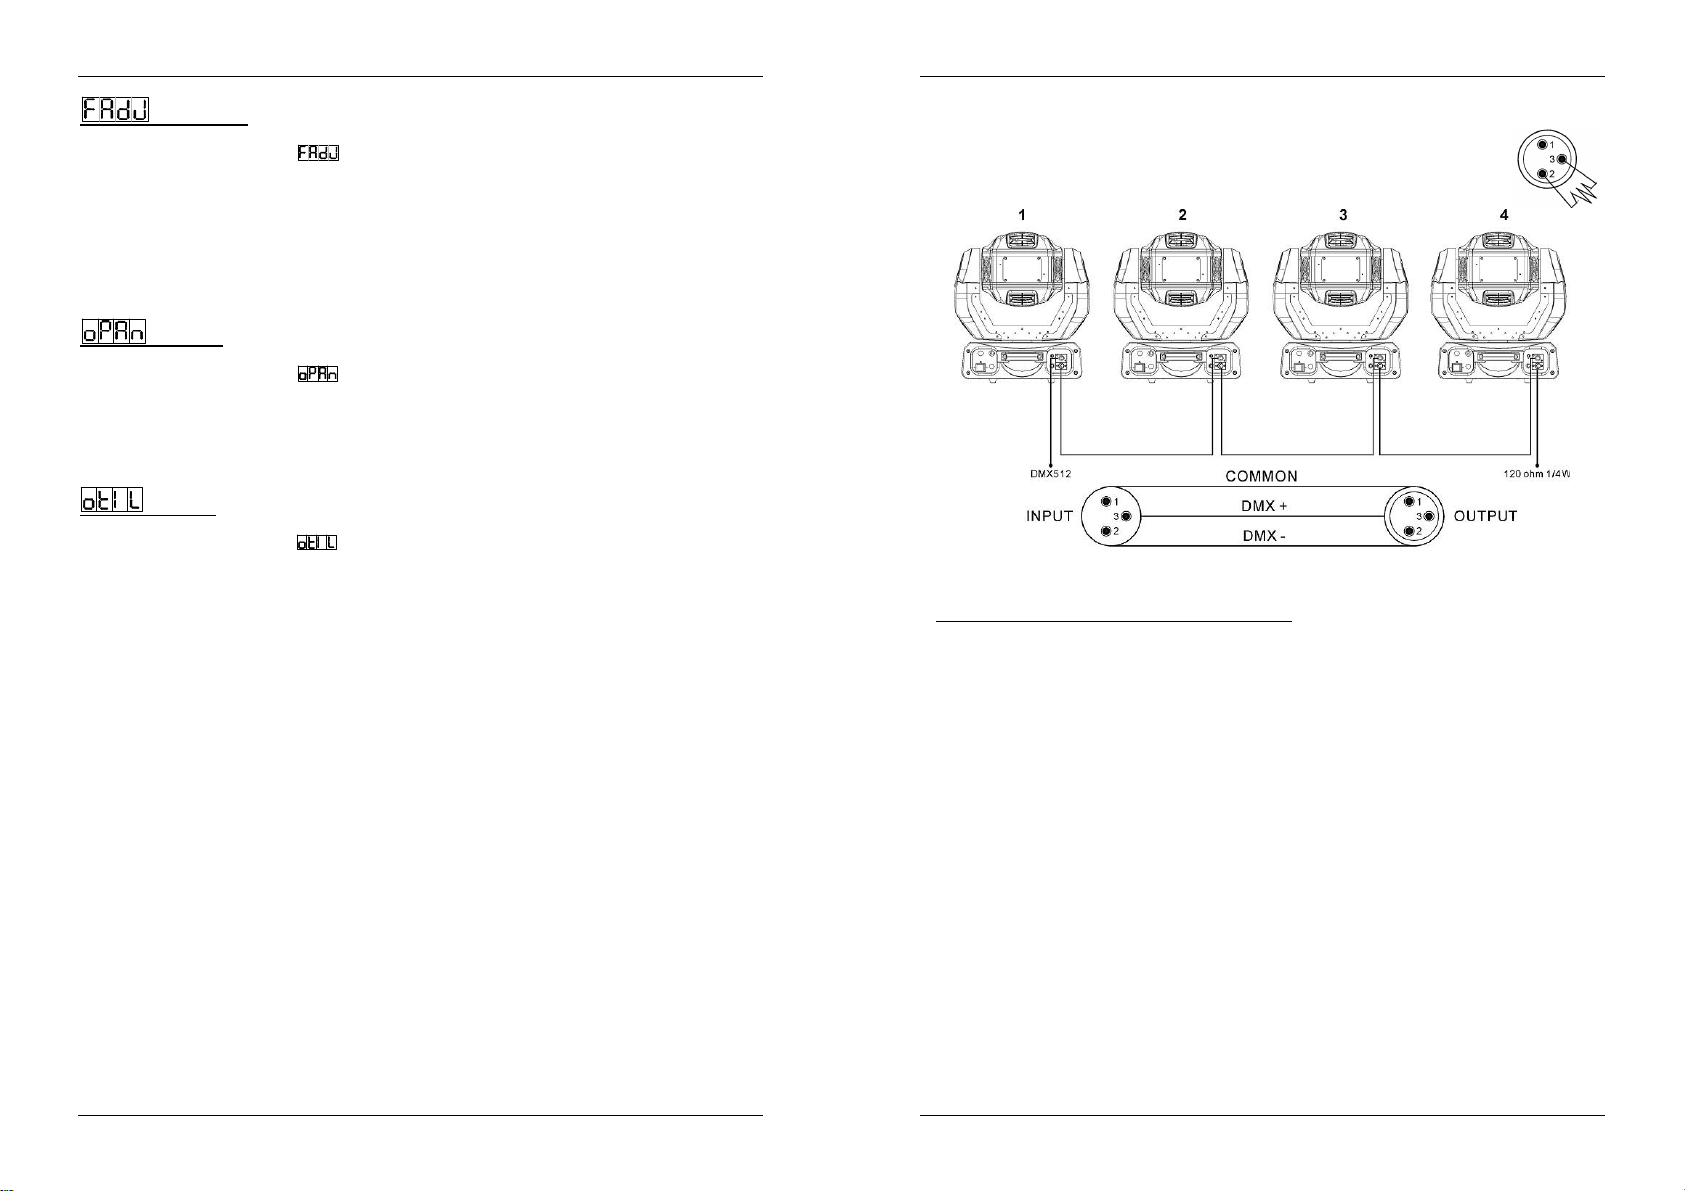
PresstheMENU button for at least 5 seconds to activate offset mode
UseDOWN and UP button until is shownon the display.
Press the ENTER buttonand the unit will focus on “tilt 135°”position
Press the ENTER buttonand the unit will focus on “tilt 45°” position
Pressthe ENTER button and theunit willfocuson “pan 0°” position
Pressthe ENTER button and theunitwillfocus on “pan 90°” position
PresstheENTER button and the unit willfocus on “pan 180°”position
Pressthe ENTER button and theunit willfocus on “pan 270°”position
In the Previous 6 steps you areable to adjust the focus with the UP/DOWN buttons on the unit
To go back to the main functions without any change wait 8 seconds.
PresstheMENU button for at least 5 seconds to activate offset mode
UseDOWN and UP button until is shown on the display.
Pressthe ENTER button so the display starts blinking.
UseDOWN and UP button to adjust the pan home position.
Once the position is selected, press the ENTER button to setup OR automatically return to the offset
functionswithoutany changes by pressing the MENU button
To go back to the main functions without any change wait 8 seconds.
PresstheMENU button for at least 5 seconds to activate offset mode
UseDOWN and UP button until is shown on the display.
Pressthe ENTER button so the display starts blinking.
UseDOWN and UP button to adjust the tilt homeposition.
Once the position is selected, press the ENTER button to setup OR automatically return to the offset
functionswithoutany changes by pressing the MENU button
To go back to the main functions without any change wait 8 seconds.
FocusAdjust
Panoffset
Tilt offset
HOW TO CONNECT THE UNIT BY DMX
The DMX-protocol is a widely used high speed signal to control intelligent light equipment.
You need to “daisy chain” your DMX controller and all the connected light effects with a
goodquality XLR M/F balanced cable. To prevent strange behavior of the light effects, due
to interferences, you must use a 90Ω to 120Ω terminator at the end of the chain. Never
use Y-splitter cables, this simply won’t work!
Each light effect in the chain needs to have its proper starting address so it knows which commands from the
controllerit has to decode.
HOW TO SET THE THE RIGHT STARTING ADDRESS:
Refer to the previous chapter (DMX-512 address setting) to learn how to set the starting address on this unit.
The starting address of each unit is very important. Unfortunately it is impossible to tell you in this user
manual which starting addresses you have to set becausethis completely depends on the controller you will
use… So please refer to the user manual of your DMX-controller to find out which starting addresses you
must set.
Briteq
®
9/69 BT250S
Briteq
®
10/69 BT250S
Page 8
ENGLISH OPERATION MANUAL
ENGLISH OPERATION MANUAL
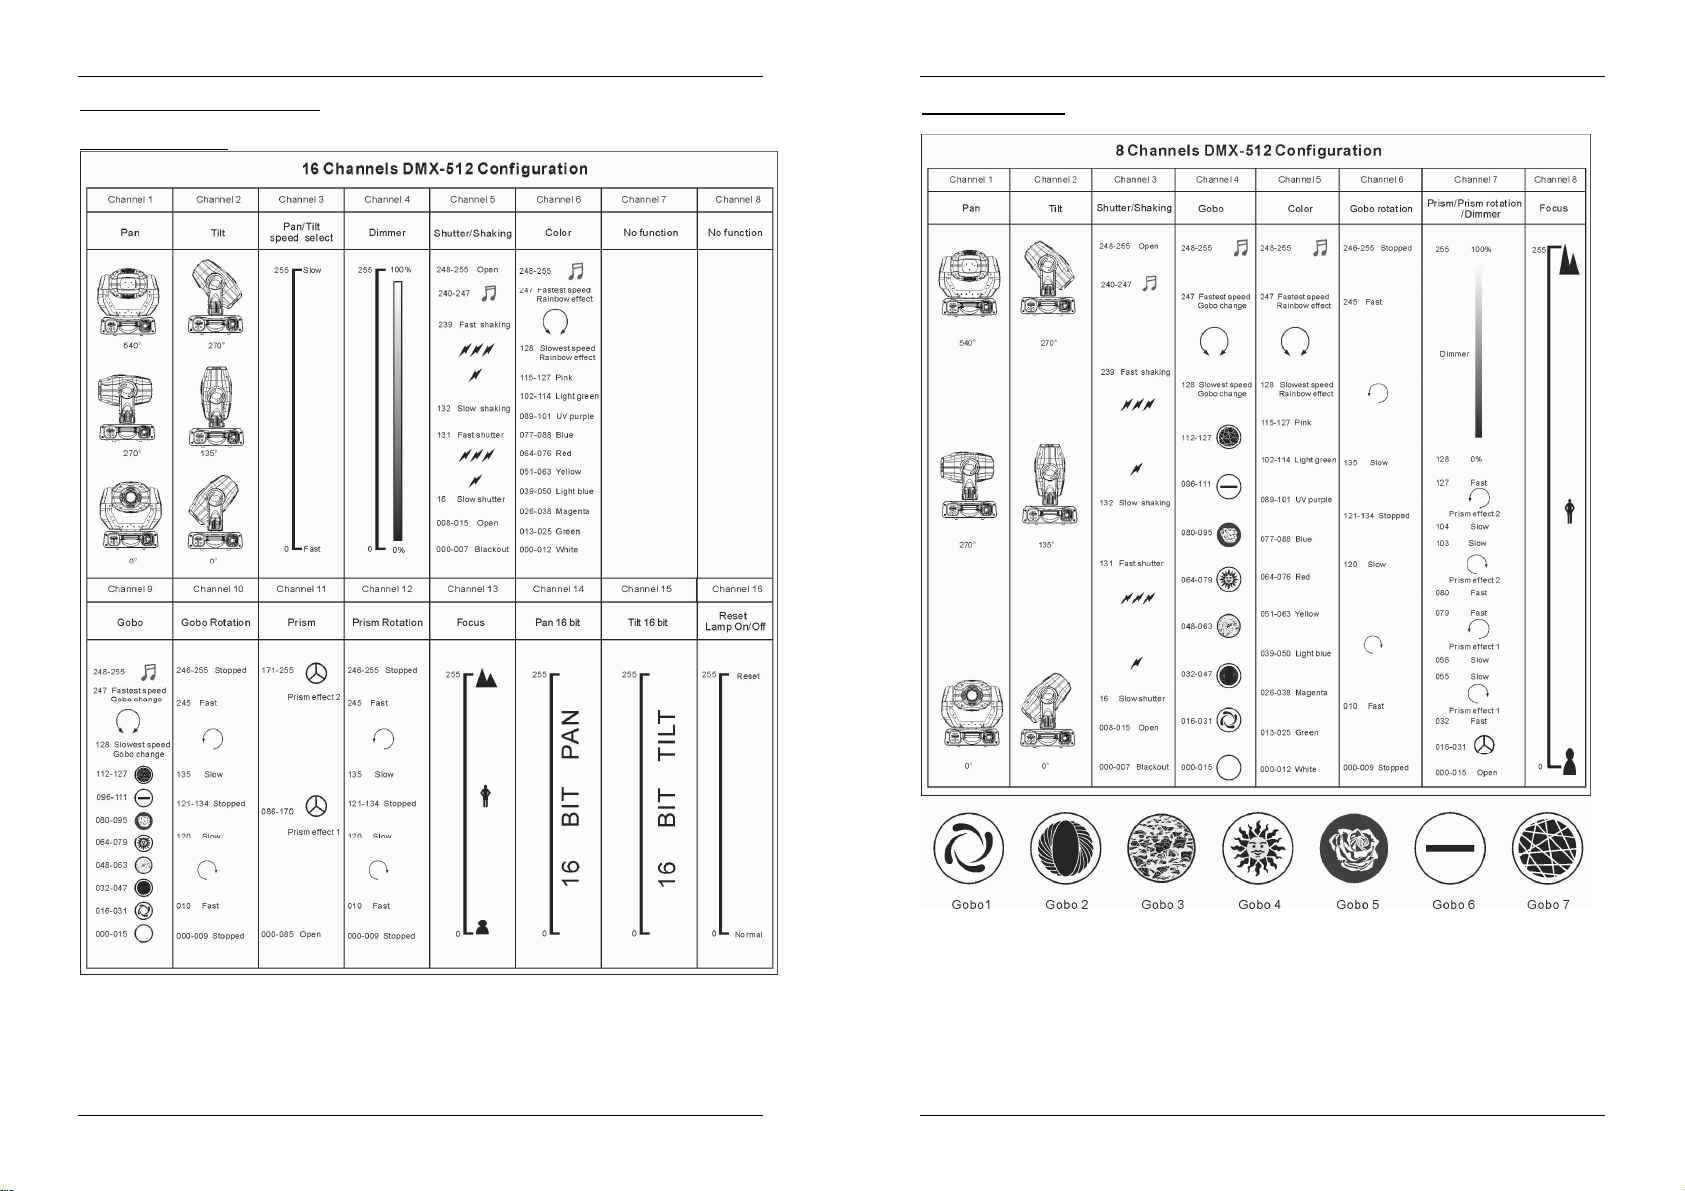
DMX-CONFIGURATIONOF BT250S:
16 channel modus
8 channel modus
1. For DMX reset, put DMX value of CH-8 & CH-16 to 255, the unit will reset after about five seconds.
For lamp on, put DMX value of CH-8 to 247 & CH-16 to 255.
For lamp off, put DMX value of CH-8 to 239 & CH-16 to 255.
2. For color sound activated,put DMX value of CH-6 to248-255.
For gobo sound activated,put DMX value of CH-9 to 248-255.
®
Briteq
11/69 BT250S
Briteq
®
12/69 BT250S
Page 9

ENGLISH OPERATION MANUAL
ENGLISH OPERATION MANUAL
HOW TO OPERATE THE UNIT
Every time you turn the unit on, it will show I250 on the display and move all the motors to their ‘home’
position and you may hear some noises for about 20 seconds. After that the unit will be ready to receive
DMXsignal or run the built-inprograms.
YOU CAN OPERATE THE UNIT IN THREE WAYS:
BY MASTER/SLAVE BUILT-IN PREPROGRAM FUNCTION:
Select this function when you want an instant show. By linking the units in master/slave connection, the
first unit will control the other units to givean automatic, sound activated, synchronized light show. Its DMX
input will have nothing plugged into it, and itsmaster-LEDwill be constantlyonand sound-LED will flash to
themusic.
Important! This function only works when the blackout mode in the menu of the master is set to
OFF,otherwise nothing will happen!Read more about this optionin the“Main Menu” paragraph.
BY EASY CONTROLLER:
When used in Master/slave mode we strongly advice you to use the CA-8 “Easy
controller” Just connect this small controllerto the 1/4” jack of the master unit, and you
will be able to control the following
FUNCTIONS:
Stand by
Function
Mode
o By master/slavebuilt-inpreprogram function
o By CA-8 easy controller
o By universalDMX controller ( 8 & 16 channel DMX mode )
MASTER has 4 built-inshows: You can select (show 1), (show 2), (show3) or
(show4) directly in the menu of the master.
SLAVES have 2 working options: The other units are set to slave mode (slave-
LED is constantly on). In order to create a great light show you can introduce
contrast movements (pan/tilt of slave is inversed) In the menu of the slave units
you can go to option and select:
o Normalslave: slave works in sync with the master.
o 2 light show: slave works in oppositewith the master.
Blackout the unit
Strobe
1.Gobo/Colorsync.
Strobe
2.Sync.strobe
3.Two-lightstrobe
Sound 1
(LED off )
X/Ymoving showmode
selection
(Show 1 ~ Show 4)
Sound 2
(LED normalblinking)
Color/Goboselection
1. Hold on forgobo change.
2. Press shortly for color
change.
Slow/Sound3
(LED on)
X/Ymovingsetting
1.Pan position
2.Tilt position
3.Dimmer
Firstset Master unit,then set
Slave units’ position.
Position/Latch
(LED fastblinking)
MAINTENANCE
Makesurethe areabelowtheinstallation place is free from unwanted persons during servicing.
Switch offthe unit, unplug the mains cable and wait until the unit has been cooled down.
During inspectionthe following points should be checked:
All screws used for installing the device and any of its parts should be tightly fastened and may not be
corroded.
Housings, fixations and installations spots (ceiling, truss, suspensions) should be totally free from any
deformation.
When an opticallensis visibly damaged due to cracks or deep scratches, it must be replaced.
The mains cables must be in impeccable condition and should be replaced immediately when even a
small problem is detected.
In order to protect the device from overheat the cooling fans (if any) and ventilation openings should be
cleanedmonthly.
The interiorof the device should be cleanedannually using a vacuum cleaner or air-jet.
The cleaning of internal and external optical lenses and/or mirrors must be carried out periodically to
optimizelight output. Cleaning frequency depends on the environmentin which the fixtureoperates:damp,
smoky or particularly dirty surroundings can cause greater accumulationofdirton theunit’s optics.
Clean with a soft cloth using normal glass cleaning products.
Always dry the parts carefully.
Clean the external optics at least once every 30 days.
Clean the internaloptics at least every90 days.
Attention: We strongly recommend internal cleaning to be carried out by qualified personnel!
SPECIFICATIONS
Mains Input: AC230V,50Hz
Fuse: 10 A/250V
SoundControl: Internalmicrophone
Pan/Tilt: 540° / 270° with automaticcorrection
Beam angle: 13°
DMXconnections: 3pin XLR male / female
Lamp: MSD250/2 orNSD250/2
Size: 428 x 371 x 466 mm
Weight: 23 kg
Briteq
You can download the latest version of this user manual on our website: www.briteq-lighting.com
Every informationis subject to change withoutprior notice
®
13/69 BT250S
Briteq
®
14/69 BT250S
Page 10
FRANÇAIS MODE D’EMPLOI
FRANÇAIS MODE D’EMPLOI
Merci d’avoir choisi ce produit BriteQ®. Pour votre sécurité et pour une utilisation optimale de toutes les
possibilités de l’appareil,lisez attentivement cette noticeavantutilisation.
EN VOUS INSCRIVANT POUR LA LETTRE D’INFORMATION VOUS SEREZ TOUJOURS
TENU AU COURANT DES DERNIERESNOUVELLES CONCERNANT NOS PRODUITS:
NOUVEAUTES, ACTIONSSPECIALES, JOURNEES PORTES OUVERTES, ETC.
SURFEZ SUR: WWW.BEGLEC.COM
CARACTERISTIQUES
Cet appareil ne produit pas d’interférences radio. Il répond aux exigences nationales et européennes. La
conformité a été établie et les déclarations et documents correspondants ontété déposés par le fabricant.
Puissant moving head intelligentpour les discothèques et les sociétés de location
16 canaux DMX (pan – tilt – vitesse mouvements pan/tilt - dimmer – shutter/Shaking– couleur – gobo –
rotation desgobos – prisme – rotation du prisme - focus – Pan 16Bit – Tilt 16Bit – reset+lamp on/off)
choixentre8 ou 16 canaux
Possibilitéd’adresserle DMX à distance.
Mouvementspan 540° / tilt 270° souples,prévud’une correctiondeposition.
7 gobos rotatifsinterchangeables (D= 26,8mm) + ouverturedu gobo
9 couleurs dichroïques trapézoïdales+ blanc et effetarc-en-ciel à vitesse variable
Prismeà 3-facettesrotatif dans les deux sens à vitesse variable
L’écran LED du menupeutêtreallumé/éteint
Angle du faisceau: 13° + possibilité de régler le focus par DMX
Black-outet effetstroboscopiquerapide jusqu’à 10 flashs/seconde
Atténuationlinéaire 0-100%
Peut être utilisé en mode maître/esclave grâce aux programmes intégrés, commandés par le micro
interne.
Contrôleur CA-8 disponible en option pour la commande à distance de différentes fonctions, notamment:
black out, différents programmes stroboscopiques, sélection manuelle de la couleur / du gobo et de la
position X/Y,sélectiondu programme et fonctionnementlent/rapide.
Ventilation forcée par ventilateur etprotection électronique contre les surchauffes
AVANT UTILISATION
Avant d’utiliser cet appareil, assurez-vous de l’absence de dommage lié au transport. En cas
d’endommagement,n’utilisezpasl’appareil et contactez le vendeur.
Important: Cet appareil a quitté notre usine en parfaite condition et bien emballé. Il est primordial que
l’utilisateur suive les instructions de sécurité et avertissements inclus dans ce manuel. La garantie ne
s’applique pas en cas de dommage lié à une utilisation incorrecte. Le vendeur ne prend pas la
responsabilité des défauts ou de tout problème résultant du fait de n’avoir pas tenu compte des mises en
garde de ce manuel.
Conservez ce manuel dans un endroit sûr pour toute consultation future. Si vous vendez l’appareil,
assurez-vous d’y joindre ce manuel également.
Vérifiez le contenu:
Vérifiezsi l’emballage contient les articles suivants:
Moded'emploi
AppareilBT250S
2 Crochetsdesupport
INSTRUCTIONS DE SECURITE:
CAUTION
techniciensqualifiés.
La flèche dans un triangle met l'utilisateur en garde contre la présence de haute tension sans
isolationdans l'appareilqui peutcauser un risque d'électrocution.
Un point d'exclamation dans un triangle prévient de la présence d'instructions de fonctionnement et
de maintenancese trouvantdans le manuel, fourni avec l'appareil.
Ce symbole signifie: uniquement pour usage à l'intérieur
Ce symbole signifie: Lire le mode d’emploi.
Ce symbole détermine: la distance minimum des objets allumés. La distance minimum entre le
projecteur et la surface à éclairerdoitêtre plus de 1 mètre.
Afin de protéger l’environnement, merci de recycler les emballages autant que possible.
Un nouvel effet lumière peut provoquer de la fumée et/ou une odeur non souhaitée, disparaissant après
quelquesminutes.
Afin d’éviter tout risque d’incendie ou de choc électrique, ne pas exposer cet appareil à la pluie ou l’humidité.
Pour éviter la formation de condensation à l’intérieur de l’appareil, patientez quelques minutes pour laisser
l’appareil s’adapter à la température ambiante lorsqu’il arrive dans une pièce chauffée après le transport. La
condensation empêche l’unité de fonctionner en performanceoptimale et peut même causer des dommages.
Cette unité est destinée à une utilisation à l’intérieur uniquement.
Ne pas insérer d’objet métallique ou verser un liquide dans l’appareil. Aucun objet rempli de liquides, tels que
des vases, ne peut être placé sur cet appareil. Risque de choc électrique ou de dysfonctionnement. Si un corps
étrangerest introduit dans l’unité, déconnectez immédiatement de la source d’alimentation.
Aucune source de flamme nue, telle que les bougies allumées, ne peut être placée sur l'appareil.
Placez l’appareil dans un endroit bien ventilé, éloigné de tout matériau ou liquide inflammable. L’appareil doit
être fixéà 50cm minimum desmurs.
Ne pas couvrir les ouvertures de ventilation, un risque de surchauffe en résulterait.
Ne pas utiliser dans un environnement poussiéreux et nettoyezl’unité régulièrement.
Ne pas laisser l’unité à portée des enfants.
Les personnes non expérimentées ne doivent pas utiliser cet appareil.
La température ambiante maximum d’utilisation de l’appareil est de 40°C. Ne pas l’utiliser au-delà de cette
température.
La température des parois de l’unité peut atteindre 85°C. Ne pas toucher la coque à mains nues en cours de
fonctionnement.
Assurez-vous que la zone au-dessous du lieu d’installation ne comporte pas de personnes indésirables pendant
le montage, le démontage et les opérations de maintenance.
Laissez l’appareil refroidir environ 10 minutes avant de remplacer l’ampoule ou d’effectuer des réparations.
Débranchez toujours l’appareil si vous ne l’utilisez pas de manière prolongée avant de changer une ampoule ou
d’entreprendre des réparations.
Les installations électriques ne peuvent être faites que par du personnel qualifié et conformément aux
régulations de sécurité électrique et mécanique en vigueur dans votre pays.
Assurez-vous que la tension d’alimentation de la source d’alimentation de la zone dans laquelle vous vous
trouvez ne dépasse pas celui indiqué à l’arrière de l’appareil.
Le cordon d’alimentation doit toujours être en condition parfaite. Mettez immédiatement l’unité hors tension si le
cordon est écrasé ou endommagé.
Ne laissez jamais le cordon d’alimentation entrer en contact avec d’autres câbles !
L’appareil doit être à la masse selon les règles de sécurités.
Ne pas connecter l’unité à un variateur de lumière.
Utilisez toujours les câbles appropriés et certifiés lorsque vous installez l’unité.
Pour éviter tout choc électrique, ne pas ouvrir l’appareil. En dehors des ampoules et du fusible principal, il n’y a
pas de pièces pouvant êtrechangées par l’utilisateur à l’intérieur.
Ne jamais réparer ou court-circuiter un fusible. Remplacez systématiquement un fusible endommagé par un
fusible de mêmes type et spécifications électriques !
En cas de problèmes de fonctionnement sérieux, arrêtez toute utilisation de l’appareil et contactez votre
revendeur immédiatement.
ATTENTION: afin de réduire le risque d’électrocution, n’enlevez jamais le
couvercle de l’appareil. Il n’y a aucune pièce à l’intérieur de l’appareil que
vous pouvez remplacer vous-même. Confiezl’entretien uniquement à des
BRITEQ® 15/69 BT250S
BRITEQ® 16/69 BT250S
Page 11
FRANÇAIS MODE D’EMPLOI
FRANÇAIS MODE D’EMPLOI
La coque et les lentilles doivent être remplacées si visiblement endommagées.
Utilisez l’emballage d’origine si l’appareil doit être transporté.
Pour des raisons de sécurité, il est interdit d’apporter toute modification à l’unité non spécifiquement autorisée
par les parties responsables.
Important: Ne jamais fixer directement la source de lumière ! Ne pas utiliser d’effets en présence de personnes
souffrant d’épilepsie.
MISE EN PLACE / REMPLACEMENT DES AMPOULES
En cas d’opération de maintenance ou de
remplacement des ampoules, ne pas ouvrir
l’installation dans les 10 minutes suivant la
fin de l’utilisation jusqu’à ce que l’appareil ait
l’unité avant toute opération de maintenance. Utilisez
toujours le même type de pièces (ampoules, fusibles,
etc.) Lors du remplacement, n’utilisez que des pièces
véritables.
Coupezl’alimentation et débranchez l’appareil.
Attendez environ 15 minutes jusqu’à ce que l’appareil ait
Enlevez les 2 vis situées à l'arrière de l'appareil afin d'ouvrir
A l'intérieur, vous serez à même de voir la douille de la
Retirez l'ancienne lampe touten tenant la douille de la lampe
Maintenez également la douille de la lampe quand vous
Ne touchez pas l’ampoule les mains nues! Ceci réduit considérablement la duré de vie de l’ampoule. Si
Remettez la nouvelleampoule dans l’appareil. Assurez-vous queles fils ne touchent pas l’ampoule.
Refermez le compartiment lampe au moyen des vis.
Assurez vous que la lampe soit bien placée au centre du réflecteur afin de lui garantir un rendement
Prêt!
refroidi. Débranchez systématiquement
refroidi.
le compartiment de la lampe (voir la lettre A sur la figure).
lampe. Retirezdélicatement la lampe de son compartiment.
pendantl'opération.
introduirez la nouvelle lampe dans la douille par un
mouvementde pression, etce,avec la plus grande précaution.
Attention! Reportez-vous à l’étiquette à l’arrière de l’appareil ou aux spécifications techniques de ce
manuel pour savoir quelle ampouleutiliser. Ne jamais installerd’ampoules à puissanceplus élevée!
vous avez touché l’ampoule, nettoyez-la à l’aide d’un chiffon et un peu d’alcool dénaturé. Frottez
l’ampoule avant de l’installer.
optimal. Allumezl'appareil et ajustez la position de la lampe. Utilisez à cet effet les vis A, B et C situées à
l'arrière de l'appareil. (A sur la figure ci-contre)
INSTALLATION EN HAUTEUR
Important: L’installationdoit être faite par du
personnel qualifié uniquement. Une
installation incorrecte peut causer des
blessures sévères et/ou endommager
l’appareil. L’installation en hauteur exige de
l’expérience! Les limites de charge doivent
être respectées, du matériel d’installation
certifié doit être utilisé, et l’appareil installé
doit subir des inspections de sécurité
régulièrement.
Assurez-vous que la zone au-dessous du lieu
d’installation ne comporte pas de personnes
indésirables lors de l’installation, la
désinstallation ou la maintenance.
Placez l’appareil dans un endroit bien ventilé, éloigné de tout matériau ou liquide inflammable. L’appareil
doit être fixé à
L’appareil doit être hors de portée du public et en dehors des zones de passage de personnes ou des
zones où le public est installé.
Avantl’installation assurez-vousque la zone d’installation supporte un point localisé minimumde10 fois le
poids de l’appareil.
Utilisez systématiquement un câble de sécurité qui peut supporter 12 fois le poids de l’appareil lors de
l’installation. Ce câble de sécurité secondaire doit être installé de manière à ce qu’aucune partie de
l’appareilnepuisse descendre de plus de20 cm si lesupport principaltombe.
L’appareil doit être bien fixé,un montage à balancement est dangereuxet nedevrait pas être considéré !
Ne pas couvrir les ouvertures de ventilation pour éviter tout risque de surchauffe.
L’utilisateur doit s’assurer que les installations techniques et de sécurité sont bien approuvées par un
expert avant la première utilisation. Les installations doivent être inspectées chaque année par du
personnelqualifiépour assurerune sécurité optimale.
50cm minimum
des mursà l’entour.
COMMENT REGLER L’APPAREIL
PANNEAU DE CONTRÔLE:
CHANGER LES GOBOS ROTATIFS
ATTENTION: N’installez les gobos que si l’appareil est éteint!
Ne desserrez jamais les vis des gobos rotatifs car vous ouvririez ainsi le roulement à billes.
Réparer cela est très difficile!
Coupezl’alimentation et débranchez l’appareil.
Ouvrez le couvercleenplastique(4vis)
Repérez la roue à gobos et retirez l’anneau
de fixation du gobo que vous voulez
remplacerà l’aide d’un outil approprié.
Retirez le gobo et insérez le nouveau gobo.
Comprimez l’anneau de fixation et insérez-le
devant le gobo.
Prêt!
BRITEQ® 17/69 BT250S
1. ECRAN afficheles différentsmenus etles fonctions sélectionnées.
BRITEQ® 18/69 BT250S
Page 12

FRANÇAIS MODE D’EMPLOI
FRANÇAIS MODE D’EMPLOI
2. LEDS
3. TOUCHES
4. ENTREE POUR LE CONTROLEURA DISTANCE : connectez le contrôleur à distance optionnel (CA-8)
via l'entrée jack ¼" afin decontrôlerl'appareilau niveaudu stand by, de la fonction et du mode.
5. SENSITIVITY: vous pouvez régler la sensibilité du micro si vous utilisez cet appareil de façon autonome
ou en mode maître/esclave.
6. DMX IN/OUT: est utilisé pour les configurations en DMX512. Utilisez des câbles symétriques XLR M/F
à 3 broches de bonne qualité pour relier les appareils entre eux.
MENU PRINCIPAL:
Pour sélectionner une des fonctions pre-
set, appuyez sur la touche MENU jusqu’à
ce que la fonction que vous désirez
apparaisseà l’écran.
Sélectionnez la fonction à l’aide de la
touche ENTER. L’écran clignotera.
Utilisez les touches DOWN et UP pour
changerde mode.
Dès que vous avez sélectionné le mode
requis, appuyez sur la touche ENTER
pour confirmer. Après 8 secondes l’écran
retournera automatiquement aux
fonctions principales sans avoir modifié
quoi que ce soit. Pour retourner aux
fonctions sans effectuer de changements,
appuyez sur la touche MENU. Les
fonctions principales sont affichées à
droite.
Est utilisé pourrégler l’adresse de départ
dans une configurationDMX.
Appuyez sur la touche MENU jusqu’à ce
que soit affiché àl’écran.
Appuyez sur la touche ENTER, l’écran
commence à clignoter.
Utilisez les touches DOWN et UP pour
changerl’adresseDMX512.
Quand l’adresse désirée est affiché à
l’écran, appuyez sur la touche ENTER
pour confirmervotre choix.
(Où il retournera automatiquement aux
fonctions principales sans aucune
modification après 8 secondes)
Pour retournerauxfonctions sans effectuer de changements, appuyez à nouveausur la touche MENU.
DMX Allumé Présence d’un signal DMX
MASTER Allumé Mode maître
SLAVE Allumé Mode esclave
SOUND Clignote Activation musicale
MENU Pour sélectionnerlesfonctionsdeprogrammation
DOWN Pour reculer dans les fonctionssélectionnées
UP Pouravancer dans les fonctions sélectionnées
ENTER Pour confirmerla fonction sélectionnée
Reglagede l’adresseDMX512
ChannelMode (Mode canal)
Appuyezsur le bouton MENUjusqu'à ce que les lettres soient affichées par l'écran.
Appuyezsur le bouton ENTER, ce qui a pour conséquence que l'écran commenceà clignoter.
Utilisez les boutons DOWN et UP pour sélectionner l'un des deux modes : (16 canaux) ou
(8 canaux).
Une fois que le mode est sélectionné, appuyez sur le bouton ENTER pour confirmer (ou vous retournerez
vers les fonctions principales si aucune activité n'estdétectéepar l'appareil pendant 8 secondes ).
Pour retourner vers les fonctions sans effectuer de changements, appuyez de nouveau sur le bouton
MENU.
Est utilisé pourchoisir le Show quand l’appareil fonctionne defaçon autonome ou en maître/esclave.
Appuyezsur la toucheMENU jusqu’à ce que est affichéà l’écran.
Appuyezsur la touche ENTER,l’écran commence à clignoter.
Utilisezles touches DOWN et UP pour sélectionner (show 1) ou (show 2) ou (show
3) ou ( show4 ).
Dès que le mode de fonctionnement est affiché à l’écran, appuyez sur la touche ENTER pour confirmer
votre choix.
(Où il retourneraautomatiquement aux fonctionsprincipalessans aucune modificationaprès 8 secondes)
Pour retournerauxfonctions sans effectuer de changements, appuyez à nouveausur la touche MENU.
Est utilisé pourque l’appareil esclave fonctionnede façon opposée au maître ou pour fonctionnerde
façon complètement synchronisé.
Appuyezsur la toucheMENU jusqu’à ce que est affichéà l’écran.
Appuyezsur la touche ENTER,l’écran commence à clignoter.
Utilisezles touches DOWN et UP pour sélectionner (normal)ou (2 light show).
Dès que le mode de fonctionnement est affiché à l’écran, appuyez sur la touche ENTER pour confirmer
votre choix.
(Où il retournera automatiquementaux fonctions principales sans aucune modificationaprès8secondes)
Pour retournerauxfonctions sans effectuer de changements, appuyez à nouveausur la touche MENU.
Black-out mode: quand aucun signal DMX est détecté, l’appareil se met en black-out et attends un
signal DMX.
Mode « pas de black-out »: quand aucun signal DMX est détecté, l’appareil se met automatiquement
à fonctionner de façon autonome.
Appuyezsur la toucheMENU jusqu’à ce que est affiché à l’écran.
Appuyezsur la touche ENTER,l’écran commenceà clignoter.
Utilisezles touches DOWN et UP pour sélectionner (yes black-out) ou (no black-out).
Dès que le mode de fonctionnement est affiché à l’écran, appuyez sur la touche ENTER pour confirmer
votre choix.
Show Mode
Show 1 mode- l’appareil est placé parterre. Angle du mouvement tilt : 210°.
Show 2 mode- l’appareil est fixé au plafond. Angle du mouvement tilt : 90°.
Mode show3 : l'appareilest placé sur le haut-parleur.
Le projecteurreste continuellement dirigé vers le public, donc, devant la scène. Angledu
mouvementpan (de gauche à droiteà gauche) : 160°. Angle du mouvement tilt : 90°(60° audessus
de l'horizontale; 30° en dessous de l'horizontale).
Mode show4 : l'appareil est fixé au plafond.
La plupart du temps, le spot projette son faisceau devant la scène. Angle du mouvement pan (de
gaucheà droite à gauche) : 160°. Angle du mouvementtilt : 90° (verticalement,devant 75°; derrière
15 °).
SlaveMode
ModeBlack-out
BRITEQ® 19/69 BT250S
BRITEQ® 20/69 BT250S
Page 13

FRANÇAIS MODE D’EMPLOI
FRANÇAIS MODE D’EMPLOI
(Où il retournera automatiquement aux fonctionsprincipalessans aucune modificationaprès 8 secondes)
Pour retournerauxfonctions sans effectuer de changements, appuyez à nouveausur la touche MENU.
Normal: le mouvementpan n’est pas inversé.
Pan inversion: le mouvement pan estinversé
Appuyezsur la toucheMENU jusqu’à ce que est affichéà l’écran.
Appuyezsur la touche ENTER,l’écran commence à clignoter.
Utilisezles touches DOWN et UP pour sélectionner (normal) ou (paninversion).
Dès que le mode de fonctionnement est affiché à l’écran, appuyez sur la touche ENTER pour confirmer
votre choix.
(Où il retourneraautomatiquement aux fonctionsprincipalessans aucune modificationaprès 8 secondes)
Pour retourner auxfonctions sans effectuer de changements, appuyez à nouveau sur la touche MENU.
Normal: le mouvementtilt n’est pas inversé.
Tilt inversion: le mouvementtilt est inversé
Appuyezsur la toucheMENU jusqu’à ce que est affichéà l’écran.
Appuyezsur la touche ENTER,l’écran commence à clignoter.
Utilisezles touches DOWN et UP pour sélectionner (normal) ou (tilt inversion).
Dès que le mode de fonctionnement est affiché à l’écran, appuyez sur la touche ENTER pour confirmer
votre choix.
(Où il retournera automatiquementaux fonctions principales sansaucune modification après 8 secondes)
Pour retournerauxfonctions sans effectuer de changements, appuyez à nouveausur la touche MENU.
Display on: l’écran est toujours allumé.
Display off: l’écran est éteint quand il n’est pas utilisé.
Appuyezsur la toucheMENUjusqu’à ce que l’écran affiche .
Appuyezsur la touche ENTER,l’écran commence à clignoter.
Utilisezles touches DOWN et UP pour sélectionner (écran toujours allumé) ou (écranéteint
si pas utilisé).
Dès que le mode de fonctionnement est affiché à l’écran, appuyez sur la touche ENTER pour confirmer
votre choix.
(Où il retourneraautomatiquement aux fonctionsprincipalessans aucune modificationaprès 8 secondes)
Pour retourner auxfonctions sans effectuerde changements, appuyez à nouveausur la touche MENU.
Display normal: possibilitéde lire ce qui est affiché à l’écran quand l’appareilest posé par terre.
Displayinversion: possibilitéde lire ce quiestaffiché à l’écran quand l’appareil estsuspendu.
Appuyezsur la toucheMENU jusqu’à ce que clignotesur l’écran. (affichage normal)
Utilisez la touche ENTER pour changer l’affichage (affichage inversé), l’option sera
automatiquement enregistrée après 8 secondes. Ou appuyez à nouveau sur la touche ENTER pour
retournerà l’affichage normal
Pourretournervers les fonctions,appuyezsur la touche MENU.
InversionPan
InversionTilt
Led Display
InversionDisplay
Est utilisé pourvousaider à régler le focus des faisceaux et des gobos.
Appuyezsur latouche MENU jusqu’à ce que clignoteà l’écran.
Appuyez sur la touche ENTER pour que l’appareil adoptelaposition “tilt90°”.
Appuyezsur la touche ENTER pour quel’appareiladopte la position “pan 0°”.
Appuyezsur la touche ENTER pour que l’appareiladopte la position “pan 90°”.
Appuyezsur la touche ENTER pour que l’appareil adoptelaposition “pan 180°”.
Appuyezsur le bouton ENTER pour que l'appareil adoptela position “pan 270°”.
Dans les 5 pas précédents vous pouvez ajuster le focus a l’aide des touches UP/DOWN de l’appareil
(l’écran affiche la valeur du focus).
Attention: vous pouvez uniquement effectuer un réglage “général” du focus couvrantles 5 positions, il n’est
donc pas possibleréglerparfaitementle focus pour toutesles directions individuellement.
Pour retourner auxfonctions, appuyez sur la touche MENU.
Est utilisé pouractiver le programme interne “self-test” quipassera en revue toutes les possibilités
de l’appareil.
Appuyezsur la toucheMENU jusqu’à ce que clignoteà l’écran.
Appuyezsur la touche ENTERpour démarrerleprogrammeintégré « self-test ».
Pour retourner auxfonctions, appuyez sur la touche MENU.
Utilisé pour afficher la température à l'intérieurdu compartimentde la lampe.
Appuyezsur le bouton MENU jusqu'à ceque les lettres se mettent à clignoter sur l'écran.
Appuyez sur le bouton ENTER et la température de service de lalampe seraaffichéesur l'écran.
Pour retournervers les fonctions, appuyez de nouveausur le bouton MENU.
Vouscommunique le nombre d’heures de service de l’appareil.
Appuyezsur la toucheMENU jusqu’à ce que clignoteà l’écran.
Appuyezsur la touche ENTER pour que l’appareilaffiche le nombre d’heures de service à l’écran.
Pour retourner aux fonctions,appuyezsur la toucheMENU.
Utilisé pour allumer et éteindre la lampe de manière à pouvoirrefroidir lalampe grâce aux
ventilateursinternes avantde latransporter.
Appuyezsur le bouton MENUjusqu'à ce que les lettres se mettent à clignoter sur l'écran.
Appuyezsur le bouton ENTER, ce qui a pour conséquence que l'écran commenceà clignoter.
Utilisezles boutons DOWN et UP pour sélectionner l'un des deux modes : (la lampe sera allumée)
ou (la lampe sera éteinte).
Une fois que le mode est sélectionné, appuyez sur lebouton ENTER pour confirmer (ou vous retournerez
vers les fonctions principales si aucune activitén'estdétectéeparl'appareil pendant8 secondes).
Pour retourner vers les fonctions sans effectuer de changements, appuyez de nouveau sur le bouton
MENU.
FocusAdjust
Self-Test
Ambienttemperature of lamp
Fixture Hours
Lamp Display
BRITEQ® 21/69 BT250S
Poureffectuer une mise à zéro de l’appareil.
Reset
Appuyezsur la toucheMENU jusqu’à ce que clignoteà l’écran.
Appuyezsur ENTER pour renvoyertous les canauxàleurpositiond’origine.
Pour retourner aux fonctions,appuyez sur la touche MENU.
Veuillez également consulter le chapitre concernant la configuration des canaux DMX pour découvrir
commenteffectuer une mise à zéro (reset) par commande DMX.
BRITEQ® 22/69 BT250S
Page 14

FRANÇAIS MODE D’EMPLOI
FRANÇAIS MODE D’EMPLOI
HOME POSITION ADJUST
Appuyez sur le bouton MENU pendant au
moins 5 secondes pour aller vers le mode
Offset.
Vous êtes maintenant en mesure d'ajuster
la position de référence ('home position',
qui est donc la position "zéro").
Quand vous désirez ajuster la position de
référence ('home position') des gobos et
des couleurs, vous devez d'abord choisir
le mode .
Les fonctions sont décrites ci-dessous.
Appuyez sur le bouton MENU pendant au moins 5 secondes pour activer le mode Offset.
Utilisezles boutons DOWN et UP jusqu'à ce que les lettres soient affichéespar l'écran.
Appuyez sur le bouton ENTER et l'appareil se mettra en position “tilt135°”.
Appuyez sur le boutonENTER et l'appareil se mettra en position “tilt 45°”.
Appuyez sur le bouton ENTER et l'appareilse mettraen position “pan 0°”.
Appuyez sur le bouton ENTER et l'appareilse mettraen position “pan 90°”.
Appuyez sur le bouton ENTER et l'appareil se mettra en position “pan 180°”.
Appuyez sur le bouton ENTER et l'appareil se mettra en position “pan 270°”.
Au cours des 6 étapes décrites ci-dessus, vous serez en mesure d'ajuster le focus grâce aux boutons
UP/DOWNprésentssur l'appareil.
Pour retourner vers les fonctions principales sans effectuer le moindre changement, attendez pendant 8
secondes.
Appuyez sur lebouton MENUpendant au moins 5 secondes pour activer le mode Offset.
Utilisez les boutons DOWN et UP jusqu'à ce que les lettres soientaffichées par l'écran.
Appuyez sur leboutonENTER,ce qui a pour conséquence que l'écran commence à clignoter.
Utilisez les boutons DOWN et UP pour ajuster la position de référence du mouvement pan (pan home
Un fois que la position a été déterminée, appuyez sur le bouton ENTER pour confirmer, ou retournez
Pour retourner vers les fonctions principales sans effectuerle moindre changement, attendez pendant 8
FocusAdjust
Panoffset
position).
automatiquement aux fonctions offset sans effectuer le moindre changement en appuyant sur le bouton
MENU.
secondes.
COMMENT BRANCHER LES APPAREILS EN DMX
Le protocole DMX est un signal à haute vitesse qui sert à contrôler les projecteurs dits
« intelligents ». Vous devezrelierlecontrôleur DMX et tous les appareils “en chaîne” à l’aide d’un
câble symétrique XLR M/F de très bonne qualité. Pour éviter un comportement étrange des
appareils, suite aux interférences,vous devez utiliser un « terminal» de 90Ω à 120Ω à la fin de la
chaîne. N’utilisezjamaisdes câbles répartiteurs-Y, ceci ne fonctionnera tout simplement pas!
Chaque appareil dans la chaîne doit avoir sa propre adresse de départ afin de savoir quelles commandes,
venant du contrôleur, il doit décoder.
COMMENTREGLER L’ADRESSE DEDEMARRAGEEXACTE:
Référez-vous au chapitre précédent (réglage de l’adresse DMX-512) pour apprendre à régler l’adresse de
départ sur cet appareil. L’adresse de départ de chaque appareil est très importante. Malheureusementil est
impossible de vous expliquer dans ce mode d’emploi quel adresse de démarrage vous devez introduire car
cela dépends entièrement du contrôleur que vous utiliserez … veuillez donc vous référer au mode d’emploi
de votre contrôleurDMX pour savoir quelle adresse vous devez utiliser.
Appuyez sur lebouton MENUpendantau moins 5 secondes pour activerlemode Offset.
Tilt offset
Utilisez les boutons DOWN et UP jusqu'à ce que les lettres soient affichées par l'écran.
Appuyez sur leboutonENTER,ce qui a pour conséquence que l'écran commence à clignoter.
Utilisez les boutons DOWN et UP pour ajuster la position de référence du mouvement tilt (tilt home
position).
Un fois que la position a été déterminée, appuyez sur le bouton ENTER pour confirmer, ou retournez
automatiquementauxfonctions offset sans effectuerle moindre changement en appuyant sur le bouton
MENU.
Pour retourner vers les fonctions principales sans effectuerle moindre changement, attendez pendant 8
secondes.
BRITEQ® 23/69 BT250S
BRITEQ® 24/69 BT250S
Page 15

FRANÇAIS MODE D’EMPLOI
FRANÇAIS MODE D’EMPLOI
CONFIGURATIONDMXDU BT250S:
Mode à 16 canaux
Mode à 8 canaux
1. Pour effectuer un reset DMX, mettez la valeur DMX de CH-8 & de CH-16 à 255, l'appareil opérera
un resetaprès à peu près 5 secondes.
Pour que la lampe soitallumée,mettez la valeur DMX de CH-8 à 247 & celle de CH-16 à 255.
Pour que la lampe soitéteinte,mettezla valeur DMX de CH-8 à 239 & celle de CH-16 à 255.
2. Pour activer le mode 'colorsound', mettez la valeur DMXde CH-6 de 248 à 255.
Pour activer le mode 'gobo sound', mettezla valeur DMX de CH-9 de 248 à 255.
BRITEQ® 25/69 BT250S
BRITEQ® 26/69 BT250S
Page 16

FRANÇAIS MODE D’EMPLOI
Pressioncourte
FRANÇAIS MODE D’EMPLOI
COMMENT UTILISER L’APPAREIL
Chaque fois que vous allumerez l’appareil, l’écran affichera I250 et tous les moteurs retourneront à leur
position ‘initiale’ ce qui fait que vous entendrez des bruits pendant environ 20 secondes. Après cela,
l’appareil seraprêt à recevoir des signaux DMXou à parcourir ses programmes.
Vous pouvezutiliser l’appareil selon 3 façons:
EN UTILISANT LES PROGRAMMES INTÉGRÉS MAÎTRE/ESCLAVE:
Sélectionnez cette fonction si vous voulez un show instantané. En reliant tous les appareils selon le
principe maître/esclave, le premier appareil contrôlera tous les autres appareils en effectuant un show
automatiqueet synchronisé au rythme de la musique. Rien ne sera branché à son entrée DMX et son Led
« master » sera constammentallumé, le Led « sound » clignotera au rythmede la musique.
EN UTILISANT LE CONTRÔLEURCA-8:
Si vous utilisez l’appareil en mode maître/esclave nous vous recommandons d’utiliser
le contrôleur CA-8. Connectez ce petit contrôleur à l’entrée jack 1/4” de l’appareil
maître. Cecivous permettra de contrôler les fonctionssuivantes:
o En utilisantles programmes intégrés maître/esclave
o En utilisant le petit contrôleur
o En utilisantun contrôleurDMXuniversel
L’appareil Maître possède 2 shows préprogrammés: vous pouvez sélectionner (show 1),
Les appareils Esclaves possèdent 2 options: les autres appareils sont réglés en mode esclave (le
Stand by L'appareil est totalement éteint.
Fonction
Mode
(show2), (show 3) ou (show 4) immédiatement dans le menu du master (maître).
Led « slave » est constamment allumé). Afin de créer un magnifique show vous
pouvez introduire des mouvements contrastés (pan/tilt de l’appareil esclave est
inversé) dans le menu des appareils esclaves vous pouvez aller à l’option
etsélectionner:
o Normal slave: l’appareil esclave fonctionne de façon
synchronisé par rapport à l’appareil maître.
o 2 light show: l’appareil esclave fonctionne à l’opposé de
l’appareil maître.
Strobe
1.Gobo / Color
sync.
strobe
2.Sync. strobe
3.Two-lightstrobe
Son 1
(la LED est
éteinte)
Sélectiondu mode
moving show X/Y
(Show1 - Show4)
Son 2
(la LED clignote
normalement)
Sélection
Color/Gobo
1. Pression
longuepour
changementde
gobo.
2.
pourchangement
de couleur.
Lent/son3
(la LED est
allumée)
Réglage du mouvementX/Y.
1. Position pan.
2. Position tilt.
D'abordrégler l'appareil
Master,ensuiterégler les
appareilsSlave.
Position/Latch
(la LED clignote rapidement)
MAINTENANCE
Assurez-vous que la zone au-dessous du lieu d’installation ne comporte pas de personnes indésirables
lors de la maintenance
Mettez l’unité hors tension, débranchez le cordon d’alimentationet attendez que l’appareil ait refroidi.
Pendantl’inspection, les points suivants doiventêtre vérifiés :
Toutes les vis utilisées pour l’installation de l’appareil ou de chacune de ses pièces doivent être bien
fixéeset non corrodées.
Les niches, fixations et structures de support (plafond, poutres, suspensions) doivent être totalement
intactes,sansaucunedéformation.
Lorsqu’une lentille optique est visiblement endommagée (fissure ou éraflures profondes), elle doit être
remplacée.
Les câbles doivent être en parfaite condition etdoivent être remplacés immédiatementen cas de détection
d’un problème,mêmebénin.
Pour protéger l’appareil de toute surchauffe, les ventilateurs (si applicable) et les ouvertures de ventilation
doiventêtre nettoyéesmensuellement.
L’intérieur de l’appareil doit être nettoyé annuellementà l’aide d’un aspirateurou jetd’air.
Le nettoyage des lentilles optiques internes et externes et/ou des miroirs doit être effectuépériodiquement
pour optimiser la production de lumière. La fréquence de nettoyage dépend de l’environnement dans
lequel l’appareil fonctionne: des environnements humides, enfumés ou particulièrement sales peuvent
entraînerune accumulationde saleté plus importantes sur les optiques de l’appareil.
Nettoyezà l’aide d’un chiffondouxavec desproduits de nettoyagepour verres normaux.
Séchez toujours les partiessoigneusement.
Nettoyezlesoptiques externesou moins une fois tous les 30 jours.
Nettoyezles optiques internes ou moins une foistousles90 jours.
Attention: Nous vous recommandons fortement de faire exécuter le nettoyage interne par du
personnel qualifié !
SPECIFICATIONS
Alimentation: AC230V,50Hz
Fusible: 10 A/250V
Contrôle de son: Microphoneinterne
MouvementsPan/Tilt: 540° / 270° aveccorrection automatique
Angle du faisceau : 13°
Connexions DMX : connecteur XLR mâle / femelle à 3 broches
Ampoule: MSD250/2etNSD250/2
Taille: 428 x 371 x 466 mm
Poids: 23kg
BRITEQ® 27/69 BT250S
Chacune deces informationspeut être modifiéesansavertissement préalable. Vous pouvez
télécharger la dernière version de ce moded’emploide notre site Web: www.briteq-lighting.com
BRITEQ® 28/69 BT250S
Page 17

NEDERLANDS HANDLEIDING
NEDERLANDS HANDLEIDING
Hartelijk dank voor de aankoop van dit BriteQ®product. Om ten volle te kunnen profiteren van alle
mogelijkheden en voor uw eigen veiligheid, gelieve de aanwijzingen zeer zorgvuldig te lezen voor U begint
het apparaatte gebruiken.
DOOR U OP ONZE MAILINGLIJST IN TE SCHRIJVEN ONTVANGT U STEEDS DE
LAATSTE INFORMATIE OVER ONZE PRODUKTEN:NIEUWIGHEDEN, SPECIALE
ACTIES, OPENDEURDAGEN, ENZ.
SURF NAAR: WWW.BEGLEC.COM
KARAKTERISTIEKEN
In dit apparaat is radio-interferentieonderdrukt. Dit product voldoet aan de gangbare Europese en nationale
voorschriften. Het is vastgesteld dat het apparaat er zich aan houdt en de desbetreffende verklaringen en
documenten zijn door de fabrikant afgegeven.
Krachtigeintelligentemoving headvoordiscotheken en verhuurfirma’s
16 DMX kanalen (pan – tilt – pan/tiltsnelheid - dimmer – shutter/shaking – kleur – gobo- gobo rotatie –
prisma – prismarotatie - focus – Pan 16bit – Tilt 16bit - reset + lamp on/off)
Omschakelbaar8/16kanalen
DMXadressenvanop afstandinstelbaar
Vloeiende540° pan en 270° tilt met automatischepositie correctie
7 verwisselbareroterende gobo’s (D=26,8mm) + open
9 trapezoïde dichroïde kleuren + wit en regenboogeffect met variabele snelheid
3-facetprisma, roteertin beide richtingen metvariabelesnelheid
Menu gestuurde LED display, kan aan/uit gezetworden
Lichtbundel13°met focusregeling via DMX
Black-outen snel strobe effect tot 10 flitsen/seconde
Vloeiendelineaire dimmer0-100%
Kan gebruikt worden in Master/slave modemetde ingebouwde muziek-gestuurdeprogramma’s.
Met de in optie verkrijgbare CA-8 controller kunt u verschillende functies besturen, waaronder: black-out,
verschillende strobe programma’s, manuele kleur/gobo selectie en X/Y positie, programmakeuze en
slow/fastmode.
Ventilatorkoeling en elektronische oververhittingbeveiliging
VOOR DE IN GEBRUIKNAME
Controleer voor het eerste gebruik van het apparaat of het tijdens het transport beschadigd werd. Mocht er
schade zijn, gebruik het dan niet, maar raadpleeg eerstuw dealer.
Belangrijk: Dit apparaat verliet de fabriek in uitstekende staat en goed verpakt. Het is erg belangrijk dat de
gebruiker de veiligheidsaanwijzingen en raadgevingen in deze gebruiksaanwijzing uiterst nauwkeurig volgt.
Elke schade veroorzaakt door verkeerd gebruik van het apparaat valt niet onder de garantie. De dealer
aanvaardt geen verantwoordelijkheid voor mankementen en problemen die komen door het veronachtzamen
van dezegebruiksaanwijzing.
Bewaardeze brochure op een veiligeplaats om hem inde toekomstnogmaalste kunnen raadplegen. Indien
U het apparaatverkoopt, denkt U er wel aanom de gebruiksaanwijzing bij te voegen.
Controleer de inhoud:
Controleerofde doos volgendeonderdelen bevat:
Handleiding
BT250S toestel
2ophangbeugels
VEILIGHEIDSVOORSCHRIFTEN:
CAUTION
De bliksempijl die zich in een gelijkbenige driehoek bevindt is bedoeld om u te wijzen op het gebruik of de
aanwezigheid van niet-geïsoleerde onderdelen met een “gevaarlijke spanning” in het toestel die
voldoende kracht heeft om een risico van elektrocutie in te houden.
Het uitroepteken binnen de gelijkbenige driehoek is bedoeld om de gebruiker erop te wijzen dat er in de
meegeleverde literatuur belangrijke gebruik en onderhoudsinstructies vermeld staan betreffende dit
onderdeel.
Dit symbool betekent: het apparaat mag enkel binnenhuis worden gebruikt.
Dit symbool betekent: Lees de handleiding!
Dit symbool bepaalt: de minimumafstand van te belichten voorwerpen. De minimumafstand tussen
projector en het verlichte voorwerp moet meer dan 1 meters zijn.
Om het milieu te beschermen, probeer zoveel mogelijk het verpakkingsmateriaal te recycleren.
Een nieuw lichteffect kan soms ongewenste rook en/of reuk veroorzaken. Dit is normaal en verdwijnt na een
paarminuten.
Stel dit apparaat niet bloot aan regen of vocht, dit om het risico op brand en elektrische schokken te voorkomen.
Om de vorming van condensatie binnenin te voorkomen, laat het apparaat aan de omgevingstemperatuur
wennen wanneer het, na het transport, naar een warm vertrek is overgebracht. Condensatie kan het toestel
soms verhinderen perfect te functioneren. Het kan soms zelfsschade aan het apparaat toebrengen.
Gebruik dit apparaat uitsluitend binnenshuis.
Plaats geen stukken metaal en mors geen vocht binnen in het toestel om elektrische schokken of storing te
vermijden. Indien een vreemd voorwerp in het apparaat geraakt, moet U het direct van het lichtnet afkoppelen.
Plaats de installatie op een plaats met goede ventilatie, ver van brandbare materialen en/of vloeistoffen. De
installatiemoet op minstens 50 cm van de muren rondom geplaatst worden.
Bedek geen enkele ventilatieopening om oververhitting te vermijden.
Zorg dat het toestel niet in een stoffigeomgeving wordt gebruikt en maak het regelmatig schoon.
Houd het apparaatuit de buurt van kinderen.
Dit apparaat mag niet door onervaren personen bediend worden.
De maximum veilige omgevingstemperatuur is 40°C. Gebruik het apparaat dus niet bij hogere temperaturen.
De temperatuur van het oppervlak van het apparaat kan 85°C bereiken. Raak de metalen ombouw tijdens het
gebruik niet met blotehanden aan.
Verzeker er U van dat er zich onder de plaats waar het toestel wordt geïnstalleerd geen ongewenste personen
bevinden tijdens het bevestigen en losmaken alsookbij het onderhoud.
Laat het toestel ongeveer 10 minuten afkoelen alvorens de lamp te vervangen of alvorens te starten met de
onderhoudsbeurt.
Trek altijd de stekker uit wanneer het apparaat gedurende langere tijd niet wordt gebruikt of alvorens de lamp te
vervangen of alvorenste beginnen met de onderhoudsbeurt.
De elektrische installatie behoort uitsluitend uitgevoerd te worden door bevoegd personeel, volgens de in uw
land geldende regels betreffende elektrische en mechanische veiligheid.
Controleer dat de beschikbare spanning niet hoger is dan die aangegeven op de achterzijde van het toestel.
De elektrische kabel behoort altijd in uitstekende staat te zijn. Zet het apparaat onmiddellijk af als de elektrische
kabel gekneusd of beschadigd is.
Laat de elektrische draad nooit in contact komen met andere draden.
Volgens de veiligheidsvoorschriften moet deze installatie geaard worden.
Sluit het apparaat niet aan op een elektronische dimmer.
Gebruik altijd een geschikte en gekeurde veiligheidskabel bij het installeren van het toestel.
Om elektrische schokken te voorkomen, moet U de behuizing niet openen. Afgezien van de lamp en de zekering
zitten er geen onderdelen in die door de gebruikermoeten worden onderhouden.
Repareer nooit een zekering en overbrug de zekeringhouder nooit. Vervang een beschadigde zekering steeds
door een zekering van hetzelfde type en met dezelfde elektrische kenmerken.
Ingeval van ernstige problemen met het bedienen van het toestel, stopt U onmiddellijk het gebruik ervan.
Contacteer uw dealer voor een eventuele reparatie.
De behuizing en de lenzen moeten vervangen worden als ze zichtbaar beschadigd zijn.
Gebruik best de originele verpakking als het toestel vervoerd moet worden.
WAARSCHUWING: Om het risico op elektrocutie zoveel mogelijk te
vermijden mag u nooit de behuizing verwijderen. Er bevinden zich geen
onderdelen in het toestel die u zelf kan herstellen. Laat de herstellingen enkel
uitvoeren door een bevoegde technicus.
BRITEQ® 29/69 BT250S
BRITEQ® 30/69 BT250S
Page 18

NEDERLANDS HANDLEIDING
NEDERLANDS HANDLEIDING
Om veiligheidsredenen is het verboden om ongeautoriseerde modificaties aan het toestel aan te brengen.
Belangrijk: Kijk nooit rechtstreeks in de lichtbron. Gebruik het lichteffect niet in de tegenwoordigheid van
personen die lijden aan epilepsie.
PLAATSEN OF VERVANGEN VAN DE LAMP
Wacht, in het geval van het vervangen van
een lamp of van het geven van een
onderhoudsbeurt, 10 minuten na het
uitzetten van de installatie met het openen
ervan totdat het apparaat is afgekoeld.
voor U begint aan het onderhoud. Gebruik altijd
hetzelfde type reserveonderdelen (lampen, zekeringen,
e.d.) Gebruik bij het vervangen van onderdelen
uitsluitendauthentieke reserveonderdelen.
Schakel het toestel uit en trek de stekker uit het
stopcontact.
Wacht gedurende ongeveer 15 minuten tot het toestel
afgekoeld is.
Schroefde 2 schroeven aan de achterzijde van het toestel
los om het lampcompartiment te openen (Zie A en B op de
foto)
Aan de binnenzijde zal u de lampsokkel zien. Trek de
lampsokkellangzaamuit hetlampcompartiment.
Verwijder de oude lamp. Hou de lampsokkel vast terwijl u
de lamp loskoppelt.
Hou de lampsokkel vast terwijl u de nieuwe lamp in de sokkel duwt.
Opgelet! Controleer het label op de achterkant van het toestel of raadpleeg de technische kenmerken in
deze handleiding om teweten welke lamp u moetgebruiken.
Raak de lamp nooit aan met blote handen! Dit verkort drastisch de levensduur van de lamp. Indien u de
lamp heeft aangeraakt, reinig deze dan met een doek en een beetje schoonmaakalcohol. Veeg de lamp
droog alvorenshem te installeren.
Plaatsde lamp in het toestel.Let er op dat de draden de lamp niet raken.
Sluithet lampcompartimentmet de schroeven
Verzeker u ervan dat de lamp in het centrum van de reflector geplaatst is voor de beste lichtopbrengst.
Schakel het toestel aan en pas de lamppositie aan door de A, B en C schroeven die zich op de achterzijde
van de kop bevinden (A op de foto)
Klaar!
Trek altijd de stekker uit het stopcontact
OPHANGEN VAN HET APPARAAT
Belangrijk: De installatie van het toestel mag
uitsluitend door bekwaam
onderhoudspersoneel uitgevoerd worden.
Onjuiste plaatsing kan ernstige letsels en/of
schade aan eigendommen tot gevolg
hebben. Het ophangen vergt veel ervaring. U
behoort de grenzen te respecteren aan de
werklast; erkende installeringmaterialen
moeten worden gebruikt; de veiligheid van
het geïnstalleerde toestel moet regelmatig
wordengecontroleerd.
Overtuig U ervan dat het gebied onder
installatieplaats vrij isvan ongewenste personen
tijdenshet plaatsen,het weghalen en het onderhoud.
Installeer het toestel op een goed geventileerde plaats, ver van brandbare stoffen en/of vloeistoffen. Het
toestelmoet worden bevestigd op
Het toestel moet worden geïnstalleerd buiten het bereik van iedereen en weg van plaatsen waar men mag
lopen en zitten.
Alvorens tot plaatsen over te gaan, moet men controleren dat de minimum puntbelasting van de
installatieplaats 10 keer het gewicht van het toestel bedraagt.
Gebruik bij het installeren van het toestel altijd een gewaarmerkte veiligheidskabel die 12 keer het gewicht
van het toestel kan dragen. Deze bijkomende veiligheidsbevestiging moet zo worden aangebracht dat
geen deel van het toestel meer dan 20 cm vallen kan als de hoofdbeveiliging faalt.
Het apparaat moet goed worden vastgezet; aan een vrij zwaaiende montage mag zelfs niet gedacht
worden.
Bedekgeenventilatieopeningen, anders zoudit oververhittingtotgevolgkunnen hebben.
De gebruiker moet er zich van verzekeren dat de installaties met betrekking tot de veiligheid en de
technische mechaniek door een expertzijn goedgekeurd alvorens ze voor de eerste keer te gebruiken. Elk
jaar moetendeinstallatiesworden gekeurd door een vakman om te controleren of de veiligheid nog steeds
perfectis.
minstens 50 cm
van de omringende muren.
INSTELLEN VAN HET TOESTEL
BEDIENINGSPANEEL:
ROTERENDE GOBOS VERVANGEN
OPGELET: Installeer de gobo’s alleen als het toestel uit staat!
Maak nooit de schroeven van de roterende gobo’s los. Zo opent u het rollager. Dit herstellen is
uiterst moeilijk!
Schakel het toestel uit en trek de stekker uit het stopcontact.
Openhet plastiekendeksel (4 schroeven)
Lokaliseer het gobowiel en verwijder de
bevestigingsring van de gobo die u wilt
vervangen metgepastgereedschap.
Verwijder de gobo en installeer de nieuwe
gobo.
Druk de bevestigingsring samen en plaats
hem voor de gobo.
Klaar!
BRITEQ® 31/69 BT250S
BRITEQ® 32/69 BT250S
Page 19

NEDERLANDS HANDLEIDING
NEDERLANDS HANDLEIDING
1. DISPLAY geeft de verschillende menu’s en de gekozen functies weer.
2. LEDS
3. TOETSEN
4. REMOTE CONTROL INGANG: sluit de optionele CA-8 afstandsbediening aan op de ¼” microfoon jack
om zo het toestel te controlerenvoor stand by, functieen modus
5. SENSITIVITY: wordt gebruikt om de gevoeligheid van de microfoon in te stellen wanneer het toestel
gebruikt wordt in standalone of master/slave mode.
6. DMX INPUT/OUTPUT: wordt gebruikt voor DMX512 verbinding. Gebruik symmetrische 3pins XLR M/V
kabels van goedekwaliteit om de toestellen met elkaar te verbinden.
DMX Aan DMX signaalaanwezig
MASTER Aan Master mode
SLAVE Aan Slave mode
SOUND Knippert Geluidsactivering
MENU Om programmeringfuncties te selecteren
DOWN Om terug te gaan in de geselecteerdefuncties
UP Om verder te gaan in de geselecteerde functies
ENTER Om de geselecteerdefuncties te bevestigen
HOOFDMENU:
Druk op de MENU toets om een van de pre-set
functies te kiezen. Druk op de toets tot de
gewenstefunctie op dedisplayverschijnt.
Selecteer de functie met de ENTER toets. De
display zal knipperen.
Gebruik de DOWN en UP toetsen om de modus
te wijzigen.
Eens u de gewenste modus geselecteerd hebt
moet u op de ENTER toets drukken om uw keuze
te bevestigen. Na 8 seconden zal de display
automatisch naar de hoofdfuncties terugkeren
zonder iets veranderd te hebben. Om naar de
functies terug te keren zonder iets te wijzigen
moet u weer op de MENU toets drukken. De
hoofdfunctiesworden hier rechtsweergegeven.
Wordt gebruikt omhet startadres van het toestel
in te stellenin een DMX configuratie.
Druk op de MENU toets tot op de display
Druk op de ENTER toets, de display begint te
Gebruik de DOWN en UP toetsen om het
Wanneer het juiste adres op de display wordt
naar de hoofdfuncties zonder iets gewijzigd te
hebben)
Om naar de functies terug te keren zonder iets te wijzigen moet u weer op de MENU toetsdrukken.
DMX512Adresinstelling
weergegeven wordt.
knipperen.
DMX512 adres te wijzigen.
weergegeven, druk dan op de ENTER toets om
uw keuze te bevestigen.
(anders keert hij na 8 seconden automatisch weer
ChannelMode
Druk op deMENU toets tot op de display weergegeven wordt.
Druk op de ENTER toets,de display begint te knipperen.
Gebruik de DOWN en UP toetsen om de (16 kanalen ) of de (8 kanalen) modus te
selecteren.
Wanneerdejuistemodus op de display wordt weergegeven,drukdan op de ENTER toetsom uw keuze te
bevestigen.
(anderskeerthijna 8 seconden automatisch weernaar de hoofdfuncties zonder iets gewijzigd te hebben)
Om naar de functies terug te keren zonder iets te wijzigen moet u weer op de MENU toetsdrukken.
Wordt gebruikt omde Show werkmodus te kiezen wanneer het toestel standaloneof in master/slave
configuratiegebruikt wordt.
Druk op deMENU toets tot op de display weergegevenwordt.
Druk op de ENTER toets,de display begint te knipperen.
Gebruik de DOWN en UP toetsenom (show 1), (show 2), (show 3) of (show
4) te selecteren.
Wanneer de gewenste modus op de display wordt weergegeven, druk dan op de ENTER toets om uw
keuze tebevestigen.
(anderskeerthijna 8 seconden automatisch weernaar de hoofdfuncties zonder iets gewijzigd te hebben)
Om naar de functies terug te keren zonder iets te wijzigen moet u weer op de MENU toetsdrukken.
Wordt gebruikt omhet slave toestel synchroonof tegenovergesteld te laten werken ten opzichtevan
de master.
Druk op deMENU toets tot op de display weergegevenwordt.
Druk op de ENTER toets,de display begint te knipperen.
Gebruik de DOWN en UP toetsen om (normal) of (2 light show) te selecteren.
Wanneer de gewenste modus op de display wordt weergegeven, druk dan op de ENTER toets om uw
keuze tebevestigen.
(anders keerthij na 8 seconden automatischweernaar de hoofdfuncties zonder iets gewijzigd te hebben)
Om naar de functies terug te keren zonder iets te wijzigen moet u weer op de MENU toetsdrukken.
Black-outmode:wanneer geen enkel DMX signaal gedetecteerd wordt, dan gaat het toestel over naar
de black-out modusen wacht op het volgende DMXsignaal.
No blackout mode: wanneer geen enkel DMX signaal gedetecteerd wordt, dan schakelt het toestel
automatischover naarstandalonewerking.
Druk op de MENU toets tot op de display weergegevenwordt.
Druk op de ENTER toets,de display begint te knipperen.
Gebruik de DOWN en UP toetsen om (yes blackout) of (no blackout) teselecteren.
Wanneer de gewenste modus op de display wordt weergegeven, druk dan op de ENTER toets om uw
keuze tebevestigen.
(anderskeerthijna 8 seconden automatisch weernaar de hoofdfuncties zonder iets gewijzigd te hebben)
Show Mode
Show 1 mode- Het toestel staat op de grond.Tiltbewegingshoek 210°.
Show 2 mode- Het toestel hangt onder het plafond.Tilt bewegingshoek 90°.
Show 3 mode – Het toestel staat op een podium,tegenover het publiek
Despot projecteertsteeds in de richting van het publiek en staat dus aan de voorkant van het
podium. Panbewegingshoek( links naar rechts naarrechts ): 160°. Tilt bewegingshoek: 90° ( 60°
boven de horizon; 30° onder de horizon.)
Show 4 mode – Het toestel hangt onder het plafond.
De spot projecteertvooral aan de voorzijde van het podium. Pan bewegingshoek ( links naar rechts
naar links): 160°. Tiltbewegingshoek: 90° ( verticaal,voorzijde75°; achterzijde 15° )
SlaveMode
BlackoutMode
BRITEQ® 33/69 BT250S
BRITEQ® 34/69 BT250S
Page 20

NEDERLANDS HANDLEIDING
NEDERLANDS HANDLEIDING
Om naar de functies terug te keren zonder iets te wijzigen moet u weer op de MENU toetsdrukken.
Normal: Pan beweging wordt nietomgekeerd.
Paninversion: Panbewegingwerkt tegenovergesteld
Druk op deMENU toets tot op de display weergegevenwordt.
Druk op de ENTER toets,de display begint te knipperen.
Gebruik de DOWN en UP toetsen om (normal) of (pan inversion)te selecteren.
Wanneer de gewenste modus op de display wordt weergegeven, druk dan op de ENTER toets om uw
keuze tebevestigen.
(anders keerthij na 8 seconden automatisch weernaar de hoofdfuncties zonderiets gewijzigd te hebben)
Om naar de functies terug te keren zonder iets te wijzigen moet u weer op de MENU toetsdrukken.
Normal: Tilt bewegingwordt nietomgekeerd.
Tiltinversion: tiltbewegingwerkt tegenovergesteld
Druk op deMENU toets tot op dedisplay weergegeven wordt.
Druk op de ENTER toets,de display begint te knipperen.
Gebruik de DOWN en UP toetsen om (normal) of (tiltinversion) te selecteren.
Wanneer de gewenste modus op de display wordt weergegeven, druk dan op de ENTER toets om uw
keuze tebevestigen.
(anderskeerthijna 8 seconden automatisch weernaar de hoofdfuncties zonder iets gewijzigd te hebben)
Om naar de functies terug te keren zonder iets te wijzigen moet u weer op de MENU toetsdrukken.
Display on: displayis steeds aan.
Display off: display is uit wanneer deze niet gebruiktwordt.
Druk op deMENU toets tot op de display weergegevenwordt.
Druk op de ENTER toets,de display begint te knipperen.
Gebruik de DOWN en UP toetsen om (display steeds aan) of (display uit wanneer niet in
gebruik).
Wanneer de gewenste modus op de display wordt weergegeven, druk dan op de ENTER toets om uw
keuze tebevestigen.
(anders keerthij na 8 seconden automatisch weer naar de hoofdfunctieszonder iets gewijzigd te hebben)
Om naar de functies terug te keren zonder iets te wijzigen moet u weer op de MENU toetsdrukken.
Display normal:display kan afgelezen worden wanneer het toestel op de grondstaat.
Display inversion:display kan afgelezen worden wanneer hettoestel onderstebovenopgehangen is.
Druk op deMENU toets tot knippert op de display. (gewone weergave)
Gebruik de ENTER toets om over te gaan naar (omgekeerde weergave), deze optie zal
automatischbehouden worden na 8 seconden. Of druk weer op de ENTER om terug te gaan naar
(gewone weergave).
Druk op de MENU toets om naar de functies weer te keren.
Pan Inversion
Tilt Inversion
Led Display
DisplayInversie
Used to help you adjusting the focus of the light beam and gobos.
Druk op deMENU toets tot knippertopdedisplay
Druk op de ENTER toets zodat het toestelnaar “tilt90°” positie gaat.
Druk op de ENTER toets zodat het toestel naar “pan 0°” positie gaat.
Druk op de ENTER toets zodat het toestelnaar “pan 90°” positie gaat.
Druk op de ENTER toets zodat het toestel naar “pan 180°” positie gaat.
Druk op de ENTER toets zodat het toestelnaar “pan 270°” positie gaat.
In de 5 vorige stappen bent u in staat om de focus aan te passen met de UP/DOWN toetsen op het toestel
(De display toontde actuele status vande focus)
Attentie: please note that you can only set an “average focus” for all 5 positions, so it is not possible to set
the focus perfectly sharp for all directions.
To go back to the functions press the MENU button.
Wordt gebruikt om het interne “zelftest” programmain te schakelen. Alle mogelijkheden van het
toestel zullendan automatischoverlopen worden.
Druk op deMENU toets tot knippertop de display.
Druk op de ENTER toetsom het interne self-test programma te starten.
Druk op de MENU toets om naar de functies weer te keren.
Wordt gebruikt om de temperatuur in hetlampcompartimentaan te duiden .
Druk op deMENU toets tot knippert op de display.
Druk op de ENTER toetsen de omgevingstemperatuurvan de lamp zal getoondworden op de display .
Druk op de MENU toets om naar de functies weer te keren.
Wordt gebruikt omhet aantal werkuren van het toestel weer te geven.
Druk op deMENU toets tot knippertop de display.
Druk op de ENTER toetsomhet aantal werkuren van het toestel weer te geven op de display.
Druk op de MENU toets om naar de functies weer te keren.
Wordt gebruikt om de lampAAN/UIT te zetten zodat u de lamp kan afkoelen met de interne
koelvinnenvooraleer tetransporteren.
Druk op deMENU toets tot knippert op de display.
Druk op de ENTER toets,de display begint te knipperen.
Gebruik de DOWN en UP toetsen om (lamp AAN)of (lampUIT) modus te selecteren.
Wanneer de gewenste modus op de display wordt weergegeven, druk dan op de ENTER toets om uw
keuze tebevestigen.
(anderskeerthijna 8 seconden automatisch weernaar de hoofdfuncties zonder iets gewijzigd te hebben)
Om naar de functies terug te keren zonder iets te wijzigen moet u weer op de MENU toets drukken.
FocusAdjust
Self-Test
Ambienttemperature of lamp
Fixture Hours
Lamp Display
BRITEQ® 35/69 BT250S
Wordt gebruikt omeen algemene reset van het toesteluit te voeren.
Druk op deMENU toets tot knippertop de display.
Druk op de ENTER toetsomallekanalen terug in te stellen volgens hun standaardwaarde.
Druk op de MENU toets om naar de functies weer te keren.
Gelieve ook het hoofdstuk over de DMX kanaalconfiguratie van het toestel om een reset via DMX uit te
voeren.
Reset
BRITEQ® 36/69 BT250S
Page 21

NEDERLANDS HANDLEIDING
NEDERLANDS HANDLEIDING
HOME POSITION ADJUST:
Druk op de MENU voor tenminste 5 seconden om
de offset modus te activeren.
Nu kan u de home position ( dit is de zero positie )
aanpassen.
Wanneer u de gobo en kleur home position wilt
aanpassen dient u eerst de modus te
gebruiken.
De mogelijke functies worden hieronder
weergegeven:
Druk op de MENU voor tenminste5 seconden om de offset modus te activeren.
Gebruik de DOWN en UP toetsen tot tot op de display weergegeven wordt.
Druk op de ENTER toets, de display begint te knipperen.
Gebruik DOWN en UP om de pan home position aan te passen.
Wanneer de positie is geselecteerd, druk dan op de ENTER toets OF ga automatisch terug naar de
Om terug te gaannaarde hoofdfuncties zonder enige veranderingen door te voeren wacht 8 seconden.
Druk op de MENU voor tenminste 5 seconden om de offsetmodus te activeren.
Gebruik de DOWN en UP toetsen tot tot op de display weergegeven wordt.
Druk op de ENTER toets, de display begint te knipperen.
Gebruik DOWN en UP om de tilt home position aan tepassen.
Wanneer de positie is geselecteerd, druk dan op de ENTER toets OF ga automatisch terug naar de
Om terug te gaannaardehoofdfuncties zonder enige veranderingen door te voeren wacht 8 seconden.
Druk op de MENU voortenminste5 seconden om de offset modus te activeren.
Gebruik de DOWN en UP toetsen tot tot op de display weergegeven wordt.
Druk op de ENTER toets zodat het toestel de “tilt 135°” positieinneemt.
Druk op de ENTER toets zodat het toestelde “tilt45°” positie inneemt.
Druk op deENTER toets zodat het toestelde “pan 0°” positie inneemt.
Druk op de ENTER toetszodathet toestelde “pan 90°” positie inneemt.
Druk op deENTER toets zodat het toestelde“pan 180°” positie inneemt.
Druk op de ENTER toetszodatehttoestel de “pan 270°” positie inneemt
In de vorige 6 stappen kunt u de focus instellen met de UP/DOWN toetsen
Om terug te gaan naar de hoofdfuncties zonder enige veranderingen door te voeren wacht 8 seconden.
Panoffset
offsetfunctieszonder veranderingen door te voeren door op de MENU toetste drukken
Tilt offset
offsetfunctieszonder veranderingen door te voeren door op de MENU toetste drukken
FocusAdjust
DMX AANSLUITINGEN
Het DMX protocol is een veelgebruikt hoge snelheidssignaal voor het besturen van
“intelligente”lichteffecten. U moet een “kettingverbinding” maken tussen uw DMX controller en
alle andere lichteffecten door middel van symmetrische XLR M/V kabels van goede
kwaliteit.Om vreemde reacties van uw lichteffecten te voorkomen, die te wijten zijn aan allerlei
storingen, moet u een signaalbegrenzer van 90Ω tot 120Ω plaatsen aan het einde van de
ketting.Gebruik nooit Y- splitsingskabels, dit zal eenvoudigwegnietwerken!
Elk lichteffect in de ketting moet haar eigen startadreshebben zodat het toestel weet welke instructies er van
de controller moetenopgevolgdwordenen welke niet.
HOE HET JUISTE STARTADRESINSTELLEN:
Zie het vorige hoofdstuk (DMX-512 adresinstelling) om te leren hoe u het startadres in dit toestel moet
instellen. Het startadres van elk toestel is zeer belangrijk. Het is echter onmogelijk om u in deze handleiding
uit te leggen welk startadres u moet instellen, aangezien dit volledig afhangt van de controller die u gaat
gebruiken… gelieve dus de handleiding van uw DMX controller te raadplegen om uit te zoeken welk
startadresu moet instellen.
BRITEQ® 37/69 BT250S
BRITEQ® 38/69 BT250S
Page 22

NEDERLANDS HANDLEIDING
NEDERLANDS HANDLEIDING
DMX-CONFIGURATE VANDE BT250S:
16-kanaals modus:
8-kanaals modus:
1. Om de DMX te resetten, zet de DMX waarden van CH-8 & CH-16 op 255, het toestel zal zichzelf
resettenna ongeveer5 seconden
Om de lamp aan te zetten, zet de DMX waarde van CH-8 op 247 & CH-16 op 255
Om de lamp uit te zetten, zet de DMX waarde van CH-8 op 239 & CH-16 op 255
2. Om de kleur muziekgestuurd te maken, zet de DMX waarde van CH-6 & CH-7 op 255
Om de gobo’s muziekgestuurd te maken, zet de DMX waarde van CH-8 & CH-9 op 255
BRITEQ® 39/69 BT250S
BRITEQ® 40/69 BT250S
Page 23

NEDERLANDS HANDLEIDING
NEDERLANDS HANDLEIDING
HOE DIT TOESTEL BEDIENEN
Telkens u het toestel aan zet zal er I250 op de display verschijnen en zullen alle motoren naar hun
basispositieterugkeren.Misschienzult u wat geluiden horen gedurende 20 seconden. Daarna zal het toestel
klaar zijnom DMX signalen te ontvangen of om de ingebouwde programma’s uit te voeren.
U kunt dit toestelop 3 manieren gebruiken:
VIADE INGEBOUWDE MASTER/SLAVEPROGRAMMA’S:
Kies deze functie wanneer u onmiddellijk een kant-en-klare show wilt. Wanneer de toestellen via
master/slave met elkaar te verbonden zijn, dan zal het eerste toestel alle andere toestellen sturen en zo
een automatische,muziekgestuurde en gesynchroniseerde show uitvoeren.Er mag niets aangesloten zijn
op de DMX ingang van het eerste toestel, zijn master LED zal continu aan zijn en de sound LED zal
knipperen op het ritme van de muziek.
VIADEEENVOUDIGE CA-8 CONTROLLER:
Wanneer de toestellen in Master/slave configuratie gebruikt worden raden wij u ten
sterksteaan de CA-8 “Easy controller” te gebruiken. Sluit deze kleine controller aan op
de 1/4” jack van demaster.Zo kunt u de volgende functies van op afstand bedienen:
Stand by
Functie
Modus
o Via de ingebouwde master/slaveprogramma’s
o Via de eenvoudige CA-8controller
o Via een universele DMX controller
De MASTER beschikt over 2 ingebouwde shows: u kunt (show 1), (show 2),
(show3) of (show 4) onmiddellijk in het menu van demasterkiezen.
De SLAVES beschikken over 2 opties: de andere toestellen staan als slave
ingesteld (slave-LEDis continu aan). Om een prachtige lichtshow te creëren kunt u
gecontrasteerde bewegingen invoeren (pan/tilt van het slave toestel werkt
omgekeerd) In the menu van het slave toestel kunt u naar optie gaan en
de volgende selectie maken:
o Normalslave: slave werkt synchroon met de master.
o 2 light show: slave werkt tegenovergesteld ten opzichte van
de master.
Blackout het toestel
Strobo
1.Gobo / kleur
sync. strobo
2.Sync. strobo
3.”Two-light”
strobo
geluid 1
(LED uit )
X/Ybewegings
showmodus
selectie
( Show 1 ~ Show 4 )
geluid 2
(LEDknippert
normaal)
Color/Gobo
selectie
1. Blijf duwen
voor gobo
2. Duw kort voor
kleurverandering
Traag/geluid3
(LED aan)
X/Ybeweging instelling
1.Pan positie
2.Tiltpositie
Stel eerst het Master toestel in, stel
daarna de de positie van de Slave
toestellenin.
Positie/vergrendelen in een positie
(LED knippertsnel)
ONDERHOUD
Overtuig U ervan dat het gebied onder de installatieplaats vrij is van ongewenste personen tijdens het
onderhoud.
Zet het toestel uit, trek de netstekkeruit het stopcontact en wacht tot het toestel is afgekoeld.
Bij inspectie moetende volgendepunten worden gecontroleerd.
Alle schroeven gebruikt om het te toestel te installeren en al zijn onderdelen moeten goed vastgedraaid
zijn en mogen niet verroestzijn.
Behuizingen, vastzetstukken, installeringplaatsen (plafond, spanten, schokbrekers) mogen absoluut niet
verwrongenzijn.
Wanneer een optische lens klaarblijkelijk beschadigd is door barsten of diepe krassen, dan moet deze
vervangenworden.
De stroomkabels moeten in perfecte staat zijn en behoren vervangen te worden, wanneer er zelfs maar
een klein probleem ontdekt werd.
Om het toestel tegen oververhitting te beschermen, behoren de ventilatoren (als die er zijn) en de
ventilatieopeningenelke maand gereinigd te worden.
De binnenkant van het toestelbehoortelk jaar gereinigd te worden meteen stofzuiger ofeen luchtspuit.
Het schoonmaken van inwendige en uitwendige optische lenzen en/of spiegels moet regelmatig worden
uitgevoerd om een zo goed mogelijke lichtuitstraling te verkrijgen. Hoe vaak ze schoon moeten worden
gemaakt hangt af van de omgeving waar het toestel wordt gebruikt: een klamme, rokerige of bijzonder
vuileomgevingkan een grotereopeenhopingvan vuil veroorzakenopdeoptischeuitrusting.
Reinig met een zachtedoek en gebruik normaleglasreinigendeproducten.
Droog de onderdelen altijdzorgvuldig af,
Reinig de uitwendigeoptische uitrusting minstenséén keerpermaand.
Reinig de inwendigeoptischeuitrusting minstens omde 3 maanden.
Let op: We bevelen sterk aan dat het schoonmaken van de binnenkant wordt uitgevoerd door
vakbekwaampersoneel!!
TECHNISCHE KENMERKEN
Netvoeding: AC 230 V, 50 Hz
Zekering: 10 A/250V
Geluidscontrole: Inwendigemicrofoon
Pan/Tilt: 540°/270° met automatischecorrectie
Stralingshoek: 13°
DMX verbinding: 3pins XLR mannelijk/vrouwelijk
Lamp: MSD250/2en NSD250/2
Afmetingen: 428 x 371 x 466 mm
Gewicht: 23 kg
BRITEQ® 41/69 BT250S
U kan de laatste versie van deze handleidingdownloadenvia Onze website: www.briteq-lighting.com
Elke inlichting kanveranderenzonderwaarschuwingvooraf
BRITEQ® 42/69 BT250S
Page 24

DEUTSCH BEDIENUNGSANLEITUNG
DEUTSCH BEDIENUNGSANLEITUNG
Vielen Dank, dass Sie sich für den Erwerb dieses BriteQ®-Produkt entschieden haben. Bitte lesen sie diese
Bedienungsanleitung sorgfältig vor der Inbetriebnahme durch, zur vollen Ausschöpfung der Möglichkeiten,
die dieses Gerät bietet sowie,zu Ihrer eigenen Sicherheit.
EIGENSCHAFTEN
Das Gerät ist funkentstört und erfüllt die Anforderungen der europäischen und nationalen Bestimmungen.
Entsprechende Dokumentationliegtbeim Herstellervor.
LeistungsstarkerintelligenterMoving-HeadScheinwerfer für Discotheken und Verleihfirmen
16 DMX Kanäle (pan - tilt – pan/tilt Geschwindigkeit - dimmer - shutter/shaking - color – gobo - gobo
Drehung– prism - prismDrehung - focus – pan 16bit – tilt 16bit – reset+ Lampe on/off)
Kann auf 8 oder 16 DMXKanäle umgeschaltetwerden
DMXFernadddressierung
Sanftes540°panning und 270° tiltBewegungen mit automatischerKorrektureinstellung
7 rotierende,austauschbaregobos (D=26,8mm) + offen
9 trapezförmige,dicroitische Farben + weiß und unterschiedlich schneller Regenbogeneffekt
3-fachPrisma,in beiden RichtungenmitunterschiedlicherGeschwindigkeit drehbar
MenügesteuertesblauesLED Display kann on/offgeschaltet werden
13°Abstrahlwinkel mit FokuseinstellungüberDMX Steuerung
Blackoutund schneller Strobeeffekt bis zu 10 Blitze/Sekunde
SanftesDimmen0-100%
Kann in Master/SlaveModus mit eingebautenmikrofongesteuertenProgrammen eingesetzt werden
Optionale CA-8 Steuerung für unterschiedliche Betriebsarten verfügbar, einschließlich: Blackout,
verschiedene Stroboskopprogramme,manuelle Color/Gobo und X/Y position Auswahl,Programmauswahl
undLangsam-/Schnell-Modus.
LüfterkühlungundelektronischerÜberhitzungsschutz
VOR DER ERSTBENUTZUNG
Vor der Erstbenutzung bitte das Gerät zuerst auf Transportschäden überprüfen. Sollte das Gerät einen
Schaden aufweisen, Gerät bitte nicht benutzen, sondern unverzüglich mit ihrem Händler in Verbindung
setzen.
Wichtiger Hinweis: Das Gerät hat das Werk unbeschädigt und gut verpackt verlassen. Es ist wichtig,
dass der Benutzer sich streng an die Sicherheitshinweise und Warnungen in der Bedienungsanleitung
hält. Schäden durch unsachgemäße Handhabung sind von der Garantie ausgeschlossen. Der Händler
übernimmt keine Verantwortung für Schäden, die durch Nichtbeachtung der Bedienungsanleitung
hervorgerufen wurden.
Die Bedienungsanleitung, für zukünftiges Nachschlagen, bitte aufbewahren. Bei Verkauf oder sonstiger
Weitergabedes Gerätes,bitte Bedienungsanleitung beifügen.
Packungsinhaltprüfen:
Bitte überprüfen Sie, dass die Packung folgende Einzelteileenthält:
Bedienungsanleitung
BT250S Gerät
2 Halters
SICHERHEITSHINWEISE
CAUTION
Sie Reparaturendem qualifiziertenKundendienst.
Das Blitzsymbol im Dreieck weist den Benutzer darauf hin, das eine Berührungsgefahr mit nicht
isolierten Teilen im Geräteinneren, welche eine gefährliche Spannung führen, besteht. Die
Spannung ist so hoch, das hier die Gefahreines elektrischenSchlagesbesteht.
Das Ausrufezeichen im Dreieck weist den Benutzer auf wichtige Bedienungs- und
Wartungshinweise in den Dokumenten hin, die dem Gerätbeiliegen.
DiesesSymbolbedeutet:Nur innerhalb von Räumenverwenden.
DiesesSymbolbedeutet:Achtung! Bedienungsanleitunglesen!
Dieses Symbol stellt fest: der minimale Abstand von beleuchteten Gegenständen. Der minimale
AusUmweltschutzgründen,Verpackung bittewiederverwenden, oderrichtig trennen.
Ein neues Gerät kann Geruch oder Rauch entwickeln. Das ist völlig normal und legt sich nach einigen
Zur Vermeidung von Stromschlag oder Feuer,Gerät bitte nicht Regen oder Feuchtigkeit aussetzen.
Zur Vermeidung von Kondensation im Inneren des Geräts, bitte nach Transport in eine warme Umgebung
GerätnichtimFreien und in feuchten Räumen und Umgebungenverwenden.
Keine Metallgegenstände oder Flüssigkeiten ins Innere des Geräts gelangen lassen, Kurzschluß oder
Gerät nur in gut belüfteter Position und entfernt von entflammbaren Materialien oder Flüssigkeiten
Ventilationsöffnungen nicht abdecken,da Überhitzungsgefahr!
Nicht in staubiger Umgebung verwendenund regelmäßig reinigen.
Für Kinderunerreichbar aufbewahren.
UnerfahrenePersonen sollen das Gerät nicht bedienen.
Umgebungstemperaturdarf 40ºC nichtüberschreiten.
Die Oberflächentemperatur kann bis zu 85ºC erreichen, Gerät während des Betriebs nicht mit bloßen
Sicherstellen, daß sich während des Auf- und Abbaus keine unbefugten Personen unterhalb des Geräts
Vordem AuswechselndesLeuchtmittelsodersonstigen Eingriffen,10 Minuten Abkühlzeit einhalten.
Stets Netzsteckerziehen,wenn Gerät für längeren Zeitraumnicht genutzt, oder es gewartetwird.
ElektrischeAnschlüsse nurdurch qualifiziertes Fachpersonal überprüfen lassen.
Sicherstellen,daß Netzspannung mit Geräteaufkleberübereinstimmt.
Gerätnichtmit beschädigtem Netzkabelbetreiben.
Netzkabelnicht mit anderenKabelnin Berührung kommenlassen!
Zur Einhaltung der Sicherheitsbestimmungenmuß das Gerät geerdet sein.
Gerät nicht an einen Dimmeranschließen.
Ausschließlichvorschriftsmäßige Kabel zur Installationverwenden.
Gerät nicht öffnen. Abgesehenvom tausch des Leuchtmittels und der Sicherung sind keine zu wartenden
Sicherung
Bei Fehlfunktion,Gerätnichtbenutzen und mitHändler in Verbindung setzen.
BeisichtbarenBeschädigungen müssen Gehäuseund Optik ersetztwerden.
Bei Transport bitteOriginalverpackungverwenden, um Schäden am Gerät zu vermeiden.
AusSicherheitsgründen dürfen an dem Gerät keineunbefugten Veränderungen vorgenommenwerden.
WichtigerHinweis: Nicht direkt in die Lichtquelle blicken! Gerät nicht verwenden, wenn sich Personen im
Raum befinden, die unterEpilepsieleiden.
Abstandzwischen Projektorund dem belichteten Gegenstandmuß mehr als 1 Meter sein.
Minuten.
einige Zeit zum Temperaturausgleich bringen. Kondensation kann zu Leistungsverlust des Gerätes oder
garBeschädigungführen.
Fehlfunktion können die Folge sein. Falls es doch einmal vorkommen sollte, bitte sofort Netzstecker
ziehen und vom Stromkreis trennen.
betreiben. Mindestabstandan allen Seiten soll mindestens50 cm sein.
Händenanfassen.
befinden.
Bauteileim Gerät enthalten.
niemals
reparieren oderüberbrücken,sondern
ACHTUNG: Um sich nicht der Gefahr eines elektrischen Schlags
auszusetzen,entfernenSie keines der Gehäuseteile.Im Geräte-inneren
befinden sich keine vom Benutzer reparierbaren Teile.Überlassen
immer
mit gleichartigerSicherungersetzen!
BRITEQ® 43/69 BT250S
BRITEQ® 44/69 BT250S
Page 25

DEUTSCH BEDIENUNGSANLEITUNG
DEUTSCH BEDIENUNGSANLEITUNG
EINSETZEN/AUSTAUSCHEN DER LICHTQUELLE
Bei Austausch oder Ersatz der Lichtquelle Gerät für mindestens 15 Minuten abkühlen
lassen. Stets Netzstecker ziehen und vom Stromkreis trennen! Stets gleichartige
Ersatzteile (Lichtquelle, Sicherungetc) verwenden. Original-Ersatzteileverwenden.
Gerätausschalten und Netzstecker ziehen.
Etwa 15 Minuten abwarten, bis sich das Gerät abgekühlt
hat.
Lösen Sie die 2 Schrauben an der Rückseite der
Befestigung, um das Lampenfachzu öffnen (Siehe A auf der
Abbildung)
Im Innern sehen Sie die Lampenfassung. Ziehen Sie die
Lampenfassung vorsichtig aus demLampenfach.
Ziehen sie die gebrauchte Lampe heraus. Halte Sie dabei
die Lampenfassungfest!
Halten Sie die Lampenfassung fest, während Sie die neue
Lampevorsichtigin die Fassung drücken.
Achtung! Geräteaufkleber oder in Technischen
Einzelheiten in dieser Bedienungsanleitung befragen,
welcher Typ Lichtquelle verwandt werden muss. Keinesfalls
Lichtquelle mit höhererWattzahleinsetzen!
Lichtquelle nicht mit bloßen Händen berühren! Das führt zu
einer dramatischen Verkürzung der Lebensdauer der
Lichtquelle. Sollten Sie die Lichtquelle doch einmal berührt
haben,mitetwas Brennspiritus reinigen und gut abwischen.
NeueLeuchtquelleeinsetzenund sicherstellen,dass keine Kabel berührt werden.
Verschließen Sie das Lampenfach mit den Schrauben.
Vergewissern Sie sich, dass sich die Lampe in der Mitte des Reflektors an der idealsten Stelle befindet.
Schalten Sie die Vorrichtung ein und richten Sie die Lampe mit Hilfe der Schrauben A, B und C, die sich
an der Rückseite des Kopfes befinden (A aufder Abbildung) aus.
Fertig!
AUSTAUSCH DER ROTIERENDEN GOBOS
ACHTUNG: Einsetzen der Gobos nur, wenn das Gerät ausgeschaltet ist!
Keinesfalls Schrauben der rotierenden Gobos lösen, da dieses auch die Kugellager öffnet.
Gerätausschalten und Netzsteckerziehen.
ObereKunststoffabdeckung abnehmen(4 Schrauben).
Gobopalette lokalisieren und Befestigungsring des
AltesGoboentfernen und neues Gobo einsetzen.
Befestigungsring zusammendrücken und auf der
Fertig!
EineReparatur istausgesprochen schwierig!
Gobos, das Sie auswechseln wollen, mit geeignetem
Werkzeug entfernen.
Vorderseitedes Gobos einsetzen.
ÜBERKOPF-MONTAGE
Wichtig: Montage ausschließlich durch
qualifiziertes Fachpersonal durchführen lassen.
Unvorschriftsmäßiger Einbau kann erhebliche
Verletzungen und/oder Schäden verursachen.
Überkopf-Montage verlangt entsprechende
Erfahrung!Belastungsgrenzen müssen beachtet
werden, geeignetes Installationsmaterial muß
verwendet werden und das installierte Gerät
muß in regelmäßigen Abständen überprüft
werden.
Sicherstellen,dass sich keine unbefugten Personen
unterhalb des Geräts befinden, während es
installiertoder gewartetwird.
Gerät in gut belüfteter Position installieren, weit entfernt von entflammbaren Materialien und/oder
Flüssigkeiten.Einen Seitenabstand von mindestens50cm einhalten.
Gerät außerhalb der Reichweitevon Personen, und nicht in niedrigen Durchgängen oder in der Nähe von
Sitzgelegenheiteninstallieren.
Vor Montage sicherstellen, dass die gewählte Position wenigstens das 10-fache Gerätegewicht
aufnehmenkann.
Zur Aufhängung stets geeignetes Befestigungsmaterial verwenden, das das 12-fache Gerätegewicht
aushalten kann. Eine zweite Sicherungsaufhängung muß angebracht werden, die ein Absacken des
Geräts vonmehr als 20 cm verhindert, solltedieBefestigung brechen.
Gerät gut befestigen. Eine freischwingende Aufhängung ist gefährlich und sollte auf gar keinen Fall in
Betrachtgezogenwerden!
Ventilationsöffnungen nicht abdecken,da Überhitzungsgefahr!
Betreibermuß sicherstellen,dass die sicherheitsrelevanten und technischen Installationenvor Erstbetrieb
fachmännischvorgenommenwordensind.
Installationen sollten jährlich durch qualifiziertes Fachpersonal inspiziert werden, um jederzeit einen
sicherenBetrieb zu gewährleisten.
EINSTELLEN DES GERÄTS
BEDIENFELD:
BRITEQ® 45/69 BT250S
BRITEQ® 46/69 BT250S
Page 26

DEUTSCH BEDIENUNGSANLEITUNG
DEUTSCH BEDIENUNGSANLEITUNG
1. DISPLAY zeigt dieverschiedenenMenüs sowie ausgewählte Funktionen.
2. LEDs
3. TASTEN
4. EingangFernsteuerung: SchließenSie die wahlweise CA-8 Fernsteuerung an der 1/4”Mikrofonbuchse
zur Steuerungvon Stand-by, Funktionund Modus an.
5. EMPFINDLICHKEIT: Zur Einstellung derEmpfindlichkeit des Mikrofons im Einzel- oder Reihenbetrieb.
6. DMX AUSGANG/EINGANG: Zur DMX512 Verbindung der Geräte wird Verwendung qualitativ
hochwertiger3-Stift XLR M/F abgeglichener Kabel empfohlen.
HAUPTMENÜ:
Zur Auswahl jeglicher voreingestellter
Funktion MENÜ-Taste so lange drücken,
bis das gewünschte Display angezeigt
wird.
Auswahl der Funktion mit EINGABE
(ENTER), das Display blinkt.
Mit ABWÄRTS und AUFWÄRTS
Betriebsartwählen.
Sobald die gewünschte Betriebsart
ausgewählt wurde, mit EINGABE
(ENTER) bestätigen. Nach 8 Sekunden
kehrt das Display automatisch ohne
Veränderung zu den Hauptfunktionen
zurück. Zurück zu den Funktionen ohne
Veränderung mit MENÜ-Taste. Die
Hauptfunktionensind rechtsabgebildet.
ZumEinstellen der Startadresse in DMX
Einstellung.
MENU-Taste drücken bis im
Display angezeigtwird.
EINGABE (ENTER) drücken und das
Display beginnt zu blinken.
Mit ABWÄRTS und AUFWÄRTS die
DMX512Adresseverändern.
Sobald die richtige Adresse im Display
angezeigt wird, mit EINGABE (ENTER)
speichern (anderenfalls nach 8 Sekunden
Rückkehr zu den Hauptfunktionen ohne
Änderung).
Zur Rückkehr zu den Funktionen ohne
VeränderungMENÜ-Taste erneutdrücken.
DMX An GegenwärtigDMXEingang
HAUPTGERÄT An Hauptgerät in Betrieb
UNTERGERÄT An UntergerätinBetrieb
TON Blinkt Tonsteuerung
MENÜ Zur Auswahlder Programmfunktionen
ABWÄRTS Zurück in den gewählten Funktionen
AUFWÄRTS Vorwärts in den gewählten Funktionen
EINGABE Bestätigungder gewählten Funktionen
DMX512 EinstellungAdresse
ChannelMode
DrückenSieMENU,bis imDisplay angezeigtwird.
Drücken Sie ENTER,damitbeginntdasDisplayzu blinken.
Mit DOWN und UP wählen Sie den (16-Kanal)oder (8-Kanal) Modus.
Nach derModusauswahl drücken Sie ENTERzumEinstellen
(oderzur automatischenRückkehr zu den Hauptfunktionen,wenn keine Eingabe innerhalb8 Sekunden).
Rückkehr zu den Funktionenohne Veränderung mit erneutemTastendruck aufMENU.
Zur Auswahldes Showbetriebs in Einzel- oderReihenbetrieb.
MENU-Tastedrücken bis im Display erscheint.
Dann EINGABE (ENTER)drücken undDisplay beginnt zu blinken.
Mit AUFWÄRTS und ABWÄRTS (Show 1), (Show 2), (show3)oder (show4)
auswählen.
Sobald die richtige Adresse im Display angezeigt wird, mit EINGABE (ENTER) speichern (anderenfalls
nach8 SekundenRückkehr zudenHauptfunktionen ohneÄnderung).
Zur Rückkehr zu den Funktionenohne Veränderung MENÜ-Tasteerneut drücken.
Untergerät arbeitet entgegengesetztoder synchron mitdem Hauptgerät.
MENÜ-Tastedrücken bis im Display angezeigt wird.
Dann EINGABE (ENTER)drücken undDisplay beginnt zu blinken.
Mit AUFWÄRTS und ABWÄRTS (Normal)oder (2Lightshow)auswählen.
Sobald die richtige Adresse im Display angezeigt wird, mit EINGABE (ENTER) speichern (anderenfalls
nach8 SekundenRückkehr zudenHauptfunktionen ohneÄnderung).
Zur Rückkehr zu den Funktionenohne Veränderung MENÜ-Taste erneut drücken.
Blackout:Wird kein DMX-Signalerkannt, gehtdas Gerät in Blackout und wartet auf das DMX-Signal.
Kein Blackout:Wird kein DMX-Signal erkannt, schaltet das Gerät automatischauf Einzelbetriebum.
MENÜ-Tastedrücken bis im Displayerscheint.
Dann EINGABE (ENTER)drücken undDisplay beginnt zu blinken.
Mit AUFWÄRTS und ABWÄRTS (Blackout ein) oder (kein Blackout)auswählen.
Sobald die richtige Adresse im Display angezeigt wird, mit EINGABE (ENTER) speichern (anderenfalls
nach8 SekundenRückkehr zudenHauptfunktionen ohneÄnderung).
Zur Rückkehr zu den FunktionenohneVeränderung MENÜ-Taste erneut drücken.
Normal: Schwenkbewegung ist nichtumgekehrt.
Schwenk Umkehrung:Schwenkbewegungistumgekehrt.
MENÜ-Tastedrücken bis im Display angezeigt wird.
Dann EINGABE (ENTER)drücken und Display beginnt zublinken.
Showbetrieb
Show1 – Bodenmontage,Neigungswinkel 210°.
Show2 – Deckenmontage,Neigungswinkel90°.
Show3 – Montage auf demLautsprecher,
Der Scheinwerferiststetsaufdas Publikum ausgerichtet, beispielsweise vorderBühne.
Schwenkwinkel (vonlinksnachrechts): 160°. Neigungswinkel: 90° (60° oberhalb desHorizonts,
30° unterhalb des Horizonts).
Show4 - Montage unterderDecke.
Der Scheinwerfer projeziert hauptsächlich vor der Bühne. Schwenkwinkel (von links nach rechts):
160°. Neigungswinkel: 90° (vertikal, vorn 75°, hinten 15°).
Reihenbetrieb
Blackout
SchwenkUmkehrung
BRITEQ® 47/69 BT250S
BRITEQ® 48/69 BT250S
Page 27

DEUTSCH BEDIENUNGSANLEITUNG
DEUTSCH BEDIENUNGSANLEITUNG
Mit AUFWÄRTS und ABWÄRTS (Normal) oder (SchwenkUmkehrung)auswählen.
Sobald die richtige Adresse im Display angezeigt wird, mit EINGABE (ENTER) speichern (anderenfalls
nach8 SekundenRückkehr zuden Hauptfunktionenohne Änderung).
. ZurRückkehr zu denFunktionenohneVeränderungMENÜ-Taste erneutdrücken.
Normal: Neigungsbewegungist nicht umgekehrt.
NeigungUmkehrung: Neigungsbewegungist umgekehrt.
MENÜ-Tastedrücken bis im Display erscheint.
Dann EINGABE (ENTER)drücken undDisplay beginnt zu blinken.
Mit AUFWÄRTS und ABWÄRTS (Normal) oder (NeigungUmkehrung)einstellen.
Sobald die richtige Adresse im Display angezeigt wird, mit EINGABE (ENTER) speichern (anderenfalls
nach 8 Sekunden Rückkehr zu den HauptfunktionenohneÄnderung).
Zur Rückkehr zu den Funktionenohne Veränderung MENÜ-Taste erneut drücken.
Display an: Displayist ständig eingeschaltet.
Display aus: Display ist ausgeschaltet,wenn nicht in Benutzung.
MENÜ-Tastedrücken bis im Display erscheint.
Dann EINGABE (ENTER)drücken undDisplay beginnt zu blinken.
Mit ABWÄRTS und AUFWÄRTS (Display ständig eingeschaltet) oder (Display
ausgeschaltet,wennnicht in Benutzung) auswählen.
Sobald die richtige Adresse im Display angezeigt wird, mit EINGABE (ENTER) speichern (anderenfalls
nach8 SekundenRückkehr zudenHauptfunktionen ohneÄnderung).
Zur Rückkehr zu den Funktionenohne Veränderung MENÜ-Taste erneut drücken.
Display Normal: Displayist lesbar, wenn Gerät auf demBoden installiert ist.
Display Umkehrung:Display ist lesbar, wenn Gerät auf dem Kopf stehendinstalliert ist.
MENÜ-Tastedrücken bis im Display blinkt (Normal Display).
Mit EINGABE (ENTER) zu Betriebsart (Display Umkehrung) umschalten, die Einstellung wird nach
8 Sekunden automatischgespeichert oder EINGABE(ENTER) erneut drücken und so zu (Normal
Display)zurückkehren.
Zur Rückkehr zu denFunktionenMENÜ-Tastedrücken.
Zur Einstellungde Brennweite des Richtstrahls und der Gobos.
MENÜ-Tastedrücken bis im Display blinkt.
EINGABE (ENTER) drücken, dasGerät begibt sich in 90°Neigungswinkel.
EINGABE (ENTER) drücken, das Gerät begibt sich in Position Schwenk0°.
EINGABE (ENTER) drücken, das Gerät begibt sich in Position Schwenk90°.
EINGABE (ENTER) drücken, das Gerät begibt sich in Position Schwenk 180°.
EINGABE (ENTER) drücken, das Gerät begibt sich in Position Schwenk 270°.
Während der vorangegangenen 5 Schritte waren Sie in der Lage, die Brennweite mit
AUFWÄRTS/ABWÄRTS auf dem Gerät einzustellen (Display zeigt die gegenwärtige BrennweitenEinstellung).
Achtung: Bittebeachtensie,dass Sie nur eine „durchschnittliche Brennweite” für alle5 Positioneneinstellen
können, eine perfekte Einstellung für jede einzelne Position ist also nicht möglich.
Zur Rückkehr zu denFunktionenMENÜ-Tastedrücken.
NeigungUmkehrung
LED Display
DisplayUmkehrung
Brennweiteeinstellen
Zur Aktivierungdes eingebautenSelbsttest-Programms,das alle Möglichkeiten des Geräts anzeigt.
MENÜ-Tastedrücken bis im Display blinkt.
Mit EINGABE (ENTER) Selbsttest starten.
Zur Rückkehr zu denFunktionenMENÜ-Tastedrücken.
Anzeige der Temperaturim Beleuchtungskörper
DrückenSieMENU,bis im Displayblinkt.
Mit ENTERwird dieUmgebungstemperatur des Beleuchtungskörpers im Displayangezeigt.
Rückkehr zu den Funktionen mit erneutemTastendruckaufMENU.
ZurAnzeige der Arbeitsstunden des Geräts.
MENÜ-Tastedrücken bis im Display blinkt.
Mit EINGABE (ENTER) die Arbeitsstunden im Display anzeigen.
Zur Rückkehr zu denFunktionenMENÜ-Tastedrücken.
ON/OFFschalten des Beleuchtungskörpers, damit die Lampe durchdenLüfter vor Transport
heruntergekühltwerdenkann
DrückenSieMENU,bis imDisplayblinkt.
Mit ENTERbeginnt dasDisplay zu blinken.
Mit DOWN und UP wählen Sie (Lampe on) oder (Lampe off) Modus.
NachderModusauswahldrücken Sie ENTER zur Einstellung
(oderzur automatischenRückkehr zu den Hauptfunktionen,wennkeine Eingabeinnerhalb8 Sekunden).
Rückkehr zu den Funktionen ohne Veränderung miterneutem Tastendruck auf MENU.
ZurerzwungenenRückstellungdes Geräts.
MENÜ-Tastedrücken bis im displayblinkt.
Mit EINGABE (ENTER) alle Einstellungen in die Standardeinstellungenzurücksetzen.
Zur Rückkehr zu denFunktionenMENÜ-Tastedrücken.
Bitte lesen Sie auch im KapitelDMX-Kanal-Konfigurationüber Rückstellung in DMXnach.
Selbsttest
Ambienttemperature of lamp
Stundenzähler
Lamp Display
Zurückstellung
HOME POSITION ADJUST
Halten Sie MENU für wenigstens 5 Sekunden
gedrückt,um den Offsetmodus aufzurufen.
Nun können Siedie home position (das ist die
Nullstellung)einstellen.
Zur Einstellung der Gobo und Farbe home
position lassen Sie erst den Modus
ablaufen.
Die Funktionensind nachstehenderklärt:
Halten Sie MENU fürwenigstens 5 SekundenzurAktivierung des Offsetmodusgedrückt.
DrückenSie DOWN und UP, bis im Display angezeigt wird.
Mit ENTER stellt sich das Gerät auf “tilt 135°” Position ein.
Mit ENTER stellt sich das Gerät auf “tilt 45°” Position ein.
Mit ENTER stellt sich das Gerät auf“pan 0°” Position ein.
Einstellender Brennweite
BRITEQ® 49/69 BT250S
BRITEQ® 50/69 BT250S
Page 28

DEUTSCH BEDIENUNGSANLEITUNG
DEUTSCH BEDIENUNGSANLEITUNG
Mit ENTER stellt sich das Gerät auf “pan 90°”Position ein.
Mit ENTER stellt sich das Gerätauf“pan 180°”Positionein.
Mit ENTER stellt sich das Gerätauf“pan 270°”Positionein.
In den vorherigen 6 Schritten können Sie den Brennweite mit den UP/DOWN Tasten des Geräts
einstellen.
Zur Rückkehrzu denHauptfunktionenohneVeränderung 8 Sekunden abwarten.
Halten Sie MENU für wenigstens 5 SekundenzurAktivierung des Offsetmodusgedrückt.
Drücken Sie DOWN und UP,bis im Display angezeigt wird.
Drücken Sie ENTER,bis das Display blinkt.
Mit DOWN und UP stellenSie die pan homeposition ein.
Nach Auswahl der Position drücken Sie ENTER zur Einstellung ODER kehren automatisch zu den
Zur Rückkehr zu den Hauptfunktionen ohneVeränderung 8 Sekunden abwarten.
Halten Sie MENU für wenigstens 5 SekundenzurAktivierung des Offsetmodusgedrückt.
Drücken Sie DOWN und UP,bis imDisplayangezeigtwird.
Drücken Sie ENTER,bis das Display blinkt.
Mit DOWN und UP stellenSie die tilt home position ein.
Nach Auswahl der Position drücken Sie ENTER zur Einstellung ODER kehren automatisch zu den
Zur Rückkehr zu den Hauptfunktionen ohneVeränderung 8 Sekunden abwarten.
Panoffset
Offsetfunktionenohne Veränderung mitTastendruck auf MENUzurück.
Tilt offset
Offsetfunktionen ohne Veränderung mit Tastendruck auf MENUzurück.
ANSCHLUSS DES GERÄTS MIT DMX
Das DMX-Protocoll ist ein weit verbreitetes Hochgeschwindigkeits-Signal zur Steuerung von
intelligenten Beleuchtungsanlagen. DMX Controller und sämtliche Lichteffekte müssen mit
einem hochwertigen XLR M/F abgeglichenen Kabel (z.B. BriteQ ref. 7-0063)in Reihe
geschaltet sein. Zur Verhinderung von unerwünschten Effekten durch Störungen muss ein
90Ω bis 120Ω Endwiderstand verwandt werden. Niemals Y-Splitter-Kabel verwenden, das
funktionierteinfach nicht!
EINSTELLENDERRICHTIGEN STARTADRESSE:
Bitte im vorherigen Kapitel (DMX-512 Adresse einstellen) nachlesen, wie die Startadresse eingestellt wird.
Die Startadresse jedes einzelnen Geräts ist ausgesprochen wichtig. Unglücklicherweise ist es unmöglich,
Ihnen in dieser Bedienungsanleitung zu erklären, welche Startadresse Sie einzustellen haben. Das hängt
vollständig von dem verwandten Controller ab… Also, bittelesen Sie in der Bedienungsanleitung Ihres DMX
Controllersnach, wiedie Startadresseeinzustellen ist.
DMX-KONFIGURATION BT250S:
16-Kanal Modus
Jeder Lichteffekt in der Reihenschaltung benötigt seine eigene Startadresse, so dass ihn Kommandos vom
Controllerauch erreichen und dekodiert werdenkönnen.
BRITEQ® 51/69 BT250S
1. Für DMX Rückstellung stellen Sie den DMX Wert von CH-8 & CH-16 auf 255 ein, das Gerät stellt sich
nach etwa5 Sekunden zurück.
FürLampeeingeschaltet stellen Sie den DMX Wert von CH-8 auf 247 &CH-16 auf 255 ein.
FürLampeausgeschaltet stellenSie den DMX Wert von CH-8 auf 239 &CH-16 auf 255 ein.
BRITEQ® 52/69 BT250S
Page 29

DEUTSCH BEDIENUNGSANLEITUNG
DEUTSCH BEDIENUNGSANLEITUNG
2. Für Farbe soundaktiviert stellen Sie den DMXWert von CH-6 &CH-7 auf 255 ein.
Für Gobosoundaktiviert stellen Sie den DMX Wert von CH-8 & CH-9 auf 255 ein.
8-Kanal Modus
BEDIENUNG DES GERÄTS
Bei jedem Einschalten wird auf dem Display I575S angezeigt und sämtliche Motoren begeben sich in
Ausgangsstellung. Für etwa 20 Sekunden hören Sie einige Betriebsgeräusche. Danach ist das Gerät
betriebsbereitundkann DMX-Signaleempfangen oderdieeingebautenProgramme abspielen.
Sie können das Gerät auf3 verschiedeneWeisen bedienen:
ALSHAUPT-/UNTERGERÄT MIT EINGEBAUTEN,VORPROGRAMMIERTENFUNKTIONEN:
AuswahldieserFunktion,fallsSieeineunverzüglicheShow ablaufen lassen wollen.Durch Verbindung der
Geräte in Haupt-/Untergeräte steuert das erste Gerät die nachfolgenden Geräte und erzeugt eine
automatische, tongesteuerte, synchronisierte Lightshow. Am DMX Eingang ist nichts angeschlossen, die
Master-LEDistständig an und die Sound-LED blinktsynchron mit der Musik.
Wichtiger Hinweis! Diese Funktion arbeitet nur, wenn Betriebsart Blackout im Menü des
Hauptgeräts AUSgeschaltet ist, anderenfalls passiert gar nichts! Mehr dazu bitte im Kapitel
„Hauptmenü”nachlesen.
MIT EASY CONTROLLER:
Bei Verwendung in BetriebsartHaupt-/Untergerät empfehlenwirdringend die Verwendung
unseres CA-8 „Easy Controller”. Diesen kleinen Controller einfach an der 1/4” Buchse des
Hauptgerätsanschließenund dann folgende Funktionen steuern:
o Als Haupt-/Untergerät miteingebauten,vorprogrammiertenFunktionen
o Mit Easy Controller
o Mit Universal DMXController
HAUPTGERÄT hat 2 eingebaute Shows: Sie können (Show 1), (Show 2),
(show3) oder (show 4) direkt im Menü des Hauptgeräts auswählen.
UNTERGERÄTE haben 2 Betriebsoptionen: Die weiteren Geräte sind auf Betriebsart Untergerät
eingestellt (Untergerät-LED ist ständig an). Um eine großartige Lightshow zu kreieren,
können Sie Kontrastbewegungen einführen (Schwenk/Neigung des Untergeräts ist
umgekehrt) im Menü der Untergerätezu Option gehen und auswählen:
o NormalUntergerät: Untergerätarbeitetsynchron mit Hauptgerät.
o 2 Lightshow: Untergerät arbeitetumgekehrtvom Hauptgerät.
Stand-by Blackoutdes Geräts
Funktion
Modus
Strobe
1.Gobo / Color
sync.
strobe
2.Sync. strobe
3.Two-lightstrobe
Sound1
(LED off )
X/YbewegteShow
Modusauswahl
( Show 1 ~ Show 4
)
Sound2
(LED blinkt normal)
Color/Gobo
Auswahl
1. Für
Gobowechsel
gedrückt halten.
2. Für
Colorwechsel
kurzdrücken.
Langsam/Sound
3 (LED on)
X/YBewegungseinstellung
1.Panposition
2.Tiltposition
Erst Mastereinstellen, dann
Slavepositioneinstellen.
Position/Latch
(LED blinktschnell)
BRITEQ® 53/69 BT250S
BRITEQ® 54/69 BT250S
Page 30

DEUTSCH BEDIENUNGSANLEITUNG
ESPAÑOL MANUAL DE FUNCIONAMIENTO
WARTUNG UND INSTANDHALTUNG
Sicherstellen,dass sich keine unbefugten Personen unterhalb des Geräts befinden, während es gewartet
wird.
Gerätausschalten, Netzstecker ziehenund warten,bis es sich abgekühlt hat.
Während der Wartung sind folgendePunkte ganz besonders zubeachten:
Sämtliche Schrauben zur Installationund Befestigung jeglicher Teile müssen fest angezogen und rostfrei
sein.
Gehäuse,Befestigungsmaterialien und Aufhängungen (Decke, Balken,abgehängte Decken) dürfen keine
Anzeichenvon Verformung zeigen.
Ist die Optik sichtbar beschädigt (Sprünge oder tiefe Kratzer), dann müssen die entsprechenden Teile
ausgewechseltwerden.
Netzkabel muß stets in einwandfreiem Zustand sein und selbst bei kleinsten Beschädigungen erneuert
werden.
Zur Vermeidung von Überhitzung müssen die Ventilatoren (sofern vorhanden) und Lüftungsschlitze
monatlichgereinigtwerden.
Gerätinnen mindestens einmal pro Jahr mit Staubsauger oder Airjetreinigen.
Reinigung der inneren und äußeren optischen Linsen und/oder Spiegel müssen in regelmäßigen
Abständen zur Beibehaltung einer optimalen Lichtausbeute vorgenommen werden. Reinigungsintervalle
hängen stark von der Umgebung ab: feuchte,verrauchte und besonders verschmutzte Umgebung führen
zu größerer Verschmutzungauf den Linsen.
Mit weichemTuch undgewöhnlichemGlasreinigersäubern.
Alle Teile stets gut abtrocknen.
ÄußereOptikmindestens alle 30 Tagesäubern.
InnereOptik mindestens alle90Tagesäubern.
Achtung: Wir empfehlen dringend, Reinigung im Innern des Geräts nur von qualifiziertem Personal
durchführen zu lassen!
TECHNISCHE EINZELHEITEN
Netzspannung: AC230V,50Hz
Sicherung: 10 A/250V
Klangregler: EingebautesMikrofon
Pan/Tilt: 540°/270° mit automatischerKorrektur
Abstrahlwinkel: 13°
DMXAnschlüsse: 3-pinXLR Stecker/Buchse
Lichtquelle MSD250W oderMSD250W/2
Abmessungen: 428 x 371 x 466 mm
Gewicht: 23 kg
MANUAL DE FUNCIONAMIENTO
Gracias por comprar este producto Briteq®. Para sacar el máximo rendimiento a sus posibilidades y por su
propia seguridad, lea estas instrucciones de funcionamiento detenidamente antes de comenzar a utilizar
estaunidad.
CARACTERÍSTICAS
Esta unidad está a prueba de interferencias de radio. Este producto cumple los requisitos de las directrices
nacionales y europeas actuales. Se ha establecido la conformidad y las instrucciones y documentos
correspondienteshansido depositadospor el fabricante.
Potentecabezal móvil inteligente para uso en discotecasy compañías de alquiler
16 canales DMX (panorámica - inclinación – panorámica/inclinación velocidad - regulador de intensidad
luminosa- obturador/sacudidas - gobo - giro de gobo – prisma - giro de prisma - enfoque – panorámica16
bit – inclinación16 bit – restauración+ lámpara encendida/apagada).
Puede cambiarsea 8 ó 16 canales DMX compatibilidad con iSolution.
DireccionamientoDMXremoto
Movimientossuavespanorámicosde 540° e inclinación de 270° con corrección de posición automática.
7 gobos giratorios, intercambiables (D=26,8mm) + abierto
9 colores dicróicos trapezoides + blanco y efecto arco iris de velocidad variable.
Prismade 3 facetas, con giro en ambas direcciones a velocidad variable.
La pantalla de LED azul comandada por menús puede encenderse o apagarse.
Ángulo de haz de 13° con ajuste de enfoque mediante control DMX.
Oscurecimientoy efectodeestroboscópicarápida hasta 10 destellos/segundo.
Regulación de intensidad luminosasuave0-100%
Se puede utilizar en modalidad esclava/maestraconprogramas activados mediantemicrófonointerno.
Controlador CA-8 disponible para diferentes modalidades de funcionamiento, incluyendo: oscurecimiento,
diferentes programas estroboscópicos, selección manual de color/gobo y selección de posición X/Y,
selección de programa y modalidadlenta/rápida.
Refrigeración por ventiladory protección electrónica contrasobrecalentamiento.
ANTES DE UTILIZAR EL APARATO
Antes de comenzar a utilizar esta unidad, compruebe que no haya habido daños durante el transporte.Si
observaalgún daño, no utilice el dispositivo y consulte primeroa su distribuidor.
Importante:
absolutamente necesario que el usuario siga estrictamente estas instrucciones y advertencias de
seguridadque aparecen en este manual de usuario. Cualquier daño producido por un manejo innecesario
queda excluido de la garantía. El distribuidor no asumirá ninguna responsabilidad por cualquier defecto o
problemaquesurja por no haber seguido el manual de usuario.
Guarde este folleto en un lugar seguro para consultarlo en el futuro. Si vende este aparato más adelante,
asegúresedeincluir este manual de usuario.
Compruebeel contenido:
Compruebeque la caja contiene los siguientes elementos:
Unidad BriteQBT250S
Instruccionesde funcionamiento
2soportesde suspensión
Este dispositivo ha salido de nuestras instalaciones en perfecto estado y bien embalado. Es
TechnischeÄnderungenkönnen auch ohne Vorankündigungvorgenommenwerden!
Sie könnensich die neueste Version dieses BenutzerhandbuchesvonunsererWebsite
herunterladen: www.briteq-lighting.com
BRITEQ® 55/69 BT250S
INSTRUCCIONES DE SEGURIDAD:
CAUT ION
cualificado.
El símbolo en forma de rayo con cabeza de flecha dentro de un triángulo equilátero se emplea para
alertar sobre el uso o presencia de "voltaje peligroso" no aislado dentro de la carcasa del producto
con la magnitud suficientepara constituir un riesgo de descarga eléctrica.
®
Briteq
PRECAUCIÓN: Para reducir el riesgo de descarga eléctrica, no quite la
cubierta superior. No existen piezas en el interior que pueda mantener o
reparar el usuario. Asigne el mantenimiento y las reparaciones a personal
56/69 BT250S
Page 31

ESPAÑOL MANUAL DE FUNCIONAMIENTO
El signo de exclamación dentro del triángulo equilátero se emplea para alertar al usuario de la
presencia de instrucciones de funcionamiento y mantenimiento importantes en el texto que
acompaña a este aparato.
Este símbolo indica: Usar sólo en el interior.
Estesímboloindica: Leerlasinstrucciones.
Este símbolo indica: La distancia mínima de objetos iluminados. La distancia mínima entre la
emisión luminosa y la superficie iluminada tiene que ser más de 1 metro.
Para proteger el medio ambiente, recicle el material de embalaje en la medida de lo posible.
Un nuevo efecto luminoso provoca a veces humo y/u olor no deseados. Esto es normal y desaparece después
dealgunos minutos.
Para evitar incendios o riesgos de descarga, no exponga la unidad a la lluvia o a la humedad.
Para evitar que se forme condensación en el interior, deje que la unidad se adapte a la temperatura exterior
cuando la lleve a una habitación cálida después del transporte. A veces la condensación impide que la unidad
funcione a pleno rendimiento y puede incluso provocardaños.
Esta unidad sólo se puede usar en el interior.
No coloque objetos metálicos ni derrame líquidos dentro del reproductor de la unidad. Se pueden producir
descargas eléctricas o fallos de funcionamiento. Si algún objeto extraño entra en la unidad, desconecte
inmediatamente el suministro eléctrico.
Coloque el aparato en un lugar bien ventilado, lejos de materiales y/o líquidos inflamables. El aparato debe
colocarsea al menos 50 cm de las paredes.
No cubra ninguna abertura de ventilación puesto que podría producirse un sobrecalentamiento de la unidad.
Evite el uso en ambientes con polvo y limpie la unidad regularmente.
Mantenga la unidad lejos de los niños.
Las personas sin experiencia no deben utilizar este aparato.
La máxima temperatura ambiente para un funcionamiento seguro es de 40°C. No utilice la unidad a
temperaturas ambiente superiores.
La temperatura de la superficie de la unidad puede alcanzar hasta 85°C. No toque la carcasa sin protección
durante el funcionamiento.
Asegúrese de que debajo del área del lugar de instalación no hay personas durante el montaje, desmontaje o
mantenimiento.
Deje que el aparato se enfríe durante al menos 10 minutos antes de reemplazar la bombilla o comenzar el
mantenimiento.
Desenchufe siempre la unidad cuando no vaya a ser utilizada durante un largo periodo de tiempo o antes de
reemplazar la bombilla o comenzar el mantenimiento.
La instalación eléctrica sólo debe ser llevada a cabo por personal cualificado, de acuerdo con la regulaciones
sobre seguridad eléctrica y mecánica de su país.
Compruebe que el voltaje disponible no supera el que se indica en el panel trasero de la unidad.
El cable de alimentación siempre debe estar en perfecto estado: Apague la unidad inmediatamente cuando
observe daños o desperfectosen el cable de alimentación.
¡Nunca deje que el cable de alimentación entre en contacto con otros cables!
Este aparato debe conectarse a tierra para cumplir con las regulaciones sobre seguridad.
No conecte la unidad a ningún regulador de voltaje.
Utilice siempre un cable de seguridad apropiado y homologado cuando instale la unidad.
Para evitar descargas eléctricas, no abra la cubierta. Además de la lámpara y el fusible de red no hay piezas en
el interior de este aparato que pueda mantener el usuario.
Nunca repare un fusible ni derive el soporte del fusible. ¡Reemplace siempre el fusible dañado por un fusible
del mismo tipo y especificación eléctrica!
En caso de que ocurran problemas de funcionamiento serios, deje de utilizar el aparato y póngase en contacto
con su distribuidor inmediatamente.
La carcasa y la lente deben reemplazarse si presentan daños visibles.
Utilice el embalaje original cuando tenga que transportar el dispositivo.
Por razones de seguridad se prohibe realizar modificaciones no autorizadas en la unidad.
Importante: ¡Nunca mire directamente a la fuente de luz! No utilice el efecto en presencia de personas
epilépticas.
ESPAÑOL MANUAL DE FUNCIONAMIENTO
REEMPLAZO Y COLOCACIÓN DE LA LÁMPARA
Cuando tenga que reemplazar la lámpara o realizar el mantenimiento de ésta, no abra
el aparato hasta 10 minutos después de haberla apagado para que se enfríe.
¡Desconecte siempre la unidad antes de realizar el mantenimiento! Utilice siempre el
piezas, utilice sólo piezas de repuesto originales.
mismo tipo de piezas de repuesto (bombillas, fusibles, etc.) Cuando reemplace
Apagueel suministro eléctricoy desenchufela unidad.
Espere unos 15 minutos hasta que la unidad se haya
enfriado.
Desenrosquelos 2 tornillos en la parte trasera del aparato
para abrir el compartimento de la lámpara (consulte A en
el gráfico)
En el interior verá el casquillo de la lámpara. Desprenda
suavemente el casquillo de la lámpara del compartimento
de la lámpara.
Desconecte la lámpara vieja. Sujete el casquillo de la
lámpara mientras desconectala lámpara!
Sujete el casquillo de la lámpara mientras empuja
suavementela nueva lámparaen el casquillo.
¡Atención! Compruebe la etiqueta en el lado posterior del
dispositivo o lea las especificaciones técnicas en este
manual para saber qué lámpara utilizar. ¡Nunca instale
lámparas con un vatiaje superior!
¡No toque la bombilla sin protegerse las manos! Esto
reduce drásticamente la vida útil de la lámpara. Si ha
tocado la lámpara, límpiela con un paño y alcohol de
quemar. Limpie la lámpara antes de instalarla.
Vuelva a colocar la nueva lámpara dentro de la unidad. Asegúrese de que los cables no toquen la
lámpara.
Cierre el compartimento de la lámpara con los tornillos
Asegúrese de que la lámparaesté situada en el centro del reflector para una mejoriluminación. Encienda
la unidad y ajuste la posición de la lámpara mediante los tornillos A, B y C, ubicados en la parte trasera
del cabezal. ( A en el gráfico )
¡Ya está!
INTERCAMBIO/GIRO DE GOBOS
Atención: Instale los gobos sólo cuando la unidad esté apagada.
Nunca desatornille los tornillos del gobo giratorio puesto que el rodamiento de bol se
Apague el suministro eléctrico y desenchufe
Abra la cubierta superior de plástico (4
Localice la rueda de gobo y retire el anillo de
Retire el gobo e inserteelnuevo gobo.
Presione el anillo de fijación e insértelo en la
¡Ya está!
abrirá. Reparar esto es muydifícil.
la unidad.
tornillos).
fijación del gobo que desee cambiar con la
herramientaadecuada.
parte frontal del gobo.
Briteq
®
57/69 BT250S
Briteq
®
58/69 BT250S
Page 32

ESPAÑOL MANUAL DE FUNCIONAMIENTO
ESPAÑOL MANUAL DE FUNCIONAMIENTO
MONTAJE SUPERIOR
Importante: La instalación sólo debe
llevarse a cabo por personal técnico
cualificado. Una instalación incorrecta
puede provocar lesiones graves y/o
daños en la propiedad. ¡El montaje
superior requiere mucha experiencia!
Deben respetarse los límites de carga
de funcionamiento, deben utilizarse
materiales de instalación
homologados, el dispositivo instalado
debe inspeccionarse regularmente por
su seguridad.
Asegúrese de que debajo del área del
lugar de instalación no hay personas
durante el montaje, desmontaje o mantenimiento.
Coloque el aparato en un lugar bien ventilado, lejos de materiales y/o líquidos inflamables. El aparato
debecolocarse
El dispositivo debe instalarse lejos del alcance de las personas y de las áreas exteriores donde éstas
puedan andar osentarse.
Antes del montaje asegúrese de que el área de la instalación puede soportar una carga mínima de 10
veces el peso de la unidad.
Utilice siempre un cable de seguridad homologado que pueda soportar 12 veces el peso del dispositivo
cuando instale la unidad. Este accesorio de seguridad secundario debe instalarse de forma que ninguna
pieza de la instalación pueda caersemás 20 cm si falla el accesorio principal.
El dispositivo debe fijarse correctamente; ¡un montaje con giro libre es peligroso y no debe considerarse!
No cubra ninguna abertura de ventilación puesto que podría producirse un sobrecalentamiento de la
unidad.
El operariodebe asegurarsede quelasinstalacionesrelacionadas con la seguridad son aprobadas por un
experto antes de utilizarlas por primera vez. Las instalaciones deberán inspeccionarse anualmente por
una persona cualificadapara asegurarque la seguridad es óptima.
a al menos 50 cm
de las paredes.
CONFIGURACIÓN DE LA UNIDAD
PANEL DE CONTROL:
7. DISPLAY muestralosvarios menús y las opciones seleccionadas.
8. LEDs
9. BOTONES
10. ENTRADA DEL MANDO A DISTANCIA: Se utiliza para conectar un controlador manual CA-8 sencillo
cuando la unidad se utilizaenmodalidad independienteo maestra/esclava.
11. SENSIBILIDAD: Se utiliza para ajustar la sensibilidad del micrófono cuando la unidad se utiliza en
modalidadindependiente o maestra/esclava.
12. ENTRADA/SALIDADMX: Se utiliza para unión DMX512. Utilice un cableXLR equilibrado de 3 clavijas
M/H de buena calidad para unir las
unidades.
MENÚ PRINCIPAL:
Para seleccionar cualquiera de las
funciones preestablecidas, pulse el
botón MENU hasta que aparezca en
pantalla la opción que desee.
Seleccione la función con el botón
ENTER. La pantalla parpadeará.
Utilice los botones DOWN y UP para
cambiarla modalidad.
Una vez que haya seleccionado la
modalidad necesaria, pulse el botón
ENTER para seleccionar.Después de 8
segundos la pantalla volverá
automáticamente a las funciones
principales sin ningún cambio. Para
volver a las funciones sin hacer
cambios pulse el botón MENU. Las
funciones principales se muestran a la
derecha.
DMX
MASTER Fijo Modalidadmaestra
SLAVE
SOUND
MENU Para seleccionar las funciones de programación
DOWN
UP
ENTER
Fijo Entrada DMX presente
Fijo Modalidad esclava
arpadeando Activaciónde sonido
Para ir hacia atrás en las funciones seleccionadas
Para ir hacia delanteen las funciones seleccionadas
Para confirmar las funciones seleccionadas
Briteq
DMX512
Se utilizapara ajustar la dirección de
inicioen una configuración DMX.
Pulse el botón MENU hasta que
se muestre en la pantalla.
Pulse el botón ENTER, la pantalla
comienza a parpadear.
Utilice los botones DOWN y UP para
cambiar ladirección DMX512.
Una vez que se muestre la dirección
correcta en pantalla, pulse el botón
ENTER paraguardarla.
(o volver automáticamente a las
funciones principales sin hacer ningún
cambiotras8 segundos)
Para volvera las funciones sin hacer cambios pulse el botón MENU otravez.
®
59/69 BT250S
Briteq
Ajustede la dirección
®
60/69 BT250S
Page 33

ESPAÑOL MANUAL DE FUNCIONAMIENTO
ESPAÑOL MANUAL DE FUNCIONAMIENTO
ModalidadCanal
Pulse elbotón MENU hasta que se muestreen la pantalla.
Pulse el botón ENTERy la pantalla comienza a parpadear.
Utiliceel botón DOWN y UP paraseleccionar la modalidad (16 canales) u (8 canales).
Una vezque haya seleccionadolamodalidad,pulseel botón ENTER araconfigurar.
(ovolverautomáticamente alasfuncionesprincipales sin hacer ningún cambiotras 8 segundos )
Para volvera lasfunciones sin hacer cambios pulse elbotón MENU otra vez.
Se utiliza para seleccionar la modalidad Espectáculo cuando se utiliza de forma independiente o en
modalidadmaestra/esclava.
Pulse elbotón MENU hasta que se muestreen la pantalla.
Pulse el botón ENTER,la pantalla comienza a parpadear.
Utilice los botones DOWN y UP para seleccionar las modalidades (Espectáculo 1) ,
(Espectáculo2) , (Espectáculo 3) o (Espectáculo 4).
Una vez que se muestre la modalidad correctaenpantalla,pulse el botón ENTER para guardarla.
(ovolverautomáticamentea las funcionesprincipalessin hacerningún cambiotras 8 segundos)
Para volvera lasfunciones sin hacer cambios pulse elbotón MENU otra vez.
210°.
inclinación90°.
espectadores.
Se utilizapara hacer que la unidadesclava funcionede manera opuesta a la maestra o en total
sincronización.
Pulse elbotón MENU hasta que se muestreen la pantalla.
Pulse el botón ENTER,la pantallacomienzaaparpadear.
Utilice el botón DOWN y UP para seleccionar entre las modalidades (normal) o
(Espectáculode2luces) .
Una vezque haya seleccionadolamodalidad,pulseel botón ENTER para guardarla.
(ovolverautomáticamentea las funcionesprincipalessin hacerningún cambiotras 8 segundos)
Para volveralas funciones sin hacer cambios pulse el botón MENU otravez.
ModalidadOscurecimiento: cuando no se detecta ninguna señal DMX, la unidad entra en modalidad
Oscurecimiento yespera a la señal DMX.
Sin modalidad Oscurecimiento: cuando no se detecta ninguna señal DMX, la unidad pasa
automáticamente a modalidad independiente.
Pulse elbotón MENU hastaque se muestre en la pantalla.
Pulse el botón ENTER,la pantallacomienzaaparpadear.
Modalidad Espectáculo
ModalidadEspectáculo1 - El aparato se coloca en el suelo.Ángulo de movimiento de inclinación
Modalidad Espectáculo 2 - El aparato se fija debajo del techo. Ángulo de movimiento de
ModalidadEspectáculo3 - El aparatose coloca en un podio,delante de los
El foco siempre se proyecta en dirección en la dirección de la audiencia; p.ej. delante del escenario.
Ángulo de movimiento panorámico(deizquierda a derechaa izquierda):160°. Ángulo de
movimiento de inclinación: 90° ( 60° por encima del horizonte;30° por debajodel horizonte)
ModalidadEspectáculo4 - El aparato se fija debajo del techo.
El foco se proyecta principalmente delante del escenario. Ángulo de movimiento panorámico
(izquierda a derecha a izquierda) :160°.
Ángulo de movimiento de inclinación: 90° ( vertical,frontal75°; trasero 15°)
Modalidadesclava
Modalidad Oscurecimiento
Utilice el botón DOWN y UP para seleccionar la modalidad (oscurecimiento sí) o
(oscurecimientono).
Una vezque haya seleccionadolamodalidad,pulseel botón ENTER para guardarla.
(ovolverautomáticamentea las funcionesprincipalessin hacerningún cambiotras 8 segundos)
Para volveralasfunciones sin hacer cambios pulse el botón MENU otravez.
Normal: El movimiento panorámicono se invierte.
Inversión panorámica: El movimiento panorámicose invierte.
Pulse elbotón MENU hasta que se muestreen la pantalla.
Pulse el botón ENTER, la pantalla comienza a parpadear.
Utilice el botón DOWN y UP para seleccionar la modalidad (normal) o (inversión
panorámica).
Una vezque haya seleccionadolamodalidad,pulseel botón ENTER para guardarla.
(o volver automáticamentea las funciones principales sin hacer ningún cambiotras8 segundos)
Para volvera lasfunciones sin hacer cambios pulse elbotón MENU otra vez.
Normal: El movimiento de inclinación no se invierte.
Inversión de inclinación: El movimientode inclinación se invierte.
Pulse elbotón MENU hasta que se muestreen la pantalla.
Pulse el botón ENTER,la pantallacomienzaaparpadear.
Utilice el botón DOWN y UP para seleccionar la modalidad (normal) o (inversión de
inclinación).
Una vez que haya seleccionado la modalidad,pulse el botón ENTER paraguardarla.
(ovolverautomáticamentea las funcionesprincipalessin hacerningún cambiotras 8 segundos)
Para volvera lasfunciones sin hacer cambios pulse elbotón MENU otra vez.
Pantallaencendida:la pantalla siempre está encendida.
Pantallaapagada: la pantallaestá apagada cuandono se utiliza.
Pulse el botón MENU hastaquela pantallamuestre .
Pulse el botón ENTER,la pantallacomienzaaparpadear.
Utilice los botones DOWN y UP para seleccionar (pantalla siempre encendida) o (pantalla
apagadacuando no se utiliza).
Una vezque haya seleccionadolamodalidad,pulseel botón ENTER para guardarla.
(ovolverautomáticamente alas funcionesprincipales sin hacerningún cambiotras 8 segundos)
Para volvera lasfunciones sin hacer cambios pulse elbotón MENU otra vez.
Pantallanormal: la pantalla se puede leer cuando launidad está en el suelo.
Inversión de pantalla la pantallase puede leer cuandola unidadestá montada al revés.
Pulse elbotón MENU hasta que parpadee en la pantalla. (pantalla normal)
Utilice el botón ENTER para cambiar a la modalidad (inversión de pantalla), la opción se
almacenará automáticamentedespués de 8 segundos. O pulse el botón ENTER de nuevo para volver a la
modalidad (pantalla normal).
Paravolvera las funciones pulse el botón MENU.
Se utiliza para ayudarle a ajustar el enfoque del haz de luz y gobos.
Pulse elbotón MENU hasta que parpadee en la pantalla.
Pulse el botón ENTER para que la unidad vaya a la posición “inclinación 90°”.
Pulse el botón ENTER para que la unidad vaya a la posición “panorámica0°”.
Inversiónpanorámica
Inversiónde inclinación
Pantalla de LED
Inversiónde pantalla
Ajuste de enfoque
Briteq
®
61/69 BT250S
Briteq
®
62/69 BT250S
Page 34

ESPAÑOL MANUAL DE FUNCIONAMIENTO
ESPAÑOL MANUAL DE FUNCIONAMIENTO
Pulse el botón ENTER para que la unidad vaya a la posición “panorámica90°”.
Pulseel botón ENTER para que la unidad vaya a la posición “panorámica180°”.
Pulse el botón ENTER para que la unidad vaya ala posición “panorámica270°”.
En los 5 pasos anteriores podrá ajustar el enfoque con los botones UP/DOWN en la unidad (la pantalla
muestra el estado en enfoque actual).
Atención: tenga en cuenta que sólo puede ajustar un “enfoque medio” para las 5 posiciones, por lo que no
es posible ajustar el enfoque perfectamentenítido para todas las direcciones.
Paravolvera lasfunciones pulse el botón MENU.
Se utilizapara activar un programade “autodiagnóstico” quemuestra todas las posibilidades de la
unidad.
Pulse elbotón MENU hasta que parpadee en la pantalla.
Pulse el botón ENTERpara iniciarel programade autodiagnóstico interno.
Paravolvera las funciones pulse el botón MENU.
Se utiliza para mostrar la temperatura dentro del compartimentode la lámpara
Pulse el botón MENU hasta que el signo parpadeeen la pantalla.
Pulse el botón ENTER y la temperatura ambiente de la lámpara se mostrará en la pantalla.
Paravolvera las funciones pulse el botón MENU otra vez.
Se utiliza para mostrar el número de horas de funcionamiento de la unidad.
Pulse elbotón MENU hasta que parpadee en la pantalla.
Pulse el botón ENTER para mostrar el númerode horas de funcionamiento en la pantalla.
Paravolvera las funciones pulse el botón MENU.
Se utilizapara ENCENDER/APAGAR la lámpara de forma que pueda enfriar la lámpara con los
ventiladoresinternos antes del transporte.
Pulse elbotón MENU hasta que parpadeeen la pantalla.
Pulse el botón ENTERy la pantalla comienza a parpadear.
Utilice el botón DOWN y UP para seleccionar la modalidad (lámpara encendida) o (lámpara
apagada).
Una vezque haya seleccionadolamodalidad,pulseel botón ENTER araconfigurar.
(ovolverautomáticamentea las funcionesprincipalessin hacerningún cambiotras 8 segundos)
Paravolvera las funciones sin hacer cambios pulse el botón MENU otravez.
Se utilizapara restaurar launidad.
Pulse elbotón MENU hasta que parpadee en la pantalla.
Pulse ENTER para restaurartodosloscanalesa su posición estándar.
Paravolvera las funciones pulse el botón MENU.
Compruebe también el capítulo sobre la configuración del canal DMX de la unidad para saber cómo forzar
una restauración medianteDMX.
Autodiagnóstico
Temperatura ambiente de lalámpara
Horas del aparato
Pantalladelámpara
Restaurar
AJUSTE DE POSICIÓN ORIGINAL
Pulse el botón MENU durante al menos 5
segundos para entrar en la modalidad
compensación.
Ahora puede ajustar la posición original
(estaes la posición cero).
Cuando desee ajustar la posición original
de gobo y de color gobo, deberá ejecutar la
modalidad primero.
Las se muestranacontinuación:
Pulse el botónMENU durante al menos 5 segundos para entraren lamodalidadcompensación.
Utiliceel botón DOWN y UP hasta que se muestre en la pantalla.
Pulse el botón ENTER y la unidad enfocaráen la posición “inclinación 135°”.
Pulse el botón ENTER y la unidad enfocará en la posición “inclinación 45°”.
Pulse el botón ENTERy la unidad enfocará en la posición “panorámica0°”.
Pulse el botón ENTER y la unidad enfocaráenla posición “panorámica 90°”.
Pulse el botón ENTERy la unidad enfocaráen la posición “panorámica 180°”.
Pulse el botón ENTER y la unidad enfocaráenla posición “panorámica 270°”.
En los 6 pasos anteriorespuede ajustar el enfoquecon los botonesUP/DOWN en la unidad.
Paravolver a las funciones principalessin hacer cambios,espere 8 segundos.
Pulse el botón MENU durante al menos 5 segundos paraentraren la modalidad compensación.
Utiliceel botón DOWN y UP hasta que se muestre en la pantalla.
Pulse el botón ENTERy la pantalla comienza a parpadear.
Utiliceel botón DOWN y UP para ajustar la posición original de panorámica.
Una vez que se ha seleccionado la posición, pulse el botón ENTER para configurar O volver
automáticamente alasfuncionesdecompensaciónsin cambios pulsando el botón MENU
Paravolver a las funciones principalessin hacercambios, espere8 segundos.
Pulse el botón MENU durante al menos 5 segundos paraentraren la modalidad compensación.
Utiliceel botón DOWN y UP hasta que se muestre en la pantalla.
Pulse el botón ENTER y la pantalla comienza a parpadear.
Utiliceel botón DOWNy UP para ajustar la posición originalde inclinación.
Una vez que se ha seleccionado la posición, pulse el botón ENTER para configurar O volver
automáticamente a las funciones de compensaciónsin cambiospulsandoel botónMENU
Paravolver a las funciones principalessin hacer cambios,espere 8 segundos.
Ajuste de enfoque
Compensaciónde panorámica
Compensación deinclinación
Briteq
®
63/69 BT250S
Briteq
®
64/69 BT250S
Page 35

ESPAÑOL MANUAL DE FUNCIONAMIENTO
ESPAÑOL MANUAL DE FUNCIONAMIENTO
CONEXIÓN DE LA UNIDAD MEDIANTE DMX
El protocolo DMX es una señal de alta velocidad muy utilizada para controlar equipo de
iluminación inteligente. Necesita conectar en cadena tipo margarita su controlador DMX y
todos los efectos luminosos conectados con un cable XLR M/F equilibrado de buena
calidad. Para evitar un comportamiento anómalo de los efectos luminosos, debido a
interferencias, debe utilizar un terminador de 90Ω a 120Ω al final de la cadena. Nunca
utilicecables divisores en Y, ¡No funcionarán!
Cada efecto luminoso en la cadena necesita disponer de su propia dirección de inicio de forma que sepa
qué comando del controlador debedescodificar.
AJUSTE DELA DIRECCIÓN DE INICIO CORRECTA:
Consulte el capítulo anterior (ajuste de dirección DMX-512) para saber cómo ajustar la dirección de inicio en
esta unidad. La dirección de inicio de cada unidad es muy importante. Lamentablemente es imposible
decirle en este manual de usuario qué dirección de inicio debe ajustar porque esto dependerá
completamente del controlador que utilice… Consulte el manual de usuario de su controlador DMX para
saberque direcciones de inicio debe ajustar.
CONFIGURACIÓNDMX DE BT250S:
Modo de 16 canales
Briteq
1. Para restaurar DMX, establezca el valor DMX de CH-8 & CH-16 a 255, launidadserestaurará después
deunos cincosegundos.
Para lámparaencendida, establezca el valor DMXde CH-8 a 247 & CH-16 a255.
Para lámpara apagada, establezca el valor DMXde CH-8 a 239 & CH-16 a 255.
2. Para activación de sonido color, establezca el valor DMXde CH-6 a248-255.
Para activación de sonido gobo, establezca el valor DMXde CH-9 a248-255.
®
65/69 BT250S
Briteq
®
66/69 BT250S
Page 36

ESPAÑOL MANUAL DE FUNCIONAMIENTO
ESPAÑOL MANUAL DE FUNCIONAMIENTO
Modo de 8 canales
MANEJO DE LA UNIDAD
Cada vez que encienda la unidad, se mostrará I250 en la pantalla, todos los motores volverán a su posición
original y puede que oiga algunos ruidos durante 20 segundos. Después de esto, la unidad estará lista para
recibir la señal DMX o ejecutar los programas incorporados.
PUEDE MANEJARLA UNIDAD DE TRESFORMAS:
MEDIANTELA FUNCIÓN PREPROGRAMADAINCORPORADAMAESTRA/ESCLAVA:
Seleccione esta unidad cuando desee un espectáculo luminoso instantáneo. Uniendo las unidades en
conexión maestra/esclava, la primera unidad controlará el resto de unidades para proporcionar un
espectáculoluminosoautomático, sonoro y sincronizado. Su entrada DMX no tendrá nada conectado y su
LED de maestra estará encendido constantementey el LED de sonido parpadeará con la música.
¡Importante! ¡Esta función sólo funciona cuando la modalidad de oscurecimiento en el menú de la
unidad maestra esté desactivada, en caso contrario, no ocurrirá nada!Lea más sobre esta opción
en el párrafo “Menú principal”.
MEDIANTECONTROLADOR FÁCIL:
Cuando se utiliza en modalidad maestra/esclava, le recomendamos encarecidamente
que utilice el "controlador fácil" CA-8. Conecte este pequeño controlador al jack de
1/4” de la unidad maestray podrá controlarlas siguientes funciones:
FUNCIONES
Stand by
Función
Modalidad
o Mediante la función preprogramadaincorporada maestra/esclava
o Mediante el controlador fácil CA-8
o Mediante controlador universalDMX(8 & 16 canalesen modalidadDMX)
MAESTRA dispone de 4 espectáculos incorporados: Puede seleccionar (espectáculo 1),
(espectáculo2), (espectáculo 3) o (espectáculo 4) directamenteen el menú de la
unidad maestra.
ESCLAVA dispone de 2 opciones de funcionamiento: Las otras unidades se ajustan en modalidad
esclava (el LED de esclava está constantemente encendido). Para crear un gran
espectáculo luminoso, puede introducir movimientos de contraste
(panorámica/inclinación de la unidad esclava se invierte) En el menú de las
unidades esclavas puede ir a la opción y seleccionar:
o Esclava normal: la unidad esclava funcionaen sincronización
con la maestra.
o Espectáculo de 2 luces: la unidad esclava funciona en
oposición a la maestra.
Oscurecelaunidad
Estroboscópica
1.Estroboscópica
sinc. Gobo /
Color
Estroboscópica
2.Estroboscópica
sinc.
3.Estroboscópica2
luces
Sonido1
(LED apagado)
Selección demodode
espectáculode
movimientoX/Y
( Espectáculo 1 ~
Espectáculo 4)
Sonido2
(LEDparpadeando
normalmente)
SelecciónColor/Gobo
1. Mantenga pulsadopara
cambiar gobo.
2. Pulse brevementepara
cambiar el color
Lento/Sonido3
(LEDencendido)
Ajuste demovimiento X/Y
1.Posiciónde panorámica
2.Posiciónde inclinación
3.Regulador deintensidad
luminosa
Primero, ajuste la unidad
maestra, luego, ajuste la
posición de la unidadesclava
Posición/Enganche
(LEDparpadeando
rápidamente)
Briteq
®
67/69 BT250S
Briteq
®
68/69 BT250S
Page 37

ESPAÑOL MANUAL DE FUNCIONAMIENTO
MANTENIMIENTO
Asegúresedeque debajo de la zona del lugar de instalación no haya personas duranteel mantenimiento.
Apaguela unidad, desenchufe el cable de red y espere hasta que la unidad se haya enfriado.
Durante la inspección deberá comprobarlos siguientes puntos:
Todos los tornillos utilizados para instalar el dispositivo y cualquiera de sus piezas deberán apretarse
firmementeyno corroerse.
Las carcasas, las fijaciones y los puntos de instalación (techo, suspensiones) no deberán presentar
ningunadeformidad.
Cuando una lente óptica esté visiblemente dañada por grietas o rasguños profundos, deberá ser
reemplazada.
Los cables de red deberán estar en perfectoestadoy deberán reemplazarse inmediatamente incluso si el
problema detectado es pequeño.
Paraproteger al aparatodel sobrecalentamiento, las aletas de refrigeración (si las hubiera) y las aberturas
de ventilación deberán limpiarsemensualmente.
El interior del dispositivo deberá limpiarse anualmente medianteuna aspiradorao chorrode aire.
La limpieza de las lentes internas y externas y/o espejos deberá llevarse a cabo periódicamente para
optimizar la emisión luminosa. La frecuencia de limpieza depende del entorno en el que funcione el
aparato: los ambientes húmedos, con humo o especialmente sucios pueden provocar una mayor
acumulación de suciedad en los elementosópticos del aparato.
Limpie con un paño suave utilizando productos de limpieza de cristalesnormales.
Seque siempre las piezas con cuidado.
Limpie los elementos ópticos externosal menos una vez cada 30 días.
Limpie los elementosópticos internos al menos una vez cada90 días.
Atención: ¡Le recomendamos encarecidamente que la limpieza interna sea llevada a cabo por
personal cualificado!
ESPECIFICACIONES
Entrada de red: CA230V,50Hz
Fusible: 10 A/250V
Control de sonido: Micrófono interno
Panorámica/inclinación: 540° / 270° con corrección automática
Ángulo de haz: 13°
Conexiones DMX: 3 clavijas XLR macho / hembra
Lámpara: MSD250/2óNSD250/2
Tamaño: 428 x 371 x 466 mm
Peso: 23kg
Puede descargar la última versión de este manualde usuarioen nuestra página Web: www.briteq-
®
Briteq
Toda la informaciónestá sujeta a cambios sinprevio aviso
lighting.com
69/69 BT250S
 Loading...