

Page 1
SYNTHESIS
OWNER’S
MANUAL
Page 2
CONGRATULATIONS. Your Synthesis Home Media System is a
wonderful investment in a lifetime of quality home entertainment.
Only JBL can provide a system of this caliber. Since the “JAZZ
SINGER ” brought sound to films in 1929, the letters J-B-L have
been intimately linked to the production of the world’s finest films.
Our 50 year devotion to the art of sound reproduction has made JBL
an integral part of the musical experience.
Now your Synthesis Home Media System has placed the best seat in
the house, in your home. We invite you to sit back, and enjoy the
perfection of this state-of-the-art sight and sound system.
System Installed for:
(Owner)
At:
(Address)
On:
(Date)
Installed By:
From:
For Service , Call:
(Installer)
(Dealership)
(Dealers Phone Number)
For JBL Customer Support and Satisfaction, Call:
JBL Synthesis Service Manager
1-(800) 645-7484, extension 233
On Long Island call
(516) 496-3400, extension 233
Page 3

TABLE
OF
CONTENTS
SECTION PAGE
1.0 _______________ BASIC OPERATIONS
1.1 Powering Up 4
1.2 Basic Remote Control Operations 4–5
1.3 Basic Cinema Operations 5
1.4 Basic Music Operations 6
1.5 Turning the System Off 7
2.0 __________ ADVANCED OPERATIONS
2.1 Advanced Cinema Operations 8
2.2 Advanced Music Operations 14
2.3 Advanced Remote Control Operations 17
3.0 ______SERVICE AND MAINTENANCE
3.1 General Service Policy 19
3.2 Audio and Video Service 19
4.0 __________CALIBRATION TEMPLATES
4.1 Synthesis One 20
4.2 Synthesis Two 21
JBL Synthesis System
Owner's Manual
©1993 Harman Consumer Group
JBL and Synthesis are registered trademarks of JBL Incorporated.
All Rights Reserved
Manual Designed by Harman Consumer Group,
Marketing Services • Woodbury
Written by James S. Weiss
Illustrated by Terry Robbins
JBL Consumer Products, Inc.
80 Crossways Park West, Woodbury, NY 11797
(516) 496-3400
8500 Balboa Boulevard, Northridge, CA 91329
(818) 893-0110
Page 4
1.0
BASIC
OPERATIONS
This Section focuses on the basic operations required to
power up the system, to use it, to make simple everyday
adjustments to both its Cinema and Music functions,
and to turn it off. More advanced adjustments are
covered in Section 2: Advanced Operations. Your
certified JBL Installer will be glad to overview these
materials with you.
1.1 Powering Up
The system can easily and quickly be turned on using
the Remote Controller, pictured on this page. Simply
push the button marked POWER and the Surround
Processor, Amplifiers, Equalizers, Crossovers, and
Speakers will all automatically power up, in sequence.
Next, turn on the Source Devices you want to use —
VCR, Laser Disc player, CD, Television/Video, Audio
Cassette Player.
You can turn these on in any order.
1.2 Basic Remote Control
Operations
Your JBL Synthesis Remote Control unit handles
virtually all of the functions of the system. Basic
Operations include Selecting Source Devices, and
Adjusting the Master Volume.
1.2.1 Selecting Source Devices
Examine the lower half of the Remote Controller until
you have found six buttons with labels above each.
These buttons allow you to directly access a particular
source device and play it through the system. The
buttons are labeled “S-VID-1”, “S-VID-2, "VCR",
“VDP”, “CD", and “AUX”. Your Installer, with your
consultation, has determined the sources available for
use in your system. Therefore certain buttons may be
inoperative, corresponding to the sources not present.
To select a source device, simply press the
corresponding button. The surround processor will
engage that source.
4
Page 5
BASIC
OPERATIONS
1.0
1.2.2 Adjusting the Master Volume
The Master Volume buttons at the top right hand part of
the Remote Controller are used to adjust the Output
Levels of the system. Press the ▲ button to make things
Louder, and the ▼button to make things Softer. These
do not adjust the Input Levels of the Source Devices. In
fact, we recommend that you do not do so. They have
been set and calibrated to mesh flawlessly with the
system, and adjusting them directly — either through
the dials on their front panels or via their own separate
Source Remote Controllers, can throw the system out of
balance.
NOTE: If, over time, you notice that one Source Device
consistently sounds Too Loud or Too Soft, call your
Certified Dealer. He or she will adjust the levels and
re–set the new levels as your “Reference Levels” to
which you can return if the system’s sound goes awry.
1.3 Basic Cinema Operations
1.3.1 Adjusting the Cinema Volume
To adjust the Volume in Cinema Mode, make sure that
the Video is powered up and that it has been selected as
the source. Then simply adjust the volume ▲ or ▼
using the MASTER VOLUME buttons.
5
Page 6
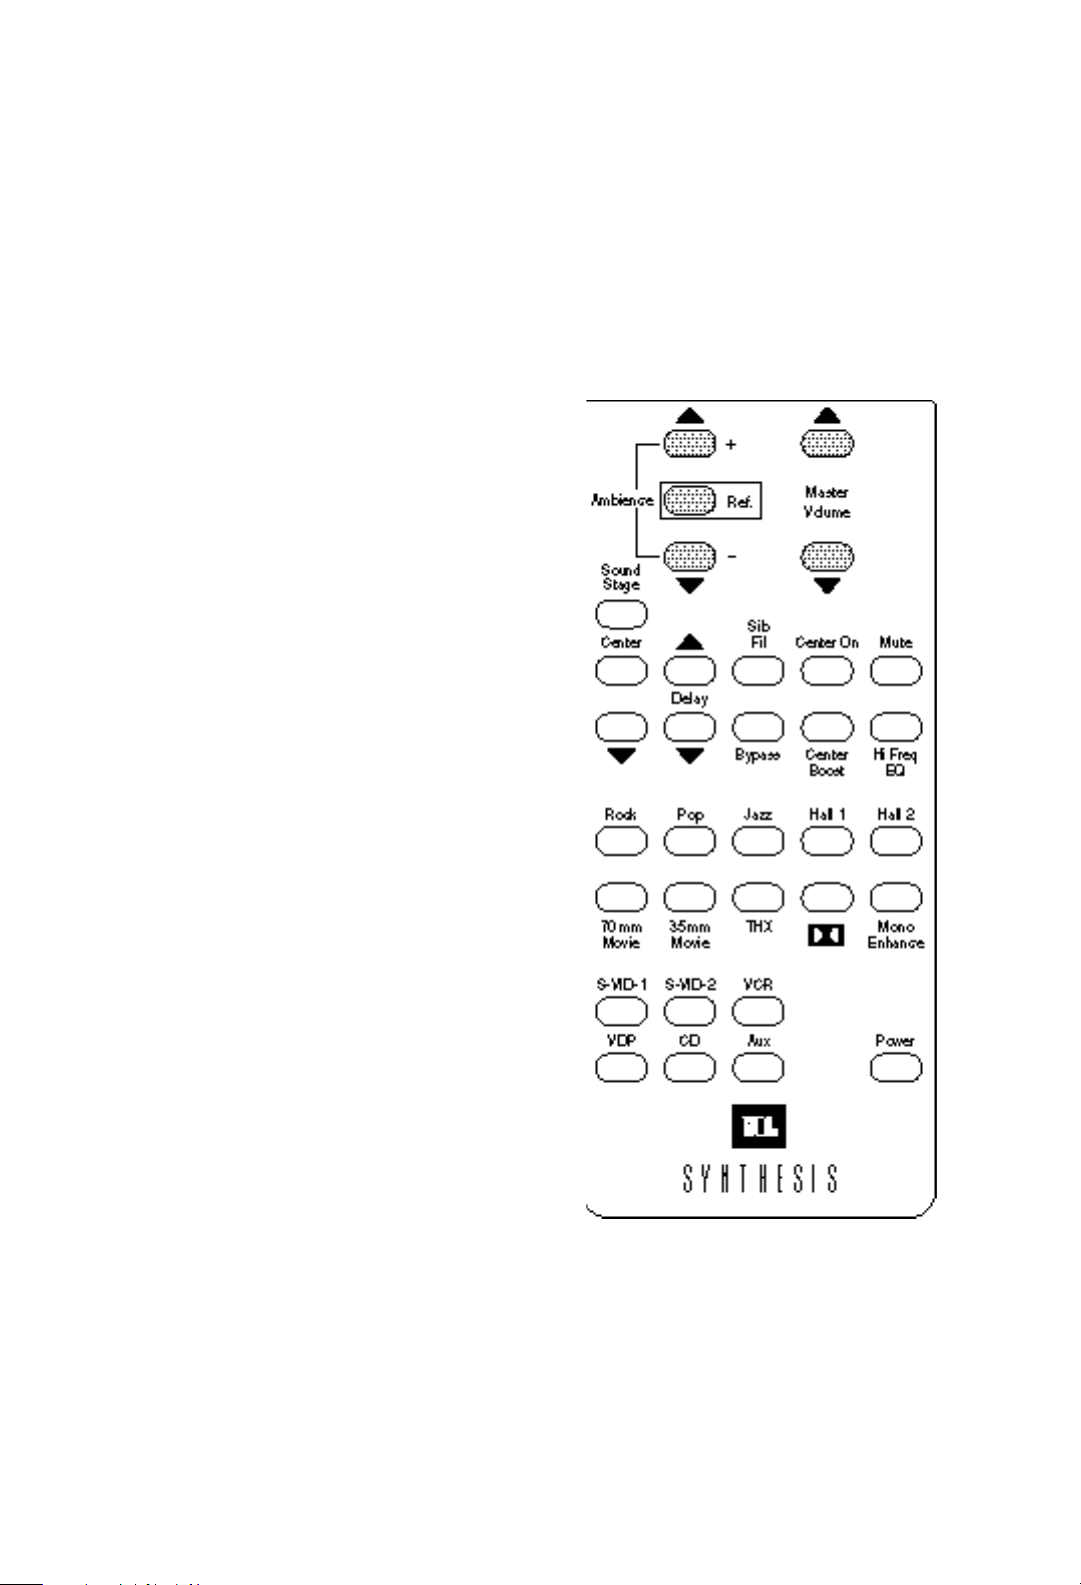
1.4 Basic Music Operations
1.4.1 Adjusting the Music Volume
To adjust the Volume in Music Mode, make sure that the
appropriate Music Source Device is powered up and
that it has been Selected as the Source. Then simply
adjust the volume ▲ or ▼using the MASTER
VOLUME buttons, as shown on the left.
Link Forward: See Section 2: Advanced Operations,
page 8.
1.4.2 Adjusting the Music Balance
To adjust the Front/Back Balance in Music Mode, make
sure that the appropriate Music Source Device is
powered up and selected as the Source. To add more
sound to the Rear Ambient Surround Speakers, press
the ▲button marked Ambience + on the remote
controller. For less sound from the Ambient Surrounds,
press the ▼ button. To restore the original pre–set
balance, press the Center button, REF, which will set the
system back to its Reference Levels.
Again, if your adjustments do not produce the desired
effects, consult with Section 2: Advanced
Operations.
If you are not able to adjust the system to your liking
using the procedures outlined therein, call your
Synthesis Dealer.
6
Page 7
BASIC
OPERATIONS
1.0
1.5 Turning the System Off
There is no preferred order of components when turning
the system off. However, there is one caution you should
follow:
NOTE: Do not turn the system off while any Source
Device is running and producing sound. Always make
sure all Source Devices are in “Idle” before pressing the
main POWER button.
Failure to do this can produce a noticeable “pop”, and
can, over time, damage your components. If you need to
turn off the sound to the system suddenly, for example,
to take a phone call or to reply to someone, press the
MUTE button.
Notes
7
Page 8

2.0
ADVANCED
OPERATIONS
There are some Operations which go beyond the
“basics” of the system and address its full array of
functional capacities in detail. Before reading this
Section, the Owner should have already read and
mastered Section 1: Basic Operations. Your certified JBL
Synthesis Installer will be glad to walk you through any
or all of the information covered in this Section.
2.1 Advanced Cinema
Operations
2.1.1 Ambience Level Adjustment
If you feel that the degree of Ambience — sound
coming from the Ambient Surround Speakers — is too
high or too low, you can adjust it by pressing the
AMBIENCE + and AMBIENCE – buttons. Pressing the
AMBIENCE + button increases the sound level of the
Surrounds; pressing the AMBIENCE – button
decreases the level. To reset the level to the “Reference
Level” as preset by your JBL Synthesis Installer, press
the REF button once.
Link Back: See Section 1, Page 4-7
8
Page 9

ADVANCED
OPERATIONS
2.0
2.1.2 Panorama Adjustment
Panorama refers to the degree of stereo separation
generated by the Left and Right Main Speakers when
listening to the simulated stereo of Mono recordings or
movies. This can be adjusted by using the SOUND
STAGE, CENTER, and ▼buttons, located at the left
side of the remote controller.
Link Forward: See Mono Enhancer, under 2.1.8,
page 13.
Pressing the SOUND STAGE button increases the
separation, spreading the sound further.
Pressing the CENTER button reestablishes the preset
Reference Level.
Pressing the button with the ▼ button decreases the
degree of Panorama or separation.
2.1.3 Setting Time Delay
Time Delay refers to the delay in onset of the Ambient
Speakers compared to the Main LCR Speakers. The
preset level is 15 milliseconds.
For an added sense of spaciousness, the listener can
press the DELAY ▲button, which increases the delay
from 15 to 30 mS in 5 mS steps. This can be effective
with longer, narrower rooms, or with some sources
which require a sound which is a bit more “echo–like”
than standard. This enhanced setting applies more
typically to Dolby Pro–Logic Surround and THX
sources, but has additional applications in music,
35mm and 70mm modes.
Pressing the DELAY ▼ button reduces the Delay from
30 back to 15 mS.
2.1.4 Center Speaker Level
Some listeners like more or less sound coming out of
the Center Main Speaker. This can depend both on the
listener’s ears and on the material generating the sound.
In THX or Dolby Pro-Logic Surround modes the Center
Channel should be left on. To do this, simply press the
CENTER ON button. For some sources, some listeners
will want to enhance the level of sound coming from the
Center Speaker. To do this, press the CENTER BOOST
Button.
9
Page 10

2.1.5 Woofer Equalization
While the JBL Synthesis System is calibrated to provide
awesome amounts of clear, clean bass, some listeners
might prefer a touch more bass for some sources. This
cannot be adjusted from the Remote Controller, but must
be done using the BASS EQ dial to the left of the
INPUT control on the Surround Processor.
The preset bass is encoded at the off or zero position. To
boost the bass level, slowly turn the dial clockwise a
little at a time until it meets your auditory needs. A full
17 db of boost is available, so go slow to avoid
shocking the equipment or your ears.
BASS EQ
10
Page 11
ADVANCED
OPERATIONS
2.0
2.1.6 Sibilant Filter
The Sibilant Filter reduces the potential “leakage” of
cinema dialogue from the Center channel into the
Ambient Surround Channels. Engage it if you are having
the sensation that the actors are talking off to the side of
you or behind you.
To activate this feature, press the button marked
SIB FIL.
2.1.7 Hi Freq. EQ
Research conducted by LucasArts Entertainment showed
that movie soundtracks which have been mixed for a
large theater venue tend to sound overly bright when
played back in a room under about 15,000 cubic feet.
This is due to the natural tendency for high frequency
sound to be attenuated as it travels through the air. Since
the distances in a large theater venue are long compared
to almost any home theater, this "HI FREQ EQ" can help
restore the natural balance.
Not all sources will benefit from this additional
frequency contouring. Therefore, we have provided a
button on your remote control which will
activate/deactivate the "HI FREQ EQ" to suit your
preference.
11
Page 12

2.1.8 Cinema Modes
The JBL Synthesis System is pre–configured for a
number of Cinema Modes, each of which has been
calibrated to take advantage of the unique properties of
each mode. Press the appropriate button for the type of
Cinema Source material you are using. Virtually all tapes
and disks are labeled for this.
• 70mm
This mode increases Delay up to 50 mS. It also
simulates a sense of Surround Sound by blending left
and right front channel information and feeding it into
the Ambient Surrounds.
To activate this mode, press the button marked
70mm MOVIE.
• 35mm
This uses a decoding matrix similar to Dolby Pro–Logic,
but increases the frequency response on the Ambient
channels and increases the Ambient Delay up to 50 mS.
To activate this mode, press the button marked
35 MM MOVIE.
12
Page 13

ADVANCED
OPERATIONS
2.0
• THX
This allows for the complete package of THX sound
manipulations, and should be pressed when using any
Source labeled as having THX–compatible sound or
Dolby Stereo.
To activate this feature, press the button marked THX.
• Dolby
This home version of the cinema Dolby Surround
technology provides audio performance virtually
identical to a Dolby theater experience. With this Mode
engaged, the Surround Processor’s sophisticated Dolby
Pro-Logic circuitry reconfigures the steering logic
constraints, and varies the Delay from 15 to 30 mS in
increments of 5 mS.
To activate this feature, press the button marked with the
familiar Dolby logo.
• Mono Enhance
Of course, most people still occasionally like to listen to
old Monaural tapes or records or watch old Mono
movies. JBL Synthesis allows you to do this without
sacrificing the cinema or sound–stage audio quality of
the system. Mono Enhance was designed for these
sources, and creates a spatial effect comparable to the
sensation of stereo.
To activate this feature, press the button marked MONO
ENHANCE.
13
Page 14

2.2 Advanced Music
Operations
As we have discussed the Music System is virtually a
“system-within-the-system”, and can operate separately
from the Cinema Mode. Within the Music System, there
are a number of adjustments you can make directly from
your Remote Controller.
2.2.1 Switching to the Music System
Most listeners prefer to listen to Music in its classic
“stereo” modality. This gives the perception that the
listener is sitting in front of a bandstand, and that all of
the sound is coming from the front of the room, where
the band is visualized to be. To switch to this “pure
stereo” mode, press the BYPASS button, which shuts
off the Center Speaker and the Ambient Surrounds,
thereby muting all of the Surround effects and engages
the music speakers.
Of course, other listeners like the sensation of being
“inside the music”. With the Center Speaker engaged
and the Ambients playing, it can feel as if you are in the
middle of the orchestra. For this experience, do not
press BYPASS.
14
Page 15

ADVANCED
OPERATIONS
2.0
2.2.2 Music Modes
Of course, there is music and then there is music. The
JBL Synthesis System allows you to configure it to play
different types of music and to take advantage of their
different characteristics.
• Rock
The Rock Mode allows you to have the best of all
possible worlds, giving you full stereo separation plus a
high degree of ambience as well. This is true Stereo
Surround like no other system can deliver – a feeling of
converting your Media Room into one giant pair of
headphones.
In Rock mode, the Panorama function is engaged, and
you can adjust the Delay up to 80 mS to give more or
less “depth” to the sound.
This mode also works well with most Electronic and New
Age recordings as well.
To engage this mode, simply press the ROCK button.
• Pop
The Pop mode yields a more “frontal” sound than does
the Rock mode. In Pop, the Ambient Surrounds each
carry a monophonic signal, giving the impression of a
concert hall presentation. Panorama is engaged and
Delay can be set anywhere up to 80 mS.
Pop mode works well for a wide variety of music,
including Pop, Light Rock, Broadway show tunes, and
some Rock as well.
To engage this mode, simply press the POP button.
15
Page 16

• Jazz
The operative word here is “live”, as the Jazz mode
makes most music sources sound engagingly present.
Again, the music’s perceived source is the front of the
room, with a bit less exaggerated stereo separation, to
make it sound as if a small combo is playing in your
living room. The Ambient channel is in Mono, for
spatiality only, and Panorama and Delay can also be
adjusted for more or less of a sense of space, both
front–to–back and side–to–side.
This mode works well not just for Jazz recordings, but
also for “New Jazz”, “Fusion Jazz”, and Blues.
To engage this mode, simply press the JAZZ button.
• Hall 1
This mode works best for small ensemble sounds,
where you desire the most “pure” unprocessed sound
possible. The Front channels are completely
unprocessed, and a slight amount of stereo surround is
extracted from the recording and sent through the
Ambient Speakers. Delay is not an option in this mode.
Instead, a special equalization curve which emulates the
natural decay of live sound over distance is applied to
the Ambient Channels. The listener has the sensation of
being very close to a natural live performance.
This mode works well for Chamber Music and virtually
all Small–Ensemble Acoustic sources.
To engage this mode, simply press the HALL 1 button.
16
Page 17

ADVANCED
OPERATIONS
2.0
• Hall 2
This mode has been designed for works on a broader
acoustic canvas, like orchestral and operatic works. Like
Hall 1, there is no processing of the front channels, and
the Center Speaker is disengaged (although you can
re–engage it using the CENTER button if you desire).
The Ambient mix gives the sensation not of being right
in front of the ensemble but rather of being in the
“middle of the hall” with a larger ensemble. Delay can be
set anywhere up to 80 mS.
To engage this mode, simply press the HALL 2 button.
2.3 Advanced Remote Control
Operations
2.3.1 Mute
The Mute feature does exactly what it says it does —
cuts Audio output. This allows you to answer the phone
or have a conversation without shutting down the entire
system.
Mute all Audio, whether in Cinema or Music Mode, by
pressing the MUTE button.
17
Page 18

2.3.2 Front Panel Controls
Input Level Knob
Caution: This knob should not be used for volume
control. It should be approximately 12 o’clock or straight
up. The only time it should be turned down is if you
notice the LED Level Light going into the red. The unit is
then being overloaded and at any output level distortion
is being produced.
Bass EQ Knob
While the JBL Synthesis System is calibrated to provide
awesome amounts of clear, clean bass, some listeners
might prefer a touch more bass for some sources. This
cannot be adjusted from the Remote Controller, but must
be done using the BASS EQ dial to the left of the
INPUT control on the Surround Processor.
The preset bass is encoded at the off or zero position. To
boost the bass level, slowly turn the dial clockwise a
little at a time until it meets your auditory needs. A full
17 db of boost is available, so go slow to avoid
shocking the equipment or your ears.
Notes
2.3.3
The balance of these switches perform the identical
function as the remote so please refer to Remote
Instructions for their functionality.
18
Page 19

3.0
SERVICE
Once the system is in place, it should need little or no
attention. The components are of the highest quality,
and many are built to withstand the rigors of
professional use. This Section outlines service policies
and warranties.
3.1 General Service Policy
The JBL Synthesis System is backed by our exclusive
“48–hour (no-down-time) Service Policy”.*
Any time within a component’s warranty period that you
report trouble to your certified JBL Synthesis Dealer, he
will determine the nature of the problem and contact JBL
within 24 hours.
If a damaged component is within the first 30 days of its
warranty period JBL will send your JBL Synthesis Dealer
a replacement unit, to be installed in your system, within
the specified 24 hour period, after JBL has been
contacted.
If more than 30 days of your component’s warranty
period has lapsed, and the damaged component is still
covered under warranty, JBL will provide your JBL
Synthesis Dealer with a loaner unit within the same 24
hour period to be installed in your system, and your unit
will be sent to JBL for repair.
This policy applies to systems purchased in the USA
only. Outside the USA please contact the local distributor
for warranty service.
*Weekends and holidays are excluded from this policy.
SERVICE
3.0
3.2 Audio Service
• Electrical components
All Electronic components are fully warranted for two
years, including parts and labor. Any problems
occurring within the two year warranty period will be
covered by the JBL Synthesis exclusive “48-hour no-
down-time” Service Policy.
• Loudspeakers
All Loudspeakers are fully warranted for five years,
including parts and labor. Any problems occurring
within the five year warranty period will be covered by
the JBL Synthesis exclusive “48-hour no-down-time”
Service Policy.
The vast majority of service calls for Audio will simply
require resetting the system. Call your certified JBL
Synthesis Dealer.
An Installer will make an appointment to reset the
system. On arrival, he or she will refer to the Templates
in the last section of your Manual, and will reset any
components which require it.
Call your certified JBL Synthesis Dealer for a
replacement unit, or to initiate the use of a loaner. If for
any reason you are dissatisfied or need additional
assistance, call:
JBL Synthesis Client Service Manager
(800) 645-7484, extension 233
On Long Island call
(516) 496-3400, extension 233
19
Page 20

4.0
CALIBRATION
TEMPLATES
4.1 Synthesis One
CALIBRATION
TEMPLATES
4.0
20
DATE: _________________________
OWNER: _________________________
INSTALLER _______________________
Page 21

4.2 Synthesis Two
CALIBRATION
TEMPLATES
4.0
21
Page 22

Notes
22
Page 23

JBL Consumer Products, Inc.
80 Crossways Park West, Woodbury, NY 11797
(516) 496-3400
8500 Balboa Boulevard, P.O. Box 2200, Northridge, CA 91329
(818) 893-0110
Part No. SYNOMCG 4/94
 Loading...