

Page 1
OWNER’S GUIDE
®
PRODUCT LINE:
MODEL
NUMBER:
SCS 178 and SCS 188 (230V)
DESIGN GOAL: Bring the thrill of live performance and movie sound to the
home environment by calling on JBL’s professional engineering leadership.
SATELLITE TYPE:Titanium-laminate-dome tweeter, reflex-loaded enclosure
SUBWOOFER TYPE: Bass-reflex enclosure
PORT DESIGN: FreeFlow™ flared
PROFESSIONAL REFERENCE: Cinema Loudspeaker Series
X + 0 + Y2 0M
HZ
Page 2
THANK YOU FOR CHOOSING JBL
For more than 55 years, JBL
has been involved in every
aspect of music and film
recording and reproduction,
from live performances to the
recordings you play in your
home, car or office.
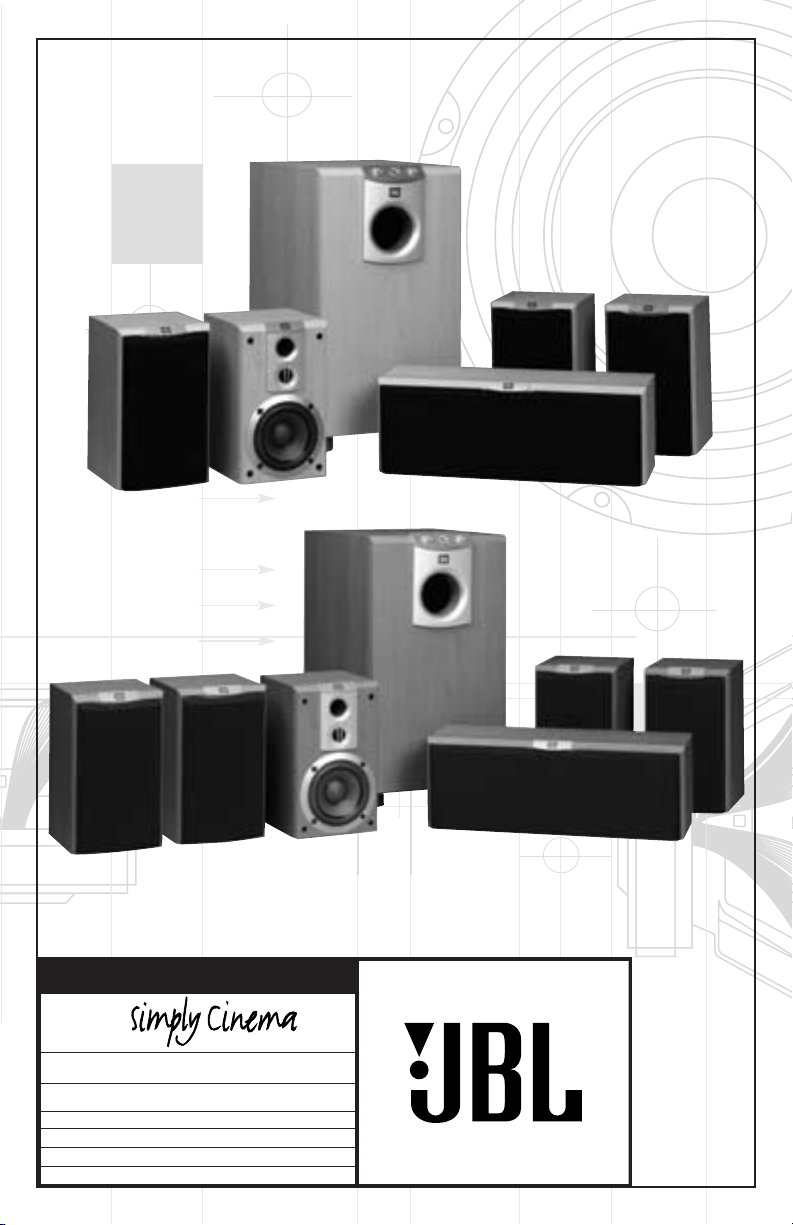
INCLUDED
Four satellites for left/right
front and surrounds. SCS 188
contains an additional satellite
to be used as surround back.
We’re confident that the JBL
system you have chosen will
or office, you will once again
choose JBL.
provide every note of enjoment
that you expected – and that
JBL Consumer Products
when you think about
purchasing additional audio
equipment for your home, car
One center channel speaker. Powered subwoofer.
Two 6.1-meter (20-foot) speaker
cables for connection from
receiver to subwoofer.
Two (Three in SCS 188)
12.2-meter (40-foot) speaker
cables for connection from
receiver to left and right rear
Three 4.6-meter (15-foot)
speaker cables for connection
satellites and surround back
speaker. (SCS 188 only)
from subwoofer to front
speakers and center speaker.
CAUTION
RISK OF ELECTRIC SHOCK
DO NOT OPEN
CAUTION: To prevent electric shock,
do not remove the grounding plug
on the power cord, or use any plug
or extension cord that does not have
a grounding plug provided.
Make certain that the
AC outlet is properly grounded.
Do not use an adapter plug
with this product.
The lightning flash with arrowhead
symbol, within an equilateral triangle, is
intended to alert the user to the
presence of uninsulated “dangerous
voltage” within the product’s enclosure
that may be of sufficient magnitude to
constitute a risk of electric shock to
persons.
The exclamation point within an
equilateral triangle is intended to alert
the user to the presence of important
operating and maintenance (servicing)
2
instructions in the literature
accompanying the appliance.
Page 3

SPEAKER PLACEMENT
Front Speakers
Surround Speakers
The front speakers should be
placed the same distance from
each other as they are from the
listening position. They should
be placed at about the same
height from the floor as the
listeners’ ears will be, or they
may be angled toward the
listeners.
The center channel speaker
should be placed slightly
behind the front left and right
speakers, and no more than
two feet above or below the
tweeters of the left and right
speakers. It is often convenient
to set the center speaker on top
of the television set, as shown
in the drawing.
Center Channel Speaker
0 – 0.6m (0 – 2 ft.)
150-180 cm
The two surround speakers
should be placed slightly
behind the listening position
and, ideally, should face each
other and be at a level higher
than the listeners’ ears. If that
is not possible, they may be
placed on a wall behind the
listening position, facing forward. The surround back
speaker (in SCS 188 only)
should be placed behind the
listening position, facing the
center speaker. The surround
speakers should not call
attention to themselves.
Experiment with their
placement until you hear a
diffuse, ambient sound
accompanying the main
program material heard in the
front speakers.
Subwoofer
The low-frequency material
reproduced by the subwoofer is
mostly omnidirectional, and this
speaker may be placed in a
convenient location in the
room. However, the best
reproduction of bass will be
heard when the subwoofer is
placed in a corner along the
same wall as the front
speakers. Experiment with
subwoofer placement by
temporarily placing the
subwoofer in the listening
position and moving around the
room until the bass
reproduction is best. Place the
subwoofer in that location.
3
Page 4

MOUNTING OPTIONS
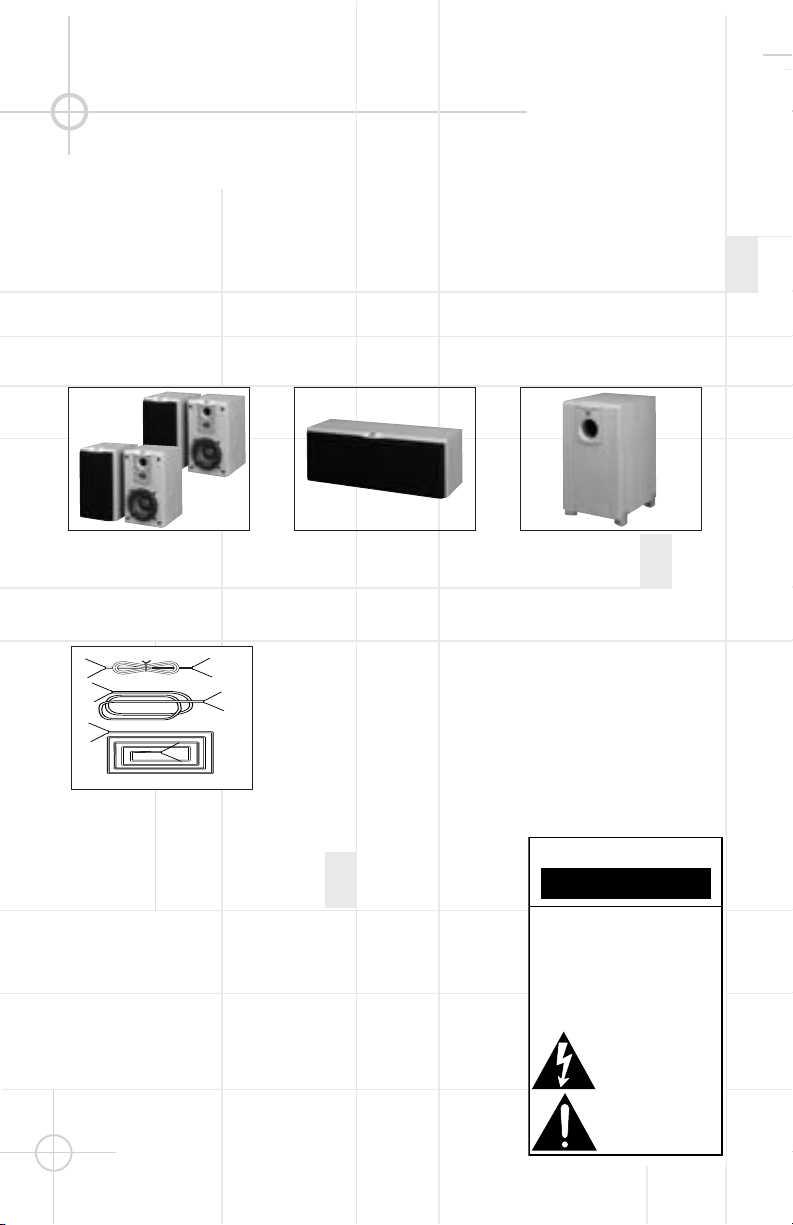
Satellites and Surrounds
On shelves.
On the wall. Wall brackets
are included.
Wall-Mounting
The customer is responsible for
proper selection and use of
mounting hardware, available
through hardware stores, to
properly and safely wall-mount
the speakers.
SPEAKER CONNECTIONS
Connection Tips
4
Separate and strip the ends of
the speaker wire as shown.
Speakers and electronics
terminals have corresponding
(+) and (–) terminals. Most
manufacturers of speakers and
electronics, including JBL, use
red to denote the (+) terminal
and black for the (–) terminal.
The (+) lead of the speaker wire
is noted with a stripe. It is
important to connect all
speakers identically: (+) on the
speaker to (+) on the amplifier
and (–) on the speaker to (–) on
the amplifier. Wiring “out of
On optional stands.
phase” results in thin sound,
weak bass and a poor stereo
image.
With the advent of multichannel
surround-sound systems,
connecting all of the speakers
in your system with the correct
polarity remains equally
important in order to preserve
the proper ambience and
directionality of the program
material.
Page 5

Dolby* Pro Logic* (Non-Digital) – Speaker Level (SCS 178 only)
Use this installation method for
Dolby Pro Logic applications
(not Dolby Digital, DTS®or
other digital processing),
where the receiver/processor
does not have a subwoofer
output, or a volume-controlled
preamp (line-) level output:
Connect your receiver or
amplifier’s front left and right
speaker terminals to the left
and right terminals on the
subwoofer that are marked
“High Level In.” Connect the
left and right terminals on the
subwoofer that are marked
“High Level Out” to the corresponding terminals on the
back of your front left and right
speakers.
Connect your receiver or
amplifier’s center, left and right
surround-speaker terminals to
the corresponding terminals on
the back of your center, left and
right surround speakers.
Left Front
+ –
+ – – +
OUT
IN
Left Front Center
+ – + –
Left Surround
+ –
Center
+ –
Subwoofer
HIGH LEVEL
L R
Receiver
Surround Back
+ –
Right Surround
Right Front
+ –
Right Front
+ –
+ –
Left Surround
+ –
Surround Back
+ –
Only in 6.1 systems
Right Surround
+ –
5
Page 6

Dolby Pro Logic (Non-Digital) – Line Level (SCS 178 and SCS 188)
LINE LEVEL IN
LFE INPUT
LFE OUT
L
R
SUBWOOFERRECEIVER
Use this installation method for
Dolby Pro Logic appli-cations
(not Dolby Digital, DTS®or
other digital processing), where
the receiver/processor is
equipped with a subwoofer
Left Front
Subwoofer
Receiver
Subwoofer
Surround Back
Surround Back
Left Surround
+ –
Left
Front
+ –
Left
Surround
+ –
output, or a volume-controlled
preamp (line-) level output:
Use RCA-type patch cords
to connect the line-level
subwoofer outputs on your
receiver or amplifier to the line-
Center
+ –
Line-
Level In
L
R
Out
R L
+ –
Center
+ –
+ –
Right
Front
+ –
Right
Surround
+ –
Right Front
+ –+ –
Right Surround
+ –
level inputs on the subwoofer.
IMPORTANT: Do not use the
LFE input on the subwoofer
with Dolby Pro Logic
processors. Note: If your
receiver or amplifier only has
one subwoofer output jack,
then you will need to use a Y-
connector (not included). Plug
the male end of the Y-
connector into your receiver or
amplifier’s subwoofer output
jack, and connect each of the
two female ends to separate
RCA-type patch cords. Finally,
plug the RCA-type patch cords
into the line-level inputs on the
subwoofer.
Connect each speaker to the
corresponding speaker
terminals on your receiver or
amplifier.
Only in 6.1 systems
Dolby Digital or DTS®(or Other Digital Surround Mode) Connection
(SCS 178 and SCS 188)
Use this installation method for
Dolby Digital, DTS
®
or other
digital surround processors:
Use the line-level input jack
marked “LFE” for the LowFrequency Effects channel.
6
Connect this jack to the LFE
output or subwoofer output
on your receiver or amplifier.
Connect each speaker to the
corresponding speaker
terminals on your receiver or
amplifier.
Make sure that you have
configured your surroundsound processor for
“Subwoofer On.” The surround
receiver should be configured
for 6.1-channel operation
(if available) and the front left,
front right, center and rear
speakers should all be set to
“Small.”
If your receiver allows you to
set the crossover frequency
between the subwoofer and the
main speakers, select either
120Hz or 150Hz, or select the
setting that is the closest
frequency below these.
Page 7

OPERATION
MIN MAX
Subwoofer
Level
MIN MAX
Subwoofer
Level
HIGH LEVEL
+ – – +
CAUTION
RISK OF ELECTRIC SHOCK
DO NOT OPEN
OUT
IN
L R
LINE LEVEL IN
LFE
L
R
AC 230V~50Hz
200 Watts
IMPORTANT: CONNECT STRIPED WIRE TO RED ( ) SPEAKER TERMINAL.
+
0° 180°
PHASE
Press the Master Power Switch
(marked Power ¡) to the ON
position to use the subwoofer.
When your receiver or amplifier
is off, or is not sending program
material to the subwoofer, the
subwoofer will be in standby
mode. When the subwoofer
senses an audio signal, it will
automatically turn itself on. If
the subwoofer does not sense a
signal after approximately
twenty minutes, it will
automatically go into standby
mode. If you will be away from
home for an extended period of
time, or if the subwoofer will
not be used, switch the Master
Power switch ¡to the "OFF"
position.
¢¡ £
™
PHASE
The Phase Control ™determines
whether the subwoofer’s pistonlike action moves in and out in
phase with the main speakers or
opposite the main speakers. This
is adjusted by pressing the button
to the 0°, or 180° position. The 0°
position of the phase button plays
the bass signal in phase with the
main speakers. The 180° position
plays the bass signal 180º, or out
of phase with the main speakers.
Proper phase adjustment
depends on several variables
such as subwoofer placement
and listener position. Adjust the
phase switch to optimize bass
output at the listening position.
Every system, room and listener
is different. There are no right or
wrong settings. This switch
offers the added flexibility to
adjust your subwoofer for
optimum performance for your
specific listening conditions
without having to move your
speakers. If at some time in the
future you happen to rearrange
your listening room, and move
your speakers, you should
experiment with the phase
switch in both positions, and
leave it in the position that
optimizes bass performance for
your taste.
Volume
Volume can be adjusted using
the Subwoofer Volume Control
£
, as shown.
Crossover
The crossover filter between
the subwoofer and satellites
can be adjusted using the
Crossover Control ¢. The
optimum setting for the
SCS 178 and SCS 188 system is
with the Crossover Control
¢
set to the "Min" position.
7
Page 8

TROUBLESHOOTING
If there is no sound from any of
the speakers:
• Check that receiver/amplifier
is on and a source is playing.
• Check that the powered
subwoofer is plugged in, its
Power switch ¡is switched
on to the “ON•” position.
• Check all wires and
connections between
receiver/ amplifier and
speakers. Make sure all wires
are connected. Make sure
none of the speaker wires are
frayed, cut or punctured.
• Review proper operation of
your receiver/amplifier.
If there is no sound coming
from one speaker:
• Check the “Balance” control
on your receiver/amplifier.
• Check all wires and con-
nections between receiver/
amplifier and speakers. Make
sure all wires are connected.
Make sure none of the
speaker wires are frayed, cut
or punctured.
• In Dolby Digital or DTS
modes, make sure that the
receiver/processor is
configured so that the
speaker in question is
enabled.
If there is no sound from the
center speaker:
• Check all wires and
connections between
receiver/
amplifier and speaker. Make
sure all wires are connected.
Make sure none of the
speaker wires are frayed, cut
or punctured.
®
• If your receiver/processor is
set in Dolby Pro Logic mode,
make sure the center speaker
is not in phantom mode.
• If your receiver/processor
is set in Dolby Digital or DTS
mode, make sure the
receiver/processor is configured so that the center
speaker is enabled.
If the system plays at low
volumes but shuts off as
volume is increased:
• Check all wires and connections between receiver/
amplifier and speakers. Make
sure all wires are connected.
Make sure none of the
speaker wires are frayed, cut
or punctured.
• If more than one pair of main
speakers is being used, check
the minimum impedance
requirements of your
receiver/amplifier.
If there is low (or no) bass
output:
• Make sure the connections to
the left and right “Speaker
Inputs” have the correct
polarity (+ and –).
• Make sure the subwoofer is
plugged into an active
electrical outlet.
• Make sure the powered
subwoofer is plugged in and
switched on.
• In Dolby Digital or DTS
modes, make sure your
receiver/processor is
configured so that the
subwoofer and LFE output are
enabled.
®
If there is no sound from the
surround speakers:
• Check all wires and
connections between
receiver/ amplifier and
®
speakers. Make sure all wires
are connected. Make sure
none of the speaker wires are
frayed, cut or punctured.
• Review proper operation of
your receiver/amplifier and its
surround-sound features.
• Make sure the movie or TV
show you are watching is
recorded in a surround-sound
mode. If it is not, check to see
if your receiver/ amplifier has
other surround modes you
may use.
• In Dolby Digital or DTS
modes, make sure your
receiver/processor is
configured so that the
surround speakers are
enabled.
• Review the operation of your
DVD player and the jacket of
your DVD to make sure that
the DVD features the desired
Dolby Digital or DTS®mode,
and that you have properly
selected that mode using both
the DVD player’s menu and
the DVD disc’s menu.
®
8
Page 9

Declaration of Conformity
We, Harman Consumer International
2, route de Tours
72500 Château-du-Loir
France
declare in own responsibility, that the product
described in this owner’s manual is in
compliance with technical standards:
EN 60065:1998
EN 55013/A14:1999
EN 55020/A14:1999
EN 61000-3-2/A14:2000
EN 61000-3-3/1.1995
EN 50081-1:1992
EN 50082-1:1992
Gary Mardell
JBL,
Harman Consumer International
France,09/03
9
Page 10

®
SPECIFICATIONS
SCS 178/SCS 188 Satellite and Surround Back
Frequency Response (-6dB): 90Hz – 22kHz
Sensitivity (2.83V/1m): 86dB
Nominal Impedance: 4 Ohms
Recommended Amplifier Power 25 – 100 Watts RMS per Channel
Drive Units: 12mm Polyamide/Titanium Laminate Video-shielded HF
Dimensions (H x W x D): 235mm x 140mm x 179mm (9.3" x 5.5" x 7")
Weight: 2.8kg (6.2lb)
SCS 178 and SCS 188 Center
Frequency Response (-6dB): 100Hz – 22kHz
Sensitivity (2.83V/1m): 88dB
Nominal Impedance: 4 Ohms
Recommended Amplifier Power 25 – 100 Watts RMS per Channel
Drive Units: 12mm Polyamide/Titanium Laminate Video-shielded HF
Dimensions (H x W x D): 145mm x 402mm x 155mm (5.7" x 15.8" x 6.1")
Weight: 4.5kg (9.9lb)
SCS 178 Active Subwoofer
Low Frequency Cut-off: 35Hz
High Frequency Cut-off: 40 Hz - 160Hz Variable
Built-in Power Amplifier: 100 Watts RMS
Drive Unit: 200mm Paper Cone Long Throw Driver. Bass Reflex Enclosure
Dimensions (H x W x D): 450mm x 250mm x 360mm (17.7" x 9.8" x 14.2")
Weight: 13.6kg (30lb)
100mm Paper Cone Video-shielded Mid/Bass
Dual 100mm Paper Cone Video-shielded Mid/Bass
SCS 178 System
Frequency Response (-6dB): 35Hz – 20kHz
Refinements may be made on occasion to existing products without notice,
but will always meet or exceed original specifications unless otherwise stated.
Simply Cinema is a registered trademark of JBL, Incorporated.
* Dolby and Pro Logic are trademarks of Dolby Laboratories.
DTS®is a registered trademark of Digital Theater Systems, Inc.
OWNER’S GUIDE
PRODUCT LINE:
MODEL
NUMBER:
SCS 178 and SCS 188
DESIGN GOAL: Bring the thrill of live performance and movie sound to the
home environment by calling on JBL’s professional engineering leadership.
SATELLITE TYPE:Titanium-laminate-dome tweeter, reflex-loaded enclosure
SUBWOOFER TYPE: Bass-reflex enclosure
PORT DESIGN: FreeFlow™ flared
PROFESSIONAL REFERENCE: Cinema Loudspeaker Series
JBL Consumer Products
250 Crossways Park Drive, Woodbury, NY 11797
Europe: 2. Route de Tours, 72500 Château du Loir, France
www.jbl.com
©2001 JBL, Incorporated.
JBL is a registered trademark of JBL, Incorporated.
Part No.
PRO SOUND
COMES HOME
406-000-01570
™
 Loading...