

Page 1
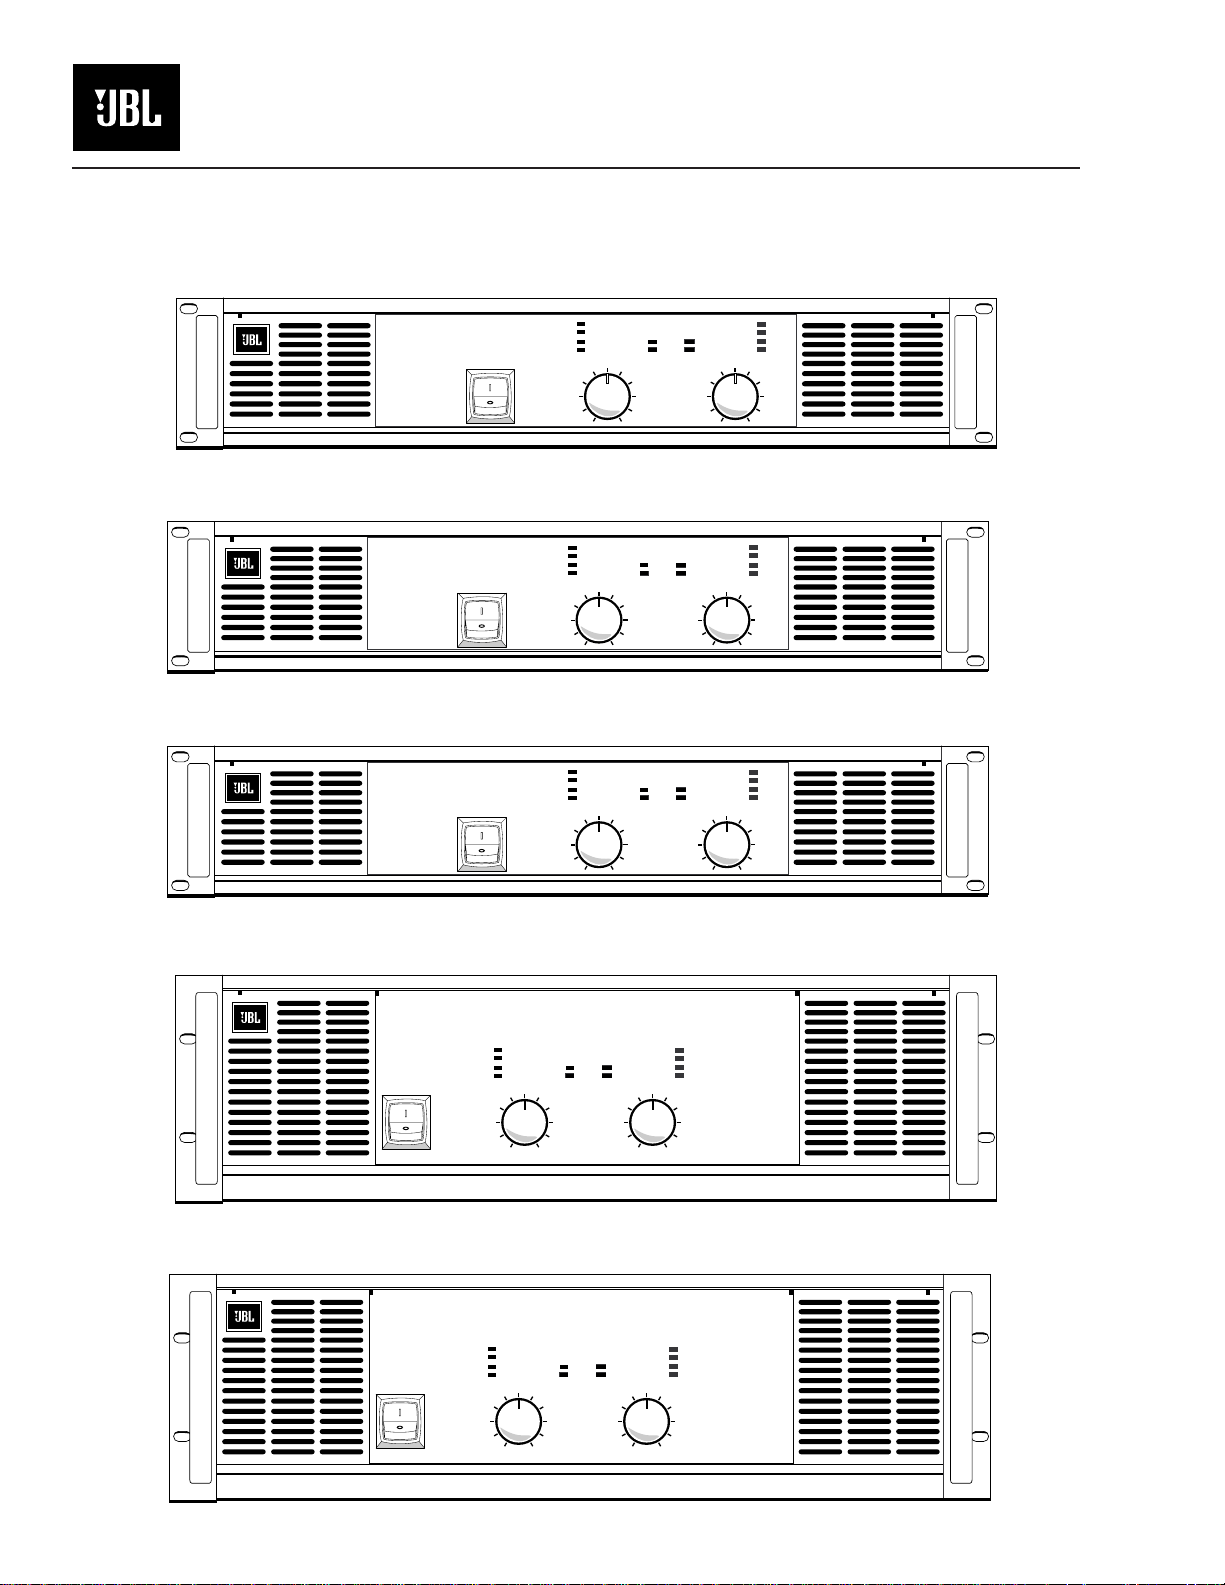
MPA Series
Power Amplifiers
Owner’s Manual
MPA275
MPA400
MPA275
MPA400
MPA600
P r o f e s s i o n a l A m p l i f i e r
P r o f e s s i o n a l A m p l i f i e r
P r o f e s s i o n a l A m p l i f i e r
Clip
-10dB
-20dB
Signal Present
10
12
14
18
24
48
Clip
-10dB
-20dB
Signal Present
10
12
14
18
24
48
Clip
-10dB
-20dB
Signal Present
10
12
14
18
24
48
8
0
8
6
2
0
8
6
2
0
6
4
2
1-CHANNEL-2
Protect
Power
4
1-CHANNEL-2
Protect
Power
4
1-CHANNEL-2
Clip
14
18
24
14
18
24
14
18
24
Signal Present
12
48
Signal Present
12
48
Signal Present
10
12
48
Clip
-10dB
-20dB
10
Clip
-10dB
-20dB
10
-10dB
-20dB
8
6
4
2
0
8
6
4
2
0
8
6
4
2
0
Protect
Power
MPA600
MPA750
MPA750
MPA1100
P r o f e s s i o n a l A m p l i f i e r
Clip
-10dB
-20dB
Signal Present
10
8
12
14
18
6
24
2
48
0
P r o f e s s i o n a l A m p l i f i e r
Clip
-10dB
-20dB
Signal Present
10
8
12
14
18
6
24
4
2
48
0
Protect
Power
4
1-CHANNEL-2
Protect
Power
1-CHANNEL-2
14
18
24
14
18
24
Signal Present
12
48
Signal Present
10
12
48
Clip
-10dB
-20dB
10
8
6
4
2
0
Clip
-10dB
-20dB
8
6
4
2
0
MPA1100
Page 2
Cautions
Sicherheitsvorschriften
Rack Mounting Precautions
To avoid damage to the amplifier mounting ears
and/or rack rails, the amplifier must be supported at all
four corners when used in portable racks.
Consult JBL Service Dept for availability of Rear
Support Brackets.
Lifting Precautions
In order to safely move or install the amplifier, it is
recommended that two persons share the weight when
lifting and positioning the unit.
CAUTION
TO AVOID ELECTRIC SHOCK, DO NOT INSERT FINGERS
OR OBJECTS INTO ANY OPENINGS IN THE CABINET.
WARNING: TOPREVENTFIREORELECTRIC
SHOCK
, DONOTEXPOSETHISEQUIPMENTTORAIN
ORMOISTURE
.
Explanation of Graphical Symbols
The lightning flash with arrowhead symbol, within an equilateral triangle, is intended to alert the user to the presence
of uninsulated “dangerous voltage” within the product’s
enclosure that may be of sufficient magnitude to constitute
a risk of electric shock to humans.
The exclamation point within an equilateral triangle is
intended to alert the users to the presence of important
operating and maintenance (servicing) instructions in the
literature accompanying the product.
Sicherheitsvorschriften für den Einbau in ein Gestell
Um Schäden auf den Befestigungsleisten des
Verstärkers und/oder den Gestellschienen zu vermeiden, muß der Verstärker beim Einbau in ein tragbares Gestell an allen vier Ecken gestützt werden.
Erkundigen Sie sich bei der JBLKundendienstabteilung nach Stützen für die
Rückseite des Verstärkers.
Sicherheitsvorschriften beim Hochheben
Um den Verstärker sicher zu verschieben oder
einzubauen, wird empfohlen, das Gewicht des
Verstärkers beim Hochheben und Verschieben gleichmäßig auf zwei Personen zu verteilen.
VORSICHT
UM ELEKTRISCHEN SCHLAG ZU VERMEIDEN, KEINE
FINGERN ODER GEGENSTÄNDE IN ÖFFNUNGEN DES
WARNUNG:
ELEKTRISCHENSCHLÄGENDASGERÄTNICHMITREGEN
ODERFEUCHTIGKEITINBERÜHRUNGBRINGEN
Erklärung der graphischen Symbole
Der Blitz mit nach unten zeigendem Pfeil in einem gleichseitigen
Dreieck weist den Benutzer auf das Vorhandensein einer
unisolierten, “gefährlichen Spannung” im Gehäuse hin, die stark
genug sein kann, einer Person einen elektrischen Schlag zu versetzen.
Das Ausrufezeichen in einem gleichseitigen Dreieck weist den
Benutzer auf nichtige Betriebs - und Wartungsvorschriften in den
Beiliegenden Unterlagen des Geräteshin.
GEHÄUSES STECKEN.
ZURVERMEIDUNGVONFEUERODER
.
CAUTION
RISK OF ELECTRIC SHOCK
DO NOT OPEN
CAUTION: TOREDUCETHERISKOFELECTRIC
SHOCK, DONOTREMOVETHECOVER. NOUSER-
SERVICEABLEPARTSINSIDE. REFERSERVICINGTO
QUALIFIEDSERVICEPERSONNEL
.
CAUTION
RISK OF ELECTRIC SHOCK:
OPEN ONLY IF QUALIFIED
AS SERVICE PERSONNEL
To reiterate the above warnings: servicing instructions are for use by qualified personnel only. To avoid
electric shock, do not perform any servicing other than
that contained in the Operation Instructions unless you
are qualified to do so. Refer all servicing to qualified
service personnel
VORSICHT
GEFAHR EINES ELEKTRISCHEN
SCHLAGES NICHT ÖFFNEN
VORSICHT:
SCHLAGESZUVERMINDERN
ENTFERNEN
INNERN
BEDIENUNGSPERSONAL
UMDASRISIKOEINESELEKTRISCHEN
,
KEINEBENUTZERBEDIENUNGSTEILEIM
.
.
BEDIENUNGNURDURCHQUALIFIZIERTES
ABDECKUNGNICHT
.
VORSICHT
GEFAHR EINES ELEKTRISCHEN SCHLAGES: NUR VON
QUALIFIZIERTEM WARTUNGSPERSONAL ZU ÖFFNEN
Eindrigliche Warnung: Wartungsvorschriften dienen
nur der Benutzung durch qualifiziertes Personal. Zur
Vermeidung eines elektrischen Schlages keine anderen
als die in den Betriebsvorschriften beschriebenen
Wartungsarbeiten ausführen, es sei denn, Sie sind dafür
qualifiziert. Wartungsarbeiten sind von qualifiziertem
Wartungspersonal auszuführen.
1
Page 3

2
Cautions .................................................................................................................1
Unit Description ....................................................................................................3
General Information....................................................................................................3
Open Input Architecture™ Slots.................................................................................3
Feature Identification...................................................................................................4
Installation.............................................................................................................5
Inputs ...........................................................................................................................5
Outputs ........................................................................................................................5
Input Connections.......................................................................................................6
Changing XLR Polarity.................................................................................................7
To Parallel the Inputs..................................................................................................7
Bridged Mono Mode ...................................................................................................8
AC Power Connection.................................................................................................9
Operation .............................................................................................................10
Controls......................................................................................................................12
Gain Control Lockout................................................................................................12
Displays......................................................................................................................12
Typical Power Up, Operation, Power Down Behavior...........................................12
Maximum Long-Term Output Power........................................................................14
Protection Circuits......................................................................................................14
Specifications.......................................................................................................16
Power Output Ratings ...............................................................................................17
Troubleshooting ..................................................................................................19
Illustrations
Figure 1. Open Input Architecture Slots.....................................................................3
Figure 2. Rear and Front Views of 2-Space High Amplifiers ....................................4
Figure 3. Rear and Front Views of 3-Space High Amplifiers ....................................4
Figure 4. Neutrik Speakon Connector Wiring for Speaker Outputs.........................5
Figure 5. Typical Unbalanced Connection.................................................................6
Figure 6. Portable Balanced System ...........................................................................6
Figure 7. Installed Balanced System...........................................................................6
Figure 8. Ground Bus Connection..............................................................................6
Figure 9. Jumper Positions for XLR Polarity Reversal................................................7
Figure 10. Switch Settings for Bridged Mono Operation...........................................7
Figure 11. Connection Options of Speaker Load for Bridged Mono ......................8
Figure 12. Speakon Connection Details for Bridged Mono Operation. ...................8
Figure 13. Gain Control Lockout...............................................................................12
Figure 14. LED Displays During Normal Operation................................................13
Figure 15. LED Displays During Abnormal Operating Conditions .........................13
Tables
Table 1. JBL MPA Series AC Power Consumption
versus Load Impedance With 110, 115 & 120 V Mains ..............................9
Table 2. JBL MPA Series AC Power Consumption
versus Load Impedance With 220, 230 & 240 V Mains.............................10
Table 3. LED Display Operation...............................................................................11
Table 4. Output Ratings With 110, 115 and 120 V Mains........................................16
Table 5. Output Ratings With 110, 115 and 120 V Mains........................................17
Table of Contents
Page 4
3
The MPA275, MPA400, MPA600, MPA750 and MPA1100 are high-efficiency professional power amplifiers, with two independent channels, respectively capable of delivering 275, 400, 600, 750 and 1100 watts into a four ohm load (per channel), and
substantially more power into lower impedance loads. Semi-toroidal power transformers (one per channel in the MPA750 and MPA1100) are mounted in each front
corner, as close as possible to the rack ears and rails. The rear panels are 16.9 inches
behind the front mounting plane, so an extra rack depth allowance (i.e., more than
18 inches) will be needed to clear XLR or Speakon connections. The built-in fan
cooling takes air in the rear, exhausting through front vents. Due to the flow-through
cooling, amplifiers may be racked with zero clearance in between, which also helps
support the weight. Rear support within the rack must be used in portable applications.
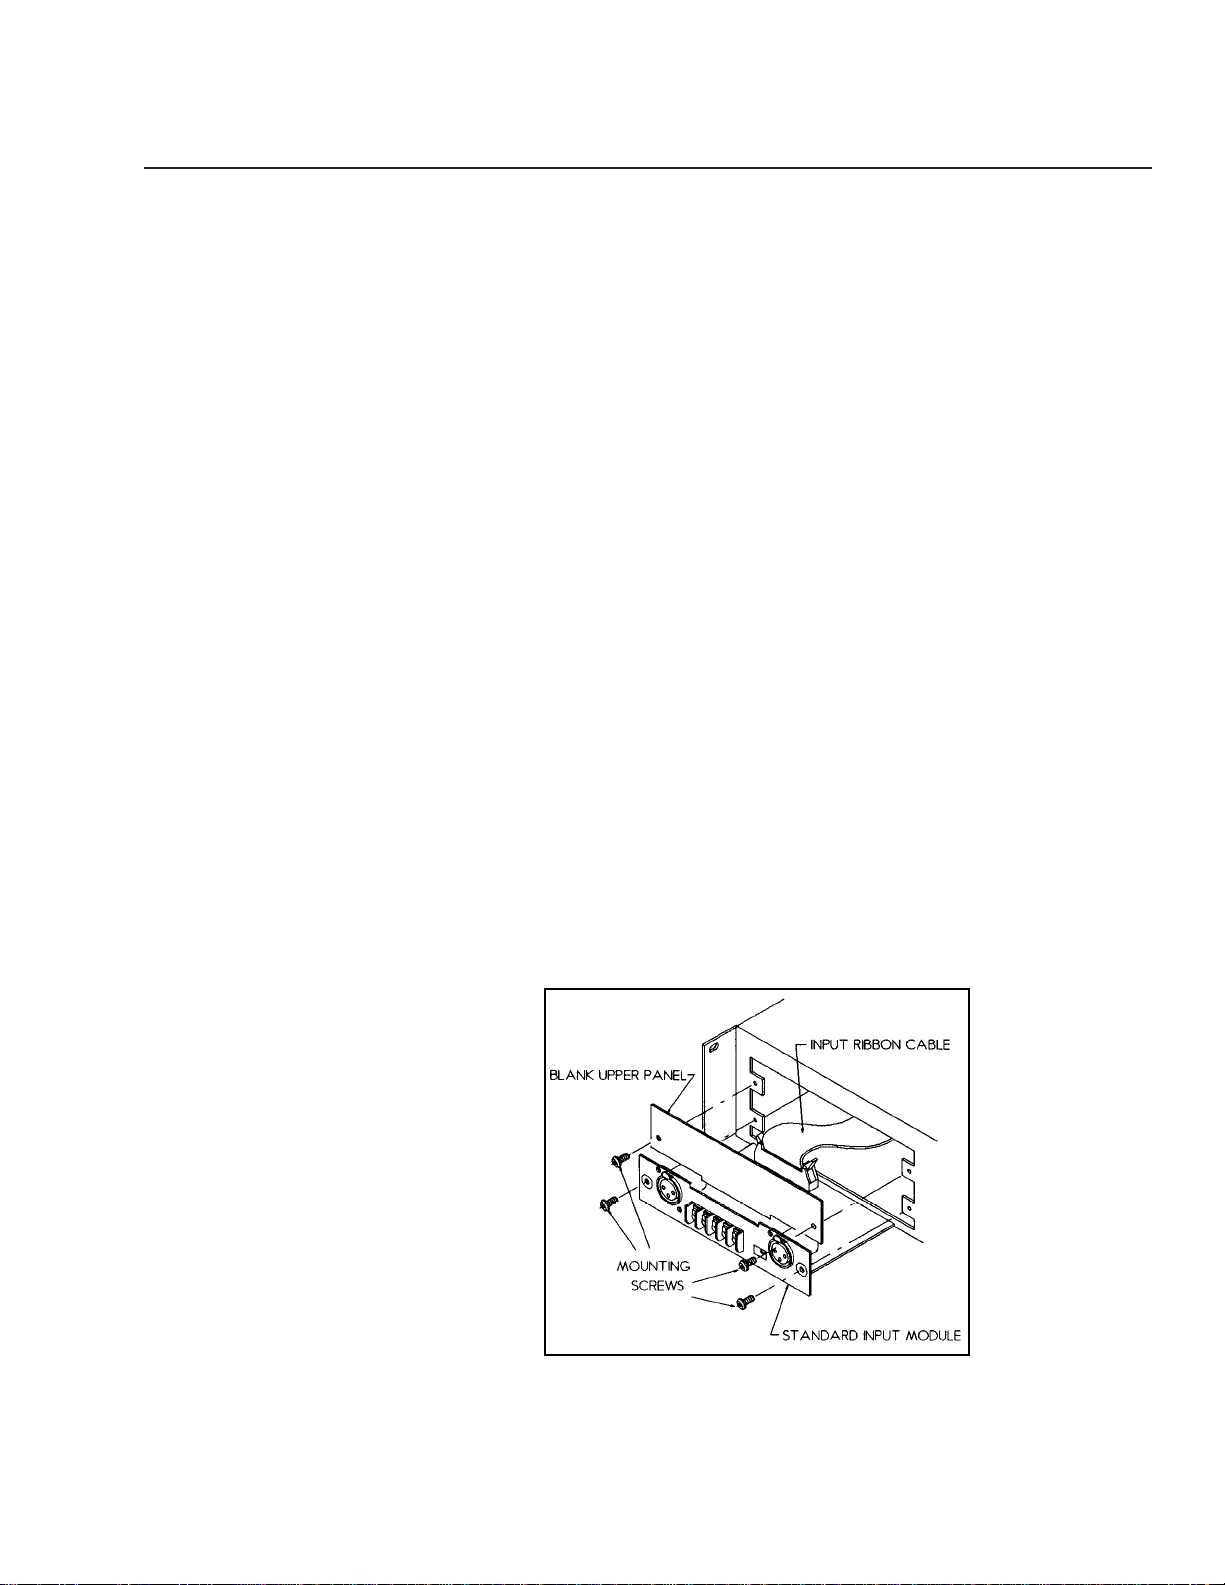
Open Input Architecture™ Slots
Provided with each MPA Series amplifier is a standard input module. This module
and the upper input cover panel can be removed, permitting future upgrades.
Internally, a ribbon cable runs behind both of these “slots.” The ribbon cable connects to the rest of the amplifier and carries several levels of DC power, and (for each
channel) the input signals, speaker output monitor, muting status, clip activity, thermal status, and power-on status. These signals are provided to support future remote
control and monitoring schemes as they become available. The JBL Marketing department will be happy to entertain suggestions for input modules.
The “standard input board” which is shipped with each amplifier has balanced
XLR and barrier strip inputs, bridging and input-parallel switches, and footprints for
passive rolloffs and popular input isolation transformers (more info is available on
request).
Unit Description
Figure 1. Open Input Architecture Slots.
Page 5
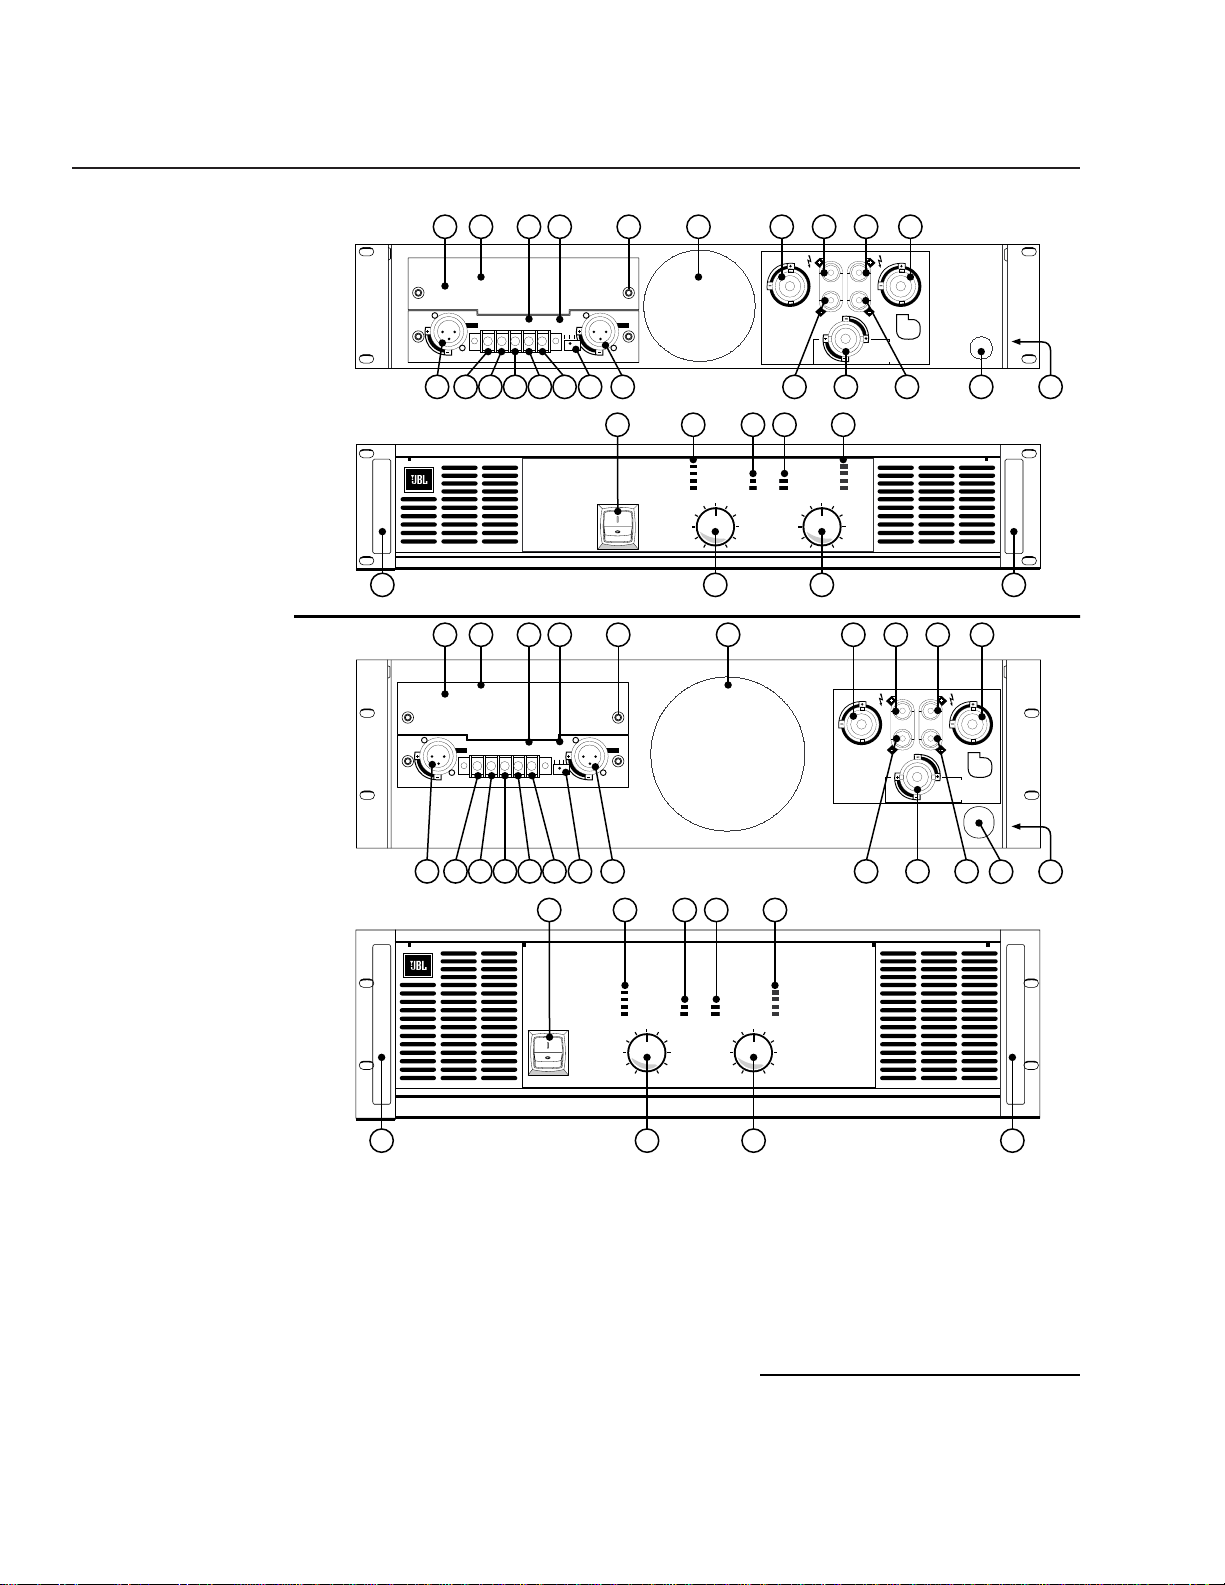
4
Figure 2. Rear and
Front Panel for
2–Space High
Models (MPA275,
MPA400 & MPA600)
Figure 3. Rear and
Front Panel for
3–Space High
Models (MPA750
and MPA1100)
Rear Panel Features
1. Upper Input Slot
2. Upper Input Cover Panel
3. Slot Product Mounting Screws
4. Lower Input Slot
5. Standard Input Board
6. Channel 2 XLR Input Connector
7. Channel 1 XLR Input Connector
8. Channel 2 (+) Terminal Block Input
9. Channel 2 (–) Terminal Block Input
10. Channel 1 & 2 Ground Terminal
11. Channel 1 (–) Terminal Block Input
12. Channel 1 (+) Terminal Block Input
13. Configuration Selector Switch
14. Fan
15. Channel 2 Speakon Output Connector
16. Channel 1 Speakon Output Connector
17. Channel 2 (+) Binding Post *
18. Channel 2 (–) Binding Post *
19. Channel 1 (+) Binding Post *
20. Channel 1 (–) Binding Post *
21. Dual-Channel Out Speakon Connector
22. Rear Rack Support (Left and Right)
23. Power Cord
Front Panel Features
24. Unit Power Switch
25. Channel 1 Level Display
26. Channel 2 Level Display
27. Channel 1 Power & Protection Display
28. Channel 2 Power & Protection Display
29. Channel 1 Gain Control
30. Channel 2 Gain Control
31. Handle (Left and Right)
*Banana output for 100–115 VAC Units Only
Unit Description
1 2 4 5 3 14 15 1617 19
CHANNEL 2
OUTPUT
– BRIDGED MONO +
CHANNEL 1
OUTPUT
GND
P1
P3
CHANNEL 2
INPUT
GND
+– –+
11
MPA600
P2
PARALLEL
STEREO
BRIDGE
CHANNEL 1
126 7
13
GND
P1
P3
DUAL CHANNEL
OUTPUT CONNECTOR
STEREO
4 OHM MIN PER CH
18 20211098
24 27 28 26
P r o f e s s i o n a l A m p l i f i e r
25
18
14
24
Clip
-10dB
-20dB
Signal Present
10
12
48
8
0
6
4
2
1-CHANNEL-2
Protect
Power
29
18
14
24
CH 2
Signal Present
10
12
48
30 3131
Clip
-10dB
-20dB
8
6
4
2
0
P2
SENSITIVITY
1 VOLT
IMPEDANCE
20K BAL
10K UNBAL
1 2 4 5 3 14 15 1617 19
CHANNEL 2
OUTPUT
P3
CHANNEL 2
GND
P1
INPUT
GND
+– –+
11
P2
GND
P1
PARALLEL
STEREO
BRIDGE
CHANNEL 1
MPA1100
P3
126 7
13
24 27 28 26
25
P r o f e s s i o n a l A m p l i f i e r
Clip
-10dB
-20dB
Signal Present
10
8
12
14
6
18
4
24
2
48
0
Protect
Power
1-CHANNEL-2
18
14
24
Signal Present
12
48
DUAL CHANNEL
OUTPUT CONNECTOR
STEREO
4 OHM MIN PER CH
Clip
-10dB
-20dB
10
8
6
4
2
0
P2
SENSITIVITY
1 VOLT
IMPEDANCE
20K BAL
10K UNBAL
CH 1
+
BRIDGED MONO
8 OHM MIN
–
23 22
CH 1
BRIDGED MONO
8 OHM MIN
+
–
CHANNEL 1
OUTPUT
23 22
– BRIDGED MONO +
CH 2
18 20211098
29
30 3131
Page 6
5
Installation
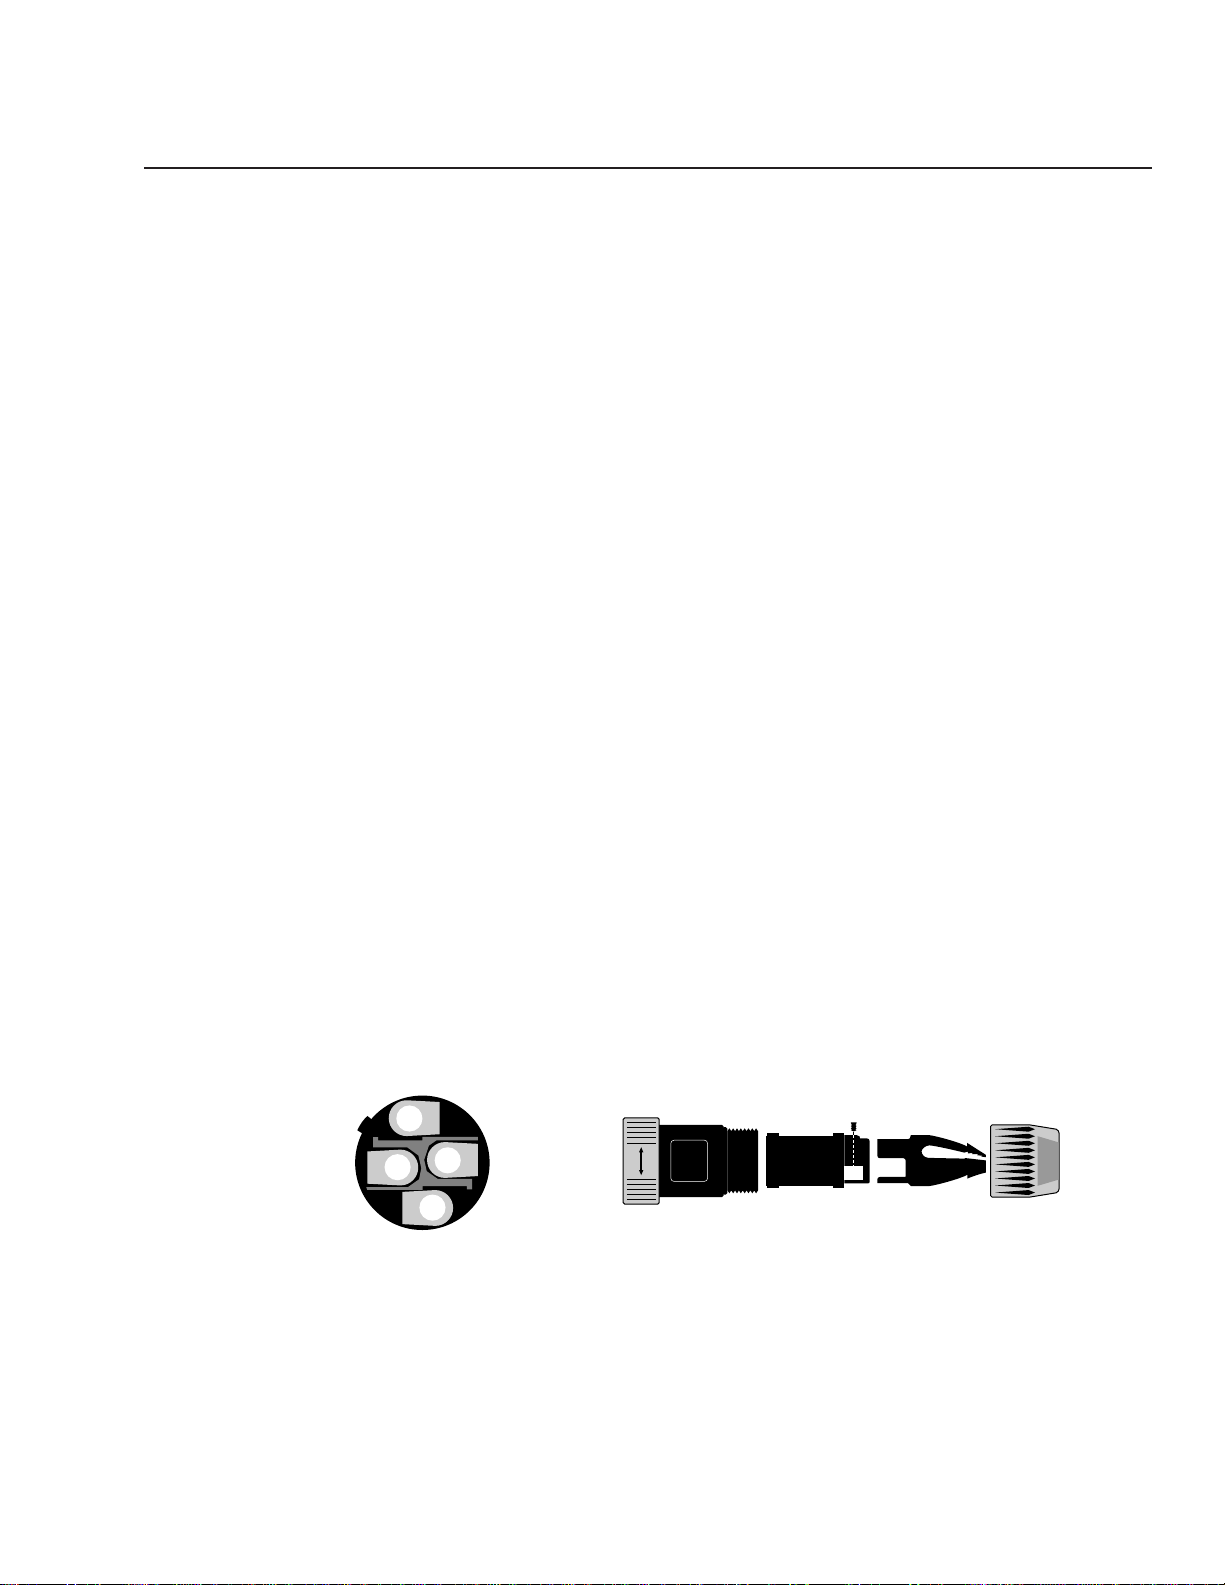
Figure 4. Neutrik Speakon Connector Wiring for Speaker Outputs
Exploded view (side)
Connection Terminals
Inputs
Balanced input connections are available via barrier strip or XLR connectors. The unit
is shipped with pin 2 high (see subsequent instructions to change polarity). As usual,
for unbalanced inputs, the unused terminal should be terminated to ground (the
negative input terminals on the barrier strip are located adjacent to the ground terminal for this purpose).
Input sensitivity is 1 Vrms, and impedance is 20 kilohm balanced, 10 kilohm
unbalanced, as is typical of JBL amplifiers.
The input jacks are located on a removable panel which has a toggle switch for
(1) bridged-mono (2) normal stereo, or (3) paralleling the inputs. See page 2 for more
information about the Open Input Architecture slots.
Outputs
Speaker connections are made via standard red/black 5-way binding posts, or by
Neutrik NL4FC Speakon connectors. The Speakon for each channel uses the standard
wiring of:
Pin 1- = Speaker Ground
Pin 1+ = Speaker Hot
Pin 2- = [Not used]
Pin 2+ = [Not used]
In addition, a central Speakon is provided with the standard stereo wiring of:
Pin 1- = Ch 1 Ground
Pin 1+ = Ch 1 Hot
Pin 2- = Ch 2 Ground
Pin 2+ = Ch 2 Hot
2–
2+
1+
1–
NEUTRIK
SPEAKON
NL4FC
SWISS MADE
Page 7
Xx
6
Input Connections
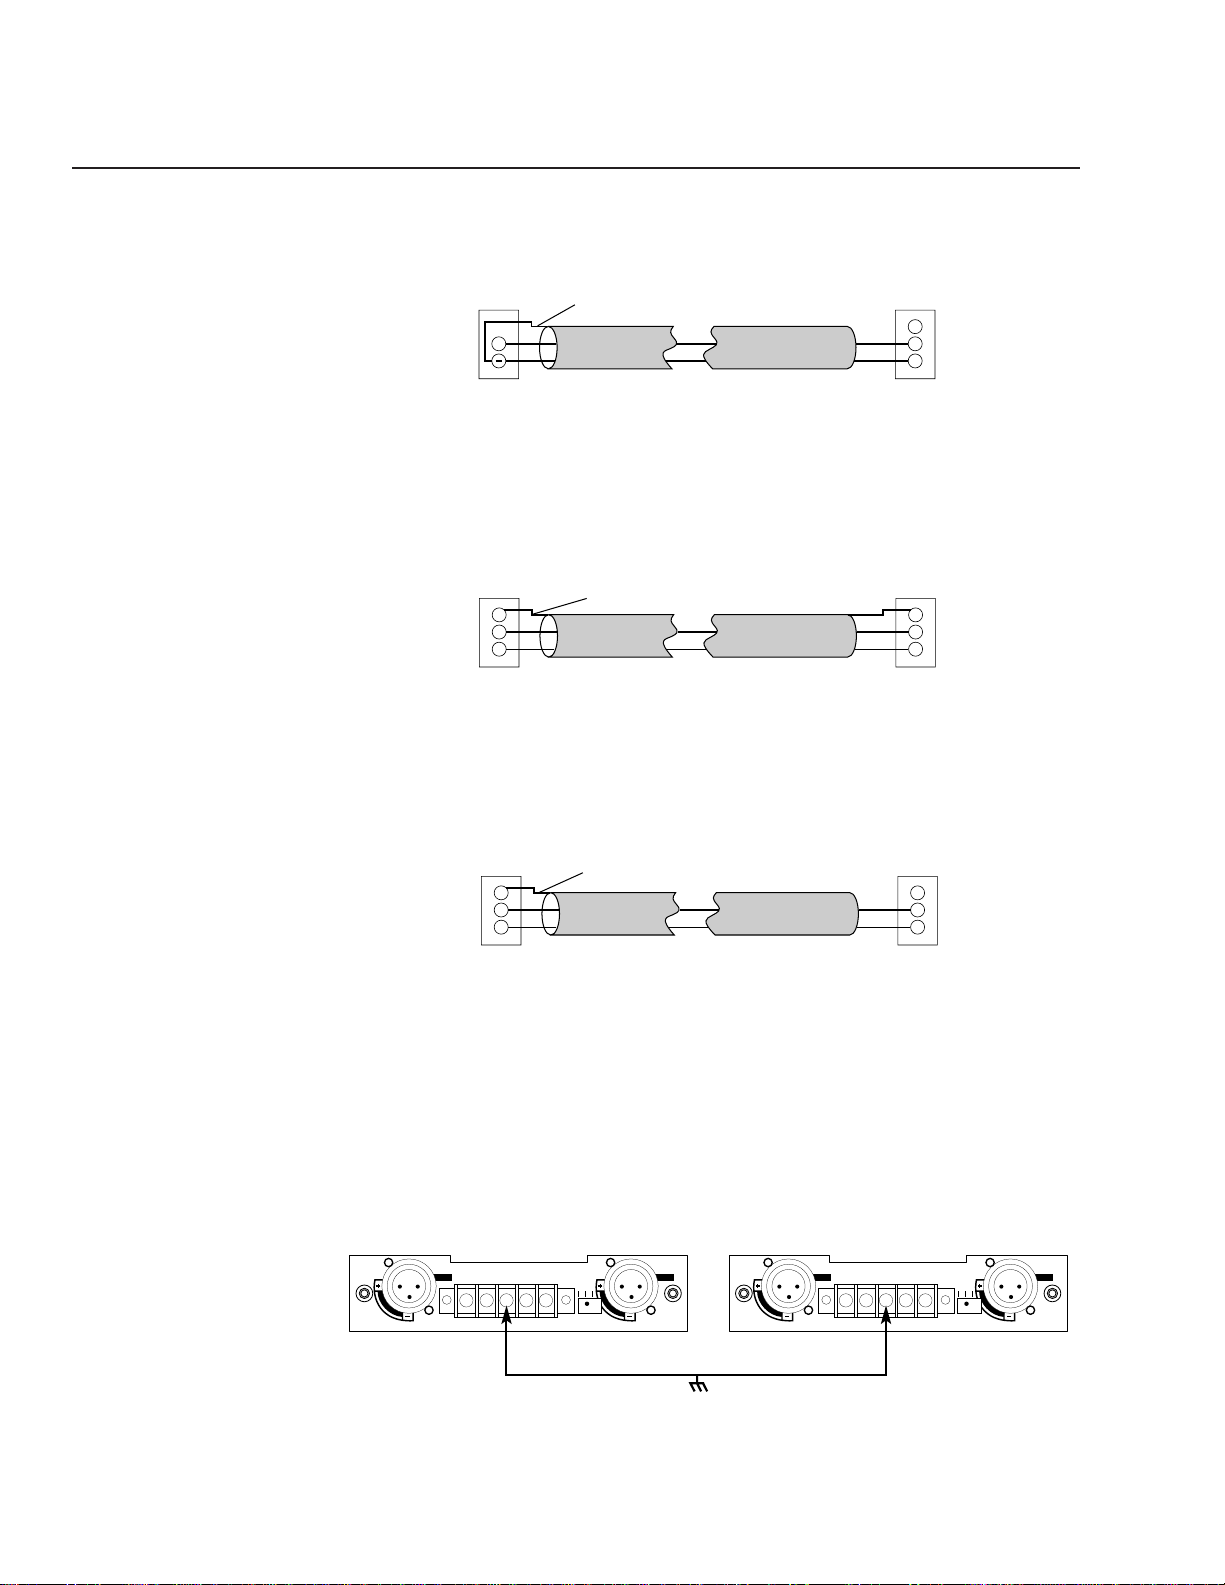
Figure 5. Typical Unbalanced Connection
To connect an unbalanced source to the input of an MPA amplifier, “+” should be
connected to pin 2, and “-” to pin 3 The “-” terminal should also be connected to the
shield at the source only. Pin 1 should not be connected at the amplifier.
Figure 6. Portable Balanced System
In a portable system using a source unit with balanced outputs, a standard XLR cable
wired pin to pin (with pin 1 connected to the shield at both ends) should be used.
Figure 7. Installed Balanced System
In an installed system using a source unit with balanced outputs, pin 1 should be
connected to the shield at the source, with no connection to pin 1 at the amplifier.
If, after wiring the input as shown above, any hum or buzzing is present, connect
the GND terminals of all amplifiers together. This bus should then be connected to a
stable earth ground. It may also be necessary to connect the chassis of the input
source device to the ground bus, particularly when using an unbalanced source.
Figure 8.
Output
(Source)
+
Unbalanced
Shield
MPA Input
1
2
3
Balanced
Output
(Source)
1
2
3
Balanced
Shield
MPA Input
1
2
3
Balanced
Output
(Source)
1
2
3
Balanced
Shield
MPA Input
1
2
3
Balanced
SENSITIVITY
1 VOLT
IMPEDANCE
20K BAL
10K UNBAL
P2
P3
CHANNEL 2
INPUT
+– –+
GND
P1
CHANNEL 1
PARALLEL
P2
GND
STEREO
BRIDGE
P1
P3
GND
SENSITIVITY
1 VOLT
IMPEDANCE
20K BAL
10K UNBAL
P2
P3
CHANNEL 2
INPUT
+– –+
GND
P1
CHANNEL 1
PARALLEL
P2
GND
STEREO
BRIDGE
P1
P3
GND
Page 8

Installation
Caution:
The XLR polarity changes
as outlined on this page
should only be done by
qualified personnel with
“board level” soldering
experience.
Changing the XLR polarity
The MPA275, MPA400, MPA600, MPA750 and MPA1100 are shipped with XLR polarity
set at pin 2 high. To convert to pin 3 high:
1. Remove the Standard Input Module and input ribbon cable. (See Figure 1).
2. Find the soldered jumpers W303, W304 (Ch 1) and W403, W404 (Ch 2), located
behind each XLR jack. These are soldered in positions marked “PIN 2 HI”.
3. Desolder each jumper, and move it lengthwise 0.2 inches to its alternate mounting position (the end marked “PIN 3 HI”), and resolder. Each jumper should fit
in its new position evenly without changing its length. All four must be moved
or the input signal will not be properly connected. (See Figure 5).
4. Label the outside of the Input panel to show that pin 3 is now High.
NOTE: THIS ADJUSTMENT DOES NOT ALTER THE POLARITY OF THE
BARRIER STRIP, which remains as marked on the rear panel.
5. Install the input ribbon cable and remount the Standard Input Module securely.
Jumper positions for
“Pin 2 High”
W303
XLR POLARITY
PIN 2 HI PIN 3 HI
W304
Jumper positions for
“Pin 3 High”
W303
XLR POLARITY
PIN 2 HI PIN 3 HI
W304
Figure 9. Jumper Positions for XLR Pin 2 High (factory preset), and Pin 3 High.
Note: Both channels must be modified for proper polarity reversal.
To Parallel the Inputs
1. Locate the selector switch adjacent to the CHANNEL 1 input XLR connector ,
and set it to the PARALLEL position (see Figure 6 below, left).
+
CHANNEL 1
PARALLEL
STEREO
P2
BRIDGE
GND
P1
P3
Parallel CH 1 & CH 2 Inputs,
Dual Mono Outputs Mode
+
CHANNEL 1
Shared CH 1 (Polarity Reversed) Input,
Bridged Output Mono Mode
PARALLEL
STEREO
P2
BRIDGE
GND
P1
P3
Figure 10. To Parallel the Input Jacks or for Bridged Mono,
Set the Toggle Switch on the Standard Input Module as Shown Here.
7
Page 9

Installation
With paralleled inputs, the signal may be looped through (or “daisy-chained”)
by going in one channel’s inputs and out the other. The amplifier Gain settings will
not affect the level at the input jacks.
BRIDGED-MONO
MODE CAUTION:
Output voltages up to 200
volts rms are available
between the MPA1100’s
bridged terminals (140
volts into an 8 ohm load).
Even on the MPA600, 150
volts rms are available
between the bridged
terminals (103 volts into
an 8 ohm load). Fully
insulated CLASS ONE
wiring must be used, and
the load must be rated up
to 2400 watts (8 ohms)
on the MPA1100, 1500
watts on the MPA750, and
1330watts (8 ohms) on
the MPA600. While the
MPA400 and MPA275
develop somewhat less
power, precautions should
be observed nonetheless.
Bridged-Mono Mode
1. Locate the selector switch adjacent to the CHANNEL 1 input XLR connector, and
set it to the BRIDGE position (see Figure 6, right side, on page 6).
2. Connect inputs to Ch 1 only. Do not connect anything to Ch 2 inputs.
3. Set Ch 2 Gain on FULL and regulate Gain with Ch 1 Gain only. Both channels
should display the same LEVEL readouts.
4. A single speaker load is used. The positive lead may be connected to Ch 1 red
binding post, and the negative lead to Ch 2 red binding post, but due to the
high voltage present (see caution note) we recommend the use of the fully
insulated Speakon connector. Both wiring options are shown in Figure 7.
–
+
–
+
2–
2+
1+
1–
CH 1
BRIDGED MONO
8 OHM MIN
CHANNEL 1
+
–
OUTPUT
CONNECT ONE
SPEAKER LOAD ONLY.
Use Either Binding Posts
or Stereo Speakon,
but not both.
CHANNEL 2
OUTPUT
DUAL CHANNEL
OUTPUT CONNECTOR
STEREO
4 OHM MIN PER CH
– BRIDGED MONO +
CH 2
Figure 11. Connection Options of Speaker Load for Bridged Mono Operation.
Speakon wiring for bridged mono, using the third, or
“stereo” Speakon:
Connect speaker positive to pin 1+.
Connect speaker negative to pin 2+.
Figure 12. Speakon Connection Details for Bridged Mono Operation.
VORSICHT BEIM ÜBERBRÜCKTEN MONO-MODUS:
Zwischen den überbrückten Terminals des MPA1100 (140 Volt bei einer Belastung von 8 Ohm) besteht eine Ausgangsspannung mit
einem quadratischen Mittelwert von bis zu 200 Volt. Selbst beim MPA600 besteht eine Ausgangsspannung mit einem quadratischen
Mittelwert von 15j0 Volt zwischen den überbrückten Terminals (103 Volt bei einer Belastung von 8 Ohm). Zu verwenden ist voll
isolierte Verdrahtung der US-Klasse Eins, und die angeschlossene Belastung muß für bis zu 2400 Watt (8 Ohm) beim MPA1100,
1500 Watt beim MPA750 und 1330 Watt (8Ohm) beim MPA600 ausgelegt sein. Obwohl die Leistung beim MPA400 und MPA275
etwas geringer ist, sind die Sicherheitsvorschriften dennoch einzuhalten.
8
Page 10

Installation
AC Power Connection
AC Connection is made through a standard Schuko or NEMA grounded plug. While
all models meet Safety Agency requirements for current consumption of less than 12
amp, 120Vac during “normal” operation, peak current consumption can be higher
on the MPA1100 or MPA750.
The amplifiers can be wired for 100, 120, or 220–240 Vac, 50–60Hz.
Some background on AC ratings is necessary to fully understand the limitations
on current draw. Essentially, there are three ratings of interest: (1) the legal operating
current as measured by the Safety Agencies, (2) the maximum expected average
under worst-case program material, and (3) the peak current draw at full output
power.
All major safety agencies around the world measure amplifier current and
temperature rise under the same “normal operating conditions” using a pink noise
signal with an average power equal to one eighth of maximum power. This was in
response to industry complaints that the former test level of one third power was
unrealistic for high-quality professional amplifiers. To put these levels in perspective,
music played at one third average power will be in a state of constant clipping, and
this power level is about the greatest one can obtain without completely obliterating
the program under clipping. The one eighth power level is about as loud as you can
play music while making some attempt to avoid obvious clipping.
We had to satisfy the following conditions:
1. Meet the safety agency requirements for “normal” current draw.
2. Remain within the functional limits of the plug for “severe program levels.”
3. Avoid unsafe conditions at full output power.
The AC consumption for each power level and load impedance is shown in
Table1 and Table 2 (see pages 9 and 10).
The safety agencies are concerned with the current levels shown under the one
eighth power column. This is because building codes prohibit the connection of a
single load which exceeds 80% of the capacity of the branch circuit.
JBL Engineering standards call for ability to operate at one third power, in order
to meet the demands of “worst-case” heavily compressed, clipped program material.
This will use the AC current shown in the one third power column. The amplifier’s
protective circuits will not permit long-term operation at full power into 2 ohms.
9
Page 11

Operation
Operation With 110 VAC, 60 Hz Power Mains
2 CH Load Max Power AC Current AC Current AC Current AC Current
Model (Ohms) (Midband) Full Power 1/3 Power 1/8 Power Idle
8+8 740 x 2 23.0 A 10.2A 5.4 A
MPA1100 4+4 1000 x 2 38.0 A 16.0 A 7.8 A 0.9 A
2+2 1300 x 2 54.0 A 23.0 A 11.4 A
8+8 480 x 2 18.0 A 9.6A 4.6 A
MPA750 4+4 700 x 2 29.0 A 14.4 A 6.4 A 0.7 A
2+2 950 x 2 38.0 A 21.0 A 10.0 A
8+8 400 x 2 15.2 A 8.4 A 3.4 A
MPA600 4+4 550 x 2 22.0 A 13.5 A 5.4 A 0.5 A
2+2 675 x 2 32.0 A 15.2 A 8.0 A
8+8 275 x 2 11.2 A 6.6 A 2.6 A
MPA400 4+4 400 x 2 16.0 A 9.6 A 4.6 A 0.4 A
2+2 525 x 2 22.0 A 13.2 A 5.4 A
8+8 180 x 2 7.6 A 5.4 A 3.6 A
MPA275 4+4 275 x 2 12.0 A 7.2 A 5.2 A 0.4 A
2+2 425 x 2 18.2 A 11.2 A 7.0 A
Operation With 115 VAC, 60 Hz Power Mains
8+8 770 x 2 24.0 A 10.4 A 5.6 A
MPA1100 4+4 1100 x 2 39.0 A 16.6 A 8.0 A 1.0 A
2+2 1400 x 2 56.0 A 23.4 A 11.8 A
8+8 510 x 2 18.6 A 9.8A 4.8 A
MPA750 4+4 760 x 2 30.0 A 14.8 A 6.8 A 0.8 A
2+2 1000 x 2 39.4 A 21.4 A 10.6 A
8+8 425 x 2 13.6 A 8.6 A 3.6 A
MPA600 4+4 610 x 2 23.0 A 13.4 A 5.6 A 0.6 A
2+2 750 x 2 33.0 A 15.6 A 8.6 A
8+8 290 x 2 11.6 A 6.8 A 2.8 A
MPA400 4+4 425 x 2 17.0 A 9.8 A 4.8 A 0.4 A
2+2 575 x 2 23.0 A 13.6 A 5.6 A.
8+8 190 x 2 7.8 A 5.6 A 3.8 A
MPA275 4+4 300 x 2 13.6 A 7.6 A 5.6 A 0.4 A
2+2 450 x 2 19.2 A 11.6 A 7.4 A
Operation With 120 VAC, 60 Hz Power Mains
8+8 800 x 2 25.0 A 10.8 A 5.8 A
MPA1100 4+4 1200 x 2 40.0 A 17.0 A 8.4 A 1.0 A
2+2 1500 x 2 58.0 A 24.0 A 12.0 A
8+8 550 x 2 19.0 A 10.0 A 5.0 A
MPA750 4+4 825 x 2 31.0 A 15.2 A 7.4 A 0.8 A
2+2 1100 x 2 41.0 A 22.0 A 11.0 A
8+8 450 x 2 16.0 A 9.0 A 4.0 A
MPA600 4+4 675 x 2 24.0 A 14.0 A 6.0 A 0.6 A
2+2 825 x 2 34.0 A 16.0 A 9.0 A
8+8 300 x 2 12.0 A 7.0 A 3.0 A
MPA400 4+4 450 x 2 18.0 A 10.0 A 5.0 A 0.4 A
2+2 650 x 2 24.0 A 14.0 A 6.0 A.
8+8 200 x 2 8.0 A 6.0 A 4.0 A
MPA275 4+4 325 x 2 13.0 A 8.0 A 6.0 A 0.4 A
2+2 500 x 2 20.0 A 12.0 A 8.0 A
Table 1. JBL MPA-Series AC Power Consumption vs Load Impedance With 110, 115 and 120V Mains
10
Page 12

11
Operation
Table 2. JBL MPA-Series AC Power Consumption vs Load Impedance With 220, 230 and 240V Mains
2 CH Load Max Power AC Current AC Current AC Current AC Current
Model (Ohms) (Midband) Full Power 1/3 Power 1/8 Power Idle
8+8 740 x 2 11.5 A 5.1A 2.7 A
MPA1100 4+4 1000 x 2 19.0 A 8.0 A 3.9 A 0.5 A
2+2 1300 x 2 27.0 A 11.5 A 5.7 A
8+8 480 x 2 9.0 A 4.8A 2.3 A
MPA750 4+4 700 x 2 14.5 A 7.2 A 3.2 A 0.4 A
2+2 950 x 2 19.0 A 10.5 A 5.0 A
8+8 400 x 2 7.6 A 4.2 A 1.7 A
MPA600 4+4 550 x 2 11.0 A 6.5 A 2.7 A 0.3 A
2+2 675 x 2 16.0 A 7.6 A 4.0 A
8+8 275 x 2 5.6 A 3.3 A 1.3 A
MPA400 4+4 400 x 2 8.0 A 4.8 A 2.3 A 0.2 A
2+2 525 x 2 11.0 A 6.6 A 2.7 A
8+8 180 x 2 3.8 A 2.7 A 1.8 A
MPA275 4+4 275 x 2 6.0 A 3.6 A 2.6 A 0.2 A
2+2 425 x 2 9.1 A 5.6 A 3.5 A
Operation With 220 VAC, 50 Hz Power Mains
8+8 770 x 2 12.0 A 5.2 A 2.8 A
MPA1100 4+4 1100 x 2 19.5 A 8.3 A 4.0 A 0.5 A
2+2 1400 x 2 28.0 A 11.7 A 5.9 A
8+8 510 x 2 9.3 A 4.9A 2.4 A
MPA750 4+4 760 x 2 15.0 A 7.4 A 3.4 A 0.4 A
2+2 1000 x 2 19.7 A 10.7 A 5.3 A
8+8 425 x 2 7.8 A 4.3 A 1.8 A
MPA600 4+4 610 x 2 11.5 A 6.7 A 2.8 A 0.3 A
2+2 750 x 2 16.5 A 7.8 A 4.3 A
8+8 290 x 2 5.8 A 3.4 A 1.4 A
MPA400 4+4 425 x 2 8.5 A 4.9 A 2.4 A 0.2 A
2+2 575 x 2 11.5 A 6.8 A 2.8 A.
8+8 190 x 2 3.9 A 2.8 A 1.9 A
MPA275 4+4 300 x 2 6.3 A 3.8 A 2.8 A 0.2 A
2+2 450 x 2 9.6 A 5.8 A 3.7 A
Operation With 230 VAC, 50 Hz Power Mains
8+8 800 x 2 12.5 A 5.4 A 2.9 A
MPA1100 4+4 1200 x 2 20.0 A 8.5 A 4.2 A 0.5 A
2+2 1500 x 2 29.0 A 12.0 A 6.0 A
8+8 550 x 2 9.5 A 5.0 A 2.5 A
MPA750 4+4 825 x 2 15.5 A 7.6 A 3.7 A 0.4 A
2+2 1100 x 2 20.5 A 11.0 A 5.5 A
8+8 450 x 2 8.0 A 4.5 A 2.0 A
MPA600 4+4 675 x 2 12.0 A 7.0 A 3.0 A 0.3 A
2+2 825 x 2 17.0 A 8.0 A 4.5 A
8+8 300 x 2 6.0 A 3.5 A 1.5 A
MPA400 4+4 450 x 2 9.0 A 5.0 A 2.5 A 0.2 A
2+2 650 x 2 12.0 A 7.0 A 3.0 A.
8+8 200 x 2 4.0 A 3.0 A 2.0 A
MPA275 4+4 325 x 2 6.5 A 4.0 A 3.0 A 0.2 A
2+2 500 x 2 10.0 A 6.0 A 4.0 A
Operation With 240 VAC, 50 Hz Power Mains
Page 13

Operation
Controls
The front-mounted Gain controls have 11 detents for easy matching of levels. The
Gain scale showsdB of attenuation from full gain, with positions for 0 (full), -2, -4,
-6, -8, -10, -12, -14, 18, -24, and ∞(full off). Attenuation is accurate within 1dB
(down to -14dB).
Gain Control Lockout
Provided with each amplifier are two lockout knob caps. Carefully remove the Gain
control knob (A), as shown in Figure 9. Cover the opening by snapping in the lockout knob cap (B). The Gain control can no longer be adjusted.
Displays
The LED displays for each channel operate as follows:
LED Label Color Behavior
Power Green Main power supply active on this channel.
Figure 13. Gain
Control Lockout
Installation
Signal Present Green Triggers at -36 dB below full output.
-20 dB Green Triggers at -23 dB.
-10 dB Yellow Triggers at -11 dB.
Clip Red Shows activity of Limiting circuit, which responds to
both clipping and to thermal overload.
Protect Red Flashes as amplifier approaches maximum tempera-
ture. Illuminated steadily plus flashing during thermal
muting. Illuminated steadily during non-thermal
muting.
Table 3. LED Display Operation
Typical Power Up, Operation, Power Down Behavior
When the amplifier is first turned on, the green POWER displays will light up for
both channels, and there will be a 3 second turn-on delay, during which all red LEDs
will be bright (PROTECT and CLIP). If a channel will not come out of muting, it may
be responding to an excessive high frequency level at the input (see page 12,
“ProtectionCircuits”). Turning down the Gain controls (before you power up the amp
is best) allows the muting to release, and is always a good idea to prevent an unexpected input signal from overdriving the load.
Signal Level will be shown as the green Signal Present, -20dB and the yellow
-10dB display illuminate with increasing signal level (see Figure 10 on next page).
When the amplifier is turned off, muting should be virtually instantaneous, with
all red LEDs illuminated until the power supply discharges.
12
Page 14

Operation
NO SIGNAL
Clip
-10dB
-20dB
Signal Present
SIGNAL PRESENT (-30 dB)
Clip
-10dB
-20dB
Signal Present
LEVEL -20 dB
Clip
-10dB
-20dB
Signal Present
LEVEL -10 dB
Clip
-10dB
-20dB
Signal Present
CLIPPING
Clip
-10dB
-20dB
Signal Present
Protect
Power
Protect
Power
Protect
Power
Protect
Power
Protect
Power
ON/OFF MUTING
Clip
-10dB
-20dB
Signal Present
SHORTED LOAD
Clip
-10dB
-20dB
Signal Present
CLIPPING
Clip
-10dB
-20dB
Signal Present
OVERHEATING
Clip
-10dB
-20dB
Signal Present
THERMAL MUTING
Clip
-10dB
-20dB
Signal Present
Protect
Power
Protect
Power
Protect
Power
Protect
Power
Protect
Power
CLIP is illuminated at full brightness when the output is muted
(PROTECT LED is on, too).
If CLIP is illuminated at less than
full LEVEL display, the load is
shorted or abnormal. PROTECT
may flash, too.
CLIP flashing at full LEVEL
display indicates the amp has
reached full power (clipping)
and the limiter is acting to
prevent severe overdrive.
A steady CLIP glow after the
flashing PROTECT display has
started indicates the onset of
thermal limiting.
PROTECT flashes as the amplifier approaches max temperature.
Full brightness plus flashing
indicates thermal muting.
Figure 14. LED Displays
During Normal Operation
Key to LED representations:
Figure 15. LED Displays DuringAbnormal Operating Conditions
Not Illuminated
Full Brightness
Variable or
Occasional Flashing
Flashing
Full Bright
& Flashing
13
Page 15

Operation
Maximum Long-Term Output Power
In most cases, the desired sound level can be obtained without using the full power
output of the amplifier. The level displays are then used to confirm that both channels are working as desired.
If the amplifier is operated at extreme power levels, it may overheat or the
speakers may be damaged. The following guidelines will help you determine how
much power can be delivered to the speakers without thermal limiting (which is
indicated by flashing of the red PROTECT display).
8 Ohm Loads
The amplifier can be played at practically any volume without overheating.
However, if the amplifier is pushed into continuous triggering of the CLIP display, the
average output power can reach higher levels than more most speakers will take.
4 Ohm Loads
The amplifier’s maximum long-term power capacity will be reached when the
LEVEL -10 is on almost all the time, with occasional flashing of the CLIP display. If
the CLIP display is on half the time, the amplifier is liable to start indicating thermal
limits are being approached in a few minutes (full brightness flashing of the PROTECT LED).
14
2 Ohm Loads
To avoid overheating on those models rated at 2 ohms (see Specifications), the
LEVEL -10 display should not be on more than about half the time, with only occasional clipping.
Protection Circuits
The essence of high-efficiency, lighter-weight designs is to control more power with
fewer or smaller load-bearing components. The MPA275, MPA400, MPA600, MPA750
and MPA1100 represent a considerable step forward, with high efficiency due to the
multi-step power supplies. Because of the higher power flow, effective protection
circuits become even more important.
The inputs are resistively buffered for overload and RF protection. Chassis
bypass capacitors are installed at inputs and outputs to further improve RF rejection.
All models have short circuit protection that is based on averaging the output
power. This protection circuit permits full output current into resistive or reactive
2 ohm loads, but if the output is shorted, the current is cut back to a safe level of about
25%.
Turn-on/off muting prevents transients from the amplifier or preceding devices
from reaching the speakers. The MPA275, MPA400, MPA600, MPA750 and MPA1100
use simultaneous relay and electronic muting to guarantee minimum possible on/off
noise. The limiter (see subsequent paragraphs) is fully activated during muting, so
that its release time cushions the onset of full volume. The turn-on delay has been
Page 16

Operation
extended somewhat, and the turn-off muting has been quickened, to ensure muting
even of poorly designed preceding components. On/off muting is equally effective
whether the amplifier is turned off with its own switch or with a remote switch.
Inrush current is limited by an NTC resistor (Negative Temperature Coefficient)
which starts at a high resistance and then diminishes after turn-on to avoid loss of
power. The amplifier’s inrush current is no more severe than amplifiers of one half to
one third its power rating.
DC Fault protection uses a load grounding relay.
Careful attention has been paid to thermal tracking and response. Sensors are
located on each power transformer, as well as each channel’s heat sink, so that
overheating of either component will trigger the thermal defenses. Instead of an
abrupt amplifier shutdown at the temperature limit, we now have 4 levels of
response. At temperatures of 50°to 65°C, the fan speed is elevated from slow to full,
to improve cooling as needed with the minimum possible noise. At temperatures of
about 75°C, the red PROTECT LED begins to flash at a gradually increasing rate. At
85°C, the limiter circuit begins to reduce gain, which is shown by progressively
brighter illumination of the red CLIP LED. At 90°C, gain is reduced by the maximum
amount of 15dB. If this does not arrest the temperature rise (in case of an output
short or blocked ventilation), the amplifier will finally enter full muting, which causes
full shutdown of the output bias circuit. Thermal tracking can be monitored at the
input slot (see below).
Clipping activates a “Clip-Limit” circuit. This permits the amp to reach the point
of clipping without premature limiting, for exceptional headroom capability.
However, once clipping is reached (for any reason), input volume is then limited to
prevent gross clipping. This circuit limits distortion caused by clipping to about 1%
to10% (depending on degree of overdrive), which is audible but not severe.
An ultrasonic detector mutes the amplifier in case of gross overloads above
20kHz, to prevent load or amplifier burnout. The amplifier will reproduce high
frequencies into normal loads without muting, but if the amp is turned on with highlevel, high frequency input above 10 kHz, the amplifier will not come out of turn-on
muting (this applies to full-level pink noise as well). This feature is intended to protect high frequency drivers from accidental burnout due to high frequency system
oscillations, etc.
While not a protection feature in its own right, the remote monitoring capability
built into the input slot provides the foundation for computer control and monitoring
as such systems become available. The input slot has lines to read the status (for
each channel) of power-on, input level, speaker level, thermal level, clip, protect,
and mute status.
15
Page 17

Specifications
General Specifications
DISTORTION
FREQUENCY RESPONSE
DAMPING FACTOR
DYNAMIC HEADROOM
NOISE
SENSITIVITY
VOLTAGE GAIN
INPUT IMPEDANCE
CONTROLS
INDICATORS
(each channel)
CONNECTORS
(each chan., except one stereo Speakon)
COOLING
AMPLIFIER PROTECTION
LOAD PROTECTION
OUTPUT CIRCUIT TYPE
POWER REQUIREMENTS
POWER CONSUMPTION
SMPTE-IM, less than 0.05 %
20Hz to 20kHz, ±0.1dB
8Hz to 100kHz, +0/-3dB
Greater than 200
3dB at 4 ohms (2 dB for MPA275)
100dB below rated output (20Hz to 20kHz)
1 Vrms for rated power (8 ohms)
MPA1100: 80 (38 dB)
MPA750: 63 (36 dB)
MPA600: 56 (35 dB)
MPA400: 45 (33 dB)
MPA275: 35.5 (31 dB)
10 kilohms unbalanced, 20 kilohms balanced
Front: AC switch, Ch 1 & Ch 2 Gain (2dB detents). Rear: One toggle switch for
paralleling inputs and for bridged output configuration
POWER: Green LED
SIGNAL PRESENT: Green LED
LEVEL -20: Green LED
LEVEL -10: Yellow LED
CLIP: Red LED
PROTECT: Red LED (flashes for over-temp)
Input: Barrier strip and XLR
Speakers:
Continuously variable speed fan, rear-to-front air flow
Full short circuit†, open circuit, ultrasonic, and RF protection, thermal limit-
ing/muting; stable into reactive or mismatched loads
On/off muting, clip limiting, DC-fault load grounding relay with internal fault
fuses
Complementary linear, high-efficiency outputs: 3-step on MPA1100; 2-step on
MPA750, MPA600 & MPA400; 1 step on MPA275
100, 120, 220–240 Vac, 50–60Hz
See Charts on pages 9 and 10.
5-way binding posts, Speakon connectors, st. Speakon**
16
DIMENSIONS
WEIGHT
48.3 cm (19") rack mounting,
45.5 cm (17.9") deep (rear support ears),
MPA1100 &MPA750 are 13.3 cm (5.25") high (3 spaces);
MPA600, MPA400 &MPA275 are 8.9 cm (3.5") high (2 spaces)
MPA1100:29 kg (64 lbs) net, 31.8 kg (70 lbs) shipping
MPA750: 24.9 kg (55 lbs) net, 26.8 kg (59 lbs) shipping
MPA600: 20 kg (44 lbs) net, 22.2 kg (49 lbs) shipping
MPA400: 19.1 kg (42 lbs) net, 21.2 kg (47 lbs) shipping
MPA275: 18.1 kg (40 lbs) net, 20.4 kg (45 lbs) shipping
** For mating cable, use Neutrik NL4FC connector.
†Output Averaging™ short circuit protection (US Patent 4,321,554).
Continued
Page 18

Specifications
Load & Measurement Conditions
8 ohms/channel
20 Hz – 20 kHz
0.1% THD
8 ohms/channel
20 Hz – 15 kHz *
0.1% THD
4 ohms/channel
20 Hz – 20 kHz
0.1% THD
4 ohms/channel
20 Hz – 15 kHz *
0.1% THD
8 ohms/channel
1 kHz
1% THD
4 ohms/channel
1 kHz
1% THD
2 ohms/channel
1 kHz
0.1% THD, ±1 dB
8 ohms bridged mono
20 Hz – 20 kHz
0.1% THD
8 ohms bridged mono
20 Hz – 15 kHz *
0.1% THD
4 ohms bridged mono
1 kHz
0.1% THD, ±1 dB
60 Hz AC
Power Mains
110 VAC
115 VAC
120 VAC
110 VAC
115 VAC
120 VAC
110 VAC
115 VAC
120 VAC
110 VAC
115 VAC
120 VAC
110 VAC
115 VAC
120 VAC
110 VAC
115 VAC
120 VAC
110 VAC
115 VAC
120 VAC
110 VAC
115 VAC
120 VAC
110 VAC
115 VAC
120 VAC
110 VAC
115 VAC
120 VAC
Output RMS Power in Watts
MPA1100 MPA750 MPA600 MPA400 MPA275
660
690
720
900
1000
1100
740
770
800
1000
1100
1200
1200
1300
1400
1800
2000
2200
2400
2600
2800
450
475
500
650
700
750
480
510
550
700
760
825
900
950
1000
1300
1400
1500
1800
1900
2000
350
375
400
500
550
600
400
425
450
550
610
675
650
725
800
1000
1100
1200
1300
1450
1600
250
260
275
350
375
400
275
290
300
400
425
450
500
550
600
700
750
800
1000
1100
1200
160
170
175
225
250
275
180
190
200
275
300
400
350
375
400
450
500
550
700
750
800
Table 4. Output Power Ratings When Used With 110, 115 & 120 VAC 60 Hz Mains
17
Page 19

Specifications
Load & Measurement Conditions
8 ohms/channel
20 Hz – 20 kHz
0.1% THD
8 ohms/channel
20 Hz – 15 kHz *
0.1% THD
4 ohms/channel
20 Hz – 20 kHz
0.1% THD
4 ohms/channel
20 Hz – 15 kHz *
0.1% THD
8 ohms/channel
1 kHz
1% THD
4 ohms/channel
1 kHz
1% THD
2 ohms/channel
1 kHz
0.1% THD, ±1 dB
8 ohms bridged mono
20 Hz – 20 kHz
0.1% THD
8 ohms bridged mono
20 Hz – 15 kHz *
0.1% THD
4 ohms bridged mono
1 kHz
0.1% THD, ±1 dB
50 Hz AC
Power Mains
220 VAC
230 VAC
240 VAC
220 VAC
230 VAC
240 VAC
220 VAC
230 VAC
240 VAC
220 VAC
230 VAC
240 VAC
220 VAC
230 VAC
240 VAC
220 VAC
230 VAC
240 VAC
220 VAC
230 VAC
240 VAC
220 VAC
230 VAC
240 VAC
220 VAC
230 VAC
240 VAC
220 VAC
230 VAC
240 VAC
Output RMS Power in Watts
MPA1100 MPA750 MPA600 MPA400 MPA275
660
690
720
900
1000
1100
740
770
800
1000
1100
1200
1200
1300
1400
1800
2000
2200
2400
2600
2800
450
475
500
650
700
750
480
510
550
700
760
825
900
950
1000
1300
1400
1500
1800
1900
2000
350
375
400
500
550
600
400
425
450
550
610
675
650
725
800
975
1075
1175
1300
1450
1600
250
260
275
350
375
400
275
290
300
400
425
450
500
550
600
675
725
775
1000
1100
1200
160
170
175
225
250
275
180
190
200
275
300
325
350
375
400
425
475
525
700
750
800
Table 5. Output Power Ratings When Used With 220, 230 & 240 VAC 50 Hz Mains
*Amplifier’s output protective circuitry prevents full power output above 15kHz.
Specifications subject to change without notice.
18
Page 20

19
Channel will not come out of muting:
A. If reducing Gain to zero does not release muting, the channel is defective or
overheated (see below).
B. If reducing Gain releases the muting, advance Gain slowly while watching the
LEVEL displays (in case there is an abnormal signal which could blow the
speakers).
No sound is heard:
A. Is the channel in muting? (PROTECT is bright, see below).
B. If the LEVEL displays are active, (1) the speaker is open (blown), (2) there is an
open circuit in the speaker wiring, or (3) there is an open circuit in the internal
output wiring of the amplifier. (Consult a JBL dealer for service.)
C. If there is no LEVEL (SIGNAL PRESENT, -20dB, -30dB) or CLIP displays, (1)
there is no input signal, or (2) the ribbon cable to the input module may not be
seated well.
D. If the CLIP display is bright or peaking with little or no LEVEL display, this
indicates shorted speaker line (especially if PROTECT starts flashing).
Channel goes into muting (temp-protect LED is on):
A. If flashing of the PROTECT display is visible, amplifier has muted due to
extreme overheating. Fan should be running at full speed, and unless ventilation is blocked, operation should resume within one minute.
B. The amplifier will mute in response to extreme high frequency overdrive, and
output will not be restored until the frequency or level is lowered. Try turning
down the Gain control to release muting, and determine the source of abnormal
frequencies.
C. Muting which does not respond to either condition suggests DC shutdown or
other amplifier fault.
Hum Problems:
A. Ground lift of the signal is not available in these amplifiers due to the design
which utilizes grounded-collector transistor mounting to improve thermal efficiency. Low-emission AC transformers are used, and balanced inputs afford
hum rejection. If hum persists despite the balanced inputs, check the tightness
of the rear panel screws which hold the input panel in place (two outer screws,
and two screws holding barrier strip). If the input wiring is near SCR (silicon
controlled rectifier) dimmers, transformer-isolated inputs may be necessary
because of the exceptionally high noise field voltages generated by SCRs.
Troubleshooting
Page 21

20
Troubleshooting
Overheating:
A. If ventilation is blocked, or if the amplifier is overdriven into low impedance
loads, it can overheat. The thermal protection system’s normal response to
rising temperatures is as follows:
25–50° C: Fan runs on low speed.
50–60° C: Fan Speed rises gradually from slow to full.
75° C: PROTECT LED starts flashing.
85° C: PROTECT flash rate increases, and CLIP starts to glow steadily. The
limiter will begin to reduce amplifier gain, up to 15 dB.
90° C: Full muting occurs, as indicated by bright CLIP display and bright
PROTECT display (with rapid flashing superimposed). Full muting
should occur only if the load is shorted, ventilation is completely
blocked, or the fan fails.
Page 22

For Further Assistance
General information or Technical Assistance
For more information on JBLproducts, including these power amplifiers, contact your
nearest JBL professional products dealer or the JBL factory at the address below.
Repairs
Please do not ship your amplifier(s) to JBL or a JBL authorized repair facility without
prior authorization. You may obtain that authorization by contacting the factory or
repair facility directly. Please ship amplifiers in original packing materials or equivalent to prevent further damage during shipment, and insure the shipment adequately.
Mark the return materials authorization number (RMA) clearly on the outside of the
package and on any correspondence.
JBL Incorporated
8500 Balboa Boulevard
Northridge, California 91329 USA
Telephone (818) 893-8411
21
Page 23

JBL Incorporated
8500 Balboa Boulevard
Northridge, California 91329USA
A Harman International Company
Part No. TD-007500-OB/PS137-2
 Loading...