

Page 1
HT SERIES
LOUDSPEAKERS
OWNER’S
MANUAL
HT1DHT1F HT1S
HT
Page 2

INTRODUCTION
Congratulations on choosing JBL
HT Series loudspeakers. Their
highly accurate, uncolored and
balanced sound character will
greatly increase your enjoyment of
the Home Theater experience. We
at JBL build with careful attention
to detail, using only the highest
quality materials. They will give
you many years of excellent
performance.
The HT Series rivals the
performance of more expensive
loudspeakers. It meets Home
THX®Audio System Performance
Standards.
THX®-Licensed Home Audio
System: When used with a Home
THX®controller and amplifiers,
your complete 7-piece JBL HT
Series speaker system, will deliver
state-of-the-art THX®home theater
experience to your home. The HT
Series also delivers accurate
stereo music reproduction when
listening to CD's, tapes, or other
program information.
Pure Titanium Tweeter with
Diamond Surround: provides a
well-defined high frequency output
with low distortion, flat and smooth
high frequency response, and no
break-up in the audio range.
High Polymer Laminate Midbass Drivers and Woofers:
combine to provide tight bass and
well-defined, smooth midrange,
without harshness, stridency, or
listener fatigue.
High Quality Crossover
Network: Our computer-optimized
dividing network employs up to
third-order (18 dB per octave)
crossover sections. JBL uses
audiophile-grade polypropylene
capacitors and low-loss/lowdistortion inductors to prevent
phase or amplitude distortions.
Acoustically Optimized Cabinet
and Grille Design: provide
smooth uncolored sound and
eliminate diffraction and unwanted
resonances.
Magnetic Shielding: allows you
to place your front channel and
subwoofer speakers near video
monitors without creating
interference or distorting the
picture.
3
Page 3
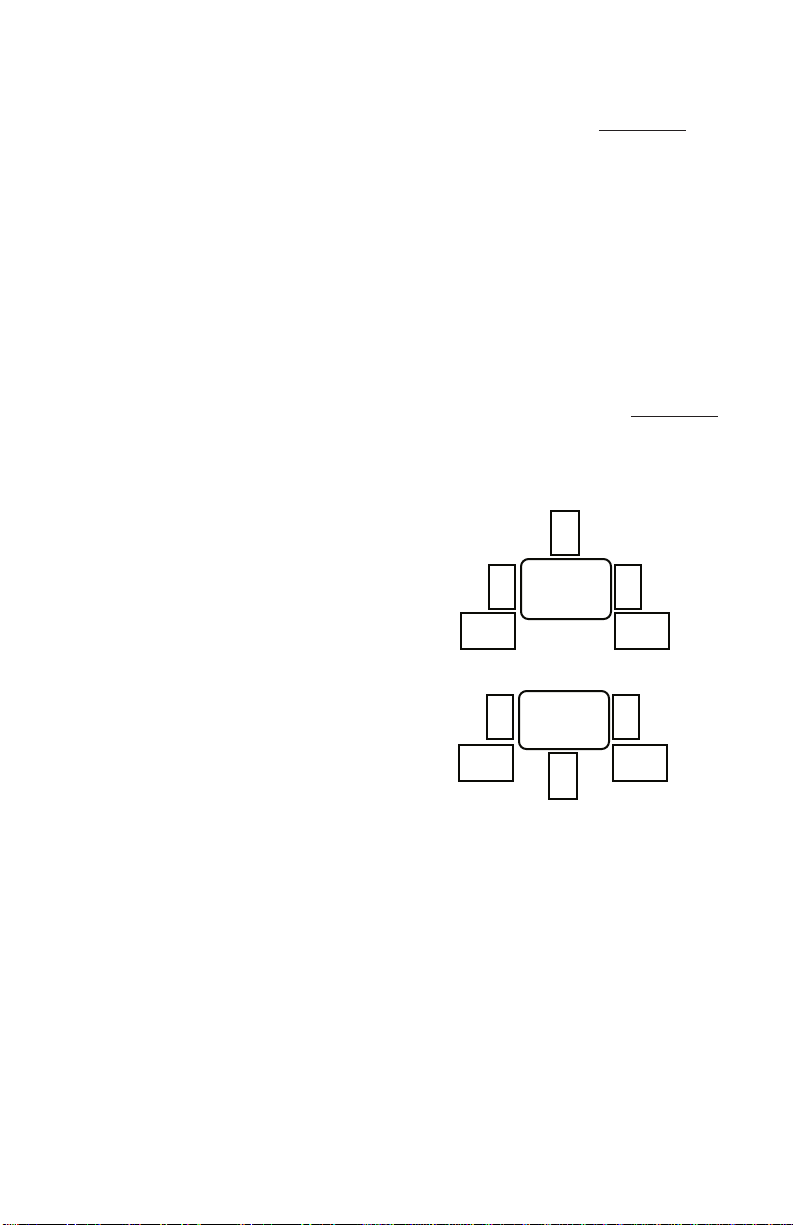
PLACEMENT
SCREEN
SUB
SUBLRCSCREEN
SUB
SUBLRCOR
Placing your speaker components
properly is vital to achieving the
correct sonic performance. Please
read the following sections
carefully for proper placement.
They are divided into front
channel speakers (HT1F: LeftCenter-Right), subwoofers
(HT1S), and dipolar surround
speakers (HT1D).
FRONTS (Left-Center-Right)
The Left and Right front channel
speakers should be located on
either side of the T.V. screen or
projector. Closer to the screen
gives you more localization while
farther (two to three feet from the
screen on each side) will give you
a wider sound field. Ideally, you
want to try to put the speakers
about 45 degrees apart from each
other, viewed from the listening
position. The center line of the
speaker (the area between the two
tweeters) should be at the same
height as actors on the screen
would be. Depending on the
height of your T.V. screen, you
may be able to place the Left and
Right speakers directly on top of
your subwoofer cabinets. If your
screen height doesn't allow this,
you may place the Left and Right
speakers on a speaker stand to
achieve the proper height.
Depending upon your
configuration, you may also need
a stand for the center speaker that
tilts it so that it points towards the
listener's ear level. Your JBL
dealer can help you purchase a
stand that meets your height
requirement.
The Center channel front speaker
should be positioned vertically
and centered either above or
below the middle of the screen (or
behind the screen if you have a
projection T.V. with a perforated
screen). All three front speakers
should be mounted "flush" to the
screen and in the same plane
relative to the screen.
The Left and Right should be at
the exact same height, and the
Center should be no more than 2
feet higher or lower. Your Center
channel speaker must be vertically
oriented. Turning it on its side will
prevent your HT1 system from
producing the correct sound field.
SUBWOOFERS
The Subwoofers can be placed
on either side of the screen or in
the corners of the room. A good
configuration for a mono
amplifier/dual HT1S setup that
lessens the effect of room modes
is one subwoofer in a corner, the
other in the middle of a wall.
4
Page 4

SURROUNDS
C
SCREEN
R
SUBLSUBSS
VIEWING
POSITION
FLOOR PLAN
SURROUND
SURROUND
Place the Surrounds to the sides, or
slightly behind the viewing position
with the rear panel of the speaker
(where the speaker wire connections
are) up against the wall.
Do not
position the Surround speakers so
that the drivers (under the grille area)
point directly at the listener. Remove
both grilles from each Surround and
note the location of the oval port tube
hole on the baffle. Align the driver side
with the oval port tube so it faces the
direction of the screen. This will mean
one surround is "right-side-up" and the
other "upside-down" in relation to each
other. This will not affect the sound
quality. You may replace the grilles so
that the orientation of the JBL Logo is
correct. Correct height placement for
the Surrounds is between 2 and 3
feet above seated ear level. Mount
your Surrounds on speaker stands or
place them on shelves attached to
the wall.
If your home theater room is of a
configuration that does not lend itself
to the above placement suggestions,
then it becomes more important to
consider the “null” direction of the
Surround. The null baffle is the blank
panel between the two rounded edges
of the cabinet. It is most important to
point this panel at the listening
position. Creativity and careful
listening will tell you where the ideal
position is for the placement of the
Surround speakers. For example, if
your listening position is up against
the rear wall of the room, placing the
Surrounds about 3 feet in front of the
listening position with the null baffle
turned to the point at the listening
position would work best. Further
guidance can be had from your
certified THX®dealer.
NOTE: Do not attempt to install any
type of mounting brackets onto
your speakers. Drilling holes in the
5
product or improperly installing
mounting brackets may void your
JBL warranty and cause a safety
hazard.
A JBL factory authorized custom
installer can suggest and install
appropriate brackets. Contact JBL
or your installer/dealer for
additional information.
CONNECTIONS
To connect the loudspeaker
systems to the receiver or
amplifier, use two-conductor
insulated wire. Your JBL dealer
can recommend suitable cables,
or you can buy wire at most
hardware stores. High-quality
connectors and cable offer
consistent performance that won't
deteriorate over time. We
recommend #16 AWG wire as a
minimum size. If your speakers
are more than 30 feet (10 m) from
your receiver or amplifier, use
larger diameter wire. Make
connections at the terminals
located on the back of the
loudspeaker system. The
terminals accept bare wire or dual
banana plugs, either of which will
provide easy, secure connections.
Page 5

Preparing the hookup wire
1. First determine the distance
between your amplifier and the
most distant speaker in each
group (fronts, surrounds,
subwoofers).
2. Now make the hookup wires for
all speakers in each group
(fronts, surrounds, subwoofers)
this length, even if one HT
Series loudspeaker is much
closer to your amplifier than the
other. This will help maintain
proper signal balance.
3. Strip off 3/8" of insulation from
both ends of each conductor.
4. Twist each set of thin wires into
a tightly-bunched spiral.
5. Now find a visual difference
between the two conductors of
each molded pair of speaker
wire. Differentiating marks can
be a different color wire
(copper or "silver"); a strand of
yarn in one conductor; thin,
raised ribs on one part of the
outer insulation; or a printed "+"
marking on one of the
insulators. It doesn't matter
which of the two strands of wire
go to (+) and (-) on the
speakers and amplifier, as long
as all speakers are connected
identically. Unscrew the
binding post, insert the wire
into the hole, then re-tighten
the binding post. If using
banana plug type wire
connectors just insert them
directly into the posts making
sure the lug on the negative (-)
side of the banana plug is
placed into the black binding
post. For each channel,
connect the red terminal on the
loudspeaker to the red or (+)
loudspeaker connection
terminal on the amplifier and
the black to the black or (-).
Connecting the loudspeakers
this way ensures that they will
be in phase; that is, work
together, not in opposition.
Connecting the loudspeakers
out of phase will not damage
them, but will result in less
bass and poor imaging.
HOOK UP TO AMPLIFIER
Connect your HT speakers to your
amplifier following the Red (+) to
Red and Black (-) to Black
convention as outlined in the last
section.
LEFT and RIGHT FRONTS
As seated in your viewing area,
the front speaker to your left
should be connected to the
terminals labeled "Left Front" on
the amplifier. The speaker to the
right should be connected to the
amplifier terminals labeled "Right
Front".
CENTER CHANNEL
Your remaining front channel
speaker (located above, below or
behind the screen) should be
connected to the amplifier
terminals labeled "Center
Channel".
SURROUNDS
As seated in your viewing area,
the surround speaker to your left
should be connected to the terminals labeled "Left Surround" of
the amplifier. The surround
speaker to the right should be
connected to the amplifier
terminals labeled "Right
Surround".
6
Page 6

Left
Front
Blk Red
(-) (+)
•
•
Right
Front
Right
Surround
Left
Surround
Amplifier
Left
Surd
Right
Surd
Center
Front
Left
Front
Right
Front
Center
Front
Blk Red
(-) (+)
•
•
Blk Red
(-) (+)
•
•
Blk Red
(-) (+)
•••••••••••
•
(-) (+)
(-) (+)
(-) (+)
(-) (+)
(-) (+)++
-
-
+
+
-
-
First Subwoofer
Second Subwoofer
Two Subwoofers From Single Amp Terminal
Two Subwoofers From Two Amp Terminals
+
+
-
-
Second Subwoofer
+
+
-
-
First Subwoofer
•
•
(-) (+)
Subwoofer
(Wires to Subwoofer)
Hook-up Option 1
Hook-up Option 2
+
+
-
-
Subwoofer
One Subwoofer From Single Amp Terminal
Hook-up Option 3
Blk Red
(-) (+)
•
•
(Remove Srap)
7
Page 7

SUBWOOFERS
You may connect your subwoofers
in several ways depending on how
many subwoofer amplifier outputs
are available. Read the following
instructions carefully to insure
proper hook-up of your
subwoofers. Improper hook-up
can degrade performance or even
damage to your amplifier.
REFER TO SUBWOOFER
HOOK-UP DIAGRAM.
Note: You will need at least one
subwoofer amplifier channel to
drive your passive HT1S
Subwoofers.
Using two HT1S Subwoofers
(from single subwoofer
amplifier terminal output).
Connect the wire from the
amplifier speaker terminal marked
"Subwoofer" to the left-hand set
of Red and Black binding posts on
the
first subwoofer
you follow the Red (+) to Red and
Black (-) to Black convention.
Unscrew the right-hand binding
posts and remove the connecting
strap. Place the strap with your
owner's manual for safekeeping.
Run a second wire from the right
hand binding post of the
subwoofer
subwoofer
left-hand binding posts. DO NOT
remove the strap connecting the
second
set of binding posts. This results in
a series connection of your
subwoofers that will not damage
your amplifier. Your dual
subwoofer connection is complete.
See figures on page 7.
Using two HT1S Subwoofers
(from two subwoofer amplifier
terminal outputs).
If your amplifier is equipped with
over to the
and connect to the
subwoofer's right-hand
. Make sure
first
second
two subwoofer outputs, you must
determine how they are wired. If
they are two parallel-wired outputs
from the same amplifier channel,
wire the subwoofers as in the
previous paragraph to only one
output.. If on th other hand, they
are two separate channels of
amplification, follow the hook-up
method described under "Using a
single HT1S Subwoofer". Connect
wires from one amplifier subwoofer
output terminal to the first
subwoofer's left-hand binding
posts
leaving the connecting strap
in place on the right-hand binding
posts.
Connect wires from the
other amplifier subwoofer output
terminal to the other subwoofer's
left-hand binding posts
leaving the
connecting strap in place on the
right-hand binding posts.
dual subwoofer connection is
complete. See figures on page 7.
Using a single HT1S Subwoofer.
Connect the wire from the
amplifier terminal marked
"Subwoofer" to the left-hand set
of Red and Black binding posts on
the subwoofer. Make sure you
follow the Red (+) to Red and
Black (-) to Black convention. DO
NOT remove the strap connecting
the right-hand set of binding posts.
Your single subwoofer connection
is complete.
Your
NOTE: THX®-LICENSE IS
DEPENDENT ON THE USE OF
TWO SUBWOOFERS. USING
JUST ONE SUBWOOFER WITH
YOUR THREE FRONTS AND
TWO SURROUNDS MAY
ACHIEVE SUFFICENT SOUND
PRESSURE LEVELS IN
SMALLER ROOMS, BUT IS NOT
THX®CERTIFIED. CONSULT
YOUR JBL DEALER.
8
Page 8

TROUBLESHOOTING
The vast majority of new speaker
"malfunctions" end up being
traced to connections or switch
settings. To avoid requesting
service for correctly functioning
speakers, check the following tips
before requesting service.
No sound at all or very faint
sound from either speaker
1. Amp/receiver tape monitor
button pushed in while using
CD, FM or phono inputs.
2. Wrong speaker switch, "A" or
"B" speaker output.
3. Sound source (CD,cassette
deck, turntable) not turned on,
not activated, not hooked up or
not selected on amp/receiver
front panel.
No sound from one speaker
1. Balance control turned all the
way left or right.
2. Speaker wire has become
disconnected.
3. One of the connections
between sound source and
amp/receiver is faulty or has
become disconnected.
Both speakers play at low
volumes but shut off as volume
is increased OR sound turns on
and off intermittently
A few strands of speaker wire may
be shorting out. Recheck the
connections.
Bass is very weak AND/OR
sound seems to come from,
instead of between the speakers
1. The polarity (+ & -) of one
speaker has been reversed
relative to the other. Double
check connections.
2. Speakers are too far away from
the back and side walls or too
far apart. Experiment again
with the speaker placement. If
you are still encountering
problems, consult your JBL
dealer.
GENERAL CARE
The grille is held in place by pins
near the edges. To remove the
grille, grasp it by both top and
bottom edges and pull gently. To
replace grille, re-position it
carefully and press gently at the
corners. Do not push on the center
area of the grille.
The loudspeaker cabinet may be
cleaned with a slightly damp cloth.
To remove dust from the grille
cloth, use a vacuum with a brush
attachment. Spots may be
removed with a commercial spot
remover. Do not use any cleaners
or solvents on the speaker drivers
themselves.
SERVICE
Should your loudspeaker ever
need service, return it to the
JBL dealer from whom it was
purchased. If this is impractical,
call 800-336-4JBL for your nearest
warranty station. Do not return
products to the JBL factory without
prior authorization.
9
Page 9

Specifications HT1F HT1D HT1S
High Frequency 1" Pure 1" Pure N/A
Dome Transducer Titanium Titanium
Mid-bass Transducer 5" 5" N/A
(High Polymer Laminate)
Low Frequency N/A N/A 12"
(High Polymer Laminate)
Crossover Frequency 2.8 kHz 2.8 kHz N/A
Frequency 70 Hz to 110 Hz to 35 Hz to
Response (- 6 dB) 20 kHz 20 kHz 80 Hz
Sensitivity(1 Watt/1 meter) 87 dB 87 dB 91 dB
Nominal Impedance 8 ohms 6 ohms 6 ohms
Recommended 10 to 100 10 to 100 10 to 100
Amplifier Power* Watts Watts Watts
External Dimensions
Height 17-1/2" 13-7/8" 21-1/2"
Width 10" 9-1/4" 25-1/4"
Depth 8-1/2" 7-3/4" 17-5/8"
External Dimensions
Height 445 mm 352 mm 546 mm
Width 254 mm 235 mm 641 mm
Depth 216 mm 197 mm 448 mm
Weight (each) 21 lbs 15 lbs 62 lbs
9.5 kg 6.8 kg 28.1 kg
Shipping Weight 73 lbs 38 lbs 76 lbs
33.2 kg 17.3 kg 34.5 kg
*Undistorted continuous power per channel.
JBL continually strives to improve its speakers. New materials, production
methods and design refinements are introduced into existing models without
notice as a routine expression of our design philosophy. For this reason,
JBL HT Series Loudspeakers may differ in some respect from their published
specifications and descriptions, but will always equal or exceed the original
specifications unless otherwise stated.
THX is a registered trademark of Lucasfilm LTD. Manufactured under license of Lucasfilm LTD.
10
Page 10

H
HT1F
JBL Consumer Products, Inc.
80 Crossways Park West
Woodbury, NY 11797
8500 Balboa Blvd.
Northridge, CA 91329
A Harman International Company
Part No. 75721
 Loading...