

Page 1
Page 2

Instruction
Contents
Safety Precautions ................................................................
Unpacking Your Product .......................................................
Installation ............................................................................
The Film Scanner .................................................................
Loading Slides ......................................................................
Loading Negatives ................................................................
Capturing Images ..................................................................
Saving Images .....................................................................
Cleaning & Maintenance .....................................................
Trouble Shooting .................................................................
Technical Specifications .....................................................
1
3
4
5
6
7
9
14
17
18
20
Page 3

1. Safety Precautions
Please read these notes carefully before initial use.
General Notes:
Do not place the device on an unstable surface. If it falls it may cause
personal injury.
Follow the safety and operating instructions for the other devices to be
connected to your film scanner.
Do not overload your PC with USB connections. Connecting too many
devices to your computer, such as wireless mice, media players, mobile
phones, and other USB devices may result in an insufficient supply of power
to your film scanner for normal operation.
Please make sure that this scanner does not get into the hands of children it
is not a toy!
Please contact our technical support for questions regarding the scanner, its
mode of operation, safety and proper connection.
Do not disassemble the device and do not open the housing, there is danger
of electric shock. The retailer is not liable for any damage incurred during use
of this device, or for the complaints of third parties.
DS100 may become slightly warm during use. This does not indicate
malfunction.
1
Page 4

Ambient Conditions:
Set the scanner up so that the ventilation openings are not obstructed. For
example do not place it on a bed, sofa, carpet, or similar surfaces.
Do not place the device close to heat sources such as radiators or ovens.
And do not subject the device to high temperatures or severe temperature
fluctuations. Protect it against solar radiation.
Avoid severe stress, vibration and strong impact. Do not drop or shake the
device. It can also be damaged by strong pressure on the LCD display.
Keep the scanner away from water and other liquids. It should not be used
in rain or snow. Moisture may cause electric shock or even fire.
Cleaning and Care:
Use a soft, dry cloth to clean the surface.
Store the device in a clean and dry location.
Packing:
Do not leave the packing material lying around. Plastic bags are dangerous
and not toys.
Interference:
Most electronic devices such as lamps, computers, telephones, etc. create
an electromagnetic field. Keep the film scanner away from electrical devices
to avoid unwanted interference and interaction.
If liquid or a foreign object enters the device, have it checked by an authorized
person before you continue to use it.
We recommend you contact our service center.
2
Page 5

Start of Operation:
To ensure proper operation please read all the operating
instructions and the notes on safety carefully!
USB Connection:
Use the USB cable to connect the device to your PC.
This symbol on the product or in the instructions means that your electrical and electronic
equipment should be disposed at the end of its life separately from your household waste.
There are separate collection systems for recycling in the EU. For more information, please
contact the local authority or your retailer where you purchased the product.
2. Unpacking Your Product
The following items should be included. Please contact your
retailer if you have not received any of these items.
◆Film scanner with USB cable connected
◆CD-ROM
◆Negative Film Holder
◆Positive Slide Holder
◆Instruction
◆Brush
3
Page 6

3. Installation
Before connecting to the computer for the first time insert the CDROM and choose the following options on the CD:
Please follow this order:
1: Install Driver
2: Install BlazePhoto Software
3: Install Directx 9.0
Note: if you are running Windows XP Service Pack 2 or higher or
Windows Vista and XP professional this is not needed.
4: Install Adobe Reader if you do not have this installed on your
computer already
After installation please restart your computer-this is
important!
After restarting, connect the USB cable from the film scanner into
your computer.
Note: if many USB
as Mobile Phones, Media players or other USB powered devices
there may be inadequate power for the film scanner. Please
unplug all unneeded USB devices before saving images with the
film scanner.
Upon the first connection of the film scanner the Hardware Wizard
will automatically launch. Choose the selection to search and
automatically install the hardware drivers.
devices are connec
ted to your computer such
4
Page 7
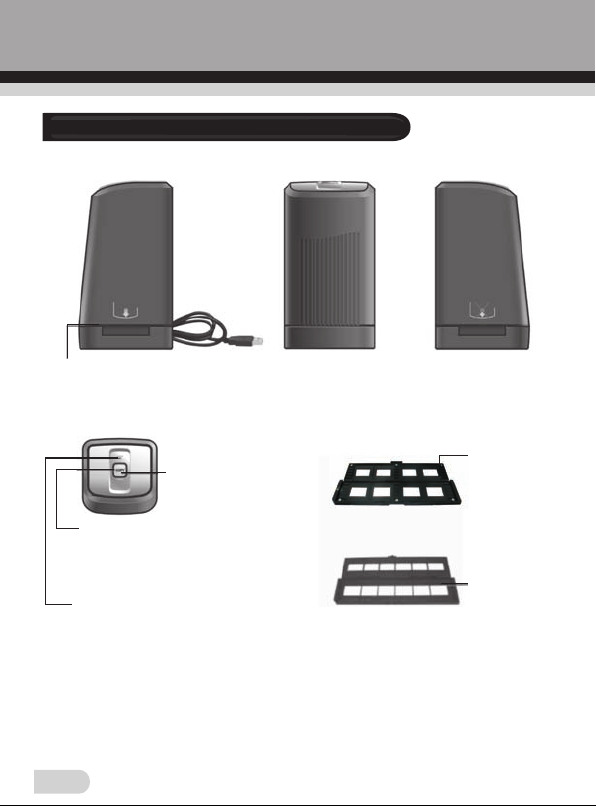
4. The film scanner
Slot USB Cable
Power LED
Copy Button:
Press this button to capture and
save the image loaded in the holder
NOTE:This button will light up when
connected to a USB Power source
Ready Light:
Will turn green when the slide or negative
holder is in the correct position
Positive
Slide Holder
Negative
Film Holder
5
Page 8
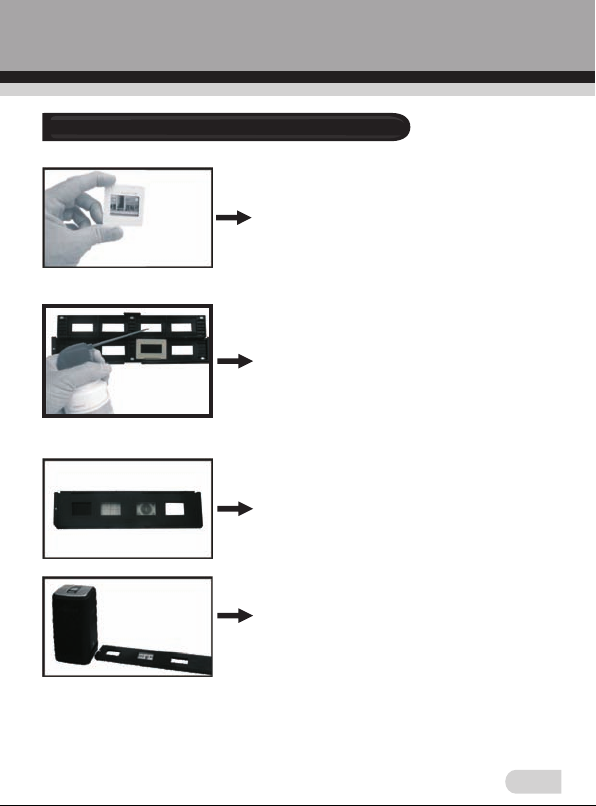
5. Loading Slides
Slide: The light, shade and color of
the slide is exactly the same as
original image.
With the slide holder laid open place
the slide onto the holder with the
glossy side facing up and the image
should be upright,
Note: Handle slides with care. Any
dust scratches or fingerprints will
show up on your saved images. If
possible wear cotton gloves when
handling slides. It is recommended to
use compressed air to remove any
dust on the slides. This is not included
with the film & photo scanner but can
be purchased from an office or
electronics supply retailer.
Close the slide holder an
edge
s so that it locks in place.
Hold it in the position as shown in the
film scanner.
Insert the Slide Holder into the slot on
the right side of the film scanner as
shown.
d press the
6
Page 9

6. Loading Negatives
Negative film properties: The light and
shade, color of the Negative is exactly
inverted from the original image.
Place the film onto the holder with the
glossy side facing up and the image
should be upright. Use the tabs in the
holder to align the negatives film.
Note: Handle negatives with care. Any
dust, scratches or fingerprints will
show up on your saved images. If
possible wear cotton gloves when
handlin g negati ves. I t i s
recommended to use compressed air
to remove any dust on the negatives.
This is not included with the film &
photo scanner but can be purchased
from an office or
retailer.
Close the negative holder and press
the edges so that it locks in place
Hold it in the position as shown in the
film scanner.
Insert the negative holder into the slot
on the right side of the film scanner as
shown.
electroni
cs supply
7
Page 10

Film H older : The desi gn of the f ilm holde r foll ows ISO
standard. In some case s the h oles on th e film will not m atch
exactly to alignment of the ho lder, as thi s i s c aused by us ing
non-standardized f ilm. I n this case the re wil l be a sma ll bla ck
line on the edge of the frame that can easily be cropp ed out
using the BlazePhoto softwar e.
8
Page 11

7. Capturing images
After installation and connection of the film scanner to the
computer:
◆ Click on the START menu of your windows PC and launch
BlazePhoto from the programs menu, wait for the application to
launch.
“BlazePhoto” Window
◆Choose “Get Photo” from the menu bar
◆ Then choose “Acquire from Film Scanner” from the drop down
menu
The following window will appear “Select Scanner & Video
Device” Window
9
Page 12

◆Select the “OVT Scann er” cho ice
◆ Choos e the locati on on your computer to save the captu red
images into
◆Choose the color d epth
◆Choose the resol ution a s 1800 or 3 600 DPI
◆Choose the forma t
◆Choose the type of f ilm you a re scan ning (t he defa ult film type is
negative)
◆After all settin gs have b een mad e click t he OK but ton
Note: When choose the Slide, the following window will be appeared:
10
Page 13

If you want to adjust brigh tness ma nuall y, please choose ”Yes” in
“Open Brig htnes s M anual Cont rol Box”, the n c lick the OK butt on,
“Brightness Manual Co ntrol Bo x” windo w will be appe ared, you
can adjust brigh tness a utoma tical ly or man ually.
“OVT Scanner” Window
This wi ndow will sh ow yo u the p revie w of th e image load ed from
the film scanner.
Note: If you sc an n egati ves, the so ftwar e wi ll convert them to sli de
image and displa y in the “O VT Sc anner” Window.
11
Page 14

◆I f you fin d t he preview hap pen inco mplet e i mage, pl ease c heck
the display sett ing and c hange i t to 32 bit .
Win dows XP
12
Page 15

Win dows Vi sta
“Color/Brightness Adj ustment” Win dow
User can cli ck “Co lor/B right ness Ad justment” on the applic ation
window, th e follo wing window will be appeared. Th en click”+”/“- “
to increase/de creas e brigh tness /colo r balance l evel.
13
Page 16

8. Saving images
Capture/Save the image
Note: To get the best quality capture please wait a few seconds
after the image has been put into place, you will see the image
darken and adjust the best settings.
◆Insert the film/slide holder from the right side of scanner (Arrow
sign on the right side) and push it. When the film/slide holder is
in the correct position “Click” will be heard and Ready light will
be in green. The image can be previewed in OVT Scanner main
window by clicking on the “Get Photo” and “Acquire from Film
Scanner”
Note: The film/slide holder could be push forward only. No pull
back to the right side allowed. If taking out needed push the
film/sli
de holder
◆Click “Capture” on the application window or press “Copy”
button on the film scanner
◆After the first image captured push the film/slide holder forward
again. When the film/slide holder is in the correct position
“Click” will be heard and Ready light will be in green again.
Then you can capture the second image. The captured images
will be on the right corner of OVT Scanner main window.
◆The captured images will appear as thumbnails on the film strip
◆You may capture up to 12 images before saving to your
computer
Important: After you capture your images you still need to save
them to your computer-The images will not be saved on the film
scanner after you exit
and pull back from the left side
the OVT Scanner window
14
Page 17

To save/ delet e image s
◆ Cl ick the “Sa ve” but ton to sa ve the capt ured im ages to th e
designated dir ector y on your c omput er.
◆ You can als o click the “D elete ” button to de lete the se lecte d
image.
15
Page 18

◆Afte r savi ng is c omple ted cl ick “E xit”. The images will appear in
BlazePhoto mai n windo w and can b e edite d.
Using BlazePhoto
From the ma in windo w o f B lazeP hoto you ma y d ouble cl ick on an
image to see it in more detail an d edit the image as des ired( as
below)
There are many edi ting features that can be appli ed by us ing the
software.
16
Page 19

9. Cleaning & Maintenance
Periodically and after consistent use the film scanner should be
cleaned using compressed air canister to clean the dust out of the
inside chamber.
◆Place the film scanner on the side and insert the end of straw
from the compressed air into door on the right side so that it
opens.
◆Gently blow out any dust on the inside of the film scanner.
Note: Compressed air is not included with the film scanner but
can be purchased from an office supply or electronics retailer.
You can also use the provided brush to clean the backlight panel
◆Place the film scanner on the side and insert the end of the
brush into the door on the right side
◆Clean the backlight panel placed in the film scanner
For
further c
bottle of lens cleaning fluid
◆Wet the end of the cotton swab with Lens Cleaning Fluid and
insert into the right side of the film scanner so the door opens.
Then clean the entire surface of the glass on the inside of the
film scanner with the cotton swab.
Note: Cotton swabs and cleaning fluid are not included with the
film scanner but can be purchased from an office supply, photo
supply or electronics retailer.
When not in use please disconnect the film scanner from the
computer and store in a clean, dry and dust-free environment.
Note: You may see a thin black or white edge line on your picture
due t
leaning you can use an ordinary cotton swab and a
o non exact size ol
d negatives. This is normal.
17
Page 20

10. Trouble Shooting
Problem: Your film scanner will not connect to the computer
Solution: Check your operating system: At the time of release the
film scanner is only compatible with Windows XP and Windows
Vista. To check your Windows operating system version go to the
START menu under windows. Highlight “My computer” with the
cursor and press the right button of the mouse. In the drop down
menu select “Properties” this will give the operating system
version and service pack number. If you are running Windows
2000, ME or 98 the film scanner will not be compatible with these
system.
◆If you have Windows XP Service Pack 1 please make sure to
install the DirectX drivers that have been included on the CDROM.
◆
Ensure that y
connection, check the operating manual of your computer to get
details on the connections of your particular computer.
◆Ensure you have at least 384MB of RAM memory. On older
computer with less systems RAM their may be insufficient memory
for the film scanner to work. Also ensure there is sufficient hard
disc space to save your images to your computer.
◆Check the other USB powered devices that are also connected
to your computer such as Cell phones, Media players, Blue Tooth
Mice or other devices. Unplug any USB device you are not
currently using.
◆Launch BlazePhoto-choose “Get Photo” and “Acquire from Film
Scanner” and ensure that “OVT Scanner” is selected.
ou are connecting to a USB 2.0 Compatible
If y
ou are still havin
I. Make sure USB cable connected the computer directly, is not
recommended to connect to a computer via USB HUB.
g troubles, follow up as below:
18
Page 21

II. Please unplug the USB, and then reconnect the scanner to
computer to see if driver updates with successful connection.
III. Please try to connect to the computer's other USB port,
because the electrical characteristics of the different USB
ports may be different.
IV. If the above operation is still invalid, please check whether the
operation system has installed other OVT driver, they may
have conflicts. Please remove the other OVT drivers and then
install our driver again.
V. If there is no OVT Scanner under Device Manager/Imaging
devices, but with USB camera, Please install the driver
manually.
VI. If the above operation is still invalid, please uninstall the half-
installed driver firstly and restart compu
driver.
Problem: Blurry images
Solution: Please ensure that the work space you are using is
stable and does not have any moving objects on. Even
the slightest vibrations can corrupt the images. Also
make sure there are no dust particles or hairs on your
slides when putting them in your scanner. You can also
clean the lens of the scanner using the cleaning brush
provided.
ter to try to reinst
all the
19
Page 22

11. Technical Specifications
◆Lens :
◆Sensor :
◆Focus Range:
◆Exposure :
◆Color Balance :
◆Scan High Resolution :
◆Data Conversion :
◆Scan Method :
◆Light Source :
◆Power :
◆Interface:
◆Operating System:
◆Software :
◆Dimensions:
◆Language:
F/6.0 f=11.87mm
5.1 Megapixel CMOS sensor
Fixed focus
Auto
Auto
3,600 DPI interpolation resolution
10 bits per color channel
Single pass
Backlight (3 white LED)
Powered from USB
USB 2.0
Windows XP/Vista/ Windows 7
BlazePhoto & driver
90x90x165mm
English, French, German, Italian,
Spanish, Traditional Chinese,
Simplified Chinese, Japanese,
Dutch, Polish, Portuguese, Korean
20
Page 23

Declaration of Conformity:
It is confirmed that this product complies with the protective requirements
stipulated in EU guidelines.
The EU conformity declaration for this product is available under
www.jay-tech.de
Intended Use:
Dia-/Film-Scanner DS100 is suitable for private indoor use.
The device is used for the digitization of slides and negatives to a PC via
USB connection.
The dimensions of the film holders supplied conform to ISO standard
(ISO = International Organization for Standardization).
It is not permitted to modify or alter any part of the product!
The manufacturer is not responsible for damage to persons or property
resulting from unintended use. This is the responsibility of the operator.
Power is supplied via USB.
Please understand that incorrect operation and/or connection are beyond
our sphere of influence. We understandably cannot be liable for any
resulting damage. Please read and observe the notes on safety.
21
Page 24

Service Procedures:
If you have reason for complaint, or your device is defective, please contact
your dealer or the service division of JAY-tech GmbH to make arrangements
for service procedures.
Service Hours: Monday – Thursday from 8:00 am to 5:00 pm
Friday from 8:00 am to 2:00 pm.
Phone No.: 02161-5758950
Email: info@jay-tech.de
Please do not send your scanner to our address unless requested to do so
by our service team. All costs and the risk of loss are the responsibility of the
sender.
We reserve the right to reject unrequested deliveries, or return the package
at the sender’s expense.
22
Page 25

 Loading...