

Jaypro Sports BLCH5CUE21 User Manual
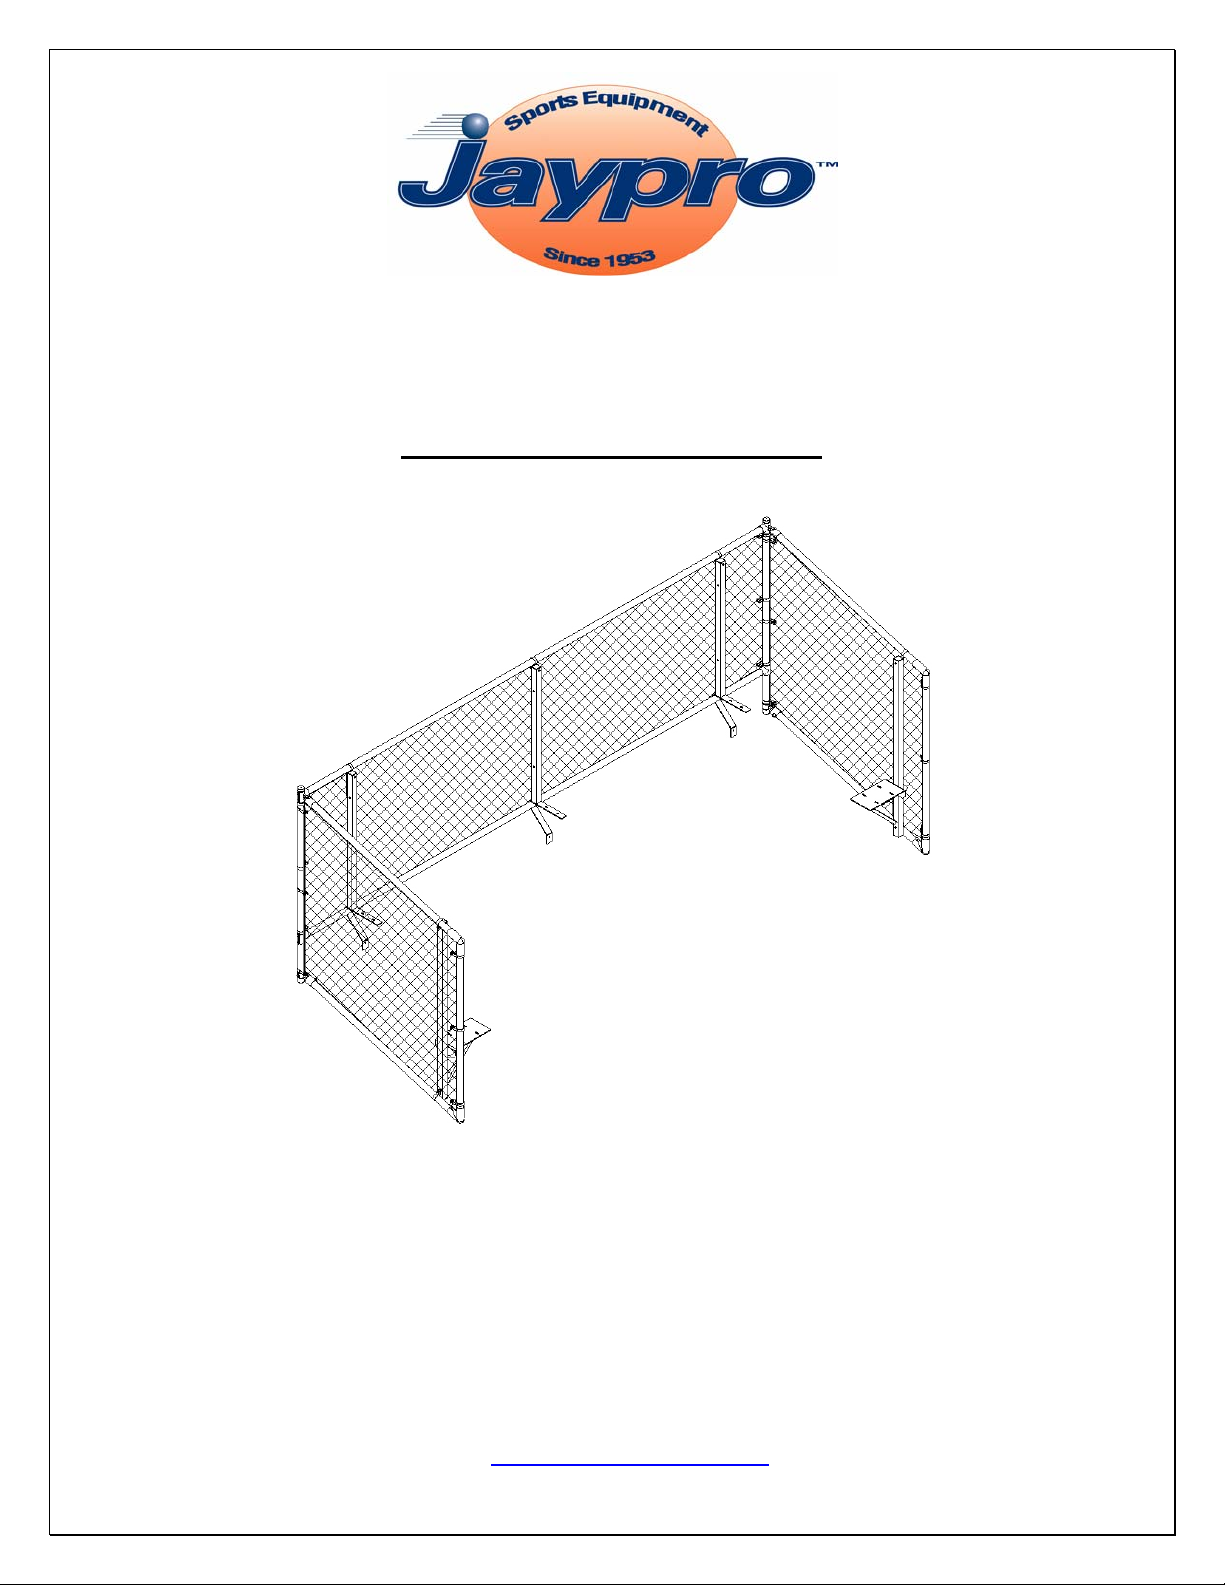
--- BLCH5CUE 15 / BLCH5CUE 21 ---
(Universal Enclosure For Five-Row Bleacher)
Installation Instructions
This enclosure is designed to fit a standard Five-Row Bleacher with a 6” to 8” rise (height difference
from seat to seat). Drilling will most likely be required.
Call Jaypro Sports Equipment at 1-800-243-0533 during
regular business hours for technical support.
www.jaypro.com
Important Notes
• Follow all warning signs and labels on equipment. Use of this equipment other
then intended, may be hazardous.
• Before each use check equipment for proper connecting hardware and structural
integrity. Replace damaged or missing hardware immediately.
• For safe operation and continued high performance from this equipment,
inspection and maintenance must be performed at the beginning and end of each
season.
Part List
Item # Quantity Part Number Part Description
1 4 GR-RP GUARDRAIL BACK SUPPORT
2 2 BLCH5CUE-GRSP GUARDRAIL SIDE SUPPORT
4 2 BLCH-5-GR-N1 1.90” x .109” WALL x 55-7/8” LONG PIPE
3 4 BLCH-5-GR-N2 1.90” x .109” WALL x 60” LONG PIPE
5 2 BLCH-5-GR-N3 1.90” x .109” WALL x 67” LONG PIPE
6 2 BLCH-5-GR-N4 REAR RAIL PIPES15’ / 21’ (ONE W/ & W/O HOLES)
7 1
8 2 BLCH-5-SC PRE-FABRICATED 5’ CHAIN LINK FENCE GALVANIZED
9 4 AR5043/AR5052 STADIUM SEAT PLANK 1 ½” x 9 ½” x 15’or 21’
10 4 AF5010 ADJUSTABLE ELBOW
11 2 AF5011 CORNER FITTING
12 2 SF177A TEE FITTING
13 2 SF186 ADJUSTABLE TEE
14 80 AF116 ALUMINUM FENCE RAIL TIE
15 26 AF56 BRACE PIPE CLAMP
16 56 AR5044 BOLT CLIP W/ SLOTS FOR 5/16” CARRIAGE BOLT
17 26 EC0023 SOFT VINYL CAP
18 44 HB5054 5/16”-18 x 1-1/4” SHORT CARRIAGE BOLT, ZP (PLANKS)
19 8 EP0018 2” x 2” BLACK SQUARE TUBE CAP
20 4 EP0019 2” ROUND CAP
21 16 EP0025 ½” HOLE PLUGS
22 8 HB4078 5/16”-18 x 1-1/2” CARRIAGE BOLT, ZP (BACK SUPPORT)
23 18 HB196 5/16”-18 x 1-1/4” CARRIAGE BOLT GALV. (CLAMPS)
24 8 HB5030 5/16”-18 x 3" CARRIAGE BOLT, ZP (RISER PLANKS)
25 8 HS4089 5/16”-18 x 3” PAN HEAD SLOT SCREW, ZP (SUPPORTS)
26 70 HN5046 5/16”-18 FLANGE NUT, ZP
27 8 HW2049 5/16” FLAT WASHER SAE, ZP
28 8 AR5045 END CAP 9 ½” FOR ALUMINUM SEAT PLANKS
29 16 HS5035 #8 x ½” PAN HEAD PHILIP SCREW SELF DRILL, ZP
30 18 HN807 5/16”–18 GALVANIZED HEX NUT
31 4 HS292 3/8”-16 HEX HEAD CAP SCREW, ZP (LOWER RAIL PIPE)
32 4 HN5042 3/8”-16 FLANGE HEX NUT
BLCH5CUE-CHN
PRE-FABRICATED CHAIN LINK PANEL GALVANIZED
© 2005 Jaypro Sports Equipment JSL-Inst034 Rev D 04-26-2010
2of 14

*** To Be Assembled by Qualified Personnel Only ***
Important:
1) Unpack all parts and check against parts list to ensure that all parts have been
included.
2) Inspect all parts for damage. Report any damages to the trucking company.
General Notes:
• There are two different 5/16” x 1-1/4” carriage bolts, galvanized and zinc plated. The
galvanized 5/16” x 1-1/4” carriage bolts (item 23) and nuts (item 30) are used to clamp the pipe
clamps. The zinc plated (ZP) 5/16” x 1-1/4” carriage bolts (item 18) and flange nuts (item 26)
are used to anchor the seat planks.
• Call Jaypro for pricing and scheduling of a field maintenance visit from one of our highly
trained specialists if you are unwilling or unable to perform the regular maintenance yourself.
This enclosure will ensure no exposed seat is higher than 30” and comes with a footboard and
kickback to complete the upgrade.
Required Tools:
- 1/2” and 9/16” Box Wrench
- 1/2” and 9/16” Socket Wrench
- Flat blade Screwdriver
- 3/16” Allen Wrench
- 5/16” Allen Wrench
- Electric Drill with 3/8” bit & Philip Screwdriver
- Rubber Mallet
-
Needle Nose Pliers
Installation Instructions
a) Install Riser Planks and Additional Foot Planks:
To bring your bleacher up to code, a double foot plank and back riser plank are required on the
fourth and fifth rows. The existing foot planks on the fourth and fifth rows will need to be removed
and repositioned to allow room for double planking.
1) Remove all hardware anchoring both fourth and fifth row foot planks. To improve access
you can also remove the fifth row seat plank at this time (removal of fifth row seat plank
will be required when installing the guardrail back supports (see step b).
2) Lay out both foot planks (9) on the fourth row support frame. New holes will need to be
drilled if they don’t already exist for the double planks. On one of the end frames measure
out the required hole spacing. Drill the necessary 3/8” holes in each of the frame supports.
3) Install the end caps on the new planks, if not already installed (see step c).
4) Install the double foot planks using the hardware shown in Detail A.
5) Install the fourth row riser plank (9) by centering it vertically in the space between the foot
plank and bottom edge of the seat plant. Drill one 3/8” hole, centered on the upper slot, in
each vertical frame member. Anchor the riser plank using the hardware shown in Detail A.
6) Repeat steps 2 thru 5 for the fifth row.
© 2005 Jaypro Sports Equipment JSL-Inst034 Rev D 04-26-2010
3of 14
FIFTH SEAT PLANK
Tube Cap (19)
ITEM 9
Guardrail Back
Support (1)
ANCHOR CONSIST OF:
- Slotted bolt clip (16)
- 5/16” x 3” Carriage bolt (24)
- 5/16” Flange nut (26)
DETAIL A
EXISTING
FIFTH FOOT
PLANK
ANCHOR CONSIST OF:
- Slotted bolt clip (16)
- 5/16” x 1-1/4” Carriage bolt (18)
- 5/16” Flange nut (26)
Slotted bolt clip (16)
FOURTH SEAT PLANK
ITEM 9
DO NOT PLUG HOLE
Guardrail Back
Support (1)
-1/2” Hole plug (21)
BOTH SIDES
-5/16” x 1-1/2” Carriage bolt (22)
-5/16” Flange nut (26)
REATTACH EXISTING PLANK
-5/16” Flange nut (26)
-5/16” x 1-1/4” Carriage bolt (18)
EXISTING LEG FRAME
© 2005 Jaypro Sports Equipment JSL-Inst034 Rev D 04-26-2010
DETAIL B
4of 14
b) Install Guardrail Back Supports:
1) Remove all hardware anchoring the top seat plank (fifth row), if not already done. Insert
mounting flange for guardrail back support (1) between seat plank and frame. Reinstall
anchoring hardware as shown in Detail B - tighten only finger tight.
2) Install the hardware securing the vertical mounting flange of the guardrail back support (1)
to the frame as shown in Detail B. Drill a 3/8” hole in the vertical frame member if needed.
3) Install remaining guardrail back supports (1) repeating steps 1 and 2.
4) Now tighten all hardware securing the guardrail back supports to the frame.
5) Insert the top cap (19) in the top of each back support (1).
6) Insert plastic plugs (21) to plug the unused holes in the back support (1) – see Detail B.
ITEM 9
DETAIL C
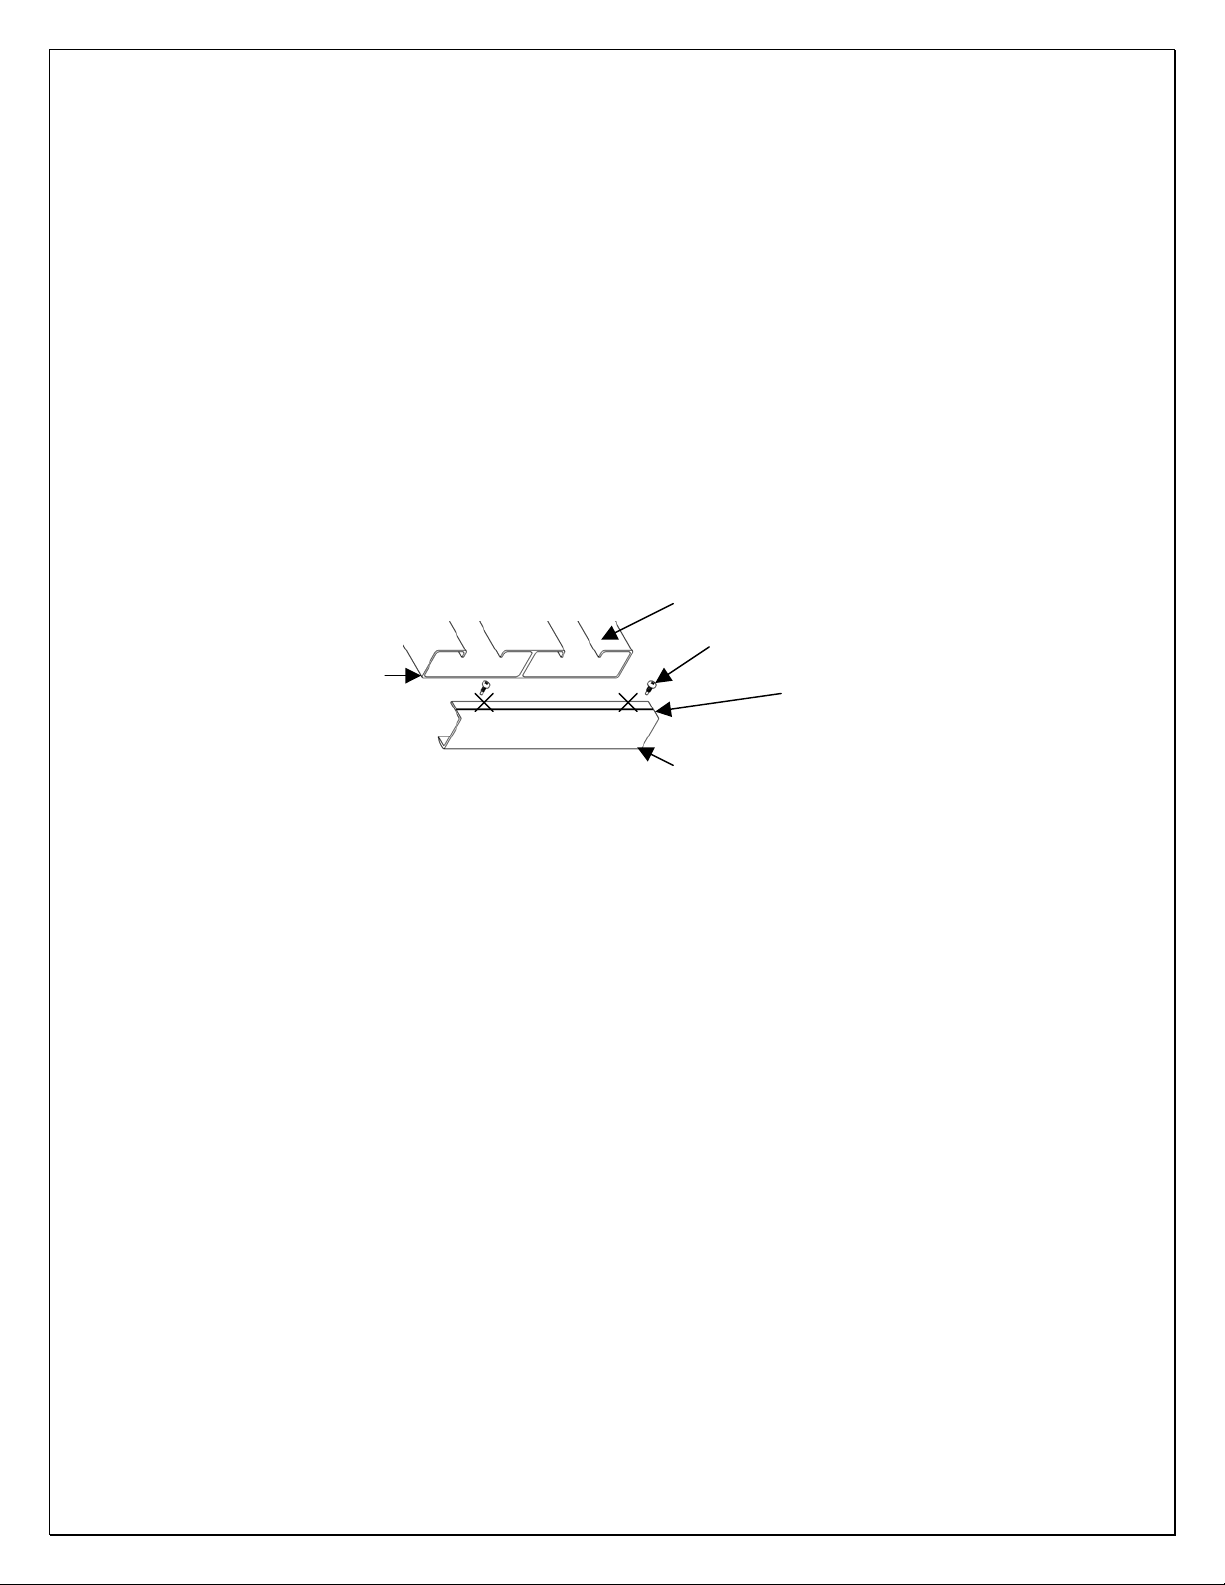
c) Install Plank End Caps:
1) Using a rubber mallet, install the end caps (28) over each end of the new planks (9). Secure
the end caps in place using the self-threading pan head Philip screws (29). - See Detail C
BOTTOM OF PLANK
#8 x ½” Self Drilling Screw (29)
LOCATE SCREWS
ALONG GROOVE IN
BOTTOM OF END CAP.
End Cap (28)
© 2005 Jaypro Sports Equipment JSL-Inst034 Rev D 04-26-2010
5of 14
 Loading...