

Page 1
---
BLCH-TOW4515 & BLCH-TOW4521
(
TRANSPORT KIT FOR 3, 4 OR 5 ROW
---
BLEACHER FROM 15 FT TO 21 FT
Installation Instructions
BLCH-TOW4515 → (For 15 FT long bleacher)
BLCH-TOW4521 → (For 21 FT long bleacher)
BLCH-TMKIT → (Mounting kit brackets with hardware)
)
Call Jaypro Sports Equipment at 1-800-243-0533
during regular business hours for technical support.
www.jaypro.com
Rev -, 4/10 Page 1 of 7
Page 2

JAYPRO SPORTS
3, 4 & 5 ROW BLEACHER TOW KIT FOR 15’ & 21’ BLEACHER
IMPORTANT NOTICE:
1. BEFORE EACH USE CHECK EQUIPMENT FOR PROPER CONNECTING
HARDWARE AND STRUCTURAL INTEGRITY. REPLACE DAMAGED OR
MISSING HARDWARE IMMEDIATELY.
2. SECURELY TIGHTEN ALL NUTS AND BOLTS.
3. THIS TOW KIT IS NOT INTENDED FOR ROAD USE. DO NOT EXCEED 5 MPH.
4. NEVER ALLOW ANYONE TO RIDE ON BLEACHER DURING
TRANSPORT.
5. USE OF THIS EQUIPMENT OTHER THAN INTENDED, MAY BE
HAZARDOUS.
6. ALTERATION OR MODIFICATION OF THIS EQUIPMENT MAY BE
HAZARDOUS AND RESULT IN INJURY. FOR REPAIR OR
REPLACEMENT, CONTACT YOUR DEALER OR JAYPRO SPORTS.
ASSEMBLY INSTRUCTIONS
TOOLS REQUIRED:
(1) 9/16” Socket or Box Wrench Set
(1) Power Drill with 7/16”Drill Bit & 7/16” Transfer Punch
• Unpack all parts and check against parts list to ensure that all have been included.
• Identify all frame components and lay them out on a flat dry surface.
• Inspect all parts for damage. Report any damages to the trucking company.
ITEM DESCRIPTION
1 TOW HITCH TONGUE WITH WARNING LABEL 1 1 N/A
2 AXLE RECEIVER 2 2 2
3 AXLE TUBE 2 2 N/A
4 U-BOLT MOUNTING BRACKET 2 4 2
5 AXLE TUBE MOUNTING BRACKET 4 4 4
6 21 FT BLEACHER TIE BAR N/A 1 N/A
7 1/2” HITCH PIN 1 1 N/A
8 3/8”-16 FLANGE HEX NUT, ZP 14 18 12
9 3/8” FLAT WASHER HDG 4 8 4
10 3/8”-16 FIN NUT HDG 4 8 4
11 12” x 4” WHEEL HUB WITH 21” x 7” TIRE 2 2 N/A
12 1-1/4” SQUARE BT8 SPINDLE 2 2 N/A
13 4” WHEEL HUB KIT 2 2 N/A
14 3/8”-16 x 2” WIDE U-BOLT 2 4 2
15 3/8”-16 x 1-1/2” CARRIAGE BOLT, ZP 8 8 8
16 3/8”-16 x 1-1/4” HEX HEAD CAP SCREW, ZP 4 8 4
17 3/8”-16 x 2” HEX HEAD CAP SCREW, ZP 2 2 N/A
18 3/8”-16 HEX NUT, ZP 5 5 4
19 3/8” FLAT WASHER, ZP 16 20 12
20 3/8” MEDIUM SPLIT LOCK WASHER, ZP 9 13 8
21 3/8”-16 x 2-3/4” HEX HEAD CAP SCREW, ZP 5 5 4
BLCH-
TOW4515
BLCH-
TOW4521
BLCH-
TMKIT
Rev -, 4/10 Page 2 of 7
Page 3
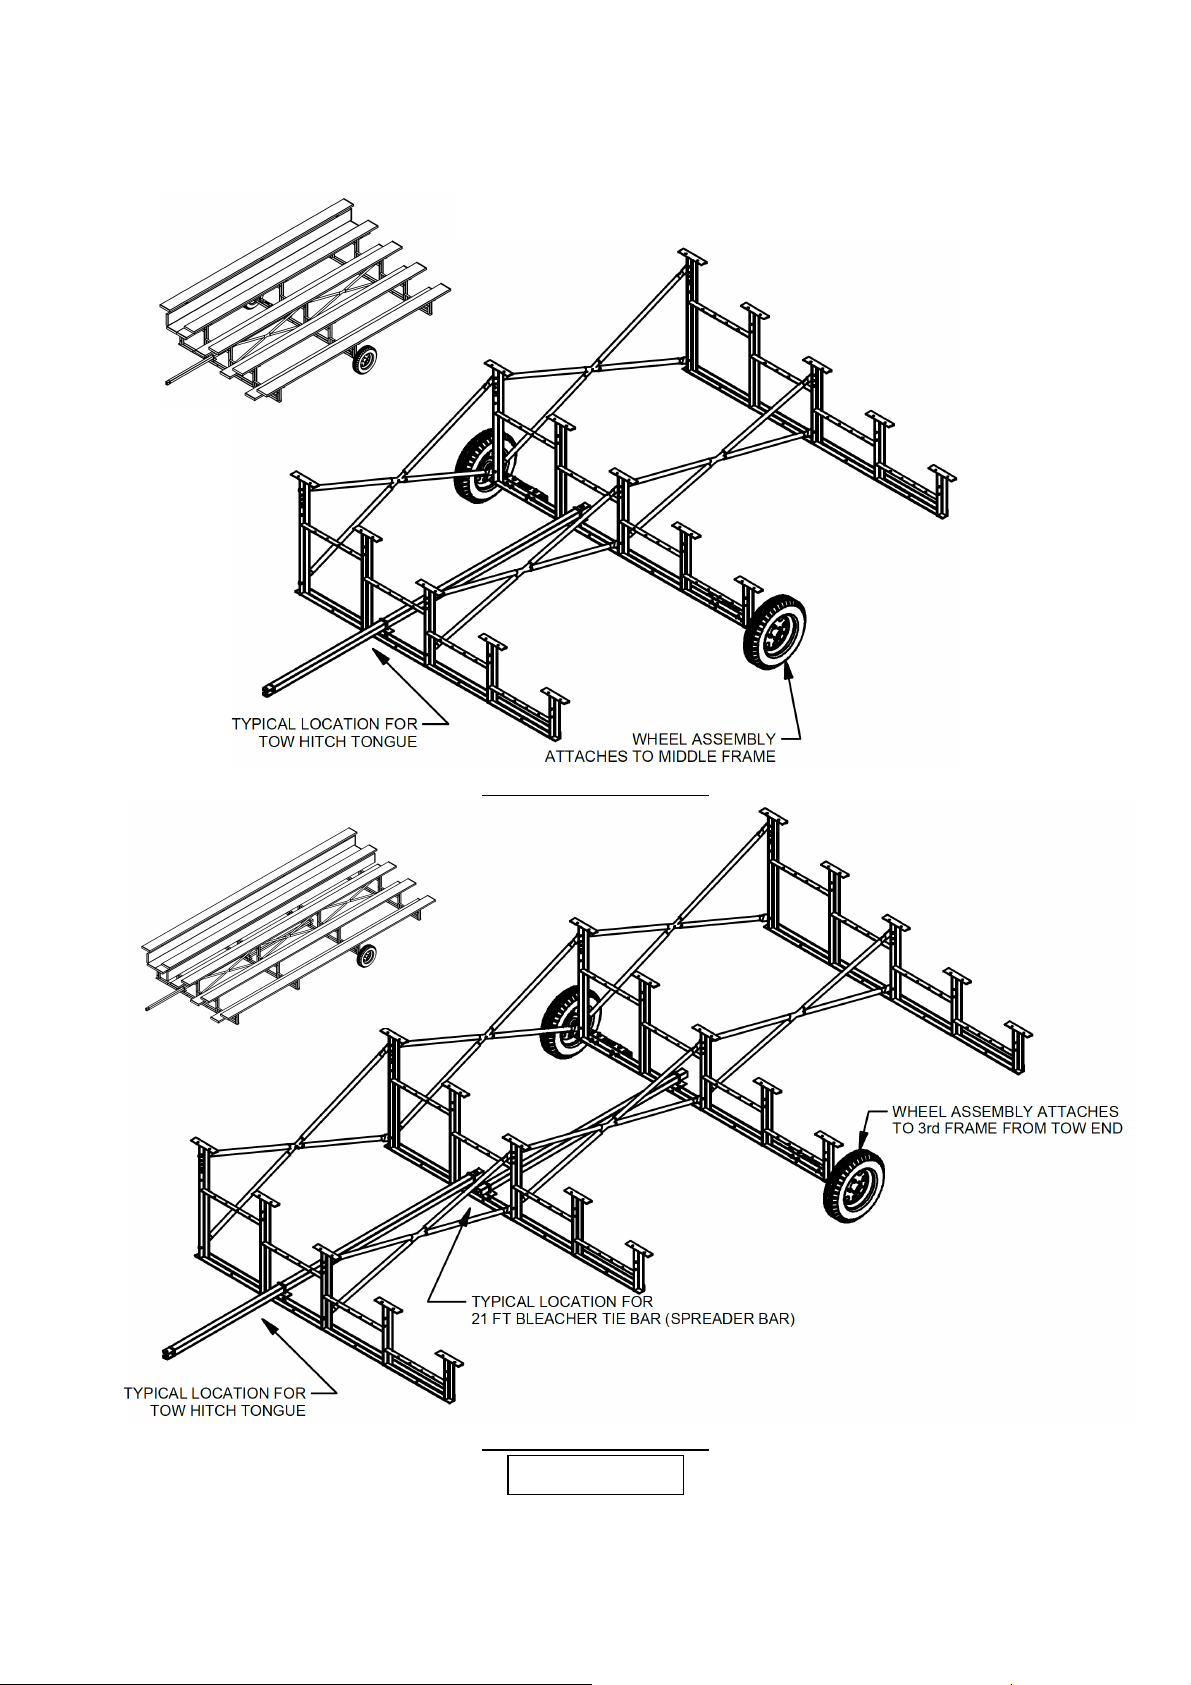
FIGURE: 1
For 15 FT long bleacher
For 21 FT long bleacher
Rev -, 4/10 Page 3 of 7
Page 4
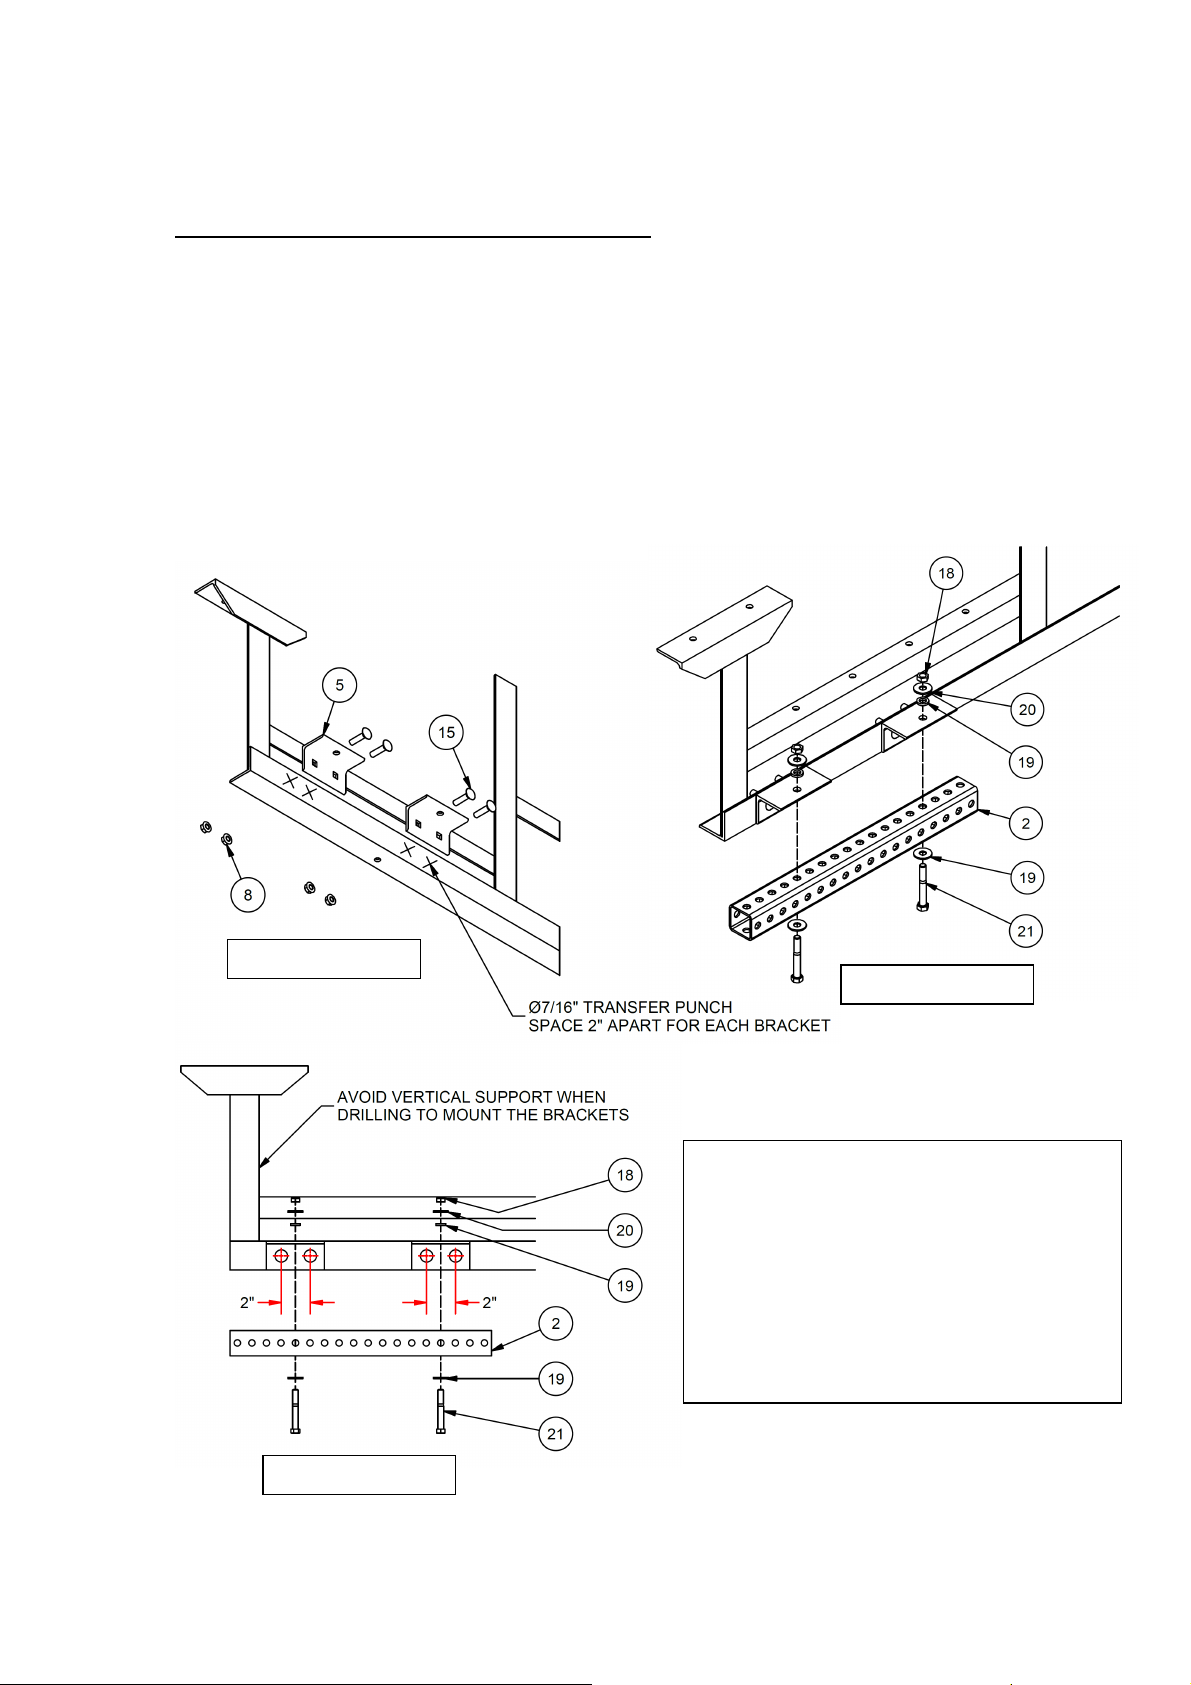
Install Wheel Mounting Brackets and Receiver:
FIGURE: 3
FIGURE: 2
F
IGURE: 4
1) Install two mounting brackets (5) on both ends of the bleacher leg selected to hold
the wheels (see figure 1). Locate where the brackets will be mounted to the lower
frame member as shown, avoiding any interference with vertical or diagonal
support members. The spacing between brackets should not exceed 18”.
2) Using a 7/16” transfer punch, locate and drill two 7/16” holes, exactly 2” apart,
for each bracket. Install all four mounting brackets to the bleacher leg using
hardware as shown in figure 2. Install nuts only finger tight at this point.
3) Attach the axle receiver (2) to the mounting brackets (5) with hardware as shown
in figure 3.
4) Square up the receiver and brackets and tighten all hardware except, the outer
most bolt holding the receiver (this bolt also holds the wheel axle in place).
The BLCH-TOW 45XX, bleacher transport
kit consists of a permanently installed
mounting bracket kit, removal wheel
assemblies and tow tongue. The BLCHTOW 4521 also includes a spreader bar to
tie the second and third frames together.
Additional mounting kits (BLCH-TMKIT)
may be purchased to install on other
bleachers.
Rev -, 4/10 Page 4 of 7
Page 5
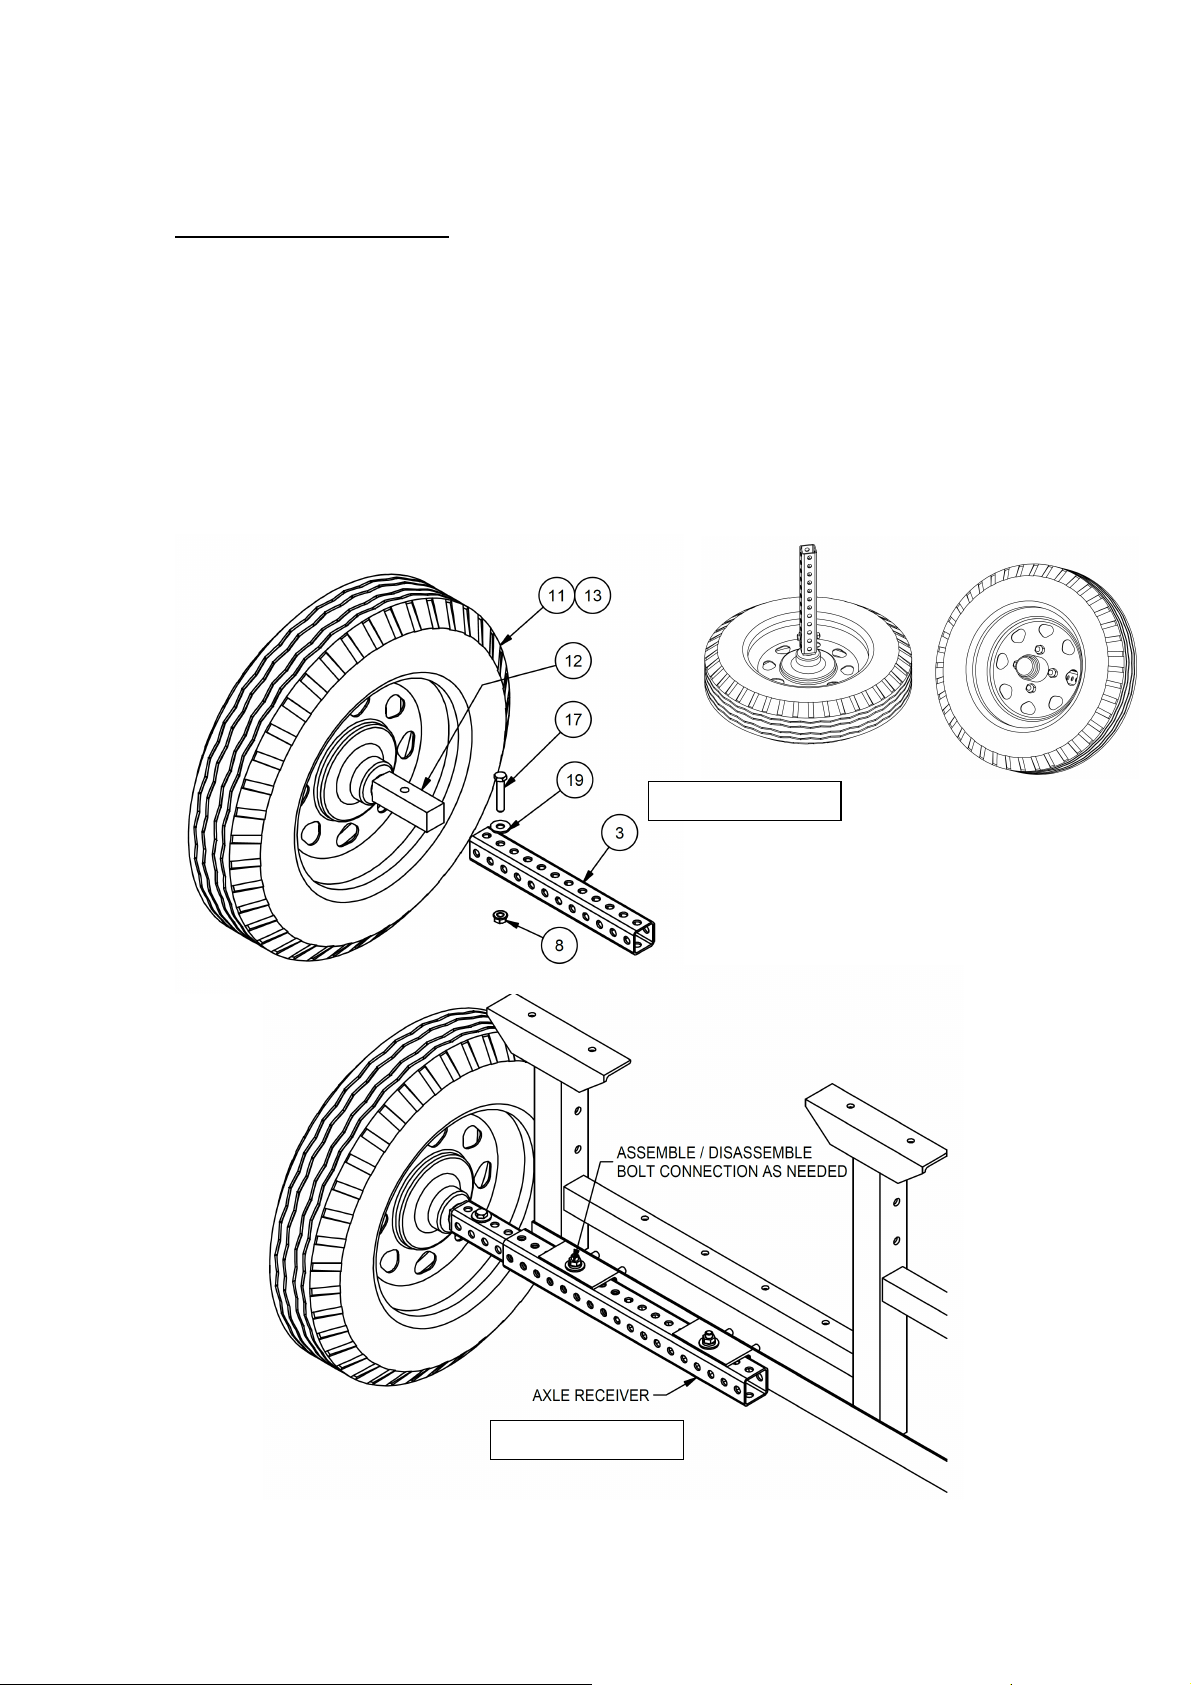
Assemble Wheel Assembly:
FIGURE: 5
FIGURE: 6
1) Assemble the 4” wheel hub kit (13) and the tire wheel (11) using the lug nuts in the
4” wheel hub kit (13). Apply grease to the inside of the hub and the bearings.
Determined the backside of the tire wheel and insert the bearing, washer, hub seal and
1.25” square BT8 spindle (12). On the front side of the tire wheel. Insert the bearing,
washer, slotted hex nut and lock the 1.25” square BT8 spindle (12) with a cotter pin.
Then apply the hubcap to finish the wheel assembly.
2) Attach the axle tube (3) to the wheel using hardware shown in the figure 5.
3) Carefully lift the bleacher and install one wheel assembly at a time. Remove the
outer most mounting bolt and insert the axle tube into the receiver. Slide the wheel as
far in as possible avoiding any contact points. Reinstall the mounting bolt and
tighten.
Rev -, 4/10 Page 5 of 7
Page 6
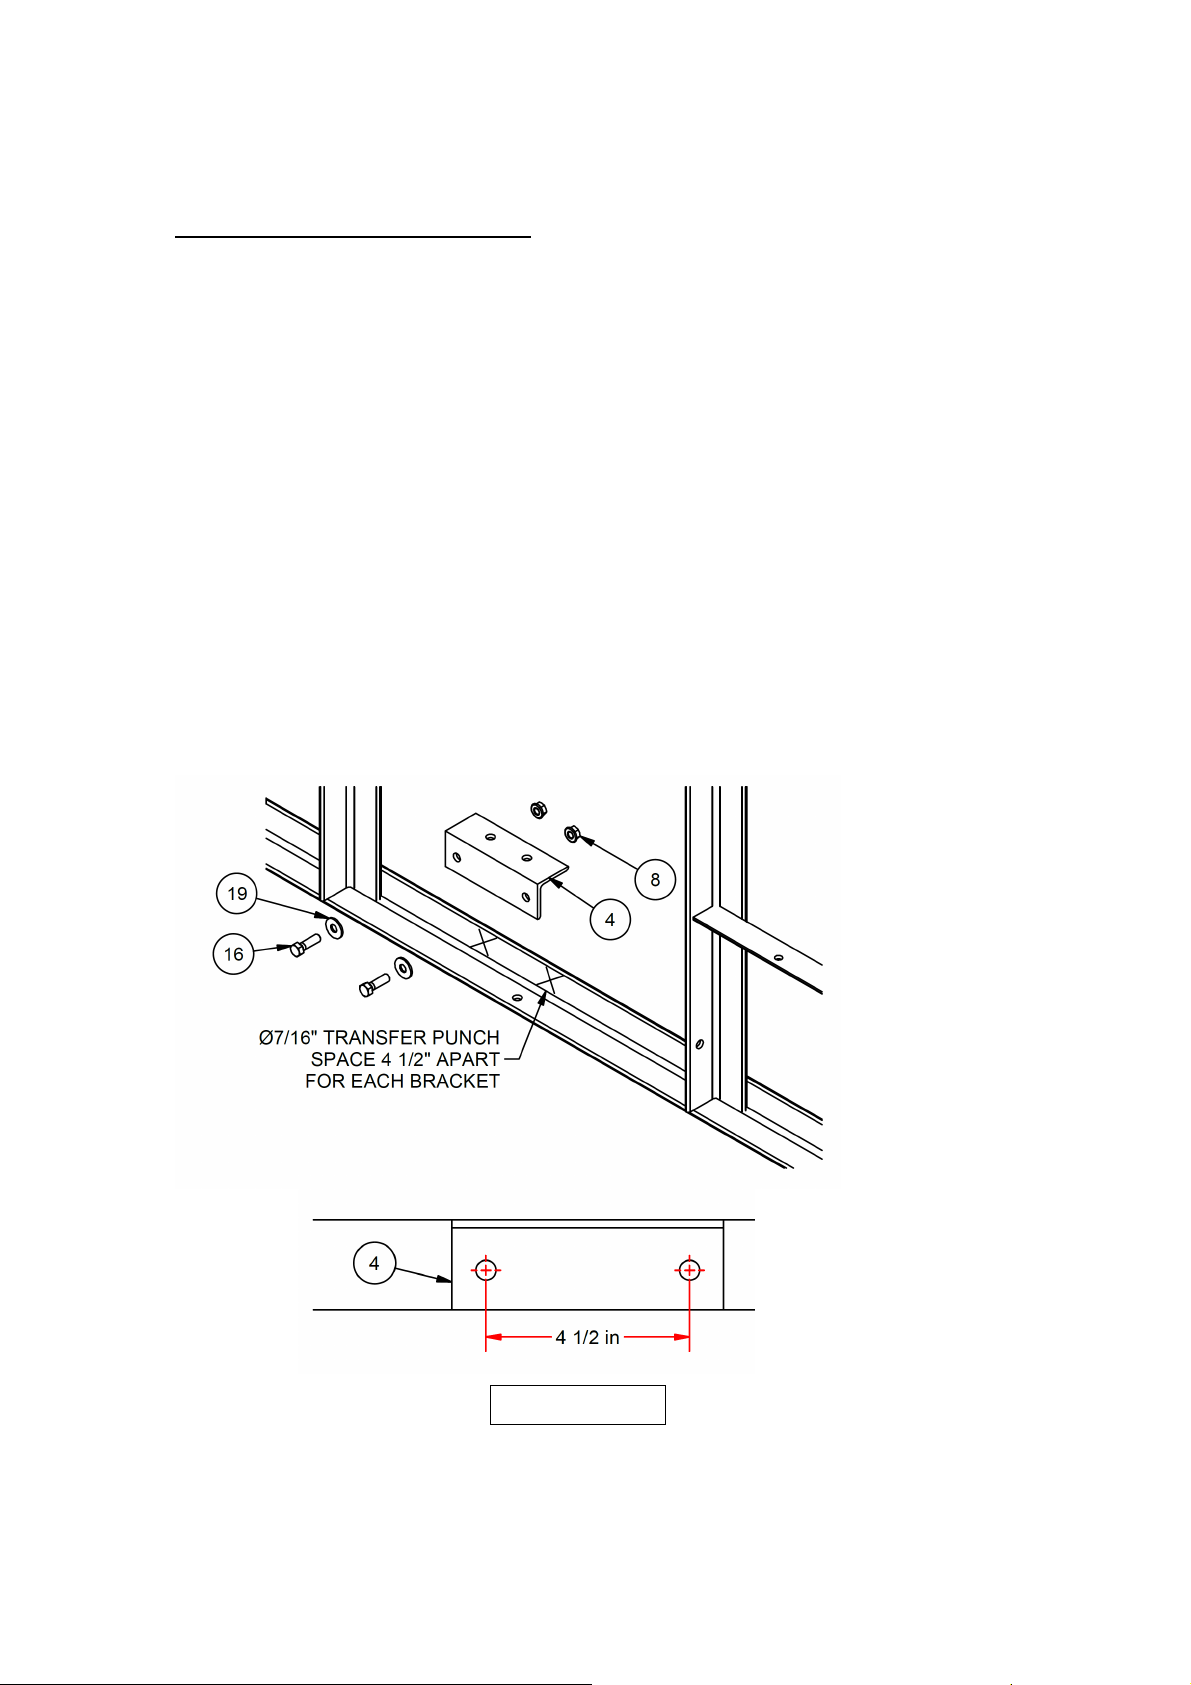
Install Tow Tongue / Spreader Bar:
FIGURE: 7
1) The mounting brackets for the tow tongue are to be installed on the first and second
frame leg, from the tow end of the bleacher. The location of the brackets, side to
side, needs to be determined. Since the bleacher has more weight towards the back
rows, the location of the tongue needs to be shifted towards that side – not centered.
On a 5-row bleacher, the tongue will be located to the right of the vertical support for
the fourth row (see figure 5). To determine the proper location, lift and place the end
frame on a jack stand or block of wood or concrete – located off the centerline
towards the top row. Make sure both wheels are blocked on both sides. Move the
stand or block from side to side until the load appears to be balanced. Mark this
location.
2) Center one of the tongue mounting brackets (4) on the location line and using a 7/16”
transfer punch, mark and drill two 7/16” holes exactly 4-1/2” apart. Install the
tongue-mounting bracket as shown in Figure 7.
3) Measure the location of the tongue-mounting bracket on the first leg and install a
bracket, in the same location, on the second leg.
4) Attach the tow tongue (1) to the two mounting brackets using the hardware shown in
Figure 8.
5) If being installed on a 21 ft bleacher, with four legs, install the spreader bar (6) on the
second and third legs. Locate the mounting brackets and spreader bar to either side of
the tow tongue.
Rev -, 4/10 Page 6 of 7
Page 7
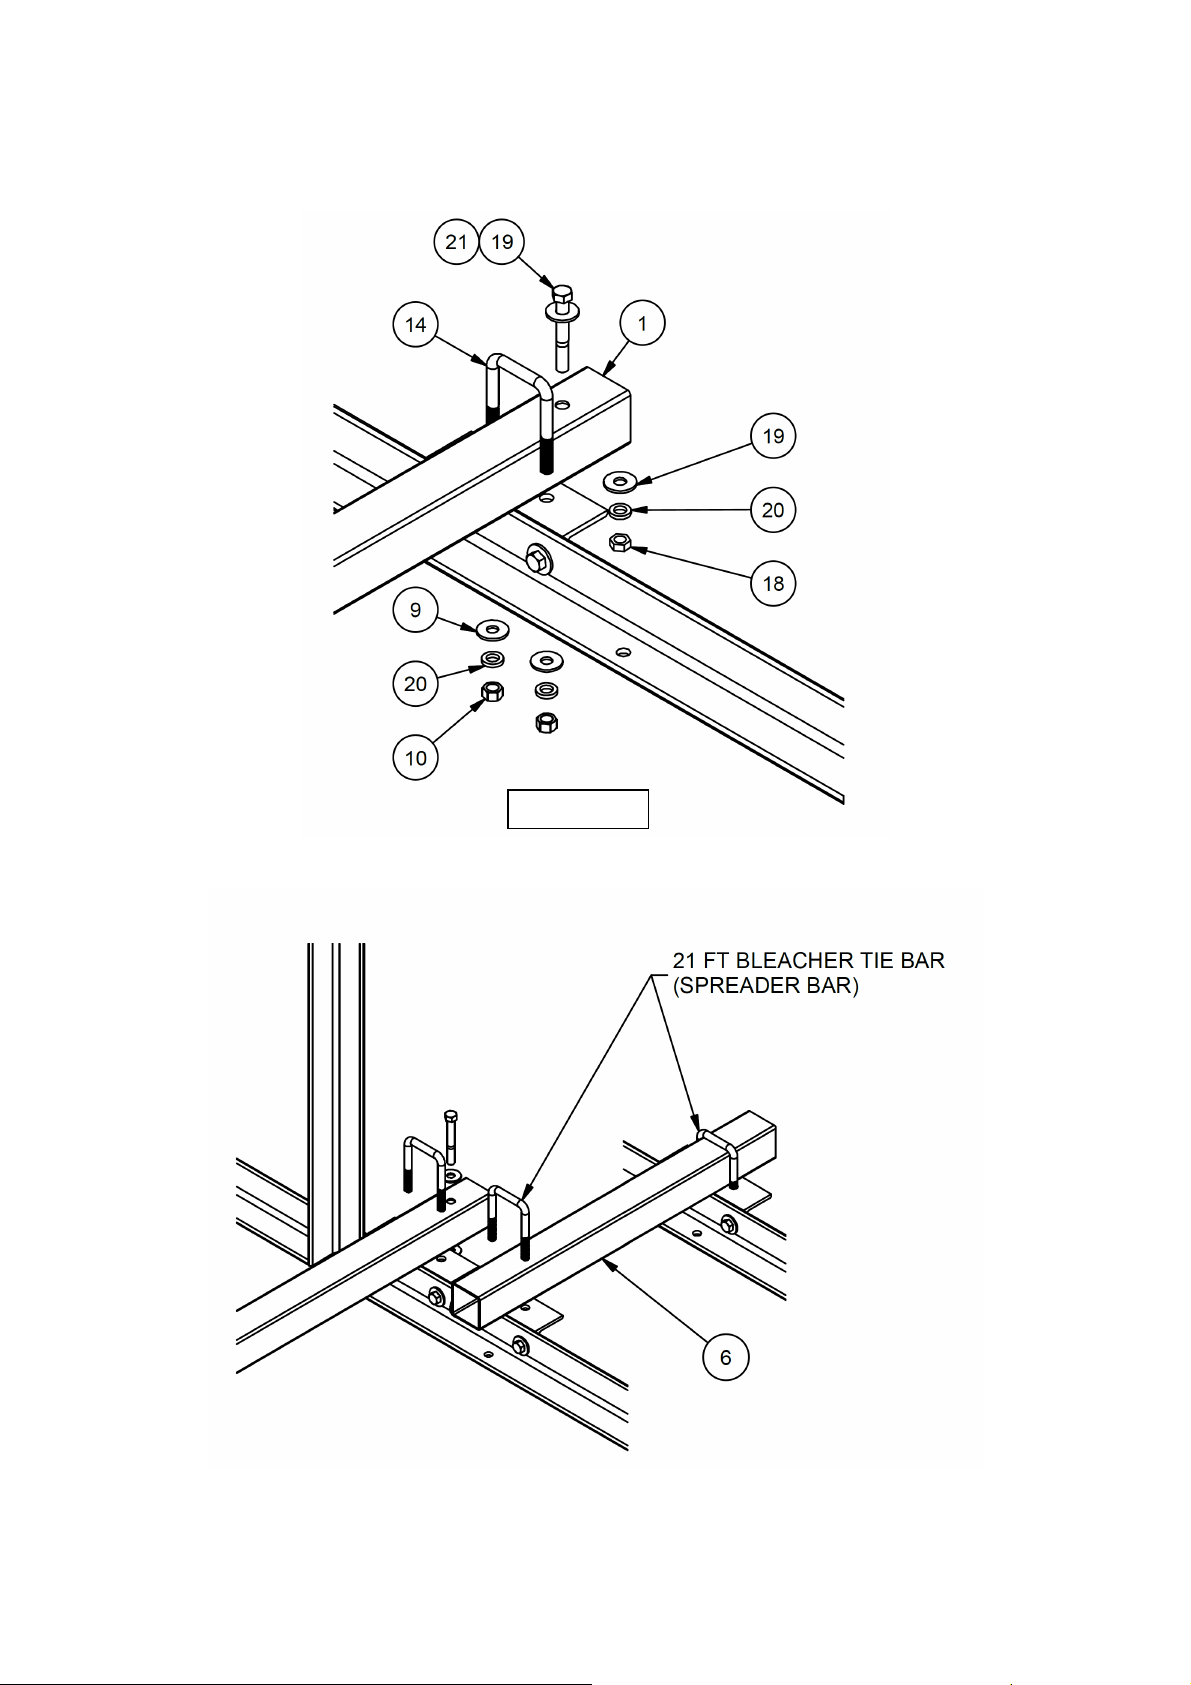
FIGURE: 8
Rev -, 4/10 Page 7 of 7
 Loading...