

Page 1
--- Jaypro Retractable Practice Cages ---
Installation and Operating Instructions
Applicable Jaypro Part Numbers / Cage Models:
BBC-700B = Ceiling Suspended Retractable Baseball Batting Cage
BBC-700M = Ceiling Suspended Retractable Multi Sport Cage
BBC-UBKIT = Installation Kit A – Direct Attached
BBC-UP5KIT = Installation Kit B – Spanning Parallel <=5’
BBC-KIT58 = Installation Kit C – Spanning Parallel >5’ & <=8’
BBC-PERPKIT = Installation Kit D – Spanning Perpendicular <=8’
BBC-RIGKIT = Installation Kit E – Peaked or Rigid Frame Building
Figure 1: Jaypro BBC-700M Multi Sport Cage
Page 2

Important Notes
Caution! This cage system is capable of lifting upwards of 1000 lbs of retractable
cage frames and nets. However, injury and / or death can result if equipment is
used in an unsafe manner.
Do not lift more than one 12’ x 70’ cage.
Follow all warning signs and labels on equipment.
Inspect all equipment before each use. Do not operate equipment if any cables are
frayed or bent, or any wires have been damaged.
Make sure there are no obstructions above or below the cage frame or catch nets
when operating the unit.
Do not operate other moveable gym equipment (such as backstops, curtains,
scoreboards, etc) close to the cage system at the same time as this unit is being
operated.
Do not leave the key in the wall switch. Only authorized personnel should have
access to the keys.
Always require that all personnel follow all safety procedures any time unit is in
operation.
Never use equipment for hoisting personnel or any other equipment besides that
for which it was designed and tested.
Should equipment become damaged or stop working as expected immediately
stop using the system and tape off an area around the cage. Do not continue using
until a qualified service technician has inspected the equipment and certified the
system as safe to resume operating.
Nets must be rolled tightly and stored on top of the frame. Do not operate unit
with an off-balance load.
Key switch must be located within clear eyesight of entire cage assembly. Never
operate cage when sightline is obstructed. Post additional personnel around cage
as needed to keep children and other unauthorized personnel clear from operating
area.
Facility personnel should never access the internal components of the winch.
© 2010 Jaypro Sports Equipment BBC-700B-M 02-08-2012
2of 24
Page 3

Only licensed electricians are permitted to provide power to the key switch, and
to and from the winch. Authorized installation personnel may provide temporary
wiring only for the purpose of testing equipment during the installation of the
product.
Call Jaypro Sports Equipment at 1-800-243-0533 during
regular business hours for any technical support questions
or issues. Refer to Cage model number listed above when
talking to customer service personnel.
www.jaypro.com
General Notes
All components of the cage system have been fully tested at the factory to insure they are in proper
working order. If for some reason the system does not work as expected after the installation has
been completed, please review all steps in the procedure as well as the troubleshooting guide. If for
some reason the system is still not functioning properly, you may call Jaypro directly at 1-800-243-
0533.
Only authorized and properly trained personnel should operate the cage. Operation of the cage
should only be done while in clear view of the surrounding area. Always keep a copy of these
operating instructions handy for anyone using the system. Jaypro recommends a policy of training
and ‘signing off’ on instructions for anyone who will be tasked with operating the system.
It is the ultimate responsibility of the person operating the cage system to insure that the unit does
not become severely out of level. If for any reason the cage frame should exceed a 6” difference in
elevation from one end to the other, STOP OPERATING IMMEDIATELY! Do not operate the
system again until the problem has been diagnosed and repaired.
Before operating cage system make sure all personnel are clear from the area
Cage hoist is capable of holding one (1) 12’ X 70’ Frame and net. Net should be rolled evenly and
stored as shown in images below during storage. Inspect cables regularly and order replacements at
the first sign of wear.
Key switch has two positions, Up and Down. Turn and hold key in direction of travel desired.
Operator should always be observant of cage and surroundings during operation.
Inspect cables and spools regularly. Order replacements at the first sign of frayed cable segments or
any wear of metal parts.
Listen for unusual sounds from hoist motor while the unit is being operated. Winches are
somewhat loud normally, but if the noise they make should change over the period of their life then
they should be inspected closely.
© 2010 Jaypro Sports Equipment BBC-700B-M 02-08-2012
3of 24
Page 4
Call Jaypro for pricing and scheduling of a field maintenance visit from one of our highly trained
specialists if you are unwilling or unable to perform the regular maintenance yourself. Jaypro
recommends that the Cage system be thoroughly inspected at least every year by a trained
specialist. Call Jaypro or your dealer to arrange for servicing.
Jaypro Sports Equipment Phone #: 1-800-243-0533 Website: www.jaypro.com
Operating Instructions
1. Key Switch Operation
a. Inserting the key and turning in the direction of travel actuates the key switch.
b. Unit direction can be continually reversed without cause for concern with regards to system
damage.
Regular Equipment Maintenance
1. Key Switch
a. Key switch is dual direction momentary actuated. No maintenance or upkeep should ever be
required. For additional or replacement keys call Jaypro (you must have the key number).
2. Wire Rope
a. Wire rope should be lubricated regularly to insure long reliable life. Obtain a suitable wire rope
lubricant from local supply or hardware store. Do not use heavy grease or engine oil for
lubricant. A recommended penetrating lubricant is MIL-G-18458 wire rope grease. Lubrication
is best applied at the point of the wire rope bending over the pulley sheave, where the strands
will be temporarily and partially separated allowing the lubricant to penetrate fully.
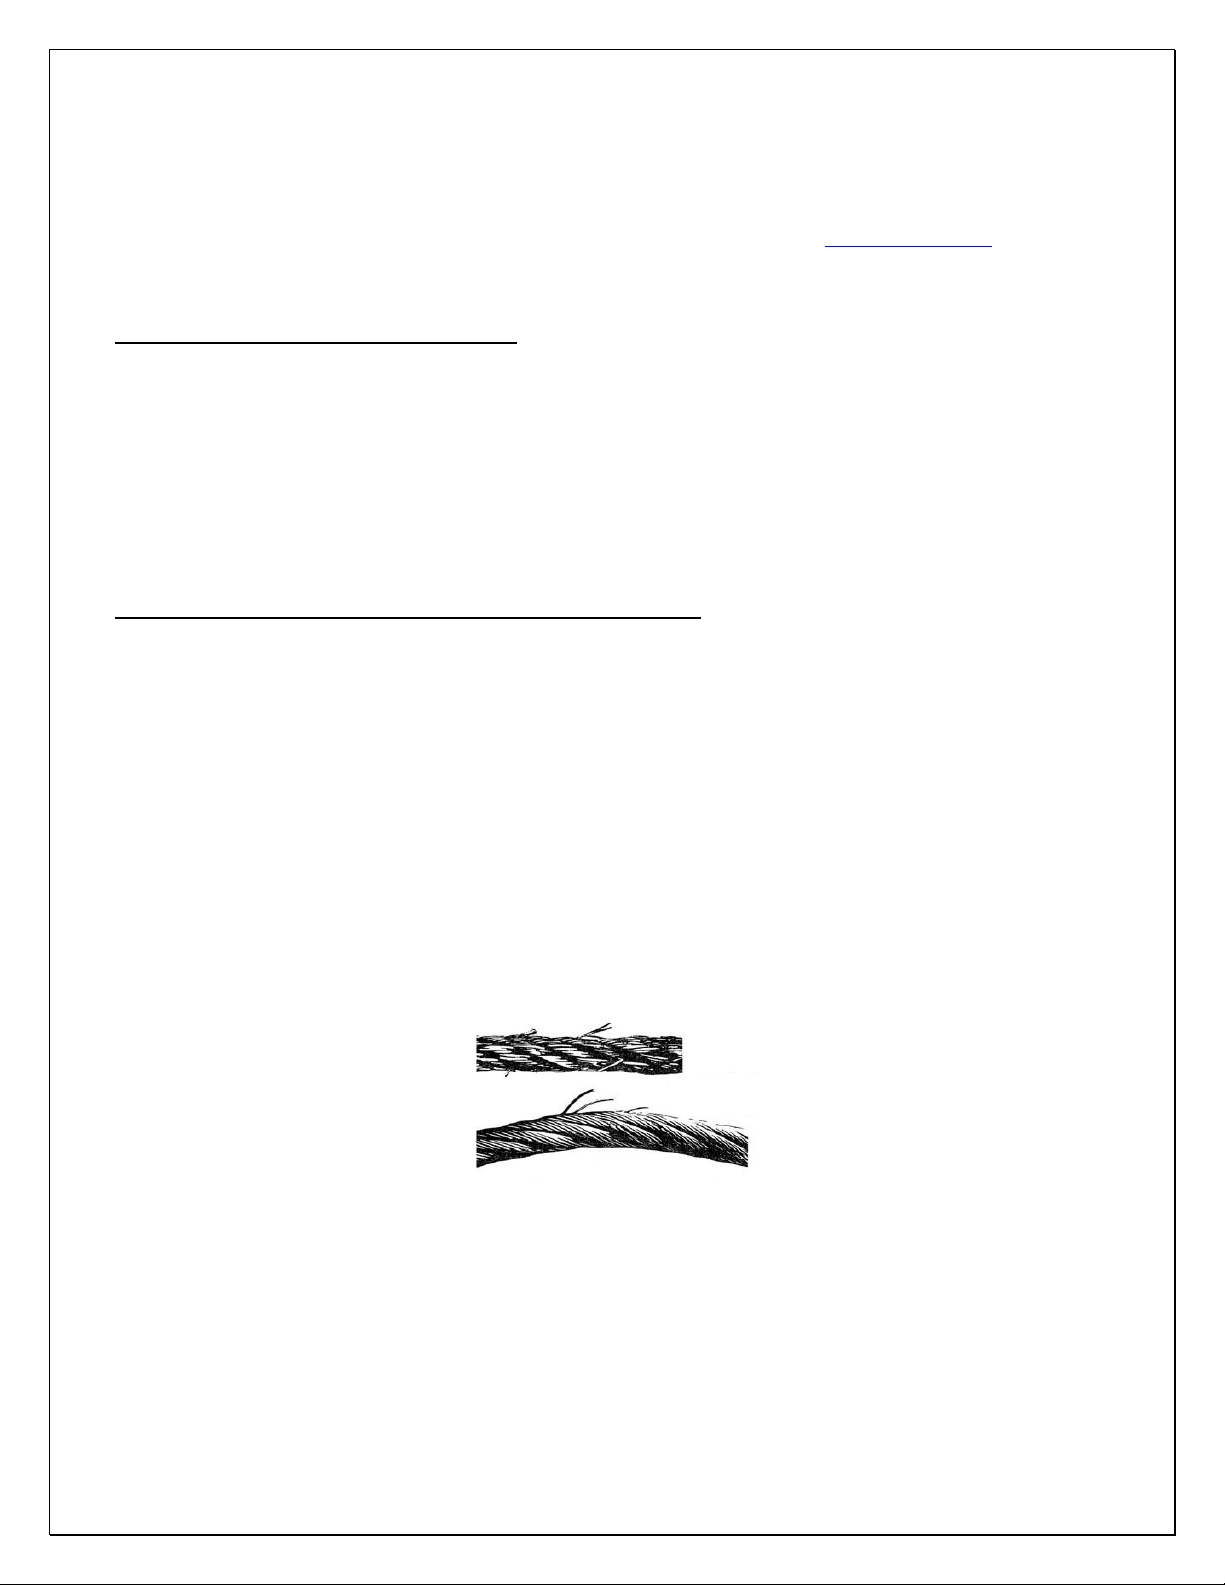
b. Inspect rope for excessive damage or broken ‘threads’. See image below – if wire rope looks
like either of these pictures, it’s time to replace it:
Figure 2: Worn and Damaged Wire Ropes - Replacements Required
c. Replacement hoist cables (wire ropes) can be obtained directly from Jaypro, or from a qualified
wire rope manufacturer or supplier. Cables are 1/8” x 7/19 Galvanized Cable with both ends
terminated with a flemished eye splices and galvanized thimbles.
3. Electric Hoists (Winches)
a. Hoist is maintenance free and should provide years of repeated reliable service, barring damage
from other equipment or electrical surge or other problem. Unit should, however, be inspected
© 2010 Jaypro Sports Equipment BBC-700B-M 02-08-2012
4of 24
Page 5
regularly and if there is any sign of wear on the visible internal components a qualified service
technician should be called in for further study.
b. Inspect all attachment hardware for both the winch and the cable. Retighten or replace all
hardware as necessary.
4. Service Plan & On-Site Maintenance Inspection
a. A thorough yearly inspection is recommended for entire system of hoists, cables, wiring, etc. If
there are no qualified personnel on site who can do this work, it is recommended that you retain
the services of a maintenance technician who is experienced with this type of equipment. You
can research the availability of such a service locally or call Jaypro directly for a factory
representative recommendation.
© 2010 Jaypro Sports Equipment BBC-700B-M 02-08-2012
5of 24
Page 6

INSTALLATION PROCEDURES
Important Note: The following installation procedures show the installation of a batting
cage being directly attached to a single I-beam or bar joist, using the BBC-UBKIT
mounting kit. Alternate mounting kits are available to attach cages between bar joists
(BBC-UP5KIT, BBC-KIT58) and perpendicular to bar joists (BBC-PERPKIT).
Although this document explains the steps in laying out the cage and drive assembly,
refer to the individual mounting kit instructions for installing the support structure.
Only trained personnel, familiar with the use of common power tools, should attempt to
install the batting cage and support structure.
TOOLS REQUIRED:
Standard Sockets.
Open ended wrenches.
Allen Wrench Set
Screwdrivers
Electric Drills
Electric Saws
Cable Cutters
Measuring devises
Levels and plumb bobs or lasers
Lifts and or scaffolding
Blocking wood
Duct tape
Thread Lock liquid
5/16” Nut Drivers
.
SKILLS:
Installation should be by persons with experience in indoor athletic equipment assembly.
Contact Jaypro Sports for a recommendation of a certified installer in your area.
UNPACKAGE AND VERIFICATION
1. Verify that all your parts are accounted for
2. Verify that no parts were damaged in shipment.
3. Layout all parts and identify for assembly
4. The winch should be unpackaged and ground tested at this point.
The lower limit should be set and the drum turned until it rests at the lower limit
position to aid in installation .
Reference the Winch documentation located within the winch box.
© 2010 Jaypro Sports Equipment BBC-700B-M 02-08-2012
6of 24
Page 7

)
ITEMS AND COUNTS
PACKAGE 1 TW-1200X-3C
(1) TW-1200X-3C WINCH
(1) KS-13 KEY SWICH
PACKAGE 2 BBC-700DT
(7) DRIVEPIPE-B 2-3/8" OD GALV TUBES 135.75"
PACKAGE 3 BBC-700DMK
(6) HS292 3/8-16 X 3" HX HD BOLT
(6) HN265 3/8-16 NYLON LOCK NUT
(18) HM6134 1/2-13 CHANNEL NUT
(18) HM6135 1-5/8 SQ STRUT WASHER W/ 9/16" HOLE
(26) HN5038 1/2-13 FLANGE NUT
(2) HS5040 1/2-13 X 4" HX HD BOLT
(2) HN2951 1/2-13 NYLON LOCK NUT
(4) HW2044 1/2 FLAT WASHER
(14) HN5016 1/2-13 X 1-3/4" COUPLING NUT
(14) HW1245 1/2 SPLIT RING LOCK WASHER
(14) HN269 1/2-13 HX NUT
(28) HS5091 5/16-18 X 1/2" SET SCREW
(4) SR5187 1/2-13 X 12" THREAD ROD
(14) SR5276 1/2-13 X 18" THREAD ROD
(7) DPC-2 DRIVE PIPE CARRIER ASSEMBLY
(14) CG-6 6" CABLE GUIDE FITTING
*Hardware in PACKAGE 3 will vary for BBC-RIGKIT (See BBC-RIGKIT support drawing package for detail parts list.
PACKAGE 4 BBC-700CK
(1) NW0048 3/4" X 25 YDS BLACK VELCRO 'ONE WRAP
(35) HM403 1/8" WIRE ROPE CABLE CLAMP
(21) HM6169 1/8" WIRE ROPE CABLE THIMBLE
(21) HB5048 3/8-16 X 5" EYE BOLT
(42) HW2050 3/8 FLAT WASHER
(21) HN265 3/8-16 NYLON LOCK NUT
(124) HS5144 #10 X 1" RND WASHER HD PHILLIPS SCREW
(7) RC5017-14 1/8" AIRCRAFT CABLE 7X19 GALVANIZED 14'
(7) RC5017-40 1/8" AIRCRAFT CABLE 7X19 GALVANIZED 40'
(4) BBC-EL CAGE ELBOW FITTING
(18) BBC-T CAGE T FITTING
PACKAGE 5 & 6 BBC-700CP & BBC-700CP-1
(2) AP5008-20 1.90 OD ALUM TUBE 20"
(9) BBC-PIPE-A 1.90 OD ALUM TUBE 144" W/ 3 HOLES
(4) AP5008-288 1.90 OD ALUM TUBE 288"
(2) AP5008-264 1.90 OD ALUM TUBE 264"
© 2010 Jaypro Sports Equipment BBC-700B-M 02-08-2012
7of 24
Page 8

PACKAGE 7 BBC-700M
(1) BBC-700M 12' X 10' X 70' TUNNEL #252 3/4" SQ NETTING
CAGE SUPPORT KITS (Contains Attachment Kit and Support Structure)
BBC-UBKIT (Direct Attached) Purchased Separately
(9) SR5239-36 1 5/8 x 1 5/8 x 36 in SINGLE STRUT CHANNEL
(18) HM6157 SINGLE STRUT BEAM CLAMP ASSEMBLY
BBC-UP5KIT (Spanning Parallel 5 ft. or less) Purchased Separately
(9) SR5239-96 1 5/8 x 1 5/8 x 96 in SINGLE STRUT CHANNEL
(36) HM6157 SINGLE STRUT BEAM CLAMP ASSEMBLY
BBC-KIT58 (Spanning Parallel 5 ft. to 8 ft) Purchased Separately
(9) SR5243-120 1 5/8 x 3 1/4 x 120 in DOUBLE STRUT CHANNEL
(36) HM6159 DOUBLE STRUT BEAM CLAMPS
BBC-PERPKIT
(2) SR5239-24 1 5/8 x 1 5/8 x 24 SINGLE STRUT CHANNEL
(8) SR5243-240 1 5/8 x 3 1/4 x 240 in DOUBLE STRUT CHANNEL
(6) HM6222 4 HOLE PLATE
(32) HM6159 BEAM CLAMPS
(24) HS5133 1/2 -13 x 1 1/4 in HEX HEAD CAP SCREW
(4) HW2050 3/8 FLAT WASHER
(4) HS 286 3/8-16 x 1 in HEX HEAD CAP SCREW
(4) HM6158 3/8-16 STRUT NUT
(24) HM6134 1/2 -13 STRUT NUT
BBC-RIGKIT
(See BBC-RIGKIT support drawing package for detailed parts lists)
(Spanning Perpendicular) Purchased Separately
(Peaked or Rigid Frame Buildings) Purchased Separately
MEASURE AND ESTABLISH LOCATION OF CAGE.
1. The cage is 12’ Wide by 70’ long once assembled.
2. There should be a clear area around the perimeter of the cage that is 3’ minimum.
3. The motor of the cage should be located outside the frame to allow for service to the
motor in either the retracted or down position.
ESTABLISH THE MOTOR REFERENCE POINT.
1. The assembly of the cage and drive system is based on the establishment of a motor
reference point.
2. The motor reference point is on the center line of the 12’ side of the cage on either end
of the cage frame.
3. The reference point must be transferred to the ceiling structure of the building to
establish the attachment points for the motor and drive pipe carriers.
4. A plumb laser is the preferred method for achieving this location.
© 2010 Jaypro Sports Equipment BBC-700B-M 02-08-2012
8of 24
Page 9
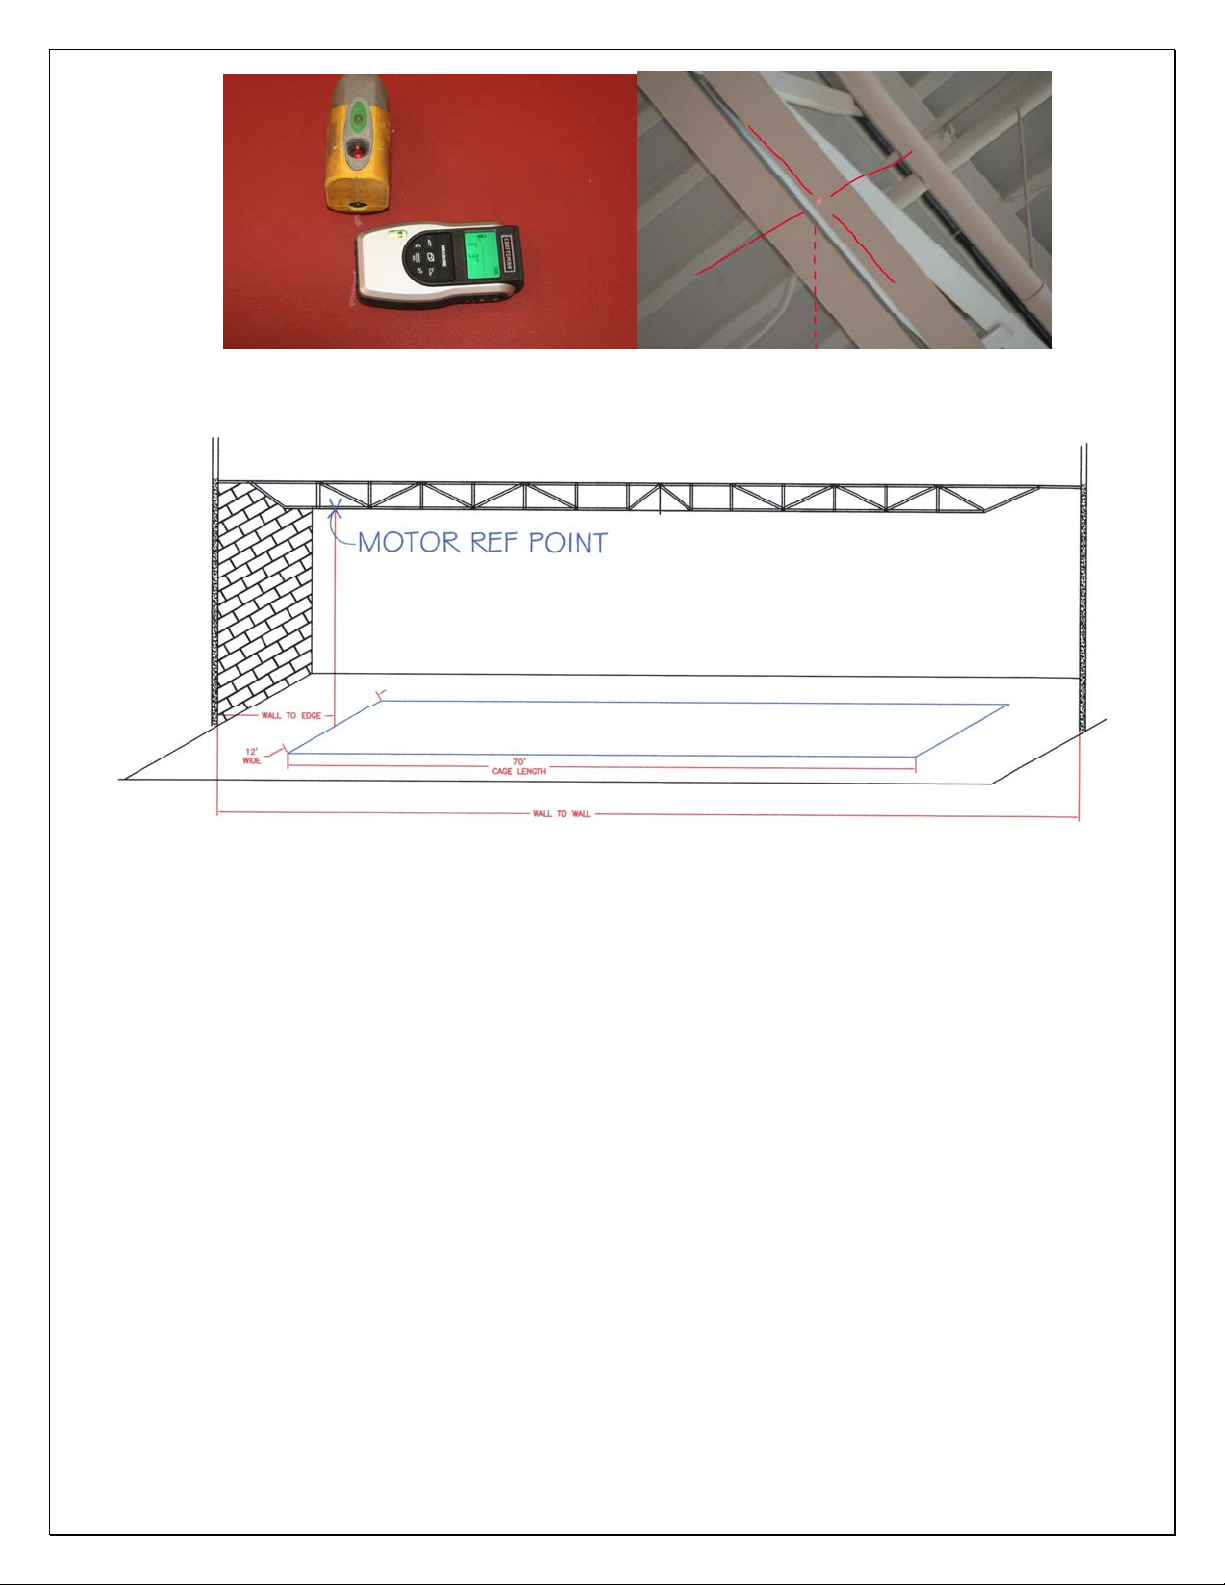
FIGURE 1- MOTOR REFERENCE POINT
INSTALL MOTOR ATTACHMENT STRUT AND MOTOR ASSEMBLY.
1. 2 pieces of Unistrut that is 11” c/c are attached to the beam with unistrut clamps at a
location of the first piece a minimum of 14” outside the frame perimeter away from
the motor reference point.
2. Loosely assemble the motor assembly and hoist it into position.
3. Attach the motor assembly to the motor strut and establish the drive pipe centerline
Above Finished Floor, (AFF).
4. Secure all nuts to mount the motor to the strut.
5. DO NOT INSTALL the winch drive bolts to the winch at this time.
© 2010 Jaypro Sports Equipment BBC-700B-M 02-08-2012
9of 24
Page 10
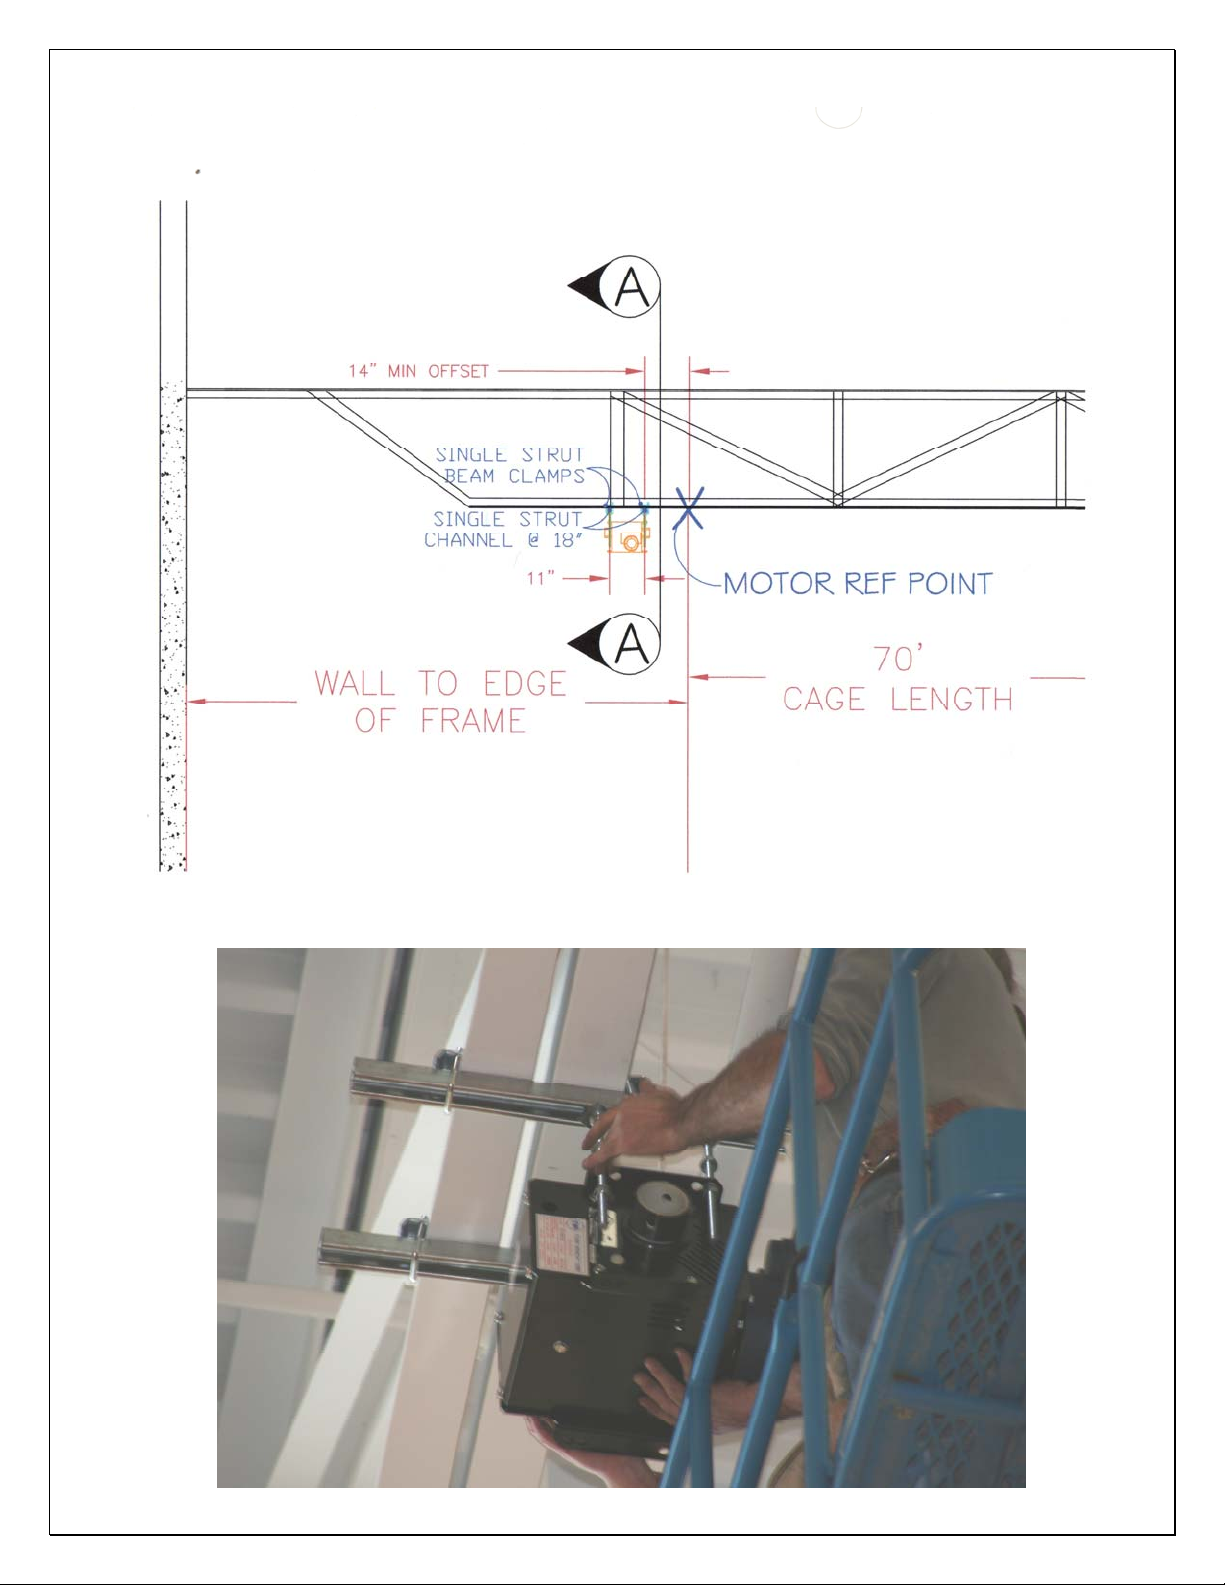
FIGURE 2 - MOTOR INSTALL
© 2010 Jaypro Sports Equipment BBC-700B-M 02-08-2012
10 of 24
Page 11
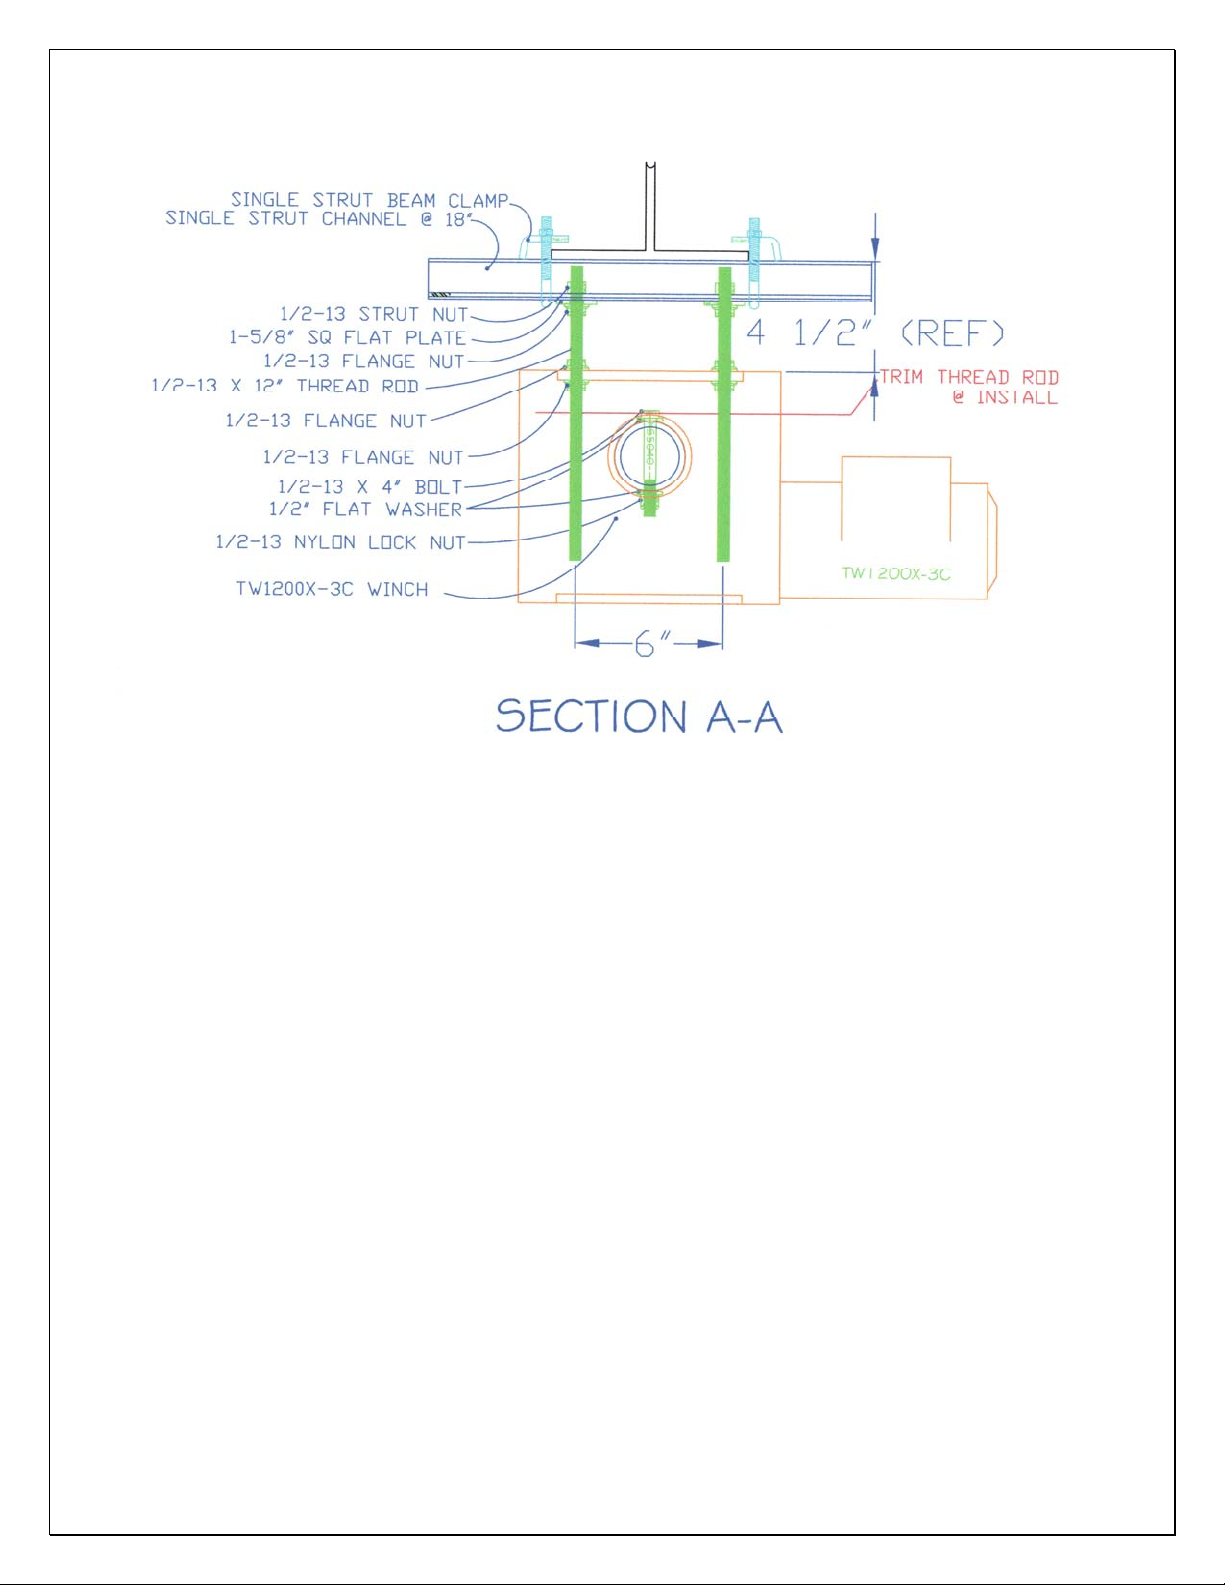
FIGURE 3 - MOTOR ASSEMBLY
INSTALL FIRST DRIVE PIPE CARRIER STRUT AND ASSEMBLY.
1. The next attachment is that of the first Drive Pipe carrier assembly to unistrut that is
located 1’ from the motor reference point to be located within the perimeter of the
cage.
2. Attach this piece of strut to the beam with usistrut beam clamps.
3. Attach a loosely assembled Drive Pipe Carrier Assembly, (DPC-A), to the strut.
4. Establish the required Drive Pipe Centerline AFF for the carrier.
5. Secure all nuts to mount the assembly to the strut.
© 2010 Jaypro Sports Equipment BBC-700B-M 02-08-2012
11 of 24
Page 12
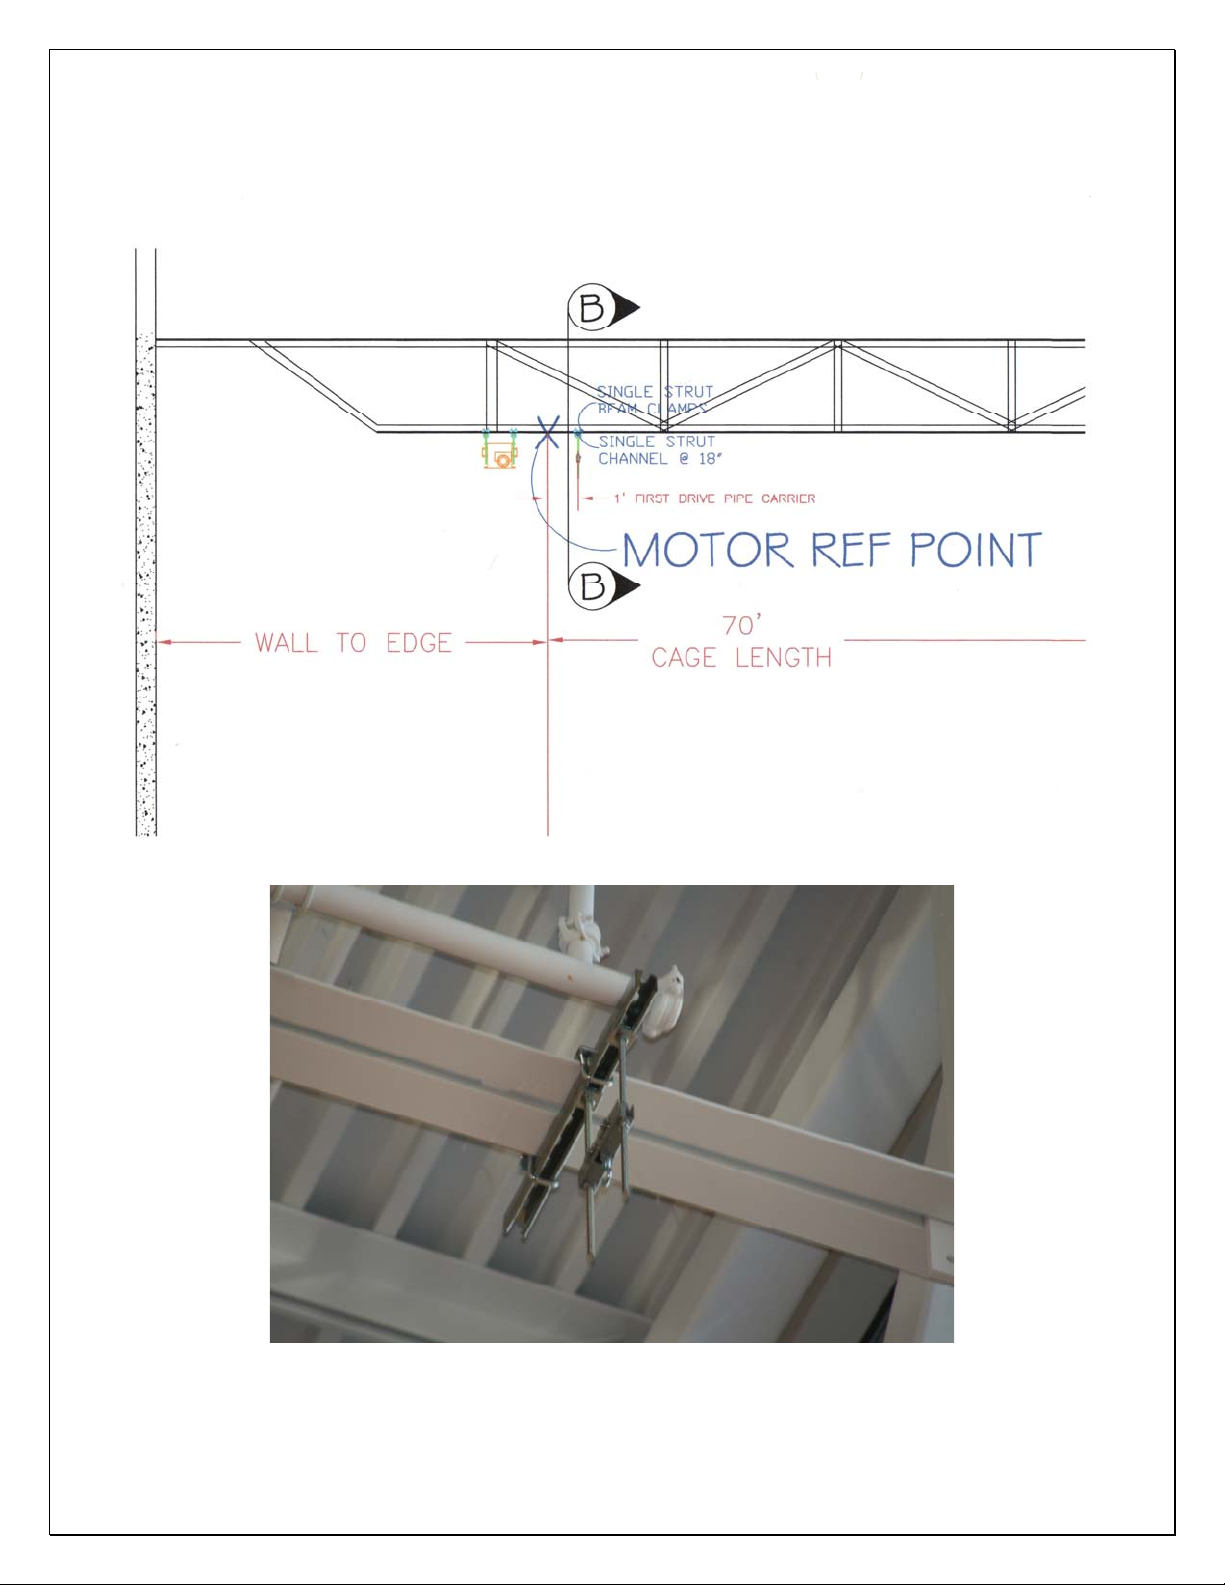
FIGURE 4 - FIRST DPC
© 2010 Jaypro Sports Equipment BBC-700B-M 02-08-2012
12 of 24
Page 13
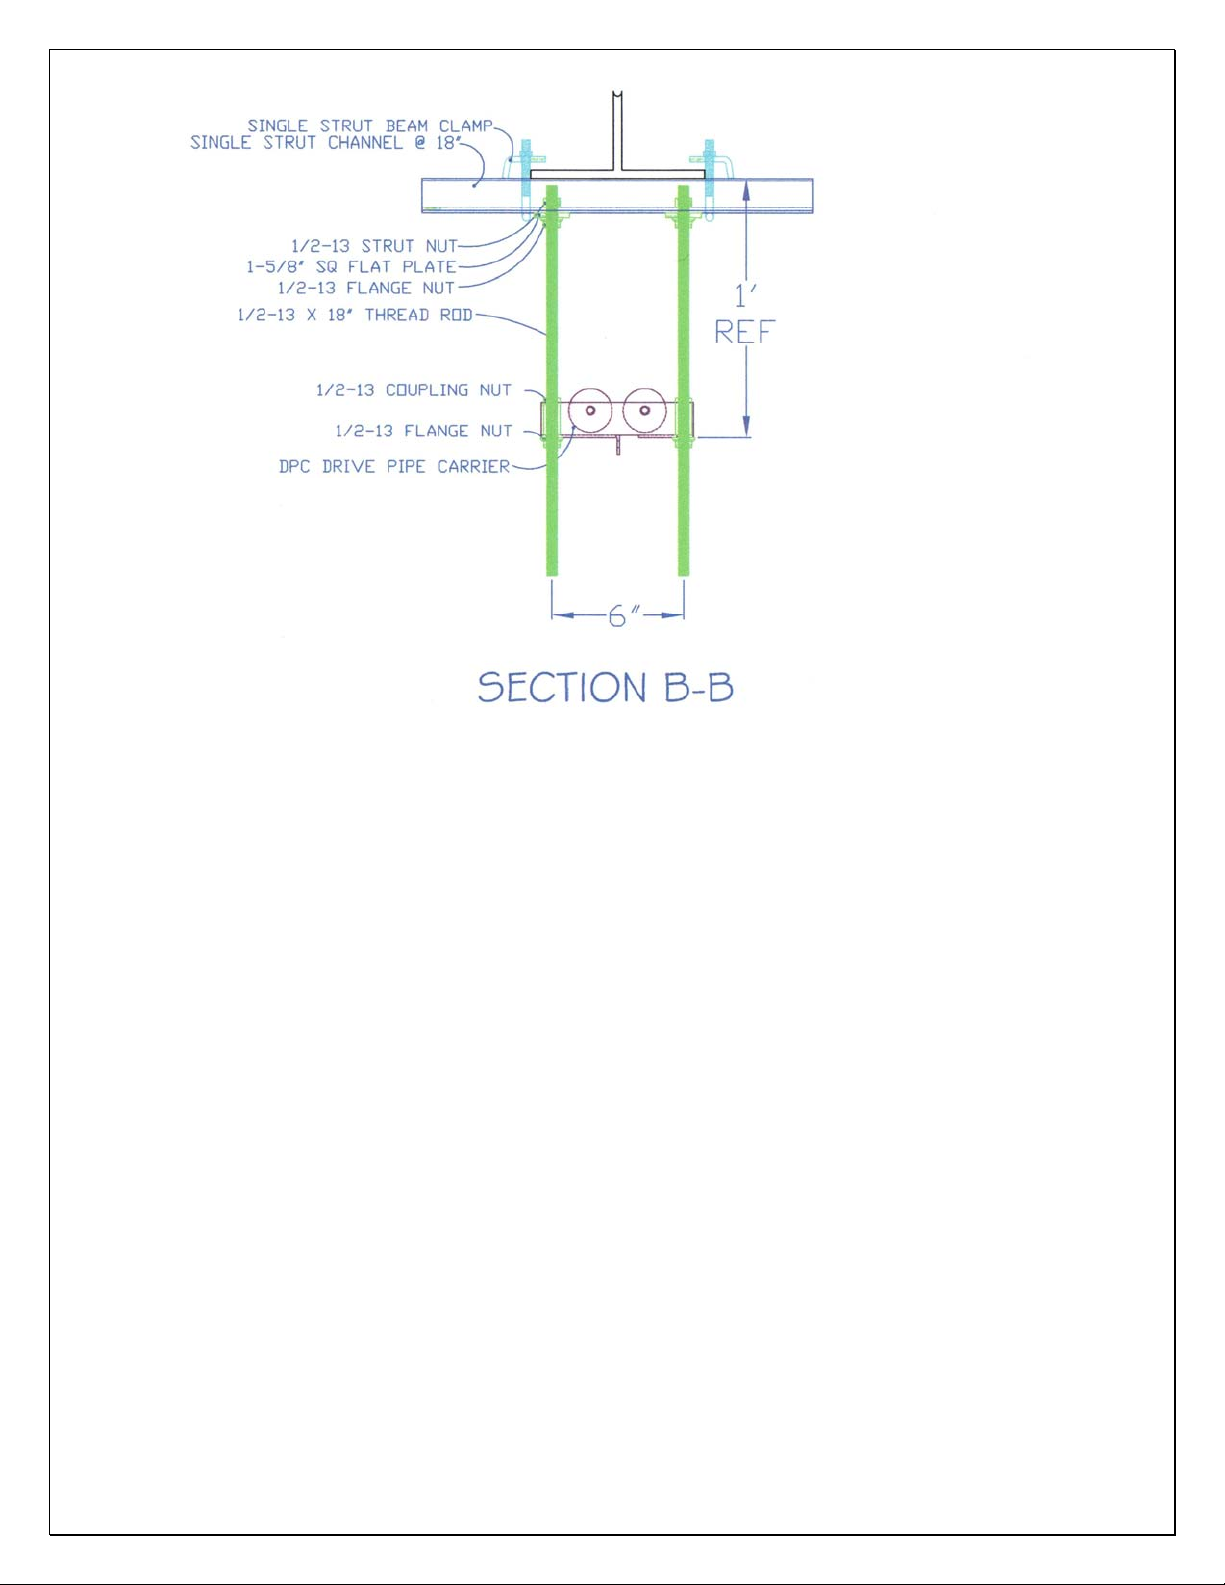
FIGURE 5 - SECTION B-B
INSTALL THE FIRST SEGMENT OF DRIVE PIPE
1. Insert the Swaged end of one section of drive pipe into the winch drum and push
towards the first DCP-A.
Pipe may be inserted opposite direction if clearance is an issue.
2. Continue to insert the drive pipe segment through the DPC-A and continue the edge
of the pipe to end 27-3/4” beyond the center of the DPC-A.
3. Temporarily secure the drive pipe section to the winch with Duct Tape to prevent it
moving unexpectedly.
© 2010 Jaypro Sports Equipment BBC-700B-M 02-08-2012
13 of 24
Page 14
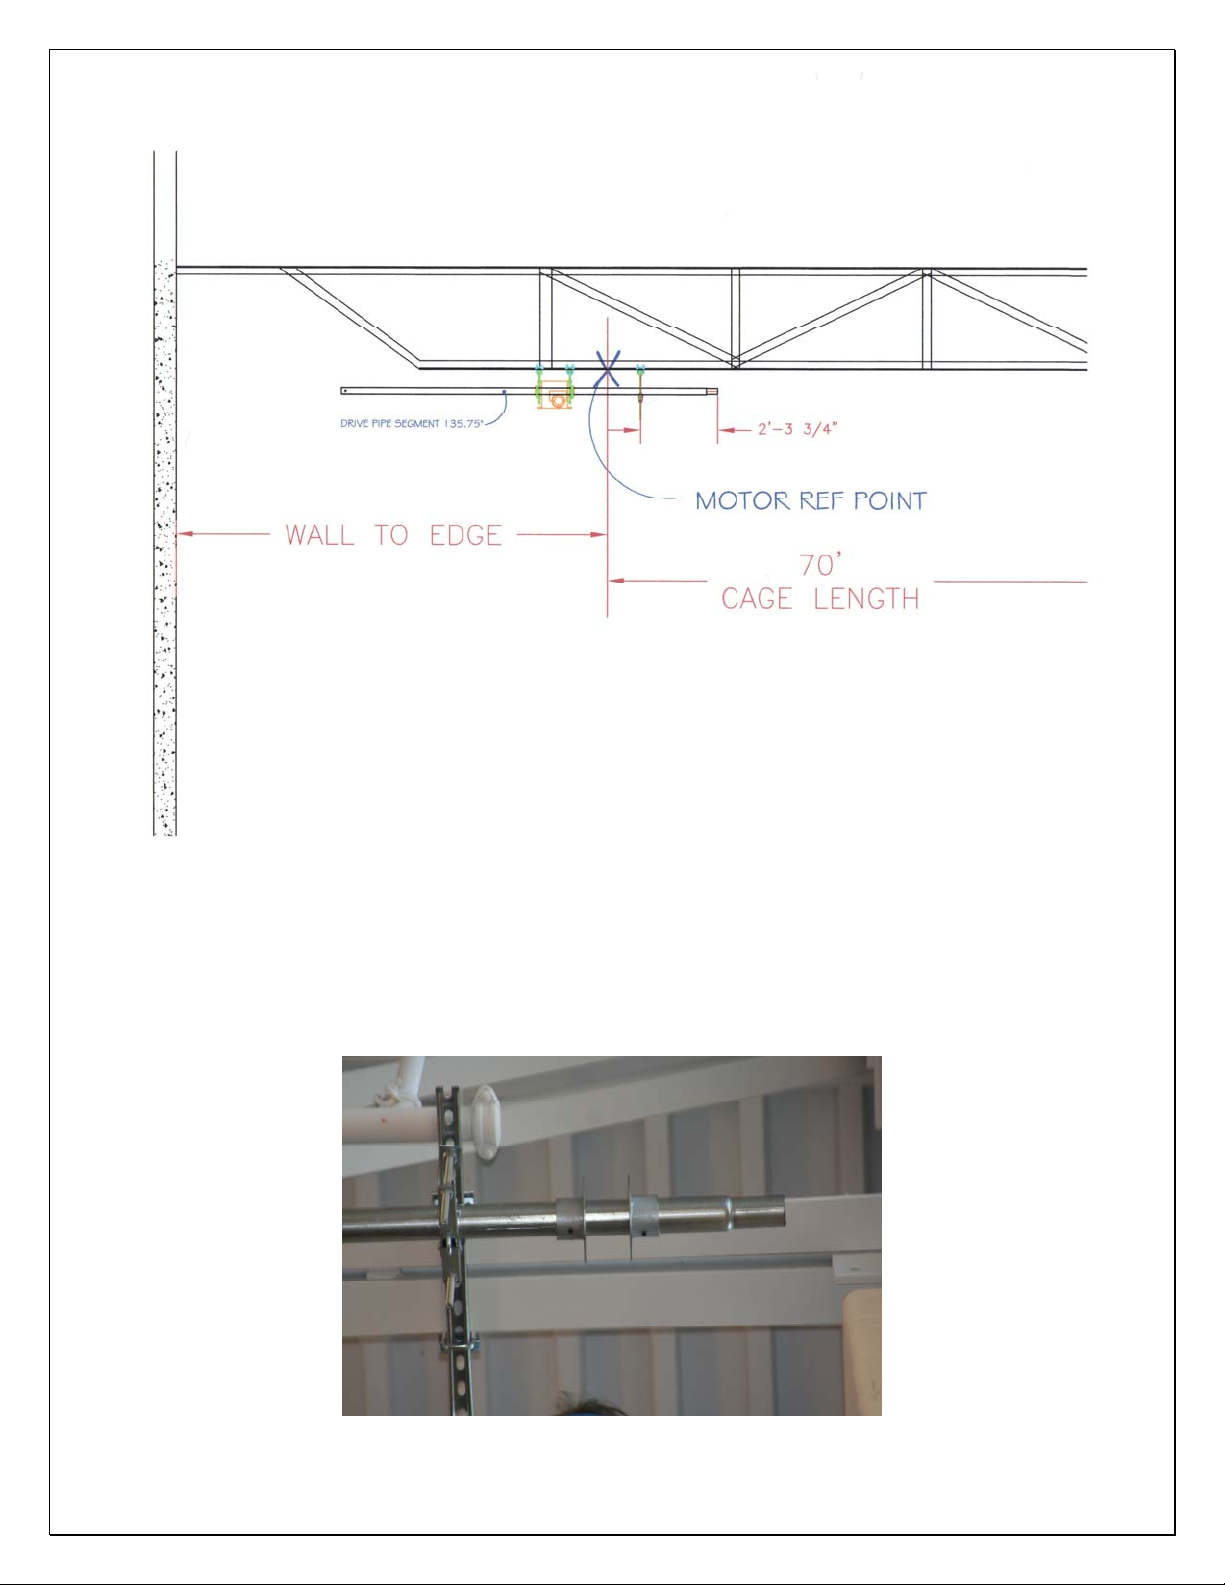
FIGURE 6- DRIVE PIPE SEGMENT
INSTALL A PAIR OF CABLE GUIDES ONTO THE DRIVE PIPE.
1. Slip a pair of cable guides on to the drive pipe.
2. Position the cable guides with the large discs next to each other.
3. DO NOT tighten these to the drive pipe at this point.
© 2010 Jaypro Sports Equipment BBC-700B-M 02-08-2012
14 of 24
Page 15
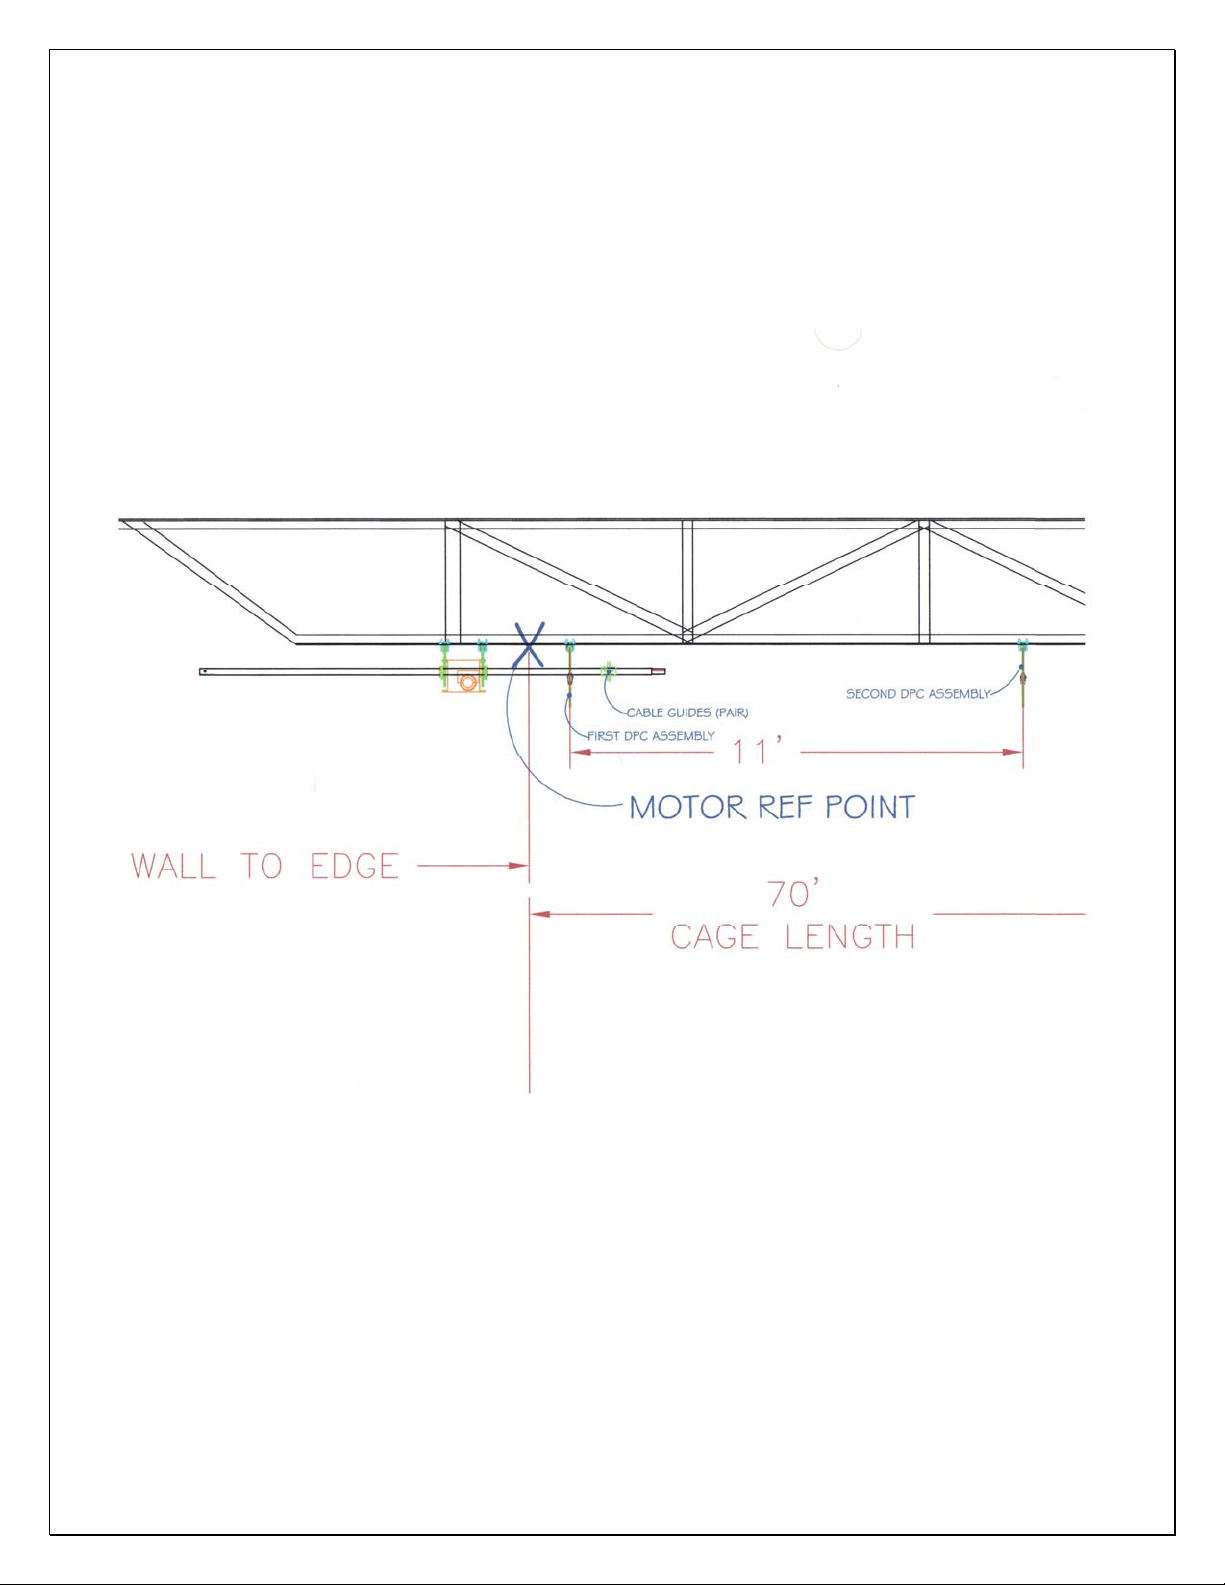
INSTALL THE SECOND DRIVE PIPE CARRIER STRUT AND ASSEMBLY.
1. You will continue to work away from the motor reference point.
2. The strut for the second drive pipe carrier is installed with strut beam clamps at a
location that is 11’ from the first drive pipe carrier location.
3. Loosely install a DPC-A to that strut and adjust for Drive Pipe Center line AFF.
4. Secure all nuts to mount the assembly to the strut.
FIGURE 7 - SECOND DPC
INSTALL THE SECOND DRIVE PIPE SEGMENT TO THE FIRST DRIVE PIPE
SEGMENT.
1 Insert a drive pipe segment through the second DPC-A towards the first drive pipe
segment.
2 Insert the drive pipe segment non-swaged end first through the second DPC-A.
3 Allow the non swaged end of Drive pipe segment 2 to go over the swaged end of
drive pipe segment one.
4 Insert the second drive pipe fully over the swage of drive pipe 1 segment.
5 Splice the Drive Pipe segments together.
© 2010 Jaypro Sports Equipment BBC-700B-M 02-08-2012
15 of 24
Page 16
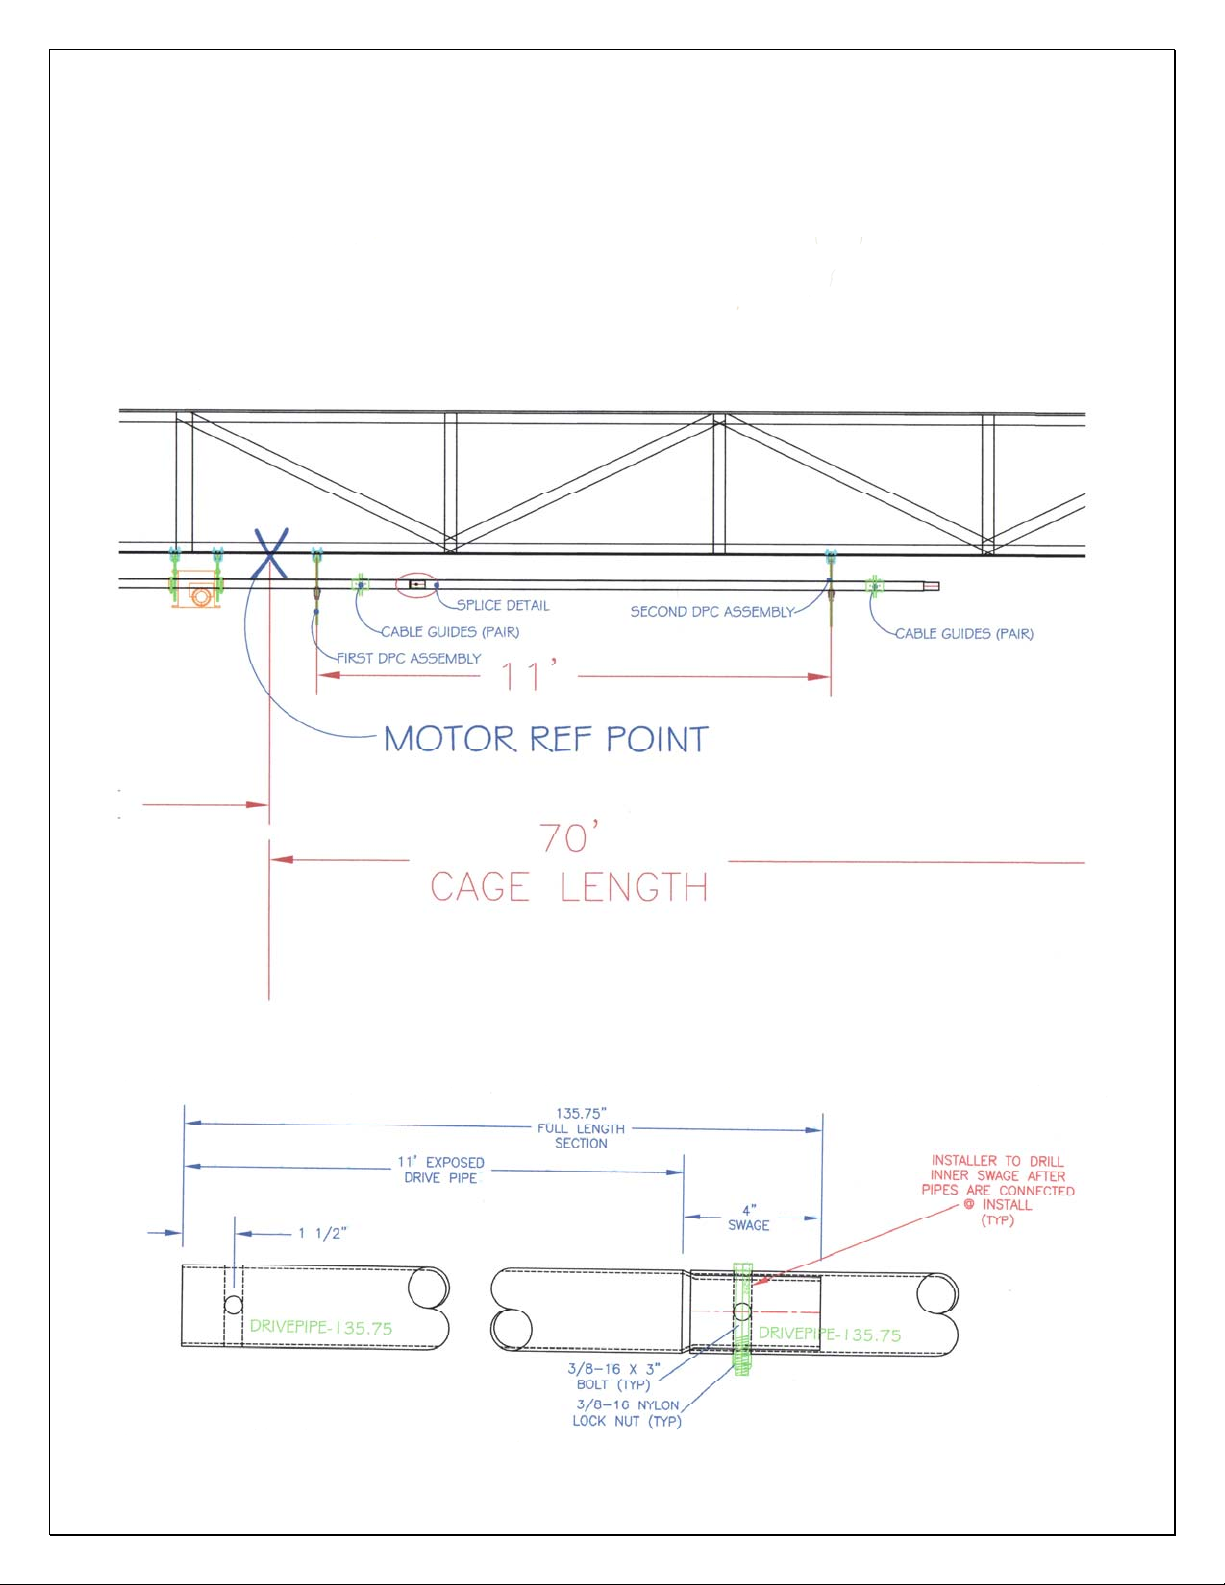
i. Drill thru the swaged end of the first drive pipe segment by using the
pre-drilled holes on the non swaged end of the second drive pipe as
alignment.
ii. Insert a 3/8” x 3” Bolt thru the hole and secure the pipes together
with a 3/8-16 Nylon Lock Nut
FIGURE 8 - SECOND DRIVE PIPE SEGMENT
FIGURE 9 - DRIVE PIPE SPLICE
© 2010 Jaypro Sports Equipment BBC-700B-M 02-08-2012
16 of 24
Page 17
INSTALL A PAIR OF CABLE GUIDES ONTO THE DRIVE PIPE.
1. Slip a pair of cable guides on to the drive pipe.
2. Position the cable guides with the large discs next to each other.
3. DO NOT tighten these to the drive pipe at this point.
CONTINUE DPC-A STRUT, ASSEMBLY, DRIVE PIPE SEGMENTS, SPLICES
AND CABLE GUIDES FOR THE REMAINING PARTS.
1. Assure that you are maintaining level drive pipe center line AFF throughout the process.
2. Each remaining DPC-A should be 11’ from the last.
VERIFY THAT THE DRIVE PIPE FULLY ASSEMBLED TURNS FREELY
ALONG IT’S LENGTH.
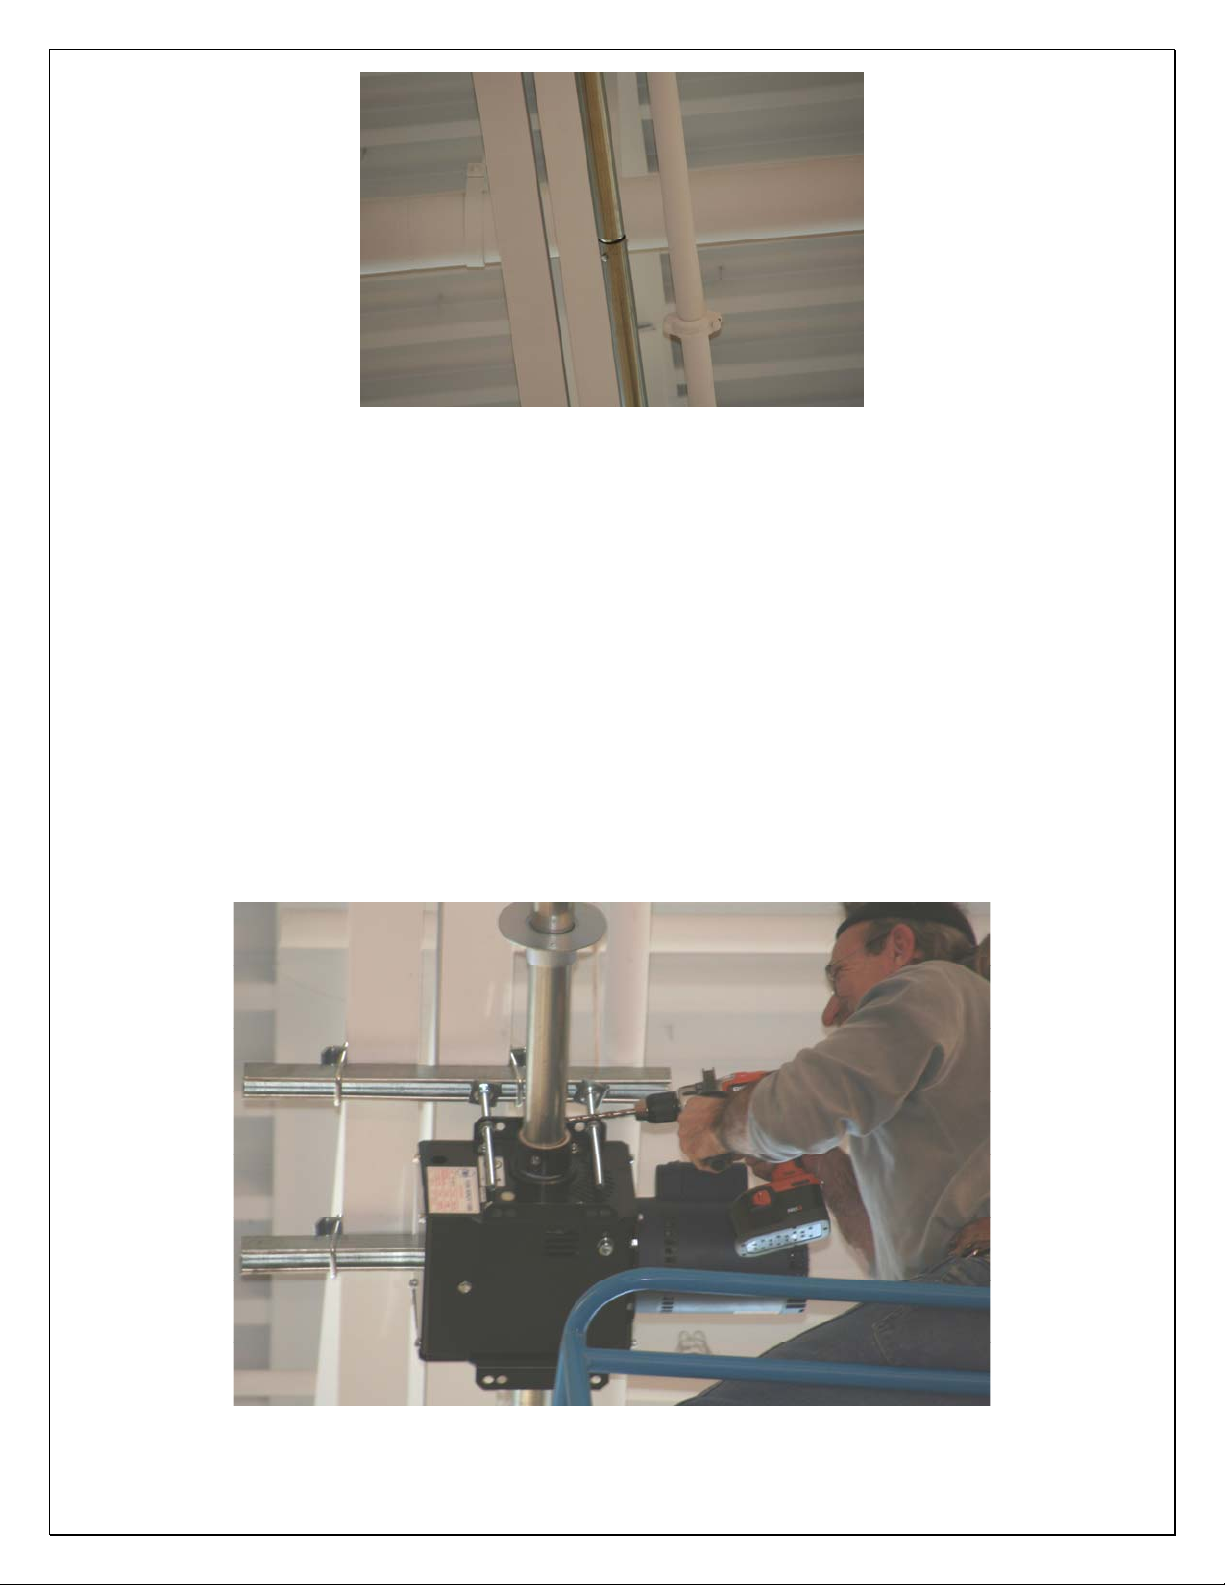
SECURE THE DRIVE PIPE TO THE WINCH
1. Drill through the drive pipe using the holes on the drive pipe collars.
2. Secure with ½-13 x 4” Bolts, washers and nylon lock nuts.
CUT ANY EXCESS DRIVE PIPE FROM DRIVE PIPE SEGMENT ONE.
© 2010 Jaypro Sports Equipment BBC-700B-M 02-08-2012
1. Allow for a min of 8” exposure before cutting away excess.
17 of 24
Page 18
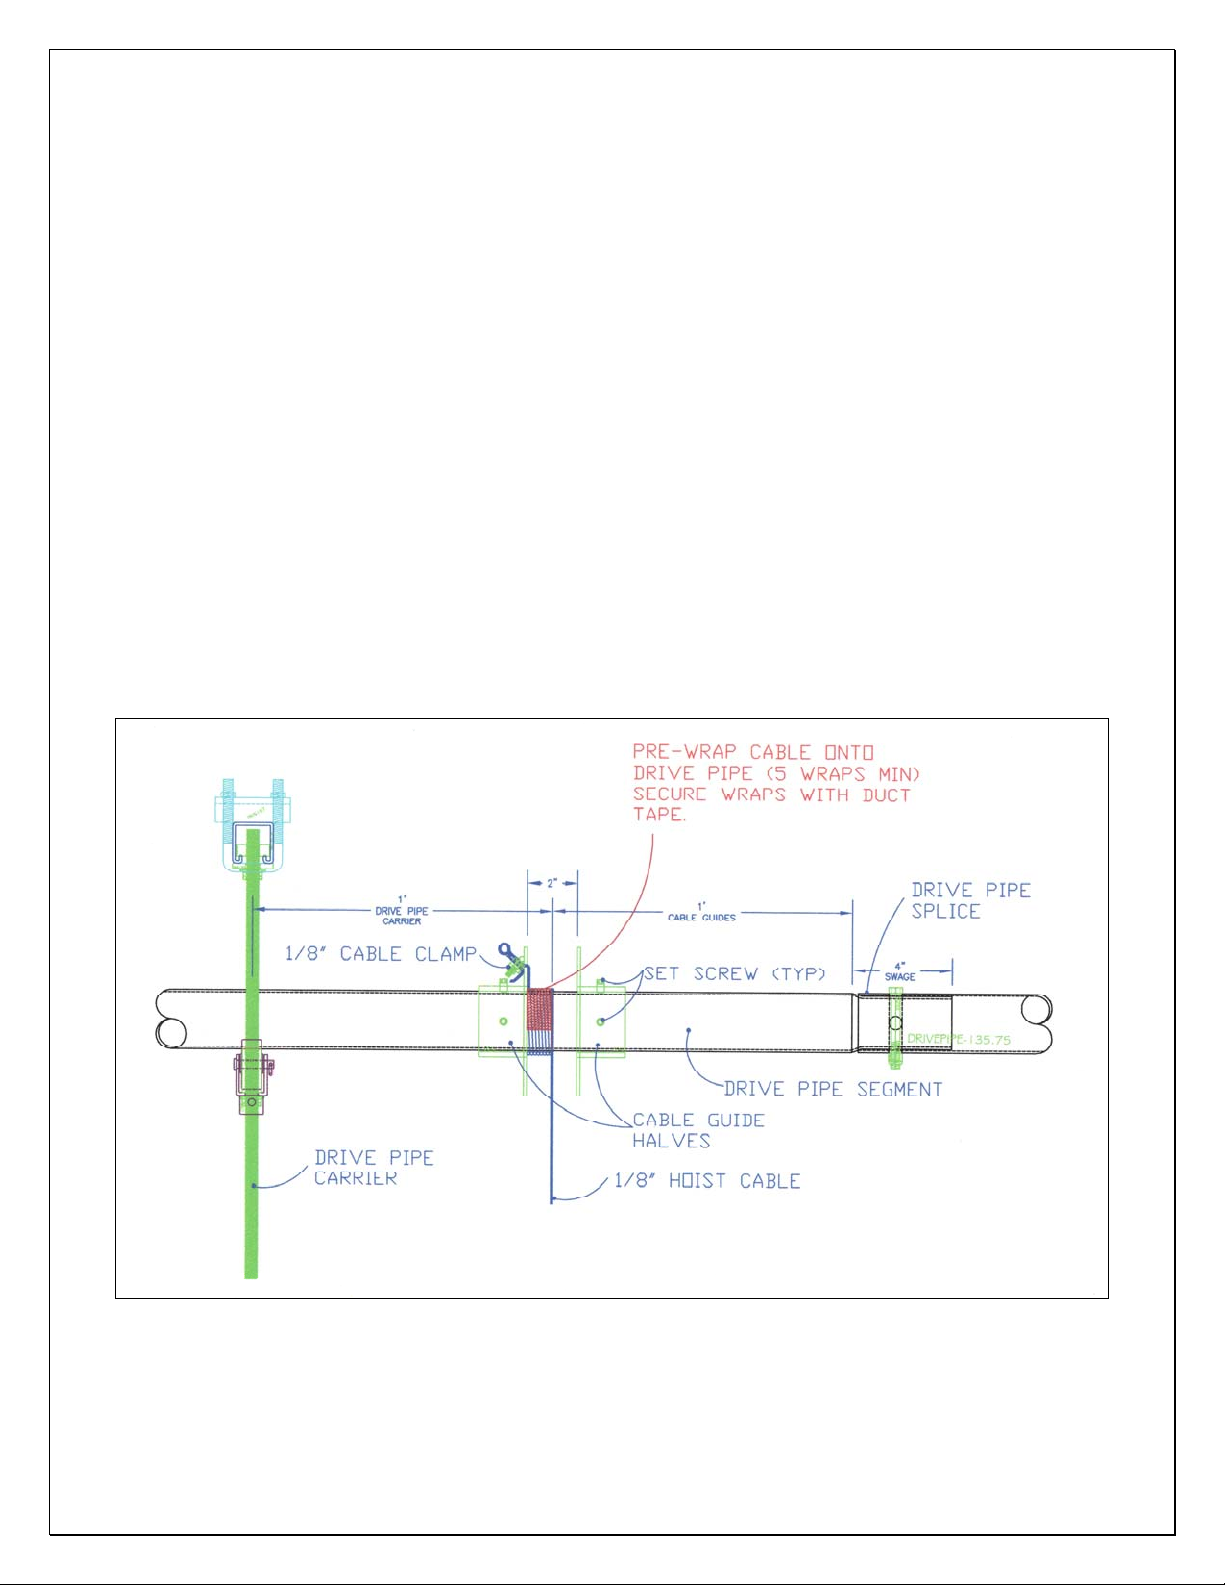
TRIM ANY EXCESS THREAD ROD THAT MAY EXIST.
POSITION AND SECURE THE CABLE GUIDE PAIRS AND HOIST CABLES.
1. Each cable guide pair should be located between a drive pipe carrier and a drive pipe splice.
IT IS CRITICAL THAT THE GUIDES BE DIRECTLY ABOVE THE HOIST CABLE
LOCATIONS. THE FIRST GUIDE IS 2’ FROM THE FRAME EDGE AND
SUBSEQUENT GUIDES ARE 11’ C/C.
2. The cable guide pairs should be positioned to allow 2” of space between the discs.
3. The 2” space should be centered and is positioned 1’ away from the nearest DPC-A.
4. Secure the Cable guides to the Drive pipe by tightening the 5/16 Set screws against the
drive pipe.
5. Pre-wrap a hoist cable with a min of 5 wraps around the drive pipe and pass the top end of
the cable through the hole in one side of the cable guide pair. Outside the 2” opening the
cable should be secured to itself with the use of a cable clamp making a loop in the cable.
6. The cable clamp should be brought tight against the disc and all slack removed from the
cable wraps on the drive pipe.
7. Align all the wraps together against the disc creating neat rows of cable.
8. Secure these rows to the drive pipe by placing duct tape over the rows to prevent them from
moving.
9. Allow the remaining length of cable to drop to the floor for installation to the frame at a
later time.
© 2010 Jaypro Sports Equipment BBC-700B-M 02-08-2012
18 of 24
Page 19
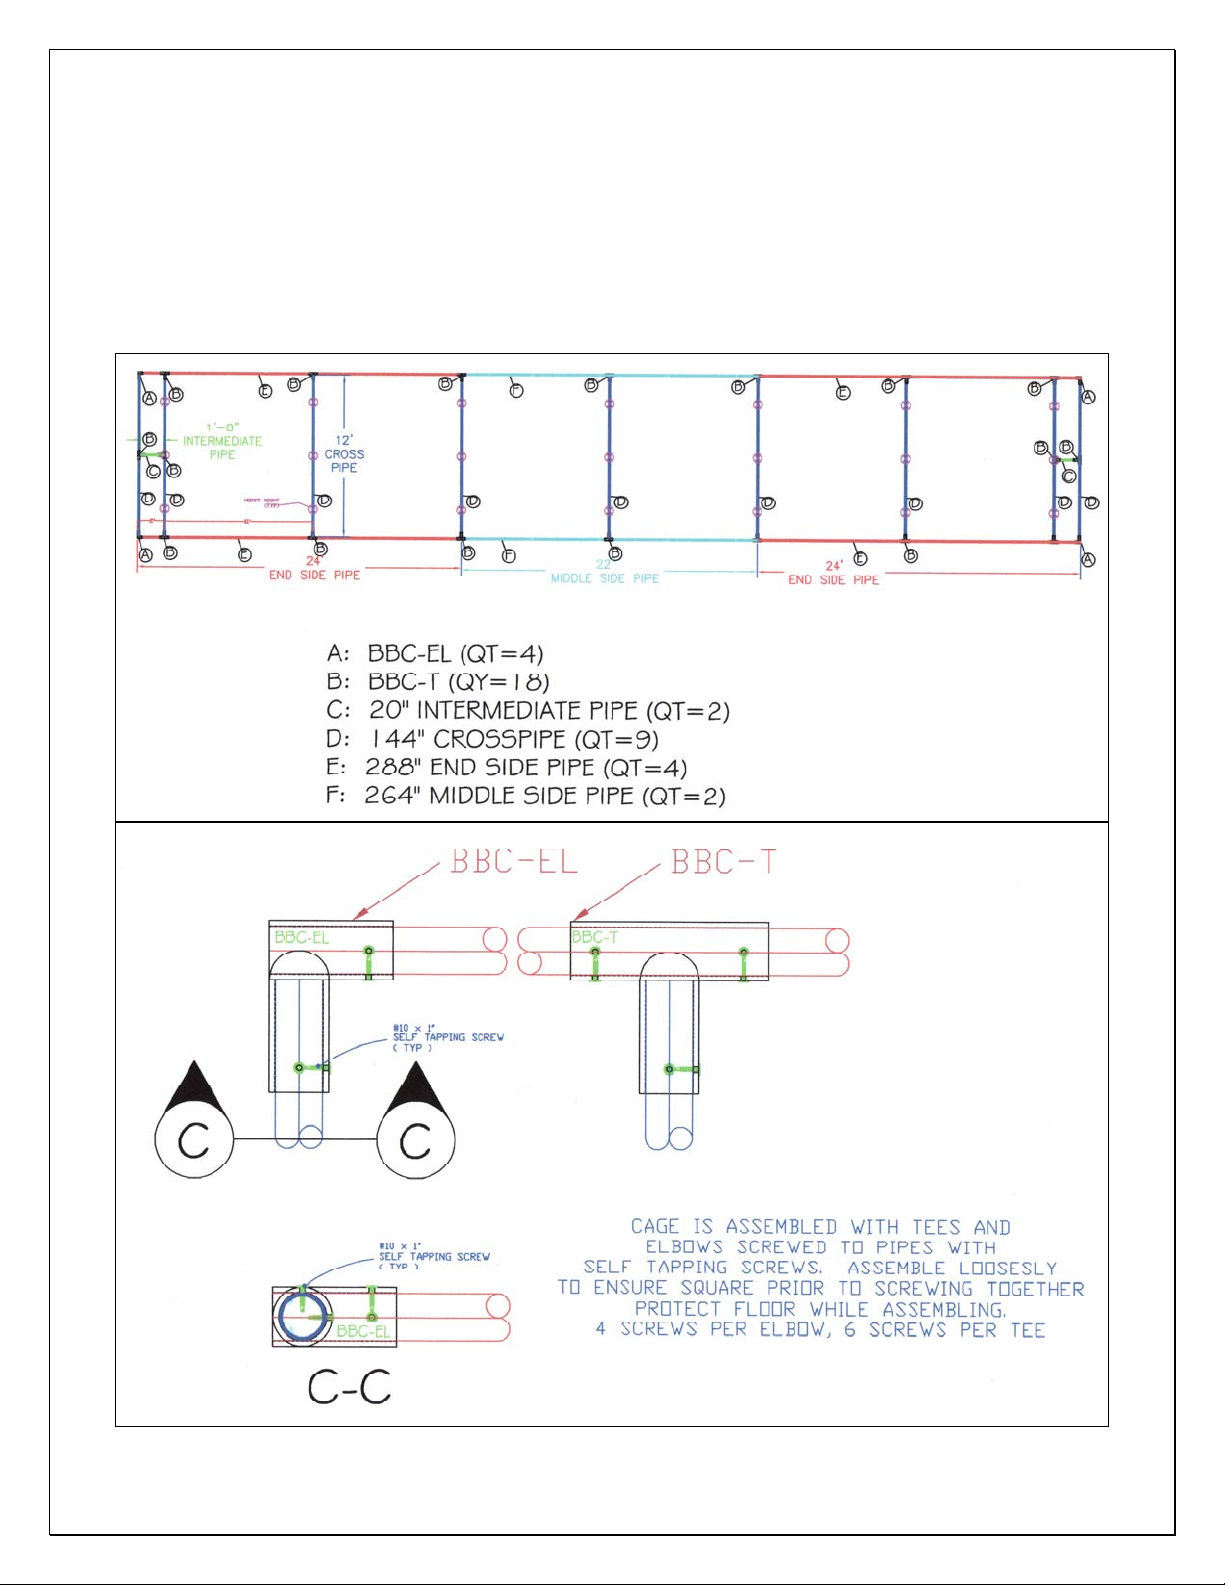
ASSEMBLE THE CAGE FRAME.
1. Protect the floor of the building by inserting wood blocks under all fame segments and fittings.
While drilling or screwing frame together, protect the floor where you are working with a scrap
piece of plywood. This will protect the floor surface should a drill accidentally slip from it’s
intended direction.
2. Assemble in final position by aligning the motor reference point to the centerline of the cage’s
12’ on the ground.
3. Assemble all segments loosely until square is established, then screw together the segments.
© 2010 Jaypro Sports Equipment BBC-700B-M 02-08-2012
19 of 24
Page 20
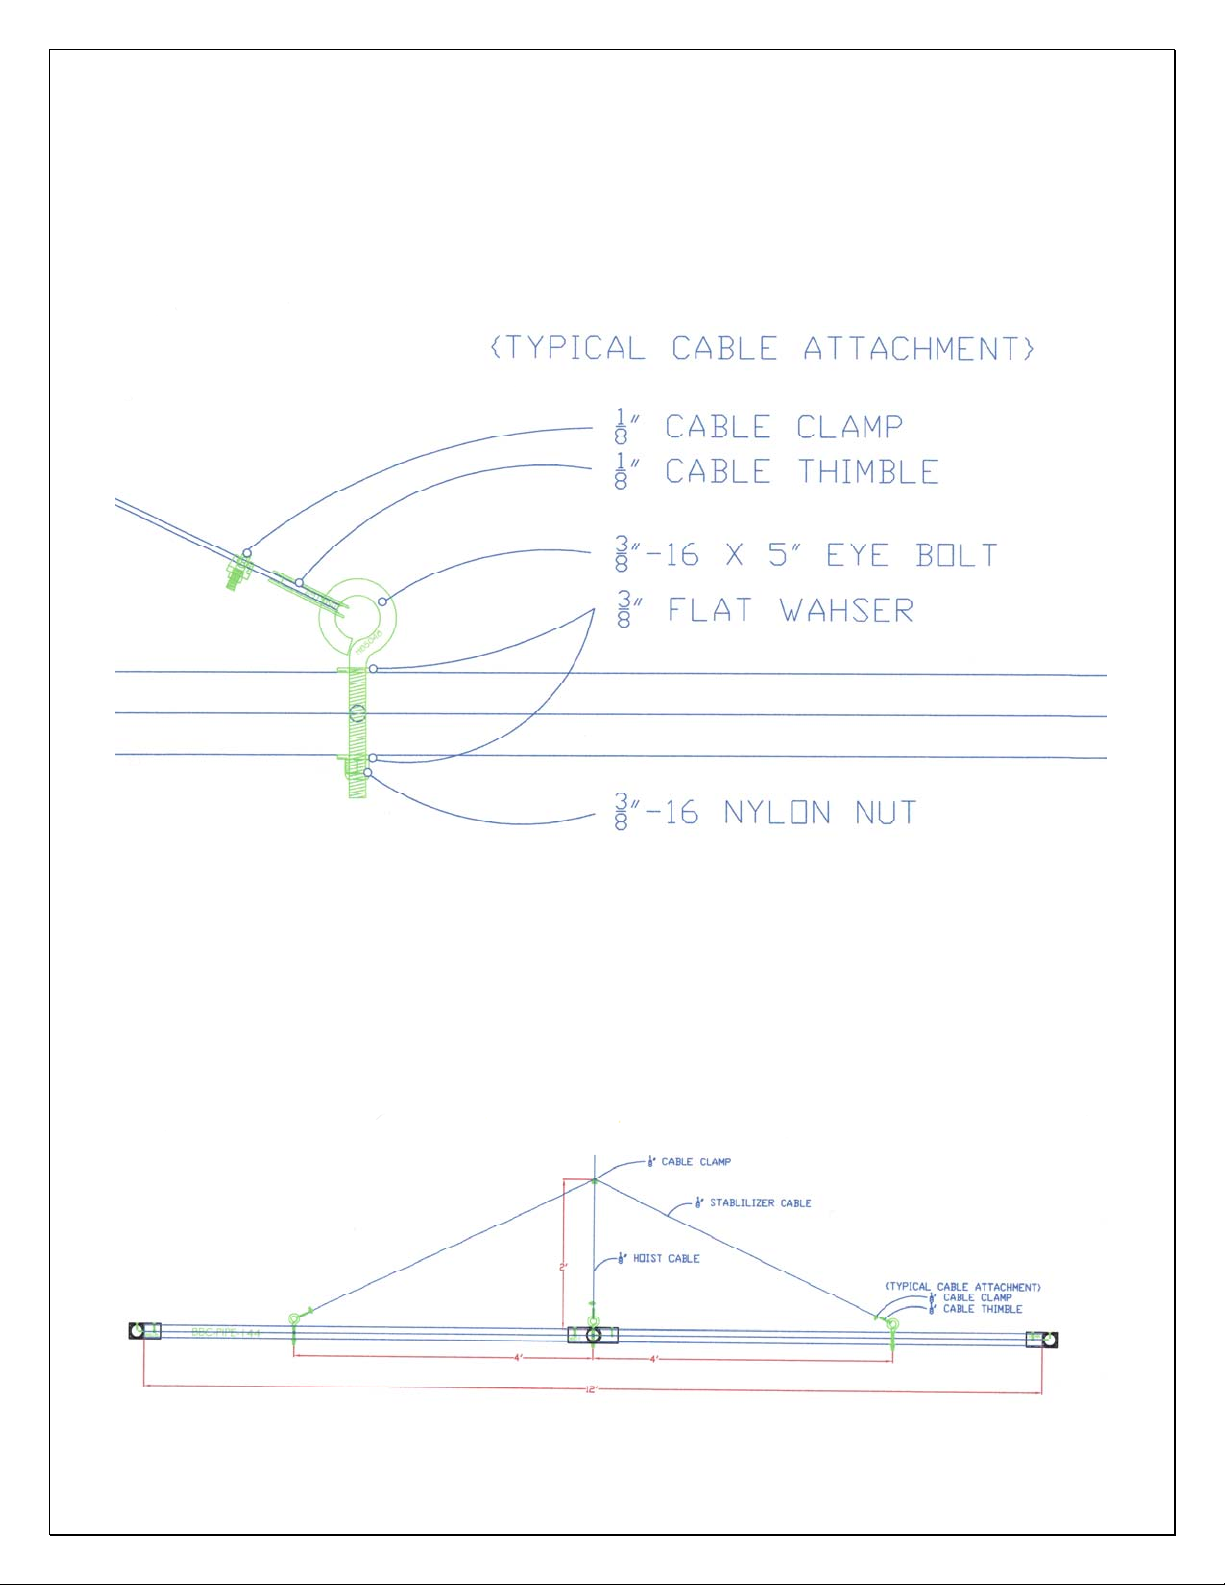
Check that all burrs have been removed from the inside of the BBC-EL and BBC-T
prior to assembly. These fitting should move freely on their pipes.
ATTACH THE ANCHORING EYE BOLTS TO THE FRAME AND SECURE
1. There are 21 connection points on the cage
2. Each connection point is a 3/8” x 5” EYE Bolt with washers and a Nylon lock nut.
3. Note that you will be required to drill through the T fitting at the end hoist cable locations.
ATTACH THE HOIST CABLES TO THE CENTER EYE BOLTS.
ATTACH THE STABILIZING CABLES TO THE OUTER EYEBOLTS
1. VERIFY A CONSISTANT LENGTH OF THE STABILIZER CABLES
2. TAPE OFF THE ENDS OF THE CABLE
ATTACH THE STABLIZING CABLES TO THE HOIST CABLE
Clamp the two cables together at aprox 24” up the main hoist cable.
© 2010 Jaypro Sports Equipment BBC-700B-M 02-08-2012
20 of 24
Page 21
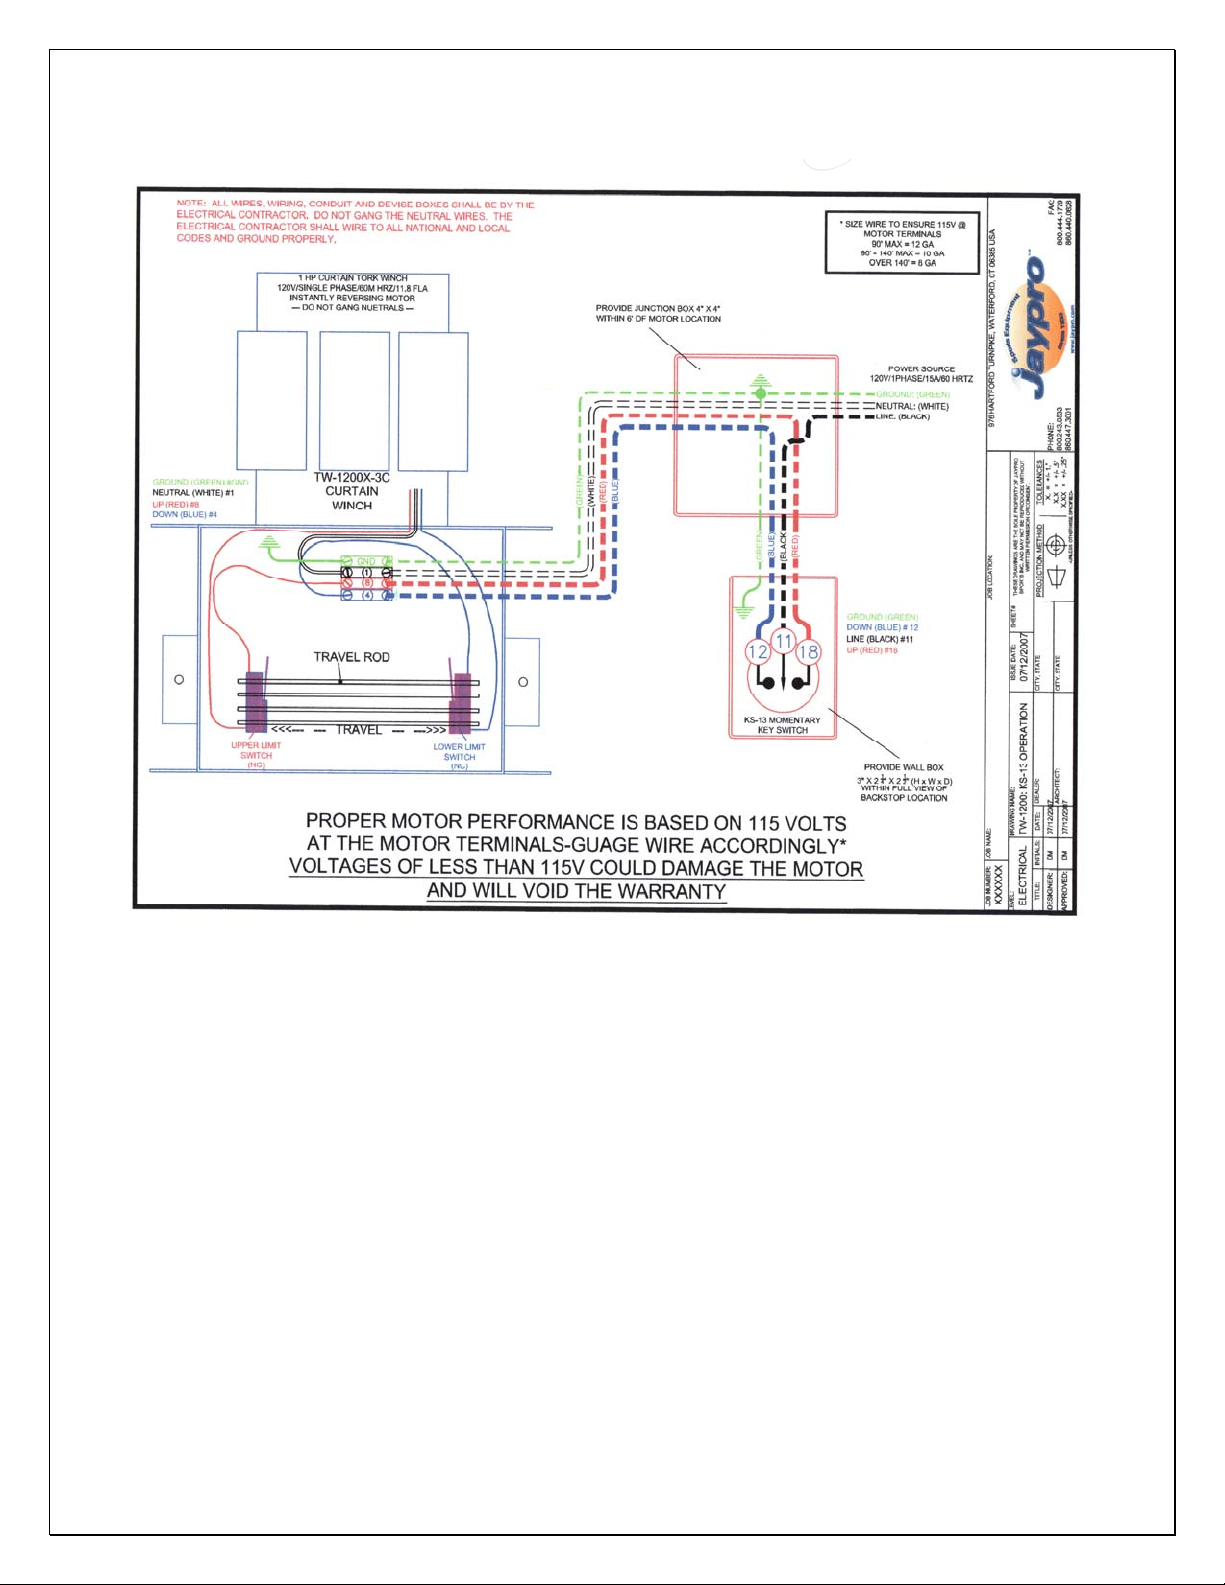
ELECTRIFY THE WINCH.
1. A licensed electrician should perform the final electrical hook ups.
HOIST THE FRAME OFF THE GROUND TO APROX 4 ½- 5’ AFF
ATTACH THE NET TO THE FRAME WITH THE VELCRO.
1. Two sided hook and loop tape is provided in a roll.
2. Cut the tape into 9” strips to secure the net to the frame.
3. The 9” tape section is wraped around the frame pipe and through the net and secured to
itself.
4. Strips should be placed 18-24” center to center along the sides and cross members of the
cage frame.
© 2010 Jaypro Sports Equipment BBC-700B-M 02-08-2012
21 of 24
Page 22
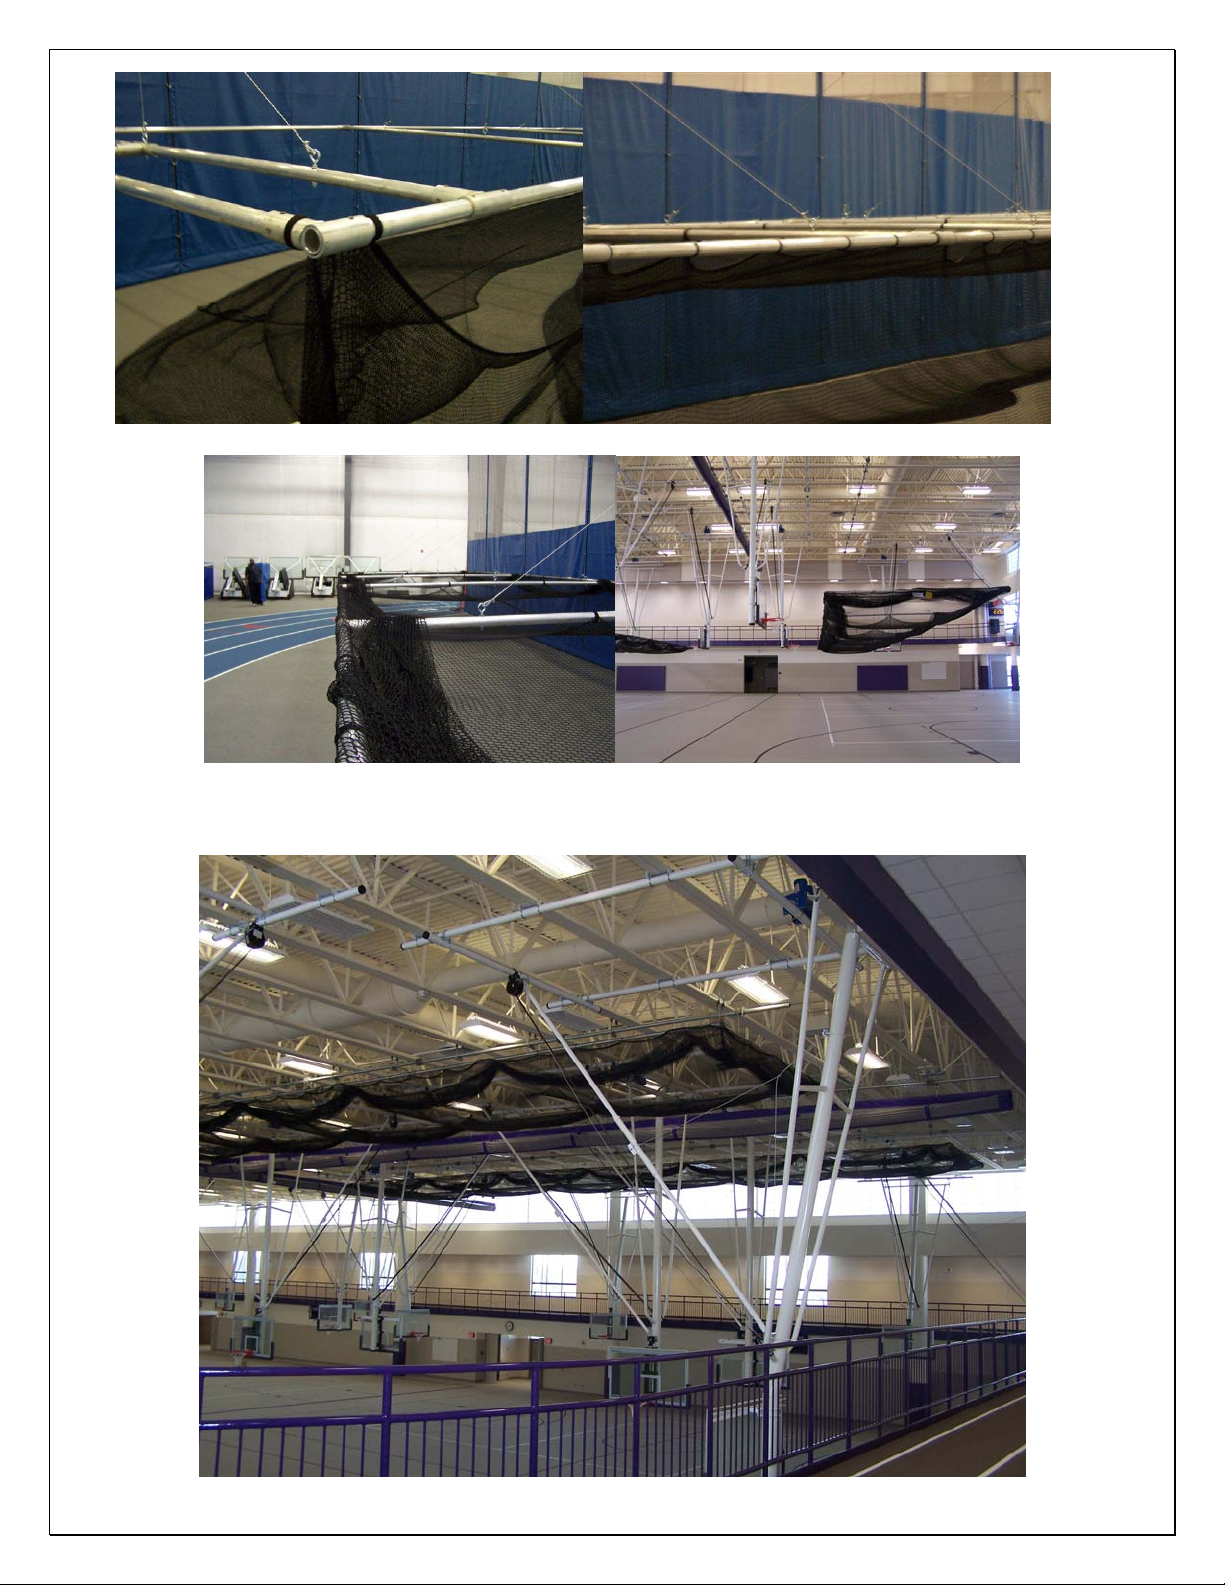
ROLL THE NET ONTO THE TOP OF THE FRAME.
HOIST THE FRAME AND NET TO THE CEILING
© 2010 Jaypro Sports Equipment BBC-700B-M 02-08-2012
22 of 24
Page 23
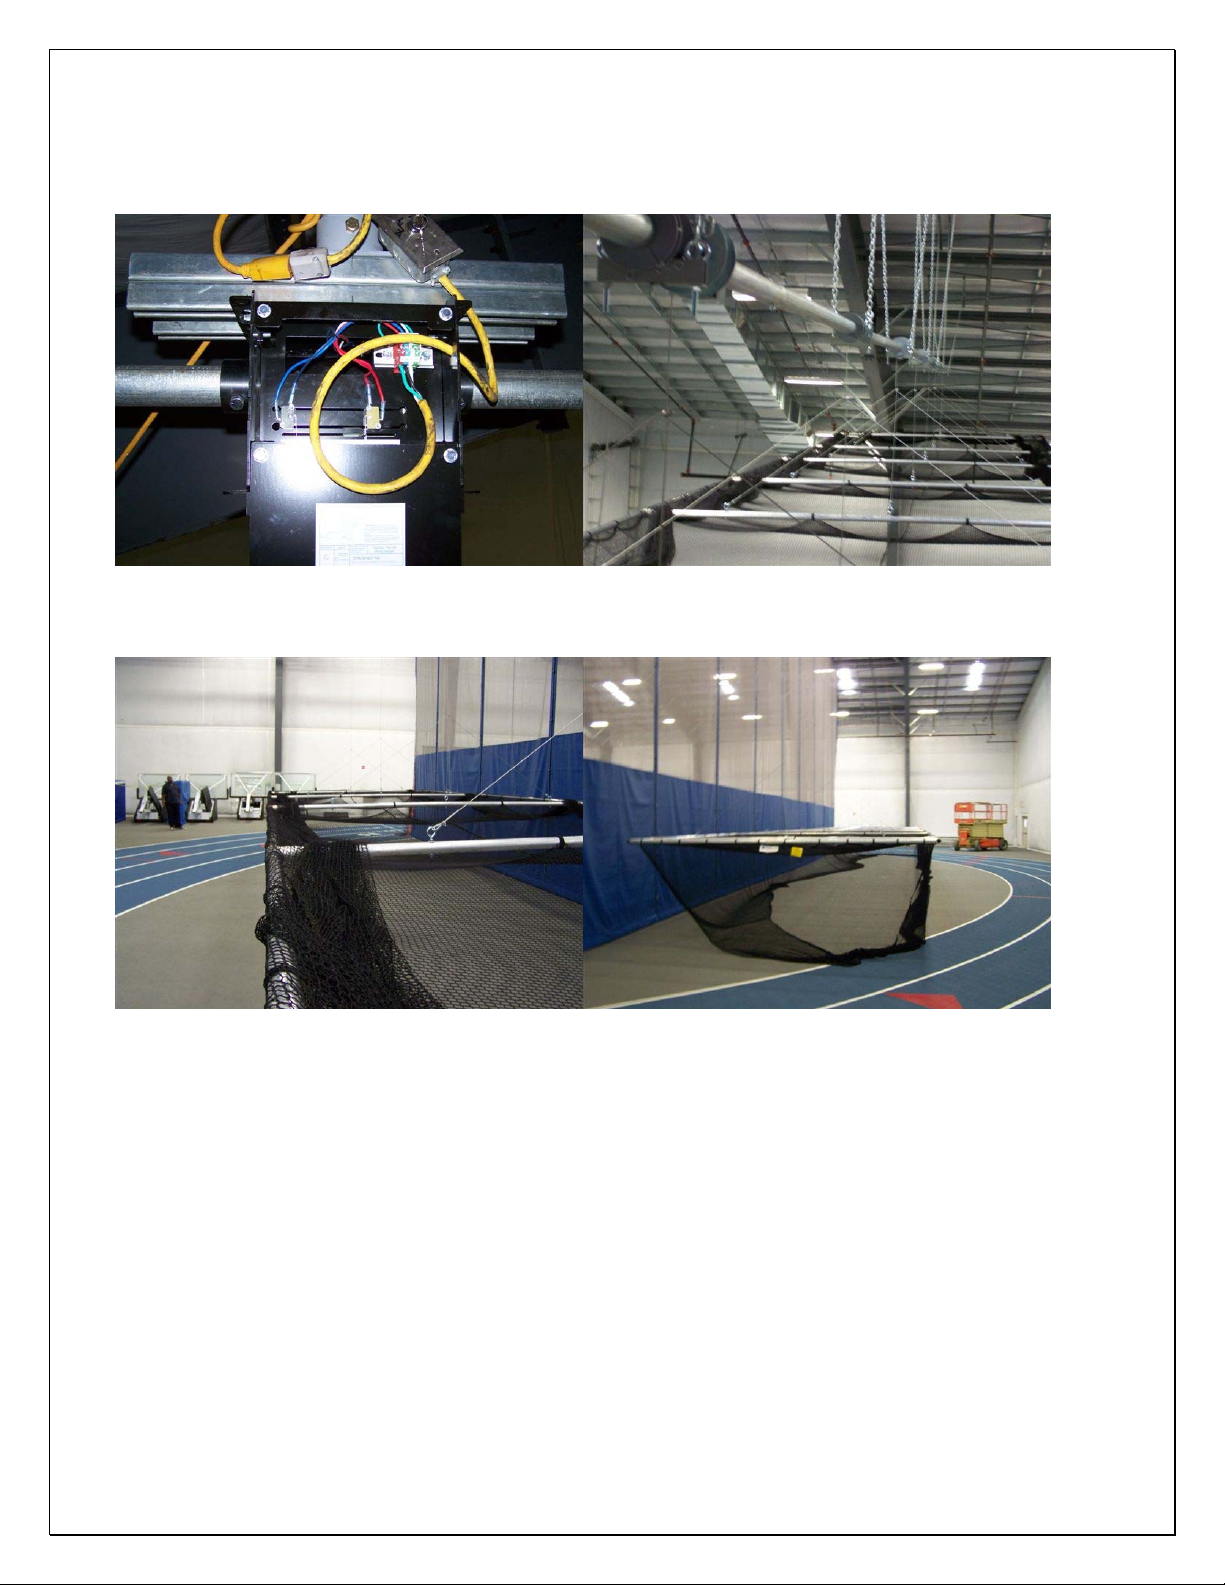
SET THE UPPER LIMIT SWITCH OF THE WINCH.
1. It is recommended that the upper limit be set with a margin of safety. The highest cable
clamp on the hoist cable should come to rest between 8 and 12” below the drive pipe.
LOWER THE FRAME AND ESTABLISH AN ADJUSTED LOWER LIMIT APROX
3’ AFF
UNROLL THE NET FROM THE TOP OF THE FRAME TO HANG FREELY
RAISE THE FRAME TO 10’ AFF
1. THIS SHOULD LEAVE APROX 1’ OF NET ON THE GROUND AND IS DESIREABLE
IF SO EQUIPPED. INSTALL A TARGET TO THE BATTERS END OF THE NET.
1. REMOVE TARGET PRIOR TO HOISTING
© 2010 Jaypro Sports Equipment BBC-700B-M 02-08-2012
23 of 24
Page 24
--- Jaypro Batting Cage System ---
Installation Record
Installer - please provide the following information and fax a copy to (860) 440-0628:
Installer Name: _______________________________________
Phone #: _______________________________________
Date: _______________________________________
G. C. Name: _______________________________________
Phone #: _______________________________________
Facility Name: (in which this Batting Cage system was installed)
_______________________________________
Address: _______________________________________
_______________________________________
_______________________________________
Contact Name: (Person who received keys for system or other facility representative)
_______________________________________
Phone #: _______________________________________
Call Jaypro Sports Equipment at 1-800-243-0533 during
regular business hours for technical support.
www.jaypro.com
© 2010 Jaypro Sports Equipment BBC-700B-M 02-08-2012
24 of 24
 Loading...