

Janome NH40 Service Manual

SERVICE MANUAL
MODEL: NH40

CONTENTS
What to do when ................................................................................................................................ 1 - 3
SERVICE ACCESS
Face Cover ............................................................................................................................................. 4
Bed Cover .............................................................................................................................................. 5
Free-arm Cover ...................................................................................................................................... 6
Front Cover ............................................................................................................................................. 7
Rear Cover ............................................................................................................................................. 8
MECHANICAL ADJUSTMENT
Presser Bar Height ................................................................................................................................. 9
Needle Drop Position ............................................................................................................................ 10
Needle to Hook Timing ......................................................................................................................... 11
Needle Bar Height ................................................................................................................................ 12
Clearance between Needle and Hook Point ......................................................................................... 13
Backlash ( Lower Shaft Gear ).............................................................................................................. 14
Feed Dog Height .................................................................................................................................. 15
Needle Swing Timing ............................................................................................................................ 16
Needle Thread Tension ......................................................................................................................... 17
Stretch Stitch Feed Balance ................................................................................................................. 18
Adjust the Buttonhole Lever Position .................................................................................................... 19
REPLACING THE ELECTRONIC COMPONENTS
Location of the Connectors .................................................................................................................. 20
Self Diagnostic Tests ..................................................................................................................... 21 - 25
Circuit Board-A ..................................................................................................................................... 26
Driving Motor ........................................................................................................................................ 27
Switching regulator ............................................................................................................................... 28
Stepping motor ( Zigzag ) ..................................................................................................................... 29
Stepping motor ( Feed ) ........................................................................................................................ 30
Oiling .................................................................................................................................................... 31

1
Condition Cause How to fix Reference
1. Skipping
Stitches
1. Needle is not inserted properly.
2. Needle is bent or worn.
3. Incorrectly threaded.
4. Needle or thread are
inappropriate for fabric being
sewn.
5. Sewing on stretch fabric.
6. Presser foot pressure is too
weak.
7. In appropriate needle bar height.
8. Inappropriate needle to hook
timing.
9. Inappropriate needle to hook
clearance.
Insert the needle properly.
Change the needle.
Rethread.
Use the recommended sewing needle
and thread.
Use a HA x #11 blue tip needle.
Adjust the presser bar level to make the
pressure stronger.
See mechanical adjustment " Needle bar
height ".
See mechanical adjustment " Needle to
hook timing ".
See mechanical adjustment " Clearance
between needle and hook ".
P. 12
P. 11
P. 13
2. Fabric not
moving
1. Foot pressure foot is too weak.
2. Incorrect feed dog height.
3. Feed dog is in down position.
4. Thread on bottom side of fabric
is jammed up.
5. Feed dog teeth are worn.
Adjust the presser bar level to make the
pressure stronger.
See mechanical adjustment " Feed dog
height ".
Raise the feed dog.
Make sure to bring both needle and bob-
bin threads under the foot when starting
sewing.
Change the feed dog.
P. 15
WHAT TO DO WHEN

2
Condition Cause How to Fix Reference
3. Breaking
upper thread.
1. Initial sewing speed is too fast.
2. Thread path is incorrect.
3. Needle is bent or dull.
4. Top tension is too strong.
5. Needle size is inappropriate for
fabric.
6. Needle eye is worn.
7. Needle hole in needle plate is
worn or burred.
Start with medium speed.
Use the proper thread path.
Replace with a new needle.
Adjust top tension correctly.
Use appropriate needle for fabric and
thread in use.
Change the needle.
Repair the hole or replace the needle
plate.
P. 17
4. Breaking
bobbin thread.
1. Bobbin holder is incorrectly
threaded.
2. Too much thread is wound on the
bobbin,
3. Lint is stuck inside the bobbin
holder.
4. Thread quality is too low.
5. Thread is jamming around the
bobbin holder.
Set the bobbin thread correctly.
Adjust the position of bobbin winder
stopper.
Clean the bobbin holder.
Change to a high quality sewing thread.
Clear out the jamming thread.
5. Needle
breakes
1. Needle is hitting the needle plate.
2. Needle is bent or worn.
3. Needle is hitting the hook.
4. The fabric moves while the needle
is piercing it, or the needle zigzags
while in fabric.
5. Fabric is being pulled too strongly
while sewing.
See mechanical adjustment " Needle
drop position ".
Change the needle.
See mechanical adjustment " Clearance
between needle and hook ".
See mec hanical adjustm ent " Needl e
swing timing ".
Guide the fabric gently while sewing.
P. 10
P. 13
P. 16

3
Condition Cause How to fix Reference
6. Noisy
operation
1. Backlash between hook gear and
lower shaft gear is too great.
2. Lower shaft gear is loose.
3. Inappropriate belt tension.
4. Not enough oil
See mechanical adjustment
“backlash (lower shaft gear)”.
Eliminate the looseness.
See part removal and replacement
“driving motor (DC motor)”.
Oil all moving parts.
P. 14
P. 27
P. 31
7. Deformation
pattern
1. Inappropriate feed balance.
2. Inappropriate needle swing
timing.
3. Top tension is too strong.
See mechanical adjustment
“stretch stitch feed balance”.
See mechanical adjustment
“Needle swing timing”.
See mechanical adjustment
“Needle thread tension”.
P. 18
P. 16
P. 17
4
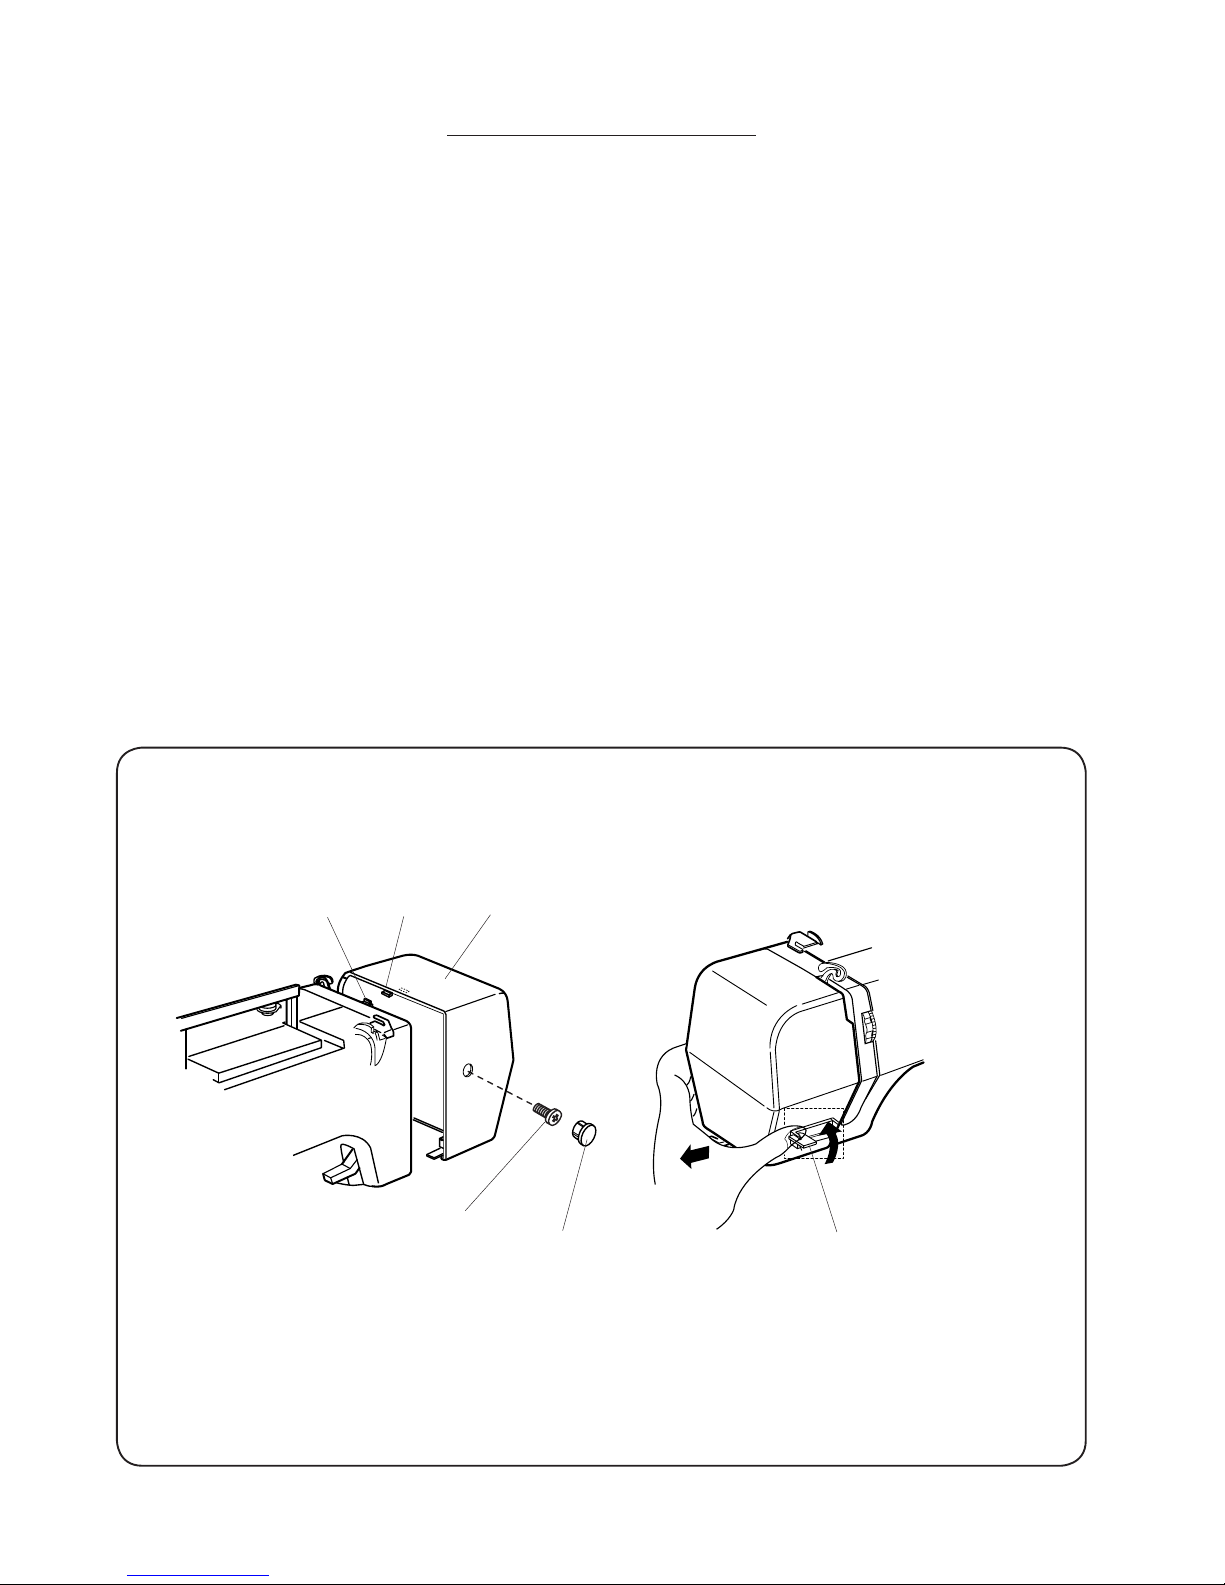
SERVICE ACCESS (1)
FACE COVER
TO REMOVE:
1. Remove the cap and setscrew (A) and remove the face cover while pushing the rib (B) up.
TO INSTALL:
2. Attach the face cover, engaging the hook (C) and the rib (B) with the rear cover and tighten screw (A)
3. Attach the cap.
Face cover
Setscrew (A)
Cap
Rib (B)
Hook (C) Hook (C)
5
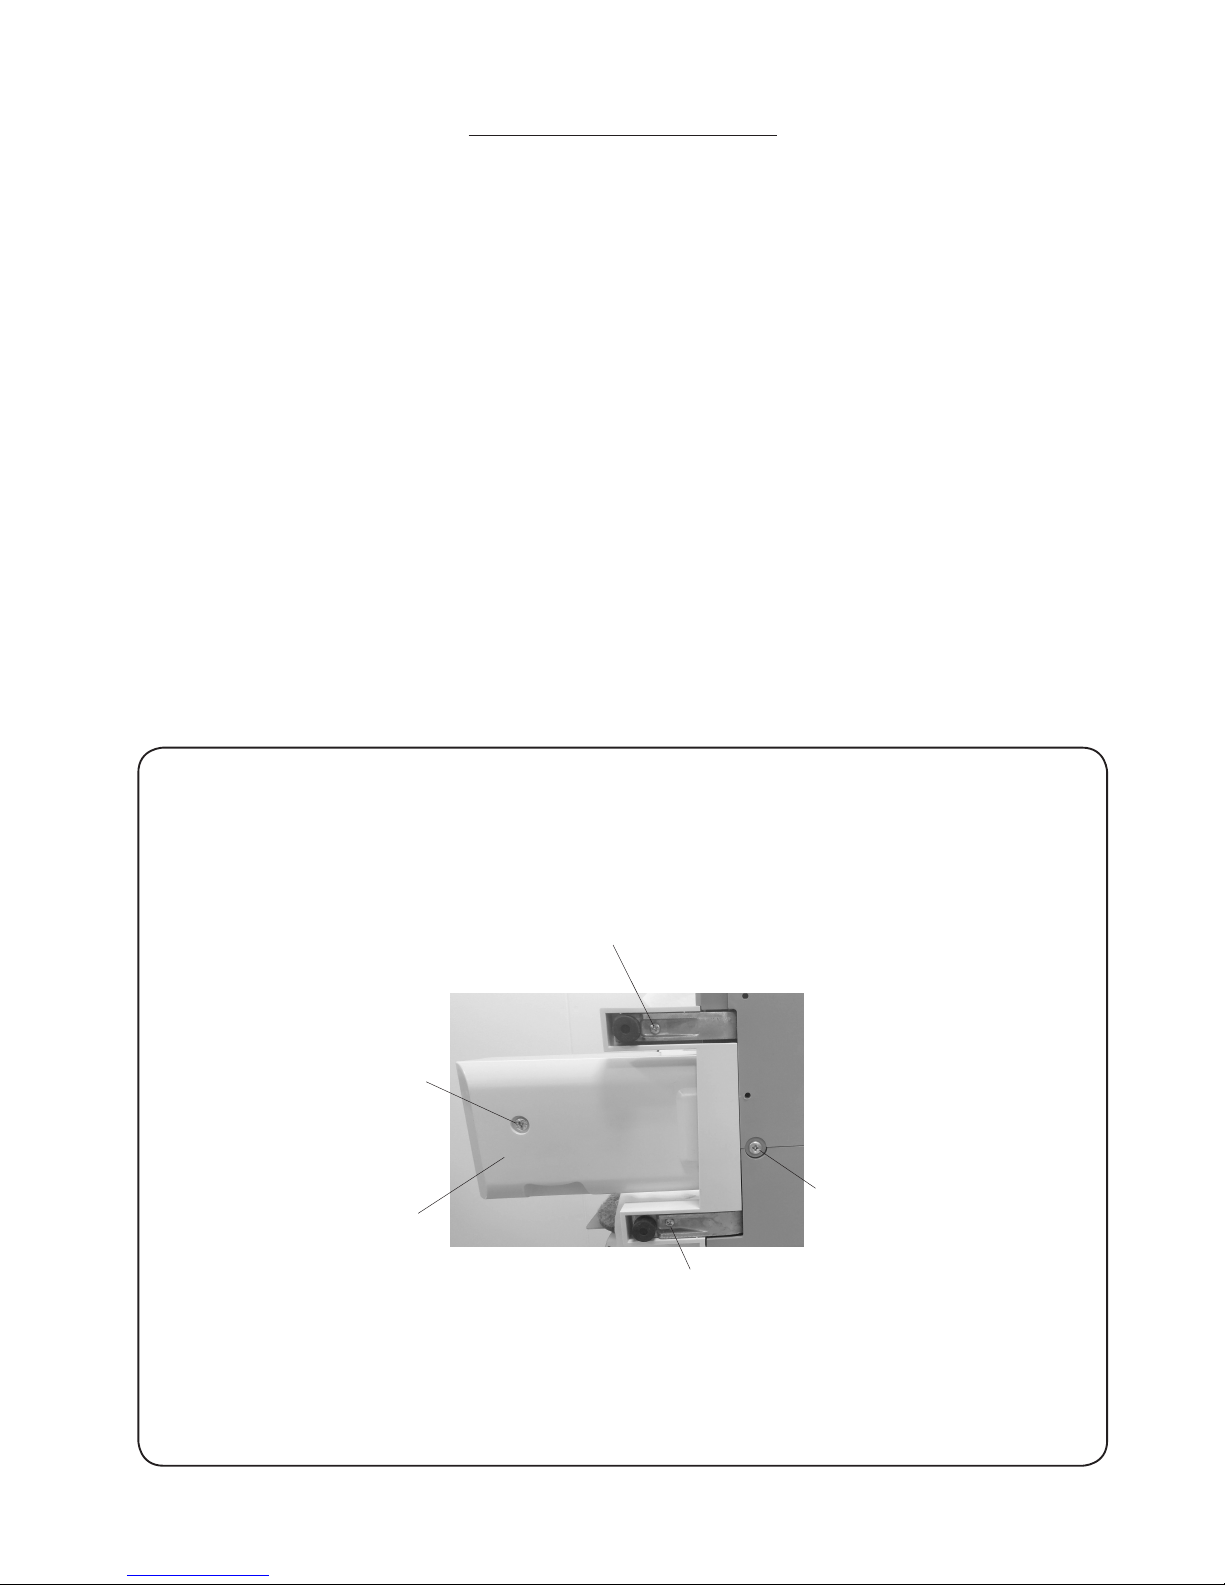
BED COVER
TO REMOVE:
1. Remove the 4 setscrews (A), remove the bed cover.
TO INSTALL:
2. Follow the above procedures in reverse.
SERVICE ACCESS (2)
Setscrew (A)
Setscrew (A)
Setscrew (A)
Bed cover
Setscrew (A)
6
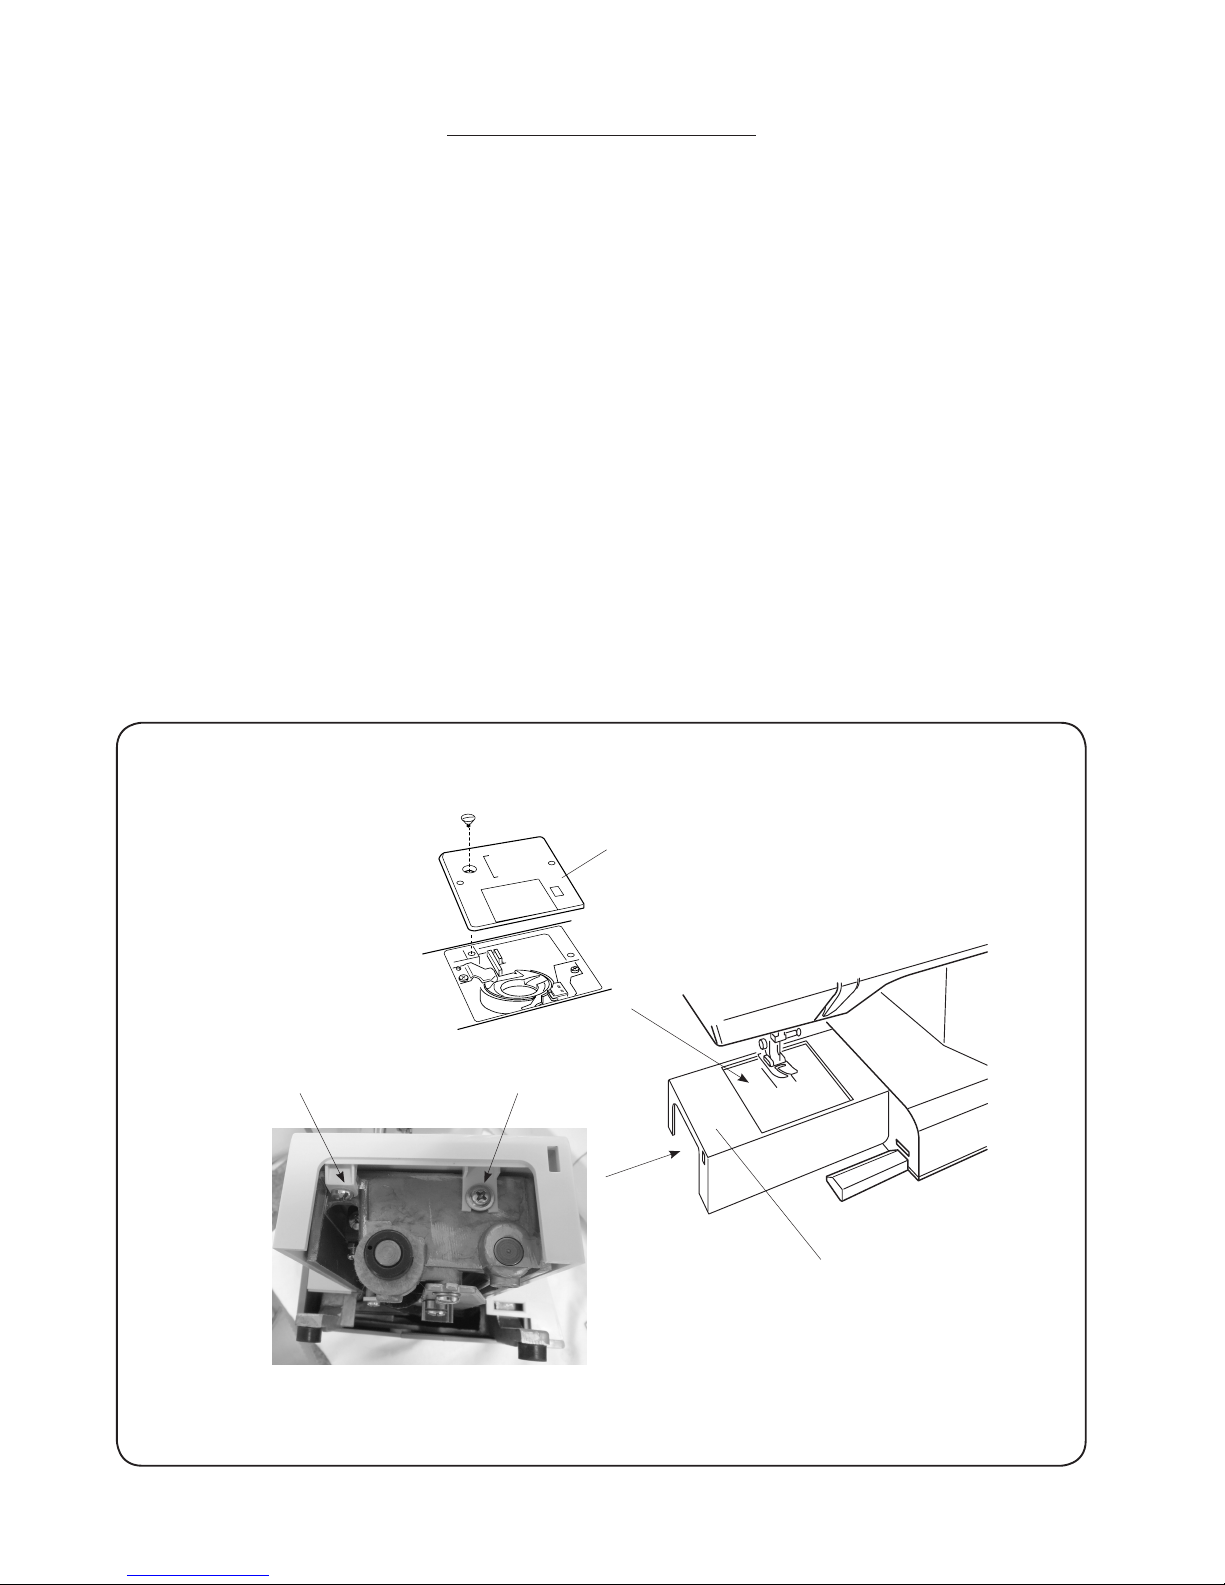
FREE-ARM COVER
TO REMOVE:
1. Remove the needle plate.
2. Remove the bed cover (see page 5).
3. Loosen the setscrew (A) and (B).
TO INSTALL:
4. Follow the above procedures in reverse.
SERVICE ACCESS (3)
Setscrew (A)
Setscrew (B)
Free-arm cover
Needle plate
7
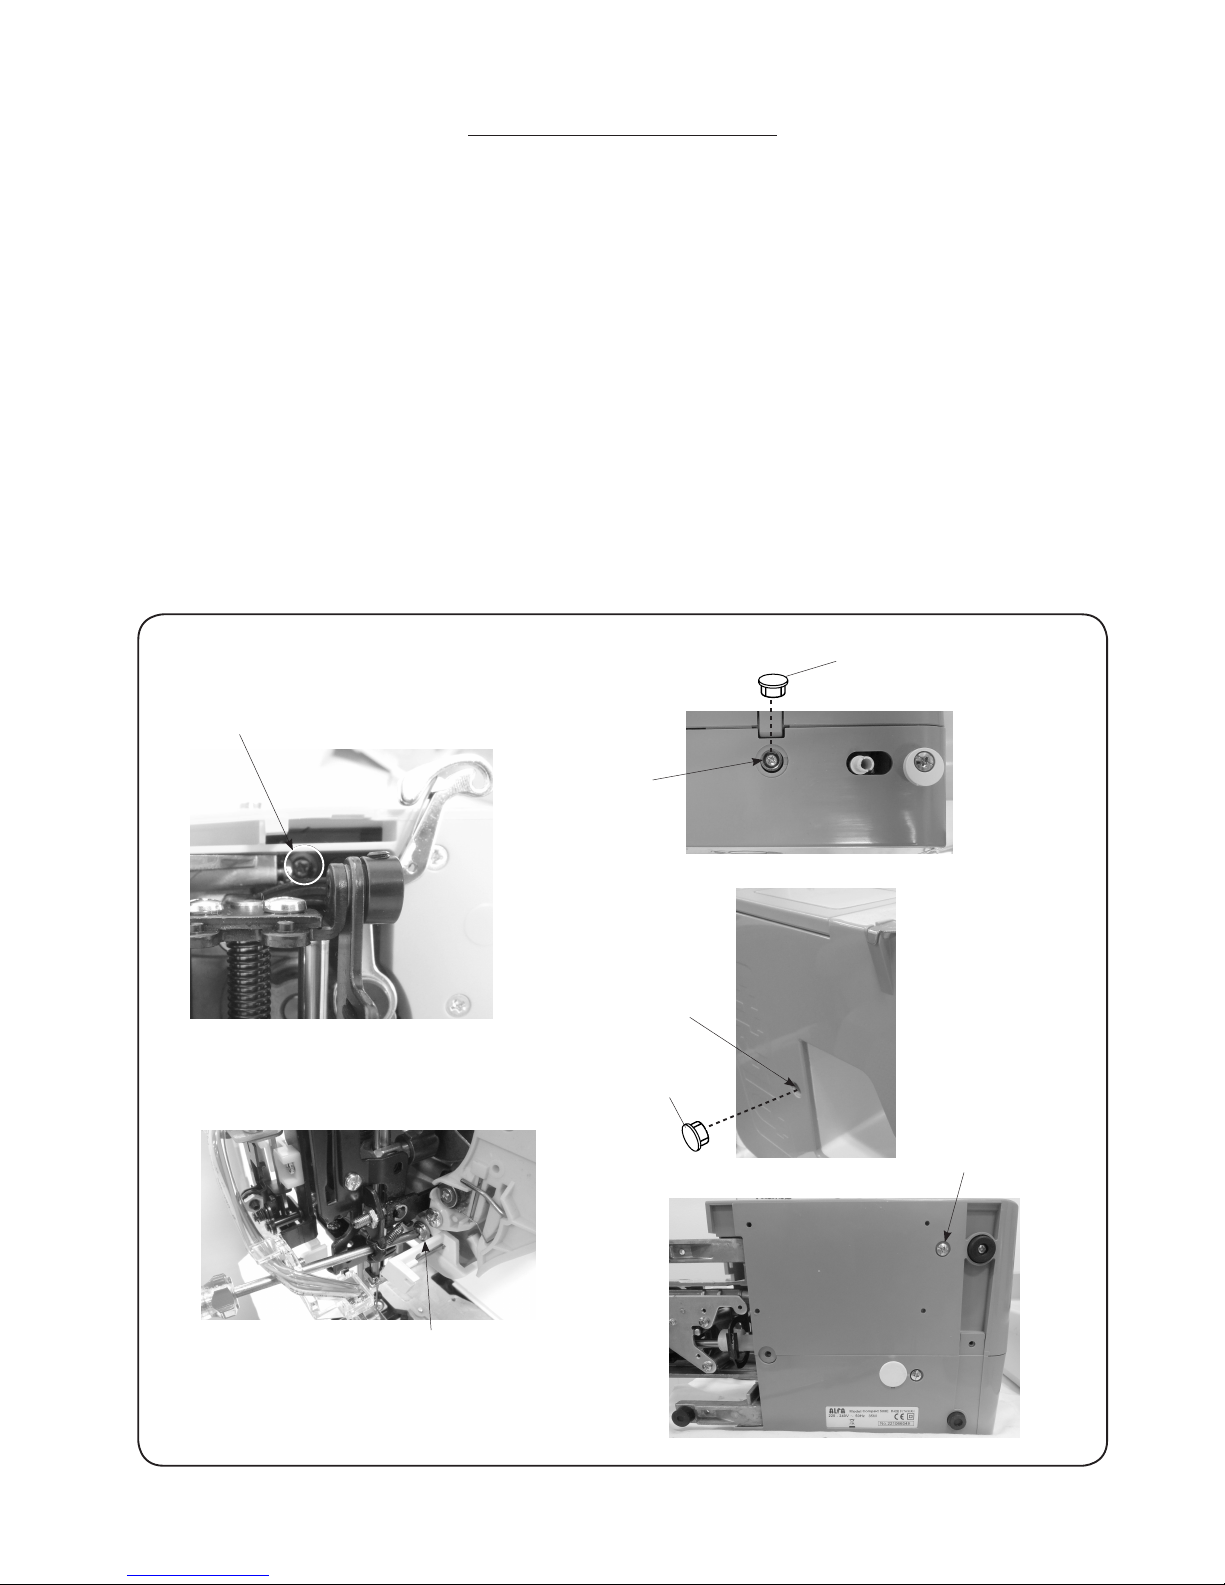
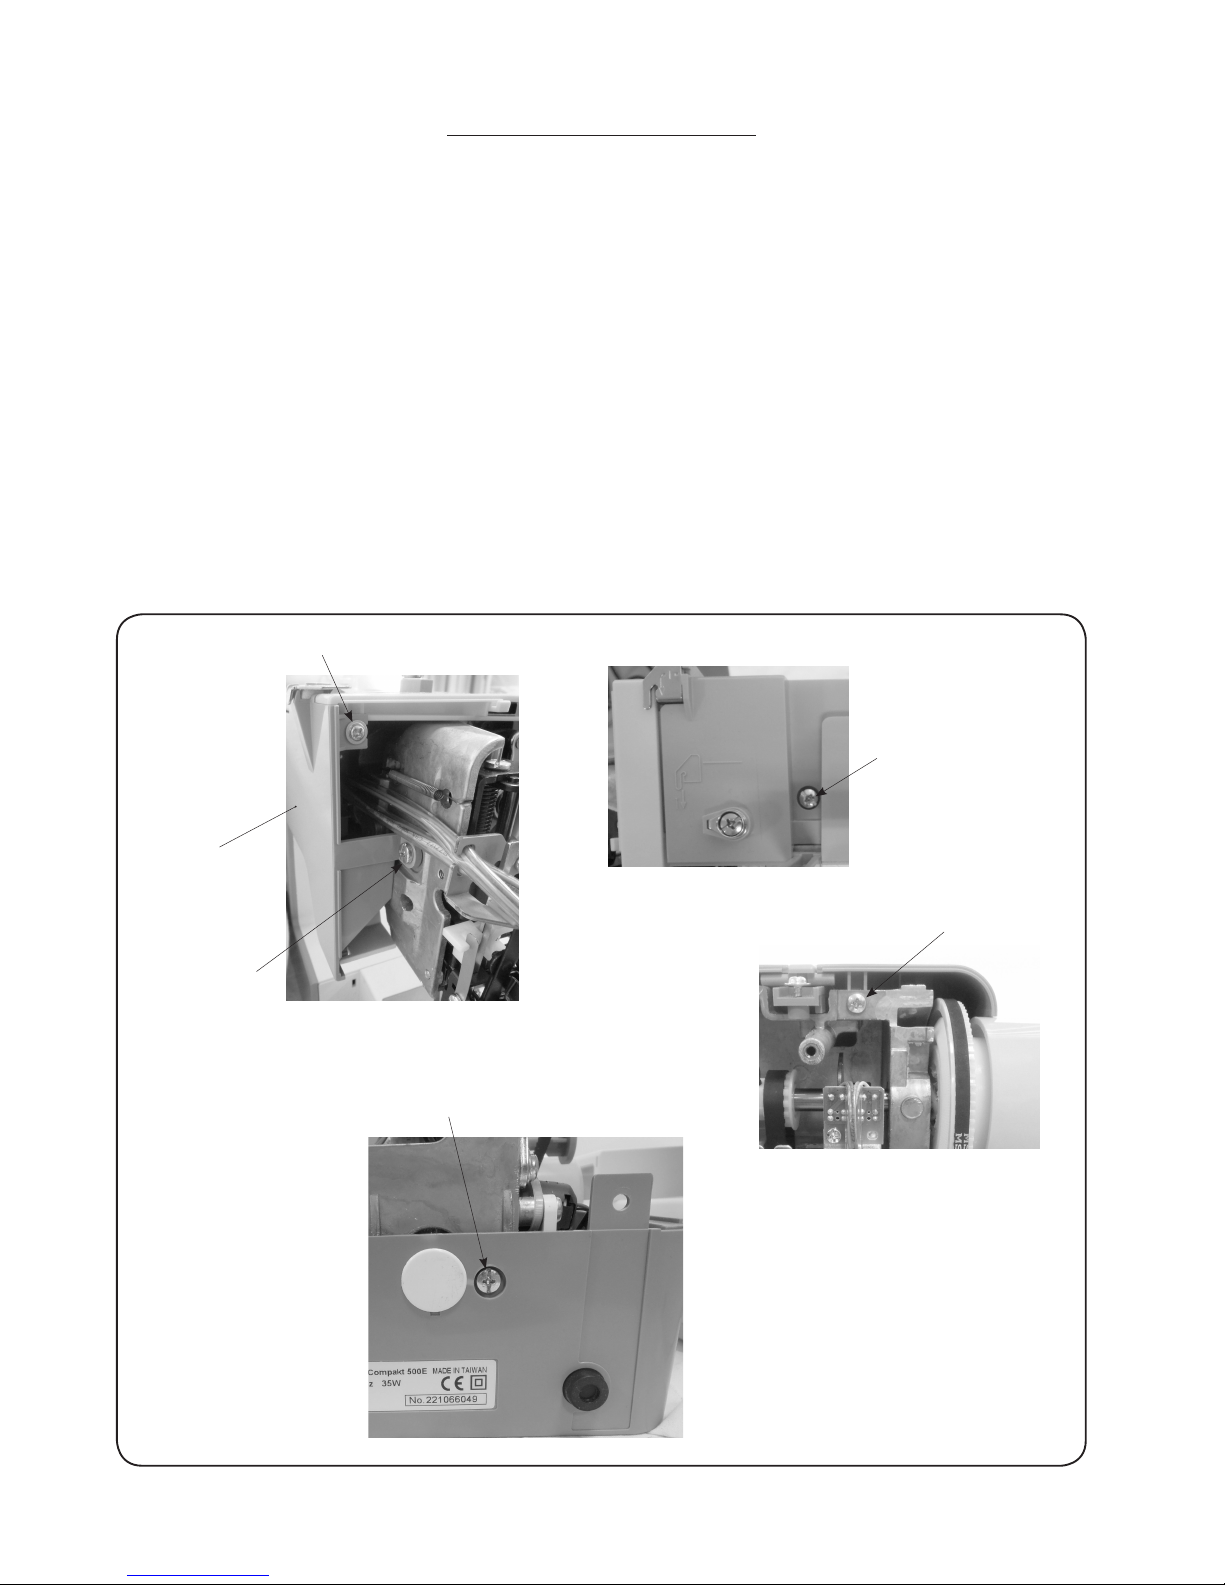
FRONT COVER
TO REMOVE:
1. Remove the face cover, bed cove and free-arm cover (see page 4–6).
2. Loosen the setscrew (A) and (B) then remove the setscrew (D) and (E).
3. Remove the cap and loosen setscrew (C).
4. Disconnect all the connectors from the circuit board-A (see page 20).
NOTE:
Do not disconnect the connectors by pulling on cord.
To disconnect, grasp the connector, not the cord.
Remove the presser lifter from the front cover first while presser lifter lowered.
(To be continued)
SERVICE ACCESS (4)
Setscrew (B)
Setscrew (A)
Setscrew (C)
Setscrew (D)
Setscrew (E)
Cap
Cap
8
SERVICE ACCESS (5)
REAR COVER
TO REMOVE:
1. Remove the front cover (see pages 7).
2. Loosen setscrews (A).
3. Remove the setscrews (B), (C), (D) and (E), then remove the rear cover.
TO INSTALL:
4. Follow the above procedure in reverse.
Setscrew (B)
Setscrew (A)
Setscrew (C)
Setscrew (E)
Rear cover
Setscrew (D)
 Loading...