

Page 1
INSTRUCTIONS
Page 2

AERO
2
español
english
français
deutsch
italiano
português
nederlands
norsk
svenska
pусский
dansk
polski
slovenščina
slovensko
český
magyar
13
21
29
37
45
53
61
69
77
85
93
101
109
117
125
133
Page 3
1 2
figures
3
Page 4

3.1 3.2
AERO
4
PRO-FIX
Page 5

4
5
2
1 2
1
figures
5
Page 6

AERO
6
6.1 6.2
Page 7

7
(2)
(4)
(1)
(3)
8
STOP
GO
(2)
(4)
(1)
(2)
(4)
(1)
figures
7
Page 8
AERO
8
9.1 9.2
Page 9

1
10
11
1
12
figures
1
9
Page 10

AERO
10
13
14.1
Page 11

14.2 15
figures
11
Page 12

AERO
12
16
17
Page 13

INDICE
ADVERTENCIAS
1.- DESPLEGADO
2.- SISTEMA PRO-FIX
3.- EXTRACCIÓN HAMACA
4.- RUEDAS DELANTERAS GIRATORIAS
5.- FRENO
6.- ARNÉS SEGURIDAD
7.- GRADUACIÓN DEL RESPALDO
8.- GRADUACIÓN DEL REPOSAPIÉS
9.- PROTECTOR
10.-REGULACIÓN DE LA POSICIÓN DE LA EMPUÑADURA
11.-PLEGADO
12.- CAPOTA
13.-MANTENIMIENTO
14.- PROTECTOR DE LLUVIA
14
15
15
16
16
16
16
17
17
17
17
18
18
18
18
español
13
Page 14

ADVERTENCIAS
AERO
14
IMPORTANTE – Guardar estas instrucciones para
consultas futuras.
ADVERTENCIA: No dejar nunca al niño desatendido.
ADVERTENCIA: Asegurarse de que todos los dispo-
sitivos de cierre están engranados antes del uso.
ADVERTENCIA: Para evitar lesiones, asegúrese de
que el niño se mantiene alejado durante el desplegado y el plegado de este producto.
ADVERTENCIA: No permita que el niño juegue con
este producto.
ADVERTENCIA: Este asiento no es adecuado para
niños menores de 6 meses.
ADVERTENCIA: Usar siempre el sistema de retención.
ADVERTENCIA: Comprobar que los dispositivos de
sujeción del capazo, del asiento o de la silla de coche
están correctamente engranados antes del uso.
ADVERTENCIA: Este producto no es adecuado para
correr o patinar.
Este vehículo es para niños desde 6 meses y hasta
15 kg.
Apto para niños menores de 6 meses únicamente
con accesorios aprobados por JANÉ.
El dispositivo de estacionamiento debe activarse al
colocar y retirar a los niños del vehículo.
Cualquier carga fijada al manillar y/o a la parte
trasera del respaldo y/o a los laterales del vehículo
afecta a la estabilidad de éste.
Page 15

Este vehículo ha sido diseñado para un único niño,
no utilizarlo con más niños a la vez.
No deben utilizarse accesorios no aprobados por
JANÉ.
Para las sillas de coche usadas junto con un chasis,
este vehículo no reemplaza una cuna o cama. Si el
niño necesita dormir, debería colocarse en un capazo, una cuna o una cama adecuados.
Solo deben utilizarse los repuestos suministrados o
recomendados por JANÉ.
La masa máxima permitida de la cestilla portaobjetos nunca puede superar lo indicado en la cestilla
(4 kg).
1.- DESPLEGADO
Para des plegar su silla A ERO tire de los puls adores situa dos en
el manillar simultáneamente.
Una vez desplegado asegúrese de que la cruz trasera queda
completamente tensa, ya que bloquea la silla para que no se
pliegue involuntariamente.
ADVERTENCIA : Es imprescindible asegurarse que el niño se
mantiene alejado de la silla durante las acciones de plegado y
desplegado.
ADVERTENCIA : La aparición de puntos de corte y compresión y
atrapamientos son inevitables durante estas operaciones.
2.- SISTEMA PRO-FIX
El chasis de su cochecito incluye el sis tema PRO-FIX, preparado para incorporar cualquiera de los siguientes por tabebés:
Koos, Matrix Light 2, Micro. El sistema PRO FIX le facilitará
el acople y la extracción de estos accesorios al chasis, de un
modo rápido, fácil y seguro, quedando éstos anclados al chasis. Para ello siga detenidamente las instrucciones de estos
accesorios. Para acceder a la zona del sistema PRO-FIX deberá
abrir los broche s del tapizado y retirar los dos tapones que
tapan dicho sistema. Guarde los tapones en un lugar seguro
y repóngalos una vez deje de utilizar el portabebés. 3.1 - 3.2
1
2
español
15
Page 16

AERO
16
3.- EXTRACCIÓN HAMACA
Esta función es necesaria para utilizar la silla con los distintos
portabebés.
Para extraer el respaldo primero retire el tapizado del repo sabrazos y el asiento.
Pulse el botón situado a ambos lados de la base del respaldo
mientras extrae el tubo del respaldo de su anclaje. 4 .1
Posteriormente libere los graduadores de reclinado del respaldo empujando hacia arriba levemente. 4.2 - 5
Siga los pasos en sentido inverso para montar el respaldo de
nuevo.
4.- RUEDAS DEL ANTERAS GIRATORIAS
Su AERO dispone de ruedas delanteras giratorias direccionales, con la posibilidad de bloquear la dirección.
Para bloquearla empuje la palanca hacia abajo una vez las
ruedas estén alineadas según el eje longitudinal del coche-
6.1
cito.
Para desbloquear la dirección tire de la palanca hacia arriba.
6.2
5.- FRENO
Su AERO dispone de un sistema de frenado que actúa simultáneamente sobre ambas ruedas traseras. Úselo como freno
de estacionamiento siempre que pueda, es un importante
elemento de seguridad.
Para frenar pise la palanca de freno.
Para liberar el freno empuje la palanca hacia arriba.
ADVERTENCIA : Una vez accionado el freno asegúrese de que el
cochecito ha quedado correctamente frenado. Puede ser nece sario rodar ligeramente el cochecito para que el freno engrane
de manera óptima.
ADVERTENCIA : Asegúrese de que el freno de es tacionamiento
está accionado antes de poner o sacar el niño del coche.
6.- ARNÉS SEGURIDAD
Su AERO dispone de un arnés de seguridad para que su hijo
esté seguro en todo momento. Ajuste el cinturón al niño
siempre que use el cochecito.
Los dos puntos de anclaje laterales pueden ser utiliz ados para
la fijación de un arnés suplementario.
8
7
Page 17

7.- GRADUACIÓN DEL RESPALDO
Con el objetivo de proporcionarle el mayor confort al niño el
respaldo del AERO tiene un sistema de reclinado.
El sistema de reclinado dispone de 5 posiciones.
Tire de la palanca trasera mientras baja el respaldo.
Para subirlo no hay que pulsar la palanca, simplemente empuje el respaldo.
9.2
9.1
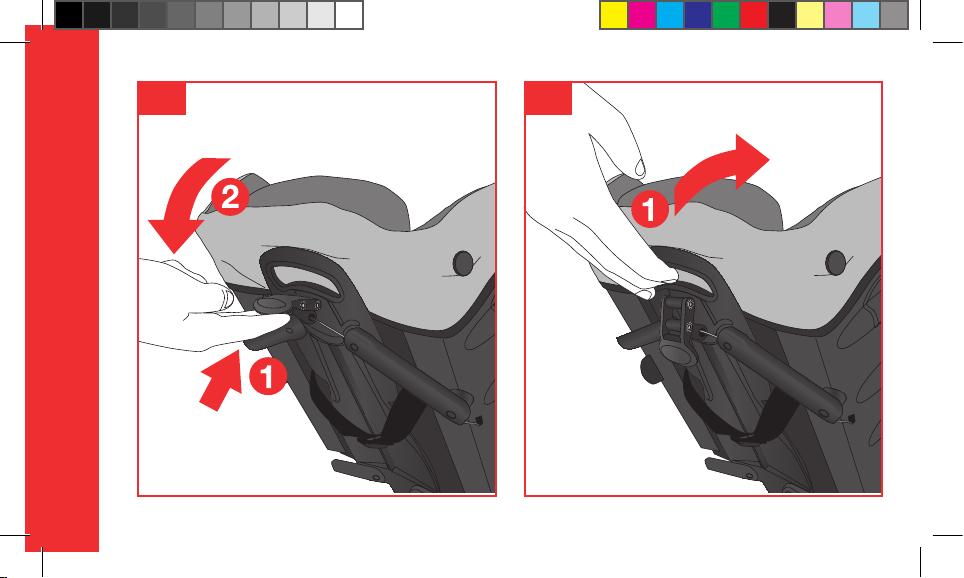
9.- PROTECTOR
Para sacar el protector pulse el botón situado en la parte inferior del apoyabrazos.
Una vez lo haya extraído sitúe los tapo nes destinados a cubrir
los agujeros del protec tor. Estos tapones tienen doble función estética, ya que no se ve el agujeros y de seguridad, para
evitar que el niño pueda meter el dedo.
11
12
8.- GRADUACIÓN DEL REPOSAPIÉS
También se puede ajustar la posición del reposapiés en función de la postura deseada para el niño en cada momento,
éste dispone de 4 posiciones diferentes.
Pulse la palanca situada en el estribo a ambos lados de la silla
mientras mueve el reposapiés hacia abajo.
Para moverlo hacia arriba no hace falta pulsar el botón, simplemente empuje el reposapiés.
ADVERTENCIA : Nunca permita que el niño se ponga de pie en el
reposapiés o estribo.
10
ADVERTENCIA : El niño debe mantenerse alejado de partes móviles cuando estas éstán siendo manipuladas por el adulto responsable. La aparició n de puntos de cor te y compresión y atrapamientos son inevitable s durante estas operaciones.
10.- REGULACIÓN DE LA POSICIÓN DE LA EMPUÑADURA
Su AERO dispone de un sistema para regular la posición de la
empuñadura y ofrece una mayor comodidad.
Pulse el botón y manténgalo pulsado mientras ajusta la posición de la empuñadura. Dispone de 5 posiciones para que
usted elija la que mejor se adapta a su s necesidades.
13
español
17
Page 18

AERO
18
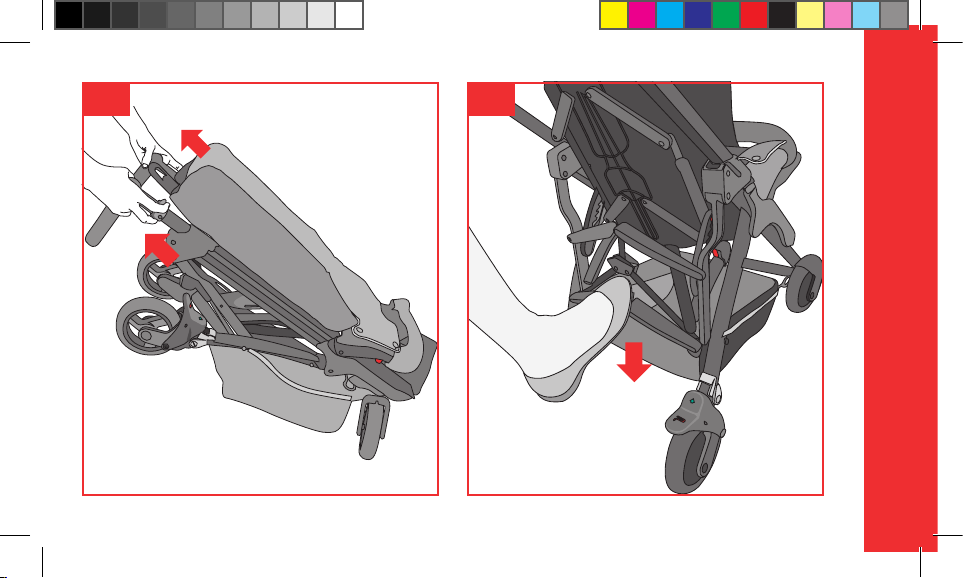
11.- PLEGADO
Tire hacia arriba simultáneamente de los 2 tiradores situados
en el manillar mientras levanta el pedal del compás inferior
tal como muestra la figura.
Posteriormente acompañe el manillar hacia abajo para que
el coche se pliegue.
Finalmente regule la empuñadura para dejar su AERO del
modo más plegado posible.
Nota : Si pliega el cochecito con la hamaca e n posición reclinada la capota puede soltarse, se recomienda poner la hamaca
en posición ver tical.
ADVERTENCIA : Es imprescindible asegurarse que el niño se
mantiene alejado de la silla durante las acciones de plegado y
desplegado.
ADVERTENCIA : La aparición de puntos de corte y compresión y
atrapamientos son inevitables durante estas operaciones.
12. - CA POTA
Para el montaje de la c apota al chasis , deslícela hasta encajar
con los laterales del manillar.
Para extraerla proceda a la inversa.
ADVERTENCIA : No colo car peso encima de la capota.
14.1-14.2
15
16
13.- MANTENIMIENTO
No exponga el tapizado al sol durante largos periodos.
Lave las partes de plástico con agua templada y jabón, secando posteriormente todos los componentes concienzudamente.
El tapizado puede desmontarse para ser lavado.
Engrase regularmente las partes móviles y mecanismos con
un spray a base de siliconas. No usar aceite o grasa.
Tanto para su seguridad como para la buena conservación de
este producto, es importante que haga una revisión periódica en cualquiera de nuestros talleres oficiales.
14.- PROTECTOR DE LLUVIA
El protector de lluvia de su AERO es muy sencillo de colocar,
sólo tiene que cubrir la hamaca y ajustar los enganches al
chasis para sujetarla. Ésta tiene una pequeña ventana que
se puede enrollar y fijar con velcros para que el niño pueda
investigar lo que le rodea con total libertad.
17
Page 19

INFORMACIÓN SOBRE LA GARANTÍA
Este ar tículo dispone de garantía según lo estipulado en la ley
23 / 2003 de 10 de julio. Conservar la factura de compra, es
imprescindible su presentación en la tienda donde adquirío el
producto para justificar su validez ante cualquier reclamación.
Quedan excluídos de la presente garantía aquellos defectos
o averías producidas por un uso inadecuado del artículo o el
incumplimiento de las normas de seguridad y mantenimiento descritas en las hojas de instrucciones y en las etiquetas de
lavado, así como los elementos de desgaste por uso normal y
manejo diario.
La etiqueta que contiene el número de chasis de su modelo,
no debe ser arrancada bajo ningún concepto, contiene información importante.
Atención:
Para obtener la máxima seguridad y atención sobre su nuevo
JANÉ, es muy impor tante que rellene la tarje ta de regist ro que
encontrará en la página www.jane.es
El registro le permitirá informarse, si es necesario, de la evolución y mantenimiento de su producto. También, siempre que
lo desee, le podremos informar de nuevos modelos o noticias
que consideremos pueden ser de su interés.
español
19
Page 20

AERO
20
Page 21

TABLE OF CONTENTS
WARNING
1.- UNFOLDING
2.- PRO-FIX SYSTEM
3.- REMOVING THE HAMMOCK
4.- FRONT SWIVEL WHEELS
5.- BRAKE
6.- SAFETY HARNESS
7.- ADJUSTING THE BACKREST
8.- ADJUSTING THE FOOTREST
9.- PROTECTOR
10.- ADJUSTING THE POSITION OF THE HANDLEBAR
11.- FOLDING
12.- HOOD
13.- MAINTENANCE
14.- RAIN COVER
22
23
23
24
24
24
24
25
25
25
25
26
26
26
26
english
21
Page 22

WARNING
AERO
22
IM POR TANT – Keep these instructions for future
reference.
WARNING: Never leave your child unattended.
WARNING: Ensure that all the locking devices are
engaged before use.
WARNING: To avoid injury ensure that your child is
kept away when unfolding and folding this product.
WARNING: Do not let your child play with this
product.
WARNING: This seat unit is not suitable for chil-
dren under 6 months.
WARNING: Always use the restraint system.
WARNING: Check that the pram body or seat unit
or car seat attachment devices are correctly engaged before use.
WARNING: This product is not suitable for running
or skating.
This vehicle is intended for children from 6 months
and up to 15 kg.
Suitable for children under 6 months old only with
accessories approved by JANÉ.
The parking device shall be engaged when placing
and removing the children.
Any load attached to the handle and/or on the
back of the backrest and/or on the sides of the vehicle will affect the stability of the vehicle.
This vehicle has been designed to be used by one
child. Do not use it with more children at the same
time.
Page 23

Never use accessories that have not been approved
by JANÉ, S.A.
For car seats used in conjunction with a chassis,
this vehicle does not replace a cot or a bed. Should
your child need to sleep, then it should be placed
in a suitable pram body, cot or bed.
Only replacement parts supplied or recommended
by JANÉ shall be used.
The maximum amount carried in the basket must
never exceed the weight indicated on the basket
(4 kg).
1.- UNFOLDING
To unfold your AERO pushchair simultaneously pull the
buttons on the handlebar.
Once it is unfolde d make sure that the cross on the back is
comple tely taut, as this locks the pushchair so that it does not
accidentally fold up.
WARNING: It is important to make sure that the child is kept
away from the pushchair while it is being folded or unfolded.
WARNING: The appearance of cut ting, compression and pinch
points are inevitable during these operations.
2.- PRO-FIX SYSTEM
The chassis of your pushchair includes the PRO-FIX system,
ready fo r fitting any of the f ollowing baby ca rriers: Koos, Matrix Light 2, Micro. The PRO FIX system makes it easy to fas ten
and remove these accessories onto and off the chassis, in a
quick, simple and safe way, with them securely fastened onto
the chas sis. To do this, follow the instructions for these accessories carefully. To access the PRO-FIX system zone unfasten
the upholster y clasps and take off the two covers concealing
the sys tem. Store the covers in a safe place an d put them back
on once you have stopped using the baby carrier. 3.1 - 3.2
1
2
english
23
Page 24

AERO
24
3.- REMOVING THE HAMMOCK
This function is necessary for using the pushchair with different baby carriers.
To remove the backres t first take the upholstery off the armrest and the seat
Press the button situated on the both sides of the base of
the backrest while you take the tube of the backrest out of
its fastening. 4.1
Then release the reclining adjusters from the backrest by
pushing upwards gently. 4.2-5
Follow the steps in reverse to put the backrest back on again.
4.- FRONT SWIVEL WHEELS
Your AERO has front swivel wheels that can be steered or the
steering can be locked.
To lock the wheels pre ss the lever downwards when the
wheels are in line with the longitudinal axle of the pushchair
6.1
To unlock the s teering, pull the lever upwards.
6.2
5.- BRAKE
Your AERO has a braking system that act s simult aneously on
both rea r wheels. Use it as a parking brake wh enever you can,
it is an important safety element.
Press the brake lever to put the brake on.
Push the lever upwards to release the brake.
WARNING: When the brake is on make sure that the pu shchair
has braked correc tly. It may be neces sary to push the pushchair
slightly for the brake to be fully activated.
WARNING: Make sure the parking brake is activated before putting the child in or out of the pushchair.
6.- SAFETY HARNESS
Your AERO has a safety harness so that your child is always
safe.
The two side fastening points of the seat can be used to fasten a supplementary harness (see section ).
7
8
Page 25

7.- ADJUSTING THE BACKREST
The backrest of the AERO can be reclined to make the child
more comfortable. The reclining system has 5 positions.
Pull the rear lever while you lower the backrest.
To raise it there is no need to press the lever, simply push
the backrest as it is fitted with a free movement mechanism.
9.1
9.2
9.- PROTECTOR
To get the protector out, press the button situated on the
lower part of the armrest.
Once it i s out, put the covers in pla ce designed to cover up the
holes of the protector.
These covers have two functions, an aesthetic one as they
hide the hole and a safety one as they prevent the child from
putting his fingers in the hole.
11
12
8.- ADJUSTING THE FOOTREST
The position of the footrest can also be adjusted to suit the
required position of the child at all times. It has 4 different
positions.
Press the lever found on the foot board on both sides of the
pushchair while moving the footrest downwards.
To move it upwards you don’t need to press the button as it
has a free movement mechanism.
WARNING: Never allow the child to stand up on the footrest or footboard.
10
WARNING: The child should be kept away from the mobile parts
when the responsible adult is handling these.
10.- ADJUSTING THE POSITION OF THE HANDLEBAR
Your AERO is fit ted with a sys tem to adjust the positio n of the
handle making it more comfortable.
Press the button and keep it pressed while you adjus t the
positi on of the handleb ar. I t has 5 position s so you can choos e
the one that suits you best.
13
english
25
Page 26

11.- FOLDING
Simultaneously pull the 2 handles on the handlebar upwards
while raising the pedal on the lower compass as shown in the
14.1-14.2
diagram.
Then push the handlebar downwards so the pushchair folds
15
up.
Lastly, adjust the handle to leave your AERO folded as compactly as possible.
Note: If you fold the pushchair with the hammock in the reclined position the hood may come loose, it is advisable to
put the hammock in the vertical position.
WARNING: It is important to make sure that the child is kept
away from the pushchair while it is being folded or unfolded.
AERO
WARNING: The appearance of cut ting, compression and pinch
points are inevitable during these operations.
12.- HOOD
To fit the hood to the chassis, slide it until fits into the sides
of the handlebar.
Follow this step in reverse to remove it.
16
13.- MAINTENANCE
Do not expose the cover to sunlight for long periods.
Wash the plastic parts with warm water and soap and
carefully dry all the components after.
The cover can be removed for washing.
Regularly grease the mobile parts and mechanisms with a
silicone-based spray. Do not use oil or grease.
For your safety and the good conservation of this product, it
is important to bring it to one of our official workshops for
regular inspections.
14.- RAIN COVER
The rain cover for your AERO is very easy to fit into
place, simply cover the hammock and fit the hooks to the
chassis to fasten it. It has a small window that can be rolled
up and secured with Velcro strips so the child is free to investigate his surroundings.
17
26
WARNING: Do not put weight on top of the hood.
Page 27

INFORMATION ABOUT THE GUARANTEE
This article comes with a guarantee in accordance with the
provisions of law 23 / 2003 of 10 th July. Keep your receipt as
proof of purchase, it is essential to present the receipt in the
shop where you bought the produc t to confirm validity of the
guarantee in the event of any problems.
This guarantee excludes any defects or breakages caused by
inappropriate use of the article or inobservance of the safety
and maintenance rules listed in the instruction pages and
on the care labels, as well as faults caused by wear and tear
through normal use and daily handling.
The label displaying the chassis number of the model should
never be taken off, it contains important information.
Notice:
For the maximum safety and care of your new JANÉ produc t,
it is ver y important that you complete the registration card
found on the web page www.jane.es
This regis tration means we can inform you , if necess ary, of the
evolution and maintenance of your product. Additionally, if
you would like, we can also inform you about new models or
news that we think may be useful for you.
english
27
Page 28

AERO
28
Page 29

INDEX
AVERTISSEMENT
1.- DÉPLIAGE
2.- SYSTÈME PRO-FIX
3.- DÉSINSTALLATION DU HAMAC
4.- ROUES AVANT PIVOTANTES
5.- FREIN
6.- HARNAIS DE SÉCURITÉ
7.- RÉGLAGE DU DOSSIER
8.- RÉGLAGE DU REPOSE-JAMBES
9.- GARDE-CORPS
10.- RÉGLAGE DE LA POSITION DES POIGNÉES
11.- PLI AGE
12.- CAPOTE
13.- ENTRETIEN
14.- HABILLAGE PLUIE
30
31
31
32
32
32
32
33
33
33
33
34
34
34
34
français
29
Page 30

AVERTISSEMENT
AERO
30
IM POR TANT – Conserver ces instructions pour
consultation ultérieure.
AVERTISSEMENT: Ne jamais laisser votre enfant sans
surveillance.
AVERTISSEMENT: S’assurer que tous les dispositifs de
verrouillage sont enclenchés avant utilisation.
AVERTISSEMENT: Pour éviter toute blessure, mainte-
nir votre enfant à l’écart lors du dépliage et du pliage
du produit.
AVERTISSEMENT: Ne pas laisser votre enfant jouer
avec ce produit.
AVERTISSEMENT: Ce siège ne convient pas à des
enfants de moins de 6 mois.
AVERTISSEMENT: Toujours utiliser le système de
retenue.
AVERTISSEMENT: Vérifier que les dispositifs de fixation de la nacelle, du siège ou du siège-auto sont correctement enclenchés avant utilisation.
AVERTISSEMENT: Ce produit ne convient pas pour
faire du jogging ou des promenades en rollers.
Ce véhicule est conçu pour des enfants âgés de 6
mois à 15 kg.
Utilisable pour des enfants de moins de 6 mois uniquement avec des accessoires approuves par JANÉ
Le dispositif de stationnement doit être activé pour
installer ou retirer les enfants du véhicule.
Une charge quelconque suspendue au guidon, et/ou à
la partie arrière du dossier, et/ou sur les côtés latéraux
du véhicule peut affecter la stabilité de ce dernier.
Page 31

Ce véhicule a été conçu pour un seul enfant, ne pas
l’utiliser avec plusieurs enfants à la fois.
N’utilisez jamais des accessoires qui n’ont pas été
approuvés par JANE, S.A.
Pour les sièges auto utilisés conjointement avec un
châssis, ce véhicule ne remplace pas un berceau ou un
lit. Si l’enfant a besoin de dormir, il faut l’installer dans
une nacelle, un berceau ou un lit adéquat.
On doit utiliser uniquement les pièces de rechange
fournies ou recommandées par JANE.
Le poids maximum autorisé dans le filet du panier ne
doit pas être supérieur à celui qui est indiqué dans le
filet (4 kg).
1.- DÉPLIAGE
Pour déplier votre poussette AERO, tirez simultanément sur
les boutons poussoir situés sur le guidon.
Une fois dépliée, vérifiez que le croisillon arrière reste bien
tendu, car c’est lui qui permet de bloquer la poussette et
d’éviter qu’elle ne se plie involontairement.
AVERTISSEMENT: Il est indispensable de vérifier que l’enfant se
tient bien éloigné de la poussette lors du pliage ou du dépliage
de cette dernière.
AVERTISSEMENT: Il y a des risques de coupures, de compression,
de se trouver coincé qui sont inévitables lors de ces opérations.
2.- SYSTÈME PRO-FIX
Le châssis de votre poussette inclus le s ystème PRO-FIX, il a
été conçu pour pouvoir ins taller toutes les coques de transport suivantes: Koos , Matrix Light 2, Micro. Le sy stème PROFIX vous facilitera l’installation et le démontage de ces accessoires sur le châssis, d’une façon rapide, facile et sûr, ces
derniers restant clip sés sur le châssis. Pour cela, suivez scrupuleusement les instructions de ces accessoires . Pour accéder
à la zone du système PRO- FIX vous devez ouvrir les attaches
de la housse et retirer les deux bouchons qui bouchent le dit
système.
Gardez les bouchons dans un endroit sûr et remettez-les dès
que vous cessez d’utiliser la coque. 3.1 – 3.2
1
2
français
31
Page 32

AERO
32
3.- DÉSINSTALLATION DU HAMAC
Cette fonction est nécessaire pour utiliser la poussette avec
différentes coques.
Pour enlever le dossier, retirez premièrement la housse de
l’appui-bras et du siège.
Appuyez sur le bouton situé de chaque côté de la base du
dossier pendant que vous retirez la barre du dossier de son
point d’ancrage. 4 .1
Postérieurement, libérez les graduations d’inclinaison du
dossier en poussant légèrement ver s le haut. 4.2 - 5
Suivez les étapes dans le sens inverse pour monter de nouveau le dossier.
4.- ROUES AVANT PIVOTANTES
Votre AERO possède des roues avant pivotantes avec blocage
directionnel, permettant de bloquer la direction.
Pour les bloquer, poussez le levier vers le bas une fois les
roues alignées suivant l’axe longitudinal de la poussette 6.1
Pour débloquer la direc tion, tirez la manette ver s le haut. 6.2
5.- FREIN
Votre AERO possède un système de frein qui agit simultanément sur les deux roues arrière. Utilisez-le comme frein de
stationnement dès que vous le pouvez, c’est un bon élément
de sécurité.
Pour freiner, appuyez avec le pied sur la pédale de frein.
Pour libérer le frein, poussez la pédale vers le haut.
AVERTISSEMENT: Une fois le f rein activé vérifiez que la pouss ette
est correctement stoppée. Il peut être nécessaire de roder légèrement la poussette afin de pouvoir enclencher le frein de façon
optimale.
AVERTISSEMENT: Assurez-vous que le frein parking est bien
enclenché avant d’asseoir ou de sor tir l’enfant de la poussette.
6.- HARNAIS DE SÉCURITÉ
Votre AERO possède un harnais de sécurité pour que votre
enfant soit toujours en sécurité.
Les deux points de fixation latéraux du siège peuvent être
utilisés pour fixer un harnais supplémentaire
7
8
Page 33

7.- RÉGLAGE DU DOSSIER
Afin d’offrir à l’enfant le plus de confor t possible, le dossier du
AERO possède un système de réglage d’inclinaison.
Le système d’inclinaison possède 5 positions.
Tirez sur la manet te arrière tout en abaissant le dossier.
Pour le remonter, il est inutile d’appuyer de nouveau sur la manette, il suffit simplement de p ousser le dossier, car ce dernier
dispose d’un mécanisme de remontage automatique.
8.- RÉGLAGE DU REP OSE-JAMBES
On peut aussi aju ster la position du repose-jambes en fonction
du positionnement souhaité pour l’enfant, ce dernier dispose
de 4 positions dif férentes.
Appuyez sur le levier situé sur l’assise des deux côtés de la poussette tout en poussant le repose-jambes vers le bas.
Pour le déplacer vers le haut il est inutile d’appuyer sur le
bouton, il dispose d’un mécanisme de remontage automatique.
AVERTISSEMENT: Ne permettez jamais à l’enfant de se tenir debout sur le repose-pieds ou sur le marchepied.
9.1
9.2
10
9.- GARDE-CORPS
Pour enlever le garde-corps, appuyez sur le bouton situé sur
la partie inférieure de l’appui-bras.
Une fois enlevé, placez les caches destinés à reboucher les
ouver tures de l’habillage.
Ces caches ont une double utilité, esthétique puisqu’on ne
voit plus les ouvertures et de sécurité afin d’éviter que l’enfant ne glisse un doigt dedans.
AVERTISSEMENT: L’enfant doit se tenir éloigné des parties mobiles lo rsque celle s-ci sont man ipulées par un a dulte respon sable.
10.- RÉGLAGE DE LA POSITION DES POIGNÉES
Votre AERO dispose d’un système pour régler la position du
guidon et appor te un supplément de confort.
Appuyez sur le bouton et tout en continuant d’appuyer sur
le bouton réglez la position de la poignée. Elle possède 5
positions de réglage afin que vous puissiez choisir celle qui
s’adapte le mieux à vos besoins.
11
12
13
français
33
Page 34

AERO
34
11.- PLIAGE
Tirez simultanément sur les deux tirettes situées sur le guidon, tout en relevant la pédale du croisillon inférieur avec
votre pie d, comme indiqué sur le schéma.
Puis poussez le guidon vers le bas pour que la poussette se plie.
Finalement, réglez le guidon de façon à laisser votre AERO le
plus plié possible.
Note: Si vous pliez la poussette avec le hamac en position
inclinée, la capote peut se défaire.
AVERTISSEMENT: Il est indispensable de vérifier que l’enfant se
tient bien éloigné de la poussette lors du pliage ou du dépliage
de cette dernière.
AVERTISSEMENT: Il y a des risques de coupures, de compression,
de se trouver coincé qui sont inévitables lors de ces opérations.
12.- CAPOTE
Pour le montage de la capote sur le châssis, faites-la glisser
jusqu’à ce qu’elle reste encastrée sur les côtés latéraux du
guidon.
Pour la retirer procéder dans le sens inverse.
AVERTISSEMENT: Ne pas poser quoique ce soit sur la capote.
15
16
14.1-14.2
13.- ENTRETIEN
Ne pas exposer le revêtement au soleil pendant de longues
périodes.
Laver les parties en plastique avec de l’eau tiède et du savon,
en séchant ensuite tous les composants consciencieusement.
Le revêtement peut se démonter pour être lavé.
Graissez régulièrement les par ties mobiles et les mécanismes
avec un spray à base de silicone.
Pour votre sécurité comme pour la bonne conservation de ce
produit, il est très important que vous effec tuiez un contrôle
périodique dans un de nos ateliers.
14.- HABILLAGE PLUIE
L’habillage pluie de votre AERO est très simple à installer,
vous devez simplement envelopper le hamac et ajuster les
crochets au châssis pour le fixer. Il possède une petite fenêtre
qui peut s’enrouler et être fixée avec des velcros pour que
l’enfant puisse découvrir ce qui l’entoure en toute liberté.
17
Page 35

INFORMATIONS SUR LA GARANTIE
Cet article dispose d’une garantie comme stipulé dans la loi
23 / 2003 du 10 juillet 2003. Conserver le ticket de caisse, sa
présentation dans le magasin où vous avez acquis le produit
est indispensable pour justifier toute réclamation.
Sont exclues de la présente garantie les défectuosités et les
pannes dues à une utilisation inadéquate du produit, ou liés
à un manquement aux normes de sécurité ou d’entretien
décrites dans les pages d’instructions et sur les étiquettes de
lavage, de même que les éléments usés par une utilisation
normale et journalière.
L’étiquette qui contient le numéro du châssis de votre modèle, ne doit être arrachée sous aucun prétex te, elle contient
des informations très importantes.
Attention:
Pour obtenir un maximum de sécurité et d’attentions, il est
très important que vous remplissiez la carte d’enregistrement que vous trouverez sur la page www.jane.es
L’enregistrement vous permettra de vous informer, si nécessaire, sur l’évolution et l’entretien de votre produit. De
même, si vous le souhaitez, nous pourrons vous informer
sur les nouveaux modèles et les informations pouvant vous
intéresser.
français
35
Page 36

AERO
36
Page 37

INHALT
WARNUNG
1.- AUSEINANDERKLAPPEN
2.- PRO-FIX SYSTEM
3.- HERAUSNEHMEN DES SITZEINHANGS
4.- DREHBARE VORDERRÄDER
5.- BREMSE
6.- SICHERHEITSGURT
7.- EINSTELLUNG DER RÜCKENLEHNE
8.- EINSTELLUNG DER FUßSTÜTZE
9.- SCHUTZ
10.- EINSTELLUNG DER POSITION DER GRIFF
11.- ZUSAMMENKLAPPEN
12.- HAUBE
13.- UNTERHALT
14.- REGENSCHUTZ
38
39
39
40
40
40
40
41
41
41
41
42
42
42
42
deutsch
37
Page 38

WARNUNG
AERO
38
WICHTIG — Anleitung für spätere Rückfragen auf-
bewahren.
WARNUNG: Lassen Sie Ihr Kind nie unbeaufsichtigt.
WARNUNG: Vergewissern Sie sich vor Gebrauch, dass
alle Verriegelungen geschlossen sind.
WARNUNG: Vergewissern Sie sich, dass Ihr Kind beim
Aufklappen und Zusammenklappen des Wagens außer Reichweite ist, um Verletzungen zu vermeiden.
WARNUNG: Lassen Sie Ihr Kind nicht mit dem Wagen
spielen.
WARNUNG: Diese Sitzeinheit ist für Kinder unter 6
Monaten nicht geeignet.
WARNUNG: Verwenden Sie immer das Rückhaltesystem.
WARNUNG: Es ist zu überprüfen, dass der Kinderwagenaufsatz oder die Sitzeinheit oder der Autokindersitz vor Gebrauch korrekt eingerastet ist.
WARNUNG: Dieses Produkt ist nicht zum Joggen oder
Skaten geeignet.
Dieser Wagen ist für Kinder ab einem Alter von 6 Monaten und mit einem Gewicht bis 15 kg bestimmt.
Nur geeignet für Kinder unter 6 Monaten und mit von
JANÉ zugelassenem Zubehör.
Die Feststellvorrichtung muss beim Hineinsetzen und
Herausnehmen der Kinder aus dem Fahrzeug aktiviert
werden.
Jede am Lenker und/oder auf der Rückseite der Rückenlehne und/oder an den Seiten des Fahrzeugs befestigte Last beeinträchtigt seine Stabilität.
Page 39

Dieses Fahrzeug wurde für ein einziges Kind entworfen und darf nicht gleichzeitig für mehrere Kinder verwendet werden.
Verwenden Sie nie Zubehöre, die von JANÉ, S.A. nicht
genehmigt worden sind.
Für die zusammen mit einem Fahrgestell verwendeten Kinderwagen ersetzt dieses Fahrzeug weder Wiege noch Bett. Wenn das Kind Schlaf braucht, muss es
in eine geeignete Babyschale, Wiege oder Bett gelegt
werden.
Es dürfen nur von JANÉ gelieferte oder empfohlene
Ersatzteile verwendet werden.
Das zugelassene Höchstgewicht des Tragekorbs für
Gegenstände darf nie das dort angegebene Gewicht
(4 kg) übersteigen.
1.- AUSEINANDERKLAPPEN
Zum Auseinanderklappen Ihres Spazierwagens ziehen Sie gleichzeitig die sich an der Lenks tange befindenden Druckknöpfe.
Nachdem er auseinandergeklappt ist, vergewissern Sie sich, dass
das Kreuz auf der Rückseite vollständig gespannt ist, da es den
Spazierwagen arretiert, damit er nicht unabsichtlich zusammenklappt.
2
WARNUNG: Es is t unerlässlich, sicherzustellen, dass das Kind vom
Sitz beim Auf- und Zuklappen entfernt gehalten wird.
WARNUNG: Das Auftreten von Schnitt-, Druck und Quetschstellen und ist bei diesen Operationen unumgänglich.
2.- PRO-FIX SYSTEM
Das Fahrgestell Ihres Kinderwagens ist mit dem PRO- FIX-System,
in das jede der folgenden Babyschalen eingebaut kann, ausgestat tet: Koos , Matrix Ligh t 2, Micro. Das PRO F IX-System w ird Ihnen
das Ankuppeln und den Abbau dieses Zubehörs ans/vom Gestell
erleichtern, und dies auf schnelle, leichte und sichere Ar t, wobei
diesem am Gestell verankert werden. Hierzu bitte aufmerksam
die Anleitungen dieses Zubehörs befolgen. Um an Bereich des
PRO- FIX-Systems zu gelangen, müssen Sie die Druckknöpfe des
Bezugs öffnen und die beiden Vers chlusskappen, die das genann te System abdecken, entfernen. Bewahren Sie die Verschlusskappen an einem sicheren Ort auf und bringen Sie sie erneut an,
wenn Sie die Babytrage nicht mehr verwenden. 3.1 - 3.2
1
deutsch
39
Page 40

AERO
40
3.- HERAUSNEHMEN DES SITZEINHANGS 5.- BREMSE
Diese Funktion ist notwendig, um den Kinderwagen mit den
verschiedenen Babytragen zu verwenden.
Zum Herausnehmen der Rückenlehne ziehen Sie zuerst den
Bezug von der Arms tütze und dem Sitz ab.
Den Knopf zu beiden Seiten der Basis der Rückenlehne drücken, während die Stange der Rückenlehne aus ihrer Veran kerung gezogen wird. 4.1
Danach die Lehnregulierer der Rückenlehne befreien, indem
leicht nach oben gedrückt wird. 4.2-5
Befolgen Sie die S chritte in umgekehrter Reihe nfolge, um die
Rückenlehne erneut anzubringen.
4.- DREHBARE VORDERRÄDER
Ihr AERO verfügt über sich drehende Steuerungsräder, mit
der Möglichkeit der Richtungsblockierung.
Um sie fes tzustellen, drücken Sie den Hebel nach unten, so bald die Räder nach der Längsachse des Buggys ausgerichtet
sind. 6 .1
Um die Steuerung zu entriegeln, an dem Hebel nach oben
ziehen. 6.2
Ihr AERO verfügt über ein Bremssystem, das gleichzeitig auf
beide Hinterräder einwirkt. Immer wenn möglich als
bremse benutzten, dies ist ein wichtiges Sicherheit-selement.
Drücken Sie zum Bremsen den Bremshebel.
Zum Lösen der Bremse schieben den Hebel nach oben.
WARNUNG: Nachdem die Bremse betätigt wurde, überprüfen,
dass de r Wagen korrekt g ebremst is t. Es könnte erf orderlich sei n,
den Wagen leicht zu drehen, damit die Bremse optimal greift.
WARNUNG: Vergewissern Sie sich, dass die Fest stellbremse angezogen ist, bevor Sie das Kind in den Wagen setzen oder aus
ihm herausholen.
6.- SICHERHEITSGURT
Ihr AERO verfügt über einen Sicherheitsleibgurt, damit Ihr
Kind jederzeit sicher ist.
Die beiden seitlichen Befestigungspunkte des Sitzes können
auch zur Befestigung eines zusätzlichen Leibgurtes eingesetzt warden
Park-
7
8
Page 41

7.- EINSTELLUNG DER RÜCKENLEHNE
Um dem Ki nd einen höher en Komfort zu bie ten hat der AERO
eine verstellbare Rückenlehne. Das Rückenlehnsystem verfügt über 5 Stellungen.
Am hinteren Hebel ziehen während die Rückenlehne gesenkt
9.1
wird.
Um diese anzuheb en, muss der Hebel nicht gedrü ckt werden,
einfach nur die Rückenlehne anheben, denn diese verfügt
über einen frei beweglichen Mechanismus.
8.- EINSTELLUNG DER FUßSTÜTZE
Auch die Position der Fußstütze kann abhängig von der gewünschten Haltung für das Kind eingestellt werden. Sie ist
4-fach verstellbar.
Drücken Sie auf den sich an der Stütze der beiden Seiten des
Kinderwagens befindenden Hebel, während Sie die Fußstütze nach unten bewegen.
Um diese nach oben zu bewegen, braucht der Knopf nicht
gedrückt zu werden, denn diese verfügt über einen frei beweglichen Mechanismus.
WARNUNG: Dem Kind nie erlauben, dass es sich auf der Fußstütze
oder Trittbrett mit den Füßen aufstellt.
10
9.2
9.- SCHUTZ
Um den Schutz abzunehmen, den Knopf im unteren Teil der
Armlehne drücken.
Nachdem dieser herausgenommen wurde, die Stöpsel zum
Schließen der Löcher der Schutzvorrichtung aufsetzen.
Diese Stöpsel erfüllen eine doppelte Funktion, einmal ästhe tisch, indem die Löcher verborgen werden, aber auch um zu
verhindern, dass das Kind seine Finger in die Löcher stecken
kann.
12
WARNUNG: Das Kind muss von den beweglichen Teilen entfernt gehalten werden, wenn diese von einem verant wortlichen Er wachsenen gehandhabt werden.
10.- EINSTELLUNG DER POSITION DER GRIFF
Ihr AERO verfügt über ein System zur Einstellung der
Griffposition, welches sich sehr bequem handhaben lässt .
Den Knopf drücken und solange gedrückt halten wie die
Position des Griffes eingestellt wird. Es gibt 5 Positionen,
damit Sie immer diejenige auswählen können, die sich am
besten Ihren jeweiligen Anforderungen gerecht wird.
11
13
deutsch
41
Page 42

11.- ZUSAMMENKLAPPEN
Ziehen Sie die beiden sich an der Lenkstange befindenden
Griffe nach oben, während Sie das Pedal des unteren Tasters
so wie auf der Abbildung gezeigt hochziehen.
Danach f ühren Sie die Len kstange na ch unten, dami t der Spazierwagen zusammenklappt.
Schließlich stellen Sie den Griff ein, um Ihren AERO so klein
wie möglich zusammenklappen zu können.
Hinweis: Wenn Sie den Buggy mit dem Sitzeinhang in zurückgelehnter Position zusammenklappen, kann sich die Haub e
lösen. Es wird empfohlen, den Sitzeinhang in senkrechte Position zu s tellen.
15
14.1-14.2
13.- UNTERHALT
Polstereinlage nicht übermäßig lange einer direkten
Sonneneinstrahlung aussetzen.
Plastikteile mit lauwarmem Wasser und Seife reinigen.
Anschließend alle Bauteile sorgfältig trocknen.
Fetten Sie die beweglichen Teile und Vorrichtungen reg elmäßig mit einem Spray auf Silikonbasis ein.
Sowohl zu Ihrer Sicherheit als auch zur guten Konservierung
des Produktes ist es wichtig, eine regelmäßige Überprüfung
in einer unserer of fiziellen Werkstätten vornehmen zu lassen.
AERO
42
WARNUNG: Es is t unerlässlich, sicherzustellen, dass das Kind vom
Sitz beim Auf- und Zuklappen entfernt gehalten wird.
WARNUNG: Das Auftreten von Schnitt-, Druck und Quetschstellen und ist bei diesen Operationen unumgänglich.
12.- HAUBE
Um die Haube am Fahrgestell anzubringen, schieben Sie sie,
bis sie in den Seiten des Lenkers einrastet .
Um sie zu entfernen, gehen Sie auf umgekehr te Weise vor.
WARNUNG: Nie Gewichte auf die Haube legen.
16
14.- REGENSCHUTZ
Der Regenschutz Ihres AERO is t sehr leicht anzubringen. Sie
müssen nur die Hängematte abdecken und die Verschlüsse
auf den Rahmen einstellen, um ihn zu befestigen. Er hat ein
kleines aufrollbares Fenster, das mit Klettverschlüssen befestigt werden kann, damit das Kind seine Umgebung völlig frei
erkunden kann.
17
Page 43

INFORMATIONEN ZUR GARANTIE
Dies er Ar ti kel hat Garantie laut de n Be stimmunge n de s Gesetzes 23 /2003 vom 10. Juli 2003. Bewahren Sie diese Einkaufsrechnung auf. Ihre Vorlage in dem Laden, wo Sie das Produkt
erworben haben, ist unumgänglich, um ihre Gültigkeit bei
jeder Reklamation zu beweisen.
Jene Mängel oder Schäden, die durch unsachgemäßen Gebrauch des Artikels oder Nichteinhaltung der in der Bedienungsanleitung und auf den Pflegeetiketten beschriebenen
Sicherheits- und Wartungsvorschriften verursacht wurden,
sind von der vorliegenden Garantie ausgeschlossen, ebenso
wie die Verschleißteile durch normalen Gebrauch und täglichen Umgang.
Das Etikett, das die Fahrgestellnummer Ihres Modells enthält,
darf unter keinen Umständen abgerissen werden, denn es
enthält wichtige Informationen.
Achtung:
Um maxim ale Sich erheit und Betreuu ng für Ihren neue n JAN É
zu erhalten, ist es sehr wichtig, dass Sie die Re gistrierungskarte, die Sie auf der Webseite www.jane.es finden, ausfüllen.
Die Registrierung wird Ihnen ermöglichen, falls notwendig,
sich üb er die En twic klung und Pfl eg e Ihres Pro dukt es zu inf ormieren. Ebenso können wir Sie, wenn Sie es wünschen, über
die neuesten Modelle oder Nachrichten, die unserer Ansicht
nach für Sie von Interesse sind, informieren.
deutsch
43
Page 44

AERO
44
Page 45

INDICE
AVVERTENZA
1.- APERTURA
2.- SISTEMA PRO-FIX
3.- ESTRAZIONE SEDUTA
4.- RUOTE ANTERIORI PIROETTANTI
5.- FRENO
6.- IMBRAGATURA DI SICUREZZA
7.- GRADUAZIONE DELLO SCHIENALE
8.- GRADUAZIONE DEL POGGIAPIEDI
9.- PROTETTORE
10.- REGOLAZIONE DELLA POSIZIONE DELL’IMPUGNATURA
11.- CHIUSURA
12.- CAPOTTINA
13.- MANUTENZIONE
14.- PARAPIOGGIA
46
47
47
48
48
48
48
49
49
49
49
50
50
50
50
italiano
45
Page 46

AVVERTENZA
AERO
46
IMPORTANTE – Conservare le presenti istruzioni per
consultazioni future.
AVVERTENZA: non lasciare mai il bambino privo di
vigilanza.
AVVERTENZA: assicurarsi che tutti i dispositivi di
chiusura siano inseriti prima dell’uso.
AVVERTENZA: per evitare lesioni, assicurarsi che il
bambino sia lontano durante l’apertura e la chiusura
di questo prodotto.
AVVERTENZA: non consentire al bambino di giocare
con questo prodotto.
AVVERTENZA: questo prodotto non è adatto a bambini di età inferiore ai 6 mesi.
AVVERTENZA: usare sempre il sistema di trattenuta.
AVVERTENZA: verificare che i dispositivi di trattenuta
del portabebè, della seduta o del seggiolino auto siano correttamente inseriti prima dell’uso.
AVVERTENZA: questo prodotto non è adatto per correre o pattinare.
Questo veicolo è destinato a bambini dai 6 mesi e fino
a 15 kg.
Adatto a bambini di età inferiore a 6 mesi solo con
accessori approvati da JANÉ.
Il dispositivo di stazionamento deve essere attivato
quando si posiziona e si ritira il bambino dal veicolo.
Qualunque carico fissato al manubrio e/o alla parte
posteriore dello schienale e/o ai lati del prodotto ne
compromette la stabilità.
Page 47

Questo veicolo è stato progettato per trasportare un
solo bambino alla volta. Non utilizzarlo con più bambini contemporaneamente.
Non utilizzare accessori non approvati da JANÉ.
Nel caso di seggiolini auto usati insieme a un telaio,
questo veicolo non sostituisce una culla o un lettino.
Se il bambino ha bisogno di dormire deve essere sistemato in un portabebè, una culla o un lettino adeguati.
Non utilizzare mai pezzi di ricambio non approvati da
JANÉ, S.A.
Il peso massimo consentito per il cestino portaoggetti non può mai superare quello indicato sul cestino
stesso (4 kg).
1.- APERTURA
Per aprire il passeggino AERO sollevare contemporaneamente i bloccaggi situati sul manubrio.
Una volta aperto assicurarsi che l’incrocio posteriore del telaio sia teso completamente, in modo da bloccare il passeggino
ed evitare così movimenti non desiderati.
AVVERTENZA : È imprescindibile assicurarsi che il bambino venga
tenuto lontano dal passeggino durante le azioni di chiu sura e
apertura.
AVVERTENZA : L’apparizione di punti di taglio, compressione e
intrappolamento sono inevitabili durante queste operazioni.
2.- SISTEMA PRO-FIX
Il telaio della carrozzina è dotato del sistema PRO- FIX, progettato per accogliere uno qualsiasi dei seguenti por tabebé:
Koos, Matrix Light 2, Micro. Il sistema PRO FIX faciliteràl’accoppia mento e l’estrazi one di questi a ccessori al telaio, in una
maniera rapida, facile e sicura, fissandoli al telaio. A tal fine
seguire attentamente le istruzioni di questi accessori.
Per accedere alla zona del sistema PRO-FIX aprire i bottoni
del rivestimento e rimuovere i due tappi che chiudono il sistema. Conservare i tappi in un luogo sicuro e riposizionarli
quando il seggiolino non viene utilizzato. 3.1 - 3.2
1
2
italiano
47
Page 48

AERO
48
3.- ESTRAZIONE SEDUTA
Questa funzione è necessaria per utilizzare il passeggino con
diversi accessori. Per estrarre lo schienale rimuovere prima il
rivestimento dai braccioli e la seduta.
Per estrarre lo schienale togliere innanzitutto il rivestimento
del bracciolo. 4 .1
Premere il bottone situato in entrambi i lati della base dello
schienale mentre si estrae il tubo dello schienale dal suo fissaggio. 4.2-5
Seguire il procedimento inverso per montare di nuovo lo
schienale.
4.- RUOTE ANTERIORI PIROETTANTI
Il vostro AERO dispone di ruote anteriori girevoli
direzionali, con la possibilità di bloccare la direzione.
Per bloccare la ruota premere la leva verso il basso quando
le ruote sono allineate secondo l’asse longitudinale del pas seggino. 6.1
Per bloccare la direzione tirare la leva verso l’alto. 6.2
5.- FRENO
Il vostro AERO dispone di un sistema di frenatura che agisce
simultaneamente su entrambe le ruote posteriori.
Usare come freno di stazionamento ogni qual volta sia possibile, è un importante elemento di sicurezza.
Per frenare premere la leva del freno.
Per sbloccare il freno spingere la leva verso l’alto.
AVVERTENZA : Una volta azionato il freno assicurarsi che il passeggino sia rimasto frenato correttamente. Potrebbe essere
necessario ruotare leggermente il passeggino affinché il freno
ingrani in maniera ottima.
AVVERTENZA : Assicurarsi che il freno di stazionamento sia azionato prima di adagiare o togliere il bambino dal passeggino.
6.- IMBRAGATURA DI SICUREZZA
Il vostro AERO dispone di una imbragatura di sicurezza p erché vostro figlio stia al sicuro in ogni momento.
I due punti di fissaggio laterali della seduta possono essere
usati per il fissaggio di un’imbracatura supplementare
7
8
Page 49

7.- GRADUAZIONE DELLO SCHIENALE
Allo scopo di proporzionare un maggior comfort al bambino,
lo schienale del AERO dispone di un sistema reclinabile.
Il sistema reclinabile dispone di 5 p osizioni.
Tirare la leva posteriore mentre si abbassa lo schienale.
Per sollevarlo non bisogna premere la leva, semplicemente
spingere lo schienale giacché questo dispone di un meccanismo di movimento libero.
9.2
9.1
9.- PROTETTORE
Per togliere il protettore premere il bottone situato nella
parte inferiore del bracciolo.
Una volta estratto situare i tappi destinati a coprire i fori del
protet tore.
Questi tappi hanno una doppia funzione: estetica, giacché
tappano i fori, e di sicurezza per evitare che il bambino
possa mettere le dita.
11
12
8.- GRADUAZIONE DEL P OGGIAPIEDI
Si può anche regolare l’inclinazione del poggiapiedi in funzione della posizione desiderata per il bambino a seconda dei
momenti. Esso dispone di 4 posizioni diver se.
Premere la leva che si trova sul predellino su entrambi i lati del
passe ggino e contemporaneamente spostare il poggiapiedi
verso il basso.
Per muoverlo ver so l’alto non è necessario p remere il bottone,
dispone di un meccanismo di movimento libero.
AVVERTENZA : Non permettere mai al bambino di mettersi in piedi sul poggiapiedi o pedana.
10
AVVERTENZA : Il bambino deve essere tenuto lontano dalle parti
mobili durante le operazioni di manipolazione effet tuate da un
adulto responsabile.
10.- REGOLAZIONE DELLA POSIZIONE DELL’IMPUGNATURA
AERO è dot ato di un sistema per regolare la posizione
dell’impugnatura e offre una maggiore comodità.
Premere il bottone e mantenerlo premuto mentre si regola
la posizione dell’impugnatura. Dispone di 5 posizioni per scegliere quella che si adatta meglio alle vostre necessità.
13
italiano
49
Page 50

AERO
50
11.- CHIUSURA
Tirare contemporaneamente ver so l’alto i due bloccaggi situati sul manubrio e al tempo stesso spingere verso l’alto il
pedale del tirante inferiore, come mostrato dalla figura.
14.1-14.2
Fatto questo, spingere il manubrio verso il basso per consentire la chiu sura del passeggino.
Infine, regolare l’impugnatura per portare AERO nella posizione più chiusa possibile.
Nota: se si chiude il passeggino con la seduta in posizione
reclinata la capottina può staccarsi. Si raccomanda di portare
la seduta in posizione ver ticale.
AVVERTENZA : È imprescindibile assicurarsi che il bambino venga
tenuto lontano dal passeggino durante le azioni di chiu sura e
apertura.
AVVERTENZA : L’apparizione di punti di taglio, compressione e
intrappolamento sono inevitabili durante queste operazioni.
12.- CAPOTTINA
Per montare la capottina sul telaio, farla scivolare fino a che
non si incastra sui fianchi del manubrio.
Per estrarla seguire il procedimento inverso.
AVVERTENZA : Non collocare peso sulla cappotta.
15
16
13.- MANUTENZIONE
Non esp orre il rivestimento ai raggi solari per intervalli lunghi.
Lavare le parti di plastica con acqua insaponata , poi asciugare scrupolosamente tutti gli elementi.
Il rives timento può essere tolto e lavato.
Lubrificare regolarmente le par ti mobili e i meccanismi con
uno spray a base di silicone. Non usare olio o grasso.
È importante sottoporre il prodotto a una revisione periodica in uno qualunque dei nostri centri ufficiali, sia per la sua
sicurezza che per la buona conservazione del prodotto stesso.
14.- PARAPIOGGIA
Il parapioggia del AERO è molto semplice da installare: basta semplicemente stenderlo sulla sdraiett a fino a coprirla e
applicare gli agganci al telaio perché rimanga teso. Il parapioggia è dotato di una piccola finestra che si può arrotolare
e fissare con il velcro, di modo che il bambino possa osservare
ciò che lo circonda in completa liber tà.
17
Page 51

INFORMAZIONI SULLA GARANZIA
Questo articolo è completo di garanzia, secondo quanto stabilito dalla legge 23 del 10 luglio 2003. Conservare lo scontrino d’acquisto, poiché in caso di reclami sarà necessario presentarlo al negozio dove è stato acquistato il prodotto per
dimostrare la validità della garanzia.
Sono esclusi dalla pres ente gara nzia i difetti o le avarie dov uti a un uso non adeguato del prodotto o al mancato compimento delle norme di sicurezza e manutenzione descritte nei
libret ti di istruzioni e sulle etichette per il lavaggio. Lo stesso
vale per i danni dovuti all ’u sura in caso di utilizz o pr olungato.
L’etichetta che contiene il numero di telaio del modello non
deve essere rimossa in nessun caso, dato che contiene informazioni importanti.
Attenzione:
Per garantire la massima sicurezza e consulenza riguardo il
suo nuovo JANÉ, è molto importante compilare il modulo di
registrazione che troverà sul sito www.jane.es
La registrazione le consentirà di es sere informato, se è neces sario, riguardo l’evoluzione e la manutenzione del suo prodotto. Inoltre, sempre se lo desidera, la potremo informare
su i nu ov i model li o alt re nov ità che rit enia mo di suo int eress e.
português
51
Page 52

AERO
52
Page 53

INDICE
AVISO
1.- DESDOBRAGEM
2.- SISTEMA PRO-FIX
3.- EXTRAÇÃO CADEIRA
4.- RODAS DIANTEIRAS ROTATIVAS
5.- TRAVÃO
6.- ARNÊS DE SEGURANÇA
7.- GRADUAÇÃO DO ENCOSTO
8.- GRADUAÇÃO DO REPOUSA-PÉS
9.- PROTECTOR
10.- REGULAÇÃO DA POSIÇÃO DA PEGA
11.- DOBRAGEM
12.- CAPOTA
13.- MANUTENÇÃO
14.- PROTECTOR DE CHUVA
54
55
55
56
56
56
56
57
57
57
57
58
58
58
58
português
53
Page 54

AVISO
AERO
54
IMPORTANTE - Guarde estas informações para
futuras consultas.
AVISO: Não deixar nunca a criança sozinha.
AVISO: Assegure-se de que todos os dispositivos de
fecho estão engrenados antes do uso.
AVISO: Para evitar lesões, assegure-se de que a
criança se mantém afastada durante a desdobragem
e a dobragem deste produto.
AVISO: Não permita que a criança brinque com este
produto.
AVISO: Este assento não é adequado para crianças
menores de 6 meses.
AVISO: Usar sempre o sistema de retenção.
AVISO: Comprovar se os dispositivos de sujeição da
alcofa, do assento ou da cadeira de automóvel estão
corretamente engrenados antes do uso.
AVISO: Este produto não é adequado para correr ou
patinar.
Este veículo é para crianças a partir dos 6 meses e
até 15 kg.
Apto para crianças menores de 6 meses apenas com
acessórios aprovados pela JANÉ.
O dispositivo de estacionamento deve ser ativado ao
colocar e ao retirar as crianças do veículo.
Qualquer carga fixada ao guiador e/ou à parte
traseira do encosto e/ou às laterais do veículo afeta
a estabilidade do mesmo.
Este veículo foi desenhado para uma única criança,
Page 55

não devendo ser usado com mais de uma criança ao
mesmo tempo.
Não devem ser usados acessórios não aprovados
pela JANÉ.
Para as cadeiras de automóvel usadas em conjunto
com um chassis, este veículo não substitui um berço
ou cama. Se a criança necessitar de dormir, deve ser
colocada numa alcofa, berço ou cama adequadas.
Não utilize nunca peças de substituição que não
tenham sida aprovadas pela JANÉ, S.A.
A massa máxima permitida da cesta porta-objetos
nunca pode superar o indicado na cesta (4 kg).
1.- DESDOBRAGEM
Para des dobrar o carrin ha basta prem ir em simultâne o os dois
botões situados no guiador.
Uma vez de sdobrado as segure- se que a cruz trase ira fica completamente tensionada, pois bloqueia o carrinho para que
não se dobre involuntariamente.
AVISO: É imprescindível assegurar-se que a criança se mantém
afastada da cadeira durante as acções de dobragem e desdobragem.
AVISO: A aparição de pontos de cor te e compressão e entala mentos é inevitável durante estas operações.
2.- SISTEMA PRO-FIX
O chassis do seu carrinho inclui o sis tema PRO-FIX, preparado para incorporar qualquer um dos seguintes porta bebés:
Koos, Matrix Light 2, Micro.
O sistema PRO FIX facilitar-lhe-á o acoplamento e a ex tracção
destes acessórios ao chassis, de um modo rápido, fácil e seguro, ficando aqueles ancorados no chassis. Para isso, siga com
atenção as instruções destes acessórios.
Para aceder à zona do sistema PRO- FIX deverá abrir os fechos
da cobertura e retirar os dois tampões que cobrem o referido
sistema. Guarde os tampões num local seguro e recoloque-os
logo que deixe de usar o por ta- bebés. 3.1 - 3.2
1
2
português
55
Page 56

AERO
56
3.- EX TRAÇÃO CADEIR A
Esta função é necessária para utilizar a cadeira com os diferentes porta-bebés.
Para extrair o encosto retire em primeiro a cobertura do apoio
de braços e o assento.
Para extrair o encosto primeiro retire o estofo do repousa
braços.
Prima o botão situado a ambos os lados da base do encos to
enquanto extrai o tubo do encosto da sua ancoragem. 4 .1
Posteriormente liberte os graduadores de reclinado do
encosto empurrando para cima levemente. 4.2-5
Siga os passos em sentido inverso para montar o encosto de
novo.
4.- RODAS DIANTEIRAS ROTATIVAS
O seu AERO d ispõe de roda s dianteiras gira tórias direcci onais,
com a possibilidade de bloquear a direcção.
Para a bloquear empurre a alavanca para baixo logo que as
rodas estejam alinhadas segundo o eixo longitudinal do carrinho 6 .1
Para desbloquear a direcção puxe a alavanca para cima. 6.2
5.- TRAVÃO
O seu AERO dispõe de um sistema de travagem que actua
simultaneamente sobre ambas as rodas traseiras.
Use- o como travão de estacionamento sempre que puder, é
um importante elemento de segurança.
Para travar pise a alavanca de travagem.
Para libertar o travão puxe a alavanca para cima.
AVISO: Uma vez accionado o travão, cer tifique-se que o carrinho
ficou correctamente travado. Pode ser necessário fazer rodar
ligeiramente o carrinho para que o travão engrene de forma
óptima.
AVISO: Assegure-se de que o travão de estacionamento está accionado antes de instalar ou retirar a criança do carro.
6.- ARNÊS DE SEGURANÇA
O AERO dispõe de um arnês de segurança, para que o seu
bebé esteja seguro em todo o momento.
Os dois pontos de fixação laterais do assento podem ser utilizados para a fixação de um arnês suplementar
7
8
Page 57

7.- GRADUAÇÃO DO ENCOSTO
Com o obje ctivo de proporciona r o maior conforto ao bebé , o
encosto do AERO tem um sistema de reclinado.
O sistema de reclinado dispõe de 5 posições.
Puxe a alavanca traseira enquanto baixa o encosto.
Para o subir não tem que premir a alavanca, simplesmente
empurre o encosto uma vez que este dispõe de um mecanismo de movimento livre.
8.- GRADUAÇÃO DO REPOUSA-PÉS
Também é pos sível ajustar a posição do apoio de pés em função da postura pretendida para a criança em cada momento,
dispondo para isso de 4 posições diferentes.
Prima a alavanca situada nos estribos laterais enquanto move
o apoio de pés para baixo.
Para o mover para cima não é neces sário premir o botão, dispõe de um mecanismo de movimento livre.
AVISO: Nunca permita que a criança se ponha de pé no repousa-
-pés o estribo.
9.2
10
9.1
9.- PROTECTOR
Para tirar o protector prima o botão situado na parte inferior
do apoia braços.
Quando o tiver ex traído situe as tampas destinadas a cobrir
os buracos do protector.
Estas tampas têm dupla função, estética, já que não se vê o
buraco, e de segurança para evitar que o bebé possa meter
o dedo.
AVISO: A criança deve manter-se afastada das partes móveis
quando estas estiverem a ser manipuladas pelo adulto responsável.
10.- REGULAÇÃO DA POSIÇÃO DA PEGA
A sua AERO dispõe de um sistema para regular a posição da
pega e oferece uma maior comodidade.
Prima o botão e mantenha premido enquanto ajusta a posição da pe ga. Dispõe de 5 posiçõe s para escolher a q ue melhor
se adaptar às suas necessidades.
11
12
13
português
57
Page 58

AERO
58
11.- DOBRAGEM
Puxe para cima em simultâneo dos 2 puxadores no guiador
enquanto levanta o pedal do fixador inferior, tal como apresenta a figura.
De segu ida empurre o gui ador para baixo para que o carrinho
se dobre.
Finalmente regule a pega para deixar a sua AERO o mais dobrada possível.
Nota: Se dobrar o carrinho com a cadeira na posição inclinada, a capota pode soltar-se, pelo que se recomenda colocar a
cadeira na posição vertical.
AVISO: É imprescindível assegurar-se que a criança se mantém
afastada da cadeira durante as acções de dobragem e desdobragem.
AVISO: A aparição de pontos de cor te e compressão e entala mentos é inevitável durante estas operações.
12. - CA POTA
Para a mont agem da capota ao chassis, faça-a deslizar até
encaixar com as laterais do guiador.
Para a extrair proceda da forma inver sa.
AVISO: Não colocar peso sobre a capota.
14.1-14.2
15
16
13.- MANUTENÇÃO
Não deixe o forro exposto ao sol durante períodos prolongados.
Lave as partes de plástico com água tépida e sabão e seque
bem todos os componentes.
O forro pode ser desmont ado para lavagem.
Lubrifique regularmente as par tes móveis e mecanismos com
um spray à base de silicone. Não usar óleo ou gordura.
Tanto para sua segurança como para a boa conservação destes produto, é importante que faça uma revisão periódica em
qualquer uma das nossas oficinas oficiais.
14.- PROTECTOR DE CHUVA
O protec tor de chuva do AERO é muito simples de colocar,
apenas tem de cobrir a cadeira e ajustar os engates ao chassis
para o fixar. Este tem uma p equena janela que se pode enrolar e fixar com velcros para que a criança possa ver o que a
rodeia com total liberdade.
17
Page 59

INFORMAÇÃO SOBRE GARANTIA
Este artigo dispõe de uma garantia segundo o estipulado na
lei 23 / 2003 de 10 de julho. Conserve a fatura de compra,
pois é imprescindível a sua apresentação na loja onde adquiriu o produto para justificar a sua validade perante qualquer
reclamação.
Ficam excluídos da presente garantia os defeitos ou avarias
prod uzidas pelo uso inadequado do artig o ou pelo incumprimento das normas de segurança e manutenção descritas nas
folhas de ins truções e nas etiquetas de lavagem, assim como
os elementos de desgaste por uso normal e manuseamento
diário.
A etiqueta que contém o número de chassis do seu modelo,
não deve ser removida sob nenhum pretex to pois contém informação importante.
Atenção:
Para obter a máxima segurança e apoio sobre o seu novo
JANÉ, é muito importante que preencha o cartão de regis to
que encontrará na página www.jane.es
O registo permite informar-se, se necessário, sobre a evolução e man ut enção do seu prod uto. Tam bé m, sem pre que pretenda, podemo s enviar- lhe info rma ção sobre os novos mod elos ou no ticia s que consi de remos possam se r do seu inte resse.
português
59
Page 60

AERO
60
Page 61

INHOUD
WAARSCHUWING
1.- UITKLAPPEN
2.- PRO-FIX-SYSTEEM
3.- VERWIJDERING ZITJE
4.- DRAAIWIELEN
5.- REM
6.- VEILIGHEIDSTUIGJE
7.- VERSTELLING VAN DE RUGLEUNING
8.- VERSTELLING VAN DE VOETSTEUN
9.- BESCHERMING
10.- REGELING VAN DE STAND VAN DE DUWSTANG
11.- INKLAPPEN
12.- ZONNEKAP
13.- ONDERHOUD
14.- REGENHOES
62
63
63
64
64
64
64
65
65
65
65
66
66
66
66
nederlands
61
Page 62

WAARSCHUWING
AERO
62
BELANGRIJK - Bewaar deze gebruiksaanwijzing voor
eventuele raadpleging in de toekomst.
WAARSCHUWING: Laat het kind nooit zonder
toezicht achter.
WAARSCHUWING: Zorg ervoor dat alle sluitingen
voor gebruik vastzitten.
WAARSCHUWING: Om letsels te vermijden moet u
ervoor zorgen dat het kind uit de buurt blijft wanneer
u dit product uit- en inklapt.
WAARSCHUWING: Laat het kind niet met dit product
spelen.
WAARSCHUWING: Dit stoeltje is niet geschikt voor
baby’s jonger dan 6 maanden.
WAARSCHUWING: Gebruik altijd het tuigje.
WAARSCHUWING: Controleer voor gebruik of de
bevestigingen van de reiswieg, van het kinderzitje of
van het autostoeltje goed vastzitten.
WAARSCHUWING: Dit product is niet geschikt om
ermee te rennen of skaten.
Deze wagen is bestemd voor kinderen vanaf 6
maanden en tot een gewicht van 15 kg.
Uitsluitend geschikt voor baby’s jonger dan 6 maanden
met de door JANÉ goedgekeurde accessoires.
De parkeerinrichting dient te worden geactiveerd
wanneer de kinderen in de wagen worden gezet en
eruit worden gehaald.
Elke last die aan de duwstang en/of aan de achterkant
van de rugleuning en/of de zijkanten van de wagen
worden bevestigd, tast de stabiliteit ervan aan.
Page 63

Deze wagen is ontworpen voor slechts één kind.
Gebruik hem niet voor meerdere kinderen tegelijk.
Er mogen geen niet door JANÉ goedgekeurde
accessoires worden gebruikt.
Voor autostoeltjes die samen met een chassis worden
gebruikt vervangt deze wagen geen wieg of bed. Als
het kind moet slapen, dan dient hij in een geschikte
reiswieg, wieg of bed te worden gelegd.
Gebruik nooit reserveonderdelen die niet door JANÉ,
S.A. zijn goedgekeurd.
De maximaal toegestane massa van het
boodschappenmandje mag nooit meer dan het op
het mandje aangeduide gewicht zijn (4 kg).
1.- UITKLAPPEN
Trek tegelijk aan de drukknoppen die zich op de duwstang
bevinden om uw AERO wandelwagen uit te klapp en.
Zorg ervoor dat het achterkruis geheel gespannen komt te
zitten zodra de wandelwagen is uitgeklapt. De wagen wordt
hiermee vergrendeld, zodat hij niet per ongeluk inklapt.
WAARSCHUWING: U dient erop toe te zien dat het kind verwijderd blijft van de wandelwagen wanneer deze wordt in- en
uitgeklapt.
WAARSCHUW ING: Bij het ve rrichten van deze handelingen is het
onvermijdelijk dat er snij- en samendrukkingspunten zijn en dingen vastgeklemd kunnen komen te zitten.
2.- PRO-FIX-SYSTEEM
Het onderstel van uw wandelwagen is voorzien van het PROFIX-systeem, waarmee een willekeurige van de volgende
babystoeltjes kan worden bevestigd : Koos, Matrix Light 2,
Micro. Met het PRO -FIX-systeem
kunt u deze accessoires gemakkelijk, snel en veilig aan het
frame vastmaken en er weer van afhalen. Volg hier voor de
instructies van deze accessoires zorgvuldig op.
Om toegang te krijgen tot de zone van het PRO-FIX-systeem
dient u de gespen van de bekleding los te maken en de twee
doppen waarmee dat systeem is bedek t te verwijderen. Bewaar de doppen op een veilige plek en vervang ze wanneer u
het babyzitje niet langer gebruikt. 3.1 - 3.2
1
2
nederlands
63
Page 64

AERO
64
3.- VERWIJDERING ZITJE 5.- REM
Deze functie is noodzakelijk om de wan delwagen met de verschillende babyzitjes te gebruiken.
Om de rugleuning te verwijderen dient eerst de bekleding
van de armleuning en van de zitting te worden ver wijderd.
Druk de knop aan weerszijden van de onderkant van de rugleuning in terwijl u de buis van de rugleuning uit zijn bevestiging haalt. 4 .1
Maak daarna de regelaars voor de stand van de rugleuning
los door deze iets omhoog te drukken. 4.2-5
Volg de stappen in omgekeerde volgorde om de rugleuning
weer terug te plaatsen.
4.- DRAAIWIELEN
Uw AERO is aan de voorkant uitgerust met richtbare draaiwielen die vergrendeld kunnen worden.
Druk de hendel omlaag nadat de wielen op één lijn zijn gezet
met de lengteas van de wandelwagen om het te blokkeren 6.1
Trek voor het ontgrendelen van de wielen de hendel omhoog.
6.2
Uw AERO beschik t over een remsysteem dat
tegelijkertijd op beide achterwielen inwerkt. Gebruik dit sy steem zo mogelijk altijd als parkeerrem. Het is een belangrijk
veiligheidselement.
Druk de remhendel in om te remmen.
Druk de hendel omhoog om de rem te lossen.
WAARSCHUWING: Zorg er na het inschakelen van de rem voor
dat de wan delwagen go ed is afgeremd . Het kan nodig zij n om de
wandelwagen iets te verplaatsen zodat de rem optimaal
koppelt.
6.- VEILIGHEIDSTUIGJE
Uw AERO beschik t over een veiligheidstuigje zodat uw kind
steeds veilig is.
De twee bevestigingspunten aan de zijkant van het zitje
kunnen worden gebruikt om er een extra tuigje aan vast te
maken
7
8
Page 65

7.- VERSTELLING VAN DE RUGLEUNING
Om het kind de bes te comfort te ve rschaffen is de rugleuning
van de AERO uitgerust met een verstelsysteem.
Het verstels ysteem beschikt over 5 standen.
Trek aan de achterhendel ter wijl u de rugleuning omlaag
drukt.
9.1
Om de rugleuning omhoog te halen hoeft de hendel niet te
worden ingedrukt. Druk de rugleuning simpelweg omhoog,
hij is namelijk voorzien van een mechanisme voor de vrije
beweging.
Ook kan de positie van de voetsteun worden versteld op
grond van de gewenste houding van het kind. Deze beschikt
over 4 verschillende standen.
Druk de hendel op de voetrust aan weerszijden van de wandelwagen in terwijl u de voetsteun naar beneden verplaatst.
10
Om de voetsteun omhoog te brengen hoef t de knop niet te
worden ingedrukt, daar deze over een mechanisme voor de
vrije beweging beschikt.
9.2
8.- VERSTELLING VAN DE VOETSTEUN
WAARSCHUWING: Laat het kind nooit op de voetsteun of voetrust gaan staan.
9.- BESCHERMING
Druk de knop aan de onderkant van de armsteun in om de
bescherming te verwijderen.
Breng de doppen die bestemd zijn voor het afdekken van de
gaten aan, nadat de bescherming is verwijderd.
Deze doppen hebben een dubbele functie: een esthetische
functie (men ziet het gat niet) en een veiligheidsfunc tie (om
te voorkomen dat het kind zijn vinger erin kan steken).
WAARSCHUWING: Het kind moet ver wijderd blijven van de
bewegende delen wanneer deze door een verantwoordelijke
volwassene worden gemanipuleerd.Bij het verrichten van deze
handelingen is het onvermijdelijk dat er snij- en samendrukkingspunten zijn en dingen vastgeklemd kunnen komen te zitten.
10.- REGELING VAN DE STAND VAN DE DUWSTANG
Uw AERO beschik t over een verstelsysteem voor de positie
van de duw stang en biedt u meer comfort.
Druk de knop in en houd deze ingedruk t terwijl u de stand
van de duw stang instelt. Er zijn 5 standen beschikbaar zodat
u de stand kan kiezen die voor u het comfortabelst is.
11
12
13
nederlands
65
Page 66

AERO
66
11.- INKL APPEN
Trek de twee knoppen op de duwstang tegelijk omhoog terwijl u het pedaal van de onderste passer optilt zoals in de
afbeelding wordt getoond.
Druk de duwstang daarna omlaag om de wandelwagen in
te klappen.
Verstel tenslotte de duwstang om uw AERO zo veel mogelijk
in te klappen.
Opmerking: Als u de wandelwagen met het zitje in achterovergeleunde positie inklapt, kan de zonnekap losraken.
Aanbevolen wordt om het zitje in ver ticale positie te zetten.
WAARSCHUWING: U dient erop toe te zien dat het kind verwijderd blijft van de wandelwagen wanneer deze wordt in- en
uitgeklapt.
WAARSCHUWING: Bij het verrichten van deze handelingen is het
onvermijdelijk dat er snij- en samendrukkingspunten zijn en dingen vastgeklemd kunnen komen te zitten.
12.- ZONNEKAP
Om de zonnekap op de chassis te monteren, dient deze te
worden verschoven totdat hij in de zijkanten van de duwstang past.
Ga omgekeerd te werk om hem weer te verwijderen.
WAARSCHUWING: Leg geen gewicht op de kap.
15
16
14.1-14.2
13.- ONDERHOUD
Stel de bekleding niet langdurig bloot aan de zon.
Was de plastic del en met lauw water e n zeep en maak daarna
alle onderdelen zorgvuldig droog.
De bekleding kan worden losgehaald om gewassen te worden.
Smeer de beweegbare onderdelen en mechanismen regelmatig met een siliconenspray. Gebruik geen olie of smeervet.
Het is zowel voor uw veiligheid als voor het goede behoud van
dit product bela ngr ijk dat u het re gelmatig na la at kijken in een
van onze officiële werkplaatsen.
14.- REGENHOES
De regenhoes van uw AERO is zeer gemakkelijk om aan te
brengen. U hoeft alleen de zitting maar te bedekken en de
haakje s aan de chassis vast te make n. De regenhoes heef t een
klein raampje die kan worden opgerold en met klittenband
kan worden vastgemaakt zodat het kind ongedwongen rond
kan kijken.
17
Page 67

INFORMATIE OVER DE GARANTIE
Dit artikel heef t een garantie zoals bepaald in de wet 23/2003
van 10 juli. Bewaar de aankoopbon. Deze moet in de winkel
waar u het product heeft gekocht worden getoond om bij
klachten de geldigheid ervan te rechtvaardigen.
Defec ten en storingen veroorzaakt door onjuist gebruik van
het artikel of de niet-naleving van de onderhouds- en veiligheidsnormen die in de instructiebladen en de wasetiketten
staan vermeld, alsmede elementen die door normaal gebruik
en dagelijkse hantering verslijten, vallen buiten deze garantie.
Het etiket met het chassisnummer van uw model mag onder
geen beding worden verwijderd, want het bevat belangrijke
informatie.
Opgelet:
Voor de maximale veiligheid en zorg ten aanzien van uw
nieuwe JANÉ produc t is het erg belangrijk dat u de registratiekaar t invult die op de website www.jane.es is te vinden.
Met de registratie kunt u zo nodig informatie inwinnen over
de ont wik ke li ng en het onde rhoud van uw pro du ct. Oo k ku nnen wij u desgewenst informatie verstrekken over nieuwe
modellen of nieuws waar van wij denken dat het interessant
voor u kan zijn.
nederlands
67
Page 68

AERO
68
Page 69

INNHOLD
ADVARSEL
1.- ÅPNING
2.- PRO-FIX-SYSTEMET
3.- FJERNING AV BAGEN
4.- SVINGENDE FORHJUL
5.- BREMS
6.- SIKKERHETSSELER
7.- REGULERING AV RYGGEN
8.- REGULERING AV FOTSTØTTEN
9.- BESKYTTELSESANORDNING
10.- REGULERING AV HÅNDTAKSPOSISJONEN
11.- SAMMENFOLDING
12.- KALESJE
13.- VEDLIKEHOLD
14.- REGNTREKKET
70
71
71
72
72
72
72
73
73
74
74
75
75
75
75
norsk
69
Page 70

ADVARSEL
AERO
70
VIKTIG – Ta vare på disse instruksene til senere bruk.
ADVARSEL: La aldri barnet være uten oppsyn.
ADVARSEL: Forsikre deg om at alle låsemekanismer
er koplet til før bruk.
ADVARSEL: For å unngå skader, forsikre deg om at
barnet ikke er i nærheten når dette produktet legges
sammen og slås ut.
ADVARSEL: Ikke tillat at barnet leker med dette
produktet.
ADVARSEL: Dette setet er ikke egnet for barn under
6 måneder.
ADVARSEL: Bruk alltid festesystemet.
ADVARSEL: Kontroller at festemekanismene til bagen,
setet eller stolen er riktig koplet til før bruk.
ADVARSEL: Dette produktet er ikke egnet for løping
eller bruk med rulleskøyter.
Dette kjøretøyet er for barn fra 6 måneder og opp
til 15 kg.
Egnet for barn under 6 måneder kun med tilleggsut styr
godkjent av JANÉ.
Parkeringsmekanismen må aktiveres når barna settes
eller tas ut fra kjøretøyet.
Enhver last som festes til håndtaket og/eller
ryggstøttens bakside og/eller på sidene av kjøretøyet
vil påvirke dennes stabilitet.
Dette kjøretøyet er laget for ett eneste barn, ikke bruk
det med flere barn samtidig.
Man må ikke bruke tilleggsutstyr som ikke er godkjent
av JANÉ.
Page 71

Dette produktet er egnet for barn som ikke er i stand
til å sette seg alene, snu seg rundt eller sette seg
opp ved å støtte seg på hender og knær. Barnets
maksimumsvekt: 9kg.
Når du bruker bagen, hold stroppene for transport
utenfor bagen mens den er i bruk.
For bilseter som brukes med ramme, vil kjøretøyet
ikke kunne erstatte en vugge eller seng. Hvis barnet
trenger å sove, bør det legges i en passende bag,
vugge eller barneseng.
Bruk aldri reservedeler som ikke er blitt godkjent av
JANÉ, S.A.
Den høyest tillatte vekten i bærenettet må aldri være
høyere enn det som er oppgitt på nettet (4 kg).
1.- ÅPNING
Trykk knappene som står på håndtaket ned samtidig for å
åpne AERO-vognen.
Når vognen er åpnet, kontroller at krysset bak er helt stramt.
Dette er viktig for det besky tter vognen mot ufrivillig sammenfolding av vognen.
ADVARSEL: Det er viktig å kontrollere at barnet holder seg unna
vogna mens du folder den sammen eller åpner den.
ADVARSEL: Under disse handlingene kommer nødvendigvis
skjære- og klemmepunkter til syne.
2.- PRO-FIX-SYSTEMET
Rammen på vognen er utstyrt med PRO FIX-sys temet, klart for å
bruke følgende bærebager: Koos , Matrix Light 2, Micro. Systemet
PRO- FIX gjør det raskt, enkelt og sikkert å set te på og ta av dette
utst yret som festes direk te på rammen. Følg anvisningene på utstyret for å gjøre det te.
For å få adgang til systemet PRO- FIX må du åpne knappene i setetrekket og fjerne de to dekslene som dekker til det te systemet.
Oppbevar dekslene på et trygt sted og sett dem på igjen når du ikke
lenger bruker barnesetet. 3.1 - 3.2
1
2
norsk
71
Page 72

AERO
72
3.- FJERNING AV BAGEN 5.- BREMS
Denne funksjonen er nødvendig for å bruke vognen med
ulike barneseter.For å ta ut r ygglenet, fjern førs t setetrekket
fra armlenet og setet
Trykk deretter knappen plassert på begge sider av ryggens
nedredel mens du fjerner røret fra festet til ryggen. 4 .1
Frigjør til slut t mekanismen e som regulere r posisjonen t il ryggenved å skyve dem forsiktig oppover. 4.2-5
Følg de samme stegene omvendt vei for å montere rygglenet
på nytt.
4.- SVINGENDE FORHJUL
AERO-vogna di er utstyrt med dreibare forhjul med selvstyring og har muligheten til å blokkere st yringen.
For å spe rre dem, tryk k spaken nedover når hjulene er inns tilt
i barnevognens kjøreretning 6.1
Trekk håndtaket oppover for å frigjøre styringen igjen 6.2
AERO-vogna er utst yrt med et bremsesystem som virker samtidig på begge bakhjulene. Bruk denne som parkeringsbrems
når det te er mulig. Det er et viktig sikkerhetselement.
Trø på bremsepedalen for å bremse.
Skyv pedalen oppover for å slippe bremsene igjen.
ADVARSEL: Når bremsen står på, skal du kontrollere at bremsen
faktis k bremser vogna. Det kan være at du må trille vogna litt for
at bremsen skal gå i lås på best mulig måte.
ADVARSEL: Forsikre deg om parkeringsbremsen står på, før du
setter i eller tar ut barna fra vogna.
6.- SIKKERHETSSELER
AERO-vogna er utst yrt med en sikkerhets sele for at barnet
ditt alltid skal sitte sikkert.
De to festepunk tene på siden av setet kan brukes til å feste
en ekstra sele
7
8
Page 73

7.- REGULERING AV RYGGEN
Ryggen til AERO-vogna er utstyrt med et reguleringssystem
for å gi barnet bes t mulig komfort. Reguleringss ystemet har
5 posisjoner.
Trekk i håndtaket bak mens du sk yver ryggen ned.
Det er ikke nødvendig å trekke i håndtaket for å reise ryggen igjen.
Du skal bare skyve den opp, da denne er utstyrt med en mekanisme for fri bevegelse.
Man kan og så justere inn stillingen til fothvileren i henhold til
den ønskede stillingen for barnet til enhver tid. Denne har 4
ulike innstillinger.
Trykk inn spaken som ligger på b rettet på begge side r av vognen, mens du beveger fothvileren nedover.
Det er ik ke nødve ndig å trykke på k nappen igjen f or å bevege
den oppover, da denne er uts tyr t med en mekanisme for fri
bevegelse.
9.1
9.2
8.- REGULERING AV FOTSTØTTEN
10
ADVARSEL: Du skal ikke tillate at barnet står på fotstøtten eller
på trinnet.
9.- BESKYT TELSESANORDNING
Hvis du vil ta av beskyttelsesanordningen, trykker du knap pen nederst på armlenet.
Når du har tatt den vekk, skal du plassere pluggene for å
dekke hullene til beskyttelsesanordningen.
Disse pluggen har dobbel funksjon, estetisk for å dekke hullet og sikkerhetsfunk sjon for å unngå at barnet stikker inn
12
fingrene.
ADVARSEL: Barnet skal holde seg borte fra bevegelige deler når
disse blir håndtert av en ansvarlig voksen person.
10.- REGULERING AV HÅNDTAKSPOSISJONEN
Din AERO har et system for å regulere håndtakets innstilling
og gir slik mer komfor t.
Trykk knappen og hold den nede mens du justerer håndtaksposisjonen.
Den er ut styrt med 5 posisjoner for at du skal kunne velge
den som best oppfyller dine behov.
11
13
norsk
73
Page 74

AERO
74
11.- SAMMENFOLDING
Trekk begge håndtakene på håndtaket oppover samtidig, og
mens du hever pedalen til det nederste le ddet slik det vises
på figuren.
Etterpå følger du håndtaket nedover slik at vognen folder
seg sammen.
Til sist reguler håndtaket for å kunne legge s ammen din
AERO så mye som mulig.
Merk: Hvis du legger sammen barnevognen med bagen i
nedfelt posisjon, vil kalesjen kunne løsne. Det anbefales å ha
bagen i vertikal posisjon.
ADVARSEL: Det er viktig å kontrollere at barnet holder seg unna
vogna mens du folder den sammen eller åpner den.
ADVARSEL: Under disse handlingene kommer nødvendigvis
skjære- og klemmepunkter til syne.
12.- KALESJE
For å montere kalesjen til rammen, trekk den nedover til den
fester seg til håndtakets sidestenger.
For å fjerne den, gjør det samme omvendt vei.
ADVARSEL: Ikke plasser tunge gjenstander oppå overtrekket.
14.1-14.2
15
16
13.- VEDLIKEHOLD
Du skal ikke la trekket utset tes for direkte sol over lengre
perioder.
Vask plas tikkdelene med lunket vann og nøytral såpe.
Etterpå skal du nøye tørke alle delene.
Smør regelmessig de bevegelige delene og mekanismene
med en silikonspray. Ikke bruk verken olje eller smørefett.
Både for din sikkerhet og for et godt vedlikehold av dette
produktet, er det viktig at du foretar en jevnlig kontroll ved
ett av våre offisielle servicesteder.
14.- REGNTREKKET
Regntrekket på Sole rever se-vogen er meget enkelt å set te
på. Du trenger bare å dekke skråstolen og justere festene på
vognen for å feste det. Regntrekket har et lite vindu som du
kan rulle opp og fes te med borrelås, slik at barnet kan fritt
fortsette sin oppdagelsesreise.
17
Page 75

OPPLYSNINGER OM GARANTIEN
Dette produktet har garanti i henhold til spansk Lov nr. 23,
av 10. juli 2003. Ta vare på kjøpsfakturaen, det er helt nødvendig å fremvise denne i butikken der du kjøpte produktet,
for slik å bekrefte dens gyldighet ved enhver reklamasjon.
Denne garantien dekker ikke feil eller skader som er forårsaket av urik tig bruk av produktet eller manglende oppf yllelse
av sikkerhets- og vedlikeholdsreglene beskrevet i bruksanvisningen og vaskelappene, samt slitasje av elementene grunnet vanlig og daglig bruk.
Lappen som inneholder rammenummeret til din modell må
ikke under noen omstendigheter rives av, da den inneholder
viktige opplysninger.
Viktig:
For å få maksimal sikkerhet og informasjon om din nye JANE,
er det meget vik tig at du f yller ut registreringskortet som du
finner på nettsiden www.jane.es
Registreringen gjør det mulig å få informasjon, hvis det er
nødvendig, om utviklingen og vedlikeholdet av produktet
ditt. Såfremt du ønsker det, kan vi også informere deg om
nye modeller eller nyheter som vi mener kan være av interesse for deg.
norsk
75
Page 76

AERO
76
Page 77

INNEHÅLL
VARNING
1.- UPPFÄLLNING
2.- PRO-FIX-SYSTEMET
3.- BORTTAGNING AV RYGGSTÖDET
4.- FRÄMRE SWIVELHJUL
5.- BROMS
6.- SÄKERHETSBÄLTE
7.- INSTÄLLNING AV RYGGSTÖDET
8.- INSTÄLLNING AV FOTSTÖDET
9.- SKYDD
10.- JUSTERING AV HANDTAGETS LÄGE.
11.- HOPFÄLLNING
12.- SUFFLET
13.- UNDERHÅLL
14.- REGNSKYDD
78
79
79
80
80
80
80
81
81
81
81
82
82
82
82
svenska
77
Page 78

VARNING
AERO
78
VIKTIGT - Spara dessa anvisningar för att kunna läsa
dem igen vid behov.
VARNING: Lämna aldrig barnet utan uppsikt.
VARNING: Försäkra dig om att alla fästanordningar/
spärrar är ordentligt fastsatta/låsta innan du
använder produkten.
VARNING: För att undvika skador måste du se till att
barnet håller sig på behörigt avstånd vid upp- och
hopfällningen av denna produkt.
VARNING: Produkten är ingen leksak, låt inte barn
leka med den.
VARNING: Denna stol är inte avsedd att användas av
barn under 6 månader.
VARNING: Du måste alltid använda spärrsystemet.
VARNING: Kontrollera att alla fästanordningar/
spärrar på babyskyddet, sittvagnen eller bilbarnstolen
är ordentligt fastsatta/låsta innan du använder
produkten.
VARNING: Den här produkten är inte avsedd
att användas när du springer/joggar eller åker
rullskridskor (inlines/rollerblades).
Denna produkt är avsedd att användas för barn från 6
månaders ålder och upp till 15 kg.
Får endast användas av barn under 6 månader
tillsammans med godkända tillbehör från JANÉ.
Bromsfunktionen bör aktiveras när barnet ska
placeras i eller tas ut ur produkten.
Alla typer av föremål/vikter som placeras på
handtaget och/eller på baksidan av ryggstödet och/
Page 79

eller på sidan av produkten kommer att påverkas dess
stabilitet.
Produkten har utformats för ett barn, den får inte
användas för flera barn samtidigt.
Du får inte använda tillbehör som inte är godkända
av JANÉ.
Om bilbarnstolen används tillsammans med ett chassi
så ersätter inte denna produkt en vagga eller säng.
Om barnet behöver sova så bör han/hon läggas i ett
lämpligt babyskydd, i en vagga eller en säng.
Använd aldrig reservdelar som inte är godkända av
JANÉ, S.A.
Vikten på de föremål som placeras i förvaringskorgen
får aldrig överskrida den maxvikt som anges på
korgen (4 kg).
1.- UPPFÄLLNING
För att fälla upp AERO-vagnen drar man samtidigt i båda
knapparna som sitter på handtaget.
När vagnen fällts upp, kontrollera at t det bakre korset är helt
spänt, eftersom det måste blockerar vagnen så att den inte
fälls ihop oavsik tligt.
VARNING: Det är absolut nödvändigt at t vagnen är utom räckhåll för barnet när denna vik s ihop eller vecklas upp.
VARNING: Det finns risk för skär- eller klämskador eller fastklämning under denna hantering.
2.- PRO-FIX-SYSTEMET
Barnvagnens chassi har ett PRO -FIX-SYSTEM som är ut format
för användning med följande babyliftar: Koos, Matrix Light
2, Micro. Systemet PRO FIX gör det lätt att passa in och ta
bort dessa tillbehör på/ från chassit snabbt, lätt och säkert så
att de blir fast förankrade i chassit. För att komma åt platsen
där PRO-FIX- systemet sitter måste du öppna knapparna till
klädseln och ta bort de skydd som sitter över detta sy stem.
Förvara skydden på en säker plats och sät t tillbaka dem när
du inte längre använder babyskyddet. 3.1 - 3.2
2
1
svenska
79
Page 80

AERO
80
3.- BORTTAGNING AV RYGGSTÖDET 5.- BROMS
Denna funktion är nödvändig för att använda vagnen med
de olika babyskydden.
För at t ta bort ryg gstödet mås te du först ta b ort klädse ln från
armstöden och stolen.
Tryck på knappen som sitter på båda sidorna om ryggstödets
bas medan du drar ut ryggstödets rör ur dess förankring. 4.1
Frigör sedan lutningsmekanismen på ryggstödet genom att
trycka lätt uppåt. 4.2-5
Följ stegen i omvänd ordning för att sätta fast ryggstödet
igen.
4.- FRÄMRE SWIVELHJUL
Din AERO har vridbara framhjul och möjlighet at t blockera
deras riktning.
För att spärra hjulen trycker du spärren nedåt när hjulen är
ställda rakt i vagnens färdriktning 6.1
För att häva spärren på hjulens riktning, dra spaken uppåt.
6.2
Din AERO har ett bromssystem som inverkar samtidigt på
båda bakhjulen. Använd det som parkeringsbroms när du
kan, det är en viktig säkerhetsdetalj.
För att bromsa, tryck på bromsspaken.
För att lossa bromsen, tryck spaken uppåt.
VARNING: När bromsen har aktiverats kontrollera att vagnens
broms har fungerat som den ska. Det kan bli nödvändigt att
förflytta vagnen något för att bromsen ska ta på optimalt sät t.
VARNING! Försäkra dig om att parkeringsbromsen är aktiverad
innan du placerar eller lyfter ur barnet ur vagnen.
6.- SÄKERHETSBÄLTE
Din AERO har en säkerhetssele för att ditt barn alltid ska sitta
säker t.
De två fästpunkterna på sidan av sitsen kan användas för att
fästa en extra sele.
7
8
Page 81

7.- INSTÄLLNING AV RYGGSTÖDET
För att kunna erbjuda dit t barn största möjliga bekvämlighet
har AERO -vagnens ryggstöd ett lutningssystem. Lutningssystemet har 5 lägen.
Dra i den bakre spaken medan du sänker ryggstödet.
För att höja det behöver man inte trycka på spaken, utan
tryck bara på ryggstödet eftersom detta har en frigöringsmekanism.
8.- INSTÄLLNING AV FOTSTÖDET
Det går även att justera fotstödets position efter vilken ställning man vill att barnet ska ha. Fotstödet kan ställas in i 4
olika lägen.
Tryck på spärren som sitter på stödet på båda sidor av stolen
medan du trycker fotstödet nedåt.
För att höja fotstödet behöver man inte tr ycka på knappen,
eftersom det har en frigöringsmekanism.
VARNING: Låt aldrig barnet stå upp i fotstödet eller fotsteget.
9.2
10
9.1
9.- SKYDD
För att ta fram sk yddet , tryck på knappen som sitter nedtill
på armstödet.
När skyddet tagits fram, sätt i pluggarna som är avsedda för
att täppa till sk yddet s hål.
Dess a pluggar har en du bbel funkti on, en esteti sk för att man
inte ska s e hålet och en säkerhets funktion, fö r att undvika att
barnet sticker in fingrarna.
VARNING: Barnet får inte vara i närheten av de rörliga delarna
när dessa hanteras av en ansvarig vuxen.
10.- JUSTERING AV HANDTAGETS L ÄGE.
Din AERO har ett system för att justera handtagets position
vilket ger större bekvämlighet.
Tryck på knappen och håll den intryckt medan du justerar
handtagets läge. Det har 5 lägen för att du ska kunna välja
det som bäst passar dina behov.
11
12
13
svenska
81
Page 82

AERO
82
11.- HOPFÄLLNING
Dra samtidigt uppåt i de två knapparna som sitter på handtaget medan du lyfter den nedre pedalen på staget såsom
visas på bilden.
Tryck därefter handtaget nedåt så att vagnen fälls ihop.
Slutligen justerar du handtaget för att fälla ihop din AERO så
mycket som möjligt.
OBS: Om du viker ihop barnvagnen med ryggstödet i bakåtlutat läge så kan suffletten lossna. Därför rekommenderar vi
att ryggstödet placeras i vertikalt läge.
VARNING: Det är absolut nödvändigt at t vagnen är utom räckhåll för barnet när denna vik s ihop eller vecklas upp.
VARNING: Det finns risk för skär- eller klämskador eller fastklämning under denna hantering.
12.- SUFFLET
För att sätta fast suf fletten på chassit skjuter du ned den tills
den fastnar på handtagets sidor.
Gör tvärtom om du vill ta bort suf fletten.
VARNING: Placera aldrig föremål på suffletten.
14.1-14.2
15
16
13.- UNDERHÅLL
Utsätt inte klädseln för starkt solljus under lång tid.
Tvätta plastdelarna med ljummet vatten o ch tvål och torka
sedan alla delarna noggrant.
Klädseln kan tas av för tvätt.
Smörj alla rörliga delar och mekanismer regelbundet med en
silikonbaserad sprej. Använd inte olja eller fett.
För att säkerställa produktens säkerhet och dess goda skick är
det viktigt att göra en regelbundet återkommande övers yn
av denna vid någon av våra officiella verkstäder
14.- REGNSKYDD
Det är mycket lätt att sätta på regnskyddet på din AEROvagn. Man behöver bara täcka över babysittern och haka i
fästk rokarna på unde rredet. De n har ett litet fö nster som kan
rullas ihop och fästas med kardborrband för att barnet fritt
ska kunna undersöka sin omgivning.
17
Page 83

INFORMATION OM GARANTIN
Denna artikel har en garanti i enlighet med bestämmelserna i
lag 23/ 2003 av den 10 juli. För att verifiera garantins giltighet
vid en eventuell reklamation är det absolut nödvändigt att
man har sparat inköpskvittot och visar upp det i affären där
produkten inhandlats.
Denna garanti omfattar inte de defek ter och skador som
up ps tåt t till föl jd av ol äm plig anv än dning av ar ti ke ln ell er un derlåtenhet att följa de säkerhets- och underhållsföreskrifter
som beskrivs i bruksanvisningen och på tvättetiketterna eller
på grund av vanligt slitage genom användning.
Etiketten där chassinumret för din modell anges får under
inga omständigheter avlägsnas då den innehåller viktig information.
OBS!
För att få bästa möjliga säkerhet och omsorg för din nya JANÉ
är det mycket viktigt att du fyller i registreringskortet som du
hittar på vår webbsida www.jane.es
Registreringen gör det möjligt för dig att få information, om
det behövs, om utvecklingen och underhållet av din produkt.
När du så önskar kan vi även informera om nya modeller eller
nyheter som vi anser kan vara av intresse för dig.
svenska
83
Page 84

AERO
84
Page 85

СОДЕРЖАНИЕ
ПРЕДУПРЕЖДЕНИЕ
1.- РАСК ЛАДЫВАНИЕ
2.- СИСТЕМАPRO-FIX
3.- СНЯТИЕГАМАКА
4.- ПЕРЕДНИЕПОВОРОТНЫЕКОЛЕСА
5.- ТОРМОЗ
6.- РЕМНИБЕЗОПАСНОСТИ
7.- РЕГУЛИРОВКАСПИНКИ
8.- РЕГУЛИРОВКАПОДНОЖКИ
9.- БАМПЕР
10.-РЕГУЛИРОВКАПОЛОЖЕНИЯРУЧКИ
11.- СК Л А Д ЫВА Н ИЕ
12.-КАПЮШОН
13.-УХОД
14.-ДОЖДЕВИК
86
87
87
88
88
88
88
89
89
89
89
90
90
90
90
pусский
85
Page 86

ПРЕДУПРЕЖДЕНИЕ
AERO
86
ВАЖНО – Сохранить эти инструкции для будущих
консультаций.
ПРЕДУПРЕЖДЕНИЕ: Никогда не оставляйте ребенка
без присмотра.
ПРЕДУПРЕЖДЕНИЕ: Перед использованием
удостоверьтесь, что все механизмы блокировки
приведены в действие.
ПРЕДУПРЕЖДЕНИЕ: Во избежание травм убедитесь,
что ребенка нет рядом,
когда складывается или раскладывается данное
изделие.
ПРЕДУПРЕЖДЕНИЕ: Не разрешайте ребенку играть с
этим изделием.
ПРЕДУПРЕЖДЕНИЕ: Это сиденье не предназначено
для детей младше 6 месяцев.
ПРЕДУПРЕЖДЕНИЕ: Всегда пользоваться системой
удержания.
ПРЕДУПРЕЖДЕНИЕ: Проверить перед
использованием, что все механизмы крепления
люльки, автокресла или автомобильного сиденья
надежно зафиксированы.
ПРЕДУПРЕЖДЕНИЕ: С этим изделием нельзя бегать
или кататься на коньках.
Это транспортное средство предназначено для детей
с 6 месяцев до достижения ими веса 15 кг.
Может быть использовано для детей младше 6
месяцев только с приспособлениями, одобренными
JANÉ.
Стояночный тормоз должен быть задействован, когда
вы кладете ребенка в коляску или вынимаете из нее.
Page 87

Любой груз, повешенный на ручку коляски и/ или
на заднюю часть спинки и/ или на боковины, может
нарушить равновесие коляски.
Эта коляска предназначена для перевозки одного
ребенка, не использовать для перевозки более
одного ребенка одновременно.
Не должны использоваться неодобренные JANÉ
аксессуары.
Переноска, установленная на шасси, не заменяет
люльку или кроватку. Если ребенку нужно спать,
используйте для этого люльку или кроватку.
Никогда не используйте запасные детали,
неодобренные JANÉ, S.A.
Максимально допустимый вес корзины для вещей
никогда не должен превышать вес, указанный на
корзине (4 кг).
1.-Раск ладывание
Чтобы разложить коляску AERO нажмите одновременно на обе
кнопки, расположенные на ручке коляски.
Разложив коляску, убедитесь, что задняя крестовина полностью
раскрыта, так как она блокирует сидень е от непроизвольного
складывания.
ПРЕДУПРЕЖДЕНИЕ: Необходимо убедиться, что ребенка нет
рядом с коляской, когда складывается или раскладывается
коляска.
ПРЕДУПРЕЖДЕНИЕ: Появление точек сжатия и захвата неизбежны во время таких операций.
2.-Си стемаPro-FIX
Шасси Вашей коляски оборудовано системой PRO-FIX, позволяющей установку следующих переносок: Koos, Matrix Light 2, Micro.
Система PRO FIX сделает установку на шасси и снятие данных
модулей боле быстрыми, легкими и безопасными. Для этого тщательно соблюдайте инструкцию к данным модулям. Чтобы иметь
доступ к системе PRO-FIX Вы должны поднять обивку на поручнях, вынув 2 заклепки. Чтобы иметь доступ к системе PRO-FIX
необходимо расстегну ть застежки обивки и снять две заглушки,
закрывающие данную систему. Храните заглушки в надежном месте и установите их после снятия переноски. 3 .1 - 3.2
2
1
pусский
87
Page 88

AERO
88
3.- С НЯТИЕГАМАКА
Эта функция необходима для установки на коляске различных переносок. Чтобы снять спинку, сначала снимите
обивк у с подлокотников и сиденья.
Нажимайте на кнопку, расположенную по обеим сторонам
основания спинки, в то время как будете вынимать трубку
спинки из фиксатора. 4 .1
Постепенно освободите регуляторы высоты спинки, слегка
толкая их вверх. 4.2-5
Для установки спинки выполните эту операцию в обратном
порядке.
4.- П ЕРЕДНИЕПОВОРОТНЫЕКОЛ ЕСА
Ваша AERO имеет плавающие передние колеса с возможностью фиксации направления колес.
Для их фиксации толк ните рычаг вн из после того, как коле са будут выровнены по продольной оси коляски 6 .1
Чтобы зафиксировать направление, потяните рукоятку
вверх 6.2
5.-Тормоз
Ваша AERO имеют систему торможения, которая действует одновременно на оба задних колеса. Используйте его как стояночный
тормоз всегда, когда это будет возможно, это очень важный элемент безопасности.
Чтобы поставить коляску на тормоз, нажмите ногой на рычаг тормоза.
Чтобы снять блокировку колес, толкните рычаг тормоза вверх.
ПРЕДУПРЕЖДЕНИЕ: Задействовав тормоз, убедитесь, что
коляска надежно стоит на тормозе. Может, будет необходимо
прокатить слегка коляску, чтобы тормоз был задействован
оптимально.
ПРЕДУПРЕЖДЕНИЕ: Проверьте что стояночный тормоз приведен в действие перед тем как поместить или вынуть ребенка
из коляски.
6.-РЕМ НИБЕЗО ПАСНОС ТИ
Ваша AERO имеет ремень безопасности, чтобы Ваш ребенок находился в безопасности в любой момент
Двe боковых точки крепления сиденья могут быть использованы
для крепления дополнительного ремня
8
7
Page 89

7.- Регулиров каспи нки
С целью обеспечения ребенку большего комфорта, спинка
AERO имеет систему регулирования спинки.
Система регулирования спинки располагает 5 положениями.
Тяните за задний рычаг, в то время как будете опускать спинку.
9.1
Чтобы поднять ее, не нужно нажимать на рычаг, просто толкайте
спинк у, так как она имеет механизм свободного движения.
9.2
9.- Бамп ер
Чтобы снять бампер, нажмите на кнопку, расположенную в
нижней части подлокотников.
Сняв бампер, вставьте заглушки, предназначенные для закрытия отверстий.
Эти заглушки имеют двойную функцию: эстетическую, так
как не видны отверстия и безопасности, чтобы ребенок не
смог засунуть в отверстие пальчик.
11
12
8.- Регулировкаподножки
Также можно отрегулировать положение подножки, чтобы выбрать для ребенка желаемое положение в любой момент. Подножка регулируется в 4 положениях.
Нажимайте на рычаг, расположенный на подножке по обеим сторонам коляски и одновременно опускайте подножку.
Чтобы поднять подножку, не нужно нажимать на кнопку, так как
подножка располагает механизмом свободного движения.
ПРЕДУПРЕЖДЕНИЕ: Никогда не позволяйте ребенк у вставать
на подножку коляски.
10
ПРЕДУПРЕЖДЕНИЕ: Ребенок не должен находиться возле
подвижных частей коляски, когда взрослый проводит с ними
какие-либо действия.
10.-Регул ировкаполож енияручки
Ваша коляска AERO оснащена системой регулирования положения ручки и предоставляет большее удобство.
Нажмите на кно пку и держите ее нажатой, пока устанавливаете ручку в нужном положении.
13
pусский
89
Page 90

AERO
90
11.-Складывание
Потяните одновременно 2 рукоятки затвора на ручке коляски,
пока поднимаете педаль нижнего натяжного механизма, как это
указано на рисунке.
Затем опустите ручку вниз, чтобы сложить коляску.
Наконец, регулирует ручку, чтобы Ваша AERO была сложена более компактно.
При мечание: Если ск ладыв ать коляску с гам аком в нак лонно м положении, капюшон может отсоединиться. Рекомендуется установить гамак в вертикальное положение.
ПРЕДУПРЕЖДЕНИЕ: Необходимо убедиться, что ребенка нет
рядом с коляской, когда складывается или раскладывается
коляска.
ПРЕДУПРЕЖДЕНИЕ: Появление точек сжатия и захвата неизбежны во время таких операций.
12.-КАПЮШОН
Для установки капюшона на шасси, опускайте его, пока не наденете на ручки коляски.
Чтобы снять его, выполните эту операцию в обратном порядке.
ПРЕДУПРЕЖДЕНИЕ: Не класть тяжелые вещи на капот.
14.1-14.2
16
15
13.-УХОД
Обивка не должна находиться под прямыми солнечными
лучами длительное время.
Пластиковые части мойте теплой водой с мылом, затем
тщательно высушивайте все детали.
Обивк у можно снять для стирки.
Регулярно смазывайте подвижные части и механизмы силиконовой смазкой. Не используйте в этих целях растительное масло и жир.
В целях безопасности и для с охранности данного изделия важно,
чтобы его периодически осматривали в лю бой из наших официа льных мастерских.
14.-ДОЖД ЕВИК
Дождевик вашей коляски AERO устанавливается очень легко. Вам
нужно только накрыть гамак и прикрепить его крючками к шасси.
На дождевике имеется маленькое окошко, которое скатывается
в рулон и фиксируется липучками, чтобы ребенок мог свободно
изучать все, что находится вокруг него.
17
Page 91

ИНФОРМАЦИЯОГАРАНТИИ
Данное изделие имеет гарантию, предусмотренную законом 23 / 2003 от 10 июля. Сохраните товарный чек, необходимый для предъявления в магазине, где Вы приобрели
изделие, для подтверждения юридической силы в случае
любой рекламации.
Данная гарантия не распространяется на дефекты и поломки, которые являются результатом неправильной эксплуатации или нарушения норм безопасности и у хода,
описанных в инструкции и на этикетке по правилам стирки,
как и на элементы естественного износа, появившиеся при
нормальном ежедневном пользовании.
Ни в коем случае не срывайте этикетку с номером шасси
Вашей модели, она содержит важную информац ию.
Внимание:
Для максимальной надежности и заботы о Вашем новом
изделии фирмы JANÉ, очень важно чтобы Вы заполнили
регистрационный талон, который Вы найдете на странице
www.jane.es
Регистрация позволит Вам получать информацию, в случае
необход им ос ти, об изм ен ен ия х и об ухо де за вашим изделием. Также всегда, когда Вы пожелаете, мы можем информировать Вас о новых моделях и новостях, которые, мы по лагаем, будут интересными для Вас.
pусский
91
Page 92

AERO
92
Page 93

INDHOLDSFORTEGNELSE
ADVARSEL
1.- UDFOLDNING
2.- PRO FIX-SYSTEM
3.- UDTAGNING AF LIGGESTOLEN
4.- BEVÆGELIGE FORHJUL
5.- BREMSE
6. SIKKERHEDSSELETØJ
7.- INDSTILLING AF RYGLÆNET
8.- INDSTILLING AF FODSTØTTEN
9.- BESKYTTELSESINDRETNING
10.- INDSTILLING AF HÅNDTAGET
11.- SAMMENFOLDNING
12.- KALECHE
13.- VEDLIGEHOLDELSE
14.- REGNSLAG
94
95
95
96
96
96
96
97
97
97
97
98
98
98
98
dansk
93
Page 94

ADVARSEL
AERO
94
VIGTIGT – Opbevar denne vejledning til senere brug.
ADVARSEL: Efterlad aldrig barnet uden opsyn.
ADVARSEL: Kontroller, at alle låseanordninger er
blokeret korrekt før brug.
ADVARSEL: For at undgå at barnet kommer til
skade, er det vigtigt at sikre sig, at det ikke befinder
sig i nærheden, når produktet foldes sammen eller
foldes ud.
ADVARSEL: Lad ikke barnet lege med dette produkt.
ADVARSEL: Denne stol er ikke egnet til børn under
6 måneder.
ADVARSEL: Anvend altid fastholdelsesanordningen.
ADVARSEL: Kontroller, at fastgørelsesanordningerne
til liften, sædet eller autostolen er låst korrekt før brug.
ADVARSEL: Dette produkt er ikke egnet til at jogge
med eller til at bruge sammen med rulleskøjter.
Denne vogn er beregnet til børn fra 6 måneder og
op til 15 kg.
Kun egnet til børn under 6 måneder med tilbehør, der
er godkendt af JANÉ.
Parkeringsanordningen skal være slået til, når
børnene sættes i eller løftes op af vognen.
Enhver form for belastning, der er fastgjort til styret,
bag på ryglænet eller på siden af vognen, påvirker
stabiliteten.
Denne vogn er designet til at kunne anvendes af et
enkelt barn, og den må ikke anvendes med flere børn
ad gangen.
Page 95

Anvend ikke tilbehør, der ikke er godkendt af JANÉ.
Hvad angår autostole, som anvendes sammen med
et stel, erstatter denne vogn ikke en vugge eller en
seng. Hvis barnet skal sove, skal det lægges i en lift,
en vugge eller en seng.
Anvend aldrig reservedele, som ikke er godkendt af
JANÉ, S.A.
Den højst tilladte belastning af varekurven må aldrig
overstige den vægt, der er angivet på kurven (4 kg).
1.- UDFOLDNING
Træk i trykknapperne på håndtaget samtidigt for at folde AEROklapvognen ud.
Når du har foldet klapvognen ud, er det vigtigt at kontrollere at
krydset bag på vognen er strammet til, da krydset skal blokere klap vognen for at den ikke kan folde sig sammen af sig selv.
ADVARSEL: Det er vigtigt at sikre sig, at barnet ikke befinder sig
i nærheden af vognen, når den foldes sammen eller foldes ud.
ADVARSE L: Det kan ikke undgås, at d er fremkommer skarpe kanter og steder, hvor man kan skære sig, eller hvor kropsdele kan
komme i klemme, når man udfører disse handlinger.
2.- PRO FIX-SYSTEM
Vognens stel er forsynet med et PRO FIX-s ystem, der er beregnet til at montere en hvilken som helst af nedenstående
babylif te: Koos, Matrix Light 2, Micro. Med PRO FIX- systemet
er det både hurtigt, let og sikker t at montere og afmontere
disse tilbehør på stellet, idet delene låses fast på stellet. Følg
nøje brugsvejledningen til disse tilbehør. For at få adgang til
det ste d på klapvognen, hvor PRO-FIX- systemet sidder, skal
man åbne for stoflukningerne og fjerne de to propper, som
sidder og lukker ned til PRO-FiX- systemet. Gem propperne et
sted, hvor de ikke bliver væk , og sæt dem på igen, når du ikke
skal bruge babybærestolen længere. 3.1. – 3.2
1
2
dansk
95
Page 96

AERO
96
3.- UDTAGNING AF L IGGESTOLEN 5.- BREMSE
Denne funktion er nødvendig for kunne bruge stolen med
forskellige babybærestole.
For at fje rne rygstykket, skal man før st fjerne stoffet på armlænene og sæddet.
Tryk på den knap, som sidder på begge sider af r yglænets
underside, og træk samtidig ryglænets støtterør ud af beslaget. 4 .1
Derefter løsnes ryglænets indstillingsanordninger ved at
trykke dem let opad. 4.2-5
Følg rækkefølgen i omvendt orden for igen at påsætte rygstykket.
4.- BEVÆGELIGE FORHJUL
Din AERO -klapvogn er forsynet med drejelige forhjul med
mulighe d for blokering af hjulenes køreretning.
For at blokere vognen, skal man skubbe det lille betjeningsgreb fremad med hjulene placeret i fremadgående retning ( i
vognens længderetning). 6.1
For at fjerne retningsblokeringen trækkes stangen opad. 6.2
Din AERO -klapvogn er forsynet med et bremsesystem, der
aktiverer begge baghjul samtidigt. Anvend systemet som
parkeringsbremse så ofte som muligt, da det er en vigtig sikkerhedsanordning.
Tryk på bremsestangen for at bremse.
Bremsen frigøres ved at skubbe s tangen opad.
ADVARSEL: Når bremsen er slået til, er det vigtigt at kontrollere,
at vognen er bremset korrekt. Det kan være nødvendigt at køre
vogne n en lidt frem og tilb age, for at bre msen fastlå ses optimalt .
ADVARSEL: Kontroller at parkeringsbremsen er slået til, før barnet sættes i eller løftes ud af klapvognen.
6. SIKKERHEDSSELETØJ
AERO-klapvognen er forsynet med en sikkerhedssele, for at
dit barn altid kan sidde sikkert.
De to fas tspænding spunkter i sid erne kan bruges til en ek stra
barnevognssele.
7
8
Page 97

7.- INDSTILLING AF RYGLÆNET
For at barnet kan sidde så komfortabelt som muligt, er det
muligt at indstille hældningen af r yglænet på AERO -klapvognen.
Ryglænet kan indstilles i 5 positioner.
Træk i den bageste stang, medens r yglænet samtidig læg-
9.1
ges ned.
Det er ikke nødvendigt at anvende stangen for at rejse det
op. Det er tilstrækkeligt at trække i ryglænet , da det er forsynet med en mekanisme, der tillader fri bevægelse.
8.- INDSTILLING AF FODSTØTTEN
Man kan og så indstille positionen på fodstøt ten alt efter den
ønskede stilling, som barnet skal sidde i. Fodstøtten kan indstilles til 4 forskellige positioner.
Tryk på betjeningsgrebet, som sidder på bøjlen på begge sidder af stolen, mens du bevæger fodstøtten nedad.
Det er ikke nødvendigt at tr ykke på knappen for at rejse den
op, da fod støtten er forsynet med en mekanisme, der tillader
med fri bevægelse.
ADVARSEL: Giv aldrig barnet lov til at stå op på fodstøtten eller bøjlen.
9.2
10
9.- BESKYT TELSESINDRETNING
Beskyttelsesindretningen tages ud ved at trykke på knappen
på undersiden af armstøtten.
Når den fjernet , placeres dækslerne for at dække over hullerne i beskyttelsesanordningen.
Disse dæksler har en dobbelt funktion. På den ene side skal
de skal dække hullerne, for at de ikke skal ses, og på den
anden side skal de sikre, at barnet ikke kan komme en finger
ind i hullet.
ADVARSEL: Barnet må ikke befinde sig i nærheden af bevægelige dele, når de håndtere s af en ansvarlig voksen person.
10.- INDSTILLING AF HÅNDTAGET
Din AERO er udst yret med et system, s å du kan indstille håndtagene, og det b etyder, at vognen bliver mere behagelig i
brug.
Tryk på knappen og hold den nede, medens du indstiller
håndtaget. Håndtaget har 5 indstillinger du kan vælge mellem for at finde den, der bedst passer til dig.
12
11
13
dansk
97
Page 98

AERO
98
11.- SAMMENFOLDNING
Træk opad samtidig i de 2 greb i håndtaget, medens du løf ter
pedalen på den neders te stiver som vist på figuren.
Deref ter skal du bevæge håndtaget nedad således at vognen
folder sig sammen.
Endelig kan du regulere håndtaget, så din AERO bliver klappet sammen så meget som muligt.
Bemærk: Hvis du klapper vognen sammen med ligge stolen i
tilbage lænet position, kan kalechen rive sig løs . Det anbefales
at place re liggestolen i lodre t stilling, før man klapper vogne n
sammen.
ADVARSEL: Det er vigtigt at sikre sig , at barnet ikke befinder sig
i nærheden af vognen, når den foldes sammen eller foldes ud.
ADVARSE L: Det kan ikke undgås, at d er fremkommer skarpe kanter og steder, hvor man kan skære sig, eller hvor kropsdele kan
komme i klemme, når man udfører disse handlinger.
12.- KALECHE
Når kalechen skal sættes på vognstellet, lader man den glide
ned, indtil den passer i hver side på håndtaget.
For at fjerne kalechen, skal processen i den omvendte rækkefølge foretages.
ADVARSEL: Læg ikke noget tungt oven på kalechen.
15
14.1-14.2
16
13.- VEDLIGEHOLDELSE
Undgå at udsæt te betrækket for direkte sol i længere tids rum.
Vask plas tikdelene med lunkent vand og sæbe. Tør derefter
alle delene grundigt.
Betrækket kan tages af for at vaske det.
Smør bevægelige dele og mekanismer regelmæssigt med silikonespray. Anvend ikke olie eller fedt.
Såvel af hens yn til sikkerheden som for at sikre en god vedligeholdelse af dette produkt er det vigtigt at få foretaget
et regelmæssigt ef tersyn på et af vores autoriserede serviceværksteder.
14.- REGNSL AG
Det er meget enkelt at montere regnslaget på AERO-klap vognen. Dæk stolen og sæt deref ter fas tgøringsanordningerne fast på stellet. Regnslaget har et lille vindue som kan
rulles op og sættes fast med burrebånd , så barnet kan se sig
omkring uden nogen hindringer.
17
Page 99

GARANTIOPLYSNINGER
Dette produkt leveres med garanti i henhold til bestemmelserne i spansk Lov 23 / 2003 af 10. juli. Gem kvit teringen, da
den skal fremvises ved enhver reklamation i den forretning,
hvor du købte produk tet, for at dokumentere garantiens gyldighed.
Denne garanti omfatter ikke fejl eller skader, der er ops tået
som følge af forkert brug af produktet eller manglende overholdelse af reglerne for sikkerhed og vedligeholdelse beskre vet i brugervejledningen og vaskeanvisningerne på etiketterne. Garantien omfatter heller ikke dele, som slide s ved normal
og daglig brug.
Bemærk:
For at opnå den største sikkerhed og service for din nye JANÉ
er det meget vigtigt, at du udfylder registreringskortet, som
du finder på www.jane.es
Ved at registrere produktet kan du holde dig informeret om
udviklingen og vedligeholdelsen af dit produk t. Hvis du ønsker de t, kan vi også informe re dig om nye modeller eller andre
nyheder, som vi mener kan have din interesse.
dansk
99
Page 100

AERO
100
 Loading...