

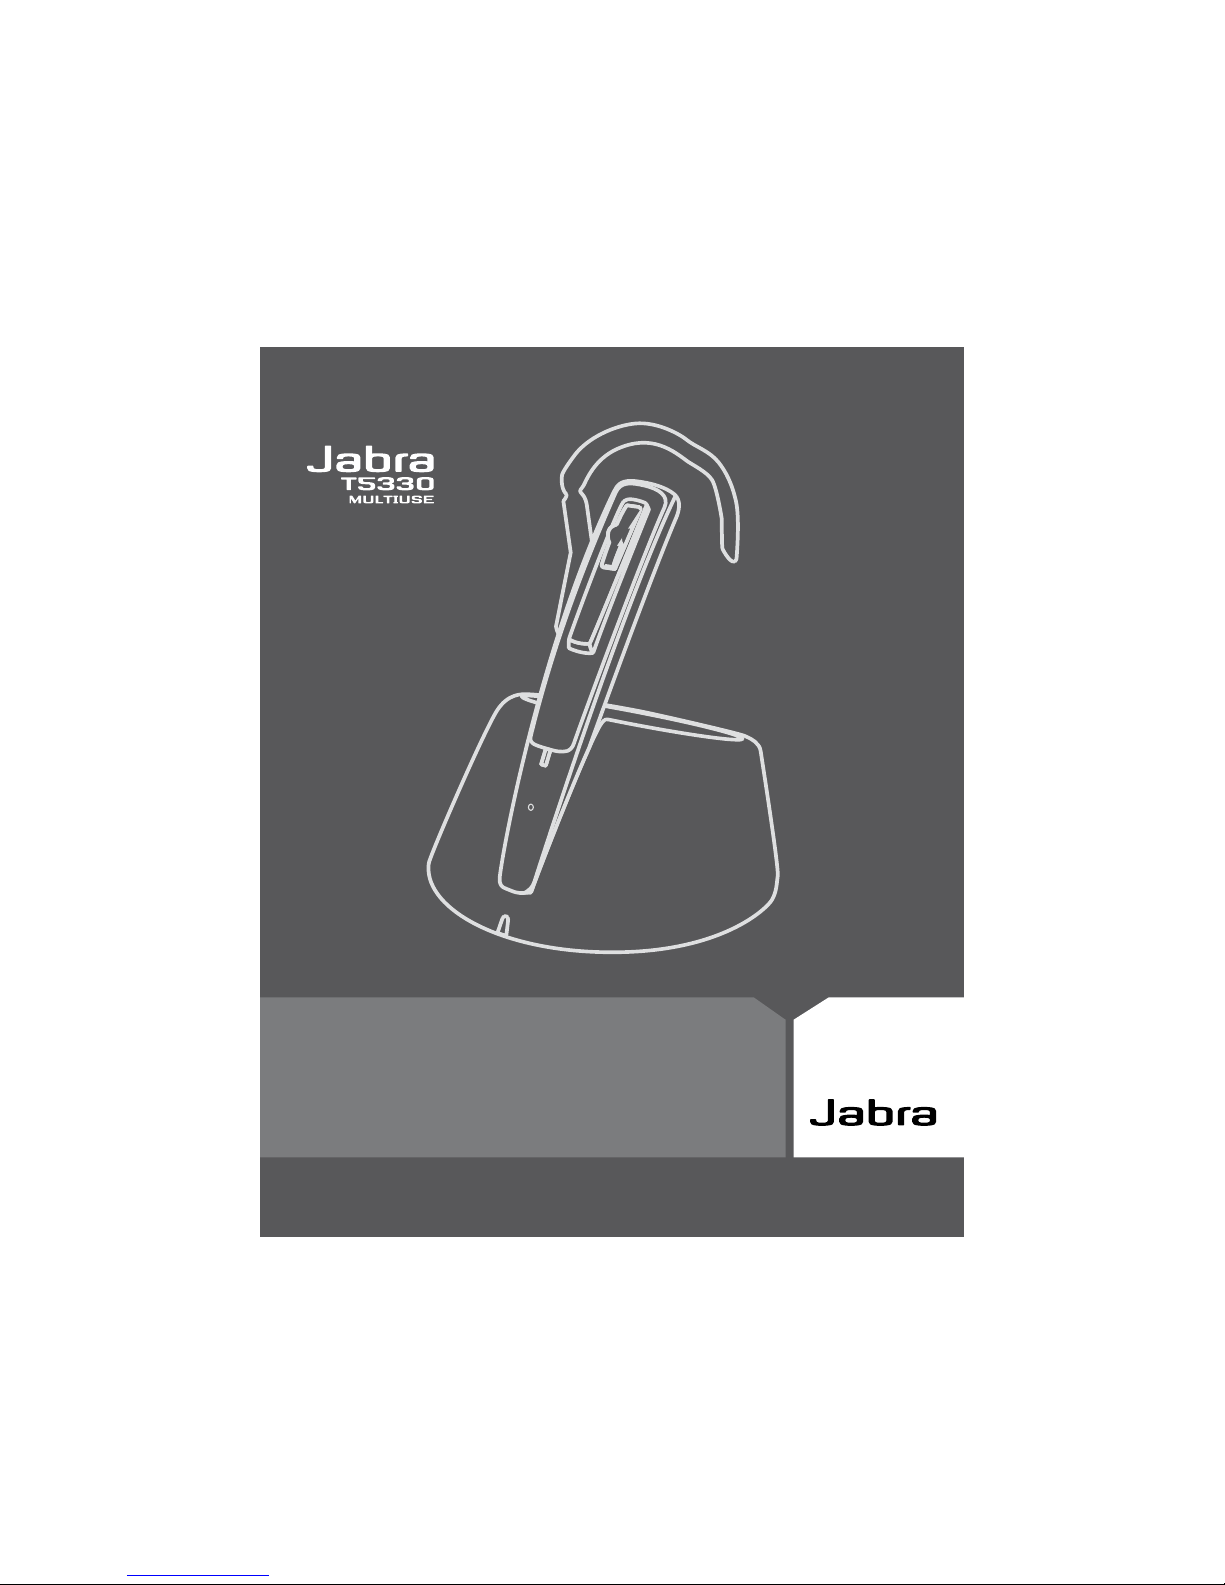
USER MANUAL

Jabra T5330 Mulituse UM NA: 81-02115 RevD
User manual ENG 1
Guide d’utilisation FR
20
Manual del usuario
ES
39
Manual do Utilizador P
58

1
English
Contents
1. Overview ..................................................2
2. Fitting the headset ...........................................3
3. Setting up your desk phone ....................................4
4. For use with mobile phone .....................................7
5. Making a call from your deskphone ...............................8
6. Answering a call from your deskphone ............................9
7. Use for mobile phone . . . . . . . . . . . . . . . . . . . . . . . . . . . . . . . . . . . . . . . .10
8. Features..................................................12
9. Reset / Pairing .............................................14
10. Using the Jabra T5330 Multiuse with multiple Bluetooth-enabled devices....15
11. With two mobile phones ......................................15
12. Troubleshooting & FAQ.......................................16
13 Maintenance, safety and disposal ...............................17
14. Appendix – GN 1000 Remote Handset Lifter (RHL) (optional accessory) . . .18
Thank you
Thank you for purchasing Jabra T5330 Multiuse, we hope you will be delighted with its operation.
Please read the user guide to get started and to make best use of the headset’s many features.

2
English
3
English
1. Overview
Headset
[1] Visual indicator
[2] Answer/end button
[3] Volume up/down
[4] Ear hook
[5] Mute button
[6] Microphone
[7] Reset button
[8] Snap-on cover (replaceable)
Base unit
[9] Charge cradle
[10] Visual indicator
[11] Clear dial tone switch
[12] AUX port
[13] Telephone port
[14] Handset port
[15] AC power adapter port
[16] Transmit volume
[17] Reset button
[18] Headset switch
Cords & adapters
[19] Connection cord
[20] AC power adapter
10
9
19
20
15
13
12
14
11
16
17
18
1
2
3
5
4
6
8
7
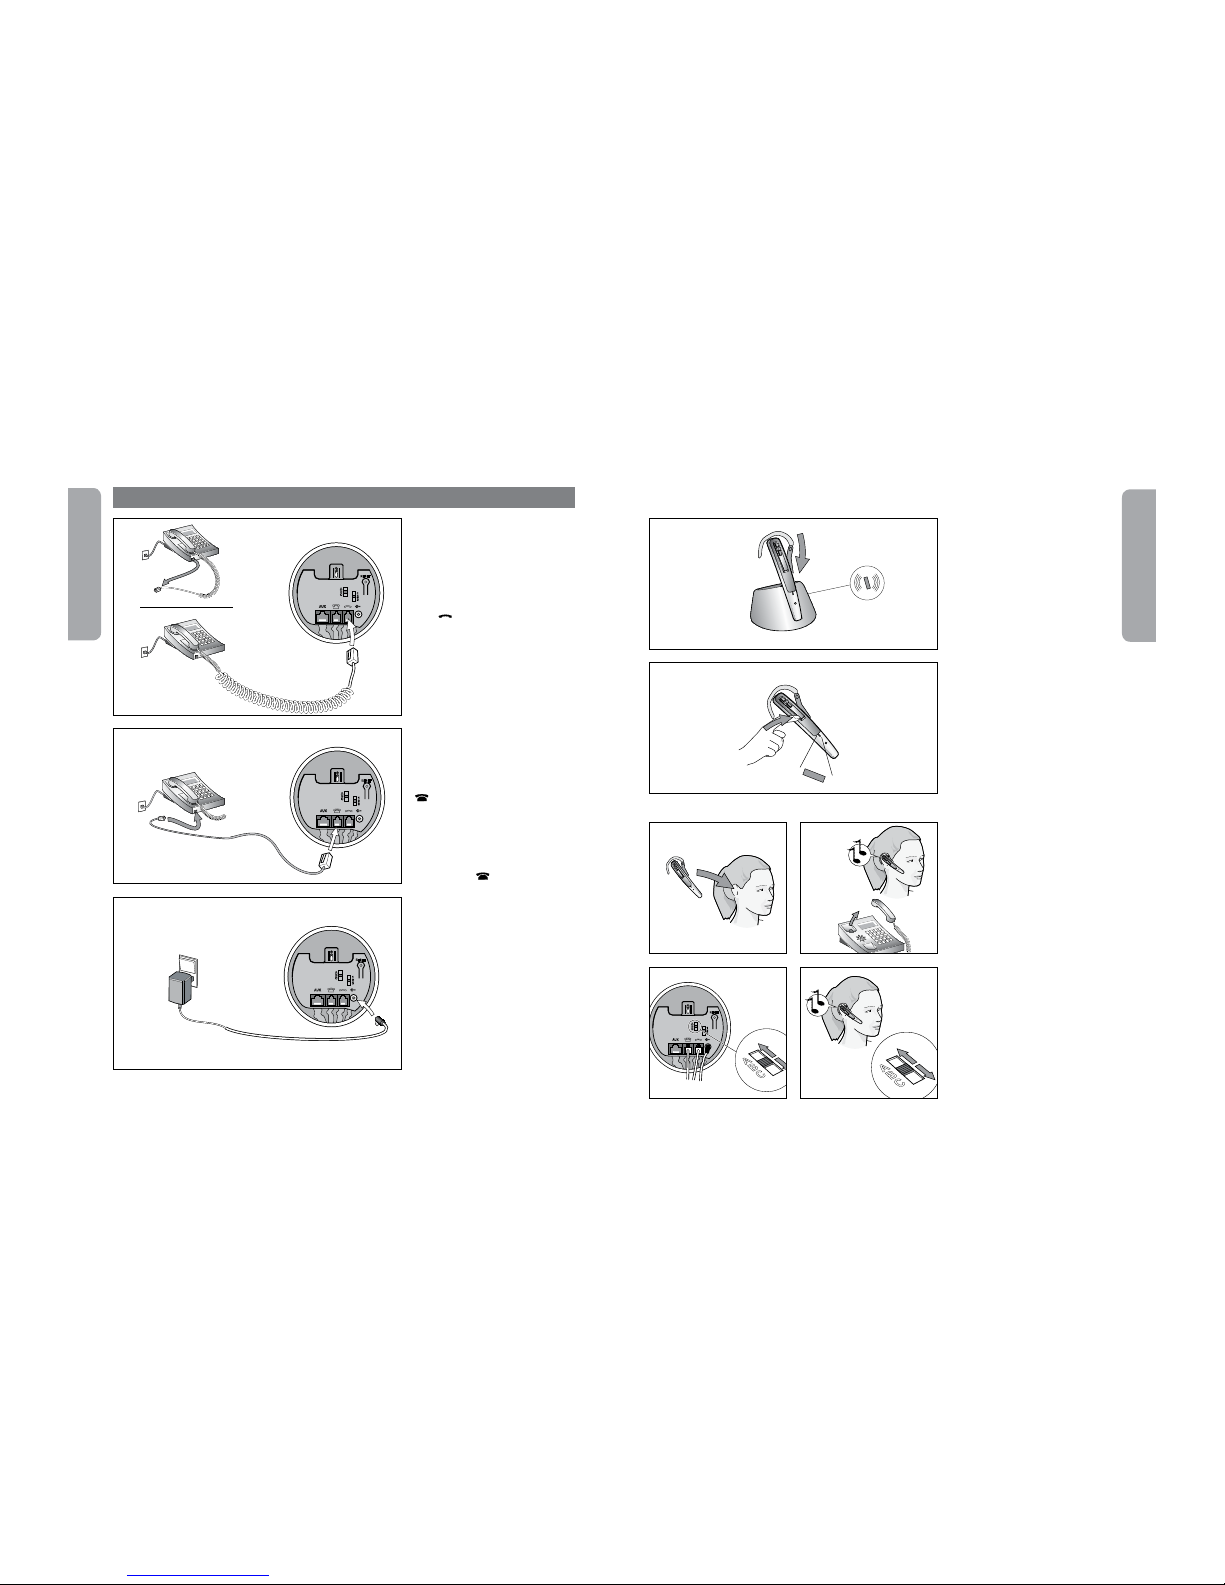
Fitting to ear
2.1 Open hinged ear hook as
wide as possible.
1)
2.2 Hold headset to the ear so
speaker fits comfortably and
microphone points toward the
mouth.
2.3 Close hinged ear hook over
the ear.
2.4 Bend or twist flexible rubber
part of the ear hook for a comfortable fit.
Further adjustment
2.5 Ear hook hinge can be placed
in either of 2 slots, to provide the
best possible fit.
Fitting to left ear
2.6 Pull ear hook hinge from the
slot and insert it on opposite
side of headset marked with L.
Perform steps 2.1 – 2.4 above.
2. Fitting the headset
1)
Note: The new headset is configured for use with the right ear.
2.1 2.2
2.3
2.4
2.5 2.6
4
English
5
English
If your telephone has a
headset port, go directly to
3.2b.
3.1 Unplug handset cord from
your telephone and connect to
the port on base unit marked
with
.
3.2a Connect enclosed telephone
cord to the now empty handset
port on telephone, and to the
port on base unit marked with
.
3.2b (Headset port use only)
Connect enclosed telephone cord
to the headset port on telephone,
and to the port on base unit
marked with
.
3.3 Connect AC power adapter
to port on bottom of base unit,
then connect to AC power outlet.
Visual indicator on base will light
green.
3. Setting up your desk phone
3.1
3.3
3.2
Note: AUX port is used for Remote Handset Lifter (RHL). Please refer to Appendix.
3.4 Place headset in charge
cradle and charge a minimum of
30 min. before use. A full charge
takes about 2 hours. Visual
indicator on headset will flash
green while headset is charging,
and light steady green when fully
charged.
3.5 Turn on headset by pressing
answer/end button for 2 sec.
(visual indicator will flash twice
with green light and will beep
three times), or by placing
headset in charge cradle. Turn off
headset by pressing answer/end
button for 2 sec. (visual indicator
will flash twice with green light
and will beep three times).
3.4
3.5
3.8
3.6
Clear dial tone
3.6 Take headset out of charge
cradle and put it on.
3.7 Lift handset from telephone,
tap the Answer/End button on
the headset to establish an audio
connection and listen for a dial
tone in headset.
3.8 If dial tone is missing or
unclear, slowly slide the clear dial
tone switch on bottom of base
unit through the 3 settings.
3.9 Set switch to the position
that gives the clearest dial tone.
2 sec
3.7
3.9
6
English
7
English
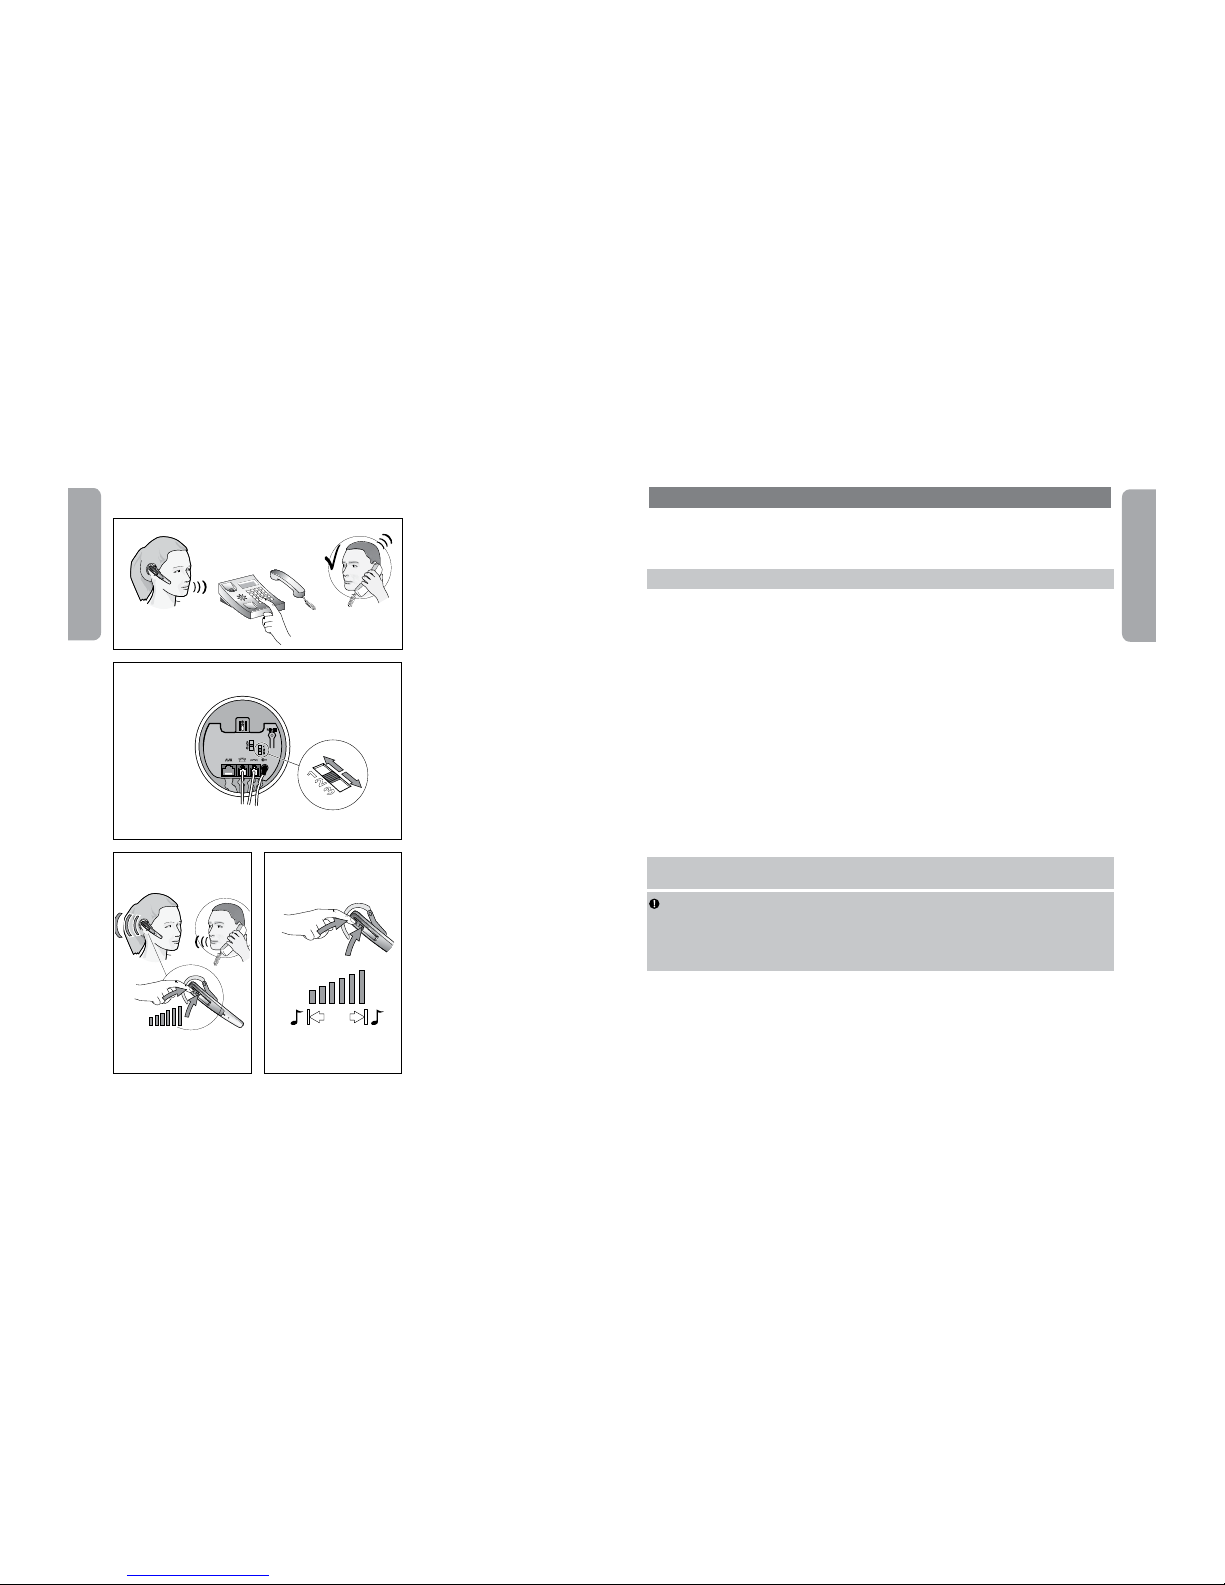
Setting transmit volume
3.10 Make a call (see section 4)
to someone who can act as a test
person.
3.11 Adjust outgoing volume with
transmit volume control on base
unit. Switch through the 3 settings
until test person confirms the
appropriate volume.
1)
Setting incoming volume
3.12 During a call, adjust incoming
volume by pressing Volume button
on headset.
3.13 A tone in headset will
indicate when min./max. volume is
reached.
3.11
3.12 3.13
3.10
1)
Note: If you can hear your own voice, transmit volume is probably too high.
Reduce volume setting on your desk phone (if available feature) and compensate by increasing volume on headset.
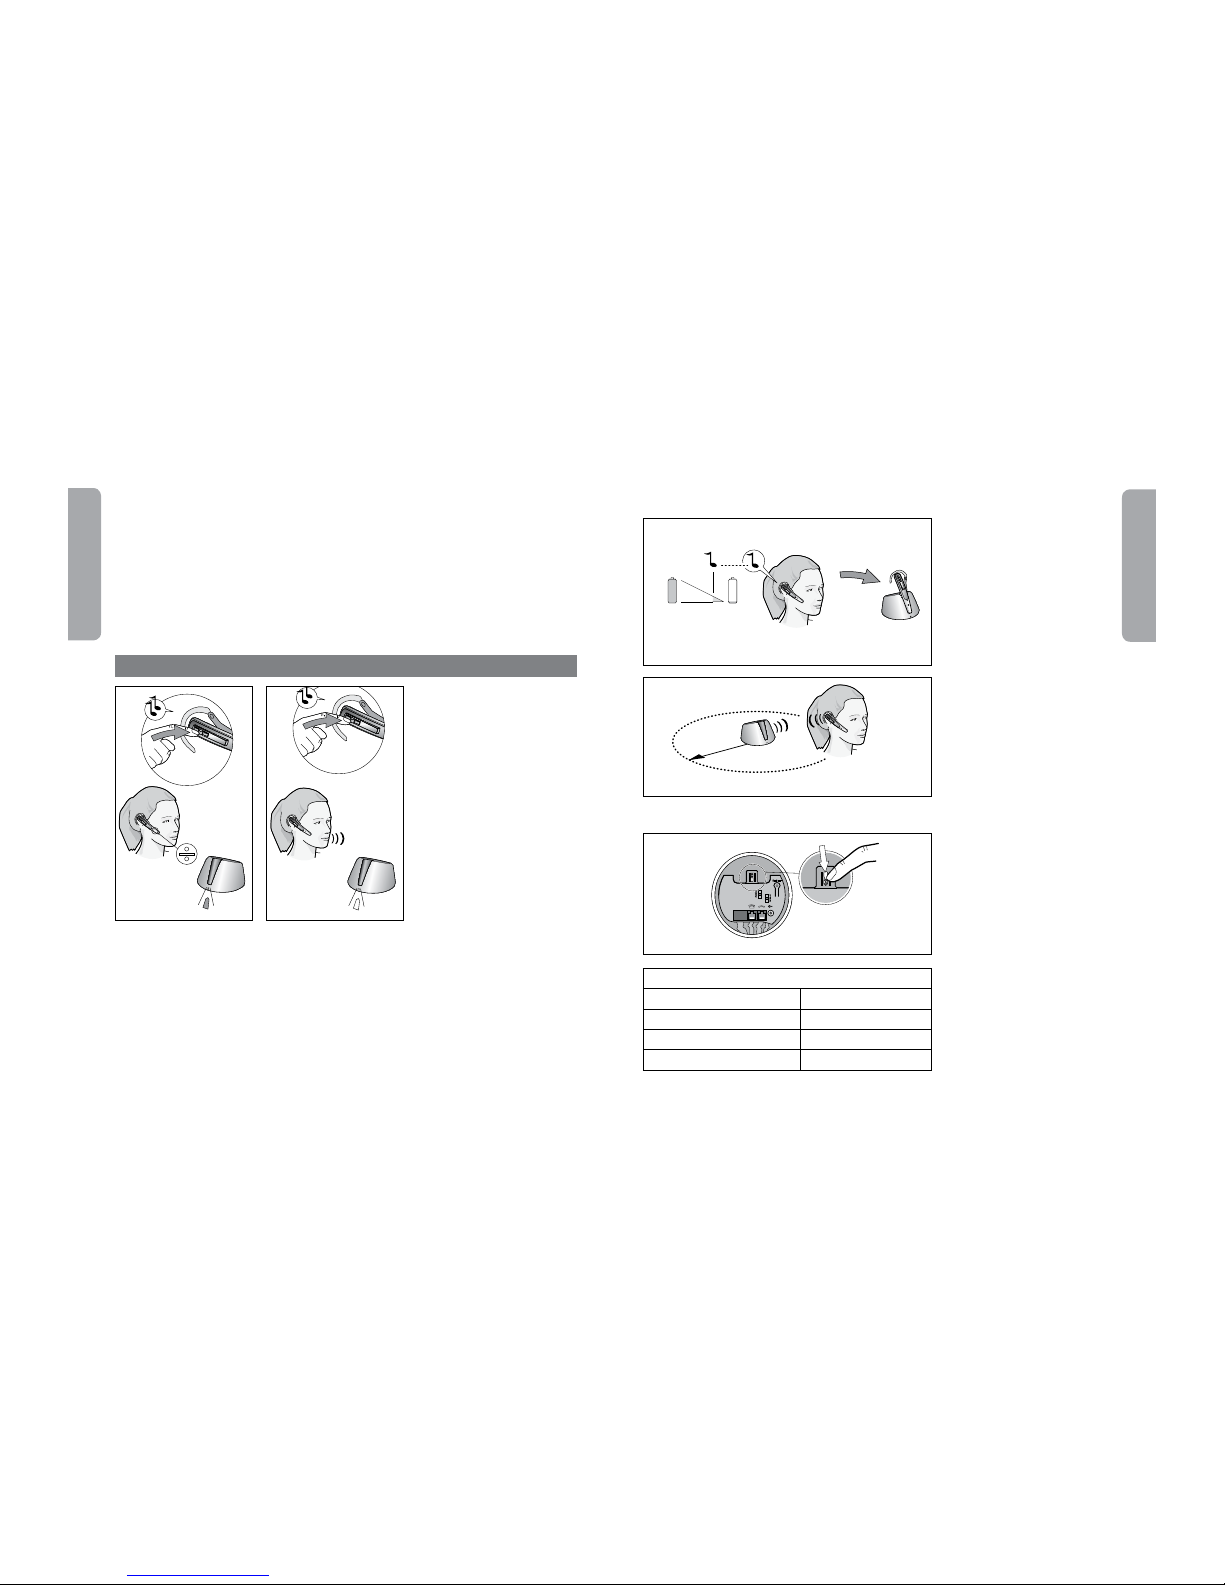
4. Setting up your mobile phone
Setup
Pairing your headset with your mobile phone
NOTE:
Before use, please charge your headset (see 3.4).
Before you use your Jabra T5330 Multiuse with a mobile phone, you need to pair it with your
mobile phone.
Make sure the headset is on.
Remove snap-on cover. Press reset button on headset for 3 sec. Visual indicator on headset
will flash red/green rapidly. (see 9.1)
Set your Bluetooth® phone to ‘discover’ the Jabra T5330 Multiuse:
o Follow your phone’s instruction guide. This usually involves going to a ‘setup,’ ‘connect’ or ‘Bluetooth’
menu on your phone and selecting the option to ‘discover’ or ‘add’ a Bluetooth® device.
o Your phone will find the Jabra T5330 Multiuse and will ask if you want to pair with it.
Accept pairing by pressing Yes/OK (or similar) on the phone and confirm with the passkey
or PIN ‘0000’ (4 zeros).
Your phone will confirm when pairing is complete. If pairing is unsuccessful, repeat the steps
above. Some mobile phones require manual connection after pairing.
NOTE:
If you accidentally put the headset into pairing mode, tap the Answer/End button 3 to exit
pairing mode.
IMPORTANT:
The same headset can be paired with multiple mobile phones. However, if you
have multiple mobile phones paired, switched on and within range of the headset, the headset will
not be able to connect to the base. It is only possible to be connected to one mobile phone and the
headset base at a time. To be able to connect with the headset base, only have one paired mobile
phone turned on and within range of the headset.
8
English
9
English
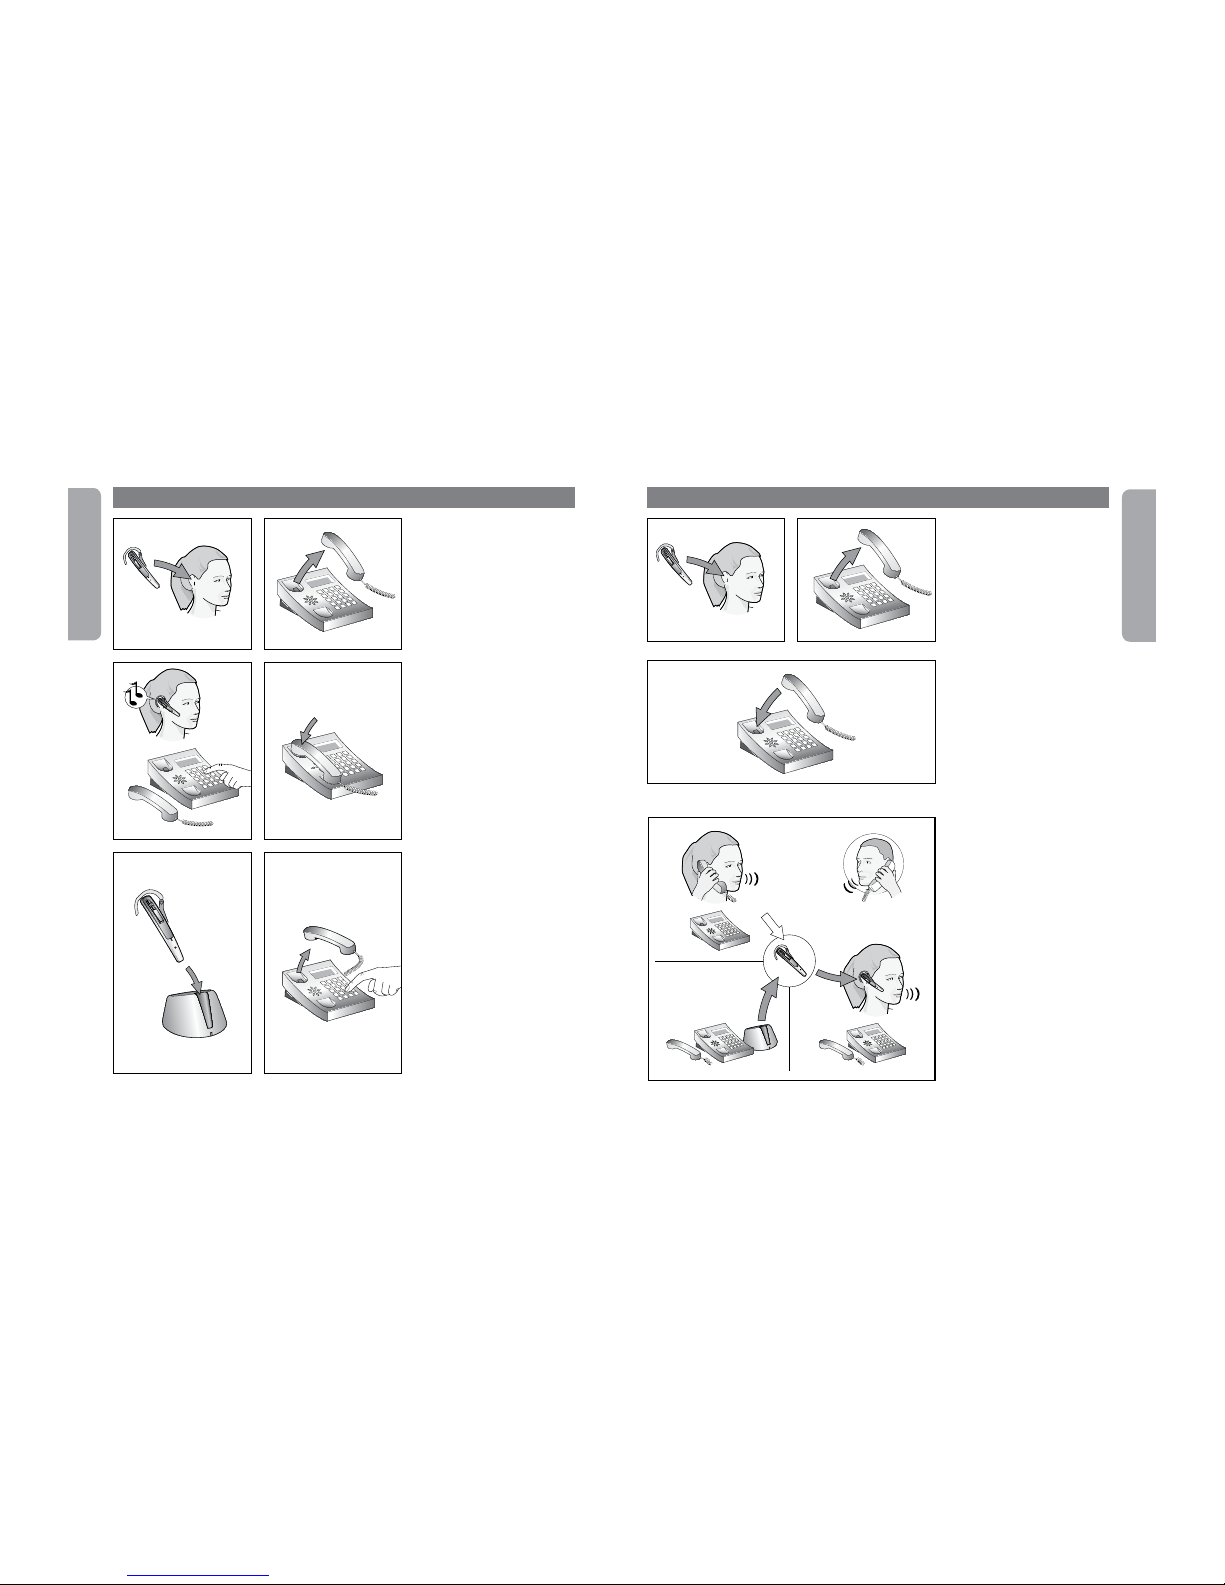
5.1 Put on headset.
1)
5.2 Lift handset from telephone,
or press telephone´s “line” button
if connected to the headset port.
Then tap Answer/End button to
transfer the call to headset.
5.3 Wait for dial tone, then dial
number.
5.4 To end call, tap the Answer/
End button on the headset and
replace handset on telephone, or
press telephone’s “end call” button
if base is connected directly to
telephone’s headset port.
Making a call with handset
5.5 Place headset in charge cradle.
5.6 Use handset as usual.
5. Making a call from your deskphone
5.1
5.4
5.2
5.3
1)
Note: If making a call with telephone handset, make sure the headset is placed in charge cradle.
Otherwise, the call will be routed through to the headset.
5.6
5.5
6.1 Put on headset.
1)
6.2 Lift handset from telephone,
or press telephone’s “line” button
if connected to the headset port.
Then tap Answer/End button to
transfer the call to headset.
6.3 To end call, tap the Answer/
End button on the headset and
replace handset on telephone,
or press telephone’s “end call”
button if base is connected directly
to telephone’s headset port.
6. Answering a call from your deskphone
6.2
6.3
6.1
6.4
Switching from handset to
headset
6.4 During a call using telephone
handset, take headset from charge
cradle. Tap Answer/End button and
the call will automatically be routed
to the headset.
1)

10
English
11
English
7. Making and answering a call from your mobile phone
Use
Making and ending a mobile phone call
When you make a call from your mobile phone, the call will transfer to your headset
automatically (this is subject to phone settings, see you mobile phone User Manual to find out
how to activate this feature).
If your phone does not allow this feature, see your mobile phone User Manual on how to
answer a call with a headset.
To end a call, tap the headset Answer/End button, OR press End/No (or similar) on your
mobile phone.
Answering and ending an incoming mobile phone call
To answer, tap the headset Answer/End button on your headset after the first ring.
To end a call, tap the headset Answer/End button, OR press End/No (or similar) on your
mobile phone.
IMPORTANT:
If you answer a call on your mobile phone handset, some mobile phone models
will not automatically transfer the call to your headset.
Switching from headset to mobile phone*
You can switch from your headset to your mobile phone during an active call. You might want to
do this if, for example, your headset battery is running low.
Use the menu on your mobile phone to switch from headset to mobile phone during an active
call (see your mobile phone User Manual).
Switching from mobile phone to headset*
It is possible to switch from your mobile phone to your headset during an active call.
Use the menu on you mobile phone to switch from mobile phone to headset during an active
call (see your mobile phone User Manual).
Rejecting an incoming call*
Press the headset Answer/End button when the phone rings to reject an incoming call.
Depending on your phone settings, the person who called will either be forwarded to your voice
mail or hear a busy signal.
* Mobile phone dependent. Check your mobile phone User Manual for further information.
Making a call with Voice Dial*
Press the headset Answer/End button to enter Voice Dial mode. (Consult your mobile phone
User Manual for more information about how to use this feature.)
For best results, record the voice dialing tag through your headset.
Redialing the last number*
Double tap the headset Answer/End button.
Using call waiting and placing a call on hold*
This lets you put a call on hold during a conversation and answer a waiting call.
Press the Answer/End button once to put the active call on hold and answer the waiting call.
Press the Answer/End button to switch between the two calls.
Tap the headset Answer/End button to end the active conversation.
6.5
1)
Important: Do not replace handset on telephone, as this will disconnect the call.
Switching from headset to
handset
6.5 During a call using the headset,
pick up telephone handset and replace
headset to charge cradle. Call will not
be routed through to the telephone
handset, before headset is in the
charge cradle.
12
English
13
English
Staying within range
The sound in your headset will deteriorate if you move beyond range.1) Move back into range to
restore sound quality. If you move too far from your mobile phone, the call might be ended or
re-routed to your mobile phone, depending on what mobile phone model you are using. Please
see your mobile phone User Manual for more information on this function.
Remember!
For optimal performance, wear the Jabra T5330 Multiuse and your mobile phone on the same
side of your body or within line of sight. In general, you will get better performance when there
are no obstructions between your headset and your mobile phone.
1)
Note: If answering a call with telephone handset, make sure the headset is placed in charge cradle.
Otherwise, the call will be routed through the headset.
8.2
8. Features
8.1
Muting & unmuting
8.1 Press mute button on
headset. Visual indicator on base
unit will turn red and a dual tone
will be heard in the headset.
8.2 To unmute, press mute
button again. Visual indicator on
base unit will change from red to
flashing green and a dual tone
will be heard in the headset.
2)
Important: If headset is out of range for more than 1 min., the link between base and headset will be
terminated.
Low battery
8.3 App. 10 minutes before the
headset runs out of battery, the
visual indicator on headset will
start to flash with a red light and a
series of tones will be heard.
If the battery runs out of power,
visual indicator on headset will
switch off automatically. Replace
headset to charge cradle, and
continue the call using telephone
handset.
Out of range
8.4 If going out of range (approx.
10 meters/30 feet), all buttons
except answer/end button will
stop working until back in range
again.
2)
If headset is muted when going
out of range it will also be muted
when going within range again.
Headset switch
8.
5 If the headset is absent, the
headset switch must be activated
in order to use the handset.
8.4
8.3
8.5
Features:
Range 10 m / 30 feet
Talk time / standby time
6 hours / up to 100 hours
Transmission protocol Bluetooth
Frequency band 2,4 GHz
10 m / 30 feet
10 min

14
English
15
English
9.1
9.2
9.3
9. Reset / Pairing
9.1 Remove snap-on cover. Press
reset button on headset for 3 sec.
Visual indicator on headset will
flash red/green rapidly.
1)
9.2 Then press reset button
on base unit for 3 sec. Visual
indicator on base unit will flash
red/green rapidly.
9.3 Make sure headset and base
are within 1 meter/3 feet of each
other. When pairing is successful,
both visual indicators will flash
green 10 times, and the visual
indicator on base unit will turn to
steady green.
1)
Note: The headset is already paired with the base unit from the factory. Pairing should only be necessary if
a new headset has to work with an existing base unit (or vice versa).
~
3 sec
~
3 sec
1 m / 3 feet
10. Using the Jabra T5330 Multiuse with multiple Bluetooth-enabled devices
Your Jabra T5330 Multiuse can be paired with up to 8 devices. However, only two can be connected
(paired with the headset, turned on and in range) with the headset at one time. This could be any
two Bluetooth® devices (for example, a mobile phone and the Jabra T5330 Multiuse headset base,
or a Bluetooth-enabled PC and a mobile phone or two mobile phones).
This means that when the headset is in range of the T5330 Multiuse headset base, only one
mobile phone or Bluetooth-enabled device can be connected to the headset (paired with the
headset, turned on and in range) if you want to use your Jabra T5330 Multiuse with your desk
phone.
The headset is per default paired with the headset base. This means that the headset will
automatically connect to the base if in range and turned on. If you want the headset to be
connected to two other devices (than the headset base) you need to manually close down the
connection from the headset to the base. You can do this by pressing and holding the volume
up/down button simultaneously for 4 seconds.
To reestablish the connection to the base, simply repeat the procedure by pressing and holding
the volume up/down button simultaneously for 4 seconds.
11. With two mobile phones
You can have two Bluetooth enabled mobile phones connected (paired with the headset, turned
on and in range) to the Jabra T5330 Multiuse simultaneously.
Last Number Redial* will dial the last number dialled when the headset was connected to any
mobile – not necessarily the last number dialled on the mobile phone you are using with the
headset at the time.
* If the mobile phone supports this feature
NOTE:
When multiple Bluetooth-enabled devices are paired with the headset, the Voice Dial*
function will work with the last device that was paired.

16
English
17
English
12. Troubleshooting & FAQ
Q: Nothing happens when I try to adjust the clear dial tone.
A: Make sure the base is powered (visual indicator on base unit is steady green). Then establish
a voice link between base and headset (visual indicators on base unit and headset are
flash ing green). Also ensure that the telephone is activated (handset is off the hook or “line”
button is pressed).
Q: I hear myself when I talk.
A: Your transmit volume level (please refer to section 3.10) is probably too high.
Set the transmit volume level to a lower level (3->2, 2->1).
Q: The sound in the headset is of poor quality or the person in the other end can’t hear me.
A: Make sure that you have positioned the clear dial tone switch correctly. To do this call a friend
to adjust the clear dial tone switch.
Q: When I press the answer/end button, the GN 1000 RHL lifts, but the call is not connected.
A: Make sure that you are using the telephone’s handset port, and not the headset port
(if your telephone has one), when using a GN 1000 RHL for remote answering.
Q: I have moved desk at work. Is it possible to put my headset onto another base?
A: Yes, this is possible. The headset only needs to be paired to the new base. Just follow the
procedure as described in section 7 of this guide.
Q: I cannot hear anything in my headset when using the mobile phone
A:
- Increase the volume on the headset (Or phone).
- As the volume level needed might be different on your deskphone and mobile phone it
might be best to adjust the level on the phones.
- Then use the headset volume level adjustments for general adjustments: Ensure that the
headset is paired with the mobile phone.
- Make sure that the phone is connected to the headset - if it does not connect either from
the phone’s Bluetooth menu or by tapping the answer/end button, follow the pairing
procedure (See “Pairing your headset with your mobile phone” in the user manual).
Note: If your desk phone has a volume button, it might help to adjust it to optimize the sound quality in your
headset.
Maintenance
The ear hook can be wiped with a dry or slightly damp cloth. The cords and base unit can be drydusted as required. Avoid getting moisture or liquids into any button sockets, receptors or other
openings. Avoid exposing the product to rain.
Children and product packaging
The packaging, including plastic bags and wrapping parts, are not toys for children. The bags
themselves or the small parts they contain may cause choking if ingested.
Batteries and product disposal
Do not expose the headset batteries to heat. Dispose of the product and/or batteries according to
local standards and regulations.
Need more help?
For your country’s support details, see the European and Australasia Safety & Declaration or
North American Declaration & Warranty that came with your Jabra T5330 Multiuse.
13 Maintenance, safety and disposal

18
English
14.1
14.2
14. Appendix – GN 1000 Remote Handset Lifter (RHL) (optional accessory)
The GN 1000 Remote Handset
Lifter (RHL) is an optional accessory that automatically lifts and
lowers your telephone’s handset
when making, answering or
ending a call.
Setting up
14.1 Attach RHL to telephone
handset cradle. Connect RHL cord
to AUX port on bottom of base
unit.
Making/answering a call
14.2 Put on headset, or press
answer/end button if already
wearing headset. The RHL will
automatically lift telephone
handset.
Ending a call
14.3 Press answer/end button,
or place headset in charge cradle.
The RHL will automatically replace
telephone handset, and the call
will be terminated.
Note: Out of range. If headset is out of range for more than 1 min., any on-going call will be terminated
14.3
20
Français
21
Français
Sommaire
1. Description................................................21
2. Ajustement du micro-casque ...................................22
3. Configurer votre téléphone fixe .................................23
4. À utiliser avec téléphones portables .............................26
5. Passer un appel à partir de votre téléphone fixe ....................27
6. Prendre un appel à partir de votre téléphone fixe ...................28
7. Passer et prendre un appel à partir de votre téléphone mobile..........29
8. Fonctions .................................................31
9. Réinitialisation / couplage ....................................33
10. Utiliser le Jabra T5330 multi-usages avec plusieurs
périphériques Bluetooth ......................................34
11. Avec deux téléphones portables ................................34
12. Dépannage et questions fréquentes .............................35
13. Entretien, sécurité et mise au rebut..............................36
14. Annexe – Levier de décroché à distance GN 1000 (RHL)
(accessoire optionnel)........................................37
Merci pour votre confiance
Vous venez d’acheter un Jabra T5330 multi-usages, merci pour votre confiance. Nous espérons
qu’il vous donnera entière satisfaction. Veuillez lire ce guide d’utilisation afin de prendre en main
votre micro-casque et d’utiliser au mieux ses nombreuses fonctions.
Micro-casque
[1] Voyant lumineux
[2] Bouton de prise/fin d’appel
[3] Volume +/[4] Contour d’oreille
[5] Bouton « secret »
[6] Micro
[7] Bouton de réinitialisation
[8] Cache amovible (remplaçable)
10
9
19
20
15
13
12
14
11
16
17
18
1
2
3
5
4
6
8
7
1. Description
Cordons et
adaptateurs
[19] Cordon de raccorde-
ment
[20] Adaptateur secteur
Base
[9] Socle de charge
[10] Voyant lumineux
[11] Commutateur de
réglage de la tonalité
[12] Port AUX
[13] Port « téléphone »
[14] Port « combiné »
[15]
Port « adaptateur secteur »
[16] Volume de transmission
[17] Bouton de réinitialisation
[18] Commutateur « micro casque »

22
Français
23
Français
Ajustement sur l’oreille
2.1 Ouvrez le contour d’oreille
articulé à fond.
1)
2.2 Mettez le micro-casque
en place de manière à ce que
l’écouteur repose confortablement contre votre oreille et que
le micro soit dirigé vers votre
bouche.
2.3 Refermez le contour d’oreille
articulé contre votre oreille.
2.4 Recourbez l’extrémité en
caoutchouc souple afin qu’elle
épouse la forme de votre oreille.
Réglage complémentaire
2.5 Pour un confort optimal,
insérez la charnière du contour
d’oreille dans la fente la plus
adaptée à votre morphologie
Ajustement sur l’oreille
gauche
2.6 Dégagez la charnière du
contour d’oreille de la fente et
insérez-la sur le côté opposé
du micro-casque (L). Procédez
ensuite selon les étapes 2.1 à 2.4
ci-dessus.
2.1
2.4
2.3
2.2
2.5
2. Ajustement du micro-casque
1)
N.B. : le nouveau micro-casque est livré configuré pour l’oreille droite.
2.6
Si votre téléphone possède un
port « micro-casque », passez
directement au point 3.2b.
3.1 Débranchez le cordon du
combiné de votre téléphone et
raccordez-le au port
de la
base.
3.2a Raccordez le cordon
téléphonique fourni au port
« combiné » libre du téléphone et
au port
de la base.
3.2b (Uniquement si vous utilisez
le port « micro-casque »)
Raccordez le cordon téléphonique
fourni au port « micro-casque »
du téléphone et au port
de
la base.
3.3 Branchez l’adaptateur secteur
sur le port situé sous la base puis
sur une prise électrique. Le voyant
lumineux de la base devient vert.
3. Configurer votre téléphone fixe
3.3
3.1
3.2
N.B. : le port AUX est destiné au levier de décroché à distance (RHL). Voir annexe.

24
Français
25
Français
3.4 Placez le micro-casque dans
le socle de charge et chargezle au moins 30 mn avant de
l’utiliser. Une charge complète
dure environ 2 heures. Le voyant
lumineux du micro-casque est
vert clignotant pendant la mise en
charge et vert fixe quand celle-ci
est terminée.
3.5 Allumez le micro-casque
en appuyant sur le bouton de
prise/fin d’appel pendant 2 s.
(le voyant clignotera deux fois
en vert et émettra trois bips) ou
en le plaçant dans son socle de
charge. Eteignez le micro-casque
en appuyant sur le bouton de
prise/fin d’appel pendant 2 s. (le
voyant clignotera deux fois en vert
et émettra trois bips).
3.7
3.6
3.9
3.8
3.5
3.4
Tonalité
3.6 Prenez le micro-casque dans
son socle de charge et mettez-le.
3.7 Soulevez le combiné du
téléphone, tapez sur le bouton
Réponse/Fin de l'oreillette afin
d'établir la connexion audio et entendre la tonalité dans l'oreillette.
3.8 En l’absence de tonalité ou
si celle-ci n’est pas nette, faites
lentement coulisser le commutateur de réglage de la tonalité
situé sous la base pour tester les
3 réglages.
3.9 Réglez le commutateur sur la
position dans laquelle la tonalité
est la plus nette.
1 s
Réglage du volume de
transmission
3.10 Appelez une personne qui
peut vous aider à réaliser l’essai
(voir section 4).
3.11 Réglez le volume des appels
sortants à l’aide du curseur de
réglage de la base. Testez les
3 réglages jusqu’à ce que la
personne confirme que le volume
est correct.
1)
Réglage du volume des
appels entrants
3.12 En cours d’appel, réglez le
volume des appels entrants en
appuyant sur le bouton de volume
du micro-casque.
3.13 Le micro-casque émet un bip
sonore quand vous atteignez le
volume max./min.
3.11
3.10
3.133.12
1)
N.B. : si vous entendez votre voix, le volume de transmission est probablement trop élevé.
Réduisez le réglage du volume sur votre téléphone fixe (si cette fonction est disponible) et compensez
en augmentant le volume sur le micro-casque.

26
Français
27
Français
4. À utiliser avec téléphones portables
Configuration
Appairer le micro-casque avec votre téléphone portable
N.B. :
avant la première utilisation, veuillez charger votre micro-casque (voir 3.4).
Avant d’utiliser votre Jabra T5330 multi-usages avec un téléphone portable, vous devez
les appairer.
Assurez-vous que le micro-casque est en marche.
Retirez le couvercle rabattable. Appuyez sur le bouton de réinitialisation pendant 3 secondes.
L’indicateur visuel sur le micro-casque clignotera rapidement en rouge/vert. (voir 9.1).
Réglez votre téléphone Bluetooth® pour qu’il « détecte » le Jabra T5330 multi-usages :
o Suivez le mode d’emploi de votre téléphone. Généralement, les étapes sont les suivantes :
« réglages », « connexion » ou bien le menu Bluetooth de votre téléphone, puis l’option
« détection » ou « ajout » d’un périphérique Bluetooth®.
o Votre téléphone détecte le Jabra T5330 multi-usages puis vous demande si vous voulez
appairer les deux.
Acceptez en appuyant sur « Oui » ou « OK » (ou l’équivalent) sur le téléphone et saisissez le
mot de passe ou code PIN = 0000 (4 zéros).
Votre téléphone confirme que l’appairage est terminé. En cas d’échec, répétez les étapes
précédentes. Certains téléphones portables requièrent une connexion manuelle après l’appairage.
N.B. :
si, accidentellement, vous mettez le micro-casque en mode d’appairage, tapez sur la touche
Réponse/Fin (5) pour quitter le mode d’appairage.
IMPORTANT :
le même micro-casque peut être appairé avec plusieurs téléphones portables.
Or, si plusieurs téléphones portables appairés se trouvent allumés dans la portée du microcasque, celui-ci ne pourra pas se connecter au concentrateur Bluetooth. Il n’est pas possible
d’être connecté à plus d’un seul téléphone portable et à la base du micro-casque à la fois.
Pour être en mesure de vous connecter à la base du micro-casque, veillez donc à n’avoir qu’un
seul téléphone portable appairé allumé et dans la portée du micro-casque.
5.1 5.2
5.3
5.1 Mettez le micro-casque.
1)
5.2 Décrochez le combiné ou
appuyez sur le bouton de prise de
ligne du téléphone s’il est raccordé
au port « micro-casque ». Ensuite,
tapez sur le bouton Réponse/Fin
pour transférer l’appel au microcasque.
5.3 Attendez la tonalité puis
composez le numéro.
5.4 Pour couper la communication,
tapez sur le bouton Réponse/Fin
sur le micro-casque et raccrochez le
combiné, ou appuyez le bouton de
fin d’appel du téléphone si la base
est raccordée directement au port
« micro-casque » du téléphone.
Passer un appel avec le
combiné
5.5 Placez le micro-casque dans
le socle de charge.
5.6 Utilisez le combiné de façon
normale.
5. Passer un appel à partir de votre téléphone fixe
5.4
1)
N.B. : si vous passez un appel avec le combiné, vérifiez que le micro-casque se trouve dans le socle de
charge. Dans le cas contraire, l’appel sera redirigé vers le micro-casque.
5.65.5

28
Français
29
Français
6.1 Mettez le micro-casque.
1)
6.2 Décrochez le combiné ou
appuyez sur le bouton de prise de
ligne du téléphone s’il est raccordé
au port « micro-casque ». Ensuite,
tapez sur le bouton Réponse/Fin
pour transférer l’appel au microcasque.
6.3 Pour couper la communication, tapez sur le bouton
Réponse/Fin sur le micro-casque
et raccrochez le combiné, ou appuyez le bouton de fin d’appel du
téléphone si la base est raccordée
directement au port « microcasque » du téléphone.
6. Prendre un appel à partir de votre téléphone fixe
6.2
6.1
6.3
6.4
Basculer du combiné vers le
micro-casque
6.4 Lors d’un appel via le combiné,
prenez le micro-casque dans
le socle de charge. L’appel est
automatiquement redirigé vers le
micro-casque.
1)
Basculer du micro-casque
vers le combiné
6.5 Lors d’un appel via le microcasque, décrochez le combiné et
replacez le micro-casque dans le
socle de charge. L’appel ne sera
pas redirigé vers le combiné tant
que le micro-casque ne sera pas
dans le socle de charge.
1)
Important : ne raccrochez pas le combiné car la communication serait coupée.
7. Passer et prendre un appel à partir de votre téléphone mobile
Utilisation
Émettre et terminer un appel depuis un téléphone portable
Si vous effectuez un appel à partir de votre téléphone portable, il sera automatiquement
transféré au micro-casque. (Cela dépend cependant des paramètres du téléphone ; consultez
le mode d’emploi de ce dernier pour savoir comment activer la fonction).
Si votre téléphone n’assure pas cette fonction, consultez le mode d’emploi pour savoir comment
répondre à un appel à l’aide d’un micro-casque.
Pour terminer un appel, tapez sur la touche Réponse/Fin du micro-casque, OU appuyez sur
« End/No » (ou l’équivalent) sur votre téléphone portable.
Prendre et terminer un appel entrant sur le téléphone portable
Pour prendre un appel, tapez sur la touche Réponse/Fin de votre micro-casque après la
première sonnerie.
Pour terminer un appel, tapez sur la touche Réponse/Fin du micro-casque, OU appuyez sur
« End/No » (ou l’équivalent) sur votre téléphone portable.
IMPORTANT :
si vous répondez à un appel en utilisant le combiné de certains téléphones
portables, l’appel ne sera pas automatiquement transféré au micro-casque.
6.5

30
Français
31
Français
Passer du micro-casque au téléphone portable*
Vous pouvez passer de votre micro-casque à votre téléphone portable au cours d’un appel.
Cela peut être utile si par exemple le niveau de charge de la batterie du micro-casque est faible.
Servez-vous du menu de votre téléphone portable pour passer du micro-casque au téléphone
au cours d’un appel (voir mode d’emploi du téléphone portable).
Passer du téléphone portable au micro-casque*
Il est possible de passer de votre téléphone portable au micro-casque au cours d’un appel.
Servez-vous du menu de votre téléphone portable pour passer du téléphone au micro-casque
au cours d’un appel (voir mode d’emploi du téléphone portable).
Refuser un appel entrant*
Pour refuser un appel entrant, appuyez sur la touche Réponse/Fin du micro-casque
à la sonnerie du téléphone.
Selon les paramètres de votre téléphone, le correspondant sera transféré sur votre messagerie
vocale ou recevra la tonalité « occupé ».
* Dépend du modèle de téléphone Pour plus d’informations, vérifiez le mode d’emploi de votre
téléphone portable.
Effectuer un appel par numérotation vocale*
Appuyez sur la touche Réponse/Fin du micro-casque pour entrer en mode de numérotation
vocale. (Consultez le mode d’emploi de votre téléphone portable pour plus d’informations sur
cette fonction.)
Vous obtiendrez de meilleurs résultats si vous enregistrez l’identité de numérotation vocale via
votre micro-casque.
Rappeler le dernier numéro*
Double-tapez sur la touche Réponse/Fin du micro-casque.
Utiliser la fonction double appel/mise en attente*
Cette fonction vous permet de mettre un appel en attente pendant que vous répondez à un
autre appel.
Pour mettre l’appel en cours en attente et répondre à l’appel entrant, appuyez une fois sur la
touche Réponse/Fin.
Appuyez sur la touche Réponse/Fin pour passer d’un appel à l’autre.
Tap ez sur la touche Réponse/Fin du micro-casque pour finir l’appel en cours.
1)
N.B. : si vous prenez un appel avec le combiné, vérifiez que le micro-casque se trouve dans le socle de
charge. Dans le cas contraire, l’appel sera redirigé vers le micro-casque.
6.1
8. Fonctions
Secret
8.1 Pour activer le secret, appuyez sur le bouton « secret » du
micro-casque. Le voyant lumineux
de la base devient rouge et un
double bip retentit dans le microcasque.
8.2 Pour désactiver le secret,
appuyez de nouveau sur le
bouton. Le voya nt rouge de la
base devient vert clignotant et
un double bip retentit dans le
micro-casque.
Rester dans la portée
Le son dans votre micro-casque se détériore si vous êtes hors portée.1) Revenez dans la portée
pour restituer la qualité sonore. Si vous vous éloignez trop de votre téléphone portable, l’appel
risque d’être coupé ou bien redirigé vers votre téléphone portable, en fonction du modèle de ce
dernier. Veuillez consulter le mode d’emploi de votre téléphone portable pour plus d’informations
sur cette fonction.
N’oubliez pas :
pour une performance optimale, portez le Jabra T5330 multi-usages et votre téléphone mobile
du même côté ou dans la même ligne de visée. Vous obtiendrez généralement une meilleure
performance s’il n’y a aucun obstacle entre l’oreillette et le téléphone.
8.2
8.1

32
Français
33
Français
10 mn
10 m
2)
Important : si le micro-casque reste plus d’une minute hors de la zone de portée, sa liaison avec la base
sera interrompue.
Batterie déchargée
8.3 Environ 10 minutes avant
que la batterie ne soit totalement
déchargée, le voyant lumineux
du micro-casque devient rouge
clignotant et une série de bips
retentissent. Le voyant lumineux
s’éteint automatiquement lorsque
la batterie est vide. Replacez le micro-casque dans le socle de charge
et poursuivez votre conversation
à l’aide du combiné.
Limite de portée
8.4 Si vous sortez de la zone
de portée (environ 10 mètres),
tous les boutons, sauf le bouton
de prise/fin d’appel, cessent de
fonctionner jusqu’à ce que vous
vous rapprochiez.
2)
Si le micro-casque est en mode
secret quand vous sortez de la
zone, il le restera quand vous y
reviendrez.
Commutateur « micro-casque »
8.5 En l’absence du micro-casque,
vous devez activer le commutateur
« micro-casque » pour pouvoir
utiliser le combiné.
8.4
8.3
Caractéristiques :
Portée 10 m
Autonomie de conversation /
en veille
6 heures / jusqu’à
100 heures
Protocole de transmission Bluetooth
Bande de fréquences 2,4 GHz
8.5
9. Réinitialisation / couplage
9.1 Retirez le cache amovible.
Appuyez sur le bouton de
réinitialisation du micro-casque
pendant 3 secondes. Le voyant
du micro-casque se met à
clignoter en rouge/vert rapidement.
1)
9.2 Appuyez alors 3 secondes
sur le bouton de réinitialisation
de la base . Le voyant de la base
se met à clignoter en rouge/vert
rapidement.
9.3 Vérifiez que le micro-casque
et la base ne sont pas éloignés
de plus de 1 mètre. Si le couplage
est réussi, les deux voyants
clignotent en vert à 10 reprises et
le voyant de la base devient vert
fixe.
1)
N.B. : le couplage entre le micro-casque et la base est effectué en usine. Un nouveau couplage ne sera
nécessaire qu’en cas d’ajout d’un nouveau micro-casque à une base existante (ou inversement).
1 m
~ 3 s
9.1
9.2
9.3
~ 3 s

34
Français
35
Français
10. Utiliser le Jabra T5330 multi-usages avec plusieurs périphériques Bluetooth
Votre Jabra T5330 multi-usages peut être appairé avec jusqu’à 8 périphériques. Or, seulement
deux appareils (appairés avec le micro-casque, allumés et dans la portée) peuvent être connectés
au micro-casque à la fois. Cela peut être n’importe quels périphériques Bluetooth® (par ex. un
téléphone portable et la base du micro-casque Jabra T5330, ou un PC compatible avec Bluetooth
et un téléphone portable, ou deux téléphone portables).
Autrement dit, lorsque le micro-casque est dans la portée de la base du micro-casque T5330 multiusages, seul un téléphone portable ou périphérique Bluetooth (appairé avec le micro-casque, allumé
et à portée) peut être connecté au micro-casque si vous souhaitez utiliser votre Jabra T5330 multiusages avec votre téléphone fixe.
Le micro-casque est par défaut appairé avec la base du micro-casque. Cela signifie que le microcasque sera automatiquement connecté à la base à condition d’être dans la portée et activé.
Si vous voulez que le micro-casque soit connecté à deux autres périphériques (en plus de la base du
micro-casque) vous devez fermer manuellement la connexion du micro-casque à la base. Pour cela,
appuyez sur les touches volume sonore haut et bas simultanément et maintenez-les enfoncées
pendant 4 secondes.
Pour rétablir la connexion à la base, il vous suffit de répéter la procédure en appuyant sur les
touches volume sonore haut et bas simultanément et en les maintenant enfoncées pendant
4 secondes.
11. Avec deux téléphones portables
Deux téléphones portables Bluetooth (appairés avec le micro-casque, allumés et à portée)
peuvent être connectés au Jabra T5330 multi-usages en même temps.
La fonction Rappel du dernier numéro* permet de rappeler le dernier numéro composé avec le
micro-casque connecté au téléphone portable – mais pas forcément le dernier numéro composé
sur le téléphone portable que vous utilisez avec le micro-casque.
* Si le téléphone portable assure cette fonction.
N.B. :
si plusieurs périphériques Bluetooth sont appairés avec le micro-casque, la fonction de
numérotation vocale fonctionnera avec le périphérique qui a été appairé en dernier.
12. Dépannage et questions fréquentes
Q: Il ne se passe rien quand j’essaye de régler la tonalité.
R: Vérifiez que la base est alimentée (voyant de la base vert fixe). Etablissez une liaison vocale
entre la base et le micro-casque (voyants de la base et du micro-casque verts clignotants).
Vérifiez aussi que le téléphone est activé (combiné raccroché ou bouton de prise de ligne
enfoncé).
Q: J’entends ma voix quand je parle.
R: Le niveau du volume de transmission (voir section 3.10) est probablement trop élevé.
Réglez le volume de transmission sur un niveau moins élevé (3->2, 2 ->1).
Q: Le son du micro-casque est de mauvaise qualité ou mon correspondant ne m’entend pas.
R: Vérifiez que le commutateur de réglage de la tonalité est réglé sur une position adaptée.
Appelez un ami pour vous aider à effectuer le réglage.
Q: Quand j’appuie sur le bouton de prise/fin d’appel, le GN 1000 RHL décroche le combiné mais
la communication ne s’établit pas.
R: Quand vous utilisez le GN 1000 RHL pour prendre les appels à distance, assurez-vous qu’il
est raccordé au connecteur « combiné » et non au connecteur « micro-casque » du téléphone
(si votre appareil en possède un).
Q: J’ai changé de bureau. Est-il possible d’utiliser mon micro-casque avec une autre base ?
R: Oui, c’est possible. Il suffit de coupler votre micro-casque avec la nouvelle base. Pour cela,
procédez comme indiqué à la section 7 de ce guide.
Q: Je n’entends rien dans le casque lorsque j’utilise le téléphone portable.
R:
- Augmentez le volume dans le micro-casque (ou le téléphone).
- Comme le volume nécessaire peut être différent sur votre téléphone fixe et votre téléphone
mobile, mieux vaut ajuster le niveau sur les téléphones.
- Ensuite, utilisez les réglages de niveau de volume du micro-casque pour les réglages
généraux : Assurez-vous qu’il a été correctement appairé avec le téléphone portable.
- Vérifiez dans le menu Bluetooth du téléphone, ou en appuyant sur la touche Réponse/Fin,
que le téléphone est bien connecté à l’oreillette. Sinon, répétez la procédure d’appairage
(voir « Appairer le micro-casque avec votre téléphone portable »).
N.B. : si votre téléphone fixe possède un bouton de volume, il pourra être utile de l’utiliser pour optimiser la
qualité sonore du micro-casque.

36
Français
37
Français
Entretien
Vous pouvez nettoyer le contour d’oreille avec un chiffon sec ou légèrement humide. Si nécessaire,
dépoussiérez les cordons et la base avec un chiffon sec. Evitez toute pénétration d’humidité ou de
liquide dans les connecteurs, écouteurs et autres ouvertures. Evitez d’exposer le produit à la pluie.
Emballages et sécurité des enfants
Ne laissez jamais des enfants jouer avec les sachets en plastique dans lesquels sont emballés les
composants. En cas d’ingestion, ces sachets et les nombreuses petites pièces qu’ils contiennent
peuvent causer un étouffement.
Mise au rebut des batteries et du produit
N’exposez pas les batteries du micro-casque à la chaleur. Le produit et/ou les batteries doivent être
mis au rebut conformément aux normes et réglementations en vigueur.
Besoin d’aide supplémentaire ?
Pour les détails de support pour votre pays, consultez la Déclaration de sécurité pour l’Europe
et l’Australasie ou la Garantie et déclaration pour l’Amérique du Nord livrée avec le Jabra
T5330 multi-usages.
13.
Entretien, sécurité et mise au rebut
14. Annexe – Levier de décroché à distance GN 1000 (RHL) (accessoire optionnel)
Le levier de décroché à distance
GN 1000 (RHL) est un accessoire
optionnel qui soulève et abaisse
automatiquement votre combiné
téléphonique quand vous passez,
prenez ou terminez un appel.
Installation
14.1 Fixez le RHL sur le support du
combiné téléphonique. Raccordez
le cordon du RHL au port AUX situé
sous la base.
Passer/prendre un appel
14.2 Mettez le micro-casque ou,
si vous le portez déjà, appuyez sur
le bouton de prise/fin d’appel. Le
RHL décroche automatiquement le
combiné du téléphone.
Terminer un appel
14.3 Appuyez sur le bouton de
prise/fin d’appel ou placez le
micro-casque dans le socle de
charge. Le RHL raccroche automatiquement le combiné et l’appel se
termine.
N.B. : limite de portée. Si le micro-casque reste plus d’une minute hors de la zone de portée, tous les appels
en cours seront interrompus.
14.3
14.2
14.1

39
Español
Índice
1. Descripción general..........................................40
2. Colocación de los microcascos . . . . . . . . . . . . . . . . . . . . . . . . . . . . . . . . .41
3. Configuración de su teléfono de escritorio.........................42
4. Para utilizar con teléfono móvil .................................45
5. Realizar una llamada desde su teléfono de escritorio.................46
6. Responder a una llamada desde su teléfono de escritorio .............47
7. Realizar y responder llamadas en el teléfono móvil ..................48
8. Funciones.................................................50
9. Reiniciar / emparejamiento ....................................52
10. Utilizar el Jabra T5330 Multiuso con varios dispositivos Bluetooth........53
11. Con dos teléfonos móviles ....................................53
12. Solución de problemas y preguntas más frecuentes .................54
13. Mantenimiento, seguridad y eliminación del producto ................55
14. Apéndice - descolgador remoto (RHL) GN 1000 (accesorio opcional) .....56
Gracias
Gracias por adquirir Jabra T5330 Multiuso, esperamos que sus funciones le satisfagan. Para iniciarse en el uso y sacar el mayor partido de las muchas funciones de los microcascos, le rogamos que
lea atentamente el manual del usuario.

40
Español
41
Español
10
9
19
20
15
13
12
14
11
16
17
18
1
2
3
5
4
6
8
7
1.
Descripción general
Microcascos
[1] Indicador visual
[2] Botón Responder/finalizar
[3] Subir/bajar volumen
[4] Gancho de sujeción en el oído
[5] Botón silenciador o mute
[6] Micrófono
[7] Botón de reinicio
[8] Sujeción en la tapa (sustituible)
Unidad base
[9] Soporte de carga
[10] Indicador visual
[11] Ajuste del tono de
marcación claro
[12] Puerto AUX
[13] Puerto del teléfono
[14] Puerto del microteléfono
[15] Puerto del adaptador
de corriente CA
[16] Volumen de transmisión
[17] Botón de reinicio
[18] Conmutador de
microcascos
Cables y adaptadores
[19] Cable de conexión
[20] Adaptador de
corriente CA
Colocación en el oído
2.1 Abra el gancho para fijación
en el oído tanto como sea
posible.
1)
2.2 Sujete los microcascos en el
oído de manera que el altavoz
se ajuste cómodamente y el
micrófono quede dirigido hacia la
boca.
2.3 Cierre el gancho para fijación
en torno al oído.
2.4 Gire o flexione la pieza de
goma flexible del gancho para
fijación de manera que ajuste
cómodamente.
Más ajustes
2.5 El gancho para sujeción se
puede colocar en cualquiera de
las 2 ranuras para que el ajuste
sea el mejor posible.
Colocación en el oído
izquierdo
2.6 Tire del gancho de sujeción
desde la ranura e insértelo en la
parte opuesta de los microcascos
marcada con una L. Lleve a cabo
los pasos 2.1 – 2.4 mencionados
arriba.
2.1 2.2
2.3
2.4
2.5
2. Colocación de los microcascos
1)
Nota: Los nuevos microcascos están configurados para su uso en el oído derecho.
2.6

42
Español
43
Español
Si su teléfono dispone de un
puerto de microcascos, vaya
directamente al paso 3.2b.
3.1 Desenchufe el cable del
microteléfono y conéctelo al
puerto de la unidad base marcado
con
.
3.2a Conecte el cable del teléfono adjunto al puerto vacío del
teléfono y al puerto de la unidad
base marcado con
.
3.2b (Sólo para uso en el puerto
del microteléfono)
Conecte el cable del teléfono
adjunto al puerto del teléfono y al
puerto de la unidad base marcado
con
.
3.3 Conecte el adaptador de
corriente CA al puerto que se
encuentra en la parte inferior de
la unidad base. Luego, conecte
a la salida de corriente CA.
El indicador visual de la base se
iluminará en verde.
3. Configuración de su teléfono de escritorio
3.1
3.3
3.2
Nota: El puerto AUX se utiliza para el descolgador remoto (RHL). Consulte el Apéndice.
3.4 Coloque los microcascos en
el soporte de carga y cárguelos
por un mínimo de 30 minutos
antes de usarlos. La carga
completa dura alrededor de
2 horas. El indicador visual de los
microcascos parpadeará en verde
mientras que se estén cargando
y la luz verde será fija cuando esté
totalmente cargado.
3.5 Encienda los microcascos pulsando el botón responder/finalizar
durante 2 segundo (el indicador
visual parpadeará dos veces en
verde durante dos segundos y
se escucharán tres “pitidos”),
o bien coloque los microcascos
en el soporte de carga. Apague
los microcascos pulsando el
botón responder/finalizar durante
2 segundos (el indicador visual se
iluminará en verde dos veces y se
escucharán tres pitidos) .
3.7
3.6
3.9
3.8
3.5
3.4
Tono de marcación claro
3.6 Quite los microcascos del
soporte de carga y póngaselos.
3.7 Tome el auricular del teléfono, pulse brevemente el botón
Responder/finalizar del auricular
para establecer una conexión
de audio y escuchar el tono de
marcación en el auricular.
3.8 Si no hay tono de marcación,
o no es claro, deslice lentamente
el conmutador de tono de marcación de la parte de debajo de la
unidad base, por las 3 posiciones.
3.9 Ponga el conmutador en la
posición que le proporcione el
tono de marcación más claro.
2 seg

44
Español
45
Español
Ajuste del volumen de
transmisión
3.10 Realice una llamada (véase
sección 4) a alguna persona que
pueda realizar una prueba de
teléfono.
3.11 Ajuste el volumen de salida
con el control del volumen de
transmisión situado en la unidad
base. Pase por las 3 posiciones
hasta que la persona que esté
realizando la prueba confirme que
el volumen es el adecuado.
1)
Ajuste del volumen de
llamadas entrantes
3.12 Durante una llamada, ajuste
el volumen entrante, pulsando
el botón de volumen de los
microcascos.
3.13 Un tono en los microcascos
indicará cuándo se ha alcanzado el
volumen mín/máx.
3.10
3.133.12
3.11
1)
Nota: Si escucha su propia voz, probablemente el volumen de transmisión sea demasiado alto.
Reduzca el volumen de su teléfono de escritorio (si tiene esa función) y ajuste el volumen de su microcasco.
4. Para utilizar con teléfono móvil
Configuración
Sincronizar su auricular con el teléfono móvil
NOTA:
Antes de utilizarlo, cargue su auricular (ver 3.4)
Antes de usar su Jabra T5330 Multiuso con un teléfono móvil, debe sincronizarlo con el
teléfono móvil.
Asegúrese de que los auriculares están encendidos.
Quite la carcasa extraíble Pulse el botón de reinicio del auricular durante tres segundos.
El indicador visual del auricular parpadeará en verde o rojo rápidamente. (ver 9.1)
Configure el teléfono móvil Bluetooth® para “descubrir” el Jabra BT5330 Multiuso:
o Siga las instrucciones de su teléfono. Esto normalmente implica ir a un menú ‘setup,’
‘connect’ o ‘Bluetooth’ en el teléfono y seleccionar la opción para “descubrir” o “agregar” un
dispositivo Bluetooth®.
o Su teléfono detectará el Jabra T5330 Multiuso y le preguntará si quiere sincronizarlo.
Para aceptar la sincronización, pulse Yes/OK (o similar) en el teléfono y confírmelo con la clave
de acceso o PIN = 0000 (4 ceros).
Su teléfono confirmará la sincronización cuando ésta haya terminado. Si la sincronización
no se ha realizado correctamente, repita los pasos anteriores. Algunos teléfonos móviles
requieren conexión manual después de la sincronización.
NOTA:
Si pone los auriculares en modo de sincronización accidentalmente, pulse brevemente el
botón Responder/fin para salir del modo de sincronización.
IMPORTANTE:
El mismo auriculares se puede sincronizar con teléfonos móviles. De todas
formas, si sincroniza varios teléfonos móviles encendidos y dentro del alcance del auricular, no
será posible conectar el auricular con el hub Bluetooth. Sólo es posible conectarse a un teléfono
móvil y al auricular al mismo tiempo. Para que sea posible conectarse con la base del auricular
encienda sólo un teléfono móvil sincronizado y dentro del alcance del auricular.

46
Español
47
Español
5.1 Póngase los microcascos.
1)
5.2 Descuelgue el auricular,
o pulse el botón “line” del teléfono
si está conectado al puerto de los
microcascos.
5.3 Espere el tono de marcación y,
a continuación, marque el número.
4.4 Para finalizar una llamada,
vuelva a poner el auricular en el
teléfono o pulse el botón “end
call” si la base está conectada
directamente al puerto de los
microcascos.
Realizar una llamada con el
teléfono
5.5 Coloque los microcascos en el
soporte de carga.
5.6 Utilice el auricular del teléfono
como de costumbre.
5. Realizar una llamada desde su teléfono de escritorio
1)
Nota: Si realiza una llamada con el teléfono, asegúrese de que los microcascos están situados en el soporte
de carga. De no hacerlo así, la llamada se desviará por los microcascos .
5.1
5.4
5.2
5.3
5.6
5.5
6.1 Póngase los microcascos.
1)
6.2 Descuelgue el auricular,
o pulse el botón “line” del teléfono
si está conectado al puerto de
los microcascos. Después pulse
brevemente el botón Responder/
finalizar para transferir la llamada
a los microcascos.
6.3 Para finalizar una llamada,
pulse brevemente el botón
Responder/finalizar del microcasco
y vuelva a poner el auricular del
teléfono o pulse el botón “finalizar
llamada” del teléfono si la base
está conectada directamente
al puerto de los microcascos.
6. Responder a una llamada desde su teléfono de escritorio
6.2
6.1
6.3
6.4
Cambiar de teléfono
a microcascos
6.4 Para terminar una llamada,
pulse el botón Responder/fin del
auricular y cambien el aparato en
el teléfono, o pulse el botón del
teléfono “Finalizar llamada” si la
base está conectada directamente
al puerto del auricular.
1)

48
Español
49
Español
1)
Importante: no cuelgue el auricular ya que desconectaría la llamada.
Cambiar de microcascos
a teléfono
6.5 Durante una llamada en la que
esté utilizando los microcascos,
levante el auricular y vuelva
a colocar los microcascos en
el soporte de carga. La llamada no
se redirigirá al teléfono hasta que
los microcascos no se encuentren
de nuevo en el soporte de carga.
7. Realizar y responder llamadas en el teléfono móvil
Uso
Realizar y terminar llamadas en el teléfono móvil
Al hacer una llamada desde su móvil, la llamada se transferirá a su auricular automáticamente
(dependiendo de las propiedades del teléfono; consulte el Manual de Usuario de su teléfono
móvil para saber cómo activar esta función.)
Si su teléfono no admite esta función, consulte el Manual de Usuario de su teléfono móvil para
saber cómo responder a una llamada con el auricular.
Para responder una llamada, pulse brevemente el botón Responder/fin, O pulse el botón Fin/
No (o similar) de su teléfono móvil.
Responder y terminar una llamada entrante
Para responder, pulse brevemente el botón Responder/fin del auricular después de que suene
por primera vez.
Para finalizar una llamada, pulse brevemente el botón Responder/fin, O pulse el botón Fin/No
(o similar) de su teléfono móvil.
IMPORTANTE:
Si responde una llamada en su teléfono móvil, dependiendo del modelo, no será
transferida automáticamente a los auriculares.
6.5
Cambiar del auricular al teléfono*
Puede cambiar del auricular al teléfono móvil durante una llamada activa. Puede que desee hacer
esto si, por ejemplo, los auriculares tiene poca batería.
Utilice el menú de su teléfono móvil para cambiar de auricular a teléfono móvil durante una
llamada activa (consulte el Manual de usuario de su teléfono móvil.)
Cambiar del teléfono al auricular*
Puede cambiar del auricular al teléfono móvil durante una llamada activa.
Utilice el menú de su teléfono móvil para cambiar de auricular a teléfono móvil durante una
llamada activa (consulte el Manual de usuario de su teléfono móvil.)
Rechazar una llamada entrante*
Para rechazar una llamada entrante, pulse el botón responder/fin del auricular cuando suene
el teléfono.
Dependiendo de la configuración de su teléfono, la llamada será transferida a su buzón de voz
o el llamante escuchará la señal de ocupado.
* Depende del teléfono móvil. Para más información, consulte el manual de usuario de su teléfono móvil.
Hacer una llamada con marcación por voz*
Presione
el botón Responder/fin del auricular para iniciar el modo Marcación por voz. (Para más
información sobre cómo utilizar esta función, consulte el manual de usuario de su teléfono.)
Para obtener mejores resultados, grabe la marcación por voz con sus auriculares.
Remarcar el último número*
Pulse dos veces el botón Responder/fin del auricular.
Llamada en espera y poner una llamada en espera*
Esto le permite retener una llamada mientras está hablando y responder a una llamada en espera.
Pulse el botón Responder/fin una vez para poner en espera la llamada activa y responder a la
otra llamada.
Pulse el botón Responder/fin para alternar entre las dos llamadas.
Pulse brevemente el botón Responder/fin del auricular para finalizar la llamada activa.

50
Español
51
Español
1)
Nota: Si responde una llamada con el teléfono, asegúrese de que los microcascos están situados en el
soporte de carga. De no hacerlo así, la llamada se desviará por los microcascos.
8. Funciones
Silenciador y eliminador del
silenciador o mute
8.1 Pulse el botón del silenciador
en los microcascos. El indicador visual de la unidad base se iluminará
en rojo y se escuchará un tono en
los microcascos.
8.2 Para eliminar el silenciador,
pulse el botón de silenciador
de nuevo. El indicador visual
de la unidad base cambiará
de rojo a verde parpadeante
y se escuchará un tono en los
microcascos. Después pulse
brevemente el botón Responder/
finalizar para transferir la llamada
a los microcascos.
Permanecer dentro del alcance
Si se sale del alcance del teléfono, el sonido de su auricular se deteriorará.
1)
Vuelva a colocarse
dentro del alcance para recuperar la calidad del sonido. Si se aleja demasiado de su teléfono
móvil, la llamada puede interrumpirse o enrutarse de nuevo a su teléfono móvil, en función del
teléfono móvil que esté usando. Para más información sobre cómo utilizar esta función, consulte
el manual de usuario de su teléfono.
¡Recuerde!
Para un rendimiento óptimo, lleve el Jabra T5330 Multiuso y su teléfono móvil en el mismo lado
del cuerpo o dentro de la misma línea visual. En general, obtendrá mejores resultados si no hay
obstáculos entre su auricular y su teléfono móvil.
8.1 8.2
2)
Importante: Si los microcascos están fuera del alcance más de un minuto, cesa el enlace entre la base y los
microcascos.
Batería baja
8.3 Aprox. 10 minutos antes de
que los microcascos se queden sin
batería, el indicador visual de los
microcascos empezará a parpadear
en rojo y se escucharán unos tonos.
Si la batería se agota, el indicador
visual de los microcascos se apagará
automáticamente. Vuelva a colocar
los microcascos en el soporte de
carga y prosiga la llamada utilizando
el auricular del teléfono.
Fuera del alcance
8.4 Si se mueve fuera del alcance
(aprox. 10 metros), ningún botón,
excepto el de responder/finalizar,
estará operativo hasta que vuelva
a situarse en el área de alcance.
2)
Si los microcascos están silenciados
cuando se mueva del área de alcance, seguirán silenciados cuando se
vuelva a situar en dicha área.
Conmutador de microcascos
8.5 Si no hay microcascos, se
debe activar el conmutador de los
microcascos para poder utilizar el
auricular.
10 m / 30 pies
10 min
Características:
Alcance 10 m / 30 pies
Tiempo de conversación/
espera
6 horas / hasta
100 horas
Protocolo de transmisión Bluetooth
Banda de frecuencia 2,4 GHz
8.4
8.3
8.5

52
Español
53
Español
9. Reiniciar / emparejamiento
9.1 Quite la sujeción de la
tapa. Pulse durante 3 segundos
el botón de reinicio de los
microcascos El indicador visual de
los microcascos parpadeará con
mucha rapidez en rojo y verde.
1)
9.2 Luego, pulse el botón de
reinicio en la unidad base durante
3 segundos. El indicador visual de
la unidad base parpadeará con
mucha rapidez en rojo y verde.
9.3 Asegúrese de que los
microcascos y la base estén como
mucho a 1 metro el uno del otro.
Cuando el emparejamiento se ha
producido, los dos indicadores
parpadean en verde 10 veces y el
indicador visual de la unidad base
se vuelve verde.
1)
Nota: Los microcascos vienen emparejados de fábrica con la unidad base. El emparejamiento es necesario
exclusivamente si se ponen en funcionamiento unos microcascos nuevos con la unidad base ya existente
(o viceversa).
9.1
9.2
9.3
~
3 seg
~
3 seg
1 m / 3 pies
10. Utilizar el Jabra T5330 Multiuso con varios dispositivos Bluetooth
Su Jabra T5330 Multiuso se puede sincronizar con hasta 8 dispositivos. Sin embargo, sólo dos
pueden conectarse (sincronizado con el auricular, encendido y al alcance) con el auricular a la vez.
Éstos pueden ser dos dispositivos Bluetooth® cualquiera (por ejemplo, un teléfono móvil y la base
del auricular Jabra T5330, o un PC con Bluetooth y un teléfono móvil o dos teléfonos móviles.)
Esto significa que cuando el auricular está dentro del alcance de la base T5330 Multiuso, sólo
un teléfono móvil o un dispositivo Bluetooth pueden conectarse al auricular (sincronizado con
el auricular, encendido y dentro del alcance) si desea usar su Jabra T5330 Multiuse con su teléfono
de escritorio.
El auricular está sincronizado de forma predeterminada con la base del auricular. Esto significa
que el auricular se conectará automáticamente a la base si está dentro del alcance y conectado.
Si desea que el auricular se conecte con otros dos dispositivos (distintos a la base), tendrá que
cerrar manualmente la conexión desde el auricular a la base. Esto se hace manteniendo pulsados
los botones de subir y bajar volumen durante 4 segundos.
Para reestablecer la conexión con la base, repita simplemente el proceso manteniendo pulsados los
botones de subir y bajar volumen durante 4 segundos.
11. Con dos teléfonos móviles
Sólo puede tener dos teléfonos móviles Bluetooth (sincronizado con el auricular, encendido
y dentro del alcance) conectados simultáneamente al Jabra T5330 Multiuso.
Remarcar el último número* volverá a marcar el último número marcado cuando el auricular
estaba conectado a algún móvil - no necesariamente el último número marcado en el teléfono
móvil que usó con el auricular la última vez.
* Si el teléfono móvil es compatible con esta función.
NOTA:
Cuando varios dispositivos Bluetooth están sincronizados con el auricular, la función
Marcación por voz* funcionará con el último dispositivo con el que estaba sincronizado.

54
Español
55
Español
12. Solución de problemas y preguntas más frecuentes
P: Cuando intento ajustar el tono de marcación claro, no sucede nada.
R: Asegúrese de que la base está conectada (el indicador visual de la unidad base está verde).
A continuación, establezca un enlace de voz entre la base y los microcascos (los indicadores
visuales de la unidad base y de los microcascos parpadean en verde. Asegúrese también de
que el teléfono está activado (el auricular está en el gancho o está pulsado el botón “line”).
P: Oigo mi voz mientras hablo.
R: Probablemente el nivel de volumen de transmisión es demasiado alto (consulte la sección
3.10). Ponga el nivel de volumen de transmisión en un nivel más bajo (3->2, 2->1).
P: El sonido de los microcascos no es de buena calidad o bien la persona al otro lado del
teléfono no me puede escuchar.
R: Asegúrese de que ha situado la posición del ajuste del tono de marcación claro correctamen-
te. Para ello, llame a un compañero y ajuste el tono.
P: Cuando pulso el botón responder/finalizar, se descuelga el GN 1000 RHL, pero no se conecta
la llamada.
R: Asegúrese de que está utilizando el puerto del auricular del teléfono y no el puerto de los
microcascos (si su teléfono dispone de uno), cuando utilice el GN 1000 RHL para responder
llamadas remotas.
P: Me han cambiado de sitio en el trabajo. ¿Se pueden poner mis microcascos en otra base?
R: Sí, se puede. Los microcascos sólo necesitan estar emparejados a la nueva base. Sencillamen-
te siga los procedimientos tal y como se describen en la sección 7 de esta guía.
P: No oigo nada en el auricular cuando uso el teléfono móvil.
R:
- Suba el volumen del auricular (o del teléfono).
- Como el volumen necesario puede ser diferente en el teléfono de escritorio y en el móvil, lo
mejor pude ser ajustar el nivel de los teléfonos.
- Después ajuste el volumen de los auriculares para hacer un ajuste general: Asegúrese de
que el auricular está sincronizado con el teléfono móvil.
- Asegúrese de que el teléfono está conectado al auricular – si no lo está, conéctelo a través
del menú Bluetooth del teléfono o pulsando brevemente el botón responder/fin. Siga el
procedimiento de sincronización (Consulte “Sincronizar su auricular con el teléfono móvil”
en el manual de usuario).
Nota: Si el teléfono de su mesa dispone de un botón de volumen, sería conveniente ajustarlo para optimizar
la calidad de sonido de los microcascos.
Mantenimiento
El gancho de fijación en el oído se puede limpiar con un paño seco o ligeramente humedecido.
Limpie el polvo de la base y de los cables cuando sea necesario. Evite que la humedad o líquidos
puedan penetrar en las tomas, los receptores u otros orificios. No exponga el producto a la lluvia.
Precaución infantil e información sobre el embalaje
El embalaje, que incluye las bolsas de plástico y otros materiales, no es apto para jugar y debe
mantenerse fuera del alcance de los niños. Las bolsas o las piezas pequeñas contenidas en ellas
podrían provocar asfixia si son ingeridas.
Baterías y eliminación del producto
No exponga las baterías de los microcascos al calor. Elimine el producto y/o las baterías de acuerdo
con las normativas y reglamentos locales.
Más ayuda
Para conocer la información de contacto de soporte de su país, consulte la Declaración
de seguridad europea y de australasia o la Garantía norteamericana que se entrega con su
Jabra T5330 multiuso.
13. Mantenimiento, seguridad y eliminación del producto

56
Español
14.
Apéndice - descolgador remoto (RHL) GN 1000
(accesorio opcional)
El descolgador remoto GN 1000
(RHL) es un accesorio opcional
que descuelga y cuelga el auricular
de su teléfono mientras realiza,
responde o finaliza una llamada.
Configuración
14.1 Coloque el RHL en el soporte
del auricular del teléfono. Conecte
el cable del RHL al puerto AUX que
se encuentra en la parte inferior de
la unidad base.
Realizar/responder a una
llamada
14.2 Póngase los microcascos o
pulse el botón responder/finalizar
si ya tiene puestos los microcascos. El RHL descolgará automáticamente el auricular del teléfono.
Finalizar una llamada
14.3 Pulse el botón responder/finalizar, o coloque los microcascos
en el soporte de carga. El RHL
sustituirá automáticamente al
auricular y la llamada finalizará.
14.1
14.2
14.3
Nota: Fuera del alcance. Si los microcascos están fuera del alcance más de un minuto, finalizará cualquier
llamada en curso.

58
Português
59
Português
Índice
1. Descrição geral .............................................59
2. Colocar o auricular ..........................................60
3. Configuração do telefone .....................................61
4. Configuração do telefone celular ................................64
5. Realização de um telefonema ..................................65
6. Atendimento de um telefonema pelo auricular......................66
7. Realização e atendimento de um telefonema pelo telefone celular .......67
8. Funcionalidades ............................................69
9. Reinicialização / Emparelhamento ...............................71
10. Uso do Jabra T5330 Multiuso com diversos dispositivos ativados
para Bluetooth .............................................72
11. Com dois telefones celulares...................................72
12. Resolução de problemas e FAQ .................................73
13. Manutenção, segurança e eliminação ............................74
14. Apêndice – Levantador do Auscultador Remoto GN 1000 (RHL)
(acessório opcional) .........................................75
Obrigado
Obrigado por adquirir o Jabra T5330 Multiuso, esperamos que o seu funcionamento seja do seu
agrado. Leia o manual do utilizador para iniciar a utilização e tirar o maior partido das muitas
funcionalidades do auricular.
Auricular
[1] Indicador visual
[2] Botão Atender/terminar
[3] Volume para cima/para
baixo
[4] Gancho para orelha
[5] Botão Silêncio
[6] Microfone
[7] Botão Reinicializar
[8] Tampa de encaixe
(substituível)
10
9
19
20
15
13
12
14
11
16
17
18
1
2
3
5
4
6
8
7
1. Descrição geral
Cabos e adaptadores
[19] Cabo de ligação
[20] Adaptador de
corrente CA
Unidade de base
[9] Suporte de carregamento
[10] Indicador visual
[11] Interruptor de um sinal
de marcação claro
[12] Porta AUX
[13] Porta de telefone
[14] Porta do auscultador
[15] Porta do adaptador de
corrente CA
[16] Volume de transmissão
[17] Botão Reinicializar
[18] Interruptor de auricular

60
Português
61
Português
Colocar na orelha
2.1 Abrir o gancho para orelha
articulado na maior extensão
possível.
1)
2.2 Fixe o auricular à orelha
de modo a que o auscultador
fique confortavelmente colocado
e o microfone fique na direcção
da boca.
2.3 Fechar o gancho para orelha
articulado sobre a orelha.
2.4 Dobre ou torça a parte de
borracha flexível do gancho
para orelha para uma colocação
confortável.
Ajustes adicionais
2.5 A dobradiça do gancho para
orelha pode ser colocado numa
das 2 ranhuras, para possibilitar
a melhor colocação possível.
Colocação na orelha
esquerda
2.6 Retire a dobradiça do gancho
para orelha da ranhura e insira-a
no lado oposto do auricular marcado com L. Execute os passos
2.1 – 2.4 acima.
2.1
2.4
2.3
2.2
2.5
2. Colocar o auricular
1)
Nota: O novo auricular está configurado para utilização na orelha direita.
2.6
Se o telefone tiver uma porta
de auricular, vá directamente
para 3.2b.
3.1 Desligue o cabo do ausculta-
dor do telefone e ligue-o à porta
na unidade de base marcada com
um
.
3.2a Ligue o cabo o telefone
fornecido à porta vazia do
auscultador no telefone e à porta
na unidade de base marcada com
um
.
3.2b (Apenas utilização com
a porta do auricular).
Ligue o cabo do telefone
fornecido à porta do auricular no
telefone e à porta na unidade de
base marcada com um
.
3.3 Ligue o adaptador de
corrente CA à porta no fundo da
unidade de base, em seguida,
ligue à saída de corrente CA.
O indicador visual na base acende
uma luz verde.
3. Configuração do telefone
3.1
3.3
3.2
Nota: A porta AUX é utilizada para o Levantador de Auscultador Remoto (RHL). Consulte o Apêndice.

62
Português
63
Português
3.4 Coloque o auricular no suporte
de carregamento e deixe a carregar
durante, pelo menos, 30 min. antes
da utilização. Um carregamento
completo demora cerca de 2 horas.
O indicador visual no auricular emite
uma luz verde intermitente durante
o carregamento, a luz deixa de
piscar quando o carregamento tiver
terminado.
3.5 Ligue o auricular premindo
o botão atender/terminar durante
2 seg. (o indicador verde pisca
duas vezes e são emitidos três
bipes), ou colocando o auricular no
suporte de carregamento. Desligue
o auricular premindo o botão
atender/terminar durante 2 seg.
(o indicador vermelho pisca duas
vezes e são emitidos três bipes).
3.4
3.8
3.9
3.6
3.7
Sinal de marcação claro
3.6 Retire o auricular do suporte de
carregamento e coloque-o na orelha.
3.7 Levante o fone de ouvido
do telefone, toque no botão
Atender/Terminar no fone para
estabelecer uma conexão de
áudio e escutar um tom de
discagem no fone.
3.8 Se o sinal de marcação não
for ouvido ou não for claro, faça
deslizar lentamente o o interruptor do sinal de marcação claro
no fundo da unidade de base
através das 3 configurações.
3.9 Coloque o interruptor na posição na qual o sinal de marcação
é mais claro.
3.5
2 seg.
Definir o volume da
transmissão
3.10 Realize uma chamada
(consulte a secção 4) para alguém
que possa funcionar como teste.
3.11 Ajuste o volume de emissão
com o controlo de volume da
transmissão na unidade de base.
Mude através das 3 configurações
até a pessoa com a qual executa
o teste confirmar o volume
adequado.
1)
Definir o volume da recepção
3.12 Durante uma chamada, ajuste o volume da recepção premindo
botão Volume no auricular.
3.13 Um sinal no auricular
indica quando o volume mín./máx.
é atingido.
3.12
3.11
3.13
3.10
1)
Nota: Se conseguir ouvir a sua própria voz, o volume da transmissão estará provavelmente demasiado alto.
Abaixe o volume do aparelho (se esse recurso estiver disponível) e faça a compensação aumentando o volume
do auricular.

64
Português
65
Português
4. Configuração do telefone celular
Configuração
Emparelhamento do fone de ouvido com o telefone celular
OBSERVAÇÃO:
Carregue o fone de ouvido antes de utilizá-lo (veja 3.4).
Antes de utilizar o Jabra T5330 Multiuso com um telefone celular, é preciso emparelhá-lo ao telefone.
Verifique se o fone de ouvido está ligado.
Remova a cobertura ajustável. Pressione o botão “reset” no fone de ouvido por 3 segundos.
O indicador visual no fone de ouvido emitirá rapidamente uma luz verde/vermelha. (veja 9.1)
Ajuste o telefone Bluetooth® para ‘descobrir’ o Jabra T5330 Multiuso:
o Siga as instruções fornecidas no manual do telefone. Este procedimento, normalmente,
necessita que se acesse um menu ‘configuração’, ‘conexão’ ou ‘Bluetooth’ no telefone e se
selecione a opção ‘descobrir‘ ou ‘adicionar‘ um dispositivo Bluetooth®.
o O telefone encontrará o Jabra T5330 Multiuso e perguntará se você deseja emparelhá-los.
Aceite, pressionando Sim/OK (ou um botão parecido) no telefone e confirme com a senha ou
PIN “0000” (4 zeros).
O telefone confirmará quando o emparelhamento estiver concluído. Se o emparelhamento não
for concluído com sucesso, repita as etapas acima. Alguns telefones celulares necessitam de
uma conexão manual após o emparelhamento.
OBSERVAÇÃO:
Se você acidentalmente colocar o fone de ouvido no modo de emparelhamento,
pressione o botão Answer/End (Atender/encerrar) 3 para sair do modo de emparelhamento.
! IMPORTANTE:
O mesmo fone de ouvido pode ser emparelhado a vários telefones celulares.
Porém, se você tiver diversos telefones celulares emparelhados, ligados e dentro da área de
alcance do fone de ouvido, o fone não conseguirá se conectar ao Bluetooth Hub. Só é possível
se conectar a um telefone celular e à base do fone de ouvido. Para se conectar à base do fone
de ouvido, tenha somente um telefone celular emparelhado ligado e dentro da área de alcance
do fone de ouvido.
5.1 Coloque o auricular.
1)
5.2 Levante o auscultador do
telefone ou prima o botão de
“linha” do telefone se estiver ligado
à porta do auricular. Em seguida,
prima o botão atender/terminar
para transferir a chamada para
o auscultador.
5.3 Aguarde o sinal de marcação,
em seguida, marque o número.
5.4 Para terminar uma chamada,
prima o botão Atender/Terminar
no auricular e volte a colocar
o auscultador no telefone, ou
então, prima o botão “terminar
telefonema” do telefone se a base
estiver diretamente ligada à porta
do auricular.
Realizar um telefonema com
o auscultador
5.5 Coloque o auricular no suporte
de carregamento.
5.6 Utilize o auscultador como
é habitual.
5. Realização de um telefonema
5.1 5.2
5.3
1)
Nota: Se realizar um telefonema com o auscultador do telefone, certifique-se de que o auricular está colo-
cado no suporte de carregamento. Caso contrário, o telefonema será encaminhado através do auricular.
5.65.5
5.4

66
Português
67
Português
6.1 Coloque o auricular.
1)
6.2 Levante o auscultador do
telefone ou prima o botão de
“linha” do telefone se estiver
ligado à porta do auricular. Então
prima o botão Atender/Terminar
para transferir a chamada para
o auscultador.
6.3 Para terminar uma chamada,
prima o botão Atender/Terminar
no auricular e volte a colocar
o auscultador no telefone, ou
então, prima o botão “terminar
telefonema” do telefone se a base
estiver diretamente ligada à porta
do auricular.
6. Atendimento de um telefonema pelo auricular
6.2
6.1
6.3
6.4
Mudar do auscultador para
o auricular
6.4 Durante um telefonema
utilizando o auscultador do telefone,
retire o auricular do suporte de
carregamento. Prima o botão
Atender/Terminar e o telefonema
será automaticamente encaminhado
para o auricular.
1)
1)
Importante: Não volte a colocar o auscultador no telefone, uma vez que esta acção irá desligar
o telefonema.
Mudar do auricular para
o auscultador
6.5 Durante um telefonema
utilizando o auricular, levante
o auscultador do telefone e volte
a colocar o auricular no suporte de
carregamento. O telefonema não
será encaminhado para auscultador do telefone, antes do auricular
estar no suporte de carregamento.
7. Realização e atendimento de um telefonema pelo telefone celular
Uso
Como fazer e encerrar uma ligação
Ao fazer uma ligação do telefone celular, a ligação será automaticamente transferida para
o fone de ouvido (recurso sujeito aos ajustes do telefone, consulte o manual do usuário do
seu telefone para saber como ativá-lo).
Se seu telefone celular não tiver este recurso, consulte o manual do usuário para obter
informações sobre como atender uma ligação com um fone de ouvido.
Para encerrar uma ligação, pressione o botão Answer/End (Atender/encerrar) OU pressione
End/No (Encerrar/não) (ou um botão parecido) no telefone celular.
Como atender e encerrar uma ligação recebida
Para atender, pressione o botão Answer/End (Atender/encerrar) no fone de ouvido, após
a primeira chamada.
Para encerrar uma ligação, pressione o botão Answer/End (Atender/encerrar) OU pressione
End/No (Encerrar/não) (ou um botão parecido) no telefone celular.
! IMPORTANTE:
Alguns modelos de telefone não transferem automaticamente a ligação para
o fone de ouvido se você atendê-la no fone de ouvido do telefone celular.
6.5

68
Português
69
Português
Transferência do fone de ouvido para o telefone celular*
Você pode transferir uma ligação em andamento do fone de ouvido para o telefone celular. Você
poderá querer fazer isso se, por exemplo, a bateria do seu fone de ouvido estiver fraca.
Use o menu no telefone celular para transferir uma ligação em andamento do fone de ouvido
para o telefone (consulte o manual do usuário do telefone).
Transferência do telefone celular para o fone de ouvido*
É possível transferir uma ligação em andamento do telefone celular para o fone de ouvido.
Use o menu no telefone celular para transferir uma ligação em andamento do telefone para
o fone de ouvido (consulte o manual do usuário do telefone).
Como rejeitar uma ligação recebida*
Pressione o botão Answer/End (Atender/encerrar) no fone de ouvido quando o telefone tocar
para rejeitar uma chamada recebida.
Dependendo da configuração do telefone, a pessoa que telefonou será encaminhada para
o correio de voz ou ouvirá um sinal de ocupado.
* Depende do telefone celular. Para mais informações consulte o manual do usuário do telefone celular.
Como fazer uma ligação com a discagem de voz*
Pressione o botão Answer/End (Atender/encerrar) no fone de ouvido para entrar no modo
de discagem de voz. (Consulte o manual do usuário do telefone celular para obter mais
informações sobre como utilizar este recurso.)
Para obter melhores resultados, grave a informação de discagem com voz pelo fone de ouvido.
Rediscagem do último número*
Pressione duas vezes o botão Answer/End (Atender/encerrar).
Chamada em espera e retenção de chamada*
Esta função lhe permite reter uma ligação durante uma conversa e atender uma chamada em espera.
Pressione uma vez o botão Answer/End (Atender/encerrar) para reter a ligação ativa e atender
a chamada em espera.
Pressione o botão Answer/End (Atender/encerrar) para alternar entre as duas chamadas
Pressione o botão Answer/End (Atender/encerrar) no fone de ouvido para encerrar
a conversa ativa
1)
Nota: Se atender um telefonema com o auscultador do telefone, certifique-se de que o auricular está
colocado no suporte de carregamento. Caso contrário, o telefonema será encaminhado para o auricular.
8. Funcionalidades
Silenciar e anular o silêncio
6.1 Prima o botão de silêncio no
auricular. O indicador visual na unidade de base fica vermelho e um
sinal de marcação será ouvido no
auricular.
6.2 Para desactivar o silêncio,
prima de novo o botão de de silêncio. O indicador visual na unidade
de base muda de vermelho para
verde intermitente e um sinal de
marcação será ouvido no auricular.
Permanência na área de cobertura
A qualidade do som no seu fone de ouvido ficará ruim se você sair da área de alcance.1)
Para restabelecer a qualidade do som volte para dentro da área de alcance. Se você ficar muito
longe do seu telefone celular, a ligação poderá ser encerrada ou redirecionada para o telefone,
dependendo do modelo de telefone que estiver usando. Consulte o manual do usuário do
telefone para obter mais informações sobre esta função.
Lembre-se!
Para obter um melhor desempenho, use o Jabra T5330 Multiuso e o telefone celular no mesmo
lado do corpo ou dentro da linha de vista. Em geral, você obterá melhor desempenho quando
não existirem obstáculos entre o fone de ouvido e o telefone celular.
8.2
8.1

70
Português
71
Português
2)
Importante: Se o auricular estiver fora do raio de alcance durante mais de 1 min., a ligação entre a base
e o auricular será interrompida.
Bateria fraca
8.3 Aprox. 10 minutos antes do auricular ficar sem bateria, o indicador
visual no auricular fica intermitente
com uma luz vermelha e são ouvidos vários sinais. Se a bateria ficar
descarregada, o indicador visual no
auricular apaga-se automaticamente. Volte a colocar o o auricular no
suporte de carregamento e continue
o telefonema utilizando o auscultador do telefone.
Fora do alcance
8.4 Se sair do alcance (aprox.
10 metros), todos os botões
excepto o botão atender/terminar
deixarão de funcionar até estar de
novo no raio de alcance.
2)
Se o auricular ficar em modo silêncio quando sai do raio de alcance,
também ficará em silêncio quando
regressar ao raio de alcance.
Interruptor de auricular
8.5 Se o auricular não estiver
disponível, o interruptor do
auricular deverá ser activado para
poder utilizar o auscultador.
Características:
Alcance 10 m / 30 pés
Tempo de conversação/espera 6 horas / até 100 horas
Protocolo de transmissão Bluetooth
Banda de freqüência 2,4 GHz
10 min
10 m / 30 pés
8.4
8.5
8.3
9. Reinicialização / Emparelhamento
9.1 Remova tampa de encaixe.
Prima o botão de reinicialização
no auricular durante 3 seg.
O indicador visual no auricular
pisca com uma luz vermelha/verde
rapidamente.
1)
9.2 Em seguida, prima o botão
de reinicialização na unidade de
base durante 3 seg. O indicador
visual na unidade de base
fica intermitente com uma luz
vermelha/verde rapidamente.
9.3 Certifique-se de que o auricular e a base se encontram a uma
distância de 1 metro. Quando
o emparelhamento é executado
com êxito, os dois indicadores
visuais piscam com uma luz verde
10 vezes e o indicador visual
na unidade de base fica verde
estável.
1)
Nota: O auricular já está emparelhado com a unidade de base de origem. O emparelhamento só deverá ser
necessário se um novo auricular tiver de funcionar com uma unidade de base existente (ou vice-versa).
1 m / 3 pés
~ 3 seg.
~ 3 seg.
9.1
9.2
9.3

72
Português
73
Português
10. Uso do Jabra T5330 Multiuso com diversos dispositivos ativados para Bluetooth
O Jabra T5330 Multiuso pode ser emparelhado com até 8 dispositivos. Porém, somente dois podem
ser conectados (emparelhados com o fone de ouvido, ligados e dentro da área de alcance) ao
fone de ouvido de cada vez. Estes podem ser quaisquer dispositivos Bluetooth® (por exemplo, um
telefone celular e a base do fone de ouvido Jabra T5330, ou um PC habilitado para Bluetooth e um
telefone celular ou dois telefones celulares).
Isso significa que quando o fone de ouvido está dentro da área de alcance da base do fone
de ouvido T5330, somente um telefone celular ou dispositivo habilitado para Bluetooth pode ser
conectado ao fone de ouvido (emparelhado com o fone de ouvido, ligado e dentro da área de
alcance) se você quiser usar o Jabra T5330 Multiuso com seu telefone convencional.
O fone de ouvido é emparelhado à base por padrão. Isso significa que o fone de ouvido
é automaticamente conectado à base se estiver ligado e dentro da área de alcance. Se você
desejar conectar o fone de ouvido a dois outros dispositivos (que não a base do fone de ouvido)
é necessário encerrar manualmente a conexão do fone de ouvido com a base. Para isso pressione
e mantenha pressionado o botão de volume por 4 segundos.
Para restabelecer a conexão com a base, repita o procedimento pressionando e mantendo
pressionado o botão de volume por 4 segundos.
11. Com dois telefones celulares
É possível conectar dois telefones celulares habilitados para Bluetooth (emparelhados
com o fone de ouvido, ligados e dentro da área de alcance) ao Jabra T5330 Multiuso
simultaneamente.
Rediscagem do último número* ligará para o último número discado com o fone de ouvido
conectado a qualquer telefone celular, não necessariamente o último número discado no
telefone celular em que o fone está conectado no momento.
* Se o telefone celular der suporte a este recurso.
OBSERVAÇÃO:
quando diversos dispositivos habilitados para Bluetooth estão emparelhados com
o fone de ouvido, a função de discagem por voz* funcionará com o último dispositivo que foi
emparelhado.
12. Resolução de problemas e FAQ
P: Nada acontece quando tento ajustar o sinal de marcação claro.
R: Certifique-se de que a base está ligada (o indicador visual na unidade de base fica verde estável).
Em seguida, estabeleça uma ligação de voz entre a base e o auricular (os indicadores visuais
na unidade de base e no auricular piscam a verde). Certifique-se também de que o telefone
está activado (o auscultador está no descanso ou o botão de “linha” está premido).
P: Oiço a minha voz quando falo.
R: O nível do volume da transmissão (consulte a secção 3.10) está provavelmente demasiado
elevado. Defina o nível do volume de transmissão para um nível mais baixo (3->2, 2->1).
P: O som do auricular é de má qualidade ou o meu interlocutor não me ouve.
R: Certifique-se de que o interruptor de sinal de marcação claro está posicionado correctamente.
Para isso, realize um telefonema para ajustar o interruptor de sinal de marcação claro.
P: Quando primo o botão atender/terminar, o GN 1000 RHL levanta, mas a ligação não é concluída.
R: Certifique-se de que está a utilizar a porta do auscultador do telefone e não a porta do
auricular (caso o telefone tenha uma), quando utilizar um GN 1000 RHL para o atendimento
remoto.
P: Mudei de secretária no emprego. É possível colocar o meu auricular noutra base?
R: Sim, é possível. O auricular apenas necessita de ser emparelhado com a nova base. Siga
o procedimento descrito na secção 7 deste manual.
P: Não consigo ouvir nada no fone de ouvido quando estou usando o celular.
R:
- Aumente o volume no fone de ouvido (ou do telefone).
- Como o nível de volume necessário pode ser diferente no telefone e no celular, é recomendável ajustar o volume dos telefones.
- Em seguida, use os ajustes de nível de volume do fone de ouvido para fazer ajustes gerais:
verifique se o fone de ouvido está emparelhado com o celular.
- Certifique-se de que o telefone esteja conectado ao fone de ouvido, se ele não se conectar
pelo menu Bluetooth do telefone ou quando você pressiona o botão atender/terminar,
siga o procedimento de emparelhamento. (Veja: “Emparelhamento do fone de ouvido com
o telefone celular”, no manual do usuário.
Nota: Se o telefone da secretária tiver um botão de volume, este poderá ajudar a ajustá-lo para optimizar
a qualidade do som no auricular.

74
Português
75
Português
Manutenção
O gancho para orelha pode ser limpo com um pano seco ou ligeiramente húmido. É possível limpar
o pó dos cabos e da unidade de base consoante a necessidade. Evite que a humidade ou líquidos
penetrem nas entradas, receptores ou noutras saliências. Evite expor o produto à chuva.
Crianças e embalagem do produto
A embalagem, incluindo os sacos de plástico que se utilizam para embalar os acessórios, não
são brinquedos para crianças. Os próprios sacos ou as peças pequenas que estes contêm podem
provocar a asfixia se ingeridos.
Eliminação de baterias e do produto
Não exponha as baterias do auricular ao calor. Elimine o produto e/ou as baterias de acordo com
as normas e regulações locais.
Precisa de mais ajuda?
Para obter detalhes de suporte para seu país, consulte a Declaração e Segurança Européia e da
Australásia ou a Declaração e garantia Norte-americana que acompanham seu Jabra T5330 Multiuso.
13.
Manutenção, segurança e eliminação
14. Apêndice – Levantador do Auscultador Remoto GN 1000 (RHL) (acessório opcional)
O Levantador de Auscultador
Remoto GN 1000 (RHL) é um acessório opcional que levanta e baixa
automaticamente o auscultador do
telefone quando realiza, atende ou
termina um telefonema.
Configuração
14.1 Ligue o RHL ao suporte do
auscultador do telefone. Ligue
o cabo do RHL à porta AUX no
fundo da unidade de base.
Realização/atendimento de
um telefonema
14.2 Coloque o auricular ou prima
o botão atender/terminar se já
estiver com o auricular colocado.
O RHL levanta automaticamente
o auscultador do telefone.
Terminar um telefonema
14.3 Prima o botão atender/terminar ou coloque o auricular
no suporte de carregamento.
O RHL irá substituir automaticamente o auscultador do telefone
e o telefonema irá terminar.
14.2
14.1
Nota: Fora do alcance. Se o auricular estiver fora do raio de alcance durante mais de 1 min., qualquer
telefonema em curso será interrompido.
14.3

Australia 61 3 8823 9111
Austria 43 1 403 4134
Canada 1 905 212 11 02
Denmark 45 43 43 15 52
France 33 1 30 58 30 31
Germany 49 803 126 510
Hong Kong 852 21 04 68 28
Italy 39 02 5832 8253-61-74
Japan 81 3 5297 7975
P. R. China 86 10 6583 2311
Singapore 65 65 42 45 50
Spain 34 91 639 80 64
Sweden 46 8 693 09 00
United Kingdom 44 1784 220 140
USA 1 603 598 1100
The Jabra brand is wholly owned by GN Netcom. Customer service is provided by
GN Netcom. Please see details below.

www.jabra.com
MADE IN CHINA
© 2008 GN Netcom A/S. All rights reserved. Jabra® is a registered
trademark of GN Netcom A/S. All other trademarks included herein
are the property of their respective owners. The Bluetooth® word
mark and logos are owned by the Bluetooth SIG, Inc. and any use
of such marks by GN Netcom A/S is under license. (Design and
specications subject to change without notice).
 Loading...