

Page 1

USB 3.0 MULTI-ADAPTER
VGA & Gigabit Ethernet
User Manual
Manuel de l'utilisateur
Bedienungsanleitung
Manual del usuario
JUA370
ユーザー マニュア
使用手冊
JUA370
Page 2

USB 3.0 MULTI-ADAPTER
VGA & Gigabit Ethernet
JUA370
User Man ual
JUA370
Page 3

Table of Contents
INTRODUCTIONS ............................................................................................................................. 3
System Requirements ................................................................................................................ 3
Specifications.............................................................................................................................. 4
Package Contents ..................................................................................................................... 5
GETTING STARTED ............................................................................................................................ 6
INSTALLATION FOR WINDOWS ....................................................................................................... 6
Device Driver Installation .......................................................................................................... 6
Verify Device Driver Installation ............................................................................................... 9
Uninstalling the Device Driver .................................................................................................. 9
INSTALLATION FOR MAC .............................................................................................................. 10
Device Driver Installation ........................................................................................................ 10
Verify Device Driver Installation ............................................................................................. 13
Network Setting on MAC ......................................................................................................... 13
Uninstalling the Device Driver ................................................................................................ 14
FUNCTIONS INSTRUCTIONS: WINDOWS 7 ................................................................................... 15
FUNCTIONS: WINDOWS XP .......................................................................................................... 18
FUNCTIONS: MAC ......................................................................................................................... 23
TECHNICAL SUPPORT ........................................................................................................................ 27
LIMITED WARRANTY ......................................................................................................................... 27
Page 4

USB 3.0 MULTI-ADAPTER USER MANUAL
INTRODUCTIONS
The j5create USB 3.0 Multi-Adapter series provides extra connectivity for your computer with 5
Gb/s faster transfer speed. These pocket-sized multi-adapters allow you to add an add i tional
USB computer peripheral, VGA monitor or gigabit LAN through USB port.
With j5create multi-adapters, there is no need to open up your computer to add a n
expensive graphics card, you simply load the drivers, plug in the adapter to the USB port, then
plug in the VGA monitor cable into the adapter and you are ready. It supports three viewing
modes: primary, extended, mirror modes. With “plug & play” functionality between your
computer and 2nd monitor or projector, you will be able to create a new visual environment
in seconds.
The gigabit multi-adapter all ows you to add networking capabilities to a computer without
them through a Wi-Fi connection. It has an RJ-45 connector that supports 10/100/1000 Mbps
Ethernet performance – perfect for your Ultrabook or MacBook.
j5create’s elegan t multi-adapter series provides you with a fast and portable alternative
solution.
System Requirements
Microsoft Windows 8, 7, XP (32-bit or 63-bit)
Mac OS X 10.8 / 10.7 / 10.6
CPU: Intel 2 core Qua d 2.33 GHz
RAM: 2 GB DDR2
Available USB port (USB 3.0 is recommended)
Note for Video Player:
*Windows XP users: “Windows Media Player” is recommended for video playback
*Windows XP users & MAC users: Some Windows XP & MAC products are not supported
by USB 3.0 at this time, therefore we suggest USB 2.0 for ‘office applications’ only; Video
Playback is not recommend due to USB 2.0 bandwidth limitations causing limited video
performance.
3
Page 5
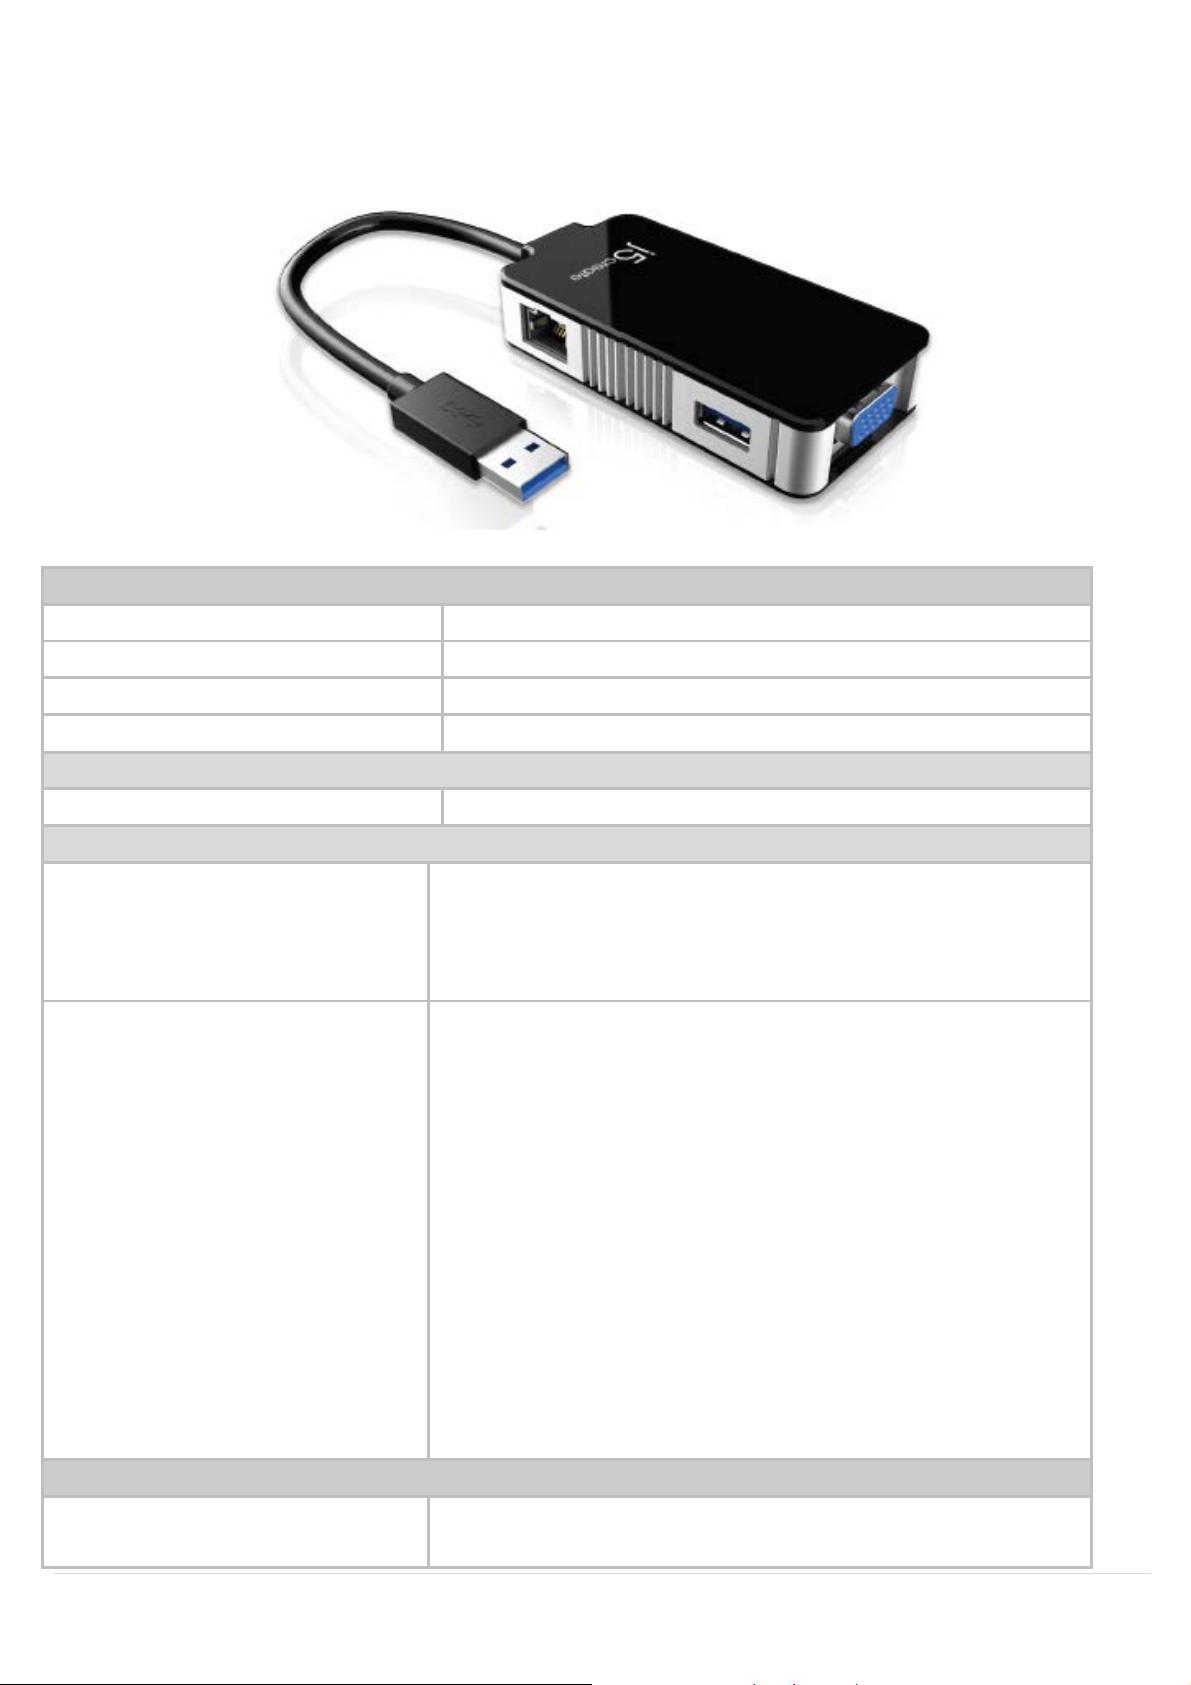
Interface
Host In terface
USB 3.0 Male Type-A connector
Video Interface
VGA-DB 15 pin Female connector
Ethernet Port
RJ-45 Female connector (Gigabit Ethernet)
USB Port
USB 3.0 Femal e connector
Power
Power Mode
Bus-powered
Functions
Display
Video Playback: 1080P
Ethernet
Transfer Rate:
Supports IEEE 802.1Q VLAN tagging and 2 VLAN ID
Physical Specifications
Dimensions
Main body: 43.75(W)x 90.6(H)x18.6(D) mm
Specifications
Display resolution: 2048 x 1152 @ 32bit
Display Modes: Primary, Extended, Mirror
Display Rotation: 0°, 90°, 180°, 270°
1000 Mbps (Hal f Duplex) / 1000 Mbps (Full Duplex)
IEEE:
IEEE 802.3az, IEEE 802.3, 802.3u, and 802.3ab, IEEE
802.3x
Modes:
- Supports Wake on LAN function, suspend mode and
remote wakeup via link-change, magic packet, or
Microsoft wak e up frame
filtering
- Supports Jumbo Frame
- Supports Checksum Offload (IPv4, I P v6, T C P, UDP)
and TCP Large Send Offload
Cable length: 14.5 cm
4
Page 6
Weight
Approximately 58.5 g (including cable)
Aspect Ratio
Resolution
Color Depth
Wide Screen Display
Standard Display
4:3
800 x 600
16,32 bits
USB 3.0 MULTI-ADAPTER USER MANUAL
Video Resolutions and Color Depth Support
16:9 2048 x 1152 16,32 bits
16:10 1920 x 1200 16,32 bits
16:9 1920 x 1080 16,32 bits
16:10 1680 x 1050 16,32 bits
16:9 1600 x 900 16,32 bits
16:10 1440 x 900 16,32 bits
16:9 1360 x 768 16,32 bits
16:10 1280 x 800 16,32 bits
15:9 1280 x 768 16,32 bits
16:9 1280 x 720 16,32 bits
4:3 1600 x 1200 16,32 bits
4:3 1400 x 1050 16,32 bits
5:4 1280 x 1024 16,32 bits
4:3 1280 x 960 16,32 bits
4:3 1152 x 864 16,32 bits
4:3 1024 x 768 16,32 bits
Package Contents
USB 3.0 Multi-Adapter JUA370
Quick Installation Guide
Driver CD
5
Page 7
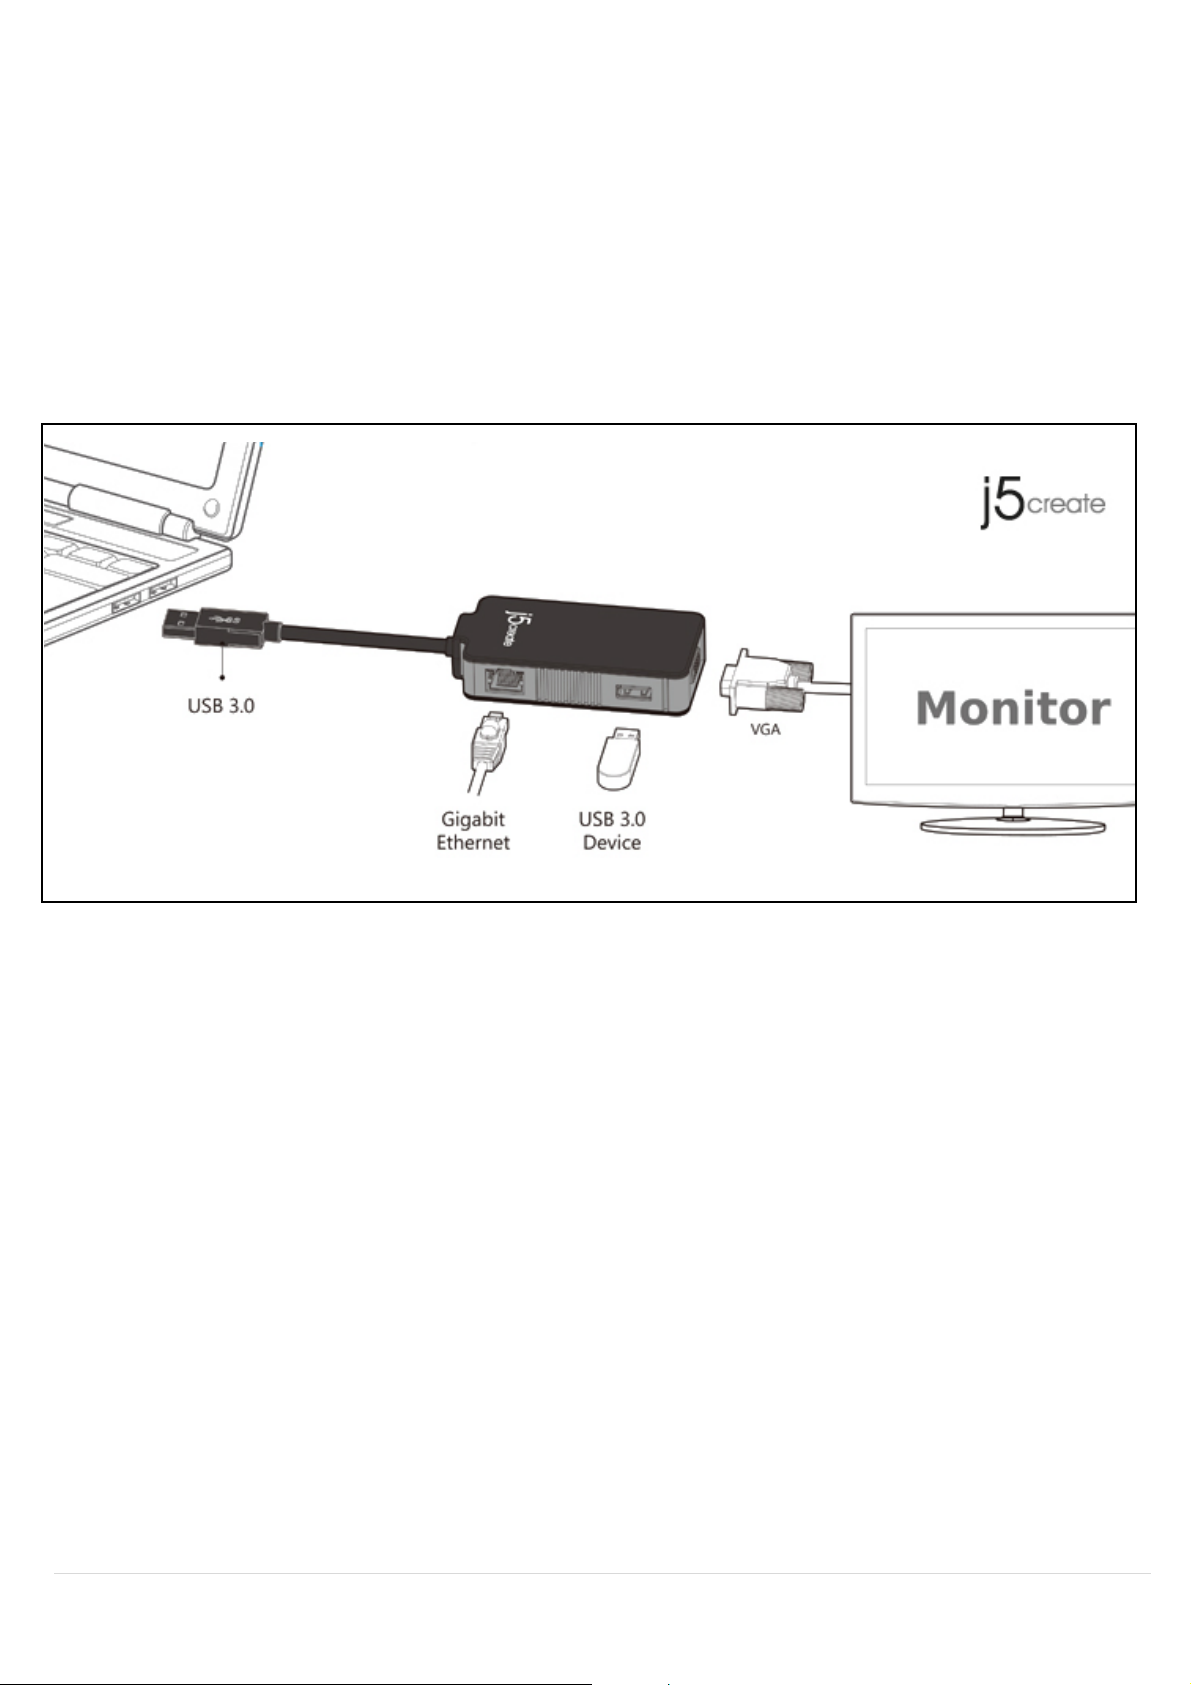
GETTING STARTED
Notes Before Installation
Install the driver completely before inserting the USB cable into your computer
Run the setup program as an administrator to avoid errors in installation
Connect the VGA Cable for the display to the VGA port on the JUA370 first before
connecting the USB cable to the computer
Un-install the previous driver first before installing the latest driver
1. Start the device driver installation (please refer to your PC system OS installation in the next
section) *N
2. Connect the USB 3.0 cable connector to the host laptop
3. Connect the VGA cable for the display device
4. Connect the Ethernet cable
5. Your USB HUB port is now ready to use
ote: install driver completely before following steps 2 through 5.
INSTALLATION FOR WINDOWS
Device Driver Installation
This section illustrates the simple device driver installation guide for Windows 7 operating system.
When your computer is ready to use, insert the Driver CD into the CD-ROM drive. The se
program should be launched automatically; if it doesn’t, go to Computer, click on your CD
6
tup
Page 8

1. The installation page will be launched. To
2. After pressing the installation option, the
3. Read the license agreement, check I
4. When the Install Shield Wizard is complete,
5. After restarting your computer connect the
6. Windows 7:
USB 3.0 MULTI-ADAPTER USER MANUAL
drive, and manually run the setup CD. Double Click on Setup.exe to start.
※Make sure the USB cable is unplugged from your PC or Notebook before executing the
installation program .
start click on Install the Latest Driver. Please
make sure you are connected to the internet
or press Install Driver to start the installation.
accept the terms of the license agreement,
InstallShield Wizard will launch, click Next
to contin ue.
select Yes, I want to restart my computer
click Next >
USB 3.0 MULTI-ADAPTER USB cable to y our
PC or Notebook. The Installing device
driver software message will pop-up.
When the driver software has been
installed successfully the message to the
right will appe a r on your computer.
Windows XP: An icon ( ) will be seen
on the lower right toolbar. Your driver
software was installed successfully when
the message to the right is shown.
The display functions of the USB3.0 Multi-Adapter will be activated after the computer has
been restarted. You might see the mirror display shown on the display device.
now. Click Finish to restar t.
7
Page 9
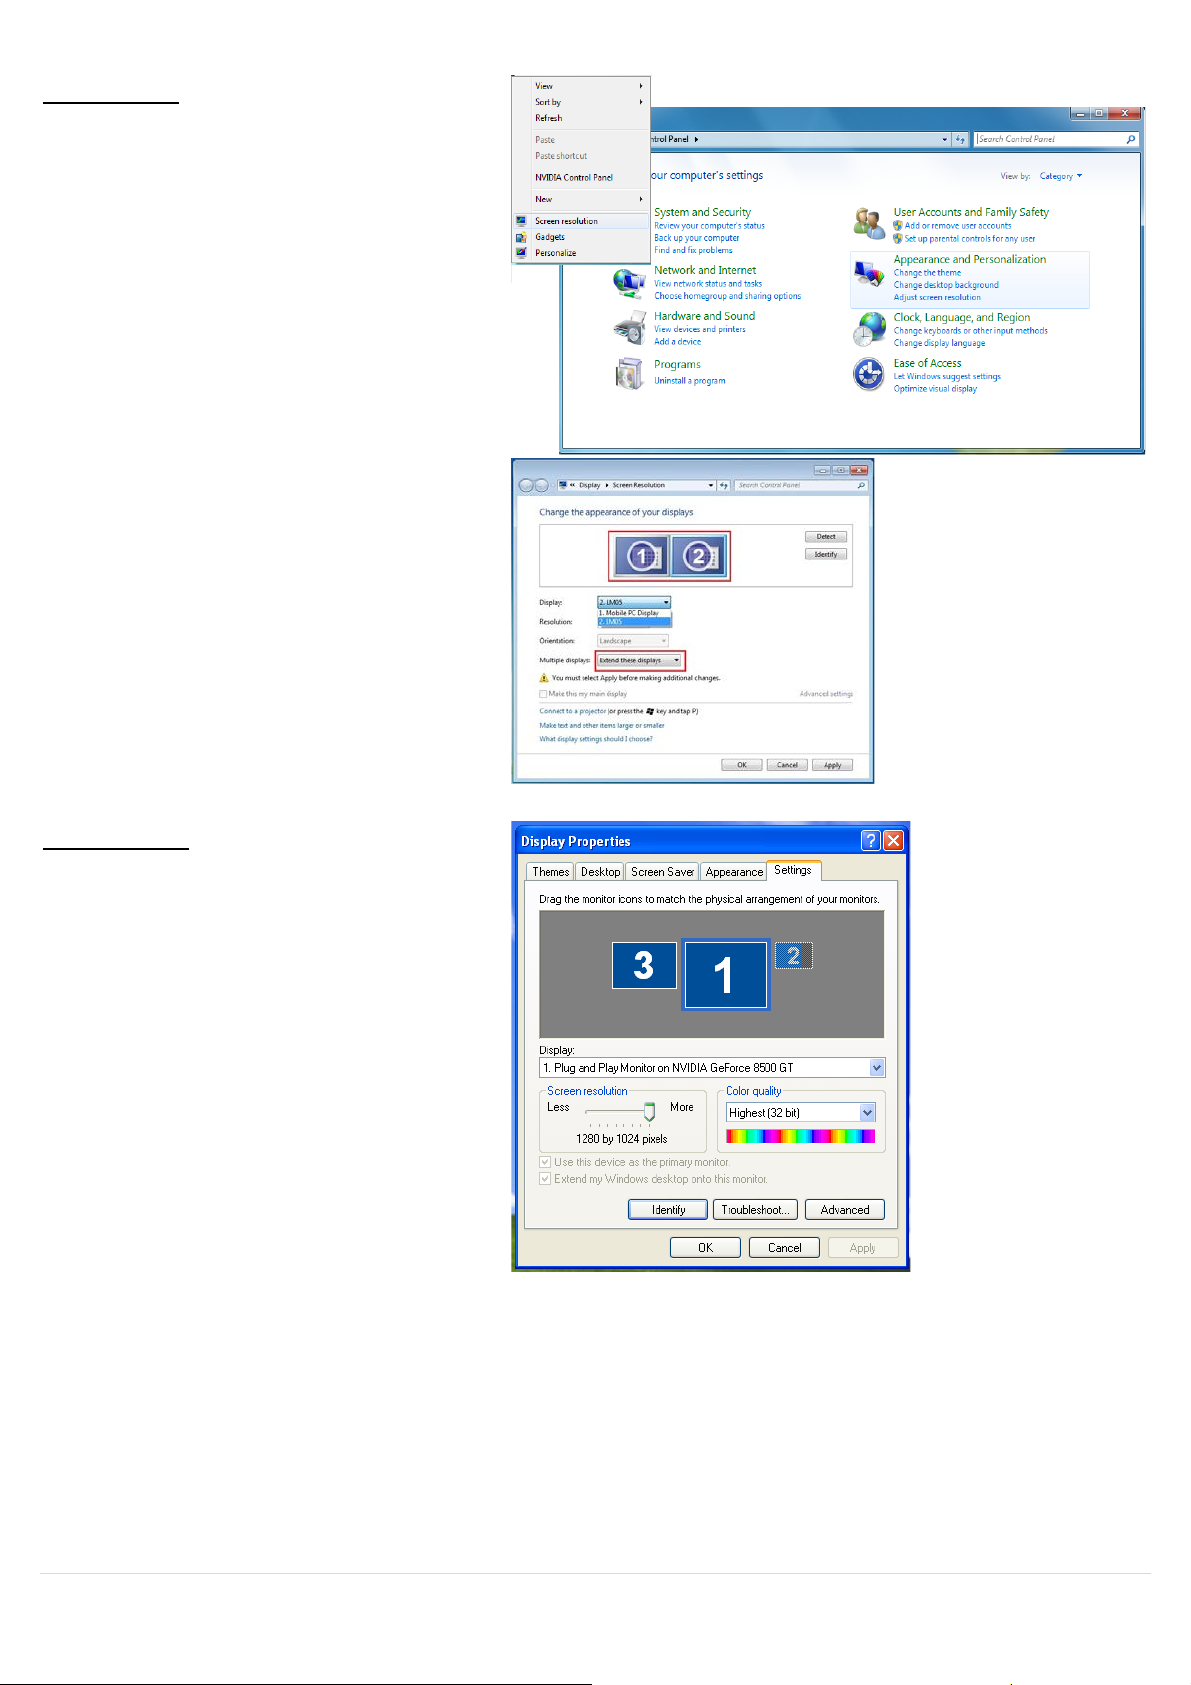
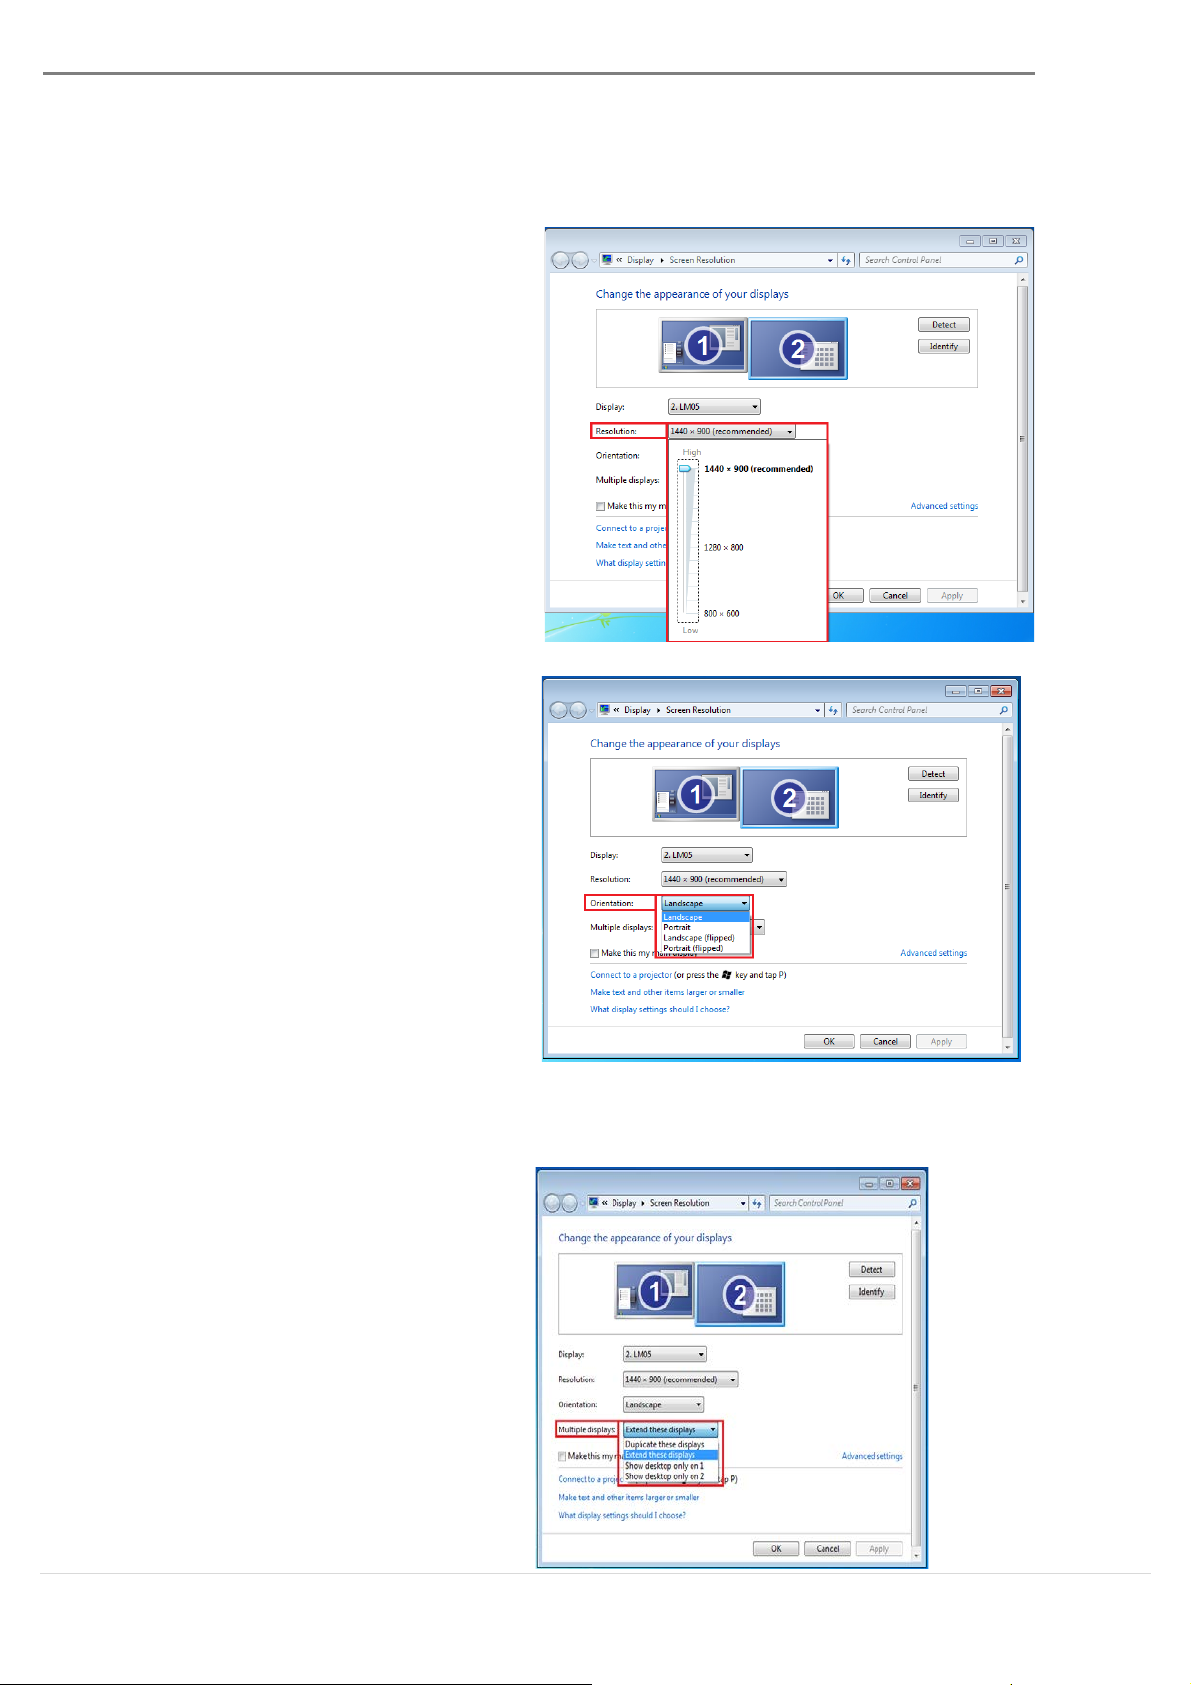
Windows 7:
When the Screen Resolution window
Windows XP:
You can modify the corresponding
position of each extend display via
display settings. Go to START →
Control Panel → Appearance and
Personalization → Adjust screen
resolution
※or Right click on the desktop and go
to Screen Resolution
pops up, you can identify each
monitor’s number by clicking Identify.
You can drag the monitor to your
preferred location.
You can modify the corresponding
position of each extended display via
display settings.
Go to Start → Control Panel → Display
Properties →Settings
When the Display Properties window
appears, each monitor’s number can
be identified by clicking Identify.
You can drag the monitor to your
preferred location.
Note:
If your internal graphics card has Dual Display Ports…..
When using one USB 3.0 MULTI-ADAPTER:
The display device that is connected to the 2nd VGA port will be numbered as the 3rd monitor
and the display device that is connected to the USB 3.0 MULTI-ADAPTER will be numbered as
the 2nd monitor.
8
Page 10
Windows 7:
Windows XP:
1. Click Start→ Control Panel → Programs
2. A message will appear confirming that you
install the application. Click ‘ok’ to
USB 3.0 MULTI-ADAPTER USER MANUAL
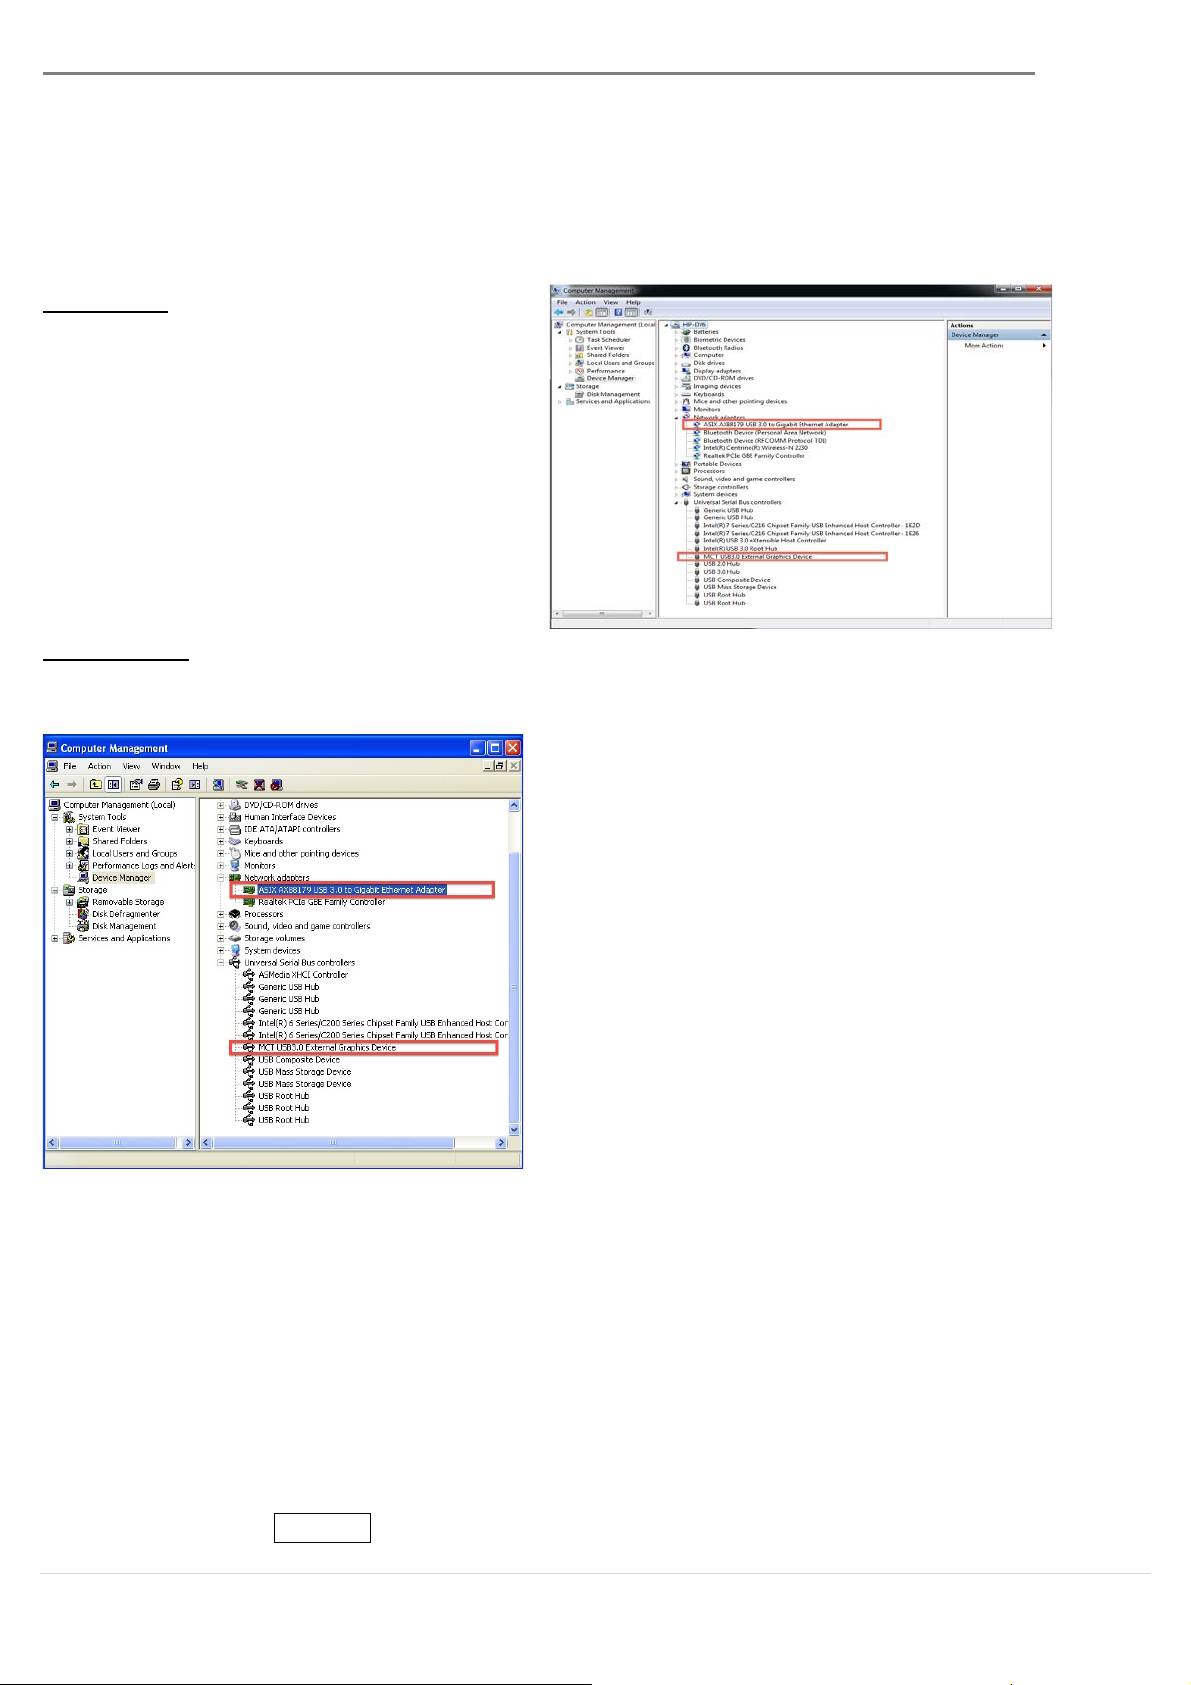
Verify Device Driver Installation
Follow the steps below to verify the driver installation status of the USB 3.0 Multi-Adapter
Right Click My Computer Manager
Device Manager click + sign of
Network adapter & Sound, video and
game control & Universal Serial Bus
controllers
Right Click My Computer, Manager → Device Manager click + sign of Display Adapter &
Network adapter & Sound, video and game controllers & Universal Serial Bus controllers
Uninstalling the Device Driver
*Unplug the USB Cable of the USB 3.0 MULTI-ADAPTER before uninstalling the driver
and Features→ Uninstall or change a
program Select j5 USB 3.0 MULTIADAPTER... Click Uninstall
want to uncontinue.
9
Page 11

3. When the driver is completely
1. Insert the Driver CD into the CD-ROM drive;
uninstalled, select “Yes, I want to restart
my computer now.” Click Finishto
restart.
INSTALLATION FOR MAC
Device Driver Installation
Installing the device driver enables your computer’s operating system to recognize the USB3.0
Multi-Adapter. Be sure that you are referring to the appropriate installation procedure before
you begin installing.
※ Make sure the USB cable is unplugged from your Mac Desk top or Mac Notebook before
executing the setup program.
This section illustrates the device driver installation procedure for a computer running Snow
Leopard.
and run the .dmg file to load drivers in the
mac install folder
2. The installation page will be launched;
To begin installation click on start Get Last
Driver online, please make sure you are
connected to the internet or press Install Lan
to start the installation.
10
Page 12
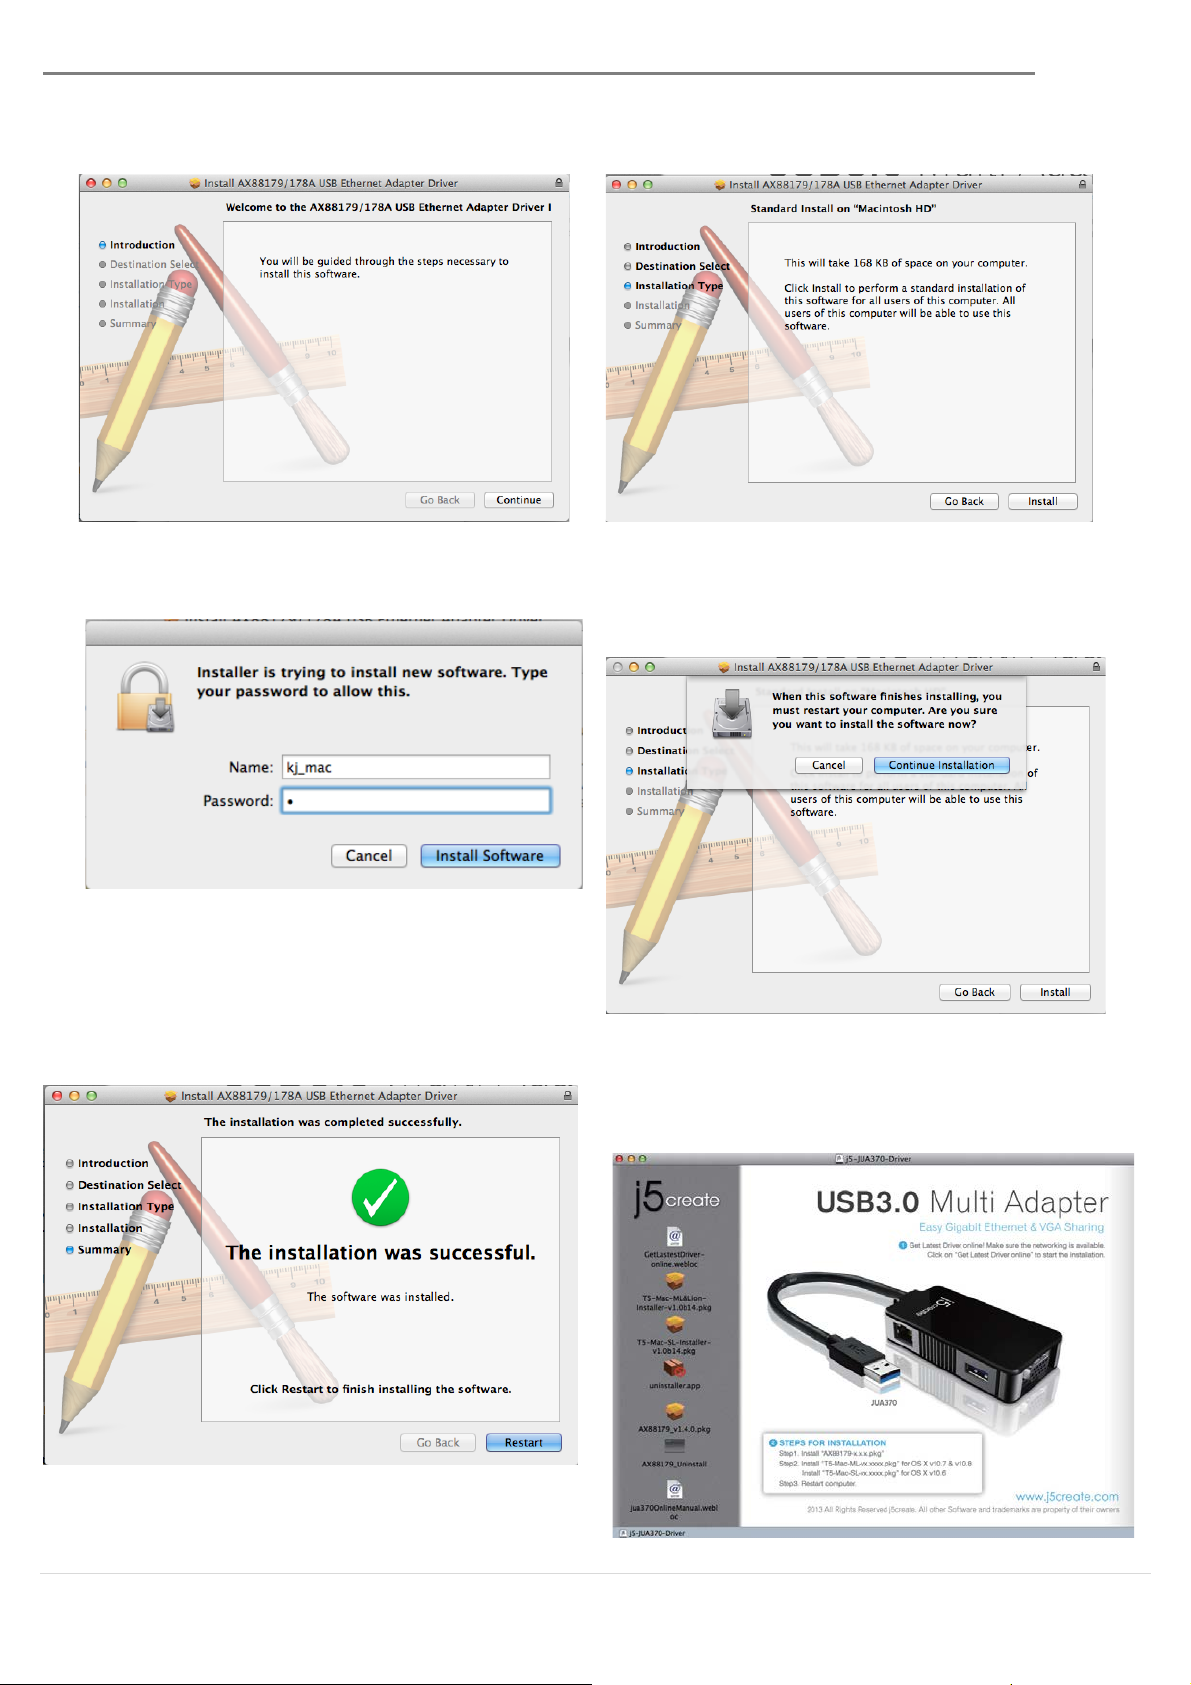
3. Click Continue to proceed
4. Type in your password and click OK
Installation is processing…This will take a
5. Installation is completed, click Close
6. After the Lan driver installation has finished,
USB 3.0 MULTI-ADAPTER USER MANUAL
few moments
choose the OS version you are using and
press Install Driver to start the installation
11
Page 13
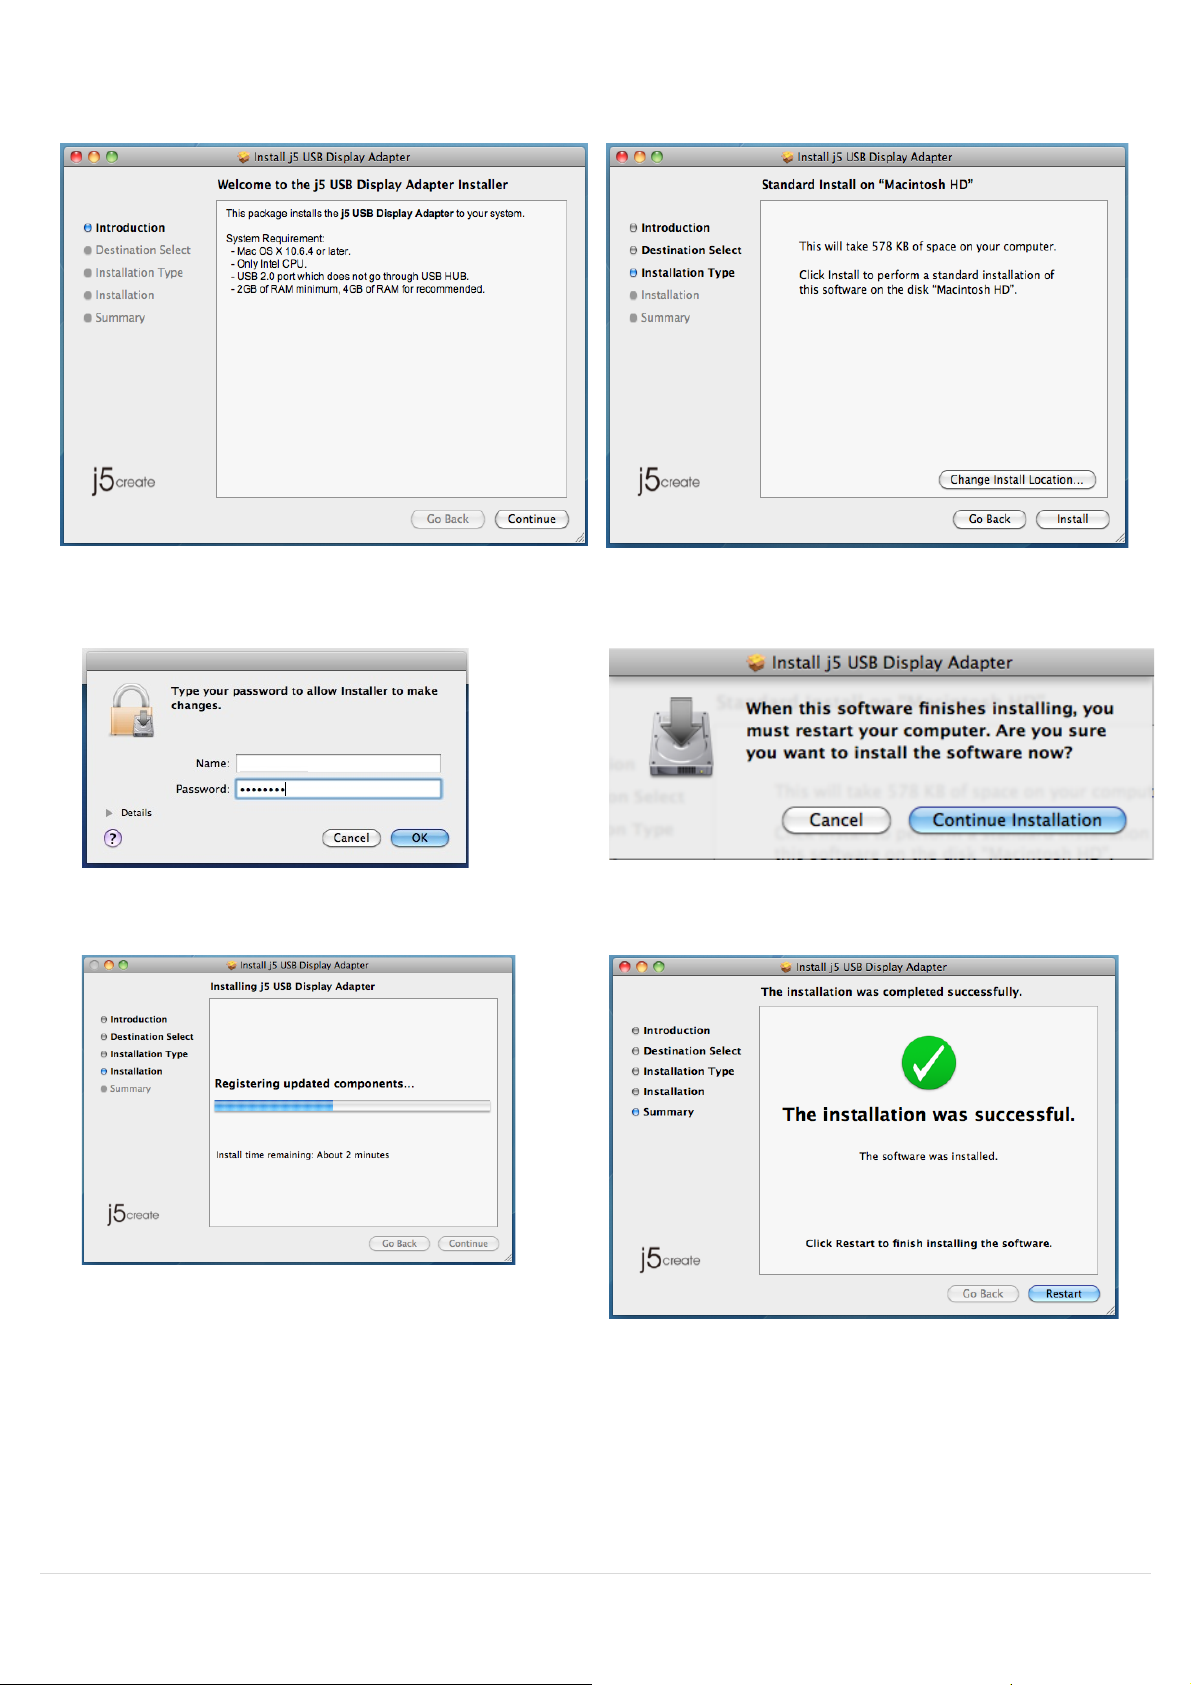
7. Click Continue to proceed
8. Type in your password and click OK
9. Click Continue Installation
10. Installation is processing…This will take a
11. Click Restart to complete the software
few moments
installation
12
Page 14

2. The picture shows the installation process for the
USB 3.0 MULTI-ADAPTER USER MANUAL
Verify Device Driver Installation
Follow the steps below to verify the driver installation status of the USB 3.0 Display Adapter
1. GO , select About This Mac and
select More Info
…
USB 3.0 Multi-Adapter
Network Setting on MAC
Go to and then “System Preferences”.Choose the “Network” tab to ad just.
13
Page 15
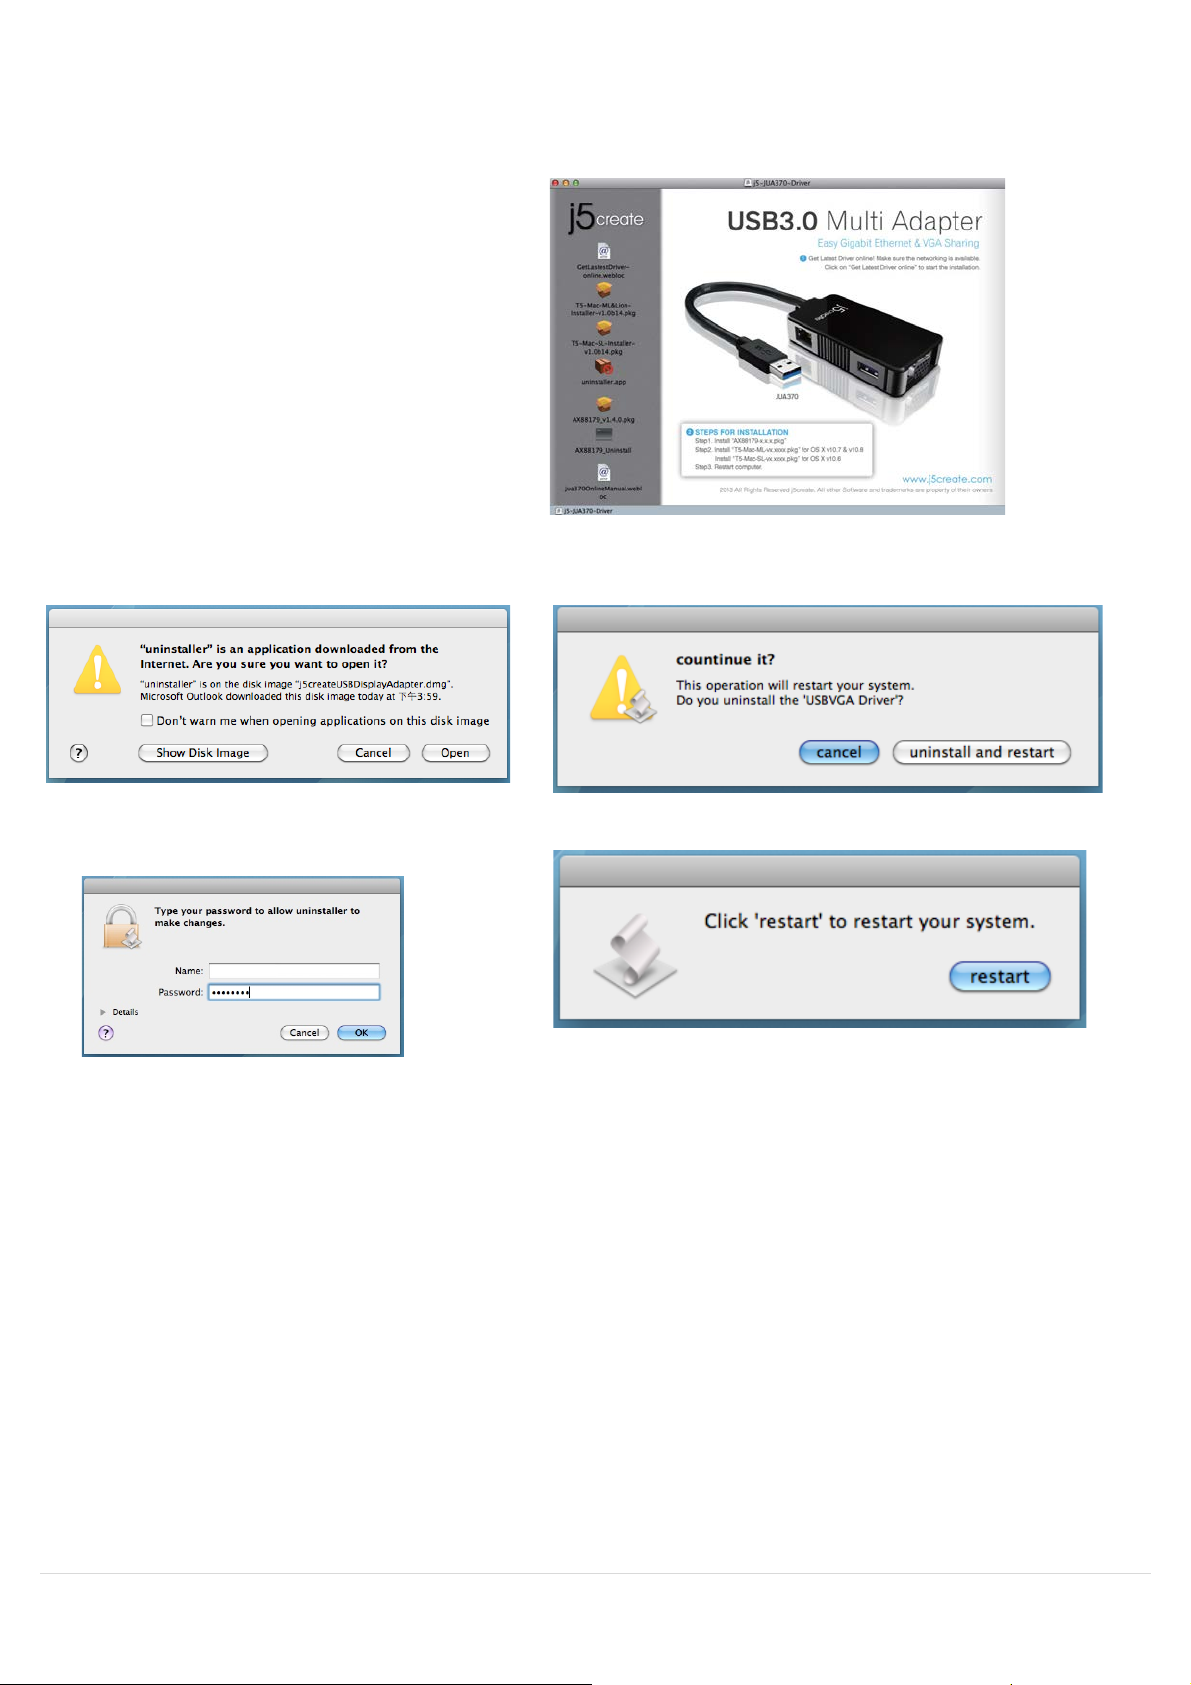
1. Unplug the USB Cable of USB 3.0
3. Click Open to proceed
4. Click Uninstall and restart to proceed
5. Type in your password to allow un-
6. Restart your system.
Uninstalling the Device Driver
MULTI-ADAPTER from the USB por t
2. To un-installation, please press the
Uninstall Driver icon
installation and click OK to proceed
14
Page 16
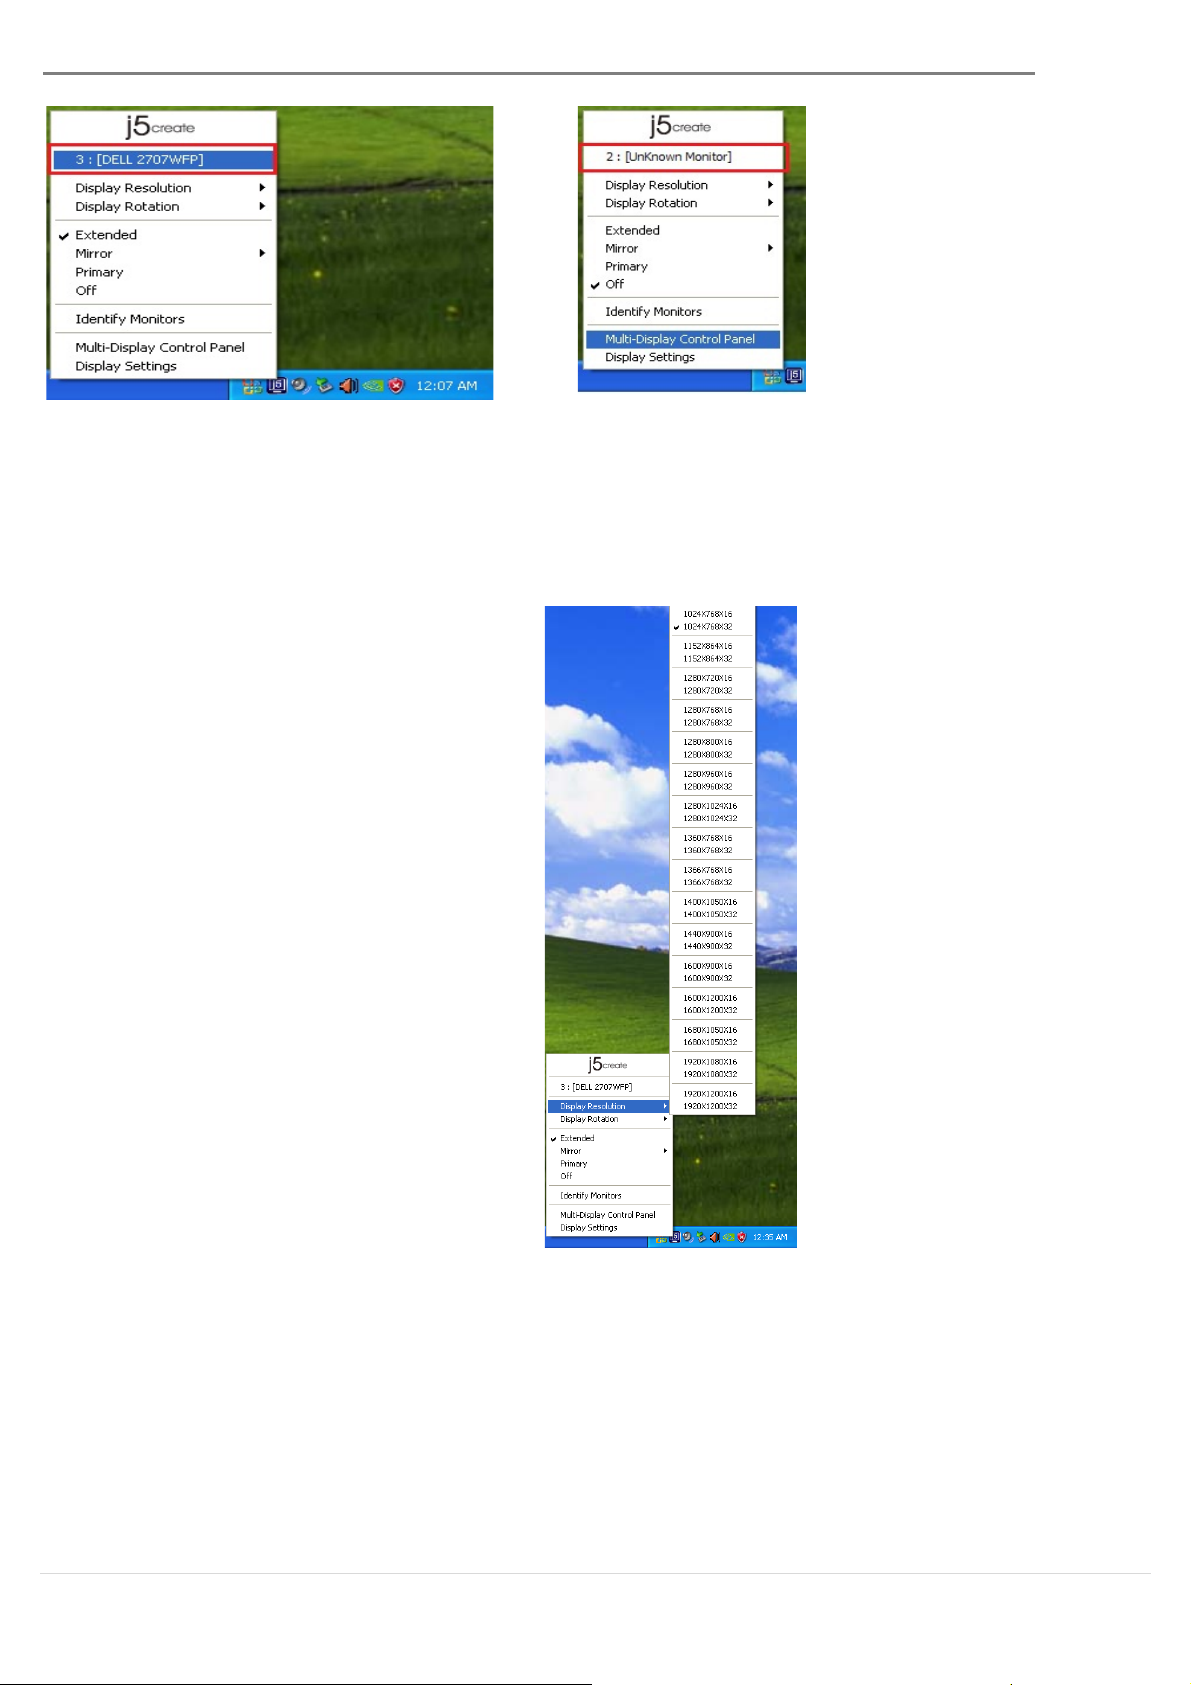
Display Resolution
.
Display Orientation
Extended mode (Default)
USB 3.0 MULTI-ADAPTER USER MANUAL
FUNCTIONS INSTRUCTIONS: WINDOWS 7
Fast access to Display Resolution settings
The resolution list will show when you
move the cursor over Display Resolution
Select your desired resolution.
Default resol ution: 1024 x 768 x 32 bit
The Orientation allows you to turn the
display on the device that is connected
to the USB 3.0 MULTI-ADAPTER
Display Mode
This feature allows the display device
attached to the USB 3.0 MULTI-ADAPTER
to work as an “extended” display of the
on-board screen.
You can adjust the position by clicking
the number of the display first and then
select Extend these displays and clic k
Apply
15
Page 17
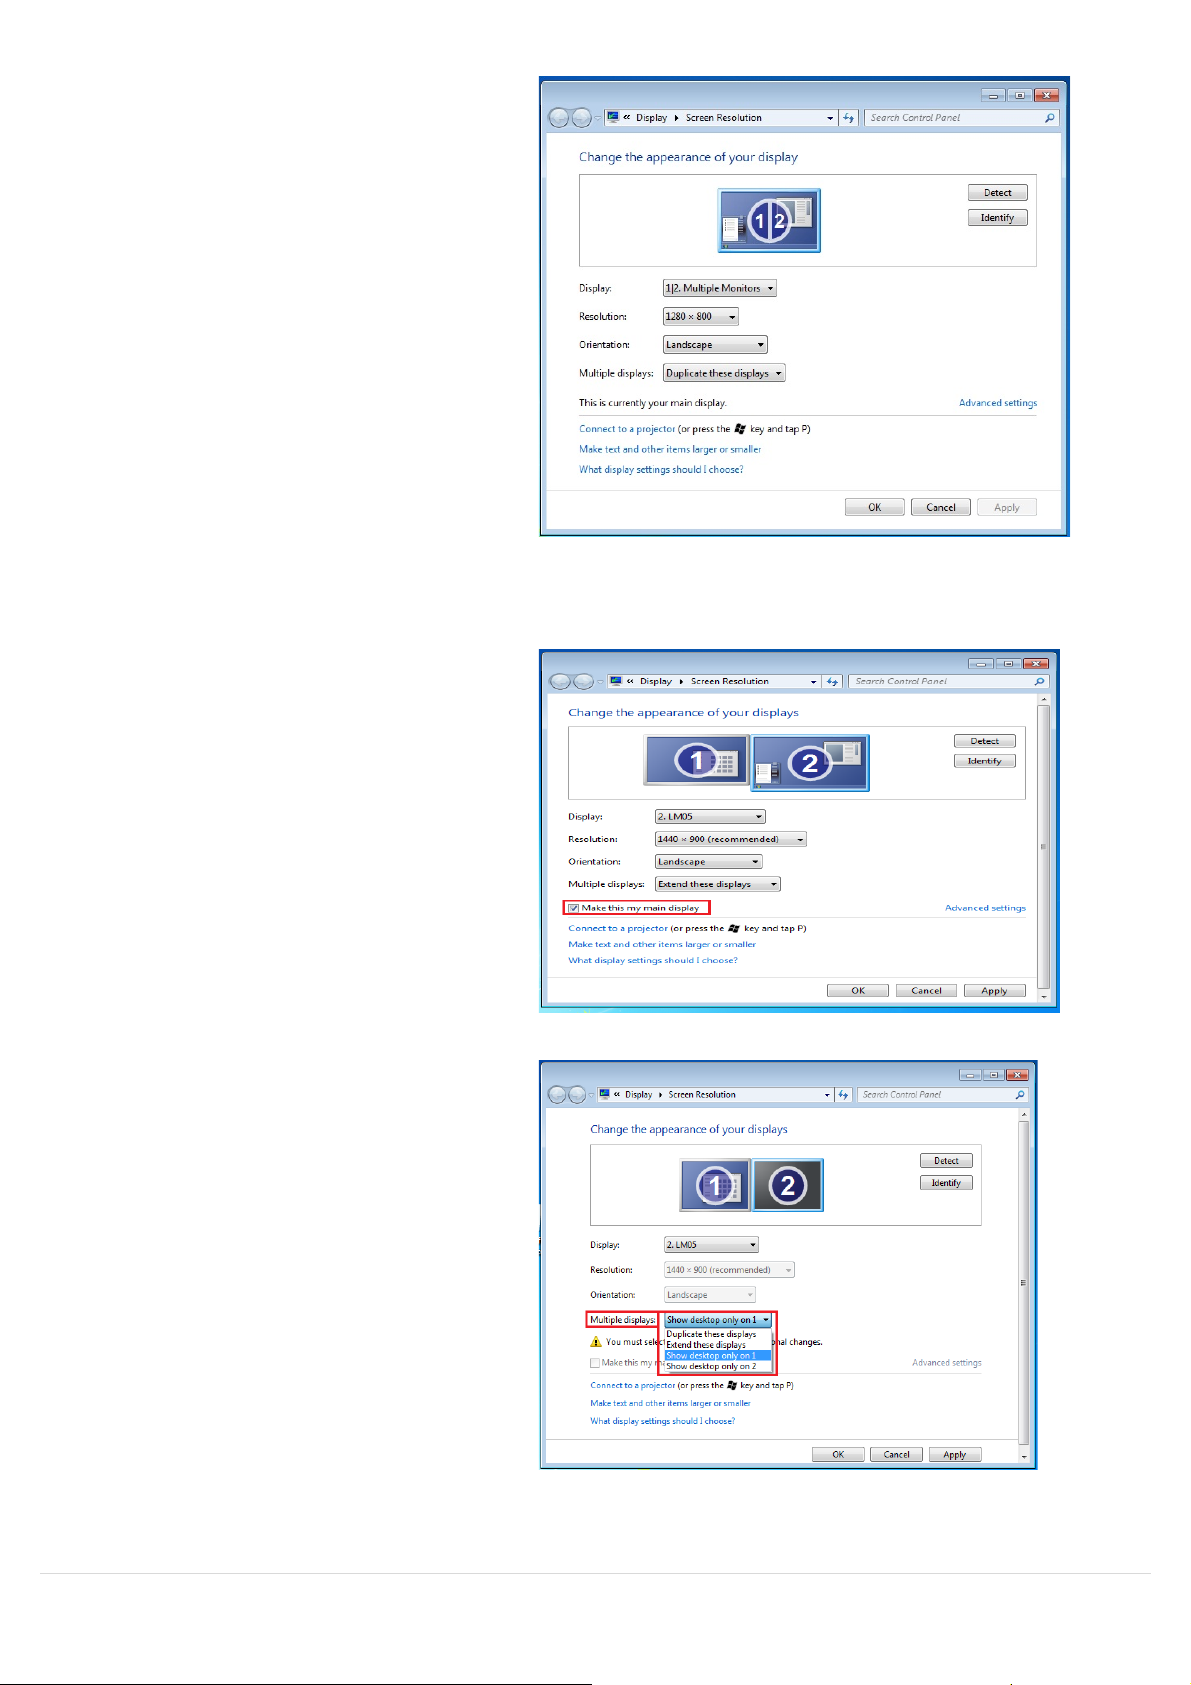
Make this my
Off mode
Mirror mode-Duplicate
This feature allows the same contents of
the on-board screen to be displayed on
the screen connected to the USB 3.0
MULTI-ADAPTER
You can select Duplicate these displays
and click Apply
Note:
The resolution for the secon d ar y an d
primary displays must be the same when
using Mirror Mode (This may be lower than
the preferred resolution for the display).
Only 2 displays can be m irrored at the
same time. Windows 7 OS may have other
limitations.
Primary mode
When you want to switch the enabled
monitor as the main display and extend
the view to the on-board screen.
Choose the Number of the main displ ay
you want and click on
main display.
You can turn one display on while the
other is off
Select Show desktop only on 1 and the
2nd displ ay will b e o ff
Select Show desktop only on 2 and the
1st display will be off
16
Page 18
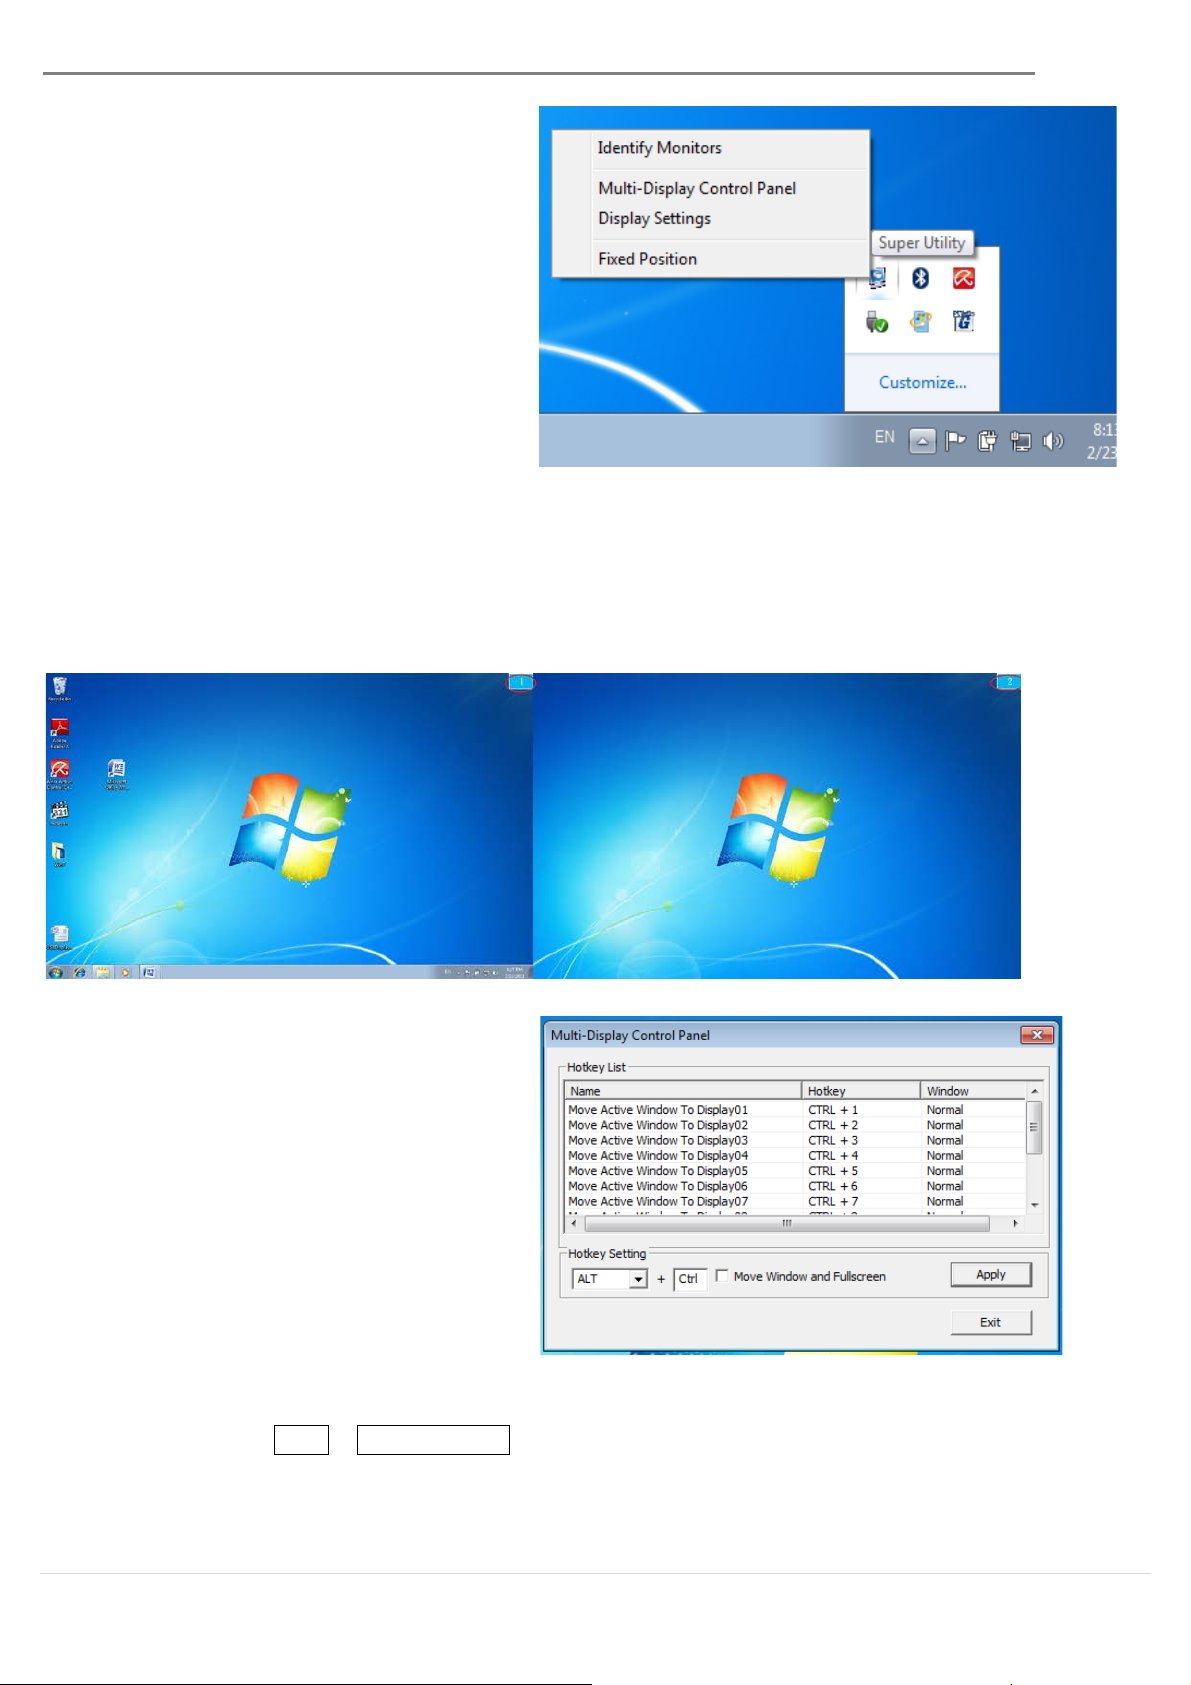
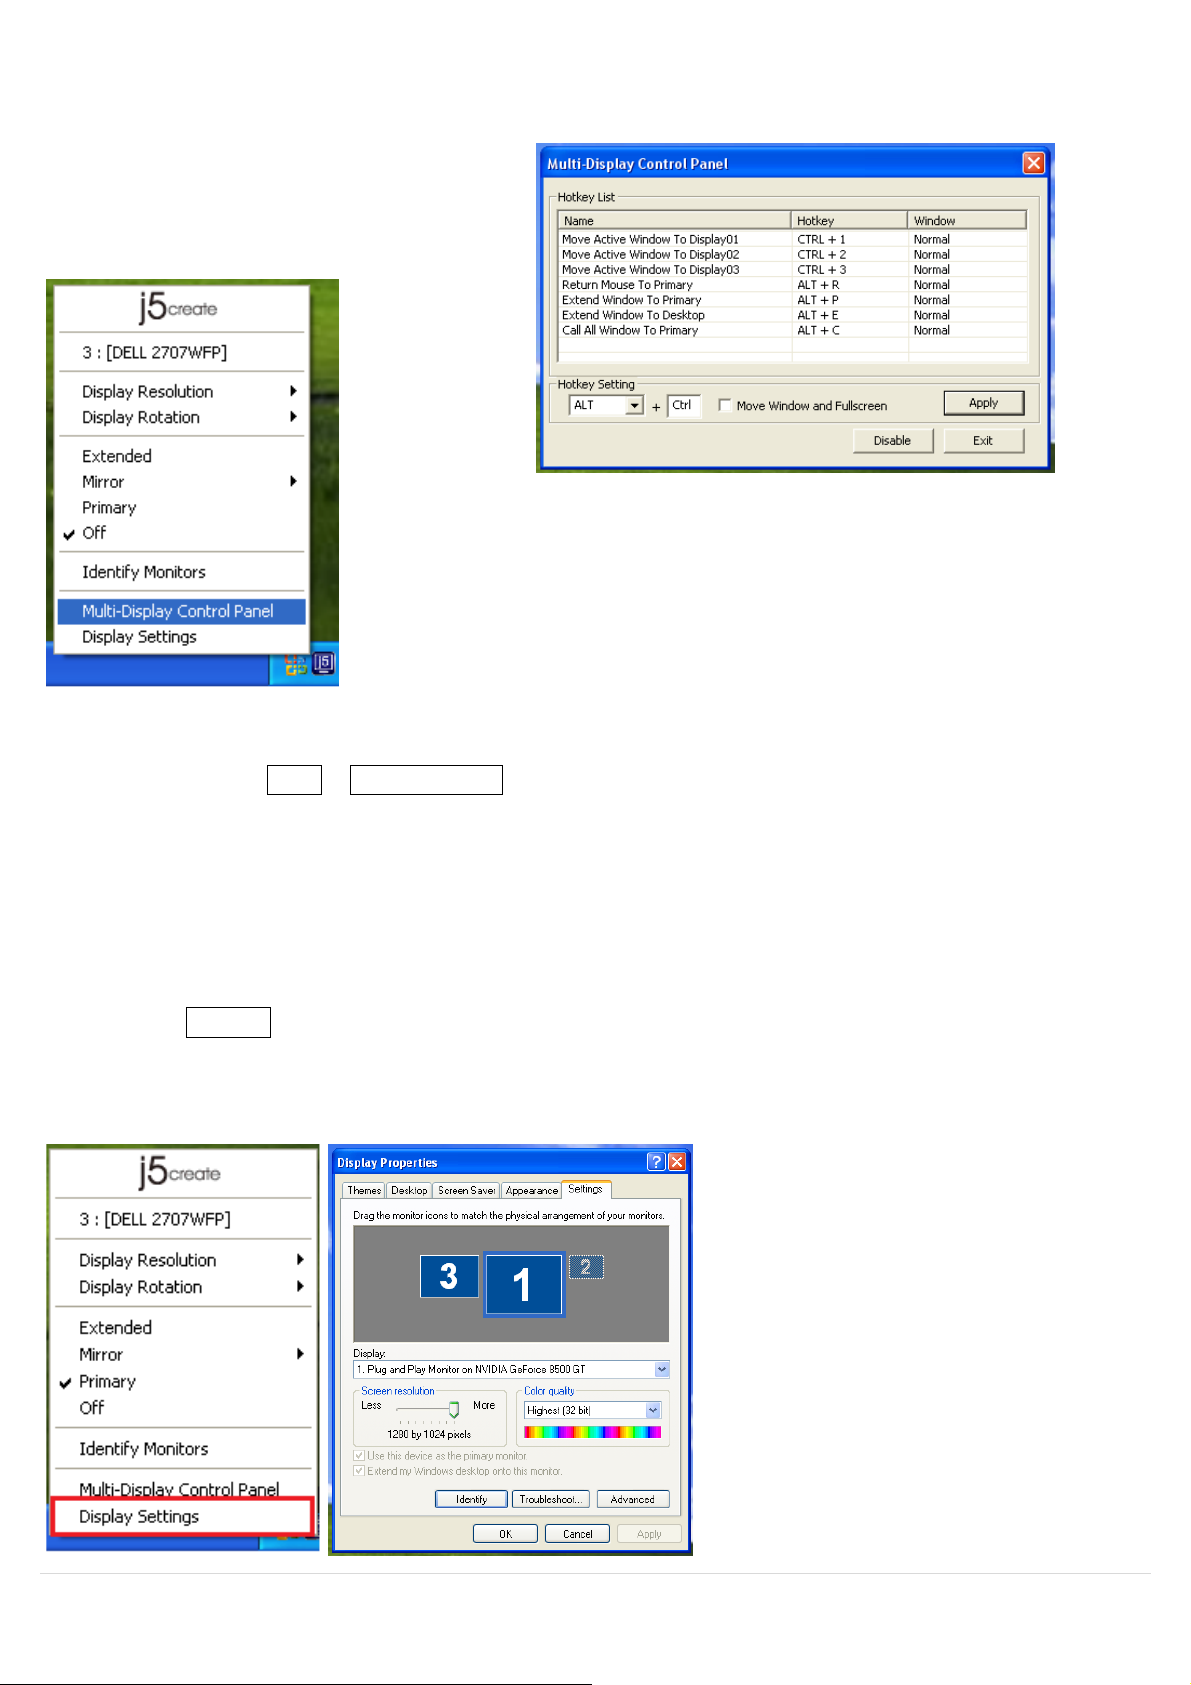
Multi-Display Control Panel
※Using Hotkeys
USB 3.0 MULTI-ADAPTER USER MANUAL
Super Utility
A super utility provides more options.
You can find the icon on the lower right
side of the task bar.
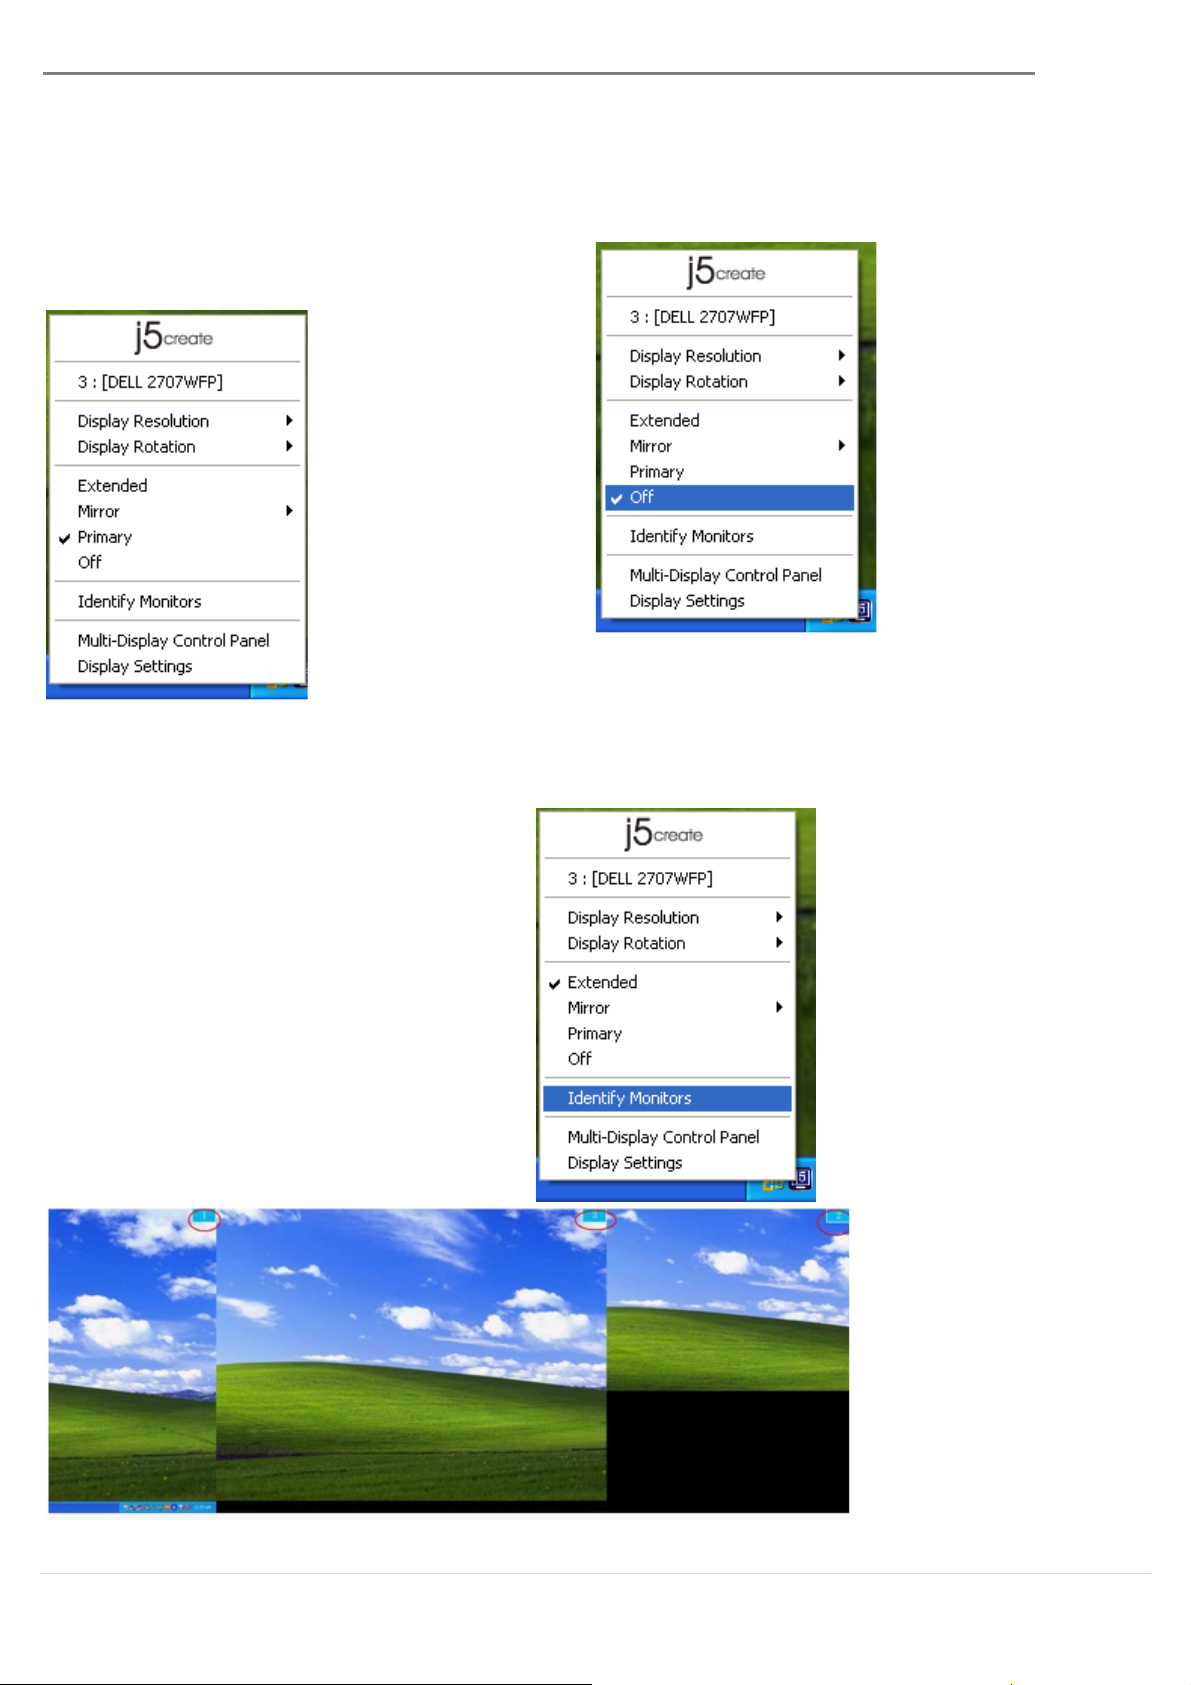
Identify Monitors
When Identify Monitors is selected, a serial number will be shown in the upper right corner of
the display device. You can see the serial number of each display when using the Hotkey
function.
This unique feature allows a faster and
simpler working experience using a
multi-display device. A series of Hotkey
settings will he lp you move quickly from
the active window or cursor to the
desired display.
Default setting is Ctrl + Display No.
Click the window you want to move on the task bar to activate it and then press the
Hotkey
17
Page 19
※Setting Hotkeys
Display Setting
For example: To move the window to Display02 and automatically enlarge it to a full
screen, follow the steps below:
Choose Move Active Window to Display02, check Move Window and Full Screen and
click Apply .
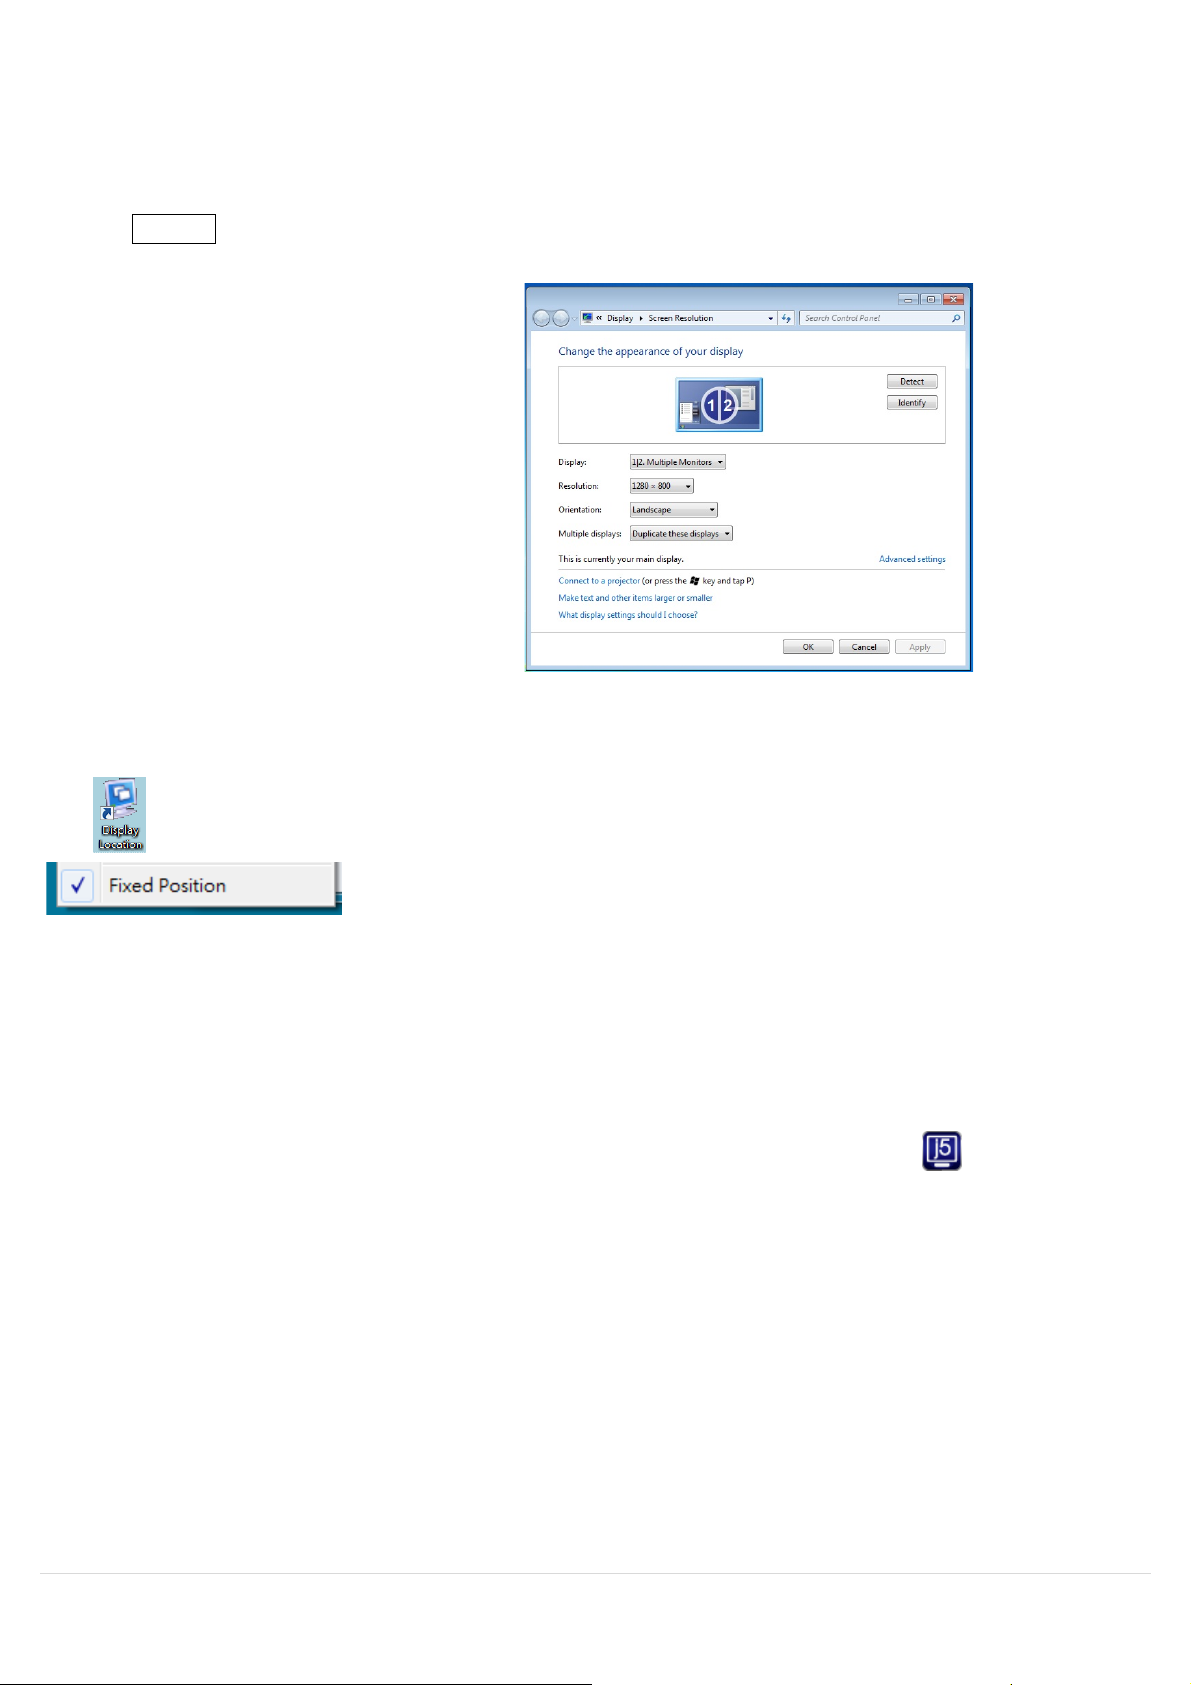
Fast access to the system Display
Settings
Display Location & Fix Position
This function helps you arrange the positions of all the display locations you have set. You will
see icon on your desktop. After choosing Display Location Setting, make a “Check”
in the Fixed Position box. All display locations will be fixed. This
function is great for multi-display users.
FUNCTIONS: WINDOWS XP
You can choose all the functions quickly and easily by clicking on this icon( ) seen on the
lower right side of the toolbar.
Display ID
Smart Display Device ID Detection
The USB 3.0 MULTI-ADAPTER supports VESA defined DDC/EDID. The utility will show the display
device ID whenever it is attached to the USB 3.0 MULTI-ADAPTER
18
Page 20
Default Resolution: 1024 x 768x 32 bit
USB 3.0 MULTI-ADAPTER USER MANUAL
If there is no display device attached to the USB 3.0 MULTI-ADAPTER it will show up as Unknown
Monitor. In some cases, the attached display device does not support EDID, in this case the ID
will also show up as Unknown Monitor.
Display Resolution
The resolution list will show up when you
move the cursor over Display
Resolution. Select yo u r desired
resolution.
19
Page 21
Display Rotation
Display Mode
When Mirror is selected, the screen of
The Display Rotation option allows you
to rotate your display.
There are 4 options available:
0 degrees/ 90 degrees/180 degrees/
270 degrees under the Extended or
Primary display mode.
Extended (Default Mode)
This default displ ay m ode allows the
attached USB 3.0 MULTI-ADAPTER
enabled display device to work as an
“Extended” display of the on-board
screen.
Mirror Mode
the display device will be the same as
the main display and Display Rotation
will be automatically disabled.
You can select either Horizontal Flip, or
Vertical Flip.
20
Page 22
Primary Mode
Off
When Identify Monitors is selected, a
USB 3.0 MULTI-ADAPTER USER MANUAL
When Primary is selected, the display device
will become the main display. The display of
the internal graphics card will automatically
switch to be the extended display and act
as an extension.
When Off is selected it will disable the
display connected to the USB 3.0 MULTI-
ADAPTER.
Identify Monitors
serial number will be shown at the
upper right corner of the attached
display devices.
You can use the Hotkey function to find
out the serial number of each display.
21
Page 23
When Multi-Display Control Panel is
※ Using Hotkeys
※
Multi-Display Control Panel
selected, the Multi-Display Control Panel
window will pop-up to allow you to
modify the Hotkeys.
Default setting is Ctrl + Display No.
Click the window you want to move o n task bar to activate it and then press the
Hotkey.
Setting Hotkeys
For example: To move the window to Display03 and automatically enlarge it to full
screen, follow the steps below:
Choose Move Active Window to Display03, check Move Window and Full screen,
and click Apply to ac tivate your changes.
Display Settings
For fast access to the system click on Display Settings
22
Page 24
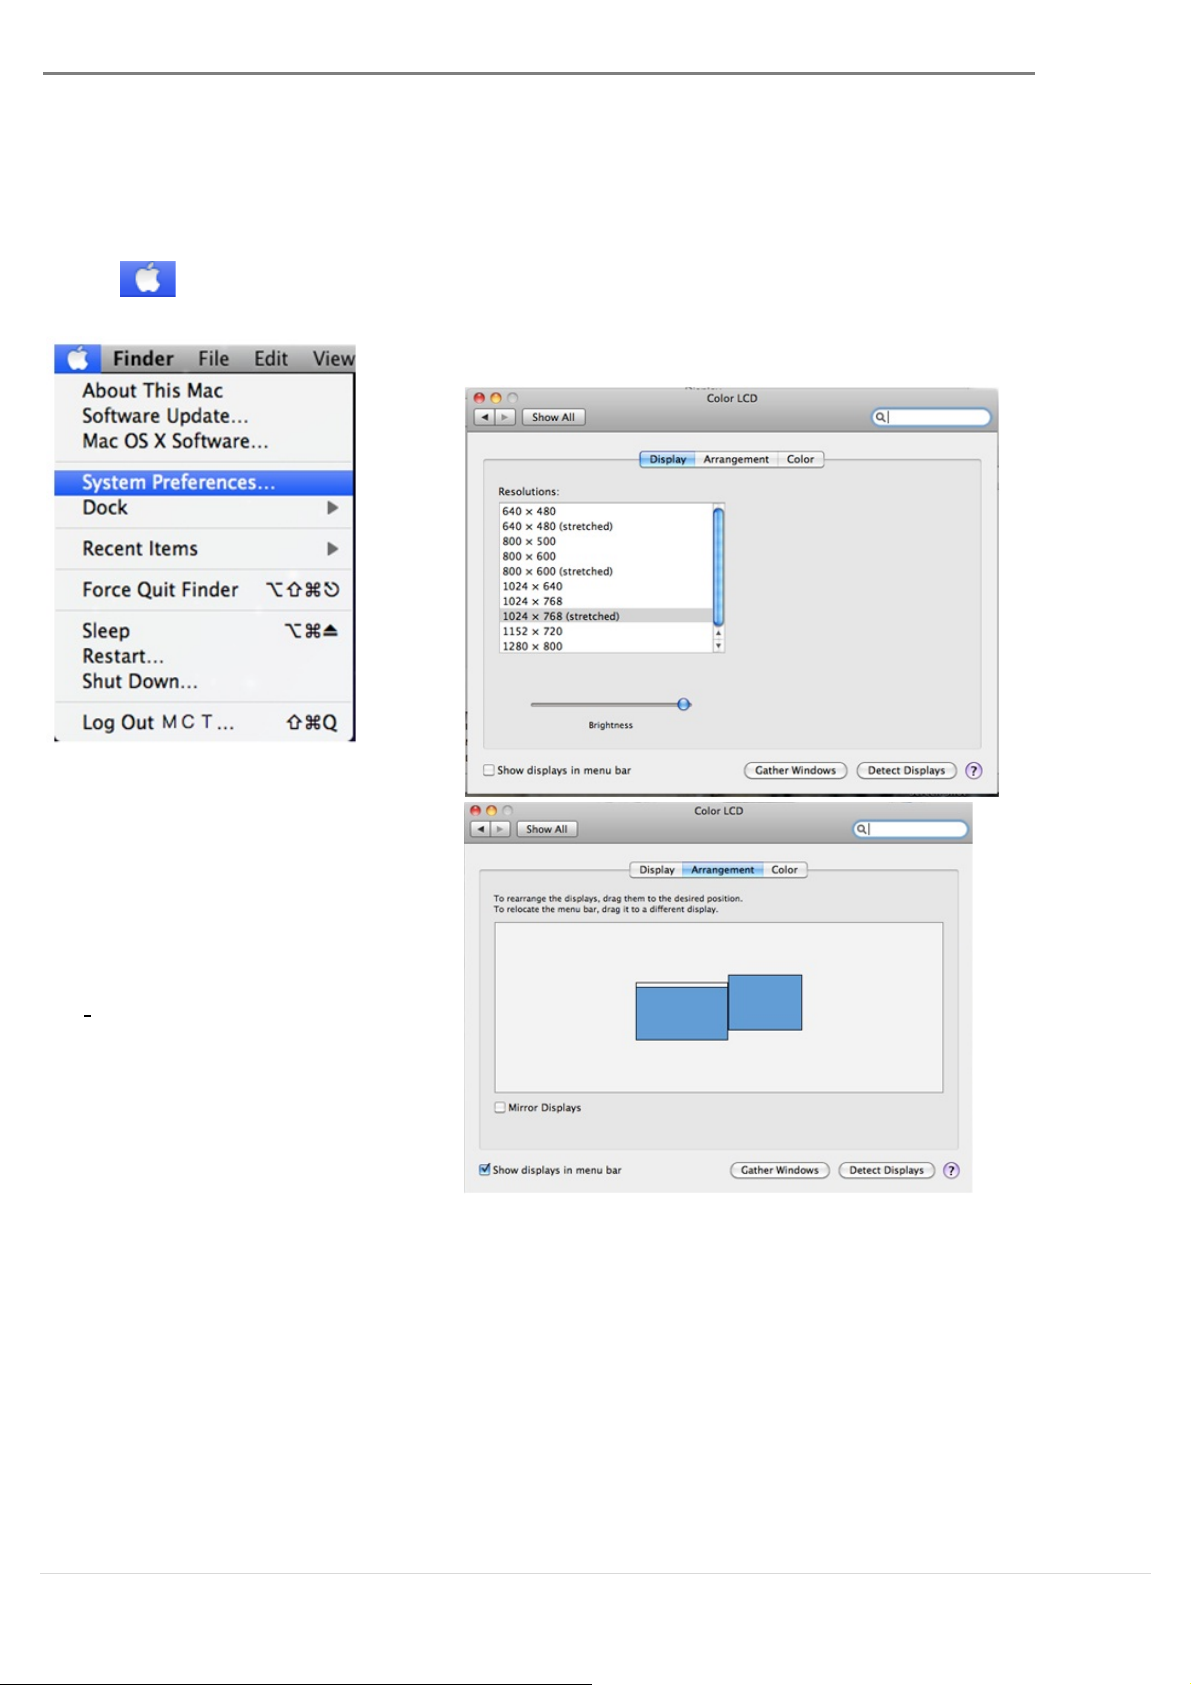
From System Preferences click on the Display
Display Mode
and
the
If you cannot see the Display window to adjust your secondary monitor resolution,
USB 3.0 MULTI-ADAPTER USER MANUAL
FUNCTIONS: MAC
Display Resolution
Go to , and then System
Preferences
tab. You should see the screen below.
On this screen, you can adjust the resolution,
display mode and color range.
Click on the Arrangement tab
uncheck Mirror Displays to turn
Mirror display op tion off. Another
window will automatically appear
on the screen that represents the
USB Display device.
You can move the menu bar
to any display to assign any
display to Primary.
click on the Gather Windows button.
23
Page 25
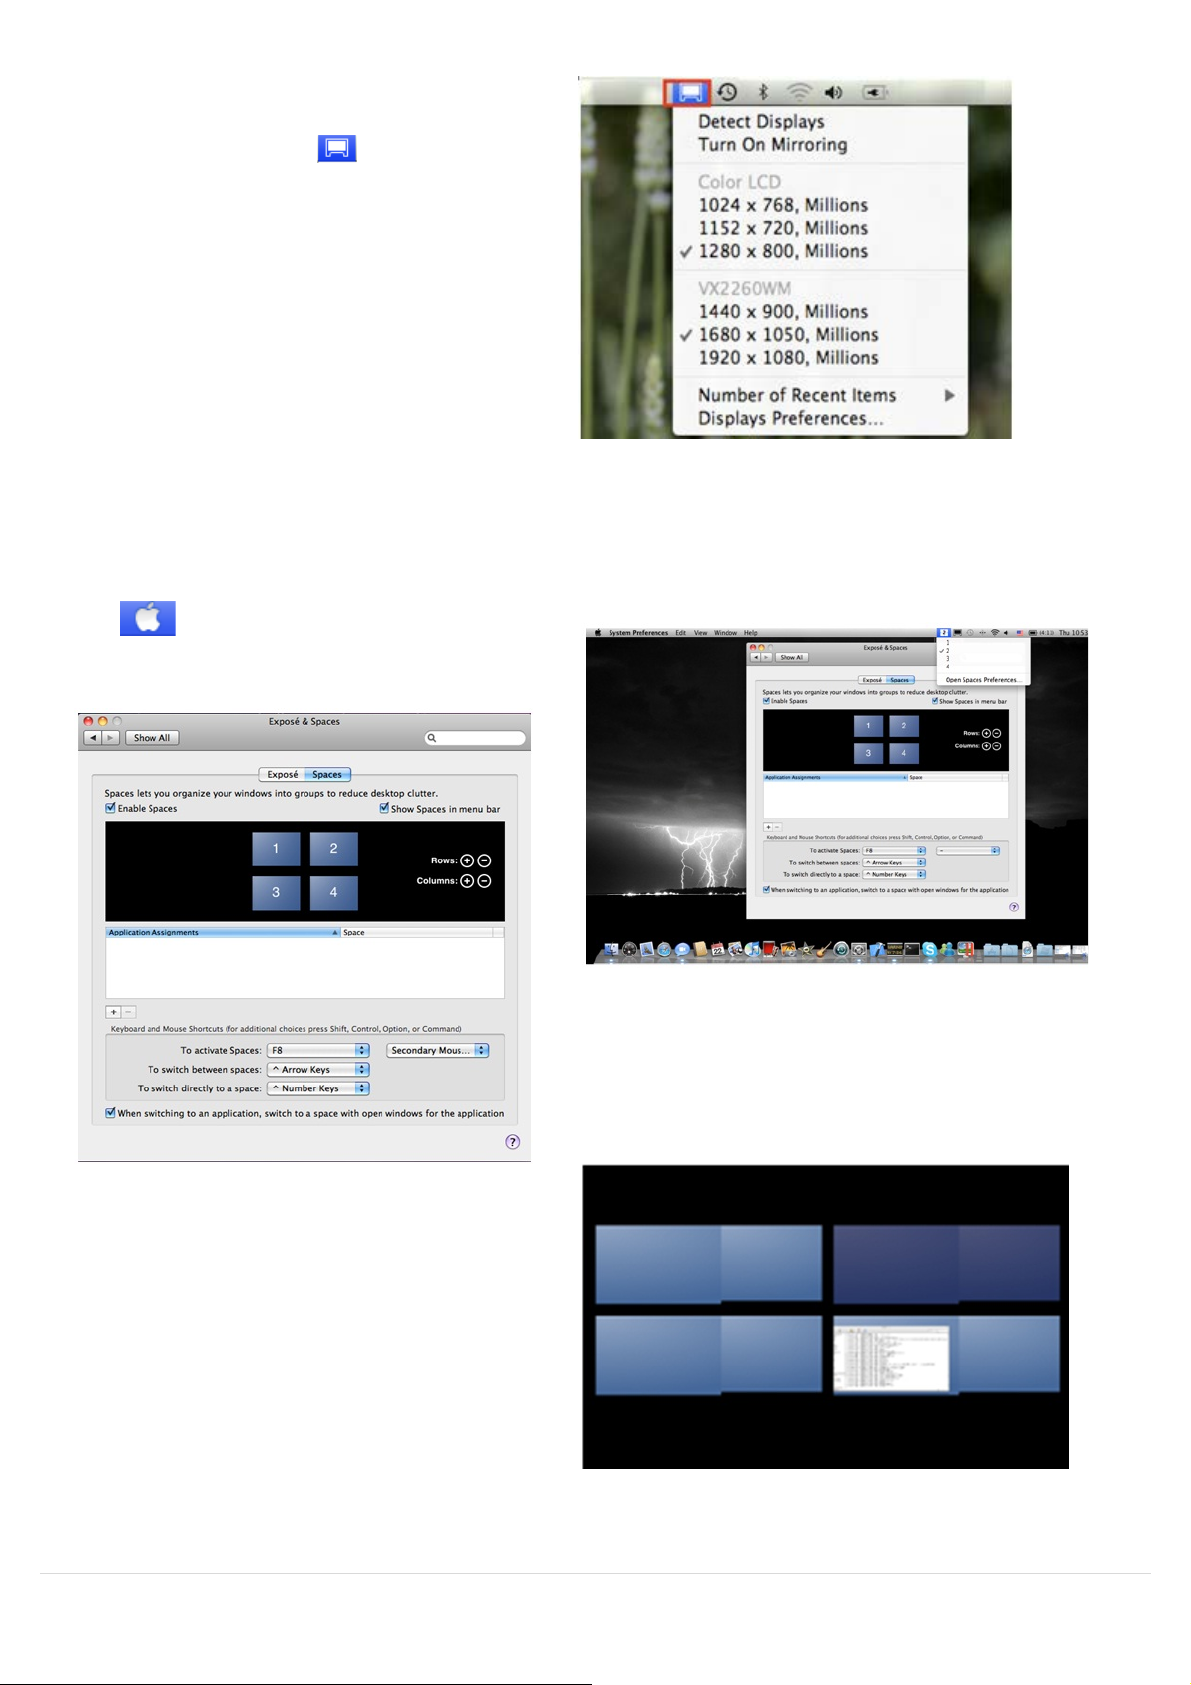
TIP: For quick access to the USB Display
Space
F8: you will see the Space Layout with a
Device click Show Display in Menu Bar. You
will see the display icon appear and you
can double-click it for quick access at any
time.
Windows Arrangement
You can arrange the windows on your
display by selecting Exposé & Spaces
Go to , and then System Preferences
From System Preferences click on Exposé &
Spaces. You should see the screen below.
Click Show Spaces in Menu Bar. You
should see the space number on the
menu bar, you can choose any space
on the list at any time.
single keystroke. You can drag any window
to another space.
24
Page 26
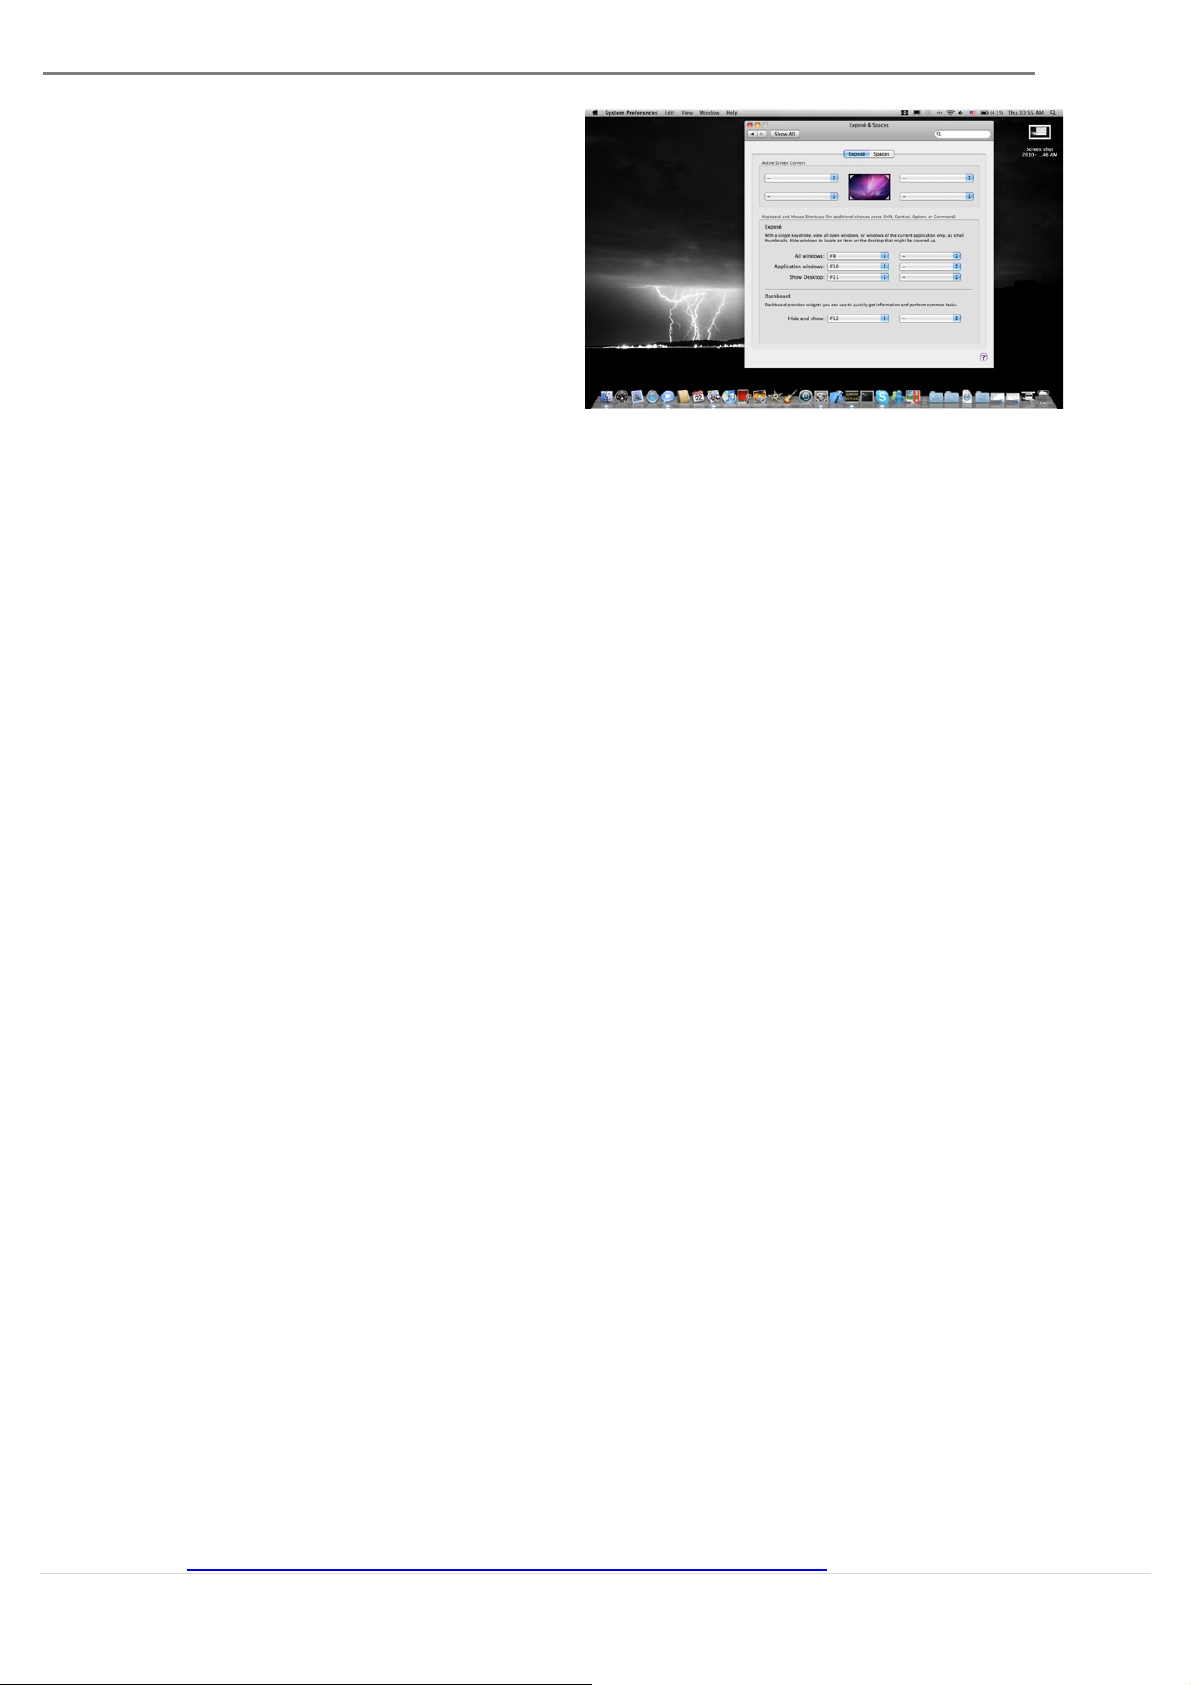
Exposé
USB 3.0 MULTI-ADAPTER USER MANUAL
View different windows with a single
keystroke.
F9 : view all open windows
F10: view windows of the current
application only
F11: show desktop
*For more windows arrangement functions,
please see Apple’s computer user manual.
TROUBLE SHOOTING
If you have any questions about the use of the JUA370 USB3.0 Multi-Adapter, please follow the instructions below.
If any further assistance is needed, please visit our website or call j5create’s support hotline.
Known Issues
- Direct 3D is not supported under XP. It is supported under Win 7 Aero mode.
General Recommendations
- Incompatibilities exist when using other Video over USB Devices on a single system. Please ensure that all
other Video over USB drivers are uninstalled before continuing with your j5create installation.
- Check to make sure that the device is plugged in correctly to the host system.
- Make sure that the USB port that you are using is JUA370.
- Unplug the USB cable of USB Display device and re-insert it.
- Check to see that the monitor is connected correctly and is powered ON.
- Make sure to restart your computer after the driver installation.
- Try a different USB port and/or computer.
- Unplug all other USB devices from the system.
- Try connecting the USB cable of USB Display device directly to the computer instead of through a hub.
- Reset/refresh/resynchronize your monitor.
Media Playback
- During video playback on all platforms, please do not change the display mode, position or arrangement
of the video player window (such as dragging the video player window between the main display and
attached display). This may cause the video player to stop playing. We suggest stopping the video
playback, moving the window to the attached USB graphics display device and then selecting the video
clip to start playing.
- Cursor movement is slower when the mouse hovers on the video region of the Flash player,
- Downsizing your screen landscape lower than 50 % will help smooth out jumpy video playback for videos
running in Full Screen Mode.
- You may experience poor video performance on USB graphics devices with low spec PC systems.
- Video rendering using hardware overlays is supported.
- Some DVD playback software packages do not support playing on a second display adapter of any kind.
You may try to open the media player in the secondary display first before you start playing the DVD.
- Your PC may lack certain media codec to support the playback of certain video formats. Please use the
link below to install license free media codec.
K- Lite:
http://www.free-codecs.com/download/K_Lite_Codec_Pack.htm
25
Page 27

- Video/Media players have different decoding capabilities under different display modes. For better
performance while watching DVDs or certain video formats on the attached USB graphics display, it is
recommended that you use the following license free software:
Media Player Classic:
Others
- Some graphic cards, i.e. Intel, prevent other secondary graphics chipsets from being set as the primary card.
As the result of this, primary mode might not work or the display maybe disabled.
- If you have problems during the boot up process, start your computer in Safe Mode and uninstall the driver.
Hold the CTRL key until the Windows’ startup menu appears and select Safe Mode.
- To verify the driver version that you installed, please click Control Panel → Add or Remove Programs to
check the program: USB Display Device (Trigger 2) 9.xx.xxxx.0159 (the number is the driver version). Some
limitations exist on supported file formats in different media players. We have enclosed our compliance test
results in the tables according to different operating systems, main system graphic cards/chipsets, media
players, and the supported media format. It will be updated periodically with new the versions of media
players and/or with our latest driver.
http://sourceforge.net/projects/guliverkli/
26
Page 28

USB 3.0 MULTI-ADAPTER USER MANUAL
TECHNICAL SUPPORT
If you have any issues using this product please follow the instructions below before returning
this product to the store.
1. The User Manual
It contains detailed instructions and a troubleshooting section. Many common issues can
be easily resolved by reading the user manual.
2. Online Support
Please visit the j5create website (www.j5create.com) to find the latest software for your
device. If you are still experiencing the same issue, you can submit a description of your
problem via email service@j5create.com . Our j5create technical service support team
will reply to you within the next 24 business hours.
3. Telephone Support
Please feel free to call us at 888-689-4088 and one of our support technicians will be
happy to assist you.
Customer Service: Toll free number: 888-988-0488
Technical Support: Toll free numbe r : 888-689-4088
Email: service@j5create.com
Please contact Technical Support during business hours. 10:00AM-6:00PM E.S.T Monday- Friday
for further assistance.
LIMITED WARRANTY
j5create offers a limited 1-year warranty. User’s wear & tear damage is not included.
The user shall call or email j5create customer service with defective information concerning the product and obtain a return
authorization number.
Users are responsible for one way return freight cost and we will take care of one way freight back.
In order to obtain a return authorization, user should have the following information handy when calling or emailing the service
team:
(i) a copy of original purchase invoice to verify your warranty
(ii) a product serial number
(iii) a description of the problem
(iv) customer’s Name, address, and telephone number
j5create does not warrant that the operation of the product will be uninterrupted or error-free. j5create is not responsible for
damage arising from failure to follow instructions relating to the product’s use. This warranty does not apply to:(a) consumable
parts, unless damage has occurred due to a defect in materials or workmanship; (b) cosmetic damage , including but not
limited to scratc hes, dents ,and broken plastic on ports; (c) damage caused by use with non-j5create products; (d) damage
27
Page 29

caused by natural disasters (flood, fire, earthquake, lighting strike, typhoon etc.,)(e) damage cau sed by human misuse (lost,
accident, abuse, misuse or other external causes); (f) damage caused by operating the p roduct outside the permi tted or
intended uses describe d b y j5create ; (g) damage caused by service (including upgrades and expansions) performed by
anyone who is not a representative of j5create or a j5create Authorized Service Provider; (h) a product or part that has been
modified to alter functionality or capability without the writte n permission of j5create; or (i) if any j5create serial number on the
product has been removed or defaced.
If such a situation occurs, j5create will calculate the cost of materials and repair for your reference.
This warranty is given by j5create in lieu of any other warranties express or implied.
REGULATORY COMPLIANCE
FCC
This equipment has been tested and found to comply with FCC Part 15 Subpart B § 15.109/15.107 Class B.
Operation is subject to the following two conditions:
• This device may not cause harmful interference
• This device must accept any interference, including interference that may cause undesired operation of the
device.
CE
This equipment is in compliance with the requirements of the following regulations:
EN 55022 Class B (2006),
EN 55024 (1998+A1:2001+ A2:2003), (IEC/EN 61000-4-2 (1995+A1:1998+A2:2001)/-3(2006)
C-Tick
This equipment is in compliance with the requirements of the following regulations:
EN 55022 (2006) Class B, AS/NZS CISPR22 © IEC: 2005.
VCCI
This equipment is in compliance with the requirements of the following regulations:
CISPR22 © IEC: 2005
Disclaimer
Information in this document is subject to change without notice. The manufacturer does not make any
representations or warranties (implied or otherwise) regarding the accuracy and completeness of this document
and shall in no event be liable for any loss of profit or any commercial damage, including but not limited to
special, incidental, consequential, or other damage. No part of this document may be reproduced or transmitted
in any form by any means, electronic or mechanical, including photocopying, recording or information recording
and retrieval systems without the expressed written permission of the manufacturer.
28
Page 30

Page 31

USB 3.0 MULTI-ADAPTER
Manuel de l'utilisateur
VGA & GigaLAN
JUA370
JUA370
Page 32

USB3.0 MULTI-ADAPTER Manuel de
l'utilisateur
Table of Contents
Introductions .............................................................................................................................. 3
Environnements requis ................................................................................................. 3
Caractéristiques physiques .......................................................................................... 4
Contenu de l'emballage .............................................................................................. 5
MISE EN ROUTE .......................................................................................................................... 6
INSTALLATION POUR WINDOWS .............................................................................................. 7
Installation du pilote ..................................................................................................... 7
Vérification de l'installation du pilote .......................................................................... 9
Désinstallation du pilote ............................................................................................. 10
INSTALLATION POUR MAC ..................................................................................................... 11
Installation du pilote ................................................................................................... 11
Vérification de l'installation du pilote ........................................................................ 13
Red configuración en MAC ....................................................................................... 14
Désinstallation du pilote ............................................................................................. 14
INSTRUCTIONS SUR LES FONCTIONS: WINDOWS 7 .............................................................. 15
INSTRUCTIONS SUR LES FONCTIONS: WINDOWS XP ............................................................ 18
INSTRUCTIONS SUR LES FONCTIONS: MAC........................................................................... 23
DEPANNAGE ............................................................................................................................ 25
SUPPORT TECHNIQUE .............................................................................................................. 27
GARANTIE DE j5 create .......................................................................................................... 27
2
Page 33

USB3.0 MULTI-ADAPTER Manuel de l'utilisateur
Introductions
La gamme de multi- adaptateurs j5create USB 3.0 offre une connectivité supplémentaire
pour votre ordinateur avec un taux de transfert de 5 Go/s . Ces multi-adaptateurs de poche
vous permettent d'ajouter un périphérique informatique USB supplémentaire, un moniteur
VGA ou le LAN gigabit via un port USB.
Avec les multi-adaptateurs j5create, il n'est pas nécessaire d'ouvrir votre ordinateur pour
ajouter une carte graphique onéreuse, il vous suffit de charger les pilotes, de brancher
l'adaptateur sur le port USB, puis de brancher le câble du moniteur VGA sur l'adaptateur et
vous êtes prêt. Trois modes d'affichage sont pris en charge : les modes primaire, étendu et
miroir. Avec la fonctionnalité "plug & play" entre votre ordinateur et le 2ème moniteur ou
projecteur, vous êtes en mesure de créer un nouvel environnement visuel en quelques
secondes.
Le m ulti - ad ap tateur gigabit vous permet d'ajouter des capacités de réseau à un ordinateur
qui en est dépourvu, via une connexion Wi-Fi. Il dispose d'un connecteur RJ-45 qui prend en
charge les performances Ethernet 10/100/1000 Mbit/s - idéal pour votre Ultrabook ou votre
MacBook.
La gamme élégante de multi-adaptateurs j5create vous propose une solution alternative
rapide et portable.
Environnements requis
Microsoft Windows 8.1, 8, 7, XP (32 bits ou 64 bits)
Mac OS X 10.8 / 10.7 / 10.6
Un Port USB disponible (USB 3.0 est recommandé)
CPU: Intel Core 2 Quad 2.33 GHz
RAM: 2 Go DDR2
Note pour Lecteur vidéo:
* Windows XP utilisateur :“Windows Media Player” est recommandé pour lire la vidéo
* Windows XP utilisateur& MAC utilisateur: produits MAC & Windows XP ne prend pas en
charge l'USB 3.0 en ce moment, donc nous vous suggérons USB 2.0 pour « l’application de
bureau » seulement. Le Jeu Vidéo Retour n'est pas recommandé à cause de la bande
passante USB 2.0 qui limite la vidéo.
3
Page 34

Interface
Interface hôte
Connecteur USB 3.0 Type A (connecteur femelle)
Interface Vidéo
Interface Vidéo
Port Ethernet
Connecteur Ethernet RJ-45 (Gigabit Ethernet)
Port en aval
Connecteur femelle USB 3.0 Type-A
Alimentation
Mode d'alimentation
Alimenté par bus
Fonction
Afficher
La lecture vidéo: 1080P
Ethernet
Transfer Rate:
Supports IEEE 802.1Q VLAN tagging and 2 VLAN ID
USB3.0 MULTI-ADAPTER Manuel de l'utilisateur
Caractéristiques physiques
Résolution d'affichage: 2048 x 1152 @ 32bit
Affichage: Principal, Etendu, Miroir
Rotation de l'affichage: 0°, 90°, 180° , 270°
1000 Mbps (Hal f Duplex) / 1000 Mbps (Full Duplex)
IEEE:
IEEE 802.3az, IEEE 802.3, 802.3u, and 802.3ab, IEEE
802.3x
Modes:
- Supports Wake on LAN function, suspend mode
and remote wakeup via link-change, magic
packet, or Microsoft wakeup frame
filtering
- Supports Jumbo Frame
- Supports Checksum Offload (IPv4, I P v6, T C P, UDP)
4
Page 35

Format de l'image
Résolution
Profondeur des couleurs
Écran large
Affichage standard
4:3
800 x 600
16,32 bits
and TCP Large Send Offload
Caractéristiques physiques
Dimensions
Corps: 43.75(W)x 90.6(H)x18.6(D) mm
Poids
Environ 58.5 g (including cable)
USB3.0 MULTI-ADAPTER Manuel de l'utilisateur
Câble: 14.5 cm
Résolutions et profondeur des couleurs
16:9 2048 x 1152 16,32 bits
16:10 1920 x 1200 16,32 bits
16:9 1920 x 1080 16,32 bits
16:10 1680 x 1050 16,32 bits
16:9 1600 x 900 16,32 bits
16:10 1440 x 900 16,32 bits
16:9 1360 x 768 16,32 bits
16:10 1280 x 800 16,32 bits
15:9 1280 x 768 16,32 bits
16:9 1280 x 720 16,32 bits
4:3 1600 x 1200 16,32 bits
4:3 1400 x 1050 16,32 bits
5:4 1280 x 1024 16,32 bits
4:3 1280 x 960 16,32 bits
4:3 1152 x 864 16,32 bits
4:3 1024 x 768 16,32 bits
Contenu de l'emballage
USB 3.0 Multi-Adapter JUA370
CD de pilotes avec E-manuel
Guide d'installation rapide
5
Page 36

USB3.0 MULTI-ADAPTER Manuel de l'utilisateur
MISE EN ROUTE
Remarques avant l'installation
Installez entièrement le pilote avant d'insérer le câble USB dans votre ordinateur
Exécutez le programme d'installation en tant qu'administrateur pour éviter des
erreurs d'installation
Connectez d'abord le câble VGA du dispositif d'affichage au port VGA de la
USB3.0 Multi-Adapter avant de connecter le câble USB à l'ordinateur
Désinst allez le pilote précédent avant d'installer le dernier pilote
1. Lancez l'installation du pilote (veuillez vous référer à l'installation du système d'exploitation
de votre PC dans la section suivante)
* Remarque: Effectuez l'installation complète du pilote avant de passer aux étapes
suivantes.
2. Connectez le connecteur du câble USB 3.0 à l'ordinateur portable hôte
3. Connectez le câble VGA du dispositif d'affichage
4. Connectez le câble Ethernet
5. Les ports HUB USB sont maintenant prêts à l'emploi
6
Page 37

USB 3.0 MULTI-ADAPTER USER MANUAL
1. La page d'installation sera lancée. Pour
2. Après avoir appuyé sur l'option
d'installation, l'assistant d'installation va se
3. Lisez le contrat de licence et cochez la
4. Lorsque l'assistant d'installation est
5. Après le redémarrage de votre
INSTALLATION POUR WINDOWS
Installation du pilote
Cette section illustre l'installation simple du pilote pour le système d'exploitation Windows 7.
Lorsque votre ordinateur est prêt à être utilisé insérez le CD-ROM dans le lecteur de CD. Le
programme d'installation doit se lancer automatiquement, s'il ne démarre pas, allez dans
« Ordinateur, » cliquez sur votre lecteur optique, et lancez manuellement le CD
d'installation. Double-cliquez sur « Setup.exe » pour démarrer.
※ Assurez-vous que le câble USB est débranché de votre PC ou de l'ordinateur portable
avant d'exécuter le programme d'installation.
commencer installation, cliquez sur
“ Installer le dernier pilote”. Assurezvous que le réseau est disponible
appuyez sur “Installer le pilote” pour
démarrer l'installation
lancer, cliquez sur Suivant> pour
continuer
case «J'accepte les termes du contrat
de licence.» Cliquez sur Suivant > pour
l'accepter et continuer.
ordinateur connectez le câble USB de
la USB3.0 Multi-Adapter à votre PC ou
votre ordinateur portable. Le message
« Installation du pilote » apparaîtra.
terminé, sélectionnez «Oui, je veux
redémarrer mon ordinateur maintenant.»
Cliquez sur Terminer pour redémarrer.
7
Page 38

6. Windows 7:
Windows 7:
Lorsque la fenêtre Résolution de l'écran
Lorsque le pilote a été installé avec
succès le message ci-dessous
apparaîtra sur votre ordinateur.
Windows XP : Une icône ( )
apparaîtra sur la barre d'outils inférieure
droite. Les images du message ci-dessous
montrent que le pilote est correctement
installé.
The Display functions of the USB3.0 MULTI-ADAPTER will be activated after the computer
restarted. You might see the mirror display is shown on the display device.
Vous pouvez modifier la position
correspondante de chaque extension
d'affichage via les paramètres d'affichage.
Allez à « DEMARRER » → « Panneau de
configuration » → « Apparence et
personnalisation » → « Modifier la résolution
de l'écran »
※ ou faites un clic droit sur le bureau et allez
à « Résolution de l'écran »
apparaît, vous pouvez identifier le numéro
de chaque moniteur en cliquant sur
« Identifier. » Vous pouvez faire glisser le
moniteur à l'endroit désiré.
8
Page 39

USB 3.0 MULTI-ADAPTER USER MANUAL
Windows XP:
Vous pouvez modifier la position
correspondante de chaque extension
Panneau de
Apparence et
Lorsque la fenêtre Propriétés d'affichage
apparaît, chaque numéro de moniteur
Faites glisser le moniteur à la position
Windows 7:
Gestionnaire de
Contrôleurs de
Windows XP:
d'affichage via les paramètres d'affichage.
Allez à «DEMARRER»
configuration»
«
personnalisation» «Propriétés d'affichage»
«Paramètres»
peut être identifié en cliquant sur
«Identifier»
désirée.
Remarque:
Si votre carte graphique interne est à double ports d'affichage …..
Lors de l'utilisation d'un USB3.0 MULTI-ADAPTER
Le dispositif d'affichage connecté au 2
dispositif d'affichage connecté à l'USB3.0 MULTI-ADAPTER sera numéroté 2
Vérification de l'installation du pilote
«
ème
port VGA sera numéroté 3
ème
moniteur, le
ème
moniteur.
La procédure suivante sert à vérifier l'état de l'installation du pilote de la USB3.0 MULTI-
ADAPTER
Faites un clic droit sur « Poste de travail »
« Gérer »
«
périphériques » cliquez sur le signe « + »
de « Cartes réseau » et « Contrôleurs
audio, vidéo et jeu » et «
bus USB »
”
Faites un clic droit sur «Poste de travail» «Gérer» «Gestionnaire de périphériques» cliquez sur le
signe «+» de «Cartes graphiques» et «Contrôleurs audio, vidéo et jeu» et «Contrôleurs de bus
USB»
9
Page 40

Cliquez sur « Démarrer » Panneau de
Programmes et
Désinstaller ou modifier
j5 NEWPORT STATION...
Un message apparaîtra confirmant que vous
Cliquez sur
1. Quand le pilote est complètement
Désinstallation du pilote
※ Débranchez le câble USB de la USB3.0 MULTI-ADAPTER avant de désinstaller le pilote
configuration
fonctionnalités
souhaitez désinstaller l'application.
« OK » pour continuer.
un programme
Sélectionnez
Cliquez sur Désinstaller
désinstallé, sélectionnez « Oui, je veux
redémarrer mon ordinateur
maintenant ». Cliquez sur Terminer pour
redémarrer.
10
Page 41

USB 3.0 MULTI-ADAPTER USER MANUAL
1. Insérez le CD de pilotes dans le lecteur de
3. Cliquez sur «Continuer» pour continuer
4. Tapez votre mot de passe et cliquez sur «
Installation en cours… Cela va prendre
INSTALLATION POUR MAC
Installation du pilote
L'installation du pilote permet au système d'exploitation de votre ordinateur de reconnaître
la Newport Station. Assurez-vous que vous utilisez la procédure d'installation appropriée
avant de commencer l'installation.
※ Assurez-vous que le câble USB est débranché de votre ordinateur de bureau Mac ou
votre ordinateur portable Mac avant d'exécuter le programme d'installation.
Cette section illustre la procédure d'installation du pilote pour un ordinateur fonctionnant
sous Snow Leopard.
CD-ROM; et exécutez le fichier .dmg pour
charger les pilotes dans le dossier
« mac_install »
2. La page d'installation sera lancée. Pour
commencer installation, cliquez sur
“ Installer le dernier pilote”. Assurez-vous
que le réseau est disponible ou appuyez
sur “Installer le LAN pilote” pour démarrer
l'installation
OK »
quelques instants
11
Page 42

5. L'installation est terminée, cliquez sur «
6. Une fois que l'installation du pilote Lan
7. Cliquez sur « Continuer » pour continuer
8. Tapez votre mot de passe et cliquez sur «
OK »
9. Cliquez sur « Continuer l'installation »
Fermer »
est terminée, Assurez-vous que le réseau
est disponible ou Choisissez la version OS
que vous utilisez appuyez sur “Installer le
pilote” pour démarrer l'installation
12
Page 43

USB 3.0 MULTI-ADAPTER USER MANUAL
10. Installation en cours… Cela va prendre
11. Cliquez sur « Redémarrer » pour terminer
«À propos
L'image ci-dessous montre le processus
quelques instants
l'installation du logiciel
Vérification de l'installation du pilote
La procédure suivante vous permet de vérifier l'état de l'installation du pilote de l'USB3.0
Multi-Adapter
Aller à , sélectionnez
de ce Mac» et sélectionnez «Plus
d'installation pour un USB3.0 Multi-Adapter
d'infos ...»
13
Page 44

Débranchez le câble USB de la USB3.0
Pour la désinstallation, appuyez sur
Cliquez sur «Ouvrir» pour continuer
Cliquez sur «Désinstaller et redémarrer» pour
Tapez votre mot de passe afin de
permettre la désinstallation et cliquez
sur «OK» pour continuer.
6. Redémarrez votre système
Red configuración en MAC
Vaya a y luego “Preferencias de Sistema” Elija la etiqueta “Red” para ajustar.
Sélectionner "AX88179 USB 3.0 to Gigabit Ethernet".
Désinstallation du pilote
MULTI-ADAPTER du port USB
l'icône "Désinstaller le pilote"
continuer
14
Page 45

USB 3.0 MULTI-ADAPTER USER MANUAL
Résolution d'affichage
Orientation de l'affichage
Mode d'affichage
INSTRUCTIONS SUR LES FONCTIONS: WINDOWS 7
ID de l'affichage
Détection intelligente de l'ID du dispositif d'affichage
Accès rapide au paramétrage de
Résolution d'affichage
La liste des résolutions s'affichera lorsque
vous déplacez le curseur sur Résolution
d'affichage. Sélectionnez la résolution
souhaitée pour l' USB3.0 MULTI-ADAPTER.
Résolution par dé faut: 1024 x 768 x 32
bits
L'Orientation vous permet d'activer le
dispositif d'affichage, qui est connecté à
l'USB3.0 MULTI-ADAPTER
Mode Etendu (Par défaut)
Cette fonctionnalité permet au dispositif
d'affichage connecté à l' USB3.0 MULTI-
ADAPTER de fonctionner comme un
affichage «étendue» de l'écran de
bord.
Vous pouvez ajuster la position en
cliquant d'abord sur «numéro» de
l'affichage et sélectionnez «Etendre ces
15
Page 46

affichages» et cliquez sur «Appliquer»
Mode miroir-Dupliquer
Mode principal
Cette fonctionnalité permet d'afficher le
contenu de l'écran de bord sur l'écran
de l'USB3.0 MULTI-ADAPTER
Vous pouvez sélectionner «Dupliquer
ces écrans» et cliquez sur «Appliquer»
Remarque pour le système
d’exploitation Windows 7 (en mode
Miroir):
La résolution des affichages secondaire
et principal doit être la même lorsque
vous utilisez le mode Miroir (Celle-ci peut
être inférieure à la résolution préférée
pour l'affichage). Seuls 2 affichages
peuvent être mis en miroir
simultanément. Le système
d’exploitation Windows 7 peut avoir
d’autres limites.
Lorsque vous voulez basculer le
moniteur activé comme affichage
principal et étendre la visualisation à
l'écran de bord.
Choisissez le «Numéro» de l'affichage
principal que vous voulez voir attribuer
et cochez «En faire mon affichage
principal».
Mode Désactivé
Pour désactiver l'un des affichages:
Sélectionnez «Afficher le bureau
seulement sur 1» et le 2
ème
affichage
sera désactivé
Sélectionnez «Afficher le bureau
seulement sur 2» et le 1er affichage sera
désactivé
16
Page 47

USB 3.0 MULTI-ADAPTER USER MANUAL
Panneau de contrôle multi-affichages
※
※
Super Utilitaire
Un super utilitaire offre davantage
d'options, l'icône se trouve sur la barre
des tâches en bas à droite
Identifier les Moniteurs
Lorsque «Identifier les moniteurs» est sélectionné, un numéro de série s'affiche dans le coin
supérieur droit des dispositifs d'affichage. Vous pouvez voir le numéro de série de chaque
affichage lorsque vous utilisez la fonction de raccourci clavier.
Cette caractéristique unique offre une
expérience de travail plus simple pour
les environnements multi-écran. Une
série de réglage de raccourcis clavier
aide à se déplacer rapidement entre
les dispositifs d'affichage souhaités.
Utilisation des raccourcis clavier
Le réglage par défaut est Ctrl + N° d'affichage.
Cliquez sur la fenêtre que vous souhaitez déplacer sur la barre des tâches pour la rendre
active et appuyez sur Raccourci clavier
Paramétrer les Raccourcis clavier
Par exemple: Déplacez la fenêtre sur Affichage03, et agrandissez-la automatiquement
en plein écran.
Choisissez «Déplacez la fenêtre active sur Affichage03», cochez «Déplacer la fenêtre et
plein écran», et cliquez sur Appliquer
17
Page 48

Paramétrage de l'affichage
Accès rapide au système «Paramètres
d'affichage»
Position fixe
Cette fonction vous aide à organiser les positions de tous les emplacements d'affichage
que vous avez définis dans Affichage > Résolution de l'écran Après «Paramétrage de
l'emplacement de l'affichage», Cochez dans cette fonction.
Tous les emplacements d'affichage seront fixés. C'est l'idéal pour l'utilisateur de multiaffichages.
INSTRUCTIONS SUR LES FONCTIONS: WINDOWS XP
Vous pouvez choisir toutes les fonctions simplement et directement en cliquant sur cette
icône ( ) visibl e s u r la barre d'outils dans le coin inférieur droit.
.
ID de l'affichage
Détection intelligente de l'ID du dispositif d'affichage
L' USB3.0 MULTI-ADAPTER prend en charge DDC/EDID défini par VESA. L'utilitaire affichera
l'ID du dispositif d'affichage chaque fois qu'il est connecté à l' USB3.0 MULTI-ADAPTER
18
Page 49

USB 3.0 MULTI-ADAPTER USER MANUAL
Display Resolution
Rotation de l'affichage
S'il n'y a pas de périphérique d'affichage connecté à l' USB3.0 MULTI-ADAPTER, l'ID
s'affichera comme «Moniteur inconnu.» Si le dispositif d'affichage ne prend pas en charge
EDID, l'ID sera également définie en tant que «Moniteur inconnu».
Résolution par défaut: 1024 x 768 @ 32
bits
La liste des résolutions app araîtra
lorsque vous déplacez le curseur sur
Résolution d'affichage. Sélectionnez la
résolution souhaitée.
La Rotation de l'affichage vous permet
de tourner le dispositif d'affichage, qui
est connecté à l'USB3.0 MULTI-ADAPTER.
C'est une fonction utile pour certains
dispositifs d'affichage rotatifs.
Il y a 4 options
disponibles:
0 degré / 90 degrés / 180 degrés / 270
19
Page 50

degrés sous le mode d'affichage
Mode d'affichage
Lorsque Miroir est sélectionné, l'écran
Etendu ou Principal.
Etendu (Mode par défaut)
Le mode d'affichage par dé faut
permet au dispositif d'affichage
connecté de l' USB3.0 MULTI-ADAPTER
de fonctionner en tant qu'affichage
«Etendu» de l'écran de bord. Cette
fonctionnalité d'espace de travail
étendu améliore l'efficacité de travail.
Mode Miroir
du dispositif d'affichage, qui est
connecté à l'USB3.0 MULTI-ADAPTER, est
le même que l'écran principal, et
Rotation de l'affichage est
automatiquement désactivé.
Vous pouvez sélectionner
«Retournement Horizontal», ou
«Retournement Vertical ».
20
Page 51

USB 3.0 MULTI-ADAPTER USER MANUAL
Mode Principal
Désactivé
Quand Identifier les moniteurs est sélectionné,
Lorsque Principal est sélectionné, le dispositif
d'affichage, qui est connecté à l'Adaptateur
d’affichage USB3.0, deviendra l'affichage
principal, l'affichage de la carte graphique
interne passera automatiquement à
l'affichage étendu et agira comme un
bureau d'extension.
Lorsque Désactivé est sélectionné, cela
désactive l'affichage de l’ USB3.0 MULTI-
ADAPTER.
Identifier le moniteur
un numéro de série s'affiche dans le coin
supérieur droit du dispositif d'affichage
connecté.
Vous pouvez utiliser la fonction de Raccourci
clavier pour trouver le numéro de série de
chaque affichage.
21
Page 52

Lorsque Panneau de contrôle multi-
※Utilisation des raccourcis clavier
※
Panneau de contrôle multi-affichages
affichages est sélectionné, la fenêtre du
panneau de contrôle multi-affichages
apparaît afin de permettre la
modification des raccourcis clavier.
Le réglage par défaut est Ctrl + N° d'affichage.
Cliquez sur la fenêtre que vous souhaitez déplacer sur la barre des tâches pour la
rendre active et appuyez sur Raccourci clavier.
Paramétrer les raccourcis clavier
Par exemple: Déplacez la fenêtre sur Affichage03, et agrandissez-la
automatiquement en plein écran.
Choisissez «Déplacez la fenêtre active sur Affichage03», cochez «Déplacer la fenêtre
et plein écran», et cliquez sur Appliquer pour la rendre active.
Paramétrage de l'affichage
Accès rapide au système «Paramétrage de l'affichage»
22
Page 53

USB 3.0 MULTI-ADAPTER USER MANUAL
Aller à , puis «Préférences système»
Dans «Préférences Système», cliquez sur
l'onglet «Affichage». Vous devriez voir cet
Sur cet écran, vous pouvez régler la
Mode d'affichage
Si vous ne pouvez pas voir la Fenêtre d'affichage pour régler la résolution de votre
INSTRUCTIONS SUR LES FONCTIONS: MAC
Résolution d'affichage
écran.
résolution, le mode d'affichage et la gamme
des couleurs.
Cliquez sur l'onglet «organisation», et
décochez «Affichage miroir» pour
désactiver la mise en miroir de l'écran.
Vous verrez automatiquement une
autre fenêtre apparaître à l'écran qui
représente l'USB3.0 Multi-Adapter
Vous pouvez déplacer la barre de
menu sur n'importe quel affichage
pour attribuer n'importe quel
affichage au Principal.
moniteur secondaire, cliquez sur le bouton «Rassembler les fenêtres».
23
Page 54

ASTUCE: Pour simplifier l'utilisation de
Organisation des fenêtres
Space
F8: vous pourre z voir la Disposition des
l'USB3.0 MULTI-ADAPTER, cliquez sur «Faire
apparaître l'affichage dans la barre de
menu.» Vous verrez l'icône d'affichage
sur laquelle vous pouvez double-
cliquer à tout moment.
Vous pouvez organiser les fenêtres sur
l'écran par «Exposé et Spaces»
Aller à , puis
«Préférences système»
Dans Préférences système cliquez sur
«Exposé et Spaces.» Vous devriez voir cet
écran.
Cliquez sur «Afficher Spaces dans la
barre de menu.» Vous devriez voir le
numéro d'espace sur la barre de menu
et vous pouvez choisir n'importe quel
espace dans la liste à tout moment.
espaces avec une seule touche. Vous
pouvez déplacer n'importe quelle fenêtre
sur un autre espace.
24
Page 55

USB 3.0 MULTI-ADAPTER USER MANUAL
Exposé
F10: afficher les fenêtres de l'application en
l'utilisateur d’Apple.
Afficher différentes fenêtres avec une
seule touche.
F9: afficher toutes les fenêtres ouvertes
cours seulement
F11: afficher le bureau
*Pour plus de fonctions d'organisation des
fenêtres, veuillez consulter le manuel de
DEPANNAGE
Si vous avez des questions concernant l'utilisation de la JUA370 USB3.0 Multi-Adapter,
veuillez suivre les instructions ci-dessous. Si une aide supplémentaire est nécessaire, visitez
notre site Web ou appelez l'assistance en ligne de j5 create.
Problèmes connus
- Direct 3D n'est pas pris en charge sous XP. Il serait pris en charge sous Windows 7 en
mode Aero.
Recommandations générales
- Il existe des incompatibilités lors de l'utilisation d'autres périphériques de Vidéo par USB
sur un seul système. Veuillez faire en sorte que tous les autres pilotes de Vidéo par USB
soient désinstallés avant de poursuivre l'installation de j5 create.
- Assurez-vous que le périphérique est correctement branché au système hôte.
- Assurez-vous que le port USB que vous utilisez est USB3.0 Multi-Adapter.
- Débranchez le câble USB du dispositif d'affichage USB et réinsérez-le.
- Vérifiez que le moniteur est connecté correctement et qu'il est sous tension.
- Prenez soin de redémarrer votre ordinateur après l'installation du pilote.
- Essayez un autre port USB et/ou ordinateur.
- Débranchez tous les autres périphériques USB du système.
- Essayez de brancher le câble USB du dispositif d'affichage USB directement à
l'ordinateur et non via un concentrateur.
- Réinitialiser/rafraîchir/resynchroniser votre moniteur.
Lecture des médias
- Pendant la lecture vidéo sur toutes les plates-formes, ne pas changer le mode
25
Page 56

d'affichage, la position ou l'emplacement de la fenêtre du lecteur vidéo (tels que de
glisser la fenêtre du lecteur vidéo entre l'écran principal et l'affichage connecté).
Cela peut entraîner le lecteur vidéo d'arrêter la lecture. Nous vous proposons
d'arrêter la lecture vidéo, déplacer la fenêtre sur l'affichage du dispositif graphique
USB connecté, puis de sélectionner le clip vidéo pour commencer la lecture.
- Le mouvement du curseur est plus lent lorsque la souris passe sur la région de la vidéo
du lecteur Flash.
- La réduction de votre paysage d'écran à moins de 50 % aidera à atténuer la lecture
saccadée de la vidéo pour les vidéos en cours d'exécution en mode plein écran.
- Vous pouvez rencontrer de mauvaises performances vidéo sur les dispositifs
graphiques USB avec les systèmes à faible spec. PC.
- Le rendu vidéo utilisant les superpositions matérielles est pris en charge.
- Certains logiciels de lecture de DVD ne supportent pas la lecture sur une seconde
carte graphique d'aucune sorte. Vous pouvez essayer d'ouvrir le lecteur multimédia
sur l'écran secondaire avant de commencer la lecture du DVD.
- Votre PC peut manquer de certains codecs média pour prendre en charge la lecture
de certains formats vidéo. Utilisez le lien ci-dessous pour installer le codec média
gratuit.
K- Lite: http://www.free-codecs.com/download/K_Lite_Codec_Pack.htm
- Les lecteurs Vidéo/Média ont différentes capacités de décodage sous différents
modes d'affichage. Pour une meilleure performance de visualisation des DVD ou de
certains formats vidéo sur l'affichage graphique USB connecté, il est recommandé
d'utiliser le logiciel libre suivant:
Media Player Classic: http://sourceforge.net/projects/guliverkli/
Autres
- Certaines cartes graphiques, comme Intel, empêchent les autres chipsets graphiques
secondaires d'être défini comme carte principale. À la suite de cela, le mode
principal peut ne pas fonctionner ou l'affichage peut être désactivé.
- Si vous rencontrez des problèmes lors du processus de démarrage, démarrez votr e
ordinateur en mode sans échec et désinstallez le pilote. Maintenez la touche CTRL
jusqu'à ce que le menu de démarrage de Windows s'affiche, puis sélectionnez Mode
sans échec.
- Pour vérifier la version du pilote que vous avez installé, cliquez sur « Panneau de
configuration » → « Ajouter ou supprimer des programmes » pour vérifier le
programme: USB Display Device (Trigger 2) 9.xx.xxxx.0159 (le nombre représente la
version du pilote).
- Certaines limitations existent dans différents lecteurs multimédias pour la prise en
charge du format de fichier. Nous joignons notre résultat de test de conformité dans
les tableaux en fonction des différents systèmes d'exploitation, des cartes
graphiques/chipset des principaux systèmes, des lecteurs multimédias, et des formats
de média pris en charge. Il sera mis à jour périodiquement avec la nouvelle version
de lecteurs multimédias ou de notre dernière version du pilote.
26
Page 57

USB 3.0 MULTI-ADAPTER USER MANUAL
SUPPORT TECHNIQUE
Si vous rencontrez des problèmes lors de l'utilisation de ce produit, suivez les instructions cidessous avant de retourner ce produit au magasin.
1. Le Manuel de l'utilisateur
Il contient les instructions détaillées et la section de dépannage; de nombreux
problèmes courants peuvent être facilement résolus en lisant le manuel de
l'utilisateur.
2. Support en ligne
Visitez le site Web de j5 create (www.j5create.com) pour trouver la dernière version
du logiciel pour votre appareil. Si vous rencontrez toujours le même p roblème, vous
pouvez soumettre une description du problème par email à service@j5create.com.
j5 create, l'équipe de l'assistance technique vous répondra sous 24 heures.
3. Assistance téléphonique
Veuillez nous appeler au +1-888-689-4088 et nos techniciens se feront un plaisir de
vous aider.
Service clientèle:Numéro gratuit: +1-888-988-0488
Assistance technique:Numéro gratuit: +1 888-689-4088
E-mail: service@j5create.com
Veuillez contacter l'Assistance technique pendant les heures ouvrables. 10:00AM-6:00PM
U.S.A E.S.T. Du lundi au vendredi pour toute assistance supplémentaire.
GARANTIE DE j5 create
j5 create offre une garant ie limitée de 1 ans. L'usure due à l'utilisation n'est pas incluse.
L'utilisateur doit appeler ou envoyer un e-mail au service clientèle de j5 create pour donner des
informations sur le défaut du produit et obtenir un numéro d'autorisation de reto ur.
Les utilisateurs so n t responsables du coût d'expédition de retour et nous prendrons en charge le
renvoi de l'appareil.
Afin d'obtenir une auto risat ion de retour, l'utilisateur do it avoir les informations suivantes à portée de
main lors de l'appel ou de l'envoi d'e-mail à l' équipe de l'assistance:
(i) une copie de la facture d' achat originale pour vérifie r votre garantie
(ii) un numéro de série du pro duit
(iii) une description du pro bl èm e
27
Page 58

(iv) un numéro d'autorisation de retour du mat ériel
(v) Nom, adresse et numéro de t él éph o ne du client
j5 create ne garantit pas qu e le fo nctionnement du produit s era ininterrompu ou sans erreur. j5
create n'est pas responsable des dommages résultant du non-resp ect des instructions d'utilisation
du produit. Cette garantie ne s'applique pas : (a) à des pièc es consommables, à moins qu e le
dommage ne soit dû à un défaut de m atériaux ou de fabrication; (b) aux dommages cosmétiques,
y compris mais non limité aux rayures, enta illes, et plastique cas sé sur les ports; (c) les do mmages
causés par l'utilisation de produits non -j5 create; (d) les dommages causés par les catastrophes
naturelles (inondations, incendie, tremblemen t de t erre, foudre, typhon etc.,) (e) les dommages
causés par une mauvaise ut i l isation (perte, accident, abus, m auvais usage ou d'autres ca uses
externes) (f) les dommages causés par l'ut il is at io n du produit en dehors des ut i li sations auxquelles il
est destiné décrites par j5 create; (g) les dommage s causés par l'entretien (y compris les mises à
niveau et extensions) effectué par une personne autr e qu'u n représentant de j5 create ou un
fournisseur de servic es autorisé de j5 create; (h) un produ it o u un e pièce qui a été modifié afin
d'altérer la fonctionn alité ou les capacités sans l'autorisation écrite de j5 create; ou ( i) le cas
échéant le numéro de sér ie de j5 crea t e du produit a été retiré ou effacé.
Si une telle situation se prod uit, j5 create va calculer le coût des m atériaux et de la réparation pour
référence.
Cette garantie est donnée par j5 create en lieu et place de t o ut e autre garantie expresse ou
implicite.
CONFORMITÉ RÉGLEMENTAIRE
FCC Cet équipemen t a été testé et déclaré conforme aux normes FCC Par tie 15 Sous-partie B § 15.109/15.107 Classe B. Son
fonctionnement est soumis aux deux conditions suivantes:
• Cet appareil ne peut causer des interférences nuisib les
• Cet appareil doit accepter toute interf érence, y compris les interfér ences qui peuvent causer un mauva is fonctionnemen t de
l'appareil.
CECet équipement est conforme aux exigences des règlements suivants:
EN 55022 Classe B (2006),
EN 55024 (1998+A1:2001+ A2:2003), (IEC/EN 61000-4-2 (1995+A1:1998+A2:2001)/-3(2006)
C-TickCet équipement est conforme aux exigences des règlements suivants:
EN 55022 (2006) Classe B, AS/NZS CISPR22 © IEC: 2005.
VCCICet équipement est conforme aux exigences de s règlements suivants:
CISPR22 © IEC: 2005
Avis de non responsabilité
Les informations contenues dans ce document sont sujettes à changement sans préavis. Le fabricant ne fait aucune représentation ou
garantie (expresse ou implicite) quant à l'exactitude et l'exhaustivité de ce document et ne doit en aucun cas être tenu responsable de
toute per t e de profits ou de tout préjudi ce commercial, y compris mais sans s'y limiter des dommag es spéciaux, i ndirects, accessoires, ou
autres. Aucune partie de ce document ne peut être reproduite ou transmise sous quelque forme et par quelque moyen, électronique
ou mécanique, y compris la photocopie, l'enregistrement ou l'enregistrement des informations et les systèmes de récupération, sans la
permission écrite expresse du fabricant.
28
Page 59

USB 3.0 MULTI-ADAPTER
VGA & GigaLAN
Bedienungsanleitung
JUA370
JUA370
Page 60

USB3.0 MULTI ADAPTER Benutzerhandbuch
Table of Contents
Einleitung .................................................................................................................................... 3
Systemvoraussetzungen ............................................................................................... 3
Physikalische Spezifikationen ...................................................................................... 4
Packungsinhalt .............................................................................................................. 5
ERSTE SCHRITTE .......................................................................................................................... 6
INSTALLIEREN BEI WINDOWS .................................................................................................... 6
Installieren des Gerätetreibers ..................................................................................... 6
Prüfen der Gerätetreiberinstallation ............................................................................ 9
Deinstallieren des Gerätetreibers .............................................................................. 10
INSTALLIEREN BEI MAC ............................................................................................................ 10
Installieren des Gerätetreibers ................................................................................... 10
Prüfen der Gerätetreiberinstallation .......................................................................... 13
Netzwerk auf MAC ...................................................................................................... 13
Deinstallieren des Gerätetreibers .............................................................................. 14
INSTRUCTIONS SUR LES FONCTIONS: WINDNOWS 8, 7 ....................................................... 15
INSTRUCTIONS SUR LES FONCTIONS: WINDOWS XP ............................................................ 19
INSTRUCTIONS SUR LES FONCTIONS: MAC........................................................................... 23
FEHLERBEHEBUNG ................................................................................................................... 25
TECHNISCHE HILFE ................................................................................................................... 26
GARANTIE VON j5 create ...................................................................................................... 27
2
Page 61

USB3.0 MULTI ADAPTER Benutzerhandbuch
Einleitung
Die j5create USB 3.0 Multiadapter-Serie mit einer schnelleren Übertragungsgeschwindigkeit
von 5 GB/s bietet zusätzliche Konnektivität für Ihren Computer. Mit diesen Multiadaptern im
Hosentaschenformat können Sie über den USB-Anschlu s s zusätzlich ein USB-ComputerPeripheriegerät, einen VGA-Monitor oder ein Ggigabit LAN hinzufügen.
Mit j5create Multiadaptern brauchen Sie Ihren Computer nicht zu öffnen, um eine teure
Grafikkarte einzubauen, sondern Sie laden einfach einige Treiber, verbinden den Adapter mit
dem USB-Anschluss, verbinden das VGA-Monitorkabel mit dem Adapter und sind startklar. Er
unterstützt drei Anzeigemodi: Primär, Erweitert, Mirror. Dank der “Plug-and-Play”-Funktionalität
zwischen Ihrem Computer und dem 2ten Monitor oder Projektor können Sie in
Sekundenschnelle eine neue, visuelle Umgebung schaffen.
Der Gigabit Multiadapter ermöglicht Ihnen, einen Computer ohne Wi-Fi-Verbindung mit
Netzwerkfunktionen zu versehen. Er besitzt einen RJ-45-Anschluss, der eine Ethernet-Leistung
von 10/100/1000 Mbit/s unterstützt – perfekt für Ihr Ultrabook oder MacBook.
Die elegant j5create Multiadapter-Serie bietet Ihnen eine schnelle und tragbare
Alternativlösung.
Systemvoraussetzungen
Windnows 8.1, 8, 7, XP (32-bit oder 64-bit)
Mac OS X 10.8 / 10.7 / 10.6
Freier USB -Anschluss(USB 3.0 empfohl e n)
CPU: Intel Core 2 Quad 2.33 G Hz
RAM: 2 GB DDR2
Anmerkunng für Video-Player:
* Windows XP-Nutzer: Empfohlen “Windows Media Player” für Videowiedergabe
* Windows XP & MAC-Nutzer: Windows XP &MAC-Produkte unterstützen derzeit USB 3.0,
deswegen ist USB 2.0 nur für den ‘Bürogebrauch’; Videowiedergabe wird nicht empfohlen,
auf Grund der begrenzten Bandbreite USB 2.0, welche nur unzureichende Videoqualität liefert.
3
Page 62

Schnittstelle
Host-Schnittstelle
USB 3.0 Typ-A-Anschluss
Video Schnittstelle
VGA -Buchse DB 15-polige Buchse
Ethernet -Anschluss
RJ-45-Anschluss (Gigabit Ethernet)
USB Port
USB 3.0-Anschluss (Typ-A, Buchse)
Strom
Stromversorgung
Über den USB-Bus versorgt versorgt
Aufgabe
Anzeige
Videowiedergabe: 1080P
Ethernet
Übertragungsrate:
USB3.0 MULTI ADAPTER Benutzerhandbuch
Physikalische Spezifikationen
Anzeigeauflösung: 2048 x 1152 mit 32bit
Unterstützte Anzeigemodi: Primary (Hauptmonitor),
Extended (Erweitert), Mirror (Spiegel)
Drehung des Bildschirms: 0°, 90°, 180°, 270°
1000 Mbps (Hal f Duplex) / 1000 Mbps (Full Duplex)
IEEE:
IEEE 802.3az, IEEE 802.3, 802.3u, and 802.3ab, IEEE
802.3x
Modes:
- Unterstützt Wake on LAN funktion, suspend mode
and remote wakeup via link-change, magic packet,
or Microsof t wa k eup frame
- Unterstützt IEEE 802.1Q VLAN tagging and 2 VLAN ID
filtering
- Unterstützt Jumbo Fr a me
- Unterstützt Checksum Offload (IPv4, IPv6, TCP, UDP)
4
Page 63

Seitenverhältnis
Auflösung
Farbtiefe
Breitbildanzeige
Standardanzeige
4:3
800 x 600
16,32 bits
and TCP Large Send Offload
Physikalische Spezifikationen
Abmessungen
Hauptgehäuse: 43.75(B)x 90.6(H)x18.6(T) mm
Gewicht
ca. 58.5 g (Kabel im Lieferumfang enthalten)
USB3.0 MULTI ADAPTER Benutzerhandbuch
Kabellänge: 14.5 cm
Auflösung und Farbtiefe
16:9 2048 x 1152 16,32 bits
16:10 1920 x 1200 16,32 bits
16:9 1920 x 1080 16,32 bits
16:10 1680 x 1050 16,32 bits
16:9 1600 x 900 16,32 bits
16:10 1440 x 900 16,32 bits
16:9 1360 x 768 16,32 bits
16:10 1280 x 800 16,32 bits
15:9 1280 x 768 16,32 bits
16:9 1280 x 720 16,32 bits
4:3 1600 x 1200 16,32 bits
4:3 1400 x 1050 16,32 bits
5:4 1280 x 1024 16,32 bits
4:3 1280 x 960 16,32 bits
4:3 1152 x 864 16,32 bits
4:3 1024 x 768 16,32 bits
Packungsinhalt
USB 3.0 Multi-Adapter JUA370
Treiber-CD mit elektronischem Benutzerhandbuch
Kurzanleitung
5
Page 64

USB3.0 MULTI ADAPTER Benutzerhandbuch
ERSTE SCHRITTE
Hinweise vor der Installation
Installieren Sie den Treiber vollständig, bevor Sie das USB-Kabel an den Computer anschließen.
Starten Sie das Setup-Programm als Administrator, um Fehler bei der Installation zu vermeiden
Schließen Sie zuerst das VGA-Kabel an den VGA-Anschluss des Anzeigegeräts und den der
USB3.0 Multi Adapter und dann das USB-Kabel an den Computer an.
Deinstallieren Sie den alten Treiber, bevor Sie den neuesten Treiber installieren.
Beginnen Sie mit der Installation des Gerätetreibers (wählen Sie dazu die Beschreibung, die für
das Betriebssystem Ihres PCs geeignet ist).
* Hinweis: Installieren Sie zuerst den Treiber erst vollständig, bevor Sie weitere Schritte
ausführen.
Schließen Sie den USB 3.0-Kabels an das Laptop an.
Schließen Sie das VGA-Kabel des Anzeigegeräts an.
Schließen Sie das Ethernet-Kabel an
Die USB HUB-Anschlüsse können jetzt verwendet werden.
INSTALLIEREN BEI WINDOWS
Installieren des Gerätetreibers
In diesem Abschnitt wird die Treiberinstallation unter Windows beschrieben. Wenn
der Computer bereit ist, legen Sie die Treiber-CD in das CD-ROM-Laufwerk. Das
Setup-Programm wird normalerweise automatisch gestartet. Ist das nicht der Fall,
klicken Sie auf “Computer”, wählen dort das optische Laufwerk aus und starten die
6
Page 65

USB3.0 MULTI ADAPTER Benutzerhandbuch
Die Installationsseite wird gestartet. Um die
dass das Netzwerk verfügbar ist, oder klicken
”, um die
Jetzt wird der InstallShield Wizard
Klicken Sie
Lesen Sie sich die Lizenzvereingarung durch,
”. Klicken
Wenn der InstallShield-Assistent
“Ja, ich
”
, um den
Wenn der Computer wieder hochgefahren ist,
Windnows 8, 7:
Nachdem die Treibersoftware erfolgreich
installiert wurde, erscheint auf dem Bildschirm
Bildschirms erscheint in der Taskleiste das
.Die Treibersoftware wurde
erfolgreich installiert, wenn die folgende
Installations-CD manuell. Klicken Sie doppelt auf die Datei “Setup.exe”, um die
Installation zu starten .
※ Stellen Sie sicher, dass das USB-Kabel noch nicht am PC oder Notebook
angeschlossen ist, während das Installationsprogramm ausgeführt wird.
Installation zu starten, klicken Sie auf “ Den
neuesten Treiber installieren”. Stellen Sie sicher,
sie auf “ Treiber installieren
Installation zu starten
und markieren Sie die Option “Ich stimme den
Bedingungen des Lizenzvertrags zu
Sie zum Fortfahren auf Weiter >.
(Installationsassistent) gestartet.
zum Fortfahren auf Next> (Weiter).
abgeschlossen ist, wählen Sie
möchte meinen Computer jetzt neu starten
Klicken Sie auf Fertig stellen
Computer neu zu starten.
schließen Sie die USB3.0 Multi Adapter mit dem
USB-Kabel an den PC oder das Notebook an.
Die Meldung “Installieren von
Gerätetreibersoftware” erscheint.
die folgende Meldung.
Windows XP : I n der rechten unteren Ecke des
Symbol
Meldung erscheint
Page 66

USB3.0 MULTI ADAPTER Benutzerhandbuch
Windnows 8, 7:
Sie können die jeweilige Position jedes
Anzeigegeräts über die
oder klicken Sie mit der rechten
Maustaste auf den Bildschirm, und
wählen Sie die Option
Wenn das Fenster Bildschirmauflösung
erscheint, können Sie die
Nummernbezeichnung der
Anzeigegeräte ermitteln, indem Sie auf
Sie können den
Monitor an die gewünschte Position
Windows XP:
Position jedes
Anzeigegeräts über die
Darstellung und
der Anzeigegeräte ermitteln, indem Sie
Sie können die Auflösung der einzelnen
Monitore ändern oder die virtuelle
Position anpassen, indem Sie das
Monitorsymbol entsprechend
Die Anzeigefunktionen der USB3.0 Multi Adapter werden nach dem Neustart des
Computers aktiviert. Möglicherweise wird jetzt das Spiegelbild des Hauptmonitors auf
dem Anzeigegerät angezeigt.
Anzeigeeinstellungen ändern. Gehen
Sie zu “START” → “Systemsteuerung” →
“Darstellung und Anpassung” →
“Bildschirmauflösung anpassen”
※
“Bildschirmauflösung”
“Identifizieren” klicken.
verschieben.
Sie können die jeweilige
Anzeigeeinstellungen ändern.
Gehen Sie zu “START” →
“Systemsteuerung” → “
Anpassung” → “Anzeigeeigenschaften”
→ “Einstellungen”
Sie können die Nummernkennzeichnung
auf “Identifizieren” klicken.
verschieben
Page 67

USB3.0 MULTI ADAPTER Benutzerhandbuch
Windnows 8, 7:
klicken Sie auf das
Windows XP:
und
Hinweis:
Wenn die interne Grafikkarte zwei Monitore unterstützt…..
Wenn Sie eine Newport Station verwenden Das Anzeigegerät, das an den zweiten
VGA-Anschluss angeschlossen ist, wird als 3. Monitor bezeichnet. Das Anzeigegerät,
das an die Newport Station angeschlossen ist, ist der 2. Monitor.
Prüfen der Gerätetreiberinstallation
So prüfen Sie den Status der Treiberinstallation der USB3.0 MULTI ADAPTER
Klicken Sie mit der rechten Maustaste auf
“Arbeitsplatz” “Manager”
“Gerätemanager”
“+”-Zeichen neben “Netzwerkadapter”,
“Audio-, Video- und Gamecontroller”
und “USB-Controller”.
Klicken Sie mit der rechten Maustaste auf “Arbeitsplatz”, “Manager” → “Gerätemanager”
klicken Sie auf das “+”-Zeichen bei “Grafikkarte”, “Netzwerkadapter”, “Audio-, VideoGamecontroller” und “USB-Controller”
Page 68

USB3.0 MULTI ADAPTER Benutzerhandbuch
Klicken Sie auf “Start” → Systemsteuerung
Eine Meldung erscheint, mit der Sie aufgefordert
werden, die Deinstallation des Programms zu
Wenn der Treiber fertig deinstalliert wurde,
Ja, ich möchte meinen
, um den Computer neu zu
Deinstallieren des Gerätetreibers
※ Trennen Sie das USB-Kabel der USB3.0 MULTI ADAPTER ab, bevor Sie den Treiber
deinstallieren.
→ Programme und Funktionen →
Programm deinstallieren oder ändern
Wählen Sie j5 NEWPORT STATION... Klicken
Sie auf Deinstallieren.
bestätigen. Klicken Sie zum Fortfahren auf ‘OK’.
wählen Sie “
Computer jetzt neu starten”. Klicken Sie auf
Fertig stellen
starten.
INSTALLIEREN BEI MAC
Installieren des Gerätetreibers
Durch die Installation des Gerätetreibers kann das Betriebssystem des Computers die
USB3.0 Multi Adapter erkennen. Achten Sie darauf, dass Sie die Beschreibung für das
von Ihnen verwendete Betriebssystem befolgen.
Page 69

USB3.0 MULTI ADAPTER Benutzerhandbuch
Legen Sie die Treiber-CD in das CD-ROM-
und starten Sie die Datei
mit der Endung .dmg, um die Treiber im
Die Installationsseite wird gestartet. Um
die Installation zu starten, klicken Sie auf
Stellen Sie sicher, dass das Netzwerk
Klicken Sie zum Fortfahren auf
Geben Sie Ihr Passwort ein, und klicken
Sie auf “OK”.
Die Software wird installiert… Das kann
Wenn die Installation abgeschlossen ist,
klicken Sie auf “Schließen”
Nach Abschluss der LAN-Treiber
Installation, klicken sie auf “ Treiber
※ Stellen Sie sicher, dass das USB-Kabel nicht an Ihrem Mac Desktop oder Mac
Notebook angeschlossen ist, bevor Sie das Setup-Programm ausführ en.
In diesem Abschnitt wird beschrieben, wie der Gerätetreiber bei einem mit Snow
Leopard laufenden Computer installiert wird.
Laufwerk ein;
“ mac_install” Ordner zu laden
“ Den neuesten Treiber installieren”.
verfügbar ist, oder klicken sie auf “ LAN
installieren”, um d ie Installation zu starten
“Fortfahren”.
einen Moment dauern.
Page 70

USB3.0 MULTI ADAPTER Benutzerhandbuch
installieren”, um die Installation zu starten
Klicken Sie zum Fortfahren auf
Geben Sie Ihr Passwort ein, und klicken
Klicken Sie auf “Installation fortsetzen”
Die Software wird installiert… Das kann
einen Moment dauern.
Klicken Sie auf “Neustart”, um die
Softwareinstallation abzuschließen.
(wählen Sie die Betriebssystemversion, die
Sie verwenden&).
“Fortfahren”
Sie auf “OK”.
Page 71

USB3.0 MULTI ADAPTER Benutzerhandbuch
, wählen Sie
“About This Mac” und dann “ More
Die Abbildung unten zeigt die Installation
Prüfen der Gerätetreiberinstallation
Führen Sie die folgenden Schritte aus, um den Installationsstatus des Treibers für den
USB3.0 MULTI ADAPTER zu prüfen.
Gehen Sie zu
Info…”.
eines the USB3.0 Multi Adapter
Netzwerk auf MAC
Gehen Sie auf und dann auf „ Systempräferenzen“. Wählen Sie „
Page 72

USB3.0 MULTI ADAPTER Benutzerhandbuch
Trennen Sie das USB-Kabel der USB3.0
Um den Treiber zu deinstallieren, klicken
Sie auf das Symbol “ Treiber
Klicken Sie zum Fortfahren auf “Öffnen”
Klicken Sie auf “Deinstallieren und neu starten”
Geben Sie Ihr Passwort ein, um die
Deinstallation zuzulassen, und klicken Sie
6. Starten Sie das System neu.
Netzwerk“ zur Justage aus.
Wählen "AX88179 USB 3.0 to Gigabit Ethernet"
Deinstallieren des Gerätetreibers
MULTI ADAPTER vom USB-Anschluss ab.
deinstallieren”
auf “OK”
Page 73

USB3.0 MULTI ADAPTER Benutzerhandbuch
Résolution d'affichage
Accès rapide au paramétrage de
La liste des résolutions s'affichera lorsque
. Sélectionnez la résolution
Résolution par défaut: 1024 x 768 x 32
Orientation de l'affichage
vous permet d'activer le
dispositif d'affichage, qui est connecté
INSTRUCTIONS SUR LES FONCTIONS: WINDNOWS 8, 7
Résolution d'affichage
vous déplacez le curseur sur Résolution
d'affichage
souhaitée pour l' USB3.0 MULTI ADAPTER.
bits
L'Orientation
à l'USB3.0 MULTI ADAPTER
Page 74

USB3.0 MULTI ADAPTER Benutzerhandbuch
Mode d'affichage
USB3.0 MULTI
de fonctionner comme un
affichage «étendue» de l'écran de
Vous pouvez ajuster la position en
«Etendre ces
Mode miroir-Dupliquer
contenu de l'écran de bord sur l'écran
Remarque pour le système d’exploitation
La résolution des affichages secondaire et
principal doit être la même lorsque vous utilisez
résolution préférée pour l'affichage). Seuls 2
affichages peuvent être mis en miroir
Mode principal
Lorsque vous voulez basculer le
moniteur activé comme affichage
principal et étendre la visualisation à
de l'affichage
principal que vous voulez voir attribuer
«En faire mon affichage
Mode Etendu (Par défaut)
Cette fonctionnalité permet au dispositif
d'affichage connecté à l'
ADAPTER
bord.
cliquant d'abord sur «numéro» de
l'affichage et sélectionnez
affichages» et cliquez sur «Appliquer»
Cette fonctionnalité permet d'afficher le
de l' USB3.0 MULTI ADAPTER
Vous pouvez sélectionner «Dupliquer
ces écrans» et cliquez sur «Appliquer»
Windnows 8, 7 (en mode Miroir):
le mode Miroir (Celle-ci peut être inférieure à la
simultanément. Le système d’exploitation
Windnows 8, 7 peut avoir d’autres limites.
l'écran de bord.
Choisissez le «Numéro»
et cochez
principal».
Page 75

USB3.0 MULTI ADAPTER Benutzerhandbuch
Mode Désactivé
Sélectionnez «Afficher le bureau
nez «Afficher le bureau
Super Utilitaire
Un super utilitaire offre davantage
d'options, l'icône se trouve sur la barre
Pour désactiver l'un des affichages:
seulement sur 1» et le 2
ème
affichage
sera désactivé
Sélection
seulement sur 2» et le 1er affichage sera
désactivé
des tâches en bas à droite
Identifier les Moniteurs
Lorsque «Identifier les moniteurs» est sélectionné, un numéro de série s'affiche dans
le coin supérieur droit des dispositifs d'affichage. Vous pouvez voir le numéro de série
de chaque affichage lorsque vous utilisez la fonction de raccourci clavier.
Page 76

USB3.0 MULTI ADAPTER Benutzerhandbuch
Cette caractéristique unique offre
une expérience de travail plus
simple pour les environnements
écran. Une série de réglage
de raccourcis clavier aide à se
déplacer rapidement entre les
※Utilisation des raccourcis clavier
Cliquez sur la fenêtre que vous souhaitez déplacer sur la barre des tâches pour la
※
Paramétrage de l'affichage
Accès rapide au système
Panneau de contrôle multiaffichages
multi-
dispositifs d'affichage souhaités.
Le réglage par défaut est Ctrl + N° d'affichage.
rendre active et appuyez sur Raccourci clavier
Paramétrer les Raccourcis clavier
Par exemple: Déplacez la fenêtre sur Affichage03, et agrandissez-la
automatiquement en plein écran.
Choisissez «Déplacez la fenêtre active sur Affichage03», cochez «Déplacer la fenêtre
et plein écran», et cliquez sur Appliquer
«Paramètres d'affichage»
Position fixe
Cette fonction vous aide à organiser les positions de tous les emplacements
d'affichage que vous avez définis dans Affichage > Résolution de l'écran Après
«Paramétrage de l'emplacement de l'affichage», Cochez
dans cette fonction. Tous les emplacements d'affichage seront fixés. C'est l'idéal
pour l'utilisateur de multi-affichages.
Page 77

USB3.0 MULTI ADAPTER Benutzerhandbuch
Résolution d'affichage
lorsque vous déplacez le curseur
.
Sélectionnez la résolution
INSTRUCTIONS SUR LES FONCTIONS: WINDOWS XP
Vous pouvez choisir toutes les fonctions simplement et directement en cliquant sur
cette icône ( ) visible sur la barre d'outils dans le coin inférieur droit.
ID de l'affichage
Détection intelligente de l'ID du dispositif d'affichage
L'USB3.0 MULTI ADAPTER prend en charge DDC/EDID défini par VESA. L'utilitaire
affichera l'ID du dispositif d'affichage chaque fois qu'il est connecté à l'USB3.0 MULTI
ADAPTER
S'il n'y a pas de périphérique d'affichage connecté à l'Adaptateur d’affichage
USB3.0, l'ID s'affichera comme «Moniteur inconnu.» Si le dispositif d'affichage ne
prend pas en charge EDID, l'ID sera également définie en tant que «Moniteur
inconnu».
Résolution par défaut: 1024 x 768 x
32 bits
La liste des résolutions apparaîtra
sur Résolution d'affichage
souhaitée.
Page 78

USB3.0 MULTI ADAPTER Benutzerhandbuch
Rotation de l'affichage
permet de tourner le dispositif
d'affichage, qui est connecté à
C'est une fonction utile pour
certains dispositifs d'affichage
270 degrés sous le mode
Mode d'affichage
Le mode d'affichage par défaut
permet au dispositif d'affichage
de fonctionner
en tant qu'affichage «Etendu» de
l'écran de bord. Cette
fonctionnalité d'espace de travail
étendu améliore l'efficacité de
Lorsque Miroir est sélectionné, l'écran
du dispositif d'affichage, qui est
Adaptateur d’affichage
, est le même que l'écran
principal, et Rotation de l'affichage est
Vous pouvez sélectionner
», ou
Mode Principal
est sélectionné, le
dispositif d'affichage, qui est connecté à
l'Adaptateur d’affichage USB3.0, deviendra
Désactivé
est sélectionné,
cela désactive l'affichage de
l'Adaptateur d’affichage USB3.0
La Rotation de l'affichage vous
l'Adaptateur d’affichage USB3.0.
rotatifs.
Il y a 4 options disponibles:
0 degré / 90 degrés / 180 degrés /
d'affichage Etendu ou Principal.
Etendu (Mode par défaut)
connecté de l'Adaptateur
d’affichage USB3.0
travail.
Mode Miroir
connecté à l'
USB3.0
automatiquement désactivé.
«Retournement Horizontal
«Retournement Vertical ».
Lorsque Principal
Lorsque Désactivé
Page 79

USB3.0 MULTI ADAPTER Benutzerhandbuch
l'affichage principal, l'affichage de la carte
graphique interne passera
automatiquement à l'affichage étendu et
Quand Identifier les moniteurs est
sélectionné, un numéro de série
s'affiche dans le coin supérieur droit du
Vous pouvez utiliser la fonction de
Raccourci clavier pour trouver le
Panneau de contrôle multi-affichages
est sélectionné, la fenêtre
affichages apparaît afin de
permettre la modification des
agira comme un bureau d'extension.
Identifier le moniteur
dispositif d'affichage connecté.
numéro de série de chaque affichage.
Lorsque Panneau de contrôle multi-
affichages
du panneau de contrôle multi-
raccourcis clavier.
Page 80

USB3.0 MULTI ADAPTER Benutzerhandbuch
※USB3.0 Multi Adapter des raccourcis clavier
la fenêtre que vous souhaitez déplacer sur la barre des tâches pour la
※
Le réglage par défaut est Ctrl + N° d'affichage.
Cliquez sur
rendre active et appuyez sur Raccourci clavier.
Paramétrer les raccourcis clavier
Par exemple: Déplacez la fenêtre sur Affichage03, et agrandissez-la
automatiquement en plein écran.
Choisissez «Déplacez la fenêtre active sur Affichage03», cochez «Déplacer la fenêtre
et plein écran», et cliquez sur Appliquer pour la rendre active.
Paramétrage de l'affichage
Accès rapide au système «Paramétrage de l'affichage»
Page 81

USB3.0 MULTI ADAPTER Benutzerhandbuch
Résolution d'affichage
, puis «Préférences
Dans «Préférences Système», cliquez sur l'onglet
Sur cet écran, vous pouvez régler la résolution, le
Mode d'affichage
et décochez «Affichage miroir»
pour désactiver la mise en miroir
de l'écran. Vous verrez
ent une autre
araître à l'écran qui
USB3.0 MULTI
Vous pouvez déplacer la barre
de menu sur n'importe quel
n'importe quel affichage au
Principal.
Si vous ne pouvez pas voir la Fenêtre d'affichage pour régler la résolution de votre
moniteur secondaire, cliquez sur le bouton «Rassembler les fenêtres».
INSTRUCTIONS SU R LES FONCTION S: MAC
Aller à
système»
Cliquez sur l'onglet «organisation»,
«Affichage». Vous devriez voir cet écran.
mode d'affichage et la gamme des couleurs.
automatiquem
fenêtre app
représente l'
ADAPTER
affichage pour attribuer
Page 82

USB3.0 MULTI ADAPTER Benutzerhandbuch
ASTUCE: Pour simplifier l'utilisation de
, cliquez sur «Faire
apparaître l'affichage dans la barre de
cliquer à
Organisation des fenêtres
Vous pouvez organiser les fenêtres sur
cliquez sur
«Exposé et Spaces.» Vous devriez voir cet
Space
de menu.» Vous devriez voir le numéro
d'espace sur la barre de menu et vous
pouvez choisir n'importe quel espace
dans la liste à tout moment.
F8: vous pourrez voir la Disposition des
espaces avec une seule touche. Vous
pouvez déplacer n'importe quelle fenêtre
l'USB3.0 MULTI ADAPTER
menu.» Vous verrez l'icône d'affichage
sur laquelle vous pouvez doubletout moment.
Cliquez sur «Afficher Spaces dans la barre
l'écran par «Exposé et Spaces»
Aller à , puis «Préférences système»
Dans Préférences système
écran.
sur un autre espace.
Page 83

USB3.0 MULTI ADAPTER Benutzerhandbuch
Exposé
*Pour plus de fonctions d'organisation des
le manuel de
l'utilisateur d’Apple.
Afficher différentes fenêtres avec une seule
touche.
F9: afficher toutes les fenêtres ouvertes
F10: afficher les fenêtres de l'application en
cours seulement
F11: afficher le bureau
fenêtres, veuillez consulter
FEHLERBEHEBUNG
Wenn Sie Fragen zur Verwendung der JUA370 USB3.0 MULTI ADAPTER haben, gehen Sie
folgendermaßen vor. Hilfe fin den Si e auf un serer Website, aber Sie können auch die SupportHotline von j5 create anrufen.
Bekannte Probleme
Direct 3D wird bei XP nicht unterstützt. Es wird bei Win 7 Aero unterstützt.
Allgemeine Empfehlungen
Kompatibilitätsprobleme treten auf, wenn mehrere Video-über-USB-Geräte an einem System
angeschlossen sind. Stellen Sie sicher, dass alle anderen Video-über-USB-Treibe r deinstallier t
wurden, bevor Sie j5 creat e i n st allieren.
Prüfen Sie, ob das Gerät ri cht i g an das Host-System angeschlossen wurde.
Stellen Sie sicher, dass d er USB-Anschluss der USB3.0 M u lti Adapter verwendet wird.
Trennen Sie das USB-Kabel des USB-Anzeigegeräts ab, und schließen Sie e s wieder an.
Prüfen Sie, ob der Monitor richtig angeschlossen und eingeschaltet wurde.
Stellen Sie sicher, dass d er Computer nach der Treiberinstallation neu gestartet wurd e.
Verwenden Sie einen anderen USB -Anschluss und/oder Computer.
Trennen Sie alle anderen U SB-Geräte vom System ab.
Schließen Sie das USB-Kabel des USB-Anzeigegeräts ohne den Umweg über einen Hub direkt
an den Computer an.
Führen Sie ein Reset/eine Aktualisierung/eine Sy n chronisierung des Monitors au s.
Medienwiedergabe
Wechseln Sie unabhängig von der Plattform während der Videowiedergabe niemals den
Anzeigemodus oder die Position oder die Anordnung des Videoplayer-Fensters (z. B. darf das
Videoplayerfenster nicht zwischen die Hauptanzeige und das angeschlossene Anzeigegerät
verschoben werden). Anderenfalls kann der Videoplayer dadurch gestoppt werden. Es wird
empfohlen, zunächst die Videowiedergabe zu stoppen, dann das Fenster in das an das USBGrafikgerät angeschlossene Anzeigegerät zu verschieben und dann den Videoclip zu
starten.
Die Cursorbewegung wird langsamer, wenn die Maus über die Videoregion des Flashplayers
geschoben wird.
Ein Verkleinern der Bildschirmanzeige unter 50 % kann helfen, wenn die Anzeige bei der
Page 84

USB3.0 MULTI ADAPTER Benutzerhandbuch
Wiedergabe im Vollbild modus zu stark r uckelt.
Auch bei PC-Systemen mit unzureichenden Spezifikationen kann die Wiedergabequalität
auf USB-Grafikgeräten sehr schlecht sein.
Die Videoaufnahme m it Hardware-Overlays wird unterstützt.
Einige Softwarepakete für DVD-Wiedergabe unterstützen nicht die Wiedergabe auf einer
zweiten Grafikkarte. Versuchen Sie, zuerst auf dem zweiten Anzeigegerät den Mediaplayer
zu starten und dann die DVD wiederzugeben.
Möglicherweise fehlen dem PC Mediencodecs, um die Wiedergabe bestimmter
Videoformate zu unterstützen. Auf den folgenden Links können Sie sich lizenzfreie
Mediencodecs herunterladen.
K- Lite:
Video-/Medienplayer haben bei verschiedenen Anzeigemodi verschiedene
Decodierungsmöglichkeiten. Für eine bessere Wiedergabe von DVDs und bestimmter
Videoformate auf dem angeschlossenen USB-Grafikanzeigegerät wird die Verwendung der
folgenden lizenzfreien Programme empfohlen:
Media Player Classi c:
Sonstiges
Manche Grafikkarten (z. B. Intel) verhindern es, dass ein zweiter Grafik-Chipsatz als
Primärkarte eingestellt werden kann. Daher ist es möglich, dass der Primärmodus nicht
funktioniert oder das Anzeigegerät deaktivier t w ird.
Wenn während des Bootvorgangs Probleme auftreten, starten Sie den Computer im
abgesicherten Modus, und deinstallieren Sie den Treiber. Halten Sie die STRG-Taste gedrückt,
bis das Windows-Startmenü erscheint. Wählen Sie den abgesicherten Modus.
Um die Version des installierten Treibers zu ermitteln, klicken Sie auf “Systemsteuerung” →
“Programme hinzufügen oder entfernen”: USB Display Device (Trigger 2) 9.xx.xxxx.0159 (die
Zahl steht für die Treibe rversion).
Manche Mediaplayer unterstützen nur eine beschränkte Anzahl an Dateiformaten. Die
Ergebnisse der Kompatibilitätstests finden Sie in den Tabellen. Dort werden die
unterschiedlichen Betriebssysteme, die Haupt-Grafikkarte/der Haupt-Chipsatz, die
Mediaplayer und die unterstützten Medienformate aufgeführt. Sie werden regelmäßig
aktualisiert, wenn eine neue Version von Mediaplayern oder ein neuer Treiber auf den Markt
kommen.
http://www.free-codecs.com/download/K_Lite_Codec_Pack.htm
http://sourceforge.net/projects/guliverkli/
TECHNISCHE HILFE
Sollten Sie Probleme bei der Verwendung dieses Produkts haben, führen Sie die
folgenden Schritte aus, bevor Sie mit dem Produkt wieder zu Ihrem Händler gehen.
Das Benutzerhandbuch
Das Benutzerhandbuch enthält ausführliche Anleitungen und Vorschläge zur
Problembehebung. Viele Probleme können ganz einfach gelöst werden, wenn Sie
sich zunächst sorgfältig das Benutzerhandbuch durchlesen.
Online-Hilfe
Auf der Website von j5 create (www.j5create.com) finden Sie die neueste Software
für Ihr Gerät. Wenn das Problem weiterhin bestehen bleibt, können Sie eine E-Mail an
service@j5create.com senden, in der Sie Ihr Problem beschreiben. Das Support-Team von
j5 create wird Ihnen auf diese E-Mail innerhalb von 24 Geschäftsstunden antworten.
Telefonische Hilfe
Page 85

USB3.0 MULTI ADAPTER Benutzerhandbuch
Rufen Sie uns unter der Telefonnummer +1 888-689-4088 an. Einer unserer Techniker
wird dann versuchen, Ihr Problem mit Ihnen zusammen telefonisch zu beheben.
Kundendienst: Kostenlose Rufnummer:+1 888-988-0488
Technische Hilfe: Kostenlose Rufnummer:+1 888-689-4088
E-Mail: service@j5create.com
Kontaktieren Sie unsere Technische Hilfe Montags – Freitags während der
Geschäftszeiten. 10:00 - 18:00 U.S.A EST (15:00 - 24:00 Mitteleuropäische Sommerzeit).
GARANTIE VON j5 create
j5 create gibt eine beschränkte 1 Jahr Garantie. Schäden aus natürlicher Abnutzung fallen nicht unter
die Garantie.
Im Garantiefall muss der Nutzer den Kundendienst von j5 create per Telefon oder E-Mail kontaktieren
und den Defekt schildern. Vom Kundendienst erhält der Nutzer eine Rücksendenummer (RMA).
Der Nutzer trägt die Kosten für den Versand zur Reparatur, j5 create trägt die Kosten für den
Rückversand zum Kunden.
Um eine Rücksendenummer zu erhalten, muss der Nutzer dem Kundendienst folgende Dokumente
vorlegen und Daten angeben:
eine Kopie der Originalrechnung, um die Garantieansprüche zu belegen
die Produktseriennummer
eine Beschreibung des Problems
eine RMA-Nummer (Rücksendenummer)
Name, Adresse und Telefonnummer des Kunden
j5 create garantiert nicht für einen ununterbrochenen und fehlerfreien Betrieb des Produkts. j5 create
ist nicht haftbar für Schäden, die aus der Nichtbeachtung der Anweisungen zur Verwendung des
Produkts resultieren. Diese Garantie umfasst nicht: (a) Verschleißteile, wenn der Schaden nicht auf
Material- und Herstellungsfehler zurückzuführen ist; (b) kosmetische Schäden, einschließlich, aber nicht
beschränkt auf Schäden wie Kratzer, Dellen und
gebrochene Kunststoffteile an Anschlüssen; (c) Schäden, die aus der Verwendung mit Produkten
resultieren, die nicht von j5 create sind; (d) Schäden, die auf höhere Gewalt (Naturkatastrophen,
Überflutungen, Brände, Erdbeben, Blitzschlag, Tornados usw.) zurückzuführen sind; (e) Schäden, die
auf Missbrauch (Verluste, Unfälle, Missbrauch, Fehlgebrauch und andere externe Ursachen)
zurückzuführe n sind; (f) Schäden, die durch eine unerlaubten oder nicht von j5 create vorgesehenen
Betrieb, entstanden sind; (g) Schäden, die auf nicht zulässige Reparaturen (einschließlich
Aktualisierungen und Erweiterungen) zurückzuführen sind, oder die von Personen durchgeführt
wurden, die nicht von j5 create autorisiert oder keine a utorisierten j5 create Reparaturfachbetriebe
sind; (h) Produkte oder Teile, die ohne die schriftliche Genehmigung von j5 create geändert wurden,
um den Funktionsumfang zu ändern und (i) Produkte, bei denen die j5 create-Seriennummer ent fernt
oder unkenntlich gemacht wurde.
In einem solchen Fall berechnet j5 create für Sie die Kosten für Material und Reparatur.
j5 create gibt diese Garantie anstatt anderer sonstiger ausdrücklicher oder stillschweigender
Garantien.
EINHALTUNG GESETZLICHER VORSCHRIFTEN
FCC
Dieses Gerät wurde geprüft, und es entspricht gemäß Abschnitt 15, Unterabschnitt B, § 15,109/15,107 der FCC einem Gerät der
Page 86

USB3.0 MULTI ADAPTER Benutzerhandbuch
Klasse B .
Der Betrieb unterliegt den folgenden zwei Bedingungen:
• Dieses Gerät darf keine Störungen verursachen.
• Dieses Gerät muss alle Stö ru nge n auf ne hme n k önn en , au ch solche, die eine n u ne rw üns ch ten Be tri eb zu r Fol g e ha be n.
CE
Dieses Gerät entspricht den Anforderungen der folgenden Verordnungen:
EN 55022 Klasse B (2006),
EN 55024 (1998+A1:2001+ A2:2003), (IEC/EN 61000-4-2 (1995+A1:1998+A2:2001)/-3(2006)
C-Tick
Dieses Gerät entspricht den Anforderungen der folgenden Verordnungen:
EN 55022 (2006) Klasse B, AS/NZS CISPR22 © IEC: 2005.
VCCI
Dieses Gerät entspricht den Anforderungen der folgenden Verordnungen:
CISPR22 © IEC: 2005
Haftungsausschlusserklärung
Die in diesem Dokument enthaltenen Informationen können ohne Ankündigung geändert werden. Der Hersteller macht keine
Zusicherungen und gibt keine Garantien (weder implizit noch anderweitig) hinsichtlich der Genauigkeit und Vollständigkeit
dieses Dokuments. Er ist in keinem Fall haftbar für Gewinnverluste und sonstige wirtschaftliche Schäden, einschließlich, aber
nicht beschränkt auf direkte und indirekte Schäden, Folgeschäden und sonstige Schäden. Dieses Dokument darf ohne die
ausdrückliche schriftli che Genehmi gung des Her stellers w eder als G anzes noch in T eilen, i n keiner For m und mi t keinen Mitteln ,
weder elektronisch noch mechanisch (darunter fällt auch das Fotokopieren, Aufnehmen oder Datenaufzeichnung und das
Nutzen von Abrufsystems) reproduziert oder übertragen werden.
Page 87

USB 3.0 MULTI-ADAPTER
Manual del usuario
VGA & GigaLAN
JUA370
Page 88

USB3.0 MULTI ADAPTER Manual del usuario
Table of Contents
Instrucciones .........................................................................................................................3
REQUISITOS DEL ENTORNO .............................................................................................3
Physical Specifications ..................................................................................................4
Contenido del paquete ................................................................................................5
PRIMEROS PASOS ...................................................................................................................6
INSTALACIÓN PARA WINDOWS ............................................................................................6
Instalación del controlador del dispositivo .................................................................6
Verificar la instalación del controlador del dispositivo .............................................9
Desinstalación del controlador de dispositivo ...........................................................9
INSTALACIÓN PARA MAC ...................................................................................................10
Instalación del controlador del dispositivo ...............................................................10
Verificar la instalación del controlador del dispositivo ...........................................13
Mise en réseau sur Mac ..............................................................................................13
Desinstalación del controlador de dispositivo .........................................................14
INSTRUCCIONES DE LAS FUNCIONES: WINDOWS 8, 7 .......................................................15
INSTRUCCIONES DE LAS FUNCIONES: WINDOWS XP .........................................................19
INSTRUCCIONES DE LAS FUNCIONES: MAC .......................................................................23
SOLUCIÓN DE PROBLEMAS .................................................................................................26
SOPORTE TÉCNICO ..............................................................................................................27
GARANTÍA DE j5 create ......................................................................................................28
2
Page 89

USB3.0 MULTI ADAPTER Manual del usuario
Instrucciones
La serie de multiadaptadores USB 3.0 j5create proporciona conectividad adicional para su
equipo con una velocidad de transferencia más rápida de 5 Gb/s. Estos multiadaptadores de
bolsillo permiten agregar un periférico USB adicional para su PC, un monitor VGA o una
conexión LAN gigabit a través de un puerto USB.
Con los multiadaptad ore s j5create, no es necesario que abr a su PC para agregar tarjetas
gráficas caras. Simplemente tiene que cargar los controladores, enchufar el adaptador al
puerto USB y, a continuación, enchufar el cable del monitor VGA al adaptador. Admite tres
modos de visualización: primario, extendido y simetría. Con la funcionalidad Conectar y listo
(plug & play) entre su PC y el segundo monitor o proyector, podrá crear un nuevo entorno
visual en segundos. El multiadaptador gigabit permite agregar funcionalidades de red a un
equipo sin conexión Wi-Fi. Cuenta con un conector RJ-45 que proporciona funcionalidad
Ethernet 10/100/1000 Mbps, perfec to para su ultraportátil o MacBook.
La elegante serie de multiadaptadores de j5create proporciona una solución alternativa
rápida y portable.
REQUISITOS DEL ENTORNO
Windows 8.1, 8, 7, XP (32 bits o 64 bits)
Mac OS X 10.8 / 10.7 / 10.6
Un puerto USB disponible (USB 3.0 recomendado)
CPU: Intel Core 2 Quad 2.33 GHz
RAM: 2 GB DDR
Nota para el Reproductor de Video:
* Usuario Windows XP: “ Windows Media Player” es recomendado para reproducc ión de video
Atención
* Usuario MAC: productos M AC no son compatibles con USB 3.0 por el momento, por lo tanto
sugerimos el uso de USB 2.0 para “aplicación de oficina” únicamente; Reproducción de Video
no se recomienda debido a que las limitaciones del ancho de banda del USB 2.0 resultan en un
imperfecto desempeño del video.
3
Page 90

Interfaz
Interfaz host
Conector USB 3.0 tipo A
Interfaz de vídeo y audio
Conector hem bra VGA -DB de 15 contactos
Puerto Ethernet
Ethernet RJ-45 (Gigabit Ethernet)
Puerto de bajada
USB 3.0 (conector hembra Type-A)
Corriente
Modo de energía
Alimentado por bus
Función
Mostrar
Reproducción de vídeo: 1080P
Rotación de pantalla: 0°, 90°, 180°, 270°
Ethernet
Transfer Rate:
change, magic packet, or
Supports IEEE 802.1Q VLAN tagging and 2 VLAN ID
Supports Checksum Offload (IPv4, IPv6, TCP, UDP)
and TCP Large Send Offload
Especificaciones fís icas
USB3.0 MULTI ADAPTER Manual del usuario
Physical Specifications
Resolución de la pantalla: 2048 x 1152 @ 32bit
Modo de pantalla: Extendido, Mirror, primario
1000 Mbps (Hal f Duplex) / 1000 Mbps (Full Duplex)
IEEE:
IEEE 802.3az, IEEE 802.3, 802.3u, and 802.3ab, IEEE
802.3x
Modes:
- Supports Wake on LAN function, suspend mode and
remote wakeup via linkMicrosoft wak e up frame
filtering
- Supports Jumbo Frame
-
4
Page 91

Dimensiones
Cuerpo principal:
Longitud del cable: 14.5 cm
Peso
Aproximadamente
Relación de aspecto
Resolución
Profundidad del color
Pantalla ancha
Standard Display
4:3
800 x 600
16,32 bits
USB3.0 MULTI ADAPTER Manual del usuario
Resoluciones y profundidad del color
16:9 2048 x 1152 16,32 bits
16:10 1920 x 1200 16,32 bits
16:9 1920 x 1080 16,32 bits
16:10 1680 x 1050 16,32 bits
16:9 1600 x 900 16,32 bits
16:10 1440 x 900 16,32 bits
43.75(W)x 90.6(H)x18.6(D) mm
58.5 g (including cable)
16:9 1360 x 768 16,32 bits
16:10 1280 x 800 16,32 bits
15:9 1280 x 768 16,32 bits
16:9 1280 x 720 16,32 bits
4:3 1600 x 1200 16,32 bits
4:3 1400 x 1050 16,32 bits
5:4 1280 x 1024 16,32 bits
4:3 1280 x 960 16,32 bits
4:3 1152 x 864 16,32 bits
4:3 1024 x 768 16,32 bits
Contenido del paquete
USB 3.0 Multi-Adapter (JUA370)
CD de controladores con manual electrónico
Guía de instalación rápida
5
Page 92

USB3.0 MULTI ADAPTER Manual del usuario
PRIMEROS PASOS
Notas antes de la instalación
Instale el controlador por completo antes de insertar el cable USB en su ordenador
Ejecute el programa de instalación como administrador para evitar errores durante el
transcurso de la misma
Conecte el Cable VGA de pantalla al puerto VGA de la Newport Station antes de
conectar el cable USB al ordenador
Desinstale el controlador anterior antes de instalar el controlador nuevo
1. Inicie la instalación del controlador del dispositivo (consulte la instalación en el sistema
operativo de su PC en la sección siguiente)
Nota: Instale el controlador por completo antes de seguir estos pasos.
2. Conecte el cable conector USB 3.0 tipo A y luego al portátil anfitrión
3. Conecte el cable VGA del dispositivo de pantalla
4. Conecte el cable Ethernet
5. Los del HUB USB 3.0 están lis tos ahora para ser utilizados
INSTALACIÓ N PARA WINDOWS
Instalación del controlador del dispositivo
Esta sección ilustra una guía sencilla de instalación de los controladores para el sistema
operativo Windows. Cuando su ordenador esté listo inserte el CD de controladores (Driver CD)
en la unidad de CD-ROM. El programa de instalación debería abrirse automáticamente; de lo
6
Page 93

La página de instalación se abrirá. Para
”. Asegúrese de que la
Tras presionar la opción de instalación, el
Lea el acuerdo de licencia, marque
Acepto los términos del acuerdo de
Cuando el Asistente para la instalación
InstallShield Wizard haya finalizado,
“Si, deseo reiniciar el equipo
Tras reiniciar el ordenador, conecte el cable
Instalando el
Windows 8, 7:
con éxito, aparecerá el mensaje siguiente
) en la barra de tareas
La imágenes de los mensajes siguientes
muestran que el software del controlador
USB3.0 MULTI ADAPTER Manual del usuario
contrario, vaya a “Equipo”, haga clic en su unidad óptica y arranque el CD de instalación
manualmente. Haga doble clic en “Setup.exe” para arrancar.
※ Asegúrese de que el cable USB esté desenchufado del PC o portátil antes de ejecutar el
programa de instalación.
iniciar la instalación haga clic en “Instalar el
último controlador
red esté disponible o presione “Instalar
controlador” para iniciar la ins talación
“
licencia” y haga clic en Siguiente >
Asistente InstallShield se abrirá, haga clic en
Siguiente> para continuar
seleccione
ahora.” Haga clic en Finalizar para reiniciar.
USB de la Newport Station a su PC o portátil.
Aparecerá el mensaje “
software del controlador del dispositivo”.
Cuando el controlador haya sido instalado
en el ordenador.
Windows XP :
Verá el icono (
en la esquina inferior derecha.
ha sido instalado con éxito.
Las funciones de Pantalla de la USB3.0 Multi Adapter se activarán tras reiniciar el ordenador.
Puede que vea una pantalla espejo en el dispositivo de pantalla.
7
Page 94

Windows 8, 7:
Puede modificar la posición de cada
pantalla extendida en la configuración
riencia y
Ajustar la
Cuando aparezca la ventana
Resolución de la pantalla, podrá
identificar cada número de monitor
arrastrar el monitor hasta la ubicación
Windows XP:
Puede modificar la posición de cada
en la configuración
Apariencia y
Propiedades de
Cuando aparezca la ventana
de monitor podrá ser identificado
Arrastre el monitor hasta la
ubicación deseada.
USB3.0 MULTI ADAPTER Manual del usuario
de pantalla. Vaya a “INICIO” → “Panel
de control” → “Apa
personalización” → “
resolución de pantalla”
※ o haga clic con el botón derecho
en el escritorio y vaya a “Resolución de
la pantalla”
haciendo clic en “Identificar”. Puede
deseada.
pantalla extendida
de la pantalla. Vaya a “INICIO” →
“Panel de control” → “
personalización” → “
pantalla” → “Configuración"
Propiedades de pantall a, cada número
haciendo clic en
“identificar”
Nota:
Si su tarjeta gráfica interna tiene puertos de pantalla duales…..
Cuando utilice un USB3.0 MULTI ADAPTER
El dispositivo de pantalla que esté conectado al 2o puerto VGA será numerad o como monitor
3o, el dispositivo de pantalla conectado al USB3.0 MULTI ADAPTER será numerado como 2o
monitor.
8
Page 95

Windows 8, 7:
“Adaptador de
Control de sonido, vídeo y
Controladores de Bus Serie
Windows XP:
Administrador de
Haga clic en “Inicio” → Panel de control
Seleccione j5 USB3.0 MULTI ADAPTER...
Aparecerá un mensaje confirmando que
USB3.0 MULTI ADAPTER Manual del usuario
Verificar la instalación del controlador del dispositivo
El procedimiento siguiente sirve para verificar el estado de la instalación del controlador de la
USB3.0 MULTI ADAPTER
Haga clic con el botón derecho en “Mi
PC” “Administrador”
“Administrador de dispositivos” haga
clic en el signo “+” de
red” y “
juegos” y “
Universal”
Haga clic con el botón derecho en “Mi PC”, “Administrador” → “
dispositivos” haga clic en el signo "+” de “Adaptador de pantalla” y “Adaptador de red” y
“Controladores de sonido, vídeo y juegos” y “Controladores de Bus Serie Universal”
Desinstalación del controlador de dispositivo
※ Desenchufe el cable USB de la USB3.0 Multi Adapter antes de desinstalar el controlador
→ Programas y características →
Desinstalar o cambiar un programa
desea desinstalar la aplicación. Haga clic en
‘ok’ para continuar.
9
Page 96

Haga clic en Desinstalar
Cuando el controlador haya sido
desinstalado por completo, seleccione
Sí, deseo reiniciar mi ordenador
USB3.0 MULTI ADAPTER Manual del usuario
“
ahora”. Haga clic en Finalizar para
reiniciar.
INSTALACIÓN PARA MAC
Instalación del controlador del dispositivo
Si instala el controlador del dispositivo, el sistema operativo podrá reconocer la USB3.0 Multi
Adapter. Asegúrese de consultar la instalación apropiada antes de comenzar la instalación.
※ Asegúrese de que el cable USB esté desenchufado de su Mac de sobremesa o Mac
portátil antes de ejecutar el programa de instalación.
Esta sección ilustra el proceso de instalación del controlador para un ordenador con Snow
Leopard.
10
Page 97

Inserte el CD de controladores en la
y ejecute el
cargar los
Para iniciar la instalación haga clic en
de que la red esté disponible opresione
Haga clic en “Continuar” para proceder
Escriba su contraseña y haga clic en “OK”
La instalación está procesándose… Tardará
La instalación se ha completado, haga
Tras finalizar la instalación del controlador Lan,
instalación
USB3.0 MULTI ADAPTER Manual del usuario
unidad de CD-ROM
archivo .dmg para
controladores en la carpeta “mac_install”
“Instalar el último controlador”. Asegúrese
“Instalar LAN” para iniciar la instalación
clic e n “Cerrar”
unos momentos
elija laversión del SO que utiliza y presione
“Instalar controlador” para iniciar la
11
Page 98

Haga clic en “Continuar” para proceder
Escriba su contraseña y haga clic en “OK”
Haga clic en “Continuar instalación”
La instalación está procesándose… Tardará
Haga clic en “Reiniciar” para completar la
USB3.0 MULTI ADAPTER Manual del usuario
unos momentos
instalación del software
12
Page 99

La imagen siguiente mostrará el proceso de
USB3.0 MULTI ADAPTER Manual del usuario
Verificar la instalación del controlador del dispositivo
El procedimiento siguiente le ayudará a verificar el estado de la instalación del controlad or del
USB Display Adap ter
VAYA A , s elecc ione “Acerca
de este Mac” y seleccione “Más
información…”
instalación para un USB3.0 Multi Adapter
Mise en réseau sur Mac
Aller à la , puis “Préférences Système”. Choisissez “Réseau” onglet pour ajuster..
Seleccionar "AX88179 USB 3.0 to Gigabit Ethernet"
13
Page 100

Desenchufe el cable USB de la USB3.0
antes de desinstalar el
Para desinstalar, presione el icono
Haga clic en “Abrir” para continuar
Haga clic en “Desinstalar y reiniciar” para proceder
Escriba la contraseña para permitir la
desinstalación y haga clic en
“Aceptar” para continuar.
6. Reinicie el sistema
USB3.0 MULTI ADAPTER Manual del usuario
Desinstalación del controlador de dispositivo
Multi Adapter
controlador
“Desinstalar controlador”
14
 Loading...