

Page 1

USB 3.0 HDMI Display Adapter
User Manual
Manuel de l'utilisateur
Bedienungsanleitung
Manual del usuario
Kullanma Kılavuzu
JUA350
ユーザー マニュア
使用手冊
JUA350
Page 2

USB 3.0 HDMI Display Adapter
User Manual
JUA350 Manual
Page 3

Table of Contents
INTRODUCTION ........................................................................................................................... 3
GETTING STARTED –Notes for Before Installation ................................................................... 7
INSTALLATION FOR WINDOWS 8,7 .................................................................................... 7
INSTALLATION FOR WINDOWS XP ................................................................................... 17
INSTALLATION FOR MAC .................................................................................................. 26
FUNCTIONS INSTRUCTIONS: WINDOWS 8, 7 .................................................................. 34
FUNCTIONS INSTRUCTIONS: WINDOWS XP .................................................................... 40
FUNCTIONS INSTRUTIONS: MAC ...................................................................................... 46
TROUBLE SHOOTING ................................................................................................................. 50
TECHNICAL SUPPORT ............................................................................................................... 52
REGULATORY COMPLIANCE................................................................................................... 53
WARRANTY OF j5create .......................................................................................................... 54
2
Page 4

USB DISPLAY ADAPTER USER MANUAL
INTRODUCTION
Thank you for purchasing the j5 create(JUA350) USB 3.0 HDMI Display Adapter! This
USB to HDMI adapter acts as an external video card for your MAC or Windows
compatible PC or Laptop. It allows you to add an additional HDMI monitor/display
through any available USB port. There is no need to open up the computer to add an
expensive video card. With the (JUA350) you simply load the drivers, plug in the
adapter to the USB port, then plug in the HDMI monitor cable into the adapter and
you are ready.
The j5 create JUA350 supports three viewing modes and HDMI audio. Primary and
Extended mode allow you to have individual applications open on each monitor
vastly improving productivity and extend your desktop across multiple displays, which
is great for spreadsheets. Mirroring mode is used to clone one screen onto another,
which is ideal for presentations. In addition you can “Plug & Play” between your
computer and a 2nd monitor or projector, to create new visual environments in
seconds.
j5 create has developed this compact design for the sophisticated user who cares
about function as well as elegance.
Functions
Easily add an additional display instantly through the USB3.0 and HDMI
connection.
Video playback performs at 1080P HD with a resolution of up to 2048 x 1152.
Add an additional monitor without adding an expensive, internal video card,
avoiding complicated installation
Hot swappable USB enables you to add or remove monitors without
rebooting your system
Move and view your large spreadsheets across two screens without
overlapping windows
Multitask with larger landscape/desktop space
Ideal for viewing multiple windows at the same time
Great for multitasking in a wide variety of applications including: Phone
centers, Stock Markets, Hospitals, Graphic Design, Editing, Accounting, Etc.
A must have for surfing the web and working on your email/facebook/twitter
accounts all at the same time.
Highlighted Features
Supports display resolution:2048 x 1152 @ 32bit
Super Speed USB 3.0 up to 5 Gbit/s
Supports 1080P Video Playback
Plug-and-Play USB connectivity
Allows for up to 4 adapters in Windows
Allows for up to 2 adapters in Macs
3
Page 5

USB DISPLAY ADAPTER USER MANUAL
Supports Display Modes: Primary, Extended, Mirror
Display Rotation: 0°, 90°, 180°, 270°
Audio imbedded 8kHz~48kHz
Aluminum enclosure that is non-toxic and recyclable
Easy driver install
Usage
Editor:
• Efficient editing of documentation on one screen and researching
reference materials on the other
Presentation:
• Use mirror mode while your laptop is plugged into a projector through the
USB 3.0 Display Adapter
• Use Primary mode to have two monitors and projector for creative displays
Office:
• Dual display scenario: view large spreadsheets across 2 screens with display
continuity. (For example: Excel document)
• Independent: using desk space and doing multi-job at the same time-
increase efficiency.
• Read and reply to email on one screen and open
attachments on the other
Graphics Workstation:
• Design and check reference material at the same time.
• More space for tablets and photo/video editing
Entertainment:
• Watch TV/Movie while searching the program preview
• Play games online on one screen with the strategy guide on the other
screen
Stock Market Trading:
• Monitor multiple stock markets and market news simultaneously
Coding/Programming:
• Allows effective code programming on one screen and software program
companion on the other screen.
4
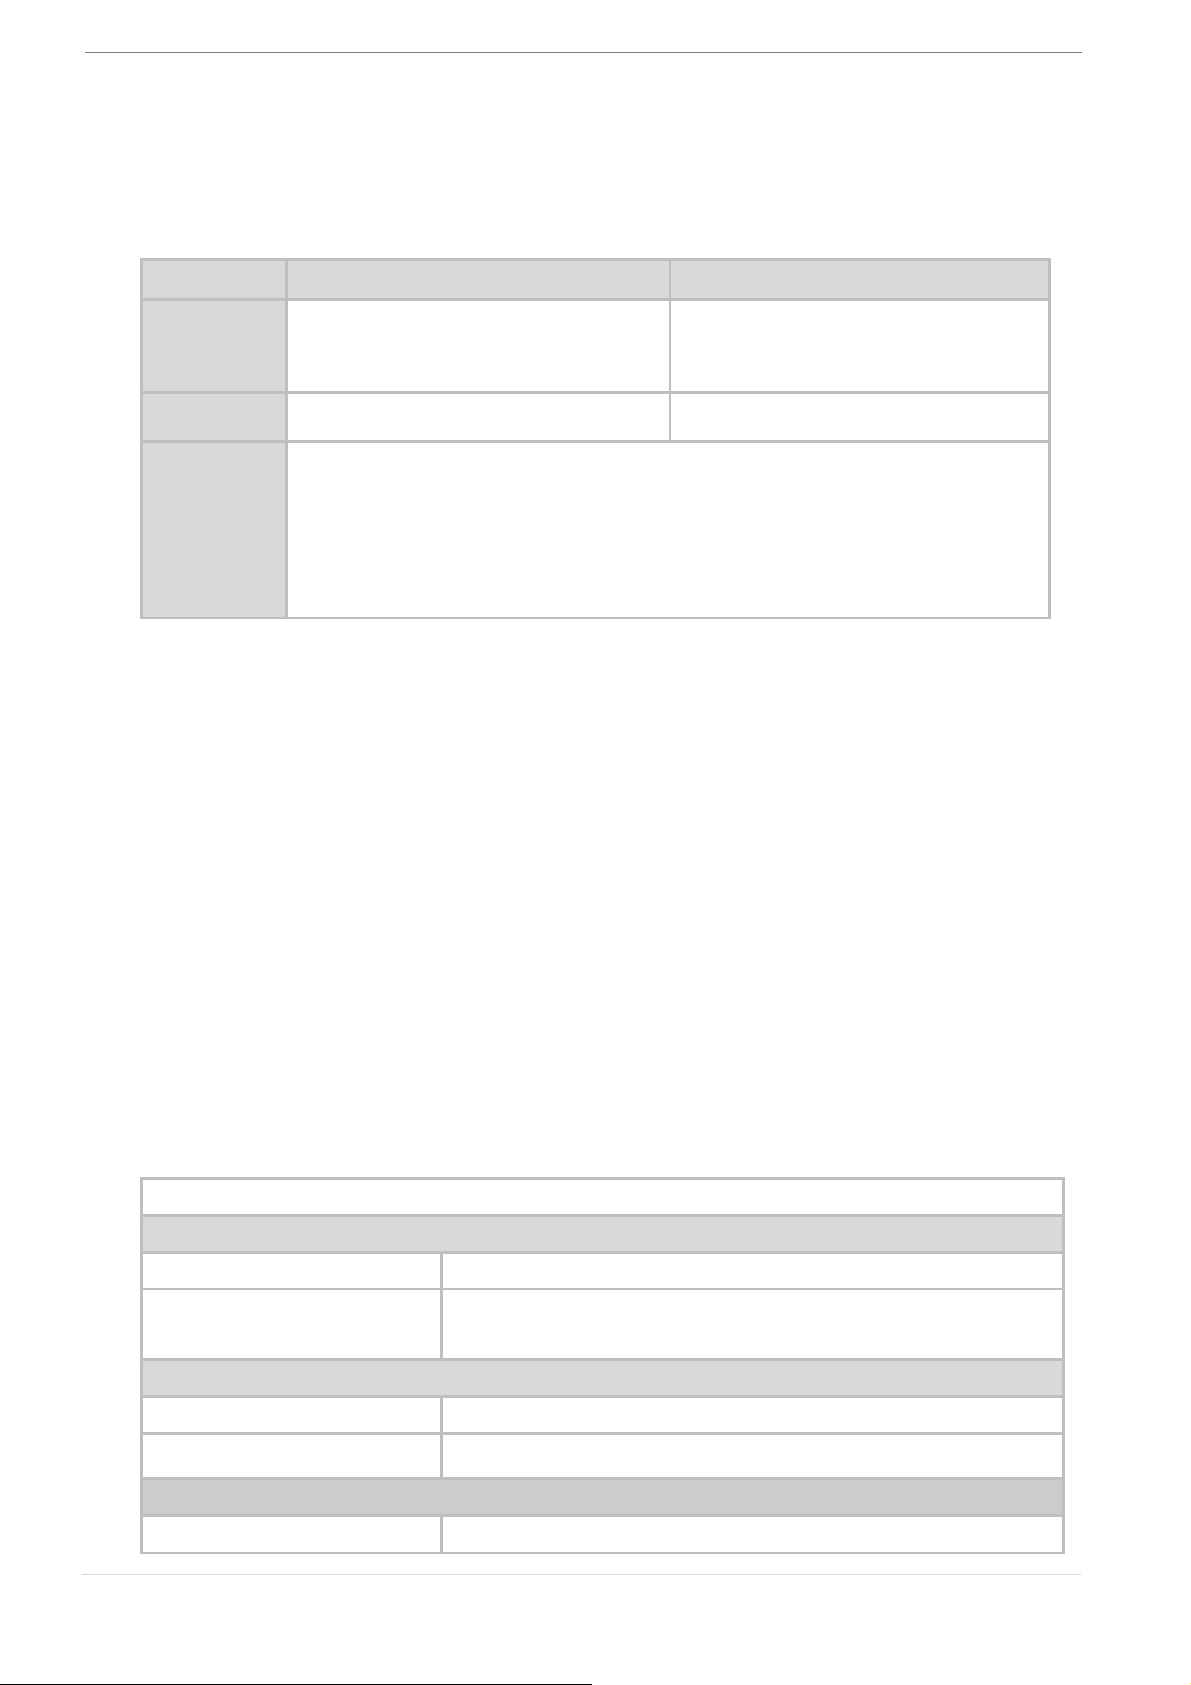
Page 6

QTY
1~2 Dongle
3~4 Dongles
CPU
Intel 2 Quad 2.33 GHz or
above
Intel i5 3.10 GHz or above
RAM
2 GB or Higher
4 GB or Higher
Full HD
Video
Playing Video on the extended monitor
CPU: Intel Core i5 processor with 3.1 GHz or Higher
RAM: 4 GB memory or higher
※ Higher Processor recommended for Multi-Displays and optimal
performance.
Model: JUA 350
Interface
Host Interface
USB 3.0 Female Type-A Connector
Video & Audio
Interface Interface
HDMI Female Connector
Power
Power Mode
Bus-powered or Self- Powered
Power Consumption
≦500mA
Physical Specification
Housing Material
Aluminum
USB DISPLAY ADAPTER USER MANUAL
Required Environments
Microsoft Windows 8, 7, XP (32-bit or 64-bit) Compatible
Mac OS X Mt. Lion/ Lion /Snow Leopard Compatible
Available USB port ( USB 3.0 recommended)
Minimum System Requirements
Note:
USB HUB is not recommended for USB 3.0 display adapter
Note for Video Player:
*Windows 8 & 7 user: “Windows Media Player” is recommended for video playback
*Windows XP user & MAC user: Windows XP & MAC products are not supported
by USB 3.0 at this time, therefore we suggest USB 2.0 for ‘office application’ only;
Video Playback is not recommend due to USB 2.0 bandwidth limitations causing
limited video performance.
Note:
To ensure that your device is equipped with the most current driver, please visit
our website at www.j5create.com and install the latest driver for this model.
Physical Specifications
5
Page 7

Dimensions
Main body: 41(W)x 72(H)x14(D) mm
Cable length: 200 mm
Weight
Approximately 53 g
Aspect Ratio
Resolution
Color Depth
Wide Screen Display
16:9
2048 x 1152
16,32 bits
16:10
1920 x 1200
16,32 bits
16:9
1920 x 1080
16,32 bits
16:10
1680 x 1050
16,32 bits
16:9
1600 x 900
16,32 bits
16:10
1440 x 900
16,32 bits
16:9
1360 x 768
16,32 bits
16:10
1280 x 800
16,32 bits
15:9
1280 x 768
16,32 bits
16:9
1280 x 720
16,32 bits
Standard Display
4:3
1600 x 1200
16,32 bits
4:3
1400 x 1050
16,32 bits
5:4
1280 x 1024
16,32 bits
4:3
1280 x 960
16,32 bits
4:3
1152 x 864
16,32 bits
4:3
1024 x 768
16,32 bits
4:3
800 x 600
16,32 bits
USB DISPLAY ADAPTER USER MANUAL
Resolutions and Color Depth
Package Contents
USB 3.0 Display Adapter(JUA350)
HDMI to DVI Convertor
Quick Installation Guide
Driver CD with E-Manual
6
Page 8

USB DISPLAY ADAPTER USER MANUAL
GETTING STARTED –Notes for Before Installation
Install driver completely before inserting the USB 3.0 Display Adapter USB
Cable into your computer
Run the setup program as an administrator to avoid errors in installation
Uninstall the previous driver first before updating the latest driver
Connect the HDMI connector or the HDMI to DVI convertor of the USB 3.0
HDMI Display Adapter to the HDMI or DVI cable of the display device. Then
connect the device to the USB port of the computer
It is recommended to use an independent power supply for USB Hub while
multiple dongles are connected to the USB Hub
The display screen will flash during installation
INSTALLATION FOR WINDOWS 8,7
Device Driver Installation
This section illustrates the procedure for device driver installation for Windows 7. To
start, insert the Driver CD into your computer’s CD-ROM drive. The setup program
should be launched automatically. If Autorun does not begin, go to “Computer”, Click
on your optical drive, and manually run the setup CD by double-clicking on
“Setup.exe”
※Please make sure the USB cable of USB 3.0 Display Adapter is unplugged from your
PC or Notebook before executing the installation program.
1. The installation page will be launched. To start click on “ Install the Latest Driver”.
Please make sure the network is available or press “Install Driver” to start the
installation
7
Page 9

USB DISPLAY ADAPTER USER MANUAL
2. After pressing the installation option, the InstallShield Wizard will launch, click
Next> to continue
3. Read the license agreement and check “I accept the terms of the license
agreement.” Click Next > to accept it and continue.
8
Page 10

USB DISPLAY ADAPTER USER MANUAL
4. Driver installation proceeding…..
5. When Install Shield Wizard is complete, select “Yes, I want to restart my computer
now.” Click Finish to restart.
9
Page 11

USB DISPLAY ADAPTER USER MANUAL
6. After rebooting connect the external display device (monitor/ projector) to the
HDMI connector or the DVI connector of USB Display Adapter and turn on the
display device.
7. Connect the USB 3.0 Display Adapter into an available USB port of a PC or
Notebook, After Inserting the USB 3.0 Display Adapter into an USB port, the
“Installing device driver software” message will pop up.
If the Driver software was installed successfully the following message should
appear:
If you’re not going to install another USB 3.0 Display Adapter, restart your PC. The
functions of the USB 3.0 Display Adapter will be activated after the computer restarted.
Multi USB 3.0 Display Adapter Installation
For installation of multiple USB 3.0 Display Adapters, during the “Install Shield Wizard
complete” step, select “No, I will restart my computer later.” and click Finish to
continue next step below
10
Page 12

USB DISPLAY ADAPTER USER MANUAL
A. Connect all external display devices (monitor/ projector) to the HDMI /DVI
connector of USB 3.0 Display Adapters and switch power on.
B. Connect the USB 3.0 Display Adapter into an available USB port of a PC or
Notebook.
After Inserting an USB 3.0 Display Adapter into a USB port, the systems will
automatically start the installation procedure and the prompt message will pop-up
on the task bar.
The Device driver software was installed properly,
if you are going to install more USB 3.0 Display Adapters, repeat step A& B or restart
computer.
The functions of the USB 3.0 Display Adapter will be activated after the computer
restarted. You might see the extend display shown on the display device.
You can modify the corresponding position of each extend display via display settings.
Go to “START” → “Control Panel” → “Appearance and Personalization” → “Adjust
screen resolution”
※ Right-click on the desktop and go to “Screen Resolution”
11
Page 13

USB DISPLAY ADAPTER USER MANUAL
When the ‘Screen Resolution’ window appears, each monitor’s number can be
identified by clicking “Identify.” Drag the monitor to the location you want.
Setup The Sound
Microsoft’s audio system restricts the audio function to one output at a time; therefore,
when using the USB HDMI multi-display adapter only one output will receive audio.
The following explains how to set-up and change the default sound output from the
display device connected with the USB 3.0 HDMI Display Adapter.
1. Go to “Control Panel> Hardware and Sound” and select “Changes system sounds”
12
Page 14

Single USB 3.0 HDMI Display Adapter
Multi-USB 3.0 HDMI Display Adapter
USB DISPLAY ADAPTER USER MANUAL
2. The speaker options , for single and Multi- USB 3.0 HDMI Display Adapters, are
shown below.
Note:
1. The speakers are numbered according to the number if USB ports detected by
your computer system.
2. The Default sound will output from the USB 3.0 HDMI Display Adapter with the
greatest number of USB ports.
3. To change the default sound output, use your mouse to right click in the sound
options box on your desktop, then select “Test” to choose which speaker you
want to use as your default.
13
Page 15

USB DISPLAY ADAPTER USER MANUAL
4. Select the Speaker you want and then click “Set Default”
Verify Device Driver Installation
The following procedure helps you to verify the driver installation status of the USB 3.0
Display Adapter.
Right-click “My Computer” “Manager” “Device Manager” click “+” sign of
“Sound, video and game controllers” & “Universal Serial Bus controllers”
The picture below shows the installation process for a Single USB 3.0 Display Adapter
14
Page 16

USB DISPLAY ADAPTER USER MANUAL
The picture below shows the installation process for a Multiple USB 3.0 Display Adapter
Device Driver Un-installation
※ Unplug the USB 3.0 Display Adapter before un-installing the driver.
1. Click “Start”→ Control Panel → Programs and Feature→ Uninstall or Change a
Program Select j5 HDMI DISPLAY ADAPTER ... Click Uninstall
2. A message will appear asking if you want to remove the selected application.
Click ‘ok’ to continue.
15
Page 17

USB DISPLAY ADAPTER USER MANUAL
3. Driver un-installation proceeding….
4. When the driver uninstall is completed select “Yes, I want to restart my computer
now.” Click Finish to restart.
16
Page 18

USB DISPLAY ADAPTER USER MANUAL
INSTALLATION FOR WINDOWS XP
Device Driver Installation
This section illustrates the procedure for device driver installation for Windows XP. To
start, insert the Driver CD into your computer’s CD-ROM drive. The setup program
should be launched automatically. If Autorun does not begin, go to “Computer”, Click
on your optical drive, and manually run the setup CD by double-clicking on
“Setup.exe”
※Please make sure the USB 3.0 Display Adapter USB cable is unplugged from your PC
or Notebook before executing the installation program.
1. The installation page will be launched. To begin installation click on “ Install the
Latest Driver” , please make sure the network is available or press “Install Driver” to
start the installation
2. After pressing the installation option, the InstallShield Wizard will launch, click
Next> to continue
17
Page 19

USB DISPLAY ADAPTER USER MANUAL
3. Read the license agreement and check “I accept the terms of the license
agreement.” Click Next > to accept it and continue.
4. Driver installation proceeding…..
5. When Install Shield Wizard is complete, select “Yes, I want to restart my computer
now.” Click Finish to restart.
18
Page 20

USB DISPLAY ADAPTER USER MANUAL
6. After your computer is rebooted, connect the external display device (monitor/
projector) to the HDMI/DVI connector of USB 3.0 Display Adapters and turn it on.
7. Connect the USB 3.0 Display Adapter into an available USB port of a PC or
Notebook, After Inserting the USB 3.0 Display Adapter into an USB port, the
“Installing device driver software” message will pop up.
An icon ( ) will be seen on the lower right toolbar.
The message pictures below shows Driver software is installed successfully.
If you’re not going to install another USB 3.0 Display Adapter, restart your PC. The
functions of the USB 3.0 Display Adapter will be activated after the computer restarted.
Multi-USB 3.0 Display Adapter Installation
For installation of multiple USB 3.0 Display Adapters, during the “Install Shield Wizard
complete” step, select “No, I will restart my computer later.” and click Finish to
continue next step below
19
Page 21

When Display Properties windows
appears, each monitor’s number can
be identified by clicking “
“ identify”
Drag the monitor to the location you
want.
USB DISPLAY ADAPTER USER MANUAL
A. Connect all external display devices (monitor/ projector) to the HDMI/DVI
connector of USB 3.0 Display Adapters and switch power on.
B. Connect the USB 3.0 Display Adapter into available USB port of PC or
Notebook.
After Inserting an USB 3.0 Display Adapter into a USB port, the systems will
automatically start the installation procedure and the prompt message will popup on the task bar.
The Device driver software was installed properly, if you are going to install more USB
3.0 Display Adapters, repeat step A & B or restart computer
The functions of the USB 3.0 Display Adapter will be activated after the computer
restarted. You might see the mirror display shown on the display device.
You can modify the corresponding position of each extend display via display settings.
Go to “START” → “Control Panel” → “Appearance and Personalization” → “Display
Properties” →“Settings”
20
Page 22

USB DISPLAY ADAPTER USER MANUAL
Note:
If your internal graphics card is Dual Display Ports…..
1. When using one USB 3.0 Display Adapter
The display device which connected to the 2nd HDMI port will be numbered 3rd
monitor, the display device which connected to the USB 3.0 Display Adapter will be
numbered 2nd monitor.
2. When using two USB 3.0 Display Adapter
The display device which a port to the 2nd HDMI port will be numbered 4th monitor,
the display device which connected to the USB 3.0 Display Adapter will be
numbered 2nd and 3rd monitor and so on…
Setup The Sound
Microsoft’s audio system restricts the audio function to one output at a time; therefore,
when using the USB HDMI multi-display adapter only one output will receive audio.
The following explains how to set-up and change the default sound output from the
display device connected with the USB 3.0 HDMI Display Adapter.
1. Go to “Control Panel> Sounds, Speech, and Audio Devices” and select “Changes
the speaker settings”.
21
Page 23

Single USB 3.0 HDMI Display Adapter
Multi-USB 3.0 HDMI Display Adapters
USB DISPLAY ADAPTER USER MANUAL
2. The speaker options, for single and Multi- USB 3.0 HDMI Display Adapters, are
shown below.
Note:
1. The speakers are numbered according to the number if USB ports detected by
your computer system.
2. The Default sound will output from the USB 3.0 HDMI Display Adapter with the
greatest number of USB ports.
3. Select “the Default device” you want, and click “apply”. then click “ Volume” to
choose which speaker you want to use as your default.
22
Page 24

USB DISPLAY ADAPTER USER MANUAL
Verify Device Driver Installation
The following procedure helps you to verify the driver installation status of USB 3.0
Display Adapter
Right-click “My Computer” “Manager” “Device Manager” click “+” sign of
“Display Adapter” & “Sound ,video, and game controller” “Universal Serial Bus
controllers”
The picture below shows the installation process for a Single USB 3.0 Display Adapter
23
Page 25

USB DISPLAY ADAPTER USER MANUAL
The picture below shows the installation process for a Multiple USB 3.0 Display Adapter
24
Page 26

USB DISPLAY ADAPTER USER MANUAL
Device Driver Un-installation
※Unplug the USB 3.0 Display Adapter before un-installing the driver
1. Click “Start”→ Control Panel → Programs and Feature→ Uninstall or change a
program Select j5 DISPLAY ADAPTER... Click Uninstall
2. Confirm windows will pop out, Click to continue.
3. Driver un-installation proceeding….
25
Page 27

USB DISPLAY ADAPTER USER MANUAL
4. When the driver uninstall is completed select “Yes, I want to restart my computer
now.” Click Finish to restart.
INSTALLATION FOR MAC
Device Driver Installation
Installing the device driver enables your computer’s operating system to recognize the
USB 3.0 Display Adapter. Be sure that you are referring to the appropriate installation
procedure before you begin installing.
※ Make sure the USB cable of USB 3.0 Display Adapter is unplugged from your Mac
Desktop or Mac Notebook before executing the setup program.
1. Insert the Driver CD into the CD-ROM drive
2. The installation page will be launched; To begin installation click on start “ Get Last
Driver online” , please make sure the networking is available or Choose the OS
version you are using and press “Install Driver” to start the installation
26
Page 28

USB DISPLAY ADAPTER USER MANUAL
3. Click “Continue” to proceed
4. Click “Continue” to proceed
5. Type in your password and click “OK”
6. Click “Continue Installation”
27
Page 29

USB DISPLAY ADAPTER USER MANUAL
7. Installation is processing…This will take a few moments
8. Click “Restart” to complete the software installation
9. Connect the external display device (monitor/projector) to the HDMI/DVI
connector of USB 3.0 Display Adapter and turn on the display device
28
Page 30

USB DISPLAY ADAPTER USER MANUAL
10. Plug the USB 3.0 Display Adapter into the USB port of your Mac Desktop or Mac
Notebook. The screen will turn on automatically, and be in “Mirror Mode”
To change your screen preferences choose the “System Preference”->“Displays”->
“Arrangement” tab to set up the monitor position.
* please refer to the section : Function Instructions: Mac
Setup The Sound
Mac audio system restricts the audio function to one output at a time; therefore, when
using the USB HDMI multi-display adapter only one output will receive audio.
1. GO , and then “System Preferences”
2. Go to the “System Preferences” and select “Sound”
29
Page 31

• Single USB 3.0 HDMI Display Adapter
• Multi-USB 3.0 HDMI Display Adapter
USB DISPLAY ADAPTER USER MANUAL
3. The speaker“Output” options , for single and Multi- USB 3.0 HDMI Display Adapters,
are shown below. You can select a device for sound output by clicking it.
Verify Device Driver Installation
The following procedure helps you to verify the driver installation status of USB 3.0
Display Adapter
1. GO , select “About This Mac” and select “ More Info…”
30
Page 32

USB DISPLAY ADAPTER USER MANUAL
The picture below shows the installation process for a Single USB 3.0 Display Adapter
The picture below shows the installation process for Multiple USB 3.0 Display Adapter
31
Page 33

USB DISPLAY ADAPTER USER MANUAL
Device Driver Un-installation
1. Unplug the USB 3.0 Display Adapter from the USB port
2. To un-installation , please press the “Uninstall Driver” icon
3. Click “Open” to proceed
4. Click “Uninstall and restart” to proceed
32
Page 34

USB DISPLAY ADAPTER USER MANUAL
5. Type in your password to allow un-installation and click “OK” to
proceed
6. Restart your system
33
Page 35

USB DISPLAY ADAPTER USER MANUAL
FUNCTIONS INSTRUCTIONS: WINDOWS 8, 7
This section describes the many functions provided by the USB 3.0 Display Adapter.
‘Display device’ here means any number of things such as CRT,LCD monitor, TV
display, or projector.
Display ID
Smart Display Device ID Detection
Window 7 OS supports VESA defined DDC/EDID. It will be shown as the Display device
ID whenever it is attached to the USB 3.0 Display Adapter.
Display Resolution
Fast Access to Display Resolution setting
The resolution list will show when moving the cursor on Display Resolution. Select the
resolution you want for the USB 3.0 Display Adapter.
Default resolution: 1024 x 768 x 32 bit
34
Page 36

USB DISPLAY ADAPTER USER MANUAL
Display Orientation
The Orientation allows you to turn the display device, which is connected to USB 3.0
Display Adapter
Display Mode
Extended mode (Default)
This feature allows the display device attached to the USB 3.0 Display Adapter to work
as an “extended” display of the on-board screen.
You can adjust the position by clicking “number” of the display first and select “Extend
these displays” and click “Apply”
35
Page 37

USB DISPLAY ADAPTER USER MANUAL
Mirror mode-Duplicate
This feature allows the same contents of the on-board screen to be displayed to the
screen of the USB 3.0 Display Adapter
You can select “Duplicate these displays” and click “Apply”
Note:
The resolution for the secondary and primary displays must be the same when using
Mirror Mode (This may be lower than the preferred resolution for the display). Only 2
displays can be mirrored at the same time. Windows 7 OS may have other limitations.
36
Page 38

USB DISPLAY ADAPTER USER MANUAL
Primary mode
When you want to switch the enabled monitor as main display and extend view to onboard screen.
Please choose the “Number” of the main display you want it to be and check on
“Make this my main display”.
Off mode
To turn one of the displays off:
Select “Show desktop only on 1” and the 2nd display will be off
Select “Show desktop only on 2” and the 1st display will be off
37
Page 39

USB DISPLAY ADAPTER USER MANUAL
Super Utility
A super utility provides more options, you can find the icon on the lower right task bar
Identify Monitors
When “Identify Monitors” is selected, a serial number will be shown at the upper right
corner of the display devices. You can see the serial number of each display when
using the Hotkey function.
Multi-Display Control Panel
This unique feature provides a simpler working experience for the multi-display
environments. A series of Hotkey setting helps move quickly between desired display
devices.
38
Page 40

USB DISPLAY ADAPTER USER MANUAL
※Using Hotkeys
Default setting is Ctrl + Display No.
Click the window you want to move at the task bar to become active, and then
press Hotkey
.
※Setting Hotkeys
For example: Move window to Display03, and automatically enlarge it to full screen.
Choose “Move Active Window to Display03”, check “Move Window and Full
screen”, and click Apply
Display Setting
Fast access to the system “Display Setting”
Fix Position
This function helps you arrange the positions of all the display locations you have set in
Display > Screen Resolution. After “Display Location Setting”, make a “Check”
in this function. All display location will be fixed. It is great for
multi-displayer user.
39
Page 41

USB DISPLAY ADAPTER USER MANUAL
FUNCTIONS INSTRUCTIONS: WINDOWS XP
You can choose all the functions simply and directly only by clicking on this icon ( )
seen on the lower right toolbar.
Display ID
Smart Display Device ID Detection
The USB 3.0 Display Adapter supports VESA defined DDC/EDID. The utility should show
the display device ID whenever it is attached to the USB 3.0 Display Adapter.
If there is no display device attached to the USB 3.0 Display Adapter the ID will show
up as “Unknown Monitor.” If the attached display device does not support EDID, the
ID will also be defined as “Unknown Monitor”.
40
Page 42

The resolution list will show up when you
move the cursor over Display
Resolution. Select the resolution you
want.
The Display Rotation allows you to turn the
display device, which is connected to USB
3.0 Display Adapter. It is a useful function
for some rotatable display device.
There are 4 options
available:
0 degree/ 90 degrees/180 degrees/ 270
degrees under the Extended or Primary
display mode.
USB DISPLAY ADAPTER USER MANUAL
Display Resolution
Default Resolution: 1024 x 768x 32 bit
Display Rotation
41
Page 43

A default display mode allows the
attached USB 3.0 Display Adapter
enabled display device to work as
“Extended” display of the on-board
screen. This extended working space
feature improves work efficiency.
When Mirror selected, the screen of
display device, which is connected to
USB 3.0 Display Adapter, will be the
same as the main display, and Display
Rotation will be disabled automatically.
You can select either “Horizontal Flip”,
or “Vertical Flip”.
USB DISPLAY ADAPTER USER MANUAL
Display Mode
Extended (Default Mode)
Mirror Mode
42
Page 44

When Primary is selected, the display
device, which is connected to USB 3.0
Display Adapter, will become the main
display, the display of the internal
graphics card will automatically switch
to be the extended display and act as
an extension desktop.
When Off selected, it will disable the
display of the USB 3.0 Display Adapter.
USB DISPLAY ADAPTER USER MANUAL
Primary Mode
Off
43
Page 45

When Identify Monitors is selected, a
serial number will be shown at the
upper right corner of attached display
device.
You can use the Hotkey function to find
out the serial number of each display.
When Multi-Display Control Panel is
selected, the Multi-Display Control Panel
window will pop-up to enable the
modification of the Hotkeys.
USB DISPLAY ADAPTER USER MANUAL
Identify Monitor
Multi-Display Control Panel
44
Page 46

※ Using Hotkey
Default setting is Ctrl + Display No.
Click the window you want to move on task bar to become active, and then
press Hotkey.
※ Setting Hotkey
For example: Move window to Display03, and automatically enlarge it to full
screen.
Choose “Move Active Window to Display03”, check “Move Window and Full
screen”, and click Apply to make it active.
USB DISPLAY ADAPTER USER MANUAL
Display Setting
Fast access to the system “Display Setting”
45
Page 47

USB DISPLAY ADAPTER USER MANUAL
FUNCTIONS INSTRUTIONS: MAC
Display Resolution
Go to , and then “System Preferences
From “System Preferences” click on the “Display” tab. You should see this screen.
On this screen, you can adjust the resolution, display mode and color range.
Display Mode
Click on the “Arrangement” tab, and uncheck “mirror display” to un-Mirror the screen.
You will automatically see another window appear on the screen that represents the
USB 3.0 Display Adapter.
46
Page 48

USB DISPLAY ADAPTER USER MANUAL
You can move the menu bar to any display to assign any display to Primary.
If you cannot see the Display window to adjust your secondary monitor resolution,
click on the “Gather Windows” button.
TIP: To simplify using the USB 3.0 Display Adapter,
click “show display in menu bar.” You will see the
display icon that you can double-click on at
any time.
Windows Arrangement
You can arrange Windows on display by “Expose & Spaces”
Go to , and then “System Preferences”
From System Preferences click on “Exposé & Spaces.” You should see this screen.
47
Page 49

USB DISPLAY ADAPTER USER MANUAL
Space
Click “Show Spaces in menu bar.” You should see the space number on the menu
bar that you can choose any space on the list at any time.
F8: you will see the Space Layout with a single keystroke. You can draw any window to
other space.
48
Page 50

USB DISPLAY ADAPTER USER MANUAL
Exposé
View different windows with a single keystroke.
F9 : view all open windows
F10: view windows of the current application
only
F11: show desktop
*For more windows arrangement functions, please see Apple’s computer user manual.
49
Page 51

USB DISPLAY ADAPTER USER MANUAL
TROUBLE SHOOTING
If you have any questions about using this device, follow the instructions below. If any
further assistance is needed, please visit our website or call j5 create support hotline.
Known Issues
- The print screen function in the extend display currently is not supported under
MAC OS. 10.6.
General Recommendations
- Incompatibilities exist when using other Video over USB Devices on a single
system. Please ensure that all other Video over USB drivers are uninstalled before
continuing with j5 create installation.
- Check to make sure that the device is plugged in correctly to the host system.
- Make sure that the USB port that you are using is USB Display Adapter.
- Unplug the USB cable of USB Display device and re-insert it.
- Check to see that the monitor is connected correctly and is powered ON.
- Make sure to restart your computer after the driver installation.
- Try a different USB port and/or computer.
- Unplug all other USB devices from the system.
- Try connecting the USB cable of USB Display device directly to the computer
instead of through a hub.
- Reset/refresh/resynchronize your monitor.
Media Playback
- During video playback on all platforms, please do not change the display mode,
position or arrangement of the video player window (such as dragging the video
player window between the main display and attached display). This may cause
the video player to stop playing. We suggest stopping the video playback,
moving the window to the USB graphics device attached display and then
selecting the video clip to start playing.
- Cursor movement is slower when the mouse hovers on the video region of the
Flash player,
- Downsizing your screen landscape lower than 50 % will help smooth out Jerky
video playback for videos running in Full Screen Mode,.
- You may experience poor video performance on USB graphics devices with low
spec PC systems.
- Video rendering using hardware overlays is supported.
- Some DVD playback software packages do not support playing on a second
display adapter of any kind. You may try to open the media player in the
secondary display first before you start playing the DVD.
- Your PC may lack certain media codec to support the playback of certain
video formats. Please use the link below to install license free media codec.
K- Lite: http://www.free-codecs.com/download/K_Lite_Codec_Pack.htm
50
Page 52

USB DISPLAY ADAPTER USER MANUAL
- Video/Media players have different decoding capabilities under different
display modes. For better performance watching DVDs or certain video formats
on the attached USB graphics display attached, it is recommended to use the
following license free software:
Media Player Classic: http://sourceforge.net/projects/guliverkli/
Others
- Some graphics card, i.e. Intel, prevents other secondary graphics chipset from
being set as the primary card. As the result of this, primary mode might not work
or the display maybe disabled.
- If you have problems during the boot up process, start your computer in Safe
Mode and uninstall the driver. Hold the CTRL key until the Windows startup menu
appears and select Safe Mode.
- To verify the driver version that you installed, please click “Control Panel” → “Add
or Remove Programs” to check the program: USB Display Device (j5create)
9.xx.xxxx.0159 (the number means the driver version).
- Some limitation exists in different media player on file format support. We enclose
our compliance test result in the tables according to different operating system,
main system graphics card/chipset, media players, and the supported media
format. It will be updated periodically with new version of media players or our
latest driver.
51
Page 53

USB DISPLAY ADAPTER USER MANUAL
TECHNICAL SUPPORT
If you have any issue using this product please follow instruction below before
returning this product to the store.
1. The User Manual
It contains the detail instruction and troubleshooting section. Many common
issues can be easily resolved by reading the user manual.
2. Online Support
Please visit the j5 create website (www.j5create.com) to find the latest software
for your device. If you are still experiencing the same issue, you can submit a
description of your problem via email service@j5create.com . Our j5 create
technical service support team will reply to you within the next 24 business hours.
3. Telephone Support
Please feel free to call us at +1 888-689-4088 and one of our support technicians
will be happy to assist you
Customer Service:
Toll free number:+1 888-988-0488
Technical Support:
Toll free number: +1 888-689-4088
Email: service@j5create.com
Please contact Technical Support during business hours. 10:00AM-6:00PM E.S.T
Monday- Friday for further assistance.
52
Page 54

USB DISPLAY ADAPTER USER MANUAL
REGULATORY COMPLIANCE
FCC
This equipment has been tested and found to comply with FCC Part 15 Subpart B § 15.109/15.107 Class
B.
Operation is subject to the following two conditions:
• This device may not cause harmful interference
• This device must accept any interference, including interference that may cause undesired operation
of the device.
CE
This equipment is in compliance with the requirements of the following regulations:
EN 55022 Class B (2006),
EN 55024 (1998+A1:2001+ A2:2003), (IEC/EN 61000-4-2 (1995+A1:1998+A2:2001)/-3(2006)
C-Tick
This equipment is in compliance with the requirements of the following regulations:
EN 55022 (2006) Class B, AS/NZS CISPR22 © IEC: 2005.
VCCI
This equipment is in compliance with the requirements of the following regulations:
CISPR22 © IEC: 2005
Disclaimer
Information in this document is subject to change without notice. The manufacturer does not make any
representations or warranties (implied or otherwise) regarding the accuracy and completeness of this
document and shall in no event be liable for any loss of profit or any commercial damage, including
but not limited to special, incidental, consequential, or other damage. No part of this document may
be reproduced or transmitted in any form by any means, electronic or mechanical, including
photocopying, recording or information recording and retrieval systems without the expressed written
permission of the manufacturer.
53
Page 55

USB DISPLAY ADAPTER USER MANUAL
WARRANTY OF j5create
j5create offers a limited 2-year warranty. User’s wear & tear damage is not included.
The user shall call or email j5create customer service with defect information of the
product and obtain a return authorization number.
Users are responsible for one way return freight cost and we will take care of one way
freight back.
In order to obtain a return authorization, user should have the following information
handy when calling or emailing the service team:
(i) a copy of original purchase invoice to verify your warranty
(ii) a product serial number
(iii) a description of the problem
(iv) a return Material authorization number
(v) customer’s Name, address, and telephone number
j5create does not warrant that the operation of the product will be uninterrupted or
error-free. j5create is not responsible for damage arising from failure to follow
instructions relating to the product’s use. This warranty does not apply to:(a)
consumable parts, unless damage has occurred due to a defect in materials or
workmanship; (b) cosmetic damage, including but not limited to scratches,
dents ,and
broken plastic on ports; (c) damage caused by use with non-j5create products; (d)
damage cause by natural disasters ( flood, fire, earthquake, lighting strike, typhoon
etc.,)(e) damage caused by human misuse( lost, accident, abuse, misuse or other
external causes) (f) damage caused by operating the product outside the permitted
or intended uses described by j5create ; (g) damage caused by service (including
upgrades and expansions) performed by anyone who is not a representative of
j5create or a j5create Authorized Service Provider; (h) a product or part that has been
modified to alter functionality or capability without the written permission of j5 create;
or (i) if any j5create serial number on the product has been removed or defaced.
If such a situation occurs, j5create will calculate the cost of materials and repair for
your reference.
This warranty is given by j5create in lieu of any other warranties express or implied.
Copyright© 2011 j5create. All rights reserved. All trade names are registered trademarks of their
respective owners. Features and specifications are subject to change without notice. Product may not
be exactly as shown in the diagram
54
Page 56

55
Page 57

USB 3.0 HDMI Display Adapter
Manuel de l'utilisateur
JUA350 Manual
Page 58

Table of Contents
INTRODUCTION .................................................................................................................... 3
MISE EN ROUTE –Remarques Avant l'installation ............................................................... 7
INSTALLATION POUR WINDOWS 8,7 ............................................................................. 7
INSTALLATION POUR WINDOWS XP ........................................................................... 17
INSTALLATION POUR MAC ......................................................................................... 28
INSTRUCTIONS SUR LES FONCTIONS: WINDOWS 8,7 ........................................................ 36
INSTRUCTIONS SUR LES FONCTIONS: WINDOWS XP ......................................................... 45
INSTRUTIONS SUR LES FONCTIONS: MAC .......................................................................... 52
DEPANNAGE ...................................................................................................................... 56
SUPPORT TECHNIQUE ......................................................................................................... 58
CONFORMITÉ RÉGLEMENTAIRE ......................................................................................... 59
GARANTIE DE j5create ...................................................................................................... 60
2
Page 59

ADAPTATEUR D'AFFICHAGE USB HDMI MANUEL DE L'UTILISATEUR
INTRODUCTION
Merci d'avoir acheté l'Adaptateur d’affichage USB3.0 HDMI j5 create (JUA350) !Cet
adaptateur USB vers HDMI agit comme une carte vidé o externe pour votre MAC ou PC
compatible Windows ou ordinateur portable. Il vous permet d'ajouter un
moniteur/affichage HDMI supplémentaire via tout port USB disponible. Il n'est pas
né cessaire d'ouvrir l'ordinateur pour ajouter une carte vidéo coûteuse. Avec le (JUA350) il
vous suffit de charger les pilotes, de brancher l'adaptateur sur le port USB, puis de
rebrancher le câ ble du moniteur HDMI dans l'adaptateur et vous ê tes prê t.
Le j5 create JUA350 prend en charge trois modes de visualisation et audio HDMI. Les
modes Principal et Etendu vous permettent d'avoir des applications séparé es ouvertes
sur chaque moniteur amé liorant considérablement la productivité et é tendant votre
bureau sur plusieurs écrans, ce qui est idéal pour les tableaux. Le mode Miroir est utilisé
pour cloner un é cran sur un autre, ce qui est idéal pour les pré sentations. En outre, vous
pouvez «Plug & Play» entre votre ordinateur et un deuxième moniteur ou projecteur,
pour cré er de nouveaux environnements visuels en quelques secondes.
j5 create a dé veloppé ce design compact pour l'utilisateur averti qui se soucie des
fonctions ainsi que de l'élé gance.
Fonctions
Il est facile d'ajouter un é cran instantanément grâ ce à la connexion USB3.0 et
HDMIL.
La lecture vidéo HD 1080p s’effectue avec une résolution allant jusqu'à 2048 x
1152
Ajouter un moniteur supplémentaire sans l'ajout d'une carte vidéo interne
coûteuse, é vitant ainsi une installation compliquée
L'USB échangeable à chaud vous permet d'ajouter ou de supprimer des
moniteurs sans avoir à redé marrer votre système
Dé placez et consultez vos grandes feuilles de calcul sur deux écrans sans
fenê tres superposé es
Multitâ che avec paysage/espace de bureau plus grand
Idé al pour l'affichage de plusieurs fenê tres simultané ment
Idé al pour le multitâ che dans une grande varié té d'applications, notamment:
Centres de té lé phone, marché s boursiers, hô pitaux, conception graphique,
é dition, comptabilité , etc.
Un must pour surfer sur le web et travailler sur vos comptes de
messagerie/facebook/twitter simultané ment.
Principales caractéristiques
Prend en charge la ré solution d'affichage: 2048X1152 @ 32 bits
USB 3.0 Super Speed jusqu'à 5 Gbit/s
Supporte 1080p Lecture Vidéo
Connectivité USB Plug & Play
Permet jusqu'à 4 adaptateurs sur Windows
3
Page 60

ADAPTATEUR D'AFFICHAGE USB HDMI MANUEL DE L'UTILISATEUR
Permet jusqu'à 2 adaptateurs sur Windows
Prend en charge les modes d'affichage: Principal, Etendu, Miroir
Rotation de l'affichage: 0°, 90°, 180°, 270°
Audio ancrée 8kHz ~ 48kHz
Boîtier en aluminium non-toxique et recyclable
Installation aisée des pilotes
Utilisation
Editeur:
• Edition efficace de la documentation sur un écran et recherche de matériels
de ré fé rence sur l'autre
Présentation:
• Utilisez le mode Miroir quand votre ordinateur portable est branché sur un
projecteur via l'Adaptateur d’affichage USB3.0
• Utilisez le mode Principal pour avoir deux moniteurs et projecteurs pour des
affichages créatifs
Bureau:
• Scé nario à double affichage: Afficher de grandes feuilles de calcul sur 2
é crans avec continuité d'affichage. (Par exemple: Document Excel)
• Indé pendant: le fait d'utiliser l'espace du bureau et de faire plusieurs travaux
simultané ment, permet d'accroître l'efficacité .
• Lisez et ré pondez aux e-mails sur un é cran et ouvrez
les piè ces jointes sur l'autre
Station de travail graphique:
• Dessinez et consultez le maté riel de ré fé rence en mê me temps.
• Plus d'espace pour les tablettes et l'é dition de photo/vidé o
Loisirs:
• Regarder la TV/film tout en cherchant sur le programme
• Jouez en ligne sur un écran avec le guide de straté gie sur l'autre é cran
Opérations boursières:
• Surveillez plusieurs marché s boursiers et les nouvelles des marché s
simultané ment
Codage/Programmation:
• Permet la programmation efficace de code sur un écran et un logiciel
compagnon sur l'autre é cran.
4
Page 61
QTE
1~2 Dongle
3~4 Dongles
CPU
Intel 2 Quad 2.33 GHz ou
supérieur
Intel i5 3.10 GHz ou supérieur
RAM
2 Go ou plus
4 Go ou plus
Regarder
des
vidéos
Regarder des vidé os sur l'é cran é tendu
CPU: Intel Core i5 3.10 GHz ou supé rieur
RAM: 4 GB memory ou plus
※ Processeur supérieur recommandé pour le multi-affichage et
offrir des performances optimales.
Modèle: JUA 350
Interface
Interface hô te
Connecteur USB 3.0 Type A
Interface Vidéo et
Audio
Connecteur femelle HDMI
Alimentation
Mode d'alimentation
Alimenté par bus ou auto-alimenté
Consommation
≦500mA
Caractéristiques physiques
Maté riau du boîtier
Aluminium
ADAPTATEUR D'AFFICHAGE USB HDMI MANUEL DE L'UTILISATEUR
Environnements requis
Compatible Microsoft Windows 8,7, XP (32 bits ou 64 bits)
Compatible Mac OS X Mt. Lion/ Lion/Snow Leopard
Port USB disponible ( USB 3.0 est recommandé )
Configuration minimale requise
Note :
« concentrateur USB » n’est pas recommandé pour la ADAPTATEUR D'AFFICHAGE
USB
Note pour Lecteur vidéo:
*Windows 8, 7 utilisateur :“Windows Media Player” est recommandé pour lire la
vidé o
* Windows XP utilisateur & MAC utilisateur: produits MAC & Windows XP ne prend
pas en charge l'USB 3.0 en ce moment, donc nous vous suggé rons USB 2.0 pour
« l’application de bureau » seulement. Le Jeu Vidéo Retour n'est pas recommandé
à cause de la bande passante USB 2.0 qui limite la vidé o.
Note subsidiaire:
Afin de s'assurer que votre appareil est é quipé du pilote le plus ré cent, s'il vous plaît
visitez notre site Web sur www.j5create.com et installer le dernier pilote pour ce
modè le.
Caractéristiques physiques
5
Page 62

Dimensions
Corps: 41(l)x 72(H)x14(P) mm
Longueur du câ ble: 200 mm
Poids
Environ 53 g
Format de l'image
Résolution
Profondeur des couleurs
Écran large
16:9
2048 x 1152
16,32 bits
16:10
1920 x 1200
16, 32 bits
16:9
1920 x 1080
16, 32 bits
16:10
1680 x 1050
16, 32 bits
16:9
1600 x 900
16, 32 bits
16:10
1440 x 900
16, 32 bits
16:9
1360 x 768
16, 32 bits
16:10
1280 x 800
16, 32 bits
15:9
1280 x 768
16, 32 bits
16:9
1280 x 720
16, 32 bits
Affichage standard
4:3
1600 x 1200
16, 32 bits
4:3
1400 x 1050
16, 32 bits
5:4
1280 x 1024
16, 32 bits
4:3
1280 x 960
16, 32 bits
4:3
1152 x 864
16, 32 bits
4:3
1024 x 768
16, 32 bits
4:3
800 x 600
16, 32 bits
ADAPTATEUR D'AFFICHAGE USB HDMI MANUEL DE L'UTILISATEUR
Résolutions et profondeur des couleurs
Contenu de l'emballage
Adaptateur d’affichage USB3.0 HDMI (JUA350)
Convertisseur HDMI vers DVI
Guide d'installation rapide
CD de pilotes avec E-manuel
6
Page 63

ADAPTATEUR D'AFFICHAGE USB HDMI MANUEL DE L'UTILISATEUR
MISE EN ROUTE –Remarques Avant l'installation
Installez entiè rement le pilote avant d'insé rer le câ ble USB de l'Adaptateur
d’affichage USB3.0 HDMI dans votre ordinateur
Exé cutez le programme d'installation en tant qu'administrateur pour éviter des
erreurs d'installation
Dé sinstallez le pilote pré cé dent avant de mettre à jour le dernier pilote
Branchez le connecteur HDMI ou le convertisseur HDMI vers DVI de
l'adaptateur d'affichage HDMI USB 3.0 au câ ble HDMI ou DVI du périphérique
d'affichage. Connectez ensuite le pé riphérique au port USB de l'ordinateur
Il est recommandé d'utiliser une alimentation indé pendante pour le
concentrateur USB lorsque plusieurs dongles sont connecté s au concentrateur
USB
L'é cran clignote lors de l'installation
INSTALLATION POUR WINDOWS 8,7
Installation du pilote
Cette section illustre la procé dure d'installation du pilote pour Windows 7. Pour
commencer, insérez le CD de pilotes dans le lecteur de CD-ROM de votre ordinateur.
Le programme d'installation devrait se lancer automatiquement. Si l'exécution
automatique ne démarre pas, allez à «Poste de travail», cliquez sur votre lecteur
optique, et lancez manuellement le CD d'installation en double-cliquant sur
«Setup.exe»
※Assurez-vous que le câ ble USB 3.0 de l'Adaptateur d’affichage USB3.0 HDMI est
dé branché de votre PC ou de votre ordinateur portable avant d'exécuter le
programme d'installation.
1. La page d'installation sera lancé e. Pour commencer installation, cliquez sur
“ Installer le dernier pilote”. Assurez-vous que le ré seau est disponible appuyez sur
“Installer le pilote” pour démarrer l'installation
7
Page 64

ADAPTATEUR D'AFFICHAGE USB HDMI MANUEL DE L'UTILISATEUR
2. Aprè s avoir appuyé sur l'option d'installation, l'assistant d'installation va se lancer,
cliquez sur Suivant> pour continuer
3. Lisez le contrat de licence et cochez la case «J'accepte les termes du contrat de
licence.» Cliquez sur Suivant > pour l'accepter et continuer.
8
Page 65

ADAPTATEUR D'AFFICHAGE USB HDMI MANUEL DE L'UTILISATEUR
4. procédure d'installation du pilote…..
5. Lorsque l'assistant d'installation est terminé, sé lectionnez «Oui, je veux redémarrer
mon ordinateur maintenant.» Cliquez sur Terminer pour redémarrer.
9
Page 66

ADAPTATEUR D'AFFICHAGE USB HDMI MANUEL DE L'UTILISATEUR
6. Aprè s le redémarrage de votre ordinateur, connectez le dispositif d'affichage
externe (moniteur / projecteur) au connecteur HDMI de l'Adaptateur d’affichage
USB3.0 HDMI et allumez le dispositif d'affichage.
7. Connectez l'Adaptateur d’affichage USB3.0 HDMI dans un port USB disponible d'un
PC ou d'un ordinateur portable, après avoir inséré l'Adaptateur d’affichage USB3.0
HDMI dans un port USB, le message «Installation du pilote» apparaît.
Si le pilote a été installé avec succè s le message suivant doit apparaître:
Si vous ne dé sirez pas installer un autre Adaptateur d'affichage USB 3.0 HDMI,
redémarrez votre PC. Les fonctions de l'Adaptateur d'affichage USB 3.0 HDMI seront
activé es aprè s le redé marrage de l'ordinateur.
Installation de plusieurs Adaptateurs d'affichage USB 3.0 HDMI
Pour l'installation de plusieurs Adaptateurs d'affichage USB 3.0 HDMI, au cours de l'é tape
«Installation de l'assistant d'installation terminé e», sé lectionnez «Non, je redémarrerai
mon ordinateur plus tard.» et cliquez sur Terminer pour continuer par l'é tape suivante ci-
dessous
A. Connectez tous les pé riphé riques d'affichage externes (moniteur / projecteur) au
connecteur HDMI des Adaptateurs d'affichage USB 3.0 HDMI et mettez sous tension.
B. Connectez l'Adaptateur d'affichage USB 3.0 HDMIdans un port USB disponible d'un
PC ou d'un ordinateur portable.
10
Page 67

ADAPTATEUR D'AFFICHAGE USB HDMI MANUEL DE L'UTILISATEUR
Aprè s avoir inséré un Adaptateur d'affichage USB 3.0 HDMI dans un port USB, les
systèmes lanceront automatiquement la procé dure d'installation et le message d'invite
apparaîtra sur la barre des tâ ches.
Le pilote a été correctement installé,
si vous comptez installer plus d'Adaptateurs d'affichage USB 3.0 HDMI ré pé tez les é tapes
A et B ou redémarrez l'ordinateur.
Les fonctions de l'Adaptateur d'affichage USB 3.0 HDMI seront activé es aprè s le
redémarrage de l'ordinateur. L'affichage é tendu devrait apparaître sur le dispositif
d'affichage.
Vous pouvez modifier la position correspondante de chaque extension d'affichage via
les paramè tres d'affichage. Allez à «DEMARRER» → «Panneau de configuration» →
«Apparence et personnalisation» → «Modifier la ré solution de l'é cran»
※ Faites un clic droit sur le bureau et allez à «Résolution de l'é cran»
Lorsque la fenê tre «Ré solution de l'écran » apparaît, chaque numéro de moniteur peut
ê tre identifié en cliquant sur «Identifier.» Faites glisser le moniteur à la position dé siré e.
11
Page 68

ADAPTATEUR D'AFFICHAGE USB HDMI MANUEL DE L'UTILISATEUR
Régler le son
Le système audio de Microsoft restreint la fonction audio à une sortie à la fois; donc,
lorsque vous utilisez l'adaptateur USB HDMI multi-affichage, seule une sortie recevra
l'audio.
Ce qui suit explique comment installer et changer la sortie audio par défaut du
dispositif d'affichage connecté à l'Adaptateur d’affichage USB3.0 HDMI.
1. Allez à «Panneau de configuration> Sons et périphé riques audio» et sé lectionnez
«Modifier les sons du systè me»
12
Page 69

Adaptateur d’affichage USB3.0 HDMI
unique
Plusieurs adaptateurs d'affichage USB
HDMI
ADAPTATEUR D'AFFICHAGE USB HDMI MANUEL DE L'UTILISATEUR
2. Les options de haut-parleur, pour les Adaptateurs d'affichage USB HDMI uniques et
multiples, sont indiquées ci-dessous.
Remarque:
1. Les haut-parleurs sont numé roté s en fonction du nombre de ports USB détecté s
par votre ordinateur.
2. Le son par dé faut sera é mis par l'Adaptateur d’affichage USB3.0 HDMI avec le
plus grand nombre de ports USB.
3. Pour changer la sortie son par défaut, avec votre souris faites un clic droit dans les
boîtes d'options de sons sur votre bureau, puis sélectionnez «Test» pour choisir le
haut-parleur que vous souhaitez utiliser par dé faut.
13
Page 70

ADAPTATEUR D'AFFICHAGE USB HDMI MANUEL DE L'UTILISATEUR
4. Sélectionnez le haut-parleur dé siré et cliquez sur «Par dé faut»
Vérification de l'installation du pilote
La procé dure suivante vous permet de vé rifier l'é tat de l'installation du pilote de
l'Adaptateur d’affichage USB3.0 HDMI.
Faites un clic droit sur «Poste de travail» «Gé rer» «Gestionnaire de périphériques»
cliquez sur le signe « +» «Contrôleurs de bus USB»
L'image ci-dessous montre le processus d'installation pour un Adaptateur d’affichage
USB3.0 HDMI unique
14
Page 71

ADAPTATEUR D'AFFICHAGE USB HDMI MANUEL DE L'UTILISATEUR
L'image ci-dessous montre le processus d'installation pour plusieurs Adaptateurs
d'affichage USB
Désinstallation du pilote
※ Dé branchez l'Adaptateur d’affichage USB3.0 avant de dé sinstaller le pilote.
1. quez sur «Dé marrer» → Panneau de configuration → Programmes et fonctionnalités
→ Désinstaller ou modifier un programme
Sélectionnez ADAPTATEUR D'AFFICHAGE j5 ... Cliquez sur Dé sinstaller
15
Page 72

ADAPTATEUR D'AFFICHAGE USB HDMI MANUEL DE L'UTILISATEUR
2. Un message apparaîtra demandant si vous souhaitez supprimer l'application
sélectionné e. Cliquez sur «OK» pour continuer.
3. Désinstallation du pilote en cours….
4. Quand l'installation du pilote est terminé e, sé lectionnez «Oui, je veux redémarrer
mon ordinateur maintenant». Cliquez sur Terminer pour redé marrer.
16
Page 73

ADAPTATEUR D'AFFICHAGE USB HDMI MANUEL DE L'UTILISATEUR
INSTALLATION POUR WINDOWS XP
Installation du pilote
Cette section illustre la procé dure d'installation du pilote pour Windows XP. Pour
commencer, insérez le CD de pilotes dans le lecteur de CD-ROM de votre ordinateur.
Le programme d'installation devrait se lancer automatiquement. Si l'exécution
automatique ne démarre pas, allez à «Poste de travail», cliquez sur votre lecteur
optique, et lancez manuellement le CD d'installation en double-cliquant sur
«Setup.exe»
※Assurez-vous que le câ ble USB de l'Adaptateur d'affichage USB 3.0 est débranché de
votre PC ou de l'ordinateur portable avant d'exécuter le programme d'installation.
1. La page d'installation sera lancé e. Pour commencer installation, cliquez sur
“ Installer le dernier pilote”. Assurez-vous que le ré seau est disponible appuyez sur
“Installer le pilote” pour démarrer l'installation
17
Page 74

ADAPTATEUR D'AFFICHAGE USB HDMI MANUEL DE L'UTILISATEUR
2. Aprè s avoir appuyé sur l'option d'installation, l'assistant d'installation va se lancer,
cliquez sur Suivant> pour continuer
3. Lisez le contrat de licence et cochez la case «J'accepte les termes du contrat de
licence.» Cliquez sur Suivant > pour l'accepter et continuer.
18
Page 75

ADAPTATEUR D'AFFICHAGE USB HDMI MANUEL DE L'UTILISATEUR
4. Procédure d'installation du pilote…..
5. Lorsque l'assistant d'installation est terminé, sélectionnez «Oui, je veux redémarrer
mon ordinateur maintenant.» Cliquez sur Terminer pour redémarrer.
19
Page 76

ADAPTATEUR D'AFFICHAGE USB HDMI MANUEL DE L'UTILISATEUR
6. Aprè s le redémarrage de votre ordinateur, connectez le dispositif d'affichage
externe (moniteur/projecteur) au connecteur HDMI de l'Adaptateur d'affichage USB
3.0 et allumez-le.
7. Connectez l'Adaptateur d'affichage USB 3.0 HDMI dans un port USB disponible d'un
PC ou d'un ordinateur portable, après avoir inséré l'Adaptateur d’affichage USB3.0
HDMI dans un port USB, le message «Installation du pilote» apparaît.
Une icô ne ( ) apparaîtra sur la barre d'outils infé rieure droite.
Les images du message ci-dessous montrent que le pilote est correctement installé.
Si vous ne dé sirez pas installer un autre Adaptateur d'affichage USB 3.0, redé marrez
votre PC. Les fonctions de l'Adaptateur d'affichage USB 3.0 seront activées après le
redémarrage de l'ordinateur.
Installation de plusieurs Adaptateurs d'affichage USB 3.0
Pour l'installation de plusieurs Adaptateurs d'affichage USB, au cours de l'é tape
«Installation de l'assistant d'installation terminé e», sé lectionnez «Non, je redémarrerai
mon ordinateur plus tard.» et cliquez sur Terminer pour continuer par l'é tape suivante ci-
dessous
20
Page 77

ADAPTATEUR D'AFFICHAGE USB HDMI MANUEL DE L'UTILISATEUR
A. Connectez tous les pé riphé riques d'affichage externes (moniteur / projecteur)
au connecteur HDMI des Adaptateurs d'affichage USB 3.0 et mettez sous
tension.
B. Connectez l'Adaptateur d'affichage USB 3.0 dans un port USB disponible d'un
PC ou d'un ordinateur portable.
Aprè s avoir inséré un Adaptateur d'affichage USB 3.0 dans un port USB, les
systèmes lanceront automatiquement la procé dure d'installation et le message
d'invite apparaîtra sur la barre des tâ ches.
Le pilote a été correctement installé, si vous désirez installer d'autres Adaptateurs
d'affichage USB, ré pé tez les é tapes A et B ou redé marrez l'ordinateur
Les fonctions de l'Adaptateur d'affichage USB 3.0 seront activé es aprè s le redé marrage
de l'ordinateur. L'affichage miroir devrait apparaître sur le dispositif d'affichage.
Vous pouvez modifier la position correspondante de chaque extension d'affichage via
les paramè tres d'affichage.
Allez à «DEMARRER» → «Panneau de configuration» → «Apparence et personnalisation»
→ «Proprié té s d'affichage» → «Paramètres»
21
Page 78

Lorsque la fenê tre Proprié té s
d'affichage apparaît, chaque
numé ro de moniteur peut ê tre
identifié en cliquant sur
«Identifier»
Faites glisser le moniteur à la
position désirée.
ADAPTATEUR D'AFFICHAGE USB HDMI MANUEL DE L'UTILISATEUR
Remarque:
Si votre carte graphique interne est à double ports d'affichage …..
1. Lors de l'utilisation d'un Adaptateur d'affichage USB 3.0 HDMI
Le dispositif d'affichage connecté au 2
dispositif d'affichage connecté à l'Adaptateur d’affichage USB3.0 HDMI sera
numé roté 2
2. Lors de l'utilisation de deux Adaptateurs d'affichage USB3.0 HDMI
Le dispositif d'affichage connecté au 2
dispositif d'affichage connecté à l'Adaptateur d’affichage USB3.0 HDMI sera
numé roté 2
Régler le son
Le système audio de Microsoft restreint la fonction audio à une sortie à la fois; donc,
lorsque vous utilisez l'adaptateur USB HDMI multi-affichage, seule une sortie recevra
ème
moniteur.
ème
et 3
ème
l'audio.
Ce qui suit explique comment installer et changer la sortie audio par défaut du
dispositif d'affichage connecté à l'Adaptateur d’affichage USB3.0 HDMI.
1. Allez à «Panneau de configuration> Sons et périphé riques audio» et sélectionnez
«Modifier les paramè tres des haut-parleurs».
è me
port HDMI sera numé roté 3
è me
port HDMI sera numé roté 4
moniteur, et ainsi de suite...
è me
moniteur, le
è me
moniteur, le
22
Page 79

Adaptateur d’affichage USB3.0 HDMI
unique
Plusieurs Adaptateurs d'affichage USB
HDMI
ADAPTATEUR D'AFFICHAGE USB HDMI MANUEL DE L'UTILISATEUR
2. Les options de haut-parleur, pour les Adaptateurs d'affichage USB HDMI uniques et
multiples, sont indiquées ci-dessous.
Remarque:
1. Les haut-parleurs sont numé roté s en fonction du nombre de ports USB détecté s
par votre ordinateur.
2. Le son par défaut sera émis par l'Adaptateur d’affichage USB 3.0 HDMI avec le
plus grand nombre de ports USB.
3. Sélectionnez «le Périphé rique par dé faut» dé siré , et cliquez sur «Appliquer». puis
cliquez sur « Volume» pour choisir le haut-parleur que vous souhaitez utiliser par
dé faut.
23
Page 80

ADAPTATEUR D'AFFICHAGE USB HDMI MANUEL DE L'UTILISATEUR
Vérification de l'installation du pilote
La procé dure suivante vous permet de vé rifier l'é tat de l'installation du pilote de
l'Adaptateur d’affichage USB3.0 HDMI
Faites un clic droit sur «Poste de travail» «Gérer» «Gestionnaire de périphériques»
cliquez sur le signe «+» de «Cartes graphiques» et «Contrô leurs audio, vidé o et jeu» et
«Contrôleurs de bus USB»
L'image ci-dessous montre le processus d'installation pour un Adaptateur d’affichage
USB3.0 HDMI unique
24
Page 81

ADAPTATEUR D'AFFICHAGE USB HDMI MANUEL DE L'UTILISATEUR
L'image ci-dessous montre le processus d'installation pour plusieurs Adaptateurs
d'affichage USB3.0 HDMI
25
Page 82

ADAPTATEUR D'AFFICHAGE USB HDMI MANUEL DE L'UTILISATEUR
Désinstallation du pilote
※Dé branchez l'Adaptateur d’affichage USB3.0 HDMI avant de dé sinstaller le pilote
1. Cliquez sur «Dé marrer» → Panneau de configuration → Programmes et
fonctionnalités → Désinstaller ou modifier un programme
Sélectionnez ADAPTATEUR D'AFFICHAGE j5 ... Cliquez sur Dé sinstaller
26
Page 83

ADAPTATEUR D'AFFICHAGE USB HDMI MANUEL DE L'UTILISATEUR
2. La fenêtre Confirmer apparaîtra, cliquez pour continuer.
3. Désinstallation du pilote en cours….
4. Quand l'installation du pilote est terminée, sélectionnez «Oui, je veux redé marrer
mon ordinateur maintenant». Cliquez sur Terminer pour redé marrer.
27
Page 84

ADAPTATEUR D'AFFICHAGE USB HDMI MANUEL DE L'UTILISATEUR
INSTALLATION POUR MAC
Installation du pilote
L'installation du pilote permet au système d'exploitation de votre ordinateur de
reconnaître l'Adaptateur d’affichage USB3.0 HDMI. Assurez-vous que vous utilisez la
procé dure d'installation approprié e avant de commencer l'installation.
※ Assurez-vous que le câble USB de l'Adaptateur d’affichage USB3.0 HDMI est
débranché de votre ordinateur de bureau Mac ou votre ordinateur portable Mac
avant d'exé cuter le programme d'installation.
Cette section illustre la procé dure d'installation du pilote pour un ordinateur
fonctionnant sous Snow Leopard.
1. Insérez le CD de pilotes dans le lecteur de CD-ROM;
2. La page d'installation sera lancé e. Pour commencer installation, cliquez sur
“ Installer le dernier pilote”. Assurez-vous que le ré seau est disponible ou Choisissez la
version OS que vous utilisez appuyez sur “Installer le pilote” pour démarrer
l'installation
28
Page 85

ADAPTATEUR D'AFFICHAGE USB HDMI MANUEL DE L'UTILISATEUR
3. Cliquez sur «Continuer» pour continuer
4. Cliquez sur «Continuer» pour continuer
29
Page 86

ADAPTATEUR D'AFFICHAGE USB HDMI MANUEL DE L'UTILISATEUR
5. Tapez votre mot de passe et cliquez sur «OK»
6. Cliquez sur «Continuer l'installation»
7. Installation en cours… Cela va prendre quelques instants
30
Page 87

ADAPTATEUR D'AFFICHAGE USB HDMI MANUEL DE L'UTILISATEUR
8. Cliquez sur «Redé marrer» pour terminer l'installation du logiciel
9. Connectez le dispositif d'affichage externe (moniteur/projecteur) au connecteur
HDMI de l'Adaptateur d’affichage USB3.0 HDMI et allumez le dispositif d'affichage.
10. Branchez l'Adaptateur d’affichage USB3.0 HDMI au port USB de votre ordinateur de
bureau Mac ou votre ordinateur portable Mac. L'é cran s'allumera
automatiquement, et sera en «Mode Miroir»
Pour modifier vos pré fé rences d'é cran choisissez l'onglet «Préfé rences systè me»-
>«Affichages»-> «Organisation» pour définir la position du moniteur.
reportez-vous à la section : Instructions sur les fonctions : Mac
31
Page 88

ADAPTATEUR D'AFFICHAGE USB HDMI MANUEL DE L'UTILISATEUR
Régler le son
Le système audio de Mac restreint la fonction audio à une sortie à la fois; donc, lorsque
vous utilisez l'adaptateur USB HDMI multi-affichage, seule une sortie recevra l'audio.
1. Aller à , puis «Préfé rences systè me»
2. Allez à «Préférences systè me» et sé lectionnez «Son»
32
Page 89

• Adaptateur d’affichage USB3.0 HDMI
unique
• Plusieurs adaptateurs d'affichage USB
HDMI
ADAPTATEUR D'AFFICHAGE USB HDMI MANUEL DE L'UTILISATEUR
3. Les options de «Sortie» de haut-parleur, pour les Adaptateurs d'affichage USB HDMI
uniques et multiples, sont indiquées ci-dessous.Vous pouvez sélectionner un
pé riphé rique de sortie audio en cliquant dessus.
Vérification de l'installation du pilote
La procé dure suivante vous permet de vé rifier l'é tat de l'installation du pilote de
l'Adaptateur d’affichage USB3.0 HDMI
Aller à , sélectionnez «À propos de ce Mac» et sé lectionnez «Plus d'infos ...»
33
Page 90

ADAPTATEUR D'AFFICHAGE USB HDMI MANUEL DE L'UTILISATEUR
L'image ci-dessous montre le processus d'installation pour un Adaptateur d’affichage
USB3.0 HDMI unique
L'image ci-dessous montre le processus d'installation pour plusieurs Adaptateurs
d'affichage USB HDMI
34
Page 91

ADAPTATEUR D'AFFICHAGE USB HDMI MANUEL DE L'UTILISATEUR
Désinstallation du pilote
1. Débranchez l'Adaptateur d’affichage USB3.0 HDMI du port USB
2. Pour la dé sinstallation, appuyez sur l'icône "Dé sinstaller le pilote"
3. Cliquez sur «Ouvrir» pour continuer
4. Cliquez sur «Dé sinstaller et redé marrer» pour
continuer
35
Page 92

ADAPTATEUR D'AFFICHAGE USB HDMI MANUEL DE L'UTILISATEUR
5. Tapez votre mot de passe afin de permettre la désinstallation et cliquez
sur «OK» pour continuer.
6. Redémarrez votre système
INSTRUCTIONS SUR LES FONCTIONS: WINDOWS 8,7
Cette section décrit les nombreuses fonctions fournies par l'Adaptateur d’affichage
USB3.0 HDMI. «Dispositif d'affichage» signifie ici un certain nombre de choses telles que
CRT, é cran LCD, é cran de télé viseur ou projecteur.
ID de l'affichage
Détection intelligente de l'ID du dispositif d'affichage
Le SE Windows 7 prend en charge DDC/EDID VESA. Il sera affiché comme l'ID du
dispositif d'affichage chaque fois qu'il est raccordé à l'Adaptateur d’affichage USB3.0
HDMI.
36
Page 93

ADAPTATEUR D'AFFICHAGE USB HDMI MANUEL DE L'UTILISATEUR
Résolution d'affichage
Accès rapide au paramétrage de Résolution d'affichage
La liste des ré solutions s'affichera lorsque vous dé placez le curseur sur Ré solution
d'affichage. Sé lectionnez la ré solution souhaitée pour l'Adaptateur d’affichage USB3.0
HDMI.
Ré solution par dé faut: 1024 x 768 x 32 bits
37
Page 94

ADAPTATEUR D'AFFICHAGE USB HDMI MANUEL DE L'UTILISATEUR
Orientation de l'affichage
L'Orientation vous permet d'activer le dispositif d'affichage, qui est connecté à
l'Adaptateur d’affichage USB3.0 HDMI
38
Page 95

ADAPTATEUR D'AFFICHAGE USB HDMI MANUEL DE L'UTILISATEUR
Mode d'affichage
Mode Etendu (Par défaut)
Cette fonctionnalité permet au dispositif d'affichage connecté à l'Adaptateur
d’affichage USB3.0 HDMI de fonctionner comme un affichage «é tendue» de l'é cran de
bord.
Vous pouvez ajuster la position en cliquant d'abord sur «numéro» de l'affichage et
sélectionnez «Etendre ces affichages» et cliquez sur «Appliquer»
39
Page 96

ADAPTATEUR D'AFFICHAGE USB HDMI MANUEL DE L'UTILISATEUR
Mode miroir-Dupliquer
Cette fonctionnalité permet d'afficher le contenu de l'é cran de bord sur l'écran de
l'Adaptateur d’affichage USB3.0 HDMI
Vous pouvez sélectionner «Dupliquer ces é crans» et cliquez sur «Appliquer»
Remarque pour le système d’exploitation Windows 7 (en mode Miroir):
La ré solution des affichages secondaire et principal doit être la même lorsque vous
utilisez le mode Miroir (Celle-ci peut ê tre infé rieure à la ré solution préféré e pour
l'affichage). Seuls 2 affichages peuvent ê tre mis en miroir simultanément. Le systè me
d’exploitation Windows 7 peut avoir d’autres limites.
40
Page 97

ADAPTATEUR D'AFFICHAGE USB HDMI MANUEL DE L'UTILISATEUR
Mode principal
Lorsque vous voulez basculer le moniteur activé comme affichage principal et étendre
la visualisation à l'é cran de bord.
Choisissez le «Numéro» de l'affichage principal que vous voulez voir attribuer et cochez
«En faire mon affichage principal».
41
Page 98

ADAPTATEUR D'AFFICHAGE USB HDMI MANUEL DE L'UTILISATEUR
Mode Désactivé
Pour dé sactiver l'un des affichages:
Sélectionnez «Afficher le bureau seulement sur 1» et le 2
ème
affichage sera désactivé
Sélectionnez «Afficher le bureau seulement sur 2» et le 1er affichage sera désactivé
Super Utilitaire
Un super utilitaire offre davantage d'options, l'icône se trouve sur la barre des tâ ches en
bas à droite
Identifier les Moniteurs
Lorsque «Identifier les moniteurs» est sélectionné, un numé ro de sé rie s'affiche dans le
coin supérieur droit des dispositifs d'affichage. Vous pouvez voir le numéro de série de
chaque affichage lorsque vous utilisez la fonction de raccourci clavier.
42
Page 99

ADAPTATEUR D'AFFICHAGE USB HDMI MANUEL DE L'UTILISATEUR
Panneau de contrôle multi-affichages
Cette caracté ristique unique offre une expé rience de travail plus simple pour les
environnements multi-é cran. Une sé rie de ré glage de raccourcis clavier aide à se
dé placer rapidement entre les dispositifs d'affichage souhaités.
is clavier
Le ré glage par dé faut est Ctrl + N° d'affichage.
Cliquez sur la fenê tre que vous souhaitez déplacer sur la barre des tâ ches pour la
rendre active et appuyez sur Raccourci clavier
※Paramétrer les Raccourcis clavier
※Utilisati
on des
raccourc
Par exemple: Dé placez la fenê tre sur Affichage03, et agrandissez-la
automatiquement en plein é cran.
Choisissez «Dé placez la fenê tre active sur Affichage03», cochez «Dé placer la fenêtre
et plein écran», et cliquez sur Appliquer
Paramétrage de l'affichage
43
Page 100

ADAPTATEUR D'AFFICHAGE USB HDMI MANUEL DE L'UTILISATEUR
Accès rapide au système «Paramètres d'affichage»
Position fixe
Cette fonction vous aide à organiser les positions de tous les emplacements
d'affichage que vous avez dé finis dans Affichage > Résolution de l'écran Après
«Paramé trage de l'emplacement de l'affichage», Cochez
dans cette fonction. Tous les emplacements d'affichage seront fixés. C'est l'idéal pour
l'utilisateur de multi-affichages.
44
 Loading...