


Index:
Parameter Page MENU
Cyanide 4 CN1
Iron (Free or Total) 5 FE2
Ammonia 5 NH3
Phosphate 6 PO4
BT-pH 6 PH5
Sulfide 7 SS6
Transmission 7 TR7
Biguanide 8 TR7
(NOTE: Other tests are read as %Transmission and
require the use of a conversion table that is available for
download from our website www.sensafe.com)
Specifications 2
About Y our Photometer 3
Tips for Best Accuracy 9
Battery Installation 10
Warranty (2 year) 10
Reorder Information 11
Accuracy Comparison 12
Kit Components 12
Visit us online at sensafe.com/micro8 for up-to-date
product information & NEW tests available.
IDEAL FOR DRINKING WATER, POOLS AND SPAS,
ENVIRONMENTAL, & EDUCATIONAL TESTING
Revision 08/19/10
Part No. 486800-K
© 2010 Industrial Test Systems, Inc. • EXACT® is a registered trademark of Industrial Test Systems, Inc., Rock Hill, SC USA
Micro 8
Advanced Photometer System
U.S. Patent No. 7,333,194, South African Patent No. 2007/0628 and international patent
applications including International Patent Appln. No. PCT/US2005/033985; and Eur. Pat. App. 1,725,864
Manufactured By: Industrial Test Systems, Inc.
1875 Langston Street, Rock Hill, SC 29730 USA
Phone: 1-800-861-9712 - INSIDE THE U.S.
1-803-329-9712 - OUTSIDE THE U.S.
Fax: 1-803-329-9743
ITS@SENSAFE.COM
WWW.SENSAFE.COM
www.poolcheckonline.com
n
g I
nte
rn
Micro 8 is
Manufactured
and tested in
an ISO 9001
Facility
The eXact® Micro 8 Advanced
Photometer System has been
designed for use with the eXact
®
Strip
Micro reagent delivery system.
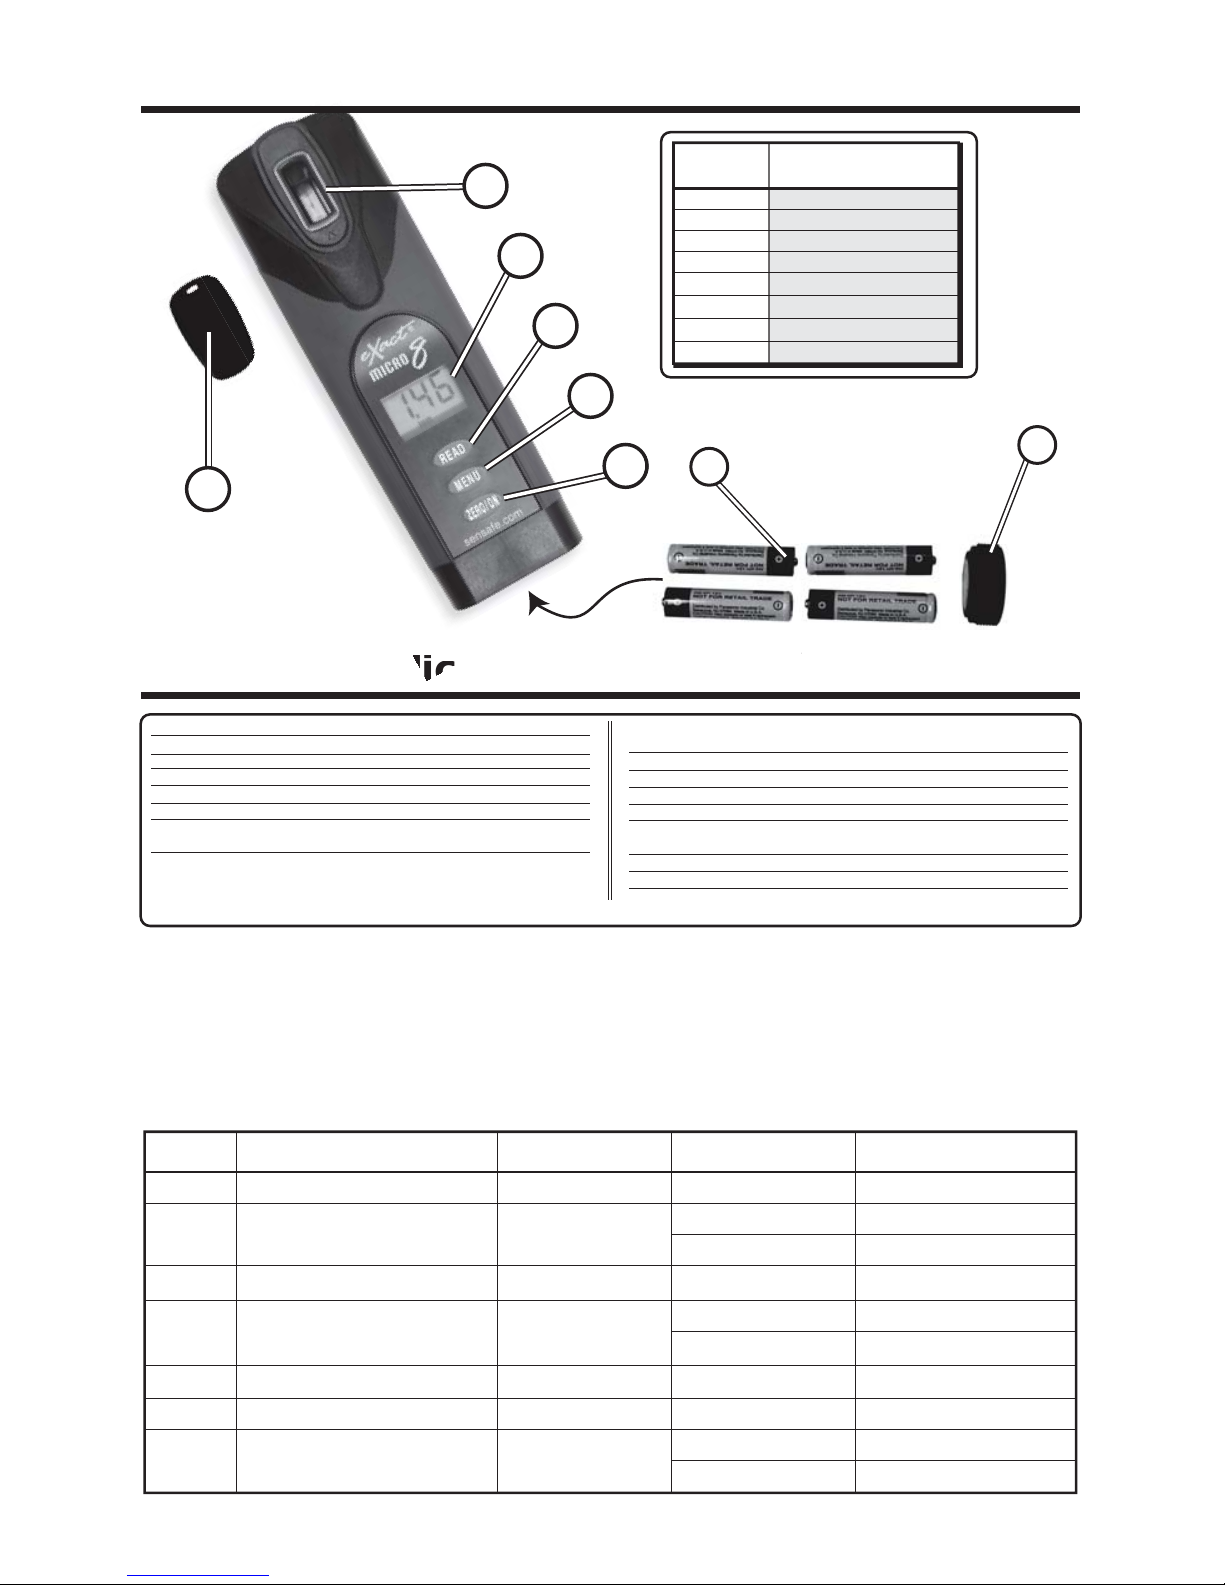
eXact® Micro 8 Meter Specifications
eXact
®
Micro 8 is a “Green” Alternative
2
eXact® Micro 8 Photometer
Menu Tests for Range Resolution +/- Accuracy
CN1 Cyanide 0.00 - 1.90 ppm 0.01 0.05 or 4%
0.01
(0.00 - 2.49 ppm) 0.02
0.1
(2.5 - 7.5 ppm) 0.3 or 5%
NH3 Ammonia 0.00 - 2.00 ppm 0.01 0.04 or 2%
0.01
(0.00 - 3.0 ppm) 0.03 or 1%
0.01
(3.1 - 4.0 ppm) 0.1 or 2%
PH5 BT-pH 5.0 - 10.0 pH 0.1 0.2
(0.5 above pH 7.8)
SS6 Sulfide 0.01 - 0.70 ppm 0.01 0.04 or 5%
0.1
(99.9 - 10.0 %T) 0.1
(used for other test parameters) 0.01 (9.99 - 0.01 %T) 0.01
eXact® Micro 8 Specifications
FE2 Iron (Free or Total) 0.00 - 7.5 ppm
PO4 Phosphate 0.00 - 4.0 ppm
TR7 Transmission 99.9 - 0.01 %T
e
X
F
E
D
C
B
A
r Specification
s
G
H
+
–
ITEM PICTURED
LETTER
COMPONENT
NAME
A
Mixing Cap
B
Cell (Built-in Plastic, 4 ml)
C
LCD Display
D
READ Button
E
MENU Button
F
ZERO/ON Button
G
Battery Cover with loop for lanyard
H
AAA Batteries (x4) NOT INCLUDED
eXact® Micro 8 has been designed to offer the user a more “Green” and cost-effective alternative to testing. Instead of
using a 10ml water sample, eXact® Micro 8 uses a 4ml water sample, which uses up to 60% less chemical per test.
The resolution and accuracy of the meter is maintained by designing the photo cell with a 20mm pathlength.
(Used for Iron test)
Measurement Method: Photometric
Light Source: Light Emitting Diode (LED)
Wavelength: 638 nm
Transmission Range: 100 - 0.00 %T
Photometric Precision: +/- 0.1/0.01 %T
Automatic Range Selection: See Specifications below
Display: 3-digit customized liquid crystal display
with annunciators
CELL Pathlength: 20mm
Cell Chamber: Custom-molded, proprietary, PET plastic
fused into chamber, non-removable
Sample Volume: 4 ml (0.13 oz)
Operating Temperature Range: 0 - 50°C (32° - 122°F)
Power Supply: (4) AAA alkaline batteries Not Included
Battery Life: >2000 tests with alkaline batteries
Electromagnetic Compliance: Emitted Interference - EN 61326
(EMC) Immunity to Interference - EN 61326
Waterproof Rating: Exceeds IP67
Weight: Instrument: 140 g (5 oz)
Dimensions: Instrument: 5 (W) x 3.5 (D) x 16.5 (H) cm;
(2 x 1.4 x 6.375 in)

3
About Your eXact® Micro 8 Instrument
About The Accuracy/Calibration Of The Micro 8 Photometer System
The eXact® Micro 8 Advanced Photometric System has been factory calibrated for your convenience.
Customer calibration for your own special application can be performed in the Transmission Menu. You
can expect the fixed calibrations or algorithms in the meter to be valid for the life of the meter because of
the quality, Long-Life LED, the photo cell, and the software as written into the meter. A blue dye
calibration solution is available for verification of meter performance.
To save power, the meter is designed to turn off after 3 minutes (timed from the last button pressed).
Should the meter turn off, the last stored zero in the meter will remain valid when the meter is turned on
again. The eXact® Micro 8 Photometer is controlled by three buttons:
1. ZERO/ON: When first pressed, this button turns the meter on. When the meter is on and this button is
pressed, it zeroes the sample in the cell. Once the meter is zeroed, this zero value applies to all menu
parameters and is stored and retained even when meter turns off. It is recommended that each new water
sample analyzed is zeroed before testing, to maximize accuracy.
2. MENU: With each press, when the meter is on, the MENU button advances through the tests in the
following sequence: CN1, FE2, NH3, PO4, PH5, SS6, TR7. Each test menu can store up to 20 results. To
retrieve the stored results, go to the desired test using the MENU key. When the desired test is displayed,
release button and allow meter to display the last test result in that MENU. Then, press and hold down the
MENU key. Continue holding down the MENU key to scroll the stored results for that test, starting with the
most recent result. The meter will retrieve from stored memory and display the last 20 readings in sequence
beginning with -20, which is the latest result, followed by -19, which is the 2nd latest result … finally -01, which
is the oldest result retained. Only the last 20 readings are stored in each menu. This meter is able to store
140 results in memory (20 in each menu).
3. READ: When pressed once, this button starts a 20 or 30 SECOND countdown timer depending on the
parameter being tested. If READ is pressed a second time during the countdown, the meter exits the current
timing and performs the next function.
If the parameter being measured is below or above the detection range, the display will show “LO” (Under
Range) or “HI” (Over Range), respectively. This feature is menu specific.

1
4
Cyanide Test Procedure
Remove one (1) eXact® Strip Micro CN-1, Part No.
486812-A from the bottle before beginning the test.
Set the strip in a dry, convenient place and recap
the bottle immediately. Next, remove one (1) eXact
®
Strip Micro CN-2, Part No. 486812-B from the bottle
before beginning the test. Set this strip in a dry,
convenient place separate from the CN-1 strip. Recap
the bottle immediately.
REMOVE STRIP
1
6b
6a
Dip the eXact® Strip Micro CN-1, Part No. 486812-A
into the CELL and immediately press READ. This
starts the 30 SECOND countdown timer. During this
time move the strip in a gentle back and forth motion.
Because the strip is 8mm wide, the strip will need to be
angled in order to fit in the cell. Be sure test pad is fully
submerged. Remove and discard the strip after “1”
on the display disappears. The cursor will move across
the display, informing you to get ready with the CN-2 strip.
When the 30 SECOND countdown starts, dip
immediately the eXact
®
Strip Micro CN-2, Part No.
486812-B into the CELL. During this time, with the strip
angled slightly, move the strip in a gentle back and forth
motion. Remove and discard the strip after “1” on
the display disappears. The meter will automatically
start
to count up to 600 seconds. At 600 seconds, the
cursor will move across the display
while the meter
prepares to measure the sample. Record result displayed
(this result is automatically stored in CN1).
DIP STRIP AND PRESS “READ”
6
5
Press the ZERO/ON button. The cursor will move
across the display followed by 0.00 PPM. Sample is
ready for testing.
ZERO METER
5
4
Rinse the CELL at least 3 times with the water sample
you will be testing - rinsing minimizes the potential for
cross-contamination from a previous test. Finally, fill
cell to capacity (4ml) with the water sample. NOTE:
The calibration of the meter is based on a water
temperature between 18°C and 25°C. If temperature
is below 18°C, your final Cyanide value may read low.
FILL METER WITH SAMPLE
4
3
Press and re-press the MENU button until the
display shows the parameter CN1.
SELECT TEST: CN1
3
Cn
CN1
2
Press the ZERO/ON button to power the meter on;
the display will show all annunciators,
then the current MENU selection,
followed by the last reading.
TURN METER ON
2
annunciators
(Cyanide Kit 486812 - CN-1 and CN-2 Strip)
5
Press the ZERO/ON button. The cursor will move across the display, followed by 0.00 PPM.
Sample is ready for testing.
ZERO METER
4
Tilt meter to discard about 0.2mL water in order to leave room for powder reagent. Add the contents
of one eXact® Reagent EZ Open REDUCER, Part No. 486601 to the CELL and cap meter cell with
mixing cap. Press READ to start the 20 SECOND countdown timer, place thumb over cap to keep
cap securely in place, and mix the sample by turning the meter upside-down repetitively. When
time displays 1, hold the meter upright and the cursor will flash and the meter will begin to count
up to 40 seconds. After the 40 seconds, a result will be displayed (ignore this result).
ADD REAGENT, CAP, AND MIX
(For Ferrous Iron, skip this step)
1
Press the ZERO/ON button to power the meter on; the display will show all annunciators,
then the current MENU selection, followed by the last reading.
TURN METER ON
2
Press and re-press the MENU button until the display shows the parameter FE2.
SELECT TEST: FE2
3
Rinse the CELL at least 3 times with the water sample you will be testing - rinsing minimizes
the potential for cross-contamination from a previous test. Fill cell to capacity (4ml) with the
water sample.
FILL METER WITH SAMPLE -
(See Accuracy Tip 16 on Page 9)
5
6
Dip the eXact® Strip Micro FE (TPTZ), Part No. 486631 into the CELL and immediately press
READ. This starts the 20 SECOND countdown timer. During this time, move the strip in a gentle
back and forth motion. Remove and discard the strip after “1” on the display disappears.
The cursor will flash and the meter will begin to count up to 40 seconds. After the 40 seconds, the
result will be displayed. Record this result (this result is automatically stored in FE2).
NOTE: If your
result is 2.2 ppm or greater, repeat Step 6 by using a second TPTZ Strip within the next 30
seconds. This assures that all iron has reacted with adequate TPTZ reagent and that the full
range of 7.5ppm gives best accuracy.
DIP STRIP AND PRESS “READ”
Total Iron, TPTZ (Fe+2/Fe+3) Test Procedure
FE2
FE
6
Dip the eXact® Strip Micro NH3, Part No. 486654-A into the CELL and immediately press
READ. This starts the 20 SECOND countdown timer. During this time move the strip in a gentle
back and forth motion. Remove and discard the strip after
“1” on the display disappears
.
The meter will automatically start
to count up for 500 seconds. After the 500 seconds, the
cursor will move across the display
while the meter prepares to measure the sample.
Record result displayed (this result is automatically stored in NH3).
DIP STRIP - (read carefully and follow procedure closely)
5
Press the ZERO/ON button. The cursor will move across the display, followed by 0.00 PPM.
Sample is ready for testing.
ZERO METER
4
Add 3 drops of eXact® Reagent NH3, Part No. 486654-B to the CELL.
ADD REAGENT
1
Press the ZERO/ON button to power the meter on; the display will show all annunciators,
then the current MENU selection, followed by the last reading.
TURN METER ON
2
Press and re-press the MENU button until the display shows the parameter NH3.
SELECT TEST: NH3
3
Rinse the CELL at least 3 times with the water sample you will be testing - rinsing minimizes
the potential for cross-contamination from a previous test. Finally, fill cell to capacity (4ml)
with the water sample.
Tilt meter to discard about 0.2mL water in order to leave room for
liquid reagent.
NOTE: The calibration of the meter is based on a water temperature between
14°C and 28°C. If temperature is below 14°C, your final Ammonia value may read low.
FILL METER WITH SAMPLE
Ammonia (NH3) Test Procedure
NH3
NH
3
(Ammonia Kit 486654 - Reagent and Strips)
(Total Iron Kit 486650 - Reducer and Strips)

5
Dip the eXact® Strip Micro PO4, Part No. 486814 into the CELL and immediately press
READ. This starts the 20 SECOND countdown timer. During this time move the strip in a gentle
back and forth motion. Remove and discard the strip after “1” on the display disappears.
The meter will automatically start
to count down for 120 seconds. After the 120 seconds, the
cursor will move across the display
while the meter prepares to measure the sample. Record
result displayed (this result is automatically stored in PO4).
DIP STRIP - (read carefully and follow procedure closely)
4
Press the ZERO/ON button. The cursor will move across the display, followed by 0.00 PPM.
Sample is ready for testing.
ZERO METER
1
Press the ZERO/ON button to power the meter on; the display will show all annunciators,
then the current MENU selection, followed by the last reading.
TURN METER ON
2
Press and re-press the MENU button until the display shows the parameter PO4.
SELECT TEST: PO4
3
Rinse the CELL at least 3 times with the water sample you will be testing - rinsing minimizes
the potential for cross-contamination from a previous test. Finally, fill cell to capacity (4ml) with
the water sample. NOTE: The calibration of the meter is based on a water temperature between
12°C and 31°C. If temperature is below 12°C, your final Phosphate value may read low.
FILL METER WITH SAMPLE
Phosphate (PO4) Test Procedure
6
PO
4
PO4
BT-pH Test Procedure
BT-PH
PH5
Press the ZERO/ON button to power the meter on; the display will show all annunciators,
then the current MENU selection, followed by the last reading.
TURN METER ON
1
Dip the eXact® Strip Micro BT-PH, Part No. 486652 into the CELL and immediately press READ.
This starts the 20 SECOND countdown timer. During this time move the strip in a gentle back
and forth motion. Remove and discard the strip after “1” on the display disappears.
The
cursor will move across the display
while the meter prepares to measure the sample. Record
result displayed (this result is automatically stored in PH5).
DIP STRIP AND PRESS “READ”
5
Press the ZERO/ON button. The cursor will move across the display followed by 0.00.
Sample is ready for testing.
ZERO METER
4
Rinse the CELL at least 3 times with the water sample you will be testing - rinsing minimizes
the potential for cross-contamination from a previous test. Finally, fill cell to capacity (4ml)
with the water sample.
FILL METER WITH SAMPLE
3
Press and re-press the MENU button until the display shows the parameter PH5.
SELECT TEST: PH5
2
(Phosphate Kit 486814 - Strips only)
(BT-pH Kit 486652 - Strips only)

5
Dip the eXact® Strip Micro S2-, Part No. 486818-B into the CELL and immediately press READ.
This starts the 20 SECOND countdown timer. During this time move the strip in a gentle back
and forth motion. If water temperature is below 20°C, remove and discard the strip after “1”
on the display disappears. If water temperature is above 20°C, remove and discard the strip
after “10” on the display appears. The meter will automatically, at time “0”, start
to count up
for 180 seconds. After the 180 seconds, the cursor will move across the display
while the
meter prepares to measure the sample. Record result displayed (this result is automatically
stored in SS6). NOTE: Maximum detection is 1.10 ppm, however best accuracy at less than
20°C is for levels less than 0.70 ppm.
DIP STRIP AND PRESS “READ”
4
Add 4 drops of eXact® Reagent S2-, Part No. 486818-A. Press the ZERO/ON button. The
cursor will move across the display, followed by 0.00 PPM. Sample is ready for testing.
ZERO METER
1
Press the ZERO/ON button to power the meter on; the display will show all annunciators,
then the current MENU selection, followed by the last reading.
TURN METER ON
2
Press and re-press the MENU button until the display shows the parameter SS6.
SELECT TEST: SS6
3
Rinse the CELL at least 3 times with the water sample you will be testing - rinsing minimizes the
potential for cross-contamination from a previous test. Finally, fill cell to capacity (4ml) with the
water sample. Tilt meter to discard about 0.2mL water in order to leave room for liquid reagent.
NOTE: The calibration of the meter is based on a typical well water temperature of greater
than 20°C (68°F) and uses a 20-second dip (see step 5).
FILL METER WITH SAMPLE
Sulfide (as S2-) Test Procedure
7
S
2-
SS6
1
Remove one (1) eXact® Strip Micro, part number is dependent upon the test being run,
from the bottle before beginning the test. Set the strip in a dry, convenient place and
recap the bottle immediately.
REMOVE STRIP
6
Dip the eXact® Strip Micro (or add Reagent) into the CELL immediately press READ. This starts
the 20 SECOND countdown timer. During this time move the strip in a gentle back and forth motion.
Remove and discard the strip after “1” on the display disappears. The cursor will move across
the display while the meter prepares to measure the sample. Record result displayed (this result is
automatically stored in TR7). After testing is completed, rinse cell immediately.
DIP STRIP AND PRESS “READ”
5
Press the ZERO/ON button. The cursor will move across the display, followed by 100 %T.
The sample is ready for testing.
ZERO METER
2
Press the ZERO/ON button to power the meter on; the display will show all annunciators,
then the current MENU selection, followed by the last reading.
TURN METER ON
3
Press and re-press the MENU button until the display shows the parameter TR7.
Some of the tests listed on the chart on page 11 will require the TR7 MENU and a
conversion chart available at www.sensafe.com.
SELECT TEST: TR7
4
Rinse the CELL at least 3 times with the water sample you will be testing - rinsing
minimizes the potential for cross-contamination from a previous test. Finally, fill cell to
capacity (4ml) with the water sample.
FILL METER WITH SAMPLE
Transmission Test Procedure
TR
TR7
(Sulfide Kit 486818 - Reagent and Strips)

8
5
Dip the eXact® Strip Micro Biguanide, Part No. 486810 into the CELL and immediately press
READ. This starts the 20 SECOND countdown timer. During this time move the strip in a
gentle back and forth motion. Remove and discard the strip after “1” on the display
disappears.
The cursor will move across the display
while the meter prepares to measure the
sample. Record result displayed (this result is automatically stored in TR7).
DIP STRIP AND PRESS “READ”
6
Find the “TR” result in the table below to determine the Biguanide concentration in ppm (parts per
million). (Example: a “TR” result of 65.3 (use only the 65 for the chart) equals a Biguanide value of
19 ppm). Record result.
After testing is completed, rinse cell immediately.
USE TABLE
4
Press the ZERO/ON button. The cursor will move across the display, followed by 100 %T.
Sample is ready for testing.
ZERO METER
1
Press the ZERO/ON button to power the meter on; the display will show all annunciators, then
the current MENU selection, followed by the last reading.
TURN METER ON
2
Press and re-press the MENU button until the display shows the parameter TR7.
SELECT TEST: TR7
3
Rinse the CELL at least 3 times with the water sample you will be testing - rinsing minimizes
the potential for cross-contamination from a previous test. Finally, fill cell to capacity (4ml) with
the water sample.
FILL METER WITH SAMPLE
Biguanide Test Procedure
Biguanide Table
Sulfate results require the table below. Follow eXact® Micro 8 Biguanide Test
Procedure (above) using
eXact® Strip Micro Biguanide, Part No. 486810.
eXact® Strip Micro Biguanide, Part No. 486810 - for 4mL Samples
Rev. 111109-BT
tr
90
80
70
60
50
40
30
20
10
0
9876543210
<1
1
9
16
23
31
40
52
70
>100
<1
1
10
17
24
32
41
54
72
>100
<1
2
10
17
25
33
42
55
75
>100
<1
3
11
18
26
34
43
57
77
>100
<1
4
12
19
26
35
45
58
80
>100
<1
5
12
20
27
35
46
60
84
>100
<1
6
13
20
28
36
47
62
88
>100
<1
7
14
21
29
37
48
64
93
>100
<1
7
15
22
29
38
50
66
100
>100
<1
8
15
23
30
39
51
68
>100
>100
Biguanide
TR7
(Biguanide Kit 486810 - Strips only)

9
1.
2.
3.
4.
5.
6.
7.
8.
9.
10.
11.
12.
13.
14.
15.
16.
17.
18.
eXact® Micro 8 Tips For Best Accuracy
About the eXact® Micro 8 TR7 MENU
Become familiar with the meter and the different tests by reading the instructions carefully.
Observe the dip time (as required for the test) for accurate results.
Be sure the CELL is filled to capacity (4ml), especially for tests like pH.
Rinse the CELL with clean water immediately after completing the test. (Some test reagents will
stain or coat the CELL)
Just before testing, rinse the sample CELL with the sample water several times to get a
representative sample. (Use deionized or distilled water for rinsing if you have a limited sample).
Store the meter and all test materials out of direct sunlight and away from chemical storage areas.
Minimize exposure of meter and test reagents to heat above 100°F (38°C).
Dry the outside of the meter when testing is complete or before storage of the meter.
Each eXact
®
Strip Micro is valid for ONLY one test. Discard strip after single use in regular trash
that is inaccessible to children and pets.
Each bottle of eXact
®
Strip Micro contains the quantity of strips notated on the bottle. Due to the
manufacturing process, you may find one or two strips that are noticeably smaller or larger in
width than the normal strips in the bottle for the test. These should be discarded. Using these
strips may give unreliable results.
Each conversion table supplied has a unique revision number located in the bottom right corner of
the chart. It is recommended that you visit www.sensafe.com at least every 6 months to check for
any updated revisions for conversion chart or methodology.
Tests are calibrated at 75°F +/- 2°F (24°C +/- 1°C). If water sample is 60°F (15°C) or cooler, most
tests may require additional time for full chemical development. At the end of the normal test
procedure, press READ again and compare value after this countdown. If the new value is higher,
then use the new value for your result. When possible, it is recommended that the water sample
be warmed to room temperature before testing.
Normally the mixing cap is used for tests like Iron. A stirrer (such as a clean, plastic coffee stirrer)
may also be used in place of the mixing cap. Use the stirrer with gentle, back and forth motion,
during the 20-second countdown timing.
Our lab testing with the Micro 8 meter has shown that zeroing and measuring of the sample does
not require any cell cover for accurate results, even in full sunlight.
Remove batteries when meter is not used for more than a month.
Clean cell with 0.1N HCl before filling the meter with the sample to be tested for Iron. This is
especially important when testing low levels of Iron after running a Sulfide test, which uses an Iron
reagent. It is recommended that Iron testing be done before Sulfide testing if possible.
Rinse the CELL with clean water immediately after completing the test. A stained cell will need to
be cleaned according to procedure as described in About the Built-In Cell/Cleaning Cell (page 10).
Do not drop meter. This may cause meter to stop functioning or result in broken CELL or display.
These kinds of meter failures are not covered by the warranty.
TR7: Different ions react with a specific indicator to form a color or a precipitate that proportionally indicates the
concentration of the ion present by the transmission value found. A conversion chart is then used to determine the
ion concentration using the transmission value. The advantage of using transmission measurement is that many
different ions can be determined in one MENU, which expands the flexibility of this meter. Once you have
determined the %T result for the test you ran, find this %T result in the conversion chart and read the concentration
corresponding for this %T. The Micro 8 gives the %T values as 3 digits (example 99.2) but only the first two digits are
used in the charts (round off your %T value to two digits). Tests that can be used with the Micro 8 in TR7 MENU are
listed on page 11. Typically, common tests are supplied with the conversion chart in this booklet. For conversion
charts and information about the tests not given in this booklet, visit our website. You can also use the TR7 MENU to
develop your own custom conversion chart for unusual samples or uncommon tests
.

10
The following are some common messages that may be displayed, including error messages. If an
error message other than those listed below is displayed, please contact technical support in the USA
at (803) 329-0162 (ext. 0).
LCD Message
HI
LO
LO
Description
In READ mode: test sample concentration is above
the measurement range (test specific).
In READ mode: test sample concentration is below
the measurement range (test specific).
In ZERO mode: sample absorbance (due to a
cloudy or colored sample or a dirty cell) is too high
to zero, the meter will read “LO”.
Low battery indication.
Corrective Action
Dilute and retest. Dilution Kit available
(Part Number 487200) (Not valid for pH)
Sample value is below detection capability of
meter.
Dilute sample, filter sample, or clean cell. Meter
will not function until valid ZERO is recorded
Replace the batteries.
About The Built-In Cell/Cleaning Cell
The built-in CELL is transparent plastic and, when filled to the top, contains 4ml. The sturdy CELL design
will last for over 20,000 readings. Scratches on the CELL will not interfere or compromise the accuracy of
the readings because of its fixed position. For best accuracy, rinse cell with clean water immediately after a
test is completed. Do not use solvents, such as acetone, to clean the cell. When the CELL becomes stained
or cloudy from repeated testing, or when the meter does not blank when you press the ZERO/ON button,
the cell needs to be cleaned. Clean as follows: Fill cell with clean water and move the Cell cleaning brush
up-and-down and back-and-forth along the walls of the cell. Afterwards, rinse the cell and the meter is ready
for use again. Cleaning the cell regularly is especially recommended after you run a test that is using
turbidity or precipitation chemistry for analysis (Calcium, Potassium, Cyanuric Acid, etc.).
eXact® Micro 8 Meter Messages
eXact® Photometer 2-Year Limited Warranty
Registration of your eXact® photometer must be received within 30 days from date of purchase to
activate the warranty. The eXact
®
photometer is warranted to be free from defects in materials and
workmanship for a period of two (2) years from the date of purchase by the customer. ITS will repair or
replace any part of the product which is deemed to be faulty or otherwise defective. The non-transferable
warranty does not cover product damage caused by abuse (such as crushing a tablet in the cell),
dropping meter, or improper use. If the meter is faulty or otherwise defective contact ITS by phone
(+1-803-329-9712 Ext. 0) or email (its@sensafe.com) to describe the problem and obtain a return
authorization form before returning the photometer to ITS. Damage caused by improper packing of the
photometer for return shipment to ITS will not be covered by the warranty. Customer is responsible for
shipping charges to ITS. ITS pays postage when photometer is returned to customer. A maximum
processing fee of $75 will be charged for repair or replacement of non-registered photometers and
damages not covered by this warranty. Registration for warranty is possible by phone (+1-803-329-9712
Ext. 0) or online at http://www.sensafe.com/micro/warranty/ (Personal data is kept confidential)
1. Unscrew the O-ring sealed battery cover counter-clockwise. Use proper sized pliers if necessary.
Do not disturb the sealing O-ring.
2. Remove the used batteries.
3. Install 4 new AAA batteries following the diagram for correct polarity (see below).
4. Replace the battery cover. Be sure to tighten the cover securely. This is necessary for meter to
be waterproof.
5. Dispose of the used batteries in accordance with your
local regulations.
6. Press ZERO/ON button to confirm the meter turns on.
The meter is now ready for operation.
7. Meter will not work if battery orientation is incorrect.
8. Meter will not work if battery contacts are bent due to a dropped meter. Confirmed by rattling in meter.
To Install/Replace “AAA” Batteries:
TOP VIEW

11
eXact® Strip Micro 8 Reagent Reorder Information
* Results utilize the Tr-7 (Transmission) meter function and require the use of a conversion table. See respective test procedures
for more information and tables.
PRICES & SPECIFICATIONS SUBJECT TO CHANGE WITHOUT NOTICE.
If your required procedure is not listed in this manual, please see the back page for our contact information.
NOTE: Because most of our products are test strips or use reagents that have little or no hazard in the quantity sold, MSDS
sheets are not supplied with the test. The exceptions are the Manganese (486606) test, which comes with 2 strips and one liquid
reagent (PAN); Fluoride (486643) test, which is a liquid reagent (SPADNS), and Iron (481623) test, which is a powder reagent.
Hydrazine (486649), Ammonia (486654), and Sulfide (486818) use a liquid and strip.
To ensure optimal performance, store your eXact® kit in a cool, dry place away from
excess heat (below 100°F / 38°C), moisture, and oxidizers such as Chlorine and Bromine.
N/A
N/A
0.00 - 1.90 ppm
0.00 - 7.5 ppm
0.00 - 7.5 ppm
0.00 - 2.00 ppm
0.00 - 4.0 ppm
5.0 - 10.0
0.01 - 1.1 ppm
Coming Soon
0 - 600 ppm
1 - 100 ppm
20 - 900 ppm
3 - 300 ppm
5 - 75 ppm
0.2 - 20 ppm
5.3 - 2.7
1 - 10 ppm
Coming Soon
0 - 200 ppm
3 - 580 NTU
PARAMETER
No.
PART NO. # OF TESTS DETECTION RANGE CHEMISTRY
eXact
®
Strip Micro (4mL ) Reagent Specifications - For use with eXact
®
Micro 8, Part no. 486800
eXact
®
Micro 8 (meter only)
Carrying case with foam
Cyanide
Total Iron, TPTZ (Fe+2/Fe+3)
Iron, Ferrous (Fe+2)
Ammonia
Phosphate
BT–pH
Sulfide
Alkalinity , Total*
Aluminum*
Biguanide*
Calcium (as CaCO3)*
Chloride (as NaCl)*
Cyanuric Acid*
Magnesium*
CG-pH
Potassium*
Protein (as BSA)*
Sulfate (as SO4)*
Turbidity*
1
2
3
4
5
6
7
8
9
10
11
12
13
14
15
16
17
18
19
486800
486001
486812
486650
486631
486654
486814
486652
486818
486816
486821
486810
486629
481657
481652
486813
486817
486621
486620
486608
None
N/A
N/A
50
50
50
25
50
100
50
50
50
50
50
25
130
50
50
50
50
50
No Reagent
N/A
N/A
Isonicotinic/Barbituric Acid
TPTZ + Reducer
TPTZ
Salicylate method
Molybdate Method
Bromothymol blue + Thymol blue
DPD Reagent / FeCl3
Alizarin Red S + Citrate
Pyrocatechol Violet
Bromophenol Blue
Oxalic Acid
Silver (ppt)
Melamine
Ammonium Phosphate (ppt)
Bromcresol Green
Tetraphenylborate
Sulfosalicylic Acid
Barium (ppt)
Turbidity

12
For US Inquiries and Re-Orders:
Industrial Test Systems, Inc.
1875 Langston Street,
Rock Hill, SC 29730 USA
Phone: 1-800-861-9712 - INSIDE THE U.S.
1-803-329-9712 - OUTSIDE THE U.S.
Fax: 1-803-329-9743
ITS@SENSAFE.COM
WWW.SENSAFE.COM
www.poolcheckonline.com
For European & Middle East Inquiries and Re-Orders:
ITS Europe, LTD
The UK Centre for Homeland Security
Building 7, Chilmark
Salisbury, Wiltshire SP3 5DU, United Kingdom
Tel: +44 (0)1722 717911 Fax: +44 (0) 1722 717941
SALES@SENSAFE.COM
WWW.ITSEUROPE.CO.UK
www.poolcheckonline.com
eXact® Strip Micro FE TPTZ Accuracy
Micr o 8 TPTZ Iron v s. DR890 TPTZ Ir on
y = 0.9811x + 0.0281
R
2
= 0.9988
0.0
1.0
2.0
3.0
4.0
5.0
6.0
7.0
8.0
0.0 1.0 2.0 3.0 4.0 5.0 6.0 7.0 8.0
DR 890 ( ppm)
Micro 8 ( ppm)
Total Iron results are compared using the eXact® Strip Micro FE TPTZ with the eXact® Reagent EZ OPEN
REDUCER in the eXact® Micro 8 Meter using Menu FE2 versus Hach® DR890 Colorimeter in Program 39 using
Hach® TPTZ Iron powder pillows (cat 26087-99).
Contact Information
DR890 Micro 8
0.00 0.00
0.04 0.05
0.07 0.08
0.12 0.12
0.28 0.29
0.54 0.55
0.77 0.75
1.01 1.04
1.07 1.05
1.37 1.39
1.63 1.61
1.86* 1.88
2.15* 2.13
2.35* 2.30
2.60* 2.61
2.88* 2.96
5.00* 4.95
5.53* 5.63
7.40* 7.10
*Sample diluted appropriately
to read within the limits of the
Hach® DR890, which is 1.80 ppm.
(486800-K)
Kit Includes:
1 eXact® Micro 8 Meter
(486800)
eXact® Strip Micro Total Iron (TPTZ)
(486631)
eXact® Strip Micro Phosphate
(486814)
eXact® Strip Micro Ammonia
(486654)
eXact® Strip Micro Sulfide
(486818)
eXact® Strip Micro BT-pH
(486652)
1 Mixing Cap
1 Cell Cleaning Brush
Plastic Carrying Case
The eXact® Micro 8 Kit
 Loading...