

Page 1

Music-Tel A
Release 2.7
April 2008
Promotion On Hold IP / MP3 System
Installation and Programming Manual
Page 2

Music-Tel A Installation and Operation Manual Table of Contents
Table of Contents
1. Introduction ............................................................................................................................1
1.1 Manual Audience and Contents.........................................................................................1
1.2 System Description............................................................................................................2
1.2.1 General Description ......................................................................................................2
1.2.2 Physical Description .....................................................................................................3
1.2.3 Technical Data ..............................................................................................................5
1.2.3.1 Programming Cable Specifications..........................................................................5
1.2.3.2 Network Cable Specifications..................................................................................5
1.2.3.3 Technical Specifications ..........................................................................................5
1.2.3.4 IPMAN-A Hardware Plug.......................................................................................6
1.2.3.5 Technical Specifications ..........................................................................................7
1.3 Standard Workflow ...........................................................................................................8
2. Installation............................................................................................................................11
2.1 Unpacking........................................................................................................................11
2.2 General Installation Information .....................................................................................12
2.3 Pre-Installation Instructions.............................................................................................14
2.3.1 Music-Tel A Installation with DHCP Instructions .....................................................15
2.3.2 Music-Tel A Installation Instructions.........................................................................15
3. MAN Software .....................................................................................................................17
3.1 General ............................................................................................................................17
3.2 MusicTel Utility Program (MAN)...................................................................................17
3.2.1 File Menu....................................................................................................................20
3.2.1.1 New........................................................................................................................21
3.2.1.2 Open.......................................................................................................................21
3.2.1.3 Close ......................................................................................................................21
3.2.1.4 Save........................................................................................................................21
3.2.1.5 Save As ..................................................................................................................22
3.2.1.6 Open Default..........................................................................................................22
3.2.1.7 Print........................................................................................................................23
Installation and Operation Manual i
Page 3

Music-Tel A Installation and Operation Manual Table of Contents
3.2.1.8 Print Preview..........................................................................................................23
3.2.1.9 Print Setup..............................................................................................................24
3.2.1.10 Recent File .............................................................................................................25
3.2.1.11 Options...................................................................................................................25
3.2.1.12 Exit.........................................................................................................................26
3.2.2 View Menu .................................................................................................................26
3.2.2.1 Toolbar...................................................................................................................26
3.2.2.2 Status Bar...............................................................................................................26
3.2.3 Communication...........................................................................................................27
3.2.3.1 Read Configuration................................................................................................27
3.2.3.2 Send Configuration ................................................................................................28
3.2.3.3 Read Recordings ....................................................................................................29
3.2.3.4 Update Recordings.................................................................................................30
3.2.3.5 Delete Recordings..................................................................................................33
3.2.3.6 Backup ...................................................................................................................35
3.2.3.7 Restore ...................................................................................................................36
3.2.3.8 Software Upgrade ..................................................................................................37
3.2.3.9 Communication Selection......................................................................................38
3.2.3.10 Password ................................................................................................................39
3.2.3.11 Reset.......................................................................................................................39
3.2.4 Parameters...................................................................................................................40
3.2.4.1 Network Settings....................................................................................................40
3.2.4.2 Date & Time ..........................................................................................................41
3.2.4.3 IPMAN-A Server IP Address ................................................................................41
3.2.4.4 Polling Interval.......................................................................................................42
3.2.4.5 MAC Address ........................................................................................................43
3.2.4.6 SNMP Parameters options .....................................................................................44
3.2.5 Tasks ...........................................................................................................................46
3.2.5.1 View Audio Files ...................................................................................................46
3.2.5.2 Tasks ......................................................................................................................47
3.2.5.3 Task Schedule.........................................................................................................49
3.2.5.4 Holidays..................................................................................................................50
3.2.6 Statistics......................................................................................................................51
3.2.6.1 General...................................................................................................................51
3.2.7 Help.............................................................................................................................51
3.2.7.1 Help Topics............................................................................................................51
3.2.7.2 About MAN ...........................................................................................................51
3.3 File Types ........................................................................................................................52
3.4 IPMAN-A Server (IPMAN-A)........................................................................................53
3.4.1 Device Setup...............................................................................................................54
3.4.1.1 First Configuration.................................................................................................55
3.4.1.2 Set Task..................................................................................................................56
3.4.1.3 Target Browse........................................................................................................57
3.4.1.4 Action Browse .......................................................................................................58
3.4.1.5 Create Configuration File ......................................................................................59
Installation and Operation Manual ii
Page 4

Music-Tel A Installation and Operation Manual Table of Contents
3.4.1.6 Browse for the Configuration or MP3 File Name .................................................59
3.4.2 Device Maintenance ...................................................................................................60
3.4.2.1 New Device............................................................................................................61
3.4.2.2 Adding a New Device or New Folder....................................................................61
3.4.2.3 Edit Device.............................................................................................................63
3.4.2.4 Delete Device.........................................................................................................64
3.4.2.5 Current Configuration............................................................................................64
3.4.2.6 Set New Task .........................................................................................................64
3.4.2.7 View Task ..............................................................................................................64
3.4.3 Monitor .......................................................................................................................65
3.4.3.1 Reports ...................................................................................................................65
3.4.4 File Types ...................................................................................................................66
4. MP3 File Size Calculation Table .........................................................................................67
Installation and Operation Manual iii
Page 5

Music-Tel A Installation and Operation Manual Introduction
1. Introduction
1.1 Manual Audience and Contents
This manual is intended for System Installers and Administrators, responsible for the
installation, setup and programming of the Music-Tel A system. It contains the description of
the MAN and IPMAN-A programs.
The Music-Tel A solution does not include the IPMAN-A server/administration program.
This program can be bought separately and comes with a plug. IPMAN-A enhances the
capabilities of the Music-Tel A by providing a centralized manager and database.
NOTE
This manual contains the following:
Chapter Heading
Please read this manual before the installation, programming and operation of the
Music-Tel A.
1
2
3
4
5
Introduction
Installation
MAN Utility Software
IPMAN-A Server Software
MP3 File Size Calculation Table
1
Page 6

Music-Tel A Installation and Operation Manual Introduction
1.2 System Description
1.2.1 General Description
The Music-Tel A a unique Music and Messaging on Hold solution. The unit is an advanced
self-updating solution that generates an IP call to the predefined server in its MoH Production
House. It then downloads its dedicated MP3 files and schedules. The unit can, depending on
the file size, hold up to 100 MP3 music/messaging files. The maximum size of an MP3 file is
4MB.
The Music-Tel A offers 32MB of recording space and has an internal clock to schedule daily,
weekly and holiday playback lists.
The IPMAN-A Server (IP Manager for Music-Tel A) is a PC-based central administration
program providing MP3 files and predetermined schedules on request to Music-Tel A units in
the field. Containing all required information for unit identification, it responds to IP calls
from registered Music-Tel A units. The MAN (Music-Tel A Utility Program) is used for
configuring and maintaining the Music-Tel A. The user-friendly MAN is capable of
preparing configuration and maintenance information for the Music-Tel A and offering it to
the Music-Tel A via IPMAN-A.
The configuration file contains the list of announcement messages, predefined schedules for
playing messages, adjustments of the volume level via software, flash memory usage
statistics and other configuration settings.
Main Features:
z Self-updating – it regularly requests updates from its associated production house
Dynamic Host Configuration Protocol (DHCP) recognition that allows easy IP
connection for fast and easy installation
The Simple Network Management Protocol (SNMP) support. SNMP protocol can be
used in
network management systems to monitor MusicTel-A devices for conditions
that warrant administrative attention.
z Capacity of up to 100 MP3 music/messaging files provides you:
32 MB of high quality recording capacity
1 hour and 40 minutes of MP3 files (when using the recommended format)
z Up to 32MB storage memory
z Internal clock for scheduling daily, weekly and holiday playbacks
z Two audio outputs (one for a 600 and another for an 8 connection)
2
Page 7
Music-Tel A Installation and Operation Manual Introduction
1.2.2 Physical Description
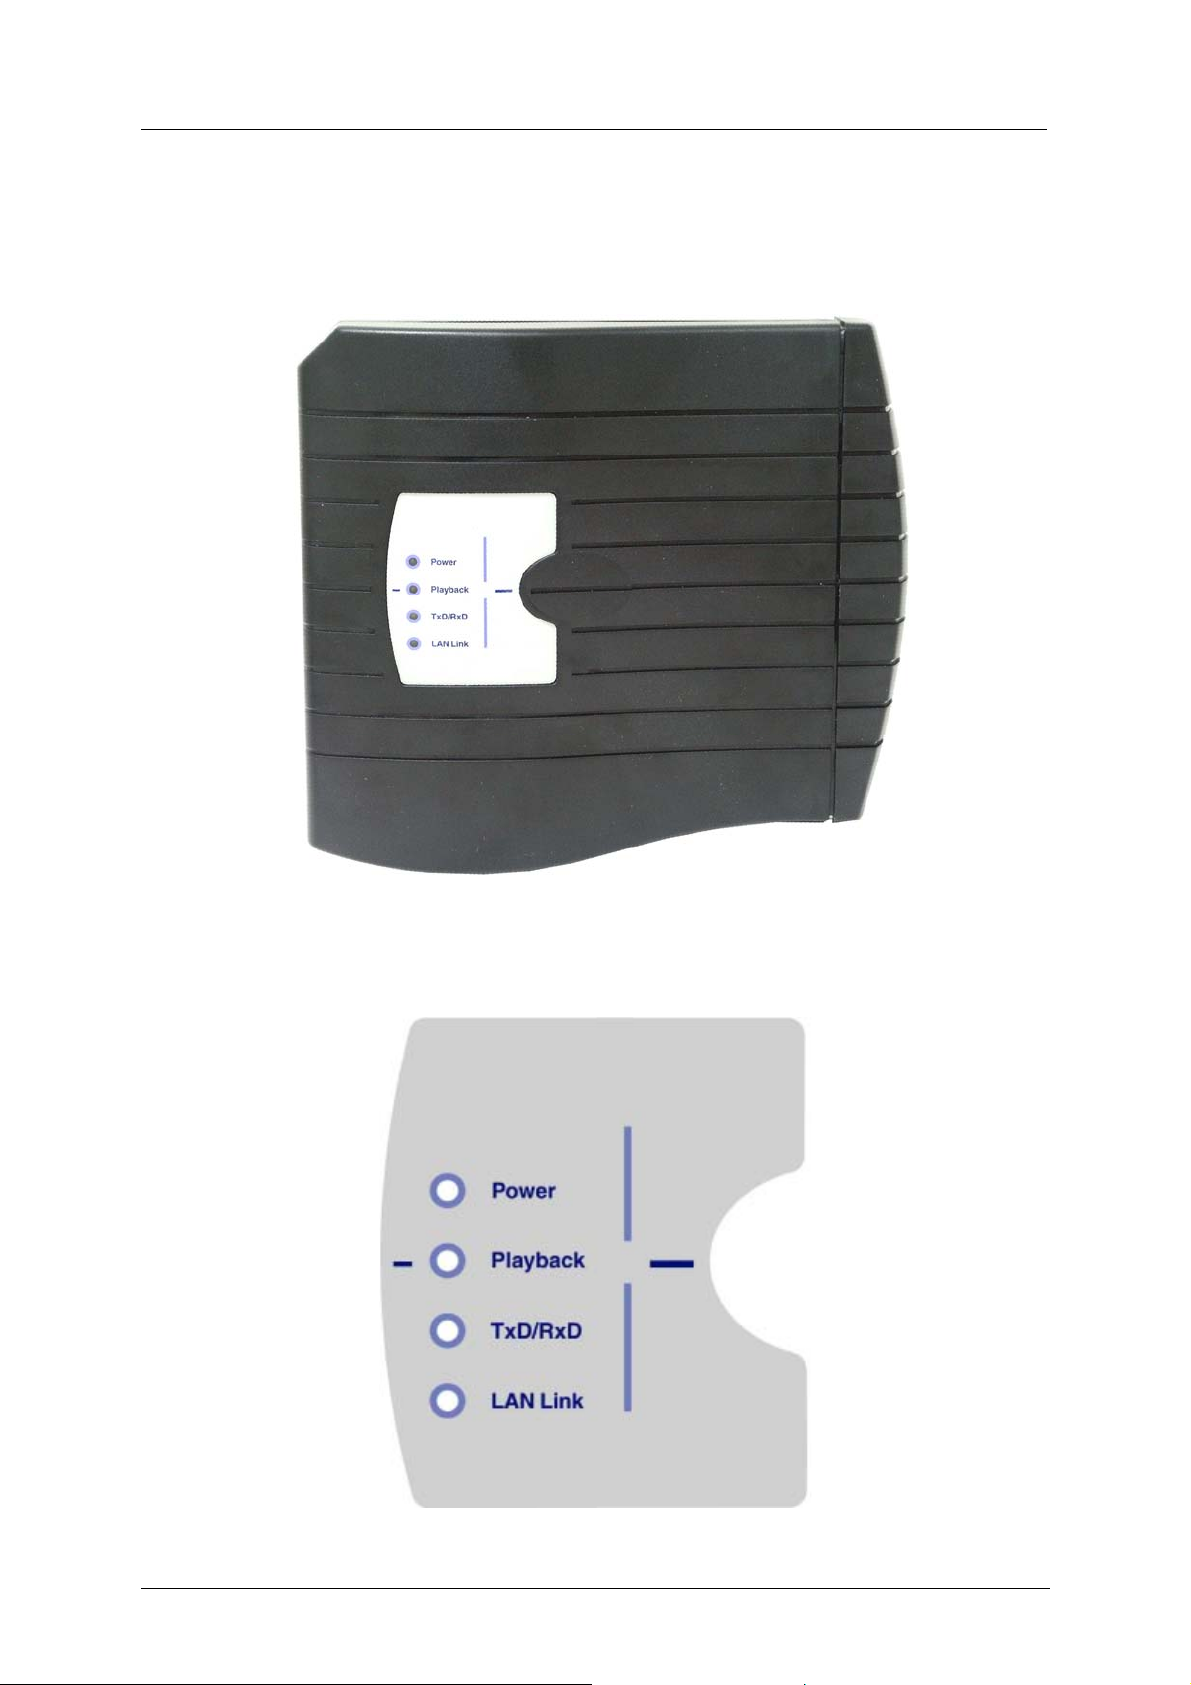
The Music-Tel A has been designed to fit in the same housing as all ITS Music family
products.
Figure 1-1: Front View
The indicators on the front panel are displayed in Figure
1-2:
Figure 1-2: Front Panel Indicators
3
Page 8
Music-Tel A Installation and Operation Manual Introduction
Indicator Color Function
Power Green Indicates that the power is on.
Playback Red Indicates that information is played back to a caller
TxD/RxD Yellow Indicates that the Music-Tel A is in data transfer/receive
mode
LAN Link Green Indicates that the Music-Tel A is connected to and accessed
via the LAN
NOTE
The “Power” LED Off status in the power mode indicates that System seeking the
IPMAN-A server in the network.
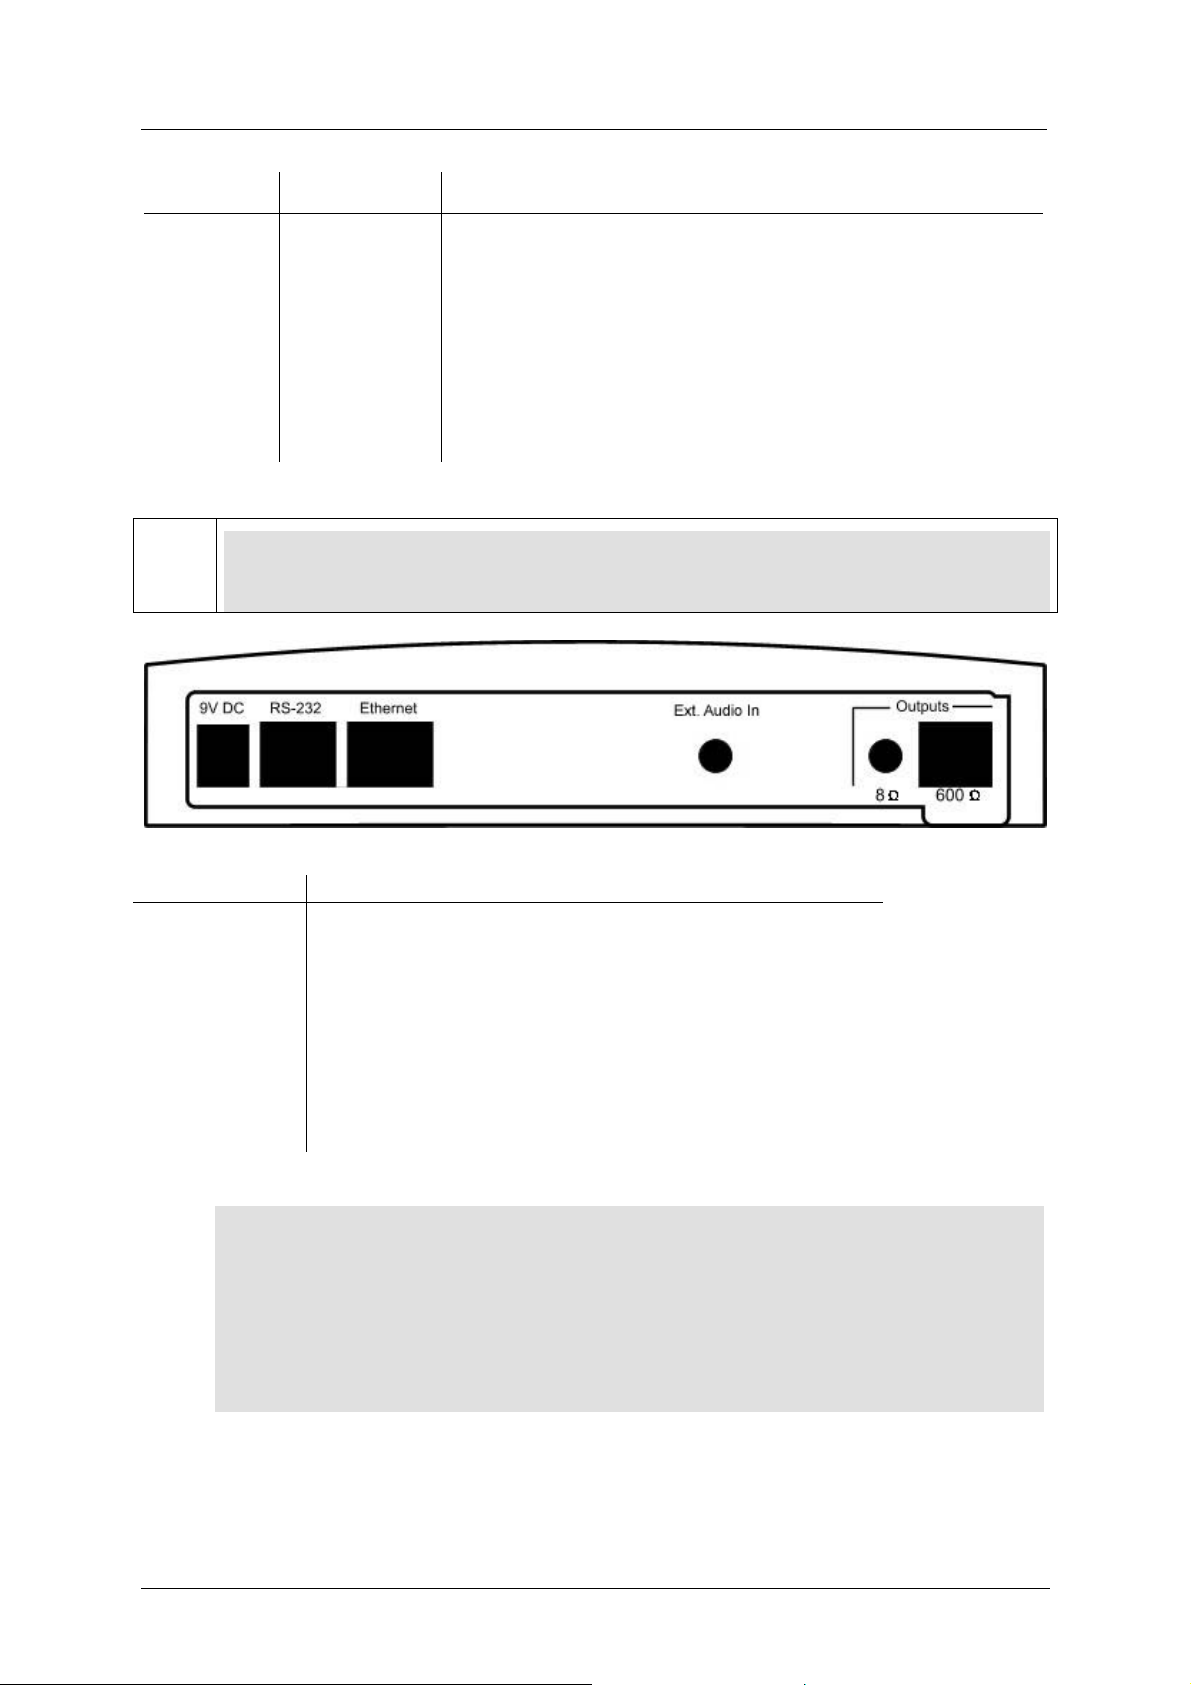
Figure 1-3: Side View – Connectors
Connector Function
9V DC Connection of power supply
RS-232 Connection to PC COM port
Ethernet Network connection
Output – 8 Connection to the PABX (see note)
Output – 600 Connection to the PABX (see note)
Ext. Audio In Connection from external audio device
NOTE
The Music-Tel A can only be connected to one PABX at a time, but at the same
time, the 8 connector can be used for Audio Output.
The Audio output and Audio input connectors are only Mono.
4
Page 9
Music-Tel A Installation and Operation Manual Introduction
1.2.3 Technical Data
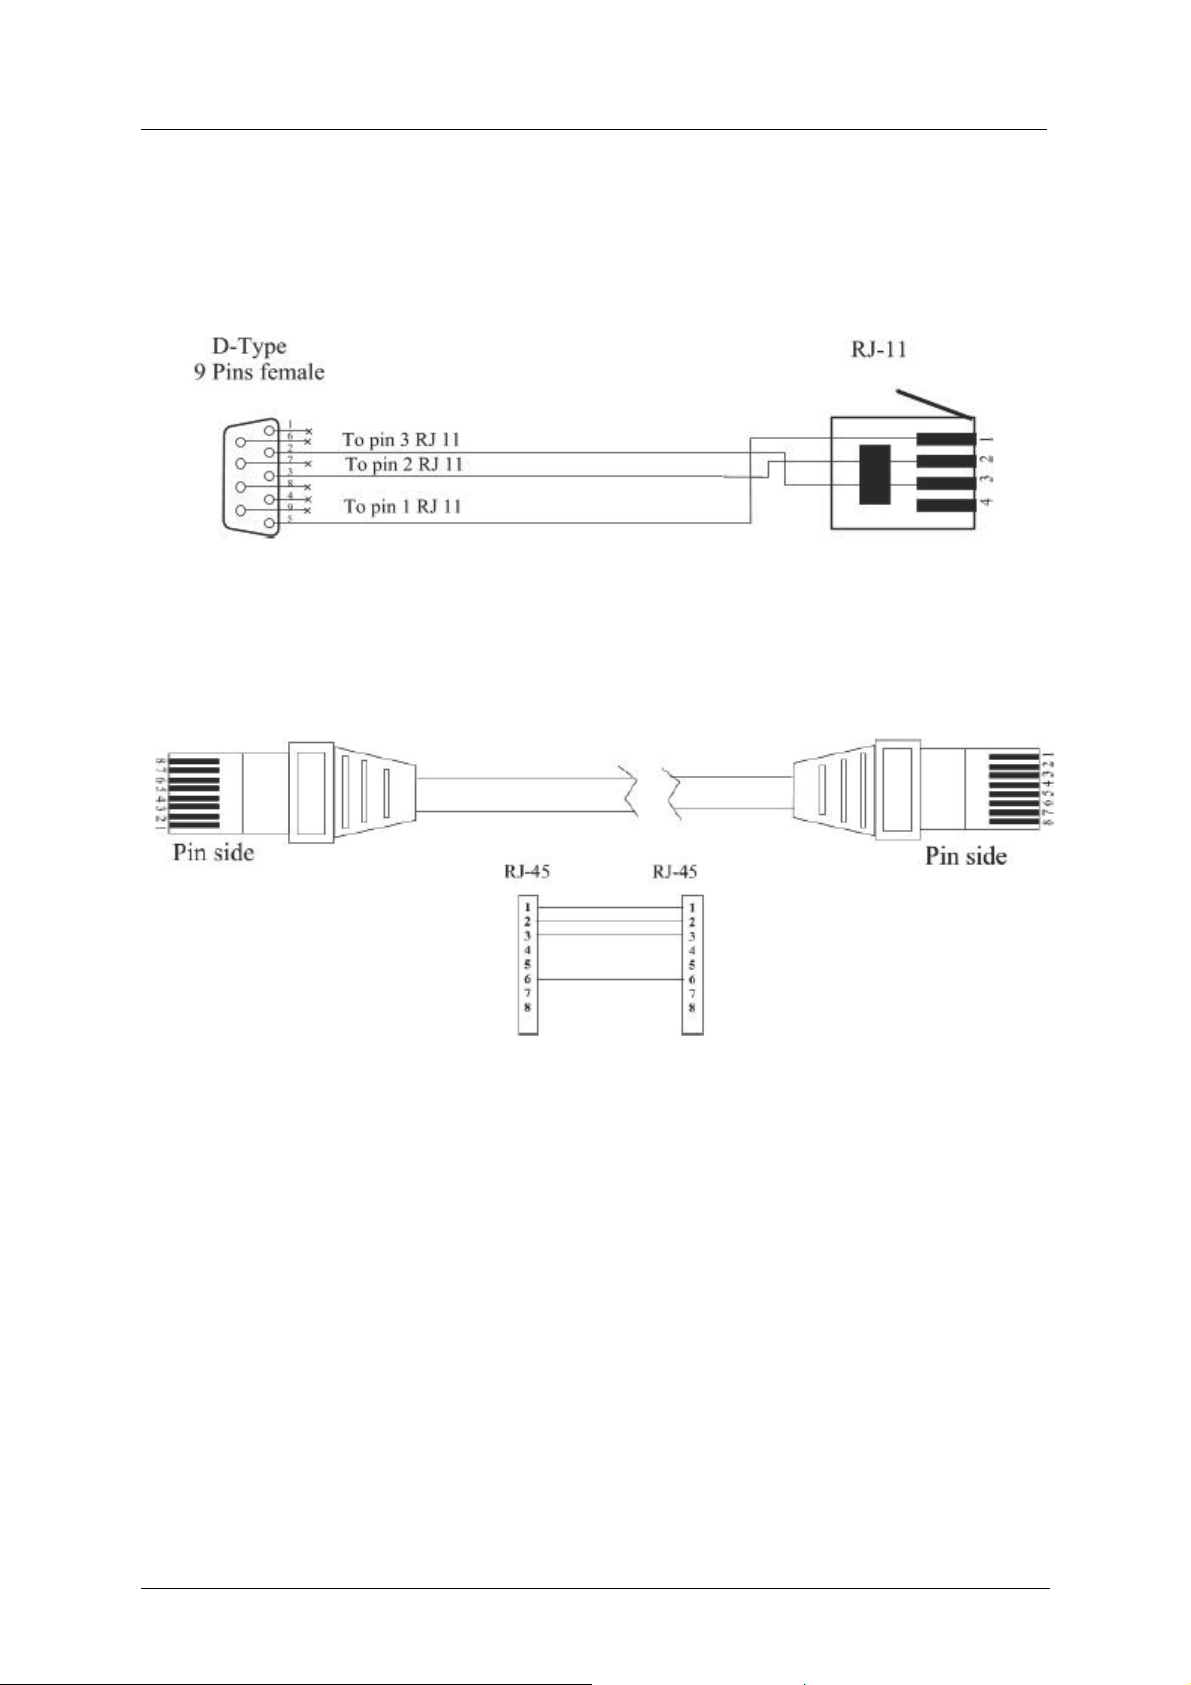
1.2.3.1 Programming Cable Specifications
The Music-Tel A comes with a special programming cable, illustrated in Figure 1-4:
Figure 1-4: RS-232 Cable specifications
1.2.3.2 Network Cable Specifications
The Music-Tel A comes with a network cable. The specifications are displayed in Figure 1-5.
Figure 1-5: Network cable
1.2.3.3 Technical Specifications
The IPMAN-A Server should have the following specifications:
z Pentium 4 - 2.4GHz
z 256MB RAM
z Windows 2000 Server
z Display setup as 1024x768 True Color (32 bit)
z Sound card
5
Page 10
Music-Tel A Installation and Operation Manual Introduction
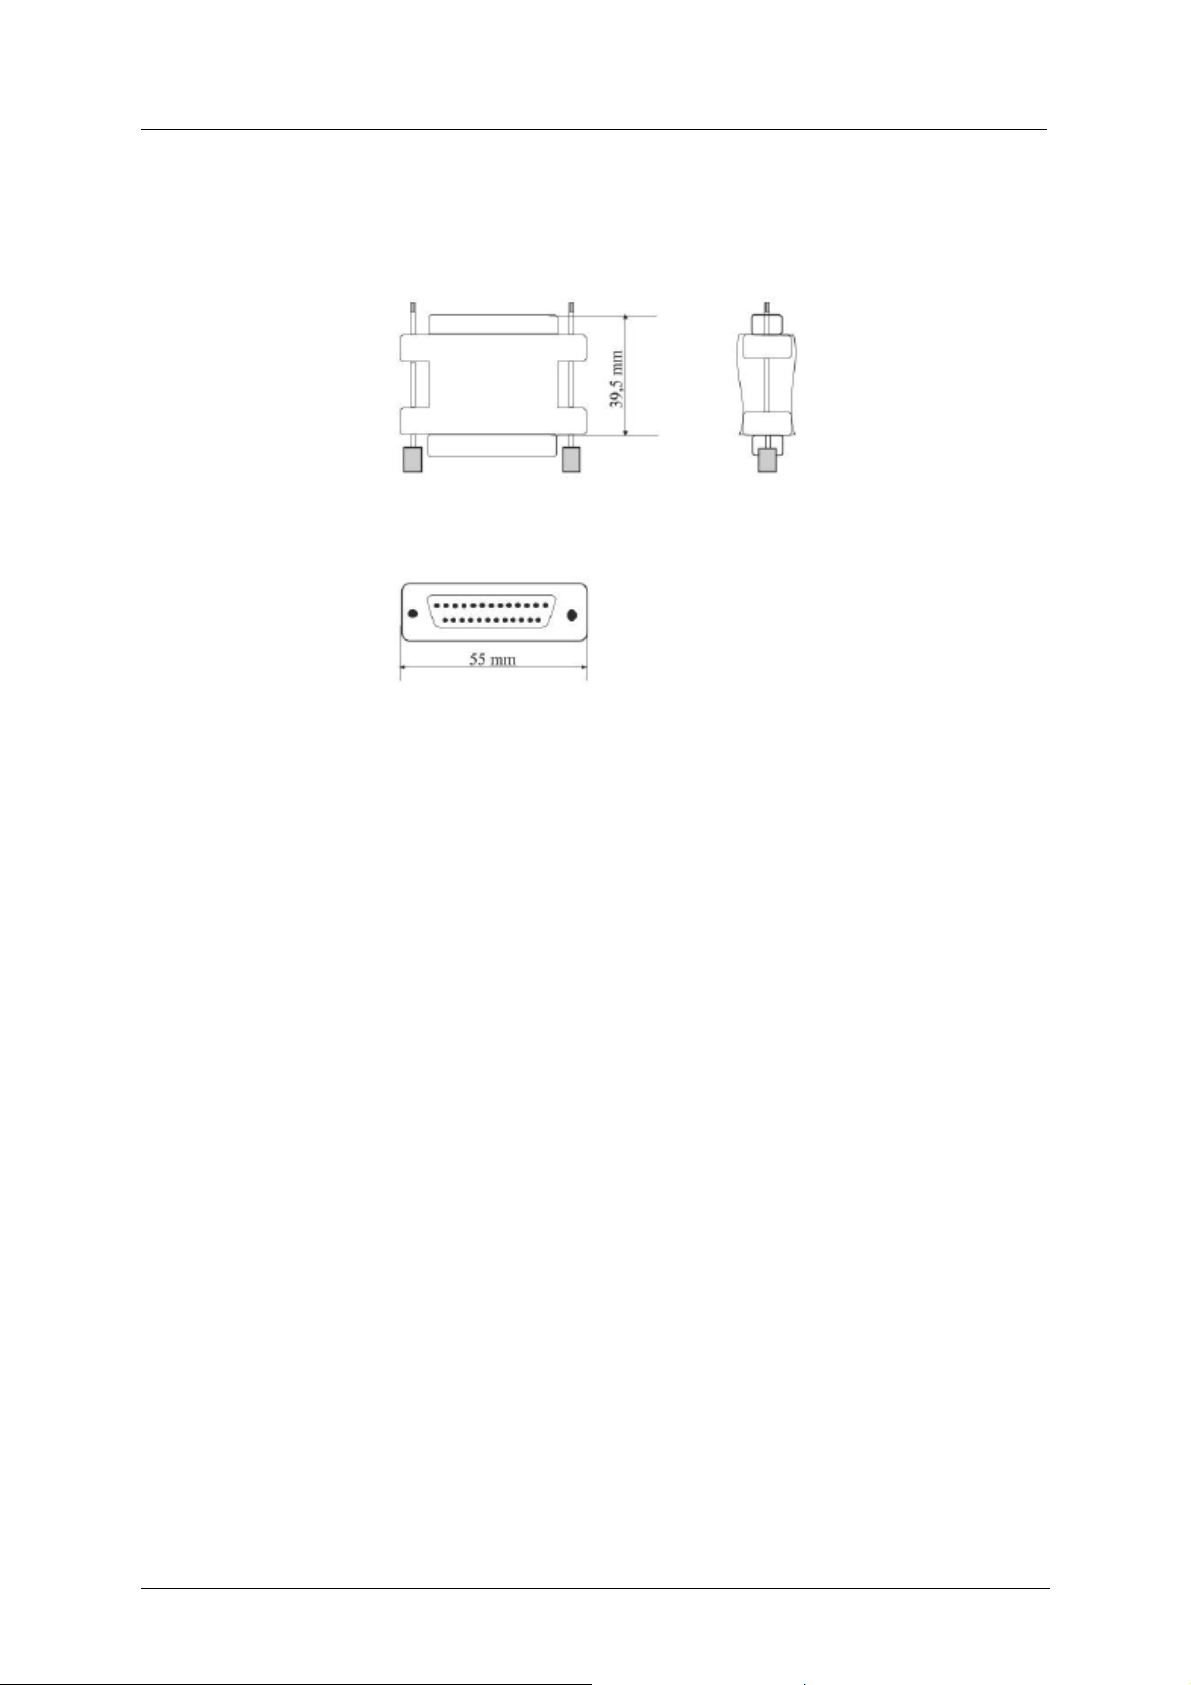
1.2.3.4 IP MAN-A Hardware Plug
The IPMAN-A server only works with a hardware plug that needs to be inserted in the
Parallel (printer) port of the server.
Figure 1-6: IPMAN-A Hardware Plug
6
Page 11

Music-Tel A Installation and Operation Manual Introduction
1.2.3.5 Technical Specifications
Memory Capacity
Utility Program
32MB
MAN
Remote Server Program IPMAN-A
Ethernet Connection
RJ-45 socket (10/100Mbps)
Serial Communication Port RJ-11 socket (RS-232 up to 115000 bps)
Supported File Format MP3
Daily Task Scheduler, weekly Yes
Maximum Number of Recorded Files Depending on File size up to 100
Programmable RS-232 or network (using TCP/IP capabilities)
Real-Time Clock Yes
Watch Dog Yes
Flash Memory For 32MB recording time and 32MB buffer
Display 4 LEDs
Audio output to audio equipment
Up to 2.0V p-p@ on impedance 8 (3.5mm
mono/stereo audio socket)
Audio output to PBX Up to 1.5V p-p@ on impedance 600 (RJ-11
socket, pin 2 and 3)
Audio input from external devices
Power Supply
Up to 0dB audio input > lOk (3.5mm
mono/stereo audio socket)
Input: 110VAC, 60Hz
Output: 220VAC, 50Hz
9VDC, 800mA
Dimensions(HxWxD) 200x220x3 0mm
7.9x8.7x1.2 inch
7
Page 12
Music-Tel A Installation and Operation Manual Introduction
1.3 Standard Workflow
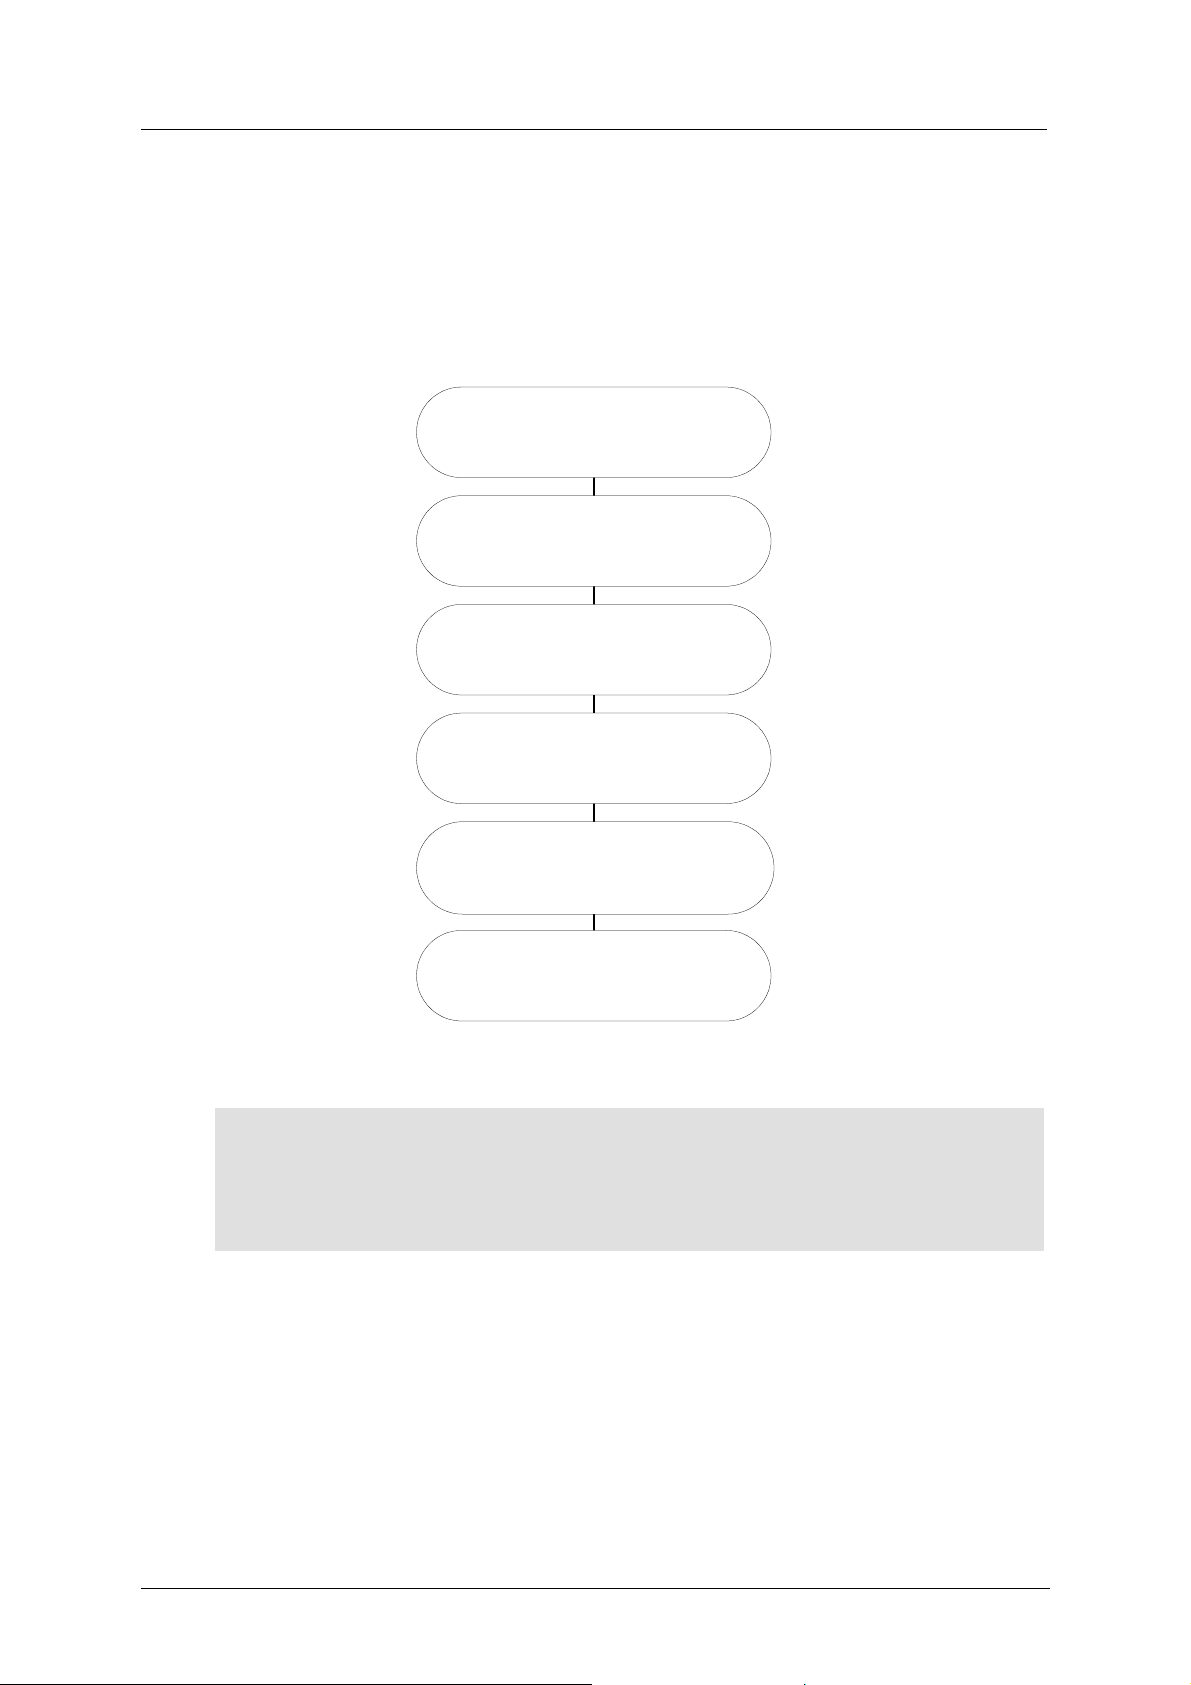
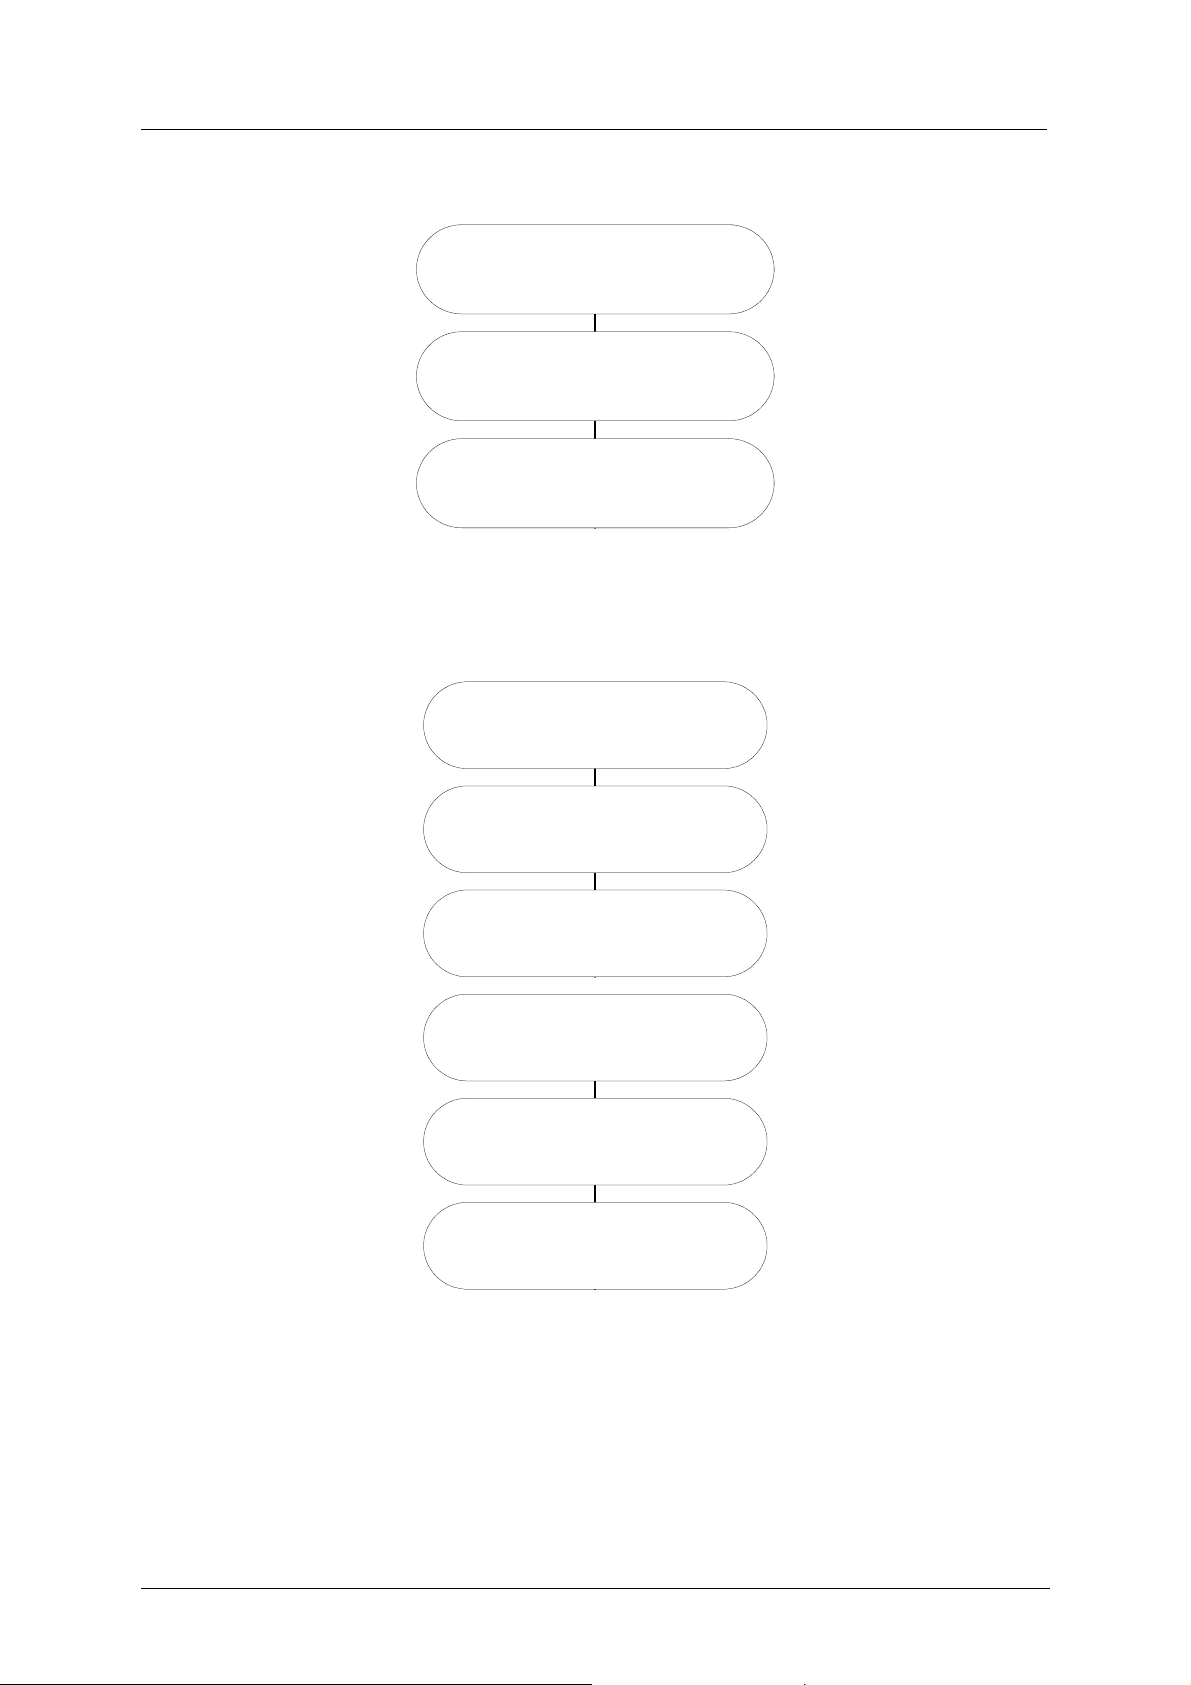
The following pictures show a schematic overview of a basic installation of the Music-Tel A,
including the two different methods of installation in the network:
Pre-Installation (Pn)
Unpack Unit (P1)
Connect RS-232 and Power
Supply (P2)
Install IPMAN-A Server Software
(P3)
Check MAC Address of
REMOTE LINK IP (P4)
Add MAC Address of IPMAN-A
Server Database (P5)
Add IPMAN-A Server IP
Address and Date & Time (P6)
Figure 1-7: Music-Tel A Pre-Installation Flow
NOTE
P6 is a task that can be performed by the technician on location with MAN-A. If so,
this task should be moved to the task after I+D2 or I5.
8
Page 13
Music-Tel A Installation and Operation Manual Introduction
REMOTE LINK IP Ins tallation
with DHCP (I+DN)
Unpack Unit (I+DN)
Mount Unit on Location (I+D2)
Connect Power Network and
PABX (I+D3)
Figure 1-8: Music-Tel A Pre-Installation With DHCP
REMOTE LINK IP Installation
Unpack Unit (I1)
Mount Unit on Location (I2)
Connect RS-232 and Other
Cables (I3)
Communication Selection, COM
Port (I4)
Enter Network Properties (I5)
Remove RS2-232 (I6)
Figure 1-9: Music-Tel A Pre-Installation
9
Page 14
Music-Tel A Installation and Operation Manual Introduction
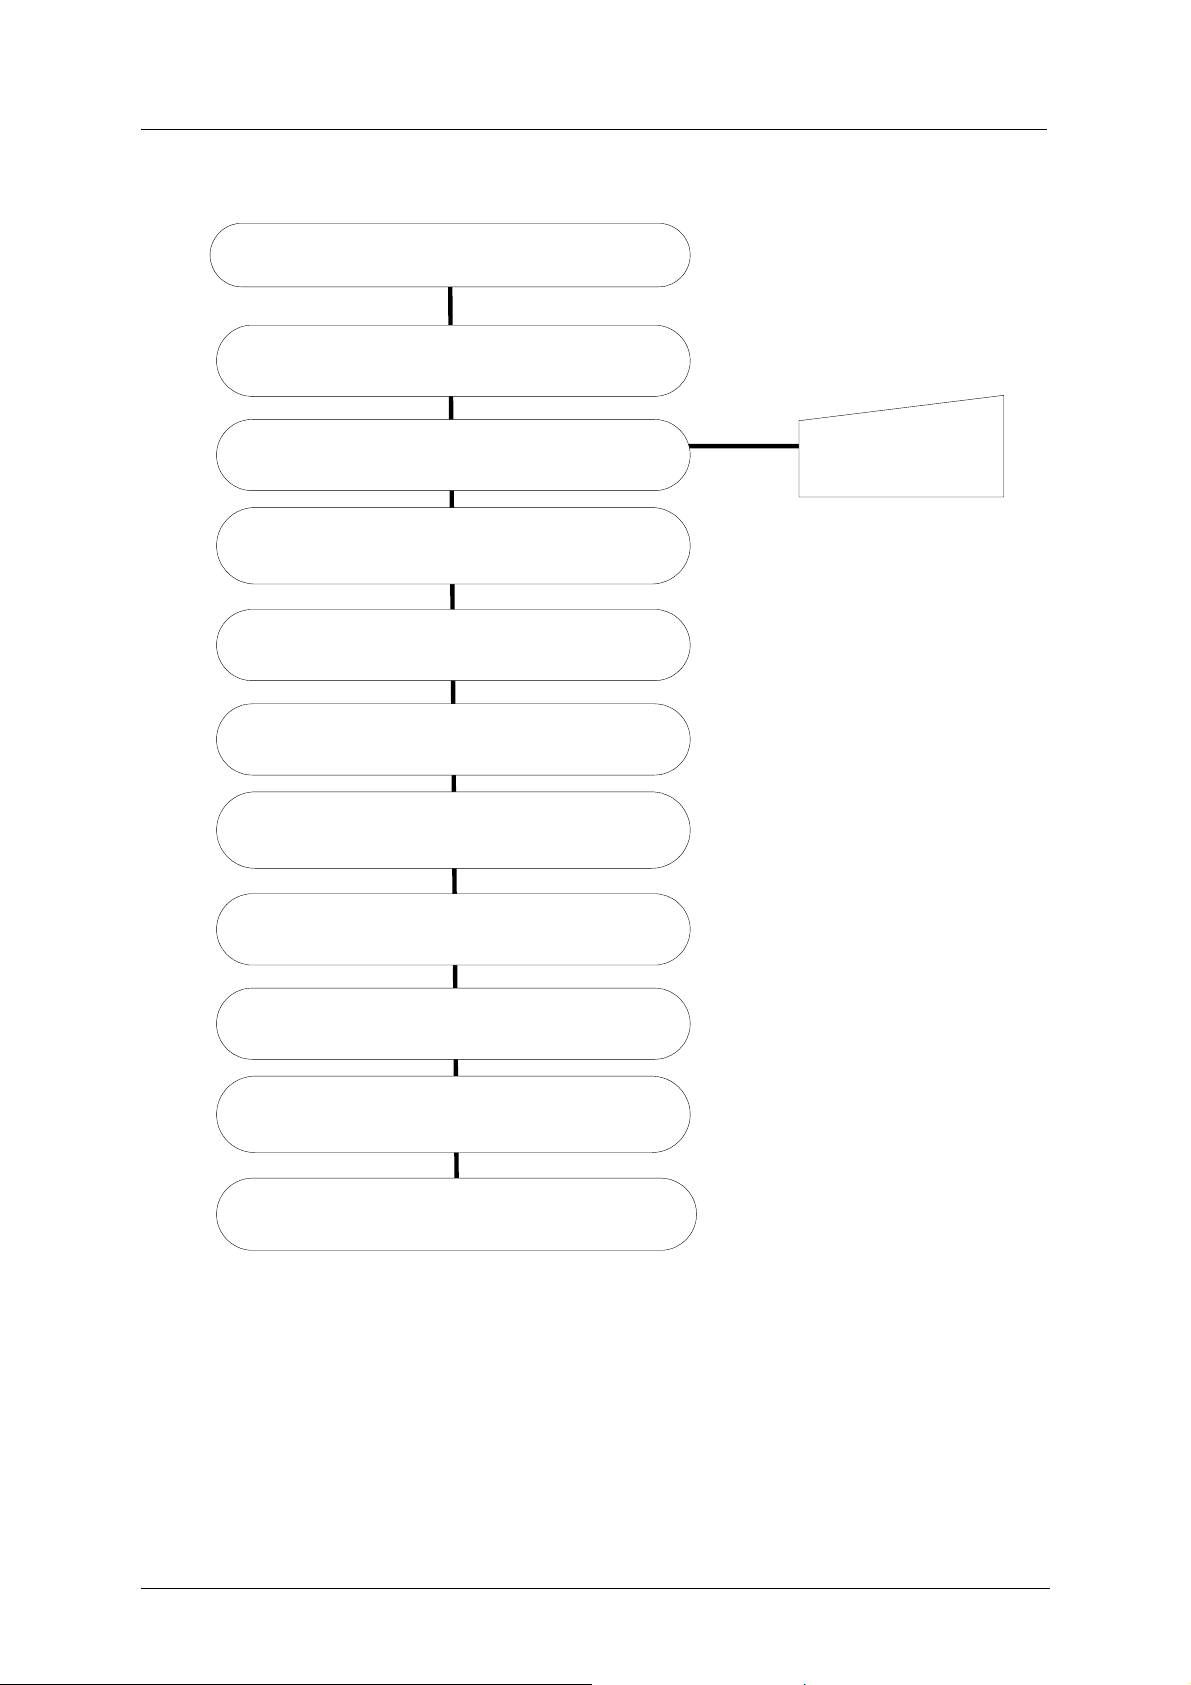
Initial IPMAN-A Remote Programming (RPn)
Device Maintenance (RP1)
After Initial polling, Set New Task (RP2)
Update Recording (RP4)
Update Current Configuration as a new Task (RP5)
Save Stored Config File as a copy and work on it
(RP6)
Task Editor (RP7)
View Audio Files (RP8)
Tasks (RP9)
Task Scheduler (RP10)
Prepare MP3 Files
(RP3)
Save Configuration (RP11)
Prepare Configuration File for Next Task (RP12)
Figure 1-10: Music-Tel A Pre-Installation Flow
10
Page 15

Music-Tel A Installation and Operation Manual Installation
2. Installation
2.1 Unpacking
The following table details the contents of the Music-Tel A package.
NOTE
Should the package be damaged or should items from the packing list be missing,
contact your distributor directly.
Nr. Item Quantity
1 Music-Tel A 1
2 Installation CD with MAN software, Manual, MP3 examples 1
3 Power Supply
Input: 110VAC, 60Hz or 220VAC, 50Hz
Output 9VDC, 800mA
4 Network cable RJ-45 - RJ-45 1
5 RS-232 cable D-Type 9 pin - RJ-11 1
6 Screws and plugs 2
7 Drill template 1
The contents of the IPMAN-A package are as follows:
Nr. Item Quantity
1
1 Installation CD with IPMAN-A Server software, MAN-A1
software, Manual, MP3 examples
2 Software/Hardware Plug
1
MAN-A is almost identical to MAN. The difference is that MAN-A does not contain the local communication
protocols and therefore is missing some menus and buttons.
11
1
Page 16
Music-Tel A Installation and Operation Manual Installation
2.2 General Installation Information
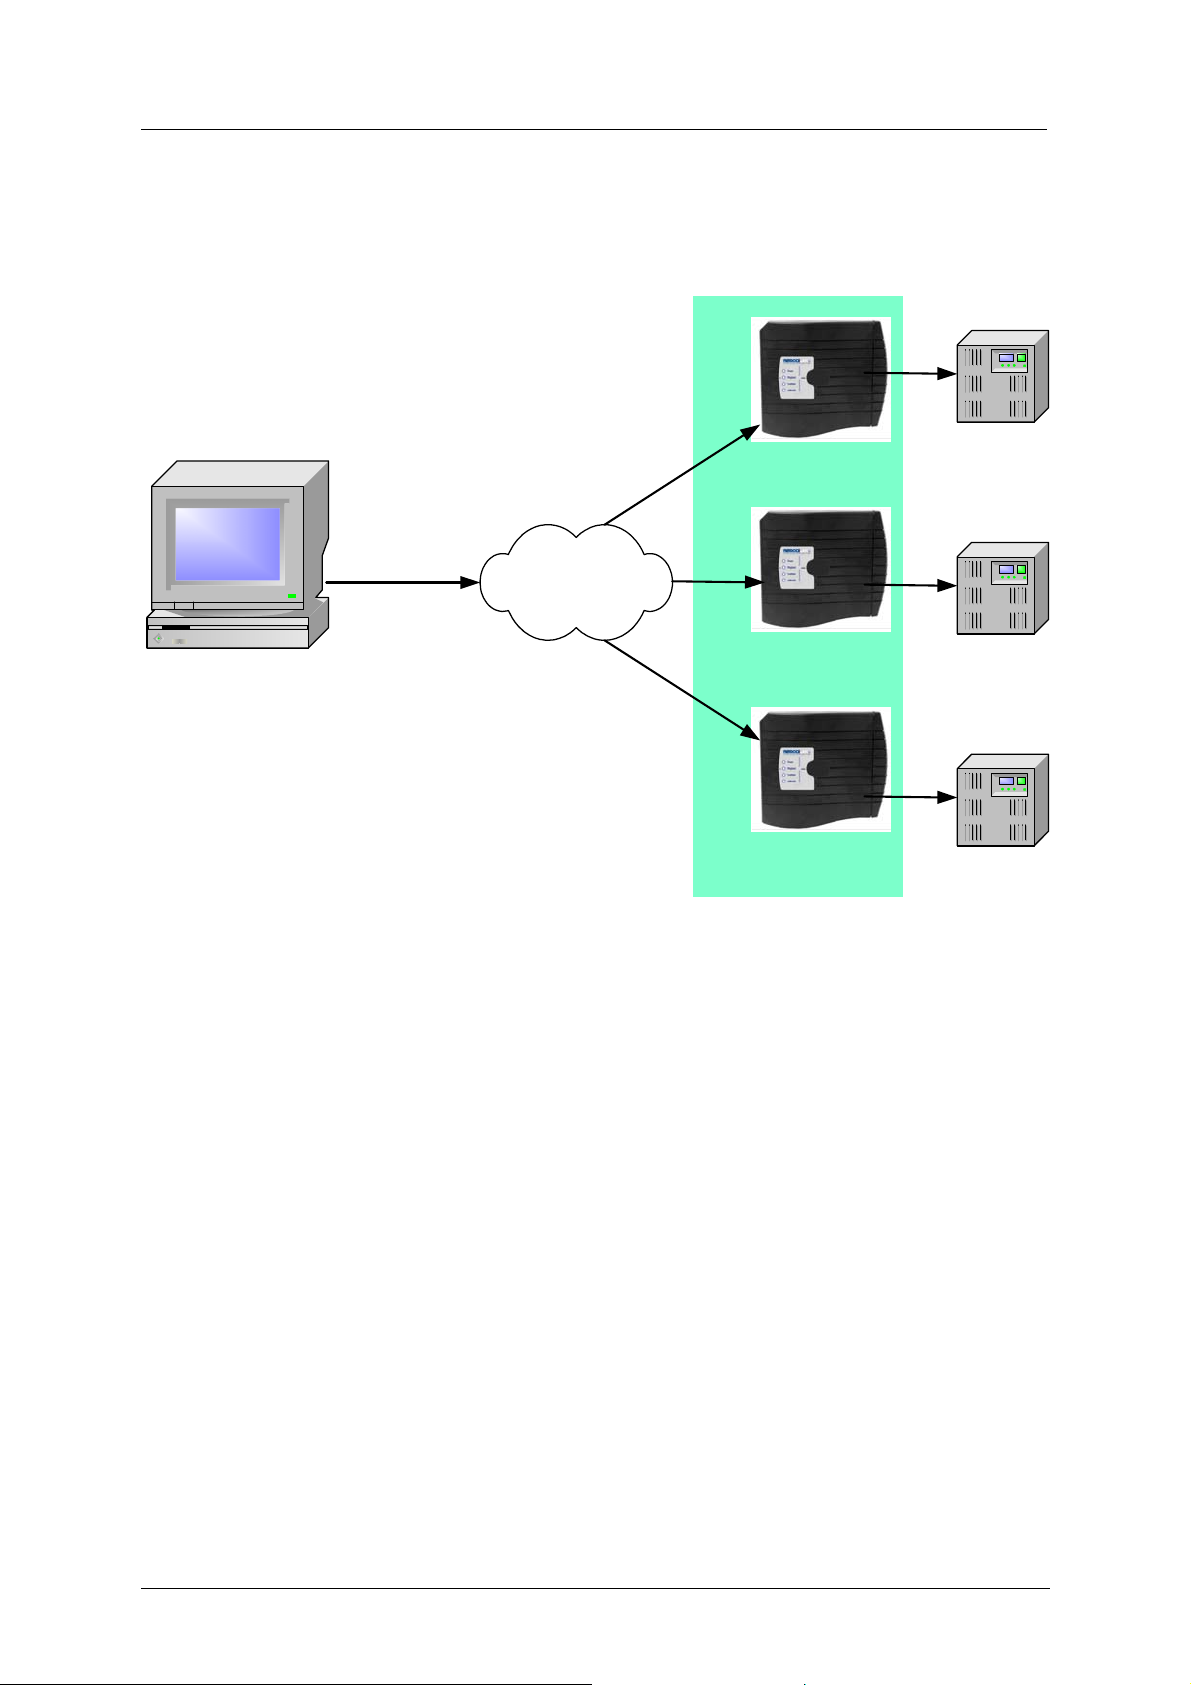
Figure 2-1 shows an example of a setup for the Music-Tel A:
PBX
MP3
Internet
MP3
Music-Tel A
Production
Music-Tel A
House
MP3
PBX
Music-Tel A units send an IP call to
the Production House server at
specific time intervals. IPMAN-A
software will provide MP3 files when
available.
Music-Tel A
PBX
Figure 2-1: Music-Tel A Pre-Installation Flow
The Music-Tel A environment is based on two components:
• The IPMAN-A server
• The Music-Tel A unit
The IPMAN-A Server is the center of the environment, where the administration of all
Music-Tel A units takes place, the units register after installation and the units are remotely
configured and updated.
The Music-Tel A unit is linked to the PABX and performs its Music on Hold function. The
unit checks regularly whether there is updated information available at the IPMAN-A Server
and downloads it. The regular check is called polling.
12
Page 17

Music-Tel A Installation and Operation Manual Installation
During the initial environment installation process, the IPMAN-A Server has to be defined in
the Network with a fixed IP address (a fixed location in the network). The next step is to add
all MAC addresses (Media Access Control address = unique hardware/Ethernet card number)
to the MAC database.
Each Music-Tel A unit has to be initialized with this IP address to be able to communicate
with the IPMAN-A Server. When a Music-Tel A unit is sent to its final location, additional
information will have to be added to the MAC database (address, contact, etc.)
The method of the Music-Tel A installation at its final location depends on whether a DHCP
(Dynamic Host Configuration Protocol) server is available in the network or not. This DHCP
server automatically assigns an IP address to the Music-Tel A unit in the network. In this case
the installation of the Music-Tel A unit will be physically placing the unit at its location,
connecting the power supply, network cable and the PBX to the unit. The Music-Tel A will
automatically start registering itself with the IPMAN-A Server and the configuration will be
handled remotely.
When the network does not have a DHCP server the Music-Tel A has to be initially installed
at its final location. In the Network Settings window you will have to insert the IP Address of
the Music-Tel A, Subnet Mask and Gateway IP Address (all provided by your local network
administrator). In the Device Selection window the Music-Tel A entry has to be added. It
needs to be named and its IP Address needs to be inserted. When using a PC for connecting
to the Music-Tel A, the filled in IP address is sufficient for the MAN to find it locally or
remote.
The MAN uses the TCP protocol and port 10254 is used for the data-transfer between the
MAN and the Music-Tel A.
NOTE
During startup of the Music-Tel A, an automatic check for the DHCP server is
taking place. This will be concluded within 4 minutes. Should the Music-Tel A not
find the DHCP server, the network parameters of the Music-Tel A will have to be
added via the RS-232 connection manually.
13
Page 18
Music-Tel A Installation and Operation Manual Installation
2.3 Pre-Installation Instructions
Before the Music-Tel A unit can be installed, the MAC address and final destination
information of the unit needs to be added to the database of the IPMAN-A Server.
• Insert the hardware plug in the Parallel (printer) Port of the server.
• Install the IPMAN-A Server software on the server.
• Check the MAC address of the Music-Tel A unit.
• Add the Music-Tel A to the device list.
• Add the MAC address and final destination information to the database.
NOTE
Make sure that the MAC Address is entered in the exact way as is written on the
device label.
• Connect the Music-Tel A via its RS-232 socket to the COM port of the PC.
• Connect the Power Supply to the Music-Tel A.
• Add the IPMAN-A Server IP address to the Parameters/IPMAN-A Server IP Address.
• Add the MAC Address of the device to the Parameters/MAC Address.
• Add the Date&Time and Polling Interval.
• Click OK.
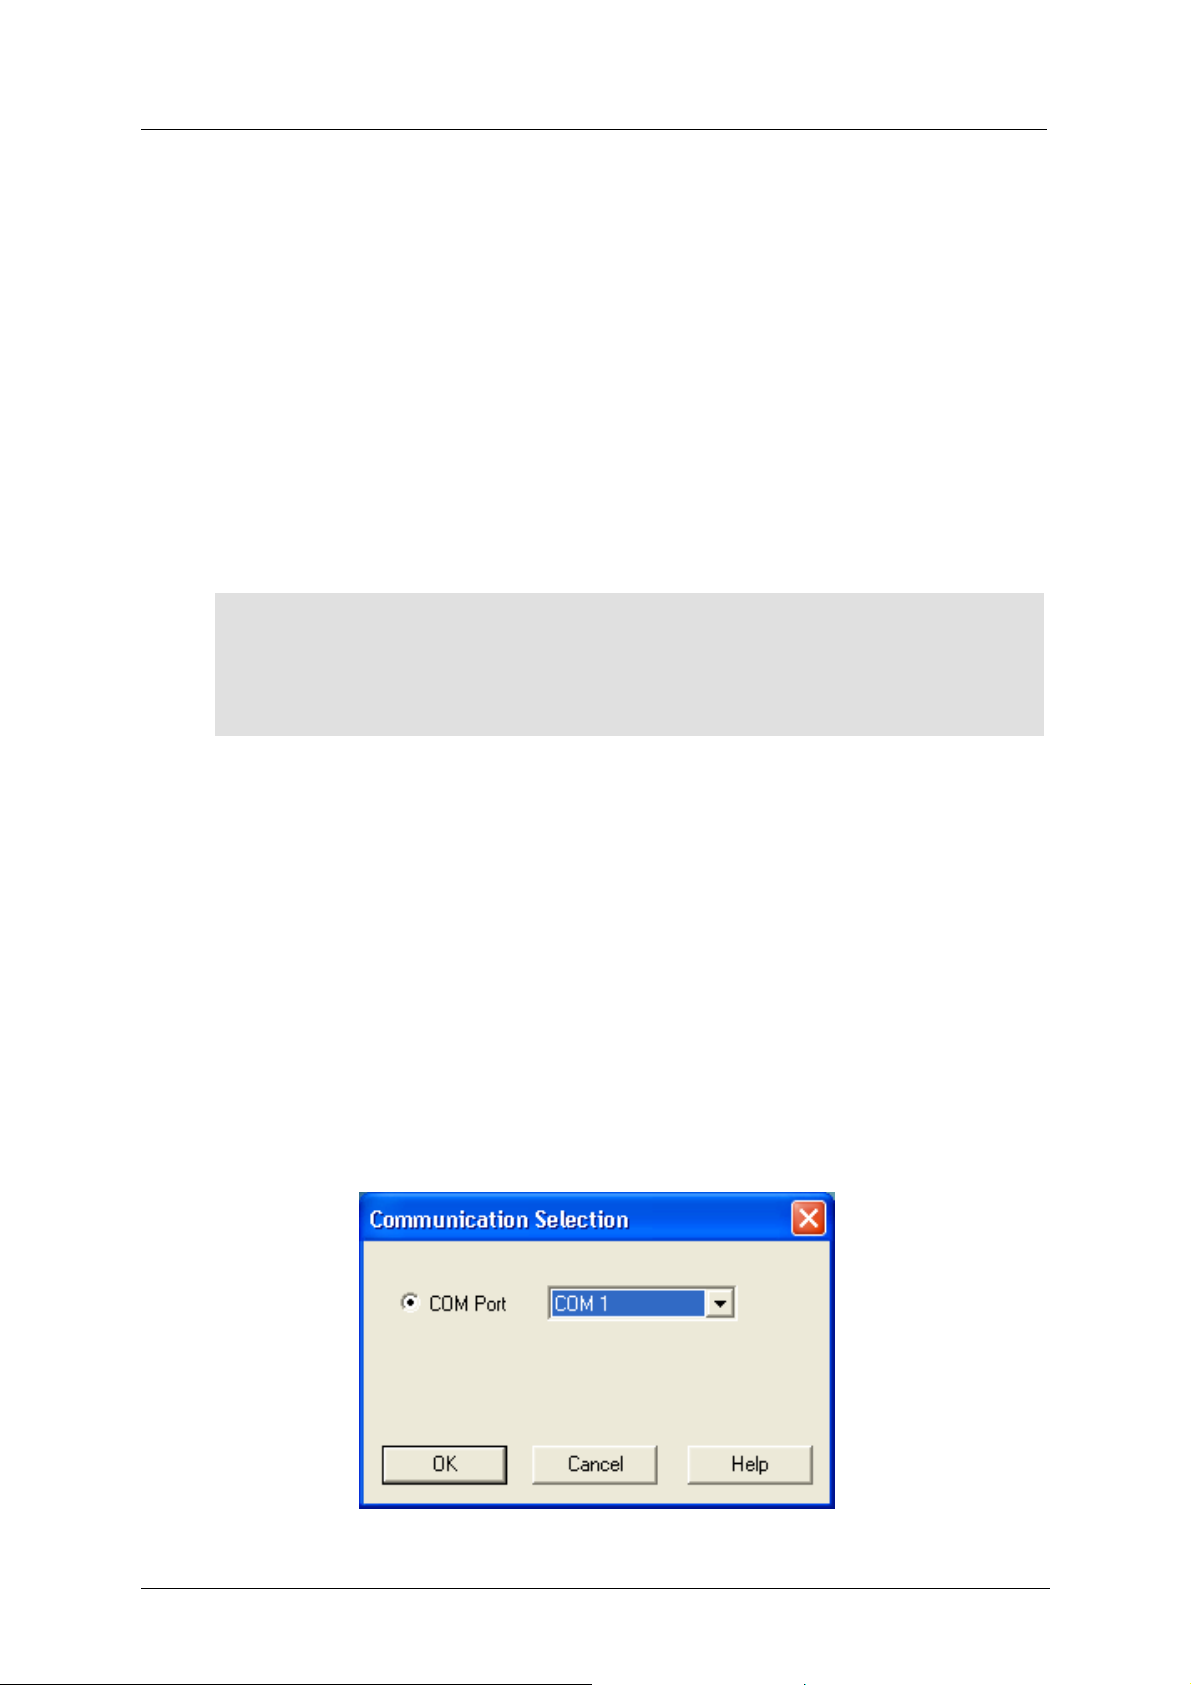
• Select the correct COM port in Communication Selection window.
Figure 2-2: Communication Selection Window
14
Page 19

Music-Tel A Installation and Operation Manual Installation
• Click OK. The IP Address and MAC Address have been set.
• Close MAN and disconnect the Music-Tel A unit.
2.3.1 Music-Tel A Installation with DHCP Instructions
To install the Music-Tel A with DHCP, perform the steps as follows:
• Connect the Power Supply to the Music-Tel A.
• Connect the Network cable to the Music-Tel A and the LAN socket of the network.
• Connect the Music-Tel A to the PABX.
The Music-Tel A will automatically connect to the remote IPMAN-A Server, register itself
and download configuration information.
2.3.2 Music-Tel A Installation Instructions
To install the Music-Tel A, perform the steps as follows:
• Connect the Music-Tel A via its RS-232 socket to the COM port of the PC.
• Connect the Power Supply to the Music-Tel A.
Now the initial software installation of the MAN can start. The automatic detection of DHCP
will be performed at startup for about 4 minutes. After this the Music-Tel A is ready for
manual installation of the network parameters.
To install the MAN software on the PC:
• Insert the CD in the Drive (Auto-Play CD).
• Run the Music-Tel A Utility software (SETUP.EXE).
• Run the MAN program from Start/Programs/MAN.
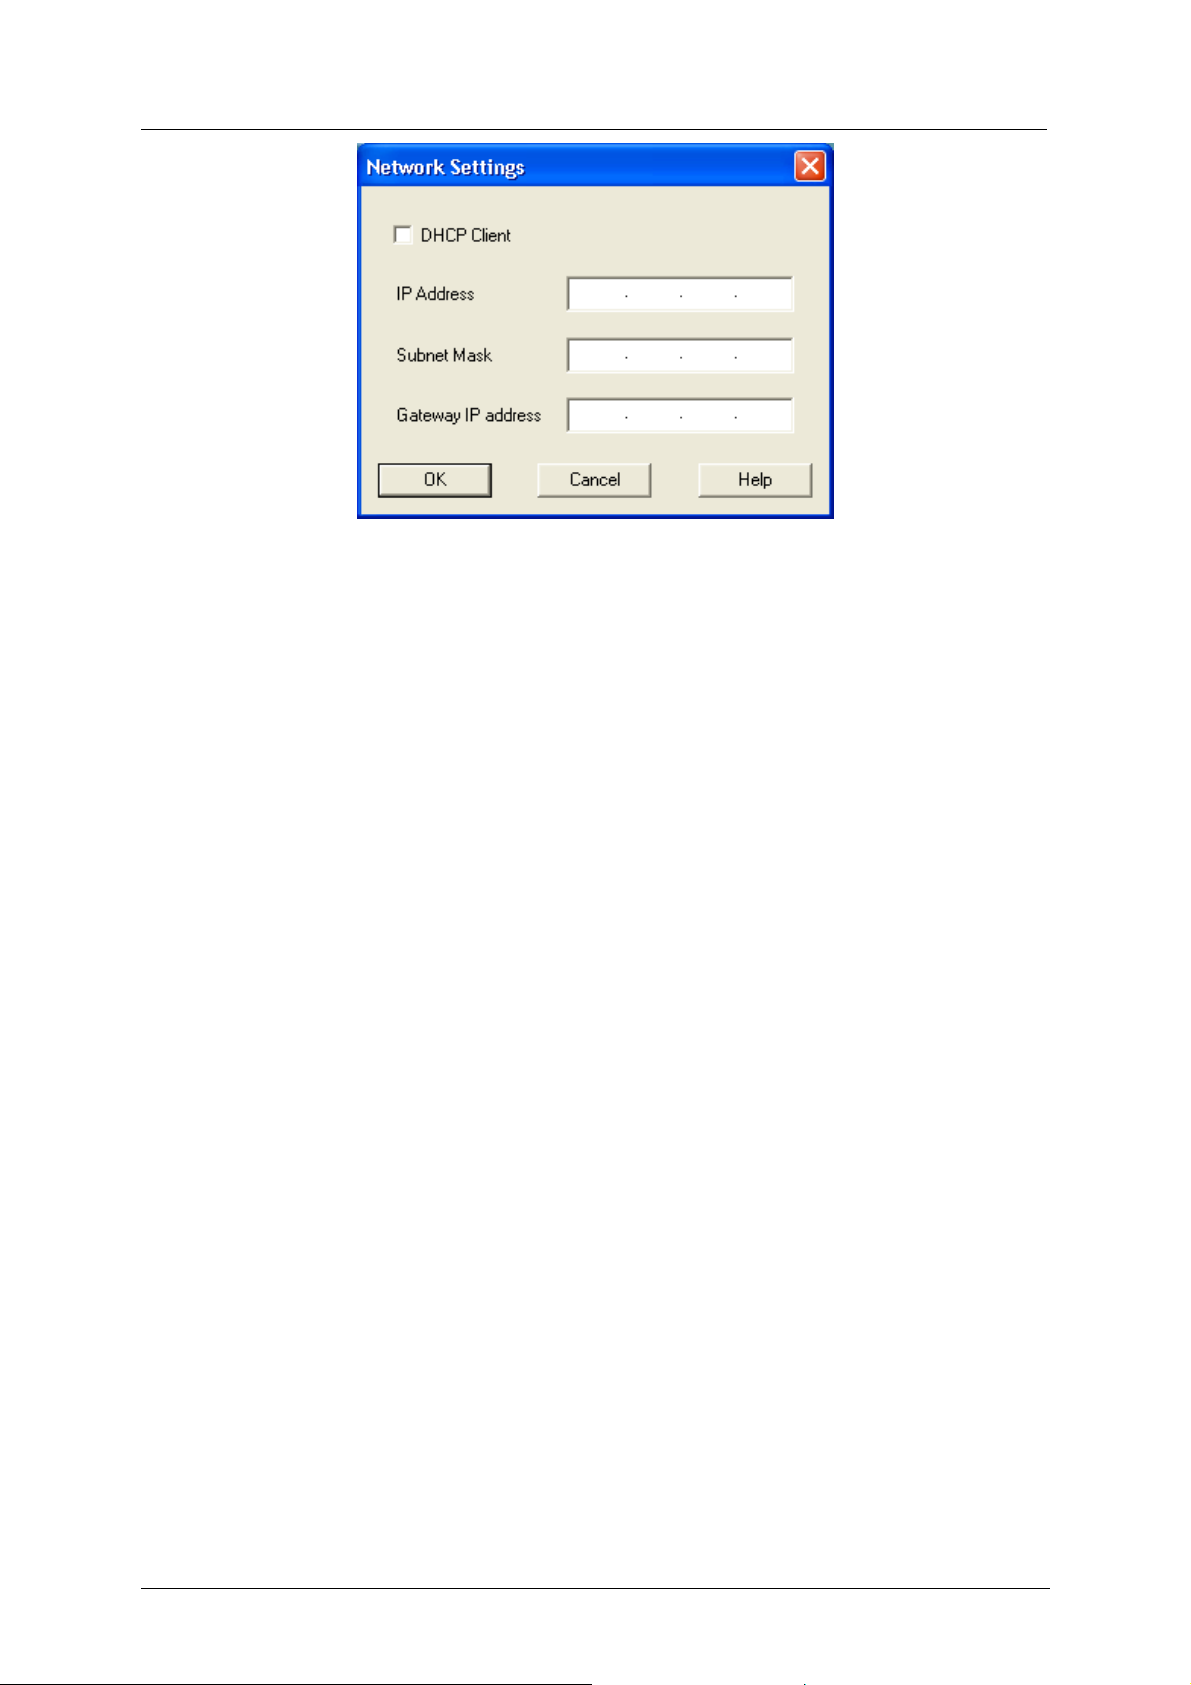
• Click Parameters/Network Settings. Network Settings window opens.
15
Page 20
Music-Tel A Installation and Operation Manual Installation
Figure 2-3: Network Settings Window
• Fill in the IP address information (IP Address, Subnet Mask and Gateway IP Address).
• Click OK.
• Make sure that you have chosen the correct COM port (see Figure
2-2).
• Click OK.
Now the IP Address has been set. Connect the network cable tot the Ethernet socket on the
Music-Tel A and make the connection between the PABX and the Music-Tel A. Disconnect
the RS-232 connection.
16
Page 21

Music-Tel A Installation and Operation Manual MAN Software
3. MAN Software
3.1 General
The initial installation of the MAN software is simple as described in the previous chapter.
The MAN software (and IPMAN-A Server, if bought) and Help file has been added to a
menu under the Start/Programs menu. In this Chapter the Music-Tel A Utility Program
(MAN) will be described. The IPMAN-A Server software will be described at a later stage.
3.2 MusicTel Utility Program (MAN)
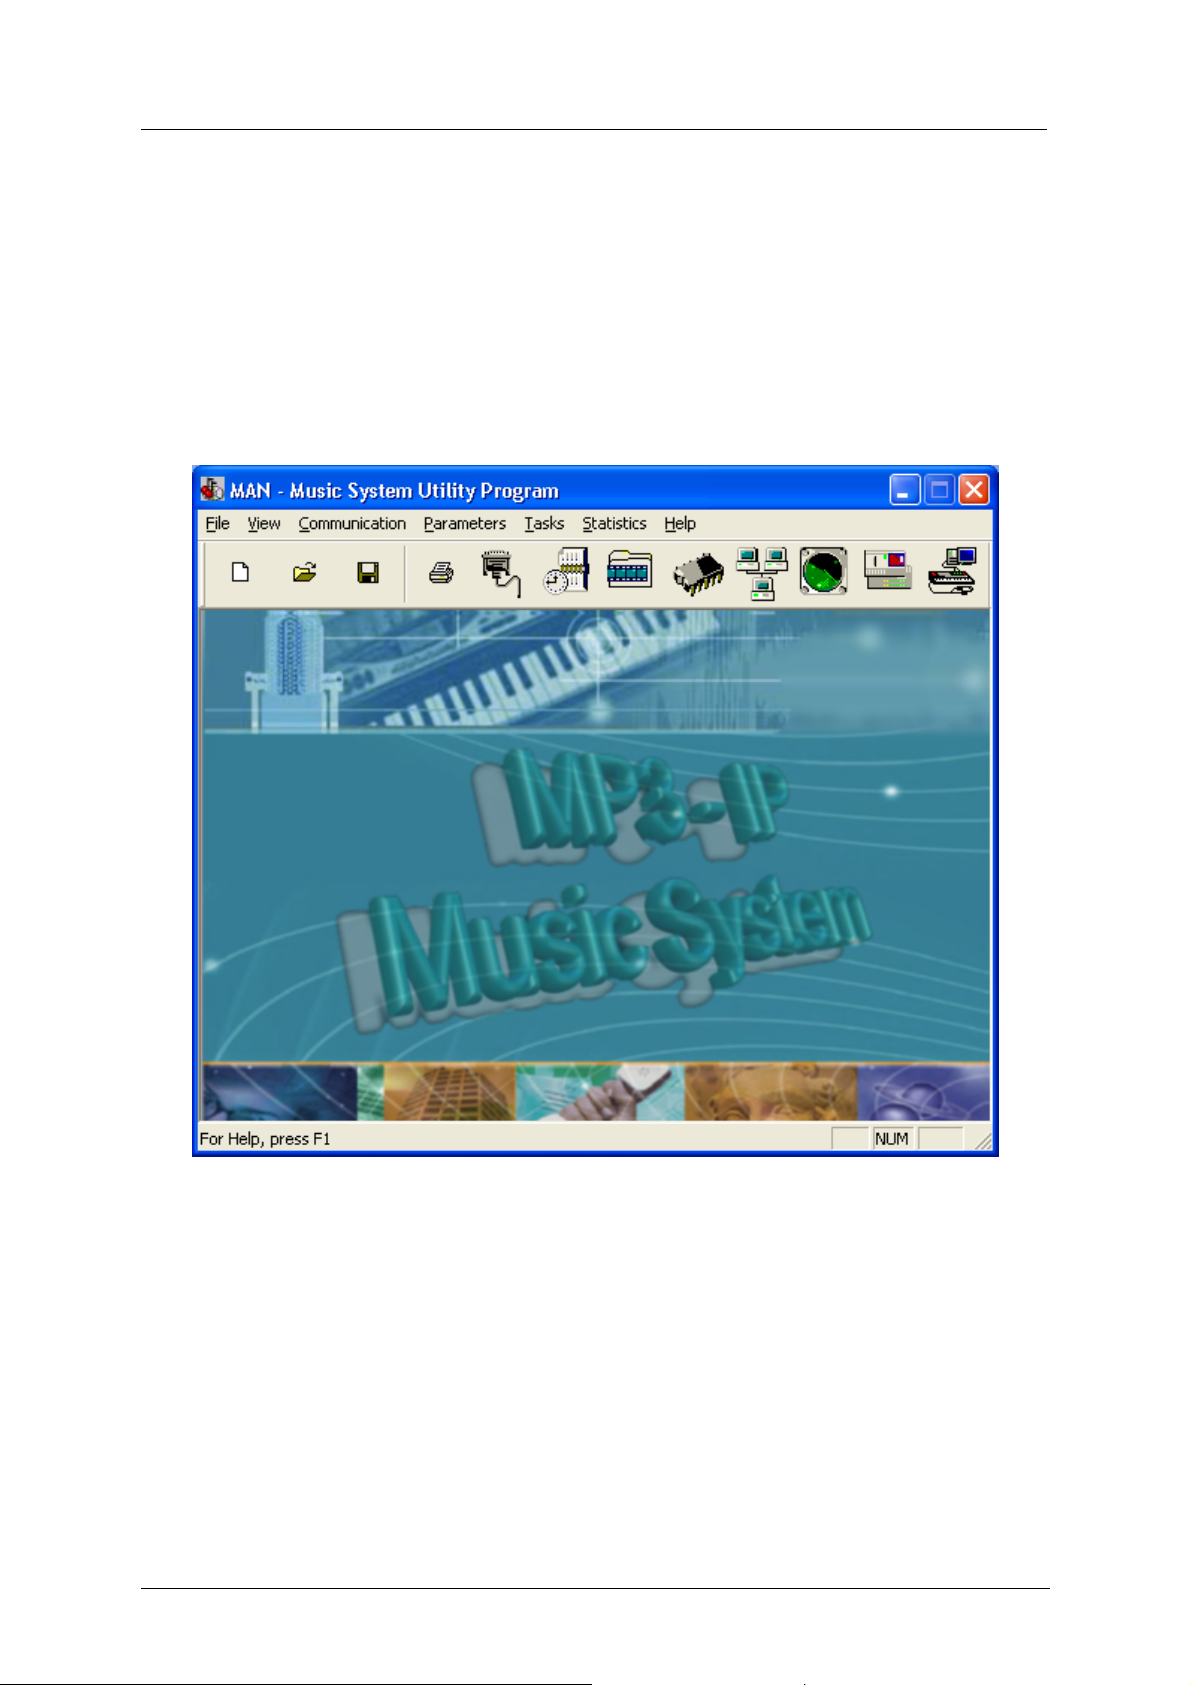
The MAN is a user-friendly program, which helps you to configure the Music-Tel A. The
toolbar and menus are discussed in the following paragraphs.
NOTE
When performing configuration related tasks (backup, restore, etc.), make sure that the LAN
cable is removed and the tasks are performed via the RS-232. Don't forget to re-attach the
LAN cable after the configuration related task has been performed.
When making a change in the configuration (e.g. changing the volume level of an Audio file),
the change will only become active after you have sent the information to the device via the
Send Configuration function or after the job has been picked up by the device, during its
Most units will be initially configured from a remote location. For this IPMAN-A is
used. Make sure that you are connected to the correct device, by selecting the
appropriate Music-Tel A from the device list.
designated polling time. The following paragraph explains this more in depth.
17
Page 22
Music-Tel A Installation and Operation Manual MAN Software
When a configuration file is sent to the unit, the MP3 file changes will be executed when the
currently running interrupt and background MP3 files have finished playing. Other changes
like in the schedules will be executed directly on reception. After an MP3 file is finished, the
unit automatically performs a check to see if the other line (Background or Interrupt) is free
too. Is this the case the updated MP3 files will replace the old one's and start working.
External music does not affect this process.
Figure 3-1: MAN Main Screen
18
Page 23
Music-Tel A Installation and Operation Manual MAN Software
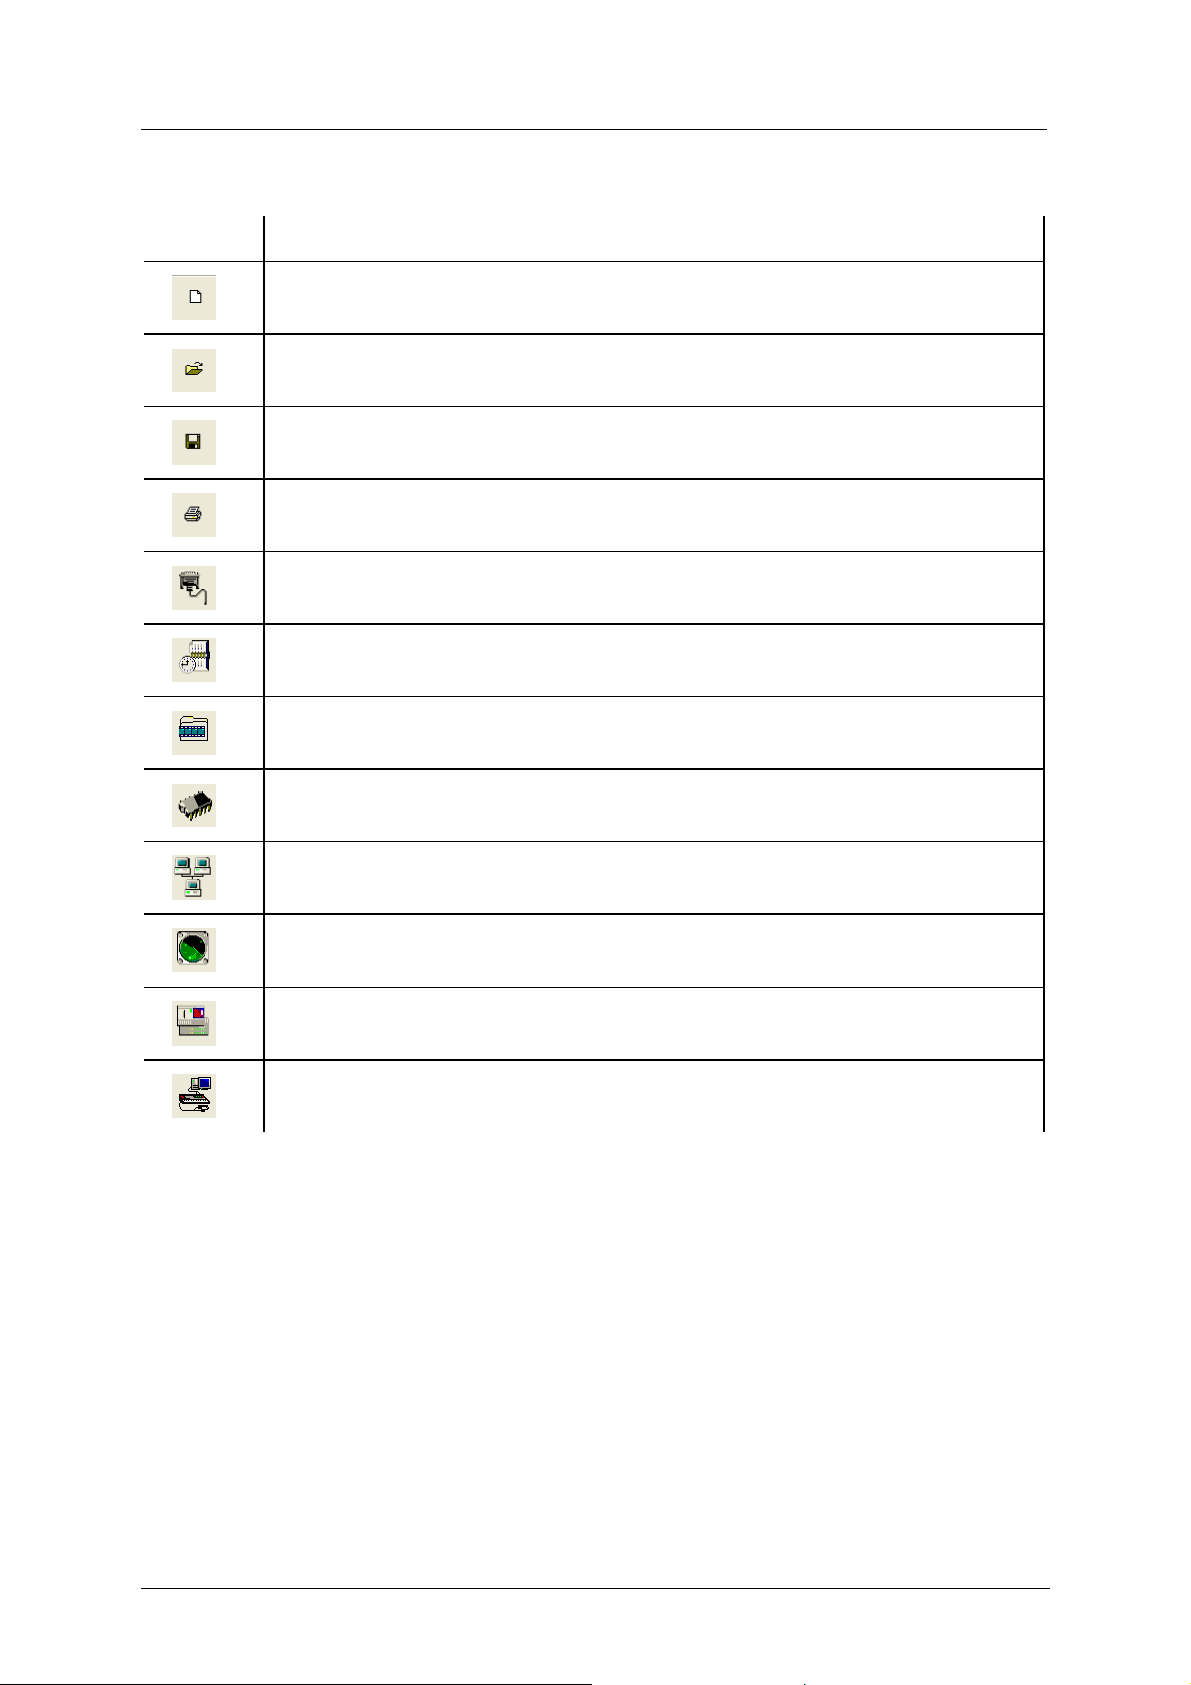
The following function buttons can be pressed on the main screen toolbar:
Button Function
New – Starts a new MAN configuration file
Open – Opens an existing MAN configuration file
Save – Saves the open MAN configuration file
Print – Prints the contents of the open MAN configuration file
Communication selection – Selects the COM Port
Read Configuration – Reads the configuration file from the device
Send Configuration – Sends the configuration file to the device
MAC Address – Inserts the MAC Address of the device
Network Settings – Inserts the network settings of the device
Polling Interval – Sets the Polling Interval for the communication with the
IPMAN-A server
IPMAN-A Server IP Address
Tasks – Inserts Tasks
19
Page 24

Music-Tel A Installation and Operation Manual MAN Software
The following menus can be accessed via the main screen:
Menu Item Functions in Menu Item
File
View Toolbar, Status Bar
Communication
Parameters
Tasks None (Window with function tabs)
Statistics General
Help Help Topics, About MAN
New, Open, Close, Save, Save As, Open Default, Print, Print Preview,
Print Setup, Recent File, Options, Exit
Read Configuration, Send Configuration, Read Recordings, Upgrade
Recordings, Backup, Restore, Software Upgrade, Communication
Selection, Password, Reset
Network Settings, Date & Time, IPMAN-A Server IP Address, Polling
Interval, SNMP parameters options, MAC Address
3.2.1 File Menu
The File menu contains the following functions:
Function Description
New Creates a new MAN configuration file
Open Opens an MAN configuration file
Close Closes the current configuration file
Save Saves an MAN configuration file
Save As
Open Default Opens the default MAN configuration file
Print Prints the contents of the configuration file
Print Preview Opens a preview of the information to be printed
Print Setup Sets up the printer for printing
Recent File Displays recently used files
Options Opens the file location options window
Exit Exits the program
Saves an MAN configuration file under a different name
20
Page 25
Music-Tel A Installation and Operation Manual MAN Software
3.2.1.1 New
To start a new MAN configuration file:
• Click FileÆNew. An empty MAN configuration file is created.
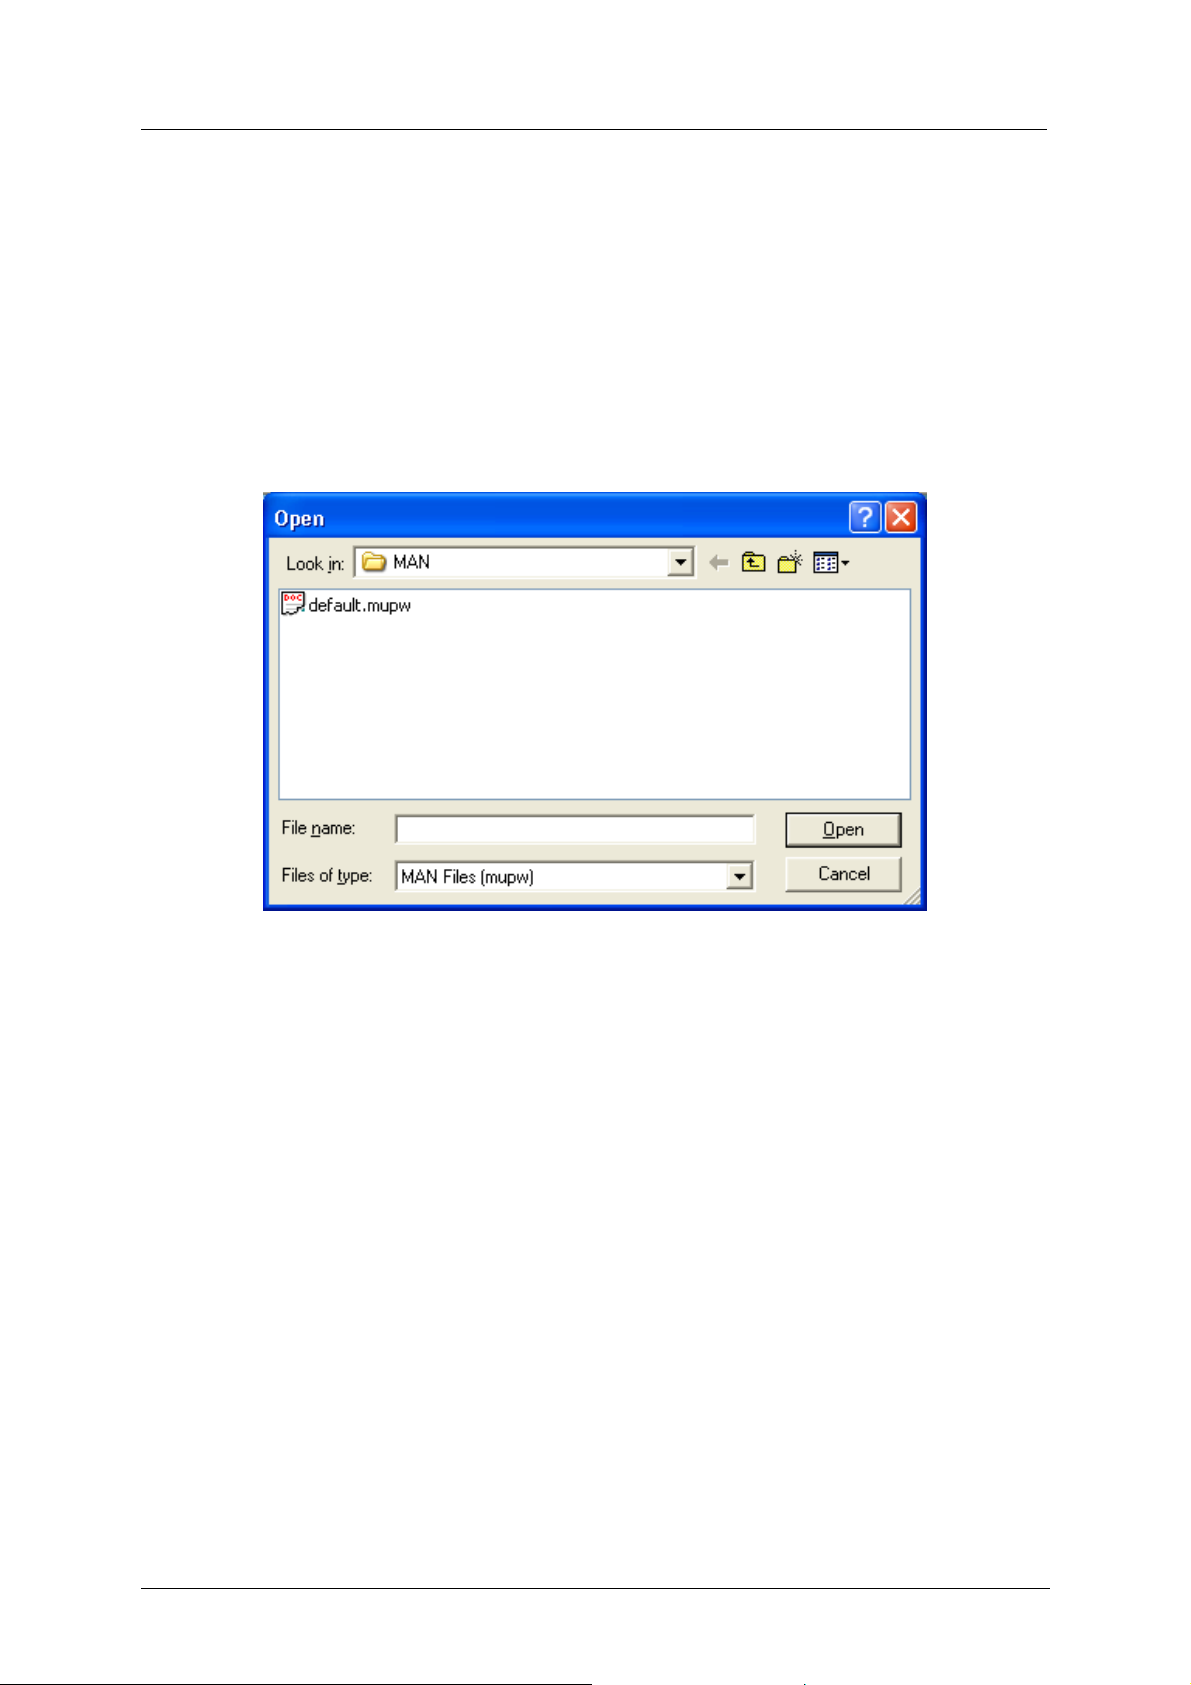
3.2.1.2 Open
To open an MAN configuration file from your local hard drive or the network:
• Click FileÆOpen. Open window opens.
Figure 3-2: Open Window
• Browse for the required file and select it.
• Click Open or double-click the file. The configuration file is loaded.
3.2.1.3 Close
To close the current MAN configuration file:
• Click FileÆClose. The current file is closed, without saving or uploading the file to the
Music-Tel A.
3.2.1.4 Save
To save an MAN configuration file to your local hard drive or the network:
• Click FileÆSave. The current file is saved in the previously defined location on the hard
drive or the network.
21
Page 26
Music-Tel A Installation and Operation Manual MAN Software
3.2.1.5 Save As
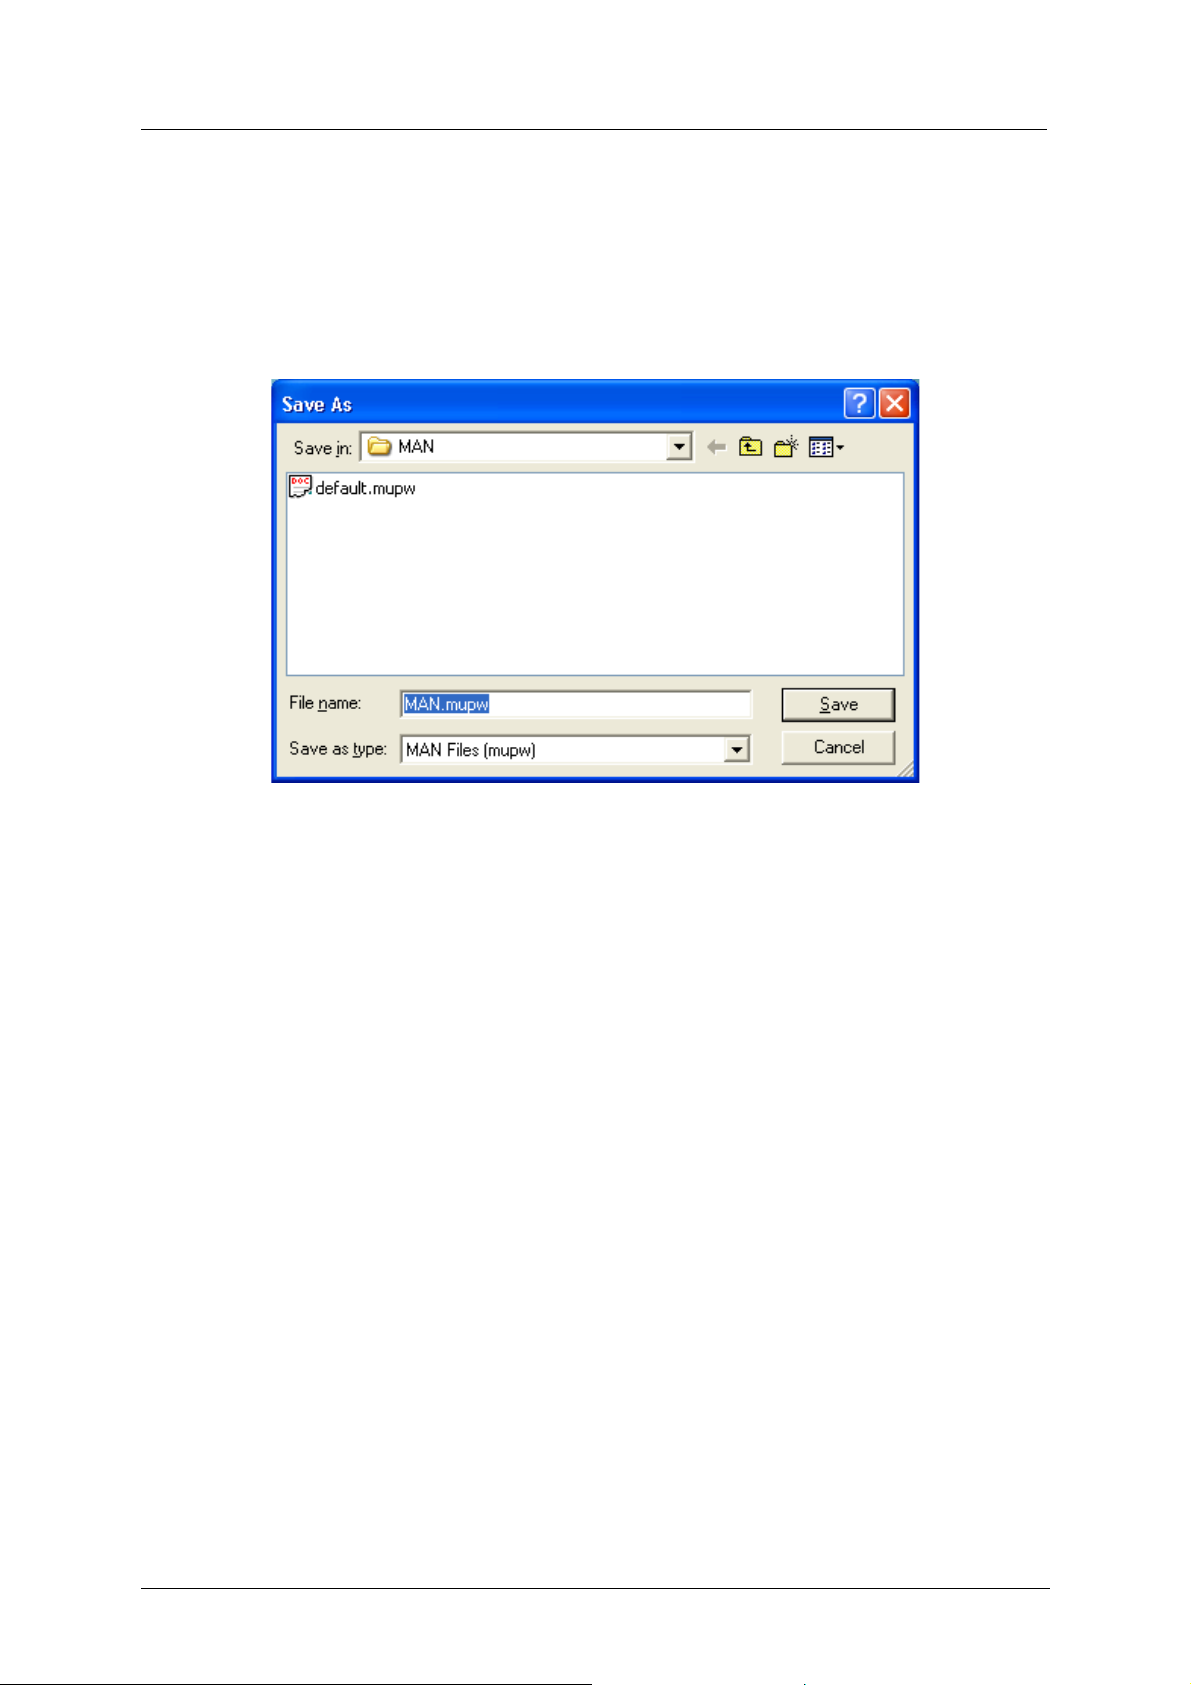
To save an MAN configuration file with a new name or to save a new MAN configuration
file on the hard drive or the network:
• Click Click FileÆSave As. Save As window opens.
Figure 3-3: Save As Window
• Select the location to where you want to save the MAN configuration file.
• Insert the name for the MAN configuration file.
• Click Save. The current file is saved in the specified location, with the specified name.
3.2.1.6 Open Default
To open the default MAN configuration file:
• Click FileÆOpen Default. The default MAN configuration file opens.
22
Page 27
Music-Tel A Installation and Operation Manual MAN Software
3.2.1.7 Print
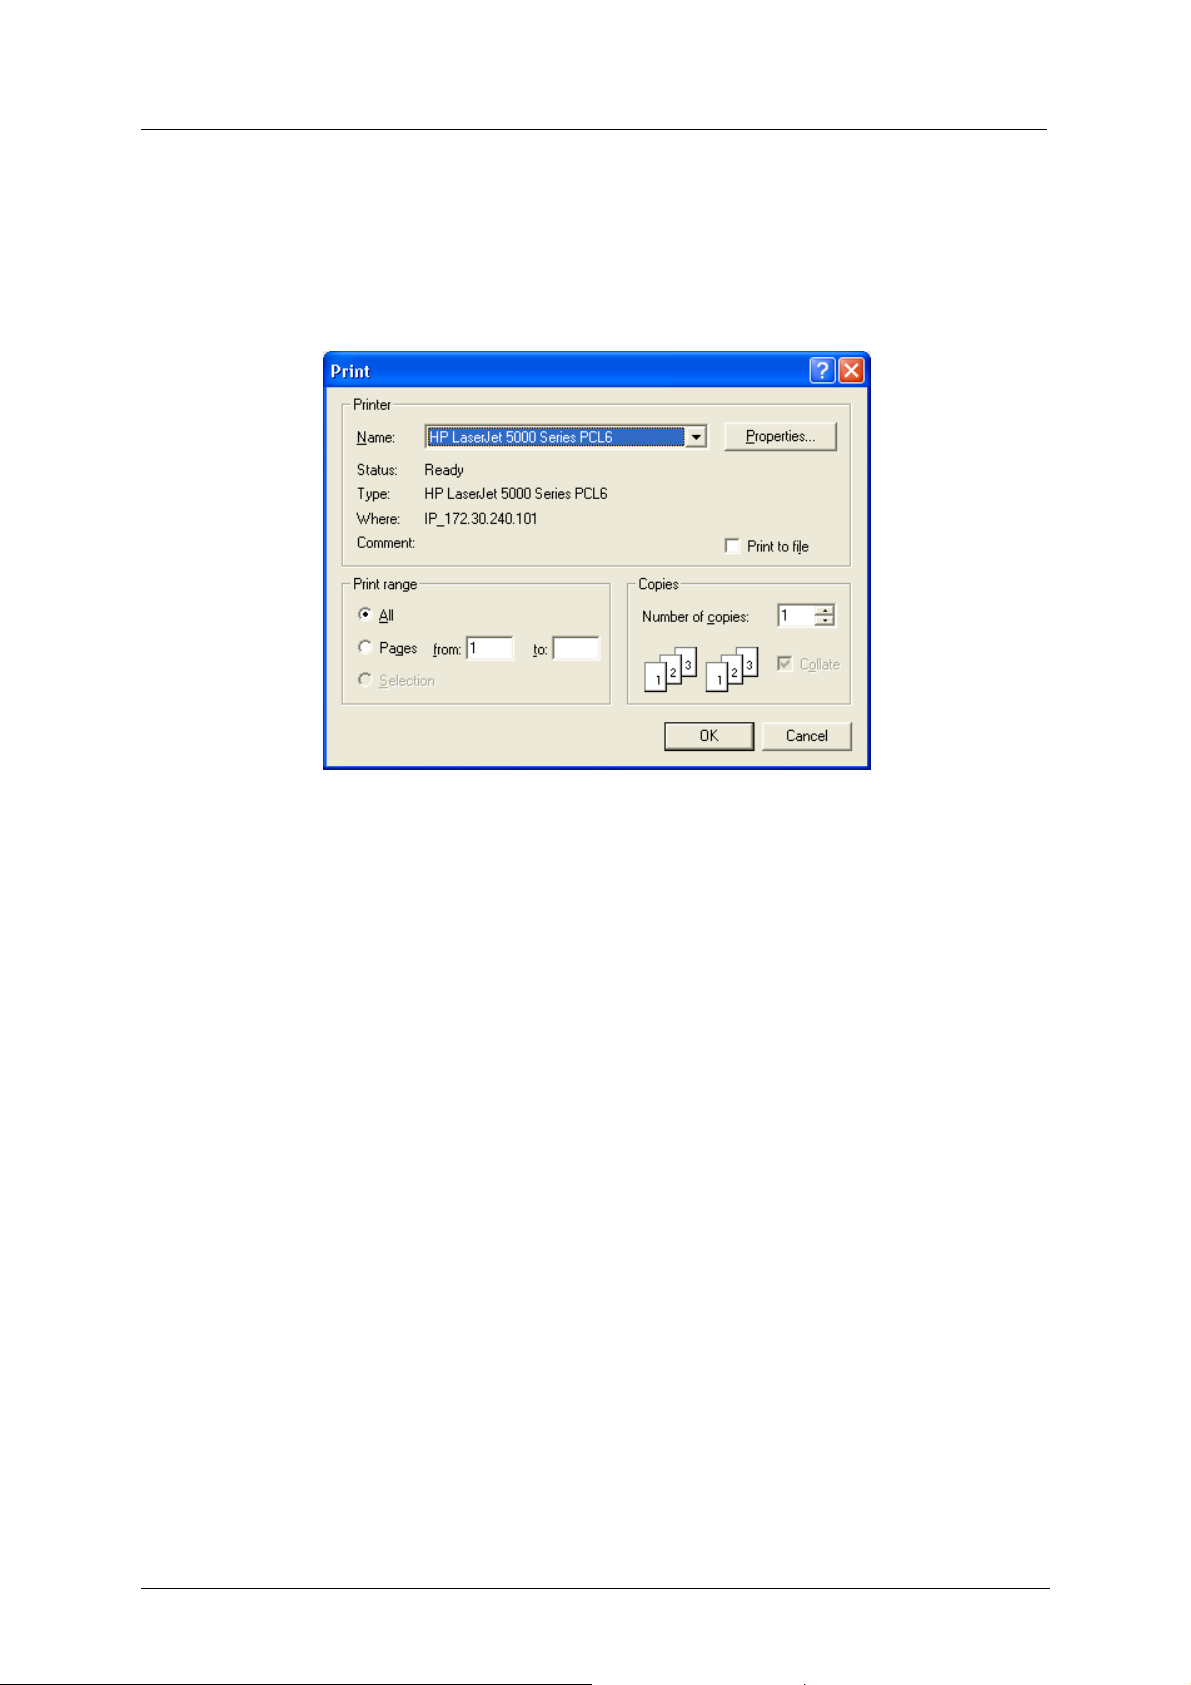
To print the contents of the open MAN configuration file:
• Click FileÆPrint. Print window opens.
Figure 3-4: Print Window
• If required, modify the printer properties, print range and number of copies.
• Click OK. The rcontents are printed.
3.2.1.8 Print Preview
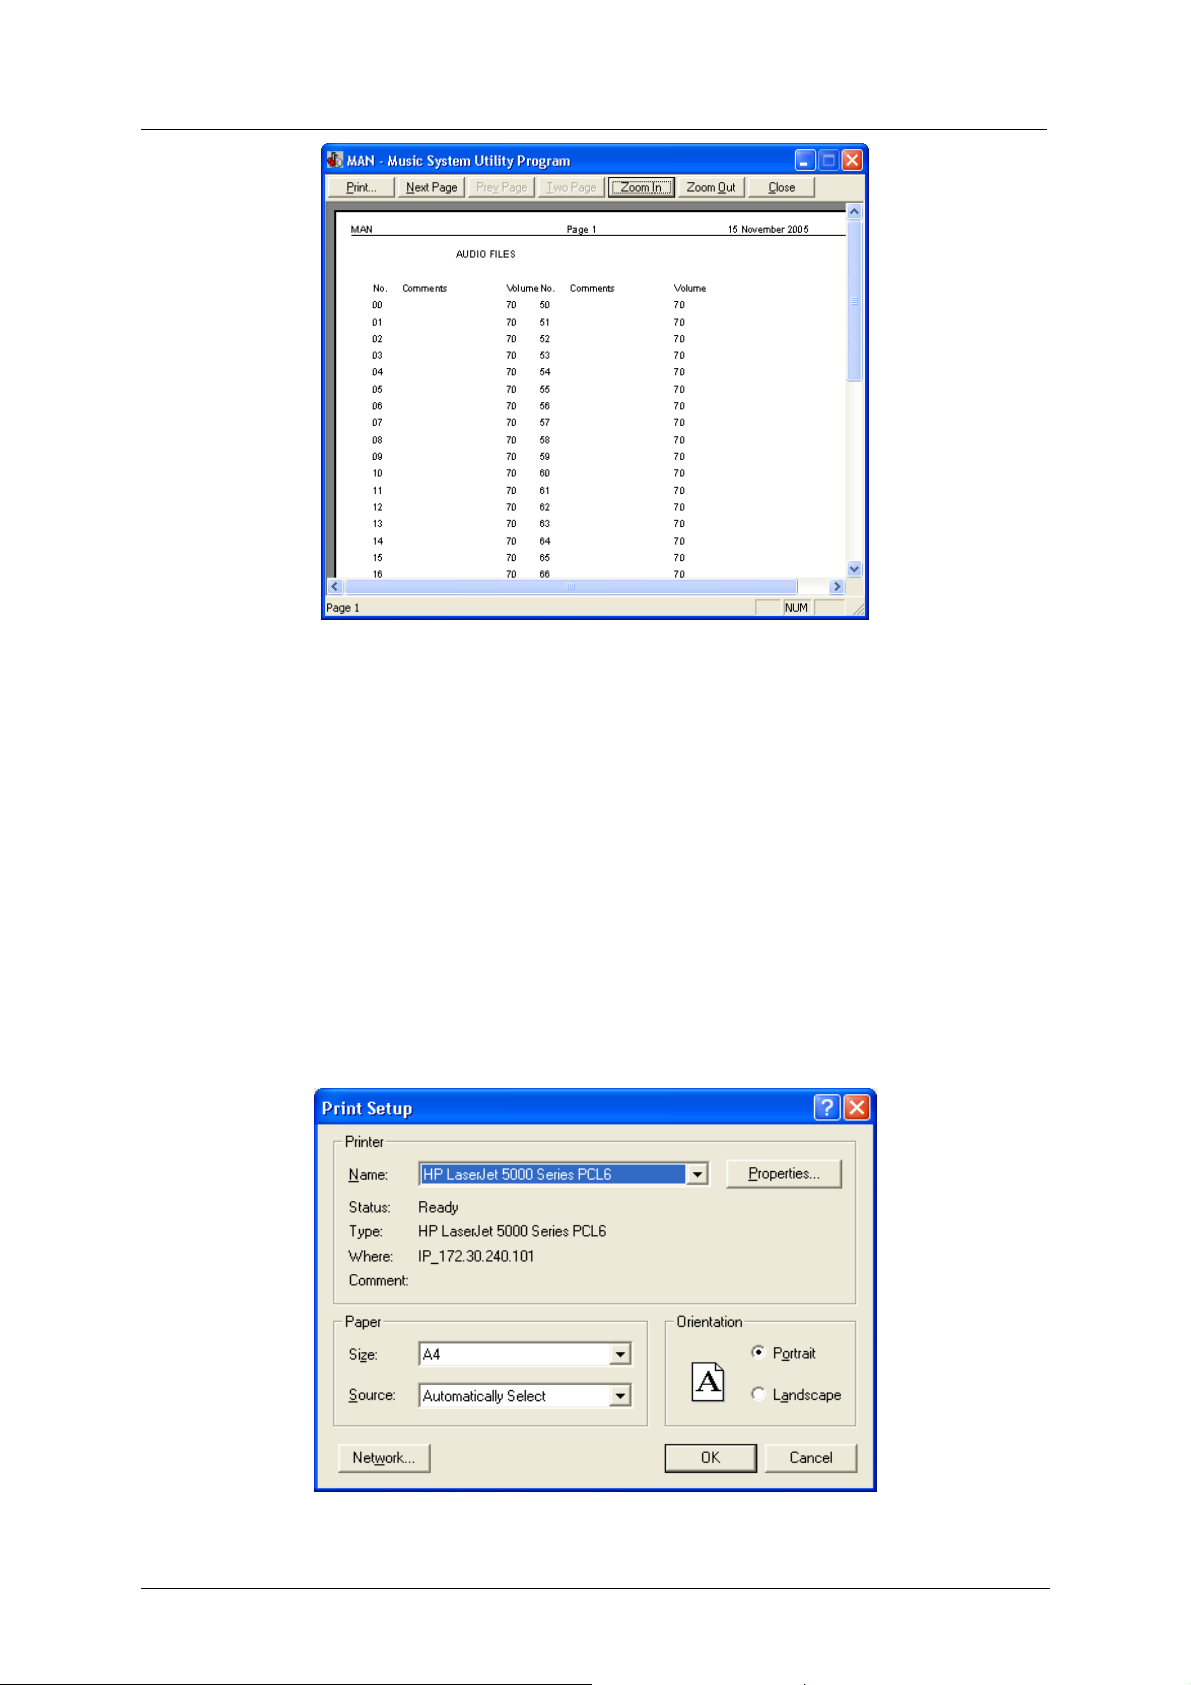
To preview the contents of the open MAN configuration file:
• Click FileÆPrint Preview. The print preview opens.
23
Page 28
Music-Tel A Installation and Operation Manual MAN Software
Figure 3-5: Print Preview Window
In the print preview window you can activate the Print function, zoom in and out, select one-
page or two-page display and close the window.
3.2.1.9 Print Setup
To setup the print result:
• Click FileÆPrint Setup. Print Setup window opens.
• If required, select another printer, paper size and orientation.
• Click OK. The printer has now been setup to provide you with the required print result.
Figure 3-6: Print Setup Windo w
24
Page 29
Music-Tel A Installation and Operation Manual MAN Software
3.2.1.10 Recent File
This section in the File menu shows the files you recently opened, during the ongoing session.
3.2.1.11 Options
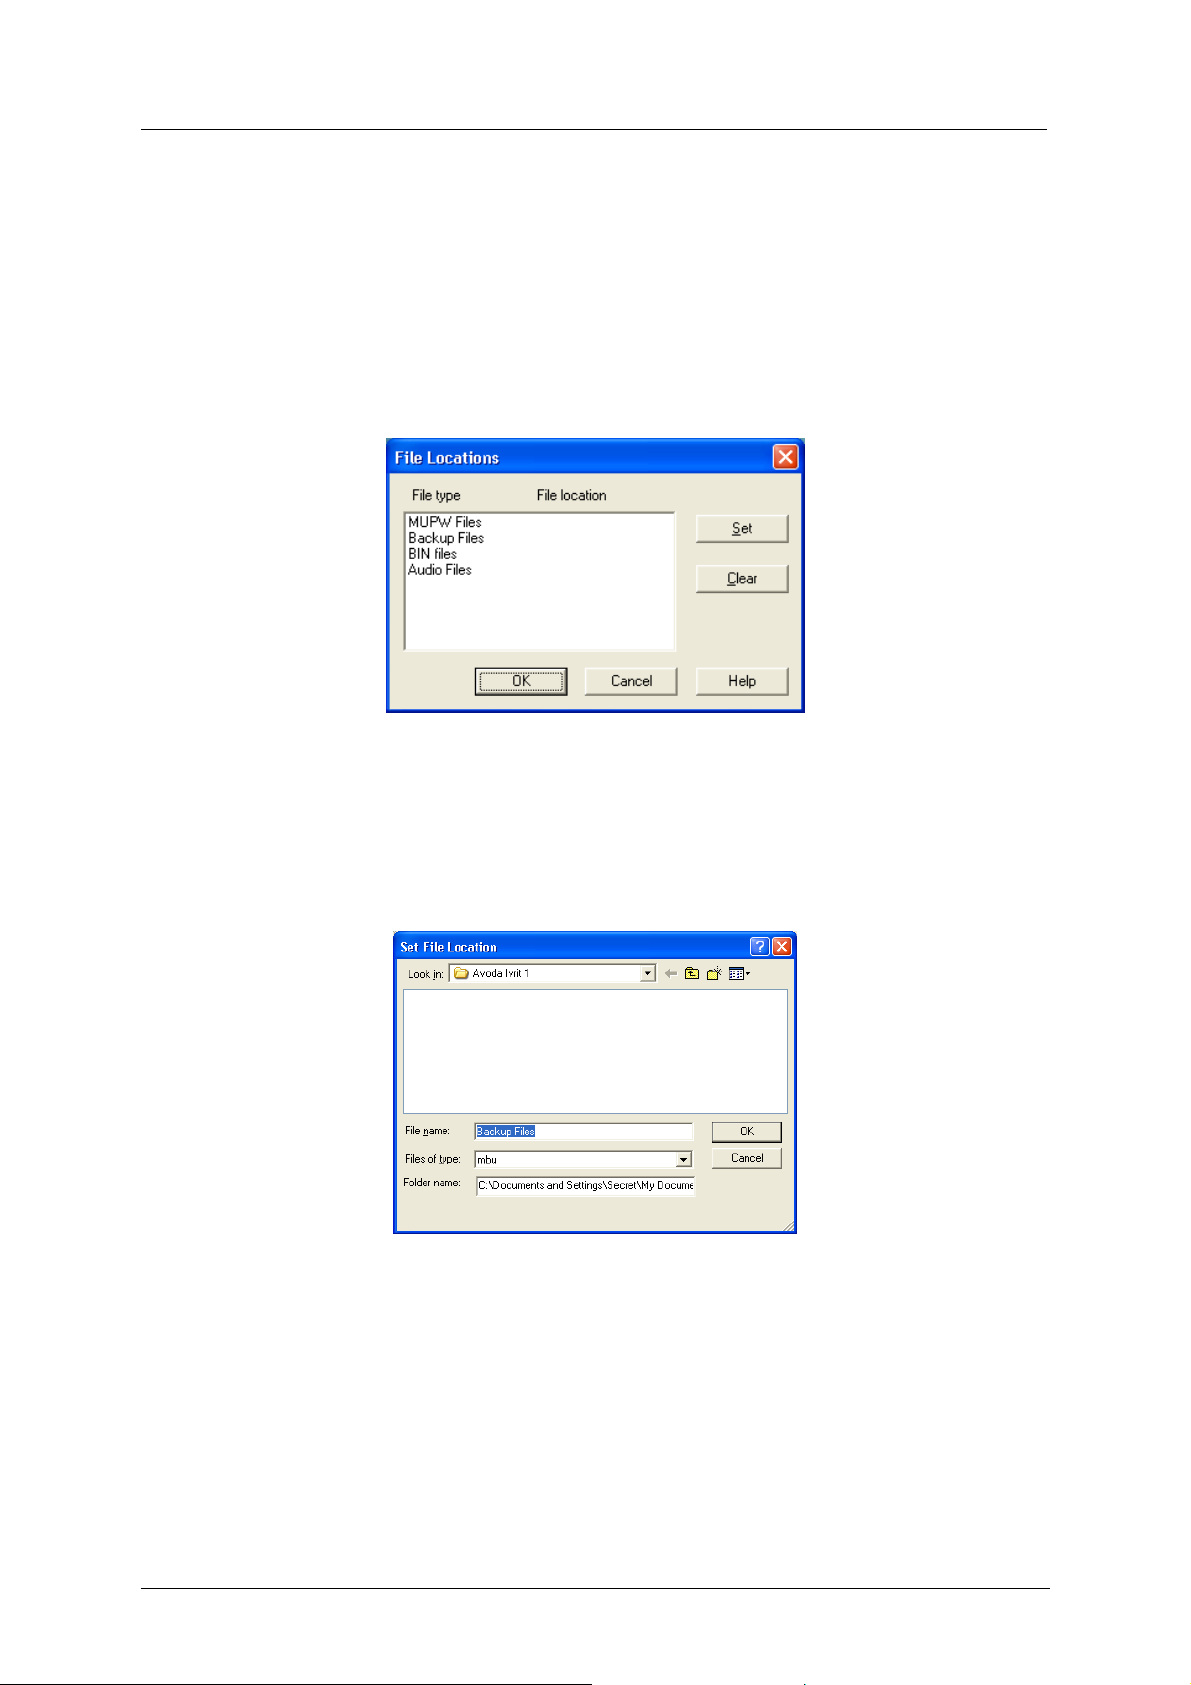
To define the location of the files created by the Music-Tel A:
• Click FileÆOptions. File Locations window opens.
Figure 3-7: File L ocat ions Window
• Select the file for which you want to define the location.
• Click Set. Set File Location window opens.
Figure 3-8: Set File Location Window
• Define the required location.
• Click OK to confirm and close Set File Location window.
• If required, repeat the steps to set the location for other files.
• Click OK to confirm and close File Locations window.
25
Page 30
Music-Tel A Installation and Operation Manual MAN Software
NOTE
3.2.1.12 Exit
To exit the Music Utility Program, perform the steps as follows:
• Click FileÆExit. The Music Utility Program is closed without saving the current open
See section 3.3 for a description of the file types.
file. Should you want to save the changes made in the current MAN configuration file,
use FileÆSave or FileÆSave As first.
3.2.2 View Menu
The View menu contains the following functions:
Function Description
Toolbar Displays a row with buttons under the menus
Status Bar Displays status information at the bottom of the main screen
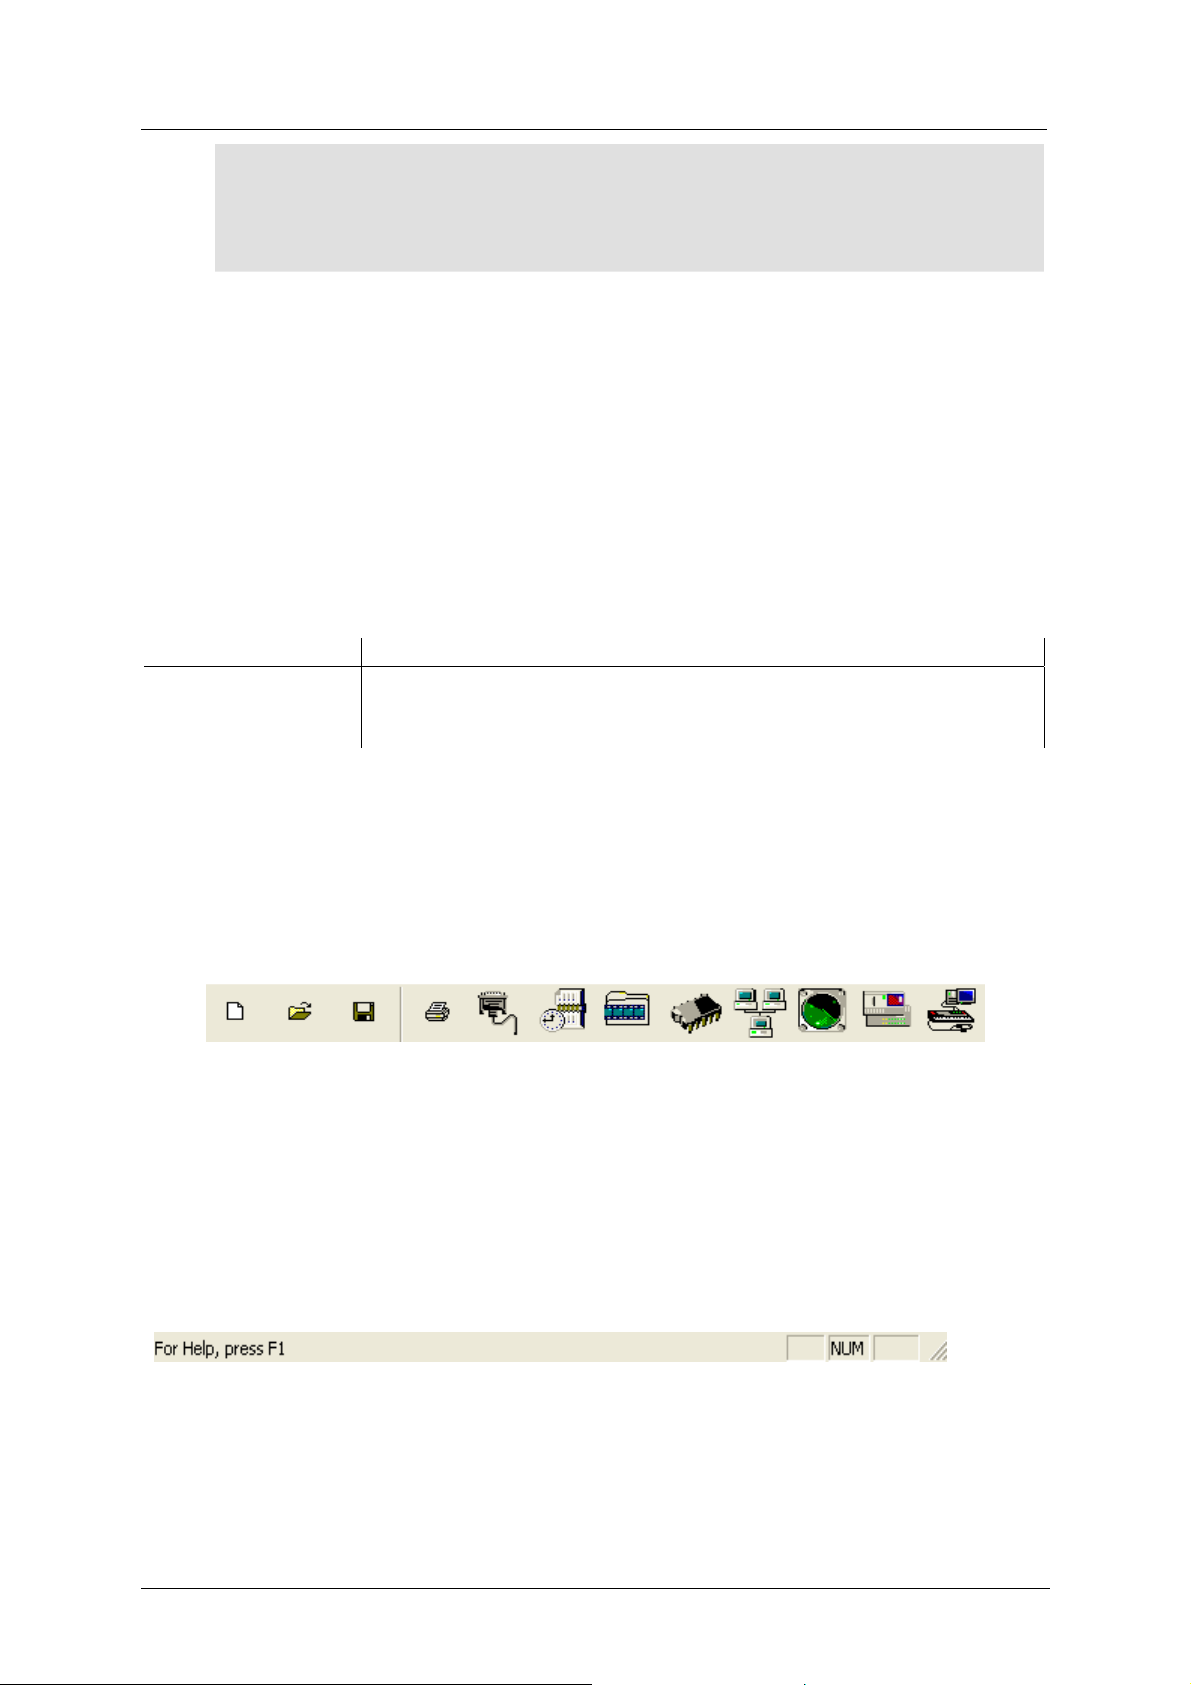
3.2.2.1 Toolbar
To view the Toolbar:
• Click ViewÆToolbar. The toolbar function is marked with a checkmark in the View
menu, and the toolbar is displayed.
Figure 3-9: Toolbar
3.2.2.2 Status Bar
To view the Status Bar:
• Click ViewÆStatus Bar. The status bar function is marked with a checkmark in the View
menu and the status bar is displayed.
Figure 3-10: Status Bar
26
Page 31
Music-Tel A Installation and Operation Manual MAN Software
3.2.3 Communication
The communication menu contains the following functions:
Function Description
Read Configuration Reads configuration information from the Music-Tel A
Send Configuration Sends configuration information to the Music-Tel A
Read Recordings Reads the list of audio files in the MAN
Update Recordings Updates the list of audio files in the Music-Tel A
Backup Makes a backup of the Music-Tel A database
Restore Restores the backup of the Music-Tel A database
Software Upgrade Upgrades the Music-Tel A software
Communication Selects the communication type between the PC and the Music-Tel
Password Changes the Music-Tel A password
Reset Resets the Music-Tel A
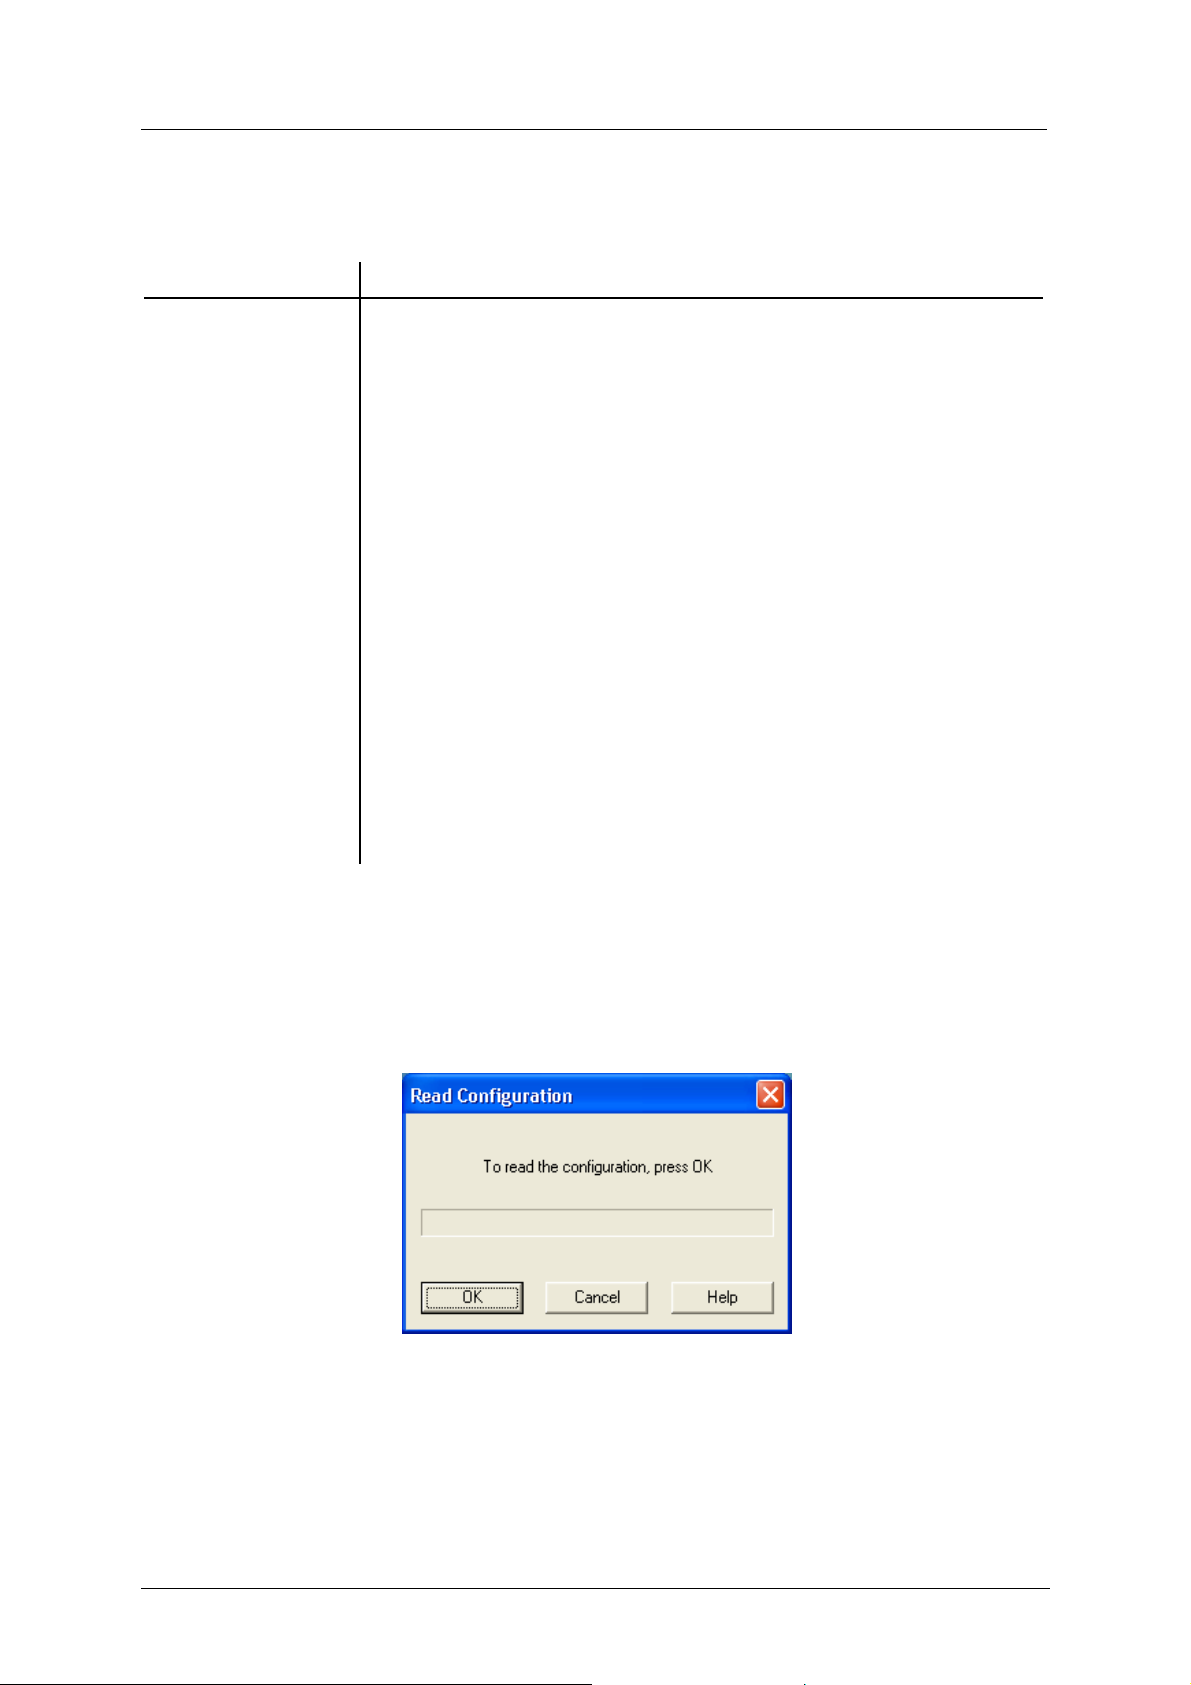
3.2.3.1 Read Configuration
To read the current configuration of the Music-Tel A:
• Click CommunicationÆRead Configuration. Read Configuration window opens.
Figure 3-11: Read Configuration Window
27
Page 32
Music-Tel A Installation and Operation Manual MAN Software
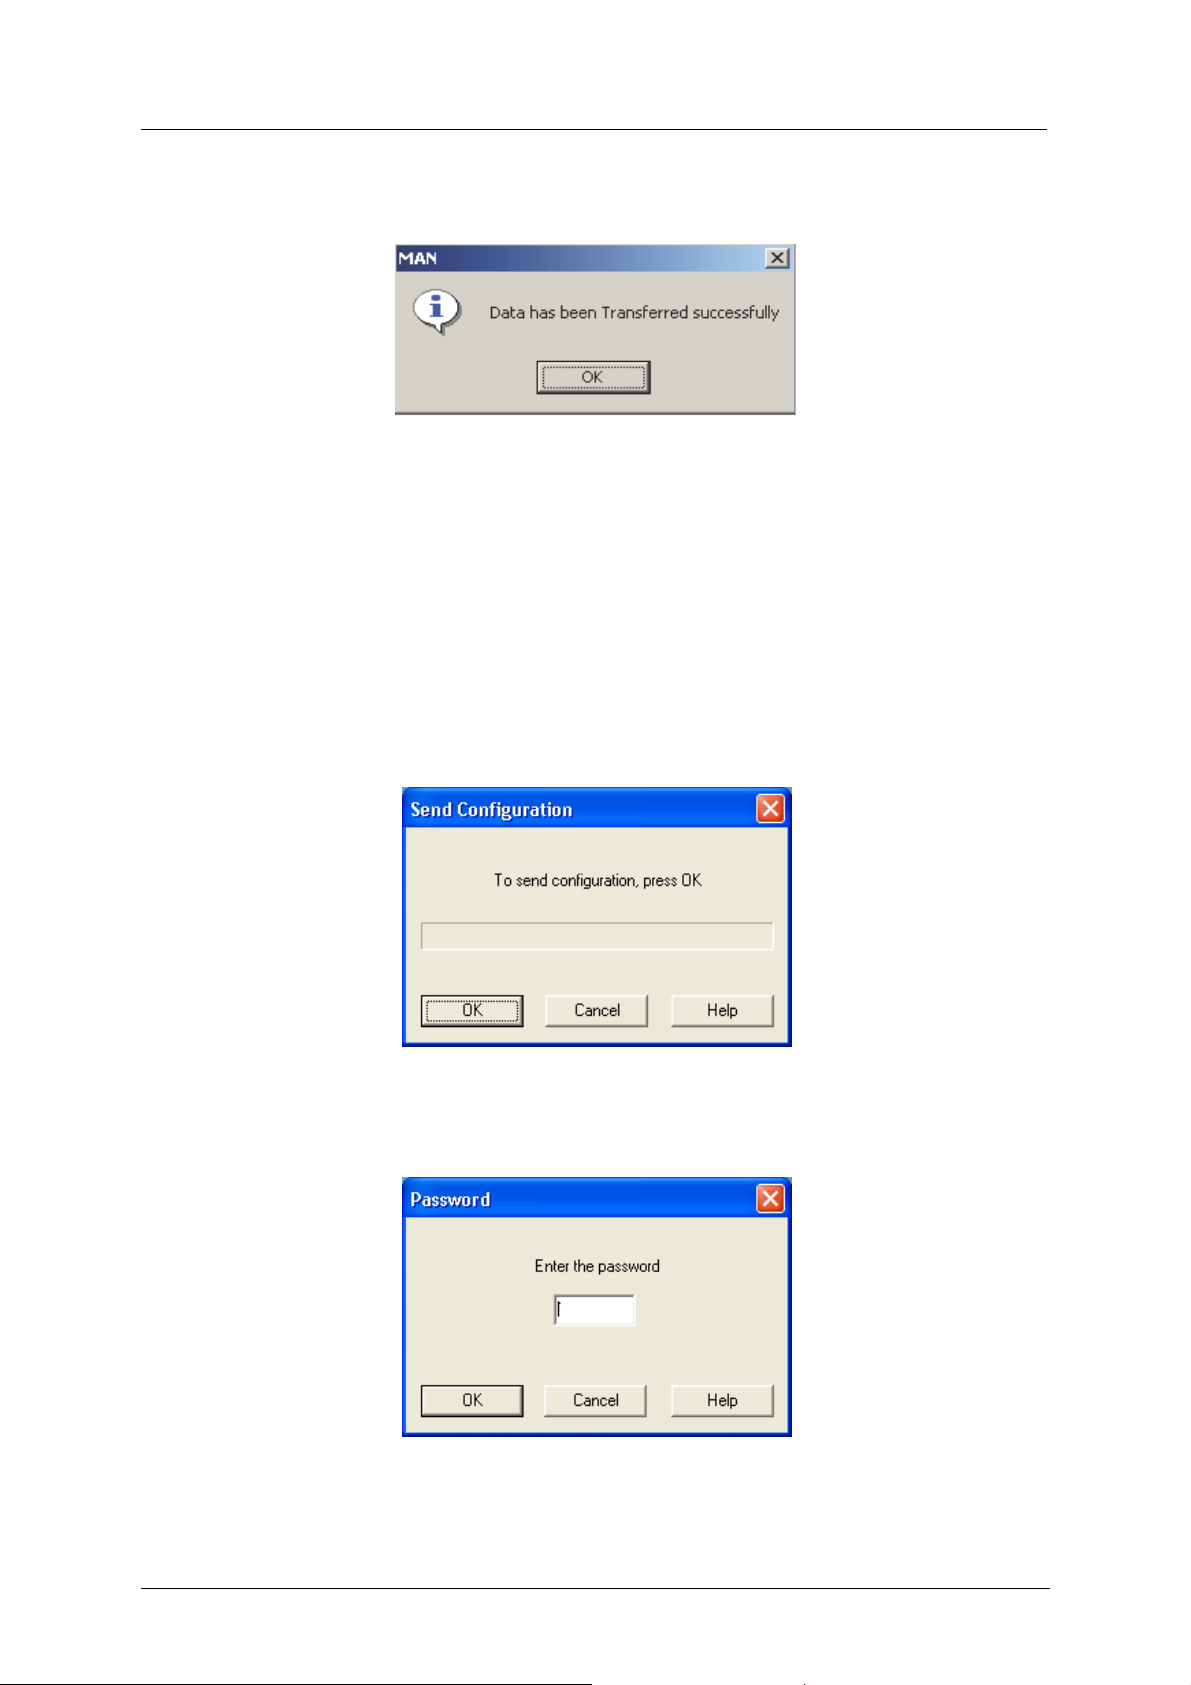
• Click OK. A confirmation window appears.
Figure 3-12: Confirmation Window
• Click OK to close the confirmation window. Now you are able to make changes to the
configuration of the Music-Tel A.
3.2.3.2 Send Configuration
To send the configuration to the Music-Tel A:
• Click CommunicationÆSend Configuration. Send Configuration window opens.
Figure 3-13: Send Configuration Window
• Click OK. Password window opens.
Figure 3-14: Password Window
• Enter the password in the field.
28
Page 33
Music-Tel A Installation and Operation Manual MAN Software
• Click OK. A confirmation window appears (see Figure 3-12).
• Click OK to close the confirmation window. The updated configuration data has been
sent to the Music-Tel A.
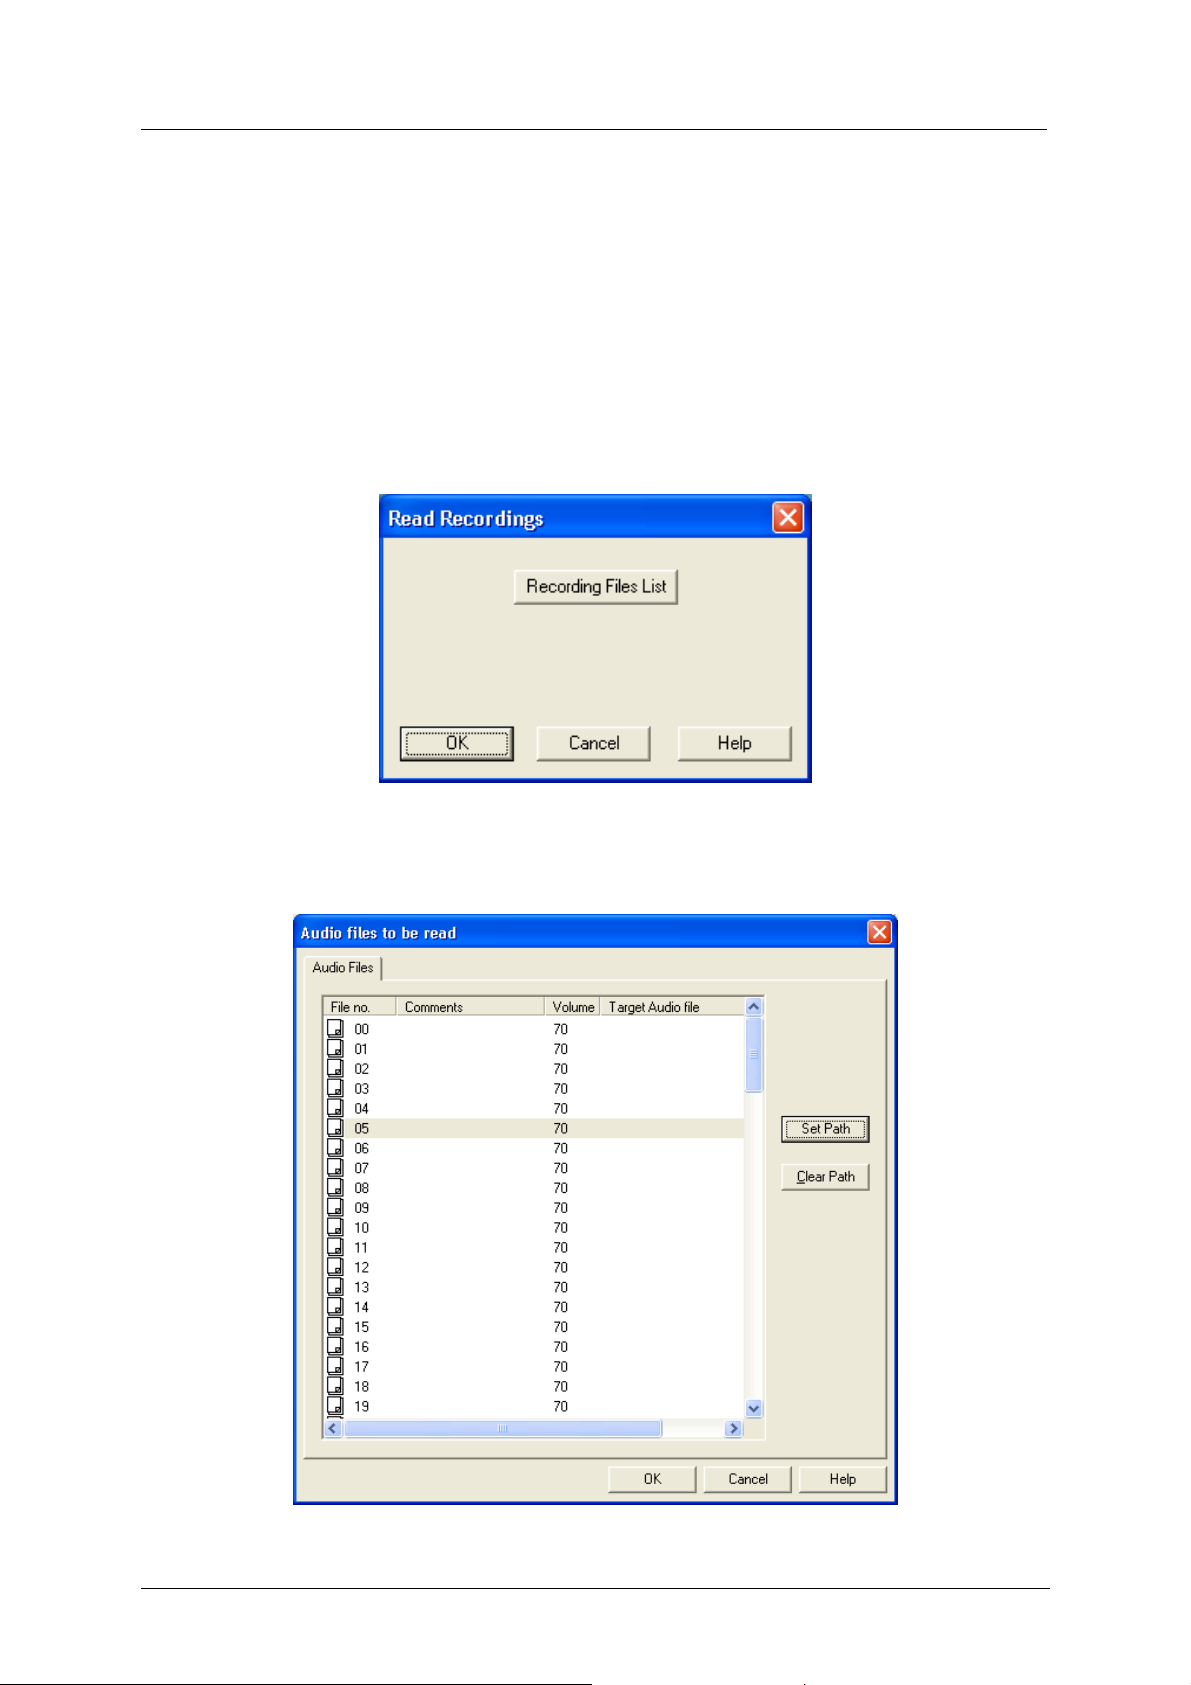
3.2.3.3 Read Recordings
To read the current list of music files in the system:
• Click CommunicationÆRead Recordings. Read Recordings window opens.
Figure 3-15: Read Recordings Window
• Click Recording Files List. Audio files to be read window opens.
Figure 3-16: Audio Files to be Read Window
29
Page 34
Music-Tel A Installation and Operation Manual MAN Software
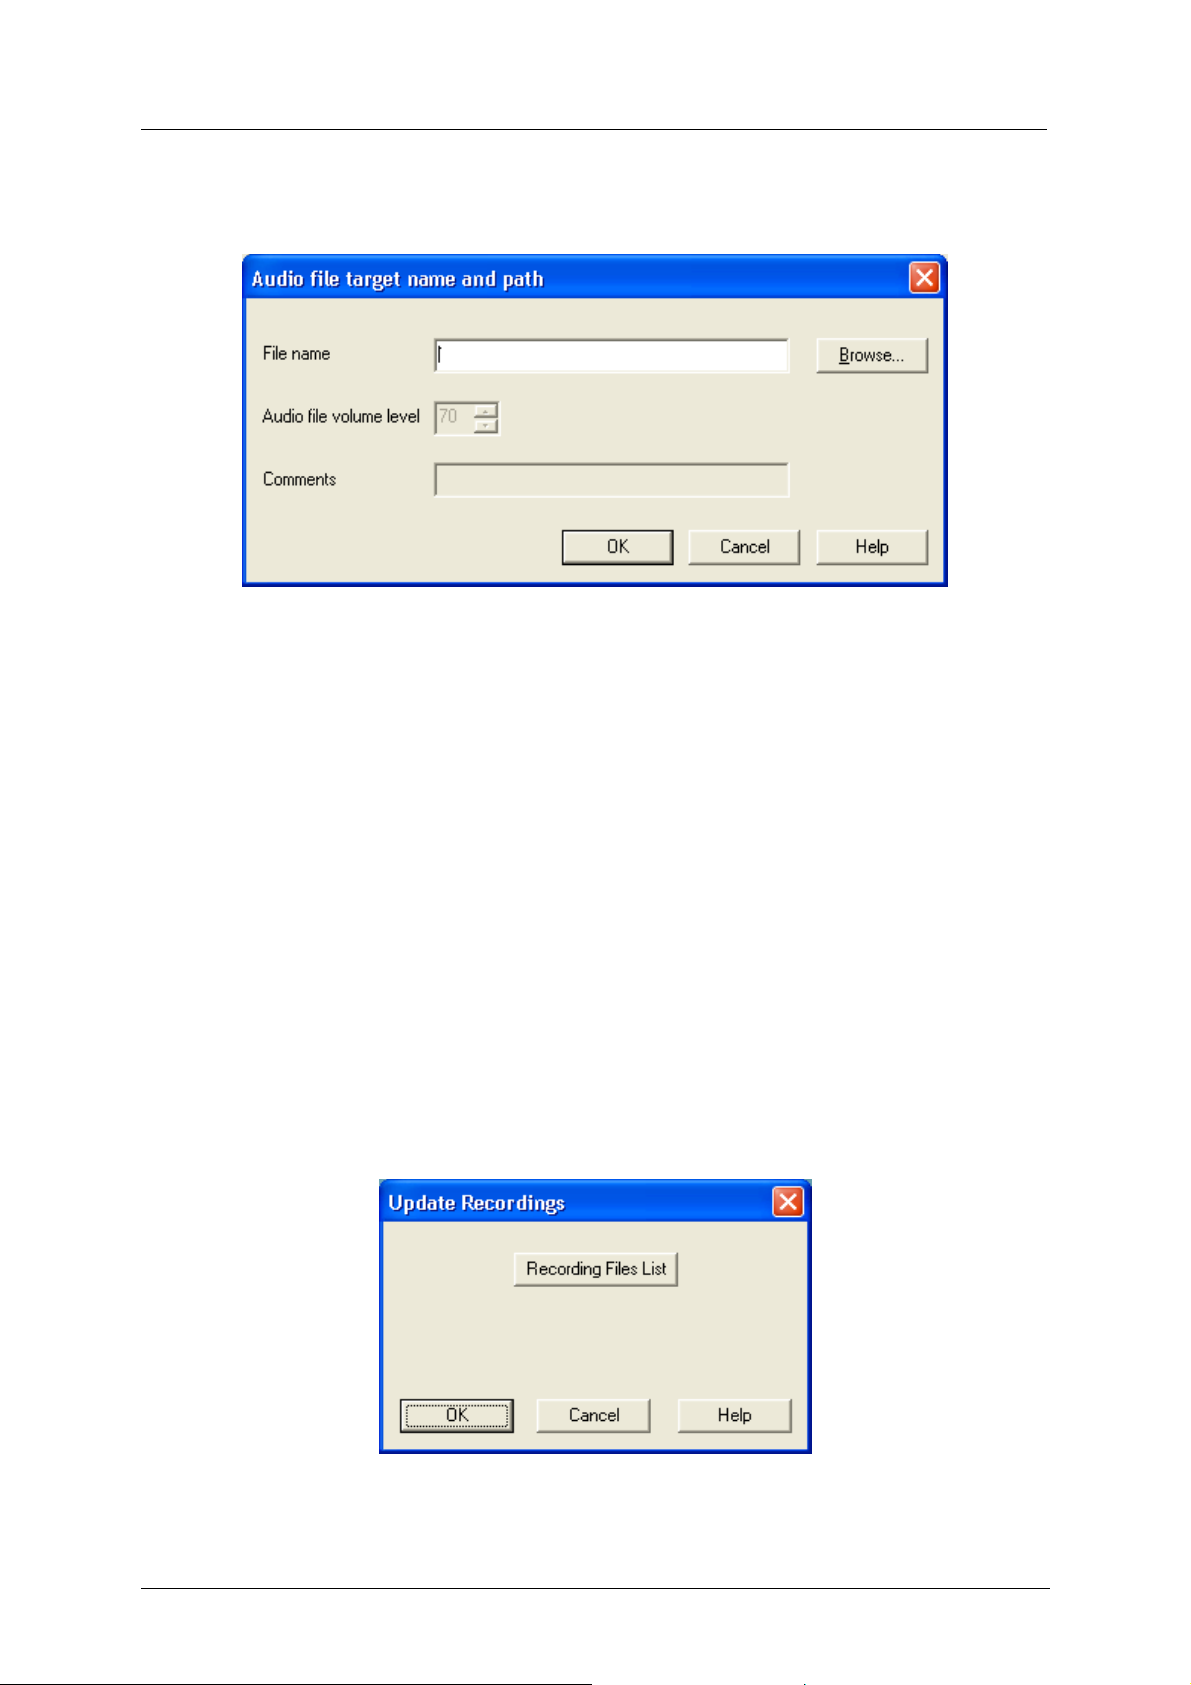
• Select the files for reading. You may select multiple files using the Shift or Ctrl keys.
• Click Set Path. Audio file target name and path window opens.
Figure 3-17: Audio Files Target Name and Path Window
• Click Browse and select the location to which the file must be downloaded.
• Click OK to close Audio file target name and path window.
• Click OK to close Audio files to be read window.
• Click OK to close Read Recordings window. A confirmation window appears (see
Figure
3-12).
• Click OK to close the confirmation window.
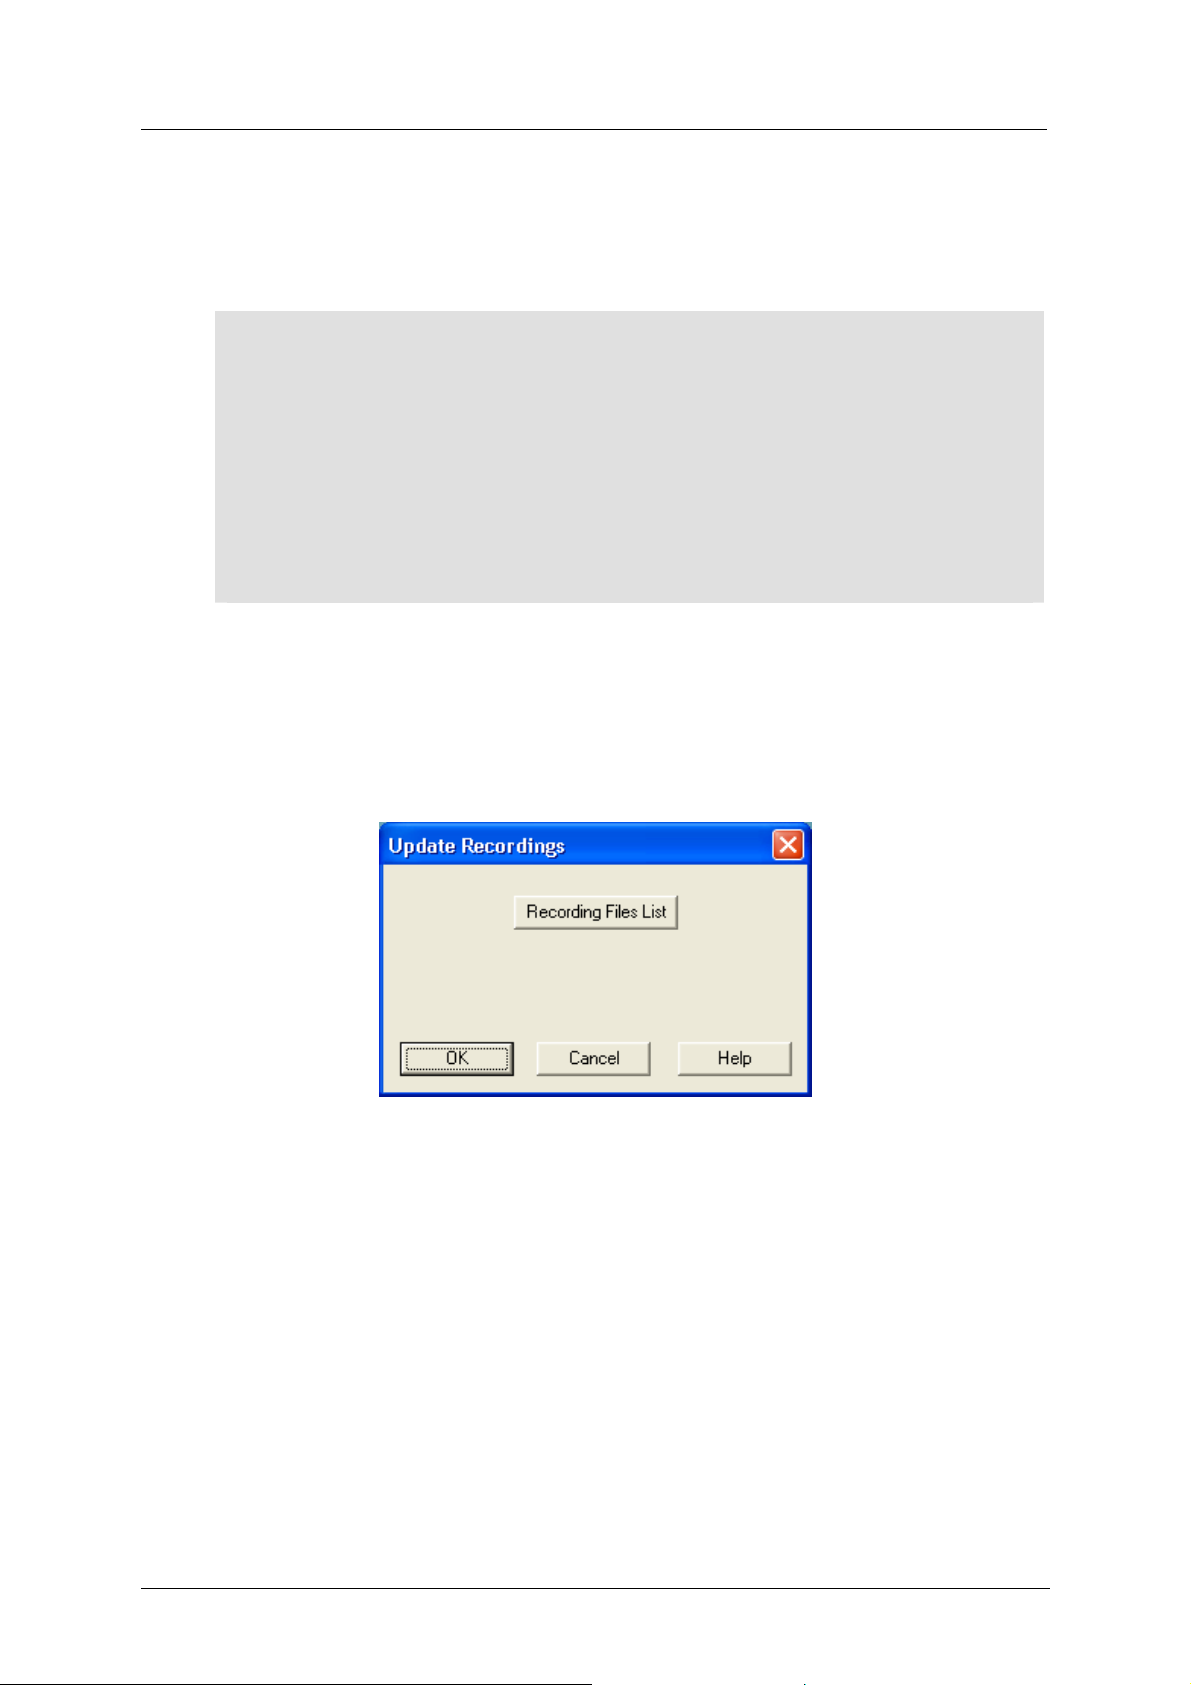
3.2.3.4 Update Recordings
To update the current list of music files in the system, perform the steps as follows:
• Click CommunicationÆUpdate Recordings. Update Recordings window opens.
Figure 3-18: Update Recordings Window
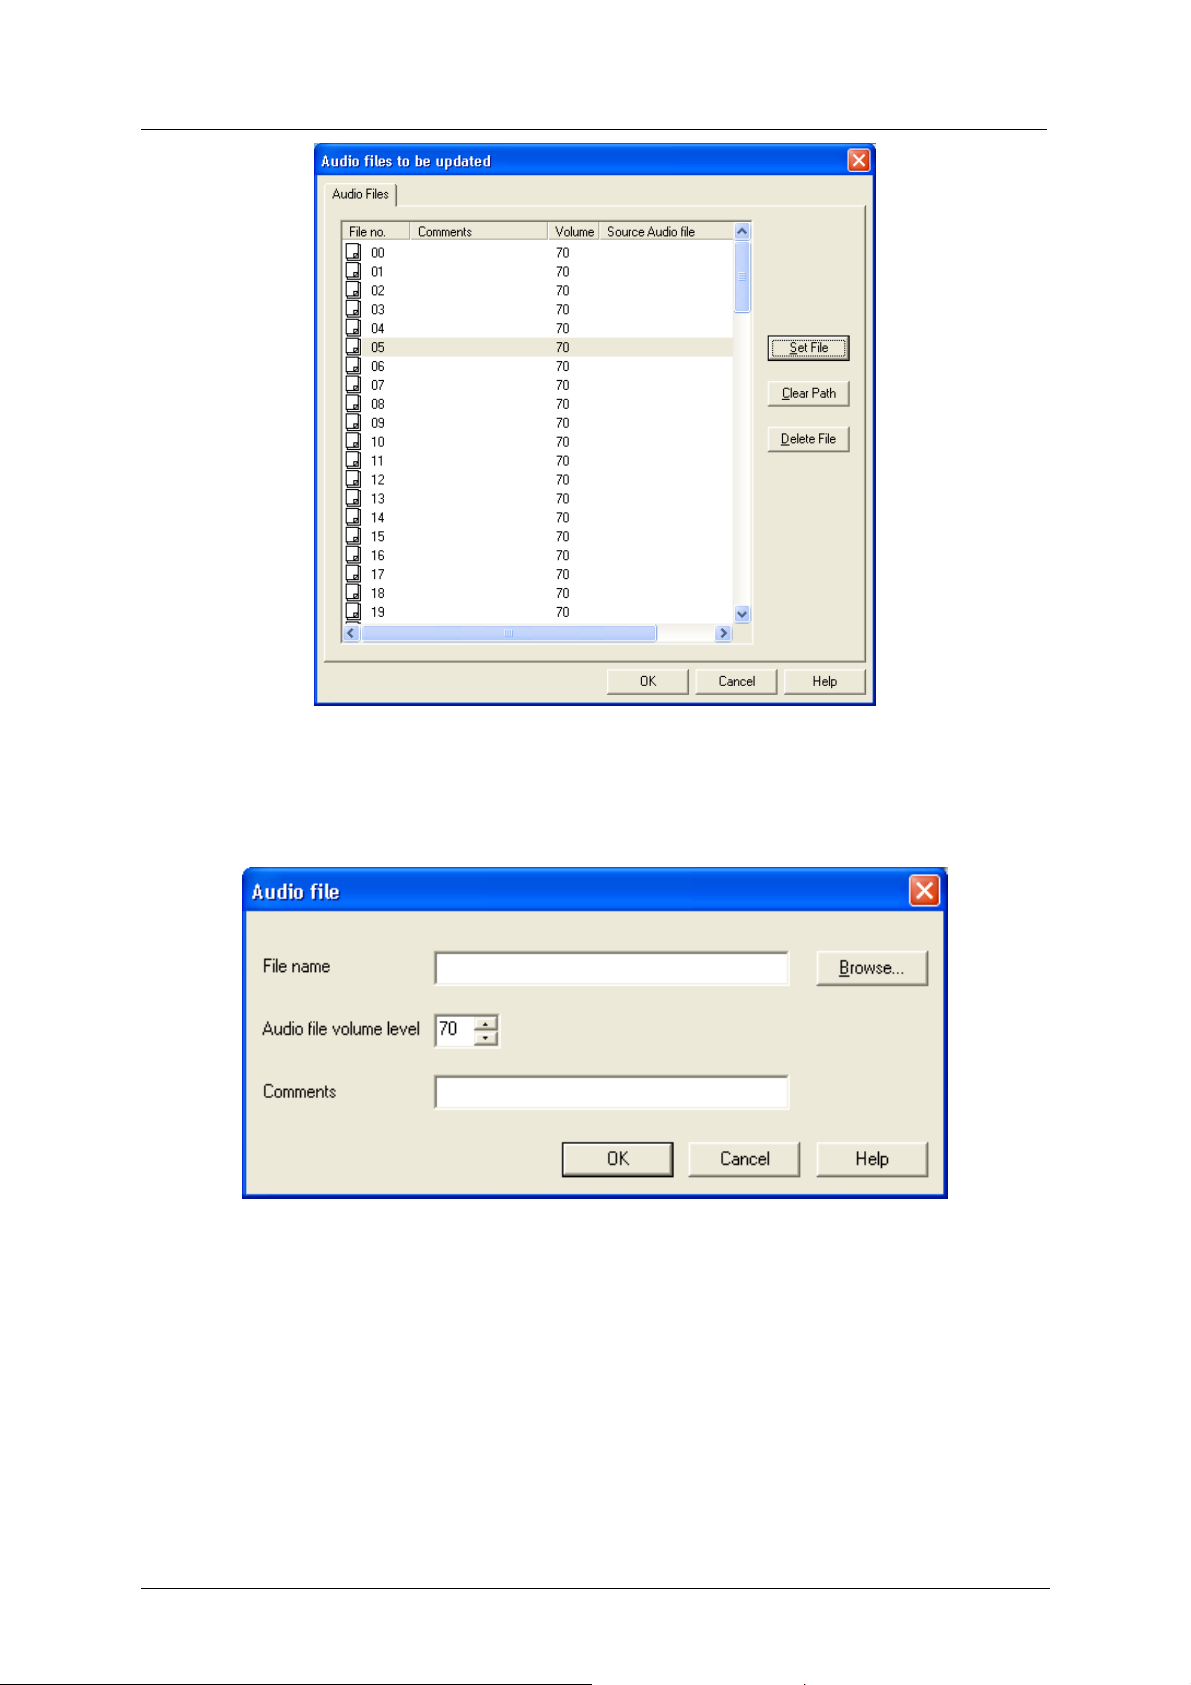
• Click Recording Files List. Audio files to be updated window opens.
30
Page 35
Music-Tel A Installation and Operation Manual MAN Software
Figure 3-19: Audio Files to be Updated Window
• Select a file number.
• Click Set File. Audio file window opens.
Figure 3-20: Audio File Window
• Click Browse. Select Audio File window opens.
31
Page 36
Music-Tel A Installation and Operation Manual MAN Software
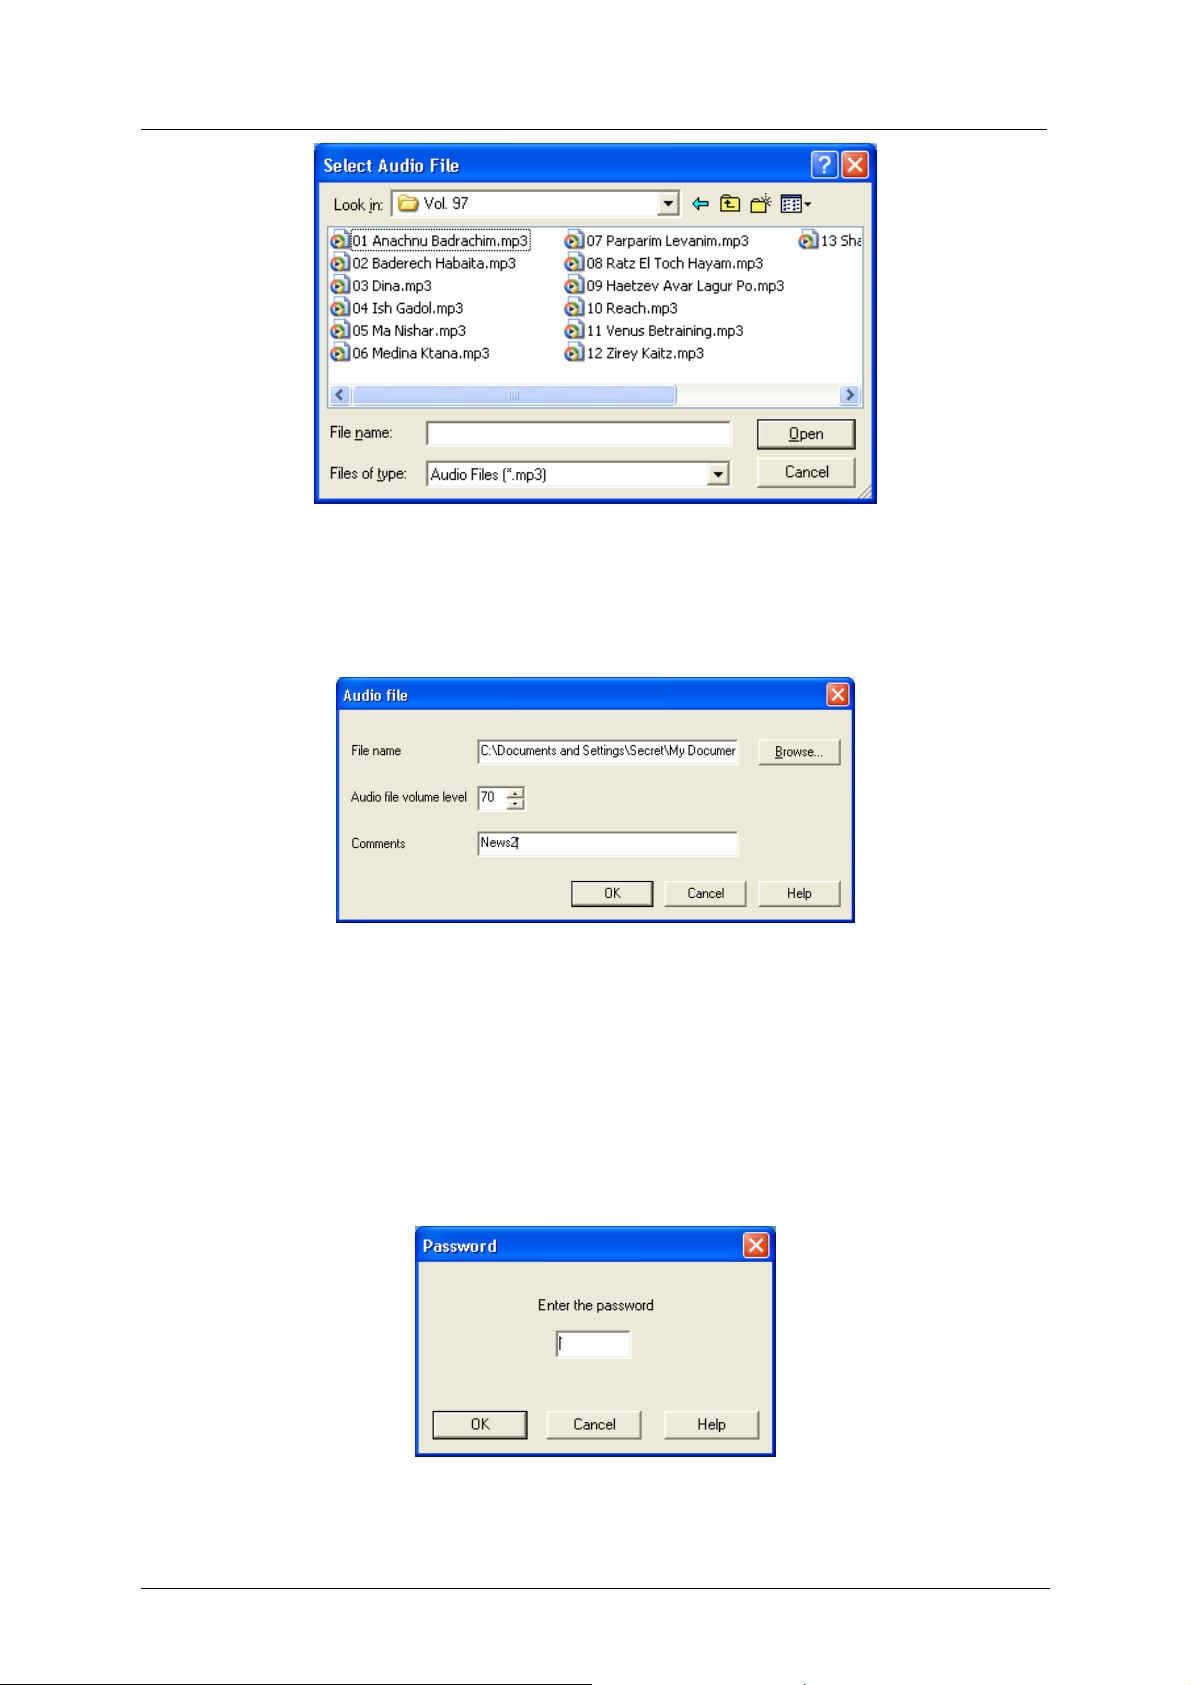
Figure 3-21: Select Audio File Window
• Select the path you want the file to be uploaded from.
• Click Open. Audio file window opens.
Figure 3-22: Audio File Window
• Set the volume level.
• Insert a description in Comments field.
• Click OK to close Audio File window.
• Click OK. Password window opens.
Figure 3-23: Password Window
• Enter password.
32
Page 37
Music-Tel A Installation and Operation Manual MAN Software
• Click OK. A confirmation window appears (see Figure 3-12).
• Click OK to close the confirmation window. The current list of music files in the system
has been updated.
NOTE
3.2.3.5 Delete Recordings
The recommended MP-3 file configuration is:
Mode: Mono.
Bandwidth: 22 kHz.
Bit Rate: 48kBps.
To delete music files from the current list of music files in the system, perform the steps as
follows:
• Click CommunicationÆUpdate Recordings. Upgrade Recordings window opens.
Figure 3-24: Update Recordings Window
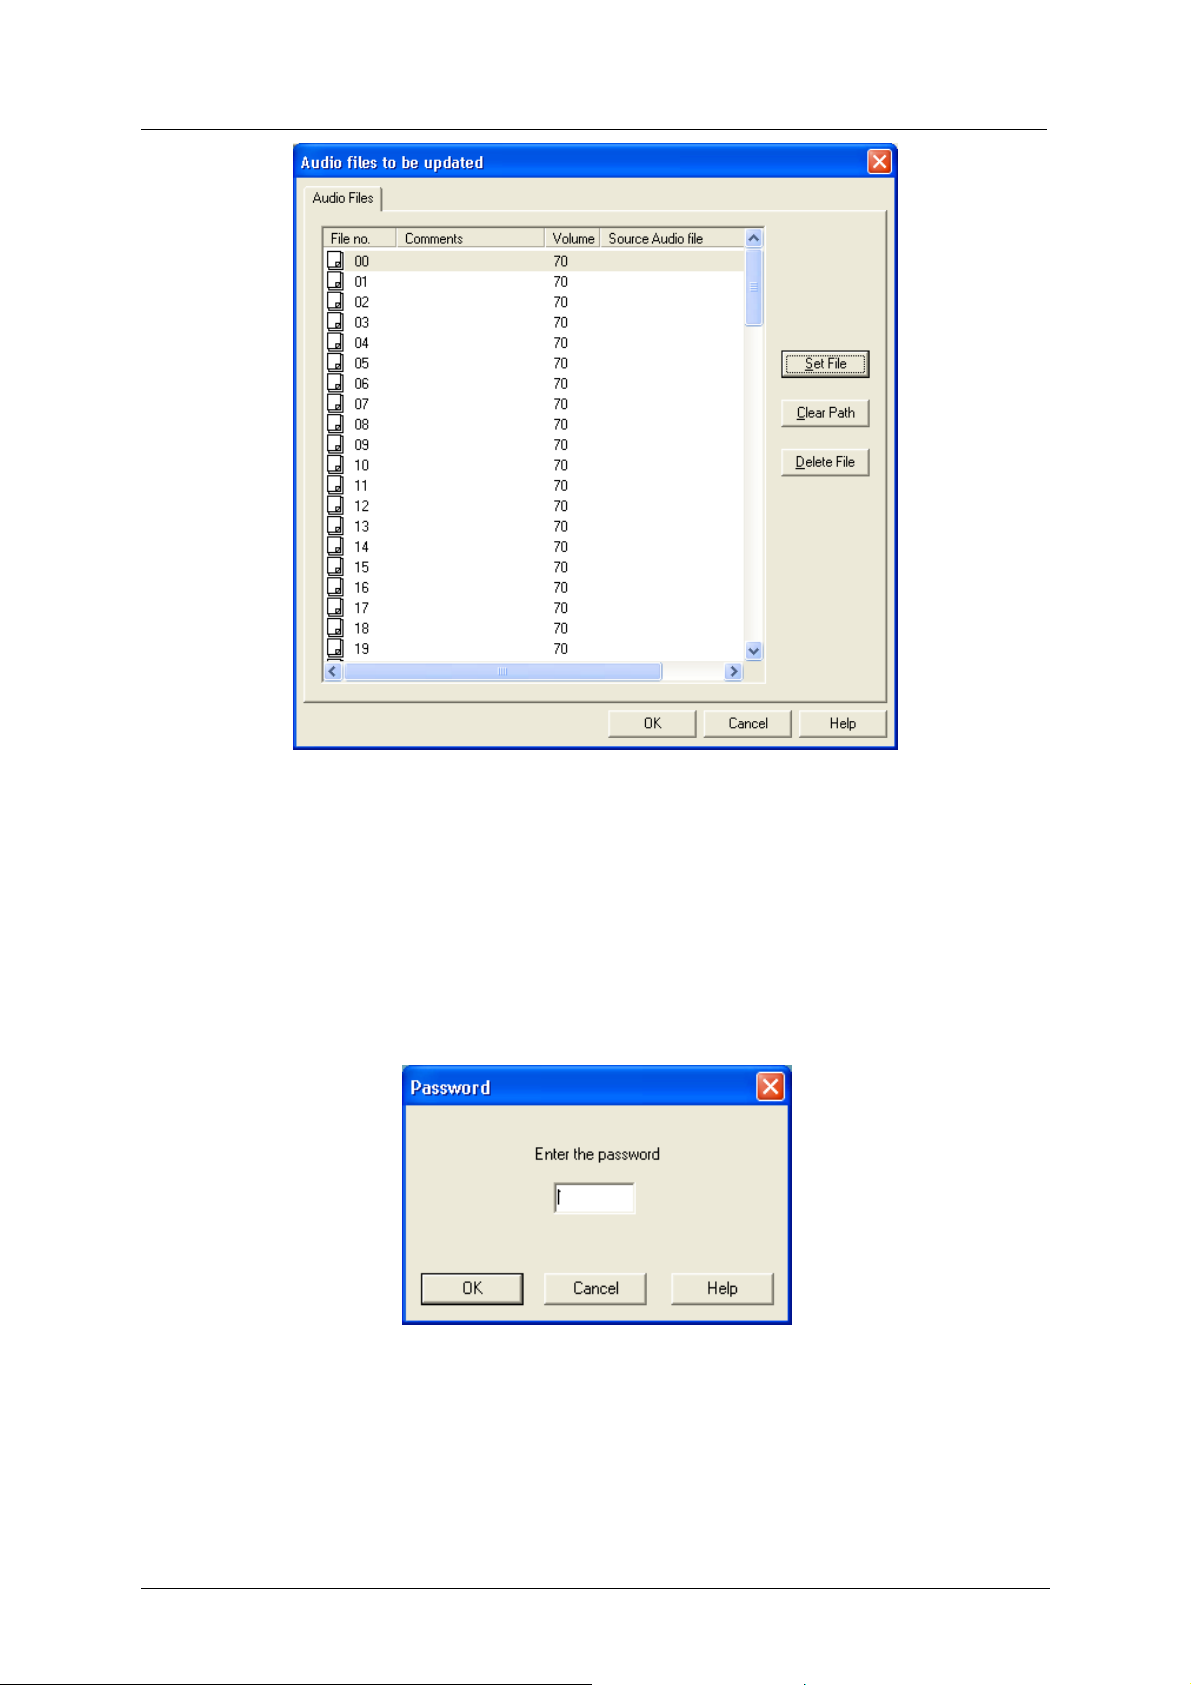
• Click Recording Files list. Audio Files to be updated window opens.
33
Page 38
Music-Tel A Installation and Operation Manual MAN Software
Figure 3-25: Audio Files to be updated Window
• Select a file number.
• Click Delete File. The selected file is deleted.
• Click OK to close Audio Files to be updated window.
• Click OK. Password window opens.
Figure 3-26: Password Window
• Enter password.
• Click OK. A confirmation window appears (see Figure
3-12).
• Click OK to close confirmation window. The current list of music files in the system has
been updated.
34
Page 39
Music-Tel A Installation and Operation Manual MAN Software
3.2.3.6 Backup
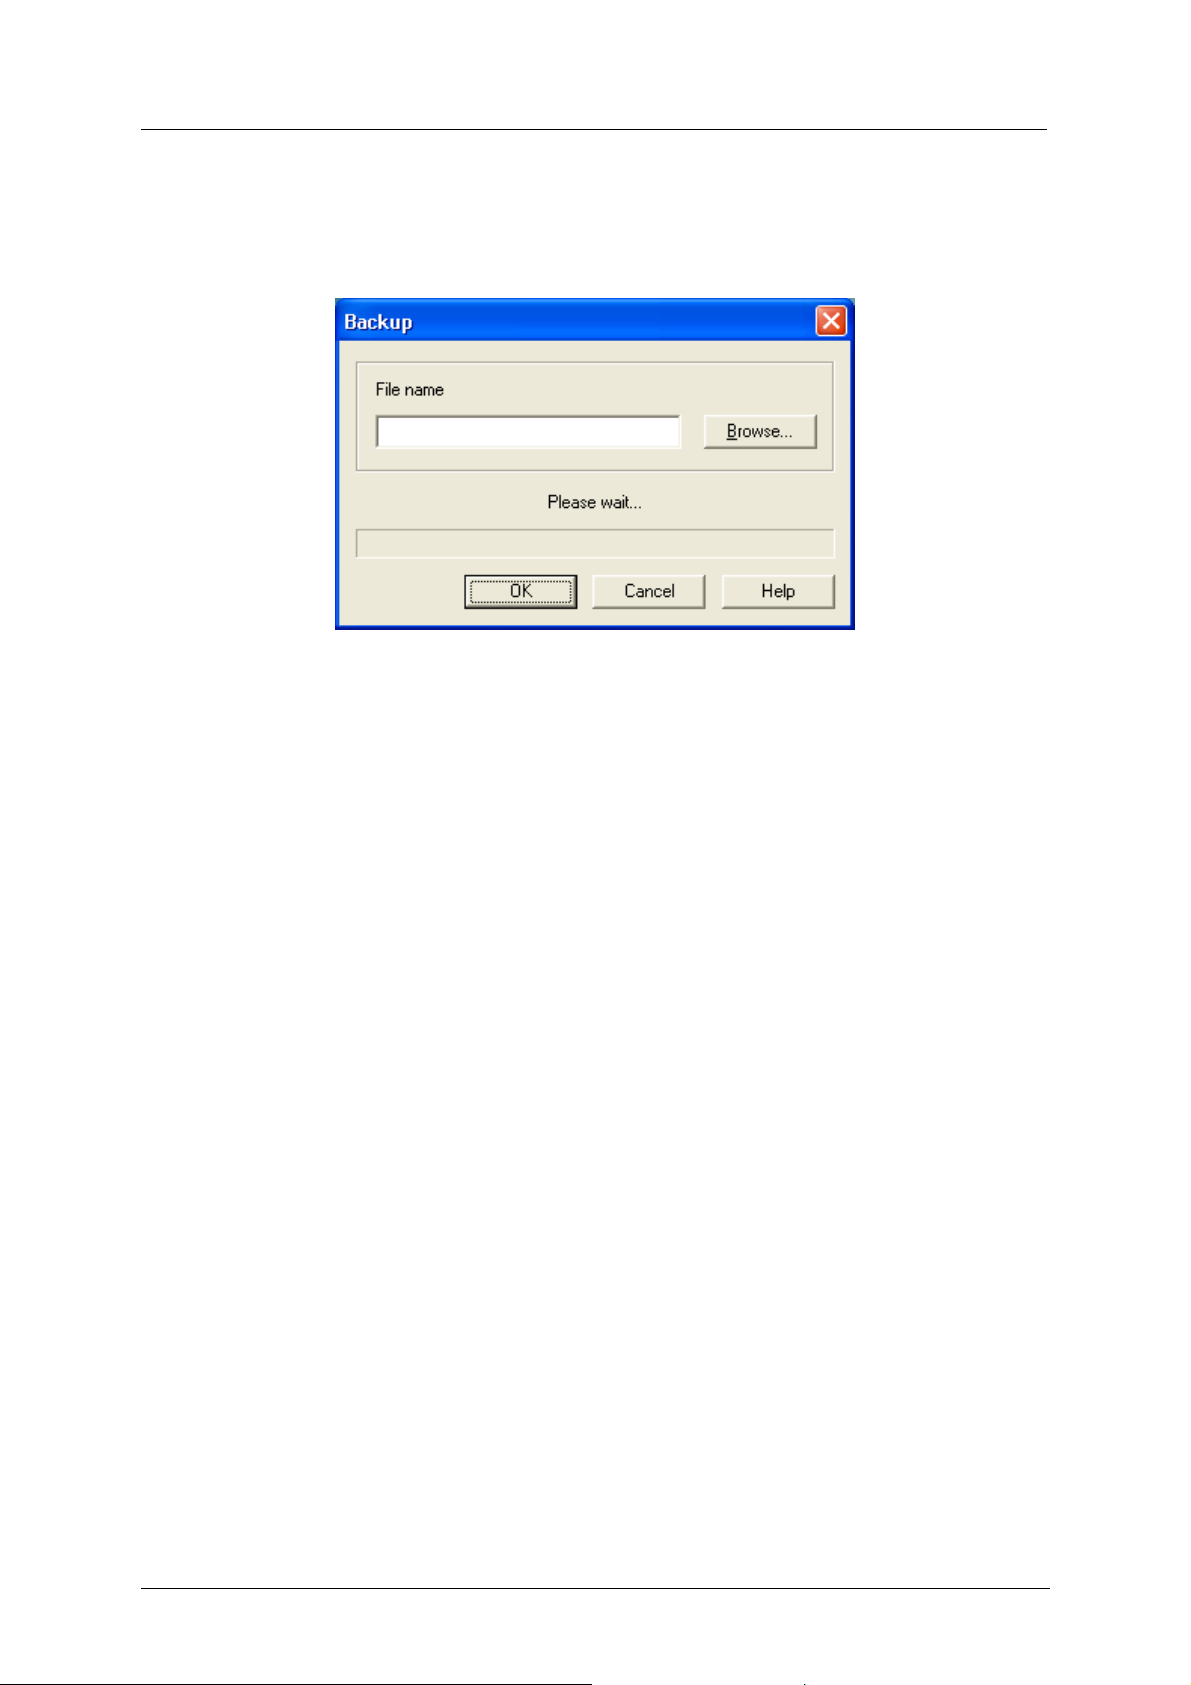
To create a full backup of the Music-Tel A, perform the steps as follows:
• Click CommunicationÆ Backup. Backup window opens.
Figure 3-27: Backup Window
• Define the backup filename (you may browse to change the backup directory).
• Click OK to confirm and close Backup window. A confirmation window appears (see
Figure
3-12).
• Click OK to close confirmation window. The backup file can now be used for another
system or as a backup for the current system.
35
Page 40
Music-Tel A Installation and Operation Manual MAN Software
3.2.3.7 Restore
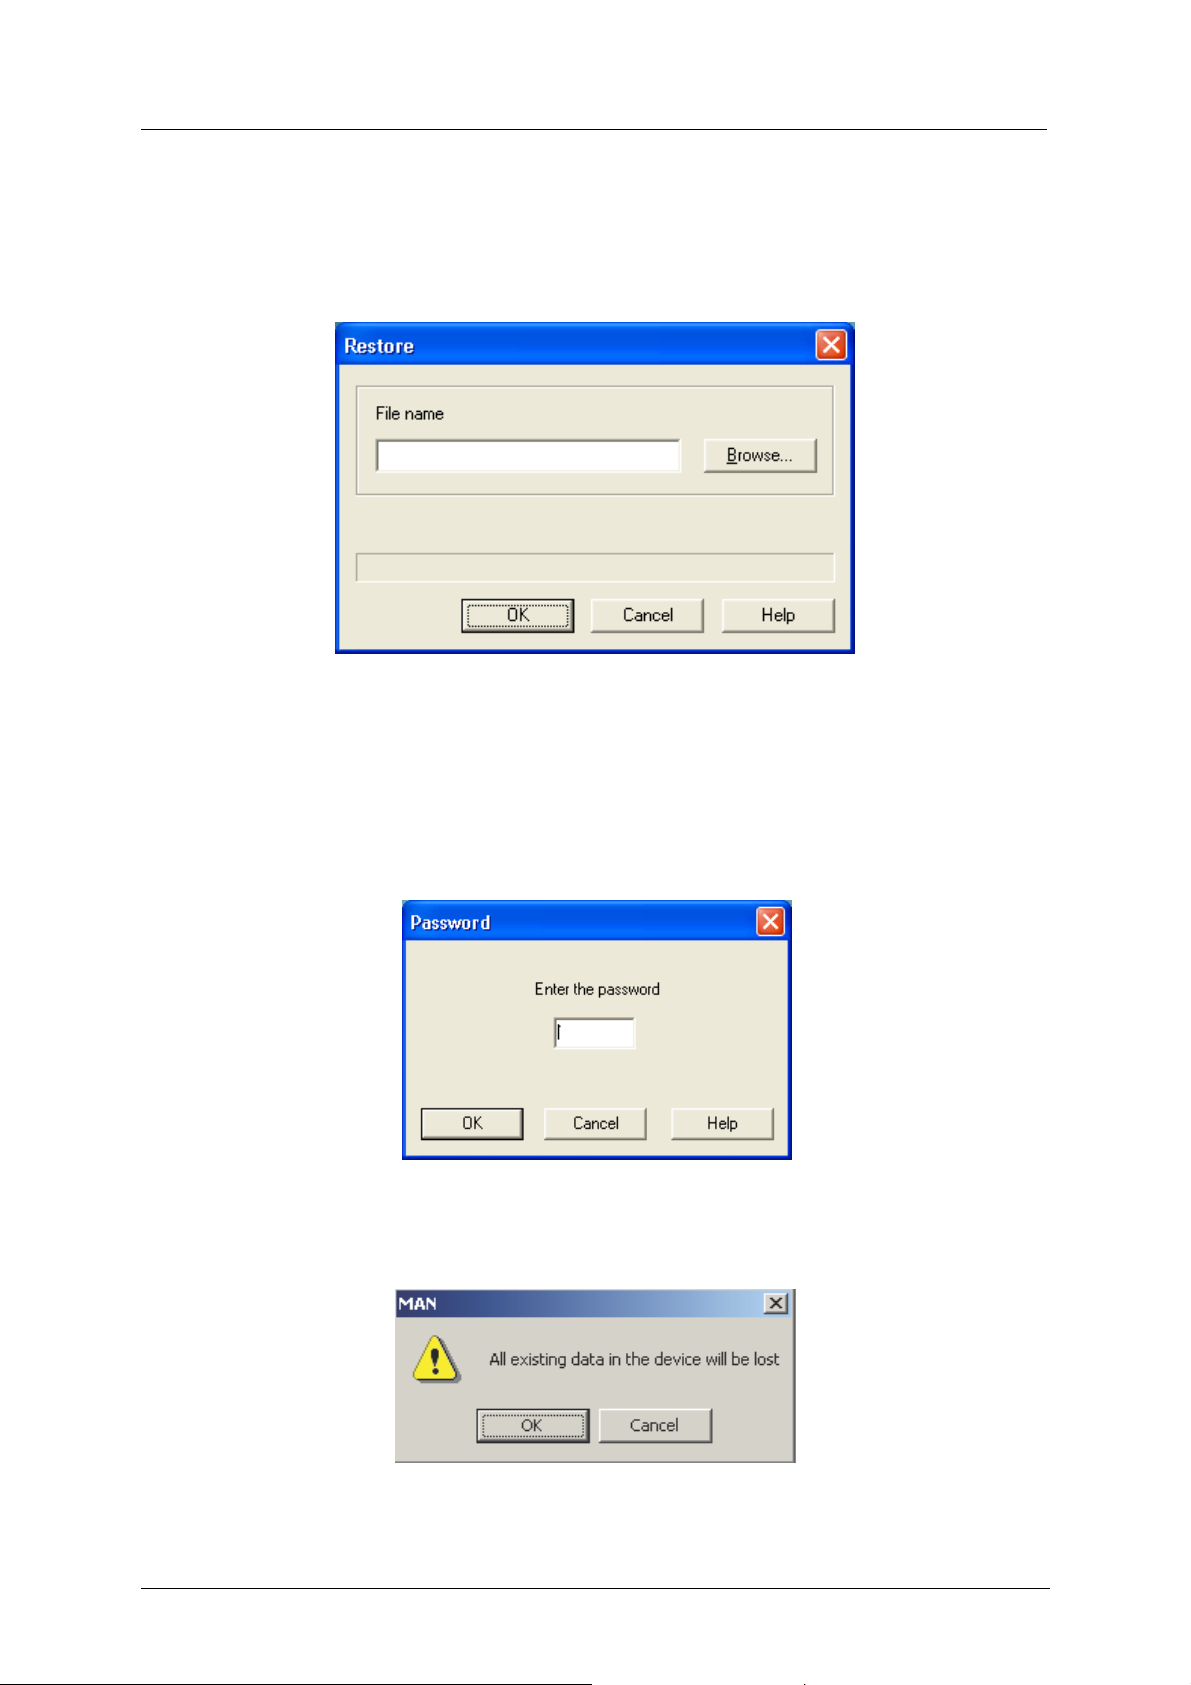
To restore a full backup of the Music-Tel A, perform the steps as follows:
• Click CommunicationÆRestore. Restore window opens.
Figure 3-28: Restore Window
• Fill in the filename of the backup to be restored (you may browse to change the directory).
• If you used Browse, Click Open.
• Click OK. Password window opens.
Figure 3-29: Password Window
• Enter the password (default is 1234). A warning window appears.
Figure 3-30: MAN Warning window
36
Page 41
Music-Tel A Installation and Operation Manual MAN Software
• Click OK to accept the warning and close the window. A confirmation window appears
(see Figure 3-12).
• Click OK to close the confirmation window. The Music-Tel A now contains all the
information from the backup.
3.2.3.8 Software Upgrade
To upgrade the System Software (not the configuration data), make sure you have an RS-232
connection to the Music-Tel A:
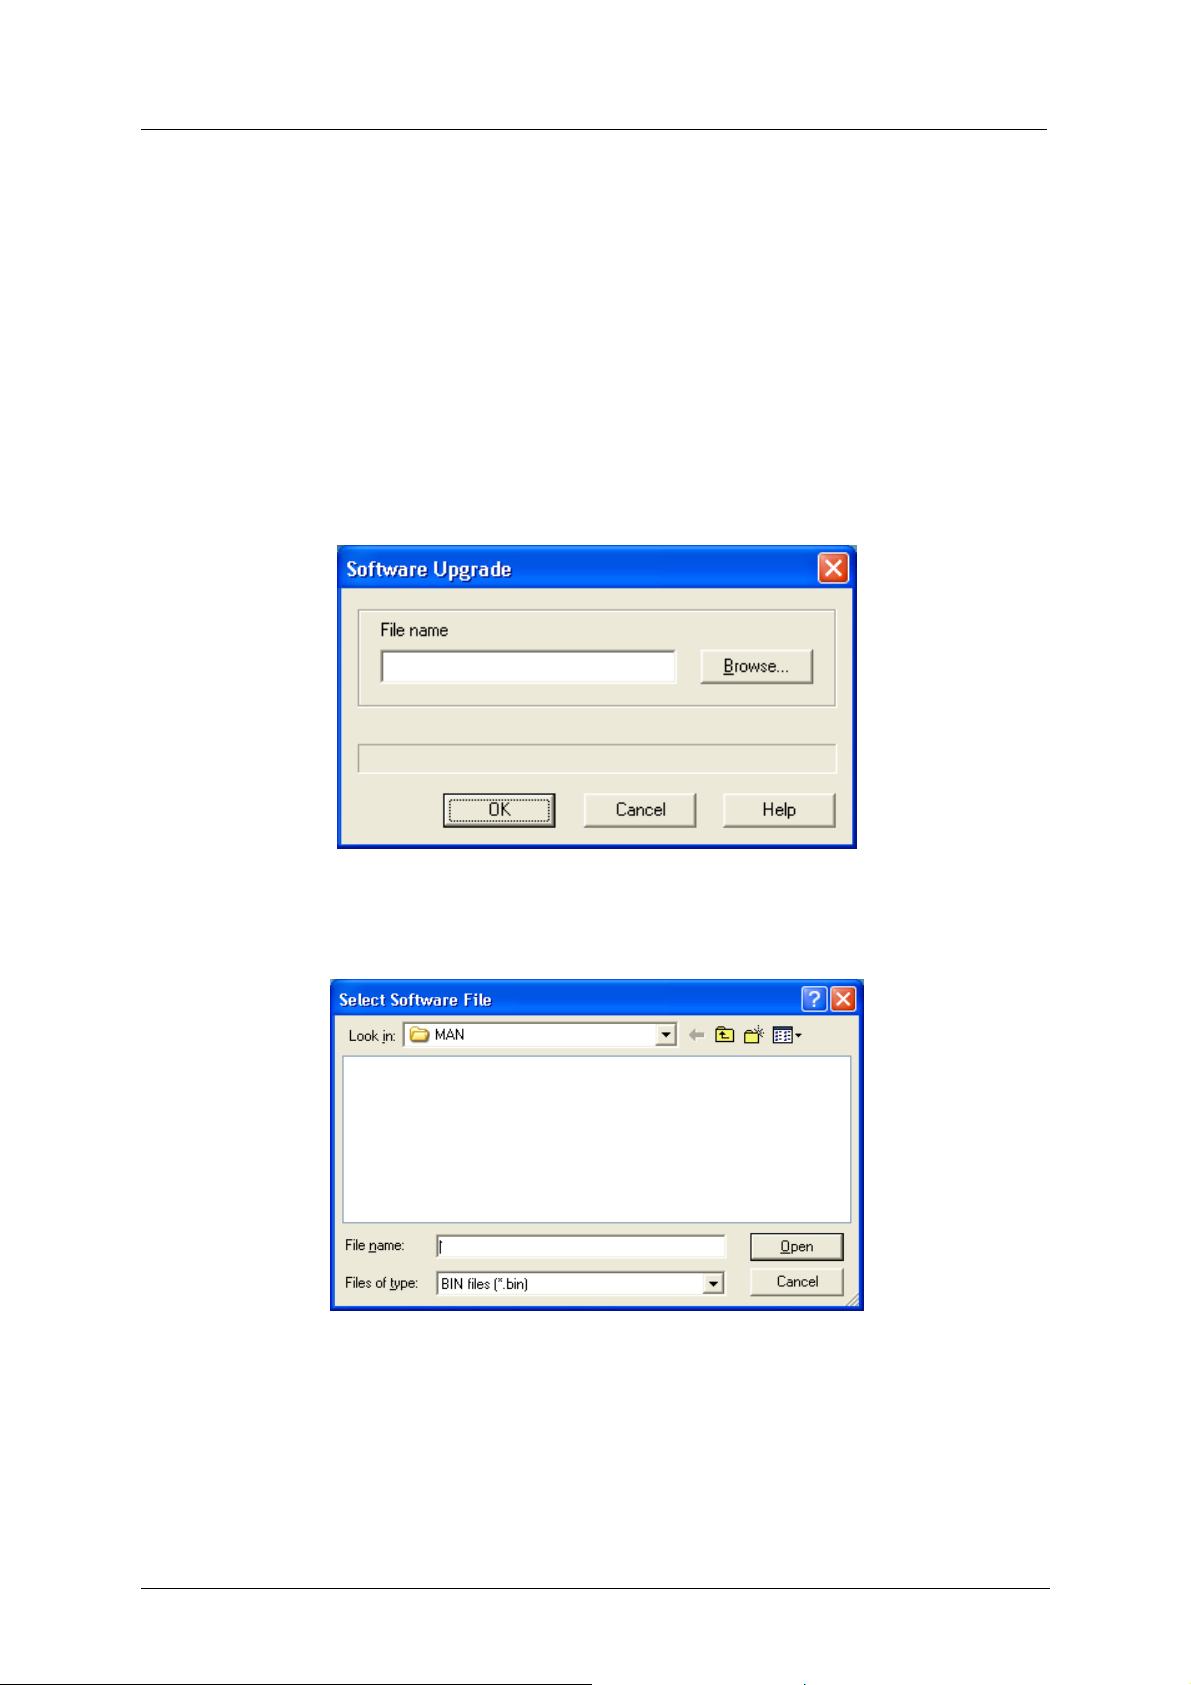
• Click CommunicationÆSoftware Upgrade. Software Upgrade window opens.
Figure 3-31: Software Upgrade Window
• Browse for the upgrade file (*.bin).
Figure 3-32:Select Software File Window
• Click Open.
• Click OK to close the Software Upgrade window. Password window opens.
37
Page 42
Music-Tel A Installation and Operation Manual MAN Software
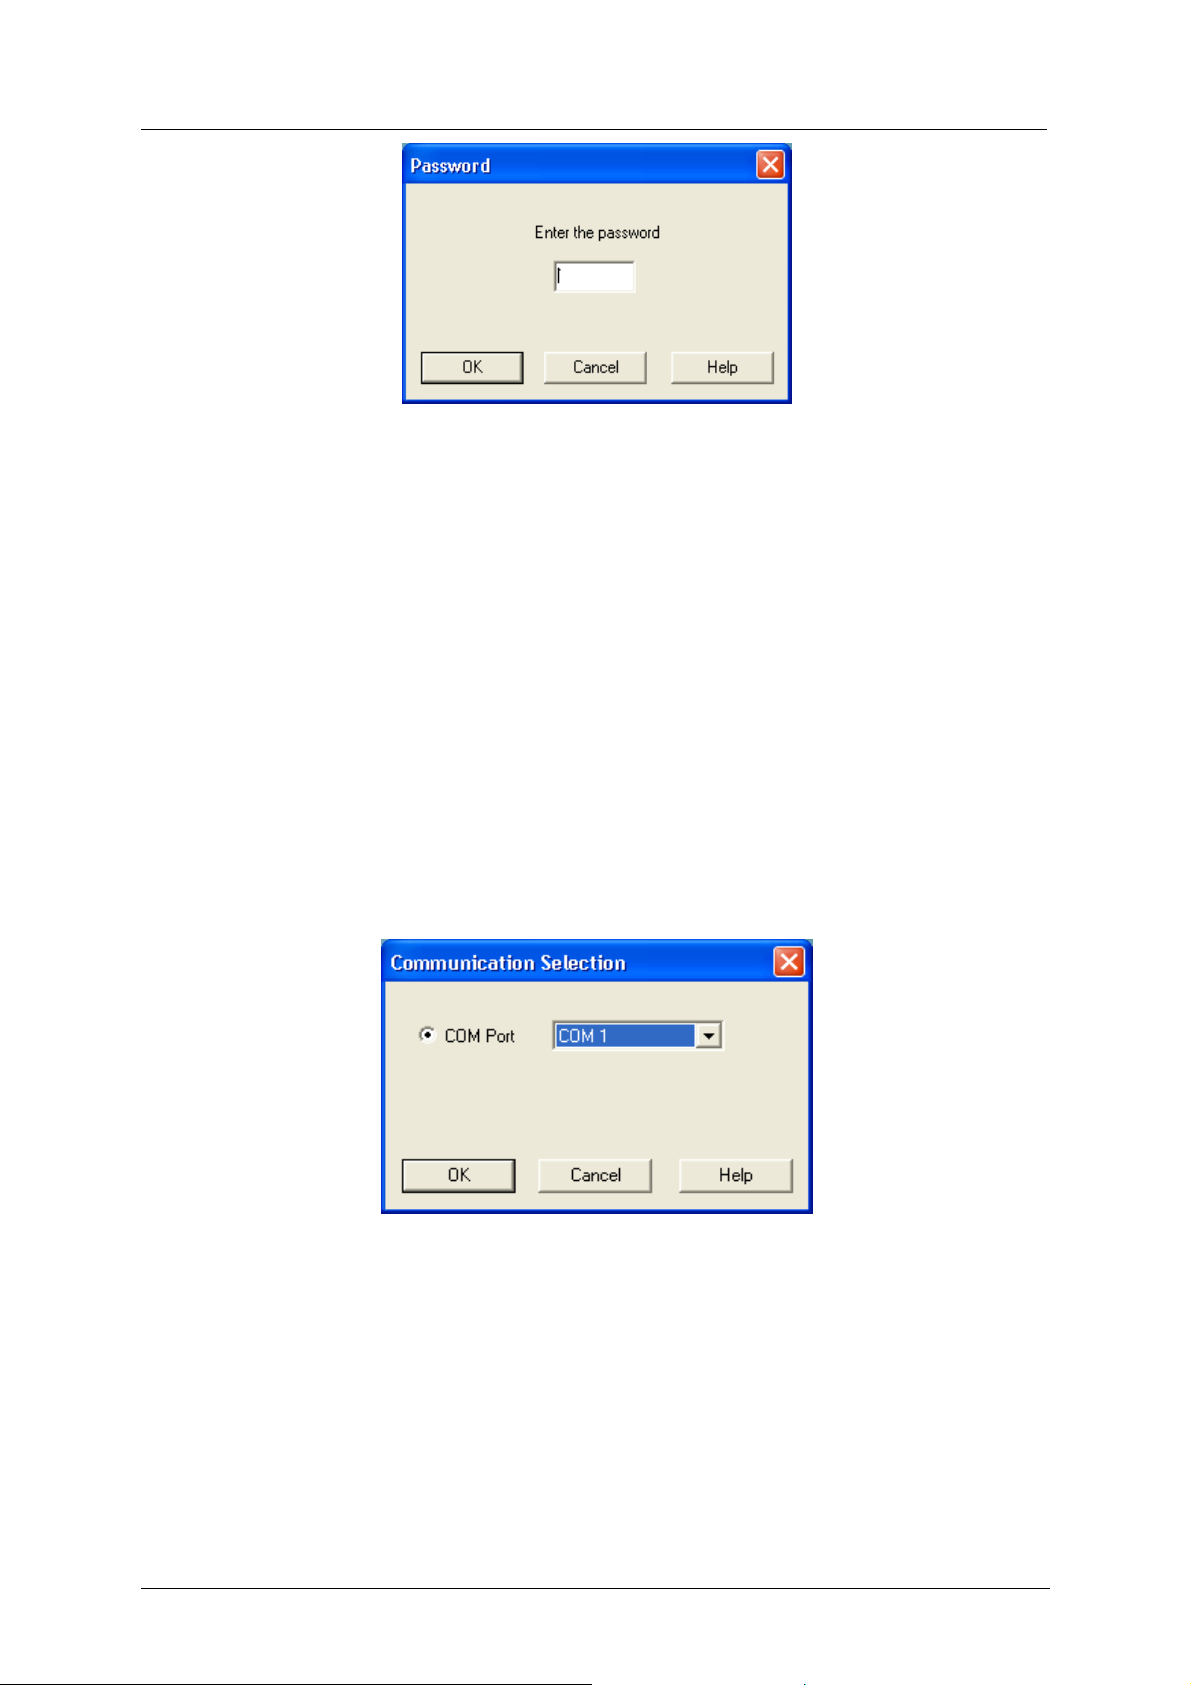
Figure 3-33: Password Window
• Enter password.
• Click OK. A confirmation window appears (see Figure 3-12).
• Click OK to close the confirmation window.
3.2.3.9 Communication Selection
The Communication selection defines the communication method, you will be using when
locally configuring the Music-Tel A. To define the communication method, perform the steps
as follows:
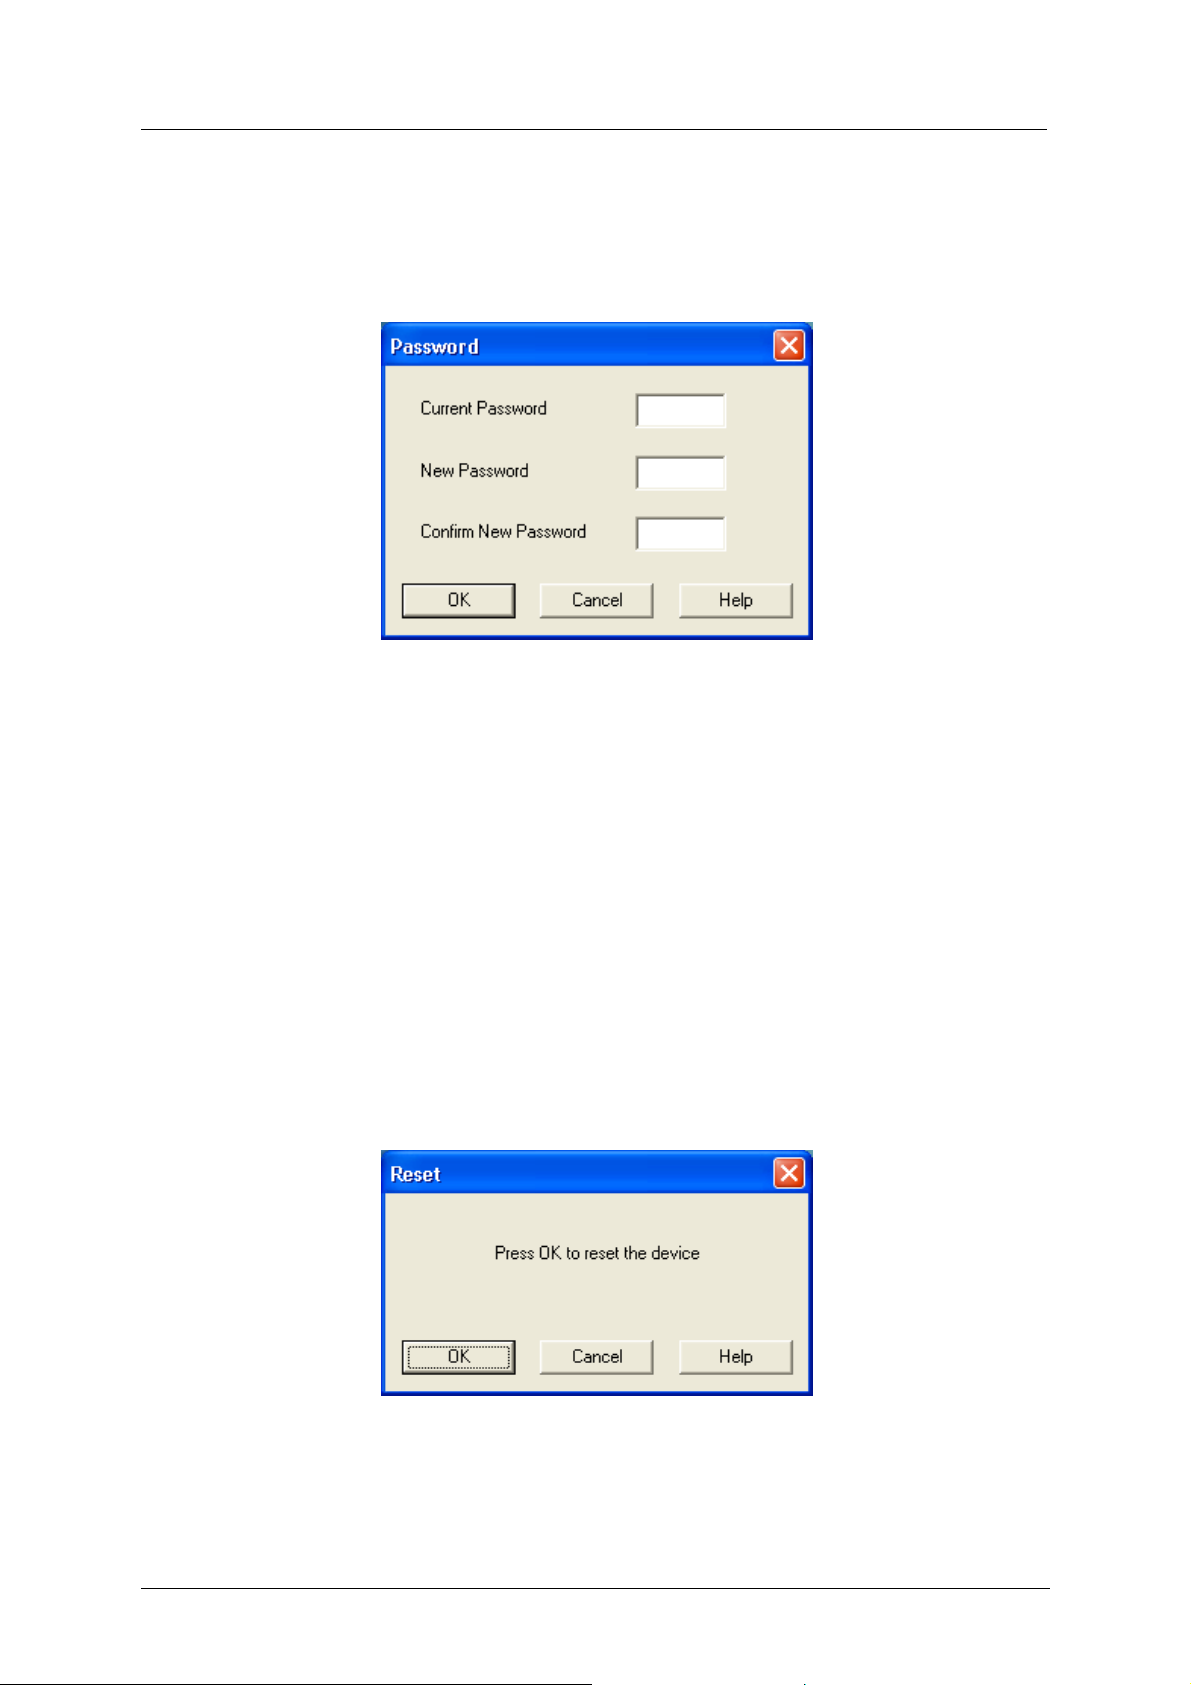
• Click CommunicationÆ Communication selection. Communication selection window
opens.
Figure 3-34: Communication selection Window
• Select a communication port from COM port combo-box and click OK. The
communication method is defined.
38
Page 43
Music-Tel A Installation and Operation Manual MAN Software
3.2.3.10 Password
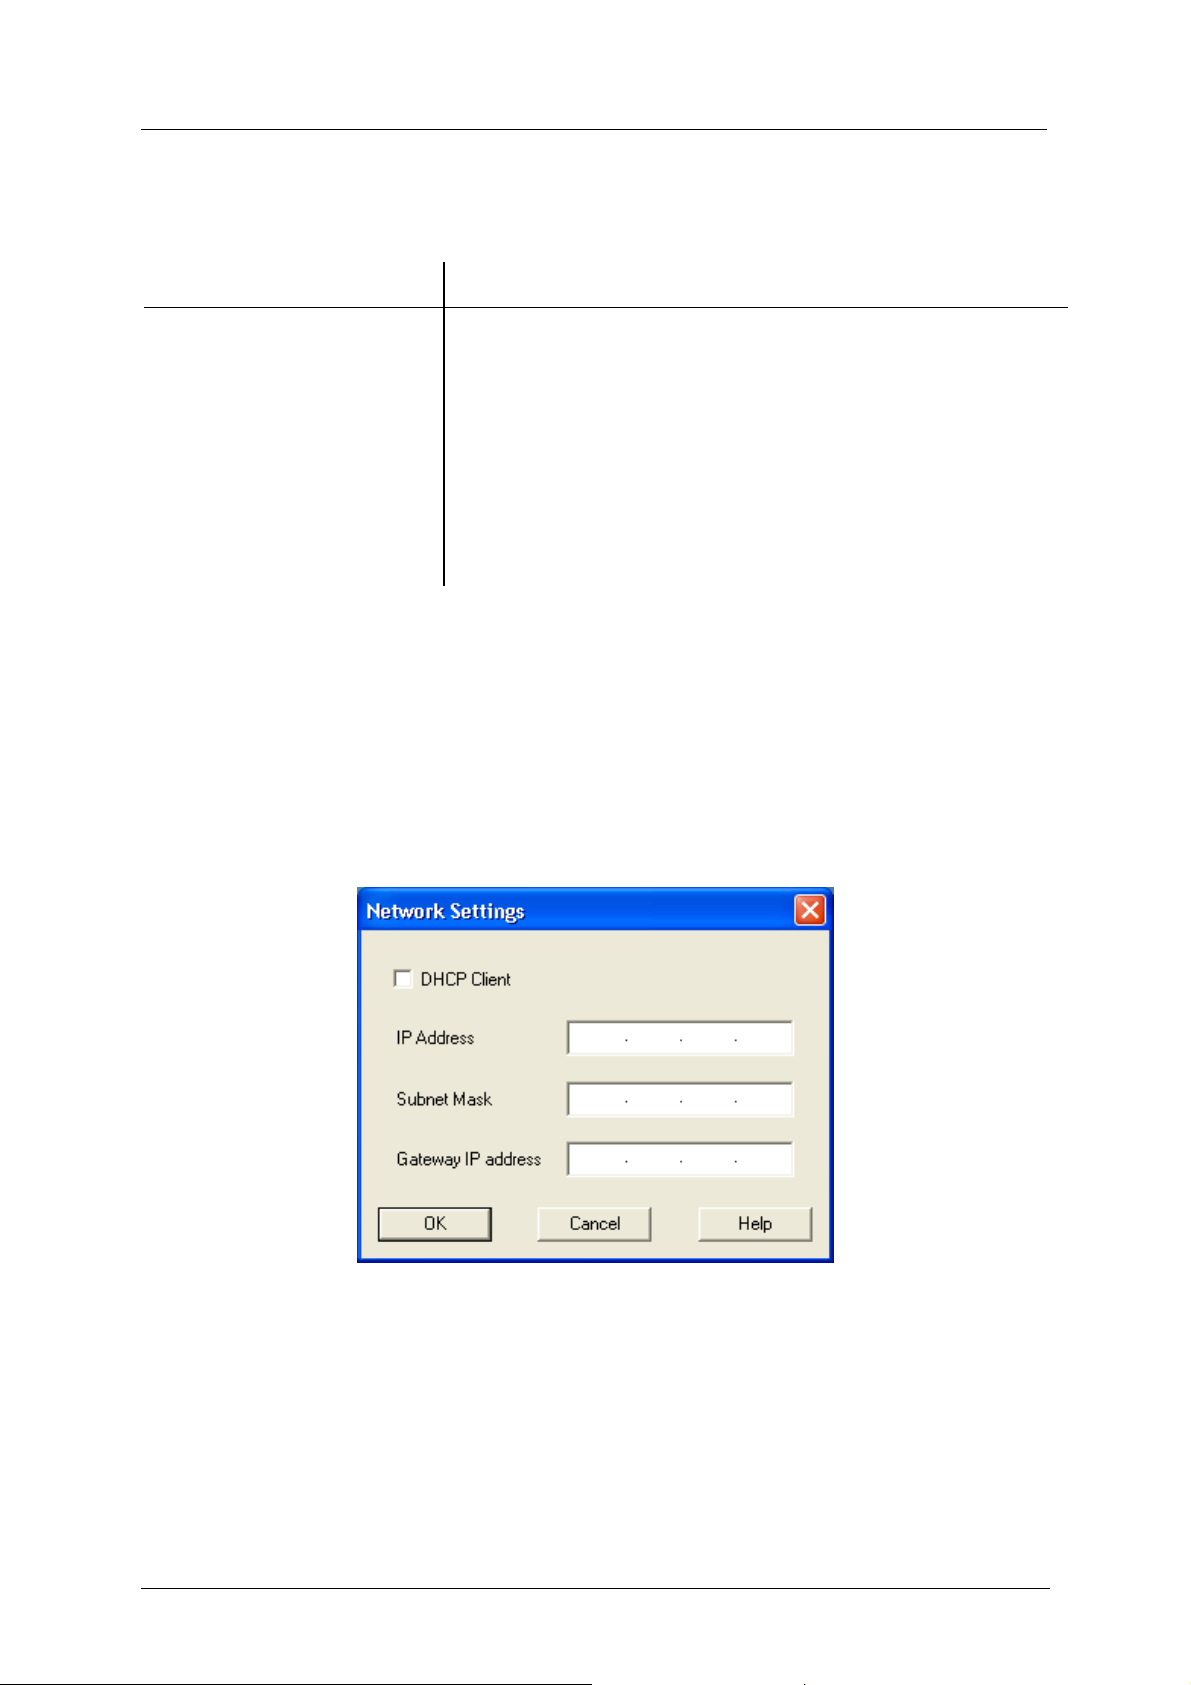
To define a new password, perform the steps as follows:
• Click CommunicationÆPassword. Password Definition window opens.
Figure 3-35: Password Definition Window
• Fill in the Current Password (default is 1234).
• Fill in the New Password in the New Password and Confirm Password fields.
• Click OK. A Confirmation window appears (see Figure 3-12).
• Click OK to close the confirmation window. The password has been changed
successfully.
3.2.3.11 Reset
To perform hardware reset to the Music-Tel A, peform the steps as follows:
• Click CommunicationÆReset. Reset window opens.
Figure 3-36: Reset Window
• Click OK. The Music-Tel A is reset.
39
Page 44
Music-Tel A Installation and Operation Manual MAN Software
3.2.4 Parameters
The Parameters menu contains the following functions:
Function Description
Network Settings
Define the network parameters for the Music-Tel A
Date & Time Define the Date and Time on the Music-Tel A
IPMAN-A Server IP Address
Polling Interval
Define the fixed IP Address of the IPMAN-A Server
Define the interval time after which the Music-Tel A is
checking for updates from the IPMAN-A Server
SNMP Parameters Option
MAC Address
Define the MusicTel-A SNMP management parameters
The predefined MAC Address of the Music-Tel A device
3.2.4.1 Network Settings
To set the network parameters for the Music-Tel A, perform the steps as follows:
• Click ParametersÆ Network Settings. Network Settings window opens. The parameters
defined in the Network Settings window is essential for connection to the Music-Tel A.
These parameters, together with the Communication Selection define the communication
flow.
Figure 3-37: Network Settings Window
• Insert the IP adress in the IP Address field.
• Insert the subnet mask parameters in the Subnet Mask.
• Insert the gateway IP address in the Gateway IP Addrress field.
• Click OK to modify changes and close the Network Settings window.
40
Page 45
Music-Tel A Installation and Operation Manual MAN Software
NOTE
3.2.4.2 Date & Time
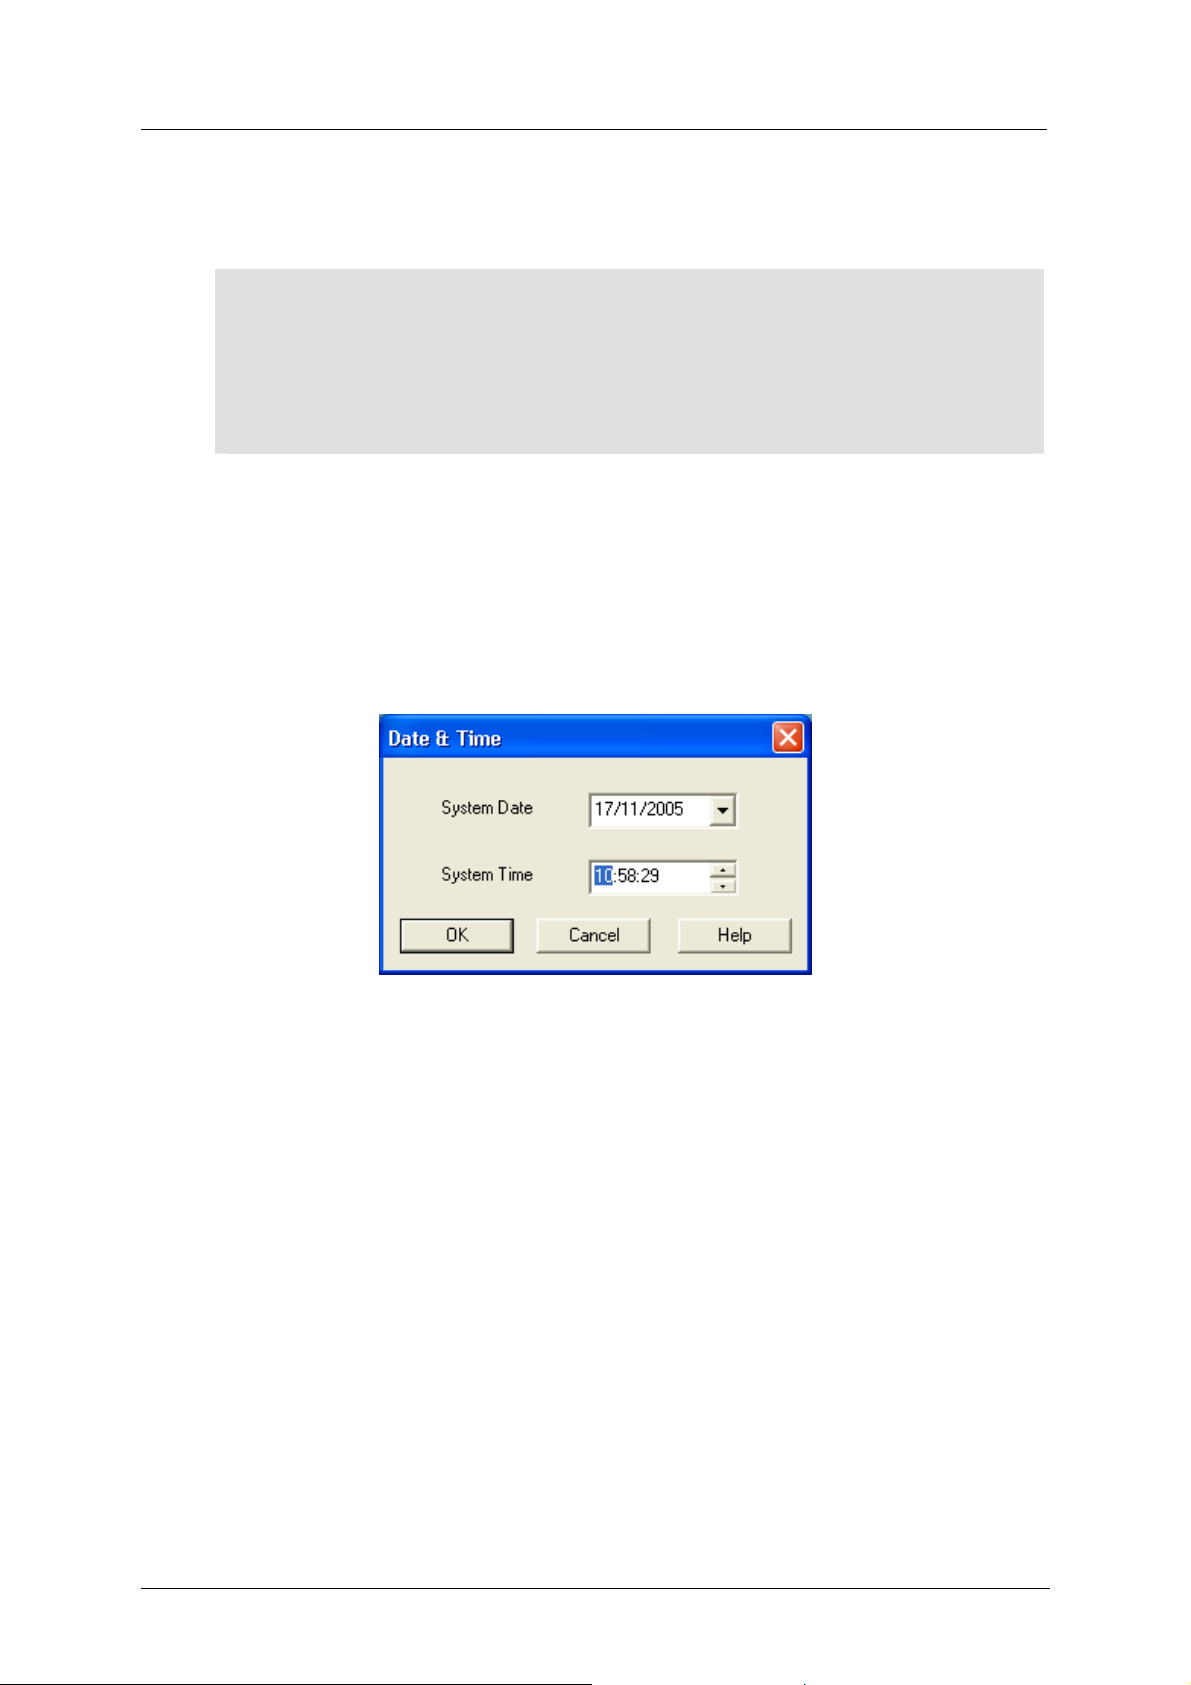
To go to the date and time parameters of the Music-Tel A, perform the steps as follows:
• Click ParametersÆDate & Time. Date & Time window opens. This displays the date and
The initial network setting can only be performed via the RS-232 connection.
Should you network use a DHCP server, mark the DHCP box and the network
settings will be automatically assigned.
time of the Music-Tel A (if connected). If the Music-Tel A is not connected, you will
receive a request to connect to the Music-Tel A.
Figure 3-38: Date & Tim e Window
When the communication parameter to the Music-Tel A is set to COM 1 and there is no
physical connection, a time-out error and an error that date and time to the device have not
been set will appear. After the second error the Date & Time window will display
information from the PC.
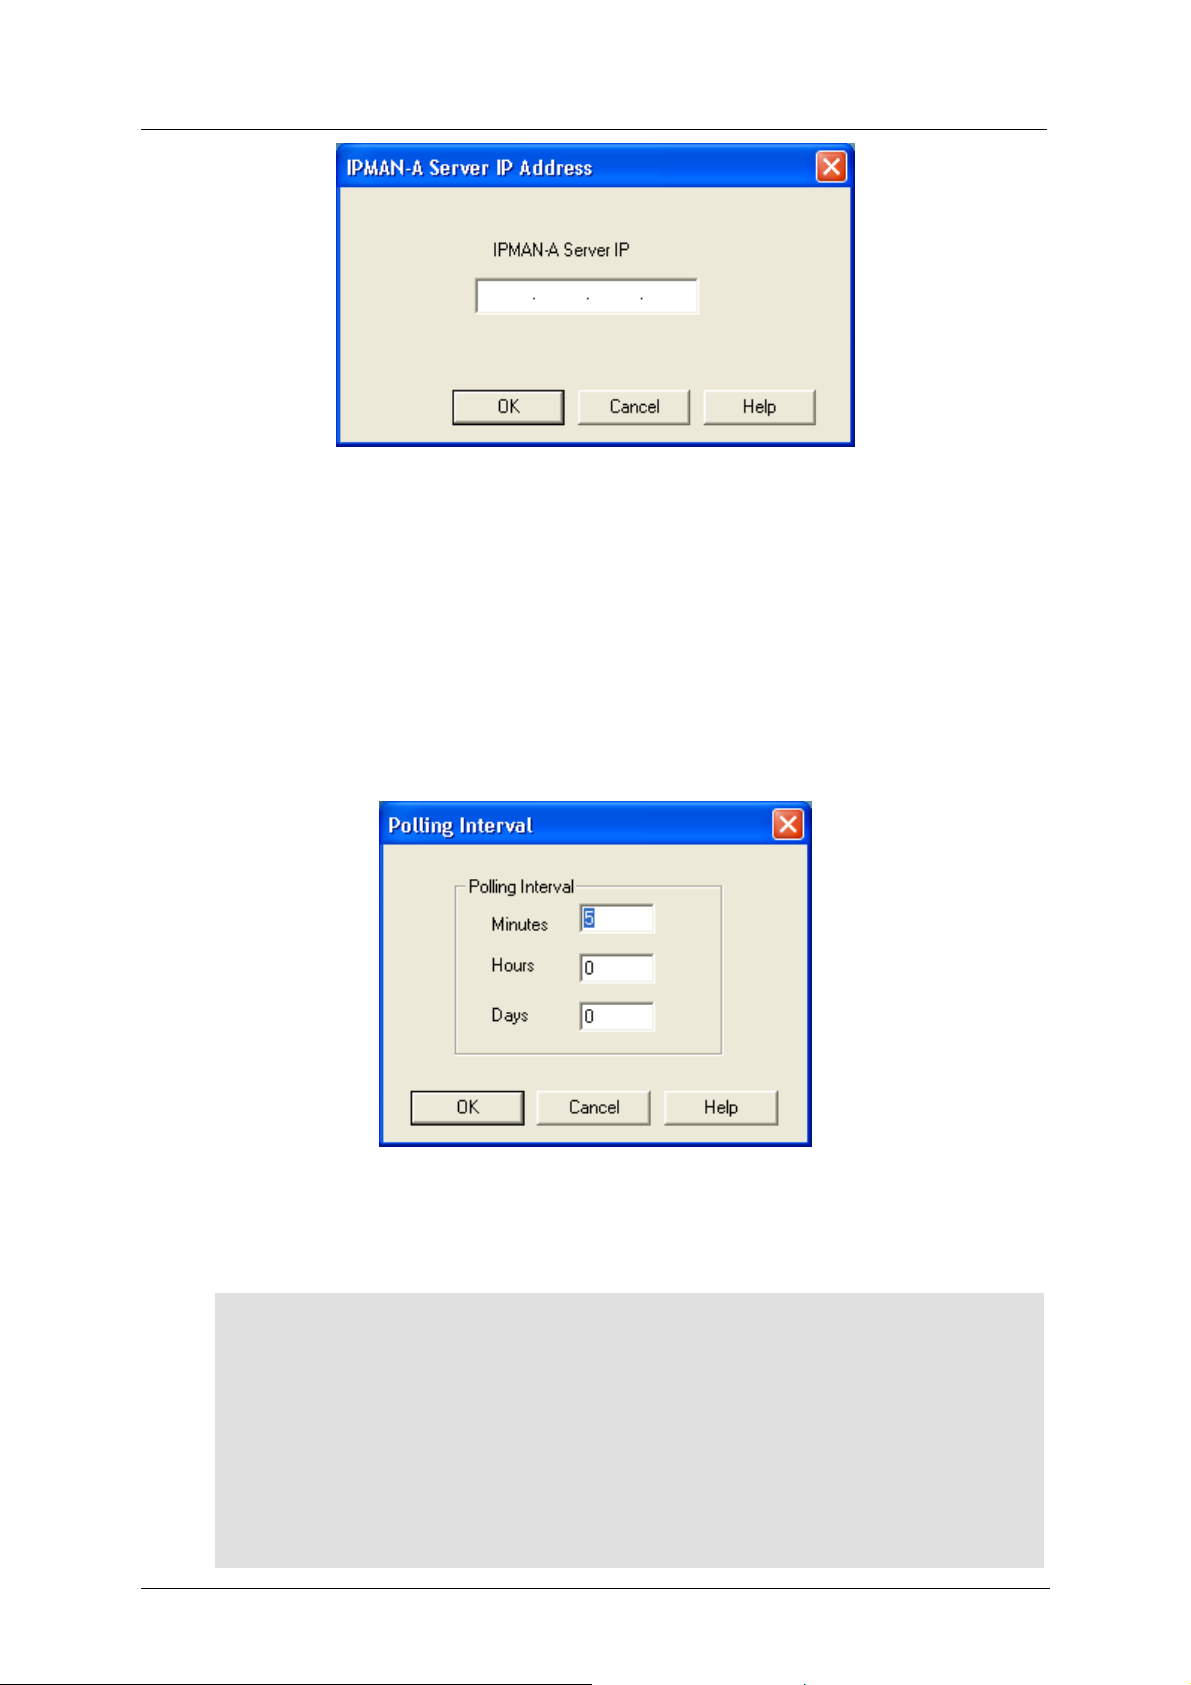
3.2.4.3 IPMAN-A Server IP Address
To set the IPMAN-A Server IP Address, perform the steps as follows:
• Click ParametersÆIPMAN-A Server IP Address. IPMAN-A Server IP Address window
opens.
41
Page 46
Music-Tel A Installation and Operation Manual MAN Software
Figure 3-39: IPMAN-A Server IP Address Window
• Enter the IPMAN-A server IP address.
• Click OK.
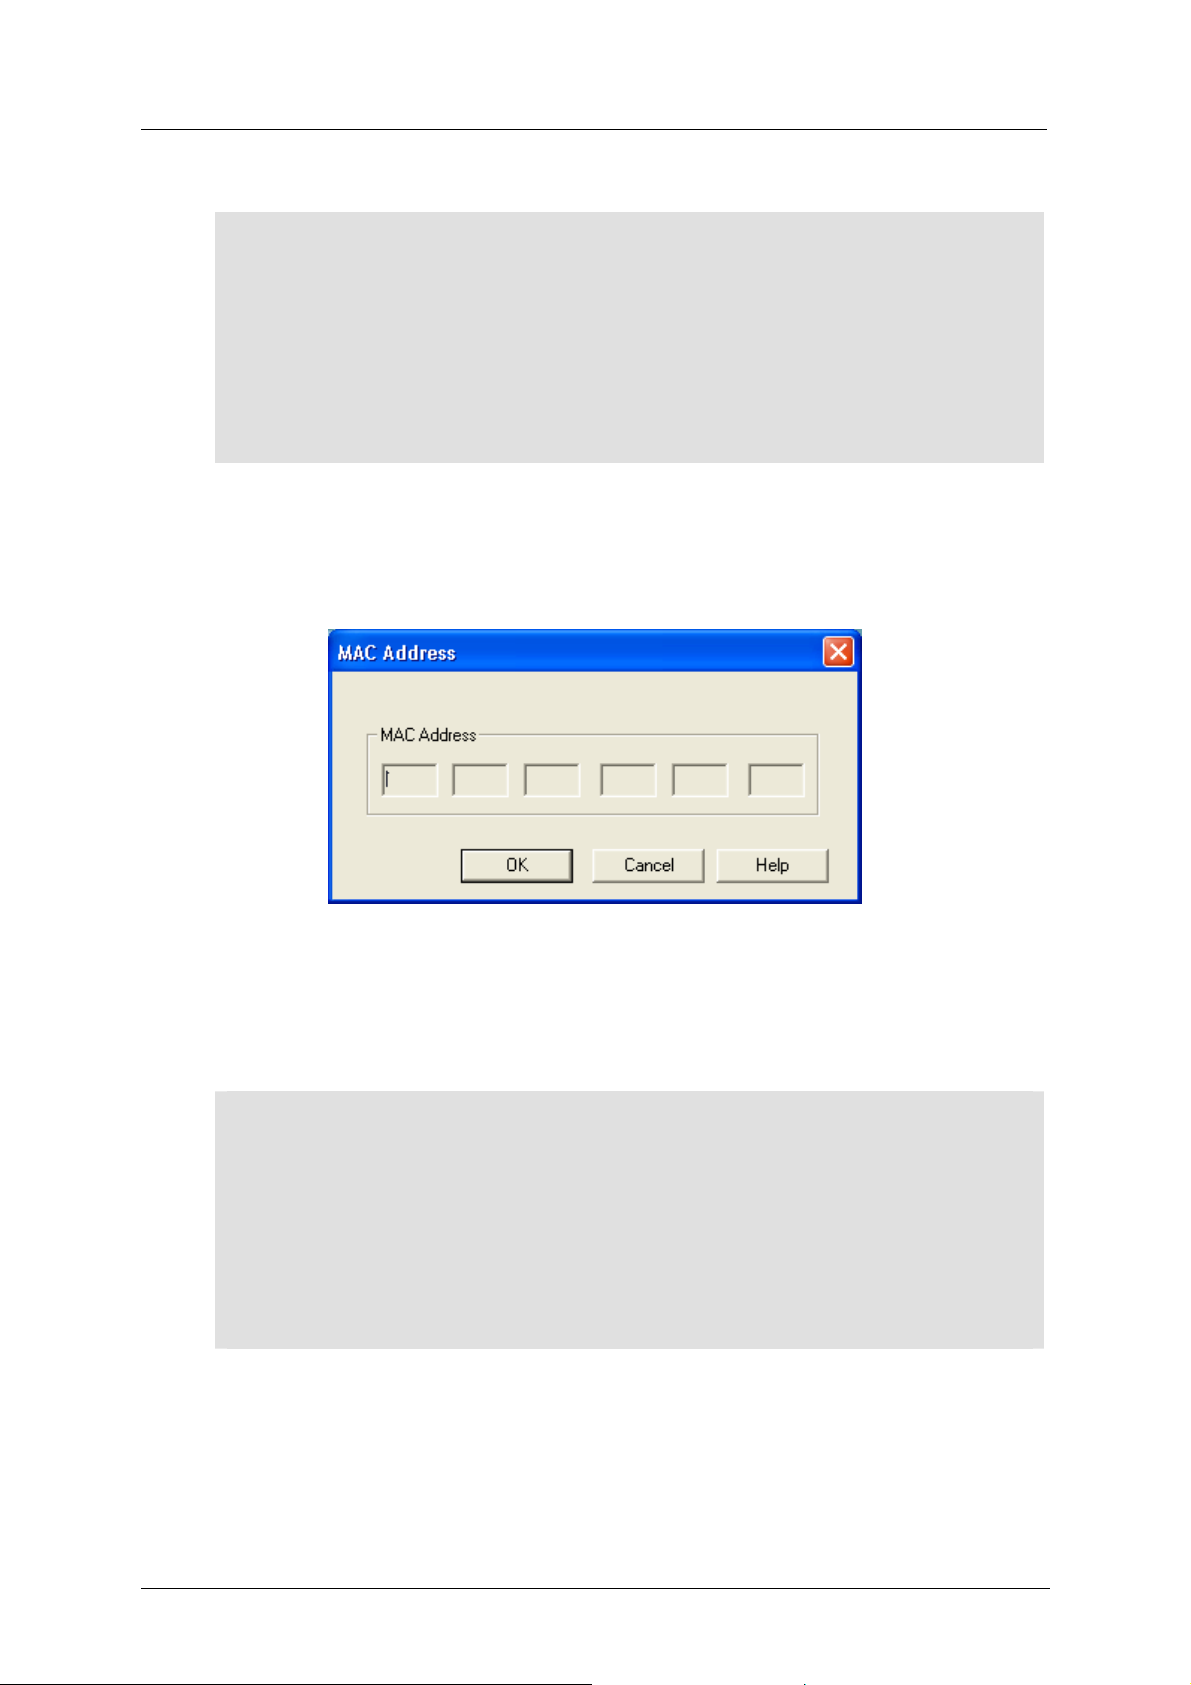
3.2.4.4 Polling Interval
To set the Polling Interval, perform the steps as follows:
• Click ParametersÆPolling Interval. Polling Interval window opens.
Figure 3-40: IPMAN-A Polling Interval Window
• Insert the interval time.
NOTE
42
The interval ranges are as follows:
Minutes: 0-60.
Hours: 0-24.
Days: 0-30.
It is illegal to leave all interval time parameters as 0.
Page 47
Music-Tel A Installation and Operation Manual MAN Software
• Click OK to modify changes and close the Polling Interval window.
NOTE
3.2.4.5 MAC Address
To set the MAC Address for the Music-Tel A, perform the steps as follows:
• Click ParametersÆMAC Address. MAC Address window opens.
The Polling Interval is the interval time, after which the Music-Tel A tries to
communicate with the IPMAN-A Server and checks if there are updates available.
Should the Music-Tel A not be able to contact the IPMAN-A Server at the interval
time (due to a communication or network error), the unit will try to contact the
IPMAN-A Server again during the next scheduled time.
Figure 3-41: MAC Address Window
• Insert the MAC Address.
• Click OK. The MAC Address is defined.
NOTE
Generally, the MAC Address is already set. This is a pre-installation action, as
information about this unit needs to be added to the device list in the IPMAN-A
server.
Make sure that the MAC Address is entered in the exact format (number groups and
spaces) as printed on the unit label.
43
Page 48
Music-Tel A Installation and Operation Manual MAN Software
3.2.4.6 SNMP Parameters options
SNMP protocol can be used in network management systems to monitor MusicTel-A
devices for conditions that warrant administrative attention. In typical SNMP usage, there are
a number of MusicTel-A devices to be managed, and one or more systems managing them. A
software component usually called an “Agent” runs on each managed MusicTel-A device and
reports information via SNMP to the managing system – SNMP Manager. Essentially, SNMP
agents expose management data on the managed systems as variables (such as "system
description","system name", "system IP address" etc). The variables accessible via SNMP are
organized in the MusicTel-A Management Information Bases (MIBs) which is a part of the
device’s firmware and not required special instalaltions.
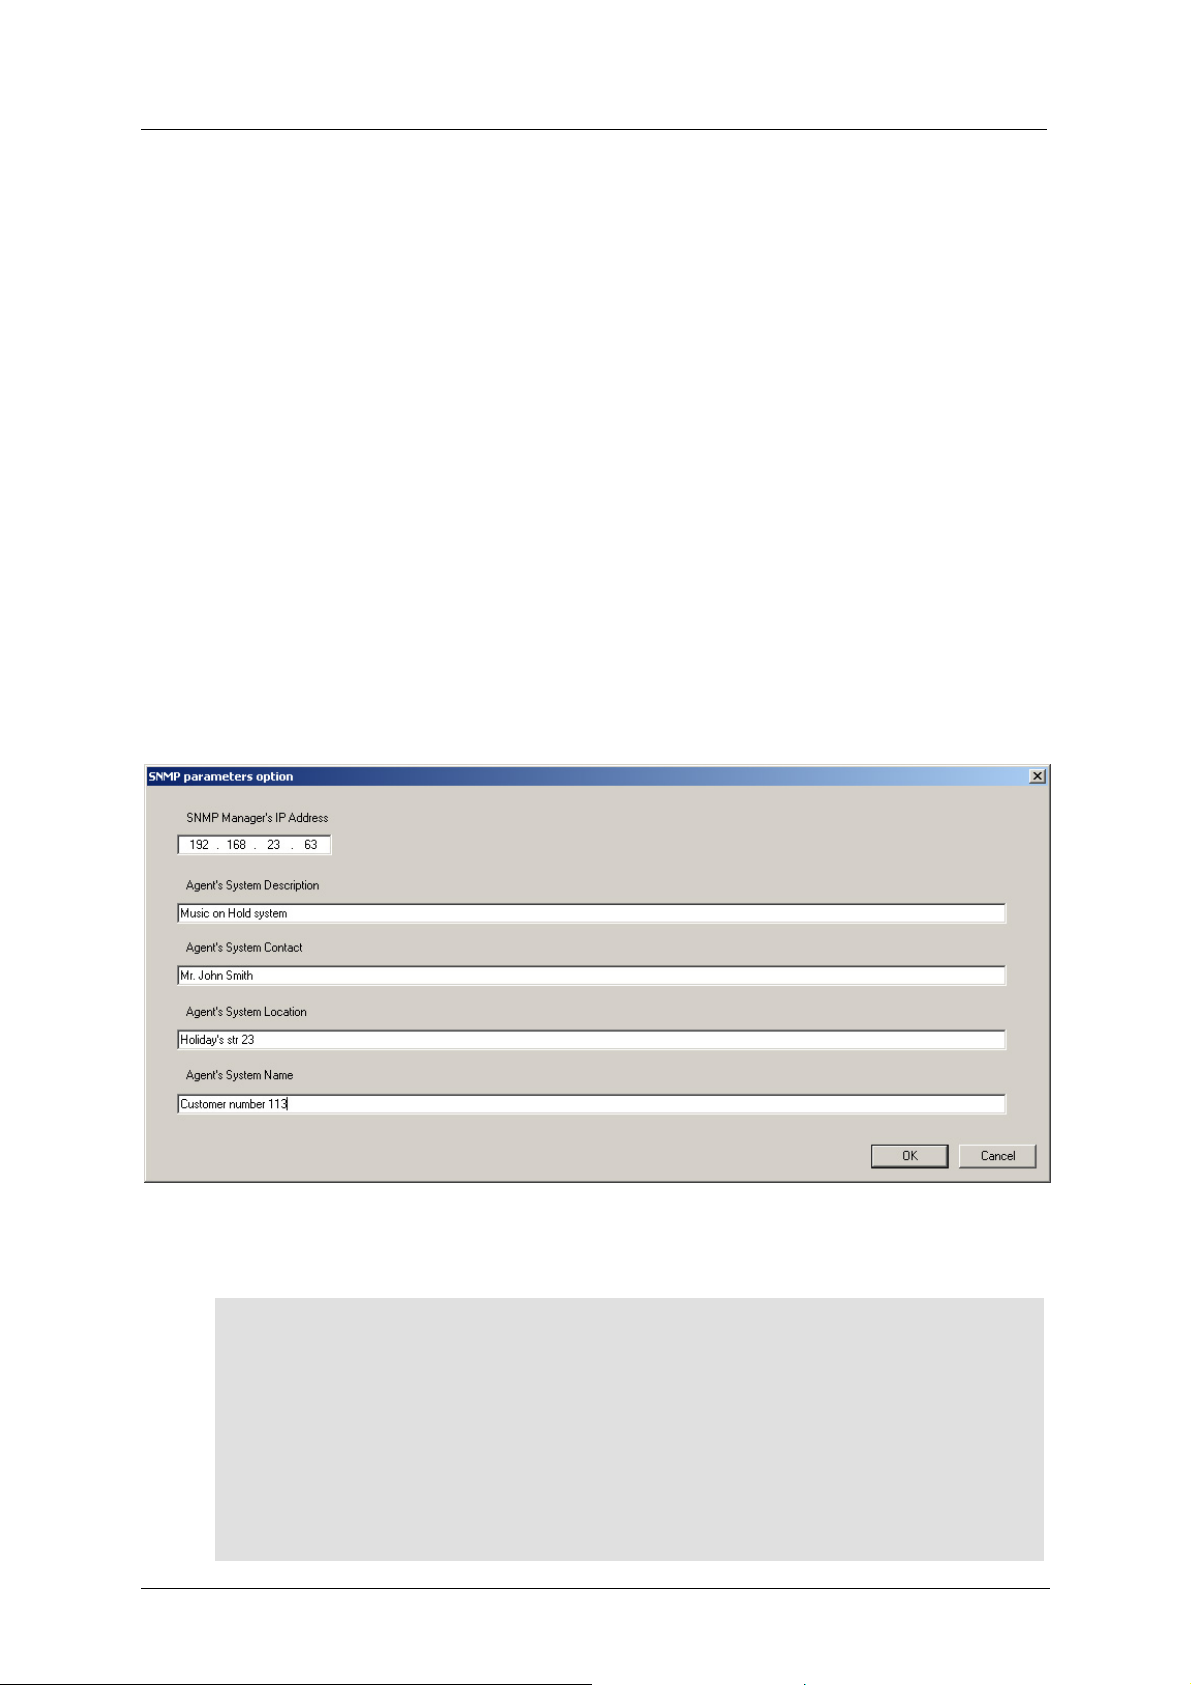
To set the SNMP parameters for the Music-Tel A, perform the steps as follows:
• Click ParametersÆSNMP parameters options. SNMP parameters options window
opens.
Figure 3-42 SNMP Parameters screen
NOTE
44
In default settings SNMP Parameters fields are empty.
All fields are obligatory required for the SNMP correct functionality
SNMP Manager’s IP Address is the existing customer’s SNMP Manager’s (Server)
IP address.
Agent’s System Description – Up to 128 symbols free text which provides the
Page 49

Music-Tel A Installation and Operation Manual MAN Software
unique MusicTel-A description. Follow by this description possible to identify
device in the network
Agent’s System Contact – Up to 128 symbols free text which provides the
MusicTel-A system responsible contact person information
Agent’s System Location – Up to 128 symbols free text which provides the
MusicTel-A system physical address information. (Region, City , street etc)
Agent’s System Name - Up to 128 symbols free text which provides the MusicTel-
A system unique name in the network.
All listed parameters are the part of MIB’s data base and uses by SNMP management
equipment during administration processes.
45
Page 50
Music-Tel A Installation and Operation Manual MAN Software
3.2.5 Tasks
The Task Editor window contains 4 tabs for the following functions:
Tab Function
View Audio Files View and edit the available audio files
Tasks Create tasks
Task Schedule Schedule a task
Holidays Define holidays
To open the Task Editor, click Tasks in the menu bar. Task Editor window opens.
3.2.5.1 View Audio Files
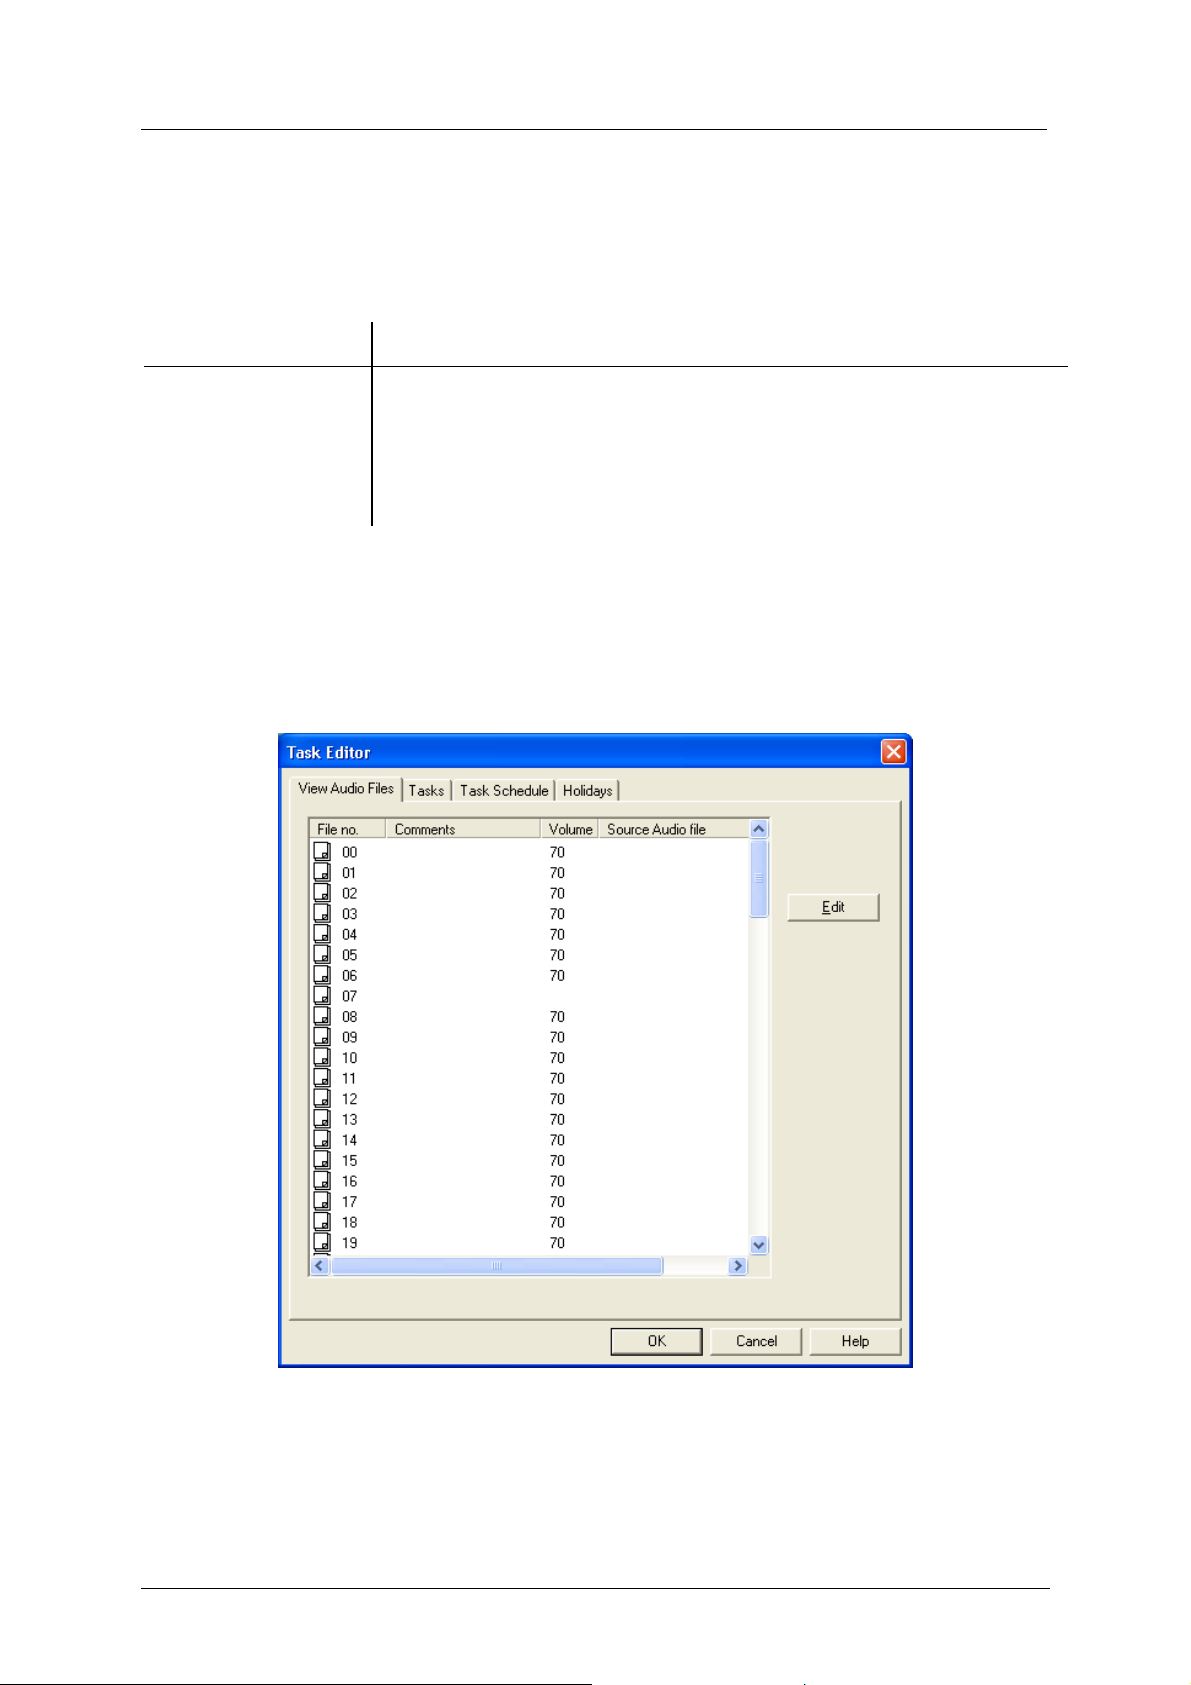
The Task Editor window contains four tabs. The first tab, View Audio Files, must contain
files, before you are able to update the information in the Tasks tab.
Figure 3-43: Task Editor Window – View Audio Files Tab
To add audio files, perform the steps as detailed in Paragraph 3.2.3.4. You define a maximum
of 100 file numbers (00-99).
46
Page 51
Music-Tel A Installation and Operation Manual MAN Software
You can modify the following information in View Audio Files tab:
• Comments – you can enter free-text comments describing the contents of the
music/information file.
• Volume – you can set the playback volume level of the music/information file (01 – 99).
3.2.5.2 Tasks
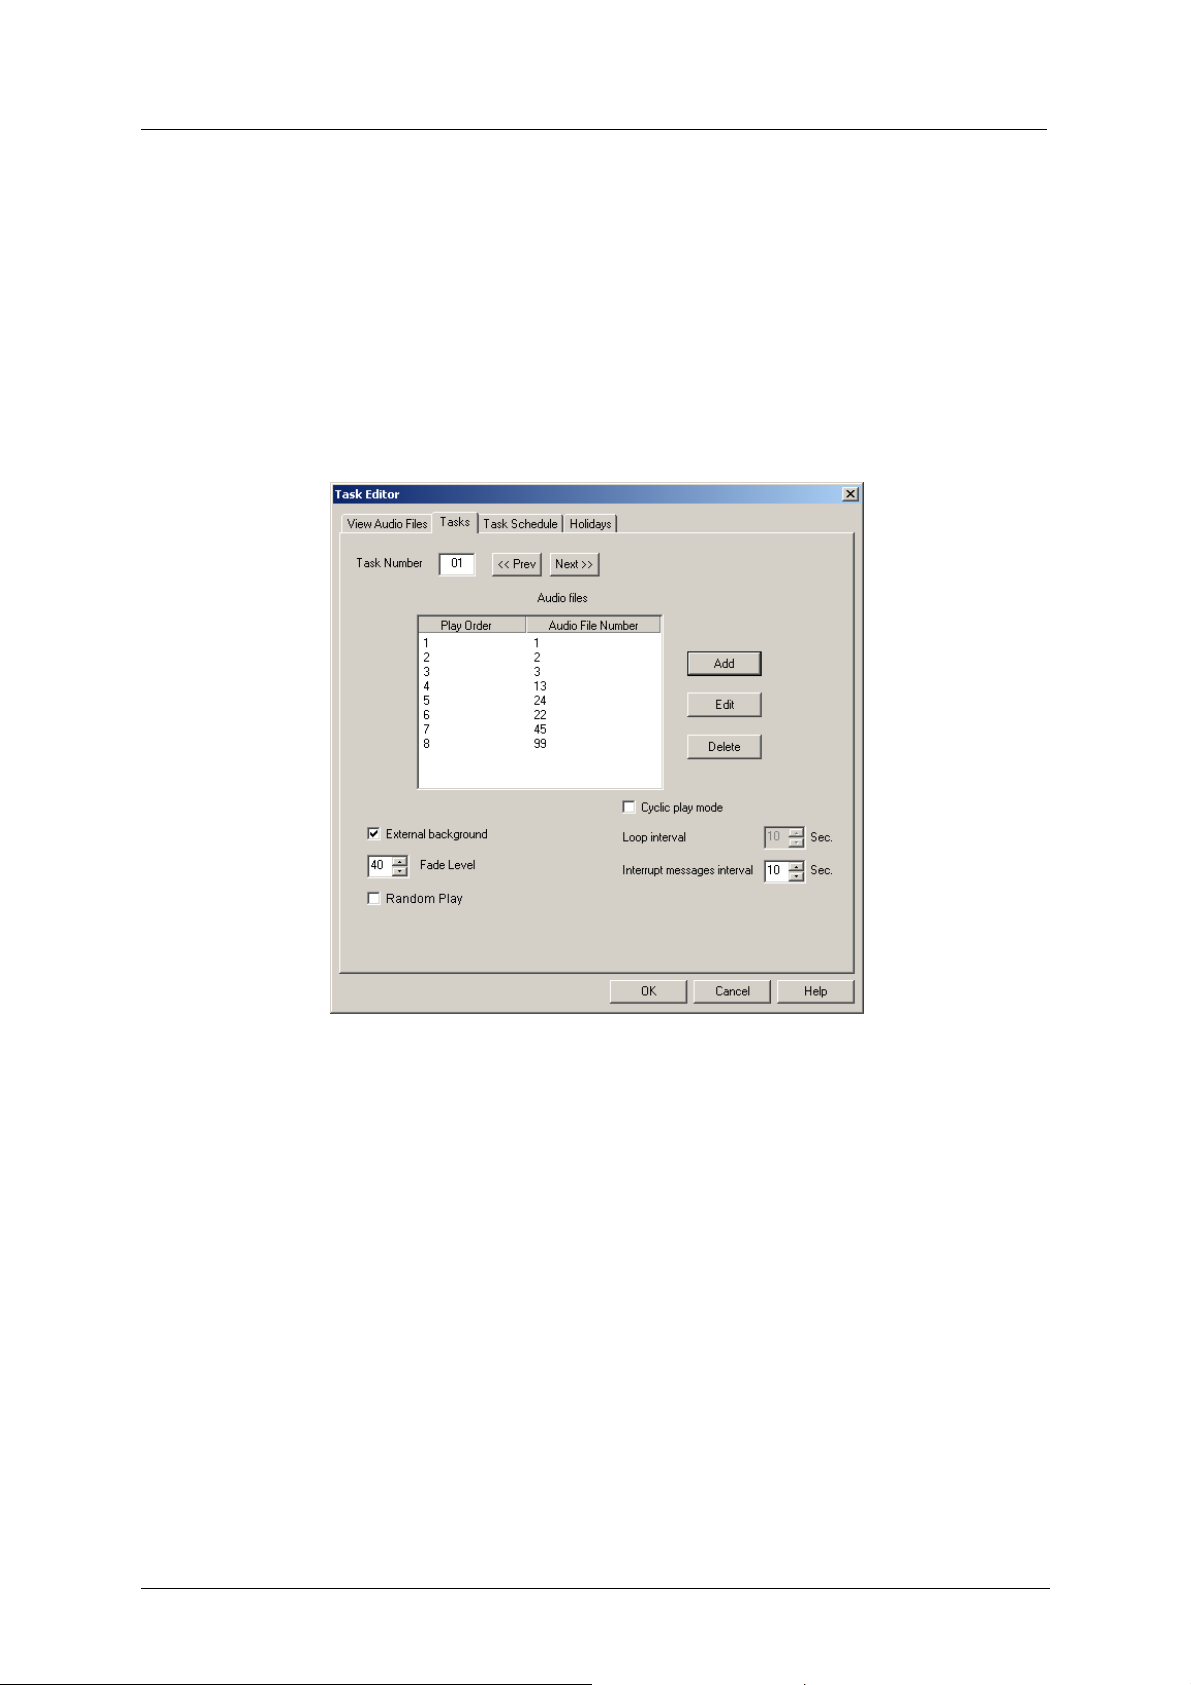
The next step is to set tasks on the Tasks tab.
Figure 3-44: Task Editor Window – Tasks Tab
On the Tasks tab you must define the following:
• The task number – this number will be used when scheduling the chosen
music/information. You can define up to 20 tasks.
Within each task number the following information blocks need to be edited:
• Audio Files – this block defines which and how the Audio MP3 files will be presented.
You can define up to 100 Interrupt Messages per task.
For the Audio Files you have to define:
• Playing order – this is number of the MP3 file in the playback order.
47
Page 52

Music-Tel A Installation and Operation Manual MAN Software
• Audio file number – this is the number of the Audio file that will be run (taken from the
View Audio Files list).
• You can set an MP3 file for playback using the Add button.
• You can modify the MP3 file order settings in the Task using Edit button.
• To delete an MP3 file from the playback order, select a file and click Delete. The file is
deleted from the task, but remains in the system.
• Random play (see Note) – if you have defined more than one Audio file number, the
system will play the selected Audio files randomly.
NOTE
This feature is accessible in specific firmware version only. Please check your
version with manufacturer.
• External background – you can create the Background music by connecting a radio or
endless recording to the Music-Tel A. To enable external background, select this
checkbox.
• Fade level – the external music and interrupt messages can be mixed by applying the Fade
level parameter. This parameter can be set from 00 to 95 in steps of 5. The default is 30.
For the Audio files you have to define and mark:
• Cyclic play mode – this instructs the Music-Tel A to repeat the interrupt message(s) at a
time, set by the Loop interval and Audio files interval.
• Loop interval – this instructs the Music-Tel A to repeat the Audio files at the specified
time.
• Audio files interval – this defines the time between each Audio file in the list of audio
files. This interval can be set from 0-600 in steps of 1 second.
48
Page 53
Music-Tel A Installation and Operation Manual MAN Software
NOTE
3.2.5.3 Task Schedule
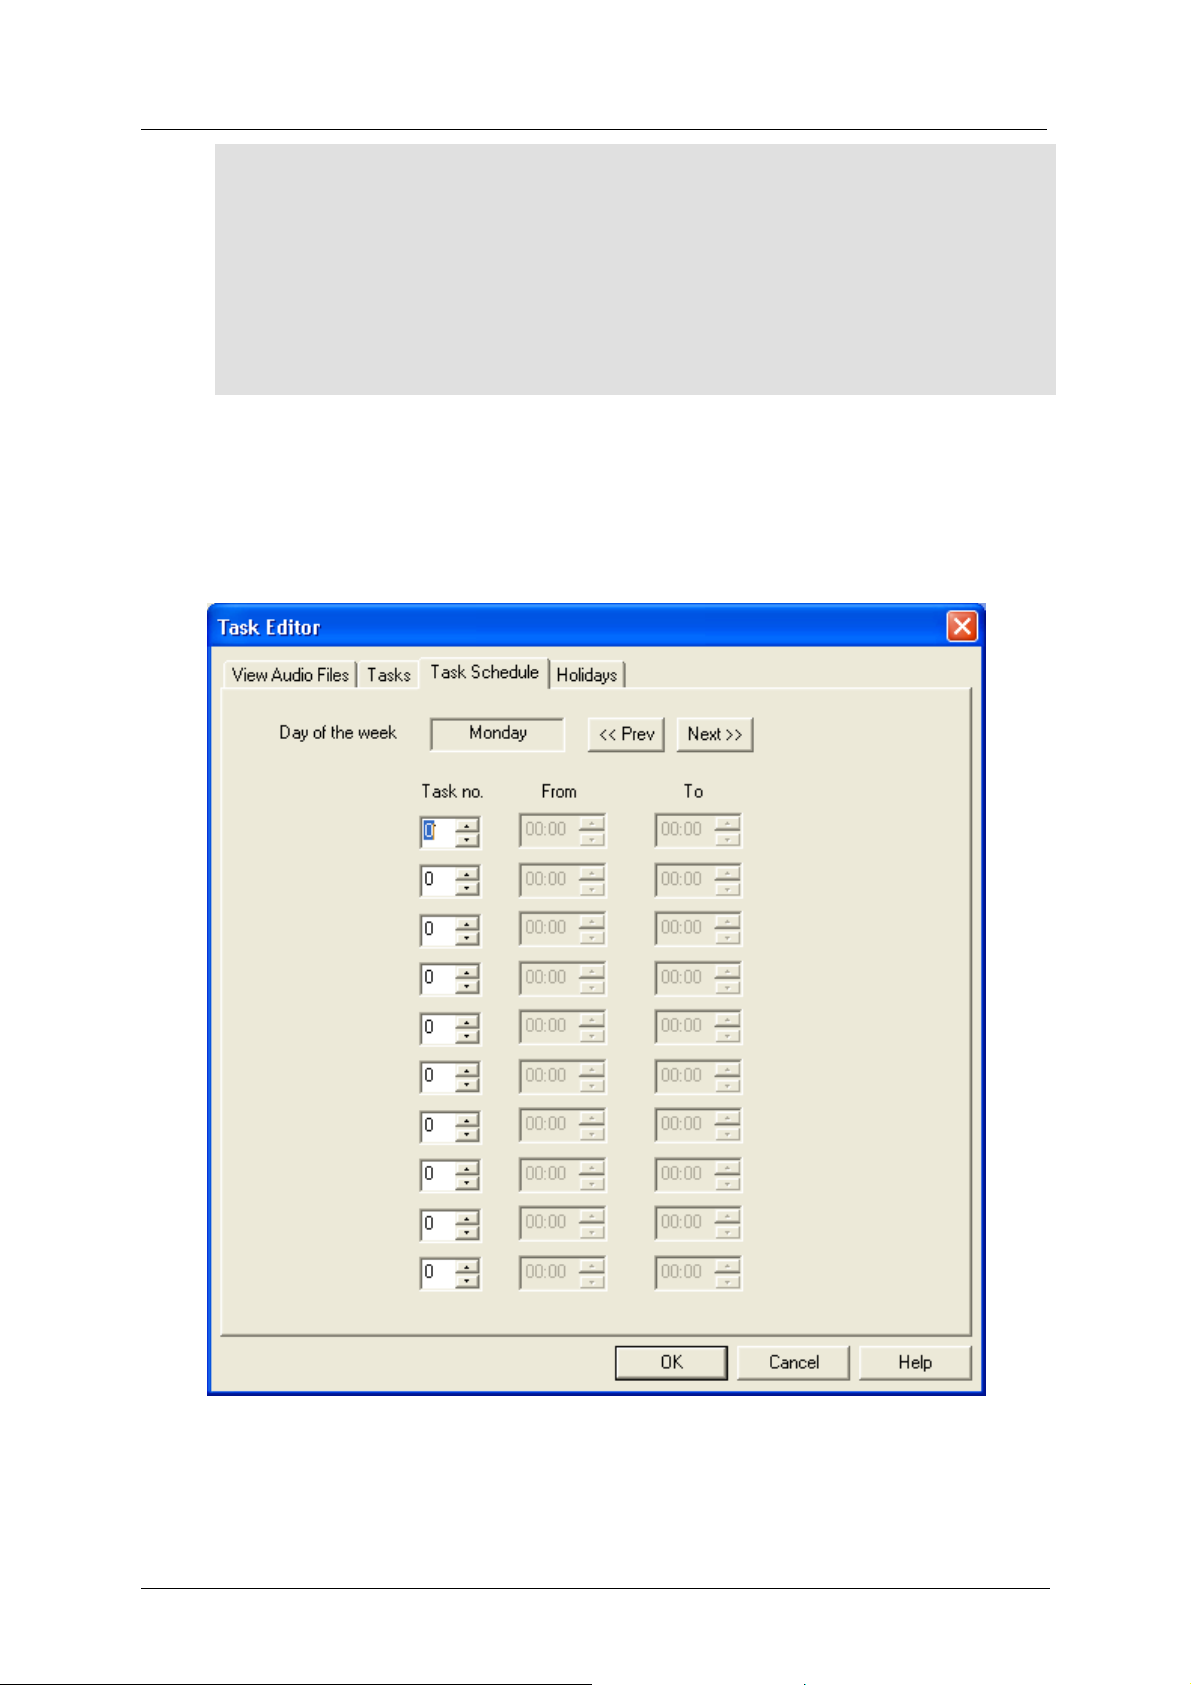
On the Task Schedule tab you can define the day of the week and the time for which a
certain pre-defined task should be run. You can set 10 tasks per day. A full day runs from
00:00 to 23:59.
The use of the Fade level parameter will provide the following result: The External
background music is playing until the first Audio file is scheduled to be played. At
that moment, the External background music is faded, but continues to play. When
the Audio file is finished, the fading is cancelled and the external background music
will continue to play at the defined level.
Figure 3-45: Task Editor Window – Task Scheduleb Tab
49
Page 54
Music-Tel A Installation and Operation Manual MAN Software
NOTE
3.2.5.4 Holidays
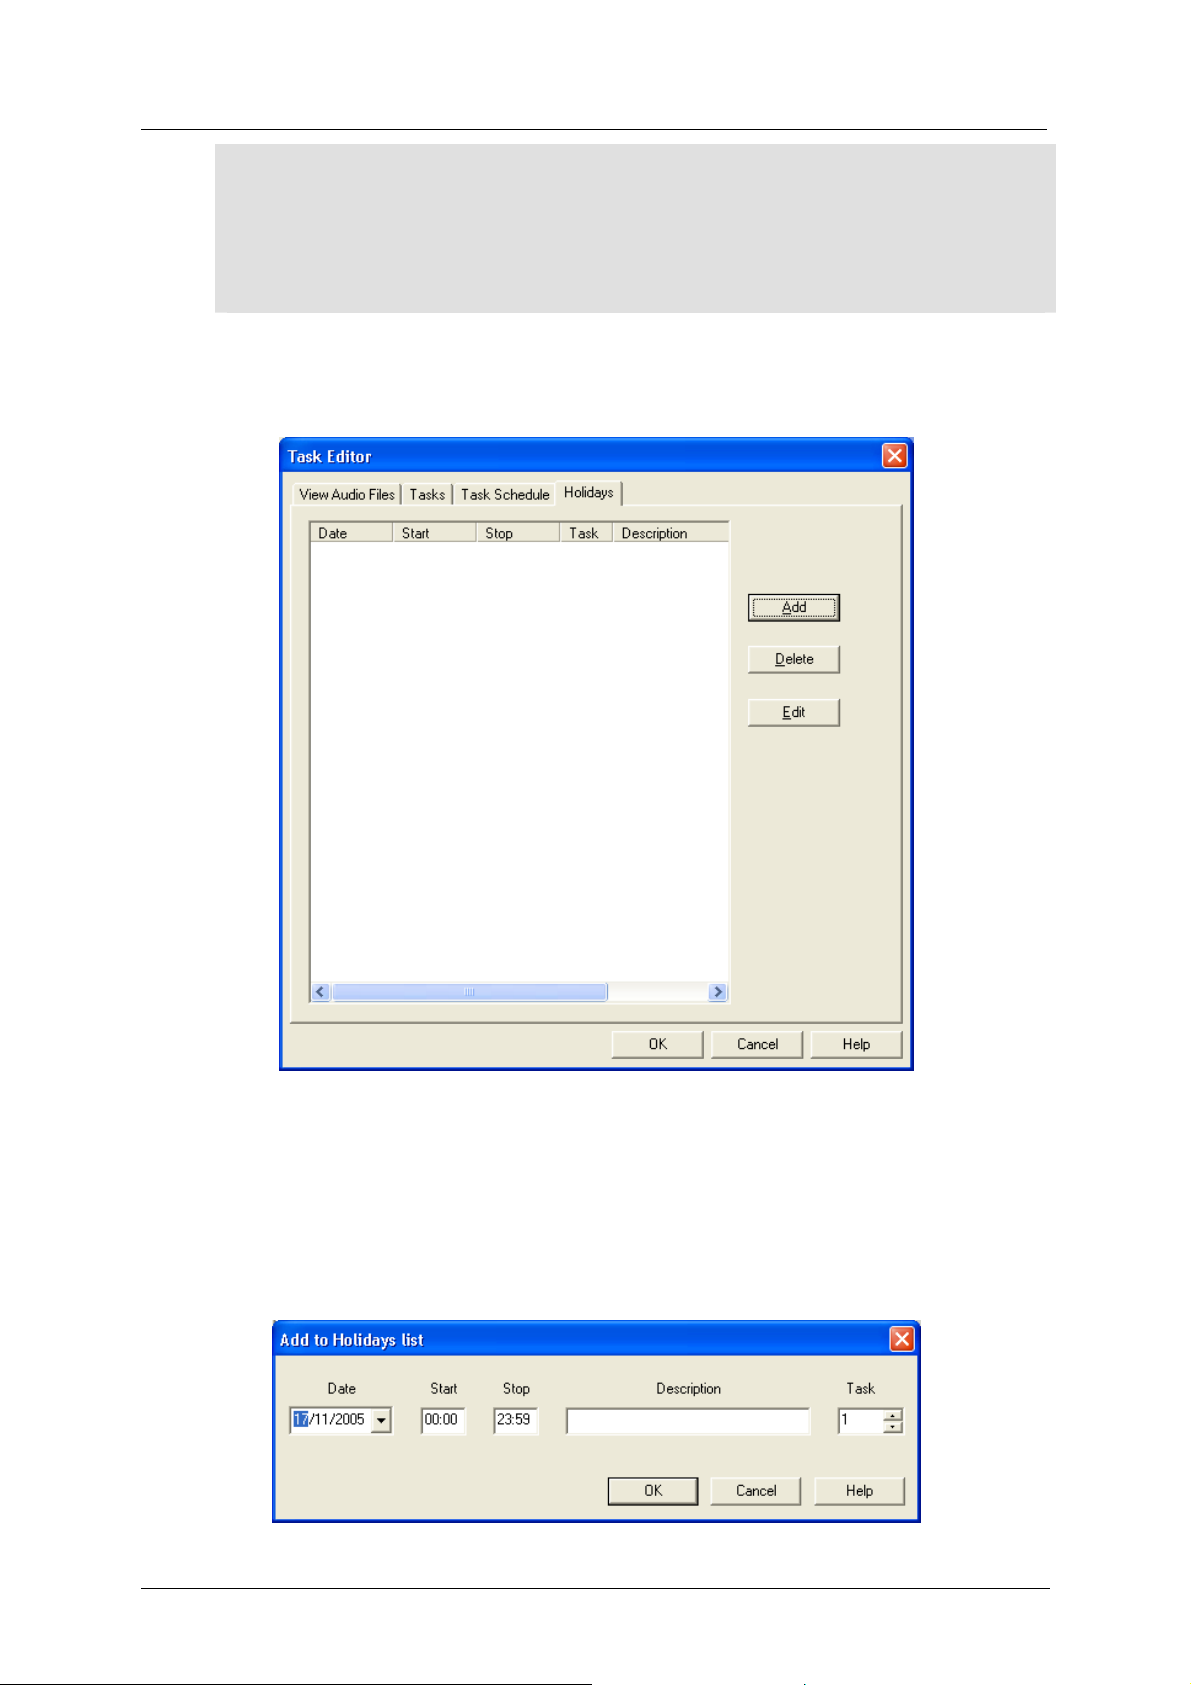
On the Holidays tab you can define yearly holidays and the time for a task to run.
For maintenance purposes it is necessary to insert a non-working period of minimum
10 minutes per week. When maintenance is needed, you either wait till the non-
working period or change the unit clock to the specified non-working period.
Figure 3-46: Task Editor Window – Holidays Tab
To add a holiday, perform the steps as follows:
• Click Add. Add to Holidays List window opens.
• Insert the holiday specifications and click OK. The holiday is defined.
Figure 3-47: Add to Holidays List window
50
Page 55
Music-Tel A Installation and Operation Manual MAN Software
3.2.6 Statistics
The Statistics menu contains the following function:
Function Description
General Shows product version and used and total memory size
3.2.6.1 General
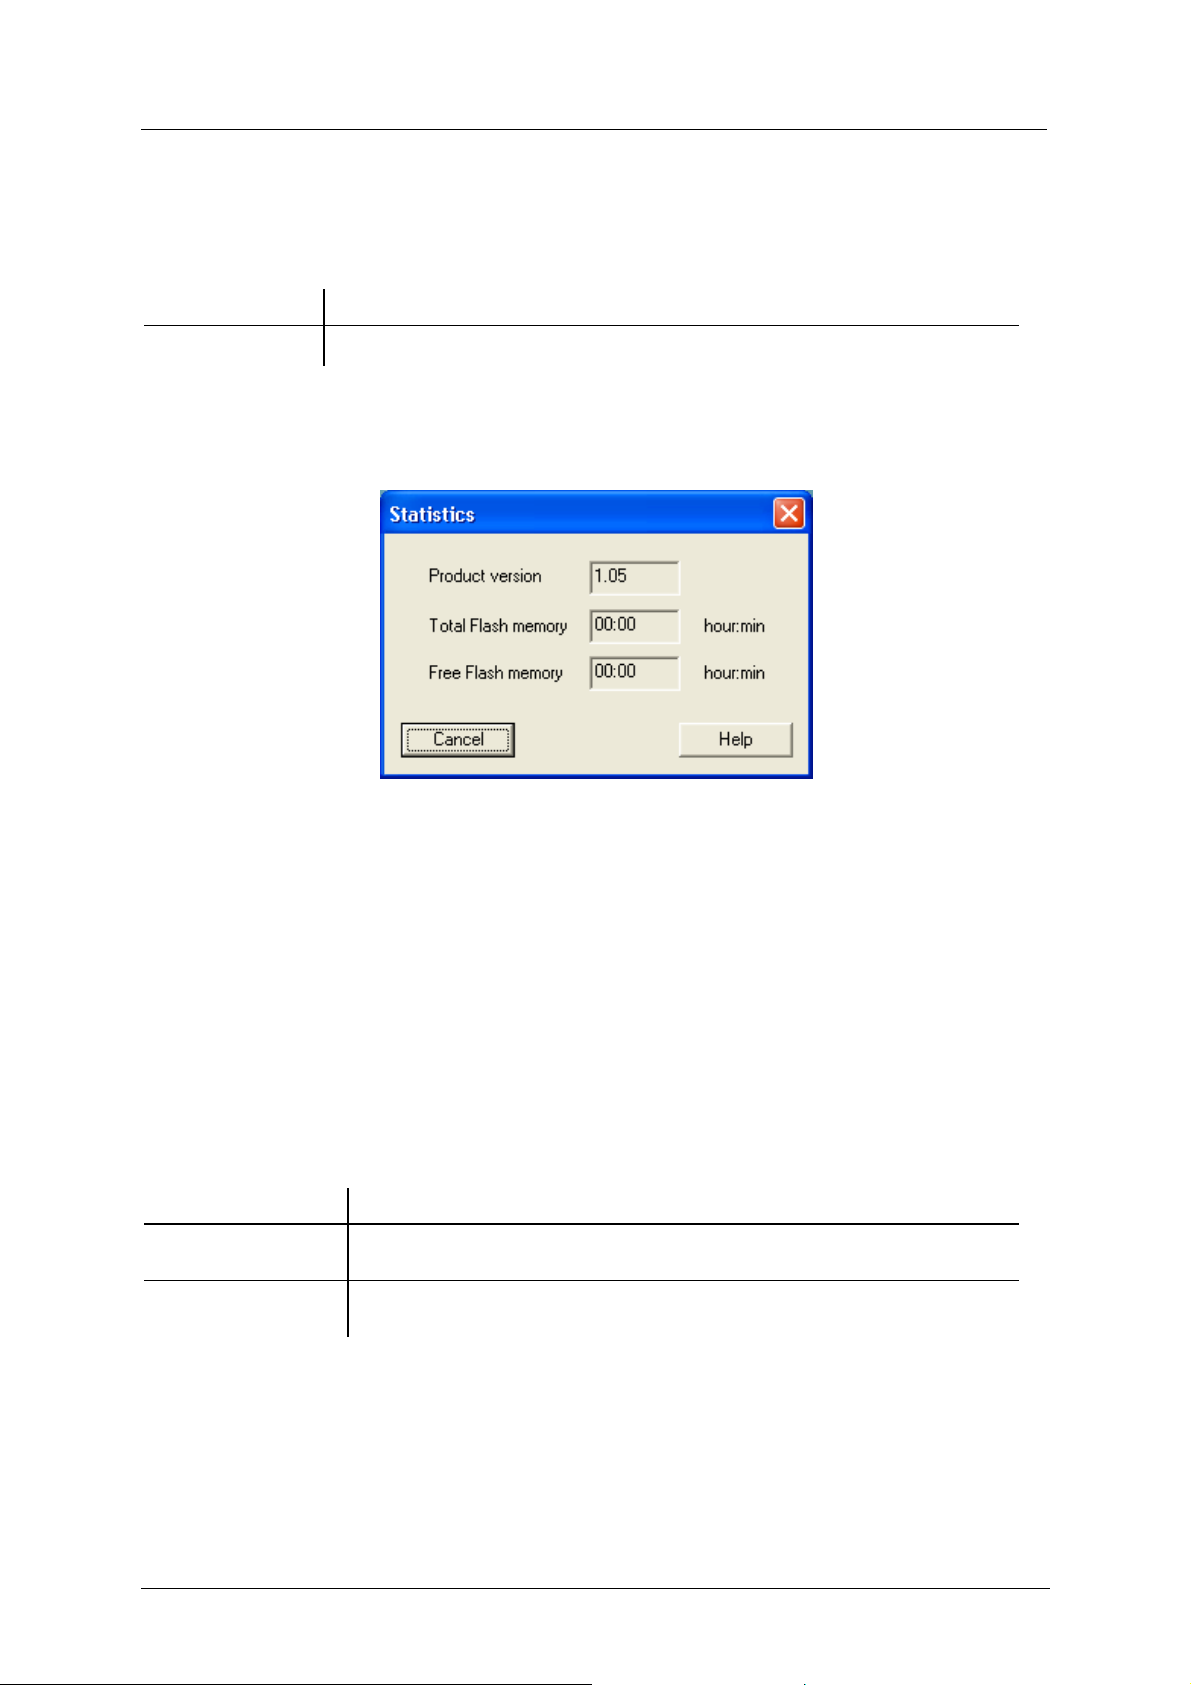
To view the general statistics, click StatisticsÆGeneral. Statistics window opens.
Figure 3-48: Statistics window
The statistics window displays the following properties:
• Product Version – the software version of the Music-Tel A.
• Total Flash memory.
• Free Flash memory.
3.2.7 Help
The Help menu contains the following functions:
Function Description
Help Topics The Help function in the MAN
About MAN
Version information about the MAN software
3.2.7.1 Help Topics
To open the Help module, click HelpÆHelp Topics. An online help module opens.
3.2.7.2 About MAN
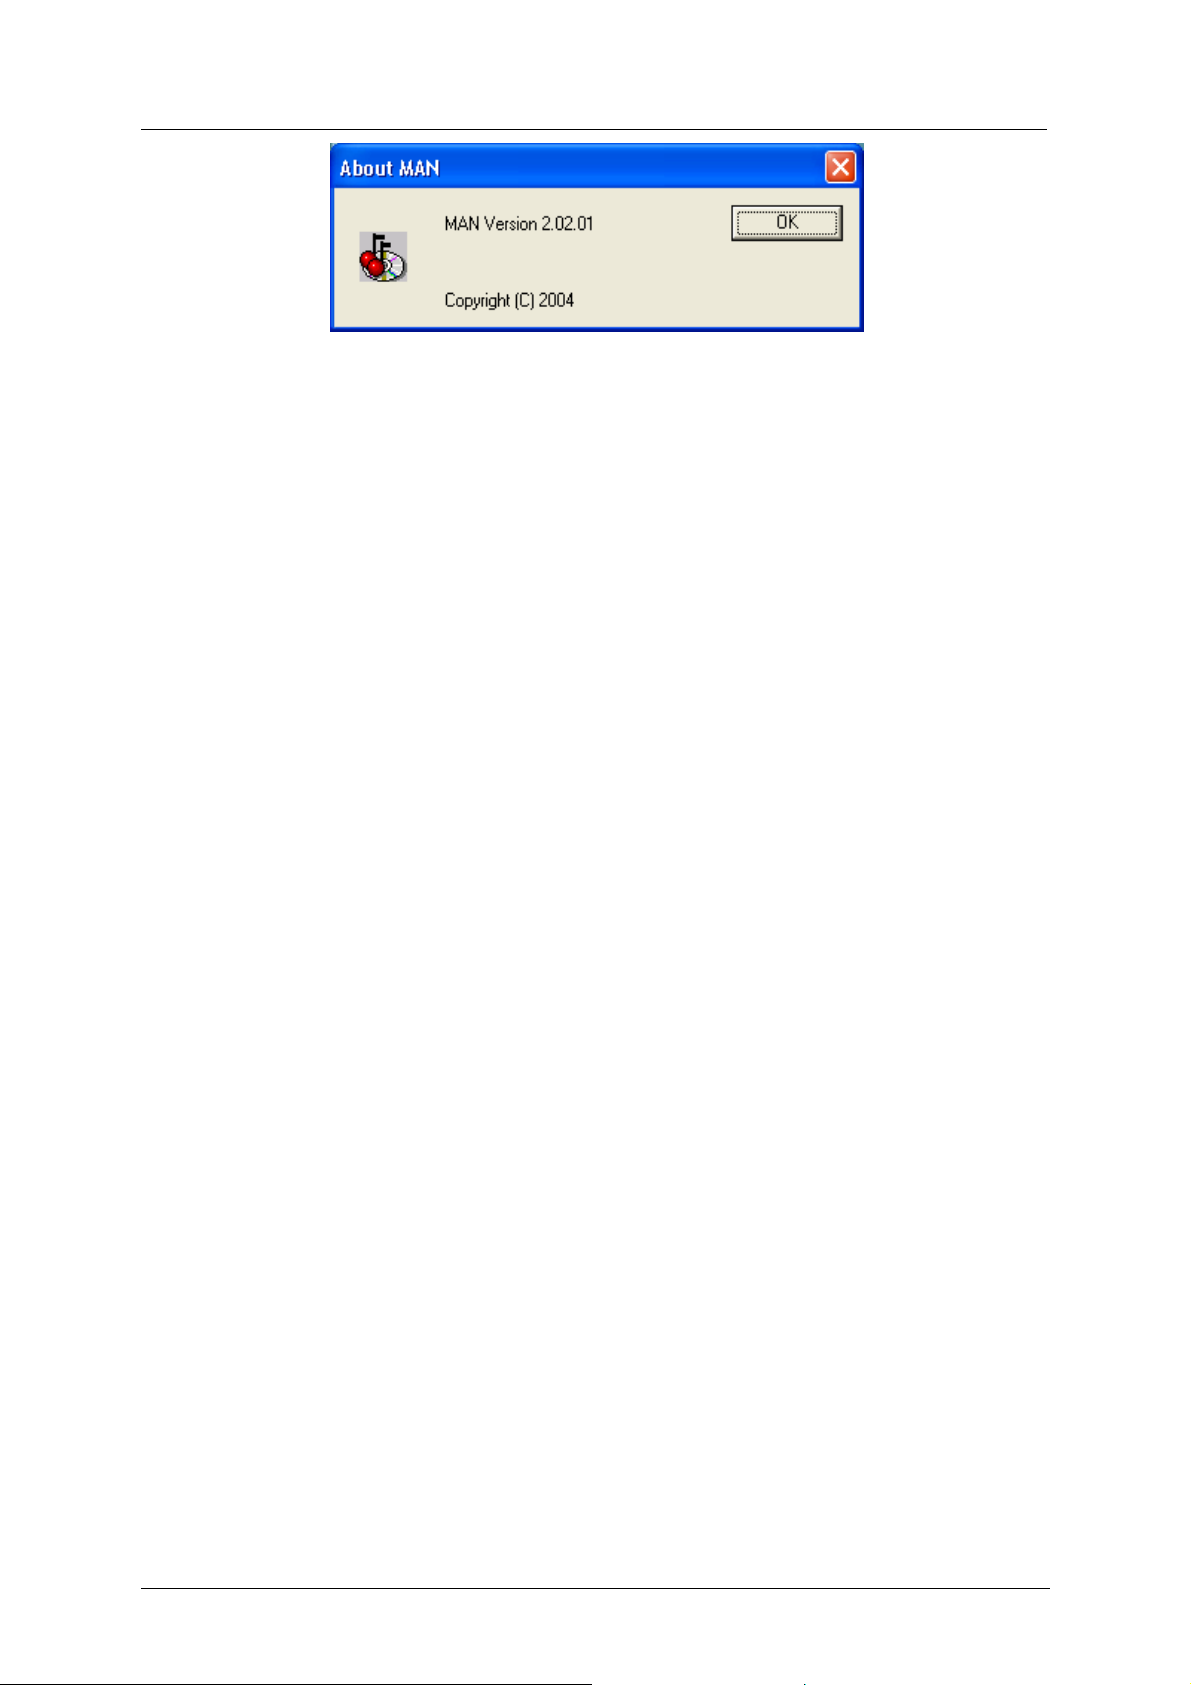
The About MAN window displays the MAN software version information. To open the
About MAN window, click HelpÆAbout MAN.
51
Page 56
Music-Tel A Installation and Operation Manual MAN Software
Figure 3-49: About MAN window
3.3 File Types
When working with the MAN software, you will come across files of the following file
extensions:
*.MUPW
This file contains all the configuration parameters, excluding the Audio files. The *.MUPW
file can be found in the same directory as MAN-A.EXE, unless you have changed the
location while saving or via FileÆOptions.
*.MP3
This is a music file format, used in the Music-Tel A. The *.MP3 file can be found on your
computer. You can store the *MP3 files in the same directory as MAN-A.EXE, unless you
have changed the location while saving or via FileÆOptions.
*.BIN
This is the extension of the software upgrade file. This file can only be uploaded into the
Music-Tel A when directly connected via the RS-232. When connected via the network, the
function is grayed-out. The *.BIN file can be found in the same directory as MAN-A.EXE,
unless you have changed the location while saving or via FileÆOptions.
*.MBU
This is the backup file that will be created when performing a Backup action in the MAN
program. This file can be used to restore the information of the Music-Tel A after a crash or
corruption of the information (use the Restore function). The *.MBU file contains all the
Music-Tel A configuration parameters and Audio files. The *.MBU file can be found in the
same directory as MAN.EXE, unless you have changed the location while saving or via
FileÆOptions.
52
Page 57
Music-Tel A Installation and Operation Manual MAN Software
3.4 IPMAN-A Server (IPMAN-A)
IPMAN-A, the IP-Remote Utility Program for the Music-Tel A, is the utility used for
updating the Music-Tel A device(s) remotely.
NOTE
When a configuration file is sent to the unit, the MP3 file changes are executed when the
currently running interrupt and background MP3 files have finished playing. Other changes,
like in the schedules, are executed directly on reception. After an MP3 file is finished, the
unit automatically performs a check to see if the other line (Background or Interrupt) is also
The IPMAN-A hardware plug must be inserted into the parallel (printer) port of the
server, otherwise you will not be able to use the software.
free. In this the case, the updated MP3 files will replace the old ones and start working.
External music does not affect this process.
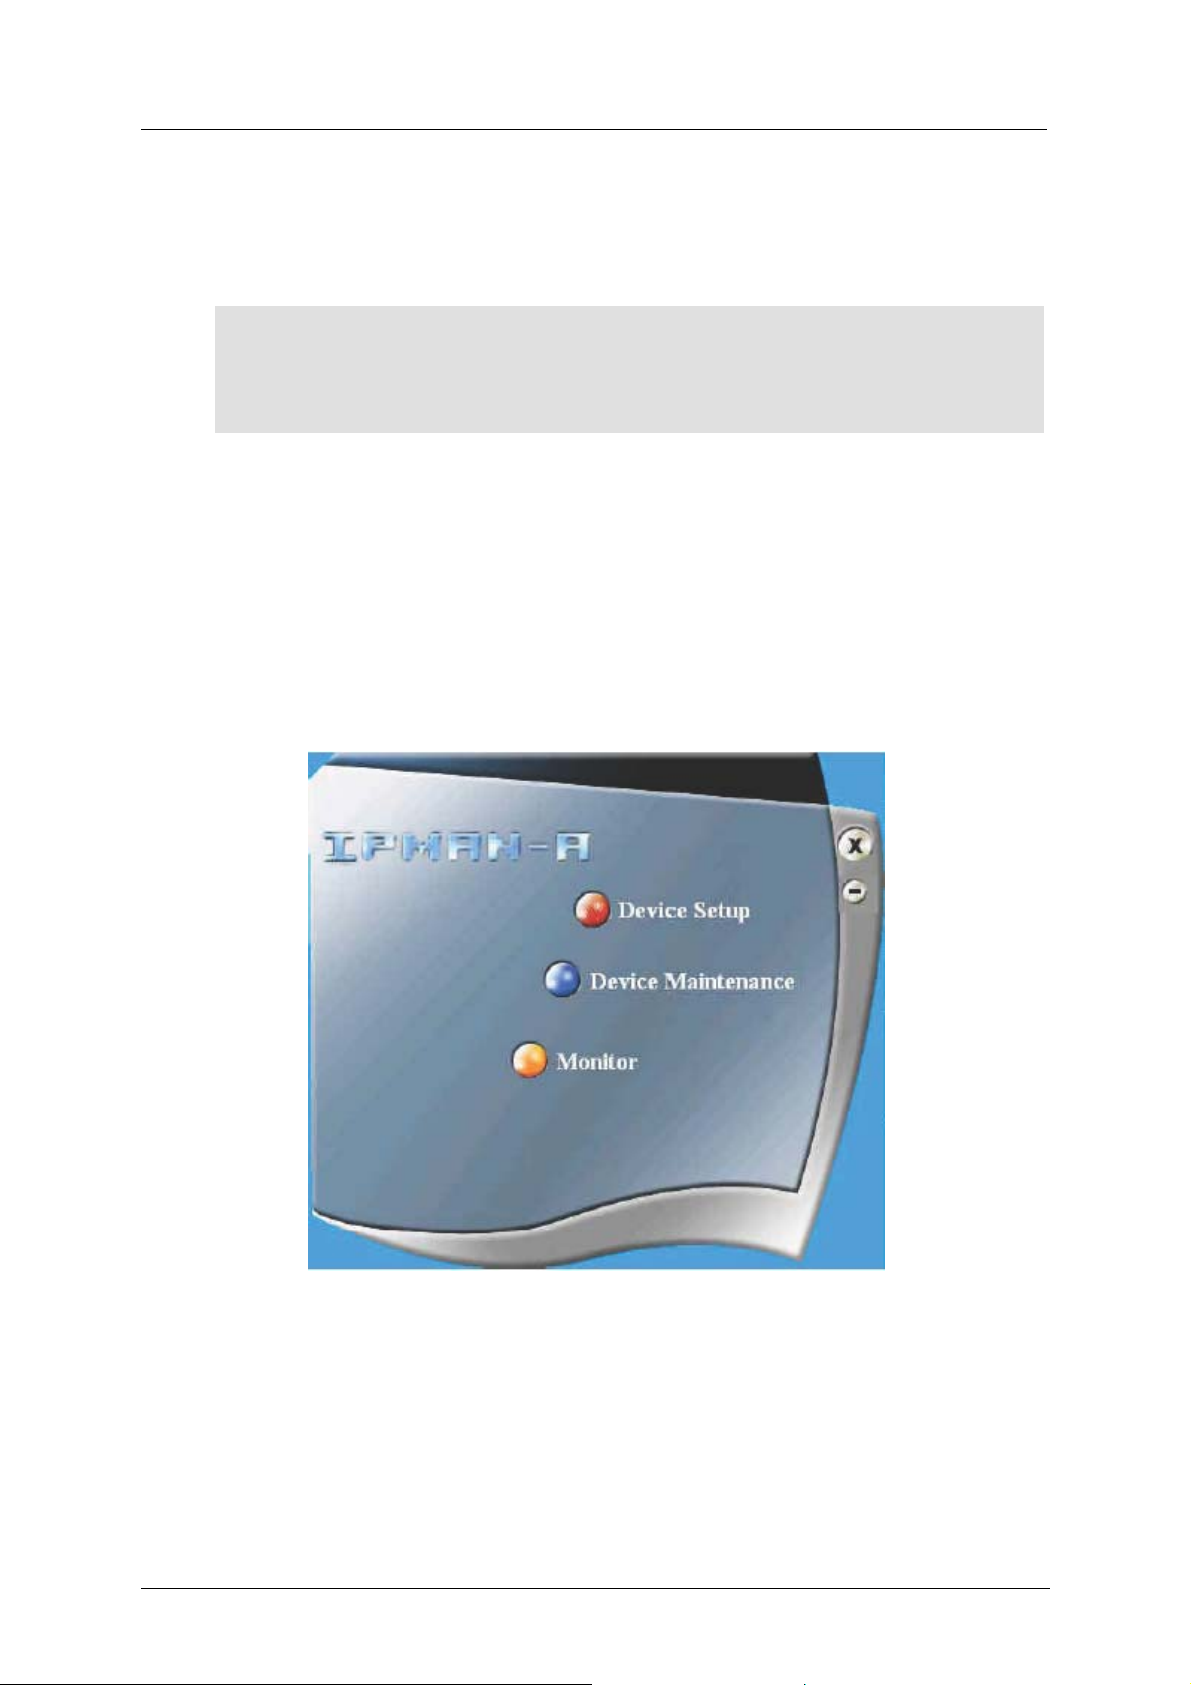
Figure 3-50: IPMAN-A Server – Main window
53
Page 58
Music-Tel A Installation and Operation Manual MAN Software
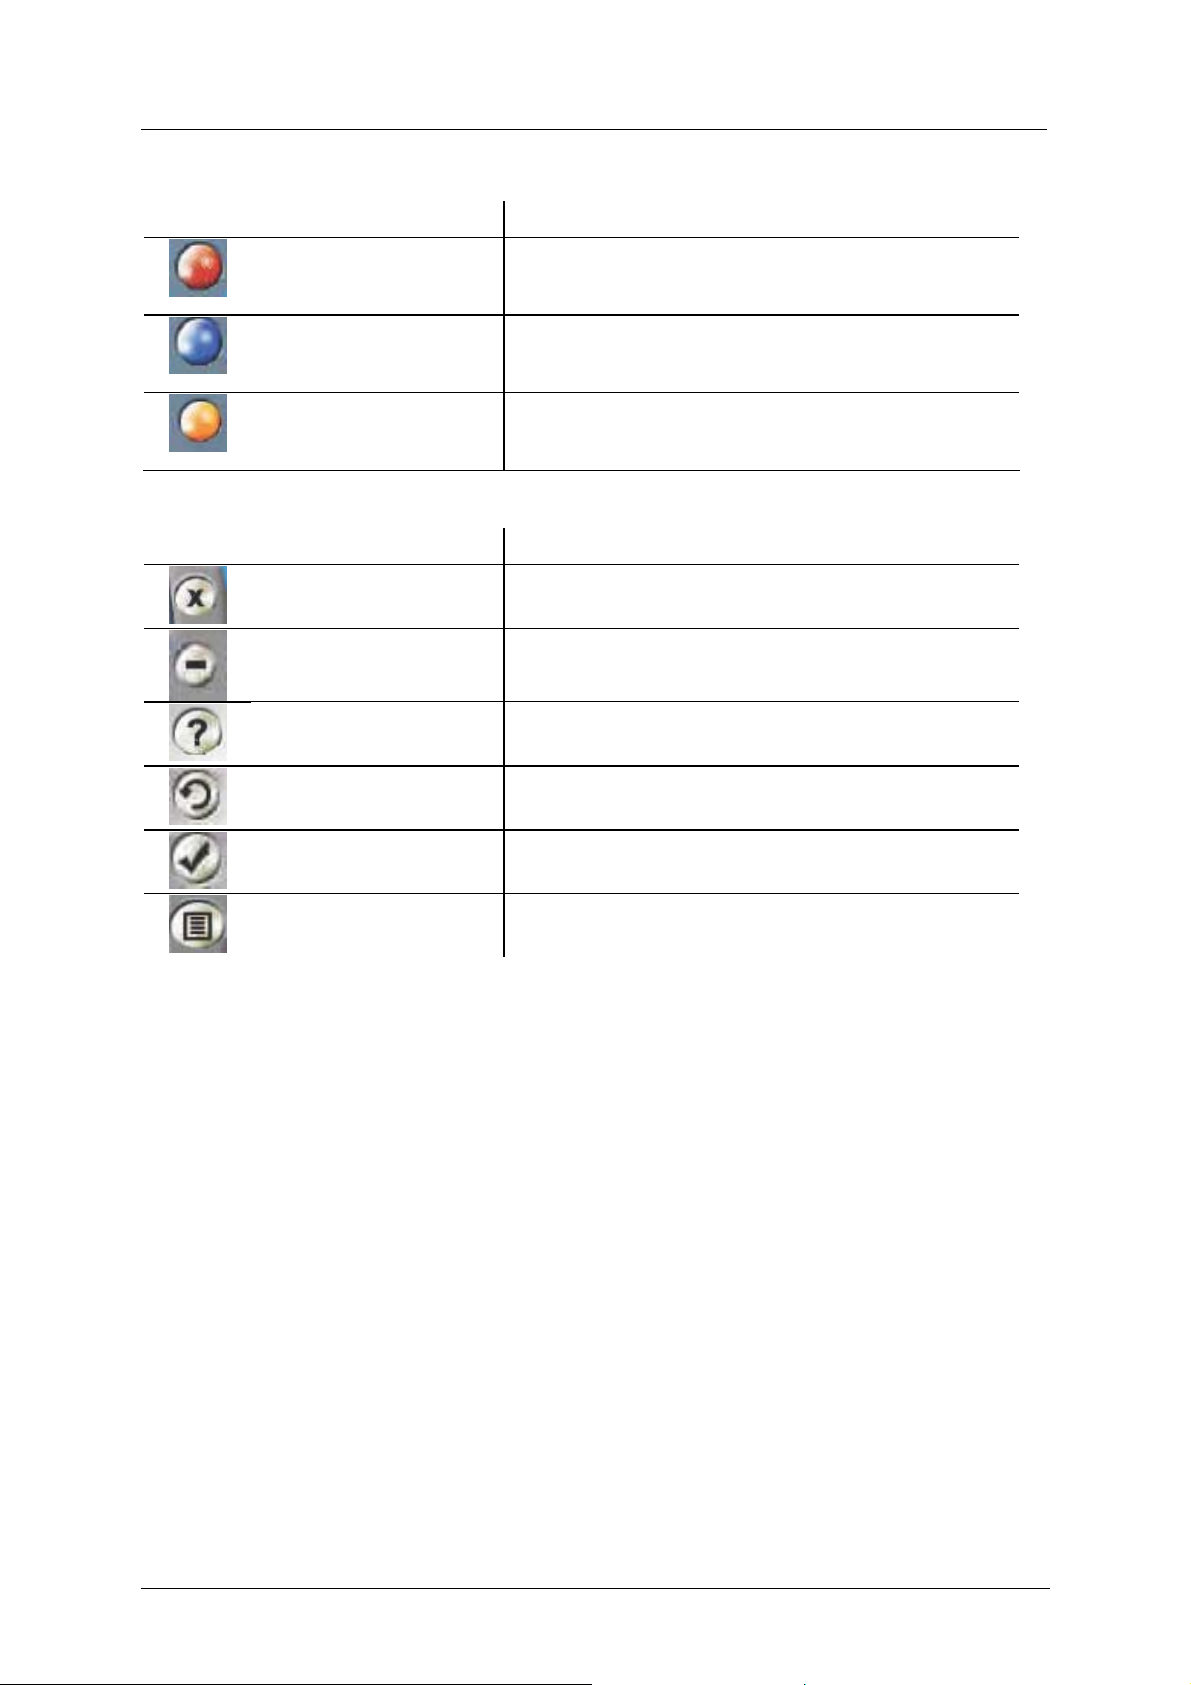
The IPMAN-A main window contains the following buttons:
Button Function
Device Setup Features to initially setup the device
Device Maintenance
Monitor Monitor screen of activities
The IPMAN-A windows contain the following general interface buttons:
Button Function
Close Closes the window
Minimize Minimizes the window
Help Opens an online help module
Undo Cancels an operation
Accept Accepts an operation
Report Opens the Reports window
Features to perform maintenance on devices
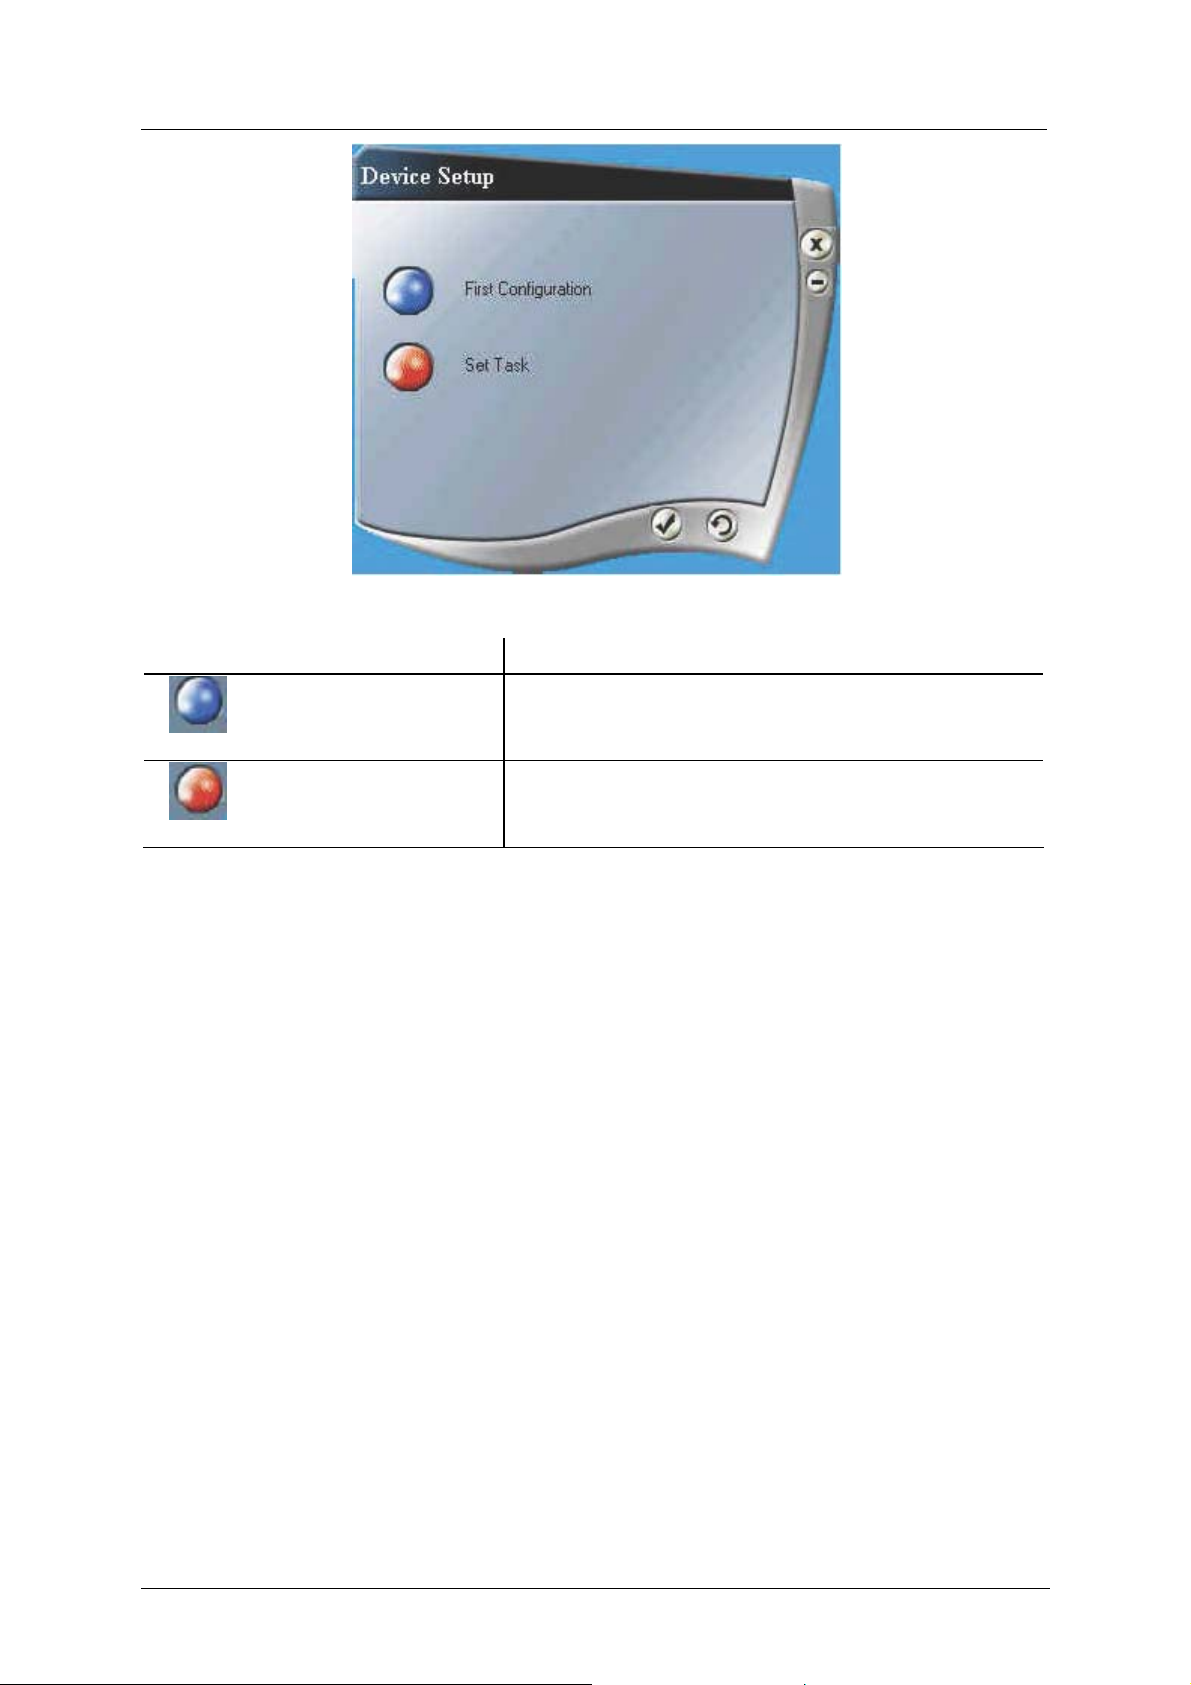
3.4.1 Device Setup
Per device you are able to configure the unit and to set tasks for that unit and others. These
actions are often done at the initial configuration of a unit. Upon clicking the Device Setup
button, the following window appears:
54
Page 59
Music-Tel A Installation and Operation Manual MAN Software
Figure 3-51: Device Setup window
Button Function
First Configuration Enter IP address, Subnet Mask, Gateway IP Address,
IPMAN-A Address and System Date and Time for the
device
Set Task Defines tasks and selects the units to which they must
be sent
3.4.1.1 First Configuration
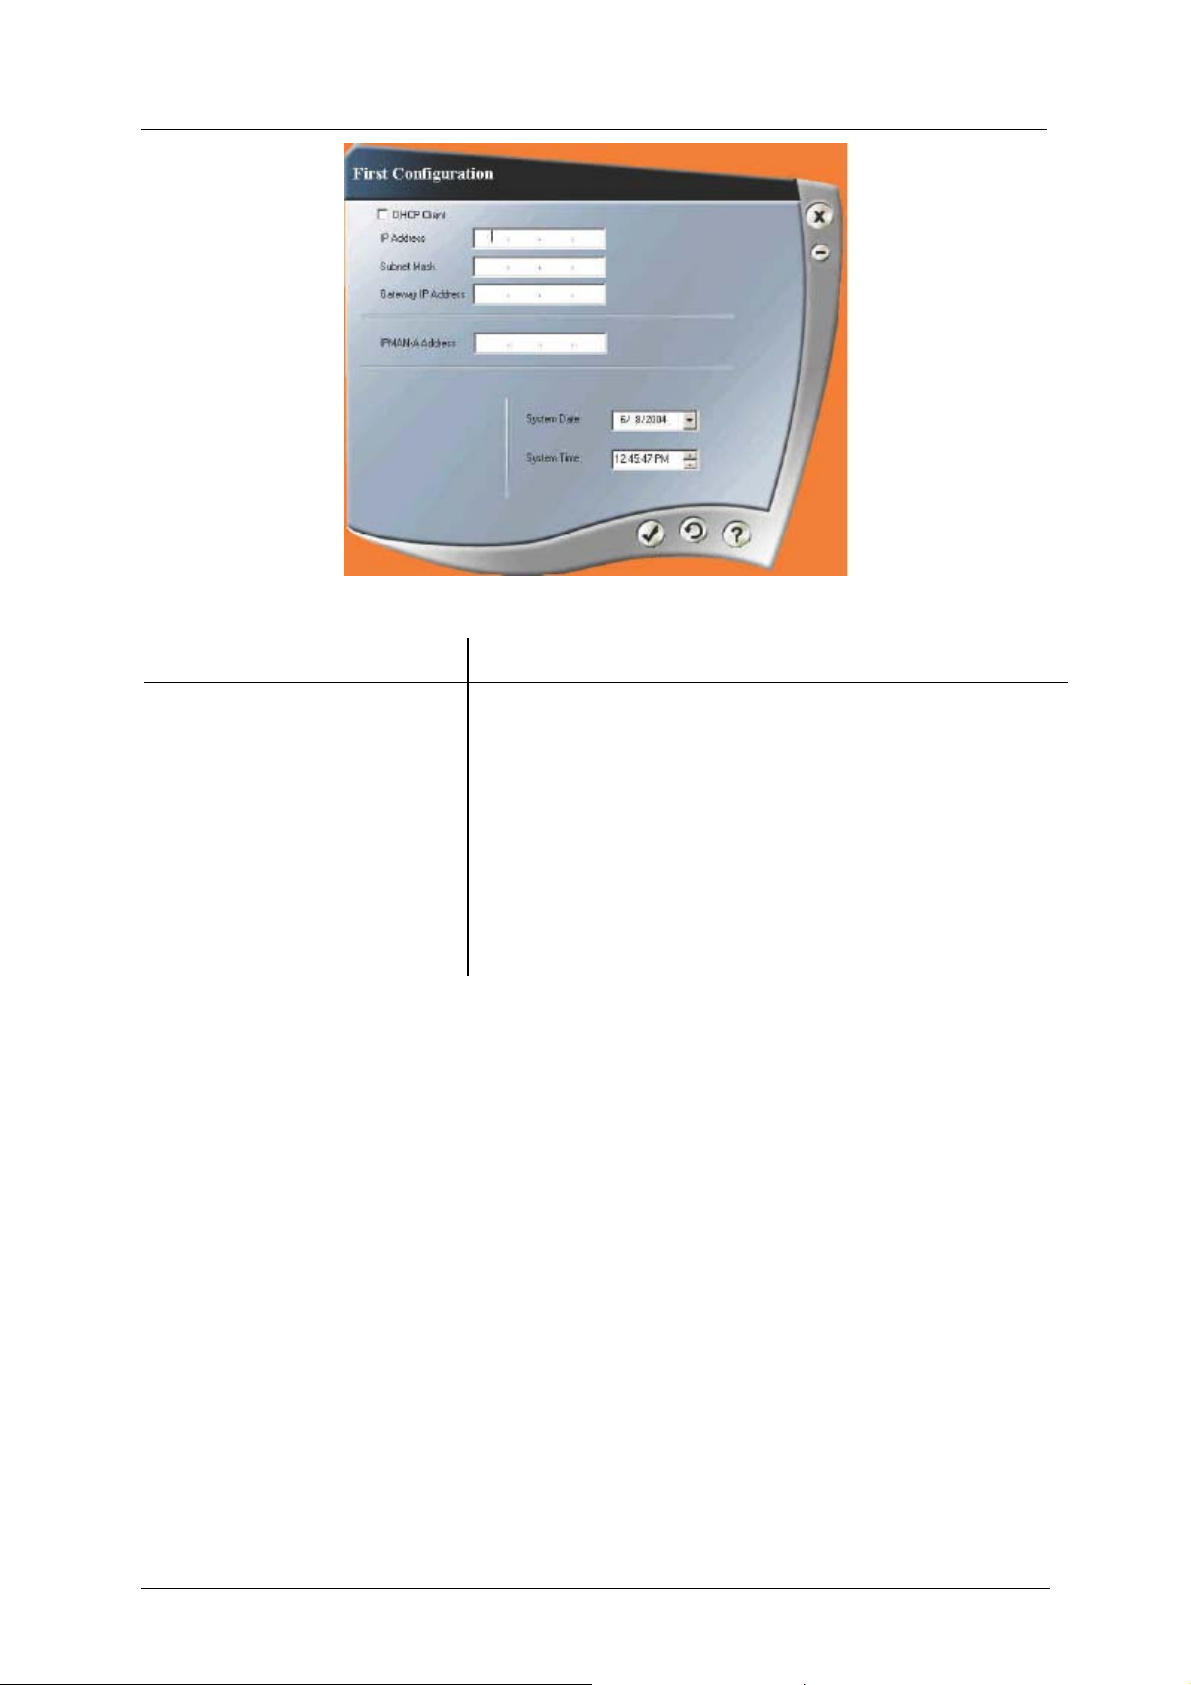
Pressing the First Configuration button takes opens First Configuration window. This
window is used to specify the network location information of the device. If you select the
DHCP Client checkbox, you imply that the network in which the unit is placed, will have this
protocol running. Otherwise, you must set manually the IP address, Subnet Mask and Gateway
IP Address (supplied by the network administrator). The IPMAN-A Address must always be
added manually. This address defines where the device will find updates. The window has a
number of standard buttons and fields:
55
Page 60
Music-Tel A Installation and Operation Manual MAN Software
Figure 3-52: First Configuration window
Function Description
DHCP Client
A check-box that defines the availability of DHCP in the
device destination network
IP Address Internet Protocol Address of the device
Subnet Mask Subdivision of the IP Address of the host
Gateway IP Address Internet Protocol Address of the gateway
IPMAN-A IP Address
Internet Protocol Address of the IPMAN-A server
System Date Date of the unit
System Time Time of the unit
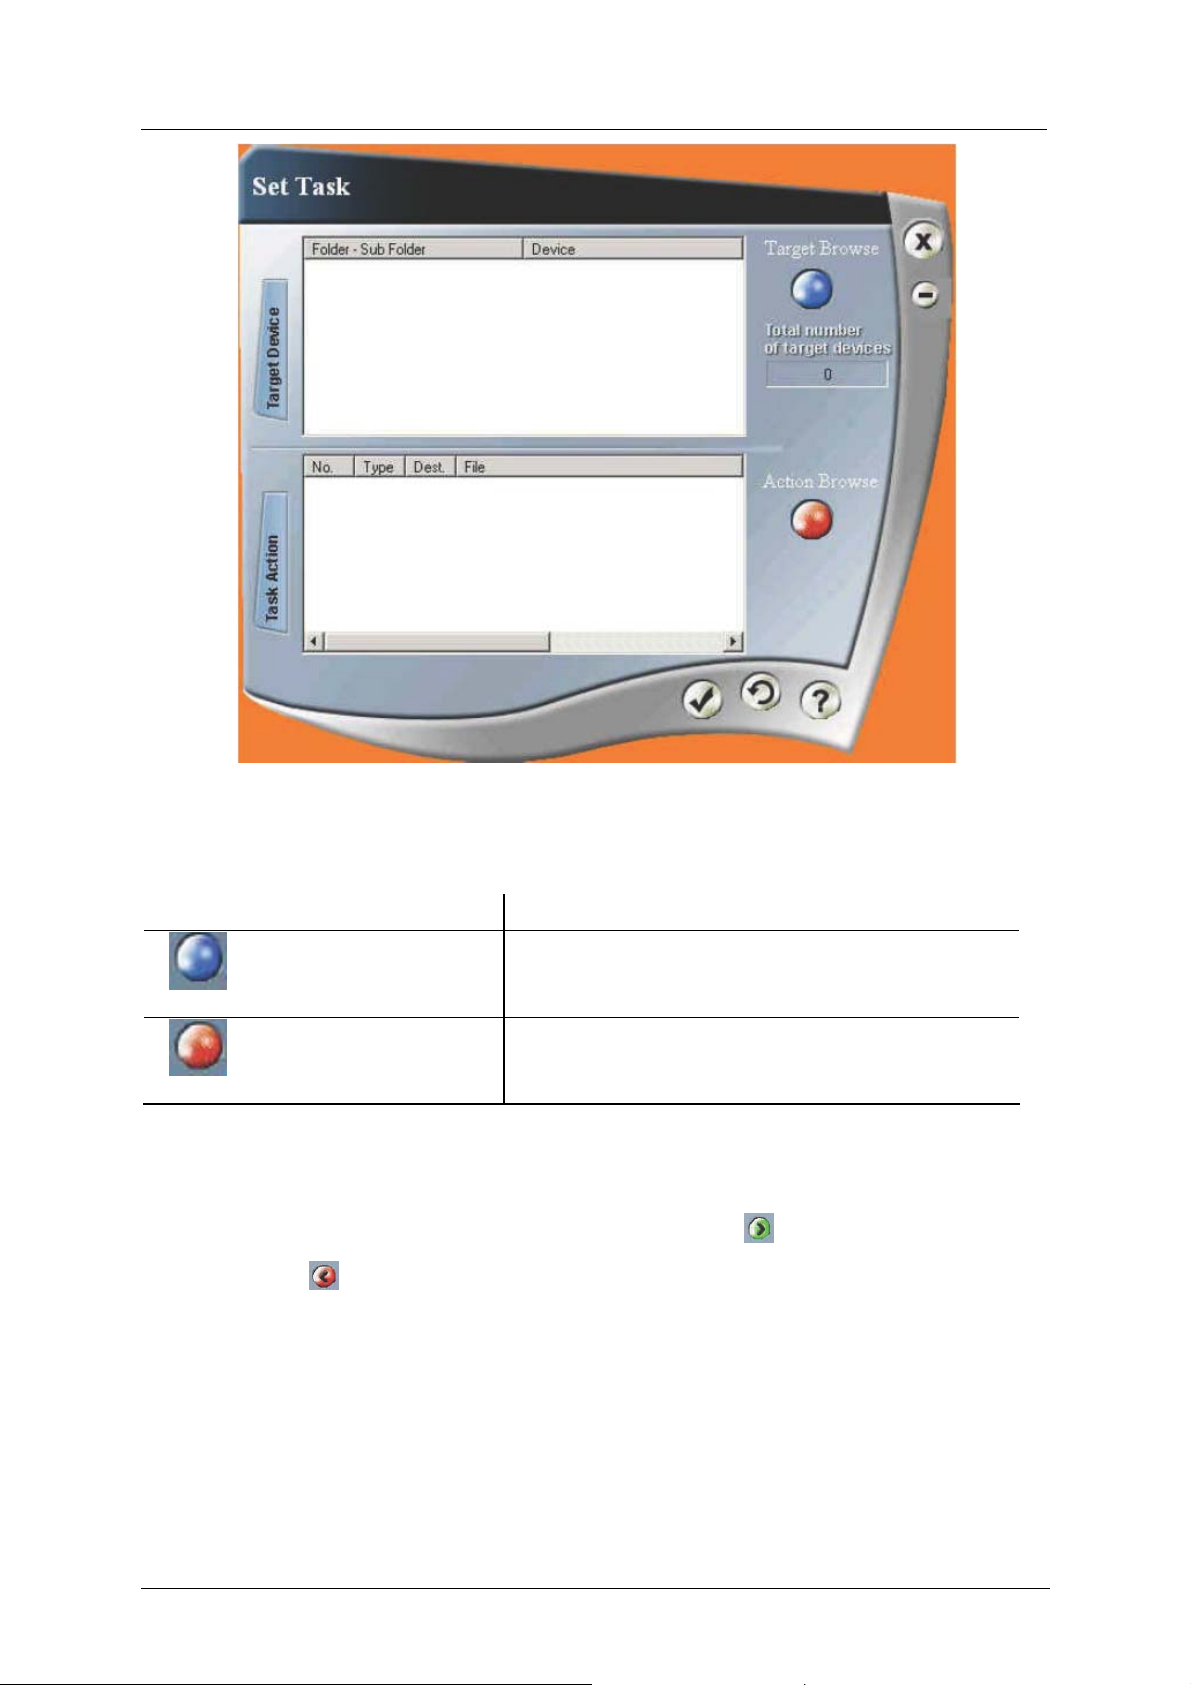
3.4.1.2 Set Task
Pressing the Set Task button opens Set Task window, in which the tasks and targets are
shown and where they can be chosen.
56
Page 61
Music-Tel A Installation and Operation Manual MAN Software
Figure 3-53: Set Task window
Button Function
Target Browse
Action Browse
Selects the device(s) required to perform a task
Defines the task(s) for the selected device(s)
3.4.1.3 Target Browse
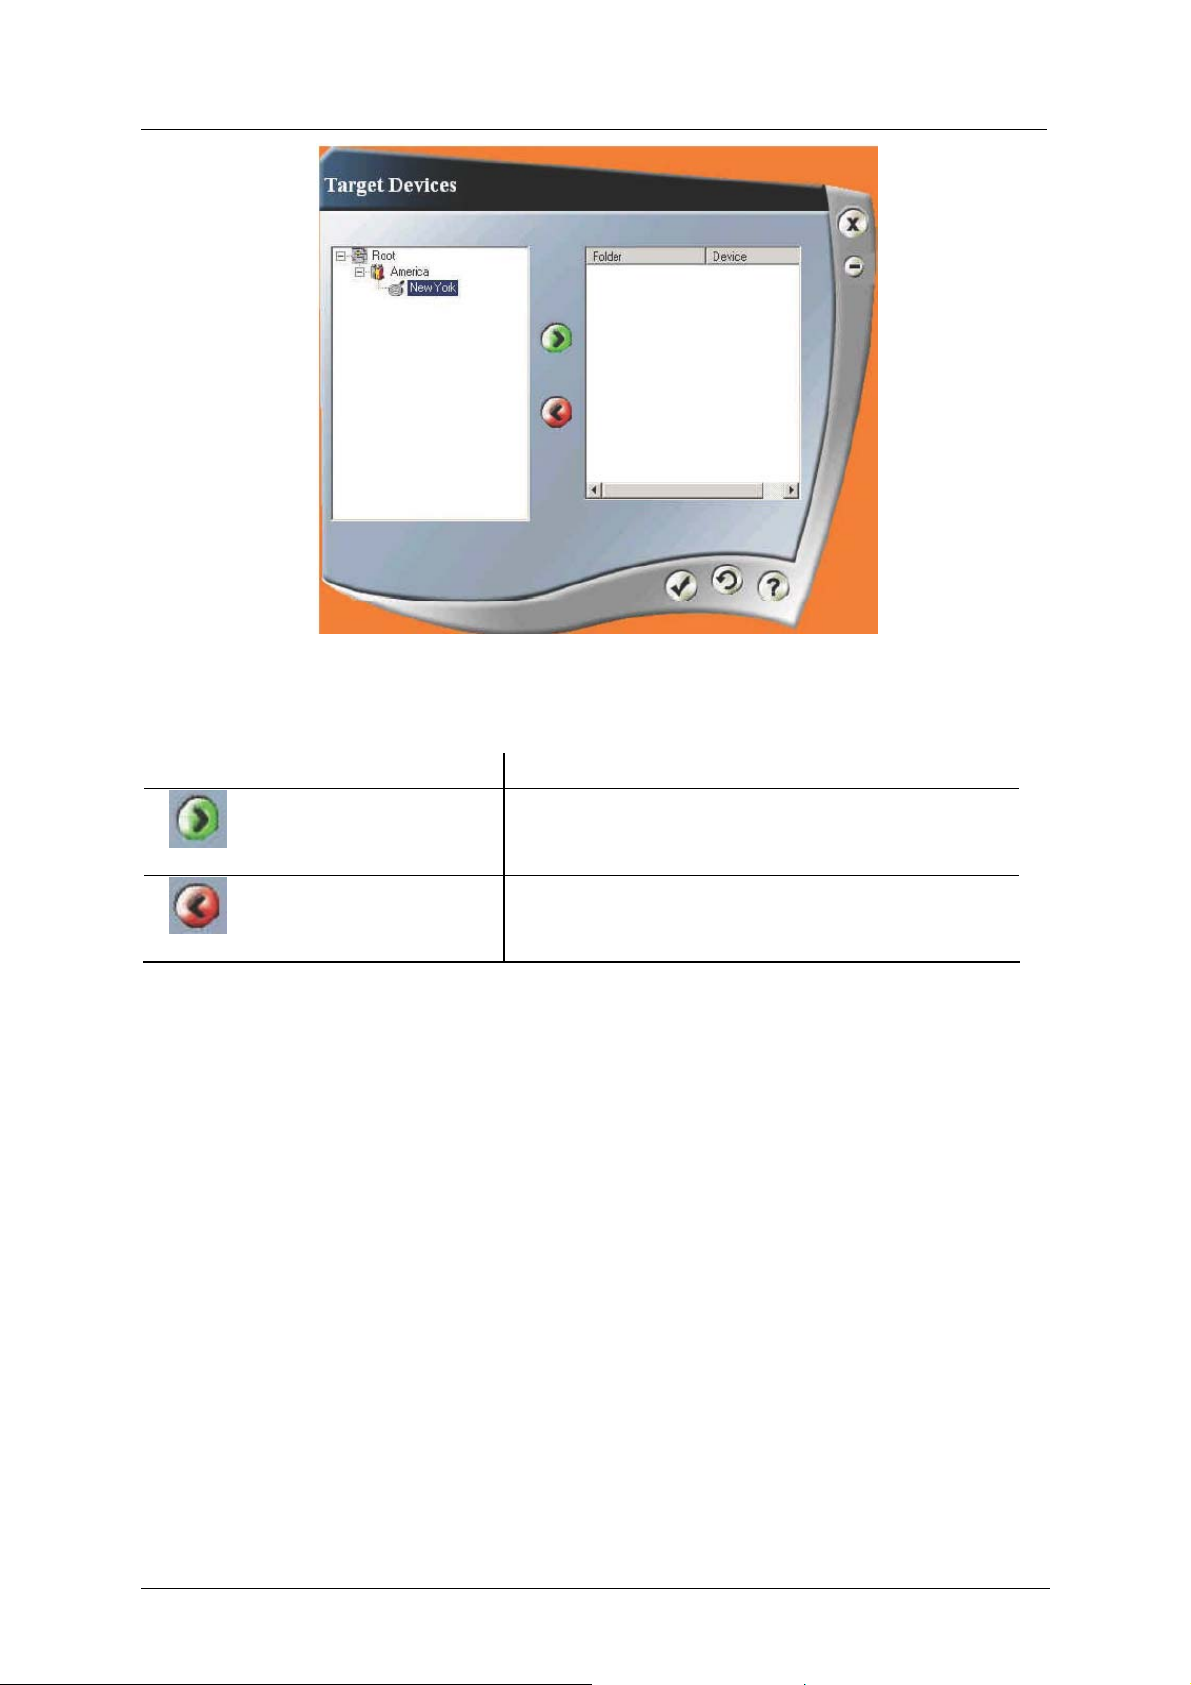
Clicking the Target Browse button opens the Target Devices window. By selecting a device
or more devices and moving them to the right pane pane (use
the right and use
to remove devices from the selection list or double-click), you can define
to move selected devices to
for which devices the task is defined. Upon clicking the Root and sub-folders, the devices are
displayed.
57
Page 62
Music-Tel A Installation and Operation Manual MAN Software
Figure 3-54: Target Device window
Button Function
Adds selected device(s) to list
Removes selected device(s) from list
3.4.1.4 Action Browse
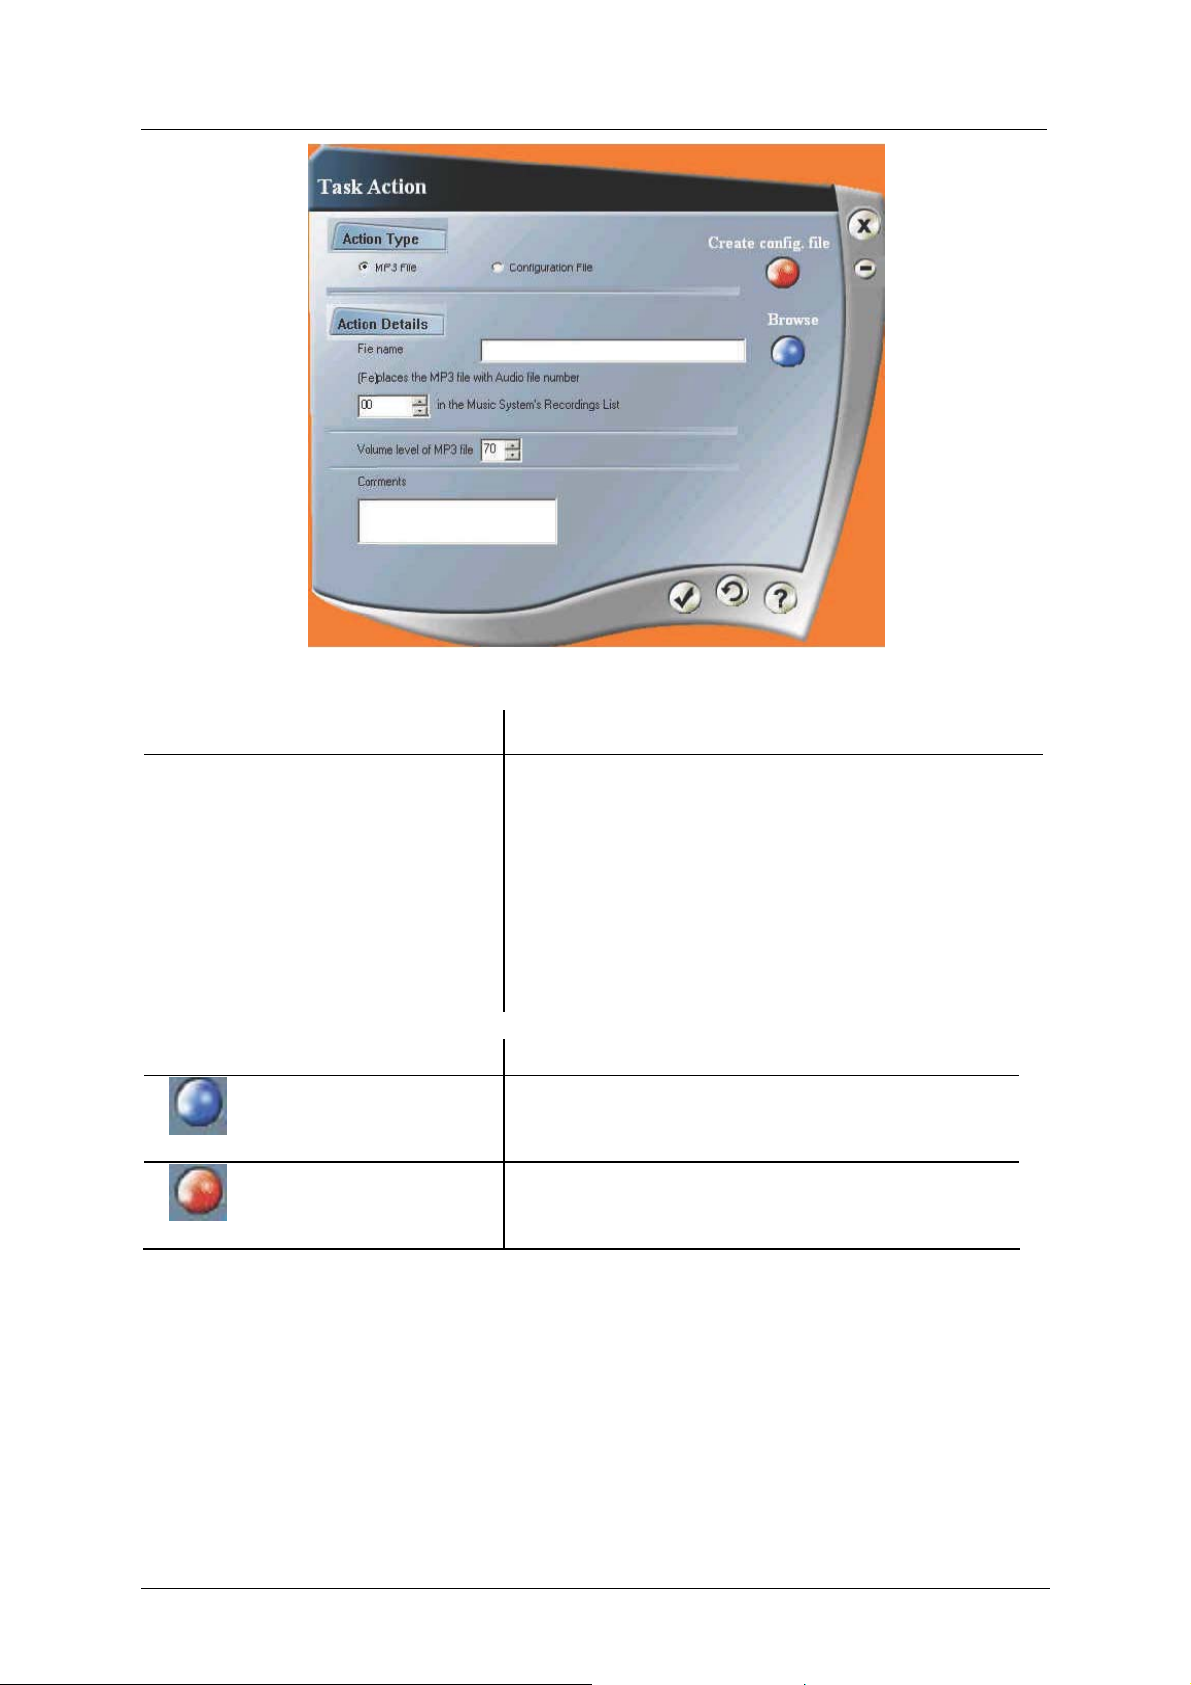
Clicking on the Action Browse button will give a window, in which the type of action can be
chosen.
58
Page 63
Music-Tel A Installation and Operation Manual MAN Software
Figure 3-55: Task Action window
Function Description
MP3 File/Configuration File radio
Select the required action type
button
File name Name of Configuration/MP3 file
Audio file number Place in the audio file list of the device, to which the
selected file must go
Volume level Volume level of MP3 file when played back in the
device
Comments A field for a free-text description
Button Function
Target Browse Creates a configuration file
Action Browse
Browses for the Configuration or MP3 file name
3.4.1.5 Create Configuration File
Clicking this button initiates the MAN-A program, in which the complete configuration of
the device can be created (refer to MAN software described above). Closing this program
returns you to the IPMAN-A Task Action window.
3.4.1.6 Browse for the Configuration or MP3 File Name
Clicking this button opens a standard search window, in which you can search and open a
configuration file with the extension .MUPW or an MP3 file with the extension .MP3.
59
Page 64
Music-Tel A Installation and Operation Manual MAN Software
3.4.2 Device Maintenance
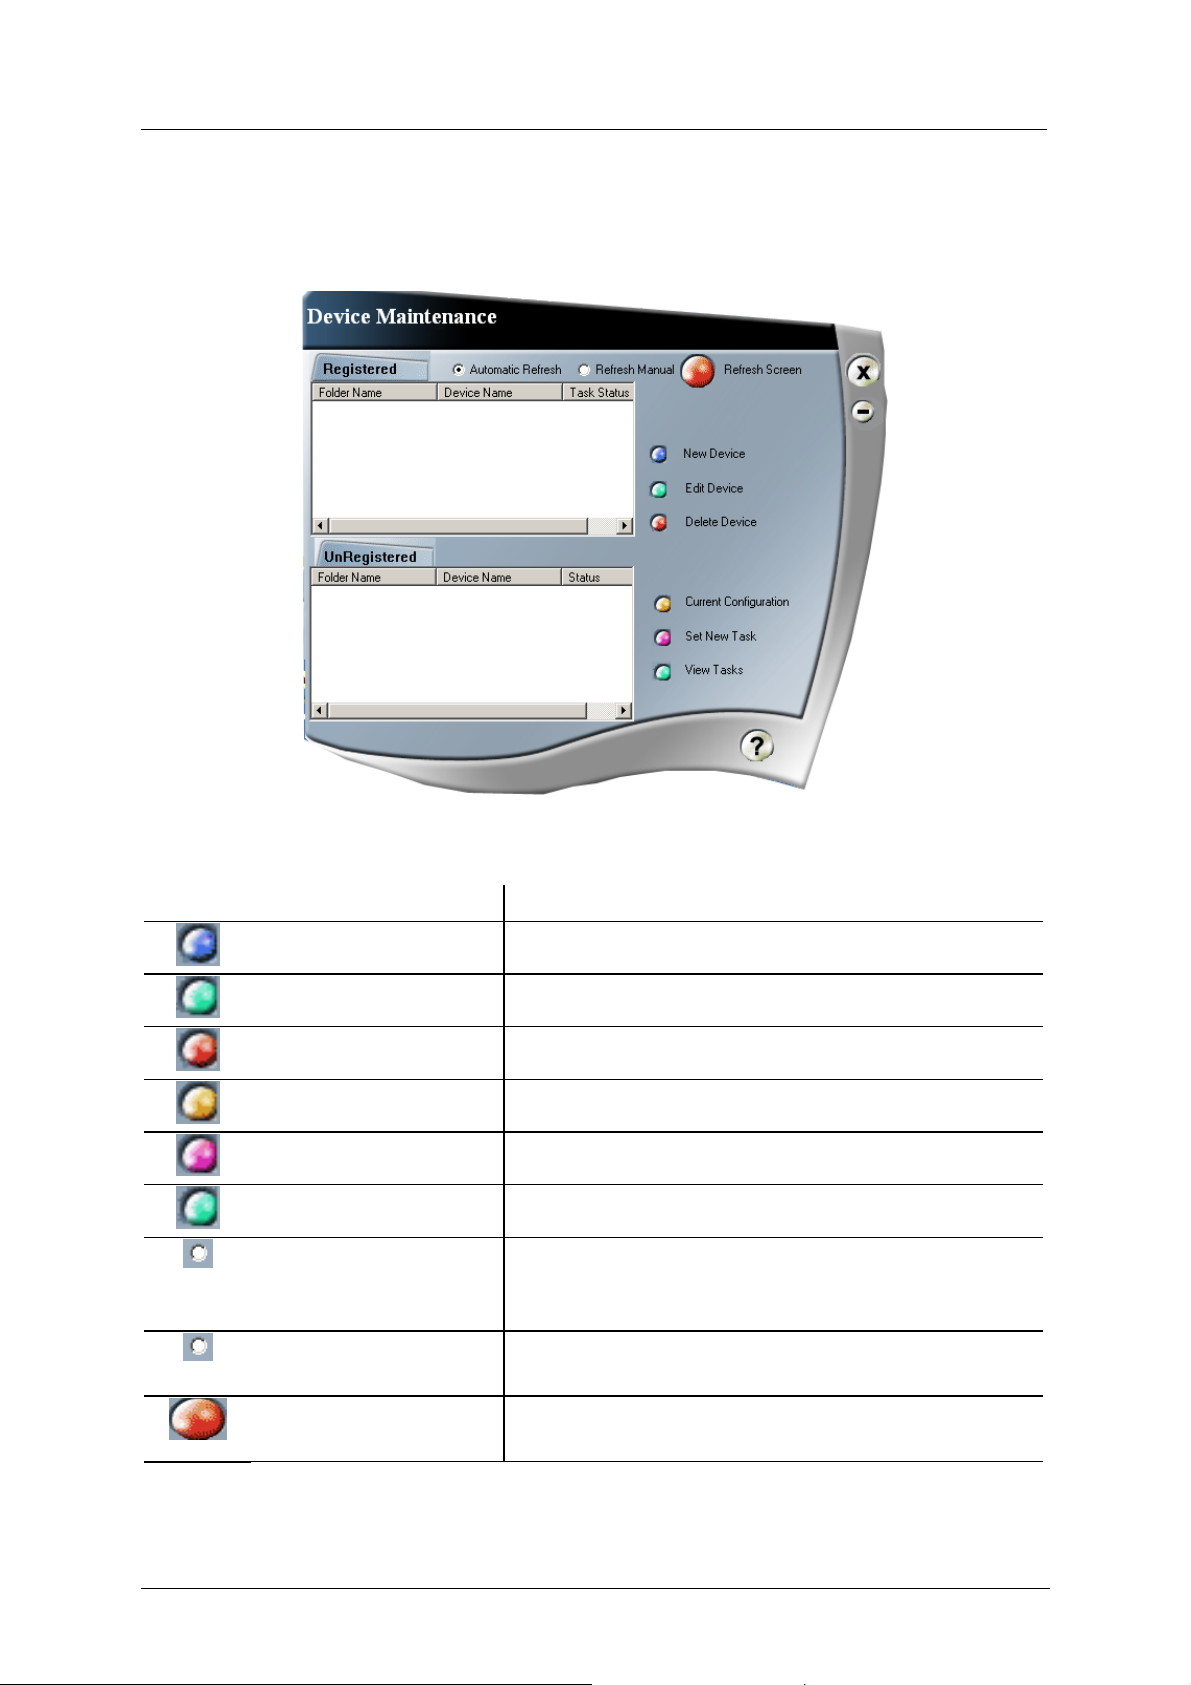
Pressing the Device Maintenance button opens a window, in which a number of actions can
be activated.
Figure 3-56: Device Maintenance window
Button Function
New Device Creates a new device or folder
Edit Devce Edits device or a folder
Delete Device Deletes a device or a folder
Current Configuration Opens the current configuration for a selected device
Set New Task Sets a new task or tasks for one or more device(s)
View Tasks View active tasks (with possibility to delete them)
Automatic Refresh When selected, refreshed the screen is refreshed
automatically every time that connection with server is
made and displays devices that changed status.
Refresh Manual Sets manual refreshing mode and enables the Refresh
Screen button
Refresh Screen When pressed, refreshes the screen. Active only when
60
Refresh Manual radio button is selected
Page 65
Music-Tel A Installation and Operation Manual MAN Software
NOTE
3.4.2.1 New Device
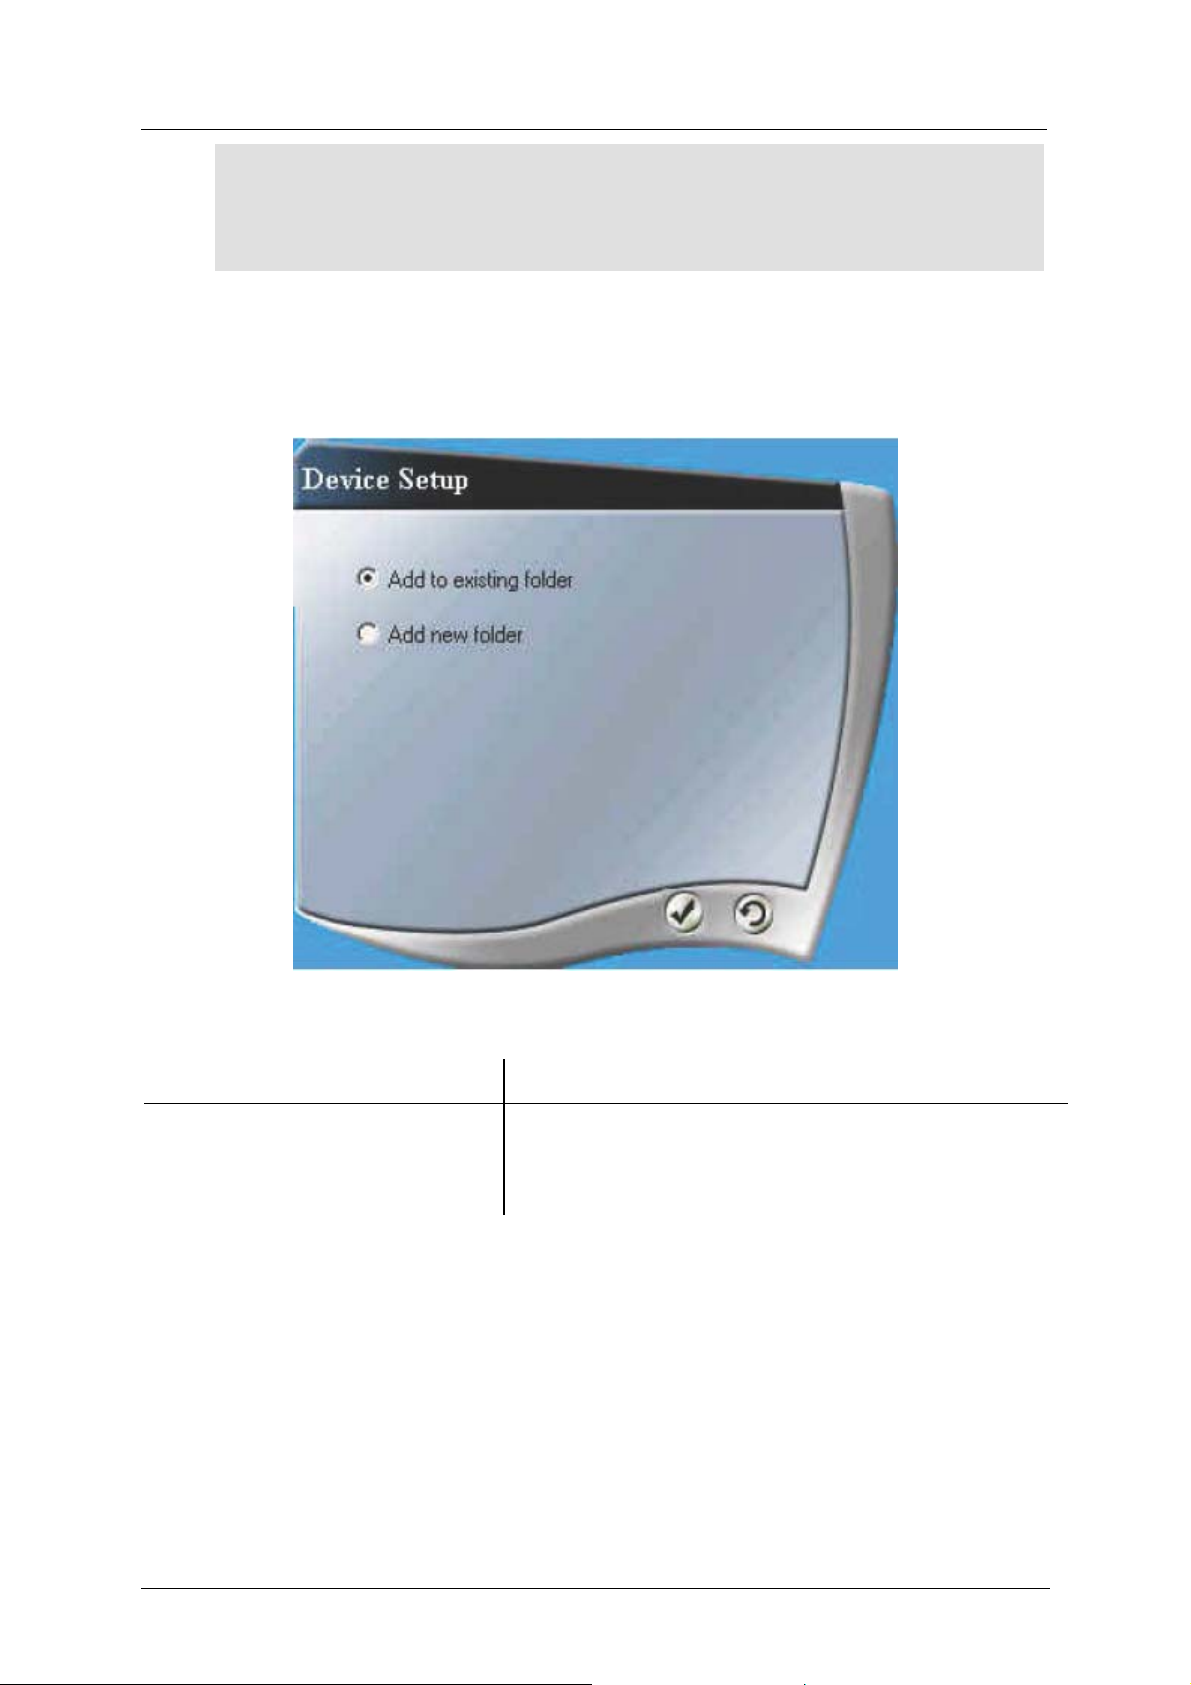
Clicking this button opens Device Setup window, in which you can select whether a new
device is added to an existing folder or a new folder is created.
Waiting tasks can be edited and/or deleted by right-clicking the task and selecting
the required action from pop-up menu.
Figure 3-57: Device Maintenance window
Function Description
Add to existing folder or Add new
folder radio button
3.4.2.2 Adding a New Device or New Folder
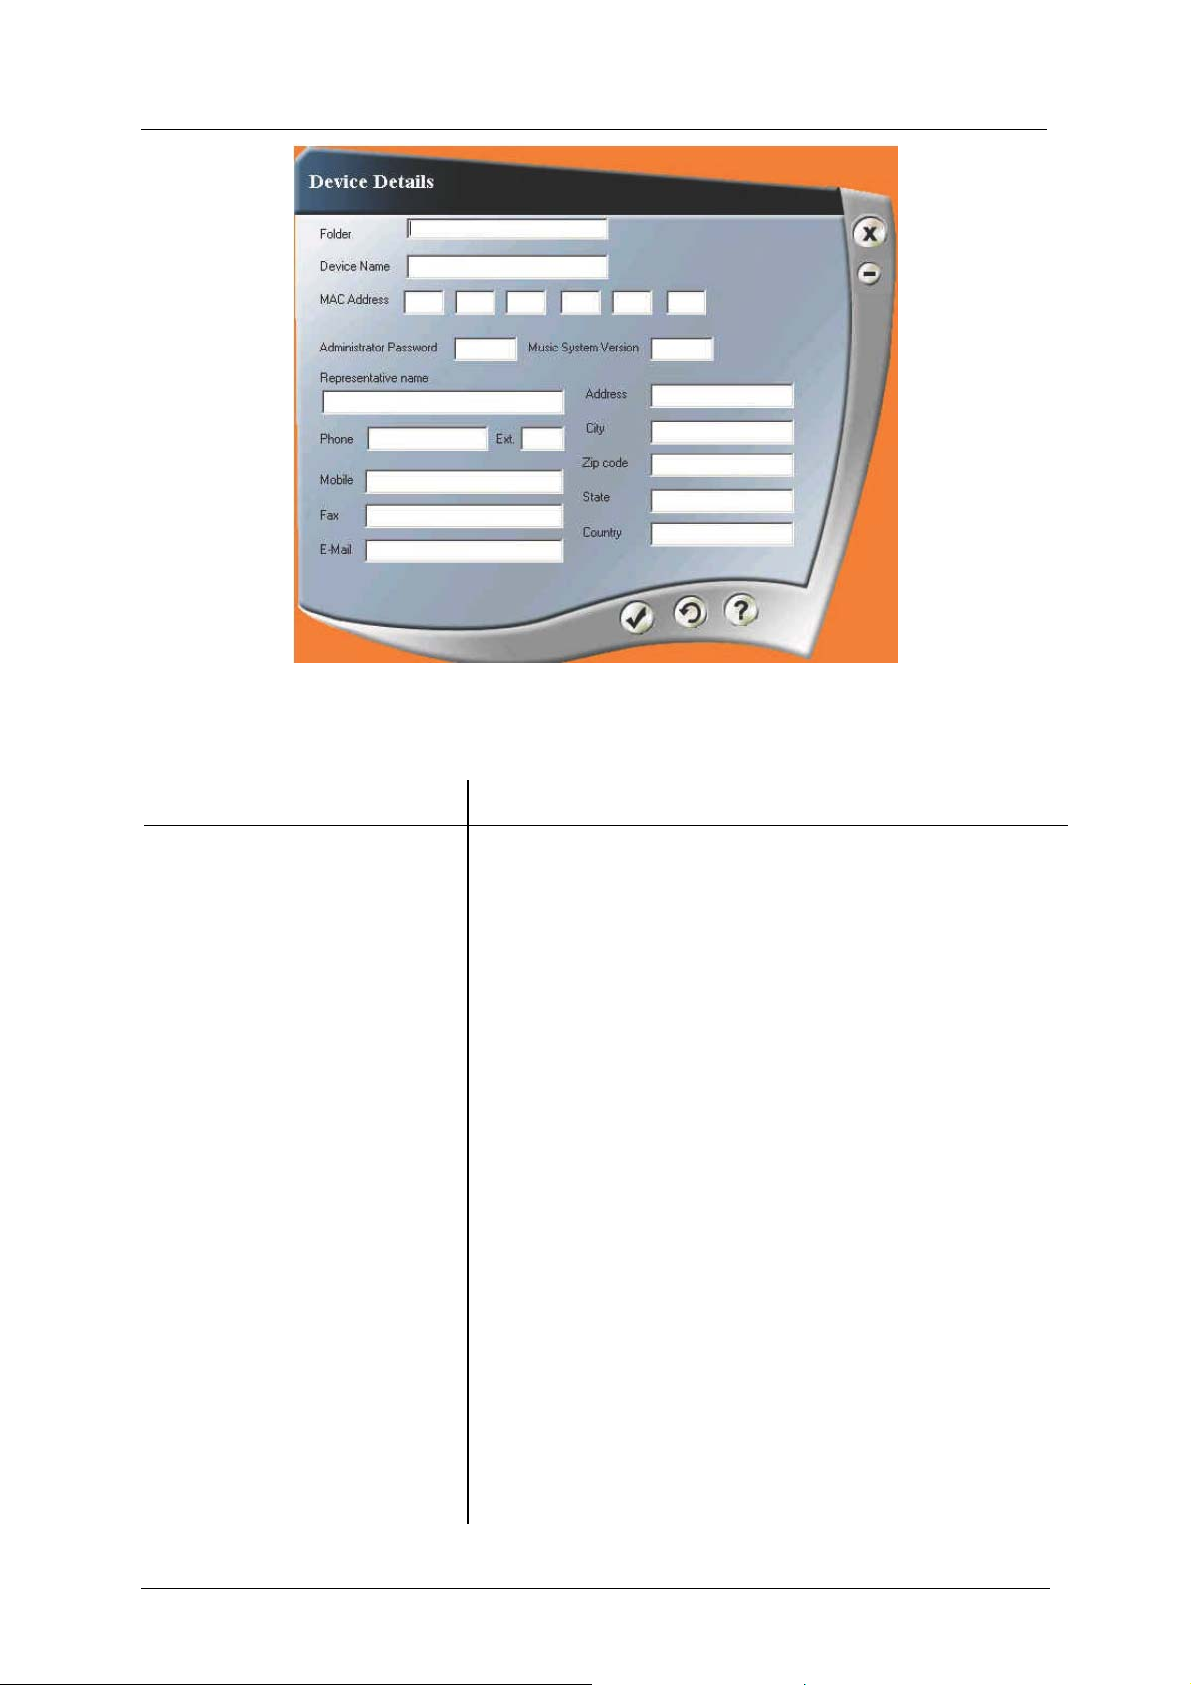
The procedures of adding a new device, new folder or both, are rather silmilar. When you add
a new device to an existing folder, the current folder has already been filled-in and a choice
out of the current folder and other folders can be made. In general, the following Device
Details window appears:
Select the required action to either add a new device or to
add a new folder. When adding a new folder, a new
device can also be added.
61
Page 66
Music-Tel A Installation and Operation Manual MAN Software
Figure 3-58: Device Details window
It is recommended to enter as much information as possible to facilitate better maintenance.
Function Description
Folder Name of the new folder
Device Name Name of the new device in the folder
MAC Address MAC Address of the device
Administrator Password Password for maintenance of device
Music System Version Version of the device
Representative Name Name of the representative
Phone Phone number of the representative
Ext. Phone extension of the representative
Mobile Mobile phone number of the representative
Fax Fax number of the representative
E-Mail E-Mail address of the representative
Address Address of the device
City City of the device
Zip code Zip code related to the address of the device
State State related to the address of the device
Country Country related to the address of the device
62
Page 67
Music-Tel A Installation and Operation Manual MAN Software
3.4.2.3 Edit Device
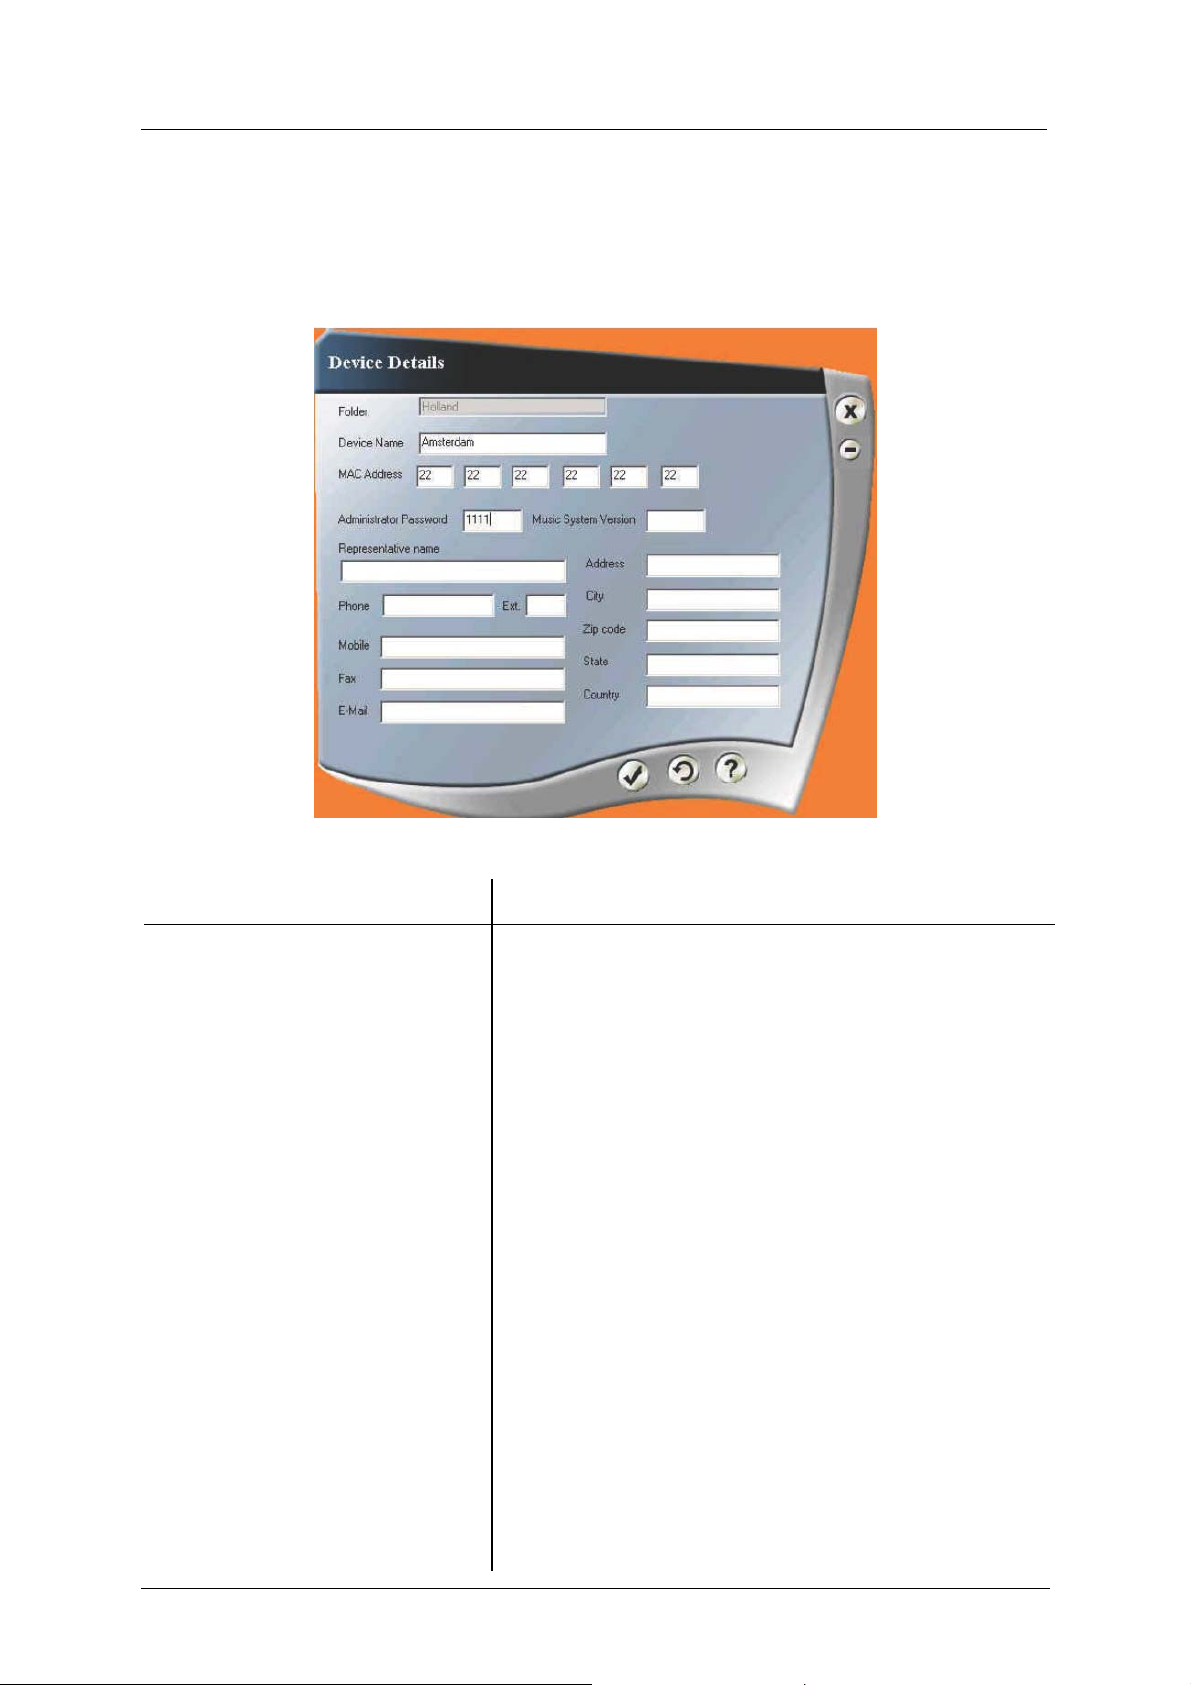
Before clicking on this button you have to select a device from the list with the folder name
and device name. Then the correct device information will open. The name of the folder will
be grayed-out to indicate that it cannot be edited.
Figure 3-59: Device Details Window
Function Description
Device Name Name of the device in the folder
MAC Address MAC Address of the device
Administrator Password Password for maintenance of device
Music System Version Version of the device
Representative Name Name of the representative
Phone Phone number of the representative
Ext. Phone extension of the representative
Mobile Mobile phone number of the representative
Fax Fax number of the representative
E-Mail E-Mail address of the representative
Address Address of the device
City City of the device
Zip code Zip code related to the address of the device
State State related to the address of the device
Country Country related to the address of the device
63
Page 68
Music-Tel A Installation and Operation Manual MAN Software
3.4.2.4 Delete Device
Select the device to be deleted and click Delete Device. The device is deleted.
3.4.2.5 Current Configuration
Before clicking this button, select the device from which you want to load the current
configuration. A standard Windows browser opens, where you can a configuration file with
the extension .MUPW.
NOTE
When selected and opened, the MAN utility for Music-Tel A will open and you can modify
The system will automatically open the folder with the latest saved configuration
file for the chosen device.
the configuration. Closing the MAN utility returns you to the Device Maintenance window
of IPMAN-A.
3.4.2.6 Set New Task
Clicking this button takes opens Set Task window (see Paragraph
3.4.2.7 View Task
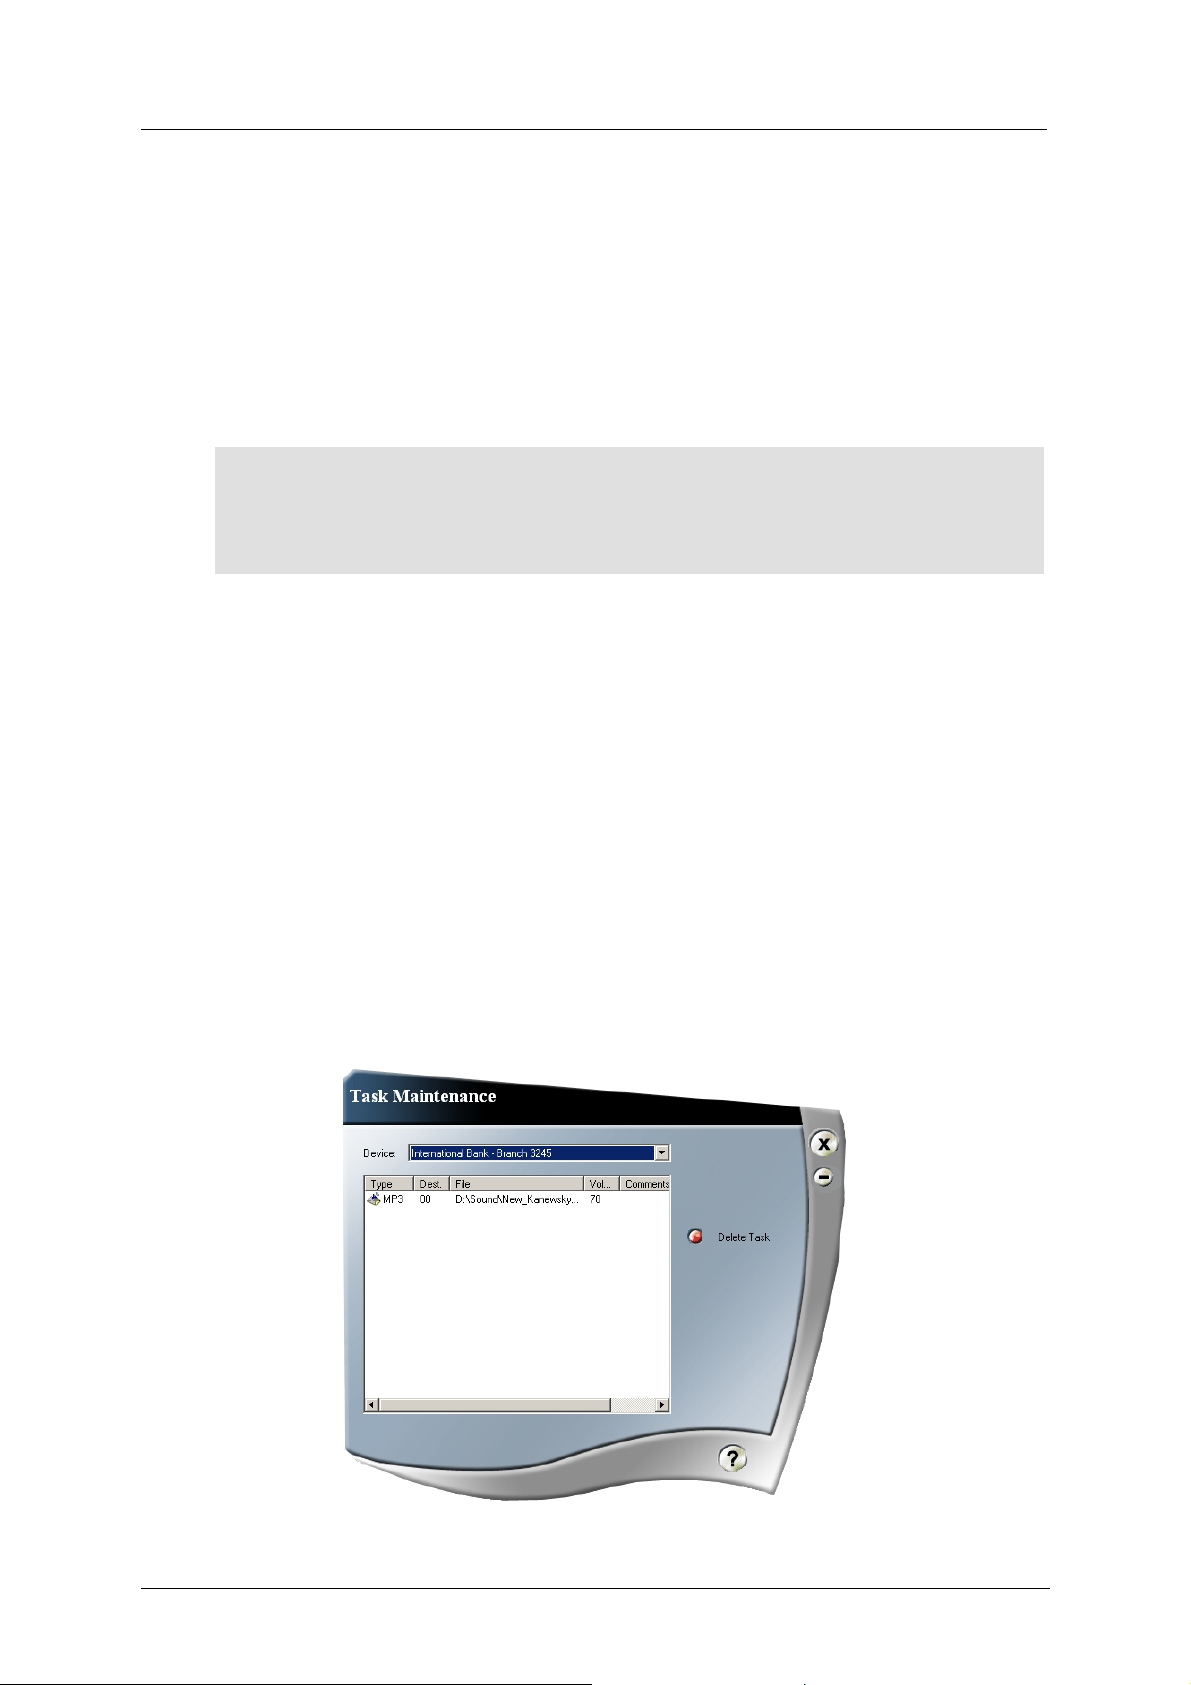
Clicking this button opens Tasks Maintenance window, in which you can select a device
and see all active tasks for specific device. To delete a task, select a task from the list and
click Delete Task.
3.4.1.2).
Figure 3-60: Task Maintenance Window
64
Page 69
Music-Tel A Installation and Operation Manual MAN Software
3.4.3 Monitor
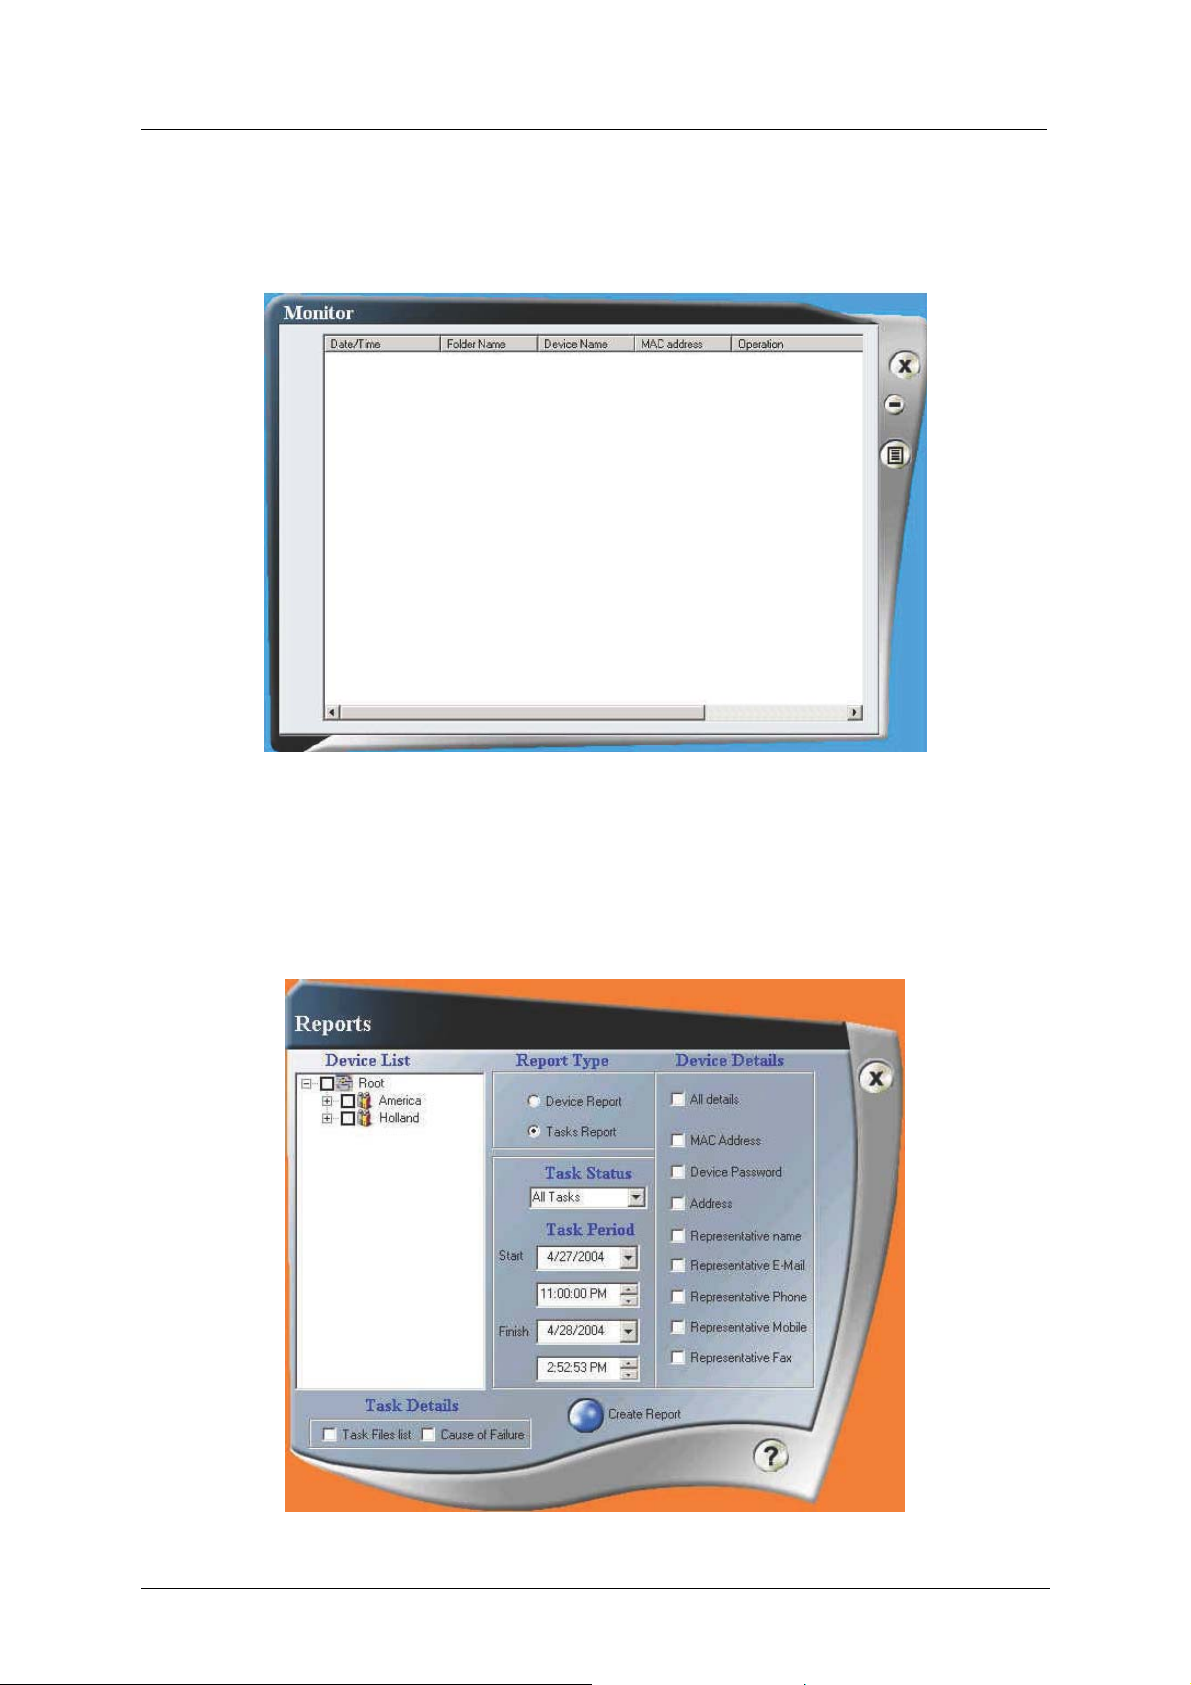
The Monitor button opens the Monitor window, in which you can monitor the actions and
statuses of the different devices.
Figure 3-61: Monitor window
3.4.3.1 Reports
Clicking the Reports button opens the Reports window, in which the required report can be
defined by making selections and marking several parameters.
Figure 3-62: Reports window
65
Page 70

Music-Tel A Installation and Operation Manual MAN Software
Function Description
Device List Selects the required device(s) and/or folder(s)
Report Type Selects the required report (Task or Device)
Device Details
Task Status
Selects the required device details (all or selective)
Selects the required status (All Tasks, Untransmitted,
Suspended, Failed, Successful)
Task Period Defines the required period
Task Details
Defines the report details (Task Files or Cause of Failure)
Button Function
Create
Report
Activates the creation of the report, based on the specified
parameters and for the specified device(s)
Clicking the Create Report button creates the report and opens it in Notepad application.
3.4.4 File Types
When working with the IPMAN-A server software, you will come across files with the
following file extensions:
*.MDB
This is the file (ERAP.MDB) containing all the information in the IPMAN-A database. The
ERAP.MDB file can be found in the Program Files directory.
*.MP3
This is a music file, used in the Music-Tel A. The *.MP3 file can be found anywhere on you
computer.
66
Page 71

Music-Tel A Installation and Operation Manual MP3 File Size Calculation Table
4. MP3 File Size Calculation Table
The following table shows the maximum available recording time per MP3 file type.
Mode Bandwidth Bit-rate Quality
Mono 8kHz 28Kbits Microphone 181 Kb 2h 50 min
Mono 8kHz 48Kbits Microphone 362 Kb 1h 40 min
Mono 8kHz 64Kbits Microphone 477Kb 1h 10 min
Mono 16kHz 32Kbits Mono radio 248 Kb 2h 10 min
Mono 16kHz 48Kbits Mono radio 361 Kb 1h 40 min
Mono 16kHz 64Kbits Mono radio 477 Kb 1h 10 min
Mono 22kHz 32Kbits Cassette Tape 248 Kb 2h 10 min
Mono 22kHz 48Kbits Cassette Tape 361 Kb 1h 40 min
Mono 22kHz 64Kbits Cassette Tape 477 Kb 1h 10 min
Mono 44kHz 32Kbits Cassette Tape 248 Kb 2h 10 min
File size for
1 min. of
recording
time
Maximum
recording
time
Mono 44kHz 48Kbits Cassette Tape 361 Kb 1h 40 min
Mono 44kHz 64Kbits CD 477 Kb 1h 10 min
Mono 48kHz 32Kbits Cassette Tape 357 Kb 1h 30 min
Mono 48kHz 48Kbits Cassette Tape 356 Kb 1h 30 min
Mono 48kHz 64Kbits CD 475 Kb 1h 10 min
NOTE
67
The maximum MP3 file size is 4MB.
Page 72

Music-Tel A Installation and Operation Manual Chapter 4. MP3 File Size Calculation Table
1
 Loading...