

Page 1
www.isys‐group.com
iTerraTL1290
UserGuide
iSys - The Imaging Systems Group Inc. © Copyright 2009
Page 2

Table of Contents
Ordering Consumable Supplies 2
Safety Information 3
120-Volt Models 3
220/240-Volt Models
Unpacking and Installation 5
Duplexer 8
Replacing the Fuser
Replacing the Transfer Belt
Replacing the Waste Toner Bottle 12
Using the Exit Door
Loading the printer on the feeder
Loading Paper into the Cart 14
Cart Menu Summary
Changing Settings
Menu Options 19
Printer Menu Summary
Using the Printer Menu
Changing Settings
Buttons and Lights 19
Display Panel Messages 20
Menu (Functions) Information
Status Information 20
Configuration Information 21
Help Mode
Changing Paper (Media) Settings 21
Media Weight 21
Individual Print Jobs
All Print Jobs (Defaults) 21
Reset to Factory Defaults 21
Maintenance
Cleaning the LED Heads 22
Cleaning the Paper Tray Feed Rollers 22
Error Messages
Help Button 23
Cart Menu Error Messages 24
Paper Jams
Tray Side Cover 24
Printer Side Cover
Printer Top Cover 26
Avoiding Paper Jams
Dealing with Unsatisfactory Printing
Interfaces
Driver Installation
Warnings and Precautions
Cutter Blade
TL1290 Printer Cart 38
Printer and Feeder Cable
Features and Specifications
Printer Specifications 39
Features
Limitation of Liability
Material Safety Data Sheet
iTerra TL1290 Warranty
3
10
10
12
13
16
16
19
19
19
20
21
21
22
23
24
25
27
28
29
29
38
38
39
39
39
40
41
42
Page 3

iSys is an ISO 9001 Registered Firm
Thank you for selecting the iTerra TL1290. iSys will make every effort to assist you with operation of your new printer. It is our
sincere desire that your ownership experience meets your highest expectations.
This user guide is provided to help you easily install and operate your new printer. It contains important information on the
features and functions of the iTerra TL1290.
Need Help?
If you require additional assistance or information, please contact the iSys Technical Support team at:
iSys - The Imaging Systems Group Inc.
911 28th Street N.E.
Calgary, AB T2A 7X1
Canada
Toll Free in North America: 1-800-415-4797
Phone: (403) 204-5212
Fax: (403) 204-1971
E-mail: support@isys-group.com
THE INFORMATION CONTAINED IN THIS DOCUMENT IS SUBJECT TO CHANGE WITHOUT NOTICE. EXCEPT
AS PROVIDED BY LOCAL LAW, THE IMAGING SYSTEMS GROUP INC. (ISYS) MAKES NO WARRANTY OF ANY
KIND WITH REGARD TO THIS MATERIAL, INCLUDING, BUT NOT LIMITED TO THE IMPLIED WARRANTIES OF
MERCHANTABILITY AND FITNESS FOR A PARTICULAR PURPOSE. ISYS SHALL NOT BE LIABLE FOR
ERRORS CONTAINED HEREIN OR FOR INCIDENTAL OR CONSEQUENTIAL DAMAGES IN CONNECTION WITH
THE FURNISHING, PERFORMANCE OR USE OF THIS MATERIAL.
WARNING: A WARNING indicates the potential for personal injury.
CAUTION: A CAUTION provides additional information which, if ignored, may result in
equipment malfunction, damage or personal injury.
NOTE: A NOTE indicates special attention is required.
This Symbol indicates an area of possible concern
due to static discharge into the circuitry. When you
see this symbol in the manual, please observe proper
precautions to minimize damage to circuitry.
ILLUSTRATIONS: Illustrations and components are representative only. Your unit may differ slightly from those pictured in this
document.
1
Page 4

Ordering Consumable Supplies
Using non-Qualified TL1290 media and consumables will void the printers’ warranty.
• Reach iSys toll-free by phone at 1-866-415-4797 within North America or 1-403-204-5200 globally.
• Reach iSys by fax at 1-403-204-1971.
• All prices in US dollars.
• Credit Cards accepted.
• Sales tax, and shipping and handling are added where applicable.
• An iSys purchase can be used to order products directly if the order value is over $500, excluding freight and taxes and if you
have been approved for credit.
Paper
Media iSys Part Number
Case of 6000 Sheets WLFF2000HWHB
Toner Cartridges
Color iSys Part Number
Black WL1-BKT
Cyan WL1-CYT
Magenta WL1-MGT
Yellow WL1-YWT
Fusers
Voltage iSys Part Number
230 Volt WL1-Fuser230
120 Volt WL1-Fuser120
Transfer Belts
Item iSys Part Number
Transfer Belt WL1-Belt
Waste Bottle
Item iSys Part Number
Case of 12 WL1-WBT
2
Page 5

Safety Information
120-Volt Models
Your iSys product has been carefully designed to give you years of safe, reliable performance. As with all electrical equipment,
there are a few basic precautions you should take to avoid hurting yourself or damaging the product.
• Carefully read the provided setup and operating instructions.
• Save all provided documentation for future reference.
• Read and follow all warning and instruction labels on the product itself.
• Unplug the product before you clean it. Use only a damp cloth; do not use liquid or aerosol cleaners.
• Place your product on a firm, solid surface. If you put it on something unsteady, it may fall and be damaged. If you place it on
a soft surface, such as a rug, sofa, or cushion, the vents may be blocked, causing the product to overheat.
• Protect your product from overheating. Make sure no obstructions block the openings of the product. Do not put the product
on or near a heat source (such as a radiator or heat register). Keep the product out of direct sunlight.
• Always use this product in a well ventilated area. Allow enough room around the product for adequate ventilation and easy
access to the paper trays. If you put the product in any kind of enclosure, make sure the enclosure is well ventilated.
• Do not use your product near water. Do not spill liquid of any kind into it.
• Be certain that your power source matches the rating listed on the back of the product. If you are not sure, check with your
dealer or with your local power company.
• Do not connect this product to an uninterruptible power supply (UPS).
• Your product has a grounded, three-prong plug as a safety feature. This plug only fits into a grounded outlet. If the plug does
not fit, the outlet may be an older, non-grounded type. Contact an electrician to have the outlet replaced. Do not use an
adapter to defeat the grounding.
• Install the product near an easily accessed power outlet.
• Avoid damaging the power cord. Do not put anything on it or place it where it will be walked on. If the cord becomes damaged
or frayed, replace it immediately.
• If you are using an extension cord or power strip with the product, make sure that the total of the amperes required by all the
equipment on the extension is less than the extension’s rating. The total ratings of all equipment plugged into the outlet
should not exceed 15 amperes.
• Do not poke anything into the ventilation slots of the product. You could get an electrical shock or cause hazardous electrical
arcing, which could cause a fire.
• Aside from the routine maintenance described in the documentation, do not try to service the product yourself. Removing the
cover may expose you to shocks or other hazards.
• Do not make any adjustments other than those outlined in the documentation. You may cause damage that will require
extensive repair work. The provided documentation explains how to get your product serviced by qualified iSys technicians. If
anything happens that indicates that your product is not working properly or has been damaged, unplug it immediately and
follow the procedures in the provided documentation for having your product serviced.
• Here are some of the things to look for.
• The power cord or plug is frayed or damaged.
• Liquid has been spilled into the product, or the product has been exposed to water.
• The product has been dropped, or the cabinet is damaged.
• The product does not function normally when you are following the operating instructions.
220/240-Volt Models
This product has been carefully designed to give years of safe, reliable performance. As with all electrical equipment, however,
there are a few basic precautions that should be taken to avoid injury or damage:
Ensure this and all other documentation is both read carefully and retained for future reference.
Ensure all warning and instruction labels on the product are read, understood and followed in order to prevent any
risk of injury.
This product may be heavy. Please check the weight of the product and take all necessary precautions to prevent
the risk of personal injury.
The product must be placed on a flat solid surface strong enough to support its weight to prevent any risk of injury.
Ensure that there is adequate ventilation all around the product to prevent overheating and any risk of fire.
Keep the product away from direct heat sources such as radiators and out of direct sunlight to prevent any risk of
overheating.
The power supply required for this product is 220-240 VAC, 50/60 Hz. (For any DC powered product, the figures are
9.6- 31.2VDC, 4-1.8A.) Refer to your product’s rating label on the machine for full power rating details. Ensure that
3
Page 6

you have a suitable power supply before connecting the product. If in doubt contact your dealer or check with your
local power provider.
Ensure both the product and mains power switches are in the OFF position before connecting the AC power cable.
Do not connect or disconnect the power plug with a wet hand as this may cause electric shock.
Always hold the power plug to connect/disconnect the power cable to/from the mains socket. Unplugging by pulling
on the cable can cause fraying and may lead to fire or electric shock.
This product has an earthed plug as a safety feature and will only connect to an earthed socket. Do not attempt to
defeat the earthing or there is a risk of fire or shock.
If using an extension cable or power strip ensure that the total current rating (amperes) of all connected equipment is
less than the maximum rating of the extension cable, power strip or wall outlet. If the product is already supplied with
a fitted power strip then no additional power strip or extension cable should be used to connect to the mains wall
outlet. Otherwise, fire or shock may occur.
Ensure the power cable is routed so as not to be damaged or cause a trip hazard. If the cable becomes frayed or
damaged replace it immediately to prevent any risk of shock.
Do not twist, constrict or knot the power cable as this can cause overheating which may lead to fire or electric shock.
Ensure the power socket to which the product is connected is easily accessible at all times and not obstructed.
Use only the power cable supplied. Using a power cable not intended for this product may lead to fire or electric
shock.
To avoid risk of fire and electric shock, do not use the power cable supplied with this product for any other electrical
equipment.
If you do not connect the power cord or any other cables only as directed in the User’s Guide, this may result in a
fire.
It is recommended that the machine is switched off prior to opening covers; otherwise there is a risk of electric
shock.
When the product cover is open, do not touch the fuser unit or print head as you may receive burns. Allow it to cool
before touching.
If the product casing gets extremely hot or smoke, unusual smells or abnormal noises are emitted from the product,
there is a risk of fire. Unplug the mains connector and contact your iSys.
If the product has been knocked over or damaged, there is a risk of electric shock, fire and/or injury. Unplug the
mains connector and contact iSys.
If any liquid (for example water) is allowed to enter the product, there is a risk of fire. Unplug the mains connector
and contact your iSys.
Do not place containers containing liquid on the product as electric shock, fire and/or injuries may occur.
If any foreign objects (for example clips) are allowed to enter the product, there is a risk of electric shock, fire and/or
injury. Unplug the mains connector before removing the object.
Do not introduce foreign objects into the ventilation holes or operate this product with any covers open or doors
removed as electric shock, fire and/or injuries may occur.
Do not use an extremely flammable spray near the product as the product contains high temperature parts that may
cause a fire.
Switch the product off before cleaning to prevent any risk of injury. Clean using a damp cloth. Do not use liquid or
aerosol cleaners.
Ensure loose clothing and hair is kept clear of moving parts when the product is in operation to prevent possible risk
of injury.
Do not carry out any operations on the product that are not specified in the User’s Guide. This may result in electric
shock, fire and/or injury.
Do not touch the battery if one is fitted to the product. There is a risk of explosion if the battery is replaced by an
incorrect type. The product battery should not require replacement during the life of the product.
Do not throw toner cartridges or image drum cartridges into a fire as you may receive burns from a dust explosion.
After installing additional memory, hard disk drive, or any other internally fitted option, any covers removed or doors
opened must be closed or replaced and secured to prevent risk of fire.
The acoustic noise of this product is less than 70 dB (A) as measured in accordance with EN ISO 7779.
The operating condition range for your product is: 10 to 32°C and 20 to 80% RH. Operation of the product outside
this range could result in damage to the product.
If a scanner, finisher etc. is fitted, exercise care when moving these items so as to avoid risk of entrapment or
personal injury.
If the product is installed on a cabinet or high capacity feeder, ensure wheel locks are applied once placed in final
position for use, to prevent risk of movement or injury.
4
Page 7

Unpacking and Installation
Check components:
(1) Printer, (2) Light-shield bags, paper tray media labels, LED lens cleaning pad, (3) Power Cable, (4) Ferrite Core, (5) CD
(includes User Guide, warranties, and Drivers), (6) Toner Cartridges.
STEP 1 STEP 2
Choose a location for your printer Lift printer and place on the cart
NOTE: See page 13 for instructions on how to properly
place the printer on the cart.
STEP 3 STEP 4
Remove any shipping tape. Lift the top cover.
STEP 5
1. Lift the operator panel (a), open front cover (b), remove tape (c)
2. Close the front cover and adjust the operator panel (d).
5
Page 8

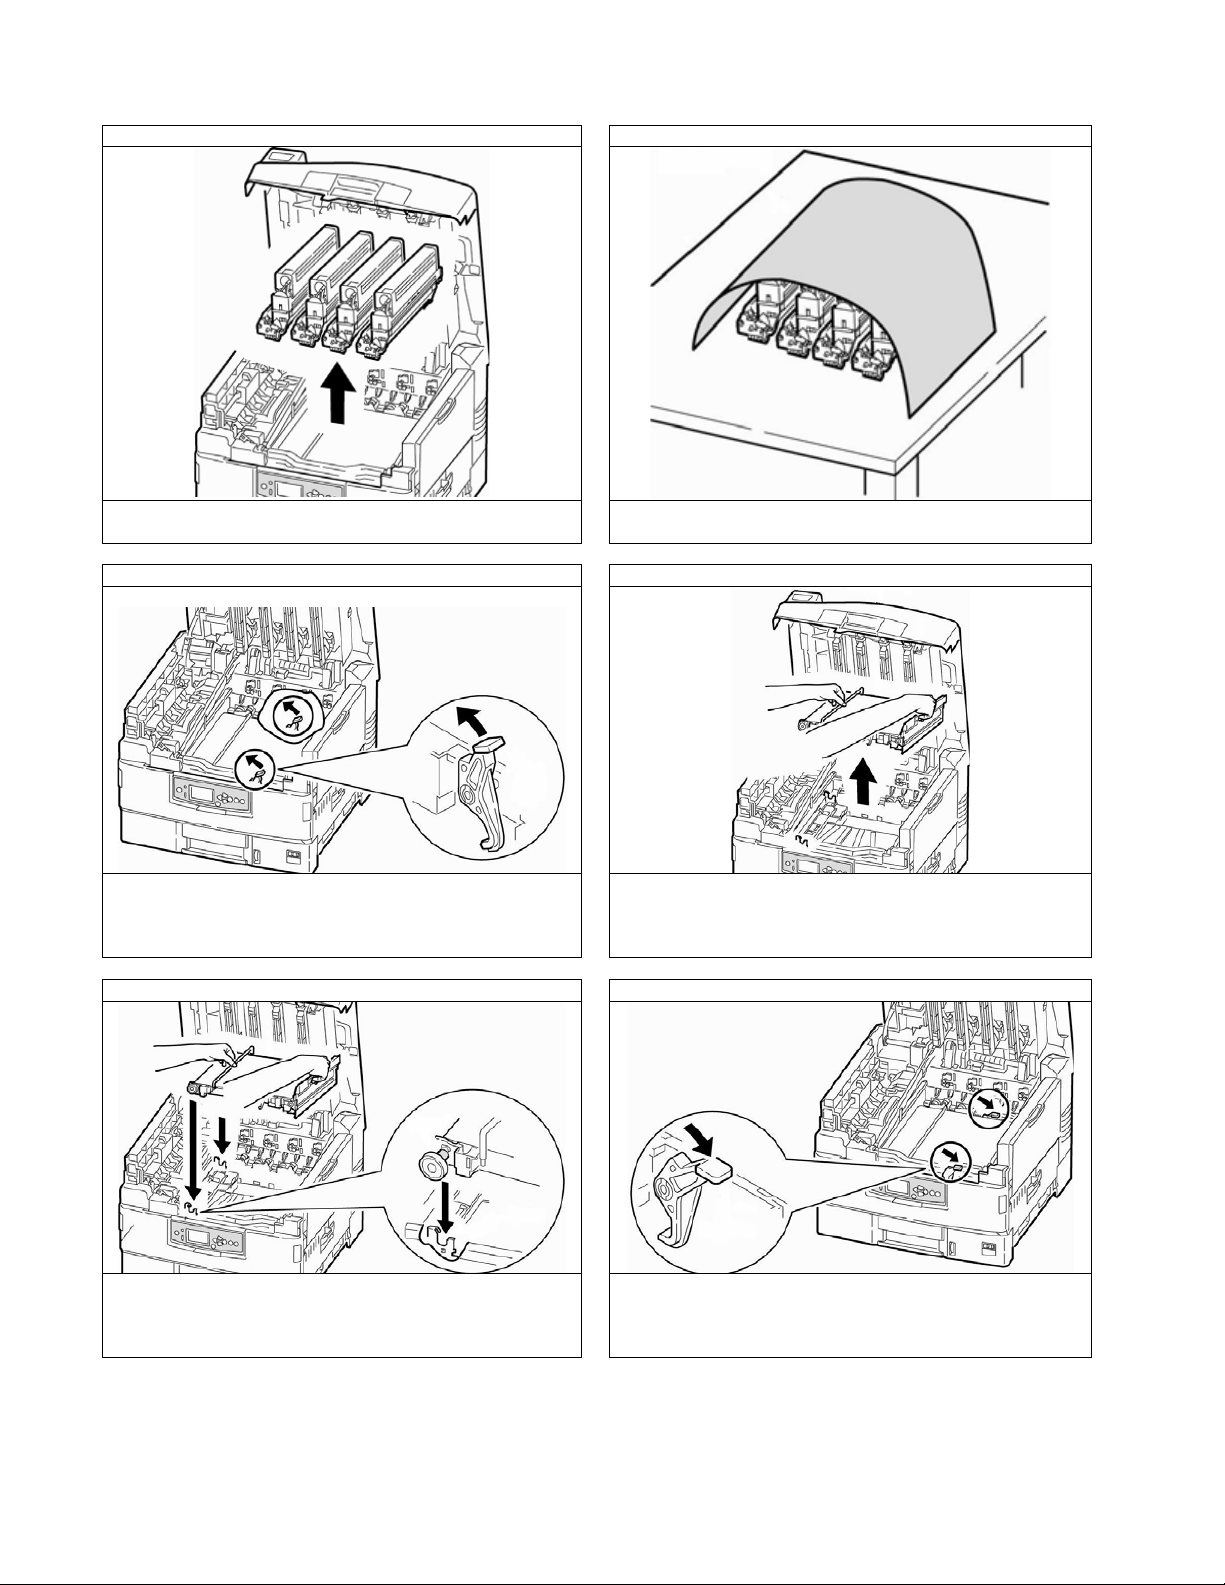
STEP 6 STEP 7
Remove colored image drum packing pieces. Remove tape
STEP 8 STEP 9
Remove protective sheet 1. Remove colored locks (b).
2. Remove tape then remove colored seals (a).
NOTE: Be sure all tape is removed from image drum
cartridges.
STEP 10 STEP 11
1. Shake toner cartridge from side to side to distribute
toner (a).
2. Remove sealing tape from toner cartridge bottom (b).
Align the notch on the end of the toner cartridge with the
tab (a) in the image drum, and then lower the toner
cartridge into the image drum. Press down to make sure
it is seated correctly.
6
Page 9

STEP 12 STEP 13
1. Lock toner cartridge with colored lever.
2. Repeat these steps for remaining toner cartridges.
STEP 14 STEP 15
1. Pull out the paper tray (a).
2. Remove the colored shipping retainer (b).
3. Insert the appropriate media size label (c). This is
helpful if optional trays are installed.
STEP 16 STEP 17
Close the top cover.
Load paper.
1. Set guides (a, b) to paper size. Make sure the paper
guides are snug against the paper.
2. Close the paper tray (c).
Install the paper catcher.
1. Lift cover where paper catcher is placed.
2. Align tabs on catcher in notches on printer.
3. Press down until catcher is fully seated.
7
Page 10
STEP 18 STEP 19
1. Insert the power cable.
2. Turn the printer ON.
In order to reduce electromagnetic interference—”noise”
that interferes with TVs or other appliances—you must
place the included ferrite core on the network cable.
1. Loop the cable as shown placing the core about 1 inch
from the connector on the printer end. Note: The network
cable is not provided.
2. Connect the network cable between the printer and
the Ethernet hub or router. Install the parallel cable if
used.
Note: Install the printer software BEFORE connecting the
USB cable.
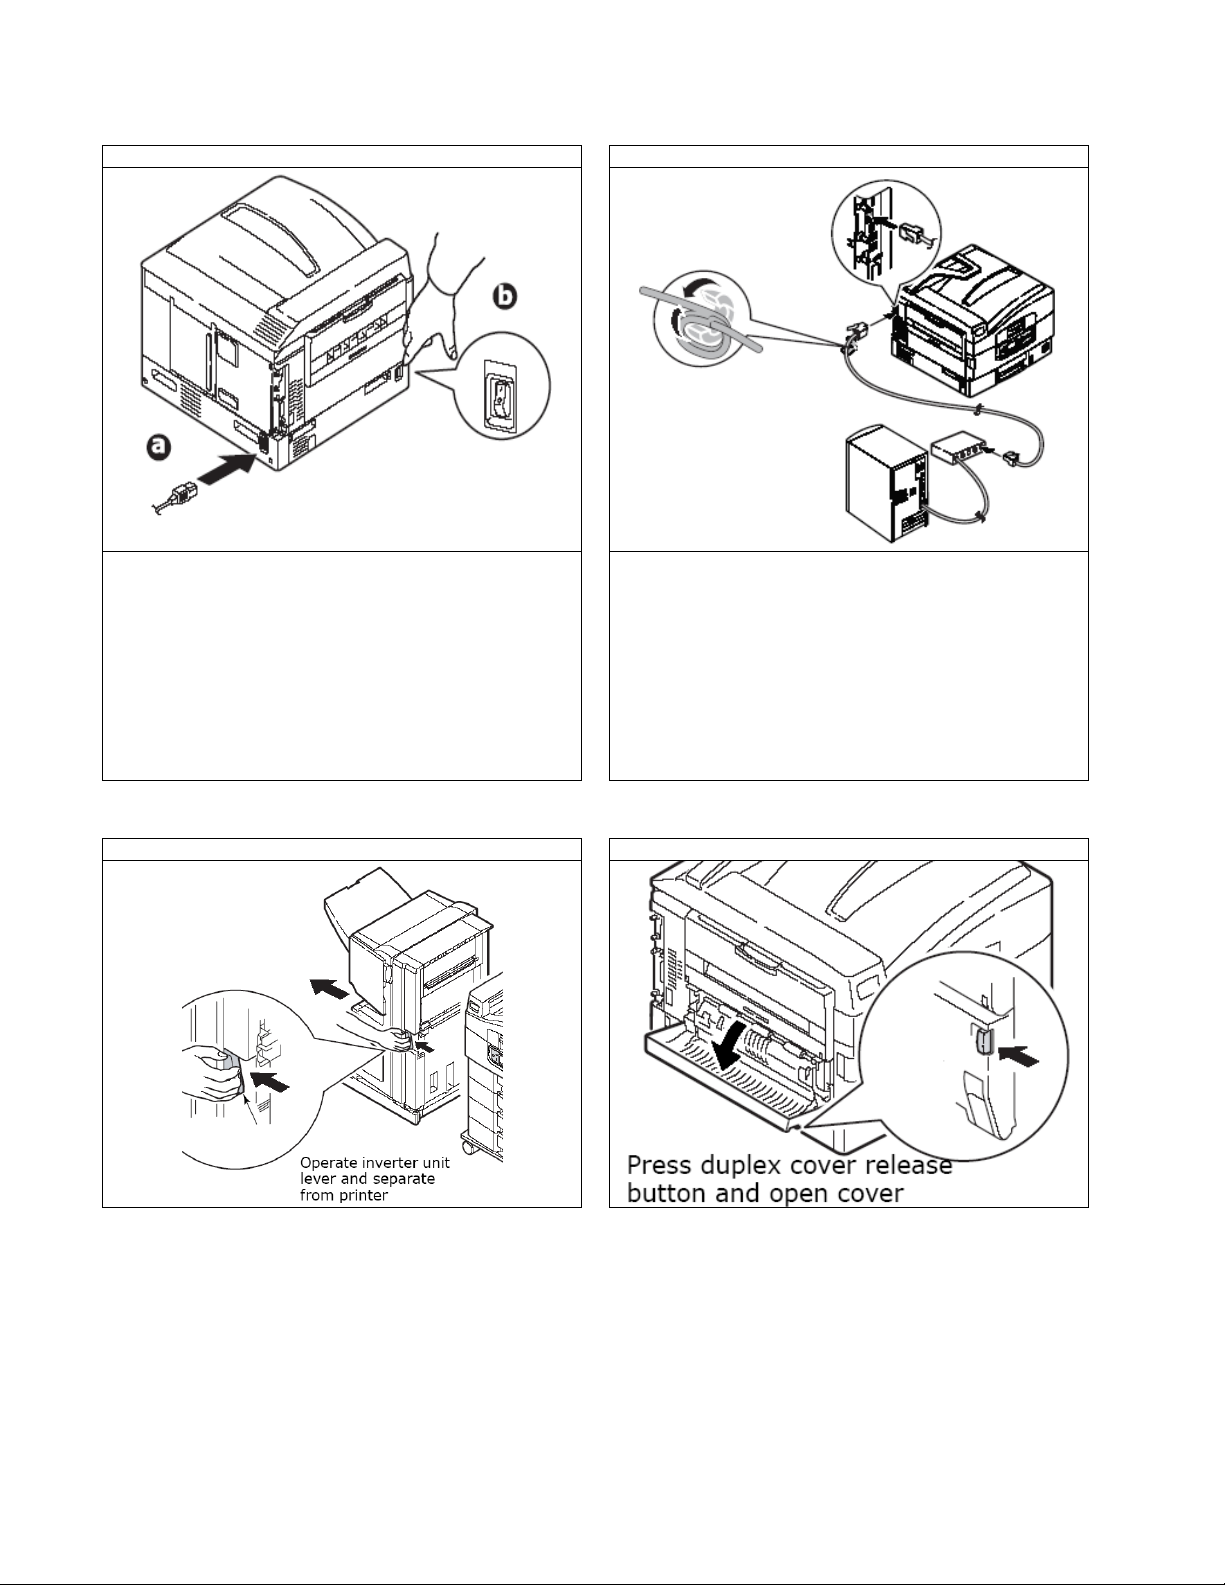
Duplexer
STEP 1 STEP 2
8
Page 11
STEP 3 STEP 4
STEP 5 STEP 6
STEP 7 STEP 8
STEP 9 STEP 10
9
Page 12

Replacing the Fuser
STEP 1 STEP 2
CAUTION: The Fuser may be hot.
Lift the Blue tab up to unlock the fuser.
Using the handle, gently Lift the fuser out of the printer
Replacing the Transfer Belt
STEP 1 STEP 2
Turn off the printer.
NOTE: If the hard disk drive is installed in your printer,
press the SHUTDOWN/RESTART button for several
seconds before turning the printer off.
Open the top cover.
CAUTION: The fuser is very HOT after the printer has
been printing. Be careful not to touch it!
10
Page 13
STEP 3 STEP 4
Remove the four image drums/toner cartridge units and
place them on a flat surface.
STEP 5 STEP 6
Cover them with dark paper or plastic to protect them
from light.
Lift the transfer belt latches to release them. Grasp the blue handles and lift the transfer belt out.
Dispose of it in accordance with local regulations.
WARNING: Do not incinerate the used transfer belt. It
may explode and cause a fire hazard.
STEP 7 STEP 8
Unpack the new transfer belt, grasp the blue handles and
lower the left side of the belt into the printer, fitting the
pins into the guides at the front and back, then lower the
right side.
Push down on the belt latches to lock the new belt in
place.
11
Page 14

STEP 9 STEP 10
Put the image drum/toner cartridge units back into the
printer.
1. Close the top cover.
2. Turn the Printer on.
Replacing the Waste Toner Bottle
STEP 1 STEP 2
Open the door and remove the waste toner bottle. Follow the instructions on the label to ensure proper
disposal.
12
Page 15

Loading the printer on the feeder
STEP 1
To properly align the pins with the printer, align the printer flush
with the back and left sides of the cart. Place the printer down
level on the cart.
13
Page 16

Loading Paper into the Cart
STEP 1 STEP 2
The image above shows the black sliders
Set the black sliders to the correct paper width. In the cart menu, under Media Management, select the
correct paper size. The paper guide will automatically
change its position to the correct paper size. You may
manually change paper size in the guide menu. It is optimal
to leave 1/32” on each side between the paper and the
guide.
STEP 3 STEP 4
Place the box into the printer. Ensure that the iMark is
located at the back and left side of the box.
NOTE: To ensure that the paper feeds smoothly we
recommend that the box fold adjacent to the orange feed
roller is removed.
Feed the paper over the guide.
14
Page 17

STEP 5 STEP 6
Gently pull the paper downwards and feed the paper
underneath the orange roller.
STEP 7 STEP 8
Open the Plexiglas paper loading door , and remove the
top piece of fanfold paper at the perforation, place the
paper three quarters of the way up the path so that the
paper has covered the paper sensors completely. Close
the red guides on the each side of the paper and close the
bottom guide. Close the Plexiglas paper loading door.
Take up the tension on the paper by gently pulling it
downwards. Ensure that the paper tension is even on
both sides. Be careful not to pull the paper out
completely.
While taking up the tension on the paper close the guide.
15
Page 18

STEP 9 STEP 10
To load the paper, press the load button
on the cart menu
STEP 11
Close both of the cart doors. The printer will not print until
all doors are closed and the cart menu displays idle. Do
Not open any printer doors while printing.
Open the cutter door and while using caution, carefully
remove the piece of cut paper. Close the cutter door
CAUTION: Do not place hands inside machine while
printing. Keep hands away from the cutter blade.
Cart Menu Summary
Changing Menu Settings
1. To use the Menu you must first press offline.
2. Press Menu (far right button). Use the Arrow buttons to move up & down through menu items. Press Select
3. To choose a selection – press Select – you will see a pointer on the left margin that will blink. Press up or down arrow to
change options. Press Deselect to save changes (blinking will stop)
4. To Exit – scroll down to exit, then select.
**If at any time you need to re-boot the printer without turning the unit on and off by the rear power switch, press and hold the
middle button for >2 seconds. Printer will go into soft power off mode. Press middle button again (holding for >2 seconds) and
printer will perform reboot sequence.
16
Page 19

Menu Options
Media Management
Media Type – Selecting this allows you to change the media type. You may choose from 6 options:
Media Type 1. Media Size: 8.50" W x 6.25" L
Media Weight: Light
Media TOF: Bottom
Media Type 2. Media Size: 8.75" W x 6.25" L
Media Weight: Light
Media TOF: Bottom
Media Type 3. Media Size: 9.00" W x 6.25" L
Media Weight: Light
Media TOF: Bottom
Media Type 4. Media Size: 12.00" W x 8.50" L
Media Weight: Light
Media TOF: Bottom
Media Type 5. Media Size: 12.50" W x 8.50" L
Media Weight: Light
Media TOF: Bottom
Media Type 6. Media Size: 12.90" W x 8.50" L
Media Weight: Light
Media TOF: Bottom
17
Page 20

Adjustments
TOF Sensor – allows you to adjust the sensor when troubleshooting. Your printer has been configured at the factory to sense low
black density I-marks, so adjustment is not normally required. If you feel you need to make adjustments to the sensor, please
contact an iSys certified technician and you will be walked through the process.
CAUTION: Careful consideration must be taken when you are to make these changes.
Control Panel
LCD Contrast – Allows you to select from 1 – 8 the contrast of the lighting on your display. Different environmental operating
conditions may require this setting to be adjusted.
Sound Options – Allows you to set your error sounds by time (30 sec, 5 sec, or Off). When sound audible is active, press any front
panel key and beeping will stop.
Firmware Upgrade
This allows you to upload a firmware file, provided by iSys - The Imaging Systems Group Inc., from your host computer. (Options
are Upload File – Yes/No)
Instructions and new firmware will be posted on the website: www.isys-group.com. You will normally be notified by iSys - The
Imaging Systems Group Inc. if updating is required.
18
Page 21

Printer Menu Summary
Configuration
• Page Count, Supplies Life
• Network and System Settings, etc.
Print Secure Job (Password Protected)
Appears only if the Hard Disk Drive (HDD)
• Print out confidential documents downloaded to the
HDD
Admin Setup (Password Protected)
• Various Network Setups
• Print Setup
• PS and PCL Setups
• IBM and Epson Setups
• Color Setup
• Memory and Flash Memory Setups
• HDD and System Setups
• Reset/Save/Restore Settings
Print Statistics (Password Protected)
Using the Printer Menu
Changing Settings
Print Information
• Printer & Network Configurations
• Print Demo Page
•Lists, etc.
Menus
• Set the size, weight and type of media for the
various feed trays
Calibration
• Density adjustments
• Registration
• Color tuning
NOTE: The default Password is 0000.
The steps involved in using the menus are typically as follows:
1. Ensure that the display panel indicates that the printer is ready to print.
2. Enter User menu mode by pressing either the Enter button or the Up-arrow or Down-arrow button and press the
latter two repeatedly until the desired menu is highlighted in the displayed list.
3. Press the Enter button to select this menu.
4. Press the Up-arrow or Down-arrow buttons repeatedly until the desired Item is highlighted.
5. Press the Enter button to select this Item.
6. Press the Up-arrow or Down-arrow buttons repeatedly until the desired Value is highlighted.
7. Press the Enter button to select this Value. (If you are setting a parameter, ensure that an asterisk (*) appears
beside the selected parameter Value.)
8. Press the Online button to exit menu mode and return to the ready to print status. Refer to the section entitled
“Getting started” on page 41 and “Appendix B – Menu system” on page 107 for examples of using the menus.
Buttons and Lights
• Shutdown/Restart button Hold down for more than 2 seconds for a soft shutdown. You can then press this
button again for a restart or use the Power switch to turn off the printer completely.
• Ready light On: indicates ready to print Flashing: indicates processing print data Off: indicates unable to receive
data (offline)
• Attention light Off: indicates normal operation Flashing: indicates error(s) present but printing can continue On:
indicates error(s) present and printing cannot continue
• Display panel Displays status and setup information for the printer and user help information in your chosen
language
• Up-arrow button Enters menu mode and enables upward movement through the displayed list of menu items
19
Page 22

• Down-arrow button Enters menu mode and enables downward movement through the displayed list of menu
items
• Back button Returns to the previous higher level menu item
• Enter button Enters menu mode and selects the menu item highlighted in the display panel
• Online button Switches between online (printer ready to receive data) and offline (printer not ready to receive
data)
• Cancel button Cancels current print job
• Help button Provides additional textual or image data to supplement what is displayed on the display panel
Display Panel Messages
MESSAGE COMMENT
Ready to Print Your printer is online and ready to print.
Printing tttttt Your printer is printing and paper is currently being fed from tttttt, where tttttt identifies
a tray.
tttttt Near End The paper supply in the tray identified by tttttt will run out soon.
cccccc Toner Low The remaining toner of color cccccc is running low.
Fuser Unit Near Life The fuser unit is nearing the end of its working life. Change Fuser Unit The fuser unit
has reached the end of its working life and has to be changed.
Inverter is Removed The Inverter unit has been separated from the printer and all Finisher functions are
disabled. (Finisher/Inverter is an optional accessory.)
Invalid Data
Press ONLINE Button
Change Paper in tttttt
mmmmmm
pppppp
Press ONLINE button
Please see HELP for details
Install Paper tttttt
mmmmmm
Please see HELP for details
Install Tray tttttt The printer has tried to take paper from a tray that has been removed. Ensure that
Open Cover Paper Remains
tttttt
Please see HELP for details
Check Image Drum
cccccc
Please see HELP for details
Invalid data has been received by the printer. Press the ONLINE button to clear this
warning.
There is a mismatch between the media in the tray and print data. Load media of size
mmmmmm and type pppppp into tray tttttt. The message may remain for some time
after you have closed the tray. You can have the printer ignore this error for the
current print job by pressing the ONLINE button. You can access help details by
pressing the HELP button.
The printer has tried to take paper from an empty tray. Load media of size mmmmmm
into tray tttttt. The message may remain for some time after you have closed the tray.
You can access help details by pressing the HELP button.
tray tttttt is correctly located or put tray tttttt loaded with paper back into the printer.
Additional paper has been detected after a paper jam has been cleared. Open tttttt
side cover to check for additional paper. You can access help details by pressing the
HELP button.
Check that the image drum of color cccccc is correctly installed. You can access help
details by pressing the HELP button.
Menu (Functions) Information
There are four types of display panel message:
• Status information
• Menu (functions) information
• Configuration information
• Help information
Status Information
Status information is associated with three printer states:
• In the Information state, such as idling or printing, the printer is able to process print jobs.
• In the Warning state, the printer has encountered some minor problem but is still able to process print jobs.
• In the Error state, the printer has encountered a problem and cannot continue printing until the user has
intervened and removed the cause of the trouble.
The top two lines of the display panel show the printer status. The bottom of the display panel normally shows a bar
chart of the toner usage.
Menu (Functions) Information
There are three types of menu (functions) information:
• User menus: accessed by pressing the Enter button, Up-arrow or Down-arrow button on the control panel.
These menus are available to the general user to make various settings that are used in the running of the
printer.
20
Page 23

• Administrator menu: accessed by pressing the Enter button for more than 2 seconds while turning on the printer
power supply (including Restart). Available to administrator level users. Restricts the changes that general users
can make via the user menus.
• System maintenance menu: accessed by pressing the Up-arrow and Down-arrow buttons together for more
than 2 seconds while turning on the printer power supply (including Restart). Available to support staff to allow
printer configurations and special functions to be set.
Configuration Information
Configuration information displays printer configuration information such as internal firmware versions.
Menu options at each level can be scrolled through by moving the highlight with the Up-arrow/Down-arrow buttons
and a highlighted option at that level can be selected by pressing the Enter button. When the lowest level menu has
been selected, you can change the setting for that menu by selecting the required highlighted value from a list or by
entering a numeric value. In other cases, you can display or print configuration information.
Help Mode
When an error has occurred, press the Help button. Information displays that will help you correct the error.
Changing Paper (Media) Settings
Wrong media settings can cause:
• Poor quality printing
• Flaking
• Damage to the printer
Media Weight
The default media weight setting for all trays is AUTO.
Individual Print Jobs
If you are using special media for only one print job, you can adjust the media settings in the driver. Load the media in
the appropriate tray (usually the MP tray). In your application, click File → Print and adjust the media settings as
necessary.
All Print Jobs (Defaults)
1. Press Enter.
2. key → Menus. Press Enter.
3. With Tray Configuration highlighted, press Enter.
4. key → tray to be configured. Press Enter.
5. Use the and Enter keys to scroll through the submenus and to make your setting changes.
6. Press ON LINE to exit the Menu Mode.
Reset to Factory Defaults
1. Press Enter.
2. Use the key to scroll down to Admin Setup. Press Enter. Enter Password appears
3. Use the ∆ and keys to set the first digit in the password. Press Enter.
NOTE: The default Password is 0000.
4. Repeat the previous step until all four digits of the password are entered.
5. Press Enter.
6. key → Settings. Press Enter.
7. Highlight Reset Settings. Press Enter.
8. Press Enter. The printer resets and goes back to the Ready to Print state.
21
Page 24

Maintenance
Cleaning the LED Heads
Clean the LED heads:
• Any time you replace a toner cartridge
• If printing is showing signs of faded images, white stripes or blurred letters
STEP 1 STEP 2
Open the top cover.
Use the LED cleaner provided with the toner cartridges
or a soft, lint-free cloth to gently wipe each of the four
heads (1). Move the cleaner as shown, using a fresh
section for each pass. Be careful not to damage the
guards (2). When finished, close the top cover.
Cleaning the Paper Tray Feed Rollers
STEP 1 STEP 2
Remove items such as wrist watches or bracelets so
they do not catch in the mechanism.
STEP 3 STEP 4
If a hard disk drive is installed in the printer, press and
hold the Shutdown/Reset button on the control panel
for 3 seconds and wait for the display to tell you it is
okay to turn off the printer. Otherwise go to the next
step.
Turn the printer off.
STEP 5 STEP 6
Open Tray 1 side cover and pull out the paper guide
plate.
22
Page 25

Remove Tray 1 from the printer. Gaining access through the gap left by Tray 1, wipe the
3 paper feed rollers (2) with a soft cloth lightly
moistened with water.
STEP 7 STEP 8
Replace Tray 1. Return the paper guide plate to its original position and
close Tray 1 side cover.
STEP 9
Turn on the printer.
Error Messages
Help Button
Your printer has a built-in help system. When an error message appears on the display, press HELP. The display
shows information that will help you correct the error. Use the key to move down through the Help information.
Cart Menu Error Messages
23
Page 26

Errors 1 to 9 – Emergency Stop, Control PCB Internal Errors
If the cart menu displays errors 10 to 19 ensure that all doors on the cart are closed completely and ensure that the
media is loaded into the printer correctly also ensure that the media is located under the media sensors. If the cart
menu continues to display this error, remove all media and reboot the printer.
Errors 10 to 19 – Media load, unload, and feed errors
If the cart menu displays errors 10 to 19 check the media path and ensure that the media is loaded into the printer
correctly also ensure that the media is located under the media sensors. If the cart menu continues to display this
error, remove all media and reboot the printer.
Errors 20 to 29 – Swing Errors
If the cart menu displays errors 20 to 29 check the media path and ensure that the media is loaded into the printer
correctly also ensure that the media is located under the media sensors. If the cart menu continues to display this
error, remove all media and reboot the printer.
Errors 30 to 39 – Cutter Errors
If the cart menu displays errors 30 to 39 check the media path and ensure that the media is loaded into the printer
correctly. If the cart menu continues to display this error, reload the media and ensure all the proper settings have
been set.
If you still receive an error message please contact iSys Service Support by phone 1-866-415-4797, or by email
support@isys-group.com.
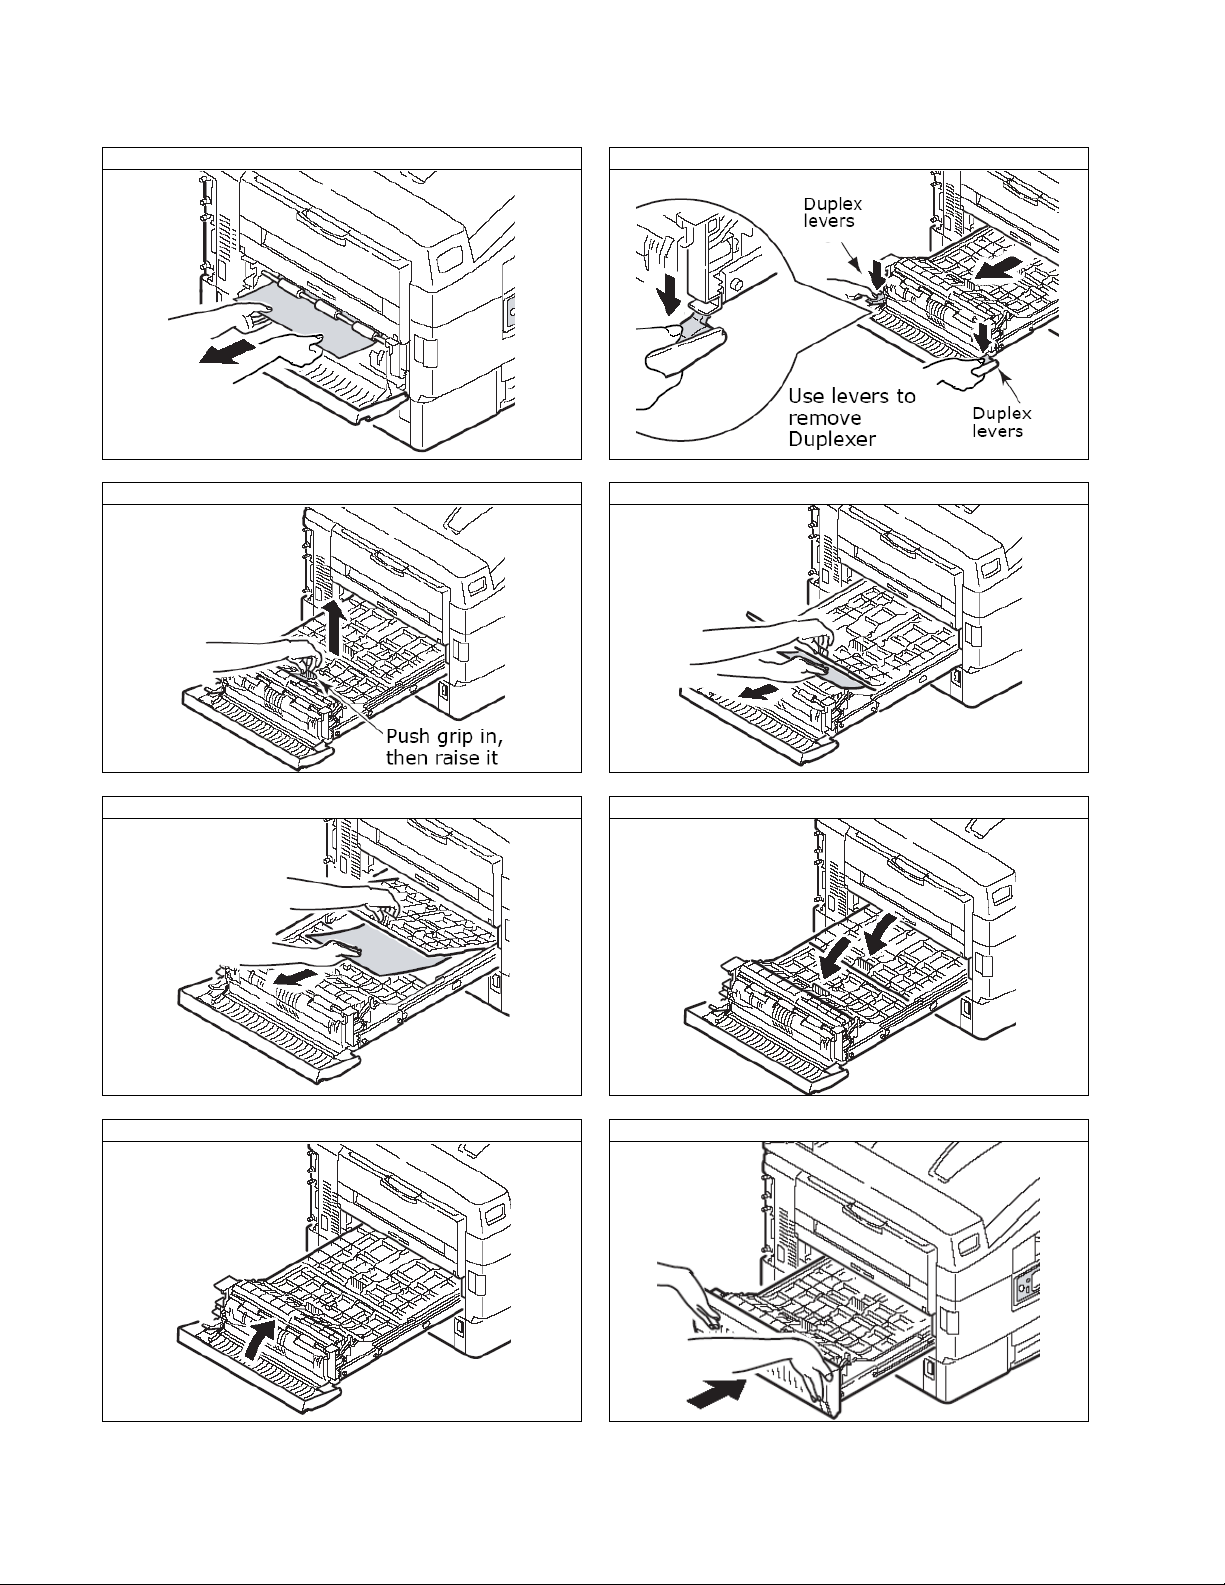
Paper Jams
If you are experiencing frequent paper jams, check the following items.
• Is the printer level?
• Is the media you are using within specification? Media that is too light or too heavy will often cause jams.
• Are the settings (printer and driver) appropriate for the media being used?
• Do not use creased or curled media.
• Remove the media from the tray. Fan and align the stack. Replace the media.
• Clean the feed rollers (see page 22).
Tray Side Cover
STEP 1 STEP 2
24
Page 27

STEP 3 STEP 4
Printer Side Cover
STEP 1 STEP 2
STEP 3 STEP 4
25
Page 28

Printer Top Cover
STEP 1 STEP 2
WARNING: Be careful not to touch the fuser unit
which may be hot after printing. If the fuser unit is hot,
wait until it cools before attempting to remove any
jammed paper.
STEP 3 STEP 4
STEP 5 STEP 6
26
Page 29

STEP 7 STEP 8
STEP 9 STEP 10
STEP 11
Avoiding Paper Jams
The following table summarizes possible causes of paper jams and suggests ways of avoiding them.
POSSIBLE CAUSE SUGGESTED REMEDY
The printer is not level. Place the printer on a steady, level surface.
Your print media is too light or too heavy. Use appropriate media
Your print media is damp or charged with static
electricity.
Use media that has been stored in appropriate temperature and
humidity conditions.
27
Page 30

Your print media is creased or curled. Use appropriate media. Decurled media can be used.
Your print media sheets are not aligned with
each other.
Y our print media is not aligned properly in the
paper tray.
Remove the sheets, jog them into alignment and reload them.
Adjust the paper stop and paper guides of the tray, or the
manual feed guide on the MP Tray to align the media properly.
Dealing with Unsatisfactory Printing
SYMPTOMS POSSIBLE CAUSES STEPS TO TAKE
Vertical white lines
can be seen on the
printed page.
Printed images are
fading vertically.
Printing is light. The toner cartridge is not
Partially faded
images. White
spots and lines
appear in solid
printing.
Vertical lines
appear.
Horizontal Lines
and spots appear
periodically.
White area of paper
is lightly stained.
Periphery of the
letters is smudged.
Toner comes off
when it is rubbed.
Glossiness is not
uniform.
The LED head is dirty. Wipe the LED head with a LED lens cleaner or with a soft
cloth.
The toner is low. Replace the toner cartridge.
Foreign materials may be
present in the image drum.
Light-shielding film of the
image drum cartridge is dirty.
The LED head is dirty. Wipe the LED head with a LED lens cleaner or with a soft
The toner is low. Replace the toner cartridge.
The paper is not suitable for
the printer.
properly seated
The toner is low. Replace the toner cartridge.
The paper is moist. Use paper stored in proper temperature and humidity
The paper is not suitable for
the printer.
Thickness and type of paper
are inappropriate.
Paper is moist or dry Use paper stored in proper temperature and humidity
The image drum cartridge is
damaged.
The toner is low. Replace the toner cartridge.
When the interval is about
94mm (4in), the image drum
(the green tube) is damaged
or dirty.
When the interval is about
42mm (1.5in), there may be
foreign particles in the image
drum cartridge.
When the interval is about
87mm (3.5in), the fuser unit
is damaged.
The image drum cartridge
has been exposed to light.
Paper contains static. Use paper stored in proper temperature and humidity
The toner is low. Replace the toner cartridge.
The LED head is dirty. Wipe the LED head with a LED lens cleaner or with a soft
The thickness and type of
the paper are incorrectly set.
The thickness and type of
the paper are incorrectly set.
Replace the image drum cartridge.
Wipe the film with a LED lens cleaner or with a soft cloth.
cloth.
Use recommended paper.
Reinstall the toner cartridge.
conditions
Use recommended paper.
Set a proper value for [Media Weight] and [Media Type] in
the menu setup, or set one value thicker for [Media Weight].
conditions
Replace the image drum cartridge.
Wipe it lightly with a soft cloth. Replace the image drum
cartridge when it is damaged.
Open/close the top cover, and print again.
Replace the fuser unit.
Replace the image drum cartridge if the problem is not
resolved.
conditions.
cloth.
Set the correct value of [Media Type] and [Media Weight] in
the menu setup or set one value thicker for [Media Weight].
Set the correct value of [Media Type] and [Media Weight] in
the menu setup or set one value thicker for [Media Weight].
28
Page 31

Interfaces
The iTerra TL1290 has three interface options, USB, Centronics, and network.
Network
1. Enter the printer Menu.
2. Scroll down to Admin Setup h Enter password aaaaaa (six lower case a’s) h Press Enter
3. Enter the Admin Setup menus h Enter the Network Setup menu
4. Scroll down to the IP Address menu h Press Enter h Enter in the IP address (Use the ‘UP’ ‘DOWN’ arrow keys
to choose the number. Hit Enter to move right to the next Column. Why an * (asterisk) symbol appears, the IP
address has been saved.
5. Hit Back to exit. Scroll down to the Subnet Mask menu h Hit Enter h Enter the Subnet Mask
6. Hit Back to exit. Scroll down to the Gateway Address menu h Hit Enter h Enter the Gateway Address
Driver Installation
STEP 1
Go to Windows Start h Settings h Printers and Faxes
29
Page 32

STEP 2
Select Add a Printer on the Left hand side of the window h Press Next
STEP 3
Welcome to the Add Printer Wizard h Press Next
30
Page 33

STEP 4
Select Local printer attached to this computer h Press Next
STEP 5
Select Create a new port: Type of port h Standard TCP/IP Port h Press Next
31
Page 34

STEP 6
Welcome to the Add Standard TCP/IP Printer Port Wizard h Press Next
STEP 7
Enter the printers IP Address into the box h Press Next
32
Page 35

STEP 8
Under Device Type h Select Standard h Generic Network Card h Press Next
STEP 9
Completing the Add Standard TCP/IP Printer Port Wizard h Press Finish
33
Page 36

STEP 10
Select Have Disk
STEP 11
Select Browse h Locate and select the TL1290 Driver h Press Ok h Press Next
34
Page 37

STEP 12
Select the iSys iTerra TL1290 Printer h Press Next
STEP 13
Enter the printer name h Select yes if you would like the iSys iTerra TL1290 to be your
default printer or no if you do not h Press Next
35
Page 38

STEP 14
Select a sharing option h Press Next
STEP 15
Enter a location and a comment h Press Next
36
Page 39

STEP 16
Select Yes or No to print a test page h press Next
STEP 17
Completing the Add Printer Wizard h press Finish
37
Page 40

STEP 18
If this message appears after installing the driver h Select Continue Anyway
Warnings and Precautions
Cutter Blade
TL1290 Printer Cart
38
Page 41

Printer and Feeder Cable
CAUTION:
(dis)connecting the cable between printer
and feeder. Failure to do so may result in
damage not covered under warranty. See
product manual for details.
Turn the printer off before
Features and Specifications
Printer Specifications
Plotter Carriage Width 12.9”
Maximum Plot Width 12.9”
Print Technology Color LED
Print Resolution 300 dpi or 600 dpi
Color Print Speed 4.75” per second
Consumables Fanfold Paper, Toners, Drums, Fusers, Transfer Belts, Waste Toner Container
Data Format PCL5
Connectivity Interfaces Standard - Centronics, USB 2.0, Network 10/100/1000 Base-T
Drivers Windows XP, Vista (32, 64 Bit Versions)
Warranty 6 Months
Power Requirements 120-Vac or 230-Vac, 50 - 60 Hz, 12 A
Dimensions & Weight 23.7” x 23.5” x 46.5” (60.2cm x 59.69cm x 118cm), 312lbs (142kg)
Operating Temperature 50°F to 89.6°F (10°C to 32°C)
Operating Humidity 20% to 60% RH non-condensing
Certifications FCC Class A, CE
Features
• While printing at 4.75” per second the iTerra TL1290 maintains its vibrant, wide spectrum color
• Easy to operate, fast learning curve
• Jobs consistently start on the correct fanfold sheet
• Nonstop imaging and high utilization rate
• Cuts between print jobs without operator intervention
• Produces many copies quickly
• Unattended operation
• Print 12.9” wide format well log prints
• Simple to use color LCD front operator panel
• High resolution and color provide an unbeatable image quality
• High speed data processing allows jobs to print fast
39
Page 42

Limitation of Liability
The Imaging Systems Group’s total liability to the purchaser, or to any third party, for damages from any and all
causes whatsoever, regardless of the form of action, whether in contract or in tort, including negligence, and any
infringement of proprietary rights or any misappropriation or unlawful use of any proprietary rights or property of any
third party shall, in the aggregate, be limited to purchase price actually paid by the purchaser for the product relating
to the damages. The limitation of liability provisions of this agreement reflect an informed voluntary allocation of the
risks (known and unknown) that may exist in connection with the provisions of the goods and services provided
hereunder by The Imaging Systems Group Inc., and that such voluntary risk allocation represents a fundamental part
of the agreement reached between The Imaging Systems Group Inc. and the purchaser.
The Imaging Systems Group Inc. shall not be liable for any special, direct or indirect, incidental, consequential,
exemplary, punitive or any similar or other damages of any nature suffered by the purchaser whatsoever including,
without limitation, loss of use or lack of availability of the purchaser facilities, including its computer resources and
any stored data, loss of profits or revenue, or other commercial loss, or any claim for contribution or indemnity in
respect of any claims against the purchaser, regardless of whether The Imaging Systems Group Inc. has been
advised of the possibility of such damages.
The Imaging Systems Group Inc.
911 28 Street NE
Calgary, Alberta, Canada
T2A 7X1
Phone: 1-403-204-5200
Fax: 1-403-204-1971
Toll Free: 1-866-415-4797
e-mail: support@isys-group.com
www.isys-group.com
40
Page 43

Material Safety Data Sheet
Emergency First Aid Procedures
Toner inhaled. Remove person to fresh air. If necessary, seek medical attention.
Toner swallowed (ingested) Never give anything by mouth to an unconscious person. If possible, rinse out mouth
and give several glasses of water to drink. If symptoms persist, seek medical attention.
Toner gets in the eyes. Flush eyes with large quantities of cool water for 15 minutes, keeping the eyelids open with
fingers. If necessary, seek medical attention.
Toner gets on the skin. Wash toner off the skin with plenty of cool water and soap. If necessary, seek medical
attention. Note: Small amounts of toner on skin or clothing can easily be removed with soap and cold water. Hot
water makes toner harder to remove.
Fire and Explosion Hazard Data
Minimal fire hazard. Large quantities may cause risk of dust explosion.
Flash Point (Method Used): Not applicable.
Flammable Limits
o Lower Explosive Limit: Not applicable.
o Upper Explosive Limit: Not applicable.
Auto-Ignition Temperature: Not applicable.
Explosion Data
o Sensitivity to Mechanical Impact: Not available.
o Sensitivity to Static Discharge: Not available.
Extinguishing Media: Water, foam or dry chemical.
Special Fire Fighting Procedures: Fight fire from upwind position. Avoid inhalation of smoke or gases. Wear self-
contained breathing apparatus. Cool the container with water spray.
Hazardous Combustion Products: Carbon monoxide. Also produces carbon dioxide.
Toxicological Properties
Routes of Entry: Inhalation, Ingestion, Eyes, Skin.
Effects of Acute Exposure: Not available.
Effects of Chronic Exposure: Not available. In a study in rats of chronic inhalation exposure to a typical toner, a
mild to moderate degree of lung fibrosis was observed in 92% of the rats in the high concentration (16 mg/m3)
exposure group. A minimal to mild degree of lung fibrosis was observed in 22% of the rats in the middle (4 mg/m3)
exposure group. No pulmonary change was reported in the lowest (1 mg/m3) exposure group, the most relevant level
to potential human exposures.
Exposure Limits (ACGIH TLV):
o Inhalable Particulates: 10 mg/m3Respirable Particulates: 3 mg/m3
Irritancy: Not available.
Sensitivity: Not available
41
Page 44

iTerra TL1290 Warranty
iSys - The Imaging Systems Group Inc. (iSys) warrants the TL1290 (Product) to be free from defects in materials and
workmanship and will remedy any such defect according to the terms of this Limited Warranty.
iSys warrants the Product to be free from defects in material and workmanship occurring under normal usage, within the
normal operating range and duty cycles specified. If the iSys Customer Service Representative Department receives
notice of such defects during the warranty period, iSys at its option, and within a reasonable time, will repair or replace
the defective Product. A certified iSys service representative shall perform repairs, and such repairs, at the option of
iSys, may be performed at the customer site, a dealer site, a service depot or the factory. Replacement Product, at the
option of iSys, may be either new or equivalent in performance to new. Delivery is defined by a signed and dated receipt
from the original carrier or iSys dealer delivering the Product, or down time for repair and replacement.
iSys does not warrant the operation of the Product to be uninterrupted or error free. iSys assumes no liability for and
holds itself harmless against any claims of consequential costs or damages which may arise from interruption or error in
the operation of the Product.
iSys does not warrant defects, malfunctions and/or failures, which in its opinion, result from conditions of improper use,
abuse, neglect, operation outside the published environmental specifications, improper site preparation and
maintenance, the use of unqualified or unauthorized media (papers, films, toners, inks, fusers or belts), inadequate
preventative maintenance, unauthorized modifications or unauthorized maintenance. Such conditions shall render this
warranty void and otherwise release iSys from its liability under this Product warranty. Consumables are non-warranty
items.
All product returned to factory must be accompanied by an RMA number, obtained by calling the iSys Service
Department at 403.204.5200. Shipping and handling charges to vendor for repair are the sole responsibility of the
customer. iSys will cover shipping charges on the return of the repaired unit for the term of the warranty as stated above.
Shipping will consist of Standard Shipment level or Best Effort. Accelerated or Premium Shipping Service is available but
costs will be fully born by customer. Any international duties and taxes payable on transporting the repaired unit across
international borders will be the responsibility of the customer. The TL1290 Printer is a Canadian made product and
therefore falls under the import/export laws of NAFTA.
A written receipt for the Product, showing the date of purchase, dealer’s name, and both the model and serial
number/PID’s of the Product must accompany any request or claim for work to be performed under this Limited
Warranty.
Additional information on obtaining service under this Limited Warranty or for obtaining Extended Warranty coverage
contact iSys – The Imaging Systems Group directly at 866.415.iSys (4797) or at 403.204.5200.
iSys will repair, or at its option replace, at no charge, any defective component(s) of the Product for 550,000 feet
or six months from the date of purchase (whichever comes first). This Limited Warranty extends to the original
purchaser only. This Limited Warranty does not extend to consumab le items.
TO THE EXTENT ALLOWED BY LOCAL LAW, THIS
WARRANTY IS EXCLUSIVE AND NO OTHER WARRANTY
OR CONDITION, WHETHER WRITTEN OR ORAL, IS
EXPRESSED OR IMPLIED AND THE IMAGING SYSTEMS
GROUP INC. SPECIFICALLY DISCLAIMS ANY IMPLIED
WARRANTIES INCLUDING, BUT NOT LIMITED TO,
WARRANTIES OF MERCHANTABILITY, FITNESS FOR A
PARTICULAR PURPOSE AND QUALITY SATISFACTION.
THE WARRANTY TERMS CONTAINED HEREIN, EXCEPT
TO THE EXTENT LAWFULLY PREMITTED, DO NOT
EXCLUDE, RESTRICT OR MODIFY AND ARE IN ADDITION
TO APPLICABLE STATUTORY RIGHTS. USE OF THE
PRODUCT CONSTITUTES ACCEPTANCE OF THIS
WARRANTY.
Corporate Headquarters:
iSys – The Imaging Systems Group Inc.
th
Street NE Calgary AB T2A 7X1
911-28
www.isys-group.com
1.866.415.iSys (4797)
42
 Loading...