

Page 1

iTerra Mi875
User Guide
Page 2

1. Table of Contents
1. Table of Contents ....................................................................................................................................................... 2
2. Limitation of Liability .................................................................................................................................................. 4
3. iTerra Mi875 Warranty ............................................................................................................................................... 5
4. Safety Information ...................................................................................................................................................... 6
5. iTerra Mi875 Front View ............................................................................................................................................. 9
iTerra Mi875 Top View ................................................................................................................................................. 10
Turn Around Latches .................................................................................................................................................... 11
iTerra Mi875 Peripherals .............................................................................................................................................. 12
6. iTerra Mi875 Rear View ............................................................................................................................................ 13
7. iTerra Mi875 Side View ............................................................................................................................................. 14
8. iTerra Mi875 Consumables ....................................................................................................................................... 15
9. Unpacking the Printer ............................................................................................................................................... 16
10. Loading Media ...................................................................................................................................................... 19
Paper Path .................................................................................................................................................................... 19
11. User Interface Panel ............................................................................................................................................. 21
Main Menu ................................................................................................................................................................... 21
Offline Main Menu ....................................................................................................................................................... 21
Interface Menu Page 1 ................................................................................................................................................. 22
Plot Control................................................................................................................................................................... 22
Printhead Maintenance ................................................................................................................................................ 23
Page 2 ........................................................................................................................................................................... 23
Adjustments ................................................................................................................................................................. 24
Diagnostics ................................................................................................................................................................... 24
Page 3 ........................................................................................................................................................................... 25
Control Panel ................................................................................................................................................................ 25
Network Settings .......................................................................................................................................................... 26
Network Configure ....................................................................................................................................................... 26
Printer Maintenance Menu .......................................................................................................................................... 27
Cleaning the Printheads ............................................................................................................................................ 27
Releasing the Printhead Latch .................................................................................................................................. 27
December 2011: Revision 001 2
Page 3

Getting Ready to Move the Printer........................................................................................................................... 27
Printer Adjustments and Information........................................................................................................................... 28
Adjustments ............................................................................................................................................................. 28
Warnings/Errors ....................................................................................................................................................... 28
Defaults .................................................................................................................................................................... 28
Network Configuration Menu ....................................................................................................................................... 28
Control Panel LCD Contrast ...................................................................................................................................... 28
Setting the IP Address ............................................................................................................................................... 29
Setting the Subnet Mask Address ............................................................................................................................ 29
Setting the Gateway Address ................................................................................................................................... 29
Applying Network Settings ....................................................................................................................................... 30
12. Common Display Panel Procedures ...................................................................................................................... 31
Printer Shutdown Menu ............................................................................................................................................... 31
Restarting the Printer after a Move .............................................................................................................................. 31
13. Toolbox ................................................................................................................................................................. 32
Main Screen Menu ....................................................................................................................................................... 33
User Interface ............................................................................................................................................................... 33
Diagnostics ................................................................................................................................................................... 34
Ink Usage ...................................................................................................................................................................... 34
Network Configuration ................................................................................................................................................. 35
Service Menus .............................................................................................................................................................. 35
14. Replacing Consumables ........................................................................................................................................ 36
Replacing Ink Cartridges ............................................................................................................................................... 36
Replacing the Printhead ............................................................................................................................................... 37
Dirty Fan Filter .............................................................................................................................................................. 38
Out of Paper ................................................................................................................................................................. 39
Output Stacking Incorrectly .......................................................................................................................................... 39
15. Trouble Shooting .................................................................................................................................................. 40
Clearing Paper Jams ...................................................................................................................................................... 40
Streaking in Prints ......................................................................................................................................................... 41
Blank Pages ................................................................................................................................................................... 42
16. iTerra Mi875 Specifications .................................................................................................................................. 43
December 2011: Revision 001 3
Page 4

2. Limitation of Liability
The Imaging Systems Group’s total liability to the purchaser, or to any third party, for damages from any and all causes
whatsoever, regardless of the form of action, whether in contract or in tort, including negligence, and any infringement
of proprietary rights or any misappropriation or unlawful use of any proprietary rights or property of any third party shall,
in the aggregate, be limited to purchase price actually paid by the purchaser for the product relating to the damages.
The limitation of liability provisions of this agreement reflect an informed voluntary allocation of the risks (known and
unknown) that may exist in connection with the provisions of the goods and services provided hereunder by The
Imaging Systems Group Inc. and that such voluntary risk allocation represents a fundamental part of the agreement
reached between The Imaging Systems Group Inc. with the purchaser.
The Imaging Systems Group Inc. shall not be liable for any special, direct or indirect, incidental, consequential,
exemplary, punitive or any similar or other damages of any nature suffered by the purchaser whatsoever including,
without limitation, loss of use or lack of availability of the purchaser facilities, including its computer resources and any
stored data, loss of profits or revenue, or other commercial loss, or any claim for contribution or indemnity in respect of
any claims against the purchaser, regardless of whether The Imaging Systems Group Inc. has been advised of the
possibility of such damages.
The Imaging Systems Group Inc.
911 28 Street NE
Calgary, Alberta, Canada
T2A 7X1
www.isys-group.com
www.isys-media.com
Phone: 1-403-204-5200
Fax: 1-403-204-1971
Toll Free: 1-866-415-4797
e-mail: support@isys-group.com
December 2011: Revision 001 4
Page 5

3. iTerra Mi875 Warranty
TO THE EXTENT ALLOWED BY LOCAL LAW, THIS
WARRANTY IS EXCLUSIVE AND NO OTHER
WARRANTY OR CONDITION, WHETHER WRITTEN
OR ORAL, IS EXPRESSED OR IMPLIED AND THE
IMAGING SYSTEMS GROUP INC. SPECIFICALLY
DISCLAIMS ANY IMPLIED WARRANTIES INCLUDING,
BUT NOT LIMITED TO, WARRANTIES OF
MERCHANTABILITY, FITNESS FOR A PARTICULAR
PURPOSE AND QUALITY SATISFACTION. THE
WARRANTY TERMS CONTAINED HEREIN, EXCEPT
TO THE EXTENT LAWFULLY PREMITTED, DO NOT
EXCLUDE, RESTRICT OR MODIFY AND ARE IN
ADDITION TO APPLICABLE STATUTORY RIGHTS.
USE OF THE PRODUCT CONSTITUTES
ACCEPTANCE OF THIS WARRANTY.
Corporate Headquarters:
iSys –group
911-28th Street NE Calgary
AB T2A 7X1
Canada
www.isys-group.com
1-866-415-iSys (4797)
The Imaging Systems Group Inc. (iSys) warrants the iTerra Mi875 (Product) to be free from defects in materials and
workmanship and will remedy any such defect according to the terms of this Limited Warranty.
iSys warrants the Product to be free from defects in material and workmanship occurring under normal usage, within
the normal operating range and duty cycles specified. If the iSys Customer Service Representative Department
receives notice of such defects during the warranty period, iSys at its option, and within a reasonable time, will repair or
replace the defective Product. A certified iSys service representative shall perform repairs, and such repairs, at the
option of iSys, may be performed at the customer site, a dealer site, a service depot or the factory. Replacement
Product, at the option of iSys, may be either new or equivalent in performance to new. Delivery is defined by a signed
and dated receipt from the original carrier or iSys dealer delivering the Product, or down time for repair and
replacement.
iSys does not warrant the operation of the Product to be uninterrupted or error free. iSys assumes no liability for and
holds itself harmless against any claims of consequential costs or damages which may arise from interruption or error in
the operation of the Product.
iSys does not warrant defects, malfunctions and/or failures, which in its opinion, result from conditions of improper use,
abuse, neglect, operation outside the published environmental specifications, improper site preparation and
maintenance, the use of unqualified or unauthorized media (papers, films or inks), inadequate preventative
maintenance, unauthorized modifications or unauthorized maintenance. Such conditions shall render this warranty void
and otherwise release iSys from its liability under this Product warranty. Consumables are non-warranty items.
All product returned to factory must be accompanied by an RMA number, obtained by calling the iSys Service
Department at 403-204-5200 or as otherwise instructed. Shipping and handling charges to vendor for repair are the
sole responsibility of the customer. iSys will cover shipping charges on the return of the repaired unit for the term of the
warranty as stated above. Shipping will consist of Standard Shipment level or Best Effort. Accelerated or Premium
Shipping Service is available but costs will be fully born by customer. Any international duties and taxes payable on
transporting the repaired unit across international borders will be the responsibility of the customer. The Mi875 Printer
is a Canadian made product and therefore falls under the import/export laws of NAFTA.
A written receipt for the Product, showing the date of purchase, dealer’s name, and both the model and serial
number/PID’s of the Product must accompany any request or claim for work to be performed under this Limited
Warranty.
Additional information on obtaining service under this Limited Warranty or for obtaining Extended Warranty coverage
contact iSys – The Imaging Systems Group directly at 866-415-iSys (4797) or at 403-204-5200.
iSys or its authorized service partner will repair, or at its option replace, at no charge, any defective
component(s) of the Product for a period of one (1) year from the date of purchase. This Limited Warranty
extends to the original purchaser only. This Limited Warranty does not extend to consumable items.
December 2011: Revision 001 5
Page 6

4. Safety Information
120 Volt Models
Your iSys product has been carefully designed to give you years of safe, reliable performance. As with all electrical
equipment, there are a few basic precautions you should take to avoid hurting yourself or damaging the product.
Save all provided documentation for future reference.
Read and follow all warning and instruction labels on the product itself.
Unplug the product before you clean it. Use only a damp cloth; do not use liquid or aerosol cleaners.
Place your product on a firm, solid surface. If placed on something unsteady, it may fall and be damaged. If
placed on a soft surface, the vents may be blocked, causing the product to overheat.
Protect your product from overheating. Make sure no obstructions block the openings of the product. Do not
put the product on or near a heat source (such as a radiator or heat register). Keep the product out of direct
sunlight.
Always use this product in a well ventilated area. Allow enough room around the product for adequate
ventilation and easy access to the paper trays. If the product is placed in any kind of enclosure, make sure
the enclosure is well ventilated.
Do not use the product near water. Do not spill liquid of any kind on it.
Be certain that your power source matches the rating listed on the back of the product. If you are not sure,
check with your dealer or local power company.
Do not connect this product to an uninterruptible power supply (UPS).
Your product has a grounded, three-prong plug as a safety feature. This plug only fits into a grounded outlet.
If the plug does not fit, the outlet may be an older, non-grounded type. Contact an electrician to have the
outlet replaced. Do not use an adapter to defeat the grounding.
Install the product near an easily accessible power outlet.
Avoid damaging the power cord. Do not put anything on it or place it where it will be walked on. If the cord
becomes damaged or frayed, replace it immediately.
If you are using an extension cord or power bar with the product, make sure the total amperes required by all
the equipment on the extension is less than the extension’s rating. The total ratings of all equipment plugged
into the outlet should not exceed 15 amperes.
Do not poke anything in the ventilation slots of the product. You could get an electrical shock or cause
hazardous electrical arcing, which could cause a fire.
Aside from the routine maintenance described in the documentation, do not try to service the product
yourself. Removing the cover may expose you to shocks or other hazards.
Do not make any adjustments other than those outlined in the documentation. You may cause damage that
will require extensive repair work. The provided documentation explains how to get your product serviced by
qualified iSys technicians. If anything happens that indicating your product is not working properly or has
been damaged, unplug it immediately and follow the procedures in the provided documentation for having
your product serviced.
Here are some of the things to look for.
The power cord or plug is frayed or damaged.
Liquid has been spilled into the product, or the product has been exposed to water.
The product has been dropped, or the cabinet is damaged.
The product does not function normally when following the operating instructions.
December 2011: Revision 001 6
Page 7
December 2011: Revision 001 7
Page 8
December 2011: Revision 001 8
Page 9
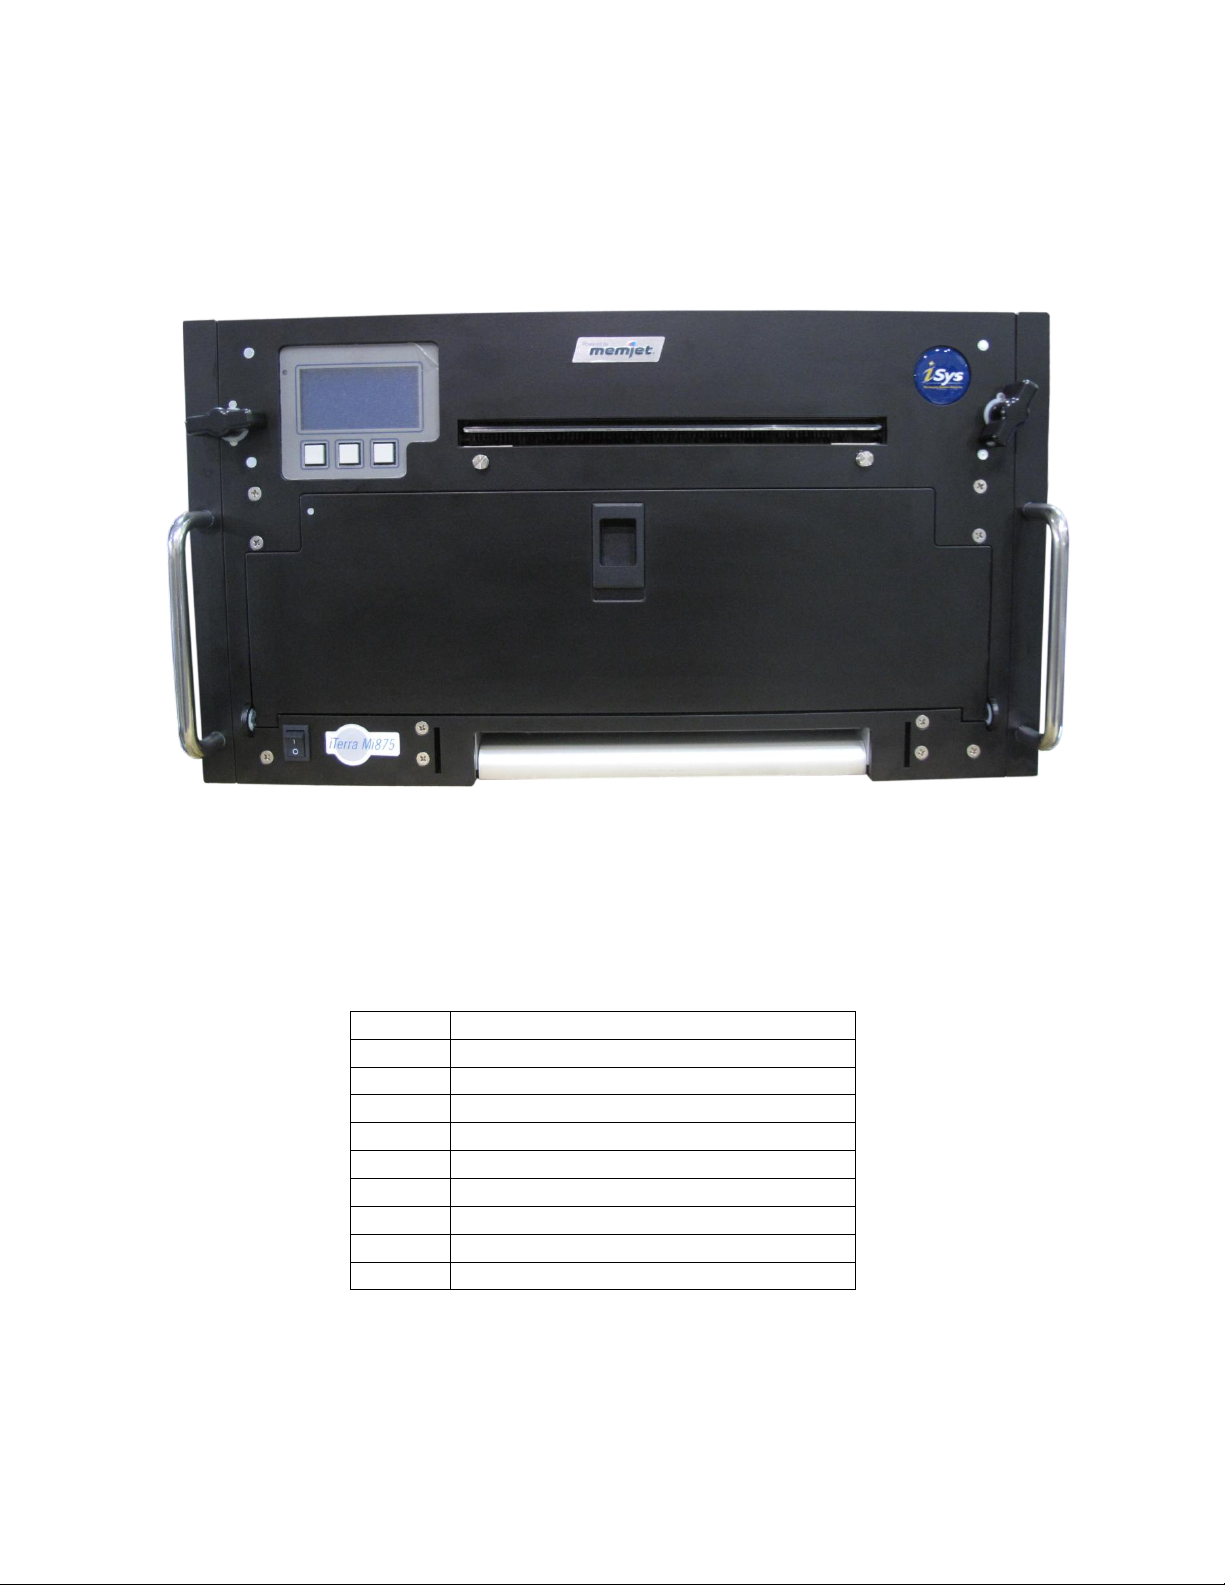
5. iTerra Mi875 Front View
Letter
Part
A
Display Panel
B
Paper Output Slot
C
Holding Screws for Paper Output tray
D
Handles for rackmount version
E
Latch to Ink Cartridges
F
Latches to attach to rack
G
Slots for Input Paper Basket
H
Paper Input
I
Power switch
B
A
C C D D E F F
G G H
I
December 2011: Revision 001 9
Page 10
iTerra Mi875 Top View
Printhead Latch
Input Ink
Tubes
Output Ink
Tubes
Clamshell latches
December 2011: Revision 001 10
Page 11

Turn Around Latches
Turn Around Latch Releases
December 2011: Revision 001 11
Page 12

iTerra Mi875 Peripherals
Input Media Basket
Output Media Basket
December 2011: Revision 001 12
Page 13
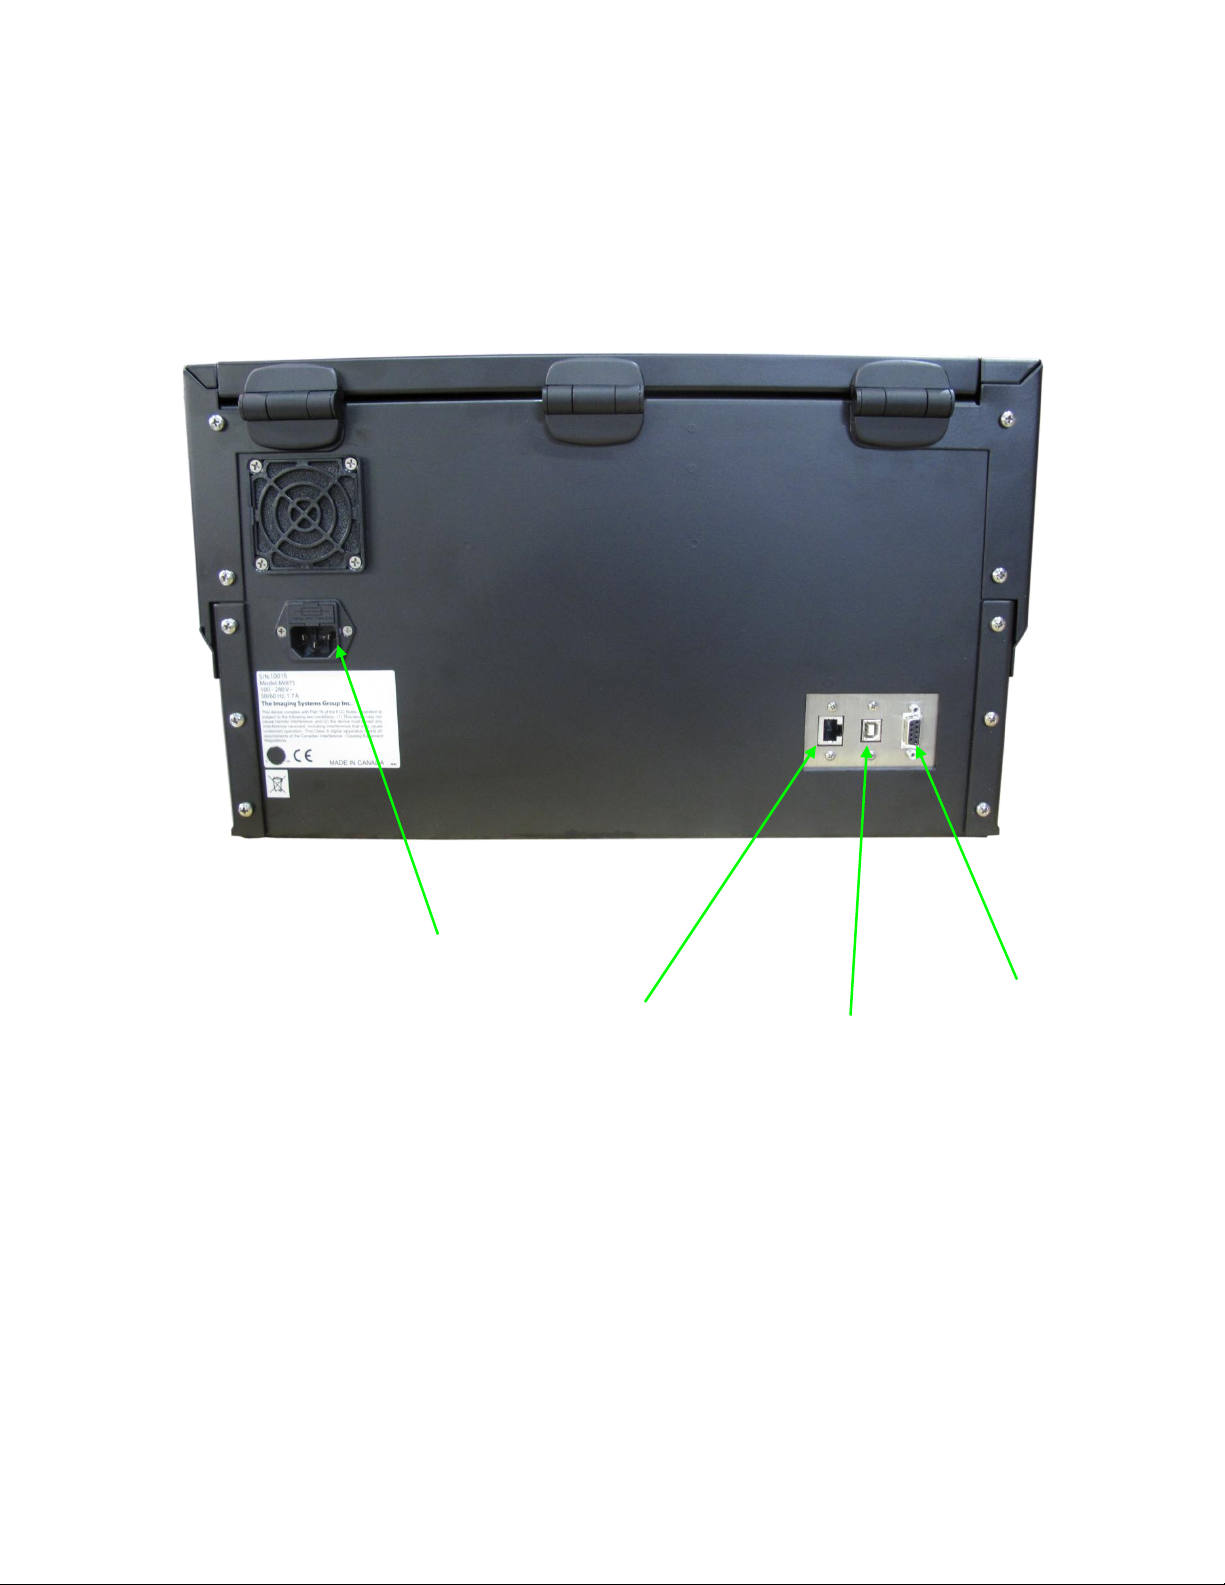
6. iTerra Mi875 Rear View
Power connector
USB connection
Ethernet Connection
Serial connection
December 2011: Revision 001 13
Page 14

7. iTerra Mi875 Side View
December 2011: Revision 001 14
Page 15

Flex
Chassis
Sample pack of clean room wipes
8. iTerra Mi875 Consumables
The iTerra Mi875 comes with a printhead and a set of 5 cartridges – 1 Cyan, 1 Magenta, 1 Yellow and 2
Black.
Printhead
Ink Cartridges
December 2011: Revision 001 15
Page 16

9. Unpacking the Printer
STEP 1
STEP 2
Open the door at the front of the printer and release the
latches that hold the ink cartridges.
Insert the cartridges. Continue with all five cartridges.
The black ink cartridges may go in either position.
Ensure the latches are fully closed when complete.
STEP 3
STEP 4
Remove the printhead from its box. Open the foil cover and
remove the printhead.
Remove the protective orange cover.
Retain the cover.
Gently remove the protective tapes.
Caution: do not touch the print nozzles on the
underside of the printhead.
Flex
Nozzles
Open the printer box. With two people, remove the printer and place on an even surface.
Caution: The printer is heavy. ALWAYS use two people to lift and/or move the printer.
The box should contain the printer, input and output media baskets, five ink cartridges (1 Magenta, 1 Yellow, 1
Cyan and 2 Black), a printhead cartridge, a sample pack of clean room wipes, a User Guide, sample paper and
a CD with driver installation and instructions.
Ensure all the elements are in the box.
Open the top of the printer and remove any packing material.
Remove the ink cartridges from their wrapping.
December 2011: Revision 001 16
Page 17

STEP 5
STEP 6
Power up the printer.
Open the printer to expose the engine.
From the menu, select:
1. Offline
2. Maintenance
3. PH Release
4. Select
5. Up arrow to Yes
6. Save
7. Exit to Offline
8. Offline
This will release the printhead latch. There should be a click
sound as the latch is released.
IMPORTANT: Do not pull the printhead latch back
manually. This will cause the latch to break.
Move the printhead latch fully back.
Remove the blue ink connector covers.
Insert the printhead, angled towards the back of the printer. Then
push the printhead forward.
Printhead latch fully back
Connectors
December 2011: Revision 001 17
Page 18

STEP 7
STEP 8
Orient the printhead so the flex is towards the connectors.
Angle the printhead back towards the latch.
When inserted, push the printhead forward so it joins the
connectors.
Gently close the printhead latch.
The printer will automatically begin to prime the printhead.
Gently push the print engine back into the chassis and close
the latches.
STEP 9
Install the input media basket and the output media basket.
Input Basket
Output Basket
December 2011: Revision 001 18
Page 19

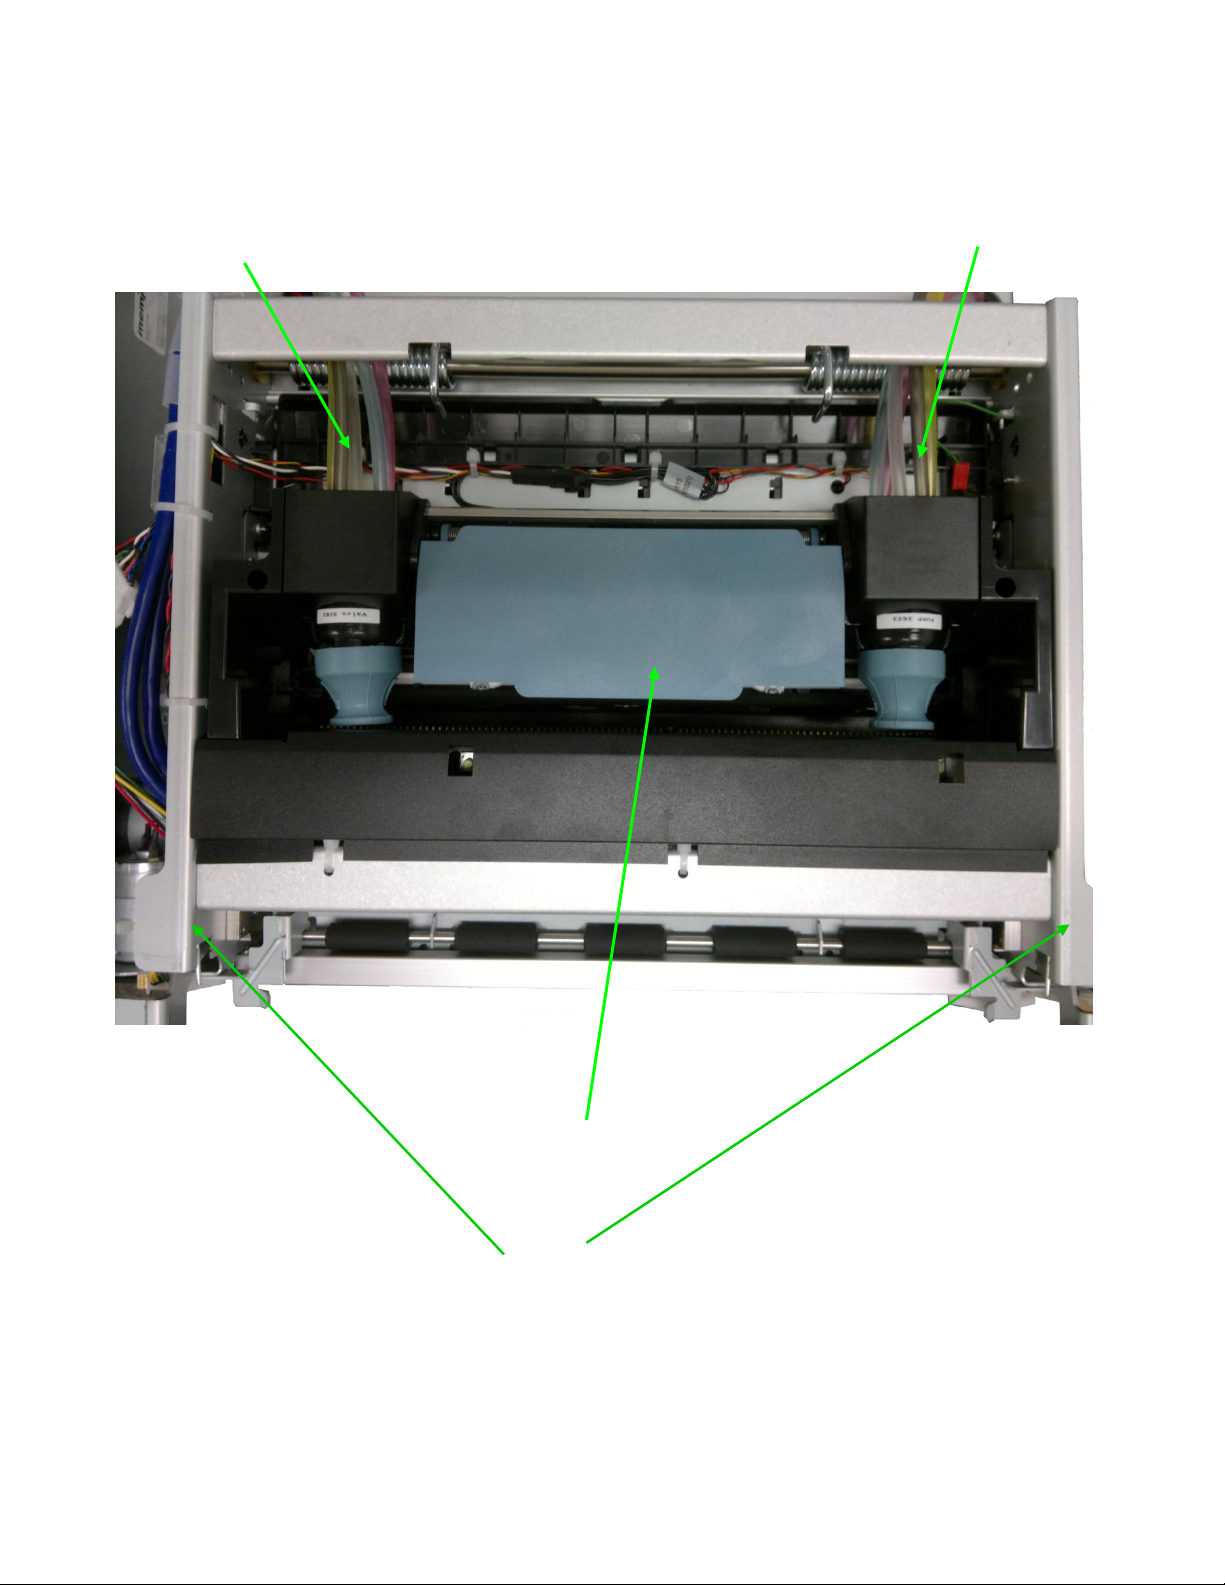
10. Loading Media
Printhead
Service
Station
Turn-around
Ink Cartridges
Take up
rollers
Cutter
Paper Path
December 2011: Revision 001 19
Page 20

STEP 1
STEP 2
Open the box of media.
Place the media in the input basket with the tickmark showing.
IMPORTANT: Tear off the first page before loading paper. The
first page should contain NO tickmark.
Feed the media into the input slot as far as it will go (it will
take about 2 full pages).
Turn the printer Offline.
Press Load/Eject
The media should catch and be fed through, ready to
print.
If the paper does not load correctly, it will automatically
eject. Repeat the process until the paper is loaded.
Turn the printer online.
Tickmark
To prevent paper jams:
• Do not load damaged paper.
• Do not load paper of different sizes or types at the same time.
• Do not pull the paper out during printing
December 2011: Revision 001 20
Page 21

11. User Interface Panel
Main Menu
Online – toggles between Online and Offline
Shutdown – performs a clean shutdown. An orange light next to
the display panel will flash when it is safe to turn the power off.
Cancel Job
o Press and release to cancel a print job
o Press and hold for one (1) second to reset the printer.
The printer will power up when the button is released.
Offline Main Menu
Offline toggles between Online and Offline
Press the Load/Eject button once lightly to load paper. To eject
paper, hold down the button
Menu enters the menu options
LED
December 2011: Revision 001 21
Page 22

Interface Menu Page 1
The user interface options on Page 1 are:
Plot Control
o allows the user to increase or decrease the starting point of the print
o allows the user to increase or decrease the cut position at the end of the
plot
Printhead Maintenance
o allows the user to perform either a Light or Heavy clean on the printhead
Ink Maintenance
o allows the user to re-initialize the inks if excessive tilt has shown the
cartridges as falsely empty
Plot Control
Plot control allows modification of the print start position and the end of job cut position.
December 2011: Revision 001 22
Page 23

Printhead Maintenance
The options from this screen are:
a user initiated clean of the printhead, either light or heavy
release of the printhead latch to safely remove the printhead
Page 2
Page 2 …
Adjustments for the length of time the turn around motor is engaged for paper
loading and retracting.
The Transport option deprimes the printhead. This should be used prior to
transporting the printer, as it causes ink in the printhead and ink lines to be
returned to the ink cartridges.
Diagnostics allows printing of test pages and display of the current firmware
version.
December 2011: Revision 001 23
Page 24

Adjustments
The adjustments allow modifications to the time the rollers feed in paper or retract
paper.
The Retract Time option should be increased if there if extra paper in the turnaround
after the paper has retracted at the end of a job.
Diagnostics
The Diagnostics page allows for various diagnostic plots to print, and for display of current
versions of firmware in the printer, and firmware in the display board.
December 2011: Revision 001 24
Page 25

Page 3
Page 3 gives access to the Control Panel menu settings, and setting and configuring the
network.
Control Panel
The Control Panel allows the user to adjust the brightness of the display; and to turn
warning sounds on or off.
December 2011: Revision 001 25
Page 26

Network Settings
Network Settings allow the user to set the values for an IP address, the Subnet Mask and
the Default Gateway.
Please note that the values are not sent to the printer until they are saved using Network
Configure.
Network Configure
Manual/Auto:
allows the printer to be set to DHCP or have a static IP address. The default is
manual, which is a static address. If changing to DHCP, must be set before Apply
Settings.
Apply Settings:
Updates all the values set in Network Settings and Manual/Auto to the printer.
December 2011: Revision 001 26
Page 27

Printer Maintenance Menu
Cleaning the Printheads
1. Turn the printer Offline
2. Select Menu
3. Select Maintenance
4. Select PH Cleaning
5. Select NONE . This will produce a flashing arrow
6. Arrow UP to select PH Light Clean or PH Heavy Clean
7. Press Save
8. Down Arrow to Exit to Offline
9. Press Select
10. Select Offline to turn the printer Online
Releasing the Printhead Latch
1. Turn the printer Offline
2. Select Menu
3. Select Maintenance
4. Select PH Release
5. Press Select again
6. At the flashing arrow, up arrow to Yes
7. Press Save
8. Down arrow to Exit to Offline
9. Press Select
10. Select Offline to turn the printer Online
Getting Ready to Move the Printer
1. Turn the printer Offline
2. Press Load/Eject to eject any paper in the printer
3. Select Menu
4. Select Transport
5. Select Set
6. Select NO. This will produce a flashing arrow.
7. Up arrow to YES
8. Select Save
9. Down Arrow to Exit to Offline
10. Select Offline to turn the printer ONLINE
December 2011: Revision 001 27
Page 28

Printer Adjustments and Information
Adjustments
1. Turn the printer Offline
2. Select Menu
3. Select until you reach Page 2
4. Select Adjustments
5. Choose Load Time or Retract Time
6. Select the value
7. When the arrow is flashing, use the up or down arrow key to set the desired value
8. Select Save
9. Down arrow to Exit to Offline
10. Press Offline to bring the printer online
Warnings/Errors
1. Turn the printer Offline
2. Select Menu
3. Select until you reach Page 2
4. Select Warnings/Errors
5. Arrow down until you find the relevant error
6. Press Select to view the warning/error
7. Down arrow to Exit to Offline
8. Press Offline to bring the printer online
Defaults
1. Turn the printer Offline
2. Select Menu
3. Select Page 1 until you reach Page 2
4. Select Defaults
5. Down arrow to Exit to Offline
6. Press Offline to bring the printer online
Network Configuration Menu
Control Panel LCD Contrast
1. Turn the printer Offline
2. Select Menu
3. Select until you reach Page 3
4. Arrow down Control Panel
5. Press Select
6. Select LCD Contrast
7. Press Select again. This will produce a flashing arrow.
December 2011: Revision 001 28
Page 29

8. Press the up or down arrow to change the LCD contrast setting
9. Press Save
10. Down arrow to Exit to Offline
11. Press Offline to bring the printer online
Setting the IP Address
1. Turn the printer Offline
2. Select Menu
3. Select until you reach Page 3
4. Arrow down to Network Settings
5. Press Select
6. Arrow down to IP Address
7. Press Select
8. When the arrow is flashing, use the up and down arrows to adjust the value
9. When you have set the desired value, press Save
10. Press Select again and change the next value.
11. Continue until the desired IP address is set
12. Down arrow to Exit
13. Follow the procedure for Applying Network Settings
Setting the Subnet Mask Address
1. Turn the printer Offline
2. Select Menu
3. Select until you reach Page 3
4. Arrow down to Network Settings
5. Press Select
6. Arrow down to Subnet Mask
7. Press Select
8. When the arrow is flashing, use the up and down arrows to adjust the value
9. When you have set the desired value, press Save
10. Press Select again and change the next value.
11. Continue until the desired IP address is set
12. Down arrow to Exit
13. Follow the procedure for Applying Network Settings
Setting the Gateway Address
1. Turn the printer Offline
2. Select Menu
3. Select until you reach Page 3
4. Arrow down to Network Settings
5. Press Select
6. Arrow down to Gateway
7. Press Select
December 2011: Revision 001 29
Page 30

8. When the arrow is flashing, use the up and down arrows to adjust the value
9. When you have set the desired value, press Save
10. Press Select again and change the next value.
11. Continue until the desired IP address is set
12. Down arrow to Exit
13. Follow the procedure for Applying Network Settings
Applying Network Settings
1. Turn the printer Offline
2. Select Menu
3. Select until you reach Page 3
4. Arrow down to Network Configure
5. Select Apply Settings
6. Press Select
7. When the flashing arrow appears, up arrow to Yes
8. Press Save
9. Down arrow to Exit to Offline
10. Press Offline to bring the printer online
December 2011: Revision 001 30
Page 31

12. Common Display Panel Procedures
It is important to follow these procedures when performing routine tasks. They will help extend the life
of the consumables and help with print quality.
Printer Shutdown Menu
Releasing the Printhead Latch
1.
2. Turn the printer Offline
3. Select Menu
11. Select Maintenance
12. Select PH Release
13. Press Select again
14. At the flashing arrow, up arrow to Yes
15. Press Save
16. Down arrow to Exit to Offline
17. Press Select
18. Select Offline to turn the printer Online
4. Getting Ready to Move the Printer as outlined above.
5. If removing the ink tanks and printhead, follow the printhead removal procedure
outlined in Releasing the Printhead Latch
6. Remove the ink tanks.
7. From the main menu, select Shutdown.
8. When Shutdown is complete, power down the printer.
This will shut the printer down in an orderly fashion.
Restarting the Printer after a Move
1. Power the printer on.
2. Wait until the printer has performed its own maintenance.
3. Perform a PH Heavy Clean as outlined in Cleaning the Printheads above.
4. Load paper.
December 2011: Revision 001 31
Page 32

13. Toolbox
To access the toolbox, from Start menu select iTerra, then iTerra Mi875 then Toolbox.
The Toolbox is an alternate option for viewing printer status and configuring various parameters in the printer.
It is not recommended to keep the Toolbox open constantly as the refresh rate may lock up the pc. The
recommended use is to use it as an alternative method for maintenance when you are remote from the printer.
December 2011: Revision 001 32
Page 33

Main Screen Menu
The Toolbox main menu.
From here, you can monitor the status of the printer and navigate to various menus to configure parameters.
To get a static read of the status of the printer, Stop Refresh can be turned on. To get an update again, click Start
AutoRefresh.
User Interface
From within the user interface, you can navigate to perform various printer functions.
Current printer status
readings
Toggle between Auto Refresh
and static status displays
December 2011: Revision 001 33
Page 34

Diagnostics
The diagnostic page display information about the print engine unit.
Diagnostic prints can be generated from this screen.
Ink Usage
The ink Usage page is currently not active.
December 2011: Revision 001 34
Page 35

Network Configuration
The network values can be set in this page.
NOTE: Do NOT change the printer name. It is assigned automatically and if changed, may result in disabling the
printer.
Service Menus
The Service Menus are password protected, and are for technician use only.
December 2011: Revision 001 35
Page 36

14. Replacing Consumables
STEP 1
STEP 2
Open the front cover.
Open the latch containing the empty ink cartridge.
Remove the ink cartridge and package appropriately.
STEP 3
Place the new ink cartridge into the slot until the needle is inserted
into the septum. Close the latch to secure the ink cartridge in
place.
Close the front cover.
Replacing Ink Cartridges
December 2011: Revision 001 36
Page 37

Replacing the Printhead
STEP 1
STEP 2
Deprime the printhead:
Follow the procedure outlined in Getting
Ready to Move the Printer
Release the latches and pull the printer forward.
Be aware the printer is heavy and take
precautions not to allow the printer to
overbalance.
Follow the procedure outlined in Releasing the
Printhead Latch
Turn the printer Offline.
Push the printhead gently towards the back of the printer,
then gently pull upwards to remove the printhead.
STEP 3
STEP 4
Package the used printhead appropriately.
Unpack the new printhead, ready to insert.
NOTE: ensure that the nozzles on the lower side of the
printhead are not touched.
Flex
Nozzles
December 2011: Revision 001 37
Page 38

STEP 7
STEP 8
Gently place the printhead in the printer, then push forward
until the printhead is in place.
Close the printhead latch.
Gently push the print engine back into the chassis until the
latches catch.
Turn the printer Online.
The printhead should prime automatically.
When the prime is complete, you may wish to perform a
Cleaning the Printheads routine.
STEP 1
The protective cover on the fan clips out, allowing
the filter to be changed if it is clogged up with dirt.
Dirty Fan Filter
December 2011: Revision 001 38
Page 39

Out of Paper
If a print job runs out of paper part way through, perform the following:
1. From the main menu, select Cancel Job
2. Verify the job has been deleted from the print queue
3. If the print engine motor keep spinning, press and hold Cancel Job for a full second.
This will reset the printer. When you release the button, the printer will come back up.
Output Stacking Incorrectly
The output basket is designed to hold one print job. Not clearing the basket between print jobs may result
in the output stacking incorrectly.
December 2011: Revision 001 39
Page 40

15. Trouble Shooting
STEP 1
STEP 2
Cut the paper at the input tray.
Turn the printer offline
Press Load/Eject to move paper through the printer.
Open the top of the printer.
STEP 3
STEP 4
Open the clam shell on the print engine.
See if any paper is caught in the paper path.
Remove any jammed paper.
Check to ensure there are no fragments of paper left in the
paper path.
Close the clam shell gently.
Gently unlatch the turnaround. Lift the turnaround straight
up and check for any jammed paper.
When the turnaround is clear, gently lower the turnaround
back onto the printer and relatch the mechanism.
Tear paper
here
latches
Clearing Paper Jams
NOTE: When removing jammed paper, do NOT attempt to pull paper through printer, either backwards or
forwards.
December 2011: Revision 001 40
Page 41

STEP 5
Reload the paper into the input slot. Make sure a page without a
tick mark is the first page.
Turn the printer Offline
Press the Load/Eject button and ensure the paper catches and
moves into position ready to print.
From the main menu, select Cancel Job.
Turn the printer back online
Issue
Correction
Dehydrated printhead
Run a heavy clean cycle
Streaks from fibres
Run a light clean cycle
Open the clamshell and with a clean room wipe and DI
water clean the rollers and area behind the printhead.
USE ONLY DI or distilled water. Tap water contains
particles that may permanently block the printhead
nozzles.
Black marks in print
Open the clamshell. Using the clean room wipe and DI
water, carefully clean the output paper path of any visible
ink.
USE ONLY DI or distilled water. Tap water contains
particles that may permanently block the printhead
nozzles.
Streaking in Prints
Streaking in prints may indicate a number of issues:
December 2011: Revision 001 41
Page 42

Blank Pages
If your printer is putting out blank pages only, check the following:
open the lid of the printer and verify there is ink in the inlet lines
release the printhead and remove it from the printer. Check the flex is clean. If not, wipe away any
visible ink, being careful not to touch the nozzles. Reseat the printhead.
December 2011: Revision 001 42
Page 43

Printer Specifications
PRINT TECHNOLOGY
Color InkJet
PLOTTER CARRIAGE WIDTH
8.75”, 22.23cm
MAXIMUM PRINTABLE WIDTH
8.5”, 21.59cm
PRINT RESOLUTION
800dpi or 1600dpi
CONSUMABLES
Fanfold Paper, Inks, Printheads
CONNECTIVITY INTERFACES
USB 2.0, 10/100 Network
WARRANTY
1 Year
DRIVERS
Windows XP, Windows 7 – 32 & 64 Bit
OPTIONS
Input Basket, Auto Stacker
DATA FORMAT (INTERNAL)
ZxDraw
POWER REQUIREMENTS
110V or 220V
60Hz – 50Hz
10A-5A
MEASUREMENTS (W x D x H)
17 ½ “ x 22 ¾ “ x 14 ½”
444.5mm x 577.85mm x 368.3mm
WEIGHT
64 lbs, 29.1Kgs
OPERATING TEMPERATURE
15C – 35C, 59 – 95F
OPERATING HUMIDITY
20% to 80% RH non-condensing
16. iTerra Mi875 Specifications
December 2011: Revision 001 43
 Loading...