

Page 1

Page 1
www.isys-group.com
iTerra IJ1800
User Guide
Page 2

Page 2
Table of Contents
1.
Unpacking the Printer Box
5
2.
Assembling the Printer Pedestal
7
3.
Unwrapping the Printer
11
4.
Assembling the Media Basket
15
5.
Removal of Printer Packaging
17
6.
Installing Ink Cartridges
19
7.
Installing the Printheads
21
8.
Loading Fanfold Paper
25
9.
IP Configuration and Driver Installation
29
10.
Manually Installing the IJ1800 Driver
39
11.
Installation of Printer Monitor Application
47
A.
Operating the Front Panel
57
B.
Unloading Fanfold Paper
63
C.
Paper Jam
66
Appendix
Limitation of Liability
The Imaging Systems Group‟s total liability to the purchaser, or to any third party, for damages from
any and all causes whatsoever, regardless of the form of action, whether in contract or in tort,
including negligence, and any infringement of proprietary rights or any misappropriation or unlawful
use of any proprietary rights or property of any third party shall, in the aggregate, be limited to
purchase price actually paid by the purchaser for the product relating to the damages. The limitation
of liability provisions of this agreement reflect an informed voluntary allocation of the risks (known
and unknown) that may exist in connection with the provisions of the goods and services provided
hereunder by The Imaging Systems Group Inc., and that such voluntary risk allocation represents a
fundamental part of the agreement reached between The Imaging Systems Group Inc. and the
purchaser.
The Imaging Systems Group Inc. shall not be liable for any special, direct or indirect, incidental,
consequential, exemplary, punitive or any similar or other damages of any nature suffered by the
purchaser whatsoever including, without limitation, loss of use or lack of availability of the purchaser
facilities, including its computer resources and any stored data, loss of profits or revenue, or other
commercial loss, or any claim for contribution or indemnity in respect of any claims against the
purchaser, regardless of whether The Imaging Systems Group Inc. has been advised of the possibility
of such damages.
iSys - The Imaging Systems Group Inc.
911 - 28th Street N.E. Calgary, AB CANADA T2A 7X1
Phone 1-866-415-4797 Fax: (403) 204-1971
e-mail: support@isys-group.com
www.isys-group.com
Page 3
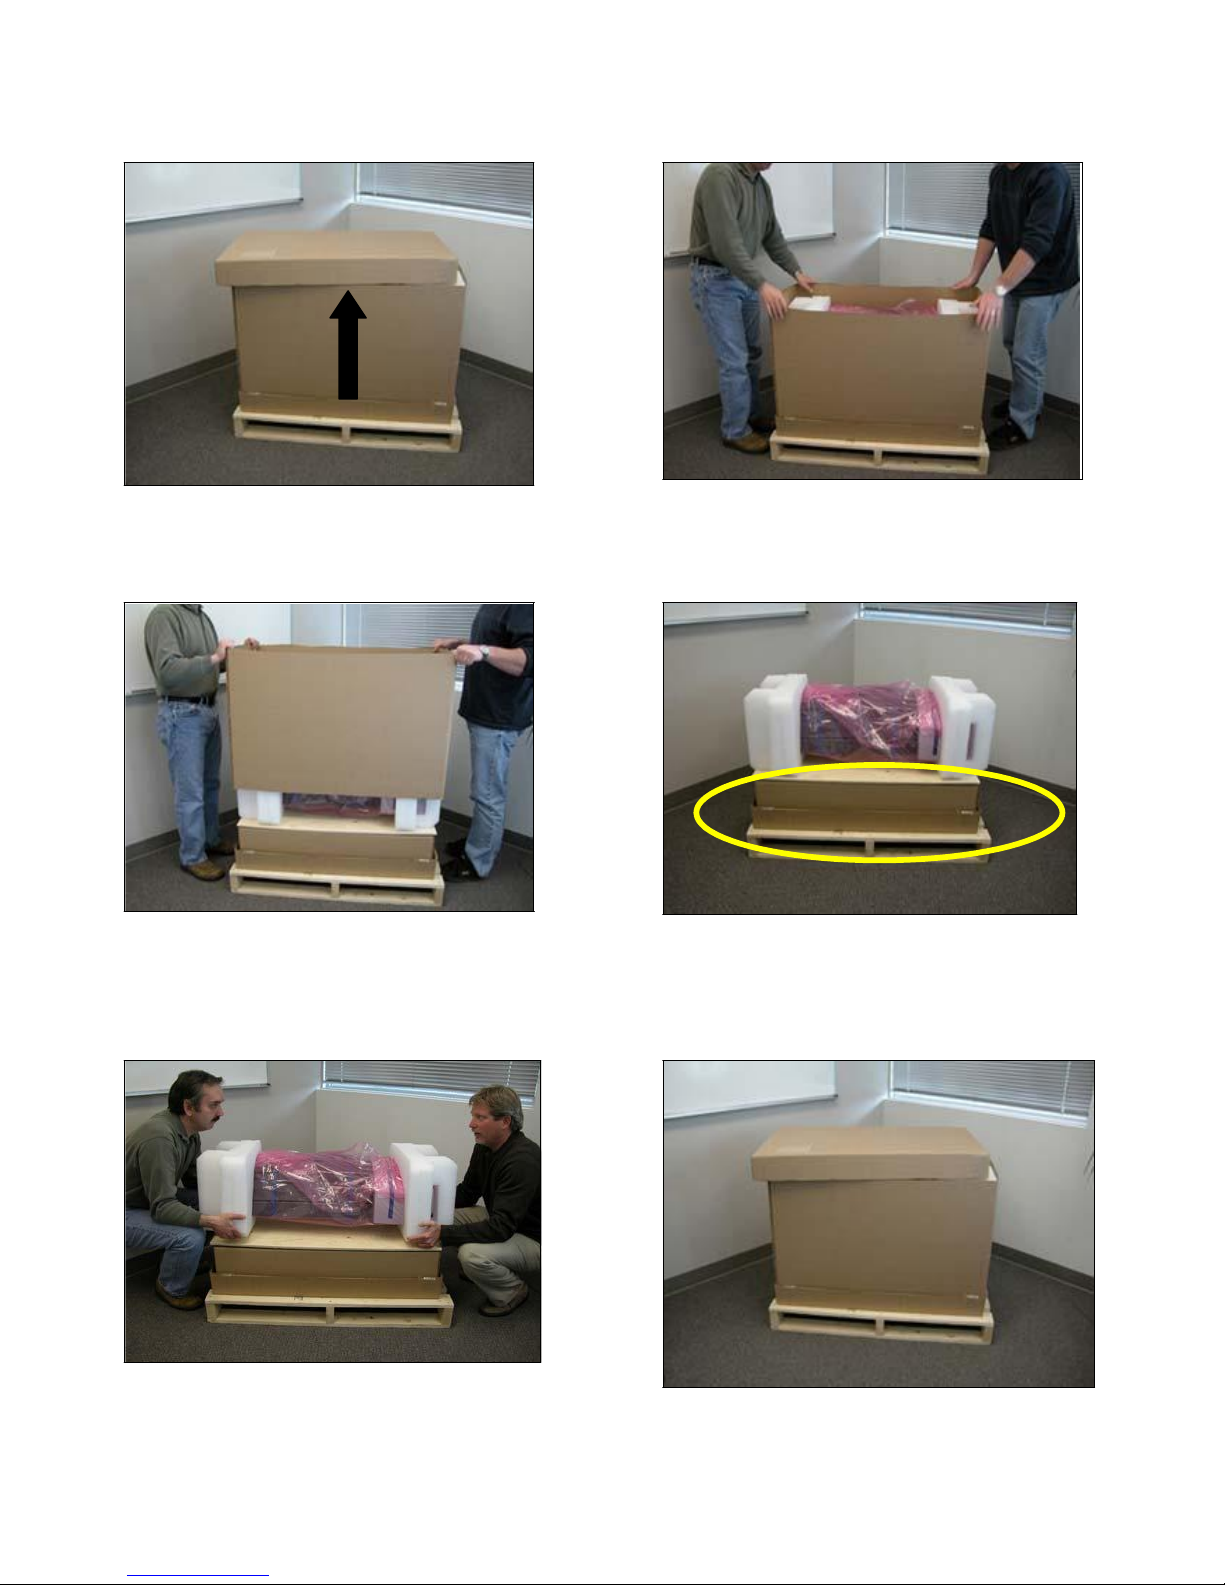
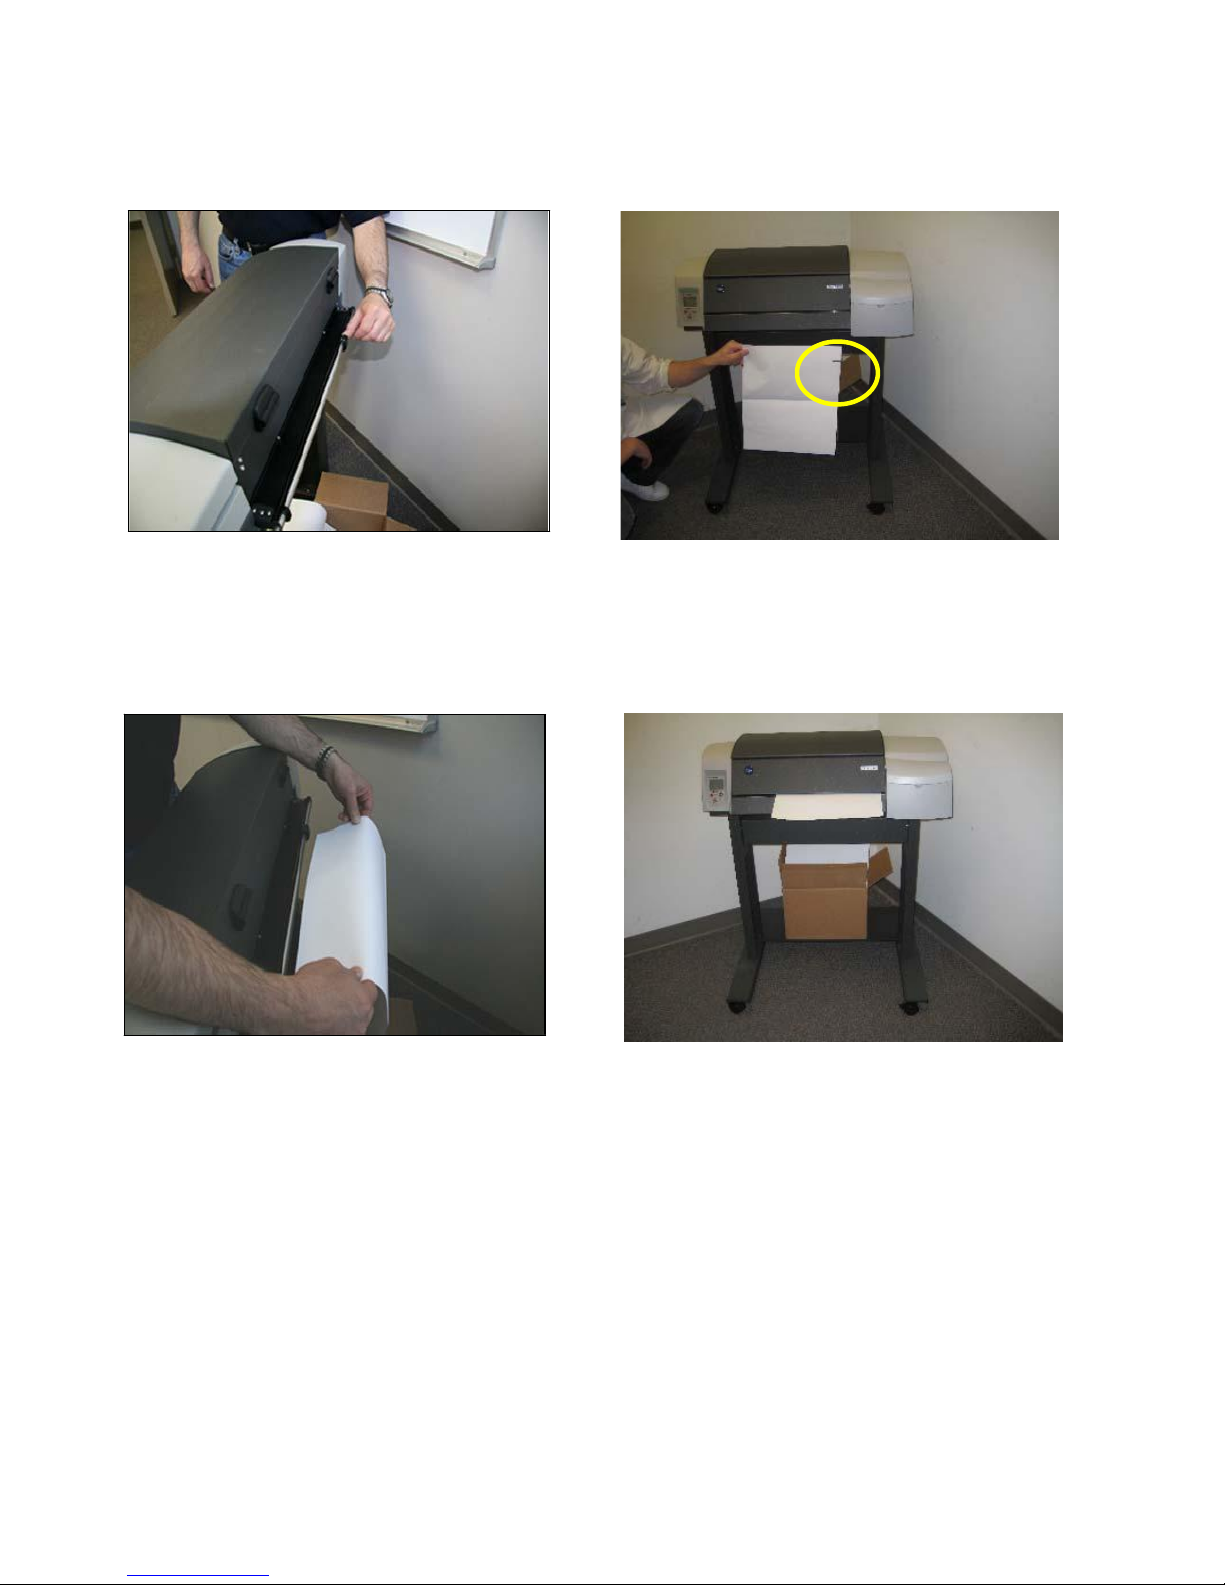
1 Unpacking the Printer Box
STEP 1.1 STEP 1.2
The iTerra IJ1800 Printer will be
shipped on a skid.
STEP 1.3 STEP 1.4
Remove the outer shell of the box.
STEP 1.5 STEP 1.6
Remove the printer from the box and
place it on the floor.
Unwrap the packaging and remove lid
from printer box.
The printer pedestal box should be
located underneath the printer box.
Store the box and printer packaging in
case future shipping is required.
Page 3
Page 4
Page 4
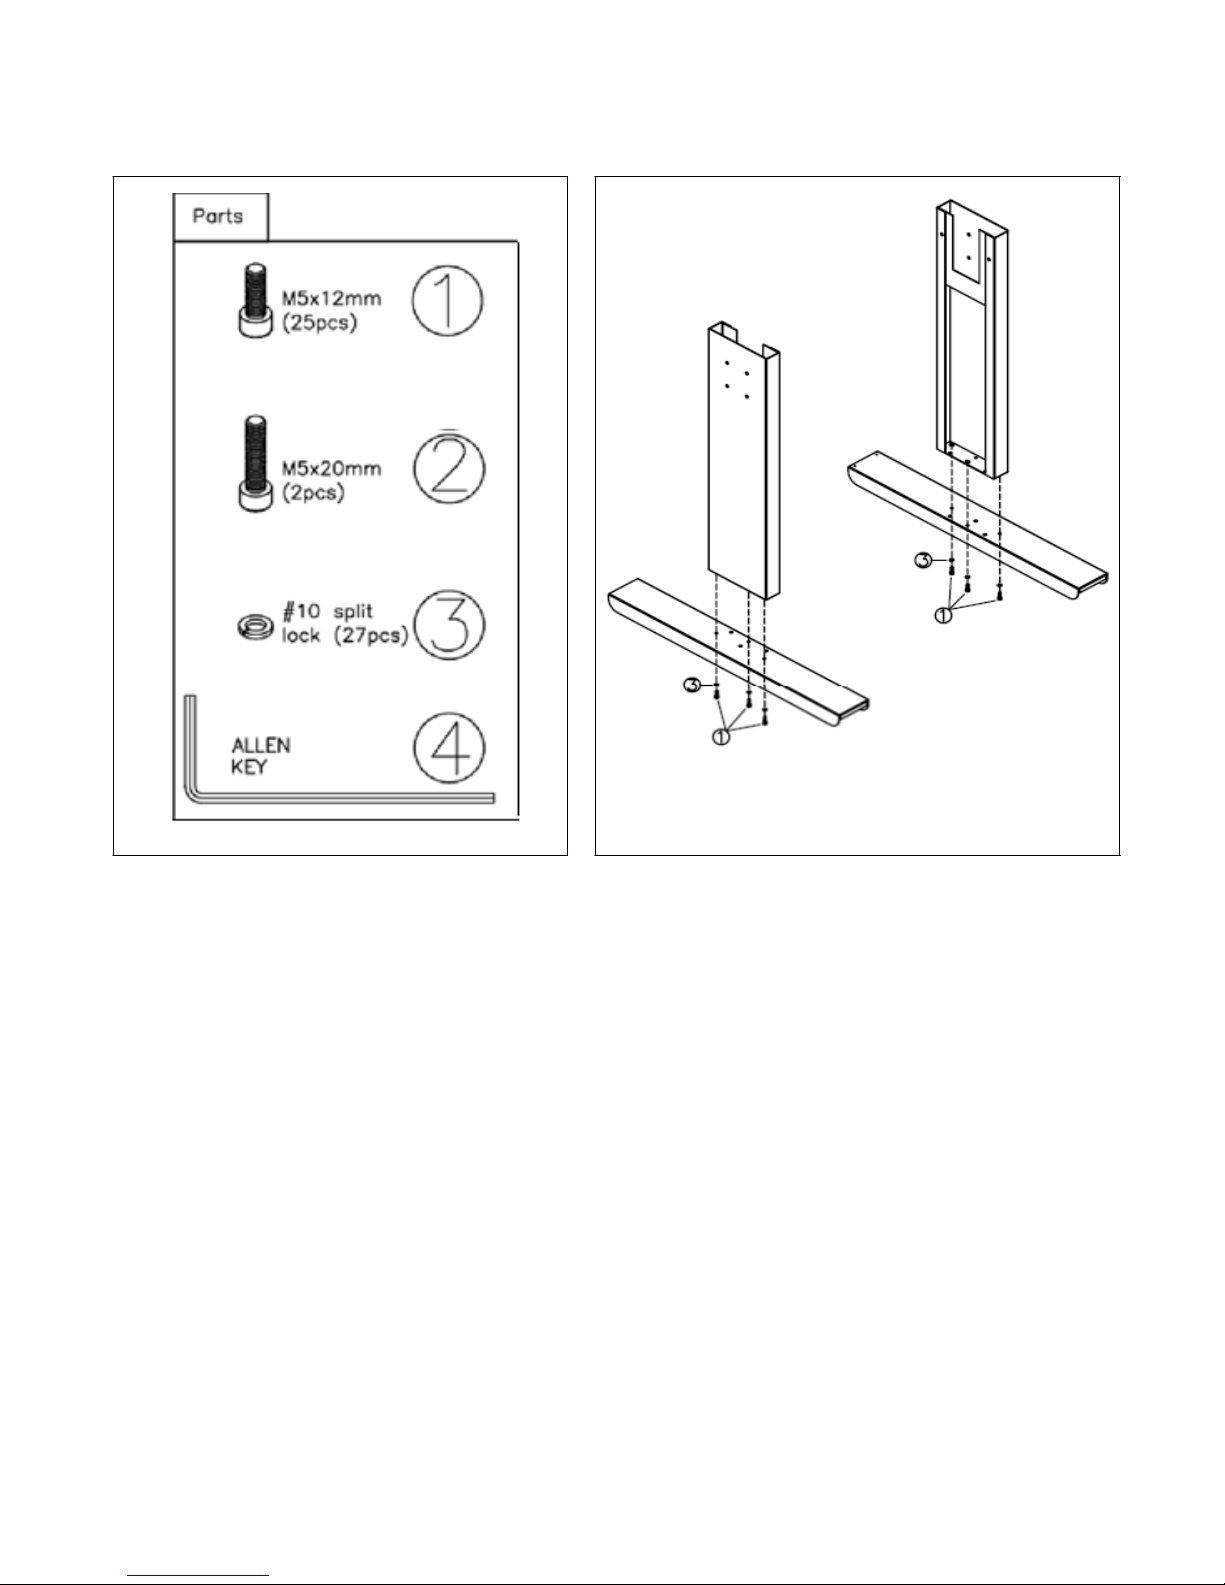
2 Assembling the Printer Pedestal
STEP 2.1 STEP 2.2
Use parts 2 and 3 to attach the printer
to the pedestal.
Assemble pedestal legs left and right.
Page 5

Page 5
2 Assembling the Printer Pedestal - continued
STEP 2.3 STEP 2.4
Install cross beam into left and right
legs.
Install printer left and right supports onto the
cross beam.
STEP 2.5 STEP 2.6
Install the media locator plate onto
the right leg and left leg.
Once you have the printer unwrapped, attach
the iTerra IJ1800 printer to the pedestal.
Page 6
Page 6
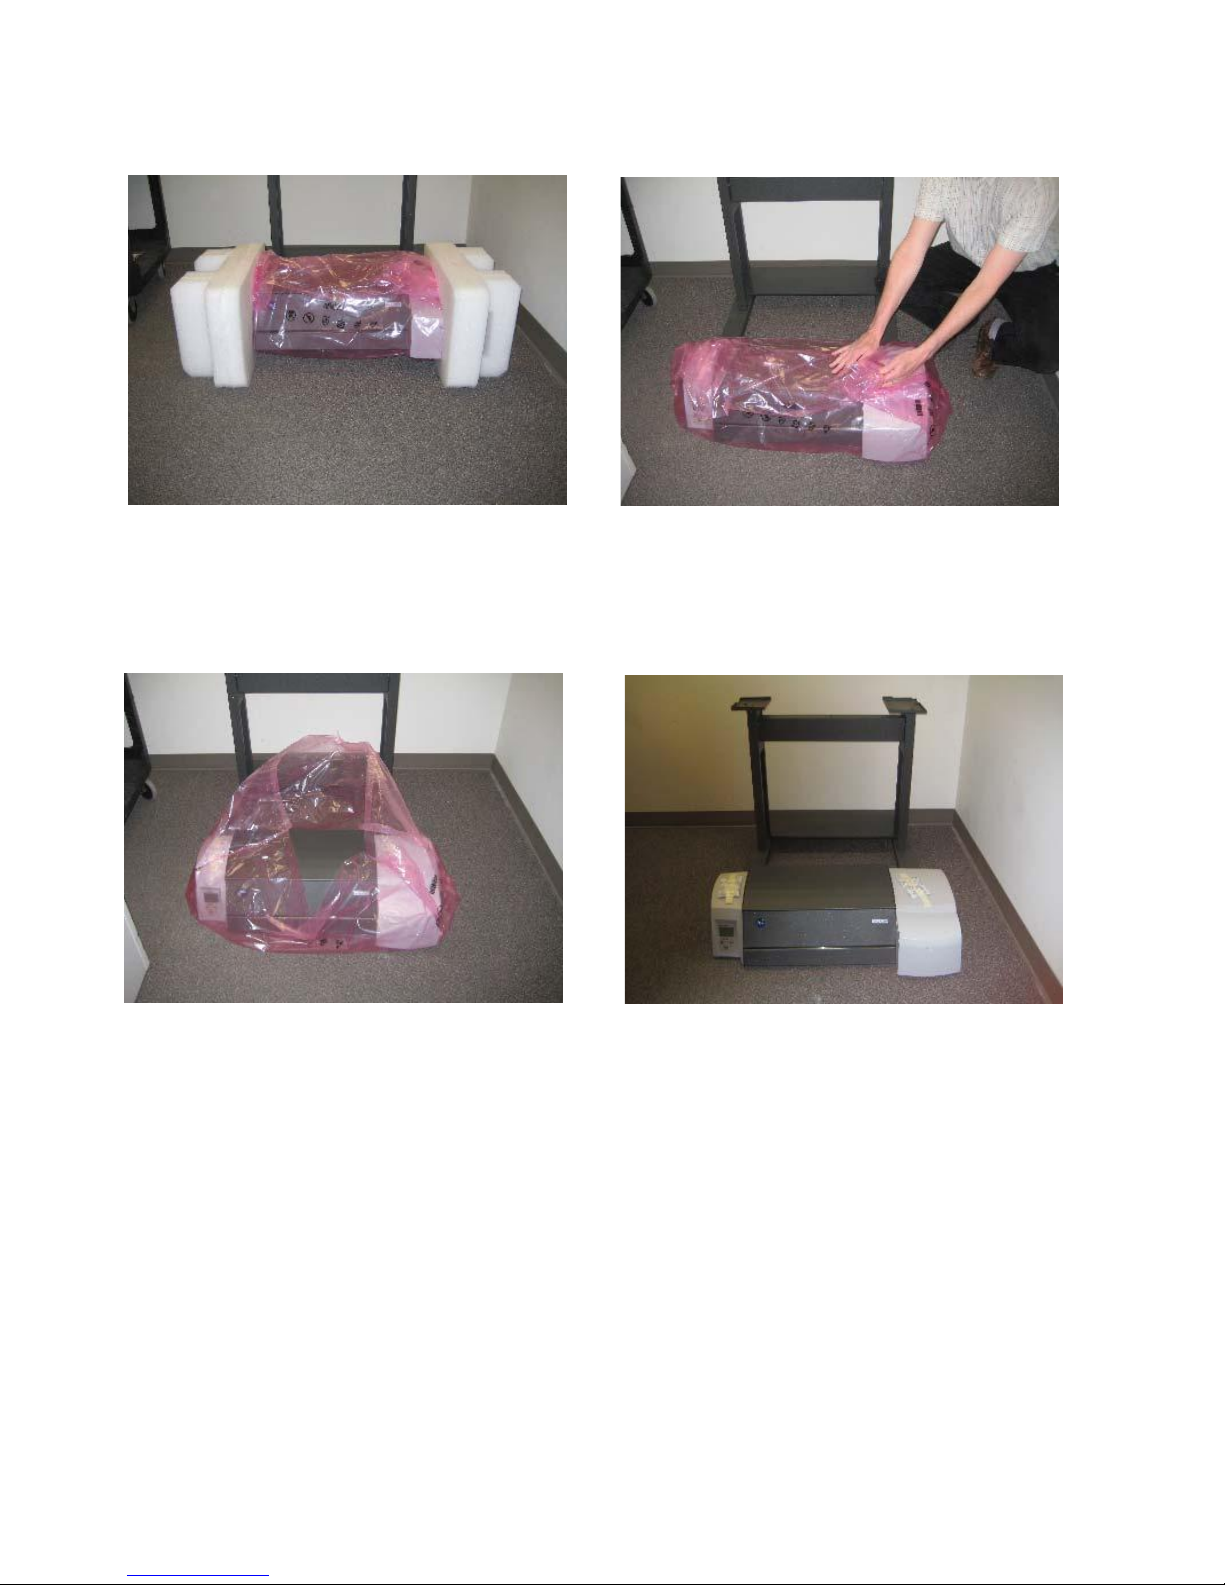
3 Unwrapping the Printer
STEP 3.1 STEP 3.2
Place the printer on the floor near the
assembled pedestal.
STEP 3.3 STEP 3.4
Make sure both packaging end caps are
removed from the printer.
Remove the printer from the plastic bag. The printer is now ready to be placed on
the pedestal. The printer weight is 44 lbs
(19.96 kg).
Printer with Pedestal dimensions:
Width = 35" (890mm)
Depth = 29.95" (743mm)
Height = 39.18" (996mm)
Page 7
Page 7
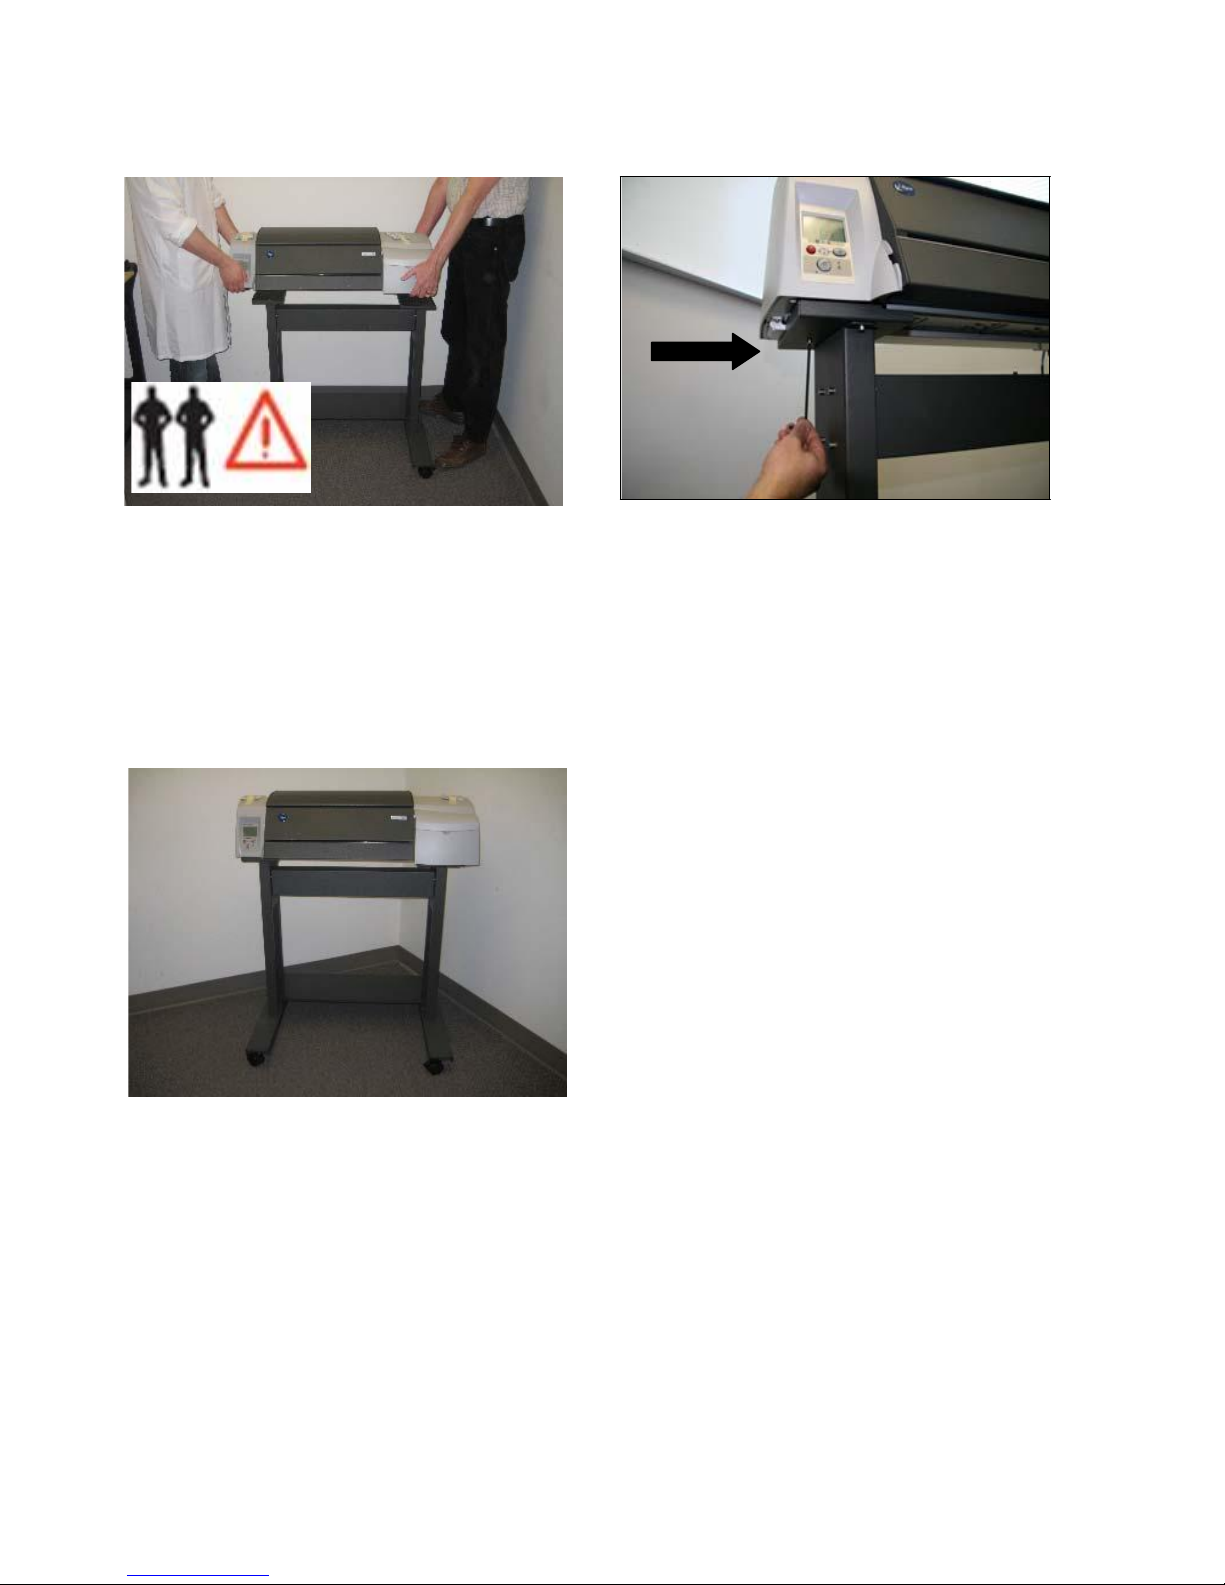
3 Unwrapping the Printer - continued
STEP 3.5 STEP 3.6
Two people should place the printer on
the pedestal. Make sure you lock the
wheels. If you do not wish to use the
pedestal, place the printer on a stable
surface, respecting the weight and
dimensions of the iTerra IJ1800
(described in previous step).
STEP 3.7
To secure the printer to the pedestal
make sure you use the parts provided
along with the Allen Key. See illustration
in Step 2.6.
Once the printer is secured to the
pedestal remove tape and the little
storage bags from the printer.
Page 8

Page 8
4 Assembling the Media Basket
STEP 4.1
Attach basket to the mounting bracket.
STEP 4.1.2
Page 9

Page 9
4 Assembling the Media Basket -
continued
STEP 4.2 STEP
Once the printer is mounted onto the
pedestal, attach the basket to the
pedestal cross support beam.
Ensure the locator pin of the pedestal
crossbeam sticks through the slot of the
basket bracket.
4.3
Page 10

Page 10
5 Removal of Printer Packaging
STEP 5.1 STEP 5.2
Open the hinged flaps on the right side of
the printer. Remove the foam packaging.
Close the hinged flaps at the right of the
printer.
STEP 5.3 STEP 5.4
Insert the power cable into the printer
and then, into the power socket. Wait 15
seconds before turning on the printer.
STEP 5.5
Press the Power key to switch the printer
on.
The front panel and yellow light will start
to flash. Wait until the timer icon
disappears.
Page 11
Page 11
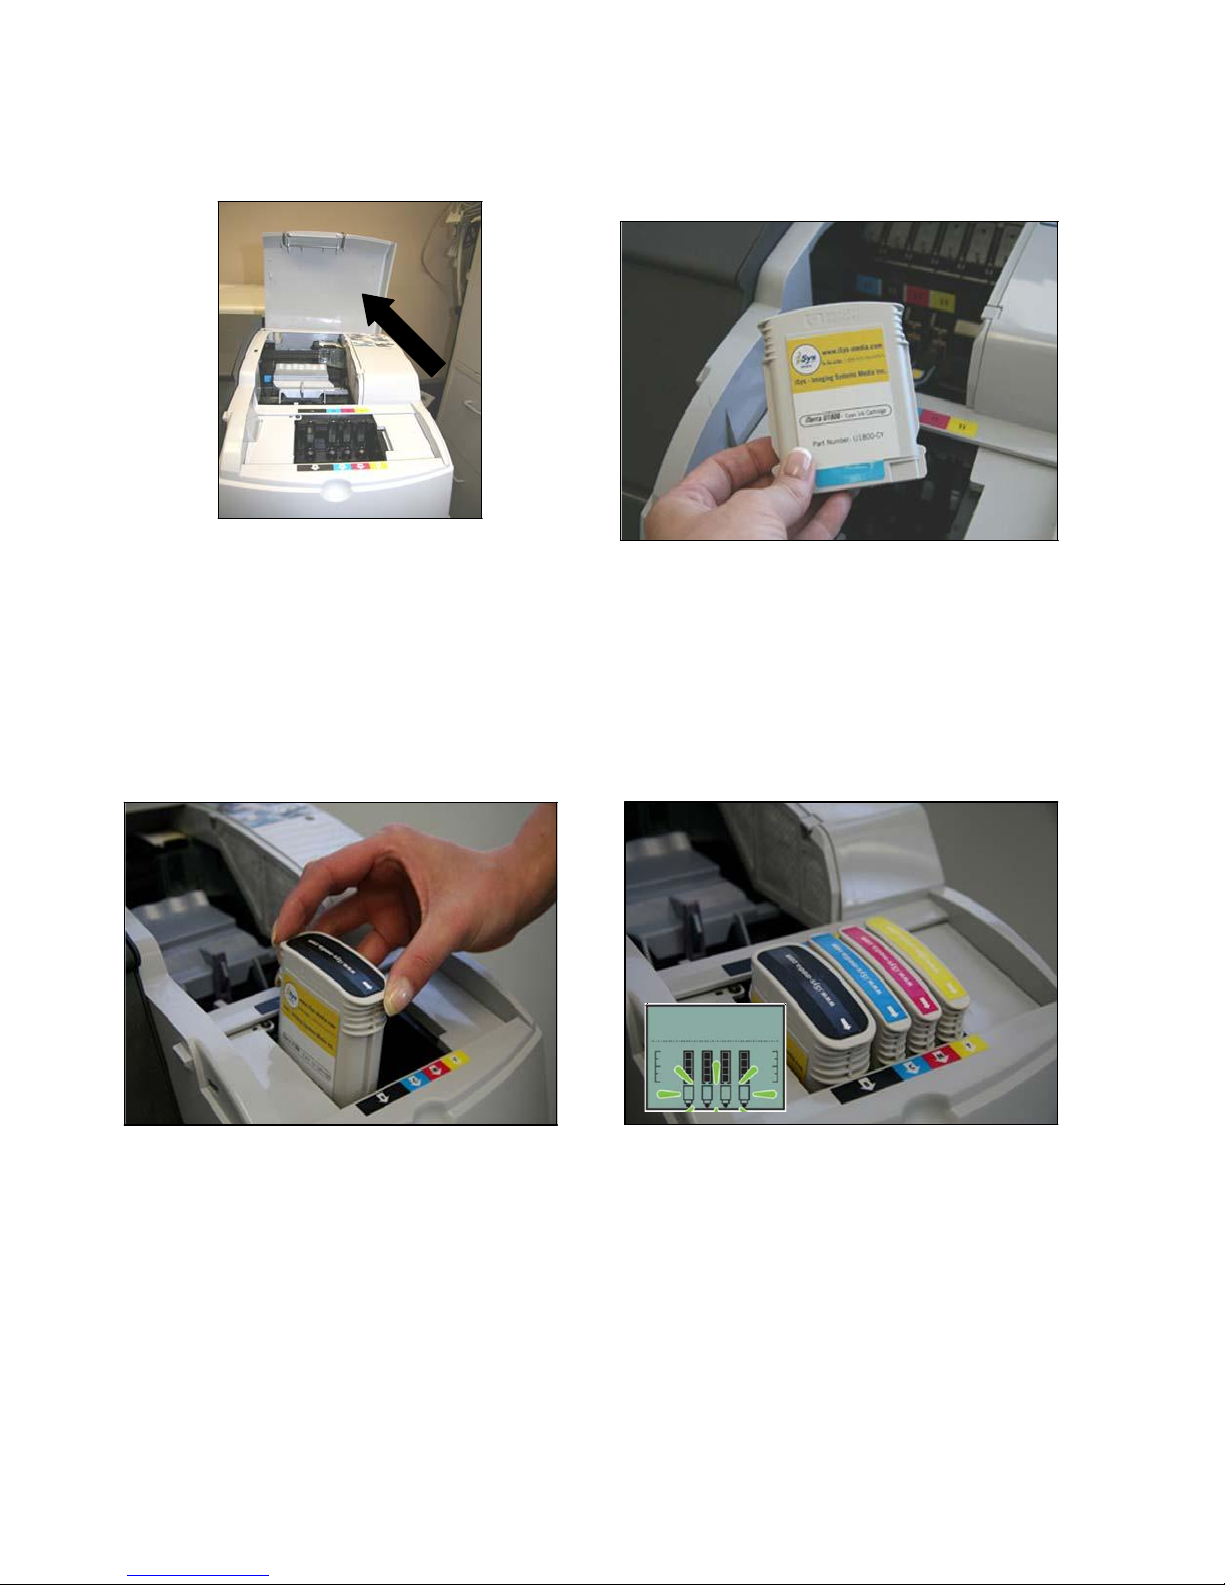
6 Installing Ink Cartridges
*NOTE: Ink Cartridges MUST be installed prior to insertion of printheads*
STEP 6.1 STEP 6.2
Open the hinged flaps at the right of the
printer.
The ink cartridges for the iTerra IJ1800
are available through iSys Media. They
can be ordered by calling:
1-866-415-4797
or visit
www.isys-media.com
STEP 6.3 STEP 6.4
Match the color of the cartridge to the
slot in the printer. Insert the cartridge
until it clicks into place. As the ink
cartridges are inserted, the front panel
will display the ink levels.
Once the last ink cartridge is inserted
only the printhead icons should be
flashing.
Page 12
Page 12
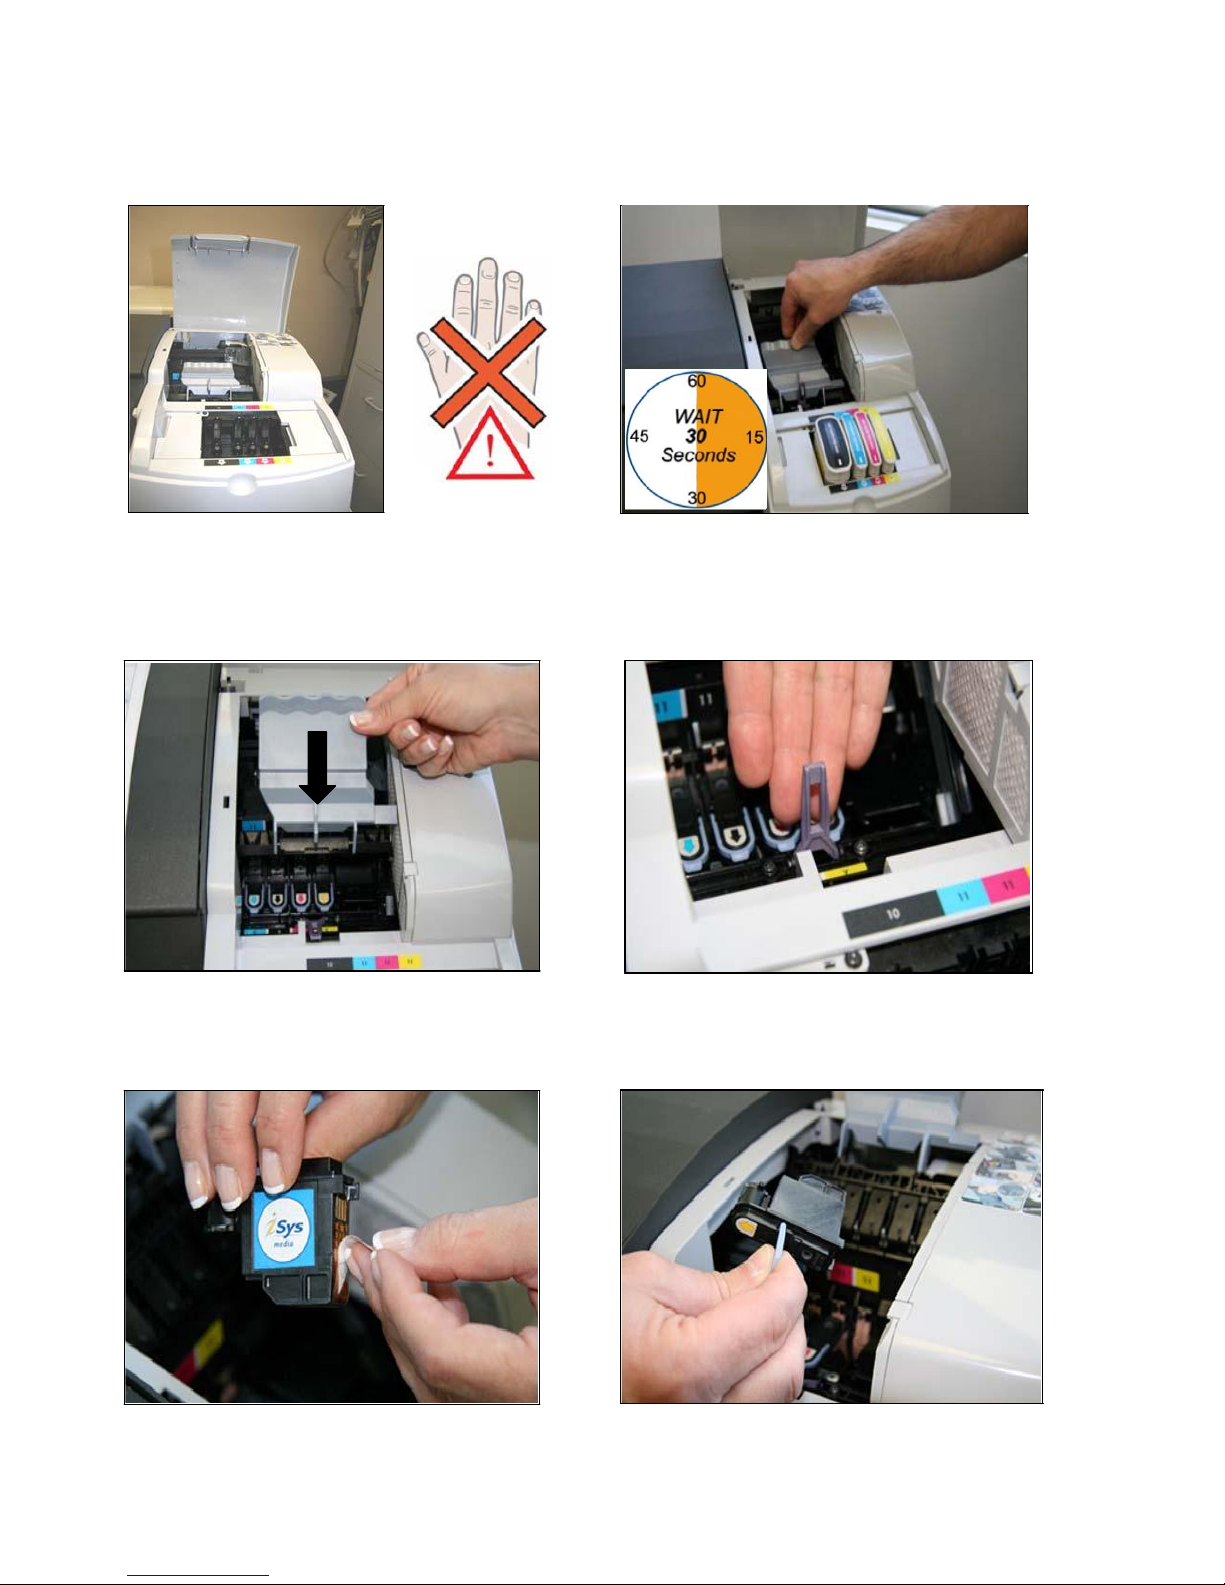
7 Installing the Printheads
STEP 7.1 STEP 7.2
Open the second hinged flap at the right.
The print carriage will move to the left,
Wait 30 seconds before opening the
printhead cover A.
then back to the right. Wait for it to stop.
STEP 7.3 STEP 7.4
Pull the printhead cover up and towards
the front.
The hook at the front should unlatch
itself. Lift the printhead cover back.
STEP 7.5 STEP 7.6
Unpack the printheads and remove the
protective tapes.
Lift the small handle on the top of the
printhead then match the color of the
printheads to the slot in the printer.
Page 13
Page 13
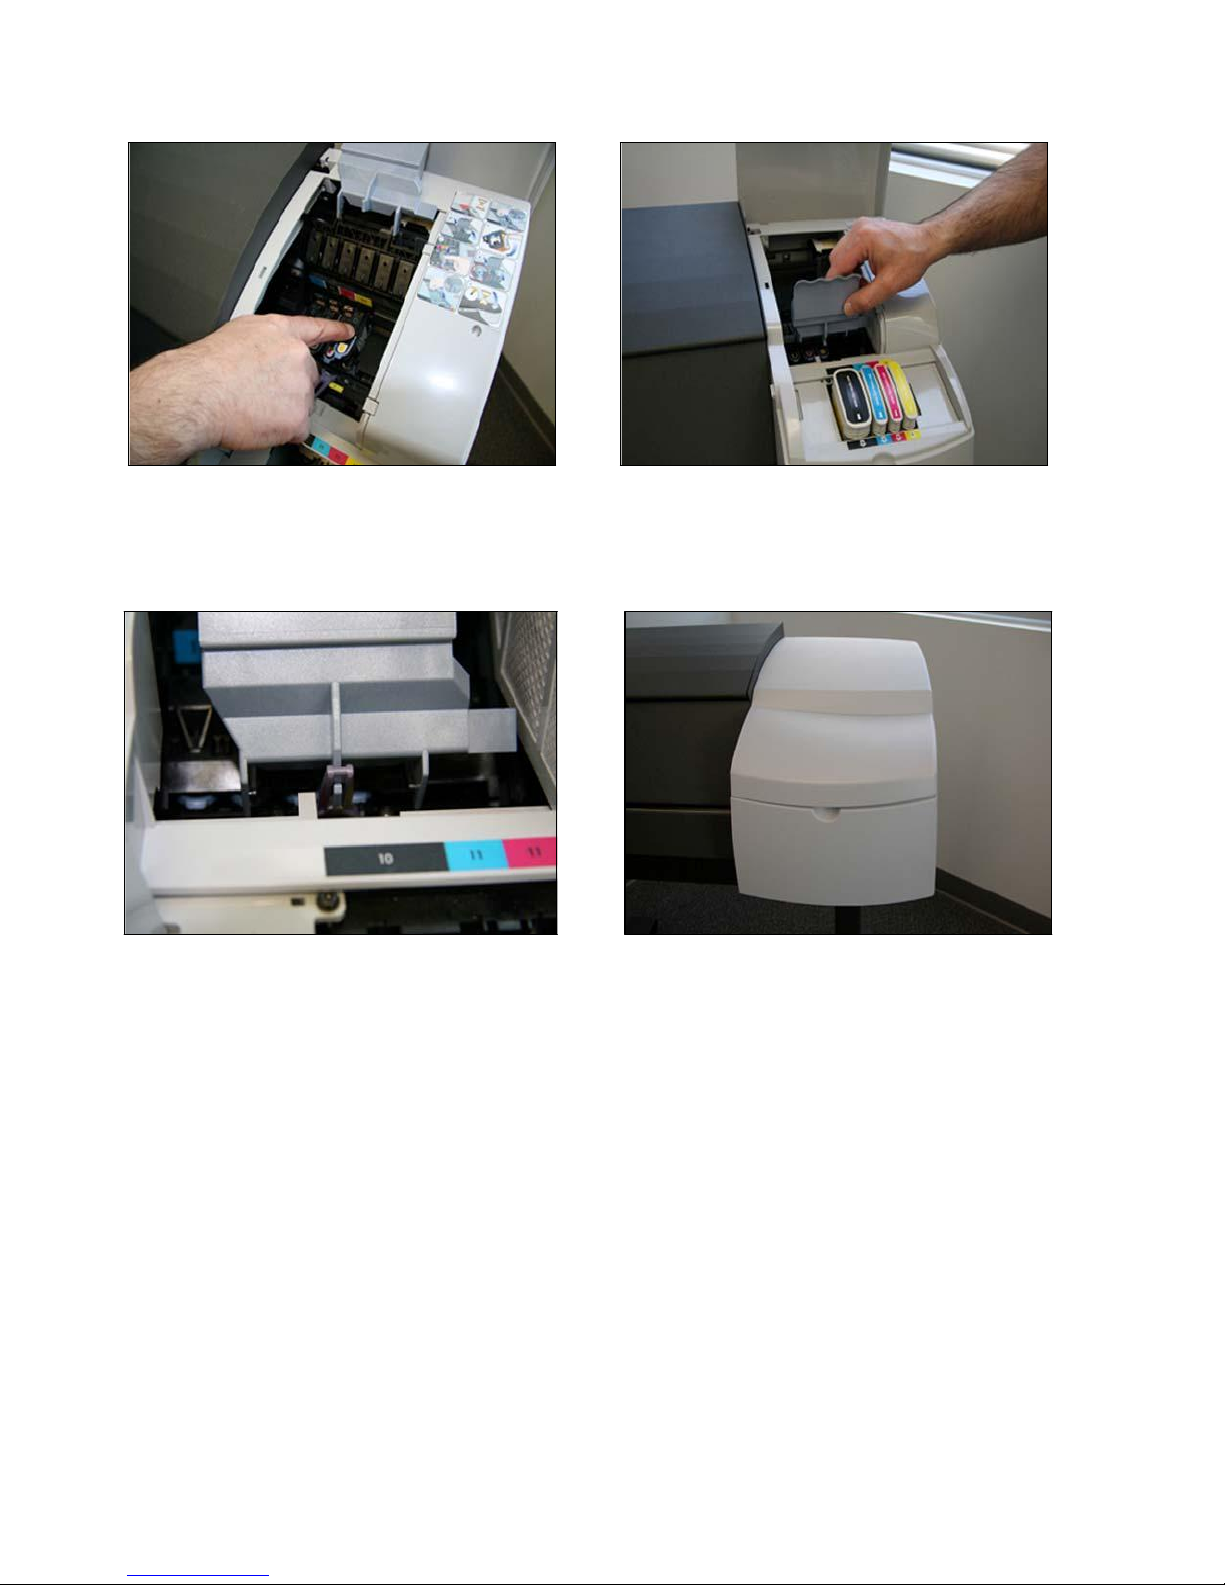
STEP 7.7 STEP 7.8
Press the printheads firmly into their
appropriate slots so they click into place,
Once all of the printheads are in place,
pull the whole printhead cover forward.
returning the handle to its lower position.
STEP 7.9 STEP 7.10
Return the printhead cover to its original
position ensuring that the hook and the
latch engage.
Lower the two hinged flaps until flap 2
clicks into place.
Note: After closing the flap, the printer
will automatically perform internal
calibrations on the printheads and then
on the alignment. There must be paper
loaded in the printer in order to complete
this step.
Page 14
Page 14
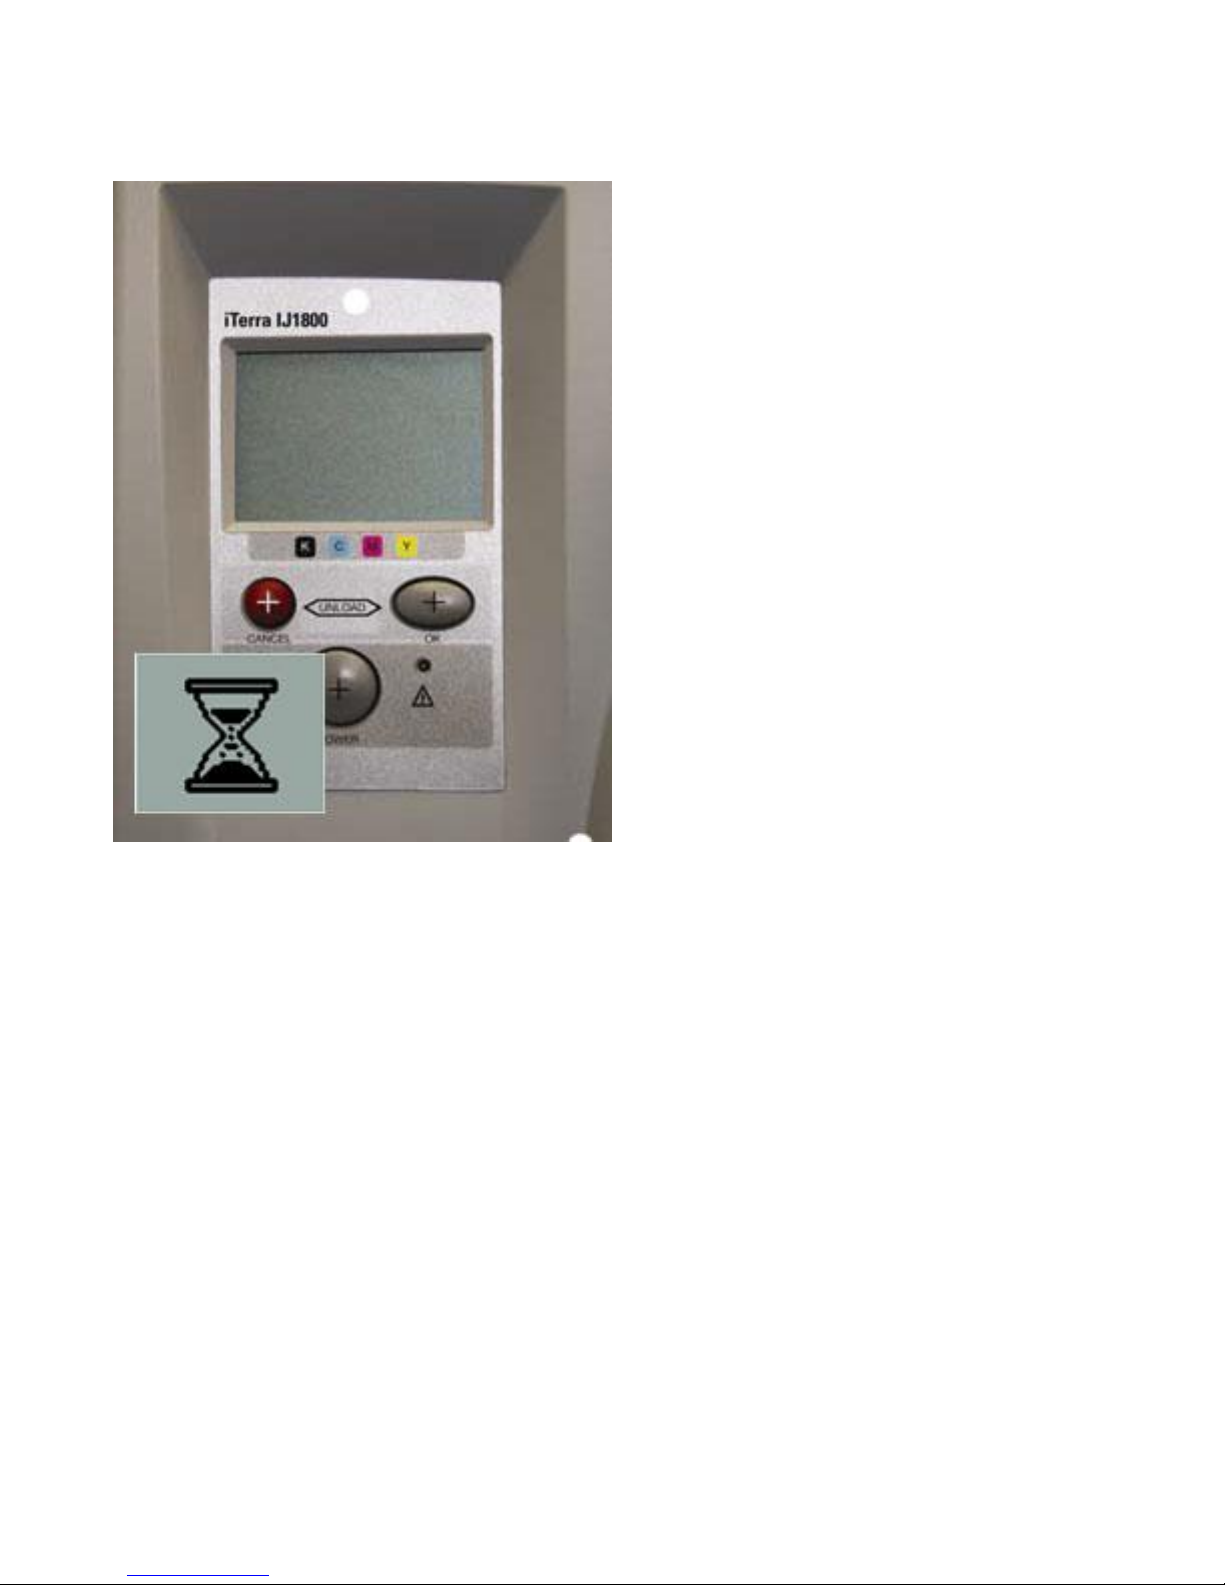
Step 7.11
Wait until the timer icon disappears from the front panel.
Page 15
Page 15
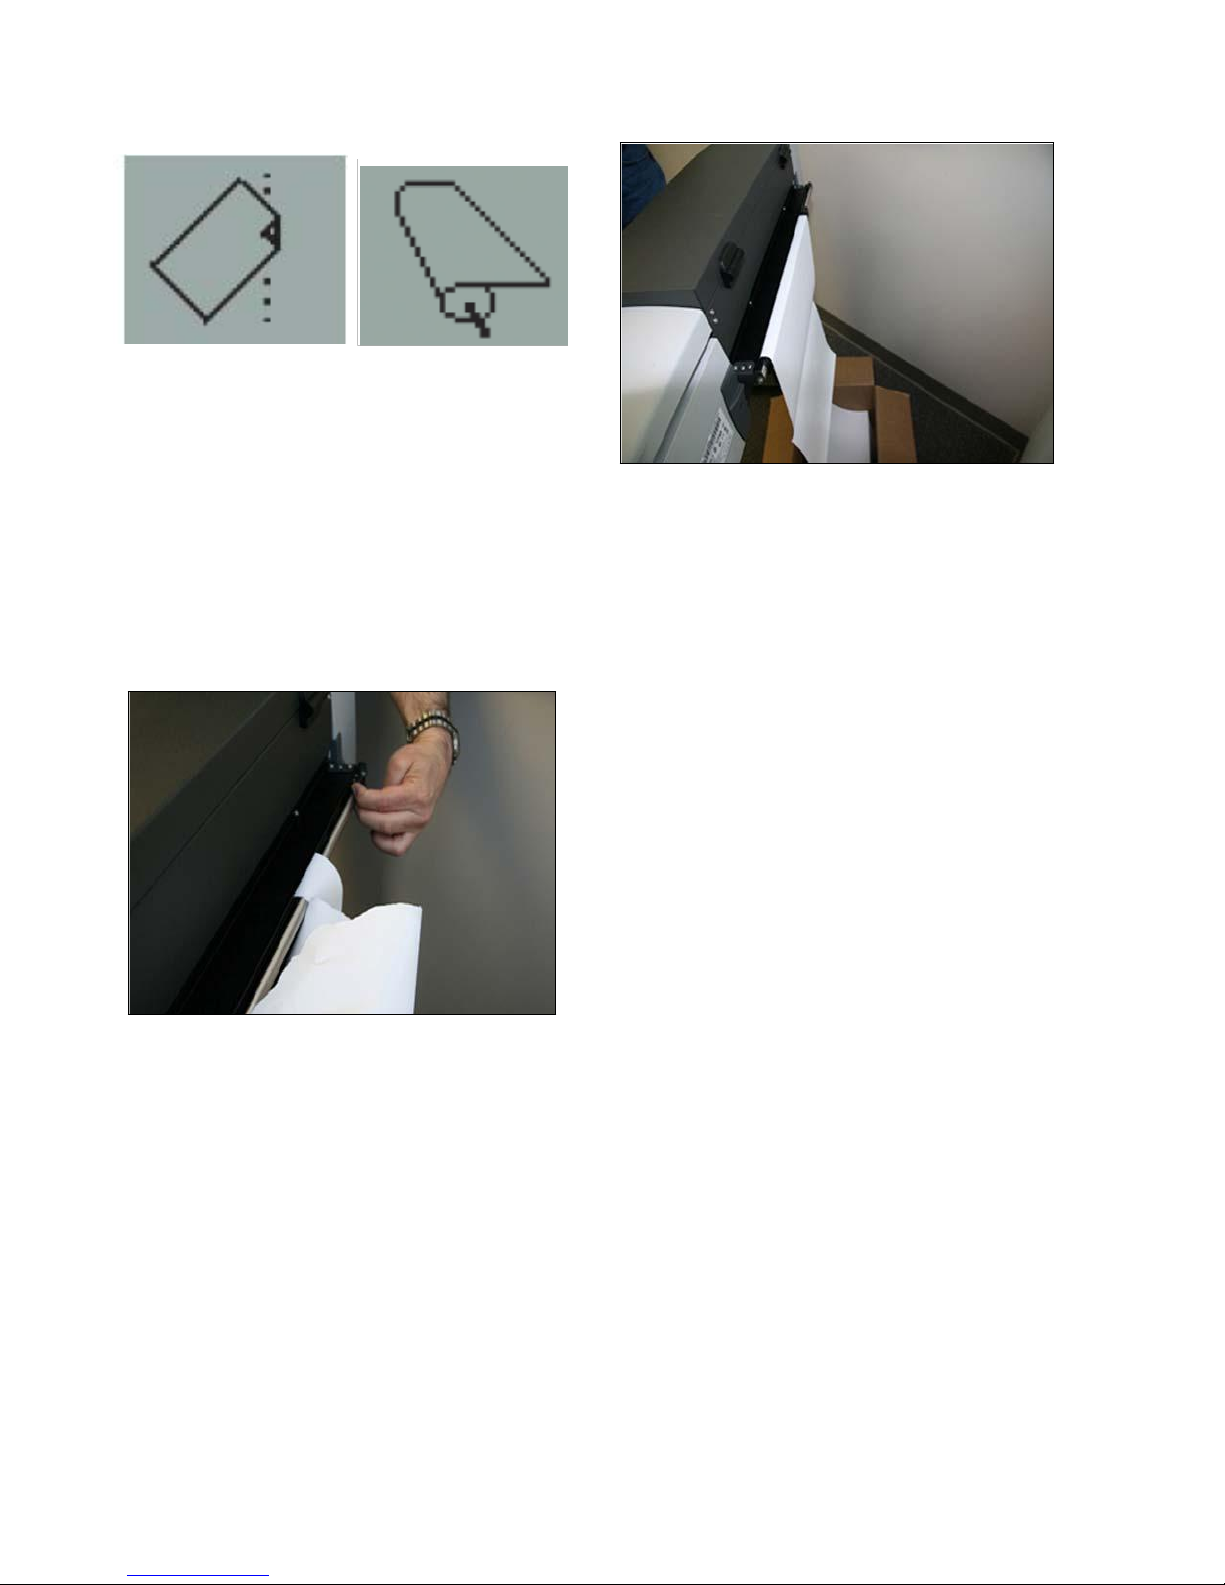
8 Loading Fanfold Paper
STEP 8.1 STEP 8.2
At the back of the printer, adjust the
guide to match the width of the paper
currently being used. Please note, only
one size of paper can be used at a time.
STEP 8.3 STEP 8.4
Load the paper into the back of the
printer, ensuring the I-Mark is facing
down on the right hand side.
Loading paper from the back of the
printer, align the paper to the right, then
using 2 hands feed the paper into the
load guide opening at the back of the
printer until you feel it stop. The printer
will then beep twice. Wait approximately
two seconds while holding the paper
straight.
IMPORTANT: Do not pull on the fanfold
paper once it is taken up into the printer,
that is, if there is any resistance.
The printer will then conduct a skew test
to ensure the paper is aligned correctly.
Page 16
Page 16
STEP 8.5 STEP 8.6
If the paper is properly aligned, the front
panel will show a roll of paper.
If not properly aligned, the printer will
eject the paper and the front panel will
If the fanfold paper is fed correctly, you
will only be able to print once you have
installed the printheads and ink
cartridges.
show the roll misaligned icon.
STEP 8.7
If there is a paper jam see Appendix C.
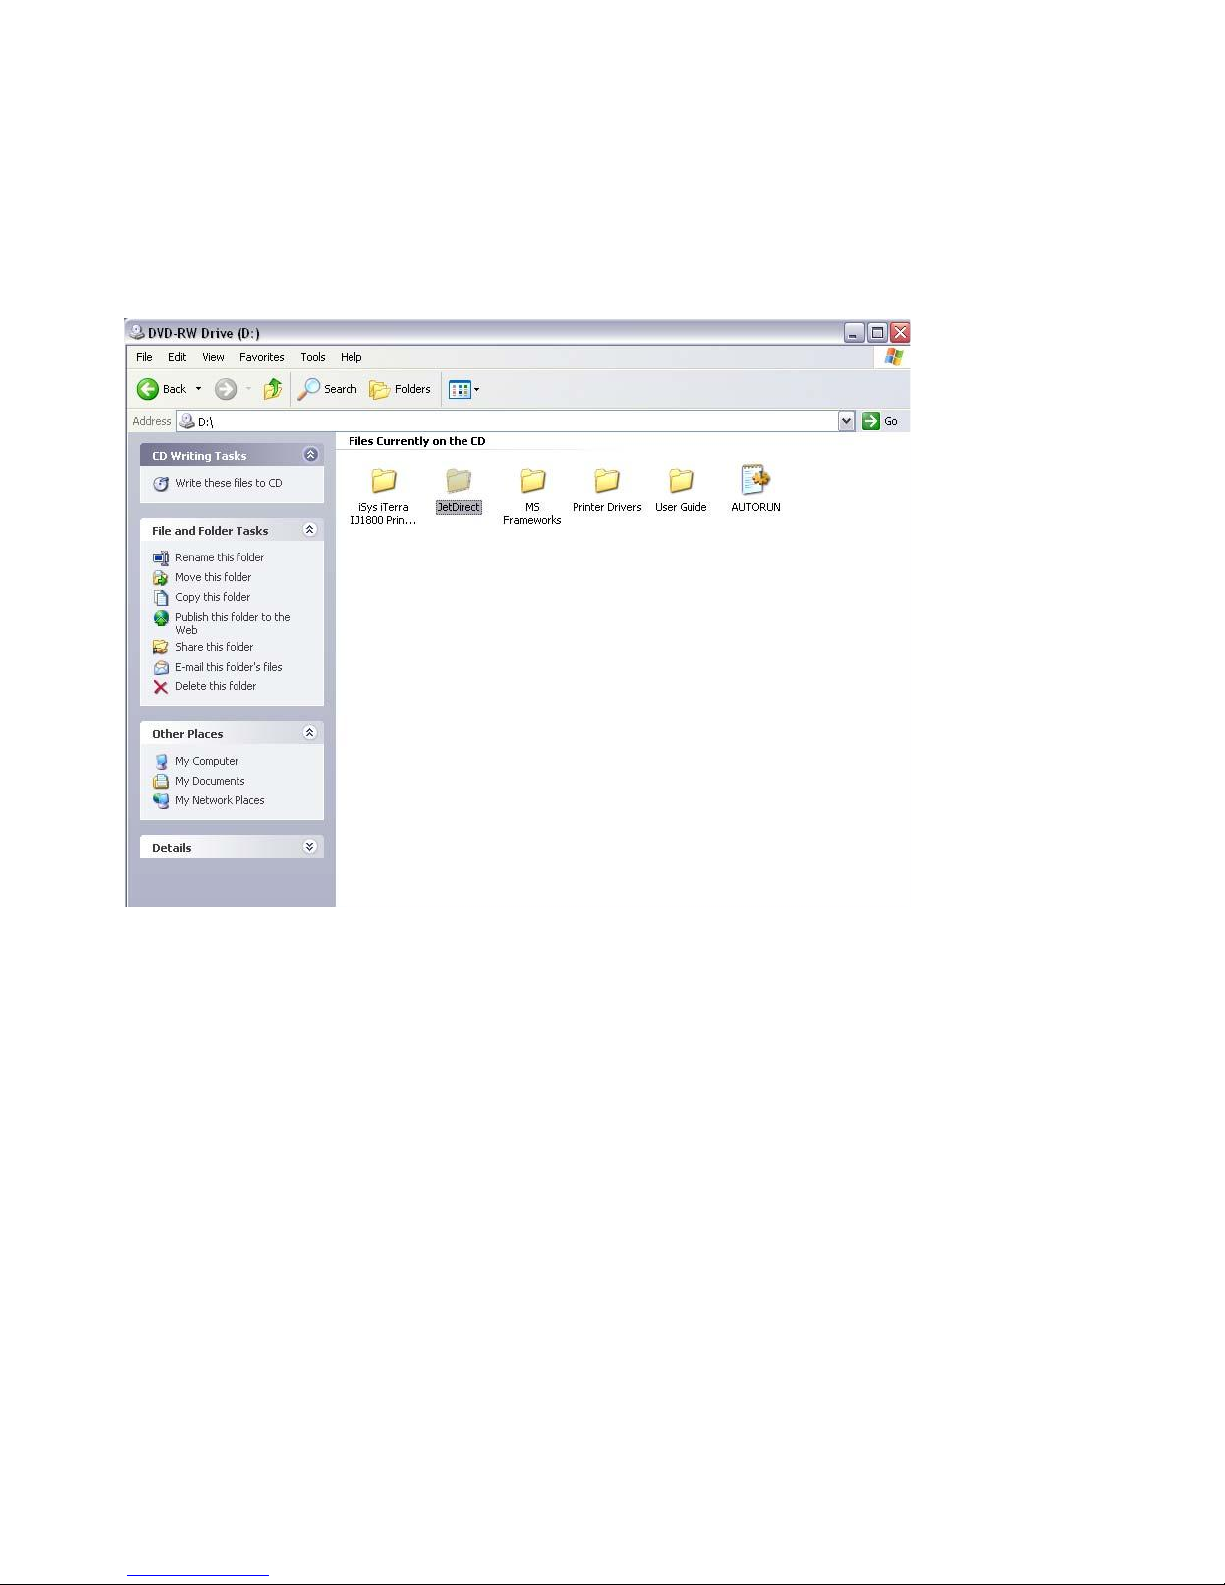
9 IP Configuration and Driver Installation
1. Connect the printer to the network. The printer will try to obtain IP from your
DHCP server.
2. Power on the printer.
3. Insert the iTerra IJ1800 CD into your PC (see example on next page).
4. Follow the instructions below to set up IP and install the driver.
Page 17
Page 17
9 IP Configuration and Driver Installation - continued
SEE ATTACHED CD:
Part Number: CD-IJ1800
STEP 9.1
Insert the IJ1800 CD and enter the JetDirect folder
Page 18
Page 18
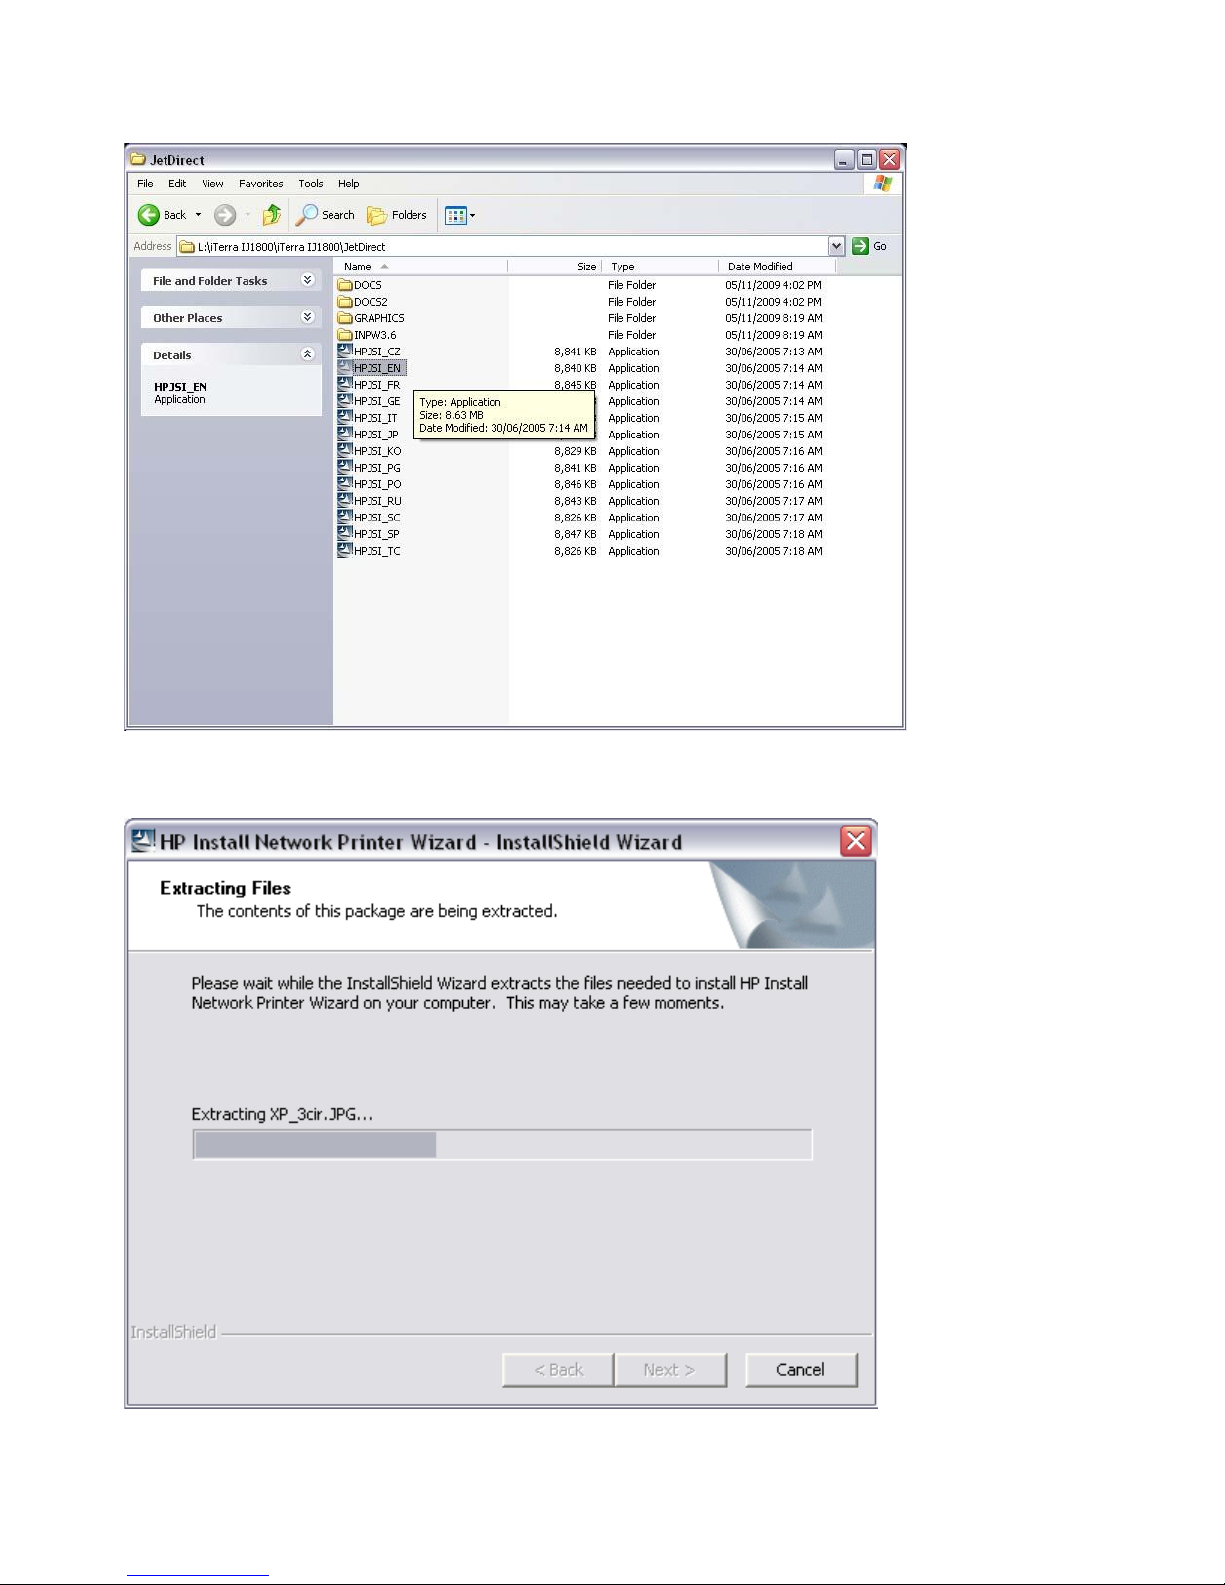
STEP 9.2
Select the .exe for your language (i.e. EN=English)
STEP 9.3
The InstallShield Wizerd will begin.
Page 19

Page 19
STEP 9.4
Click the „Next‟ Button.
STEP 9.5
Select “Wired” option and click the „Next‟ button.
Page 20
Page 20
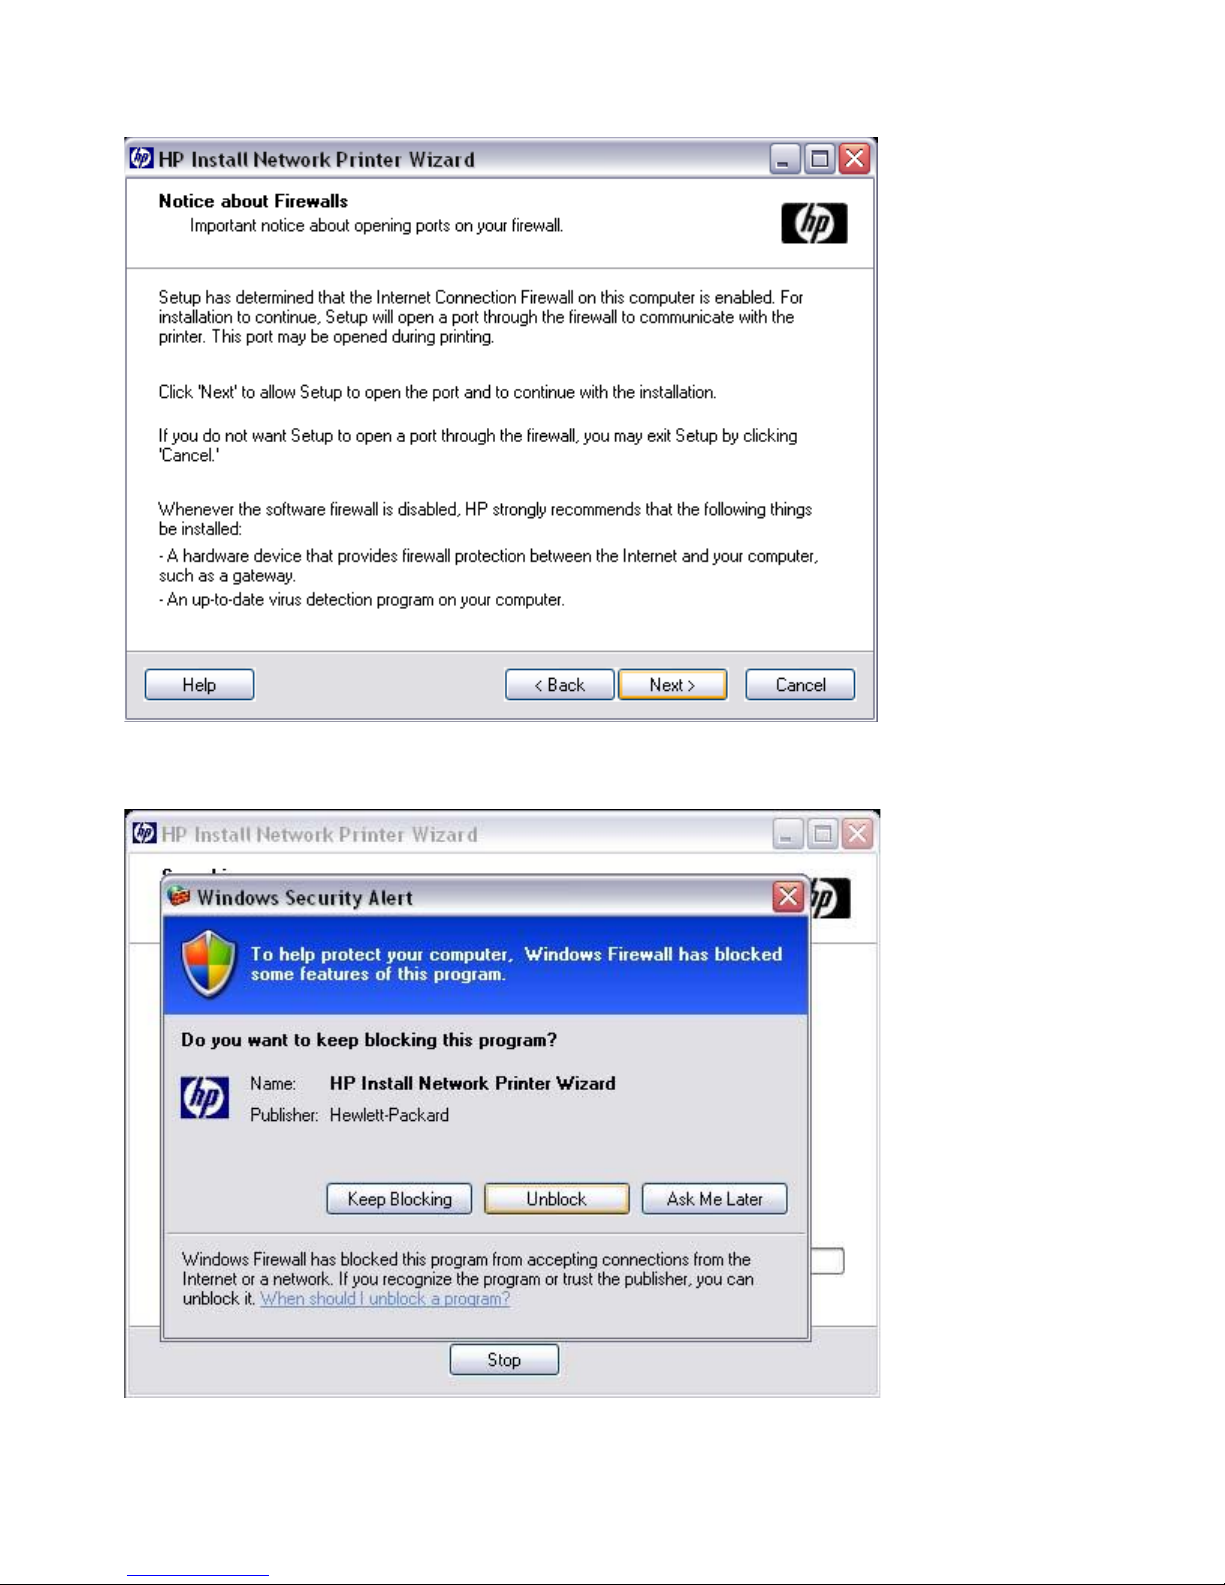
STEP 9.6
Message - Notice about Firewalls. Click the „Next‟ button.
STEP 9.7
If this message appears click the „Unblock‟ button.
Page 21
Page 21
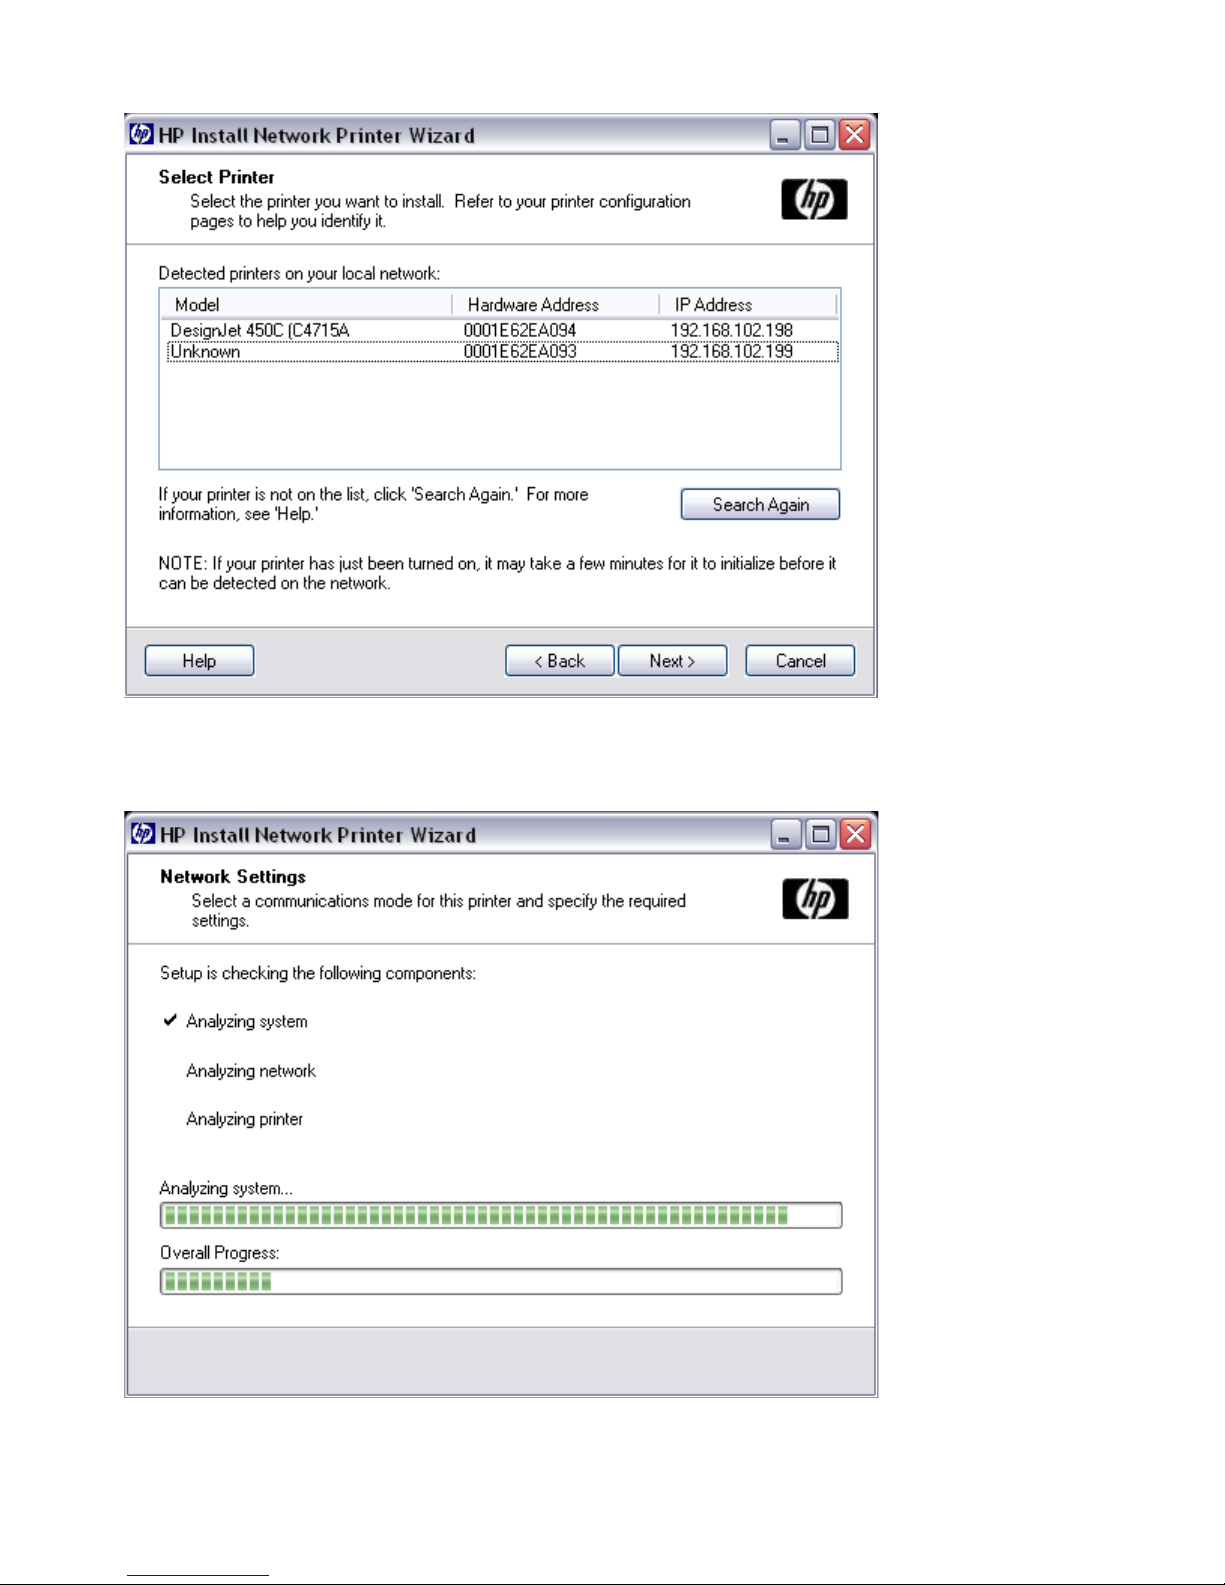
STEP 9.8
Select the printer iTerra IJ1800 and click „Next‟.
STEP 9.9
Setup is checking components.
Page 22
Page 22
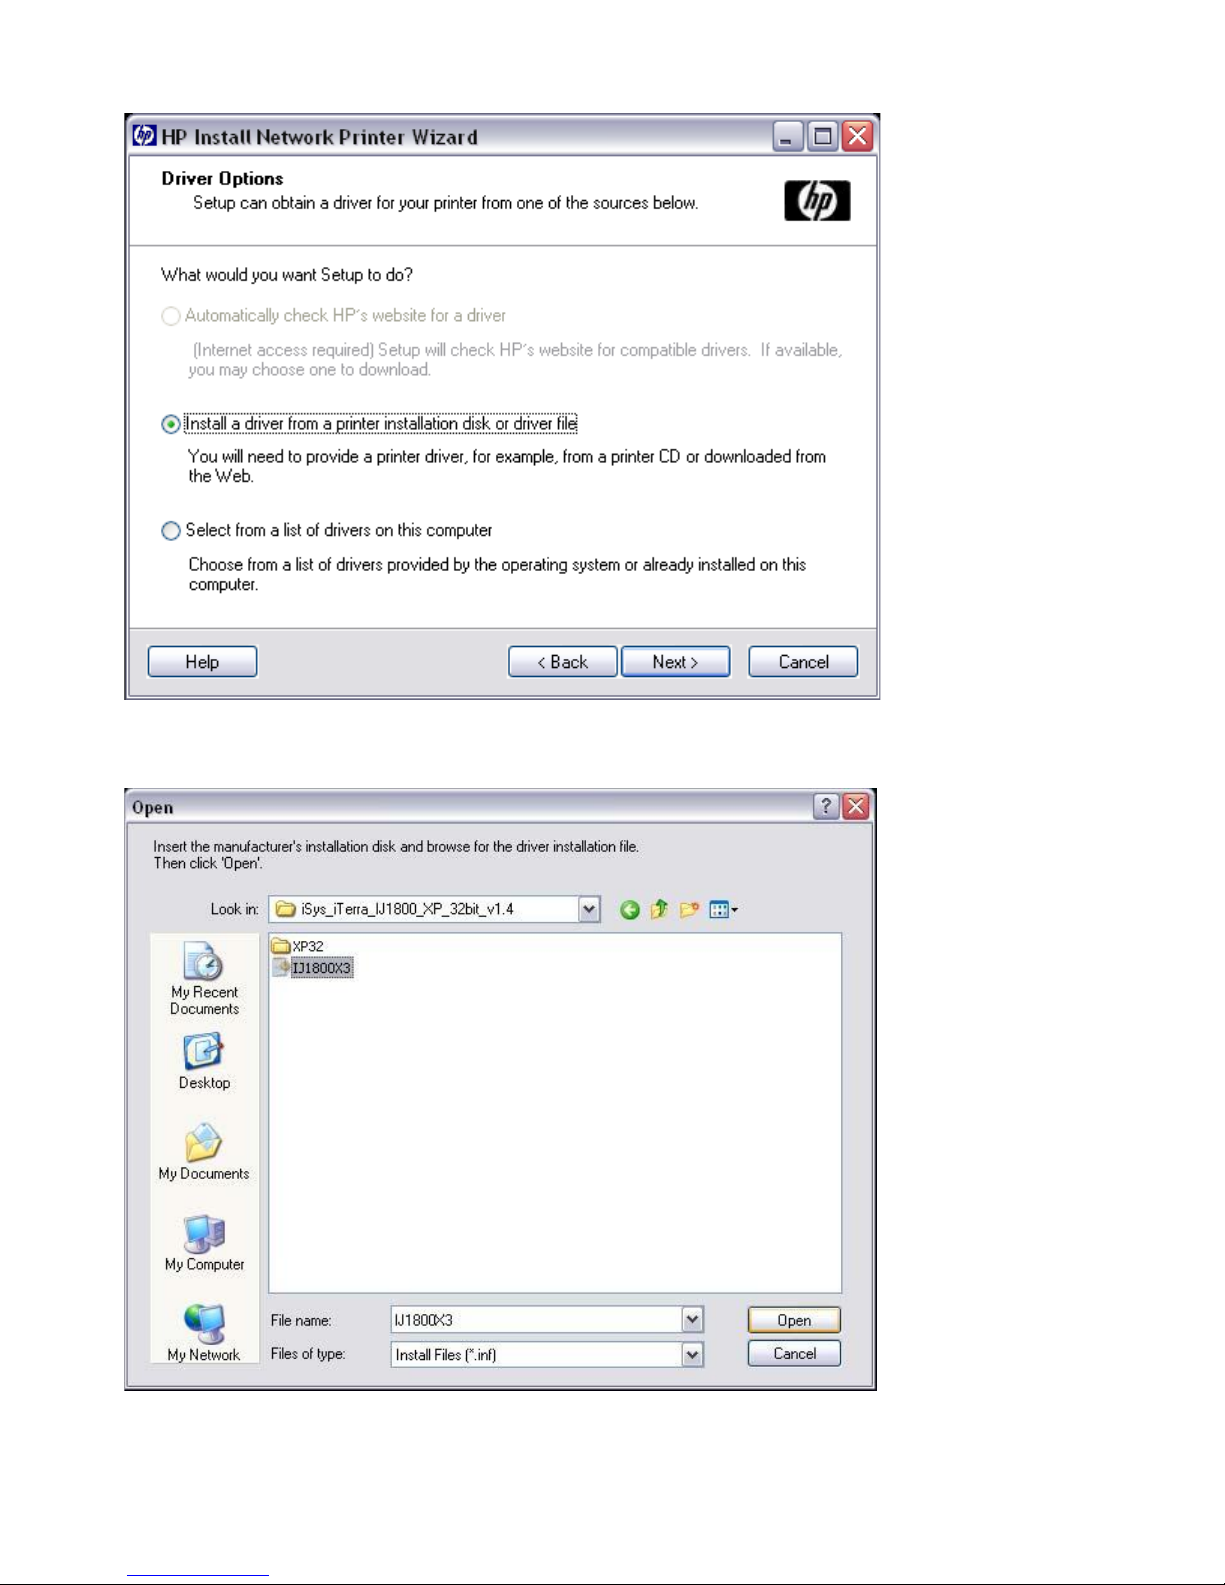
STEP 9.10
Select the second option and click „Next‟.
STEP 9.11
Select CD and the folder „iSys iTerra IJ1800 Driver‟. Open the folder
containing the Driver for your operating system. Select the file „.inf‟
and click „Open‟.
Page 23
Page 23
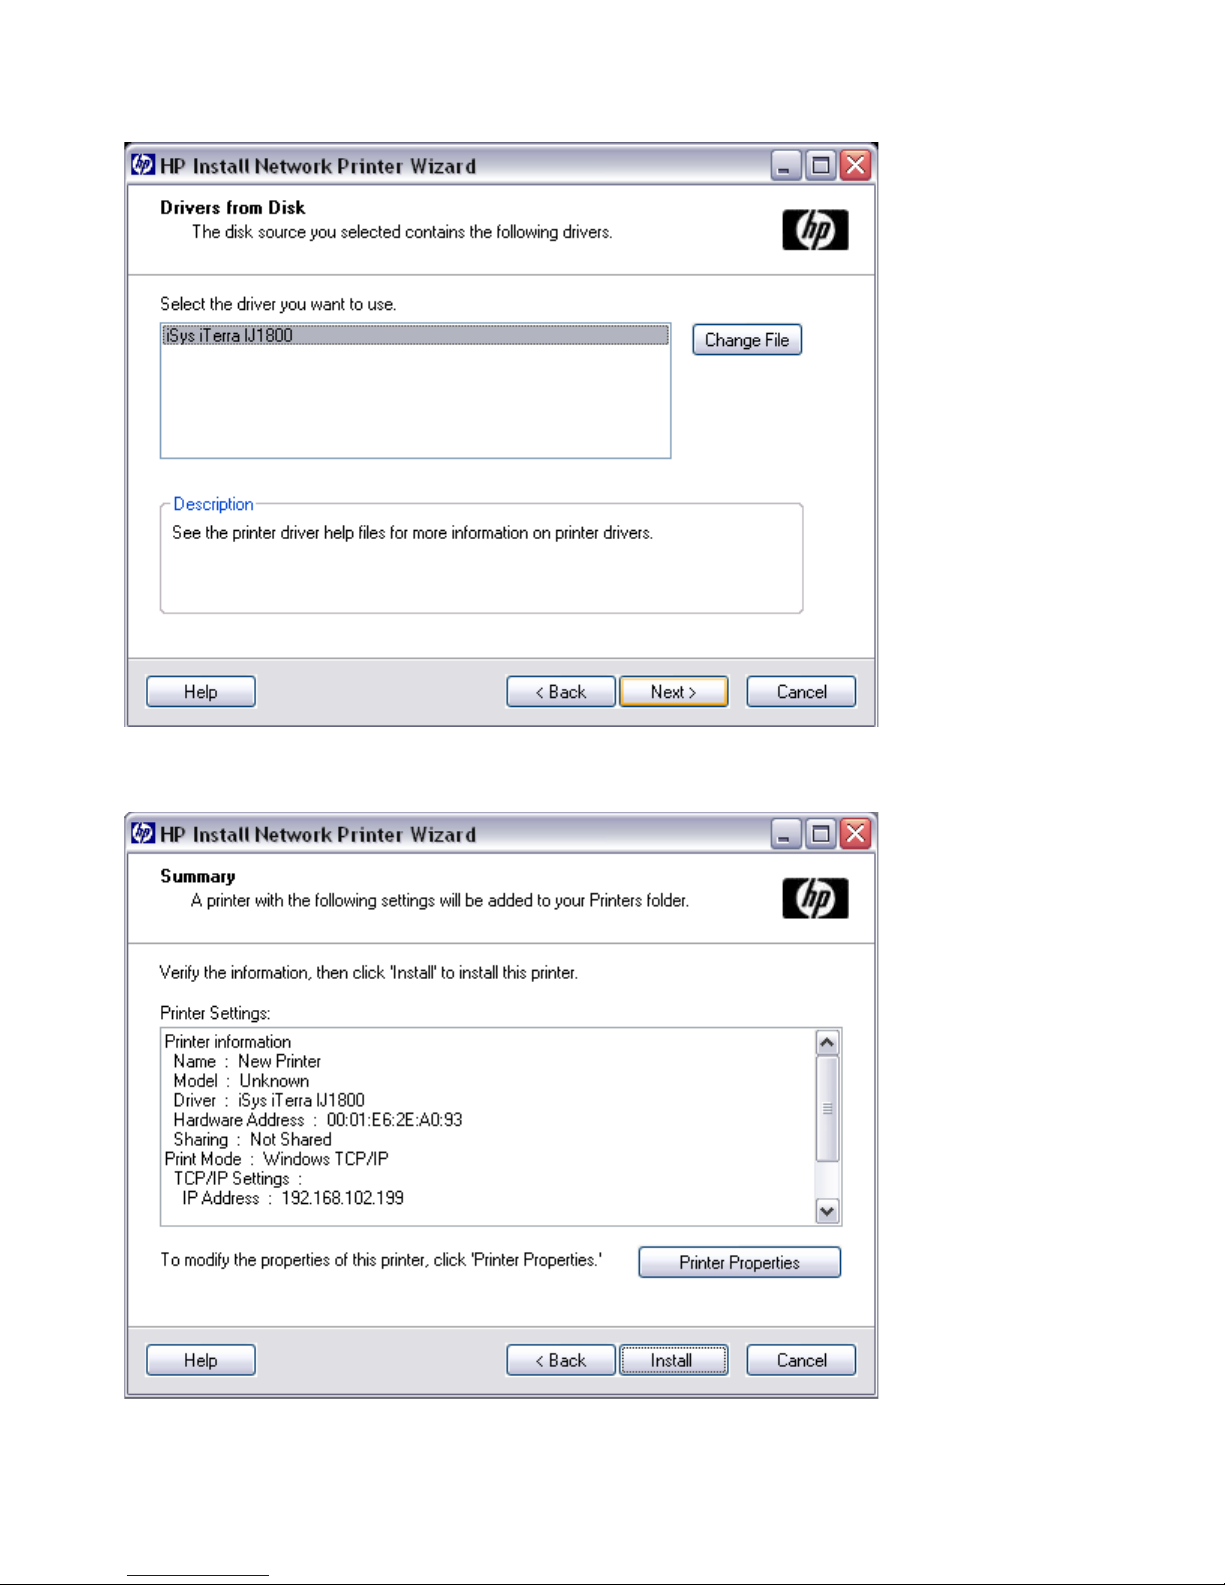
STEP 9.12
Select the iSys iTerra IJ1800 and click „Next”.
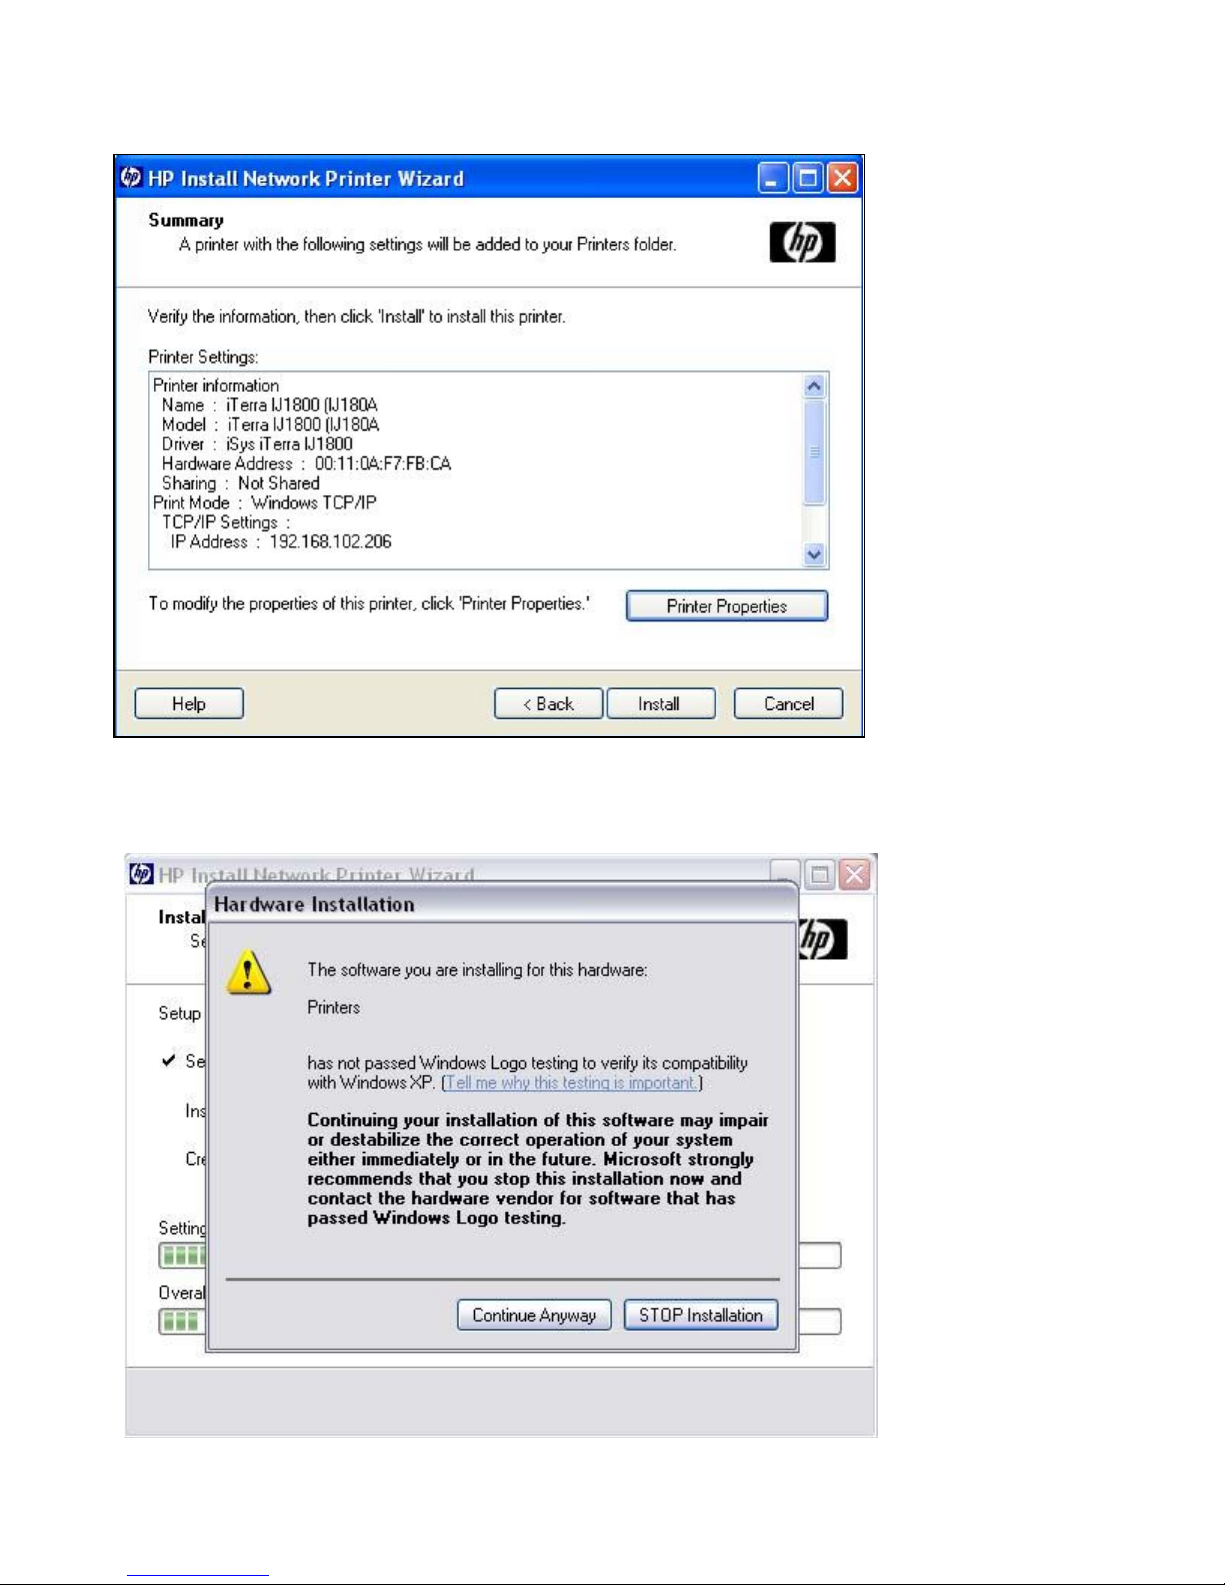
STEP 9.13
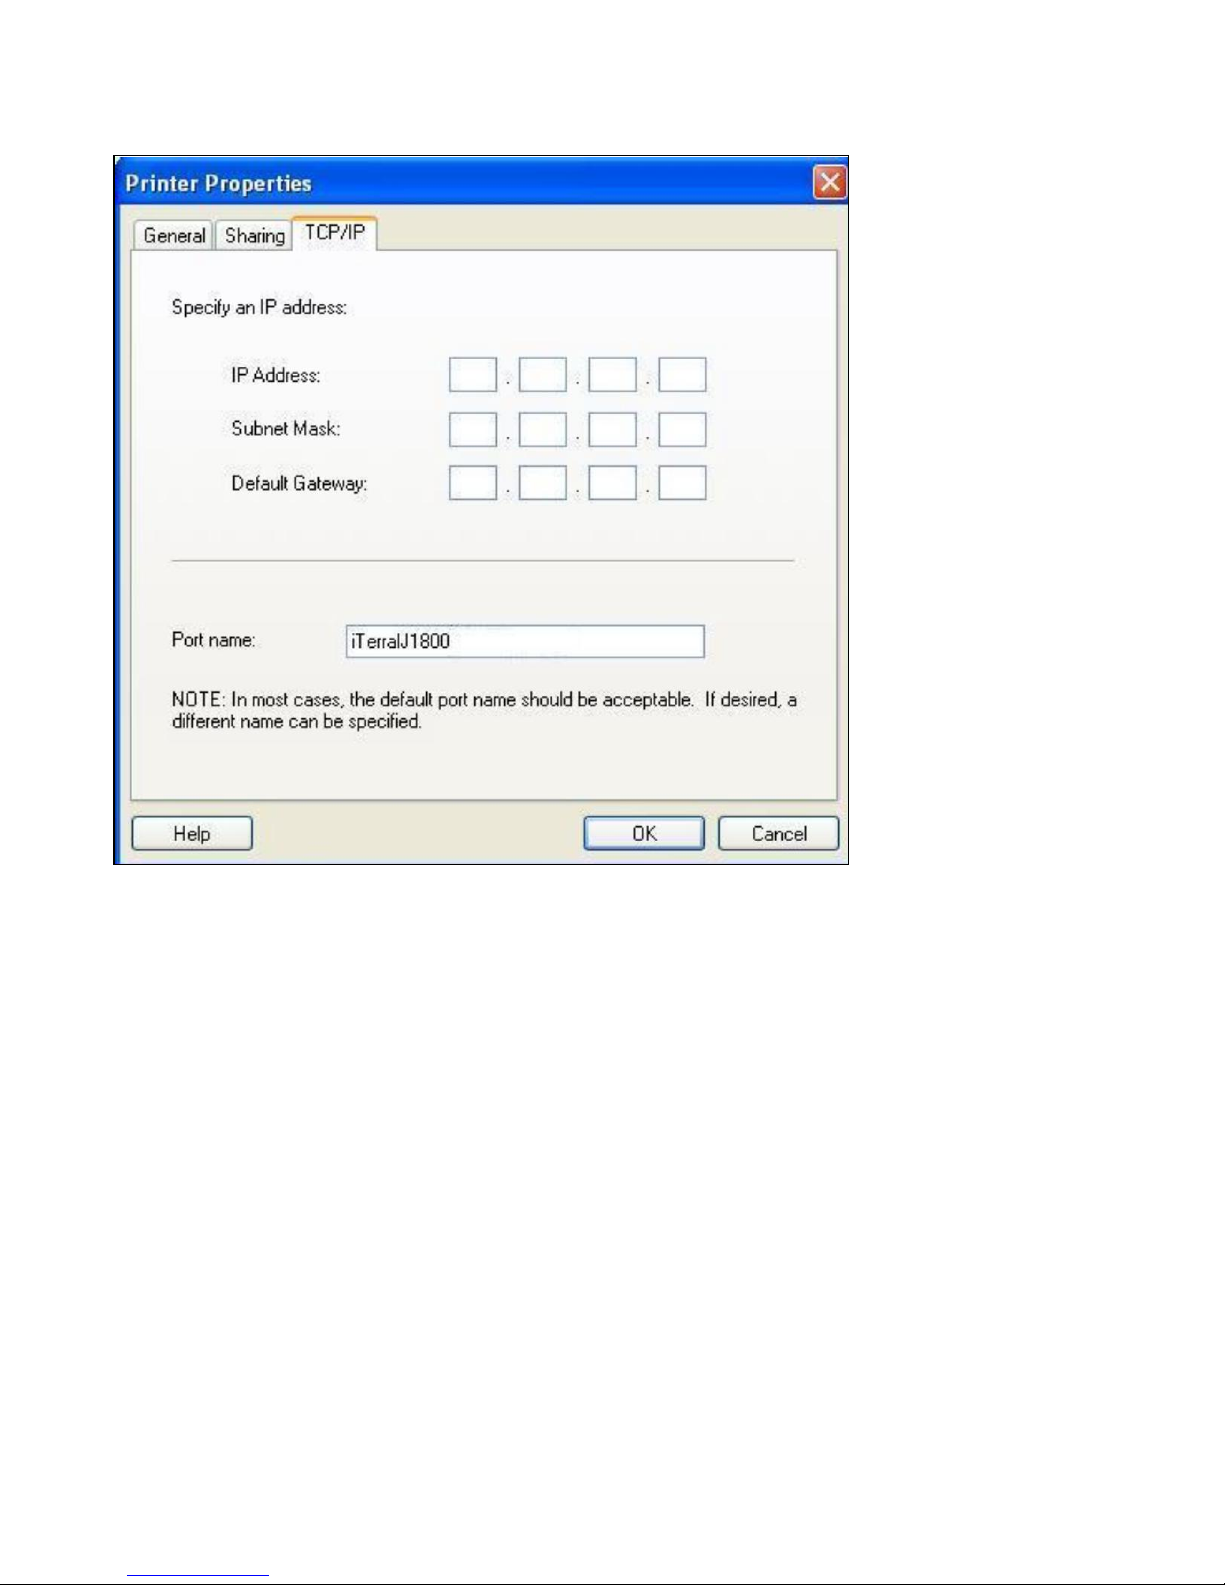
Click „Printer Properties‟ button to Set IP address.
Page 24
Page 24
STEP 9.11
Select the tab „TCP/IP and type your IP address.
Page 25
Page 25
STEP 9.12
Click „Install‟.
STEP 9.13
Click „Continue Anyway‟.
Page 26

Page 26
STEP 9.14
Click „Finish‟.
Page 27
Page 27
10 Manually Installing the IJ1800 Driver – Windows XP and
Windows 2000 (Centronics or
USB)
STEP 10.1
You will need the driver CD or the driver files from the „The Imaging
Systems Group‟ website www.isys-group.com
Open the Printers folder. (Mouse Click) start/Settings/Printers or
(Keyboard Sequence) Windows Key, s, p
STEP 10.2
Click the „Add Printer‟ icon which will start up the „Add Printer Wizard‟
Page 28

Page 28
10 Manually Installing the IJ1800 Driver – Windows XP and
Windows 2000 - continued
STEP 10.3
Click „Next ‟.
STEP 10.4
Select how you would like the printer to be connected.
Make sure the „Automatically . . . ‟ checkbox is UNCHECKED
Page 29

Page 29
STEP 10.5
Select the output port you would like then select „Next >‟
Note: if the printer is on a TCP/IP address, use the Jetdirect Software
supplied to change the IP address of the printer. Then use „create a
new port:‟ option if a TCP/IP port has not already been created. To
create a TCP/IP port you will need the printers IP address.
Page 30

Page 30
STEP 10.6
Select „Have Disk‟
STEP 10.7
Select „Browse‟.
Page 31

Page 31
STEP 10.8
Select CD and the folder „iSys iTerra IJ1800 Driver‟. Open the folder containing the
Driver for your operating system. Select the file „.inf‟ and click „Open‟.
Page 32

Page 32
STEP 10.9
Select the file „.inf‟ and click „Open‟.
STEP 10.10
Click „Next‟.
Page 33
Page 33
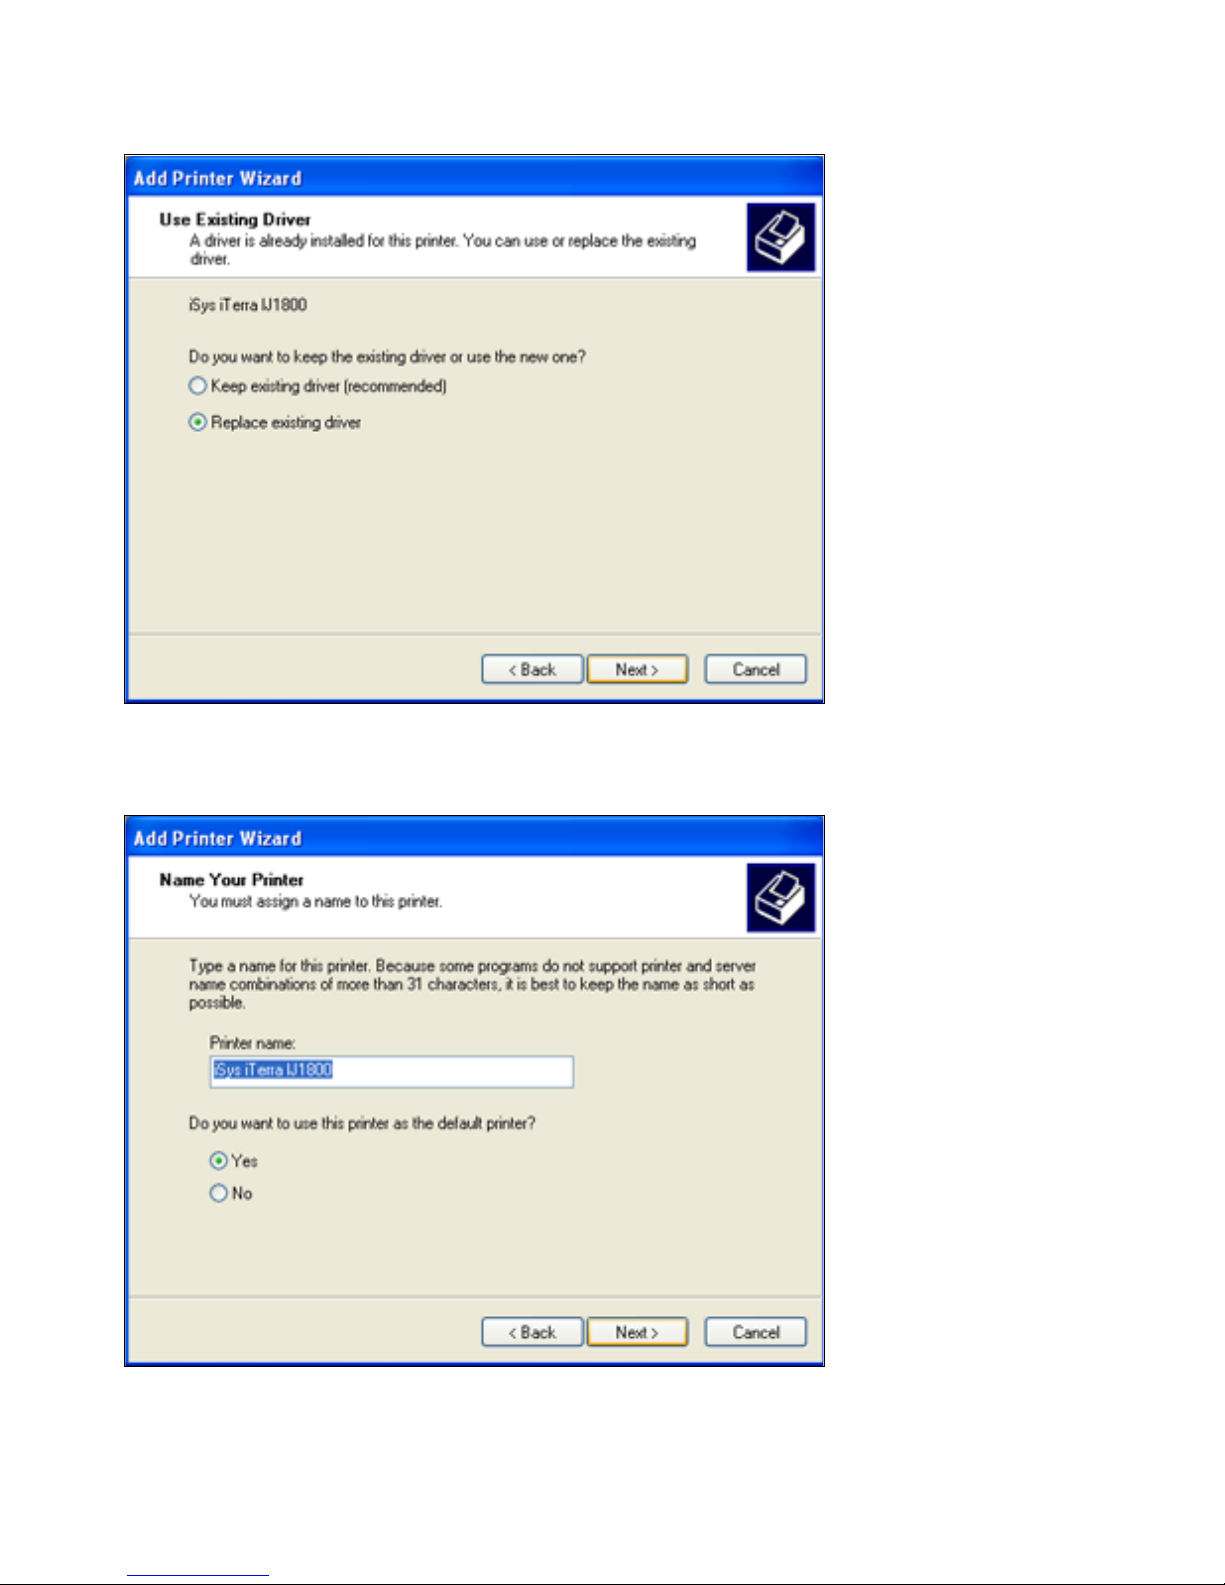
STEP 10.11
Select „Replace existing driver‟ and click „Next‟
STEP 10.12
You can change the name of the printer if you like to something more
recognizable such as „Jerry‟s IJ1800 Printer‟. Then click „Next‟.
Page 34
Page 34
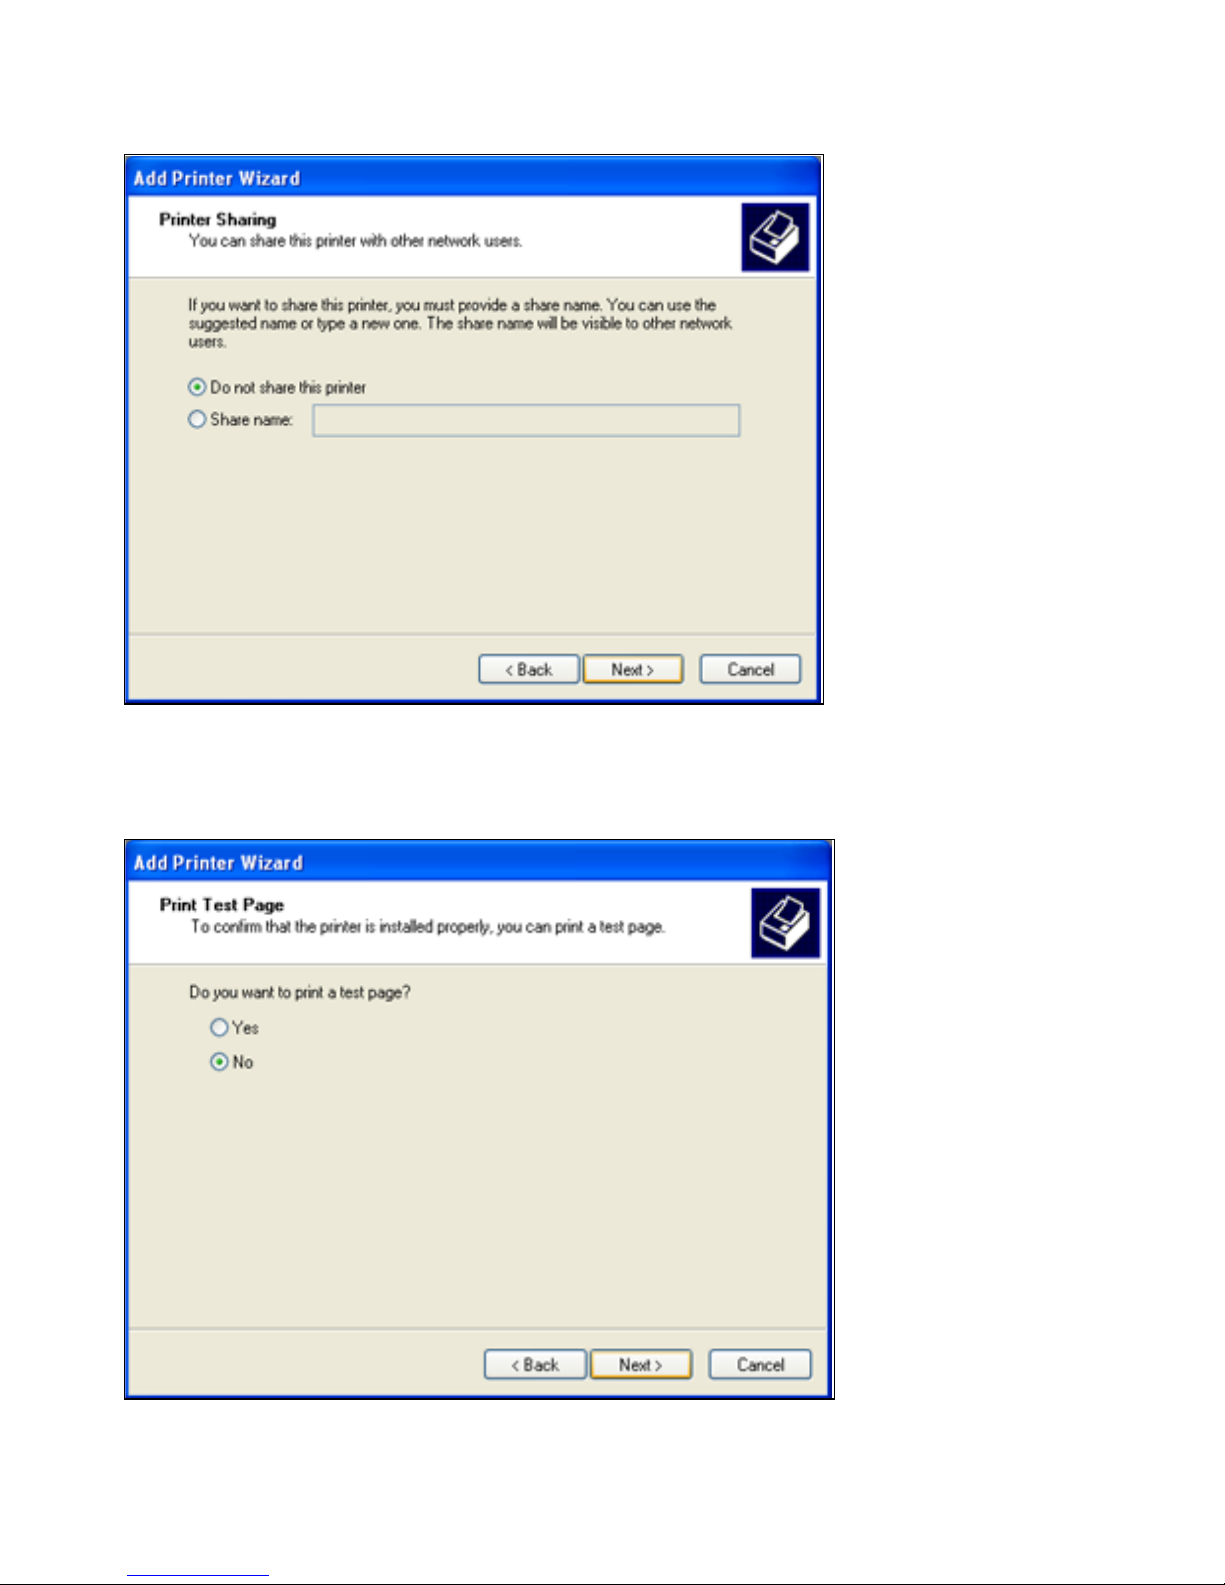
STEP 10.13
You may share the printer with other users if you like. Click „Share
name‟ and enter the information. Click „Next‟.
STEP 10.14
Click „Next”.
Page 35

Page 35
STEP 10.15
Click „Finish‟.
STEP 10.16
Click „Continue Anyway‟. Once the files are copied, the printer is ready
for use.
Page 36
Page 36
11 Installation of the Printer Monitor Application
The iSys IJ1800 Printer Monitor application allows the user to view the status of the
printer as well as run any necessary function to keep the quality of your printout
looking its best.
Installation Notes
This application requires Microsoft Frameworks Ver 2.0 or better. If you have access to
the internet from the computer you will be installing this application on, the installation
application will download and install Microsoft‟s Frameworks for you if not already
installed and will continue on to finish installing the iSys IJ1800 Printer Monitor. If you
do not have access to the internet, a copy of the Microsoft Frameworks application has
been included on the supplied CD within the „MS Frameworks‟ directory.
On the supplied CD within the „IJ1800 Monitor‟ directory, run the setup.exe application
and follow the instructions. This will create a desktop icon that will launch the
application and a copy of it is also present from the „Start/Programs‟ menu.
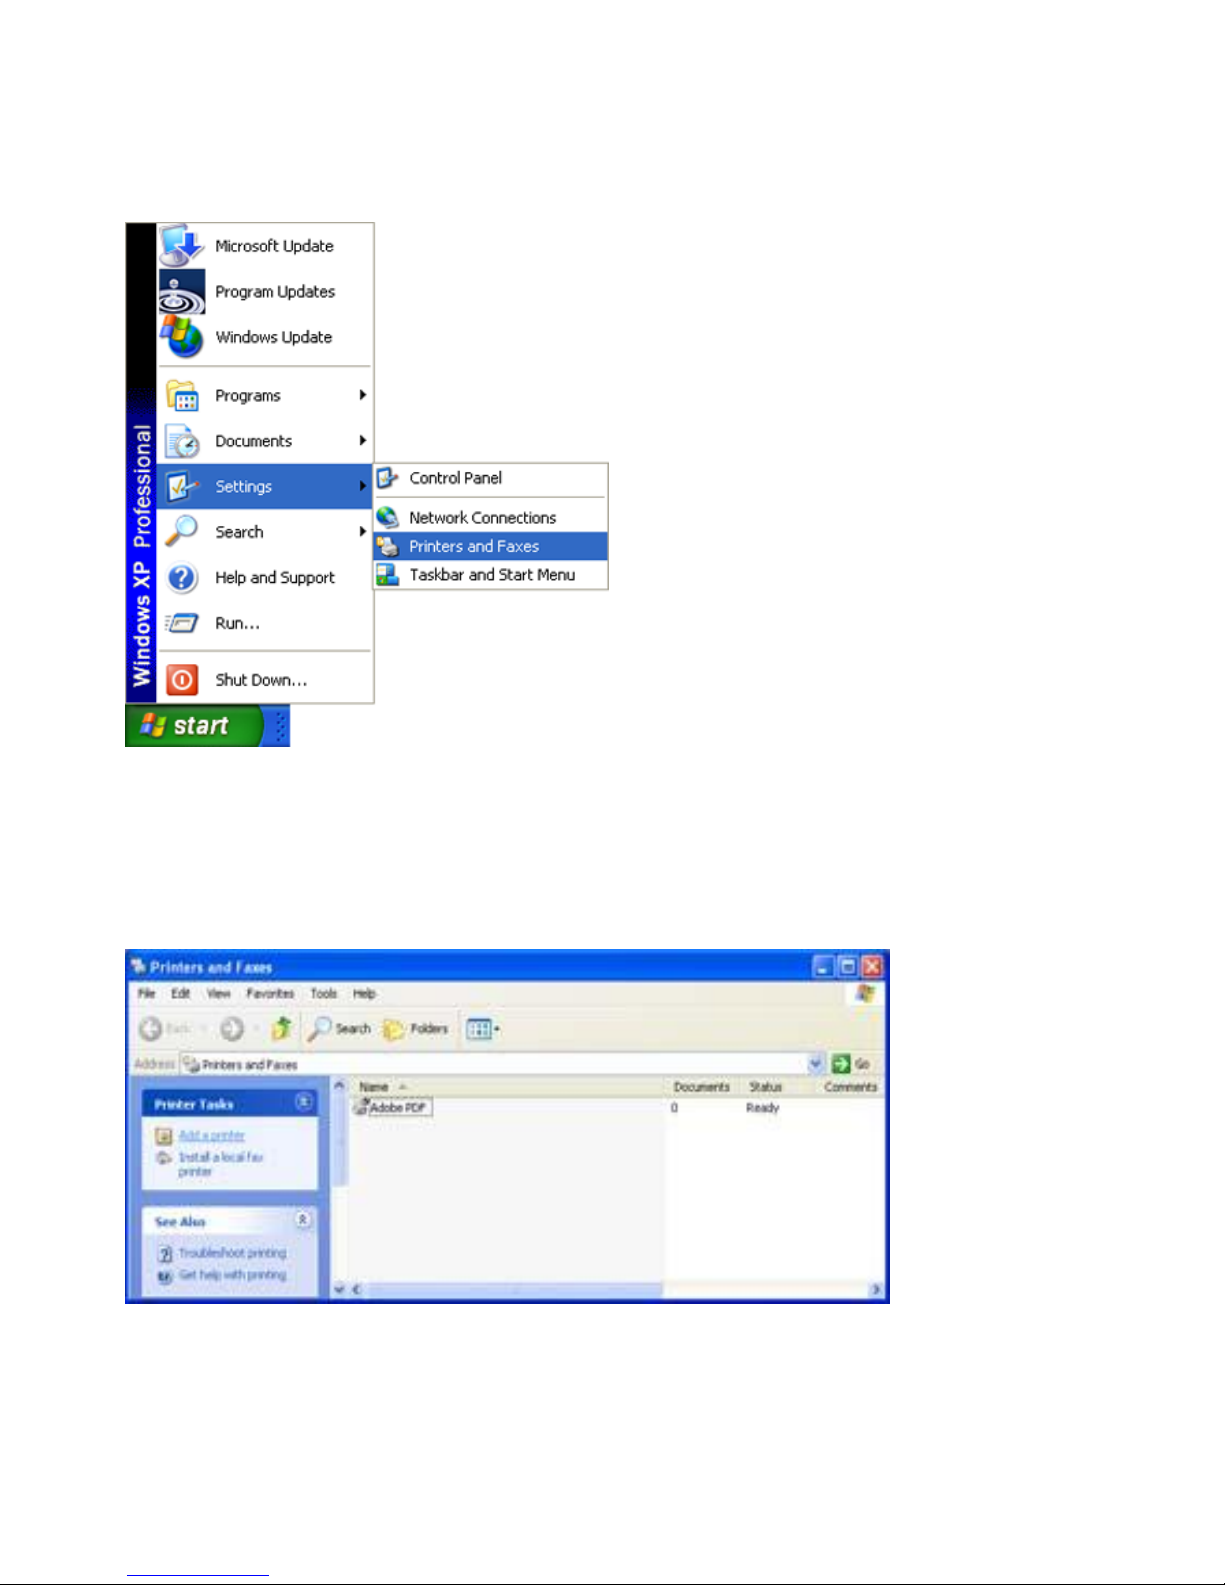
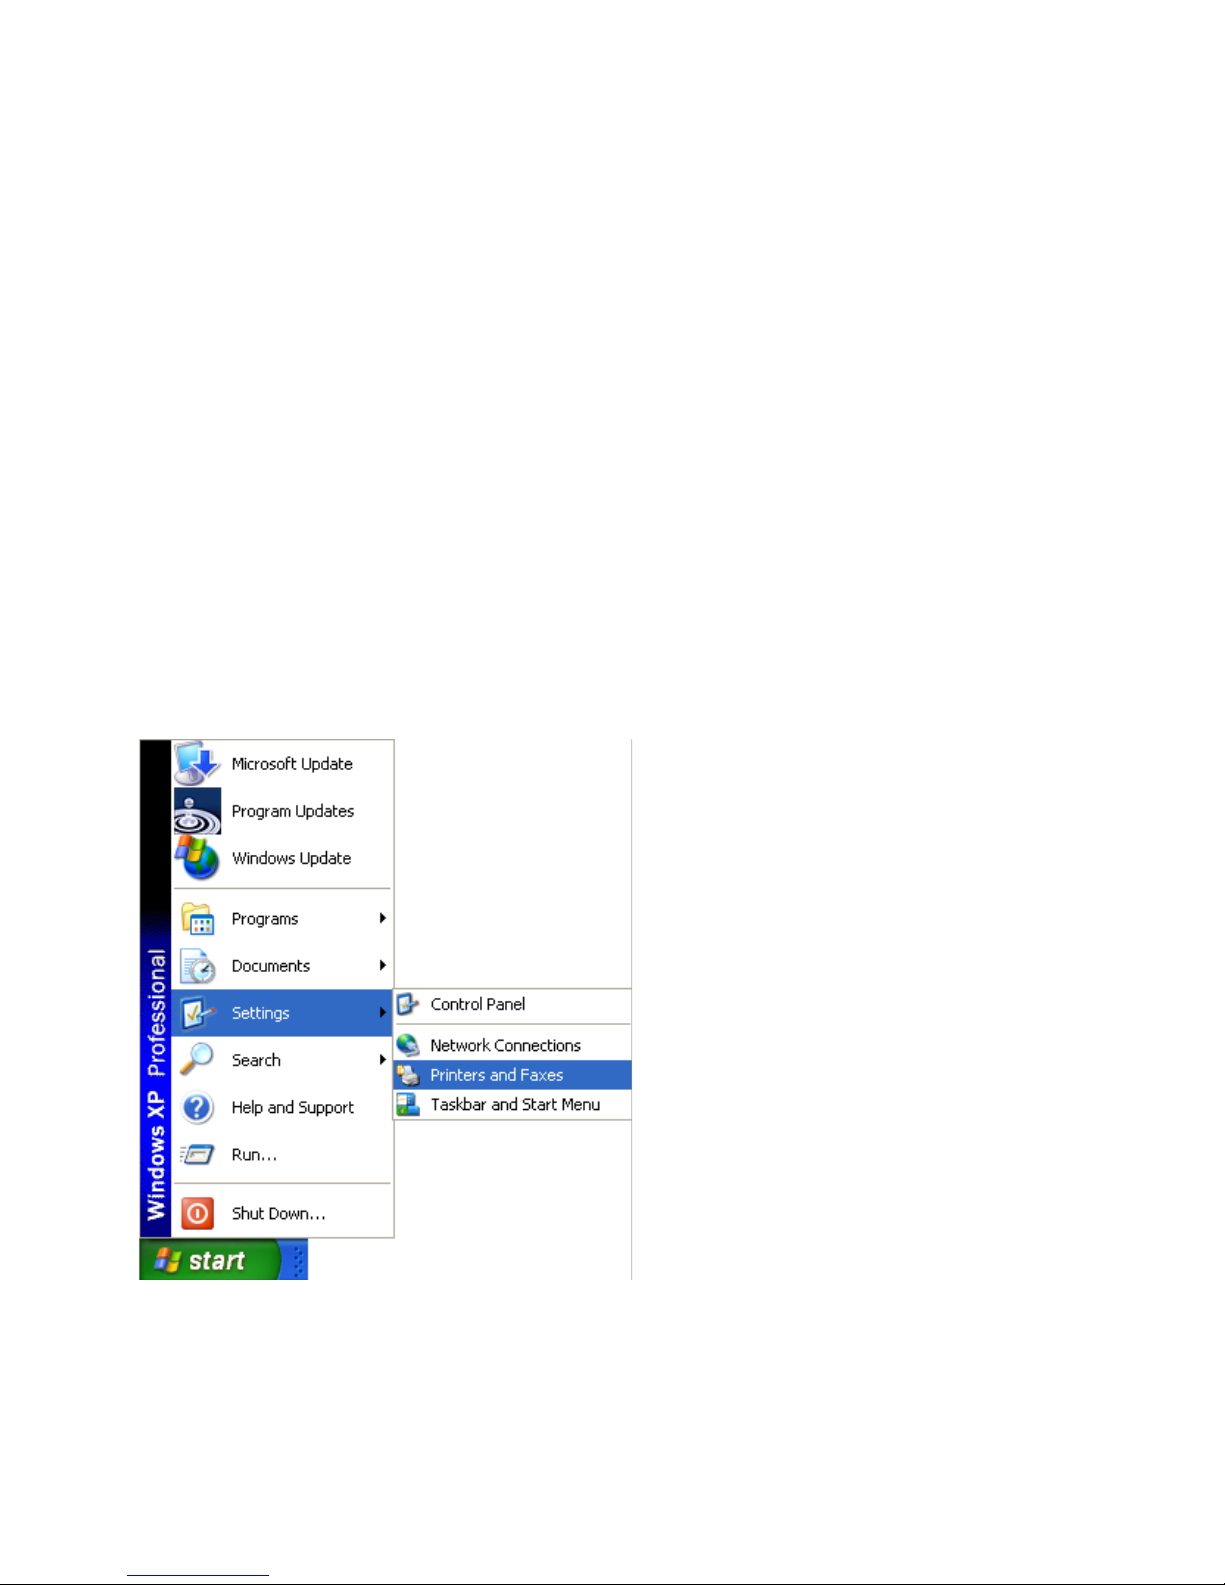
STEP 11.1 Retrieving The Printers IP Address
Click „Settings‟ then „Printers and Faxes.‟
Page 37

Page 37
STEP 11.2
NOTE: Running the application for the first time will require that you
know the IJ1800‟s IP address. If you have the printer driver installed
for the printer you would like to monitor, you can usually retrieve the
IP address from the Printer Properties under the Ports tab.
STEP 11.3
Right clicking on the printer will open a selection sheet where you can
select the Properties item.
Page 38

Page 38
STEP 11.4
Notice the IP in the above case. The IP for this printer would be
„192.168.102.206‟. If you still don‟t know the IP address, you should
talk to your technical support personal.
STEP 11.5 Running the Application
Functionality – The Settings Tab
Upon running the application for the first, the application looks very
plain. The only option you have is to click the „Add IP‟ button.
Page 39
Page 39
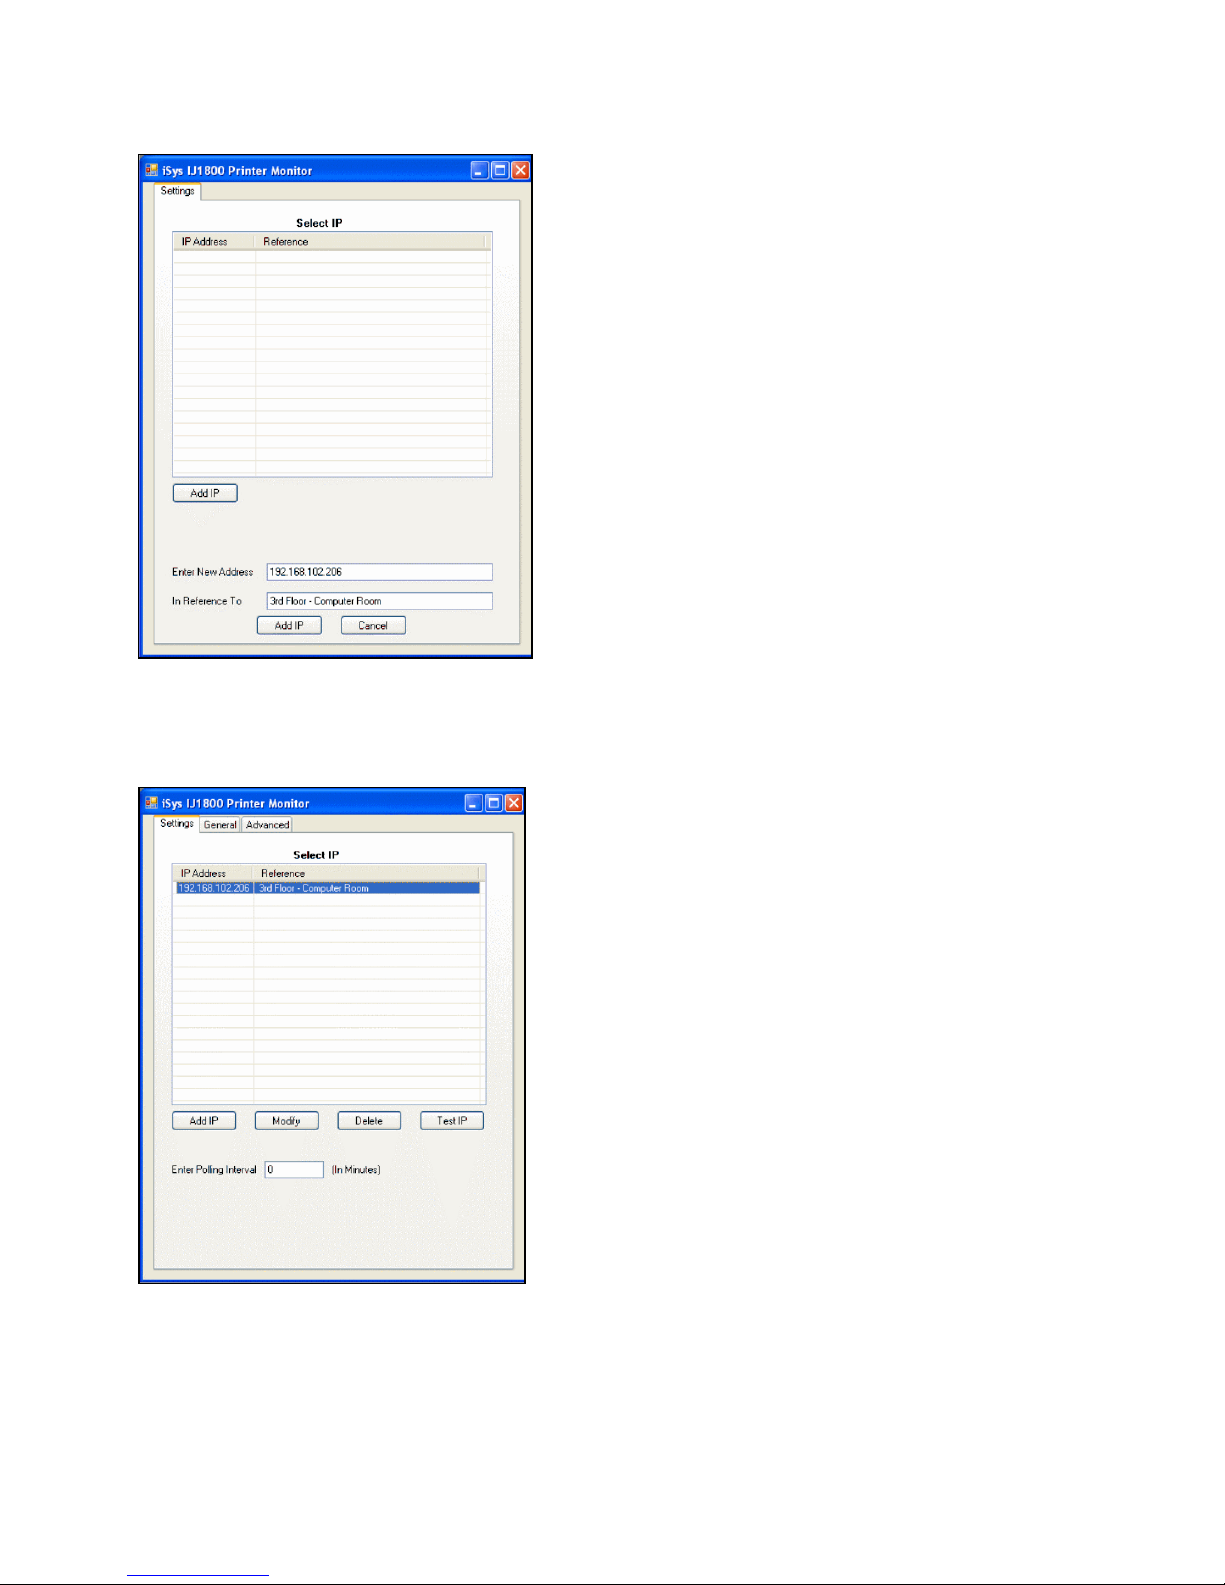
STEP 11.6
Through clicking the “Add IP” button, a few more input items are
revealed.
STEP 11.7
After you have entered an IP address and a text reference about the
printer (you will see we have entered the IP address
“192.168.102.206” with a reference to “3rd Floor – Computer Room”)
you can select the printer from the list, which will reveal more
options.
Page 40
Page 40
You can Add another IP Address, Modify the current selected IP
address or reference, Delete the selected line or test whether or not
the application can detected a IJ1800 at the IP address you entered.
Note: the „Test IP‟ button will turn green if an IJ1800 was found or
turn red if one wasn‟t.
The box has two functions relating to the „General‟ tab at the top of
the application window. With a value of „0‟, the user has the option
of hitting the „Manual Update‟ button or with a value greater than 0 it
will automatically update the „General‟ screen every „X‟ number of
minutes.
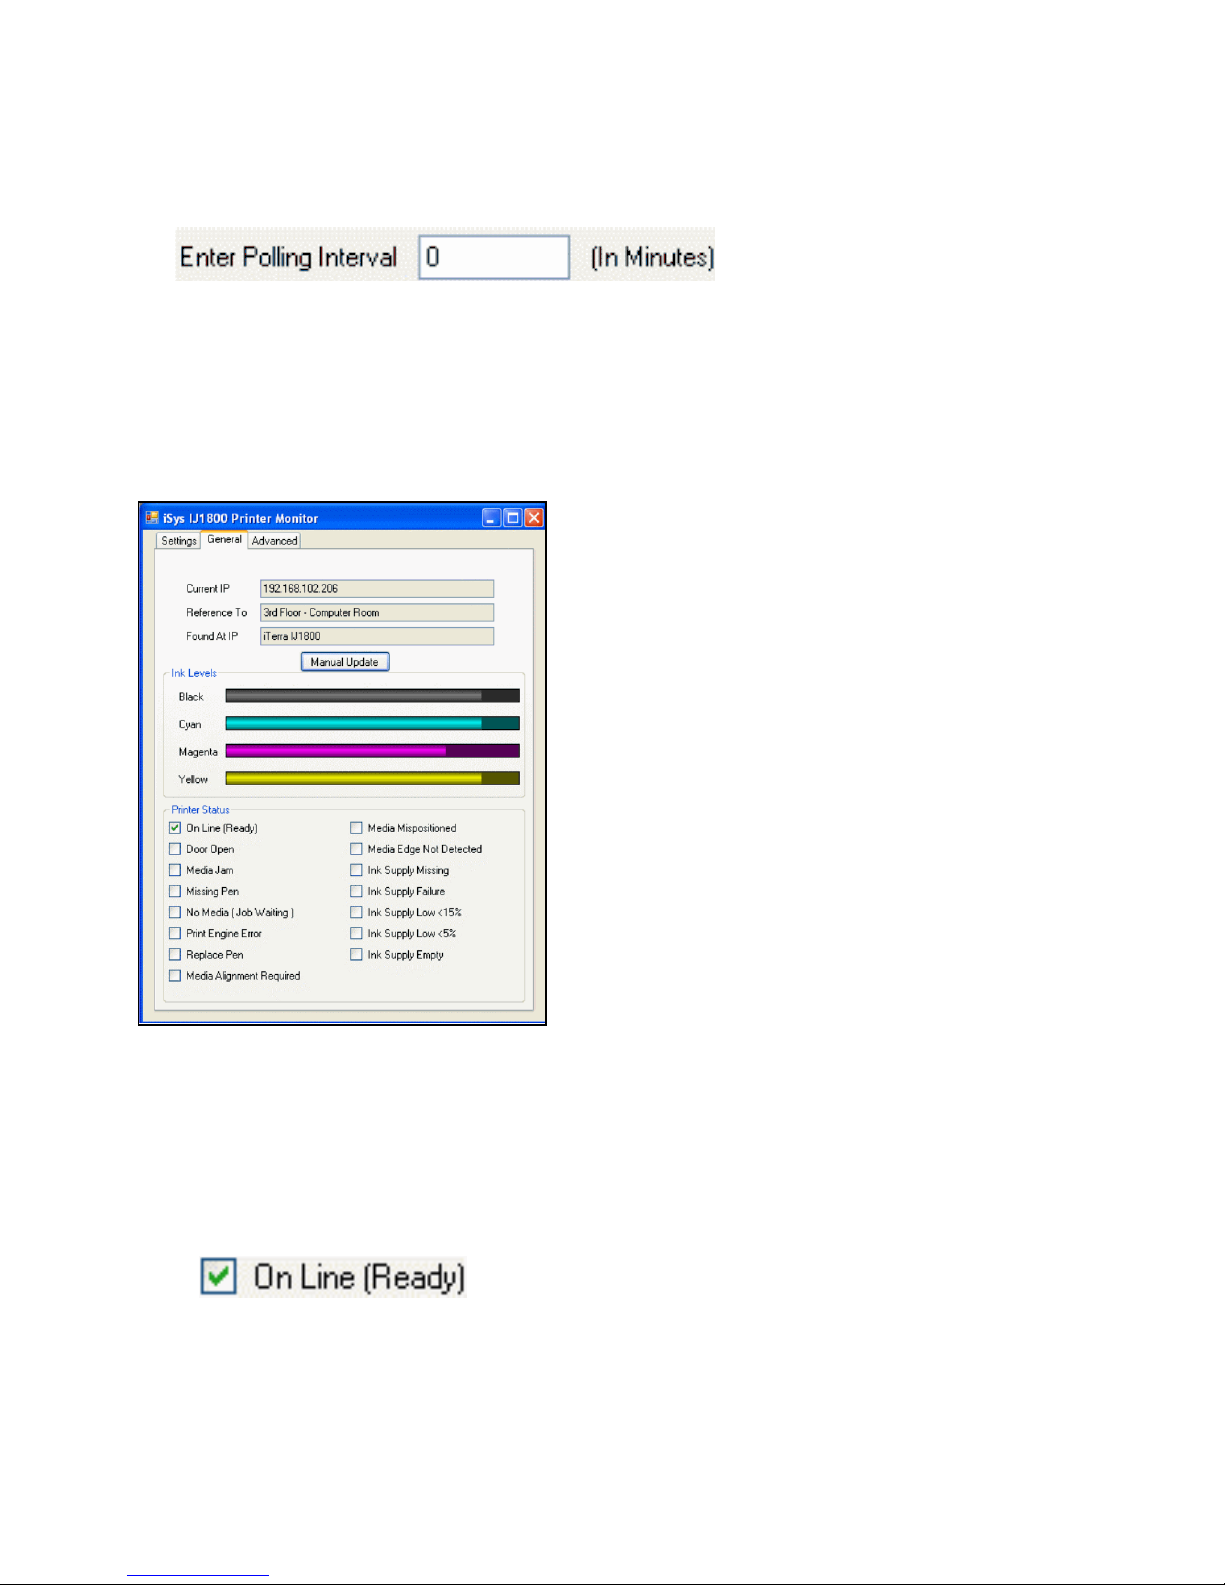
STEP 11.8
Functionality – The General Tab
This is the general status display. It shows the ink levels for the
printer and also its status and warnings. Here‟s an example.
The general status display is updated upon entering this display and
can be updated as described in the previous section. There are two
unique items is the display.
The status will change to reflect what the
printer is doing.
The item
(Printing, Drying Media, Accessing Pens, Aligning Pens, Loading
Media, Unloading Media, Checking Pens, Nesting Plots, Cancelling Job
and Replacing Print Kit). The other unique item is the „Manual
Update‟ button, which is only present if the polling interval is a value
of 0.
may change to the following items
Page 41
Page 41
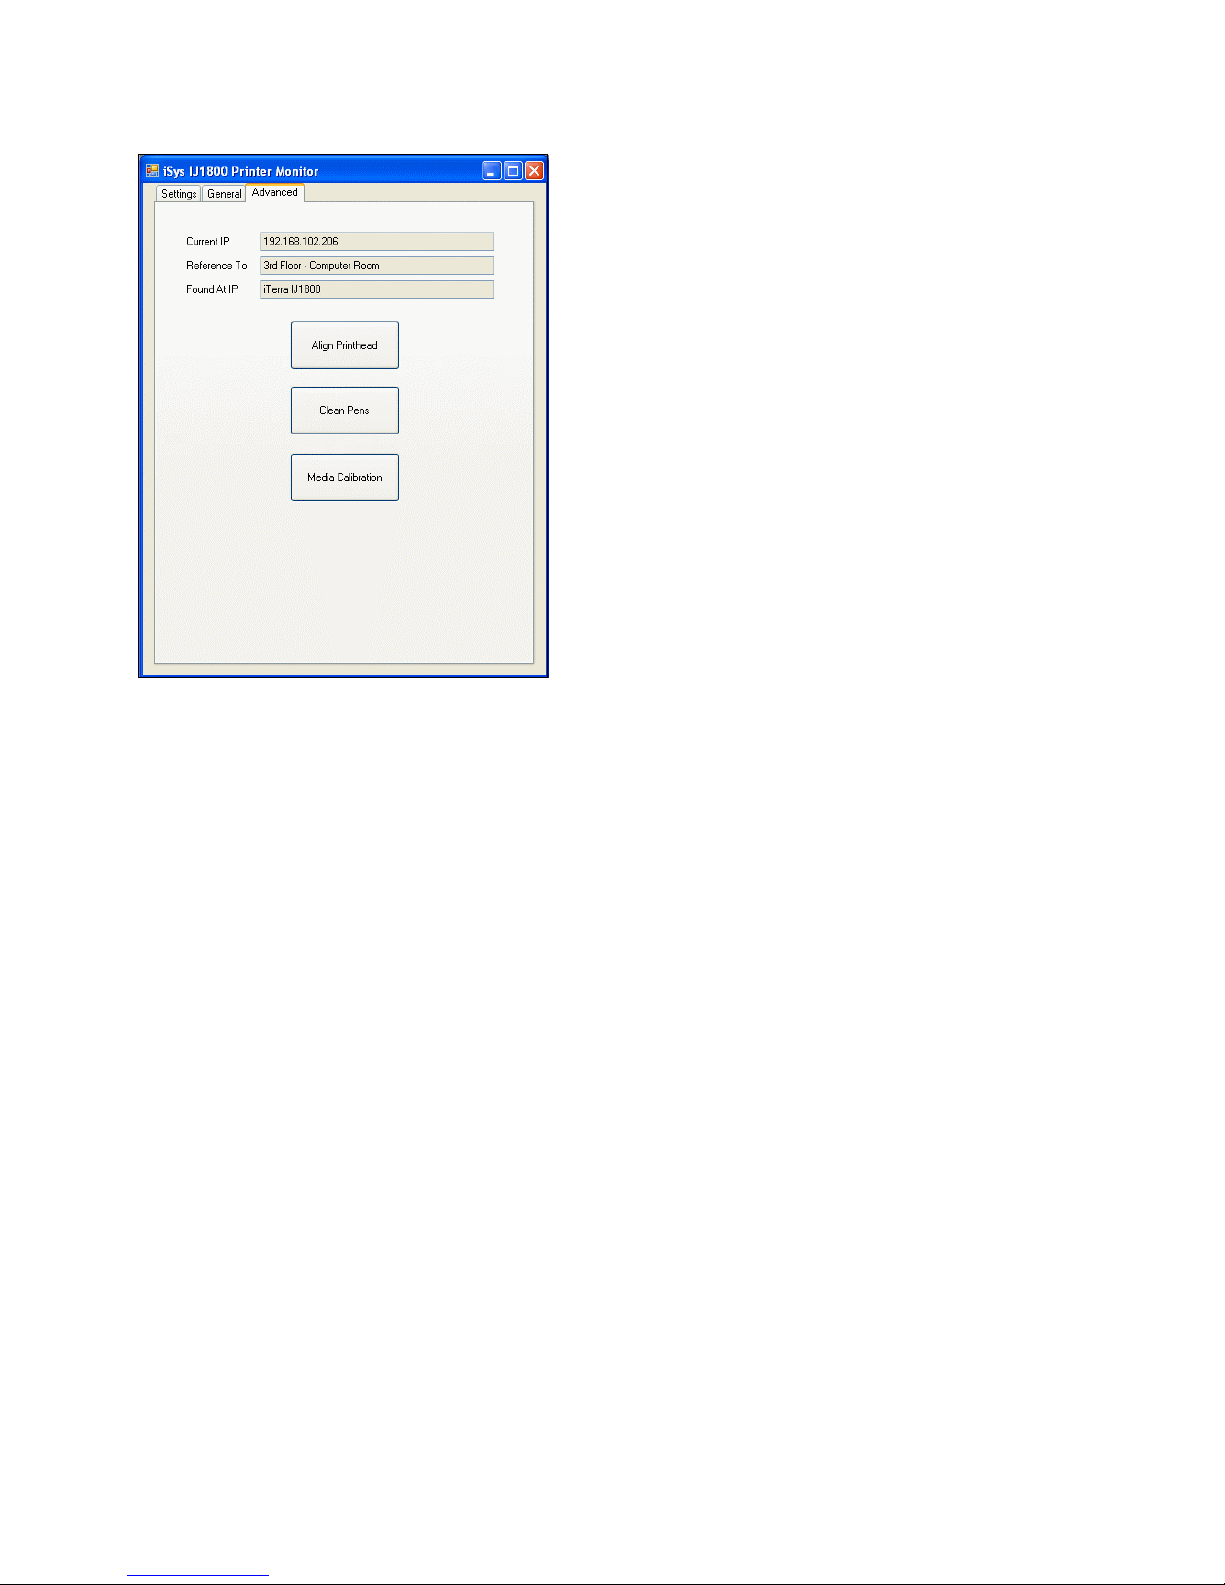
STEP 11.9
Functionality – The Advanced Tab
The third tab labelled „Advanced‟ allows the user to apply some
maintenance functions to the printer.
Align Printhead – Aligns the printheads so colors register correctly
Clean Pens – Used when print nozzles appear clogged
Media Calibration – Calibrates to a media thickness so plot lengths are
correct
Align printheads and clean pens are fairly simple functions and
basically only require that there is media present.
Media calibration requires a 3 step process:
1) Print a plot
2) Scan the plot
3) Reset the rear paper feed path
Note: The „Media Calibration‟ button does not respond immediately
and usually takes 10 seconds to retrieve data from the printer. If the
data has been retrieved correctly the button will turn green.
Page 42

Page 42
STEP 11.10
IMPORTANT: Media calibration requires a sheet of blank paper,
the same as the fan fold media you are using with minimum
dimensions of 11”x17”.
Page 43

Page 43
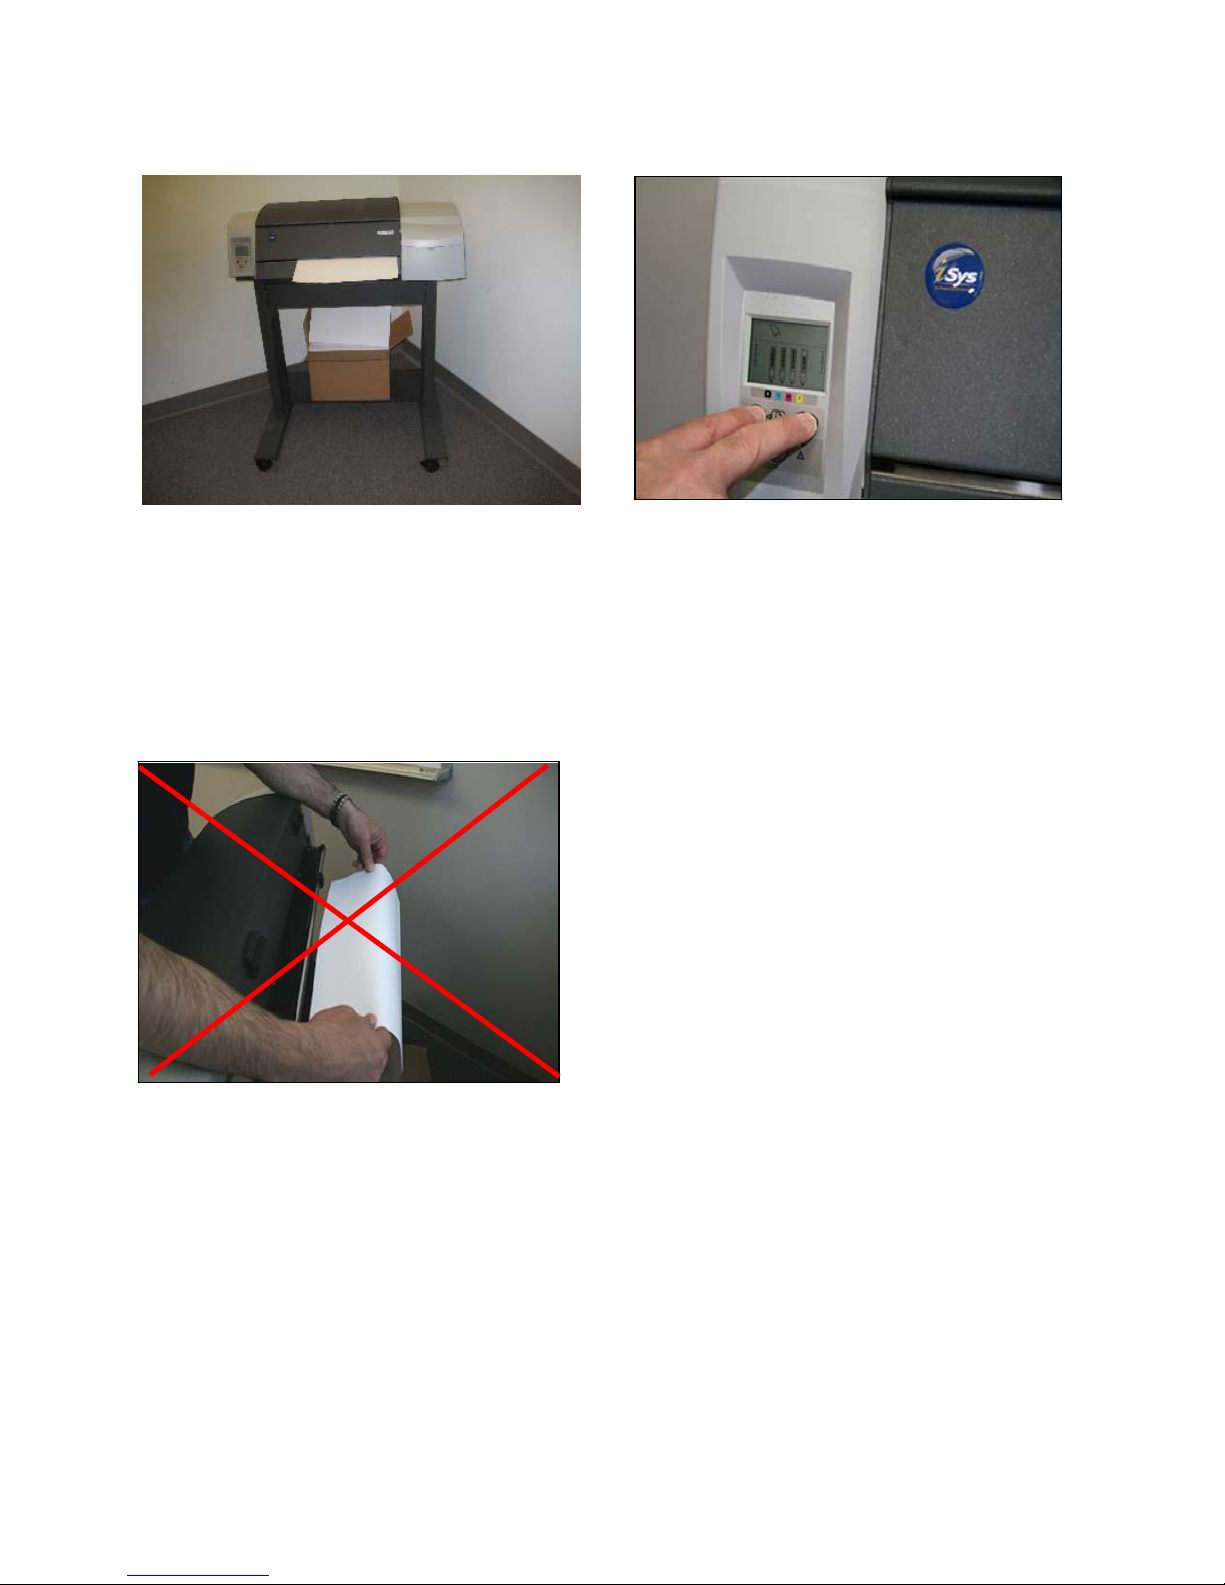
STEP 11.11
a) Insert a blank sheet of paper into the rear paper path using the
11” side as the side that enters the printer first. Wait until the paper
has been accepted and that there are no paper skew issues or front
panel errors. Now you may click on the “Print Calibration Plot” button.
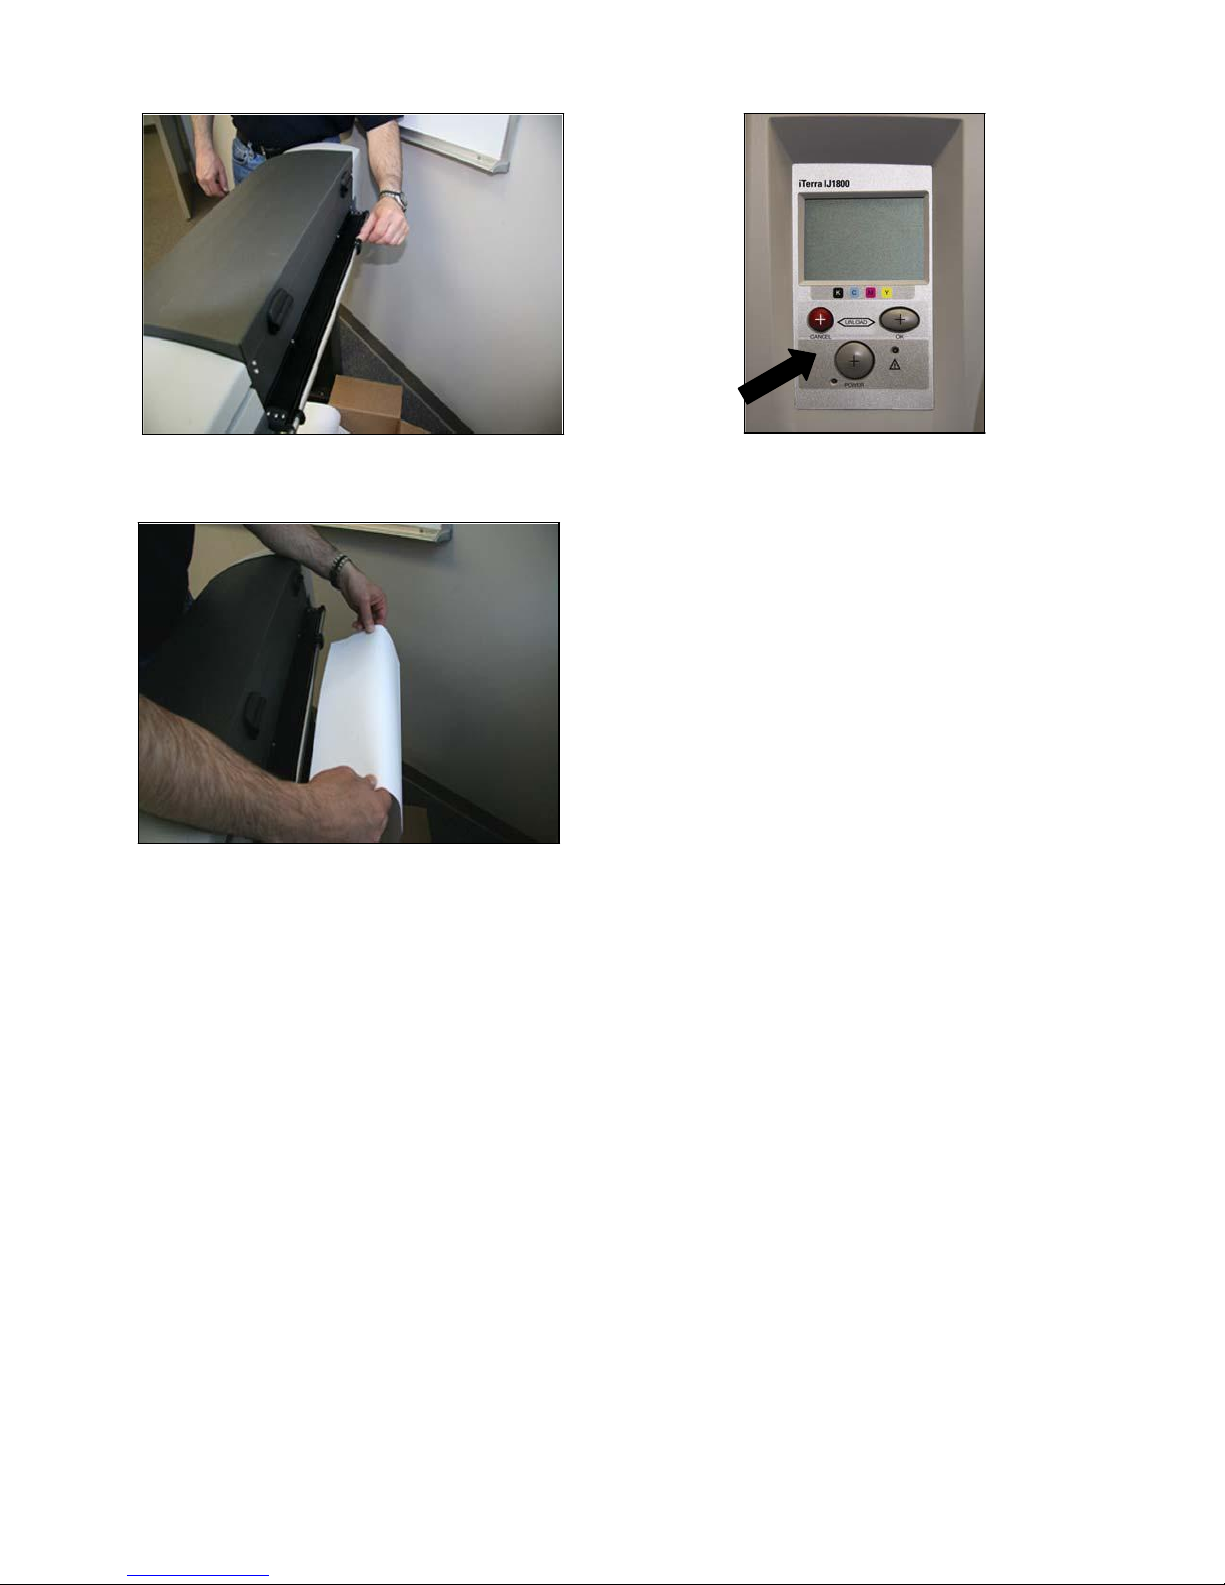
b) With NO media in the printer click on the “Scan Calibration Plot”.
You may notice some sounds coming from the printer. Wait until the
front panel shows the „No Media‟ symbol. Place the plotted sheet of
paper from step 1 into the rear paper path using the 17” side with the
printed arrows, face up into the printer first. You will notice that the
printer will not automatically accept the media; you will have to press
the „OK‟ key on the front panel. It may be best for someone to do
this from the printers left hand side so the user can hold the plot with
their left hand and use there right hand to press the button. The
printer will now accept the media and once skew has been
conformed, scanning of the plot will commence.
c) Click on the “Reset After Scan” button
Page 44

Page 44
Appendix A Operating the Front Panel
Front Panel Front Panel Display
The front panel (or control panel) of the
printer gives information about the status
of the printer, and also has three keys (or
buttons) that let you control the actions
of the printer.
1
3 2
5
The numbers correspond to the following
elements:
1. Display area
2. OK key: Indicates to the printer that:
• You have now loaded paper, and the
printer may start printing;
• You have corrected a problem i.e.: you
have removed jammed paper or
replaced a failing printhead – and that
the printer should continue with its
activity i.e.: it should resume printing;
4
6
Page 45

Page 45
Front Panel Display
3. Cancel key: Cancels the current
operation.
4. Attention light: The Attention
(yellow) light is on when the
printer requires a user action for example, to close the top
cover (if the display is blank).
5. Power key: Turns the power on
and off.
6. Power light: The Power (green)
light is on when the printer is
switched on.
Appendix A Operating the Front Panel - continued
Ink Cartridge Levels Printhead Problem
The four icons shown here refer to the
amount of ink in each of the ink
cartridges.
A flashing printhead icon (at the bottom)
indicates a problem with that printhead.
Page 46

Page 46
Busy Paper Status
When flashing: Printing, canceling job,
drying, powering off. The icon flickers if
the top or side cover is open.
Action: Close the top cover or close the
When flashing: Out of paper or paper
stalled.
Action: Add paper or clear the paper path.
When off: Normal.
side cover.
When off: Printer is powered off, idle, or
awaiting user action.
Paper Status Paper Misaligned
When on: The fanfold paper is loaded.
When flashing: You are out of paper or
the fanfold paper is stuck.
Action: Load paper or clear the paper
path.
When off: There is no paper loaded.
When flashing: The paper is misaligned
and must be reloaded to print.
Action: Reload the paper.
When off: Normal.
Page 47

Page 47
Press a Key Paper Jam
When flashing: Printer waiting.
Action: Press the OK key.
When flashing: Paper jammed, paper
stalled or carriage stalled.
Action: Clear the paper jam. Appendix C
for more information.
When off: Normal.
Hardware Error Unload Paper
When flashing: Hardware error.
Action: Call iSys Authorized Service
Personnel
Phone: 1-866-415-4797
When off: Normal.
Paper Misaligned
When flashing: The paper is misaligned
and must be reloaded.
Action: Unload the paper and reload it,
paying special attention to alignment.
When off: Normal.
When flashing: The printer is waiting for
you to unload the paper manually.
Action: Unload the paper completely.
When off: Normal.
Page 48
Page 48
Appendix B Unloading Fanfold Paper
Tear at Perforations Unloading Paper
Tear the paper at the perforations closest
to the front of the printer.
Do Not Pull Paper
IMPORTANT: Do not pull on the fanfold
paper once it is taken up into the printer,
that is, if there is any resistance.
If you want to unload the fanfold paper
press the cancel and OK keys on the front
panel at the same time. If the fanfold
paper is longer you may have to press the
2 buttons numerous times in order to
remove the paper.
Page 49

Page 49
Appendix C Paper Jam
Press the OK button (the upper right key)
on the printer's front panel. If
this does not solve the problem . . .
Tear the fanfold paper at the perforations
to remove excess paper from the
and
the back at the printer.
Lift the top cover and pull out any paper
that may be stuck. Be careful when you
lift the cover, not to damage or disturb
the tubes or other internal parts of the
printer.
front
Turn off the printer.
Move the media width slider away from the
paper. Slide assembly to the right.
Carefully pull the paper out of the printer
from the front and the back. If you do not
pull it out straight, you may damage the
paper sensor.
Page 50
Page 50
Put the media width slider back to its
original location.
Reload a clean I-Mark sheet of paper.
Turn on the printer.
 Loading...