

Page 1
FIPS 140-2 LEVEL 3
English User Manual - Table of Contents ...............................................4
Deutsch Benutzerhandbuch - Inhaltsverzeichnis ...................................32
iStorage diskAshur PRO
Français Manuel d’utilisation - Table des matières ...............................60
www.istorage-uk.com
www.istorage-uk.com
2
®
Manual / Handbuch / Manuel – v5.3F
#1
Page 2
User Manual
HDD & SSD Range
Manual / Handbuch / Manuel – v5.3F
®
2
Please make sure you remember your PIN (password), without it there
is no way to access the data on the drive.
If you are having difficulty using your diskAshur PRO2 drive please contact our technical department
iStorage diskAshur PRO
by email - support@istorage-uk.com or by phone on +44 (0) 20 8991 6260.
#2
www.istorage-uk.com
Page 3

Copyright © iStorage, Inc 2017. All rights reserved.
Windows is a registered trademark of Microsoft Corporation.
All other trademarks and copyrights referred to are the property of their respective owners.
Distribution of modified versions of this document is prohibited without the explicit permission of the copyright holder.
Distribution of the work or derivative work in any standard (paper) book form for commercial purposes is prohibited unless prior permission is
obtained from the copyright holder.
DOCUMENTATION IS PROVIDED AS IS AND ALL EXPRESS OR IMPLIED CONDITIONS, REPRESENTATIONS AND
WARRANTIES, INCLUDING ANY IMPLIED WARRANTY OF MERCHANTABILITY, FITNESS FOR A PARTICULAR
PURPOSE OR NON-INFRINGEMENT, ARE DISCLAIMED, EXCEPT TO THE EXTENT THAT SUCH DISCLAIMERS ARE HELD TO BE LEGALLY INVALID
All trademarks and brand names are the property of their respective owners
Trade Agreements Act (TAA) Compliant
iStorage diskAshur PRO
2
®
Manual / Handbuch / Manuel – v5.3F
www.istorage-uk.com
#3
Page 4

Table of Contents
Introduction ....................................................................................................................................5
Box contents ..................................................................................................................................5
1. diskAshur PRO2 LED States .....................................................................................................6
2. How to use the diskAshur PRO2 for the first time .....................................................................6
3. Unlocking the diskAshur PRO2 ............................................................................................... 7
4. Locking the diskAshur PRO2 ...................................................................................................7
5. Entering Admin Mode .............................................................................................................7
6. Changing the Admin PIN .........................................................................................................8
7. Setting a User PIN Policy ........................................................................................................9
8. How to check the User PIN Policy ...........................................................................................10
9. Adding a new User PIN in Admin Mode .................................................................................. 11
10. Changing the User PIN in Admin Mode ..................................................................................11
11. Deleting the User PIN in Admin Mode ....................................................................................11
12. Set Read-Only in Admin Mode ................................................................................................ 12
13. Enable Read/Write in Admin Mode .........................................................................................12
14. How to create a Self-Destruct PIN ...........................................................................................12
15. How to delete the Self-Destruct PIN ........................................................................................13
16. How to Unlock with the Self-Destruct PIN ............................................................................... 13
17. How to Create an Admin PIN after a Brute Force attack or Reset ............................................14
18. Setting the Unattended Auto-Lock Clock ................................................................................. 14
19. Turn off the Unattended Auto-Lock Clock ................................................................................ 15
20. How to check the Unattended Auto-Lock Clock ........................................................................ 15
21. How to Unlock diskAshur PRO2 with User PIN ........................................................................16
22. Changing the User PIN in User Mode .....................................................................................16
23. Set Read-Only in User Mode ................................................................................................... 17
24. Enable Read/Write in User Mode ............................................................................................17
25. Brute Force Protection .............................................................................................................18
26. How to perform a complete reset ............................................................................................ 18
27. Initialising and formatting the diskAshur PRO2 .......................................................................19
28. diskAshur PRO2 Setup for Mac OS ......................................................................................... 21
29. diskAshur PRO2 Setup for Linux (Ubuntu 17.10) ....................................................................23
30. Hibernating, Suspending or Logging off from the Operating System .....................................26
Manual / Handbuch / Manuel – v5.3F
®
2
31. How to check Firmware in Admin Mode .................................................................................. 26
32. How to check Firmware in User Mode ..................................................................................... 27
33. Technical Support ...................................................................................................................28
34. Warranty and RMA information ...............................................................................................28
iStorage diskAshur PRO
#4
www.istorage-uk.com
Page 5
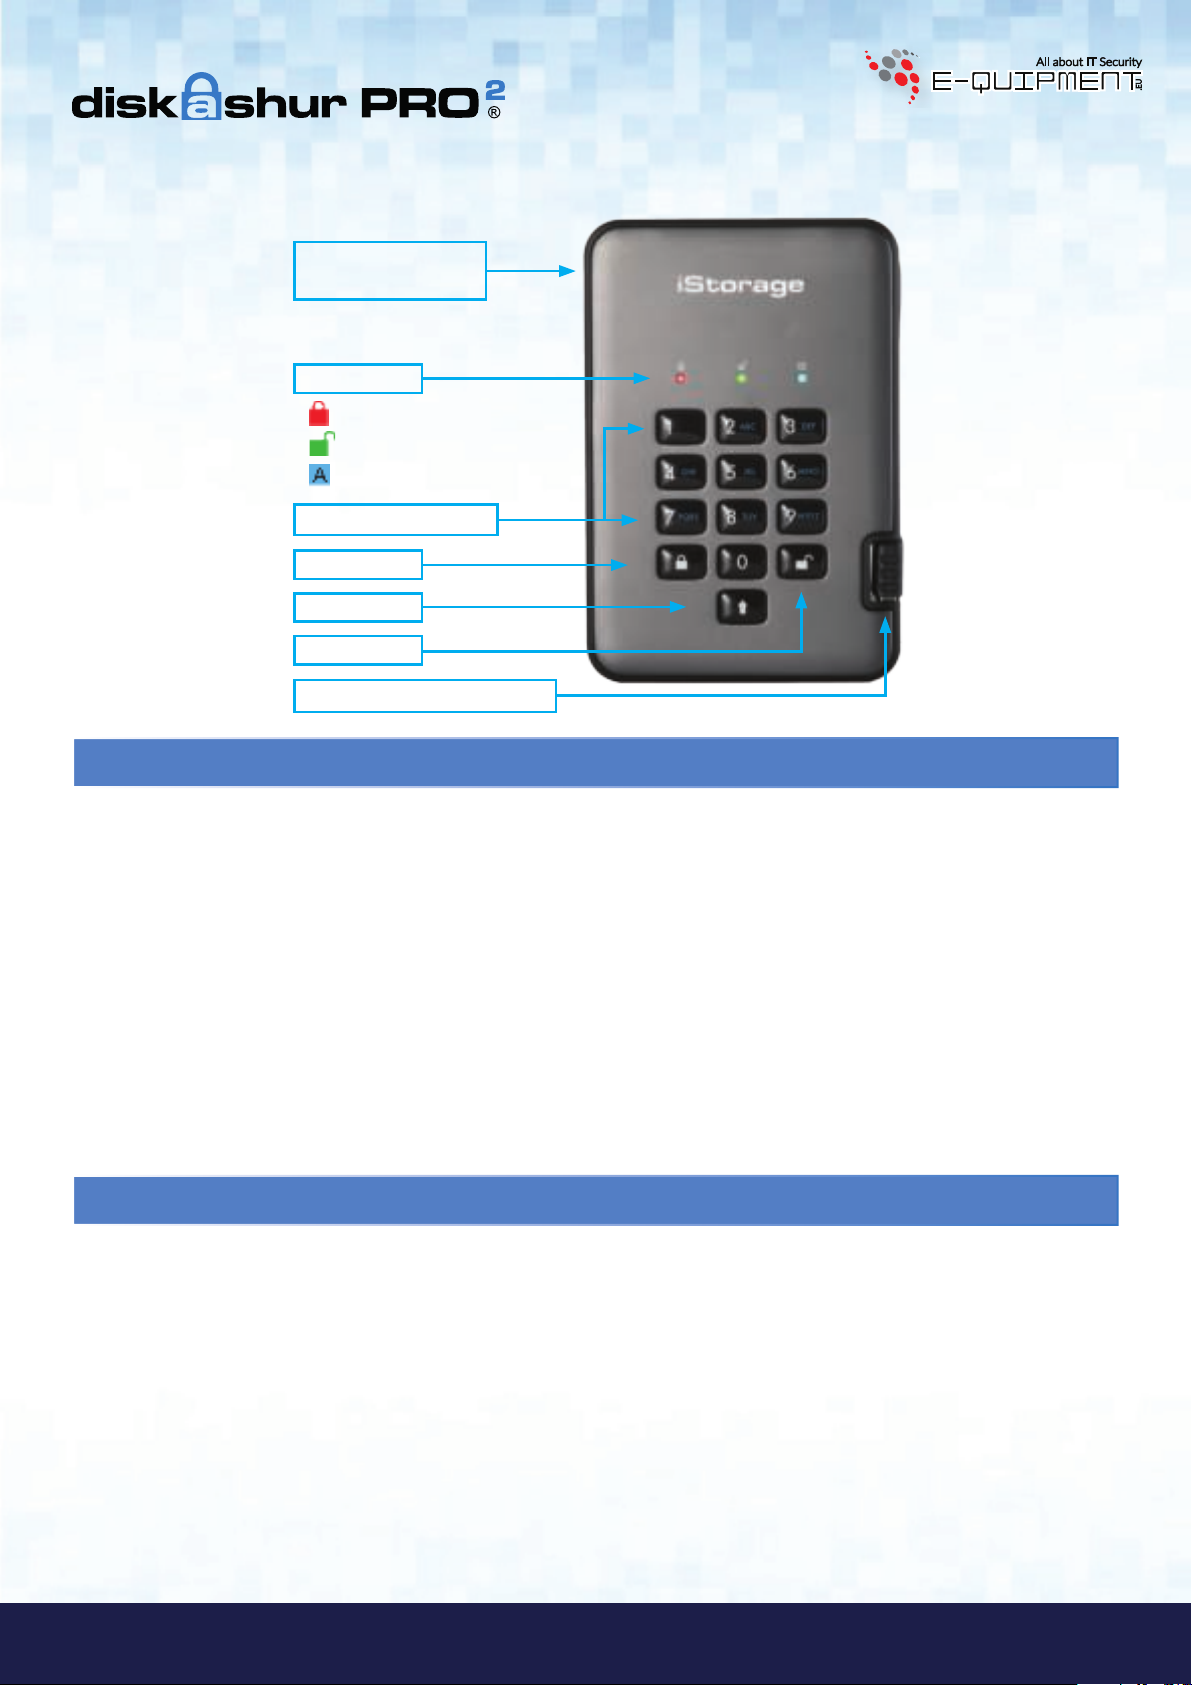
Introduction
Tamper Proof and Evident Design
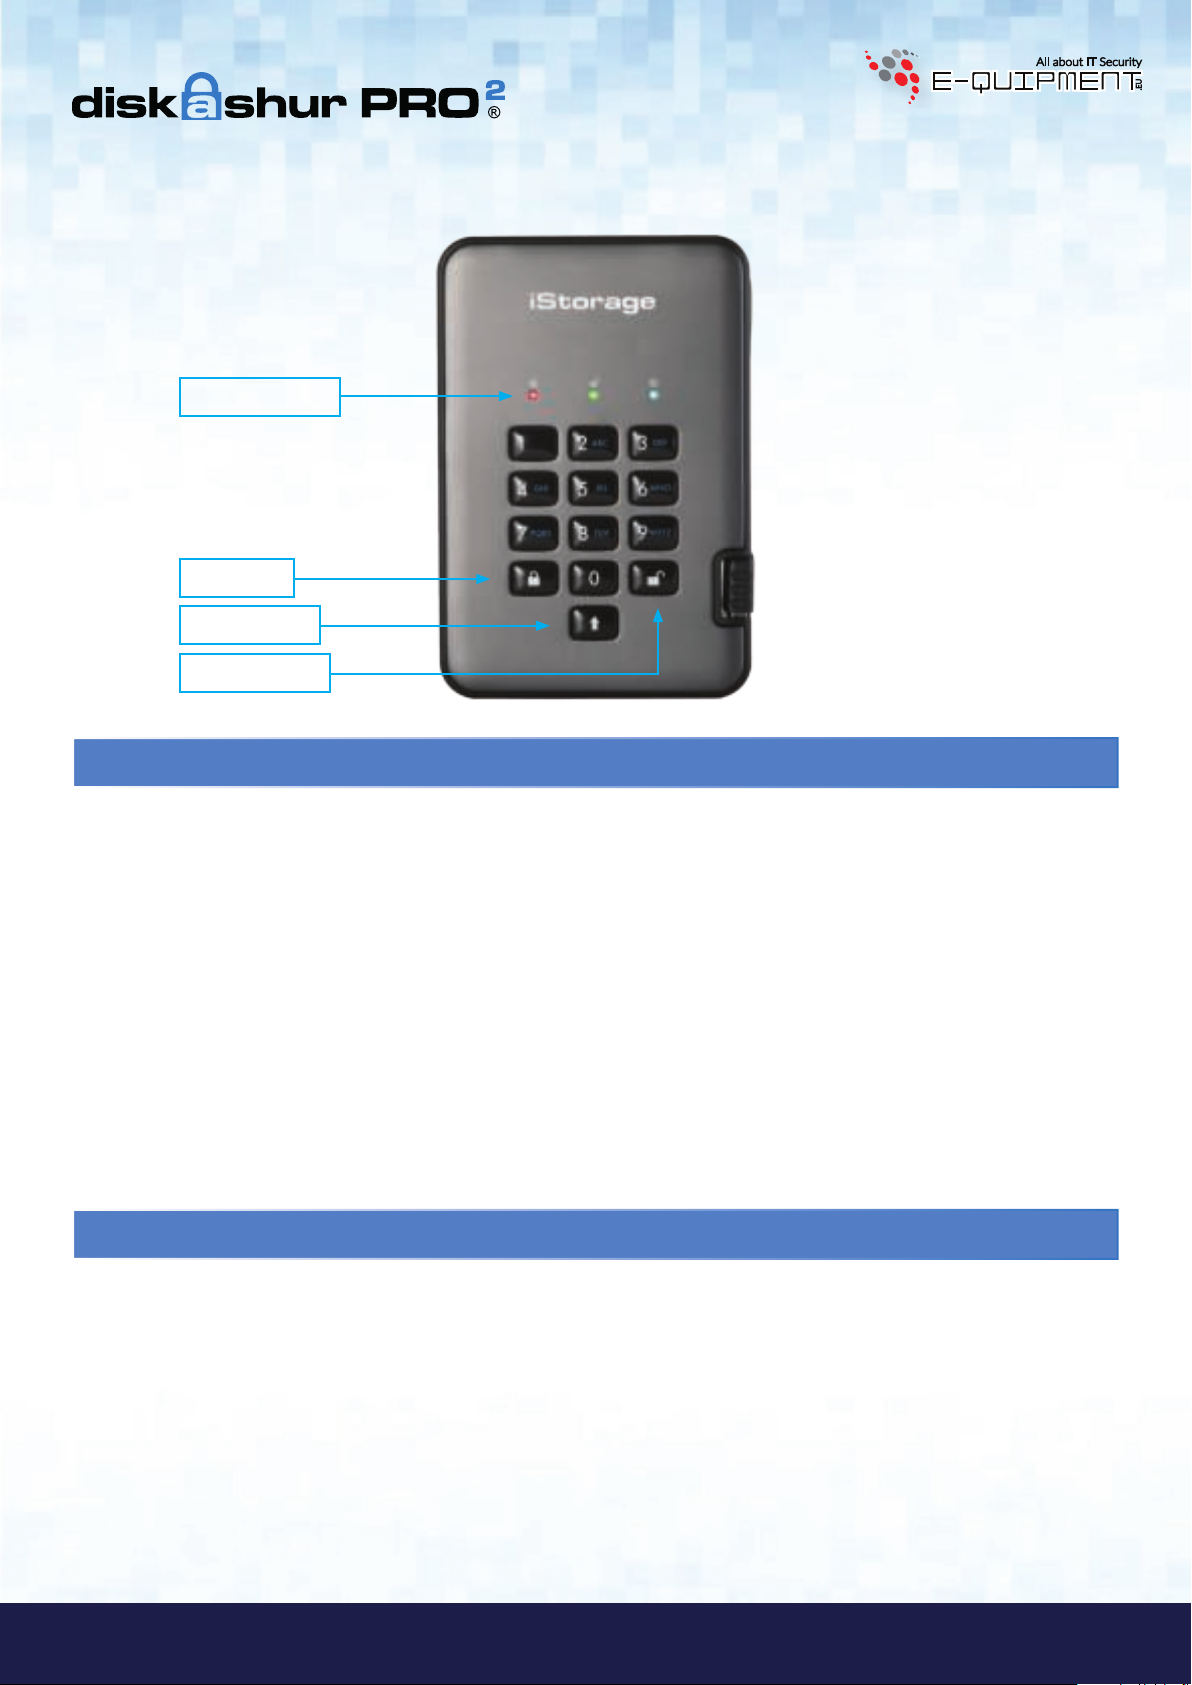
DESK LOCK
SLOT CONNECTION
LED LIGHTS
- Standby State/Locked
- User Mode/Unlocked
- Admin Mode
Alphanumeric Keypad
LOCK
SHIFT
UNLOCK
Integrated USB 3.1 Cable
The diskAshur PRO2 is an easy to use, ultra-secure, hardware encrypted portable drive with capacities of up to 5TB. Simply
connect the integrated USB 3.1 cable to any computer and enter a 7-15 digit PIN, if the correct PIN is entered, all data stored
on the drive will be decrypted and accessible. To lock the drive and encrypt all data, simply eject the diskAshur PRO2 from the
host computer and the entire contents of the drive will be encrypted (full disk encryption) using military grade AES 256-bit
hardware encryption (XTS mode). If the drive is lost or stolen and an incorrect PIN is entered 15 consecutive times, the drive
will reset, the encryption key will be deleted and all data previously stored on the drive will be lost forever.
One of the unique and underlying security features of the GDPR compliant diskAshur PRO2 is the dedicated hardware based
secure microprocessor (Common Criteria EAL4+ ready), which employs built-in physical protection mechanisms designed to
defend against external tamper, bypass attacks and fault injections. Unlike other solutions, the diskAshur PRO2 reacts to an
automated attack by entering the deadlock frozen state, which renders all such attacks as useless. In plain and simple terms,
without the PIN there’s no way in!
Box Contents
1. diskAshur PRO2 Drive with integrated USB Cable
2. Elegant Travel Case
3. Quick Start Guide
iStorage diskAshur PRO
2
®
Manual / Handbuch / Manuel – v5.3F
www.istorage-uk.com
#5
Page 6
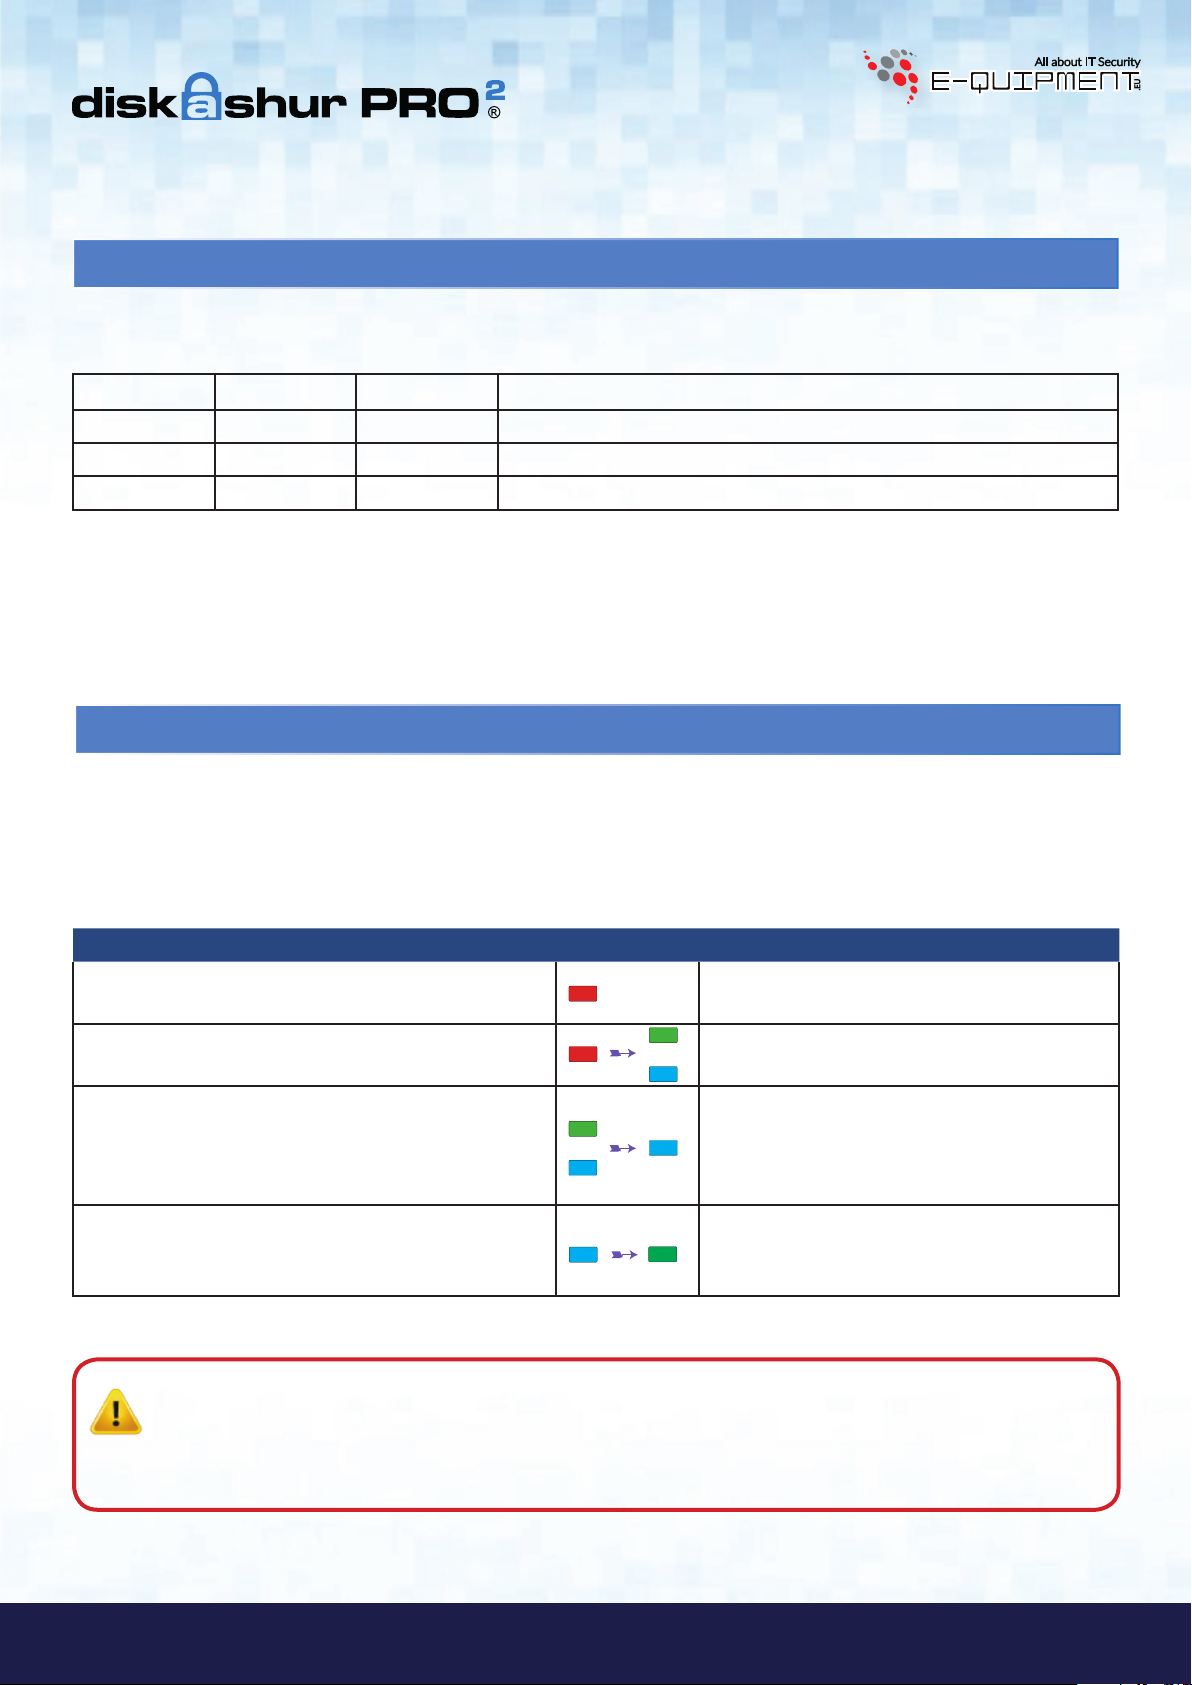
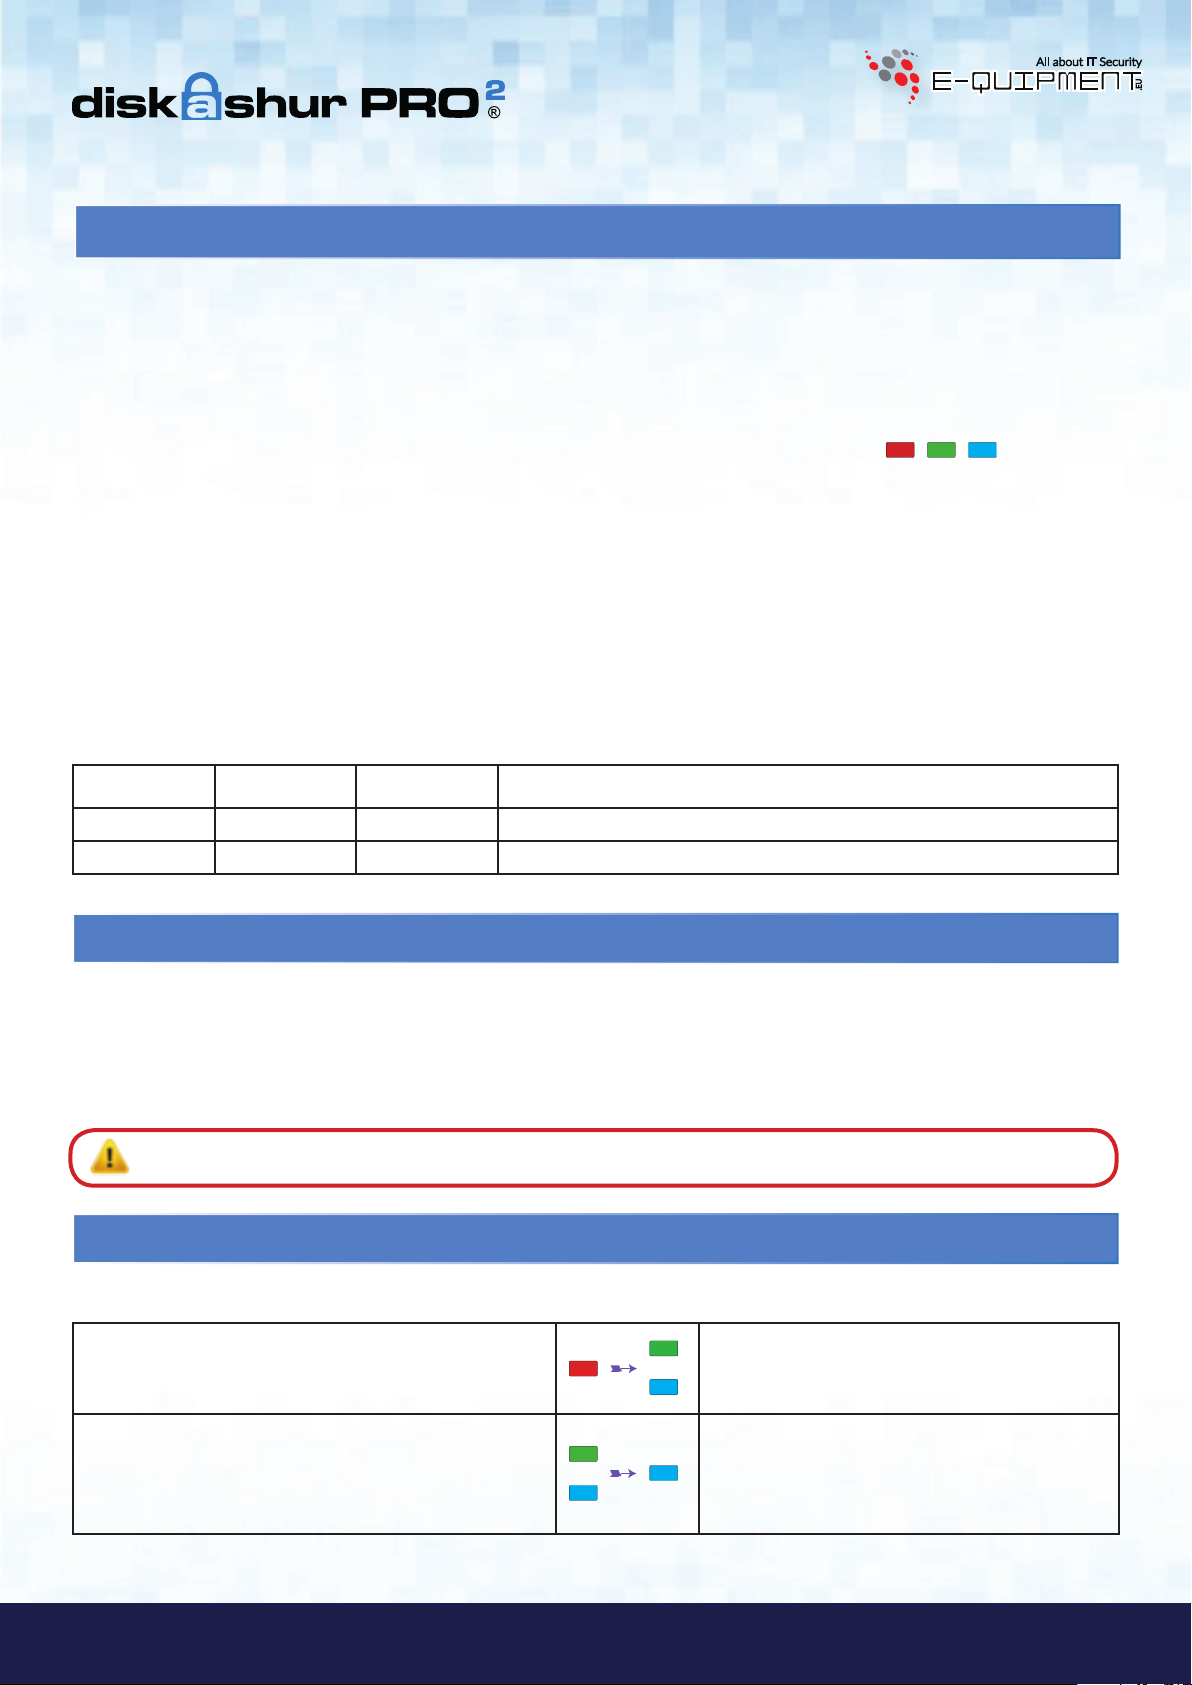
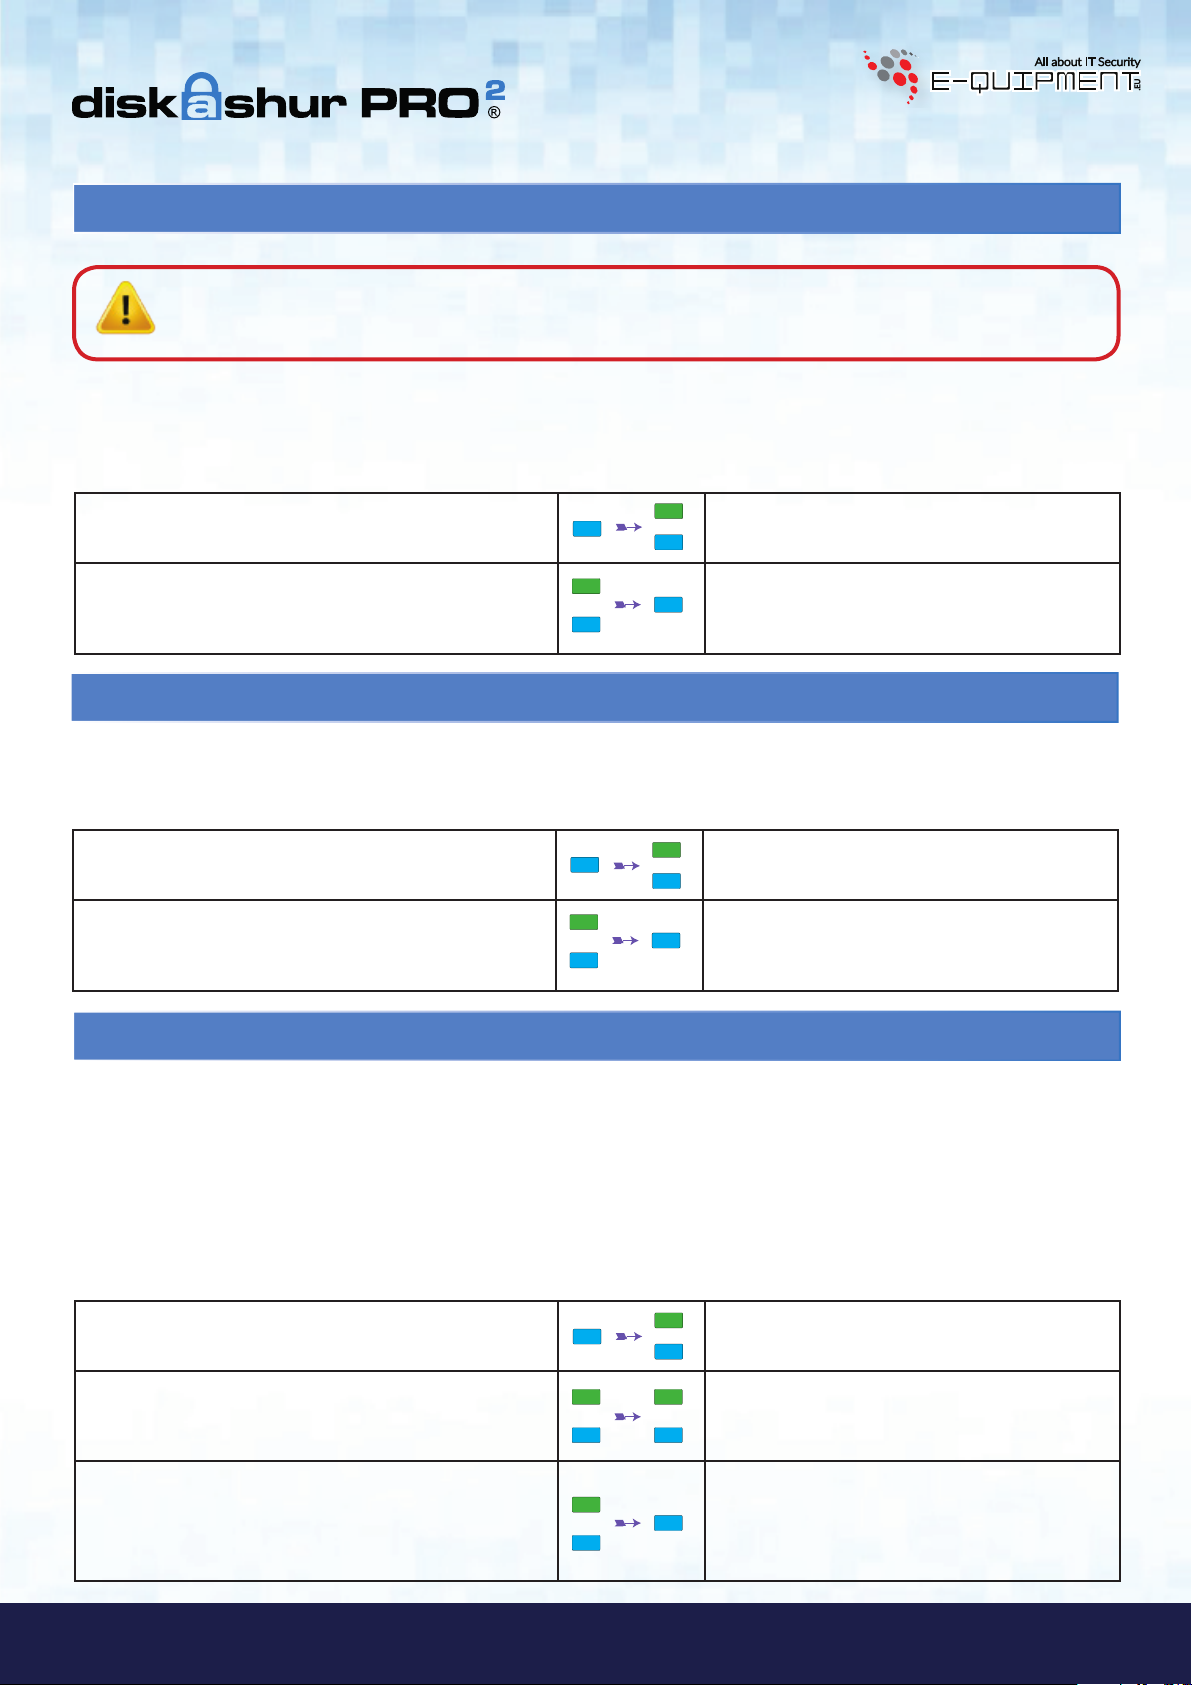
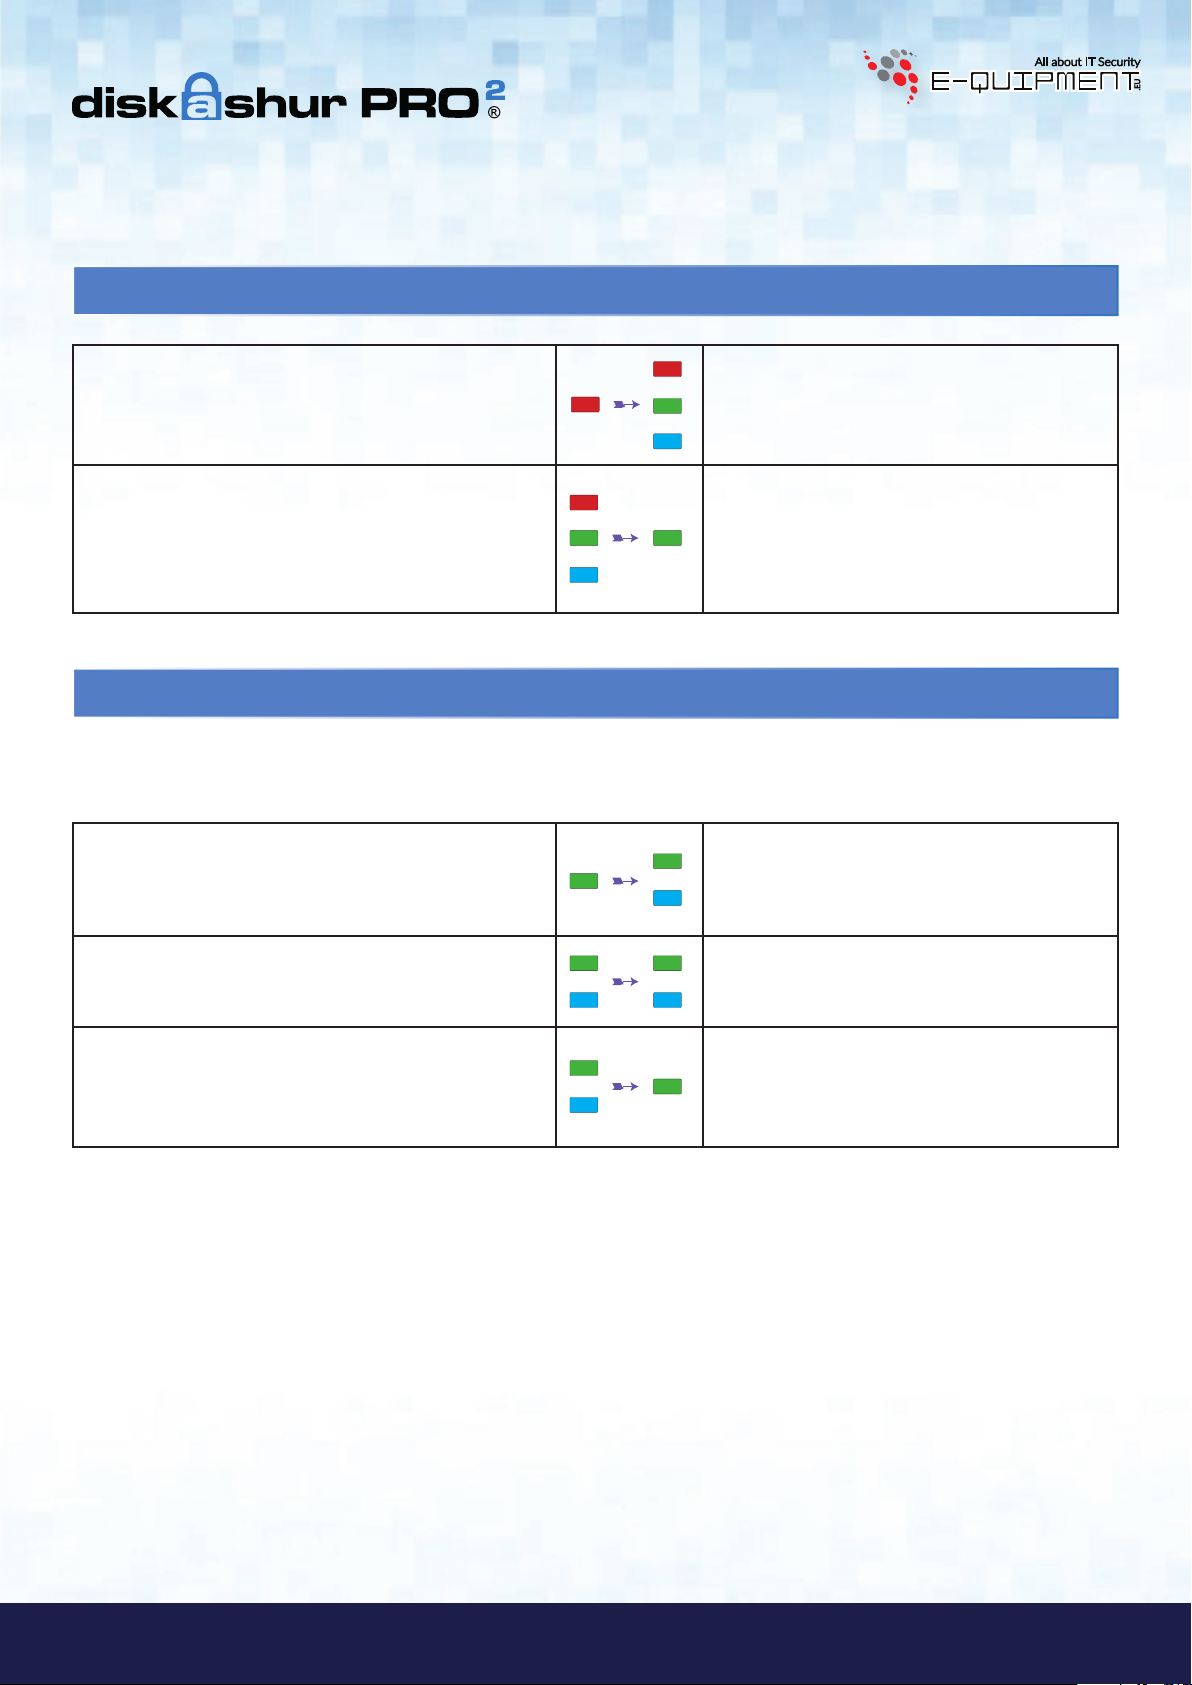
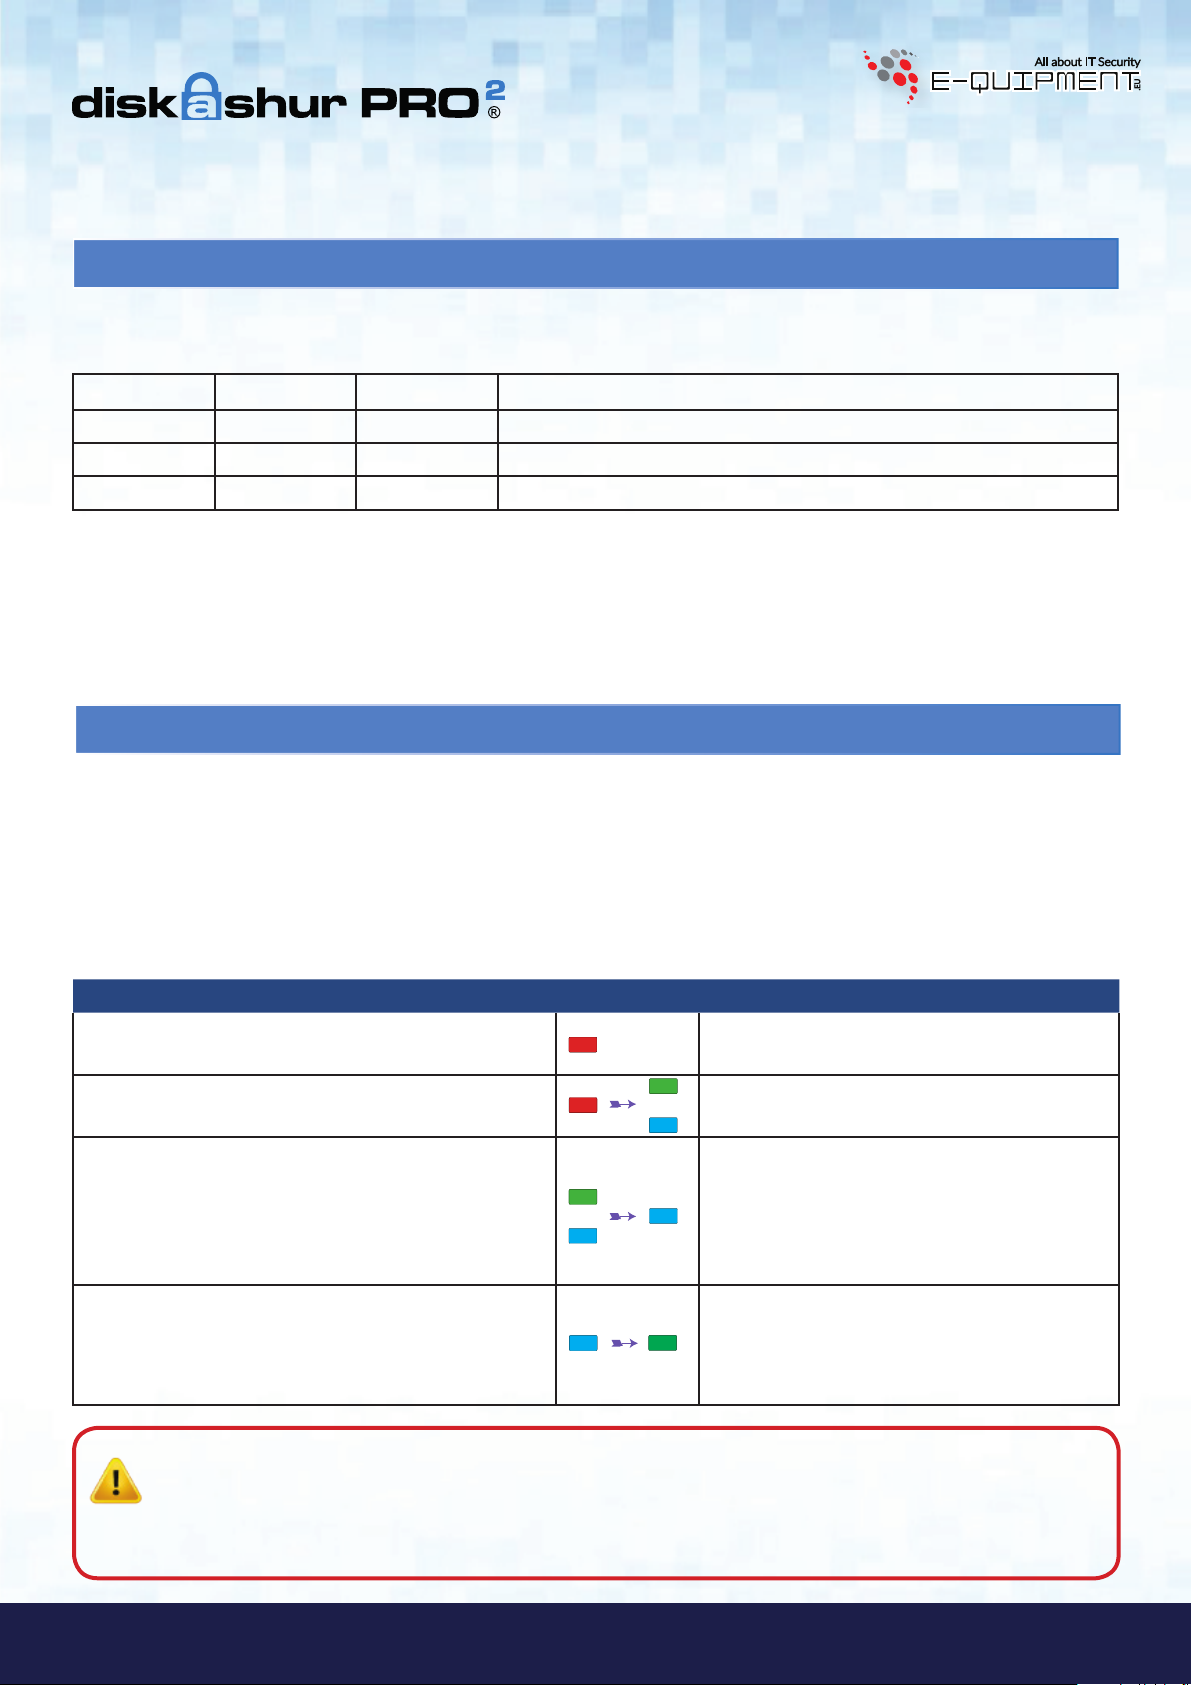
1. diskAshur PRO2 LED States
When the diskAshur PRO2 is plugged in, there are three possible behaviours for the LED indicators as shown in the table
below.
RED GREEN BLUE diskAshur PRO2 State
Solid Off Off Factory Reset
Solid Solid Solid Brute Force
Solid Off Off Standby
1. In Factory Reset State, the drive is waiting for the operation to set up an Admin PIN.
2. In Brute Force state, the drive is waiting for an operation to get more PIN entry attempts.
3. In Standby state, the drive is waiting for an operation to unlock the drive, or enter Admin mode, or reset the drive.
1
2
3
2. How to use the diskAshur PRO2 for the first time
The diskAshur PRO2 is shipped with a default Admin PIN of 11223344 and although it can be used straight out of the box
with the default Admin PIN, for security reasons we
by following the instructions under section 6
‘Changing the Admin PIN’.
highly recommend a new Admin PIN be created immediately
Please follow the instructions in the table below to unlock the diskAshur PRO2 for the first time with the default Admin PIN.
Instructions - first time use LED LED State
1. Connect the diskAshur PRO
Standby State
2. In Standby State (solid
RED LED), press and hold
down “UNLOCK + 1” buttons
to a USB port -
RED LED will be solid awaiting PIN entry
Solid
RED LED will change to blinking GREEN
and BLUE LEDs
2
GREEN and BLUE LEDs blink rapidly together
3. Enter the Admin PIN (default - 11223344) and
press “UNLOCK” button
4. Press the “UNLOCK” button once to unlock
2
diskAshur PRO
Manual / Handbuch / Manuel – v5.3F
®
2
and access drive contents
Note: Once the diskAshur PRO2 has been successfully unlocked, the GREEN LED will remain on and in a solid
state and will only blink when data is being transferred. It can be locked down immediately by pressing the ‘LOCK’
button once or by (
strongly recommended) clicking the ‘Safely Remove Hardware/Eject’ icon within your
for a few seconds then to a solid
finally a solid
diskAshur PRO
BLUE LED will change to a blinking
Solid
BLUE LED indicating the
2
is in “Admin Mode”
GREEN and finally solid GREEN LED indicating
the diskAshur PRO2 is unlocked
GREEN and
operating system.
iStorage diskAshur PRO
#6
www.istorage-uk.com
Page 7
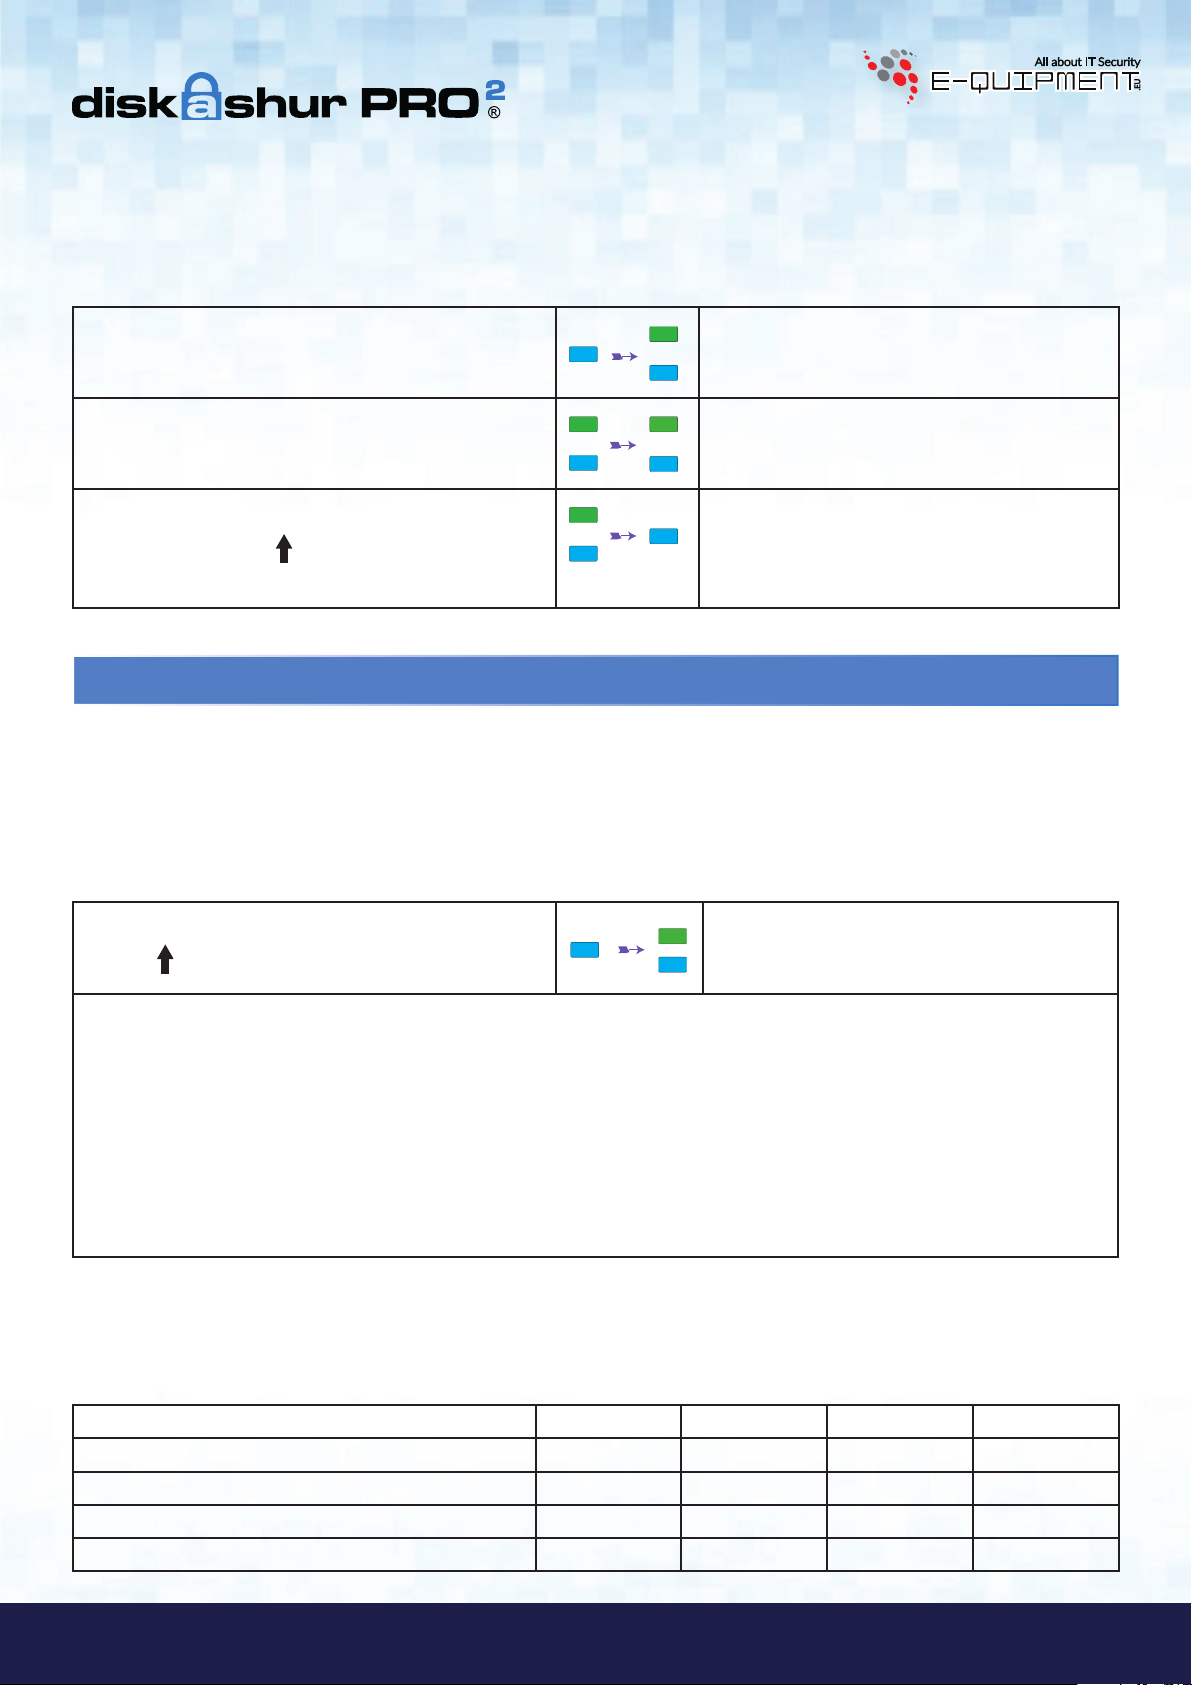
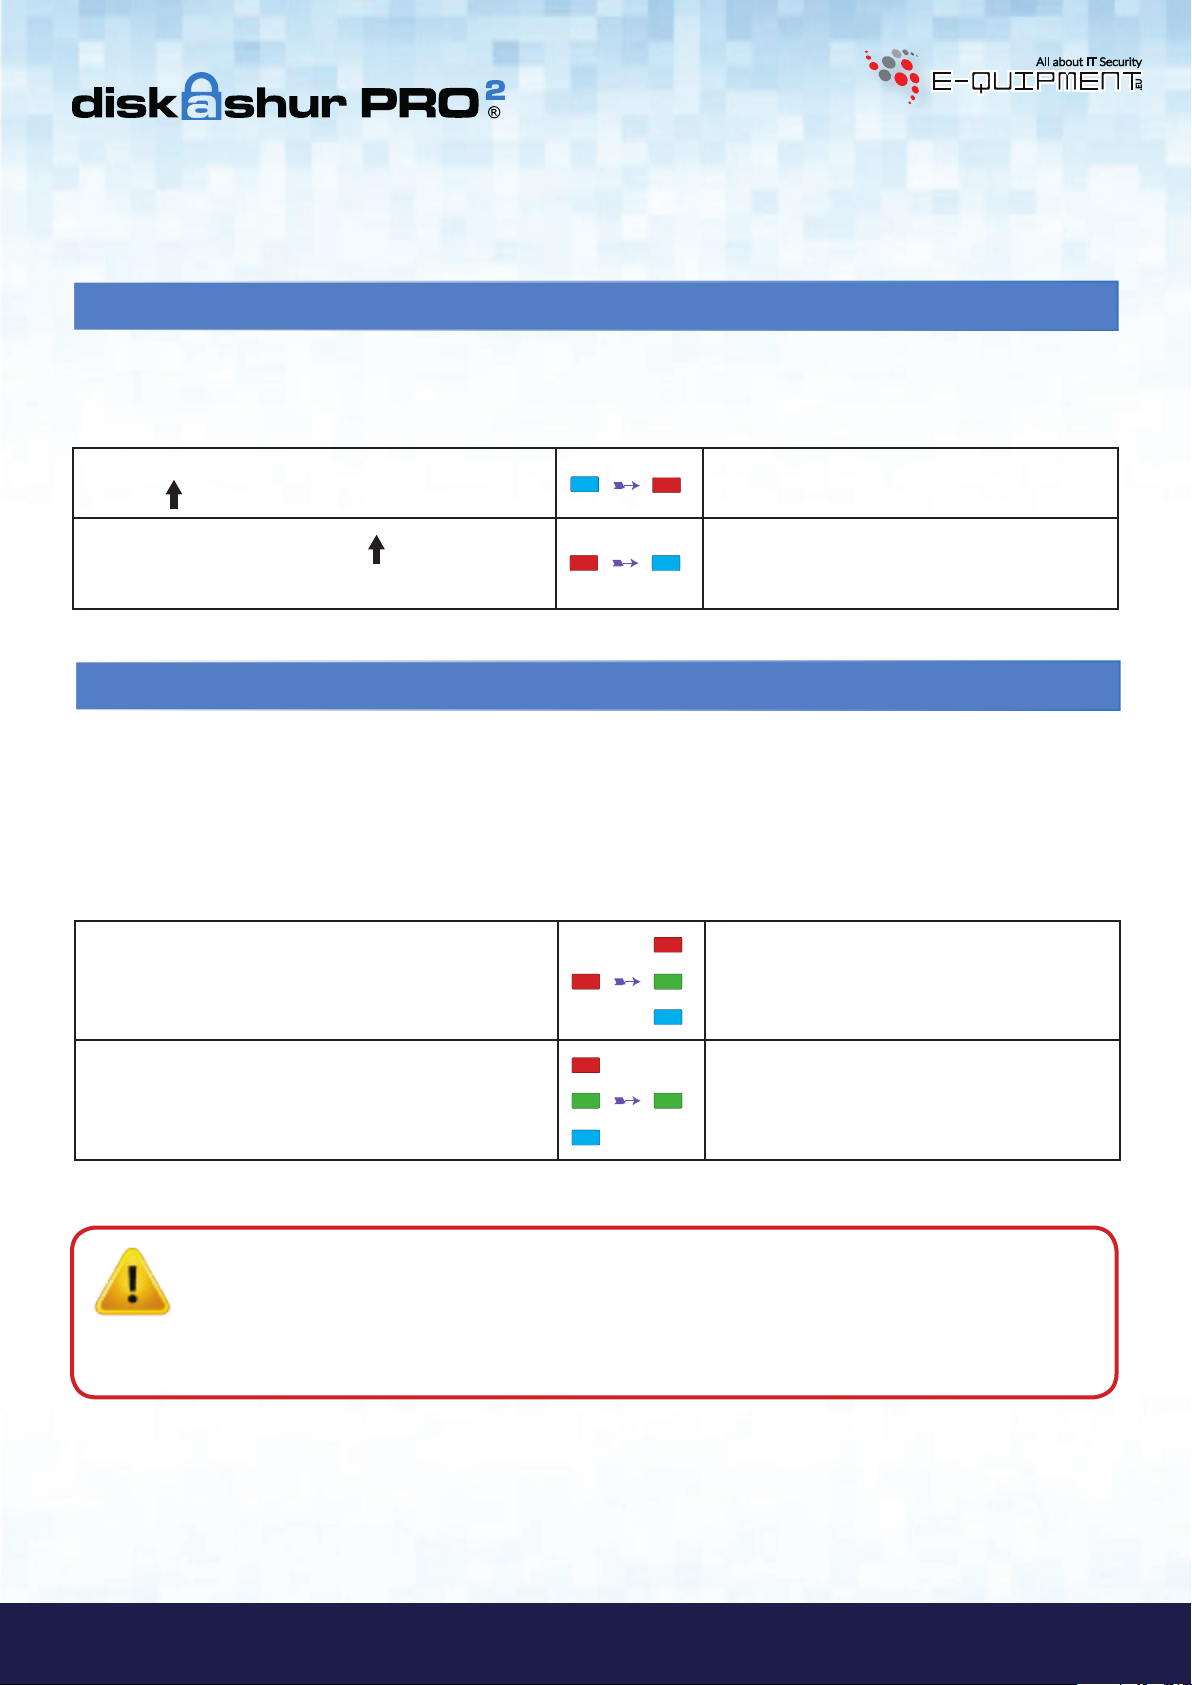
3. Unlocking the diskAshur PRO
2
The diskAshur PRO2 can be unlocked with either an Admin or User PIN whilst in standby state (solid RED LED).
1. To unlock as the Administrator, in Standby state (
BLUE LEDs will blink together), next, enter the Admin PIN and press the “UNLOCK” button, LED will change to a solid
and
RED LED) press and hold down both ‘UNLOCK + 1’ buttons (GREEN
BLUE and finally press the ‘UNLOCK’ button again - LED changes to GREEN indicating the drive is unlocked.
2. To unlock as a User, in standby state (RED LED) first press the “UNLOCK” button (all LEDs, blink on and
off) and then enter the User PIN and press the “UNLOCK” button again.
3. If correct User PIN is entered, both GREEN and BLUE LEDs will blink alternately and then return to a solid GREEN LED.
4. If correct Admin PIN is entered, both GREEN and BLUE LEDs will rapidly blink together, then to a solid BLUE and then to
the unlocked state, a solid GREEN LED.
5. If correct PIN is entered, the drive displays as “iStorage diskAshur PRO2 USB Device” under “Computer Management/
Device Manager”.
In an unlocked state (GREEN LED), there are two possible behaviours for the LED indicators, shown in the table below.
RED GREEN BLUE diskAshur PRO
Off
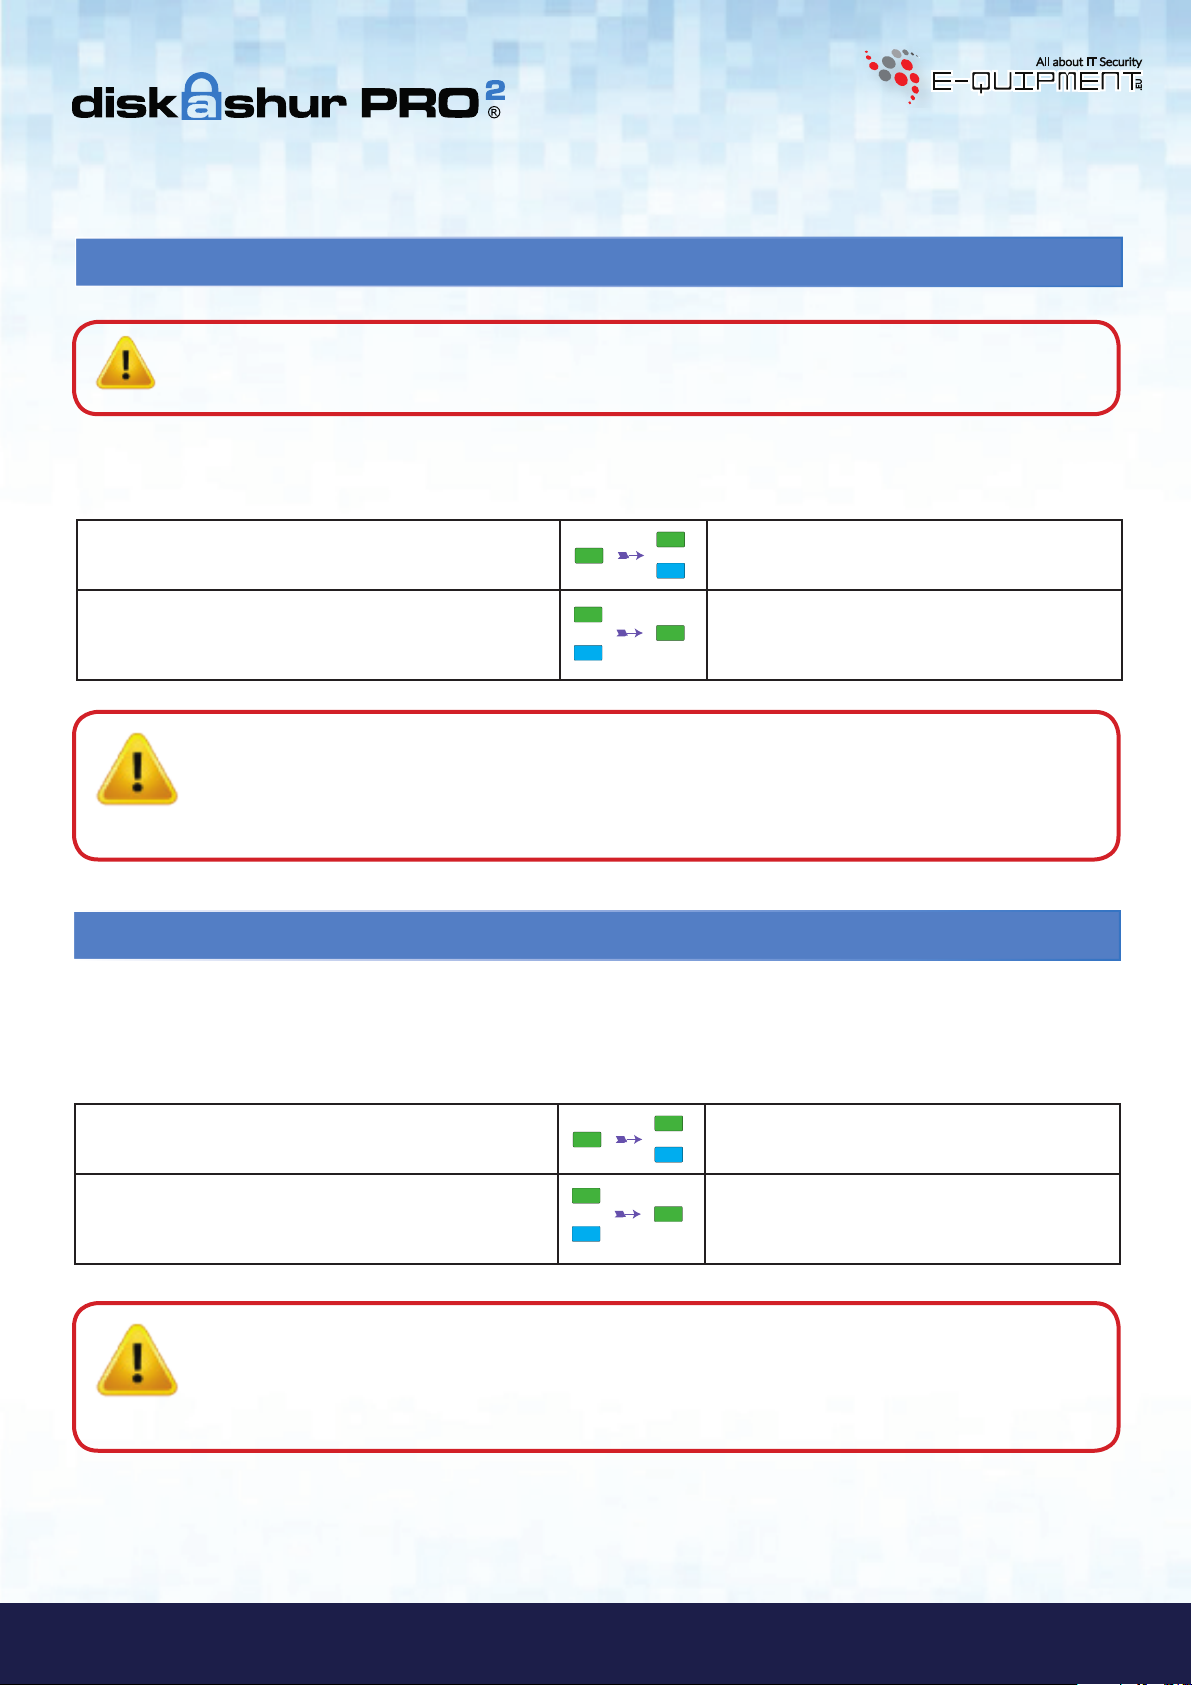
Off
4. Locking the diskAshur PRO
Solid Off No data transfer
Blink Off Data transfer in progress
2
2
To lock the drive, press the “LOCK” button once or by clicking the ‘Safely Remove Hardware/Eject’ icon within your operating
system. If data is still being written to the drive, please wait until all data has been written to the drive before pressing the
‘LOCK’ button or safely ejecting from the Operating System. When the unattended Auto-Lock timeout is activated, the drive
will automatically lock after a predetermined amount of time.
Note: The diskAshur PRO2 cannot be recognized by the operating system in standby state.
5. Entering Admin Mode
To enter the Admin Mode, do the following:
1. In standby state (solid RED LED), press and hold
down “UNLOCK + 1” buttons
2. Enter the Admin PIN (default - 11223344) and press
“UNLOCK” button
Solid
RED LED will change to blinking GREEN
and BLUE LEDs
GREEN and BLUE LEDs blink rapidly together
for a few seconds then to a solid
finally a solid
diskAshur PRO
BLUE LED indicating the
2
is in “Admin Mode”
GREEN and
iStorage diskAshur PRO
2
®
Manual / Handbuch / Manuel – v5.3F
To exist Admin mode, press the “LOCK” button.
www.istorage-uk.com
#7
Page 8
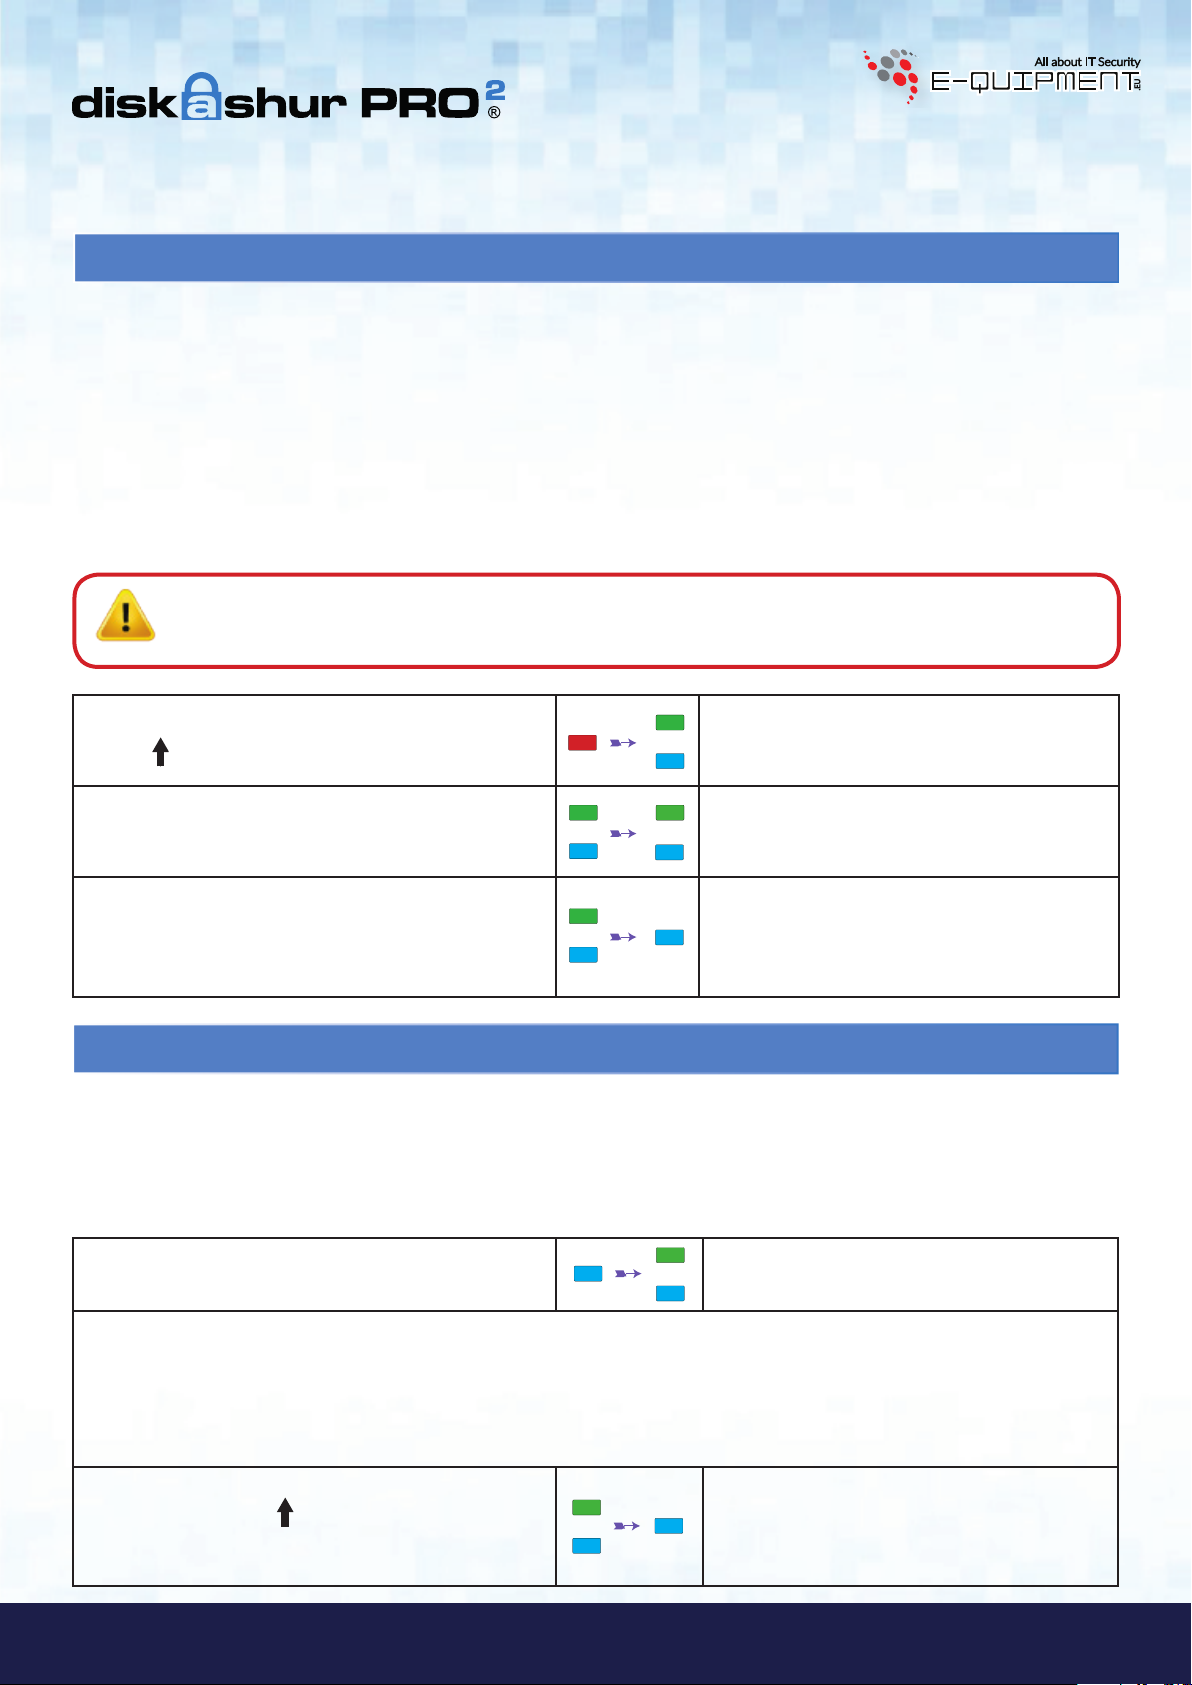
6. Changing the Admin PIN
PIN requirements:
• Must be between 7-15 digits in length
• Must not contain only repetitive numbers, e.g. (3-3-3-3-3-3-3)
• Must not contain only consecutive numbers, e.g. (1-2-3-4-5-6-7), (7-8-9-0-1-2-3-4), (7-6-5-4-3-2-1)
Password Tip: You can create a memorable word, name, phrase or any other Alphanumerical PIN combination
by simply pressing the key with the corresponding letters on it.
Examples of these types of Alphanumerical PINs are:
• For “
7 (
Password” you would press the following keys:
pqrs) 2 (abc) 7 (pqrs) 7 (pqrs) 9 (wxyz) 6 (mno) 7 (pqrs) 3 (def)
• For “iStorage” you would press:
4 (gh
i) 7 (pqrs) 8 (tuv) 6 (mno) 7 (pqrs) 2 (abc) 4 (ghi) 3 (def)
Using this method, long and easy to remember PINs can be created.
Note: The SHIFT key can be used for additional combinations. SHIFT + 1 is a separate value than just 1.
To create a PIN using additional combinations, press and hold down the SHIFT button whilst entering
your 7-15 digit PIN. e.g. SHIFT + 26756498.
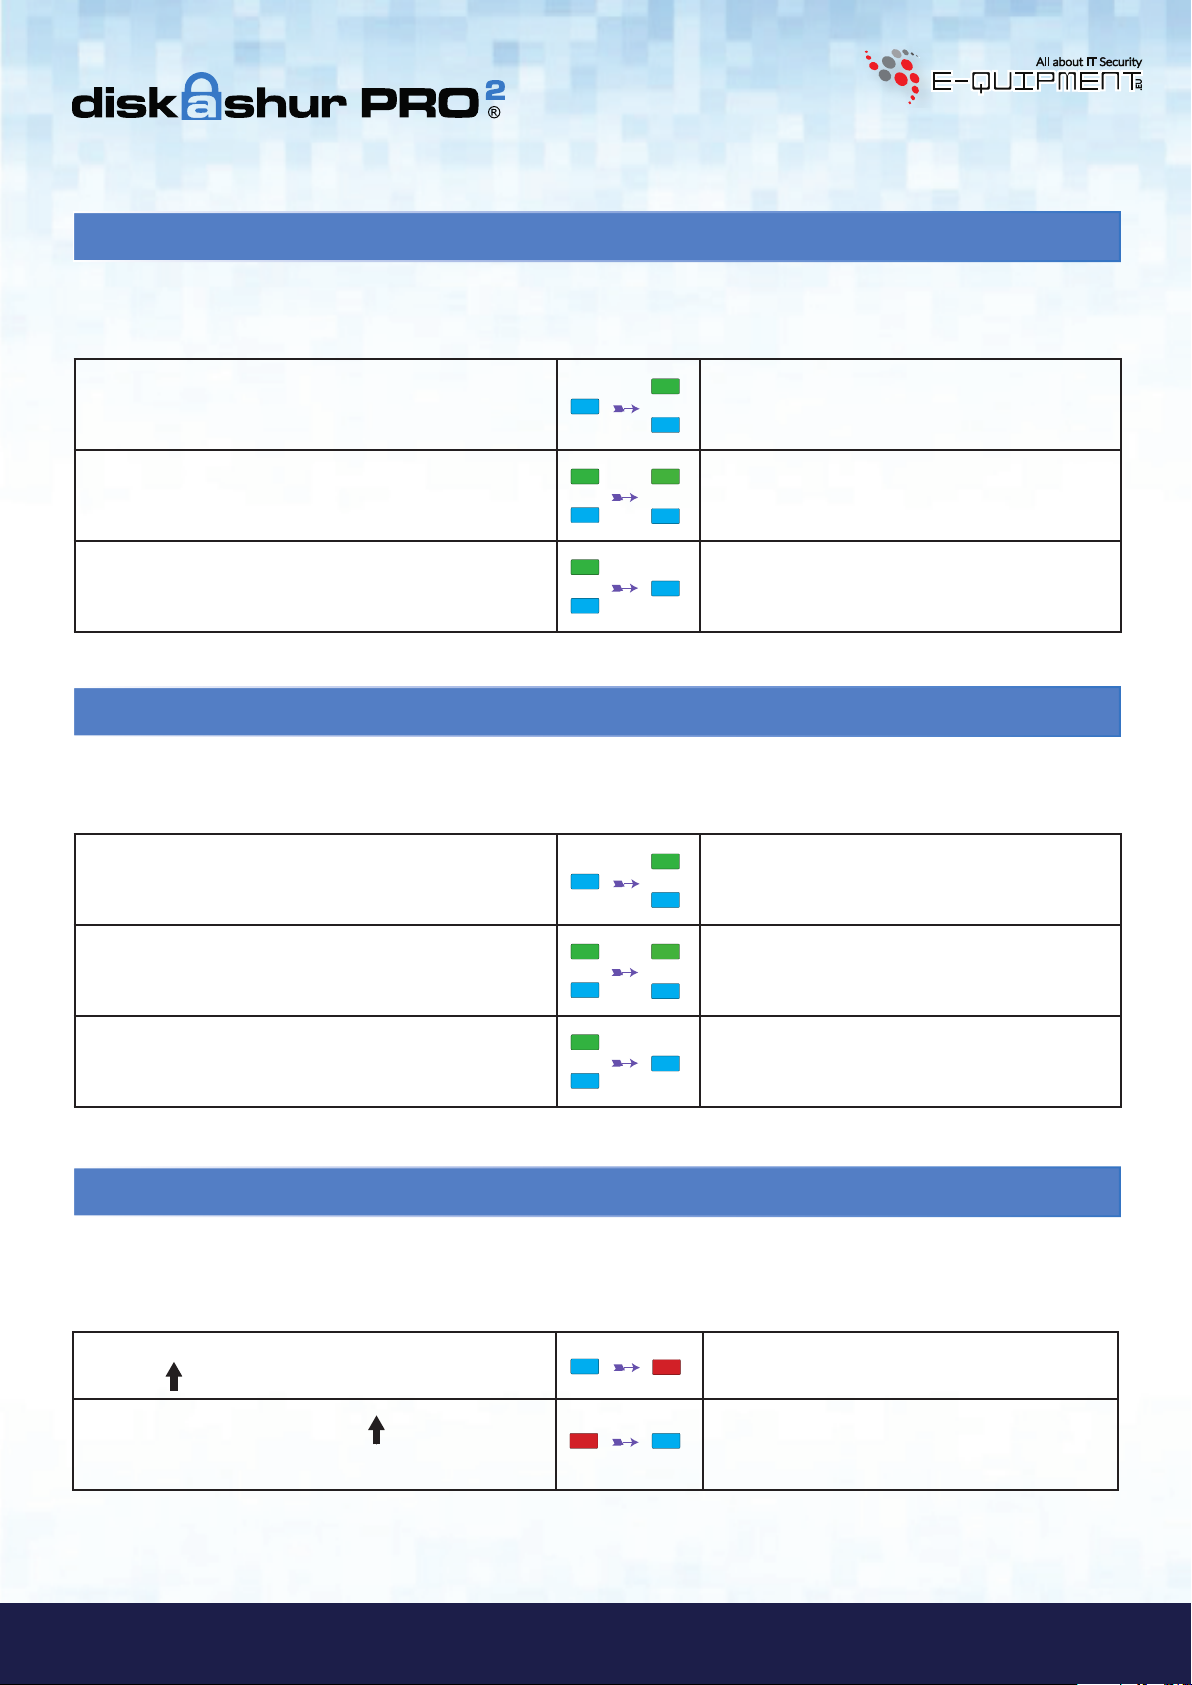
To change the Admin PIN, first enter the “Admin Mode” as described in section 5. Once the drive is in Admin Mode
(solid
BLUE LED) proceed with the following steps.
1. In Admin mode, press and hold down
“UNLOCK + 2” buttons
2. Enter NEW Admin PIN and press “UNLOCK” button
Manual / Handbuch / Manuel – v5.3F
®
2
3. Re-enter the NEW Admin PIN and press “UNLOCK”
button
Solid
BLUE LED will change to blinking GREEN
and solid BLUE LEDs
Blinking
switch to a single
back to blinking
GREEN and solid BLUE LEDs will
GREEN LED blink and then
GREEN and solid BLUE LEDs
Blinking GREEN and solid BLUE LEDs change
to a rapidly blinking
solid
BLUE LED indicating the Admin PIN has
BLUE LED and finally to a
been successfully changed
iStorage diskAshur PRO
#8
www.istorage-uk.com
Page 9

7. Setting a User PIN Policy
The Administrator can set a restriction policy for the User PIN. This policy includes setting the minimum length of the PIN
(from 7 to 15 digits), as well as requiring or not the input of a 'Special Character'. The “Special Character” functions as
'Shift + digit'.
To set a User PIN Policy (restrictions) you will need to enter 3 digits, for instance '091', the first two digits (09) indicate
the minimum PIN length (in this case, 9) and the last digit (1) denotes that a 'Special Character' must be used, in other
words 'Shift + digit'. In the same way, a User PIN Policy can be set without the need of a 'Special Character', for instance
'120', the first two digits (12) indicate the minimum PIN length (in this case,12) and the last digit (0) meaning no Special
Character is required.
Once the Administrator has set the User PIN Policy, for instance '091', a new User PIN will need to be created. If the
Administrator creates the User PIN as '247688314' with the use of a 'Special Character' (Shift+digit), this can be
placed anywhere along your 7-15 digit PIN during the process of creating the User PIN as shown in the examples below.
A. 'Shift + 2', '4', '7', '6', '8', '8', '3', '1', '4',
B. '2', '4', 'Shift + 7', '6', '8', '8', '3', '1', '4',
C. '2', '4', '7', '6', '8', '8', '3', '1', 'Shift + 4',
Note:
• If a 'Special Character' was used during the creation of the User PIN, for instance, example 'B' above, then
the drive can only be unlocked by entering the PIN with the 'Special Character' entered precisely in the order
created, as per example 'B' above - (‘2’, ‘4’, ‘Shift + 7’, ‘6’, ‘8’, ‘8’, ‘3’, ‘1’, ‘4’).
• Users are able to change their PIN but are forced to comply with the set 'User PIN Policy' (restrictions), if
and when applicable.
• Setting a new User PIN Policy will automatically delete the User PIN if one exists.
• This policy does not apply to the ‘Self-Destruct PIN’. The complexity setting for the Self-Destruct PIN and
Admin PIN is always 7-15 digits, with no special character required.
iStorage diskAshur PRO
2
®
Manual / Handbuch / Manuel – v5.3F
www.istorage-uk.com
#9
Page 10
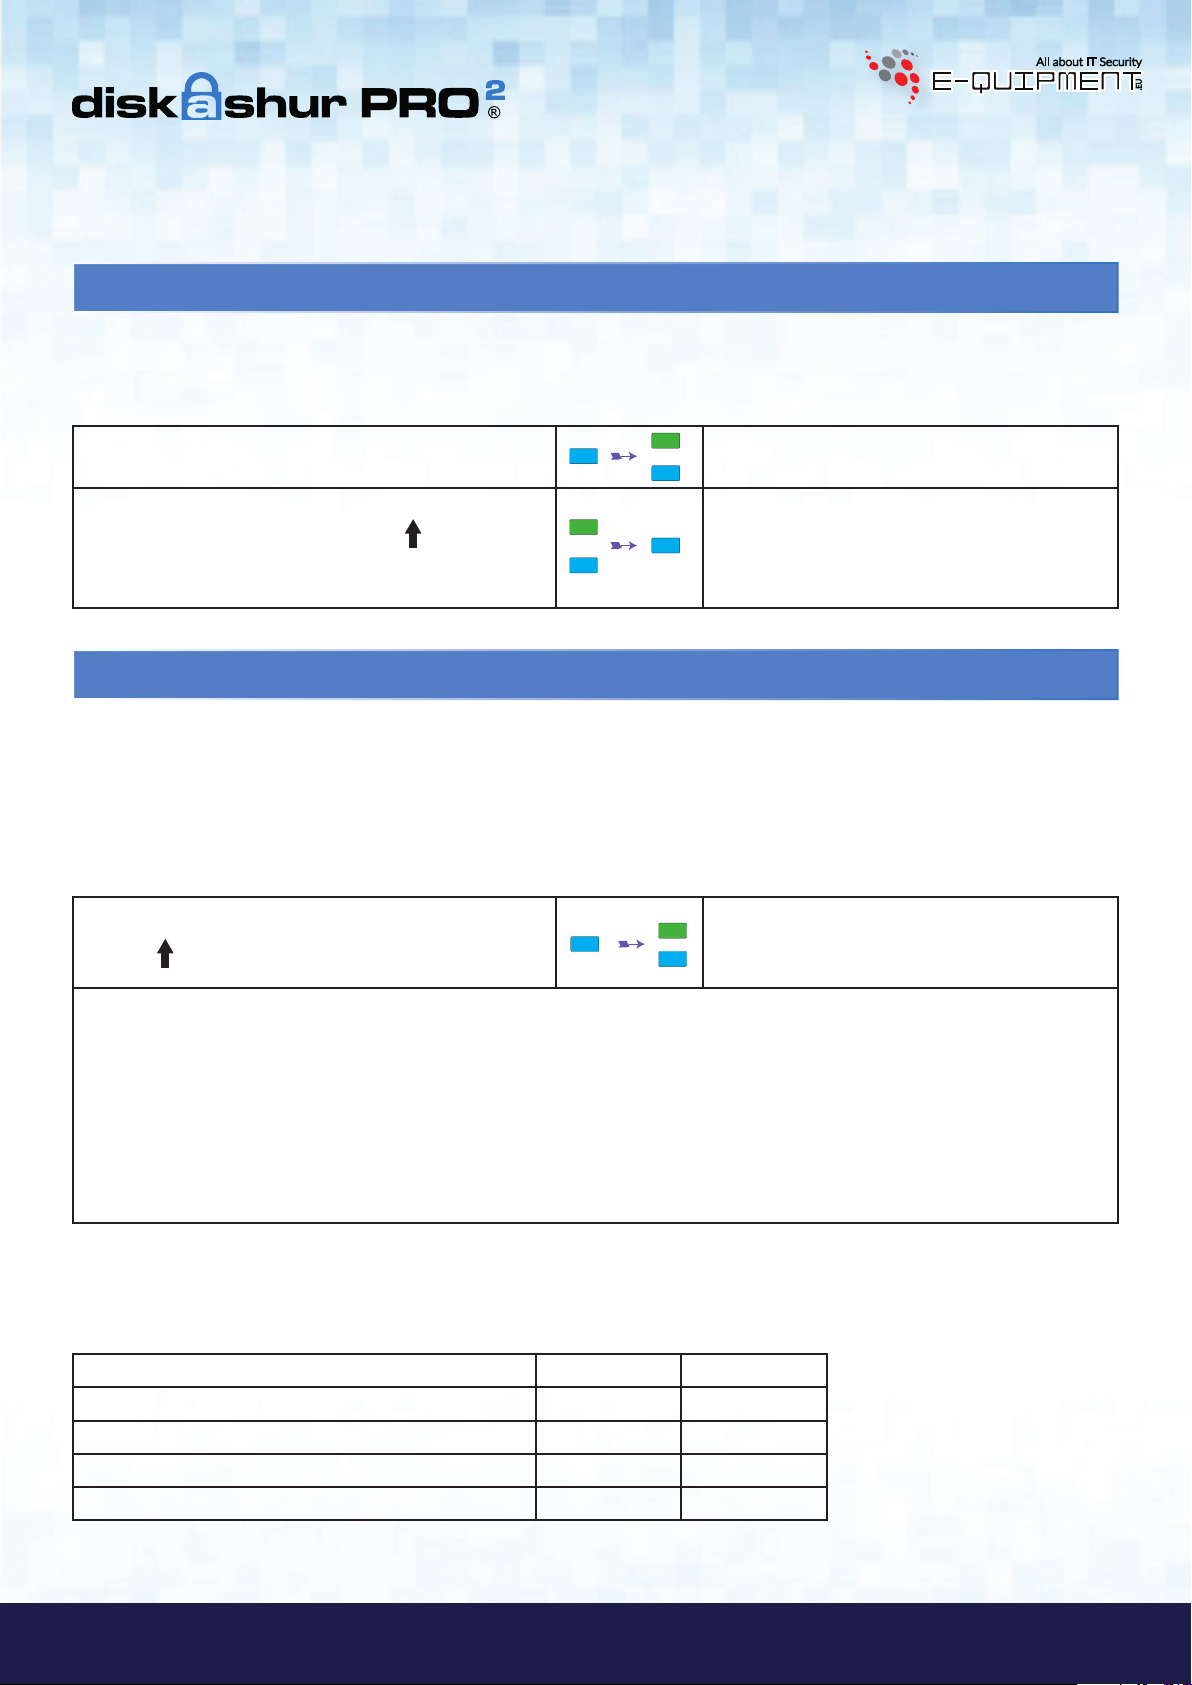
To set a User PIN Policy, first enter the “Admin Mode” as described in section 5. Once the drive is in Admin Mode
(solid
BLUE LED) proceed with the following steps.
1. In Admin mode, press and hold down
“UNLOCK + 7” buttons
2. Enter your 3 digits, remember the first two digits
denote minimum PIN length and last digit (0 or 1)
whether or not a special character has been used.
3. Press the "SHIFT" (
) button once
Solid
BLUE LED will change to blinking GREEN
and solid BLUE LEDs
Blinking
GREEN and solid BLUE LEDs will
continue to blink
Blinking
a solid
GREEN and Solid BLUE will change to
GREEN LED and finally to a solid BLUE
LED indicating the User PIN Policy has been
successfully set.
8. How to check the User PIN Policy
The Administrator is able to check the User PIN Policy and can identify the minimum PIN length restriction and whether or
not the use of a Special Character has been set by noting the LED sequence as described below.
To check the User PIN Policy, first enter the “Admin Mode” as described in section 5. Once the drive is in Admin Mode
(solid
BLUE LED) proceed with the following steps.
1. In Admin mode press and hold down
SHIFT (
) + 7
Solid
BLUE LED will change to blinking GREEN
BLUE LEDs
and
2. Press the “UNLOCK” button and the following happens;
a. All LED’s (
RED LED blink equates to ten (10) units of a PIN.
b. A
c. Every
BLUE blink indicates that a 'Special Character' was used.
d. A
e. All LED’s (
f. LEDs return to solid
RED, GREEN & BLUE) become solid for 1 second.
GREEN LED blink equates to a single (1) unit of a PIN
RED, GREEN & BLUE) become solid for 1 second.
BLUE
The table below describes the LED behaviour whilst checking the User PIN Policy, for instance if you have set a 12 digit User
PIN with the use of a Special Character, the
BLUE LED blink indicating that a Special Character must be used.
single
Manual / Handbuch / Manuel – v5.3F
®
2
PIN Description 3 digit Setup RED GREEN BLUE
RED LED will blink once (1) and the GREEN will blink twice (2) followed by a
12 digit PIN with use of a Special Character 121 1 Blink 2 Blinks 1 Blink
12 digit PIN with NO Special Character used 120 1 Blink 2 Blinks 0
9 digit PIN with use of a Special Character 091 0 9 Blinks 1 Blink
iStorage diskAshur PRO
9 digit PIN with NO Special Character used 090 0 9 Blinks 0
#10
www.istorage-uk.com
Page 11
9. Adding a new User PIN in Admin Mode
To add a New User, first enter the “Admin Mode” as described in section 5. Once the drive is in Admin Mode
BLUE LED) proceed with the following steps.
(solid
1. In Admin mode, press and hold down
“UNLOCK + 3” buttons
2. Enter New User PIN and press “UNLOCK” button
3. Re-enter the New User PIN and press “UNLOCK”
button
Solid
BLUE LED will change to blinking GREEN
and solid BLUE LEDs
Blinking
switch to a single
back to blinking
GREEN and solid BLUE LEDs will
GREEN LED blink and then
GREEN and solid BLUE LEDs
GREEN LED rapidly blinks for a few seconds
then changes to a solid
BLUE LED indicating the
User PIN has been successfully created
10. Changing the User PIN in Admin Mode
To change an existing User PIN, first enter the “Admin Mode” as described in section 5. Once the drive is in Admin
Mode (solid
1. In Admin mode, press and hold down
“UNLOCK + 3” buttons
2. Enter New User PIN and press “UNLOCK” button
3. Re-enter the New User PIN and press “UNLOCK”
button
BLUE LED) proceed with the following steps.
Solid
BLUE LED will change to blinking GREEN
and solid BLUE LEDs
Blinking
switch to a single
back to blinking
GREEN and solid BLUE LEDs will
GREEN LED blink and then
GREEN and solid BLUE LEDs
GREEN LED rapidly blinks for a few seconds
then changes to a solid
BLUE LED indicating the
User PIN has been successfully changed
11. Deleting the User PIN in Admin Mode
To delete a User PIN, first enter the “Admin Mode” as described in section 5. Once the drive is in Admin Mode
BLUE LED) proceed with the following steps.
(solid
1. In Admin mode, press and hold down
“SHIFT (
2. Press and hold down “SHIFT (
) + 3” buttons
) + 3” buttons
again.
Solid
www.istorage-uk.com
BLUE LED will change to blinking RED
LED
Blinking
LED and then to a solid
RED LED will change to solid RED
BLUE LED indicating
the User PIN was successfully deleted
iStorage diskAshur PRO
2
®
Manual / Handbuch / Manuel – v5.3F
#11
Page 12
12. Set Read-Only in Admin Mode
Important: If data has just been copied to the diskAshur PRO2, make sure to properly disconnect the drive
first by clicking ‘Safely Remove Hardware/Eject’ the diskAshur PRO2 from the Operating System before
reconnecting and setting the diskAshur PRO2 as ‘Read-Only/Write-Protect’.
When Admin writes content to the diskAshur PRO2 and restricts access to read-only, the User cannot change this setting in
User mode. To set the diskAshur PRO2 to Read-Only, first enter the “Admin Mode” as described in section 5. Once the drive
is in Admin Mode (solid
BLUE LED) proceed with the following steps.
1. In Admin mode, press and hold down “7 + 6”
buttons. (7=
Read + 6=Only)
Solid
BLUE LED will change to blinking GREEN
BLUE LEDs
and
GREEN and BLUE LEDs will change to a solid
2. Release 7+6 buttons and press “UNLOCK”
GREEN LED and then to a solid BLUE LED
indicating the drive is configured as Read-Only
13. Enable Read/Write in Admin Mode
To set the diskAshur PRO2 to Read/Write, first enter the “Admin Mode” as described in section 5. Once the drive is in
Admin Mode (solid
1. In Admin mode, press and hold down “7 + 9”
buttons. (7=
Read + 9=Write)
BLUE LED) proceed with the following steps.
Solid
BLUE LED will change to blinking GREEN
BLUE LEDs
and
GREEN and BLUE LEDs change to a solid
2. Release 7+9 buttons and press “UNLOCK”
GREEN LED then to a solid BLUE LED
indicating the drive is configured as Read/Write
14. How to create a Self-Destruct PIN
The self-destruct feature allows you to set a PIN which can be used to perform a crypto-erase on the entire drive.
When used, the self-destruct PIN will delete ALL data, Admin/User PINs and then unlock the drive. Activating this
feature will cause the Self-Destruct PIN to become the new User PIN and the diskAshur PRO2 will need to be partitioned
and formatted before any new data can be added to the drive.
To set the Self-Destruct PIN, first enter the “Admin Mode” as described in section 5. Once the drive is in Admin Mode
(solid BLUE LED) proceed with the following steps.
1. In Admin mode, press and hold down
“UNLOCK + 6” buttons
Manual / Handbuch / Manuel – v5.3F
2. Create a 7-15 digit Self-Destruct PIN and press the
®
2
“UNLOCK” button
Solid
BLUE LED will change to blinking GREEN
and solid
BLUE LEDs
Blinking GREEN and solid BLUE LEDs will
switch to a single
back to blinking
GREEN LED blink and then
GREEN and solid BLUE LEDs
GREEN LED will rapidly blink for several
3. Re-enter the PIN and press the “UNLOCK” button
iStorage diskAshur PRO
seconds and then changes to a solid BLUE LED
to indicate the Self-Destruct PIN has been
successfully configured
#12
www.istorage-uk.com
Page 13
15. How to Delete the Self-Destruct PIN
To delete the Self-Destruct PIN, first enter the “Admin Mode” as described in section 5. Once the drive is in Admin Mode
BLUE LED) proceed with the following steps.
(solid
1. In Admin mode, press and hold down
“SHIFT (
2. Press and hold down “SHIFT (
) + 6” buttons
) + 6” buttons
again
Solid
BLUE LED will change to a blinking RED
LED
Blinking
change to a solid
RED LED will become solid and then
BLUE LED indicating the
Self-Destruct PIN was successfully deleted
16. How to Unlock with the Self-Destruct PIN
When used, the self-destruct PIN will delete ALL data, Admin/User PINs and then unlock the drive. Activating this feature will cause the Self-Destruct PIN to become the new User PIN and the diskAshur PRO2 will need to be partitioned
and formatted before any new data can be added to the drive.
To activate the Self-Destruct mechanism, the drive needs to be in the standby state (solid
RED LED) and then proceed with the
following steps.
1. In standby state, press the “UNLOCK” button
RED LED switches to all LEDs, RED, GREEN &
BLUE blinking on and off
2. Enter the Self-Destruct PIN and press the
“UNLOCK” button
Important: When the Self-Destruct mechanism is activated, all data, the encryption key and the Admin/User
PINs are deleted. The Self-Destruct PIN becomes the User PIN. No Admin PIN exists after
the Self-Destruct mechanism is activated. The diskAshur PRO
perform a complete reset
Admin privileges including the ability to create a User PIN.
RED, GREEN and BLUE blinking LEDs will
change to
GREEN and BLUE LEDs alternating
on and off for approximately 15 seconds and
finally shifts to a solid
2
will need to be reset (see ‘
GREEN LED
How to
’ Section 26, on page 17) first in order to create an Admin PIN with full
www.istorage-uk.com
iStorage diskAshur PRO
2
®
Manual / Handbuch / Manuel – v5.3F
#13
Page 14
17. How to Create an Admin PIN after a Brute Force attack or Reset
It will be necessary after a Brute Force attack or when the diskAshur PRO2 has been reset to create an Admin PIN before the
drive can be used. If the drive has been brute forced or reset, the drive will be in a standby state (solid RED LED). to create an
Admin PIN proceed with the following steps.
PIN requirements:
• Must be between 7-15 digits in length
• Must not contain only repetitive numbers, e.g. (3-3-3-3-3-3-3)
• Must not contain only consecutive numbers, e.g. (1-2-3-4-5-6-7), (7-8-9-0-1-2-3-4), (7-6-5-4-3-2-1)
Note: The SHIFT key can be used for additional combinations. SHIFT + 1 is a separate value than just 1.
To create a PIN using additional combinations, press and hold down the SHIFT button whilst entering
your 7-15 digit PIN. e.g. SHIFT + 26756498.
1. In Standby state, press and hold down
“Shift (
) + 1” buttons
2. Enter NEW Admin PIN and press “UNLOCK” button
3. Re-enter the NEW Admin PIN and press “UNLOCK”
button
Solid
RED LED will change to blinking GREEN
and solid BLUE LEDs
Blinking
switch to a single
back to blinking
Blinking
change to
seconds and then to a solid
GREEN and solid BLUE LEDs will
GREEN LED blink and then
GREEN and solid BLUE LEDs
GREEN LED and solid BLUE LED
BLUE LED rapidly blinking for a few
BLUE LED indicat-
ing the Admin PIN was successfully configured.
18. Setting the Unattended Auto-Lock Clock
To protect against unauthorised access if the drive is unlocked and unattended, the diskAshur PRO2 can be set to
automatically lock after a pre-set amount of time. In its default state, the diskAshur PRO2 Unattended Auto Lock feature is
turned off. The Unattended Auto Lock can be set to activate between 5 - 99 minutes.
To set the Unattended Auto Lock, first enter the “Admin Mode” as described in section 5. Once the drive is in Admin
Mode (solid
1. In Admin mode, press and hold down
“UNLOCK + 5” buttons
BLUE LED) proceed with the following steps.
Solid BLUE LED will change to blinking GREEN
BLUE LEDs
and
2. Enter the amount of time that you would like to set the Auto-Lock timeout feature for, the minimum time that can be set is
5 minutes and the maximum being 99 minutes (5-99 minutes). For example enter:
Manual / Handbuch / Manuel – v5.3F
®
2
05 for 5 minutes
20 for 20 minutes
99 for 99 minutes
3. Press the “SHIFT” (
iStorage diskAshur PRO
) button
Blinking
a solid GREEN for a second and then finally to a
solid
GREEN and BLUE LEDs will change to
BLUE LED indicating the Auto-Lock time
out is successfully configured
#14
www.istorage-uk.com
Page 15
19. Turn off the Unattended Auto-Lock Clock
To turn off the Unattended Auto Lock, first enter the “Admin Mode” as described in section 5. Once the drive is in Admin
Mode (solid
BLUE LED) proceed with the following steps.
1. In Admin mode, press and hold down
“UNLOCK + 5” buttons
2. Enter “00” and press the “SHIFT” (
) button
Solid BLUE LED will change to blinking GREEN
and
BLUE LEDs
Blinking
a solid
solid
GREEN and BLUE LEDs will change to
GREEN for a second and then finally to a
BLUE LED indicating the Auto-Lock time
out has been successfully switched off
20. How to check the Unattended Auto-Lock Clock
The Administrator is able to check and determine the length of time set for the unattended auto-lock clock by simply noting
the LED sequence as described on the table at the bottom of this page.
To check the unattended auto-lock, first enter the “Admin Mode” as described in section 5. Once the drive is in Admin
Mode (solid
1. In Admin mode press and hold down
SHIFT (
BLUE LED) proceed with the following steps.
) + 5
Solid
BLUE LED will change to blinking GREEN
and
BLUE LEDs
2. Press the “UNLOCK” button and the following happens;
a. All LED’s (
b. Each
c. Every
d. All LED’s (
e. LEDs return to solid
RED, GREEN & BLUE) become solid for 1 second.
RED LED blink equates to ten (10) minutes.
GREEN LED blink equates to one (1) minute.
RED, GREEN & BLUE) become solid for 1 second.
BLUE
The table below describes the LED behaviour whilst checking the unattended auto-lock, for instance if you have set the drive
to automatically lock after 26 minutes, the
RED LED will blink twice (2) and the GREEN LED will blink six (6) times.
Auto-Lock in minutes RED GREEN
8 minutes 0 8 Blinks
15 minutes 1 Blink 5 Blinks
26 minutes 2 Blinks 6 Blinks
40 minutes 4 Blinks 0
www.istorage-uk.com
iStorage diskAshur PRO
2
®
Manual / Handbuch / Manuel – v5.3F
#15
Page 16
21. How to Unlock diskAshur PRO
2
with User PIN
1. In a standby state (solid RED LED) Press the
“UNLOCK” button
RED LED switches to all LEDs, RED, GREEN &
BLUE blinking on and off
RED, GREEN and BLUE blinking LEDs will
GREEN and BLUE LEDs
GREEN LED and
Green LED indicating
2. Enter User PIN and press the “UNLOCK” button
change to alternating
then to a rapidly blinking
finally shifts to a solid
drive successfully unlocked in User mode
22. Changing the User PIN in User Mode
To change the User PIN, first unlock the diskAshur PRO2 with a User PIN as described above in section 21. Once the drive is
in User Mode (solid
1. In User mode press and hold down “UNLOCK + 4”
GREEN LED) proceed with the following steps.
Solid
GREEN LED will change to a blinking
GREEN LED and a solid BLUE LED
Blinking GREEN and solid BLUE LEDs will
2. Enter New User PIN and press the “UNLOCK” button
3. Re-enter New User PIN and press the “UNLOCK”
button
switch to a single
back to blinking
Blinking
GREEN and solid BLUE LEDs will
GREEN LED blink and then
GREEN and solid BLUE LEDs
switch to a rapidly blinking
then to a solid
GREEN LED indicating
GREEN LED and
successful User PIN change
Manual / Handbuch / Manuel – v5.3F
®
2
iStorage diskAshur PRO
#16
www.istorage-uk.com
Page 17
23. Set Read-Only in User Mode
Important: If data has just been copied to the diskAshur PRO2, make sure to properly disconnect the drive
first by clicking ‘Safely Remove Hardware/Eject’ the diskAshur PRO2 from the Operating System before
reconnecting and setting the diskAshur PRO2 as ‘Read-Only/Write-Protect’.
To set the diskAshur PRO2 to Read-Only, first enter the “User Mode” as described in section 21. Once the drive is in User
Mode (solid
GREEN LED) proceed with the following steps.
1. In User mode, press and hold down “7 + 6”
buttons. (7=
Read + 6=Only)
Solid
GREEN LED will change to blinking
GREEN and BLUE LEDs
GREEN and BLUE LEDs will change to a solid
2. Release 7+6 buttons and press “UNLOCK”
GREEN LED indicating the drive is configured
as Read-Only
Note: 1. This setting is activated the next time the drive is unlocked.
2. If a User set the drive as Read-Only, Admin can override it by setting the drive as Read/Write in
Admin mode.
3. If Admin set the drive as Read-Only, the User cannot set the drive as Read/Write
24. Enable Read/Write in User Mode
To set the diskAshur PRO2 to Read/Write, first enter the “User Mode” as described in section 21. Once the drive is in User
Mode (solid
GREEN LED) proceed with the following steps.
1. In User mode, press and hold down “7 + 9”
buttons. (7=
Read + 9=Write)
2. Release 7+9 buttons and press “UNLOCK”
Note: 1. This setting is activated the next time the drive is unlocked.
2. If a User set the drive as Read-Only, Admin can override it by setting the drive as Read/Write in
Admin mode.
3. If Admin set the drive as Read-Only, the User cannot set the drive as Read/Write
www.istorage-uk.com
GREEN LED will change to blinking
Solid
GREEN and BLUE LEDs
GREEN and BLUE LEDs will change to a solid
GREEN LED indicating the drive is configured
as Read/Write
iStorage diskAshur PRO
2
®
Manual / Handbuch / Manuel – v5.3F
#17
Page 18
25. Brute Force Protection
If an incorrect PIN is entered 15 (3 x 5 PIN clusters) consecutive times, then all Admin/User PINs, the encryption key and
all data will be deleted and lost forever. The diskAshur PRO2 will then need to be formatted and partitioned before it can be
reused.
1. If a PIN is entered incorrectly 5 (five) consecutive times, all LEDs -
RED, GREEN, BLUE will light up and become solid.
2. Unplug the drive and re-plug it into the host to get five more PIN attempts. If PIN is incorrectly entered 5 more times, (10
in total - 5 from step 1 and 5 from step 2) all LEDs -
3. Unplug the drive, hold down the “SHIFT” button and replug it into the host, all LEDs -
RED, GREEN, BLUE will light up and become solid again.
RED, GREEN, BLUE will light up
and blink together.
4. With all LEDs blinking, enter “47867243” and press the “UNLOCK” button to get 5 final attempts.
Caution: After 15 consecutive incorrect PIN entries the Brute Force Defence Mechanism activates and deletes
all Admin/User PINs, the encryption key and data. A new Admin PIN must be created, refer to Section
17 on page 13 on ‘
2
will also need to be partitioned and formatted before any new data can be added to the drive.
PRO
How to Create an Admin PIN after a Brute Force attack or Reset’, the diskAshur
26. How to perform a complete reset
To perform a complete reset, the diskAshur PRO2 must be in a standby state (solid RED LED). Once the drive is reset then all
Admin/User PINs, the encryption key and all data will be deleted and lost forever and the drive will need to be formatted and
partitioned before it can be reused.
To reset the diskAshur PRO2 proceed with the following steps.
1. In standby state, press and hold down “0” button
until all LEDs blink alternately on and off
2. Press and hold down “2 + 7” buttons until all LEDs
become solid for a second and then to a solid
Manual / Handbuch / Manuel – v5.3F
®
2
RED LED
Important: After a complete reset a new Admin PIN must be created, refer to Section 17 on page 13 on ‘How to
Create an Admin PIN after a Brute Force attack or Reset
partitioned and formatted before any new data can be added to the drive.
iStorage diskAshur PRO
#18
www.istorage-uk.com
Solid
RED LED will change to all LEDs, RED,
GREEN and BLUE blinking alternately on and
off
RED, GREEN and BLUE alternating LEDs will
change to all solid for a second and then to a
solid
RED LED indicating the drive has been
reset
’, the diskAshur PRO2 will also need to be
Page 19
27. Initialising and formatting the diskAshur PRO2
After a ‘Brute Force Attack’ or a complete reset of the diskAshur PRO2 will delete all data, encryption key and partition settings.
You will need to initialise and format the diskAshur PRO2 before it can be used.
To initialise your diskAshur PRO2, do the following:
1. Attach the diskAshur PRO2 to the computer.
2. Create a new Admin PIN - see page 13, section 17, ‘How to create an Admin PIN after a Brute Force attack or reset’.
3. With the diskAshur PRO
Windows 7: Right click Computer and then click Manage and then select Disk Management
4.
2
in standby state (
RED LED) enter New Admin PIN to unlock (GREEN LED).
Windows 8: Right-click left corner of desktop and select Disk Management
Windows 10: Right click on the start button and select Disk Management
5. In the Computer Manage window, click Disk Management. In the Disk Management window, the diskAshur PRO2 is
recognised as an unknown device that is uninitialised and unallocated.
Note: If the Initialise Disk Wizard window opens, click Cancel.
iStorage diskAshur PRO
6. Right-click Unknown Disk, and then select Initialise Disk.
www.istorage-uk.com
2
®
Manual / Handbuch / Manuel – v5.3F
#19
Page 20

7. In the Initialise Disk window, click OK.
8. Right-click in the blank area under the Unallocated section, and then select New Simple Volume. The Welcome to
the New Simple Volume Wizard window opens.
9. Click Next.
10. If you need only one partition, accept the default partition size and click Next.
11. Assign a drive letter or path and click Next.
12. Create a volume label, select Perform a quick format, and then click Next.
Manual / Handbuch / Manuel – v5.3F
13. Click Finish.
®
2
14. Wait until the format process is complete. The diskAshur PRO2 will be recognised and it is available for use.
iStorage diskAshur PRO
#20
www.istorage-uk.com
Page 21
28. diskAshur PRO
2
Setup for Mac OS
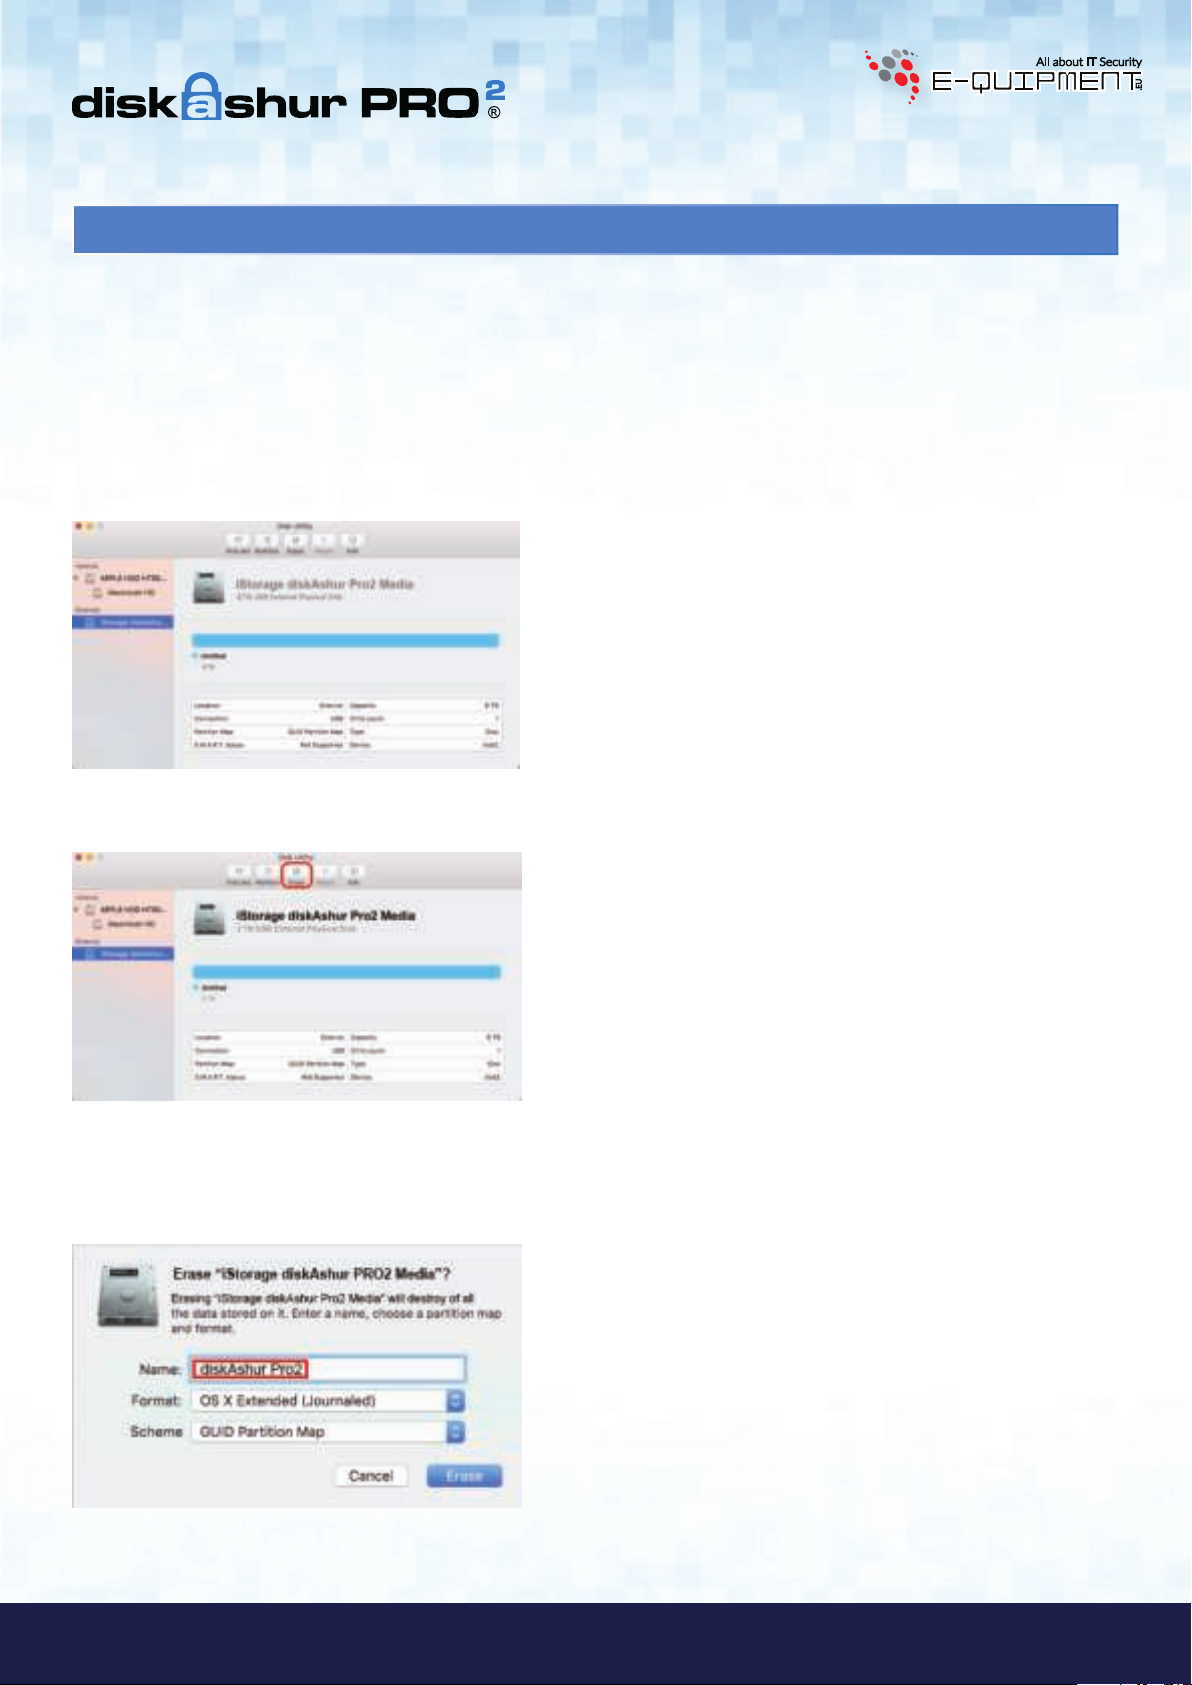
Your diskAshur PRO2 is preformatted exFAT. To reformat the drive to a Mac compatible format please read below.
Once the drive is unlocked, open Disk Utility from Applications/Utilities/Disk Utilities.
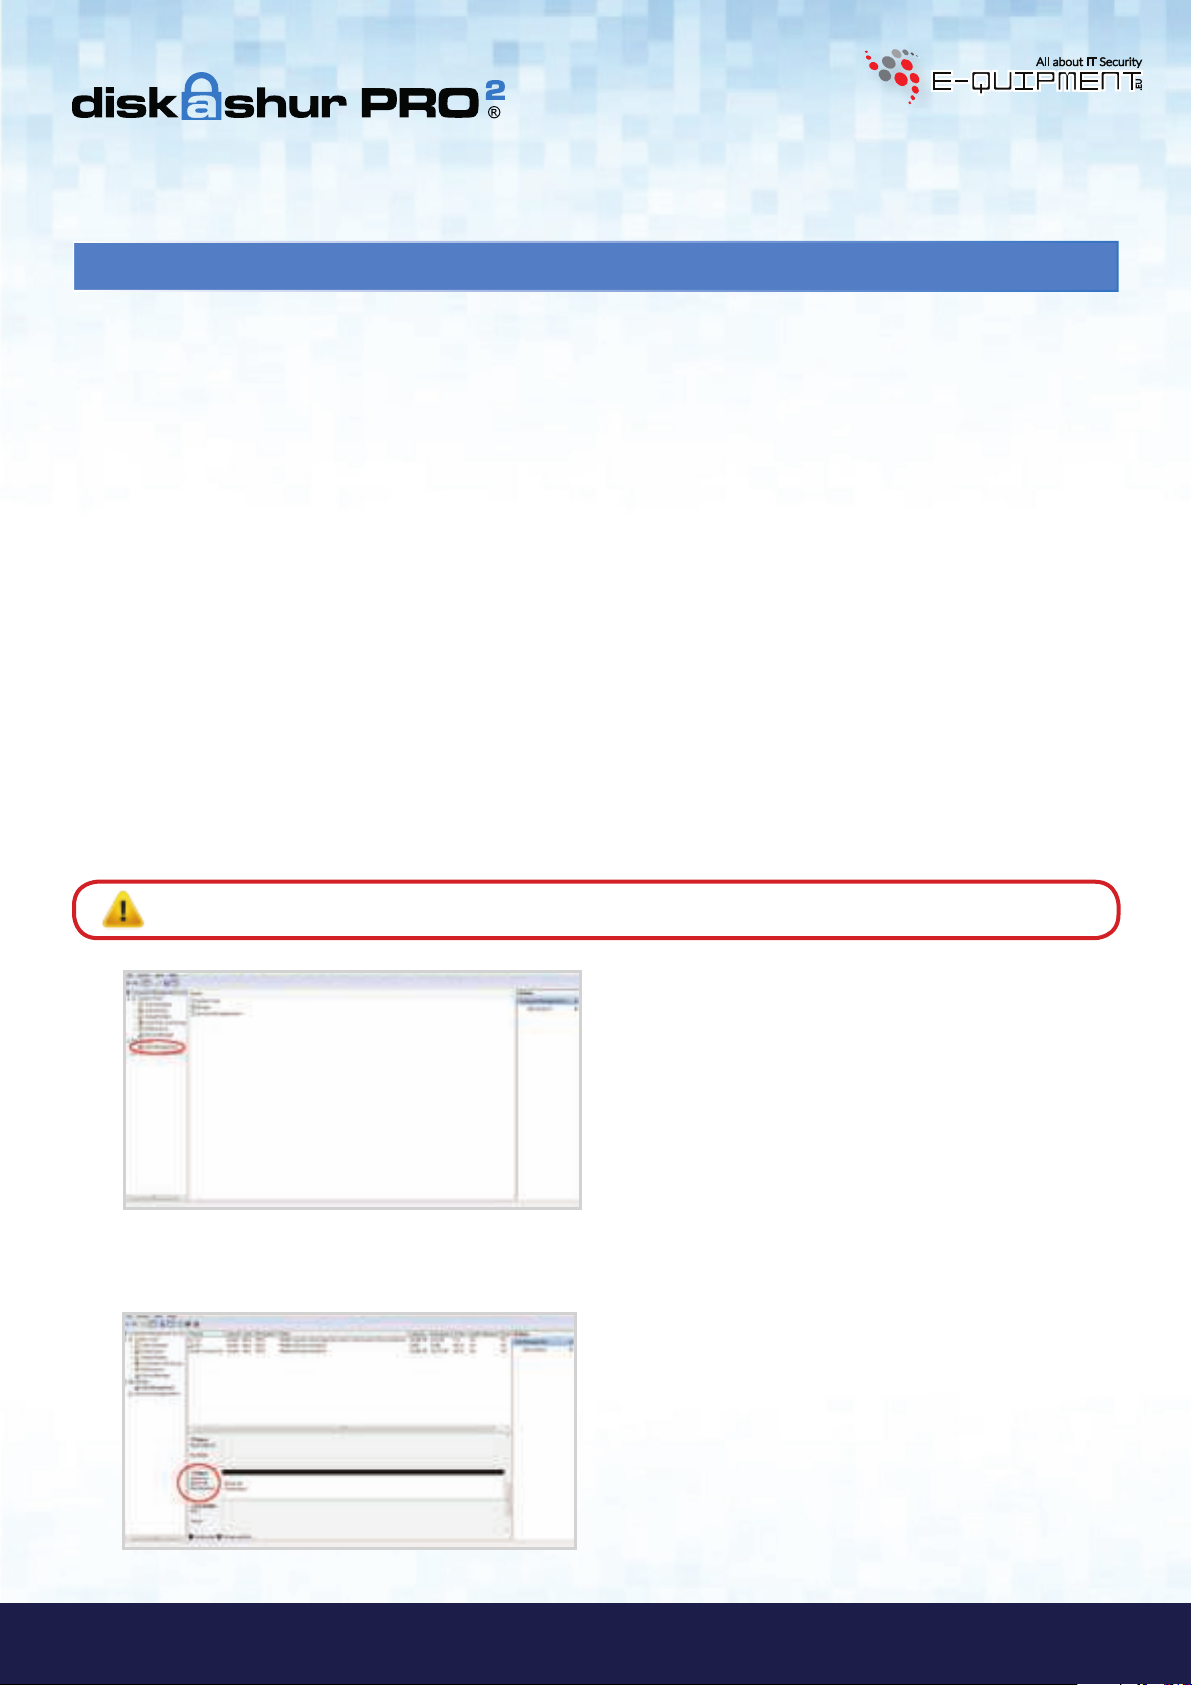
To format the diskAshur PRO2:
1. Select diskAshur PRO2 from the list of drives and volumes. Each drive in the list will display its capacity, manufacturer, and
product name, such as ‘iStorage diskAshur PRO2 Media’ or 232.9 diskAshur PRO2.
2. Click the ‘Erase’ button (figure 1).
figure 1
3. Enter a name for the drive (figure 2). The default name is Untitled. The name of the drive will eventually appear on the
desktop.
iStorage diskAshur PRO
2
®
Manual / Handbuch / Manuel – v5.3F
figure 2
www.istorage-uk.com
#21
Page 22
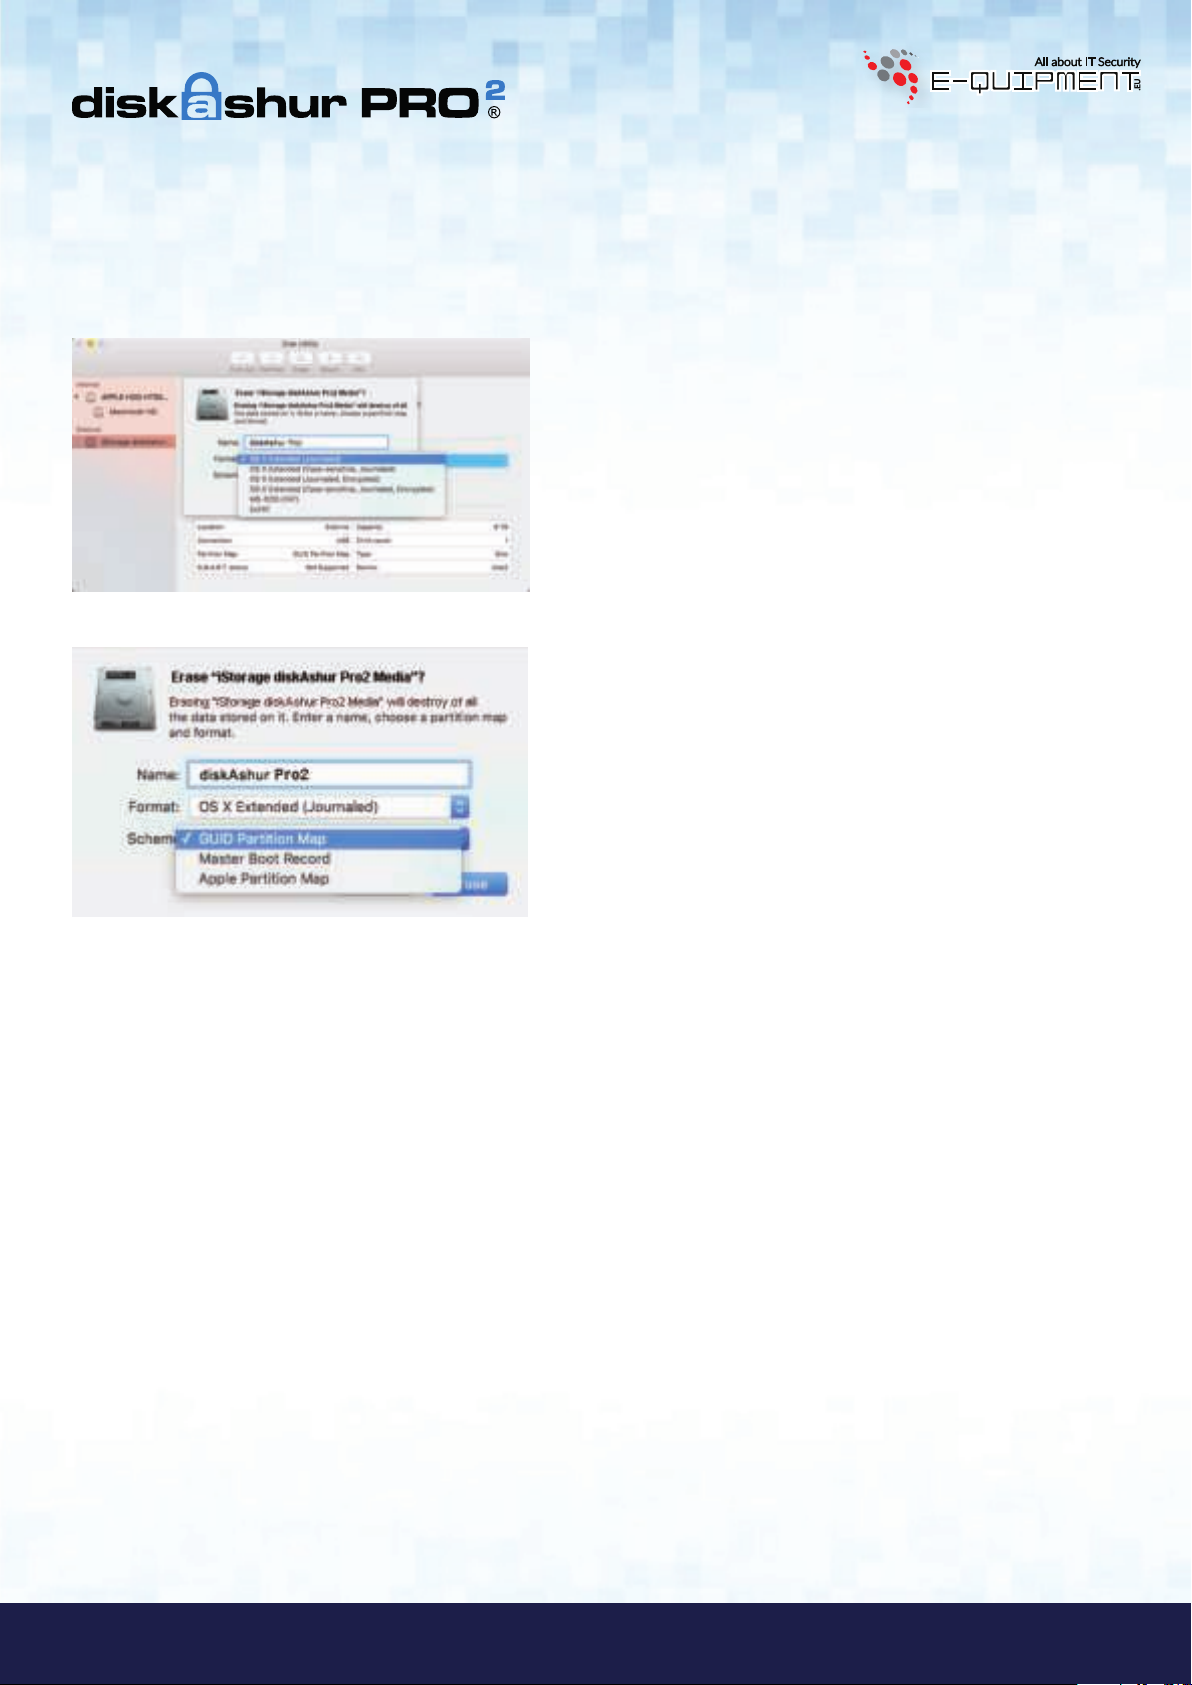
4. Select a scheme and volume format to use. The Volume Format dropdown menu (figure 3) lists the available drive formats
that the Mac supports. The recommended format type is ‘Mac OS Extended (Journaled).’ The scheme format dropdown menu
lists the available schemes to use (figure 4). We recommend using ‘GUID Partition Map’ on drives larger than 2TB.
figure 3
figure 4
5. Click the ‘Erase’ button. Disk Utility will unmount the volume from the desktop, erase it, and then remount it on the
desktop.
Manual / Handbuch / Manuel – v5.3F
®
2
iStorage diskAshur PRO
#22
www.istorage-uk.com
Page 23
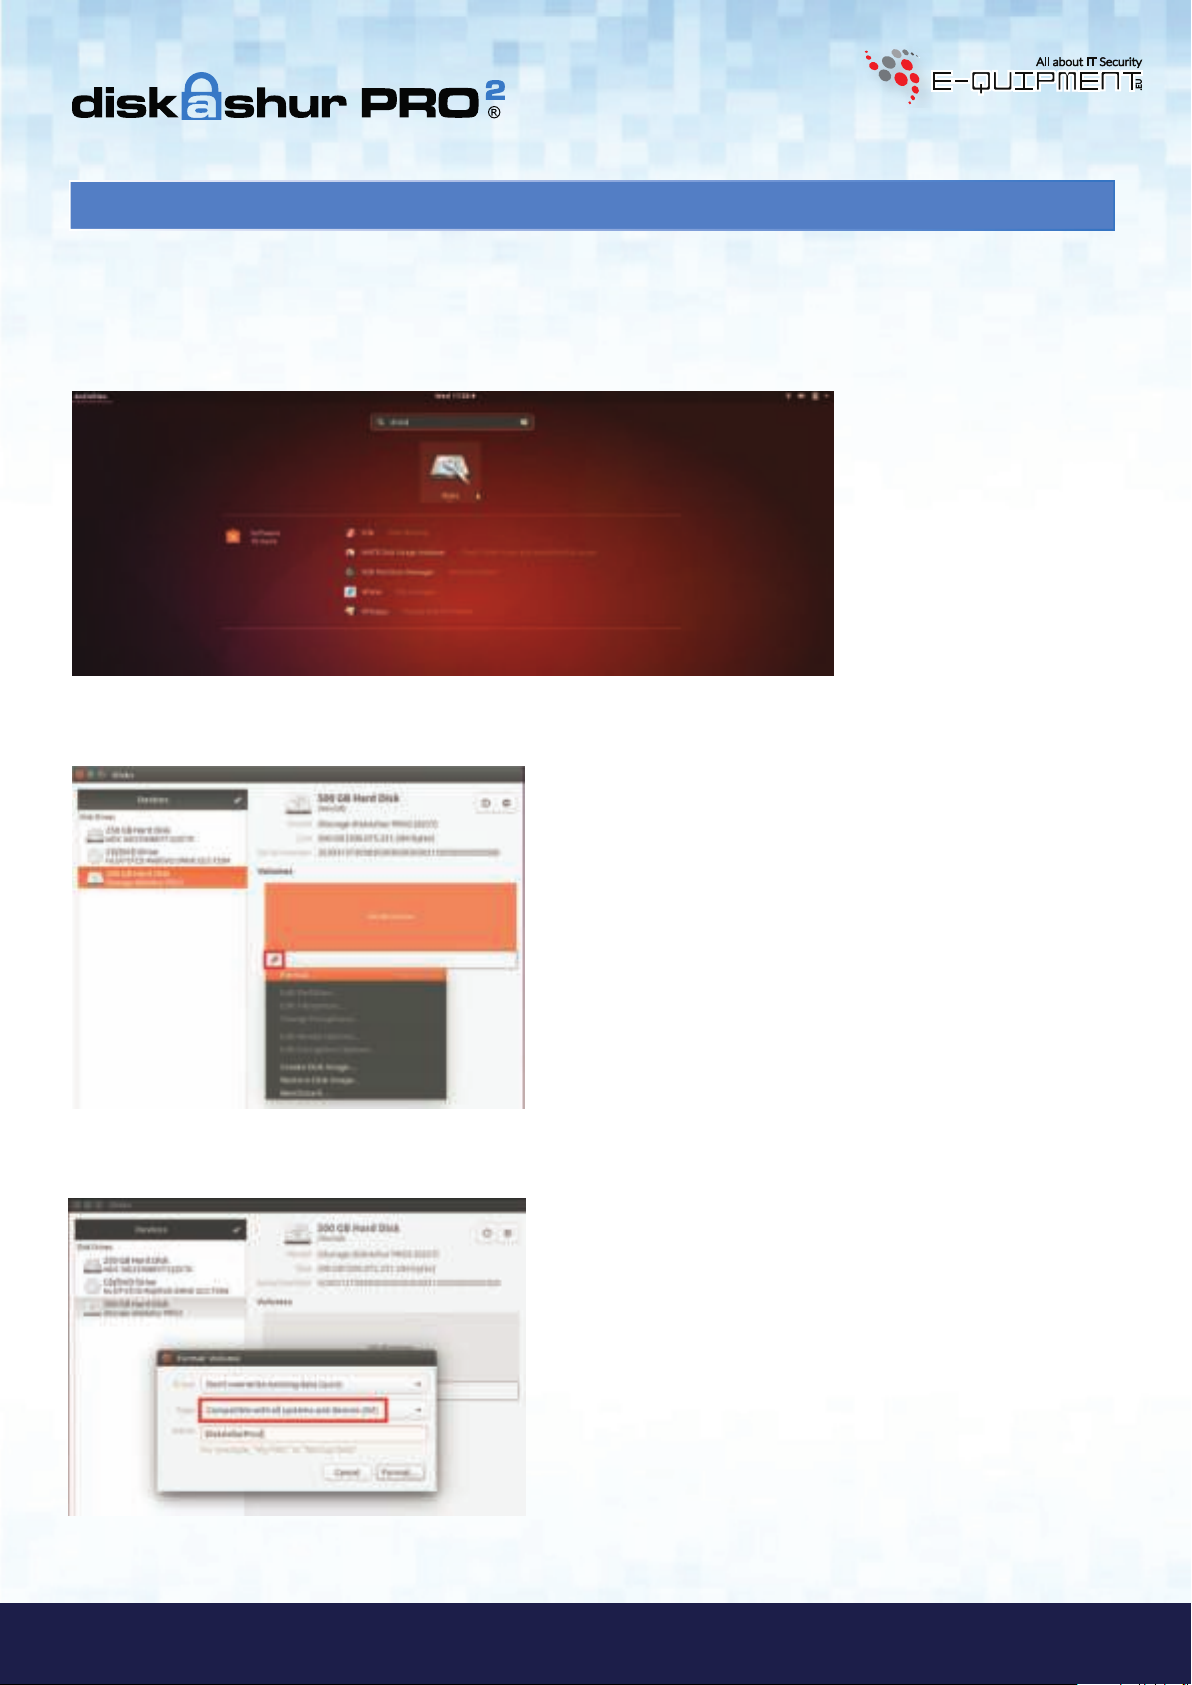
29. diskAshur PRO
2
Setup for Linux (Ubuntu 17.10)
If your diskAshur PRO2 has been initialised and formatted exFAT, you can directly use the drive on Ubuntu.
If not, please read below.
To format the diskAshur PRO
2
as FAT filesystem:
1. Open ‘Show Application’ and type ‘Disks’ in the search box. Click on the ‘Disks’ utility when displayed.
2. Click to select the drive (500 GB Hard Disk) under ‘Devices’. Next click on the gears icon under ‘Volumes’ and then
click on ‘Format’.
3. Select ‘Compatible with all systems and devices (FAT)’ for the ‘Type’ option. And enter a name for the drive,
e.g: diskAshur PRO2. Then, click the ‘Format’ button.
www.istorage-uk.com
iStorage diskAshur PRO
2
®
Manual / Handbuch / Manuel – v5.3F
#23
Page 24
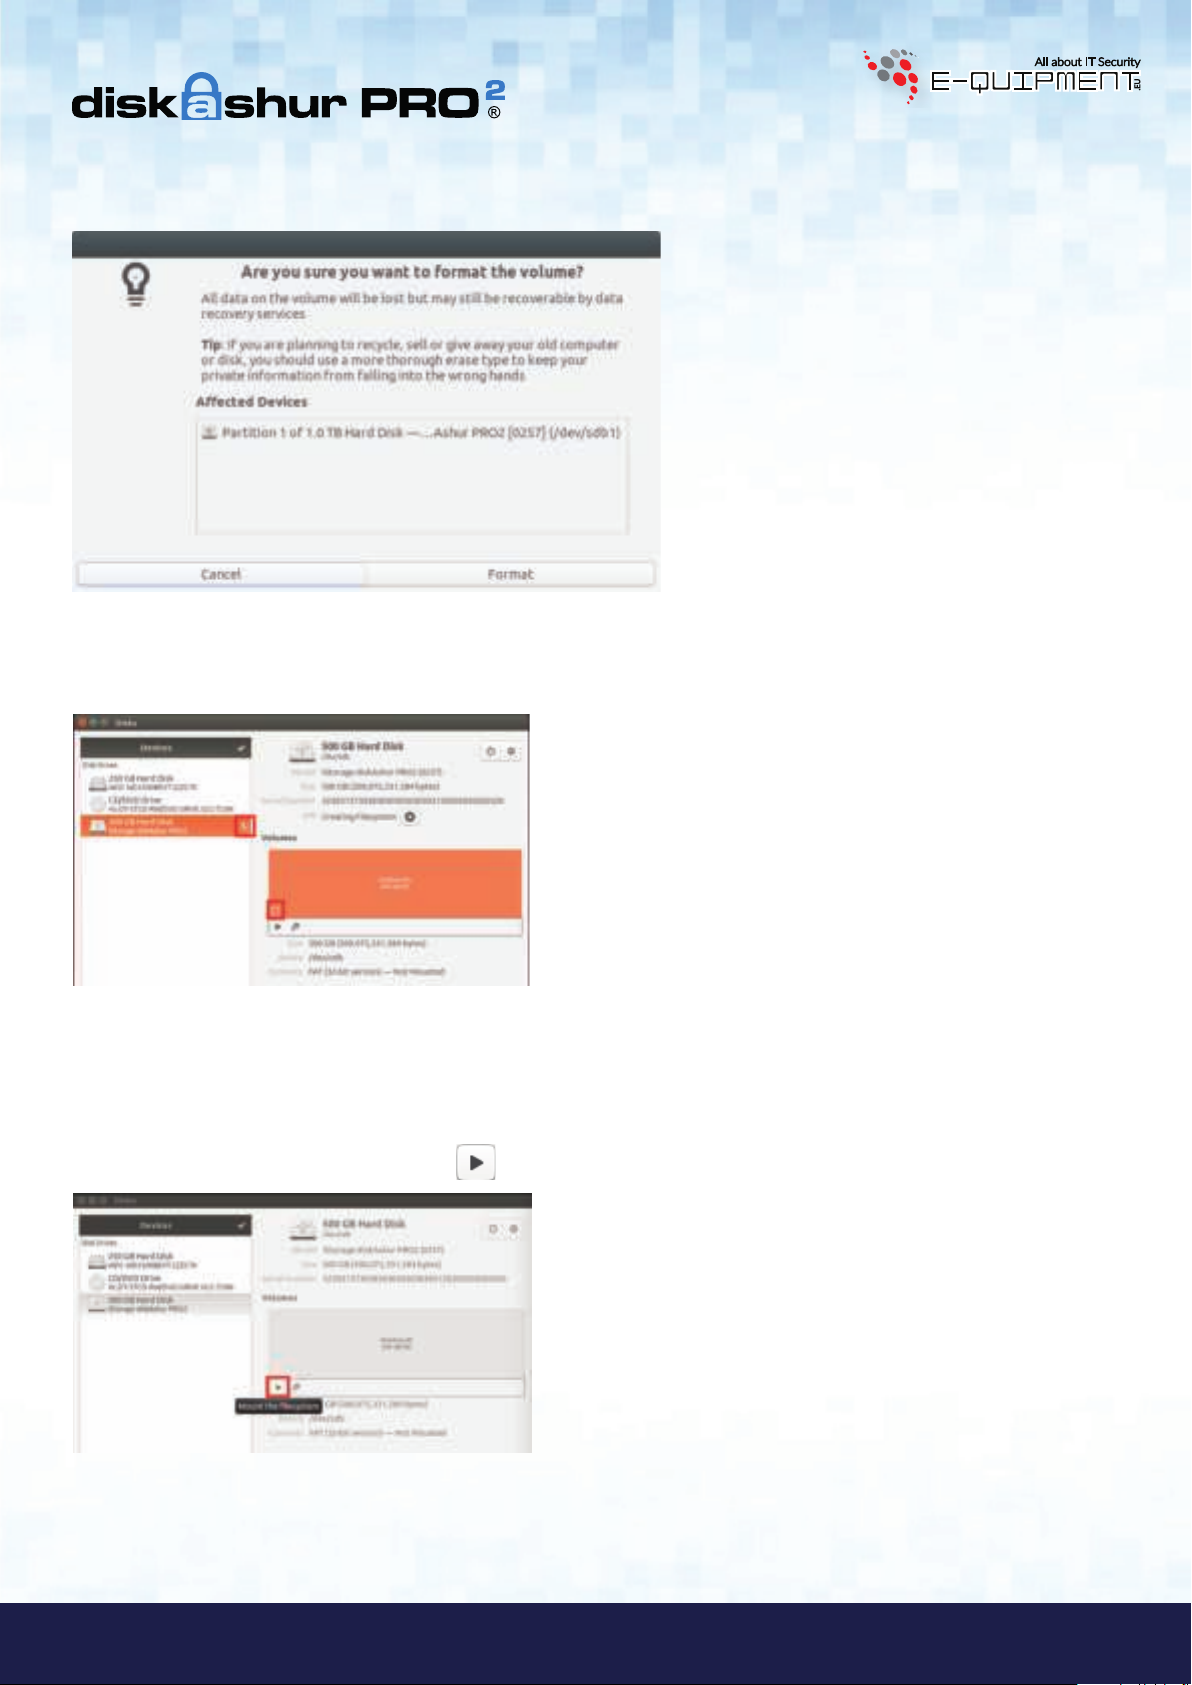
4. Click ‘Format’ again.
5. The drive will start to be formatted.
6. After the format process is finished, click to mount the drive to Ubuntu.
Manual / Handbuch / Manuel – v5.3F
®
2
iStorage diskAshur PRO
#24
www.istorage-uk.com
Page 25
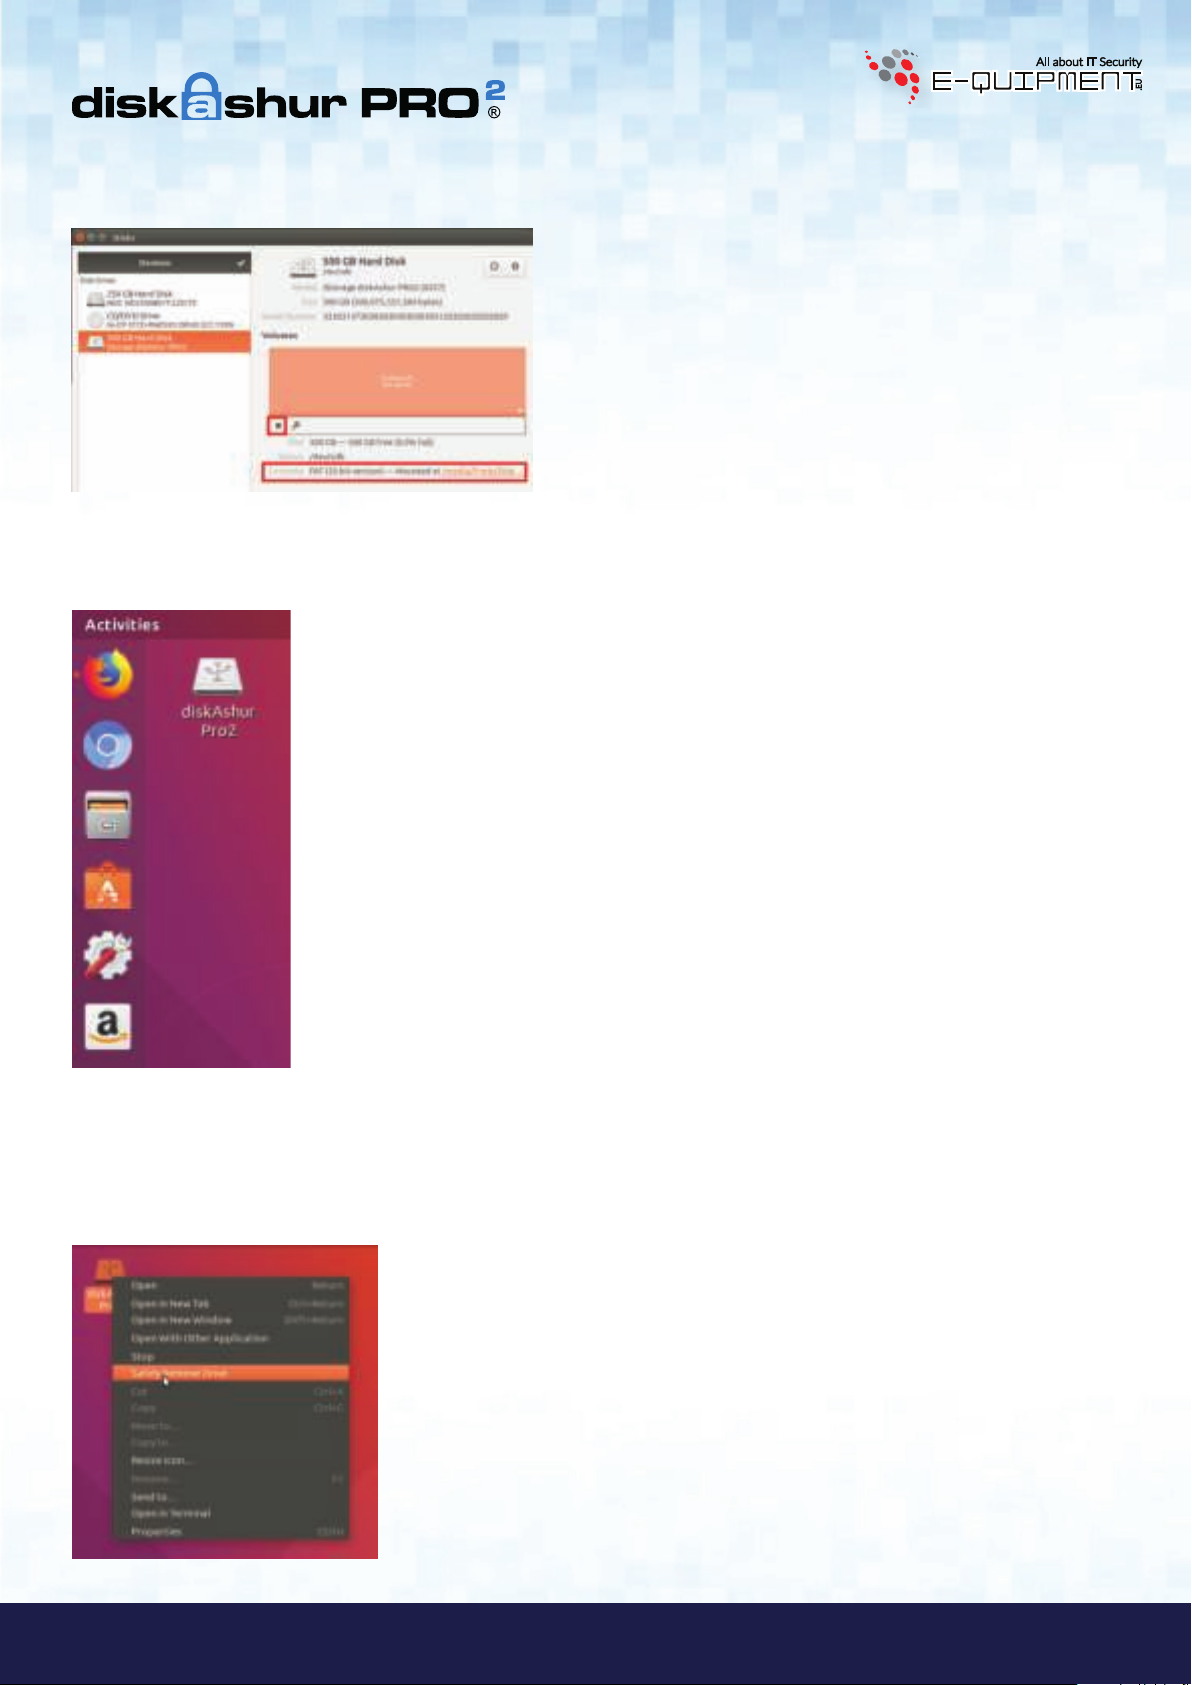
7. Now the drive should be mounted to Ubuntu and ready to use.
8. A disk icon will be shown as seen in the image below. You can click the disk icon to open your drive.
2
Lock diskAshur PRO
strongly recommended to right click your drive icon and then click ‘Safely Remove’ in the OS to eject (lock) your
It is
for Linux (Ubuntu 17.10)
diskAshur PRO2, especially after data has been copied or deleted from the drive.
www.istorage-uk.com
iStorage diskAshur PRO
2
®
Manual / Handbuch / Manuel – v5.3F
#25
Page 26
30. Hibernating, Suspending, or Logging off from the Operating System
Be sure to save and close all the files on your diskAshur PRO2 before hibernating, suspending, or logging off from the
operating system.
It is recommended that you lock the diskAshur PRO2 manually before hibernating, suspending, or logging off from your
system.
To lock, simply press the ‘LOCK’ button on the diskAshur PRO2 or by clicking the ‘Safely Remove Hardware/Eject’ icon within
your operating system.
Attention: To ensure your data is secure, be sure to lock your diskAshur PRO2 if you are away from your
computer.
31. How to check Firmware in Admin mode
To check the firmware revision number, first enter the “Admin Mode” as described in section 5. Once the drive is in Admin
Mode (solid
1. In Admin mode press and hold down “3 + 8” until
GREEN and BLUE LEDs blink together
BLUE LED) proceed with the following steps.
Solid
BLUE LED will change to blinking GREEN
BLUE LEDs
and
2. Press the “UNLOCK” button and the following happens;
a. All LED’s (
b.
RED LED blinks indicating the integral part of the firmware revision number.
GREEN LED blinks indicating the fractional part.
c.
d. All LED’s (
e. LEDs return to solid
RED, GREEN & BLUE) become solid for 1 second.
RED, GREEN & BLUE) become solid for 1 second.
BLUE
For example, if the firmware revision number is ‘1.2’, the RED LED will blink once (1) and the GREEN LED will blink two (2)
times. Once the sequence has ended the
Manual / Handbuch / Manuel – v5.3F
LED.
®
2
RED, GREEN & BLUE LED’s will blink together once and then return to a solid BLUE
iStorage diskAshur PRO
#26
www.istorage-uk.com
Page 27

32. How to check Firmware in User Mode
To check the firmware revision number, first enter the “User Mode” as described in section 21. Once the drive is in User
Mode (solid
GREEN LED) proceed with the following steps.
1. In User mode press and hold down “3 + 8” until
GREEN and BLUE LEDs blink together
Solid
GREEN LED will change to blinking
GREEN and BLUE LEDs
2. Press the “UNLOCK” button and the following happens;
a. All LED’s (
b.
RED LED blinks indicating the integral part of the firmware revision number.
GREEN LED blinks indicating the fractional part.
c.
d. All LED’s (
e. LEDs return to solid
RED, GREEN & BLUE) become solid for 1 second.
RED, GREEN & BLUE) become solid for 1 second.
GREEN
For example, if the firmware revision number is ‘1.2’, the RED LED will blink once (1) and the GREEN LED will blink two (2)
times. Once the sequence has ended the
RED, GREEN & BLUE LED’s will blink together once and then return to a solid BLUE
LED.
www.istorage-uk.com
iStorage diskAshur PRO
2
®
Manual / Handbuch / Manuel – v5.3F
#27
Page 28

33. Technical Support
iStorage provides the following helpful resources for you:
iStorage’s Website
https://www.istorage-uk.com
E-mail correspondence
support@istorage-uk.com
Telephone support with our Technical Support Department on +44 (0) 20 8991-6260.
iStorage’s Technical Support Specialists are available from 9:00 a.m. to 5:30 p.m.
GMT - Monday through Friday
34. Warranty and RMA information
Two Year Warranty:
iStorage offers a 2-year warranty on the iStorage diskAshur PRO2 against defects in materials and workmanship under
normal use. The warranty period is effective from the date of purchase either directly from iStorage or an authorised reseller.
Disclaimer and terms of warranty:
THE WARRANTY BECOMES EFFECTIVE ON THE DATE OF PURCHASE AND MUST BE VERIFIED WITH YOUR SALES RECEIPT OR INVOICE DISPLAYING THE DATE OF PRODUCT
PURCHASE.
ISTORAGE WILL, AT NO ADDITIONAL CHARGE, REPAIR OR REPLACE DEFECTIVE PARTS WITH NEW PARTS OR SERVICEABLE USED PARTS THAT ARE EQUIVALENT TO NEW IN
PERFORMANCE. ALL EXCHANGED PARTS AND PRODUCTS REPLACED UNDER THIS WARRANTY WILL BECOME THE PROPERTY OF ISTORAGE.
THIS WARRANTY DOES NOT EXTEND TO ANY PRODUCT NOT PURCHASED DIRECTLY FROM ISTORAGE OR AN AUTHORISED RESELLER OR TO ANY PRODUCT THAT HAS BEEN
DAMAGED OR RENDERED DEFECTIVE: 1. AS A RESULT OF ACCIDENT, MISUSE, NEGLECT, ABUSE OR FAILURE AND/OR INABILITY TO FOLLOW THE WRITTEN INSTRUCTIONS
Manual / Handbuch / Manuel – v5.3F
PROVIDED IN THIS INSTRUCTION GUIDE: 2. BY THE USE OF PARTS NOT MANUFACTURED OR SOLD BY ISTORAGE; 3. BY MODIFICATION OF THE PRODUCT; OR 4. AS A RESULT
®
2
OF SERVICE, ALTERNATION OR REPAIR BY ANYONE OTHER THAN ISTORAGE AND SHALL BE VOID. THIS WARRANTY DOES NOT COVER NORMAL WEAR AND TEAR.
NO OTHER WARRANTY, EITHER EXPRESS OR IMPLIED, INCLUDING ANY WARRANTY OR MERCHANTABILITY AND FITNESS FOR A PARTICULAR PURPOSE, HAS BEEN OR WILL BE
MADE BY OR ON BEHALF OF ISTORAGE OR BY OPERATION OF LAW WITH RESPECT TO THE PRODUCT OR ITS INSTALLATION, USE, OPERATION, REPLACEMENT OR REPAIR.
ISTORAGE SHALL NOT BE LIABLE BY VIRTUE OF THIS WARRANTY, OR OTHERWISE, FOR ANY INCIDENTAL, SPECIAL OR CONSEQUENTIAL DAMAGE INCLUDING ANY LOSS OF
DATA RESULTING FROM THE USE OR OPERATION OF THE PRODUCT, WHETHER OR NOT ISTORAGE WAS APPRISED OF THE POSSIBILITY OF SUCH DAMAGES.
iStorage diskAshur PRO
#28
www.istorage-uk.com
Page 29

E-quipment BV
Transistorstraat 31, 1322 CK Almere
www. e-quipment.eu | info@e-quipment.eu
Tel: +31 (0) 36-5250024
iStorage diskAshur PRO
2
®
Manual / Handbuch / Manuel – v5.3F
www.istorage-uk.com
#29
Page 30

Benutzerhandbuch
Manual / Handbuch / Manuel – v5.3F
®
2
Vergessen Sie Ihre PIN (Ihr Passwort) nicht, da Sie ohne PIN/Passwort
nicht auf die Daten auf der Festplatte zugreifen können.
Wenn Sie Probleme mit Ihrer diskAshur PRO2-Festplatte haben, wenden Sie sich per E-Mail oder telefo-
iStorage diskAshur PRO
nisch an unsere Technical Support-Abteilung: support@istorage-uk.com oder +44 (0) 20 8991 6260.
#30
#30
www.istorage-uk.com
www.istorage-uk.com
Page 31

Copyright © iStorage, Inc 2017. Alle Rechte vorbehalten.
Windows ist eine eingetragene Marke der Microsoft Corporation.
Alle anderen erwähnten Marken und Copyrights sind Eigentum der jeweiligen Besitzer.
Die Verteilung modifizierter Versionen dieses Dokuments ist ohne die explizite Zustimmung des Urheberrechtsinhabers nicht zulässig.
Die Verteilung des Dokuments oder abgeleiteter Versionen in standardmäßiger Papierform zu kommerziellen Zwecken ist nur mit vorheriger Zustimmung des Urheberrechtsinhabers zulässig.
DIE DOKUMENTATION WIRD "WIE VORLIEGEND" ZUR VERFÜGUNG GESTELLT UND ALLE AUSDRÜCKLICHEN ODER IMPLIZITEN BEDINGUNGEN,
ZUSAGEN UND GARANTIEN, EINSCHLIESSLICH JEGLICHER IMPLIZITER GARANTIE DER MARKTGÄNGIGKEIT, EIGNUNG FÜR EINEN BESTIMMTEN
ZWECK ODER NICHTVERLETZUNG, SIND AUSGESCHLOSSEN, AUSSER WENN EIN DERARTIGER GEWÄHRLEISTUNGSAUSSCHLUSS RECHTLICH
ALS UNGÜLTIG ANGESEHEN WIRD.
Alle Marken und Markennamen sind Eigentum der jeweiligen Besitzer.
Konform mit Trade Agreements Act (TAA)
iStorage diskAshur PRO
2
®
Manual / Handbuch / Manuel – v5.3F
www.istorage-uk.com
#31
Page 32

Inhaltsverzeichnis
Einführung .....................................................................................................................................33
Lieferumfang ..................................................................................................................................33
1. diskAshur PRO2-LED-Zustände ............................................................................................... 34
2. Erstmalige Verwendung der diskAshur PRO2 ...........................................................................34
3. Entsperren der diskAshur PRO2 .............................................................................................. 35
4. Sperren der diskAshur PRO2 ...................................................................................................35
5. Zugreifen im Admin-Modus ....................................................................................................35
6. Ändern der Admin-PIN ............................................................................................................ 36
7. Festlegen einer Benutzer-PIN-Richtlinie ..................................................................................37
8. So überprüfen Sie die Benutzer-PIN-Richtlinie ........................................................................38
9. Hinzufügen einer neuen Benutzer-PIN im Admin-Modus ........................................................39
10. Ändern der Benutzer-PIN im Admin-Modus ............................................................................39
11. Löschen der Benutzer-PIN im Admin-Modus ..........................................................................39
12. Festlegen des schreibgeschützten Zugriffs im Admin-Modus .................................................40
13. Aktivieren des Lese-/Schreibzugriffs im Admin-Modus ..........................................................40
14. Erstellen einer Selbstzerstörungs-PIN .....................................................................................40
15. Löschen der Selbstzerstörungs-PIN ........................................................................................41
16. Entsperren mit der Selbstzerstörungs-PIN ..............................................................................41
17. Erstellen einer Admin-PIN nach einem Brute Force-Angriff oder dem Zurücksetzen ..............42
18. Festlegen der Uhr für „Automatische Sperre, wenn unbeaufsichtigt“ ....................................... 42
19. Deaktivieren der Uhr für „Automatische Sperre, wenn unbeaufsichtigt“ ..................................43
20. Überprüfen der automatischen Sperre ..................................................................................... 43
21. Entsperren der diskAshur PRO2 mit Benutzer-PIN ...................................................................44
22. Ändern der Benutzer-PIN im Benutzermodus ..........................................................................44
23. Festlegen des schreibgeschützten Zugriffs im Benutzermodus ................................................ 45
24. Aktivieren des Lese-/Schreibzugriffs im Benutzermodus ......................................................... 45
25. Brute Force-Schutz ..................................................................................................................46
26. Komplettes Zurücksetzen ........................................................................................................46
27. Initialisieren und Formatieren der diskAshur PRO2 .................................................................47
28. diskAshur PRO2-Einrichtung für Mac OS ...............................................................................49
29. diskAshur PRO2 Einrichtung für Linux (Ubuntu 17.10) ...........................................................51
30. Ruhezustand, Sperre oder Abmeldung beim Betriebssystem .................................................. 54
Manual / Handbuch / Manuel – v5.3F
®
2
31. Prüfen von Firmware im Admin-Modus ..................................................................................54
32. Prüfen von Firmware im Benutzermodus ................................................................................. 55
33. Technical Support ...................................................................................................................56
34. Garantie- und RMA-Informationen ..........................................................................................56
iStorage diskAshur PRO
#32
www.istorage-uk.com
Page 33
LED-ANZEIGEN
SPERREN
SHIFT-Taste
ENTSPERREN
Einführung
Eine benutzerfreundliche ultrasichere, hardwareverschlüsselte, Desktop-Festplatte mit Kapazitäten von bis zu 5 TB. Schließen
Sie einfach das integrierte USB 3.1-Kabel an einen Computer an, und geben Sie eine 7- bis 15-stellige PIN ein. Wenn die
korrekte PIN eingegeben wird, sind alle Daten auf der Festplatte zugänglich. Um die Festplatte zu sperren und alle Daten zu
verschlüsseln, drücken Sie die Taste SPERREN auf der diskAshur PRO2, oder entfernen Sie sie sicher vom Hostcomputer.
Die gesamten Inhalte der Festplatte werden mit AES 256-Bit-Hardwareverschlüsselung (XTS-Modus) nach Militärstandard
verschlüsselt. Wenn die Festplatte verloren geht oder gestohlen und 15 Mal hintereinander eine falsche PIN eingegeben wird,
wird die Festplatte zurückgesetzt, und die Daten können nicht wiederhergestellt werden.
Eine der einzigartigen zugrundeliegenden Sicherheitsfunktionen der GDPR-kompatiblen diskAshur PRO2 ist der dedizierte
hardwarebasierte sichere Mikroprozessor (Common Criteria EAL4+-fähig), der integrierte physische Schutzmechanismen
nutzt, um Schutz gegen externe Manipulationen, Bypass-Angriffe und Fault Injections zu bieten. Im Gegensatz zu anderen Lösungen reagiert die diskAshur PRO2 auf einen automatischen Angriff, indem sie in den Deadlock-Zustand wechselt (einfriert),
sodass sich alle diese Angriffe als vergeblich erweisen. Einfach ausgedrückt: Ohne PIN ist kein Zugriff möglich!
Lieferumfang
1. diskAshur PRO2-Festplatte mit integriertem USB-Kabel
2. Eleganter Transportbehälter
3. Schnellstartanleitung
www.istorage-uk.com
iStorage diskAshur PRO
2
®
Manual / Handbuch / Manuel – v5.3F
#33
Page 34
1. diskAshur PRO2-LED-Zustände
Wenn die diskAshur PRO2 angeschlossen wird, gibt es drei mögliche Anzeigevarianten der LEDs (siehe Tabelle unten).
ROT GRÜN BLAU diskAshur PRO2-Zustand
Leuchtet Aus Aus Factory Reset
Leuchtet Leuchtet Leuchtet Brute Force
Leuchtet Aus Aus Standby
1. Im Factory Reset-Zustand wartet die Festplatte darauf, dass eine Admin-PIN eingerichtet wird.
2. Im Brute Force-Zustand wartet die Festplatte auf weitere PIN-Eingabeversuche.
3. Im Standby-Zustand wartet die Festplatte auf das Entsperren der Festplatte, das Wechseln in den Admin-Modus oder das
Zurücksetzen der Festplatte.
1
2
3
2. Erstmalige Verwendung der diskAshur PRO2
Ihre diskAshur PRO2 wird mit der standardmäßigen Admin-PIN 11223344 ausgeliefert. Obwohl die Festplatte direkt mit
der standardmäßigen Admin-PIN verwendet werden kann,
umgehende Erstellung einer neuen Admin-PIN
Admin-PIN“.
empfehlen wird aus Sicherheitsgründen dringend die
. Befolgen Sie dabei die Anweisungen unter Abschnitt 6 „Ändern der
Bitte befolgen Sie die Anweisungen in der Tabelle unten, um den diskAshur Pro2 zum ersten Mal mit dem
Standard-admin-PIN zu entsperren.
Anleitung- erstmalige Nutzung LED LED State
2
1. Verbinden Sie den diskashur PRO
mit einem USB-
Port-Standby Zustand
2. Im Standby-Zustand (
ROTE LED leuchtetet), drücken
und halten Sie die Tasten “ENTSPERREN + 1”
3. Geben Sie die Admin -PIN (Standard- 11223344)
ein, und drücken sie die Taste “ENTSPERREN”
ROTE LED leuchtetet warten auf die
Pin-Eintragung
Statt der
blinkende
Die
ROT leuchtenden LED werden eine
GRÜNE und BLAUE LED angezeigt
GRÜNE und BLAUE LED blinken einige
Sekunden schnell auf. Anschließend leuchtet
erst die
GRÜNE LED und dann die BLAUE LED.
Dies gibt an, dass sich der diskAshur PRO
Admin- Modus befindet.
4. Drücken Sie einmal die “ENTSPERREN”-Taste, um
2
den diskAshur PRO
zu entsperren und auf die inhalte
des Laufwerkes zuzugreifen
Manual / Handbuch / Manuel – v5.3F
®
2
Die Leuchtende
ende
GRÜNE LED und Anschließend leucht-
GRÜNE LED. Jetzt ist der diskAshur PRO2
enden
entsperrt.
BLAUE LED wechselt zu blink-
Hinweis: Sobald der diskAshur PRO2 erfolgreich entsperrt geworden ist, bleibt die GRÜNE LED in einem
soliden Zustand und blinkt nur wenn Daten übertragen werden. Die Festplatte kann umgehende gesperrt werden, indem Sie einmal die Taste SPERREN drücken oder (
iStorage diskAshur PRO
sicher entfernen/Auswerfen“ Ihres Betriebssystems klicken.
dringend empfohlen) auf das Symbol „Hardware
2
im
#34
www.istorage-uk.com
Page 35

3. Entsperren der diskAshur PRO
2
Die diskAshur PRO2 kann mit der Admin- oder Benutzer-PIN im Standby-Zustand (ROTE LED leuchtet) entsperrt werden.
1. Um als Administrator zu entsperren müssen sie im Stand-by zustand (
ROTE LED) die Tasten ´ENTSPERREN + 1´ ge-
drückt halten (GRÜNE und BLAUE LEDS leuchten zusammen) danach geben sie die Admin PIN ein und drücken die
„ENTSPERREN“ taste das LED wechselt zu einen soliden BLAU als letztes drücken sie die „ENTSPERREN“ taste wieder
LED wechselt zu GRÜN das Laufwerk ist entsperrt.
2. Um sie als Benutzer zu entsperren, drücken Sie die Taste ENTSPERREN (alle LEDs blinken), geben
Sie die Benutzer-PIN ein, und drücken Sie erneut die Taste ENTSPERREN.
3. Wenn die korrekte Benutzer-PIN eingegeben wird, blinken die
die
GRÜNE LED.
4. Wenn die richtige Admin-PIN eingegeben wird, blinken sowohl
GRÜNE und BLAUE LED abwechselnd und dann leuchtet
GRÜNE als auch BLAUE LEDs schnell zusammen, dann zu
einem leuchtenden BLAU und dann zum Entsperrten Zustand, GRÜNE LED leuchtetet.
5. Wenn die korrekte PIN eingegeben wird, wird die Festplatte als „iStorage diskAshur PRO
2
-USB-Gerät“ unter
„Computerverwaltung/Geräte-Manager“ angezeigt.
Im Entsperrt-Zustand (
ROT GRÜN BLAU diskAshur PRO
Aus
Aus
4. Sperren der diskAshur PRO
GRÜNE LED) gibt es zwei mögliche Anzeigevarianten der LEDs (siehe Tabelle unten).
2
Leuchtet Aus Keine Datenübertragung
Blinkt Aus Datenübertragung
2
Die Festplatte kann gesperrt werden, indem Sie einmal die Taste SPERREN drücken oder auf das Symbol „Hardware sicher
entfernen/Auswerfen“ Ihres Betriebssystems klicken. Wenn Daten weiter auf die Festplatte geschrieben werden, warten Sie,
bis alle Daten auf die Festplatte geschrieben wurden, bevor Sie die Taste SPERREN drücken oder die Hardware sicher vom
Betriebssystem entfernen. Wenn das Timeout für „Automatische Sperre, wenn unbeaufsichtigt“ aktiviert ist, wird die Festplatte
automatisch nach einem vorab festgelegten Zeitraum gesperrt.
Hinweis: Die diskAshur PRO2 kann vom Betriebssystem im Standby-Zustand nicht erkannt werden.
5. Zugreifen im Admin-Modus
Um in den Admin-Modus zu wechseln, gehen Sie wie folgt vor:
1. Halten Sie im Standby-Zustand (ROTE LED leuchtet)
die Tasten ENTSPERREN + 1 gedrückt.
2. Geben Sie die Admin-PIN (Standard: 11223344) ein,
und drücken Sie die Taste ENTSPERREN.
Um den Admin-Modus zu verlassen, drücken Sie die Taste SPERREN.
www.istorage-uk.com
Statt der leuchtenden
blinkende
GRÜNE und eine blinkende BLAUE
ROTEN LED werden eine
LED angezeigt.
GRÜNE und BLAUE LED blinken einige
Die
Sekunden schnell. Anschließend leuchtet die
GRÜNE LED und dann die BLAUE LED. Dies
2
gibt an, dass sich die diskAshur PRO
im Ad-
min-Modus befindet.
iStorage diskAshur PRO
2
®
Manual / Handbuch / Manuel – v5.3F
#35
Page 36

6. Ändern der Admin-PIN
PIN – Anforderungen:
• Muss zwischen 7 und 15 Ziffern aufweisen
• Darf nicht nur gleiche Ziffern enthalten, z. B. (3-3-3-3-3-3-3)
• Darf nicht nur sequenzielle Ziffern enthalten, z. B. (1-2-3-4-5-6-7), (7-8-9-0-1-2-3-4), (7-6-5-4-3-2-1)
Passwort-Tipp: Sie können ein Wort, einen Namen, eine Phrase oder eine andere alphanumerische PIN-Kombination
erstellen, die aussagekräftig ist, indem Sie einfach die Taste mit den entsprechenden Buchstaben drücken.
Beispiele für alphanumerische PINs sind:
Password würden Sie die folgenden Tasten drücken:
• Für
pqrs) 2 (abc) 7 (pqrs) 7 (pqrs) 9 (wxyz) 6 (mno) 7 (pqrs) 3 (def)
7 (
• Für iStorage würden Sie die folgenden Tasten drücken:
4 (gh
i) 7 (pqrs) 8 (tuv) 6 (mno) 7 (pqrs) 2 (abc) 4 (ghi) 3 (def)
Mit dieser Methode können lange und einfach zu merkende PINs erstellt werden.
Hinweis: Die Taste SHIFT kann für zusätzliche Kombinationen verwendet werden. SHIFT + 1 ist ein
separater Wert zu 1. Um eine PIN mit zusätzlichen Kombinationen zu erstellen, halten Sie die Taste
SHIFT während der Eingabe Ihrer 7- bis 15-stelligen PIN gedrückt. Z. B. SHIFT + 26756498.
Um die Admin-PIN zu ändern, wechseln Sie zuerst in den Admin-Modus wie in Abschnitt 5 beschrieben. Wenn sich die
Festplatte im Admin-Modus befindet (
1. Halten Sie im Admin-Modus die Tasten
ENTSPERREN + 2 gedrückt.
2. Geben Sie die NEUE Admin-PIN ein, und drücken Sie
die Taste ENTSPERREN.
Manual / Handbuch / Manuel – v5.3F
®
2
3. Geben Sie die NEUE Admin-PIN erneut ein, und
drücken Sie die Taste ENTSPERREN.
iStorage diskAshur PRO
BLAUE LED leuchtet), führen Sie die folgenden Schritte durch.
Statt der leuchtenden
blinkende
GRÜNE LED und eine leuchtende
BLAUE LED angezeigt.
Statt der blinkenden
leuchtenden
blinkende
BLAUEN LED wird eine einzelne
GRÜNE LED angezeigt. Dann werden
GRÜNEN LED und der
wieder eine blinkende
leuchtende
BLAUE LED angezeigt.
BLAUEN LED werden eine
GRÜNE LED und eine
Statt der blinkenden GRÜNEN und leuchten-
BLAUEN LED wird eine schnell blinkende
den
BLAUE LED und dann eine leuchtende BLAUE
LED angezeigt. Dies gibt an, dass die Admin-PIN erfolgreich geändert wurde.
#36
www.istorage-uk.com
Page 37

7. Festlegen einer Benutzer-PIN-Richtlinie
Der Administrator kann eine Einschränkungsrichtlinie für die Benutzer-PIN festlegen. Diese Richtlinie umfasst das Festlegen der PIN-Mindestlänge (7 bis 15 Zeichen) sowie, ob ‘Sonderzeichen‘ gefordert werden oder nicht. “Sonderzeichen“
lassen sich eingeben mithilfe von ‘Shift + Ziffer’
Um eine Benutzer-PIN-Richtlinie festzulegen (Einschränkungen), müssen Sie 3 Ziffern eingeben, etwa ‘091’. Die ersten
beiden Ziffern (09) geben die Mindest-PIN-Länge an (in diesem Fall 9) und die letzte Ziffer (1) kennzeichnet, dass ein
„Sonderzeichen“ verwendet werden muss, anders gesagt ‘Shift + Ziffer’. Gleichermaßen kann eine Benutzer-PIN-Richtlinie ohne „Sonderzeichen“ festgelegt werden, etwa: ‘120’. Hier geben die ersten beiden Ziffern (12) die Mindest-PIN-Länge
an (in diesem Fall 12), während die letzte Ziffer (0) angibt, dass kein Sonderzeichen erforderlich ist.
Wenn der Administrator die Benutzer-PIN-Richtlinie festgelegt hat, etwa „091“, muss eine neue Benutzer-PIN erstellt
werden. Wenn der Administrator die Benutzer-PIN als ‘247688314‘ festlegt, unter Verwendung eines ‘Sonderzeichens’
(Shift+Ziffer), kann dieses Sonderzeichen bei der Erstellung der Benutzer-PIN an beliebiger Stelle in der 7-15-stelligen PIN
platziert werden, wie in folgenden Beispielen gezeigt.
A. 'Shift + 2', '4', '7', '6', '8', '8', '3', '1', '4',
B. '2', '4', 'Shift + 7', '6', '8', '8', '3', '1', '4',
Hinweis:
• Wenn ein „Sonderzeichen“ bei der Erstellung der Benutzer-PIN verwendet wurde, etwa ‘B’ wie
oben, kann das Laufwerk nur durch Eingabe der PIN mit dem „Sonderzeichen“ in genau der
gleichen Reihenfolge entsperrt werden, wie bei ‘B‘ oben also (‘2’, ‘4’, ‘Shift + 7’, ‘6’, ‘8’, ‘8’, ‘3’, ‘1’, ‘4’).
• Benutzer können ihre PIN ändern, müssen sich aber (falls zutreffend) an die festgelegten PIN Einschränkungen halten.
• Das Festlegen einer neuen Benutzer-PIN-Richtlinie löscht automatisch eine vorhandene Richtlinie.
• Diese Richtlinie gilt nicht für die „Selbstzerstörungs-PIN“. Die Komplexitätseinstellung für die
Selbstzerstörungs-und Administrator-PIN sieht stets 7-15 Zeichen ohne Sonderzeichen vor.
C. '2', '4', '7', '6', '8', '8', '3', '1', 'Shift + 4',
iStorage diskAshur PRO
2
®
Manual / Handbuch / Manuel – v5.3F
www.istorage-uk.com
#37
Page 38

Um eine Benutzer-PIN-Richtlinie festzulegen, rufen Sie zunächst den “Administratormodus” wie in Abschnitt 5 beschrieben auf. Befindet sich das Laufwerk im Administratormodus (durchgehend
BLAUE LED), gehen Sie wie folgt vor.
1. Drücken und halten Sie im Administratormodus die
Tasten “ENTSPERREN + 7”
2. Geben Sie Ihre 3 Ziffern ein. Die ersten zwei Ziffern
geben die Mindest-PIN-Länge an, die letzte Ziffer (0
oder 1) gibt an, ob ein Sonderzeichen verwendet wird.
3.
Drücken Sie einmal die Taste SHIFT ( )
Die durchgehend
BLAUEN LEDs blinken jetzt
GRÜN und BLAU
Die blinkende
GRÜNE und durchgehend BLAUE
LED blinken weiter
GRÜN blinkende und durchgehend BLAUE
Die
LED wechseln zu durchgehend
schließlich durchgehend
GRÜN und
BLAU und zeigen so
an, dass die Benutzer-PIN-Richtlinie erfolgreich
festgelegt wurde.
8. So überprüfen Sie die Benutzer-PIN-Richtlinie
Der Administrator kann die Benutzer-PIN-Richtlinie überprüfen und die Mindest-PIN-Länge sowie die Notwendigkeit eines
Sonderzeichens ermitteln, indem er die nachfolgend beschriebene LED-Sequenz notiert.
Um eine Benutzer-PIN-Richtlinie zu ermitteln, rufen Sie zunächst den “Administratormodus” wie in Abschnitt 5 beschrieben auf. Befindet sich das Laufwerk im Administratormodus (durchgehend
BLAUE LED), gehen Sie wie folgt vor.
1. Drücken und halten Sie im Administratormodus die
Tasten SHIFT (
) + 7
Die durchgehend
GRÜN und BLAU
BLAUEN LEDs blinken jetzt
2. Drücken Sie die Taste „ENTSPERREN” und Folgendes geschieht:
a. Alle LEDs (
ROTES LED-Blinken entspricht zehn (10) Einheiten einer PIN.
b. Ein
c. Ein
GRÜNES LED-Blinken entspricht einer (1) Einheit einer PIN
BLAUES Blinken zeigt an, dass ein „Sonderzeichen“ verwendet wurde.
d. Ein
e. Alle LEDs (
f. Die LEDs leuchten wieder durchgehend
ROT, GRÜN UND BLAU) leuchten 1 Sekunde durchgehend.
ROT, GRÜN UND BLAU) leuchten 1 Sekunde durchgehend.
BLAU
Die nachfolgende Tabelle beschreibt das LED-Verhalten beim Prüfen der Benutzer-PIN-Richtlinie. Wenn Sie etwa eine 12-stellige Benutzer-PIN mit Sonderzeichen konfiguriert haben, blinkt die
(2), gefolgt von einer einmal blinkenden
PIN-Beschreibung 3-Ziffern- ROT GRÜN BLAU
Manual / Handbuch / Manuel – v5.3F
®
2
12-stellige PIN mit Sonderzeichen 121 1 x Blinken 2 x Blinken 1 x Blinken
BLAUEN LED, die kennzeichnet, dass ein Sonderzeichen verwendet wurde.
ROTE LED einmal (1) und die GRÜNE LED blinkt zweimal
112-stellige PIN OHNE Sonderzeichen 120 1 x Blinken 2 x Blinken 0
9-stellige PIN mit Sonderzeichen 091 0 9 x Blinken 1 x Blinken
9-stellige PIN OHNE Sonderzeichen 090 0 9 x Blinken 0
iStorage diskAshur PRO
#38
www.istorage-uk.com
Page 39

9. Hinzufügen einer neuen Benutzer-PIN im Admin-Modus
Um einen neuen Benutzer hinzuzufügen, wechseln Sie zuerst in den Admin-Modus wie in Abschnitt 5 beschrieben. Wenn
sich die Festplatte im Admin-Modus befindet (
BLAUE LED leuchtet), führen Sie die folgenden Schritte durch.
1. Halten Sie im Admin-Modus die Tasten
ENTSPERREN + 3 gedrückt.
2. Geben Sie Ihre neue Benutzer-PIN ein, und drücken
Sie die Taste ENTSPERREN.
Statt der leuchtenden
blinkende
GRÜNE LED und eine leuchtende
BLAUE LED angezeigt.
Statt der blinkenden
leuchtenden
blinkende
BLAUEN LED wird eine einzelne
GRÜNE LED angezeigt. Dann werden
GRÜNEN LED und der
wieder eine blinkende
leuchtende
BLAUE LED angezeigt.
BLAUEN LED werden eine
GRÜNE LED und eine
Statt der einige Sekunden schnell blinkenden
3. Geben Sie die neue Benutzer-PIN erneut ein, und
drücken Sie die Taste ENTSPERREN.
GRÜNEN LED wird eine leuchtende BLAUE LED
angezeigt. Dies gibt an, dass die Benutzer-PIN
erfolgreich erstellt wurde.
10. Ändern der Benutzer-PIN im Admin-Modus
Um eine vorhandene Benutzer-PIN zu ändern, wechseln Sie zuerst in den Admin-Modus wie in Abschnitt 5 beschrieben.
Wenn sich die Festplatte im Admin-Modus befindet (
1. Halten Sie im Admin-Modus die Tasten
ENTSPERREN + 3 gedrückt.
2. Geben Sie Ihre neue Benutzer-PIN ein, und drücken
Sie die Taste ENTSPERREN.
BLAUE LED leuchtet), führen Sie die folgenden Schritte durch.
Statt der leuchtenden
eine blinkende
GRÜNE LED und eine leuchtende
BLAUE LED angezeigt.
Statt der blinkenden
leuchtenden
blinkende
BLAUEN LED wird eine einzelne
GRÜNE LED angezeigt. Dann werden
GRÜNEN LED und der
wieder eine blinkende
leuchtende
BLAUE LED angezeigt.
BLAUEN LED werden
GRÜNE LED und eine
Statt der einige Sekunden schnell blinkenden
3. Geben Sie die neue Benutzer-PIN erneut ein, und
drücken Sie die Taste ENTSPERREN.
GRÜNEN LED wird eine leuchtende BLAUE LED
angezeigt. Dies gibt an, dass die Benutzer-PIN
erfolgreich geändert wurde.
iStorage diskAshur PRO
11. Löschen der Benutzer-PIN im Admin-Modus
Um eine Benutzer-PIN zu löschen, wechseln Sie zuerst in den Admin-Modus wie in Abschnitt 5 beschrieben. Wenn sich
die Festplatte im Admin-Modus befindet
1. Halten Sie im Admin-Modus die Tasten
SHIFT (
) + 3 gedrückt.
2. Halten Sie die Tasten SHIFT (
gedrückt.
BLAUE LED leuchtet), führen Sie die folgenden Schritte durch.
Statt der leuchtenden
blinkende
ROTE LED angezeigt.
Statt der blinkenden
) + 3 erneut
leuchtende
BLAUE LED angezeigt. Dies gibt an, dass die
ROTE LED und dann eine leuchtende
BLAUEN LED wird eine
ROTEN LED wird eine
Benutzer-PIN erfolgreich gelöscht wurde.
www.istorage-uk.com
2
®
Manual / Handbuch / Manuel – v5.3F
#39
Page 40

12. Festlegen des schreibgeschützten Zugriffs im Admin-Modus
Wichtig: Wenn Daten gerade auf die diskAshur PRO2 kopiert wurden, trennen Sie die Festplatte zunächst ord-
nungsgemäß, indem Sie auf „Hardware sicher entfernen/Auswerfen“ für die diskAshur PRO2 im Betriebssystem
klicken, bevor Sie sie erneut anschließen und die diskAshur PRO2 als „Schreibgeschützt“ festlegen.
Wenn der Admin Inhalte auf die diskAshur PRO2 schreibt und den Zugriff auf „Schreibgeschützt“ festlegt, kann der Benutzer
diese Einstellung nicht im Benutzermodus ändern. Um die diskAshur PRO2 auf „Schreibgeschützt“ festzulegen, wechseln Sie
zuerst in den Admin-Modus wie in Abschnitt 5 beschrieben. Wenn sich die Festplatte im Admin-Modus befindet (BLAUE
LED leuchtet), führen Sie die folgenden Schritte durch.
1. Halten Sie im Admin-Modus die Tasten 7 + 6 gedrückt. (7=Read + 6=Only)
2. Lassen Sie die Tasten „7 + 6“ los, und drücken Sie
ENTSPERREN.
Statt der leuchtenden BLAUEN LED werden eine
blinkende GRÜNE und eine blinkende BLAUE
LED angezeigt.
GRÜNE und BLAUE LED ändern sich in
Die
eine leuchtende GRÜNE LED und dann in eine
leuchtende BLAUE LED. Dies gibt an, dass die
Festplatte als „Schreibgeschützt“ konfiguriert ist.
13. Aktivieren des Lese-/Schreibzugriffs im Admin-Modus
Um die diskAshur PRO2 auf „Lesen/Schreiben“ festzulegen, wechseln Sie zuerst in den Admin-Modus wie in Abschnitt 5 beschrieben. Wenn sich die Festplatte im Admin-Modus befindet (BLAUE LED leuchtet), führen Sie die folgenden Schritte durch.
1. Halten Sie im Admin-Modus die Tasten 7 + 9 gedrückt . (7=Read + 9=Write)
2. Lassen Sie die Tasten „7 + 9“ los, und drücken Sie
ENTSPERREN.
Statt der leuchtenden BLAUEN LED werden eine
blinkende GRÜNE und eine blinkende BLAUE
LED angezeigt.
GRÜNE und BLAUE LED ändern sich in
Die
eine leuchtende GRÜNE LED und dann in eine
leuchtende BLAUE LED. Dies gibt an, dass die
Festplatte als „Lesen/Schreiben“ konfiguriert ist.
14. Erstellen einer Selbstzerstörungs-PIN
Die Selbstzerstörungsfunktion ermöglicht es Ihnen, eine PIN festzulegen, mit der Sie einen Crypto-Erase für die gesamte Festplatte durchführen können. Die Selbstzerstörungs-PIN löscht ALLE Daten und Admin/Benutzer-PINs und entsperrt die
Festplatte dann. Die Aktivierung dieser Funktion führt dazu, dass die Selbstzerstörungs-PIN die neue Benutzer-PIN wird und die
diskAshur PRO2 partitioniert und formatiert werden muss, bevor neue Daten zur Festplatte hinzugefügt werden können.
Um die Selbstzerstörungs-PIN festzulegen, wechseln Sie zuerst in den Admin-Modus wie in Abschnitt 5 beschrieben. Wenn
sich die Festplatte im Admin-Modus befindet (BLAUE LED leuchtet), führen Sie die folgenden Schritte durch.
1. Halten Sie im Admin-Modus die Tasten
ENTSPERREN + 6 gedrückt.
Manual / Handbuch / Manuel – v5.3F
2. Erstellen Sie eine 7- bis 15-stellige Selbstzerstö-
®
2
rungs-PIN, und drücken Sie die Taste ENTSPERREN .
Statt der leuchtenden BLAUEN LED werden eine
blinkende GRÜNE LED und eine leuchtende
BLAUE LED angezeigt.
Statt der blinkenden
GRÜNEN LED und der
leuchtenden BLAUEN LED wird eine einzelne
blinkende GRÜNE LED angezeigt. Dann werden
wieder eine blinkende GRÜNE LED und eine
leuchtende BLAUE LED angezeigt.
Statt der einige Sekunden schnell blinkenden
3. Geben Sie die PIN erneut ein, und drücken Sie die
Taste ENTSPERREN.
iStorage diskAshur PRO
#40
www.istorage-uk.com
GRÜNEN LED wird eine leuchtende BLAUE
LED angezeigt. Dies gibt an, dass die Selbstzerstörungs-PIN erfolgreich konfiguriert wurde.
Page 41

15. Löschen der Selbstzerstörungs-PIN
Um die Selbstzerstörungs-PIN zu löschen, wechseln Sie zuerst in den Admin-Modus wie in Abschnitt 5 beschrieben. Wenn
sich die Festplatte im Admin-Modus befindet (
BLAUE LED leuchtet), führen Sie die folgenden Schritte durch.
1. Halten Sie im Admin-Modus die Tasten
SHIFT (
) + 6 gedrückt.
Statt der leuchtenden
blinkende
ROTE LED angezeigt.
Statt der blinkenden
BLAUEN LED wird eine
ROTEN LED wird eine
leuchtende ROTE LED und dann eine leucht-
2. Halten Sie die Tasten SHIFT (
gedrückt.
) + 6 erneut
ende
BLAUE LED angezeigt. Dies gibt an, dass
die Selbstzerstörungs-PIN erfolgreich gelöscht
wurde.
16. Entsperren mit der Selbstzerstörungs-PIN
Die Selbstzerstörungs-PIN löscht den Verschlüsselungsschlüssel, ALLE Daten und Admin/Benutzer-PINs und
entsperrt die Festplatte dann. Die Aktivierung dieser Funktion führt dazu, dass die Selbstzerstörungs-PIN die neue
Benutzer-PIN wird und die diskAshur PRO2 partitioniert und formatiert werden muss, bevor neue Daten zur Festplatte
hinzugefügt werden können.
Um den Selbstzerstörungsmechanismus zu aktivieren, muss sich die Festplatte im Standby-Zustand (
ROTE LED leuchtet)
befinden. Führen Sie die folgenden Schritte durch.
1. Drücken Sie im Standby-Zustand die Taste
ENTSPERREN.
2. Geben Sie die Selbstzerstörungs-PIN ein, und drücken Sie die Taste ENTSPERREN.
Wichtig: Wenn der Selbstzerstörungsmechanismus aktiviert ist, werden alle Daten, der Verschlüs-
selungsschlüssel und die Admin-/Benutzer-PINs gelöscht. Die Selbstzerstörungs-PIN wird
zur Benutzer-PIN. Nach der Aktivierung des Selbstzerstörungsmechanismus ist keine Admin-PIN vorhanden. Die diskAshur PRO
Zurücksetzen
in Abschnitt 26 auf Seite 56), um eine Admin-PIN mit umfassenden Admin-Privilegi-
en (einschließlich Erstellung einer Benutzer-PIN) zu erstellen.
Statt der ROTEN LED werden alle LEDs angezeigt (
ROT, GRÜN und BLAU) und blinken.
Die blinkenden
ROTEN, GRÜNEN und BLAUEN
LEDs ändern sich in ca. 15 Sekunden blinkende
GRÜNE und BLAUE LEDs und dann in eine
GRÜN leuchtende LED.
2
muss zunächst zurückgesetzt werden (siehe
Komplettes
iStorage diskAshur PRO
2
®
Manual / Handbuch / Manuel – v5.3F
www.istorage-uk.com
#41
Page 42
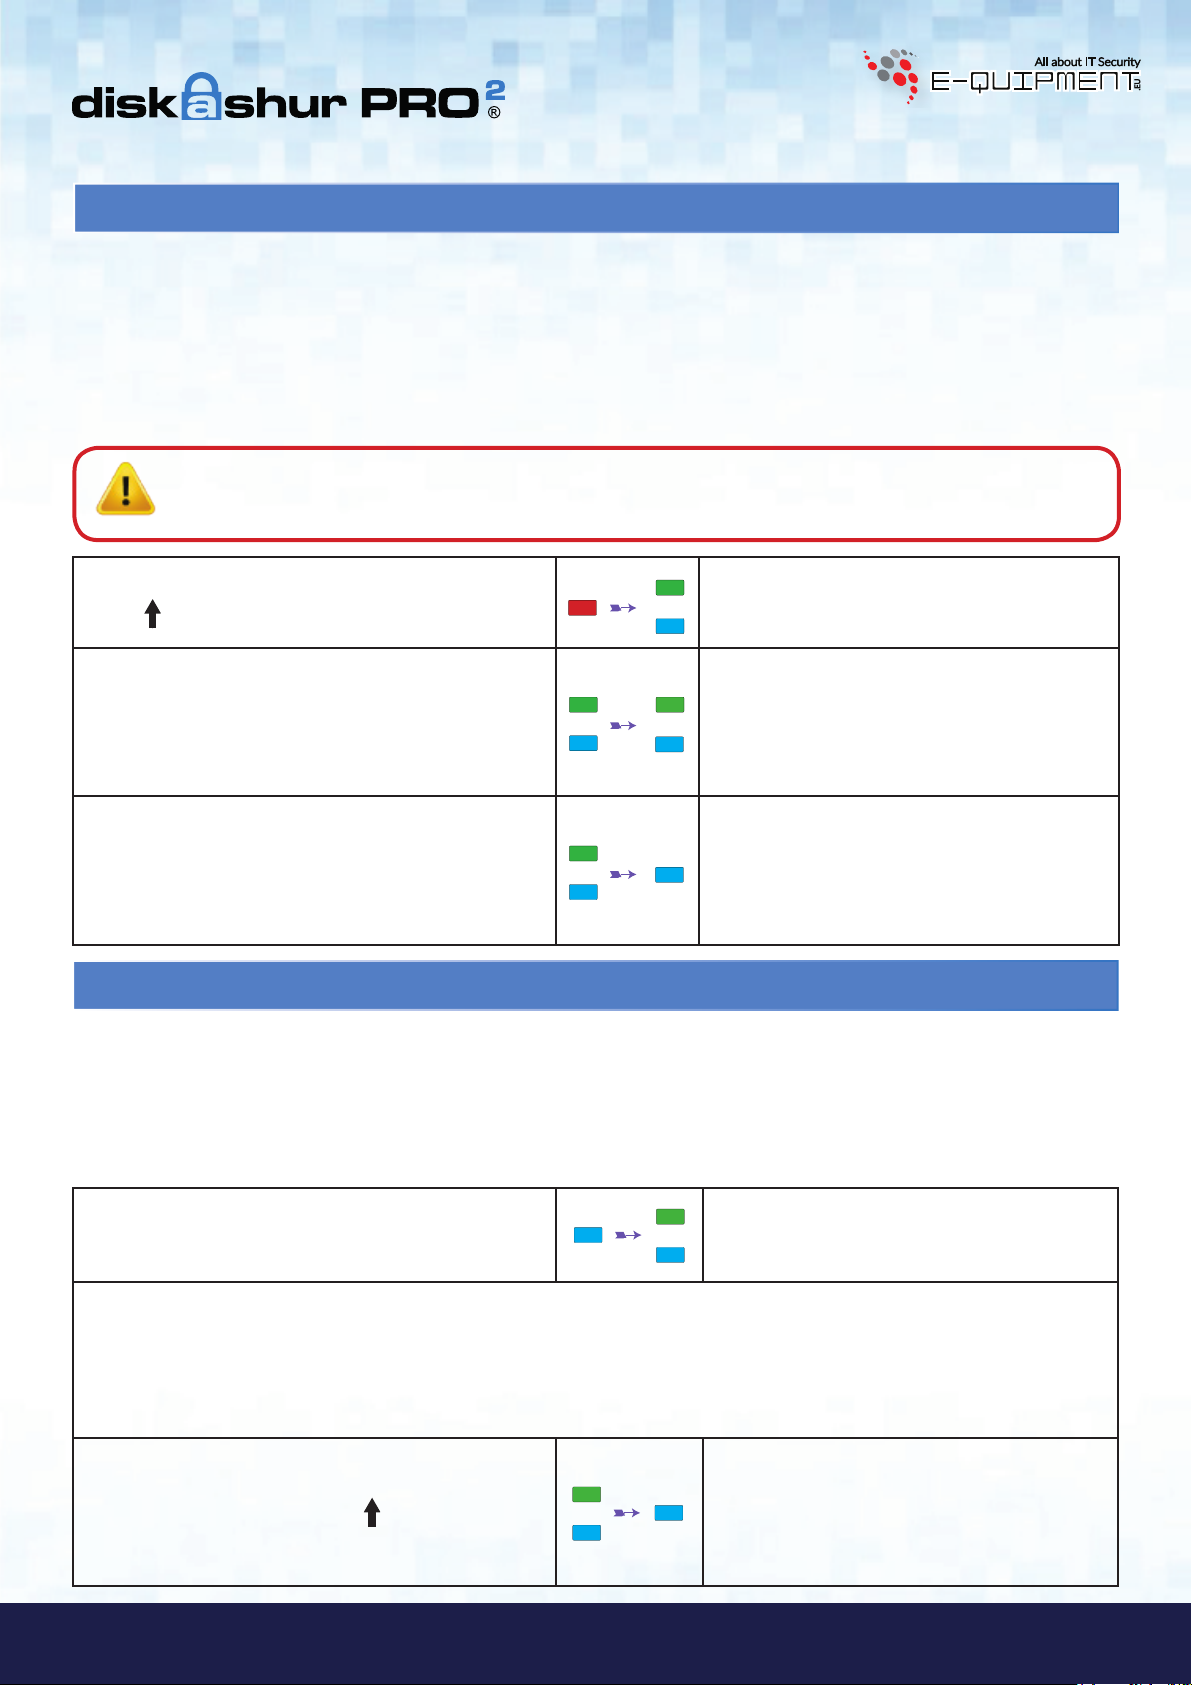
17. Erstellen einer Admin-PIN nach einem Brute Force-Angriff oder
dem Zurücksetzen
Nach einem Brute Force-Angriff oder dem Zurücksetzen der diskAshur PRO2 muss eine Admin-PIN erstellt werden, bevor die
Festplatte verwendet werden kann. Nach einem Brute Force-Angriff oder dem Zurücksetzen befindet sich die Festplatte im
Standby-Zustand (ROTE LED leuchtet). Um eine Admin-PIN zu erstellen, gehen Sie wie folgt vor.
PIN – Anforderungen:
• Muss zwischen 7 und 15 Ziffern aufweisen
• Darf nicht nur gleiche Ziffern enthalten, z. B. (3-3-3-3-3-3-3)
• Darf nicht nur sequenzielle Ziffern enthalten, z. B. (1-2-3-4-5-6-7), (7-8-9-0-1-2-3-4), (7-6-5-4-3-2-1)
Hinweis: Die Taste SHIFT kann für zusätzliche Kombinationen verwendet werden. SHIFT + 1 ist ein
separater Wert zu 1. Um eine PIN mit zusätzlichen Kombinationen zu erstellen, halten Sie die Taste
SHIFT während der Eingabe Ihrer 7- bis 15-stelligen PIN gedrückt. Z. B. SHIFT + 26756498.
1. Halten Sie im Standby-Zustand die Tasten
Shift (
) + 1 gedrückt.
2. Geben Sie die NEUE Admin-PIN ein, und drücken Sie
die Taste ENTSPERREN.
3. Geben Sie die NEUE Admin-PIN erneut ein, und
drücken Sie die Taste ENTSPERREN.
Statt der leuchtenden
blinkende
GRÜNE und eine leuchtende BLAUE
ROTEN LED werden eine
LED angezeigt.
Statt der blinkenden
leuchtenden
blinkende
BLAUEN LED wird eine einzelne
GRÜNE LED angezeigt. Dann werden
wieder eine blinkende
leuchtende
BLAUE LED angezeigt.
Statt der blinkenden
GRÜNEN LED und der
GRÜNE LED und eine
GRÜNEN und leuchtenden
BLAUEN LED wird eine einige Sekunden schnell
blinkende
de
BLAUE LED angezeigt. Dies gibt an, dass die
BLAUE LED und dann eine leuchten-
Admin-PIN erfolgreich konfiguriert wurde.
18. Festlegen der Uhr für „Automatische Sperre, wenn unbeaufsichtigt“
Um die Festplatte vor nicht autorisiertem Zugriff zu schützen, wenn sie entsperrt und unbeaufsichtigt ist, kann festgelegt
werden, dass die diskAshur PRO2 automatisch nach einem vorab ausgewählten Zeitraum gesperrt wird. Standardmäßig ist die
Funktion „Automatische Sperre, wenn unbeaufsichtigt“ der diskAshur PRO2 deaktiviert. „Automatische Sperre, wenn unbeaufsichtigt“ kann auf 5 bis 99 Minuten festgelegt werden.
Um „Automatische Sperre, wenn unbeaufsichtigt“ festzulegen, wechseln Sie zuerst in den Admin-Modus wie in Abschnitt 5
beschrieben. Wenn sich die Festplatte im Admin-Modus befindet (
BLAUE LED leuchtet), führen Sie die folgenden Schritte durch.
1. Halten Sie im Admin-Modus die Tasten
ENTSPERREN + 5 gedrückt.
Statt der leuchtenden
eine blinkende
BLAUE LED angezeigt.
BLAUEN LED werden
GRÜNE und eine blinkende
2. Geben Sie den Zeitraum für „Automatische Sperre, wenn unbeaufsichtigt“ ein, mindestens 5 Minuten und maximal
99Minuten (5 bis 99 Minuten). Geben Sie beispielsweise Folgendes ein:
05 für 5 Minuten
Manual / Handbuch / Manuel – v5.3F
®
2
20 für 20 Minuten
99 für 99 Minuten
Die blinkende
GRÜNE und blinkende BLAUE
LED ändern sich eine Sekunde in eine leuchtende
3. Drücken Sie die Taste SHIFT (
iStorage diskAshur PRO
).
GRÜNE LED und dann in eine leuchtende BLAUE
LED. Dies gibt an, dass das Timeout für die automatische Sperre erfolgreich konfiguriert wurde.
#42
www.istorage-uk.com
Page 43

19. Deaktivieren der Uhr für „Automatische Sperre, wenn unbeaufsichtigt“
Um „Automatische Sperre, wenn unbeaufsichtigt“ zu deaktivieren, wechseln Sie zuerst in den Admin-Modus wie in Abschnitt 5 beschrieben. Wenn sich die Festplatte im Admin-Modus befindet (
BLAUE LED leuchtet), führen Sie die folgenden
Schritte durch.
1. Halten Sie im Admin-Modus die Tasten
ENTSPERREN + 5 gedrückt.
Statt der leuchtenden BLAUEN LED werden eine
blinkende
GRÜNE und eine blinkende BLAUE
LED angezeigt.
GRÜNE und blinkende BLAUE
2. Geben Sie 00 ein, und drücken Sie die Taste
Die blinkende
LED ändern sich eine Sekunde in eine leuchtende
GRÜNE LED und dann in eine leuchtende BLAUE
SHIFT (
).
LED. Dies gibt an, dass das Timeout für die automatische Sperre erfolgreich deaktiviert wurde.
20. Überprüfen der automatischen Sperre
Der Administrator kann die festgelegte Länge für die automatische Sperre ermitteln, indem er die LED-Sequenz der nachstehenden Tabelle notiert.
Um die automatische Sperre zu ermitteln, rufen Sie zunächst den “Administratormodus” wie in Abschnitt 5 beschrieben
auf. Befindet sich das Laufwerk im Administratormodus (durchgehend
BLAUE LED), gehen Sie wie folgt vor.
1. Drücken und halten Sie im Administratormodus die
Tasten SHIFT (
) + 5
Die durchgehend BLAUEN LEDs blinken jetzt
GRÜN und BLAU
2. Drücken Sie die Taste „ENTSPERREN” und Folgendes geschieht:
a. Alle LEDs (
b. Ein
ROTES LED-Blinken entspricht zehn (10) Minuten.
GEÜNES LED-Blinken entspricht einer (1) Minute.
c. Ein
d. Alle LEDs (
e. Die LEDs leuchten wieder durchgehend
ROT, GRÜN UND BLAU) leuchten 1 Sekunde durchgehend.
ROT, GRÜN UND BLAU) leuchten 1 Sekunde durchgehend.
BLAU
Die nachstehende Tabelle beschreibt das LED-Verhalten beim Überprüfen der automatischen Sperre. Wenn Sie das Laufwerk
beispielsweise auf eine Sperrung nach 26 Minuten konfiguriert haben, blinkt die
ROTE LED zweimal (2) und die GRÜNE LED
sechsmal (6).
Autom. Sperre in Minuten ROT GRÜN
8 minutes 0 8 x Blinken
15 minutes 1 x Blinken 5 x Blinken
26 minutes 2 x Blinken 6 x Blinken
40 minutes 4 x Blinken 0
iStorage diskAshur PRO
2
®
Manual / Handbuch / Manuel – v5.3F
www.istorage-uk.com
#43
Page 44

21. Entsperren der diskAshur PRO
2
mit Benutzer-PIN
1. Drücken Sie im Standby-Zustand (ROTE LED leuchtet) die Taste
ENTSPERREN.
2. Geben Sie die Benutzer-PIN ein, und drücken Sie die
Taste ENTSPERREN.
Statt der
zeigt (
Die blinkenden
LEDs ändern sich in blinkende
BLAUE LEDs, dann in eine schnell blinkende
GRÜNE LED und schließlich in eine leuchtende
ROTEN LED werden alle LEDs ange-
ROT, GRÜN und BLAU) und blinken.
ROTEN, GRÜNEN und BLAUEN
GRÜNE und
GRÜNE LED. Dies gibt an, dass die Festplatte
erfolgreich im Benutzermodus entsperrt wurde.
22. Ändern der Benutzer-PIN im Benutzermodus
Um die Benutzer-PIN zu ändern, entsperren Sie zunächst die diskAshur PRO2 mit einer Benutzer-PIN, wie oben in Abschnitt
21 beschrieben. Wenn sich die Festplatte im Benutzermodus befindet (
GRÜNE LED leuchtet), führen Sie die folgenden
Schritte durch.
1. Halten Sie im Benutzermodus die Tasten ENTSPER-
REN + 4 gedrückt.
Statt der leuchtenden
eine blinkende
BLAUE LED angezeigt.
GRÜNEN LED werden
GRÜNE und eine leuchtende
2. Geben Sie die neue Benutzer-PIN ein, und drücken
Sie die Taste ENTSPERREN.
3. Geben Sie die neue Benutzer-PIN erneut ein, und
drücken Sie die Taste ENTSPERREN.
Manual / Handbuch / Manuel – v5.3F
®
2
Statt der blinkenden
leuchtenden
blinkende
BLAUEN LED wird eine einzelne
GRÜNE LED angezeigt. Dann werden
wieder eine blinkende
leuchtende
Die blinkende
BLAUE LED angezeigt.
GRÜNE und die leuchtende
BLAUE LED ändern sich in eine schnell blin-
GRÜNE LED und dann in eine leucht-
kende
GRÜNE LED. Dies gibt eine erfolgreiche
ende
Änderung der Benutzer-PIN an.
GRÜNEN LED und der
GRÜNE LED und eine
iStorage diskAshur PRO
#44
www.istorage-uk.com
Page 45

23. Festlegen des schreibgeschützten Zugriffs im Benutzermodus
Wichtig: Wenn Daten gerade auf die diskAshur PRO2 kopiert wurden, trennen Sie die Festplatte zunächst ord-
nungsgemäß, indem Sie auf „Hardware sicher entfernen/Auswerfen“ für die diskAshur PRO2 im Betriebssystem
klicken, bevor Sie sie erneut anschließen und die diskAshur PRO2 als „Schreibgeschützt“ festlegen.
Um die diskAshur PRO2 auf „Schreibgeschützt“ festzulegen, wechseln Sie zuerst in den Benutzermodus wie in Abschnitt 21
beschrieben. Wenn sich die Festplatte im Benutzermodus befindet (
GRÜNE LED leuchtet), führen Sie die folgenden Schritte durch.
1. Halten Sie im Benutzermodus die Tasten 7 + 6
gedrückt . (7=
Read + 6=Only)
2. Lassen Sie die Tasten „7 + 6“ los, und drücken Sie
ENTSPERREN.
Die leuchtende
blinkende
LED.
Die
GRÜNE und BLAUE LED ändern sich in
eine leuchtende
die Festplatte als „Schreibgeschützt“ konfigu-
GRÜNE LED ändert sich in eine
GRÜNE und eine blinkende BLAUE
GRÜNE LED. Dies gibt an, dass
riert ist.
Hinweis: 1. Diese Einstellung wird aktiviert, wenn die Festplatte das nächste Mal entsperrt wird.
2. Wenn ein Benutzer die Festplatte als „Schreibgeschützt“ festgelegt hat, kann der Admin dies
durch Festlegen der Festplatte als „Lesen/Schreiben“ im Admin-Modus überschreiben.
3. Wenn ein Admin die Festplatte als „Schreibgeschützt“ festgelegt hat, kann der Benutzer die Festplatte nicht als „Lesen/Schreiben“ festlegen.
24. Aktivieren des Lese-/Schreibzugriffs im Benutzermodus
Um die diskAshur PRO2 auf „Lesen/Schreiben“ festzulegen, wechseln Sie zuerst in den Benutzermodus wie in Abschnitt 21 beschrieben. Wenn sich die Festplatte im Benutzermodus befindet (
GRÜNE LED leuchtet), führen Sie die folgenden Schritte durch.
1. Halten Sie im Benutzermodus die Tasten 7 + 9
gedrückt . (7=
Read + 9=Write)
2. Lassen Sie die Tasten „7 + 9“ los, und drücken Sie
ENTSPERREN.
Hinweis: 1.Diese Einstellung wird aktiviert, wenn die Festplatte das nächste Mal entsperrt wird.
2. Wenn ein Benutzer die Festplatte als „Schreibgeschützt“ festgelegt hat, kann der Admin dies
durch Festlegen der Festplatte als „Lesen/Schreiben“ im Admin-Modus überschreiben.
3. Wenn ein Admin die Festplatte als „Schreibgeschützt“ festgelegt hat, kann der Benutzer die Festplatte nicht als „Lesen/Schreiben“ festlegen.
www.istorage-uk.com
Die leuchtende
blinkende
GRÜNE LED ändert sich in eine
GRÜNE und eine blinkende BLAUE
LED.
GRÜNE und BLAUE LED ändern sich in eine
Die
leuchtende
GRÜNE LED. Dies gibt an, dass die
Festplatte als „Lesen/Schreiben“ konfiguriert ist.
iStorage diskAshur PRO
2
®
Manual / Handbuch / Manuel – v5.3F
#45
Page 46
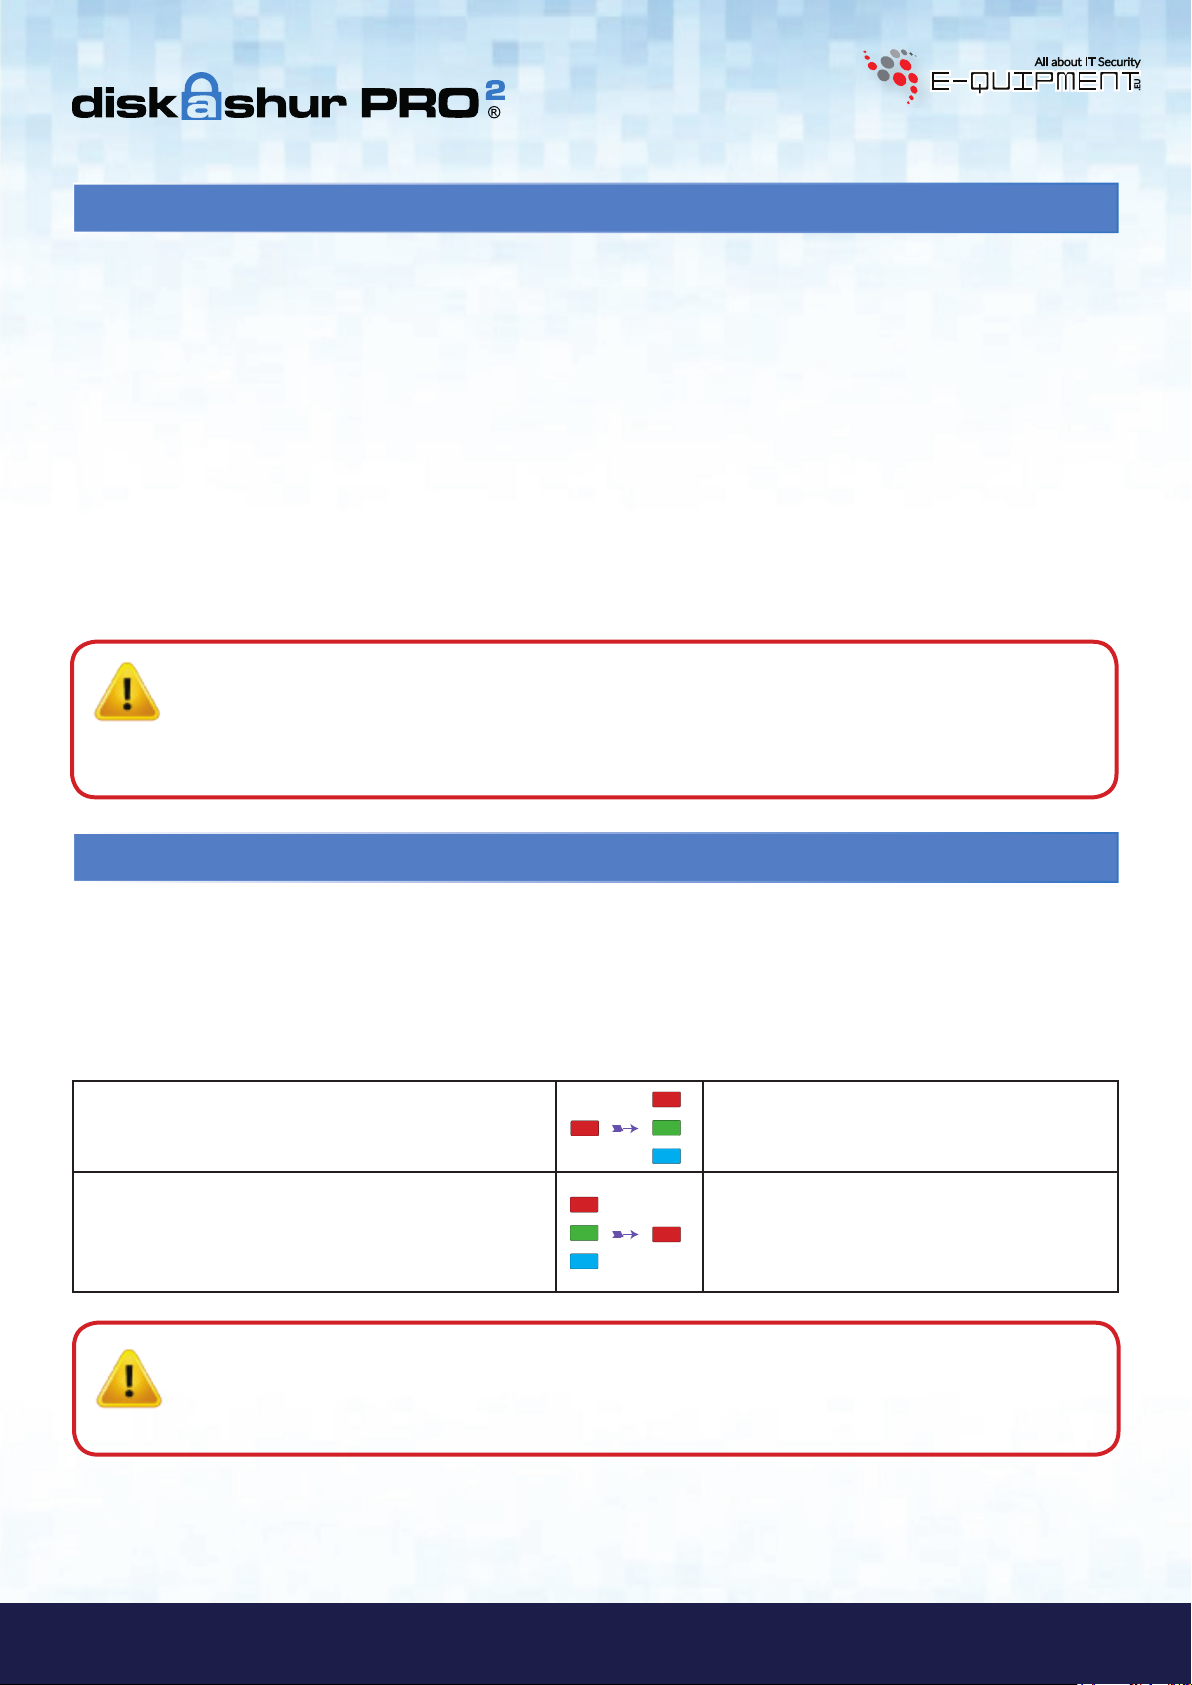
25. Brute Force-Schutz
Wenn eine PIN 15 Mal (3 x 5 PIN-Gruppen) falsch eingegeben wird, werden alle Admin/Benutzer-PINs, der Verschlüsselungsschlüssel und alle Daten gelöscht und können nicht wiederhergestellt werden. Die diskAshur PRO2 muss dann formatiert und partitioniert werden, bevor sie wiederverwendet werden kann.
1. Wenn eine PIN 5 Mal hintereinander falsch eingegeben wird, leuchten alle LEDs (
ROT, GRÜN und BLAU).
2. Trennen Sie die Festplatte, und schließen Sie sie erneut an den Host an, um weitere 5 PIN-Versuche zu erhalten. Wenn
eine PIN 5 Mal hintereinander falsch eingegeben wird (10 Mal insgesamt – 5 Mal in Schritt 1 und 5 Mal in Schritt 2),
leuchten alle LEDs (
ROT, GRÜN und BLAU).
3. Trennen Sie die Festplatte, halten Sie die Taste SHIFT gedrückt, und schließen Sie die Festplatte wieder an den Host an.
Alle LEDs (
ROT, GRÜN und BLAU )werden angezeigt und blinken.
4. Wenn alle LEDs blinken, geben Sie 47867243 ein, und drücken Sie die Taste ENTSPERREN, um 5 letzte Versuche zu
erhalten.
Achtung: Nach 15 aufeinanderfolgenden falschen PIN-Eingaben wird der Brute Force Defence-Mechanismus
aktiviert. Alle Admin/Benutzer-PINs, der Verschlüsselungsschlüssel und alle Daten werden gelöscht.
Eine neue Admin-PIN muss erstellt werden (siehe Abschnitt 17 auf Seite 52
nach einem Brute Force-Angriff oder dem Zurücksetzen
). Die diskAshur PRO
Erstellen einer Admin-PIN
2
muss partitioniert und
formatiert werden, bevor neue Daten zur Festplatte hinzugefügt werden können.
26. Komplettes Zurücksetzen
Für komplettes Zurücksetzen muss sich die diskAshur PRO2 im Standby-Zustand befinden (ROTE LED leuchtet). Wenn die
Festplatte zurückgesetzt wird, werden alle Admin/Benutzer-PINs, der Verschlüsselungsschlüssel und alle Daten gelöscht und
können nicht wiederhergestellt werden. Die Festplatte muss formatiert und partitioniert werden, bevor sie wiederverwendet
werden kann.
Um die diskAshur PRO
2
zurückzusetzen, gehen Sie wie folgt vor.
1. Halten Sie im Standby-Zustand die Taste 0 gedrückt,
bis alle LEDs abwechselnd blinken.
2. Halten Sie die Tasten 2 + 7 gedrückt, bis alle LEDs
eine Sekunde leuchten und dann eine leuchtende
LED angezeigt wird.
Wichtig: Nach dem kompletten Zurücksetzen muss eine neue Admin-PIN erstellt werden (siehe Abschnitt 17 auf
Manual / Handbuch / Manuel – v5.3F
®
2
Seite 52
hur PRO
Erstellen einer Admin-PIN nach einem Brute Force-Angriff oder dem Zurücksetzen). Die diskAs-
2
muss partitioniert und formatiert werden, bevor neue Daten zur Festplatte hinzugefügt werden
können.
iStorage diskAshur PRO
#46
ROTE
www.istorage-uk.com
Statt der leuchtenden
LEDs angezeigt (
ROTEN LED werden alle
ROT, GRÜN und BLAU) und
blinken.
Die blinkende
ROTE, GRÜNE und BLAUE LED
ändern sich eine Sekunde in leuchtende LEDs
und dann in eine leuchtende
ROTE LED. Dies
gibt an, dass die Festplatte zurückgesetzt wurde.
Page 47
27. Initialisieren und Formatieren der diskAshur PRO
2
Nach einem Brute Force-Angriff oder dem kompletten Zurücksetzen der diskAshur PRO2 werden alle Daten, der Verschlüsselungsschlüssel und die Partitionseinstellungen gelöscht.
Sie müssen die diskAshur PRO
Um Ihre diskAshur PRO
2
1. Schließen Sie die diskAshur PRO
2
initialisieren und formatieren, bevor sie verwendet werden kann.
zu initialisieren, gehen Sie wie folgt vor:
2
an den Computer an.
2. Erstellen Sie eine neue Admin-PIN (siehe Seite 52, Abschnitt 17 „Erstellen einer Admin-PIN nach einem Brute Force-Angriff oder dem Zurücksetzen“).
3. Geben Sie mit der diskAshur PRO
Windows 7: Klicken Sie mit der rechten Maustaste auf Computer und dann auf Verwalten und Datenträgerverwaltung.
4.
Windows 8: Klicken Sie mit der rechten Maustaste in die linke Ecke des Desktops, und wählen Sie Datenträgerverwaltung
Windows 10: Klicken Sie mit der rechten Maustaste auf die Schaltfläche „Start“, und wählen Sie Datenträgerverwaltung.
2
im Standby-Zustand (
ROTE LED) eine neue Admin-PIN zum Entsperren ein (GRÜNE LED).
5. Klicken Sie im Fenster „Computerverwaltung“ auf Datenträgerverwaltung. Im Fenster „Datenträgerverwaltung“ wird
die diskAshur PRO
2
als unbekanntes Gerät erkannt, das nicht initialisiert und nicht zugeordnet ist.
Hinweis: Wenn das Fenster mit dem Assistenten für die Datenträgerinitialisierung geöffnet wird, klicken Sie
auf Abbrechen.
6. Klicken Sie mit der rechten Maustaste auf „Unbekannter Datenträger“, und wählen Sie dann „Datenträger
initialisieren“.
iStorage diskAshur PRO
2
®
Manual / Handbuch / Manuel – v5.3F
www.istorage-uk.com
#47
Page 48

7. Klicken Sie im Fenster „Datenträger initialisieren“ auf OK.
8. Klicken Sie mit der rechten Maustaste in den leeren Bereich unter dem Bereich „Nicht zugeordnet“, und wählen Sie dann
„Neues einfaches Volume“. Das Fenster „Willkommen“ wird geöffnet.
9. Klicken Sie auf Weiter.
10. Wenn Sie nur eine Partition benötigen, übernehmen Sie die Standardpartitionsgröße, und klicken Sie auf Weiter.
11. Weisen Sie einen Laufwerksbuchstaben oder Pfad zu, und klicken Sie auf Weiter.
12. Erstellen Sie eine Volumebezeichnung, wählen Sie „Schnellformatierung durchführen“, und klicken Sie dann
auf Weiter.
13. Klicken Sie auf Fertig stellen.
Manual / Handbuch / Manuel – v5.3F
®
14. Warten Sie, bis der Formatierungsprozess abgeschlossen ist. Die diskAshur PRO2 wird erkannt und kann verwendet
2
werden.
iStorage diskAshur PRO
#48
www.istorage-uk.com
Page 49

28. diskAshur PRO
2
-Einrichtung für Mac OS
Ihre diskAshur PRO2 ist exFAT vorformatiert. Um die Festplatte in ein Mac-kompatibles Format neu zu formatieren, lesen Sie
die Anweisungen unten.
Öffnen Sie nach dem Entsperren der Festplatte das Datenträger-Dienstprogramm bei Anwendungen/Dienstprogramme/Datenträger-Dienstprogramme.
So formatieren Sie die diskAshur PRO
1. Wählen Sie diskAshur PRO
2
aus der Liste der Laufwerke und Volumes aus. Für jedes Laufwerk in der Liste werden Kapazi-
2
:
tät, Hersteller und Produktname angezeigt, wie „iStorage diskAshur PRO2-Datenträger“ oder 232.9 diskAshur PRO2.
2. Klicken Sie auf die Schaltfläche „Löschen“ (Abbildung 1).
Abbildung 1
3. Geben Sie einen Namen für das Laufwerk ein (Abbildung 2). Der Standardname ist „Unbenannt“. Der Name des Laufwerks
wird schließlich auf dem Desktop angezeigt.
Abbildung 2
www.istorage-uk.com
iStorage diskAshur PRO
2
®
Manual / Handbuch / Manuel – v5.3F
#49
Page 50
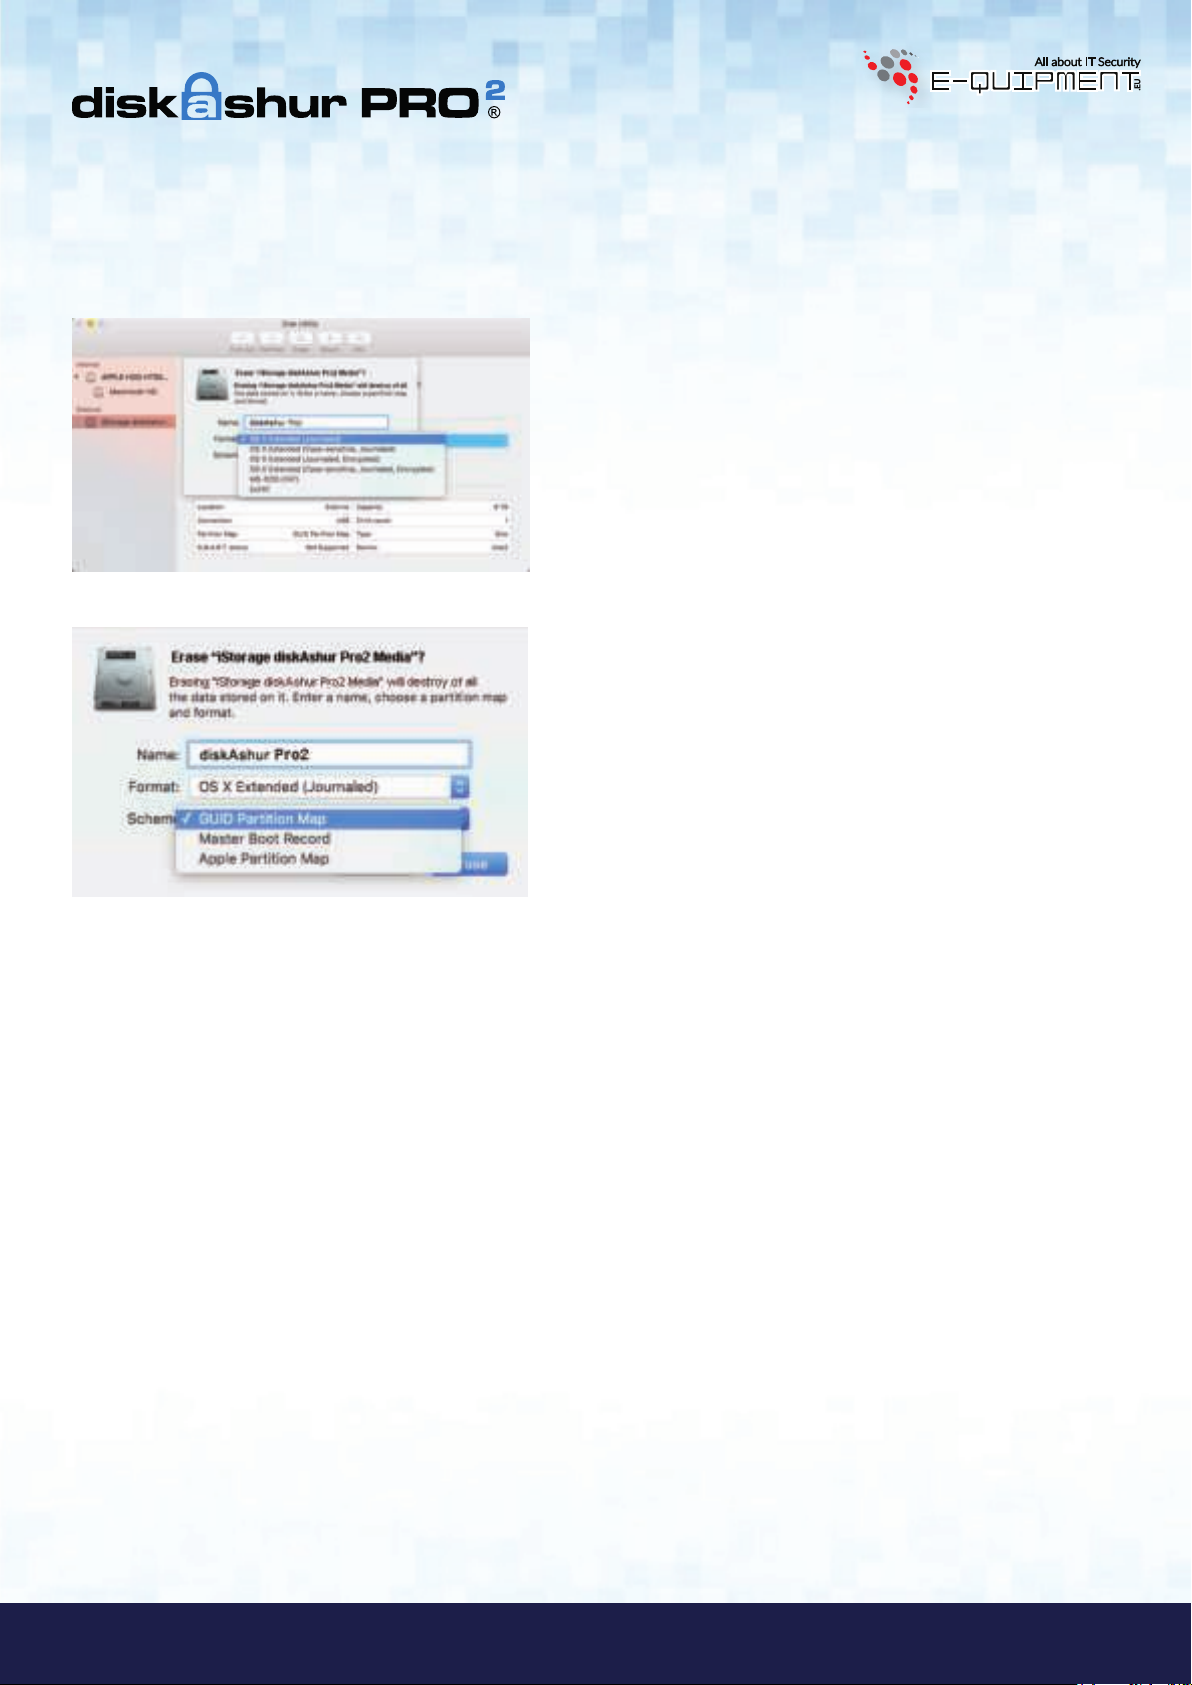
4. Wählen Sie ein Schema- und Volume-Format aus. Das Drop-down-Menü „Volume-Format“ (Abbildung 3) listet die
verfügbaren Laufwerkformate auf, die der Mac unterstützt. Der empfohlene Formattyp ist „Mac OS Extended (Journaled).“ Das
Drop-down-Menü „Schemaformat“ listet die verfügbaren Schemas auf (Abbildung 4). Wir empfehlen „GUID Partition Map“
auf Laufwerken größer als 2TB.
Abbildung 3
Abbildung 4
5. Klicken Sie auf die Schaltfläche „Löschen“. Das Datenträger-Dienstprogramm hebt die Bereitstellung des Volume auf dem
Desktop auf, löscht es und stellt es dann wieder auf dem Desktop bereit.
Manual / Handbuch / Manuel – v5.3F
®
2
iStorage diskAshur PRO
#50
www.istorage-uk.com
Page 51

29. diskAshur PRO
2
Einrichtung für Linux (Ubuntu 17.10)
Wenn Ihr iStorage diskAshur PRO2 initialisiert wurde und exFAT formatiert wurde, können Sie das Laufwerk
direkt auf Ubuntu verwenden.
Wenn es nicht funktioniert lessen sie bitte unten weiter.
2
Um das iStorage diskAshur PRO
zu formatisiern als FAT ‘Dateisystem’
1. Öffnen sie ‘Applikation anzeigen’ und schreiben sie ‘Platten’ in die such taste. Klicken die dann auf das Platte
zeichen wenn es angezeigt wird.
2. Klicken sie um das Laufwerk auszuwählen (500 GB Festplatte) unter “Geräten”. Dann drücken sie auf das zahnrad sym-
bol unter “Volumen” und dann klicken sie “Format”.
3. Wählen Sie “Kompatibel mit allen Systemen und Geräten (FAT)” für die Option “Typ”. Geben Sie einen Namen
2
für das Laufwerk ein, z. B. diskAshur PRO
. Klicken Sie dann auf die Schaltfläche “Formatieren”.
iStorage diskAshur PRO
2
®
Manual / Handbuch / Manuel – v5.3F
www.istorage-uk.com
#51
Page 52

4. Klicken Sie nochmal auf “Format”.
5. Das Laufwerk beginnt mit der Formatierung.
6. Nachdem der Formatierungsprozess abgeschlossen ist, klicken Sie um das Laufwerk auf Ubuntu zu mounten.
Manual / Handbuch / Manuel – v5.3F
®
2
iStorage diskAshur PRO
#52
www.istorage-uk.com
Page 53

7. Nun sollte das Laufwerk auf Ubuntu gemountet und betriebsbereit sein.
8. Ein Diskettensymbol wird angezeigt, wie im Bild unten zu sehen ist. Sie können auf das Diskettensymbol klicken, um das
Laufwerk zu öffnen.
Verschlüssel sie das iStorage diskAshur PRO2 für Linux (Ubuntu 17.10)
Es wird
Betriebssystem auf “Sicher entfernen” zu klicken
dringend empfohlen, mit der rechten Maustaste auf das Laufwerkssymbol zu klicken und dann im
, um den diskAshur PRO2 auszuwerfen (zu sperren), insbesondere
nachdem Daten vom Laufwerk kopiert oder gelöscht wurden.
www.istorage-uk.com
iStorage diskAshur PRO
2
®
Manual / Handbuch / Manuel – v5.3F
#53
Page 54
30. Ruhezustand, Sperre oder Abmeldung beim Betriebssystem
Speichern und schließen Sie alle Dateien auf der diskAshur PRO2 vor Ruhezustand, Sperre oder Abmeldung beim
Betriebssystem.
Es wird empfohlen, die diskAshur PRO2 vor Ruhezustand, Sperre oder Abmeldung vom
System manuell zu sperren.
Die Festplatte kann gesperrt werden, indem Sie einmal die Taste „SPERREN“ auf der diskAshur PRO2 drücken oder auf das
Symbol „Hardware sicher entfernen/Auswerfen“ Ihres Betriebssystems klicken.
Achtung: Um dafür zu sorgen, dass Ihre Daten sicher sind, sperren Sie Ihre diskAshur PRO2, wenn Sie
nicht an Ihrem Computer arbeiten.
31. Prüfen von Firmware im Admin-Modus
Um die Firmware-Revisionsnummer zu prüfen, wechseln Sie zuerst in den Admin-Modus wie in Abschnitt 5 beschrieben.
Wenn sich die Festplatte im Admin-Modus befindet (
BLAUE LED leuchtet), führen Sie die folgenden Schritte durch.
1. Halten Sie im Admin-Modus die Tasten „3 + 8“
gedrückt, bis die
GRÜNE und BLAUE LED blinken.
2. Drücken Sie die Taste ENTSPERREN. Folgendes geschieht:
a. Alle LEDs (
ROTE LED blinkt. Dies gibt den 1. Bestandteil der Firmware-Revisionsnummer an.
b. Die
GRÜNE LED blinkt. Dies gibt den 2. Bestandteil an.
c. Die
d. Alle LEDs (
e. Nur die
ROT, GRÜN und BLAU) leuchten 1 Sekunde.
ROT, GRÜN und BLAU) leuchten 1 Sekunde.
BLAUE LED leuchtet.
Wenn die Firmware-Revisionsnummer beispielsweise 1.2 ist, blinkt die
Nach der Sequenz blinken die
Manual / Handbuch / Manuel – v5.3F
®
2
ROTE, GRÜNE und BLAUE LED einmal, und dann wird eine leuchtende BLAUE LED angezeigt.
Statt der leuchtenden
blinkende
GRÜNE und eine blinkende BLAUE
BLAUEN LED werden eine
LED angezeigt.
ROTE LED einmal (1) und die GRÜNE LED zweimal (2).
iStorage diskAshur PRO
#54
www.istorage-uk.com
Page 55

32. Prüfen von Firmware im Benutzermodus
Um die Firmware-Revisionsnummer zu prüfen, wechseln Sie zuerst in den Benutzermodus wie in Abschnitt 21 beschrieben.
Wenn sich die Festplatte im Benutzermodus befindet (
GRÜNE LED leuchtet), führen Sie die folgenden Schritte durch.
1. Halten Sie im Benutzermodus die Tasten „3 + 8“
gedrückt, bis die
GRÜNE und BLAUE LED blinken.
2. Drücken Sie die Taste ENTSPERREN. Folgendes geschieht:
a. Alle LEDs (
b. Die
ROTE LED blinkt. Dies gibt den 1. Bestandteil der Firmware-Revisionsnummer an.
GRÜNE LED blinkt. Dies gibt den 2. Bestandteil an.
c. Die
d. Alle LEDs (
e. Nur die
ROT, GRÜN und BLAU) leuchten 1 Sekunde.
ROT, GRÜN und BLAU) leuchten 1 Sekunde.
GRÜNE LED leuchtet.
Wenn die Firmware-Revisionsnummer beispielsweise 1.2 ist, blinkt die
Nach der Sequenz blinken die
ROTE, GRÜNE und BLAUE LED einmal, und dann wird eine leuchtende BLAUE LED angezeigt.
Die leuchtende
blinkende
GRÜNE LED ändert sich in eine
GRÜNE und eine blinkende BLAUE
LED.
ROTE LED einmal (1) und die GRÜNE LED zweimal (2).
www.istorage-uk.com
iStorage diskAshur PRO
2
®
Manual / Handbuch / Manuel – v5.3F
#55
Page 56

33. Technical Support
iStorage bietet die folgenden nützlichen Ressourcen:
iStorage-Website
https://www.istorage-uk.com
E-Mail-Korrespondenz
support@istorage-uk.com
Telefonsupport unserer Technical Support-Abteilung: +44 (0) 20 8991-6260.
Die Technical Support-Spezialisten von iStorage sind Montag bis Freitag von 9:00 bis 17:30 Uhr
GMT erreichbar.
34. Garantie- und RMA-Informationen
2-Jahres-Garantie:
iStorage bietet eine 2-Jahres-Garantie auf die iStorage diskAshur PRO2, die Material- und Herstellungsmängel bei normaler
Verwendung umfasst. Der Garantiezeitraum gilt ab dem Datum des Kaufs entweder direkt bei iStorage oder einem autorisierten Reseller.
Haftungsausschluss und Garantiebedingungen:
DIE GARANTIE WIRD AM DATUM DES KAUFS WIRKSAM UND MUSS DURCH IHREN KASSENBON ODER IHRE RECHNUNG VERIFIZIERT WERDEN.
ISTORAGE REPARIERT DEFEKTE TEILE ODER ERSETZT SIE DURCH NEUE ODER FUNKTIONSFÄHIGE GEBRAUCHTE TEILE, DIE HINSICHTLICH IHRER LEISTUNG NEUEN TEILEN ENTSPRECHEN. ES FALLEN KEINE ZUSÄTZLICHEN KOSTEN AN. ALLE IM RAHMEN DIESER GARANTIE AUSGETAUSCHTEN TEILE UND PRODUKTE SIND EIGENTUM VON ISTORAGE.
DIESE GARANTIE GILT NICHT FÜR PRODUKTE, DIE NICHT DIREKT BEI ISTORAGE ODER EINEM AUTORISIERTEN RESELLER ERWORBEN WURDEN, ODER PRODUKTE, DIE AUS FOLGENDEN GRÜNDEN BESCHÄDIGT WURDEN ODER DEFEKT SIND: 1. ALS RESULTAT EINES UNFALLS ODER FEHLGEBRAUCHS SOWIE DER MISSACHTUNG ODER NICHTEINHALTUNG
DER SCHRIFTLICHEN ANWEISUNGEN IM ANWEISUNGSHANDBUCH: 2. DURCH DIE VERWENDUNG VON TEILEN, DIE NICHT VON ISTORAGE HERGESTELLT ODER VERKAUFT WURDEN
3. DURCH DIE MODIFIZIERUNG DES PRODUKTS ODER 4. ALS RESULTAT
Manual / Handbuch / Manuel – v5.3F
EINES SERVICE, EINER ÄNDERUNG ODER EINER REPARATUR DURCH EINE ANDERE PARTEI ALS ISTORAGE. IN DIESEN FÄLLEN IST DIE GARANTIE HINFÄLLIG. DIESE GARANTIE
®
2
DECKT NICHT NATÜRLICHE ABNUTZUNG AB.
ES WURDE UND WIRD KEINE ANDERE GARANTIE, WEDER AUSDRÜCKLICH NOCH IMPLIZIT, EINSCHLIESSLICH, ABER NICHT BESCHRÄNKT AUF EINE BELIEBIGE GARANTIE ODER
MARKTGÄNGIGKEIT UND EIGNUNG FÜR EINEN BESTIMMTEN ZWECK, DURCH ODER IM NAMEN VON ISTORAGE ODER KRAFT GESETZES IM HINBLICK AUF DAS PRODUKT ODER
INSTALLATION, VERWENDUNG, BETRIEB, AUSTAUSCH ODER REPARATUR GEGEBEN.
ISTORAGE KANN AUFGRUND DIESER GARANTIE ODER ANDERWEITIG NICHT FÜR ETWAIGE ZUFALLS-, SONDER- ODER FOLGESCHÄDEN HAFTBAR GEMACHT WERDEN, EINSCHLIESSLICH AUS DER VERWENDUNG ODER DEM BETRIEB DES PRODUKTS RESULTIERENDER DATENVERLUST, UNABHÄNGIG DAVON, OB ISTORAGE ÜBER DIE MÖGLICHKEIT
DERARTIGER SCHÄDEN INFORMIERT WURDE.
iStorage diskAshur PRO
#56
www.istorage-uk.com
Page 57

E-quipment BV
Transistorstraat 31, 1322 CK Almere
www. e-quipment.eu | info@e-quipment.eu
Tel: +31 (0) 36-5250024
iStorage diskAshur PRO
2
®
Manual / Handbuch / Manuel – v5.3F
www.istorage-uk.com
#57
Page 58

Manuel d'utilisation
Manual / Handbuch / Manuel – v5.3F
®
2
Assurez-vous de vous souvenir de votre code PIN (mot de passe), sans
lequel il est impossible d'accéder aux données du disque.
Si vous rencontrez des difficultés à utiliser le disque diskAshur PRO2, merci de contacter notre service
iStorage diskAshur PRO
technique par courriel à l'adresse support@istorage-uk.com ou par téléphone au +44(0)2089916260.
#58
#58
www.istorage-uk.com
www.istorage-uk.com
Page 59

Copyright © iStorage, Inc2017. Tous droits réservés.
Windows est une marque déposée de Microsoft Corporation.
L'ensemble des autres marques déposées et droits d'auteur auquel il est fait référence est la propriété de leurs fabricants respectifs.
La distribution de versions modifiées du présent document sans l'autorisation explicite du détenteur des droits d'auteur est interdite.
La distribution du travail ou d'une variante sous forme imprimée (papier) standard à des fins commerciales est interdite sans l'autorisation préalable
du détenteur des droits d'auteur.
LA DOCUMENTATION EST FOURNIE EN L'ÉTAT ET TOUTES CONDITIONS, DÉCLARATIONS ET GARANTIES, IMPLICITES OU EXPLICITES,
Y COMPRIS TOUTE GARANTIE IMPLICITE DE CONFORMITÉ D'USAGE POUR UN EMPLOI PARTICULIER OU DE NON-TRANSGRESSION, SONT
DÉNIÉES, SOUS RÉSERVE QUE CES DÉNIS DE RESPONSABILITÉ NE SOIENT PAS LÉGALEMENT TENUS POUR NULS.
Toutes les marques déposées et les noms de marque sont la propriété de leurs
fabricants respectifs
Conforme au Trade Agreements Act (TAA)
www.istorage-uk.com
iStorage diskAshur PRO
2
®
Manual / Handbuch / Manuel – v5.3F
#59
Page 60

Table des matières
Introduction ..........................................................................................................................................................................61
Contenu de la boîte ..............................................................................................................................................................61
1. États des LED du diskAshur PRO2 ................................................................................................................................. 62
2. Comment utiliser le diskAshur PRO2 pour la première fois ...........................................................................................62
3. Déverrouiller le diskAshur PRO2 ...................................................................................................................................63
4. Verrouiller le diskAshur PRO2 .......................................................................................................................................63
5. Accéder au mode administrateur ................................................................................................................................... 63
6. Modifier le code PIN administrateur .............................................................................................................................. 64
7. Définir une politique en matière de code PIN utilisateur ................................................................................................ 65
8. Comment vérifier la politique de code PIN utilisateur ...................................................................................................66
9. Ajouter un nouveau code PIN utilisateur en mode administrateur .................................................................................67
10. Modifier le code PIN utilisateur en mode administrateur ............................................................................................... 67
11. Supprimer le code PIN utilisateur en mode administrateur ...........................................................................................67
12. Définir le mode de lecture seule en mode administrateur .............................................................................................. 68
13. Activer le mode lecture/écriture en mode administrateur ............................................................................................... 68
14. Comment créer un code PIN d'autodestruction ............................................................................................................. 68
15. Comment supprimer le code PIN d'autodestruction ...................................................................................................... 69
16. Comment déverrouiller avec le code PIN d'autodestruction ..........................................................................................69
17. Comment créer un code PIN administrateur après une attaque par force brute ou une réinitialisation .........................70
18. Programmer la fonction de verrouillage automatique ................................................................................................... 70
19. Désactiver le verrouillage automatique .......................................................................................................................... 71
20. Comment vérifier la minuterie de verrouillage ............................................................................................................... 71
21. Comment déverrouiller le diskAshur PRO2 avec le code PIN utilisateur ........................................................................72
22. Modifier le code PIN utilisateur en mode utilisateur ...................................................................................................... 72
23. Définir le mode de lecture seule en mode utilisateur ..................................................................................................... 73
24. Activer le mode lecture/écriture en mode utilisateur ...................................................................................................... 73
25. Protection contre les attaques par force brute ...............................................................................................................74
26. Comment effectuer une réinitialisation complète ........................................................................................................... 74
27. Initialiser et formater le diskAshur PRO2 .......................................................................................................................75
28. Configuration du diskAshur PRO2 pour MacOS ..........................................................................................................77
29. Configuration du diskAshur PRO2 pour Linux (Ubuntu 17.10) ....................................................................................... 79
Manual / Handbuch / Manuel – v5.3F
®
30. Mettre en veille prolongée, suspendre ou se déconnecter du système d’exploitation ...................................................82
2
31. Comment vérifier la version du firmware en mode administrateur ................................................................................. 82
32. Comment vérifier la version du firmware en mode utilisateur ........................................................................................ 83
33. Assistance technique .....................................................................................................................................................84
iStorage diskAshur PRO
34. Informations de garantie et de service après-vente (SAV) ..............................................................................................84
#60
www.istorage-uk.com
Page 61
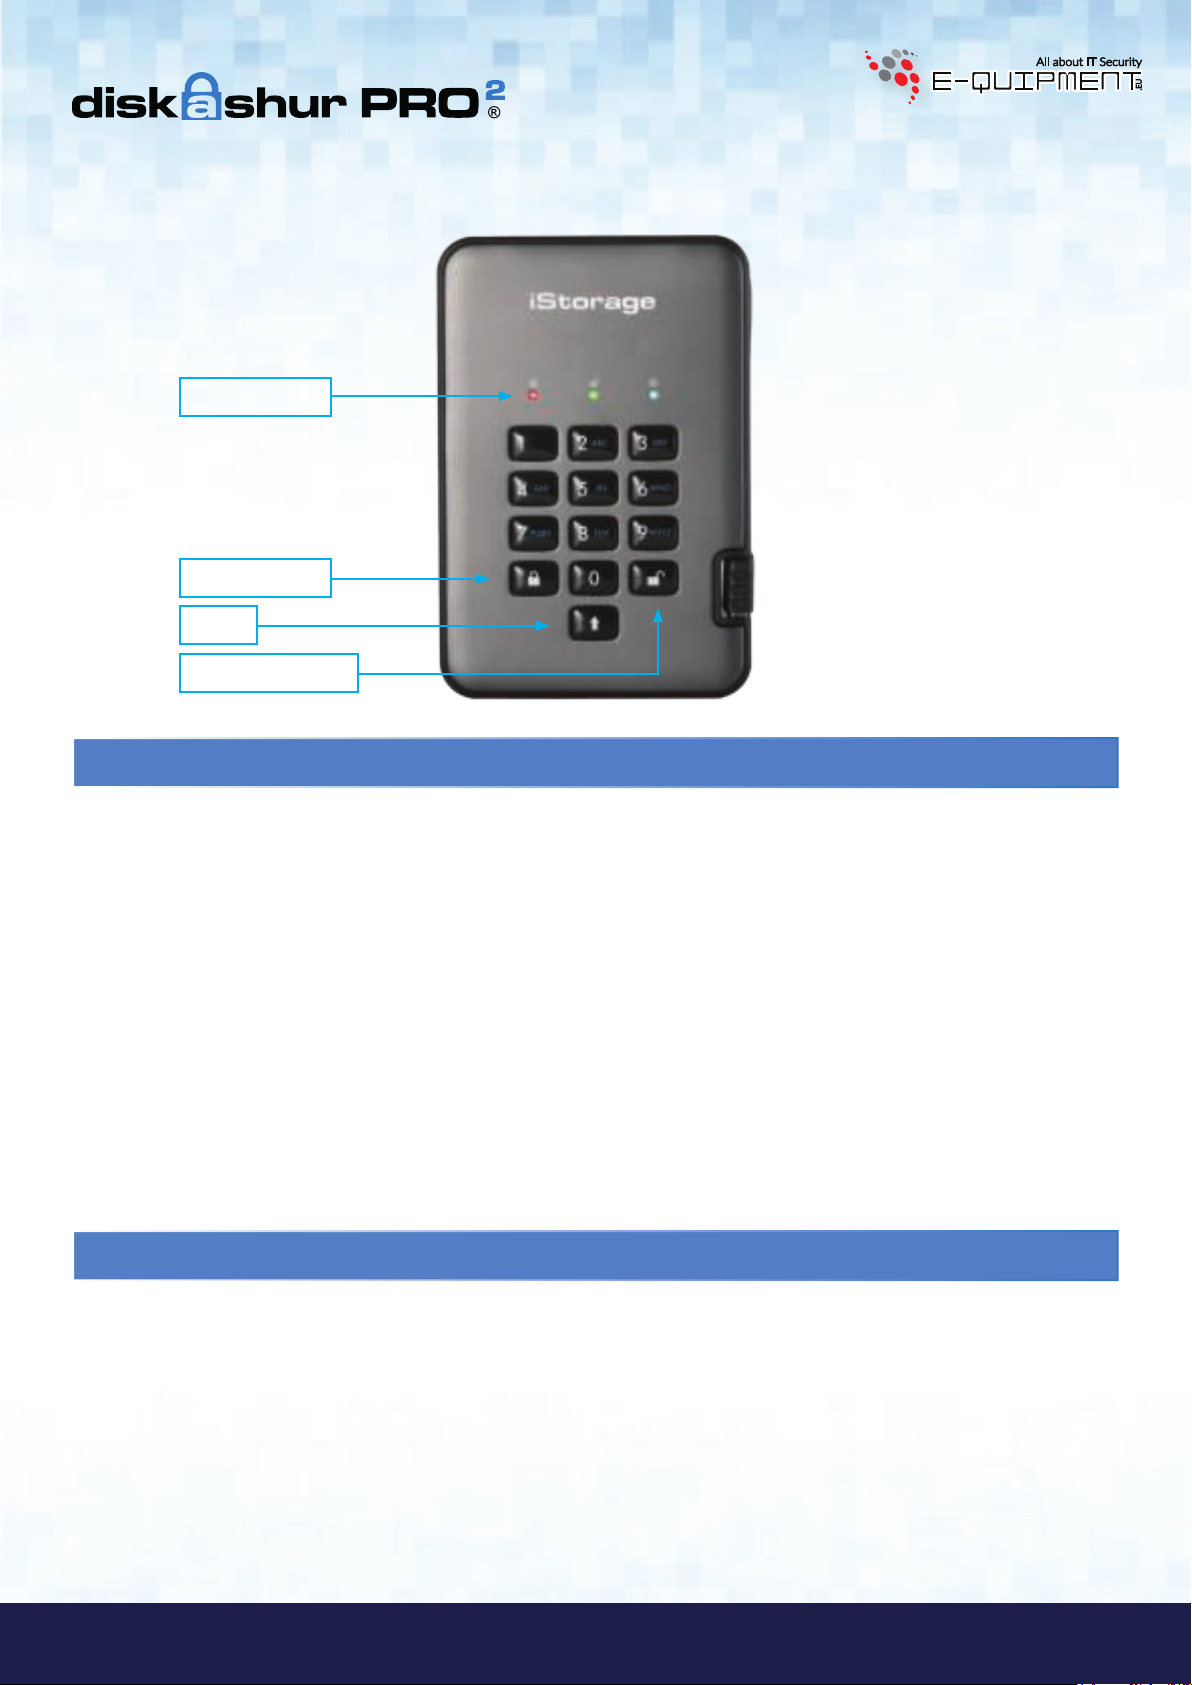
VOYANTS LED
VERROUILLER
SHIFT
DÉVERROUILLER
Introduction
Disque dur portable avec cryptage matériel très sécurisé et facile à utiliser doté d'une capacité de stockage pouvant atteindre
5To. Il vous suffit de connecter le câble USB3.1 intégré à un ordinateur et de saisir un code PIN de 7 à 15chiffres. Si le code
PIN saisi est correct, toutes les données stockées sur le disque sont accessibles. Pour verrouiller le disque et chiffrer toutes
les données, appuyez simplement sur le bouton de verrouillage situé sur le diskAshur PRO2 ou supprimez-le en toute sécurité/éjectez-le de l'ordinateur hôte. L'intégralité du contenu du disque est chiffré à l'aide du chiffrement matériel AES 256bits
de classe militaire (mode XTS). Si le disque est perdu ou volé et que le code PIN est saisi 15fois consécutives de manière
incorrecte, le disque se réinitialise et toutes les données sont perdues à jamais.
Conforme au règlement général sur la protection des données, l’une des fonctionnalités de sécurité fondamentales et uniques
du diskAshur PRO2 est le microprocesseur sécurisé intégré (conforme aux Critères Communs EAL4+), équipé de mécanismes
de protection physiques intégrés conçus pour protéger contre la falsification externe, les attaques et les injections d'erreurs.
Contrairement à d'autres solutions, le diskAshur PRO2 réagit aux attaques automatisées en entrant dans un état de blocage et
en rendant toutes ces attaques inutiles. Autrement dit, sans le code PIN, il est impossible de se connecter!
Contenu de la boîte
1. Disque diskAshur PRO2 avec câble USB intégré
2. Étui de transport élégant
3. Guide de démarrage rapide
www.istorage-uk.com
#61
iStorage diskAshur PRO
2
®
Manual / Handbuch / Manuel – v5.3F
Page 62

1. États des LED du diskAshur PRO
2
Lorsque le diskAshur PRO2 est connecté, il existe trois comportements possibles pour les témoins LED tel qu'indiqué dans le
tableau ci-dessous.
ROUGE VERT BLEU État du diskAshur PRO
Continu Éteint Éteint Réinitialisation
Continu Continu Continu Force brute
Continu Éteint Éteint Veille
3
1
2
2
1. En état de réinitialisation, le disque attend que l'opérateur saisisse un code PIN administrateur.
2. En état de force brute, le disque attend que l'opérateur effectue d'autres tentatives de saisie de code PIN.
3. En état de veille, le disque attend que l'opérateur déverrouille le disque, passe en mode administrateur ou réinitialise le
disque.
2. Comment utiliser le diskAshur PRO2 pour la première fois
Le diskAshur PRO2 est livré avec le code PIN administrateur par défaut de 11223344. Même s'il est directement prêt à
l'emploi avec le code PIN administrateur par défaut, nous vous recommandons fortement, pour des raisons de sécu-
rité, de créer immédiatement un nouveau code PIN administrateur en suivant les instructions indiquées sous la
section6 «Modifier le code PIN administrateur».
Merci de suivre les instructions indiquées dans le tableau ci-dessous afin de déverrouiller le diskAshur Pro2 pour la première
fois avec le code PIN administrateur par défaut.
Instructions (première utilisation)
2
1. Branchez le diskAshur PRO
à un port USB - Mode
Veille
2. En mode Veille (LED
ROUGE continue), appuyez
sur les boutons « DÉVERROUILLER + 1 » et
maintenez-les enfoncés
3. Saisissez le code PIN administrateur (par défaut :
11223344) et appuyez sur le bouton
« DÉVERROUILLER »
4. Appuyez une fois sur le bouton « DÉVERROUILL-
ER » pour déverrouiller le diskAshur PRO
accéder au contenu du disque
Manual / Handbuch / Manuel – v5.3F
®
2
Remarque: une fois que le diskAshur PRO2 a été déverrouillé avec succès, le voyant LED VERT reste allumé,
fixe et ne clignote que lorsque les données sont en cours de transfert. Vous pouvez le verrouiller immédiatement
en appuyant une fois sur le bouton « LOCK » (VERROUILLER) ou en cliquant sur l’icône « Safely Remove
Hardware/Eject » (Supprimer le périphérique en toute sécurité/Éjecter) (
iStorage diskAshur PRO
système d’exploitation.
2
et
LED
État de la LED
La LED ROUGE est continue en attente de la
saisie du code PIN
La LED ROUGE continue est remplacée par les
LED VERTE et BLEUE clignotantes
Les LED
VERTE et BLEUE clignotent
rapidement simultanément pendant quelques
secondes avant d’être remplacées par la LED
VERTE continue, et enfin par la LED BLEUE
continue, indiquant que le diskAshur PRO
2
est
en mode Administrateur.
La LED
BLEUE continue devient VERTE
clignotante puis VERTE continue, indiquant
que le diskAshur PRO2 est déverrouillé
fortement recommandé) dans votre
#62
www.istorage-uk.com
Page 63

3. Déverrouiller le diskAshur PRO
2
Vous pouvez déverrouiller le diskAshur PRO2 avec un code PIN administrateur ou utilisateur en état de veille (LED ROUGE continue).
1. Pour déverrouiller en tant qu’administrateur, en mode Veille (LED
ROUILLER +1 » et maintenez-les enfoncés (les LED
VERTE et BLEUE clignotent simultanément), puis saisissez le code PIN
administrateur et appuyez sur le bouton « DÉVERROUILLER ». La LED est remplacée par une LED
appuyez à nouveau sur le bouton « DÉVERROUILLER ». La LED devient
ROUGE), appuyez d’abord sur les boutons « DÉVER-
BLEUE. Pour terminer,
VERTE, indiquant que le disque est déverrouillé.
2. Pour déverrouiller en tant qu’utilisateur, appuyez d’abord sur le bouton «DÉVERROUILLER» (toutes les
LED, se mettent à clignoter), puis saisissez le code PIN utilisateur et appuyez à nouveau
sur le bouton «DÉVERROUILLER».
3. Si le code PIN utilisateur saisi est correct, les LED
VERTE et BLEUE clignotent en alternance, puis sont remplacées par la
LED VERTE continue.
4. Si le code PIN administrateur saisi est correct, les LED
remplacées par la LED
BLEUE continue, et de passer enfin à l’état déverrouillé (LED VERTE continue).
5. Si le code PIN saisi est correct, le disque apparaît en tant que «Périphérique USB iStorage diskAshur PRO
VERTE et BLEUE clignotent rapidement simultanément avant d’être
2
sous «Computer Management/Device Manager» (Gestion de l'ordinateur/Gestionnaire de périphériques).
À l'état déverrouillé (LED
VERTE), il existe deux comportements possibles pour les témoins LED, indiqués dans le tableau
ci-dessous.
ROUGE VERT BLEU diskAshur PRO
Éteint
Éteint
Continu Éteint Aucun transfert de données
Clignote Éteint Transfert de données en cours
2
»
4. Verrouiller le diskAshur PRO
2
Pour verrouiller le disque, appuyez une fois sur le bouton «DÉVERROUILLER» ou cliquez sur l'icône «Supprimer le périphérique en toute sécurité/Éjecter» dans votre système d'exploitation. Si les données sont en cours d'écriture sur le disque,
patientez jusqu'à la fin de l'écriture de toutes les données avant d'appuyer sur le bouton «VERROUILLER» ou d'éjecter
le disque en toute sécurité du système d'exploitation. Lorsque le délai de verrouillage automatique est activé, le disque se
verrouille automatiquement au bout d'un intervalle de temps prédéterminé.
Remarque: le diskAshur PRO2 ne peut pas être reconnu par le système d'exploitation en état de veille.
5. Accéder au mode administrateur
Pour accéder au mode administrateur, effectuez les étapes suivantes:
1. En mode veille (LED ROUGE continue), appuyez sur
les boutons «DÉVERROUILLER+1» et maintenez-les enfoncés.
2. Saisissez le code PIN administrateur (par défaut:
11223344) et appuyez sur le bouton «DÉVERROUIL-
LER».
La LED ROUGE continue est remplacée par les
LED VERTE et BLEUE clignotantes.
Les LED
VERTE et BLEUE clignotent rapidement
simultanément pendant quelques secondes
avant d'être remplacées par la LED VERTE
continue et enfin par la LED
indiquant que le diskAshur PRO
BLEUE continue,
2
est en mode
administrateur.
iStorage diskAshur PRO
2
®
Manual / Handbuch / Manuel – v5.3F
Pour quitter le mode administrateur, appuyez sur le bouton «VERROUILLER».
www.istorage-uk.com
#63
Page 64

6. Modifier le code PIN administrateur
Exigences pour le code PIN:
• Doit être composé de 7 à 15chiffres.
• Ne doit pas contenir que des nombres répétitifs (c.-à-d. 3-3-3-3-3-3-3).
• Ne doit pas contenir que des nombres consécutifs (c.-à-d. 1-2-3-4-5-6-7; 7-8-9-0-1-2-3-4; 7-6-5-4-3-2-1).
Conseil pour le mot de passe: vous pouvez créer un mot, un nom, une phrase ou toute autre combinaison de code
PIN alphanumérique facile à mémoriser en appuyant simplement sur la touche de la lettre correspondante.
Voici des exemples de ces types de codes PIN alphanumériques:
• Pour le terme «
pqrs) 2 (abc) 7 (pqrs) 7 (pqrs) 9 (wxyz) 6 (mno) 7 (pqrs) 3 (def)
7 (
Password», vous appuieriez sur les touches suivantes:
• Pour le terme «iStorage», vous appuieriez sur:
4 (gh
i) 7 (pqrs) 8 (tuv) 6 (mno) 7 (pqrs) 2 (abc) 4 (ghi) 3 (def)
Cette méthode permet de créer des codes PIN longs et faciles à mémoriser.
Remarque: la touche SHIFT peut être utilisée pour d'autres combinaisons. SHIFT + 1 est une valeur
différente de 1. Pour créer un code PIN utilisant d'autres combinaisons, appuyez sur le bouton
SHIFT et maintenez-le enfoncé pendant la saisie de votre code PIN de 7 à 15chiffres (c.-à-d.
SHIFT + 26756498).
Pour modifier le code PIN administrateur, accédez d'abord au mode administrateur tel que décrit dans la section5. Une
fois que le disque est en mode administrateur (LED
1. En mode administrateur, appuyez sur les boutons
«DÉVERROUILLER + 2» et maintenez-les enfoncés.
2. Saisissez le NOUVEAU code PIN administrateur et
appuyez sur le bouton «DÉVERROUILLER».
BLEUE continue), effectuez les étapes suivantes.
La LED
LED
Les LED
BLEUE continue est remplacée par les
VERTE clignotante et BLEUE continue.
VERTE clignotante et BLEUE continue
sont remplacées par la LED
une seule fois, puis par les LED
tante et
BLEUE continue.
VERTE qui clignote
VERTE cligno-
Les LED VERTE clignotante et BLEUE continue
3. Ressaisissez le NOUVEAU code PIN administrateur et
appuyez sur le bouton «DÉVERROUILLER».
Manual / Handbuch / Manuel – v5.3F
®
2
sont remplacées par la LED
à clignoter rapidement avant d'être continue,
indiquant que le code PIN administrateur a été
correctement modifié.
BLEUE qui se met
iStorage diskAshur PRO
#64
www.istorage-uk.com
Page 65
7. Définir une politique en matière de code PIN utilisateur
L’administrateur peut définir une politique de restriction pour le code PIN utilisateur. Cette politique consiste à définir la
longueur minimum du code PIN (de 7 à 15 chiffres), ainsi que la saisie ou non d’un « caractère spécial ». Le « caractère
spécial » fonctionne à l’aide de « SHIFT + chiffre ».
Pour définir une politique (restrictions) en matière de code PIN d’utilisateur, vous devez saisir 3 chiffres, par exemple «
091 », les deux premiers chiffres (09) indiquent la longueur minimale du PIN (dans ce cas, 9) et le dernier chiffre (1)
indique qu’un « caractère spécial » doit être utilisé, en d’autres termes « SHIFT + chiffre. » De la même manière, une
politique de code PIN utilisateur peut être définie sans recourir à un « caractère spécial », par exemple
« 120 », les deux premiers chiffres (12) indiquent la longueur minimale du PIN (dans ce cas, 12) et le dernier chiffre (0),
qui indique qu’aucun caractère spécial
n’est requis.
Une fois que l’administrateur a défini la politique de code PIN utilisateur, par exemple « 091 », un nouveau code PIN utilisateur doit être créé. Si l’administrateur crée le code PIN utilisateur « 247688314 » avec l’utilisation d’un « caractère
spécial » (shift+chiffre), celui-ci peut être placé n’importe où dans votre code PIN de 7 à 15 chiffres durant le processus
de création du code PIN utilisateur, comme montré dans les exemples ci-dessous.
A. 'Shift + 2', '4', '7', '6', '8', '8', '3', '1', '4',
B. '2', '4', 'Shift + 7', '6', '8', '8', '3', '1', '4',
C. '2', '4', '7', '6', '8', '8', '3', '1', 'Shift + 4',
Remarque :
• Si un « caractère spécial » a été utilisé durant la création du code PIN utilisateur, par exemple, l’exemple
« B » ci-dessus, ce disque ne peut être déverrouillé qu’en saisissant le code PIN avec le « caractère spécial »
précisément dans l’ordre créé soit, dans l’exemple « B » ci-dessus - (« 2 », « 4 », « SHIFT + 7 » , « 6 »,
« 8 », « 8 », « 3 », « 1 », « 4 »).
• Les utilisateurs peuvent changer leur code PIN mais sont contraints de respecter la « politique de code
PIN utilisateur » définie (restrictions), si et quand elle est applicable.
• Le fait de définir une nouvelle politique en matière de code PIN utilisateur supprimera automatiquement le
code PIN utilisateur s’il en existe un.
• Celle politique ne s’applique pas au « code PIN d’autodestruction ». Le paramètre de complexité pour le
code PIN d’autodestruction et le code PIN admin est toujours de 7 à 15 chiffres, sans caractère spécial requis.
iStorage diskAshur PRO
2
®
Manual / Handbuch / Manuel – v5.3F
www.istorage-uk.com
#65
Page 66

Pour définir une politique de code PIN utilisateur, accédez d’abord au mode administrateur tel que décrit dans la
section 5. Une fois que le disque est en mode administrateur (LED
BLEUE continue), effectuez les étapes suivantes.
1. En mode administrateur, appuyez sur les boutons «
DÉVERROUILLER + 7 » et maintenez-les enfoncés.
La LED
LED
BLEUE continue est remplacée par les
VERTE clignotante et BLEUE continue
2.Saisissez vos 3 chiffres, n’oubliez pas que les deux
premiers chiffres représentent la longueur minimale du
code PIN et que le dernier chiffre (0 ou 1) indique si un
Blinking
GREEN and solid BLUE LEDs will
continue to blink
caractère spécial a été utilisé ou non.
VERTE clignotante et BLEUE continue
VERTE continue,
BLEUE continue, indiquant que le
3. Appuyez une fois sur le bouton «SHIFT» (
)
Les LED
sont remplacées par la LED
puis une LED
code PIN utilisateur a été correctement défini.
8. Comment vérifier la politique de code PIN utilisateur
L’administrateur peut vérifier la politique de code PIN utilisateur et peut identifier la règle de longueur minimale du code PIN
et si l’utilisation d’un caractère spéciale a été définie ou non en notant la séquence de LED décrite ci-dessous.
Pour vérifier le numéro de révision du microprogramme, accédez d’abord au « mode administrateur » tel que décrit dans
la section 5. Une fois que le lecteur est en mode administrateur (LED
BLEUE continue), effectuez les étapes suivantes
1. En mode administrateur, appuyez sur les boutons
«SHIFT» (
) + 7
La LED
LED
BLEUE continue est remplacée par les
VERTE et BLEUE clignotantes
2. Appuyez sur le bouton « DÉVERROUILLER » et vous observerez ce qui suit :
a. Toutes les LED (
b. Un clignotement de la LED
c. Chaque clignotement de la LED
d. Un clignotement
e. Toutes les LED (
f. Les LED reviennent au
ROUGE, VERTE et BLEUE) s’allument en continu pendant 1 seconde.
ROUGE est égal à dix (10) unités d’un code PIN.
VERTE est égal à une (1) unité d’un code PIN.
BLEU indique l’utilisation d’un caractère spécial.
ROUGE, VERTE et BLEUE) s’allument en continu pendant 1 seconde.
BLEU continu.
Le tableau ci-dessous décrit le comportement des LED lorsque vous vérifiez la politique de code PIN utilisateur, par exemple
si vous avez défini un code PIN utilisateur de 12 chiffres avec utilisation d’un caractère spécial, la LED
une fois (1) et la LED
VERTE clignotera deux fois (2), suivie d’un seul clignotement de la LED BLEUE indiquant qu’un seul
ROUGE clignotera
caractère spécial doit être utilisé.
Description du PIN Configuration
Manual / Handbuch / Manuel – v5.3F
®
2
Code PIN de 12 chiffres avec utilisation d’un caractère spécial 121 1 clignotement 2 clignotements 1 clignotement
Code PIN de 12 chiffres SANS utilisation d’un caractère spécial 120 1 clignotement 2 clignotements 0
Code PIN de 9 chiffres avec utilisation d’un caractère spécial 091 0 9 clignotements 1 clignotement
Code PIN de 9 chiffres SANS utilisation d’un caractère spécial 090 0 9 clignotements 0
iStorage diskAshur PRO
à 3 chiffres
ROUGE VERT BLEU
#66
www.istorage-uk.com
Page 67

9. Ajouter un nouveau code PIN utilisateur en mode administrateur
Pour ajouter un nouvel utilisateur, accédez d'abord au mode administrateur tel que décrit dans la section5. Une fois
que le disque est en mode administrateur (LED
BLEUE continue), effectuez les étapes suivantes.
1. En mode administrateur, appuyez sur les boutons
«DÉVERROUILLER + 3» et maintenez-les enfoncés.
2. Saisissez le nouveau code PIN utilisateur et appuyez
sur le bouton «DÉVERROUILLER».
3. Ressaisissez le nouveau code PIN utilisateur et
appuyez sur le bouton «DÉVERROUILLER».
La LED
LED
Les LED
sont remplacées par la LED
une seule fois, puis par les LED
tante et
La LED
BLEUE continue est remplacée par les
VERTE clignotante et BLEUE continue.
VERTE clignotante et BLEUE continue
VERTE qui clignote
VERTE cligno-
BLEUE continue.
VERTE clignote rapidement pendant
quelques secondes, puis est remplacée par la
BLEUE continue, indiquant que le code PIN
LED
utilisateur a été correctement créé.
10. Modifier le code PIN utilisateur en mode administrateur
Pour modifier un code PIN utilisateur existant, accédez d'abord au mode administrateur tel que décrit dans la section5. Une fois que le disque est en mode administrateur (LED
1. En mode administrateur, appuyez sur les boutons
«DÉVERROUILLER + 3» et maintenez-les enfoncés.
2. Saisissez le nouveau code PIN utilisateur et appuyez
sur le bouton «DÉVERROUILLER».
3. Ressaisissez le nouveau code PIN utilisateur et
appuyez sur le bouton «DÉVERROUILLER».
BLEUE continue), effectuez les étapes suivantes.
La LED
LED
Les LED
sont remplacées par la LED
une seule fois, puis par les LED
tante et
La LED
BLEUE continue est remplacée par les
VERTE clignotante et BLEUE continue.
VERTE clignotante et BLEUE continue
VERTE qui clignote
VERTE cligno-
BLEUE continue.
VERTE clignote rapidement pendant
quelques secondes, puis est remplacée par la
BLEUE continue, indiquant que le code PIN
LED
utilisateur a été correctement modifié.
11. Supprimer le code PIN utilisateur en mode administrateur
iStorage diskAshur PRO
Pour supprimer un code PIN utilisateur, accédez d'abord au mode administrateur tel que décrit dans la section5. Une
fois que le disque est en mode administrateur (LED
1. En mode administrateur, appuyez sur les boutons
«SHIFT (
) + 3» et maintenez-les enfoncés.
2. Appuyez à nouveau sur les boutons
«SHIFT (
) + 3» et maintenez-les enfoncés.
BLEUE continue), effectuez les étapes suivantes.
La LED
LED
La LED
LED
BLEUE continue est remplacée par la
ROUGE clignotante.
ROUGE clignotante est remplacée par la
ROUGE continue, puis par la LED BLEUE
continue, indiquant que le code PIN utilisateur
a été correctement supprimé.
www.istorage-uk.com
2
®
Manual / Handbuch / Manuel – v5.3F
#67
Page 68
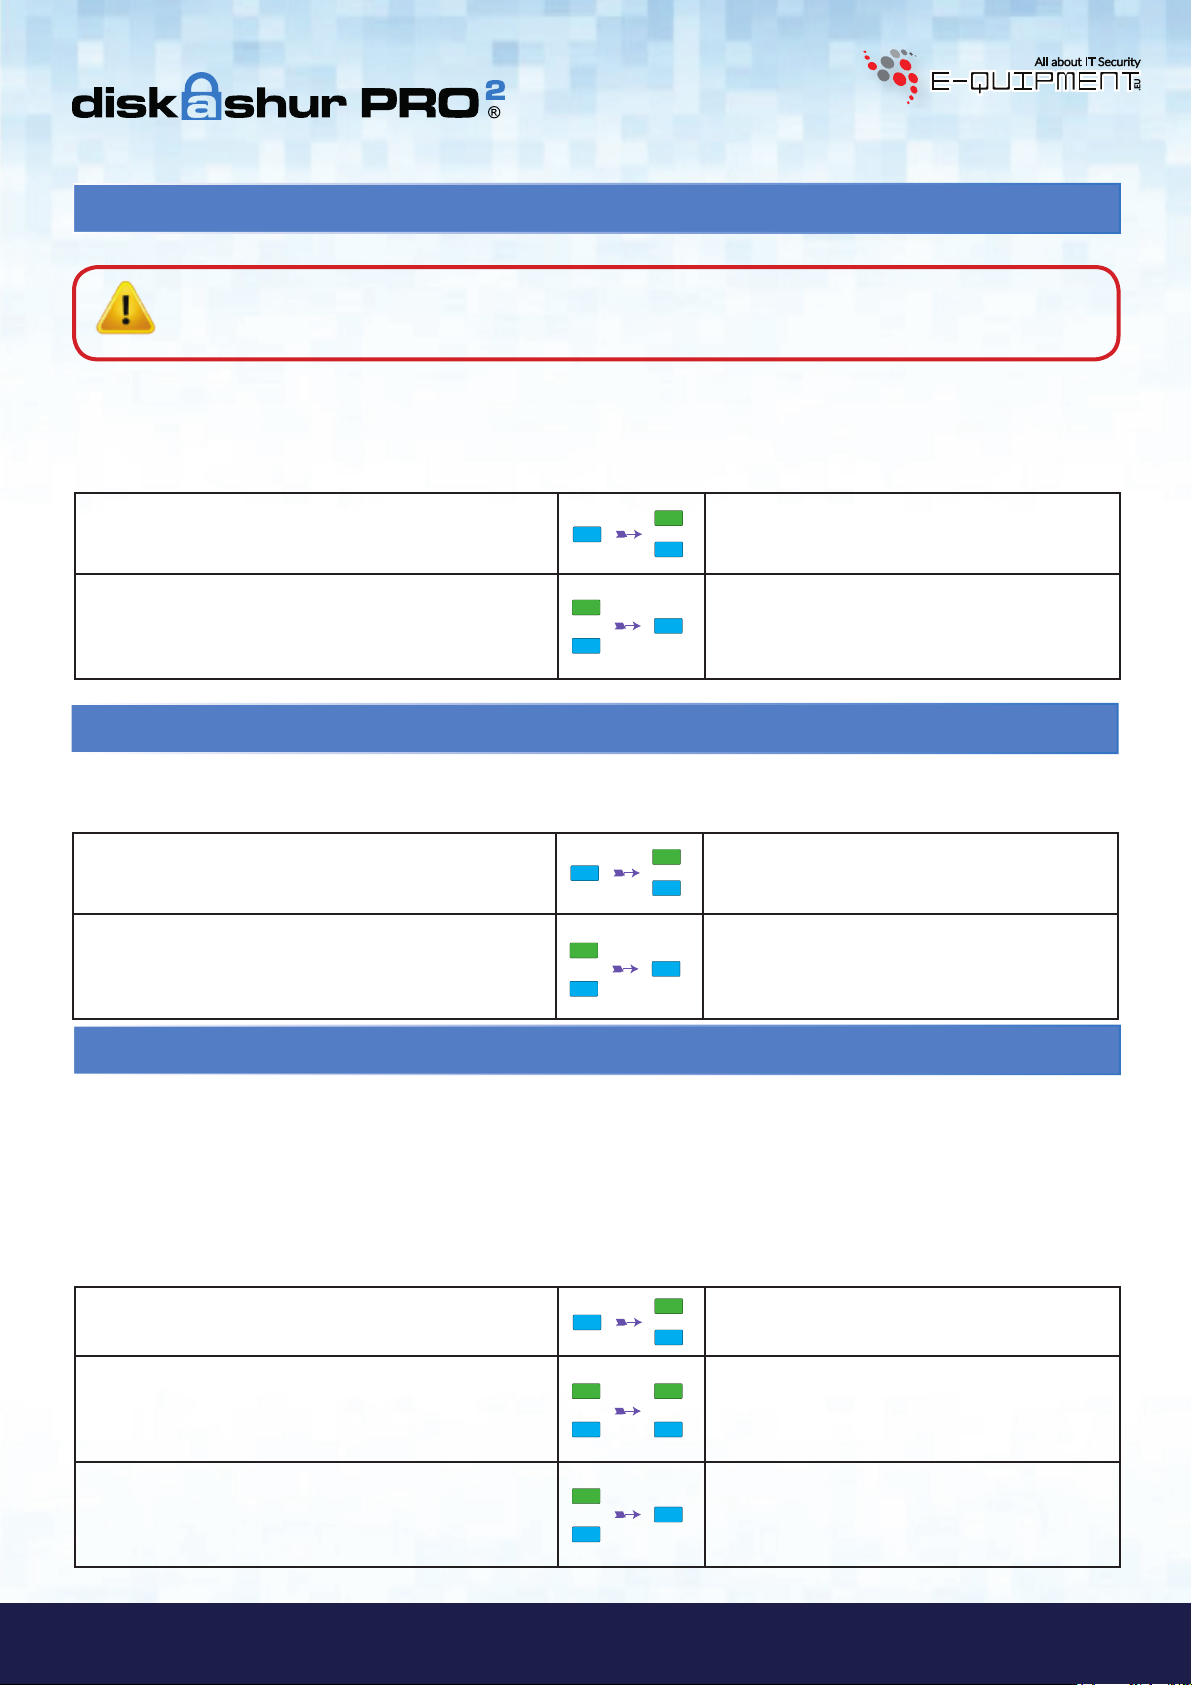
12. Définir le mode de lecture seule en mode administrateur
Important: si les données viennent d'être copiées sur le diskAshur PRO2, veillez d'abord à déconnecter correctement
le disque en cliquant sur Supprimer le périphérique en toute sécurité/Éjecter le diskAshur PRO2 du système d'exploitation avant de reconnecter et de définir le diskAshur PRO2 sur «Lecture seule/Protection en écriture».
Quand l'administrateur écrit du contenu sur le diskAshur PRO2 et limite l'accès au mode lecture seule, l'utilisateur ne peut
pas modifier ce paramètre en mode utilisateur. Pour configurer le diskAshur PRO2 en mode lecture seule, accédez d'abord au
mode administrateur tel que décrit dans la section5. Une fois que le disque est en mode administrateur (LED BLEUE
continue), effectuez les étapes suivantes.
1. En mode administrateur, appuyez sur les boutons
«7 + 6» et maintenez-les enfoncés. (7=Read (lecture) + 6=Only (seule))
2. Relâchez les boutons 7+6 et appuyez sur «DÉ-
VERROUILLER».
La LED BLEUE continue est remplacée par les
LED VERTE et BLEUE clignotantes.
Les LED
VERTE et BLEUE sont remplacées par
la LED VERTE continue, puis par la LED BLEUE
continue, indiquant que le disque est configuré
en mode lecture seule.
13. Activer le mode lecture/écriture en mode administrateur
Pour configurer le diskAshur PRO2 en mode lecture/écriture, accédez d'abord au mode administrateur tel que décrit dans
la section5. Une fois que le disque est en mode administrateur (LED BLEUE continue), effectuez les étapes suivantes.
1. En mode administrateur, appuyez sur les boutons
«7 + 9» et maintenez-les enfoncés. (7=Read (lec-
La LED BLEUE continue est remplacée par les
LED VERTE et BLEUE clignotantes.
ture) + 9=Write (écriture))
VERTE et BLEUE sont remplacées par
2. Relâchez les boutons 7+9 et appuyez sur «DÉ-
VERROUILLER».
Les LED
la LED VERTE continue, puis par la LED BLEUE
continue, indiquant que le disque est configuré
en mode lecture/écriture.
14. Comment créer un code PIN d'autodestruction
Avec la fonctionnalité d'autodestruction, vous définissez un code PIN permettant d'effacer les données chiffrées sur le disque
entier. Lorsqu'il est utilisé, le code PIN d'autodestruction supprime TOUTES les données, les codes PIN administra-
teur/utilisateur, et déverrouille le disque. L'activation de cette fonctionnalité définit le code PIN d'autodestruction comme le
nouveau code PIN utilisateur, et le diskAshur PRO2 doit être partitionné et formaté avant que toute nouvelle donnée puisse être
ajoutée au disque.
Pour définir le code PIN d'autodestruction, accédez d'abord au mode administrateur tel que décrit dans la section5. Une
fois que le disque est en mode administrateur (LED
1. En mode administrateur, appuyez sur les boutons
«DÉVERROUILLER + 6» et maintenez-les enfoncés.
2. Créez un code PIN d'autodestruction de 7 à
Manual / Handbuch / Manuel – v5.3F
®
15chiffres et appuyez sur le bouton «DÉVERROUIL-
2
LER».
BLEUE continue), effectuez les étapes suivantes.
La LED BLEUE continue est remplacée par les
LED VERTE clignotante et BLEUE continue.
Les LED
VERTE clignotante et BLEUE continue
sont remplacées par la LED VERTE qui clignote
une seule fois, puis par les LED VERTE clignotante et BLEUE continue.
La LED VERTE clignote rapidement pendant
3. Ressaisissez le code PIN et appuyez sur le bouton
«DÉVERROUILLER».
iStorage diskAshur PRO
#68
www.istorage-uk.com
plusieurs secondes, puis est remplacée par la LED
BLEUE continue pour indiquer que le code PIN
d'autodestruction a été correctement configuré.
Page 69
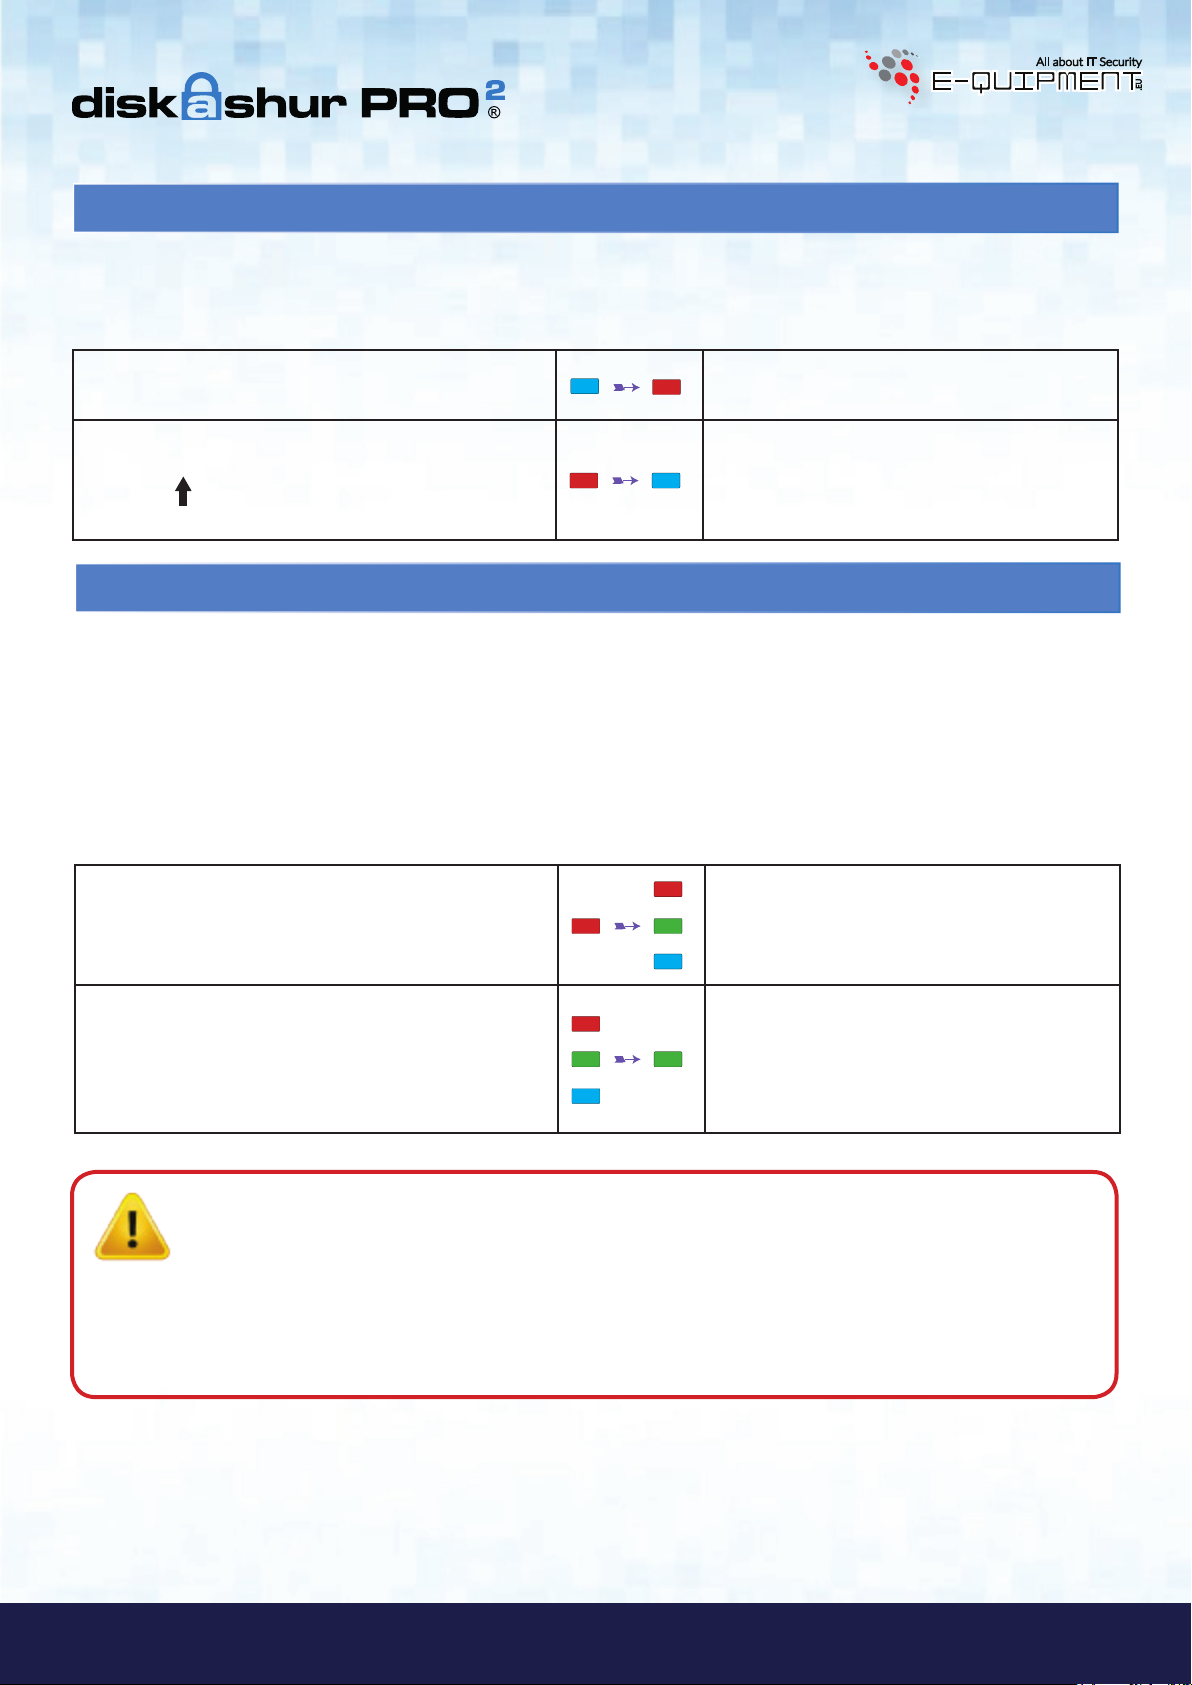
15. Comment supprimer le code PIN d'autodestruction
Pour supprimer le code PIN d'autodestruction, accédez d'abord au mode administrateur tel que décrit dans la section5.
Une fois que le disque est en mode administrateur (LED
BLEUE continue), effectuez les étapes suivantes.
1. En mode administrateur, appuyez sur les boutons
«DÉVERROUILLER + 6» et maintenez-les enfoncés.
2. Appuyez à nouveau sur les boutons
«SHIFT (
) + 6» et maintenez-les enfoncés.
La LED
LED
La LED
puis est remplacée par la LED
BLEUE continue est remplacée par la
ROUGE clignotante.
ROUGE clignotante devient continue,
BLEUE continue,
indiquant que le code PIN d'autodestruction a
été correctement supprimé.
16. Comment déverrouiller avec le code PIN d'autodestruction
Lorsqu'il est utilisé, le code PIN d'autodestruction supprime la clé de chiffrement, TOUTES les données, les codes
PIN administrateur/utilisateur, puis déverrouille le disque. Activer cette fonctionnalité définit le code PIN d'autodestruction comme le nouveau code PIN utilisateur, et le diskAshur Pro2 doit être partitionné et formaté avant que toute
nouvelle donnée puisse être ajoutée au disque.
Pour activer le mécanisme d'autodestruction, le disque doit être en état de veille (LED
ROUGE continue), puis effectuez les
étapes suivantes.
1. En état de veille, appuyez sur le bouton «DÉVER-
ROUILLER».
La LED
LED,
clignoter.
ROUGE est remplacée par toutes les
ROUGE, VERTE et BLEUE qui se mettent à
2. Saisissez le code PIN d'autodestruction et appuyez
sur le bouton «DÉVERROUILLER».
Important: quand le mécanisme d'autodestruction est activé, toutes les données, la clé de chiffrement et
les codes PIN administrateur/utilisateur sont supprimés. Le code PIN d'autodestruction
devient le code PIN utilisateur. Aucun code PIN administrateur n'existe après l'activation du mécanisme d'autodestruction. Le diskAshur PRO2 doit d'abord être réinitialisé (voir la
section26 «
Comment effectuer une réinitialisation complète» à la page94) afin de créer un
code PIN administrateur avec les pleins privilèges administrateur, notamment la possibilité de
créer un code PIN utilisateur.
Les LED
sont remplacées par les LED
qui clignotent en alternance pendant environ
15secondes avant d'être remplacées par la LED
VERTE continue.
ROUGE, VERTE et BLEUE clignotantes
VERTE et BLEUE
iStorage diskAshur PRO
2
®
Manual / Handbuch / Manuel – v5.3F
www.istorage-uk.com
#69
Page 70

17. Comment créer un code PIN administrateur après une attaque
par force brute ou une réinitialisation
Après une attaque par force brute ou quand le diskAshur PRO2 a été réinitialisé, vous devez créer un code PIN administrateur
avant de pouvoir utiliser le disque. Si le disque a été attaqué par force brute ou réinitialisé, il se met en état de veille (LED
ROUGE continue). Pour créer un code PIN administrateur, effectuez les étapes suivantes.
Exigences pour le code PIN:
• Doit être composé de 7 à 15chiffres.
• Ne doit pas contenir que des nombres répétitifs (c.-à-d. 3-3-3-3-3-3-3).
• Ne doit pas contenir que des nombres consécutifs (c.-à-d. 1-2-3-4-5-6-7; 7-8-9-0-1-2-3-4; 7-6-5-4-3-2-1).
Remarque: la touche SHIFT peut être utilisée pour d'autres combinaisons. SHIFT + 1 est une valeur
différente de 1. Pour créer un code PIN utilisant d'autres combinaisons, appuyez sur le bouton SHIFT et
maintenez-le enfoncé pendant la saisie de votre code PIN de 7 à 15chiffres (c.-à-d. SHIFT + 26756498).
1. En état de veille, appuyez sur les boutons
«SHIFT (
) + 1» et maintenez-les enfoncés.
2. Saisissez le NOUVEAU code PIN administrateur et
appuyez sur le bouton «DÉVERROUILLER».
ROUGE continue est remplacée par les
La LED
LED VERTE clignotante et BLEUE continue.
Les LED
VERTE clignotante et BLEUE continue
sont remplacées par la LED VERTE qui clignote
une seule fois, puis par les LED VERTE clignotante et BLEUE continue.
VERTE clignotante et la LED BLEUE
3. Ressaisissez le NOUVEAU code PIN administrateur et
appuyez sur le bouton «DÉVERROUILLER».
La LED
continue sont remplacées par la LED BLEUE qui
se met à clignoter rapidement avant d'être continue, indiquant que le code PIN administrateur a
été correctement configuré.
18. Programmer la fonction de verrouillage automatique
Pour protéger le disque contre les accès non autorisés s'il est déverrouillé et laissé sans surveillance, il est possible de
configurer le diskAshur PRO2 de façon à ce qu'il se verrouille automatiquement au bout d'un intervalle de temps prédéfini.
Par défaut, la fonctionnalité de verrouillage automatique du diskAshur PRO2 est désactivée. Le verrouillage automatique peut
être défini de façon à se déclencher au bout de 5 à 99minutes.
Pour définir le verrouillage automatique, accédez d'abord au mode administrateur tel que décrit dans la section5. Une
fois que le disque est en mode administrateur (LED
BLEUE continue), effectuez les étapes suivantes.
1. En mode administrateur, appuyez sur les boutons
«DÉVERROUILLER + 5» et maintenez-les enfoncés.
La LED BLEUE continue est remplacée par les
LED VERTE et BLEUE clignotantes.
2. Saisissez la durée sur laquelle vous souhaitez définir le délai de verrouillage automatique, le délai minimal possible étant
de 5minutes et le maximal étant de 99minutes (de 5 à 99minutes). Par exemple, saisissez:
05 pour 5minutes;
Manual / Handbuch / Manuel – v5.3F
®
2
20 pour 20minutes;
99 pour 99minutes.
Les LED
VERTE et BLEUE clignotantes sont
remplacées par la LED VERTE continue pendant
3. Appuyez sur le bouton «SHIFT(
) ».
une seconde, puis enfin par la LED
BLEUE
continue, indiquant que le délai du verrouillage
iStorage diskAshur PRO
#70
www.istorage-uk.com
automatique a été correctement configuré.
Page 71
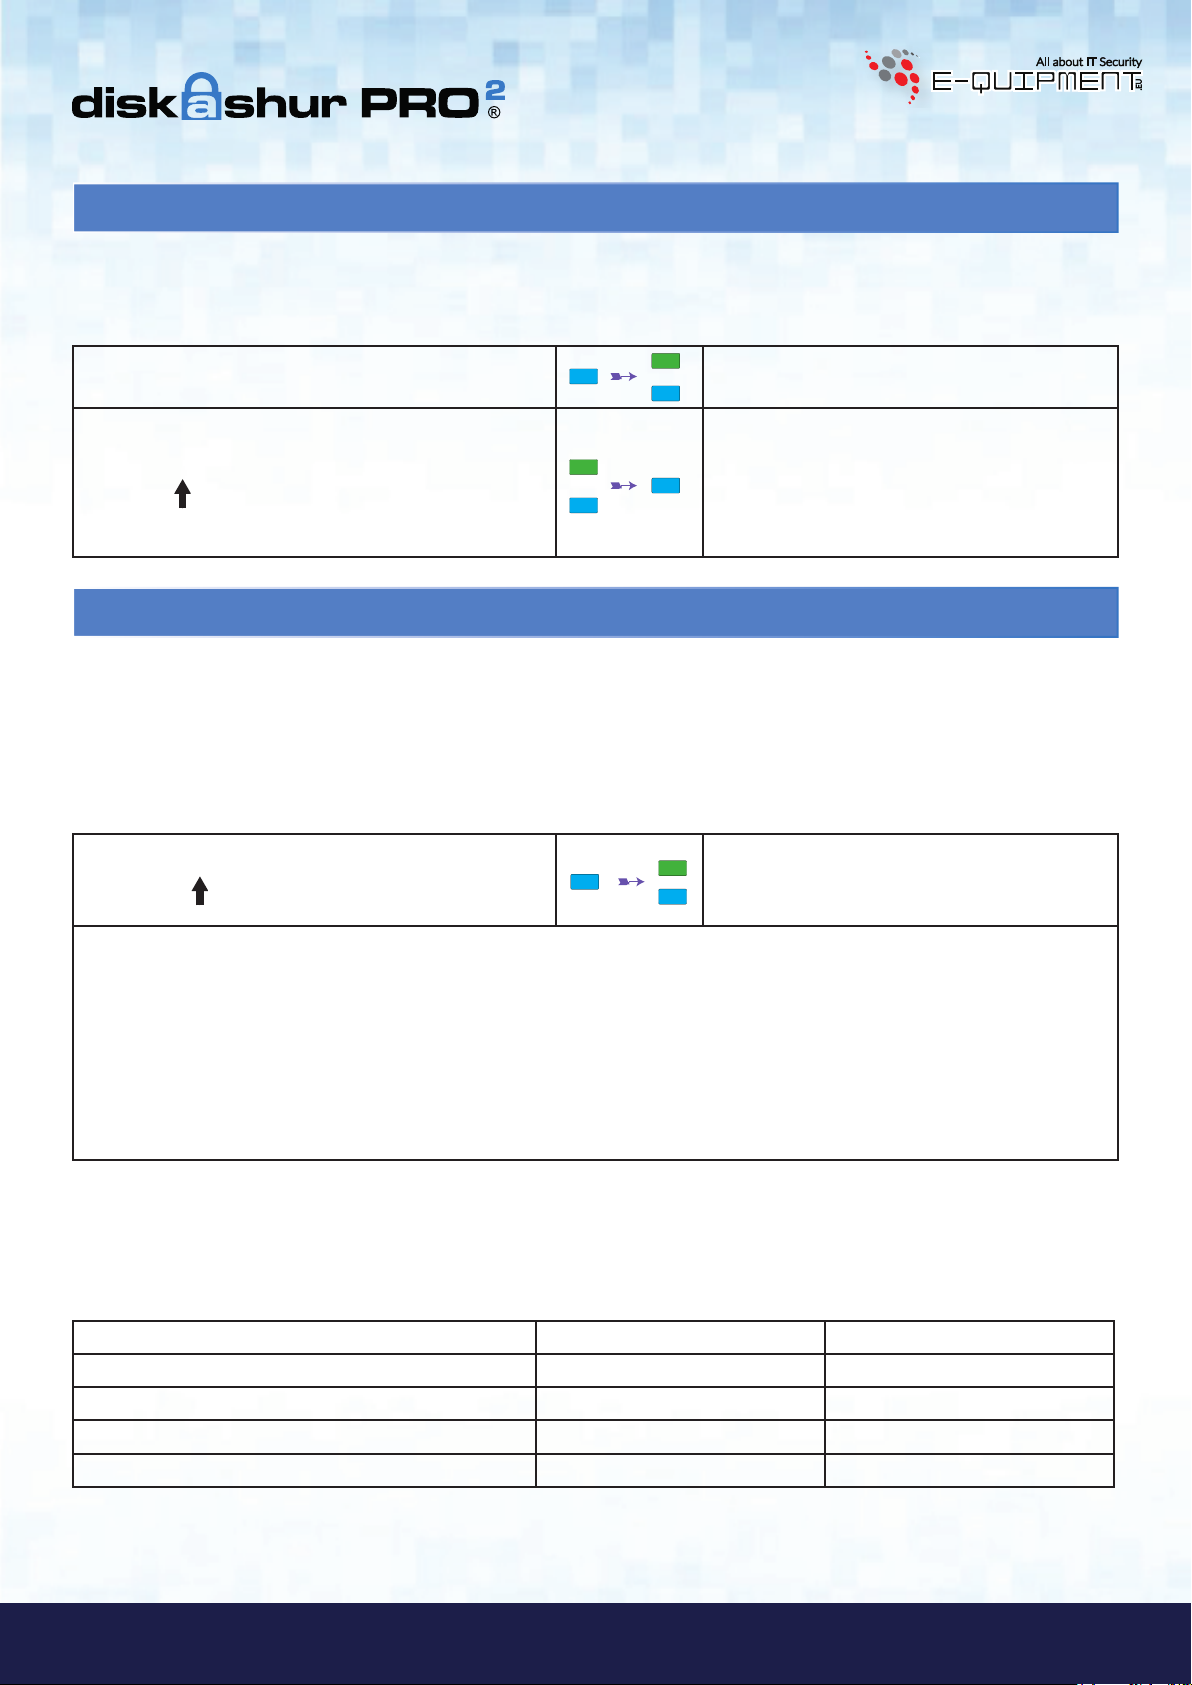
19. Désactiver le verrouillage automatique
Pour désactiver le verrouillage automatique, accédez d'abord au mode administrateur tel que décrit dans la section5. Une
fois que le disque est en mode administrateur (LED BLEUE continue), effectuez les étapes suivantes.
1. En mode administrateur, appuyez sur les boutons
«DÉVERROUILLER + 5» et maintenez-les enfoncés.
2. Saisissez «00» et appuyez sur le bouton
«SHIFT(
) ».
La LED BLEUE continue est remplacée par les
VERTE et BLEUE clignotantes.
LED
Les LED
remplacées par la LED
une seconde, puis enfin par la LED
VERTE et BLEUE clignotantes sont
VERTE continue pendant
BLEUE
continue, indiquant que le délai du verrouillage
automatique a été correctement désactivé.
20. Comment vérifier la minuterie de verrouillage
L’administrateur est en mesure de vérifier et de déterminer la durée de temps définie pour la minuterie de verrouillage automatique en notant simplement la séquence des LED décrite dans le tableau en bas de cette page.
Pour vérifier le verrouillage automatique pour non utilisation, accédez d’abord au « mode administrateur » tel que décrit dans
la section 5. Une fois que le lecteur est en mode administrateur (LED BLEUE continue), effectuez les étapes suivantes.
1. En mode administrateur, appuyez sur les boutons
«SHIFT» (
) + 5
La LED
LED
BLEUE continue est remplacée par les
VERTE et BLEUE clignotantes
2. Appuyez sur le bouton « DÉVERROUILLER » et vous observerez ce qui suit :
a. Toutes les LED (
b. Chaque clignotement de la LED
c. Chaque clignotement de la LED
d. Toutes les LED (
e. Les LED reviennent au
ROUGE, VERTE et BLEUE) s’allument en continu pendant 1 seconde.
ROUGE est égal à dix (10) minutes.
VERTE est égal à une (1) minute.
ROUGE, VERTE et BLEUE) s’allument en continu pendant 1 seconde.
BLEU continu.
Le tableau ci-dessous décrit le comportement des LED lorsque vous vérifiez la minuterie de verrouillage automatique, par
exemple si vous avez programmé le lecteur pour se verrouiller automatiquement au bout de 26 minutes, la LED
clignotera deux (2) fois et la LED
VERTE clignotera six (6) fois.
ROUGE
Verrouillage automatique en minutes ROUGE VERT
8 minutes 0 8 clignotements
15 minutes 1 clignotement 5 clignotements
26 minutes 2 clignotements 6 clignotements
40 minutes 4 clignotements 0
iStorage diskAshur PRO
2
®
Manual / Handbuch / Manuel – v5.3F
www.istorage-uk.com
#71
Page 72

21. Comment déverrouiller le diskAshur PRO
2
avec le code PIN utilisateur
1. En état de veille (LED ROUGE continue), appuyez sur
le
bouton «DÉVERROUILLER».
La LED
LED,
ROUGE est remplacée par toutes les
ROUGE, VERTE et BLEUE qui se mettent à
clignoter.
Les LED clignotant en
ROUGE, VERT et BLEU
sont remplacées pour alterner entre les LED
2. Saisissez le code PIN utilisateur et appuyez sur le
bouton «DÉVERROUILLER».
VERTE et BLEUE, puis par une LED VERTE
qui se met à clignoter rapidement avant d'être
continue, indiquant que le disque a été correctement déverrouillé en mode utilisateur.
22. Modifier le code PIN utilisateur en mode utilisateur
Pour modifier le code PIN utilisateur, déverrouillez d'abord le diskAshur PRO2 avec un code PIN utilisateur tel que décrit
dans la section21. Une fois que le disque est en mode utilisateur (LED
1. En mode utilisateur, appuyez sur les boutons «DÉ-
VERROUILLER + 4» et maintenez-les enfoncés.
VERTE continue), effectuez les étapes suivantes.
La LED VERTE continue est remplacée par les
VERTE clignotante et BLEUE continue.
LED
2. Saisissez le nouveau code PIN utilisateur et appuyez
sur le bouton «DÉVERROUILLER».
3. Ressaisissez le nouveau code PIN utilisateur et
appuyez sur le bouton «DÉVERROUILLER».
Manual / Handbuch / Manuel – v5.3F
®
2
Les LED VERTE clignotante et BLEUE continue
sont remplacées par la LED
une seule fois, puis par les LED
tante et
Les LED
BLEUE continue.
VERTE clignotante et BLEUE continue
sont remplacées par la LED
VERTE qui clignote
VERTE cligno-
VERTE qui se met
à clignoter rapidement avant d'être continue,
indiquant que le code PIN utilisateur a été
correctement modifié.
iStorage diskAshur PRO
#72
www.istorage-uk.com
Page 73

23. Définir le mode de lecture seule en mode utilisateur
Important: si les données viennent d'être copiées sur le diskAshur PRO2, veillez d'abord à déconnecter correctement
le disque en cliquant sur Supprimer le périphérique en toute sécurité/Éjecter le diskAshur PRO2 du système d'exploitation avant de reconnecter et de définir le diskAshur PRO2 sur «Lecture seule/Protection en écriture».
Pour configurer le diskAshur PRO2 en mode lecture seule, accédez d'abord au mode utilisateur tel que décrit dans la section21. Une fois que le disque est en mode utilisateur (LED
VERTE continue), effectuez les étapes suivantes.
1. En mode utilisateur, appuyez sur les boutons «7 +
6» et maintenez-les enfoncés. (7=
6=
Only (seule))
Read (lecture) +
2. Relâchez les boutons 7+6 et appuyez sur «DÉVERROUILLER».
La LED
LED
Les LED
la LED
est configuré en mode lecture seule.
VERTE continue est remplacée par les
VERTE et BLEUE clignotantes.
VERTE et BLEUE sont remplacées par
VERTE continue indiquant que le disque
Remarque: 1. Ce paramètre sera activé la prochaine fois que le disque sera déverrouillé.
2. Si un utilisateur configure le disque en mode lecture seule, l'administrateur peut modifier ce
paramètre par le mode lecture/écriture en mode administrateur.
3. Si l'administrateur configure le disque en mode lecture seule, l'utilisateur ne peut pas configurer le disque en mode lecture/écriture.
24. Activer le mode lecture/écriture en mode utilisateur
Pour configurer le diskAshur PRO2 en mode lecture/écriture, accédez d'abord au mode utilisateur tel que décrit dans la
section21. Une fois que le disque est en mode utilisateur (LED
1. En mode utilisateur, appuyez sur les boutons «7 +
9» et maintenez-les enfoncés. (7=
9=
Write (écriture))
Read (lecture) +
2. Relâchez les boutons 7+9 et appuyez sur «DÉVERROUILLER».
VERTE continue), effectuez les étapes suivantes.
La LED
LED
Les LED
la LED
VERTE continue est remplacée par les
VERTE et BLEUE clignotantes.
VERTE et BLEUE sont remplacées par
VERTE continue indiquant que le disque
est configuré en mode lecture/écriture.
iStorage diskAshur PRO
Remarque: 1. Ce paramètre sera activé la prochaine fois que le disque sera déverrouillé.
2. Si un utilisateur configure le disque en mode lecture seule, l'administrateur peut modifier ce
paramètre par le mode lecture/écriture en mode administrateur.
3. Si l'administrateur configure le disque en mode lecture seule, l'utilisateur ne peut pas configurer le disque en mode lecture/écriture.
www.istorage-uk.com
2
®
Manual / Handbuch / Manuel – v5.3F
#73
Page 74

25. Protection contre les attaques par force brute
Si un code PIN incorrect est saisi 15fois consécutives (3x5groupes de codes PIN), tous les codes PIN administrateur/
utilisateur, la clé de chiffrement et toutes les données sont supprimés et perdus à jamais. Le diskAshur PRO2 doit ensuite être
formaté et partitionné avant de pouvoir être réutilisé.
1. Si un code PIN incorrect est saisi 5 (cinq) fois consécutives, toutes les LED (
ROUGE, VERTE et BLEUE) s'allument en
continu.
2. Déconnectez le disque et reconnectez-le à l'hôte afin de disposer de cinq tentatives supplémentaires pour saisir le code de
PIN. Si le code PIN saisi est incorrect 5fois de plus (10fois au total: 5fois à l'étape1 et 5fois à l'étape2), toutes les LED
(
ROUGE, VERTE et BLEUE) s'allument à nouveau en continu.
3. Déconnectez le disque, maintenez le bouton «SHIFT» enfoncé et reconnectez-le à l'hôte: toutes les LED (
BLEUE) s'allument et clignotent simultanément.
et
ROUGE, VERTE
4. Pendant que les LED clignotent, saisissez «47867243» et appuyez sur le bouton «DÉVERROUILLER» pour disposer
de 5dernières tentatives.
Attention: À l'issue de 15saisies incorrectes consécutives du code PIN, le mécanisme de défense contre la force
brute se déclenche et supprime tous les codes PIN administrateur/utilisateur, la clé de chiffrement et
les données. Un nouveau code PIN administrateur doit être créé: consultez la section17 de la page90
intitulée «
tialisation
Comment créer un code PIN administrateur après une attaque par force brute ou une réini-
2
». Le diskAshur PRO
doit aussi être partitionné et formaté avant que toute nouvelle donnée
puisse être ajoutée au disque.
26. Comment effectuer une réinitialisation complète
Pour effectuer une réinitialisation complète, le diskAshur PRO2 doit être en état de veille (LED ROUGE continue). Une fois
que le disque est réinitialisé, tous les codes PIN administrateur/utilisateur, la clé de chiffrement et toutes les données sont
supprimés et perdus à jamais, et le disque doit être formaté et partitionné avant de pouvoir être réutilisé.
Pour réinitialiser le diskAshur PRO2, effectuez les étapes suivantes.
1. En état de veille, appuyez sur le bouton «0» et
maintenez-le enfoncé jusqu'à ce que toutes les LED se
mettent à clignoter en alternance.
2. Appuyez sur les boutons «2 + 7» et maintenez-les
enfoncés jusqu'à ce que toutes les LED deviennent
continues pendant une seconde, puis soient remplacées
par la LED ROUGE continue.
Manual / Handbuch / Manuel – v5.3F
®
2
Important: après une réinitialisation complète, un nouveau code PIN administrateur doit être créé: consultez la
section17, page90 intitulée «
force brute ou une réinitialisation
Comment créer un code PIN administrateur après une attaque par
». Le diskAshur PRO
La LED
toutes les LED,
ROUGE continue est remplacée par
ROUGE, VERTE et BLEUE, qui
se mettent à clignoter en alternance.
Les LED
ROUGE, VERTE et BLEUE qui cligno-
taient en alternance s'allument toutes en continu pendant une seconde, puis sont remplacées
par une LED ROUGE continue indiquant que le
disque a été réinitialisé.
2
doit aussi être partitionné et formaté avant
que toute nouvelle donnée puisse être ajoutée au disque.
iStorage diskAshur PRO
#74
www.istorage-uk.com
Page 75

27. Initialiser et formater le diskAshur PRO
2
Après une «attaque par force brute» ou une réinitialisation complète du diskAshur PRO2, toutes les données, la clé de chiffrement et les paramètres de partition sont supprimés.
Vous devez initialiser et formater le diskAshur PRO
Pour initialiser le diskAshur PRO
1. Branchez le diskAshur PRO
2
, effectuez les étapes suivantes:
2
à l'ordinateur.
2
avant de pouvoir l'utiliser.
2. Créez un nouveau code PIN administrateur: voir page90, section17 «Comment créer un code PIN administrateur après
une attaque par force brute ou une réinitialisation».
3. Lorsque le diskAshur PRO
déverrouiller (LED
4.
Windows7: Faites un clic droit sur Ordinateur, cliquez sur Gérer, puis sélectionnez Gestion des disques.
VERTE).
2
est en état de veille (LED
ROUGE), saisissez le nouveau code PIN administrateur afin de le
Windows8: Faites un clic droit dans le coin gauche du bureau et sélectionnez Gestion des disques.
Windows10: Faites un clic droit sur le bouton Démarrer et sélectionnez Gestion des disques.
5. Dans la fenêtre Gestion de l’ordinateur, cliquez sur Gestion des disques. Dans la fenêtre Gestion des disques, le
diskAshur PRO
2
est reconnu comme périphérique inconnu non initialisé et non alloué.
Remarque: si la fenêtre Initialiser l'assistant de disque s'ouvre, cliquez sur Annuler.
6. Faites un clic droit sur Disque inconnu, puis sélectionnez Initialiser le disque.
iStorage diskAshur PRO
2
®
Manual / Handbuch / Manuel – v5.3F
www.istorage-uk.com
#75
Page 76
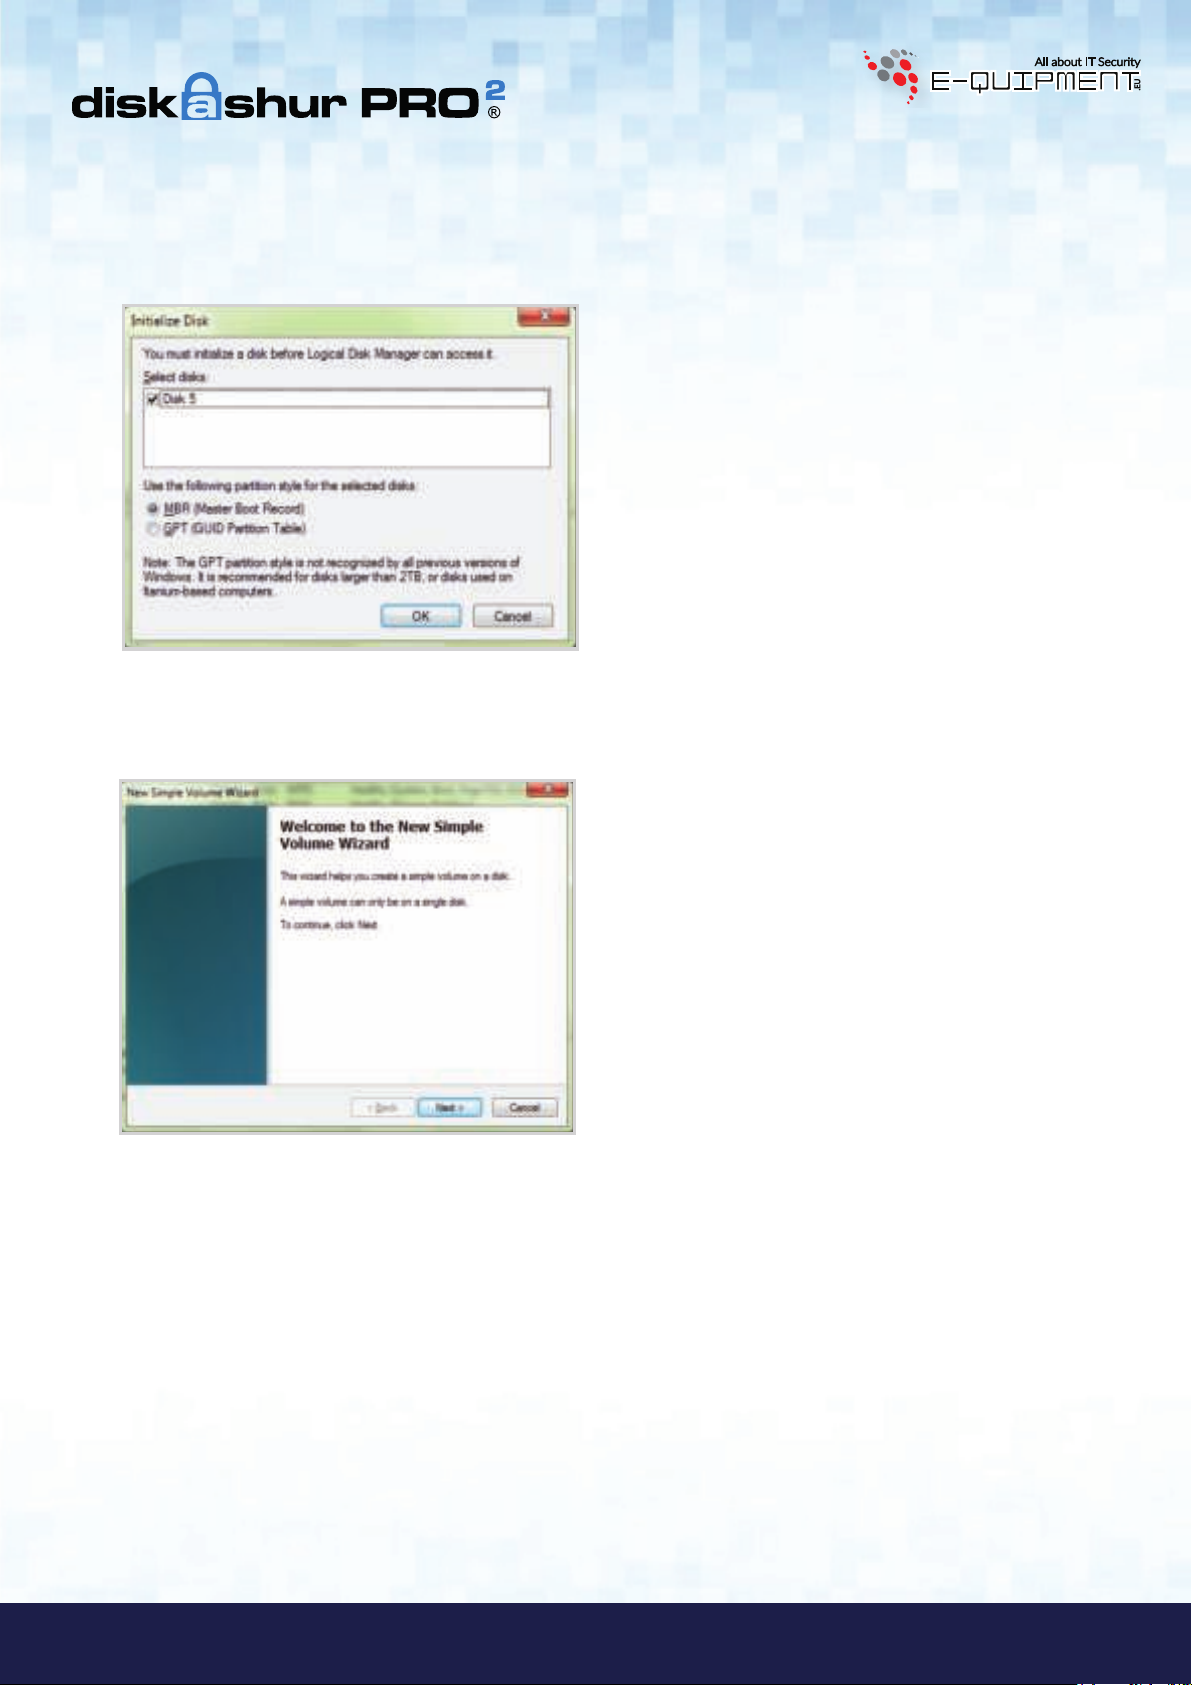
7. Dans la fenêtre Initialiser le disque, cliquez sur OK.
8. Faites un clic droit dans la zone vide située sous la section Non alloué, puis sélectionnez Nouveau volume simple. La
fenêtre de bienvenue dans l'Assistant Création d'un volume simple s'ouvre.
9. Cliquez sur Suivant.
10. Si vous avez besoin d'une seule partition, acceptez la taille de partition par défaut et cliquez sur Suivant.
11. Affectez une lettre ou un chemin de disque et cliquez sur Suivant.
12. Créez un libellé de volume, sélectionnez Effectuer un formatage rapide, puis cliquez sur Suivant.
Manual / Handbuch / Manuel – v5.3F
®
2
13. Cliquez sur Terminer.
14. Patientez jusqu'à la fin du formatage. Le diskAshur PRO2 est reconnu et peut être utilisé.
iStorage diskAshur PRO
#76
www.istorage-uk.com
Page 77

28. Configuration du diskAshur PRO
2
pour MacOS
Le diskAshur PRO2 est préformaté exFAT. Pour reformater le disque en un format compatible Mac, lisez les informations
indiquées ci-après.
Une fois que le disque est déverrouillé, ouvrez Utilitaire de disque dans Applications/Utilitaires/Utilitaires de disque.
Pour formater le diskAshur PRO
1. Sélectionnez diskAshur PRO
2
:
2
dans la liste des disques et des volumes. Chaque disque de la liste affiche sa capacité, son
fabricant et le nom de produit, tel que «iStorage diskAshur PRO2 Media» ou 232.9 diskAshur PRO2.
2. Cliquez sur le bouton «Erase» (Effacer) (figure1).
figure1
3. Saisissez un nom pour le disque (figure2). Le nom par défaut est Sans titre. Le nom du disque finit par apparaître sur le
bureau.
iStorage diskAshur PRO
2
®
Manual / Handbuch / Manuel – v5.3F
figure2
www.istorage-uk.com
#77
Page 78

4. Sélectionnez un format de modèle et de volume à utiliser. Le menu déroulant Volume Format (Format de volume) (fi-
gure3) répertorie les formats de disque disponibles pris en charge par Mac. Le type de format recommandé est «Mac OS
Extended (Journaled)». Le menu déroulant du format de modèle répertorie les modèles disponibles à utiliser (figure4).
Nous vous recommandons d'utiliser «GUID Partition Map» sur les disques d'une capacité supérieure à 2To.
figure3
figure4
5. Cliquez sur le bouton «Effacer». L'utilitaire de disque démonte le volume du bureau, l'efface et le remonte sur le
bureau.
Manual / Handbuch / Manuel – v5.3F
®
2
iStorage diskAshur PRO
#78
www.istorage-uk.com
Page 79

29. Configuration du diskAshur PRO
2
pour Linux (Ubuntu 17.10)
Si votre diskAshur PRO2 a été initialisé et formaté exFAT, vous pouvez utiliser votre disque sous Ubuntu.
Si ce n’est pas le cas, veuillez suivre les instructions ci-dessous.
2
Pour formater le diskAshur PRO
sous système de fichier FAT:
1. Ouvrir ‘Toutes les applications’ et tapez le mot-clé ‘Disques’ dans le champ de recherche. Cliquez sur l’utilitaire
‘Disques’ lorsqu’il s’affiche.
2. Sélectionnez le disque (Disque dur de 500Go) que vous souhaitez formater sous le ‘gestionnaire de périphériques’.
Ensuite, cliquez dans le menu d’actions sous l’onglet ‘Volumes’ et sélectionnez ‘Formater’
3. Sélectionnez ‘Compatible avec tous les systèmes et périphériques (FAT)’ pour l’option ‘Type’ de fichier. Et
entrez un nom pour le disque, par exemple: diskAshur PRO2. Ensuite, cliquez sur le bouton ‘Formater’.
www.istorage-uk.com
iStorage diskAshur PRO
2
®
Manual / Handbuch / Manuel – v5.3F
#79
Page 80

4. Cliquez de nouveau sur ‘Formater’
5. Le formatage du disque commence.
6. Une fois le processus de formatage terminé, cliquez pour monter le disque sous Ubuntu.
Manual / Handbuch / Manuel – v5.3F
®
2
iStorage diskAshur PRO
#80
www.istorage-uk.com
Page 81

7. Le disque est maintenant monté et prêt à l’emploi.
8. Un icône disque devrait être visible comme dans l’exemple ci-dessous. Vous pouvez cliquer sur l’icône disque pour
ouvrir votre disque.
2
Déconnecter votre diskAshur PRO
Il est
vivement recommandé de faire un clic droit sur l’icône du disque et de sélectionner ‘éjecter’ pour
retirer votre diskAshur PRO
2
en toute sécurité depuis , surtout si des données ont été copiées ou supprimées sur le disque.
pour Linux (Ubuntu 17.10)
www.istorage-uk.com
iStorage diskAshur PRO
2
®
Manual / Handbuch / Manuel – v5.3F
#81
Page 82

30. Mettre en veille prolongée, suspendre ou se déconnecter du sys-
tème d'exploitation
Veillez à sauvegarder et à fermer tous les fichiers sur le diskAshur PRO2 avant de le mettre en veille prolongée, de le suspendre ou de le déconnecter du système d'exploitation.
Il est recommandé de verrouiller le diskAshur PRO
de le déconnecter de votre système.
Pour verrouiller le disque, appuyez simplement sur le bouton «VERROUILLER» sur le diskAshur PRO
l'icône «Supprimer le périphérique en toute sécurité/Éjecter» dans votre système d'exploitation.
Attention: pour vous assurer que vos données sont sécurisées, veillez à verrouiller le diskAshur PRO2 si
vous vous éloignez de votre ordinateur.
31. Comment vérifier la version du firmware en mode administrateur
Pour vérifier le numéro de la version du firmware, accédez d'abord au mode administrateur tel que décrit dans la section5. Une fois que le disque est en mode administrateur (LED
2
manuellement avant de le mettre en veille prolongée, de le suspendre ou
2
ou en cliquant sur
BLEUE continue), effectuez les étapes suivantes.
1. En mode administrateur, appuyez sur les boutons «3
+ 8» et maintenez-les enfoncés jusqu'à ce que les LED
VERTE et BLEUE clignotent simultanément.
La LED
LED
BLEUE continue est remplacée par les
VERTE et BLEUE clignotantes.
2. Appuyez sur le bouton «DÉVERROUILLER» et vous observerez ce qui suit:
a. Toutes les LED (
b. La LED
c. La LED
ROUGE clignote, indiquant la partie intégrante du numéro de révision la version du firmware.
VERTE clignote, indiquant la partie fractionnaire du numéro.
d. Toutes les LED (
e. Les LED reviennent au
ROUGE, VERTE et BLEUE) s'allument en continu pendant 1seconde.
ROUGE, VERTE et BLEUE) s'allument en continu pendant 1seconde.
BLEU continu.
Par exemple, si le numéro de de la version du firmware est «1.2», la LED ROUGE clignote une (1) fois et la LED VERTE
clignote deux (2) fois. Une fois la séquence terminée, les LED
puis sont remplacées par la LED
Manual / Handbuch / Manuel – v5.3F
®
2
BLEUE continue.
ROUGE, VERTE et BLEUE clignotent une fois simultanément,
iStorage diskAshur PRO
#82
www.istorage-uk.com
Page 83
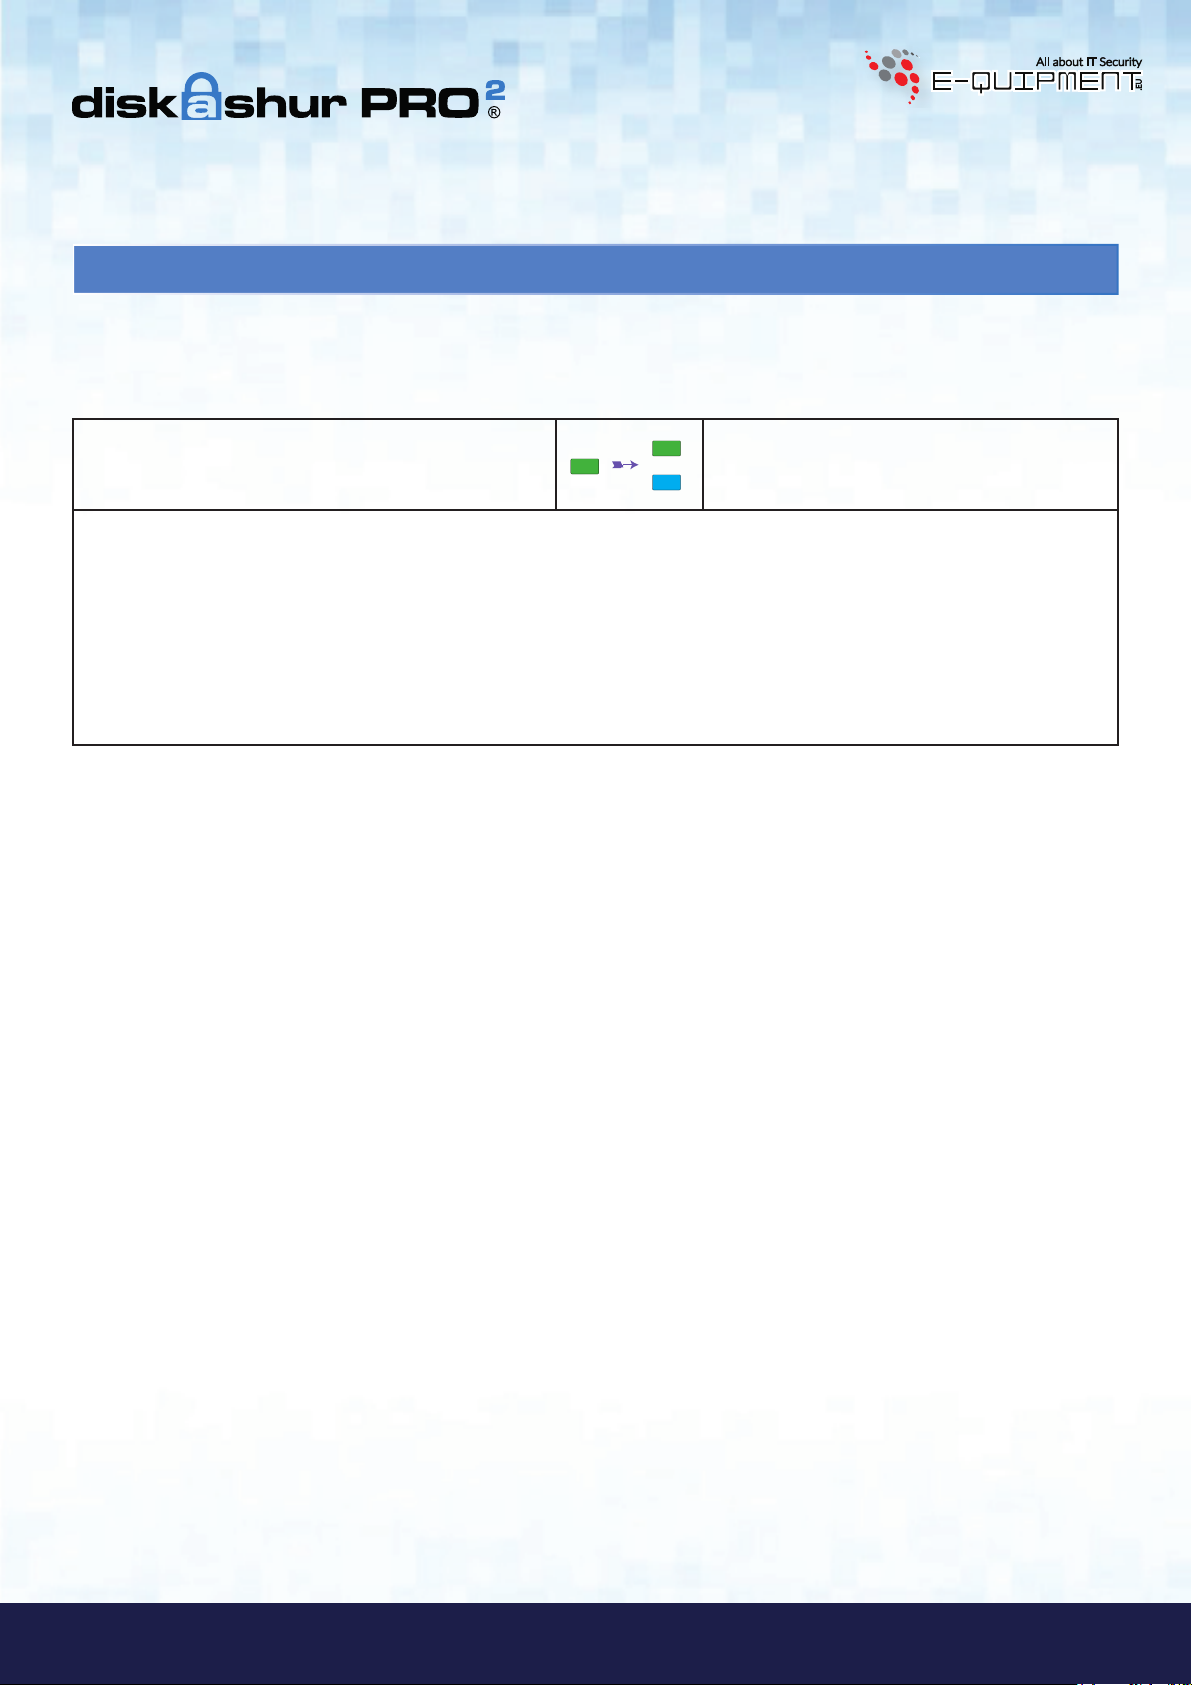
32. Comment vérifier la version du firmware en mode utilisateur
Pour vérifier le numéro de la version du firmware, accédez d'abord au mode utilisateur tel que décrit dans la section21.
Une fois que le disque est en mode utilisateur (LED
VERTE continue), effectuez les étapes suivantes.
1. En mode utilisateur, appuyez sur les boutons «3 +
8» et maintenez-les enfoncés jusqu'à ce que les LED
VERTE et BLEUE clignotent simultanément.
La LED
LED
VERTE continue est remplacée par les
VERTE et BLEUE clignotantes.
2. Appuyez sur le bouton «DÉVERROUILLER» et vous observerez ce qui suit:
a. Toutes les LED (
b. La LED
c. La LED
ROUGE clignote, indiquant la partie intégrante du numéro de la version du firmware.
VERTE clignote, indiquant la partie fractionnaire du numéro.
d. Toutes les LED (
e. Les LED reviennent au
ROUGE, VERTE et BLEUE) s'allument en continu pendant 1seconde.
ROUGE, VERTE et BLEUE) s'allument en continu pendant 1seconde.
BLEU continu.
Par exemple, si le numéro de la version du firmware est «1.2», la LED ROUGE clignote une (1) fois et la LED VERTE clignote deux (2) fois. Une fois la séquence terminée, les LED
sont remplacées par la LED
BLEUE continue.
ROUGE, VERTE et BLEUE clignotent une fois simultanément, puis
www.istorage-uk.com
iStorage diskAshur PRO
2
®
Manual / Handbuch / Manuel – v5.3F
#83
Page 84

33. Assistance technique
iStorage vous fournit les ressources utiles suivantes:
SiteWeb d'iStorage
https://www.istorage-uk.com
Correspondance par courriel
support@istorage-uk.com
Assistance téléphonique avec notre service d'assistance technique au +44(0)2089916260.
Les spécialistes de l'assistance technique d'iStorage sont disponibles de 9h00 à 17h30
GMT, du lundi au vendredi
34. Informations de garantie et du service après-vente (SAV)
Garantie de deux ans:
iStorage offre une garantie de 2ans sur le iStorage diskAshur PRO2 contre les vices de fabrication et de main-d'œuvre
dans des conditions d'utilisation normales. La période de garantie prend effet à la date de l'achat, effectué directement
auprès d'iStorage ou d'un revendeur autorisé.
Clause et conditions de non-responsabilité:
LA GARANTIE PREND EFFET À LA DATE D'ACHAT ET DOIT ÊTRE VÉRIFIÉE À L'AIDE DE VOTRE TICKET DE CAISSE OU FACTURE MENTIONNANT LA DATE D'ACHAT DU PRODUIT.
ISTORAGE RÉPARERA OU REMPLACERA, SANS FRAIS SUPPLÉMENTAIRES, LES PIÈCES DÉFECTUEUSES PAR DE NOUVELLES PIÈCES OU DES PIÈCES D'OCCASION UTILISABLES
COMPARABLES AUX NEUVES EN MATIÈRE DE PERFORMANCE. TOUTES LES PIÈCES ÉCHANGÉES ET LES PRODUITS REMPLACÉS AU TITRE DE CETTE GARANTIE DEVIENNENT LA
PROPRIÉTÉ D'ISTORAGE.
CETTE GARANTIE NE COUVRE PAS LES PRODUITS NON ACHETÉS DIRECTEMENT AUPRÈS D'ISTORAGE OU D'UN REVENDEUR AUTORISÉ, NI LES PRODUITS ENDOMMAGÉS OU
RENDUS DÉFECTUEUX: 1. À LA SUITE D'UN ACCIDENT, D'UN USAGE NON CONFORME, DE NÉGLIGENCE, D'ABUS, DE MANQUEMENT OU D'INCAPACITÉ DE SUIVRE LES INSTRUCTIONS ÉCRITES FOURNIES DANS LE GUIDE D'INSTRUCTIONS; 2. PAR L'UTILISATION DE PIÈCES NON FABRIQUÉES OU VENDUES PAR ISTORAGE; 3. PAR LA MODIFICATION
DU PRODUIT; 4. À LA SUITE
D'UN SERVICE, D'UNE ALTÉRATION OU D'UNE RÉPARATION EFFECTUÉE PAR QUICONQUE AUTRE QU'ISTORAGE, ET SERA NULLE. CETTE GARANTIE NE COUVRE PAS L'USURE
Manual / Handbuch / Manuel – v5.3F
NORMALE.
®
2
AUCUNE AUTRE GARANTIE, EXPRESSE OU IMPLICITE, Y COMPRIS TOUTE GARANTIE IMPLICITE DE CONFORMITÉ D'USAGE POUR UN EMPLOI PARTICULIER, N'A ÉTÉ OU NE SERA
FAITE PAR ISTORAGE, EN SON NOM OU EN VERTU DE LA LOI EN CE QUI CONCERNE LE PRODUIT OU SON INSTALLATION, UTILISATION, FONCTIONNEMENT, REMPLACEMENT OU
RÉPARATION.
ISTORAGE N'EST PAS RESPONSABLE EN VERTU DE CETTE GARANTIE, OU AUTREMENT, POUR TOUT DOMMAGE ACCESSOIRE, SPÉCIAL OU CONSÉQUENSIEL, Y COMPRIS TOUTE
PERTE DE DONNÉES DÉCOULANT DE L'UTILISATION OU DU FONCTIONNEMENT DU PRODUIT, QU'ISTORAGE AIT EU CONNAISSANCE OU NON DE LA POSSIBILITÉ DE TELS
DOMMAGES.
iStorage diskAshur PRO
#84
www.istorage-uk.com
Page 85

E-quipment BV
Transistorstraat 31, 1322 CK Almere
www. e-quipment.eu | info@e-quipment.eu
Tel: +31 (0) 36-5250024
iStorage diskAshur PRO
2
®
Manual / Handbuch / Manuel – v5.3F
www.istorage-uk.com
#85
 Loading...