

Page 1
QUICK START GUIDE
Before the drive can be used, an Admin PIN MUST be created. This Admin PIN can be used to access the drive or
set any of the Admin mode features of the drive.
To Set-up the Admin PIN:
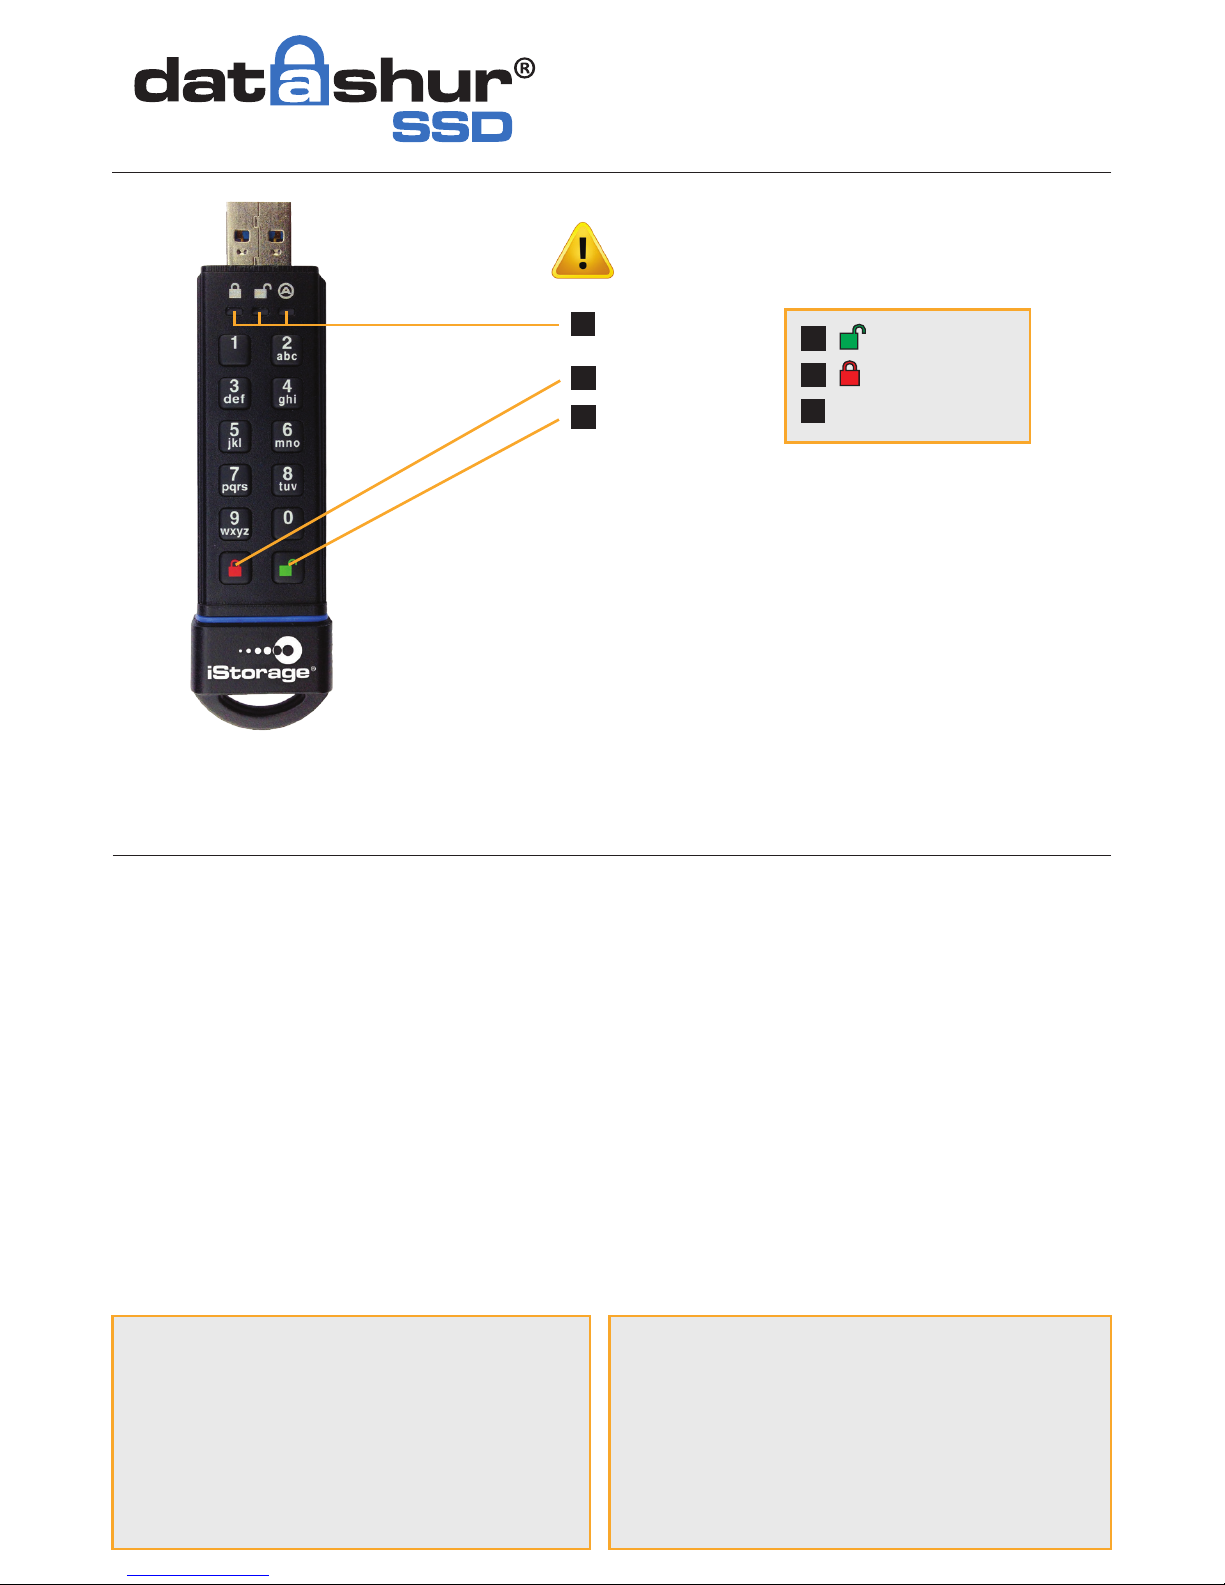
1. Awaken the drive by pressing the UNLOCK Button. The BLUE and GREEN LEDs will turn solid.
2. Press UNLOCK + 9 at the same time. The LEDs will change to a solid BLUE
and blinking GREEN.
3. Enter the PIN that you will use for the Admin PIN, ensuring that your PIN meets the requirements (as per
below), then press the UNLOCK Button.
If accepted the GREEN LED will blink and BLUE LED will stay solid (continue to step 4).
The RED LED will blink if it does not meet the requirements (as per below), then the LEDs will return to a
solid BLUE and blinking GREEN (restart from step 2).
4. Re-enter the new Admin PIN and press the UNLOCK Button, if accepted the GREEN LED will blink
for 1 second. The LEDs will then return to a solid BLUE.
5. The drive is now in Admin mode and any Admin features can be set (e.g. adding a new User PIN etc.).
6. To exit Admin mode, press the LOCK Button. The drive will return to locked standby mode.
7. If no action is taken for 30 seconds, the drive will return to a locked sleep mode.
PIN REQUIREMENTS:
PINs MUST be a minimum length of 7 and maximum 16 digits
Cannot contain all sequential numbers (e.g. 2345678
or 9876543)
Cannot contain all repeating numbers (e.g. 1111111)
Battery Note:
The datAshur SSD® has an internal rechargeable battery with a smart charging circuit.
For safety, each datAshur SSD ships with a partial charge. Although the drive can be
used out of the box, we recommend inserting the datAshur SSD into a powered USB
port for 80 minutes to fully charge.
The battery will automatically charge when the drive is inserted into a powered USB
port, regardless of its operational mode. In standby mode, the RED LED blinks to
indicate charging and turns solid when fully charged.
If the battery is completely discharged, the drive will go through a self-test
(RED, GREEN and BLUE LED blinking sequence) when inserted into a USB port.
NOTE: It’s normal for the datAshur SSD to be warm to the touch during use.
First Time Use
3
2
1
UNLOCK Button
LED Indicator lights
LOCK Button
2
3
1
NOTE:
When the drive is not in use all LEDs are off, the drive is locked
and cannot be accessed.
To awaken the drive press the UNLOCK Button.
The RED LED will turn solid.
If the drive has never been used, the LEDs will turn solid BLUE
and GREEN.
The drive comes preformatted with NTFS file system for Windows.
For Mac, Linux and Android please refer to your OS formatting
requirements or datAshur SSD User manual.
Page 2

iStorage provides the following helpful resources:
• iStorage Website (http://www.istorage-uk.com).
Check for up-to-date information.
• E-mail us at support@istorage-uk.com
• Call the Technical Support Department at +44 (0) 20 8991 6260
• iStorage’s Technical Support Specialists are available
from 9:00 a.m to 5:30 p.m. GMT, Mon- Fri.
Performing a Complete Re-Set
A complete reset of the drive will delete the encryption key and all stored data. To return all the settings to the
factory default, perform the following:
1. Press and hold LOCK + UNLOCK
+
2
at the same time
for 10 seconds.
The RED and BLUE LEDs will blink alternately followed by the GREEN LED turning solid for two seconds.
The LEDs will then returns to alternating
BLUE
and RED.
2. When released
the BLUE and GREEN LEDs will turn solid.
3. A new Admin PIN will need to be created and the drive will need to be formatted (see overleaf).
You have successfully reset the datAshur SSD.
To lock the drive, disconnect it from the USB port or press the LOCK Button.
When locked, the RED LED will turn solid.
If the drive is plugged in and data is still being written to the drive, the datAshur SSD will wait until all data has been
written to the drive and it will then lock automatically. The LOCK Button can also be used to exit Admin mode.
NOTE: The datAshur SSD drive will not be recognised by the operating system in standby mode (RED LED solid).
Locking the drive
1. To awaken the drive, press the UNLOCK Button. The RED LED will turn solid.
2. Enter either your Admin PIN or User PIN and press the UNLOCK Button. If the PIN is accepted, the
GREEN LED will blink quickly four times. The GREEN LED will then blink slowly until inserted into a USB port
where it will turn solid. If the PIN is entered incorrectly, the RED LED will blink.
3. The drive is unlocked and ready to use. If it is not inserted into a USB port within 30 seconds, the drive
will lock (RED LED will turn solid) and return to sleep mode.
Unlocking the drive
1. Enter the Admin Mode by holding UNLOCK + 0
at the same time
for five seconds.
The RED LED will blink.
2. Enter the Admin PIN and press the UNLOCK Button. The BLUE LED will turn solid.
3. Press UNLOCK
+
1
at the same time. T
he LEDs will turn to a solid BLUE and blinking GREEN.
4. Enter a new User PIN and press the UNLOCK Button
ensuring that your PIN meets the requirements overleaf
.
The GREEN LED will blink three times, the LEDs will then return to a solid BLUE and blinking GREEN.
5. Re-enter the User PIN and press the UNLOCK Button. If the GREEN LED stays solid for three seconds
followed by a solid BLUE, the User PIN was accepted. The drive has now returned to Admin mode.
The RED LED will blink three times if the entry does not match. Then the LEDs will return to a solid BLUE and
blinking GREEN (restart from step 4).
Adding a User PIN in addition to the Admin PIN
SECURING THE MAINSTREAM
QUICK START GUIDE
 Loading...