

Page 1

User’s Guide
Page 2

Components 04
Locating the controls 05
LCD display 07
Installing iriver plus 3 10
0101
Getting Started
Turning on/off the player 12
Selecting menu 13
Using HOLD 14
Connecting products 15
0202
Basic Operations
Simple Player 20
Music
Now Playing 24
Videos 25
Pictures 27
Text 28
Flash Games 29
FM Radio 30
Recordings 32
0303
Using the Player
0404
Setting up the telephone function
36
Date/Time 37
Fonts 37
Wireless network 37
Reset all settings 37
Power off type 37
Language 37
Display 37
DB update 37
Format Device 37
Advanced 37
About 37
Setting up the Product
Using iriver plus 3 41
Copyrights/Certication/
Trademarks/Limited Liability 43
Safety Instructions 44
Troubleshooting 46
0505
Other Information
Page 3

Getting Started
Components 04
Locating the controls 05
LCD display 07
Installing iriver plus 3 10
Page 4
4
Getting Started Getting Started
5
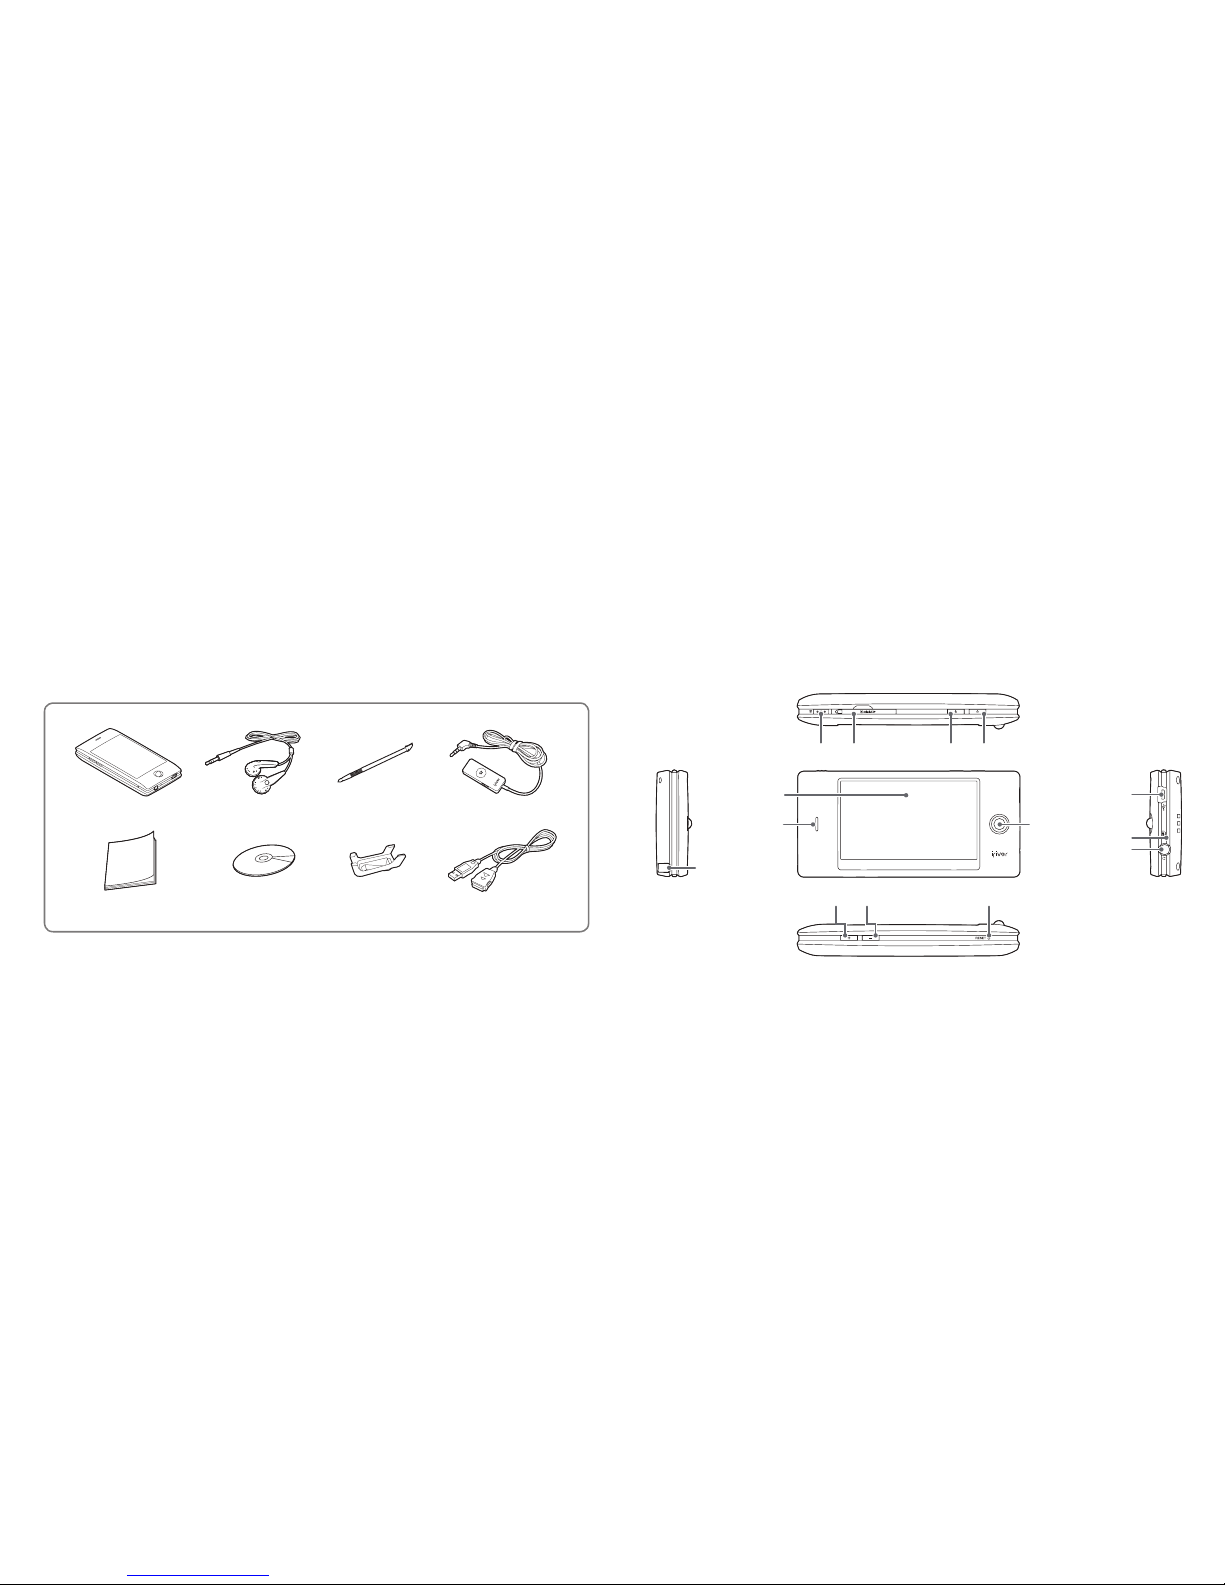
Components
Components are subject to change without notice and may vary from images shown.
The W10 comes with a Stylus pen.
Locating the controls
Quick Start Guide & Warranty Card
Installation CD Clip USB cable
Stylus pen
HOLD key Mini SD card slot
POWER
Smart key
LCD
Speaker Menu button
USB jack
MIC
Earphones jack
Volume + Volume – RESET
W10 Earphones Stylus pen Remote control
Page 5
6
Getting Started Getting Started
7
Locating the controls LCD display
Remote control
button for
mobile phone
Current status
Volume [+/–] button
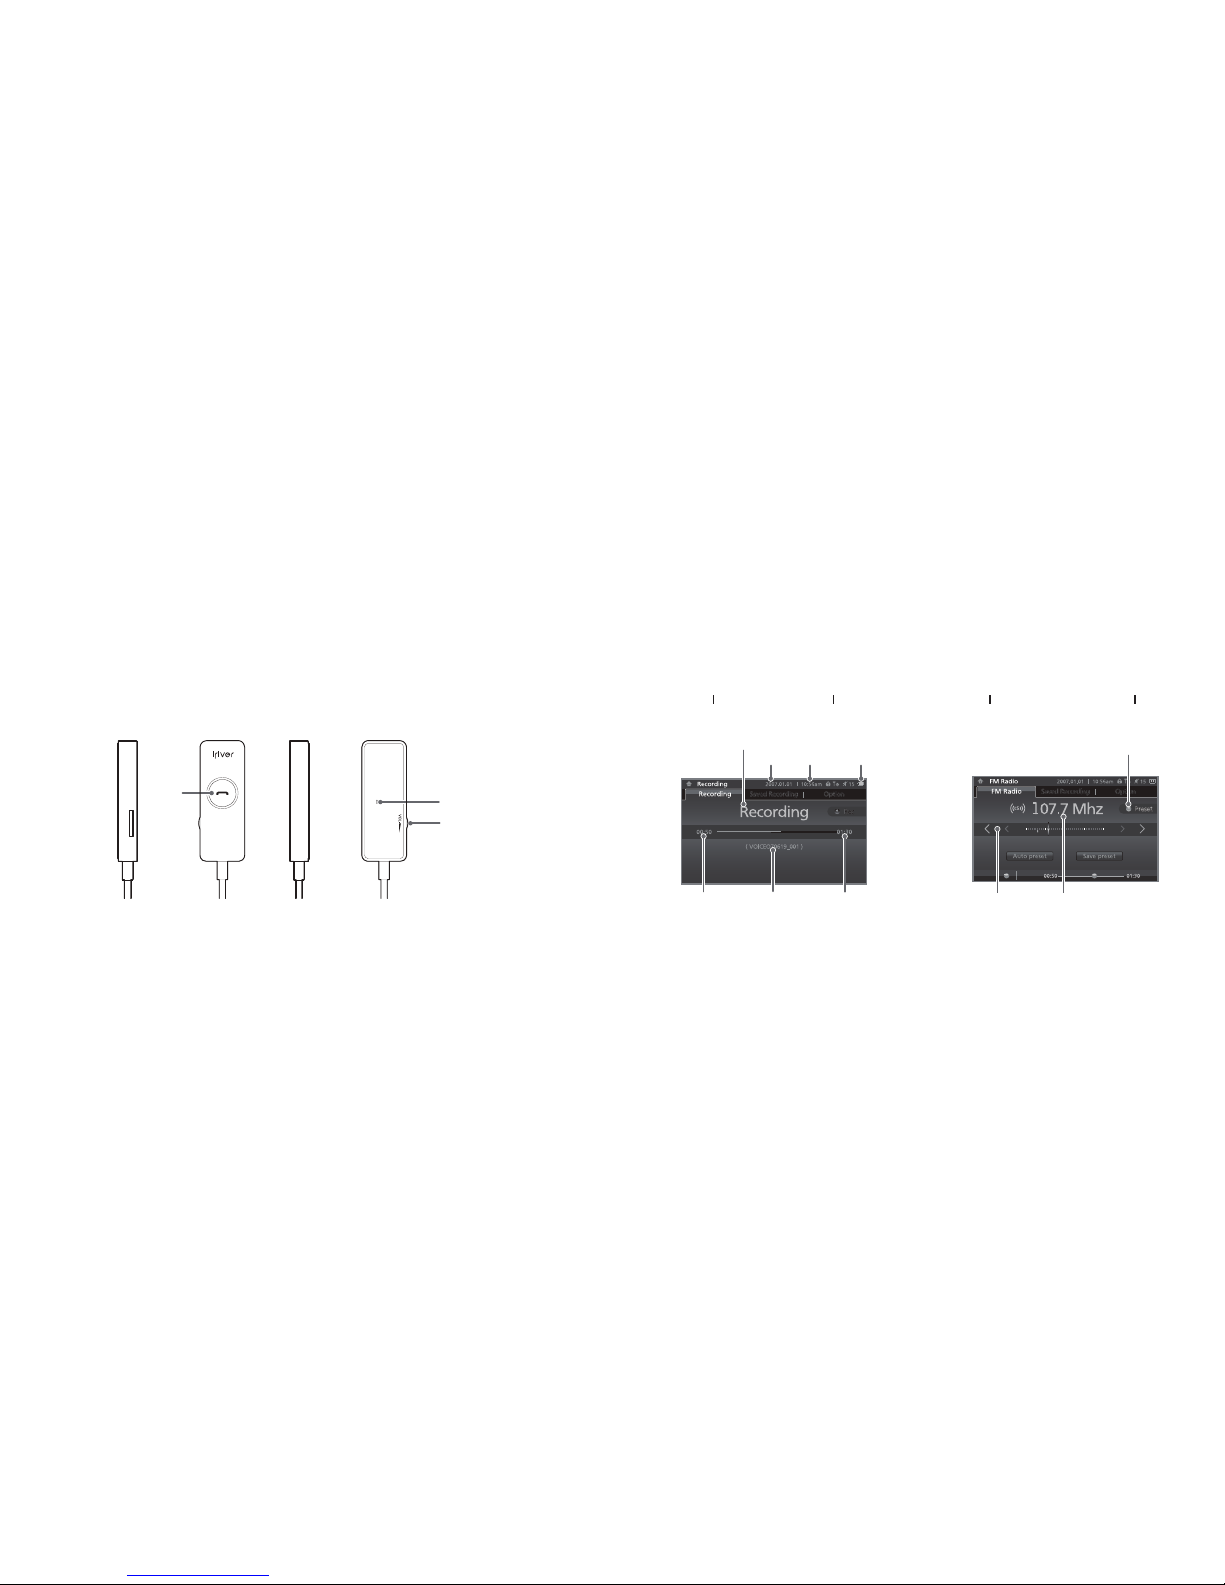
While recording voice
Current date Current time Battery
Elapsed recording time Recorded le name Remaining recording time
PRESET On/Off
While listening to FM radio
Frequency indicator Current frequency
Page 6
8
Getting Started Getting Started
9
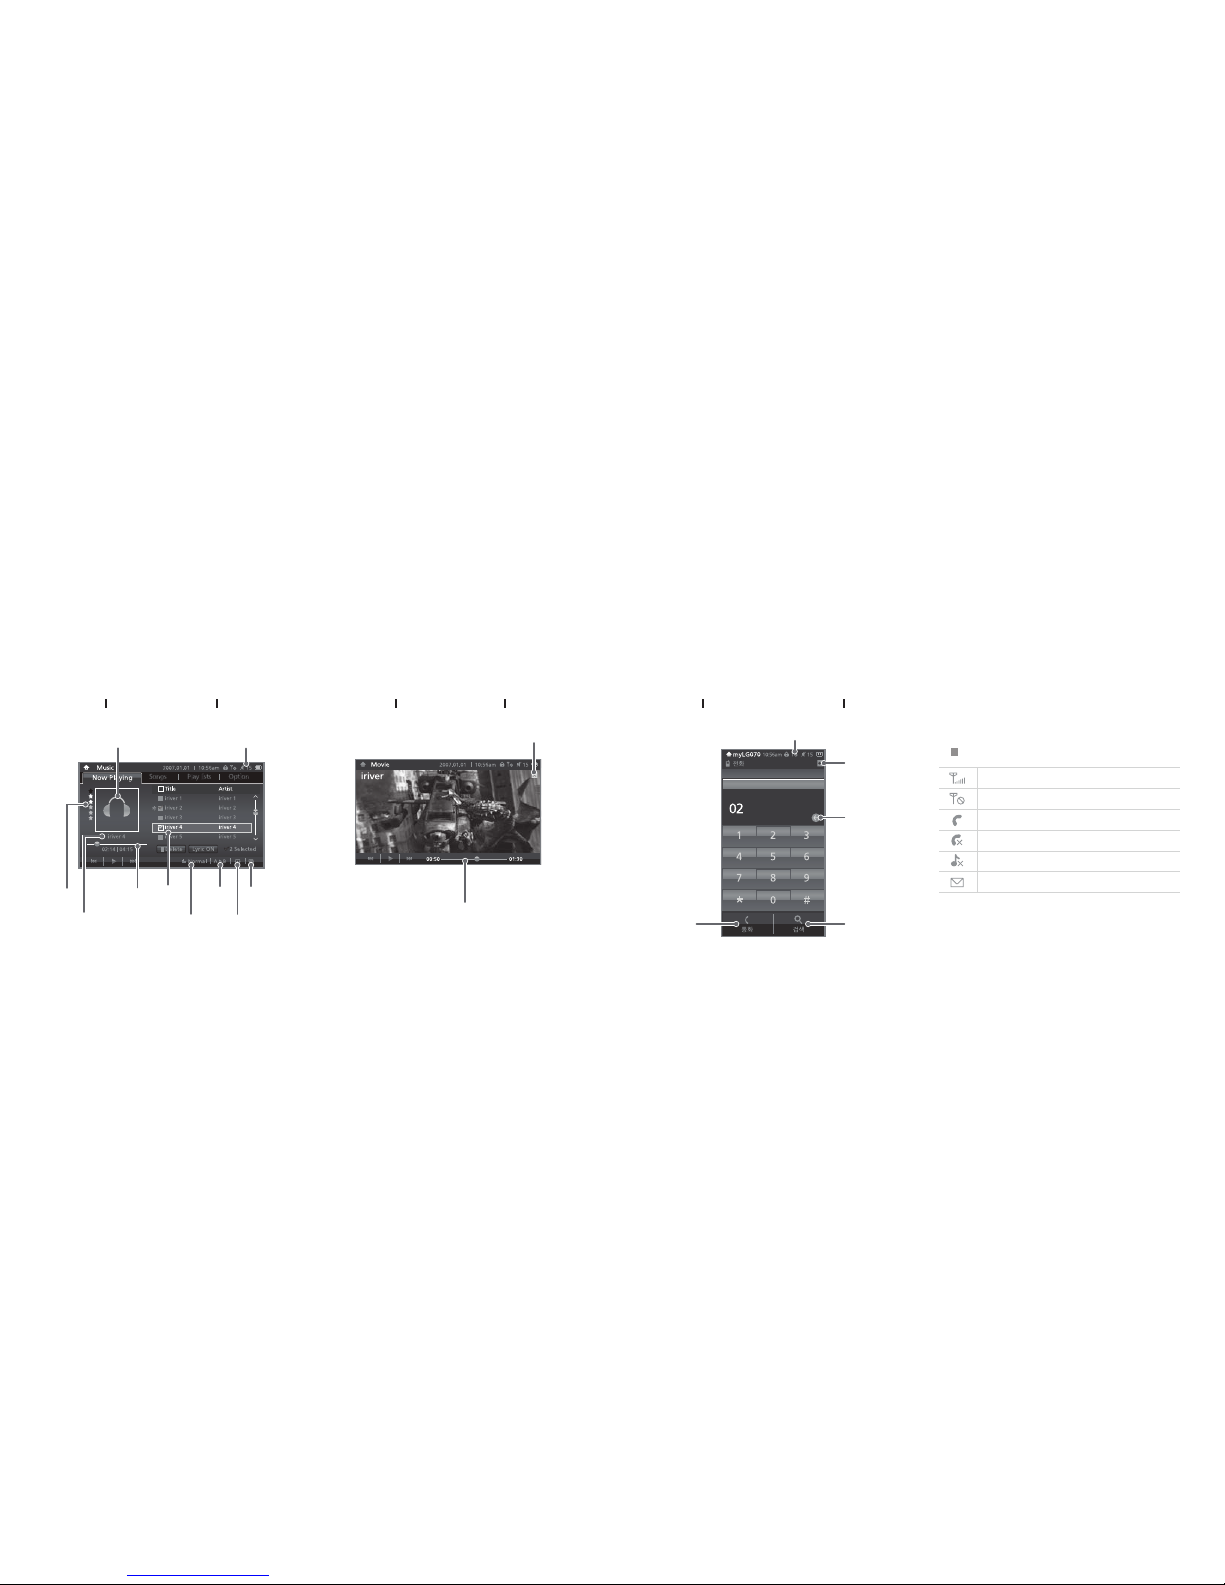
While playing music While playing video
Album picture Volume
Rating
File name/information
Progress bar
Album
information
Equalizer Play mode
A-B repeat
Fade in
Progress bar
Exit button
LCD display LCD display
While using mobile phone
Viewing the displayed icons
Signal strength indicator
No signal indicator
Dialing or receiving call indicator
No service indicator
No ringtone indicator
Message indicator
No signal indicator
Exit button
Clear button for
deleting number or
character
Phonebook buttonCall list
button
Page 7

10
Getting Started Getting Started
11
1
Installing iriver plus 3
Insert the installation CD to your PC to display the installation process screen.
Select iriver plus 3 and click the [Install] button.
Complete the installation process following the on-screen instructions.
Installing iriver plus 3
iriver plus 3 is an integrated software that efciently manages music, video and picture les.
iriver plus 3 gives you freedom to transfer music, video and picture les from PC to the product.
Note
Minimum requirements for using iriver plus 3
• Intel® Pentium® ll 233 MHz or higher processor speed • Windows® 2000/XP
• 64 MB or above memory ▪ 30 MB or above hard disk space
• Speaker and sound card which supports 16 bit • Microsoft Internet Explorer version 6.0 or later
• SVGA or high resolution monitor (1024x768 resolution or higher)
For more information on using iriver plus 3, refer to page 38 - 40.
Basic Operations
Turning on/off the player 12
Selecting menu 13
Using HOLD 14
– Connecting products 15
– Connecting earphones 15
– Connecting remote control 15
– Charging the player 16
– Inserting/Removing Mini SD card 17
–
Recommended types of Mini SD card
17
– Connecting the W10 to your PC 18
– Copying le/folder
(Using as a removable disk) 19
–
Disconnecting the W10 from your PC
20
Page 8

12
Basic Operations Basic Operations
13
1
Turning on the player
Press the button on the product to turn it on.
Turning on/off the player
2
Turning off the player
Press and hold the button on the product to
turn it off.
Note
This product has automatic power saving function to save battery power. Based on the setting in power saving mode,
the product will be automatically turned off after designated period without operation.
For more information on setting up the product, refer to [Settings-Power Off Type-Auto Power Off]. (Refer to page 35.)
Touch Screen
The W10 has touch screen type LCD which
operates with user’s direct touch.
Touch with a Stylus pen to display the Main
menu.
Selecting menu
2
Select/Exit menu
In the Main menu, touch and release a menu with
a Stylus pen to display it.
To close the current menu and return to the menu
list, touch the Exit button.
1
Note
Do not press LCD with a sharp tip or excessive
power to avoid damage.
Note
Touch to move to the other menu from the
current menu.
Page 9

14
Basic Operations Basic Operations
15
1
Using HOLD
Slide the HOLD key to left to lock the product.
Using HOLD
Note
Volume control will be disabled while the HOLD key is activated.
Connecting earphones
Connect the earphones to the earphones jack of
the product.
Connecting products
2
Connecting remote control
Connect the remote control to the earphones jack
of the product.
1
Connect the earphones to the jack of the remote
control.
To clip the remote control to your cloth, put the
clip as shown below.
Page 10

16
Basic Operations Basic Operations
17
3
Charging the player
Turn on your PC and connect the W10 to it using the USB cable.
Connecting products
Note
• While the product is connected to PC using the USB cable, the integrated battery is will be charged automatically.
Do not use any other USB cable that is not provided with the product.
It may case a malfunction.
• Check if the W10 is connected to a high-power USB 2.0 port.
Some low-power USB ports built in some peripheral devices such as certain keyboards and USB hub without
integrated power may not provide enough power to charge.
• While the PC is switched to standby mode, the product may not be charged.
• Charge the product only in room temperature. The product may not be charged in extremely hot and cold place.
• The available usage time of charged battery becomes gradually short after sometime.
• The product will be fully charged within 3 hours. (Based on fully discharged and stop mode)
• The charging time might be extended when you use the product while charging.
Inserting/Removing Mini SD card
Open the card slot cover after turning off the product.
Insert and slightly press a Mini SD card to the
direction as shown below.
Press the card again to remove it.
Connecting products
5
Recommended types of Mini SD card
Manufacturer: SanDisk
4
Note
•
Be sure to insert/remove a Mini SD card after turning off the product.
• Do not use excessive power to insert a Mini SD card.
• Do not remove a Mini SD card while it is being used.
• Do not insert or remove a Mini SD card repeatedly.
• If you insert a Mini SD card improperly, it can cause a
malfunction of the product or the card cannot be removed.
Note
• Using improper type of Mini SD card may cause a
malfunction of the product.
• Transfer speed of Mini SD card is subject to change
depending on PC.
• Always backup valuable data rst since formatting Mini
SD card will delete all data in the card.
• Do not turn off the product or remove a Mini SD card while it
is being formatted.
• It is recommended to format a Mini SD card as a FAT32
system in case it is less than 2 GB.
• If a Mini SD card was formatted by the product, reset the
product after disconnecting a USB cable and connect the
cable again.
• Format the Mini SD card when it is not detected or causes
a malfunction.
• Mini SD card is not enclosed with the product. Please
purchase it separately.
Page 11

18
Basic Operations Basic Operations
19
6
Connecting the W10 to your PC
Press the button on the product to turn it on.
Turn on your PC and connect the W10 to it using the USB cable.
Connecting products
If it is properly connected, the LCD will be shown as below.
Copying le/folder to the product
After selecting the le/folder in your PC, drag & drop
it to the drive which appears as the product.
Connecting products
2
Deleting le/folder from the product
After selecting the le/folder, click it with the right
mouse button and select [Delete].
Click [Yes] in the [Conrm File Delete/Conrm
Folder Delete] popup window to delete the
le/folder.
1
Copying le/folder (Using as a removable disk)
Note
• Always properly connect the USB cable.
•
When you transfer data using the USB cable, never disconnect it or turn off the power to protect your data from damage.
Page 12

20
Basic Operations
3
Disconnecting the W10 from your PC
Click the icon on the taskbar to disconnect the
product using the “Safely Remove Hardware” menu.
Connecting products
Click the [OK] button to conrm the disconnection.
Using the Player
Simple Player 22
- Selecting Simple
Player 22
Music 23
- Selecting Music 23
- Creating Playlist 23
Now Playing 24
- Displaying Music
Screen 24
- Listening Music 24
- Selecting Additional
Features 24
Videos 25
- Selecting Video 25
- Playing Video 25
- Selecting Additional
Features 26
Pictures 27
- Selecting Picture 27
- Viewing Picture 27
- Selecting Additional
Features 27
Text View 28
- Selecting Text 28
- Viewing text 28
- Selecting Additional
Features 28
Flash Games 29
Playing Flash Games 29
Selecting Game Features
29
FM Radio 30
- Listening to FM
Radio 30
- Scanning FM Radio
Station 30
- Selecting Additional
Features 30
Recording 32
- Selecting Additional
Features 32
- Browsing Device 33
- Browsing Device 33
- Deleting le 33
Note
• The icon on the taskbar may be hidden in some operating systems.
Click “Show hidden icons” to display the hidden icon.
▪ The “Safely Remove Hardware” may not be available while using some applications such as Windows Explorer or
Windows Media Player.
• Close all applications rst before performing the “Safely Remove Hardware”.
▪ If the “Safely Remove Hardware” is not performed properly, try it after a few minutes.
Page 13

22
Using the Player Using the Player
23
1
Selecting Simple Player
1. Select the [Simple Player] in the Main menu.
2. Select a music, video or FM radio with a Stylus pen.
Simple Player
Simple Player allows you to conveniently select and play music, video or FM radio.
Selecting Music
1. Select [Music-Songs] in the Main menu.
2. Select an Artist, Album, Genre or Music List with a
Stylus pen.
3. Check the checkbox beside a song and touch [Play]
or [Add] button.
4. The screen will be changed to the Now Playlist with
a message “The song is now added.”
Music
2
Creating Playlist
1. Check the checkbox beside a song and touch
the [Make a List] button.
2. Select the folder from 1 to 5 and touch [Add] or
[Save] button.
1
Note
Max. playtime: Approximately 27 hours (based on MP3, 128 Kbps, 44.1 KHz, Volume level 20, EQ Normal, LCD off)
When a Mini SD card is inserted, you can display the le list by selecting [Internal Memory/External Memory].
You can manage your own playlist using iriver plus 3.
Page 14

24
Using the Player Using the Player
25
Now Playing
3
Selecting Additional Features
While playing music, select [Options] to display
additional features.
●
Play mode: Selects the play mode which decides the
playing order.
●
Add to Quick List/Play: Adds and plays selected
music to the Quick List.
●
Select EQ: Selects the EQ which will be activated
while playing music.
●
Rating: Classies your favorite music by star ratings.
●
A↔B Repeat: Repeats selected block during playback.
●
Custom EQ: Changes levels of each frequency range
to create your own equalization.
●
SRS WOW HD: Sets the levels of 3D sound effect.
- SRS: Customizes SRS 3D sound effects.
- Trubass: Customizes the bass sound level
- Focus: Sets the clarity of sound.
-
WOW: Sets the proper boost level by earphone model.
- Denition: Recovers reduced sound to original level.
●
Play Speed: Sets the speed of music playback.
●
Fade-In: Volume increases gradually when playbackstarts.
Displaying Music screen
1. Select the [Music-Now Playing] in the Main menu.
2. The rating and screen of currently playing music will
be displayed.
1
Note
The W10 supports direct browsing function which is operated
by touching certain point in the progress bar while playing.
Check the checkbox beside a le in the list and touch the
[Delete] button.
Listening to Music
●
Press the [+/-] button to control the volume.
●
While playing, touch the button to pause/
resume.
●
While playing, touch the button to fast
forward/fast reverse.
●
While playing, touch the button to play the
previous/next music.
2
1
Selecting Video
1. Select [Videos] in the Main menu.
2. Touch a le with a Stylus pen in the Videos list.
3. Touch it again to play the video le.
4. Touch [ ] to play the video le in the current screen.
5. Drag & drop the video le to the current screen to
play it.
Videos
Note
When a Mini SD card is inserted, you can display the Videos list by selecting [Internal Memory/External Memory].
2
Playing Video
Press the
[ / ]
button to control the volume.
While playing, touch the [ / ] button to pause/
resume.
While playing, touch the [ ] button to fast forward/
fast reverse.
While playing, touch the [ / ] button to fast reverse/
fast forward.
Page 15

26
Using the Player Using the Player
27
3
Selecting Additional Features
While playing video, select [Options] to display additional features.
Scan Speed: Sets the speed of fast forward and fast reverse.
Resume: Selects whether the video is resumed from the last played point or from the beginning of a le when the
player was stopped.
Sequential Play: When there are les with related names, selects whether those are played with sequential
order or not.
Videos
Note
Max. playtime: Approximately 5 hours (based on avi, video: 320x240@30fps, 2Mbps, Audio: based on MP3, 320Kbps,
44.1KHz, CBR) Max. play time is subject to change depending on video type.
Be sure to use iriver plus 3 when you transfer video le.
Otherwise, unexpected errors might be occurred during video playback.
1
Selecting Picture
1. Select [Pictures] in the Main menu.
2. Touch a le with a Stylus pen in the Pictures list.
3. Touch it again to display with full screen size.
4. Touch [ ] in the current screen to display it with full
screen size.
5. Drag & drop the picture le to the current playing
screen to display it with full screen size.
Pictures
Note
When a Mini SD card is inserted, you can display the
picture list by selecting [Internal Memory/External
Memory].
3
Selecting Additional Features
While viewing picture, select [Options] to display
additional features.
Selects the Fade effect during a slide show.
Image Delay: Selects the time each picture is displayed
on the screen during a slide show.
Set As Wallpaper: Selects the image to be used as a
wallpaper.
2
Viewing Picture
While playing picture, touch [ / ] to start/pause a
slide show.
While playing picture, touch [ / ] to display the
previous/next picture.
While playing picture, touch [ ] to enlarge image.
While playing picture, touch [ ] to set it as wallpaper.
Page 16

28
Using the Player Using the Player
29
1
Selecting Text
1.Select [Text View] in the Main menu.
2. Touch a le with a Stylus pen in the Text list.
3. Touch it again to play the text le.
4. Touch [ ] in the current screen to display the text
le.
5. Drag & drop the picture le to the current playing
screen to display the text le.
Text View
You can read text le conveniently.
Note
When a Mini SD card is inserted, you can display the
text list by selecting [Internal Memory/External
Memory].
3
Selecting Additional Features
While viewing text, select [Options] to display additional
features.
Font Size: Selects the size of font.
Auto Scroll Speed: Sets the scroll speed.
Text Language: Selects the proper language for foreign
text.
2
Viewing text
Touch [ / ] to move text up or down page by page.
Touch [ / ] to start or stop the automatic scroll
function.
Touch [ ] to move text up or down.
If you stop viewing text, the last displayed page will be
stored. (You can store 10 pages for latest 10 text
les.)
1
Playing Flash Games
1. Select [Flash Games] in the Main menu.
2. Touch content with a Stylus pen in the Flash Games
list.
3. Touch it again to play a game.
4. Touch [ ] in the current screen to play a game.
5. Drag & drop the le to the current screen to play a
game.
Flash Games
You can play various contents and ash games.
Note
When a Mini SD card is inserted, you can display the
game list by selecting [Internal Memory/External Memory].
Key function settings are subject to change depending on contents.
If you start ash game while listening to music, music will
stop and the ash game will be played.
2
Selecting Game Features
Refer to the picture below to check the common key
functions in ash games.
Enter
LeftUPRight
Down
Page 17

30
Using the Player Using the Player
31
While deactivating [Channel], press the [ / ] button
to move to the next/previous frequency.
While deactivating [Channel], press the [ / ] button
to move to the available next/previous frequency.
While activating [Channel], press the [ / / / ]
button to move to the next/previous channel.
1
Listening to FM Radio
1.Select [FM Radio] in the Main menu.
2. Press the [ / / / ] button to select the FM radio
station.
FM Radio
2
Scanning FM Radio Station
3
Selecting Additional Features
While listening to FM radio, select [Saved Recording] to
display the recorded le list.
Recording: Records the radio broadcasting which you
are listening to.
Play/Delete Recorded FM Broadcasting: Check the
checkbox beside the le from the recorded le list and
select the [Play] button. Check the checkbox beside
the le and select the [Delete] button.
When a Mini SD card is inserted, you can display the
le list by selecting [Internal Memory/External Memory].
Save Preset/Delete Preset: Stores the current
frequency to the channel.
If the frequency is already stored, the existing channel
will be deleted.
Auto Preset: Automatically scans and stores
frequencies to the channels.
Up to 30 channels can be stored.
3
Selecting Additional Features
While listening to FM radio, select [Options] to display additional features.
Tuner Region: Sets the frequency range based on local standard.
– Korea/US: 87.5 - 108.0 MHz
– Japan: 76.0 - 108.0 MHz
– Europe: 87.50 - 108.00 MHz
Stereo/Mono: Switches the radio reception mode between Stereo/Mono.
Recording Volume: Controls the recording volume of radio.
FM Recording Quality: Sets the recording quality of radio broadcasting.
Speaker On/Off: Selects whether you will activate or deactivate speaker.
The cord of earphones functions as an antenna during radio reception with speaker.
FM Radio
Note
f the remaining memory capacity or power is not enough, the recording will be automatically stopped.
The recorded le will be saved in the Recordings/FM Radio folder as following format. (YYYY: Year, MM: Month, DD:
Day, XXX: Sequential number)
Internal memory: TUNERYYYYMMDD_XXX.MP3 External memory: E_TUNERYYYYMMDD_XXX.MP3
The le size per one minute varies by the recording quality.
Low: Approximately 250KB Middle: Approximately 500KB High: Approximately 1MB
Page 18

32
Using the Player Using the Player
33
1
Recording
1. Select [Recording] in the Main menu.
2. In standby mode, press the [Recording] button to
start the recording and press the button again to
stop it.
Recording
Note
You cannot select the Main menu while recording.
Select it after nishing recording process.
You cannot control the volume while recording.
If the remaining memory space or power is not enough,
the recording will be automatically stopped.
The recorded le will be saved in the Recordings/Saved
Recordings folder as following format. (YYYY: Year, MM:
Month, DD: Day, XXX: Sequential number)
Internal memory: VOICEYYYYMMDD_XXX.MP3
External memory: E_VOICEYYYYMMDD_XXX.MP3
The le size per one minute varies by the recording quality
Low: Approximately 250KB Middle: Approximately 500KB
High: Approximately 1MB
2
Selecting Additional Features
In Standby mode, select [Save Recording] to display the
recorded le list.
Play/Delete Recorded File: Check the checkbox beside
the le from the recorded le list and select the [Play]
button. Check the checkbox beside the le and select
the [Delete] button.
When a Mini SD card is inserted, you can display the
le list by selecting [Internal Memory/External Memory].
Voice Recording Quality: Sets the quality of recorded
voice.
1
Browsing Device
1. Select [Videos, Pictures, Text View-Folder] in the
Main menu.
2. In le (folder) list, touch the previous/next le (folder)
with a Stylus pen.
3. Press it again to move to a sub-folder or play the
selected le.
Browsing Device
You can manually check and play various media saved in W10.
Note
When a Mini SD card is inserted, you can display the le
(folder) list by selecting [Internal Memory/External
Memory].
2
Deleting le
1. Check the checkbox beside the le and select the
[Delete] button.
Note
You cannot delete the le which is currently being
played.
Page 19

Settingupthe
telephonefunction 36
SoundSettings 36
LocalNumber 36
ScanningWirelessLAN36
CallForward 36
ResetAllSettings 36
MobilePhoneInfo 36
Date/Time 37
Fonts 37
WirelessNetwork 37
ResetAllSettings 37
PowerOffType 37
AutoPowerOff 37
SleepTimer 37
SystemInformation 37
MemoryCapacity 37
FirmwareVersion 37
FlashLiteVersion 37
Language 37
Display 37
LCDBrightness 37
Backlight 37
DBupdate 37
FormatDevice 37
Advanced 37
TextScrollSpeed 37
USBMode 37
About 37
Setting up the Product
Page 20

36
Setting up the Product Setting up the Product
37
Setting up the telephone function
Sound Settings: Sets sounds such as Ringtone, LCD
Touch Tone, Popup Tone and SMS Reception Sound.
– Ringtone: Sets the ringtone for incoming call.
–
SMS Reception Sound: Sets the SMS reception sound.
–
System Sound: Sets the LCD touch tone and popup tone.
– Earpiece Volume: Sets the volume for earpiece.
Local Number: Sets the default local number.
Scanning Wireless LAN: Shows information on the dened wireless LAN
service prole or wireless LAN service appeared nearby.
– Viewing wireless LAN service
① Displays information on signal strength and encryption
condition of wireless LAN services.
② Displays names of wireless LAN services
Setting up the W10
Users can congure their own settings in the W10.
The menu congurations are subject to change with different rmware versions.
–
Checking detailed information of wireless LAN service
Checks detailed information of wireless LAN
service using the [Connection Info] button.
– Adding wireless LAN service prole
Sets wireless LAN service prole using the [Settings] button.
Call Forward: Forwards incoming call to the
user-dened number when user is absent or busy.
Reset All Settings: Resets all mobile phone settings of the W10.
Mobile Phone Info: Displays mobile phone information of the W10.
– My Phone Number: Shows the phone number.
– Firmware Version: Shows the rmware version.
– MAC Address: Shows the MAC Address of the W10.
① ②
Free wireless LAN service
Encrypted wireless LAN service
Date/Time
Date/Time: Sets the current date and time.
– [ / / / ] button
– Moves menu items, [ ] button
– Conrms selected menu.
Fonts
Fonts: Changes the font to be displayed.
Wireless Network
Wireless Network: Sets the wireless network of the W10.
Reset All Settings
Reset All Settings: Resets the product to the factory setting.
Power Off Type
Auto Power Off: Automatically turns the power off after
designated time without operation
Sleep Timer: Automatically turns the power off after designated time.
System Information
Memory Capacity: – Device: Shows memory capacity.
– SD Memory: Shows memory capacity of SD card.
Firmware Version: Shows the rmware version.
Flash Lite Version: Shows the Flash Lite version.
Setting up the W10
Language
Language: Selects the language for your convenience.
Display
LCD Brightness: Changes the brightness of display.
Backlight: Sets the time that the backlight is turned on.
DB update
DB update: Updates the library data of a le.
Format Device
Format Device: Deletes all data in the product.
Advanced
Text Scroll Speed: Sets the scroll speed of characters
when le information is too long to display at one time.
USB Mode: Select USB Mode: Selects the USB con
nection type to your PC.
– Custom: When USB connection is made, the
product is also connected to PC.
– USB Connection: When USB connection is made,
the product starts to be charged.
About
About: Displays information of the product.
Page 21

Other Information
Using iriver plus 3 41
Transferring Media to the iriver W10 41
- Using iriver plus 3 41
- Using Windows Explorer 41
Using iriver plus 3 42
- Initializing Disk 42
- Upgrading Firmware 42
Copyrights/Certication/Trademarks/
Limited Liability 43
Safety Instructions 44
Safety Instructions 45
Troubleshooting 46
Page 22

40
Other Information Other Information
41
Adding Media to Library
1. When you run iriver plus 3 for the rst time, the Add
Media Wizard will start.
2. Follow the on-screen instructions on the PC to add
media les such as music and picture to the library.
Using iriver plus 3
2
Ripping Songs from a CD
1. Insert an audio CD into the CD drive and
run iriver plus 3.
2. In iriver plus 3, select the checkbox from
[Music-CD Drive] and click [CD Ripping] in
bottom left.
3. After ripping song, select the [All Music] to check
whether the ripped song is added to the library.
1
Using iriver plus 3
1. Connect the product to the USB jack of your PC
using the USB cable and run iriver plus 3.
2. Select the checkbox beside the le to transfer and
click
[ ]
.
3. The selected le starts to transfer and the progress
status is displayed in the Status window on bottom left.
4. Now you can nd the selected music in your library.
Using iriver plus 3
2
Using Windows Explorer
1. Connect the product to the USB jack of your PC
using the USB cable.
2. Copy the contents to proper folders as below.
▪ Text: W10/Text
▪ Music: W10/Music
▪ Picture: W10/Picture
▪ Video: W10/Video
1
Transferring Media to the iriver W10
Note
▪ The supported le formats are listed below.
Type
Flash
Game
Text
Music
Extension
SWF
SWF
TXT
MP3, WMA
OGG
Format
Flash le type
Frame rate
Audio
Adobe Flash Lite 2.1
Less than 15 frames/sec.
ADPCM or MP3
128Kbps, Less than 44.1 KHz
Unicode text, Local code text
8~320Kbps
Q1~Q10
Type
Picture
Video
Extension
JPG
AVI
WMA
Format
MPEG4 SP(Simple Prole), Less than 30 frames/sec. 2Mbps
QVGA(320X240)
Supports MP3 up to 320 Kbps, 44.1 Khz is recommended, CBR
WMV9 SP, Less than 30 frames/sec. 768 Kbps
QVGA(320X240)
Supports WMA up to 320 Kbps
Baseline JPG (Progressive JPG is not supported.)
Video
Resolution
Audio
Video
Resolution
Audio
Page 23

42
Other Information Other Information
43
Initializing Disk
1. Connect the product to the USB jack of your PC
using the USB cable and run iriver plus 3.
2. Select [Tools-Portable Device-Initialize Disk]
and click [Start] when the message to conrm
initialization appears.
3. The initialization process is completed and the
product is disconnected from your PC.
Using iriver plus 3
2
Upgrading Firmware
1. After connecting the product to the USB jack of
your PC using the USB cable, run iriver plus 3.
The PC should be connected to internet.
2. Select [Tools-Portable Device-Firmware
Upgrade] and complete the upgrade process
following the on-screen instructions.
1
Note
You need to backup necessary les before
initialization as formatted les cannot be recovered.
Note
▪
Do not disconnect the product from PC while downloading
rmware upgrade le. After the download is completed,
disconnect the cable to activate the rmware upgrade.
▪ If the already installed rmware is the latest version,
the message to conrm latest version appears.
▪
When connect the product to your PC, if there is latest
rmware, the instruction message appears automatically.
Copyrights/Certication/Trademarks/Limited Liability
iriver Limited has all the rights of the patent, trademark,
literary property and intellectual property related to this
manual. You may not copy or reproduce any part of this
manual unless authorized by iriver Limited. You can be
punished by using any part of this manual illegally.
The software, audio and video which have an intellectual
property are protected by copyright and international laws.
It is user’s responsibilities when he/she reproduces or
distributes the contents created by this product.
The companies, institutions, products, people and events
used in examples are for demonstration purposes only.
This manual does not imply, conclude, or describe associations between the manufacturer and any other companies,
institutions, products, people, or events.
Users are responsible for observing the copyrights and
intellectual properties.
©1999~2007 iriver Limited. All rights reserved.
Copyrights
MIC, FCC, CE
Certication
Windows 2000, Windows XP and Windows Media Player are the
registered trademarks of Microsoft Corp.
is a trademark of SRS Labs, Inc.
WOW technology is incorporated under license from SRS Labs, Inc.
Trademarks
Neither the Manufacturer, importers nor dealers are responsible for
any accidental damage including bodily injury or any damage resulting
from misuse or unsuitable operation by you.
The information on this manual is prepared with the current player
specications. The manufacturer, iriver Limited, is adding new features
to the product and may persistently apply new technologies hereafter.
All standards may be changed at any time without notice.
Limited Liability
Page 24

Caution: Exposure to Radio Frequency Radiation.
To comply with FCC RF exposure compliance requirements, for mobile configurations, a separation distance
of at least 20 cm must be maintained between the antenna of this device and all persons.
This device must not be co-located or operating in conjunction with any other antenna or transmitter.
Page 25

44
Other Information Other Information
45
Do not display a same image on the screen for certain
amount of time since it may cause ghost effect.
Do not place objects inside the device other than CD’s.
It may cause malfunction.
Do not place heavy objects on the player.
It may cause damage and malfunction.
Do not dampen your player with rain (water), beverage,
chemicals, cosmetics and so on.
It may cause damage and malfunction.
Keep away from harsh environments including humid,
dusty, and smoky areas.
It may cause malfunction.
Keep out of direct sunlight and extreme heat and cold.
It may cause malfunction.
Do not keep the product close to magnetic substance such
as magnet, TV, monitor and speaker.
It may cause malfunction.
Never dismantle, repair, or rebuild your player without permission.
It may cause damage and malfunction.
Do not clean with chemical or detergent.
It may cause malfunction.
Do not drop or subject the device to impact.
It may cause damage and malfunction.
Do not press more than two buttons altogether.
It may cause damage and malfunction.
Do not disconnect the USB cable while transferring data.
It may cause damage and malfunction.
Do not disconnect the USB cable while transferring data.
It may cause malfunction.
Try to connect the product to the rear USB port in your PC.
In some individually assembled PCs, improper USB port may
cause malfunction.
Do not connect any other device or object to the Earphone
jack except for earphones.
It may cause damage and malfunction.
Safety Instructions
Product
Do not use headphones / earphones while cycling, driving,
or operating any motorized vehicle.
It is dangerous and is illegal in some areas.
Do not use the product while moving including driving,
walking or mountain climbing.
It may cause injury.
Use the product in a safe place to avoid accident.
It may cause injury.
Always be careful not to be tumbled by nearby objects when
you use the product while moving.
It may cause injury.
Always be careful not to be tumbled by nearby objects when
you use the product while moving.
It may cause injury.
It is not recommended to use the product during electrical storms.
It may cause injury.
Do not bend an antenna with excessive power to avoid damage.
It may cause injury.
Keep the antenna away from electric sources such as power outlet.
It may cause injury.
Reduce volume or stop using the player if you experience a
ringing in your ears.
It may cause injury.
Do not listen to music via headphone/earphone with high
volume for a long time.
It may cause injury.
Do not use headphone / earphones at high volume.
It may cause injury.
Keep headphone-/earphone cords under control to avoid
getting caught on nearby objects.
It may cause injury.
Do not sleep with headphones / earphones in the ears.
Do not use headphones / earphones for excessive periods of time.
It may cause injury.
Safety Instructions
Others
Page 26

46
Other Information
The player will not power on!
- Check whether the battery is discharged. Charge the product
using USB cable and check it again.
- Insert a thin and pointed object (such as a straightened paper
clip) into the reset hole to reset the device.
The product cannot be charged after connecting power.
- Check whether the USB cable is rmly connected.
The product does not support a phone call!
- Check whether it is connected to wireless LAN service.
- Turn the player on and off to check the error message.
- Check whether the battery is fully charged.
- Check whether you are in available service area.
The signal is too bad!
- Check whether the volume is set to “0”.
- Check whether the product is blocked by nearby object such
as wall or there is electromagnetic wave.
LCD screen is not clear.
- Set the LCD brightness in [Settings-Display-LCD Brightness].
The product cannot be connected properly using the USB cable.
- Check whether the USB cable is rmly connected.
Poor radio or DMB/DAB service reception with heavy noise!
- Check whether the earphones jack is dirty.
- Check whether an earphone is connected.
- Adjust the position of the player and earphones.
- Turn off any nearby electronic equipment to avoid potential
interference.
No sound during playback!
- Check whether the volume is set to “0”.
- Check whether the plug or connection jack of earphones is dirty.
- Check whether the music le is corrupted.
The memory space is changed after formatting.
- The memory space can be changed depending on the
operating system.
The start-up time is too long.
- Check whether too many les are stored in the product.
Troubleshooting
Please check out!
 Loading...