

Page 1

User's Guide
Page 2
Contents
Chapter 1
Getting Started
Components
Locating the Controls
LCD Display
Installing Windows Media Player 11
Chapter 2
Basic Operations
Turning on/off the Player
Selecting menu
Using HOLD
Connecting Products
Chapter 3
Using the T60
4
Music
5
Browser
6
FM Radio
7
Recording
Playing Other Contents
Chapter 4
Setting up the T60
10
Setting the Menu Functions
11
Sound
12
Display
13
Recording
Timer
Advanced
Chapter 5
Other Information
Using Windows Media Player 11
18
Copyrights/Certification/
20
Trademarks/Limited Liability
21
Safety Instructions
23
Troubleshooting
24
26
27
27
28
28
28
30
33
34
36
Page 3

Page 4

Contents
Contents
Chapter 1
Getting Started
Components
Locating the Controls
LCD Display
Installing Windows Media Player 11
4
5
6
7
Page 5
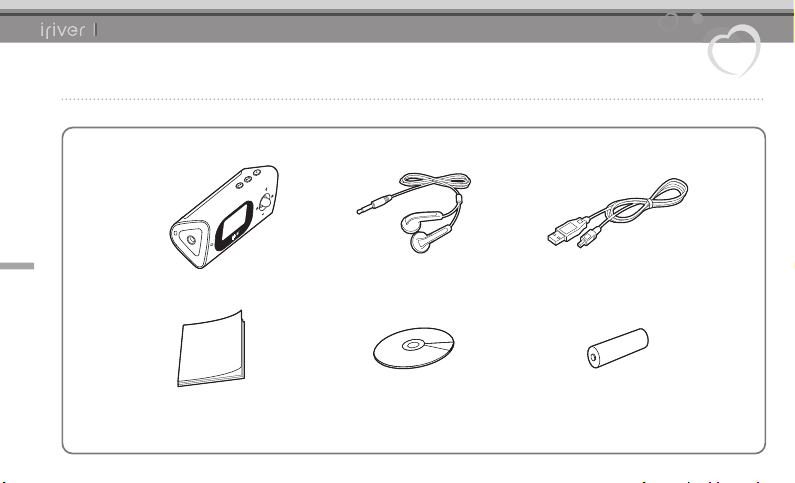
Components
4
Chapter1 Getting Started
Components are subject to change without notice and may vary from images shown.
T60
T60
USB CableEarphones
Quick Start Guide & Warranty Card
Installation CD
Battery (AAA size x 1ea)
Page 6
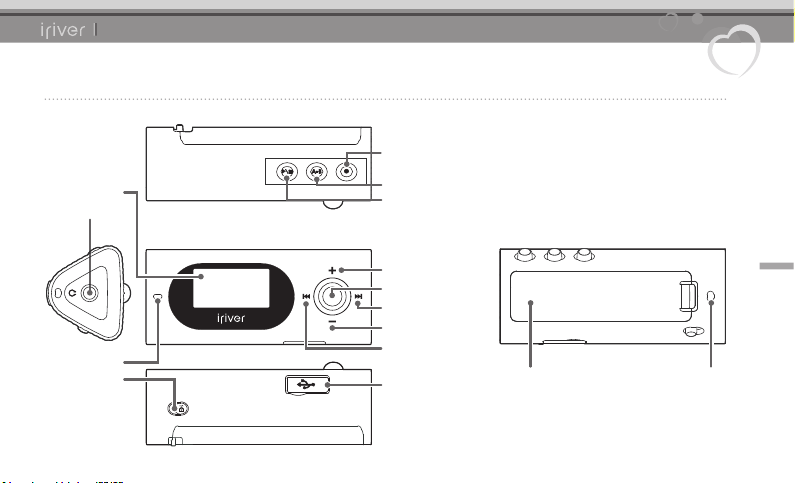
Chapter1 Getting Started
Locating the Controls
LCD
Earphones jack
T60
Recording button
A-B (Interval repeat) button
Play/Stop button
MIC
HOLD key
Volume + button
NAVI/Menu button
Next/Fast forward button
Volume - button
Previous/Fast Reverse
button
USB jack
5
Necklace connection loopBattery cover
Page 7
Chapter1 Getting Started
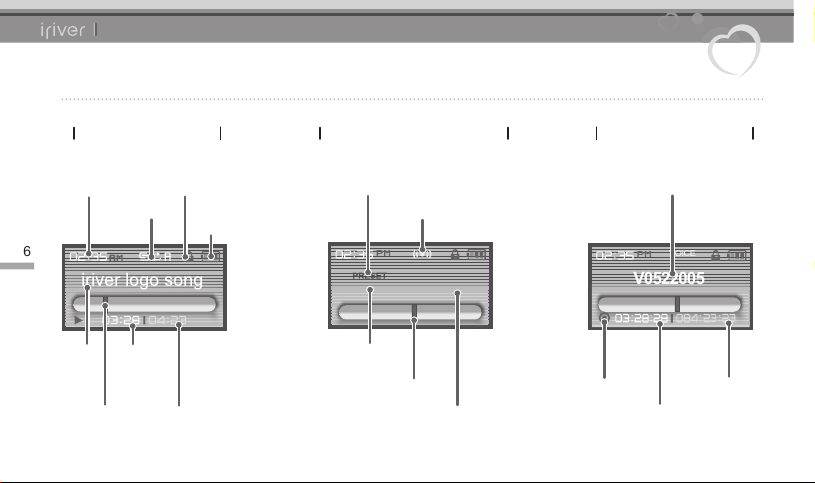
LCD Display
T60
While recording voiceWhile listening to FM radioWhile playing music
6
Title name
Current time
Progress bar
Lock indicator
Play mode
Playing time
Total playing
time of the title
Battery
indicator
PRESET On/Off
CH
09
Channel number
Frequency indicator
Stereo
87.5
Current frequency
Recorded file name
V0522005
Current status
Elapsed recording time
VOICE
recording time
Remaining
Page 8

Chapter1 Getting Started
Installing Windows Media Player 11
Windows Media Player 11 is an integrated program that efficiently manages music and picture files.
Using Windows Media Player 11, you can save music and picture files from PC to the T60.
T60
1. Insert the installation CD to your PC to display the
installation process screen.
2. Click [Install] and complete the installation process
following the on-screen instructions.
Note
Minimum requirements for using Windows Media Player 11.
®
Pentium®ll 233MHz or higher processor speed Windows® XP 64MB or above memory
Intel
30MB or above hard disk space Speaker and sound card which supports 16 bit
Microsoft Internet Explorer version 6.0 or later SVGA or high resolution monitor (1024x768 resolution or higher)
For more information on using Windows Media Player 11, refer to page 30 -32.
7
Page 9

Page 10

Contents
Contents
Chapter 2
Basic Operations
Turning on/off the Player
Selecting menu
Using HOLD
Connecting Products
Connecting earphones to the T60
Changing battery
Connecting the T60 to your PC
Copying file/folder (Using as a removable disk)
Disconnecting the T60 form your PC
10
11
12
13
13
14
15
16
Page 11
Chapter2 Basic Operations
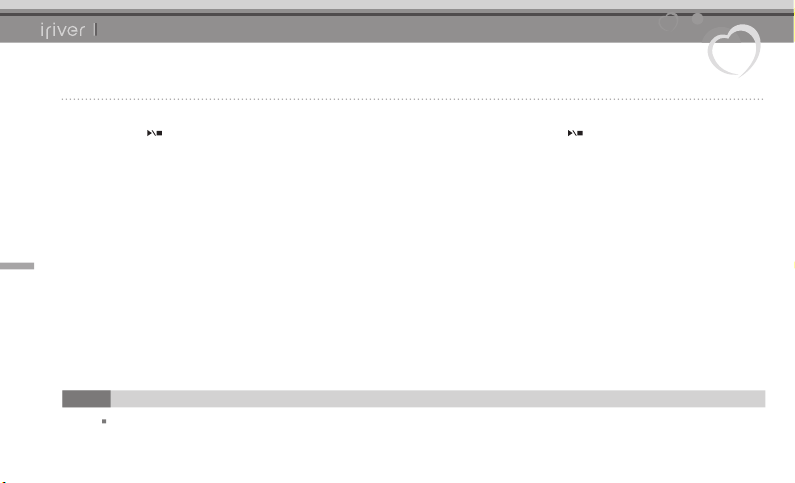
Turning on/off the Player
T60
1. Press the [ ] button on the product to turn it on. 2. Press and hold the [ ] button on the product to turn
10
Note
This product has automatic power saving function to save battery power. Based on the setting of power saving mode, the
product will be automatically turned off after designated period without operation. For more information on setting this mode,
refer to [Settings-Timer-Power Off Timer]. (Refer to page 28.)
it off.
Page 12
Chapter2 Basic Operations
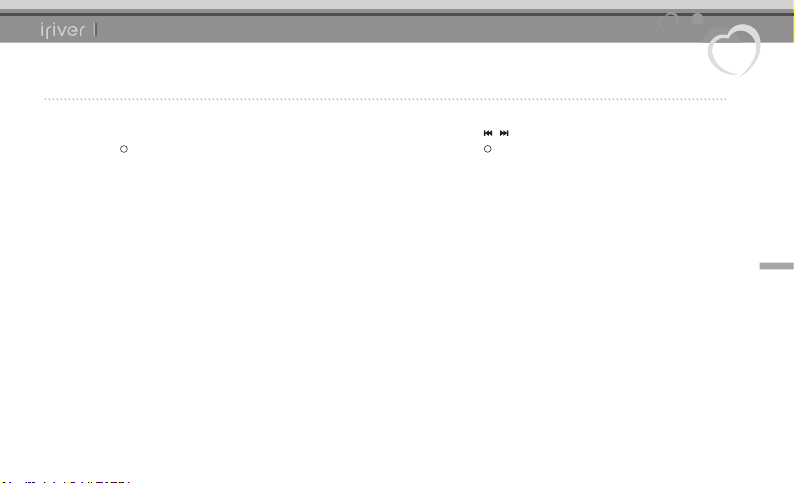
Selecting menu
T60
1. Once you turn on the product, then press and
hold the [ :NAVI] button to display the menu
selection screen.
2. Press the [ / ] button to select the menu and
press the [ :NAVI] button to display the mode
screen.
11
Page 13
Chapter2 Basic Operations
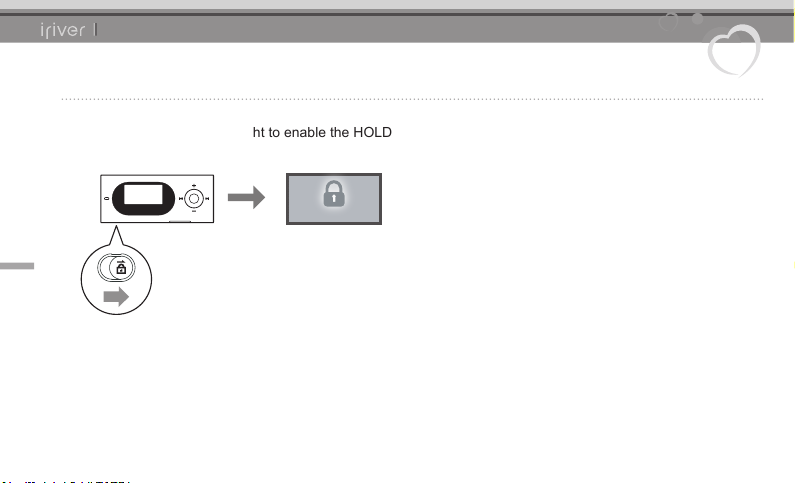
Using HOLD
1. Slide the HOLD switch to right to enable the HOLD
function.
12
T60
Page 14

Chapter2 Basic Operations
Connecting Products
Connecting earphones to the T60 Changing battery
1. Connect the earphones to the jack of the product. 1. Press the projecting point of battery cover and slide
it to the direction of arrow.
2. Check the direction of +/- terminals and put a
battery (AAA size, 1.5V).
3. Put and close the battery cover by sliding it to
the direction of arrow.
Note
To avoid corrosion, remove the batteries if the
player is not to be used for a long time.
When corrosion occurs, wipe the battery compartment
immediately with a dry cloth and insert a new battery.
T60
13
Page 15

Chapter2 Basic Operations
Connecting Products
Connecting the T60 to your PC
1. Press the [ ] button on the product to turn it on.
2. Turn on your PC and connect the T60 to it using
USB cable.
14
T60
3. If it is properly connected, the LCD will be shown
as below.
Page 16
Chapter2 Basic Operations
Connecting Products
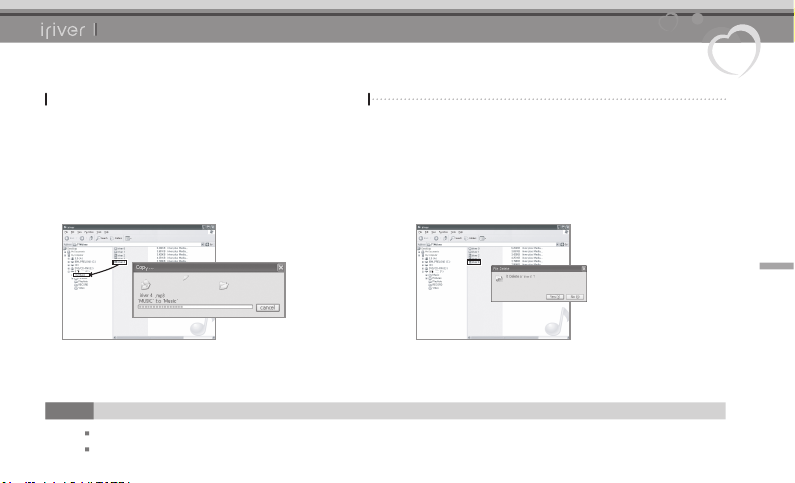
Copying file/folder (Using as a removable disk)
Copying file/folder to the product
1. After selecting the file/folder in your PC, drag &
drop it to the drive which appears as the product.
Note
Always properly connect the USB cable.
When you transfer data using the USB cable, never disconnect it or turn off the power to protect your data from damage.
Deleting file/folder from the product
1. After selecting the file/folder, click it with the right
mouse button and select [Delete].
2. Click [Yes] in the [Confirm File Delete/Confirm
Folder Delete] popup window to delete the file/folder.
T60
15
Page 17

Chapter2 Basic Operations
Connecting Products
Disconnecting the T60 form your PC
1. Disconnect the product from your PC.
16
T60
Page 18

Chapter 3
Using the T60
Music
Selecting Music
Listening to Music
Additional Features
A-B Repeat
-
- Selecting EQ
- Selecting Play Mode
- Adding File to Selected Music
- Deleting File or Folder
- Listening to Music in Playlist
Browser
Browsing Device
Viewing Image File
18
20
20
18
18
18
18
19
19
19
Contents
Contents
FM Radio
Listening to FM Radio
Scanning FM Radio Station
Additional Features
Switching STEREO/MONO
-
- Storing Channel Manually
- Storing Channel Automatically
- Deleting Channel
- Recording FM Radio Station
Recording
Recording
Playing Other Contents
Playing Audible File
21
21
21
21
21
22
22
23
24
Page 19

Chapter3 Using the T60
Music
Selecting Music
1. Select [Music] in the Main menu.
2. In the Standby screen, press the [ :NAVI] button
to display the music list screen. Press the
[
/ / ] button to select the music file.
/
: Moves to upper folder
: Moves to lower folder
/ : Moves within current folder
3. Press the [ :NAVI] button to play the music file.
18
Listening to Music
Press the
While playing, press the [ ] button to pause/resume.
While playing, press and hold the [ / ] button to
play fast forward or fast reverse.
While playing, press the [ / ] button to play previous
or next music.
/ ] button to control the volume.
[
T60
Additional Features
A-B Repeat
1. Press the [ ] button while playing to select the
beginning (A) point. Press it again to select the end
(B) point.
2. Now the player plays between A-B point repeatedly.
Selecting EQ
1. Press and hold the [ ] button to display the
[EQ SELECT] screen and press the [
button to select the EQ.
2. Press the [ :NAVI] button to play music with selected EQ.
Selecting Play Mode
1. Press the [ ] button to display the [Selecting Play
Mode] screen and press the [
select the play mode.
2. Press the [ :NAVI] button to play music with selected
play mode.
/ / ]
/
/ / ] button to
/
Page 20

Chapter3 Using the T60
Music
Additional Features
Adding File to Selected Music
1. While not playing music in music list, press the
[
/ / ]
button to add a file to the selected music file.
/
2. Press and hold the [ ] button to display the
confirming message. Press the
select [YES] and press the [ :NAVI] button to add
the file to the music list. (A file in the Recordings/
FM Radio and Recordings/Voice folder cannot be added.)
3. In music list screen, press the [ / / / ] button to
select iQuickList.pla and press the [ :NAVI]
button to play files by the order in the playlist.
Deleting File or Folder
1. While not playing music in music list, press the
[
2. Press the [ ] button to display the confirming
message. Press the
and press the [ :NAVI] button to delete the file
or folder. (You can delete empty folder only.)
] button to select the file or folder.
/
/
/
/ ] button to select [YES]
[
/ ] button to
[
Listening to Music in Playlist
1. In music list, press the [ / / / ] button to select
the Playlist folder and select the playlist which you
made in Windows Media Player 11.
2. Press the [ :NAVI] button to play music files by
the order in the playlist.
Note
Max. playtime: Approximately 19 hours (based on MP3,
128 Kbps, 44.1 KHz, Volume level 20, EQ Normal, LCD off)
You can manage your own playlist using Windows
Media Player 11.
T60
19
Page 21

Chapter3 Using the T60
Browser
Browsing Device
1. Select [Browser] in the main menu to display all files
in the player as a file tree.
2. Press the [ / / / ] button to browse file.
20
T60
Viewing Image File
1. Select the image file in file list and press the [ :NAVI]
button to display it.
Note
Supported file types: BMP: Mono, 4/8/16/24-bit color
(BMP file with RLE format is not available.)
Page 22

Chapter3 Using the T60
FM Radio
Listening to FM Radio Additional Features
1. Select [FM Radio] in the Main menu.
2. Press the [ / ] button to select the FM radio station.
Scanning FM Radio Station
Press the [ :NAVI] button to exit the Preset mode
and press the
previous/next frequency.
Press the [ :NAVI] button to exit the Preset mode,
then press and hold the
the available previous/next frequency.
Press the [ :NAVI] button to select the Preset
mode and press the
stored previous/next channel.
[ / ] button to move to the
/ ] button to move to
[
/ ] button to move to the
[
Switching STEREO/MONO
1. While listening to FM radio, press the [ ] button
to switch the reception mode between STEREO
and MONO.
Storing Channel Manually
1. Press the [ :NAVI] button to exit the Preset mode,
then press and hold the
radio station to store.
2. Press the [ ] button to display the storing channel
screen.
3. Press the [ / / / ] button to select the channel
number and press the [ ] button to store it.
(
■ : Occupied channel, □ : Empty channel)
Storing Channel Automatically
1. Press the [ :NAVI] button to exit the Preset mode,
then press and hold the [ ] button to store
current FM radio station to a channel automatically.
/ ] button to select the
[
T60
21
Page 23

Chapter3 Using the T60
FM Radio
Additional Features
Deleting Channel
1. Press the [ :NAVI] button to select the Preset
mode and press the [ ] button to display the
deleting channel screen.
2. Press the [ / / / ] button to select the channel
number and press the [ ] button to delete it.
(■ : Occupied channel, □ : Empty channel)
22
T60
Recording FM Radio Station
1. While listening to radio, press the [ ] button to start
recording. While recording, press the [ ]
button to
pause it. Press the button again to resume recording.
2. Press the [ ] button again to stop recording.
Note
You cannot control the volume while recording.
If the remaining memory space or power is not
enough, the recording will be automatically stopped.
The recorded file will be saved in the Recordings/FM
Radio folder as following format.
TMMDDXXX.MP3 (MM: Month, DD: Day, XXX: Sequential number)
You can setup the recording quality in [SettingsRecording-FM Setting]. The file size per one minute
varies by the recording quality.
Low: Approximately 500 KB
Middle: Approximately 1 MB
High: Approximately 2MB
Page 24
Chapter3 Using the T60
Recording
Recording
1. Select [Recording] in the Main menu.
2. In standby mode, press the [ ] button to start
recording. While recording, press the [ ]
to pause it. Press the button again to resume recording.
3. Press the [ ] button again to stop recording.
Note
You cannot control the volume while recording.
If the remaining memory space or power is not enough, the recording will be automatically stopped.
The recorded file will be saved in the Recordings/Voice folder as following format.
VMMDDXXX.MP3 (MM: Month, DD: Day, XXX: Sequential number)
You can setup the recording quality in [Settings-Recording-Voice Setting]. The file size per one minute varies by
recording quality.
Low : Approximately 250KB Middle: Approximately 500KB High: Approximately 1MB
button
T60
23
the
Page 25

Chapter3 Using the T60
Playing Other Contents
Playing Audible File
What is Audible?
A leading company in audio entertainment and
educational programming, Audible provides various
audio programs more than 80,000 cumulative hours.
For more information, please visit http://www.audible.com.
Transferring Audible file to the product
24
To transfer Audible file to the product, you need to use
Audible Manager. For more information, please visit
http://www.audible.com.
T60
Playing Audible File
1. Select the [Browser] in the Main menu.
2. Press the [ / / / ] button to select a downloaded
file in the Service-AUDIBLE folder and press the
[ :NAVI]
Note
button to play it.
For more information on setting up Audible function,
refer to [Settings-Advanced-Audible]. (Refer to page 28.)
Page 26

Chapter 4
Setting up the T60
Setting the Menu Functions
Sound
SRS Setting
User EQ
Display
Backlight Timer
LCD Contrast
Screen Saver
Scroll Speed
Tag Info.
Language
26
Recording
Voice Setting
FM Setting
27
Voice Detect
27
Timer
Date & Time
27
Power Off Timer
27
Sleep Timer
27
Alarm/FM Rec.
27
Select Alarm
27
FM Rec. Reserve
27
Contents
Contents
28
28
28
28
28
28
28
28
28
Advanced
Resume
Scan Speed
Playback Speed
Study Mode
Tuner Region
Battery Select
Load Default
Format
System Info
Audible
28
28
28
28
28
28
28
28
28
28
Page 27

Chapter4 Setting up the T60
Setting up the T60
Setting the Menu Functions
1. Select [Settings] in the Main menu.
2. Press the [ / ] button to select the menu and
press the [ :NAVI] button to display the sub menu.
3. Press the [ / ] button to select the sub menu and
press the [ :NAVI] button to display the function
setting screen. Press the [
up the function.
26
4. Press the [ ] button to exit the sub menu.
You can configure your own settings in the T60.
The menu configurations are subject to change with different firmware versions.
/ / ] button to set
/
T60
Page 28
Chapter4 Setting up the T60
Setting up the T60
Sound
SRS Setting: Sets the levels of 3D sound effect.
- SRS: Customizes SRS 3D sound effects.
- FOCUS: Sets the clarity of sound.
- TRUBASS: Customizes the bass sound level.
- WOW: Sets the proper boost level by earphone model.
- DEFINITION: Recovers reduced sound to original level.
User EQ: Changes levels of each frequency range
to create your own equalization.
Display
Backlight Timer: Sets the time that the backlight is
turned on.
LCD Contrast: Changes the brightness of display.
Screen Saver: Automatically displays screen saver
after a selected time at playback mode.
Scroll Speed: Sets the scroll speed of characters
when file information is too long to
display at one time.
Tag Info.: Sets the display type of lyric and tag
information.
Language: Selects the language for your convenience.
T60
27
Page 29

Chapter4 Setting up the T60
Setting up the T60
Recording
Voice Setting: Sets the quality of recorded voice.
FM Setting: Sets the recording quality of radio
broadcasting.
Voice Detect: Records voice only when sound can
be detected.
Timer
28
Date & Time: Sets the current time and date.
Power Off Timer: Automatically turns the power off
after designated time without operation.
Sleep Timer: Automatically turns the power off after
designated time.
Alarm/FM Rec.: Selects a function to be operated at
the designated Alarm time.
Set Alarm: Selects a time to operate alarm.
FM Rec. Reserve: Sets a time and station to be
recorded.
T60
Advanced
Resume: Selects whether the file is resumed from
the last played point or from the beginning
of a file when the player was stopped.
Scan Speed: Sets the speed of fast forward and
fast reverse.
Playback Speed: Sets the speed of music playback.
Study Mode: While playing, press
skip the current track set time ahead.
Tuner Region: Sets the frequency range based on
local standard.
-
- JAPAN : 76.0~108.0MHz
- EUROPE : 87.50~108.00MHz
Battery Select: Selects the current battery.
Load Default: Resets the product to the factory setting.
Format: Deletes all data in the product.
System Info: Displays system information of the product.
Audible: Sets functions for Audible file such as
browsing type.
(An icon will be displayed when you turn on this function.)
KOREA / USA : 87.5~108.0MHz
/ ] button will
[
Page 30

Chapter 5
Other Information
Using Windows Media Player 11
Adding Media to Library
Ripping Songs from a CD
Transferring Media to the T60
- Using Windows Media Player 11
- Using Windows Explorer
Initializing Disk
Upgrading Firmware
30
30
31
31
32
32
Contents
Contents
Copyrights/Certification/Trademarks/Limited Liability
Safety Instructions
Product Safety
Other important things to remember
Troubleshooting
Please check out!
34
35
36
33
Page 31

Chapter5 Other Information
Using Windows Media Player 11
Adding Media to Library
1. When you run Windows Media Player 11 for the first
time, the Add Media Wizard will start.
2. Follow the on-screen instructions on the PC to add
media files such as music and picture to the library.
30
T60
Ripping Songs from a CD
1. Insert an audio CD into the CD drive and run Windows
Media Player 11.
2. Select the [Ripping] tab from Windows Media Player
11. Select the checkbox beside music to rip and click
the [Start Ripping] in bottom right.
3. The ripped music will be stored in [My Documents-My
Music] and automatically added to library.
Page 32

Chapter5 Other Information
Using Windows Media Player 11
Transferring Media to the T60
Using Windows Media Player 11
1. After connecting the product to the USB jack of
your PC using the USB cable, run Windows Media
player 11.
2. After selecting the file in your PC, drag & drop it to
the right pane.
3. Click [Start Synchronizing] to start transferring file.
4. Now you can find the selected music in your library.
Using Windows Explorer
1. Connect the product to the USB jack of your PC
using the USB cable.
2. After selecting the file/folder in your PC, drag &
drop it to the drive which appears as the product.
T60
31
Page 33

Chapter5 Other Information
Using Windows Media Player 11
Initializing Disk
1. After connecting the product to the USB jack of your
PC using the USB cable, run Windows Media player 11.
2. After selecting [iriver MP3 T60], click the right mouse
button and select [Format]. Click [OK] when the
message to confirm initialization appears.
3. The initialization process is completed and the
product is disconnected from your PC.
32
T60
Upgrading Firmware
1. After connecting the product to the USB jack of your
PC using the USB cable, visit iriver web-site to
download new firmware upgrade file.
2. Copy the file to the T60 and disconnect the cable to
activate the upgrade process.
Note
You need to backup necessary files before initialization
as formatted files cannot be recovered.
Note
Do not disconnect the product from PC while copying
firmware upgrade file.
When you are using Windows Media Player 11, use
[iriverFirmwareUPdater] in the installation CD for more
convenient firmware upgrade.
Page 34

Chapter5 Other Information
Copyrights/Certification/Trademarks/Limited Liability
Copyrights Certification
iriver Limited has all the rights of the patent, trademark,
literary property and intellectual property related to this
manual. You may not copy or reproduce any part of this
manual unless authorized by iriver Limited. You can be
punished by using any part of this manual illegally.
The software, audio and video which have an intellectual
property are protected by copyright and international
laws. It is user’s responsibilities when he/she
reproduces or distributes the contents created by this
product.
The companies, institutions, products, people and
events used in examples are for demonstration
purposes only. We don't have any intension to be related
with any companies, institutions, products, people and
events through this manual and should not draw
inferences.
Users are responsible for observing the copyrights and
intellectual properties.
©1999~2007 iriver Limited. All rights reserved.
MIC, FCC, CE
Trademarks
Windows 98 SE/ME, Windows 2000, Windows XP,
Windows Media Player are the registered trademarks of
Microsoft Corp.
is a trademark of SRS Labs, Inc.
WOW technology is incorporated under license from
SRS Labs, Inc.
Limited Liability
Neither the manufacturer, importers nor dealers are
responsible for any accidental damages including bodily
injury or any damage resulting from misuse or unsuitable
operation by you.
The information on this manual is prepared with the
current player specifications. The manufacturer, iriver
Limited, is adding new features to the product and may
persistently apply new technologies hereafter. All
standards may be changed at any time without notice.
T60
33
Page 35

Chapter5 Other Information
Safety Instructions
Product Safety
Do not place objects inside the device other than CD's.
It may cause malfunction.
Do not place heavy objects on the player.
It may cause damage and malfunction.
Do not dampen your player with rain (water), beverage,
chemicals, cosmetics and so on.
34
It may cause damage and malfunction.
Keep away from harsh environments including humid,
dusty, and smoky areas.
It may cause malfunction.
Keep out of direct sunlight and extreme heat and cold.
It may cause malfunction.
T60
Do not keep the product close to magnetic substance
such as magnet, TV, monitor and speaker.
It may cause malfunction.
Never dismantle, repair, or rebuild your player without
permission.
It may cause damage and malfunction.
Do not clean with chemical or detergent.
It may cause malfunction.
Do not drop or subject the device to impact.
It may cause damage and malfunction.
Do not press more than two buttons altogether.
It may cause damage and malfunction.
Do not disconnect the USB cable while transferring data.
It may cause malfunction.
Page 36

Chapter5 Other Information
Safety Instructions
Other important things to remember
Do not use headphones / earphones while cycling,
driving, or operating any motorized vehicle.
It is dangerous and is illegal in some areas.
Reduce volume or stop using the player if you experience
a ringing in your ears.
It may cause injury.
Reduce volume while walking, especially at pedestrian
crosswalks.
It may cause injury.
Do not listen to music via headphone/earphone with
high volume for a long time.
It may cause injury.
Do not use headphone / earphones at high volume.
It may cause injury.
Keep headphone-/earphone cords under control to
avoid getting caught on nearby objects.
It may cause injury.
Do not sleep with headphones / earphones in the ears.
Do not use headphones / earphones for excessive
periods of time.
It may cause injury.
Try to connect the product to the rear USB port in your PC.
In some individually assembled PCs, improper USB
port may cause malfunction.
T60
35
Page 37

Chapter5 Other Information
Troubleshooting
Please check out!
The player will not power on!
- Check whether the battery is discharged.
- Check whether the battery has been inserted in properly.
- Check whether the HOLD switch on the player is ON.
The LCD display is turned off frequently.
- To save power consumption, the LCD is designed to be
turned off after designated time.
Set up the duration in [Settings-Display-Backlight Timer].
36
Characters in LCD are corrupted.
- Check whether the proper language has been selected.
Set up proper language in [Settings-Display-Language].
Poor radio reception with heavy noise!
- Check whether an earphone is connected.
(The earphones cord functions as an antenna.)
- Adjust the position of the player and earphones.
- Turn off any nearby electronic equipment to avoid
potential interference.
T60
No sound during playback!
- Check whether the volume is set to "0".
- Check whether the plug or connection jack of
earphones is dirty.
- Check whether the music file is corrupted.
The stored file is not played in the T60.
- The T60 supports 700 music files and 500 folders.
File download is not available.
- Check whether the battery is discharged.
- Check whether the USB cable is firmly connected.
The memory space is changed after formatting.
- The memory space can be changed depending on
the operating system.
Page 38

Chapter5 Other Information
Federal Communications Commission (FCC)
Caution :
Any changes or modifications in construction of this device which are not expressly approved by the party
responsible for compliance could void the user’s authority to operate the equipment.
This device complies with part 15 of the FCC Rules.
Operation is subject to the following two Conditions :
(1) This device may not cause harmful interference, and
(2) this device must accept any interference received, including interference that may cause undesired operation.
for compliance could void the user’s authority to operate the equipment.
Note
This equipment has been tested and found to comply with the limits for a Class B digital device, pursuant to Part 15 of
the FCC Riles. These limits are designed to provide reasonable protection against harmful interference in a residential
installation. This equipment generates, uses and can radiate radio frequency energy and, if not installed and used in
accordance with the instructions, may cause harmful interference to radio communications. However, there is no
guarantee that interference will not occur in a particular installation. If this equipment does cause harmful interference
to radio or television reception, which can be determined by turning the equipment off and on, the user is encouraged
to correct the interference by one or more of the following measures:
- Reorient or relocate the receiving antenna.
- Increase the separation between the equipment and receiver.
- Connect the equipment into an outlet on a circuit different from that to which the receiver is connected.
- Consult the dealer or an experienced radio/TV technician for help.
T60
 Loading...